

Page 1

AdvisorOne Quick Operation Guide
EN
CNF
ES
PR
English: Quick Operation Guide
Introduction
AdvisorOne (part # AVO-1037) is a wireless, self-contained system used to detect, control and inform of security and life safety
conditions and threats. AdvisorOne uses a proprietary wireless technology to communicate with various types of sensors. The
panel relays sensor status both visually using At-A-Glance icons on the touch screen display and audibly with beeps and verbal
chimes.
• Can be connected to the internet via broadband through an Ethernet connection.
• Is controlled via the integrated touch screen.
Using the AdvisorOne system
Use this guide to quickly begin operating the AdvisorOne security system.
An access code is needed to perform certain system functions. The default master code is 1-2-3-4 when AdvisorOne is shipped
from the factory. The code should be changed after the system is installed (see “User codes” on page 4).
Main screen
The Main screen provides quick access to all system features that allows the user the ability to control the system. See Table 1 on
page 2 for more information on these functions.
P/N 466-4404 Rev L 16SEP2015 1
Page 2
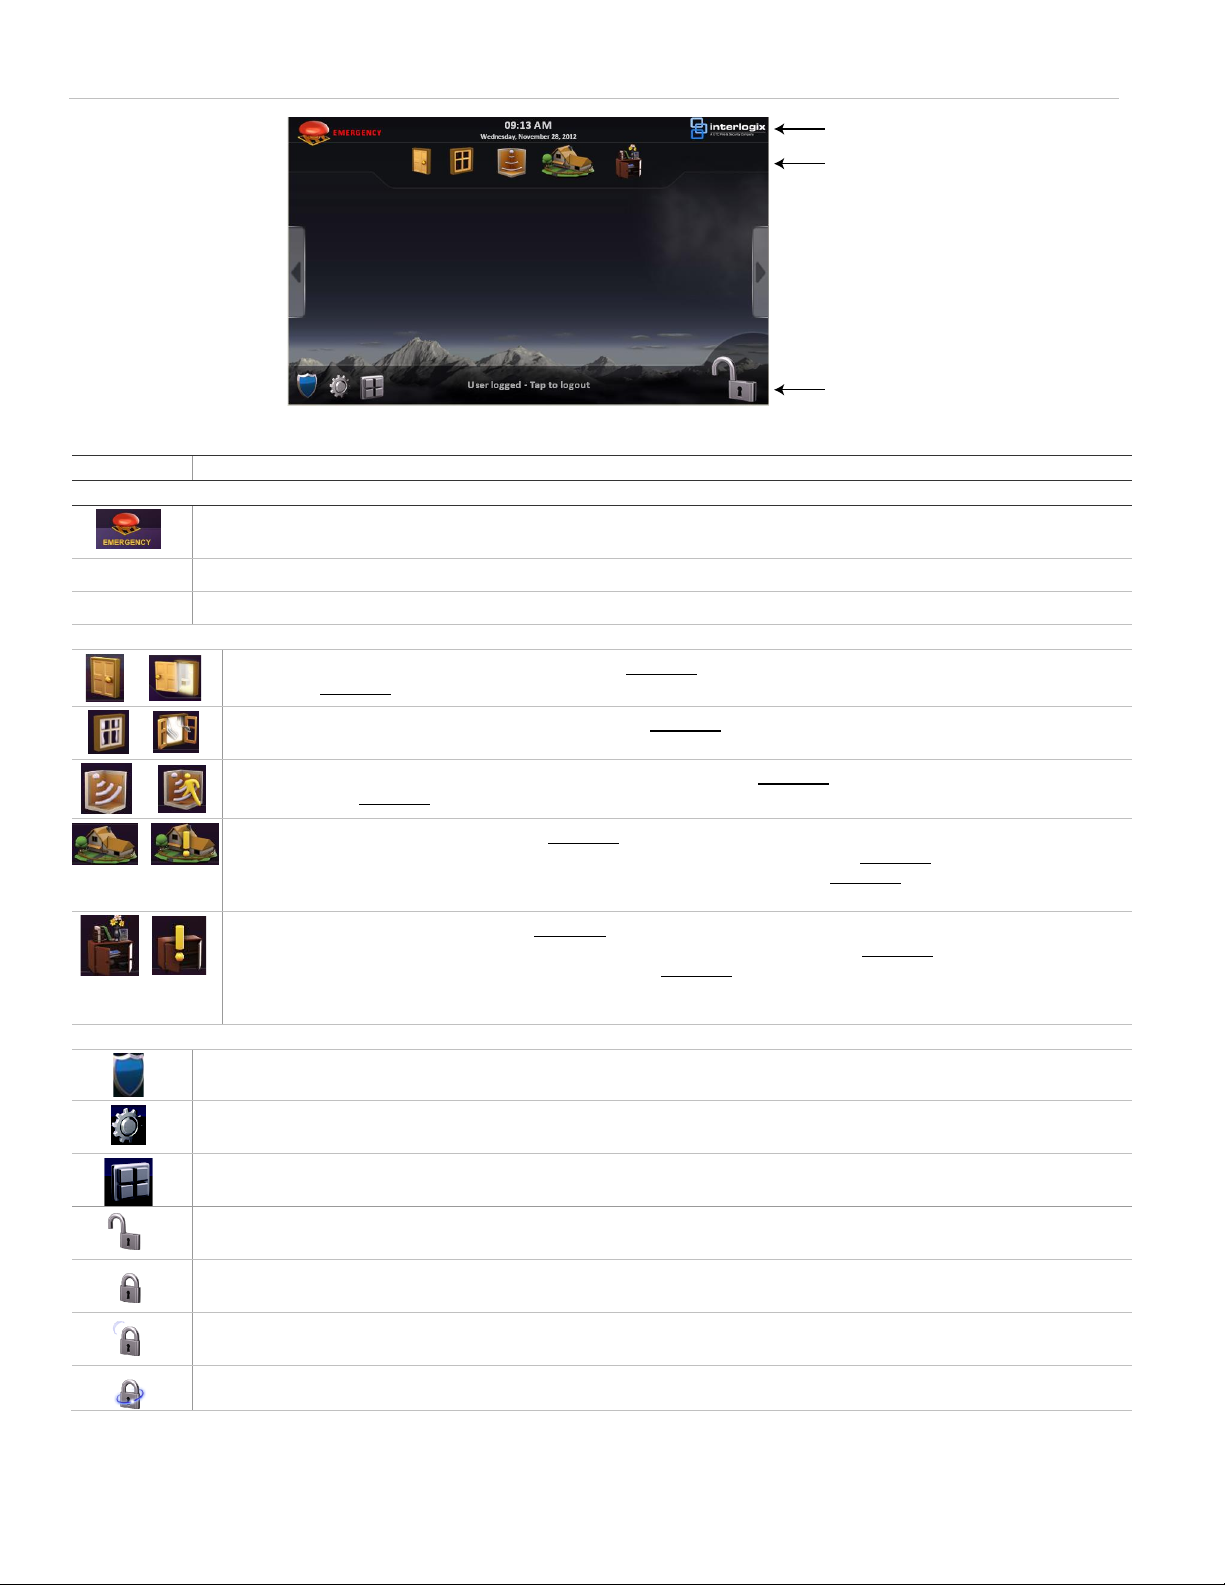
Figure 1: AdvisorOne Main screen
Top Bar
At a Glance area
Bottom Bar
Icon
Description
Top bar
Access the emergency screen to select the appropriate icon (Fire, Police, or Auxiliary).
Time & Date
The current system time and date. To change the time and date see “To set the date and time:” on page 4.
An icon that provides quick access to system help, FAQ’s, and dealer contact information.
At-A-Glance area (If not programmed the At-A-Glance icons will be grayed out and “N/A” will appear)
Door status - The icon depicted on the left indicates all monitored doors are closed. The icon depicted on the right indicates
one or more monitored doors are open. Press the icon to obtain more information.
Window status - The icon depicted on the left indicates all monitored windows are closed. The icon depicted on the right
indicates one or more windows are open. Press the icon to obtain more information.
Motions sensor status - The icon depicted on the left indicates no recent monitored motion is detected. The icon depicted on
the right indicates monitored motion was detected in the last 10 minutes.
Property status - Depicts status changes in monitored property protection in the building (i.e. water detection, glassbreak
detection, smoke detection, CO detection, etc). The icon depicted on the left indicates all monitored sensors are closed and no
activity has occurred since being checked. The icon depicted on the right indicates a monitored sensor is tripped or there is
unacknowledged activity.
Assets status - Depicts status changes in monitored assets in and around the building (i.e. movement of recreational vehicles,
lawn care equipment, artwork, electronics, etc). The icon depicted on the left indicates all monitored sensors are closed and no
activity. The icon depicted on the right indicates one or more monitored assets have unacknowledged activity. Press icon to
obtain more information.
Note: By obtaining more information this acknowledges the activity and resets the icon status to normal.
Bottom bar
Security Status - Press to access the System Status, Zone Status, and Events security status screens.
Settings and Configuration - Press to access the General settings, Display, Sound, Date & Time, Applications, and Configuration
screens.
Applications - Press to gain quick access to the applications in the system. Press to access the active and inactive applications in
the system. Contact the dealer for more information.
Disarm - Pressing this icon will begin the sequence of disarming the system.
Note: When disarmed, only 24-hour sensors (smoke, carbon monoxide detectors, etc) remain active.
Arm Stay - Arms perimeter doors and windows only. Interior devices, such as motions remain off so you can stay inside the
premises without setting off an alarm.
Arm Night - Arms doors, windows, and interior motions, while leaving designated interior protection inactive. Contact the dealer for
more information.
Arm Away - Arms perimeter door/window sensors and interior motion sensors for maximum protection.
Note: The screen to
the left is an example.
Some systems are
configured differently.
Table 1: Main screen
2 AdvisorOne Quick Operation Guide
Page 3
Security Status screen
Icon
Description
System Status
Displays event name and details of the event.
Zone Status
Displays the status of the zones in your system.
Events
Displays a log of all system events (i.e. arming/disarming, alarms, connection issues, etc). The screen consists of Event Name,
Occurred On, and Details.
Icon
Description
General
Press General to access and/or configure the Chime, Apps Shown on Main Screen, Expertise, Help, and About options.
Display
Press Display to access and/or program the Brightness, Contrast, Background, Screen Saver, Screen Saver Time and Calibration.
Displaying the Applications icon is enabled or disabled here.
Sound
Press Sound to access and/or program Keypress Volume, Beep Volume, and Voice Volume sound options; adjustable from 1(low)
to 10(high) bars.
Date & Time
Press Date & Time to access and/or program the Show Date, Time Format, and Date Format date and time options.
Applications
Press Applications to make applications active or inactive in the system.
Configuration
Press Configuration to access and or program the Bypass Device, Users, Tests, Time Date, and Downloader options.
To enter programming mode:
1. From the Settings screen, press CONFIGURATION.
2. Enter Master user code.
Note: The Access Granted screen will appear. Press OK or wait 4 seconds
and the screen will automatically go to the main Options screen.
To access the Security Status screen, press on the main screen. Use the Security Status screen to check the status of the
system.
Table 2: Security Status screen options
Settings Screen
To access the Settings screen, press on the Main screen. Use the Settings screen to configure system options.
Table 3: Settings screen options
Applications
Note: Applications not evaluated by UL.
To access applications on the AdvisorOne system from the Main screen:
Swipe a finger on the middle part of the screen left or right to scroll through the options.
OR
Press and then press the desired application from the list on the Applications screen.
Programming
The AdvisorOne security system allows users to program certain options.
AdvisorOne Quick Operation Guide 3
Page 4

To set the date and time:
1. From the Settings screen, press CONFIGURATION.
2. Enter Master user code.
Note: The Access Granted screen will appear. Press OK or wait 4
seconds and the screen will automatically go to the Global Options screen.
3. From the main Options screen, press TIME DATE.
4. From the Date/time settings screen, press the up and down arrows next to
Year, Month, and Day to set the Date.
5. From the Date/time settings screen, press the up and down arrows next to Hours, Minutes, and Seconds to set the Time.
User codes
To add a user code:
1. From the main Options screen, press USERS.
2. From the Users screen, press USERS.
3. From the list of users screen, press ADD.
4. From the User Configuration screen, enter the user name and user pin
number.
5. Press CONTINUE to save changes and exit the User Configuration
screen.
6. Press CLOSE twice to exit the Users screen and return to the main
Options screen.
Note: The duress code, when used in place of
another user code, generates a silent duress alarm
that is reported to the central monitoring station.
Contact the dealer for more information.
To send an emergency alarm:
1. Press .
2. Press the appropriate alarm (Fire, Police, or Auxiliary).
Note: Fire alarms are sent instantly. Police and auxiliary alarms could be
delayed. Contact the dealer for more information.
User codes are needed to perform certain system functions, such as arming and disarming the system or programming certain
system functions. Contact the dealer about what system functions require a user code.
Note: Disarming the system will always require an user code.
Life safety
AdvisorOne as a life safety system detects, controls, and informs of security and life safety conditions in the home.
Emergency icon
Note: If the system is connected to a security monitoring service, the authorities will be notified. This option may not be enabled.
Contact the dealer for details. Priority of signaling is 1. Fire, 2. Police, 3. Auxiliary.
4 AdvisorOne Quick Operation Guide
Page 5

If an emergency alarm is initiated by mistake:
1. Press .
2. Enter user access code.
3. Press OK from the Alarm Restored screen.
4. Press CLOSE from the Alarms and Faults screen to return to the Main screen.
Note: An aborted alarm will result in audible and visual annunciation.
Note: The alarm screen image above is for a panic alarm. The alarm could be a fire or police alarm.
To Arm Stay, Arm Night, or Arm Away:
See Table 1 on page 2 for more information.
Exit delay - Turn this option ON to enable the
exit delay.
Silent exit. Turn this option ON to silence the
exit beeps during arming.
1. Press .
2. Set arming options. To display arming options, press SHOW OPTIONS. To
hide arming options, press HIDE OPTIONS.
3. Press ARM STAY, ARM NIGHT, or ARM AWAY.
Note: If no trouble conditions exist, proceed to step 6.
5. From the Arm Protest screen, press BYPASS next to any devices that need
to be bypassed.
6. The arming countdown screen will appear. To cancel arming, press CANCEL
in the top right corner of the countdown screen.
Note: Entry and exit delay beeps sound once a second until the last 10 seconds
when the beeps sound twice a second.
Arming and disarming
Use the steps below to arm and disarm the system:
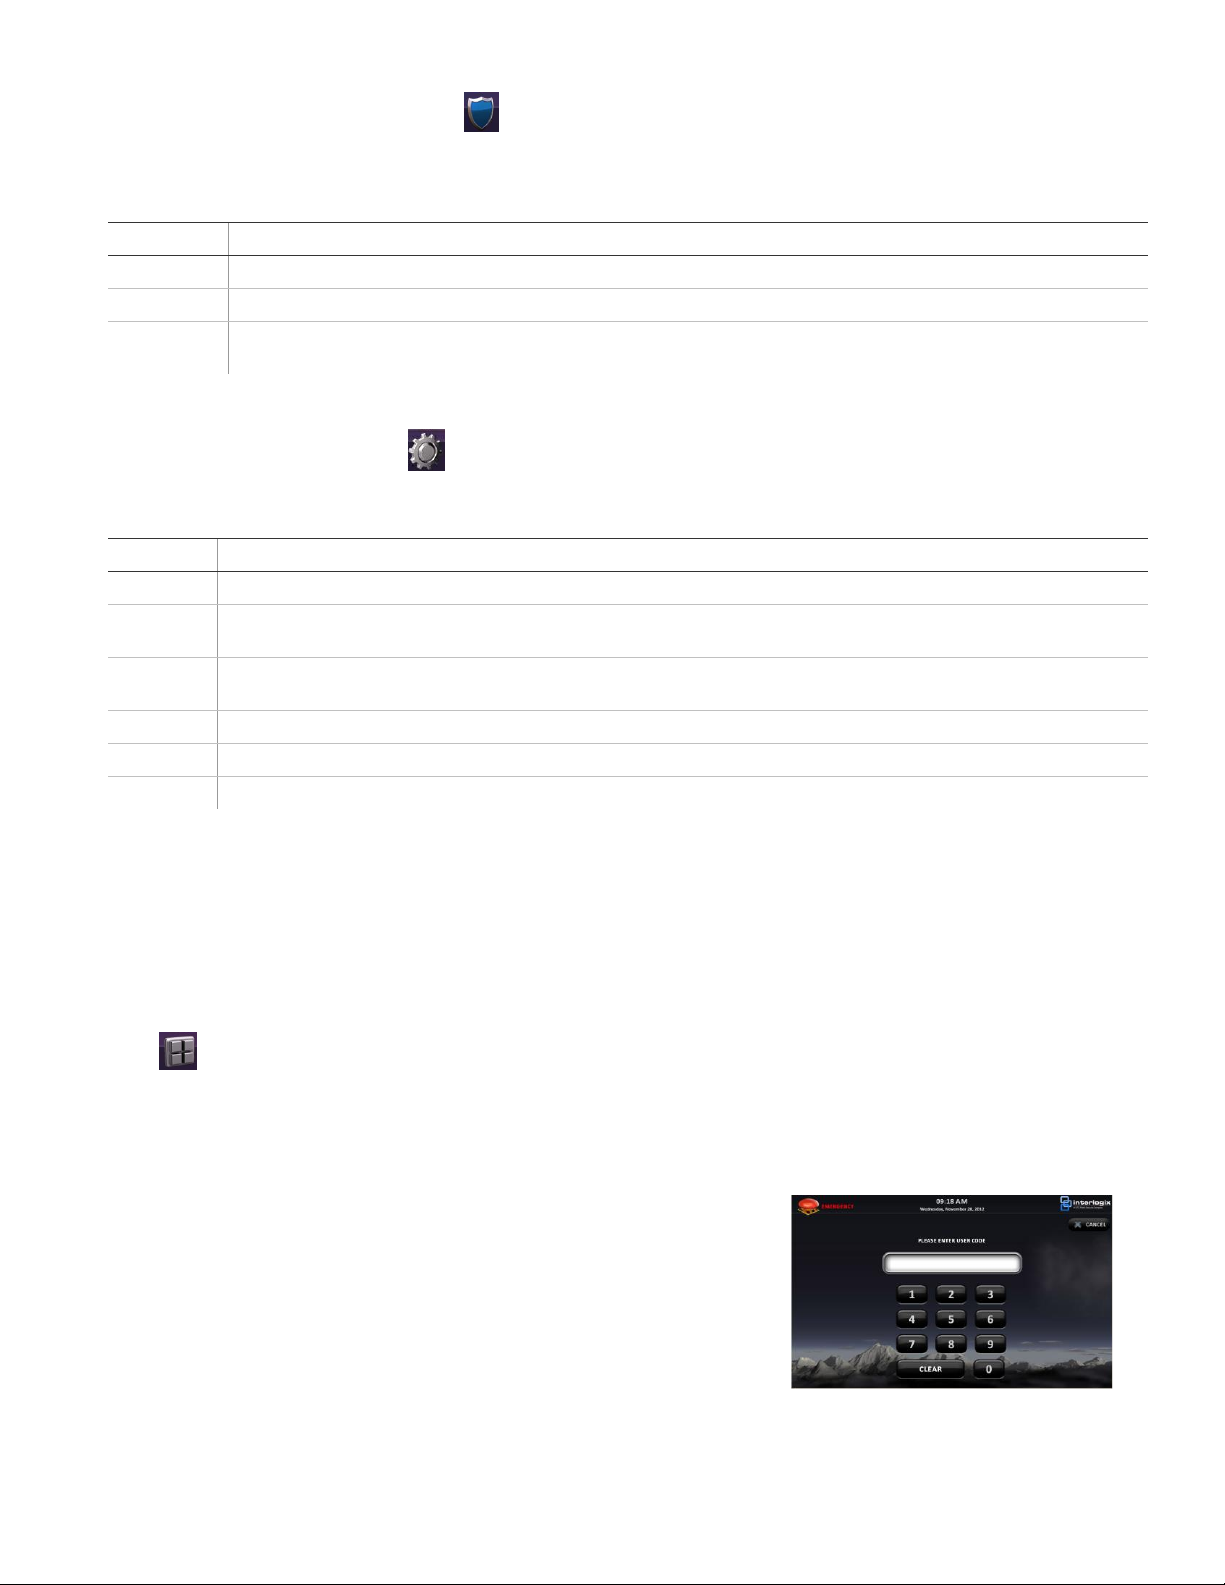
To disarm:
1. Press .
2. Enter the code when the keypad screen appears. If an incorrect code is entered, press CLEAR and enter the correct code.
Exit/entry delay
AdvisorOne provides a delay after entering or exiting the premises before the system is armed or disarmed. An exit time restart
feature will recognize when the system is armed, a person leaves the premises and quickly reenters The system will restart the exit
delay to give users the full exit delay again. The restart will only occur once.
Double knock
Double knock (two-trip) refers to a zone needing two sensor trips (one or multiple sensors) to be present to generate an alarm. If
the zone becomes active and would normally trigger an alarm, either the zone needs to remain active for the programmed Double
Knock time or the zone has to return to normal and trigger again within the Double Knock interval before sending an alarm to the
central station.
Fire alarm verification
If this option is off, the panel immediately reports to the central station when a smoke detector goes into alarm.
With this option on, if a single smoke detector goes into alarm, the panel will not report for 60 seconds unless another smoke
detector goes into alarm. If the first smoke detector is cleared of an alarm within the first 60 seconds, no report will be sent to the
central station unless it or a second smoke detector goes into alarm within the panel siren timeout period (5 minutes). Contact the
dealer for more information.
AdvisorOne Quick Operation Guide 5
Page 6

Call waiting
Activity
Beep response
Arm Stay
Three beeps verify that motion sensors are armed.
Arm Night
Two beeps verify that door/window sensors are armed.
Arm Away
Four beeps verify that door/window and motion sensors are armed.
Disarm
One beep indicates the system is disarmed.
Chime
Two beeps.
Property/asset management
One beep. (Information displays on the touchscreen).
Trouble beeps
Six beeps every minute. Press Listen next to Panel Status to stop beeps for 4 hours.
RF Jam
Trouble beeps and “RF Jam Fault” displayed
No activity beeps
TBD
To help prevent a call waiting option on the phone service interfering with an alarm, this option will be turned on if the panel reports
to a central station and the phone system has a call waiting service. Contact the dealer for more information.
Unvacated premises
Unvacated premises is a feature that determines whether the system automatically arms down to Stay (perimeter sensors are
armed. Interior sensors are disarmed) if the system is armed to Away (perimeter and interior sensors are active) without opening or
closing a perimeter door (on), or remains at the armed level chosen (off). This feature does not work from a key fob. Autobypass
must be on for this feature to work. Contact the dealer to see how these options are programmed.
Swinger Shutdown
This setting determines if a sensor or zone will go into alarm twice during an arming period (an active arming level) and will not be
active again until the alarm is canceled (Swinger Shutdown is enabled) or the sensor has not been activated for 8 hours or zone
will always be active and will go into alarm multiple times during an arming period (an active arming level) without canceling the
alarm (Swinger Shutdown is disabled). Contact the dealer for more information.
Note: Swinger Shutdown does not affect Smoke, Fire, Carbon Monoxide and Environmental sensors.
Alarms
The system provides annunciation to indicate an alarm condition. When an alarm is active, the Main screen will display the alarm
status (see Table 1 on page 2).
To cancel an alarm
• To view additional alarm information, press from the Main screen, then press EVENTS.
• To cancel the alarm, press and enter a valid user code.
• “Alarm Aborted” will be spoken and displayed.
• The alarm cancel window is the amount of time the user has to cancel an alarm before it is reported. The amount of time to
cancel an alarm before it is reported to the central station is 15-60 seconds. Contact the dealer for more information.
After alarms are canceled, the system will be disarmed.
Status beeps need to update
The panel sounds status beeps to alert to various system events and conditions as shown in Table 4 below.
A trouble condition will be indicated by a flashing exclamation point over the status shield. Pressing the status shield will display the
condition.
Table 4: Status beeps
6 AdvisorOne Quick Operation Guide
Page 7

Alarm sirens
Function
Fire ( set to 5min
per UL Canada)
CO Detector
Intrusion
Emergency
Interior and panel siren
Temporal 3
Temporal 4
Steady
Fast on/off
Exterior siren
Temporal 3
Temporal 4
Steady
To perform the sensor test:
1. Place all sensors in their secured (non alarm) state.
2. From the main Options screen, press TESTS.
3. From the Testing screen, press SENSORS.
4. Trip the sensor (see Table below). The signal level is recorded under the sensor on the Sensors screen.
Sensor
Instructions
Minimum packets required
Hardwire contact
Open the hardwire contact.
1
Door/window
Open the secured door or window.
6 of 8
Carbon monoxide alarm
Press and hold the Test/Hush button (approximately 5 seconds) until the unit
beeps two times, and then release the button.
6 of 8
Glassbreak
Test with an appropriate glass break sensor tester.
6 of 8
Motion sensor
Avoid the motion sensor field of view for 5 minutes, and then enter its view.
6 of 8
Wireless Smoke
Press and hold the test button until the system sounds transmission beeps.
6 of 8
Key fob
Press and hold the Lock and Unlock buttons simultaneously for 3 seconds.
6 of 8
Exterior and interior sirens make three different alarm sounds on the premises, each indicating a different type of alarm. Sirens are
programmed by the installer to time out and stop sounding after a specified time. Consult with your installer to determine if your
system is configured with a communicator delay. A communicator delay will prevent a report to the central station if the control
panel is disarmed within 30-45 seconds after an intrusion alarm is triggered. Note that fire-type alarms are normally reported
without a delay.
Table 5 below describes the siren sounds used by the security system.
Table 5: Siren sounds
Notes:
Alarms will not be transmitted in test mode.
Temporal 3 refers to a continuous pattern of three siren pulses, then off for 1.5 seconds, three siren pulses, then off for 1.5
seconds.
Auxiliary/Emergency alarms have not been evaluated for medical applications by UL and should not be used for medical
emergencies.
Devices that are not UL Listed are not for UL applications. Among these may include unlisted water detection devices,
environmental sensors, key fobs, asset management devices, garage door openers, electric gate, motors etc.
System tests
The system should be tested every week. Test with both AC and Battery connected in USA. In Canada, test with AC and Battery
and once a month with Battery only (ULC requirement).
Sensor test
Sensors should be tested one at a time to make sure they are sending strong signals to the panel. Sensors should be tested at
least once a week.
Table 6: Tripping sensors for sensor test
AdvisorOne Quick Operation Guide 7
Page 8

Note: Refer to specific sensor installation instructions for complete operation and testing details. If all sensors have not been
Emergency planning
Smoke detector placement
Periodically discuss and rehearse emergency plans
to include the following:
• Understand how to use the security system.
• Check with the dealer to make sure smoke
detectors are located on each floor of the
premises.
• Know the normal state of doors and windows:
open, closed, or locked.
• Escape fast! (Do not stop to pack).
• Use a different escape route if closed doors
feel hot to the touch.
• Crawl and hold your breath as much as
possible to help reduce smoke inhalation
during an escape.
• Meet at a designated outdoor location.
• Emphasize that no one should return to the
premises if there is a fire.
• Notify the fire department from a neighbor’s
phone.
• Emphasize that no one should enter the
premises if they hear sirens in the house.
• If you arrive at the premises and hear sirens,
do not enter. Call for emergency from a cell
phone or neighbor’s phone.
Use the following guidelines when drawing your floor
plan:
• Show all building levels.
• Show exits from each room (two per room are
recommended).
• Show the location of all security system
components.
• Show the location of any fire extinguishers.
tested, the test mode will time out and the panel will return to normal in 15 min.
Communication test
To test communication with the central station:
1. Call the central station and tell the operator that the system will be tested.
2. Arm the system.
3. Test an emergency icon (Fire, Police, or Auxiliary) and trip at least one sensor of each type (fire, intrusion, etc.) to verify that
the appropriate alarms are working correctly. There could be a delay on intrusion devices.
4. When finished testing the system, call the central station to verify that the alarms were received and instruct them to resume
monitoring the system.
Note: If the system is not connected to a central monitoring station, the central station communication test will not be available.
Maintenance & support
This system is intended to be checked by a qualified technician at least once every 3 years. Contact the dealer for battery
replacement needs.
8 AdvisorOne Quick Operation Guide
Page 9

Cleaning the touch screen
If necessary, use a soft cloth to clear smudges on the touch screen. Do not use glass cleaner on the touch screen.
Disposal
Dispose of all equipment is accordance with local requirements. Contact the dealer for more information.
Support
There may be additional features or programming options for the system depending on how it was installed. Contact the dealer or
Interlogix for more information.
Industry Canada Compliance
IC ID: 1175C-AVO1037
This Class B digital apparatus complies with Canadian ICES-003.
This device complies with Industry Canada license-exempt RSS standard(s). Operation is subject to the following two conditions:
(1) this device may not cause interference, and (2) this device must accept any interference, including interference that may cause
undesired operation of the device.
FCC Compliance
Part 68. This equipment complies with Part 68 of the FCC rules and the requirements adopted by ACTA.
FCC registration number: US: B4ZAL04B55972
Ranger Equivalence 0.2B
Load Number 0.2
This equipment has been tested and found to comply with the limits for a Class B digital device, pursuant to Part 15 of the FCC
Rules. These limits are designed to provide reasonable protection against harmful interference in a residential installation.
This equipment generates, uses and can radiate radio frequency energy and, if not installed and used in accordance with the
instructions, may cause harmful interference to radio communications. However, there is no guarantee that interference will not
occur in a particular installation.
If this equipment does cause harmful interference to radio or television reception, which can be determined by turning the
equipment off and on, the user is encouraged to try to correct the interference by one or more of the following measures:
• Reorient or relocate the receiving antenna.
• Increase the separation between the equipment and receiver.
• Connect the equipment into an outlet on a circuit different from that to which the receiver is connected.
• Consult the dealer or an experienced radio/TV technician for help.
Changes or modifications not expressly approved by UTC Fire and Security Americas Corporation, Inc. could void the user’s
authority to operate the equipment.
Contact information
www.utcfireandsecurity.com or www.interlogix.com
For customer support, see www.interlogix.com/customer-support
© 2013 UTC Fire & Security Americas Corporation, Inc. Interlogix is part of UTC Climate Controls & Security, a unit of United
Technologies Corporation. All rights reserved.
AdvisorOne Quick Operation Guide 9
Page 10

Canadian French: Quick Operation Guide
Spanish: Quick Operation Guide
Portuguese: Quick Operation Guide
10 AdvisorOne Quick Operation Guide
 Loading...