

Page 1

:HE6FDOH
Based on technology from Valence™ Research, Inc.
User’s Guide
,QWHUJUDSK&RPSXWHU6\VWHPV
Huntsville, AL
Page 2

WebScale™ User’s Guide
Version 2.1
©1998 by Intergraph Computer Systems, Inc.
Portions ©1998 by Valence™ Research, Inc.
This document may not be reproduced or transmitted in any form or by any means,
electronic or mechanical, including photocopy, recording, or by any information storage
and retrieval system, without written permission from Intergraph Computer Systems,
Inc.
Specifications are subject to change without notice.
WebScale is a trademark of Intergraph Computer Systems, Inc.
Convoy Cluster and Valence are trademarks of Valence Research, Inc.
Windows NT is a registered trademark of Microsoft Corporation.
Please direct all correspondence to:
Intergraph Computer Systems, Inc.
Huntsville, Alabama 35894-0001
U.S.A.
1-800-345-4856
info@intergraph.com
Page 3

WELCOME TO WEBSCALE™
Thank you for selecting WebScale™ based on technology from Valence™ Research,
Inc. By clustering two or more Windows NT computers with WebScale, you will
dramatically enhance the availability of your Internet server applications, such as World
Wide Web, proxy, DNS, and FTP servers. At the same time, WebScale can help you to
scale your server’s performance to keep up with the ever-increasing demands of your
Internet-based clients. Best of all, WebScale provides a cost-effective solution that
works with all of your Internet-based services.
This User’s Guide explains what WebScale does and how it works to deliver high
availability and scalability for your Internet server applications. Step-by-step
instructions for installing and using WebScale help you to get your WebScale cluster up
and running quickly and easily. This guide also explains how to obtain technical
support if you have problems.
i
Page 4

TABLE OF CONTENTS
WELCOME TO WEBSCALE™ I
TABLE OF CONTENTS II
WHAT’S NEW IN VERSION 21
REMOVAL OF SINGLE NIC LIMITATIONS 1
R
EMOTE CLUSTER CONTROL 2
E
NHANCED SESSION SUPPORT 2
P
ERFORMANCE ENHANCEMENTS 2
INTRODUCTION 4
ADVANTAGES OF USING WEBSCALE 5
VERVIEW OF WEBSCALE’S SOFTWARE CONFIGURATION 7
O
ATABASE ACCESS WITHIN LOAD BALANCED SERVER APPLICATIONS 8
D
INSTALLATION AND CONFIGURATION 9
SYSTEM REQUIREMENTS 9
S
INGLE NETWORK INT ERFACE CARD LIMITATIONS 10
Q
UICK START GUIDE FOR WINDOWS NT EXPERTS 10
I
NSTALLATION 13
S
ETUP: CONFIGURING WEBSCALE’S PARAMETERS 19
S
ETTING UP THE WINDOWS NT BINDINGS 35
NSTALLING SOFTWARE UPGRADES 46
I
D
ISABLING AND REMOVING WEBSCALE 47
EXECUTION AND CONTROL 49
THEORY OF OPERATION 49
C
LUSTER CONTROL 54
E
RROR DETECTION AND HANDLING 59
VENT LOGGING 60
E
TROUBLESHOOTING GUIDE 64
GLOSSARY OF TERMS 71
INDEX 75
ii
Page 5

WHAT’S NEW IN VERSION 2
WebScale™ Version 2, has exciting new features that make WebScale easier to install
and use. This version also incorporates several performance enhancements that take full
advantage of the latest, pipelined network drivers and adapter cards and ensure smooth
failover and failback behavior. The key changes are outlined in the following
subsections.
Removal of Single NIC Limitations
By default, WebScale now directs network traffic to the cluster NIC’s using a multicast
cluster MAC address instead of by using a non-multicast cluster MAC address. The
WebScale driver no longer instructs the NIC driver (via the Windows NT Registry) to
load the cluster MAC address into the NIC card at system startup. This has several
important benefits:
• Cluster hosts do not need two NIC cards to allow them to communicate with each
other. One cluster NIC can be used on each cluster host, and both the cluster’s
primary IP address and the dedicated IP address can be bound to this card via
WebScale.
• Cluster hosts now avoid the additional networking overhead associated with the
use of a single NIC card. In previous versions, all cluster hosts would receive
network traffic from outside the cluster that was intended for a particular host.
This overhead is now removed.
• WebScale now works properly with Ethernet switches, which require that all
switch ports have unique MAC addresses.
• WebScale now works with network adapter cards that do not allow their MAC
addresses to be changed. (Only a few, low-end cards have this limitation.)
• WebScale’s internal (one per second) messages now introduce less network
overhead on the subnet since only the cluster hosts receive them. They were
previously broadcast to all hosts.
WebScale automatically handles the resolution of the cluster IP address to its associated
multicast cluster MAC address by the Address Resolution Protocol (ARP). However,
the use of a multicast MAC address may not be supported by the ARP implementation
on some routers. In this case, it is necessary to create a static ARP entry within the
router.
For backward compatibility, WebScale supports non-multicast cluster IP addresses that
were used in previous versions. The WebScale Setup dialog lets you select between
multicast and non-multicast addressing. Starting with version 2.1, you can use a unicast
MAC address with switches.
Page 6

WebScale™ User’s Guide
Also new with version 2.1, WebScale now automatically generates the cluster MAC
address based on the cluster’s primary IP address. This simplifies installation and lets
you put multiple WebScale clusters on the same subnet without manually changing the
MAC address. When configuring your router, you can use the new webscale
ip2mac command to conveniently list the MAC address used for a given cluster IP
address.
Remote Cluster Control
WebScale’s cluster control program (webscale.exe) has been enhanced to let you start,
stop, and query the cluster from any networked Windows NT system. You can control
all cluster hosts with one command, or you can control them individually. The control
program has full password protection to prevent unauthorized access. When executed
on the cluster hosts, the control program operates in the same manner as it did in
previous versions.
Starting with version 2.1, you can now instruct WebScale to complete all outstanding
connections prior removing a host from the cluster or disabling traffic handling for port
rules using the webscale drainstop and webscale drain <port> commands.
This avoids disrupting service to clients when these cluster set changes need to be made.
Enhanced Session Support
Support for client sessions has been enhanced in version 2. If a server application (such
as a web server) maintains state information about a client session that spans multiple
TCP connections, it is important that all TCP connections for this client be directed to
the same cluster host. In previous versions of WebScale, you could optionally force this
behavior by setting the WebScale registry parameter ScaleSingleClient to 0. Otherwise,
WebScale would load balance TCP connections from a single client across the cluster to
maximize performance. Starting with version 2, you can invoke support for client
sessions, called client affinity, individually for each port range.
In addition, version 2 lets you optionally modify WebScale’s session support to direct
all client requests from a TCP/IP Class C address range to a single cluster host. This
feature ensures that clients which use multiple proxy servers to access the cluster will
have their TCP connections directed to the same cluster host. The use of multiple proxy
servers at the client’s site causes requests from a single client to appear to originate
from different systems. Assuming that all of the client’s proxy servers are located
within the same 256 host Class C address range, you can now ensure that client sessions
are properly handled with minimum impact on load distribution among the cluster hosts.
Performance Enhancements
Version 2 incorporates numerous internal performance enhancements to further
streamline WebScale’s actions and ensure that WebScale takes full advantage of the
2
Page 7

WebScale™ User’s Guide
latest NDIS device drivers and NIC hardware. WebScale fully pipelines all packet
reception and transmission to the maximum extent supported by NDIS drivers and
protocol stacks. Also, WebScale’s load balancing mechanisms have been refined to
ensure the smoothest possible load transfers when cluster hosts enter and exit the cluster
and during recovery from subnet conditions.
3
Page 8

WebScale™ User’s Guide
INTRODUCTION
WebScale™ Software is an innovative software product that enhances the availability
and scalability of Internet server applications, such as web servers, FTP servers, and
other mission-critical applications. A single Windows NT computer can only provide a
limited level of reliability and scalable performance. However, by combining the
resources of two or more Windows NT computers into a single cluster, WebScale
cluster can deliver the reliability and performance that web servers and other mission
critical applications need. The following diagram depicts a cluster with four host
computers, or servers, within the cluster:
Each host runs a separate copy of the desired server applications, such as web servers,
FTP, telnet, email, etc. For some services, such as web servers, a copy of the
application runs on all hosts within the cluster, and WebScale load-balances the
workload between them. For other services, such as email, only one copy of the service
handles the workload within the cluster. Instead of load balancing these services,
WebScale allows the network traffic to flow to one host, and it moves the traffic to
another host in case of failure.
WebScale clusters together several computers running server applications that use the
TCP/IP networking protocol. WebScale allows all of the machines in the cluster to be
addressed by the same set of cluster IP addresses (while maintaining their existing
addressability using unique, dedicated IP addresses). WebScale distributes incoming
client requests in the form of TCP/IP traffic across the hosts.
To scale server performance WebScale can load-balance the incoming TCP/IP traffic
4
Page 9

WebScale™ User’s Guide
across all the hosts in the cluster. In this case, a copy of the server application runs on
all of the load-balanced hosts, and the load is partitioned among the hosts; the load
percentage to be handled by each host can be tailored as necessary. Hosts can be
dynamically added to the cluster as necessary to handle increased load. WebScale can
also direct all traffic to a designated single host, called the default host.
WebScale manages the TCP/IP traffic as necessary to maintain high availability for
server applications. When a host fails or goes offline, WebScale automatically
reconfigures the cluster to direct client requests to the remaining computers. For loadbalanced applications, the load is automatically redistributed among the surviving
computers. Applications with a single server have their traffic redirected to a specific
host. Connections to the failed or offline host are lost. Once the necessary maintenance
is completed, the offline computer can transparently rejoin the cluster and regain its
share of the workload.
Advantages of Using WebScale
WebScale installs as a standard Windows NT networking driver on two or more
Ethernet or FDDI connected computers. Once installed, it operates in a fully
transparent manner to both server applications and to TCP/IP clients worldwide.
WebScale’s simple and elegant approach to clustering server applications lets users
employ off-the-shelf software components, such as existing WWW, FTP, or proxy
servers and other popular Internet applications. WebScale enhances fault-tolerance and
scales performance transparently to the TCP/IP protocol, to server applications, and to
clients.
WebScale gives the user flexible, fine-grained control over its operations. It lets the
system administrator configure load balanced (also called multi-server) and singleserver network traffic handling parameters for individual TCP/UDP ports and for
sequential groups of ports (called port ranges). In addition, individual servers can be
commanded to dynamically (i.e., without re-booting the server) leave and join the
cluster by issuing simple commands. Cluster parameters also can be modified without
bringing down the cluster.
WebScale’s approach to load balancing TCP/IP connections is superior to using a
round-robin domain name server (DNS) because:
• the same server IP addresses are used across the cluster,
• a round-robin DNS does not provide fault tolerance (it blindly directs traffic to
failed servers),
• WebScale’s load balancing has finer granularity (per-client request vs. per-DNS
query from the client),
• each client benefits from WebScale’s load balancing since its requests are
distributed across the cluster,
5
Page 10

WebScale™ User’s Guide
• WebScale allows finer control over the load distribution among the servers by
designating load percentages to be assigned for the servers (the next version of
WebScale will provide dynamic load balancing according to the measured server
load).
WebScale’s implementation in software that is distributed across the cluster hosts has
several advantages over the use of centralized, hardware-based solutions for distributing
TCP/IP requests within a cluster. First, it avoids introducing a single point of failure
that can disrupt operations. Second, WebScale’s performance tracks the constantly
improving performance of the systems on which it runs. Hardware-based solutions
have fixed performance limits with limited lifetimes.
WebScale’s fully distributed architecture also has advantages in comparison to other
software solutions, which redirect incoming IP packets to load balance traffic among the
cluster hosts. WebScale imposes significantly less overhead because it does not modify
and retransmit packets. It also can respond faster to system outages and rebalance the
load within a few seconds.
6
Page 11

WebScale™ User’s Guide
Overview of WebScale’s Software Configuration
WebScale runs as a Windows NT networking driver and its operations are transparent to
the TCP/IP networking stack. The above diagram shows the relationship between
WebScale and the other software components in a typical configuration of a WebScale
Server:
To ensure maximum network performance, WebScale normally uses a second network
interface card (NIC) to handle cluster traffic, while other network traffic to the server
goes through a separate NIC. However, a second network card is not required.
7
Page 12

WebScale™ User’s Guide
Database Access within Load balanced Server Applications
Some server applications access a database that is updated by client requests. When
these applications are load balanced in the cluster, these updates need to be properly
synchronized. Each server can use independent copies of databases residing within
their individual servers, which are merged offline as necessary. Alternatively, the
clustered servers can share access to a separate, networked database server, as shown in
the diagram below. A combination of these approaches can also be used. For example,
web pages can be replicated among all clustered servers to ensure fast access and
complete fault tolerance. However, database requests should be forwarded to a shared
database server to synchronize updates from multiple web servers. Some missioncritical applications may require the use of highly available database engines to ensure
complete fault tolerance for the service. Over the next five years, clustered database
software will be deployed to deliver highly available and scalable database access
within the cluster.
For more information on how WebScale achieves fault-tolerance and scalability, please
consult the section Theory of Operation.
8
Page 13

WebScale™ User’s Guide
INSTALLATION AND CONFIGURATION
To install and fully configure WebScale for use, please follow the instructions in the
following sections for all Windows NT systems that you plan to use in the cluster.
System Requirements
Quick Start Guide
Installation
Setup
Setting Windows NT
Bindings
Installing Software
Upgrades
Disabling and Removing
Hardware and software requirements for
running WebScale
Abbreviated installation instr uctio ns for
Windows NT experts
How to obtain and install WebScale on your
Windows NT syste m
Detailed, step-by-step instructions for setting
WebScale’s parameters
Detailed, step-by-step instructions for setting
the correct Windows NT bindings
How to install upgrades to your WebScale
How to temporarily disable or to remove
WebScale
System Requirements
WebScale is designed to work as a standard networking device driver under the
Windows NT 4.0 Server or Workstation operating system. Since WebScale is designed
to provide clustering support for TCP/IP-based server applications, the Windows NT
TCP/IP protocol must be installed in order to take advantage of WebScale’s
functionality. The current version of WebScale operates on FDDI or Ethernet based
local area networks within the cluster. It has been tested on 10 Mbps, 100 Mbps, and
gigabit Ethernet networks with a wide variety of network adapter cards.
WebScale consumes less than 1.2MB of hard-drive space and occupies between 250KB
and 4MB of RAM during operation using the default parameters, depending on the
network load. The parameters can be modified to allow up to 15MB memory to be
used. Typical memory usage ranges between 500KB to 1MB.
For optimum cluster performance, a dedicated network interface card (NIC) should be
installed to handle cluster traffic. In this configuration, one card will carry all of the
usual networking traffic destined to the server as an individual computer on the
network, while the other one will handle the networking traffic addressed to the server
as part of WebScale cluster. If multicast cluster MAC addressing is disabled, it is still
possible to use WebScale with a single NIC in the system, but this will limit overall
performance and networking functionality within the cluster itself; please refer to the
Single network interface card limitations topic for more details.
9
Page 14

WebScale™ User’s Guide
If you are using a router to connect your cluster to its clients, be sure that the router has
its proxy ARP support enabled. (This allows the router to map the cluster’s primary IP
address and other multi-homed addresses to the corresponding MAC address.) If your
router does not route to the cluster with proxy ARP support enabled, you also can create
a static ARP entry in the router. Cisco routers require a static ARP entry because they
do not support proxy ARP for multicast MAC addresses.
Single Network Interface Card Limitations
Note: The limitations described in this section apply only when multicast cluster MAC
address support is disabled. Starting with Version 2, a multicast cluster MAC address is
used by default for cluster operations. For backward compatibility with previous
versions, you can disable the use of multicast cluster MAC addressing in the WebScale
Setup dialog. In this case, please carefully read the limitations described below.
If you disable multicast support, you should install a dedicated network interface card
(NIC) to handle cluster traffic in order to achieve optimum performance and the full
range of networking functionality. Although it is possible to have a successful cluster
installation with only one NIC, there are two limitations to this approach:
• Computers within the cluster will not be able to communicate among themselves
with any networking protocol, not just TCP/IP. This can be a special problem if
one or more of the clustered servers also act as primary and backup domain
controllers.
• Networking traffic destined to individual servers within the cluster will generate
additional networking overhead for all machines in the cluster.
These limitations may not be important for many installations. If the computers within
the cluster are only accessed from outside the cluster (i.e., there are no intra-cluster
communications) and non-cluster communications are infrequent (for example short
nightly updates of the web server content to individual computers in the cluster), the use
of a single networking card should be sufficient. Also, it is always possible to test and
demo WebScale using a single network card prior to installing additional cards for
operational purposes.
The topic Setting Up the Windows NT Bindings contains special instructions for
setting up WebScale on computer with a single network interface card. When using a
single NIC, you later can add a second NIC later and follow the instructions in the
subsection for multiple network interface cards.
Quick Start Guide for Windows NT Experts
The following guide lets Windows NT experts quickly install and configure WebScale
for use. This guide assumes that you are familiar with installing network adapter cards
and driver software for Windows NT systems. For more detailed, step-by-step
10
Page 15

WebScale™ User’s Guide
instructions, please refer to the Installation section.
Before installing WebScale, be sure to read the section System Requirements.
Have the following items ready:
• The websNNN.exe file that contains the WebScale distribution. This file can be
obtained from Intergraph Computer Systems, Inc. The NNN encodes the version
number of the distribution; for example, webs10b.exe is the Beta release of
WebScale.
• The cluster’s full Internet name that you plan to use, such as, cluster.your-
company.com.
• The IP address that you plan to use for the cluster. This cluster IP address will be
used on all hosts in the cluster.
• The current IP address for each host in the cluster. This dedicated IP address is
unique to each host and is used for network traffic other than that to be serviced
by the cluster as a whole, such as, telnet sessions with individual hosts.
• (Optional) A license key from Intergraph Computer Systems. If you are
installing WebScale for evaluation purposes, no license key is needed.
• (Optional) A second network adapter card to handle the cluster’s network traffic.
You can use your existing adapter cards to run WebScale; please see the section
Single Network Interface Card Limitations. The second adapter is called
cluster adapter, and the host’s original adapter card is called the dedicated
adapter. If you have a single adapter card, it will serve both purposes.
To install and configure WebScale, please follow these steps for each host to be used in
your WebScale cluster:
æ If you are using a router to send network traffic directly to the cluster, be sure that
the router has its “proxy ARP” functionality enabled. See System
Requirements for details.
æ If you are using multiple adapter cards, install the second network adapter card.
æ Unpack the WebScale distribution by running websNNN.exe.
æ Start the Windows NT Network setup dialog.
æ Install WebScale as a new adapter; use the WebScale distribution files when
prompted for a disk. This will install two networking objects, a WebScale Virtual
NIC adapter and a WebScale Driver protocol.
⇒ When installation completes, the WebScale Setup dialog will automatically start.
(You can also run this dialog by highlighting the WebScale Virtual NIC adapter and
clicking on the Properties button.)
11
Page 16

WebScale™ User’s Guide
æ Fill out the requested cluster, host, and licensing information in the dialog and
click on the Apply button to make use of the features enabled by your license key.
æ Create port rules to specify how you want WebScale to handle network traffic for
specific TCP and/or UDP ports. Refer to the Port Rules section for more details.
æ Click on the OK button to complete the WebScale Setup dialog.
æ Select the Bindings tab in the Windows NT Network dialog and view the bindings
for all protocols.
æ Bind the WebScale Driver protocol to the WebScale Virtual NIC adapter and to the
cluster adapter.
æ Unbind the WebScale Driver protocol from the dedicated adapter (unless you are
using a single adapter, in which case you should leave the adapter bound).
æ Bind the TCP/IP protocol and the WINS Client protocol to the WebScale Virtual
NIC adapter.
æ Bind the TCP/IP protocol and the WINS Client protocol to the dedicated adapter
(unless you are using a single adapter, in which case you should unbind the
adapter).
æ Unbind the TCP/IP protocol and the WINS Client protocol from the cluster adapter.
It will already be unbound if you have a single adapter.
æ Move the WebScale Virtual NIC adapter below the dedicated adapter in the list of
adapters for the TCP/IP protocol and the WINS Client protocols.
æ Close the Network setup dialog.
æ Restart the computer.
After installation has been completed on all hosts in the cluster, you can control cluster
operations using the webscale.exe control program, which is described in the
Execution and Control section.
If you should need to disable the WebScale driver after installation:
æ Unbind the WebScale Driver from all hardware adapters.
æ Unbind the TCP/IP protocol and the WINS Client protocol from the WebScale
Virtual NIC adapter.
æ Bind the TCP/IP protocol and the WINS Client protocol to the hardware adapters
as desired.
12
Page 17

WebScale™ User’s Guide
Installation
WebScale must be installed and configured on every Windows NT computer (called a
host) that will be part of a cluster. Please follow these steps to install WebScale on each
host:
Before installing WebScale, be sure to read the section System Requirements.
Have the following items ready:
• The cluster’s full Internet name that you plan to use, such as, cluster.your-
company.com.
• The IP address that you plan to use for the cluster. This cluster IP address will be
used on all hosts in the cluster.
• The current IP address for each host in the cluster. This dedicated IP address is
unique to each host and is used for network traffic other than that to be serviced
by the cluster as a whole, such as, telnet sessions with individual hosts.
• (Optional) A license key from Intergraph Computer Systems. If you are
installing WebScale for evaluation purposes, no license key is needed.
• (Optional) A second network adapter card to handle the cluster’s network traffic.
You can use your existing adapter cards to run WebScale; please see the section
Single Network Interface Card Limitations. The second adapter is called
cluster adapter, and the host’s original adapter card is called the dedicated
adapter. If you have a single adapter card, it will serve both purposes.
Note: If you are using a router to send network traffic directly to the cluster, be sure that
the router has its “proxy ARP” functionality enabled. See System Requirements for
details.
Step 1: Obtain the WebScale Distribution
WebScale is distributed as a single diskette containing compressed files. The NNN
encodes the version number of the distribution; for example, webs10b.exe is the Beta
release of WebScale.
If you download WebScale, please run the executable file on a Windows NT or
Windows 95 system to self-extract the installation files, which should be placed on a
single diskette or in a single directory on your hard drive. The websNNN.exe program
lets you specify the target path for the extracted files. It also lets you optionally run
WebScale Help after extracting the files.
Step 2 (Optional): Install a Second Network Interface Card
If you plan to use a second NIC to handle network traffic handled by the WebScale
cluster, install the card at this point. Note that you can install WebScale using your
existing NIC (subject to possible limitations described in the previous section Single
Network Interface Card Limitations) and then later add a second NIC and update
your WebScale installation.
13
Page 18

WebScale™ User’s Guide
To install the NIC and its software driver, please follow the instructions supplied by the
hardware manufacturer. Be careful that the hardware resources needed by the card,
such as interrupt request levels (IRQ’s) and IO ports, do not interfere with those used by
the already installed NIC.
Step 3: Install the WebScale Driver
Because WebScale is a standard Windows NT networking driver, it can be installed,
configured and removed through the Network component of the Windows NT Control
Panel. Although its installation is straightforward, it should be performed by a system
administrator who is familiar with installing and managing networking software.
To run the Windows NT Network setup dialog:
æ Go to Start button on your taskbar and choose Control Panel under the Settings
entry.
æ In the Control Panel folder, double-click on the Network icon.
You can also reach Network setup dialog by right-clicking on the Network
Neighborhood icon on your desktop and then choosing Properties. The following step-
by-step instructions will guide you through the rest of the installation process:
æ Click on the Adapters tab to see the list of installed network adapters.
At this point, the following Network dialog will appear as follows:
14
Page 19

WebScale™ User’s Guide
WebScale is classified as a networking adapter in the Windows NT networking
component hierarchy and will be added to the list recognized by Windows NT.
æ Click on the Add button to begin installing WebScale.
Windows NT will display the Select Network Adapter dialog (see below) to show a list
of adapters supplied with Windows NT. Note that WebScale is not in this list of
adapters.
15
Page 20

WebScale™ User’s Guide
æ Click on the Have Disk button.
The following Insert Disk dialog will appear to let you tell Windows NT where it can
find WebScale installation files.
æ Fill out the directory path to the WebScale installation files and click on the OK
button.
If you copied the WebScale installation files to a diskette, make sure that the diskette is
in your floppy drive now. If you copied the WebScale installation files to a directory on
your hard disk, then enter the path to that directory.
If Windows NT successfully finds the WebScale installation files, you should see the
16
Page 21

WebScale™ User’s Guide
following Select OEM Option dialog, which lets you select WebScale for installation. If
you do not see this dialog, you should re-check that you have entered the correct path to
the WebScale installation files during the previous step, that the diskette you have
placed in your floppy drive contains WebScale installation files, and that the files have
not been corrupted.
æ Click on the OK button.
Some files will be copied to your hard drive, and you will be presented with a screen
containing the license agreement. Make sure that you read and understand the
agreement; if you have any questions, please contact Intergraph Computer Systems.
æ Click on the Agree button to accept the license agreement.
By doing so, you will be bound by this agreement. If you choose not to accept the
agreement, press the Disagree button and the installation will terminate. You will need
to manually remove the WebScale Virtual NIC adapter that was just installed. To do
this, highlight the WebScale Virtual NIC adapter shown in list of adapters in the
Network dialog and click on the Remove button. For more details on removing
WebScale, please refer to the Disabling and Removing WebScale section.
After you click on the Agree button for the WebScale license agreement, you will be
presented with the WebScale Setup dialog which lets you configure your system for
cluster operations.
æ Configure your WebScale installation for cluster operations. Please refer now to
the Setup: Configuring WebScale’s Parameters section for step-by-step
instructions on configuring WebScale.
æ Click on the OK or Cancel button.
After you exit the WebScale Setup dialog, you should see WebScale Virtual NIC listed
17
Page 22

WebScale™ User’s Guide
among the network adapters in the Network dialog:
æ Click on the Bindings tab in the Network setup dialog.
The Windows NT network bindings let you to specify the precise relationship between
WebScale and the rest of your networking components.
æ Please refer now to the Setting Up the Windows NT Bindings topic for step-
by-step instructions on setting up these bindings.
æ Click on the Close button to exit the Network setup dialog.
You will be prompted to reboot your system at this point. The WebScale driver will
automatically load next time you start your system. You have now successfully
installed WebScale! Please refer to the topic Execution and Control for information
on controlling the WebScale during normal operations.
18
Page 23

WebScale™ User’s Guide
Setup: Configuring WebScale’s Parameters
WebScale must be configured on each host computer within the cluster using the
WebScale Setup dialog. This dialog appears automatically during the installation
process. After installation, it can be invoked from the Network setup dialog from
Control Panel folder as follows:
æ In the Control Panel folder, double-click on the Network icon.
æ Click on the Adapters tab to see the list of installed network adapters.
æ Select WebScale Virtual NIC in the list of network adapters.
æ Click on the Properties button.
The WebScale Setup dialog can also be started by running the command
webscale setup
from the command-line prompt. This method is more restrictive and will not allow you
to change all of WebScale’s parameters.
The WebScale Setup dialog appears as follows:
19
Page 24

WebScale™ User’s Guide
This dialog sets parameters that are recorded in the Windows NT registry. WebScale’s
parameters are organized into four major sections, each of which is represented by a
separate box in the WebScale Setup dialog:
Cluster Parameters
Host Parameters
Licensing Information
Port Rules
To set cluster-wide parameters
To set parameters specific to each
host within the cluster
To enter the license key and see
licensing information
To set parameters that control how
cluster traffic is handled for groups
of TCP and UDP ports
Please refer to the sections for each of these areas to set their corresponding parameters.
While you are running the dialog, you can obtain a brief description of each parameter
by positioning the mouse over the parameter. You can obtain a more detailed
description by clicking on the parameter and hitting the F1 key. Use the tab key to
move between parameter fields.
20
Page 25

WebScale™ User’s Guide
In addition to the above parameters, the WebScale Setup dialog has three buttons that
apply to all parameters:
æ Click on the OK button to save all of the entered parameters in the registry and exit
the dialog.
æ Click on the Cancel button to exit the dialog without making any changes to the
registry that were entered in the dialog during the current session.
æ Click on the Help button to view WebScale’s on-line help information.
You can also press the Enter key to invoke the action of the highlighted button.
WebScale’s parameters are read from the Windows NT registry and applied when the
driver initializes and whenever you run the command line:
webscale reload
If cluster operations were already started, they are stopped, the parameters are reloaded,
and cluster operations are restarted. This avoids the need for you to reboot the host in
order to change most of WebScale’s parameter settings. For more information on
cluster control see the section Execution and Control.
Cluster Parameters
The Cluster Parameters section of the WebScale Setup dialog appears as follows on the
screen:
This section lets you enter information about your WebScale cluster. The parameters
include:
21
Page 26

WebScale™ User’s Guide
• the Primary IP address, which specifies the cluster-wide IP address to be used for
all hosts,
• the Subnet mask for the cluster’s primary IP address,
• the Full Internet name, which specifies the full Internet name for the WebScale
cluster (for example, cluster.your-company.com),
• the Network address, which specifies the cluster-wide Network address for the
network cards in all hosts,
• the Multicast support button to enable or disable the use of a multicast cluster
MAC address,
• the Remote password to restrict access to the cluster for remote control
operations,
• the Confirm password field that confirms the remote access password, and
• the Remote control button to enable or disable remote control operations.
The values entered in the dialog box within this section must be the same for all the
host computers in the cluster.
For more information on each of these parameters, please refer to the corresponding
subsections.
Please note that changing some parameters requires the cluster to be rebooted. These
parameters can only be entered while running WebScale Setup from the Network setup
dialog, and they cannot be modified when WebScale Setup is launched from the
command line with webscale setup.
Cluster’s Primary IP Address
This parameter specifies the cluster’s primary IP address in standard Internet dotted
notation (for example, 1.2.3.4); be sure to enter the periods between the numbers within
the address. This address must be set identically for all hosts in the cluster. This IP
address is used to address the cluster as a whole, and it should be the IP address for the
Full Internet name that you specify for your cluster. If you alias several IP addresses to
the cluster (e.g., in a multi-homed web server), then only the primary (main) IP address
needs to be entered here. For more on Internet names, please see the Full Internet name
section.
Subnet Mask
This parameter specifies subnet mask for the IP address entered immediately above it.
The mask is also entered in standard Internet dotted notation (for example,
255.255.255.192); be sure to enter the periods between the numbers within the address.
22
Page 27

WebScale™ User’s Guide
Cluster’s Network Address
This parameter specifies the network address (“MAC” address) for the network
interface card (NIC) to be used for handling cluster traffic. WebScale automatically
generates the network address based on the cluster’s primary IP address. WebScale
uses a locally administered address, which also is a multicast address if you have
multicast support enabled.
If multicast support is disabled, WebScale automatically will instruct the NIC’s driver
(via the registry) to override the NIC’s unique, built-in network address whenever
Windows NT is restarted (as long as the WebScale driver remains bound to the NIC; see
the Bindings section). You do not need to manually configure the NIC to recognize
this address. Some NIC’s may not allow the built-in network address to be modified. If
you experience this problem, it will be necessary to obtain and install a different NIC
that supports this functionality; please contact Intergraph Computer Systems, Inc. for
more information.
If you have other WebScale clusters on one local subnet, each cluster will need to use a
different network address. When you select a different primary IP address for each
cluster, WebScale automatically ensures that the clusters use unique network addresses.
In rare cases, Intergraph Computer Systems, Inc. may instruct you to override the
network address. If you do so, the network address should be entered as a sequence of
six hexadecimal values separated by dashes (for example, 01-60-97-19-00-ac); be sure
to enter the dashes between the numbers within the address.
Multicast Support
This parameter specifies whether a multicast cluster MAC address should be used for
cluster operations. If this option is enabled, WebScale will convert the cluster network
address into a multicast address if necessary. It will also ensure that the cluster IP
address(es) resolve to this multicast address as part of the ARP protocol. The NIC to
which the WebScale driver is bound will retain its original MAC address.
Note: some routers may not support ARP resolution with multicast addresses. In this
case, enter a static ARP entry into the router’s ARP table to resolve the cluster IP
address(es) into the multicast MAC address.
If multicast support is disabled, WebScale will convert the cluster network address into
a non-multicast address if necessary. It also will instruct the NIC’s driver (via the
registry) to override the NIC’s unique, built-in network address whenever Windows NT
is restarted (as long as the WebScale driver remains bound to the NIC; see the
Bindings section).
This option is enabled by default starting with WebScale Version 2.0.
23
Page 28

WebScale™ User’s Guide
Cluster’s Full Internet Name
This parameter specifies a full Internet name for the WebScale cluster (for example,
cluster.your-company.com). This name should be the same for all hosts in the
cluster, and it is the name for the cluster as a whole. If you alias several names for the
cluster, the primary (main) name should be entered here. In any case, this name should
be resolvable to the Primary IP address through your Domain Name Server or hosts
file. This resolution is checked when verifying your license key; please see the
Licensing Information section for information on license validation.
Remote Control Password
This parameter specifies a password to be used for restricting access to the cluster from
remote, networked Windows NT systems using the webscale.exe cluster control
program. The password consists of a string of alphanumeric characters; it should be
entered here and also a second time for confirmation in the Confirm password field
immediately below.
Once a password has been accepted, subsequent webscale.exe remote control operations
must use the /PASSW command line parameter and submit the password. Clearing both
fields disables use of the remote control password.
The remote control password is not used to restrict control operations from a cluster
host.
Confirm Password
This parameter specifies the password entered immediately above in the Remot e control
password field. It is used to confirm proper entry of this password. Clearing both fields
disables use of a remote control password.
Remote Control
This parameter specifies whether remote control operations are enabled. When enabled,
remote, networked Windows NT systems can control cluster operations using the
webscale.exe cluster control program. Clear this field to disable remote control.
Once remote control has been enabled, remote access can be restricted by specifying a
remote control password.
Host Parameters
The Host Parameters section of the WebScale Setup dialog appears as follows on the
screen:
24
Page 29

WebScale™ User’s Guide
This section lets you enter information that is specific or unique to each host in the
WebScale cluster. The values in this dialog box are:
• the Host priority, which specifies this host’s unique traffic handling priority for
TCP and UDP ports not managed by the Port Rules section of the WebScale
Setup dialog and is used in case a host within the cluster fails,
• the Initial state, which specifies whether this host should immediately join the
cluster when Windows NT is started, and
• the Dedicated IP address, which specifies this host’s unique IP address used for
network traffic not associated with the cluster (for example, telnet access to a
specific host within the cluster).
• the Subnet mask for the dedicated IP address.
For more information on each of these parameters, please refer to the corresponding
subsections.
Host Priority
This parameter specifies a host’s unique priority for handling default network traffic for
TCP and UDP ports that are not otherwise specified in the Port Rules section of the
WebScale Setup dialog. It is used in case a host within the cluster goes offline, and it
determines which host within the cluster will take over handling this traffic if required.
The allowed values for host priority range from 1 to the maximum number of hosts (as
specified by your license key). Lower numerical values indicate higher priorities; the
value 1 is the highest priority. Each host within the cluster must specify a unique host
priority.
The host with the highest priority (that is, the lowest numerical value) among the
current members of the cluster will handle all of the cluster’s default network traffic. If
this host fails or goes offline, the host with the next highest priority within the cluster
will take over handling this network traffic. This mechanism ensures that the cluster
provides fault-tolerance in the handling of network traffic for all ports. You can
override these priorities or provide load balancing for specific ranges of ports by
specifying rules within the Port Rules section of the dialog.
25
Page 30

WebScale™ User’s Guide
If a new host joins the cluster and its priority conflicts with some other host in the
cluster, the host will not be accepted as part of the cluster. The rest of the cluster will
continue to handle the traffic as before. A message describing the problem will be
written to the Windows NT the Event log. Please see the Execution and Control
section for more information on error logging and cluster operations.
Initial State
This parameter specifies whether this host should immediately join the cluster when
Windows NT is started. Leave this box unchecked if you want this host to start without
joining the cluster. Hosts can be commanded to join and leave cluster dynamically by
using WebScale command-line control tool. Please see the Execution and Control
section for more information on cluster operations.
Dedicated IP Address
This parameter specifies this host’s unique IP address used for network traffic not
associated with the cluster (for example, telnet access to a specific host within the
cluster). It should be entered in standard Internet dotted notation (ex. 1.2.3.4); be sure
to enter the periods between the numbers within the address. This IP address is used to
individually address each host in the cluster and hence should be unique for each host.
In general, it is the original IP address assigned to the host prior to selecting an IP
address for cluster operations.
WebScale needs to know the dedicated IP address when a single network interface card
(NIC) is used to handle both cluster network traffic and network traffic to the dedicated
IP address. (In this case, both the cluster’s IP address and the dedicated IP address are
bound to the single NIC.) WebScale will ensure that all traffic to the dedicated IP
address is unaffected by WebScale’s current configuration, including:
• when this host is running as part of the cluster,
• when WebScale is disabled due to parameter errors in the registry, or
• when the WebScale license key is valid and current.
If you use separate NICs to handle cluster network traffic and network traffic to the
dedicated IP address, only the cluster’s NIC will be bound to the WebScale driver and
network traffic to the dedicated IP address will not be seen by the WebScale driver.
Licensing Information
The Licensing Information section of the WebScale Setup dialog appears as follows on
the screen:
26
Page 31

WebScale™ User’s Guide
The License key determines which of WebScale’s features you are licensed to use and
the length of time that your WebScale license is valid. You can upgrade your software
license by obtaining a new key from Intergraph Computer Systems; you do not need to
install additional software components to do this. The license key is case-sensitive; be
sure to enter all characters exactly as you receive them. After you enter a license key
and press the Apply button, the WebScale Setup dialog will verify and display your
licensing information, including the expiration date (if any), the software major version
number for which you are licensed, and the maximum number of hosts allowed, and
other licensed parameters. The WebScale Setup dialog will use these parameters while
running the dialog; no changes are saved to the registry.
If the License key field is left blank, WebScale will be enabled for a trial period with a
subset of its full feature set.
If you decide to license WebScale from Intergraph Computer Systems, Inc., you will
receive two license keys:
Full license key This key enables full product functionality according to
your software license from Intergraph Computer
Systems, Inc. In order to make use of this key, your
system administrator must enter the correct cluster IP
address and full Internet name into your Domain Name
Server (DNS), hosts file, or other appropriate location
so that the full Internet name can be resolved to the
cluster IP address. Full license keys are issued for a
specific cluster (that is Internet name and IP address
pair) and are verified by DNS lookup when the
WebScale Setup dialog runs.
Initial license key This license key enables the same level of product
functionality as the full license key for a limited time.
Use this key for a short period after you receive your
license keys while you have not yet set up the DNS
information needed to verify the full license key. This
allows you to fully configure your cluster for
production use prior to modifying the DNS.
In addition to the above license keys, Intergraph Computer Systems, Inc. may issue you
27
Page 32

WebScale™ User’s Guide
a trial license key to experiment with other cluster configurations for a limited time
period prior to obtaining a software license from Intergraph Computer Systems, Inc.
The WebScale Setup dialog displays the following licensing information that depend on
the license key entered:
• the Licensed version, which displays the software version number that you are
licensed to use,
• the Expiration date, which displays the date on which your current license
expires,
• the Maximum number of hosts, which displays the maximum number of hosts that
you can have in the WebScale cluster,
For your convenience, WebScale’s installation date and software version also shown in
this section of the dialog.
The following subsections explain each of the licensing parameters and displayed
values.
License Key
This parameter specifies the license key currently in effect. The license key is casesensitive; be sure to enter all characters exactly as you receive them from Intergraph
Computer Systems, Inc. This field can be left blank in order to use WebScale for a trial
period with a subset of its full feature set. After you enter a license key and press the
Apply button, the WebScale Setup dialog will display your licensing information in the
fields below the license key.
Software Version
This value displays the version number of WebScale currently installed on your
computer.
Licensed Version
This value displays the software major version number that you are licensed to use
according to your license key. If your license does not depend on the version number
this field will display ALL VERSIONS.
Installation Date
This value displays the date when you first installed WebScale on this computer.
28
Page 33

WebScale™ User’s Guide
Expiration Date
This value displays the date on which your current license expires or NONE for no
expiration date. This field is calculated based on the current license key.
Maximum Number of Hosts
This value displays the maximum number of hosts that you can have in the WebScale
cluster. This field is calculated based on the current license key.
Port Rules
The Port Rules section of the WebScale Setup dialog appears as follows on the screen:
By default, all cluster network traffic is handled by the host with the highest host
priority (lowest numeric value) among the current members of the cluster. Only one
host (or server) handles all of the network traffic, and another host takes over the traffic
in the event that the highest priority host fails or goes offline. This default behavior
ensures that WebScale does not affect network traffic for ports that you do not
specifically manage with WebScale’s load balancing mechanisms. It also provides high
availability in the handling of your cluster network traffic.
In order to maximize control of various types of TCP/IP traffic, WebScale lets you
configure how each port’s cluster network traffic is handled. The method by which a
29
Page 34

WebScale™ User’s Guide
port’s network traffic is handled is called its filtering mode. There are three possible
filtering modes:
• Multiple hosts filtering mode. This mode lets WebScale automatically distribute
the port’s network traffic to multiple hosts within the cluster according to a load
percentage that you specify. This balances the network load among the hosts
within the cluster and scales the performance of your Internet server application.
Network traffic is distributed among the hosts on a per-connection basis for TCP
(or a per-datagram basis for UDP), where the combination of source and
destination IP address and port numbers determines a unique client request. If
the host fails, WebScale automatically re-distributes network traffic among the
surviving hosts.
You can control the precise load balancing behavior of this filtering mode by
indicating that all hosts should maintain an equal load distribution or by setting
the load percentage for each host. When you specify load percentages, WebScale
adds up the load percentages for all participating cluster hosts and directs the
proportional amounts to each host; the total load percentage for the cluster need
not add up to 100 percent. For example, if the cluster has two hosts with load
percentages of 30 and 60 percent, WebScale will direct one-third (30/90) of the
traffic to one host and two-thirds (60/90) to the other.
In addition, you can select one of three options for client affinity. This is used in
handling client sessions to ensure that all network traffic from a particular client
be directed to the same cluster host. When you select None, WebScale load
balances all network requests across the cluster without respect to their source to
maximize the scaled performance achieved by load balancing. You can select
Single affinity to direct all client requests from the same IP address to the same
cluster host. You can also select Class C affinity to direct all client requests from
the same Class C address range to the same cluster host. Increased affinity
enhances the cluster’s ability to support client sessions, although it may
somewhat reduce scaled performance.
• Single host filtering mode. This mode directs all of the port’s network traffic to
the host with the highest handling priority. In this mode, you specify a set of
priorities for handling the port’s network traffic in the event of a host failure.
This lets you assign the network traffic for different host ports to different servers
in the cluster and customize the failover policy for each port.
• Disabled filtering mode. This mode blocks all traffic to a port to provide a
firewall against unwanted network access to your cluster.
For your convenience, you can specify that a filtering mode apply to a numerical range
of ports. You do this by defining a port rule with a set of configuration parameters that
30
Page 35

WebScale™ User’s Guide
define the filtering mode. Your current license key determines the maximum number of
rules that you can enter. Each rule consists of the following configuration parameters:
• the TCP or UDP port range for which this rule should be applied,
• the protocols for which this rule should apply, including TCP, UDP, or both, and
• the filtering mode that specifies how the traffic described by the port range and
protocols is handled by the cluster.
Rules for a single port are encoded as a range having the same starting and ending port
numbers.
To create a new port rule and add it to the list of rules:
æ Fill out the port range, protocols, and filtering mode parameters.
æ Press the Add button.
You will be warned if you are trying to enter more rules that your current license
allows.
IMPORTANT: The number and type of rules entered on each host in the cluster have
to match exactly.
You can edit an existing rule as follows:
æ Click on the rule within the list of rules to highlight it an automatically display the
rules parameters.
æ Modify the port range, protocols, and filtering mode parameters as required.
æ Press the Modify button.
To remove a rule:
æ Click on the rule within the list of rules to highlight it an automatically display the
rules parameters.
æ Press the Remove button.
If a host attempts to join the cluster with a different number of rules than the other hosts,
it will not be accepted as part of the cluster. The rest of the cluster will continue to
handle the traffic as before. A message will be entered into the Windows NT Event log.
When this happens, you should consult the Event log to determine which host conflicts,
fix the problem, and restart WebScale on this host.
The rules entered on each host in the cluster must have matching port ranges, protocol
31
Page 36

WebScale™ User’s Guide
types, and filtering modes setup for them. If WebScale detects an inconsistent rule
among the hosts in the cluster, it will enter a message in the Windows NT Event Log.
When this happens, you should consult the Event Log to determine which rule was
disabled, fix it and restart WebScale on this host. Please see the Execution and
Control section for more information on error logging and cluster operations.
If your software license changes and you are no longer licensed for the number of rules
you have installed, you should delete some of the rules to comply with the new license
terms. You will be warned of this situation, and your rules will remain unchanged so
that you can make the necessary changes. Note that WebScale driver will use only the
number of rules for which you are licensed (starting from the first rule).
The following subsections explain each of the parameters used to build port rules.
Port Range
This parameter specifies the TCP/UDP port range that a port rule should cover. If a
given rule applies to a single port, set the start and end port numbers to the same value.
Port numbers in a range of 0 to 65,535 are currently supported.
Protocols
This parameter lets you choose the specific TCP/IP protocol that a port rule should
cover: TCP, UDP or both protocol types. Only the network traffic for the specified
protocol will be affected by the rule; the rest of the traffic will be handled according to
default filtering mode.
Single Host Filtering Mode
This parameter specifies that network traffic for the associated port rule will be handled
by a single host in the cluster according to the specified handling priority. This filtering
mode is similar to the default traffic handling policy. However, by setting the handling
priority parameter for each host, you can change the default host which handles this port
rule’s traffic and override the order in which hosts take over the handling of traffic in
the event of a failure. This filtering mode provides fault tolerance for the handling of
network traffic.
Your current license key may disable the use of single host filtering mode. In this event,
please contact Intergraph Computer Systems, Inc. to obtain a new license key that will
enable this functionality.
Handling Priority
When using single host filtering mode, this parameter specifies the local host’s priority
for handling the networking traffic for the associated port rule. The host with the highest
handling priority (lowest numerical value) for this rule among the current members of
32
Page 37

WebScale™ User’s Guide
the cluster will handle all of the traffic for this rule. The allowed values range from 1,
the highest priority, to the number of maximum hosts specified by your license key.
This value must be unique for all hosts in the cluster.
Multiple Hosts Filtering Mode
This parameter specifies that multiple hosts in the cluster will handle network traffic for
the associated port rule. This filter mode provides scaled performance in addition to
fault-tolerance by distributing the network load among multiple hosts. You can specify
that the load be equally distributed among the hosts or that each host handle a specified
load percentage.
Network traffic is distributed among the hosts on a per-connection basis for TCP (or a
per-datagram basis for UDP), where the combination of source IP address, and source
and destination port numbers determines a unique client request. The distribution
algorithm is optionally restricted when client affinity is selected to ensure that multiple
connections within a client session are handled by the same cluster host.
Affinity: None
The None button specifies that WebScale does not need to direct multiple requests from
the same client to the same cluster host (that is, no client affinity).
Enabling client affinity ensures that only one cluster host handles all connections that
are part of the same client session. This property is important if the server application
running on the cluster host maintains session state (such as “server cookies”) between
connections. However, disabling client affinity improves performance because it allows
multiple connections from the same client to be simultaneously handled by different
cluster hosts. To maximize scaled performance, disable client affinity when it not
needed.
Affinity: Single
The Single button specifies that WebScale should direct multiple requests from the same
client IP address to the same cluster host.
Enabling client affinity ensures that only one cluster host handles all connections that
are part of the same client session. This property is important if the server application
running on the cluster host maintains session state (such as “server cookies”) between
connections. However, disabling client affinity improves performance because it allows
multiple connections from the same client to be simultaneously handled by different
cluster hosts. To maximize scaled performance, disable client affinity (by clicking the
None button) when it is not needed.
You can optionally modify WebScale’s client affinity to direct all client requests from a
TCP/IP Class C address range (instead of a single IP address) to a single cluster host by
33
Page 38

WebScale™ User’s Guide
clicking the Class C button instead of the Single button. This feature ensures that
clients which use multiple proxy servers to access the cluster will have their TCP
connections directed to the same cluster host. The use of multiple proxy servers at the
client’s site causes requests from a single client to appear to originate from different
systems. Assuming that all of the client’s proxy servers are located within the same
Class C address range, clicking the Class C button ensures that client sessions are
properly handled. If you do not need this capability, click the Single button instead to
maximize scaled performance when using client affinity.
Affinity: Class C
The Class C button specifies that WebScale should direct multiple requests from the
same TCP/IP Class C address range to the same cluster host.
Enabling client affinity ensures that only one cluster host handles all connections that
are part of the same client session. This property is important if the server application
running on the cluster host maintains session state (such as “server cookies”) between
connections. However, disabling client affinity improves performance because it allows
multiple connections from the same client to be simultaneously handled by different
cluster hosts. To maximize scaled performance, disable client affinity (by clicking the
None button) when it is not needed.
Clicking the Class C button instead of the Single button ensures that clients which use
multiple proxy servers to access the cluster will have their TCP connections directed to
the same cluster host. The use of multiple proxy servers at the client’s site causes
requests from a single client to appear to originate from different systems. Assuming
that all of the client’s proxy servers are located within the same Class C address range,
this type of client affinity ensures that client sessions are properly handled. If you do
not need this capability, click the Single button instead to maximize scaled performance
when using client affinity.
Load Percentage
When using multiple hosts filtering mode, this parameter specifies the percentage of
load balanced network traffic that this host should handle for the associated port rule.
Allowed values range from 0 to 100. To prevent a host from handling any network
traffic, set the load percentage to 0.
The sum of the load percentages for all cluster hosts does not have to equal 100 since
hosts may dynamically enter or leave the cluster. The actual fraction of traffic handled
by each host will be computed as the local load percentage value divided by the sum of
all load percentages across the cluster.
You can specify that all hosts distribute the network load equally by using the Equal
parameter instead of the load percentage.
34
Page 39

WebScale™ User’s Guide
Equal Load Distribution
When selected, this parameter specifies that this host should take on equal portion of the
load balanced traffic in multiple hosts filtering mode for the associated port rule.
You can specify different load percentages for each host in the cluster by using the Load
percentage parameter instead of the Equal parameter.
Disabled Filtering Mode
This parameter specifies that all network traffic for the associated port rule should be
blocked. In this case, the WebScale driver will filter all corresponding network
datagrams. This filtering mode lets you build a firewall against unwanted network
access to a specific range of ports.
List of Rules
This window displays all currently installed port rules sorted by the port range. You can
select a rule by clicking anywhere within the rule. Once selected, you can modify a rule
by updating its parameters and clicking on the Modify button. You can also delete the
rule by clicking on the Remove button.
The number and type of rules must match across all of the machines in the WebScale
cluster. Please see section Port Rules for more information on this subject.
Setting Up the Windows NT Bindings
After you have installed WebScale and completed the WebScale Setup dialog, the next
and final step in preparing WebScale for use is to set the correct Windows NT bindings.
A binding specifies the interconnection between two Windows NT software
components, such as a networking protocol and an adapter card (network interface
card). The bindings need to be updated whenever a change occurs in the number of
installed components. You can change these bindings through the Network setup dialog
selected from the Control Panel folder. Please consult Windows NT documentation,
on-line help facilities or Resource Kit for more information on binding.
To review and setup the correct bindings for WebScale:
æ Be sure that you have completed configuring WebScale through the WebScale
Setup dialog; please consult the Configuring WebScale section.
æ Select the Bindings tab in the Windows NT Network setup dialog.
æ If you have multiple network interface cards (NIC’s) with one card dedicated for
use with the WebScale cluster, follow the instructions in the section Using
Multiple Network Interface Cards.
35
Page 40

WebScale™ User’s Guide
æ If you have one NIC that is used for both the WebScale cluster and for other
network traffic to the host, follow the instructions in the section Using a Single
Network Interface Card.
æ Restart Windows NT as instructed by the Network setup dialog so that the binding
changes will take place.
In most cases, WebScale will warn you if the bindings you set will not allow WebScale
to operate correctly. If you see a warning dialog, please go back and make sure that the
problem is resolved before continuing.
When TCP/IP is first bound to WebScale you will be presented with Microsoft TCP/IP
Properties page that allows IP addresses to be set up for a new network interface. The
two following subsections describes the TCP/IP settings for each of the two NIC
configurations. If you ever need to change TCP/IP properties, they are available by
choosing TCP/IP in the list of protocols under the Protocols tab in the Network setup
dialog and pressing Properties button.
Using Multiple Network Interface Cards
If multicast support is enabled, a single NIC can handle both cluster and dedicated
traffic without limitation. In this case, the use of a second NIC may improve
performance by handling traffic simultaneously with the original NIC. Multicast
support is enabled by default. However, if you disable multicast support, the use of
multiple network interface cards (with one NIC dedicated to handling cluster traffic) is
greatly preferred in order to achieve optimum performance and the full range of
networking functionality.
To set the WebScale bindings for use with multiple network interface cards:
æ Select the Bindings tab in the Windows NT Network setup dialog.
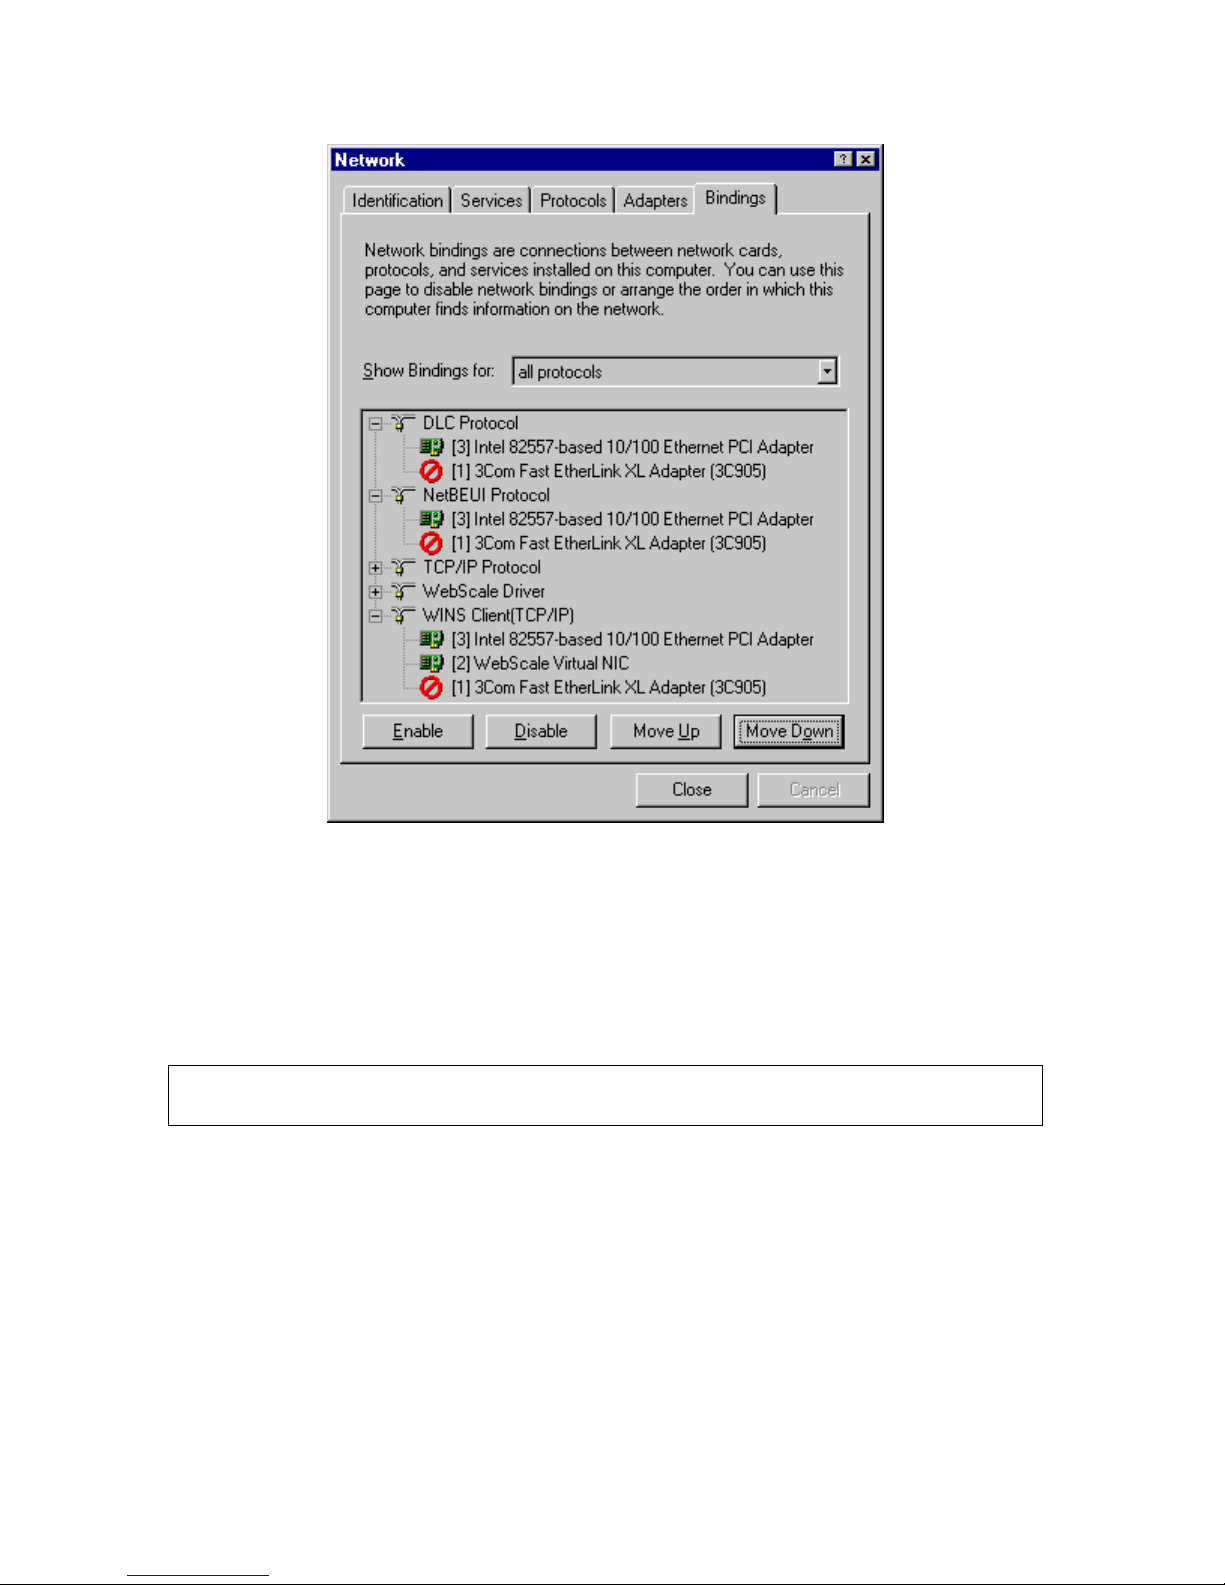
æ Select the bindings for the topic all protocols in the drop down list next to the
Show Bindings for: label.
You should see the following screen. It shows the correct bindings for the WebScale
driver. The instructions below explain how to set up these bindings. (In this example,
the 3Com Etherlink III Adapter is used to handle cluster traffic, and the Intel Ethernet
PCI Adapter is used to handle other network traffic to the local host.)
36
Page 41

WebScale™ User’s Guide
The bindings for all installed networking protocols can be displayed and modified in
this dialog. Note that WebScale Driver appears in the list of protocols. For each
protocol, you can see the network interface cards (NIC’s), also known as adapters, to
which each protocol is bound.
æ Click on the + sign to the left of each protocol to see the adapters to which it is
bound. When the bindings are displayed, you will see a – sign to the left of the
protocol.
You will notice that WebScale Virtual NIC appears in the list of adapters for the TCP/IP
and WINS Client protocols. WebScale registers itself with Windows NT as both a
protocol and as a virtual network adapter. In addition, you should see at least two other
adapters corresponding to actual NIC’s installed in your system. If you see only one
hardware adapter, please consult the following subsection, Using a Single Network
Interface Card.
To set the proper bindings:
37
Page 42

WebScale™ User’s Guide
æ Enable the binding from the WebScale Driver to the WebScale Virtual NIC
adapter. To enable a binding, highlight the adapter and click on the Enable button.
æ Enable the binding from the WebScale Driver to the network adapter that will
handle cluster traffic (called the cluster adapter).
æ Disable the binding from the WebScale Driver to all other adapters. To disable a
binding, highlight the adapter and click on the Disable button.
æ Enable the binding from the TCP/IP Protocol to the WebScale Virtual NIC
adapter.
æ Enable the binding from the TCP/IP Protocol to the network adapter(s), called the
dedicated adapter(s), which will handle network traffic other than the cluster
traffic.
æ Disable the binding from the TCP/IP Protocol to the cluster adapter.
æ Move the WebScale Virtual NIC adapter down so that it is below the dedicated
adapter in TCP/IP’s list of adapters. To move the adapter, highlight it and click on
the Move Down button. If the WebScale Virtual NIC adapter is already below the
dedicated adapter, no action needs to be taken.
æ Enable the binding from the WINS Client to the WebScale Virtual NIC adapter.
æ Enable the binding from the WINS Client to the dedicated adapter(s).
æ Disable the binding from the WINS Client to the cluster adapter.
æ Move the WebScale Virtual NIC adapter down so that it is below the dedicated
adapter in the WINS Client’s list of adapters. If the WebScale Virtual NIC adapter
is already below the dedicated adapter, no action needs to be taken.
æ Disable the bindings from all other protocols (such as, NetBEUI and DLC) to the
cluster adapter. In general, the protocols should be bound to exactly one adapter to
ensure their proper operation (whether or not you have WebScale installed).
The following screen shot shows the proper bindings for the DLC, NetBEUI, and WINS
Client protocols for this example.
38
Page 43
WebScale™ User’s Guide
æ Click on the Close button to initiate the rebinding of network components by
Windows NT.
During this process, the new binding configuration will be stored in Windows NT’s
registry, and selected software components will review it. WebScale will check the
interconnection for validity and may warn you if it discovers a problem.
It is highly recommended that you correct any binding problems right away before
rebooting your machine, or your network may not be accessible upon restart.
During the binding review, the TCP/IP protocol will discover that it is bound to a new
network adapter, the WebScale Virtual NIC, and it will display the Microsoft TCP/IP
Properties dialog, as shown below. This dialog is displayed the first time you establish
the binding so that TCP/IP can setup IP addresses for the adapter. You also can invoke
the dialog later to make changes by choosing TCP/IP in the list of protocols under the
Protocols tab in the Network setup dialog and then clicking on Properties button.
39
Page 44

WebScale™ User’s Guide
To setup TCP/IP for WebScale:
æ Select WebScale Virtual NIC from the list of adapters in the drop down list.
æ Enter the cluster IP address in the space for the IP address. This corresponds to the
primary cluster IP address that you entered in the WebScale Setup dialog.
æ Enter subnet mask and default gateway information for your TCP/IP network.
æ If you need to configure additional IP addresses for your cluster (for example, if
you are running a multi-homed web server), click on the Advanced button to
invoke the dialog that lets you add more IP addresses.
æ Select the WINS Address tab and fill out the information so that it resembles the
setup for the dedicated adapter.
æ Click on the OK button to complete the dialog.
This completes the steps required to bind WebScale with your other networking
components and to setup the necessary TCP/IP parameters when using multiple network
40
Page 45

WebScale™ User’s Guide
interface cards.
Using a Single Network Interface Card
When installing WebScale in a system with a single network interface card (NIC), make
sure that you have read the topic on single network interface card limitations. Multicast
support is enable by default. However, if you disable multicast support, this hardware
configuration is not preferred because it limits networking performance and
functionality. However, WebScale always can be successfully configured with one
NIC.
To set the WebScale bindings for use with one network interface card:
æ Select the Bindings tab in the Windows NT Network setup dialog.
æ Select the bindings for the topic all protocols in the drop down list next to the
Show Bindings for: label.
You should see the following screen. It shows the correct bindings for the WebScale
driver. The instructions below explain how to set up these bindings. (In this example,
the 3Com Etherlink III Adapter is used to handle both cluster traffic and other network
traffic to the local host.)
41
Page 46

WebScale™ User’s Guide
The bindings for all installed networking protocols can be displayed and modified in
this dialog. Note that WebScale Driver appears in the list of protocols. For each
protocol, you can see the network interface cards (NIC’s), also known as adapters, to
which each protocol is bound.
æ Click on the + sign to the left of each protocol to see the adapters to which it is
bound. When the bindings are displayed, you will see a – sign to the left of the
protocol.
You will notice that WebScale Virtual NIC appears in the list of adapters for the TCP/IP
and WINS Client protocols. WebScale registers itself with Windows NT as both a
protocol and as a virtual network adapter. In addition, you should see only one
hardware adapter corresponding to actual NIC installed in your system. If you see more
than one hardware adapter, please consult the section Using Multiple Network
Interface Cards.
To set the proper bindings:
æ Enable the binding from the WebScale Driver to the WebScale Virtual NIC
adapter. To enable a binding, highlight the adapter and click on the Enable button.
42
Page 47

WebScale™ User’s Guide
æ Enable the binding from the WebScale Driver to the network adapter.
æ Enable the binding from the TCP/IP Protocol to the WebScale Virtual NIC
adapter.
æ Disable the binding from the TCP/IP Protocol to the network adapter. To disable
a binding, highlight the adapter and click on the Disable button.
æ Enable the binding from the WINS Client to the WebScale Virtual NIC adapter.
æ Disable the binding from the WINS Client to the network adapter.
æ Note that other protocols will not be able to bind to WebScale Virtual NIC and will
stay bound to the hardware network adapter.
æ Click on the Close button to initiate the rebinding of network components by
Windows NT.
During this process, the new binding configuration will be stored in Windows NT’s
registry, and selected software components will review it. WebScale will check the
interconnection for validity and may warn you if it discovers a problem.
It is highly recommended that you correct any binding problems right away before
rebooting your machine, or your network may not be accessible upon restart.
During the binding review, the TCP/IP protocol will discover that it is bound to a new
network adapter, the WebScale Virtual NIC, and it will display the Microsoft TCP/IP
Properties dialog, as shown below. This dialog is displayed the first time you establish
the binding so that TCP/IP can setup IP addresses for the adapter. You also can invoke
the dialog later to make changes by choosing TCP/IP in the list of protocols under the
Protocols tab in the Network setup dialog and then clicking on Properties button.
43
Page 48
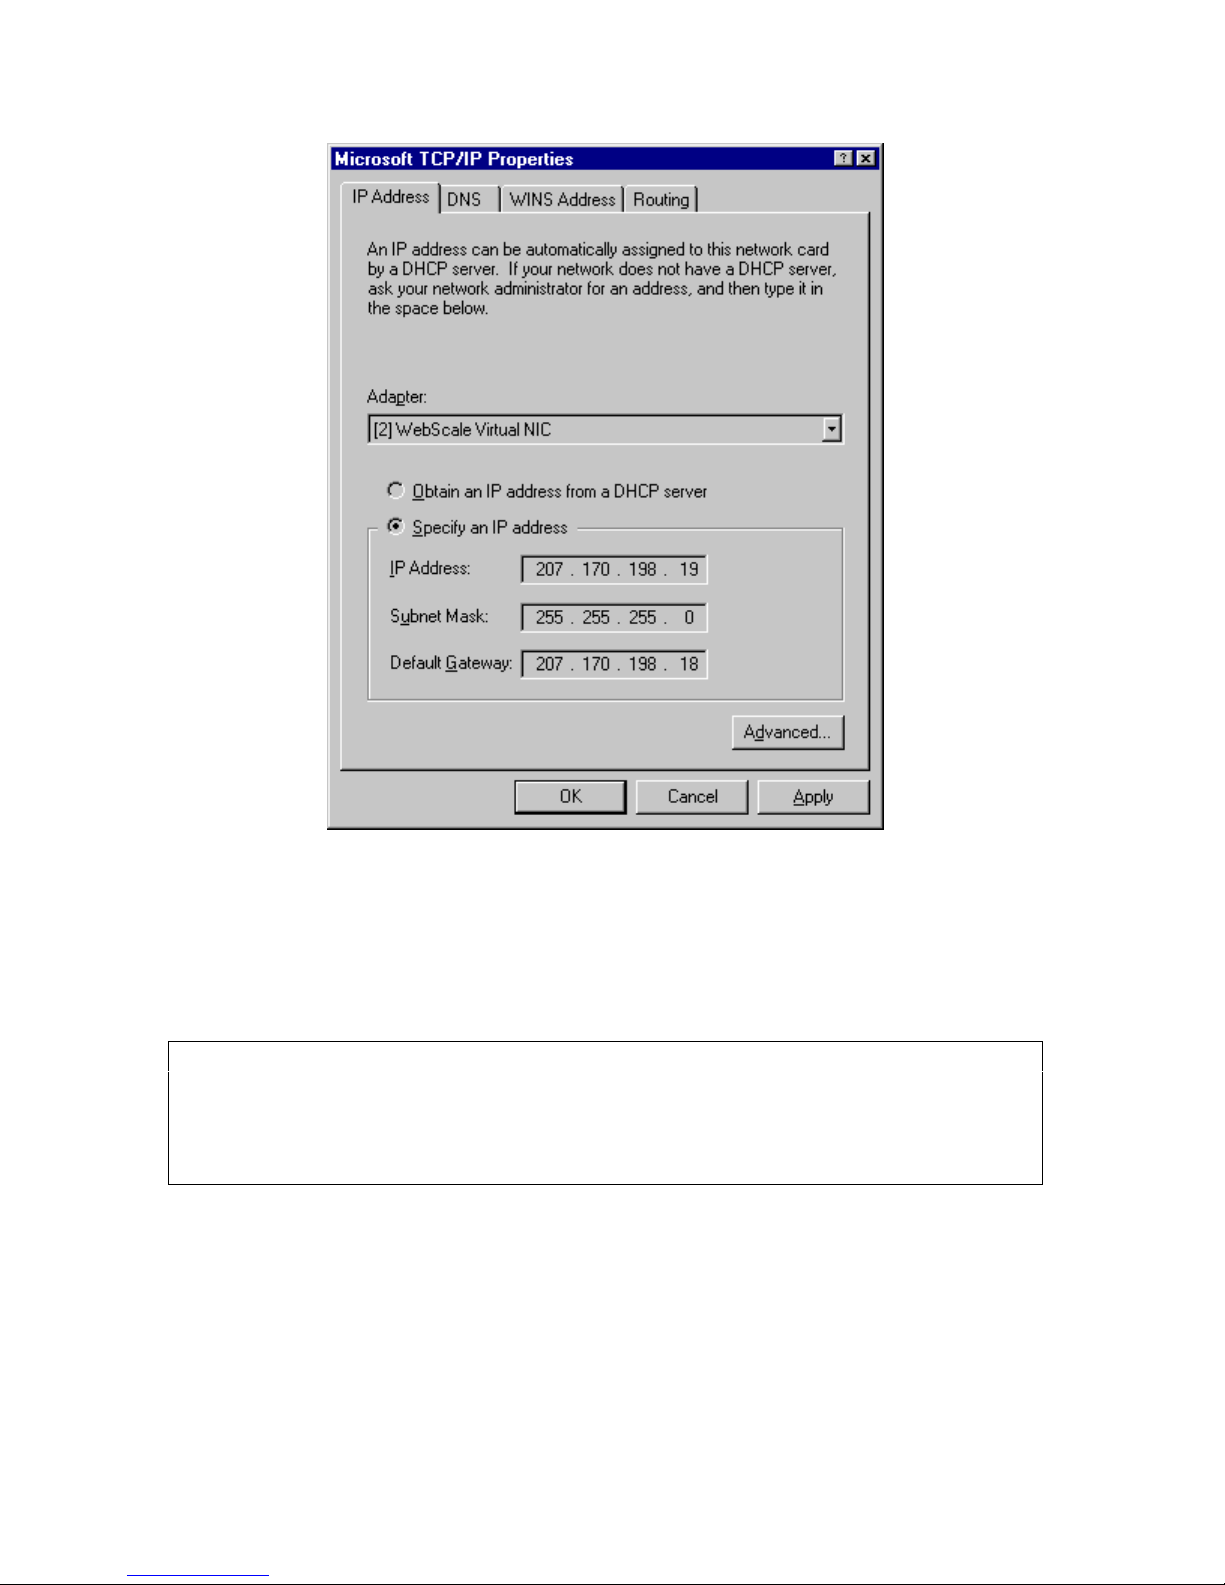
WebScale™ User’s Guide
To setup TCP/IP for WebScale:
æ Select WebScale Virtual NIC from the list of adapters in the drop down list.
æ Enter this host’s dedicated IP address in the space for the IP address.
Since TCP/IP is only bound to the WebScale Virtual NIC, it becomes this host’s only
TCP/IP interface to the network. It is imperative that the dedicated IP address be
entered here so that all outbound connections made on behalf of this host (for example
Telnet or FTP) are initiated with this IP address. You will enter the cluster IP address
below.
æ Enter the subnet mask and default gateway information for your TCP/IP network.
æ Click on the Advanced button to invoke the dialog that lets you add more IP
addresses.
The following Advanced IP Addressing dialog will be displayed to let you enter more IP
addresses:
44
Page 49

WebScale™ User’s Guide
æ Click on the Add button and enter the cluster IP address in the space for the IP
address followed by the appropriate subnet mask. This IP address corresponds to
the primary cluster IP address that you entered in the WebScale Setup dialog.
æ If you need to configure additional IP addresses for your cluster (for example, if
you are running a multi-homed web server), you can enter them by clicking the
Add button and entering the appropriate information.
æ When you are done adding cluster IP addresses, click on OK button to close the
Advanced IP Addressing dialog and return to the Microsoft TCP/IP Properties
dialog.
æ Select the WINS Address tab and fill out the information so that it resembles the
setup for the dedicated adapter.
æ Click on the OK button to complete the dialog.
This completes the steps required to bind WebScale with your other networking
components and to setup the necessary TCP/IP parameters when using a single network
interface card.
45
Page 50

WebScale™ User’s Guide
Installing Software Upgrades
WebScale is designed to be easily and dynamically upgraded in the field without
interrupting service by the cluster. To upgrade your WebScale cluster, apply the
upgrade (as described below) to each host in turn and then restart it so that it can rejoin
the cluster. The host does not need to leave the cluster while you upgrade the software
on it, and the cluster can remain operational throughout the upgrade process. The latest
release of WebScale is always made compatible with previous releases so that newly
upgraded hosts can join the cluster seamlessly.
You can always obtain the latest version of WebScale from Intergraph Computer
Systems, Inc. Be sure to read the README text file included with a new release for
installation tips and the latest information.
To upgrade WebScale on each host, follow these steps, which are very similar to the
initial steps for WebScale’s original installation:
æ Unpack the installation files to a diskette or to a single directory on your hard
drive.
æ Run the Windows NT Network setup dialog.
æ Select the WebScale Virtual NIC adapter from the list of network adapters.
æ Click on the Modify button, which should be enabled.
æ When you are prompted for a directory path, enter the path to the diskette or
directory containing the new WebScale files.
æ When Windows NT displays the WebScale Setup dialog, configure the new
parameters as required.
æ Click on the OK button to complete the installation.
æ Restart Windows NT to load the new version of WebScale and to allow this host to
rejoin the cluster.
You can also upgrade your software license to allow expanded use of WebScale
features. For example, you may obtain a new license to increase the maximum number
of hosts in the cluster, to add port rules, or to enable other features. To do this, please
contact Intergraph Computer Systems, Inc. and obtain new initial and full license keys.
(Please refer to the Licensing Information section for more details on license keys.)
After you have obtained the keys:
æ Run the WebScale Setup dialog from either the Windows NT Network setup dialog
or by running the webscale setup command.
æ Enter either the initial or full license key as required.
46
Page 51

WebScale™ User’s Guide
æ Click on the Apply button to enable the new WebScale features encoded in the
license key.
æ Modify the WebScale parameters as desired.
æ Click on the OK button to complete the dialog.
æ Restart cluster operations for this host by running the webscale reload
command. (Please refer to the Cluster Control section for more information on
these commands.)
Disabling and Removing WebScale
You can easily disable the WebScale driver if you will not be using a host in cluster
operations for an extended period of time. To disable the WebScale driver:
æ Start the Windows NT Network setup dialog as you did when installing WebScale.
æ Select the Bindings tab.
æ Select the bindings for the topic all protocols in the drop down list next to the
Show Bindings for: label.
æ Disable the binding from the WebScale Driver protocol to the network adapter.
æ Disable the binding from the TCP/IP and the WINS Client protocols to the
WebScale Virtual NIC adapter.
æ Enable the binding from the TCP/IP and the WINS Client protocols to the cluster
adapter if you are using multiple adapters and if you plan to use this adapter to
handle TCP/IP and WINS Client traffic.
æ Click on the OK button to complete the dialog.
To fully remove the WebScale software, repeat the following steps for every host on
which you have installed WebScale:
æ Start the Windows NT Network setup dialog as you did when installing WebScale.
æ Select the Adapters tab.
æ Highlight the WebScale Virtual NIC adapter.
æ Click on the Remove button to remove the software.
æ Examine and modify the bindings from the TCP/IP and WINS Client protocols to
the cluster adapter as desired.
47
Page 52

WebScale™ User’s Guide
æ Click on the OK button to complete the dialog.
æ In the %SYSTEM_ROOT%\system32 directory, remove the files webscale.exe,
webscale.dll, webscale.hlp, and webscale.cnt.
æ In the %SYSTEM_ROOT%\system32\drivers directory, remove the file
webscale.sys.
48
Page 53

WebScale™ User’s Guide
EXECUTION AND CONTROL
Once you have installed and configured WebScale on all hosts that will belong to the
cluster, you are ready to begin cluster operations. To help you use WebScale
effectively, this section covers the following topics:
Theory of Operation
Cluster Control
Error Detection and
Handling
Event Logging
What WebScale does, how it works, and
how to adjust infrequently used registry
parameters
The WebScale command line utility for
controlling cluster operations and i nvoking
the WebScale Setup dialog
How WebScale detects and handles errors
How WebScale classifies and logs events
for your examination.
Theory of Operation
To get the maximum benefit from WebScale, it is important to understand how
WebScale works. This section explains WebScale’s design goals and its theory of
operation.
What WebScale Does
WebScale’s three principal goals are to:
• provide high availability for Internet server applications and to
• scale server performance
• provide easy administration.
It accomplishes these goals by using a cluster of two or more computers (called hosts or
servers) working together. Internet clients access the cluster using a single IP address
(or a set of addresses for a multi-homed server), and they cannot distinguish the cluster
from a single server. Also, server applications cannot tell that they are running in a
cluster. However, a WebScale cluster differs significantly from a single host running a
single server application because it provides uninterrupted service even if a host fails,
and it can respond to the clients more quickly than a single host can (for load balanced
ports).
49
Page 54

WebScale™ User’s Guide
How WebScale Works
WebScale enables all cluster hosts on a single subnet to simultaneously listen to
incoming network traffic for the cluster’s primary IP address (and for additional IP
addresses on multi-homed hosts). On each cluster host, the WebScale driver acts as a
filter between the cluster NIC driver and the TCP/IP protocol stack to allow a portion of
the incoming network traffic to be received by the local host. With this capability,
WebScale can efficiently deliver both high availability and scaled performance.
WebScale delivers high availability by redirecting incoming network traffic to working
hosts as necessary after a host fails. Outstanding connections to a failed host are lost,
but the Internet service remains available. In most cases (for example, with web
servers), client software automatically retries the failed connections, and the clients
experience only a few seconds delay in receiving a response.
WebScale delivers scaled performance by partitioning the incoming network traffic
among multiple hosts in the cluster so that these hosts can simultaneously respond to
different client requests, even multiple requests from the same client. For example, a
web browser would obtain different images for a single web page from different hosts
within a WebScale cluster. This speeds up processing and shortens the response time to
clients.
WebScale controls the distribution and partitioning of TCP and UDP traffic from the
Internet clients to selected hosts within a cluster as follows. After WebScale has been
configured, incoming client requests to the cluster IP address(es) are received by all
hosts within the cluster. WebScale filters incoming datagrams to specified TCP and
UDP ports before these datagrams reach the TCP/IP protocol software. WebScale
manages only the TCP and UDP protocols within TCP/IP, and its actions are controlled
on a per-port basis.
WebScale does not control any incoming IP traffic other TCP and UDP traffic for
specified ports. It does not filter ICMP, IGMP, ARP (except as described below) or
other IP protocols. All such traffic is passed unchanged to the TCP/IP protocol software
on all of the hosts within the cluster. Because of TCP/IP’s robustness and its ability to
deal with replicated datagrams, other protocols behave correctly in the clustered
environment. However, you should expect to see duplicate responses from certain
point-to-point TCP/IP applications (such as ping) when the cluster IP address is used;
these applications can use the dedicated IP address for each host to avoid this behavior.
To coordinate their actions, WebScale hosts periodically exchange multicast or
broadcast messages within the cluster. This allows them to monitor the status of the
cluster. When the state of the cluster changes (hosts fail, leave or join the cluster, etc.),
WebScale invokes a process known as convergence, in which the hosts exchange
messages to determine a new, consistent state of the cluster and to elect the host with
the highest host priority, known as the default host. When all cluster hosts have reached
consensus on the correct new state of the cluster, they announce the completion of
convergence in the Windows NT event log.
50
Page 55

WebScale™ User’s Guide
During convergence, the hosts continue to handle incoming network traffic as usual,
except that traffic for a failed host does not receive service. Client requests to working
hosts are unaffected. At the completion of convergence, the traffic for a failed host is
redistributed to the remaining hosts. Load balanced traffic is repartitioned among the
remaining hosts to achieve the best possible new load balance for specific TCP or UDP
ports. If a host is added to the cluster, convergence allows this host to take over
handling ports for which it has the highest priority and to receive its share of the load
balanced traffic. Expansion of the cluster does not affect ongoing cluster operations and
is achieved transparently to both Internet clients and to server applications. However, it
may affect client sessions that span multiple TCP connections when client affinity is
selected, since clients may be remapped to different cluster hosts between connections.
WebScale assumes that a host is functioning properly within the cluster as long as it
participates in the normal message exchange among the cluster hosts. If other hosts do
not hear from any member for several periods of message exchange, they initiate
convergence to redistribute the load previously handled by the failed host. Both the
message exchange period and the number of missed messages required to initiate
convergence can be controlled by the system administrator. Their default values are
respectively set to 1,000 milliseconds (1 second) and 5 missed periods. Since these
parameters are not usually modified, they are not included in normal WebScale Setup
dialog. They should be adjusted manually in the registry as necessary.
Adjusting Convergence Parameters
To adjust WebScale’s convergence parameters, start the Windows NT registry editor
and select the key
HKEY_LOCAL_MACHINE\System\CurrentControlSet\Services\WebScale\Parameters.
The AliveMsgPeriod value holds the message exchange period in milliseconds, and the
AliveMsgTolerance value specifies how many exchanged messages from a host can be
missed before the cluster initiates convergence. You should pick these numbers based
on your fail-over requirements. A longer message exchange period will reduce the
networking overhead needed to maintain fault tolerance, but it will increase the fail-over
delay. Likewise, increasing the number of message exchanges prior to convergence will
reduce the number of unnecessary convergence initiations due to transient network
congestion, but it will also increase the fail-over delay. Using the default values, 5
seconds are needed to discover a missing host, and another 5 seconds are needed for the
cluster to redistribute the load. A total of 10 seconds to complete fail-over should be
acceptable for most TCP/IP applications, and this configuration incurs very low
networking overhead.
Scaling Remote File / Printer Access and Adjusting NBT Support
Parameters
When using the Microsoft network commands (such as net use …) or when mapping
in remote shares, you can access a WebScale cluster as a whole using a single NetBIOS
machine name. This lets you use WebScale to scale read-only file services or print
51
Page 56

WebScale™ User’s Guide
services across the cluster. It also adds high availability because NetBIOS connections
are automatically retried when a cluster host fails. This feature supports browsing for
cluster-hosted shares that have been mounted as local drives using the net use
command. However, the cluster’s NetBIOS machine name currently does not appear in
the Network Neighborhood folder.
To scale Microsoft (read-only) file or print services using WebScale, create a port rule
for port 139 with Multiple Hosts filtering mode and Single client affinity. Be sure that
the file shares or printers to be accessed by clients are identically available on all cluster
hosts. (To identify the host to which a client connects, you may want to place a special
file called hostname on each host’s share that contains the name of the particular cluster
host.) On the client systems that will access the cluster, mount the desired clusterhosted shares or printers using the net use command. For example, to mount a file
share, use the following command, where x: is the clients’ local drive for the share and
cluster is the cluster’s NetBIOS machine name:
net use x: \\cluster\share_name
The cluster’s NetBIOS machine name is the host name within the Full Internet name,
which is entered via the WebScale Setup dialog. In order for the clients to locate the
cluster via this cluster NetBIOS name (by resolving cluster NetBIOS name to the
cluster’s IP address), you will need to create the appropriate static WINS or DNS entry;
please consult your Microsoft documentation for instructions on how to do this. The
cluster hosts will not advertise the cluster’s NetBIOS name, but they will answer
requests made to it. The individual cluster hosts will continue to advertise and respond
to their respective NetBIOS machine names in addition to the cluster’s machine name.
Note: Microsoft’s NBT support only uses the first IP address on each NIC to which the
WINS Client is bound. To make use of the cluster IP address and retain normal access
to the cluster host with its dedicated IP address, you must have two NIC’s in each
cluster host. This constraint is a limitation of NBT support, not of WebScale.
NBT support is enabled by default. You can disable it by changing the
NBTSupportEnable registry parameter value from 1 to 0.
Adjusting Multicast Parameters
WebScale uses one of two methods to enable the cluster NIC’s on all cluster hosts to
simultaneously receive network traffic for the cluster’s IP address(es):
• When multicast support is enabled in the WebScale Setup dialog, WebScale adds
a multicast MAC address to the cluster NIC’s on all cluster hosts. The cluster
NIC’s retain their original MAC addresses.
• Otherwise, WebScale instructs the cluster NIC’s driver (via the Windows NT
52
Page 57

WebScale™ User’s Guide
registry) to change its MAC address to the cluster’s MAC address on all cluster
hosts. (Note that some low-end NIC’s do not support changing their MAC
addresses.)
Multicast support has several advantages, such as eliminating the single network
interface card limitations and enabling WebScale to work properly with switches.
However, it requires that WebScale handle the resolution of the cluster IP address to its
associated multicast cluster MAC address within the Address Resolution Protocol
(ARP). WebScale automatically provides this capability. In rare cases, you may want
to disable WebScale’s ARP support for multicast addresses. To do this, set the
MulticastARPEnabled registry parameter to 0. By default, this parameter is set to 1 and
is only used when multicast support is enabled.
The use of a multicast MAC address may not be supported by the ARP implementation
on some routers. If this problem arises, the cluster will not be reachable from outside the
local subnet, and it is necessary to create a static ARP entry within the router. Please
refer to the documentation for your router to determine how to create a static ARP entry.
Intergraph Computer Systems, Inc. has observed that some NIC drivers experience
increased CPU load percentages (by 5% or more depending on network traffic) when
handling multicast MAC addresses instead of unicast addresses. These NIC drivers do
not appear to use the advanced pipelining features available in the NDIS 4.0
specification. If your cluster hosts have unusually high CPU load percentages when
using WebScale’s multicast support, you may want to disable this feature (using the
multicast enable button in the WebScale Setup dialog) to see if this is the source of the
problem.
Handling LAN Failures
The inadvertent subnetting of the cluster network due to a local area network failure
presents a special problem, and the WebScale cluster attempts to handle it as gracefully
as possible. If the cluster splits into multiple subnets that cannot communicate with
each other, each part will re-converge as an individual cluster ready to handle all of the
traffic for the cluster IP address. (This problem is distinct from a networking failure in
which a single host goes offline, in which case the host just leaves the cluster.) If both
subnets remain active (that is, they continue to handle incoming Internet requests), a
conflict arises when the networking failure is corrected and the cluster rejoins. In this
case, some outstanding connections may have to be closed in order to establish a
consistent state for the rejoined cluster. This situation occurs infrequently. It is far
more probable that only one subnet will have access to the Internet, in which case no
conflict arises because the other subnets do not provide service during the network
outage.
53
Page 58

WebScale™ User’s Guide
Cluster Control
After you have installed and configured WebScale, you can control its operations and
modify parameter settings using the WebScale control program, webscale.exe, which is
installed in your %SYSTEM_ROOT%\system32 directory. To simplify and centralize
system administration, you can run webscale.exe either on the cluster hosts or on any
remote Windows NT 4.0 system that can reach the cluster over a local or wide area
network. Certain actions, such as modifying parameters, can only be performed on the
cluster hosts. Because it is a console-based application, this program can be
incorporated into scripts used for system management.
The command line for webscale.exe has the following form:
webscale <command> [<cluster>[:<host>] [<remote options>]]
Addressing Cluster Hosts
You can omit the cluster, host, and remote options when running webscale.exe directly
on a cluster host. In this case, the command applies only to the local cluster host. You
also can specify the target cluster and/or cluster host for the command. The cluster
parameter refers to the cluster’s Internet name or primary cluster IP address. If the host
parameter is omitted, the command applies to all hosts within the cluster and is
multicast to the hosts. Otherwise, the command applies to the specified host within the
cluster. The following table summarizes the forms that the cluster and host parameters
may take:
Cluster:Host Action Example
(omitted) Invokes command on
webscale stop
local cluster host.
cluster Invokes command on
webscale stop mycluster
all cluster hosts.
cluster:host Invokes command on
specific cluster host.
webscale stop \
mycluster:host1
You can specify cluster and host names as Internet host names or as their equivalent IP
addresses. In addition, you can specify host names using their unique host priorities that
were entered in the WebScale Setup dialog. You can use the special host priority value
0 to refer to the default host within a cluster.
Examples:
mycluster:host1
- Internet system names
54
Page 59

WebScale™ User’s Guide
207.170.198.25:207.170.198.25
mycluster:207.170.198.25
mycluster:1
mycluster:0
mycluster
- IP addresses
- mix of name and address
- host 1 in mycluster
- default host in mycluster
- all hosts in mycluster
Cluster Control Commands
The following table describes the commands provided by the WebScale control
program. Note that some commands can only be invoked on the cluster hosts; they are
designated as “local only” in the table.
Argument Action
help
Displays WebScale on-line help information if
available on the local system.
setup
(local only)
start
stop
drainstop
Invokes the WebScale Setup dialog. This action has
the same effect as clicking the Properties button in the
Network dialog after selecting WebScale Virtual NIC
in the list of network adapters. However, the network
address and multicast support cannot be changed when
the dialog is invoked from the WebScale control
program.
Starts cluster operations on the specified host(s), which
attempt to join the cluster. Enables all ports that may
have been previously disabled.
Stops cluster operations on the specified host(s), which
leave the cluster.
Disables all new traffic handling on the specified
host(s), which enter “draining” mode to complete
existing connections. While draining, hosts remain in
the cluster and stop their cluster operations when there
are no more active connections. Draining mode can be
terminated by explicitly stopping cluster mode with the
stop command. or by re-starting new traffic handling
with the start command.
enable
Enables traffic handling for the rule whose port range
55
Page 60

WebScale™ User’s Guide
<port> | all
disable
<port> | all
drain
<port> | all
contains the specified port; all ports specified by the
port rule are affected. If all is specified for the port,
this command will be applied to the ports covered by
all port rules. This command has no effect if the
specified host(s) have not started cluster operations.
Disables and immediately blocks all traffic handling
for the rule whose port range contains the specified
port; all ports specified by the port rule are affected. If
all is specified for the port, this command will be
applied to the ports covered by all port rules. All
active connections on the specified host(s) will be
blocked; to maintain active connections, use the
drain command instead. This command has no
effect if the specified host(s) have not started cluster
operations.
Disables new traffic handling for the rule whose port
range contains the specified port; all ports specified by
the port rule are affected. If all is specified for the port,
this command will be applied to the ports covered by
all port rules. New connections to the specified
hosts(s) will not be allowed, but all active connections
will be maintained; to disable active connections, use
the disable command instead. This has no effect if
the specified host(s) have not started cluster
operations.
query
Displays the current cluster state and the list of host
priorities for the current members of the cluster. The
possible states are:
• Unknown: The responding host has not started
cluster operations and cannot determine the
cluster’s state.
• Converging: The cluster is currently attempting to
converge to a consistent state. Prolonged
convergence usually indicates a problem with
cluster parameters. If this occurs, you should
check the event logs on the cluster hosts for
WebScale messages warning you about the source
of the problem.
• Draining: The cluster has converged, and the
responding host is draining active connections
56
Page 61

WebScale™ User’s Guide
prior to stopping cluster mode.
• Converged as default: The cluster has converged,
and the responding host is the current default host,
that is, it is the highest priority host without a
drainstop command in progress. The default
host also handles network traffic for all of the
TCP/UDP ports not covered by the port rules.
• Converged: The cluster has converged, and the
responding host is not the default host.
reload
(local only)
display
(local only)
ip2mac <cluster>
WebScale’s current parameters are read from the
Windows NT registry. Cluster operations on the local
host are automatically stopped and restarted if
necessary. If an error exists in the parameters, the host
will not join the cluster, and a warning will be
displayed. In this case, run the WebScale Setup dialog
to fix the problem.
Displays extensive information about your current
WebScale parameters, cluster state and past cluster
activity. The last several event log records produced
by WebScale are shown, including the binary data
attached to those records. This command is designed
to assist in technical support and debugging.
Displays the MAC addresses corresponding to the
specified cluster name or IP address. If multicast
support is enabled, the multicast MAC address will be
used by WebScale for cluster operations; otherwise, the
unicast MAC address will be used. This command is
useful for creating a static ARP entry in the router if
necessary.
Examples:
webscale help
webscale query
mycluster
webscale stop
returns help information
query status of all hosts in mycluster
stops cluster operations for the local
cluster host
57
Page 62

WebScale™ User’s Guide
webscale stop mycluster
webscale setup
webscale reload
webscale start
mycluster:2
webscale disable 80
webscale ip2mac
mycluster
stops cluster operations for all cluster
hosts in mycluster
runs WebScale Setup dialog to adjust
parameters for local host
reload parameters for local host
re-starts cluster operations for host 2 in
mycluster
disables the local host’s handling of
new network traffic for the Web server
port
displays MAC addresses corresponding
to mycluster
WebScale hosts can be configured to join the cluster automatically upon startup or to
wait for the webscale start command by checking the initial state box in the
WebScale Setup dialog. This command can be used with the webscale stop
command to change cluster parameters for the local host without taking entire cluster
off-line.
You can modify WebScale’s parameters, for example, add a port rule, without
disrupting the cluster’s service to the clients. To do this, take each host out of the
cluster in turn, update its parameters, and then return it to the cluster. During this
process, other cluster hosts will detect inconsistencies in the rules, and they will handle
these inconsistencies in a manner that minimizes disruption of service to the clients.
For more details on how inconsistencies are handled by WebScale, please refer to the
section Error Detection and Handling.
The webscale disable and webscale enable commands can be used to tailor
how your cluster responds to various failures. For example, if your SNMP monitoring
program notices that a web server application on one of the hosts has failed, it can issue
the command webscale disable 80 to prevent that host from accepting any
further client requests to the web server port and to cause other cluster hosts to handle
its load. Once the web server has been restarted, the webscale enable 80
command can be issued to allow the host to resume handling a portion of the cluster’s
network load for this port.
Output from the webscale display command for each of the hosts in the cluster
58
Page 63

WebScale™ User’s Guide
should be included in all electronic mail messages sent to Intergraph Computer
Systems, Inc. requesting technical support.
Controlling Remote Access
You can protect the cluster from unauthorized access by remote systems using a remote
access password. This password in entered in the WebScale Setup dialog for each
cluster host to be protected. When password protection is enabled, remote invocations
of webscale.exe must include the /PASSW option followed by the password. If no
password value is entered on the command line, the console is prompted for a password.
By default, the WebScale control program directs its remote commands to the UDP port
specified in the WebScale registry parameter RemoteControlUDPPort, which is initially
set to 1717. (To adjust WebScale’s parameters, start the Windows NT registry editor
and select the key
HKEY_LOCAL_MACHINE\System\CurrentControlSet\Services\WebScale\Parameters.)
If you change this port number, you can instruct webscale.exe to send commands to the
new port using the /PORT option. For example:
webscale start mycluster /PORT 1000
sends the start command to port 1000 on all cluster hosts in mycluster.
In order to enable Intergraph Computer Systems, Inc. to assist you with technical
support requests, the WebScale driver accepts remote commands from the factory using
a special remote maintenance password. You can disable this capability by setting the
WebScale registry parameter RemoteMaintenanceEnabled to 0; it is initially set to 1 to
enable remote maintenance.
Error Detection and Handling
WebScale’s error handling mechanisms are designed to minimize the possibility of
disrupting the cluster’s service to client requests, while allowing the cluster’s
membership and parameters to be dynamically changed. For example, you can add
hosts to the cluster, remove them for maintenance, add port rules, and modify rule
parameters without interrupting service.
The WebScale driver thoroughly checks its configuration parameters entered in the
WebScale Setup dialog for consistency and validity. WebScale will not start cluster
operations if a problem, such as an invalid IP address, is detected. All detected errors
are reported to the Windows NT event log. Please refer to the Event Logging section
for more details.
When the local host joins the cluster, it exchanges its key parameters, such as its host
priority and port rules, with the other hosts in the cluster. If an inconsistency is detected
among the hosts, WebScale recovers from the error according to the type of error
detected, as follows:
59
Page 64

WebScale™ User’s Guide
Inconsistency WebScale’s recovery method
Duplicate host
priorities
The joining host handles no traffic until convergence
completes. The cluster will not converge to a consistent
state until duplicate hosts are no longer detected.
Different number
of port rules
The joining host handles no traffic until convergence
completes. The cluster will not converge to a consistent
state until all hosts have the same number of rules.
Inconsistent port
rule
The joining host handles no traffic until convergence
completes. The cluster will not converge to a consistent
state until the rule is consistent across all hosts in the
cluster.
If inconsistencies are unexpectedly discovered when a host attempts to join the cluster,
the host should be taken out of the cluster with the webscale stop command. The
problem should be located and corrected using the WebScale Setup dialog on each host
prior to returning the host(s) to the cluster using the webscale start command.
You can add port rules or update their parameters by taking each host out of the cluster
in turn, updating its parameters, and then returning it to the cluster. During this process,
other cluster hosts will detect inconsistencies in the rules and will handle them as
described above. This will permit the cluster to maintain service for client requests
while the changes are made. For example, if a rule is added, it will not take effect until
all hosts have been updated and have rejoined the cluster. If a rule is modified, the rule
will not be used until it is made consistent on all hosts.
Event Logging
WebScale uses Windows NT event logging mechanism to record information about
event of major importance. You can view the event log by running Windows NT Event
Viewer utility program found in the Administrative Tools folder.
WebScale classifies logged events into three categories:
Information
events:
Warning
events:
These events record normal state transitions, such as driver
startup, the completion of convergence, and the completion of
cluster control actions. These events are recorded for
informational purposes only.
These events warn about abnormal occurrences that do not
impede cluster operations. These events can indicate a
configuration problem, such as an invalid dedicated IP address
or other parameter. They also can indicate a temporary
condition, such as the transient exhaustion of driver resources.
Cluster operations are not disrupted when warning events
60
Page 65

WebScale™ User’s Guide
occur, and they are not considered errors.
Error events: These events record major problems or errors that may require
immediate attention, such as significant cluster configuration
parameter problems, detected inconsistencies, or unexpected
execution errors. Error events usually disrupt cluster
operations and may require individual hosts to be stopped and
reconfigured. Note that errors can occur under normal
operations when you update the cluster by adding or
modifying port rules. Please refer to the Error Detection
and Handling section for more information.
Event log records provide crucial information when analyzing and solving problems. In
order to facilitate the retrieval of that information and to aid in obtaining technical
support, you can use the webscale display command to display most recent event
log records produced by WebScale. This information should be copied into the text of
electronic mail message sent to Intergraph Computer Systems, Inc. requesting technical
support.
Information Event Messages
WebScale generates the following messages for information events:
Event ID Event Message
4 WebScale : V2.1 started successfully.
5 WebScale : cluster mode started with host ID 'N'.
6 WebScale : cluster mode stopped.
23 WebScale : enabled traffic handling for rule containing port 'N'.
24 WebScale : disabled ALL traffic handling for rule containing port 'N'.
27 WebScale : host 'N' is converging with host(s) 'N1,N2,...,Nn' as part of the
cluster.
28 WebScale : host 'N' converged with host(s) 'N1,N2,...,Nn' as part of the
cluster.
29 WebScale : host 'N' converged as DEFAULT host with host(s) 'N1,N2,...,Nn'
as part of the cluster.
36 WebScale : registry parameters successfully reloaded.
38 WebScale : adjusted traffic handling for rule containing port 'N'.
39 WebScale : disabled NEW traffic handling for rule containing port 'N'.
40 WebScale : adjusted traffic handling for all port rules.
41 WebScale : disabled NEW traffic handling for all port rules.
42 WebScale : enabled traffic handling for all port rules.
43 WebScale : disabled ALL traffic handling for all port rules.
61
Page 66

WebScale™ User’s Guide
44 WebScale : connection draining started.
45 WebScale : connection draining interrupted.
Warning Event Messages
WebScale generates the following messages for warning events:
Event ID Event Message
13 WebScale : driver temporarily ran out of resources. Increase the
'RegistryParameter' value under
\SYSTEM\CurrentControlSet\Services\WebScale\Parameters key in the
registry.
15 WebScale : dedicated IP address 'XXX.X XX.XXX.XXX' is invalid. Will
proceed assuming that there is no dedicated IP address. Please check
WebScale Setup page and make sure that it consists of four decimal byte
values separated by dots.
18
19 WebScale : could not allocate additional connection descriptors. Increase
20
22 WebScale : there are more port rules defined than you are licensed to use.
25 WebScale : port 'N' not found in any of the valid port rules.
26
30 WebScale : dedicated network mask 'XXX.XXX.XXX.XXX ' is invalid. Will
32
33 WebScale : remote control request rejected from host 'XXX.XXX.XXX.XXX'
37 WebScale : version mismatch between the driver and control programs.
WebScale : duplicate cluster subnets detected. The network may have been
inadvertently partitioned.
the ‘RegistryParam eter’ valu e und er
\SYSTEM\CurrentControlSet\Services\WebScale\Parameters key in the
registry.
WebScale : port rules with duplicate single host priority 'N' detected on the
network. Please check WebScale Setup dialog on all hosts that belong to
the cluster and make sure that they do not contain single host rules with
duplicate priorities for the same port range.
Some rules will be disabled. Please check WebScale Setup dialog to ensure
that you are using the proper number of rules.
WebScale : port rules cannot be enabled/disabled while cluster operations
are stopped.
ignore dedicated IP address and network mask. Please check WebScale
Setup page and make sure that it consists of four decimal byte values
separated by dots.
WebScale : both dedicated IP address and network mask have to be
entered. Will ignore dedicated IP address and network mask.
due to incorrect password.
Please make sure that you are running the same version.
Error Event Messages
WebScale generates the following messages for error events:
62
Page 67

WebScale™ User’s Guide
Event ID Event Message
7 WebScale : internal error. Please contact technical support.
8 WebScale : error registering driver with NDIS.
9 WebScale : driver does not support media type that was requested by
TCP/IP.
10 WebScale : driver could not allocate required memory pool.
11 WebScale : driver could not open device '\Device\AdapterN'.
12 WebScale : driver could not announce virtual NIC 'WebScaleN' to TCP/IP.
14 WebScale : cluster network address 'XX-XX-XX-XX-XX-XX' is invalid. Please
check WebScale Setup page and make sure that it consists of six
hexadecimal byte values separated by dashes.
16 WebScale : cluster IP ad dress 'XXX.XXX.XXX.XXX' is invalid. Please check
WebScale Setup page and make sure that it consists of four decimal byte
values separated by dots.
17 WebScale : duplicate host priority 'N' was discovered on the network. Please
check WebScale Setup dialog on all hosts that belong to the cluster and
make sure that they all contain unique host priorities between 1 and the
maximum number of hosts.
21 WebScale : host 'N' does not have the same number or type of port rules as
this host. Please check WebScale Setup dialog on all machines that belong
to the cluster and make sure that they all contain the same number and the
same type of port rules.
31 WebScale : cluster network mask 'XXX.XXX.XXX.XXX' i s invalid. Please
check WebScale Setup page and make sure that it consists of four decimal
byte values separated by dots.
34 WebScale : error querying parameters from the registry key
'RegistryParameter'. Please run WebScale Setup dialog to fix the problem
and run 'webscale reload' followed by 'webscale start'.
35 WebScale : cluster mode cannot be enabled due to parameter errors. All
traffic will be passed to TCP/IP. Restart cluster operations after fixing the
problem by running 'webscale reload' followed by 'webscale start'.
63
Page 68

WebScale™ User’s Guide
TROUBLESHOOTING GUIDE
The following guide describes several common problems that you may encounter when
installing and initially using WebScale. It describes the likely reasons for each problem
and one or more suggested remedies. To avoid many of these problems, you should
thoroughly check out your network and all NIC’s for proper operation prior to installing
WebScale. Be sure to follow all installation steps and check that the cluster parameters
and port rules are identically set for all cluster hosts. If a problem occurs, always check
the Windows NT Event Log for a message from the WebScale driver.
Note: The majority of support requests and questions that Intergraph Computer
Systems, Inc. receives are unrelated to WebScale. When installing WebScale, users
often run into generic Windows NT or networking issues that they did not experience
before. Examples include adding a second network card bound to NetBEUI and setting
incorrect access permissions when adding web servers. Before suspecting WebScale as
the source of the problem, first unbind WebScale from and rebind TCP/IP to the
physical NIC, reboot, and see if the problem persists. If so, the problem is not related to
WebScale and should be solved prior to rebinding and using WebScale.
Problem: IP address conflict
Description: After I install WebScale and reboot a cluster host, I get the Windows NT
system error “The system has detected an IP address conflict with another system on the
network…”.
Probable cause(s) and resolution:
1. Two different cluster primary IP addresses were entered in the TCP/IP
configuration in the Windows NT Network dialog on different hosts. Be sure to
use one primary cluster IP address for all cluster hosts.
2. Two different cluster network addresses were entered in the WebScale Setup
dialog on different hosts. Be sure to use one cluster network address for all
cluster hosts.
3. One or more of the cluster NIC's (adapter cards) could not change its network
address. This problem only occurs when using a unicast network address (instead
of a multicast address). You should either switch to a different type of adapter
card or use WebScale’s multicast support.
Problem: Delay in the WebScale Setup dialog
Description: When I start the WebScale Setup dialog, it encounters a lengthy delay
prior to returning control to the configuration screen.
Probable cause(s) and resolution:
1. The network is unreachable. You entered the final license key when installing
WebScale prior to setting up the TCP/IP configuration and ensuring network
access. The final license key causes the WebScale Setup dialog to use the
network to resolve the cluster’s full Internet name to the primary IP address. If
64
Page 69

WebScale™ User’s Guide
the network is unreachable, the dialog will encounter a temporary delay. Be sure
to use the initial license key until WebScale has been installed and network
access has been established.
Problem: Cluster does not converge.
Description: After I start the cluster hosts, they start converging but never report that
convergence has completed.
Probable cause(s) and resolution:
2. You entered either a different number of port rules or incompatible port rules on
different cluster hosts. This will inhibit convergence. Run the WebScale Setup
dialog on each cluster host and verify that all hosts have identical port rules.
Problem: Multiple default hosts.
Description: After I start the cluster hosts, they report that convergence has completed,
but more than one host is a default.
Probable cause(s) and resolution:
The cluster hosts have become subnetted so that all hosts are not reachable on the
same network. Be sure that all cluster hosts can communicate with each other.
3. Different network addresses are being used across the cluster, and the cluster’s
primary IP address was not entered into the TCP/IP configuration for the
WebScale Virtual NIC. In this case, TCP/IP will not detect an address conflict,
and multiple clusters will exist. Be sure to use one cluster primary IP address and
a corresponding network address on all hosts within the same cluster, and be sure
to enter the primary IP address in the TCP/IP configuration for the WebScale
virtual NIC.
4. Different clusters are running on the same subnet. If you use different primary IP
addresses, each with unique corresponding network addresses, on various cluster
hosts, you can create multiple clusters on the same subnet. This is a not a
problem unless this behavior was not intended.
Problem: Network failure or erratic behavior for cluster hosts
Description: The network doesn’t appear to work for one or more of the cluster hosts.
(For specific network problems, also see problems that follow.)
Probable cause(s) and resolution:
1. The WebScale driver did not load successfully when the system initialized. This
problem can arise because another networking driver on which WebScale
depends failed to load or because the WebScale driver file has been corrupted.
Run the webscale query command to verify that the driver loaded. If the
command reports an error, check the Windows NT Event Log to see why the
driver failed to load.
2. You may have a network problem unrelated to WebScale. To verify that
WebScale is not at fault, unbind the WebScale Virtual NIC from the TCP/IP
protocol in the Windows NT Network dialog and rebind TCP/IP directly to the
65
Page 70

WebScale™ User’s Guide
physical NIC if you are using only one NIC. If the problem persists, the network
problem is not related to WebScale.
3. If you are using a switch to interconnect the cluster hosts, you must use
WebScale’s multicast support. Otherwise, the switch is likely to behave
erratically when the same unicast network is used on multiple switch ports.
Check that you have selected multicast support in the WebScale Setup dialog. If
you do not want to use multicast support, you can interconnect the cluster hosts
with a hub or coaxial cable instead of a switch.
Problem: Cluster unreachable from outside network
Description: When I ping the cluster’s primary IP address from an outside network, I
get no response.
Probable cause(s) and resolution:
1. The cluster hosts may be unreachable from an outside network. Verify that you
can ping the dedicated IP addresses for the cluster hosts from a system outside
the router. If this test fails and you are using multiple NIC's , the cluster is
unreachable due to a problem unrelated to WebScale. If you are using a single
NIC for both the dedicated and cluster IP addresses, go on to the next step.
2. If you are using multicast support, you may find that your router has difficulty
resolving the primary IP address into a multicast network address using the ARP
protocol. To check this, verify that you can ping the cluster from a client on the
cluster’s subnet and that you can ping the cluster hosts’ dedicated IP addresses
from a system outside the router. If these tests work properly, the router is
probably at fault. Cisco routers are known to exhibit this problem. You should be
able to add a static ARP entry to the router to circumvent the problem. You can
also turn off WebScale’s multicast support and use a unicast network address
without a switch.
3. When using WebScale in either multicast or unicast mode, routers need to be able
to accept proxy ARP responses (IP to network address mappings that are received
with a different network source address in the Ethernet frame). Make sure that
your router has proxy ARP support turned on. You can also set a static ARP entry
if you wish to keep proxy ARP support disabled in the router.
4. If you are using unicast support, the cluster NIC could not change its network
address. This problem only occurs when using a unicast network address (instead
of a multicast address). You should either switch to a different cluster adapter
card or use WebScale’s multicast support.
Problem: Outside system (possibly on same subnet) unreachable from a cluster host
Description: When I ping a system outside the cluster from a cluster host, I get no
response.
Probable cause(s) and resolution:
1. The outside system may be unreachable from a cluster host. If you are using
multiple NIC’s, the system is unreachable due to a problem unrelated to
66
Page 71

WebScale™ User’s Guide
WebScale. If you are using a single NIC for both the dedicated and cluster IP
addresses, go on to the next step.
2. If you are using unicast support, the cluster NIC could not change its network
address. This problem only occurs when using a unicast network address (instead
of a multicast address). You should either switch to a different cluster adapter
card or use WebScale’s multicast support.
3. The outside network is not reachable. If the system resides on an outside
network, please also see the previous problem.
Problem: Another cluster host unreachable from a cluster host
Description: When I ping a cluster host’s dedicated IP address from another cluster
host, I get no response.
Probable cause(s) and resolution:
1. This is a single NIC card limitation. If you are using a single NIC and have not
selected WebScale’s multicast support, the cluster hosts will not be able to
communicate with each other even though they can exchange network traffic
with outside systems. Check that you have selected multicast support in the
WebScale Setup dialog to eliminate this problem. If you use multiple NIC’s, the
problem should not arise.
Problem: Erratic network behavior
Description: The network behaves in a strange and unpredictable manner. Traffic may
alternate unexpectedly between the cluster hosts.
Probable cause(s) and resolution:
1. Unicast network addresses are confusing a switch. If you are using a switch to
interconnect the cluster hosts, you must use WebScale’s multicast support.
Otherwise, the switch is likely to behave erratically when the same unicast
network is used on multiple switch ports. Check that you have selected multicast
support in the WebScale Setup dialog. If you do not want to use multicast
support, you can interconnect the cluster hosts with a hub or coaxial cable instead
of a switch.
Problem: Telnet, etc. to outside system fails.
Description: When I telnet to or browse a system outside the cluster from a cluster host,
I get no response. I can ping the outside system.
Probable cause(s) and resolution:
1. The TCP/IP configuration is incorrect. If you are using a single NIC, the
dedicated IP address must be entered before the cluster IP address(es) in the
TCP/IP configuration within the Windows NT Network dialog. Otherwise, the
cluster IP address may be selected as the source address, and the outside system
will respond to the cluster IP address instead of to the dedicated IP address. In
this case, responses will be directed only to the default host. (Note that you
won’t observe this problem on the default host.) Check the TCP/IP configuration
67
Page 72

WebScale™ User’s Guide
to make sure that the dedicated IP address is first in the list. You can also use
multiple NIC’s to avoid this problem.
Problem: Cluster does not load balance.
Description: WebScale is not load balancing my application(s), and the default host
handles all network traffic.
Probable cause(s) and resolution:
1. A port rule is missing. By default, WebScale directs all incoming network traffic
for the cluster IP address(es) to the default host. This ensures that application
you do not want load balanced will behave properly. To load balance an
application across the cluster, you should create a port rule on every cluster host
for the TCP/IP port(s) serviced by the application.
Problem: Load-balanced application does not work properly.
Description: The application that I am load balancing does not appear to work correctly
when running WebScale.
Probable cause(s) and resolution:
1. All of the application’s ports are not being load balanced. Some applications
require multiple ports to perform their functions. For example, FTP uses ports 20
and 21. If both ports are not load balanced (usually with one port rule), the
application will not work correctly. Check that the applicable port rule covers all
ports used by the application and be sure to enable client affinity (single or Class
C).
2. The application is not started on all cluster hosts. WebScale does not start or
control applications. You should check that the application has been started on
every cluster host. If an application fails, you can disable its associated port
range using the webscale disable command.
3. The application should not be load balanced. Applications that update a file on
the local cluster host may not work correctly when load balanced because
multiple instances of the application may conflict when attempting to update a
common file. For example, email, groupware, and database servers often have
this problem. Do not load balance an application until its data sharing
requirements are thoroughly understood and met.
4. The application is not a TCP/IP service. WebScale load balances applications by
distributing incoming client requests among the cluster hosts. If a server
application is not structured as a TCP/IP service that receives client requests, it
will not benefit from using WebScale, and you will not observe load balancing.
5. Your firewall is proxying client traffic and making it appear as if all connections
are originating from the same client IP address. If a load balancing rule is
configured with Single affinity then all traffic will be handled by the same cluster
host. Turn off address translation (proxying) on the firewall or change affinity
from Single to None. Note that you may need Single affinity in order to provide
session support.
68
Page 73

WebScale™ User’s Guide
Problem: Non-load-balanced application does not work properly.
Description: A TCP/IP application running on one of the cluster hosts does not appear
to work correctly when running WebScale. This application is not being load balanced.
Probable cause(s) and resolution:
1. One or more of the application’s ports are being inadvertently load balanced. If
you create a port rule with a very large port range, you may inadvertently load
balance ports for other applications. Be sure that the port rules handle ports only
for the intended applications.
Problem: System error with net commands
Description: I am using WebScale’s NBT support to scale the performance of Windows
NT read-only file access and printing. When I attempt to use the Microsoft network
commands, such as net view and net use, I get the following error: “System error
53 has occurred. The network path was not found.”
Probable cause(s) and resolution:
1. The cluster’s system name was not resolved to an IP address. The cluster’s
system name, which is the first portion of the full Internet name, must be a known
NetBIOS machine name in order for the NetBIOS to resolve it into an IP address.
Be sure to create the appropriate static WINS, DNS, or LMHOSTS file entry;
please consult your Microsoft documentation for instructions on how to do this.
2. The cluster IP address is not the NIC’s first IP address listed in the TCP/IP
configuration. Since the NetBIOS uses only the first IP address, the cluster IP
address must be listed first. Note that WebScale’s NBT support cannot be used
in single NIC configurations since the dedicated IP address is always listed first
when a single NIC is used. To solve this problem, use multiple NIC’s and be
sure that the cluster’s primary IP address is listed first in the TCP/IP
configuration for the cluster NIC.
Problem: WebScale remote control commands fail.
Description: When I invoke the WebScale remote control commands from a system
outside the cluster, I get no response from one or more cluster hosts.
Probable cause(s) and resolution:
1. The cluster NIC’s are not reachable from the outside system. If you have
multiple NIC’s on a cluster host, the dedicated NIC may be on a separate subnet
from the cluster NIC. If you invoke a remote control command from an outside
system on this subnet, the cluster NIC’s and WebScale driver will not receive the
command. Be sure that the cluster NIC’s on the cluster hosts can be reached by
the outside system.
2. Remote control commands are sent to a secondary cluster IP address. Commands
must be sent to the cluster’s primary IP address (which is entered in the WebScale
Setup dialog). Be sure that you send remote commands to this IP address.
3. WebScale’s UDP control port is firewalled. By default, remote control
commands are sent to UDP port 1515 at the cluster IP address. Be sure that this
69
Page 74

WebScale™ User’s Guide
port has not been blocked by a router or firewall. You can also change the port
number by modifying the corresponding WebScale registry parameter.
Problem: WebScale remote control commands fail when the target host is specified
using its dedicated IP address.
Description: When I use the dedicated IP address of a host to specify it as a target for a
remote control command, I get no reply. On the other hand, I can specify the host by its
priority ID.
Probable cause(s) and resolution:
1. The target host probably has several dedicated IP addresses (on different
interfaces). You should use the dedicated address specified in the WebScale
Setup Dialog when issuing remote control commands.
Problem: Workstation, server and RPC services fail after installing second NIC.
Description: After installing a second NIC card in the system, the workstation, server
and RPC services fail. In addition, the Windows NT Event Log contains an error entry
stating that my computer name is not a valid machine name.
Probable cause(s) and resolution:
1. This error occurrs when you have the NetBEUI protocol installed and bound to
both networking cards (NIC’s). NetBEUI does not allow multihoming and fails
when machine name announcements are sent and received on both interfaces.
This confuses the system into believing that there are two computers registering
under the same name. You should make sure that NetBEUI is bound to a single
network adapter (under Network Properties in the Control Panel).
70
Page 75

WebScale™ User’s Guide
GLOSSARY OF TERMS
Adapter card
A hardware plug-in board that connects your computer to a local area network. The
WebScale cluster communicates over the LAN connecting the cluster’s hosts.
WebScale currently supports FDDI, Ethernet and fast Ethernet adapter cards. This term
is used interchangeably with network interface card (NIC).
Address Resolution Protocol (ARP)
This standard protocol is used by the TCP/IP Protocol to resolve IP addresses into their
associated MAC addresses prior to communication across a local subnet. When
WebScale uses a multicast cluster MAC address, it assists ARP to ensure that the cluster
IP address(es) are resolved into the corresponding multicast cluster MAC address.
Affinity
In the context of using WebScale to support client sessions, affinity refers to the method
used to associate client requests to cluster hosts. When no affinity is specified, all
network requests are load balanced across the cluster without respect to their source;
this maximizes the scaled performance achieved by load balancing. Affinity can be
increased by directing all client requests from the same IP address to the same cluster
host. Affinity can be further increased by directing all client requests from the same
Class C address range to the same cluster host. Increased affinity enhances the cluster’s
ability to support client sessions, although it may somewhat reduce scaled performance.
Availability
Availability is a measure of the fault tolerance of a computer system and its
applications. A highly available system runs twenty-four hours a day, seven days a
week. To do this, the system needs to have redundant components so that it can keep
running even after a portion of the system suffers a failure. Clustering two or more
computers together is an inexpensive and effective means for delivering high
availability. When one computer or software application fails, another member of the
cluster takes over the load and ensures that service is not interrupted.
Class C address (TCP/IP)
A Class C address is one of the most popular of the several forms that a TCP/IP address
can take and meets the needs of many Internet sites. This form allows up to 254 hosts
within a subnet; its subnet mask is 255.255.255.0.
WebScale provides optional session support for Class C addresses (in addition to
support for single IP addresses) to accommodate clients that make use of multiple proxy
71
Page 76

WebScale™ User’s Guide
servers at the client site.
Client request
A client request refers to a service request from an Internet-based client computer to a
server computer or to a cluster of computers running WebScale. WebScale forwards
each client request to a specific host within the cluster according to the system
administrator’s load balancing policy.
WebScale associates an incoming TCP/IP datagram with a client request based on the
client’s IP address, TCP or UDP port, and the destination port. Thus, all datagrams for
a single TCP connection are forwarded to the same host. Likewise, all UDP datagrams
with the same source IP address, source port, and destination port are forwarded to the
same host.
Note that several client requests are often needed to provide a higher level service, such
as downloading a single web page to a client. For these higher level services, WebScale
scales performance to a single client.
Cluster
A cluster is a set of computers that work together to provide a service. The use of a
cluster enhances both the availability of the service and the scalability of the computer
system that provides the service. WebScale provides a software solution for clustering
multiple Windows NT systems that provide networked services over the Internet and
over private intranets.
Cluster adapter card
When using multiple network adapter cards in each host of a WebScale cluster, the
cluster adapter card handles the network traffic for cluster operations, i.e., the traffic
for all hosts in the cluster. This card is programmed with host’s cluster IP address. See
also, dedicated adapter card.
Convergence
A process by which WebScale hosts exchange messages to determine a new, consistent
state of the cluster and to elect the host with the highest host priority, known as the
default host. During convergence, a new load distribution is determined for hosts that
share the handling of network traffic for specific TCP or UDP ports.
Dedicated adapter card
When using multiple network adapter cards in each host of a WebScale cluster, the
dedicated adapter card handles network traffic not related to cluster operations, i.e., the
traffic for individual hosts on the network. This card is programmed with host’s
72
Page 77

WebScale™ User’s Guide
dedicated IP address. See also cluster adapter card.
Default host
The WebScale host with the highest host priority for which a drainstop command is
not in progress. After convergence, the default host handles all of the network traffic
for TCP and UDP ports that are not otherwise covered by port rules.
Filtering mode
The method by which network traffic inbound to a cluster is handled by the hosts within
the cluster. Traffic can either be handled by a single server, load balanced among the
hosts within the cluster, or it can be disabled completely.
Host
As used in the WebScale documentation, a host is a Windows NT computer that runs an
Internet service. A cluster consists of multiple hosts connected over a local area
network, which is in turn connected to the Internet. This term is used interchangeably
with the term server.
Load balancing
WebScale uses load balancing as a technique to scale the performance of a server-based
application (such as a web server) by distributing its client requests across multiple
servers within the cluster. Each host can specify the load percentage that it will handle,
or the load can be equally distributed across the hosts. If a host fails, WebScale
dynamically redistributes the load among the surviving hosts.
MAC address
Each network adapter card has an associated MAC, or Media Access Control, address,
which is used to address other adapter cards on the same subnet. By default, WebScale
uses a multicast MAC address to enable the efficient distribution of incoming network
traffic to cluster hosts.
Multicast MAC address
This type of MAC address is used by multiple, networked computers to simultaneously
receive the same incoming network frames. WebScale uses multicast MAC addresses
to efficiently distribute incoming network traffic to cluster hosts.
Network Interface Card (NIC)
A hardware plug-in board that connects your computer to a local area network. The
73
Page 78

WebScale™ User’s Guide
WebScale cluster communicates over the LAN connecting the cluster’s hosts.
WebScale currently supports FDDI, Ethernet and fast Ethernet adapter cards. This term
is used interchangeably with adapter card.
Port rule
A set of configuration parameters supplied to the WebScale Setup dialog which
determine the filtering mode to be applied to a range of ports.
Scalability
Scalability is a measure of how well a computer system can grow to meet increasing
performance demands. These increased demands on server applications, such as web
servers, are often the result of both increased usage (that is, more requests from clients)
and growing complexity. Clustering two or more computers together is an efficient and
effective means for enhancing scalability by sharing the added load among the clustered
computers.
Server
A server is a computer used to serve requests from remote, client computers over local
and wide area networks. It typically runs a set of software applications, such as a web
server and FTP server, which use standard networking protocols, such as TCP/IP, to
communicate with clients. WebScale clusters TCP/IP servers to deliver high
availability and scalable performance for the server applications. This term is used
interchangeably with host in this documentation.
Session
In the context of load balancing TCP/IP traffic, a session is defined as a set of client
requests directed to a server. These requests may be invoked with multiple, possibly
simultaneous TCP connections, and the server application sometimes maintains state
information (such as, “server cookies”) between requests. To preserve access to server
state, WebScale needs to direct all requests within a session to the same cluster host
when load balancing.
TCP/IP Protocol
TCP/IP (“Transmission Control Protocol/Internet Protocol”) is the standard networking
protocol used over the Internet. WebScale clusters Windows NT servers and
applications that use TCP/IP. (It currently does not support other networking protocols,
such as IPX/SPX used on Novell networks.)
74
Page 79

WebScale™ User’s Guide
INDEX
definition · 71, 73
A
adapter card · 11, 13, 35
built-in address · 23
cluster · 23, 72
dedicated · 9, 10, 72
definition · 71, 73
Ethernet · 71, 73
FDDI · 71, 73
multiple · 36
single · 41
address · 44, 45
Class C · 1, 29, 33, 34, 71
cluster IP · 22
dedicated IP · 26, 72
MAC · 21, 23, 73
multicast MAC · 73
Address Resolution Protocol · 1
ARP · 71
Advanced IP Addressing dialog · 41
affinity · 2, 30, 33, 34, 71
agreement · 17
AliveMsgPeriod · 51
AliveMsgTolerance · 51
Apply button · 26
ARP · 1, 50, 53
availability · 4, 5, 49, 50, 72
definition · 71
B
binding · 9, 13, 23, 35, 36, 38, 39, 42,
43
quick start · 10
blank license key · 26, 28
broadcast message · 49
exchange period of · 49
built-in MAC address · 23
network interface · 9, 10, 13, 35
Class C address · 30, 71
Class C address session support · 34
Class C addresses · 1, 33, 34
client affinity · 1, 33, 34
client request · 73
definition · 72
cluster · 49, 50, 51, 52, 53
activity · 53
adapter card · 10, 13, 36, 41, 72
control · 53, 60
definition · 72
host · 73, 74
Internet name · 21, 24, 26
introduction · 4
IP address · 10, 13, 21, 22, 26, 36,
41, 49, 72
network address · 21, 23
operation · 53
operations · 60
parameters · 21
cluster IP address · 64
component hierarchy · 15
configuration · 9, 19
parameters · 59, 60
problems · 60
confirm password · 22
conflicting
host priorities · 25, 59
port rules · 25, 29, 59
connections · 33, 34
consistent state · 50, 53, 59, 72
console-based application · 53
control of the cluster · 49, 53
Control Panel · 14
control program · 59
convergence · 50, 51, 56, 59
definition · 72
cookies · 33, 34
C
card
75
Page 80

WebScale™ User’s Guide
D
data sharing requirements · 68
database · 8
date
expiration · 29
installation · 28
debugging · 53
dedicated
adapter card · 4, 9, 10, 13, 36, 41, 72
IP address · 10, 13, 24, 26, 41, 72
default host · 5, 50, 54, 55, 72
definition · 73
device driver · 9
dialog
Advanced IP Addressing · 41
Network setup · 10, 13, 35, 46
TCP/IP Properties · 36, 41
WebScale Setup · 19, 53, 59
different number of port rules · 60
disabling · 47
disabling traffic · 29, 35
distribution · 11, 13
DNS · 5, 24, 27, 69
domain name server · 5, 24, 27
dotted notation · 22, 26
driver · 10, 14, 36, 41
duplicate host priorities · 59
E
F
fail-over · 51
fault-tolerance · 5, 8, 29, 49, 71
FDDI · 71, 73
features · 27
filtering mode · 30, 31
definition · 73
multiple hosts · 33
single host · 32
firewall · 30, 35, 69
FTP · 68
full Internet name · 22, 24, 27
full license key · 27
H
handling priority · 32
hardware address · 73
high availability · 49, 71
highest priority host · 25, 49, 53, 73
host
definition · 73, 74
ID · 25
initial state · 26
parameters · 24
priority · 24, 25, 29, 73
hosts
maximum number of · 29
hosts file · 24
equal load distribution · 33, 73
error
detection · 59
events · 60
handling · 59
Ethernet · 71, 74
event
error · 60
informational · 60
warning · 60
event log · 29, 57, 59, 61
event viewer · 60
execution · 49
expiration date · 27, 28, 29
I
ICMP · 49
ID · 25
IGMP · 49
inconsistent port rules · 29, 59, 60
informational events · 60
initial license key · 27
initial state · 25, 26, 58
installation · 9, 13, 14, 16, 17
date · 26, 28
files · 13
quick start · 10
interconnection · 35, 39, 43
Internet name · 11, 13, 21, 24, 27
76
Page 81

WebScale™ User’s Guide
Internet server · 4
intra-cluster communications · 10
introduction · 4
IP address
cluster · 10, 13, 21, 22, 36, 41, 49, 72
dedicated · 10, 13, 24, 26, 41, 72
mask · 22
IP protocols · 49
ip2mac · 57
K
key · 27, 28
L
LAN failures · 53
license agreement · 13
license key · 11, 13, 26, 28, 64
blank · 26, 28
full · 26
initial · 26
trial · 26
licensed version · 28
licensing information · 26, 28
limitations of a single networking card
· 10
list of rules · 31, 35
LMHOSTS file · 69
load balancing · 4, 5, 6, 29, 30, 74
client requests · 72
definition · 73
load distribution · 33, 34, 35
load percentage · 33, 34, 35, 73
lookup of IP address · 26
M
rules · 26
message exchange period · 51
mode of filtering · 73
multicast
MAC address · 23
support · 23
multicast MAC address · 73
multicast support · 1, 10, 22, 36, 41, 52,
53, 66
multiple hosts · 4, 30, 33, 34, 35
multiple NICs · 35, 36
N
name of the cluster · 21, 24
name resolution · 24
NBT support · 69
NetBEUI protocol · 36, 41
NetBIOS · 69
network
interface card · 9
traffic · 32, 33, 49, 73
network address · 22, 23
network addresses · 64
network interface card · 7, 10, 11, 13,
23, 36, 37, 41, 72
definition · 71, 73
network mask · 22
Network setup dialog · 10, 13, 46
networking
components · 35
device driver · 9
protocol · 10, 35, 36, 41, 74
NIC · 4, 9, 10, 13, 14, 36, 37, 42, 72
definition · 71, 73
number of
hosts · 29
missed messages · 49
MAC
multicast address · 23
MAC address · 21, 23, 73
maintenance · 59
major version · 28
maximum number of
hosts · 26, 29
O
on-line help · 55
operation
theory of · 49
77
Page 82

WebScale™ User’s Guide
P
parameters · 20, 21, 59, 60
password · 24
confirm · 21
remote · 21
performance · 74
performance enhancement · 73
performance enhancements · 1, 2
ping command · 66
port range · 2, 4, 32, 35, 74
port rule · 68
port rules · 12, 13, 25, 29, 35, 60
definition · 74
primary IP address · 22, 36, 41
priority · 25, 26, 29, 30, 32
conflict · 25
properties · 19
protocol · 10, 31, 32
ARP · 71
binding · 35, 36, 41
TCP/IP definition · 74
proxy ARP support · 10
Q
quick start guide · 10
R
range of ports · 29, 32
reboot · 21
registry · 21, 51, 52, 53, 59
reload · 57, 58
remote access password · 53
remote control · 22, 24
password · 24
remote maintenance · 49
remote password · 22
removing · 47
request from a client · 72, 73
requirements for WebScale system · 9
resolution · 24, 26
round-robin · 5
router · 10
rules · 31, 32
S
scalability · 4, 8, 29, 33, 49, 72, 73
definition · 74
ScaleSingleClient · 2
scaling client performance · 33, 34
server · 4, 5, 7, 8
definition · 73, 74
server cookies · 33, 34
session · 2, 74
session support · 2, 29, 33, 34, 71
setup · 9, 14, 17, 18, 19, 20, 21
quick start · 10
single host · 4, 30, 32
single host rules option · 26
single host session support · 33
single IP address · 49
single NIC · 35, 41
limitations · 10
single NIC card limitation · 67
SNMP · 58
software
license · 26
upgrades · 46
version · 26, 28
startup · 24, 26
subnet · 23
subnet mask · 22, 25
subnetting · 53, 65
switch · 67
system
management · 53
requirements · 9
T
TCP · 30, 31, 32, 50, 51
TCP/IP configuration · 65
TCP/IP Properties dialog · 35, 36, 41
TCP/IP protocol · 4, 9, 10, 13, 29, 32,
39, 43, 50
definition · 74
technical support · 57, 58, 59, 61
theory of operation · 49
trademark · ii
traffic · 29, 30, 31, 32, 33
78
Page 83

WebScale™ User’s Guide
filtering · 73
handling priority of · 25
transparency · 4
trial
license key · 26
period · 26, 28
Troubleshooting Guide · 64
U
UDP · 31, 32, 50, 51
unknown cluster state · 53
upgrade · 9, 46
V
version · 27, 28
current software · 26, 28
licensed for · 26, 28
version 2 · 10
version 2 changes · 1
virtual NIC · 10, 13, 36, 41
W
warning events · 60
web pages · 8
WebScale Driver · 11, 12, 18, 37, 38,
42, 43
WebScale Setup dialog · 19, 53, 59
WebScale Virtual NIC · 11, 12, 17, 37,
38, 40, 42, 43, 44, 65
webscale.exe · 53, 54, 59
disable · 53
display · 53, 60
enable · 53
help · 53
query · 53
reload · 19
setup · 53
start · 53, 59
stop · 53, 59
what’s new · 1
Windows NT · 9
WINS · 69
WINS client · 12, 13, 37, 38, 42, 43
79
 Loading...