

Page 1

Intergraph ViZfx Voyager
July 1997
DSA082810
Page 2

Warranties and Liabilities
The information and the software discussed in this document are subject to change without notice and
should not be considered commitments by Intergraph Corporation. Intergraph Corporation assumes no
responsibility for any errors in this document.
The software discussed in this document is furnished under a license and may be used or copied only in
accordance with the terms of the license. No responsibility is assumed by Intergraph for the use or
reliability of software on equipment that is not supplied by Intergraph or its affiliated companies.
All warranties given by Intergraph Corporation about equipment or software are set forth in your purchase
contract, and nothing stated in, or implied by, this document or its contents shall be considered or deemed a
modification or amendment of such warranties.
Copyright
1997, Intergraph Corporation including this documentation, and any software and its file formats and
audio-visual displays described herein; all rights reserved; may only be used pursuant to the applicable
software license agreement; contains confidential and proprietary information of Intergraph and/or other
third parties which is protected by copyright, trade secret and trademark law and may not be provided or
otherwise made available without prior written authorization.
Restricted Rights Legend
Use, duplication, or disclosure by the United States Government is subject to restrictions as set forth in
subdivision (c)(1)(ii) of the rights in technical data and computer software clause at DFARS 252.227-7013.
Unpublished rights reserved under the copyright laws of the United States.
Intergraph Corporation, Huntsville AL 35894-0001
Trademarks
Intergraph and the Intergraph logo are registered trademarks of Intergraph Corporation. ViZfx™ is a
trademark of Intergraph Corporation.
Microsoft®, Windows®, and Windows NT® are registered trademarks of Microsoft Coporation. Intel®
and Pentium® are registered trademarks of Intel Corporation. Premiere® is a registered trademark of
Adobe Systems Incorporated. Speed Razor® and Speed Razor Mach 3® are registered trademarks of
in:sync corporation. Open GL® is a registered trademark of Silicon Graphics, Inc. InstallShield® is a
registered trademark of InstallShield Corporation, a business unit of Stirling Technologies, Inc.
Other brands and product names are trademarks of their respective owners.
Acknowledgments
Footage provided courtesy of Virginia Tech. Reproduction of this footage is strictly forbidden without prior
written consent from Virginia Tech University Relation/Visual Communications. Sample AVI files
included on the ViZfx CD-ROM provided courtesy of Video Tape Recording, Ltd.
Page 3

Contents
Preface............................................................................................................................... v
About This Document........................................................................................................ v
Document Conventions...................................................................................................... v
Finding Additional Information on ViZfx......................................................................... vi
Finding Intergraph on the Internet..................................................................................... vi
Getting Support.................................................................................................................vi
Using the Intergraph Bulletin Board Service ................................................................... vii
Using the Intergraph FAXLink........................................................................................viii
1 Get Started..................................................................................................................... 1
Hardware and Software Requirements............................................................................... 1
Note to Premiere Users........................................................................................ 1
Notes to Speed Razor Users................................................................................. 1
Installing ViZfx.................................................................................................................. 2
Removing ViZfx................................................................................................................. 2
2 Learn the Interface ....................................................................................................... 3
The Effect Window............................................................................................................ 3
General Tab ......................................................................................................... 3
Parameters Tab .................................................................................................... 4
Curves Tab........................................................................................................... 4
Input/Output Tab.................................................................................................. 6
The Sequencer.................................................................................................................... 8
The Effects....................................................................................................................... 11
Common Parameters.......................................................................................... 11
OpenGL Capability and the Parameter Window................................................ 11
Geometry Transforms........................................................................................ 11
Color Transforms............................................................................................... 16
Masks................................................................................................................. 20
Composites......................................................................................................... 22
Shines................................................................................................................. 23
Particles.............................................................................................................. 26
Transitions ......................................................................................................... 29
Miscellaneous .................................................................................................... 30
iii
3 Applying Effects .......................................................................................................... 33
Before You Begin ............................................................................................................ 33
Get Started........................................................................................................................ 33
Import the Targa File ......................................................................................... 33
Page 4

iv
4 Saving Key Frames......................................................................................................37
Before You Begin............................................................................................................. 37
Get Started........................................................................................................................ 37
Reopen the Chromator Effect.............................................................................37
5 Using the Curves Tab.................................................................................................. 39
Before You Begin............................................................................................................. 39
Get Started........................................................................................................................ 39
Reopen the Chromator Effect.............................................................................39
6 Using the Sequencer .................................................................................................... 41
Before You Begin............................................................................................................. 41
Get Started........................................................................................................................ 41
Set up Foreground and Background Images....................................................... 41
Apply the Bump Effect.......................................................................................44
Apply Another Composite Effect.......................................................................46
Continue the Voyage........................................................................................................47
7 Frequently Asked Questions.......................................................................................53
Index................................................................................................................................57
Page 5

Preface
Whether you are creating special effects for film, video, or games, Intergraph’s ViZfx
provides resolution-independent, hardware-accelerated 2D and 3D effects—many of these
effects use OpenGL® technology so you can dynamically create dramatic effects, without
having to key in specific parameters. And, ViZfx contains a Sequencer that lets you string
together multiple images and effects to create your own clips. All of this is combined in a set
of plugins that allow you to quickly apply, view, and modify effects, either in Adobe
Premiere® or in:sync Speed Razor®.
About This Document
Intergraph ViZfx Voyager is organized as follows:
u
The Preface contains various information such as document conventions, how to get
technical support, and how to get in touch with Intergraph Corporation by telephone,
FAX, e-mail, or on the Internet.
v
u
Chapter 1, “Get Started,” describes how to install and configure the ViZfx plugins for
both Premiere and Speed Razor, and lists the minimum system requirements.
u
Chapter 2, “Venture Into ViZfx,” provides some sample workflows that are designed to
help you learn how to use the Sequencer, the Effect Window, and the effects themselves
within your application.
u
Chapter 3, “Learn The Interface,” contains information on the Effect Window, Curve
Editor, the Sequencer, and each of the effects.
u
Chapter 4, “Frequently Asked Questions,” addresses issues users have encountered.
Document Conventions
Bold
Italic Variable values that you supply, or cross-references.
Monospace
SMALL CAPS Key names on the keyboard, such as D, ALT or F3; names of files and
CTRL+D Press a key while simultaneously pressing another key; for example, press
Commands, words, or characters that you key in literally.
Output displayed on the screen.
directories. You can type filenames and directory names in the dialog boxes
or the command line in lowercase unless directed otherwise.
CTRL and D simultaneously.
Page 6

vi
Finding Additional Information on ViZfx
For more information, consult the ViZfx Reference Guide, which is the on-line Help delivered
on the ViZfx CD. You can look up information on effects, commands, parameters, and options
using the Find button and key words, or simply browse the document—the document layout
follows the product interface. If you are unfamiliar with using on-line documents, press F1 to
activate Windows Help, which will instruct you on using and customizing Help.
Finding Intergraph on the Internet
You can find Intergraph on the Internet in the following ways:
u
If you have a World Wide Web browser, connect to Intergraph Online, the Intergraph
Web server, at http://www.intergraph.com.
u
Using a File Transfer Protocol (FTP) program or Gopher program, visit
ftp.intergraph.com or gopher.intergraph.com.
u
Get information from Intergraph’s email server at info@intergraph.com. Put help in the
body of the message (the subject line is ignored) to get information on such subjects as
Intergraph’s online services and where to get World Wide Web browsers.
Getting Support
When you register your copy of ViZfx, you are entitled to our complimentary support plan.
With this plan, you get life-time, toll-free telephone support as well as e-mail support. In
addition to support for ViZfx, you will receive late-breaking news, information on upgrades,
fixes, and new products, as well as any special offers Intergraph is running.
You can either return the Registration Card that came in the ViZfx package, or visit our World
Wide Web site (http://www.intergraph.com/vizfx) and register on-line.
If you experience problems with ViZfx, or have questions about the information in this
document, you can contact Intergraph for help.
u
Contact us through email at vizfx@ingr.com.
u
In the United States, call the ICS Solutions Center at 1-800-226-4891 between the hours
of 8:00 a.m. and 5:00 p.m. Central Time, Monday through Friday (except holidays).
u
Outside the United States, contact the Intergraph subsidiary or distributor from which you
purchased ViZfx. A list of all of the Intergraph international locations is printed on the
International Registration Card, and is also available under the Technical Support topic in
the On-line Help.
Page 7

You will need the following information when you call or write:
u
Workstation manufacturer
u
Workstation model and type of graphics adapter in your system
u
Amount of system memory (RAM)
u
Product serial number
u
The product with which you are using ViZfx (either Premiere or Speed Razor)
u
Any other plugins you may be using with your application
u
Your name, telephone number, and email address
u
A brief description of the problem
Using the Intergraph Bulletin Board Service
Available 24 hours a day, 7 days a week, the Intergraph Bulletin Board Service (IBBS) is an
electronic forum for Intergraph customers to exchange information with Intergraph’s technical
and marketing staff, and with other Intergraph customers. You can use the IBBS to get
technical support information, documentation and training information, programs, and
software updates and fixes. The IBBS is also available for you to give suggestions, make
inquiries, and report problems.
vii
To connect to the IBBS:
1. Set your system’s communications protocol for eight (8) data bits, no parity, one (1) stop
bit, and any baud rate up to 14,400.
2. Using a modem, dial the IBBS number, 1-205-730-8786. You can dial 1-205-730-6504 if
you are using a 2,400 baud connection.
3. Mirror sites are maintained for locations outside the United States. Information on these
sites is available on Intergraph Online, Intergraph’s World Wide Web server.
4. When connected, respond to the login request by keying in your user ID. If you have not
connected before, key in new to create a user ID.
5. Follow the menus to find what you need. If you are new to computer bulletin boards, the
IBBS provides clear choices and plenty of online help. A text file that explains IBBS
commands and organization is available for you to download.
If you have trouble connecting to or using the IBBS, log a support request through the
Customer Response Center (product entry IBBS), send a fax to 1-205-730-1110, or leave a
message for the System Operator (Sysop) at 1-205-730-1413.
Page 8

viii
Using the Intergraph FAXLink
Use the Intergraph FAXLink to get technical support information by fax 24 hours a day, seven
days a week. From a touch-tone phone or fax machine phone:
u
Call 1-800-240-4300 to get new user instructions, an index listing of available documents,
and an overview of the categories of available information.
u
Call 1-205-730-9000 to order the documents (up to five per call).
Follow the prompts provided to locate and deliver the information you need.
Page 9
1 Get Started
Intergraph ViZfx is a collection of plugins for Adobe Premiere or in:sync Speed Razor.
Therefore, you should be comfortable in working with whichever product you use. Refer to
the documentation delivered with your application if you need to familiarize yourself with that
product, then start working with the ViZfx plugins.
Hardware and Software Requirements
Intergraph ViZfx is delivered on CD-ROM and must be loaded on your computer’s hard disk.
The minimum hardware and software configuration your system needs to run ViZfx is as
follows:
u
Windows NT® operating system version 4.0 or higher, or Windows 95® operating
system
u
An Intel® 486/66, Pentium®, or Pentium Pro processor
u
At least 16 megabytes of RAM; 64 megabytes of RAM recommended
1
u
True color (16.7 million colors) graphics adapter; a display resolution of 1024 x 768 or
better is recommended
u
23 megabytes of free disk space for installation
u
Microsoft® or Microsoft-compatible mouse; three-button mouse recommended
u
Adobe Premiere 4.2 or higher, or Speed Razor mach 3.5.1 or higher
Note to Premiere Users
If you install Premiere after installing ViZfx, you must copy the files in VIZFX\PREMIERE into
the Premiere product’s plugins directory. You can contact the makers of Premiere at the
Adobe Web site (http://www.adobe.com).
Notes to Speed Razor Users
Speed Razor mach 3.5.1 is required for the ViZfx plugins to function; the application will
crash if you use it with an earlier version of Speed Razor. You can get the latest version of
Speed Razor from the in:sync Web site (http://www.in-sync.com).
If you install Speed Razor after installing ViZfx, you can make ViZfx easier to find by
creating a separate directory under the
Copy all of the .
VFX files from the VIZFX\RAZOR35 subdirectory into this new directory.
RAZOR\EFFECTS directory to hold the ViZfx plugins.
Page 10

2
Installing ViZfx
To install ViZfx on your system:
1. Insert the ViZfx CD into your system’s CD-ROM drive.
2. In Explorer or File Manager, double-click the
The ViZfx Setup Wizard is activated.
3. Follow the prompts to load ViZfx onto your system.
Removing ViZfx
To remove ViZfx from your system:
1. Double-click the unInstallShield icon (in the ViZfx program group or menu).
The unInstallShield Wizard is activated, and prompts you for confirmation before
removing ViZfx.
2. Follow the prompts to remove ViZfx from your system.
The ViZfx plugins and related files are removed from your system.
SETUP.EXE file on the CD-ROM.
Page 11
2 Learn the Interface
After you install ViZfx on your computer, you can begin working with the plugins. Depending
on whether you are using Premiere or Speed Razor, you will access the plugins differently.
For instance, in Premiere the plugins are contained under the list of Filters and Transitions; in
Speed Razor you need to install the effects into the library before you can use them. Consult
your product’s documentation for more information on where plugins are stored and how you
access them.
The Effect Window
Whether you are working in Premiere or Speed Razor, all of the effects have an Effect
Window. This is where you create the particular look you want in an effect. You can access
this from the Sequencer (which is discussed later) or directly from the list of effects.
The Effect Window has four tabs: General (which contains the Presets), Parameters, Curves
(for some effects), and Input/Output. Also, the Effect Window has an Input window, an
Output window, and in some cases, a Parameter window and two input windows.
3
NOTE If you access an effect from the list of filters (Premiere) or from the library (Razor), there is no
Input/Output tab. This tab is available only from within the Sequencer.
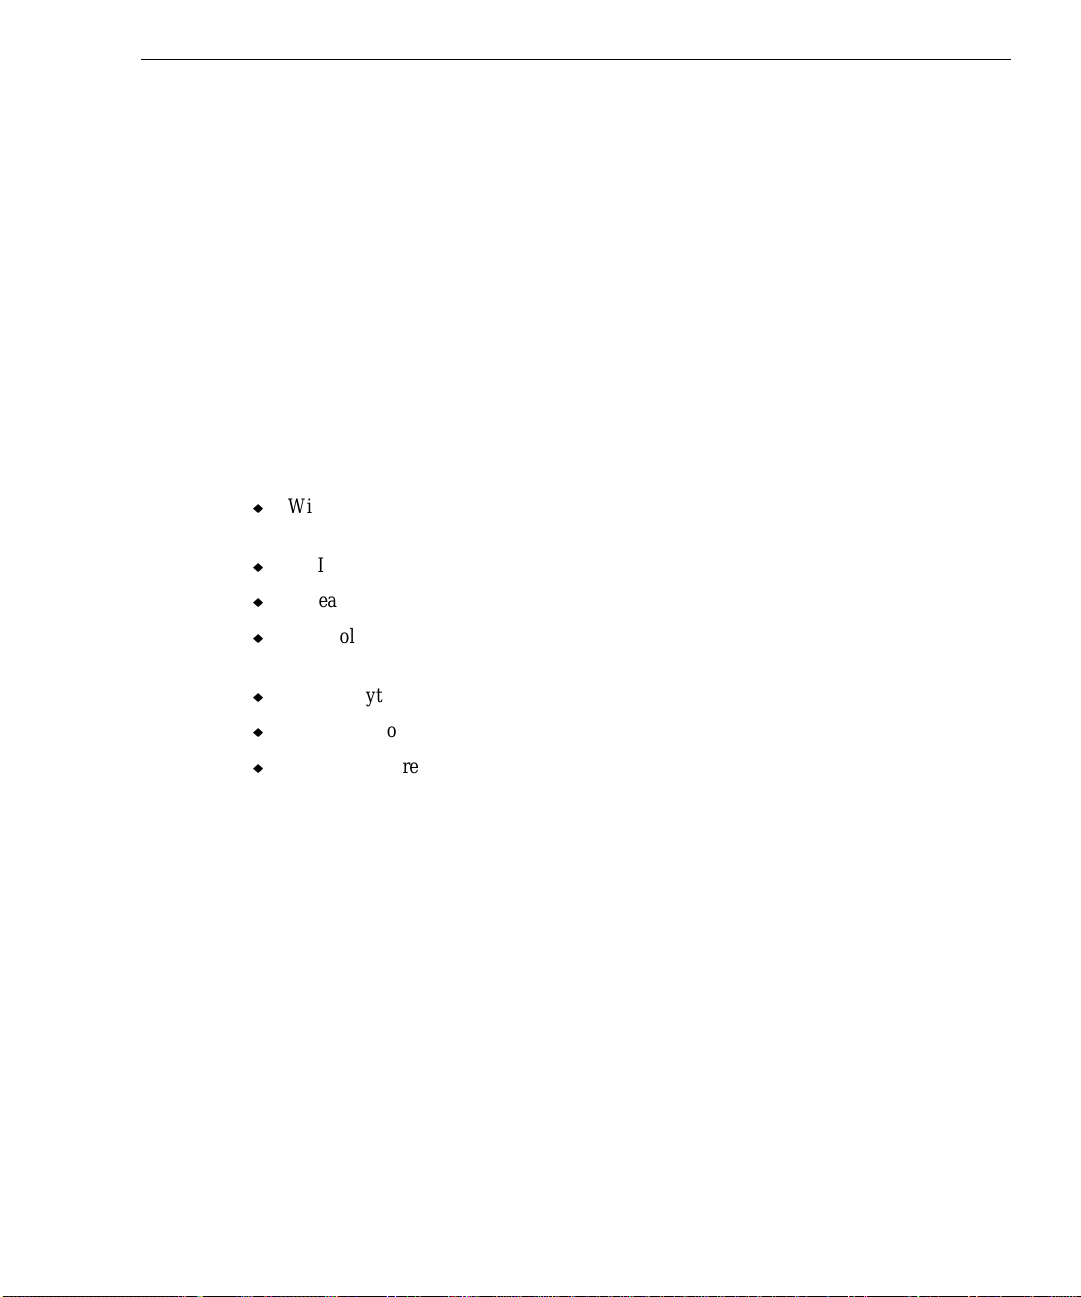
General Tab
You can define parameters and save
them as Presets using the General tab.
Then, when you want to re-create a
particular effect, you can select that
preset instead of having to redefine
all of the parameters. We have
created some presets for you and
delivered them with ViZfx.
To save a preset, set up the parameters for any particular effect. Then, click the General tab,
key in a name for the preset in the Select preset text entry field and click Save. Whenever you
go back into that effect, you can select the preset you saved from the pulldown menu.
Parameters Tab
This tab contains the controls for setting parameters and keys on the current effect. Each effect
has a Parameters tab with options specific to that particular effect. Look in ViZfx Help for
Page 12
4
detailed information on each effect’s parameters, or see “The Effects” later in this chapter for
a brief description and an example of each effect.
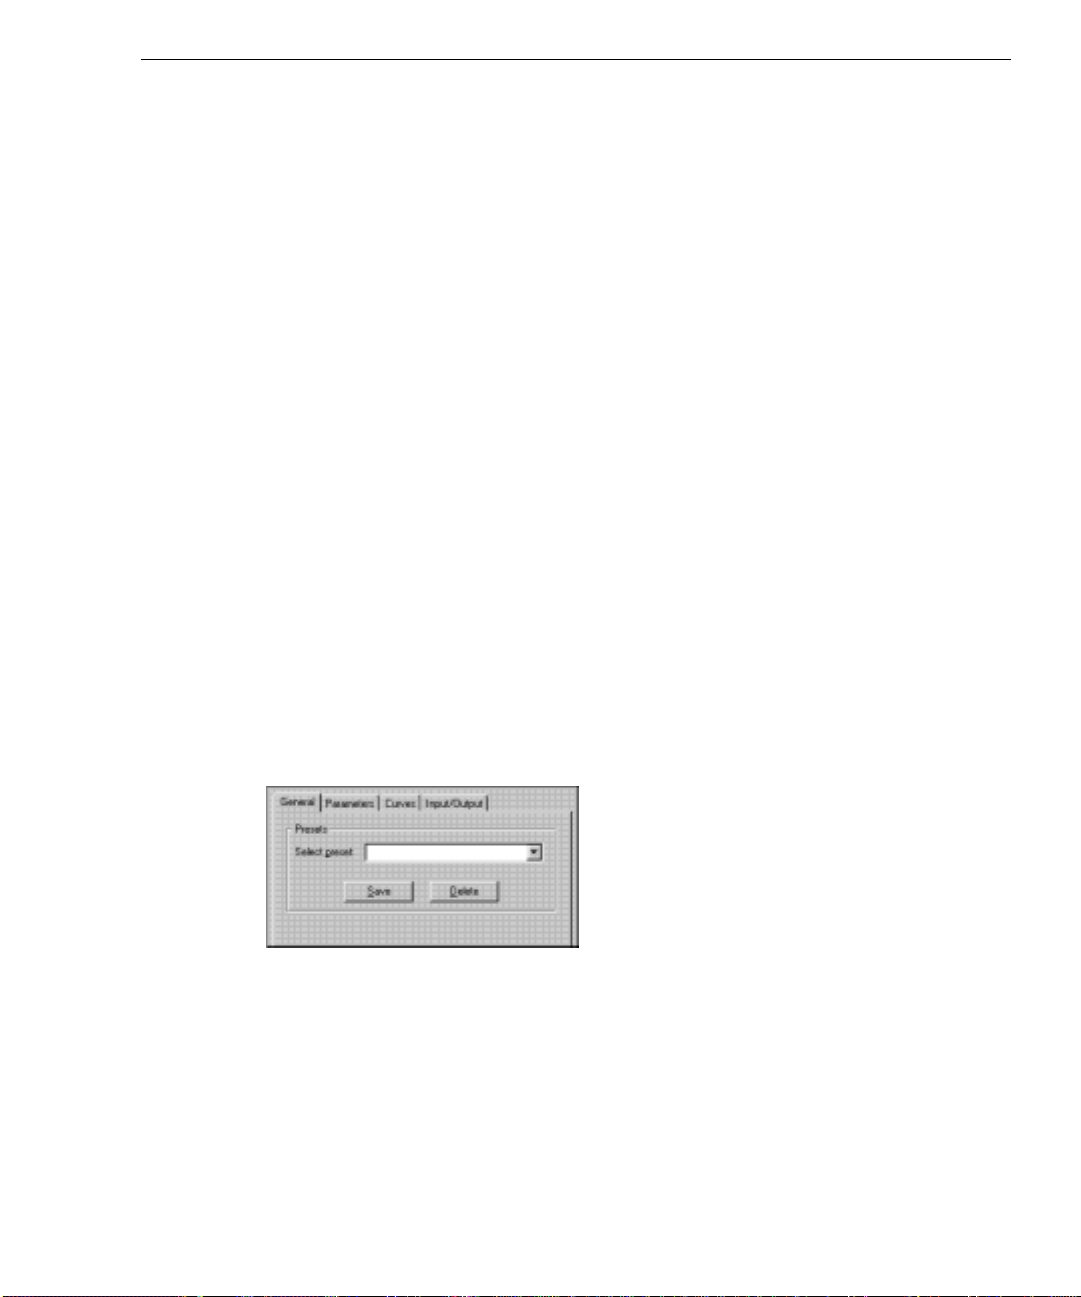
Curves Tab
The Curves tab lets you control the transition between key frames using a graphic curve, and
you can add or remove key frames for more control. The horizontal axis represents the frame
number, and the vertical axis represents the value taken by that parameter over time. Press the
right mouse button to access a menu of commands; depending on the mode you are in, the
available commands are Add Point, Zoom In, Zoom Out, and Fit to Window, or access these
tools from the buttons at the top of the dialog box.
Curve Type
There are two types of curves in the Curve Editor, Bezier and Linear (click the appropriate
toggle to work in the mode you require). In Bezier mode, each curve point has three objects:
an anchor point and two handles. A smooth curve is drawn between key frames, and the
handles let you control the curvature at each key frame. After adding points (by pressing the
CTRL key and clicking the background), you can move their handles by holding the SHIFT key
Page 13

and dragging the handle. Or, move the anchor point by holding the CTRL key and dragging the
point. In Linear mode, a straight line is drawn between each key frame.
Editing
Use the Editing mode to add, delete, and move points, or move the handles (in Bezier mode).
Scrolling
The Scrolling mode lets you move back and forth along the curve.
Zooming
5
Use the Zooming mode to zoom into and out of the view area. Press
view area to zoom out, or simply click in the view area to zoom in. Press
CTRL and click in the
CTRL + SHIFT and
click in the view area to fit the curve to the window.
Fit To Window
This option fits all of the points of the curve to the current dialog box size.
Undo Zoom
If you have zoomed into the view area, this option will take you back out, one zoom level at a
time. This command will also undo the Fit To Window and Scroll commands.
Full Size
Click this button to activate a bigger Curve Editor window. Except for the addition of OK,
Cancel, and Help buttons, this dialog box is the same as that displayed by the Curves tab.
Value
This field displays the value of a selected point and updates every time you select a point.
Parameter
The Parameter field displays a list of the available parameters for the current effect.
Page 14
6
Input/Output Tab
The Input/Output property page is available
when you run effects from within the
Sequencer (as opposed to choosing an effect
from the list of Filters in Premiere or from
the library of effects in Speed Razor). This is
where you define the file (or files) you want
used as input, and where you specify the
location of the resulting file (output).
Many effects are double-input effects; that is,
you can have a primary and a secondary
image. In this case, there are fields for you to
specify both files.
Buffer
Click this radio button and select or key in a
buffer name to import an image from that
buffer.
File
This option imports an image from a file.
You can either key in a filename or click the Browse button to locate the image.
Browse
This button activates the Select a Directory dialog box. Use this to move to the directory that
contains the file you want and click OK.
Swap
The Swap parameter changes the order of the background (primary) image and the foreground
(secondary) image. This option is available only for double-input effects.
Files of Type
This specifies the type of file to list in the display box. You can display one type of file, or all
available file types.
Name
The Name display field lists all of the available files of the type you specified.
Page 15
The following items are available only when you select an .AVI file or a sequence of images:
Stats
7
This field displays information on the clips (.
AVI files), such as the starting and
ending frame, and the number of frames by which the clip increments.
Scrub Preview
Scrub Preview displays the clip you selected. By default, the first frame in the clip is
displayed.
Color Channel/Alpha Channel Toggles
Depending on the toggle you select, this displays either
the RGB color channel or the alpha channel in the
Scrub Preview window.
Scrub
This field specifies the current frame in the Scrub Preview window. You can key in a
new frame number or move the Scrub slider to change frames.
Begin/End Range
Here, you specify the first and last frames,
respectively, in the Scrub Preview display.
You can either move the slider or key in a
frame number, then click either the Begin Range button to define the beginning of the
range, or click the End Range button to define the last frame in the range.
Align
Click this button to move the effect current frame marker to the same frame as the
slider puck (which indicates the current frame displayed in the Scrub Preview).
Step Forward/Step Backward
These buttons advance the Scrub Preview or move it
back by the number of frames specified in the Step text
field.
Auto Size
Click this button to convert the length of the effect window timeline to match the
number of frames you have selected from the input file.
Page 16

8
Output
In/Out
These buttons specify the beginning and ending frames, respectively, for your input
file. Key in a frame number and press
Step
Use this option to specify the increment by which the frames will advance or move
back when you click the Step Forward or Backward buttons.
Fill Method
You can specify what the Scrub Preview will display if it runs out of frames. The
options are Fill With Black, Repeat Last Frame, Pong, and Cycle.
Reverse
This option makes the Fill Method run in the opposite direction.
ENTER.
Use these fields to specify where the output is placed; you can display it on the screen, save it
to a default or named buffer, or save it to a file.
The Sequencer
This option is similar to the Construction Window in Premiere or the Composition Window in
Speed Razor, but it offers you additional flexibility by letting you place an unlimited number
of clips or effects, and gives you total freedom in placing and combining them.
When you first choose the Sequencer, there are no scheduled effects in it. You must either
select effects from the effects menu or create empty effects and edit them later. Once you
place an effect in a specific location on the Sequencer Time Line, it becomes a scheduled
effect. This simply means that the effect has a specific start frame, a specific end frame, and a
defined location in the order of the Sequencer.
All of the Sequencer commands are described in detail in ViZfx Help. Just click Contents
from the Help pulldown menu and then click the Display button to view the topic you need.
Page 17
9
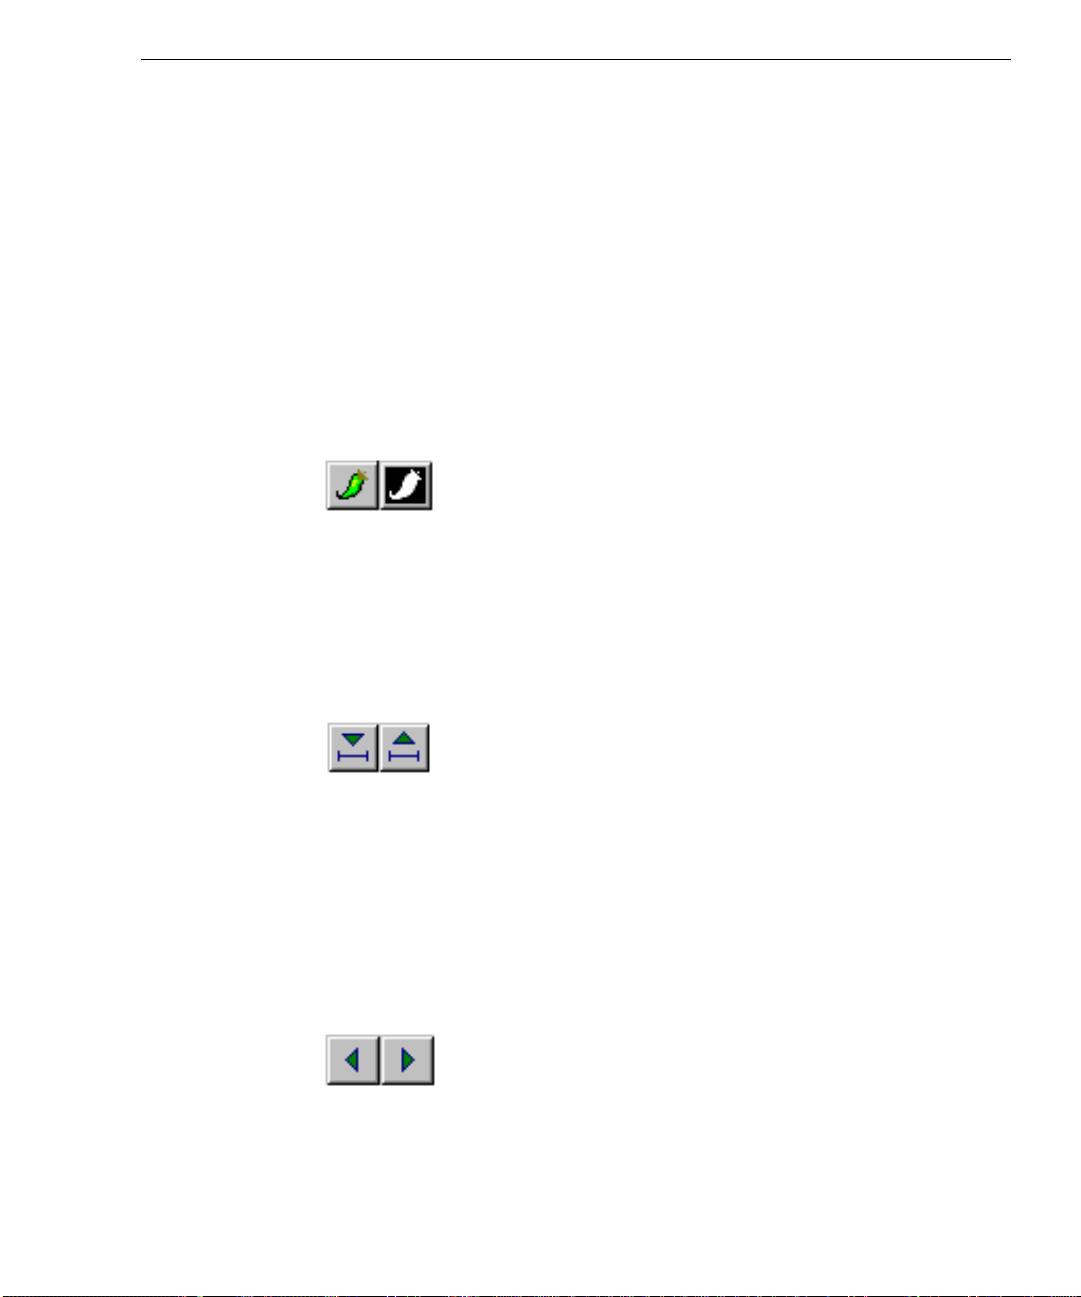
Main Toolbar
The Main Toolbar contains commands for opening new or existing files, inserting sequences
and empty effects, editing effects, as well as toggles for viewing frame numbers, timecodes
and effect properties, and locking keys. All of these commands are contained in the File, Edit,
and View pulldown menus. Select the View pulldown menu and then select Main to display
this toolbar.
Execution Toolbar
The commands on the Execution Toolbar let you control the execution of the effect, and are
also contained on the Execute pulldown menu. Use these commands to define the execution
range, move forward or backward through the sequence, refresh the display, execute the
sequence, or stop the execution. Also, this is where you specify whether the sequence moves
by effects or frames. Select the View pulldown menu and then select Execution to display this
toolbar.
Display Toolbar
The Display Toolbar contains commands for manipulating the view of the Display Pane.
Select the View pulldown menu and then select Display to display this toolbar.
Page 18

10
Effect Area
This is a graphical description of the sequence. Each scheduled effect in the sequence is
shown as a highlighted section, or slot, in a row of the effect area. There is a handle on each
side of the Effect Area (this is true for each row in the sequence); click and drag these back
and forth to change the extent of the effect. The colored lines in the Effect Area represent the
buffers (defined in the Legend, which is discussed later).
Effect Properties
The Effect Properties options provides information on the effect such as the effect name,
starting and ending frame, and effect length.
Image Subpane
This subpane displays image data resulting from executed effects.
Text Subpane
The Text Subpane displays the parameters you defined for the sequence as that sequence is
run.
Sequencer Timeline
This scale shows the entire sequence extent. Tick marks and intervals indicate the frame
number, and the current frame is indicated by a red vertical line. Click and drag the handles
(displayed as arrows) on either side of the slider under the Timeline to zoom in and out of the
sequence view.
Legend
The Sequencer Legend provides you with a key to the colored lines displayed in the Effect
Area. For example, if an Effect Area contains two yellow lines on the top, and a blue line on
the bottom, it means that there are two input files (the yellow lines) and the default buffer is
the output (indicated by the blue line).
Status Bar
The Status Bar displays messages that help you use ViZfx, as well as the Current Frame
number, position, RGB and Alpha channel information.
Page 19

The Effects
The ViZfx effects are divided into eight categories: Geometry Transforms, Color Transforms,
Masks, Composites, Shines, Particles, Transitions, and Miscellaneous. Each effect has its own
Parameters page where you create and define the effect. See ViZfx Help on the ViZfx CD-
ROM for a description of each effect’s parameters.
Common Parameters
The double-input effects have Secondary Input Offset parameters where you define the
amount by which the primary image is horizontally and vertically offset from the secondary
image. Also, these effects have a Wraparound option. Select this to copy the portions of the
secondary image that are cut off by an offset to the opposite side of the image.
Another option that is available for many of the effects is Antialiasing. Use this option to
control the quality of the output image; a higher antialiasing value produces better quality but
computes slower. Likewise, a lower antialiasing value produces a lower quality image, but
computes faster.
11
OpenGL Capability and the Parameter Window
The Parameter Window is an additional preview window that is provided for the effects that
have OpenGL capability (if you do not have an OpenGL card, you will see a wireframe
representing the image). This window allows you to manipulate the effect directly using the
mouse instead of having to edit individual parameters. When you manipulate the image in the
Parameter Window, the appropriate parameters are dynamically updated in the Parameter
Page.
Geometry Transforms
These effects change the shapes of images without changing the image colors.
Bump
Page 20
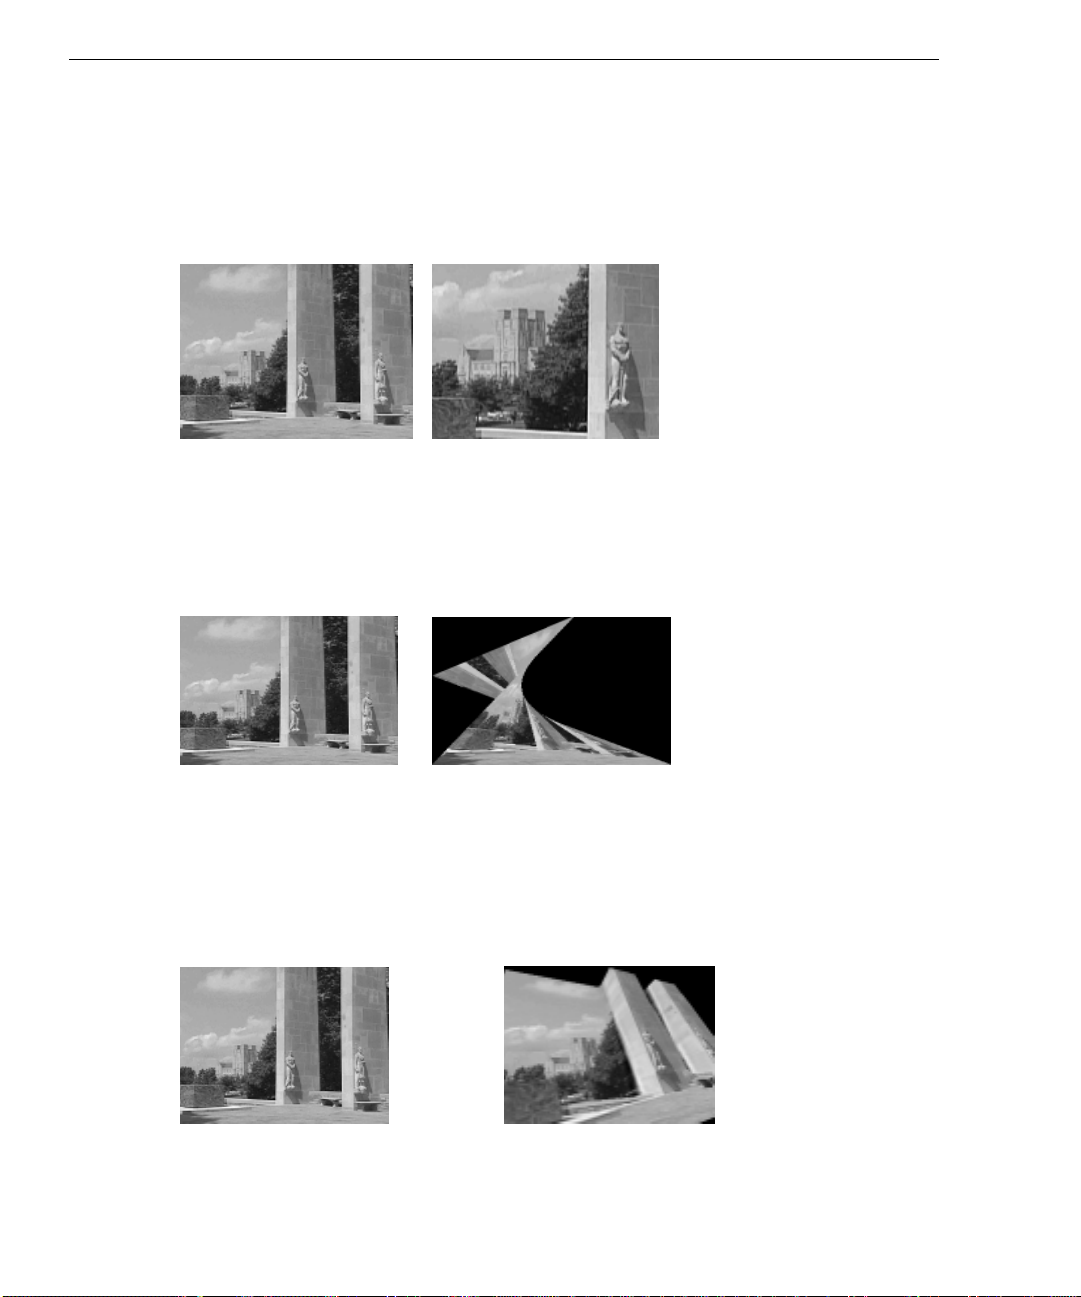
12
The Bump effect distorts one image based on the luminance of a second image. This second
image acts like an irregular pane of glass through which you view the first image. You define
the Bump Intensity and Smoothness.
Crop
Use the Crop effect to select a rectangular portion of an image and store it as a new image.
This is useful if you need to define a view around an image; or, select a rectangular region to
pan across the image. This effect uses the OpenGL capability. You define the Width, Height,
Extents, and Offset values of the resulting image.
Deform
This effect distorts images over time. You can distort an image by moving any or all of the
input image corners to different positions. The output image will always be the same size as
the input image, therefore any part of the distorted image that falls outside the area of the input
image is clipped. If you modify the image so that it is smaller than the input image, the
remaining area is filled with black. This effect uses the OpenGL capability.
Displacement
Displacement makes 3D transformations by displacing the input image’s pixels in the Z direction.
The displacement amount is determined by the luminance values of a secondary input image. You
Page 21
13
specify the type of displacement, the softening and loft intensities, as well as offsets and whether or
not to apply antialiasing. This effect uses the OpenGL capability.
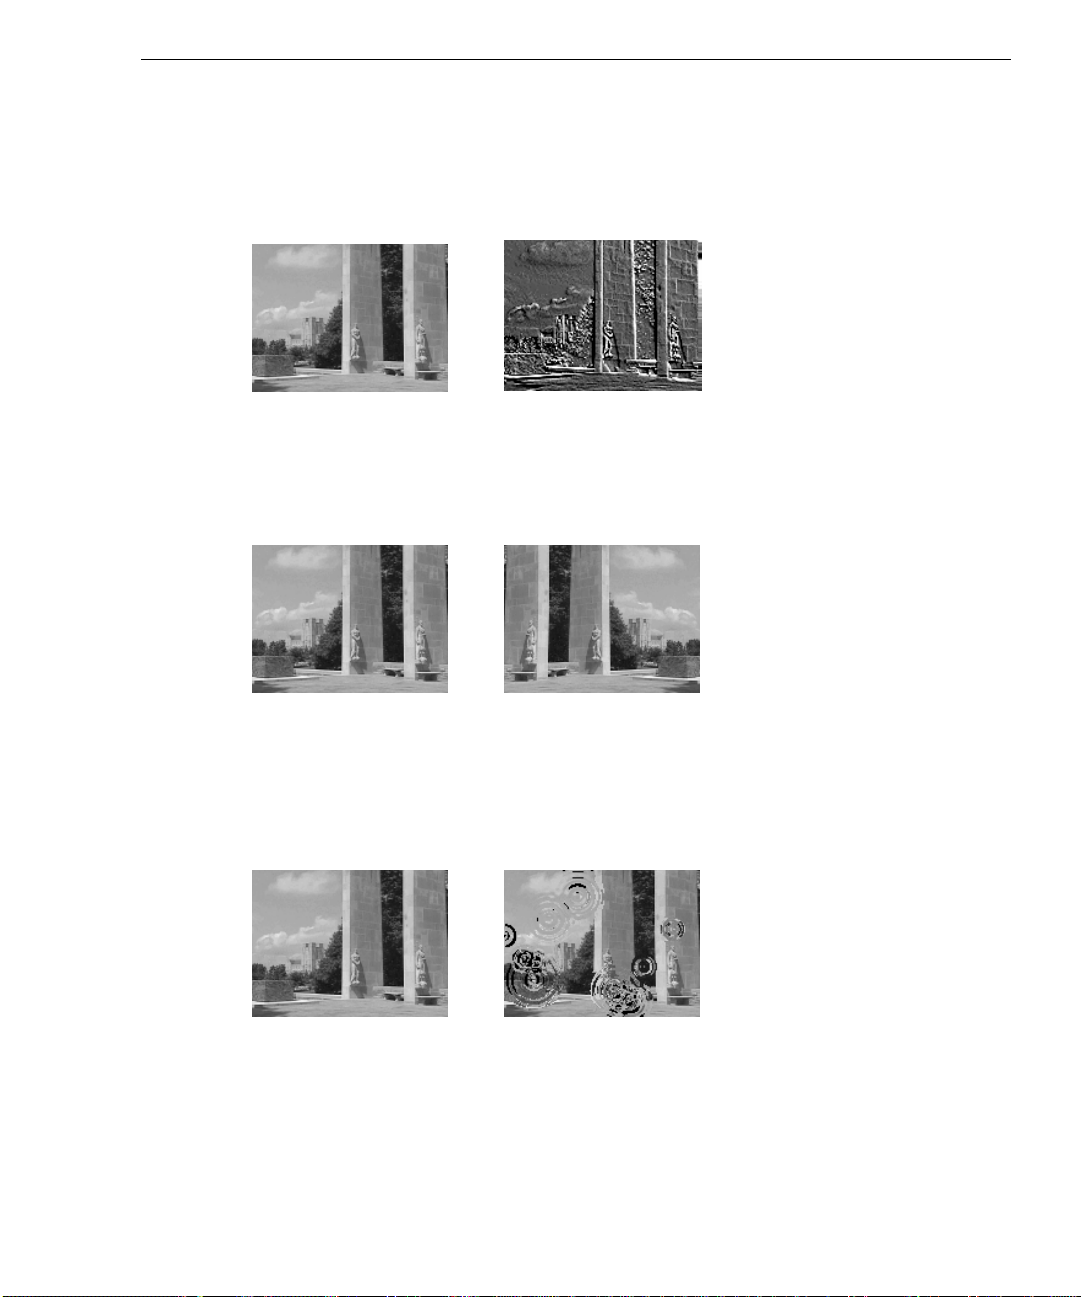
Emboss
The Emboss effect gives an image the appearance of depth and of being lit by up to three light
sources. You can place these light sources at various angles in order to enhance the 3D effect. The
third dimension (the depth) is produced based on criteria you choose.
Flip
This effect flips images horizontally or vertically, or both horizontally and vertically. You can
also rotate images by multiples of 90 degrees either with a flip or without one. This effect flips
your input along an axis; if you want to rotate the input incrementally over time, use the Rotate
effect.
Raindrops
You can make an image appear as though raindrops are falling on it using this effect. You can
either have the raindrops fall in a random pattern (determined by the Random parameter and a
Random Seed that you define), or you can specify exact positions for the raindrops. Also, you can
have the raindrops fall on the image, or outside of the image frame. You can either view the input
image through the disturbed water, or save the water surface as a grayscale image that you can use
in 3D effects such as Displacement or Bump.
Page 22

14
Ripple
Make ripples on a surface like those made when a stone is dropped into a body of water. You
control the origin of the ripples, as well as the quantity, speed, and intensity (amplitude).
Rotate
Rotate images over a specified increment of time, by any angle and around any point. This effect
uses the OpenGL capability. You define the rotation angle and center, and you can apply
antialiasing.
Scale
Enlarge or reduce images based on X and Y scale factors you define. There are two methods
of scaling: Scale By Resize and Scale By Zoom Around Point. This effect uses the OpenGL
capability.
Transformations
Page 23

Use this effect to translate, rotate, scale, and crop the input image over time. You define the
perspective, offset, rotation center, scale factor, and output image size. This effect uses the
OpenGL capability.
Translate
Move the input image in two dimensions over time with this effect, which uses the OpenGL
capability. You specify the texture of the translation as Fine or Rough, and specify the Offset.
If the offset goes past the boundary, you decide whether the portion that exceeds the boundary
is copied to the other side with the Wraparound option.
Whirl
15
Make an image disappear down the drain with the Whirl effect. Our Whirl lets you specify
different inner and outer angles, and you can choose to fill in the spaces with more image data
or leave them black.
Page 24

16
Color Transforms
The Color Transforms effects change the color, the intensity, or the brightness of each pixel or
group of pixels, but do not change the position or shape of the original image like the
Geometry Transforms effects. Most of the functions of ViZfx fall under the general area of
Color Transforms.
Blur
Use this effect to blur an image—producing a result similar to an out-of-focus photograph.
You specify the filter and the intensity of the blur.
Chromator
Chromator controls the amount of color, or the chroma level, in images. This chroma level
determines how much an image differs from its black and white equivalent. You specify the
chroma level and the mode.
Contrast
Increase or decrease the contrast in an image’s color or luminance with this effect, and control
the intensity of that contrast. You can apply this effect to an entire image, or to the alpha
channel of an image.
Convolve
Page 25

17
This effect modifies the input image by applying a convolution filter that can change over
time. There are several preset filters you can select, and you define the intensity and specify
whether or not to apply the effect to an image’s alpha channel.
Dye
Apply any color you want to an image, while preserving its black and white areas. You specify
the color, intensity of the dye, whether or not to preserve the saturation value, and whether to
apply the dye to the entire image or just the alpha channel.
Gamma
Adjust the relative appearance of the different brightness levels in images—useful if you need
to correct the way particular monitors display these levels. You control the gamma level, and
whether or not to apply the effect to just the alpha channel.
HSV
The HSV effect lets you directly manipulate the hue, saturation, and value of an image to
change its overall color. You define the hue rotation, saturation and value adjustments, and
whether to apply the effect to an entire image or just its alpha channel.
Intensify
Use the Intensify effect to interactively change the curve that defines the intensity of each
color channel in an image. You can increase or decrease the contrast, solarize, posterize, and
create negatives, as well as manipulate each color channel.
Page 26

18
Median
The Median effect filters images to remove extraneous points, such as when an edge detection
filter is used and produces “noise” in the image. This effect can improve the resulting image.
Because of the way this effect works, the output can be blurry—in this case, use the Sharpen
effect to correct the image. This effect does not have the Parameters, Curve, and General tabs,
but only has the Input/Output tab.
Negative
This effect converts images to their negative counterpart. You can apply this effect to the red,
green, or blue colors, the alpha channel, or any combination of these. You also specify the
intensity of the effect.
Noise
Use this effect to apply visual noise to an image, similar to photographic grain. You control
the block size of the noise, the level, distribution, and color, as well as the position and
whether or not noise is applied only to the alpha channel.
Page 27

19
Posterize
The Posterize effect reduces the number of colors available to each color channel. You specify
the number of output colors as well as the affected image transparency.
Radial Zoom
This effect radially distorts images. The distortion is similar to that of a photograph that is
taken with a slow shutter speed while zooming in or out; the center is not affected, but points
in the periphery are blurred.
Shade
You can apply a shade to an image, using a color that you specify and the intensity that you
want. Apply the shade to the entire image, or just to its alpha channel.
Sharpen
Page 28

20
Masks
Anytime you need to correct a blurry image (for example, after using the Median effect to
scale images or after applying a blurry filter), use the Sharpen effect. You decide how
intensely the effect is applied.
Tint
Apply a color filter to images by scaling the hue of the selected color based on the luminance
of the pixels in each input image. After you apply a tint, the resulting image will preserve only
the black areas of the original image; total black remains black, but anything else is replaced
by the tinting color. Whites can appear only when the tinting color is white or gray. You
define the tint color and intensity.
Masks are alpha channels used to isolate the shapes in images or to specify the transparency of
each pixel on the screen. Masks can be created automatically by programs that specify the
transparency of each pixel on the screen, or they can be created manually.
Alpha Tools (single input)
This effect lets you manipulate the alpha channels of an image. You can do this by copying the
alpha channel to one or more of that image’s color channels, copying a color channel of an
image into the alpha channel of that image, or modifying the alpha channel of an image by
copying it into itself.
Alpha Tools (double input)
This Alpha Tools effect works on two images; you can either copy the alpha channel of one
image to the alpha channel of a second image, or copy a color channel of an image into the
alpha channel of a second image. You can also invert the alpha, and intensify the effect.
Page 29

21
Balloon
This effect enlarges or reduces the alpha channel in one-pixel increments. You can apply this
algorithm to the RGB color channels, in which case the dark colors or the bright colors invade
their neighboring pixels with each iteration of the effect. You define the modification type and
which channels are affected, as well as the radius.
Combine Alpha
Use the Combine Alpha effect to create a union, an intersection, or a subtraction on the alpha
channels of two images.
Compare
Create masks based on the differences between two images with this effect. These differences
can be one or many color channels, including the alpha channel.
Key Maker
Key Maker allows you to create alpha channels based on the content of the input images. You
can choose from Luminance, RGB maximums, minimums, or averages, saturation, or value.
Define the clipping limits, as well as the black and white limits, and whether or not to apply a
matte.
Matte (single input)
Adjust the visual contents of an image to its corresponding alpha, or to an external alpha
channel. You define the matte intensity and the matted image transparency.
Page 30

22
Matte (double input)
This effect works in the same way as the single input effect, while allowing you to import two
images.
Moving Polygons
Create and animate polygons that you can use as masks; matte images; or generate colored
polygonal shapes to display over images or a black background. This command is very useful
if you want to create a mask from an image that does not have its own alpha channel. You
define the area of the effect, color, transparency, and intersections. This effect uses the
OpenGL capability.
Composites
These effects let you combine images to create new images.
Composite
Combine a pair of images into a single image. You can offset images and combine images of
different sizes. You define the offsets and transparency. This effect uses the OpenGL
capability.
Page 31

Shines
23
Trail
Create trails that fade away or remain visible. This effect combines preceding frames into a
single image. You specify the length of the trail.
These effects produces shines, glows, and shadows on images.
Color Glow
Color Glow generates a glow around the objects of an image using the colors of that object.
This effect uses the alpha channel; you specify how the glow is displayed (either with or
without the object), where the glow is placed (behind or in front of the object), how far the
glow extends from the object, and the intensity of the glow.
Edge Shine
Pass one or more gleams over the edges of image shapes with this effect. These shapes are
determined by the alpha channel. You specify the width of the shine, the starting position,
radius, angle, color, number, transparency, and decay region.
Page 32

24
Foggy Glow (single input)
Create a glow around the shapes of an image, and add color to its background. This glow
resembles natural light; the shapes are determined by the alpha channel. As with Color Glow,
you determine all of the aspects of the effect.
Foggy Glow (double input)
This effect works just like the single input effect, and you can apply it to two input images.
Again, you define all of the aspects of the effect, including the glow placement, direction,
spread, and intensity. You also define the offset of the secondary image.
Glow (single input)
This glow produces a halo effect around the shapes of images (these shapes are determined by
the alpha channel). You specify all of the parameters of the glow including the radius, color,
and transparency.
Page 33

25
Glow (double input)
Like the single input effect, this glow produces a halo around image shapes. You can apply
this glow to two input images, and you define all of the parameters of the effect. All shapes are
determined by the alpha channel.
Gradient Glow
Gradient Glow produces concentric rings of gradient colors, or a ring glow, around the shapes
in images. You define this color, and the placement, direction, angle, and radius of the glow.
Outline
Outline images using shapes determined by the alpha channel. You specify the outline display,
direction, color, radius, and transparency.
Shadow
Page 34

26
Particles
This effect generates a drop shadow behind the shapes in images similar to the drop shadows
used in text processors and slide software. The shadow is used to give a 3D look to a
composite of images. You define the starting position of the shine, its width, angle, decay
region, speed, color, and transparency. Apply multiple shines, and decide whether they affect
an entire image or just the alpha channel.
ViZfx provides several ways to demolish images—you can blast them into pieces, pulverize
them, erode them, or simply melt them.
Blast
Blow your image into a million pieces—or however many pieces you want. You determine the
velocity, direction, explosion center, particle size, and particle speed.
Erode to Image
Make one image erode to another image with this effect. You define the speed, pixel fade
duration, and the offset of the second image.
Erode to Black
Page 35

27
Don’t want to reveal another image? (Or you want to make it look like it has mold growing on
it?) Use the Erode to Black effect. Again, you define the speed, pixel fade duration, and delay
of the erosion.
Melt
Destroy your images in a gentler fashion—make them melt away. You define every aspect of
the melt, including the direction, particle height and width (the image is divided into
rectangles that gradually lengthen and move), the area that will melt, and the speed in which
the melting occurs. You can also set length and speed minimums and variances.
Mosaic
If you’re not in such a destructive mood, create a mosaic from your image. Each tile in the
mosaic has a unique color; you define the transparency as well as the block size.
Point Dissolve to Black
Dissolve your image, point by point, to reveal nothing but black. You specify the intensity of
the dissolve, as well as the point size and position.
Page 36

28
Pulverize
Make the image fall away, bit by bit, or fly away into oblivion. You specify how and when the
particles begin moving, their direction, duration, and speed. You also define the size of the
particles, and give them a delay if you want.
Scatter
Send the image flying off in random directions. This is different than the Blast effect, which
has an explosion center. With the Scatter effect, each particle has a random direction. Use the
Intensity and Delay parameters to control how long it takes the effect to finish, and specify the
particle size and type (either circles or squares).
Page 37

Transitions
Use these effects to reveal a secondary image. There are several blinds effects, or you can
perform a dissolve or erosion to make the primary image disappear. All of the blinds effects
divide the image into slats—just like the slats in window blinds. However, you can choose
from several kinds of slats to make your transitions with our blinds. You have complete
control over the number of slats, the direction in which they open, and the offset. See the online Help for an .AVI example for each of these effects.
Concentric Blinds
With Concentric Blinds, the slats are rings that can open toward or away from the center of the
image. You can specify whether the rings are circular or elliptical, and you define the center
point and ellipse ratio.
29
Point Dissolve to
As with Point Dissolve to Black, this effect makes your image disappear point by point—but
with this effect, you can reveal another image. You determine the intensity, point size and
position, and the offset of the secondary image.
Radar Blinds
Image
Page 38

30
Radar Blinds divides the slats into concentric rings that open either clockwise or
counterclockwise. As with Concentric Blinds, the shape is either circular or elliptical,
depending on your choice.
Tokyo Blinds
Tokyo Blinds divides the slats into rectangular shapes that you can open simultaneously, from
the center outward, or toward the center (again, the center is a point that you define). You
specify the rotation angle and offset of the secondary image.
Venetian Blinds
Venetian Blinds divides the slats into strips that you can open along any angle. Make the
blinds open simultaneously, from left to right, or from right to left. As with the other blinds,
you specify all of the parameters to meet your needs.
Miscellaneous
These commands let you open and copy images from various sources, save them to various
sources, and combine inputs.
Page 39

Concatenate
Use Concatenate to connect two inputs into the same output. The output size will be enlarged
to fit both images.
Copy Image
Use this option to copy an image from any input source (a buffer or a file name) to any output
source (again, a buffer or a file name).
31
Open Image
Open Image allows you to retrieve an image from disk and place it in one or more of the
following places: the screen, a default buffer, a buffer you define, or another file.
Save Image
Use Save Image to place an image where you want: the screen, default buffer, a buffer of your
choice, or a file name.
Swap Buffers
This option swaps the top two images in the default buffer. When you select Swap Buffers, the
Copy to Sequence dialog box is activated and displays all of the effects in the active sequence.
Page 40

32
Page 41

3 Applying Effects
Now that you have installed ViZfx on your computer, it is time to start using the effects. The
following tutorial will teach you how to apply an Intergraph ViZfx effect as well as the basic
operation of the effects; This tutorial includes instructions for both Premiere and Speed Razor
users.
Before You Begin
You should already be familiar with Premiere or Speed Razor. If you have any questions
about your application, consult the user’s guide before starting this tutorial.
Get Started
33
Import the Targa File
To import the Targa file:
1. Start your application (either Premiere or Speed Razor).
2. Premiere–From the File pulldown menu, click Import, then select File from the
secondary menu.
In the Look in field, move to the T
(*.tga; *.vda; *.icb; *.vst) and then select the file V
image file V
Razor–From the File pulldown menu, click Import Media; in the Look in field move to
the T
UTORIAL folder. In the Files of type field, select Targa Seq (*.tga) and then select the
file V
IZFX.TGA file and click OK. The Targa image file VIZFX.TGA should be loaded into
your Library Window.
3. Select the ViZfx.tga file from either the project window or from the library and drag it to
the first line of your editing interface (for Premiere, A Track; for Razor, V1 Track).
4. Now you will apply the Chromator effect:
Premiere–In the Construction Window, select the targa file that you just placed on the A
track. From the Clip pulldown menu, click Filters. Scroll down the Available list and
select ViZ Chromator, then click Add. The Chromator Effect Window is activated and the
General tab is selected.
UTORIAL folder. In the Files of type field, select Targa
IZFX.TGA and click OK. The Targa
IZFX.TGA should be loaded into your Project Window.
Page 42

34
Razor–From the File pulldown menu, click Add Effect(s). In the Look in field, move to
the C:/R
AZOR351/EFFECTS/VIZFX folder where the ViZfx effects are located. All Effects
(*vfx; *8bf; *eff) should already be selected in the Files of type field.
NOTE If this filter was not listed, you need to install the ViZfx software. See the installation
instructions at the beginning of this manual if you need more information on installing the
plugins.
Drag the ViZ Chromator effect icon to the track directly beneath the VIZFX.TGA file. The
Chromator Effect Window should now be open with the General tab selected.
5. Click the Parameters tab (this is where you create the effect; see The Effects section for
more information on the different effects).
NOTE There is an icon on the left of the Chroma Level parameter that contains a red, jagged line.
This means that the Chroma Level can be changed over time; that is, it is a dynamic variable.
Because this parameter can be changed over time, you can save different values at different
frame locations, thus creating key frames.
NOTE The Key Control Pad is where you save and delete these parameters. The slider and fields at
the bottom of the Effect Window let you move define the beginning and ending frames, as well
as the current frame; also, you can use the text entry fields and slider at the bottom of the
window to move from one frame to another.
NOTE Notice that there is an icon to the left of the Mode parameter; this icon has a straight blue line,
which means that the setting cannot be changed over time—this is referred to as a static
variable. You select one setting in this box and it remains the same throughout the effect.
7. Drag the Chroma Level slider bar to 3.0 (or, you can key 3.0 into the text entry field).
8. At the bottom of the Effect Window, click Preview.
Your effect is displayed in the Output Window.
9. At the bottom of the Effect Window, click OK.
Page 43

Premiere–The ViZ Chromator effect should now be listed in the Current filters list in the
Filters dialog box. Click OK to accept the effect, close the dialog box, and return to the
Construction Window.
Razor–When you selected OK in the last step, you should have returned to the Razor
Composition window.
10. Follow your usual workflow, whether you use Premiere or Razor, to test the Chromator
effect you just created. (Consult the user documentation for your product if you need
more information on how to do a Preview.)
This is just a sample of the many powerful effects included in Intergraph ViZfx. For detailed
information on each effect and the effect parameters, look the Help delivered on the ViZfx
CD.
35
Page 44

36
Page 45

4 Saving Key Frames
In the first part of the tutorial you learned how to apply an Intergraph ViZfx effect to a file,
and learned the general layout of the Effect Window. Now, you will learn the basics of key
framing and how to use the timeline controls.
A key frame is a point (frame) along the timeline that contains values you have saved for that
particular location. When you save two key frames, the values between those two key frames
are interpolated, thus animating the effect. For example:
1 --- 2 --- 3 --- 4 --- 5 --- 6 --- 7 --- 8 --- 9 --- 10
X = 10
Key Frame 1
Key Frame 1 is set up so that at frame 1 the value of X = 10. Key Frame 2 is set up so that at
frame 10 the value of X = 100. The rest of the frames are interpolated so that at frame 2, X =
20; at frame 3, X = 30; and so on until you reach frame 10, where X = 100.
X = 100
Key Frame 2
37
Before You Begin
You should have already worked through the first part of the tutorial. If you have exited your
application, go back into it and open the targa file you were editing in the first section of the
tutorial.
Get Started
Reopen the Chromator Effect
To reopen the Chromator effect:
Premiere–Select the targa file, then from the Clip pulldown menu select Filters. When the
Filters dialog box opens, you should see ViZ Chromator in the Current list. Double-click on
ViZ Chromator to open its effect window.
Razor–Double-click on the ViZ Chromator effect on the V2 track; the effect window is
activated.
Page 46

38
To apply key frames to the Chromator effect:
1. Make sure that the Current Frame is set to 1 (you can either move the slider to frame 1, or
key in the frame number in the Current Frame text entry field).
2. Click the Parameters tab; set the Chroma Level to 1.0 (you can either key it into the text
entry field or use the slider).
3. Click the Save button (in the Key Control Pad section of the Parameters tab).
A key frame is created at that location.
4. Drag the timeline slider to the end of the timeline.
5. Make sure that the Chroma Level is still set to 1.0, and click Save again.
A key frame is saved for the last frame of the effect.
6. Drag the timeline slider to the middle of the timeline. Set the Chroma Level to 10, then
click the Save button again.
This saves a key frame with a Chroma Level of 10 for the middle of the timeline.
7. Drag the slider back and forth along the timeline, and notice the behavior of the Chroma
Level slider. At the beginning and end of the timeline the Chroma Level is set to 1.0, and
at the middle it is set to 10.0. All of the values in between are interpolated accordingly.
8. At the bottom of the effect window, click OK.
Premiere–ViZ Chromator should be displayed in the list of Current Filters; on the Filters
dialog box, click OK. You are returned to the Construction Window.
Razor–When you select OK on the ViZfx Chromator effect window you are returned to
the Razor Composition Window.
9. Preview the Chromator effect with the key frames. Consult your product’s documentation
for information on how to perform a Preview.
Page 47

5 Using the Curves Tab
Now that you have created a Chromator effect and saved a few key frames, you can look at a
graph of the effect.
Before You Begin
If you exited your application after saving the key frames, go back into it and open the targa
file you were editing in the first section of the tutorial.
Get Started
Reopen the Chromator Effect
39
To reopen the Chromator effect:
1. Premiere–Select the targa file, then from the Clip pulldown menu select Filters. When
the Filters dialog box opens, you should see ViZ Chromator in the Current list. Doubleclick on ViZ Chromator to open its effect window.
Razor–Double-click on the ViZ Chromator effect on the V2 track; the effect window is
activated.
2. At the top of the Effect Window, click the Curves tab.
The Curves tab is displayed, and by default shows a graphical representation of the
Chromator effect in Linear mode.
Page 48

40
3. Click the Bezier icon to change from a linear graph to a Bezier graph.
The difference between the two types is that a linear curve travels in a straight line while
approaching the key frame; Bezier curve values slowly approach the final key frame
value. This makes the effect look like it slows down.
4. At the bottom of the effect window, click OK.
Premiere–ViZ Chromator should be displayed in the list of Current Filters; on the Filters
dialog box, click OK. You are returned to the Construction Window.
Razor–When you select OK on the ViZfx Chromator effect window you are returned to
the Razor Composition Window.
5. Preview the Chromator effect with the Bezier mode applied. Consult your product’s
documentation for information on how to perform a Preview.
Page 49

6 Using the Sequencer
If you worked through the first sections of this tutorial, you are probably ready for something
more advanced. The following section teaches you how to apply several effects, as well as
how to use the Sequencer.
Before You Begin
You should already be familiar with Premiere or Speed Razor. If you have any questions
about your application, consult the user’s guide before starting this tutorial.
41
All of the files used in this tutorial are located in the T
completed project file is called
users.
TUTORIAL.PPJ for Premiere users, and TUTORIAL.RZR for Razor
Get Started
Set up Foreground and Background Images
To set up foreground and background images:
1. Start your application (either Premiere or Speed Razor), and open the appropriate project
file from the ViZfx CD (
Razor users).
You should now have files located within the Premiere Project Window or the Razor
Library window. These project files also configure the general settings for Premiere and
Razor.
2. Drag the file named
Premiere Users–open the filters window and add the Sequencer effect (ViZ Sequencer)
to this clip.
Razor Users–drag the Sequencer effect from the library window and place it beneath the
CAMPUS.AVI.
PROJECT.PPJ for Premiere users, and PROJECT.RZR for Speed
CAMPUS.AVI to the first track within your application.
UTORIAL folder on the ViZfx CD. The
Page 50

42
The Sequencer effect interface should be open now.
3. From the Effects menu on the Sequencer, select the Composite effect (contained in the
Composites group).
The Composite effect window opens and you can edit this effect.
There is a timeline at the bottom of the effect window with a starting frame of 1 and an
ending frame of 240.
4. Double-click the number 240, and key in 15.
5. Select the Input/Output tab, then click Foreground Input.
6. In Foreground Input field, click File.
7. Select the
button and move to the
BLACK.TGA file from the list. If this file is not available, click the Browse
TUTORIAL folder on the ViZfx CD, and then select the BLACK.TGA
file.
Now that you have the images set up, you will set up the parameters for the first effect.
Make sure that the Effect Window current frame is set to 1.
Page 51

8. At the top of the Effect Window, click the Parameters tab, then set the fields to the
following values:
Composite Type: Alpha
Use Alpha Channel: Selected
Foreground Transparency: 0
Foreground Offset: X=0, Y=0
Wraparound: Not selected
43
9. Save this key frame; click the Save button in the Key Control Pad. Highlight all of the
parameters and click OK.
10. In the Current frame field, key in 15 and press
TAB.
11. Again on the Parameters page, set the fields to the following values:
Composite Type: Alpha
Use Alpha Channel: Selected
Foreground Transparency: 1
Foreground Offset: X=0, Y=0
Wraparound: Not selected
12. Click the Save button on the Key Control Pad again and highlight all of the parameters,
then click OK.
Page 52

44
13. At the bottom left of the Composite Effect Window, click OK.
The Copy to Sequence dialog box is activated, and the default name of the effect,
Composite, is displayed.
14. In the Copy to Sequence dialog box, click OK.
The Composite Effect Window is dismissed, and you return to the Sequencer. A copy of
the effect you just created is displayed in the Sequencer.
You have finished setting up the first effect; the video will dissolve from black to the
over the first 15 frames. After you preview this effect within your product, go on to the next
exercise.
Apply the Bump Effect
The second effect you will apply to the clip is the Bump effect.
To apply the Bump effect:
1. From the Geometry Transforms group under the Effects menu, click Bump.
The Effect Window for Bump is activated.
2. At the bottom of the Effect Window, set the starting frame to 45, and set the ending frame
to 95.
3. Make sure the timeline puck is positioned at frame 45, and click the Input/Output tab.
4. Set the Primary Input to the Default buffer; for the Secondary Input, click the File radio
button.
5. Select the
available files, click the Browse button and move the
CD.)
TITLE.TGA file for the Secondary input. (If this file is not displayed in the list of
TUTORIAL directory on the ViZfx
CAMPUS.AVI
Page 53

6. Click the Parameters tab and set the fields to the following values:
Bump Intensity: 0
Bump Smoothness: .5
Secondary Input Offset: X=2, Y=-30
Antialiasing: 2
Make sure Wraparound and Use Alpha Channel are unselected.
45
7. Save all of these parameters using the Save button on the Key Control Pad.
8. Move the puck on the timeline to frame 60.
9. Set up the following values:
Bump Intensity: 1
Bump Smoothness: .175
Secondary Input Offset: X=2, Y=30
Antialiasing: 2
Wraparound and Use Alpha Channel should still be unselected.
10. Save a key frame for these parameters (remember that you have been using the Save button on the
Key Control Pad to do this).
11. Move the puck to frame 75, and save these same parameters to another key.
Page 54

46
12. Finally, move the puck to frame 95 and save a key for the following values:
Bump Intensity: 0
Bump Smoothness: .175
Secondary Input Offset: X=2, Y=30
Antialiasing: 2
Wraparound and Use Alpha Channel should still be unselected.
13. Save a key frame for these parameters (Key Control Pad, Save button).
14. Click OK at the bottom of the Effect Window to save this effect to the Sequencer.
The Copy to Sequence dialog box is activated, prompting you to name this effect.
15. Click the After radio button to place this effect after the Composite effect you created
earlier and click OK.
The dialog box is dismissed and the effect is placed after the first effect in the sequence.
By default, the effect is named “Bump.”
Apply Another Composite Effect
The last effect you will apply in this tutorial is another Composite effect.
To apply another Composite effect:
1. Select the Composite effect from the Composites group on the Effects menu.
The Composite’s Effect Window is activated again.
2. On the Effect Window timeline, set the first frame to 210 and the last frame to 240.
3. Click the Input/Output tab, and select the
BLACK.TGA file for the foreground input image.
4. At frame 210, set up the following values on the Parameters tab:
Composite Type: Alpha
Use Alpha Channel: Selected
Foreground Transparency: 1
Foreground Offset: X=0, Y=0
Wraparound: Not selected
5. Save a key for all of these parameters (Key Control Pad, Save button).
6. Move to frame 240 and change the Foreground Transparency to 0, save all of the
parameters again.
7. Click the OK button at the bottom of the Effect Window.
Page 55

The Copy to Sequence dialog box is activated again, prompting you to name this effect.
8. Make sure After is selected, and click OK to save this Composite as the last effect (by
default, the effect is named Composite).
9. From the File menu on the Sequencer, select Close; click Yes when you are prompted to
save the changes.
Premiere–Click OK on the Filter Window.
The effect is applied to the clip. You have created your first sequence of effects using
ViZfx, and can preview it to see what you created. Once you have done that, go on to the
next part of the tutorial.
Continue the Voyage
Now that you have applied a couple of effects to a clip, it is time to get a little more advanced.
In this section, you will add the title effect, apply a glow, and then pulverize the title. This will
involve using the layering capabilities of Premiere or Speed Razor
To add the title effect and apply a glow:
47
1. Place the
Premiere Users–Place the
TARGA.TGA file.
TARGA.TGA file on the Super or S1 track. Using the info
window, place the clip so that it starts at the 0:00:02:15 location. Right-click on the targa
file and select Transparency. When the Transparency interface opens, select Alpha
Channel from the pulldown menu.
Speed Razor Users–Place the
TARGA.TGA file on the V3 track with the beginning of the
clip at 0:00:02:15. As you drag the clip along the track, the readout at the top of the Speed
Razor interface will let you know where you are.
2. Now apply the Sequencer filter to the file:
Premiere Users–Right-click on the
TITLE.TGA and select Filters. In the Filters menu,
click ViZ Sequencer.
Speed Razor Users–Drag the ViZ Sequencer to the location under the
TITLE.TGA on V4.
You should now see the Sequencer dialog box. Next, you will generate a key, or alpha
channel, for this image.
Page 56

48
3. From the Effects menu Masks group, select Key Maker.
The Key Maker Effect Window is activated. The values of this key will remain the same
throughout the effect, so you will only have to define them once, and you won’t have to
save any key frames.
4. Set the fields on the Parameters tab to the following values:
Criterion: Luminance
Black Limit: .050
White Limit: .175
Invert Alpha: Not Selected
Apply Matte: Not Selected
5. Click OK. When the Copy to Sequence dialog box displays, click OK again.
6. From the Geometry Transforms group of Effects, click Translate.
Page 57

49
7. Set the fields on the Parameters tab to the following values:
Quality: Fine
Offset (% of input image): X=2, Y=30
8. Click OK, and make sure After is selected on the Copy to Sequence dialog box. Click OK
again.
The effect is saved and placed in the sequence.
9. From the Shines group on the Effects menu, click Glow (single input).
10. Set the starting key frame to 15, and make sure that the current frame is set to 15.
Page 58

50
11. Set the fields on the Parameters tab to the following values:
Display Glow: Along With
Place Glow: Behind
Direct Glow: Away From
Glow Color: R=1, G=.75, B=0
Radius: .001
Transparency: 1
12. From the Parameter page, click the Save button and highlight all of the parameters; then
click OK.
Page 59

13. Move the puck to frame 45 and set the fields on the Parameters tab to the following
values:
Display Glow: Along With
Place Glow: Behind
Direct Glow: Away From
Glow Color: R=1, G=.75, B=0
Radius: 8
Transparency: .1 (notice the decimal)
14. From the Parameter page, click the Save button and highlight all of the parameters; then
click OK.
15. On the Effect Window, click the OK button and copy this effect to the last place in the
sequence.
Now you will pulverize the title. You should still be in the Sequencer.
To pulverize the title:
1. From the Particles group in the Effect menu, click Pulverize.
51
2. Set the starting frame to 35 instead of 1, and make sure that the current frame is set to 35.
3. Set the fields on the Parameters tab to the following values:
Selected Lines: Arrow Pointing Up (this is the default)
Starting Position (%):75
Speed (%/frame):.5
Effect Area: Union (the default)
Movement Direction: Arrow Pointing Down (the default)
Particle Width: 5
Particle Height: 5
Maximum Delay: 5
Particle Speed Minimum: 2.2
Particle Speed Variance: 6
4. Click OK, and make sure that Glow (single channel) is selected.
5. Select Before from the Copy to Sequence dialog box. Click OK.
Placing the Pulverize effect before the Glow effect makes the particles glow as they fall
down the screen.
Page 60

52
6. Click OK, and close the Sequencer; answer Yes when you are prompted to apply the
changes.
7. Finally, dissolve the Title key onto the footage you created in the first section of the
tutorial:
Premiere Users–The Super tracks has an area at the bottom of the clip that represents the
transparency of that clip. Drag the first dot to a Fade Level of 0%. Select a location along
the line where the cursor changes to a hand. Click once and drag this location to 100% at
the three-second mark along the timeline.
Razor Users–In Razor’s View pulldown menu, verify that Show Video Opacity Graphs is
selected. If it is, you should see white bars along the top of all the clips that are on the
timeline. Select the ViZ Sequencer effect you created on V4. In the Item Info window,
select the Video Tab and unselect the Lock Video Opacity Graph. This will let you
change the opacity and have the title dissolve over a 15-frame duration. Hold
CTRL and
right-click on the white line at the top of the Sequencer. This should create a white dot
where you clicked. Right-click on the first white dot on this line and drag it down to a
value of 0. Select the white dot you just created and move to the 0:00:03:00 locate at a
value of 100.
That’s it! You have now re-created the .AVI file using some of the effects in the ViZfx library
and should have a basic idea of how the ViZfx plugins work within your application.
Page 61

7 Frequently Asked Questions
Here are a few questions that our users have asked. We regularly update our frequently-asked
questions (FAQ) site at http://www.intergraph.com/digitalmedia/vizfx/faq.htm.
I can’t find the filters. Where are they?
First, read your application documentation (Premiere or Speed Razor) to find out how to apply
effects to clips. For Premiere users, you must apply a filter to a clip. For Speed Razor users,
you will need to load the ViZfx effects into your library.
I did that, but still can’t find the filters—what else could be wrong?
When you installed the ViZfx software you were prompted to specify a directory to contain
ViZfx. The default selections are based upon standard Adobe Premiere and in:sync Speed
Razor set-ups. You can drag and drop the filters into the correct location by doing the
following:
u
Locate the filters you need—they should be contained in the C:\PROGRAM
FILES\INTERGRAPH\VIZFX directory. There are two folders within this location, one for
Premiere and one for Speed Razor.
u
Take the contents of the folder you want to use and place them in the following location:
53
−
For Adobe Premiere, place the contents in the Adobe Premiere Plugin folder.
−
For in:sync Speed Razor, place the contents in the effects folder.
I skipped that part of the installation; is that a problem?
No. The plugins for both Premiere and Speed Razor are always installed in the same place as
the ViZfx software. The default location for this is C:\P
ROGRAM FILES\INTERGRAPH\VIZFX.
Why can’t I edit my curve parameters?
For the curve parameters to show, you must be in true color. Select Start/Setting/Control
Panel, and then double-click Display. Select the Settings tab and make sure Color Palette is
set to True Color.
Why don’t I get the same output in Premiere that I got in the Sequencer?
There are two possibilities:
u
The final output needs to be sent to the default buffer. You may have inadvertently sent
the final clip to a named buffer or saved to disk. In order for the output to arrive back into
Premiere correctly, you must send it to the default buffer.
u
You may have resized the final image while you were in the Sequencer. If so, the final
output is being scaled back to the original clip size. For example, if your original clip was
640 x 480 and you went into the Sequencer and scaled the image down to 580 x 420, your
output will be scaled back to 640 x 480 when you go back to Premiere. If this result is
acceptable to you, then everything is fine. However, if you want to keep the other size you
Page 62

54
will have to use the Save Image effect (in the Miscellaneous group) to output from within
the Sequencer, or save from the final effect on the Sequencer.
What is a buffer?
A buffer is a place to hold one image in memory within the Sequencer. These images are
available for effect processing within the Sequencer. There are two types of buffers: named
and default.
What is a named buffer?
A named buffer is a place to hold one image that you name. That image can be read an
unlimited number of times and in any frame following the point where it is created.
What is a default buffer?
The default buffer works like an inbox during the processing of a frame. Every time an image
is put in the default buffer it is like putting a picture in the inbox. Every time an image is read
from the default buffer it is like picking up the picture on top of the inbox and using it. Thus,
once an image is read, it is gone.
Do I have to use buffers?
Yes, but only a little. The image coming from the application is the first image in the default
buffer for each frame. To get the image from your application, you must read it from the
default buffer. Conversely, the image that is given back to the application is the top image in
the default buffer. Thus, you must have an image left in the default buffer after every frame.
Except for these two cases, you need not use buffers. You can exchange images via files, but
this is slower. If using the default buffer is confusing you can use named buffers.
Why would I use the Sequencer?
The Sequencer is useful if you need to apply an effect only to a few frames of a clip—in the
Sequencer, effects can be as short or long as you need them.
The Sequencer allows double input effects to be layered. Several of our effects can be used to
layer multiple streams of video, and you can do this many layers deep with the Sequencer. The
effects that let you do this are available only from within the Sequencer in Premiere.
Some ViZfx effects can change the image size. Size-change effects are available within the
Sequencer where these odd-sized images can be handed between effects. But watch out—the
Sequencer must return an image of the original size to Premiere. So, if a resized image is left
at the end of the frame, it is automatically scaled back to the original size. Because of this,
some effects are available only from within the Sequencer.
I have applied the Glow effect to a clip and I can’t get anything to happen. Why?
All effects that are listed under the Shines category require an alpha channel in order to work.
The effect takes the contact between the white and black alpha areas and performs the effect to
glow out (or in) from that edge—the contact between the black and white alpha should be
sharp. Add an alpha channel using the Alpha Tools effect (or some other application or effect)
and try again. Everything should work as expected.
Page 63

55
I know my clip has an alpha but I still can’t get the Glow effect to work in Speed Razor.
Select your clip in Speed Razor. Make sure that the Enable Mask selection in the item info
window is unselected so that the alpha is included with the image when it comes into the
effect.
I can’t find the effect to merge two images—where is it?
If you are using Premiere and want to use any effect that takes advantage of two inputs
(excluding the Transition Blind effects), you will have to apply the Sequencer filter within
Premiere. (The Transition Blinds and Point Dissolve to Image effects are available from the
Transition window.) All of the effects are available from within the Sequencer under the
Effects pulldown menu.
If you are using Speed Razor, just place the effect you want to use in the library.
Does ViZfx work on other platforms that have Premiere and Speed Razor—for example,
DEC Alpha, SGI, and Macintosh?
Intergraph does not intend to support other hardware platforms at this time.
Does ViZfx work on WindowsNT 3.51?
ViZfx works only with an Intel-based system running Windows NT 4.0 or Windows 95.
Page 64

56
Page 65

Index
57
about this document, v
align, 7
alpha channel, 7
alpha channels, 54
Alpha Tools
double input, 22
single input, 22
antialiasing, 12
auto size, 8
Balloon, 22
begin range, 7
Bezier, 5
Blast, 28
Blur, 17
browse, 6
buffer, 6
buffers, 54
default, 54
named, 54
swap, 33
Bump, 12
applying, 44
Chromator, 17
color channel, 7
Color Glow, 25
Color Transforms, 17
Combine Alpha, 22
Compare, 23
composite, 24
applying, 46
Composites, 24
Concatenate, 33
Concentric Blinds, 31
Contrast, 17
Convolve, 18
Copy Image, 33
Crop, 13
curve
editing, 5
fit to window, 5
full size, 5
parameter, 5
scrolling, 5
undo zoom, 5
value, 5
zooming, 5
curve editor, 4
curve parameters, 53
curve type, 5
default buffer, 54
Deform, 13
dependencies
hardware, software, 1
Displacement, 13
display toolbar, 10
document conventions, v
double-input effects, 6
Dye, 18
Edge Shine, 25
effect
area, 10
properties, 10
Effect Window, 3
effects, 12
common parameters, 12
Emboss, 14
end range, 7
Erode
to Black, 28
to Image, 28
execution toolbar, 10
file, 6
type, 6
fill method, 8
filters, 53
Flip, 14
Foggy Glow
double input, 26
single input, 25
frequently asked questions, 53
Gamma, 18
general
Page 66

58
presets, 3
Geometry Transforms, 12
Glow, 54
double input, 26
single input, 26
Gradient Glow, 27
hardware dependencies, 1
HSV, 18
image subpane, 10
in, 8
input/output, 6
installing ViZfx
ViZfx, installing, 2
Intensify, 18
Intergraph
BBS, vii
FAXLink, viii
on the Internet, vi
Key Maker, 23
applying, 48
legend, 11
linear, 5
main toolbar, 9
Masks, 22
Matte
double input, 23
single input, 23
Median, 19
Melt, 29
Miscellaneous, 32
Mosaic, 29
Moving Polygons, 23
name, 7
named buffers, 54
Negative, 19
Noise, 19
Open Image, 33
OpenGL, 12
out, 8
Outline, 27
output, 8
parameter window, 12
parameters, 4
Particles, 28
Point Dissolve
to Black, 29
to Image, 31
Posterize, 20
presets
general, 3
product information, vi
Pulverize, 30
Radar Blinds, 31
Radial Zoom, 20
Raindrops, 14
removing ViZfx
ViZfx, removing, 2
reverse, 8
Ripple, 15
Rotate, 15
Save Image, 33
Scale, 15
Scatter, 30
scrub, 7
scrub preview, 7
secondary input offset, 12
Sequencer, 9, 54
sequencer timeline, 10
Shade, 20
Shadow, 27
Sharpen, 20
Shines, 25
software dependencies, 1
stats, 7
status bar, 11
step, 8
step backward, 7
step forward, 7
support, vi
swap, 6
Swap Buffers, 33
targa.tga
placing, 47
text subpane, 10
Tint, 21
Tokyo Blinds, 32
Trail, 24
Transformations, 16
Transitions, 31
Translate, 16
Page 67

59
Venetian Blinds, 32
Whirl, 16
wraparound, 12
Page 68

60
 Loading...