

Page 1
GIGABIT
SATA NAS
USER
MANUAL
MODELS 505888
& 505895
INT-505888/505895-UM-0110-01
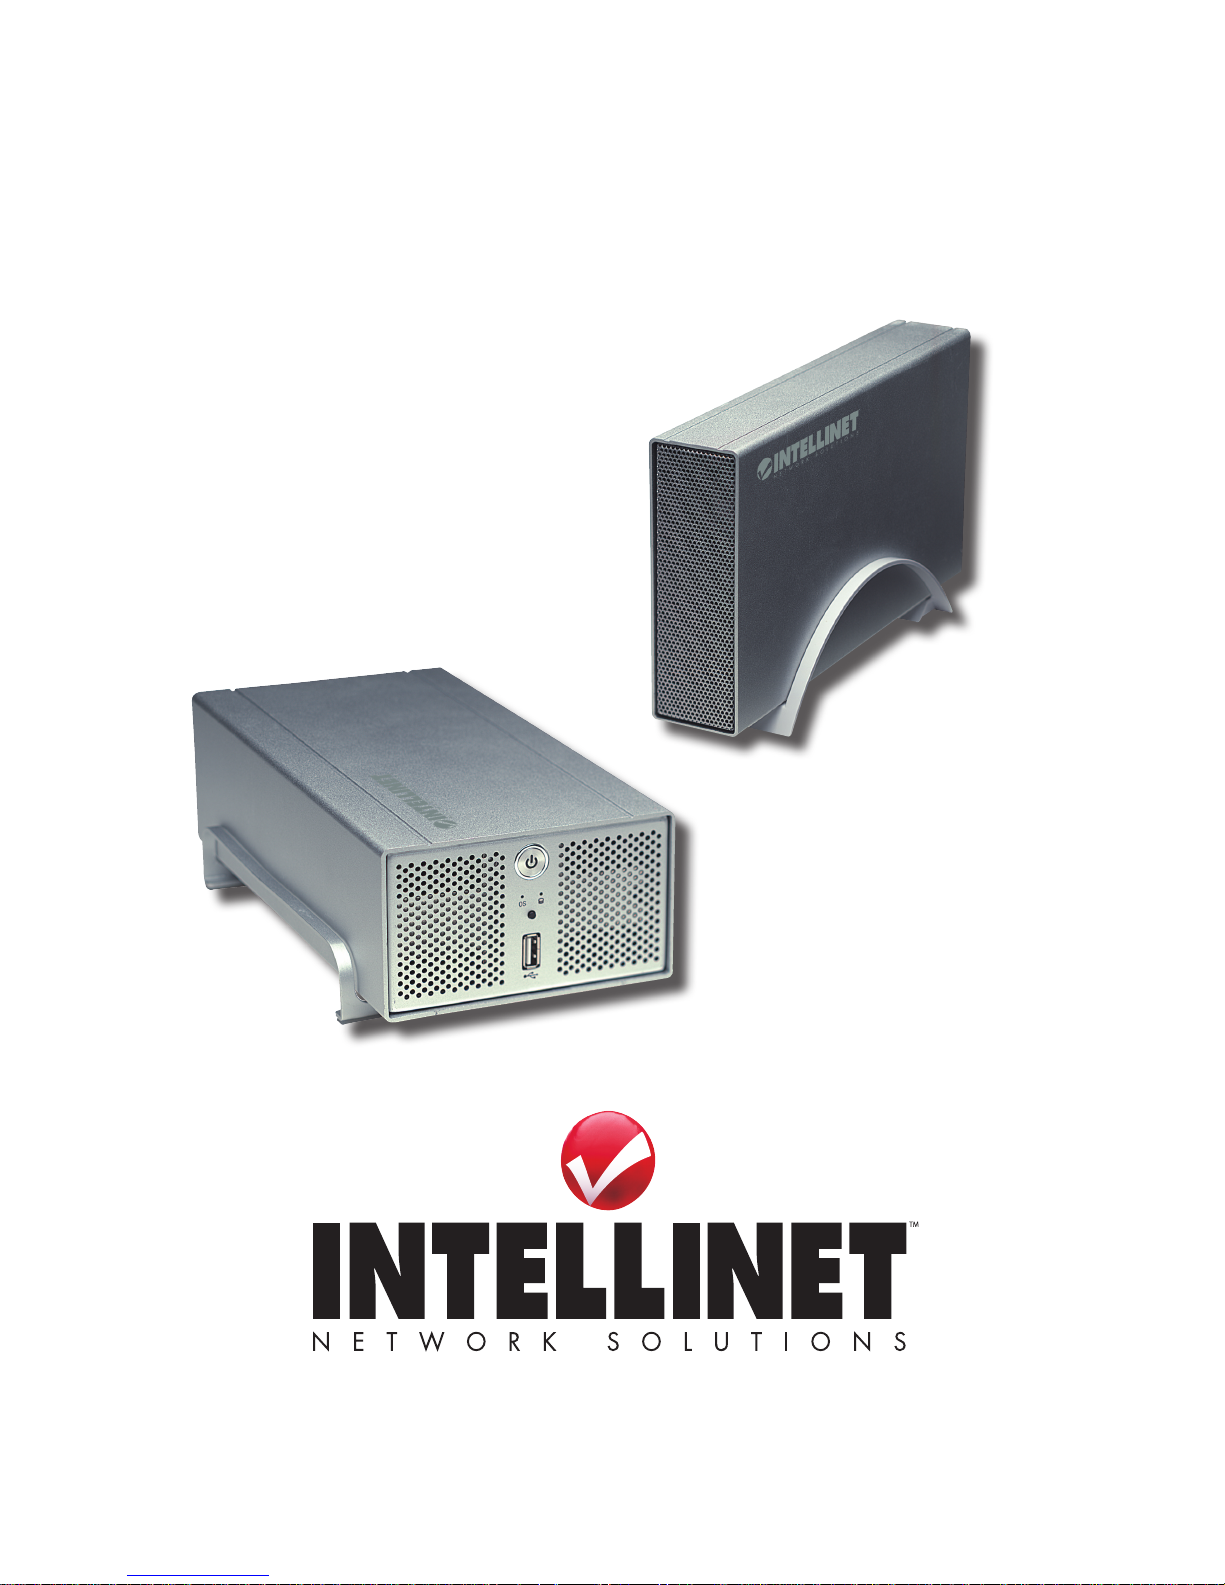
Model 505888: 1.5 TB
Model 505895: 3 TB
Page 2

2
Thank you for purchasing the INTELLINET NETWORK SOLUTIONS™ Gigabit SATA
NAS, Model 505888 (1.5 TB) or Model 505895 (3 TB). Either model provides an
easy solution for home and ofce users who require the benets of the 3 S’s:
speed, streaming and abundant storage space.
You can install a SATA hard drive — up to 1.5 TB for Model 505888 and up to 3 TB
for Model 505895 — for extremely fast access to data storage on your network. If
more space is needed, you can connect two additional USB HDDs. And with the
convenient power-saving design, the SATA NAS will put the HDD to sleep if it isn’t
needed — saving more than 80 percent of its power.
With a Gigabit network connection, this device provides ultra-fast data throughput,
making it the perfect network storage unit for smaller work groups. Plus, it allows
you to stream videos and photos through the media player in your home
entertainment center, and streams MP3 les to your media player via iTunes and
downloads les via the BitTorrent network to the NAS without your PC being on.
Detailed instructions in this user manual make installation reasonably quick and
simple so you’ll soon be enjoying the benets of all these popular features:
• Holds one (Model 505888) or two (Model 505895) 3.5” SATA-I or SATA-II hard
drives (up to 1.5 TB each, not included)
• Model 505895 supports RAID congurations (RAID 0, 1, JBOD)
• Hi-Speed USB ports to connect an additional external USB hard drive or USB
printer or USB memory stick
• Supported USB hard drive le systems: FAT32 and NTFS
• Made from high-quality aluminum for optimized heat dissipation
• Cooling fan automatically adjusts to internal temperature (Model 505895 only)
• Integrated iTunes Digital Audio Access Protocol (DAAP) server delivers audio
streams to any iTunes-compatible media player on the network
• Built-in FTP server allowing remote users to upload and download les
• BitTorrent client to download les from the BT network while having your
computer turned off
• Cross-platform le sharing for Windows, Linux and Mac OS
• Supported le serving protocols: CIFS (Samba), FTP and NFS
• Supports user groups and user accounts with quota management
• User (name/password) and Sharing Level (read/write) security
• Supports Self-Monitoring Analysis and Reporting Technology-enabled (SMART)
hard drives
• Adjustable hard drive spin-down time
• Easy Web-based conguration via Web browser
• Firmware update via Web browser
• Two-Year Warranty
Page 3

3
CONTENTS
TABLE OF CONTENTS
1 HARDWARE ........................................... 4
1.1 Model 505888 / 1.5 TB ....................4
1.1.1 System Requirements ...............4
1.1.2 Front Panel ................................4
1.1.3 Quick Setup ...............................4
1.1.4 Hard Drive Installation ...............5
1.2 Model 505895 / 3 TB .......................6
1.2.1 System Requirements ...............6
1.2.2 Front Panel ................................6
1.2.3 Quick Setup ...............................6
1.2.4 Hard Drive Installation ...............7
2 QUICK INSTALLATION .......................... 9
2.1 Connections & Conguration ...........9
2.2 Power On/Off Procedures ................9
2.2.1 Model 505888 / 1.5 TB ..............9
2.2.2 Model 505895 / 3 TB ............... 10
3 SYSTEM SETUP / LOGGING IN .......... 11
3.1 PC Login ........................................ 11
3.2 Peer to Peer Login ......................... 13
3.3 Mac Login ...................................... 13
3.4 Bonjour Login ............................... 14
4 WEB CONFIGURATION ....................... 16
4.1 Basic .............................................. 16
4.1.1 Quick Setup ............................. 16
4.2 Control Panel ................................. 19
4.2.1 Users and Groups ................... 19
4.2.2 File and Print ........................... 20
4.2.3 System .....................................22
4.2.4 Network Service ...................... 25
4.2.5 Maintenance ............................ 27
4.2.6 Log File ....................................33
4.3 Personal Information ...................... 34
4.3.1 Account ...................................34
5 NETWORK STORAGE ......................... 35
5.1 File Access on a PC ......................35
5.1.1 F TP .......................................... 35
5.1.2 Windows Explorer ....................36
5.1.3 Mapping a Network Drive ........36
5.1.4 Disconnecting a Network Drive...38
5.2 File Access on a Mac .....................39
5. 2.1 S MB .........................................39
5.2.2 FTP ..........................................40
6 ADDITIONAL FEATURES .................... 41
6.1 U Pn P ............................................. 41
6.2 Bonjour and iTunes ........................ 41
6.2.1 iTunes ...................................... 42
6.3 USB Drive ...................................... 43
6.3.1 Sharing a USB Drive ............... 43
6.3.2 The NAS as a USB Drive ........ 44
6.4 USB Backup ..................................45
6.5 USB Printer .................................... 45
6.5.1 Installation on a PC .................46
6.5.2 Installation on a Mac ................48
6.2.1 iTunes ...................................... 42
6.6 BitTorrent .......................................51
7 GLOSSARY .......................................... 53
8 FREQUENTLY ASKED QUESTIONS ... 54
9 SPECIFICATIONS................................. 56
section page section page
Package Contents
• Gigabit SATA NAS
• Power adapter
• Quick install guide and installation CD with user manual
NOTE: Some screen images have been modied to t the format of this manual.
Page 4

4
HARDWARE
1 HARDWARE
1.1 Model 505888 / 1.5 TB
1.1.1 System Requirements
•
Computer with Internet browser and network access for setup
•
Switch or router with one free Ethernet port for the NAS
•
One 3.5” SATA-I or SATA-II hard drive with 20 GB – 1.5 TB (1.5 Gbps)
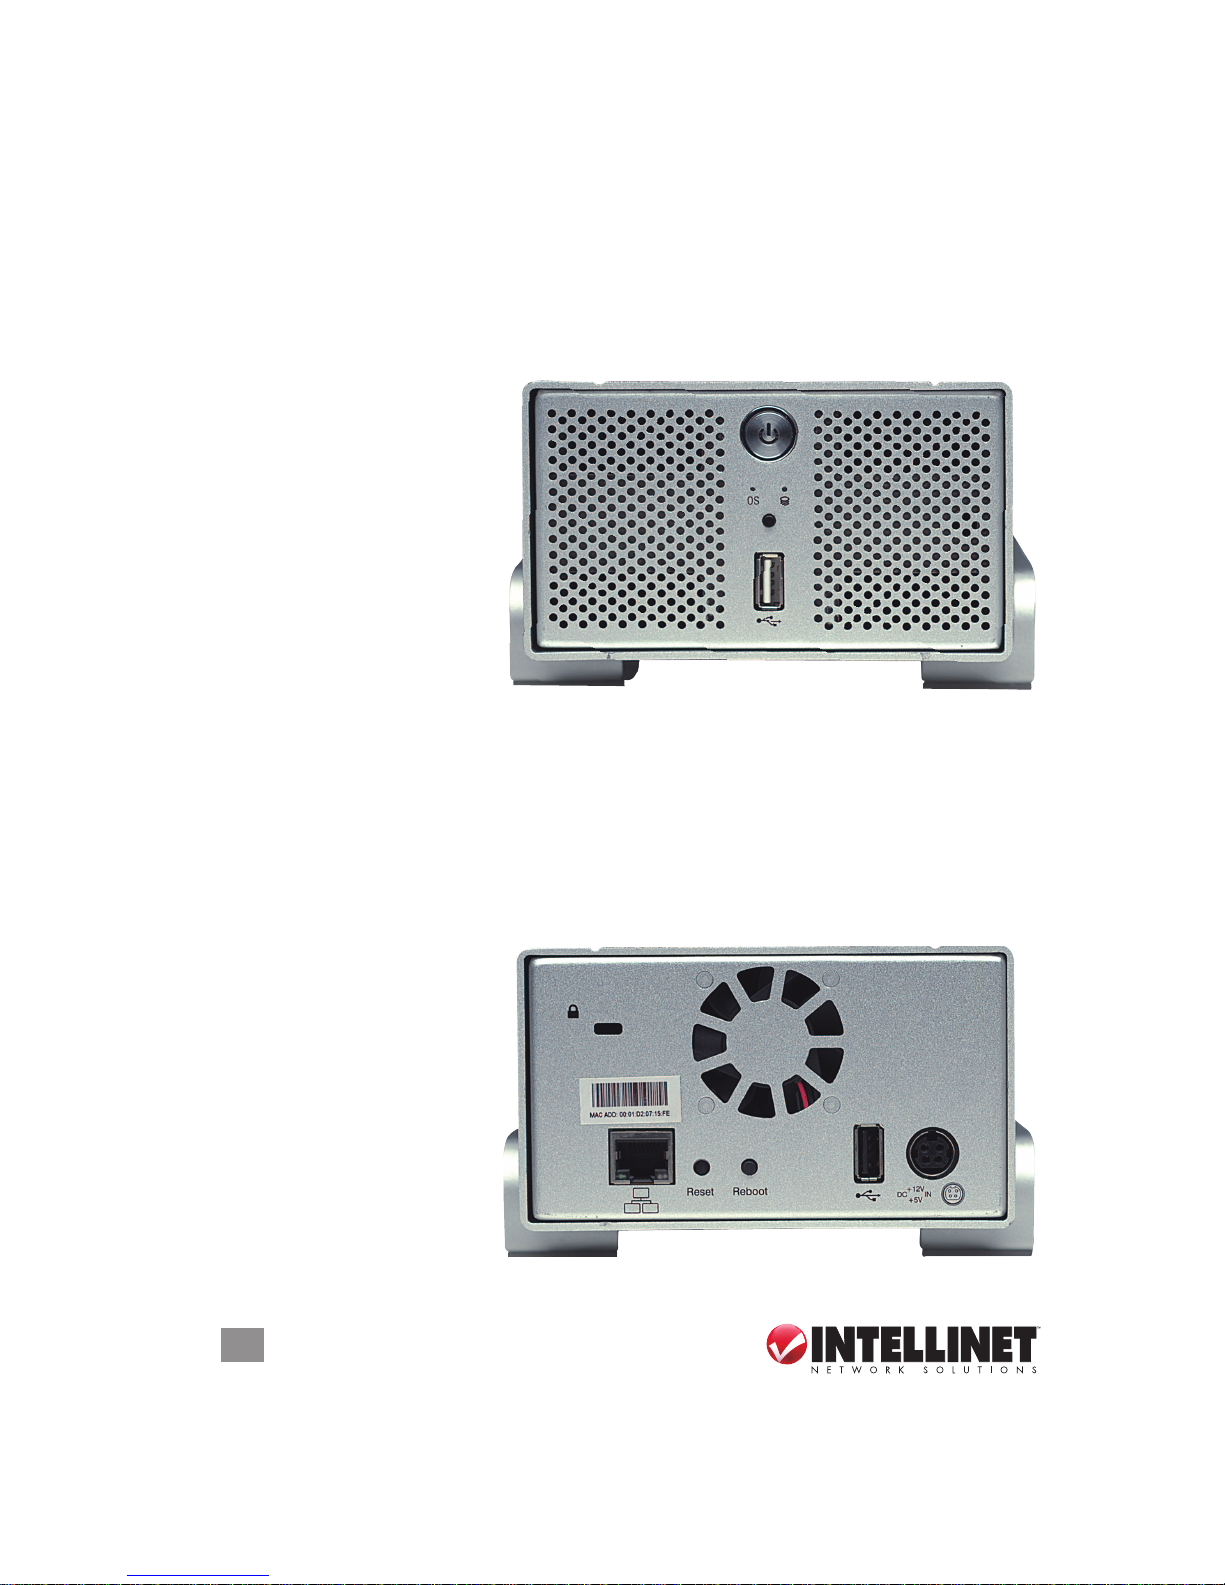
1.1.2 Front Panel
Two LEDs are positioned behind the frontpanel grille: Blue indicates power is on;
red indicates data access. NOTE: This
unit doesn’t feature an On/Off switch. To
turn it off, simply remove the power supply;
or when using the network drive, go to the
Turn Off Server screen in the System section and click “Turn off.” To turn it back on,
re-connect the power supply or allow about two minutes for the system to re-boot
when using the network drive.
1.1.3 Rear Panel
The buttons and jacks on
the rear panel are detailed
below from left to right.
Gigabit Ethernet port —
This RJ45 jack features
two LEDs. When ashing
green, the left LED indicates activity. The right LED is unlit when linked at 10
Mbps; green at 100 Mbps; orange at 1000 Mbps NOTE: The device can be used
as a network drive or an external USB drive, but not both at the same time. When
both USB (USB device port) and Ethernet cables are connected, the device will
act as a USB hard drive.
Restart button — Press and release for a hardware reset of the network drive. The
device will restart after you release the button.
Reset button — When the network drive is powered up and ready, press and
release for a software reset, or press and hold it for 5 seconds before releasing
to reset all the network drive settings to factory defaults (which will erase all
user accounts and groups).
USB host port — This USB type-B port is the host connection to the computer
when using the device as an external USB HDD.
LEDs
Page 5
5
HARDWARE
USB device port — This USB type-A port is for connection to an external USB hard
drive, USB ash drive or USB printer.
Power adapter jack — For external USB devices, it’s recommended that the USB
drives have their own power supply.
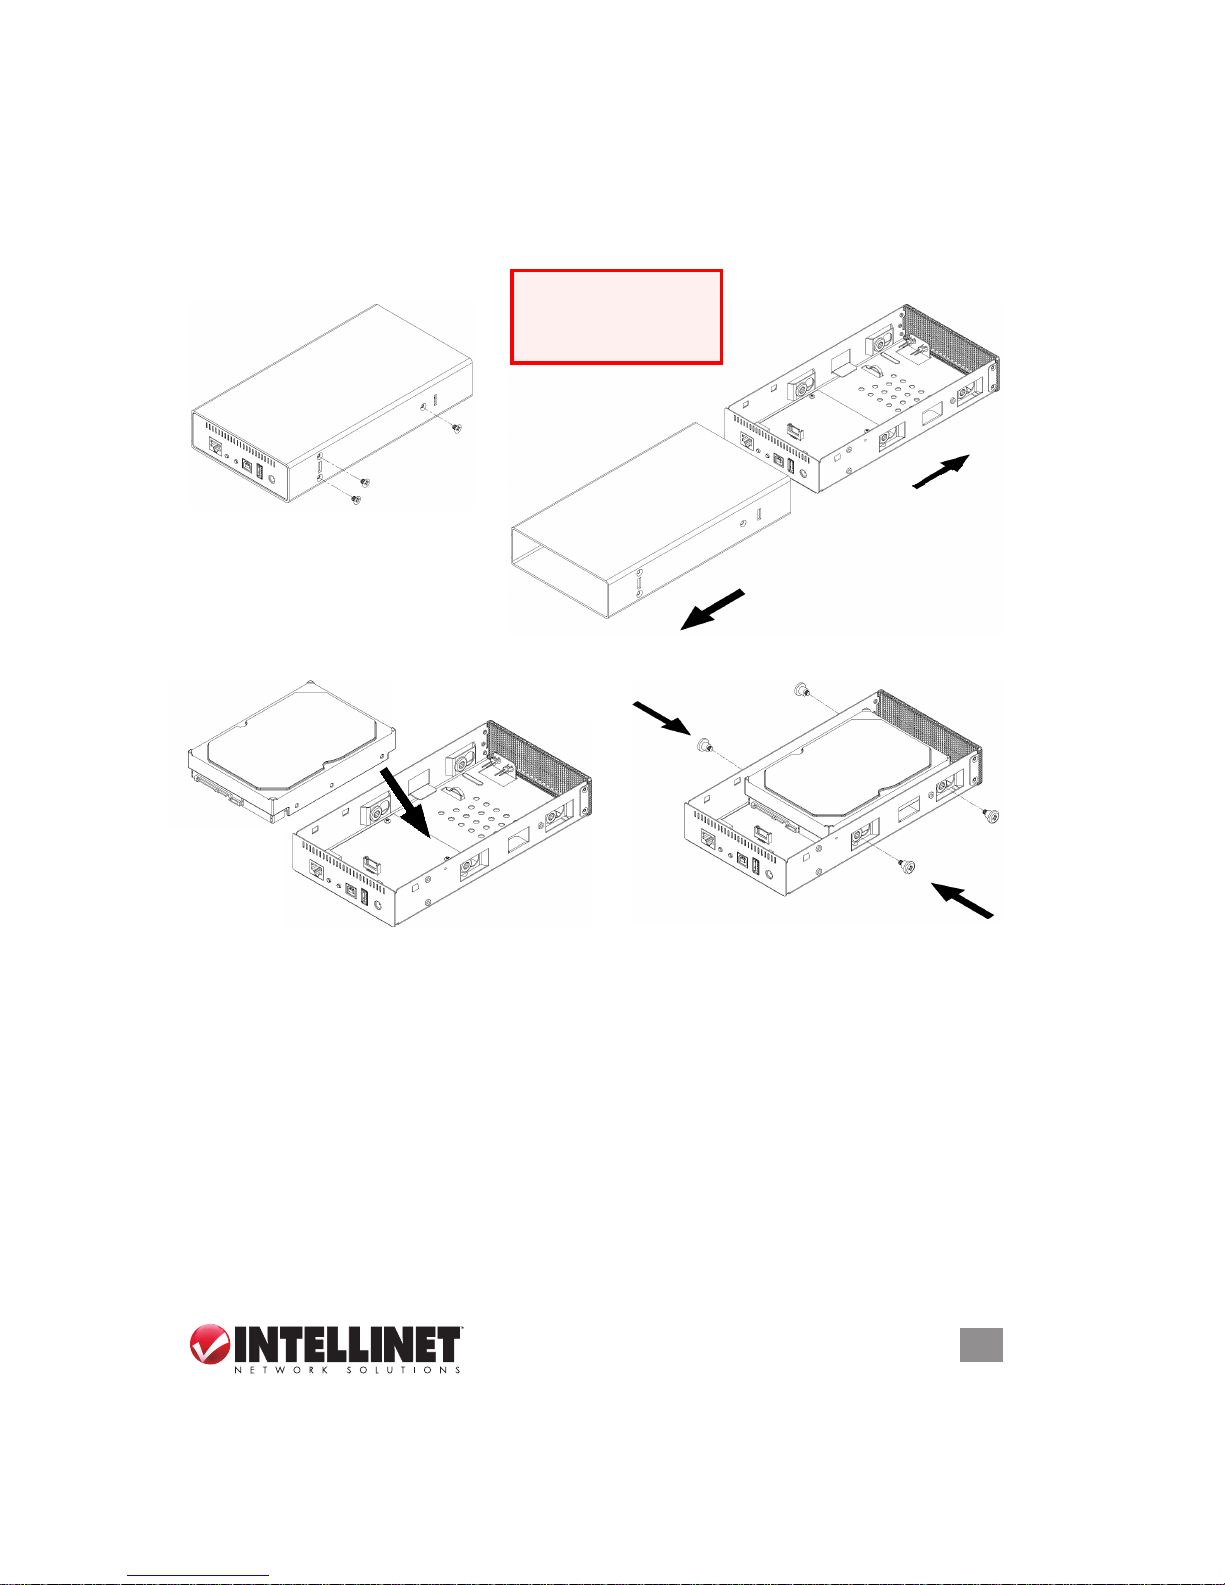
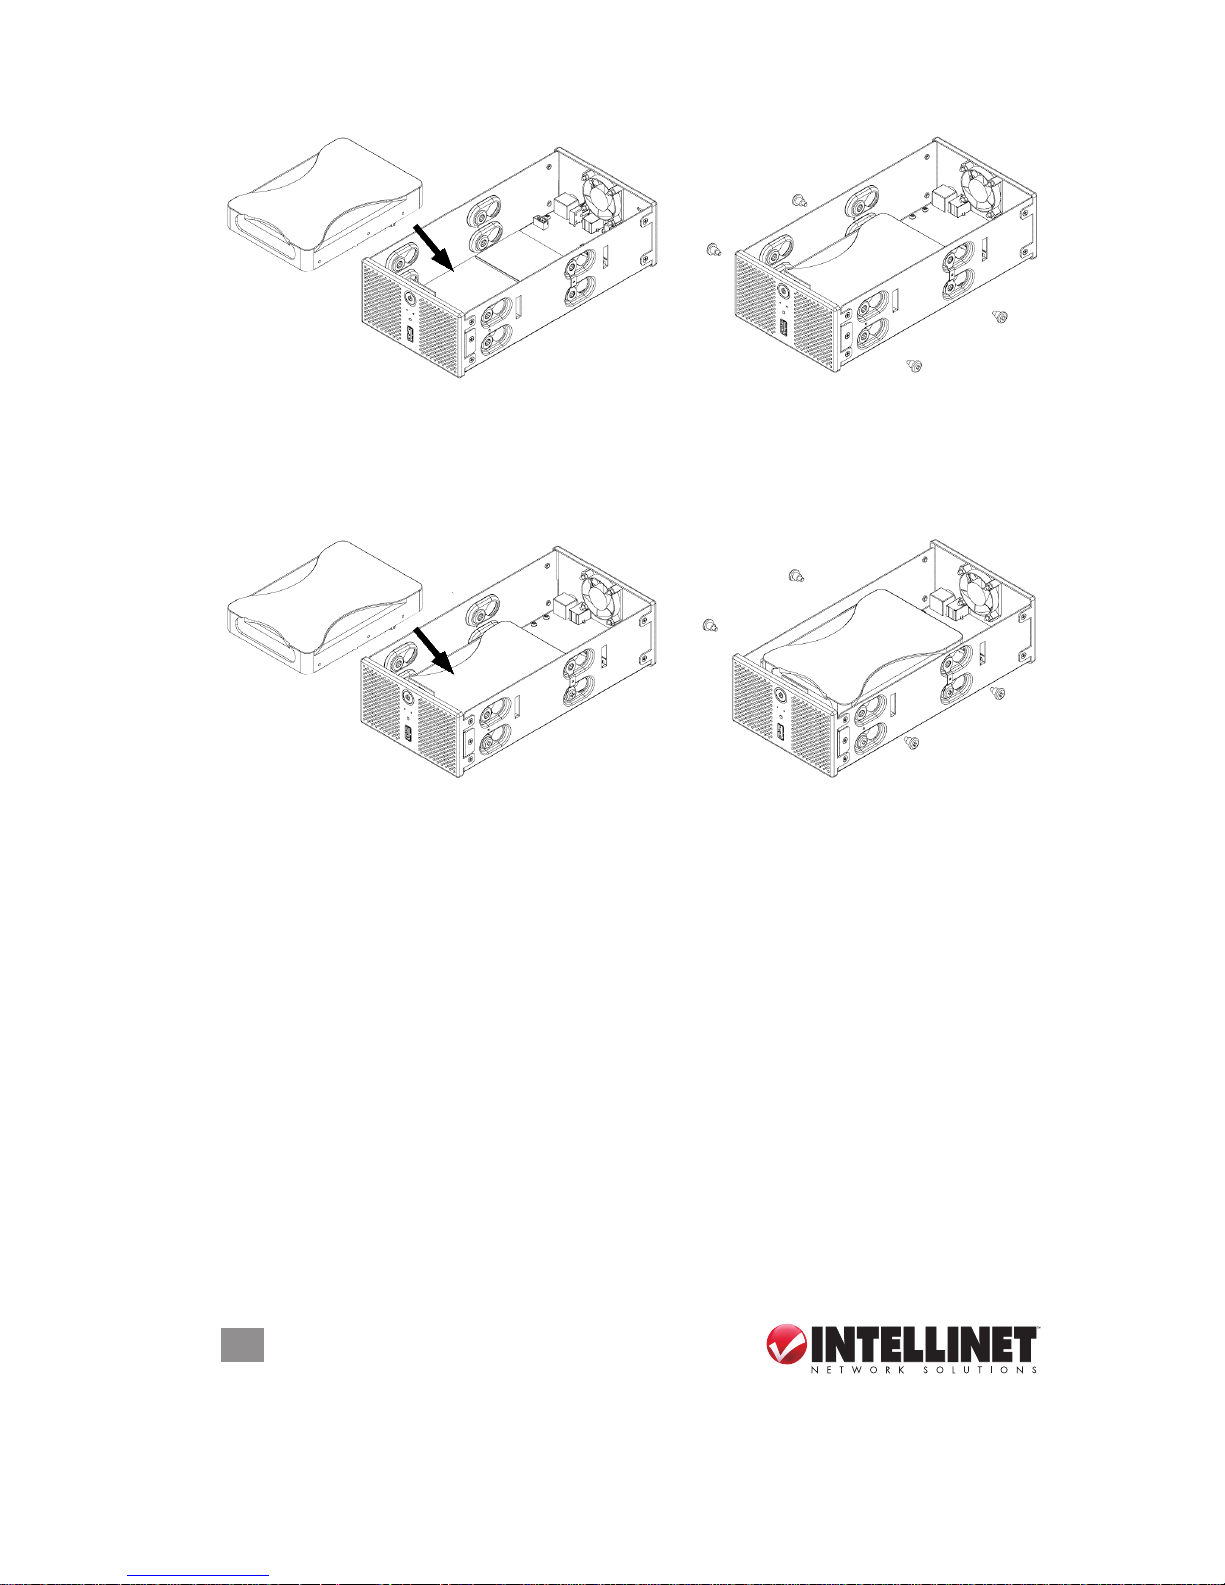
1.1.4 Hard Drive Installation
5. Reverse Steps 2 and 1, sliding the inner enclosure back into the outer chassis
and replacing the 3 screws in the chassis bottom.
6. If desired, align the stand with the holes in the chassis and lightly snap the stand
in place.
NOTE: Be careful not to damage any cables or components during the assembly,
and make sure the cables are rmly connected.
4. Secure the drive using 2 screws
on each side.
2. Push the inner
enclosure out to
separate it from
the outer chassis.
3. Set the hard drive in the enclosure and
connect the SATA and power cables.
1. Remove the 3 screws from
the chassis bottom.
(Disengage the unit from
the stand if it’s attached.)
CAUTION! Handle the
device very carefully, as
some metal edges may
be sharp or rough.
Page 6
6
HARDWARE
1.2 Model 505895 / 3 TB
1.2.1 System Requirements
•
Computer with Internet browser and network access for setup
•
Switch or router with one free Ethernet port for the NAS
•
One or two 3.5” SATA-I or SATA-II hard drives (1.5 Gbps) with 20 GB – 1.5 TB per
drive (3 TB total)
•
For RAID 0 and 1, two hard drives of identical capacity are recommended
1.2.2 Front Panel
The buttons and jacks on
the front panel are detailed
below from top to bottom.
Power switch — Press to
turn the unit on or off; On
will display a blue light.
NOTE: It takes about a
minute for the system to
boot once the unit is on.
LED status indicators — The
OS (operating system) LED on the left lights green to indicate the system is on/
ready; blinks to indicate the system is starting or is shutting down; and remains
off to indicate the system has shut down. The HDD (activity) LED on the right
lights amber to indicate an error (disk not found or a RAID error); blinks to
indicate data access; and remains off to indicate there is no disk activity.
USB backup button — Press and hold in for 4 seconds to back up your les.
USB device port — This USB type-A port is for connection to an external USB hard
drive, USB ash drive or USB printer.
1.2.3 Rear Panel
The buttons and jacks on
the rear panel are detailed
below from top to bottom,
left to right.
Security lock slot — Lock is
not included.
Ventilation fan— The black
jumper at J4/J5 can be
re-positioned to set the
mode for the fan speed.
Page 7
7
HARDWARE
The jumper is placed on J4 at the factory (as shown at right) so
that the fan speed will automatically adjust to the temperature
of the device during operation. (The thermal sensor needs to be
connected — see Step 5 of section 1.2.4 below.) If you prefer,
you can set the fan to run at high speed by re-positioning the
jumper to J5; or you can set the fan to run at low speed by
removing the jumper altogether. NOTE: Be sure to disconnect
power to the device before changing any of the fan or jumper connections.
Gigabit Ethernet port — This jack features multiple LEDs. When lighted green, the
left LED indicates a link. The right LED ashes green to indicate activity at 10
Mbps; both green and orange at 100 Mbps; and orange at 1000 Mbps.
Restart button — Press and release for a hardware reset of the network drive. The
device will restart after you release the button.
Reset button — When the network drive is powered up and ready, press and
release for a software reset, or press and hold it for 5 seconds before releasing
to reset all the network drive settings to factory defaults (which will erase all
user accounts and groups).
USB device port — This second USB type-A port is also for connection to an
external USB hard drive, USB ash drive or USB printer.
Power adapter jack — For external USB devices, it’s recommended that the USB
drives have their own power supply. If two bus-powered USB drives are connected
at the same time, at least one of them needs to be powered by an external
power supply
.
1.2.4 Hard Drive Installation
FAN
FAN
CONNECTION
THERMAL SENSOR
CONNECTION
J5
J4
JUMPER
CAUTION! Handle the
device very carefully, as
some metal edges may
be sharp or rough.
2. Push the inner
enclosure out to
separate it from
the outer chassis.
1. Remove the 4 screws from
the chassis bottom.
Page 8
8
HARDWARE
8. Reverse Steps 2 and 1, sliding the inner enclosure back into the outer chassis
and replacing the 4 screws in the chassis bottom.
NOTE: Be careful not to damage any cables or components during the assembly,
and make sure the cables are rmly connected.
6. Set the second hard drive in the enclosure
and connect the SATA and power cables.
7. Secure the drive using 2
screws on each side.
3. Set the rst hard drive in the enclosure
and connect the SATA and power cables.
5. Using the tape provided, attach the thermal probe (black and white wire) to the
rst hard drive. Choose a location between the two drives so the probe won’t
be damaged during the installation of the second drive.
4. Secure the drive using 2
screws on each side.
Page 9

9
QUICK INSTALLATION
2 QUICK INSTALLATION
2.1 Connections & Conguration
Following is a quick installation procedure to get you up and running. For further
details on each of the settings, refer to subsequent sections in this manual.
1.
Install one or two hard drives. NOTE: Without installing and formatting a drive
rst, the other functions of the Gigabit SATA NAS will not be available.
2. Connect the Ethernet cable from your network router or switch to the device.
3. Model 505888: When everything is connected, turn the Gigabit SATA NAS on
by connecting the power adapter. Give it about two minutes to boot up.
Model 505895: When everything is connected, turn the Gigabit SATA NAS on
by pressing the Power switch. Give it about two minutes to boot up.
4. On the included installation CD, run the INTELLINET_nas.exe utility. If needed,
refer to Section 3: System Setup / Logging In in the manual.
5. Access the Web conguration interface via your Web browser, then refer to
Section 4: Web Conguration in the user manual.
5. Model 505888: Go to the Maintenance menu and use the disk utility to format
the drive. When only using the Gigabit SATA NAS as network drive, using EXT2
is recommended; when also using it as a USB drive, NTFS or FAT32 will be
more convenient, depending on your operating system.
Model 505895: Go to the Maintenance menu and use the disk utility to format
the drive. If two identical drives are installed, you can also go to the RAID
Setting section and create your RAID array.
6. Once the drive has been formatted, go to the Basic menu and follow the quick
setup wizard instructions. This will help you to set up the IP conguration, add
the rst user and prepare le sharing, after which you’ll be ready to start sharing
or downloading les. NOTE: Set the speed for your network card to auto and
not full or half speed.
2.2 Power On/Off Procedures
2.2.1 Model 505888 / 1.5 TB
To turn the power on, simply connect the power supply. NOTE: Always connect the
power adapter to the Gigabit SATA NAS before you plug it into an AC outlet. It’ll
take about two minutes for the network drive to go online and be ready.
To turn off the network drive, log in via your Web browser, stop all current downloads,
go to the “Turn Off Server” section in the System menu and turn the server off.
Once the system has shut down, remove the power adapter from the AC outlet.
Page 10

10
QUICK INSTALLATION
When using Gigabit SATA NAS as a USB drive, eject the external drive from your
system, then remove the power adapter from the AC outlet.
2.2.2 Model 505895 / 3 TB
To turn the power on, rst connect the power adapter to the Gigabit SATA NAS,
then plug it into an AC outlet. Press the Power switch. The blue backlight LED will
turn on, and the unit will start to boot up. It will take about a minute for the device
to go online and be ready. During bootup, the OS LED will be blinking.
To turn the power off, log in via your Web browser, stop all current downloads, go
to the “Turn Off Server” section in the System menu, and turn the server off or use
the Power switch. The OS LED will be blinking for about 5 seconds; the system
will shut down about 20 seconds later. NOTE: If the device is not in use for a
longer period of time, remove the power adapter from the AC outlet.
IMPORTANT: To protect your les and help prevent the loss of your data, it’s
strongly recommended that you keep two copies of your data: one copy on your
Gigabit SATA NAS and a second copy either on your internal drive or another
storage media, such as a CD, DVD, tape or additional external drive. Any loss or
corruption of data while using this Gigabit SATA NAS is the sole responsibility of
the user, and under no circumstances will INTELLINET NETWORK SOLUTIONS
be held liable for compensation or the recovery of this data.
Page 11
11
SYSTEM SETUP / LOGGING IN
3 SYSTEM SETUP / LOGGING IN
To congure your network drive, open your Web browser, enter the IP address,
then use the Web conguration interface for further setup. Options for identifying
your device’s IP address once it’s connected to the network are described below
.
3.1 PC Login
Open the INTELLINET_nas.exe utility on the included CD. This will list the device
automatically and allow you to access the Web conguration interface with a simple
click of your mouse. You can use the same utility at a later point to map the network
drive after you set up your shares.
1. Turn on the NAS, ensuring it’s connected to the same network as your computer.
2. Start the utility by double-clicking on the .exe le and clicking “Setup.”
3. Your Gigabit SATA NAS should automatically display in the device list. If it
doesn’t, make sure the utility has access to the network and search again.
You may need to congure your rewall or even temporarily turn it off.
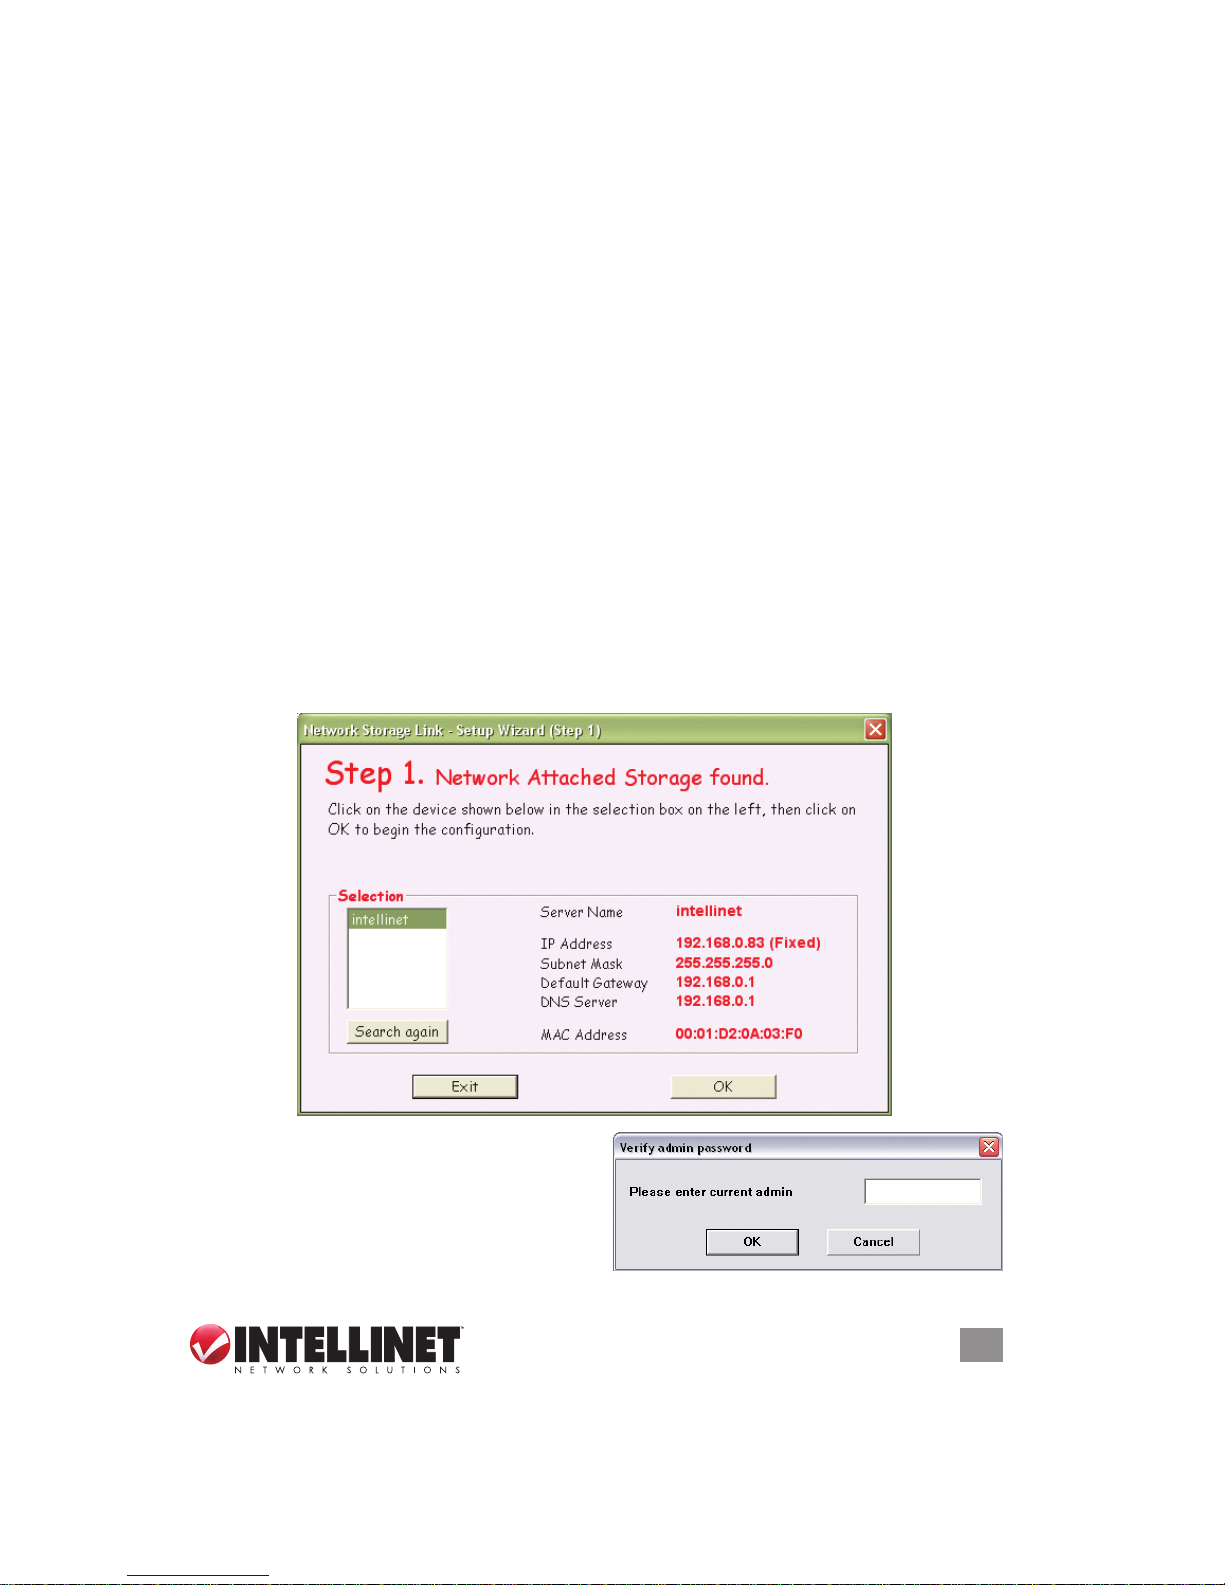
4. With the utility’s Step 1: Network Storage Link(s) Have Been Found screen
displayed, select your device and click “OK” to start the setup wizard.
5. Before you can access the Gigabit
SATA NAS, you need to enter the
admin password. Enter the default —
“admin” — in the text eld, then click
“OK” to log in.
Page 12
12
SYSTEM SETUP / LOGGING IN
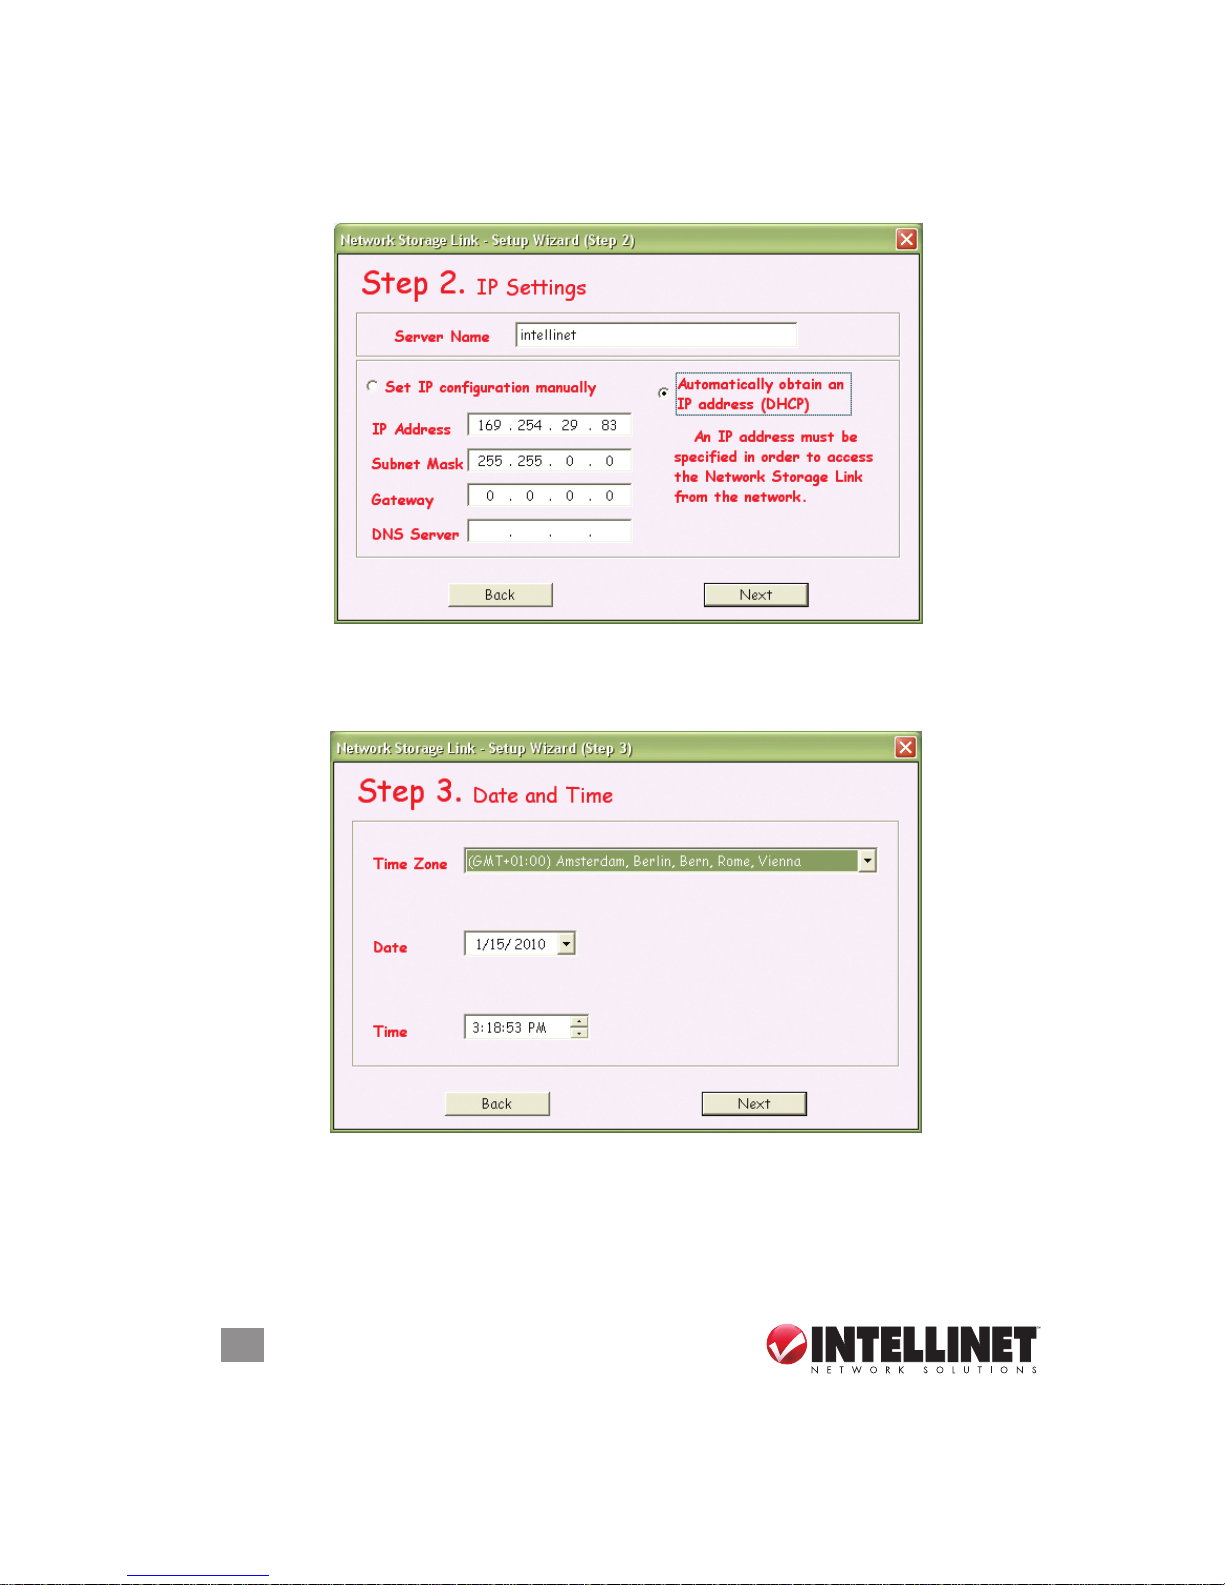
6. When the Step 2: IP Settings screen displays, you can dene the name for
your device and set up the IP conguration. Selecting “Automatically obtain an
IP address (DHCP)” is recommended. When set, click “Next” to continue.
7. When the Step 3: Date and Time screen displays, you can set up the date and
time. Select your time zone from the drop-down menu, set the date and the
time, then click “Next” to continue.
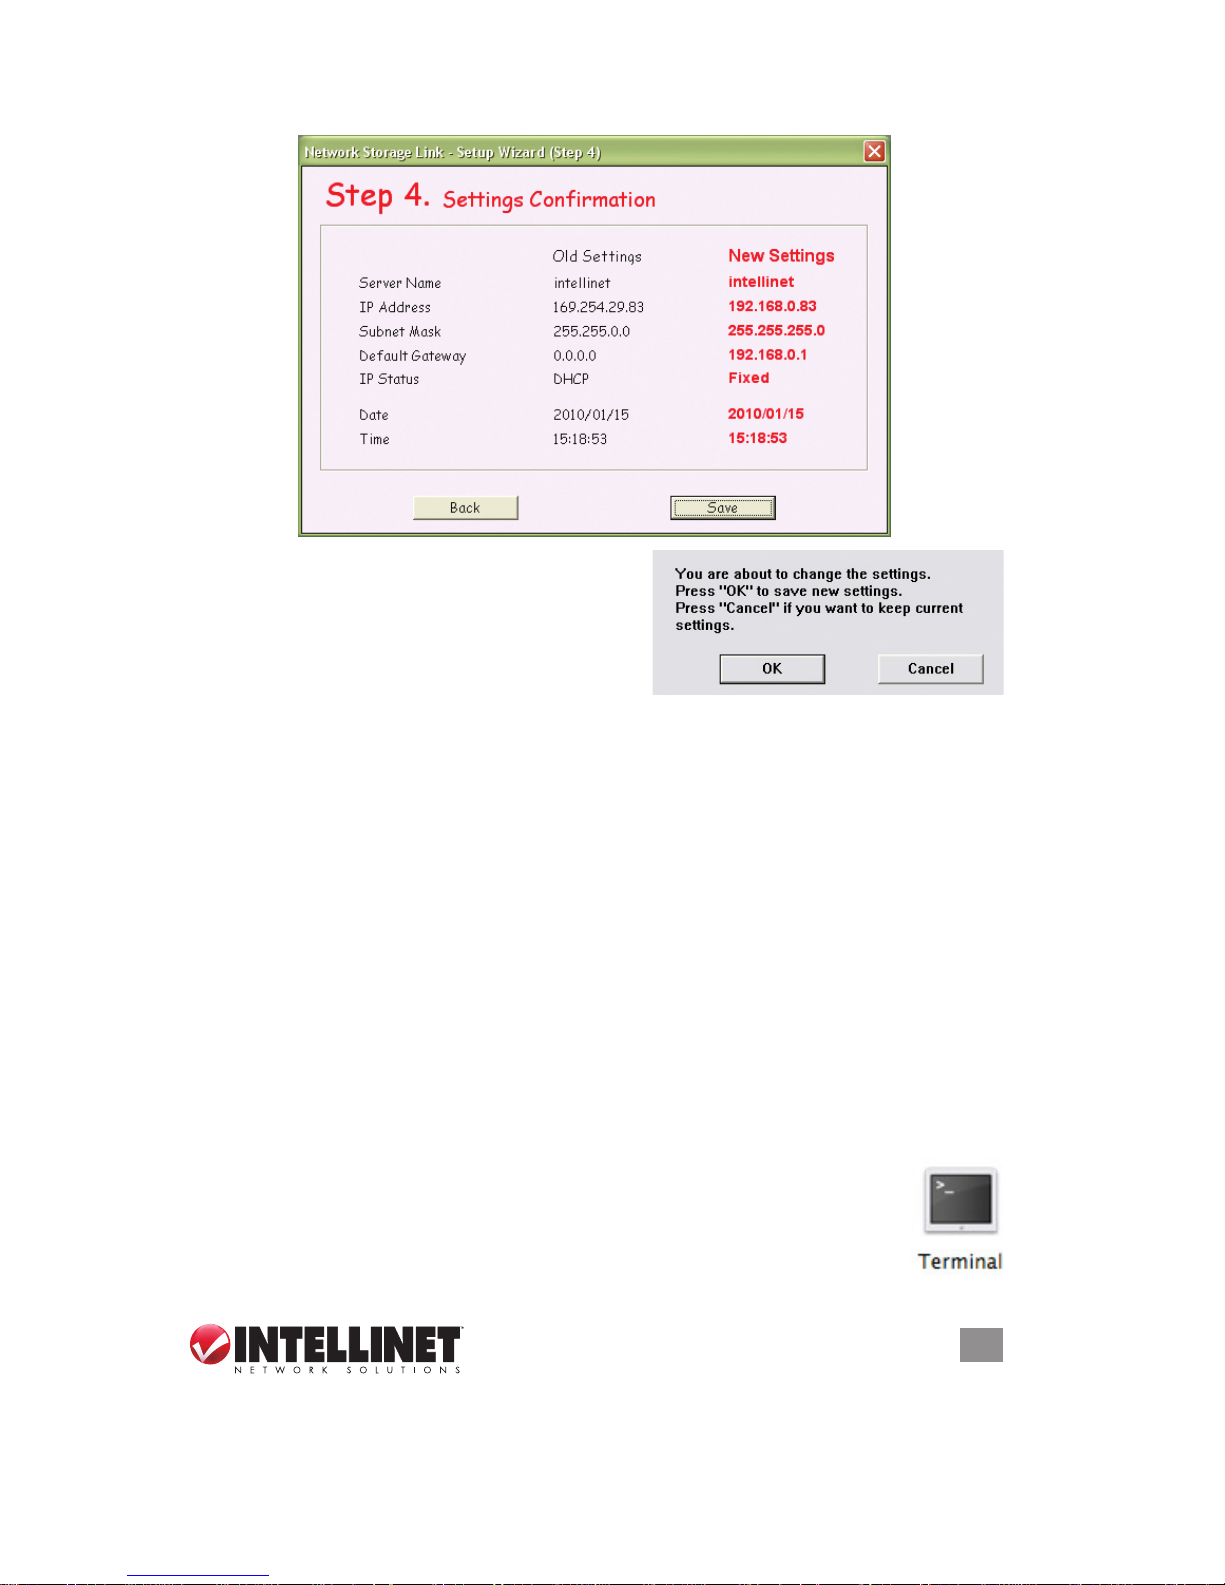
8. When the Step 4: Settings Conguration screen displays, you can compare
your new settings with the previous conguration. If you nd a mistake, click
“Back” to make changes; otherwise, click “Save.”
Page 13
13
SYSTEM SETUP / LOGGING IN
9. The setup wizard will remind you that the
previous settings will now be updated with
the new conguration. Click “OK” to nish
the setup wizard.
Once you’ve identied the IP address (as
conrmed above on the Step 4 screen), you can simply enter that into the URL
address eld of your Web browser to access the Web conguration interface of
your device. NOTE: This option may not work on a Mac.
3.2 Peer to Peer Login
If you connect the Gigabit SATA NAS directly to your computer (PC or Mac) using
Ethernet cable, you can access the device using its default IP: 192.168.1.1. Open
the Web browser and enter 192.168.1.1 to access the Web conguration interface.
NOTE: This option only works when Bonjour is disabled (see 3.4 below).
3.3 Mac Login
When the Bonjour service is disabled, the only way to access the Login screen is
by using its IP address. First, you need to nd out the IP address of your Gigabit
SATA NAS, then use the Web browser to access the Web conguration interface.
1. Turn on the NAS, ensuring it’s connected to the same network as your
computer.
2. Open the Terminal utility, which is usually located in your Applications
folder under Utilities.
Page 14
14
SYSTEM SETUP / LOGGING IN
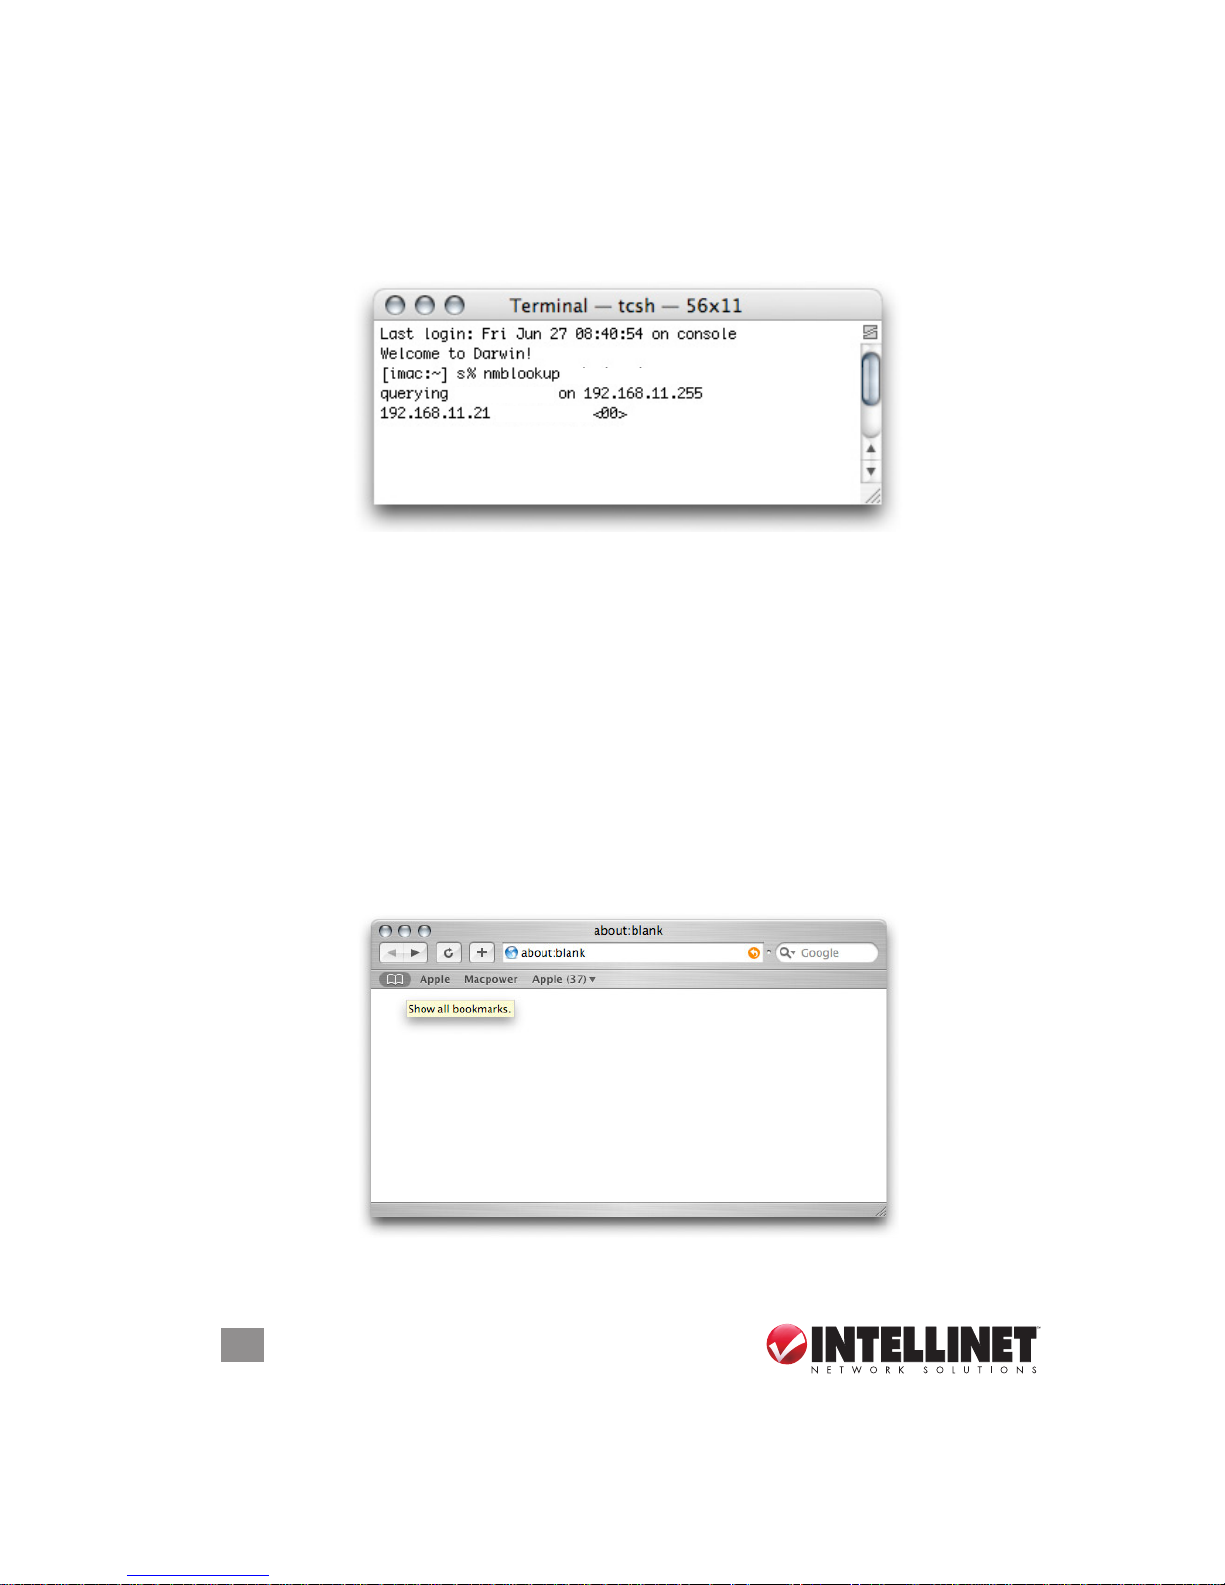
3. Enter “intellinet.” This is the default name of the Gigabit SATA NAS: If it’s been
changed and you don’t know the current correct name, reset the device rst to
re-establish the default settings.
4. After entering the previous command and pressing the <Enter> key, it should
return an IP address, followed by the name you just entered.
5. Open your Web browser and enter the IP address from the previous step to
access the Web conguration interface. The default username and password
are both “admin.”
NOTE: When Bonjour is disabled, you can use the Peer to Peer method to log in
and set up your network drive.
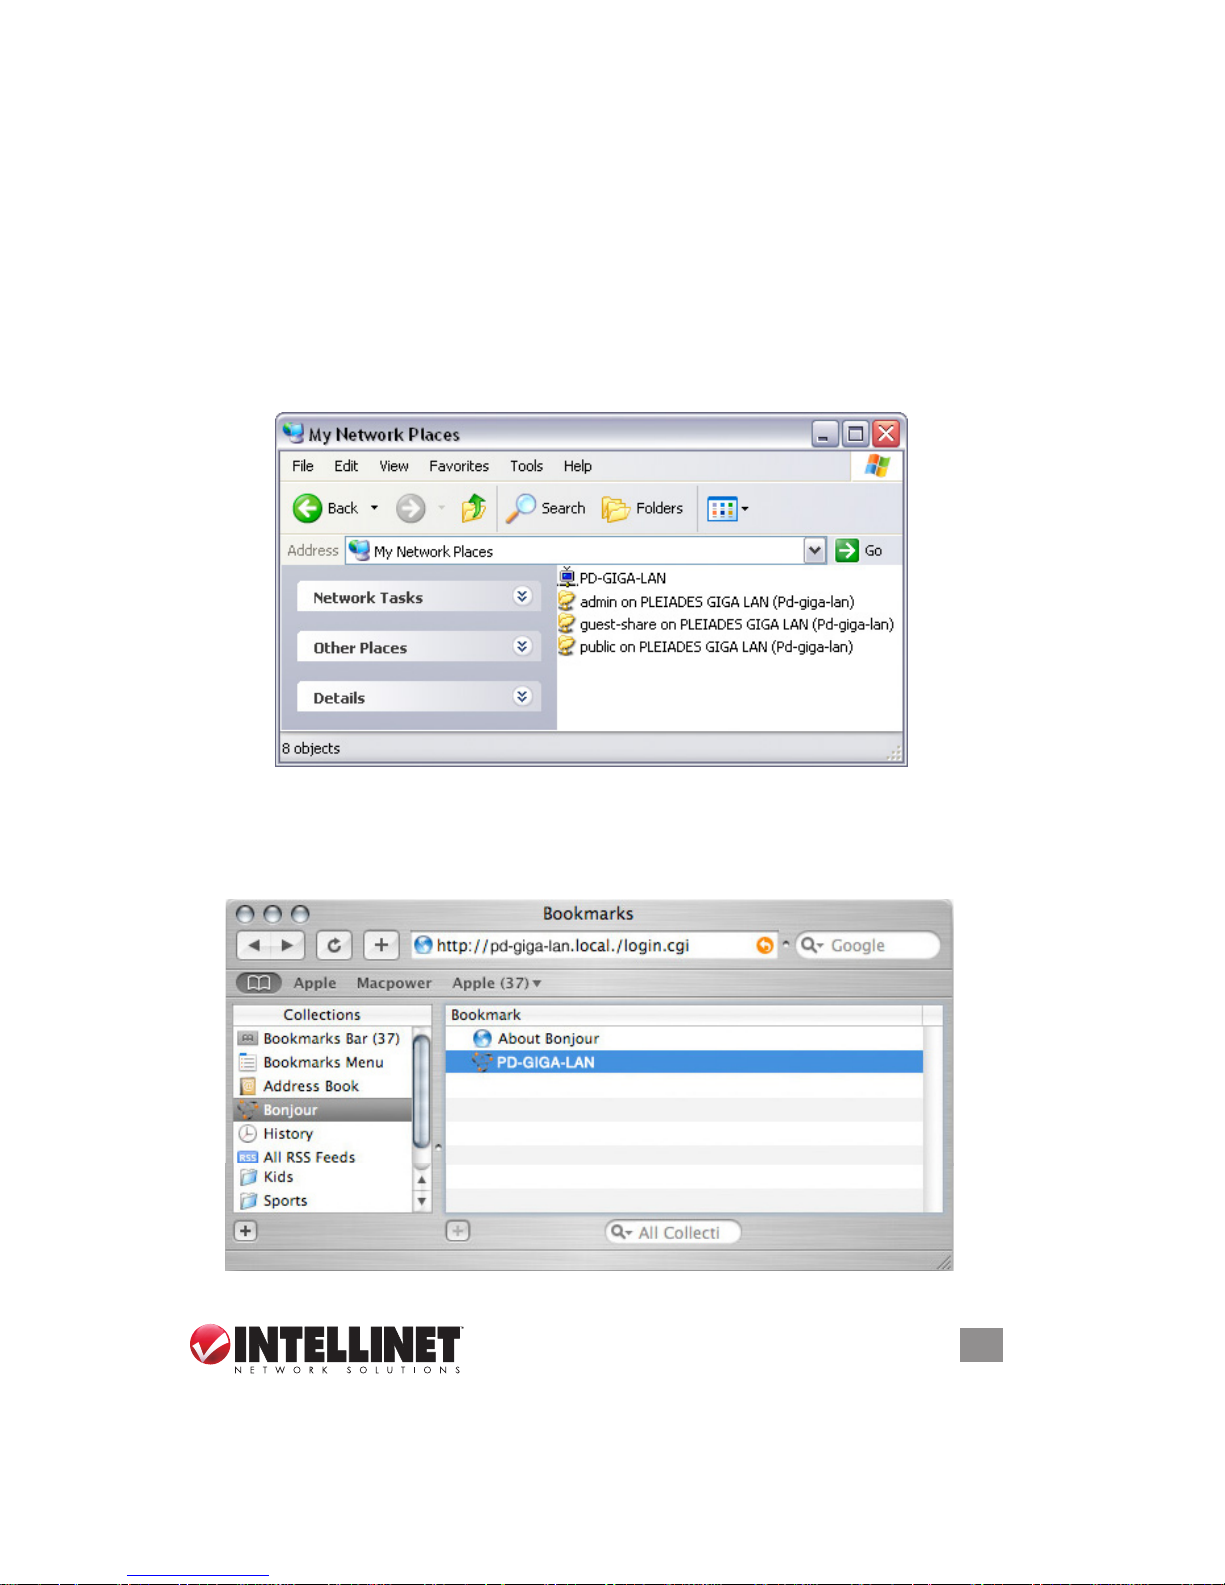
3.4 Bonjour Login
When the Bonjour service on the device is enabled, all you need to do is access
the Bonjour tab in your bookmarks folder and select the Gigabit SATA NAS.
1. Turn on the NAS, ensuring it’s connected to the same network as your computer.
2. Open your Web browser. If not already displayed, click on the bookmarks icon
to show all bookmarks.
intellinet
intellinet
intellinet
Page 15

15
SYSTEM SETUP / LOGGING IN
3. Select “Bonjour” and browse for “intellinet.” Click on it to display the Login
screen.
4. The default login is “admin” for both username and password.
intellinet
Page 16
16
WEB CONFIGURATION
4 WEB CONFIGURATION
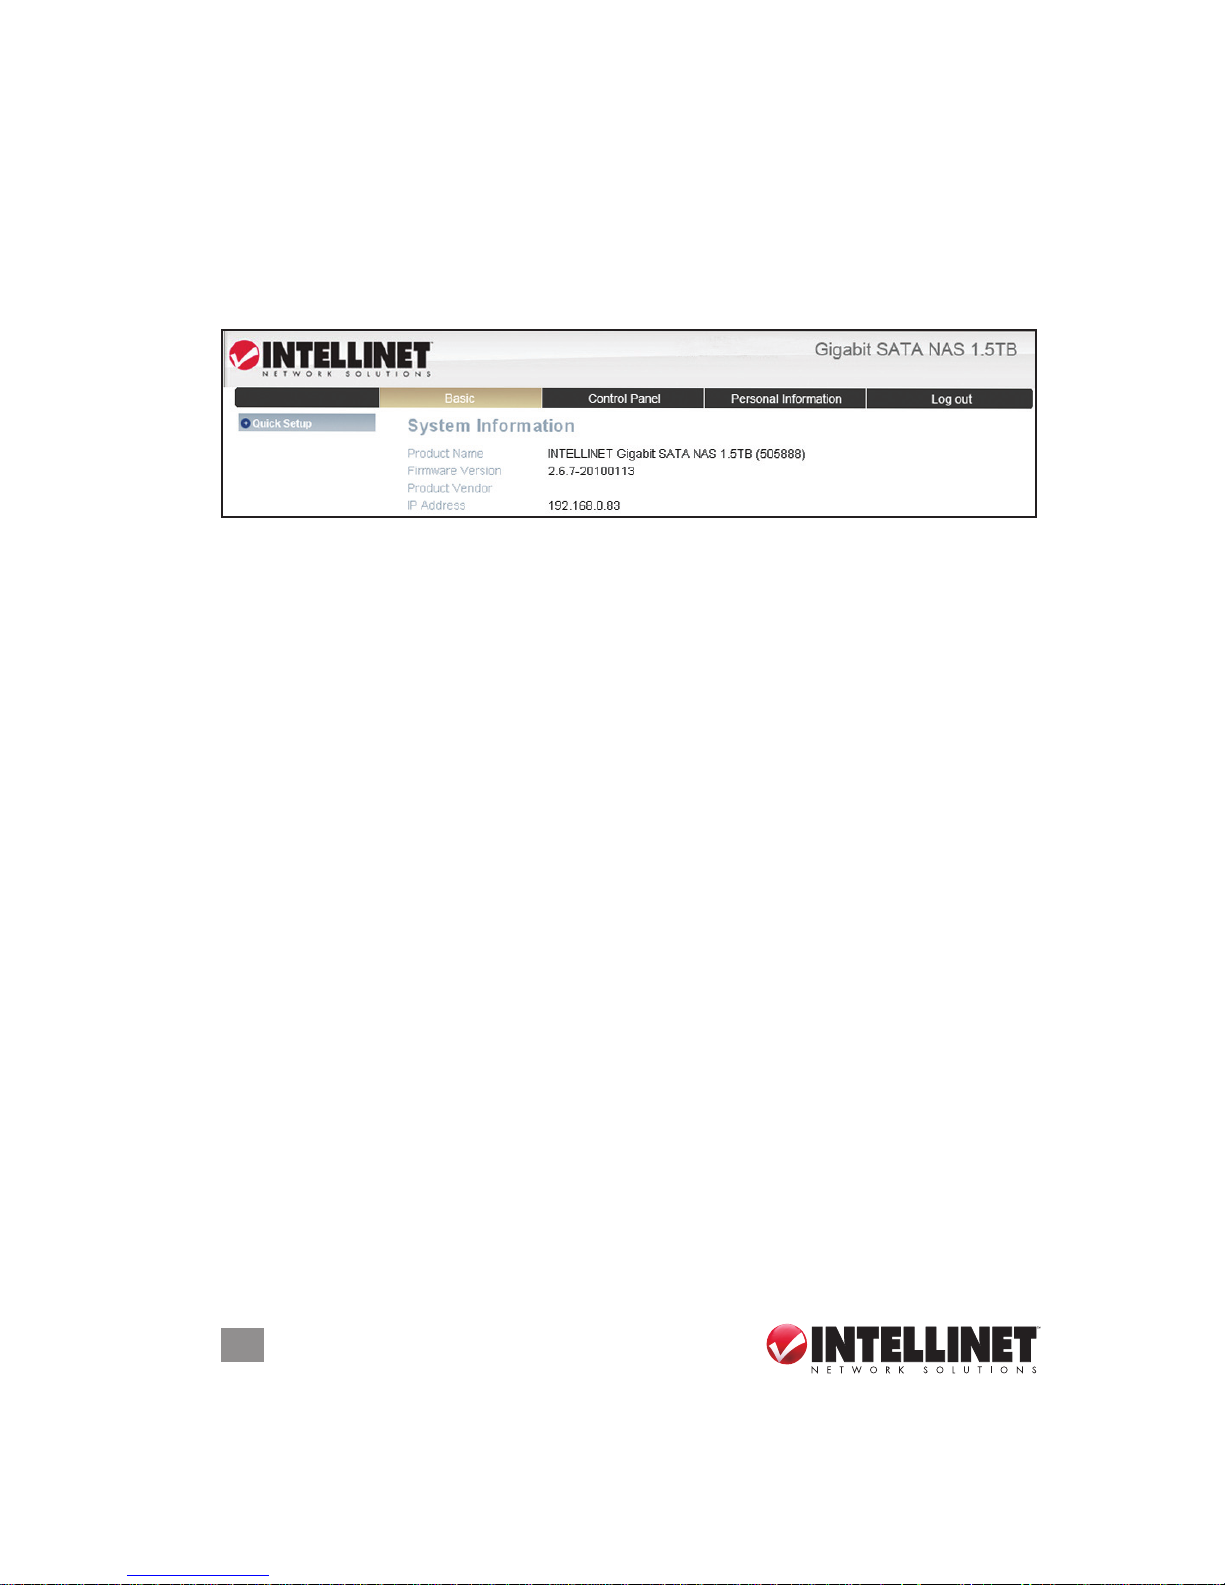
Open your Web browser, enter the IP address of your Gigabit SATA NAS (refer to
Section 3: System Setup / Logging In) and log in. The default login is “admin” for
both the username and the password. The initial screen that displays presents four
primary menu options: Basic, Control Panel, Personal Information and Log Out.
Basic — The settings in this menu are aimed at the user who wants to quickly set
up the LAN disk and share les on the local network. Only the most basic
functions and settings are available, but it is ideal for someone using this
device for the rst time. For a more advanced setup, see 4.2: Control Panel.
Control Panel — This menu includes all the settings and information the Gigabit
SATA NAS offers. You can access specic settings or adjust and modify
everything manually.
Personal Info — This menu is for the system administrator account. It includes the
option to set the password and some others related to the Web interface.
Log Out — This can be used to log out once all the settings have been congured.
NOTE: Without installing and formatting a drive rst, the other functions of the
Gigabit SATA NAS will not be available. The settings options presented in this
section only affect the network drive and do not apply to the USB drive.
4.1 Basic
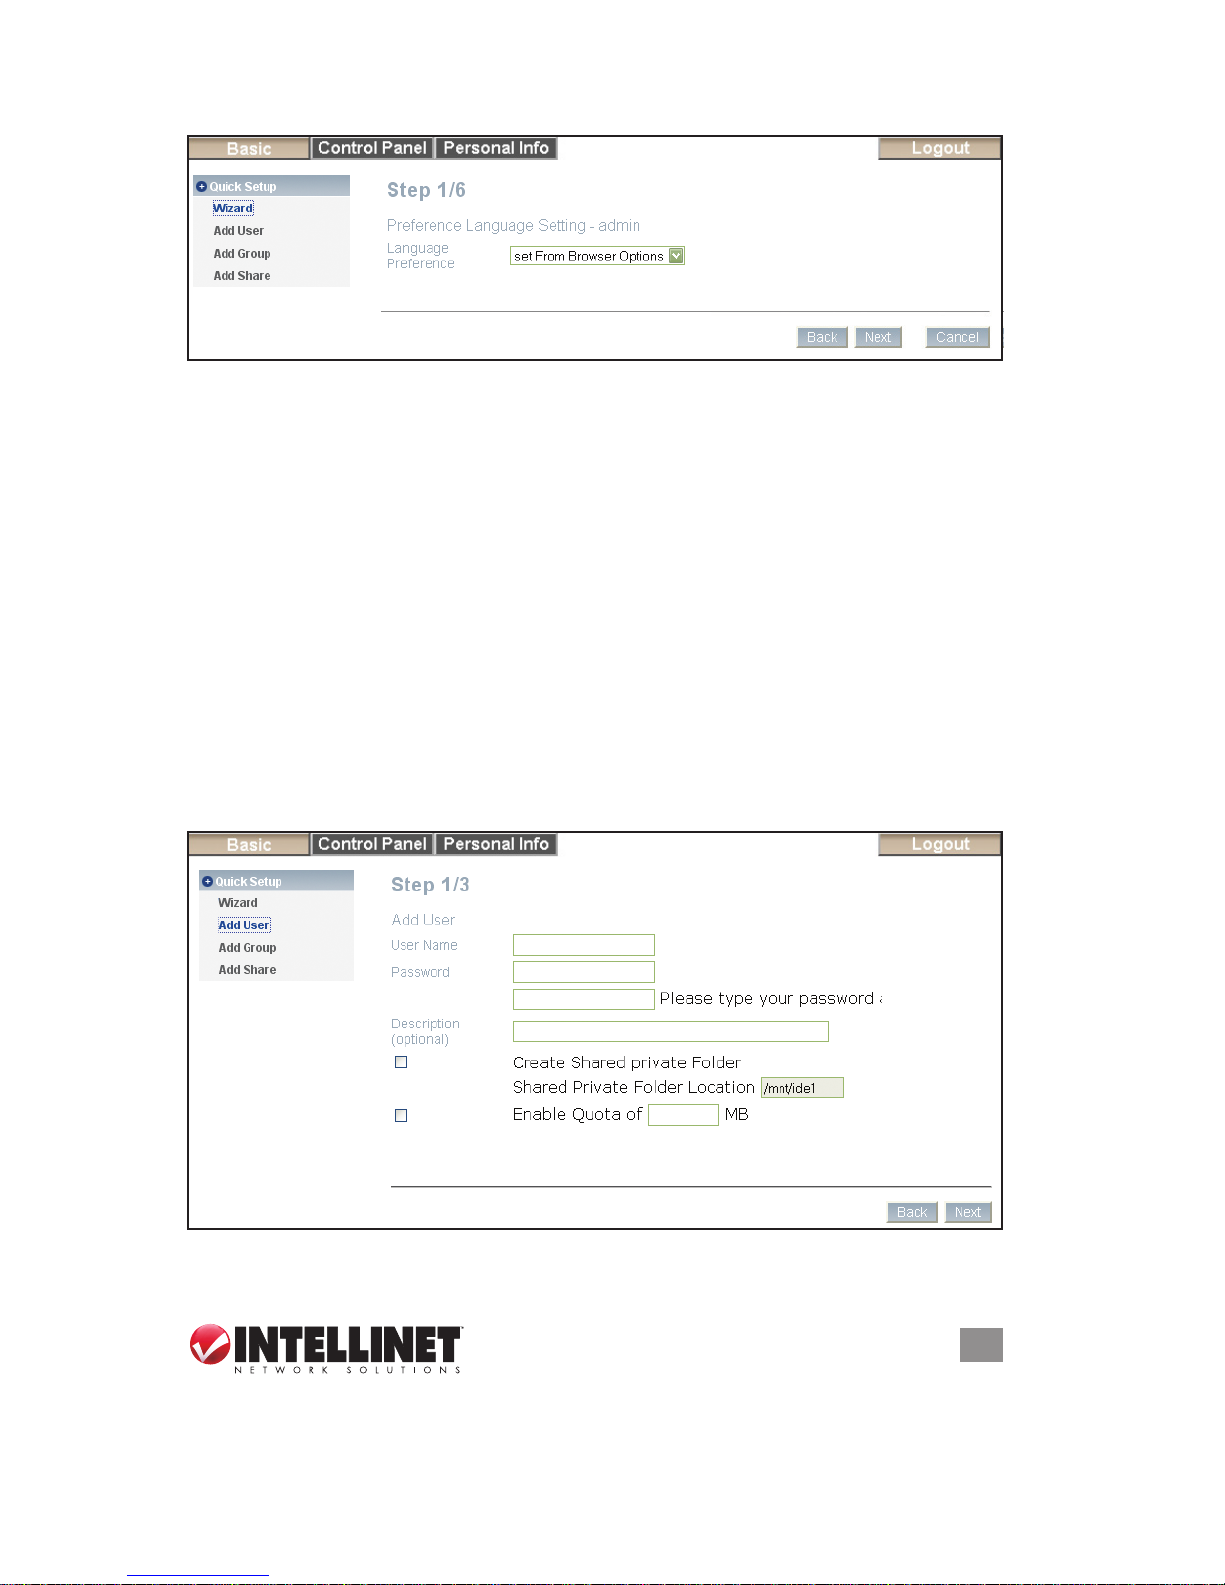
4.1.1 Quick Setup
As mentioned above, these are basic settings. For detailed explanations, refer to
4.2.1: Users and Group Management, 4.2.2: File and Print or 4.2.3: System.
4.1.1.1 W i zard
The setup wizard can be used to congure all the basic LAN settings for your
network drive.
• PC users, if you’ve followed the setup wizard steps in Section 2, there’s no need
to repeat the procedure unless you want to change some of the settings or you
haven’t yet completed the setup.
Page 17
17
WEB CONFIGURATION
• Mac users, follow the setup wizard step below to quickly prepare your network
drive for le sharing.
1. Select your preferred language for the Web interface from the drop-down list.
2. Set a new password for the Web conguration interface (not required, but
strongly recommended).
3. If you prefer a different hostname for your NAS, you can change the name here;
otherwise, simply use the default name.
4. It’s recommended that you set both IP Address and DNS Server to obtain the
IP automatically; but, if required, you can set it manually. If you need help in
manually lling in these elds, contact your network administrator.
5. Set the date and time manually or select your time zone from the drop-down
list and use an NTP server to synchronize the time via the Internet.
6. Click “Save” to save the new settings.
4.1.1.2 Add User
This screen lets you quickly add and congure a new user account.
1. Enter the username and password for the new account. At this point, you can
Page 18

18
WEB CONFIGURATION
also create a private folder for that user and set the quota limit.
2 If there are other users already set up, they can be added to the user account
management.
3. If desired, congure the permissions to the shared folder and add or remove
other users.
4.1.1.3 Add Group
This screen lets you quickly add a new group.
1. Enter the group name.
2. Congure which members will be included in this group by adding or removing
them from the list.
3. Congure the share permissions by adding (read only or writable) or removing
them from the list.
4.1.1.4 Add Share
This screen lets you quickly add a new share.
1. Enter the share name and, if desired, a description for the share.
2. Congure the Windows/FTP access permissions by adding (read only or writable)
or removing members or groups from the list.
3. Congure the NFS access permissions by adding unique IP addresses or a
subnet.
Page 19
19
WEB CONFIGURATION
4.2 Control Panel
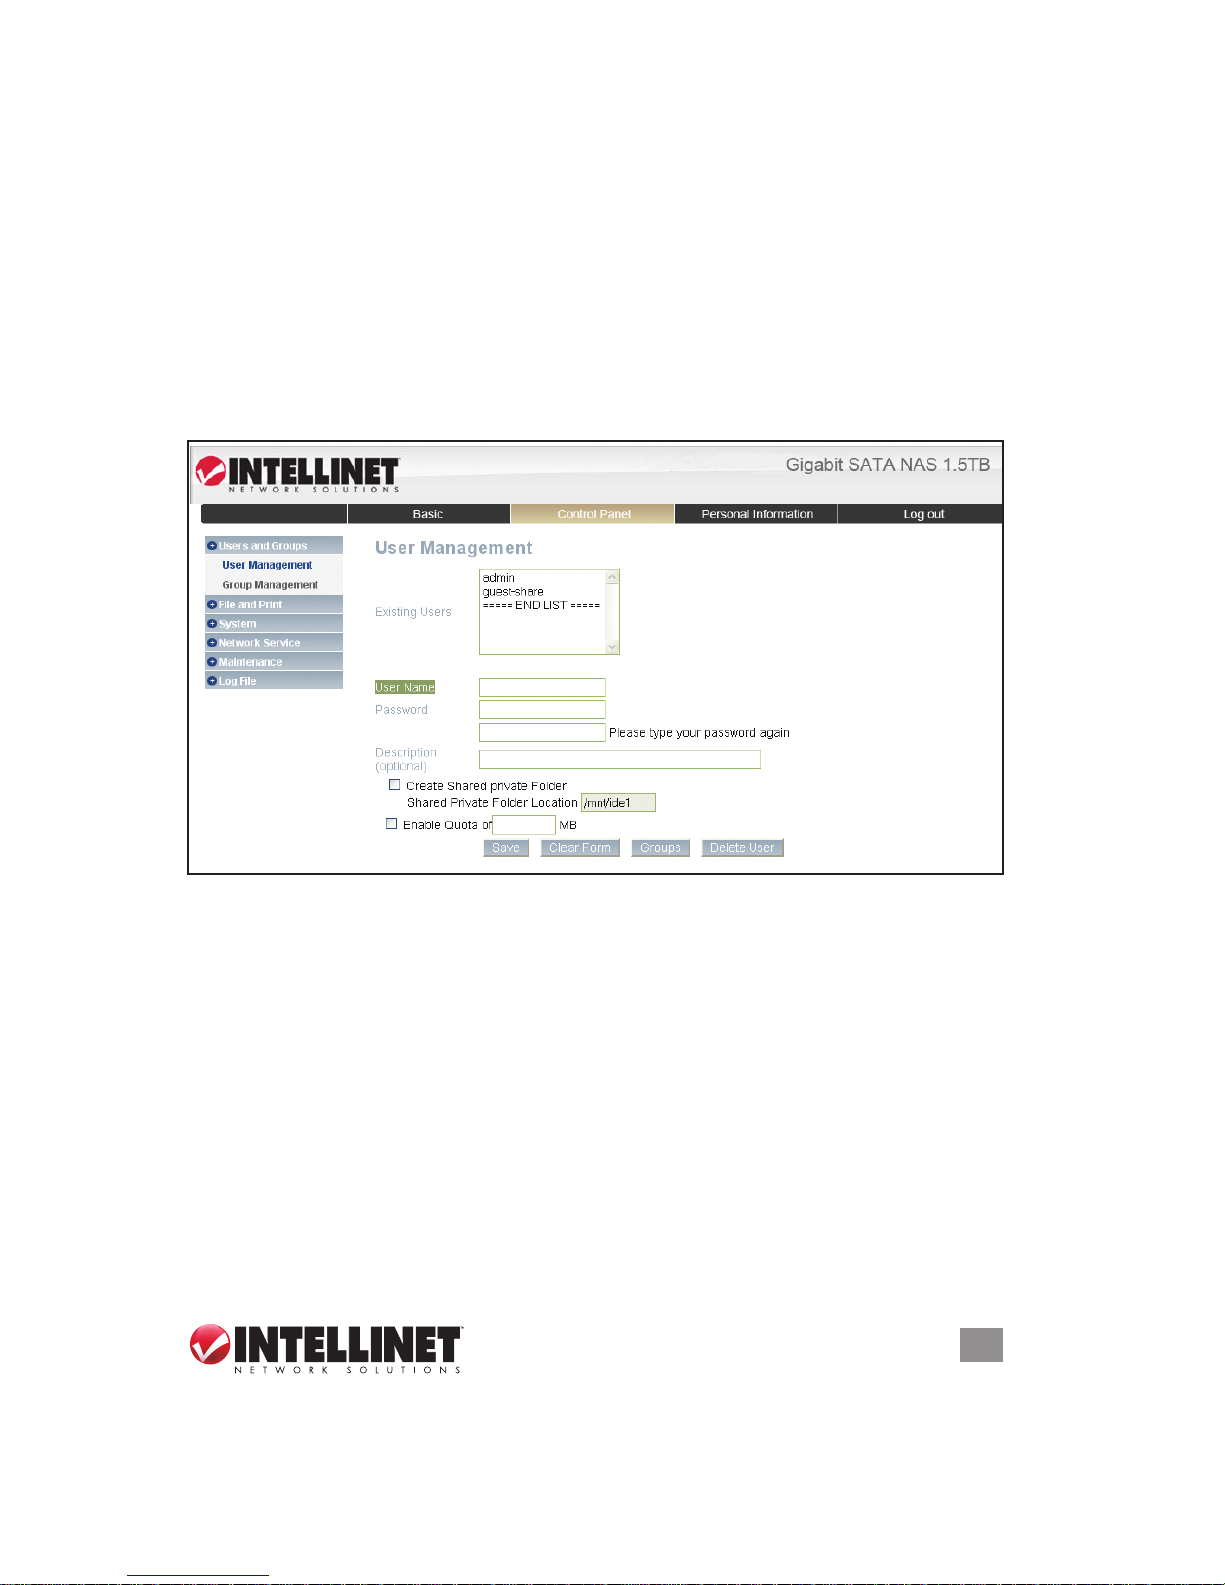
4.2.1 Users and Groups
In this section, the administrator can manage the users and groups for the NAS.
Start by adding your users rst, then create the groups and assign the members
to their groups. NOTE: These settings only apply to the network drive, not when
the drive is connected to the computer directly via USB.
4.2.1.1 User Management
In this section, you can see all existing users for the NAS and manage them by
adding or removing them from the list.
Existing Users — Lists the current users of the Gigabit SATA NAS.
Adding Users — To add a new user, clear the form by clicking “Clear Form” and
ll in a username and password. The description is optional, but it’s
recommended to help manage multiple users. If required, you can create a
private folder for that user and set a limit for the capacity. Once done, click
“Save” to create the new user. To add this user to an existing group, select the
user from the existing users list and click “Groups” for further settings.
Modifying Users — Select the user from the existing users list and modify the
settings. Once done, click “Save” to apply the new settings.
Removing Users — To remove a user, select it from the existing users list and
click “Delete User.”
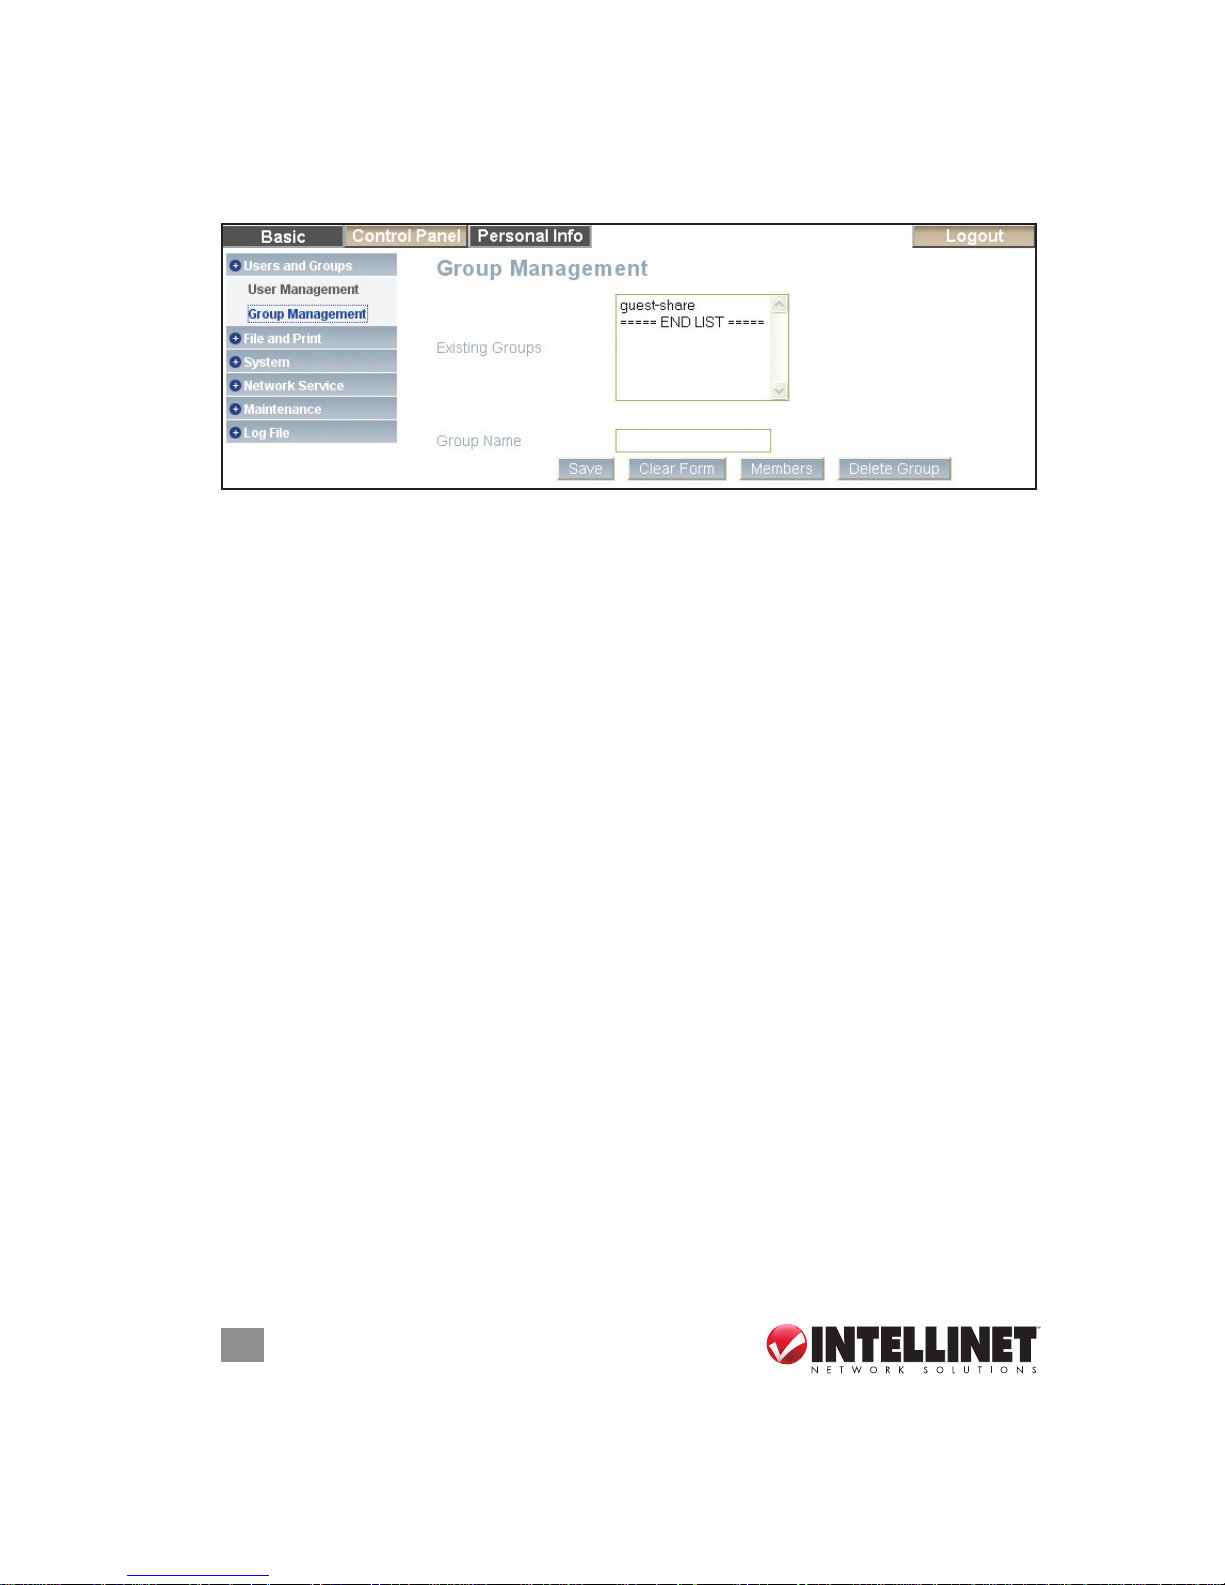
4.2.1.2 Group Management
In this section, you can see all existing groups for the NAS and manage them by
Page 20
20
WEB CONFIGURATION
adding or removing them from the list. Groups are not required to grant access to
the Gigabit SATA NAS, but they’ll help the administrator manage multiple users and
easily share a folder among a group of people.
Existing Groups — Lists the current groups of the Gigabit SATA NAS.
Adding Groups — To add a new group, clear the form by clicking “Clear Form” and
enter a new group name. Once done, click “Save” to create the new group. To
add members to this group, select the group from the existing groups list and
click “Members” for further settings.
Modifying Groups — Select the group from the existing groups list and modify the
members by clicking “Members” for further settings. Once done, click “Save”
to apply the new settings.
Removing Groups — To remove a group, select it from the existing groups list and
click “Delete Group.”
4.2.2 File and Print
In this menu, you can congure all the settings related to the FTP, NFS and printer
server in order to manage how your les and folders are shared.
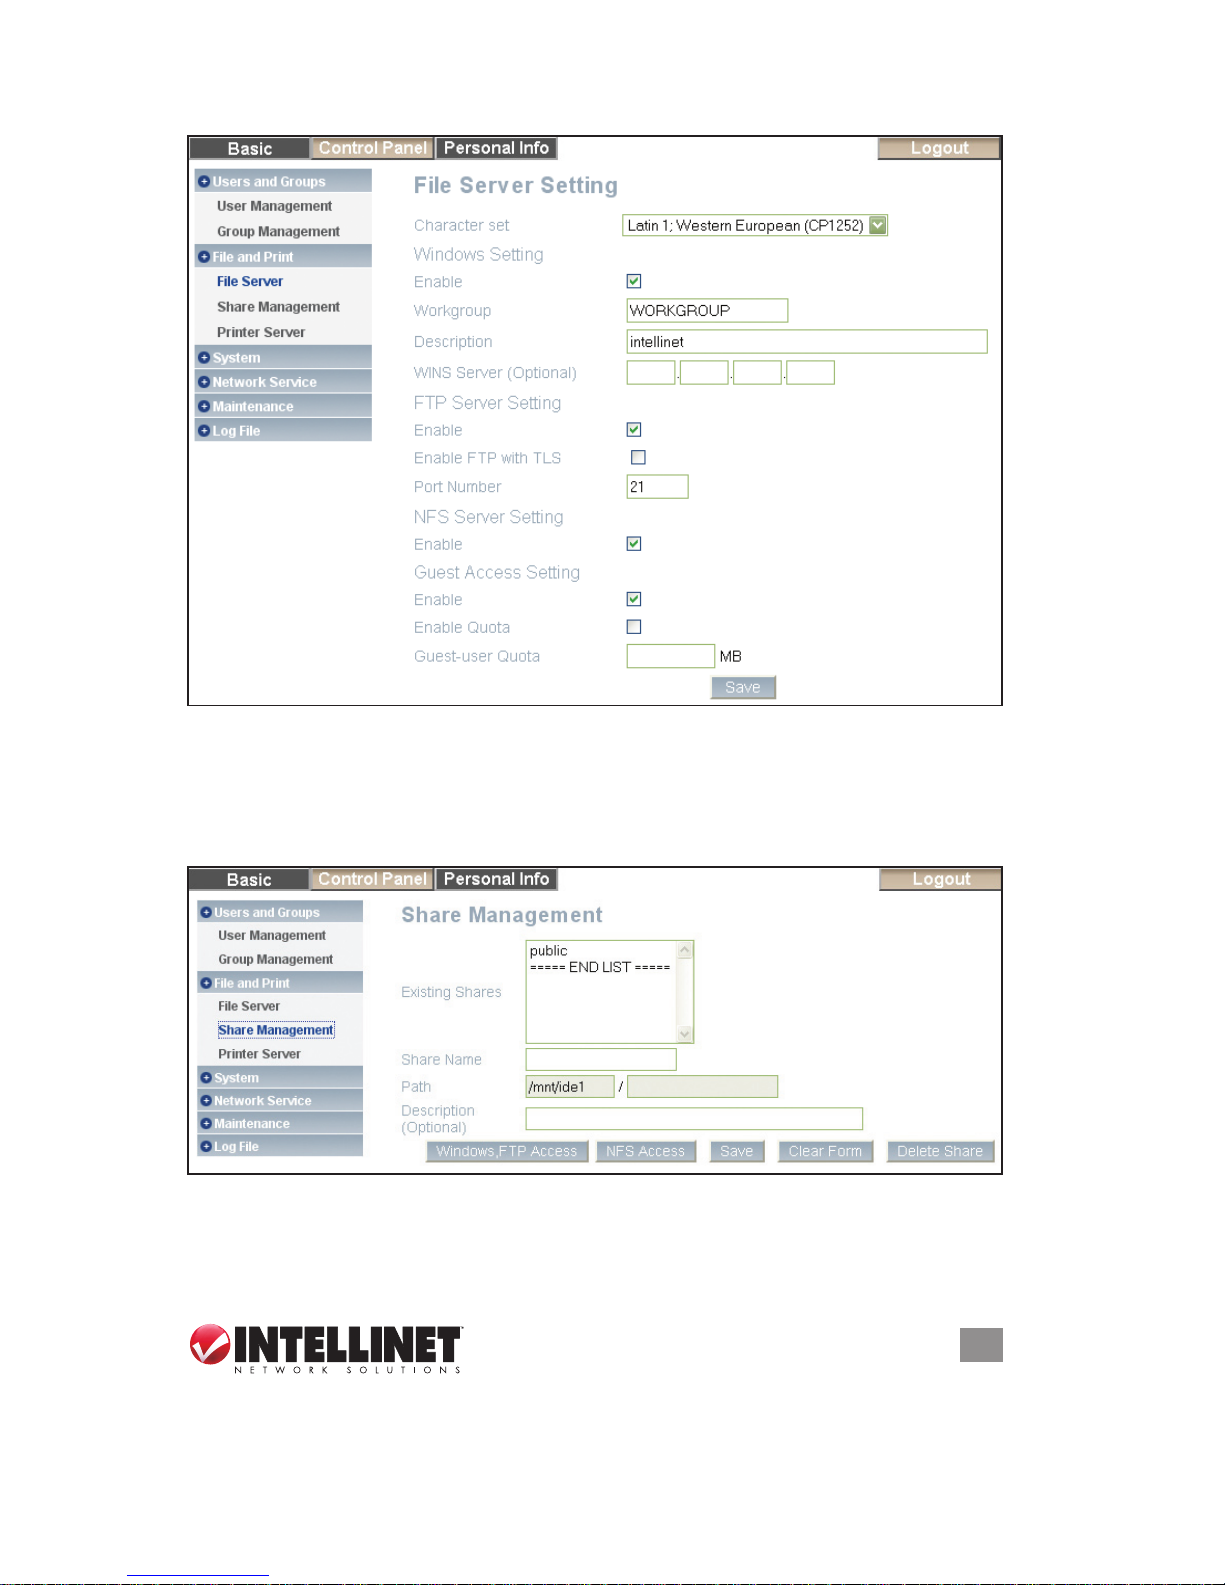
4.2.2.1 File Server
In this section, you can modify the server settings and enable or disable a service.
NOTE: After making any changes to the settings, click “Save” to apply the new
conguration.
Character Set — Select the language of your le names from the drop-down list.
Windows Setting — In this section, you can change the workgroup the Gigabit
SATA NAS belongs to and modify its description. The IP for the WINS (Windows
Internet name server) can be left blank unless this is required for your network.
FTP Server — This can be enabled or disabled. When enabled, the default FTP
port number will be set to 21, but you can change that if required.
NFS Server — This can either be enabled or disabled to suit your requirements.
Guest Access — To enable guest access (guest-share), enable it and, if required,
Page 21
21
WEB CONFIGURATION
set a limit for the disk space. For security reasons, the guest access can also
be disabled.
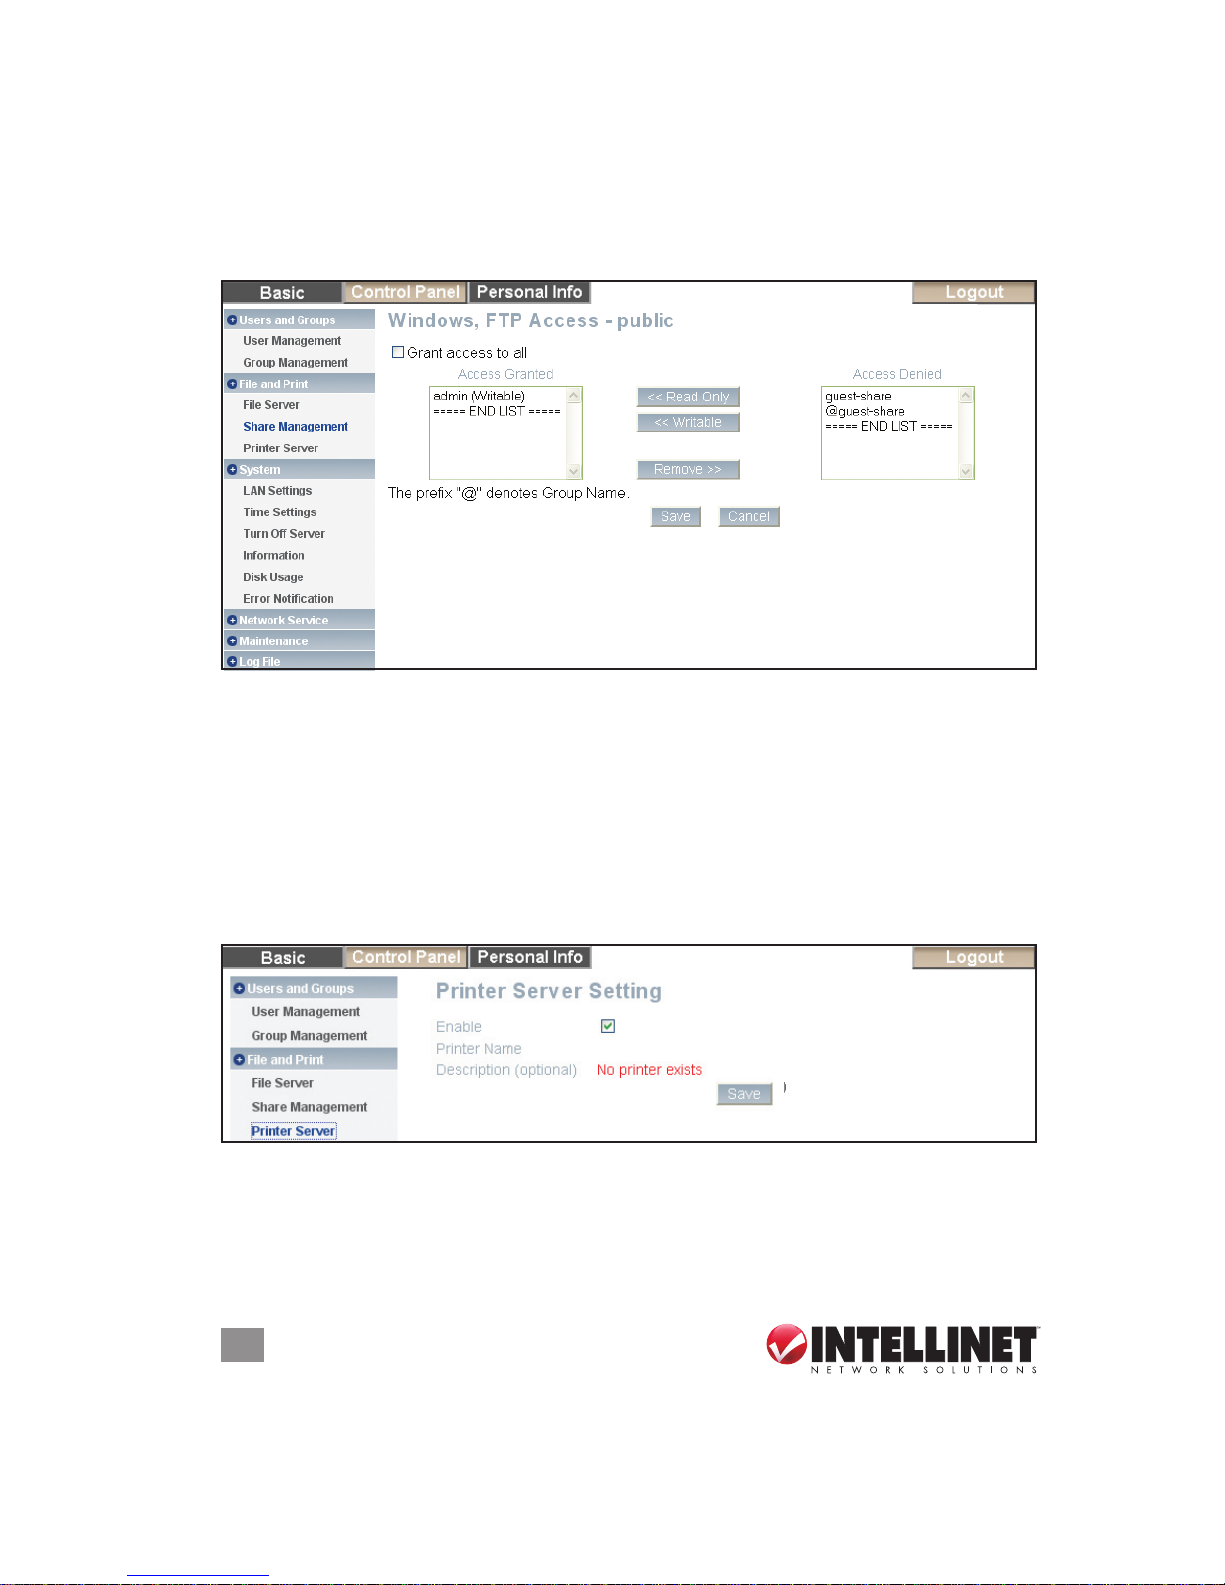
4.2.2.2 Share Management
In this section, you can manage the shares and access rights.
Existing Shares — Lists the current shares on the NAS.
Adding Shares — To add a new share, clear the form by clicking “Clear Form” and
enter a new share name. Once done, click “Save” to create the new group.
Page 22
22
WEB CONFIGURATION
Select the new group from the existing shares list; then, depending on how you
share the les, click “Windows, FTP Access” or “NFS Access” and add the
users or groups that will have access to this share. You can allow access for
all users or dene each user and group separately. Names with an “@” for the
rst letter are groups.
Modifying Shares — Select the share from the existing shares list and modify the
access rights by clicking “Windows, FTP Access” or “NFS Access” for further
settings. Once done, click “Save” to apply the new settings.
Removing Shares — To remove a share, select it from the existing shares list and
click “Delete Share.”
4.2.2.3 Printer Server
In this section, you can enable or disable the printer server and check the details of
the connected USB printer.
4.2.3 System
In this menu, you can congure the basic network settings for the Gigabit SATA
NAS and nd details related to the rmware or disk usage.
Page 23
23
WEB CONFIGURATION
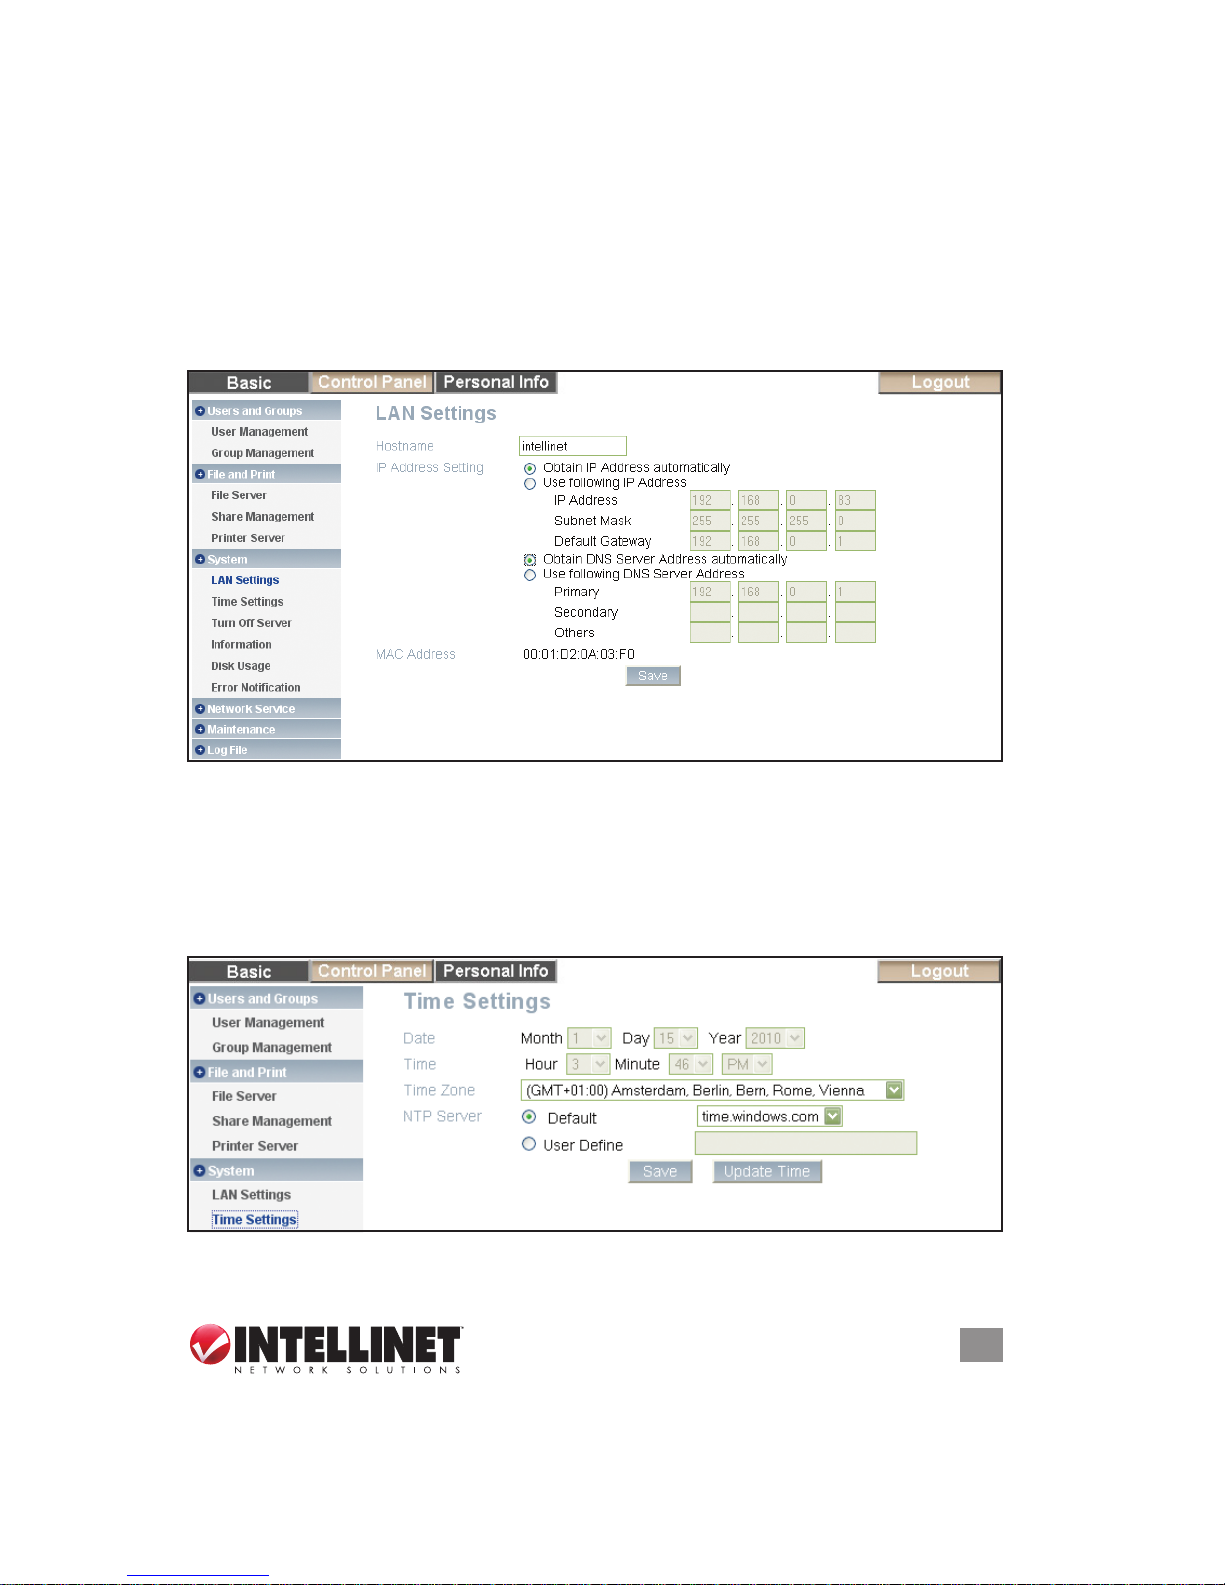
4.2.3.1 LAN Settings
In this section, you can dene the hostname for the NAS and set up the IP
conguration. Selecting “Obtain IP/DNS address automatically” is recommended.
When selecting a hostname, make sure to use a unique name and not one that
has already been used on the local network.
If required, you can also set the individual addresses yourself. If you need help in
manually lling in these elds, contact your network administrator. NOTE: After
making any changes to the settings, click “Save” to apply the new conguration.
4.2.3.2 Time Settings
In this section, you can set the date and time manually or select your time zone
from the drop-down list and use an NTP server to synchronize the time via the
Internet. When setting manually, click “Save” to apply the new time and save the
settings; when synchronizing via the Internet, select the NTP server and click
“Update Time.”
NOTE: To use the NTP function, you need to enter a valid NTP server or select one
Page 24
24
WEB CONFIGURATION
from the drop down list. If the default address at time.windows.com doesn’t work,
nd a new one and try again or turn off the NTP server and set the time manually.
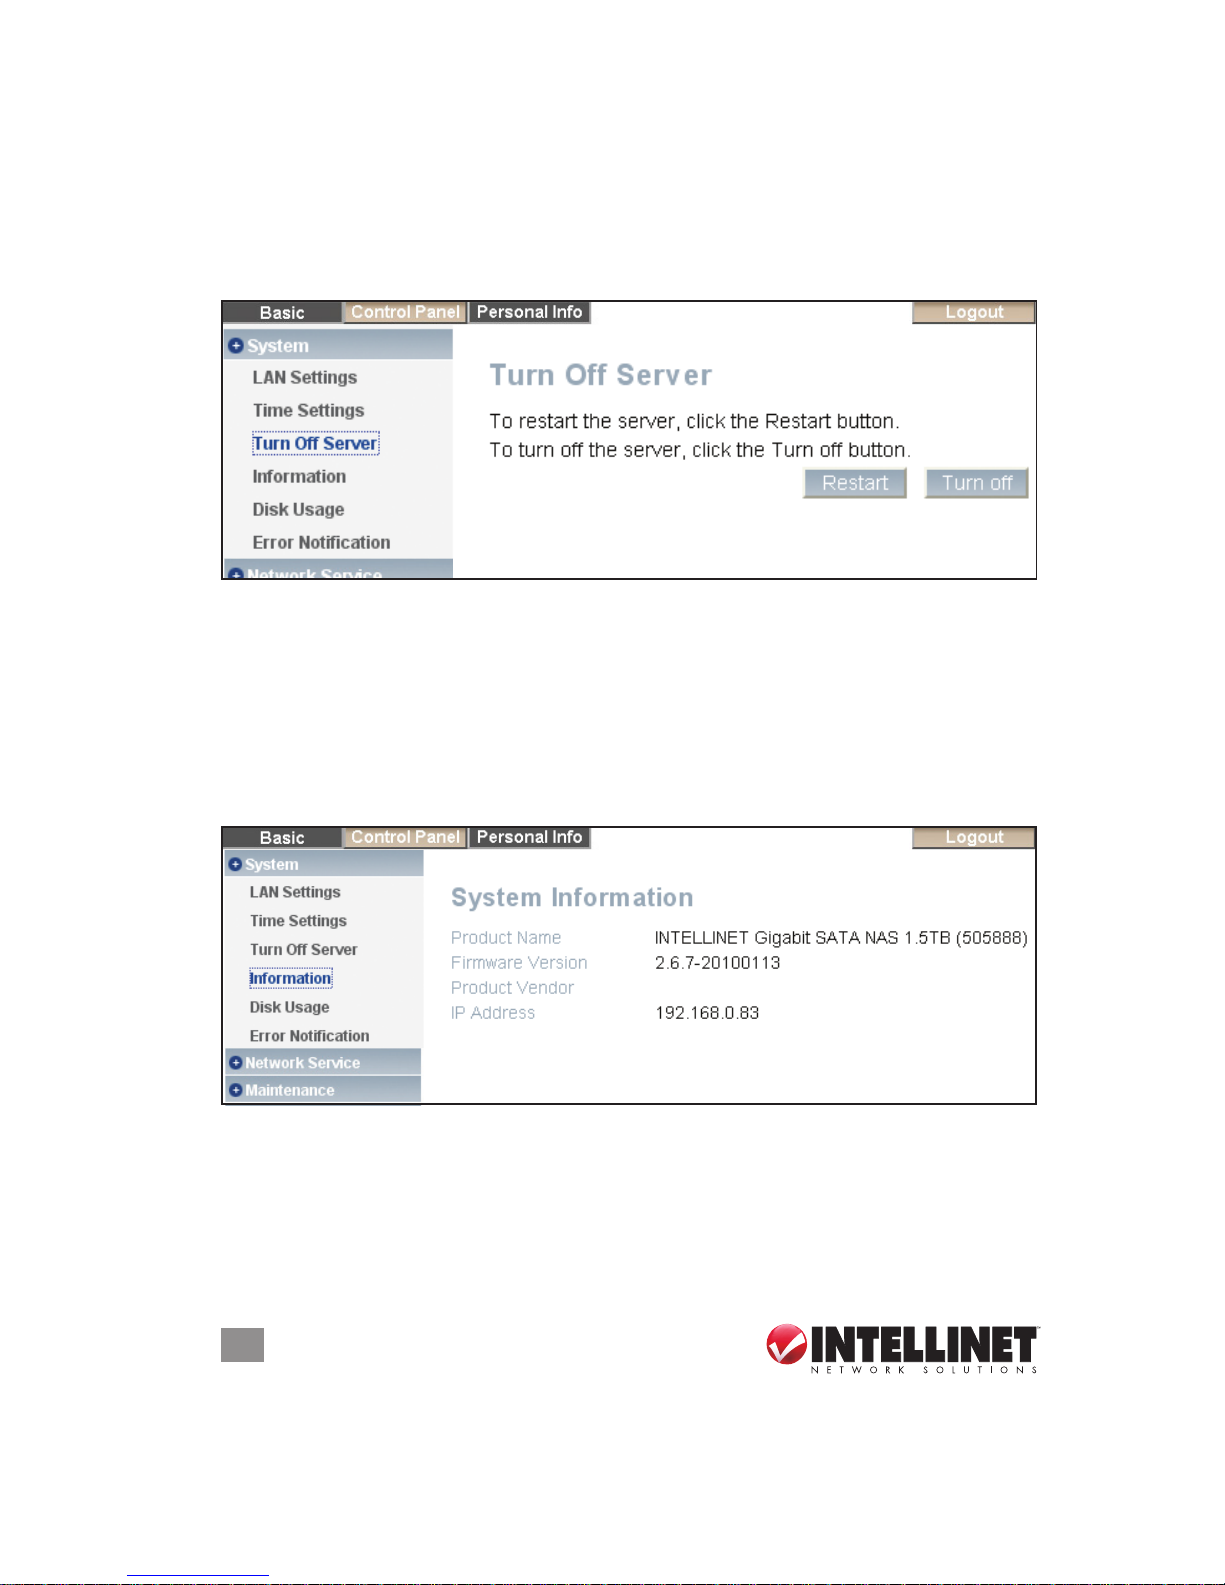
4.2.3.3 Turn Off Server
In this section, you can restart the server or turn off the NAS via the Web browser.
Make sure that nobody is accessing the device when you restart it or turn it off.
Click “Restart” to restart the server. The system will restart and automatically prompt
you for the login when it’s ready. Click “Turn Off” to shut down the system. The
browser will prompt you to close the window after about 90 seconds (Internet
Explorer only; for other browsers, close it manually).
4.2.3.4 Information
In this section, you’ll nd the product name, the current rmware and the current
IP address.
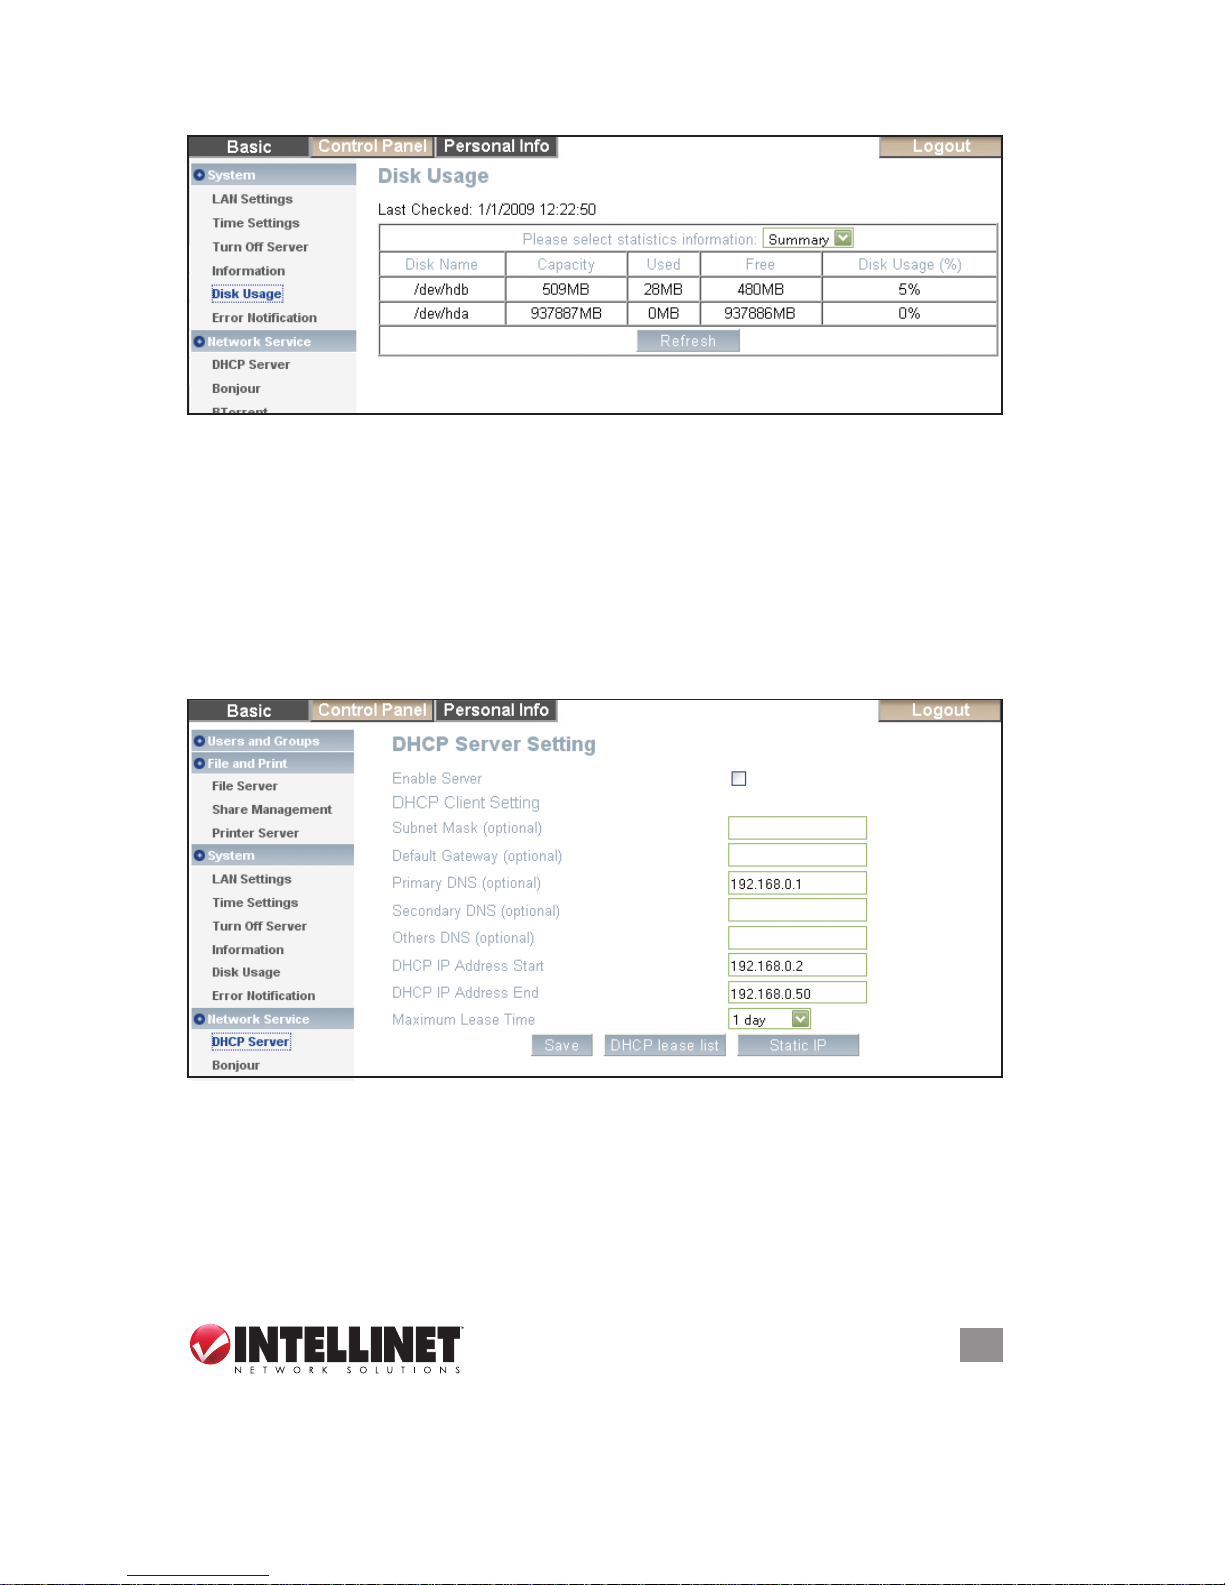
4.2.3.5 Disk Usage
In this section, you’ll nd a summary of the hard disk status and disk usage. Click
“Refresh” to update the information.
Page 25
25
WEB CONFIGURATION
4.2.4 Network Service
In this menu, you can enable or disable network services like the DHCP server,
Bonjour and the BitTorrent download service.
4.2.4.1 DHCP Server
In this section, you can enable and set up the DHCP server. In general, there is
already a DHCP server on the local network, so you don’t need to enable this; but
if required, enable it and congure the addresses. Once you’ve set everything up,
click “Save” to start the DHCP server and save the settings.
4.2.4.2 Bonjour
In this section, you can enable or disable the Bonjour service. For Mac users, turn
it on for easy access to the Login page via the Web browser. You can also enable
iTunes so music les can be accessed. When the iTunes option is enabled, you can
store MP3 music les in the “/public/music” folder and play them directly from iTunes.
The Gigabit SATA NAS will automatically appear in iTunes under Shared Devices.
Page 26

26
WEB CONFIGURATION
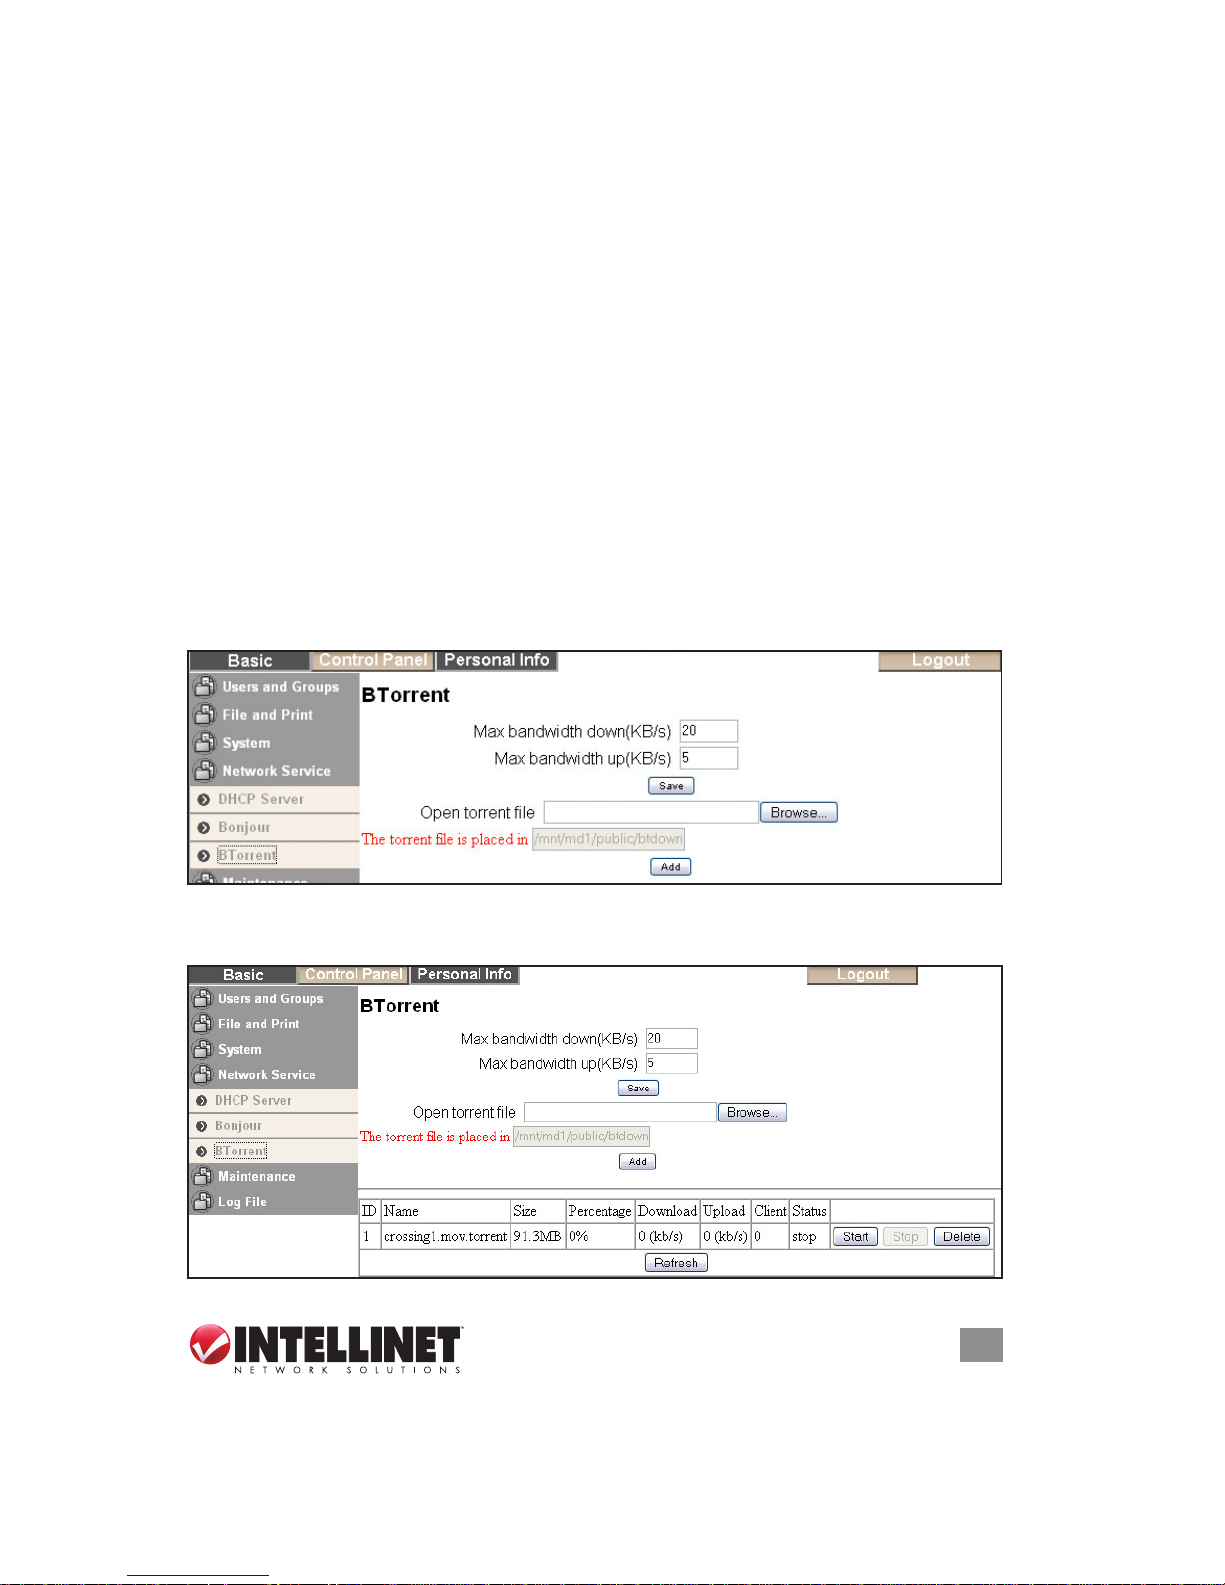
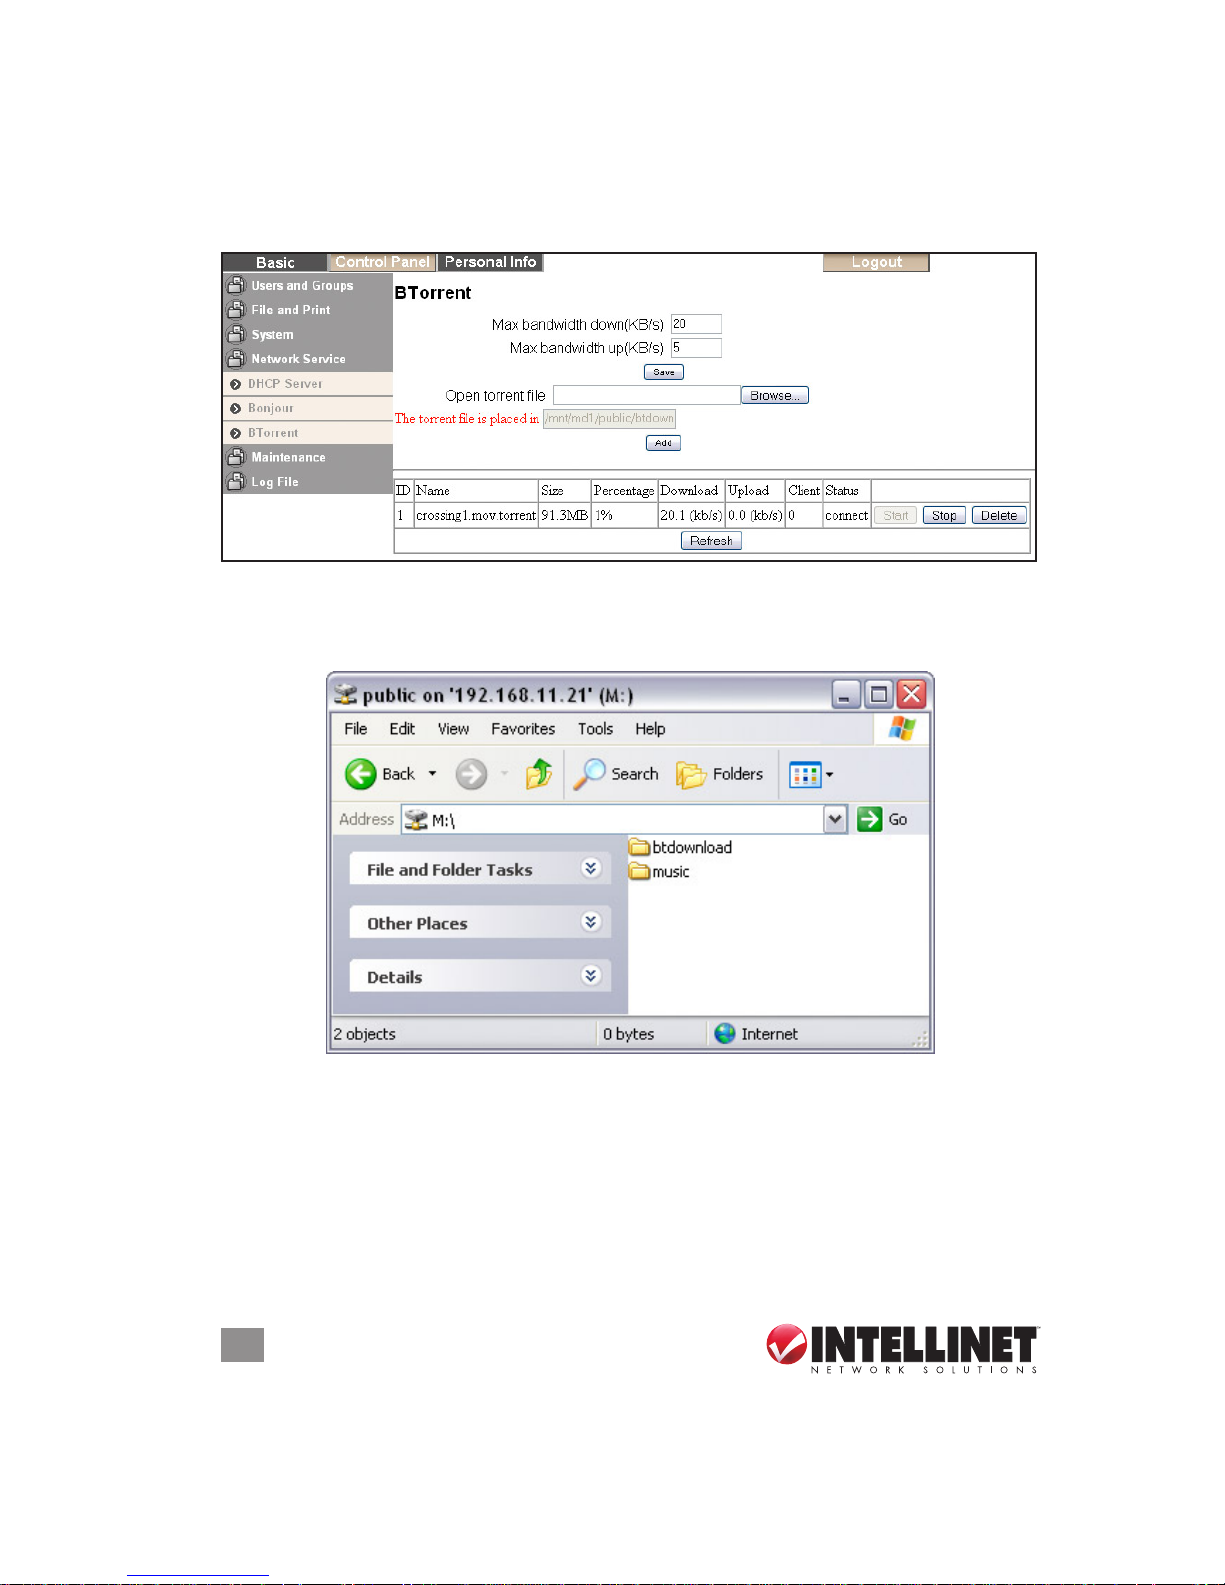
4.2.4.3 BitTorrent
In this section, you can manage your torrents and add new downloads to the queue.
Before you add the rst job, set a limit for the download and upload speed based
on your network’s bandwidth. After changing the settings, click “Save” to apply the
new conguration. NOTE: If there is no hard drive installed or if the drive isn’t
formatted, this menu is not available.
To start downloading les, you need to download a torrent le from the Internet rst,
then upload it to the NAS. Once the torrent le is added, you can start downloading.
The downloaded les will be stored in your “/public/btdownload” folder.
The BitTorrent client on the Gigabit SATA NAS can download ve les at a time,
with a maximum of 40 les in the queue. Remember to start the download again
if the device has been turned off or rebooted before the le has been downloaded
completely. (Also see Section 6: Additional Features / BitTorrent.)
NOTE: The BitTorrent client on the NAS uses the TCP protocol and the ports 6881-
6889. Make sure those ports are not blocked by your router or its rewall and, if
necessary, set up port forwarding so trafc for those ports is forwarded to the NAS.
Page 27

27
WEB CONFIGURATION
4.2.5 Maintenance
In this menu, you can format the hard drive(s), upgrade the rmware and manage
the conguration settings.
4.2.5.1 Disk Utility
This utility can be used to format the hard drive(s) and view related disk information.
Encryption — The Gigabit SATA NAS supports 128-bit loop-AES encryption for the
EXT2 le system. When enabled, the drive needs to be formatted again, and
you’ll be prompted for a password (which has to be exactly 20 characters).
File System (Model 505888 / 1.5 TB) — The available le systems are EXT2, EXT3,
FAT32 and NTFS. For the drive installed in the Gigabit SATA NAS, using EXT2
is recommended for optimum performance and functionality when it is used as
network drive only. If it’s to be connected to a PC via USB, as well, then NTFS
is the preferred le system, so that it can be mounted without the need to install
additional applications to read the EXT2 partition. The performance of the
network drive will not be as good as with EXT2, however.
File System (Model 505895 / 3 TB) — For drives not in a RAID array, there’s a
choice among EXT2, EXT3 and FAT32. For drives installed in the Gigabit SATA
NAS, using EXT2 is recommended for optimum performance and functionality.
Scandisk — Click “Scan” to check the disk integrity. If possible, any errors found
will automatically be xed. This can take awhile to nish, depending on the
capacity of the drive. During any such xes, the disk can not be used.
Unmount — This function is only available for external USB drives attached to the
NAS. Click “Unmount” to eject the USB drive before you disconnect it.
Page 28

28
WEB CONFIGURATION
Detail — Click “Detail” to see additional disk information. If the drive supports
S.M.A.R.T, it will also report the disk’s health status.
HDD Power Management — To save power and reduce heat, you can let the hard
disk spin down if not used for a certain amount of time. Enter a time in minutes
and click “Save” to apply the new setting. NOTE: The “disk spin down” function
might not work properly for some WD hard drives due to the lack of the E3h
command.
4.2.5.2 RAID Setting
In this section (Model 505895 only), you can manage the RAID array and set up
your drives. The Gigabit SATA NAS supports RAID 0 and RAID 1. Two hard drives
of identical capacity and make are required. If only one drive is installed, the RAID
conguration will not be available.
RAID 0 — Used when speed is the primary objective, RAID Level 0 (also called
“striping”) is not redundant. This form of array splits each piece of data across
both of the drives in segments; since data is written without any form of parity
data-checking, it allows for the fastest data transfer compared to the other
setups. However, if one drive becomes damaged, the whole array can become
corrupted.
RAID 1 — This mode requires two identical drives for implementation. A RAID 1
creates an exact copy (or mirror) of a set of data on the second drive, useful
when reliability and backup are more important than data capacity. Available
capacity to the user will only be as large as a single drive, but when one of the
Page 29

29
WEB CONFIGURATION
hard drives fails, it can be replaced and the data rebuilt.
JBOD — Used to combine two hard drives of different capacity into a single, larger
hard drive. If you’re using two identical drives, RAID 0 is recommended instead.
NOTE: Creating the RAID system can take awhile, depending on drive capacity.
Do not turn off power or interrupt the system in any other way during this process!
The use of the EXT2 le system for optimum performance and functionality is
recommended. Also, changing the RAID setup requires that you to re-format the
drives. Make sure you back up all data before doing so.
4.2.5.2.1 Rebuilding a RAID Array
When using RAID 1, if one of the drives fails, the faulty HDD has to be replaced
and the RAID 1 array rebuilt.
1. Log in and go to the RAID Setting menu to check the disk status. If there’s a
problem, it will show which drive needs to be replaced.
2. Turn off the power, remove the power supply from the AC outlet and replace the
defective HDD with a new one.
3. Turn on the power and go to the RAID Setting menu. Click “Add disk” to start
rebuilding your RAID array.
NOTE: On the bridge board of the Gigabit SATA NAS, the P1 connector indicates
the drive at hdb, whereas P2 indicates the drive at hda. With rmware v2.6.3 or
later, P1 indicates the drive at hdc and P2 the drive at hdd.
Page 30

30
WEB CONFIGURATION
4. Depending on capacity, rebuilding can take awhile. Do not turn off the power
or interrupt the system in any other way. The HDD LED will be on while the
RAID array is being rebuilt.
Page 31

31
WEB CONFIGURATION
5. When the procedure is complete, the HDD LED will turn off and the disk status
will show that the system is ready.
NOTE: Clicking “Remove system data” or “Remove raid system” will erase all data!
Only use these if you need to set up a different RAID system.
4.2.5.3 Firmware Upgrade
In this section, you can check the current rmware version and upgrade if a new
one is available. Download the latest rmware and store it on your computer, then
browse for the *.gz le, select it and start the upgrade. The upgrade process takes
about 10-20 minutes.
Page 32
32
WEB CONFIGURATION
NOTE: Never turn off your device during the rmware upgrade procedure, as this
may damage it. If for any reasons (e.g., power supply failure during the rmware
upgrade) the procedure fails, you may not be able to operate your device anymore.
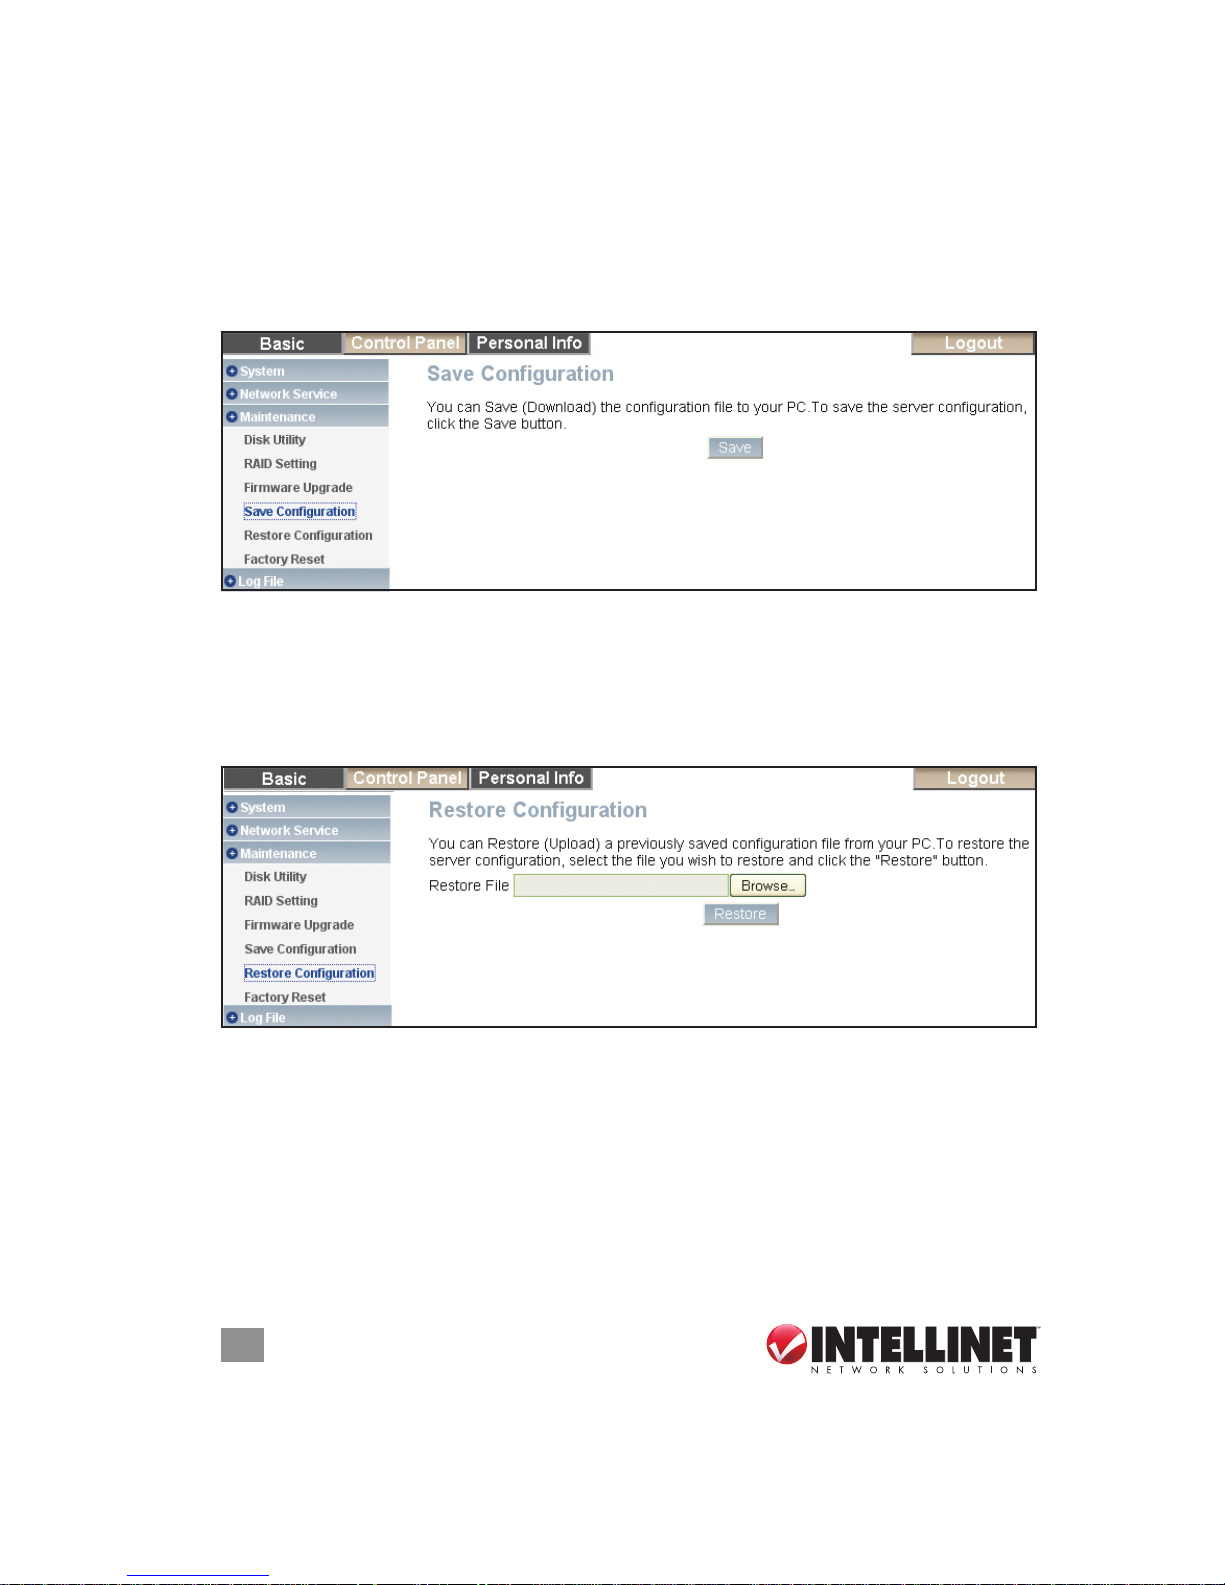
4.2.5.4 Save Conguration
For backup and before every rmware upgrade, you can use this function to save
the current conguration. Click “Save” and save the “cong.tar” le on your computer.
4.2.5.5 Restore Conguration
To quickly restore previous settings or set up multiple units, you can save the
conguration and then use this function to upload a previous backup. Browse for
the “cong.tar” le on your computer and click “Restore” to restore the previous
settings.
Page 33
33
WEB CONFIGURATION
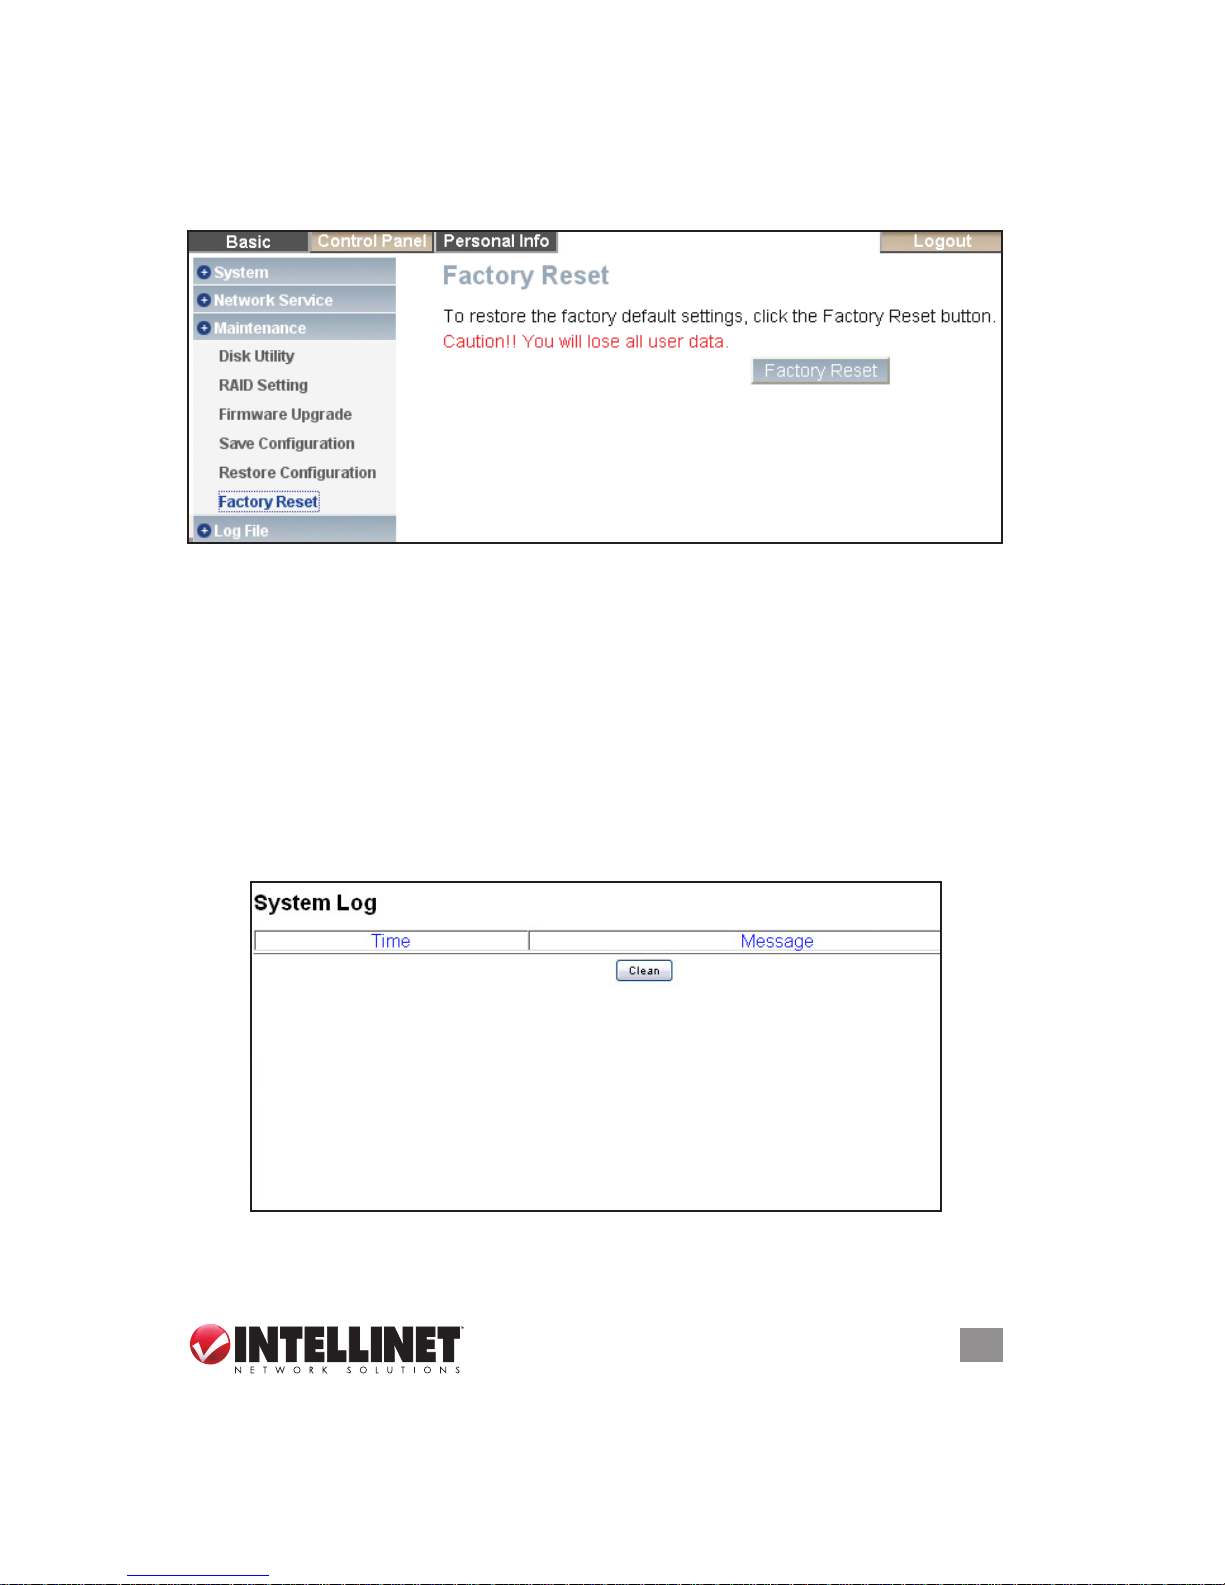
4.2.5.6 Factory Reset
Clicking “Factory Reset” will restore all settings to their default conguration. First,
however, save your current conguration in case you want to restore it again later.
NOTE: When “Factory Reset” is clicked, all users, groups and other congurations
will be lost. The les inside the shared folders won’t be erased, but only the
administrator will have access to them via an SMB connection, unless the same
share name is set up again and access is granted for new users. To completely
erase the les inside the shares, use the Share Management menu to remove the
shares before the reset, or use the administrator account after the reset, log in via
SMB and delete the les.
4.2.6 Log File
This menu includes all the log les of your Gigabit SATA NAS. You can nd logs for
the SAMBA, FTP and DHCP servers, as well as system and administration logs.
NOTE: To delete old log les, click “Clean.”
Page 34
34
WEB CONFIGURATION
4.3 Personal Information
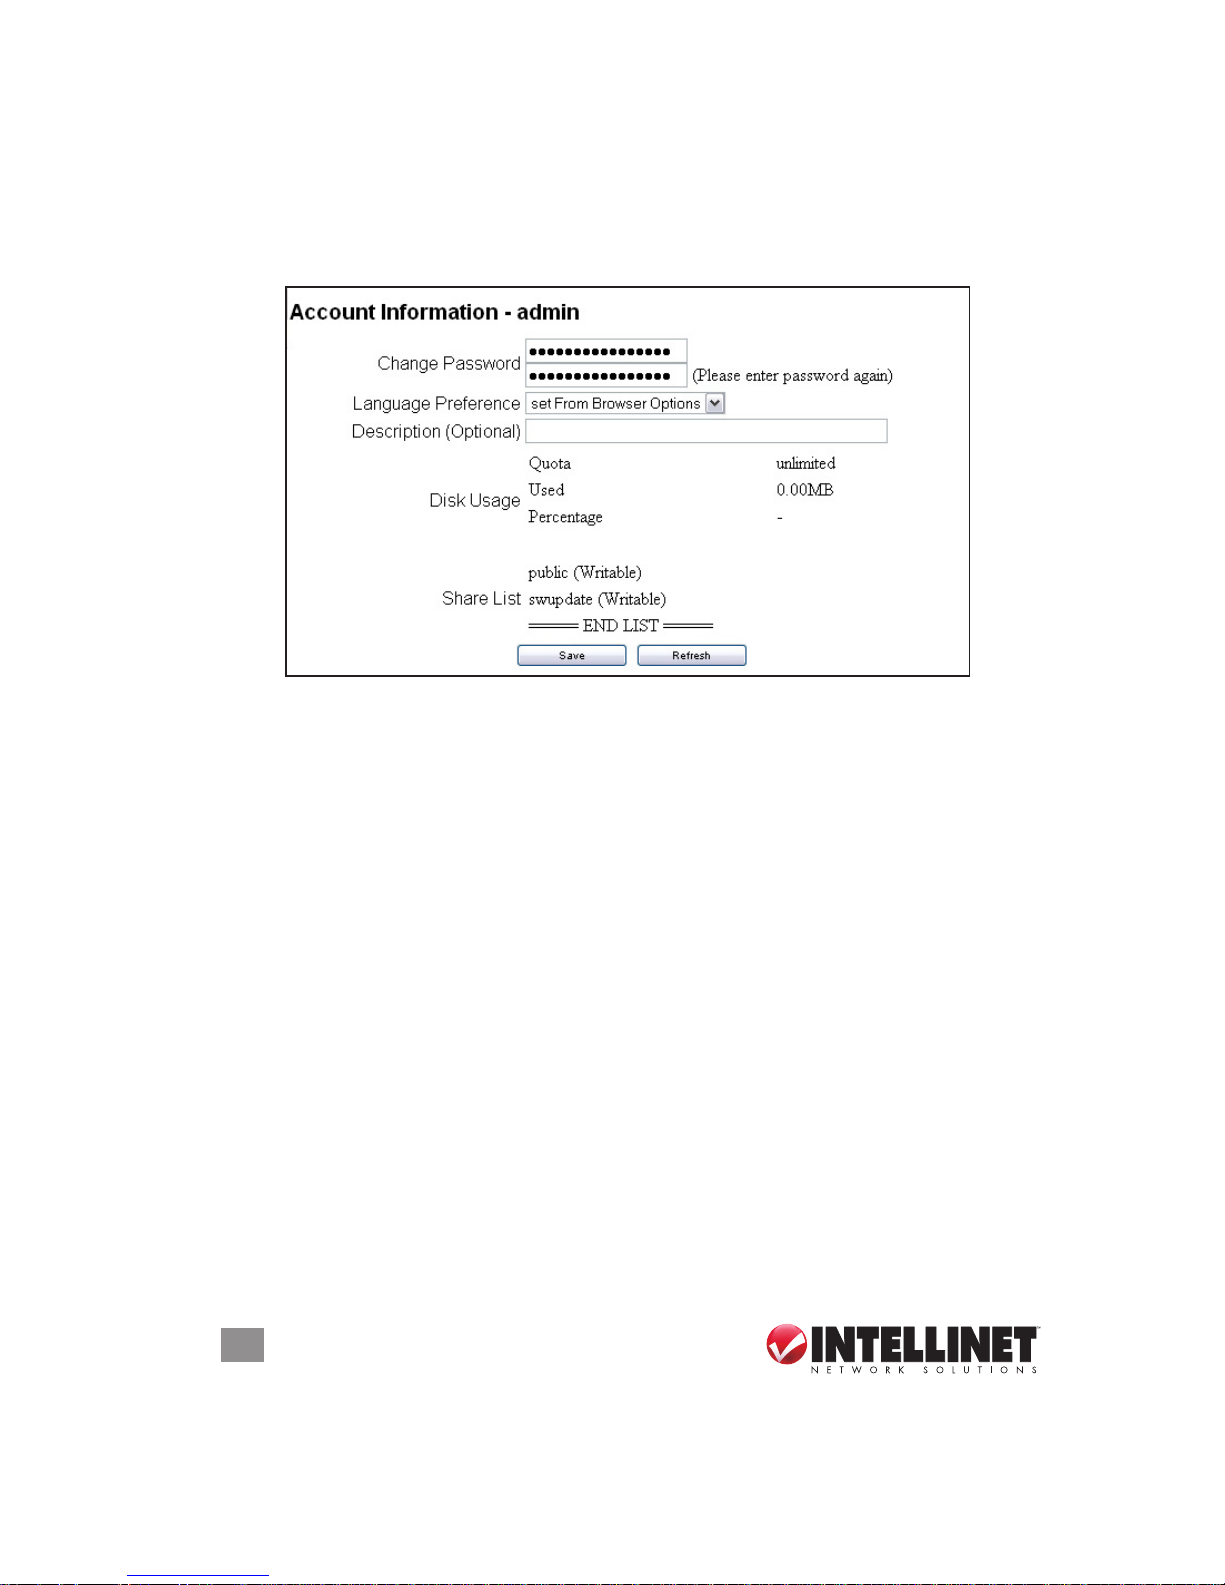
4.3.1 Account
In this menu, you can change your admin password and the menu language for the
conguration interface. An overview of disk usage and a share list are also presented.
Page 35
35
NETWORK STORAGE
5 NETWORK STORAGE
To access the data on the Gigabit SATA NAS via the network connection, you can
use either FTP or SMB. Before you can access the shared folders, you need to
set up your users, groups and shares (see Section 3).
5.1 File Access on a PC
5.1.1 FTP
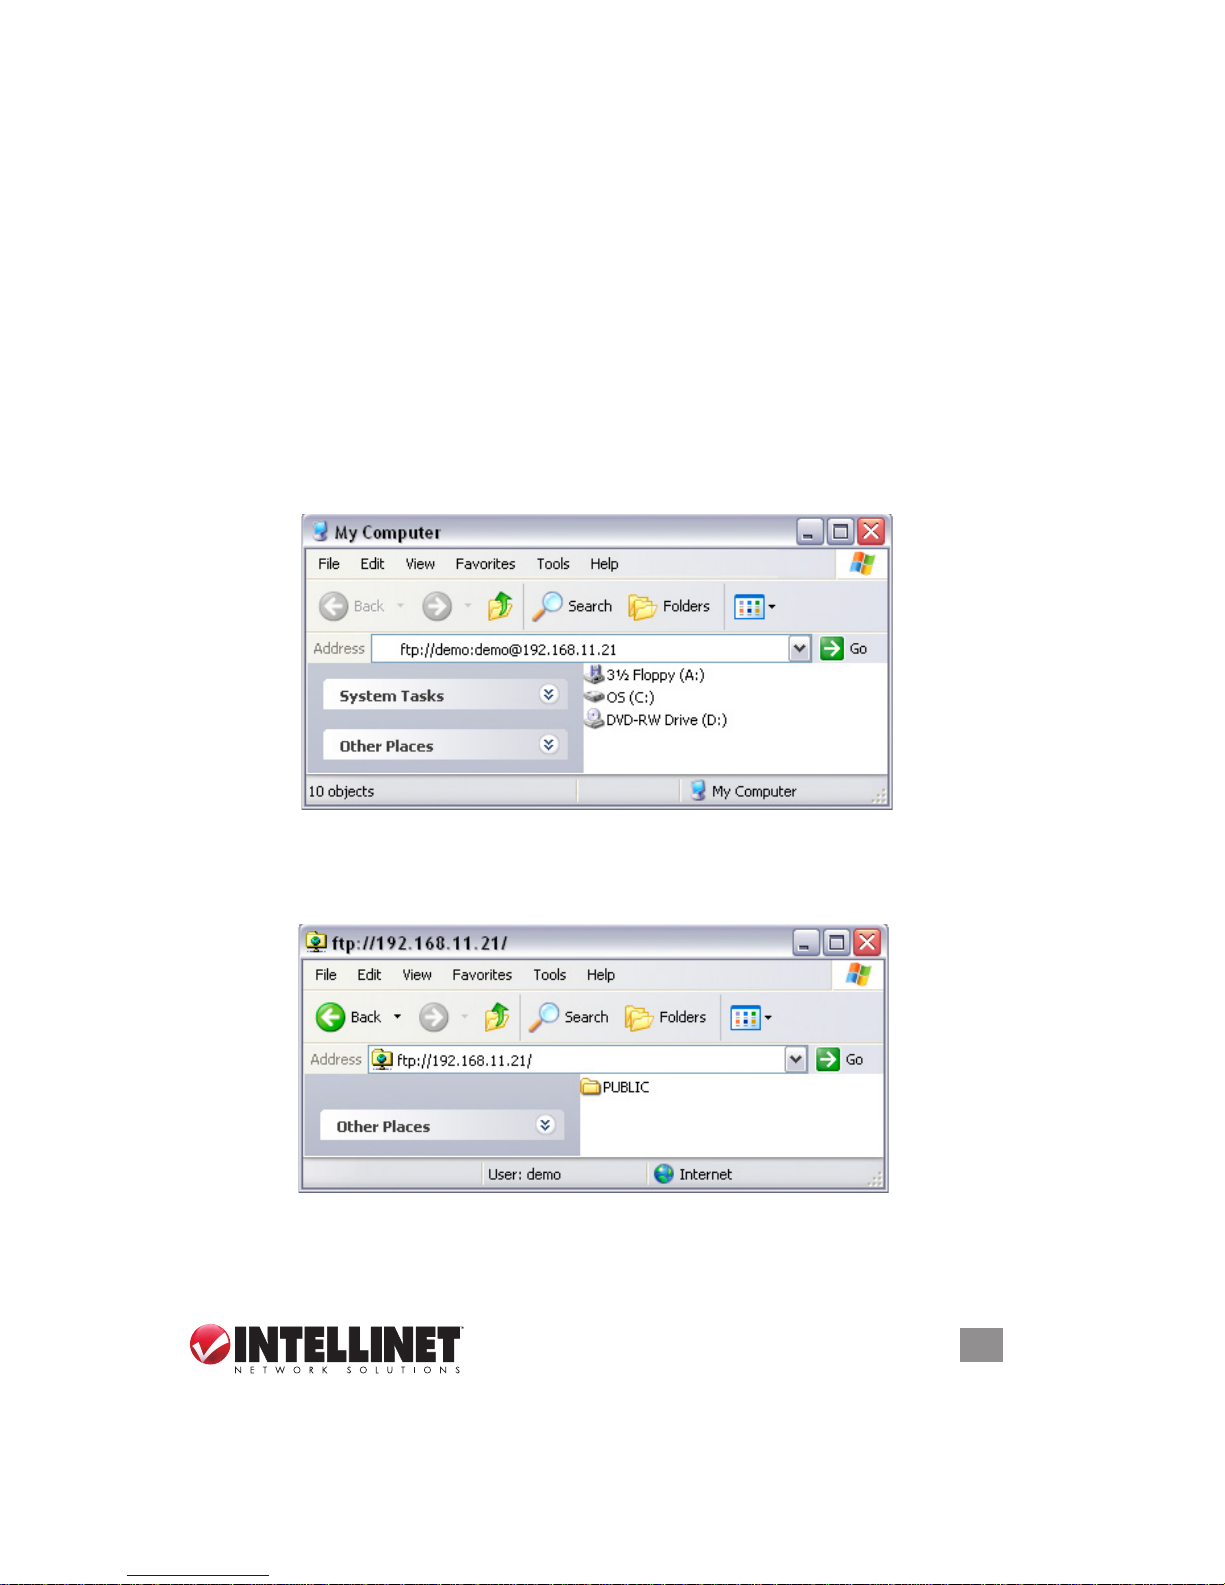
Open Windows Explorer and enter “ftp://” followed by the IP address of the Gigabit
SATA NAS. Add the username and password in front of the IP address with “@” in
between; for example: ftp://demo:demo@192.168.11.21.
After login, you can access the available folders and transfer your les. Remember
that les can’t be opened directly via FTP: You always need to transfer them to
your computer rst.
NOTE: For FTP transfers, it’s recommended that you install and use a dedicated
FTP application, either a free utility or a professional shareware program.
Page 36
36
NETWORK STORAGE
5.1.2 Windows Explorer
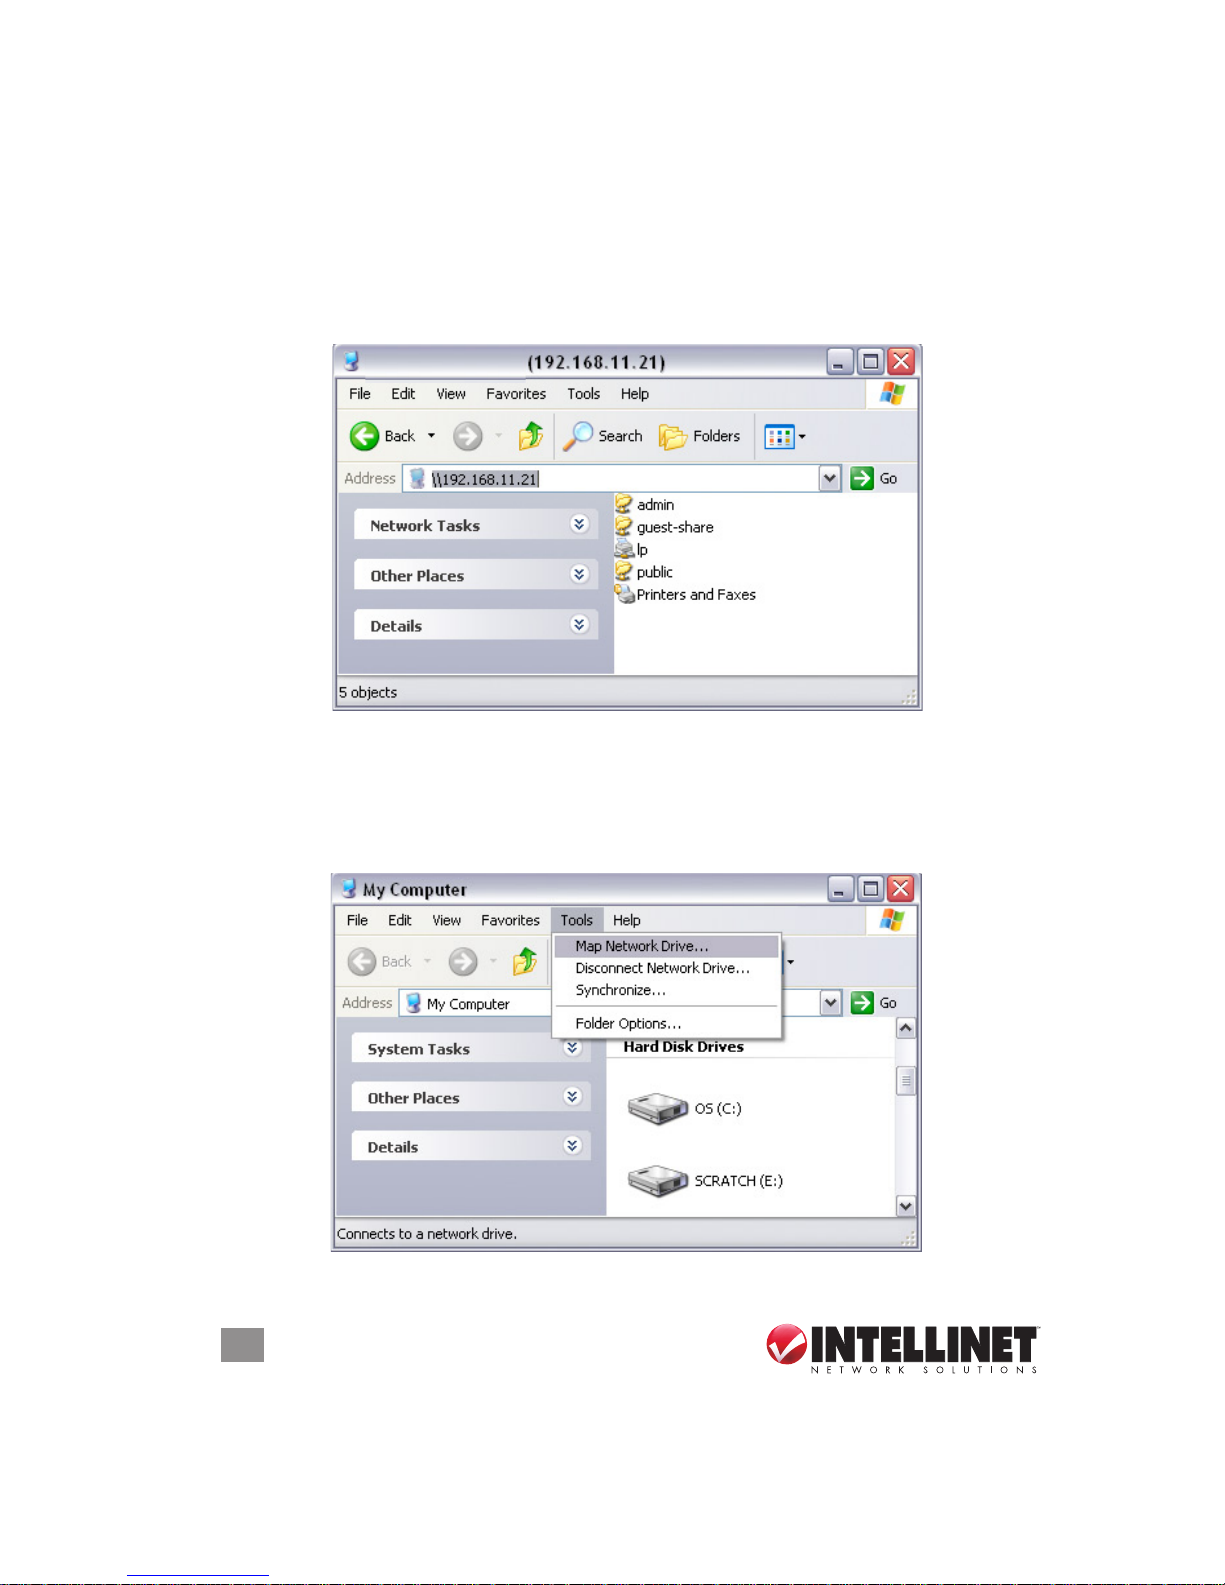
Open Windows Explorer and enter “\\” followed by the IP address of the Gigabit
SATA NAS; for example: “\\192.168.11.21.” All available folders and shares on the
NAS will display, which you can then access directly.
You can copy les to the network storage as if it were a folder on your local drive.
Depending on the bandwidth, you can also directly play and open the les, although
transferring the data to your local drive rst is recommended.
5.1.3 Mapping a Network Drive
For easy access, mapping the storage as a network drive is recommended.
1. Double-click on My Computer, go to the Tools menu and select “Map Network
Drive….”
GIGABIT SATA NAS
Page 37
37
NETWORK STORAGE
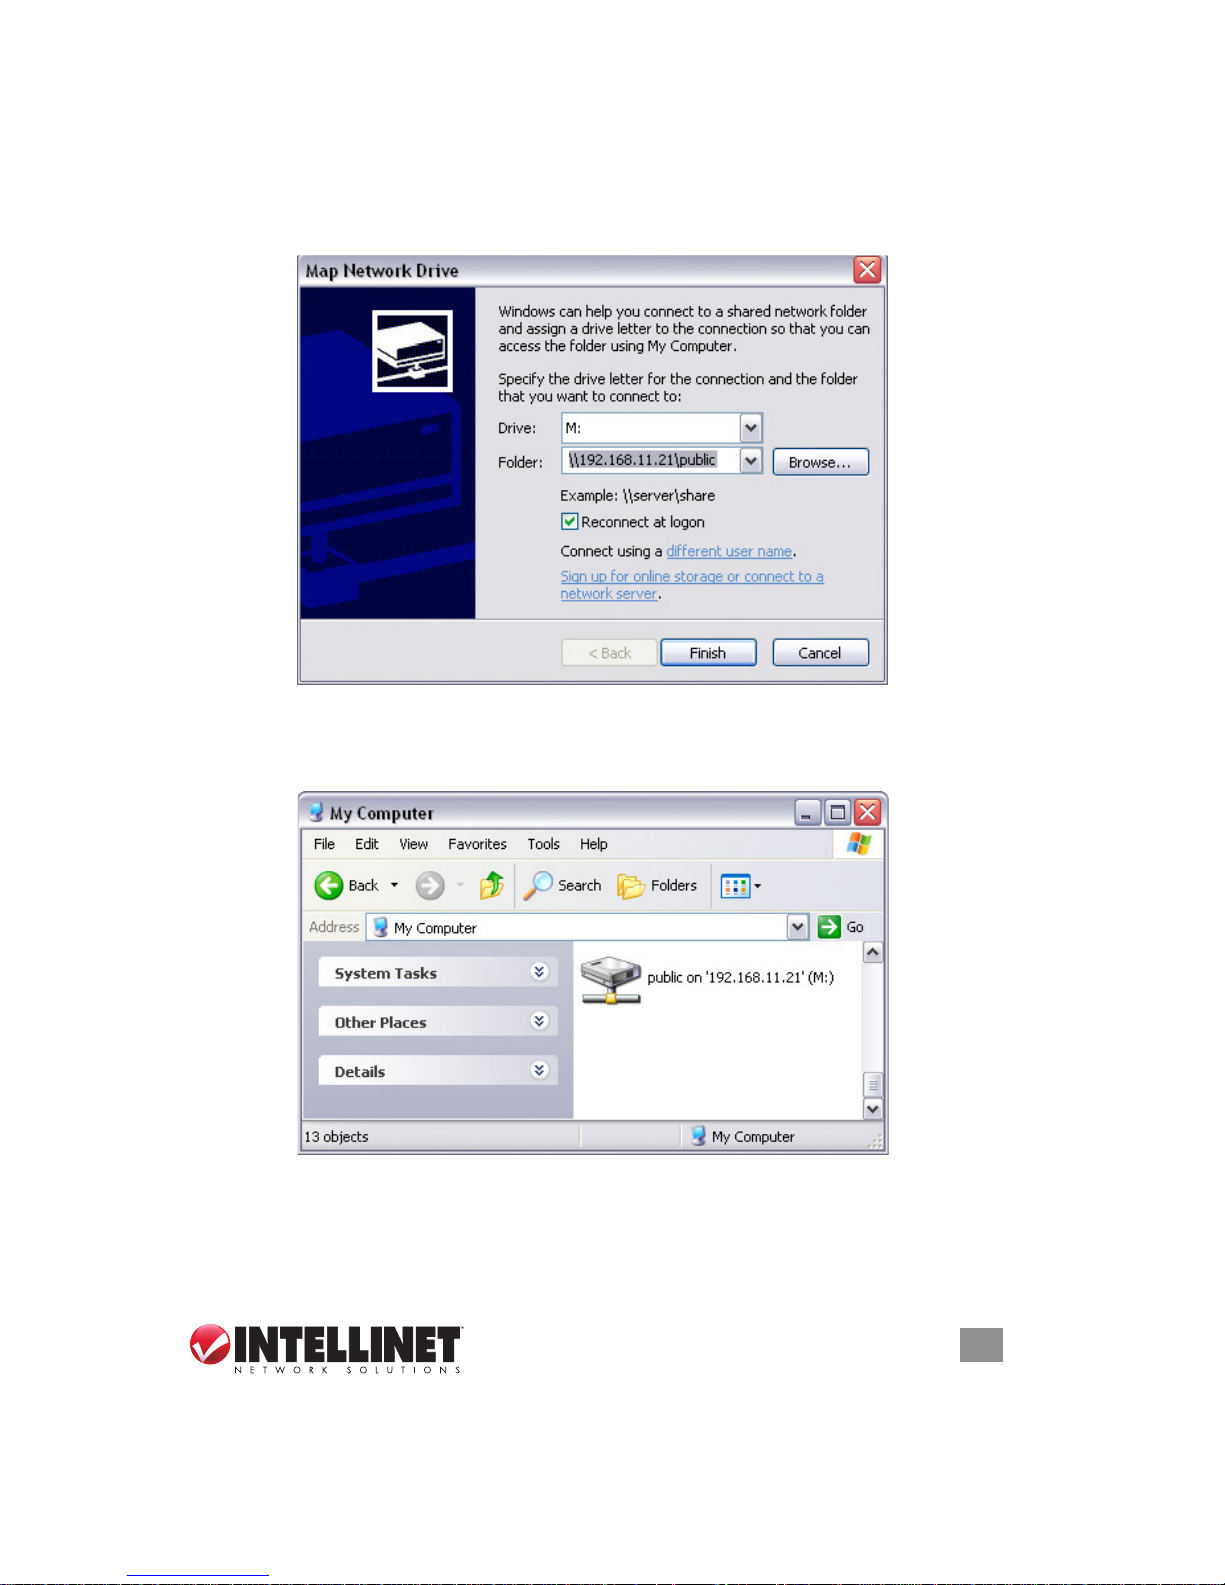
2. Follow the setup wizard on-screen instructions and ll in the path to your NAS.
When entering the IP address, also add the folder; for example, “\\192.168.11.21\
public.” Alternatively, you can nd the shares by clicking “Browse” to locate the
folder.
3. Once the drive’s been mapped, you can nd and access it under My Computer.
This link will still be there even after rebooting your operating system if you’ve
selected “Reconnect at logon.”
NOTE: For quick and temporary access, you can also simply go to My Network
Places, view the workgroup computers and select your NAS.
Page 38
38
NETWORK STORAGE
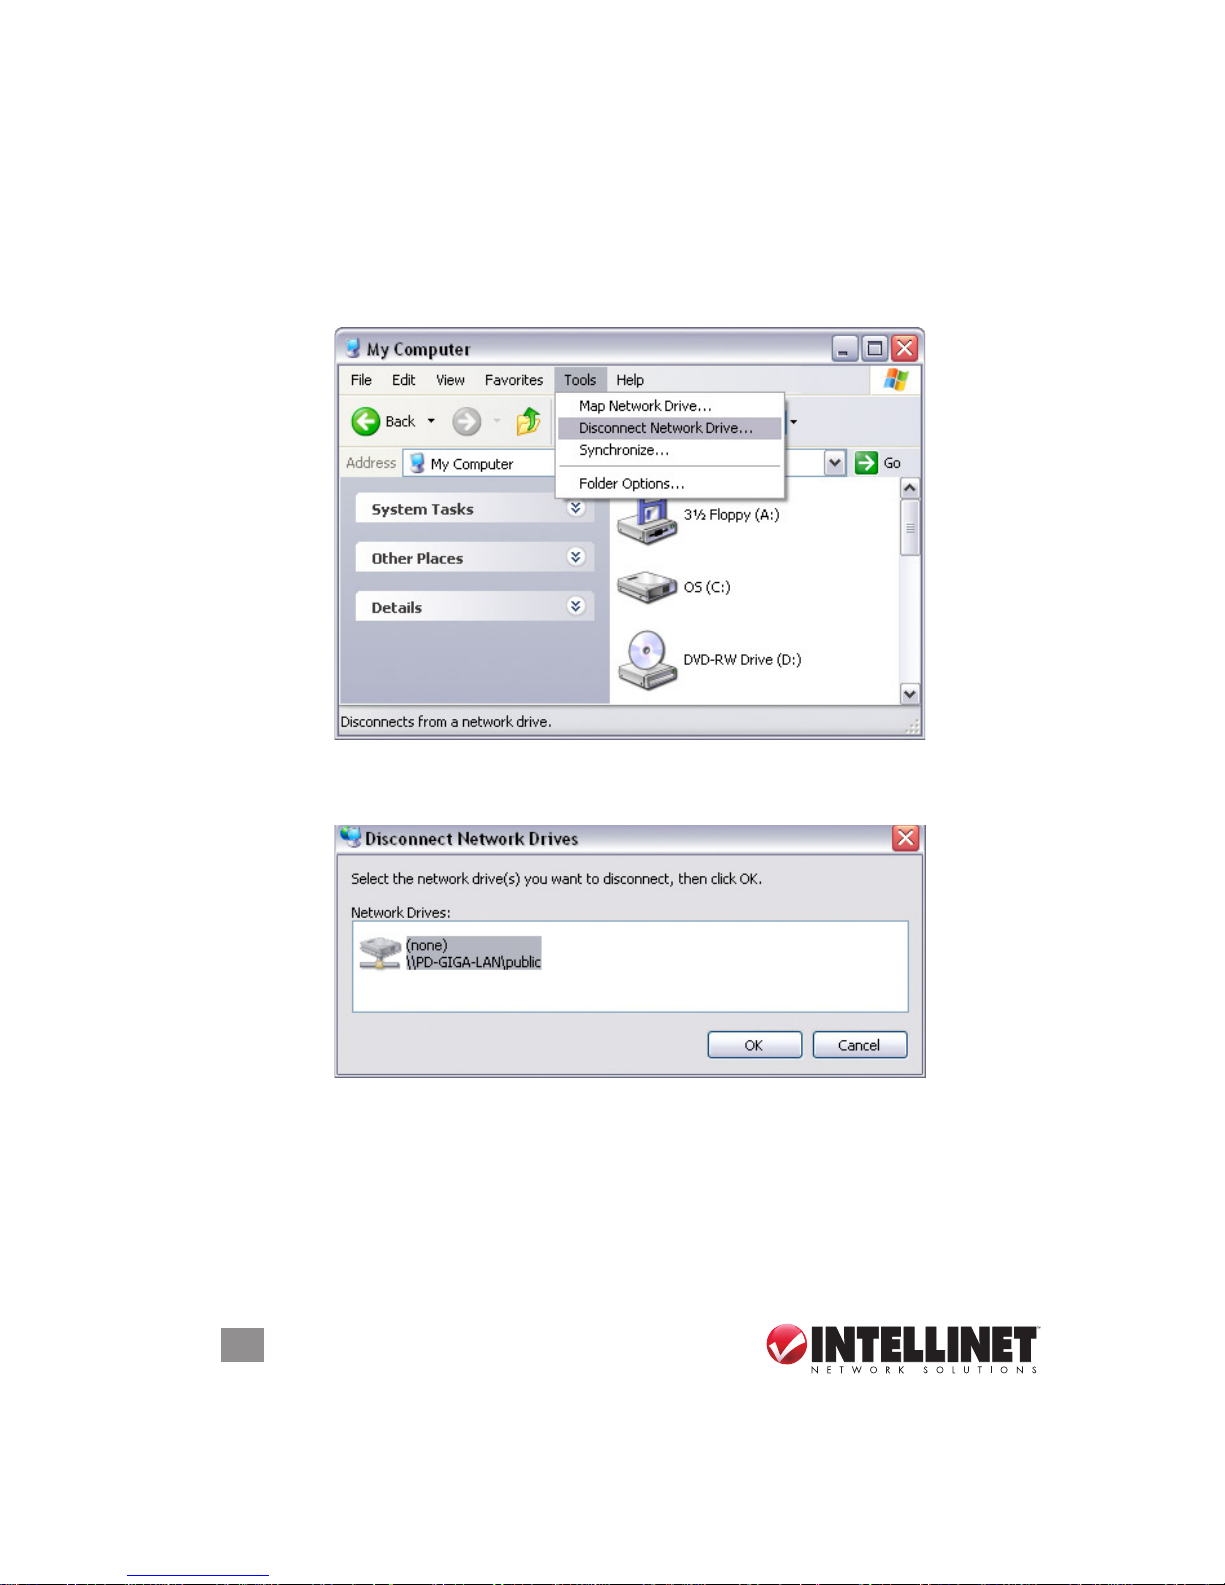
5.1.4 Disconnecting a Network Drive
When you don’t need a mapped network drive anymore, disconnecting it is
recommended. It is also necessary to disconnect a temporary network drive when
you try to log in with a new password but have not restarted the computer rst.
1. Double-click on My Computer, go to the Tools menu and select “Disconnect
Network Drive….”
2. Select any temporary or mapped network drives you want to remove, then
click “OK.”
NOTE: If you experience problems with the network access, disconnect all network
drives on the NAS, reboot your computer and try again.
Page 39
39
NETWORK STORAGE
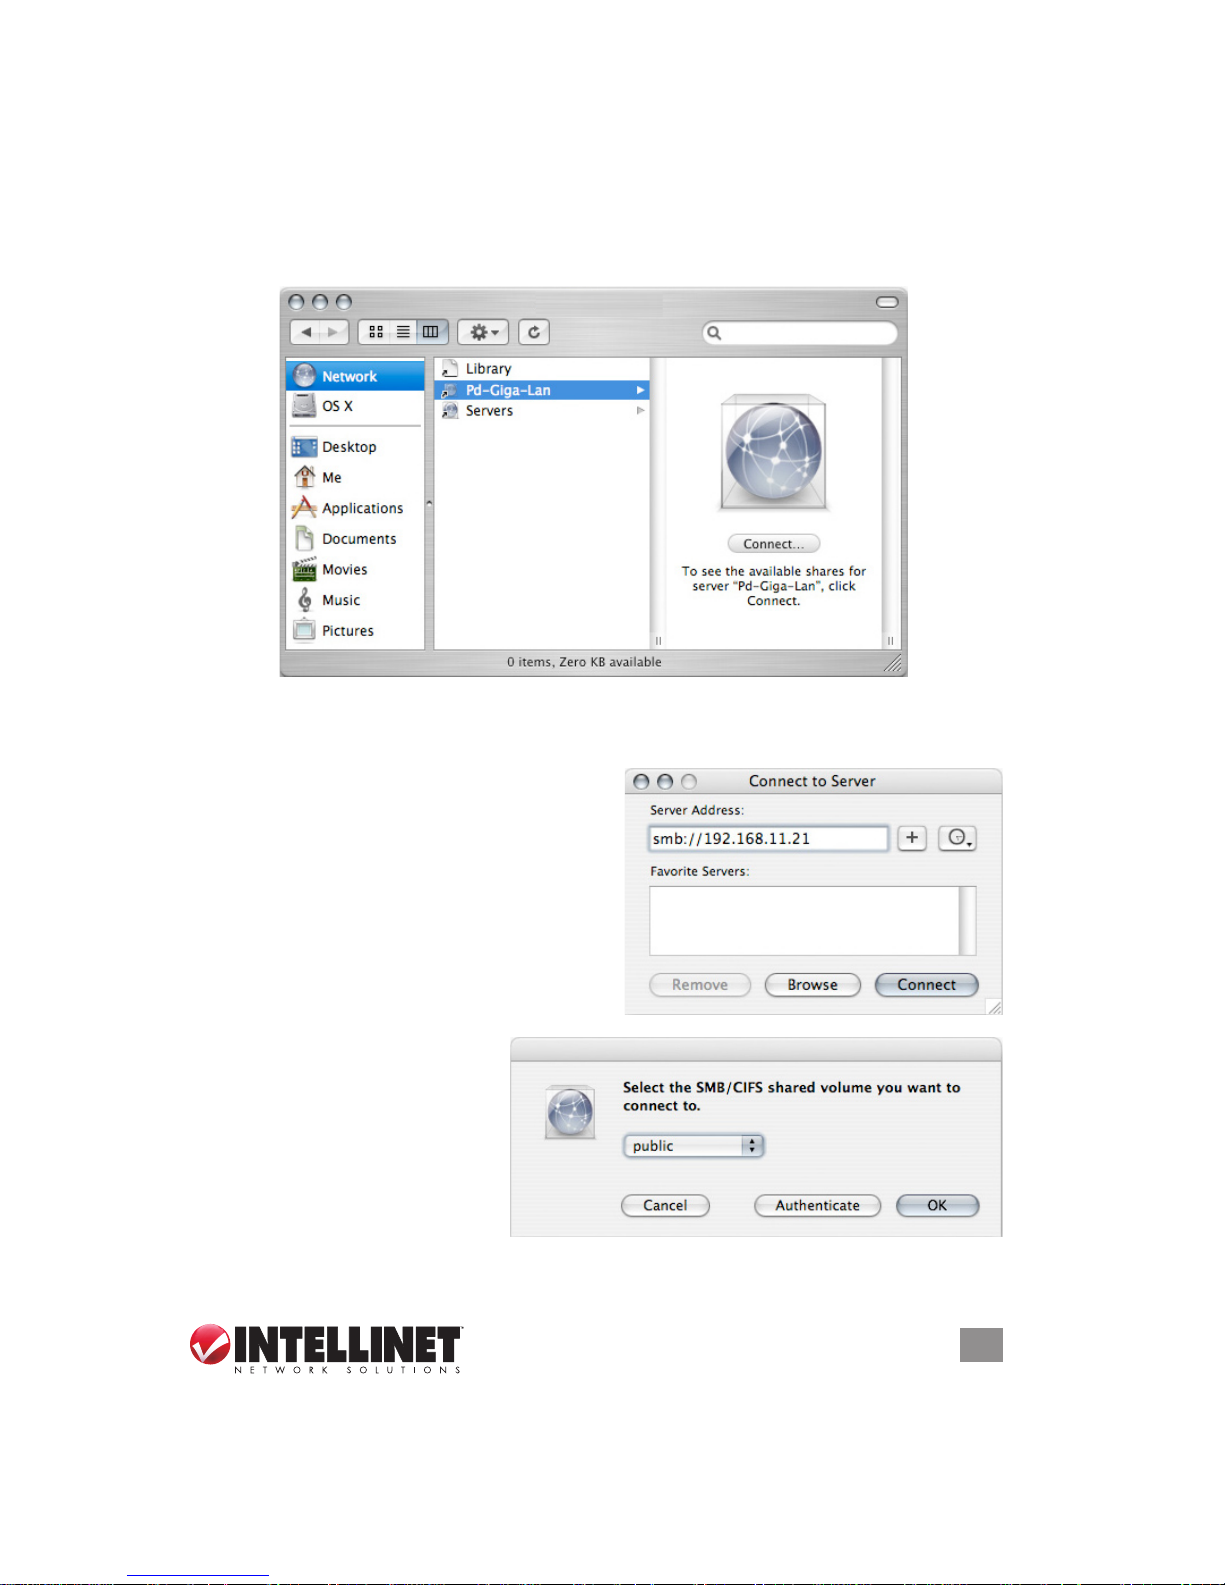
5.2 File Access on a Mac
5.2.1 SMB
To mount and access the network storage, open your Finder, click “Go” and choose
“Network.” Browse for your network drive and click on it to access the folder.
Or use the “Connect to Server” command.
1. Click “Go” and choose “Connect to Server.”
2. Enter “smb://” followed by the IP address
of your Gigabit SATA NAS, or click
“Browse” to locate the folder on your
network. Click “Connect” once the
server address has been entered.
3. When prompted, choose a
folder. After you enter the
correct password (if
passwords have been set),
the folder will appear on
your desktop.
Page 40
40
NETWORK STORAGE
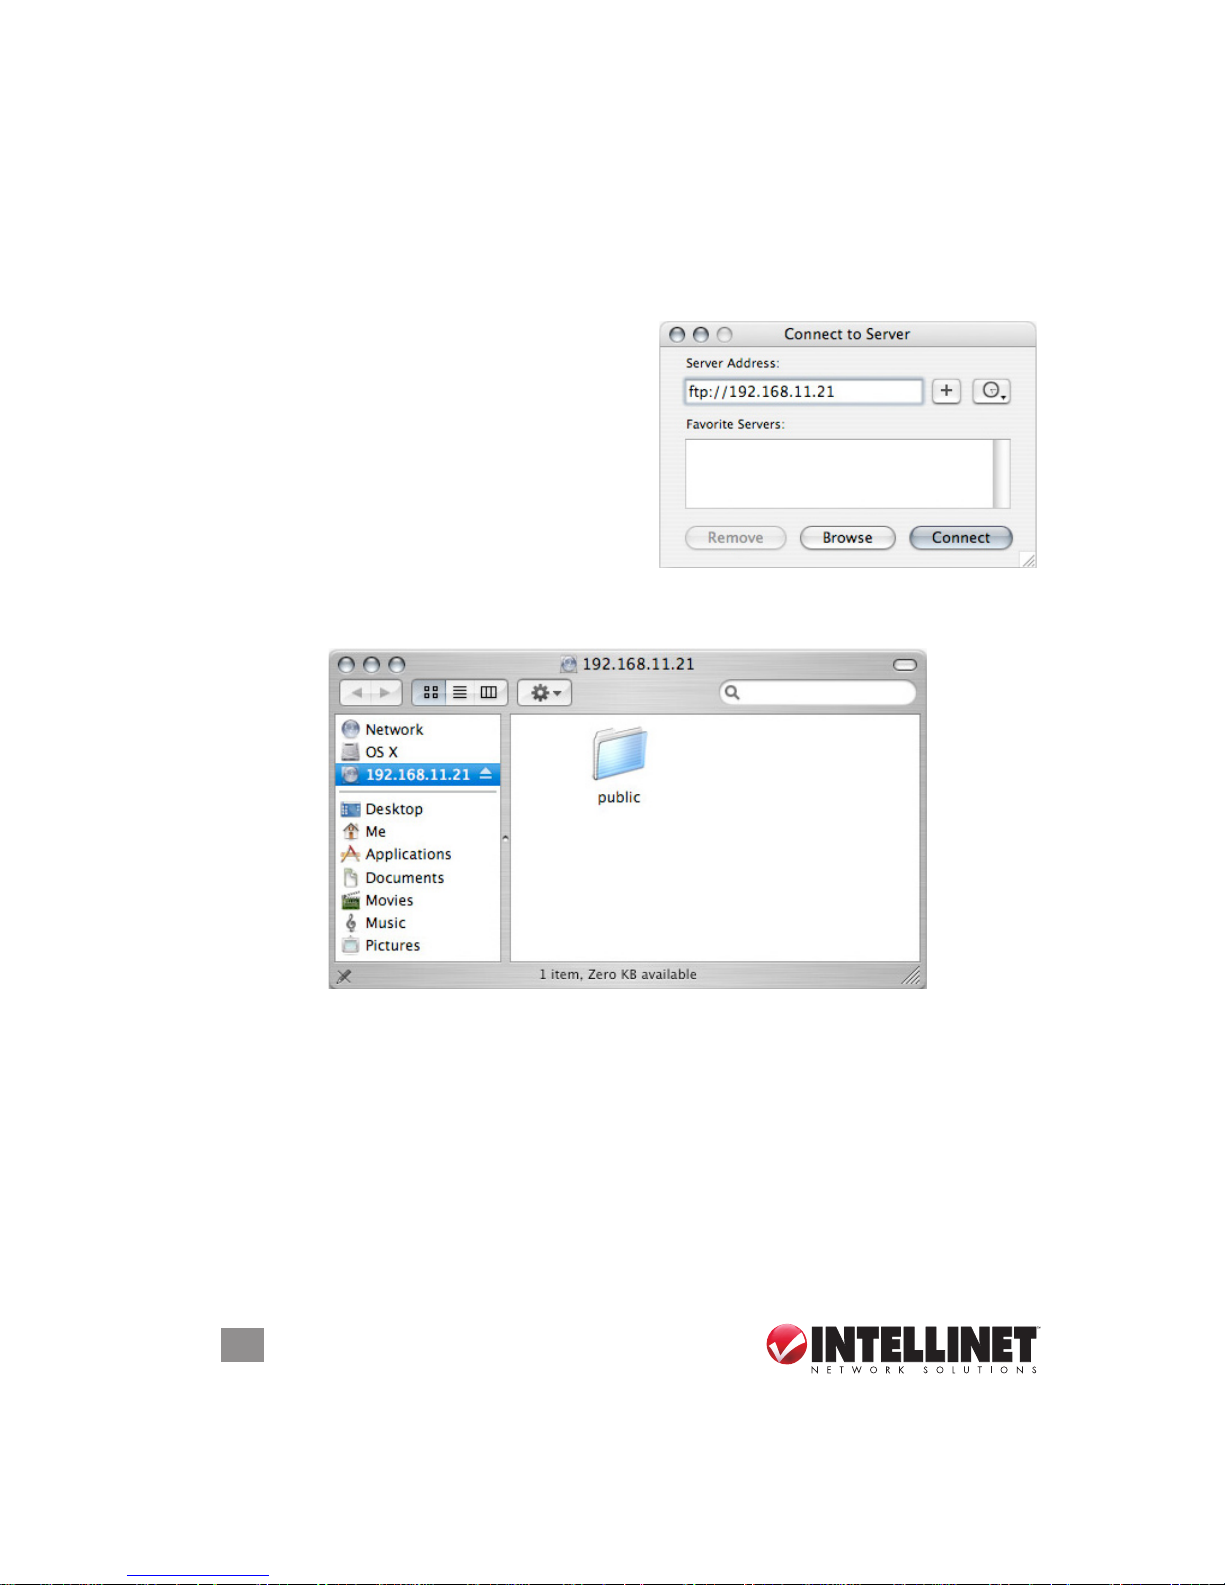
5.2.2 FTP
The FTP utility on the Mac will be able to read the data on the network drive, but
you can’t upload new data to the drive. To do that, you need to install a dedicated
FTP application, which can either be a free utility or a professional shareware
program.
1. Click “Go” and choose “Connect to Server.”
2. Enter “ftp://” followed by the IP address
of your Gigabit SATA NAS. Click
“Connect” once the server address has
been entered.
3. When prompted, choose a folder. After you enter the correct password (if
passwords have been set), the folder will appear on your desktop.
Page 41
41
ADDITIONAL FEATURES
6 ADDITIONAL FEATURES
6.1 UPnP
The Gigabit SATA NAS supports UPnP v1.0. To access the device on a PC, go to
My Network Places, where the NAS will be listed as a UPnP device. You can select
it and access the conguration page. NOTE: There’s no need to congure anything:
This function is turned on by default and other devices will be able to recognize it
automatically.
6.2 Bonjour and iTunes
For easy access to the Web conguration interface on the Mac, a shortcut to the
Gigabit SATA NAS is available in the bookmarks collection under Bonjour.
Page 42

42
ADDITIONAL FEATURES
6.2.1 iTunes
When the iTunes support for Bonjour is enabled, the Gigabit SATA NAS will appear
as a shared music folder in your iTunes library. Store your MP3 les in the music
folder of the Gigabit SATA NAS and play them over the network.
1. Make sure the support for iTunes in the Bonjour menu is enabled.
2. Store your MP3 les in the music folder of the NAS. The folder’s already been
created in “/public/music.”
Page 43

43
ADDITIONAL FEATURES
3. Start iTunes and the Gigabit SATA NAS will appear as a shared device.
6.3 USB Drive
USB drives connected to the network drive can be shared and accessed on the
network. Plus, instead of a network drive, the NAS can be used as a USB drive.
6.3.1 Sharing a USB Drive
A USB drive with the le system FAT32 or NTFS that is connected to the NAS can
be shared and accessed over the network via SMB or FTP.
Page 44

44
ADDITIONAL FEATURES
Connect the USB drive to the Gigabit SATA NAS and go to My Network Places.
The external drive will show up as “usb1,” and you can access it to transfer les
without further login. Before disconnecting it, go to the Disk Utility menu and click
“Unmount” to eject the drive.
NOTE: To access the USB drive via FTP, leave the “md1” directory and you’ll nd
the “usb1” folder in the root directory.
6.3.2
The NAS as a USB Drive (Model 505888 / 1.5 TB only)
When the Gigabit SATA NAS isn’t connected to the network, it can also be used
as a simple USB mass storage device.
1. Login via the Web browser, stop all current downloads, go to Section 3.2.3.3:
System / Turn Off Server and turn the server off.
2. Once the system has shut down, remove the power supply from the AC outlet
and disconnect the Ethernet cable.
3. Connect the USB cable to the USB device port on the NAS and the USB port
on your computer.
4. Turn on the NAS. The USB drive will automatically appear: in My Computer for
Windows; on the desktop for Mac.
IMPORTANT: Depending on the le system used to format the drive and the OS,
the USB drive might not be accessible without the installation of additional software
applications to mount the drive. The EXT2 le system is ideal for the network drive,
but is not natively supported by Windows or Mac; so if you intend to use it as a
USB drive, choosing NTFS or FAT32 might be more convenient to use (although
slower for the network drive). Remember that when formatting the drive, all data
will be lost, including the data related to the network drive.
The user accounts and access rights used for the network drive don’t apply to the
Page 45

45
ADDITIONAL FEATURES
USB drive. When connected directly to the computer via USB, all data can be
accessed and modied!
NOTE: The Gigabit SATA NAS has to be turned off to change it from acting as a
USB drive to a network drive and vice versa. When both USB and Ethernet cables
are connected, the USB connection has priority and the NAS will act as a USB
drive until disconnected and restarted.
6.4 USB Backup (Model 505895 / 3 TB only)
The USB backup function can be used to quickly and conveniently copy the les
from an external USB drive to the internal SATA hard drives.
1. Connect the USB drive to the front port of the Gigabit SATA NAS.
2. Press the button just above the USB port for 4 seconds to back up your les.
3. A new folder based on date and time will be created in the /public directory. All
les will be copied to that folder. During the backup process, the yellow LED will
blink. When nished, the LED will stop blinking and the NAS will automatically
eject the drive so that you can remove the USB drive.
NOTE: For external USB devices, using self-powered USB drives is recommended.
Only drives formatted using FAT32 are supported! If more than one USB drive is
connected, only the les from the second drive will be copied.
6.5 USB Printer
The Gigabit SATA NAS is equipped with an additional USB host port (or ports) and
a printer server. Connect your USB printer to the USB host port on the NAS and
enable the printer server to share the printer among other workstations on the
same local network.
Page 46

46
ADDITIONAL FEATURES
Printing via the shared network printer will be slower than when the printer is
connected directly to the USB port on the computer. After you click “Print,” wait for
the printer to receive the data.
1. Connect your USB printer to the USB host port on the Gigabit SATA NAS and
turn both devices on.
2. Log in to make sure the printer server is enabled and the printer has been
recognized.
Once these initial steps are complete, refer either to Section 6.5.1: Installation on
a PC or Section 6.5.2: Installation on a Mac.
6.5.1
Installation on a PC
1. On your PC, go to Start and select “Printers and Faxes.”
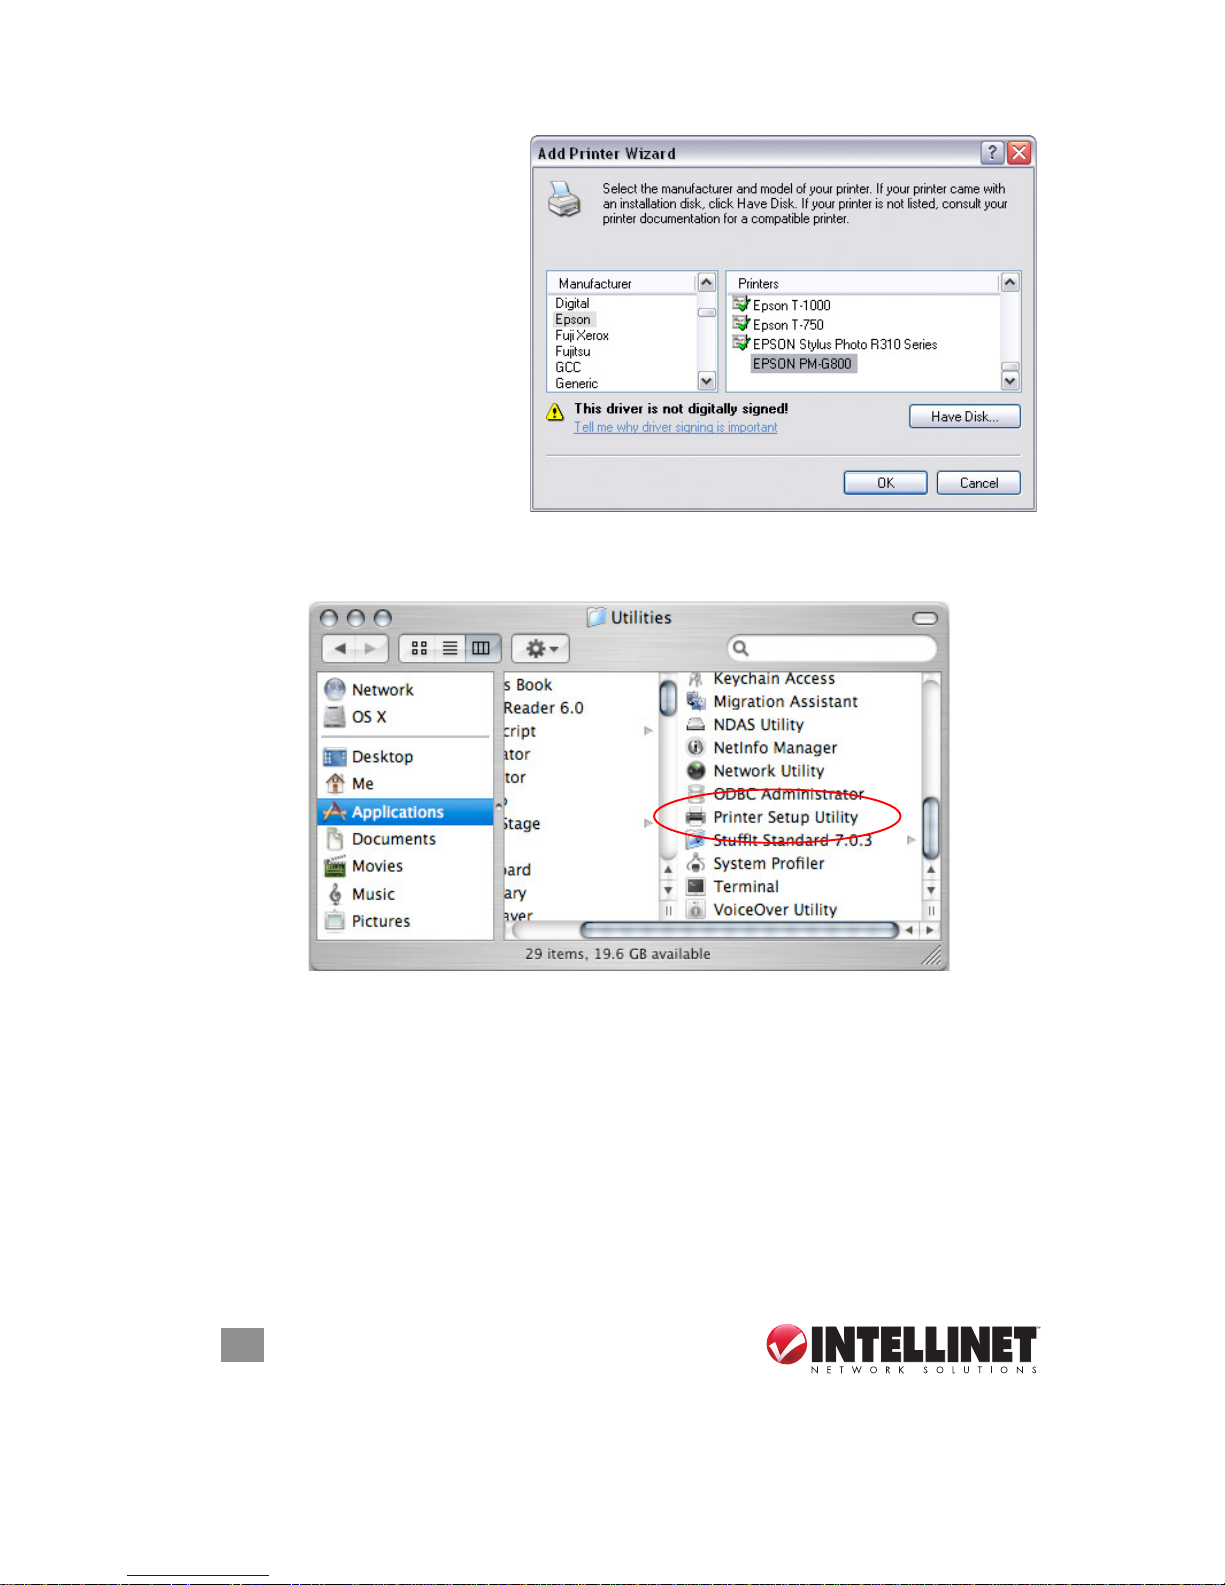
2. Go to File and select “Add Printer” to bring up the printer setup wizard.
3. Click “Next” to start the setup wizard.
Page 47

47
ADDITIONAL FEATURES
4. When the Local or Network
Printer screen displays,
select “A network printer…”
and click “Next.”
5. When the Specify a Printer
screen displays, select
“Connect to this printer…”
and click “Next.”
6. When the Browse for
Printer screen displays,
nd the Gigabit SATA NAS
in the Shared Printers
list, select “lp” and click
“Next.”
Page 48
48
ADDITIONAL FEATURES
7. When the next screen
displays, select your printer
from the list or browse for
the corresponding driver
on your local drive. Click
“OK” to complete the
procedure. Your printer is
now set up.
6.5.2
Installation on a Mac
1. Go to Applications and open the Printer Setup Utility in the Utilities folder.
Page 49
49
ADDITIONAL FEATURES
2. When the Printer
Browser screen displays,
click “More Printers.”
3. Use the Windows
Printing and the
Workgroup drop-down
menus to display the
Gigabit SATA NAS in
the window. Select it
and click “Choose.”
Page 50
50
ADDITIONAL FEATURES
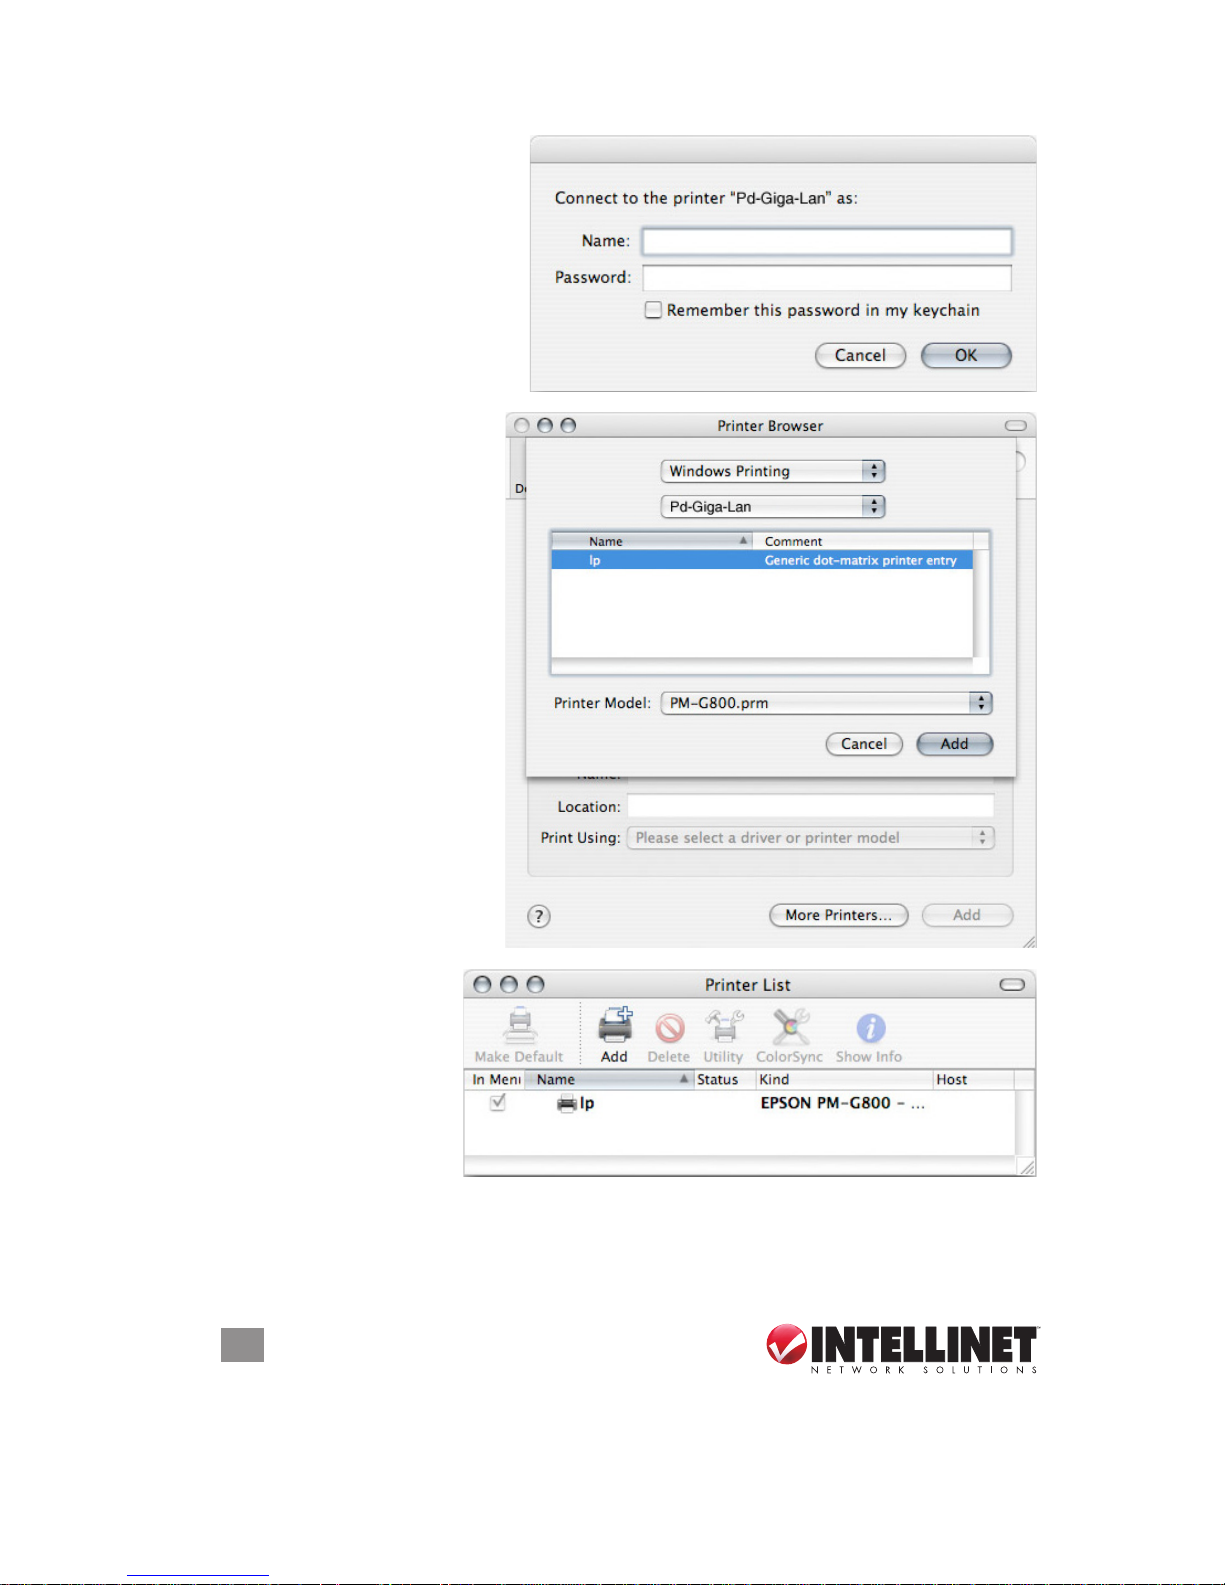
4. When prompted, enter a
name and password —
either as an administrator
or user — and click “OK.”
5. Select the lp printer from
the list, then nd the
corresponding printer
model to install the
correct printer driver.
Click “Add.”
6. A Printer List screen
should display with
your selectionin the
list, indicating that
your printer is now
set up.
Page 51
51
ADDITIONAL FEATURES
6.6 BitTorrent
Used in conjunction with its built-in BitTorrent client, the Gigabit SATA NAS can be
set to download media les from the Internet and have them saved directly to the
internal SATA hard drive. You can then turn off your computer.
The BitTorrent client on the NAS uses the TCP protocol and ports 6881-6889. Make
sure those ports are not blocked by your router: If necessary, set up port forwarding
so that the trafc for those ports is forwarded to your NAS.
The BitTorrent client on the NAS can download ve les at a time, with a maximum of
40 les in the queue. Before turning off the device, stopping all current downloads
rst is recommended. After the device has been rebooted or turned off, the partial
downloads will need to be started again to continue the download process.
1. Browse the Internet for the media les you want to download, and store the
torrent les on your local drive.
2. Log in to the Web interface and go to the BTorrent screen in the Network
Service menu (see Section 4.2.4.3).
3. Click “Browse” and locate your previously downloaded torrent le. Select it and
click “Add” to add the le to the download queue.
4. Click “Start” to begin the download process. NOTE: If the new le doesn’t appear
on the list, click “Refresh” or re-select “BTorrent” from the left-hand menu.
Page 52
52
ADDITIONAL FEATURES
The le is now being downloaded (as indicated by the updated information in the
Percentage and Download columns below) and, if you like, you can turn off your
computer. Remember to start the download process again if the Gigabit SATA NAS
has been turned off or rebooted before the le has been downloaded completely.
Once the le has been downloaded, you can delete it from the download list and
access the media le on your Gigabit SATA NAS. All les will be stored in the
“/public/btdownload” folder.
pend
Page 53

53
GLOSSARY
7 GLOSSARY
BitTorrent — This is a peer-to-peer (P2P) le distribution client application, and
also refers to its related le-sharing protocol. BitTorrent is designed to distribute
large amounts of data widely without incurring the corresponding consumption
in costly server and bandwidth resources.
EXT2 — The ext2, or second extended, le system is a le system found mostly
on Linux operating systems. This is the recommended le system for the
Gigabit SATA NAS network drive.
EXT3 — The ext3, or third extended, le system is a journaled le system found
mostly on Linux operating systems.
FAT32 — File Allocation Table (FAT) is a le system developed by Microsoft for
MS-DOS. The FAT le system is considered relatively uncomplicated, and is
consequently supported by virtually all existing operating systems for personal
computers. The maximum size of a single le is limited to 4 GB.
FTP — FTP, or File Transfer Protocol, is a commonly used protocol for exchanging
les over any network that supports the TCP/IP protocol (such as the Internet
or an intranet). There are two computers involved in an FTP transfer: a server
(Gigabit SATA NAS) and a client (user’s computer).
NTFS — NTFS, or New Technology File System, is the standard le system of
Windows NT and its descendants. NTFS has several improvements over FAT,
but is not compatible with other operating systems (except, perhaps, in Read
Only mode).
LAN — A local area network (LAN) is a computer network covering a small local
area, like a home, ofce or small group of buildings such as a residence, ofce
complex or college.
SMB — Server Message Block (SMB) is a network application-level protocol mainly
applied to share les, printers, serial ports and miscellaneous communications
between nodes on a network.
Torrent — A torrent can mean either a torrent metadata le or all les described
by it, depending on context. The torrent le contains metadata about all the
les it makes downloadable, including their names and sizes and checksums
of all pieces in the torrent. It also contains the address of a tracker that
coordinates communication between the peers in the swarm.
Page 54

54
FAQ
8 FREQUENTLY ASKED QUESTIONS
Q: Why aren’t some of the functions and menus available?
A: The functions of the Gigabit SATA NAS require that a hard drive be installed.
Make sure you have a hard drive installed and that it is formatted, preferably
using EXT2.
Q: I lost my password. What do I do?
A: Press the Reset button and hold it for 5 seconds to reset the NAS to its default
settings. The default login is “admin”/”admin.” Resetting the device will erase
all user and group accounts, plus some other settings.
Q: I can’t access the Web conguration interface. What’s the correct IP?
A: See Section 3 about how to log in. If the instructions don’t help, turn on your
device and wait for it to boot, then press and hold the Reset button for ve
seconds to reset its IP address and server name.
Q: Why doesn’t FTP access on my Mac doesn’t work properly?
A: The FTP utility on the Mac will be able to read the data on the network storage,
but you can’t write new data to the drive. To upload les, you need to install a
dedicated FTP application.
Q: Why can’t I restart or turn off the server?
A: Make sure there are no current le transfers in process or any other disk activity.
Close any other applications that might still be accessing the NAS, then try again.
Q: What port is the BitTorrent client on the Gigabit SATA NAS using?
A: The BitTorrent client is using the TCP protocol and the ports 6881-6889.
Q: How many les can the BitTorrent client download at the same time?
A: It can download ve les at a time, with another 40 in the queue.
Q: Does the Gigabit SATA NASN support SSH or Telnet access?
A: No, it doesn’t support SSH, Telnet or TFTP access.
Q: Why doesn’t the torrent le show up on the list after clicking “Add”?
A: If the new le doesn’t show up or the page stays blank, refresh the page or
re-select “BTorrent” from the left-hand menu to reload the page.
Q: Can I use the Gigabit SATA NAS as a USB and network drive at the same
time?
A: No, it can be used either as a USB drive or as a network drive, but not both at
the same time. When both cables are connected, the USB connection has
priority.
Page 55

55
FAQ
Q: Which le system is recommended for the internal hard drive?
A: If the device is mainly used as network drive, using the EXT2 le system is
recommended. When the drive is also often used as a USB drive, the most
suitable le system will depend on the operating system. NTFS is most suitable
for Windows, and FAT32 offers the best compatibility.
Q: Why doesn’t the connected the USB cable show up on my computer?
A: If the device is currently used as a network drive, it has to be restarted rst.
Depending on the le system of the internal hard drive, your operating system
might not natively support it, and you need to either install an additional
application to mount the drive or re-format it using a different le system.
Page 56

56
SPECIFICATIONS
9 SPECIFICATIONS
Model 505888 / 1.5 TB
Standards
• IEEE 802.3 (10Base-T Ethernet)
• IEEE 802.3ab (Twisted Pair Gigabit Ethernet)
• IEEE 802.3u (100Base-TX Fast Ethernet)
General
• LAN: RJ45 10/100/1000 Mbps data port
• USB: one Hi-Speed USB 2.0 USB type-A port for external USB hard drive, USB
ash drive or USB printer
• USB: one USB type-B port for host connection to computer when using the
device as an external USB HDD
• Data throughput: up to 25 MBps (FTP, read)
• Internal hard drive:
– Design: 3.5” SATA-I or SATA-II
– Maximum size: 1.5 TB
• External USB hard drives:
– Supported le systems: FAT32, NTFS
– Maximum size: 1 TB
• File serving protocols: CIFS (Samba), FTP, NFS
• iTunes server:
– iTunes version mt-daapd-0.2.4
– Maximum connection limit: 8
• FTP server max. connection limit: 8
• Samba server:
– Version samba-3.0.25 (supporting NTLMv2 authentication for Windows Vista)
– Maximum connection limit: 8
• BitTorrent client options:
– Maximum upload bandwidth
– Maximum download bandwidth
– Status/statistics for active torrents
• Certications: FCC Class B, CE, RoHS, VCCI
Security / User Management / Network Shares
• Maximum user accounts: 8
• Maximum user groups: 8
• Username/password-based security
• Folder level security (read/write)
Page 57

57
SPECIFICATIONS
• Disk space usage (quota) management
• Supported network clients: Windows, Linux, Mac OS
Environmental
• Dimensions: 237 (l) x 137 (w) x 42 (h) mm (9.33 x 5.39 x 1.54 in.)
• Weight: 1.65 kg (3.6 lbs.)
• Operating temperature: 5 – 40°C (41 – 104°F)
• Operating humidity: 5 – 90% RH, non-condensing
• Storage temperature: -20 – 70°C (-4 – 158°F)
Power
• External power adapter: 12 V DC, 2.0 A
• Power consumption:
– 12.4 Watts maximum with HDD active
– 1.2 Watts maximum with HDD turned off
Package Contents
• Gigabit SATA NAS 1.5 TB
• Power adapter
• Installation CD with user manual
• Quick install guide
Model 505895 / 3 TB
Standards
• IEEE 802.3 (10Base-T Ethernet)
• IEEE 802.3ab (Twisted Pair Gigabit Ethernet)
• IEEE 802.3u (100Base-TX Fast Ethernet)
General
• LAN: RJ45 10/100/1000 Mbps data port
• USB: 2 Hi-Speed USB 2.0 USB type-A ports for external USB hard drive, USB
ash drive or USB printer
• Data throughput: up to 25 MB/s (FTP, read)
• Internal hard drive:
– Design: 3.5” SATA-I or SATA-II
– Maximum size: 1.5 TB
– Total capacity: 3 TB (RAID 0)
• External USB hard drives:
– Supported le systems: FAT32, NTFS
– Maximum size: 1 TB
• File serving protocols: CIFS (Samba), FTP, NFS
Page 58

58
SPECIFICATIONS
iTunes server:
– iTunes version mt-daapd-0.2.4
– Maximum connection limit: 8
• FTP server max. connection limit: 8
• Samba server:
– Version samba-3.0.25 (supporting NTLMv2 authentication for Windows Vista)
– Maximum connection limit: 8
• BitTorrent client options:
– Maximum upload bandwidth
– Maximum download bandwidth
– Status/statistics for active torrents
• Certications: FCC Class B, CE, RoHS, VCCI
Security / User Management / Network Shares
• Maximum user accounts: 8
• Maximum user groups: 8
• Username/password-based security
• Folder level security (read/write)
• Disk space usage (quota) management
• Supported network clients: Windows, Linux, Mac OS
Environmental
• Dimensions: 237 (l) x 137 (w) x 42 (h) mm (9.33 x 5.39 x 1.54 in.)
• Weight: 1.65 kg (3.6 lbs.)
• Operating temperature: 5 – 40°C (41 – 104°F)
• Operating humidity: 5 – 90% RH, non-condensing
• Storage temperature: -20 – 70°C (-4 – 158°F)
Power
• External power adapter: 12 V DC, 2.0 A
• Power consumption:
– 25.1 Watts maximum with HDD active
– 1.8 Watts maximum with HDD turned off
Package Contents
• Gigabit SATA NAS 3 TB
• Power adapter
• Installation CD with user manual
• Quick install guide
Page 59

SAFETY & COMPLIANCE STATEMENTS
FCC Part 15
This equipment has been tested and found to comply with the limits for a Class B
digital device, pursuant to Part 15 of Federal Communications Commission (FCC)
Rules. These limits are designed to provide reasonable protection against harmful
interference in a residential installation. This equipment generates, uses and
can radiate radio frequency energy and, if not installed and used in accordance
with the instructions, may cause harmful interference to radio communications.
However, there is no guarantee that interference will not occur in a particular
installation. If this equipment does cause harmful interference to radio or television
reception, which can be determined by turning the equipment off and on, the user
is encouraged to try to correct the interference by one or more of the following
measures:
• Reorient or relocate the receiving antenna.
• Increase the separation between the equipment and the receiver.
• Connect the equipment to an outlet on a circuit different from the receiver.
• Consult the dealer or an experienced radio/TV technician for help.
EU Countries Intended for Use
The ETSI version of this device is intended for home and ofce use in Austria,
Belgium, Denmark, Finland, France, Germany, Greece, Ireland, Italy, Luxembourg,
the Netherlands, Portugal, Spain, Sweden and the United Kingdom. The ETSI
version of this device is also authorized for use in EFTA member states Iceland,
Liechtenstein, Norway and Switzerland. EU Countries Not Intended for Use: None.
Disposal of Used Electric and Electronic Equipment in Private
Households
(applicable in the European Union and other European countries with
separate collection systems)
This symbol on the product — or in the manual and in the warranty, and/or on its
packaging — indicates that this product shall not be treated as household waste.
Instead, it should be taken to an applicable collection point for the recycling of
electrical and electronic equipment. By ensuring this product is disposed of correctly,
you will help prevent potential negative consequences to the environment and
human health, which could otherwise be caused by inappropriate waste handling
of this product. If your equipment contains easy removable batteries or accumulators,
please dispose of these separately according to your local requirements. The
Page 60

recycling of materials will help to conserve natural resources. For more detailed
information about recycling of this product, please contact your local city ofce,
your household waste disposal service or the shop where you purchased this
product.
In countries outside of the EU: If you wish to discard this product, please contact
your local authorities and ask for the correct manner of disposal.
Dieses auf dem Produkt oder der Verpackung angebrachte Symbol zeigt an, dass
dieses Produkt nicht mit dem Hausmüll entsorgt werden darf. In Übereinstimmung
mit der Richtlinie 2002/96/EG des Europäischen Parlaments und des Rates über
Elektro- und Elektronik-Altgerate (WEEE) darf dieses Elektrogerät nicht im
normalen Hausmüll oder dem Gelben Sack entsorgt werden. Wenn Sie dieses
Produkt entsorgen möchten, bringen Sie es bitte zur Verkaufsstelle zurück oder
zum Recycling-Sammelpunkt Ihrer Gemeinde.
Ce symbole sur Ie produit ou son emballage signie que ce produit ne doit pas
etre traite comme un dechet menager. Conformement à la Directive 2002/96/EC
sur les dechets d’equipements electriques et electroniques (DEEE), ce produit
electrique ne doit en aucun cas etre mis au rebut sous forme de dechet municipal
non trie. Veuillez vous debarrasser de ce produit en Ie renvoyant à son point
de vente ou au point de ramassage local dans votre municipalite, à des ns de
recyclage.
Questo simbolo sui prodotto o sulla relativa confezione indica che il prodotto non
va trattato come un riuto domestico. In ottemperanza alia Direttiva UE 2002/96/EC
sui riuti di apparecchiature elettriche ed elettroniche (RAEEI), questa prodotto
elettrico non deve essere smaltito come riuto municipale misto. Si prega di
smaltire il prodotto riportandolo al punto vendita o al punto di raccolta municipale
locale per un opportuno riciclaggio.
Este simbolo en el producto o su embalaje indica que el producto no debe tratarse
como residuo domestico. De conformidad con la Directiva 2002/96/CE de la UE
sobre residuos de aparatos electricos y electronicos (RAEEI), este producto
electrico no puede desecharse con el resto de residuos no clasicados. Deshagase
de este producto devolviendolo al punta de venta o a un punta de recogida
municipal para su reciclaje.
Page 61

INTELLINET NETWORK SOLUTIONS™ offers a complete line
of active and passive networking products.
Ask your local computer dealer for more information or visit
www.intellinet-network.com .
Copyright © INTELLINET NETWORK
SOLUTIONS
All products mentioned are trademarks or registered trademarks of their respective owners.
 Loading...