

Page 1

Intel® PRO/Wireless 2011B LAN
Adapter Quick Installation Guide
Additional documentation is on the
Intel CD.
Page 2

Product Model
Intel® PRO/Wireless 2011B LAN PC Card product model:
WPC2011BWW
WPC2011BJP
Copyright
Copyright © 2001, 2002 Intel Corpora tion. All rights reserved.
Intel Corporation, 5200 N. E. Elam Young Parkway, Hillsboro, OR 97124-6497
Intel Corporation assumes no responsibility for errors or omissions in this document. Nor does Intel
make any commitment to update the information contained herein.
Intel® PRO/Wireless 2011B LAN is a registered trademark of Intel Corporation.
†Other product and cor pora te names may be trademarks of oth er c ompanies and are used only for
explanation and to the owners’ benefit, without intent to infringe.
Intel® PRO/Wireless 2011B LAN Adapter Quick Installation Guide
A63056-002
Page 3

About This Docum ent
Conventions
GUI Screen text
Italics indicates the first use of a term, book title, variable or
Bold indicates important user information, license provisions or
URL
This document uses the following for certain conditions or information:
indicates the name of a control in a GUI-based
application.
menu title.
warranty conditions.
indicates a Uniform Resource Locator, such as a Web
page address.
indicates tips or special requirements.
indicates conditions that can cause equipment damage or data
loss.
Intel® PRO/Wireless 2011B LAN Adapter Quick Installation Guide i
indicates a potentially dangerous condition or procedure that
only Intel® PRO/Wireless 2011B LAN-trained personnel
should attempt to correct or perform.
Page 4

Customer Support
Web and Internet Sites
Support: http://support.intel.com
Network Products: http://www.intel.com/network
Corporate: http://www.intel.com
Customer Support Technicians
For the U.S. and Canada
If you are using this product in conjunction with Intel® PRO/Wireless 2011B
LAN hardware in a business or office environment and want customer support,
please call +1 916-377-7000 (7:00 – 17:00 M–F Pacific T ime). You can also visit
the Intel customer support web site (
For Worldwide Access
Intel has technical support centers worldwide. Many of the centers are staffed by
technicians who speak the local languages. For a list of all Intel support centers,
the telephone numbers, and the times they are open, refer to the Customer
Support Phone Numbers web site
http://www.intel.com/support/9089.htm).
(
Product Warranty
This product is covered by a Limited Lifetime Warranty. See the online manuals
for details.
http://support.intel.com).
Regulatory Notices
All regulatory notices are provided in the online manuals and on the web
http://www.intel.com/support).
(
Software License Agreement
Software included with this product is protected by a specific Software License
Agreement, provided in the online manuals. By using this software you agree to
the provisions in the Software License Agreement.
Register Online
Register online to receive technical support, product upgrade notices,
information updates, and special offers. To register online, re-insert the CD and
Online Registration.
click
ii Intel® PRO/Wireless 2011B LAN Adapter Quick Installation Guide
Page 5

Installation Steps
Step 1: Read About the Installation
Installing an Intel® PRO/Wireless 2011B LAN Adapter is part
of the bigger process of installing a wireless LAN (WLAN).
The steps in this guide are for installing the adapter only.
It is likely that part of the wireless network is already installed.
If you are not sure, ask your network administrator.
If the wireless networks uses ac cess po ints, thes e acces s points
are probably installed and you simply install the adapter.
Continue with step 2 in this guide.
If you are setting up your computer to communicate with other
computers in a peer-to-peer network, check to see if the other
computers are already set up to communicate in a peer-to-peer
network. If so, note the SSID, channel, and encryption ke ys the
computers are using before continuing with step 2.
The Steps Outlined
Step 2: Attach regulatory compliance labels.
Step 3: Install the hardware for the Intel® PRO/Wireless
2011B LAN Adapter. This adapter is most likely a PC card.
Step 4: Install the driver software.
Step 5: Install the Intel® PRO/Wireless 2011B LAN Software.
Step 6: Configure the adapter.
Step 7: Make sure that the adapter is installed correctly.
For steps 2 through 7, read the subsection entitled “Before You
Start.” Failure to read this subsection could result in the adapter
not functioning in the network.
Intel® PRO/Wireless 2011B LAN Adapter Quick Installation Guide 1
To install the Intel® PRO/Wireless 2011B LAN Adapter, you
must log onto a computer with an administrative account. If
you log onto the computer with an account that does not have
administrative privileges, the installation fails.
Page 6

Installation Steps
Step 2: Attach the Regulatory Compliance Label
A sheet of peel and stick regulatory compliance labels is
shipped with the adapter. F ollow the directions on the sheet and
affix the appropriate label to the adapter.
Step 3: Install the Hardware
Before You Start
If the hardware is already installed, go to step 4.
Notebook Requirements
Installing the Intel® PRO/Wireless 2011B L A N Adapter in a
notebook computer requires the following minimum
configuration:
• 233 MHz Pentium II
• 64 MB RAM
• A CD-ROM drive
• A video card capable of 256 colors
• One of the following operating systems: Microsoft
Windows† 95C, Windows 98, Windows 98 SE, Windows
ME or Windows 2000.
If you are unfamiliar with these terms, check with your
network administrator to make sure that your computer meets
these minimum requirements.
If the installation fails, the following information may be
useful to a network administrator. You do not have to be
familiar with these terms to continue with the installation.
However, if you encounter a problem d urin g the in stallation,
present this information to your network administrator.
• A Type II PC card slot
• An available interrupt request line (IRQ)
• An available input/output (I/O) port address
If You Are Running Microsoft Windows 95, Windows 98,
or Windows 2000
2 Intel® PRO/Wireless 2011B LAN Adapter Quick Installation Guide
Installation and removal methods vary for different notebook
computers. Refer to your owner’s manual for specific
instructions.
Page 7

Installation Steps
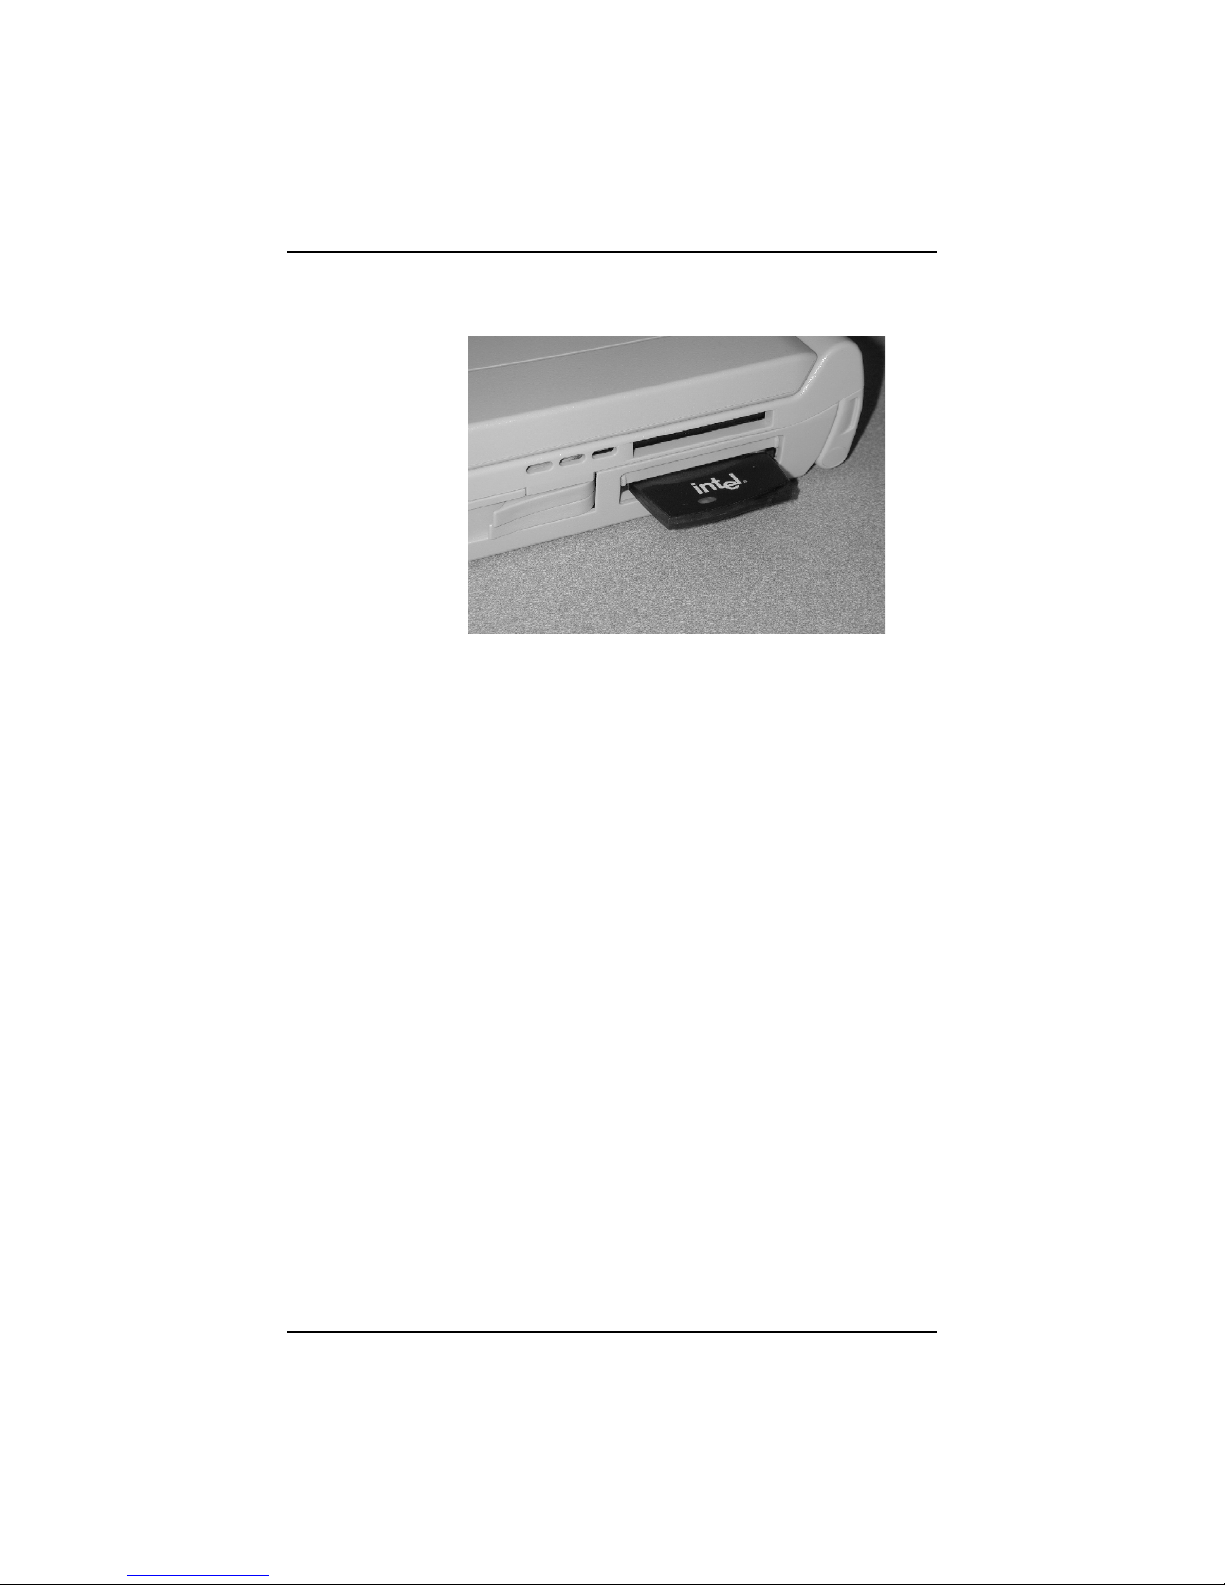
1. Slide in the PC Card until it firmly seats. Align the card
properly when inserting. Insert the card firmly without
forcing. You may have to press very firmly.
2. Insert the PC Card in the notebook computer as shown
below.
Intel® PRO/Wireless 2011B LAN Adapter Quick Installation Guide 3
Page 8
Installation Steps
3. When fully inserted the PC Card antenna and LED
protrudes as shown below.
4. If the power to the computer is off, turn the power on.
5. The computer automatically assigns resources to the
adapter and displays a wizard for the driver software.
If You Are Running Microsoft Windows CE
Make sure that the Windows CE device has the hardware
capability to accommodate a Type II PC Card. You do not need
to insert the card into the Windows CE device yet.
Obtain the following information from your network
administrator. You need this information to complete the
installation.
• Network Name (SSID)
• Encryption Mode Open / 40-bit / 128-bit
• Encryption Keys if Encryption Mode is 40-bit or 128-bit
• Encryption Key Number (1, 2, 3, or 4)
• DHCP (Yes / No)
• IP Address if the DHCP setting is No
• Subnet Mask
• Default Gateway Address
• Primary DNS Server Address
• Secondary DNS Server Address
• Primary WINS Server Address
• Secondary WINS Server Address
4 Intel® PRO/Wireless 2011B LAN Adapter Quick Installation Guide
Page 9

Installation Steps
Step 4: Install the Adapter Driver Software
Before You Start
In this step, you install the driver software for the adapter. The
driver software allows the operating system to recognize the
hardware. This software is different from the Intel® PRO/
Wireless 2011B LAN Software that you will install later.
Make sure that you know what operating system you are
running. The instructions differ for each operating system.
If you are running Windows CE, make sure that the Windows
CE device is communicating with a desktop computer through
synchronization software. If it is not already installed, install it
now and make sure that it is working properly. Refer to the
documentation that is shipped with the Windows CE device.
During the driver installation, the wizard asks you for the
Network Name (SSID). You may also see the term ESSID. For
more information, see the first section in this guide. Before
continuing, obtain the appro priate Networ k Name (SSID) from
your network administrator.
At this point, the hardware is installed and a wizard screen
should display. If your computer recognizes the hardware and
the new hardware wizard does not display, either one of the
following is true:
• The latest version of the driver software is installed. Skip
this step and go to step 5.
• A previous version of the driver software is installed. In
this case, you must remove it first and return to step 2 in
this guide. For instructions on how to remove the previous
version, insert the Intel CD, click
Intel® PRO Network Connections window, and select
PRO/Wireless 2011B LAN Adapter.
If you are not sure, contact your network administrator.
View User Guides in the
Intel® PRO/Wireless 2011B LAN Adapter Quick Installation Guide 5
Page 10

Installation Steps
If You Are Running Microsoft Windows XP
1. The Found New Hardware Wizard begins. Do NOT click
Next yet. Verify that
(Recommended) is checked.
Automatic sea rch for a better drive r
2. Insert the Intel CD in the CD-ROM drive. The Intel® PRO
Network Connections w indow displays . Disregard thi s
screen for now and click the wizard screen.
3. Windows XP installs the driver. The adapter’s properties
dialog box displays. Click
Close to use the default profile
and continue with the installation.
4. You can configure the adapter later on with either
Windows XP or Intel PROSet II. However, if you want to
configure the adapter at this point, click the
and type in the SSID for your wireless network.
5. The Found New Hardware dialog box displays again
stating Windows has finished installing the software
required for this device. Click
Finish.
If You Are Running Microsoft Windows 2000
1. Insert the Intel CD in the CD-ROM drive. The Intel® PRO
Network Connections w indow displays . Disregard thi s
screen for now and click the wizard screen.
Setting tab
2. When the
Found New Hardware Wizard begins, follow
the wizard prompts and make sure that you select the
Search for a suitable driver for my device button.
3. Enter the SSID for the network in the
window. Click
4. The
Found New Hardware dialog box displays again
OK.
Easy Setup
stating Windows has finished installing the software
required for this device. Click Finish.
If You Are Running Microsoft Windows 98
1. Insert the Intel CD in the CD-ROM drive. The Intel® PRO
Network Connections w indow displays . Disregard thi s
screen for now and click the wizard screen.
2. When Windows 98 recognizes the adapter, the
Hardware Wizard begins. Follow the wizard prompts and
6 Intel® PRO/Wireless 2011B LAN Adapter Quick Installation Guide
Add New
Page 11

Installation Steps
make sure that you select the Search for best driver for
your device
.
3. Enter the Network Name (SSID), also called ESSID, for
the network in the Easy Setup window. Click OK.
4. When prompted, restart the computer.
If You Are Running Microsoft Windows ME
1. Insert the CD-ROM in the CD-ROM drive. The Intel®
PRO Network Connections window displays. Disregard
this screen for now and click the wizard screen.
2. When Windows ME recognizes the adapter, the
Hardware Wizard begins. Follow the wizard prompts and
make sure that you select the
driver
and Specify the best driver for your device
checkbox. Enter the SSID for the network in the
Setup window. Click OK.
3. Click
Finish.
4. When prompted, restart the computer.
If You Are Running Windows NT
Before starting the driver installation, make sure that WinNT
Service Pack 6 and CardWizard 5.0 is installed and that
network services or properties are not set up. Also, make sure
that you have the Microsoft Windows NT Setup CD and the
Microsoft Windows Service Pack CD ready.
1. If the computer is already on, reboot. Otherwise, turn on
the computer .
2. The Wizard displays. Click
3. The CardWizard for Windows NT dialog box displays.
Click OK.
Add New
Specify the location of the
Easy
Correct.
Intel® PRO/Wireless 2011B LAN Adapter Quick Installation Guide 7
4. When prompted to install Windows NT Networking, click
Yes.
5. The next Wizard window displays. Click
Next.
Page 12

Installation Steps
6. The next Wizard window displays. Click Select from
list..
.
7. The Select Network Adapter dialog box displays. Click
Have Disk.
8. Insert the Intel CD.
9. Type in the path to the CD-ROM drive followed by the
directory “Wireless\Winnt”. Click
10. Select
11. Click
Intel(R) PRO/Wireless LAN 3.3 volt PC Card.
Click
OK.
Next. The next Network Setup Wizard window
OK.
displays.
12. Click Next again.
13. Click
14. Click
Next again.
Next again.
15. Remove the Intel CD and insert the OEM CD.
16. Type in the path to the \I386 system folder on your OEM
CD.
17. The Intel PRO/Wireless LAN Easy Setup window
displays. Enter the Networ k Name(SS ID) of your wi reless
network.
18. Click
19. Click
20. Click
OK. When prompted about TCP/IP configuration,
click
Yes.
Next.
Next again.
21. Enter Workgroup or Domain information, if necessary.
Click
Next.
22. Click
Finish to end the wizard. Click Yes to reboot the
computer and remove any boot floppies or CDs.
23. Reinstall Service Pack 6.
If You Are Running Microsoft Windows 95C
1. Insert the Intel CD in the CD-ROM drive. The Intel® PRO
Network Connections w indow displays . Disregard thi s
screen for now and click the wizard screen.
8 Intel® PRO/Wireless 2011B LAN Adapter Quick Installation Guide
Page 13

Installation Steps
2. When Windows 95 recognizes the adapter, the Hardware
wizard
begins.
3. Select
Next. Select it only once.
4. When the Hardware wizard is finished, select
Locations
. Enter the drive name for the CD-ROM drive
followed by the Win95 directory. Follow the prompts.
5. Enter the SSID for the network in the
window. Click
6. Click
Finish.
OK.
7. When prompted, restart the computer.
If You Are Running Microsoft Windows CE
1. Insert the Intel CD. The installation file is called Intel PRO
Wireless For PocketPC V1.0.exe and is located in the
Wireless/WinCE directory.
2. Double-click the installation file. The installation begins.
3. When the Installing Application dialog box displays, click
Yes. The installation program uses the default application
install directory.
4. When the Application Downloading Complete dialog box
displays, click
5. When the download from the laptop/desktop computer to
the Windo ws CE device is complete, the Easy Setup dialog
box displa ys.
OK.
Other
Easy Setup
Intel® PRO/Wireless 2011B LAN Adapter Quick Installation Guide 9
6. In the Easy Setup dialog box, enter the ESSID. This is also
called the SSID or Network Name.
7. If the Easy Setup dialog box does not display on the
Windows CE device, tap
PRO/Wireless Settings
Start, Settings, and then Intel
. This is another way to display
the Easy Setup di alog box.
8. Click the Advanced button. Select the tabs along the
bottom of the Intel WLAN Setup window to make changes
to the advanced settings. These settings include security
settings. For more information, refer to the Intel® PRO/
Wireless 2011B LAN User’s Guide. This guide is available
on the Intel CD or in the software package you
downloaded from the Intel support website. The tabs you
Page 14

Installation Steps
see here are the same tabs in the Network Control Panel
Applet (NCPA).
9. When you finish making changes, click OK to close the
application.
10. Insert the adapter and reset the Windows CE device. On
some devices, you are not prompted to reset the device.
However, for the adapter to function properly, you must
reset the device.
Step 5: Install Intel® PRO/ Wirel ess LAN Software
Before You Start
You launch the software installatio n from th e Intel CD. If you
do not have an Intel CD, go to the Intel support website at
http://support.intel.com and download the software
package.
Instructions for Windows XP
You can manage adapters through either Intel PROSet II or
Windows XP .
If you decide to manage your adapter s through Windows XP,
do not install the Intel PRO/Wireless LAN Software and do the
following.
1. Left-click the Windows XP Network icon in the System
Tray. This is typically in the lower right corner of your
computer screen.
2. Click the
3. Click the
4. Make sure that the
wireless network settings
Properties button.
Wireless Network ta b.
Use Windows to configure my
checkbox is checked.
If you decide to manage yo ur adapters through I ntel PR OS et II,
do the following.
1. Left-click the Windows XP Network icon in the System
Tray. This is typically in the lower right corner of your
computer screen.
2. Click the
3. Click the
Properties button.
Wireless Network ta b.
10 Intel® PRO/Wireless 2011B LAN Adapter Quick Installation Guide
Page 15

Installation Steps
4. Make sure that the Use Windows to configure my
wireless network settings
5. Follow the instructions below for installing the software
on a Windows 2000 system.
checkbox is NOT checked.
Instructions for Windows 98, Windows Me, and Windows
2000
1. If the Intel CD is in the CD-ROM drive, re-insert the CD
into the CD-ROM drive. Otherwise, insert the CD in the
CD-ROM drive. If you downloaded the software package
from the Intel support website, navigate to the directory
where the package is located and double-click the
autorun.exe file.
2. Click
3. Select either Typical or Custom.
• If you are NOT a network administrator, select
• If you are a network administrator, select Custom and
4. Follow the instructions on the wizard screens.
Install Drivers and Utilities in the Intel® PRO
Network Connections w indow.
Typical.
This option installs Intel PROSet II only.
select the Access Point Administration Tools. This option
installs both Intel PROSet II and the Administration Tools.
Instructions for Windows 95
Install the Intel® PlusPack Utilities. To install this software,
run the setup program.
If you have the Intel CD, the setup program is located in the
wireless\apps\win95\setup directory. If you downloaded the
software package from the Intel support website, navigate to
the directory of the software package and then to the
wireless\apps\win95\setup directory in that directory. Doubleclick setup.exe.
Step 6: Configure the Intel® PR O/Wireless 2011B
LAN Adapter
Before You Start
11 Intel® PRO/Wireless 2011B LAN Adapter Quick Installation Guide
In this step, configure the adapter.
Page 16

Installation Steps
If you are running Windows 95, configure the adapter with the
Intel® PlusPack Utilities.
If you are ru nning Windows 98, Windows ME, or Windows
2000, configure the adapter with
Intel® PROSet II.
If You Are Running Microsoft Windows 98, Windows ME,
or Windows 2000
1. Select the wireless adapter on the left side of the Intel®
PROSet II wind ow.
2. Select
Help from the Help menu and select the topic
Changing Network Settings.” Follow the instructions
“
for mobile and security settings.
If You Are Running Microsoft Windows 95
1. Click Start, select Settings, and then click Control Panel .
2. From the Windows 95 Control Panel, double-click
Network and select Intel PRO/Wireless LAN PC Card.
Click the
3. From the
Properties tab.
Easy Setup window, click the Advanced button
to view the adapter settings.
4. Use the NCPA Mobile Unit, Mobile IP, Encryption and
WLAN Adapter tabs to view or adjust the PC Card
configuration settings. For more information, refer to the
online hel p for
NCPA.
5. Restart the system for the changes to take effect.
6. Intel recommends that you update the firmware on the
adapter. To do this, run the
WLAN Update Utility. To
download the latest firmware, go to the Intel support web
http://support.intel.com).
site (
Step 7: Make Sure That the Adapter Is Working
12 Intel® PRO/Wireless 2011B LAN Adapter Quick Installation Guide
To see if the adapter is installed correctly, try going to a
popular external website like
www.yahoo.com. If the browser
reports an error, use the troubleshooting tips below.
If you do not have an internet connection, try pinging a device
on the network. If you are unfamiliar with pinging devices,
contact your network administrator.
Page 17

Installation Steps
With exception of a wired network connection, the Intel®
PRO/Wireless 2011B LAN Adapter is just like any mobile
wired adapter. In addition to standard troubleshooting
techniques for wired network adapters, try the following
troubleshooting tips:
• The Network Name (SSID) of all access point and/or
adapters must match. Make sure that they do.
• If you are using WEP encryption , the adapter mu st support
this option. The encryption keys for the access point and
adapter must match. Also, the key you selected must be
identical. You can select keys 1, 2, 3, or 4.
13 Intel® PRO/Wireless 2011B LAN Adapter Quick Installation Guide
Page 18

Installation Steps
14 Intel® PRO/Wireless 2011B LAN Adapter Quick Installation Guide
 Loading...