

Page 1

Page 2

welcome
Welcome to the Intel® Web Tablet. The tablet is designed to
give you and your entire family simple, portable, and personal
access to the Internet from any room in your home!
The tablet provides quick access to the Internet and email.
Each of the five home buttons along the top of the tablet can
be set up to provide a separate, customized web experience
for one of your family members.
Page 3

|
1
CONTENTS
WELCOME TO THE TABLET
Use it Everywhere in Your Home.................................2
Enjoy a Customized Web Experience .......................... 3
WHAT IS THE INTEL® WEB TABLET?
How Does the Tablet Work?........................................4
Privacy, Security, and Parental Control........................ 6
The Tablet as Part of an AnyPoint™ Wireless
Home Network.........................................................7
IDENTIFYING PARTS OF THE TABLET 8
OPERATING YOUR TABLET
Turning the Tablet On and Off ...................................10
Using the Button Bar................................................. 10
Knowing Who Is Using the Tablet..............................11
Checking the Wireless Signal Strength ......................11
Checking the Battery Charge..................................... 11
Typing with the Tablet ............................................... 11
Printing from the Tablet............................................. 12
Turning the Screen Saver On and Off........................ 12
Using the Tablet as an Electronic Picture Frame........ 12
GOING PLACES ON THE WEB
Using Your Home Page.............................................13
Going Places and Searching on the Web..................13
Using Email with the Tablet........................................ 13
Using the Tablet’s Info Center ...................................13
THE TABLET AND YOUR INTERNET CONNECTION
Always Connected vs. Dial-up Connection................ 14
Hanging Up the Phone Line.......................................14
Keeping Home Page Conten t Fres h....... ..... ..... .... .....15
Getting Automatic Software Updates......................... 15
TAKING CARE OF YOUR TABLET
Handling the Tablet ...................................................16
Cleaning and Maintaining the Touch Screen..............16
Cleaning and Maintaining the Hand Grips..................16
Caring for the Tablet’s Battery...................................16
Ordering Accessories and Replacement Parts........... 16
GETTING HELP
Online Help and Quick Tour.......................................17
Contacting Customer Support...................................17
Troubleshooting Usage Probl em s............................ ..17
INSTALLATION – SPECIAL CASES 19
Installi ng the Tablet and the AnyPoint™ Network
Drivers for the First Time......................................... 20
Installing the Tablet into an Existing AnyPoint™
Wireless Home Network.......................................... 23
Installing Additional Tablets........................................25
Removing and Reinstalling the Tablet PC Software....26
Troubleshooti ng Insta lla tio n Prob le ms.... ..... ...............28
PC AND KEYBOARD RE QUIREMENTS
PC Requirements......................................................29
Keyboard Requirements............................................ 29
Canada Compliance Statem en t
(Industry Canada).................................................... 29
INFORMATIONS SUR LA TABLETTE 31
INDEX 57
Page 4
2
| WELCOME TO THE TABLET
WELCOME TO THE TABLET
Congratulations on your purchase of the Intel® Web Tablet. We
believe this new device will revolutionize the way you use the
web at home. This product guide will help you learn about the
tablet, so read on and take a test drive.
Use it Every wher e in Your Home
The Intel Web Tablet is easy for everyone to use. Take the tablet
onto the veranda to surf the web while you sip iced tea on a
summer afternoon. Use the tablet in the TV room to browse
while you watch TV. Catch up on the latest news while you eat
breakfast at your kitchen table. Listen to a web radio station
while you relax in your room. The possibilities are endless, so
take the tablet with you wherever you may wander around
your home.
Top 10 Ways to Use The Intel Web Tablet
1 Set up a home page that you can go to anytime by pressing
your personal home button.
2 Look up local listings, then get more information on your
favorite show or sports team while you’re watching
television.
3 Surf the web on the tablet while someone else is surfing on
the PC.
4 Find a recipe, shop for groceries, and get tips on preparing a
special meal.
5 Research travel destinations and make travel arrangements.
6 Shop online for the perfect gift or that special something
you’ve been wanting.
7 Help your child research a school homework assignment by
searching the web and printing out the results.
8 Set up your favorite photos as the tablet’s screen saver, then
show them to family and friends.
9 Keep in touch by reading and sending email from the
comfort of your bedroom.
10 Enjoy listening to music on the web.
Page 5
WELCOME TO THE TABLET |
3
Enjoy a Customized Web Experience
The home buttons at the top of the tablet let you access personal
home pages for up to five family members. We encourage you
to select a home page that’s just right for you and to use your
web-based email from the tablet. Your home button lets you
access your personal favorites and browsing history as well.
Set up all five home buttons to create five different web
experiences.
Find Out Wh at’s New on the Tablet
Read the Insider News to discover all that’s new on the tablet.
You can have the newsletter sent to your email address or read it
anytime in the tablet’s Info Center.
Order Accessories
You can further enhance your Internet experience by visiting
www .shop- intel.com
to purchase a charging cradle or additional
tablets for your home, or to order a replacement battery
or stylus.
We want you to love your tablet. We hope it becomes an
important part of your morning ritual before you head off
to work and a way to relax and unwind in the evening.
The tablet provides a convenient, simple way for
everyone in your home to access the Internet.
For the tablet to meet your ever-changing needs, we have
designed it so that you will automatically receive new
features as they become available.
To ensure that we are providing you with the tablet
experience you want,
we want to hear from you!
Send us
email at
webtablet_feedback@intel.com
. Your product ideas
and suggestions will help us continue to enrich the tablet
experience. We take these ideas into consideration as we
plan new tablet features.
Page 6
4
| WHAT IS THE INTEL® WEB TABLET?
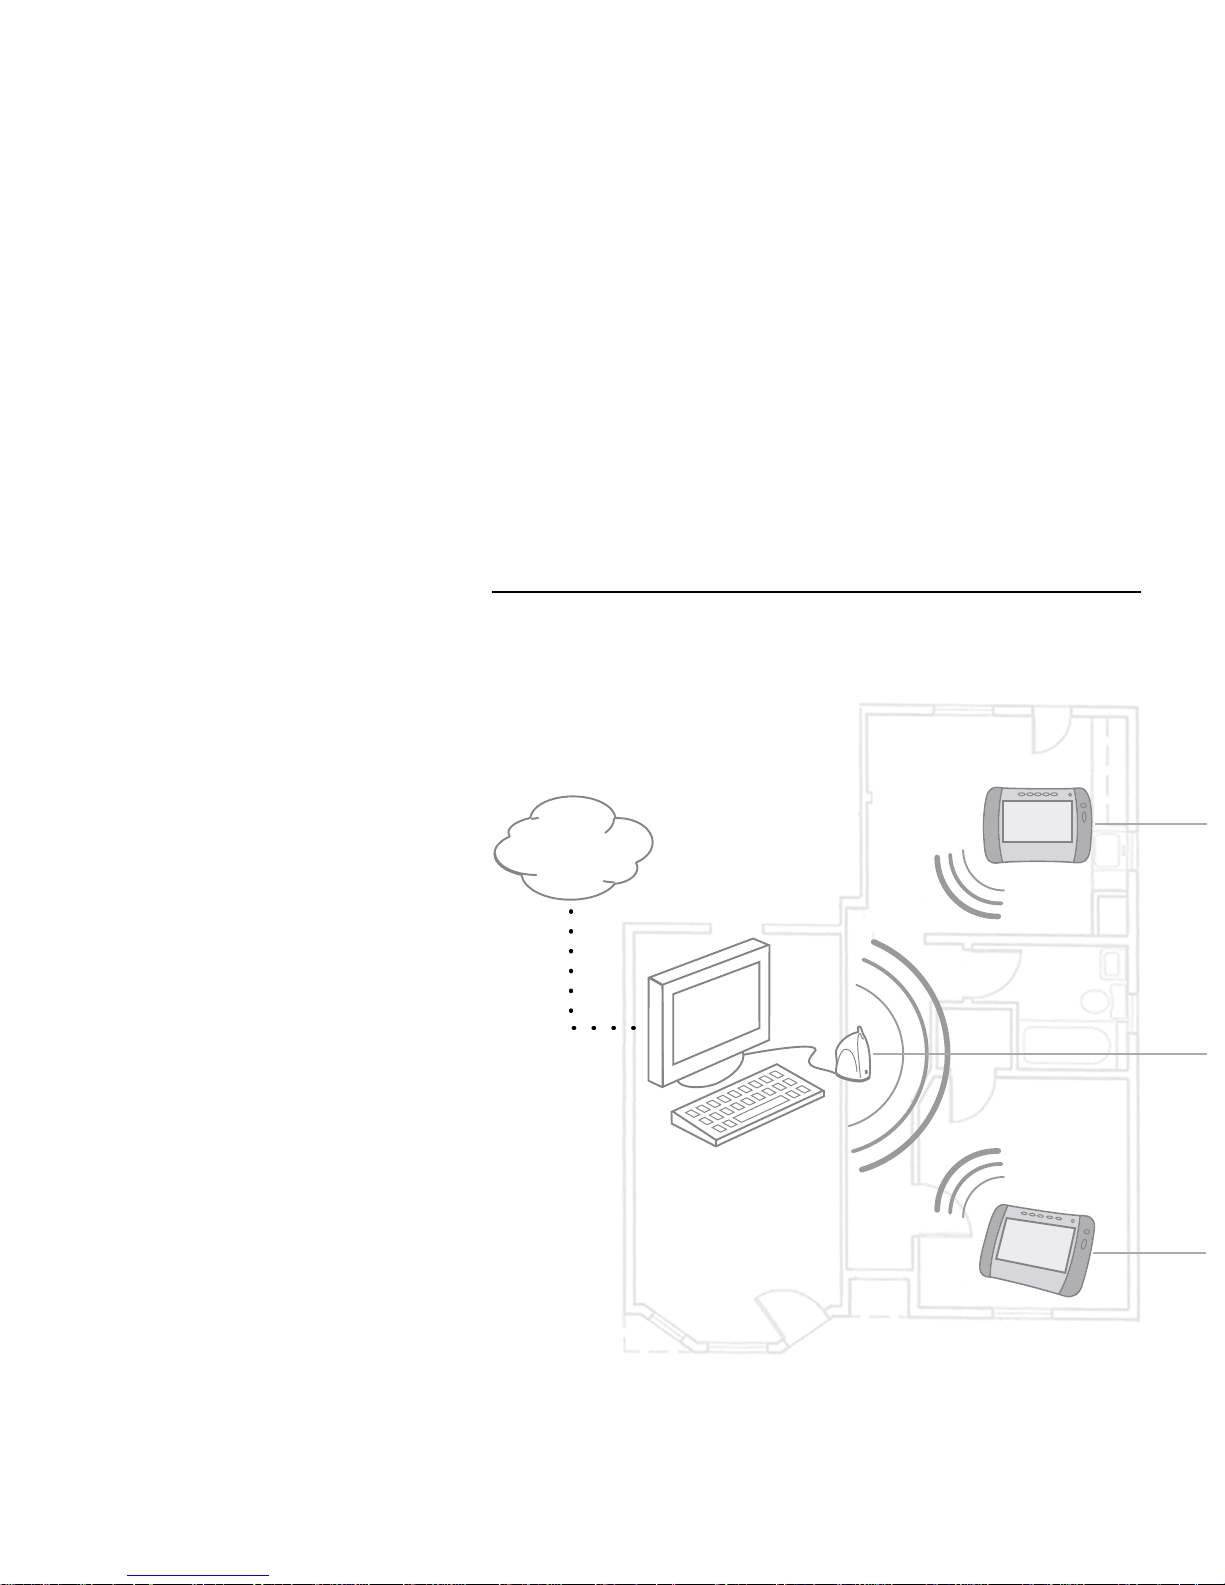
WHAT IS THE INTEL® WEB TABLET?
The Intel® Web Tablet is a portable,
wireless home electronic device that
lets you select a personal home page,
browse the web, and access email from
anywhere in your home.
The tablet connects to the Internet
through a PC and Internet connection
you already use. Using Intel
AnyPoint™ wireless home networking
technology, the tablet allows you the
freedom to surf the web from any room
in your home!
How Does the Tablet Work?
You install tablet software and an
AnyPoint Wireless Home Network
USB Adapter on an existing PC in
your home. Using HomeRF* wireless
networking technology, the tablet
communicates with the PC and shares
the PC’s Internet connection. This
means the PC must be turned on for
your tablet to work.
For information about setting up the
PC to communicate with your tablet,
see the Installation Poster or the
“Installation Instructions” chapter of
this guide.
Internet
Page 7

WHAT IS THE INTEL® WEB TABLET? |
5
Tablet Software on the PC
As part of the tablet installation process, you install tablet
software on the PC and set up how the tablet will share the PC’s
Internet connection. Whenever the tablet software is running on
the PC, you’ll see a small tablet icon in the icon tray in the lower
right corner of the Windows* desktop.
Using Your Tablet w ith the PC
The tablet software on the PC allows the tablet and the PC to
access the Internet at the same time, using just one Internet
connection. That means you can use the tablet to check your
stock portfolio while someone else is browsing their favorite
web sites on the PC!
After initial setup, use the Tablet Connection Wizard on the PC
if you need to make changes to the way your tablet connects to
the Internet. For example, run the wizard if you change your
Internet service provider (ISP) or the type of Internet service
you use. Use the wizard to change how often the PC connects to
the Internet to get fresh tablet content. You can access the Tablet
Connection Wizard from the Windows Start Menu on the PC or
by clicking the tablet icon in the icon tray at the bottom of the
Windows desktop.
Usin g Multiple Tabl e t s in Your Home
The tablet software on the PC supports up to five unique tablet
users at a time, allowing you to use more than one tablet
simultaneously in your home.
The PC is turned on and
the AnyPoint Wireless
Home Network Adapter
is connected to it. The
PC has an existing
Internet connection.
Note:
You can use the
PC to access the Internet
or run other software
while someone else uses
the tablet!
You turn on the tablet
and view your home
page for the latest news.
The PC automatically
connects to the Internet
and the tablet shares that
connection.
You use the tablet to
browse for information
about interesting topics
and events and then
decide to do some
shopping on the web.
Someone else turns on a
second tablet. The
wireless adapter picks up
the second tablet’s signal
and begins communicating
with it. The two tablets
and the PC all share the
same Internet connection.
Page 8

6
| WHAT IS THE INTEL® WEB TABLET?
Privacy, Security, and Parental Control
The Wireless Network Code
The Intel Web Tablet communicates with the PC using Intel
AnyPoint wireless home networking technology. The network
code that you create during tablet installation helps to deter
anyone from “listening in” on the wireless connection while you
browse. Only devices that use the same network code and are
within a certain proximity to each other can communicate over
the same wireless connection. You can change your network
code at any time using the Wireless Control Panel on the PC and
the network code setting on the tablet.
The network code that you create when you install the tablet
software onto the PC allows multiple tablet installations to exist
independently in a given area. The network code uses 24-bit
encoding that provides 16 million possible combinations.
Similar to the security code on a cordless phone, the network
code on the tablet greatly minimizes the likelihood of
interference from eavesdropping and other nearby tablets.
Secure Transactions
Many web sites use a special type of secure communication that
prevents unauthorized access to the information that is sent to or
from those sites. The tablet supports these types of secure
Internet transactions.
You’ll know you’re at a secure web site when a lock icon
appears in the button bar at the bottom of the tablet screen.
Internet Connection Security
The security of the connection between the PC and your ISP is
governed by your ISP. Read the information provided by your
ISP to learn about their security policies.
Proxy Settin gs for S ecu rity an d Pa r en ta l Con tro l
If the PC has a firewall set up through a proxy server, or if the
Internet browser on the PC uses a proxy server to connect to the
Internet or to enable parental control software, you can set up
the tablet to use the same proxy settings as your browser. Use
the Tablet Connection Wizard to enter proxy settings for the
tablet.
For more information about tablet proxy settings, click
Help
on
the Proxy Settings dialog box of the Tablet Connection Wizard.
For the latest information about tablet privacy, security, and
parental controls, go to
www .intel.com/home/web tablet/support
.
Page 9

WHAT IS THE INTEL® WEB TABLET? |
7
The Tablet as Part of an AnyPoint™ Wireless
Home Network
By purchasing the Intel Web Tablet, you’ve taken the first step
toward creating a wireless PC home network. The AnyPoint
Wireless Home Network USB Adapter that your tablet uses, in
conjunction with AnyPoint Wireless Home Network software
(sold separately), can be used to transform the tablet’s PC into a
home network server.
To create your own AnyPoint Wireless Home Network, you
must have one HomeRF AnyPoint Wireless Home Network
Adapter for each PC you want on your home network. In
addition, you must install the AnyPoint Wireless Home
Network software onto each PC.
Importan t:
If you already have an AnyPoint Wireless Home
Network, use its server PC as the tablet’s PC. Follow the
instructions in this manual for installing the tablet into an
existing AnyPoint Wireless Home Network.
To learn more about creating an AnyPoint Wireless Home
Network, go to
www .intel.com/anypoint
.
For information on tablet compatibility with other home
networking solutions, including the AnyPoint Phoneline Home
Network, check the Technical Issues available at the tablet’s
Info Center and at
www .intel.com/home/webtablet/suppo rt
.
Page 10
8
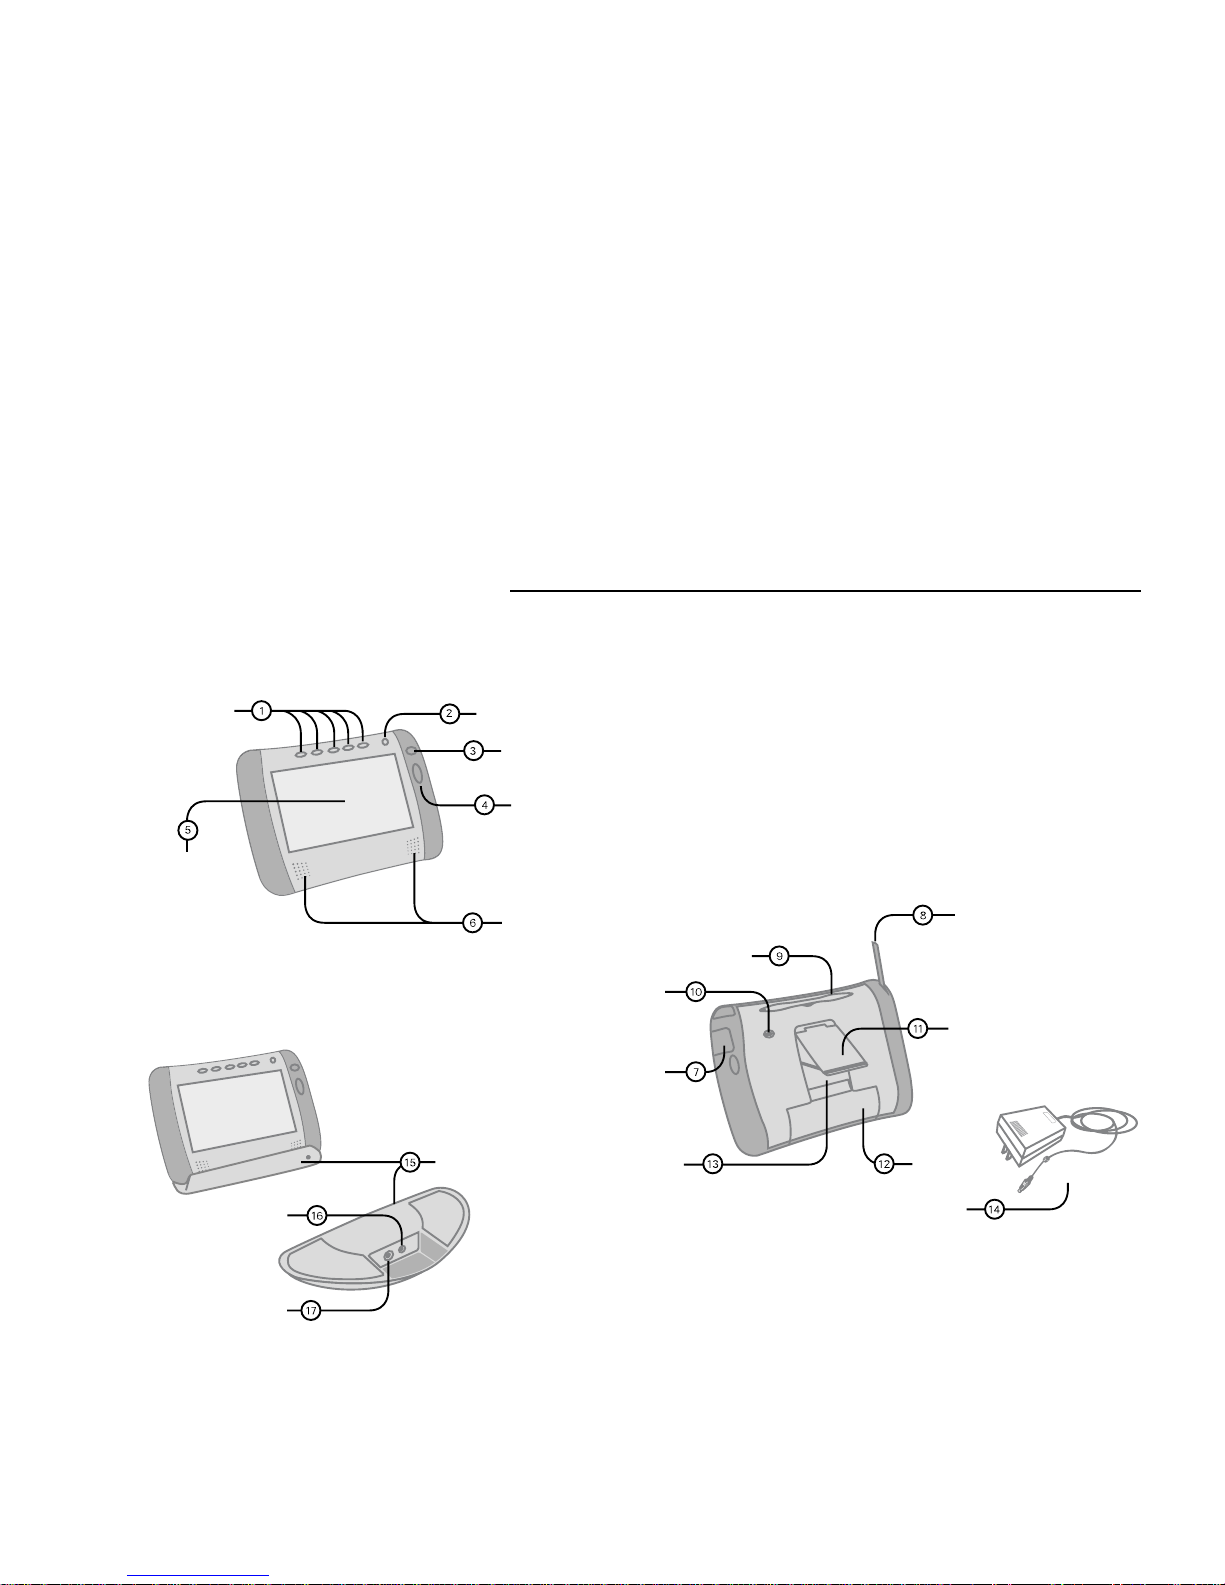
| IDENTIFYI NG PARTS OF THE TAB LET
• AC Power Jack
• Headphone Jack
Access Panel
Stylus Tether Anchor
Touch Screen
Home Buttons
Print Button
Back/Forward Button
Scroll Wheel
Speakers
Charging Cradle
Power Jack
PS/2 Keyboard Jack
Stylus
Antenna
Flip Stand
Battery
AC Power Adapter
Reset Button
IDENTIFYIN G PARTS OF THE TABLET
Front View
Back View
Optional Charging Cradle
(sold separately)
Page 11

IDENTIFYING PARTS OF THE TABLET |
9
The tablet has
home buttons
for up to five family members.
Use your personal home button to turn on the tablet and go
directly to your personal home page. You can make any
web page your home page. If the tablet is already on, your
home button returns you to your home page.
Use the
print button
to print the displayed page.
Use the
back/forward button
to view web pages that you
visited recently.
Use the
scroll wheel
to move the current web page up and
down for viewing.
Use the
touch scre en
to interact with web pages by
touching the screen with the stylus or your finger.
Use the tablet
speakers
to listen to audio on the web.
Open the
access panel
to use the
AC power jack
or
headphone jack
.
Raising the
antenna
may improve your tablet’s ability to
send and receive signals in your home.
Use the
stylus
to interact with the touch screen.
Use the
stylus tether anchor
if you want to keep the stylus
with the tablet by attaching the stylus tether.
Use the
flip stand
to keep the tablet upright when using the
tablet on a table.
Use a screwdriver to remove the rechargeable
battery
if you
need to replace it.
Use the stylus to press the
reset button
if you need to reset
the tablet.
The
AC power adapter
provides electrical power for
charging the tablet and for using a hardware keyboard with
the optional charging cradle. It allows you to use the tablet
while it is plugged into an electrical outlet instead of using
the tablet battery. To plug the AC power adapter into the
tablet, open the access panel (7) and plug the adapter into
the AC power jack.
The optional
charging cradle
(sold separately) is an
accessory that acts as a stand and as a power source for your
tablet. It allows you to use a hardware keyboard with the
tablet.
Use the cradle
power jack
to plug the AC power adapter
into the charging cradle, so the tablet’s battery can charge
while the tablet is resting in the cradle.
Use the cradle
keyboard jack
to plug in a standard PS/2
keyboard for use while the tablet is in the cradle.
1
1
1
2
1
3
1
4
1
5
1
6
1
7
1
8
1
9
1
10
1
11
1
12
1
13
1
14
1
15
1
16
1
17
Page 12

10
| OPERATING YOUR TABLET
OPERATING YOUR TABLET
Turning the Tablet On and Off
Turn the tablet on by pressing your home button. Each of the
five home buttons at the top of the tablet turns the tablet on and
takes a family member to their home page in a single button
press. (If you have not yet set up your own home button, press
one that no one else is using and set the home page you want.)
The tablet turns itself off after a period of inactivity. If you want
to turn the tablet off immediately, touch
controls
on the bottom
of the screen and then touch
turn tablet OFF
. You can also turn
the tablet off by pressing the purple home button and the print
button at the same time.
Using the Button Bar
The button bar appears at the bottom of the tablet screen. Use
the button bar to access tablet functions, open tablet panels, and
go places on the web. When a web page is loading, an indicator
shows the progress of the page as it loads.
Note:
The tablet’s browser controls may be updated over time.
Look up the latest information on how to use the button bar and
other tablet features in the online User Guide, available in the
tablet’s Info Center.
What You Can Do from the Button Bar and Tablet Panels
web•search
Open the web•search panel to go to a specific web
address (URL) or check your current location.
Type a phrase and touch
search the w eb
to search
for information. Come here to access your
browsing history, web-based email, or the tablet’s
Info Center, and anytime you want to change your
home page or email sign-in page.
favorites
Go to your list of favorites.
add
Open the favorites panel to add the current web
site to your list of favorite web sites.
stop and
reload
Stop the current web page from loading and reload
(refresh) the current web page.
controls
Open the control panel to control physical
functions of the tablet (such as screen brightness,
speaker volume, touch screen accuracy), check the
tablet’s signal strength and battery charge, turn the
screen saver on or off, and turn the tablet off.
?
Use the ? button to get help on using the tablet and
link to the Info Center for more information.
horizontal
scro ll a r ro w s
Move a web page right or left on the screen.
(Scroll arrows appear only when needed.)
on-screen
keyboard
When you want to type, touch a text box to bring
up the on-screen keyboard.
Look at the… to…
progress
indicator
View the loading progress of the current web
page.
lock icon
See whether the current web site is a secure site.
Page 13

OPERATING YOUR TABLET |
11
Knowing Who Is Using the Tablet
You can tell at a glance which family member is using the tablet
by checking for their home button color. Each member’s home
button color is shown along the top edge of the button bar and in
the loading progress indicator.
Checking the Wireless Signal Strength
The signal strength indicator on the control panel lets you know
the strength of the signal that the tablet is receiving from the
PC’s wireless adapter. If the signal strength becomes too weak
(for example, you may be too far away from the wireless
adapter), the tablet cannot communicate with the PC. As the
signal gets weaker, browsing performance may slow or stop
entirely. Moving closer to the wireless adapter and raising the
antenna may improve reception.
Checking the B attery C ha rge
The battery power indicator, also on the control panel, lets you
know how much power is available in your tablet’s rechargeable
battery. When the battery charge level becomes low, a warning
message appears indicating that you should recharge the battery.
To recharge the battery, open the tablet’s access panel and
connect the AC adapter to the AC power jack. If you purchased
an optional charging cradle, connect the AC adapter to the
charging cradle and then set the tablet into the cradle. It takes
approximately six hours to fully recharge the battery.
You can continue to use the tablet while it is charging.
Typing with the Tablet
The on-screen keyboard is available whenever you need it.
When you want to type information in a text box, touch the text
box with the stylus or your finger to bring up the on-screen
keyboard.
If the keyboard doesn’t appear when you touch a text box, touch
controls
on the button bar, then touch the
show keyboar d
button.
The on-screen keyboard is similar to a standard PC keyboard.
Letters and numbers are in the same location; however, web
shortcut keys and commonly used web symbols have been
added. Special characters and symbols are available when you
touch the
symbols
key.
To type an upper-case letter, touch the
shift
key and then the
letter you want, or touch
caps lock
to keep the upper-case
keyboard displayed while you type several letters.
If you purchased an optional charging cradle, you can use a
more conventional method of typing by plugging a standard
0.5-amp (or less) PS/2* keyboard into the cradle keyboard jack.
Place the tablet into the charging cradle and begin typing. You
must connect the charging cradle to AC power when you use an
attached keyboard. When the PS/2 keyboard is connected, the
on-screen keyboard does not appear automatically.
Note:
If your hardware keyboard has special/shortcut keys (such
as Internet shortcut keys and function keys), they will not work
with the tablet.
Page 14

12
| OPERATING YOUR TABLET
Printing from the Tablet
You can print a web page from your tablet by pressing the print
button on your tablet. The tablet sends the page that is currently
on the tablet screen to the PC’s default Windows printer. No
additional setup is required.
Turning the Screen Saver On and Off
If you turn the screen saver feature on and then turn the tablet
off while it is connected to AC power, the tablet displays a
screen saver image.
To turn the screen saver feature on or off, touch
controls
on the
button bar, then touch the
screen saver
on/off button.
Using the Tablet as a n E lectronic Picture Frame
You can turn your tablet into an electronic picture frame when
the tablet is not in use but connected to AC power. Display the
tablet on your kitchen counter or in the family room with your
favorite photos on the screen. See a new picture every few
seconds.
Requirem ents
To be displayed, pictures must use JPEG or GIF format and be
200 KB or less in size (or contain less than 1 million pixels).
Larger files and other file types will not display.
Making Your Pictures Available to the Tablet
To make your pictures available for display, copy them to your
tablet’s PC in the
screensaverpictures
subfolder of the Web
Tablet folder.
If you did not change the location when you installed the tablet
software, copy your files to the following folder:
C:\Program Files\Intel\W eb Tablet\screensaverpictures
Displaying Y o ur Pictur es on the Tablet
Your pictures will replace the screen saver image normally
displayed when you have the tablet’s screen saver feature turned
on and the tablet is off but charging.
To make sure the tablet’s screen saver is turned on, press your
home button, touch the
controls
button on the button bar, then
touch the
screen saver
button until it shows on.
Now, whenever the tablet is turned off and connected to AC
power to recharge its battery, your pictures will be shown on the
tablet.
T urning Of f the Picture Fra me Fea tur e
Remove all pictures from the
screensaverpictures
folder. Then
the default screen saver image will be used instead of your
pictures.
Page 15

GOING PLACES ON THE WEB |
13
GOING PLACES ON THE WEB
Using Your Home Page
Each of the home buttons at the top of the tablet lets you set up a
personal home page. There are five home buttons, so you can set
up a different home page for up to five family members. Just
press your home button anytime to go to your home page. The
information you see on your home page is updated periodically
throughout the day to keep it current and accurate.
Initially your home page is the tablet’s Info Center, but you can
change to any home page you like, at any time. Touch
web•search
on the button bar, then the
change
button for
my
home page
.
Going Places and Searching on the Web
The tablet puts the web right at your fingertips, with lots of ways
to get around.
Use your favorites list to keep track of your favorite web sites so
that you can easily return to them.
• To add the current page as a favorite, touch
add
on the
button bar.
• To view your favorites list, touch
favorites
on the button
bar, then touch an entry in your list to go there.
Touch
web•search
on the button bar for the navigation tools
available on the web
•
search panel.
• To go to a specific web address, type the address (URL),
then touch the
go to web s ite
button or the
enter
key on the
keyboard.
• To search for information, type a search word or phrase,
then touch the
search the web
button.
• To return to web pages you have visited, touch
my history
,
then touch an entry in the history list to go there.
Using Email with th e Tablet
The tablet provides easy access to an existing web-based email
account for each home button, from the
my email page
button
on the web
•
search panel. Web-based email is accessible through
a web browser like Netscape* or Internet Explorer*. If you
already have web-based email, you can set up the tablet to easily
access your account by touching
web•search
on the button bar,
then the
change
button for
my email page
.
If you are using Microsoft* Outlook*, Eudora*, or Netscape
mail, you probably aren’t using web-based email but POP3 mail
instead. In this case, you will need to sign up for web-based
email to access email from the tablet. Check with your email
provider to see if you can access their POP3 mail through a webbased account. Some providers offer this service for free.
Using the Tablet’s Info Center
The tablet’s Info Center provides a wealth of information for
tablet users, including an online User Guide and Quick Tour, the
latest Insider News newsletter, Frequently Asked Questions
(FAQs), and easy access to ordering tablet accessories.
You can go to the Info Center anytime by touching the
info
center
button on the web•search panel. You can also get there
by touching the
?
(help) button on the button bar, then the Info
Center link on the help page.
Note:
The tablet’s browser controls may be updated over time.
Look up the latest information in the online User Guide.
Page 16

14
| THE TABLET AND YOUR INTERNET CONNECTION
THE TABLET AND YOUR INTERNET CONNECTION
Always Connected vs. Dial-up Connection
The tablet uses the PC to connect to the Internet. With today’s
technology, people have a number of options for accessing the
Internet. These include:
• Always connected (cable and most DSL)
• Dial-up connection (phone line and satellite)
Always Connected
With a persistent connection, the tablet use does not interfere
with your family’s use of the phone line. The PC is always
connected to the Internet. Data transfer rates are considerably
faster than those of traditional analog phone line connections.
This is the ideal connection type for the tablet.
Note:
Some DSL providers dial up to the Internet instead of
staying connected. In these situations, configure your tablet to
use a dial-up connection.
Dial-up Connection
With a dial-up connection, the PC must dial the number to your
ISP (Internet Service Provider) to access the Internet. If you
have a dedicated phone line for the PC, accessing an open phone
line is not an issue. However, if the PC shares a phone line with
the rest of your household, you cannot use the tablet and the
phone at the same time.
Hanging U p the P hone Line
Important! Please read this if you access the Internet
using the same phone line as your telephone or fax
machine.
If the tablet initiates a dial-up Internet connection, you can hang
up the phone line from the tablet. Otherwise, hang up the phone
line from the PC.
Hanging Up the Phone from the T ablet
1 Touch the
controls
button on the button bar to open the con-
trol panel.
2 Touch the
turn tablet OFF
button.
3 At the PC, a warning message appears indicating that the
dial-up connection is about to be ended.
4 Wait a few seconds and the PC will automatically
disconnect, or click
Disconnect Now
on the PC to hang up
the phone line.
Hanging Up the Phone from the PC
1 At the PC, check the icon tray in the lower-right
corner of the screen for your ISP’s connection icon.
2 Right-click the icon, and select
Disconnect
.
Note:
This procedure works for most dial-up networking (DUN)
software and America Online* (AOL). If this procedure does
not work on your PC, check your ISP documentation for
information about disconnecting a dial-up session.
In case of an emergenc y
, physically disconnect the phone
line from the PC by unplugging the phone line from the
wall or from the back of the PC.
!
!
Page 17

THE TABLET AND YOUR INTERNET CONNECTION |
15
Keeping Home Pa ge Content Fresh
When you press your home button to turn the tablet on, the
tablet displays a stored copy of your home page. This gives you
something interesting to read while you wait for your Internet
Service Provider (ISP) to establish a connection to the Internet.
Once that connection is made, you can refresh your home page
or go anywhere on the web.
The tablet uses your Internet connection periodically throughout
the day to get fresh copies of your family’s home pages. This
ensures that the information you see on your stored home page
is current when you turn on the tablet.
The tablet is initially set up to get fresh home page content three
times each day. When you set up the PC during tablet
installation, you can specify when and how often you want the
tablet to get fresh content, up to four times each day. You can
update these settings anytime by running the Tablet Connection
Wizard on the PC.
Note:
If the PC uses your phone line to connect to the Internet
and your dial-up connection is a toll call (metered or long
distance), you may want to change the frequency with which the
tablet refreshes its content.
Getting Automatic Software U pdates
The tablet is designed to check for tablet software updates
automatically, so that you always have the latest features
available to your tablet.
Software updates are usually performed overnight to reduce
possible inconvenience.
The PC must be on for the tablet to get the updates.
Page 18

16
| TAKING CARE OF YOUR TABLET
TAKING CARE OF YOUR TABLET
Handling the Tablet
Do not d rop the tablet.
The tablet’s touch screen contains a
glass element that may break when dropped or subjected to
a strong impact. Avoid placing the tablet where it may
accidentally fall to the floor (like on the edge of a counter).
When you use the tablet’s flip stand, make sure that it is
fully extended and locked.
Keep the tablet away from w ater.
The tablet is not
waterproof. Like any electrical device, keep the tablet
away from water and moisture to avoid possible injury to
yourself and permanent damage to the tablet.
Avoid exposing the tablet to temperature extremes and
direct sunlight for long periods of time.
Extreme
temperatures and long-term exposure to the sun can cause
the tablet’s touch screen to become dark and eventually
stop working.
Cleaning and Maintaining the Touch Screen
Avoid scratching your tablet’s touch screen.
Use the provided
stylus or other plastic-tipped pens intended for use with a touchsensitive screen, or use your finger. Never use an actual pen or
pencil or other sharp object on the surface of the tablet.
Keep the touch screen clean.
Use a soft cloth to clean the
screen. If necessary, dampen the cloth with a diluted windowcleaning solution to clean the touch screen. Never spray the
tablet directly with any liquid or foam cleaners.
Cleaning and M aintaining th e Hand Grips
The soft material used for the hand grips on the sides of your
tablet is designed to enhance durability and feel. Because of its
soft nature, it may show scratches and blemishes. To restore the
hand grips, use De-Solve-It* or a similar cleaner on a soft cloth
and gently rub out blemishes. Never spray the tablet directly
with any liquid or foam cleaners.
Caring for the T ablet’s Battery
The tablet comes with a rechargeable lithium ion battery. When
fully charged, your tablet’s battery provides several hours of
constant use. When not in use, your tablet’s battery stays
charged for over six days. For tips on maximizing the length of
each charge, see the online User Guide, available in the tablet’s
Info Center.
When you're not using the tablet, keep it plugged into AC power
so that the battery will be fully charged the next time you use it.
You cannot overcharge the tablet’s battery by leaving the tablet
plugged in.
It takes approximately six hours to completely charge a fully
depleted battery. You do not need to fully charge the batteries
for your tablet to work. You also do not need to fully deplete the
battery to gain the maximum effectiveness of the tablet’s
battery.
While the battery is designed for years of average use, it may
eventually need to be replaced. Do not dispose of the battery in
your trash. Please recycle the battery in accordance with your
local recycling guidelines.
Ordering Ac c es s ories and Replacement Parts
You can order charging cradles, additional tablets, and
replacement parts, such as an additional stylus or battery, online
through the tablet’s Info Center
or at
www.shop-intel.com
.
!
!
!
Page 19

GETTING HELP |
17
GETTING HELP
Online Help and Quick Tour
If you have questions regarding your tablet, use the tablet’s
online
Info Center.
At the Info Center, you’ll find a variety of
information, including:
• A Quick Tour of the tablet.
• An online User Guide containing topics on how to use the
tablet and perform tablet tasks.
• Answers to our customers’ most frequently asked questions
and information about technical issues.
Type a search word or phrase in the help box at the top of Info
Center pages to get help on a specific topic.
To access the Info Center from the tablet, touch
web•search
on
the button bar, then the
info center
button. Or touch the ? (help)
button, then the Info Center link.
If you can’t get to the Info Center on the tablet, go to the PC,
click the tablet icon in the icon tray at the bottom of the
Windows* desktop, and then select Help. Or use your PC
Internet browser to go to:
www .intel.com/home/web tablet/support
To learn more about a specific tablet panel, touch the ? (help)
button on the panel. This help provides information about the
features that are available on that panel, with a link to the Info
Center for more information.
Contacting Customer Support
Our customer support team wants to hear from you.
Tou ch the
Contact Us
link at the bottom of tablet Info Center
pages to send your ideas and suggestions or to submit a problem
report. You can also contact our customer support group at:
www .intel.com/home/webtablet/support
or call us toll free at 1 (877) 777-2203.
Troubleshooti ng Usage Problems
Low or Bad Wireless Signal
Distance from the PC’s wireless adapter and interference from
household appliances (cordless phones, microwave ovens,
remote controls) are the most common reasons for low or bad
signals. To achieve a stronger signal, try the following:
• Move the tablet closer to the PC.
• Raise the tablet’s antenna.
• Change the location of the PC’s wireless adapter – move it
to a high point, like a shelf.
• Rotate the PC’s wireless adapter to different positions.
• Move the location of the appliance that is causing the
interference or turn the appliance off.
Page 20

18
| GETTING HELP
Low Battery
A low battery warning message indicates that the charge in your
tablet’s battery is running low.
To recharge the battery, open the tablet access panel and
connect the AC adapter to the AC power jack. If you purchased
an optional charging cradle, connect the AC adapter to the
charging cradle and then set the tablet into the cradle.
It takes approximately six hours to fully recharge the battery.
You can continue to use the tablet while it is recharging.
Keyboa rd or Touch Scr ee n No t Resp onding A cc urately to Touch
If you touch the screen at one spot, but the tablet responds as if
you touched somewhere nearby (for example, you touch a key
on the keyboard and get no response or a different letter than
you expected, or you touch a web-page link but the tablet acts as
if you touched a nearby link), you may need to adjust the screen
accuracy. To adjust your touch screen, touch the
controls
button
to open the control panel, and then touch the area labeled
touch
here to adjust screen accuracy
.
Note:
If you cannot open the control panel from the button bar,
press the forward button and the print button at the same time to
begin adjusting the touch screen accuracy.
Blank or Partially-Loaded Web Pages
If a web page does not display properly, touch the
reload
button
on the button bar.
Tablet Can’t Connect to th e PC
If the tablet can’t connect to the PC, you may be too far away
from the PC’s wireless adapter, or there may be something
wrong at the PC. Make sure that the PC’s wireless adapter is
securely plugged in and that the PC is turned on and logged on.
Make sure that the tablet software is running on the PC. Click
the tablet tray icon at the bottom of the Windows desktop, and
then select Status.
Additional Troubleshooting
For additional tablet troubleshooting information, go to the
tablet’s online information system, available in the Info Center.
Tou ch
web•search
on the button bar, then the
info center
button. Or touch
?
(help) on the button bar, then the Info Center
link. Use the links on the left side of the Info Center home page
or type a keyword into the help box at the top of the page.
If you can’t get to the Info Center on the tablet, go to the PC,
click the tablet icon in the icon tray at the bottom of the
Windows desktop, and then select Help. Or use your PC Internet
browser to go to:
www .intel.com/home/webtab let/support
Page 21
INSTALLATION – SPECIAL CASES |
19
INSTALLATION – SPECIAL CASES
Follow the instructions on the Installation Poster
to set up your
new Intel
®
Web Tablet. The poster contains all the information
you need to install the tablet software on your PC and set up the
tablet.
The Intel Web Tablet uses Intel AnyPoint™ wireless home
networking software to communicate with the web. Because
some homes may already have an AnyPoint Wireless Home
Network installed on their home PCs, tablet setup may differ
from household to household.
If the instructions on the Installation Poster that came with you r
tablet do not match your situation
, find the installation
procedure in this chapter that does, and follow those steps to
install the web tablet.
Important:
The PC on which you install the tablet software
must have a working Internet connection.
Troubleshooting Installation Problems
If you experience any problems during setup, refer to
the “Troubleshooting Installation Problems” section of
this guide on page 28 and check the Late-Breaking
News document that came in your product package.
For additional troubleshooting information, use your
PC Internet browser to go to
www.intel.com/home/
webtablet/support
or contact customer support toll free
at 1 (877) 777-2203.
Installing the Tablet and the An yPo int™ Netw o rk Drivers for the
First Time............................................................................. Page 20
Use this installation procedure if this is your first tablet and
you do not already have AnyPoint Wireless Home Network
software installed on your PC.
Installing the Tablet into an Existing AnyPoint™ Wireless Home
Network............................................................................... Page 23
Use this installation procedure if this is your first tablet and
you already have an AnyPoint Wireless Home Network
installed.
The tablet is not designed to be compatible with an
AnyPoint Phoneline Home Network. For details, check the
Technical Issues available in the tablet’s Info Center and at
www .intel.com/home/webtablet/support
.
Installing Additional Tablets............................................... Page 25
Use this procedure if you already have an Intel Web Tablet
and you are adding an additional tablet.
Removing and Reinstalling the Tablet PC Software........ Page 26
Use these procedures if you already installed the tablet
software on the PC, and you need to remove and/or reinstall
the software.
!
Page 22

20
| INSTALLATION – SPECIAL CASES
Installing the T ablet and the AnyPoint™ Network
Drivers for the F irst Tim e
Use the following steps if this is your first tablet and you do not
already have an AnyPoint™ Wireless Home Network installed
on your PC.
Begin Char ging the Tablet
1 Remove the plastic pull-tab from the battery case on the
rear of the tablet to activate the battery.
2 Plug the AC adapter into the wall. Open the tablet access
panel on the side of the tablet and plug the adapter into the
tablet’s AC power jack.
3 Leave the tablet connected to AC power so it can begin
charging while you complete the tablet setup. The entire
installation process takes approximately 45 minutes.
Note:
If you use the flip stand on the back of the tablet to keep
the tablet upright, make sure the stand is fully extended.
Install the Wire less Ad ap ter (O n the PC )
1 Shut down and turn off the PC.
2 Plug the AnyPoint adapter cable into an open USB port.
3 Turn on the PC.
4 After the PC starts up,
insert the Intel® Web Tablet Setup
CD into the CD-ROM drive
.
Install the Drivers (On the PC)
Important!
Do NOT click
Cancel
on ANY screen in the Add
New Hardware wizard.
1 When the Add New Hardware wizard starts, click
Next
to
begin installing the drivers.
2 Select
Search for the best driver for your device
and click
Next
.
3 If you are prompted for a drive, make sure the
CD-ROM
drive
check box is checked. Click
Next
twice to install the
drivers.
4 Click
Finish
.
5 If you are prompted to restart the PC, click
No
. You may be
asked to restart the PC more than once – click
No
each time.
6 On Windows* 98 systems, you may need to click
Finish
again.
Install the Tablet Software (On the PC)
After the drivers are installed, the Intel Web Tablet Setup screen
appears.
Note:
If the Intel Web Tablet Setup screen does not appear, open
My Computer
on your desktop. Double-click the CD-ROM
drive, and then double-click
setup.exe.
1 Click
Install
to begin installing the tablet software.
2 Follow the on-screen instructions to install the software.
Page 23

INSTALLATION – SPECIAL CASES |
21
Create a Netwo rk Code (O n the PC)
1 The Setup Wizard shows several screens and asks you to
create a network code. Use only numbers 0 through 7.
Write down the network code in the space provided below.
You will need this network code to set up the tablet.
For more information about creating a network code, click
Help
on the Setup Wizard screen.
2 Continue to follow the on-screen instructions.
• If the PC has more than one Internet connection, choose
the connection that you want to use with the tablet.
• If you are prompted for your Internet Service Provider
(ISP) password, enter and confirm the password that the
PC uses to connect to your ISP, and then click
OK
.
Restart Y o ur Computer
When you complete the Setup Wizard, you will be asked to
restart your PC.
1Click
Restart Now
to complete the PC setup.
2 When the PC restarts, you may receive a Windows logon
prompt.
• If so, do not click
Cancel
.
• Use your existing Windows logon.
• Or, if this is your first time logging on, type a User
Name but no Password and click
OK
.
3 When restart completes, you’ll see a Congratulations screen
that displays the network code you created.
4 Click
Finish
.
Note:
If you are an America Online (AOL*) customer
and you use AOL as your Internet Service Provider (ISP), you
must set your AOL preferences to store the passwords for your
AOL screen names. Do this before you continue with this
installation.
Return to the Tablet and Comple te the Insta llation
1 Return to the tablet and leave it connected to AC power
while you set it up.
2Touch
Continue
and follow the instructions on the tablet
screen.
3 When prompted for a network code, enter the network code
that you created on the PC and wrote down in the previous
section.
The tablet will reset when its setup process completes. This
could take some time.
Write your network cod e here :
Page 24

22
| INSTALLATION – SPECIAL CASES
Start Using the Tablet
After the tablet resets, you are ready to set up the home buttons
for each member of your family.
1 Press a home button.
The first person who presses a home button will be asked to
supply some additional tablet setup information.
2 Learn about tablet basics from the on-screen help. Take a
quick tour of the tablet to learn more or go directly to your
home page.
3 At the tablet’s Info Center (your initial home page), you can
set up a personal home page.
Each of your family members can repeat steps 1-3 to set up their
own home button.
Importan t!
We recommend that you leave the tablet plugged in
for 6 hours to completely charge the batteries for the first time.
You can use the tablet while it is charging.
Page 25

INSTALLATION – SPECIAL CASES |
23
Installing the Tablet into an Existing AnyPoint™
Wireless Home Network
Use the following steps if this is your first tablet and you already
have an AnyPoint™ Wireless Home Network installed.
Note:
The tablet is not designed to be compatible with an
AnyPoint Phoneline Home Network. For details, check the
Technical Issues available in the tablet’s Info Center and at
www .intel.com/home/w ebtablet/support
.
Begin Char ging the Tablet
1 Remove the plastic pull-tab from the battery case on the
rear of the tablet to activate the battery.
2 Plug the AC adapter into the wall. Open the tablet access
panel on the side of the tablet and plug the adapter into the
tablet’s AC power jack.
3 Leave the tablet connected to AC power so it can begin
charging while you complete the tablet setup. The entire
installation process takes approximately 45 minutes.
Note:
If you use the flip stand on the back of the tablet to keep
the tablet upright, make sure the stand is fully extended.
Install the Tablet Software on the Server PC
Important:
Because the tablet will use your existing Intel
AnyPoint wireless home networking software to
communicate with the Internet, you must install the tablet
software on your AnyPoint Home Network’s
server PC
.
If you purchased an Intel Web Tablet that includes a
wireless USB adapter, do NOT install the new adapter on
the server PC. The tablet will use your existing AnyPoint
Wireless Home Network’s adapter to communicate with
the PC.
1At the server PC,
insert the Intel® We b Tablet Setup CD into
the CD-ROM drive
.
2 From the Windows* desktop, open
My Computer
and
double-click the CD-ROM drive.
3 Double-click
setup.exe.
The Intel Web Tablet Setup screen
appears.
4 Click
Install
to begin installing the tablet software.
5 If you are using a version of the AnyPoint software that is
earlier than the one on the tablet’s Setup CD, you will be
asked if you want to upgrade.
• To continue with the tablet installation, you must click
Yes
. Setup will start the AnyPoint software upgrade.
• If the AnyPoint Internet Sharing Software (ISS) is
running, click
OK
when prompted to shut it down.
• When your PC restarts after the upgrade, continue with
the tablet installation. If the tablet setup program does
not restart on its own, repeat steps 2-4 above
.
Foll o w the on -screen instructions to ins ta l l t h e s oftware
1 The Setup Wizard shows several screens and displays your
existing AnyPoint network code.
Write down the network code in the space provided below.
You will need this network code to set up the tablet.
For more information about the network code, click
Help
on
the Setup Wizard screen.
Write your network cod e here :
!
Page 26

24
| INSTALLATION – SPECIAL CASES
2 Continue to follow the on-screen instructions.
• If the PC has more than one Internet connection, choose
the connection that you want to use with the tablet.
• If you are prompted for your Internet Service Provider
(ISP) password, enter and confirm the password that
this PC uses to connect to your ISP, and then click
OK
.
Restart Y o ur Computer
When you complete the Setup Wizard, you will be asked to
restart your PC.
1Click
Restart Now
to complete the PC setup.
2 When the PC restarts, you may receive a Windows logon
prompt.
• If so, do not click
Cancel
.
• Use your existing Windows logon.
• Or, if this is your first time logging on, type a User
Name but no Password and click
OK
.
3 When restart completes, you’ll see a Congratulations screen
that displays the network code.
4Click
Finish
.
Note:
If you are an America Online (AOL) customer
and you use AOL as your Internet Service Provider (ISP), you
must set your AOL preferences to store the passwords for your
AOL screen names. Do this before you continue with this
installation.
Return to the Tablet and Comple te the Installation
1 Return to the tablet and leave it connected to AC power
while you set it up.
2Touch
Continue
and follow the instructions on the tablet
screen.
3 When prompted for a network code, use the AnyPoint
network code that you found on the PC and wrote down in
the previous section.
The tablet will reset when its setup process completes. This may
take some time.
Start Using the Tablet
After the tablet resets, you are ready to set up the home buttons
for each member of your family.
1 Press a home button.
The first person who presses a home button will be asked to
supply some additional tablet setup information.
2 Learn about tablet basics from the on-screen help. Take a
quick tour of the tablet to learn more or go directly to your
home page.
3 At the tablet’s Info Center (your initial home page), you can
set up a personal home page.
Each of your family members can repeat steps 1-3 to set up their
own home button.
Important!
We recommend that you leave the tablet plugged in
for 6 hours to completely charge the batteries for the first time.
You can use the tablet while it is charging.
Page 27

INSTALLATION – SPECIAL CASES |
25
Installing Additional Tablets
Use the following steps if you already have an Intel® Web
Tablet installed in your home and you are adding a new tablet.
Note:
If you purchased an Intel Web Tablet that includes a
wireless adapter, do NOT install the new adapter on the PC. The
tablet will use your existing wireless adapter to communicate
with the PC.
Begin Char ging the Tablet
1 Remove the plastic pull-tab from the battery case on the
rear of the tablet to activate the battery.
2 Plug the AC adapter into the wall. Open the tablet access
panel on the side of the tablet and plug the adapter into the
tablet’s AC power jack.
3 Leave the tablet connected to AC power so it can begin
charging while you complete the tablet setup. The
installation process takes approximately 15 minutes.
Get Your Network Code Fr om the PC
1 At the PC, open the Windows* Control Panel, then double-
click the
Wireless Control Panel
icon. The Wireless Control
Panel dialog displays the network code in use on the PC.
2 Write down the network code in the space provided below.
You will need this network code to set up the tablet.
3 Close the Wireless Control Panel dialog.
Return to the Tablet and Comple te the Insta llation
1 Return to the tablet and leave it connected to AC power
while you set it up.
2Touch
Continue
and follow the instructions on the tablet
screen.
3 When prompted for a network code, use the AnyPoint
network code that you found on the PC and wrote down in
the previous section.
The tablet will reset when its setup process completes. After the
tablet resets, it is ready for use.
Important!
We recommend that you leave the tablet plugged in
for 6 hours to completely charge the batteries for the first
time.You can use the tablet while it is charging.
Access Your Home Page From the New Tablet
The home buttons on the new tablet will match the home buttons
on your existing tablet(s). Use the same home button on each
tablet to access your personal home page. For example, if your
home button is the green one, use the green button on any of
your tablets to access your home page.
Only one tablet can use a particular home button at any given
time. If you press a home button and someone is already using
that button on another tablet, you’ll receive a message notifying
you that another tablet is using that button.
Write your network cod e here :
Page 28

26
| INSTALLATION – SPECIAL CASES
Removing and Reinstalling the Tablet PC
Software
If the tablet software on the PC becomes damaged, you may
need to reinstall the tablet software. In some cases, you can
reinstall the software over the existing installation. In other
cases, you may need remove the software first, and then reinstall
a fresh copy.
Note:
Removing the tablet PC software will delete the home
page settings, favorites, and history for all five home buttons.
Remove the Tablet PC Software
1 At the PC, open the Windows*
Start
menu and select
Program s > Intel Web Tab let > Uninstall Tablet Software
.
The Remove Tablet Software dialog appears.
2 Select the software you want to remove:
• Make sure the
Remove Intel® Web Tablet software
check box is selected.
• You can remove the tablet’s audio player software or
leave it on your PC. To remove it, make sure the
Remove RealNetw orks* Re alPlayer*
check box is
selected.
3Click
Remove
. The PC will begin removing the tablet
software from the PC.
• If you are prompted to remove any shared files, click
Yes
.
• If you are notified that some files were not removed
because other programs may be using them, click
OK
.
4 When the software removal completes, click
Restart.
After the PC finishes restarting, use the following steps to
reinstall the tablet software.
Reinstall the Tablet PC Software
1 At the PC,
insert the Intel W e b Tablet Setup CD into the
CD-ROM drive
.
2 From the Windows desktop, open
My Computer
and
double-click the CD-ROM drive.
3 Double-click
setup.exe
. The Intel Web Tablet Setup screen
appears.
4 Click
Install
to begin installing the tablet software. Follow
the on-screen instructions to install the software.
The Setup Wizard shows several screens, and displays your
AnyPoint wireless home network code. This is the network
code that is currently set up on the tablet.
When you complete the Setup Wizard, you will be asked to
restart your PC.
5 Click
Restart Now
to complete the PC setup.
6 When the PC restarts, you may receive a Windows logon
prompt. If so, do not click
Cancel.
Use your existing
Windows logon.
7 When restart completes, you’ll see a Congratulations screen
that displays the network code.
8 Click
Finish
.
Page 29

INSTALLATION – SPECIAL CASES |
27
Reset the H o m e B utto ns
After you remove and reinstall the tablet software on the PC,
you’ll need to reestablish all the home buttons on the tablet.
Have each of your family members press their own home
button, set up their personal home page and email access, and
add web pages to their list of favorites.
As before, the first person who presses a home button will be
asked to supply some additional tablet setup information.
Page 30

28
| INSTALLATION – SPECIAL CASES
Troubleshooting Installation Problems
If You Exit Setup Before All Ste ps Are Completed...
If you exit Setup before all the installation steps are complete,
you can continue the installation later. To restart installation
later:
1 Place the Intel
®
Web Tablet Setup CD into your CD-ROM
drive.
2 At the Windows* desktop, go to
My Computer
and double-
click the CD-ROM Drive.
3 Double-click
setup.exe
.
If possible, Setup will begin at the point where you exited.
Follow the instructions on the screens to complete the setup.
If Setup Detec ts M or e than On e Ad ap ter on the PC ...
If you receive an error message telling you that the PC has an IP
address conflict, it means the PC has a network adapter with an
IP address that conflicts with the AnyPoint™ adapter’s IP
address.
The
Sugges ted IP information
box displays an alternate IP
address and Subnet mask for the AnyPoint wireless adapter.
• To accept the suggested address, click
Next
.
• To find a different IP address for the wireless adapter, click
the
Suggest New Address
button, and then click
Next
.
The Setup program will continue. Follow the instructions on the
installation poster or in this chapter to complete setting up the
tablet.
If Yo u R eceive Dial-up Netw ork ing Err ors...
If you receive the following error during setup:
“You have Dial-up Networking installed but it is not
configured to use any ISPs. Please configure Dial-up
Networking before running the connection wizard again.”
Do the following:
1 Follow the instructions from your Internet Service Provider
(ISP) to set up your PC Internet connection.
2 After the connection is set up and working, open the
Windows
Start
menu, and then select
Programs > Intel Web
Tablet > Tablet Connection Wizard
. The Intel Web Tablet
Connection Wizard appears.
3 Follow the directions on the Wizard screens to set up the
tablet to use your dial-up connection.
If Yo u Can no t Re ad the Text on the T a blet Sc r een...
If you have difficulty reading the tablet screen when you start
setting it up (before the standard controls for adjusting contrast
and brightness are available), you can adjust the touch screen
contrast at the beginning of tablet setup.
Do the following:
1 Make sure the tablet is displaying the first screen,
Welcome
to the Intel We b Tablet
.
2 Rock the back/forward button in succession – right to
increase contrast, left to decrease contrast.
Once you complete tablet setup, use the control panel to further
adjust contrast or brightness.
Page 31

PC AND KEYBOAR D R E QUIREMENTS |
29
PC AND KEYBOARD REQUIREMENTS
PC Requirements
We recommend the following minimum PC configuration to
work with your tablet:
• PC with a 200 MHz Intel
®
Pentium® processor performance
level or better
• 120 MB of available hard drive space
• 64 MB of RAM
• Sound card (to enable audio on the tablet)
• Windows* 98, 98SE, or Me* operating system
• An available USB port
• An established Internet connection, either dial-up or always
connected (broadband), with a minimum connection speed
of 56K
• Internet access through the provider of your choice
(although Internet access via free Internet providers may be
limited)
• Printer (to enable printing from the tablet)
Keyboard Requirements
If you purchased an optional charging cradle, you can use a
standard PS/2 keyboard with the tablet by attaching the
keyboard to the cradle. The keyboard that you attach must meet
the following requirements in order to work correctly with the
tablet:
• Connector type: PS/2
• Maximum current draw or consumption: 0.5 amps
Canada Co m pliance Statem ent
(Industry Canada)
This digital apparatus does not exceed the Class B limits for
radio noise emissions from digital apparatus set out in the
interference-causing equipment standard entitled: “Digital
Apparatus,” ICES-003 of the Canadian Department of
Communications.
To prevent radio interference to the licensed service, this device
is intended to be operated indoors and away from windows to
provide maximum shielding. Equipment (or its transmit
antenna) that is installed outdoors is subject to licensing.
Page 32

30
| PC AND KEYBOARD REQUIREMENTS
Page 33

INFORMATIONS SUR LA TABLETTE |
31
INFORMATIONS SUR LA TABLETTE
Bienvenue dans l’univers d’Intel® Web Tablet. La tablette a été
conçue pour vous offrir, ainsi qu’à toute votre famille, un accès
facile et personnel à Internet, et ce à partir de n’importe quel
endroit de la maison. Elle permet un accès rapide à Internet et
votre messagerie électronique. Chacun des cinq boutons
d’accueil situés sur la partie supérieure de la tablette peut être
configuré pour offrir une expérience Internet distincte et
personnalisée pour chaque membre de votre famille.
La tablette se connecte à Internet par le biais d’une connexion
Internet en cours sur un PC utilisant la technologie de
réseautique domestique Intel
®
AnyPoint™ (HomeRF*) pour
communiquer avec la tablette.
TABLE DES MATIÈRES
DE QUOI SE COMPOS E VOTRE TABLETTE
.................
32
VOTRE TABLETTE ET VOTRE CONNEXION INTERNET
..
34
COMMENT PRENDRE SOIN DE VOTRE TABLETTE
.......
35
ASSISTANCE
........................................................
37
INSTRUCTIONS RELATIVES À L’INSTALLATION
...........
39
CONFIGURA TION REQUISE
.....................................
50
GARANTIE ET ACCORD DE LICENCE D’INTEL WEB
TABLET
...............................................................
51
Page 34

32 | INFORMATIONS SUR LA TABLETTE
Panneau d'accès
• Alimentation
• Prise casque
Attache du stylet
Ecran tactile
Boutons d'accueil
Bouton d'impression
Bouton Précédente/Suivante
Molette de défilement
Haut-parleurs
Support rechargeur
Alimentation (jack)
Clavier PS/2 (jack)
Stylet
Antenne
Support rétractable
Batterie
Adaptateur d'alimentation
Bouton de restauration
DE QUOI SE COMPO SE VOTRE TABLETTE
Face avant
Face arrière
Support rechargeur optionnel
(vendu séparément)
Page 35

INFORMATIONS SUR LA TABLETTE |
33
La tablette présente des
boutons d’accueil
pour cinq
membres de la famille. Votre bouton d’accueil personnel
vous permet de mettre la tablette sous tension et d’accéder
directement à votre page d’accueil personnelle. Vous
pouvez transformer n’importe quelle page en votre page
d’accueil. Si la tablette est déjà sous tension, le bouton
d’accueil vous renvoie directement à votre page d’accueil.
Le
bouton d’impress ion
vous permet d’imprimer la page
affichée.
Le
bouton précédente /suivante
vous permet de visualiser
les pages Web que vous avez consultées récemment.
La
mo lette de défilement
vous permet de faire défiler la
page courante vers le haut ou vers le bas.
L’
écran tactile
vous permet d’interagir avec les pages Web
en touchant l’écran avec le stylet ou votre doigt.
Les
haut-parleurs
de la tablette vous permettent d’écouter
les contenus audio disponibles sur Internet.
Ouvrez le
panneau d’accès
pour accéder à la
prise d’ali-
mentation
ou la
prise de casque
.
Élevez l’
antenne
pour tenter d’améliorer la transmission et
la réception de signaux dans votre maison.
Le
stylet
vous permet d’interagir avec l’écran tactile.
Utilisez l’
attache du stylet
pour maintenir le stylet connecté
à la tablette à l’aide de l’attache fournie.
Utilisez le
support rétractable
pour maintenir la tablette en
position verticale lorsque vous l’utilisez sur une table.
Le cas échéant, vous pouvez retirer la
batterie
rechargeable
à l’aide d’un tournevis.
Vous pouvez restaurer la tablette en appuyant sur le
bouton
de restauration
à l’aide du stylet.
L’
adaptateur d’alimentation
fournit le courant électrique
nécessaire à la recharge de la tablette et à l’utilisation d’un
clavier externe. Il vous permet d’utiliser la tablette en la
branchant sur le secteur et d’économiser la batterie. Pour
brancher l’adaptateur sur la tablette, ouvrez le panneau
d’accès (7) et branchez l’adaptateur dans la prise
d’alimentation.
Le
support rechar geu r optionne l
(vendu séparément)
héberge la tablette et l’alimente en électricité.
Utilisez la
prise d’alimentation du support
pour brancher
l’adaptateur CA dans le support rechargeur et permettre à la
batterie de la tablette d’être rechargée pendant que celle-ci
repose sur le support.
Utilisez la
prise de clavier du support
si vous souhaitez
utiliser un clavier standard PS/2 lorsque la tablette est sur
son support.
1
1
1
2
1
3
1
4
1
5
1
6
1
7
1
8
1
9
1
10
1
11
1
13
1
14
1
17
1
15
1
16
1
12
Page 36

34 | INFORMATIONS SUR LA TABLETTE
VOTRE TABLETTE ET VOTRE CONNEXION INTERNET
Connexions p ermanentes ou connexions par
ligne comm u tée ?
La tablette se connecte à Internet via le PC. Les technologies
actuelles offrent plusieurs méthodes d’accès à Internet. Par
exemple :
• Connexions permanentes (câble et la plupart des
connexions DSL)
• Connexion par ligne commutée (ligne téléphonique et
satellite)
Connexions permanentes
Grâce à une connexion permanente, l’utilisation de la tablette
n’interfère pas avec l’utilisation du téléphone par votre famille.
Le PC est connecté sans interruption à Internet. Les débits de
données sont nettement supérieurs à ceux offerts par les connexions traditionnelles via une ligne téléphonique analogique. C’est
le type de connexion idéal pour la tablette.
Remarq ue :
Certains fournisseurs d’accès DSL se connectent à
Internet via le réseau téléphonique commuté au lieu de rester
connectés en permanence. Si c’est le cas pour votre fournisseur,
veuillez configurer votre tablette pour qu’elle utilise une connexion par ligne commutée.
Connexions par ligne commutée
Si vous utilisez une connexion par ligne commutée, votre PC
doit composer le numéro de votre FAI (fournisseur d’accès à
Internet) pour accéder à Internet. Si vous disposez d’une ligne
dédiée, vous n’aurez pas de problème pour accéder à une ligne
téléphonique ouverte. Cependant, si votre PC partage une ligne
téléphonique avec le reste de votre famille, vous ne pourrez pas
utiliser la tablette et le téléphone au même moment.
Arrêt d’une connexion commutée
Important ! Veuillez lire attentivement ce tte section si
vous accédez à Internet via la même ligne téléphonique
que votre téléphone ou téléco pieu r.
Si la tablette établit une connexion par ligne commutée, vous
pouvez arrêter la connexion à partir de la tablette. Sinon, vous
pouvez mettre fin à la connexion à partir du PC.
Arrêt d’une connexion à partir de la tablette
1 Pour ouvrir le tableau de commande, touchez le bouton de
commande
sur la barre de boutons.
2 Touchez le bouton
mise HORS tension
.
3 Sur le PC, un message vous avertit que la connexion
d’accès à distance va être interrompue.
4 Patientez quelques secondes pendant que le PC se décon-
necte automatiquement ou cliquez sur
Déconnecter ma in-
tenant
sur le PC pour arrêter la connexion manuellement.
Arrêt d’une connexion à partir du PC
1 Sur le PC, cherchez l’icône de connexion de votre FAI dans
la barre des applications dans le coin inférieur droit de votre
écran.
2 Cliquez sur l’icône avec le bouton droit de la souris et
sélectionnez
Déconnecter
.
Remarque :
Cette procédure fonctionne pour la plupart des connexions par ligne commutée et America Online* (AOL). Si elle
ne fonctionne pas sur votre PC, veuillez consulter la documentation de votre FAI relative à l’arrêt d’une connexion par ligne
commutée.
En cas d’urgence
, débranchez le câble téléphonique de la
prise murale ou de votre PC.
!
!
Page 37

INFORMATIONS SUR LA TABLETTE |
35
COMMENT PRENDRE SO IN D E V OT RE TABLETTE
Manipulation de la tablette
Ne laissez pas tom b er la table tte.
L’écran tactile de la
tablette contient un élément en verre qui peut se briser en
cas de chute ou de choc violent. Évitez de placer la tablette
à un endroit d’où elle est susceptible de tomber (par
exemple, sur le bord d’une table). Si vous utilisez le
support rétractable de la tablette, assurez-vous qu’il est
complètement sorti et verrouillé.
Évitez tout contact avec des produits liquides.
La tablette
n’est pas résistante à l’eau. À l’instar de tout autre appareil
électrique, maintenez la tablette loin de l’eau et de
l’humidité afin d’éviter toute blessure ou d’endommager la
tablette.
Évitez de so umettre votre tablette à des températu res
extrêmes ou à la lumière directe du soleil pendant de
long u e s p ériodes.
Des températures extrêmes et une
exposition prolongée au soleil peuvent entraîner le
noircissement de l’écran tactile et en compromettre le
fonctionnement.
Nettoyage et entr etien de l’écran tactile
Évitez de rayer l’écran tactile de vo tre tablette.
Utilisez votre
doigt, le stylet fourni ou un autre stylet à bout plastique conçu
pour être utilisé avec un écran tactile. N’utilisez jamais un vrai
stylo ou crayon ou un autre objet aigu sur la surface de la
tablette.
Maintenez l’écran tactile propre.
Nettoyez l’écran à l’aide d’un
chiffon doux. Si nécessaire, imbibez légèrement le chiffon d’un
détergent pour fenêtres pour nettoyer l’écran tactile. N’appliquez jamais de détergents liquides ou mousseux directement sur
la tablette.
Nettoyage et entretien des poignées
Le matériel utilisé pour les poignées latérales de votre tablette
est spécialement conçu pour une durabilité accrue et un toucher
agréable. Du fait de sa consistance, il peut paraître rayé ou
abîmé. Pour nettoyer les poignées, utilisez un chiffon doux
imprégné de De-Solve-It* ou d’un produit similaire et frottez
délicatement les parties abîmées. Ne vaporisez aucun détergent
liquide ou mousse directement sur la tablette.
Entretien de la ba tter ie de la tablette
La tablette est fournie avec une batterie ion-lithium
rechargeable. Lorsqu’elle est complètement chargée, la batterie
permet plusieurs heures d’utilisation constante. Lorsque la
tablette n’est pas utilisée, la batterie reste chargée pendant plus
de six jours. Pour savoir comment maximiser l’autonomie de la
batterie, veuillez consulter le Guide de l’utilisateur en ligne,
disponible à partir de l’Info Center de la tablette.
Lorsque vous n’utilisez pas la tablette, maintenez-la branchée
sur le secteur afin que la batterie soit complètement chargée la
prochaine fois que vous l’utiliserez. Vous ne pouvez pas surcharger la batterie en gardant la tablette branchée sur le secteur.
La charge complète d’une batterie épuisée dure environ six heures. Il n’est pas nécessaire de charger la batterie complètement
pour que la tablette fonctionne. De même, il est inutile d’épuiser
complètement la batterie pour tirer le meilleur parti de ses
capacités.
!
!
!
Page 38

36 | INFORMATIONS SUR LA TABLETTE
Bien que la batterie ait été conçue pour une utilisation raisonnable pendant plusieurs années, elle devra finalement être remplacée. Ne jetez pas la batterie dans vos ordures. Veuillez
recycler la batterie conformément aux consignes en vigueur
dans votre région.
Commande d’accessoires et de pièces de
rechange
Vous pouvez commander des tablettes et des supports
rechargeurs supplémentaires, ainsi que des pièces de rechange
telles qu’un stylet ou une batterie. Commandez vos accessoires
et pièces de rechange en ligne via l’
Info Center
de la tablette ou
sur www.shop-intel.com
.
Page 39

INFORMATIONS SUR LA TABLETTE |
37
ASSISTANCE
Aide en lign e et Aperçu rapide
Si vous avez des questions concernant votre tablette, utilisez
l’
Info C e nter
en ligne. Vous y trouverez plusieurs informations
utiles, y compris :
• Un aperçu rapide de la tablette
• Un guide de l’utilisateur en ligne offrant des informations
sur l’utilisation de la tablette et ses fonctionnalités.
• Les réponses aux questions fréquemment posées par les
utilisateurs ainsi que des informations d’ordre technique.
Entrez un mot clef ou une phrase dans le champ d’aide de la
partie supérieure des pages de l’Info Center pour obtenir de
l’aide sur un sujet particulier.
Pour accéder à l’Info Center à partir de la tablette, touchez
web•search sur la barre de boutons, puis le bouton Info Center.
Ou touchez le bouton ? (Aide), puis le lien Info Center.
Si vous ne parvenez pas à accéder à l’Info Center à partir de la
tablette, utilisez le navigateur Internet de votre PC et allez à
l’adresse suivante :
www .intel.com/home/web tablet/support
(en anglais)
Pour de plus amples informations sur un panneau spécifique de
la tablette, touchez le bouton ? (Aide) sur le panneau. Cette aide
contextuelle fournit des informations sur les fonctionnalités du
panneau en question, avec un lien vers l’Info Center pour de
plus amples informations
Contacter le service d'assista nce à la clien tèle
Notre équipe d’assistance à la clientèle se fera un plaisir de vous
aider.
Pour nous soumettre vos idées ou suggestions ou nous signaler
un problème, touchez le lien
Contactez-nous
au bas des pages
de l’Info Center de la tablette. Vous pouvez aussi contacter
l’équipe du service d’assistance en visitant le site:
www .intel.com/home/webtablet/support
ou en appelant gratuitement le 1 (877) 777-2203.
Dépannage
Signal hertzien de mauvaise qu alité
La distance par rapport à la carte sans fil du PC et les interférences émanant des appareils ménagers (téléphones sans fil,
fours à micro-ondes, télécommandes) constituent les causes les
plus courantes de la mauvaise qualité du signal. Pour obtenir un
meilleur signal, effectuez les démarches suivantes :
• Rapprochez la tablette du PC.
• Dressez l’antenne de la tablette.
• Mettez la carte sans fil du PC à un endroit plus élevé (par
exemple une étagère).
• Orientez la carte sans fil du PC dans différentes positions.
• Déplacez l’appareil qui provoque les interférences ou
mettez-le hors tension.
Page 40

38 | INFORMATIONS SUR LA TABLETTE
Niveau bas de la batterie
Un message d’alerte de niveau bas de la batterie indique que la
charge de votre batterie va atteindre son niveau minimal.
Pour recharger la batterie, ouvrez le panneau d’accès et
connectez le transformateur AC à la prise jack. Si vous disposez
du support rechargeur (en option), connectez le cordon
d’alimentation directement sur le support et placez la tablette
sur ce dernier.
Gardez la tablette branchée sur le secteur pendant au moins six
heures pour recharger la batterie complètement. Vous pouvez
continuer à utiliser la tablette pendant qu’elle se charge.
La réponse du clavier ou de l'écran tactile est inexacte
Si vous touchez un endroit particulier de l’écran, mais la tablette
répond comme si vous aviez touché un endroit proche (par
example, vous touche du clavier ne fournit aucune réponse ou
retourne une lettre inattendue, ou vous touche un certain lien
mais la tablette affiche un site correspondant à un lien voisin sur
l’écran), il est possible que vous ayez besoin d’ajuster la
précision de l’écran. Pour cela, touchez le bouton
contrôles
pour ouvrir le paneau de contrôle, puis la zone libellée
touchez
ici pour ajuster la précision de l’écran
.
Remarque :
Si vous ne pouvez pas ouvrir le panneau de contrôle
à l’aide de la barre de boutons, appuyez simultanément sur le
bouton Suivante et de bouton Imprimer pour accéder au réglage
de la précision de l’écran.
Pages Web vides ou incomplètement c hargées
Si une page web ne s’affiche pas complètement, touchez le
bouton
recharger
dans la barre de boutons.
La tablette ne se con ne cte pas au PC
Si la tablette n’arrive pas à se connecter au PC, il est possible
que vous soyez trop éloigné de la carte sans fil du PC, ou qu’il y
ait un problème au niveau du PC. Assurez-vous que la carte sans
fil est correctement installée et que le PC est sous tension et en
fonctionnement.
Assurez-vous que le logiciel de la tablette est bien installé sur le
PC. Cliquez sur l’icône en forme de tablette qui se trouve sur le
bureau de Windows, puis sélectionnez Statut.
Autres options de dépannage
Pour de plus amples informations regardant le dépannage de la
tablette, visitez le système d’information en ligne de la tablette,
disponible à partir de l’Info Center. Touchez le bouton d’aide
(marqué d’un point d’interrogation -
?
), puis le lien de l’Info
Center. Utilisez les liens affichés sur le côté gauche de la page
d’accueil de l’Info Center ou entrez un mot clef dans le champ
d’aide en haut de la page.
Si vous ne pouvez pas accèder à l’Info Center...
• Depuis votre PC, cliquez sur l’icône en forme de tablette
qui se trouve sur le bureau de Windows, puis sélectionnez
Aide.
• Ou utilisez le navigateur de votre PC pour vous rendre sur :
www .intel.com/home/webtab let/support
Page 41

INFORMATIONS SUR LA TABLETTE |
39
INSTRUCTIO NS RELATIVES À L’INSTALLATION
Comme le poster d’installation est seulement en Anglais, vous
trouverez ci-après, en Français, l’ensemble des instructions
d’installation.
La tablette utilise le logiciel pour réseau domestique sans fil
Intel
®
AnyPoint™ pour communiquer avec Internet. Étant
donné que certains foyers peuvent disposer d’un logiciel de
Réseau domestique AnyPoint déjà installé sur leurs PC, les
procédures d’installation de la tablette peuvent varier
Recherchez la procédure d’installation qui s’applique à votre
situation et suivez les étapes pour installer votre Intel Web
Tablet.
Important !
Le PC sur lequel vous installez le logiciel de la
tablette doit disposer d’une connexion Internet en état de
marche.
Résolution des prob lèm es d’installation
Si vous rencontrez des problèmes au cours de
l’installation, veuillez consulter la section Résolution des
problèmes d’installation à la page
49
du présent guide ou
le document Informations de dernière minute qui vous
est fourni avec le produit.
Vous pouvez obtenir de plus amples informations sur le
web à l’adresse
www .intel.com/home/webtablet/support
,
ou contacter gratuitement le service d’assistance à la
clientèle au 1 (877) 777-2203.
Installation initiale de la tablette et des pilotes du Réseau
AnyPoint™ ..............................................................................Page 40
Veuillez vous référer à cette procédure d’installation s’il
s’agit de votre première tablette et que le logiciel du Réseau
domestique AnyPoint n’est pas encore installé sur votre PC.
Déploiement de la tablette au sein d’un Réseau domestique sans
fil AnyPoint existant ...............................................................Page 43
Veuillez vous référer à cette procédure d’installation s’il
s’agit de votre première tablette et que vous utilisez déjà le
Réseau domestique sans fil AnyPoint.
La tablette n’est pas compatible avec le Réseau domestique
commuté AnyPoint. Pour plus de détails, consultez les
Information techniques de l’Info Center ou le site
www .intel.com/home/webtablet/support
.
Installation de tablettes supplémentaires ............................Page 46
Veuillez vous référer à cette procédure si vous disposez déjà
d’une tablette et que vous ajoutez une tablette
supplémentaire.
Suppression et réinstallation du logiciel de la tablette sur
le PC.........................................................................................Page
47
Veuillez vous référer à ces procédures si le logiciel de la
tablette est déjà installé sur votre PC et que vous devez le
supprimer et/ou le réinstaller.
!
Page 42

40 | INFORMATIONS SUR LA TABLETTE
Installation initiale de la t ablette et de s pilotes
du Réseau AnyPoint™
Veuillez suivre les étapes suivantes s’il s’agit de votre première
tablette et que le logiciel du Réseau domestique AnyPoint™
n’est pas encore installé sur votre PC.
Charge de la batterie de la tablette
1 Ôtez la protection plastique du boîtier de la batterie à
l’arrière de la tablette pour activer la batterie.
2 Branchez l’adaptateur d’alimentation dans la prise murale.
Ouvrez le panneau d’accès sur le côté de la tablette et
branchez l’adaptateur dans la prise d’alimentation de la
tablette.
3 Maintenez la tablette branchée sur le secteur de manière à
commencer sa charge pendant la procédure d’installation.
La procédure d’installation complète dure environ 45
minutes.
Remarq ue :
Si vous utilisez le support rétractable à l’arrière de
la tablette pour maintenir cette dernière en position verticale,
veillez à ce qu’il soit complètement déployé.
Installation de la carte sans fil (sur le PC)
1 Arrêtez le PC complètement.
2 Branchez le câble de la carte AnyPoint dans un port USB
disponible.
3 Mettez le PC sous tension.
4 Après le démarrage du PC,
intr o duisez le C D d’installation
Intel
®
Web Tablet dans le lecteur de CD-ROM
.
Installation des pilotes (sur le PC)
Important !
Ne cliquez jamais sur le bouton
Annuler
dans un
écran de l’assistant Ajout de nouveau matériel.
1 Au démarrage de l’assistant Ajout de nouveau matériel,
cliquez sur
Suivant
pour commencer l’installation des
pilotes.
2 Sélectionnez
Rechercher le meilleur pilote pour votre
périphérique
et cliquez sur
Suivant
.
3 Si vous êtes invité à sélectionner un lecteur, assurez-vous
que la case
Lecteur de CD-ROM
est sélectionnée. Cliquez
deux fois sur
Suivant
pour installer les pilotes.
4 Cliquez sur
Terminer
.
5 Si vous êtes invité à redémarrer votre PC, cliquez sur
Non
.
Vous serez peut-être invité plusieurs fois à redémarrer le
système : cliquez sur
Non
à chaque fois.
6 Sur les systèmes équipés de Windows* 98, vous devrez
peut-être cliquer sur
Terminer
une nouvelle fois.
Installation du logiciel de la tablette (sur le PC)
Après l’installation des pilotes, l’écran d’installation d’Intel
Web Tablet apparaît.
Remarque :
Dans le cas contraire, ouvrez le
Poste de travail
à
partir du Bureau. Cliquez deux fois sur le lecteur de CD-ROM,
puis deux fois sur le fichier
setup.exe.
1 Cliquez sur
Installer
pour démarrer l’installation du logiciel
de la tablette.
2 Suivez les instructions à l’écran durant la procédure
d’installation.
Page 43

INFORMATIONS SUR LA TABLETTE |
41
Création d’un code de réseau (sur le PC)
1 L’Assistant d’installation vous présente plusieurs écrans et
vous invite à créer un code de réseau. Veuillez n’utiliser que
des chiffres compris entre 0 et 7.
Veuillez créer votre propre code de réseau et le noter ci-dessous. Vous en aurez besoin pour configurer la tablette.
Pour de plus amples informations sur la création d’un code de
réseau, cliquez sur Aide dans l’écran de l’Assistant d’installation
2 Continuez en suivant les instructions à l’écran.
• Si votre PC dispose de plusieurs connexions Internet,
sélectionnez celle que vous souhaitez utiliser avec votre
tablette.
• Si vous êtes invité à fournir le mot de passe de votre
fournisseur d’accès à Internet (FAI), entrez et confirmez
le mot de passe utilisé pour vous connecter depuis ce
PC, puis cliquez sur
OK
.
Redémarrez votre ordinateur
Une fois l’installation terminée, l’Assistant d’installation vous
invitera à redémarrer votre PC.
1 Cliquez sur
Redémarrer maintenant
pour terminer l’instal-
lation.
2 Lors du redémarrage du PC, vous obtiendrez peut-être une
invite d’ouverture de session Windows.
• Si c’est le cas, ne cliquez pas sur
Annuler
.
• Utilisez votre information habituelle de connexion sous
Windows.
• Ou, s’il s’agit de votre première session, entrez un nom
d’utilisateur mais pas de mot de passe, et cliquez sur
OK
.
3 À l’issue du redémarrage complet de l’ordinateur, vous
verrez apparaître un écran de félicitations contenant le code
de réseau que vous avez selectionné.
4 Cliquez sur
Terminer
.
Remarque :
Si vous utilisez America Online* (AOL*)
et qu’AOL est votre fournisseur d’accès à Internet (FAI), vous
devez définir vos préférences AOL pour que vos mots de passe
soient sauvegardés pour vos noms d’écran AOL. Effectuez cette
procédure avant de poursuivre l’installation.
Retourner à la table tte et a che ve r l’installation
1 Retournez à la tablette et laissez-la branchée sur le secteur
pendant que vous l’installez et la configurez.
2 Touchez le bouton
Continuer
et suivez les instructions qui
apparaissent à l’écran de la tablette.
3 Lorsque vous êtes invité à fournir un code de réseau, entrez
le code de réseau que vous avez créé sur le PC et noté dans
la section précédente.
Une fois la procédure d’installation terminée, la tablette sera
réinitialisée. Cela peut prendre quelques instants.
Not e z ici votre code de rés e au :
Page 44

42 | INFORMATIONS SUR LA TABLETTE
Commencer à utiliser la tablette
Après la réinitialisation de la tablette, vous êtes prêt à configurer
les boutons d’accueil pour chaque membre de votre famille.
1 Appuyez sur un bouton d’accueil.
La première personne à configurer un bouton d’accueil sera
invitée à fournir quelques informations supplémentaires de
configuration de la tablette.
2 Découvrez les fonctions de base de la tablette à partir du
menu d’aide en ligne. Suivez la visite guidée de la tablette
pour en apprendre davantage, ou allez directement à votre
page d’accueil.
3 Une fois sur l’Info Center de la tablette (votre page
d’accueil initiale), vous pouvez configurer votre page
d’accueil personnelle.
Chaque membre de votre famille peut suivre les étapes 1 à 3
pour configurer son propre bouton d’accueil.
Importan t !
Lors de la première utilisation, il est recommandé de
garder la tablette branchée sur le secteur pendant 6 heures afin
de charger la batterie complètement. Vous pouvez utiliser la
tablette pendant qu’elle se charge.
Page 45

INFORMATIONS SUR LA TABLETTE |
43
Déploiemen t de la tablette au sein d’un R és ea u
domestique sans fil AnyPoint existant
Veuillez suivre les étapes suivantes s’il s’agit de votre première
tablette et que vous utilisez déjà un Réseau domestique sans fil
AnyPoint.
Remarq ue :
La tablette n’est pas compatible avec le Réseau
domestique commuté AnyPoint. Pour plus de détails, consultez
les Information techniques de l’Info Center ou le site
www .intel.com/home/w ebtablet/support
.
Charge de la batterie de la tablette
1 Ôtez la protection plastique du boîtier de la batterie à
l’arrière de la tablette pour activer la batterie.
2 Branchez l’adaptateur d’alimentation dans la prise murale.
Ouvrez le panneau d’accès sur le côté de la tablette et
branchez l’adaptateur dans la prise d’alimentation de la
tablette.
3 Maintenez la tablette branchée sur le secteur de manière à
commencer sa charge pendant la procédure d’installation.
La procédure d’installation complète dure environ 45
minutes.
Remarq ue :
Si vous utilisez le support rétractable à l’arrière de
la tablette pour maintenir cette dernière en position verticale,
veillez à ce qu’il soit complètement déployé.
Installation du logiciel de la tablette sur le PC serveur
Important !
Étant donné que votre tablette utilisera le
logiciel du Réseau domestique sans fil Intel AnyPoint pour
communiquer avec Internet, vous devez installer le logiciel
de la tablette sur le PC serveur de votre réseau AnyPoint.
Si vous avez acheté une tablette livrée avec un adaptateur
sans fil, n’installez PAS la nouvelle carte sur le PC. La
tablette utilisera l’adaptateur sans fil AnyPoint existant
pour communiquer avec le PC.
1 Sur le PC serveur,
introduisez le CD d’installation Intel W eb
Tablet
dans le lecteur de CD-ROM
.
2 À partir du Bureau de Windows, ouvrez le
Poste de travail
et cliquez deux fois sur le lecteur de CD-ROM.
3 Cliquez deux fois sur le fichier
setup.exe.
L’écran d’instal-
lation d’Intel Web Tablet apparaît.
4 Cliquez sur
Installer
pour démarrer l’installation du logiciel
de la tablette.
5 Si votre versoin du logiciel AnyPoint est plus ancienne que
celle livrée sur le CD d’installation de la tablette, il vous
sera proposé de la mettre à niveau.
• Pour continuer l’installation de la tablette, vous devez
cliquer sur
Oui
. Le programme d’installation procèdera à
la mise à jour du logiciel AnyPoint.
• Si le logiciel de partage d’accès à Internet (ISS) est en
train de fonctionner, veuillez cliquer sur
OK
lorsqu’il
vous est demandé de le fermer.
• Après le redémarrage du PC suivant la mise à niveau,
continuez l’installation de votre tablette. Si le
programme d’installation ne se lance pas de lui même,
veuillez répéter les étapes 2 à 4 ci-dessus.
!
Page 46

44 | INFORMATIONS SUR LA TABLETTE
Suivez les instructions à l’écran durant la procédure
d’installation
1 L’Assistant d’installation vous présente plusieurs écrans et
affiche le code du réseau AnyPoint existant.
Veuillez noter votre code de réseau dans l’espace ci-des-
sous. Vous en aurez besoin pour configurer la tablette.
Pour de plus amples informations sur le code de réseau, cliquez
sur Aide dans l’écran de l’Assistant d’installation
2 Continuez en suivant les instructions à l’écran.
• Si votre PC dispose de plusieurs connexions Internet,
sélectionnez celle que vous souhaitez utiliser avec votre
tablette.
• Si vous êtes invité à fournir le mot de passe de votre
fournisseur d’accès à Internet (FAI), entrez et confirmez
le mot de passe utilisé pour vous connecter depuis ce
PC, puis cliquez sur
OK
.
Redémarrez votre ordinateur
Une fois l’installation terminée, l’Assistant d’installation vous
invitera à redémarrer votre PC.
1 Cliquez sur
Redémarrer maintenant
pour terminer l’instal-
lation.
2 Lors du redémarrage du PC, vous obtiendrez peut-être une
invite d’ouverture de session Windows.
• Si c’est le cas, ne cliquez pas sur
Annuler
.
• Utilisez votre information habituelle de connexion sous
Windows.
• Ou, s’il s’agit de votre première session, entrez un nom
d’utilisateur mais pas de mot de passe, et cliquez sur
OK
.
3 À l’issue du redémarrage complet de l’ordinateur, vous
verrez apparaître un écran de félicitations contenant votre
code de réseau.
4 Cliquez sur
Terminer
.
Remarque :
Si vous utilisez America Online* (AOL*)
et qu’AOL est votre fournisseur d’accès à Internet (FAI), vous
devez définir vos préférences AOL pour que vos mots de passe
soient sauvegardés pour vos noms d’écran AOL. Effectuez cette
procédure avant de poursuivre l’installation.
Retourner à la tablette et achever l’installation
1 Retournez à la tablette et laissez-la branchée sur le secteur
pendant que vous l’installez et la configurez.
2 Touchez le bouton
Continuer
et suivez les instructions qui
apparaissent à l’écran de la tablette.
3 Lorsque vous êtes invité à fournir un code de réseau, entrez
le code de réseau AnyPoint du PC serveur, celui-là même
que vous avez noté dans la section précédente.
Une fois la procédure d’installation terminée, la tablette sera
réinitialisée. Cela peut prendre quelques instants.
Not e z ici votre code de rés e au :
Page 47

INFORMATIONS SUR LA TABLETTE |
45
Commencer à utiliser la tablette
Après la réinitialisation de la tablette, vous êtes prêt à configurer
les boutons d’accueil pour chaque membre de votre famille.
1 Appuyez sur un bouton d’accueil.
La première personne à configurer un bouton d’accueil sera
invitée à fournir quelques informations supplémentaires de
configuration de la tablette.
2 Découvrez les fonctions de base de la tablette à partir du
menu d’aide en ligne. Suivez la visite guidée de la tablette
pour en apprendre davantage, ou allez directement à votre
page d’accueil.
3 Une fois sur l’Info Center de la tablette (votre page
d’accueil initiale), vous pouvez configurer votre page
d’accueil personnelle.
Chaque membre de votre famille peut suivre les étapes 1 à 3
pour configurer son propre bouton d’accueil.
Importan t !
Lors de la première utilisation, il est recommandé de
garder la tablette branchée sur le secteur pendant 6 heures afin
de charger la batterie complètement. Vous pouvez utiliser la
tablette pendant qu’elle se charge.
Page 48

46 | INFORMATIONS SUR LA TABLETTE
Installation de tablettes supplémentaires
Si vous utilisez déjà une tablette et que vous souhaitez en
ajouter une autre, veuillez suivre les étapes décrites ci-dessous.
Remarq ue :
Si vous avez acheté une tablette livrée avec une
carte sans fil, N’installez PAS la nouvelle carte sur le PC. La
tablette utilisera la carte sans fil existante pour communiquer
avec le PC.
Charge de la batterie de la tablette
1 Ôtez la protection plastique du boîtier de la batterie à
l’arrière de la tablette pour activer la batterie.
2 Branchez l’adaptateur d’alimentation dans la prise murale.
Ouvrez le panneau d’accès sur le côté de la tablette et
branchez l’adaptateur dans la prise d’alimentation de la
tablette.
3 Maintenez la tablette branchée sur le secteur de manière à
commencer sa charge pendant la procédure d’installation.
La procédure d’installation complète dure environ 15
minutes.
Obtention du code de réseau à partir du PC
1 Sur le PC, ouvrez le Panneau de configuration Windows*,
puis cliquez deux fois sur l’icône
Panneau de configuration
sans fil
. Le dialogue Panneau de configuration sans fil
affiche le code du réseau auquel appartient le PC.
2 Veuillez noter votre code de réseau dans l’espace ci-
dessous. Vous en aurez besoin pour configurer la tablette.
Notez ici votre c od e de rés e au :
3 Fermez le dialogue Panneau de configuration sans fil.
Retourner à la tablette et achever l’installation
1 Retournez à la tablette et laissez-la branchée sur le secteur
pendant que vous l’installez et la configurez.
2 Touchez le bouton
Continuer
et suivez les instructions qui
apparaissent à l’écran de la tablette.
3 Lorsque vous êtes invité à fournir un code de réseau, entrez
le code de réseau AnyPoint que vous avez obtenu sur le PC
et noté dans la section précédente.
Une fois la procédure d’installation terminée, la tablette sera
réinitialisée. Elle sera ensuite prête à l’emploi.
Important !
Lors de la première utilisation, il est recommandé de
garder la tablette branchée sur le secteur pendant 6 heures afin
de charger la batterie complètement. Vous pouvez utiliser la
tablette pendant qu’elle se charge.
Accès à votre page d’accueil à partir de la nouvelle tablette
Les boutons d’accueil de la nouvelle tablette correspondront à
ceux de votre (ou vos) tablette(s) existante(s). Utilisez le même
bouton d’accueil sur chaque tablette pour accéder à votre page
d’accueil personnelle. Par exemple, si votre bouton d’accueil est
le bouton vert, utilisez le bouton vert sur n’importe quelle
tablette pour accéder à votre page d’accueil.
Seule une tablette peut utiliser un bouton d’accueil spécifique à
un moment donné. Si vous appuyez sur un bouton d’accueil qui
est déjà utilisé par un utilisateur sur une autre tablette, vous
recevrez un message vous indiquant qu’une autre tablette utilise
déjà ce bouton.
Page 49

INFORMATIONS SUR LA TABLETTE |
47
Suppression et réinstallation du logiciel de la
tablette sur le PC
Au cas où le logiciel de la tablette sur le PC serait endommagé,
vous devrez le réinstaller. Dans certains cas, vous pouvez réinstaller le logiciel sans désinstaller la version existante. Dans
d’autres, vous devrez supprimer le logiciel existant avant d’en
réinstaller un nouvel exemplaire.
Remarq ue :
La suppression du logiciel de la tablette aura pour
effet d’effacer tous les éléments de configuration, page
d’accueil, favoris, et historique, des 5 boutons d’accueil.
Suppression du logiciel de la tablette du PC
1 Sur le PC, ouvrez le menu
Démarrer
de Windows* et sélec-
tionnez
Programmes > Intel Web Tablet > Uninstall Tablet
Software
. Le dialogue Supprimer le logiciel de la tablette
apparaît.
2 Sélectionnez le logiciel que vous souhaitez supprimer.
• Assurez-vous que la case
Supprim e r le logi ciel Intel®
Web Tablet
est cochée.
• Vous pouvez supprimer le logiciel du lecteur audio
numérique de votre tablette ou le laisser installé sur
votre PC. Pour le supprimer, assurez-vous que la case
Supprimer RealNe tworks* Re alPlayer*
est cochée.
3 Cliquez sur
Supprim er pour
commencer à effacer le logiciel
de la tablette du PC.
• Si vous êtes invité à supprimer des fichiers partagés,
cliquez sur
Oui
.
• Si vous êtes avisé que certains fichiers, utilisés par
d’autres programmes, n’ont pas été supprimés, cliquez
sur
Oui
.
4 Après la suppression complète du logiciel, cliquez sur
Redémarrer
.
5 À l’issue du redémarrage du PC, veuillez suivre les étapes
suivantes pour réinstaller le logiciel de la tablette.
Réinstallation du logiciel de la ta ble tte du PC
1 Sur le PC, introduisez le CD d’installation Intel Web Tablet
dans le lecteur de CD-ROM. Le CD est à l’intérieur du dos
de ce guide de produit.
2 À partir du Bureau de Windows, ouvrez le
Poste de travail
et cliquez deux fois sur le lecteur de CD-ROM.
3 Cliquez deux fois sur le fichier
setup.exe.
L’écran d’instal-
lation d’Intel Web Tablet apparaît.
4 Cliquez sur
Installer
pour démarrer l’installation du logiciel
de la tablette. Suivez les instructions à l’écran durant la
procédure d’installation.
L’Assistant d’installation présente plusieurs écrans et
affiche votre code de Réseau domestique sans fil AnyPoint.
Il s’agit du code de réseau actuellement défini sur la
tablette.
Une fois l’installation terminée, l’Assistant d’installation
vous invitera à redémarrer votre PC.
5 Cliquez sur
Redémarrer maintenant
pour terminer l’instal-
lation.
6 Lors du redémarrage du PC, vous obtiendrez peut-être une
invite d’ouverture de session Windows. Si c’est le cas, ne
cliquez pas sur
Annuler
. Utilisez votre information
habituelle de connexion sous Windows.
Page 50

48 | INFORMATIONS SUR LA TABLETTE
7 À l’issue du redémarrage complet de l’ordinateur, vous
verrez apparaître un écran de félicitations contenant votre
code de réseau.
8 Cliquez sur
Terminer
.
Reconfigurer les boutons d’acc ueil
Après avoir supprimé et réinstallé le logiciel de la tablette sur
votre PC, vous devrez configurer de nouvau tous les boutons
d’accueil de la tablette.
Demandez à chaque membre de votre famile d’appuyer sur leur
bouton d’accueil, puis de configurer leur page d’accueil et
courrier électronique, et enfin d’ajouter les adresses de leurs
sites préférés à leur liste de favoris.
Comme auparavant, il sera demandé à la première personne qui
appuie sur un bouton d’accueil de fournir quelques informations
supplémentaires de configuration de la tablette.
Page 51

INFORMATIONS SUR LA TABLETTE |
49
Résolution des problèmes d’installation
Si vo u s qui tt e z l’ installatio n a v a n t la fin d e la p rocédure...
Si vous quittez l’installation avant la fin de la procédure, vous
pouvez poursuivre l’installation plus tard. Pour poursuivre
l’installation :
1 Introduisez le CD d’installation Intel
®
Web Tablet dans
votre lecteur de CD-ROM.
2 À partir du Bureau de Windows*, ouvrez le
Poste de travail
et cliquez deux fois sur le lecteur de CD-ROM.
3 Cliquez deux fois sur le fichier
setup.exe
.
Normalement, l’installation devrait reprendre là où vous l’avez
interrompue. Suivez les instructions à l’écran pour achever
l’installation.
Si le programme d'installation détecte plus d'une carte sur ce PC...
Si un message d’erreur vous indique l’exisence d’un conflit
d’adresses IP sur le PC, cela signifie que le PC est équipé d’une
carte réseau dont l’adresse IP est en conflit avec celle de la carte
AnyPoint™.
Une boite de dialogue s’affiche et vous suggère une autre
adresse IP et un autre masque de sous-réseau pour la carte du
réseau AnyPoint.
• Pour accepter la suggestion, cliquez sur
Suivant
.
• Pour obtenir une adresse IP différente pour la carte du
réseau sans fil, cliquez sur le bouton
Suggérer une nou velle
adresse,
puis cliquez sur
Next
.
Le programme d’installation continue. Suivez les instructions
du poster d’installation pour achever la configuration de la
tablette.
En cas d’erreurs d’accès réseau à distanc e...
Si vous obtenez le message d’erreur suivant lors de
l’installation :
« Un Accès réseau à distance est installé sur votre PC mais il n’est
pas configuré pour utiliser un FAI. Veuillez configurer l’Accès
réseau à distance avant de réexécuter l’Assistant de connexion ».
Effectuez les démarches suivantes :
1 Suivez les instructions de votre fournisseur d’accès à Inter-
net (FAI) pour configurer votre connexion Internet sur le
PC.
2 Après avoir configuré la connexion et vérifié son fonction-
nement, ouvrez le menu
Démarrer
de Windows, et sélec-
tionner
Programmes > Intel Web T ablet > Tablet Connection
Wizard
. L’Assistant de connexion d’Intel Web Tablet
s’affiche.
3 Pour configurer la tablette pour qu’elle utilise votre
connexion à distance, suivez les instructions de l’Assistant.
Si vous ne pouvez pas lire le texte à l’écran...
Si vous avez du mal pour lire l’écran de la tablette lorsque vous
commencez à la configurer (avant que les contrôles de réglage
du contraste et de la brillance soient disponibles), il est possible
d’ajuster le contraste de l’écran tactile au cours du processus de
configuration de la tablette.
Procédez comme suit :
1 Assurez vous que l’écran de bienvenue (
Welcome to the
Intel Web Tablet)
est affiché.
2 Faites tourner le bouton Précédente/Suivante – vers la
droite pour augmenter le contraste, vers la gauche pour le
diminuer.
Une fois terminée la configuration de la tablette, vous pouvez
utiliser le panneau de control pour ajuster les réglages de
contraste et brillance.
Page 52

50 | INFORMATIONS SUR LA TABLETTE
CONFIGURATION REQUISE
Configuration requise
La configuration minimale ci-dessous est recommandée :
• PC équipé d’un processeur Intel
®
Pentium® à 200 MHz ou
supérieur
• 120 Mo d’espace disponible sur le disque dur
• 64 Mo de mémoire vive
• Carte son (pour utiliser les fonctions audio de la tablette)
• Système d’exploitation Windows* 98, 98SE, ou Me*
• Un port USB disponible
• Une connexion Internet en cours, soit par accès commuté
soit permanente (à large bande), avec une vitesse minimale
de 56 Ko
• Accès à Internet via le fournisseur de votre choix
(cependant, l'accès à Internet par l'intermédiaire de
fournisseurs d'accès gratuit peut être limité)
• Imprimante (pour imprimer à partir de la tablette)
Type de clavier requis
Si vous avez acheté le support rechargeur optionnel, vous
pouvez connecter un clavier de type PS/2 au support rechargeur,
et l'utiliser avec la tablette. Le clavier doit satisfaire les
conditions minimales qui suivent pour fonctionner correctement
avec la tablette:
• Type de connexion : PS/2
• Courant d'alimentation maximum ou consommation : 0,5 A
Page 53

INFORMATIONS SUR LA TABLETTE |
51
GARANTIE ET ACCORD DE LICENCE D’INTEL WEB TABLET
Le présent document contient la garantie et l'accord de licence
de votre Intel
®
Web Tablet. Il offre des informations utiles et
importantes sur le produit, et nous vous recommandons par
conséquent d'en prendre connaissance.
Toutes les garanties et déclarations contenues dans le présent
document seront annulées si l'étiquette d'emballage est brisée ou
abîmée. Veuillez alors retourner le produit là où vous l’avez
acheté pour remplacement.
Garantie limitée d’Intel Web Tablet
Garantie limitée
Intel garantit que le matériel de la tablette Web, pour autant qu'elle soit installée
et utilisée correctement, et le CD-ROM contenant les logiciels associés seront
exempts de vices matériels et de défauts de fabrication pour une période d'un (1)
an à compter de la date d'achat.
Si la tablette Web ou le CD-ROM couvert par cette garantie limitée ne
fonctionne plus, en raison d'un défaut matériel ou de fabrication, au cours de la
période de garantie, Intel pourra, à son choix :
RÉPARER la tablette Web ou le CD-ROM par voie matérielle et/ou logicielle ;
OU
REMPLACER la tablette Web ou le CD-ROM par une tablette ou un CD-ROM
identique ; OU,
Si Intel n'est pas en mesure de réparer ou de remplacer la tablette Web ou le CDROM, REMBOURSER le montant payé pour l'achat de la tablette ou du CDROM.
LA PRÉSENTE GARANTIE LIMITÉE, AINSI QUE TOUT AUTRE
GARANTIE LÉGALE, SONT APPLICABLES UNIQUEMENT À
L'ACHETEUR INITIAL ET RESTENT VALABLES TANT QUE CET
ACHETEUR INITAL CONSERVE LA PROPRIÉTÉ DE LA TABLETTE ET
DU CD-ROM.
Étendue de la garantie limitée
La garantie NE couvre PAS les performances ou les fonctionnalités de tout
logiciel informatique inclus dans le coffret contenant la tablette. Cette garantie
couvre uniquement les défauts du support du CD-ROM, tel qu'un CD-ROM
cassé ou un défaut du CD-ROM empêchant sa lecture par le lecteur de CD-ROM
de votre ordinateur personnel. INTEL NE GARANTIT PAS QUE LE
LOGICIEL FOURNI AVEC LA TABLETTE FONCTIONNERA SANS
INTERRUPTION OU EST EXEMPT D'ANOMALIES, D'ERREURS OU DE «
BOGUES ». INTEL NE CONCÈDE AUCUNE GARANTIE CONCERNANT
L'UN DES LOGICIELS FOURNIS AVEC CETTE TABLETTE, SAUF
MENTION CONTRAIRE STIPULÉE DANS UN ACCORD DE LICENCE
ACCOMPAGNANT UN TEL LOGICIEL.
La présente garantie limitée ne couvre aucun coût relatif à l'enlèvement ou au
remplacement de quelconque matériel de la tablette, CD-ROM ou logiciel
installé sur votre ordinateur.
Elle ne couvre aucun dommage né de causes externes, y compris les accidents,
les problèmes liés à l'alimentation électrique, les utilisations non conformes aux
instructions du produit, les utilisations abusives, la négligence, les réparations ou
les installations inadéquates.
Que faut-il faire pour bénéficier de la garantie ?
Pour bénéficier de la garantie, vous DEVEZ enregistrer le matériel de la tablette
auprès d'Intel dans les trente (30) jours suivant la date d'achat. Pour enregistrer
le matériel, veuillez suivre les instructions présentées dans le programme livré
avec la tablette.
Commen t présenter une réclam a tion dans le cadr e de la
garantie
Pour faire appliquer la garantie, vous devez renvoyer la tablette à Intel. Avant de
renvoyer la tablette à Intel, vous devez contacter le Service d'assistance à la
clientèle Intel Web Tablet en composant le (877) 777-2203 ou en envoyant votre
demande à l'adresse suivante : Intel Corporation, Customer Support Department
M/S DC1-01, 5200 N.E. Elam Young Parkway, Hillsboro, OR 97124-6497,
États-Unis (si vous contactez Intel par courrier pour décrire le problème,
veuillez indiquer vos nom, adresse, numéro de téléphone et adresse
électronique).
Page 54

52 | INFORMATIONS SUR LA TABLETTE
Si vous êtes habilité à présenter une réclamation dans le cadre de la garantie,
vous recevrez une autorisation de retour de matériel (RMA) après qu'Intel aura
établi la défectuosité du matériel de la tablette ou du CD-ROM. Lorsque vous
retournez le matériel de la tablette ou le CD-ROM à Intel, vous devez faire
figurer clairement le numéro d'autorisation de retour de matériel (RMA) sur
l'emballage. Intel n'acceptera aucun retour de matériel de la tablette ou de CDROM si l'emballage ne comporte pas de numéro d'autorisation de retour de
matériel (RMA).
Si vous retournez la tablette et/ou le CD-ROM à Intel, les risques de dégâts ou
de pertes lors du transport vous incombent. Vous devez utiliser l’emballage
original (ou équivalent) et prendre en charge les frais d’envoi.
Intel pourra choisir de réparer ou de remplacer le matériel de la tablette et/ou le
CD-ROM soit par un produit neuf soit par un produit rénové. Dès sa réception
par Intel, le produit retourné deviendra la propriété d'Intel.
Le matériel de la tablette et/ou le CD-ROM de remplacement est garanti en
vertu des termes de la présente garantie et est soumis aux mêmes limitations et
exclusions pour le restant de la durée originale de la garantie ou pour une durée
de quatre-vingt-dix jours (90), quelle que soit la période arrivant à échéance le
plus tôt.
LIMITATIONS ET EXCLUSIONS DE LA GARANTIE
LES PRÉSENTES GARANTIES REMPLACENT TOUTE AUTRE
GARANTIE, EXPRESSE OU TACITE, Y COMPRIS, ET SANS
LIMITATION, LES GARANTIES IMPLICITES SUR LA
COMMERCIABILITÉ ET L'ADÉQUATION À UNE UTILISATION
PARTICULIÈRE. INTEL N'ACCORDE AUCUNE AUTRE GARANTIE
EXPRESSE QUE CELLES STIPULÉES CI-DESSUS. INTEL DÉCLINE
TOUTE AUTRE GARANTIE, EXPRESSE OU TACITE, Y COMPRIS ET
SANS LIMITATION, LES GARANTIES TACITES DE COMMERCIABILITÉ
ET D'ADÉQUATION À UN USAGE PARTICULIER. CERTAINS PAYS
N'ADMETTENT PAS L'EXCLUSION DES GARANTIES TACITES. PAR
CONSÉQUENT, LA LIMITATION CI-DESSUS PEUT NE S'APPLIQUER À
VOTRE CAS.
LA DURÉE DE TOUTES LES GARANTIES EXPRESSES ET TACITES EST
LIMITÉE À CELLE DE LA GARANTIE LIMITÉE. AUCUNE GARANTIE
N'EST APPLICABLE UNE FOIS CETTE PÉRIODE ÉCHUE. CERTAINS
PAYS N'ACCEPTENT PAS LES LIMITATIONS DE DURÉE DE
GARANTIES TACITES, SI BIEN QUE CETTE LIMITATION NE
S'APPLIQUE PEUT-ÊTRE PAS À VOTRE CAS.
LIMITATION DE LA RESPONSABILITÉ
LA RESPONSABILITÉ D'INTEL, EN VERTU DE CETTE GARANTIE OU
DE TOUT AUTRE GARANTIE TACITE OU EXPRESSE, SE LIMITE À LA
RÉPARATION, AU REMPLACEMENT OU AU REMBOURSEMENT,
SELON LES CONDITIONS MENTIONNÉES CI-DESSUS. CES RECOURS
SONT LES SEULS POSSIBLES POUR TOUTE RUPTURE DE GARANTIE.
INTEL NE PEUT ÊTRE TENU RESPONSABLE DE TOUT DOMMAGE
DIRECT, SPÉCIAL, ACCESSOIRE, INDIRECT, RÉSULTANT DU NONRESPECT DE LA GARANTIE OU EN VERTU DE TOUTE AUTRE
RÉCLAMATION, Y COMPRIS, ET SANS LIMITATION, LE MANQUE À
GAGNER, LE TEMPS D'ARRÊT, LA PERTE DE CLIENTÈLE, LES
DOMMAGES OU LE REMPLACEMENT D'ÉQUIPEMENT ET DE BIENS,
ET AUTRES FRAIS LIÉS AU RÉTABLISSEMENT, À LA REPRODUCTION
DE PROGRAMME OU DE DONNÉES STOCKÉES OU UTILISÉES PAR UN
SYSTÈME CONTENANT LE CD-ROM DE VOTRE TABLETTE OU LES
LOGICIELS L'ACCOMPAGNANT.
Certains pays n’autorisant pas l’exclusion ou la limitation de dommages
accidentels ou secondaires, les limitations ou exclusions stipulées ci-dessus
peuvent ne pas s’appliquer à votre cas.
LA PRÉSENTE GARANTIE LIMITÉE VOUS ACCORDE DES DROITS
PARTICULIERS. VOUS POUVEZ JOUIR D'AUTRES DROITS EN
FONCTION DE VOTRE PAYS DE RÉSIDENCE.
Page 55

INFORMATIONS SUR LA TABLETTE |
53
Garantie limitée du boîtier USB sans fil Intel
AnyPoint™
La garantie qui suit s'applique exclusivement au boîtier USB sans fil AnyPoint
fourni avec l'Intel Web Tablet. Sauf disposition contraire, la garantie qui suit ne
s'applique pas à l'Intel Web Tablet ni à tout autre produit associé, à l'exception du
boîtier USB sans fil AnyPoint. Inversement, la garantie d'Intel Web Tablet qui
précède ne s'applique pas au boîtier USB sans fil AnyPoint.
Intel garantit au propriétaire original que le matériel livré dans cet emballage est
exempt de tout vice matériel et de défaut de fabrication pour une durée de trois
(3) ans à compter de : (i) la date d’achat uniquement si vous enregistrez votre
produit en renvoyant la carte d’enregistrement avec la preuve d’achat ; ou (ii) la
date de fabrication ; ou (iii) la date d’enregistrement par voie électronique pour
autant que cet enregistrement survienne dans les trente (30) jours à compter de la
date d’achat.
Intel se réserve le droit d’exécuter votre commande avec un produit dont les
composants sont nouveaux ou reconstruits. La garantie ci-dessus remplace toute
autre garantie, expressE, tacite ou statutaire, y compris, mais non limitÉ À, toute
garantie de respect des droits relatifs À la propriÉtÉ intellectuelle, la
commerciabilitÉ, l’adÉquation À un usage particulier, ou toute garantie issue de
toute proposition, Échantillon ou autre.
Cette garantie ne couvre pas le remplacement des produits endommagés du fait
d’une utilisation abusive, d’un accident, d’une mauvaise utilisation, d’une
négligence, d’une modification, de réparations, d’une calamité, d’une
installation ou d’un essai inadéquat. Au cas où le produit présenterait un défaut,
Intel remplacera, ou réparera, à sa discrétion, le produit à titre gracieux, sauf
dans les cas mentionnés ci-dessous, pour autant que le produit soit renvoyé avec
un numéro d’autorisation de renvoi de matériel (RMA) soit au revendeur où
vous avez acheté le produit soit à Intel (Amérique du Nord uniquement). Si vous
renvoyez le produit, vous devez assumer les risques en cas de perte ou
dommages lors du transport. Vous devez utiliser l’emballage original (ou
équivalent) et prendre en charge les frais d’envoi. Intel pourra soit remplacer le
produit par un produit neuf ou reconstruit, soit réparer le produit avec des pièces
neuves ou réusinées. Le produit renvoyé à Intel devient la propriété d’Intel. Intel
garantit que le produit réparé ou remplacé sera exempt de tout défaut matériel ou
de fabrication pour une période de : (i) quatre-vingt dix (90) jours à compter de
la date d’envoi ; ou (ii) pour la période restante de la garantie originale de trois
(3) ans.
Cette garantie vous accorde des droits légaux spécifiques en plus des autres
droits éventuels dont vous pourriez bénéficier conformément aux lois en vigueur
dans votre pays. Toutes les pièces et composants contenus dans ce produit sont
couverts par la garantie limitée d’Intel pour ce produit. Ce dernier peut contenir
des pièces intégralement testées et recyclées. Pour de plus amples informations
sur la garantie, veuillez appeler le numéro ci-dessous.
Retour d’un p roduit défectueux (R MA)
Avant de retourner un produit, veuillez contacter le Groupe d’assistance à la
clientèle Intel et obtenir un numéro RMA en appelant :
Amérique du Nord uniquement : 1 (877) 777-2203
Autres régions : Retournez le produit à son lieu d’achat. Si le Groupe
d’assistance à la clientèle confirme la défectuosité du produit, il demandera à la
section d’autorisation de retour de matériel d’émettre un numéro RMA à
appliquer sur l’emballage du produit. Intel n’acceptera aucun produit sans
numéro RMA sur l’emballage.
LIMITA T ION DE RESPONSABILITE ET RECOURS
Intel ne peut Être tenu responsable de quelconque dommage indirect ou
spÉculatif (y compris, sans prÉjudice de ce qui prÉcÈde, les dommages
secondaires, occasionnels ou particuliers) Émanant de l’utilisation ou de
l’impossibilitÉ d’utilisation de ce produit nÉe ou non d’un contrat, d’une
nÉgligence, d’un acte dÉlictuel ou rÉsultant du non-respect des droits relatifs à
la propriÉtÉ intellectuelle, de privations de jouissance, d’interruptions
d'exploitation et des pertes de bÉnÉfices. Par dÉrogation À ce qui prÉcÈde, la
responsabilitÉ totale d’Intel pour toutes les rÉclamations Émanant de cet accord
ne pourra excÉder le montant du prix payÉ pour le produit. Ces limitations sur
les responsabilitÉs potentielles ont ÉtÉ un ÉlÉment dÉterminant lors de
l’Établissement du prix du produit. Intel n’assume ET n’autorise quiconque à
assumer quelconque autre responsabilitÉ pour ce produit.
Certains pays n’autorisant pas l’exclusion ou la limitation de dommages
accidentels ou secondaires, les limitations ou exclusions stipulées ci-dessus
peuvent ne pas s’appliquer à votre cas.
Page 56

54 | INFORMATIONS SUR LA TABLETTE
Applications de contrôle critique :
Intel décline toute responsabilité en cas
d’utilisation du produit matériel dans des applications de contrôle critique (y
compris, et uniquement à titre indicatif, les systèmes de contrôle de sécurité et
de santé, les systèmes de contrôle d’énergie nucléaire ou les systèmes de
contrôle du trafic terrestre ou aérien) par le Licencié ou ses Sous-licenciés. De
telles utilisations sont entièrement aux risques de l’utilisateur. Le Licencié
accepte de défendre, d’indemniser et d’exonérer Intel en cas de réclamations
nées de l’utilisation du produit matériel dans de telles applications par le
Licencié ou ses Sous-licenciés.
Logiciel :
Le logiciel fourni avec le boîtier n’est pas couvert par la garantie
matériel décrite ci-dessus. Pour de plus amples détails sur la garantie du logiciel,
veuillez vous référer à l’accord de licence du logiciel fourni avec le boîtier.
Contrat de licence du logiciel In tel
IMPORTAN T - À LIRE AVANT DE COPIER, D'INSTALLER OU
D'UTILISER.
Lisez attentivement les termes et conditions du présent contrat de licence avant
d'utiliser ou de charger le présent logiciel et tout matériel associé (appelés
collectivement le « logiciel »). L'utilisation ou le chargement du logiciel
constitue une acceptation des termes du présent accord. En cas de refus de ces
termes, n'installez pas le logiciel et ne l'utilisez pas.
LICENCE.
Vous pouvez copier le logiciel sur un seul ordinateur pour une
utilisation personnelle et non commerciale et en effectuer une copie de
sauvegarde, sous réserve des conditions suivantes :
1
Sauf stipulation contraire dans le présent accord, vous n'avez pas le droit
de copier, modifier, louer, vendre, distribuer ou transférer quelque partie
que ce soit du logiciel, et vous vous engagez à empêcher toute
reproduction non autorisée du logiciel.
2
Vous n’avez pas le droit d’effectuer des opérations d’ingénierie à rebours,
de décompiler ni de désassembler le logiciel.
3
Vous n’avez pas le droit de concéder le logiciel en vertu d’une souslicence.
4
Le logiciel peut comporter des parties soumises à des termes autres que
ceux définis ici, tels que définis dans le contrat de licence de ces parties.
5
Le partage de connexion Internet peut être soumis aux termes et conditions
stipulés dans la licence de votre fournisseur d’accès à Internet.
PROPRIÉT É D U LO GICI EL ET DRO ITS D 'A UTE UR.
Les droits sur toutes
les copies du logiciel demeurent la propriété d’Intel ou de ses fournisseurs. Les
fournisseurs d'Intel doivent être des bénéficiaires tiers de la présente licence
dans la limite des lois applicables. Le logiciel est soumis à droits d'auteur et
protégé par les lois des États-Unis d'Amérique et d'autres pays ainsi que par les
dispositions de traités internationaux. Vous n'êtes pas autorisé à ôter les
mentions de réserve du logiciel. Intel peut modifier, à tout moment et sans
préavis, le Logiciel ou les éléments qui y sont mentionnés, mais n'est pas tenu à
des services d'assistance ou de mise à jour y afférents. Sauf stipulation contraire
expresse, Intel n'accorde aucun droit exprès ou tacite en vertu des brevets, droits
d'auteur, marques commerciales ou autres droits de propriété intellectuelle
d’Intel. Vous ne pouvez transférer le logiciel que si le destinataire convient
d’être entièrement lié par les dispositions du présent contrat et que vous
acceptez de ne conserver aucune copie du logiciel.
MISES À NIVEAU ET MISES À JOUR
.
En vertu des présentes dispositions,
vous reconnaissez et acceptez que le Logiciel peut être mis à niveau ou mis à
jour à distance avec ou sans notification, et que de telles opérations à distance
n'affecteront en rien les droits de licence accordés pour le Logiciel.
ABSENCE DE GARANTIE, LIMITATION DE RESPONSABILITÉ
.
Dans
la limite des lois applicables, INTEL rejette expressÉment toute garantie pour le
logiciel. Le logiciel et toute documentation y affÉrente sont livrés « en l'État »,
sans garantie d'aucune sorte. Intel rejette toute garantie expresse ou tacite de
commerciabilitÉ, d'adÉquation À un usage particulier ou de respect des droits
d'auteur. Les risques nÉs de l'utilisation du Logiciel vous incombent
entiÈrement. La responsabilitÉ d'Intel et vos recours exclusifs se limitent au
coÛt du Logiciel ou À un exemplaire de remplacement du Logiciel. Dans la
limite des lois applicables, INTEL OU SES FOURNISSEURS NE SONT EN
AUCUN CAS RESPONSABLES DE QUELQUE DOMMAGE QUE CE SOIT
(Y COMPRIS, MAIS SANS QUE CETTE ÉNUMÉRATION SOIT
LIMITATIVE, LES DOMMAGES INDIRECTS ET SECONDAIRES, LES
PERTES DE BÉNÉFICE, LES INTERRUPTIONS D'ACTIVITÉS OU LES
PERTES D'INFORMATIONS) DÉRIVANT DE L'UTILISATION DE CE
PRODUIT OU DE L'INCAPACITÉ DE L'UTILISER, MÊME SI INTEL A
ÉTÉ NOTIFIÉ DE LA POSSIBILITÉ D'UN TEL DOMMAGE. Certains pays
n’autorisant pas l’exclusion ou la limitation de garanties limitÉes ou de
dommages accidentels ou secondaires, les limitations ou exclusions stipulÉes cidessus peuvent ne pas s’appliquer À votre cas. Vous pouvez Également jouir
d'autres droits en fonction de votre pays de rÉsidence.
Page 57

INFORMATIONS SUR LA TABLETTE |
55
RÉSILIATION DU PRÉSENT CONTRAT.
Intel peut dénoncer le présent
contrat à tout moment en cas de violation des dispositions qu’il contient. Le cas
échéant, vous êtes tenu de procéder à la destruction immédiate du logiciel ou
d'en renvoyer tous les exemplaires à Intel.
DROIT APPLICABLE.
Les litiges nés du présent contrat sont régis par les lois
de l'État de Californie, sans tenir compte des principes de conflit de lois et de la
Convention des Nations Unies sur les contrats de vente de marchandises. Vous
n’avez pas le droit d’exporter le logiciel en contravention des lois et règlements
en vigueur sur l'exportation. Intel n'est lié par aucun autre accord, à moins que ce
dernier ne soit sous forme écrite et signé par un représentant agréé d'Intel.
EXPORTATION.
Vous êtes tenu au respect des droits et règlements en matière
d'exportation en vigueur aux États-Unis d'Amérique. Il vous incombe de veiller
à ce que le Logiciel ne soit pas exporté, directement ou indirectement, en
violation des lois des États-Unis d'Amérique.
LIMITATION DES DROITS DU GO UVERNEMENT.
Le logiciel est fourni
avec des « DROITS LIMITÉS ». L'utilisation, la reproduction ou la publication
par le gouvernement est soumise aux restrictions définies dans les articles
FAR52.227-14 et DFAR252.227-7013 et suivants ou leurs successeurs.
L'utilisation du logiciel par le gouvernement constitue une reconnaissance des
droits de propriété d'Intel. L'Entrepreneur ou le Fabricant est Intel Corporation,
5200 N.E. Elam Young Parkway, Mailstop DC1-01, Hillsboro, Oregon 971246497, États-Unis d'Amérique. Vos droits spécifiques peuvent varier en fonction
de votre pays de résidence.
Mentions obligatoires sur les fournisseurs tiers de logiciels
.
Portions Copyright (c) 1995-1999 The Apache Group. Tous droits réservés. Le
présent produit inclut le logiciel développé par Apache Group pour une
utilisation sur le projet de serveur HTTP Apache (http://www.apache.org).
Le lecteur RealPlayer est fourni sous licence par RealNetworks, Inc. Copyright
© 1995 - 2000, RealNetworks, Inc. Tous droits réservés. RealNetworks,
RealPlayer, RealAudio et RealVideo sont de marques déposées de
RealNetworks, Inc.
Politique d'Intel en matière de traitem ent des
informations nominatives
Intel respecte votre vie privée. Si vous nous communiquez des informations
personnelles, nous les traiterons conformément à notre politique en matière de
traitement d'informations nominatives transmises en ligne. Intel recommande la
lecture du texte de sa politique en matière de traitement des informations
nominatives ainsi que celui de tous les sites Web que vous visitez. Ce texte peut
être consulté à l'adresse suivante : www.intelwebtablet.com/legal/privacy.html.
Déclarations de conformité
Avis de conform ité avec la section 15 de s règlem ents d e la FC C
Cet appareil a été soumis à des tests qui ont vérifié sa conformité aux limites
aplicables aux appareils numériques de classe B définies dans la Section 15 des
règlements de la FCC (Federal Communications Commission). Ces limites sont
destinées à apporter une protection raisonnable contre les interférences nuisibles
dans un environnement résidentiel.
Cet appareil génère, utilise et peut émettre de l’énergie radiofréquence. S’il n’est
pas installé et utilisé conformément aux instructions, il peut entraîner des
interférences nuisibles aux communications radio. Il n'est cependant pas garanti
que des interférences ne se produiront pas dans le cadre d'installations
particulières. Si cet équipement crée des interférences nuisibles qui affectent la
réception radio ou télévision, ce qui peut être déterminé en mettant l'équipement
sous tension et puis hors tension, l'utilisateur est encouragé à essayer de corriger
l'interférence d'une ou de plusieurs façons :
• Orientez votre antenne de radio ou de téléviseur dans une autre direction.
• Dans la mesure du possible, éloignez du produit votre poste de radio ou de
télévision ou votre récepteur.
• Branchez le produit dans une autre prise électrique que celle du récepteur.
Si ces conseils ne permettent pas de résoudre le problème, contactez votre
revendeur ou un réparateur TV/radio compétent.
Remarque : Cet appareil est conforme à la section 15 des règlements de la FCC.
Son fonctionnement est soumis aux deux conditions suivantes : (1) ce périphérique ne
doit pas créer d'interférence nuisible et (2) ce périphérique doit accepter toute interférence reçue, notamment les interférences qui peuvent affecter son opération.
Page 58

56 | INFORMATIONS SUR LA TABLETTE
Déclaration de conformité pour le Canada (Industrie Canada)
Cet appareil numérique de classe B ne dépasse pas les limites d’émission de
bruit radioélectrique telles qu’indiquées dans la norme sur le matériel brouilleur
intitulée : « Appareil numérique », ICES-003 du Ministère canadien des
communications.
En vue de prévenir toute interférence radioélectrique avec des services sous
licence, cet appareil doit être utilisé à l'intérieur et maintenu éloigné des
fenêtres. Toute installation de l’équipement, ou d’une antenne de transmission, à
l’extérieur, est soumise à l’obtention d’une licence.
Déclaration de conformité Laboratoires des Assureurs du
Canada
Ce produit est conforme aux exigences en matière de sécurité pour les
équipements informatiques et certifié par les Laboratoires des Assureurs
conforme à UL 1950 3ème Éd./CSA 950-95.
Page 59

INDEX |
57
INDEX
A
AC power adapter 9, 12, 18
access panel
9
adding a favorite
10
adding a tablet
25
antenna
9
AnyPoint Home Network
Phoneline Home Network
23
Wireless Home Network
4, 23
B
back/forward button 9
battery
9, 16, 18
battery charge
10, 12
blank or partially-loaded web pages
18
button bar
10
C
cached pages 15
charging cradle
9, 11, 18
cleaning and maintaining the hand grips
16
cleaning and maintaining the touch screen
16
connecting to the Internet
4
control panel
10
controlling tablet functions
10
controls button
10
customer support
contacting
52
phone number
17
web site
17, 18
customized web experienc
3
E
electronic picture frame 13
email
13
F
favorites list 10, 13
favorites panel
10
firewall
6
flip stand
9
French information (informations en Français)
31
frequently asked questions (FAQs)
17
G
going places on the web 13
H
hand grips 16
hanging up the phone line
from the PC
14
from the tablet
14
in an emergency
14
help
10, 13, 17
history of visited URLs
13
home buttons
9, 13
home page 13
horizontal scroll arrows
10
Page 60

58
|INDEX
I
icon on PC desktop 5
Info Center
13, 17
Insider News newsletter
3, 13
installation instructions
19, see also Intel® Web Tablet
Installation Poster
en Français
39
Intel AnyPoint Phoneline Home Network
23
Intel AnyPoint Wireless Home Network
4, 23
Internet connection
4
always connected Internet connection
14
dial-up Internet connection
14
security
6
K
keyboard
attaching a PS/2 keyboard
9, 11, 29
keyboard jack
9, 11
keyboard requirements
29
not responding to touch
18
on-screen keyboard
10, 11
L
loading progress indicator 10
lock icon
10
low battery
18
low or bad signal
17
M
multiple tablets 5, 25
N
network code 6
newsletter
3, 13
O
on/off controls 10
online help
17
on-screen keyboard
10, 11
ordering accessories or replacement parts
3, 16
P
parental control 6
PC requirements
29
photos on the tablet
13
power jack
9
print button
9, 12
printing from the tablet
9, 12
privacy
6
progress indicator
10
proxy settings
6
Q
quick tour of the tablet 17
R
refreshing the current page 10, 15
reload button
10
requirements
29
en Français
50
reset button
9
Page 61

INDEX |
59
S
screen saver 13
scroll arrows
10
scroll wheel
9
secure sites
6, 10
secure transactions
6
security
6
setting up your home page
13
signal strength
10, 11
software updates
15
stop button
10
stylus
9
stylus tether anchor
9
suggestions
3
support
17, 52
T
tablet
care
16
controls
10
diagrams
8
French information (informations en Français)
31
icon on PC desktop
5
installation
19, see also Intel® Web Tablet
Installation Poster
news
3, 13
technical issues
17
touch screen
9, 16
accuracy
18
brightness and contrast
10
not responding to touch
18
troubleshooting
17, 28
turning the screen saver on and off
13
turning the tablet on and off
10
typing with the tablet
10, 11
U
updates 15
URL
10, 13
User Guide (online)
10, 13
using multiple tablets
5
using the tablet
2, 10, 11
using your tablet with your PC
5
V
volume control 10
W
warranty
see Intel® Web Tablet Warranty and Licence Agreement
en Français
51
web address
10, 13
web content
going places on the web
13
keeping content fresh
15
pages blank or partially loaded
18
storing (caching)
15
web•search panel
10, 13
web•search button
10, 13
wireless network code
6
wireless signal strength
10, 11
Page 62

CONTACTING CUSTO MER SUPPORT
When you need help...
Contact our customer support group.
•
From the tablet:
Touch
web•search
on the button bar, then the
info center
button. Or touch
?
on the button bar, then the Info Center link.
To send feedback or submit a problem report, touch the
Contact Us
link at the bottom of the Info Center home page.
•
From your PC web browser:
Go to:
www .intel.com/home/webtablet/support
• Or call our customer support group toll free at
1 (877) 777-2203.
Page 63
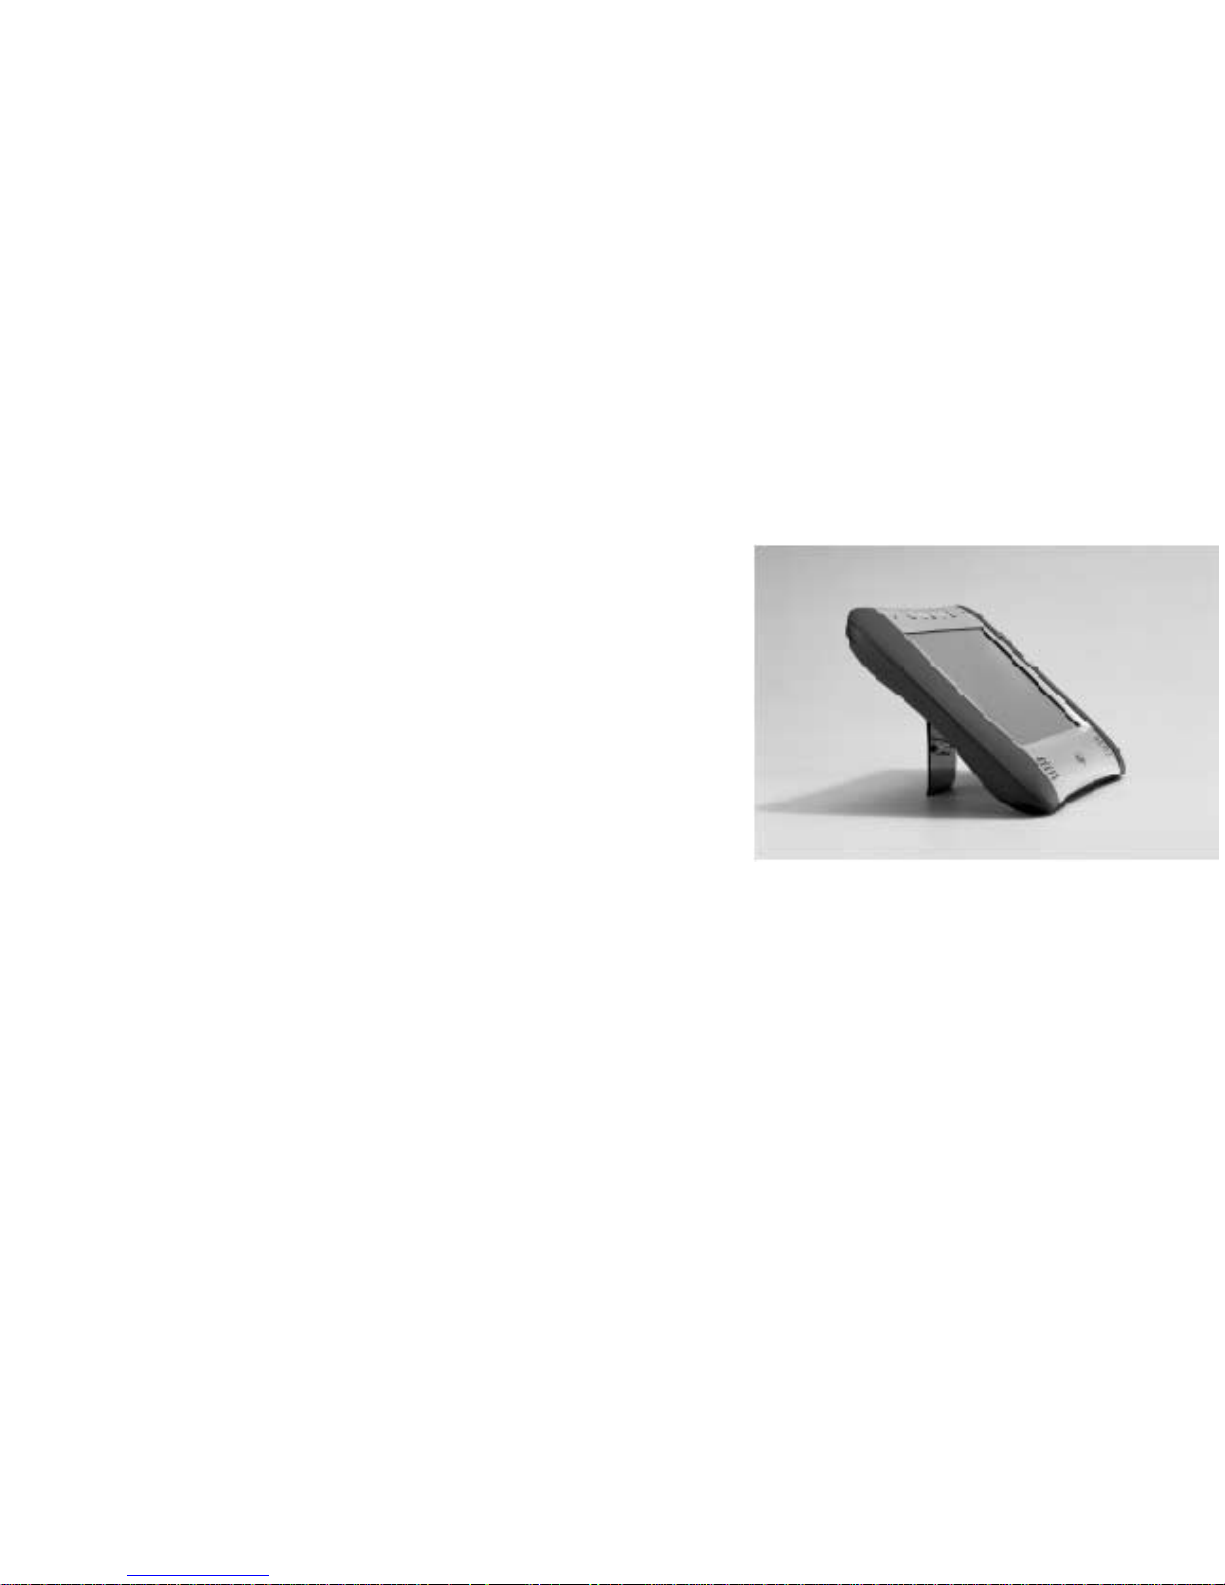
Page 64

*
Legal Statements
The Intel logo, Pentium, and AnyPoint are
trademarks or registered trademarks of Intel
Corporation or its subsidiaries in the United
States and other countries.
Other names and brands may be claimed
as the property of others.
Copyright © 2001 Intel Corporation.
All rights reserved.
Printed in U.S.A.
*A29657-007*
A29657-007
 Loading...