

Page 1

Intel® Entry Storage System SS4000-E
User Guide
A Guide for Technically Qualified Assemblers of Intel® Identified Subassemblies/
Products
Intel Order Number D39172-006
Page 2

Disclaimer
Information in this document is provided in connection with Intel® products. No license, express or implied, by
estoppel or otherwise, to any intellectual property rights is granted by this document. Except as provided in Intel's
Terms and Conditions of Sale for such products, Intel assumes no liability whatsoever, and Intel disclaims any
express or implied warranty, relating to sale and/or use of Intel® products including liability or warranties relating to
fitness for a particular purpose, merchantability, or infringement of any patent, copyright or other intellectual property
right. Intel products are not designed, intended or authorized for use in any medical, life saving, or life sustaining
applications or for any other application in which the failure of the Intel product could create a situation where
personal injury or death may occur. Intel may make changes to specifications and product descriptions at any time,
without notice.
Intel® server boards contain a number of high-density VLSI and power delivery components that need adequate
airflow for cooling. Intel's own chassis are designed and tested to meet the intended thermal requirements of these
components when the fully integrated system is used together. It is the responsibility of the system integrator that
chooses not to use Intel developed server building blocks to consult vendor datasheets and operating parameters to
determine the amount of airflow required for their specific application and environmental conditions. Intel
Corporation can not be held responsible if components fail or the server board does not operate correctly when used
outside any of their published operating or non-operating limits.
Intel, Intel Pentium, and Intel Xeon are trademarks or registered trademarks of Intel Corporation or its subsidiaries in
the United States and other countries.
* Other names and brands may be claimed as the property of others.
Copyright © 2006-2008, Intel Corporation. All Rights Reserved
Page 3
Safety Information
Important Safety Instructions
Read all caution and safety statements in this document before performing any of the
instructions. See also Intel Server Boards and Server Chassis Safety Information on the
®
Server Deployment Toolkit CD and/or at http://support.intel.com/support/
Intel
motherboards/server/sb/cs-010770.htm.
Wichtige Sicherheitshinweise
Lesen Sie zunächst sämtliche Warnund Sicherheitshinweise in diesem Dokument, bevor
Sie eine der Anweisungen ausführen. Beachten Sie hierzu auch die Sicherheitshinweise zu
Intel-Serverplatinen und Servergehäusen auf der Intel
oder unter http://support.intel.com/support/motherboards/server/sb/cs-010770.htm.
Safety Information
®
Server Deployment Toolkit CD
Consignes de sécurité
Lisez attention toutes les consignes de sécurité et les mises en garde indiquées dans ce
document avant de suivre toute instruction. Consultez Intel Server Boards and Server
Chassis Safety Information sur le Intel
vous sur le site http://support.intel.com/support/motherboards/server/sb/cs-010770.htm.
®
Server Deployment Toolkit CD ou bien rendez-
Instrucciones de seguridad importantes
Lea todas las declaraciones de seguridad y precaución de este documento antes de realizar
cualquiera de las instrucciones. Vea Intel Server Boards and Server Chassis Safety
Information en el Intel
support/motherboards/server/sb/cs-010770.htm.
重要安全指导
®
Server Deployment Toolkit CD y/o en http://support.intel.com/
Intel® Entry Storage System SS4000-E User Guide iii
Page 4

Safety Information
Warnings
These warnings and cautions apply whenever you remove the enclosure cover to access
components inside the storage system. Only a technically qualified person should
maintain or configure the storage system.
Heed safety instructions: Before working with your server product, whether you are
using this guide or any other resource as a reference, pay close attention to the safety
instructions. You must adhere to the assembly instructions in this guide to ensure and
maintain compliance with existing product certifications and approvals. Use only the
described, regulated components specified in this guide. Use of other products /
components void the UL listing and other regulatory approvals of the product and most
likely result in noncompliance with product regulations in the region(s) in which the
product is sold.
System power on/off: The power button DOES NOT turn off the system AC power. To
remove power from the storage system, you must unplug the AC power cord from the wall
outlet or the chassis. Make sure the AC power cord is unplugged before you open the
chassis, add, or remove any components.
Hazardous conditions, devices and cables: Hazardous electrical conditions may be
present on power, telephone, and communication cables. Turn off the storage system and
disconnect the power cord, telecommunications systems, networks, and modems attached
to the storage system before opening it. Otherwise, personal injury or equipment damage
can result.
Electrostatic discharge (ESD) and ESD protection: ESD can damage disk drives,
boards, and other parts. We recommend that you perform all procedures in this document
only at an ESD workstation. If one is not available, provide some ESD protection by
wearing an anti-static wrist strap attached to a chassis ground of any unpainted metal
surface on your storage system when handling parts.
ESD and handling boards: Always handle boards carefully. They can be extremely
sensitive to ESD. Hold boards only by their edges. Do not touch the connector contacts.
After removing a board from its protective wrapper or from the storage server, place the
board component side up on a grounded, static-free surface. Use a conductive foam pad if
available but not the board wrapper. Do not slide board over any surface.
Installing or removing jumpers: A jumper is a small plastic encased conductor that slips
over two jumper pins. Some jumpers have a small tab on top that you can grip with your
fingertips or with a pair of fine needle nosed pliers. If your jumpers do not have such a tab,
take care when using needle nosed pliers to remove or install a jumper; grip the narrow
sides of the jumper with the pliers, never the wide sides. Gripping the wide sides can
damage the contacts inside the jumper, causing intermittent problems with the function
controlled by that jumper. Take care to grip with, but not squeeze, the pliers or other tool
you use to remove a jumper, or you may bend or break the pins on the board.
Reinstalling enclosure cover: For proper cooling and airflow, always install the
enclosure cover before turning on the storage system. Operating it without the enclosure
cover in place can damage system parts.
iv Intel® Entry Storage System SS4000-E User Guide
Page 5

Preface
About this Manual
Thank you for purchasing and using the Intel® Entry Storage System SS4000-E.
This manual is written for system technicians who are responsible for troubleshooting,
upgrading, and repairing this storage system. This document provides a brief overview of
the features of the product, a list of accessories or other components you may need,
troubleshooting information, and instructions on how to add and replace components on
the Intel
/support.intel.com/support/motherboards/server/ss4000-e/.
Manual Organization
®
Entry Storage System SS4000-E. For the latest version o f this manual, see http:/
Preface
Chapter 1 provides a brief overview of the Intel® Entry Storage System SS4000-E. In this
chapter, you find a list of the storage system’s features, photos of the product, and product
diagrams to help you identify components and their locations.
Chapter 2 provides instructions on adding and replacing components. Use this chapte r for
step-by-step instructions and diagrams for installing or replacing components such as the
fans, power supply, drives, and other components.
Chapter 3 provides information on managing your system. This chapter explains how to
manage users, create shared folders, and perform other tasks for configuring and
managing your storage system.
®
Chapter 4 provides information on the Intel
to protect your local disks on client machines.
At the back of this book, you find technical specifications, regulatory information, safety
information, “getting help” information, and warranty information.
Client Backup and Recovery software used
Product Contents, Order Options, and Accessories
Your storage system ships with the following items:
• Intel
®
Entry Storage System SS4000-E
• Attention document, in the product box
• Intel
®
Entry Storage System SS4000-E Quick Start User's Guide, in the product box
• AC power cord (North America only)
• One RJ-45 Ethernet cable
Intel® Entry Storage System SS4000-E User Guide v
Page 6

Preface
• Software CD, containing the Intel
®
Client Backup and Recovery software and product
documentation
• Recovery CD
• Set of hard disk labels
In addition, you may need or want to purchase the following accessory item for your
storage system:
• Hard drives
For information about which accessories, memory, and third-party hardware were tested
and can be used with your storage system, and for ordering information for Intel
products, see http://support.intel.com/support/motherboards/server/ss4000-e/compat.htm.
Additional Information and Software
If you need more information about this product or information about the accessories that
can be used with this storage system, use the following resources. These files are available
at http://support.intel.com/support/motherboards/server/ss4000-e/
Unless otherwise indicated in the following table, once on this Web page, type the
document or software name in the search field at the left side of the screen and select the
option to search “This Product.”
®
For this information or
software
For in-depth technical
information about this
product
If you just received this
product and need to install
it
Accessories or other Intel
server products
Hardware and operating
systems that were
validated by Intel for this
product
Use this Document or Software
®
Intel
Entry Storage System SS4000-E Technical Product
Specification
http://support.intel.com/support/motherboards/server/ss4000-e/
®
Entry Storage System SS4000-E Quick Start User's Guide in
Intel
the product box
Spares and Configuration Guide
Tested Hardware and Operating Systems List
http://support.intel.com/support/motherboards/server/ss4000-e/
vi Intel® Entry Storage System SS4000-E User Guide
Page 7

Contents
Contents
Safety Information .....................................................................................................iii
Important Safety Instructions ................................................................................................ iii
Wichtige Sicherheitshinweise ............................................................................................... iii
Consignes de sécurité .......................................................................................................... iii
Instrucciones de seguridad importantes ............................................................................... iii
Warnings............................................................................................................................... iv
Preface ......................................................................................................................... v
About this Manual ..................................................................................................................v
Manual Organization .............................................................................................................. v
Product Contents, Order Options, and Accessories .............................................................. v
Additional Information and Software ..................................................................................... vi
Storage System Features ..........................................................................................1
Key Features and Benefits ....................................................................................................2
Front Panel ............................................................................................................................ 3
Rear Panel .............................................................................................................................5
System Requirements ...........................................................................................................6
Accessories and Spare Parts ................................................................................................ 7
Getting Started ............................................................................................................9
Setting up the Storage System ............................................................................................10
Installing the Hard Disks ........................................................................................................... 10
Attaching the Storage System to the Network .......................................................................... 15
Powering Up the Storage System ............................................................................................. 16
Powering Down the Storage System ........................................................................................ 16
Initializing your Storage System ..........................................................................................16
Installing the Console ............................................................................................................... 17
Starting the Console ................................................................................................................. 18
Initializing the Disks .................................................................................................................. 20
Configuring Your Storage System .......................................................................................21
Accessing the Manager .......................................................................................................25
Accessing the Manager Using the Console .............................................................................. 26
Accessing the Manager Using a Web Browser ........................................................................ 26
Logging in to the Manager................................................................................................... 27
Navigating the Manager....................................................................................................... 28
Viewing Information About Your Storage System ..................................................................... 30
Adding Users ....................................................................................................................... 32
Creating Shared Folders ......................................................................................................35
Managing Shared Folders ...................................................................................................36
Deleting a Shared Folder .......................................................................................................... 37
Intel® Entry Storage System SS4000-E User Guide vii
Page 8

Contents
Assigning Users to Shared Folders .......................................................................................... 38
Managing Your Storage System ..............................................................................39
Managing Users .................................................................................................................. 40
Adding Users ............................................................................................................................ 41
Modifying Users ........................................................................................................................ 41
Removing Users ....................................................................................................................... 43
Working with Groups ................................................................................................................ 43
Synchronizing the Storage System and Active Directory Server .............................................. 54
Managing Shared Folders ................................................................................................... 54
Deleting a Shared Folder .......................................................................................................... 55
Assigning Users to Shared Folders .......................................................................................... 56
Managing Backups ..............................................................................................................58
Changing the Recovery Password ........................................................................................... 59
Configuring Remote Boot ......................................................................................................... 59
Deleting a Backup .................................................................................................................... 60
Deleting a Client ....................................................................................................................... 61
Setting Up e-mail Alerts....................................................................................................... 62
Upgrading the Firmware...................................................................................................... 64
Disconnecting USB Devices................................................................................................ 65
Changing the System Settings............................................................................................ 66
Changing the Network Settings........................................................................................... 68
Reconfiguring Your Storage System Disks ......................................................................... 71
Expanding the Shared Storage ................................................................................................ 72
Reconfiguring the Disks ............................................................................................................ 73
Viewing System Status Information ..................................................................................... 76
Logging Out of the Manager................................................................................................ 77
Shutting Down the Storage System .................................................................................... 77
Working with Shared Folders ..................................................................................79
Accessing Shared Folders .................................................................................................. 79
Microsoft Windows* Users ........................................................................................................ 79
Linux* Users ............................................................................................................................. 84
Mac Users ................................................................................................................................ 84
Accessing Shared Folders using FTP ................................................................................. 85
Disconnecting from Shared Folders .................................................................................... 86
Microsoft Windows* Users ........................................................................................................ 86
Linux* Users ............................................................................................................................. 87
Mac* Users ............................................................................................................................... 87
Protecting Local Disks .............................................................................................89
Getting Started .................................................................................................................... 90
System Requirements .............................................................................................................. 90
Additional Requirements .......................................................................................................... 91
Installing the Microsoft iSCSI Initiator* ..................................................................................... 91
Installing Intel
viii Intel® Entry Storage System SS4000-E User Guide
®
Client Backup and Recovery ........................................................................... 92
Page 9

Contents
Starting Intel® Client Backup and Recovery ............................................................................. 95
Activating Your License ............................................................................................................ 96
Activating Your License Without an Internet Connection .......................................................... 97
Replacing Your Existing License .............................................................................................. 98
Protecting Your Disks ..........................................................................................................98
Manually Backing up Your Disk......................................................................................... 105
Stopping a Backup or Recovery in Progress..................................................................... 106
Changing the Backup Schedule ........................................................................................ 107
Receiving Event Notifications ............................................................................................ 108
Changing the Recovery Password ....................................................................................108
Enabling or Disabling Remote Boot ...................................................................................110
Enabling Remote Boot ............................................................................................................ 111
Disabling Remote Boot ........................................................................................................... 112
Recovering Data ................................................................................................................112
Recovering Files or Folders ....................................................................................................114
Recovering a Data Disk .......................................................................................................... 116
Recovering a System Disk Using the Recovery CD ............................................................... 117
Recovering a System Disk While Booting Remotely .............................................................. 122
Removing Protection .............................................................................................................. 126
Adding or Replacing Hard Disks ...........................................................................127
Adding Hard Disks .............................................................................................................127
Adding Hard Disks to a Linear or Normal RAID Configuration ............................................... 128
Adding Hard Disks to a Degraded RAID Configuration .......................................................... 130
Removing Hard Disks or Responding to a Disk Failure..................................................... 131
Responding to RAID Degradation .......................................................................................... 132
Responding to RAID Failure ................................................................................................... 133
Swapping Hard Disks ........................................................................................................134
Transferring Hard Disks to a New Storage System ...........................................................134
Hardware Installations and Upgrades .................................................................. 137
Before You Begin ...............................................................................................................137
Tools and Supplies Needed .................................................................................................... 137
System References ................................................................................................................ 137
Removing or Installing the Enclosure Cover ......................................................................137
Removing the Enclosure Cover .............................................................................................. 138
Installing the Enclosure Cover........................................................................................... 139
Replacing or Installing a Hard Disk.................................................................................... 140
Replacing Power Supply ....................................................................................................145
Replacing System Fan....................................................................................................... 151
Troubleshooting .....................................................................................................159
Viewing the System Log ....................................................................................................159
Troubleshooting the Storage System ................................................................................ 160
Troubleshooting Intel
Creating a Diagnostic File.................................................................................................. 165
®
Client Backup and Recovery .........................................................162
Intel® Entry Storage System SS4000-E User Guide ix
Page 10

Contents
Using Intel® Client Backup and Recovery .............................................................................. 165
Using the Recovery CD ..........................................................................................................165
Resetting the Recovery Password in the Microsoft iSCSI Initiator* ........................................ 166
Technical Specifications ........................................................................................167
Hardware Specification ..................................................................................................... 167
Software Specification....................................................................................................... 168
A Levels of RAID ....................................................................................................169
Linear ................................................................................................................................ 169
RAID 0 - Data Striping ....................................................................................................... 169
RAID 1 - Disk Mirroring/Disk Duplexing ............................................................................ 170
RAID 5 - Data Striping with Striped Parity ......................................................................... 170
RAID 5 + Spare .................................................................................................................171
RAID 10 - Combination of RAID 1 and RAID 0 ................................................................. 172
B PXE Remote Boot ...............................................................................................173
C Glossary ..............................................................................................................175
D Regulatory and Compliance Information .........................................................177
Product Regulatory Compliance ........................................................................................ 177
Intended Application ............................................................................................................... 177
Product Safety Compliance .................................................................................................... 177
Product EMC Compliance - Class B Compliance ................................................................... 178
Certifications / Registrations / Declarations ............................................................................ 178
Product Regulatory Compliance Markings ............................................................................. 179
Electromagnetic Compatibility Notices .............................................................................. 180
FCC Statement (USA) ............................................................................................................180
ICES-003 (Canada) ................................................................................................................ 180
Europe (CE Declaration of Conformity) .................................................................................. 181
VCCI (Japan) .......................................................................................................................... 181
BSMI (Taiwan) ........................................................................................................................ 181
RRL (Korea) ........................................................................................................................... 181
End of Life / Product Recycling ......................................................................................... 182
Restriction of Hazardous Substances (RoHS) Compliance .............................................. 182
E Warranty ..............................................................................................................183
Limited Warranty for Intel® Chassis Subassembly Products ............................................ 183
Extent of Limited Warranty ................................................................................................ 183
Warranty Limitations and Exclusions ................................................................................ 184
Limitations of Liability ............................................................................................................. 184
How to Obtain Warranty Service ............................................................................................ 184
Telephone Support ................................................................................................................. 185
Returning a Defective Product ................................................................................................ 185
F Getting Help ........................................................................................................187
World Wide Web ............................................................................................................... 187
x Intel® Entry Storage System SS4000-E User Guide
Page 11

Contents
Telephone ..........................................................................................................................187
U.S. and Canada .................................................................................................................... 187
Europe .................................................................................................................................... 187
In Asia-Pacific region .............................................................................................................. 188
Japan .................................................................................................................................... 188
Latin America .......................................................................................................................... 188
G Installation/Assembly Safety Instructions ...................................................... 191
English ...............................................................................................................................191
Deutsch ..............................................................................................................................193
Français .............................................................................................................................196
Español ..............................................................................................................................198
Italiano ...............................................................................................................................200
H Safety Information .............................................................................................203
English ...............................................................................................................................203
Server Safety Information ....................................................................................................... 203
Safety Warnings and Cautions ............................................................................................... 203
Intended Application Uses ......................................................................................................204
Site Selection .......................................................................................................................... 204
Equipment Handling Practices ................................................................................................ 204
Power and Electrical Warnings ............................................................................................... 204
System Access Warnings ....................................................................................................... 205
Rack Mount Warnings ............................................................................................................206
Electrostatic Discharge (ESD) ................................................................................................ 206
Other Hazards ........................................................................................................................ 207
Deutsch.............................................................................................................................. 208
Sicherheitshinweise für den Server ........................................................................................ 208
Sicherheitshinweise und Vorsichtsmaßnahmen ..................................................................... 208
Zielbenutzer der Anwendung .................................................................................................. 209
Standortauswahl ..................................................................................................................... 209
Handhabung von Geräten ...................................................................................................... 209
Warnhinweise für den Systemzugang .................................................................................... 211
Elektrostatische Entladungen (ESD) ...................................................................................... 212
Andere Gefahren .................................................................................................................... 213
Français .............................................................................................................................214
Consignes de sécurité sur le serveur ..................................................................................... 214
Sécurité: avertissements et mises en garde ........................................................................... 214
Domaines d’utilisation prévus ................................................................................................. 215
Sélection d’un emplacement ................................................................................................... 215
Pratiques de manipulation de l’équipement ............................................................................ 215
Décharges électrostatiques (ESD) ......................................................................................... 218
Autres risques ......................................................................................................................... 219
Español.............................................................................................................................. 220
Información de seguridad del servidor .................................................................................... 220
Advertencias y precauciones sobre seguridad ....................................................................... 220
Aplicaciones y usos previstos ................................................................................................. 221
Intel® Entry Storage System SS4000-E User Guide xi
Page 12

Contents
Selección de la ubicación ....................................................................................................... 221
Manipulación del equipo ......................................................................................................... 221
Advertencias el acceso al sistema ......................................................................................... 223
Descarga electrostática (ESD) ............................................................................................... 224
xii Intel® Entry Storage System SS4000-E User Guide
Page 13

List of Tables
List of Tables
Table 1. Component Definitions.................................................................................................4
Table 2. Rear Panel LEDs and Components .............................................................................6
Table 3. System Requirements.................................................................................................. 6
Table 4. Accessories and Spare Parts Descriptions .................................................................. 7
Table 5. Hardware Specifications...........................................................................................167
Table 6. Software Component Specifications ........................................................................ 168
Intel® Entry Storage System SS4000-E User Guide xiii
Page 14

List of Tables
This page intentionally left blank.
xiv Intel® Entry Storage System SS4000-E User Guide
Page 15

List of Figures
List of Figures
Figure 1. Intel® Entry Storage System SS4000-E - Front View.................................................. 1
Figure 2. Front Panel LEDs and Components ........................................................................... 3
Figure 3. Rear Panel Components............................................................................................. 5
Figure 4. Removing Drive Carrier from Storage System.......................................................... 11
Figure 5. Removing Baffle from Drive Carrier ..........................................................................11
Figure 6. Rear View of SATA Hard Disk .................................................................................. 12
Figure 7. Installing Hard Disk into Drive Carrier....................................................................... 12
Figure 8. Applying Label to Hard Disk...................................................................................... 13
Figure 9. Order of Drive Carriers.............................................................................................. 13
Figure 10. Re-installing Drive Carrier into Storage System......................................................14
Figure 11. Connecting Storage System to Network .................................................................15
Figure 12. Powering up the Storage System............................................................................ 16
Figure 13. Removing Enclosure Cover .................................................................................. 138
Figure 14. Installing Enclosure Cover .................................................................................... 139
Figure 15. Removing Drive Carrier from Storage System...................................................... 141
Figure 16. Removing Baffle from Drive Carrier ......................................................................141
Figure 17. Rear View of SATA Hard Disk .............................................................................. 142
Figure 18. Installing Hard Disk into Drive Carrier................................................................... 142
Figure 19. Affixing Label to Drive Carrier...............................................................................143
Figure 20. Order of Drive Carriers.......................................................................................... 143
Figure 21. Re-installing Drive Carrier into Storage System....................................................144
Figure 22. Removing Enclosure Cover .................................................................................. 146
Figure 23. Detaching Power Supply from Chassis................................................................. 147
Figure 24. Disconnecting Power Cables and Removing Power Supply Cage ....................... 147
Figure 25. Removing Gasket from Old Power Supply............................................................148
Figure 26. Installing Gasket on New Power Supply...............................................................148
Figure 27. Installing New Power Supply Cage....................................................................... 149
Figure 28. Securing New Power Supply Cage to Chassis .....................................................149
Figure 29. Installing Enclosure Cover .................................................................................... 150
Figure 30. Removing Enclosure Cover .................................................................................. 151
Figure 31. Removing Drive Carriers....................................................................................... 152
Figure 32. Removing Backplane from Chassis......................................................................153
Figure 33. Removing System Fan.......................................................................................... 154
Figure 34. Installing New System Fan....................................................................................155
Figure 35. Re-installing Backplane Assembly........................................................................ 156
Figure 36. Re-installing Drive Carriers ...................................................................................157
Figure 37. Installing Enclosure Cover .................................................................................... 158
Figure 38. RAID 0 - Data Striping........................................................................................... 169
Figure 39. RAID 1 - Disk Mirroring/Disk Duplexing ................................................................170
Figure 40. RAID 5 - Data Striping with Striped Parity.............................................................171
Figure 41. RAID 5 + Spare.....................................................................................................171
Figure 42. RAID 10 - Combination of RAID 1 and RAID 0..................................................... 172
Intel® Entry Storage System SS4000-E User Guide xv
Page 16

List of Figures
xvi Intel® Entry Storage System SS4000-E User Guide
Page 17
1 Storage System Features
The Intel® Entry Storage System SS4000-E is an intelligent network storage solution for
small and medium-sized offices, and home network environments. It provides up to
3.0 TB (terabytes) of hard disk space for both shared files and backups of your computer
hard disks, offering an ideal way to distribute and protect important data.
The storage system features an integrated file server with system backup, and the ability to
manage shared folders by user names or groups. It can connect to a gigabit Ethernet
network and support up to four serial ATA (SATA) hard drives. The storage system’s
performance is ideal for protecting company data and quickly restoring files from a
backup.
To make it easy to back up your computer hard disks, the storage system includes Intel
Client Backup and Recovery, a software application that provides reliable data protection
and rapid data recovery in the event of a system crash or disk failure. With Intel
Backup and Recovery, you can recover your local disks or partitions without having to
reinstall or reconfigure the operating system or applications, dramatically shortening
recovery time. One key code is included with the system. Y ou can purchase additional key
codes from http://www.intel.com/design/servers/storage/offers.
Storage System Features
®
®
Client
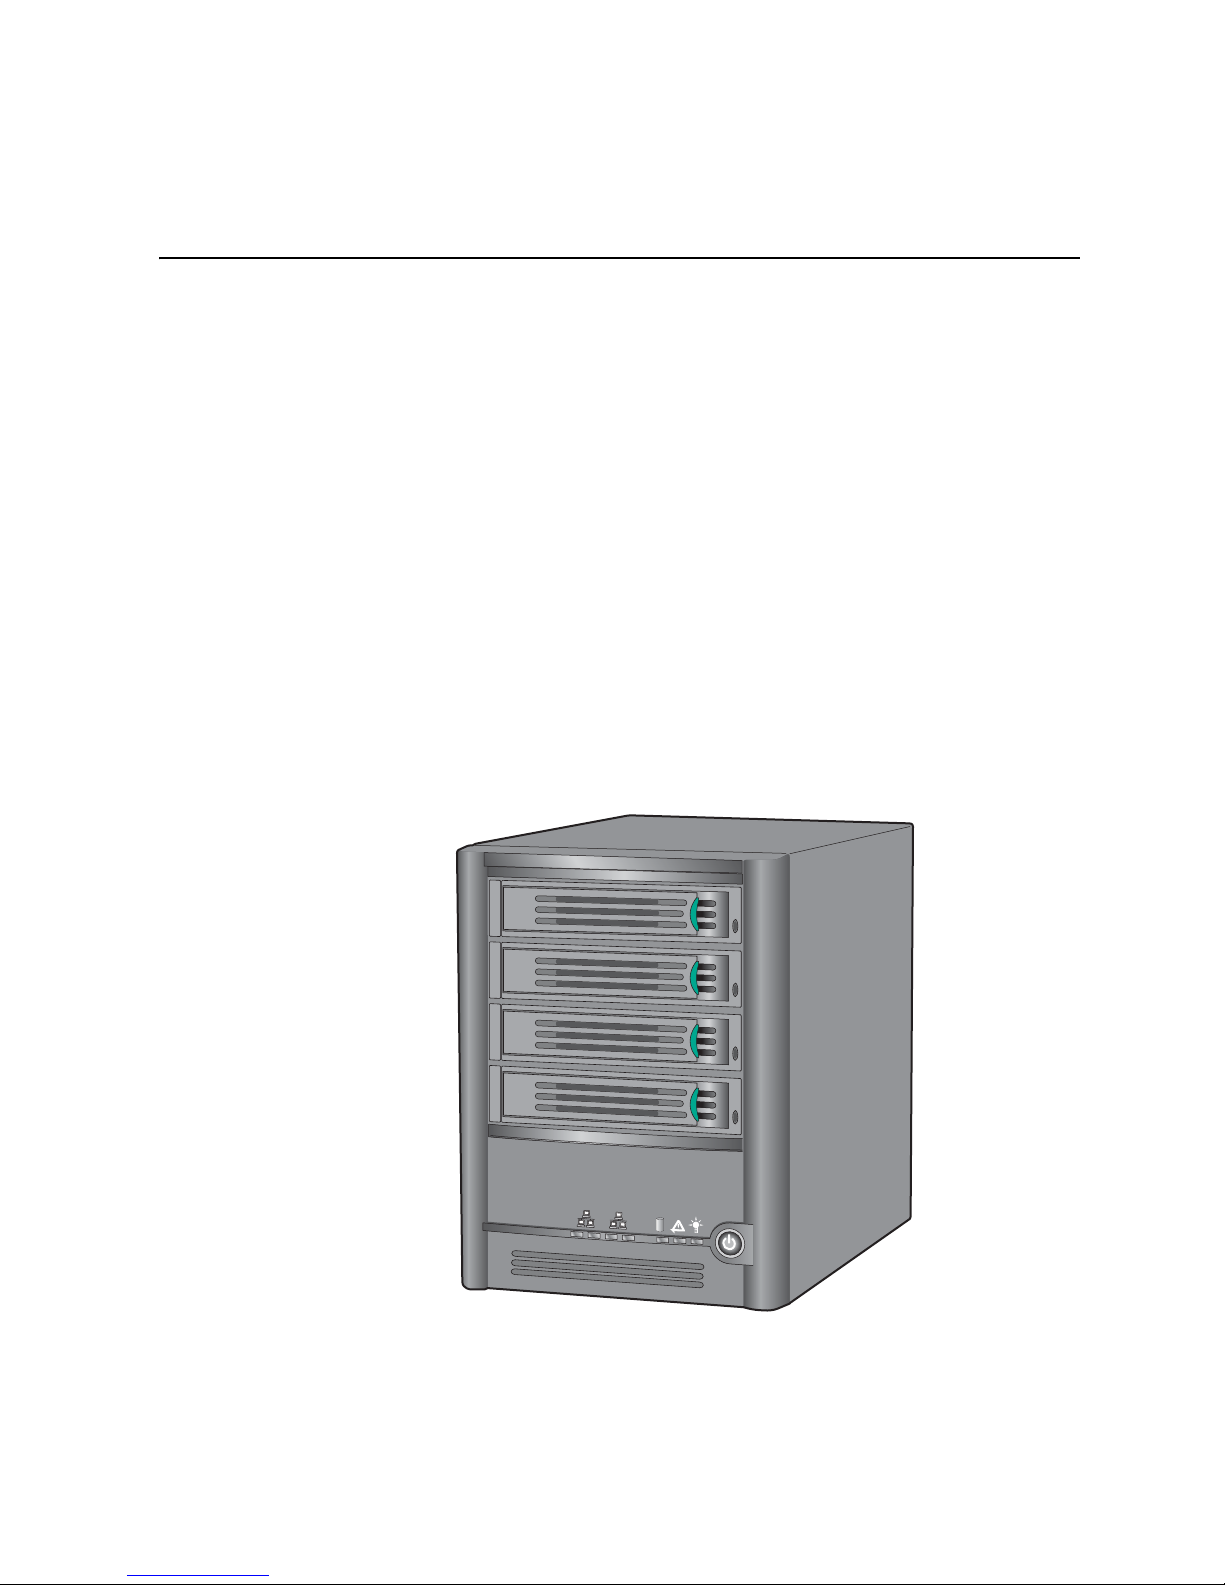
Figure 1 shows a front view of the Intel
1
2
3
4
1
2
®
Entry Storage System SS4000-E.
TP000086
Figure 1. Intel
Intel® Entry Storage System SS4000-E User Guide 1
®
Entry Storage System SS4000-E - Front View
Page 18

Storage System Features
Key Features and Benefits
• Flexible storage capacity: The Intel
four 3.5-inch SATA hard disks. You can start with one hard disk and add more as your
needs grow. See the Tested Hardware and Operating Systems List at http://
support.intel.com/support/motherboards/server/ss4000-e/ for a list of compatible
operating systems and hard drives.
®
Entry Storage System SS4000-E supports up t o
• Built-in data protection: In addition to a linear disk configuration in which all the
disks are treated as independent entities, the storage system supports several different
types of RAIDs (redundant arrays of independent/inexpensive disks). This means that
you can take advantage of the built-in data protection and data duplication offered by
advanced RAID levels. If your storage system has multiple hard drives and one fails,
you will not lose important data. For more information, see Appendix A, “Levels of
RAID”.
Caution: RAID 0 and linear disk configurations do not offer any data protection. If
you lose a hard disk, data loss occurs.
• Simple administration: You can run the browser-based management interface from
any computer in your network, and its informative wizards and configuration pages
help you accomplish your tasks quickly and easily.
• Storage and Connection Status: The HOME page of the management interface lets
you quickly determine how much space is being used and who currently is connected.
• Support for file sharing on multiple platforms: Whether the computers in your
network run Microsoft Windows*, Mac OS X* or other Mac operating system, or
Linux*, you can set up file-sharing for each of them.
• Security: Only authorized users can access the shared folders on your storage system.
You can also control whether the user can only view the information in the shared
folders or also add, modify, or delete files there.
• USB support: Additional USB storage devices may be attached to the USB ports.
• Client backup: Provides reliable data protection and rapid data recovery in case of a
system crash or hard drive failure.
• Active Directory Support: The storage system can import user and group
lists automatically making it easier to manage access to the system.
2 Intel® Entry Storage System SS4000-E User Guide
Page 19
Front Panel
Storage System Features
1
2
3
4
A
1
B
2
J
L
C
D
AF000085
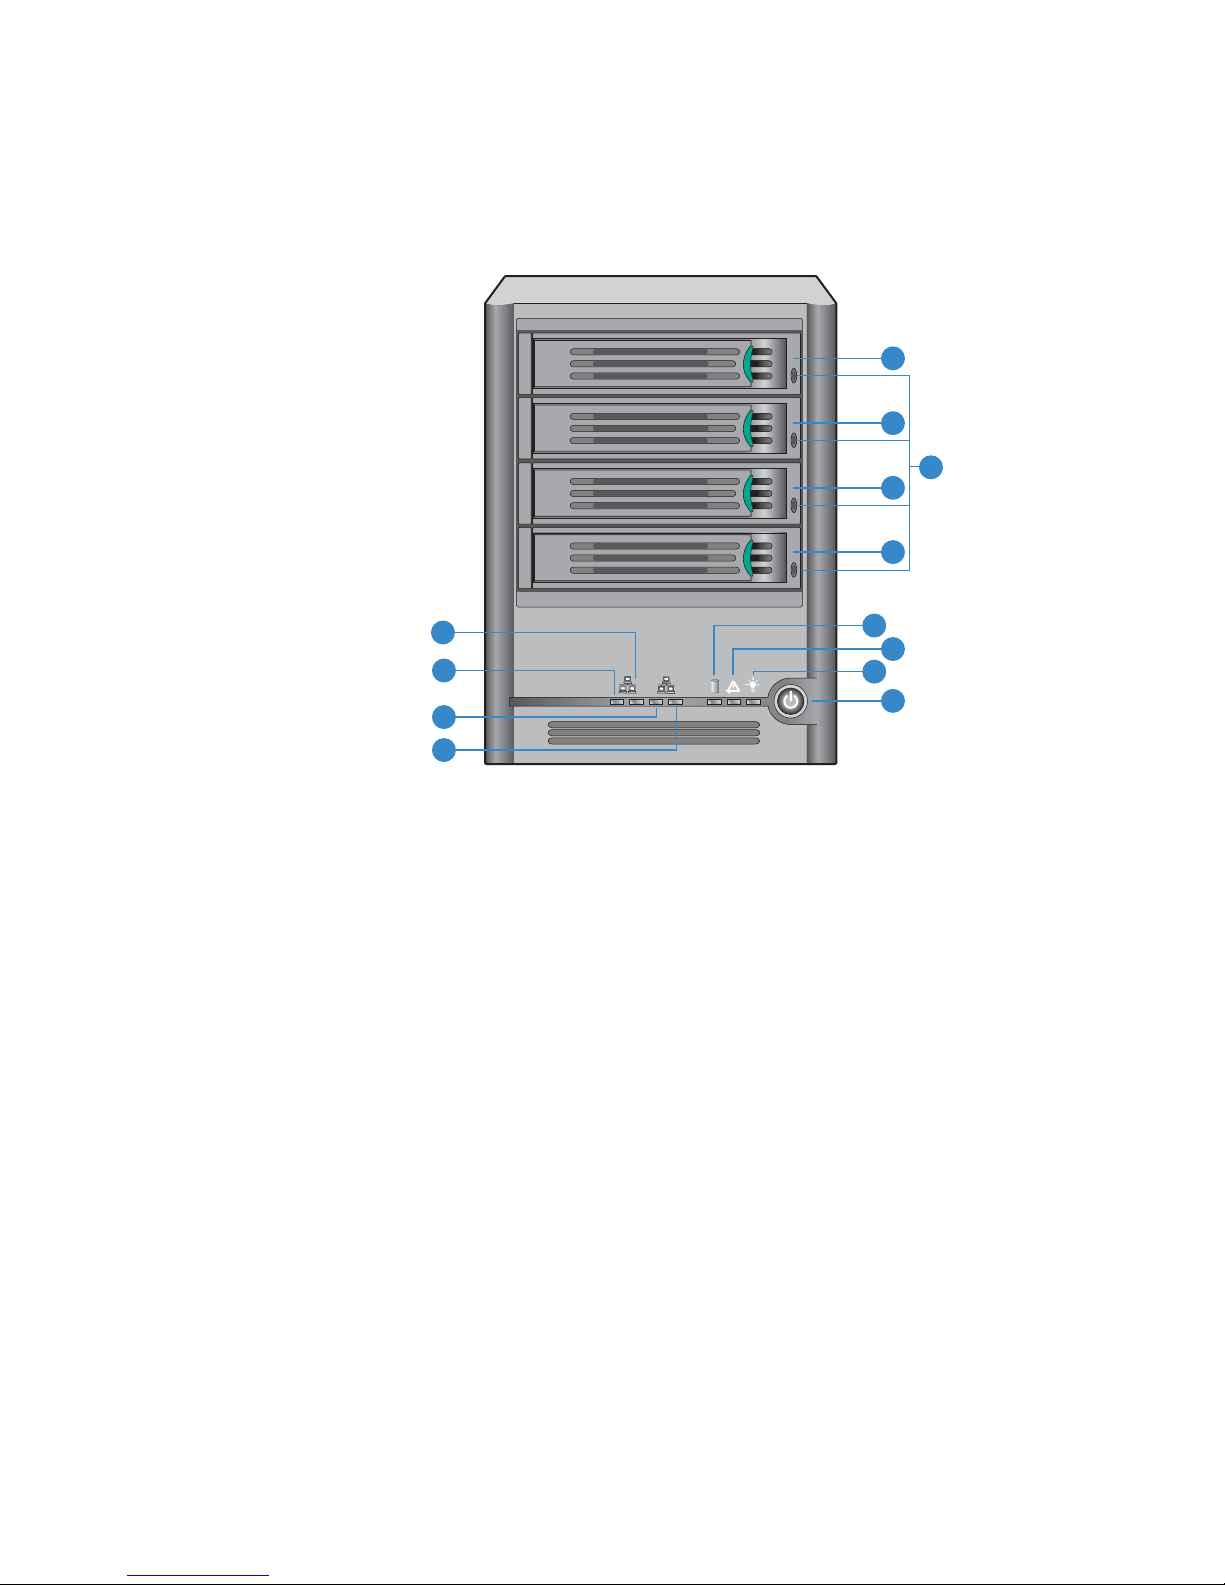
Figure 2. Front Panel LEDs and Components
E
F
G
H
I
K
M
Intel® Entry Storage System SS4000-E User Guide 3
Page 20
Storage System Features
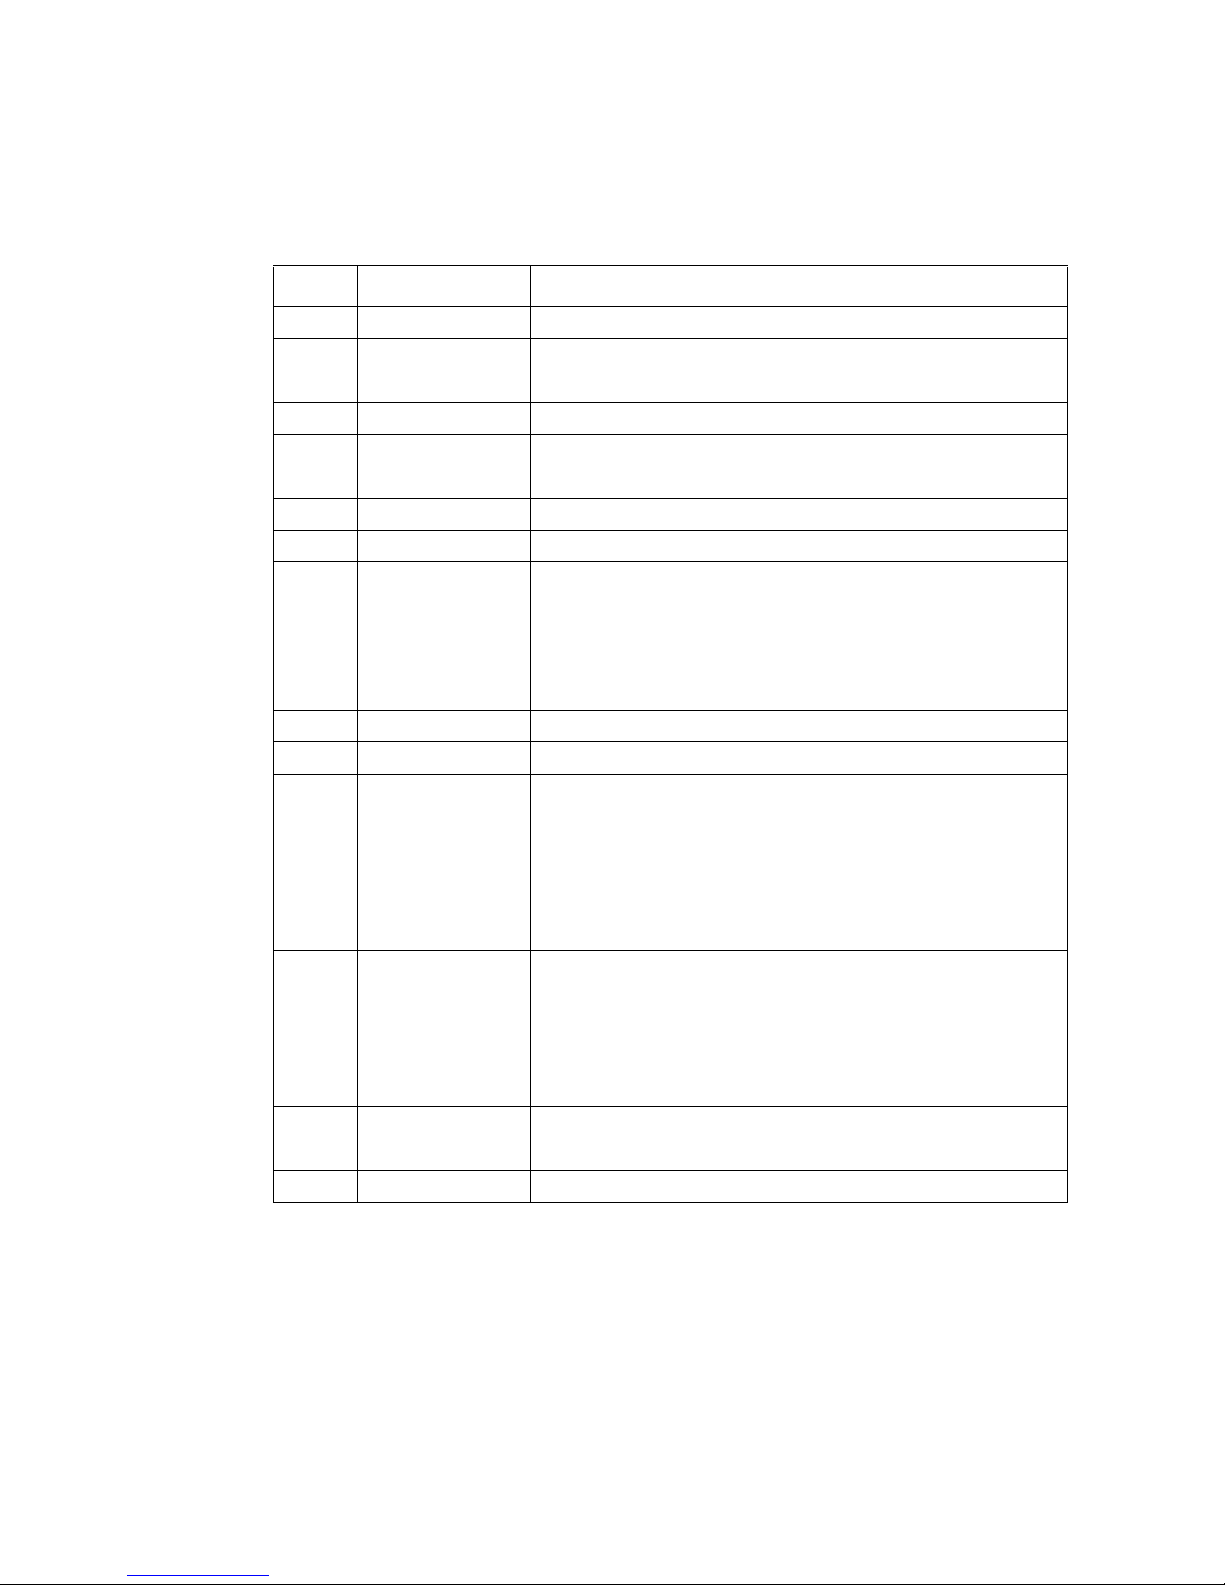
Table 1. Component Definitions
Call out Component Definition
A NIC 1 Activity LED Blinking GREEN indicates Ethernet activity.
B NIC 1 Link LED Continuous GREEN indicates an active Ethernet connection.
C NIC 2 Link LED Blinking GREEN indicates Ethernet activity.
D NIC 2 Activity LED Continuous GREEN indicates an active Ethernet connection.
E Drive Carrier - 1 3.5-in SATA drive carrier
F Drive Carrier - 2 3.5-in SATA drive carrier
G Hard Disk Activity
LED Light Pipe
H Drive Carrier - 3 3.5-in SATA drive carrier
I Drive Carrier - 4 3.5-in SATA drive carrier
J Global Disk Status
LED
K System Status LED Continuous GREEN indicates the system is running and
L Power LED Continuous GREEN indicates the system has power applied to it.
M Power Button Toggles the system power on/off.
Off indicates no active Ethernet connection.
Off indicates no active Ethernet connection.
Continuous GREEN indicates the drive is available.
Blinking GREEN indicates drive activity.
Continuous YELLOW indicates a fault condition, possibly
requiring the hard disk to be replaced.
Blinking YELLOW indicates the drive is currently rebuilding RAID.
Continuous GREEN indicates hard disk health is good (1-4 hard
disks).
Continuous YELLOW indicates a critical or non-recoverable
condition exists. It also indicates the hard drives are not
configured when initially setting up the system.
Blinking YELLOW indicates one or more hard disks are
experiencing a fault condition or a RAID is being rebuilt.
operating normally.
Blinking GREEN indicates the system is in process of powering
up or shutting down.
Continuous YELLOW indicates a fault is present, either a critical
or non-recoverable condition.
No light indicates the system does not have power applied to it.
4 Intel® Entry Storage System SS4000-E User Guide
Page 21
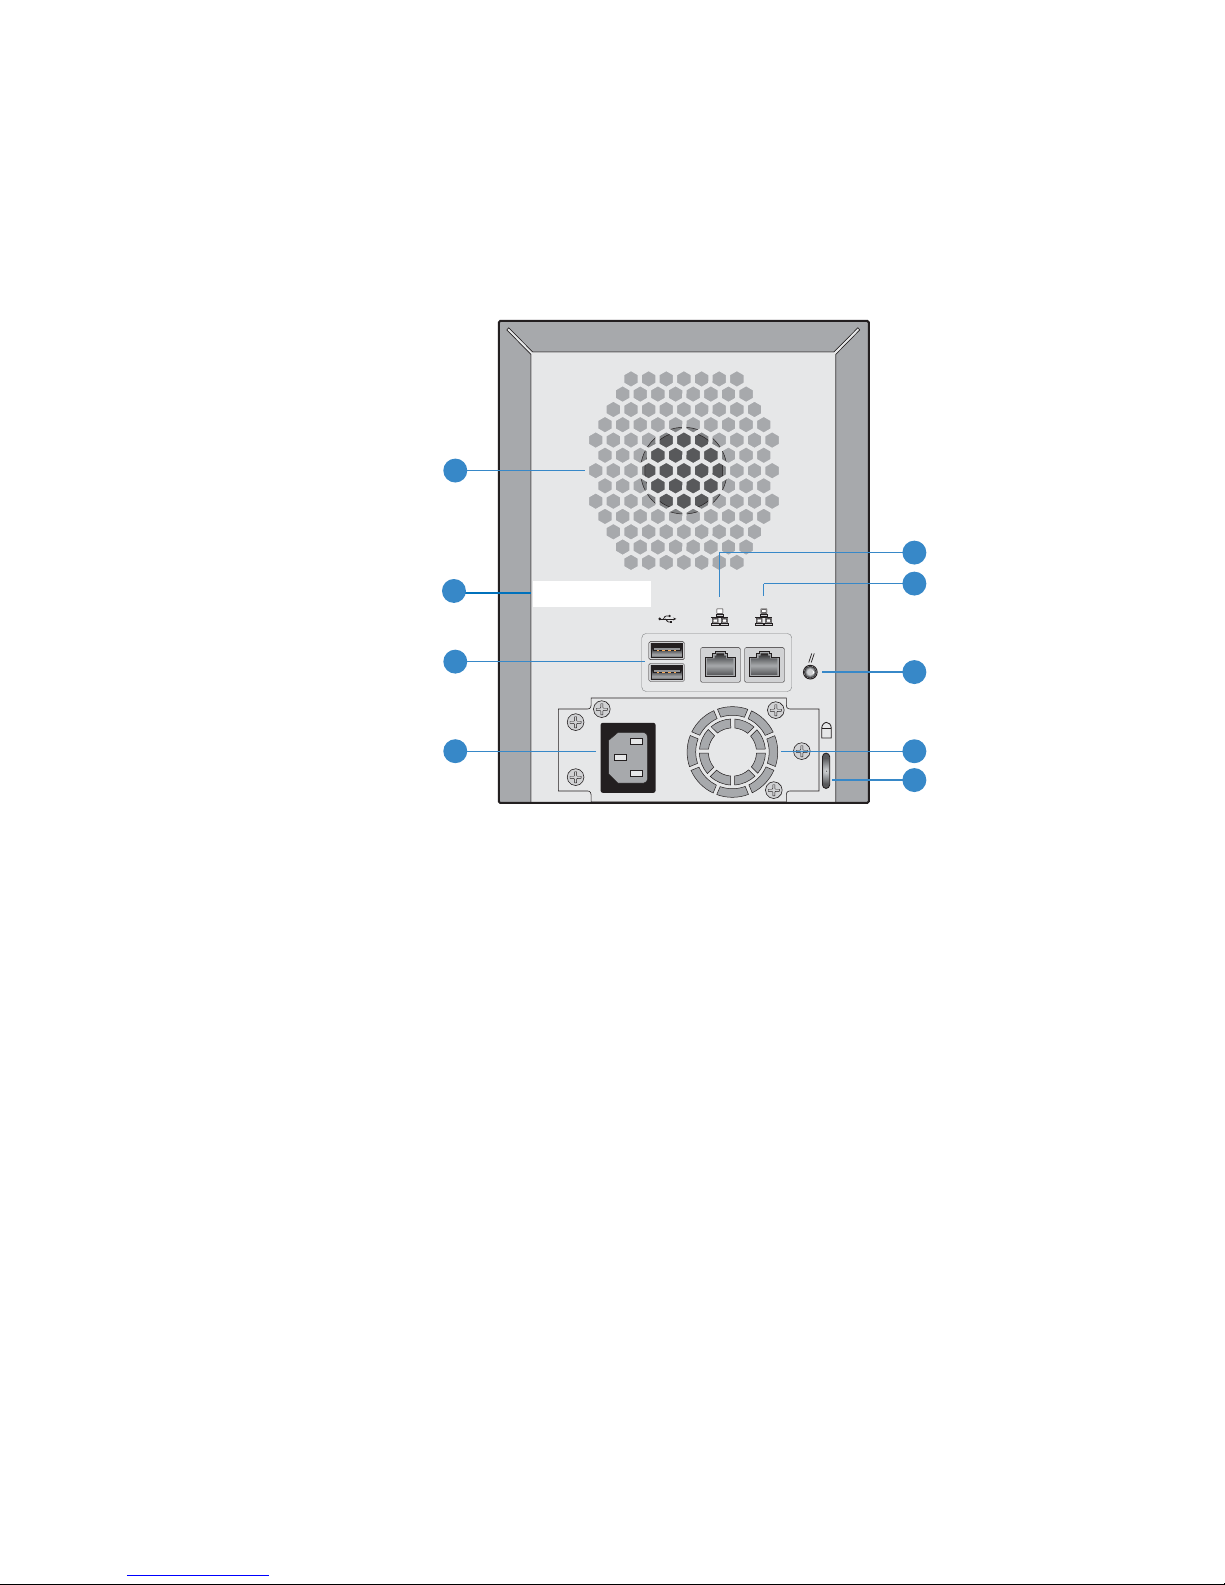
Rear Panel
The rear panel contains the system fan, power supply, USB 2.0 ports, gigabit LAN ports,
power cord connection, and reset button.
Storage System Features
A
E
Intel® Client Backup and Recovery LIcense key
B
xxxxx-xxxxx-xxxxx-xxxxxx-xxxxx
xxxxx-xxxxx-xxxxx-xxxxxx-xxxxx
21
F
C
D
Figure 3. Rear Panel Components
G
K
H
I
AF000084
Intel® Entry Storage System SS4000-E User Guide 5
Page 22
Storage System Features
Table 2. Rear Panel LEDs and Components
Call out Component Definition
A System Fan
B License Key Intel® Client Backup and Recovery License Key
C USB 2.0 Ports The USB ports connect an external USB storage device
D Power Outlet Supplies power to the device
E Gigabit LAN Port 2 Gigabit Ethernet connection. The right LED lights up GREEN
F Gigabit LAN Port 1 Gigabit Ethernet connection. The right LED lights up GREEN
G Reset Button Press the Reset Button for three seconds to revert the unit to
H Power Supply Fan
I Security Slot Anti-theft slot for attaching a security cable.
when connected to a 10/100 MB network, and ORANGE when
connected to a gigabit network.
when connected to a 10/100 MB network, and ORANGE when
connected to a gigabit network.
the system defaults.
System Requirements
The following minimum system requirements must be met before setting up the Intel
Entry Storage System SS40 00-E. See the Tested Hardware and Operating Systems List at
http://support.intel.com/support/motherboards/server/ss4000-e/ for the latest list of
compatible operating systems and hard drives.
Table 3. System Requirements
Component Requirement
Web Browser Microsoft Internet Explorer* 6.0 or above, Firefox* 1.06 or above
Network Environment TCP/IP networking environment.
SATA Hard Disk At least one SATA hard disk must be installed with an 80-GB capacity
Operating Systems
for Folder Access
Operating Systems
®
for Intel
Backup and Recovery
Active Directory
operating systems
used as Domain
Controller
Client
®
minimum. You can add additional hard disks.
Microsoft Windows Server 2003* x32 Edition, Microsoft Windows 2000*
Professional, Microsoft Windows XP* Home or Professional x32 Edition,
Apple* OS X, Red Hat* Linux
Microsoft Windows XP* Home Edition or Professional x32 Edition with
Service Pack 1 or Service Pack 2, Microsoft Windows Server 2003* x32
Edition with Service Pack 1
Microsoft Windows 2003* Enterprise x32 Edition or Small Business
Edition, each with Service Pack 1
6 Intel® Entry Storage System SS4000-E User Guide
Page 23
Accessories and Spare Parts
The Intel® Entry Storage System SS4000-E supports up to two USB devices, such as USB
drives, which you can purchase separately.
Storage System Features
The following accessories and spare parts are available for the Intel
System SS4000-E.
Table 4. Accessories and Spare Parts Descriptions
Part Number Description
FXXSS4000EPS Power Supply
FXXSS4000ECFAN Fan
FXX10DVCARBLK Hard Drive Carriers (10-pack)
®
Entry Storage
Intel® Entry Storage System SS4000-E User Guide 7
Page 24

Storage System Features
8 Intel® Entry Storage System SS4000-E User Guide
Page 25

2 Getting Started
Getting started with your Intel® Entry Storage System SS4000-E involves the following
general steps:
1. Set up your storage system: Install the hard disks, attach any optional USB devices,
attach the storage system to your network, and power up the system.
For information about this step, see “Setting up the Storage System” on page 10.
Note: If your storage system does not have the maximum number of hard disks
already installed, it is best to add all the disks that you want to use before you
initialize and configure your system. You can add more disks later, but
changing your disk configuration might cause data loss. For more
information, see “Levels of RAID” on page 169.
2. Install the Storage System Console on a computer in the same subnet as your storage
system and initialize the hard disks on your storage system. Install the operating
system and other software from your storage system’s flash memory to each of the
hard disks in your storage system. Your vendor might have already performed this
step for you.
Getting Started
For information about this step, see “Initializing your Storage System” on page 16.
3. Configure your storage system: Before you can use your storage system, you must
perform initial configuration tasks, like setting the date and time, and specifying how
much space to use for file sharing and how much to use for backups. The System
Setup Wizard guides you through this process.
For information about this step, see “Configuring Your Storage System” on page 21.
4. After the storage system restarts, access the Web-based management interface (the
Manager) and log in.
For information about this step, see “Accessing the Manager” on page 25 and
“Logging in to the Manager” on page 27.
5. Add users. This is necessary only if you use local authentication mode and want to
control access to the shared folders, or if some users in your network use Linux or
Macs other than those running Mac OS X*.
For information about this step, see “Adding Users” on page 32.
6. Create shared folders. By default, the Intel
a shared folder named public. You might want to create other shared folders. For
example, in an office environment, you might want to create a shared folder for
company policies that everyone can view, and separate folders for confidential
business documents that only selected individuals can view or change. In a home
environment, you might want to set up separate folders for different types of files, like
photos, videos, or music.
®
Entry Storage System SS4000-E includes
For information about this step, see “Creating Shared Folders” on page 35.
Intel® Entry Storage System SS4000-E User Guide 9
Page 26

Getting Started
7. Access the shared folders.
For information about this step, see “Accessing Shared Folders” on page 79.
8. Protect your computer hard disks: Install the Intel
software on each computer that you want to protect and specify which hard disks or
partitions to back up and how often backups should occur. You must purchase a key
code for each additional system that you intend to back up. The key code for backing
up your system is on the back of the unit.
For information about this step, see “Protecting Local Disks” on page 89.
Setting up the Storage System
Your storage system might come pre-installed with hard drives, or you might need to
purchase and install them yourself. If you have fewer than four hard drives, you might
want to add more now. You can add more disks later, but changing your disk configuration
might cause data loss. For more information, see Appendix A, "Levels of RAID,"
beginning on page 169.
®
The Intel
disks. If you have such devices, you can attach them now, or you can attach them later.
See the Tested Hardware and Operating Systems List at http://support.intel.com/support/
motherboards/server/ss4000-E/ for a list of tested devices.
Entry Storage System SS4000-E supports optional USB devices, such as USB
®
Client Backup and Recovery
Whether or not you add hard disks or USB devices, you must connect the storage system
to your network, power it up, and upload the firmware.
Installing the Hard Disks
Before you can use the storage system, at least one SAT A hard disk with at least an 80-GB
capacity must be installed. The Intel
any hard disks installed.
®
Important: The Intel
Entry Storage System SS4000-E suppor ts hot swapping of har d disks. However,
you should back up data before replacing any hard disks.
Important: An empty drive carrier with baffle MUST be fitted in ALL unused drive bays.There is
inadequate drive cooling if any drive bays are left open.
1. Observe all safety and ESD precautions listed in Appendix H, “Safety Information”.
2. If powered up, power down the system by pressing the power button on the front of
the system.
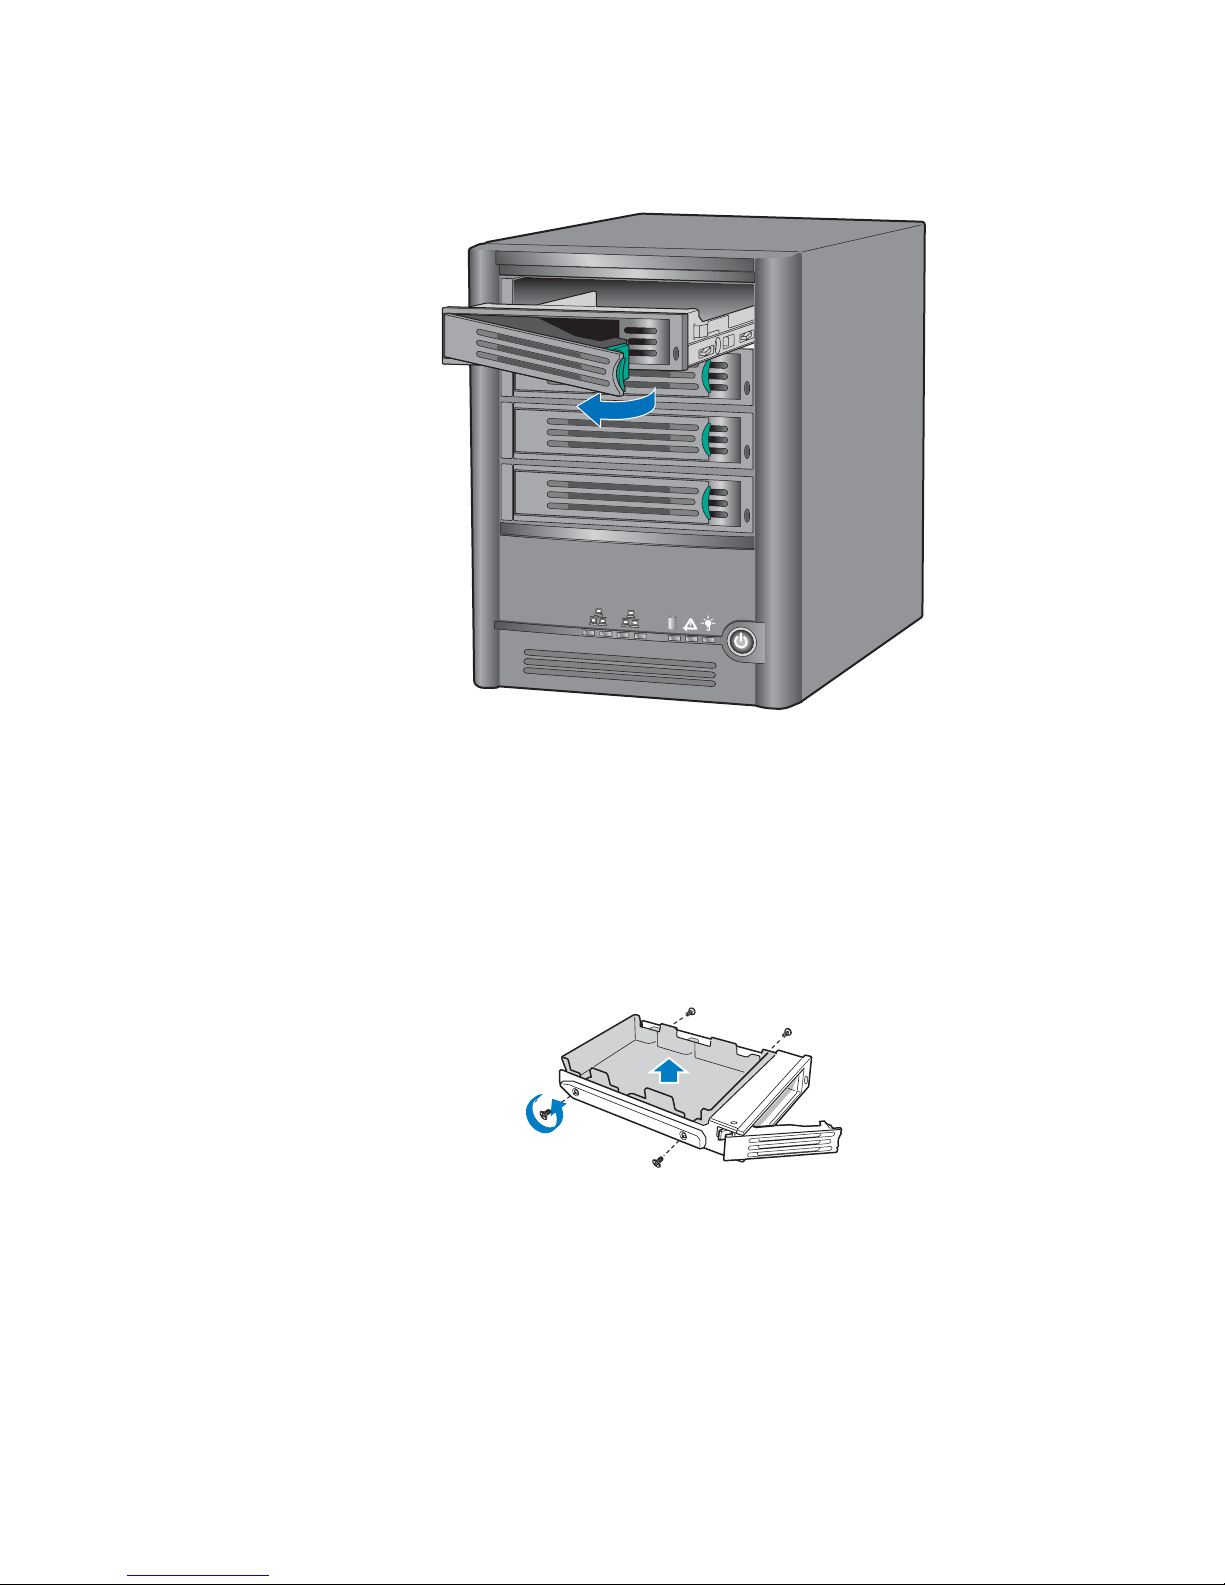
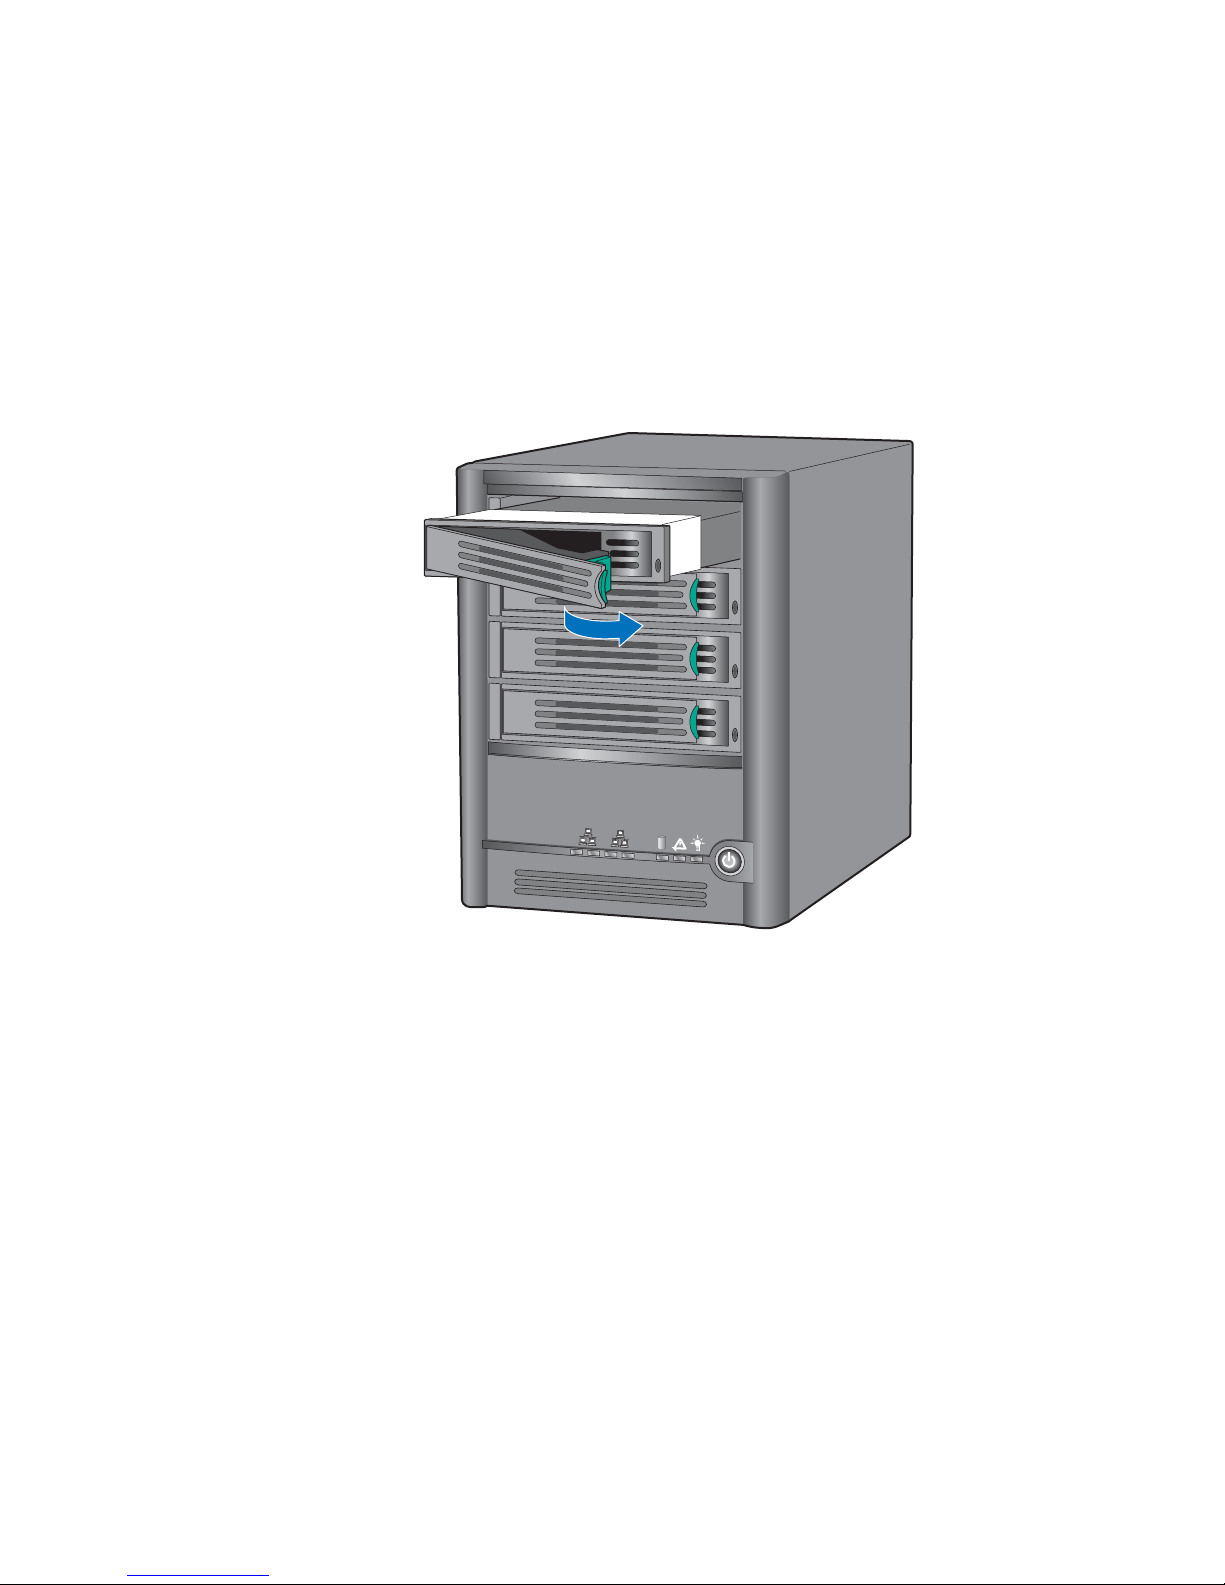
3. Press the green latch at the end of the drive carrier to disengage the drive carrier from
the storage system. Pull out on the black lever to slide the drive carrier out of the
storage system.
®
Entry Storage System SS4000-E does not ship with
10 Intel® Entry Storage System SS4000-E User Guide
Page 27
Getting Started
1
2
3
4
1
2
TP000230
Figure 4. Removing Drive Carrier from Storage System
4. Remove the four screws that attach the plastic baffle to the drive carrier. Two screws
are located on each side of the drive carrier.
Note: Store the plastic baffle for future use.
TP00928
Figure 5. Removing Baffle from Drive Carrier
Intel® Entry Storage System SS4000-E User Guide 11
Page 28
Getting Started
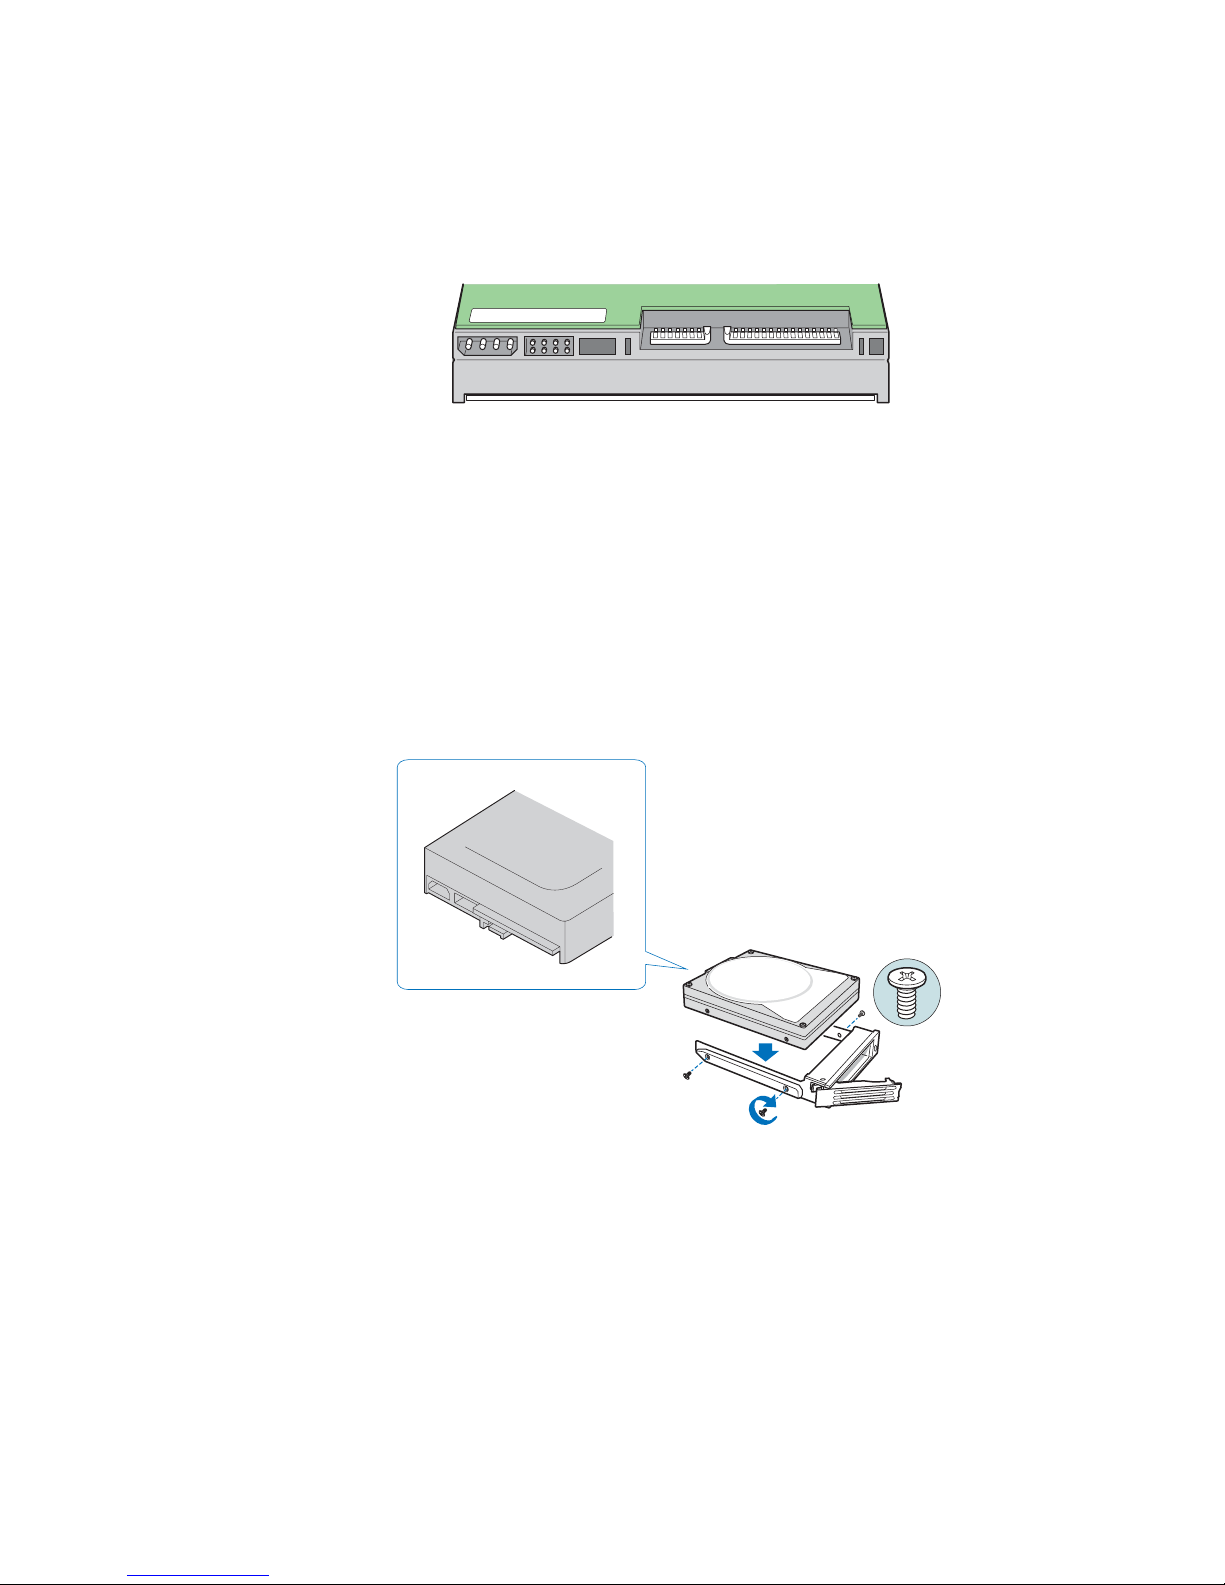
5. Remove the hard disk from its wrapper and place it on an anti-static surface. Make
sure the hard disk is a SATA hard disk. It should have a rear SATA connector similar
to the following figure.
AF000306
Figure 6. Rear View of SATA Hard Disk
6. With the hard disk circuit-side down, position the connector end of the hard disk so it
faces the rear of the drive carrier. Align the holes in the hard disk to the holes in the
drive carrier and attach the hard disk to the carrier with the screws removed in Step 4.
Note: Do not remove the side rail on the right side of the drive carrier. This rail
contains the light pipe that displays the LED light on the front of the drive
carrier. If the side rail comes loose, ensure the light pipe is properly inserted
into the LED hole before reattaching the side rail to the drive carrier.
Figure 7. Installing the Hard Disk into Drive Carrier
12 Intel® Entry Storage System SS4000-E User Guide
TP00929
Page 29
Getting Started
7. Label the hard disk with the appropriate label. Starting with the uppermost drive, label
the hard disks, 1 to 4, in the order shown in the following figure.
Note: The order of drive carriers is critical when replacing hard disks or
performing maintenance. A hard disk plugged into an incorrect slot once set
up for RAID can result in data loss or an improperly functioning storage
system.
AF000241
HD 1
Figure 8. Applying Label to Hard Disk
1
1
2
2
3
3
4
4
1
2
TP02348
Figure 9. Order of Drive Carriers
Intel® Entry Storage System SS4000-E User Guide 13
Page 30
Getting Started
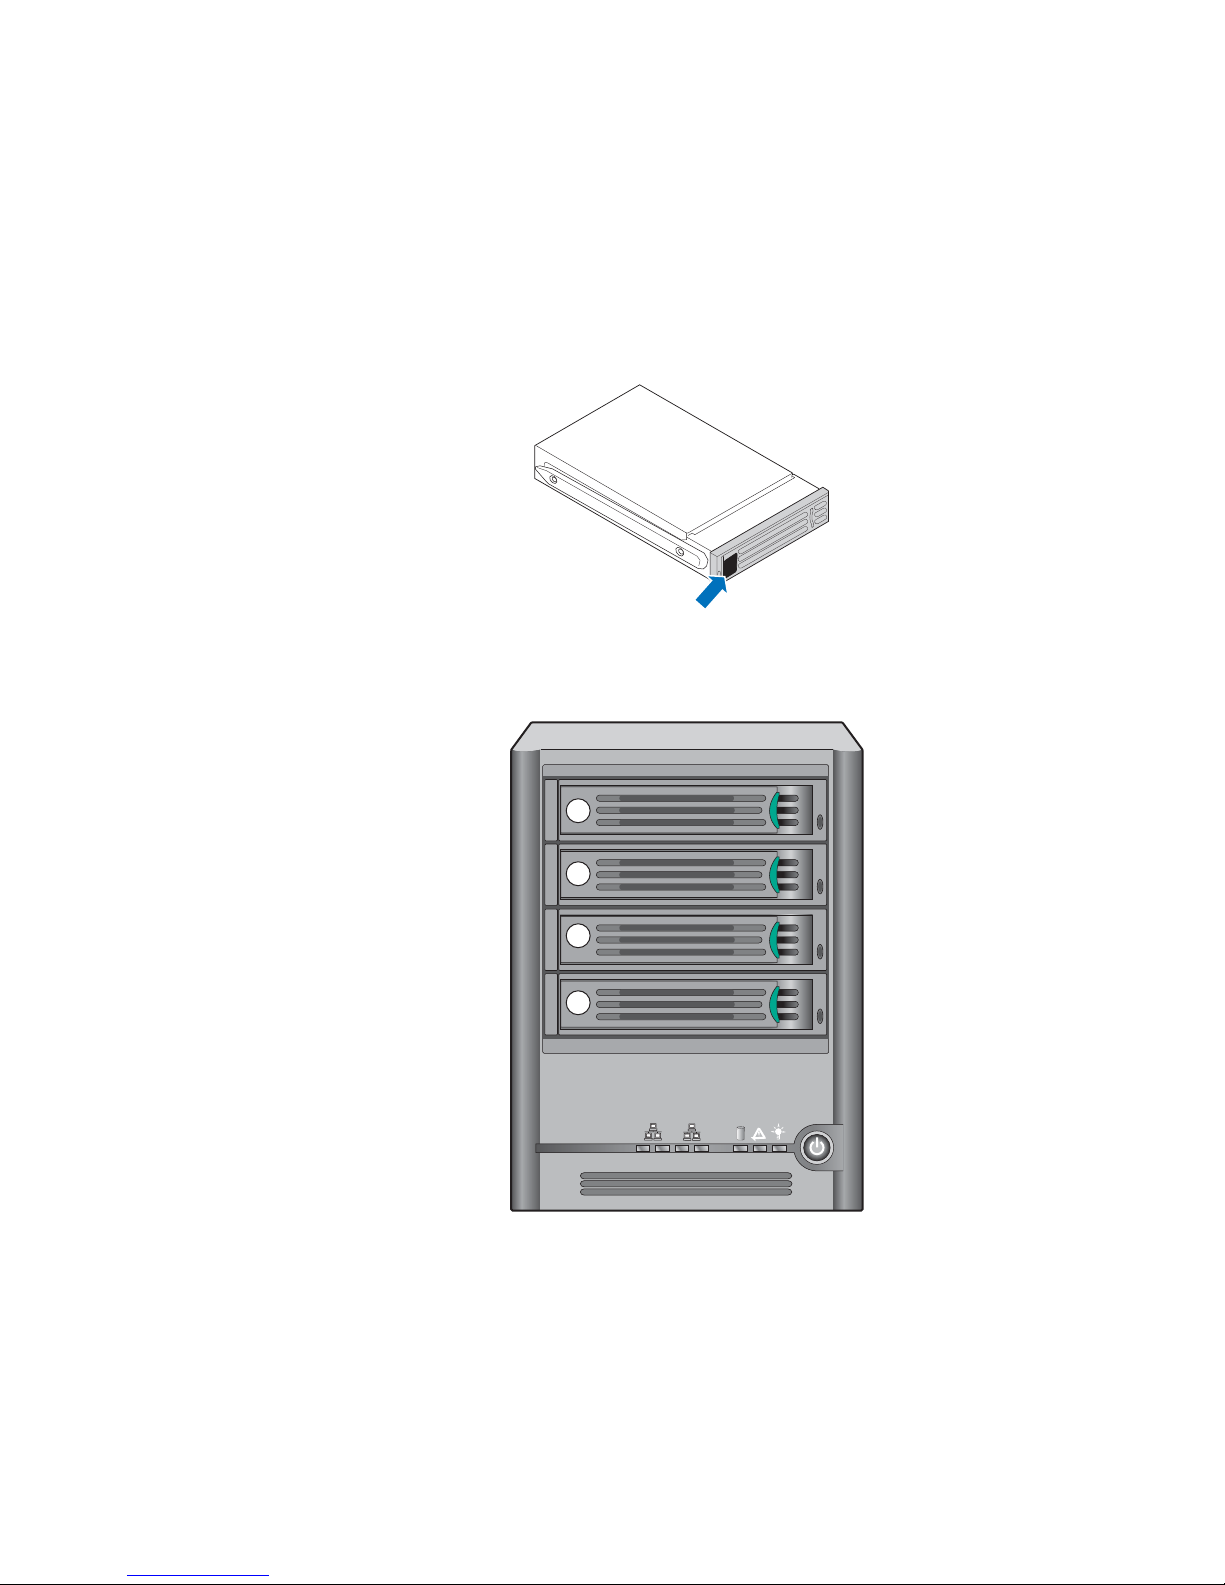
8. With the lever in the fully open position, insert the drive carrier into the storage
system. The green latch at the front of the drive carrier must be at the right. Do not
push on the black drive carrier lever until the lever begins to close by itself. Once the
black drive carrier lever begins to close by itself, push on it to lock the drive carrier
into place.
Important: Ensure the drive carrier is orientated so the hard disk is on top and the drive carrier lever
opens from the right. Do not force the drive carrier into the storage system. If there is
resistance, make sure the drive carrier lever is in the fully open position.
2
3
4
1
2
TP02349
Figure 10. Re-installing the Drive Carrier into Storage System
14 Intel® Entry Storage System SS4000-E User Guide
Page 31

Attaching the Storage System to the Network
T o connect the storage system to your network, insert on e end of the RJ-45 Ethern et cable
into the Ethernet port 1 on the back of the storage system. See letter “A” in the following
figure. Insert the other end of the RJ-45 Ethernet cable into a network port.
Getting Started
2
1
K
A
AF000237
Figure 11. Connecting Storage System to Network
Intel® Entry Storage System SS4000-E User Guide 15
Page 32

Getting Started
Powering Up the Storage System
Note: It is recommended that you plug the storage system into a surge protector or
uninterruptible power supply (UPS) to prevent damage to the system from power surges.
Plug in the system and then press the power button on the front of the storage system. See
letter “A” in the following figure.
Figure 12. Powering up the Storage System
1
2
A
AF000239
The System Status LED light blinks green while the storage system boots. Once the
system is booted, the System Status LED and Disk Status LED remains green.
The System Status LED turns solid yellow when you power up the system for the first
time, indicating the hard drives are not configured with a RAID level. It remains yellow
until the drives are configured then the Status System LED turns solid green.
Powering Down the Storage System
See “Shutting Down the Storage System” on page 77 for information on shutting down
the storage system.
Initializing your Storage System
If your vendor installed the hard disks, they might have already been initialized. The
operating system that runs the storage system is loaded on the hard drives as part of the
initialization process. If your vendor did not initialize the disks, you must do so before you
can configure and use your storage system.
T o determine whether or not your disks are initialized, and to initialize them if this was not
done, install the Storage System Console on a computer in the same subnet as your storage
system and use that application to connect to the storage system.
16 Intel® Entry Storage System SS4000-E User Guide
Page 33
Installing the Console
Install the Console on any computer that runs one of these operating systems:
• Microsoft Windows Server 2003*
• Microsoft Windows XP*
• Microsoft Windows 2000* Professional, Server, or Advanced Server with
Service Pack 2 or newer
Note: T o access the storage system, the Console launches a Web br owser, so the computer where
you install the Console must have Microsoft Internet Explorer 6.0 or Firefox 1.06 or
newer installed and set as the default browser. If you are not sure how to configure the
default browser, see the documentation for your browser.
To install the Console:
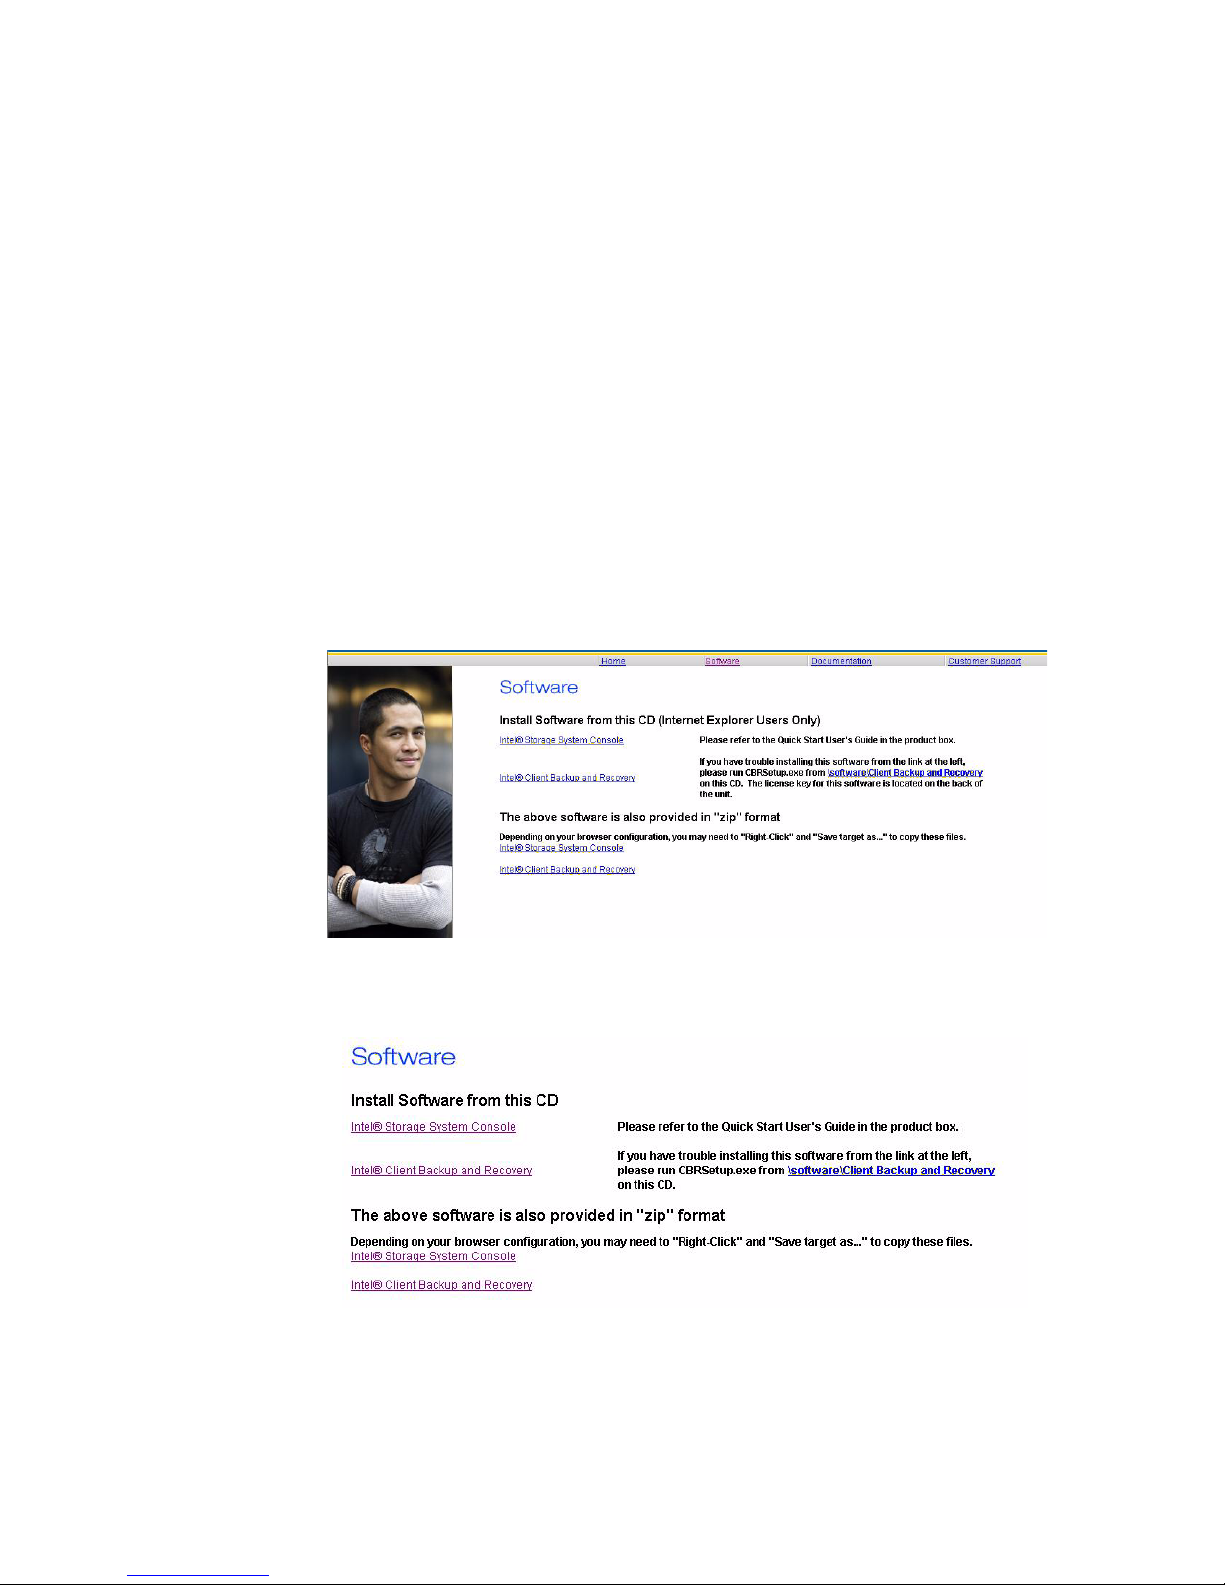
1. At a computer in the same subnet as your storage system, insert the installation CD.
2. Select Software from the top menu.
Getting Started
3. Select the “Intel
4. Start the setup utility for the Console.
5. On the welcome page, click Next.
Intel® Entry Storage System SS4000-E User Guide 17
®
Storage System Conso le” lin k to install the software.
Page 34
Getting Started
6. If you agree to the terms of the license agreement, click Yes.
7. Enter your name and company name and then click Next.
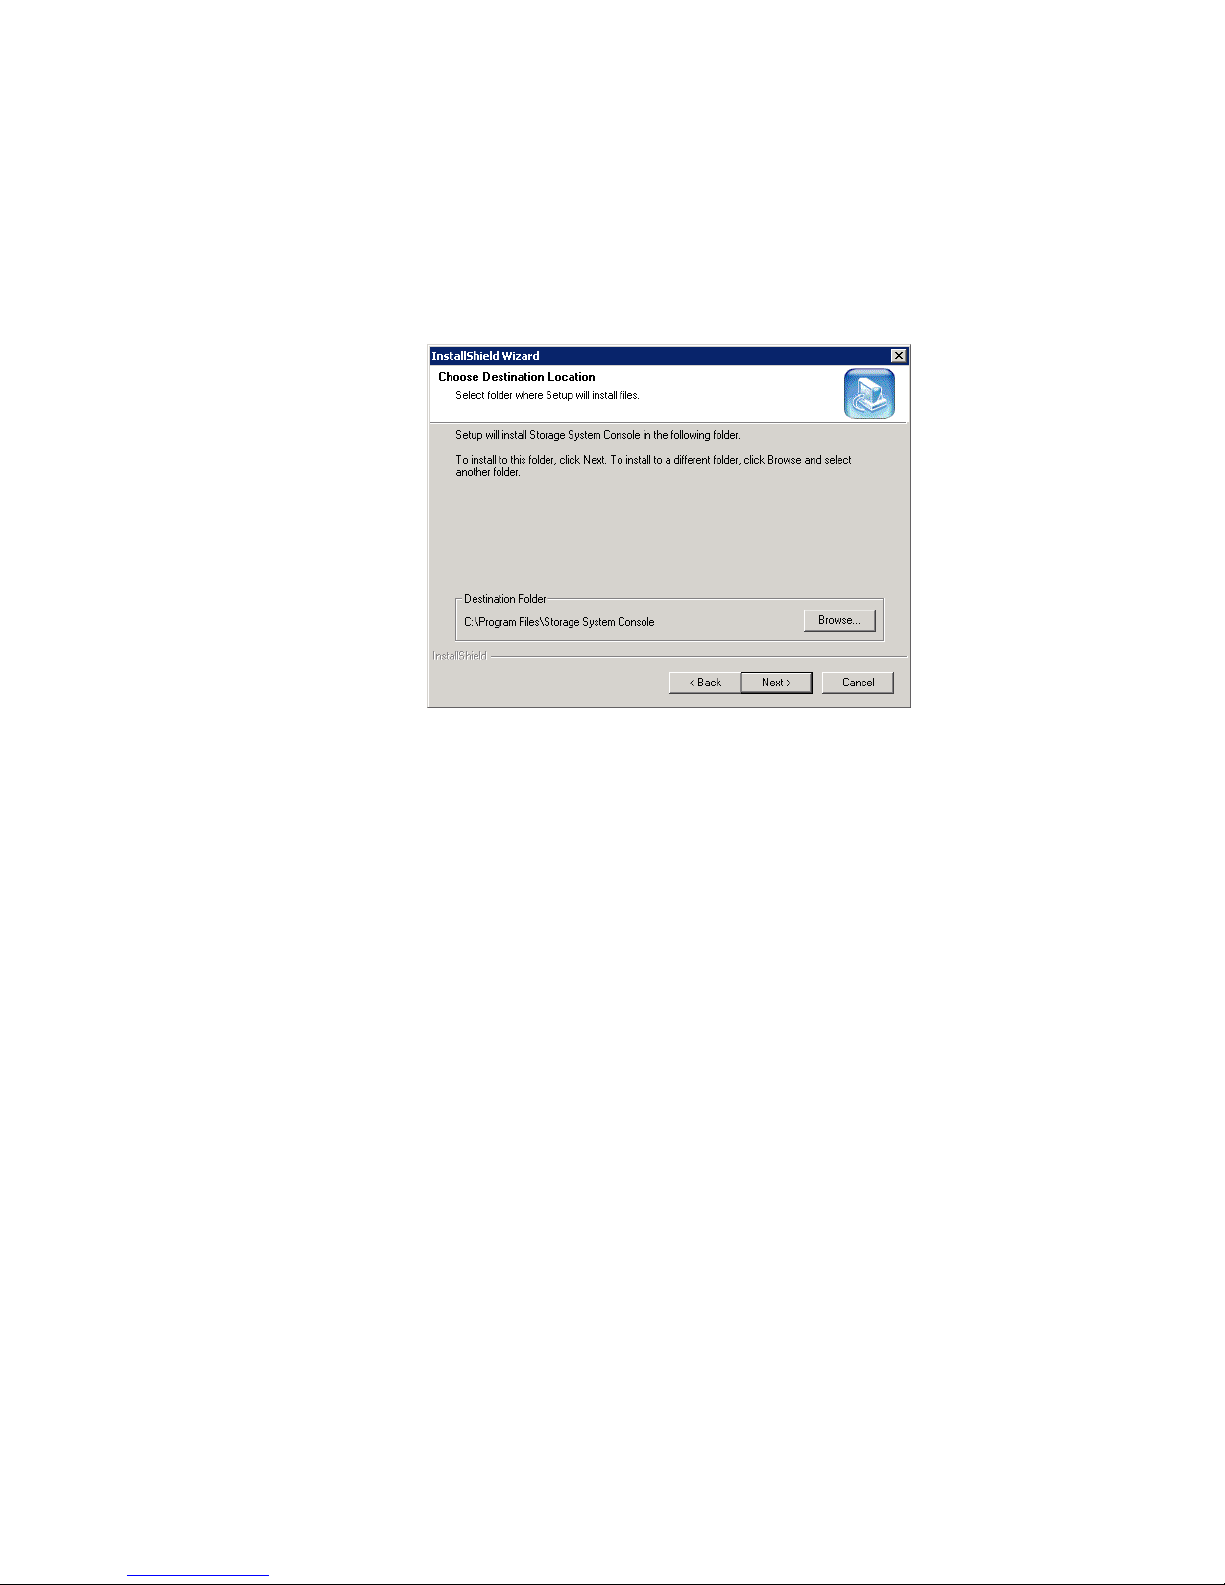
8. Click Next to install the Console in the displayed location, or click Browse to select
or specify a different location and then click Next.
9. Review your selections and click Next.
10. .If you want to start the Console immediately after it is installed, click the Launch
Storage System Console check box. Click Finish.
Starting the Console
Note: If the storage system is not dir ectly connected to your comp uter and your network does not
have a DHCP server, you must change the IP address of your computer to use the same
subnet as the storage system. You can change it back after you configure the storage
system.
To do this, access your local area network (LAN) properties. For example, you might
right-click My Network Places and click Properties, and then right-click your network
connection and click Properties. In the list, select Internet Protocol (TCP/IP) and click
Properties. The IP address can be any address beginning with 192.168.0 except
192.168.0.101, since that’s the IP address used by the storage system. The subnet mask
must be 255.255.255.0. Then click OK to close each open dialog box.
When you configure the storage system, as described in “Configuring Your Storage
System” on page 21, you can specify the IP address you want the storage system to use. If
the IP address of the storage system is in a different subnet than your computer, you must
specify the gateway, as described in “Changing the Network Settings” on page 68. This
ensures that you can manage th e storag e system from any computer using a Web browser,
as described in “Accessing the Manager” on page 25. Then you can change your
computer’s IP address back to its original setting.
18 Intel® Entry Storage System SS4000-E User Guide
Page 35

Getting Started
To start the console:
1. Click Start > Programs > Storag e System Co nsole.
As soon as you start the Console, it scans the network for storage systems. This might
take a few minutes. When the scan is complete, the left pane displays a tree view of all
the storage systems it found.
Each storage system has two ports for connecting to the network. If your storage
system uses both ports, two items display in the tree in the left pane, each using the
same name. You can identify the IP address used by each port by clicking each item in
the tree and observing the IP address area in the right pane.
Note: If you connect a storage system to the network after the Console already
scanned it, or if you subsequently change the IP address of the storage
system, you must click Discover Storage Systems to scan the network again
and update the tree in the left pane.
If no storage system displays in the left pane, your computer might not be in
the same subnet as the storage system. Be sure to install the Console on a
computer in the same subnet as the storage system and try again.
2. In the left pane, select the name of the storage system that you want to access, such as
Storage, and then click Log On Storage S ystem Manager. If your storage system
uses both available ports to connect to the network, you can select either item.
3. If your storage system is not initialized, the System Initialization page displays. For
more information, see the next section, “Initializing the Disks.”
If your storage system is initialized but not configured, the welcome page for the
System Setup Wizard displays. For more information, see “Configuring Your Storage
System” on page 21.
If your storage system is initialized and configured, the login page for the Manager
displays. For more information, see “Logging in to the Manager” on page 27.
Intel® Entry Storage System SS4000-E User Guide 19
Page 36
Getting Started
Initializing the Disks
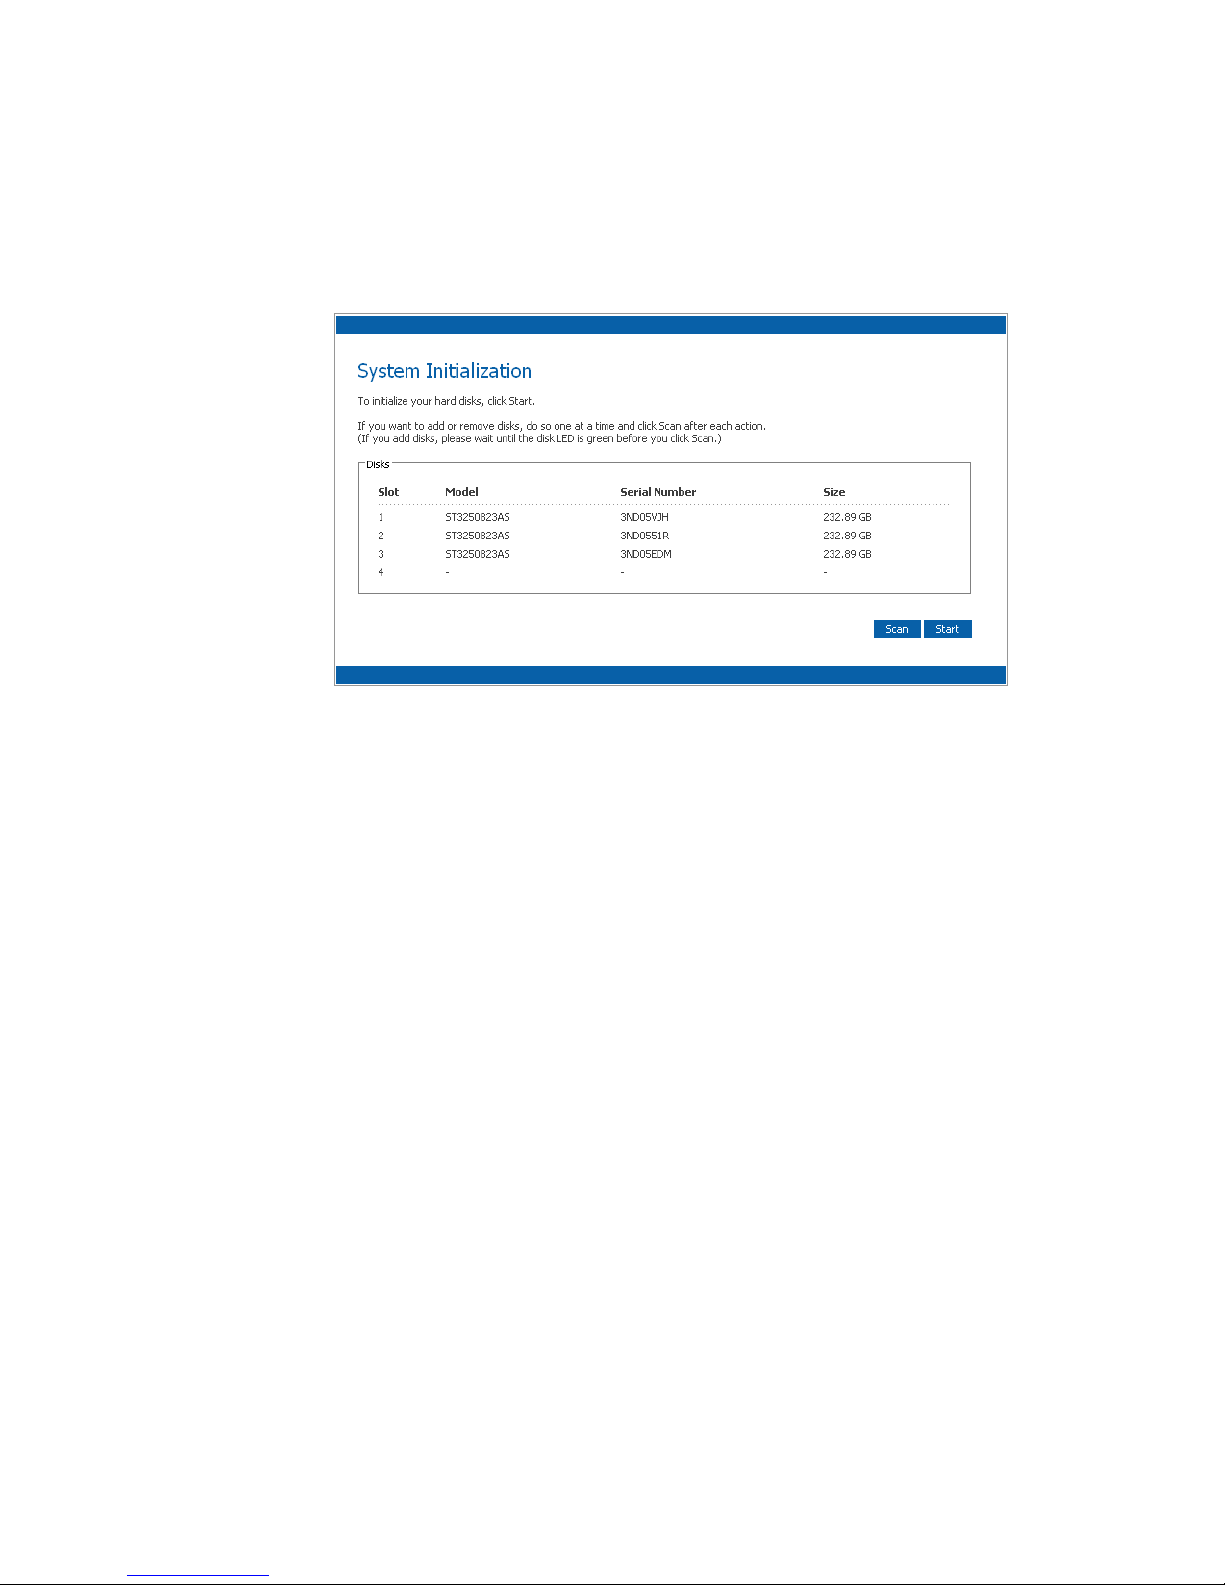
Once you install the Console and connect to the storage system, the System Initialization
page displays.
If not, all the hard disks were detected, or if you want to ad d, remove, or reord er the disks,
insert or remove the disks one at a time and click Scan after each action.
Note: If you have four disks that are not the same size, it is r ecommended that you put disks close
in size in slots 1 and 2.
For example, if one disk is 100 GB, on e disk is 200 GB, one disk is 300 GB, and one disk
is 400 GB, you should put the 100-GB disk in slot 1 and the 200-GB disk in slot 2 instead
of putting the 100-GB disk in slot 1 and the 300- or 400-GB disk in slot 2. This ensures
that if you use a RAID 10 configuration , the amount of disk space available for data is
maximized.
For more information about disk configurations, see “Levels of RAID” on page 169.
To initialize the hard disks:
1. Click Start. The firmware is uploaded to the hard disks. When this process is
complete, the storage system restarts.
Note: The operating system and storage system software are installed on each disk
in your storage system to ensure that the failure or removal of any one disk
does not cause the entire storage system to fail.
2. If the welcome screen does not display immediately after the storage system restarts,
close the browser window and log in again using the Console.
You can now perform the initial configuration as described in “Configuring Your
Storage System” on page 21.
20 Intel® Entry Storage System SS4000-E User Guide
Page 37

Configuring Your Storage System
Once your storage system is initialized as described in “Initializing your Storage System”
on page 16, follow these steps to run the System Setup wizard and perform the initial
configuration:
1. If you have not installed the Storage System Console, install it as described in
“Logging in to the Manager” on page 27 and start it as described in “Starting the
Console” on page 18.
In the left pane, click the name of the storage system. If you use both Ethernet ports,
the name of the storage system displays twice in the left pane. You can click either
one. Then click Log On Storage System Manager.
The welcome page displays:
Getting Started
2. On the welcome page, click Next. The End User Software License Agreement page
displays:
3. If you agree to the terms, select the I accept the license agreement check box and
then click Next. The Host Name page displays:
Intel® Entry Storage System SS4000-E User Guide 21
Page 38

Getting Started
4. Click Next to accept the default storage system name (Storage), or enter the name
you prefer.
The storage system name can be up to 15 characters long and include letters, numbers,
and hyphens.
Click Next. The Date/Time page displays:
5. Specify the current date, time, and time zone in 24-hour format. For example,
2:00 P.M. is entered as 14:00:00.
Note: The storage system time does not automatically change to reflect daylight
savings time. For more information, see “Changing the System Settings” on
page 66.
Click Next. The Network Settings page displays:
22 Intel® Entry Storage System SS4000-E User Guide
Page 39

Getting Started
6. By default, if your network has a DHCP server, the storage system obtains its IP
address from that server.
If your network does not have a DHCP server or if the storage system is directly
attached to your computer, the default IP address and subnet mask are used. The
default IP address is 192.168.0.101, and the default subnet mask is 255.255.255.0.
To accept the default settings, click Next. Otherwise, specify the desired settings and
then click Next.
When you click Next, the Disk Configuration page displays. The options that display
on this page vary , depend ing on the number of hard disks currently installed in the
system.
Caution: RAID 0 and linear disk configurations do not offer any data protection. If
you lose a hard disk, data loss occurs.
7. If you want to add or remove hard disks, do so one at a time and click Scan after each
action.
Note: It is strongly recommended that you install all the hard disks you want to use
in the storage system at this time, since changing the number of hard disks
later can require disk reconfiguration and possible data loss.
To accept the default disk configuration, which provides the best level of data
protection available for the number of hard disks currently installed, click Next. By
default, a linear disk configuration is used for a single hard disk, RAID 1 is used for
two hard disks, and RAID 5 is used for three or four hard disks.
Intel® Entry Storage System SS4000-E User Guide 23
Page 40

Getting Started
If you want to change the disk configuration, select the desired RAID level and then
click Next. For detailed inf ormation about the different RAID levels, see Appendix A,
"Levels of RAID," beginning on page 169.
When you click Next, the Disk Space Distribution page displays:
8. Capacity in your storage system is divided into partition: one for a shared public
folder, one for user home folders, and one for backups. To accept the defaults, click
Finish. Otherwise, specify the disk space allocations for the home user folders and the
public folders in GB. The remaining space is allocated for backup. When you are
done, click Finish.
Note: Y ou can expand the a mount of disk space allocated for shar ed or home folders
later as long as free disk space is available, but you cannot reduce it without
reconfiguring your disks and losing all your data.
If you plan to back up computer disks to your storage system, it is
recommended that you use the minimum amount of space for shared or home
folders, back up all the computer disks you plan to protect, and then expand
the space allocated for shared folders. This ensures that adequate space is
available for backups.
24 Intel® Entry Storage System SS4000-E User Guide
Page 41

Getting Started
9. On the confirmation message, click OK.
The Configuration page displays and the system is configured according to the
settings you specified. Once the configuration is complete, the system restarts.
10. After the storage system restarts, you can access the Manager, add users, and create
shared folders.
For more information, see “Accessing the Manager” on page 25, “Logging in to the
Manager” on page 27, “Adding Users” on page 32, and “Creating Shared Folders” on
page 35.
Accessing the Manager
After you complete the initialization process and configure your storage system as
described in “Initializing your Storage System” on page 16 and “Configuring Your
Storage System” on page 21, you can access the Manager to add users, create shared
folders, and perform other tasks related to managing your storage system.
There are two ways to access the Manager:
• Using the Console
• Using a Web browser (Microsoft Internet Explorer* 6.0 or Firefox* 1.06 or newer)
Using the Console, you can access the Manager only from a computer in the same subnet
as the storage system, but you do not have to know the name or IP address of the storage
system or otherwise modify the network settings.
Using a Web browser, you can access the Manager from any computer in your network,
but you must know the name or IP address of the storage system. In addition, if you
configured the storage system to use a specific IP address, you might need to specify the
IP address of the gateway in your network before you can successfully access the
Manager using a Web browser. First access the Manager using the Console and then
specify the gateway address as described in “Changing the Network Settings” on page 68
and try to access it with a Web browser.
Intel® Entry Storage System SS4000-E User Guide 25
Page 42

Getting Started
Accessing the Manager Using the Console
To access the Manager using the Console:
1. If you have not already done so, install the Console on each computer from which you
plan to manage the storage system as described in “Installing the Console” on
page 17.
2. Start the Console and connect to the storage system as described in “Starting the
Console” on page 18 .
3. Log in to the Manager as described in “Logging in to the Manager” on page 27.
Accessing the Manager Using a Web Browser
To access the Manager using a Web browser:
1. From any computer in your network, run Microsoft Internet Explorer 6.0* or Firefox
1.06* or newer, enter the following in the address bar, and then press Enter:
https://storage_system
where storage_system is the fully qualified domain name or IP address of the storage
system.
Note: You can use the storage system name only if your computer is in the same
subnet as the storage system, if you added the storage system’s IP address and
name to your local hosts file, or if you manually registered the name with a
DNS server in your network.
When the login page displays, you can bookmark it so you can quickly and easily
access it the next time.
2. Log in to the Manager as described in “Logging in to the Manager” on page 27.
26 Intel® Entry Storage System SS4000-E User Guide
Page 43

Logging in to the Manager
To ensure your connection to the storage system is secure, the HTTPS protocol is used,
and only individuals who know the administrator user name and password can view or
change any of the storage system settings.
To log in to the Manager:
1. When the security alert appears, click Yes. The login page displays.
Getting Started
2. Enter the administrator user name and password.
The default user name is admin, and the default password is storage. These are casesensitive. Once you log in, you can change both the administrator user name and
password at any time. For more information, see “Changing the System Settings” on
page 66.
3. Click Log In.
Intel® Entry Storage System SS4000-E User Guide 27
Page 44
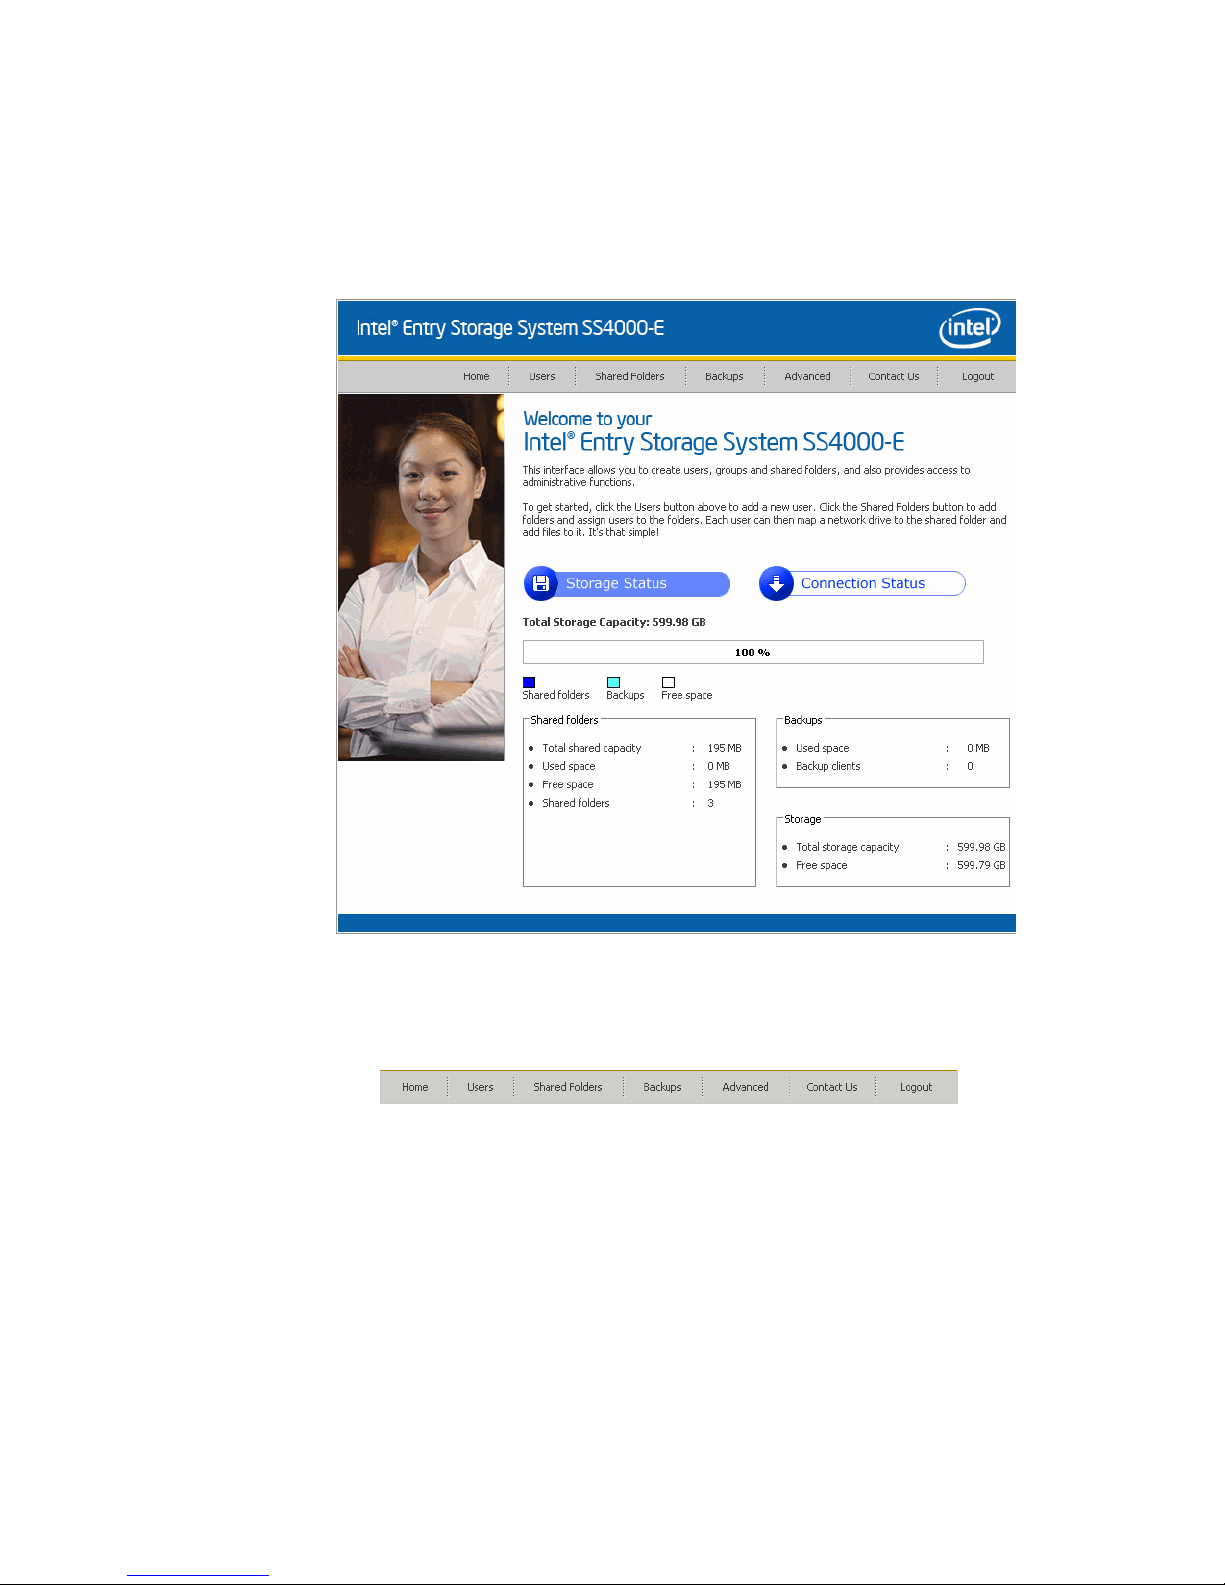
Getting Started
Navigating the Manager
Once you log in to the Manager, the Home page displays:
The top of every page in the Manager displays a navigation bar that lets you access all the
features of the storage system:
• Home—Displays information about your storage system, including how the storage
space is being used and which users are connected. For more information, see
“Viewing Information About Your Storage System” on page 30.
• Users—Displays a list of all currently configured users. If you use local
authentication mode, you can add, modify, and remove all types of users, and add,
modify , and remove groups of Microsoft Windows* and Mac OS X* users. If you use
Active Directory authentication mode, you can add, modify, and remove Linux users
and other Mac users. You can also use this page to change the authentication mode.
For more information, see “Adding Users” on page 32.
28 Intel® Entry Storage System SS4000-E User Guide
Page 45

Getting Started
• Shared Folders—Displays a list of all currently configured shared folders and lets
you add and remove shared folders, and change which users can access them.
For more information, see “Creating Shared Folders” on page 35 and “Managing
Shared Folders” on page 54.
• Backups—Displays a list of all computer disk backups that currently exist and lets
you change the recovery password, delete backups or a backup client, and change
information related to booting remotely.
For more information, see “Managing Backups” on page 58 and Chapter 5,
"Protecting Local Disks," beginning on page 89.
• Advanced—Provides access to advanced storage system configuration options, such
as setting up e-mail alerts; upgrading the firmware; removing USB devices; changing
the system, network, or disk configuration settings; viewing information about the
system status or system events; and shutting down the system remotely.
For more information, see Chapter 3, "Managing Y our Storage System," beginning on
page 39.
• Contact Us—Provides information about Intel and the other products and services it
offers.
• Log Out—Logs you out of the Manager.
Intel® Entry Storage System SS4000-E User Guide 29
Page 46

Getting Started
Viewing Information About Your Storage System
The Home page can display two different views: S torage Status and Connection Status.
Switch from one view to the other by selecting the desired option from the View list.
• Storage Status - Displays information about the total storage capacity on the storage
system, how much disk space is allocated for shared folders, how much is currently
used by backups, and how much is available for either. Initially, there is no used
backup space. The information on this page changes as each computer backs up its
hard disks to the storage system. You might have to refresh the browser window to
reflect these changes.
This page also indicates how much of the storage space allocated for shared folders is
actually used, the total number of shared folders, and the number of networked
computers (backup clients) that back up one or more disks on the storage system.
Note: The amount of used backup capacity is greater than the total size of all the disks listed on
the Backups page because additional storage space is needed for the data that changed
between backups.
• Connection Status - Displays a list of the Microsoft Windows* and Mac OS X* users
currently connected to shared folders, including which shared folder they are
accessing and when they logged on.
30 Intel® Entry Storage System SS4000-E User Guide
Page 47

Getting Started
Notes:
— If anyone accessed a shared folder using the guest user name, which is described
in more detail in “Adding Users” on page 32, guest displays in the Users column,
followed in parentheses by the computer name.
— Due to the nature of the NFS protocol, Linux and other Mac users are not listed
on this page.
— Ongoing backup or recovery activities do not display on this page.
— This page indicates only that a connection with a shared folder was established;
this does not necessarily mean that the user opened any files there.
Intel® Entry Storage System SS4000-E User Guide 31
Page 48

Getting Started
Adding Users
Note: By default, the Intel® Entry Storage System SS4000-E uses local authentication mode. If
your site uses Active Directory, you might want to use Active Directory authentication
mode instead. Since all user data and all shared folder assignments are deleted when you
switch from one mode to another, you should decide which mode you want to use before
proceeding. For more information, see “Changing Authentication Mode” on page 48.
In local authentication mode, by default, the Intel
includes a user named guest that has a password of guest. Microsoft Windows* and Mac
OS X* users can access all shared folders that guest is authorized to access. However, you
might want to add other users as well. For example, if you want to restrict access to a
shared folder that contains confidential information, you would add at least one user and
authorize that user to access that shared folder and not authorize the guest user to access
it. Adding a user for each individual or computer in your network provides flexibility and
security, enabling you to control who can access what information.
In addition, only Microsoft Windows* and Mac OS X* users can use the guest user name.
Linux users and Mac users who do not use Mac OS X must have user names created to
allow them to access shared folders. In Active Directory authentication mode, you can add
only Linux/other Mac users.
®
Entry Storage System SS4000-E
You can add up to 128 Microsoft Windows or Mac OS X users, and up to 128 Linux or
other Mac users, for a total of up to 256 users.
Note: Since each Linux/other Mac user can represent multiple users, the number of actual users
can be higher.
To add a user:
1. In the navigation bar, click Users. The Users & Computers page displays.
32 Intel® Entry Storage System SS4000-E User Guide
Page 49

Notes:
Getting Started
2. Click Add.
3. Select the type of user you want to add, and then click Next. The operating system
used by the user determines which option you should choose—Windows/Mac OS X
user (CIFS) or Linux/Other Mac user (NFS).
• Linux users and Mac users who are not using Mac OS X access shared folders using
the Network File System (NFS). In this environment, access to shared folders is given
to entire computers, not to individual users of those computers. However , in Microsoft
Windows and Mac OS X environments, each computer user can have individual
access to a shared folder.
• If your storage system uses Active Directory authentication mode, you can add only
Linux/other Mac users.
The page that displays next varies, depending on the user type you select.
Windows/Mac OS X User (CIFS)
Intel® Entry Storage System SS4000-E User Guide 33
Page 50

Getting Started
Linux/Other Mac User (NFS)
4. Enter the requested user information and click Done:
For this type of user Do this
Windows/Mac OS X user
(CIFS)
Linux/Other Mac user (NFS) Enter a computer description and the IP address or computer
Enter the user name and password for accessing the shared
folders. Enter the password a second time to confirm it.
The user name can be up to 20 characters long and can include
letters and numbers. The password can be up to 24 characters
long.
If the user name and password that you specify here are the same
as the person’s Windows user name and password, the person is
not prompted to provide a user name and password when
accessing the shared folder.
name of the person’s computer.
The Computer description can be the name of the person who
typically uses the computer, or any other description that you want
to provide to identify the computer in the Users list. This
description can be up to 15 characters long.
The IP address or computer name is the IP address or the
actual computer name in the computer's system configuration.
You can create a single user that actually represents multiple
users. In the IP address or computer name text box, you can
use the wildcard characters * and ? to indicate a range of names.
For example, client* or client? would include all computers
in the subnet whose name begins with client. *.company.com
would include all computers in the domain company.com.
However, these wildcards cannot be used with IP addresses.
The specified user name and type displays in the list on the Users & Computers
page.
5. Repeat steps 2 through 4 until you add all the users you want to add at this time. You
can add more users later.
If you want to put Windows and Mac OS X users into groups, see “Working with
Groups” on page 43.
34 Intel® Entry Storage System SS4000-E User Guide
Page 51

Creating Shared Folders
By default, the Intel® Entry Storage System SS4000-E includes a shared folder named
public. In local authentication mode, all Windows and Mac OS X users are automatically
assigned to this folder and can create, modify, or delete files there unless you change the
list of authorized users or their access rights as described in “Assigning Users to Shared
Folders” on page 56. In Active Directory authentication mode, you must manually assign
users to this folder in order to provide them with access.
You might want to create other shared folders as well. For example, in an office
environment, you might want to create a shared folder for company policies that everyone
can only view, and separate shared folders for confidential business files that only selected
individuals or departments can view or change. In a home environment, you might want to
create separate folders for different types of files, such as photos, videos, or music.
You can create up to 128 shared folders. Users who can access and write to these shared
folders can create additional sub-folders for organizing the files they store there.
To create a shared folder:
1. In the navigation bar, click Shared Folders.The Shared Folders page displays:
Getting Started
Note: The Shared folders list includes usbdisk1 and usbdisk2 whether or not any
USB disks are connected to the storage system.
2. Click Add.
Intel® Entry Storage System SS4000-E User Guide 35
Page 52
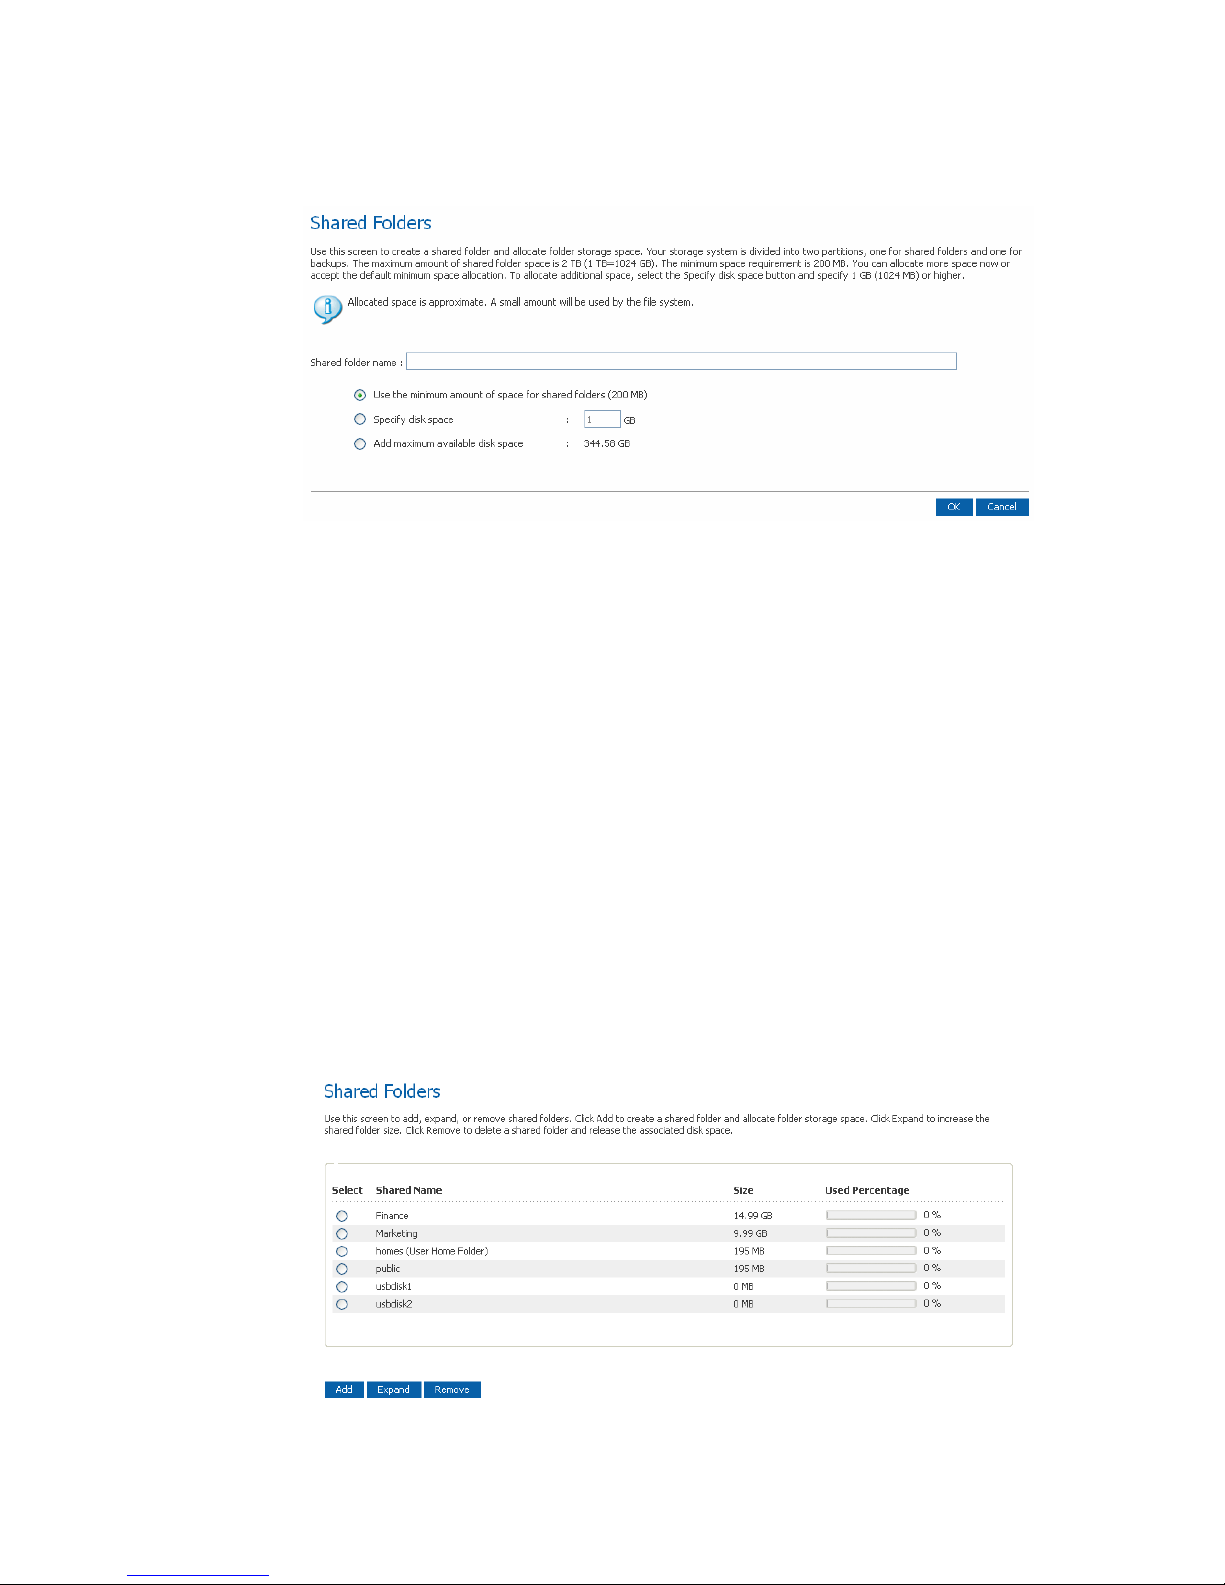
Getting Started
3. In the Shared folder name text box, enter a unique name for the shared folder. This
name can be up to 64 characters long and can contain letters, numbers, hyphens,
underlines, and spaces.
4. Your storage system is divided into several partitions, one for shared folders, one for
home folders, and one for backups. The maximum amount of a shared folder space is
2 TB (1 TB=1024 GB). The minimum space requirement is 200 MB. You can allocate
more space now or accept the default minimum space allocation. To allocate
additional space, select the Specify disk space button and specify 1 GB (1024 MB) or
higher. To allocate the maximum available, select the Add maximum available disk
space" raid button. After setting the appropriate value, click OK. The folder is created
and the Shared Folders screen display.
Managing Shared Folders
When you click Shared Folders in the navigation bar, the page displays a list of shared
resources, including both shared folders and USB devices. When you select an item in the
Shared folders list, the users and groups that can access that item display in the Users
with access list. For groups, the group name is preceded by @.
36 Intel® Entry Storage System SS4000-E User Guide
Page 53

Getting Started
By default, the storage system includes a shared folder named public. In local
authentication mode, all users are automatically assigned to this folder and can create,
modify, or delete files there. You can change the list of authorized users or their access
rights. In Active Directory authentication mode, you must manually assign users to this
folder in order to provide them with access.
The Shared folders list includes a NAS share called homes (user home folders), and
usbdisk1 and usbdisk2, whether or not any USB disks are connected to the storage
system.
You can create additional shared folders and delete them at any time. For both shared
folders and USB disks, you can change which users can access them and what they can do
with the subfolders and files.
Deleting a Shared Folder
Once you create a shared folder, you can delete it at any time. When you delete a shared
folder, any users who are currently accessing it are immediately disconnected from it.
Caution: Deleting a shared folder deletes all the subfolders and files in that shared folder. If you
want to delete only selected subfolders or files, access the shared folder, as described in
“Accessing Shared Folders” on page 79, and delete the desired items.
Note: You cannot delete the public or the homes folder.
You cannot delete the contents of a USB disk using the Shared Folders page.
To delete its contents, you must give yourself read/write access to that disk as
described in “Assigning Users to Shared Folders” on page 56, access the
disk as described in “Accessing Shared Folders” on page 79, and then delete
the desired folders and files.
To remove the USB disk from the storage system, use the Manager to
disconnect it as described in “Disconnecting USB Devices” on page 65. Then
physically unplug the USB disk from the storage system.
Even after you physically unplug the USB disk, it remains in the Shared
folders list. This ensures that you do not have to re-assign users if you later
reconnect the USB disk.
To delete a shared folder:
1. In the navigation bar, click Shared Folders.
2. In the Shared folders list, select the shared folder you want to delete.
3. Click Remove.
Intel® Entry Storage System SS4000-E User Guide 37
Page 54

Getting Started
Assigning Users to Shared Folders
1. In the navigation bar, click Shared Folders.
2. In the Shared folders screen, select the shared assignments from the left menu.
3. Click Assign Access
4.
Select either the CIFS, NFS or GROUP tabs, and then the user you want to
assign and change the access level.
Although you can choose only one user type at a time, you can assign both types of
users to the same shared folder.
5. When finished, click Apply then OK.
6. To assign users of a different type, repeat this procedure, selecting the other user type
in Step 4.
38 Intel® Entry Storage System SS4000-E User Guide
Page 55

Managing Your Storage System
3 Managing Your Storage System
The Web-based storage system Manager enables you perform a number of tasks to help
you get the most from your storage system:
• Managing Users—Add, modify, or remove users; put users into groups; or change the
authentication mode.
• Managing Shared Folders—Create shared folders, rename existing shared folders,
change which users can access existing shared folders or their access rights, and
delete shared folders that you no longer want to keep.
• Changing Authentication Mode—Change the storage the authentication mode to
either local or authenticate using active directory.
• Managing Backups—View which computer disks are backed up, change the password
for recovering a backup, specify which backup to remotely boot from, or delete a
backup or backup client.
• Setting Up e-mail Alerts—Specify whether or not e-mail notifications should be sent
when a problem occurs, and who should receive the notifications.
• Upgrading the Firmware—Upgrade your storage system firmware to the latest
version.
• Disconnecting USB Devices—If you are using optional USB devices, you must use
the Manager to disconnect them before you physically unplug them.
• Changing the System Settings—Change the storage system name or time and date
settings, as well as the user name or password for logging in to the Manager.
• Changing the Network Settings—Change the workgroup name, the storage system’s
IP address(es), or the gateway or DNS server settings, or enable the storage system to
act as an FTP server.
• Reconfiguring Your Storage System Disks—Change the proportions of your storage
system that are allocated to shared folders and backups, or change your disk.
configuration.
• V iewing System S tatus Information—See details about CPU and memory u sage, how
long the storage system has been running, disk temperatures, etc.
• Logging Out of the Manager—Log out of the Manager so that no one else can use
your computer to make changes to the storage system.
• Shutting Down the Storage System—Shut down the storage system using the
Manager rather than pushing the power button on the storage system manually.
Intel® Entry Storage System SS4000-E User Guide 39
Page 56

Managing Your Storage System
Managing Users
When you click Users in the navigation bar, the Users & Computers page displays a list
of all configured Windows and Mac OS X users, and all Linux and other Mac computers.
In this guide, the term user refers to both individuals and computers.
By default, the storage server uses local authentication mode, which means that you can
add, modify, or remove all types of users at any time. If you are using Active Directory
authentication mode, you can add, modify, or remove Linux or other Mac users, but not
Windows users. All Windows users are controlled entirely by the Active Directory server.
For more information about authentication modes, see “Changing Authentication Mode”
on page 48.
If you are using local authentication mode, you can also put Windows and Mac OS X
users into groups. This makes it easier to give several users access to the same shared
folder at once. For example, in an office environment, you might create one group for all
users and give that group read-only access to a shared folder with corporate policies. You
might then create separate groups for each department, such as Sales or HR, and give
those groups read/write access to shared folders with information specifically for those
groups. Each user can be a member of multiple groups.
If you are using Active Directory authentication mode, you cannot create groups with the
Manager. All groups are controlled by the Active Directory server.
40 Intel® Entry Storage System SS4000-E User Guide
Page 57

Adding Users
To add a user, see “Adding Users” on page 32.
Modifying Users
In local authentication mode, for Windows and Mac OS X users you can change the
password used to access the shared folders, but not the user name. This change will not
affect current connections, but will take effect the next time the person tries to connect to
a shared folder. In Active Directory authentication mode, you cannot modify Windows/
Mac OS X users, only Linux/other Mac users.
For Linux and Mac users, you can change the IP address or computer name, but not the
computer description. Changing this information immediately disconnects that computer
from the shared folders.
Note: To change the user name or computer description, you must remove the existing user as
described in “Removing Users” on page 43, and then add a new user with the desired
name or description as described in “Adding Users” on page 32.
Managing Your Storage System
To modify a user:
1. In the navigation bar, click Users.
2. Select the radio button next to the user that you want to modify.
3. Click Edit.
Note: If the storage system uses Active Directory authentication mode and you select a
Windows/Mac OS X user, this button displays dimmed.
The page that displays next varies, depending on the type of user you selected.
Windows/Mac OS X User (CIFS)
Intel® Entry Storage System SS4000-E User Guide 41
Page 58

Managing Your Storage System
Linux/Other Mac User (NFS)
4. Make the desired change and click OK:
For this type of user Do this
Windows/Mac OS X user
(CIFS)
Linux/Other Mac user
(NFS)
Enter the password for accessing the shared folders. Enter the
password a second time to confirm it.
NOTE: If the user name and password specified here are the same as
the person’s Windows user name and password, the person is
not prompted to provide a user name and password when
accessing the shared folders.
Enter the computer’s IP address or the actual computer name in the
computer’s system configuration.
A single user can actually represent multiple computers. In the IP
address or computer name text box, you can use the wildcard
characters * and ? to indicate a range of names. For example,
client* or client? would include all computers in the subnet
whose name begins with
all computers in the domain company.com. However, these wildcards
cannot be used with IP addresses.
NOTE: If the user is currently connected to a shared folder, changing
this information disconnects the user.
client. *.company.com would include
42 Intel® Entry Storage System SS4000-E User Guide
Page 59

Removing Users
In local authentication mode, you can remove any user except the guest user. In Active
Directory authentication mode, you can remove any Linux user or Mac user not running
Mac OS X, but you cannot remove any Windows/Mac OS X user. Those can be removed
only on the Active Directory server.
If you remove a user who is currently connected to the storage system, that user remains
connected until the user disconnects from the shared folder or shuts down the computer.
To remove a user:
1. In the navigation bar, click Users.
2. Select the radio button next to the user that you want to remove.
3. Click Remove.
Note: If the storage system uses Active Directory authentication mode and you select a
Windows/Mac OS X user, this button appears dimmed.
4. When prompted to confirm the removal, click OK. The user no longer displays in the
list on the Users page.
Managing Your Storage System
Working with Groups
Windows and Mac OS X users can be put into groups, which makes it easier to give
several users access to the same shared folder at once.
To view user groups:
1. In the navigation bar, click Users.
2. In the left pane, click Groups. The page displays a list of all currently configured
groups.
3. Select a group from the Groups list to view the members of that group. The members
of that group in the adjacent Members list.
Intel® Entry Storage System SS4000-E User Guide 43
Page 60
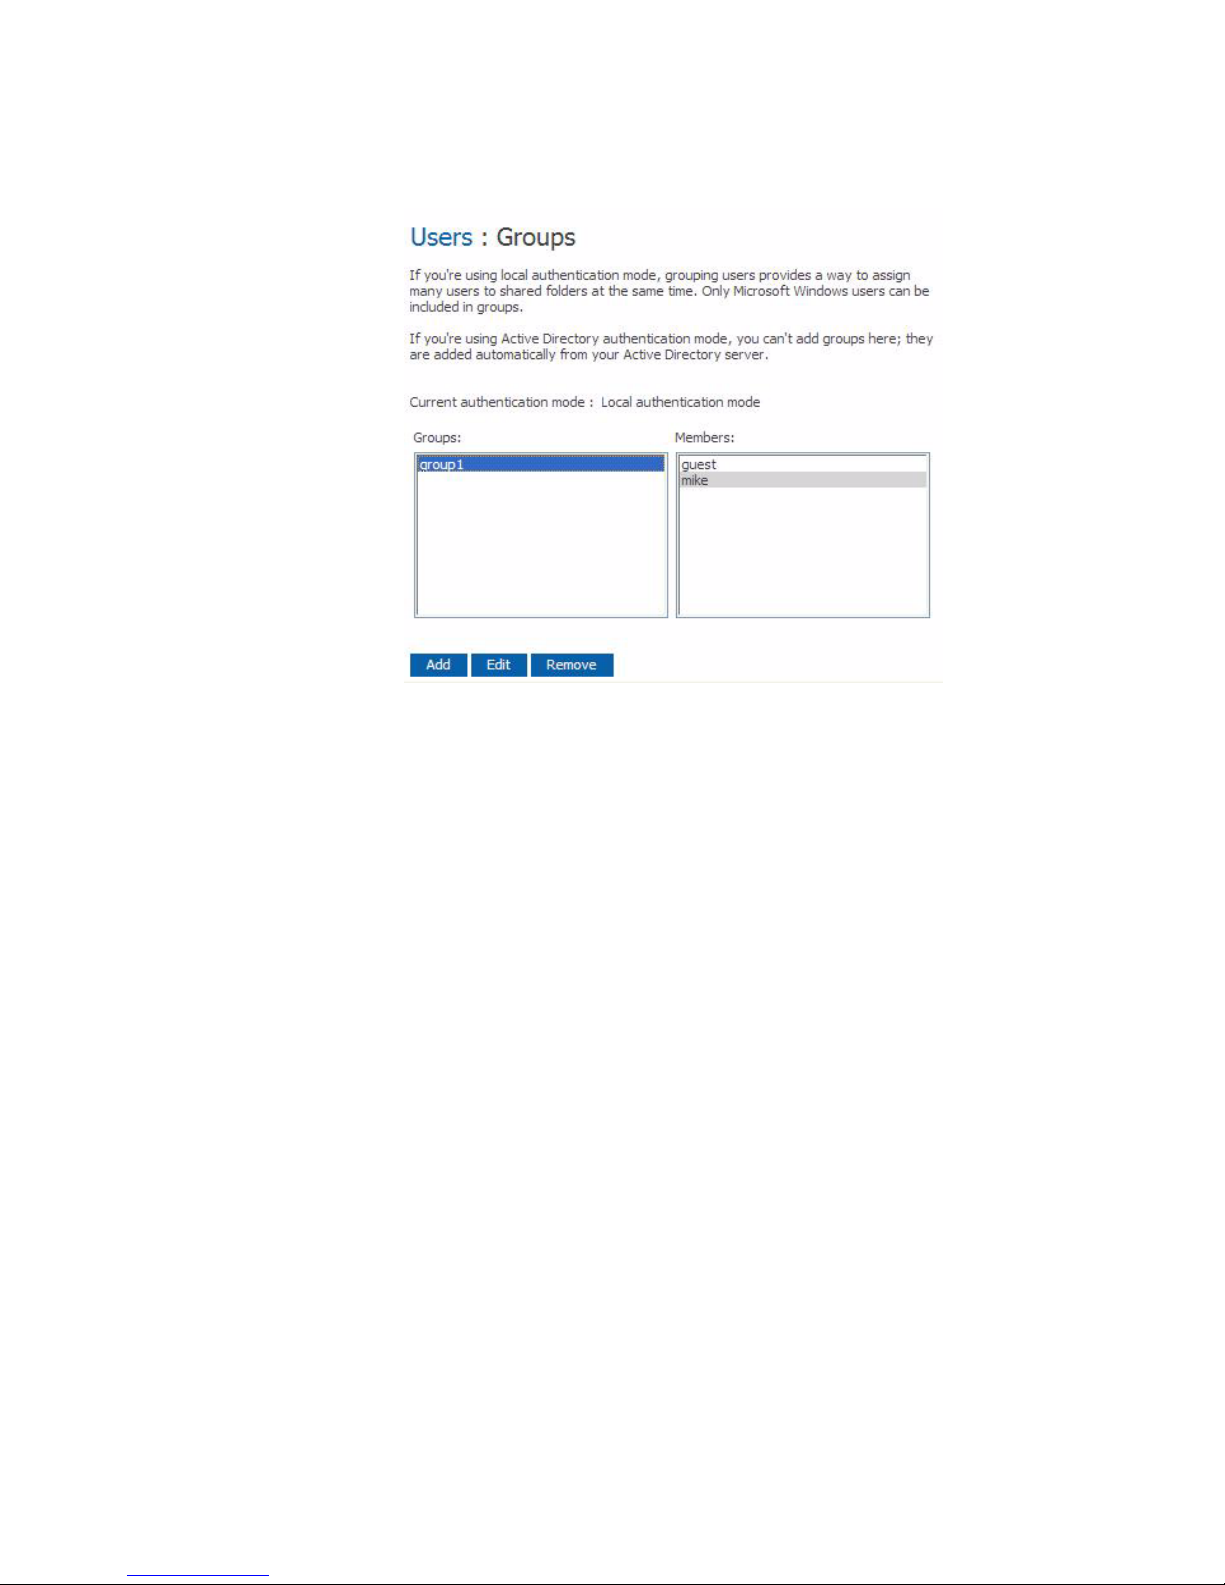
Managing Your Storage System
If you are using local authentication mode, you can add a group, modify the group
membership, or remove groups at any time. If you are using Active Director y
authentication mode, you can view the group membership but you cannot add, modify, or
remove groups. Those actions can be done only on th e Active Directory server.
Adding a Group
In local authentication mode, when you create a group, you typically assign users to
groups as you add them, although you can create an empty group and add users later. You
can create up to 128 groups. Users must be created before they can be added to a group.
see “Adding Users” on page 32. A user can be a member of multiple groups.
To add a group:
1. In the navigation bar, click Users.
2. In the left pane, click Groups.
44 Intel® Entry Storage System SS4000-E User Guide
Page 61
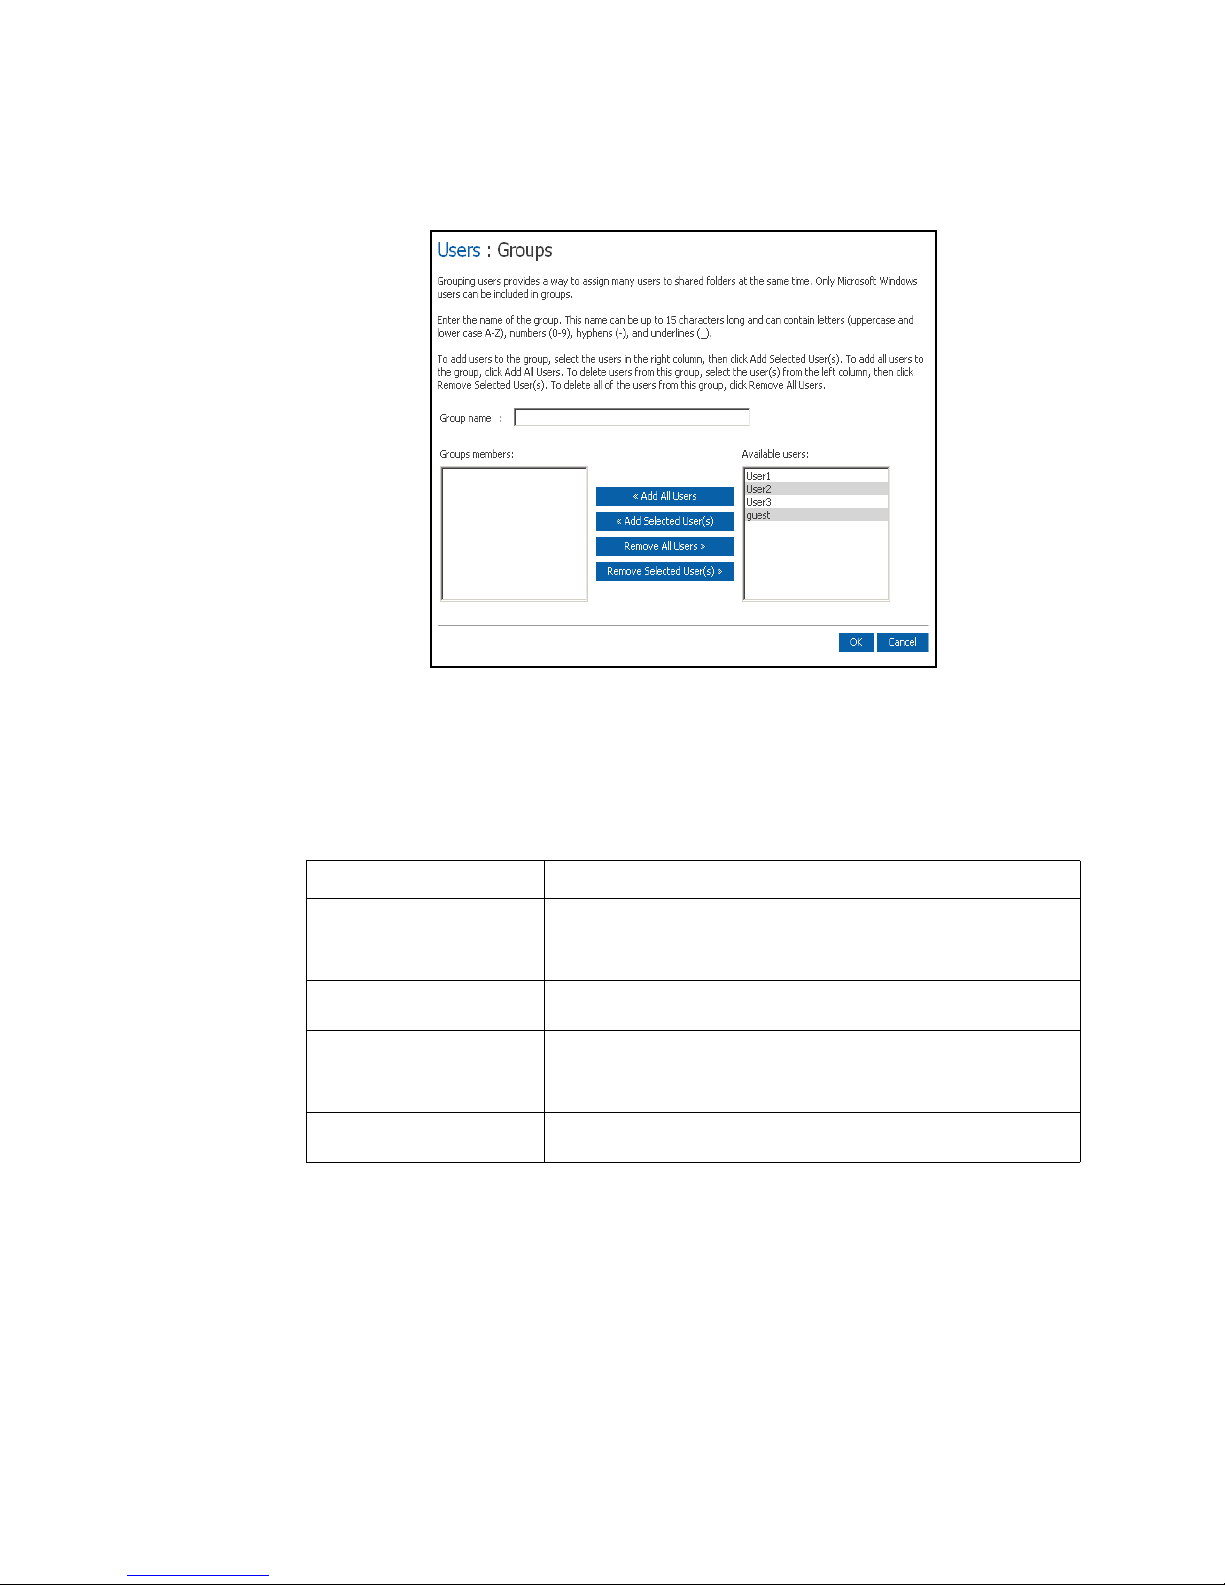
3. Click Add.
Managing Your Storage System
Note: If the storage system uses Active Directory authentication mode, this button displays
dimmed.
4. In the Group name text box, enter a unique name for the group. This name can be up
to 15 characters long and can include letters, numbers, hyphens, and underlines.
5. Specify which users should belong to this group, and then click OK:
To do this Do this
Add all users to the group Click Add All Users.
All users move from the Available users list to the Group
members list.
Add selected users to the
group
Remove all users from the
group
Remove selected users from
the group
NOTES:
a. To select multiple, contiguous users, hold down the Shift key and select the first user, then select
the last user. All users between the first and last selected user are selected.
To select multiple, non-contiguous users, hold down the Ctrl key as you select each user.
In the Available users list, select the user(s) that you want to add
and then click Add Selected User(s).
Click Remove All Users.
All users move from the Group members list to the Available
users list.
In the Group members list, select the user(s) that you want to
remove from the group and then click Remove Selected User(s).
a
a
Intel® Entry Storage System SS4000-E User Guide 45
Page 62

Managing Your Storage System
Changing the Group Membership
In local authentication mode, you can change which users are members of each group at
any time. When you add a user to a group, that user has immediate access to all the shared
folders that the group is authorized to access. However, if you remove a user from a
group, the change does not take effect until that user disconnects from the shared folder or
shuts down the computer.
For example, the user Alice might be a member of both the Marketing and Executives
groups. The Marketing group might have read-only access to the Budget shared folder,
and the Executives group might have read/write access. As a member of the Executives
group, Alice would have read/write access to that shared folder. If Alice is currently
connected to that shared folder and you subsequently remove her from the Executives
group, she continues to have read/write access to that folder until she disconnects or shuts
down her computer. The next time she connects, she continues to have access to the
shared folder since she is still a member of the Marketing group, but she is able to only
view the files there; she cannot add, modify, or delete files.
To change the group membership:
1. In the navigation bar, click Users.
2. In the left pane, click Groups.
3. In the Groups list, select the group whose membership you want to change.
4. Click Edit.
Note: If the storage system uses Active Directory authentication mode, this button appears
dimmed.
46 Intel® Entry Storage System SS4000-E User Guide
Page 63

Managing Your Storage System
5. Assign users to this group as needed, and then click OK:
To do this Do this
Add all users to the group Click Add All Users.
Add selected users to the
group
Remove all users from the
group
Remove selected users from
the group
NOTES:
a. To select multiple, contiguous users, hold down the Shift key and select the first user, then select
the last user. All users between the first and last selected user are selected.
To select multiple, non-contiguous users, hold down the Ctrl key as you select each user.
In the Available users list, select the user(s) that you want to add
and then click Add Selected User(s).
Click Remove All Users.
In the Group members list, select the user(s) that you want to
remove from the group and then click Remove Selected User(s).
a
The selected users move from one list to the other.
On the Groups page, when you select this group in the Groups list, the adjacent
Members list immediately reflects the changes you just made.
a
Removing a Group
In local authentication mode, removing a group does not remove the users that are
members of that group; it simply means that the group no longer displays in the Groups
list on the Groups page. The users remain listed on the Users & Computers page. In
Active Directory authentication mode, you cannot remove a group on the storage system.
That can be done only on the Active Directory server.
However, removing a group can affect access to shared folders. When you remove a
group, the members of that group no longer has access to any shared folders that the group
was authorized to access unless they were granted individual access as well.
For example, the Executives group might include Alice, Bob, and Carlos, and that group
might have read/write access to the Budget shared folder. If you remove the Executives
group, Alice, Bob, and Carlos remain users, but they no longer have access to that shared
folder.
On the other hand, if the Executives group had read/write access to the Budget shared
folder, but Alice had read-only access, when you remove the group, Bob and Carlos no
longer have access to the Budget shared folder since their access rights were determined
by their group membership, but Alice continues to have read-only access, since that
access right was granted to her on a user level.
To remove a group:
1. In the navigation bar, click Users.
2. In the left pane, click Groups.
3. In the Groups list, select the group that you want to remove.
4. Click Remove.
Intel® Entry Storage System SS4000-E User Guide 47
Page 64

Managing Your Storage System
Note: If the storage system uses Active Directory authentication mode, this button displays
dimmed.
5. When prompted to confirm the removal, click OK. The group no longer displays in
the Groups list.
Changing Authentication Mode
Your Intel® Entry Storage System SS4000-E can operate in one of two modes:
• Local authentication mode
• Active Directory authentication mode
In local authentication mode, the storage system authenticates all users who try to connect
to shared folders, and you can add, modify, or remove all types of users (both Windows/
Mac OS X and Linux/other Mac users). By default, the storage system uses local
authentication mode.
In Active Directory authentication mode, the Active Directory server authenticates all
Windows users who try to connect to shared folders. You can add, modify, or remove
Linux /other Mac users, but not Windows users. In addition, you cannot create groups. All
Windows users and groups are controlled entirely by the Active Directory server.
Notes:
• The authentication mode has no effect on backups performed using Client Backup and
Recovery.
• If you use Active Directory authentication mode, the User must change password at
next logon check box must be cleared in the properties for each user on the Active
Directory server who will be accessing shared folders on the storage system. In
addition, each user’s password can be no longer than 24 characters.
• If you use Active Directory authentication mode, you must add any Mac OS X users
to your Active Directory server in order to provide those users with access to shared
folders on the storage system.
• Active Directory authentication mode does not automatically include a guest account.
However, the Active Directory administrator can create one on the Active Directory
server.
• "ftp" and "anonymous" are reserved for internal use. It is recommended that you do
not create user accounts with these names in the Active Directory server.
• It is recommended that you select the root of all the Organization Units (OU) when
joining an Active Directory domain in order to have a listing of every user in every
OU. If you need to change the OU, you can switch to local mode and then rejoin the
domain. However, once you rejoin the domain, user rights to shares will need to be set
up again.
• If you use Active Directory authentication mode, and the clocks of the storage system
and the Active Directory server differ by more than five minutes, errors will occur
when the storage system tries to connect to the Active Directory server. This is when
you set the authentication mode, when synchronization between the two systems
occurs, and when users access shared folders. It is recommended that you configure
48 Intel® Entry Storage System SS4000-E User Guide
Page 65

Managing Your Storage System
both the storage system and the Active Directory server to set their clocks from a
common Network Time Protocol (NTP) server. To configure this on the storage
system, see “Changing the System Settings” on page 66.
You can change the authentication mode at any time, but you must provide the
administrator password to do so.
Caution: Changing the authentication mode deletes all your existing user data and shared folder
assignments. However, if any users are currently accessing shared folders, they will
remain connected until they disconnect from the shared folders or shut down their
computer.
To change the authentication mode:
1. In the navigation bar, click Users.
2. In the left pane, click Authentication Mode. The Authentication Mode page
displays the current authentication mode.
3. In the Administrator password text box, enter the password for accessing the
storage system not the active directory password.
4. Click Change Authentication Mode.
5. Click Finish. All your existing user data and user assignments are deleted, and you
can add new users as described in “Adding Users” on page 32, and assign them to
shared folders, as described in “Assigning Users to Shared Folders” on page 56.
6. If you are currently using local authentication mode, Active Directory
authentication mode is selected automatically. Click Next. The Active Directory
Server page displays.
Intel® Entry Storage System SS4000-E User Guide 49
Page 66

Managing Your Storage System
7. In the Primary server IP address text box, enter the IP address of your primary
Active Directory server. You cannot use the server’s name.
8. If desired, enter the IP address of a secondary Active Directory server in the
Secondary server IP address text box. You cannot use the server’s name. This server
will be used if the primary Active Directory server is not available.
The secondary server must be in the same domain as the primary server.
9. Click Next. The Active Directory User Login page displays.
10. In the User name text box, enter the name of a user who has privileges to access the
Active Directory tree.
When accessing the Active Directory server, this name will be appended with the
fully qualified domain name shown on this page.
11. In the Password text box, enter the password associated with the specified user name.
12. If you want to specify the name of the organizational unit that contains the users and
groups that will be able to access shared folders on the storage system, enter the name
in the Organizational unit name text box. The character limit is 256 characters. This
unit must not have more than 100 subunits, and the name must be preceded by a
forward slash, such as /Sales.
50 Intel® Entry Storage System SS4000-E User Guide
Page 67

Managing Your Storage System
Note: The name of the organizational unit cannot contain a slash. For example, if the name is
Sales/Marketing, you must either specify a different organizational unit name, leave the
name blank, or change the name of the organizational unit on the Active Directory server.
If you omit an organizational unit name here, you can b rowse the Active Directory tree on
the next page. However, if the tree has more than 100 subunits or more than 128 users or
groups, an error message displays, and you must specify an organizational unit name.
The Active Directory Tree page displays.
Note: If the storage system time and Active Directory server time differ by more than five
minutes, an error message displays. You must adjust the storage system time, time zone, or
both to ensure that they match as described in “Changing the System Settings” on
page 66.
13. Select the organizational units that contain the users or groups that are allowed to
access the shared folders on the storage system, and then click Next.
Note: Once the organizational units are entered, you cannot change them, so make your
selection(s) carefully. You can select the root of all the organizational units to get a listing
of every user in every unit. If you do setup a organizational unit and need to change it, you
can switch to local mode and then re-join the domain. However, this requires setting up
the user rights to all shared folders again.
You must select at least one organizational unit. Selecting the forward slash mark (/)
selects everyone in the tree.
Intel® Entry Storage System SS4000-E User Guide 51
Page 68
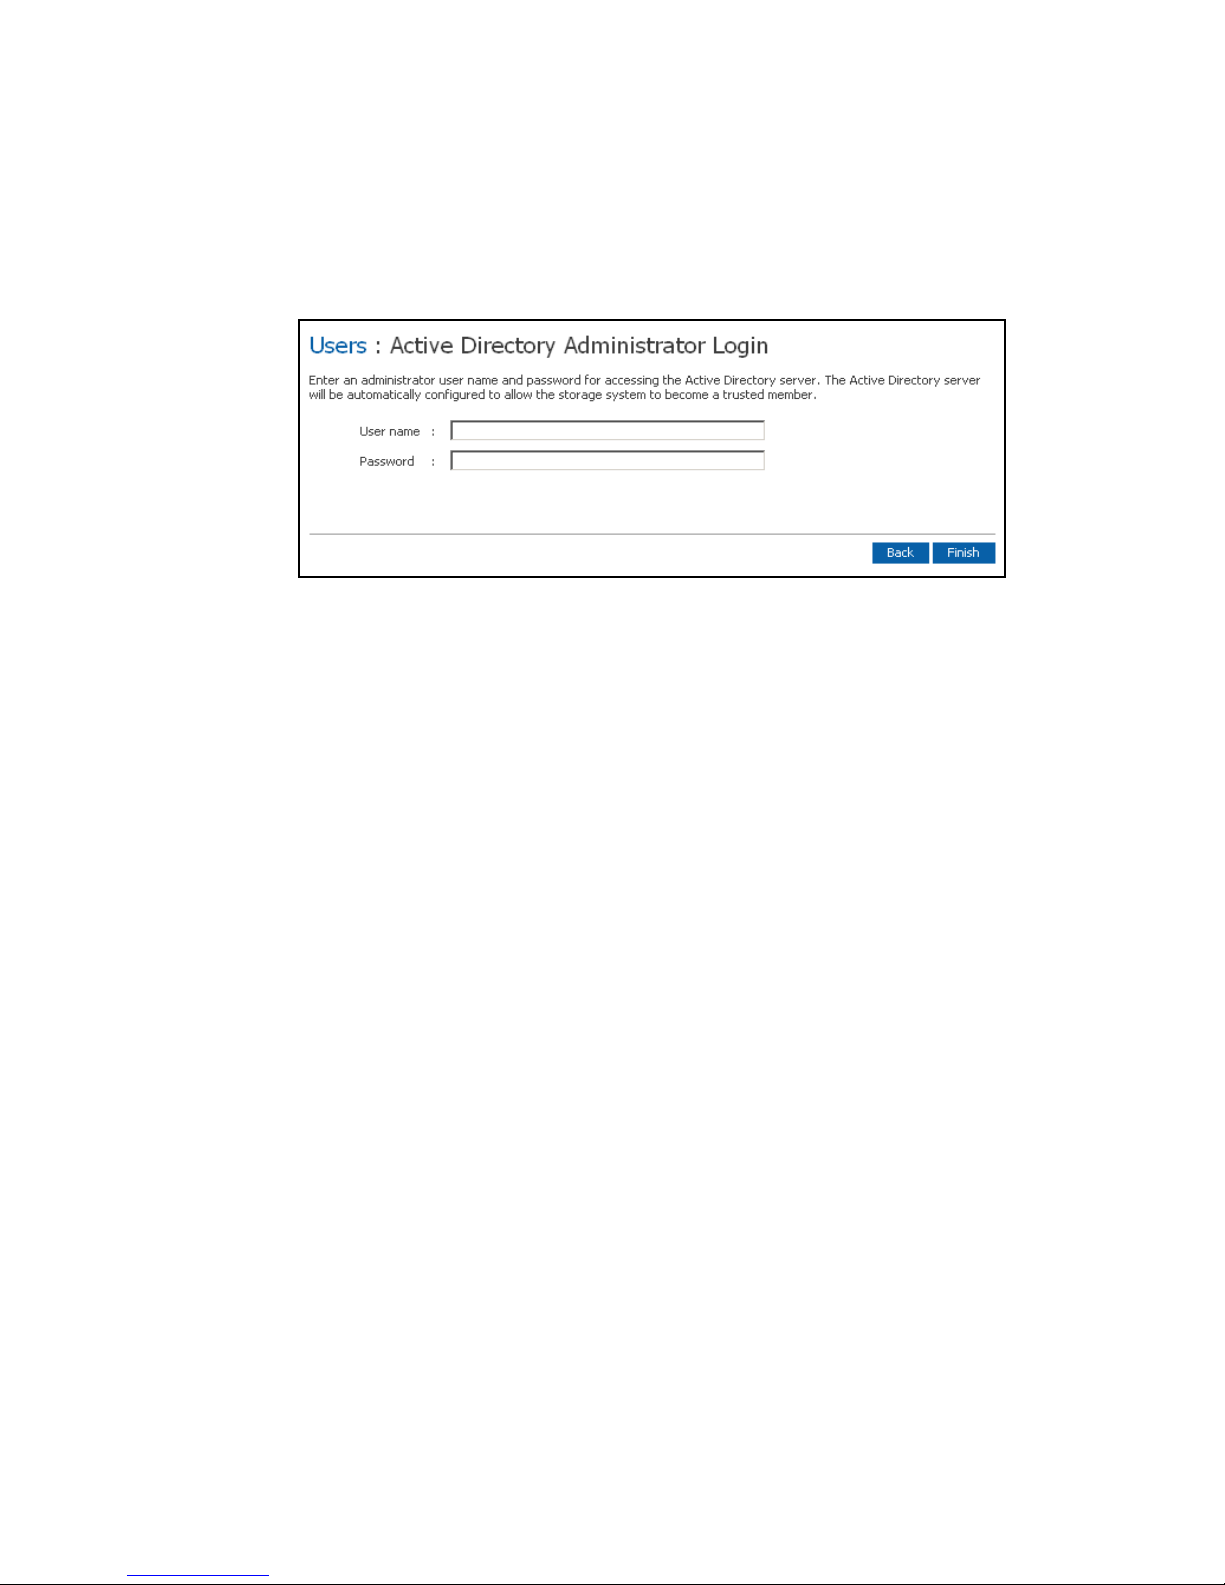
Managing Your Storage System
Note: Your storage system supports 256 users and 128 groups. If the selected organizational
unit exceeds these maximums, the excess users or groups will not be added to the storage
system.
The Active Directory Administrator Login page displays.
14. In the User name text box, enter an administrator user name for accessing the Active
Directory server.
This account will be used to automatically configure the Active Directory server to
allow the storage system to become a trusted member and communicate directly with
that server. It is used only when setting up this relationship.
15. In the Password text box, enter the password associated with the specified user name,
and then click Finish.
All the current users and groups associated with the selected organizational unit are
imported into the storage system and display on the Users & Computers and Groups
pages. At this point, you can assign these users and groups to shared folders as
described in “Assigning Users to Shared Folders” on page 56.
Modifying the Active Directory properties
If your storage system is using Active Directory authentication mode, Active Directory
Properties displays in the left pane when you click Users in the navigation bar. Click
Active Directory Properties to change the IP address of your primary or secondary
Active Directory server, the user name or password for browsing the Active Directory
tree, or how frequently the storage system should synchronize with the Active Directory
server.
To modify the Active Directory properties:
1. In the navigation bar, click Users.
2. In the left pane, click Authentication Directory Properties.
This item displays only if you are currently using Active Directory authentication
mode. T o determine which mode you ar e currently using, click Authentication Mode
in the left pane and observe the mode specified in the right pane.
52 Intel® Entry Storage System SS4000-E User Guide
Page 69
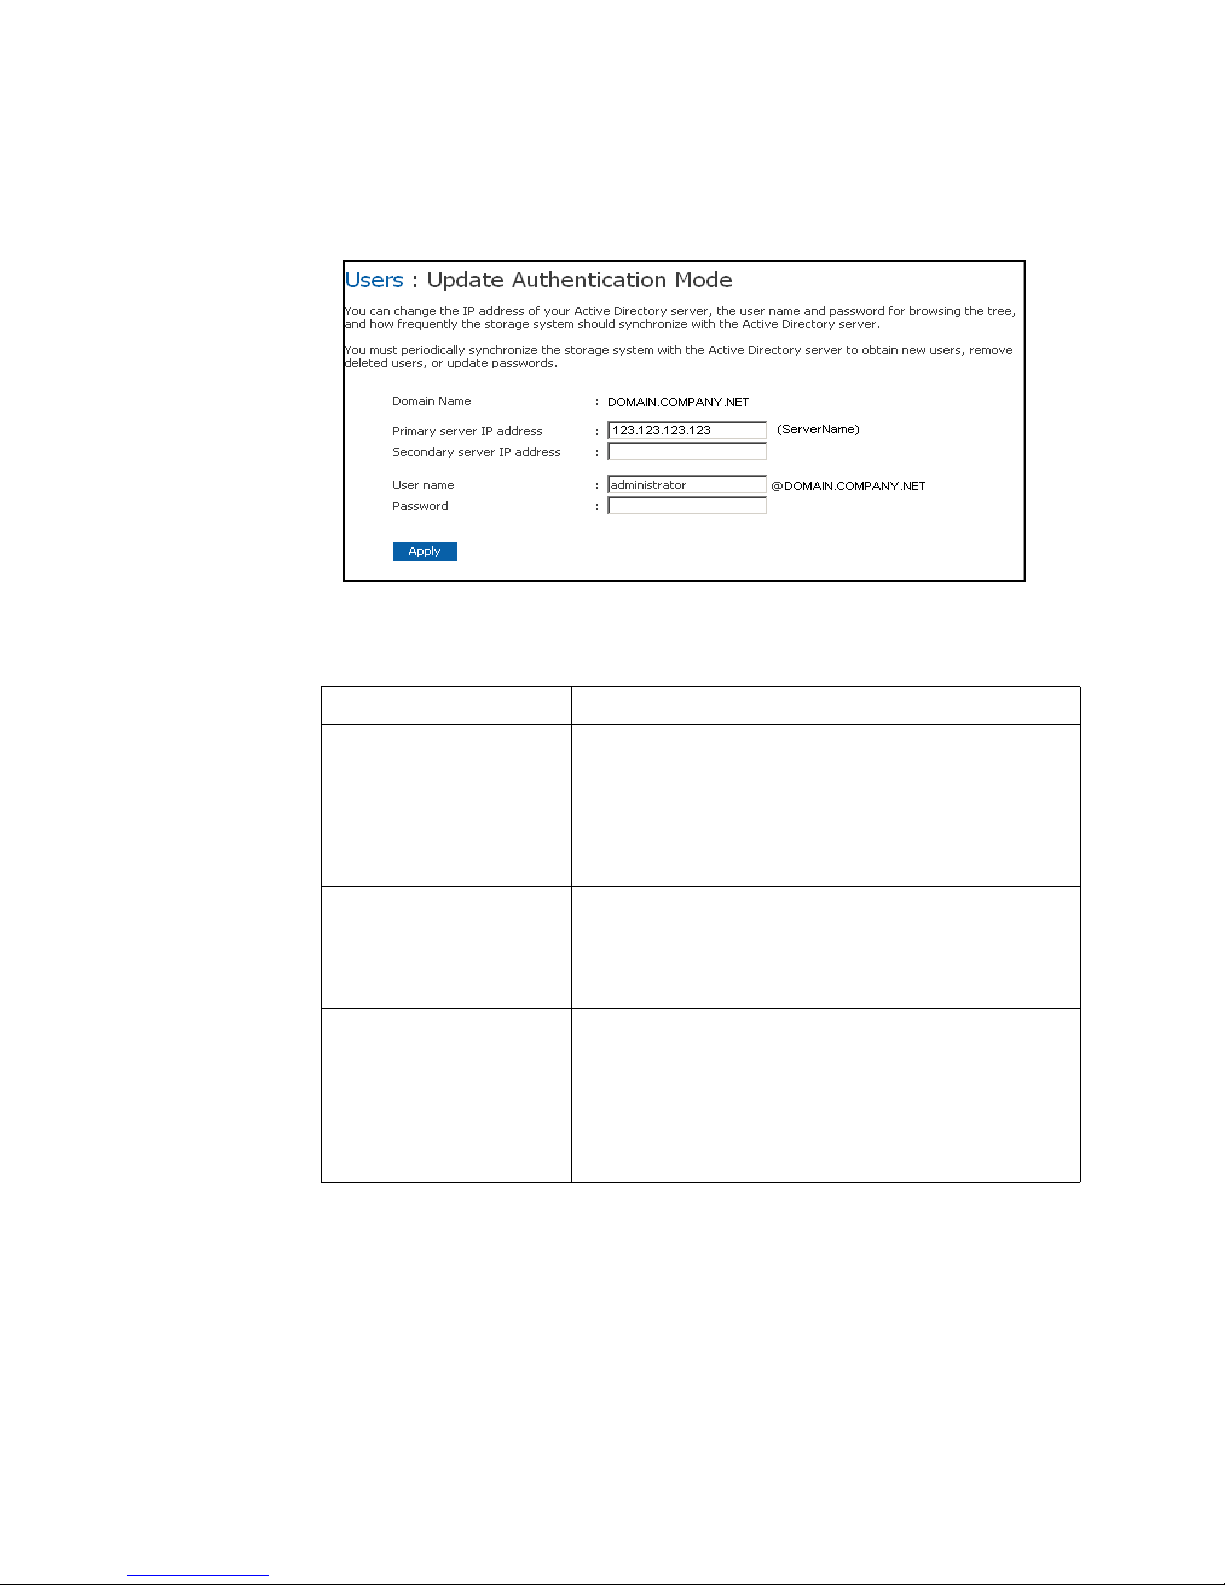
Managing Your Storage System
When you click Authentication Directory Properties, the Authentication
Directory Properties page displays.
3. Make the desired changes, if any, and click Apply:
To change this Do this
The IP address of the primary
Active Directory server
The IP address of the
secondary Active Directory
server
The user name or password
for browsing the Active
Directory tree
In the Primary server IP address text box, enter the IP
address of your primary Active Directory server. You cannot
use the server’s name.
NOTE: The new server must reside in the same domain as the
original server. To change domains, you must change
the authentication mode as described in “Changing
Authentication Mode” on page 48.
In the Secondary server IP address text box, enter the IP
address of your secondary Active Directory server. You cannot
use the server’s name.
NOTE: The secondary server must reside in the same domain
as the primary server.
In the User name text box, enter the name of a user who has
privileges to access the Active Directory tree.
In the Password text box, enter the password associated with
that user name.
This user name and password will be used to obtain new user
and group information from the Active Directory server at every
synchronization.
Intel® Entry Storage System SS4000-E User Guide 53
Page 70

Managing Your Storage System
Synchronizing the Storage System and Active Directory Server
If you add a new user or group to the Active Directory server , you must wait until the next
synchronization before assigning that user or group to a shared folder, You should also do
this if a user’s password changed on the Active Directory server and the user can no
longer access shared folders on the storage system.
To synchronize the storage system and Active Directory server:
1. In the navigation bar, click Users.
2. In the left pane, click either Users & Computers or Groups.
3. Click Synchronize. The page displays the progress of the synchronization.
Notes:
• Your storage system supports 128 users and 128 groups. If the selected organizational
unit on your Active Directory server currently exceeds the maximum, the excess users
or groups will not be added to the storage system.
• If the clocks of the storage system and the Active Directory server differ by more than
five minutes, errors will occur when the two systems synchronize. You must adjust
the storage system time, time zone, or both to ensure that they match as described in
“Changing the System Settings” on page 66.
• It is recommended that you configure both the storage system and the Active
Directory server to set their clocks from a common Network Time Protocol (NTP)
server.
For information about setting the storage system time or using an NTP server, see
“Changing the System Settings” on page 66.
Managing Shared Folders
When you click Shared Folders in the navigation bar, the page displays a list of shared
resources along with the size of each folder. \
54 Intel® Entry Storage System SS4000-E User Guide
Page 71

Managing Your Storage System
The list includes both shared folders and USB devices. Click Shared Assignments in the
left pane to see a list of the users and groups that have access to each shared folder.For
groups, the group name is preceded by an @ symbol in the Users with access list.
The Shared folders list includes a NAS share called homes as well as usbdisk1 and
usbdisk2, whether or not any USB disks have been connected to the storage system.
You can create additional shared folders and delete them at any time. For both shared
folders and USB disks, you can change which users can access them and what they can do
with the subfolders and files there.
Deleting a Shared Folder
Once you have created a shared folder, you can remove it at any time. When you delete a
shared folder, any users who are currently accessing it are immediately disconnected from
it.
Caution: Deleting a shared folder deletes all the subfolders and files in that shared folder. If you
want to delete only selected subfolders or files, access the shared folder as described in
“Accessing shared folders” on page 79 and delete the desired items.
Notes:
• You cannot delete the public or the homes folder.
• Y ou cannot delete the contents of a USB disk using the Shared Folders page. To delete
its contents, you must give yourself read/write access to that disk as described in
“Managing Shared Folders” on page 54, access the disk as described in “Accessing
shared folders” on page 79, and then delete the desired folders and files.
• To remove the USB disk from the storage system, use the Manager to disconnect it as
described in “Disconnecting USB Devices” on page 65. Then physically unplug the
USB disk from the storage system.
Even after you physically unplug the USB disk, it remains in the Shared folders list.
This ensures that you don’t have to re-assign users if you later reconnect the USB disk.
To delete a shared folder:
1. In the navigation bar, click Shared Folders.
2. In the Shared folders list, select the shared folder that you want to delete.
3. Click Remove.
4. When prompted to confirm the deletion, click OK. The shared folder no longer
displays in the Shared folders list, and all associated subfolders and files are deleted.
Intel® Entry Storage System SS4000-E User Guide 55
Page 72
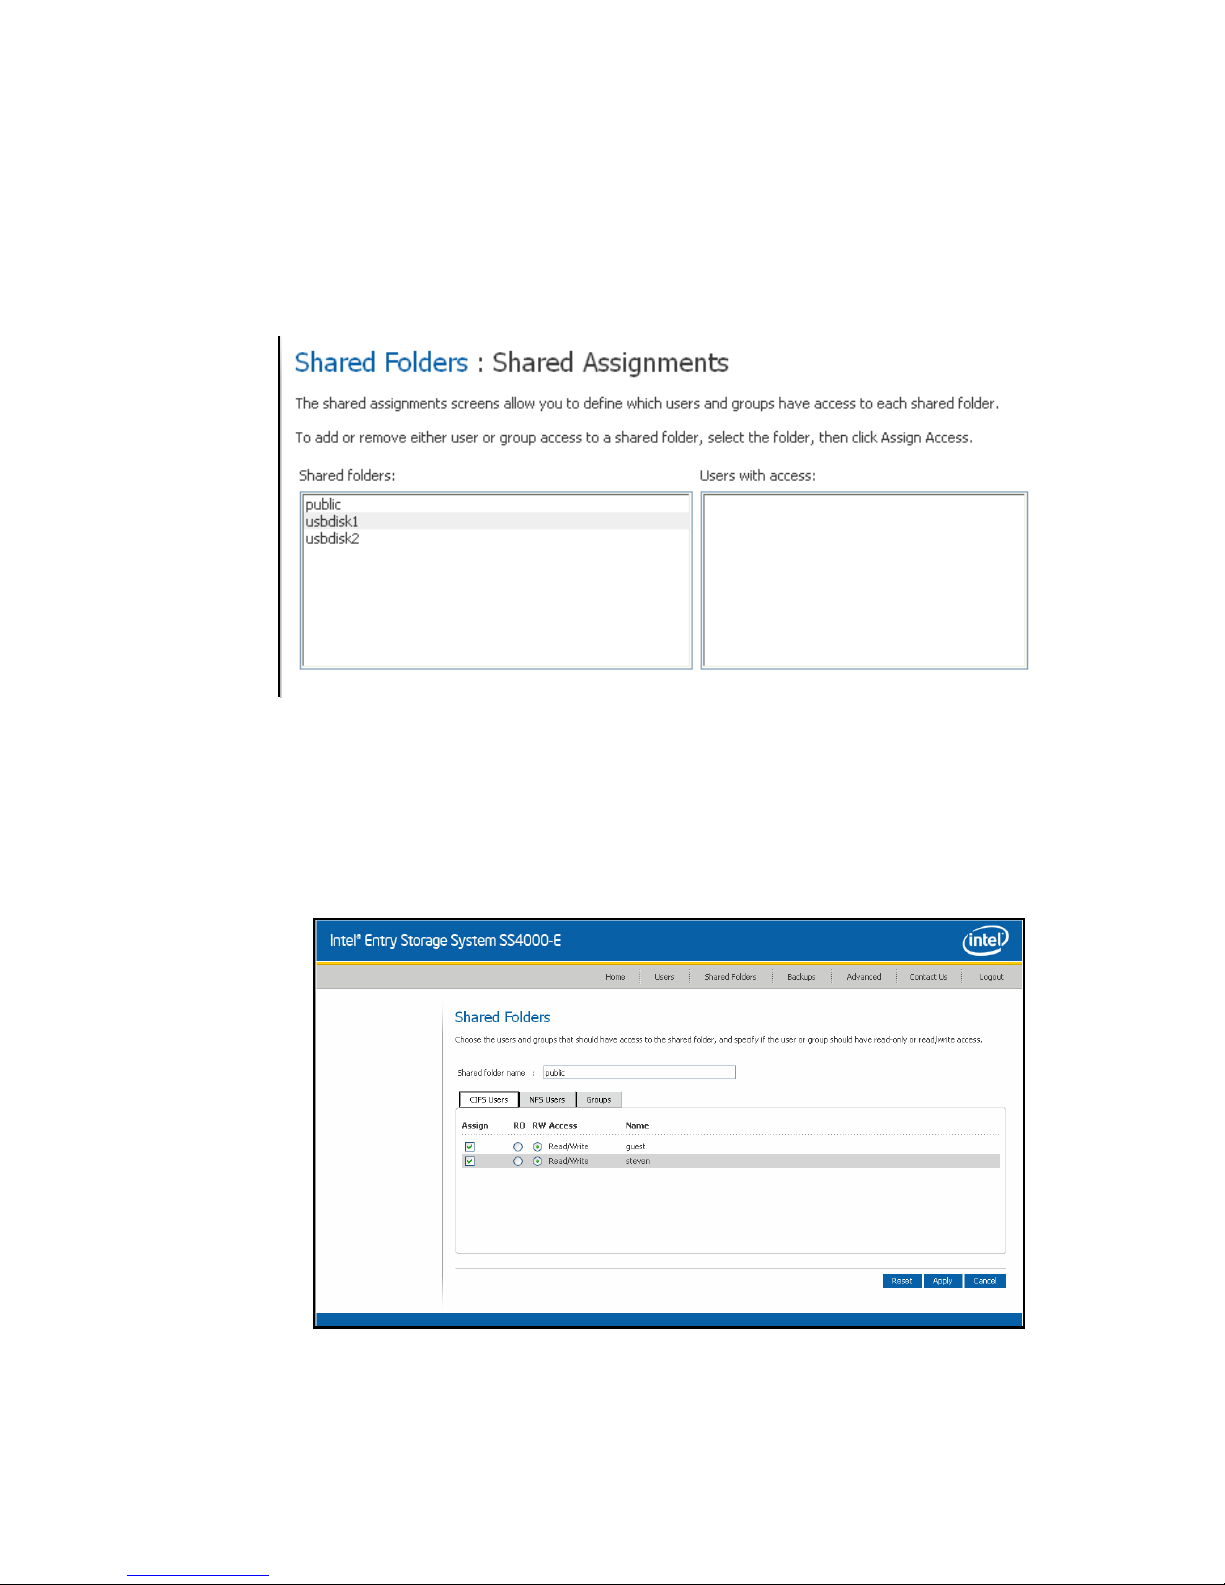
Managing Your Storage System
Assigning Users to Shared Folders
1. In the navigation bar, click Shared Folders.
2. Select Shared Assignments in the left pane. The Shared Folders: Shared
Assignments page displays:
Note: The Shared folders list includes usbdisk1 and usbdisk2, whether or not any USB disks
have been connected to the storage system.
3. In the Shared folders list, select the shared folder or USB disk to which you want to
assign access or whose user access you want to change.
4. Click Assign Access. The Shared Folders page displays, listing users and groups.
56 Intel® Entry Storage System SS4000-E User Guide
Page 73

Managing Your Storage System
5. Select the user that you want to assign and/or change the access level. You may select
either the CIFS, NFS or GROUP tab. Although you can choose only one user type at
a time, you can assign multiple user types to the same shared folders.
6. Select the radio button for either RO (read only) or RW (read/write) access. You can
specify which users can access any shared folder or USB disk, as well as setting their
level of access.
To do this Do this
Allow selected users to
access to the shared folder
or USB disk
Unassign user access Deselect the check box next to the user’s name and click Apply.
Click the check box next to the user(s) name and change their
access,
Users with read-only access can only view the files in the shared
resource; users with read/write access can view, add, modify, and
delete folders and files in the shared resource.
If you wish to cancel the selection, click the check box again to
remove the check.
For any shared folder or USB disk, you can specify which users can access it and what
level of access they have.
When you add a user to the list of authorized users for a shared folder or USB disk,
that change takes effect immediately. However, if you remove a user from the list of
authorized users, or if you change the user’s access rights, the change does not take
effect until that user disconnects from the shared folder or USB disk, or shuts down
the computer.
For example, the user Alice might have read/write access to the Budget shared folder.
If Alice is currently connected to that shared folder and you subsequently remove her
from the list of authorized users or change her access level to read-only, she will
continue to have read/write access to that folder until she disconnects or shuts down
her computer. The next time she connects, she will either not have access if she was
removed from the list of authorized users, or she will be able to only view the files
there if her access level was changed.
Notes:
• Linux users and Mac users who are not using OS X access shared folders using NFS.
In this environment, access to shared folders is given to entire computers, not to
individual users of those computers. However, in Windows and Mac OS X
environments, each computer user can have individual access to a shared folder.
• If you created groups, as described in “Adding a Group” on page 44, you can
perform this step with the Group Tab.
This tab displays all gro ups. For exam ple, if you created a group named Group1, and
added User2 and User3 to that group, by default, none of them will be assigned the
access to the shared folder.
Select Group1 and click RO (Read-Only). User2 and User3 are not assigned the
access. This allows you to specify unique access rights for those users. You could
select User3 and click RW (Read/Write). This would mean that everyone in Group1
would have read-only access to the shar ed folder except User3, who would have read/
write access to it.
Intel® Entry Storage System SS4000-E User Guide 57
Page 74

Managing Your Storage System
7. When finished, click Apply.
Note: Click Cancel to negate the shared folder assignments or Reset the current shared folder.
To assign users of a different type, repeat this procedure, selecting the other user type in
the step 5.
Managing Backups
Once the users have used Intel® Client Backup and Recovery to back up their computer
hard disks to the storage system as described in Chapter 5, "Protecting Local Disks,"
beginning on page 89, the Backups page displays a list of each computer that has done
this, the size of each protected disk, the date and time of all available backups, and the
backup disk ID. The backup disk ID is the number used to identify the backup on both the
storage server and on the Status page in the Intel
®
Client Backup and Recovery software.
58 Intel® Entry Storage System SS4000-E User Guide
Page 75

If a user ever has to recover a disk using the recovery CD or remotely boot from a backup
on the storage system, the user is prompted for a password to do so. The user had to
provide this password when protecting the disk. However, if the user forgets it, you can
reset the password using the Manager. For information about recovering a disk using the
recovery CD, see “Recovering a System Disk Using the Recovery CD” on page 117. For
information about booting remotely, see “Recovering a System Disk While Booting
Remotely” on page 122.
For booting remotely, you can also specify the MAC address to use if you want to
remotely boot a computer using a different computer’s backup, and the backup to boot
from.
In addition, when a user removes protection for a disk, the existing backups are not
deleted. The user can re-use the allocated space for new backups, or you can delete those
backups manually using the Manager.
Changing the Recovery Password
To change the recovery password:
1. In the navigation bar, click Backups.
Managing Your Storage System
2. In the Computer name list in the Recovery passwords group box, select the name of
the computer whose recovery password you want to change.
3. In the Recovery password text box, type the password to use. This password must be
12-16 characters long.
4. Click Change Password
5. When the confirmation message displays, click OK.
The user must provide this password when recovering a disk from this storage system
using the Recovery CD or when remotely booting from a backup on the storage
system.
Configuring Remote Boot
Normally, when you enable remote boot for a client computer as described in “Enabling
Remote Boot” on page 111, no additional action is necessary on the storage system.
However, if you want to remotely boot one computer from another computer’s backup,
you must change the MAC address. For example, if Computer1 has been infected by a
virus, and all of its backups are also infected, you might want to boot Computer1 from one
of Computer2’ s backup s and recover that disk to Computer1 . To do this, you must chan ge
the MAC address associated with Computer2.
Note: If you try to recover one computer from another computer’s backup, both computers must
have identical hardware. Otherwise, the recovered files do not operate properly.
You can also specify which backup to remotely boot from. By default, you alway s boot
from the latest backup. You can boot from an earlier backup but no matter which backup
you boot from, you can recover only the latest backup.
Intel® Entry Storage System SS4000-E User Guide 59
Page 76

Managing Your Storage System
To configure remote boot:
1. In the navigation bar, click Backups.
2. In the Computer name list in the Remote boot group box, select the name of the
computer whose backup you want to remotely boot from.
3. If you are remotely booting the computer from its own backup, do not change the
MAC address. However, if you are booting a different computer from the selected
computer’s backup, enter the MAC address of the NIC of the computer that you want
to remotely boot in the MAC address text box.
Remote boot must have been previously enabled on that computer.
4. From the Backup for booting remotely list, select the time and date of the backup
that you want to remotely boot from.
To always boot from the most recent backup, select Latest backup.
An asterisk (*) identifies the backup that is used for booting remotely.
Notes:
— You can r emotely boot only from backups that were cr eated after remote boot was
enabled on the client computer.
— If the selected backup is deleted to make room for newer backups, the most recent
backup is used for booting remotely.
5. Click Apply Boot Info.
6. When the confirmation message displays, click OK.
If you changed the backup for booting remotely, an asterisk displays next to the
selected backup.
Deleting a Backup
You can delete all backups for a given disk, but you cannot delete just an individual
backup from a specific date and time.
Note: If you delete all backups of all disks for a particular computer, that computer no longer
displays on the Backups page. However, that computer name remains in the storage
system and counts toward the total number of computers that are allowed to back up to the
storage system. If you want to delete all backups of all disks and the computer name, see
“Deleting a Client” on page 61.
To delete all backups of a disk:
1. In the navigation bar, click Backups.
2. Select the radio button adjacent to the disk whose backups you want to delete in the
second Select column.
3. Click Delete Backup.
4. When prompted to confirm the deletion, click OK.
60 Intel® Entry Storage System SS4000-E User Guide
Page 77

The disk no longer displays on the Backups page, and all backup versions are deleted.
If only one disk was protected, the computer name disappears from the page.
Note: If you delete a backup and the user did not previously remove protection for
Deleting a Client
If you remove the Intel® Client Backup and Recovery software from a particular
computer, or if you change the computer name, the original computer name remains on
the storage system and counts toward the total number of computers that are allowed to
back up to the storage system. To both delete all backups of all disks for a particular
computer and the computer name, you must delete the client.
To delete a client:
1. In the navigation bar, click Backups.
Managing Your Storage System
that disk, when the user subsequently accesses Client Backup and Recovery,
the Status page indicates that the backup of the protected disk is offline. To
back up the disk once again, the user must remove pr otection and then pr otect
the disk again. For more information, see “Removing Protection” on
page 126 and “Protecting Your Disks” on page 98.
2. Select the radio button to the left of the computer whose backups and computer name
you want to delete from the storage system in the first Select column.
3. Click Delete Client.
4. When prompted to confirm the deletion, click OK. The disk no longer displays on the
Backups page, and all backup versions are deleted. If only one disk was protected, the
computer name shows from the page as well.
Note: If you delete a client and the user did not previously remove protection for
that disk, when the user subsequently accesses the Intel
®
Client Backup and
Recovery software, the Status page indicates that the backup of the protected
disk is offline. To back up the disk once again, the user must remove
protection and then protect the disk again. For more information, see
“Removing Protection” on page 126 and “Protecting Your Disks” on
page 98.
Intel® Entry Storage System SS4000-E User Guide 61
Page 78

Managing Your Storage System
Setting Up e-mail Alerts
The Alerts feature is one of the Advanced menu options that allows you to set up the
storage system to notify up to three people via e-mail if a problem occurs. For example, if
one of the disks fails, or if insufficient space is available for creating new files or
performing a backup.
To take advantage of this feature, you must have access to an SMTP e-mail server either
within your own network or through an Internet service provider.
Note: The e-mail is sent within five minutes of the event. If the problem is fixed before the email
is sent, the alert is not sent.
To set up e-mail alerts:
1. In the navigation bar, click Advanced.
2. Specify whether or not the storage system should send e-mail notifications when a
problem occurs by selecting or clearing the Send e-mail notifications check box.
If you select this option, you must provide the fully qualified domain name or IP
address of your e-mail server and at least one email address.
62 Intel® Entry Storage System SS4000-E User Guide
Page 79

Managing Your Storage System
If you clear this option, e-mail notifications is not sent, and all the related fields on
this page display dimmed. However, if you previously entered information on this
page, that information is retained so that you can easily re-enable e-mail notifications
later. If you clear this option, you do not have to complete the rest of this procedure;
simply click Apply.
3. In the SMTP server name or IP address text box, enter the fully qualified domain
name or IP address of your e-mail server.
4. Specify where or not your e-mail server requires authentication by selecting or
clearing the SMTP server authentication check box.
If you select this option, you must enter a user name and password for logging into
that server in the User name and Password text boxes.
If you clear this option, no authentication is performed.
5. If your e-mail server cannot use the default sender e-mail address
(
root@localhost), or if you want the individuals who receive e-mail notifications
to be able to reply to the alert, enter the address that you want to display as the return
address in the Sender e-mail address text box.
For example, you might enter your own e-mail address, such as
MyName@MyCompany.com.
6. In the First e-mail address text box, enter the e-mail address of an individual who
should receive e-mail notifications when a problem occurs.
The e-mail address can be up to 128 characters long and must include the @ symbol,
such as MyName@MyCompany.com.
7. If you want e-mail notifications to be sent to other individuals as well, enter the
appropriate e-mail addresses in the Second e-mail address and Third e-mail address
text boxes.
8. Click Apply.
9. When the confirmation message displays, click OK.
10. To confirm that the configuration is correct, click Test E-mail, and click OK on the
confirmation message.
This sends a test message to the specified recipients. If they do not receive the test
message, make sure that all the entries on this page are correct. Y ou might also have to
modify the network settings, such as the gateway . For information about changing the
network settings, see “Changing the Network Settings” on page 68.
Intel® Entry Storage System SS4000-E User Guide 63
Page 80
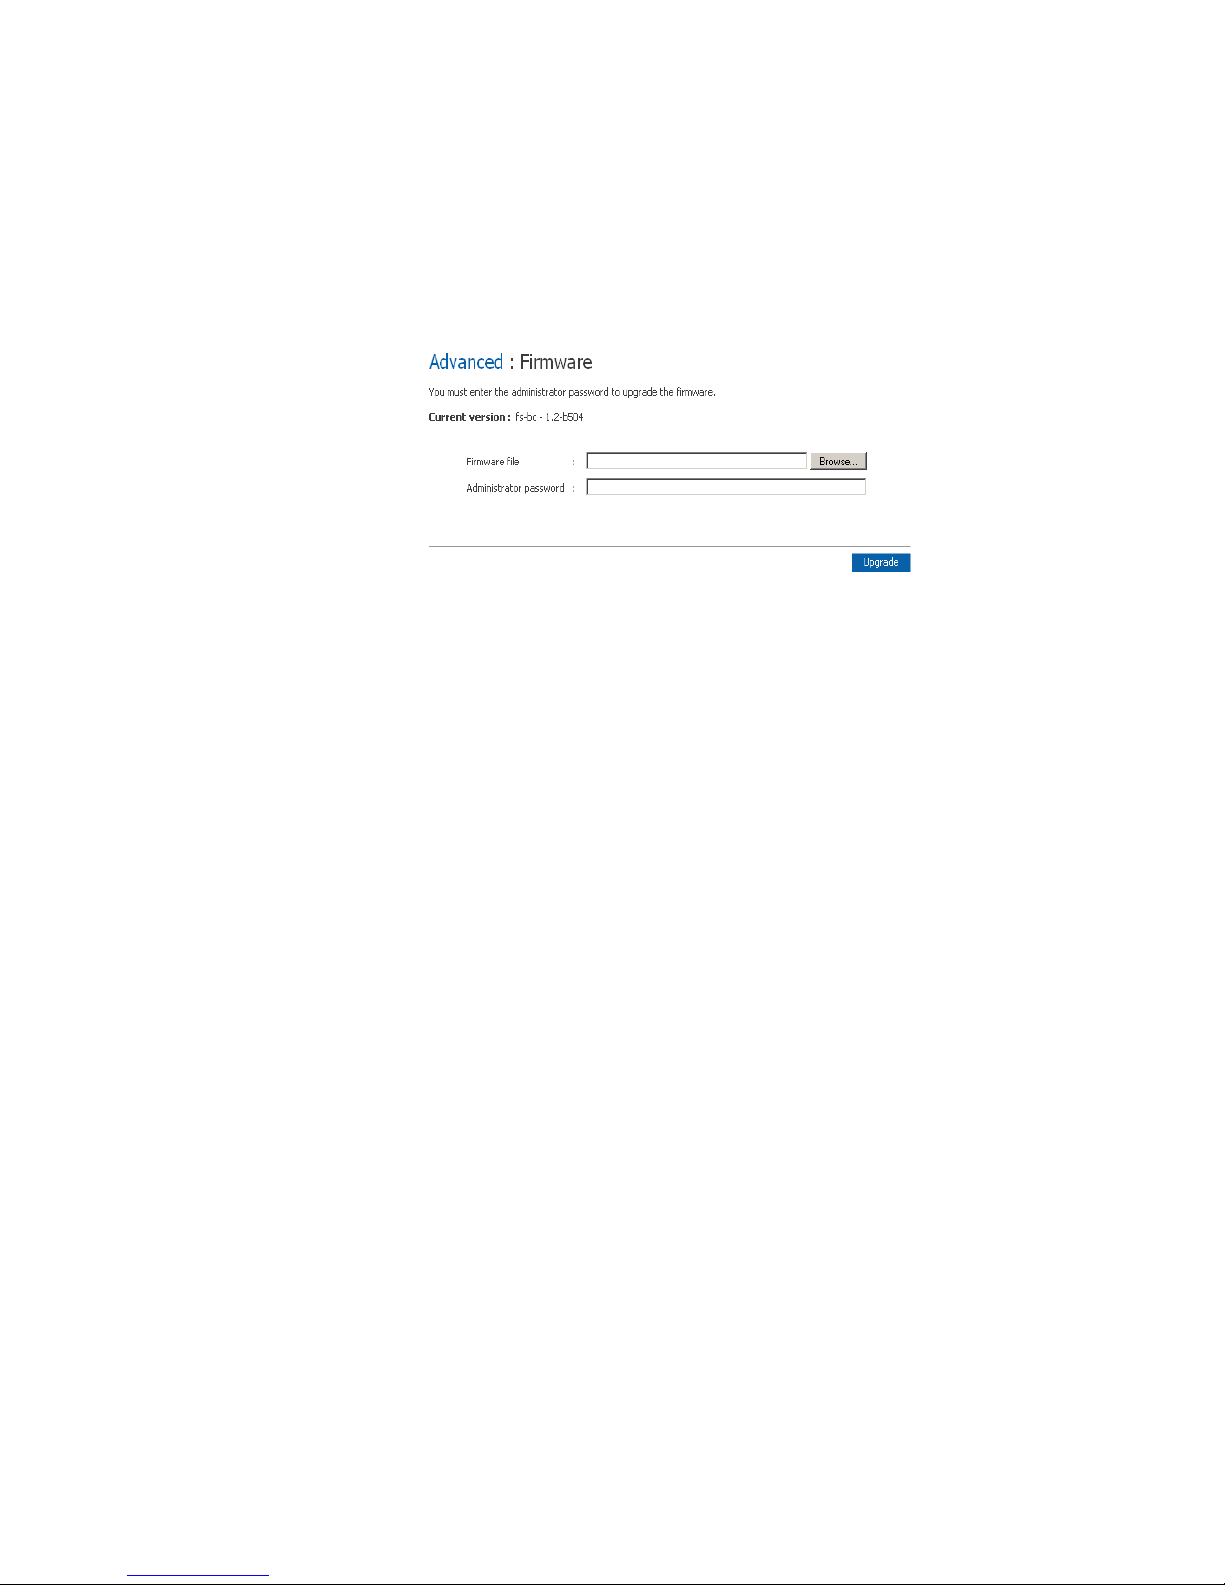
Managing Your Storage System
Upgrading the Firmware
The Firmware option is available from the Advanced tab in the top navigation bar. The
Firmware screen displays the current version of the firmware that is installed on your
storage system. It also allows you to upgrade it if newer firmware becomes available.
For additional security , you must enter your administrator password in order to upgrade
the firmware. In addition, you should backup your data before upgrading the firmware.
Caution:
• When you upgrade the firmware, the storage system restarts, and access to the
Manager is interrupted. Users cannot access the shared folders while the system
restarts. If users have shared files open, data might be lost. Be sure to have all users
save their changes and close any open files before you upgrade the firmware.
• Restarting the storage system when a backup is occurring does not have adverse
effects; the backup resumes automatically when the storage system resumes
operation. However, restarting the storage system when a disk is being recovered can
potentially corrupt the operating system, and you will need to recover the system disk
using the recovery CD, or if the system disk was not protected, r e-install the operating
system. Upgrade the firmware only when recovery is not occurring.
• You cannot use the advanced interface to upgrade from version 1.0 , 1.1, 1.2, or 1.3 to
version 1.4. Upgrading to version 1.4 is a data-destructive process due to the
structure of the firmwar e and the addition of support for drivers greater than 500 GB.
Back up your data and see the version 1.4 release notes for upgrade information.
After reading the above cautions, to upgrade the firmware:
1. In the navigation bar, click Advanced.
2. In the left pane, click Firmware.
3. In the Firmware file text box, enter the path and file name for the firmware package,
such as D:\fs20060921.pkg, or click Browse and select the file from the displayed
list.
4. In the Administrator password text box, enter the password that you use for logging
in to the Manager.
5. Click Upgrade.
6. When the confirmation message displays, click OK.
64 Intel® Entry Storage System SS4000-E User Guide
Page 81

Disconnecting USB Devices
The USB page displays a list of all USB devices that are currently attached to the storage
system, including the type of device it is, the manufacturer, and the name. USB disks are
identified by the names usbdisk1 and usbdisk2. These names cannot be changed.
When you plug a USB device into the storage system, the storage system automatically
detects it and adds that device to the USB page. You might need to click Scan to update
the display.
Managing Your Storage System
However, when you want to u nplug a USB device from the storage system, you must first
use the Manager to disconnect it. This prevents data corruption and other potential
problems with the device. Once the USB device has been disconnected via the Manager,
you can unplug it.
To disconnect a USB device:
1. In the navigation bar, click Advanced.
2. In the left pane, click USB.
3. In the list of USB devices, select the device(s) that you want to disconnect.
4. Click Disconnect.
5. When the confirmation message displays, click OK. You can now unplug the USB
device.
Note: If you inadvertently disconnect a USB device that you want to retain, unplug it from the
storage system, plug it back in, and then click Scan. This reactivates the USB device.
Since the USB device always remains on the Shared Folders page, any user assignments
are always retained.
Intel® Entry Storage System SS4000-E User Guide 65
Page 82

Managing Your Storage System
Changing the System Settings
The System page displays the settings that you specified when you initially configured the
storage system, such as the storage system name, and the current date and time.
In local authentication mode, you can change any of these settings at any time. In Active
Directory authentication mode, you can change all of the settings except the storage
system name. You can also change the administrator name and password used for logging
in to the Manager.
To change any of the system settings:
1. In the navigation bar, click Advanced.
2. In the left pane, click System.
66 Intel® Entry Storage System SS4000-E User Guide
Page 83

Managing Your Storage System
3. Make the desired changes:
To change this Do this
The storage system name In the Storage system name text box, enter the new name to
use for the storage system.
This name can be up to 15 characters long and can include
letters, numbers, and hyphens.
The system date, time, or time
zone
Network Time Protocol (NTP)
server name or IP address
The administrator name or
password
In the Date fields, enter or select the desired month, date, and
year.
In the Time field, enter or select the desired hour, minute, and
second.
In the Time zone list, select the desired time zone.
In the NTP server name or IP address text box, enter the
name or IP address of the NTP server from which the storage
system should set its time.
The storage system synchronizes its time with the NTP server
every hour.
You can use a name only if it is resolvable.
In the Administrator name text box, enter the user name to
use for logging in to the Manager.
In the Password and Confirm password text boxes, enter the
password to use for logging in to the Manager.
The user name and password are case-sensitive.
4. Click Apply.
5. When the confirmation message displays, click OK.
Intel® Entry Storage System SS4000-E User Guide 67
Page 84

Managing Your Storage System
Changing the Network Settings
The Network page displays the network settings that were set when you initially
configured the storage system. Only the first Ethernet port was configured during setup.
The second uses its default settings unless you change them here.
You can change these settings at any time.
68 Intel® Entry Storage System SS4000-E User Guide
Page 85

Managing Your Storage System
Note: Changing the IP address or subnet mask can have several effects:
• Access to the Manager is temporarily disrupted. If you access the Manager using a
Web browser and an IP address, you needs to use the new IP address. In addition, if
you added the storage system’s IP address to a local hosts file or DNS server, you
must update the IP address in those resources.
• Users who accessed the shared folders using the previous IP address is disconnected
and must access them again using the new IP address as described in “Accessing
Shared Folders” on page 79.
• Users running Intel
backup or recovery was in progress and did not complete successfully, perform the
action again.
You can also configure the storage system to act as a DHCP server. In other words, the
storage system can assign IP addresses to other computers in your network, simplifying
the network configuration of each individual system.
In addition, your storage system can act as an FTP server. This allows all
Windows/Mac OS X users to use a Web browser to access the public folder. For more
information, see “Accessing Shared Folders using FTP” on page 85.
®
Client Backup and Recovery must restart that application. If a
To change any of the network settings:
1. In the navigation bar, click Advanced.
2. In the left pane, click Network.
3. Make the desired changes:
To change this Do this
The workgroup to which the
storage system belongs
The IP address(es) used by
the storage system
The IP address of the
gateway
In the Workgroup name text box, enter the name of the workgroup.
This name can be up to 15 characters long.
In the Port 1 group box, either select Get an IP address automatically to obtain
the IP address from your DHCP server, or select Use this IP address and enter the
IP address and subnet mask in the subsequent text boxes.
If you select Get an IP address automatically and your network does not
have a DHCP server, or if the storage system is directly attached to your
computer , the de fault IP address and subnet mask are used. The defau lt IP
address is 192.168.0.101, and the default subnet mask is 255.255.255.0.
If you are using the second Ethernet port, do the same in the Port 2 group box.
If your network includes a gateway, and if the first port on the storage system uses a
specified IP address rather than obtaining one from the DHCP server, enter the IP
address of the default router in the Gateway IP address text boxes. This is typically
the same IP address as the first port, with the last number being 1.
If your network does not include a gateway, or if the first port obtains its IP address
from the DHCP server, leave these text boxes blank. If the first port obtains its IP
address from a DHCP server, the gateway obtains its IP address from the DHCP
server as well.
Intel® Entry Storage System SS4000-E User Guide 69
Page 86

Managing Your Storage System
To change this Do this
The DNS server to use If your network includes a DNS server, and if the first port on the storage system
uses a specified IP address rather than obtaining one from the DHCP server, enter
the primary IP address in the Preferred DNS server text boxes and the secondary
IP address in the Alternate DNS server text boxes.
If your network does not include a DNS server, or if the first port obtains its IP
address from the DHCP server, leave these text boxes blank. If the first port obtains
its IP address from a DHCP server, the DNS server IP address is obtained from the
DHCP server as well.
The IP address(es) used by
the storage system
The DHCP settings If you want to use the storage system as a DHCP server, in the Port 1 group box,
The packet size for
transferring data
The FTP settings If you want to use the storage system as an FTP server, select the Enable FTP
In the Port 1 group box, either select Get an IP address automatically to obtain
the IP address from your DHCP server, or select Use this IP address and enter the
IP address and subnet mask in the subsequent text boxes.
If your storage system has two Ethernet ports and you are using the second one, do
the same in the Port 2 group box. This group box does not appear if your storage
system supports only one Ethernet port.
select Use this IP address and enter the IP address and subnet mask in the
subsequent text boxes.
Then select the Enable DHCP server check box, enter the beginning IP address in
the Starting IP address text boxes, and enter the last IP address in the Ending IP
address text boxes.
For example, if the Starting IP address is 192.168.0.103 and the Ending IP
address is 192.168.0.107, the storage system allocates the IP addresses
192.168.0.103, 192.168.0.104, 192.168.0.105, 192.168.0.106, and 192.168.0.107
to the first five computers that try to obtain their IP addresses from the storage
system. As soon as one of those computers shuts down or otherwise loses its
network connection, that IP address is assigned to the next computer that tries to
obtain its IP address from the storage system.
If you do not want to use the storage system as a DHCP server, clear the Enable
DHCP server check box. If Get an IP address automatically is selected, you
cannot use the storage system as a DHCP server.
Specify whether or not to transfer larger data packets between the storage system
and the computers in your network by selecting or clearing the Jumbo Frames
check box.
If you clear this option, the storage system uses 1514-byte packets. If you select this
option, you can specify a larger packet size from 1514 to 9014 bytes.
NOTE: Using jumbo frames allows you to transfer data more quickly. However, you
can select this option only if your network, Ethernet switch, and the network
interface cards (NICs) on the computers in your network support the
specified packet size. To determine whether you can use jumbo frames,
see the documentation for those components.
server check box. If you do not want to use the storage system as an FTP server,
clear this option.
For information about accessing the storage system using FTP, see “Accessing
Shared Folders using FTP” on page 85.
4. Click Apply. When the confirmation message displays, click OK.
Note: If you changed the IP address of the storage system, you must now access the
Manager using the new IP address.
70 Intel® Entry Storage System SS4000-E User Guide
Page 87

Reconfiguring Your Storage System Disks
The Disks page displays information about all the hard disks that are installed in your
storage system:
Managing Your Storage System
This page includes the following details:
• The disk configuration that is, whether the disks use a linear or RAID configuration,
and the RAID level.
• The overall status of the disks:
— Normal—All the disks are working properly.
— Degraded—One or more disks have failed but all the data is still available.
— Failed—The storage system has stopped working properly.
• The slot where each hard disk resides.
• The model number, serial number, and size of each hard disk.
• The current status of each disk:
— Linear or RAID n—The disk is working properly as part of the specified
configuration.
— New—The disk has been added to the storage system but is not currently being
used.
— Spare—The disk is acting as a spare disk for the RAID.
— Rebuilding—The disk is being rebuilt such as when a failed disk is replaced.
— N/A—The disk is detected but not available for use, such as when it has failed.
Intel® Entry Storage System SS4000-E User Guide 71
Page 88

Managing Your Storage System
• The hot-plug indicator:
— RED—Removing the disk causes the RAID to fail.
— YELLOW—Removing the disk causes RAID degradation.
— GREEN—Removing the disk does not affect the RAID.
Note: Whenever you add or remove a disk from the storage system, you must click
Refresh to update the hot-plug indicator.
For detailed information about RAIDs and how adding, removing, or swapping disks
affects the storage system, see “Levels of RAID” on page 169.
You can change the disk configuration or amount of storage space that is allocated for
shared folders at any time. However, for additional security, you must enter your
administrator password to be able to make these changes.
Expanding the Shared Storage
The disk space on your storage system is divided into two portions. One portion is for
shared folders; the other is for backups of your computer disks. The Storage Status view
on the Home page shows how much disk space is currently allocated for shared folders,
how much is used by backups, and how much is available for either.
You can expand the amount of disk space allocated for shared folders (as long as free disk
space is available), but you cannot reduce it without reconfiguring your disks and losing
all your data. Therefore, it is recommended that you allocate the least amount of space for
shared folders until all the computer disks that you plan to protect have been backed up to
the storage system.
To expand the amount of disk space allocated for shared folders:
1. In the navigation bar, click Shared Folders.
2. Select the shared storage you want to expand.
3. Click Expand. The Shared Folders page displays:
72 Intel® Entry Storage System SS4000-E User Guide
Page 89

Managing Your Storage System
4. Select the amount of disk space to allocate. You can choose to allocate the maximum
available space or specify any amount. It is recommended that you limit expansion to
20 GB at a time due to the extensive processing time required for large expansions. To
allocate additional space, select the Specify disk space button and specify 1 GB or
higher. You can specify only whole numbers.
Note: Allocated space is approximate. A small amount will be used by the file system. For
example, allocating 200 MB might display as 195 MB on the screen.
5. Click OK.
6. When the confirmation message displays, click OK.
Reconfiguring the Disks
Caution: Changing the disk configuration deletes all user information and all data on the disks.
Before you do this, have all the users disconnect from all shared folders, as described in
“Disconnecting from Shared Folders” on page 86, and remove protection from all disks
as described in “Removing Protection” on page 126.
When you are done, you must re-add all users as described in “Adding Users” on
page 41, create new shared folders as described in “Creating Shared Folders” on
page 35, and protect their disks as described in “Protecting Your Disks” on page 98.
To change the disk configuration:
1. In the navigation bar, click Advanced.
2. In the left pane, click Disks.
3. In the Administrator password text box, enter your password for logging in to the
Manager.
4. Click Reconfigure Disks.
5. When the confirmation message displays, click OK. The Disk Configuration page
displays. The options that appear on this page vary, depending on the number of hard
disks that are currently installed in the system.
Intel® Entry Storage System SS4000-E User Guide 73
Page 90

Managing Your Storage System
6. If you want to add or remove hard disks, do so one at a time and click Scan after each
action. If you are adding disks, wait until the disk LED is green before you click Scan.
To accept the default disk configuration, which provides the best level of data
protection available for the number of hard disks currently installed, click Next. By
default, a linear disk configuration is used for a single hard disk, RAID 1 is used for
two hard disks, and RAID 5 is used for three or four hard disks.
If you want to change the disk configuration, select the desired RAID level and then
click Next. For detailed inf ormation about the different RAID levels, see Appendix A,
"Levels of RAID," beginning on page 169.
7. The Disk Space Distribution page displays:
74 Intel® Entry Storage System SS4000-E User Guide
Page 91

Managing Your Storage System
8. Your storage system is divided into several partitions, one for shared folders, one for
home folders, and one for backups. The maximum amount of a shared folder space is
2 TB (1 TB=1024 GB). The minimum space requirement is 200 MB. You can allocate
more space now or accept the default minimum space allocation. To allocate
additional space, select the Specify disk space button and specify 1 GB (1024 MB) or
higher. To allocate the maximum available, select the Add maximum available disk
space" raid button. After setting the appropriate value, hit OK. The folder is created
and the Shared Folders screen will be displayed.
Note: Y ou can expand the amount of disk space allocated for shared or home folders
later as long as free disk space is available, but you cannot reduce it without
reconfiguring your disks and losing all your data.
If you plan to back up computer disks to your storage system, it is
recommended that you use the mi nimum amou nt of spa ce for shared or home
folders, back up all the computer disks that you plan to protect, and then
expand the space allocated for shared folders. This ensures that adequate
space is available for backups.
9. When the confirmation message displays, click OK. The screen displays the progress
of the process:
When this process is complete, the storage system restarts.
10. Close the browser window.
After the system has restarted, you can access the Manager and re-create your users
and shared folders as described in “Adding Users” on page 32 and “Creating Shared
Folders” on page 35.
Intel® Entry Storage System SS4000-E User Guide 75
Page 92
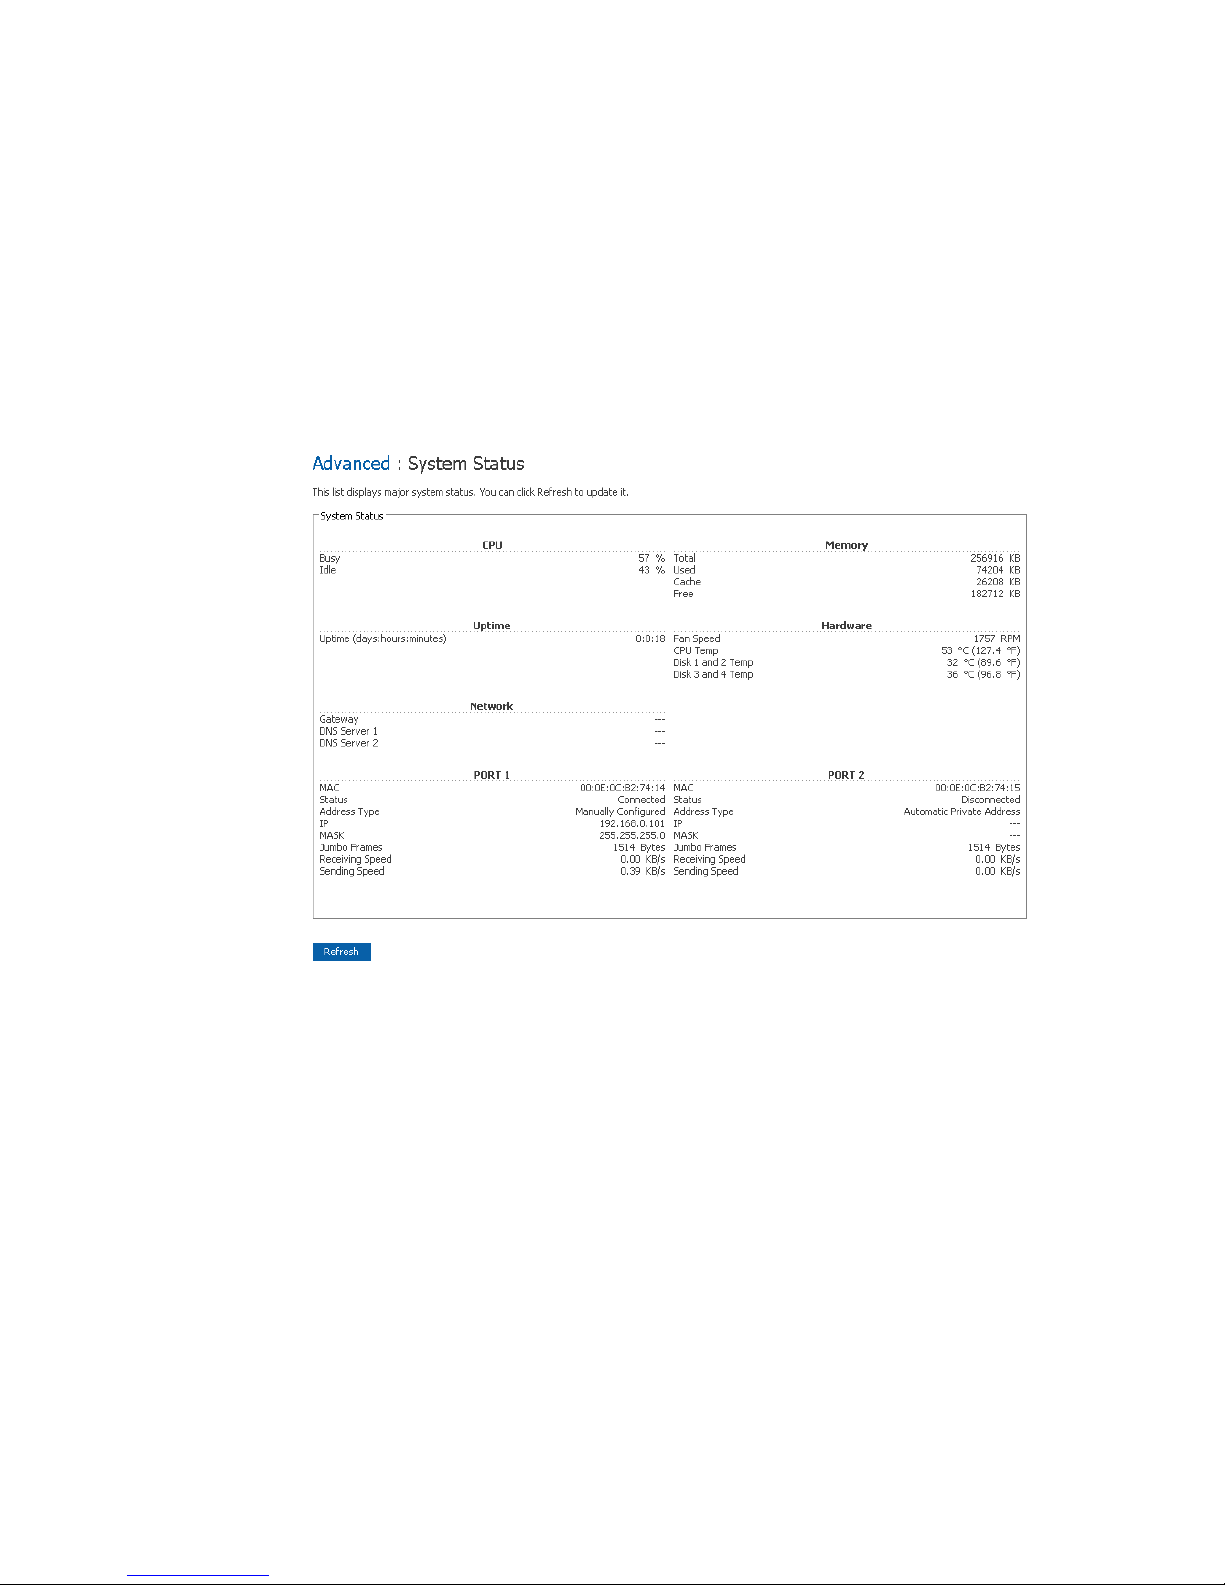
Managing Your Storage System
Viewing System Status Information
When you click Advanced in the navigation bar and click System Status in the left pane,
you can view many of the operational parameters of your storage system, including CPU
usage, memory usage, the amount of time that the storage system has been running, the
current fan speed, the temperatures of the CPU and disks, the IP address of the gateway,
the IP address(es) of the DNS servers in your network, the network settings of your ports,
the MAC addresses of your ports, and the speed at which data is being sent and received.
To update the information on this page, click Refresh.
Note: The fan speed changes depending on the temperatur e of the unit. If the temperature of the
CPU reaches or exceeds 85º C (185º F), or if the temperature of any of the disks reaches
or exceeds 55º C (131º F), the storage system shuts down automatically.
76 Intel® Entry Storage System SS4000-E User Guide
Page 93

Logging Out of the Manager
When you have finished using the Manager, you should log out to ensure that
unauthorized individuals do not make changes to the storage system.
To log out:
1. In the navigation bar, click Log Out.
2. When the confirmation message displays, click OK. The Log Out page displays:
3. To log back in to the Manager, click Log In.
Shutting Down the Storage System
Managing Your Storage System
Press the power button on the unit or shut the system down remotely using the Manager.
To shut down using the power button, press and hold the po wer button for approximately
five seconds until the System Status LED starts flashing.
Caution: Do not disconnect the power cord while the system is powering down.
The storage system shuts off after a short shutdown period. To ensure that you do not shut
down the system accidentally, you must enter your administrator password.
Caution: If you shut down the storage system, users can no longer access the shared folders on the
storage system. If users have shared files open, data might be lost. Have all users save
their changes and close any open files before you shut down the system.
Shutting down the storage system when a backup is occurring does not have any adverse
effect; the backup resumes automatically when the storage server is powered on again.
However, shutting down the storage system when a disk is being recover ed can potential ly
corrupt the user’s operating system. If this happens, the user needs to recover the system
disk using the recovery CD or, if the system disk was not protected, re-install the operating
system.
Intel® Entry Storage System SS4000-E User Guide 77
Page 94

Managing Your Storage System
To shut down the storage system using the Manager:
1. In the navigation bar, click Advanced.
2. In the left pane, click Shut Down.
3. In the Administrator password text box, enter the password for logging in to the
Manager.
4. Click Shut Down.
A message displays, indicating that the system is shutting down. Once the storage
system shuts down, if you refresh the browser window , it is blank. If you subsequently
try to access the Manager, an error message displays, since the storage system is no
longer running.
78 Intel® Entry Storage System SS4000-E User Guide
Page 95

Working with Shared Folders
4 Working with Shared Folders
Accessing Shared Folders
Once you have added users and created shared folders, as described in “Adding Users” on
page 32 and “Creating Shared Folders” on page 35, the users need to perform some simple
steps to be able to access those folders. The procedure for doing this varies, depending on
the user’s operating system. Each user can access only those shared folders that the user is
authorized to access.
Notes:
• If the storage system uses Active Directory authentication mode, and the clocks of the
storage system and the Active Directory server differ by more than five minutes,
errors will occur when users try to access the shared folders. It is recommended that
you configure both the storage system and the Active Directory server to set their
times from a common Network Time Protocol (NTP) server. To configure this on the
storage system, see “Changing the System Settings” on page 66.
• If you change the IP address of the storage system, users who accessed the shared
folders using the previous IP address is disconnected and must repeat the procedures
described here using the new IP address.
Microsoft Windows* Users
If you are using Microsoft Windows*, you have two options for accessing shared folders:
you can use My Computer/Windows Explorer to map a drive letter to the shared folder, or
you can install the Console and use that utility to map a drive letter to the shared folder.
The Console must be installed on the same subnet as the storage system. It is not
necessary to remember the name of the storage server and shared folders because they are
displayed automatically.
Intel® Entry Storage System SS4000-E User Guide 79
Page 96

Working with Shared Folders
Using My Computer/Windows Explorer
To access a shared folder using My Computer/Windows Explorer:
1. Open My Computer/Windows Explorer.
2. From the Tools menu, click Map Network Drive. The Map Network Drive dialog
box appears:
The appearance of this dialog box varies by operating system.
3. In the Drive list, select the drive letter that you want to assign to the shared folder.
4. In the Folder text box, enter the following:
\\storage_system\shared_folder
where storage_system is the name or IP address of the storage system and
shared_folder is the name of the shared folder. For example, if your storage system’s
IP address is 192.168.0.101 and the shared folder name is Photos, you would enter the
following:
\\192.168.0.101\Photos
Note: You can use the storage system name only if your computer is in the same
subnet as the storage system, if you added the storage system’s IP address and
name to your local hosts file, or if you manually registered the name with a
DNS server in your network.
Alternatively, you can click Browse and select the shared folder from the Microsoft
Windows Network.
5. To automatically connect to this shared folder each time you log on to Windows,
select Reconnect at logon.
If you clear this option, you must repeat this procedure each time you want to access
the shared folder.
6. Click Finish.
80 Intel® Entry Storage System SS4000-E User Guide
Page 97

7. If prompted, enter your user name and password for accessing this shared folder, and
then click OK.
Note: If the user name and password for accessing the shared folder ar e the same as
If the storage system uses local authentication mode and the guest user has access to
this shared folder, you can use guest as both the user name and password.
You can now access the shared folder from My Computer/Windows Explorer.
Using the Console
To access a shared folder using the Console:
1. Install the Console as described in “Installing the Console” on page 17.
2. Click Start > Programs > Storag e System Co nsole.
Working with Shared Folders
your Windows user name and password, you are not prompted to provide a
user name and password to access the shared folder.
In addition, once you pr ovide your user name and passwor d for accessing one
shared folder, you are not prompted to provide it again when you access other
shared folders to which you have access rights.
The Console application window appears:
As soon as you start the Console, it automatically scans the network for storage
systems. This might take a few minutes. As soon as the scan is complete, the left pane
displays a tree view of all the storage systems it found:
Intel® Entry Storage System SS4000-E User Guide 81
Page 98
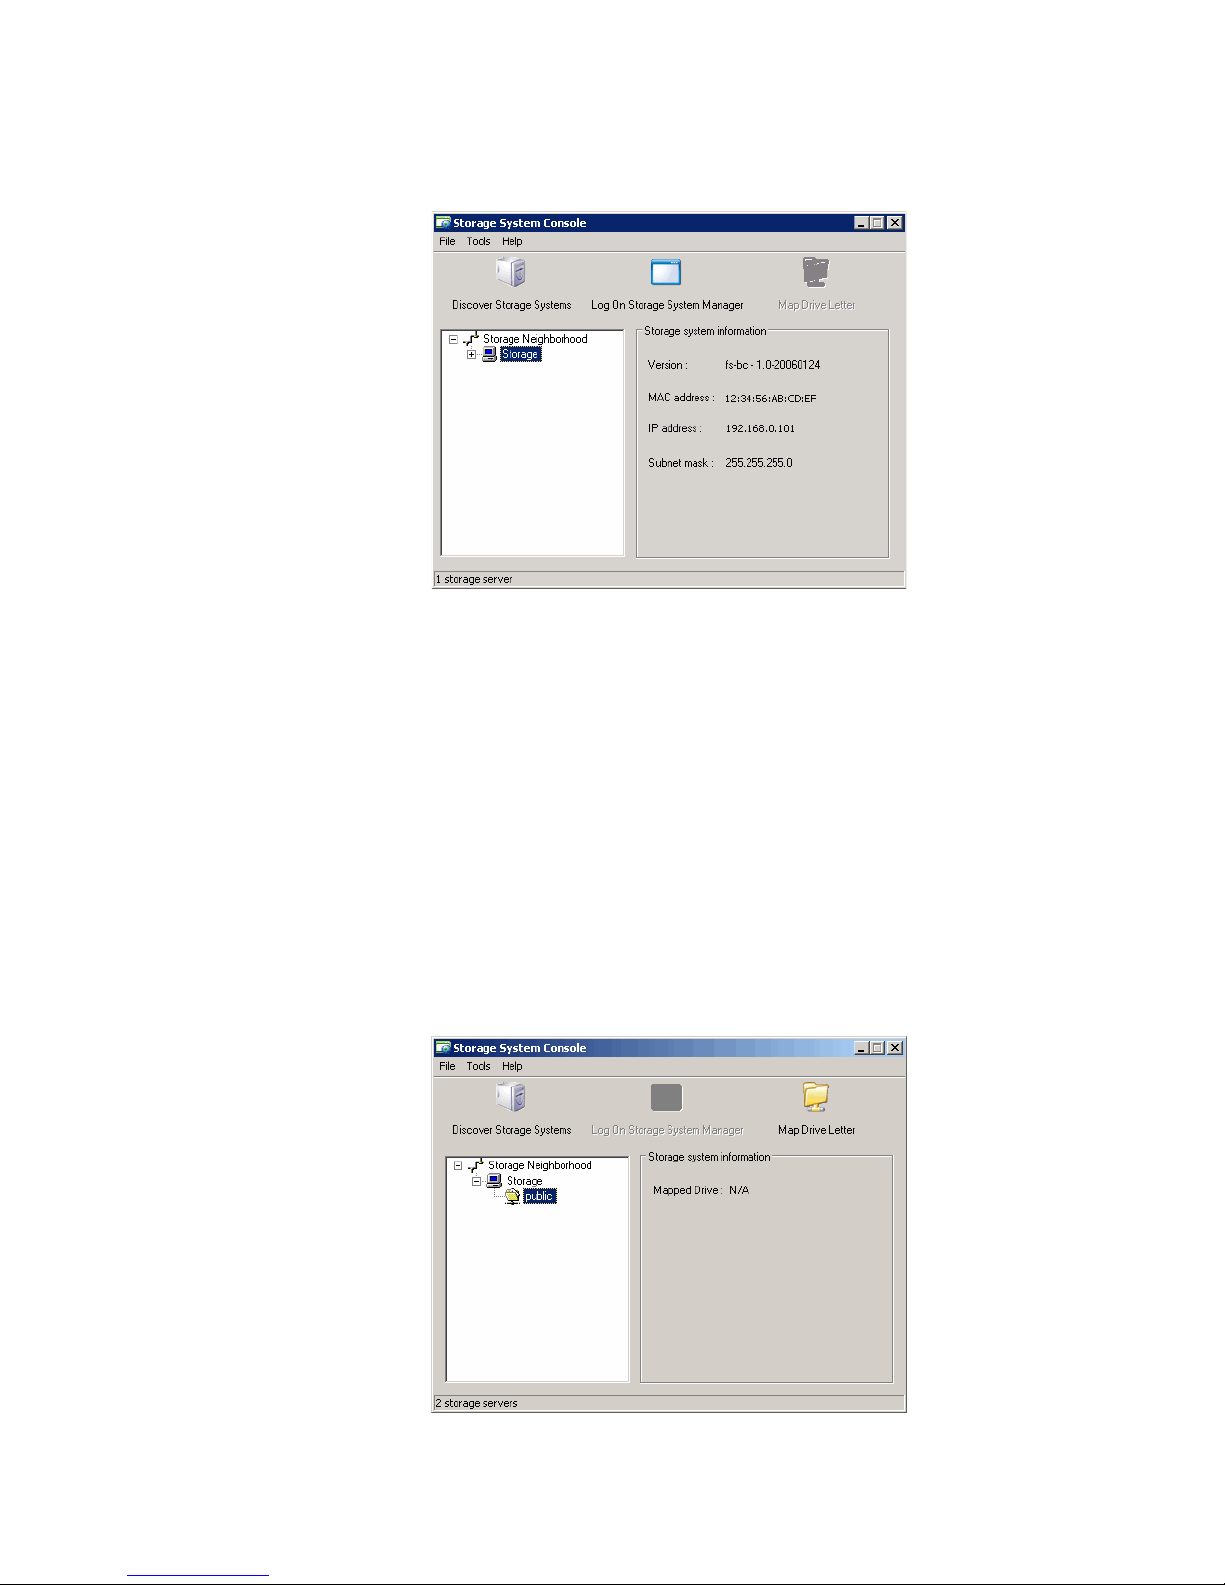
Working with Shared Folders
Each storage system has two ports for connecting to the network. If your storage
system uses both ports, two items appear in the tree in the left pane, each using the
same name. Y ou can identify the IP address used by each port by clicking each item in
the tree and observing the IP address area in the right pane.
Note: If you connect a storage system to the network after the Console has already
scanned it, or if you change the IP address of the storage system, you must
click Discover S torage Systems to scan the network again and update the tree
in the left pane.
3. In the left pane, double-click the name of the storage system that contains the shared
folders that you want to access.
If your storage system uses both available ports to connect to the network, you can
double-click either name.
The storage system name expands to display all the available shared folders.
82 Intel® Entry Storage System SS4000-E User Guide
Page 99

Notes:
Working with Shared Folders
• All shared folders appear in the left pane. However, you can access only the ones that
you are authorized to use.
• If your storage system uses Active Directory authentication mode, only the public
folder appears in the left pane.
4. In the left pane, select the name of the shared folder that you want to access and then
click Map Drive Letter.
The Map Network Drive dialog box appears with the name of the folder installed:
The appearance of this dialog box varies by operating system.
5. In the Drive list, select the drive letter that you want to assign to the shared folder.
6. To automatically connect to this shared folder each time you log on to Windows,
select Reconnect at logon.
If you clear this option, you must repeat this procedure each time you want to access
the shared folder.
7. Click Finish.
8. If prompted, enter your user name and password for accessing this shared folder, and
then click OK.
Note: If the user name and password for accessing the shared folder ar e the same as
your Windows user name and password, you are not prompted to provide a
user name and password to access the shared folder.
In addition, once you pr ovide your user name and passwor d for accessing one
shared folder, you are not prompted to provide it again when you access other
shared folders to which you have access rights.
If the guest user has access to this shared folder, you can use guest as both the user
name and password.
You can now access the shared folder from My Computer/Windows Explorer.
Intel® Entry Storage System SS4000-E User Guide 83
Page 100

Working with Shared Folders
Linux* Users
To access a shared folder on a computer running Linux:
1. Create a directory by entering the following command at the command prompt:
mkdir /my_directory
where my_directory is the name of the directory. Include the full path to the
directory, such as, /mnt/my_directory.
2. If desired, display a list of all the available shared folders by entering the following
command:
showmount -e storage_system
where storage_system is the IP address of the storage system.
3. Mount the desired shared folder by entering the following command:
mount storage_system:/nas/NASDisk-00002/folder /mnt/my_directory
where storage_system is the IP address of the storage system, folder is the name of
the shared folder, and my_directory is the name of the directory that you created in
step 1.
If you included a full path when creating the directory, be sure to include the full path
with this command, for example:
mount storage_system:/nas/NASDisk-00002/folder /mnt/my_directory
4. Repeat steps 1 through 3 for each shared folder that you want to access.
Mac Users
Mac OS X
The procedure for accessing a shared folder on a Mac varies, depending on whether the
Mac is running OS X or an older operating system. Macs running OS X can access the
same shared CIFS folders as Windows users. Macs running older operating systems can
access the same shared NFS folders as Linux users.
To access a shared folder on a Mac running OS X:
1. From the Go menu, click Connect to Server.
2. In the Address text box, enter the following and click Connect:
smb://storage_system
where storage_system is either the name or IP address of the storage system
Note: You can use the storage system name only if your computer is in the same
subnet as the storage system, if you added the storage system’s IP address and
name to your local hosts file, or if you manually registered the name with a
DNS server in your network.
3. In the Select a share list, select the name of the shared folder that you want to access
and then click OK.
84 Intel® Entry Storage System SS4000-E User Guide
 Loading...