

Page 1

SBC-455
Half-size 486 CPU Card with
Flat Panel/CRT SVGA Interface
Page 2

FCC STATEMENT
THIS DEVICE COMPLIES WITH PART 15 FCC RULES.
OPERATION IS SUBJECT TO THE FOLLOWING TWO
CONDITIONS: (1) THIS DEVICE MAY NOT CAUSE
HARMFUL INTERFERENCE. (2) THIS DEVICE MUST
ACCEPT ANY INTERFERENCE RECEIVED INCLUDING
INTERFERENCE THAT MAY CAUSE UNDESIRED OPERATION.
THIS EQUIPMENT HAS BEEN TESTED AND FOUND
TO COMPLY WITH THE LIMITS FOR A CLASS "A"
DIGITAL DEVICE, PURSUANT TO PART 15 OF THE
FCC RULES. THESE LIMITS ARE DESIGNED TO
PROVIDE REASONABLE PROTECTION AGAINTST
HARMFUL INTERFERENCE WHEN THE EQUIPMENT IS
OPERATED IN A COMMERCIAL ENVIRONMENT.
THIS EQUIPMENT GENERATES, USES, AND CAN
RADIATE RADIO FREQENCY ENERGY AND , IF NOT
INSTATLLED AND USED IN ACCORDANCE WITH THE
INSTRUCTION MANUAL, MAY CAUSE HARMFUL
INTERFERENCE TO RADIO COMMUNICATIONS.
OPERATION OF THIS EQUIPMENT IN A RESIDENTIAL AREA IS LIKELY TO CAUSE HARMFUL INTERFERENCE IN WHICH CASE THE USER WILL BE
REQUIRED TO CORRECT THE INTERFERENCE AT HIS
OWN EXPENSE.
Page 3

Copyright Notice
This document is copyrighted, 1995, 1996, by AAEON Technology Inc. All rights are reserved. AAEON Technology Inc. reserves
the right to make improvements to the products described in this
manual at any time without notice.
No part of this manual may be reproduced, copied, translated or
transmitted in any form or by any means without the prior written
permission of AAEON Technology Inc. Information provided in
this manual is intended to be accurate and reliable. However,
AAEON Technology Inc. assumes no responsibility for its use, nor
for any infringements upon the rights of third parties which may
result from its use.
Acknowledgements
ALI is a trademark of Acer Laboratories, Inc.
AMD is a trademark of Advanced Micro Devices, Inc.
AMI is a trademark of American Megatrends, Inc.
AutoCAD and AutoShade are trademarks of Autodesk, Inc.
CHIPS Logotype is a registered trademark; Chips 65545 is a
trademark of Chip and Technologies, Inc.
Cyrix is a trademark of Cyrix Corporation.
IBM, PC/AT, PS/2 and VGA are trademarks of International
Business Machines Corporation.
Intel and Pentium are trademarks of Intel Corporation.
Lotus, 1-2-3 an Symphony are trademarks of Lotus Development
Corp.
Microsoft Windows®, MS-DOS, Corporation Windows and
Microsoft are registered trademarks of Microsoft Corp.
SMC is a trademark of Standard Microsystems Corporation.
TurboDLD Classic is a trademark of Panacea Inc.
UMC is a trademark of United Microelectronics Corporation.
WordPerfect is a trademark of WordPerfect Corporation.
VESA® is a registered trademark of Video Electronics Standards
Association.
All other product names or trademarks are properties of their
respective owners.
Part No. 2006455023 SBC-455 B1 4th Edition
Printed in Taiwan July 1997
Page 4

Packing list
Before you begin installing your card, please make sure that the
following materials have been shipped:
• 1 SBC-455 CPU card
• 1 6-pin mini-DIN dual outlet adapter for keyboard and PS/2
mouse
• 1 Hard disk drive (IDE) interface cable (40 pin)
• 1 Floppy disk drive interface cable (34 pin)
• 1 Parallel port adapter (26 pin) and COM2 adapter (9 pin) kit
• 5 Utility disks with CHIPS 65545/48 utility programs and drivers
• PC/104 Expansion connector converter (pin headers)
• PC/104 Module mounting supports
If any of these items are missing or damaged, contact your distributor or sales representative immediately.
Page 5

Contents
Chapter 1: General Information ..................................................1
Introduction ........................................................................... 2
Features.................................................................................. 3
Specifications ......................................................................... 4
Board layout........................................................................... 6
Card dimensions .................................................................... 7
Chapter 2: Installation ..................................................................9
Jumpers and connectors .................................................... 1 0
Locating jumpers and connectors .................................... 11
Setting jumpers ................................................................... 1 2
Safety precautions ............................................................... 1 3
Installing the CPU ............................................................... 1 3
Removing a CPU ....................................................................13
Installing a CPU ......................................................................14
CPU type select (JP1, JP3, JP4) ............................................ 15
CPU Vcc select (JP2) ............................................................ 16
CPU clock select (JP9, JP10).................................................16
Installing DRAM (SIMMs) ............................................... 17
Installing SIMMs .....................................................................17
Removing SIMMs ...................................................................17
IDE hard drive connections (IDE) ................................... 1 8
Connecting the hard drive .......................................................1 8
IDE LED (IDE LED) ............................................................. 19
Floppy drive connections (FLOPPY DISK) .................... 2 0
Connecting the floppy drive.....................................................20
Parallel port (PRINTER) ................................................... 2 1
Installing the retaining bracket.................................................21
Parallel port DRQ and DACK (JP11) ....................................22
Power supply connections (POWER CON) .................... 2 2
Power supply connector..........................................................22
Page 6

Display connections (VGA, LCD) ..................................... 2 3
LCD signal select (JP5, JP7) ............................................ 2 4
Keyboard and PS/2 KB/ mouse connections
(KB CON, KB/PS2 MOUSE) ........................................... 2 5
Serial ports ........................................................................... 2 6
RS-232 connections (COM A, COM B) ................................26
Serial ports IRQ select (JP11) .................................................27
Watchdog timer setup......................................................... 2 8
Watchdog timer time-out signal select (JP6)...........................28
W atchdog timer programming .................................................28
External switches and LEDs ............................................. 3 0
Power LED and keylock (KEY LOCK) ................................30
External speaker (EXT SPK) ................................................. 30
Reset switch (RESET SW).....................................................31
Turbo LED (TURBO LED)....................................................31
SMI (System Management Interrupt) switch (SMI SW) .......32
Turbo Switch (TURBO SW) ..................................................32
Clear CMOS (JP12) ................................................................32
Flash BIOS Protect (JP8) .......................................................33
Flash BIOS Write-enable Voltage (JP13) ...............................33
Chapter 3: AMI WinBIOS Setup .................................................35
General information ............................................................ 36
Starting WinBIOS setup ..........................................................3 6
WinBIOS main menu ..............................................................3 6
Using a mouse with WinBIOS setup.......................................37
Using the keyboard with WinBIOS setup ...............................37
Setup ..................................................................................... 38
Standard Setup ........................................................................38
Advanced Setup ......................................................................40
Chipset Setup ..........................................................................46
Power Management Setup......................................................48
PCI/PnP Setup ........................................................................ 49
Peripheral Setup ......................................................................53
Utility..................................................................................... 56
Page 7

Security ................................................................................. 57
Setting a Password..................................................................58
Anti-virus................................................................................. 59
Default................................................................................... 60
Original ....................................................................................60
Optimal .................................................................................... 60
Fail-Safe ..................................................................................60
Exiting WinBIOS ................................................................ 6 1
Chpater 4: Flat Panel/CRT Controller Display Drivers and
Utilities ...............................................................63
Software drivers .................................................................. 6 4
Hardware configuration ..........................................................6 4
Necessary prerequisites .......................................................... 65
Before you begin .....................................................................65
WindowsÔ 95 ......................................................................... 66
WindowsÔ 3.1 . .. .. .. .. .. .. .. .... .. .. .. .. .. .... .. .. .. .. .. .. .... .. .. .. .. .. .... .. .. .. .. . 67
DOS ........................................................................................68
OS/2 ........................................................................................69
WindowsÔ NT3.51 ................................................................ 72
Windows NT4.0 ......................................................................73
Software utilities .................................................................. 7 4
The CHIPSDSP utility program..............................................74
The CHIPSCPL utility program..............................................76
Appendix A: Watchdog T imer Demo Program....... 79
Appendix B: Installing PC/104 Modules ................. 83
Appendix C: LCD Display BIOS Configuration..... 87
Page 8

Page 9

General
Information
This chapter provides background
information for the SBC-455.
Sections include:
• Card specifications
• Board layout
1
CHAPTER
Chapter 1 General Information 1
Page 10

Introduction
The SBC-455 is an all-in-one single board 486 computer with an onboard flat panel/CRT SVGA controller. It packs all the functions of
an industrial computer and its display capabilities onto a single, halfsize card. This means the SBC-455 is your absolute best solution for
embedded applications.
The on-board PCI-bus, flat panel/CRT SVGA controller uses the
CHIPS 65548 chipset with up to 1 MB of video memory. This chipset,
used with the local PCI-bus, enables 32-bit graphic throughput at up
to 33 MHz. Excellent for display-intensive applications, it supports
various LCD types including TFT, STN, B/W, and EL.
Another feature of the SBC-455 is the inclusion of a high speed, local
bus IDE controller. This controller supports (through ATA PIO) mode
3 and mode 4 hard disks, enabling data transfer rates in excess of 11
MB/second. Up to four IDE devices can be connected, including large
hard disks, CD-ROM drives, tape backup drives, or other IDE
devices. The built-in, enhanced IDE controller provides a 4-layer, 32bit, posted write buffer and a 4-layer, 32-bit read-prefetch buffer to
accomplish IDE boost performance improvements.
On-board features include two high speed RS-232 serial ports with
16C550 UARTs, one bidirectional SPP/EPP/ECP parallel port and a
floppy drive controller. In addition to the 486's 16 KB of on-chip
cache memory, the SBC-455 includes an extra 128 KB of second level
on-board cache memory.
If program execution is halted by a program bug or EMI, the board's
16-stage watchdog timer can automatically reset the CPU or generate
an interrupt. This ensures reliability in unmanned or standalone
systems.
The SBC-455 supports 5 V EDO DRAM. It also provides two 72-pin
SIMM (Single In-line Memory Module) sockets for its on-board
system DRAM. These sockets give you the flexibility to configure
your system from 1 MB to 64 MB of DRAM using the most economical combination of SIMMs.
2 SBC-455 User's Manual
Page 11

Features
• Accepts Intel, AMD, Cyrix or other compatible 486 processors, including
the P24T Pentium OverDrive
• Half-size PC/AT-compatible ISA-bus CPU card
• AMI Flash BIOS
• Daughterboard available for various flat panel displays
• On-board 32-bit PCI-bus, flat panel/CRT SVGA controller
• Built-in PCI Enhanced IDE controller, supports two IDE devices (large
hard disks, CD-ROM, tape backup, etc.)
• Up to 64 MB on-board DRAM
• Supports 5 V EDO DRAM
• Two high speed serial RS-232 ports (16C550 UARTs with 16-byte FIFO).
IRQ 3, 4 or IRQ 10, 11 can be individually selected
• One enhanced bidirectional parallel port. Supports SPP/EPP/ECP
• Watchdog timer (15 steps, 2 seconds per step)
• On-board keyboard and PS/2 mouse connector
• Connectors for PC/104 module expansion
• "Green" function supports power management
• Clear CMOS function
Chapter 1 General Information 3
Page 12

Specifications
CPU: 80486SX/DX/DX2/DX4 25/33/40/50/66/75/100/120 MHz, 5x86-100/120/
133 or Pentium OverDrive processor
Bus interface: ISA bus
Data bus: 32-bit
Processing ability: 32-bit
Chipset: ALI/1489/1487
RAM memory: 1 MB to 64 MB. Uses two 72-pin SIMM sockets
L2 Cache memory size: 128/256/512 KB 2nd level cache memory
Shadow RAM memory: Supports system and video BIOS shadow memory
Flat panel/CRT SVGA controller: SVGA, PCI-bus, CHIPS 65548 chipset with
512 KB standard video memory , upgradable to 1 MB. Provides 32-bit graphic
throughput. Features the ability to control most TFT , STN, B/W, EL flat panel
displays as well as standard CR T . Supports resolutions up to 1024 x 768 in 256
colors. Daughterboards available for various flat panel displays.
Enhanced IDE hard disk drive interface: Fast PCI bus. Supports up to two
Enhanced IDE (ATA-2) large hard disk drives or other Enhanced IDE
devices. Supports mode 3 and mode 4 hard disks (data transfer rate 11.1 MB/
sec. minimum)
Floppy disk drive interface: Supports up to two floppy disk drives, 5 1/
4"¼" (360 KB and 1.2 MB) and/or 3 1/2" (720 KB, 1.44 and 2.88 MB)
Bidirectional parallel port: Configurable to LPT1, LPT2, LPT3 or disabled
Supports SPP/EPP/ECP standards
Serial ports: Two serial RS-232 ports, uses 16C550 UARTs with 16-byte
FIFO buffer. Supports speeds up to 115 Kbps. Ports can be individually
configured from COM1 to COM4 or disabled.
BIOS: AMI Flash WIN BIOS
Watchdog timer: Can generate a system reset or IRQ15. The time interval is
software selectable from 2 to 32 seconds (15 steps, 2 seconds per step).
PC/104: 104-pin connector for a 16-bit bus
DMA channels: 7
4 SBC-455 User's Manual
Page 13

Interrupt levels: 15
Keyboard/ PS/2 mouse connector: A 6-pin mini DIN keyboard connector is
located on the mounting bracket for easy access to a keyboard and a PS/2
mouse
Bus speed: 8 MHz
System performance: 325 MHz in 80486 DX4-100 (Landmark V2.0)
Max. power requirements: +5 V @ 2.5 A
Power supply voltage: +5 V (4.75 V to 5.25 V), +12 V, -12 V; for DX4-
100/120 and P24T CPUs, a cooler is necessary
Operating temperature: 32 to 140°F (0 to 60°C)
Board size: 7.3" (L) x 4.8" (W) (185 mm x 122 mm)
Board weight: 0.6 lbs (0.26 Kg)
Chapter 1 General Information 5
Page 14
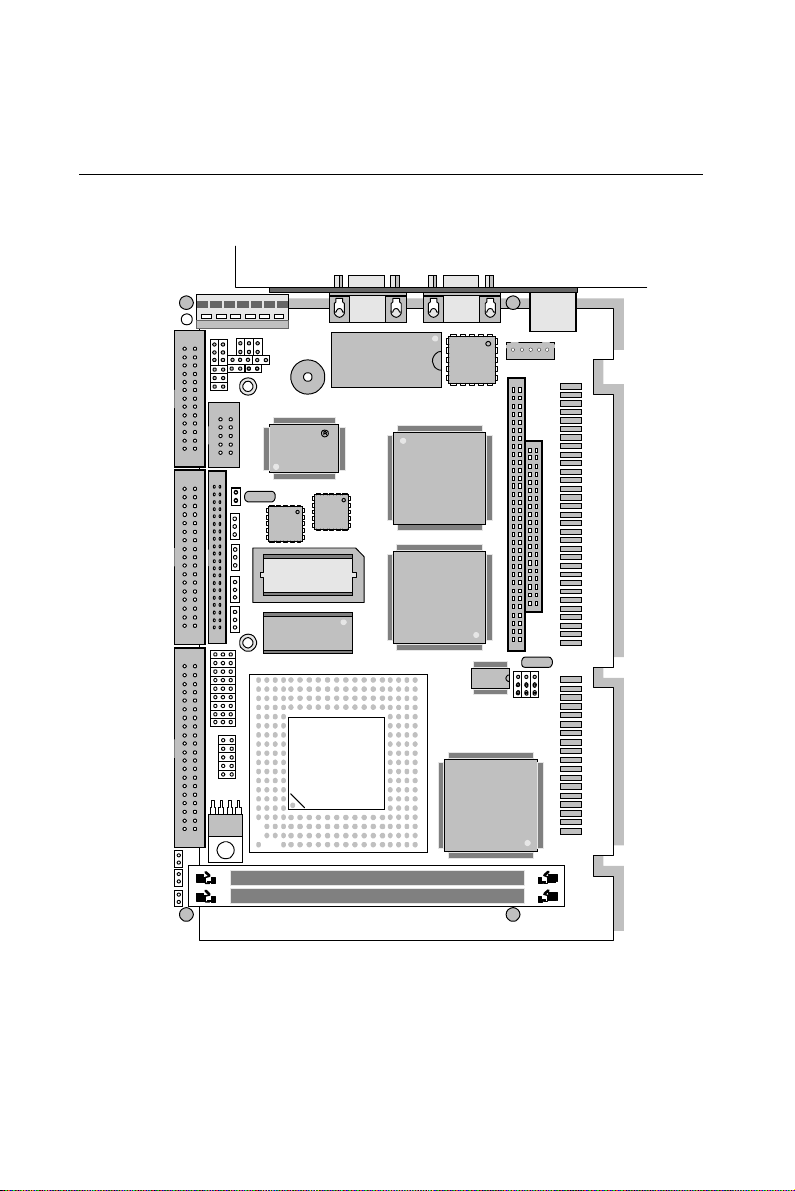
Board layout
M48T86PCI
ST
MEGA-KB
SMC
FDC37C665
24MHz
16V8
AMI BIOS
TC5142560BJ-70
ALI
M1487
FS65545 B2
CHIPS
14.318
SC464
IMI
M1489
ALI
SBC-455 486SX/DX/DX2/DX4 CPU CARD WITH CACHE REV. B1
6 SBC-455 User's Manual
Page 15
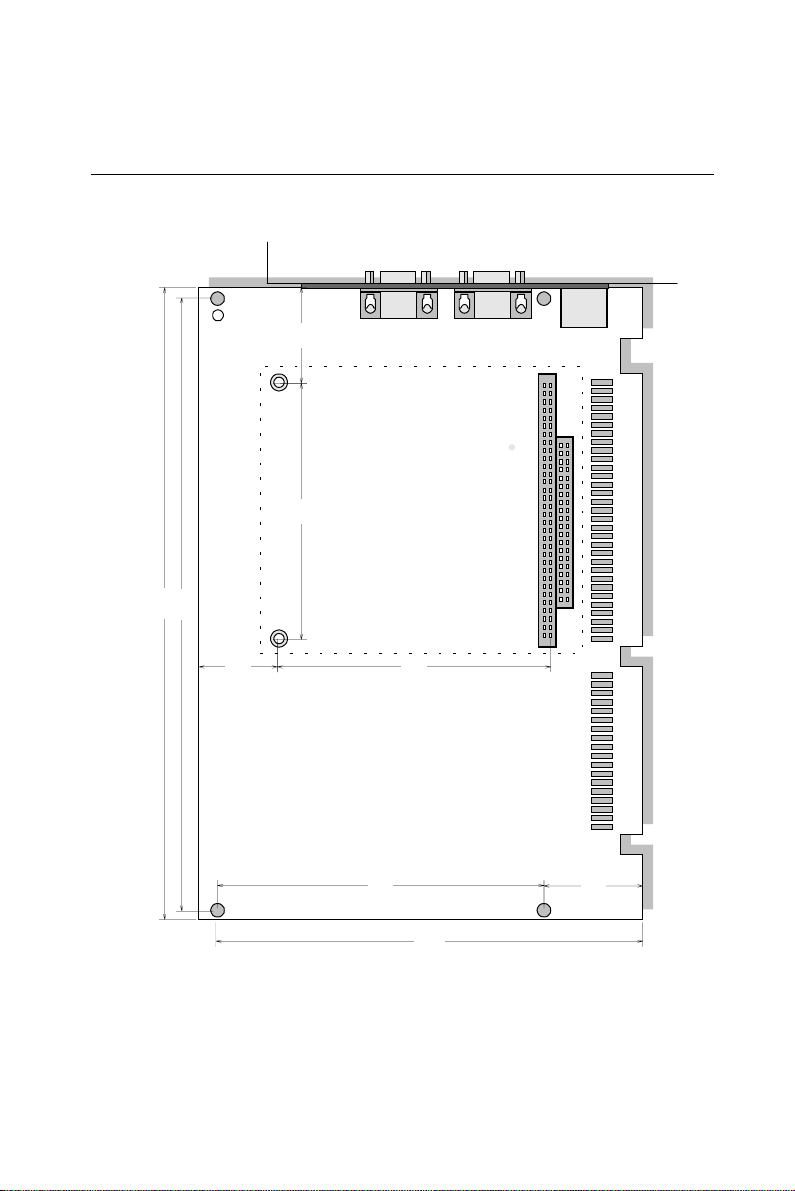
Card dimensions
73.66 26.00
185.00
178.00
19.00
98.50
80.65
19.50
SBC-455 486SX/DX/DX2/DX4 CPU CARD WITH CACHE REV. B1
122.00
Chapter 1 General Information 7
Page 16

8 SBC-455 User's Manual
Page 17

CHAPTER
2
Installation
This chapter explains set up procedures
for the SBC-455 hardware, including
instructions on setting jumpers and
connecting peripherals, switches and
indicators. Be sure to read all safety
precautions before you begin the installation procedure.
Chapter 2 Installation 9
Page 18

Jumpers and connectors
Connectors on the board link it to external devices such as hard
disk drives, a keyboard, or floppy drives. In addition, the board has
a number of jumpers that allow you to configure your system to
suit your application.
The table below lists the function of each of the board jumpers and
connectors:
Jumpers and connectors
Label Function
JP2 CPU voltage select
JP1,3,4 CPU type select
JP11 COM port IRQ and Parallel port DRQ/DACK
select
JP5 LCD clock signal select
JP7 LCD enabled signal select
JP6 Watchdog out select
JP9, 10 CPU clock select
JP12 Clear CMOS
JP8 Flash BIOS Protect
JP13 Flash BIOS Write-enable Voltage
Primary IDE Enhanced IDE connector
Floppy disk FDD connector
Printer Parallel port connector
LCD LCD panel connector
COM B Serial port 2
RESET SW Reset Switch
EXT SPK Ext. speaker
KEY LOCK Power LED and KB lock
TURBO SW Turbo Switch
SMI SW SMI Switch
POWER CON Power connector
IDE LED IDE LED
TURBO LED Turbo LED
COM A Serial port 1
VGA VGA connector
KB CON External keyboard connector
KB/PS2 MOUSE Keyboard or PS/2 mouse connector
J1,2 PC/104 module connector
SIMM1,2 DRAM module socket
10 SBC-455 User's Manual
Page 19
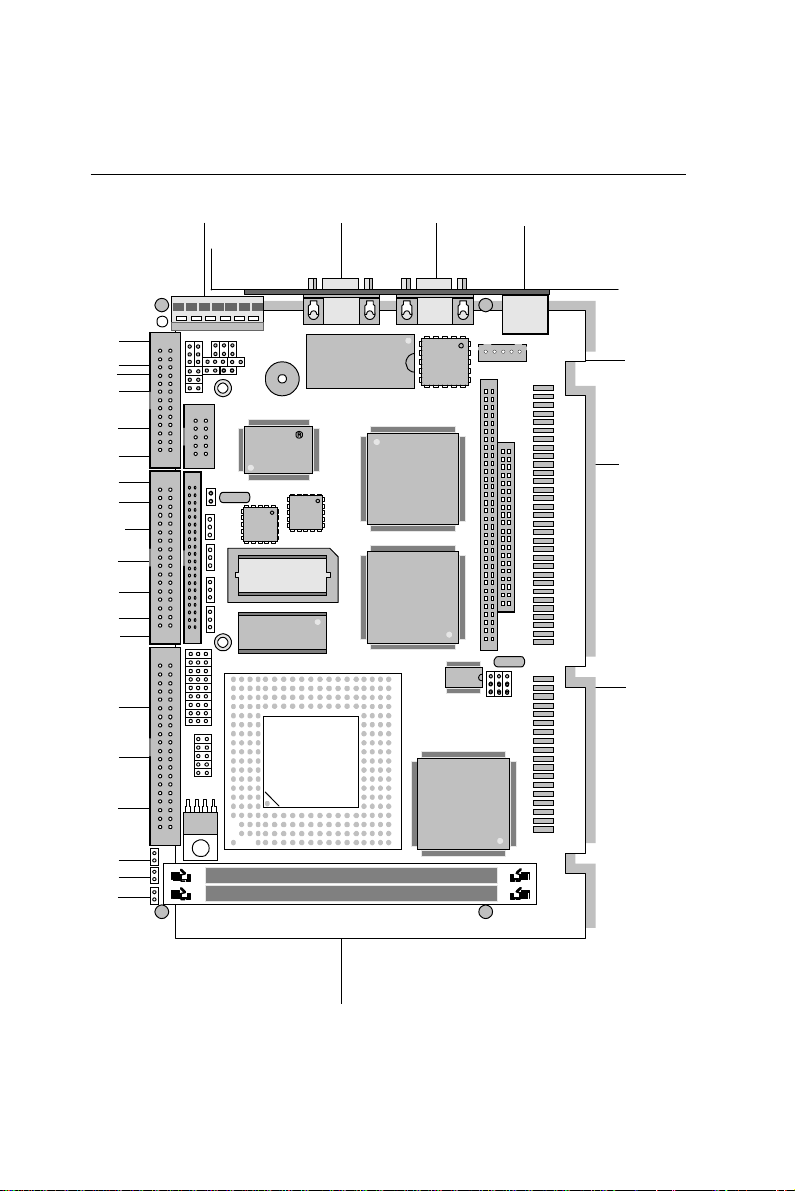
Locating jumpers and connectors
SMI SW
TURBO SW
JP12
KEY LOCK
EXT SPK
JP11
PRINTER
COM2
LCD
JP8
JP7
JP13
JP6
FLOPPY DISK
JP5
CPU TYPE
CPU Vcc
POWER CON
SMC
FDC37C665
24MHz
16V8
COM1
AMI BIOS
TC5142560BJ-70
VGA
M48T86PCI
ST
MEGA-KB
ALI
M1487
FS65545 B2
CHIPS
SC464
IMI
KB/PS2
MOUSE
14.318
KB CON
PC/104
MODULE
CONNECTOR
JP 9, 10
Primary IDE
IDE LED
TURBO LED
RESET SW
SIMM SOCKETS
M1489
ALI
SBC-455 486SX/DX/DX2/DX4 CPU CARD WITH CACHE REV. B1
Chapter 2 Installation 11
Page 20
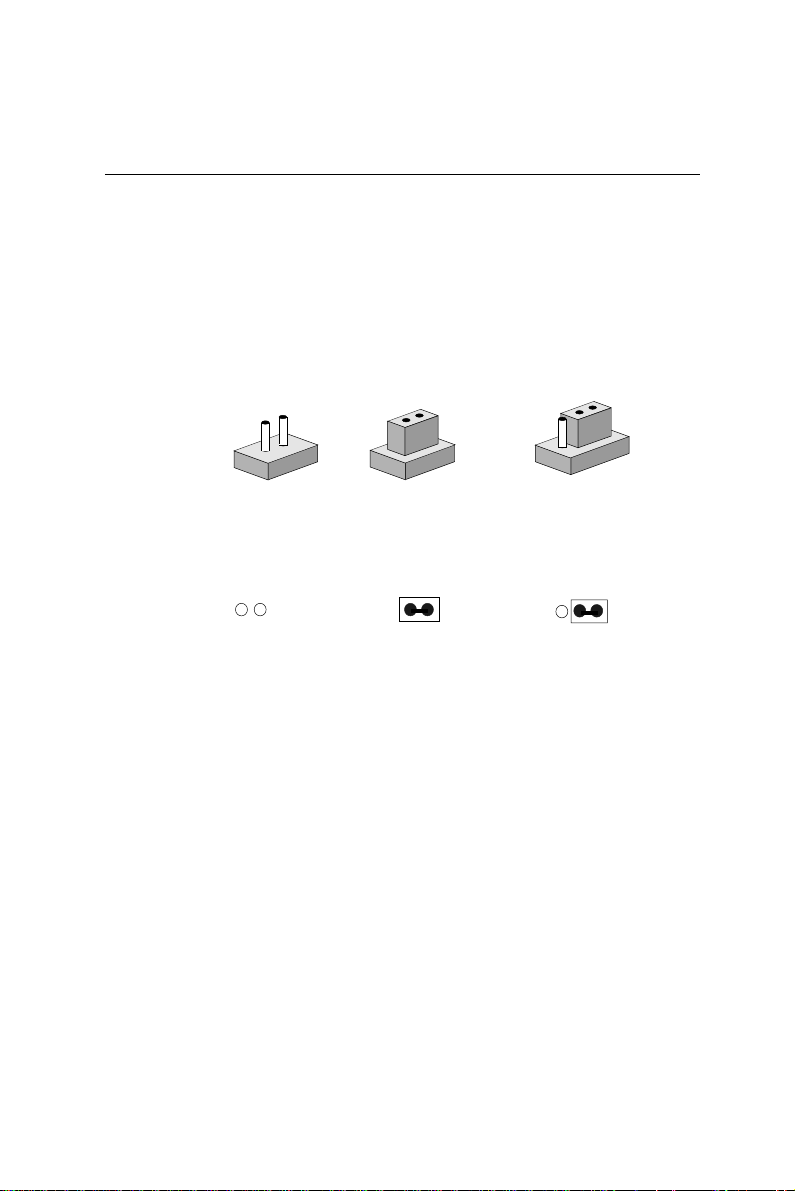
Setting jumpers
You configure your card to match the needs of your application by
setting jumpers. A jumper is the simplest kind of electric switch. It
consists of two metal pins and a small metal clip (often protected
by a plastic cover) that slides over the pins to connect them. To
close a jumper you connect the pins with the clip. To "open" a
jumper you remove the clip. Sometimes a jumper will have three
pins, labeled 1, 2 and 3. In this case you would connect either pins
1 and 2 or 2 and 3.
1
Open Closed Closed 2-3
The jumper settings are schematically depicted in this manual as
follows:
1 2 3
Open Closed Closed 2-3
A pair of needle-nose pliers may be helpful when working with
jumpers.
3
2
If you have any doubts about the best hardware configuration for
your application, contact your local distributor or sales representative before you make any changes.
Generally, you simply need a standard cable to make most
connections.
12 SBC-455 User's Manual
Page 21

Safety precautions
Warning! Always completely disconnect the power cord from
your chassis whenever you are working on it. Do
not make connections while the power is on
because sensitive electronic components can be
damaged by the sudden rush of power. Only
experienced electronics personnel should open
the PC chassis.
Caution! Always ground yourself to remove any static
charge before touching the CPU card. Modern
electronic devices are very sensitive to static
electric charges. Use a grounding wrist strap at
all times. Place all electronic components on a
static-dissipative surface or in a static-shielded
bag when they are not in the chassis.
Installing the CPU
The SBC-455 CPU card supports most 486 CPUs. The system's
performance depends on the CPU you choose. You can install or
upgrade the CPU in the board's PGA socket by following the
procedures outlined below. If your system has an existing CPU,
you need to remove it before installing the new CPU.
Removing a CPU
1. Disconnect power from the chassis, and unplug all connections
to the CPU card. Then, remove the CPU card from the chassis
by following the instructions in the user's manual for your
chassis.
2. Lift the CPU out of the PGA socket. The old chip may be
difficult to remove. You may find spray chip lubricant,
designed for pin-grid-array (PGA) devices, and a chip puller
helpful. These are available at electronics hobbyists' supply
stores.
Chapter 2 Installation 13
Page 22

Installing a CPU
T o install the CPU, follow the instructions that came with it. If no
documentation was provided, the general procedures for installing
a CPU are outlined below:
1. Lubricate the pins on the CPU with lubricant for PGA devices.
This makes the CPU slide in much easier and greatly reduces
the chance of damaging the pins and other components.
2. Carefully align the CPU so that it is parallel to the socket.
Make sure that the notch on the corner of the CPU matches the
notch on the inside of the socket.
3. Gently push the CPU into the socket. There will probably be a
small gap between the CPU and the socket even when it is
fully seated. DO NOT USE EXCESSIVE FORCE!
When you install a new CPU, you may have to adjust other
settings on the board, such as CPU type, CPU clock, and PCI
speed, to accommodate it. Make sure that the settings are correct
for your CPU. Improper settings may damage the CPU.
14 SBC-455 User's Manual
Page 23
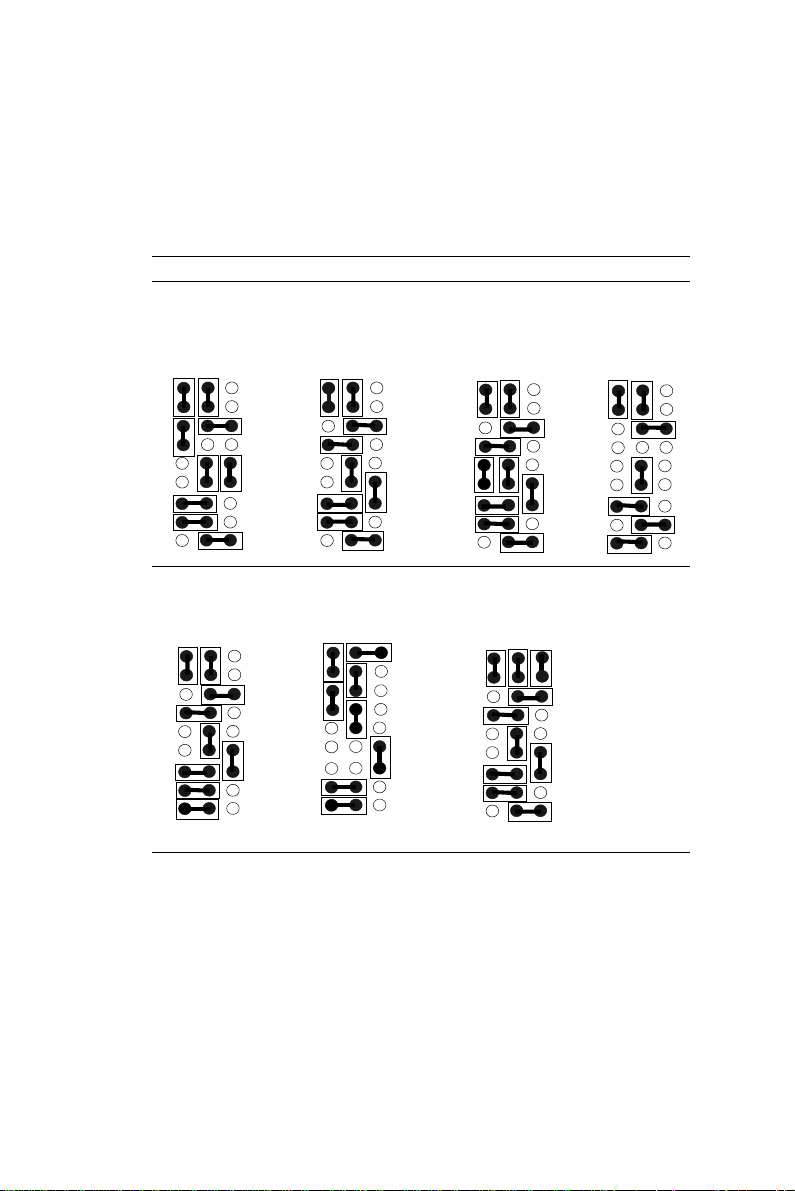
CPU type select (JP1, JP3, JP4)
JP1, JP3, and JP4 must be set to match the CPU type. The chart
below shows the proper jumper setting for their respective CPU.
CPU Type select (JP4, JP3, JP1)
Intel P24T AMD/Intel DX4 Series AMD-X5-133/ Intel 486SX
Intel P24D AMD DX2-66(WB)
Intel DX2-66 (default)
AMD DE2-66
JP 4 3 1 JP 4 3 1
Pin 1
2
3
4
5
6
7
8
9
Pin 1
2
3
4
5
6
7
8
9
Cyrix/IBM/ST Cyrix/IBM/ST/TI AMD
5x86 , DX4 DX2 Series DX2-66(WT)
Series
JP 4 3 1 JP 4 3 1
Pin 1
2
3
4
5
6
7
8
9
Pin 1
2
3
4
5
6
7
8
9
JP 4 3 1
Pin 1
2
3
4
5
6
7
8
9
JP 4 3 1
Pin 1
2
3
4
5
6
7
8
9
JP 4 3 1
Pin 1
2
3
4
5
6
7
8
9
Chapter 2 Installation 15
Page 24
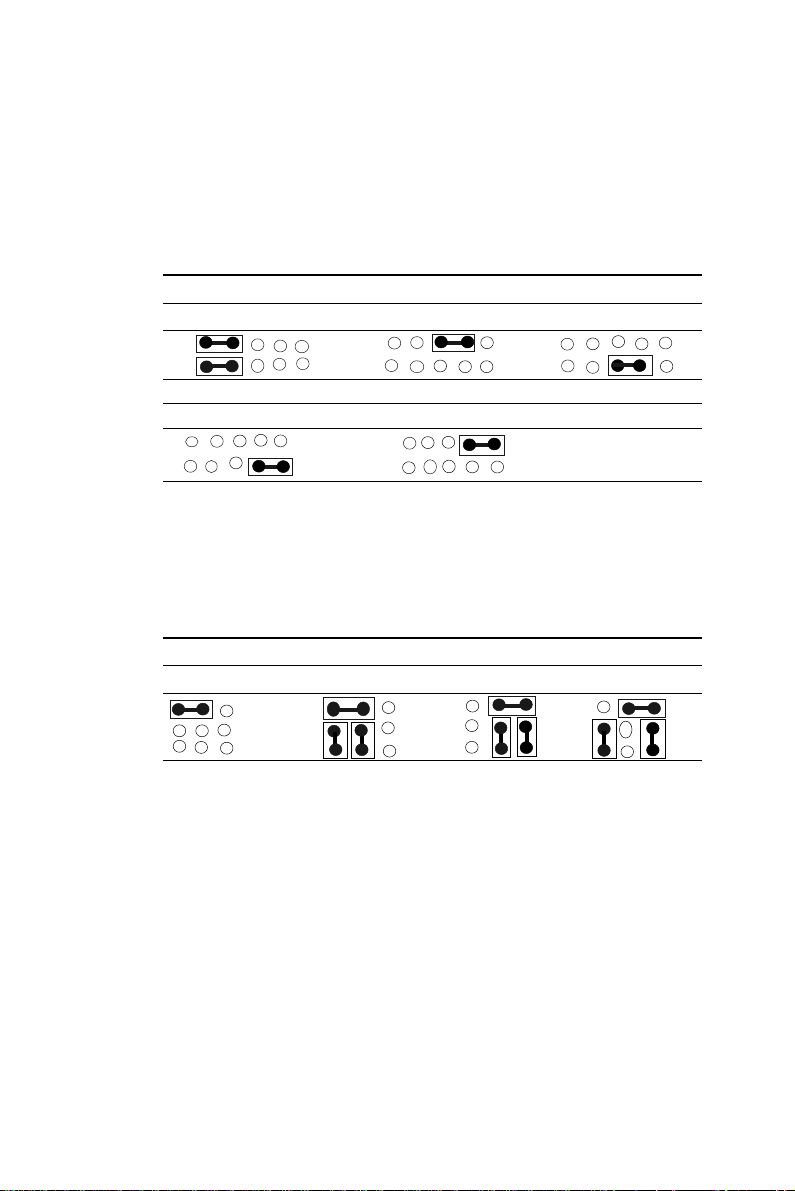
CPU Vcc select (JP2)
JP2 must be set to match the CPU type. The chart below shows the
proper jumper settings for their respective Vcc.
CPU Vcc select (JP2)
5.0 V 3.3 V 3.45 V (default)
4.0 V 3.6 V
CPU clock select (JP9, JP10)
JP9 and JP10 are used to synchronize the CPU clock with the CPU
type. Set the CPU clock according to the base CPU speed.
CPU clock select (JP9, JP10)
25 MHz 33 MHz (default) 40 MHz 50MHz
16 SBC-455 User's Manual
Page 25

Installing DRAM (SIMMs)
The SBC-455 CPU card provides two 72-pin SIMM (Single In-line
Memory Module) sockets and supports between 1 MB and 64 MB
DRAM.
When installing SIMMs, make sure that Bank 1 is filled first.
Installing SIMMs
Note that the modules can only fit into a socket one way.
1 . Insert the memory module into the socket at a moderate angle.
2. Push the module toward the vertical posts at both ends of the
socket until the module is upright and the retaining clips at
both ends of the module click into place. When positioned
correctly, the pins on top of the vertical posts should correspond to the circular holes on the ends of the module.
3. Repeat steps 1 and 2 for each module you install.
Removing SIMMs
If you need to remove a SIMM, follow the procedures below:
1 . Supporting the SIMM with a finger, use a pen or a similarly
shaped object and press one retaining clip straight down.
2. Repeat for the other side. When released, the retaining clips
will push the SIMM up and out of its upright position.
3. Carefully pull the SIMM out of the socket with your fingers.
4. Repeat the above steps for each module you remove.
Chapter 2 Installation 17
Page 26

IDE hard drive connections (IDE)
You can attach two Enhanced Integrated Device Electronics hard
disk drives to the SBC-455's internal controller. The card comes
with a 40-pin flat piggyback cable. This cable has three identical
40-pin flat-cable connectors.
Connecting the hard drive
Wire number 1 on the cable is red or blue, and the other wires are
gray.
1. Connect one end of the cable to the IDE connector. Make sure
that the red (or blue) wire corresponds to pin 1 on the connector, which is labeled on the board (on the right side).
2. Plug the other end of the cable to the Enhanced IDE hard drive,
with pin 1 on the cable corresponding to pin 1 on the hard
drive. (See your hard drive's documentation for the location of
the connector.)
Unlike floppy drives, you can make the connections with any of
the connectors on the cable. If you install two drives, you will
need to set one as the master and one as the slave. You do this
using jumpers on the drives. If you install just one drive, set it as
the master.
18 SBC-455 User's Manual
Page 27

Pin assignments
The following table lists the pin numbers and their respective
signals:
IDE Connector (PRIMARY IDE)
Pin Signal Pin Signal
1 Reset 2 GN D
3D7 4D8
5D6 6D9
7 D5 8 D10
9 D4 10 D11
11 D3 12 D12
13 D2 14 D13
15 D1 16 D14
17 D0 18 D15
19 GND 20 N.C.
21 N.C, 22 GND
23 IOW 24 GND
25 IOR 26 GND
27 IORDY 28 BALE
29 N.C. 30 GND
31 IRQ 14 32 -I/O CS16
33 A1 34 N.C.
35 A0 36 A2
37 CS0 38 CS1
39 -ACT 40 GND
IDE LED (IDE LED)
You can connect an LED to indicate that an IDE device is in use.
The pin assignments for this jumper are as follows:
IDE LED pin assignments (IDE LED)
Pin Function
1 -R/W IDE
2 Pull high
Chapter 2 Installation 19
Page 28

Floppy drive connections (FLOPPY DISK)
You can attach up to two floppy disks to the SBC-455's on-board
controller. You can use any combination of 5 1/4" (360 KB and
1.2 MB) and/or 3 1/2" (720 KB, 1.44 MB, and 2.88 MB) drives.
The SBC-455 CPU card comes with a 34-pin daisy-chain drive
connector cable. On one end of the cable is a 34-pin flat-cable
connector. There are two sets of floppy disk drive connectors, one
in the middle, and one on the other end. Each set consists of a 34pin flat-cable connector (usually used for 3.5" drives) and a
printed-circuit board connector (usually used for 5.25" drives).
Connecting the floppy drive
1 . Plug the 34-pin flat-cable connector into the FLOPPY DISK
connector.
2. Attach the appropriate connector on the other end of the cable
to the floppy drive(s). You can use only one connector in the
set. The set on the end (after the twist in the cable) connects to
the A: floppy. The set in the middle connects to the B: floppy.
Pin assignments
The following table lists the pin assignments for the FLOPPY
DISK connector:
FLOPPY DISK Connector
Pin Signal Pin Signal
1~33 (odd) GND 2 High density
4, 6 Unused 8 Index
10 Motor enable A 12 Driver select B
14 Driver select A 16 Motor enable B
18 Direction 20 Step pulse
22 Write data 24 Write enable
26 Track 0 2 8 Write protect
30 Read data 32 Select head
34 Disk change
20 SBC-455 User's Manual
Page 29

Parallel port (PRINTER)
Normally, the parallel port is used to connect the card to a printer.
The SBC-455 includes an on-board parallel port, accessed through
the PRINTER connector, a 26-pin flat-cable connector. The CPU
card comes with an adapter cable, which lets you use a traditional
DB-25 connector. The cable has a 26-pin connector on one end
and a DB-25 connector on the other, mounted on a retaining
bracket.
Installing the retaining bracket
The retaining bracket installs at an empty slot in your system's
chassis. It provides an external port that allows your parallel
peripheral to access to the card's parallel port connector.
1. Find an empty slot in your chassis.
2. Unscrew the plate that covers the end of the slot.
3. Screw in the bracket in place of the plate.
4. Next, attach the flat-cable connector to the PRINTER connector. Wire 1 of the cable is red or blue, and the other wires are
gray. Make sure that Wire 1 connects to Pin 1 of the PRINTER
connector. Pin 1 is on the right side of the PRINTER connector.
Pin assignments
PRINTER Connector
Pin Signal Pin Signal
1 Strobe 2 Data 0
3 Data 1 4 Data 2
5 Data 3 6 Data 4
7 Data 5 8 Data 6
9 Data 7 10 -Acknowledge
11 Busy 12 Paper empty
13 + Select 14 - Auto feed
15 - Error 16 - Init printer
17 - Select input 18~25 GND
Chapter 2 Installation 21
Page 30
Parallel port DRQ and DACK (JP11)
Y ou can select the parallel port DRQ and DACK by setting JP1 1.
The following charts show the available options.
Parallel port DRQ and DACK selection (JP11)
DRQ1(default) DRQ3
DACK 1 (default) DACK3
Power supply connections (POWER CON)
Power supply connector
In single board computer (non-passive backplane) applications,
you will need to connect power directly to the SBC-455 board
using POWER CON. This connector is fully compatible with the
standard PC power supply connector. See the following table for
its pin assignments:
Power connector (POWER CON)
Pin Function
1 N.C.
2 +5 V
3 +12 V
4 -12 V
5 GND
6 GND
22 SBC-455 User's Manual
DC
DC
DC
Page 31

Display connections (VGA, LCD)
The SBC-455 CPU card's SVGA connector (VGA) with PCI bus
supports monochrome display as well as high resolution color
displays. The card also features an LCD connector (LCD), which
allows you to connect various flat panel displays. The following
table lists their pin assignments:
LCD connector (LCD)
Pin Function Pin Function
1 +12 V
DC
3 GND 4 GND
5 +5 V
DC
7 EN LCD 8 GND
9P0 10P1
11 P2 12 P3
13 P4 14 P5
15 P6 16 P7
17 P8 18 P9
19 P10 20 P11
21 P12 22 P13
23 P14 24 P15
25 P16 26 P17
27 P18 28 P19
29 P20 30 P21
31 P22 32 P23
33 GND 34 GND
35 LCD clock 36 FLM (V SYS)
37 M 38 LP (H SYS)
39 GND 40 -blank
41 KB data 42 KB clock
43 PS/2 data 44 PS/2 clock
2 +12 V
6 +5 V
DC
DC
Chapter 2 Installation 23
Page 32

SVGA connector (VGA)
Pin Function
1 Red video
2 Green video
3 Blue video
4 Not used
5 GND
6 Red return (GND)
7 Green return (GND)
8 Blue return (GND)
9 Key (no pin)
10 Sync return (GND)
11 Monitor ID (not used)
12 Monitor ID
13 Horizontal sync
14 Vertical sync
15 Not used
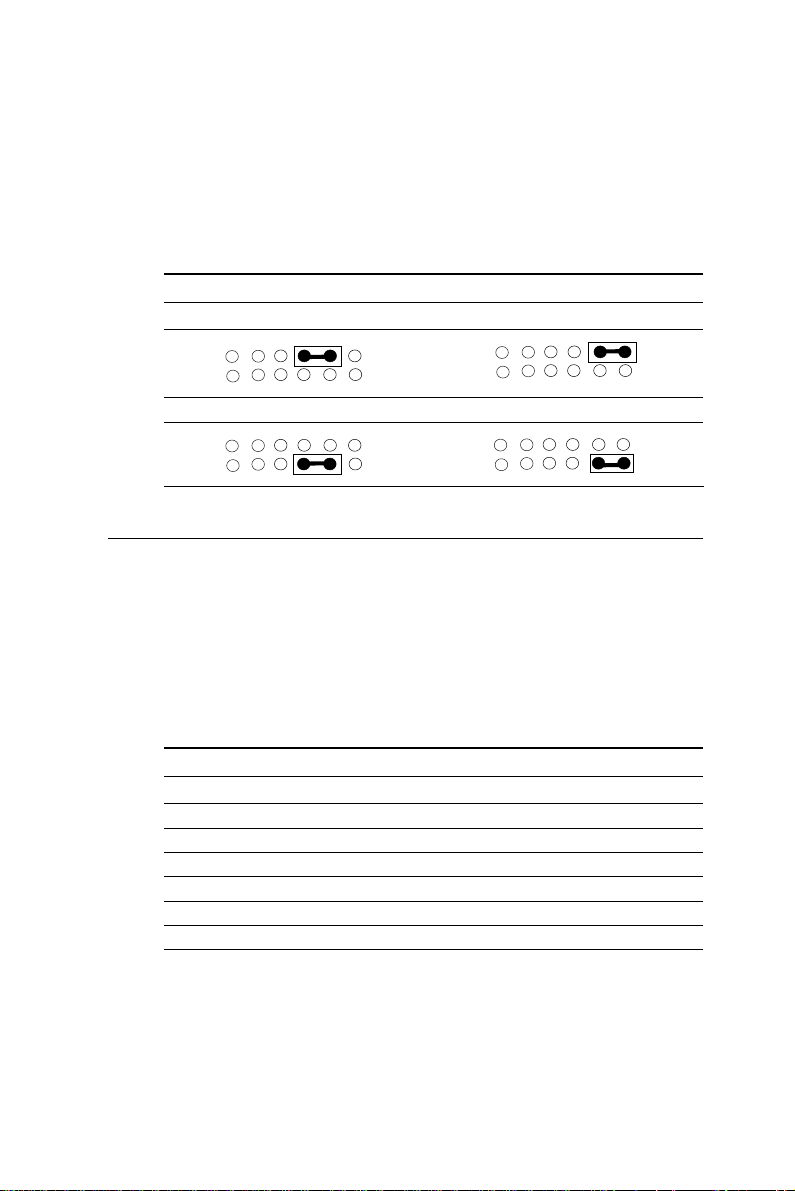
LCD signal select (JP5, JP7)
You can select the LCD control signals by setting JP5 and JP7. The
following charts show the available options.
LCD clock signal select (JP5)
*
SHF CLK from C&T65548 pin 70 ASHF CLK from SHF CLK inverse
1 3
LCD enable signal select (JP7)
*
ENVEE from C&T65548 pin 61 ENVDD from C&T65548 pin 62
1
3
3
1
13
*Default
24 SBC-455 User's Manual
Page 33

Keyboard and PS/2 KB/ mouse
connections (KB CON, KB/PS2 MOUSE)
The SBC-455 board provides two keyboard connectors. A 5-pin
connector (KB CON) supports passive backplane applications. A
second 6-pin mini-DIN connector (KB/PS2 MOUSE) on the card
mounting bracket supports single board computer applications.
The card comes with an adapter to convert the 6-pin mini-DIN
connector, used for the mouse, to the standard DIN connector for
the keyboard.
Keyboard connector (KB CON)
Pin Function
1 K.B. clock
2 K.B. data
3 N.C.
4 GND
5 +5 V
Keyboard or PS/2 mouse connector (KB/PS2 MOUSE)
Pin Function
1 K.B. data
2 PS/2 mouse data
3 GND
4 +5 V
5 K.B. clock
6 PS/2 mouse clock
DC
DC
Chapter 2 Installation 25
Page 34

Serial ports
The SBC-455 offers two RS-232 serial ports. You can select or
disable the address for each port with the BIOS Peripheral Setup
program.
The card mounting bracket holds COM A, the DB-9 serial port
connector for the first port. The parallel port and serial port
adapter kit (supplied with the card) holds COM B, the DB-9
connector for the second port. This lets you connect and disconnect the cables after you install the card. The following sections
tell how to make RS-232 connections.
RS-232 connections (COM A, COM B)
The following table shows the pin assignments for the card's RS232 ports:
RS-232 connector pin assignment (COM A, COM B)
Pin Signal
1 DCD
2RX
3TX
4 DTR
5 GND
6 DSR
7 RTS
8 CTS
9RI
26 SBC-455 User's Manual
Page 35

Serial ports IRQ select (JP11)
You can select the serial port IRQs by setting JP11 as follows:
Serial ports IRQ selection (JP11)
IRQ4 (default) IRQ1 1
COM A
IRQ3 (default) IRQ1 0
COM B
Chapter 2 Installation 27
Page 36

Watchdog timer setup
Watchdog timer time-out
signal select (JP6)
If CPU processing comes to a halt because of EMI or software
bugs, the watchdog timer can either reset the CPU or signal an
interrupt on IRQ15.
Watchdog timer time-out signal select (JP6)
Reset CPU(default) IRQ15
Watchdog timer programming
The watchdog timer must be programmed to write to I/O port
address 443 at an interval shorter than the timer's preset interval.
The timer's interval has a tolerance of ±5%, so you should program an instruction that will refresh the timer before a time-out
occurs. The following steps illustrate how you might program the
watchdog timer.
1. Write to I/O port 443 (Hex) and designate a time-out interval.
1 2 3
1 2 3
This will enable the watchdog and set up its time-out interval.
2. Write to I/O port 080 (Hex) and any random value. This will in
turn disable the watchdog timer.
28 SBC-455 User's Manual
Page 37

The watchdog timer-out interval can be set at 15 levels between 2
and 32 seconds. The following table shows the Hex values for
the appropriate time-out intervals:
Watchdog timer delay values
Delay time Value (Hex) Delay time Value (Hex)
0~2 F 16~18 7
2~4 E 18~20 6
4~6 D 20~22 5
6~8 C 22~24 4
8~10 B 24~26 3
10~12 A 26~28 2
12~14 9 28~30 1
14~16 8 30~32 0
Chapter 2 Installation 29
Page 38

External switches and LEDs
Power LED and keylock (KEY LOCK)
Y ou can connect an LED to indicate when the CPU card is on. Pin 1
of KEY LOCK supplies power to the LED; Pin 3 is the ground.
You can use a switch (or a lock) to disable the keyboard. In this
state the PC will not respond to any input. This is useful if you
don’t want anyone to change or stop a running program. Simply
connect the switch between Pins 4 and 5. The pin assignments
appear in the following table:
Power LED and keylock (KEY LOCK)
Pin Function
1 LED Power (+5 V)
2 No Connector
3 Ground
4 Keyboard lock
5 Ground
External speaker (EXT SPK)
The CPU card has its own buzzer. You can disable the internal
buzzer and connect an external speaker to EXT SPK. Enabling the
external speaker automatically disables the internal buzzer.
External speaker (EXT SPK)
Pin Function
1 Vcc
2 Speaker output
3 Buzzer in
4 Speaker output
30 SBC-455 User's Manual
Page 39

Reset switch (RESET SW)
You can connect an external switch to easily reset your computer.
This switch restarts your computer as if you had turned off the
power then turned it back on. The following table shows the pin
assignments for RESET SW.
Reset switch (RESET SW)
Pin Function
1 Ground
2 Reset
Turbo LED (TURBO LED)
Y ou can connect a LED indicator across TURBO LED to indicate
when the CPU is in Turbo mode. Marks on the circuit board
indicate LED polarity (the pin on the left is positive).
Turbo LED (TURBO LED)
Pin Function
1 Turbo
2 Ground
Chapter 2 Installation 31
Page 40

SMI (System Management Interrupt) switch (SMI SW)
You can connect an external switch to allow your computer to
enter the suspend mode.
SMI switch (SMI SW)
Pin Function Suspend mode Normal mode(default)
1 SMI
2 Ground
Turbo Switch (TURBO SW)
You can connect a switch across TURBO SW to change the CPU
speed between Turbo and non-Turbo mode. When you leave the
pins open, the CPU card operates at full speed. When you close
the pins, the card operates at slow speed for compatibility with
older software.
Turbo switch pin assignments (TURBO SW)
Pin Function Low Speed High Speed (default)
1 -Deturbo
2 Pull low
Clear CMOS (JP12)
You can connect an external switch to clear CMOS. This switch
closes JP12 and turns on the power, at which time the CMOS
setup can be clear.
Clear CMOS (JP12)
Protect (default) Clear CMOS
32 SBC-455 User's Manual
Page 41

Flash BIOS Protect (JP8)
Y ou can set the JP8 to protect BIOS write-enable. The configuration is as follows:
Flash BIOS Protect (JP8)
Write protect (default) Write-enable
Flash BIOS Write-enable Voltage (JP13)
This jumper sets the voltage supplied to the Flash BIOS Writeenable. The figure below shows the proper jumper settings for
both 5V and 12V voltage.
Flash BIOS Write-enable Voltage (JP13)
5 V (default) 12 V
Chapter 2 Installation 33
Page 42

34 SBC-455 User's Manual
Page 43

CHAPTER
3
AMI WinBIOS Setup
This chapter describes the cards diagnos-
tic tests and how to set BIOS configura-
tion data in a Windows environment.
Chapter 3 AMI WinBIOS setup 35
Page 44

General information
WinBIOS Setup configures system information that is stored in
CMOS RAM. Unlike conventional BIOS setup programs, WinBIOS
features a graphical user interface that is easy to use.
Starting WinBIOS setup
As POST executes, the following appears;
Hit <DEL> if you want to run SETUP
Press <DEL> to run WinBIOS setup.
WinBIOS main menu
The WinBIOS setup screen appears as follows:
36 SBC-455 User's Manual
Page 45

Using a mouse with WinBIOS setup
WinBIOS Setup can be accessed via keyboard, mouse, or pen. The
mouse click functions are:
single click to change or select both global and current fields
double click to perform an operation in the selected field
Using the keyboard with WinBIOS setup
WinBIOS Setup has a built-in keyboard driver that uses simple
keystroke combinations:
Keystroke Function
<tab> Move to the next window or field.
è, ç, é,
<ENTER> Select in the current field.
+ Increments a value.
- Decrements a value.
<ESC> Close the current operation and return to
<PgUp> Return to the previous page.
<PgDn> Advance to the next page.
<Home> Return to the beginning of the text.
<End> Advance to the end of the text.
<ALT>+H Access a help window.
<ALT>+<Spacebar> Exit WinBIOS Setup.
Alphabetic keys A to Z are used in the Virtual keyboard, and
Numeric keys 0 to 9 are in the Virtual keyboard and
ê
Move to the next field to the right,
left, above, or below.
previous level.
are not case sensitive.
Numeric keypad.
Chapter 3 AMI WinBIOS setup 37
Page 46

Setup
Standard Setup
The WinBIOS Setup options described in this section are selected
by choosing the Standard icon from the WinBIOS Setup main menu
selection screen, as shown below.
The Standard Setup screen appears:
Pri Master, Pri Slave, Sec Master and Sec Slave
Choose these icons to configure the hard disk drive named in the
option. When you click on an icon, the following parameters are
listed: Type, LBA/Large Mode, Block Mode, 32Bit Mode, and PIO
Mode. All parameters relate to IDE drives except Type.
Date, Day and Time Configuration
Select the Date and Time icon in the Standard setup. The current
values for each category are displayed. Enter new values through
the keyboard.
38 SBC-455 User's Manual
Page 47

Floppy A, Floppy B
Select these icons to configure the type of floppy drive that is
attached to the system: 360 KB 5 1/4", 1.2 MB 5 1/4", 720 KB 3 1/2",
1.44 MB 3 1/2", and/or 2.88 MB 3 1/2". The settings have not been
pre-installed.
User-Defined Drive
If you are configuring a SCSI drive or an MFM, RLL, ARLL, or
ESDI drive with drive parameters that do not match drive types 1-
46, you can select the User in the Type field. You must then enter
the drive parameters on the screen that appears. The drive parame-
ters include:
Cylinder (number of cylinders),
Hd (number of headers),
WP(starting write precompensation cylinder),
Sec (number of sectors),
Size (drive capacity).
Chapter 3 AMI WinBIOS setup 39
Page 48

Advanced Setup
Select the Advanced icon from the WinBIOS Setup main menu to
enter Advanced setup.
The Advanced Setup options described in this section are the
standard options as shown on the following screen.
40 SBC-455 User's Manual
Page 49

Quick Boot:
Set this option to Enabled to instruct AMIBIOS to boot quickly
when the computer is powered on. This option replaces the old
Above 1 MB Memory Test Advanced Setup option.
Setting Description
Disabled
Enabled
Boot Up Sequence:
AMIBIOS test all system memory. AMIBIOS waits up
to 40 seconds for a READY signal from the IDE hard
disk drive. AMIBIOS waits for .5 seconds after
sending a RESET signal to the IDE drive to allow the
IDE drive time to get ready again. AMIBIOS checks
for a <Del> key press and runs WINBIOS Setup if
the key has been pressed.
AMIBIOS does not test system memory above 1 MB.
AMIBIOS does not wait up to 40 seconds for a
READY signal from the IDE hard disk drive. If a
READY signal is not received immediately from the
IDE drive, AMIBIOS does not configure that drive.
AMIBIOS does not wait for .5 seconds after sending
a RESET signal to the IDE drive to allow the IDE drive
time to get ready again.
You cannot run WINBIOS Setup at system boot,
because there is no delay for the
Setup
message.
Hit <Del> to run
This option sets the sequence of boot drives (floppy drive A:, hard
disk drive C:, or CD-ROM drive) that the AMIBIOS attempts to
boot from after AMIBIOS POST completes. The settings are
C:,A:,CDROM, CDROM,A:,C:, or A:,C:,CDROM. The default
settings are A:,C:,CDROM.
Boot Up Num Lock:
Set this option to Off to turn the Num Lock key off when the
computer is booted so you can use the arrow keys on both the
numeric keypad and the keyboard. The settings are On or Off. The
default settings are on.
Chapter 3 AMI WinBIOS setup 41
Page 50

Turbo Switch:
Set this option to Enabled to permit AMIBIOS to control the
hardware turbo (speed) switch. The settings are Enabled or
Disabled.
Floppy Drive Swap:
Set this option to Enabled to permit drives A: or B: to be swapped.
The settings are Enabled or Disabled. The default settings are
Disabled.
Floppy Drive Seek:
Set this option to Enabled to specify that floppy drive A: will
perform a Seek operation at system boot. The settings are Enabled
or Disabled. The Optimal and Fail-Safe default settings are
Disabled.
Mouse Support:
When this option is set to Enabled, AMIBIOS supports a PS/2-
type mouse. The settings are Enabled or Disabled. The default
settings are Enabled.
System Keyboard:
This option specifies that a keyboard is attached to the computer.
The settings are Present or Absent. The Optimal and Fail-Safe
default settings are Present.
Primary Display:
This option specifies the type of display monitor and adapter
in the computer. The settings are Mono, CGA40, CGA80,
EGA/VGA, or Absent. The Optimal and Fail-Safe default settings
are EGA/VGA..
Display Device:
This option allows user to select display device. The settings are
CRT, LCD, and Both. The Fail-Safe default setting is Both.
42 SBC-455 User's Manual
Page 51

Password Check:
This option enables password checking every time the computer is
powered on or every time WINBIOS Setup is executed. If Always is
chosen, a user password prompt appears every time the computer
is turned on. If Setup is chosen, the password prompt appears if
WINBIOS is executed. The Optimal and Power-On defaults are
Setup.
Parity Check:
Set this option to Enabled to check the parity of all system memory.
The settings are Enabled or Disabled. The Optimal and Fail-Safe
default settings are Disabled.
OS/2 Compatible Mode:
Set this option to Enabled to permit AMIBIOS to run with IBM OS/
2. The settings are Enabled or Disabled. The default settings are
Disabled.
Wait for F1 if Error:
AMIBIOS POST error messages are followed by:
Press <F1> to continue
If this option is set to Disabled, AMIBIOS does not wait for you to
press the <F1> key after an error message. The settings are
Enabled or Disabled. The Optimal and Fail-Safe default settings
are Enabled.
Hit Del Message Display:
Set this option to Disabled to prevent :
Hit <DEL> if you want to run Setup
from appearing on the first AMIBIOS screen when the computer
boots. The settings are Enabled or Disabled. The Optimal and
Fail-Safe default settings are Enabled.
Chapter 3 AMI WinBIOS setup 43
Page 52

Internal Cache:
This option specifies the caching algorithm used for L1 internal
cache memory. The setting are:
Setting Description
Disabled
WriteBack
WriteThru
External Cache
Neither L1 internal cache memory on the
CPU nor L2 secondary cache memory is
enabled.
Use the write-back caching algorithm.
Use the write-through caching algorithm.
This option specifies the caching algorithm used for L2 secondary
(external) cache memory. The settings are:
Setting Description
Disabled
WriteBack
WriteThru
System BIOS Cacheable
Neither L1 internal cache memory on the
CPU nor L2 secondary cache memory is
enabled.
Use the write-back caching algorithm.
Use the write-through caching algorithm.
When this option is set to Enabled, the contents of the F0000h
system memory segment can be read from or written to L2 second-
ary cache memory. The contents of the F0000h memory segment are
always copied from the BIOS ROM to system RAM for faster
execution.
The settings are Enabled or Disabled. The Fail-Safe default setting
is Disabled.
Numeric Processor Test
Set this option to Enbable to permit numeric processor to be
tested. The deault setting is Disabled.
Hard Disk Delay
This option allows you to select hard disk delay time from 5 Sec to
15 Sec. The default setting is Disabled.
44 SBC-455 User's Manual
Page 53

C000,16 KB Shadow D000,16KB Shadow
C400,16 KB Shadow D400,16KB Shadow
C800,16 KB Shadow D800,16KB Shadow
CC00,16 KB Shadow DC00,16KB Shadow
E000,64KB Shadow
These options control the location of the contents of the 16KB of
ROM beginning at the specified memory location. If no adapter
ROM is using the named ROM area, this area is made available to
the local bus. The settings are:
Setting Description
Shadow
Enabled
Disabled
The contents of C0000h - C3FFFh are written to the
same address in system memory (RAM) for faster
execution.
The contents of the named ROM area are written to
the same address in system memory (RAM) for
faster execution, if an adapter ROM will be using the
named ROM area. Also, the contents of the RAM
area can be read from and written to cache memory.
The video ROM is not copied to RAM. The contents
of the video ROM cannot be read from or written to
cache memory.
Chapter 3 AMI WinBIOS setup 45
Page 54

Chipset Setup
The WinBIOS Setup options deccribed in this section are selected
by choosing the Chipset icon from the WinBIOS setup main
menu,shown below.
The following is an option list offered by Chipset Setup
Chipset setup options
Function Options
Auto Configuration Function Disabled/Enabled
AT Bus Clock 7.16
CPU Bus Speed/3
CPU Bus Speed/4
CPU Bus Speed/5
CPU Bus Speed/6
CPU Bus Speed/8
DRAM Read Timing Slow
Normal
Faster
Fastest
46 SBC-455 User's Manual
Page 55

Function Options
DRAM Write Timing Slow
Normal
Faster
Fastest
SRAM Type 2-1-1-1
3-1-1-1
3-2-2-2
4-2-2-2
SRAM Read Timing Fast
Normal
SRAM Write Timing FAST
Normal
Memory Parity Check Disabled
Enabled
DRAM Hidden Refresh Disabled
Enabled
DRAM Refresh Period Setting 15 ms
30 ms
60 ms
120 ms
Memory Hole at 15-16 M Disabled
Enabled
ISA I/O Recovery Disabled
Enabled
ISA I/O Recovery Time 0.5 ms
1.0 ms
1.5 ms
2.0 ms
2.5 ms
3.0 ms
3.5 ms
Cx5x86 Linear Wrapped Mode Disabled
Enabled
System Hidden Refresh 15 ms
30 ms
60 ms
120 ms
Chapter 3 AMI WinBIOS setup 47
Page 56

Power Management Setup
As part of the "Green" function, the Power Management setup
offers options to help reduce power consumption. To see the
options in this group, choose the Power Management Setup icon
from the WinBIOS Setup main menu.
Power Management Mode/APM Funtion
Set this option to Enabled to enable the power management and
APM (Advanced Power Management) features.
The settings are Enabled or Disabled. The default settings are
disabled.
48 SBC-455 User's Manual
Page 57

PCI/PnP Setup
PCI/PnP Setup options are displayed by choosing the PCI/PnP
Setup icon from the WINBIOS Setup main menu. All PCI/PnP Setup
options are described in this section.
Plug and Play Aware OS
Set this option to Ye s if the operating system installed in the
computer is Plug and Play-aware. AMIBIOS only detects and
enables PnP ISA adapter cards that are required for system boot.
The Windows 95 operating system detects and enables all other
PnP-aware adapter cards. Windows 95 is PnP-aware. Set this option
to No if the operating system (such as DOS, OS/2, Windows 3.x)
does not use PnP.
You must set this option correctly or PnP-aware adapter cards
installed in your computer will not be configured properly.
The settings are No or Yes. The Optimal and Fail-Safe default
settings are Ye s.
Chapter 3 AMI WinBIOS setup 49
Page 58

PCI Latency Timer (in PCI Clocks)
This option sets latency of all PCI devices on the PCI bus. The
settings are in units equal to PCI clocks. The settings are 32, 64,
96, 128, 160, 192, 224, or 248. The Optimal and Fail-Safe default
settings are 64.
VGA Locate Bus
This option allows you to select VGA bus. The setting is PCI and
ISA (Default).
CPU to PCI Write Buffer
This option sets the write buffer between CPU and PCI bus. The
default setting is Enabled.
PCI IDE BusMaster
Set this option to Enabled to specify that the IDE controller on the
PCI local bus has bus mastering capability. The settings are
Disabled or Enabled. The Optimal and Fail-safe default settings are
Disabled.
Offboard PCI IDE Card
This option specifies if an offboard PCI IDE controller adapter card
is used in the computer. You must also specify the PCI expansion
slot on the motherboard where the offboard PCI IDE controller card
is installed. If an offboard PCI IDE controller is used, the onboard
IDE controller on the motherboard is automatically disabled. The
settings are Disabled, Auto, Slot1, Slot2, Slot3, or Slot4.
If Auto is selected, AMIBIOS automatically determines the correct
setting for this option. The Optionmal and Fail-Safe default settings
are Auto.
50 SBC-455 User's Manual
Page 59

PCI Slot1 IRQ Priority
PCI Slot2 IRQ Priority
PCI Slot3 IRQ Priority
PCI Slot4 IRQ Priority
This option sets PCI slot IRQ priority.
The settings are Auto,3,4,5,7,9,10,11. The default setting is Auto.
IRQ3
IRQ4
IRQ5
IRQ7
IRQ9
IRQ10
IRQ11
IRQ12
IRQ14
IRQ15
These options specify the bus that the named interrupt request
lines (IRQs) are used on. These options allow you to specify IRQs
for use by legacy ISA adapter cards.
These options determine if AMIBIOS should remove an IRQ from
the pool of available IRQs passed to BIOS configurable devices.
The available IRQ pool is determined by reading the ESCD
NVRAM. If more IRQs must be removed from the pool, the end
user can use these PCI/PnP Setup options to remove the IRQ by
assigning the option to the ISA/EISA setting. Onboard I/O is
configurable by AMIBIOS. The IRQs used by onboard I/O are
configured as PCI/PnP.
The settings are PCI/PnP or ISA/EISA. The Optimal and Fail-Safe
default settings are PCI/PnP.
Chapter 3 AMI WinBIOS setup 51
Page 60

Reserved Memory Size
This option specifies the size of the memory area reserved for
legacy ISA adapter cards.
The settings are Disabled, 16K, 32K, or 64K and Fail-Safe default
settings are Disabled.
Reserved Memory Address
This option specifies the beginning address (in hex) of the reserved
memory area. The specified ROM memory area is reserved for use
by legacy ISA adapter cards.
The settings are C0000, C4000, C8000, CC000, D0000, D4000,
D8000, or DC000.
52 SBC-455 User's Manual
Page 61

Peripheral Setup
Peripheral Setup options are displayed by choosing the Peripheral
Setup icon from the WINBIOS Setup main menu. All Peripheral
Setup options are described in this section:
Onboard FDC
This option enables the floppy drive controller on the motherboard.
The settings are Auto, Enabled or Disabled.
Onboard Serial Port 1
This option enables serial port 1 on the motherboard and
specifies the base I/O port address for serial port 1.
The settings are Auto, Disabled, 3F8h, 3E8h, 2E8h,2F8h. The
Fail-Safe default setting is Auto.
Chapter 3 AMI WinBIOS setup 53
Page 62

Onboard Serial Port2
This option enables serial port 2 on the motherboard and specifies
the base I/O port address for serial port 2. The settings are Auto.
Disabled, 3F8h, 2F8h, 3E8h, 2E8h. The Fail-Safe default setting is
Auto.
Onboard Parallel Port
This option enables the parallel port on the motherboard and
specifies the parallel port base I/O port address. The settings are
Auto, disabled, 378, 378, 3BC. The Fail-Safe default setting is
Auto.
Parallel Port Mode
This option specifies the parallel port mode. ECP and Epp are both
bidirectional data transfer sechemes that adhere to the IEEE P1284
specification. The settings are:
Setting Description
Normal
EPP
ECP
The normal parallel port mode is used. This is the
default setting.
The parallel port can be used with devices that
adhere to the Enhanced Parallel Port (EPP) specification. EPP uses the exiting parallel port signals to
provide asymmetric bidirectional data transfer
driven by the host device.
The parallel port can be used with devices that
adhere to the Extended Capabilities Port (ECP)
specification. ECP uses the DMA protocol to
achieve transfer rates of approximately 2.5 Mbs.
ECP provides symmetric bidirectional communlations.
54 SBC-455 User's Manual
Page 63

Parallel Port DMA Channel
This option is only available if the setting for the Parallel Port
Mode option is ECP.
The settings are Disabled, DMA, CH (channel) 0, DMA CH 1, or
DMA CH3.
Parallel Port IRQ
IRQ7 is used for the Parallel Port(LPT 1). The IRQ can be changed
to IRQ5.
Onboard IDE
This option specifies the onboard IDE controller channels that will
be used. The settings are Primary, Both, or Disabled.
Chapter 3 AMI WinBIOS setup 55
Page 64

Utility
The following icons appear in this section:
Detect IDE:
If drive C: is an IDE drive, the hard disk drive parameters for
drive C: are automatically detected and reported to the Hard Disk
Drive C: screen in Standard Setup, so you can easily configure
drive C:. Drive D and CD-ROM could also be automatically
detected and reported to screen if drive D and CD-ROM are IDE
drives.
Language:
If this feature is enabled, you can select WINBIOS. Setup message
is in different languages. The default setting is English.
56 SBC-455 User's Manual
Page 65

Security
The following icons appear in this section:
Two Levels of Passwords
Both the Supervisor and the User icons configure password
support. If you use both, the Supervisor password must be set. If
this feature is enabled, you can select WINBIOS. Setup message is
in different languages. The default settings is English.
The system can be configured so that all users must enter a
password every time the system boots or when WINBIOS Setup is
executed, using either or both the Supervisor password or User .
Chapter 3 AMI WinBIOS setup 57
Page 66

The following screen appears when you select the password icon
You can enter a password by:
typing the password on the keyboard
selecting each letter via the mouse
selecting each letter via the pen stylus (pen access must be
customized for each specific hardware platform.)
Setting a Password
The password check option is enabled in Advanced Setup by
choosing either Always or Setup. Here, you determine the pass-
word to be used. The password is stored in CMOS RAM.
To assign a password,
1. Enter a 1-6 character password. The password does not appear
on the screen when typed.
2. Retype the password when prompted by WinBIOS.
A message box will appear when the password is confirmed.
Keep a record of the password. If you forget the password, you
must drain CMOS RAM and reconfigure the system.
58 SBC-455 User's Manual
Page 67

Changing a password
1. Select the Supervisor or User icon from the Security section of
the WinBIOS Setup main menu.
2. Enter the password and press <ENTER>. The screen does not
display the characters entered.
3. After the new password is entered, retype the new password as
prompted and press <ENTER>.
If the password confirmation is incorrect, an error message appears.
If the new password is entered without error, press <ESC> to return
to the WinBIOS setup Main Menu. The password is stored in
CMOS RAM after WinBIOS Setup completes. The next time the
system boots, you are prompted for the password if the password
function is present and is enabled.
Anti-virus
Select the Anti-virus icon from the Security section of the WinBIOS
Setup main menu. WinBIOS issues a warning when any program (or
virus) issues a Disk format command or attempts to write to the
boot sector of the hard disk drive. The settings are Enabled or
Disabled.
If enabled, the following appears when a write is attempted to the
boot sector. You may have to type N several times to prevent the
boot sector write.
Boot Sector Write !!!
Possible VIRUS: Continue (Y/N)? _
The following is displayed after any attempt to format any cylinder,
head, or sector of any hard disk drive via the BIOS INT 13 Hard
Disk Drive Service:
Possible VIRUS: Continue (Y/N)? _
Format!!!
Chapter 3 AMI WinBIOS setup 59
Page 68

Default
The icons in this section permit you to select a group of settings
for all WinBIOS Setup options. Not only can you use these icons
to quickly set system configuration parameters, you can also
choose a group of settings that have a better chance of working
when the system is having configuration-related problems.
Original
Choose the Original icon to return to the system configuration
values present in WinBIOS Setup when you first begin this
WinBIOS Setup session.
Optimal
You can load the optimal default settings for the WinBIOS Setup
options by selecting the Optimal icon. The Optimal default settings
are the best-case values that could optimize system performance. If
CMOS RAM is corrupted, the Optimal settings are loaded automat-
ically.
Fail-Safe
You can load the Fail-Safe WinBIOS Setup options settings by
selecting the Fail-Safe icon.
The Fail-Safe settings provide the most stable settings, though
they do not provide optimal performance. Use this option as a
diagnostic aid if the system is behaving erratically.
60 SBC-455 User's Manual
Page 69
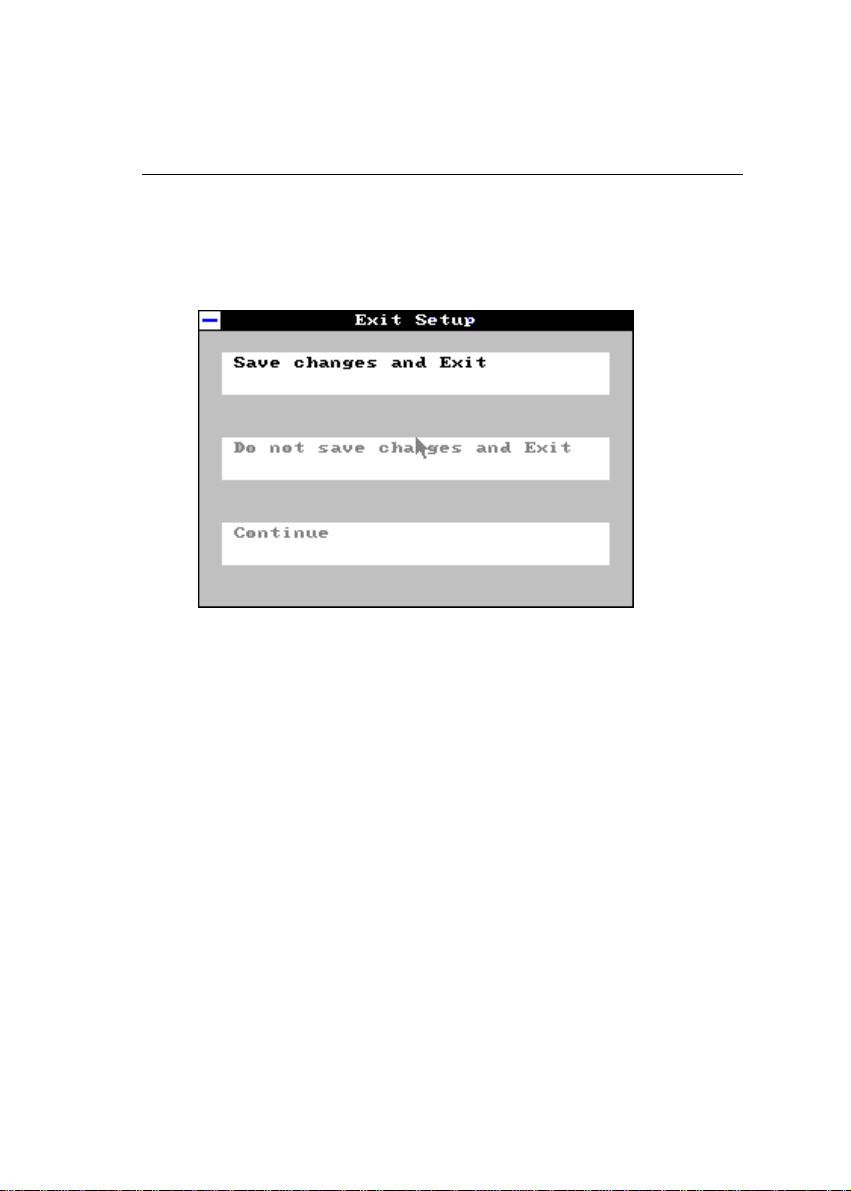
Exiting WinBIOS
You can exit WinBIOS by pressing the <ESC> key while in the
WinBIOS main menu screen.
The following screen appears:
Select the option you desire, and the system will continue its boot
up sequence.
Chapter 3 AMI WinBIOS setup 61
Page 70

62 SBC-455 User's Manual
Page 71

5
CHAPTER
Flat Panel/CRT
Controller Display Driv-
ers and Utilities
This chapter provides information about:
• Driver types and installation
• Software utility installation and use
Chapter 5 Flat Panel/ CRT Controller 63
Page 72

Software drivers
This chapter describes the operation and installation of the software
drivers supplied on the Display Driver Diskettes that are shipped with
your VGA adapter.
Y our VGA adapter is based on the CHIPS VGA Flat Panel/CR T
controller and is fully IBM VGA compatible. This controller offers a
large set of extended functions and higher resolutions. If you intend to
use your VGA adapter in standard VGA modes only, you do not need
to install any of these drivers. Since your VGA adapter is fully compatible, it does not require any special drivers to operate in standard
modes.
The purpose of the enclosed software drivers is to take advantage of
the extended features of the CHIPS VGA Flat Panel/CR T controller.
Hardware configuration
Some of the high-resolution drivers provided in this package will work
only in certain system configurations. If a driver does not display
correctly , try the following:
1 . Change the display controller to CRT-only mode, rather than flat
panel or simultaneous display mode. Some high-resolution drivers
will display correctly only in CRT mode.
2. If a high-resolution mode is not supported on your system, try
using a lower-resolution mode. For example, 1024 x 768 mode will
not work on some systems, but 800 x 600 mode is supported on
most.
64 PCM-5890 User's Manual
Page 73

Necessary prerequisites
The instructions in this manual assume that you understand elementary concepts of MS-DOS and the IBM Personal Computer. Before you
attempt to install any driver or utility, you should:
• Know how to copy files from a floppy disk to a directory on the hard
disk
• Understand the MS-DOS directory structure
• Know how to format a floppy disk
If you are uncertain about any of these concepts, please refer to the
DOS or OS/2 user reference guides for more information, before you
proceed with the installation.
Before you begin
Before you begin the driver software installation, you should make
backup copies of the Display Driver Diskettes. Store the original disks
in a safe place.
Make sure you know the version of the application for which you are
installing drivers. Your Display Driver Diskettes contain drivers for
several versions of certain applications. For your driver to operate
properly, you must install the driver for your version of the application
program.
Chapter 5 Flat Panel/ CRT Controller 65
Page 74

Windows
These drivers are designed to work with MicrosonftÒ WindowsÔ.
You just install these drivers through the WindowsÔ operating
system.
ÔÔ
Ô 95
ÔÔ
Driver installation
1. Install WindowsÔ 95 as you normally would for a VGA
display. Click the Start button, go to Settings and click on
Control Panel. Choose the Display icon and double click on
the icon. In the Display Properties window, click on the
Settings tab. Then click on Change Display type. In the
Change Display Type window, click on the Change button
under Adapter Type. This will bring up the Select Device
window.
2. Place the WindowsÔ 95 Display Driver Diskette in drive A. In
the Select Device window, click on Have Disk, Press <EN-
TER> and the name of the Chips and Technologies, Inc. Video
Controller driver will appear highlighted in the Models list box.
Select Chips and Tech. 65548 PCI(new) and Click OK to install
the selected driver. Click OK to install the selected driver.
3. Once the installation is complete, the Change Display Type
window will reappear. Click on Close to close the window. Then
the Display Properties window will reappear. Click on Apply.
Restart the system for new settings to take effect.
66 PCM-5890 User's Manual
Page 75

Ô Ô
Ô
Windows 3.1
These drivers are designed to work with Microsoft Windows Version
3.1. Y ou may install these drivers either through W indows or in DOS.
Ô Ô
Driver installation - Windows Setup
1. Install Windows as you normally would for a VGA display. Run
Windows to make sure that it is working correctly.
2 . Place the Display Driver Diskette #1 in drive A. In Windows
Program Manager, choose File from the Options Menu. Then from
the pull-down menu, choose Run. At the Command Line prompt,
type A:\WINSETUP . Press the <ENTER> key or click OK to begin
the installation.
At this point the setup program locates the directory where Windows
is installed. For proper operation, the drivers must be installed in the
Windows subdirectory.
3 . Press <ENTER> to complete the installation. Once completed, the
Display Driver Control Panel appears on the screen. This Control
Panel allows you to select and load the installed drivers.
Another method of installing these drivers is through the File Manager. Click on Drive A:, and then double-click on WINSETUP.EXE to
begin installation.
Changing Display Drivers from Windows
T o change display drivers from Windows, select the Windows Setup
icon from the Main window. You will be shown the current setup
configuration. Select Change System Settings from the Option menu.
Click on the arrow at the end of the Display line. Y ou will be shown a
list of display drivers. Click on the driver you want to select it. Then
click on the OK button. Follow the directions to complete the setup.
Chapter 5 Flat Panel/ CRT Controller 67
Page 76

Changing Color Schemes
After you change display drivers, you may notice that the color
scheme used by Windows looks strange. This is because different
drivers have different default colors. You can correct this by choosing
the same color scheme or a new color scheme. First select the Control
Panel from the Main window . Select the Color icon. Y ou will be
shown the current color scheme. Choose a new color scheme and click
the OK button.
DOS
Driver installation - DOS Setup
1. Install Windows as you normally would for a VGA display . Run
Windows to make sure that it is working correctly. Then exit from
Windows.
2 . Place the Display Driver Diskette #1 in drive A. T ype A: <ENTER>
to make this the default drive.
3 . Type SETUP <ENTER> to run the driver SETUP program. Press
any key to get to the applications list.
4. Using the arrow keys, select Windows Version 3.1 and press the
<ENTER> key . Press the <ENTER> key to select All Resolutions,
then press <END> to begin the installation.
5. At this point you will be asked for the path to your Windows
System directory (default C:\WINDOWS). When the installation is
complete, press any key to continue. Press <ESC> followed by Y to
exit to DOS.
6. Change to the directory where you installed Windows (usually
C:\WINDOWS).
7. T ype SETUP <ENTER> to run the Windows Setup program. It will
show the current Windows configuration. Use the up arrow key to
move to the Display line and press <ENTER>.
8 . A list of display drivers will be shown. Use the arrow keys to select
one of the drivers starting with an asterisk (*) and press <ENTER>.
68 PCM-5890 User's Manual
Page 77

9. Follow the directions on the screen to complete the setup. In
most cases, you may press <ENTER> to accept the suggested
option. When Setup is done, it will return to DOS. Type WIN
<ENTER> to start Windows with the new display driver.
Changing Display Drivers from DOS
T o change display drivers from DOS, change to the Windows directory
and run Setup, repeating steps 4 and 5 from the previous page.
Besides the special display drivers marked by an asterisk (*), you
should be able to use the following standard drivers:
V G A 640 x 480, 16 colors
Super VGA 800 x 600, 16 colors
Panning Drivers
Special panning drivers are provided to allow high-resolution modes to
be displayed on a flat panel or CRT. These drivers will show a section
of a larger screen, and will automatically pan or scroll the screen
horizontally and vertically when the mouse reaches the edge of the
display.
OS/2
These drivers are designed to function with the OS/2 Version 3 and 2.1
operating systems.
Driver installation
NOTE: Always use the INSTxx.CMD for the
FIRST
installation of the video device drivers. To change
video resolutions, follow
Step 3
below .
To install the drivers, follow these instructions:
1. The system display must be set to VGA mode before installing
the OS/2 SVGA drivers. Open an OS/2 full screen or windowed
session.
Chapter 5 Flat Panel/ CRT Controller 69
Page 78

2. Place the OS/2 Display Driver Diskette in drive A. Type
A:<ENTER> to make this the default drive. Then type INST2X
A: C: <ENTER> (for OS/2 2.1x systems) or INST30 A: C:
<ENTER> (for OS/2 Version 3 systems). Once the Install
Program is completed, do a system shutdown and reboot.
3. After the system has rebooted, follow these instructions:
A) OS/2 2.1x
Open an OS/2 full-screen or windowed session. At the OS/2
prompt, type DSPINSTL <ENTER> to install the new device
driver and configure the video system.
B) OS/2 Version 3
Go to the System Setup folder and run Selective Install to install the
new device driver and configure the video system.
Follow the instructions of the program to set up the OS/2 drivers in
your system. First, select Primary Display. From the list of Primary
Display Adapter Types, select Chips and Technologies 655XX.
From the list of available Display Resolutions, select a display
resolution. The correct source directory must be specified. Once
the installation is complete, the system must be shut down and
restarted for changes to take effect.
WIN-OS/2
Please note the following limitations regarding WIN-OS/2.
1. The WIN-OS/2 full screen session should be set to Enhanced
Capability . The default setting is Standard Mode. If this setting is
not changed, Windows will not run.
2 . WIN-OS/2 should be started by selecting the WIN-OS/2 Full
Screen Icon in the Command Prompts folder, or with the WIN
command in a DOS Full Screen or OS/2 Full Screen session.
3 . Do not start WIN-OS/2 in a DOS or OS/2 Window. The system
does not support the enhanced video mode being used in a
window, and therefore will not run.
70 PCM-5890 User's Manual
Page 79

4. When running WIN-OS/2, DO NOT use <ALT>+<HOME> to
switch a DOS or OS/2 Full Screen session to Windows. If this
happens, do a system shutdown and reboot.
Driver diskette copy
NOTE: Diskette copies of the OS/2 drivers must have a
VOLUME LABEL that reads “DISP 1” in order to be
an installable diskette.
To copy the OS/2 Display Driver Diskette, follow these instructions:
1. Copy all files on the OS/2 Display Driver Diskette as you
normally would onto another diskette.
2. Place the diskette copy in drive A. At the C:\ prompt, type
LABEL A: DISP 1 to properly label your diskette. Then store
your diskette copy in a safe place.
For proper installation of OS/2 drivers, all diskette copies must
be properly labeled “DISP 1”.
Chapter 5 Flat Panel/ CRT Controller 71
Page 80

ÔÔ
Ô
Windows NT 3.51
These drivers are designed to work with MicrosonftÒ WindowsÔ.
ÔÔ
Driver installation
1. Install WindowsÔ NT3.51 as you normally would for a VGA
display. Run WindowsÔ NT Control Panel from the Main Group.
Choose the Display option. In the Display Settings dialog box,
click on Change Display Type. Click on Change from the
Adapter T ype in the Display Type dialog box. Click on Other in
the Select Device dialog box.
2. Place the WindowsÔ NT Display Driver Diskette in drive A.
Press <ENTER> and the following driver names will appear
highlighted in the Models list box:
CHIPS Video Accelerator (64310,65545,65548,65550)
CHIPS Video Accelerator (65510,65530,65535,65540)
Click on Install to Install the selected driver. Once the instal
lation is complete, shutdown and restart the system.
3. Upon restart, at the Invalid Display Selection message, click on
OK and select the desired display settings from the Display
Settings dialog box. Click on Test to test the newly selected
graphic mode. A color test screen should appear, followed by the
Testing Mode window. Click on Yes to contiune. The Display
Settings Change window will appear. Click on Restart Now for
the new settings to take effect.
72 PCM-5890 User's Manual
Page 81

Windows NT 4.0
Driver Installation
1. Install Windows NT4.0 as you normally would for a VGA
display. First click the Start button, go to Settings and click
on Control Panel. Choose the Display icon and click on the
icon. In the Display Properties window, click on the Set-
tings tab. Then click on Change Display Type. In the
Change Display Type window, click on the Change button
under Adapter Type. This will bring up the Select Device
window.
2. Place the WindowsÔ NT Display Driver Diskette in drive A.
In the Select Device window, click on Have Disk, Press
<ENTER> and the name of the Chips and Technologies, Inc.
Video Controller driver will appear highlighted in the Models list box. Select Chips and Tech. 65548 PCI(new) and
Click OK to install the selected driver. Click OK to install
the selected driver.
3. Once the installation is complete, the Change Display Type
window will reappear. Click on Close to close the window.
Then the Display Properties window will reappear. Click on
Apply. Restart the system for new settings to take effect.
Chapter 5 Flat Panel/ CRT Controller 73
Page 82

SOFTWARE UTILITIES
This chapter describes the operation and installation of the following
software utilities supplied on the Display Driver Diskettes:
• CHIPSDSP
• CHIPSCPL
The CHIPSDSP utility program
This utility program is designed to work with MicrosoftÒ WindowsÔ
95.
Installing the utility
CHIPSDSP.DLL is located on the CHIPS WindowsÔ 95 driver disk.
This file is a WinsowsÔ 95 based utility for selecting display type and
refresh rate. It is a Display Properties Refresh window that
is automatically installed when installling CHIPS WindowsÔ 95 display drivers. The Display icon is in the Control Panel group. To
invoke the Display icon, simply click on the Start button, go to Set-
tings, click on Control Panel, and then double click on the Display
icon. Click on the property sheet with the heading Refresh.
How to use the utility
DISPLAY DEVICE allows you to select the display type from the
following:
• CRT Only <AL T C>
• LCD (Flat Panel) only <AL T I >
• Both CR T and LCD (Flat Panel) <AL T B>
74 PCM-5890 User's Manual
Page 83

REFRESH RATE allows you to select the refresh rate from the
following:
• Interlaced
• 56 Hz
• 60 Hz
• 70 Hz
• 72 Hz
• 75 Hz
• 85 Hz
The refresh rate is available in CRT Mode only.
Note: 1.
The refresh rates that are supported by the selected monitor are the only refresh rates that will show and be
selectable.
2.
The above refresh rates may not be supported by all
Chips products.
WINDOWSÔ DEFAULT allows you to return to the default
refresh rate setting for the selected monitor in WindowsÔ 95.
Chapter 5 Flat Panel/ CRT Controller 75
Page 84

The CHIPSCPL utility program
This utility program is designed to work with MicrosoftÒ WindowsÔ
Version 3.1.
Installing the utility
CHIPSCPL.CPL is a WindowsÔ based utility to select resolutions and
color depth. It is a Control Panel Applet with its own icon that is automatically installed when installing CHIPS WindowsÔ 3.1 linear drivers.
The Control Panel icon is in the Main W indowsÔ group. T o invoke the
control panel applet, simply click on the icon. The driver resolution and
color depth take effect only after WindowsÔ is rebooted with the new
driver.
How to use the utility
SCREEN SIZE<ALT S> allows you to select from the following
resolutions:
• 640x480
• 800x600
• 1024x786
• 1280x1024
By selecting the resoution first, it will determine the allowable
selections for color depth.
COLOR <AL T O> allows you to select the number of colors from the
following:
• 16 (4bits per pixel)
• 256 (8 bpp)
• 32K (15bpp)
• 64K (16bpp)
• 16M (24bpp)
By selecting the color depth first, it will determine the allowable
selections for resolution.
76 PCM-5890 User's Manual
Page 85

DPI<ALT P> allows you to select a large or small font.
DISPLAY<ALT D> allows you to select the display type from the
following:
• CRT only
• LCD (Flat Panel) only
• Both CRT and LCD (Flat Panel)
MONITOR SELECTION <ALT M> allows you to select from the
list of monitors.
REFRESH<ALT R> allows you to select the refresh rate from the
following:
• Interlaced
• 56 Hz
• 60 Hz
• 70 Hz
• 72 Hz
• 75 Hz
The refresh rate is available on CTR Mode only. The refresh rates
supported by the selected monitor are the only available refresh rates
that can be selected.
CURSOR-ANIMATION <ALT A> allows you to select an animated cursor instead of the hour glass wait cursor.
BIG CURSOR <ALT G> allows you to select a big cursor for better
visibility on the Flat Panel.
Version <ALT V> displays version information about the current
driver.
HELP <ALT H> displays help information on how to use the
Display Driver Control Panel.
Chapter 5 Flat Panel/ CRT Controller 77
Page 86

78 PCM-5890 User's Manual
Page 87

APPENDIX
A
Watchdog Timer
Demo Program
The following demo program illustrates
the programming steps required to enable,
set, and disable the watchdog timer.
Page 88

#include<stdio.h> #include<dos.h> #include<conio> #include
<time.h> #include<graphics.h> void mydelay(void);
/* MAIN PROGRAM */ void main (void) {
unsigned int dog=0
char inkey;
clrscr();
gotoxy(15, 6);printf("AAEON TECHNOLOGY, INC.");
gotoxy(15, 7);printf("WATCHDOG TIMER TEST & DEMO
PROGRAM");
gotoxy(15, 9);printf("Please setup watchdog delay
time:(2 Sec-30 Sec)");
/* Set watchdog timer time-out interval */
scanf("%2d",&dog); /* Input watchdog timer timeout interval (Sec) */
dog=dog/2; /* Convert time-out interval
to designated Hex */
dog=15-dog;
outportb (0x443,dog); /* Enable watchdog timer */
/* Setup screen display format */
gotoxy(15,11);printf("Now enable watchdog!");
gotoxy(15,12);printf("You can put keyboard reset or
disable watchdog.");
gotoxy(15,13);printf(" [1]. Reset watchdog.");
gotoxy(15,14);printf(" [2]. Disable watchdog.");
gotoxy(15,15);printf(" [3]. Return to O.S.");
/* Read key pressed */
while(1){
if(kbhit()){
}
run_time=0;
inkey=getch();
switch(inkey){
case '1': /* Reset Watchdog timer */
gotoxy(15,11);printf("Now enable
watchdog timer!");
outportb(0x443,dog);
run_time=0;
break;
case '2': /* Disable Watchdog timer */
gotoxy(15,12);printf("Now
disable watchdog timer!");
outportb (0x80,dog);
return;
default : break;
}
A-80 SBC-455 User's Manual
Page 89

mydelay();
run_time=run_time+1;
/* Display time elapsed */
gotoxy(45,11);printf(%2d.%1d sec",run_time/
}
}
/* USER FUNCTION LIBRARY */ void mydelay(void) /*
Delay program: */ /* Delay 109.89ms (18.2Hz*2) */{
}
10,run_time%10);
clock_t start,end;
start=clock();
end=start;
while((end-start)<2){
end=clock();
}
Appendix A Watchdog Timer Demo Program A-81
Page 90

A-82 SBC-455 User's Manual
Page 91

APPENDIX
B
Installing PC/104
Modules
This appendix gives instructions for
installing PC/104 modules.
Page 92

Installing PC/104 modules
The SBC-455's PC/104 connectors give you the flexibility to
attach PC/104 expansion modules. These modules perform the
functions of traditional plug-in expansion cards, but save space
and valuable slots. Modules include:
• PCM-3810 Solid State Disk Module
• PCM-3820 High Density Flash Disk Module
• PCM-3110 PCMCIA Module
• PCM-3111 Secondary PCMCIA Module
• PCM-3610 Isolated RS-232 and RS-422/485 Module
• PCM-3660 Ethernet Module
• PCM-3718 30 KHz A/D Module
• PCM-3724 48-channel DIO Module
• PCM-3910 Breadboard Module
To install these modules on the SBC-455 is a quick and simple
operation. The following steps show how to mount the PC/104
modules:
Step1 Remove the SBC-455 from your system paying
particular attention to the safety instructions already
mentioned above.
Step2 Make any jumper or link changes required to the CPU
card now. Once the PC/104 module is mounted, you
may have difficulty in accessing these.
Step3 Normal PC/104 modules have "male" connectors and
mount directly onto the main card. However, for
reasons that ensure better bus matching, the connectors
on the SBC-455 and the PC/104 module are both
"female". For this reason you need to plug-in a "malemale" adapter (included with the SBC-455). Please refer
to the following PC/104 module mounting
diagram on the following page. After this is in place,
you have the correct mounting connector to accept your
PC/104 module.
B-84 SBC-455 User's Manual
Page 93

Step4 Mount the PC/104 module onto the CPU card. Do this
by pressing the module firmly but carefully onto the
mounting connectors.
Step5 Secure the PC/104 module onto the CPU card using
the four mounting spacers and srews.
PC/104
Mounting Support
SBC-455
CPU Card
MaleFemale Male Female
PC/104 Mounting
Adaptor
PC/104 Module
PC/104 Module Mounting Diagram
Appendix B Installing PC/104 Modules B-85
Male
Page 94

3.775
3.575
3.500
3.250
3.575
0.200
0
0
0.200
3.350
PC/104 module dimensions (inches
3.550
±5±5
±5%)
±5±5
0.200
B-86 SBC-455 User's Manual
Page 95

APPENDIX
C
LCD Display BIOS
Configuration
This appendix gives instructions for
configuring various LCD displays.
Page 96

Configuring various LCD display
Follow the instructions below to modify the VGA BIOS:
1. To update your SBC-455 with the newly created BIOS,
execute the following command on enclosed Diskette of VGA
BIOS.
AAFLASH FILENAME.ROM
Note : Before you execute the AAFLASH.COM utility
program, please make sure you bypass both
CONFIG.SYS and AUTOEXEC.BA T .
2. The VGA Tool Diskette allows OEMs to prepare the 65548
VGA BIOS for use. The enclosed BMP utility program
enables OEMs to prepare a custom version of the BIOS. The
BMP548 (32KB BIOS) and BMPLARGE (44KB BIOS)
enable OEMs to customize the 65548 BIOS for their own
specific requirement.
Usage
BMP548 [FILE] or
BMPlarge [FILE]
For more details, please read the Refguide in the Diskette of
VGA TOOl.
C-88 SBC-455 User's Manual
Page 97

Appendix C LCD Display BIOS Configuration C-89
 Loading...