

Page 1

Intel® Reader
User Manual
Page 2

Page 3

Contents
Chapter 1. Setting Up the Reader
About the Reader ..............................................................................1
Inserting the Battery ..........................................................................1
Charging the Battery ..........................................................................3
Keeping the Battery Charged .............................................................4
Replacing the Battery ........................................................................ 5
Chapter 2. Parts of the Reader
Introducing the Reader's Features ..................................................... 6
Top Edge of the Reader .....................................................................7
Face of the Reader ............................................................................9
Bottom Edge of the Reader ............................................................. 13
Right Edge of the Reader ................................................................. 14
Chapter 3. Getting Started
Introduction ...................................................................................... 15
Point, Shoot, Listen .......................................................................... 15
Tips for Good Results ...................................................................... 20
Page 4

Chapter 4. Using the Reader Menus
An Introduction to Reader Menus .................................................. 22
About the Home Menu .................................................................... 22
About The Library ............................................................................ 23
About the Recent Items Menu ........................................................24
About the Shoot Mode Menu .......................................................... 25
About the Settings Menu ................................................................ 25
About the Help Menu ...................................................................... 26
Chapter 5. Capturing and Playing Files
Introduction ......................................................................................29
Setting the Camera Flash .................................................................29
Capturing Multiple Pages .................................................................30
About Text and Audio Files ..............................................................30
Navigating in a Text e-Book ............................................................. 31
Audio Playback Navigation ...............................................................35
Navigating to a Specic Heading or Page ........................................39
Viewing the Text Image ................................................................... 41
Page 5

Increasing and Decreasing Text Size and Text Images .....................42
Spelling a Word in a Text File ........................................................... 42
Chapter 6. Managing Files on the Reader
Introduction ......................................................................................43
Using Categories to Organize Library Files .......................................43
Creating a New Category .................................................................44
Adding a File to an Existing Category .............................................. 45
Removing a File from a Category .....................................................45
Deleting a Category .........................................................................46
Renaming a Category ...................................................................... 46
Using the Texts and Audio Menus ................................................... 47
Getting Information about a File .......................................................48
Permanently Deleting a File .............................................................48
Renaming a Text or Audio File .........................................................49
Saving a Text File as Audio ............................................................. 51
Adding Pages to a Text File .............................................................. 52
Sorting Your Files by Name or Date ................................................. 52
Page 6

Chapter 7. Customizing the Reader
The Settings Menu ..........................................................................53
Basic Settings .................................................................................. 53
Display Settings .............................................................................. 58
Voice Settings .................................................................................. 61
Security Settings .............................................................................64
Restoring Default Settings ............................................................... 67
Chapter 8. Using the Reader with Other Devices
Introduction ......................................................................................68
Connecting to the Portable Capture Station ....................................69
Using the Reader with a Mouse ......................................................69
Using the Reader with a Keyboard ...................................................69
Using the Reader with a Computer .................................................. 71
Connecting the Reader to an External Drive .................................... 76
Chapter 9. Frequently Asked Questions and Customer Support
Frequently Asked Questions ............................................................80
Customer Support ........................................................................... 83
Page 7

Appendix A. Technical Specications
Reader Specications ..................................................................... 84
Battery Pack Specications ............................................................86
AC Adapter Specications .............................................................. 87
Appendix B. Updating Your Reader Software
About the Software Update Process ..............................................88
Updating Reader Software Using a Computer ................................89
Updating Reader Software Using a Flash Drive .............................. 91
Appendix C. Care and Recycling Information
Recommended Cleaning Techniques .............................................. 94
Storing the Reader ..........................................................................95
Recycling ........................................................................................ 95
Index...........................................................................................................96
Page 8

Page 9

1
Reader User Manual
Chapter 1. Setting Up the Reader
About the Reader
The Intel® Reader combines a high resolution camera with text-to-speech software,
to convert printed text to digital text and then play it aloud to you. You can use it to
convert a variety of printed materials, including books, magazines, and mail. As the
text plays, the Reader's display screen highlights the spoken words. The Reader
also provides audio announcements and visual displays to help you know where
you are in an e-Book, and to navigate through audio and text e-Books.
The Reader can generate audio versions of printed materials, which can be played
on most digital music players or computers. The Reader is compact enough to
take with you wherever you go, and discreet enough to use anywhere, anytime.
TIP: The CD that comes with the Reader contains this Reader User Manual
and the Quick Start Guide in PDF format and in audio and digital talking book
versions. You can also hear the manual and quick start guide on the Reader by
accessing the Help menu.
IMPORTANT: For complete safety information and warnings, refer to the safety
and warranty booklet that comes with your Reader.
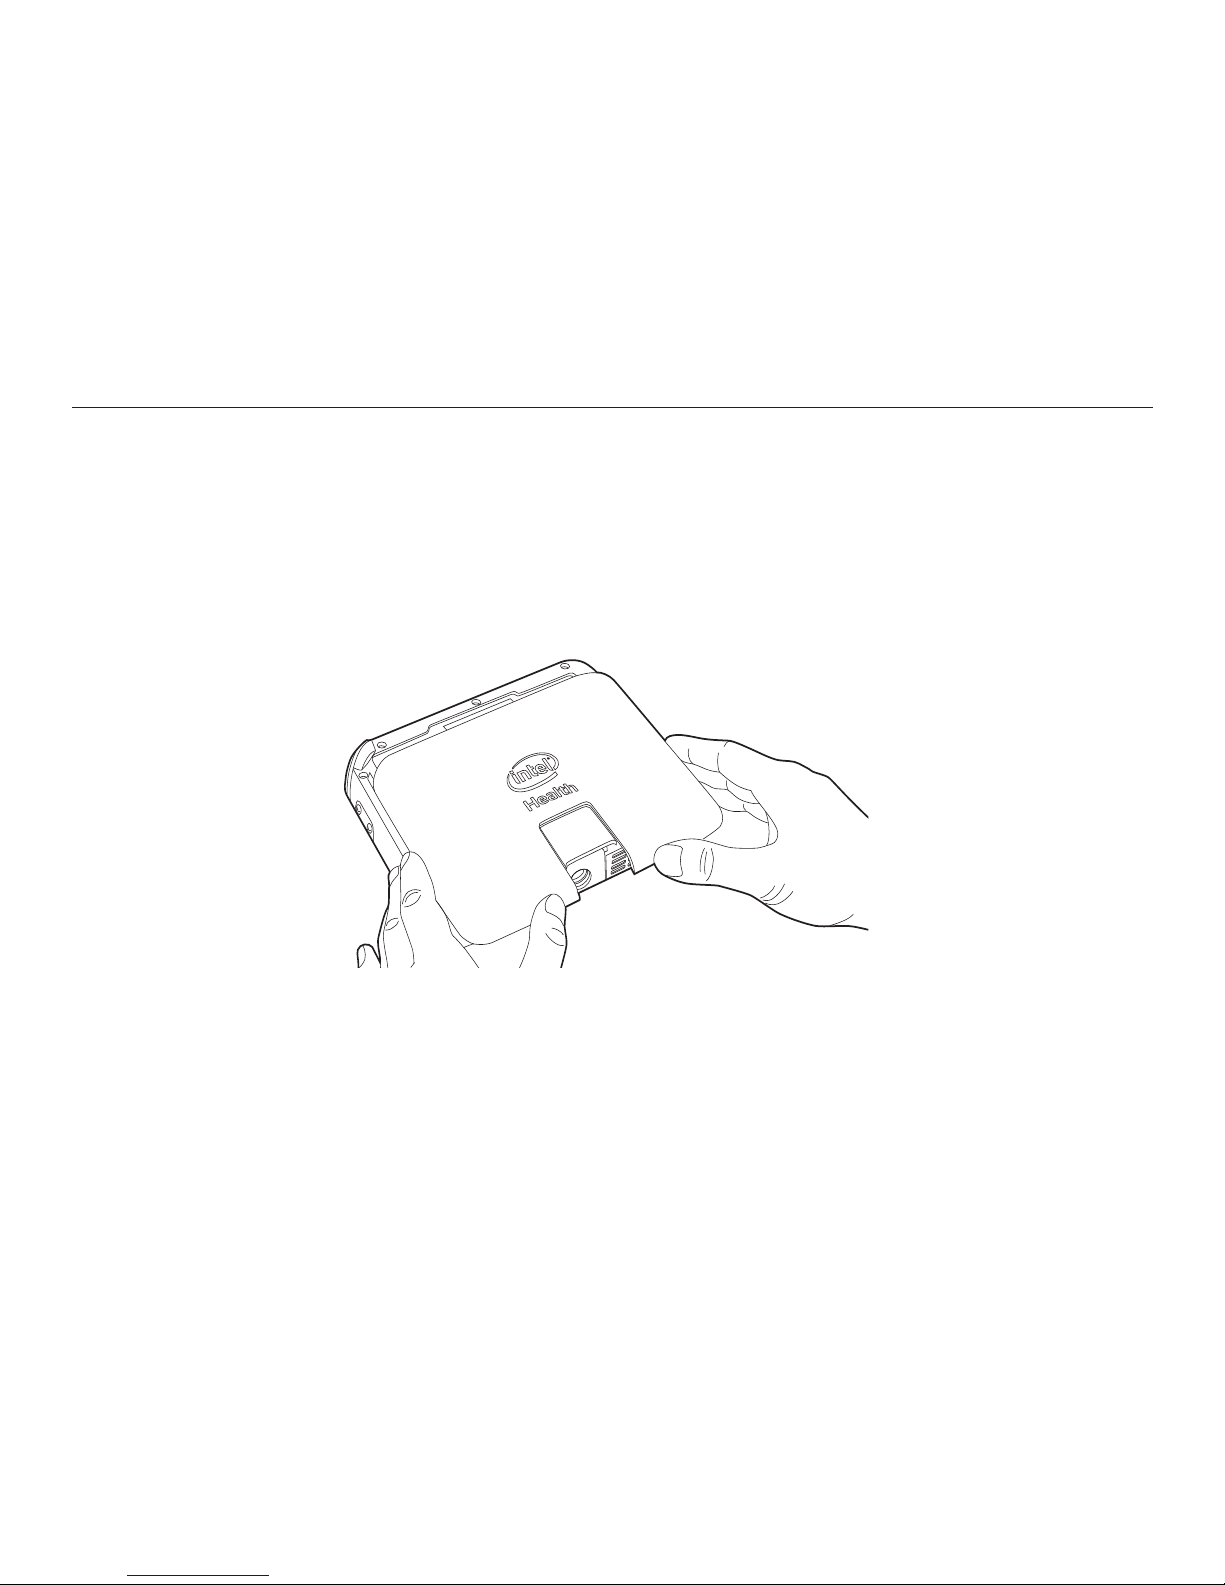
Inserting the Battery
Set the Reader on a work surface, with the display screen facing down and the
angled corner at the upper left. Set the battery on top of the Reader with the at
side down, the angled corner at the upper left, and the Intel logo facing up. In this
Page 10
2
Chapter 1. Setting Up the Reader
position, the notch at the bottom of the battery is lined up to meet the raised tab on
the bottom edge of the Reader.
Line up the left and right edges of the battery with the left and right edges of the
Reader. Slide the battery toward you until it is at against the Reader. Then slide
the battery away from you until it clicks into place, being careful not to pinch your
ngers or hands.
NOTE: Be sure to lock the battery rmly into place. The battery is locked when
you hear it click into place. The Reader will turn on, even if the battery is not
completely locked in place, but improper installation can cause damage to the
locking mechanism.
Page 11
3
Reader User Manual
1
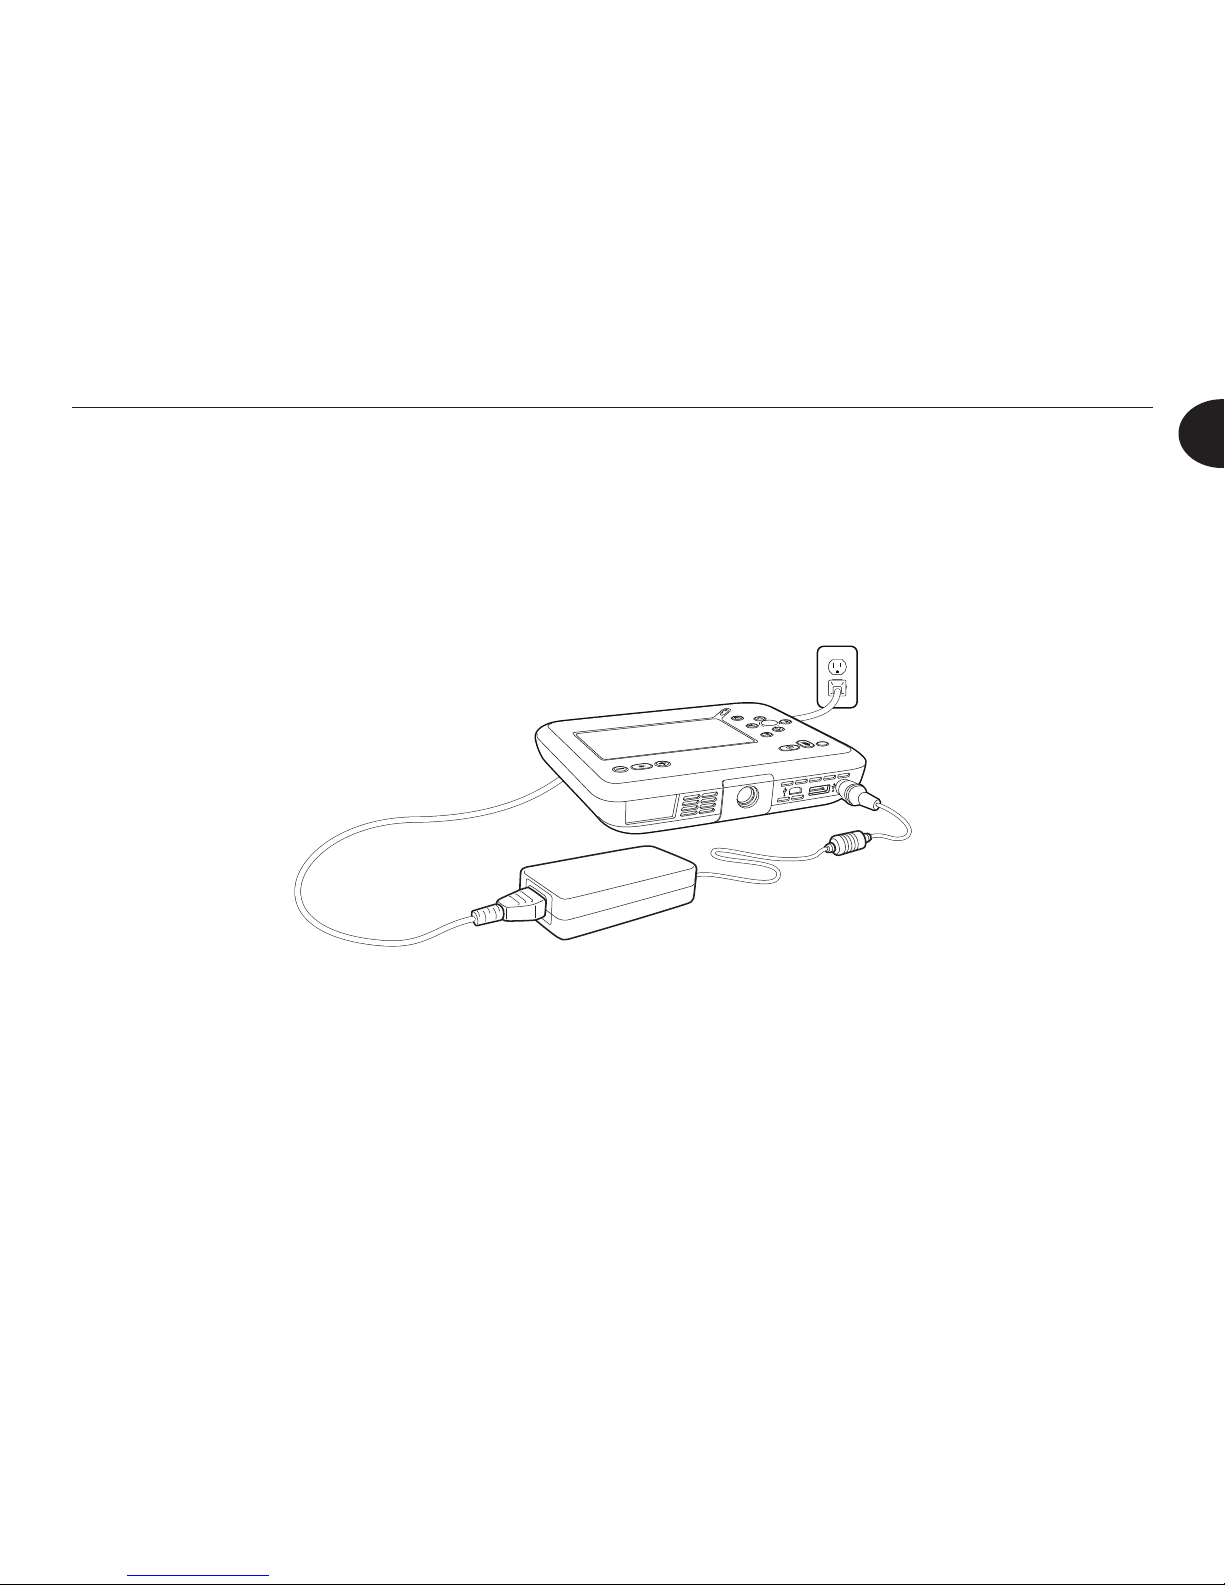
Charging the Battery
To charge the battery, plug your Reader into a power source. The Reader comes
with an AC power adapter and power cord. The power cord consists of two
sections, one of which is attached to the adapter. Connect the other section of the
cord to the adapter.
Intel® Reader
?
Plug the power cord into the power socket. When the display screen is facing up,
and the camera is pointing toward you, the power socket is located at the far right
of the bottom edge. Then plug the other end of the power cord into a wall outlet.
You can leave the Reader plugged in indenitely. You will not over-charge the
Reader by leaving it plugged in, though it is a good idea to unplug it if there is
danger of an electrical storm, to prevent damage to the Reader.
Page 12

4
Chapter 1. Setting Up the Reader
For optimal battery performance and life, it is recommended that you charge the
battery to approximately 100 percent before using the Reader for the rst time.
A full charge takes approximately 3 hours.
Keeping the Battery Charged
The Reader's battery can hold a charge for an extended period of time, but it
will eventually lose its charge. Charge the Reader to approximately 50 percent
at least every 3 months. To check your battery's charge, press the Guide
button, the round button at the lower right of the Reader face. On the Guide
menu, select Device Status and press OK. The Device Status screen appears.
The second line under the screen title tells you the amount of charge for your
battery.
IMPORTANT: Before leaving the Reader idle for several months, charge
the battery to approximately 50 percent before shutting down the Reader or disconnecting the battery. Charging the battery more than 50 percent before long-term storage can result in degraded capacity. Failure
to properly charge the battery can result in a loss of charge that might
make it impossible to recharge your battery.
Page 13
5
Reader User Manual
1
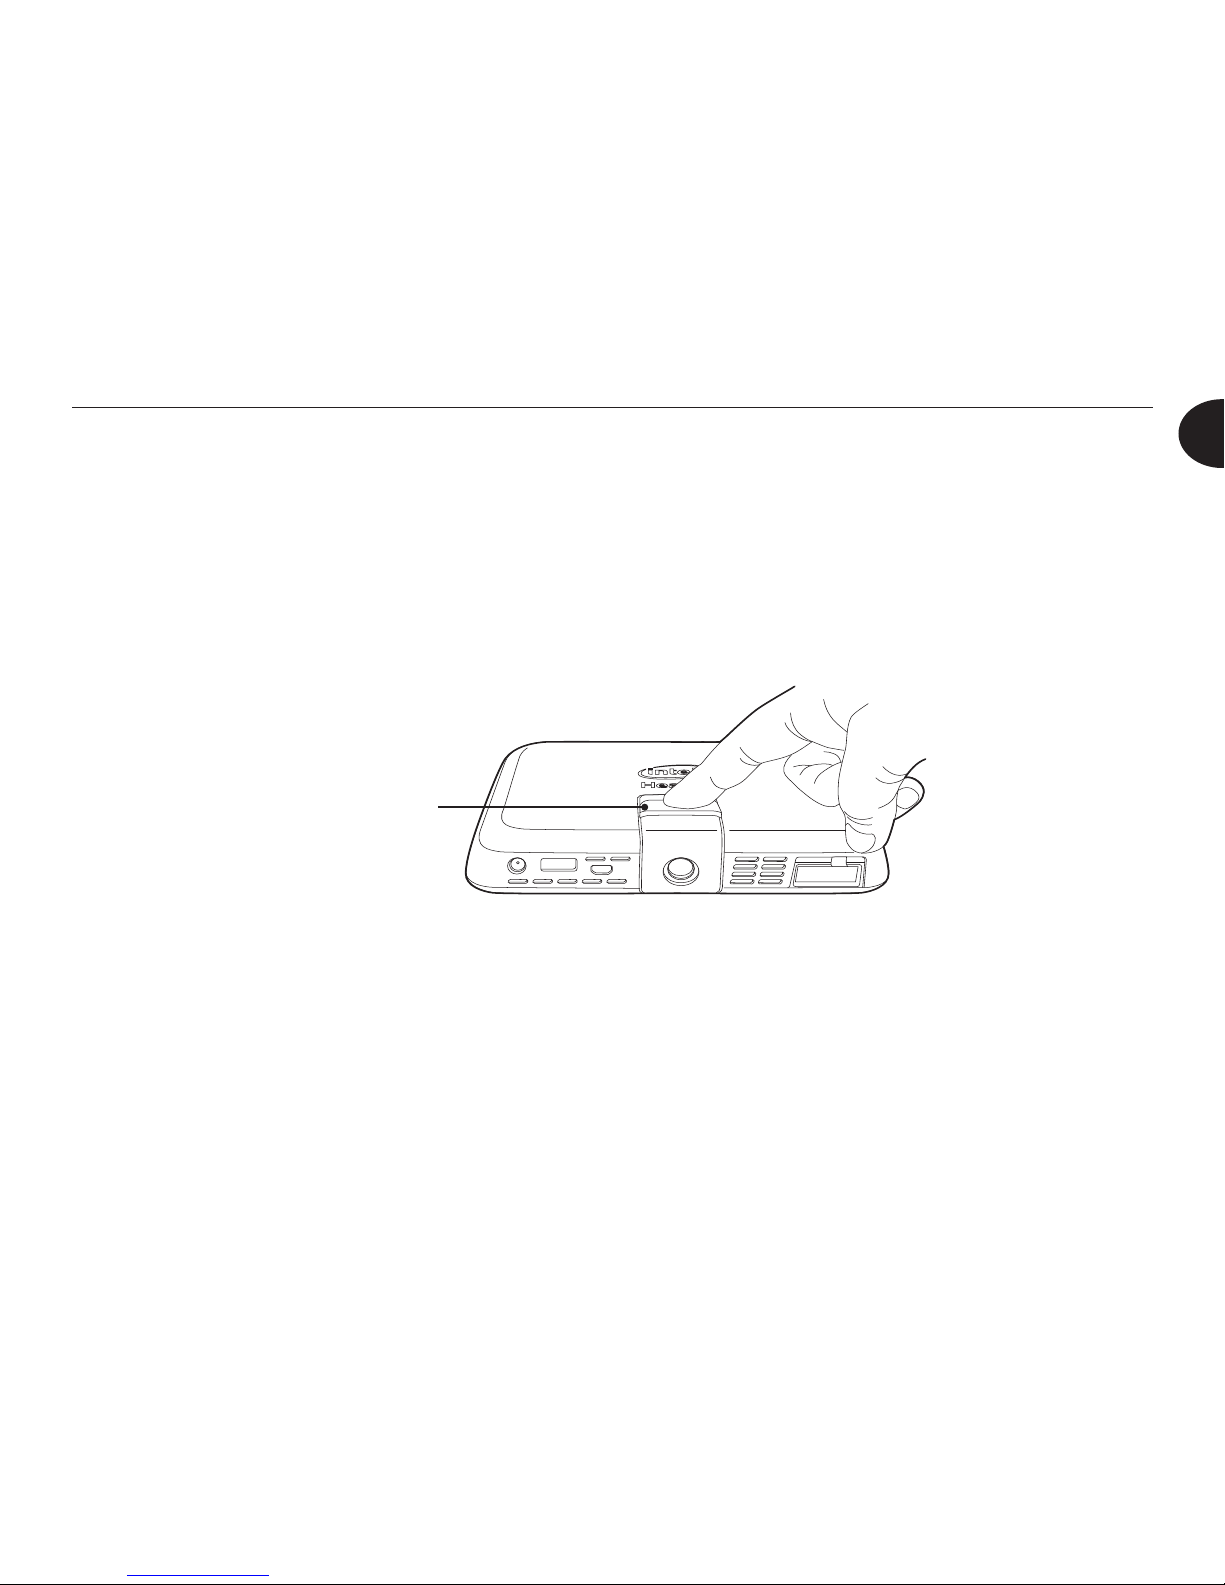
Battery Release
Replacing the Battery
From time to time, it may be necessary to replace the battery. To do so, turn off
the Reader by pressing the Power button for approximately 7 seconds. Press the
Battery Release on the back of the Reader. Slide the battery toward the camera,
and lift it off the Reader. Then install the new battery, following the instructions in
the section titled Inserting the Battery, earlier in this chapter.
Page 14
6
Chapter 2. Parts of the Reader
Introducing the Reader's Features
This chapter describes the various buttons, ports, and other features of your
Reader. Take a few moments to review these features with your Reader in hand,
until you become familiar with the position and function of each feature. At any
time, you can refer back to this section for information about any feature.
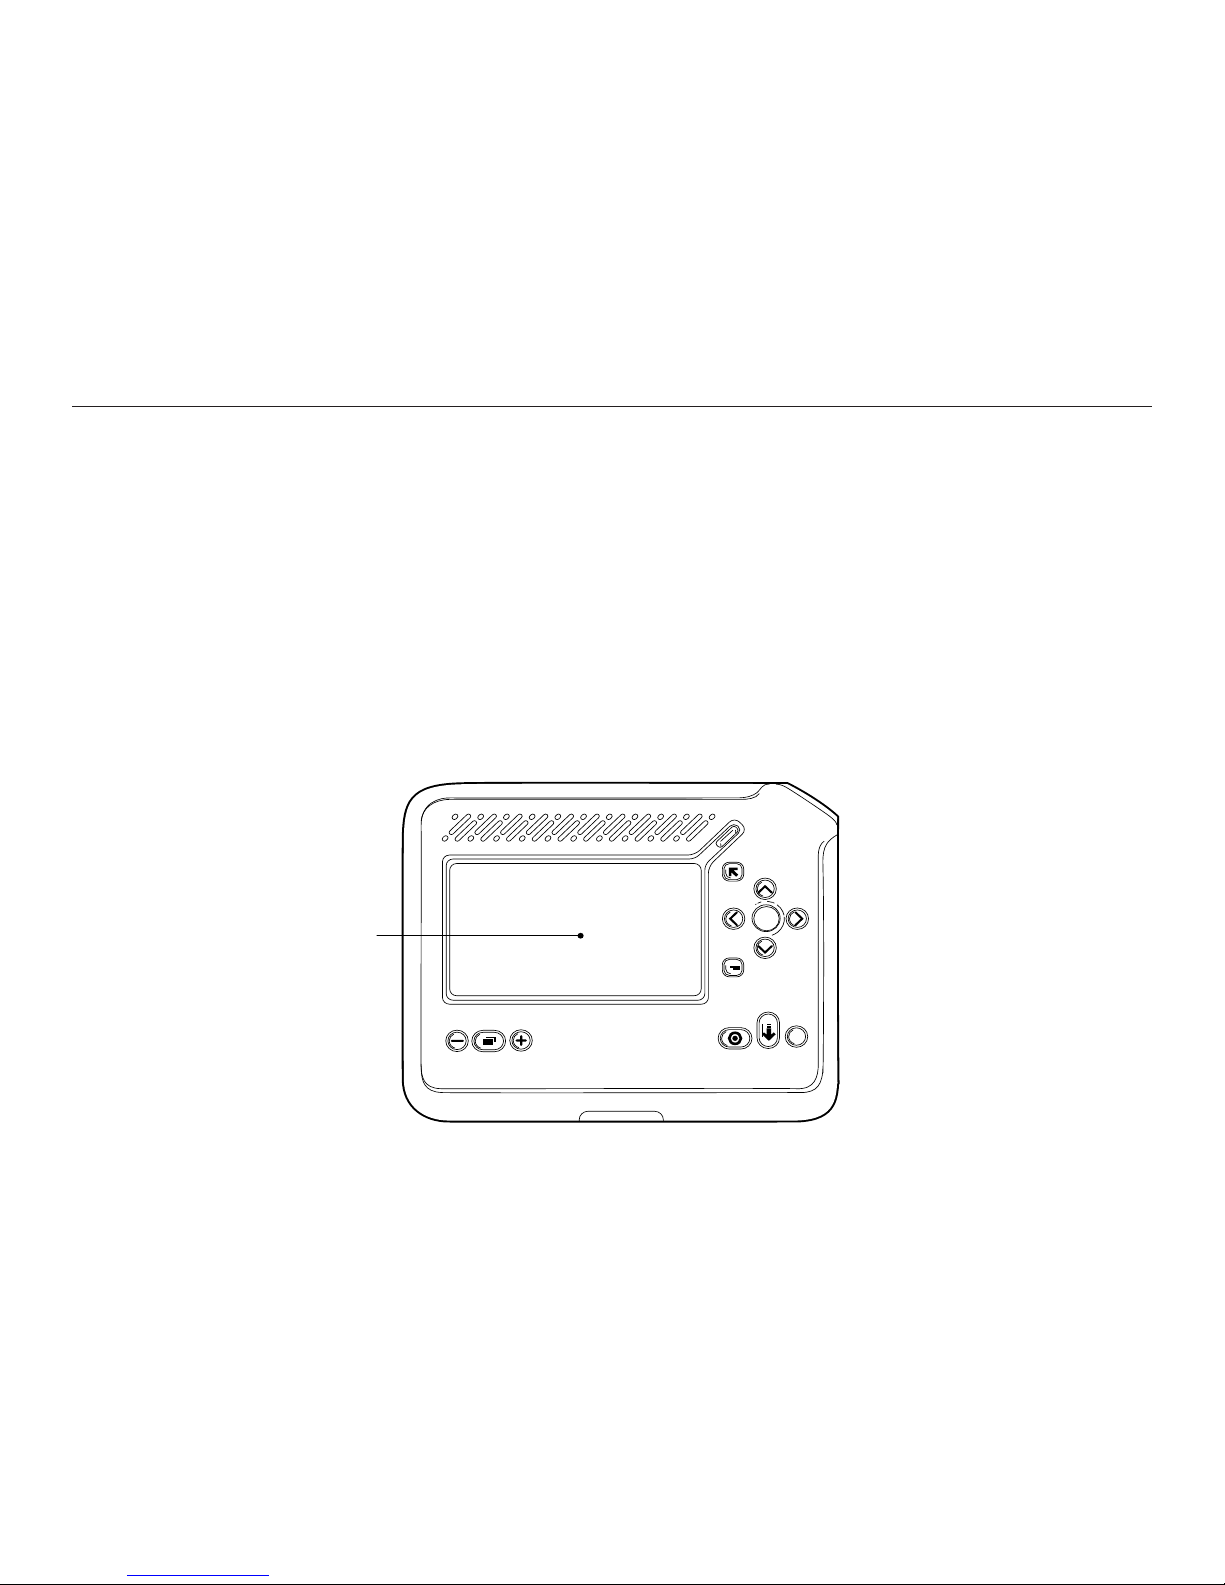
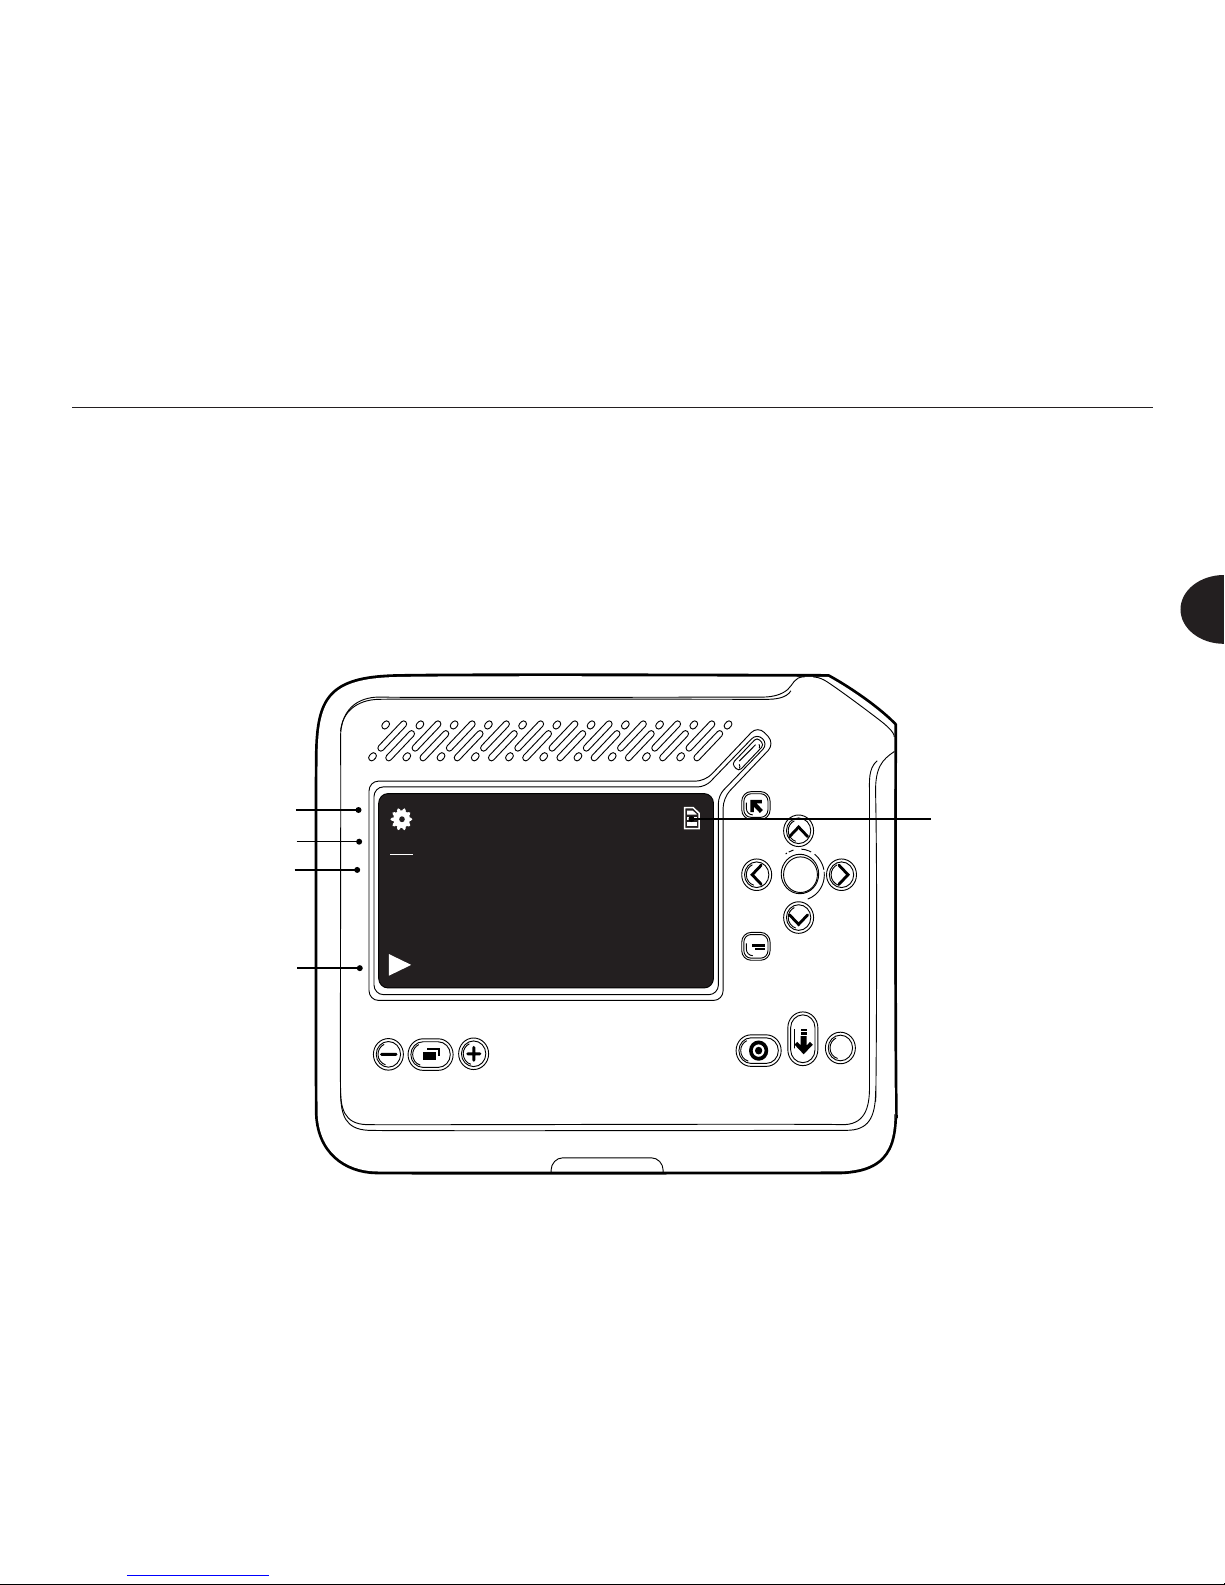
Top Edge
Display
Screen
Right Edge
Bottom Edge
Left Edge
?
Intel® Reader
Page 15
7
Reader User Manual
2
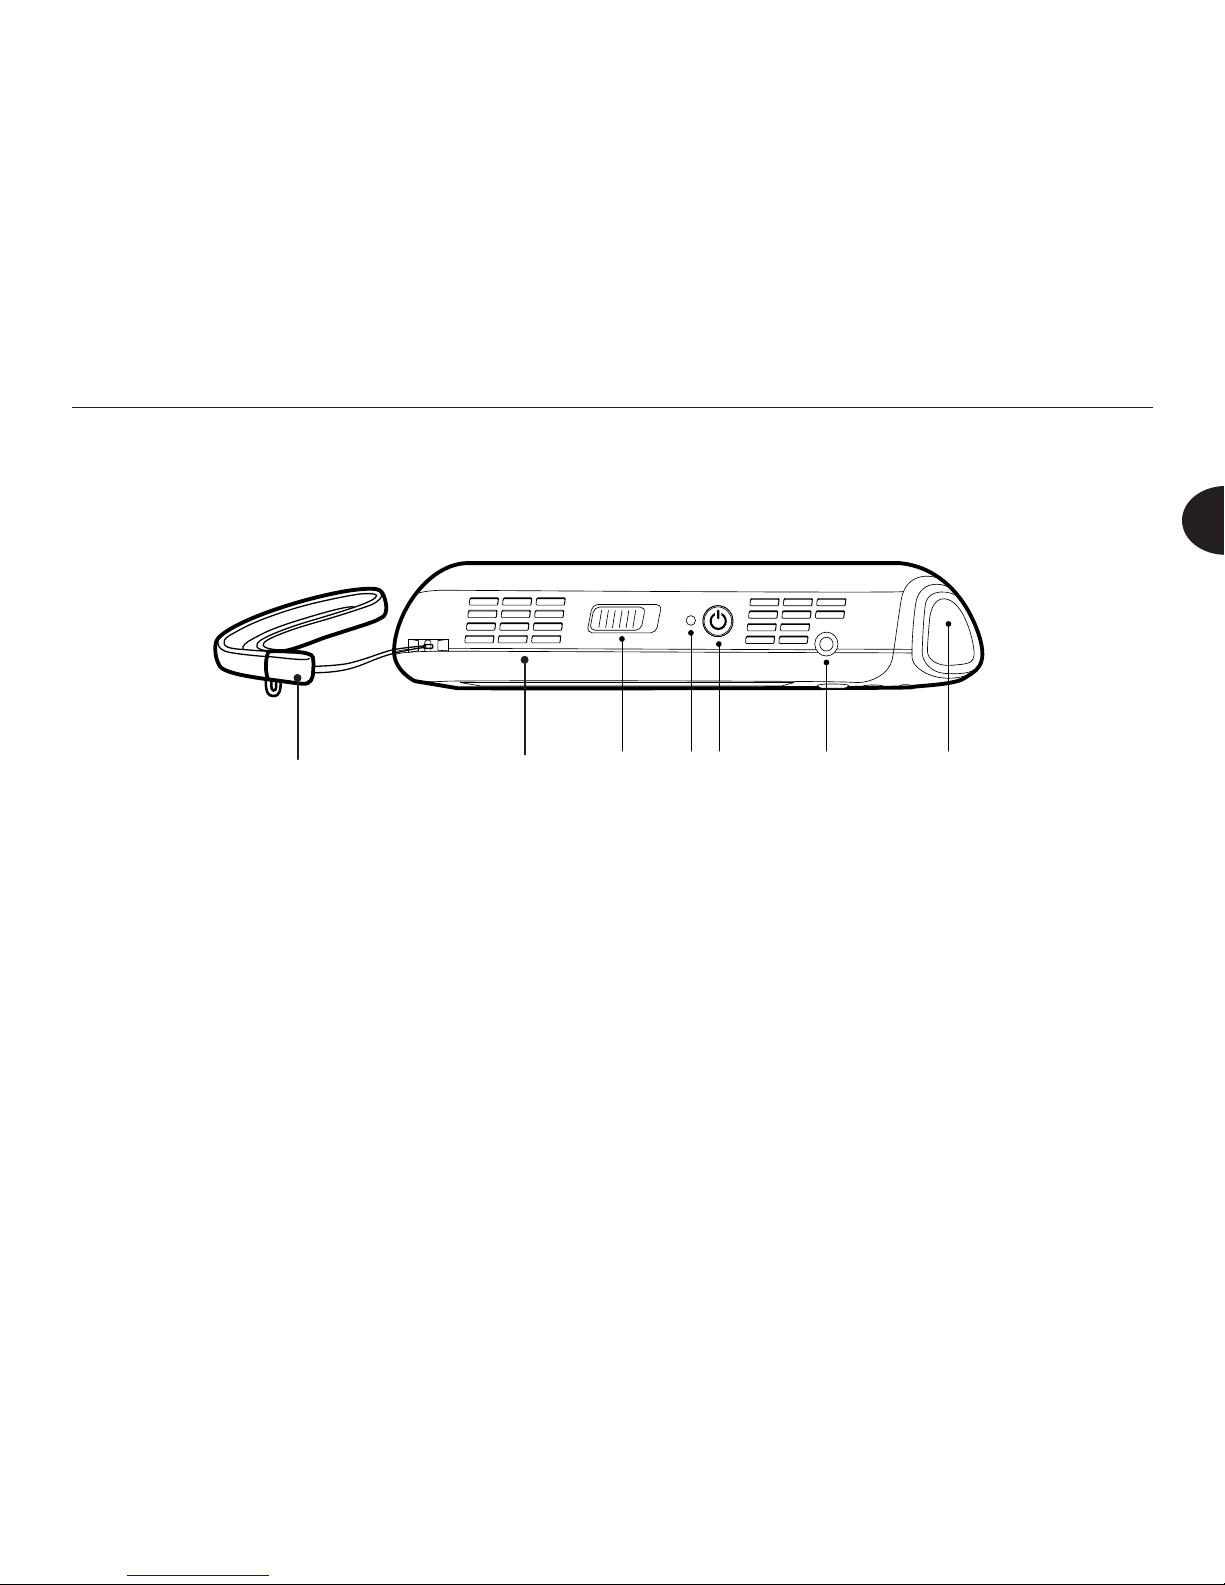
Lanyard: A cord that ts around your wrist, to help you keep hold of the Reader.
Air Vents: Vents are located to the right of the lanyard and to the right of the Power
button. To avoid overheating the Reader, do not block these vents. Keep the air
vents clear of debris.
Hold: A rectangular sliding button with ridges. Hold locks the other Reader buttons
so that button presses have no impact. Slide Hold towards the Shoot button to lock
the Reader buttons. Slide Hold away from the Shoot button to unlock the buttons.
LED: This small, round, multi-colored light on the top edge of the Reader indicates
the status of the Reader as follows:
• When the Reader is turned off completely, and is not connected to a power
source, the LED is not lit.
Hold
LED
Power
Earphone
Socket
Shoot
Air Vents
Lanyard
Top Edge of the Reader
The top edge of the Reader is the edge that is on top when the display screen faces
you, the angled corner is at the top right, and the camera lens is pointed down.
Page 16

8
Chapter 2. Parts of the Reader
• If the Reader is plugged into a power outlet, the LED indicates the battery
charge with an amber light. If the amber light is blinking slowly, the battery
is charging. If the amber light is solid, the battery is fully charged. Even if
the battery is charged between 95 percent and 99 percent, the LED might
indicate that the battery is fully charged. This is normal behavior and does not
indicate a problem with the Reader.
• If the Reader is not plugged into a power outlet, the LED turns green. A solid
green light indicates that the Reader is turned on and ready for use. A blinking
green light indicates that the Reader is turned on and in Sleep mode.
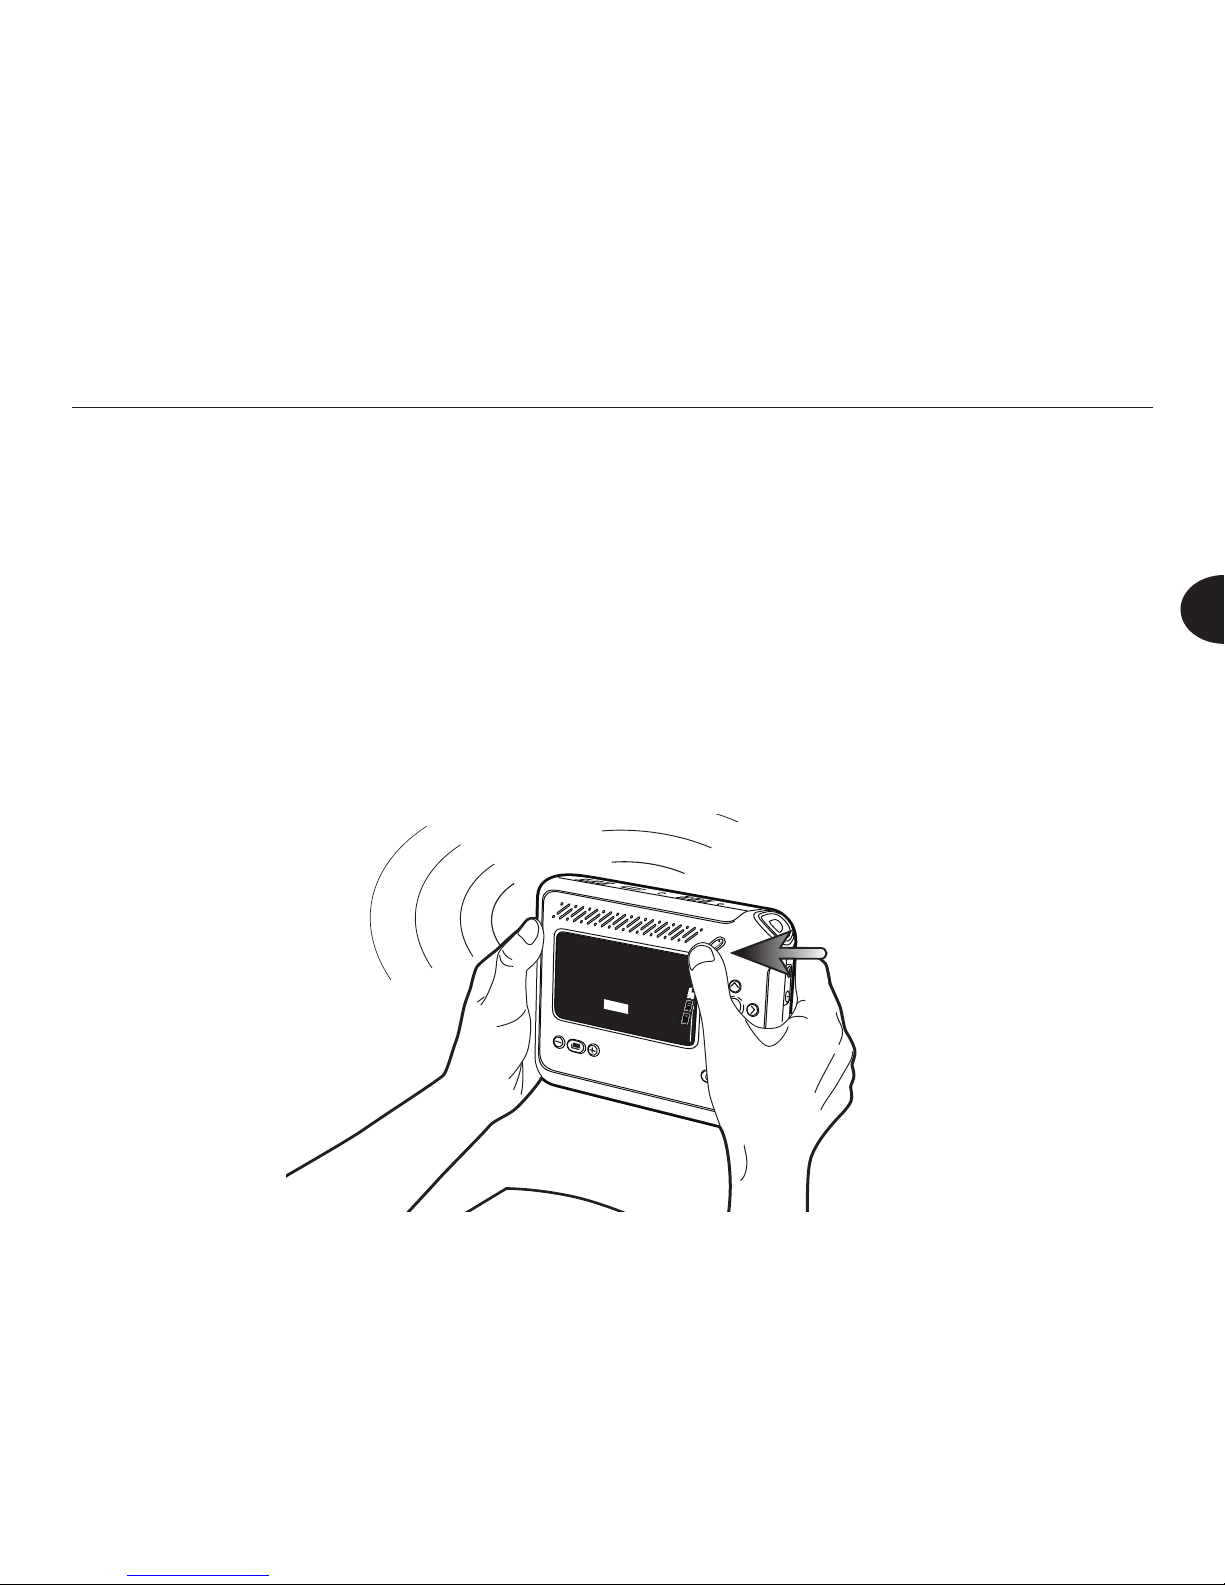
Power: A round button at the center of the top edge of the Reader. Use the Power
button as follows:
• To turn the Reader on, press Power for 1 to 3 seconds. The Reader emits a
single startup tone, and the startup sequence begins. This sequence can take
up to 60 seconds.
• To place the Reader in Sleep mode when the Reader is on, press Power for 1
to 3 seconds. To start the Reader when it is in Sleep mode, press Power for 1
to 3 seconds.
• To turn the Reader off, press Power for approximately 3 to 7 seconds. The
Reader completes any unnished processing, such as converting printed text
to digital text. Then it announces "Turning off" as it shuts down.
• If the Reader software freezes or becomes unresponsive, press Power for
more than 7 seconds to shut down the Reader. The Reader emits two tones
as it shuts down.
Page 17
9
Reader User Manual
2
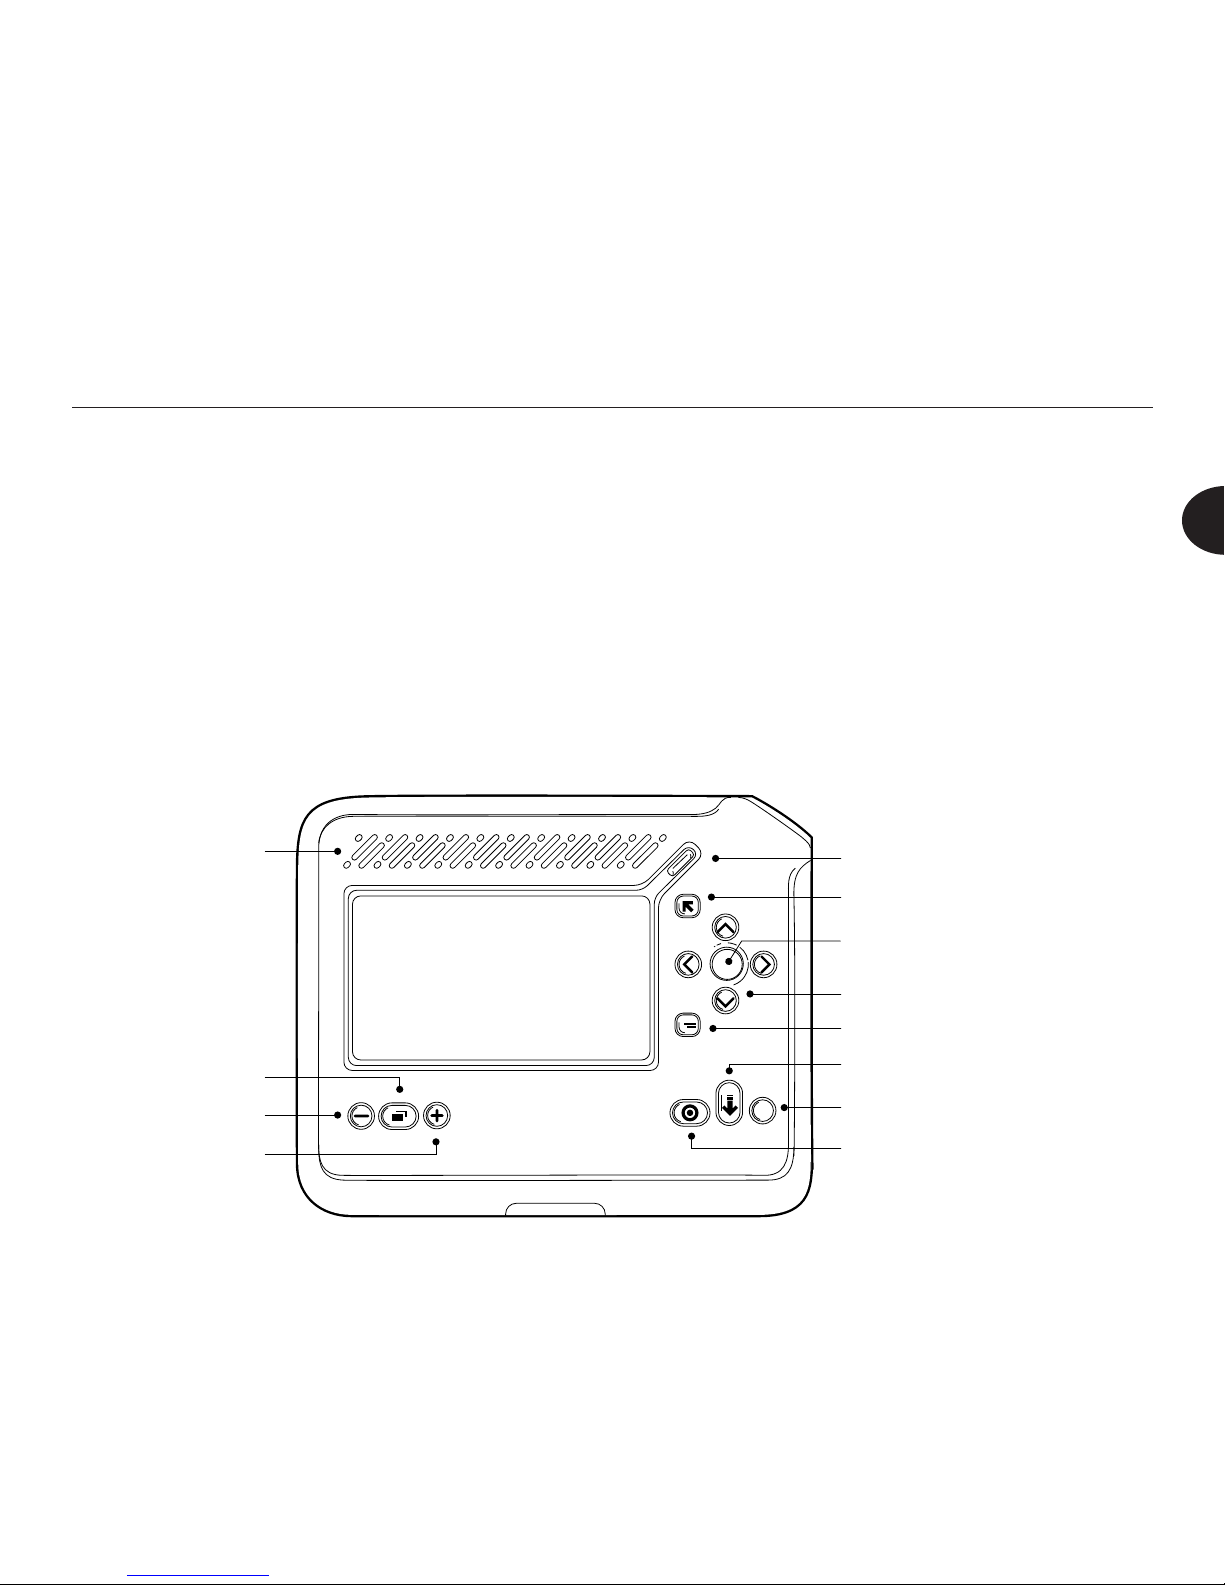
Speakers
OK
Navigation Arrows
Options
Voice Speed
View Toggle
Guide
Zoom Out
Location
Zoom In
Back
Play
?
Intel® Reader
Earphone Socket: A socket where you can plug in earphones. This socket is
located to the right of the Power button. When you use earphones, be sure to insert
them all the way into the socket, to ensure good quality sound.
Shoot: A large, at button on the angled corner of the Reader. Press this button
once to enter Shoot mode. Position the Reader above the text, then press Shoot
again to capture text images.
Face of the Reader
The face of the Reader includes the display screen and several controls that help you
play les, navigate, and make selections.
Page 18

10
Chapter 2. Parts of the Reader
Speakers: Built-in speakers are located above the display screen.
Play: A diagonal, raised button just above the upper-right corner of the display
screen. After selecting a le from the menu, press Play to listen to the le. During
playback, press Play at any time, to pause the playback.
Back: A square, raised button below the Play button. Press Back to return to the
previous menu or to cancel an action. If you lose your place at any time, press and
hold Back for two seconds to return to the Home menu.
OK: A round, recessed button with a raised edge, to the right of the display screen.
Press OK to make a selection or conrm an action. For example, to play a le in the
Texts menu, select the le name in the menu, then press OK. This action opens
the le and begins playing it. When you pause a text reading, you can press OK for
more than one second to have the Reader spell a word aloud.
Navigation (Up, Down, Left, and Right) Arrows: Four round, raised buttons
surrounding the OK button. Press these buttons to navigate in menus, text, and
audio les. For example, in the Home menu with Library selected, press the down
arrow three times to highlight the Settings menu. For more information about the
navigation arrow buttons, refer to the sections titled Navigating in a Text e-Book
and Audio Playback Navigation in Chapter 5, Capturing and Playing Files.
Options: A square, raised button below and to the left of the navigation arrow
buttons. Options displays a menu of actions you can take. The menu and the
actions change, depending on the feature you are using. For example, if you
highlight a text le in the Texts menu and press Options, the Options menu allows
Page 19

11
Reader User Manual
2
you to add the le to a category, get le information, delete the le, rename it, or
save it as an audio le. If you press Options as you listen to the le, the menu
provides all those options and also lets you go to a specic page or heading in the
le.
Location: An oval, raised button below the Options button, and the left-most
of the three buttons in the lower right corner of the Reader face. As you play an
e-Book, or when the book title is highlighted in a menu, press the Location button
to view the Location menu. Using the Location menu, you can hear the page
number of the page that is playing, and navigate to specic pages or headings. For
information about using the Location menu, refer to the section titled Navigating
to a Specic Heading or Page, in Chapter 5.
Voice Speed: A vertical, oval button to the right of the Location button. Press
Voice Speed to speed up or slow down the playback.
Guide: A round, raised button on the right of the Voice Speed button. Press the
Guide button to:
• Open the Device Status screen to view the current date and time, check the
battery's charge, and see the Reader's storage capacity.
• Access the Help menu. On this menu, you can choose to play an introduction
to the Reader, or you can play the quick start guide or select Help topics from
the user manual. You can also use the About option to see your software
version, Reader serial number and product code, or access keys to third-party
content, if you have any.
Page 20

12
Chapter 2. Parts of the Reader
• Restore the Reader to its factory settings and remove any custom settings,
such as the display theme, voice speed and voice gender. To restore all
default settings, press Guide for approximately 20 seconds.
View Toggle: A horizontal, oval button in the middle of the three buttons at the
lower left of the display screen. As you listen to the text playback, press View
Toggle to switch from viewing the words of the playback, to viewing the text
image. The text image is the image of your printed material that you see in the
display screen when you capture the text. The Reader saves this image, so that
you can view it whenever necessary as you listen to the playback. For example, you
might want to view a diagram or picture on one of the pages. When the playback
moves to a subsequent page, the image of the new page appears.
Zoom Out and Zoom In: Two round, raised buttons to the left and right of the
View Toggle button. The left button is Zoom Out, and the right button is Zoom In.
You can use the Zoom In and Zoom Out buttons in the following ways:
• To increase or decrease the size of text on the display screen as the text is
playing, or when text is paused.
• To increase or decrease the size of menu text.
• To enlarge or decrease the size of a text image on the display screen.
TIP: When you zoom in on a text image, or when you enlarge text, you can press
the navigation arrow buttons to move around in the image or text on the screen.
Page 21
13
Reader User Manual
2
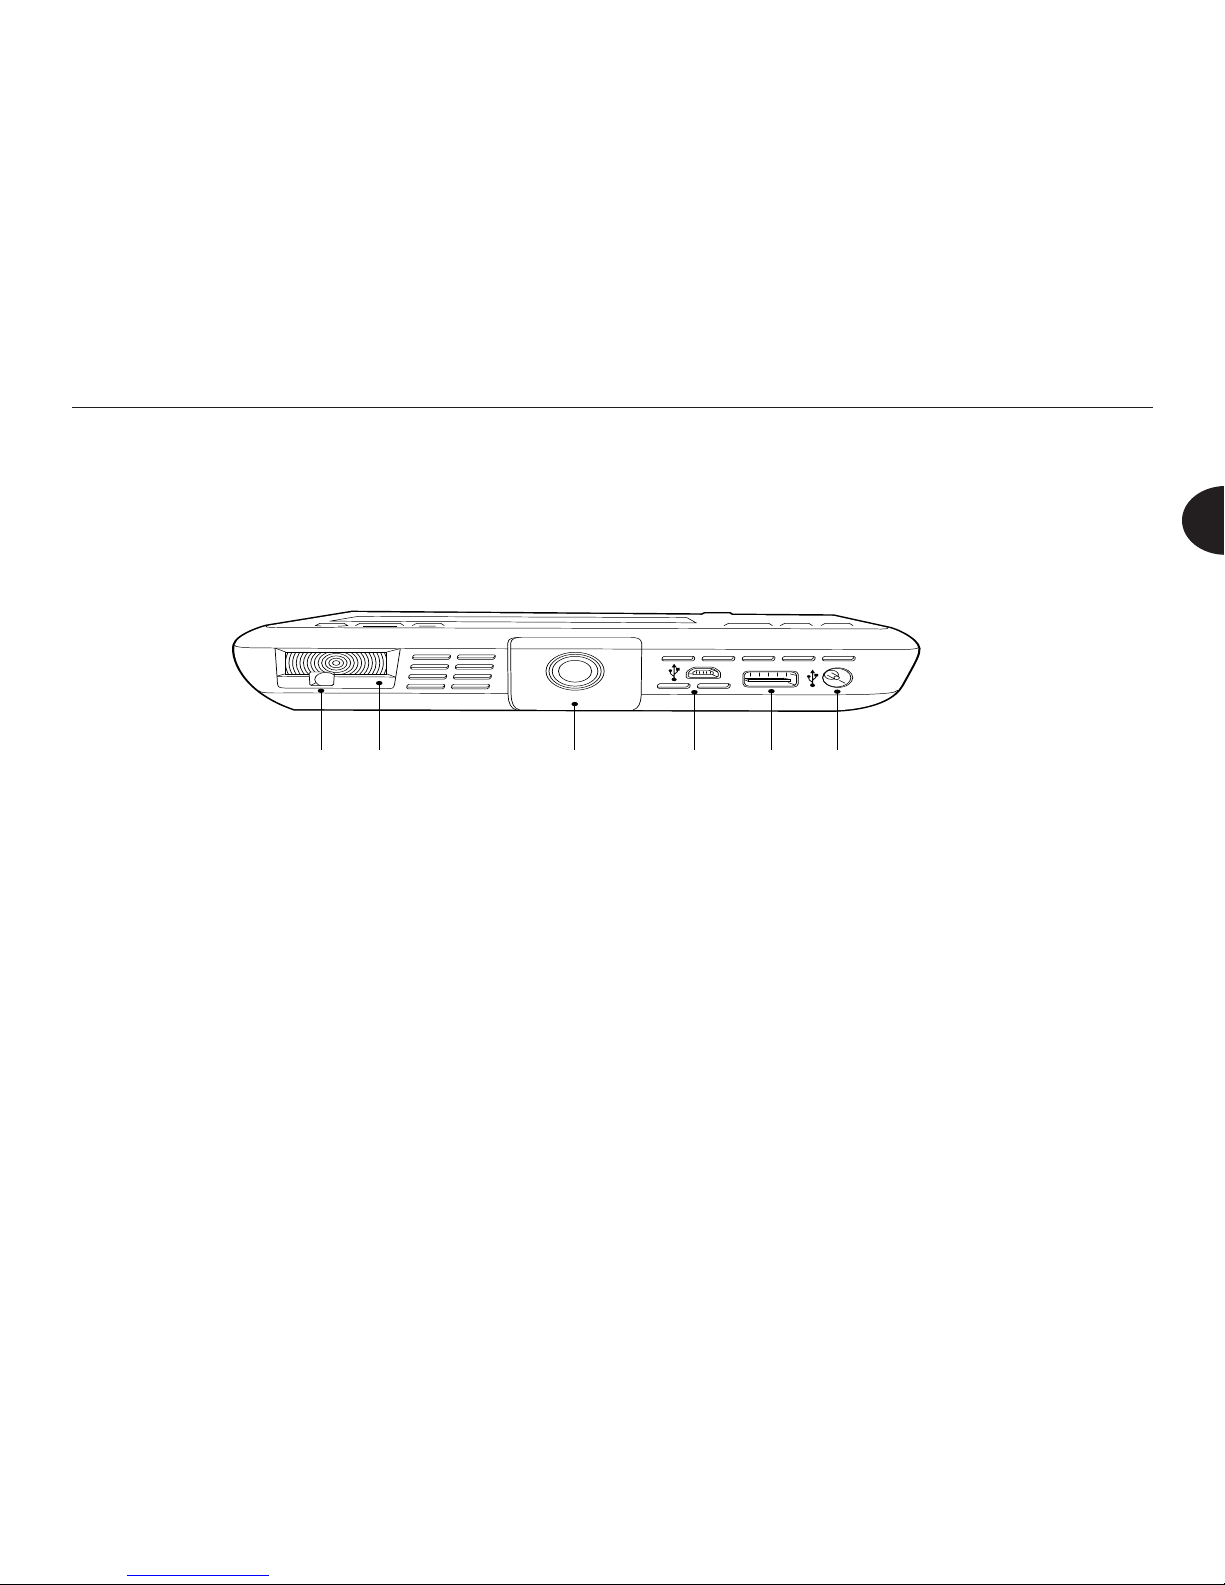
Flash
Camera
Standard
USB
Mini
USB
Power Socket
Auto-focus
LED
Bottom Edge of the Reader
The bottom edge of the Reader is at the bottom when the display screen is facing
you. The bottom edge includes the camera, the ash unit, two USB ports, and the
power socket.
Auto-focus LED: In low light, the Reader emits a red auto-focus light, which the
camera uses to focus.
Flash: A rectangular, plastic covered light at the left end of the bottom edge of
the Reader. When the ash is enabled, the Reader automatically detects when a
camera ash is needed. You can also turn off the ash.
Camera: A round, recessed lens in the center of the Reader's bottom edge. The
camera uses text or images in the center of the display screen to adjust focus.
Mini-USB: A rectangular port to the right of the camera. Use the mini-USB to
connect the Reader to a computer or a Portable Capture Station. The Capture
Page 22
14
Chapter 2. Parts of the Reader
Station is an accessory for the Reader that simplies the task of capturing large
numbers of pages.
Standard USB: A large, rectangular port to the right of the mini-USB. Use this
port to connect the Reader to a keyboard or an external ash drive. For more
information about connecting the Reader to other devices, refer to Chapter 8,
Using the Reader with Other Devices.
Power Socket: A round socket to the right of the standard USB. Plug the
power cord into this socket when charging the battery. You can leave the Reader
plugged in indenitely, without over-charging the battery.
Right Edge of the Reader
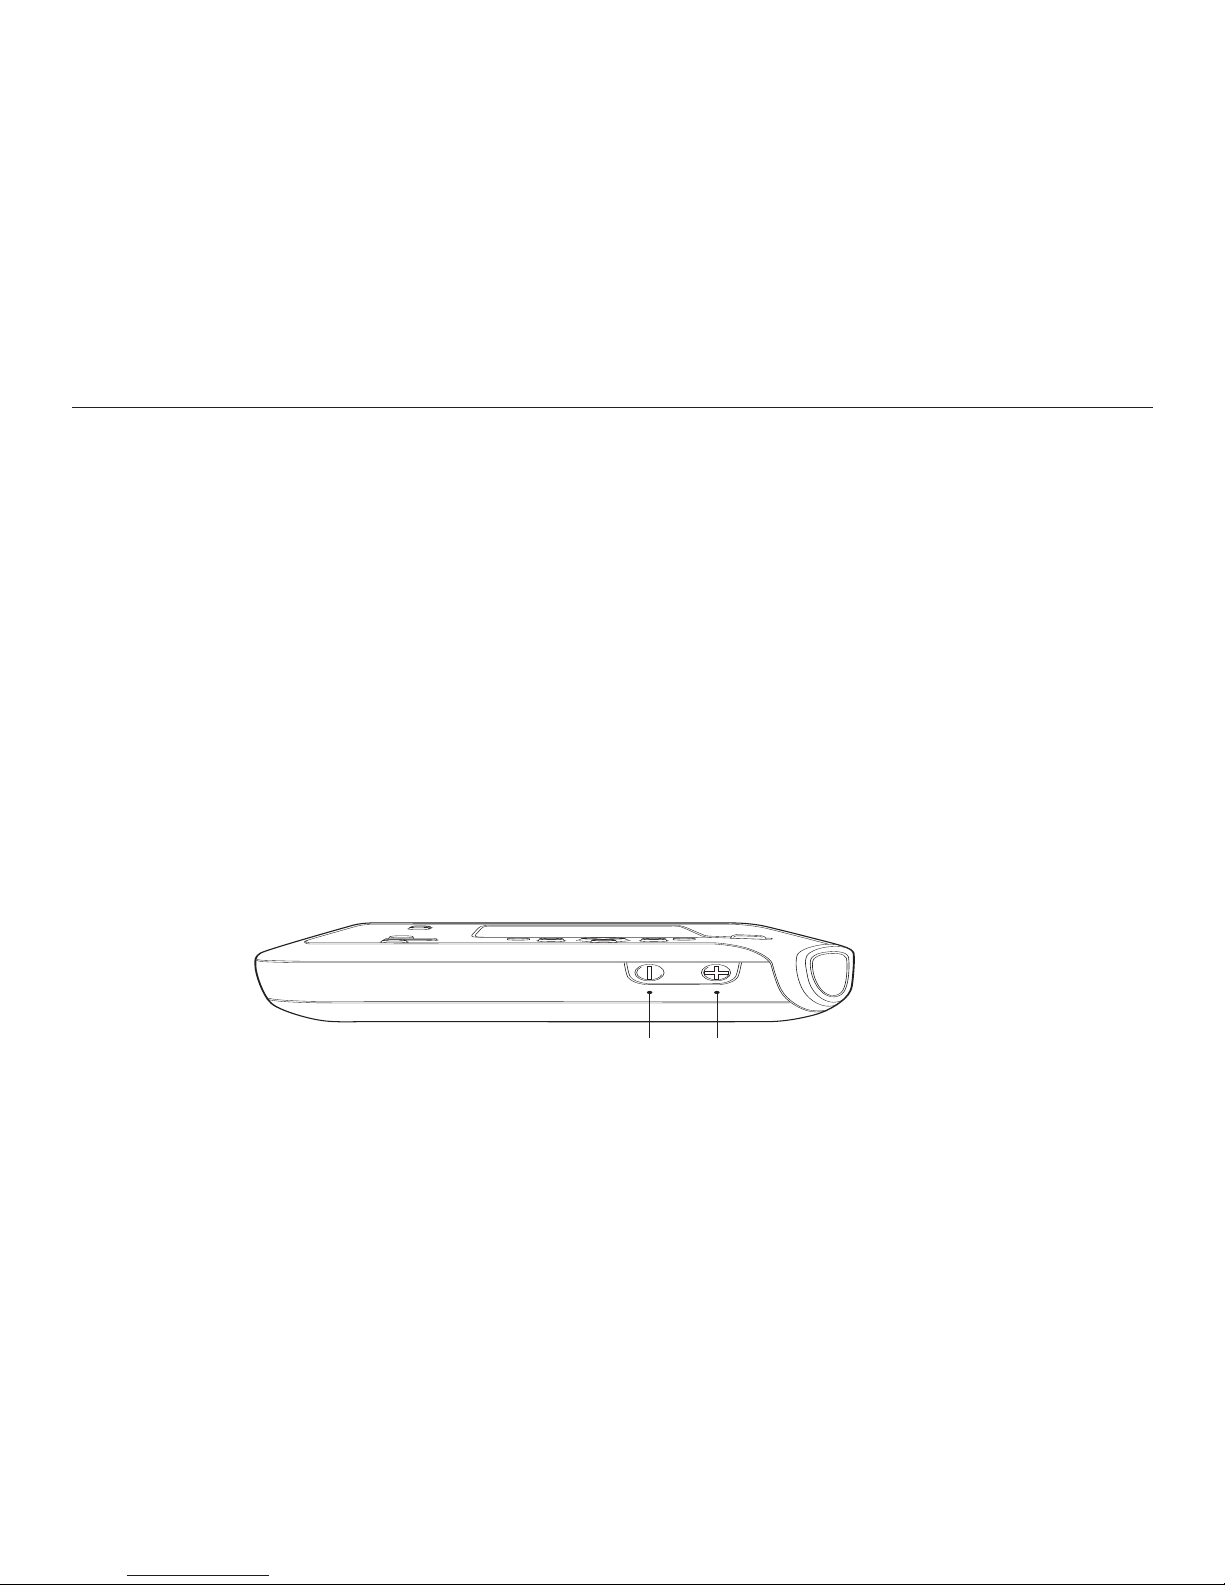
The right edge of the Reader is on the right-hand side when you hold the Reader
with the display screen facing you, and the angled corner at the upper right.
Volume Down
Volume Up
Volume Up and Volume Down: Two round, raised buttons on the right edge.
The Volume Up button has a raised plus (+) symbol. The Volume Down button
has a raised minus (-) symbol. Use these buttons to adjust the volume on the
speakers or the earphones.
Page 23

15
Reader User Manual
Chapter 3. Getting Started
Introduction
This chapter provides a step-by-step tutorial on capturing text images and playing
them back. Before reading the following topics, be sure you are familiar with the
buttons and other features of the Reader. If necessary, refer to Chapter 2, Parts of
the Reader, for additional information as you work.
Point, Shoot, Listen
Typically, you will use the Reader to capture images of text and play the text back to
you. This section is designed to help you with those basic tasks. For more detailed
information about capturing text, refer to Chapter 5, Capturing and Playing Files.
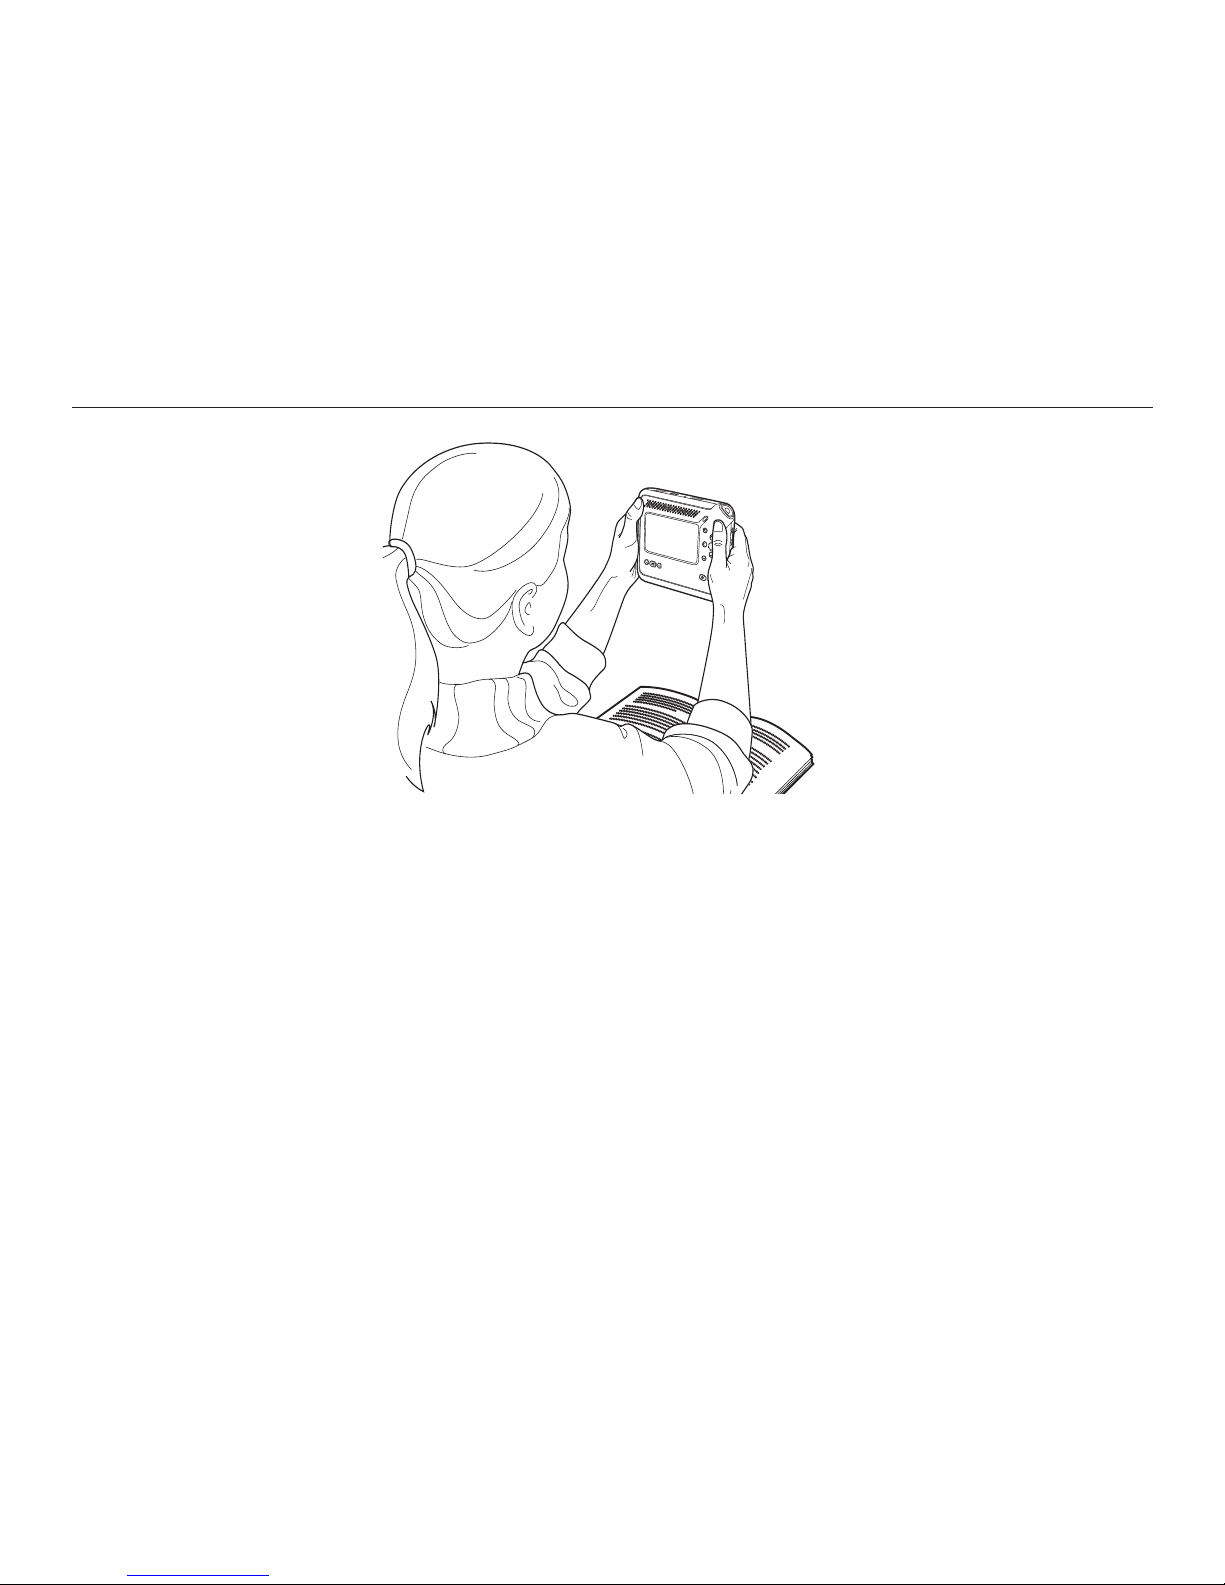
Point
Press the Shoot button or select Shoot Mode from the Home menu. Both actions
place the Reader in Shoot mode. If you have the menu reading option turned on,
the Reader announces, “Shoot mode.”
Hold the Reader with the display screen facing you, at about nose level, above the
text you wish to capture. Do not pull the Reader toward you. The camera lens is
on the bottom edge of the Reader, so the bottom edge of the Reader should be
pointed at the text.
For best results, hold the Reader so that the entire one- or two-page text lls the
display screen. Adjust the position of the Reader until you can see all the text on
the display screen.
Page 24
16
Chapter 3. Getting Started
Shoot
To capture the text, hold the Reader still and press the Shoot button again. The
Reader announces "Focusing," if you have the menu reading option turned on. At
this point, the camera is locking onto the text. The text does not need to be legible
in the display screen in order for the camera to focus on it.
Next you hear a ticking sound, and a sound like a camera's shutter click. A musical
tone tells you that the image has been captured. If you are using the display
screen, a small icon that looks like a gear appears at the upper left of the screen, to
indicate that text is being processed.
Below the gear icon are two numbers, one above the other, separated by a bar. The
bottom number is the total number of shots you have taken. The top number is the
o
o
o
o
o
o
o
o
o
o
o
o
o
o
o
o
o
o
o
o
o
o
o
o
o
o
o
o
o
o
o
o
o
o
o
o
o
o
o
o
o
o
o
o
o
o
o
o
o
o
o
o
o
o
o
o
o
o
o
o
o
o
o
o
o
o
o
o
o
o
o
o
o
o
o
o
o
o
o
o
o
o
o
o
o
o
o
o
o
o
o
o
o
o
o
o
o
o
o
o
o
o
o
o
o
o
o
o
o
o
o
o
o
o
o
o
o
o
o
o
o
o
o
o
o
o
o
o
o
o
o
o
o
o
o
o
o
o
o
o
o
o
o
o
o
o
o
o
o
o
o
o
o
o
o
o
o
o
o
o
o
o
o
o
o
o
o
o
o
o
o
o
o
o
o
o
o
o
o
o
o
o
o
o
o
o
o
o
o
o
o
o
o
o
o
o
o
o
o
o
o
o
o
o
o
o
o
o
o
o
o
o
o
o
o
o
o
o
o
o
o
o
o
o
o
o
o
o
o
o
o
o
o
o
o
o
o
o
o
o
o
o
o
o
o
o
o
o
o
o
o
o
o
o
o
o
o
o
o
o
o
o
o
o
o
o
o
o
o
o
o
o
o
o
o
o
o
o
o
o
o
o
o
o
o
o
o
o
o
o
o
o
o
o
o
o
o
o
o
o
o
o
o
o
o
o
o
o
o
o
o
o
o
o
o
o
o
o
o
o
o
o
o
o
o
o
o
o
o
o
o
o
o
o
o
o
o
o
o
o
o
o
o
o
o
o
o
o
o
o
o
o
o
o
o
o
o
o
o
o
o
o
o
o
o
o
o
o
o
o
o
o
o
o
o
o
o
o
o
o
o
o
o
o
o
o
o
o
o
o
o
o
o
o
o
o
o
o
o
o
o
o
o
o
o
o
o
o
o
o
o
o
o
o
o
o
o
o
o
o
o
o
o
o
o
o
o
o
o
o
o
o
o
o
o
o
o
o
o
o
o
o
o
o
o
o
o
o
o
o
o
o
o
o
o
o
o
o
o
o
o
o
o
o
o
o
o
o
o
o
o
o
o
o
o
o
o
o
o
o
o
o
o
o
o
o
o
o
o
o
o
o
o
o
o
o
o
o
o
o
o
o
o
o
o
o
o
o
o
o
o
o
o
o
o
o
o
o
o
o
o
o
o
o
o
o
o
o
o
o
o
o
o
o
o
o
o
o
o
o
o
o
o
o
o
o
o
o
o
o
o
o
o
o
o
o
o
o
o
o
o
o
o
o
o
o
o
o
o
o
o
o
o
o
o
o
o
o
o
o
o
o
o
o
o
o
o
o
o
o
o
o
o
o
o
o
o
o
o
o
o
o
o
o
o
o
o
o
o
o
o
o
o
o
o
o
o
o
o
o
o
o
o
o
o
o
o
o
o
o
o
o
o
o
o
o
o
o
o
o
o
o
o
o
o
o
o
o
o
o
o
o
o
o
o
o
o
o
o
o
o
o
o
o
o
o
o
o
o
o
o
o
o
o
o
o
o
o
o
o
o
o
o
o
o
o
o
o
o
o
o
o
o
o
o
o
o
o
o
o
o
o
o
o
o
o
o
o
o
o
o
o
o
o
o
o
o
o
o
o
o
o
o
o
o
o
o
o
o
o
o
o
o
o
o
o
o
o
o
o
o
o
o
o
o
o
o
o
o
o
o
o
o
o
o
o
o
o
o
o
o
o
o
o
o
o
o
o
o
o
o
o
o
o
o
o
o
o
o
o
o
o
o
o
o
o
o
o
o
o
o
o
o
o
o
o
o
o
o
o
o
o
o
o
o
o
o
o
o
o
o
o
o
o
o
o
o
o
o
o
o
o
o
o
o
o
o
o
o
o
o
o
o
o
o
o
o
o
o
o
o
o
o
o
o
o
o
o
o
o
o
o
o
o
o
o
o
o
o
o
o
o
o
o
o
o
o
o
o
o
o
o
o
o
o
o
o
o
o
o
o
o
o
o
o
o
o
o
o
o
o
o
o
o
o
o
o
o
o
o
o
o
o
o
o
o
o
o
o
o
o
o
o
o
o
o
o
o
o
o
o
o
o
o
o
o
o
o
o
o
o
o
o
o
o
o
o
o
o
o
o
o
o
o
o
o
o
o
o
o
o
o
o
o
o
o
o
o
o
o
o
o
o
o
o
o
o
o
o
o
o
o
o
o
o
o
o
o
o
o
o
o
o
o
o
o
o
o
o
o
o
o
o
o
o
o
o
o
o
o
o
o
o
o
o
o
o
o
o
o
o
o
o
o
o
o
o
o
o
o
o
o
o
o
o
o
o
o
o
o
o
o
o
o
o
o
o
o
o
o
o
o
o
o
o
o
o
o
o
o
o
o
o
o
o
o
o
o
o
o
o
o
o
o
o
o
o
o
o
o
o
o
o
o
o
o
o
o
o
o
o
o
o
o
o
o
o
o
o
o
o
o
o
o
o
o
o
o
o
o
o
o
o
o
o
o
o
o
o
o
o
o
o
o
o
o
o
o
o
o
o
o
o
o
o
o
o
o
o
o
o
o
o
o
o
o
o
o
o
o
o
o
o
o
o
o
o
o
o
o
o
o
o
o
o
o
o
o
o
o
o
o
o
o
o
o
o
o
o
o
o
o
o
o
o
o
o
o
o
o
o
o
o
o
o
o
o
o
o
o
o
o
o
o
o
o
o
o
o
o
o
o
o
o
o
o
o
o
o
o
o
o
o
o
o
o
o
o
o
o
o
o
o
o
o
o
o
o
o
o
o
o
o
o
o
o
o
o
o
o
o
o
o
o
o
o
o
o
o
o
o
o
o
o
o
o
o
o
o
o
o
o
o
o
o
o
o
o
o
o
o
o
o
o
o
o
o
o
o
o
o
o
o
o
o
o
o
o
o
o
o
o
o
o
o
o
o
o
o
o
o
o
o
o
o
o
o
o
o
o
o
o
o
o
o
o
o
o
o
o
o
o
o
o
o
o
o
o
o
o
o
o
o
o
o
o
o
o
o
o
o
o
o
o
o
o
Intel® Reader
Page 25
17
Reader User Manual
3
number of pages that have been processed and are ready for playback. For the
rst page you capture, zero is the top number, and one is the bottom number, to
indicate that one page has been captured, but the page is not yet processed. An
icon at the upper right of the display screen indicates that you are working with a
text le.
Processing Icon
Pages Processed
Pages Captured
Document Type
?
Intel® Reader
3
4
Pages are Ready
to Play
Page 26

18
Chapter 3. Getting Started
The Reader converts the image into text. Several factors affect the speed and
quality of the conversion, including: the size of the printed text, whether the page
contains images, font characteristics such as the use of italics or bold face, room
lighting, and the complexity of the page layout. An hourglass icon may appear as
processing continues.
NOTE: If you do not play the text at this point, or capture another image, the
Reader issues the following prompt: "Press Shoot to capture another image.
Press Play to hear your text."
TIP: If you are capturing a single page, or if you want to hear the rst page
before capturing more text, press Play after the rst capture. Text processing
occurs slightly faster if you press Play, instead of waiting for processing in the
Shoot mode screen.
A right-pointing triangle appears at the lower left of the display screen, to show
that the rst part of the rst page is ready to play. When the entire rst page is
ready to play, the Reader announces, "Page one of one processed," if you have
the menu reading option turned on. At the same time, a tone plays, to alert you
that you can start listening.
To capture another page, which will become the second page in the current le,
point and press Shoot again. The display screen indicates that two pages have
been captured.
Page 27
19
Reader User Manual
3
TIP: If you want to capture another page, but you want the second page to
be in a new le, press the Options button while you are in Shoot mode. In
the Shoot Options menu, select Start New Session. The Begin a new
session? prompt appears. Select Yes, and press OK.
Listen
To listen to your text or audio le, press the Play button. Play is the diagonal
button on the face of the Reader, above the upper-right corner of the display
screen.
To stop or pause the playback, press the Play button again.
DOC_M
A
Y-
18-200
8_6_42
p
m
pa
g
e
2 of
23
S
t
u
d
i
e
s ha
ve show
n
th
a
t
so
m
e
food
like turk
e
y
,
whole grain breads,
s
ugary
s
na
c
k
s,
hav
e
defin
ite
effected
o
n
the bra
i
n, r
a
is
i
n
g
an
d
low
e
rin
g
mood
-
al
t
er
i
n
g
ch
e
m
ica
ls
.
ra
i
sin
g
o
o
o
o
o
o
o
o
o
o
o
o
o
o
o
o
o
o
o
o
o
o
o
o
o
o
o
o
o
o
o
o
o
o
o
o
o
o
o
o
o
o
o
o
o
o
o
o
o
o
o
o
o
o
o
o
o
o
o
o
o
o
o
o
o
o
o
o
?
Intel® Reader
Page 28

20
Chapter 3. Getting Started
Tips for Good Results
• Hold the Reader straight and point the camera directly at the text. Holding
the camera at a severe angle can distort the text image and corrupt the
playback.
• To ensure proper focus, hold the Reader at approximately nose level when
you are seated in front of the printed material. If the Reader is too close to
or too far from the text being captured, the results will vary. Be sure to hold
the Reader still when capturing an image, and allow the device to adjust
to lighting conditions for a few seconds before shooting the rst image.
You can use the Practice Page that comes with the Reader, to become
accustomed to holding the Reader and nding the right distance from the
page.
• Ensure that there is some text or an image in the center of the material
you want to capture. The camera uses text or images in that area to adjust
focus.
• To help ensure clear images, position the Reader away from overhead lights,
windows and desk lamps. Light that shines too brightly on the page can
interfere with the Reader's ability to capture a good image.
• To capture only the text you want, remove extra items, such as unnecessary
text or your ngers, from the camera’s eld of view. Hold or wear the
lanyard when capturing an image, to prevent it from interfering with the
camera lens or the ash.
Page 29

21
Reader User Manual
3
• Use a blank piece of neutral-colored paper to cover any text or images that
you do not want to capture.
• Keep the camera lens free from smudges. For more information, refer to the
section titled Recommended Cleaning Techniques in Appendix C of this
user manual.
• Remember that you can capture multiple pages of a document before
listening to the text. The Reader then processes all the pages in the
background while you do other work. This is a great time-saving feature. If
you prefer to hear your text immediately, press Play after you have captured
all your pages.
• Lay the pages as at as possible. The Capture Station is useful for attening
the pages of large texts, such as long books.
Page 30

22
Chapter 4. Using the Reader Menus
An Introduction to Reader Menus
Text and audio les are accessible on the Reader through menus. When a menu
appears on the display screen, if you have the menu reading option turned on, the
Reader reads the name of the menu, and the name of the highlighted option.
Press the up or down arrow buttons to navigate through menu options. If you
have menu reading turned on, the Reader announces each option as you highlight
it. If you try to scroll past the rst or last item in a menu, the Reader emits a tone.
To select a menu item, press OK when the item is highlighted.
Each menu remembers the last selection you made. When you return to a menu,
the last item you opened is highlighted.
To quickly change the menu text size while you are viewing a menu, press the
Zoom In (+) button at the lower left of the Reader face to make the text larger, or
press the Zoom Out (-) button to make the text smaller.
About the Home Menu
The Home menu is the rst menu that opens when you turn on the Reader. The
Home menu displays the following options:
• Library: The Library organizes all your text and audio les. Select from the
items you have captured or transferred onto the Reader.
Page 31

23
Reader User Manual
4
• Recent Items: This menu displays your recently captured or played les,
with the most recent rst. This menu displays icons to show you the type of
le.
• Shoot Mode: This option prepares the Reader to capture text.
• Settings: Use this menu to customize the Reader's display settings, date
and time, playback voice gender and speed, and other settings.
• Help: Use this menu to play an introduction to the Reader, or to play the
quick start guide or topics from this manual. You can also use the About
option to nd the software version, serial number and product code for your
Reader, and the access keys for third-party content, if you have any.
As you navigate the Reader's menus, you can press and hold the Back button
at any time to return to the Home menu. The Back button is the raised, square
button directly beneath the Play button.
About The Library
All les created or stored on the Reader are saved in the Library. You add les to
the Library either by capturing them with the Reader, or by connecting the Reader
to a computer or external drive and downloading les. For information about the
types of les you can download, refer to the section titled Using Categories to
Organize Files, in Chapter 6.
Page 32

24
Chapter 4. Using the Reader Menus
The Reader assigns a default name to each le you capture, using the rst few
characters of the text. You can change this le name later, as described in the
section titled Renaming a Text or Audio File, in Chapter 6.
Files in the Library are organized by type, either text or audio les. Within each
type, les are organized alphabetically by le name. At the Library level, you can
choose to sort your les by the date on which they were captured or the date
when you last played them. For more information about changing how your les
are sorted, refer to the section titled Sorting Your Files by Name or Date, in
Chapter 6.
To display the Library menu, select Library on the Home menu. Then press OK.
The Library menu displays three selections: Categories, Texts, and Audio. For
more information about these selections, refer to Chapter 6, Managing Files on
the Reader.
About the Recent Items Menu
The Recent Items menu stores les that you recently played or captured. By
default, the most recent le is the rst le in the menu.
Recent Items stores text and audio les. An icon to the left of the le name tells
you which type of le it is. A text e-Book is identied by a text page icon. An
audio le is identied by musical notes. An audio e-Book, such as a DAISY book,
is identied by an open book icon.
Page 33

25
Reader User Manual
4
You work with the les in this menu just as you would any other les. To play a
le, select it and press OK. To rename a le, delete it, get information about the
le, or add it to a category, highlight the le in Recent Items and press Options.
If you delete a le from Recent Items, the le remains in the Library and any
categories to which you added it. If you rename a le in Recent Items, the new
name appears immediately in any other menu in which the name appears.
About the Shoot Mode Menu
The Shoot Mode menu prepares the Reader to capture text. To enter Shoot
mode from the Home menu, simply scroll down to this item and press OK.
About the Settings Menu
The Settings menu allows you to change the Reader's default settings. For
example, you can change the gender and speed of the voice that reads playback
text. You can change the date and time formats, make the playback text larger or
smaller, and set a Personal Identication Number (PIN) for your Reader.
For more information about the tasks you can perform using the Settings menu,
refer to Chapter 6, Managing Files on the Reader.
Page 34

26
Chapter 4. Using the Reader Menus
About the Help Menu
The Help menu provides access to a brief introduction to the Reader, as well as
the information in the quick start guide and this user manual. It also provides
information about the Reader, including the software version number, and the
serial number of the Reader, and access keys for third-party content, if you have
any.
To access Help, choose Help from the Home menu. Then, press OK. To access
Help when you are listening to a text, you can press the Guide button. On the
Guide screen, select Go to Help Menu. Press OK. The Help menu consists of
the following options:
• Introduction. This option provides a quick overview of capturing and
playing text, plus some helpful tips to ensure success.
• Quick Start Guide. This option contains the information you need to
capture and play text, along with an explanation of the Reader's key
features, helpful tips, and answers to frequently-asked questions.
• User Manual. This option contains the topics in this manual that provide
detailed information about using your Reader. If you need help with tasks
such as saving les to a computer, organizing your les into categories, or
customizing your Reader, select this option.
• About. This option lists the software version, serial number, and product
code for your Reader, plus access keys for third-party content, if you have
any.
Page 35

27
Reader User Manual
4
The Quick Start Guide and User Manual are text e-Books that you can navigate
by heading, by page, by sentence, or by word, in addition to fast-forwarding
and moving to the beginning or end of the book. For more information about
navigation, refer to the section titled Navigating in a Text e-Book, in Chapter 5.
Playing the Introduction
When you rst turn on the Reader, you will see an invitation to play a quick introduction to Reader. You can choose from the following options:
• Yes. If you choose this option, a brief introduction walks you through the
Reader's key capabilities.
• Not Now. If you choose this option, a message tells you how to access
the introduction on the Reader. Then the Home menu appears. The
invitation will be displayed the next time you start the Reader.
• Never. If you choose this option, the introduction is still available on
the Help menu on the Reader. A message tells you how to access
the introduction. Then the Home menu appears. The invitation is not
displayed again.
Playing the Quick Start Guide or User Manual
If you select Quick Start Guide and press OK, the Quick Start Guide screen
appears, and text playback begins.
NOTE: Be sure to press OK, not Play, to play the Quick Start Guide or User
Manual Help topics.
Page 36

28
Chapter 4. Using the Reader Menus
If you select User Manual, and press OK, the User Manual screen appears,
displaying a list of topics that correspond to chapter titles in the PDF version of
the manual on the CD that comes with your Reader. These topics have a plus
(+) sign beside them, indicating that they include sub-topics. Select a topic and
press OK. A list of sub-topics appears. Most sub-topic lists begin with the Play
All option. To play all of the sub-topics, select Play All and press OK. To hear an
individual topic, scroll down to that topic and press OK.
When you nish listening, press the Back button to return to the Help menu.
Then, if you were listening to a le, press Play to continue listening.
Page 37

29
Reader User Manual
Chapter 5. Capturing and Playing Files
Introduction
Chapter 3 of this manual provides the basic information about how to use
the Reader to convert printed text into digital text and listen to the playback.
This chapter provides additional information about capturing multiple pages,
navigating in text and audio les, and using other Reader features to help you
view and play your les.
Setting the Camera Flash
The Reader includes a camera ash that you can turn on or off when the Reader
is in Shoot mode. To change the ash setting, press the Shoot button once or
select Shoot Mode from the Home menu.
When the Reader enters Shoot mode, press the Options button. The Shoot
Options menu appears. Select Flash Setting and press OK. On the Flash
Setting menu, select one of the settings: Automatic Flash makes the ash
ready for use. Automatic Flash is the default setting. Turn Flash Off turns off
the ash. You are then returned to Shoot mode to capture text with the new
ash setting.
NOTE: Even when you have the Automatic Flash setting turned on, the
camera ash might not activate if there is adequate lighting to capture the
image. If you turn the Reader off after turning off the ash, the Automatic
Flash setting will be restored when you re-start the Reader.
Page 38

30
Chapter 5. Capturing and Playing Files
Capturing Multiple Pages
When you capture several images at a time, the images are grouped into a single
e-Book called a session. As long as you keep capturing pages, those pages will be
grouped together, even if they come from different printed material. For example,
you can capture four pages of a book and a magazine article in the same e-Book.
On the other hand, if you want the book to be in a different e-Book from the
magazine article, you can capture the book pages rst, then begin a new session to
capture the magazine article. A session begins when you begin capturing text, and
ends when you either play the text, begin a new session, or leave Shoot mode and
go on to another task.
There are two ways to begin a new session. You can leave Shoot mode and reenter it later. Or, while in Shoot mode, press the Options button. Select Start
New Session from the menu. Then press OK. At the Begin a new session?
prompt, select Yes, then press OK again. When you nish capturing a group of
images, press the Play button to end the session.
About Text and Audio Files
You can use the Reader to play text e-Books that you capture with the Reader, as
well as text e-Books from a third-party publisher. A text e-Book consists of multiple
pages. These types of e-Books are stored in the Texts folder by default.
Page 39

31
Reader User Manual
5
You can also play individual audio les and audio e-Books on the Reader. An
audio e-Book consists of one or more audio les, such as a DAISY audio book.
Both types of les are stored in the Audio folder by default.
The type of le you are playing determines how you can navigate through it.
Navigating in a Text e-Book
There are several ways to navigate in a text e-Book: by heading if the e-Book
uses headings, by page, by sentence, and by word. You can also fast-forward
through text, and move to the beginning or end of the e-Book. The default
navigation level is by page.
NOTE: e-Books that you capture with the Reader do not use headings, but
you can navigate in them using all the other navigation levels.
The Reader display screen shows an icon for each navigation level that applies
to the text you are reading, and the Reader announces the new level when you
change it.
Page 40

32
Chapter 5. Capturing and Playing Files
2 of 38, volume 1
Title Page and volume
Navigation icons
At the top of the display screen, the Reader displays information about the
e-Book title, page number and volume, if the e-Book is part of a multi-volume
book. To the right of the screen are icons that you select to change the
navigation level.
Page 41

33
Reader User Manual
5
Selecting a Navigation Level
To select a navigation level, press the up or down arrow button, when text is
either playing or paused. The arrow buttons are the four buttons surrounding the
OK button.
Select a navigation option
The selected icon is highlighted on the display screen, and you hear an audio
announcement of the level, even if you have menu reading turned off.
The navigation level you select remains in effect until you change it, even if you
close the e-Book or turn off the Reader.
Navigating in a Text e-Book
After you select the navigation level you want, you can navigate in the e-Book
using the right and left arrow buttons.
When the text e-Book is playing or paused:
• Press the right-pointing arrow to skip forward one heading, page, sentence,
or word at a time, depending on the navigation level you selected.
Page 42

34
Chapter 5. Capturing and Playing Files
• If you selected the heading, sentence, or word navigation levels, press the
left arrow to skip backward to the previous heading, sentence, or word.
• If you selected the page navigation level, press the left arrow to skip
backward, either to the top of the current page or to the previous page.
Short press skips forward one
heading, page, sentence, or word.
Long press fast fowards.
Skips back one heading,
page, sentence, or word.
• Press and hold the up arrow to return to the beginning of the e-Book.
• Press and hold the down arrow to go the end of the e-Book.
Long press returns to the
beginning of the e-Book.
Long press goes to the end
of the e-Book.
When text is playing, press and hold the right-pointing arrow to fast forward
through the text.
Page 43

35
Reader User Manual
5
Audio Playback Navigation
There are two types of audio les: audio e-Books, such as DAISY audio books,
and individual audio les, such as a single .mp3 or .wav le. How you navigate
depends on whether you are playing an e-Book or an individual audio le.
In an individual audio le, you can fast-forward and rewind, and you can go to
the beginning or end of the le. In an audio e-Book, you have all these options,
and also can navigate by heading or by page.
The Reader provides several tools to help you know where you are in the
e-Book and to navigate through the le. At the top of the display screen, you
can see the page number of the page you are playing and the total number
of pages in the e-Book. The Reader also announces the page number as you
navigate by page through the e-Book. If the e-Book is part of a multi-volume
book, you can see volume information as well.
Page 44

36
Chapter 5. Capturing and Playing Files
Page and volumeTitle and author
Document type
Playing time
Navigation icons
Beneath the page and volume information, a large icon tells you the type of le
you are listening to. A book icon indicates an e-Book. Musical notes indicate an
individual audio le. Beside the icon is the title and author information.
A slider at the bottom of the display screen shows how far the reading or music
has progressed, and gives you the playing time of the entire le.
Page 45

37
Reader User Manual
5
Navigating in an Audio e-Book
In an audio e-Book, you use the up and down arrow keys to select the navigation
level, just as you do in a text e-Book. In audio e-Books, you can navigate by
heading or page. The Reader announces the navigation level as you select it.
Then, you use the right and left arrow keys for navigation.
To navigate in an audio e-Book, use the following arrow buttons as the le is
playing or paused:
• Press the right-pointing arrow to advance by one heading or page.
• Press the left arrow to move back by one heading or page.
• Press and hold the right-pointing arrow to fast forward.
• Press and hold the left arrow to rewind.
Short press moves forward
by a heading or page. Long
press fast-forwards.
Short press moves back by a
heading or page.
Long press rewinds.
• Press and hold the up arrow to go to the beginning of the audio e-Book.
• Press and hold the down arrow to go to the end of the audio e-Book.
Page 46

38
Chapter 5. Capturing and Playing Files
Long press returns to the
beginning of the audio e-Book
Long press goes to the end
of the audio e-Book
Playing a Multi-Volume Book
A multi-volume book is a collection of e-Books that together make up a single
published work. An encyclopedia is one example of a multi-volume book. When
a book consists of more than one volume, Reader menus display the title of the
book, marked by a plus (+) sign, and an announcement tells you this is a multivolume book.
When you select the title, the Reader displays a list of the volumes in the book,
and announces the rst volume. Select a volume and press OK to play the text.
You can navigate in a volume just as you would in any other e-Book. You cannot
navigate from one volume to another using the arrow keys. To go to Volume 2
after playing Volume 1, return to the Reader menu and select Volume 2.
Navigating in an Individual Audio File
To navigate in an individual .mp3 or .wav le, use the following arrow buttons:
When the audio le is playing:
• Press and hold the right-pointing arrow to fast forward.
Page 47

39
Reader User Manual
5
• Press and hold the left arrow to quickly move back through the le.
Long press fast forwardsLong press rewinds
When the audio le is playing or paused:
• Press and hold the up arrow to return to the beginning of the le.
• Press and hold the down arrow to go to the end of the le.
Long press returns to the
beginning of the le
Long press goes to the
end of the le
Navigating to a Specic Heading or Page
You can navigate to a specic heading or page in a text or audio e-Book using the
Location menu. The Location menu is accessible when a le is playing, and
when the title of an e-Book is highlighted in the Texts menu.
There are two ways to access the Location menu: You can press the Location
button. Or you can press the Options button, scroll down to Location Menu,
Page 48

40
Chapter 5. Capturing and Playing Files
and press OK. On the menu that appears, you have two options: Go to Page and
Go to Heading.
Navigating to a Specic Heading
When a text or audio e-Book contains headings, you can use the Location menu
to navigate to a specic heading. On the Location menu, select Go to Heading
and press OK. The Reader displays the Headings menu, and highlights the
heading for the section you are currently playing. Scroll through the menu and
select the heading you want.
If a section includes sub-headings, the heading has a plus sign (+) beside it in
the Headings menu, and the Reader announces that sub-headings are available.
Select the heading and press OK to access the sub-headings.
Navigating to a Specic Page
On the Location menu, select Go to Page and press OK. The Go to Page screen
appears. The heading shows you how many pages are in this e-Book. The display
screen indicates how many pages are in the e-Book. The Reader prompts you to
enter a page number between 1 and the last page number in the e-Book.
In the rst eld, select the rst digit of the page number. To go to page 3, press
the down arrow until the number 3 is displayed. Press OK. When the second
eld appears, leave it blank and press OK again. The page you selected appears
on the display screen. An auditory cue tells you the page number, and playback
starts at the top of the page.
Page 49

41
Reader User Manual
5
To go to page 13, press the down arrow to display the number 1. Press OK.
When the second eld appears, press the down arrow to display the number 3.
Press OK. When the third eld appears, press OK again. The Reader displays
the page you selected. An auditory cue tells you the page number, and playback
starts at the top of the page.
Some pages of a book might use a lower-case Roman numeral or some other
non-numeric value for the page number. For example, a Preface might have
pages numbered as i, ii, and so on. To access those pages, go to page 1 and
page back through the document.
Viewing the Text Image
If you are playing a text le you captured with the Reader, and you want to view
the image you took instead of the text the Reader is playing back to you, press
the View Toggle button. View Toggle is the middle of the three buttons located
at the lower left of the display screen.
This feature is useful if you want to look at a picture or diagram as you listen to
the text. The playback continues uninterrupted as you view the image. View
Toggle works only with text les you capture using the Reader, not with text
les you download from another device.
Press the View Toggle button once to switch from viewing the playback text
to viewing the original text image you captured. Press the View Toggle button
again to return to the playback text.
Page 50

42
Chapter 5. Capturing and Playing Files
Increasing and Decreasing Text Size and Text Images
You can use the Zoom In (+) and Zoom Out (-) buttons at the lower left of the
Reader face, to zoom in or out on images on the display screen. When you are
zoomed in on a text image, press the arrow buttons to move around in the image
on the display screen.
You can also use Zoom In and Zoom Out to increase or decrease the size of text
on the screen.
Spelling a Word in a Text File
As you play a text le, the Reader can spell an individual word out loud for you.
To hear the spelling, press Play to pause the playback on the word you want
spelled. The word is highlighted on the screen. Then press OK for more than
one second. The Reader spells the word, letter by letter. Press Play again to
continue playback.
Page 51

43
Reader User Manual
Chapter 6. Managing Files on the Reader
Introduction
The Reader helps you organize and maintain the les you capture or download.
For example, you create categories to contain similar les. You can also sort les
by name or date, rename les, add pages to a le you captured with the Reader,
and delete les you no longer need.
Using Categories to Organize Library Files
The rst item in the Library menu is Categories. Categories help you quickly
access your les, by grouping similar les together. Categories can hold audio
and text les. These les must be in a format that the Reader can accept,
including unformatted .txt format, DAISY book format, .mp3 or .wav format.
NOTE: For DAISY books, the Reader supports the DAISY 2.02 and DAISY 3
formats.
In the default category, Favorites, you can place les that you want to keep
readily available. You can create additional categories and place les in them.
A le can be included in more than one category. If a le contains an account of
a family vacation at a national park, you can add it to both your Vacations category
and the Favorites category.
Page 52

44
Chapter 6. Managing Files on the Reader
Creating a New Category
To create a new category, on the Library menu, scroll down to Categories. This
action highlights Categories, without opening the Categories menu.
With Categories highlighted, press the Options button. The Category Options
menu appears. Select New Category and press OK. The New Category screen
appears, and a text eld is displayed.
In the rst text eld, select the rst character of the category name. Press the
down arrow button to select a letter. For example, press the down arrow button
once to select the letter A, or twice to select the letter B. To select a number
instead of a letter, press the up arrow button. For example, to select the number
9, press the up arrow button once.
After selecting a character, press OK to move to the next eld. After you enter
the last character, press OK twice. A message appears to conrm that the
category has been created. You are then returned to the Category Options
menu.
TIP: To create a category when you are viewing or listening to a le, press
the Options button. Select Add to Category from the Options menu, and
press OK. In the menu that appears, select New Category, and press OK.
On the New Category screen, provide a name for the category. Press OK. A
message conrms that the new category was created and your le was added.
Page 53

45
Reader User Manual
6
Adding a File to an Existing Category
To add a le to an existing category, select either Texts or Audio from the
Library menu. Press OK. Highlight a le by scrolling to it. Do not open the le.
Press the Options button. Select Add to Category, and press OK.
The Add to Category menu appears. This menu shows all the categories on your
Reader. Select the category you want, and press OK. A conrmation message
appears. Select Yes, and press OK. Another conrmation message appears. You
are then returned to the menu from which you started.
TIP: To add a le to a category as you view or listen to the le, press the
Options button. Select Add to Category, and then choose the category. On
the conrmation message that appears, select Yes, and press OK.
Removing a File from a Category
To remove a le from a category, highlight the le in the category list, but do not
open the le. Press the Options button. Select Remove from Category, then
press OK. When you are prompted to conrm the removal, select Yes, and press
OK again. A message conrms that the le has been removed. The le remains in
the Library menu, and is still available for your use.
Page 54

46
Chapter 6. Managing Files on the Reader
Deleting a Category
You can delete any category that you created. When you delete a category, you
are not deleting the les in that category. The les can still be found in either the
Texts or Audio menu in the Library.
NOTE: You cannot delete the Favorites category.
To delete a category, select Categories from the Library menu. Press OK. Find
and highlight the category you want to delete. Do not open the category. Press
the Options button. Then select Delete and press OK. A conrmation message
appears. Select Yes to conrm your deletion. Then press OK again. Another
message conrms that the category has been deleted. You are then returned to
the Categories menu.
Renaming a Category
To change the name of a category that you created, select Categories from the
Library menu. Press OK. The list of categories appears. Scroll down to the
category you want to rename. Do not open the category.
Press the Options button. The Options menu appears. Select Rename, and
press OK. The Enter New Name screen appears. On this screen, you will use
text elds to create a new le name.
In the rst eld, press the down arrow to nd a letter. Or press the up arrow
to nd a number. Then press OK to move to the next eld. To leave a space
Page 55

47
Reader User Manual
6
between words, press the right-pointing arrow button when you come to a blank
space. Then continue in the next text eld.
When you nish, press OK twice. A conrmation message appears. Select Yes
and press OK to conrm your selection. Another conrmation message appears,
and then you are returned to the Categories menu.
NOTE: You cannot rename the Favorites category.
Using the Texts and Audio Menus
The Texts menu lists the text les on the Reader. Similarly, the Audio menu lists
the audio les on the Reader. These menus display the les that you capture
using the Reader, and those that you download from a computer or external drive.
To nd a le in one of these menus, select the Library menu. Then, select either
Texts or Audio, and press OK. Scroll through the le names.
With a le highlighted in the Texts or Audio menu, you can use the Options
button to perform the following tasks:
• Add a le to a category.
• Get information about a le.
• Delete a le.
• Rename text and audio les.
• Save a text le as an audio le.
• Add pages to a text le.
Page 56

48
Chapter 6. Managing Files on the Reader
The following sections explain how to perform most of these tasks. For
information about adding a le to a category, refer to the section titled Using
Categories to Organize Library Files.
Getting Information about a File
In the Texts or Audio menu, highlight a le. Press Options. On the Options
menu, select Info. Then press OK. The Info screen appears. This screen provides:
• The title of the le
• The type of le, such as Reader book, DAISY book, or Audio
• For Reader and DAISY books, the number of pages
Permanently Deleting a File
There are three ways to permanently delete les from the Reader. You can delete
a le that you have open, as it is playing. You can delete a single le from the
Library. You can delete all les in the Library, or all les in one of its sub-menus
– either Texts or Audio.
CAUTION: You cannot recover a permanently deleted le. Before
deleting a le from the Reader, consider copying it to a computer or
external drive. For information about copying les to another device,
refer to Chapter 8, Using the Reader with Other Devices.
Page 57

49
Reader User Manual
6
To delete a single le during playback:
As the le is playing, press the Options button. The Options menu appears.
Select Delete and press OK. When you are prompted to conrm the deletion,
select Yes, and press OK. A conrmation message appears. You are then
returned to the Texts or Audio menu.
To delete one or more les from the Library:
From the Home menu, select Library and press OK. Select either Categories,
Texts, or Audio. Press OK. Navigate to the le you want to delete. Press the
Options button. Select Delete, and press OK. A conrmation message appears.
Select Yes on the message, and press OK again.
To delete all les in the Library, press Options and select Delete All. At the
Delete all media? prompt, select Yes.
To delete all les from the Texts or Audio menu:
Highlight one of these menus in the Library menu. For example, highlight Audio.
Then press Options. The Audio Options menu appears, and Delete All Audio is
highlighted. Press OK.
A conrmation message appears. Select Yes on the message, and press OK. The
message "Audio deleted" appears. You are then returned to the Library menu.
Renaming a Text or Audio File
You can rename a text or audio le that you have open, or you can select a le
from the Library and rename it.
Page 58

50
Chapter 6. Managing Files on the Reader
NOTE: You can rename any text le that you capture using the Reader. You
cannot rename text les that you download to the Reader from another source.
To rename the le that is playing or paused:
Press the Options button while the le is playing or paused. The Options menu
appears. Select Rename and press OK. The Enter New Name screen appears.
To enter the new name, press the down arrow button to nd a letter, or press the
up arrow button to nd a number. Then press OK to advance to the next eld. To
leave a space between words, press the right-pointing arrow when you reach a
blank eld. Then start the new word in the next eld. Each word automatically
begins with a capital letter.
Your le name can be up to 50 characters long. When you nish, press OK twice.
A conrmation message appears. Select Yes on the message, and press OK
again. Another conrmation message displays the le name change.
To rename a le that is not playing:
Select the le you want to rename, but do not open it. Press the Options button,
and then select Rename. To enter the new name, press the down arrow button
to nd the rst letter. To nd a number, press the up arrow button. After making a
selection, press OK to advance to the next eld.
If you want to leave a space between words, press the right-pointing arrow when
you reach a blank eld. Then start the new word in the next eld. Each word
automatically begins with a capital letter. When you nish, press OK twice. A
Page 59

51
Reader User Manual
6
conrmation message appears. Select Yes on the message and press OK again.
Another message displays the name change.
Saving a Text File as Audio
The Reader can convert a text le to audio format and store it in the Library.
You can then play the le on the Reader or download it to another device. The
Reader retains the text version of the le as well as the audio le. The les are
different le types and are stored in different menus of the Library.
In the Texts or Categories menu, highlight the le you want to convert. Press
Options. In the Options menu, select Save as Audio. Press OK.
A message gives you a progress report as the le is converted. When all pages
have been converted, another message tells you the process is complete. You
are returned to the previous menu. The audio version of the le is accessible in
the Audio menu.
NOTE: Be sure your Reader is adequately charged before you convert the
le. If the Reader loses power within a few seconds of converting text, the
converted text is lost. For information about charging procedures, refer to the
section titled Charging the Battery, in Chapter 1 of this manual.
To cancel conversion while it is in progress, press the Back button.
Page 60

52
Chapter 6. Managing Files on the Reader
Adding Pages to a Text File
After you capture a text le, you can add pages to it at any time. You can add
pages only to a text le that you captured using the Reader, not to a le you
downloaded from another device. When the text is playing, press Options to
begin adding pages. When the text is not playing, open the Texts menu and
select the le to which you want to add pages. Do not open the le. Then press
Options.
On the Options menu, select Add Pages and press OK. The Reader enters
Shoot mode immediately. Capture the new pages. Then press Play. The pages
you add will appear at the end of the original le.
Sorting Your Files by Name or Date
The Reader's menus can display your les by name in alpha-numeric order, or in
order by the date on which the les were last updated. By default, the Reader
displays le names in alpha-numeric order. If you change the default sort order,
the change applies to every menu that displays your le names, including the
Recent Items menu.
To change the way your les are sorted, highlight Library on the Home menu.
Do not open the Library menu. Press the Options button. The Library Options
menu appears. Select Show By, and press OK. The Show By menu appears.
Select either Name or Date. Press OK. Press the Back button to return to the
Home menu.
Page 61

53
Reader User Manual
Chapter 7. Customizing the Reader
The Settings Menu
There are a number of ways to change the Reader's default settings. You can
customize how the Reader displays text and plays it back to you, and you can
change the date and time formats. You can protect your privacy by setting a
Personal Identication Number (PIN) for your Reader. You can also make other
changes, such as customizing the size of the menu text and the display text. To
change any of these settings, navigate to the Home menu and select Settings.
The Settings menu options are:
• Basics
• Display
• Voice
• Security
• Restore Defaults
Basic Settings
The Reader's basic settings include the date and time, and the Sleep mode
timing. To change any of the basic settings, start by selecting Settings on the
Home menu, then select Basics and press OK.
Page 62

54
Chapter 7. Customizing the Reader
Setting the Date and Time
Date and time settings are important because the Reader attaches a date and
time stamp to the les you capture. When you rst start up the Reader, the
current date and time are set. You may need to change these settings to adjust
for daylight savings time, or when the battery is fully discharged or removed.
You can choose the format in which to display both the date and the time. The
date can be displayed in Day/Month/Year format (two digits for the day, three
characters for the month, and four digits for the year), or in Month/Day/Year
format (three characters for the month, two digits for the day, and four digits for
the year).
Similarly, the time can be set in either 12-hour format or 24-hour format. In 12hour format, 1 p.m. is displayed as 1:00. In 24-hour format, 1 p.m. is displayed as
13:00.
To set the date or time, or to change the date or time format, start by selecting
Settings on the Home menu. Select Basics, and press OK. Then select Date
and Time, and press OK. The Date and Time menu appears.
To set the date format:
On the Date and Time menu, highlight Set Date but do not press OK to select
it. Instead, press the Options button. The Date Format menu appears.
Page 63

55
Reader User Manual
7
Choose one of the date formats, either DD-MMM-YYYY Format or MMM-DD-
YYYY Format. Then press OK. Press the Back button to return to the Date and
Time menu.
To set the date:
On the Date and Time menu, select Set Date and press OK. The Set Date
screen appears, displaying the currently set date. Press the up or down arrow
buttons to select the month. If you have the menu reading option turned on, the
Reader reads each month aloud as you select it.
When you hear the month you want, press OK to advance to the day eld. Use
the up or down arrow buttons to select the day. Then press OK to advance to
the year eld.
When you have made all your selections, press OK. A conrmation message
appears. If the date is correct, select Yes and press OK. Another conrmation
message appears. You are then returned to the Date and Time menu.
If the date is not correct, select No and press OK. A message tells you the date
has not been changed. You are then returned to the Date and Time menu, with
Set Date highlighted.
To set the time format:
On the Date and Time menu, highlight Set Time but do not press OK to select
it. Press the Options button.
Page 64

56
Chapter 7. Customizing the Reader
The Time Format menu appears. Select either 12-Hour Clock or 24-Hour
Clock, and press OK. Press the Back button to return to the Date and Time
menu.
To set the time:
On the Date and Time menu, select Set Time and press OK. The Set Time
screen appears. Press the up or down arrow button to select the hour. Press
the down arrow to choose a later hour -- for example, to go from 4 o'clock to 5
o'clock. Press the up arrow to choose an earlier hour.
Then press OK to advance to the minutes. Set the minutes and press OK. If you
are using the 12-hour clock, press the down arrow button to select a.m. or p.m.
Then press OK.
A conrmation message appears. If the time is correct on this message, select
Yes and press OK. A message conrms your settings. You are then returned to
the Date and Time menu.
If the time is not correct, select No and press OK. A message tells you that the
time has not changed. You are then returned to the Date and Time menu, with
Set Time highlighted.
Setting Sleep Mode
Sleep mode helps the Reader's battery charge last longer, by powering down the
Reader without completely turning it off. From Sleep mode, the Reader restarts
Page 65

57
Reader User Manual
7
more quickly than it does after you turn the Reader off. When you restart from
Sleep mode, you are returned to the le you were viewing or playing. When you
restart after turning the Reader completely off, you see the Home menu.
Sleep mode drains the battery at a slower rate than normal use. The best
practice, therefore, is to use Sleep mode when you set aside the Reader for a
short period of time. If you do not plan to use the Reader for a day or more, turn
it off completely.
NOTE: When the Reader is in Shoot mode, it will not enter Sleep mode
before you capture an image, if the power cord is connected.
Changing the Sleep Setting
The Reader goes into Sleep mode after 10 minutes of inactivity. You can change
this setting, so that the Reader goes to sleep more quickly when you are not
using it, or never goes into Sleep mode.
To change the Sleep setting, select Settings from the Home menu, then select
Basics. On the Basics menu, select Sleep Setting. The Sleep Setting menu
appears. Choose one of the options and press OK. Press the Back button to
return to the Basics menu.
TIP: To turn the Reader back on after it goes to sleep, press the Power button
for 1 to 3 seconds. You will be returned to the le or menu you were viewing
or playing.
Page 66

58
Chapter 7. Customizing the Reader
Display Settings
You can customize your Reader's display screen by changing the size of the
menu text and the playback text, by selecting a color scheme for the Reader
display, and by setting a timeout period for the display screen. You can also
turn the display screen off to save the battery charge, and turn it on again when
needed.
To change any of these display settings, start by selecting Settings on the Home
menu, and pressing OK. Then select Display and press OK again.
Changing the Menu Text Size
To change the menu text size, go to the Display menu. Select Text Size, and
press OK. On the Text Size menu, select Menu Text Size, and press OK. Then
use the down arrow to select Small, Medium, or Large. The text size on the
display screen changes to match your selection. Press OK to select a text size.
Then press the Back button to return to the Display menu.
TIP: To quickly change the menu text size while you are viewing a menu,
press the Zoom In (+) button on the face of the Reader to make the text
larger, or press the Zoom Out (-) button to make the text smaller.
Changing the Playback Text Size
Playback text is the text shown on the display screen as the Reader plays it back
to you. To change the size of the playback text, go to the Display menu, and
press OK. Select Text Size and press OK again.
Page 67

59
Reader User Manual
7
On the Text Size menu, select Playback Text Size and press OK. Then select
Small, Medium, Large, or One Word At a Time. Press OK.
In One Word At a Time mode, the display screen shows a single word of text at
a time, and plays it back to you at the speed you select using the Voice Speed
menu. For more information about setting the voice speed, see the Adjusting
Voice Speed section, later in this chapter.
Press the Back button to return to the Text Size menu.
Setting the Display Timeout
The Reader dims the light on the display screen after a period of inactivity. When
the display screen is dim, the Reader is not turned off. The LED indicator next to
the Power button remains lit. However, you cannot see anything on the screen.
Dimming the display prevents images from being burned into the screen, and
helps preserve the battery charge.
The default timeout period is 1 minute. You can also select 30 Seconds, 5
Minutes, or Never. No matter which timeout period you select, the display will
stay lit as long as you are listening to the Reader or navigating its menus.
TIP: Letting the display time out helps your battery charge last longer. The
best practice is to set a short timeout period before the display dims.
To change the length of the timeout period, go to the Display menu and select
Display Timeout. Press OK. The Display Timeout menu appears. Select a
timeout period, then press OK. Press the Back button to return to the Display
Page 68

60
Chapter 7. Customizing the Reader
menu. Then, either change another display setting, or keep pressing Back to
return to previous menus.
To turn the display screen back on when the display is dim, press any button on
the face of the Reader.
Selecting a Display Theme
The display theme is a color scheme for the text and audio information on your
display screen. The Reader offers four display themes: Default, Blue, Red, and
Yellow.
In the Default theme, the menu title on a screen is blue on a white background,
and the sub-menu titles are white on a blue background. Screens that display
playback text or audio le information will show the text in white on a black
background.
In the Blue theme, the menus look like those of the Default theme, but the
playback text appears in white on a blue background.
In the Red theme, menu titles are red on a white background, and sub-menu
titles are white on a red background. Playback text is white on a red background.
In the Yellow theme, menu titles are black on a white background, and menu
items are black on a yellow background. The playback text is black on a yellow
background.
Page 69

61
Reader User Manual
7
To change the display theme, go to the Display menu and select Display
Theme. Press OK. The Display Theme menu appears. Select a theme and
press OK. Then press the Back button to return to the Display menu, and view
your new theme.
Turning the Display On and Off
To turn the display off, go to the Display menu and select Display Control, then
press OK. The Display Control menu appears. Select Display Off, and press OK
again. A conrmation prompt appears. Select Yes, and press OK. The Reader
announces, "Display Control menu. Display Off selected." The display screen
turns off.
When the display is off, you can turn it back on. Navigate back to the Settings
menu, and then to the Display menu. Select Display Control and press OK.
Press the up arrow button. The Reader announces, "Display Control menu.
Display On." Press OK. The display turns on, and the Reader announces,
"Display On selected." The Display Control menu is visible.
NOTE: You can turn either the display or the menu reading option on and off.
However, you cannot turn off the display and menu reading at the same time.
Voice Settings
The Reader can read your text les and menu selections in either a male or
female voice, and at the speed and voice pitch you select. You can also choose
not to hear the Reader menus.
Page 70

62
Chapter 7. Customizing the Reader
To change any of the voice settings, start by selecting Settings on the Home
menu. Then select Voice and press OK.
Reading Menus Aloud
The Reader can play your menu and sub-menu names aloud as you select them.
If you prefer to navigate visually, without hearing menu names, you can turn off
the menu reading feature. If you turn off menu reading, the Reader will still play
the voice gender, voice speed, and voice pitch options for you, so you can hear
how each option will sound.
NOTE: You can turn either the display or the menu reading option on and off.
However, you cannot turn off both the display and the menu reading option at
the same time.
To turn off menu reading:
Go to the Settings menu, then select Voice. On the Voice menu, select Read
Menus, and press OK.
The Read Menus menu appears. Select Do Not Read Menus. Press OK. A
conrmation message appears. Select Yes on the message, and press OK again.
To turn on menu reading:
Go to the Settings menu, then select Voice. On the Voice menu, select Read
Menus, and press OK. The Read Menus menu appears. Select Read Menus,
and press OK.
Page 71

63
Reader User Manual
7
Adjusting Voice Speed
To adjust how fast the Reader reads aloud, select Voice Speed on the Voice
menu. The Voice Speed menu appears, and the Reader reads aloud the name of
this menu, along with the currently selected speed.
The Voice Speed menu presents a number of options, expressed in words
per minute (w.p.m.). Select a voice speed. The Reader plays your selection at
the speed you chose, even if you turned off menu reading. You can then either
choose a different voice speed, or press OK. Press Back to return to the Voice
menu.
You can also change voice speed by pressing the Voice Speed button on the
face of the Reader. Voice Speed is the middle of the three buttons at the lower
right of the Reader face. This button takes you to the Voice Speed menu.
Choosing the Voice Gender
To select either a male or female voice, go to the Voice menu. Select Voice
Gender, and press OK. The Voice Gender menu appears.
Use the up or down arrow buttons to select a different gender. As you make a
selection, the Reader plays the voice, using the gender you chose, even if you
turned off menu reading. After making a selection, press OK. Then press the
Back button to return to the Voice menu.
Page 72

64
Chapter 7. Customizing the Reader
Choosing the Voice Pitch
To adjust the pitch of the voice, go to the Voice menu. Select Voice Pitch and
press OK. The Voice Pitch menu appears. The Reader announces the menu
name and the selected voice pitch.
Select either Very Low, Low, Normal, High, or Very High. As you make a
selection, the Reader plays the voice at the selected pitch, even if you turned
off the menu reading option. Press OK to select the pitch. Then press Back to
return to the Voice menu.
Security Settings
You can set an optional four-digit Personal Identication Number (PIN) to keep
your les more secure. Each time you turn the Reader on, you must enter the
PIN to access your les.
Turning On PIN Protection
To turn on PIN protection, go to the Settings menu and select Security. On the
Security menu, select Turn On PIN Protection. Press OK.
When the Turn On PIN? prompt appears, select Yes and press OK. The Enter
PIN screen appears. On this screen, you will use the up and down arrow buttons
to select four digits for your PIN.
Page 73

65
Reader User Manual
7
TIP: If you have menu reading turned on, the Reader will play individual numbers
aloud as you select them, and will also play aloud the entire PIN. For privacy, plug
in earphones, or enter your PIN in a private location.
The eld for the rst digit is highlighted when the Enter PIN screen appears. Press
an arrow button to select the rst digit. Then press OK to go to the second digit,
and press the up or down arrow buttons to select the next number.
TIP: Press the down arrow to scroll through numbers in ascending order, 0 to 9.
Press the up arrow button to scroll through numbers in descending order, 9 to 0.
Continue until all four numbers are selected. Then press OK.
The Reenter PIN screen appears. Enter your new PIN again, and press OK. You are
returned to the Security menu. On this menu, two new options now appear: Turn
Off Pin Protection, and Change PIN.
If you make a mistake when re-entering your PIN, an error message appears and
you are returned to the Security menu. Select Turn On PIN Protection and start
again.
Changing Your PIN
To change your PIN, go to the Settings menu and select Security and press OK.
Select Change PIN, and press OK. A Change PIN? prompt appears. Select Yes,
and press OK. The Enter Current PIN screen appears. Enter the four-digit PIN you
set when you turned on PIN protection. Press OK.
Page 74

66
Chapter 7. Customizing the Reader
The Enter New PIN screen appears. Enter your new PIN and press OK. When
prompted, enter your new PIN again, then press OK.
Turning Off PIN Protection
To turn off PIN protection, go to the Settings menu. Select Security and press
OK. On the Security menu, select Turn Off PIN Protection. When prompted for a
conrmation, select Yes, then press OK.
You are then prompted to enter your PIN. After you enter your PIN and press OK,
you are returned to the Security menu, where Turn On PIN Protection is the only
option.
Resetting Your PIN
If you forget your PIN, you can clear the old PIN using the Options button, when
the Reader prompts you for your PIN when you start or re-start the Reader. Then
you can reset your PIN.
CAUTION: If you reset your PIN, you will lose all les on the Reader,
including les you captured with the Reader and those you copied to the
Reader. To avoid this loss, use an easy-to-remember PIN, write it down,
and keep it in a secure location.
To reset the PIN, press the Options button when you are prompted to enter your
PIN. Then, select Reset a Lost PIN? and press OK. A warning message tells you
Page 75

67
Reader User Manual
7
that all your data will be erased if you reset the PIN, and asks if you want to
continue. Select Yes and press OK.
A second warning message appears. Select Yes and press OK again. A
conrmation message appears, and the Home menu appears.
Restoring Default Settings
After making changes to any of the Reader's default settings, you can restore the
default settings that your Reader used when you rst started it. If you restore
settings, you restore all settings.
There are two ways to restore default settings:
• In the Settings menu, select Restore Defaults. Press OK. A message
asks you to conrm that you want to restore the defaults. Select Yes and
press OK again. A conrmation message tells you factory settings have
been restored.
• Or press and hold the Guide button for approximately 20 seconds. A
conrmation message tells you factory settings have been restored.
Page 76

68
Chapter 8. Using the Reader with Other Devices
Introduction
The Reader connects to a wide range of other devices. For example, to capture
large amounts of text from a book or another publication, you can connect the
Reader to the Portable Capture Station. The Capture Station is an accessory for
the Reader that simplies the task of capturing large numbers of pages.
You can also connect the Reader to a keyboard and use keyboard keys in place of
the Reader buttons. You can connect the Reader to a mouse, to use the mouse
for capturing text, navigating, and selecting menu items. And you can connect
the Reader to a computer or an external ash drive, to transfer data to or from the
Reader. In most cases, you connect the device to either the Reader's mini-USB
port or the standard USB port, using the USB cable that comes with your Reader.
Devices not mentioned in this chapter may be incompatible with the Reader.
CAUTION: If replacement of your Reader is necessary, we
recommend that you remove les and personal data before
sending the Reader back. Customer Support cannot transfer
les from the Reader you return to the replacement Reader.
This chapter provides information about saving your les to a
computer or ash drive.
Page 77

69
Reader User Manual
8
Connecting to the Portable Capture Station
For detailed information about using the Reader with the Capture Station, refer to
the Portable Capture Station User Manual. Please contact your local reseller for
information about purchasing a Capture Station.
Using the Reader with a Mouse
Using a mouse, you can scroll through menu items and captured text. Begin by
plugging a mouse into the Reader's standard USB port. Then use the mouse
buttons as follows:
• To capture text using the mouse, click the left mouse button once to enter
Shoot mode. Then click it again to capture the text.
• To exit Shoot mode, press the right mouse button.
• To scroll through a menu list, roll the wheel, if your mouse has one, or click
the middle mouse button. Then click the wheel or the middle mouse button to
select an item in the list.
• To move back up the menu tree, press the right mouse button. For example,
when you nish listening to a text, press the right mouse button once to return
to the Texts menu, and once again to return to the Library.
Using the Reader with a Keyboard
If you prefer to use a keyboard instead of the Reader buttons, you can plug a
keyboard connector cable into the standard USB port on the Reader. You do not
have to turn the Reader off rst.
Page 78

70
Chapter 8. Using the Reader with Other Devices
The following table explains how to use keyboard keys for each Reader function.
Reader Function Keys to Press on Keyboard
Play Hold down the Ctrl key as you press the letter p.
Shoot To enter Shoot mode, hold down the Ctrl key as you press
the letter s. Repeat to capture text.
OK Enter
Back Home
Up arrow Up arrow on the keyboard
Down arrow Down arrow on the keyboard
Left arrow Left arrow on the keyboard
Right arrow Right arrow on the keyboard
Options Hold down the Ctrl key as you press the letter o.
Voice Speed Hold down the Ctrl key as you press the letter v.
Favorites Hold down the Ctrl key as you press the letter f.
Location Hold down the Ctrl key as you press the letter l.
Guide Esc
View Toggle Hold down the Ctrl key as you press the letter t.
Volume Down Hold down the Ctrl key as you press the minus (–) key.
Volume Up Hold down the Ctrl key as you press the plus (+) key.
Page 79

71
Reader User Manual
8
Playing Text or Audio Using the Keyboard
Connect the keyboard to the Reader's standard USB port. To select an item
from the Library, press Enter. Use the down or up arrow keys to nd the item
you want. Then hold the Ctrl key as you press the letter p on the keyboard, to
begin playing the le.
To pause the playback, press Ctrl and p again. To return to the menu, press
Home.
Playing Help Topics Using the Keyboard
At any time, press the Esc key. The Guide menu opens. Use the down arrow to
select Go to Help Menu. Press Enter. The Help menu appears. Select either
Introduction, Quick Start Guide or User Manual, and press Enter.
If you select Introduction or Quick Start Guide, playback begins immediately.
If you select User Manual, select a topic from the menu, and press Enter to
begin playback. When you nish listening to the topic, press Home one or more
times to return to your text. Press Enter to continue listening to your text.
Using the Reader with a Computer
You can connect the Reader to your computer to back up Reader les onto your
computer, and also to transfer audio les, DAISY books, and unformatted text
les from the computer to the Reader.
Page 80

72
Chapter 8. Using the Reader with Other Devices
Reader-compatible Files
The Reader can read only certain types of les. You can download and use audio
les if they have the .mp3 or .wav le extensions. However, you cannot play
iTunes les on the Reader, because those les are designed to be played on a
different type of device.
Similarly, you can play DAISY books and unformatted text les on the Reader, but
not Microsoft Word or Adobe PDF les. You can save Microsoft Word documents
as unformatted text (.txt) les, and play the unformatted text les on the Reader.
Connecting the Reader to a Computer
To connect the Reader to a computer, use the USB cable that comes with your
Reader. Plug the mini-USB end into the Reader, and then plug the standard USB
end into the computer. A message on the Reader display screen conrms that
you are connected to the computer.
When the IntelReader window appears, select Open folder to view les and
click OK on the window. The IntelReader folder opens.
This folder contains two folders – Audio and Texts – which contain the les on
your Reader. If you copy a le from your computer to one of these folders, that
le is stored in the same folder on your Reader. If you delete a le from one of
these folders, it is deleted from your Reader.
NOTE: If you use a Mac, you must empty the Trash on your desktop after
deleting a le from a Reader folder, in order to delete the le from the Reader.
Page 81

73
Reader User Manual
8
NOTE: If you connect a USB ash drive to your computer while the Reader
is connected to the computer, and the computer does not recognize the ash
drive, disconnect the Reader from the computer to continue using the ash
drive.
Copying Files from the Reader to a Computer
It is good practice to back up onto your computer any Reader les that you want
to keep. You can then delete these les from the Reader. This practice frees
up space in the Reader's memory. It also ensures that you have all your Reader
les available when you want them.
Connect the Reader to a computer, as described in the section titled Connecting
the Reader to a Computer. Open the IntelReader folder that contains the les
you want to copy to the computer. On the computer desktop, open the folder
in which you want to place the Reader le. Copy the le from the Reader folder
into the folder you opened on your computer desktop. Then, delete the le from
the Reader by deleting it from the Audio or Texts folder.
CAUTION: Do not disconnect the USB cable, turn off the Reader, or
turn off the computer when les are being copied. These actions can
result in corrupted les.
TIP: If you are copying a text that consists of multiple les, copy all of the les
associated with the book to a unique folder, so that they are organized in the
same way on the computer as they are on the Reader. This practice makes it
easier to nd your les on the computer.
Page 82

74
Chapter 8. Using the Reader with Other Devices
Viewing a Reader File on Your Computer
When you capture a text le, you are actually creating two les on the Reader.
One has an .opf le extension. This is the le that you see in menus on the
Reader, and that you can play on the Reader or on a DAISY book player. The
other version is a plain-text le that you can read on your computer without a
DAISY book reader. This le is compatible with other devices as well, including
cell phones and PDAs. It is only visible when you connect the Reader to one of
these devices.
To view the text le you created on the Reader, connect the Reader to the
computer as described in the section titled Connecting the Reader to a
Computer. A message on the Reader display screen conrms that you are
connected to the computer.
On the desktop, navigate to the IntelReader folder and open the Texts folder.
Inside the Texts folder, the book you captured is in its own folder. Open the
folder that contains the book you want to read. You will see two les that have
the same name, but different le extensions. The le with the .txt extension is
the plain-text le that you can open and read without a DAISY book player.
Playing a DAISY Book on Your Computer
Playing a DAISY book on the Reader is as simple as pressing the Play button.
When you copy a DAISY book to your computer, however, you are actually
copying a number of les. To hear the book played on your computer, you must
Page 83

75
Reader User Manual
8
have a DAISY book player installed on your computer, and you must open the
correct le.
To listen to the DAISY book on your computer, open the le with the .opf
extension. The DAISY book player opens, and you can begin listening. If you do
not have a DAISY book player, you can read the book in text format. Simply open
the le with the .txt extension.
NOTE: The Reader supports the DAISY 2.02 and DAISY 3 formats.
Copying Files from a Computer to the Reader
To copy les from a computer to the Reader, connect the Reader to a computer,
as described in the section titled Connecting the Reader to a Computer.
Navigate to the IntelReader folder. This folder is in My Computer if you are
using a PC, or Finder on the Mac. In this folder, open the folder that will contain
the les you want to copy -- either Audio or Texts. Then copy the les into that
folder.
NOTE: If you rename the Audio or Texts folder in the IntelReader folder,
your changes will not be reected in the Library. If you create new folders in
the IntelReader folder, the new folders will not appear on the Reader.
You must copy les into the appropriate folder. Audio les with the .wav and
.mp3 extensions must go into the Audio folder. DAISY books, Reader book les,
and unformatted text les must go into the Texts folder. If the les are not in the
appropriate folder, the Reader cannot use them.
Page 84

76
Chapter 8. Using the Reader with Other Devices
When you nish copying les, disconnect the Reader from the computer, using
your computer's safe ejection procedure.
NOTE: If you disconnect a Mac from the Reader without using the Mac's
safe ejection procedure, or if the Reader shuts down because of low battery
charge while it is connected to a Mac, you may see one or more system les
in the Texts folder, such as the fseventsd-uuid le. To avoid seeing these les,
always safely eject the Reader from the Mac.
Connecting the Reader to an External Drive
An external drive is any drive that can be used to transfer data to and from the
Reader using a USB port. Using an external drive, you can transfer les to and
from the Reader. The les you transfer to the Reader must be in one of the
le formats that the Reader accepts, as described in the section titled Reader-
compatible Files.
The Reader supports the type of external drive called a ash drive. A ash drive
is a device about the size of your thumb that can store large amounts of data.
The Reader supports the FAT32 and EXT3 ash drive formats.
Connecting the Reader to a Flash Drive
To connect a ash drive to the Reader, plug the drive into the standard USB port
on the bottom edge of the Reader. A message conrms that an external drive is
connected.
Page 85

77
Reader User Manual
8
After a moment, the Home menu appears with a new option, External Drive,
highlighted. Press OK to open this option. On the External Drive menu, there are
three options that are the same as the Library menu options: Categories, Texts,
and Audio. You use these options to transfer les to the Reader.
Copying Files from a Flash Drive to the Reader
To copy an individual le from the ash drive, select the ash drive's Categories,
Texts, or Audio option. Press OK. The Categories, Texts, or Audio menu opens
and displays a list of les. Select the le you want to copy, and press Options.
On the Options menu, select Copy to Library, and press OK. When copying is
complete, a conrmation message appears.
To copy all the les in one of the ash drive's folders, select the drive's Categories,
Texts, or Audio option, but do not open the option. Press the Options button. On
the menu that appears, select Copy to Library, then press OK. When copying is
complete, a conrmation message appears.
To copy everything on the ash drive to the Reader, select the External Drive
option but do not open it. Press Options. Select Copy All to Library and press
OK.
You can conrm that copying succeeded by pressing Back to return to the Home
menu, then opening the Library menu. Open the same menu that contained the
original le, either Categories, Texts, or Audio. The le now appears in that menu.
To cancel the copying process at any time, press the Back button.
Page 86

78
Chapter 8. Using the Reader with Other Devices
Copying Files from the Reader to a Flash Drive
To copy an individual le from the Reader, open the Categories, Texts, or Audio
menu in the Library. Select the le you want to copy, and press Options. On the
Options menu, select Copy to External Drive, and press OK. When copying is
complete, a conrmation message appears.
To copy all the les in one of the Library folders, select the Categories, Texts,
or Audio menu, but do not open the menu. Press Options. On the menu
that appears, select Copy to External Drive, then press OK. When copying is
complete, a conrmation message appears.
To copy all les in the Reader to the ash drive, in the Home menu highlight Library
but do not open it. Press Options. Select Copy All to External Drive and press
OK. When copying is complete, a conrmation message appears.
To cancel the copying process at any time, press the Back button.
Copying Duplicate Files
If a le on the external drive has the same name as a le on the Reader, a message
appears and gives you the following options when you try to copy the le to the
Reader:
• Replace this File. This option replaces the existing Reader le with the le
you are copying from the external drive. Copying continues with the next le.
• Skip this File. This option keeps the existing Reader le, and does not copy
the le from the external drive. Copying continues with the next le.
Page 87

79
Reader User Manual
8
• Replace All Duplicates. This option replaces all Reader les that have the
same names as those you are copying from the external drive. You are not
prompted again to replace or skip a le.
• Don’t Replace Duplicates. This option skips all les that have the same
name as les on the Reader. None of these les are copied to the Reader.
You are not prompted again to replace or skip a le. Copying continues with
les that are not duplicates.
Select the option you want and press OK. When copying is complete, a
conrmation message appears.
Safely Ejecting an External Drive
To ensure that all les have nished copying to the Reader before you remove the
external drive, it is good practice to use the safe ejection method.
On the Home menu, select External Drive. Press Options. On the External
Drive Options menu, select Eject. The Eject Drive? prompt appears. Select Yes
and press OK. A message conrms that your drive is ejected. You can then safely
remove the drive from the standard USB port.
Page 88

80
Chapter 9. FAQs and Customer Support
Chapter 9. Frequently Asked Questions and Customer
Support
Frequently Asked Questions
Question: Can I leave the Reader on when I am not using it?
Answer: You should shut the Reader down if you will not be using it for a couple
of days. You can leave it on during shorter periods of inactivity.
Question: Will I damage the Reader by leaving it plugged in?
Answer: You cannot over-charge the Reader by leaving it plugged in for an
extended period. However, you should unplug the Reader if there is danger of an
electrical storm, to prevent damage to the Reader.
Question: How can I get the camera to focus properly?
Answer: To ensure proper focus, hold the Reader at approximately nose level
when you are seated in front of the printed material. If the Reader is too close
to or too far from the text being captured, the results will vary. Be sure to hold
the Reader still when capturing an image. It also helps to ensure that text or
an image appears in the center of of the display screen. The camera uses that
quadrant to adjust focus. You can use the Practice Page that comes with the
Reader, to become accustomed to holding the Reader and nding the right
distance from the page.
Page 89

81
Reader User Manual
9
Question: How can I prevent the ash from producing a glare on the page?
Answer: Try holding the Reader with the top tipped slightly toward you, and the
camera pointed at the center of your text. This position directs the ash away
from the lens and reduces glare. Also, if you are in a well lit space, temporarily
turn off the ash. And nally, be sure there is no excess light on the page. Keep
the Reader away from overhead lights, desk lamps, or windows.
Question: I turned off the Read Menus option, but later I found it had been turned
on again. Why did this happen?
Answer: You might have turned off the display screen. You cannot turn off both
the display screen and the Read Menus option. If you turn off menu reading,
then turn off the display screen, the menu reading option turns on again.
Question: When I use my earphones, sometimes the sound comes through the
speakers. Other times, the sound is muted. Why does this happen?
Answer: It could be that the earphones aren't completely plugged in. Be sure to
insert them all the way into the earphone socket, to ensure good quality sound.
Question: Why is the time shown as 13:00 instead of 1:00?
Answer: The Date and Time setting is set to a 24-hour clock. To display the
time in 12-hour format, go to the Basics menu, and select Date and Time.
Highlight Set Time, without opening it. Press the Options button. On the Time
Format menu, select 12-Hour Clock, and press OK.
Page 90

82
Chapter 9. FAQs and Customer Support
Question: I copied my Reader les to a computer but it is difcult to nd a le on
the computer. How can I make les easier to nd?
Answer: When you back up les, copy the les as a group so that they are
organized in the same way on the computer as they are on the Reader. For
example, to nd all the les in a book, you can copy the book's folder from the
Reader to the computer.
Question: Sometimes the playback sounds garbled, or mispronounces words or
numbers. What causes this?
Answer: Text-to-speech (TTS) software has improved in recent years, but it
hasn't achieved perfection. As a result, you can encounter differences between
the printed text and the audio playback. When differences occur, you can press
View Toggle to view the image of the page you are playing, or spell out any
words that are unclear, or request assistance from another person. Here are
examples of some differences that can occur:
Mathematical, currency, and scientic symbols can be misinterpreted. The
Reader is designed to convert text into speech, and is not intended for reading
primarily mathematical, scientic, or nancial data. In time stamps, such as 9:00,
the colon can be ignored, so that the number reads as nine hundred. Similarly,
in currency, the decimal or comma separator can be ignored. In some fonts, the
numeral 1 can be interpreted as the lower-case letter L.
Abbreviations, such as PA for Pennsylvania, might not be interpreted correctly.
Latinates, such as e.g. and etc., might not be translated from the Latin.
Page 91

83
Reader User Manual
9
Customer Support
Intel recommends that you contact your local dealer or reseller before contacting
Intel, if you have any questions about the Reader. In the event your dealer or reseller
is not able to resolve the issue, you can contact Intel Customer Support in in any of
the ways shown on this page.
If replacement of your Reader is necessary, we recommend that
you remove les and personal data before sending the Reader back.
Customer Support cannot transfer les from the Reader you return to
the replacement Reader. Refer to Chapter 8 of this User Manual for
information about saving your les to a computer or ash drive.
Web Site
www.reader.intel.com. Select Support.
Email
http://supportmail.intel.com/
Select Healthcare Products as the product family, Mobile Print Readers as the
product line, and Intel Reader as the product. Fill out the information on the form,
and then click Submit. The information will be sent to an Intel Customer Support
representative, who will respond by email within one business day.
Telephone
1-800-230-7450
Intel Customer Support is available Monday through Friday, from 7:00 a.m. to
5:00 p.m., Pacic Time.
Page 92

84
Appendix A. Technical Specications
Reader Specications
Dimension Description
Processor Intel® Atom™ Processor (Z540)
Chipset Intel® SCH US15L
Memory 512 MB DDR2
LCD Display 4.3 inches (16:9 aspect ratio) full-transparent type (TFT)
18-Bit color
480 x 272 pixel display
Camera 5 megapixel, auto focus
Focus range of 10 cm to ~1 meter (4 in. to ~3 ft.)
Mechanical shutter
Flash Variable intensity based on available light.
Maximum 30 lux at 1 meter
Polarized
Data Storage 4 GB Intel Z-P140 Solid State Drive (SSD)
Approximately 2 GB available for user les.
Page 93

85
Reader User Manual
Dimension Description
Supported
Formats
DAISY 2.02 (DAISY)
NISO 2002 (z2002 or DAISY 3)
NISO 2005 (z2005 or DAISY 3)
NIMAS 1.0, NIMAS 1.1
Additional: .jpg (created by the Reader), .mp3, .wav, ASCII text
Connectivity USB 2.0 type A connector
USB 2.0 type mini-B connector
AC Power
Standard 2.5 mm (1/8 in.) stereo audio jack for external
earphones/connectivity
Power
Requirements
30 Watts maximum
Sound Integrated stereo speakers or earphone jack
Carrying Case Custom case with handle and headphone pouch
Allows camera, reading, and listening functionality
0.2 lbs
Operating
Temperature
5 to 35° C (40 to 95° F)
Operating
Humidity
Less than 90% (non condensing)
Page 94

86
Appendix A. Technical Specications
Dimension Description
Dimensions (W x
H x D)
16.5 cm x 13.6 cm x 3.3 cm (6.50 in. x 5.35 in. x 1.3 in.) (with
battery)
Weight 0.626 kg (1.38 lbs.) (with battery)
Packaged
Dimensions
29.5 cm x 19.3 cm x 16.5 cm (11.5 in. x 7.6 in. x 6.5 in.) (with
power brick, documentation, etc.)
Packaged Weight 2.18 kg (4.8 lbs.) (with power adapter and documentation)
Battery Pack Specications
Dimension Description
Type Rechargeable lithium-ion, “Smart Battery”
Rated Capacity DC 7.4V, 3300 mAh
Charging Time 150 minutes from 10% to 100%
Operating Time
1
With a fully charged battery, the Reader can:
1
• Play over 4 hours of text-to-speech or .mp3 audio
• Capture and process over 85 images of text
• Remain in standby for up to 5 days
Operating Temperature 5 to 35° C (40 to 95° F)
Recharging Temperature 0 to 40° C (32 to 100° F)
Operating Humidity Less than 90% (non condensing)
Page 95

87
Reader User Manual
Dimension Description
Dimensions (W x H x D) 15.5 cm x 13.2 cm x 1.5 cm (6.10 in. x 5.2 in. x .6 in.)
Weight .16 kg (0.35 lbs.)
1
Battery operating time will vary depending on the type of content being
captured or played, usage conditions such as screen and ash settings, as well as
environmental factors such as temperature. As the battery ages, anticipate lower
operating duration.
AC Adapter Specications
Dimension Description
Rated Input 100-240V~1.5A, 50-60Hz
Rated Output 12V, 5A
Power Cord Length Approximately 3.6 m (approximately 12 ft.)
Operating Temperature 5 to 35° C (40 to 95° F)
Operating Humidity Less than 90% (non condensing)
Dimensions (W x H x D) 5.71 cm x 3.17 cm x 13.33 cm (2.25 in. x 1.25 in. x
5.25 in.)
Weight 0.45 kg (1 lb.)
Page 96

88
Appendix B. Updating Your Reader Software
About the Software Update Process
The software that comes installed on your Reader is version 1.0.1. To ensure that
you always have the latest features installed on your Reader, you can periodically
update this software with newer versions that will be available at the following
web site: http://downloadcenter.intel.com. Visit this site from time to time, to
learn whether there are new features to install.
There are two ways to update your software:
• Connect your Reader to a computer and copy the updated software to the
Reader.
• Connect a ash drive to your computer, and copy the updated software
to the drive. Then connect the ash drive to the Reader and apply the
updates.
The following sections provide details about each method.
NOTE: After you update your software version, you cannot re-install an older
version.
Before you begin updating your software, you might want to note the software
version on your Reader, so that you can tell if there is a more recent version
on the web site. To check your current software version, select Help from the
Home menu and press OK. Then select About and press OK again. On the
Intel Reader screen, your software version appears on the rst line.
Page 97

89
Reader User Manual
Updating Reader Software Using a Computer
To update your Reader, you will rst download the software from Intel's Download
Center to your computer, then copy the updates to the Reader.
Downloading Reader Software to a Computer
1. Turn on the Reader and wait for the Home menu to appear.
2. Using the USB cable that comes with your Reader, plug the mini-USB end into
the Reader. Then plug the standard USB end into the computer. A message
on the Reader display screen conrms that you are connected to the computer.
3. On the computer, the IntelReader window appears. Select Open folder to
view les. Then, click OK.
4. Open a web browser and navigate to http://downloadcenter.intel.com.
5. In the menu at the left, select Healthcare Products. Then choose Mobile
Print Readers and Intel Reader.
6. The Downloads page appears. From the drop-down menu on this page,
select All Operating Systems. Then click Go.
7. A list of les appears, organized into categories. Find the Software Patches
category and locate the most recent software version. Click the Download
link to the right of this le.
8. The license agreement appears. Read this agreement and click Accept.
Page 98

90
Appendix B. Updating Your Reader Software
Copying Software from the Computer to the Reader
1. After you accept the license agreement, the Downloads page displays the
name of the product and the language you selected, along with a link to begin
the download process. Click the link.
2. A prompt asks if you want to run or save the update le. Choose Save.
3. In the Save As window that appears next, navigate to the IntelReader folder.
When your computer is connected to the Reader, IntelReader is in My
Computer if you use Windows, or in Finder on the Mac. Save the update le.
NOTE: It can take several seconds to save the le. Do not use your Reader,
disconnect the USB cable, or turn off the Reader or computer until the
process is complete.
4. When copying is complete, safely disconnect the Reader from the computer,
using your computer's safe ejection procedure. The Reader will not recognize
the software update while it is connected to the computer.
5. The Reader prompts you to apply the update. Select Yes, Apply Update on
the prompt, and press OK.
After the update is applied, the Reader shuts down and restarts. This process
can take 3 to 4 minutes to complete. If you restart your Reader sooner, the
software version will not be displayed correctly in the About menu.
6. To verify that the update was successful, select Help from the Home menu
and press OK. Then select About and press OK again. The new software
version appears on the rst line of the Intel Reader screen.
Page 99

91
Reader User Manual
Updating Reader Software Using a Flash Drive
A ash drive is a small, portable, USB device that stores data. You can use this type
of drive to download Reader software.
Downloading Reader Software to a Flash Drive
1. Connect the ash drive to a USB port on your computer.
2. On the computer, open a web browser and navigate to
http://downloadcenter.intel.com.
3. In the menu at the left, select Healthcare Products. Then choose Mobile
Print Readers and Intel Reader.
4. The Downloads page appears. From the drop-down menu on this page,
select All Operating Systems. Then choose Go.
5. A list of les appears, organized into categories. Find the Software Patches
category and locate the most recent software version. Click the Download
link to the right of this le.
6. The license agreement appears. Read this agreement and click Accept.
Copying Software from the Flash Drive to the Reader
1. After you accept the license agreement, the Downloads page displays the
name of the product and the language you selected, along with a link to begin
the download process. Click the link.
Page 100

92
Appendix B. Updating Your Reader Software
2. A prompt asks if you want to run or save the update le. Choose Save.
3. In the Save As window that appears next, navigate to the IntelReader folder.
When your ash drive is connected to the computer, IntelReader is in My
Computer if you use Windows, or in Finder on the Mac. Save the update le.
NOTE: It can take several seconds to copy the le. Do not disconnect the
ash drive until the process is complete.
4. When copying is complete, safely disconnect the drive from the computer,
using your computer's safe ejection method.
5. Turn on the Reader. Connect the ash drive to the standard USB port on your
Reader.
Within a few seconds, a message conrms that an external drive is attached to
the Reader.
6. Several seconds later, a prompt appears, asking whether you want to apply the
new software version. Select Yes, Apply Update on the prompt and press
OK.
A message conrms that the update is in progress. Do not turn off the Reader
or disconnect the ash drive.
After the update is applied, the Reader shuts down and restarts. This process
can take 3 to 4 minutes to complete. If you restart your Reader sooner, the
software version will not be displayed correctly in the About menu.
 Loading...