

Intel Latitude E6430, Latitude E6430 ATG, Latitude E6430s, Latitude E6530, Smart Response Setup Manual
...Page 1

Intel Responsiveness
Technologies
Dell Setup Guide
Page 2

Notes, Cautions, and Warnings
NOTE: A NOTE indicates important information that helps you
make better use of your computer.
CAUTION: A CAUTION indicates potential damage to
hardware or loss of data if instructions are not followed.
WARNING: A WARNING indicates a potential for property
damage, personal injury, or death.
____________________
Information in this publication is subject to change without notice.
© 2012 Dell Inc. All rights reserved.
Reproduction of these materials in any manner whatsoever without the written
permission of Dell Inc. is strictly forbidden.
Trademarks used in this text: Dell™ and the DELL logo are trademarks of Dell
Inc, Microsoft
registered trademarks of Microsoft Corporation in the United States and/or other
countries. Intel
are registered trademarks or trademarks of Intel Corporation in the U.S. and other
countries.
Other trademarks and trade names may be used in this publication to refer to
either the entities claiming the marks and names or their products. Dell Inc.
disclaims any proprietary interest in trademarks and trade names other than its
own.
2012 - 06 Rev. A00
®
, Windows®, and Windows Vista® are either trademarks or
®
, Pentium®, Xeon®, Core™, Atom™, Centrino®, and Celeron®
Page 3

Contents
1 Introduction . . . . . . . . . . . . . . . . . . . . . . . . 5
What do these features do? . . . . . . . . . . . . . . . . 5
What is Intel Smart Response Technology?
What is Intel Rapid Start Technology?
What is Intel Smart Connect Technology? . . . . . . 6
. . . . . 5
. . . . . . . . 5
2 System Requirements . . . . . . . . . . . . . . . . 7
Intel Smart Response Technology . . . . . . . . . . 7
Intel Rapid Start Technology
Intel Smart Connect Technology . . . . . . . . . . . 8
. . . . . . . . . . . . . 7
3 Smart Response Configuration . . . . . . . . 11
How to set up or re-configure a system for
use with Smart Response?
How to use Smart Response?
. . . . . . . . . . . . . 11
. . . . . . . . . . . 15
4 Rapid Start System Configuration . . . . . . 19
How to set up or re-configure a system for
use with Rapid Start?
. . . . . . . . . . . . . . . . 19
Contents 3
Page 4

5 Smart Connect Configuration . . . . . . . . 35
How to set up or re-configure a system for
use with Smart Connect? . . . . . . . . . . . . . . 35
A Appendix A. . . . . . . . . . . . . . . . . . . . . . . 39
B Appendix B. . . . . . . . . . . . . . . . . . . . . . . 40
4 Contents
Page 5

3
Introduction
What do these features do?
Smart Response, Rapid Start, and Smart Connect are layered technologies
that can work together to provide improved system responsiveness. Together
they comprise Intel's Responsiveness Technologies.
The purpose of this document is to help end-users understand and configure
these responsiveness technologies that are supported by the Intel chipset on
several Dell desktop and notebook computers.
Please note that some features described below are not available on all Dell
systems, as they are dependent on the Intel chipset, Dell system BIOS
enablement and specific hardware requirements. Please consult your product
documentation to determine if your product supports these technologies.
What is Intel Smart Response Technology?
Smart Response is a feature that uses both a traditional hard disk drive
(HDD) and a solid state drive (SSD) of greater than 32 GB together. It
dynamically monitors file, data, and application use, and stores frequently
used content on a special partition on the SSD device for faster access. It
provides SSD-like read/write performance for the files used most frequently,
while providing lower overall storage cost by sorting and storing less
frequently accessed content on the larger-sized traditional HDD.
What is Intel Rapid Start Technology?
Rapid Start is a feature that provides power savings similar to Windows
hibernate state, while improving resume time vs. hibernate by ~2x. Rapid
Start may be combined with Smart Response on some systems to enhance
overall system performance while also reducing power consumption when not
in use.
Introduction 5
Page 6

What is Intel Smart Connect Technology?
Smart Connect is a feature that periodically wakes the system from the
Windows sleep state to refresh email or social networking applications. When
the system is equipped with specific wireless devices, it can detect the
presence of known networks while asleep, waking only when connectivity is
available (this feature is called Net Detect).
When properly equipped with specific wireless devices, Smart Connect can
also provide quick internet connection readiness by keeping wireless devices
active in a low-power mode during sleep (this feature is called Quick
Connect). Smart Connect may be combined with Rapid Start on some
systems to help reduce power consumption while still keeping email and
other application data current.
6 Intel Responsiveness Technologies - Dell Setup Guide
Page 7

System Requirements
Intel Smart Response Technology
•Storage:
• The system must be equipped with an SSD (either SATA or
mSATA/minicard form factors) storage device with at least 18.6 GB of
available storage space and a traditional HDD. (Also see "Appendix A"
on page 39)
4
• The system must have BIOS set to
BIOS menus, this mode may be called
Start mode
NOTE: ATA and AHCI modes are not supported.
• The system must have Intel Rapid Storage driver and application
installed in the OS.
• Processor:
• System must have an Intel Core processor installed.
Intel Rapid Start Technology
•Storage:
• The system must be equipped with an SSD storage device (either
SATA or mSATA / minicard form factors), with at least 8 GB of
available storage space. (also see "Appendix A" on page 39)
• Rapid Start may be combined with Smart Response; the technologies
can share the same SSD space.
).
RAID
on mode (in some system
Smart Response mode
or
Rapid
• The system cannot have multiple disks configured in a RAID array, as
striped or mirrored disk arrays will hide the Rapid Start partition from
the BIOS.
System Requirements 7
Page 8

• The system may be configured to support both Rapid Start and
Smart Response on the same SSD device (configuration details
provided later in the document).
• Windows cannot be running in legacy ATA mode (as selected from the
storage/SATA BIOS settings menu). The system must be in AHCI,
RAID, Smart Response, or Rapid Start mode.
•Processor:
• System must have an Intel Core processor installed.
•Memory:
• System should have 8 GB of memory or less. The factory
configuration only supports 8 GB or less, and if a partition is created
manually to support larger configurations, the expected resume time
performance benefits may not be realized.
• Software/Drivers:
• Systems must have the Intel Rapid Start Technology driver installed.
• Other Limitations:
• Encryption:
• Systems configured with a Dell Data Protection Encryption accelerator card do
not support Rapid Start.
• Some software encryption vendor guidelines may recommend using Windows
hibernate in place of Windows sleep. If sleep is disabled, Rapid Start state will be
disabled automatically.
• Dell does not support self-encrypting HDD's or SSD's with Rapid Start.
•Passwords:
• Some Dell systems do not support Rapid Start when HDD (ATA security) or
system BIOS passwords are enabled.
Intel Smart Connect Technology
• Storage (also see "Appendix A" on page 39):
• Smart Connect software can only be ordered from the Dell factory on
systems ordered with an SSD.
• Smart Connect technology may work on some systems, with HDD or
hybrid HDD drives, but it is not recommended.
8 Intel Responsiveness Technologies - Dell Setup Guide
Page 9

• Processor:
• System must have an Intel Core processor installed.
•Network devices:
• Net Detect (see "Smart Connect Configuration" on page 35 for
details) is supported on these Intel wireless LAN cards in some
systems.
– Ultimate-N 6300
– Advanced-N 6250 + WiMAX
– Advanced-N 6230
– Advanced-N 6235
– Advanced-N 6205
– Wireless-N 6150 + WiMAX
– Wireless-N 1030
– Wireless-N 2230
– Wireless-N 1000
– Wireless-N 2200
• Quick Connect (see "Smart Connect Configuration" on page 35 for
details) is supported by these Dell Wireless WAN cards in some
systems:
• Dell Wireless 5560, 5802, 5804 (pending availability after launch).
•Software/Drivers:
• Systems must have the Intel Smart Connect Technology driver and
application package installed.
• Application support:
• Many social media and email applications will work with
Smart Connect by design. Smart Connect support was validated by
Intel on several applications, including:
• Microsoft Outlook
• Microsoft Live Mail
•Sobees
System Requirements 9
Page 10

• VPN: Support for restoring VPN credentials across Smart Connect
sleep cycles was validated by Intel with these VPN solutions:
• Cisco AnyConnect
•Check Point VPN
10 Intel Responsiveness Technologies - Dell Setup Guide
Page 11

5
Smart Response Configuration
How to set up or re-configure a system for use with Smart Response?
This section is a summary of steps, the detailed description of which can be
found on the Intel support website:
http://www.Intel.com/support/chipsets/sb/CS-
032826.htm
There is also an Intel setup guide available here:
http://download.Intel.com/support/chipsets/sb/Int
el_smart_response_technology_user_guide.pdf
Pre-Installation Notes
• If the system is in AHCI or ATA mode, Smart Response cannot be
configured. The procedure for changing SATA modes after Windows
installation is generally outside the scope of this document, however,
"Appendix B" on page 40 provides suggested methods that may help on
some systems.
• This section is designed to walk you through troubleshooting steps in order
to identify solutions to commonly experienced issues with USB-connected
external drives.
• The Intel Rapid Storage Technology driver and application package is
required for systems that support Smart Response. If the system supports
it, the driver and application self-extracting executable file will be available
for download from http://support.dell.com/
• Smart Response and Rapid Start can co-exist on the same SSD device.
•
On some systems (at time of publication), installation order of
Smart Response and Rapid Start is significant.
Smart Response Configuration 11
Page 12
CAUTION: Rapid Start configuration must take place AFTER Smart Response
configuration. Smart Response configuration may erase the SSD device, including
Rapid Start partition information.
1
BIOS
— Restart the system, and press F2, when the Dell splash screen
appears, to enter the BIOS setup menu.
a
Navigate to the "SATA Operation" mode menu, usually found under
"System Configuration" or "Advanced Settings."
b
Confirm that the system BIOS is set to RAID on mode (in some
system BIOS menus, this mode may be called
Rapid Start mode
NOTE: If the system is in AHCI or ATA mode, Smart Response cannot be configured
until the mode is changed. The procedure for changing SATA modes after Windows
installation is generally outside the scope of this document, however, "Appendix B" on
page 40provides suggested methods that may help on some systems.
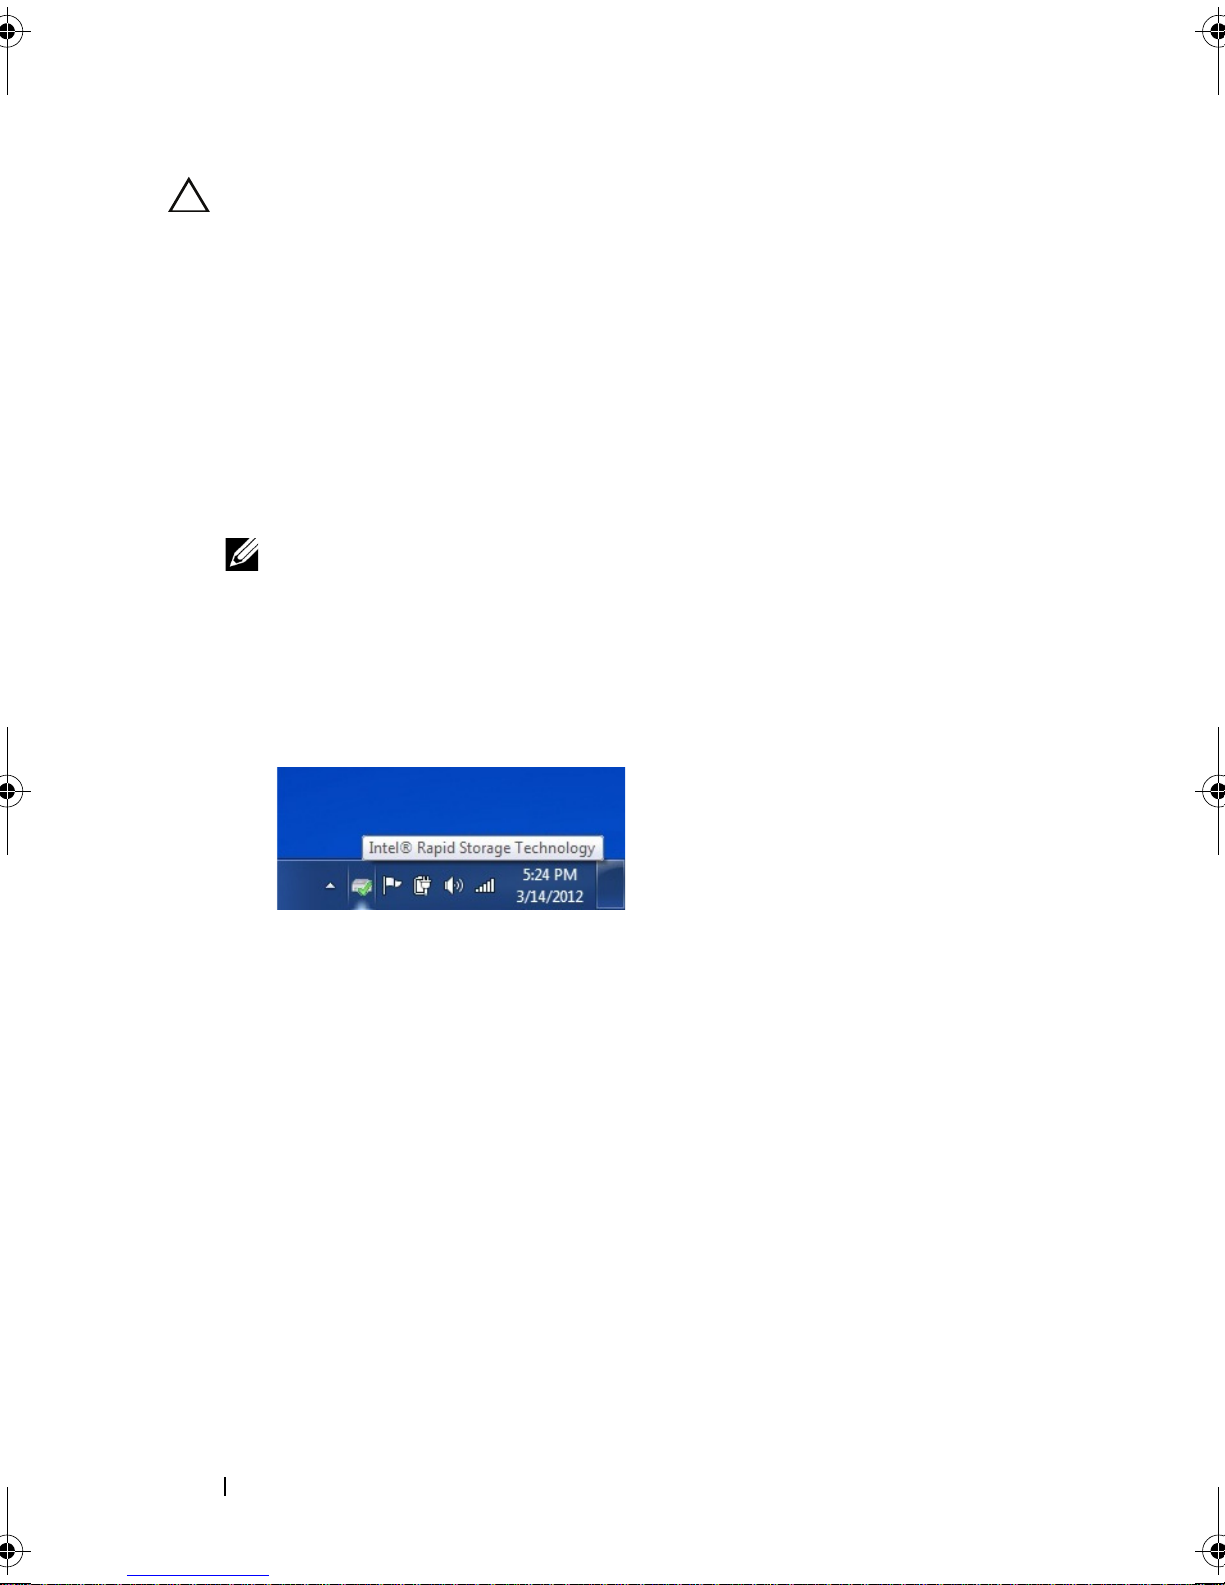
2
Launch the Intel Rapid Storage Manager application from Windows
Start
>
All programs > Intel > Rapid Storage Manager
).
Smart Response mode
, or by double-
clicking the tray icon, which looks like this:
or
12 Intel Responsiveness Technologies - Dell Setup Guide
Page 13

3
The
Accelerate
button should be visible near the top of the Rapid Storage
Technology Manager application window. Click
titled
Intel Smart Response Technology
below:
Accelerate
, and a page
will appear, similar to the picture
4
Click the "Enable acceleration" link in the middle of the Smart Response
window.
Smart Response Configuration 13
Page 14

5
A window titled "Enable Acceleration" for configuring Smart Response will
pop up.
6
Follow the instructions in the "Enable Acceleration" window to complete
configuration of Smart Response (this text is from the
Response setup guide
a
Select the SSD to be used as a cache device.
b
Select the size from the SSD to be allocated for the cache memory.
):
Intel Smart
Any remaining space on the SSD may be used for data storage. A
simple data disk labeled "Volume_0000" will be automatically created.
NOTE: If a Rapid Start will be enabled after enabling Smart Response, do not
select "Full disk capacity" at the "Select the size allocated for the cache
memory" prompt. Instead, select the 18.6 GB option, which will make a singledisk RAID 0 volume, labeled "Volume_0000" from the remaining disk space for
creating the Rapid Start partition later.
Select the drive (or RAID volume) to be accelerated. It is highly
c
recommended to accelerate the system volume or system disk for
maximum performance.
14 Intel Responsiveness Technologies - Dell Setup Guide
Page 15

d
Select the acceleration mode. By default, Enhanced mode is selected.
See "How to use Smart Response?" on page 15 for more details
regarding Enhanced and Maximized modes.
How to use Smart Response?
Once the system is configured for Smart Response, the system will
automatically begin to use the cache to enhance system performance by
storing frequently used data on the cache device, so that it can be retrieved
faster than data stored on the HDD.
Intel Rapid Storage Manager Application Settings
•
Enhanced mode
written to the cache will be simultaneously written to the hard drive to
ensure data integrity in both cache and drive, but read operations will be
accelerated by the cache.
: Acceleration is optimized for data protection. The data
Maximized mode
•
: Acceleration is optimized for input/output
performance. The data written to the cache is not always written
simultaneously to the hard drive. This improves write performance, but
also allows for the possibility of data on the cache being out of sync with
the HDD if an unexpected shutdown event (such as power failure) occurs.
Disabling
CAUTION: Deleting the Smart Response partition (!), or removing the Smart
Response SSD cache device: Manually deleting/erasing the Smart Response
partition is strongly discouraged. Depending on the state of the system, and what
files have been cached to the SSD during use, deleting the Smart Response
partition could result in permanent data loss. Should the need to disable Smart
Response arise, the safest way to disable the feature is from within the Rapid
Storage Manager application.
•
Disabling Smart Response within the Rapid Storage application
the preferred method of disabling Smart Response. Doing this will allow
the cache to be properly flushed back to the hard drive.
: This is
Smart Response Configuration 15
Page 16

Removing the mSATA/SSD or HDD
• Before removing the HDD or cache from the system, the Smart Response
feature should be disabled in the Rapid Storage Manager application by
clicking the "Disable acceleration" link either on the main status page or
under the Acceleration menu.
Repairing Inaccessible Cache
• If the HDD or mSATA/SSD cache devices are replaced without disabling
Smart Response first (due to a HDD repair process or upgrades), the status
of the cache may appear as "Inaccessible".
• In this scenario, the state can be restored by clicking the "Disassociate"
link.
NOTE: Before disassociating the drive from the cache, make sure user data
has been backed up.
A message will pop up explaining the risk of removing the cache device.
16 Intel Responsiveness Technologies - Dell Setup Guide
Page 17

"Clicking Yes will return the mSATA or SSD cache device to a blank
non-accelerated state, at which point it can be reconfigured by following the
configuration steps described in the configuration section above.
Smart Response Configuration 17
Page 18

18 Intel Responsiveness Technologies - Dell Setup Guide
Page 19

6
Rapid Start System Configuration
How to set up or re-configure a system for use with Rapid Start?
Pre-Installation Notes
• If the system is in ATA (or IDE) mode, Rapid Start cannot be configured
until the mode is changed. The procedure for changing SATA modes after
Windows installation is generally outside the scope of this document,
however, "Appendix B" on page 40 provides suggested methods that may
help on some systems.
• The Intel Rapid Start Technology driver and application package is
optional on some systems. It can enhance the resume performance of
Rapid Start if the system supports it. If the system supports the Rapid
Start software enhancements, the self-extracting executable file is available
for download from http://support.dell.com/
• Smart Response and Rapid Start may co-exist on some systems.
sequence of configuration for Smart Response and Rapid Start is
significant.
CAUTION: Rapid Start configuration must take place AFTER Smart Response
configuration. Smart Response configuration may erase the SSD device, including
Rapid Start partition information.
In the event that the original factory SSD was replaced, or a new SSD or
mSATA / minicard SSD was installed, or the Rapid Start partition is otherwise
erased, the following procedure can be used to restore Rapid Storage
functionality.
BIOS
1
screen appears, to enter the BIOS setup menu.
a
— Restart the system, and press the F2 key, when the Dell splash
Navigate to the "SATA Operation" mode menu, usually found under
"System Configuration" or "Advanced Settings."
Rapid Start System Configuration 19
The
Page 20

b
Confirm that the system BIOS is set to AHCI mode or RAID on mode
(or in some system BIOS menus, this mode may be called
or
2
Windows
Response mode
NOTE: If the system is in ATA mode, Smart Response cannot be configured until the
mode is changed. The procedure for changing SATA modes after Windows installation
is generally outside the scope of this document, however, "Appendix B" on page 40
provides suggested methods that may help on some systems.
Rapid Start mode
: From the Start menu, type "Disk Mangement" in the "Search
).
programs and files" field, and select the "Create and format hard disk
partitions" option.
Smart
20 Intel Responsiveness Technologies - Dell Setup Guide
Page 21

3
For systems with Smart Response, skip steps 3-5 and proceed to step 6.
For single-SSD systems, right-click the partition furthest to the right
(highlighted in yellow below) on the SSD (representing the end of the
disk), this will bring up an options list. Select "Shrink Volume".
Rapid Start System Configuration 21
Page 22

4
Enter the size of the required partition in the field marked "Enter the
amount of space to shrink in MB." The Dell recommendation (and factory
default) is 8192.
Notes on the size of the Rapid Start partition
• Memory configurations and partition sizes larger than 8192 MB (8 GB) are
not validated by Dell and may cause an increase in the time it takes to
wake the system up from sleep.
• The partition should be at least equal to the size of the DRAM memory
installed on the system. For example: 2 GB of DRAM only needs a
2 GB = 2048 MB partition.
22 Intel Responsiveness Technologies - Dell Setup Guide
Page 23

5
After selecting "Shrink", a new unallocated 8 GB partition will appear with
a black bar above it on the right side.
Rapid Start System Configuration 23
Page 24

6
The free space on the SSD needs to be used to create an 8 GB hibernate
partition. This can be done using the diskpart.exe utility in Windows.
From the Start menu, type "diskpart" in the "Search programs and files"
field, and press
Enter
:
24 Intel Responsiveness Technologies - Dell Setup Guide
Page 25

7
A prompt may appear: "Do you want to allow the following program to
Yes
make changes to this computer?" If this appears, select
. Then, a
command window will appear.
8
Section (i) is for systems with a single SSD (no Smart Response). For
systems configured with Smart Response, skip to "ii. For systems with
Smart Response enabled" on page 28.
a
Type "list disk", and press
Enter
. This will list all available disks. Look
for a disk that has 8 GB free. In the example, the disk is labeled "disk
0".
b
Type "select disk #", where "#" should correspond to the number
listed next to the disk which was listed with of 8 GB free space in the
Enter
"Free" column, and press
.
Rapid Start System Configuration 25
Page 26
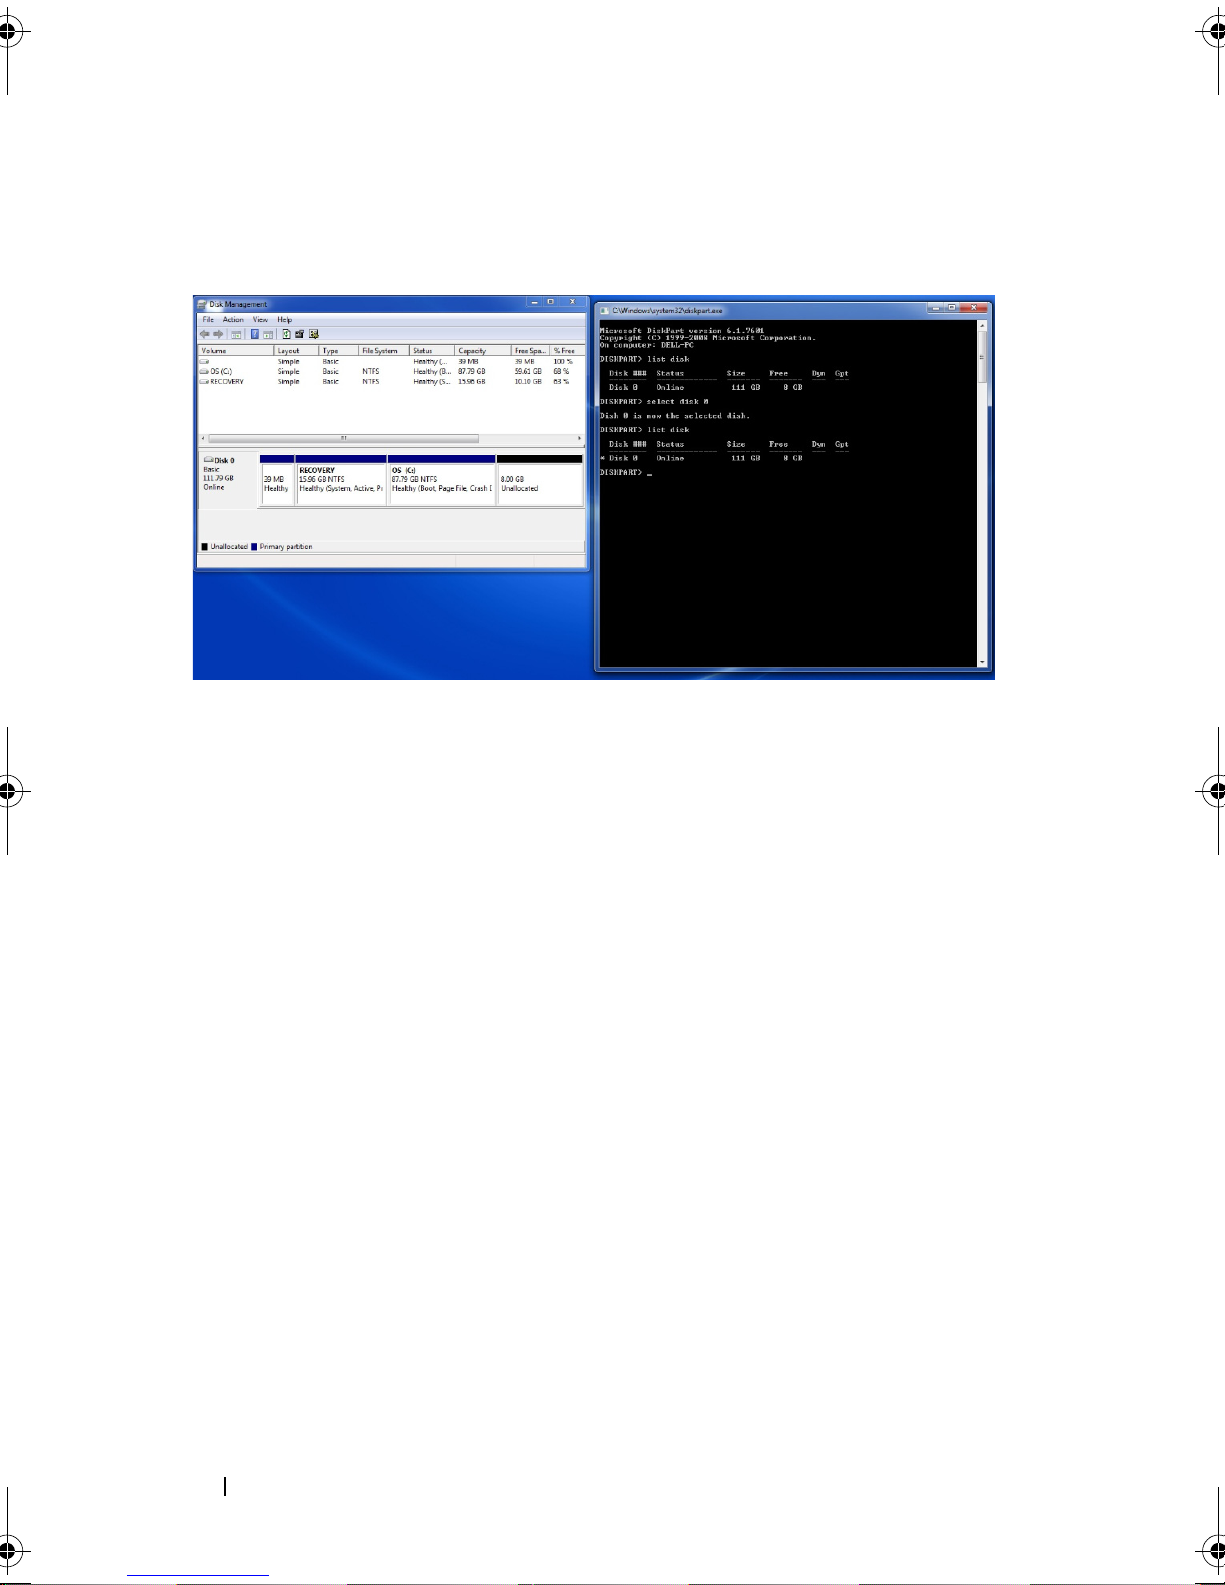
c
Type "list disk", and press
Enter
. A * should appear next to the disk
with 8 GB free.
d
Type "create partition primary", and press
Enter
.
e
Type "list partition", and press
Enter
. The color of the bar above the
8 GB partition in the Disk Management window will turn from black
to blue, the text will say "Raw / Healthy (Primary Partition)", and in
the command window, a new 8 GB partition will be listed, marked
with a *, as in this screenshot:
26 Intel Responsiveness Technologies - Dell Setup Guide
Page 27

Rapid Start System Configuration 27
Page 28
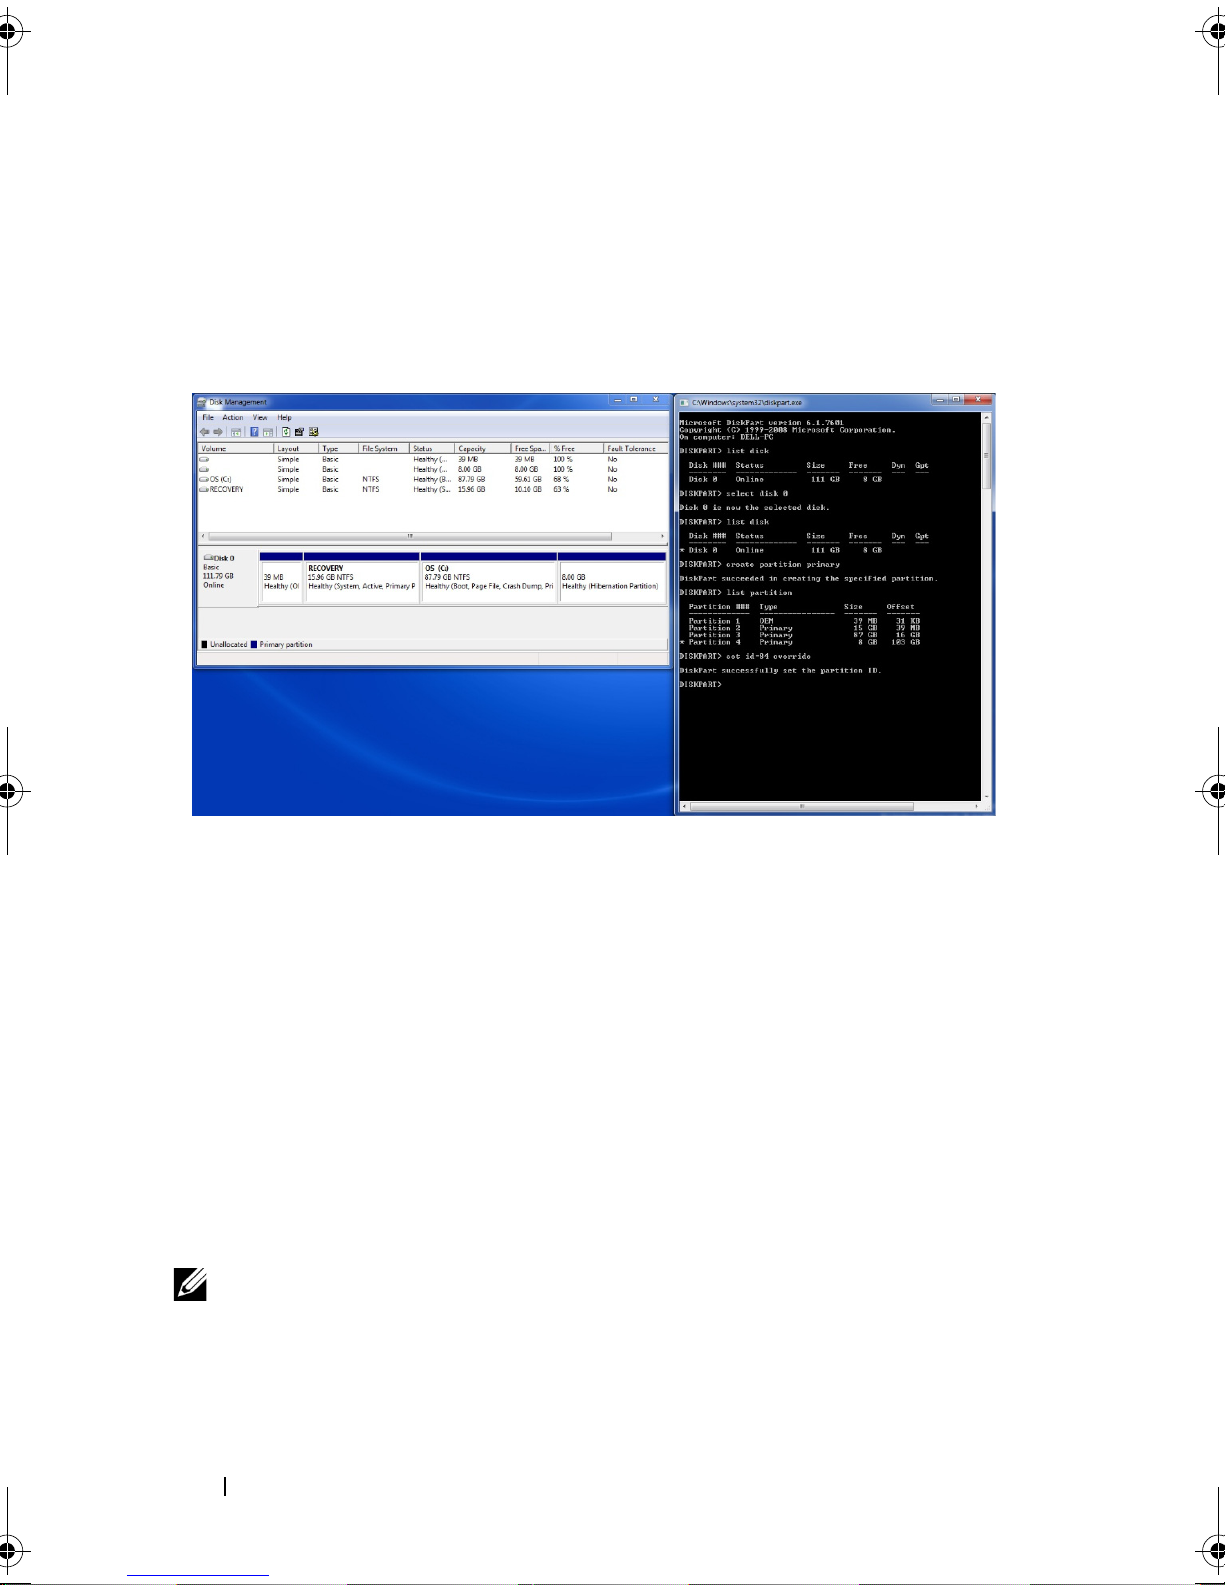
f
Type "set id=84 override", and press
Enter
. The 8 GB partition
description in the Disk Management window should change to
"Healthy (Hibernation Partition)", and the command window should
report: "DiskPart Successfully set the partition ID", as in this picture:
g
Close both windows.
ii. For systems with Smart Response enabled
After Smart Response is enabled, the Disk Management window should show
an uninitialized disk below the OS disk. This is typically "Disk 1" if the
system has both an SSD and an HDD, and it is not the same disk as the one
with the OS installed on it. Follow these steps to create the 8 GB Rapid Start
partition on that disk:
a
In the DISKPART command window, type "list disk", and press
Enter
.
This will list all available disks. Look for a disk that has at least 8 GB in
the "Free" column.
NOTE: The free space is approximately equal to the size of the SSD or mSATA if you
subtract 18.6 GB for the Smart Response cache. See picture:
28 Intel Responsiveness Technologies - Dell Setup Guide
Page 29

b
Type "select disk #", and press
Enter
. The "#" should correspond to
the number listed next to the disk with free space. In this example,
the disk is labeled "disk 1".
Rapid Start System Configuration 29
Page 30

c
Type "detail disk", and press
Enter
. The first line of the output from
this command should say "Volume_0000", which corresponds with the
default name of the spare disk space created when Smart Response
was previously enabled, as shown in this picture, highlighted yellow for
illustration purposes:
d
Type "create partition primary size=8192", and press
create an 8 GB partition in the free space on the disk selected. In the
Disk Management window, an 8 GB partition will show up with a blue
bar above it, the text will say "Raw / Healthy (Primary Partition)".
e
Type "set id=84 override", and press
description in the Disk Management window should change to
"Healthy (Hibernation Partition)", and the command window should
report: "DiskPart Successfully set the partition ID". The final result
should look something like this picture (the size of the unallocated
space may vary depending on the SSD or mSATA size:
30 Intel Responsiveness Technologies - Dell Setup Guide
Enter
Enter
. This will
. The 8 GB partition
Page 31

f
Close both windows.
9
Proceed by selecting restart from the Windows start menu.
.
: ....press F2, when the Dell splash screen appears, to enter the BIOS
10
resets..
BIOS
setup menu:
a
Navigate to the "Performance" menu or "Advanced" BIOS menu,
depending on the system, and enable the Intel Rapid Start setting (as
described in the BIOS Menu option section of this document).
b
If Rapid Start Timer or Critical Battery settings are available, enable at
least one of these settings (either Timer or Battery).
c
Select
Apply
or
Save in the BIOS
menu, and then exit BIOS Setup.
The system should proceed to boot to Windows.
11
Windows
a
: Driver/application installation.
The driver and application package can be installed by launching the
self-extracting installer provided on support.dell.com for each
supported platform.
As the system
NOTE: If the Rapid Start feature is disabled in BIOS setup, the application and
driver installation will not be allowed.
Rapid Start System Configuration 31
Page 32

How to use Rapid Start
Once the system is configured for Rapid Start, and the feature has been
enabled, the system will automatically attempt to save power by putting the
system into Rapid Start low-power mode during Windows sleep.
• The Windows hibernate option may be hidden if the system is configured
for Rapid Start.
• When the system has transitioned from Sleep to the low-power
Rapid Start state, the system will appear to be off. The power LED will not
pulse as it would in default Windows sleep.
• Waking the system from the low-power Rapid Start state can take several
seconds. During this time, the power button or power indicator will turn
on to indicate that the system is resuming, however, the screen may be
blank until Windows has resumed completely.
•
BIOS Menu options and configuration
allows users to manage Rapid Start settings.
•
Location
: The system BIOS setup menu can be entered by pressing
the F2 Key during system power-up, while the Dell logo is displayed.
The Dell Latitude system BIOS menu location for Rapid Start settings
is under the "Performance" sub-category. Other systems may
alternatively use the "Advanced" menu location for Rapid Start
settings.
: The system BIOS setup menu
•Settings
•
Intel Rapid Start Enable
setting, which will defeat the overall feature. Disabling Rapid Start at this level
also hides the device from Windows device.
NOTE: Because this setting hides the device from Windows, disabling Rapid
Start will also prevent the Rapid Start Manager application and driver
installation in Windows. If the Rapid Start Manager application (described
below) is installed and the feature is disabled in BIOS, it will report a warning
message alerting the user that the feature is not functioning.
•
Timer Enable
be used to control the timer that puts the system into Rapid Start low-power mode
when the system is asleep.
: When the Rapid Start feature is enabled (above), this option can
: The Rapid Start menu contains a main enable/disable
32 Intel Responsiveness Technologies - Dell Setup Guide
Page 33

•
Timer Value
minutes) can be configured to specify how long the system should wait in sleep
before transitioning to Rapid Start low-power mode. If a value of 0 is specified, the
system will transition immediately to Rapid Start low-power mode whenever sleep
is requested.
: When the Rapid Start Timer is enabled, the timer value (in
Low (Critical) Battery Enable
•
this option can be used to force the system into Rapid Start low-power mode
whenever the battery level drops below 3% during sleep.
: When the Rapid Start feature is enabled (above),
NOTE: Not available on all systems. When disabled or not present, the
default Windows critical battery action will function normally.
•
Automatic Disable
: Rapid Start will automatically be disabled in
BIOS setup if:
• A non-SSD storage device (HDD or hybrid drive) is installed.
• The Rapid Start Partition is missing, hidden, or deleted.
• System or HDD passwords are enabled (some systems).
• "Block Sleep" is enabled in BIOS setup.
• ATA mode is selected from the storage/SATA BIOS menu (instead of AHCI,
RAID, Smart Response, or Rapid Start mode).
• A Dell Encryption accelerator card is installed.
•A memory configuration larger than the size of Rapid Start SSD partition is
installed.
•
Intel Rapid Start Technology Manager application
: If installed, the
Rapid Start Technology Manager can be used to configure Rapid Start
settings.
•
Location
: The Rapid Start Manager can be accessed from the system
tray icon. The picture below shows how it will appear if present:
•
Settings
: The settings in the application can be accessed by doubleclicking the tray icon, or by right clicking the tray icon, and selecting
the "Settings…" option.
Rapid Start System Configuration 33
Page 34

•
Status
: This option allows the user to enable or disable Rapid Start from within
Windows.
NOTE: A selection "off" here will not be reflected as a change in the BIOS menu,
however, the feature will be disabled. This allows the user to disable the feature
from Windows without.
•
Advanced Settings
to the application will result in updates to the BIOS menu.
: These options match the settings in the BIOS menu. Updates
NOTE: Some systems which do not support critical battery will prevent
changes to that option. The option will appear grey, as seen in the
screenshot below:
34 Intel Responsiveness Technologies - Dell Setup Guide
Page 35

7
Smart Connect Configuration
How to set up or re-configure a system for use with Smart Connect?
• BIOS Settings:
•
Enable/Disable option
be found in the Smart Connect BIOS menu, located under the "Power
Management" menu or "Advanced" menu. The default state for this
option in BIOS is "disabled", unless the system was ordered with
Smart Connect enabled.
• Because this setting hides the device from Windows, disabling Smart Connect will
also prevent the Smart Connect Configuration application and driver installation
in Windows. If the Smart Connect Configuration application (described below) is
installed and the feature is disabled in BIOS, it will report a warning message
alerting the user that the feature is not functioning.
• If the Smart Connect feature is enabled in BIOS, and the Smart Connect
Configuration application and driver are not installed, an unknown device may
appear in the Windows device manager under the "System Devices" category with
the Hardware ID: INT33A0
: The Smart Connect enable/disable switch can
•
Automatic Disable
BIOS setup if:
• A non-SSD storage device (HDD or hybrid drive) is installed.
• System or HDD passwords are enabled (some systems).
• "Block Sleep" is enabled in BIOS setup (some systems).
• Intel Smart Connect Configuration Application and Driver package:
• The Smart Connect Configuration application and driver installation
package is a self-extracting executable file. If the system supports
Smart Connect, the file will be available for download from
http://support.dell.com/
: Smart Connect will automatically be disabled in
Smart Connect Configuration 35
Page 36

• After installing the application, the Windows device manager in some
systems will report a device listed as "Intel (R) Smart Connect
Technology Device".
NOTE: The Smart connect BIOS setting must be enabled prior to installing the
application. If the Smart Connect feature is enabled in BIOS, and the Smart
Connect Configuration application and driver are not installed, an unknown
device may appear in the Windows device manager with the Hardware ID:
INT33A0.
Using Smart Connect
Smart Connect Configuration application:
Once installed, the Smart Connect Configuration application can be found
in the Windows start menu by navigating to Start > All Programs > Intel >
Intel Smart Connect Configuration.
•
Enable Updating button
: By default, the Smart Connect feature will be
disabled in the application. Clicking "Enable Updating" will turn on the
Smart Connect feature, allowing the system to silently update any open
email or network applications while the system is in sleep mode.
36 Intel Responsiveness Technologies - Dell Setup Guide
Page 37

•
Update Frequency Slider
: There is a slider in the application user
interface which allows the customer to configure how often the system will
connect to the network to download updates. Shorter durations will
provide more frequent updates, but may consume more battery power over
time.
Advanced tab - Extended Power Savings
•
: There is an option in the
application user interface to set start and end times for "night mode".
During the configured window of time, the system will pause
Smart Connect updates, and the Smart Connect feature will assume the
user does not want frequent updates.
Using Smart Connect with Rapid Start
•
Rapid Start features are used together, updates and quick resume behavior
will continue normally as long as the system is connected.
: If Smart Connect and
Smart Connect Configuration 37
Page 38

If the Smart Connect wireless device does not find a network connection
while in sleep mode, the Rapid Start timer will put the system into a lowerpower state to save battery.
NOTE: If Rapid Start is enabled, the Smart Connect will automatically send
the system into Rapid Start low-power mode between the hours configured in
the "Advanced" tab extended power savings options.
•
Wireless Radio Disable Switch (some systems)
: Disabling wireless
networking by means of the mechanical wireless disable switch or software
wireless disable in Windows will temporarily pause operation of Smart
Connect. This allows platform to operate in an "airplane mode", for travel,
without permanently disabling the Smart Connect feature. When the
physical wireless network switch or setting is re-enabled, Smart Connect
will resume normal functionality.
Using Net Detect
•
: Some platforms support an additional Smart Connect
feature known as Net Detect, when equipped with specific Intel wireless
devices (WLAN). The Net Detect feature will automatically wake when a
"known" network is detected. The Net Detect feature keeps track of past
network connections, and will prevent unnecessary wake events until a
connection can be re-established. This can improve battery life. The
Net Detect feature will automatically be disabled during Extended Power
Savings hours. Net Detect may not be available on all systems at launch.
Using Quick Connect
•
: Some platforms support an additional
Smart Connect feature known as Quick Connect, when equipped with
specific Dell wireless devices (WWAN).The Quick Connect feature keeps
the network connection partially active in a low power mode while the
system is in sleep state, allowing for faster access to network when the
system wakes. Quick Connect may not be available on all systems at
launch.
38 Intel Responsiveness Technologies - Dell Setup Guide
Page 39

Appendix A
Table 8-1. Supported Storage Configurations
Boot Disk (below)/
Technology (right)
HDD only Not
HDD + SSD Not
HDD + mSATA Not
SSD only Not supported
Smart Connect Rapid Start Smart Response
Not supported Not supported
supported
supported
supported
NOTE: SSD performance
achieved without Smart
Response.
mSATA only Not supported
NOTE: SSD performance
achieved without Smart
Response.
Hybrid Drive Not
supported
Not supported Not supported
NOTE: Hybrid drive is similar in
performance to Smart Response.
Appendix A 39
Page 40

Appendix B
Registry modifications to allow transitions between BIOS ATA, AHCI, and
RAID modes.
CAUTION: Procedures for making manual changes to Windows registry settings
are generally not recommended by Dell. As with any registry modification
procedure, please be advised to back up any important files and account settings
before attempting the modifications below.
Microsoft Methods:
• Microsoft Support provides a Knowledge Base (KB) article, which explains
the error condition that occurs when attempting to switch modes, here:
http://support.microsoft.com/kb/922976
• The article includes manual instructions for alleviating the problem, as
well as a FIXME tool which can help automate the task on some systems.
40 Appendix B
 Loading...