

Page 1

Intel® Q965 Express Chipset
Development Kit User Manual
October 2007
Order Number: 3156 64-002US
Page 2

Lega l Li nes and Discl a imers
INFORMATION IN THIS DOCUMENT IS PROVIDED IN CONNECTION WITH INTEL® PRODUCTS. NO LICENSE, EXPRESS OR IMPLIED, BY ESTOPPEL OR
OTHERWISE, TO ANY INTELLECTUAL PROPERTY RIGHTS IS GRANTED BY THIS DOCUMENT. EXCEPT AS PROVIDED IN INTEL'S TERMS AND CONDITIONS
OF SALE FOR SUCH PRODUCTS, INTEL ASSUMES NO LIABILITY WHAT SOEVER, AND INTEL DISCLAIMS ANY EXPRESS OR IMPLIED WARRANTY, RELA T ING
TO SALE AND/OR USE OF INTEL PRODUCTS INCLUDING LIABILITY OR WARRANTIES RELATING TO FITNESS FOR A PARTICULAR PURPOSE,
MERCHANTABILITY, OR INFRINGEMENT OF ANY PATENT, COPYRIGHT OR OTHER INTELLECTUAL PROPERTY RIGHT. Intel products are not intended for
use in medical, life saving, life sustaining, critical control or safety systems, or in nuclear facility applications.
Intel may make changes to specifications and product descriptions at any time, without notice.
Intel Corporation may have patents or pending patent applications, trademarks, copyrights, or other intellectual property rights that relate to the
present e d subject ma tt er. The f urnishing of do cum e nts a nd ot he r materials and info rma ti on do es not pr o vid e any license, expre ss o r impl ied, by es topp el
or otherwise, to any such patents, trademarks, copyrights, or other intellectual property rights.
Designers must not rely on the absence or characteristics of any features or instructions marked “reserved” or “undefined.” Intel reserves these for
future definition and shall have no responsibility whatsoever for conflicts or incompatibilities arising from future changes to them.
Intel processor numbers are not a measure of performance. Processor numbers differentiate features within each processor family, not across different
processor families. See http://www.intel.com/products/processor_number for details.
The Intel® Q965 Express Chipset may contain design defects or errors known as errata which may cause the product to deviate from published
specifications. Current characterized errata are available on request.
Hyper-Threading Technology requires a computer system with an Intel® Pentium® 4 processor supporting HT Technology and a HT Technology enabled
chipset, BIOS and operating system. Performance will vary depending on the specific hardware and software you use. See http://www.intel.com/
products/ht/Hyperthreading_more.htm for additional information.
Contact your local Intel sales office or your distributor to obtain the latest specifications and before placing your product order.
Copies of documents which have an order number and are referenced in this document, or other Intel literature may be obtained by calling
1-800-548-4725 or by visiting Intel's website at http://www.intel.com.
BunnyPeople, Celeron, Celeron Inside, Centrino, Centrino logo, Core Inside, Dialogic, FlashFile, i960, InstantIP, Intel, Intel logo, Intel386, Intel486,
Intel740, IntelDX2, IntelDX4, IntelSX2, Intel Core, Intel Inside, Intel Inside logo, Intel. Leap ahead., Intel. Leap ahead. logo, Intel N etBurst, Intel
NetMerge, Intel NetStructure, Intel SingleDriver, Intel SpeedStep, Intel StrataFlash, Intel Viiv, I ntel vPro, Intel XScale, IPLink, Itanium, Itanium Inside,
MCS, MMX, Oplus, OverDrive, PDCharm, Pentium, Pentium Inside, skoool, Sound Mark, The Journey Inside, VTune, Xeon, and Xeon Inside are
trademarks or registered trademarks of Intel Corporation or its subsidiaries in the United States and other countries.
*Other na m es and bra nds may be claimed as th e pro perty of others .
Copyright © 2007, Intel Corporation. All Rights Reserved.
Intel® Q965 Express Chipset
DM Octob er 2007
2 Order Number: 315664 -002US
Page 3

Intel Q965 Express Chipset—
Contents
1.0 About This Manual .................................................................................................... 7
1.1 Content Overview............................................................................................... 7
1.2 Text Conventions................................................................................................ 7
1.3 Glossary of Terms and Acronyms.......................................................................... 8
1.4 Support Options ................................................................................................11
1.4.1 Electronic Support Systems......................................................................11
1.4.2 Additional Technical Support ....................................................................11
1.5 Product Literature..............................................................................................11
2.0 Development Kit Har dware F eatures........................................................................12
2.1 Overview..........................................................................................................12
2.2 Intel
2.3 Board Layout ....................................................................................................13
2.4 Thermal Considerations......................................................................................24
3.0 Development Kit Software and BIOS Features .........................................................26
3.1 Software Key Features .......................................................................................26
3.2 BIOS Features...................................................................................................26
3.3 Graphics Drivers................................................................................................29
3.4 Intel
3.5 Intel
4.0 Settin g Up & Co nfigu r ing th e Deve lopm e nt Kit.........................................................32
4.1 Overview..........................................................................................................32
4.2 Additional Hardware & Software Required .............................................................33
4.3 Setting Up the Evaluation Board ..........................................................................33
4.4 Audio Subsystem Configurations..........................................................................43
4.5 LAN Subsystem Configurations............................................................................44
4.6 Software Kit Installation .....................................................................................45
®
Q965® Express Chipset Development Kit Features Summary .........................12
2.3.1 Core Components...................................................................................14
2.3.2 Jumper Settings and Descrip tions .............................................................15
2.3.3 LED Descriptions ....................................................................................15
2.3.4 Header and Connector Descriptions...........................................................15
2.3.5 Back Panel Connectors............................................................................ 16
2.3.6 PCI Express* x16 / MEC Slot....................................................................17
2.3.7 PCI Express* x1.....................................................................................20
2.3.8 Front Panel Head er (Power up & Reset) .....................................................21
2.3.9 Front Panel USB Header...........................................................................21
2.3.10 Front Audio Header.................................................................................22
2.3.11 High Definition Audio Header....................................................................22
2.3.12 BTX Power Connectors ............................................................................23
2.3.13 SATA Pinout...........................................................................................24
2.3.14 Fan Connectors......................................................................................24
3.2.1 BIOS Overview.......................................................................................26
3.2.2 Resource Configuration............................................................................27
3.2.3 System Management BIOS (SMBIOS)........................................................27
3.2.4 Legacy USB Support ...............................................................................28
3.2.5 Boot Options ..........................................................................................28
3.2.6 BIOS Security Features ...........................................................................29
®
Active Management Technology .................................................................30
®
Quiet System Technology..........................................................................31
4.3.1 Memory Configurations............................................................................40
4.4.1 Eight-Channel (7.1) Audio Subsystem .......................................................43
4.5.1 Gigabit LAN Subsystem ...........................................................................44
4.5.2 RJ-45 LAN Connector with Integrated LEDs ................................................45
®
Q965 Express Chipset
Intel
DM Octob er 2007
3 315664-002US
Page 4

—Intel Q965 Express Chipset
4.6.1 Installation of a new Operating System.....................................................45
4.6.2 Drivers Installation.................................................................................45
5.0 Error Messages and Beep Codes ..............................................................................46
5.1 Speaker...........................................................................................................46
5.2 BIOS Beep Codes..............................................................................................46
5.3 BIOS Error Messages.........................................................................................46
5.4 Port 80h POST Codes.........................................................................................47
Figures
1 Dev Kit Board Main Components, Headers and Jumper Locations....................................14
2 Rear Panel I/O Connectors ........................................................................................ 17
3 BTX Type I Thermal Module Assembly (TMA) ...............................................................25
4 Menu Bar................................................................................................................26
5 Development Kit Board.............................................................................................32
6 Align the Development Kit Board and SRM...................................................................34
7 Assembled SRM and board........................................................................................35
8 Align the heatsink with holes on the SRM and board .....................................................36
9 Tighten the heatsink on the SRM and board.................................................................37
10 Secure the front side of the heatsink to the SRM..........................................................38
11 Secure the read end of heatsink to the SRM ................................................................39
12 Memory Channel and DIMM Configuration ...................................................................40
13 Dual Channel (Interleaved) Mode Configuration with two DIMMs ....................................41
14 Dual Channel (Interleaved) Mode Configuration with three DIMMs.................................. 41
15 Dual Channel (Interleaved) Mode Configuration with four DIMMs....................................42
16 Single Channel (Asymmetric) Mode Configuration with one DIMM...................................42
17 Single Channel (Asymmetric) Mode Configuration with 3x DIMMs ...................................43
18 Back Panel Audio Conne ctor Options for Eight-channel Audio Subsystem ......................... 43
19 LAN Connector LED locations..................................................................................... 45
Tables
1 Glossary of Terms and Acronyms .................................................................................9
2 Intel Literature Centers.............................................................................................11
3 Development Kit Features Summary...........................................................................12
4 Core Components ....................................................................................................14
5 Jumper Settings....................................................................................................... 15
6 LED Description .......................................................................................................15
7 Header and Connector Descriptions............................................................................ 15
8 Back panel connectors..............................................................................................17
9 Intel® SDVO to PCI Express* connector mapping for MEC cards.....................................18
10 PCI Express* (x1) Pinout .......................................................................................... 20
11 Front Panel Jumper Setting .......................................................................................21
12 Front Panel USB Header............................................................................................21
13 Front Audio Header ..................................................................................................22
14 High Definition Audio Header.....................................................................................22
15 2x12 BTX Power Connector .......................................................................................23
16 2x2 Auxiliary 12V Power Connector ............................................................................ 23
17 SATA Pinout............................................................................................................ 24
18 Fan connectors........................................................................................................24
19 BIOS Setup Program Menu Bar..................................................................................27
20 BIOS Setup Program Function Keys............................................................................27
21 Back panel task (Audio)............................................................................................44
22 LAN Connector LED status.........................................................................................45
Octobe r 20 07 DM
315664-002US 4
Intel® Q965 Express Chipset
Page 5

Intel Q965 Express Chipset—
23 Beep codes..............................................................................................................46
24 Lists of error messages and brief description of each.....................................................47
25 Port 80h POST Code Ranges ......................................................................................47
26 Port 80h Progress Code Enumeration ..........................................................................48
27 Typical Port 80h POST Sequence ................................................................................50
®
Q965 Express Chipset
Intel
DM Octob er 2007
5 315664-002US
Page 6
—Intel Q965 Express Chipset
Revision History
Date Revision Description
Octob er 2007 002
October 2006 001 Initi al public rele ase.
Change SDVOB to SDVOC in pins 58, 59, 62 and 63 in Table 9, “Intel® SDVO to PCI Expre ss*
connector mapping for MEC cards” on page 18.
Octobe r 20 07 DM
315664-002US 6
Intel® Q965 Express Chipset
Page 7
1.0 About This Manual
This user’s manual describes the use of the Intel® Q965® Express Chipset
Development Kit. This manual has been written for OEMs, system evaluators, and
embedded system developers. All jumpers, headers, LED functions, and their locations
on the board, along with subsystem features and POST codes, are defined in this
document.
For the latest information about the Intel
reference platform, visit:
Intel Q965 Express Chipset—About This Manual
®
Q965® Express Chipset Development Kit
http://developer.intel.com/design/intarch/devkit/index.htm
For design documents related to this platform, such as schematics and layout, please
contact your Intel Representative.
1.1 Content Overview
Chapter 1: “Development Kit Users Manual Content overview”
This chapter contains a description of conventions used in this manual. The last few
sections explain how to obtain literature and contact customer support.
Chapter 2: “Development Kit Hardware Features”
This chapter provides information on the development kit features and the board
capability. This includes the information on board component features, jumper settings,
pin-out information for connectors and overall development kit board capability.
Chapter 3: “Development Kit Software and BIOS Features”
This chapter provides an overview of development kit software and BIOS features.
Chapter 4: “Development Kit Board Setup”
This chapter provides instructions on how to configure the evaluation board and
processor assembly by setting jumpers, connecting peripherals, providing power, and
configuring the BIOS.
Chapter 5: “Error Messages and Beep Codes”
This chapter describes the various progress codes that are reported by the BIOS and
the corresponding LED Codes.
1.2 Text Conventions
The following notations may be used throughout this manual.
# The pound symbol (#) appended to a signal name indicates that
®
Q965 Express Chipset
Intel
DM Octob er 2007
7 Order Number: 315664-002US
the signal is active low.
Page 8

About This Manual—Intel Q965 Express Chipset
Variables Variables are shown in italics. Variables must be replaced with
correct values.
Instructions Instruction mnemonics are shown in uppercase. When you are
programming, instructions are not case-sensitive. You may use
either upper-case or lower-case.
Numbers Hexadecimal numbers are represented by a string of
hexadecimal digits foll owed by the character H. A zero prefix is
added to numbers that begin with A through F. (For example, FF
is shown as 0FFH.) Decimal and binary numbers are
represented by their customary notations. (That is, 255 is a
decimal number and 1111 1111 is a binary number.) In some
cases, the letter B is add ed for cla rit y.
Units of Measure The following abbreviations are used to represent units of
measure:
A amps, amperes
Gbyte gigabytes
Kbyte kilobytes
K kilo-ohms
mA milliamps, milliamperes
Mbyte megabytes
MHz megahertz
ms milliseconds
mW milliwatts
ns nanoseconds
pF picofarads
W watts
V volts
μA microamps, microamperes
μF microfarads
μs microseconds
μW microwatts
Signal Names Signal names are shown in uppercase. When several signals
share a common name, an individual signal is represented by
the signal name followed by a number, while the group is
represented by the signal name followed by a variable (n). For
example, the lower chip-select signals are named CS0#, CS1#,
CS2#, and so on; they are collectively called CSn#. A pound
symbol (#) appended to a signal name identifies an active-low
signal. Port pins are represented by the port abbreviation, a
period, and the pin number (e.g., P1.0).
1.3 Glossary of Terms and Acronyms
This section defines conventions and terminology used throughout this document.
Octobe r 20 07 DM
Order Nu mb e r: 3156 64 - 00 2U S 8
Intel® Q965 Express Chipset
Page 9
Intel Q965 Express Chipset—About This Manual
Table 1. Glossary of Terms and Acronyms (Sheet 1 of 3)
Term Description
Advanced Digital Display Card – second Generation. This card provides digital display
ADD2 Card
ACPI Advanced Configurat ion and Power Interface
ASF Alert Standard Format
BLT Block Level T ransfer
Core The internal base logic in the (G)MCH
CRT Cathode Ray Tube
DBI Dynamic Bus Inversion
DDR2 A second generation Double Data Rate SDRAM memory technology.
DMI D irect M edia Interface
DVI
FSB Front Side Bus. FSB is synonymous with Host or processor bus.
Full Reset
GMCH
GMA 3000 Intel® Graphic Medi a Acc e lerator 3000
Host This term is used synonymously with processor.
IDER IDE R edirect
INTx An interrupt request signal where “x” stands for interrupts A, B, C, and D
Intel® 64
Architecture
Intel ® Advanced
Digital Media
Boost
Intel® AMT Intel
Intel ® Advanced
Smart Cache
Intel ® DVO
Intel ® ICH8DO
Intel® QST Intel
Intel® Sma rt
Memory Access
options for an Intel Graphics Controller. It plugs into an x16 PCI Express* connector but
uses the multiplexed SDVO interface. This Advanced Digital Display Card will not work
with an Intel Graphics Controller that supports DVO and ADD cards.
Digital Video Interface. Specification that defines the connector and interface for digital
displays.
Full reset is when PWROK is de-asserted. Warm reset is when both RSTIN# and PWROK
are asserted.
Graphics Memory Controller Hub component that contains the processor interface, DRAM
controller, x16 PCI Express* Graphics port (typically, the external graphics interface), and
integrated graphics device (IGD). It communicates with the I/O controller hub (ICH8DO*)
and other I/O controller hubs over the DMI interconne ct. In this document GMCH refers
to the 82Q965 GMCH compo nent.
Intel® 64 Architecture
1
(Formerly known as Intel® EM64T) enables the proce ssor to
access larger amounts of virtual and physical memory.
128-bit SSE instructions are now issued one per clock cycle effectively doubling their
speed of execution over previous generation processors. This benefits a broad range of
applications including video, audio, encryption, engineering and scientific with improved
performance.
®
Active Management Technology
The shared L2 cache is allocated to each processor core based on workload up to the full
amount of total cache. This is more efficient than today’s dual-core processor . Sharing the
cache significantly reduces the time needed to retrieve frequently used data improving
performance.
Digital Video Out port. Term used for the first generation of Intel Graphics Controller’s
digital display channels. Digital display data is provided in a parallel format. This interface
is not electrically compatible with the 2
this document – SDVO.
nd
generation digital display channel discussed in
Eighth generation I/O Controller Hub component that contains additional functionality
compared to previous ICHs. The I/O Controller Hub component contains the primary PCI
interface, LPC interface, USB2, SATA, and other I/O functions. It communicates with the
(G)MCH over a proprietary interconnect called DMI.
®
Quiet System Technology
Optimizes functions for reducing wait time, moving data and accelerating out-of-order
execution, keep the pipeline full improving instruction throughput and performance.
®
Q965 Express Chipset
Intel
DM Octob er 2007
9 Order Number: 315664-002US
Page 10
About This Manual—Intel Q965 Express Chipset
Table 1. Glossary of Term s a n d A c ronyms (Sheet 2 of 3)
Term Description
Intel® Virtualization Technology. Intel® VT allows one hardware platform to function as
®
Intel
VT
Intel® Wide
Dynamic
Execution
IGD Int ernal Graphics Device.
LCD Liquid Crystal Display.
LVDS
MEBx Mana gement Engine BIOS Extensi ons
MEC
PCI Express*
Graphics
PECI Platform Environmental Control Interface
Primary PCI
Processor Intel® Core™2 Duo processor E6400
QST Quiet System Techno log y
SATA Serial ATA Specification
SCI System Control Interrupt. SCI is used in ACPI protocol.
SDVO
SDVO Device
SERR System Error. An indication that an unrecoverable error has occurred on an I/O bus.
SMI
SOL Serial Over LAN
SPI Ser i al Perip h era l Interface
SST Simple Serial Transport
multiple “virtual” platforms. For businesses, Intel VT Technology
improved manageability, limiting downtime and maintaining worker productivity by
isolating computing activities into separate partitions.
Improves execution speed and efficiency, delivering more instructions per clock cycle.
Each core can complete up to four full instructions simultaneously.
Low Voltage Differential Signaling. A high speed, low power data transmission standard
used for display connections to LCD panels.
Media Expansion Card – Provides digital display options for an Intel Graphics Controller
that supports MEC cards. Plugs into an x16 PCI Express connector but utilizes the
multiplexed SDVO interface. Adds Video In capabilities to platform. Will not work with an
Intel Graphics Controller that supports DVO and ADD cards. Will function as an ADD2 card
in an ADD2 supported system, but Video In capabilities will not work.
PCI Express* Graphics is a high-speed serial interface whose configuration is software
compatible with the existing PCI specifications. The specific PCI Express* implementation
intended for connecting the (G)MCH to an external Graphics Controller is a x16 link and
replac es AGP.
The Primary PCI is the physical PCI bus that is driven directly by the ICH8DO component.
Communication between Primary PCI and the (G)MCH occurs over DMI. Note that the
Primary PCI bus is not PCI Bus 0 from a configuration standpoint.
Serial Digital Video Out (SDVO). SDVO is a digital display channel that serially transmits
digital display data to an external SDVO device. The SDVO device accepts this serialized
format and then translates the data into the appropriate display format (i.e., TMDS, LVDS
and TV-Out). This interface is not electrically compatible with the previous digital display
channel - DVO. For the 82Q965 GMCH, it will be multiplexed on a portion of the x16
graphics PCI Express* interface.
Third party codec that uses SDVO as an input. May have a variety of output formats,
including DVI, LVDS, HDMI, TV-out, etc.
System Management Interrupt. SMI is used to indicate any of several system conditions
(such as, thermal sensor events, throttling activated, access to System Management
RAM, chassis open, or other system state related activity).
1
(Intel® VT) offers
Octobe r 20 07 DM
Intel® Q965 Express Chipset
Order Nu mb e r: 3156 64 - 00 2U S 10
Page 11
Intel Q965 Express Chipset—About This Manual
Table 1. Glossary of Terms and Acronyms (Sheet 3 of 3)
Term Description
Rank
UMA
Note:
1. Intel
with a processor, chipset, BIOS, enabling software and/or operating system, device drivers and
applications designed for these features. Performance will vary depending on your configuration.
Contact your vendor for more information.
A unit of DRAM corresponding to eight x8 SDRAM devices in parallel or four x16 SDRAM
devices in parallel, ignoring ECC. These devices are usually , but not always, mounted on a
single side of a DIMM.
Unified Memory Architecture. Describes an IGD using system memory for its frame
buffers.
®
Virtualization T echnology (Intel® VT), and Intel® 64 Architecture require a computer system
1.4 Support Options
1.4.1 Electron ic Su p p or t Sy s t ems
Intel’s site on the World Wide Web (http://www.intel.com/) provides up-to-date
technical information and product support. This information is available 24 hours per
day, 7 days per week, providing technical information whenever you need it.
1.4.2 A dditional Technical Support
If additional technical support is required, please contact your field sales representative
or local distribu t or.
1.5 Product Literature
Product literature can be ordered from the following Intel literature centers:
Table 2. Intel Literature Centers
Location Telephone Number
U.S. and Canada 1-800-548-4725
U.S. (fr om overseas) 708- 296-9333
Europe (U.K.) 44(0)1793-431155
Germany 44(0)1793-421333
France 44(0)1793-421777
Japan (fax only) 81(0)120-47-88-32
®
Q965 Express Chipset
Intel
DM Octob er 2007
11 Order Num ber: 3156 64-002US
Page 12

Development Kit Hardware Features—Intel Q965 Express Chipset
2.0 Development Kit Hardware Features
2.1 Overview
This chapte r provid es in form atio n on the devel op ment kit featu res and the boar d
capability. For detailed platform features please refer to the Platform Design Guide for
or datasheet for the chipset and the Inte l
Mechanical Design Guidelines.
2.2 Intel® Q965® Express Chipset Development K it Features Summary
This section summarizes the development kit features.
®
Core™2 Duo processor Thermal and
Table 3. Development Kit Features Summary (Sheet 1 of 2)
Form Factor 4 Layer μBTX (10.5 inches x 10.4 inches)
®
Intel
CoreTM 2 Duo processor E6400
Supports 1066 MHz front side bus
Processor
Memory
Chipset
Video
Audio
Legacy I/O
Control
2M Shared L2 Cache
Supports Intel
Supports Intel
Smart Cache, Intel
DDR2 dual-channel system memory interface
Four 240-pin DDR2 SDRAM DIMM sockets (two per channel) supporting dual channel
interleaved mode
Support for 533MHz, 667MHz, 800MHz unbuffered, non-ECC DDR2 SDRAM modules
Supports 128 MB to 8 GB of system memory
256 Mbit, 512 Mbit, or 1 Gbit Technology
®
Intel
®
Intel
®
Intel
Option of either using integrated graphics system or external PCI Express* graphics:
®
Intel
Supports ADD2 and Intel
additional digital display such as DVI, LVDS, etc. depending on the media expansion card
features.
Supports external PCI Express* (x16) graphics card
®
Intel
8-channel (7.1) audio subsystem and two S/PDIF digital audio outputs using the ADI
audio codec.
Port Angeles 3.0 Super I/O controller for diskette drive, serial, parallel, and PS/2* ports.
®
64 Architecture
®
Wide Dynamic Execution, Intel® Smart Memory Access, Intel Advanced
®
Advanced Digital Media Boost, Intel® Virtualization T echnology
Q965 Express Chipset, consisting of:
82Q965 Graphics Memory Controller Hub ((G)MCH)
82801G B I/O Co ntroller Hub (ICH 8 DO )
GMA3000 integrated graphics subsystem
High Definition Audio subsystem:
®
Media Expansion Card (MEC, also known as ADD2+) for
Octobe r 20 07 DM
Order Nu mb e r: 3156 64 - 00 2U S 12
Intel® Q965 Express Chipset
Page 13
Intel Q965 Express Chipset—Development Kit Hardware Features
Table 3. Development Kit Features Summary (Sheet 2 of 2)
Form Factor 4 Layer μBTX (10.5 inches x 10.4 inches)
Six SATA 1.5/3.0 Gb/s ports.
Te n Universal Serial Bus (USB) 2.0 ports – Three front panel headers for support of six
front panel ports and four back panel ports
Three 1394a PCI controller – 2 front headers for support of two ports and one back panel
Peripheral
Interfaces
LAN Support
BIOS
Expansion
Capabilities
Additional
Features
port (Disabled in this Development Kit)
PS/2-style keyboard and PS/2 mouse (6-pin mini-DIN) connectors
One VGA connector provides access to integrated graphics.
Six analog audio connectors (Line-in, Line-out, MIC-in, Surround L/R, Surround L/R Rear,
Center) and two digital audio connectors driven by Intel High Definition Audio.
One parallel port.
One diskette drive interface
Gigabit (10/100/1000 Mbits/s) LAN subsystem using the Intel® 82566DM Gigabit
Ethernet Controller
Support for Advanced configuration and power interface (ACPI), plug and play, and
SMBIOS.
AMI system BIOS.
One PCI bus connectors
One PCI Express* x16 bus add-in card connector
Two PCI Express* x1 bus add-in card connectors
Trusted Platform Module (TPM) 1.2 support
Manageability Engine (ME) support. ME Enabled LED (red-blink)
®
Active Management Technology (Intel® AMT) with System Defense support
Intel
®
Quiet System Technology (Intel® QST) support
Intel
®
Matrix Storage technology with RAID 0,1,5, 10 support
Intel
Piezo speaker for BIOS POST codes
PORT 80 Display
Thermal Diode header
BIOS configuration jumper
Clear CMOS header
Force On header
XDP-SSA connector
Internal I/O headers
•2x5 Front Panel I/O header
• 2x7 Front Panel audio header
• 1x2 Chassis intrusion header
• 3 four-wire fan headers
•2x5 Serial port header
• 2x8 High Definition audio header
• 20-pin LPC header
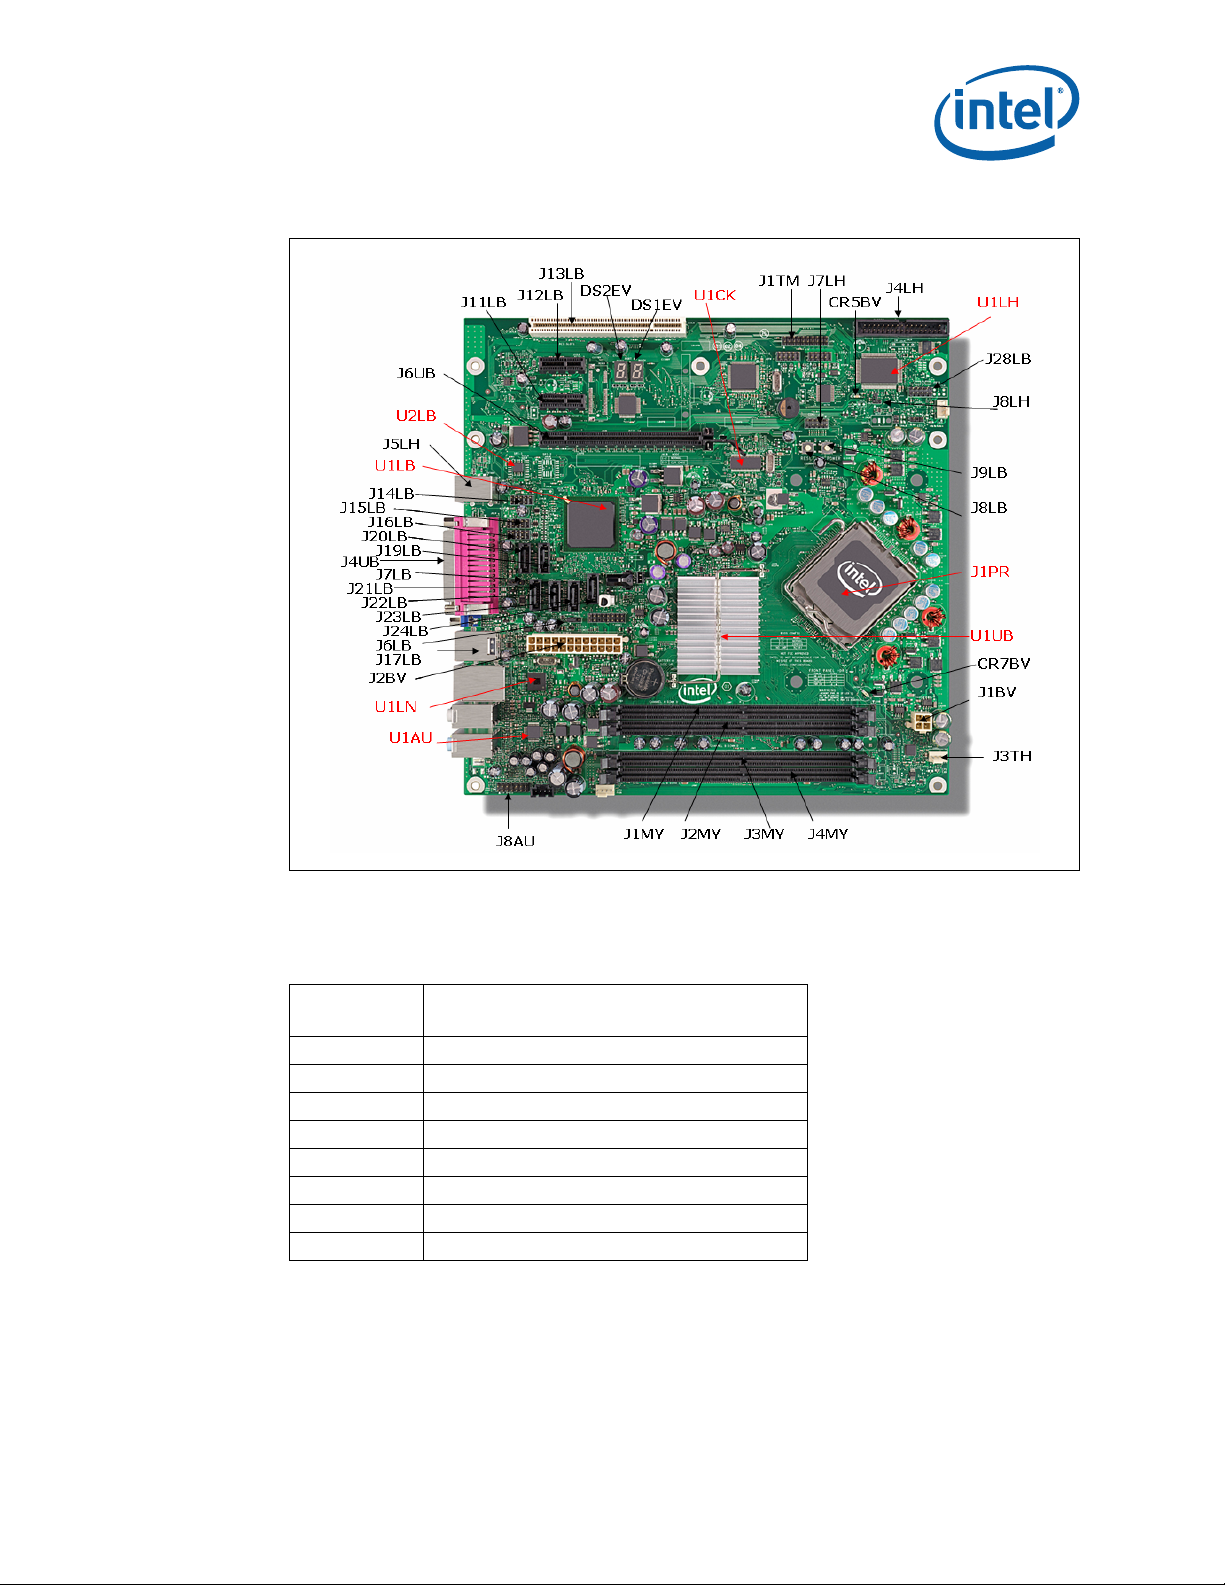
2.3 Board Layout
Figure 1 shows the location of the major components, headers and jumpers.
®
Q965 Express Chipset
Intel
DM Octob er 2007
13 Order Num ber: 3156 64-002US
Page 14
Development Kit Hardware Features—Intel Q965 Express Chipset
Figure 1. Dev Kit Board Main Components, Headers and Jumper Locations
2.3.1 Core Components
Table 4. Core Components
Reference
Designator
J1PR LGA775 processor socket
U1UB Intel
U1LB Intel® ICH8DO
U1LN Intel
U1CK Clock Generator CK505
U1LH Super I/O (Port Angles)
U1AU Audio Codec
U2LB Primary SPI Flash (stuffed with 16 Mb)
®
®
Note: There will be 2 SPI footprints on the board. Firmware Hub will not be supported. The
primary SPI flash footprint is at XU3LB and stuffed with a 16 Mb (2 MB) SPI flash
(U2LB). The secondary SPI flash footprint is at XU5LB and unstuffed.
Octobe r 20 07 DM
Order Nu mb e r: 3156 64 - 00 2U S 14
Component Description
Q965 (G)MCH
82566D M Gb LAN chi p
Intel® Q965 Express Chipset
Page 15
Intel Q965 Express Chipset—Development Kit Hardware Features
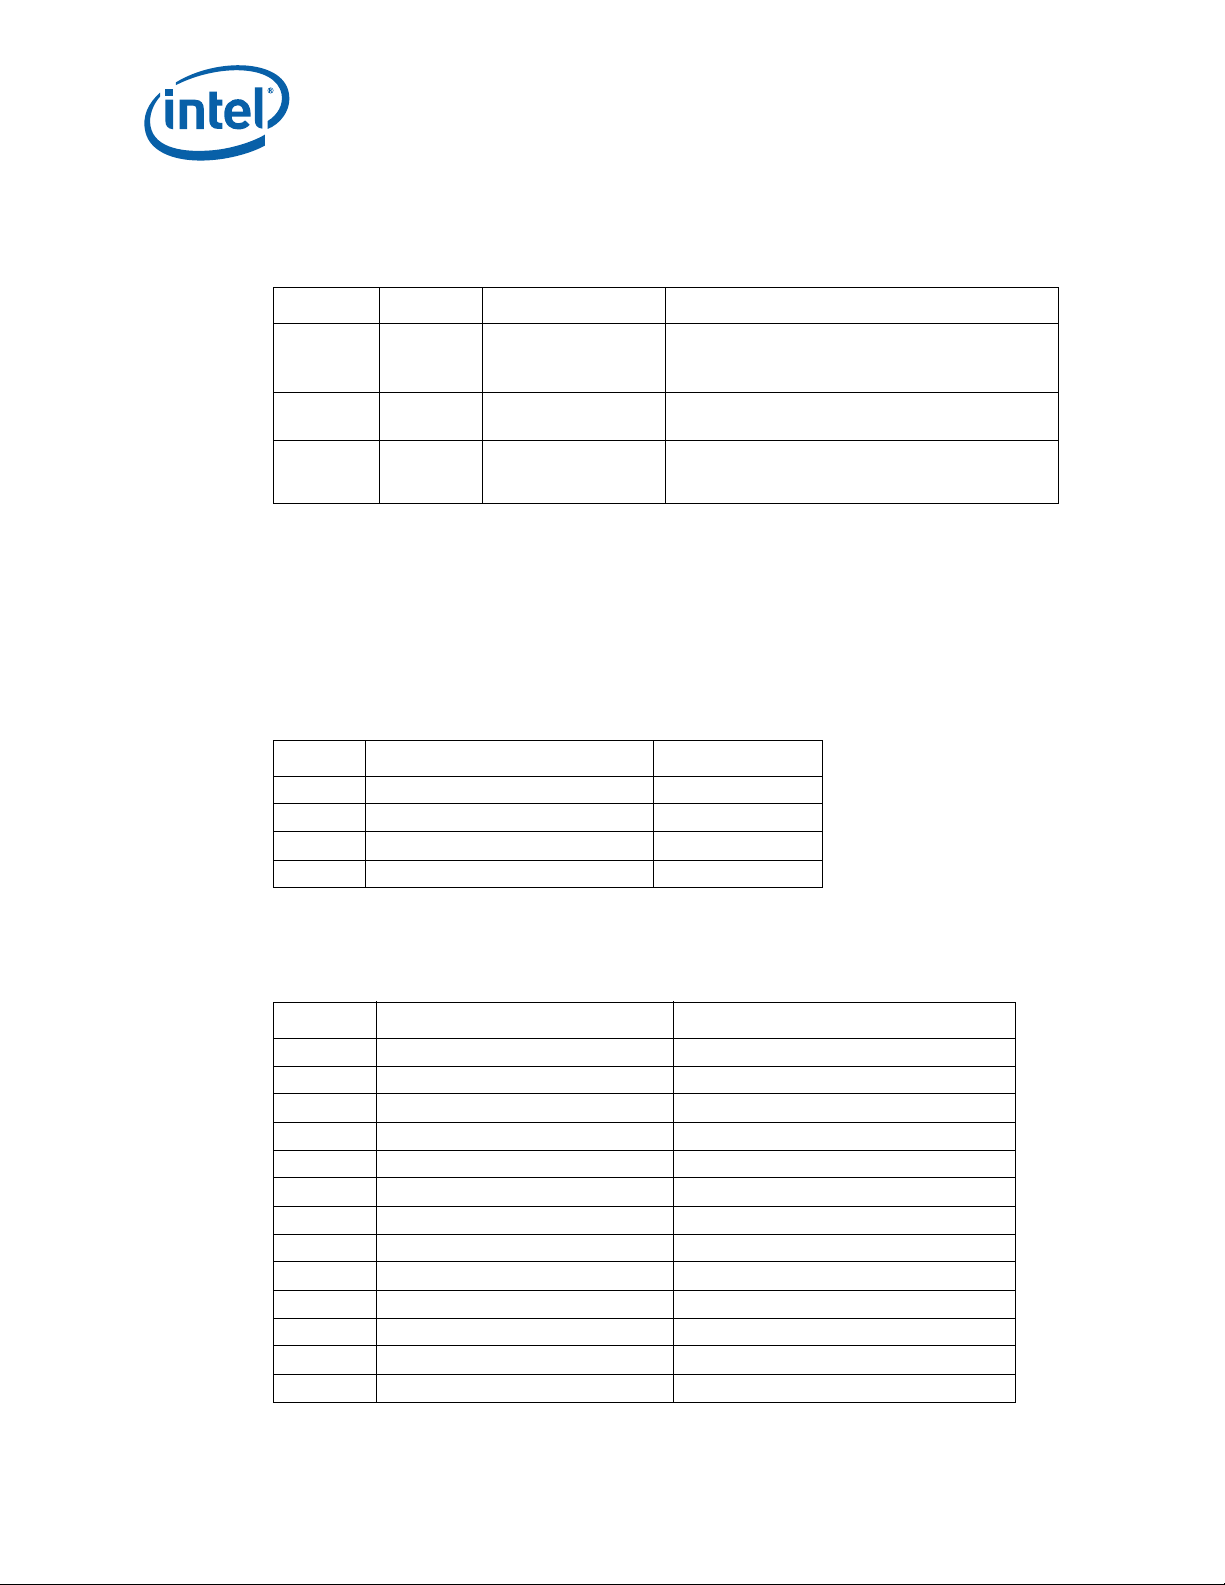
2.3.2 Jumper Settings and Descriptions
Table 5. Jumper Settings
Jumper Default Description Notes
1-2 = Normal
J7LB 1-2 BIOS Config/Recovery
J6LB 1-2 Clear CMOS
J8LH 1-2 Power-On Forcing
2-3 = Con fig Mode
Off = Recovery
1-2 = Normal
2-3 = Clear CMOS
1-2 = Normal
2-3 = Force On (Sets CPU presence bit; may not
always force board power on)
2.3.3 LED Desc r i p tions
Powe r L EDs ar e o n the bo ar d to in di c ate whe n st andby and core powe r is be in g a ppl ie d
to the planes. When on, they indicate that no devices should be inserted or removed.
Please refer to Figure 2 for the LED locations.
Caution: Inserting or removing devices when the Standby Power LEDs are on could result in
device or board damag e.
Table 6. LED Description
LED Description Notes
CR5BV 5-Volt S ta ndb y Pow er Dis p lay LED Green
DS1EV Port 80 Display – Right
DS2EV Port 80 Display - Left
CR7BV ME Enabled LED Red Blink
2.3.4 Header and Connector Descriptions
Table 7. Header and Connector Descriptions (Sheet 1 of 2)
Header Description Notes
J5LB Intruder Header
J7LH Serial Port Head er
J3AU ATAPI CD Header
J7AU High Definition Media Interface Header
J8AU Front Panel Audio Header
J28LB Front Panel Header
J3TH CPU Fan
J4TH Chassis Fan
J5TH Chassis Fan
J2BV 2x12 Standard Power Connector
J1BV 2x2 12V Power Connector
J29LB Power LED header
J24LB SATA connector SATA HDD port 0
®
Q965 Express Chipset
Intel
DM Octob er 2007
15 Order Num ber: 3156 64-002US
Page 16
Development Kit Hardware Features—Intel Q965 Express Chipset
Table 7. Header and Connector Descriptions (Sheet 2 of 2)
Header Description Notes
J22LB SATA connector SATA HDD port 1
J23LB SATA connector SATA HDD port 2
J21LB SATA connector SATA HDD port 3
J19LB SATA connector SATA HDD port 4
J20LB SATA connector SATA HDD port 5
J1MY DIMM connector Channel A DIMM 0
J2MY DIMM connector Channel A DIMM 1
J3MY DIMM connector Channel B DIMM 0
J4MY DIMM connector Channel B DIMM 1
J4LH Floppy connecto r
J6UB X16 PCI Express* Graphics slot For Graphics cards
J11LB X1 PCI Express slot PCI Express* port 4
J12LB X1 PCI Express slot PCI Express* port 5
J13LB PCI slot
J14LB USB Front Panel Header
J15LB USB Front Panel Header
J16LB USB Front Panel Header
J1TM LPC BUS Header (TPM)
J1FW 1394a Front Panel Header Disabled
J2FW 1394a Front Panel Header Disabled
J9LB Power Button
J8LB Reset B utton
J2BC XDP_SSA
In order to Plug a TPM module into this
header, you must first disable onboard TPM
This is reserved by Intel for debugging
purpose. Located at the back of the board
2.3.5 Back Pa nel Connect ors
Figure 2 shows the location of the back panel connectors for boards equipped with the
8-channel (7.1) audio subsystem. The back panel connectors are color-coded. The
figure legend lists the colors used (when applicable).
Octobe r 20 07 DM
Order Nu mb e r: 3156 64 - 00 2U S 16
Intel® Q965 Express Chipset
Page 17

Figure 2. Rear Panel I/O Connectors
Intel Q965 Express Chipset—Development Kit Hardware Features
A
A
BC
BC
Table 8. Back panel connectors
Callouts from
Figure 2.2
A J5LH PS/2 mouse port [Green]
B J5LH PS/2 keyboard port [Purple]
C J1AU S/PDIF Digital audio output
D J2AU S/PDIF Digital audio input
E J6LH Parallel port [Burgundy]
FJ4UBVGA Port
GJ17LB
H JA1LN RJ45 LAN connector
I J3FW 1394 Po rt prese nt but disabled
J J5AU Rear Spea ker Out
KJ5AUSide Speaker Out
LJ18LB
M J5AU Center channel and Subwoofer audio ou t
N J4AU MIC In
OJ4AUAudio Line In
P J4AU Audio Line Out (Front Sp eaker Out)
Designator Description
J
J
K O
K O
M
M
E
E
HI
HI
D
D
F
F
Back Panel USB Ports 1 and 2
Overlapping with 1394(J3FW)
Back Panel USB Ports 3 and 4. Overlapping with LAN MagJack
(JA1LN)
G
G
L
L
N
N
P
P
2.3.6 PCI Expr ess * x16 / MEC Slot
The PCI Express* x16 slot is following the industry PCI Express* x16 connector
standard. Table 2.7 shows the signals for PCI Express* x16 or MEC (SDVO).
®
Q965 Express Chipset
Intel
DM Octob er 2007
17 Order Num ber: 3156 64-002US
Page 18

Development Kit Hardware Features—Intel Q965 Express Chipset
Table 9. Intel® SDVO to PCI Express* connector mapping for MEC cards (Sheet 1 of 3)
Pin
Number
PCI Express*
Function
1 12 V 1 2 V PRSNT1 # NC
2 12 V 1 2 V 12V 12V
3 R SVD RSVD 12V 12V
4 GND GND GND GND
5SMCLK NC JTAG2 (TCK) NC
6 S M DAT NC JTAG3 (TDI) JTAG3 (TDI)
7 GND GND JTAG4 (TDO) JTAG4 (TDO)
83.3 V 3.3 V JTAG5 (TMS) NC
9JTAG1 (TRST#) NC 3.3 V 3.3 V
10 3.3 Vaux 3.3 Vaux 3.3 V 3.3 V
11 WAKE# WAKE# PERST# PERST#
12 RSVD RSVD GND GND
13 GND GND REFCLK+ REFCLK+
14 PET0+(or PETp0) PET0+(or PETp0) REFCLK- REFCLK15 PET0-(or PETn0) PET0-(or PETn0) GND GND
16 GND GND PER0+(or PERp0) PER0+(or PERp0)
17 PRSNT2# SDVO_C trlClk PER0-(or PERn 0) PER0-(or PERn0)
18 GND GND GND GND
19 PET1+(or PETp1) NC RSVD RSVD
20 PET1-(or PETn1) NC GND GND
21 GND GND PER1+(or PERp1) NC
22 GND GND PER1-(or PERn1) NC
23 PET2+(or PETp2) NC GND GND
24 PET2-(or PETn2) NC GND GND
25 GND GND PER2+(or PERp2) NC
26 GND GND PER2-(or PERn2) NC
27 PET3+(or PETp3) NC GND GND
28 PET3-(or PETn3) NC GND GND
29 GND GND PER3+(or PERp3) NC
30 RSVD RSVD PER3-(or PERn3) NC
31 PRSNT2# SDVO_CtrlData GND GND
32 GND GND RSVD RSVD
33 PET4+(or PETp4) NC RSVD RSVD
Side B Side A
SDVO/MEC Function
Key
End of x1 Connector
End of x4 Connector
PCI Express*
Function
SDVO/MEC Function
Octobe r 20 07 DM
Order Nu mb e r: 3156 64 - 00 2U S 18
Intel® Q965 Express Chipset
Page 19

Intel Q965 Express Chipset—Development Kit Hardware Features
Table 9. Intel® SDVO to PCI Express* connector mapping for MEC cards (Sheet 2 of 3)
Pin
Number
34 PET4-(or PETn4) NC GND GND
35 GND GND PER4+ (o r PE Rp 4) NC
36 GND GND PER4-(or PERn4) NC
37 PET5+(or PETp5) NC GND GND
38 PET5-(or PETn5) NC GND GND
39 GND GND PER5+ (o r PE Rp 5) NC
40 GND GND PER5-(or PERn5) NC
41 PET6+(or PETp6) NC GND GND
42 PET6-(or PETn6) NC GND GND
43 GND GND PER6+ (o r PE Rp 6) NC
44 GND GND PER6-(or PERn6) NC
45 PET7+(or PETp7) NC GND GND
46 PET7-(or PETn7) NC GND GND
47 GND GND PER7+ (o r PE Rp 7) NC
48 PRSNT2# ADD2+_Enable PER7-(or PERn7) NC
49 GND GND GND GND
50 PET8+(or PETp8) SDVOC_Clk+ RSVD RSVD
51 PET8-(or PETn8) SDVOC_Clk- GND GND
52 GND GND PER8+ (o r PE Rp 8) NC
53 GND GND PER8-(or PERn8) NC
54 PET9+(or PETp9) SDVOC_Blue+ GND GND
55 PET9-(or PETn9) SDVOC_Blue- GND GND
56 GND GND PER9+ (o r PE Rp 9) NC
57 GND GND PER9-(or PERn9) NC
58 PET10+(or PETp10) SDVOC_Green+ GND GND
59 PE T10-(o r PETn10) SDVOC_Green- GND GND
60 GND GND
61 GND GND
62 PET11+(or PETp11) SDVOC_Red+ GND GND
63 PE T11-(or PETn11) SDVOC_Red- GND GND
64 GND GND
65 GND GND
66 PET12+(or PETp12) SDVOB_Clk+ GND GND
67 PE T12-(or PETn12) SDVOB_Clk - GND GND
68 GND GND
Side B Side A
End of x8 Connector
PER10+(or
PERp10)
PER10-(or
PERn10)
PER11+(or
PERp11)
PER11-(or
PERn11)
PER12+(or
PERp12)
NC
NC
NC
NC
NC
®
Q965 Express Chipset
Intel
DM Octob er 2007
19 Order Num ber: 3156 64-002US
Page 20

Development Kit Hardware Features—Intel Q965 Express Chipset
Table 9. Intel® SDVO to PCI Express* connector mapping for MEC cards (Sheet 3 of 3)
Pin
Number
69 GND GND
70 PET13+(or PETp13) SDVOB_Blue+ GND G ND
71 PET13-(o r PETn13) SD VOB_Blue- GND GND
72 GND GND
73 GND GND
74 PET14+(or PETp14) SDVOB_Green+ GND GND
75 PET14-(o r PETn14) SD VOB_Green- GND GND
76 GND GND
77 GND GND
78 PET15+(or PETp15) SDVOB_Red+ GND GND
79 PET15-(o r PETn15) SDVOB_Red- GND GND
80 GND GND
81 PRSNT2# NC
82 RSVD RSVD GND GND
Note: End of x16 Con nector
Side B Side A
PER12-(or
PERn12)
PER13+(or
PERp13)
PER13-(or
PERn13)
PER14+(or
PERp14)
PER14-(or
PERn14)
PER15+(or
PERp15)
PER15-(or
PERn15)
NC
NC
NC
NC
NC
NC
NC
2.3.7 PCI Express* x1
The PCI Express* x1 connectors allow the use of any industry standard PCI Express*
device. The pin configuration of the connectors is given below:
Table 10. PCI Express* (x1) Pinout
Pin Number Side B Side A
1 12 V PRSNT1#
2 12 V 12V
3 12 V 12V
4GND GND
5SMCLK JTAG2
6SMDAT JTAG3
7GND JTAG4
83.3 V JTAG5
9JTAG1 3.3 V
10 3.3 Vaux 3.3 V
11 WAKE# PWRGD
12 RSVD GND
13 GND REFCLK+
Key
Octobe r 20 07 DM
Order Nu mb e r: 3156 64 - 00 2U S 20
Intel® Q965 Express Chipset
Page 21

Intel Q965 Express Chipset—Development Kit Hardware Features
Table 10. PCI Express* (x1) Pinout
Pin Number Side B Side A
14 HSOP0 REFCLK15 HSON0 GND
16 GND HSIP1
17 PRSNT2# HSIN1
18 GND GND
Note: End of x1 Connector
2.3.8 Front Pa nel Header (P ow er up & R es e t )
This development kit board use front panel header (J28LB) for powering-up and board
reset. Refer to Table 11 for the front panel header lists.
The front panel header is a 2x5 header, designated as J28LB. The following table
outlines the pin out and functionality of this header:
Table 11. Front Panel Jumper Setting
Pin Signal Name Description
1 HDD LED Anode HDD LED Anode
2 Green Power LED
3 HDD LED Cathode HDD LED Cathode
4 Yellow Power LED
5 Ground
6 Switch On
7 Reset
8 Ground
9 Power VCC
10 KEY No pin
2.3.9 Front Pa nel USB Hea d er
The front panel USB header is a 2x5 header, designated as J14LB, J15LB or J16LB. The
following table outlines the pin out and functionality of this header:
Table 12. Front Panel USB Header (Sheet 1 of 2)
Pin Signal names Description
1 VREG_F P_USBPWR Front panel USB power (Ports 0,1) [ +5 V or +5 V Dual] Note
2 VREG_F P_USBPWR Front panel USB power (Ports 0,1) [+5 V or + 5 V Dual]
3 USB_FP_P0 Front panel USB Port 0 negative signal
4 USB_FP_P1 Front panel USB Port 1 negative signal
5 USB_FP_P0+ Front panel USB Port 0 positive signal
6 USB_FP_P1+ Front panel USB Port 1 positive signal
7 Ground
®
Q965 Express Chipset
Intel
DM Octob er 2007
21 Order Num ber: 3156 64-002US
Page 22

Development Kit Hardware Features—Intel Q965 Express Chipset
Table 12. Front Panel USB Header (Sheet 2 of 2)
Pin Signal names Description
8 Ground
9 Key
10 USB_FP_OC0 Front panel USB over current signal (Ports 0,1)
Note: +5 V Dual switches between +5 V and +5 V Standby depending on the current board
state.
2.3.10 Front Audio Header
The front panel Audio header is a 2x7 header, designated as J8AU. The following table
outlines the pin out and functionality of this hea der:
Table 13. Front Audio Header
Pin Signal Name Description
1 AUD_PORT _1_R Port 1 Audio Ri ght
2 GND Ground
3 AUD_PORT_1_L Port 1 Audio Left
4 AUD_FP_PWR Front Panel Audio Power
5 AUD_PORT _2_R Port 2 Audio Ri ght
6 AUD_FP_RET _R Front P anel Audio Return Right
7 AUD_FP_JS Front Panel Jack Sense
8 No Connect Key Pin
9 AUD_PORT_2_L Port 2 Audio Left
10 AUD_FP_RET_L Front Panel Audio Return Left
11 AUD_VOL_UP Audio Volume Up
12 AUD_VOL_MUTE Audio Mute
13 AUD_VOL_DWN Audio Volume Down
14 GND Ground
2.3.11 High Definition Audio Header
The High Definition Audio header is a 2x8 header, designated as J7AU. The following
table outlines the pin out and functionality of this header:
Table 14. High Definition Audio Header (Sheet 1 of 2)
Pin Signal Name Description
1 AUD_LINK_BCLK_HDR
2 GND Ground
3 AUD_LINK_RST_HDR
4 VCC3 Power
5 AUD_LINK_SYNC_HDR
6 GND Ground
7 AUD_LINK_SDO_HDR
Octobe r 20 07 DM
Order Nu mb e r: 3156 64 - 00 2U S 22
Intel® Q965 Express Chipset
Page 23

Intel Q965 Express Chipset—Development Kit Hardware Features
Table 14. High Definition Audio Header (Sheet 2 of 2)
Pin Signal Name Description
8 VCC3 Power
9 AUD_LINK_SDI0
10 +12V Power
11 AUD_LINK_SDI1
12 KEY No Connect
13 TP_AUD_LINK_SDO_1_HDR
14 V_3P3_STBY\G 3.3V Standby
15 AUD_LINK_SDI2_R
16 GND Ground
2.3.12 BTX Power Connectors
Table 15. 2x12 BTX Power Connector
Pin Signal Name Pin Signal Name
1 +3.3V 13 GND
2 +3.3V 14 PS_ON#
3 GND 15 GND
4 +5V 16 GND
5 GND 17 GND
6 +5V 18 -5V
7 GND 19 +5V
8 PWDGD 20 +5V
9 5 VSB 21 -5V
10 +12V 22 +5V
11 +3.3V 23 +5V
12 -12V 24 GND
Table 16. 2x2 Auxiliary 12V Power Connector
Pin Signal Name
1 GND
2 GND
3 +12V
4 +12V
®
Q965 Express Chipset
Intel
DM Octob er 2007
23 Order Num ber: 3156 64-002US
Page 24

Development Kit Hardware Features—Intel Q965 Express Chipset
2.3.13 SATA Pinout
Table 17. SATA Pinout
Pin Signal Name
1 GND
2 TXP
3 TXN
4 GND
5RXN
6RXP
7GND
2.3.14 Fan Connectors
Table 18. Fan connectors
Pin Signal Name
1 GND
2 +12V
3 RPM
4 Control
2.4 Thermal Considerations
The development kit is shipped with a BTX TYPE I heatsink/fan thermal solution for
installation on the processor. BTX systems are designed so that all the high power
components are in-line and can be cooled using a single, continuous airflow stream.
The BTX Thermal Module Assembly (TMA) provides airflow to the central processing
unit (microprocessor) and its voltage regulation (VR), which is located at the front of
the system, an d the n to the memor y cont roll er (G)M CH , In put/Ou tput c ontro lle r (IC H),
and the add-in card (AIC) in the first slot position. This same airflow supply pattern is
available in all BTX system designs.
The Thermal Module Assembly (TMA) consi sts of 4 main parts:
• The 92mm four-wire fan
• The plastic duct assembly (black)
• The heatsink (copper and aluminum)
• The metal retention clip (for holding the heatsink to the plastic duct assembly)
Octobe r 20 07 DM
Order Nu mb e r: 3156 64 - 00 2U S 24
Intel® Q965 Express Chipset
Page 25

Intel Q965 Express Chipset—Development Kit Hardware Features
Figure 3. BTX Type I Thermal Module Assembly (TMA)
®
Q965 Express Chipset
Intel
DM Octob er 2007
25 Order Num ber: 3156 64-002US
Page 26

Development Kit Software and BIOS Features—Intel Q965 Express Chipset
3.0 Development Kit Software and BIOS Features
This chapter provides an overview of development kit software and BIOS features.
3.1 Software Key Features
The software in the kit was chosen to facilitate development of real-time applications
based on the components used in the evaluation board. The driver CD included in the
kit contains all of the software drivers necessary for basic system functionality under
the following operating systems Windows 2000/XP/XP Embedded, and Linux.
Note: While every care was taken to ensure the latest version of drivers were provided on the
enclosed CD at time of publication, newer versions may be available. Updated drivers
for Intel components can be found at: http://developer.intel.com/design/intarch/
software/driver/index.htm#q965.
For all third party components, please contact the appropriate vendor for updated
drivers.
Note: Software in the kit is provided free by the vendor and is only licensed for evaluation
purposes.
Refer to the documentation in the evaluation kit for further details on any terms and
conditions that may be applicable to the granted licenses. Customers using the tools
that work with Microso ft* produc ts must license those products . Any targets created by
those tools should also have appropriate licenses. Software included in the kit is subject
to change. Refer to http://developer.intel.com/design/intarch/devkit for details on
additional software from other third-party vendors.
3.2 BIOS Fea tures
3.2.1 BIOS Overview
This development kit ships pre-installed with Intel BIOS. The BIOS provides an
industry-standard BIOS platform to run most standard operating systems, including
Windows* 2000/XP/XP Embedded, Linux*, WEPOS and others.
The BIO S is s tor ed in a 1 6 M b SP I f l as h at the primary SPI fl a sh f oo tp r in t at X U3L B an d
can be updated using a BIOS flash programming tool. FWH will not be supported
The BIOS displays a message during POST identifying the type of BIOS and a revision
code. The BIOS Setup program can be used to view and change the BIOS settings for
the computer. The BIOS Setup program is accessed by pressing the <DELETE> key
after the Power-On Self-Test (POST) memory test begins and before the screen goes
black before booting any device. The menu bar is shown below.
Figure 4. Menu Bar
<MAIN> - <ADVANCED> - <PCIPnP> - <BOOT> - <SECURITY> - <CHIPSET> <EXIT>
Octobe r 20 07 DM
Order Nu mb e r: 3156 64 - 00 2U S 26
Intel® Q965 Express Chipset
Page 27

Intel Q965 Express Chipset—Development Kit Software and BIOS Features
Table 19 lists the BIOS setup program menu features.
Table 19. BIOS Setup Program Menu Bar
Main ADVANCED PCIPnP BOOT SECURITY CHIPSET EXIT
Displays
processor and
memory
configurations
Configures
advanced
features and
settings
Setup for
PCI and PCI
Express*
Table 20. BIOS Setup Program Function K e ys
BIOS Setup Program
Function Key
< or > Selects a different menu screen (moves the cursor left or right)
^ or Selects an item (moves the cursor up or down)
Tab Selects a field (not implemented)
Enter Executes command or selects the submenu
F9
F10 Save the cu rrent values and ex its the BIOS setup program
ESC Exits the menu
Load the optimal default configuration values for the current
menu
3.2.2 Resourc e C on fi g ur a t io n
3.2.2.1 PCI Auto Configuration
When a PCI card is added and the system is turned on, the BIOS automatically
configures interrupts, the I/O space, and other system resources. Any interrupts set to
AV A I LA B LE i n Setup are consid e r ed to be available fo r use by ad d -in card . T he r e i s o ne
32/33 PCI add-in card socket on the board.
Selects boot
options and
configurations
Description
Sets
passwords
and
security
features
Configures
different
major
components
Saves or
discard
chan ges to
setup program
options
3.2.2.2 SATA Drive Configuration
If you select AUTO in the BIOS Setup program, the BIOS automatically sets up the
SATA drive configuration with independent I/O channel support. The interface also
supports second-generation Serial ATA drives. The BIOS determines the capabilities of
each drive and configures them to optimize capacity and performance.
To take advantage of the high capacities typically available today, hard drives are
automatically configured for Logical Block Addressing (LBA) and to PIO Mode 3 or 4,
depending on the capability of the drive. You can override the auto-configuration
options by specifying MANUAL CONFIGURATION in the BIOS setup program.
Note: This board only supports Serial ATA drives.
3.2.3 System M an agement B IO S ( SMBIOS)
SMBIOS is a Desktop Management Interface (DMI) compliant method for managing
computers in a managed network. The main component of SMBIOS is the Management
Information Format (MIF) database, which contains information about the computing
system and its components.
®
Q965 Express Chipset
Intel
DM Octob er 2007
27 Order Num ber: 3156 64-002US
Page 28

Development Kit Software and BIOS Features—Intel Q965 Express Chipset
Using SMBIOS, a system administrator can obtain the system types, capabilities,
operational status, and installation dates for system components. The MIF database
defines the data and provides the method for accessing this information. The BIOS
enables applications such as third-party management software to use SMBIOS. The
BIOS stores and reports the following SMBIOS information:
• BIOS data, such as the BIOS revision level
• Fixed-system data, such as peripherals, serial numbers, and asset tags
• Resource data, such as memory size, cache size, and processor clock frequency
• Dynamic data, such as event detection and error logging
Non-Plug and play operating systems such as Microsoft Windows NT *, require an
additional interface for obtaining the SMBIOS information. The BIOS supports an
SMBIOS table interface for such operating systems. Using this support, an SMBIOS
service-level application running on a non-Plug and Play operating system can obtain
the SMBIOS information.
3.2.4 Legacy US B Sup p ort
Legacy USB support enables USB devices to be used even when the operating system’s
USB drivers are not yet av ailab le. Legacy USB support is us ed to access the BIO S Setup
program, and to install an operating system that supports USB.
Legacy USB support operates as follows:
1. When you apply power to the computer, legacy support is disabled.
2. POST begins.
3. Legacy USB support is enabled by the BIOS allowing you to use a USB keyboard to enter and configure the BIOS Setup program and the maintenance menu.
4. POST completes.
5. The operating system loads. While the operating system is loading, USB keyboards and mice are recognized and may be used to configure the operating system.
After the operating system loads the USB drivers, all legacy and non-legacy USB
devices are recognized by the operating system, and Legacy USB support from the
BIOS is no l on ger used.
To install an operating system that supports USB, follow the operating system’s
installation instructions.
3.2.5 Boot Opti ons
In the BIOS Setup program, the user can choose to boot from a diskette drive, hard
drive, CD-ROM, or fro m the netwo rk. The de fault se tt ing is f or the H ard Driv e to b e the
first, and the CD-ROM to be the second. There is no third or fourth boot option.
3.2.5.1 CD-ROM Boot
Booting from CD-ROM is supported in compliance to the El Torito bootable CD-ROM
format specification. Under the Boot menu in the BIOS Setup program, CD-ROM is
listed as a boot device. Boot devices are defined in priority order. Accordingly, if there is
not a bootable CD in the CD-ROM drive, the system will attempt to boot from the next
defined drive.
Octobe r 20 07 DM
Order Nu mb e r: 3156 64 - 00 2U S 28
Intel® Q965 Express Chipset
Page 29

Intel Q965 Express Chipset—Development Kit Software and BIOS Features
3.2.5.2 Network Boot
The network can be selected as a boot device. This selection allows booting from the
on-board LAN or a network add-in card with a remote boot ROM installed. In order to
boot from the LAN you will have to enter the BIOS and select LAN boot as your first
boot device.
3.2.5.3 Booting without Attached Devices
For use in embedded applications, the BIOS has been designed so that after passing
the POST, the operating system loader is invoked even if the following devices are not
present:
•Video adapter
•Keyboard
•Mouse
3.2.5.4 Changing the Boot Device
Pressing the <Delete> key during POST causes the BIOS menu to be displayed. Using
your arr ow k eys mo ve ov er to <B OOT > and th en arr ow down to <Boot Devic e Prior it y>
and then select which device you would like to boot first and second.
Note: Please follow the instructions on the right side of the BIOS screen to navigate and
change BIOS settings.
3.2.6 BIOS Secu r ity Features
The BIOS includ es securi ty featur es that restr ict acc ess to the BIOS Setup program and
who can boot the computer. A supervisor password and a user password can be set for
the BIOS Setup program and for booting the computer, with the following restrictions:
• The supervisor password gives unrestricted access to view and change all the
Setup options in the BIOS Setup program. This is the supervisor mode.
• The user pass wo rd giv e s re str ic t ed ac ce ss to vi ew and cha ng e Setu p op ti ons in the
BIOS Setup program. This is the user mode.
• If only the supervisor password is set, pressing the <Enter> key at the password
prompt of the BIOS Setup program allows the user restricted access to Setup.
• If both the supervisor and user passwords are set, users can enter either the
supervisor password or the user password to access Setup. Users have access to
Setup respective to which password is entered. Setting the user password restricts
who can boot the computer. The password prompt will be displayed before the
computer is booted. If only the supervisor password is set, the computer boots
without aski ng fo r a pass word. If both p asswo rds are set , the user can en ter either
password to boot the computer.
For enhanced security, use different passwords for the supervisor and user passwords.
V al id pa ss wo rd ch aracters are A-Z, a-z, a nd 0- 9. Passwords ma y be up to 1 6 cha r ac ter s
in length.
3.3 Graphics Drivers
The Intel® Q965 Express Chipset will work with the Intel® GMA3000 Extreme grap hics
driver or the Intel
®
Embedded Graphics Driver (IEGD).
®
Q965 Express Chipset
Intel
DM Octob er 2007
29 Order Num ber: 3156 64-002US
Page 30

Development Kit Software and BIOS Features—Intel Q965 Express Chipset
IEGD is created specifically for embedded platforms, offering an adaptable alternative
to drivers designed for the desktop market segments. IEGD offers Intel's embedded
customers extended life support that correlates with the extended life support of
Embedded IA-32 silicon products. IEGD differentiates itself through its configurability
and support of unique embedded market segment requirements, including an
unprecedented support of advanced display combinations, non-standard display
dimensions, and embedded operating systems such as Microsoft* XP Embedded and
WePOS.T he I nt e l
®
Graphics Media Accelerator (GMA) is designed for mainstream
desktop usage models focusing on 3D performance and ease of use.
When working with external graphics drivers, the internal graphics will automatically
disable. When a discrete graphics card is plugged into to the graphics port (PEG), the
integrated graphics will be disabled. Note that this does not apply to an ADD2 card,
which is intended to work in conjunction with integrated graphics.
IEGD allows support of external discrete graphics cards in conjunction with integrated
graphics when a discrete graphics card is plugged into the PCI Express* x1 or PCI at
the ICH. If you have a discrete graphics card plugged into the PCI Express*, it will work
in conjunc ti on wi th t he inte gra te d gr aphi c s. Note th at GMA dr ive rs wil l not suppor t this ,
only the IEGD drivers.
3.4 Intel® Active Management Technology
Intel® Active Management Technology (AMT) offers tamper-resistant and persistent
management capabilities. Specifically, Intel AMT is a hardware-based solution that
offers encrypted and persistent asset management and remote diagnostics and/or
recovery capabilities for networked platforms. With Intel AMT, IT organizations can
easily get accurate platform information, and can perform remote updating,
diagnostics, debugging, and repair of a system, regardless of the state of the operating
system and the power state of the system. Intel AMT enables IT organizations to
discover, heal, and protect all of their computing assets, regardless of system state in
the manner described below.
(1) Discovering hardware and software computing assets:
• Intel AMT stores hardware and software asset information in non-volatile memory
and allows IT to read the asset information anytime, even if the PC is off.
• Users cannot remove or prevent IT organization access to the information because
it does not rely on software agents.
(2) Healing systems remotely, regardless of the operating system or system state:
• Intel AMT provides out-of-band diagnostics and recovery capabilities for IT
organizations to remotely diagnose and repair PCs after software, operating
system, or hardware failures.
• Alerting and event logging help IT organizations detect and diagnose problems
quickly to reduce end- user do wnt ime .
(3) Protecting the enterprise against malicious software attacks:
• Intel AMT helps IT organizations keep software versions and virus protection
consistent and up-to-date across the enterprise.
• Version information is stored in non-volatile memory for access anytime by thirdparty software to check and, if necessary, wake a system to perform off-hours
updates.
(4) The key features of Intel AMT include:
• Secure Out of Ba nd (OOB) s ystem ma nagement that a llows re mote mana gement of
PCs regardless of system power or operating system state.
Octobe r 20 07 DM
Order Nu mb e r: 3156 64 - 00 2U S 30
Intel® Q965 Express Chipset
Page 31

Intel Q965 Express Chipset—Development Kit Software and BIOS Features
— SSL3.1/TLS encryption
— HTTP authentication
—TCP/IP
—HTTP web GUI
—XML/SOAP API
• Remote troubleshooting and recovery that can significantly reduce desk-side visits
and potentially increase efficiency of IT technical staff.
— System event log
— IDE-Redirection or PXE boot; Network drive or remote CD boot
—Serial over LAN
—OOB diagnostics
— Remote control
— Remote BIOS update
• Proactive alerting that decreases downtime and minimizes time to repair.
— Program mab le polic ies
— Operating system lock-up alert
— Boot failure alert
— Hardware failure alerts
• Third-party non-volatile storage that prevents users from removing critical
inventory, remote control, or virus protection agents.
• Nonvolatile storage for agents
• Tamper-resistant
• Remote hardware and software asset tracking that eliminates time-consuming
manual inventory tracking, which also reduces asset accounting costs.
—E-Asset Tag
—HW/SW inventory
For detai ls of the AMT c onfi gur ati ons , plea se con tac t you r neare st In tel repre s entat iv es
for the Intel
®
AMT OEM Bring up Guide.
3.5 Intel® Quiet System Technology
Intel® ICH8 incorporated a new integrated Intel® Quiet System Technology (Intel QST)
interface to provide a
manag e me nt solution. Intel QST ar ch itecture con s i st s o f a
bus, Platform Environment Control Interface (PECI), four T ACH pins and three Pulse
Width
Modulation (PWM) output pins to moni tor, control and manag e the system targe t
temperatur e th r o ug h a set s of
QST is run by the manageability engine (ME) residing in MCH and requires SPI flash to
host the QST firmware.
Detailed of the QST configurations, please contact your nearest Intel representatives
for the QST OEM Bring up Guide.
®
Q965 Express Chipset
Intel
DM Octob er 2007
31 Order Num ber: 3156 64-002US
low cost solution for a better system thermal/acoustic
Simple Serial Tr ansfer (SST)
thermal sensors.
Page 32

Setting Up & Configuring the Development Kit—Intel Q965 Ex press Chipset
4.0 Setting Up & Configuring the Development Kit
This chapter identifies the evaluation kit basic board’s set up and operation. Please
refer to Chapter 2.0 for the board layout, jumper setting location and the component
reference designator.
4.1 Overview
The following hardware is included in the development kit:
• One Intel® Q965 Express Chipset Development Kit reference board.
• One Intel® Core™2 Duo processor E6400 2.13GHz
• One BTX Type I Thermal Module Assembly (TMA) CPU fan heatsink
• One Support and Retention Module
• Two 512 Mbyte DDR2 667MHz unbuffered DIMMs
• One Pre-programmed and installed 2 MB SPI Flash
(SRM) heatsink mounting plate
Figure 5. Development Kit Board
Octobe r 20 07 DM
Order Nu mb e r: 3156 64 - 00 2U S 32
Intel® Q965 Express Chipset
Page 33

Intel Q965 Express Chipset—Setting Up & Configuring the Development Kit
4.2 Additional Hardware & Software Required
Before you set up and configure your evaluation board, you may want to gather some
additional hardware and software.
VGA or LCD Monitor
You can use any standard VGA or multi-resolution LCD monitor. The setup instructions
in this chapter assume that you are using a standard VGA monitor.
Keyboard
You will need a PS/2 style or USB keyboard.
Mouse
You will need a PS/2 style or USB mouse.
Hard Drives, Floppy Drives, and SATA or USB Optical Disk Drives
You can connect up to six SATA drives to the evaluation board. A floppy drive or
compact disc drive may be used to load the OS. No drives or cables are included in the
kit; the user must provide them as necessary. All the storage devices may be attached
to the board simultaneously.
Video A d apter
Integrated video is provided via the back panel of the system board. Alternately, users
can choose to use any standard external PCI Express* x16 graphics card or MEC. It is
user responsibility to install the appropriate drivers and correctly configure any
software for video adapters used. Check the BIOS for the proper video settings.
Power Supply
The evaluation board is recommended to power up using a standard desktop BTX/ATX
12 V Rev 2.2
powe r sup pl y t hat sup p ort enha nc ed B T X system thermal perform an ce . It
is recommended the power supply have a minimum of 500 W output and active PFC
(power factor correction). The power supply selected must also provide an auxiliary
2x2 12 V connector.
Other Devices and Adapters
The evaluation board functions much like a standard desktop computer motherboard.
Most PC-compatible peripherals can be attached and configured to work with the
evaluation board.
4.3 Setting Up the Evaluation Bo ard
Once the hardware described in Section 4.2 is gathered, follow the steps below to set
up the evaluation board. This manual assumes you are familiar with the basic concepts
involved with installing and configuring hardware for a personal computer system.
Note: To locate items discussed in the procedure below, please refer to Chapter 3.0.
1. Create a safe work environment.
2. Make sure you are in a static-free environment before removing any components
from their anti-static packaging. The evaluation board is susceptible to electrostatic
discharge damage, and such damage may cause product failure or unpredictable
operation.
Inspect the contents of your kit.
®
Q965 Express Chipset
Intel
DM Octob er 2007
33 Order Num ber: 3156 64-002US
Page 34

Setting Up & Configuring the Development Kit—Intel Q965 Ex press Chipset
3. Check for damage that may have occurred during shipment. Contact your sales representative if any items are missing or damaged.
Caution: Connecting the wrong cable or reversing the cable can damage the evaluation board
and may damage the device being connected. Since the board is not in a protective
chassis, use caution when connecting cables to this product.
Caution: Standby voltage is constantly applied to the board. Therefore, do not insert or remove
any hardware unless the system is unplugged.
Note: Th e evalua tio n boar d is a μBTX form factor. A μBTX chassis may be used if a protected
environment is desired.
4. Check the jumper settings (refer to Chapter 3.0). Jumper J6LB is used to clear the CMOS memory. Make sure this jumper is set for normal operation.
5. Insert the processor (enclosed in the kit is Intel
®
Core™2 Duo processor E6400)
into the LGA775 socket
6. Attach the BTX Thermal Module Assembly (TMA) over the processor to the Support and Retention Modu le (SR M) by followi ng proce du res desc ribed belo w.
7. Place t he uBTX board on the Suppo rt a nd R e tenti on Modu le (SRM) so that the h oles
A, B, C and D on the PCB line up with the corresponding locations on the SRM (see
Figure 6).
Figure 6. Align the Development Kit Board and SR M
B
C
A
A
B
D
D
SRM
C
BTX Boar d
Octobe r 20 07 DM
Order Nu mb e r: 3156 64 - 00 2U S 34
Intel® Q965 Express Chipset
Page 35

Intel Q965 Express Chipset—Setting Up & Configuring the Development Kit
The board and SRM assembly should look like the figure below.
Figure 7. Assembled SRM and board
®
Q965 Express Chipset
Intel
DM Octob er 2007
35 Order Num ber: 3156 64-002US
Page 36

Setting Up & Configuring the Development Kit—Intel Q965 Ex press Chipset
Place the heatsink on top of the processor. The heatsink should align with the holes on
the SRM and board as shown below in Figure 7. Please clean the surface of the
processor with isopropyl alcohol before attaching th e heatsink .
Figure 8. Align the heatsink with holes on the SRM and board
Octobe r 20 07 DM
Order Nu mb e r: 3156 64 - 00 2U S 36
Intel® Q965 Express Chipset
Page 37

Intel Q965 Express Chipset—Setting Up & Configuring the Development Kit
Use two 6-32 screws to partially tighten the rear end of the heatsink to the board and
the SRM as shown in Figure 9. The screw uses the threaded holes of the SRM for
retention.
Figure 9. Tighten the heatsink on the SRM and board
®
Q965 Express Chipset
Intel
DM Octob er 2007
37 Order Num ber: 3156 64-002US
Page 38

Setting Up & Configuring the Development Kit—Intel Q965 Ex press Chipset
Use two 6-32 nuts and two bolt s to secure the fr ont side of the heatsink to the SRM.
The screw ca n be dropped from the top and use a nut at the bottom or the screw can
be inserted from the bas e of the SRM int o the heat sink ( based on the accessibility of
the system).
Figure 10. Secure the front side of the heatsink to the SRM
Octobe r 20 07 DM
Order Nu mb e r: 3156 64 - 00 2U S 38
Intel® Q965 Express Chipset
Page 39

Intel Q965 Express Chipset—Setting Up & Configuring the Development Kit
Tighten the screws at the rear end of the hea tsink as show n in the figure below.
Figure 11. Secure the read end of heatsink to the SRM
Note: Please make sure all the screws are tightened before using the syst em .
8. Plug the processor heat sink fan into J3TH.
9. Connect the SATA drive through SATA cable into J24LB (SATA 0). Connect a power cable to the SATA drive.
10.(Optional) Plug the floppy disk drive through the ribbon cable into J4LH. Connect a power cable to the floppy drive.
11.Insert the two DDR2 memory (enclosed in the kit are two 512 Mbyte DDR2 667MH z unbuffered DIMMs) i nto s lots J1M Y and J3 MY. Option al to ins ert DDR2 memo ry into slots J2MY and J4MY.
12. Insert a USB CD or DVD into one of the USB ports (J17LB) at the back panel. Optional to plug a SATA CD or DVD into J22LB.
13.Connect a PS/2 Keyboard into J5LH (purple connector) at the back panel. Optional to connect a USB keyboard into J17LB.
14.Connect a PS/ 2 Mouse into J5LH (green connector) or a USB Mous e into one of the USB ports (J17LB) at the back panel.
15. Optional to connect a PCI Express x16 graphics card into J6UB. Optional to install a MEC card into J6UB.
16.Plug the front panel head er cable into J28LB.
17.Plug the monitor into the VGA connector J4UB or Plug t he monitor into the add in grap hics car d’s video connector.
18.Optional to connect the a udio speakers to J 4AU and J5AU ( Please refer to
Chapter 2.0 for details).
®
Q965 Express Chipset
Intel
DM Octob er 2007
39 Order Num ber: 3156 64-002US
Page 40

Setting Up & Configuring the Development Kit—Intel Q965 Ex press Chipset
19.Optional to connect an Ethe rnet cable to LAN Mag Jack connecto r at J18LB.
20.Connect a standard recommended BTX power supply to the board. Plug the BTX 2x12 connector i nto J2BV power supply header. Plug the BTX 2x2 12V connector into J1BV.
21.Press the J9LB Power Button to power up the board. T urn on the power to the monitor and evaluation board. Ensure that the fan sink on the processor is operating.
4.3.1 Memory Configurations
The Intel Q965 MCH supports two types of memory organization:
Dual channe l (I nterleaved) mode. This mode offers the highest throughput for real
world applications. Dual channel mode is enabled when the installed memory capacities
of both DIMM channels are equal. Technology and device width can vary from one
channel to the oth er but the insta lled memory capacit y for each channe l must be equal .
If different speeds DIMMs are used between channels, the slowest memory timing will
be used.
Single channel (Asymmetric) mode. This mod e is equivalent to single channel
bandwidth operation for real world applications. This mode is used when only a single
DIMM is installed or the memory capacities are unequal. Technology and device width
can vary from one channel to the other. If different speeds DIMMs are used between
channels, the slowest memory timing will be used.
Figure 12. Memory Channel and DIMM Configuration
Octobe r 20 07 DM
Order Nu mb e r: 3156 64 - 00 2U S 40
Intel® Q965 Express Chipset
Page 41

Intel Q965 Express Chipset—Setting Up & Configuring the Development Kit
4.3.1.1 Dual Channel (Interleaved) Mode Configurations
Figure 13 shows a dual channel configuration using two DIMMs. In this example, the
DIMM 0 sockets of both channels are populated with identical DIMMs.
Figure 13. Dual Channel (Interleaved) Mode Configuration with two DIMMs
Figure 14 shows a dual channel configuration using three DIMMs. In this example, the
combined capacity of the two DIMMs in Channel A equal the capacity of the single
DIMM in the DIMM 0 socket of Channel B.
Figure 14. Dual Channel (Interleaved) Mode Configuration with three DIMMs
®
Q965 Express Chipset
Intel
DM Octob er 2007
41 Order Num ber: 3156 64-002US
Page 42

Setting Up & Configuring the Development Kit—Intel Q965 Ex press Chipset
Figure 15 shows a dual channel configur ation using four DIMMs. In this example, the
combined capacity of the 2x DIMMs in Channel A equals the combined capacity of the
2x DIMMs in Channel B. Also, the DIMMs are matched between DIMM 0 and DIMM 1 of
both channels.
Figure 15. Dual Channel (Interleaved) Mode Configuration with four DIMMs
4.3.1.2 Single Channel (Asymmetric) Mode Configurations
Figure 16 shows a single channel configuration using 1x DIMM. In this example, only
the DIMM 0 socket of Channel A is populated. Channel B is not populated.
Figure 16. Single Channel (Asymmetric) Mode Configuration with one DIMM
Octobe r 20 07 DM
Order Nu mb e r: 3156 64 - 00 2U S 42
Intel® Q965 Express Chipset
Page 43

Intel Q965 Express Chipset—Setting Up & Configuring the Development Kit
Figure 17 shows a s ingle channel configuration using 3x DIMMs. In this example, the
combined capacity of the 2x DIMMs in Channel A does not equal the capacity of the
single DIMM in the DIMM 0 socket of Channel B.
Figure 17. Single Channel (Asymmetric) Mode Configuration with 3x DIMMs
4.4 Audio Subsystem Configurations
The board supports the Intel® High Definition Audio subsystem based on the ADI1988A
or 1988B
Analog Converter) that simultaneously support 7.1 sound playback.
audio codec. The ADI1988 series provides eight channels of DAC (Digital to
The board contains audio connectors on the back panel and two channels of
independent stereo sound output at the side of the board. T he functions of the back
panel audio connectors are dependent on the eight-channel audio subsystem, as
described in Chapter 2.0.
For more information such as specification, schematic, layout and driver on the
ADI1988 audio codec, please refer to the ADI website at www.adi.com
4.4.1 Eight-Channel (7.1) Audio Subsystem
Figure 18 shows the back panel audio connector for the eight-Channel (7.1) Audio
Subsystem. The eight-channel (7.1) audio subsystem includes the following:
•Intel
•
Figure 18. Back Panel Audio Connector Options for Eigh t- chann e l Audi o Subsystem
®
82801G I/O Controller Hub (ICH8DO)
ADI1988 audio codec
O
K
K
J
J
O
P
P
M
D
C
C
®
Q965 Express Chipset
Intel
DM Octob er 2007
43 Order Num ber: 3156 64-002US
D
M
N
N
Page 44

Setting Up & Configuring the Development Kit—Intel Q965 Ex press Chipset
Table 21 describes the lists of back panel task.
Table 21. Ba ck panel task (Aud io)
Symbols Task
CS/PDIF Out
DS/PDIF In
K (Gray) Side Speaker Out
J (Black) Rear Speaker Out
M (Orange) Center channel and Subwoofer audio out
O (Light Blue) Audio Line In
P (Green) Audio Line Out (Front Speaker Out)
N (Pin k) Mi c In
4.5 LAN Subsystem Configurations
The LAN subsystem consists of the following:
• Physical layer interface device. The development kit include the following LAN
devices:
—Intel
• RJ-45 LAN connector with integrate d s tatus LEDs.
®
82566DM for Gigabit (10/100/1000 Mbits/sec) Ethernet LAN
connectivity.
4.5.1 Gigabit LAN Subsys t em
The Gigabit (10/100/1000 Mbits/sec) LAN subsystem includes the Int el® 82566DM
controller and a RJ-45 LAN conne ctor with integ r ated status LE Ds.
®
The Intel
•PCI Express* link
• 10/100/1000 IEEE 802.3 compliant
• Compliant to IEEE 802.3x flow control support
• TCP, IP, UDP checksum offload
• Transmit TCP segmentation
• Advanced packet filtering
• Full device driver compatibility
• PCI Express* Power Management Support
• Jumbo frame support
•Intel
• Alert Standard Format (ASF) 2.0
82566DM Gigabit Ethernet Controller s upports the following features:
®
Active Management Technology
Octobe r 20 07 DM
Order Nu mb e r: 3156 64 - 00 2U S 44
Intel® Q965 Express Chipset
Page 45

Intel Q965 Express Chipset—Setting Up & Configuring the Development Kit
4.5.2 RJ-45 LA N C on nector wit h I n t eg r at ed LEDs
Two LEDs are built into the RJ-45 LAN connector as shown in Figure 19. Table 22
describes the LED states when the board is powered up and the Gigabit LAN subsystem
is operating.
Figure 19. LAN Connector LED locations
Table 22. LAN Connector LED status
LED Color L E D State Condition
Off LAN link is not established.
Left Green
N/A Off 10 Mbits/sec data rate is selected
Right
Green On 100 Mbits/sec data rate is selected
Yellow On 1000 Mbits/sec data rate is selected
On LAN link is established.
Blinking LAN activity is occurring.
4.6 Software Kit Insta llation
4.6. 1 Ins tallation o f a new Operating S ystem
The user will require d to install a new operating syste m on a SATA hard disk using an
optical drive or loading an image to the hard disk.
4.6.2 Drivers I nst allation
Once the image is loaded onto the platform and the clean build of OS is done,
Install all the relevant drivers:
•Intel
•Intel
•Intel
• Others optional – HECI driver, AMT Serial Over LAN, Intel
After installation, go to device manager and make sure there are no “!” ( Yellow bangs)
on the devices.
®
Chipset Software Installation Utility – Chipset INF files needs to be installed
first
®
Embedded Graphics Drivers or Intel® Graphics Media Accelerator Drivers
®
PRO Network Connections LAN Driver
Interface Driver (QST), Intel Matrix Storage Manager
®
Management Engine
®
Q965 Express Chipset
Intel
DM Octob er 2007
45 Order Num ber: 3156 64-002US
Page 46

Error Messages and Beep Codes—Intel Q965 Express Chipset
5.0 Error Messages and Beep Codes
This chapter describes the various progress codes that are reported by the BIOS and
the corresponding LED Codes.
The LED codes are 8-bit quantities and can be used as Port 80 codes if the platform
supports Port 80 capturing device. The higher nibble alone is used for a 4-bit LED.
The Status code driver is responsible for translating the Standard Progress/Error code
into a one-byte value. The particular enumeration scheme is set up so that the Port 80
code values will typically increase during the boot process. The early codes are for
subsystems closer to the processor and the later codes are for peripherals.
Typically, the order of initialization is Processor -> Memory -> Busses -> Output/Input
Devices -> Boot Devic es
or
Processor -> Memory -> Recovery -> Busses ->
Output/Input Devices -> Bo ot Devices
The sequence of POST is platform-specific.
5.1 Speaker
The board-mounted speaker provides audible error code (beep code) information
during POST. For information about the location of the onboard speaker refer to
Figure 1.
5.2 BIOS Beep Codes
Whenever a recoverable error occurs during POST, the BIOS “beep” as described in the
following table, Table 23.
Table 23. Beep codes
Type Pattern Frequency
Memory error Three long beeps 1280 Hz
Thermal warning
Four alternating beeps:
High to ne, low tone, hi gh tone, low tone
5.3 BIOS Error Messages
High tone: 2000 Hz
Low tone: 1600 Hz
Table below show the lists of BIOS error messages and brief description of each.
Octobe r 20 07 DM
Order Nu mb e r: 3156 64 - 00 2U S 46
Intel® Q965 Express Chipset
Page 47

Intel Q965 Express Chipset—Error Messages and Beep Codes
Table 24. Lists of error messages and brief de scription of each
Error Message Explanation
CMOS Battery low The battery may be losing power. R eplace the battery soon.
CMOS Checksum Bad
Memory Size Decreased
No Boot device available System did not find a device to boot.
The CMOS checksum is incorrect. CMOS memory may have been corrupted.
Run Setup to reset values.
Memory size has decreased since the last boot. If no memory was removed,
then memory may be bad.
5.4 Port 80h POST Codes
During the POST, the BIOS generates diagnostic progress codes (POST-codes) to I/O
port 80h. If the POST fails, execution stops and the last POST code generated is left at
port 80h. This code is useful for determining the point where an error occurred.
The following tables provide information about the POST codes generated by the BIOS:
• Table 25 lists the Port 80 h POST code ranges
• Table 26 lists the Port 80h Progress Co de Enumeration
• Table 27 lists the Port 80 h POST sequen ce
Table 25. Port 80h POST Code Ranges
Range Subsystem
0x00 – 0x0F
0x10 – 0x1F Host Processors: 0x1F is unre coverable CPU error.
0x20 – 0x2F Memory/Chips et: 0x2F is no memory detected o r no useful memory detected.
0x30 – 0x3F Recovery: 0x3F indicated recovery failure.
0x40 – 0x4F Reserved for future.
0x50 – 0x5F IO Busses: PCI, USB, ISA , ATA etc. 0x5F is unrecover able error. Start with PCI.
0x60 – 0x6F Rese rved fo r future ( for new busses) .
0x70 – 0x7F Outpu t Devices: All o utput consol es. 0x7F i s unrecover able er ror.
0x80 – 0x8F Rese rved fo r future ( new out put conso le codes).
0x90 – 0x9F Input devices: Keyb oard/Mouse. 0x9F is unrecove rable error.
0xA0 – 0xAF Reserved for future (new input console codes).
0xB0 – 0xBF
0xC0-0xCF Reserved for future.
0xD0-0xDF Boot Device Selection.
Debug codes: Can be used by any PEIM/driver for debug. Blocked on production
builds per DFT rule. Not covered in the EPS.
Boot Devices: Includes Fixed media and removable media. Not that critical since
consoles should be up at this point. 0xBF is unrecoverable error .
0xE0 – 0xFF
®
Q965 Express Chipset
Intel
DM Octob er 2007
47 Order Num ber: 3156 64-002US
0xF0 – 0xFF: 0xFF processor exception. 0xE0- 0xEE: Miscellaneous codes. See
below. 0xEF boot/S3: resume failure.
Page 48

Error Messages and Beep Codes—Intel Q965 Express Chipset
Table 26. Port 80h Progress Code Enumeration
Port 80 code Progress Code Enumeration
0x10 Power-on initialization of the host processor (Boot Strap Processor)
0x11 Host processor Cache initialization (including APs)
0x12 Starting Application processor initialization
0x13 SMM initialization
Port 80 code Progress Code Enumeration
0x21 Initializing a chipset component
0x22 R eading SPD from memory DIMMs
0x23 Detecting presence of memor y DIMMs
HOST PROCESSOR:
Chipset
Memory
0x24 Programming timing parameters in the memory controller and the DIMMs
0x25 Configuring memory
0x26 Optimizing memory settings
0x27 Initializing memory, such as ECC init
0x28 Testing memory
PCI Bus
0x50 Enumerating PCI busses
0x51 Allocating resources to PCI bus
0x52 Hot Plug PCI controller initialization
0x53-0x57 Reserved for PCI Bus
USB
0x58 Resetting USB bus
0x59 Reserved for USB
ATA/ATAPI/SATA:
0x5A Resetting PATA/SATA bus and all devices
0x5B Reserved for ATA
SMBUS
0x5C Resetting SMBUS
0x5D Reserved for SMBUS
LOCAL CONSOLE:
Octobe r 20 07 DM
Order Nu mb e r: 3156 64 - 00 2U S 48
Intel® Q965 Express Chipset
Page 49

Intel Q965 Express Chipset—Error Messages and Beep Codes
Port 80 code Progress Code Enumeration
0x70 Resetting the VGA controller
0x71 Disabling the VGA controller
0x72 Enabling the VGA controller
Remote Console
0x78 Resetting the console controller
0x79 Disabling the console controller
0x7A Enabling the console controller
Keyboard (PS2 or USB)
0x90 Resetting keyboard
0x9 Disabling the keyboard
0x9 Detecting the presence of the keyboard
0x9 Enabling the keyboard
0x9 Clearing keyboard input buffer
0x9 Instructing keyboard controller to run Self Test (PS2 only)
Mouse (PS2 OR USB)
0x98 Resetting mouse
0x99 Detecting mouse
0x9A Detecting presence of mouse
0x9B Enabling mouse
Fixed Media
0xB0 Resetting fixed media
0xB1 Disabling fixed media
0xB2 Detecting presence of a fixed media (IDE hard drive detection etc.)
0xB3 Enabling/configuring a fixed media
Removable Media
0xB8 Resetting removable media
0xB9 Disabling removable media
0xBA Detecting presence of a removable media (IDE, CDROM detection etc.)
0xBC Enabling/configuring a removable media
BDS
0xDy Trying boot selection y (y=0 to 15)
PEI Core
0xE0
Started dispatching PEIMs (emitted on first report of EFI_SW_PC_INIT_BEGIN
EFI_SW_PEI_PC_HANDOFF_TO_NEXT
0xE2 Permanent memory found.
0xE1,0xE3 Reserved for PEI/PEIMs
®
Q965 Express Chipset
Intel
DM Octob er 2007
49 Order Num ber: 3156 64-002US
Page 50

Error Messages and Beep Codes—Intel Q965 Express Chipset
Port 80 code Progress Code Enumeration
0xE4 Entered DXE phase
0xE5 Started dispatching drivers
0xE5 Started connecting drivers
0xE7 Waiting for user input
0xE8 Checking password
0xE9 Entering BIOS setup
0xEA TBD – Flash Update
0xEB Calling Legacy Option ROMs
0xEE TBD – Calling Int 19. One beep unless silent boot is enabled.
0xEF TBD – Unrecoverable Boot failure/S3 resume failure
RUNTIME PHASE/EFI OS BOOT
0xF4 Entering Sleep sta te
0xF5 Exiting Sleep state
0xF8 EFI boot service ExitBootServices ( ) has been called
0xF9 EFI runtime service SetVirtualAddressMap ( ) has been called
0xFA EFI runtime service ResetSystem ( ) has been called
PEIMS/RECOVERY
DXE Core
DXE Drivers
0x30 Crisis Recovery has initiated per User request
Port 80 code Progress Code Enum erati on
0x31 Crisis Recovery has initiated by software (corrupt flash)
0x34 Loading recovery capsule
0x35 Handing off control to the recovery capsule
0x3F Unable to recover
Table 27. Typical Port 80h POST Sequence (Sheet 1 of 2)
Port 80 code Progress Code Enumeration
0x21 Initializing a chipset component
0x22 Reading SPD from memory DIMMs
0x23 Detecting presence of memory DIMMs
0x25 Configuring memory
0x28 Testing memory
0x34 Loading recovery capsule
Octobe r 20 07 DM
Order Nu mb e r: 3156 64 - 00 2U S 50
Intel® Q965 Express Chipset
Page 51

Intel Q965 Express Chipset—Error Messages and Beep Codes
Table 27. Typical Port 80h POST Sequence (Sheet 2 of 2)
Port 80 code Progress Code Enumeration
0xE4 Entered DXE phase
0x12 Starting Application processor initialization
0x13 SMM initialization
0x50 Enumerating PCI busses
0x51 Allocating resources to PCI bus
0x92 Detectin g the pr esence o f the keyboard
0x90 Resetting keyboard
0x94 Clearing keyboard input buffer
0x95 Keyboard Self Test
0xEB Calling Video BIOS
0x58 Resetting USB bus
0x5A Resetting PATA/SATA bus and all devices
0x92 Detectin g the pr esence o f the keyboard
0x90 Resetting keyboard
0x94 Clearing keyboard input buffer
0x5A Resetting PATA/SATA bus and all devices
0x28 Testing memory
0x90 Resetting keyboard
0x94 Clearing keyboard input buffer
0xE7 Waiting for user input
0x01 Int 0x19
0x00 Ready to boot.
®
Q965 Express Chipset
Intel
DM Octob er 2007
51 Order Num ber: 3156 64-002US
Page 52

Error Messages and Beep Codes—Intel Q965 Express Chipset
Octobe r 20 07 DM
Order Nu mb e r: 3156 64 - 00 2U S 52
Intel® Q965 Express Chipset
 Loading...