

Page 1

Intel® PRO/1000 T
IP Storage Adapter
Bringing Gigabit Ethernet to Network Storage
Quick Installation Guide
1
Page 2

Additional Information
Online User Configuration Guide
The User Configuration Guide is located on the Intel® PRO/1000 T IP
Storage Adapter CD. Use your web browser to view or print topics
from the User Configuration Guide, which contains more
comprehensive configuration and troubleshooting information.
Online Services
You can download software updates, troubleshooting tips, installation
notes, and the latest documentation from http://support.intel.com
Late-Breaking News
The Late-Breaking News document provides useful information about
adapter compatibility, as well as special installation release notes that
were not available at the time this guide was created.
Legal Disclaimers
Copyright © 2002, 2003 Intel Corporation. All rights reserved.
Intel Corporation, 5200 N.E. Elam Young Parkway, Hillsboro, OR 97124-6497
Intel Corporation assumes no responsibility for errors or omissions in this document.
Nor does Intel make any commitment to update the information contained herein.
* Other names and brands may be claimed as the property of others.
Intel is a trademark or registered trademark of Intel Corporation or its subsidiaries in the
United States and other countries.
2
Page 3

Contents
Additional Information . . . . . . . . . . . . . . . . . . . . . . . . . . . . . . . . . . . . . . . . . . . . 2
Legal Disclaimers . . . . . . . . . . . . . . . . . . . . . . . . . . . . . . . . . . . . . . . . . . . . . . . . . 2
How to Use This Guide . . . . . . . . . . . . . . . . . . . . . . . . . . . . . . . . . . . . . . . . . . . . 3
Getting Started . . . . . . . . . . . . . . . . . . . . . . . . . . . . . . . . . . . . . . . . . . . . . . . . . . . 4
System Requirements . . . . . . . . . . . . . . . . . . . . . . . . . . . . . . . . . . . . . . . . . . . . . 4
Inserting the Adapter . . . . . . . . . . . . . . . . . . . . . . . . . . . . . . . . . . . . . . . . . . . . . . 5
Installing the Software . . . . . . . . . . . . . . . . . . . . . . . . . . . . . . . . . . . . . . . . . . . . . 7
Configuring the Software . . . . . . . . . . . . . . . . . . . . . . . . . . . . . . . . . . . . . . . . . . 15
Basic Troubleshooting . . . . . . . . . . . . . . . . . . . . . . . . . . . . . . . . . . . . . . . . . . . . 20
Adapter Specifications . . . . . . . . . . . . . . . . . . . . . . . . . . . . . . . . . . . . . . . . . . . . 21
Intel Automated Customer Support . . . . . . . . . . . . . . . . . . . . . . . . . . . . . . . . . . 22
How to Use This Guide
The Intel
effective Storage Area Networks (SANs) using standard LAN/ Ethernet
infrastructure. It uses the new, open iSCSI standard to transmit SCSI
storage data over Ethernet networks, dramatically lowering the total cost of
ownership for storage networks while still offering increased reliability,
availability, scalability, and manageability of stored data.
The Intel PRO/1000 T IP Storage Adapter contains field upgradeable
firmware designed to support both past and future versions of the iSCSI
specification. To locate the most appropriate firmware for your solution,
visit the Intel website. See the Upgrading the Firmware section of the
online Intel
for information on upgrading your firmware.
This guide provides information on how to install the Intel
Storage Adapter, how to install Windows* and Linux drivers, and basic
adapter configuration information to get you started. For complete details
about using the adapter, refer to the online Intel
Adapter User Configuration Guide.
®
PRO/1000 T IP Storage Adapter allows companies to build cost-
®
PRO/1000 T IP Storage Adapter User Configuration Guide
®
PRO/1000 T IP
®
PRO/1000 T IP Storage
3
Page 4

Getting Started
To get started using the Intel
1. Insert the adapter.
2. Install the driver and software.
3. Configure the software.
4. Connect to a target.
System Requirements
Before you can install the Intel
system must meet the following configuration requirements:
• One available 32- or 64-bit bus master PCI or PCI-X slot.
• A minimum 64 MB of RAM must be available.
• Microsoft* Windows* 2000 Server Family (Service Pack 2 with hot
fixes Q302895 and Q248720 or Service Pack 3), Windows* XP
Professional, or RedHat* Linux version 7.2 (2.4.7 kernel) must be
running on your system.
NOTE:For information about the hot fixes, go to
http://support.microsoft.com and search on Q302895 or Q248720
in the knowledge base. Call Microsoft* IT Support at 1-800-9364900 and reference the hot fix numbers to receive a copy of the
driver.
®
PRO/1000 T IP Storage Adapter:
®
PRO/1000 T IP Storage Adapter, your
• Category 5, twisted pair cabling must be used when running at 100/
1000 Mbps (for best results at 1000 Mbps, use CAT 5e cabling).
• An 802.3ab-compliant gigabit Ethernet switch is recommended for
acheiving the maximum 1000 Mbps speed.
4
Page 5

Inserting the Adapter
You can insert a maximum of three adapters into your system to connect to
multiple targets and increase throughput performance. To insert the Intel
PRO/1000 T IP Storage Adapter into your computer, follow these steps:
1. If your computer is not a Hot Plug system, turn it off and unplug it
before you remove the cover. If your computer is a Hot Plug system,
see your server's documentation for information about removing the
cover.
CAUTION: Failing to power down the system and remove the
power cord BEFORE removing the cover could
physically endanger you or damage the adapter or
computer.
2. Remove the cover bracket from a 32- or 64-bit PCI or PCI-X bus
master slot.
3. In a 32-bit PCI or PCI-X slot, the end of the edge connector will be
exposed and not connected. Make sure the exposed end does not
contact any conducting part of the motherboard.
NOTE:The HBAs illustrated in the figure below are for illustration
purposes only. The actual Intel
longer and has more onboard components than those depicted in
the illustration.
®
PRO/1000 T IP Storage Adapter is
®
5
Page 6
4. Secure the adapter in the slot.
5. Repeat steps 2 to 4 for each adapter you want to install.
6. Replace the computer cover and plug in the power cord and network
cable(s).
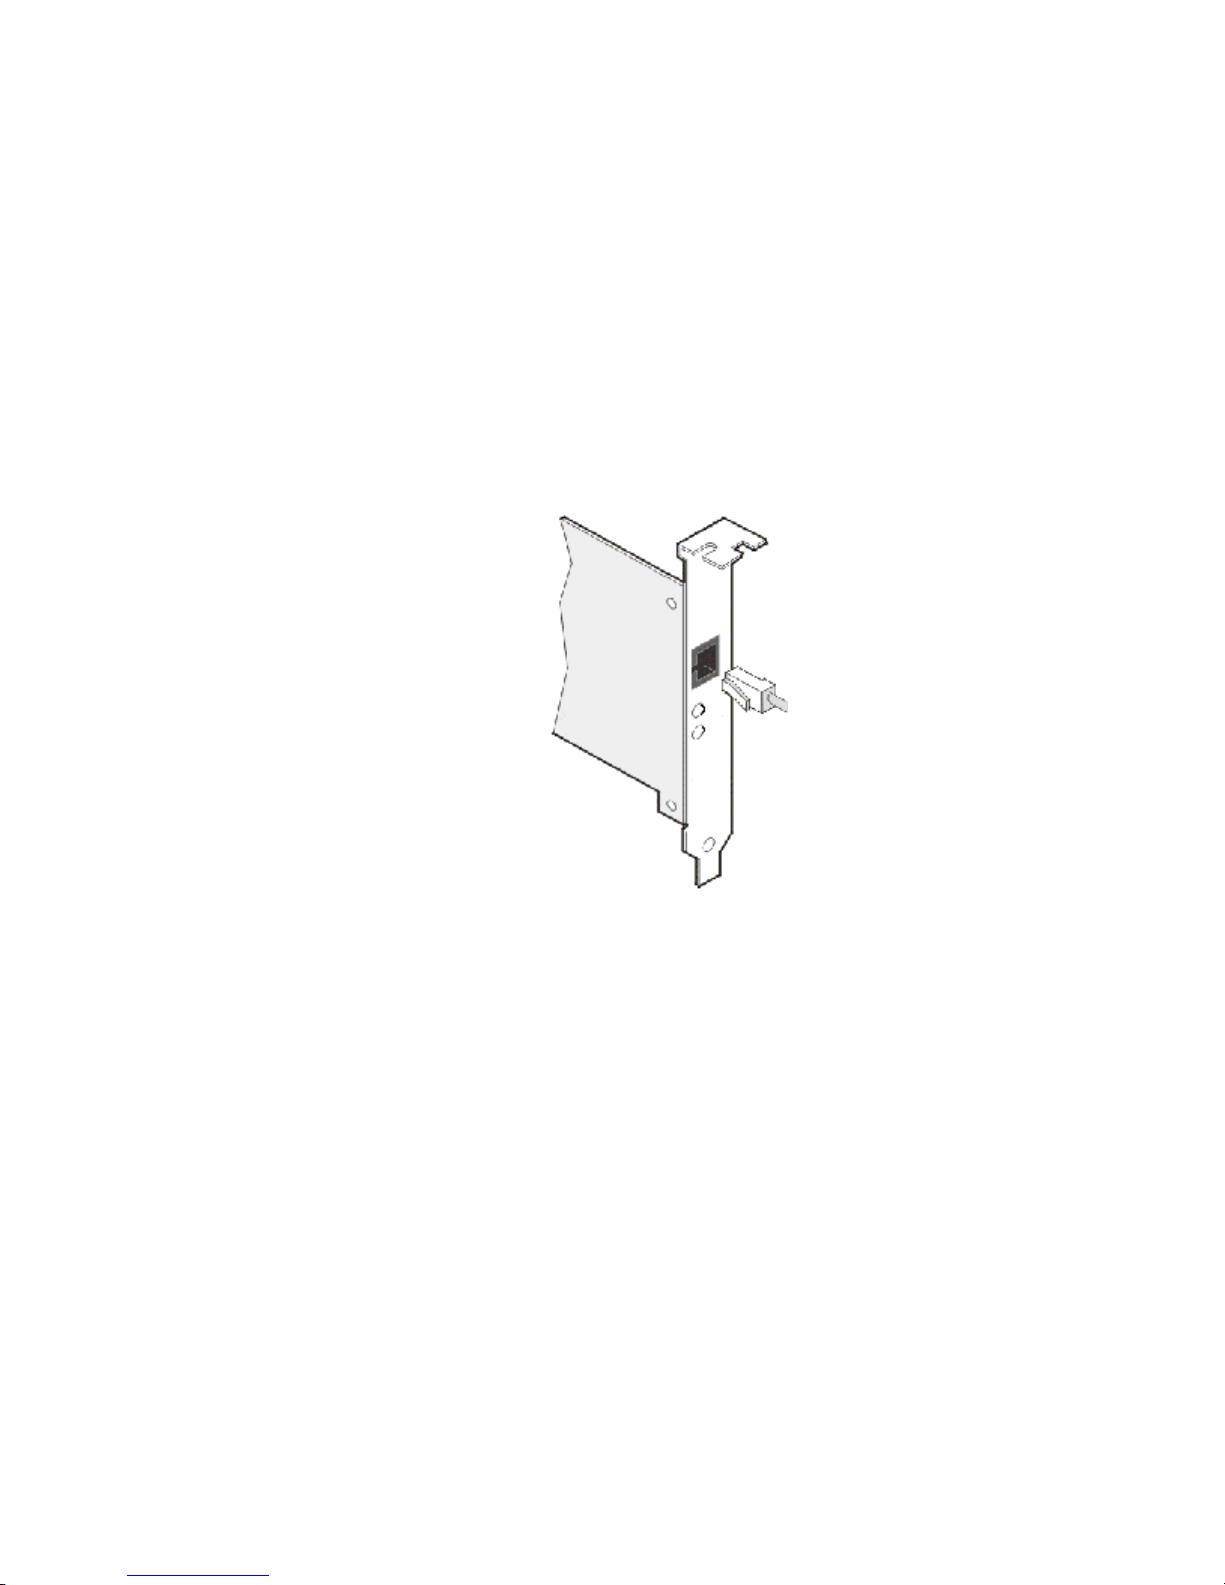
Attaching the Network Cable
To attach the Intel® PRO/1000 T IP Storage Adapter to an RJ-45
connector, insert the Category 5 twisted pair RJ-45 network cable into the
adapter connector, as shown in the figure below.
1000BASE-T or 100BASE-TX Connections
To attach the Intel® PRO/1000 T IP Storage Adapter to a 1000BASE-T or
100BASE-TX network, you must use a Category 5, twisted-pair cable (four
twisted-pair wiring). If you plan to run the adapter at 1000 Mbps, it must be
connected to a compatible 1000BASE-TX switch. For 100 Mbps, it can be
connected to a 10/100BASE-TX switch.
NOTE:Some compatible switches do not support all three speeds on a
single port. Check your switch documentation for details.
10BASE-T Connections
To attach the Intel® PRO/1000 T IP Storage Adapter to a 10BASE-T
network, use Category 3, 4, or 5 twisted-pair wiring. Residential
environments require a Category 5 cable.
Follow the steps in Installing and Updating the Driver and Application to
establish a link with your gigabit Ethernet switch.
6
Page 7
Installing the Software
You can install the software in a Microsoft* Windows* 2000, XP or
RedHat* Linux Version 7.2 environment.
Installing the Software in Windows* 2000
When you install or reinstall the Intel
driver, the control panel applet is also installed. This software allows you to
configure your adapter and targets. If you have uninstalled the driver and
want to reinstall it, you must restart your computer before following the
installation steps below. Once you have installed the Intel
Storage Adapter in your computer, connected the cable, plugged in the
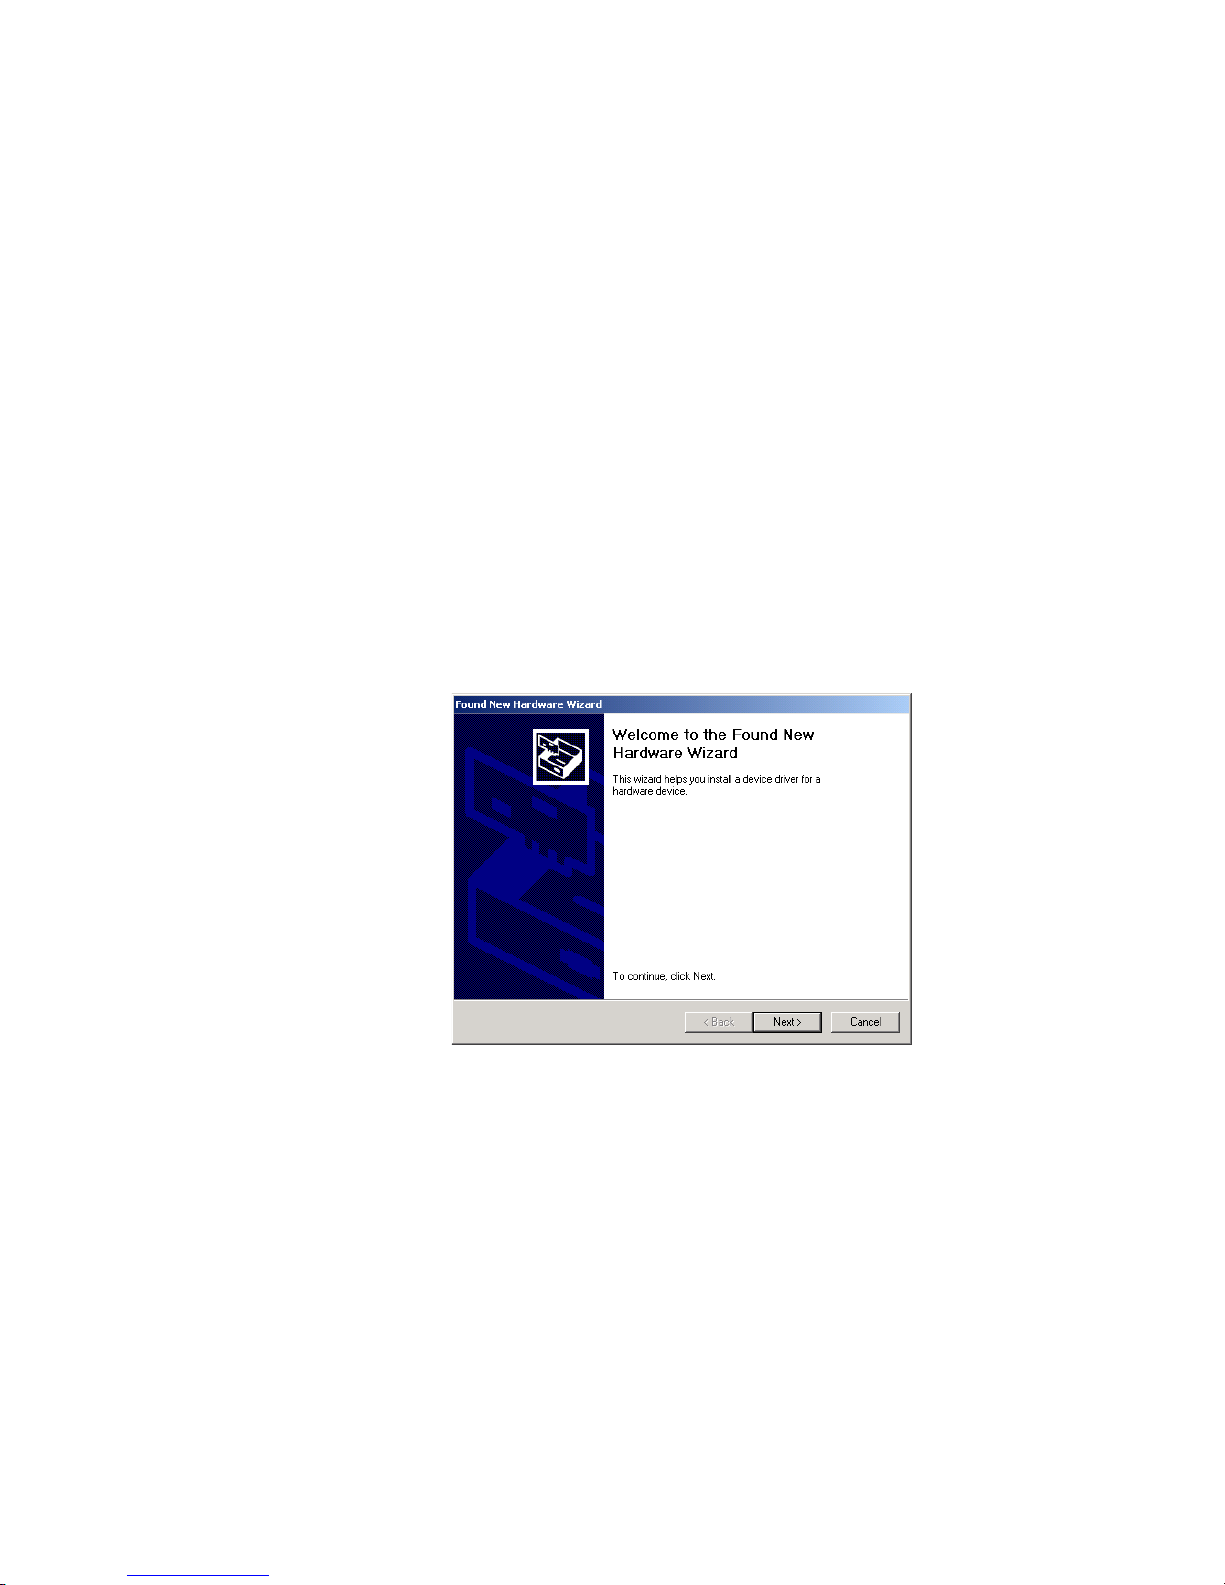
power cord, and powered on your computer, the Found New Hardware
window will appear on your screen.
To install the driver and software, follow these steps:
1. Turn on the computer with the adapter installed.
2. In the Found New Hardware Wizard window, click Next.
®
PRO/1000 T IP Storage Adapter
®
PRO/1000 T IP
7
Page 8

3. Select “Search for a suitable driver for my device” and click Next.
4. Specify the location of the is10002K.inf file, which is in the Drivers
directory on the Intel CD, insert the CD and click Next. This file
supports Windows* 2000 and XP.
8
Page 9

5. Once the wizard locates the driver, click Next to install it.
NOTE: There may be a 5-20 second delay while the driver is being
installed.
6. Click Finish.
9
Page 10

7. When the Found New Hardware Wizard appears again, click Next.
8. Select “Search for a suitable driver for my device” and click Next.
10
Page 11

9. Specify the location of the nodev.inf file, which is in the Drivers
directory on the Intel CD, and click Next.
10. Once the wizard locates the driver, click Next to install it.
11
Page 12

11. Click Finish.
Installing the Software in Windows* XP
When you install or reinstall the Intel
driver, the control panel applet is also installed. This software allows you to
configure your adapter and targets. If you have uninstalled the driver and
want to reinstall it, you must restart your computer before following the
installation steps below. Once you have installed an Intel
Storage Adapter in your computer, connected the cable, plugged in the
power cord, and powered on your computer, the Found New Hardware
window will appear on your screen. This screen will appear each time you
add another adapter to your system.
To install the driver and application, follow these steps:
1. Turn on the computer with the adapter installed.
®
PRO/1000 T IP Storage Adapter
®
PRO/1000 T IP
12
Page 13

2. In the Found New Hardware Wizard window, select Install the
Software Automatically and click Next.
3. When the Hardware Installation window appears, click Continue
Anyway.
13
Page 14

4. Wait for the installation process to complete.
NOTE: There may be a 5-20 second delay while the driver is being
installed.
5. When the Found New Hardware Wizard window appears, click
Finish.
14
Page 15

Installing the Software in Linux
To install the software in RedHat* Linux Version 7.2 using the RPM
utility, follow these steps:
1. Locate the RPM package is1000-1.1-#.i386.rpm (# represents the
RPM version number) for a single or multiple processor host.
2. Install the package:
# rpm -i [...]/RedHat72/is1000-1.1-#.i386.rpm (# represents the
RPM version number)
NOTE: The installation process will install support for a single and
multiple processor systems, but at boot-up, the SYS V script will
determine which kernel is booting and load the appropriate
module.
Configuring the Software
The Intel
Windows* (2000 or XP) or RedHat* Linux environment.
NOTE: If you already have one adapter installed and configured in your
®
PRO/1000 T IP Storage Adapter software can be used in a
system and you would like to install another adapter, remove all
the targets in PROSet before installing the new adapter.
Otherwise, PROSet indicates that both adapters are connected to
the same target and multiple connections to the same target can
occur.
Linux
NOTE: The Intel PRO/1000 T IP Storage Adapter allows you to connect to
a maximum of eight iSCSI targets at a time.
RedHat* Linux Version 7.2 configuration information is located in the
Readme.txt file in the RedHat72 directory on the Intel CD.
15
Page 16

Windows*
While configuring the software, you can press the F1 (Help) key for
information about the components of each window. At any time during
configuration, you can click Apply to apply and save the changes you have
made, OK to apply, save and exit the configuration tool, or Cancel to
cancel the changes you made since the last time you clicked Apply.
®
From the Control Panel, double-click Intel
PROSet for IP Storage.
16
NOTE:When using PROSet for the first time, you must accept the
copyright agreement and configure your SAN IP settings.
Page 17

®
3. The Intel
PROSet for IP Storage window contains five configuration
tabs. The left side of the window displays the component tree, which
is an expanded view of all the connected storage components
(adapters, targets, and routers). If you have more than one adapter
installed, each adapter is indicated in the tree and numbered as (0),
(1), (2), etc.
17
Page 18

4. Identify the Adapter. Click the Network Settings tab to enable or
disable DHCP, enter SAN IP settings (gateway is optional if the target
and initiator are in the same subnet) and create a separate initiator
name for each adapter. When you are done, click Apply to continue to
the next tab.
18
Page 19

5. Add Target. Go back to the General tab, select the adapter to which
you want to add a target and click Add Target. You can connect to a
maximum of eight targets and the adapters must connect to different
targets. Connecting multiple adapters (from the same machine or a
different machine) can result in an unwanted consequence, such as
data loss, target disconnection, system crash (Windows) or an
inability to mount the drives (Linux). A dialog box will appear that
allows you to describe where and how you want to connect to a new
target (router). Enter the new target's IP address and port. If you want
to enable CHAP security, see the Intel PRO/1000 T IP Storage
Adapter User Configuration Guide for details.
NOTE: The adapter software guarantees the ability to connect to as many
as eight targets whose names each consist of a maximum 256
characters. However, some network configurations may allow the
adapter to connect to more than eight targets.
19
Page 20

Basic Troubleshooting
If you cannot link to your switch, try the following suggestions:
• Check the LED lights on the adapter. If the LINK light is not on,
check all connections to the adapter and link partner. Make sure the
link partner is not set to match the adapter (preferably set to auto
negotiation enabled) and the driver is loaded.
• Make sure the cable is installed properly. The network cable must be
securely attached at all connections. If the cable is attached, but the
problem persists, try a different cable.
•Check the Troubleshooting section of the User Configuration Guide
for more information. If an issue continues or is not addressed here,
see the Late-breaking News document on the Intel
Storage Adapter CD or check out the Intel support Web site at
http://support.intel.com.
®
PRO/1000 T IP
20
Page 21

Adapter Specifications
CONNECTIONS
IEEE standard/network topology: 10Base-T, 100Base-T, 1000Base-T
Wiring/Connections: CAT-5, 4 pair (1000Base-T)/RJ-45
HOST BUS ADAPTER PRODUCT FEATURES
• Plug and Play Specification support
• Auto-negotiation, full duplex capable
• Power Management (Network Device Class, Power Management Reference
Specification 1.0a)
• 32 MB of external SDRAM for context memory
•4 MB Flash
• Single ported adapter
• Standard PCI form factor
• Field upgradeable firmware and software via Flash
PCI v2.2 buses supported: 64/66, 64/33, 32/66, and 32/33
NETWORK MANAGEMENT
• SNMP manageable
OPERATING SYSTEMS SUPPORT
Microsoft* Windows* 2000 Server Family (Service Pack 2 with hot fixes Q302895 and
Q248720 or Service Pack 3). Microsoft* Windows* XP Professional (32-bit). RedHat*
Linux Version 7.2 (2.4.7 kernel).
TECHNICAL FEATURES
Data rate(s) supported per port: 10/100/1000 Mbps
External Memory: 32 MB ECC SDRAM; 4 MB Flash
IEEE Support: 802.2, 802.3z, and 802.3ab
Data transfer mode: Bus-master DMA
Controller or processor: Intel® XScale™ 80200
Typical power consumption: 7.8 - 8 Watts
Data path width: 32-bit and 64-bit PCI
MAC on-board memory: 64 KB
Interrupt levels: INTA
IETF Support: iSCSI draft standard 0.6+ (visit http://www.ietf.org to download latest
standards). See Late Breaking News for instructions on downloading firmware to
support later versions of the iSCSI specification.
MAC: Intel® 82544EI
I/O Companion Chip: Intel® 80312
Operating Temperature/Humidity: 0-55 degrees C; 85% at 55 degrees C
Hardware Certifications: FCC B, CE, UL 1950, CSA 950, BSMI, VCCI Class 2
INTEL BACKING
Limited lifetime warranty; 90-day money-back guarantee (U.S./Canada only)
21
Page 22

Intel Automated Customer Support
You can reach Intel’s automated support services 24 hours a day, every day, at no charge.
The services contain the most up-to-date information about Intel products. You can access
installation instructions, troubleshooting information, and general product information.
User Configuration Guide on Your Product CD-ROM
For more information about adapter configuration or other topics, see the online User
Configuration Guide. To view the guide, insert the Intel CD in your drive and wait for the
Autorun to display. Click the User Configuration Guide button to view the guide. Note
that a web browser is required to view the guide.
Web and Internet Sites
Support: http://support.intel.com
Network Products: http://www.intel.com/network
Corporate: http://www.intel.com
Customer Support Technicians
US and Canada: 1-916-377-7000 (7:00 - 17:00 M-F PST)
Worldwide access: Intel has technical support centers worldwide. Many of the centers are
staffed by technicians who speak the local languages. For a list of all Intel support centers,
the telephone numbers, and the times they are open, visit
http://www.intel.com/support/9089.htm
Product Warranty
This product is covered by a Limited Lifetime Warranty, which is described in the online
User Configuration Guide.
Regulatory Notices
All regulatory notices are provided in the online User Configuration Guide.
Software License Agreement
Software included with this product is protected by a specific Software License
Agreement, provided in the online User Configuration Guide. By using this software you
agree to the provisions in the Software License Agreement.
22
Page 23

23
Page 24

24
 Loading...