

Page 1
Intel® Application Accelerator
RAID Edition
User’s Manual
Revision 1.1
July 2003
Page 2

INFORMATION IN THIS DOCUMENT IS PROVIDED IN CONNECTION WITH INTEL
ESTOPPEL OR OTHERWISE, TO ANY INTELLECTUAL PROPERTY RIGHTS IS GRANTED BY THIS DOCUMENT. EXCEPT AS PROVIDED IN
INTEL’S TERMS AND CONDITIONS OF SALE FOR SUCH PRODUCTS, INTEL ASSUMES NO LIABILITY WHATSOEVER, AND INTEL
DISCLAIMS ANY EXPRESS OR IMPLIED WARRANTY, RELATING TO SALE AND/OR USE OF INTEL PRODUCTS INCLUDING LIABILITY OR
WARRANTIES RELATING TO FITNESS FOR A PARTICULAR PURPOSE, MERCHANTABILITY, OR INFRINGEMENT OF ANY PATENT,
COPYRIGHT OR OTHER INTELLECTUAL PROPERTY RIGHT. Intel products are not intended for use in medical, life saving, or life sustaining
applications.
Intel may make changes to specifications and product descriptions at any time, without notice.
Designers must not rely on the absence or characteristics of any features or instructions marked "reserved" or "undefined." Intel reserves these for
future definition and shall have no responsibility whatsoever for conflicts or incompatibilities arising from future changes to them.
The Intel® Application Accelerator may contain design defects or errors known as errata which may cause the product to deviate from published
specifications. Current characterized errata are available on request.
Contact your local Intel sales office or your distributor to obtain the latest specifications and before placing your product order.
Intel and the Intel logo are trademarks or registered trademarks of Intel Corporation or its subsidiaries in the United States and other countries.
*Other names and brands may be claimed as the property of others.
Copyright © 2003, Intel Corporation
®
PRODUCTS. NO LICENSE, EXPRESS OR IMPLIED, BY
Page 3

R
Contents
Scope of This Document.....................................................................................................9
1
2 RAID Background .............................................................................................................11
3 RAID 0 (Striping)...............................................................................................................13
4 RAID 1 (Mirroring).............................................................................................................15
5 RAID Migration Feature ....................................................................................................17
6 Intel Application Accelerator RAID Edition........................................................................19
6.1 Description............................................................................................................19
6.2 Do You Need the Intel Application Accelerator RAID Edition?............................19
7 Serial ATA (SATA)............................................................................................................21
7.1 Description............................................................................................................21
7.2 Installing Serial ATA Hard Drives.........................................................................21
8 BIOS Importance / Settings ..............................................................................................23
9 Important Information on Intel Option ROM Version.........................................................25
10 Configuring BIOS for Intel RAID for Serial ATA on Intel Motherboards............................27
10.1 Creating, Deleting, and Resetting RAID Sets ......................................................27
10.2 Create RAID 0 or RAID 1 Volume........................................................................28
10.3 Delete RAID Volume ............................................................................................28
10.4 Reset RAID Data..................................................................................................28
11 Loading the Intel Application Accelerator RAID Edition Driver During Operating System
Install.................................................................................................................................29
11.1 Instructions on Creating F6 Floppy Diskette........................................................29
11.2 Installation Using F6 Method................................................................................30
12 Intel RAID Option ROM.....................................................................................................31
12.1 Description............................................................................................................31
12.2 Confirming Version of Intel RAID Option ROM Installed......................................31
12.3 Using the Intel RAID Option ROM........................................................................31
12.3.1 Creating, Deleting, and Resetting RAID Volumes................................31
12.3.2 Create RAID 0 or RAID 1 Volume ........................................................32
12.3.3 Delete RAID Volume.............................................................................37
12.3.4 Reset Disks to Non-RAID.....................................................................39
13 Installing the Intel Application Accelerator RAID Edition ..................................................41
13.1 Installation Caution...............................................................................................41
User's Manual 3
Page 4

13.2
Steps to Take Before Installing the Intel Application Accelerator RAID Edition...41
13.2.1 Resolve Conflicts in Device Manager...................................................41
13.3 Obtaining and Installing the Intel Application Accelerator RAID Edition..............41
13.3.1 Installation Steps...................................................................................42
13.3.2 Installation: Welcome Screen...............................................................43
13.3.3 Installation: License Agreement............................................................43
13.3.4 Installation: Choose Destination Location ............................................44
13.3.5 Installation: Select Program Folder ......................................................44
13.3.6 Installation: Setup Status......................................................................45
13.3.7 Installation: InstallShield* Wizard Complete.........................................46
14 Confirming the Intel Application Accelerator RAID Edition is Installed.............................47
15 Confirming Version of Intel Application Accelerator RAID Edition Installed ....................49
15.1 Using the Intel Application Accelerator RAID Edition Utility:................................49
15.2 RAID Driver File Properties:.................................................................................49
16 Issues During Installation..................................................................................................51
16.1 Symptom: Incompatible Hardware.......................................................................51
16.2 Symptom: Operating System Not Supported.......................................................51
R
17 “RAID Ready”....................................................................................................................53
17.1 “RAID Ready” Definition.......................................................................................53
17.2 “RAID Ready” System Requirements ..................................................................53
17.3 Steps on Setting Up a “RAID Ready” System......................................................53
17.4 Converting a “RAID Ready” System into RAID 0 or RAID 1 System with Migration
Feature.................................................................................................................53
17.4.1 Creating a New Partition Using Windows* Disk Management.............54
18 RAID Migration Instructions..............................................................................................55
18.1 Create RAID Volume from Existing Disk..............................................................57
18.1.1 Step 1 of 3: Select Source Disk............................................................58
18.1.2 Step 2 of 3: Select the RAID Volume Name, RAID Level, and Strip Size59
18.1.3 Strip Size Descriptions..........................................................................60
18.1.4 WARNINGS..........................................................................................60
18.1.5 Step 3 of 3: Confirm Creation of New RAID Volume............................61
18.2 Migration Process May Take Considerable Time to Complete............................61
18.3 Successful Migration ............................................................................................62
19 Uninstalling the Intel Application Accelerator RAID Edition..............................................63
19.1 Uninstall Warning .................................................................................................63
19.2 Windows* XP / Windows 2000.............................................................................63
20 Unattended Installation Under Windows* XP / Windows 2000.........................................65
21 Intel Application Accelerator RAID Edition Utility..............................................................67
21.1 Description............................................................................................................67
21.2 Create Volume Manually......................................................................................67
21.2.1 Step 1 of 2: Select the RAID Volume Name, RAID Level, and Strip Size69
21.2.2 Strip Size Descriptions..........................................................................70
21.2.3 WARNINGS..........................................................................................70
4 User's Manual
Page 5

R
21.2.4
Step 2 of 2: Confirm Creation of New RAID Volume............................71
21.3 Successful Creation .............................................................................................71
21.4 Disk and Volume Status Parameter Descriptions................................................71
21.4.1 Status Entries for Physical Disk Parameters:.......................................72
21.4.2 Status Entries for Volume Parameters: ................................................72
21.5 Generate and View a Report using the Intel Application Accelerator RAID Edition
Utility.....................................................................................................................72
21.6 Support Tab Information.......................................................................................74
22 Troubleshooting ................................................................................................................75
23 Frequently Asked Questions (FAQs)................................................................................76
Appendix A How to Identify the Intel Chipset.......................................................................................77
Appendix B Intel Chipset Software Installation Utility for Intel Chipsets ..............................................78
B.1 Description............................................................................................................78
B.2 Obtaining the Intel Chipset Software Installation Utility .......................................78
B.3 Confirming Installation of the Intel Chipset Software Installation Utility...............78
B.4 Troubleshooting....................................................................................................79
Appendix C Serial ATA.........................................................................................................................80
C.1 Description............................................................................................................80
C.2 Comparing Serial ATA versus Parallel ATA (IDE)...............................................80
C.3 System Requirements..........................................................................................81
C.4 Serial ATA Data Cable.........................................................................................81
C.5 Serial ATA Power Cable.......................................................................................82
C.6 Are a Serial ATA Data and Power Cable Needed for Serial ATA?......................82
C.7 Mixing/Matching Serial ATA Hard Drives with IDE Hard Drives..........................82
C.8 Using IDE to Serial ATA Adaptors........................................................................82
C.9 Theoretical Transfer Rates Associated with Transfer Modes..............................83
Appendix D Glossary............................................................................................................................84
User's Manual 5
Page 6

Figures
Tables
Figure 1. RAID 0 ...............................................................................................................13
Figure 2. RAID 1 ...............................................................................................................15
Table 1. Serial ATA Transfer Rates Associated With Transfer Modes ............................83
R
6 User's Manual
Page 7
R
Revision History
Revision
Number
1.0 Initial Release. March 20, 2003
1.1 Added RAID 1 and Windows* 2000 information July 3, 2003
Description Revision Date
Document Conventions
Throughout this document, symbols are used to indicate important messages to the reader. These
are marked as note, important note, caution or warning.
Note: Note and Important Note: Means reader take note. Notes can also contain helpful suggestions
or references.
Caution: Caution: This symbol means reader be careful.
Warning: Warning: Not following these instructions might render the system unusable. Certain functions
may also have consequences that you need to be aware of.
User's Manual 7
Page 8

R
This page is intentionally left blank
8 User's Manual
Page 9

Scope of This Document
R
1 Scope of This Document
This document discusses how to properly configure your system when using the Intel®
Application Accelerator RAID Edition.
The issues discussed in this guide are only relevant on systems implementing a RAID solution
and using a supported Intel chipset and supported operating system.
• Supported Intel chipsets
http://support.intel.com/support/chipsets/iaa_raid/suppchip.htm
• Supported operating system
http://support.intel.com/support/chipsets/iaa_raid/supported.htm
Please note that the Intel Application Accelerator RAID Edition does NOT support Beta or prereleased versions of any Windows* operating systems.
The majority of the issues contained in this document are related to either software configuration
or hardware integration. Intel is not responsible for the software written by third party vendors or
the implementation of Intel components in the products of third party manufacturers.
Customers should always contact the place of purchase or system/software manufacturer with
support questions about their specific hardware or software configuration.
User's Manual 9
Page 10

Scope of This Document
R
This page is intentionally left blank
10 User's Manual
Page 11

RAID Background
R
2 RAID Background
RAID (Redundant Array of Inexpensive Disks) was originally conceived at the University of
California at Berkeley in 1987 by David A. Patterson, Garth Gibson, and Randy H. Katz. The
focus of their research was to improve storage subsystem performance and reliability. As a result
of their findings, they proposed five levels of RAID (RAID 0 – RAID 5) to provide a balance of
performance and data protection. Each RAID level is designed for speed, data protection, or a
combination of both. Patterson, Gibson, and Katz published their findings in a document titled “A
Case for Redundant Arrays of Inexpensive Disks (RAID).” This document
University of California, Berkeley:
is archived at the
http://sunsite.berkeley.edu/TechRepPages/CSD-87-391
RAID was designed to improve the way computers manage and access mass storage of data by
providing an independent and redundant system of disks. Instead of writing to one Single Large
Expensive Disk (SLED), RAID writes to multiple independent disks.
User's Manual 11
Page 12

RAID Background
R
This page is intentionally left blank
12 User's Manual
Page 13
RAID 0 (Striping)
R
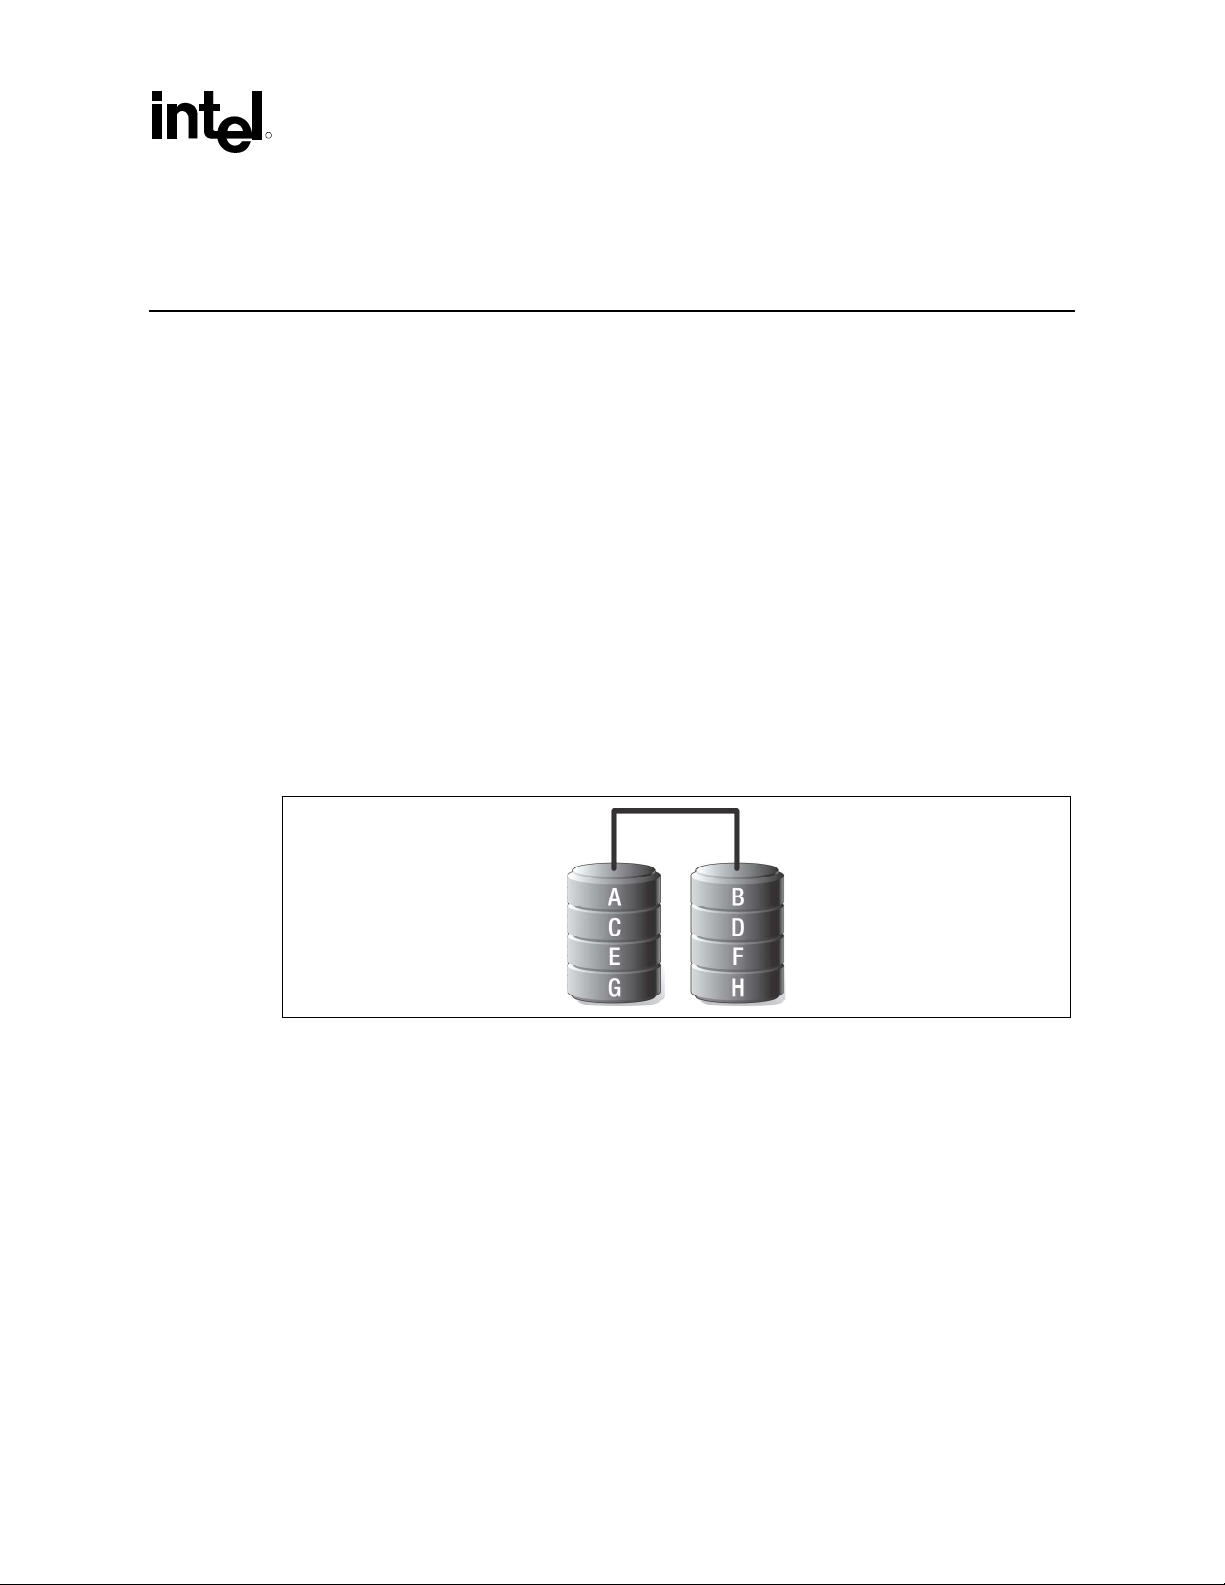
3 RAID 0 (Striping)
RAID 0 leverages the read/write capabilities of two or more hard drives working in unison to
maximize the storage performance of a computer system. Data in a RAID 0 array is arranged into
blocks that are interleaved among the disks so that reads and writes can be performed in parallel
(see below diagram). This technique, known as “striping”, is the fastest of all of the RAID levels,
especially for reading and writing large sequential files. Real world usage models where RAID 0
can be of particular benefit include loading large files into an image editing application such as
Adobe* Photoshop*, saving large movie files in a video editing application such as Adobe*
Premiere*, or creating CD or DVD images with a CD/DVD authoring package such as Roxio*
Easy CD Creator*.
The hard drives in a RAID 0 array are combined to form one volume which appears as a single
virtual drive to the operating system. For example, two 40 GB hard drives in a RAID 0 array will
appear as a single 80 GB hard drive to the operating system.
No redundancy information is stored in a RAID 0 array. This means that if one hard drive fails,
all data on both drives is lost. This lack of redundancy is also reflected by the RAID level 0,
which indicates no redundancy. RAID 0 is not recommended for use in servers or other
environments where data redundancy is a primary goal.
Figure 1. RAID 0
Minimum Disks:
Advantage:
Redundancy:
2
Highest transfer rates
None – if one disk fails all data will be lost
Application:
Typically used in desktops and workstations for maximum performance for temporary
data and high I/O rate
User's Manual 13
Page 14

RAID 0 (Striping)
R
This page is intentionally left blank
14 User's Manual
Page 15
RAID 1 (Mirroring)
R
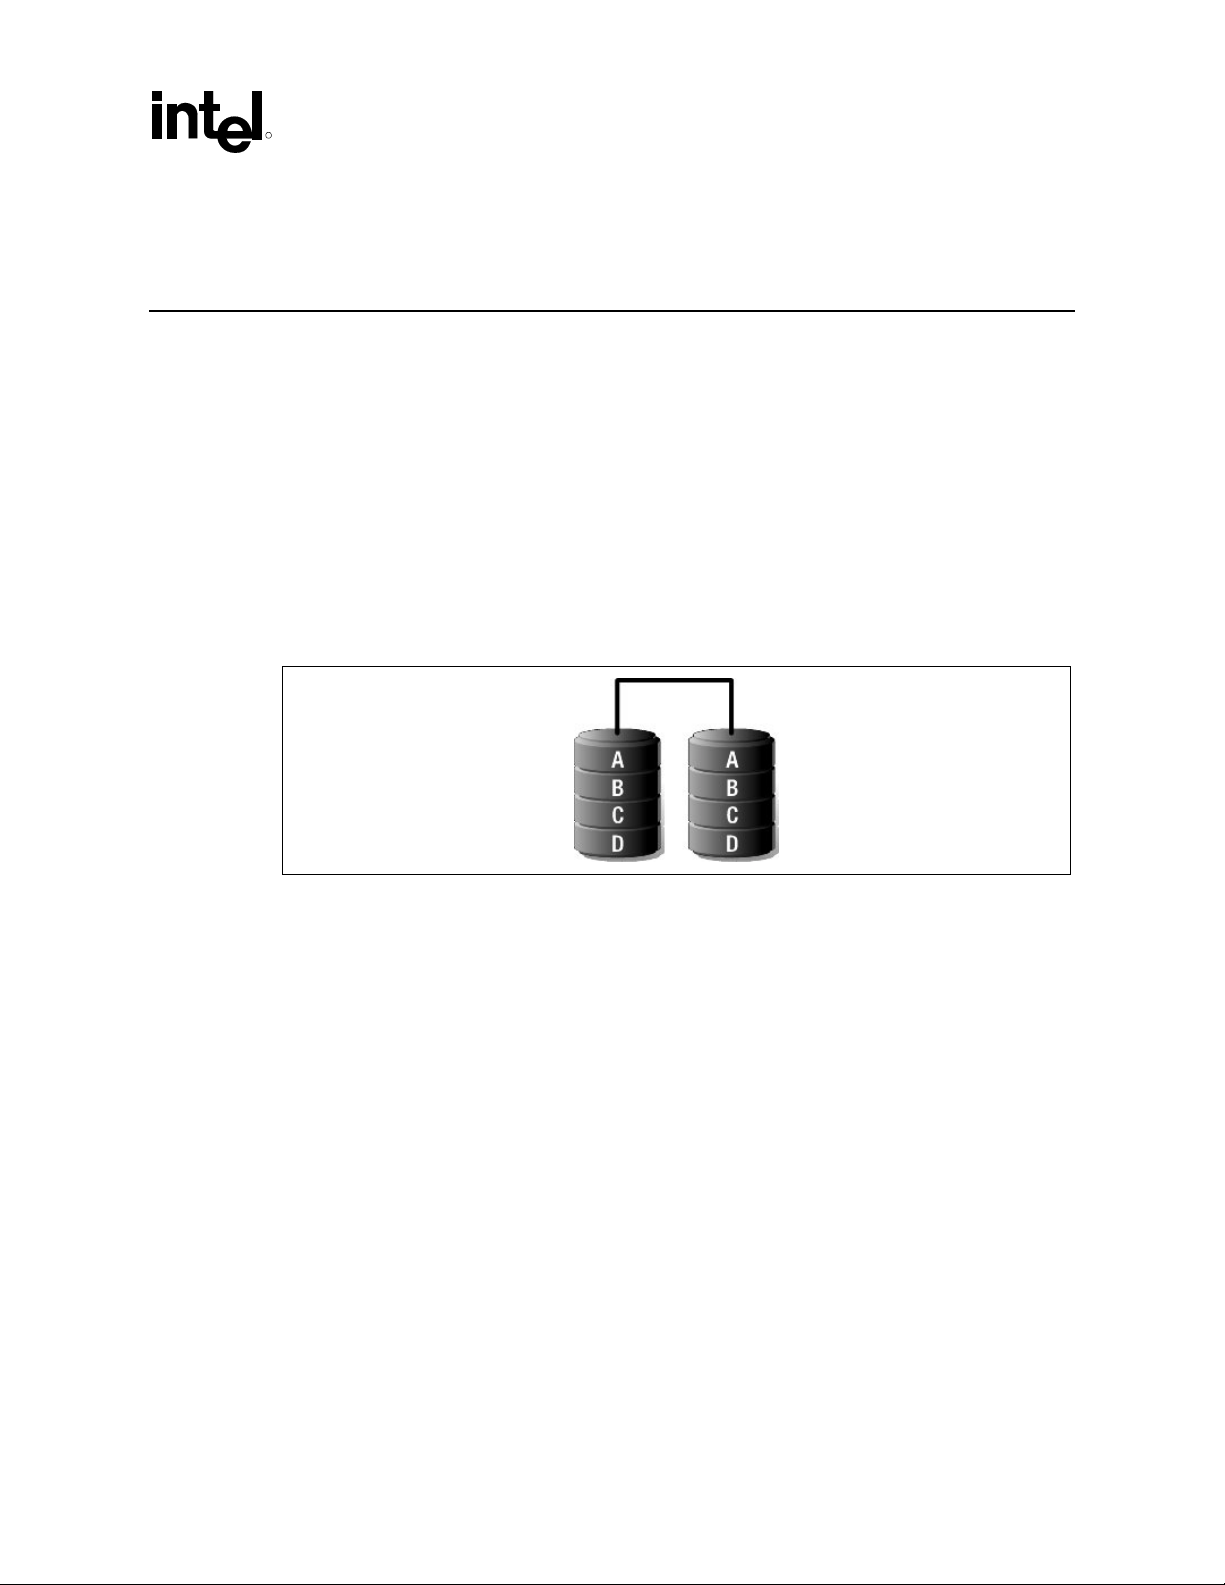
4 RAID 1 (Mirroring)
A RAID 1 array contains two hard drives where the data between the two is mirrored in real time.
Since all of the data is duplicated, the operating system treats the usable space of a RAID 1 array
as the maximum size of one hard drive in the array. For example, two 40 GB hard drives in a
RAID 1 array will appear as a single 40 GB hard drive to the operating system.
The primary benefit of RAID 1 mirroring is that it provides good data reliability in the case of a
single disk failure. When one disk drive fails, all data is immediately available on the other
without any impact to the data integrity. In the case of a disk failure, the computer system will
remain fully operational to ensure maximum productivity.
The performance of a RAID 1 array is greater than that of a single drive since data can be read
from multiple disks simultaneously, although disk writes do not realize the same benefit as is the
case with RAID 0.
Figure 2. RAID 1
Minimum Disks:
Advantage:
Redundancy:
Application:
2
100% redundancy of data. One disk may fail, but data will continue to be
accessible. A rebuild to a new disk is recommended to maintain data
redundancy.
Excellent - disk mirroring means that all data on one disk is duplicated on
another disk.
Typically used for smaller systems where capacity of one disk is sufficient
and for any application(s) requiring very high availability.
User's Manual 15
Page 16

RAID 1 (Mirroring)
R
This page is intentionally left blank
16 User's Manual
Page 17

RAID Migration Feature
R
5 RAID Migration Feature
The RAID migration feature in the Intel® Application Accelerator RAID Edition is an advanced
software technology that enables a properly configured PC, known as a “RAID Ready” system, to
be easily converted into a high-performance RAID 0 or RAID 1configuration by simply adding a
Serial ATA hard drive to the system and invoking the RAID migration process from within
Windows*.
The migration to a RAID 0 or RAID 1 configuration is performed without the traditional
requirements of an operating system re-install. All applications and data remain intact.
The migration process itself can take up to several hours depending on the size of the hard drives
being converted, but the system is still fully functional while the migration is being performed – it
is possible to conduct other activities such as surf the Web and/or run productivity applications
while the system is being migrated. The only limitation is that some disk intensive tasks may
experience slower performance during a RAID migration.
The RAID migration feature also features advanced safety algorithms to ensure that an interrupted
migration does not result in data loss or corruption. If the migration process is interrupted via a
power loss or system reset, the migration will resume from the point of it’s most recent progress
upon the next system reboot.
User's Manual 17
Page 18

RAID Migration Feature
R
This page is intentionally left blank
18 User's Manual
Page 19

Intel Application Accelerator RAID Edition
R
6 Intel Application Accelerator RAID
Edition
6.1 Description
The Intel Application Accelerator RAID Edition is the software package that enables highperformance RAID 0 arrays and redundant RAID 1 arrays in Windows* XP and Windows 2000.
The Intel Application Accelerator RAID Edition contains the following key features:
• Serial ATA RAID core driver for Windows XP and Windows 2000
• Intel Application Accelerator RAID Edition utility
• Migration Feature
6.2 Do You Need the Intel Application Accelerator RAID Edition?
The Intel Application Accelerator RAID Edition reduces the storage sub-system bottleneck,
enabling the processor and other system level hardware to be more productive and efficient. It is a
requirement in order for Intel® RAID Technology to work properly. It is not a requirement for
stand-alone Serial ATA hard drive(s) to work properly (e.g. not configured for RAID).
To use the Intel Application Accelerator RAID Edition, your system must meet ALL of the
following requirements:
• A supported Intel chipset
http://support.intel.com/support/chipsets/iaa_raid/suppchip.htm
• A supported operating system
http://support.intel.com/support/chipsets/iaa_raid/supported.htm
To take advantage of increased storage subsystem performance and overall system performance,
your system must meet the following requirement:
• A Serial ATA device (e.g. hard drive that supports Generation 1 transfers)
Warning: Serial ATA has specific requirements. Please refer to the Appendix C.3 for more information.
User's Manual 19
Page 20

Intel Application Accelerator RAID Edition
R
This page is intentionally left blank
20 User's Manual
Page 21

Serial ATA (SATA)
R
7 Serial ATA (SATA)
7.1 Description
Serial ATA (SATA) is a new storage interface designed to replace parallel ATA (e.g. IDE
technology). SATA was designed for a variety of reasons including performance headroom,
cabling issues, and voltage tolerance requirements. SATA combines software transparency, low
cost, scalability, and design flexibility. SATA has attracted widespread industry support through
the Serial ATA Working Group (www.serialata.org
Note: Please refer to Appendix A for additional information on Serial ATA hard drives.
7.2 Installing Serial ATA Hard Drives
).
Note: Please refer to Appendix A for additional information on Serial ATA hard drives.
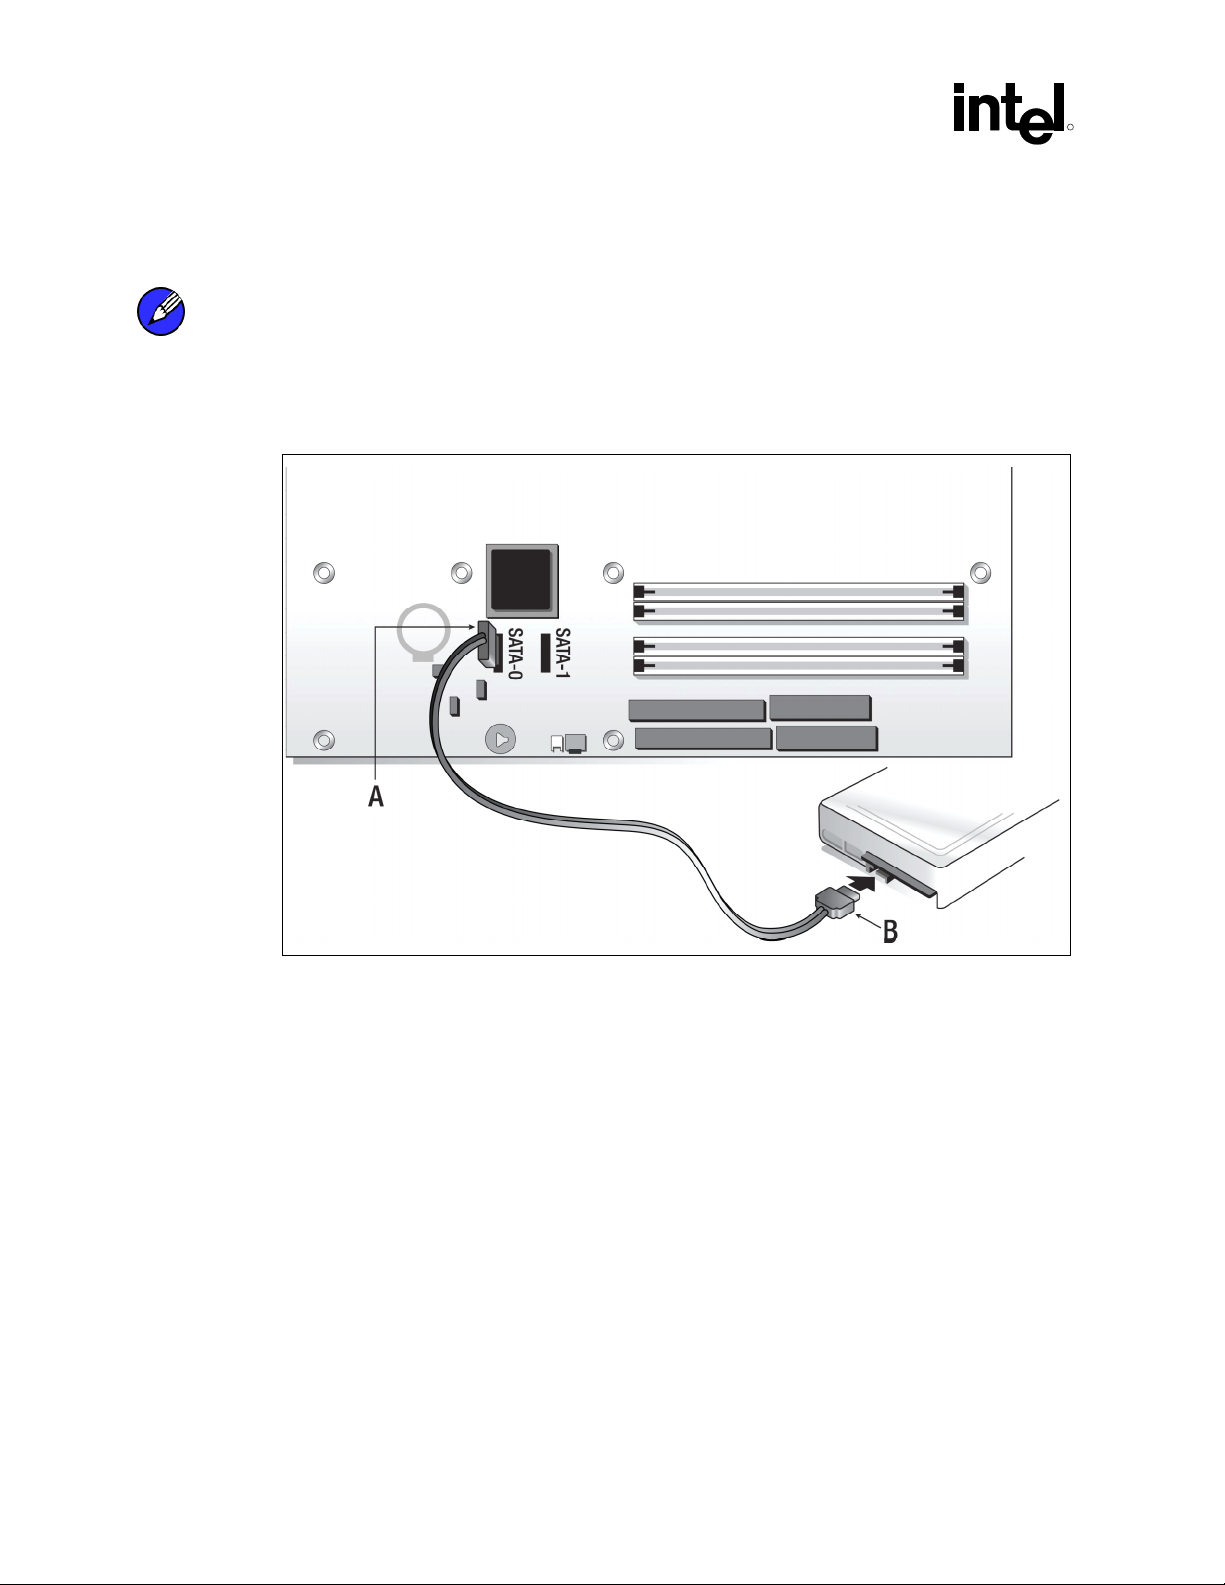
Installing Serial ATA (SATA) hard drives requires the use of a SATA data cable (7-pin, 4conductor) which supports the Serial ATA protocol and a SATA power cable. Either end of the
SATA data cable can be connected to the SATA hard drive or the connector on the motherboard.
User's Manual 21
Page 22
Serial ATA (SATA)
For correct cable installation** (refer to illustration below):
1. Attach either cable end to the connector (A) on the motherboard
2. Attach the other cable end (B) to the SATA hard drive
Note: Both the data and power SATA cables are new designs – you cannot use older 40-pin 80-
conductor IDE or regular IDE power cables with SATA hard drives.
** You should always carefully follow any instructions that come from the hard drive
manufacturer.
R
22 User's Manual
Page 23

BIOS Importance / Settings
R
8 BIOS Importance / Settings
In order to install the Intel Application Accelerator RAID Edition, it is required that the system
BIOS includes the Intel® RAID Option ROM.
It is also necessary that the system BIOS is set up correctly for the RAID controller before
installing the Intel Application Accelerator RAID Edition. Refer to the motherboard
documentation or contact the motherboard manufacturer or your place of purchase for instructions
on properly configuring the system BIOS for RAID.
If you are using an Intel motherboard with a supported Intel chipset
(see http://support.intel.com/support/chipsets/iaa_raid/suppchip.htm
to configure the BIOS for Intel® RAID for Serial ATA.
,
) Section 10 identifies how
User's Manual 23
Page 24

BIOS Importance / Settings
R
This page is intentionally left blank
24 User's Manual
Page 25

Important Information on Intel Option ROM Version
R
9 Important Information on Intel
Option ROM Version
In order to fully utilize the new features included in version 3 .5 of the Intel® Application
Accelerator RAID Edition, Intel recommends that you first upgrade your system BIOS to one that
includes version 3.5 of the Intel RAID Option ROM. You can obtain this system BIOS from your
motherboard or system manufacturer.
The Intel Application Accelerator RAID Edition needs to have the associated version of the Intel
RAID Option ROM installed on the system in order to support the entire feature set. Intel
Application Accelerator RAID Edition version 3.5 automatically checks to see if version 3.5 of
the Intel RAID Option ROM is installed. If it is not, a dialog message will appear informing you
to update your system BIOS.
If you currently have version 3.0 of the Intel Application Accelerator RAID Edition and version
3.0 of the Intel RAID Option ROM installed on your system, you can successfully upgrade to
version 3.5 of the Intel Application Accelerator RAID Edition, but you will not be able to use the
new features (e.g. RAID 1).
User's Manual 25
Page 26

Important Information on Intel Option ROM Version
This page is intentionally left blank
R
26 User's Manual
Page 27

10 Configuring BIOS for Intel RAID
for Serial ATA on Intel
Motherboards
Note: The instructions listed below are specific to motherboards manufactured by Intel with a supported
Intel chipset. Always follow the instructions that are provided with your motherboard.
** The specific BIOS settings on non-Intel manufactured motherboards may differ from the
instructions listed below. **
The SoftRAID option must be enabled in BIOS before the system can load the Intel RAID Option
ROM code for Intel RAID.
1. Enter the BIOS Setup program by pressing the <F2> key after the Power-On-Self-Test
(POST) memory test begins.
2. Select the Advanced menu, then the Drive Configuration menu.
3. Switch the Drive Mode option from Legacy to Enhanced.
4. Switch the SoftRAID option to Enabled.
5. Press <F10> to save the BIOS settings and exit the BIOS Setup program.
10.1 Creating, Deleting, and Resetting RAID Sets
Note: Please refer to Section 12 for illustration examples of the Intel RAID Option ROM windows.
The Serial ATA RAID set must be configured in the RAID Configuration utility. During the
Power-On Self Test (POST), the following message will appear for a few seconds:
Press <Ctrl-I> to enter Raid Configuration utility
After the above message appears, press the <Ctrl> and <i> keys simultaneously.
Page 28

Configuring BIOS for Intel RAID for Serial ATA on Intel Motherboards
10.2 Create RAID 0 or RAID 1 Volume
Note: Please refer to Section 12 for illustration examples of the Intel RAID Option ROM windows.
1. Select option 1 Create RAID Volume and press the <Enter> key.
2. Select the desired RAID level and press the <Enter> key.
3. Select the strip value for the RAID 0 array by scrolling through the available values by using
the <!> or <"> keys and pressing the <Enter> key.
4. The available values range from 4 KB to 128 KB in power of 2 increments. The strip value
should be chosen based on the planned drive usage. Some suggested selections are listed
below. The default selection is 128 KB.
• 16 KB – low disk usage
• 64 KB – typical disk usage
• 128 KB – performance disk usage
5. At the Create Volume prompt, press the <Enter> key to create the array. Confirm this
selection by pressing the <Y> key after the prompt.
6. Scroll to option 4 Exit and press the <Enter> key to exit the RAID Configuration utility.
Confirm the exit by pressing the <Y> key.
R
10.3 Delete RAID Volume
Note: Please refer to Section 12 for illustration examples of the Intel RAID Option ROM windows.
Warning: All data on the RAID drives will be lost.
1. Select option 2 Delete RAID Volume and press the <Enter> key to delete the RAID volume.
2. Press the <Delete> key to delete the RAID volume. Confirm the volume deletion by pressing
the <Y> key.
10.4 Reset RAID Data
Note: Please refer to Section 12 for illustration examples of the Intel RAID Option ROM windows.
Warning: All data on the RAID drives and any internal RAID structures will be lost.
1. Select option 3 Reset Disks to Non-RAID and press the <Enter> key to delete the RAID set
and remove any RAID structures from the drives.
2. Confirm the selection by pressing the <Y> key.
28 User's Manual
Page 29

Loading the Intel Application Accelerator RAID Edition Driver During
O
R
11 Loading the Intel Application
Accelerator RAID Edition Driver
During Operating System Install
1. As Windows* Setup begins, press <F6> to specify the RAID driver.
2. When queried by the installation screen, press <S> to specify an additional device.
3. Insert the floppy disk labeled Intel Application Accelerator RAID Edition Driver and press
<Enter>. (The following four files should be on this disk: IASTOR.INF, IASTOR.SYS,
IASTOR.CAT, and TXTSETUP.OEM)
4. Press <Enter> to select the Intel RAID Controller.
5. Press <Enter> to continue with Windows Setup.
11.1 Instructions on Creating F6 Floppy Diskette
To create an F6 floppy diskette that contains the files that are needed when installing the driver
via an F6 installation method, complete the following steps:
1. Download the Intel Application Accelerator RAID Edition (or use the CD shipped with your
motherboard which contains the Intel Application Accelerator RAID Edition). The Intel
Application Accelerator RAID Edition can be downloaded from the following website:
http://downloadfinder.intel.com/scripts-df/Product_Filter.asp?ProductID=961
2. The following four files need to be copied from the compressed .CAB file (which is
contained inside the Intel Application Accelerator RAID Edition .EXE package):
IASTOR.INF, IASTOR.SYS, IASTOR.CAT, and TXTSETUP.OEM.
3. To extract these files, run 'C:\SETUP.EXE -A -P C:\<path>' (as described in the ‘Advanced
Installation Instructions’ section of the README.TXT.)
4. Once these files have been extracted, copied the IASTOR.INF, IASTOR.SYS,
IASTOR.CAT, and TXTSETUP.OEM files to a floppy diskette. Note: These files should be
in the root directory of the floppy.
Note: Any spaces in the pathname or filename require quotes around the pathname or filename. The
switches do not require quotes. For example:
“C:\My Documents\setup.exe” –A –P
User's Manual 29
Page 30

Loading the Intel Application Accelerator RAID Edition Driver During Operating System Install
11.2 Installation Using F6 Method
When you start the installation of Windows* XP, you most likely will be presented with a
message stating, ‘Setup could not determine the type of one or more mass storage devices
installed in your system’. If this occurs, the instructions below document how to install the RAID
driver. To install the Intel Application Accelerator RAID Edition driver using the F6 installation
method, complete the following steps:
Note: After completing these steps and the operating system has been successfully installed, you will
still need to install the Intel Application Accelerator RAID Edition by running the typical
Setup.exe process.
1. Press F6 when prompted in the status line with the ‘Press F6 if you need to install a third
party SCSI or RAID driver’ message at the beginning of Windows XP setup (during textmode phase). Note: After pressing F6, setup will temporarily continue loading drivers an d
then you will be prompted with a screen to load support for mass storage device(s).
2. Press the ‘S’ key to ‘Specify Additional Device’
3. You will be prompted to ‘Please insert the disk labeled Manufacturer-supplied hardware
support disk into Drive A:’ Once prompted, insert the floppy disk containing the following
four files: IASTOR.INF, IASTOR.SYS, IASTOR.CAT, and TXTSETUP.OEM and press
ENTER.
R
Note: See Section 11.1 titled ‘Instructions on Creating F6 Floppy Diskette’ for instructions on how to
extract these four files from the Intel Application Accelerator RAID Edition Setup.exe file.
4. After pressing ENTER, you should be presented with a list of available SCSI Adapters; it
should list ‘Intel(R) 82801ER Serial RAID Controller’. Select this entry and press ENTER.
5. The next screen should confirm that you have selected the Intel(R) RAID controller. Press
ENTER again to continue.
6. At this point, you have successfully F6’ed in the Intel Application Accelerator RAID Edition
driver and Windows XP setup should continue. Leave the floppy disk in the floppy drive
until the system reboots itself. Windows* setup will need to copy the files from the floppy
again to the Windows installation folders. Once Windows setup has copied these four files
again, you should then remove the floppy diskette so that Windows setup can reboot as
needed.
30 User's Manual
Page 31

Intel RAID Option ROM
R
12 Intel RAID Option ROM
12.1 Description
The Intel RAID Option ROM should be integrated with the system BIOS on all motherboards
with a supported Intel chipset
http://support.intel.com/support/chipsets/iaa_raid/suppchip.htm
a PnP option ROM that provides a pre-operating system user interface for the Intel RAID
implementation and provides BIOS and DOS disk services (Int13h).
12.2 Confirming Version of Intel RAID Option ROM Installed
(see
). The Intel RAID Option ROM is
There is only one way to determine which version of the Intel RAID Option ROM has been
integrated into the system BIOS:
• Press the CTRL + i keys when you see the ‘Intel(R) RAID for Serial ATA’ status screen
appear (should appear early in system boot-up, during the Power-On Self Test (POST))
• Located in the top right corner you should see a version number in the following format:
V3.0.0.xxxx
12.3 Using the Intel RAID Option ROM
12.3.1 Creating, Deleting, and Resetting RAID Volumes
The Serial ATA RAID volume may be configured using the RAID Configuration utility stor ed
within the Intel RAID Option ROM.
During the Power-On Self Test (POST), the following message will appear for a few seconds:
Note: The ‘Drive Model’, ‘Serial #’, and ‘Size’ listed in your system can differ from the following
example.
User's Manual 31
Page 32

Intel RAID Option ROM
║
║
Intel(R) RAID for Serial ATA – RAID BIOS v3.0.0.2307
Copyright(C) 2003 Intel Corporation. All Rights Reserved.
RAID Volumes:
None defined.
Non-RAID Disks:
Port Drive Model Serial # Size Status Bootable
0 ST3120023AS 3KA0J1ZJ 111.7GB Normal Yes
1 ST3120023AS 3KA0H0M0 111.7GB Normal Yes
Press <CTRL-I> to enter Configuration Utility…
After the above message appears, press the <Ctrl> and <i> keys simultaneously to enter the RAID
Configuration Utility.
R
12.3.2 Create RAID 0 or RAID 1 Volume
Note: The following procedure should only be used with a newly-built system or if you are reinstalling
your operating system. The following procedure should not be used to migrate an existing system
to RAID 0.
After pressing the <Ctrl> and <i> keys simultaneously, the following window will appear:
Intel(R) RAID for Serial ATA - RAID Configuration Utility 0 0
Copyright(C) 2003 Intel Corporation. All Rights Reserved. v3.0.0.2307 1
╔════════════════════════════════[ MAIN MENU ]═════════════════════════════════╗
║
║ 1. Create RAID Volume ║
║ 2. Delete RAID Volume ║
║ 3. Reset Disks to Non-RAID ║
║ 4. Exit ║
║ ║
╚══════════════════════════════════════════════════════════════════════════════╝
╔════════════════════════[ DISK/VOLUME INFORMATION ]═══════════════════════════╗
║
║ RAID Volumes: ║
║ None defined. ║
║ ║
║ Non-RAID Disks: ║
║ Port Drive Model Serial # Size Status Bootable ║
║ 0 ST3120023AS 3KA0J1ZJ 111.7GB Normal Yes ║
║ 1 ST3120023AS 3KA0H0M0 111.7GB Normal Yes ║
║ ║
║ ║
║ ║
╚══════════════════════════════════════════════════════════════════════════════╝
[↑↓]-Select [ESC]-Exit [ENTER]-Select Menu 8
32 User's Manual
Page 33

Intel RAID Option ROM
║
║
║
║
║
║
║
║
║
║
R
1. Select option 1 ‘Create RAID Volume’ and press the <Enter> key and the following window
will appear:
Intel(R) RAID for Serial ATA - RAID Configuration Utility 0 8
Copyright(C) 2003 Intel Corporation. All Rights Reserved. v3.0.0.2307 1
╔════════════════════════════[ CREATE ARRAY MENU ]═════════════════════════════╗
║
║ Name: RAID_Volume1 ║
║ Strip Size: 128KB ║
║ RAID Level: RAID0(Striping) ║
║ Capacity: 223.5GB ║
║ ║
║ Create Volume ║
║
╚══════════════════════════════════════════════════════════════════════════════╝
╔════════════════════════════════════[ HELP ]══════════════════════════════════╗
║
║ ║
║ ║
║ ║
║ Enter a string between 1 and 16 characters in length that can be used ║
║ to uniquely identify the RAID volume. This name is case sensitive and ║
║ can not contain special characters. ║
║ ║
║ ║
║ ║
║ ║
╚══════════════════════════════════════════════════════════════════════════════╝
[↑↓]Change [TAB]-Next [ESC]-Previous Menu [ENTER]-Select 8
2. Specify a RAID Volume name and then press the <TAB> or <ENTER> key to advance to the
next field:
Intel(R) RAID for Serial ATA - RAID Configuration Utility 0 8
Copyright(C) 2003 Intel Corporation. All Rights Reserved. v3.0.0.2307 1
╔════════════════════════════[ CREATE ARRAY MENU ]═════════════════════════════╗
║
║ Name: RAID_Volume1
║ Strip Size: 128KB ║
║ RAID Level: RAID0(Striping) ║
║ Capacity: 223.5GB ║
║ ║
║ Create Volume ║
║
╚══════════════════════════════════════════════════════════════════════════════╝
╔════════════════════════════════════[ HELP ]══════════════════════════════════╗
║
║ ║
║ Choose the strip value best suited to your RAID usage model.
║ ║
The following are typical values. ║
║ ║
║ 16KB – Best for sequential transfers ║
║ 64KB – Good general purpose strip size ║
║ 128KB – Best performance for most desktops and workstations
║ ║
║ ║
╚══════════════════════════════════════════════════════════════════════════════╝
[↑↓]Change [TAB]-Next [ESC]-Previous Menu [ENTER]-Select 8
User's Manual 33
Page 34

Intel RAID Option ROM
║
║
║
║
║
║
║
║
3. Select the strip value for the RAID 0 or RAID 1 array by scrolling through the available
values by using the <!> or <"> keys and pressing the <Enter> key to select and advance to
the next field.
• The available values range from 4KB to 128 KB in power of 2 increments. The strip value
should be chosen based on the planned drive usage. Some suggested selections are listed
below. The default selection is 128KB.
16 KB – Best for sequential transfers
64 KB – Good general purpose strip size
128 KB – Best performance for most desktops and workstations
4. Select the RAID level by scrolling through the available values by using the <!> or <">
keys and pressing the <Enter> key to select and advance to the next field.
5. From the Strip size, press the <Tab> or <ENTER> key to advance to the ‘Create Volume’
prompt. The window will appears as follows:
Intel(R) RAID for Serial ATA - RAID Configuration Utility 0 8
Copyright(C) 2003 Intel Corporation. All Rights Reserved. v3.0.0.2307 1
╔════════════════════════════[ CREATE ARRAY MENU ]═════════════════════════════╗
║
║ Name: RAID_Volume1
║ Strip Size: 128KB ║
║ RAID Level: RAID0(Striping) ║
║ Capacity: 223.5GB ║
║ ║
║ Create Volume ║
║
╚══════════════════════════════════════════════════════════════════════════════╝
╔════════════════════════════════════[ HELP ]══════════════════════════════════╗
║
║ ║
║
║ ║
║
║ Press “ENTER” to Create the specified volume
║ ║
║
║ ║
║ ║
╚══════════════════════════════════════════════════════════════════════════════╝
[↑↓]Change [TAB]-Next [ESC]-Previous Menu [ENTER]-Select 8
R
34 User's Manual
Page 35

Intel RAID Option ROM
║
║
║
║
║
║
║
║
║
║
║
R
6. Press the <Enter> key to create the specified volume and the following prompt will appear:
Intel(R) RAID for Serial ATA - RAID Configuration Utility 0 8
Copyright(C) 2003 Intel Corporation. All Rights Reserved. v3.0.0.2307 1
╔════════════════════════════[ CREATE ARRAY MENU ]═════════════════════════════╗
║
║ Name: RAID_Volume1
║ Strip Size: 128KB ║
║ RAID Level: RAID0(Striping) ║
║ Capacity: 223.5GB ║
║ ║
║ Create Volume ║
║
║ ╔═══════════════════════════════════════════════════════════════════════╗ ║
╚═══║ ║══╝
║ Are you sure you want to create this RAID volume (Y/N) ║
╔═══║ ║══╗
║ ╚═══════════════════════════════════════════════════════════════════════╝ ║
║
║ ║
║
║ Press “ENTER” to Create the specified volume
║ ║
║
║ ║
║ ║
╚══════════════════════════════════════════════════════════════════════════════╝
[↑↓]Change [TAB]-Next [ESC]-Previous Menu [ENTER]-Select 8
7. Confirm this selection by pressing the <Y> key after the prompt. The window will be
returned to the main menu with an updated status similar to the following:
Intel(R) RAID for Serial ATA - RAID Configuration Utility 0 0
Copyright(C) 2003 Intel Corporation. All Rights Reserved. v3.0.0.2307 1
╔════════════════════════════════[ MAIN MENU ]═════════════════════════════════╗
║
║ 1. Create RAID Volume ║
║ 2. Delete RAID Volume ║
║ 3. Reset Disks to Non-RAID ║
║ 4. Exit ║
║ ║
╚══════════════════════════════════════════════════════════════════════════════╝
╔════════════════════════[ DISK/VOLUME INFORMATION ]═══════════════════════════╗
║
║ RAID Volumes: ║
║ ID Name Level Strip Size Status Bootable ║
║ 0 RAID_Volume1 RAID0(Stripe) 128KB 223.5GB Normal Yes ║
║ ├ ST3120023AS 3KA0J1ZJ Port0 111.7GB Normal ║
║ └ ST3120023AS 3KA0H0M0 Port1 111.7GB Normal
║ ║
║ Non-RAID Disks: ║
║ None defined.
║ ║
╚══════════════════════════════════════════════════════════════════════════════╝
[↑↓]-Select [ESC]-Exit [ENTER]-Select Menu 8
Note: The disk/volume information listed for your system can differ from the following example.
User's Manual 35
Page 36

Intel RAID Option ROM
║
║
║
║
8. Scroll to option 4 ‘Exit’ and press the <Enter> key to exit the RAID Configuration utility and
the following prompt will appear:
Intel(R) RAID for Serial ATA - RAID Configuration Utility 0 0
Copyright(C) 2003 Intel Corporation. All Rights Reserved. v3.0.0.2307 1
╔════════════════════════════════[ MAIN MENU ]═════════════════════════════════╗
║ 1. Create RAID Volume ║
║ 2. Delete RAID Volume ║
║ 3. Reset Disks to Non-RAID ║
║ 4. Exit ║
║ ║
║ ╔═══════════════════[ CONFIRM EXIT ]═══════════════════╗ ║
╚════════════║ ║══════════╝
║ Are you sure you want to exit? (Y/N): ║
╔════════════║ ║══════════╗
║ ╚══════════════════════════════════════════════════════╝ ║
║ RAID Volumes: ║
║ ID Name Level Strip Size Status Bootable ║
║ 0 RAID_Volume1 RAID0(Stripe) 128KB 223.5GB Normal Yes ║
║ ├ ST3120023AS 3KA0J1ZJ Port0 111.7GB Normal ║
║ └ ST3120023AS 3KA0H0M0 Port1 111.7GB Normal
║ ║
║ Non-RAID Disks: ║
║ None defined.
║ ║
╚══════════════════════════════════════════════════════════════════════════════╝
[↑↓]-Select [ESC]-Exit [ENTER]-Select Menu 8
R
║
║
9. Confirm the exit by pressing <Y> key.
36 User's Manual
Page 37

Intel RAID Option ROM
║
║
R
12.3.3 Delete RAID Volume
Warning: By performing this operation, all data on the RAID drives will be lost.
1. Select option 2 ‘Delete RAID Volume’ from the main menu window and press the <Enter>
key to select a RAID volume for deletion. The following window will appear:
Warning: If your system currently boots to RAID and you delete the RAID volume in the Intel RAID
Option ROM, your system will become unbootable.
Intel(R) RAID for Serial ATA - RAID Configuration Utility 0 0
Copyright(C) 2003 Intel Corporation. All Rights Reserved. v3.0.0.2307 1
╔════════════════════════════[ DELETE ARRAY MENU ]═════════════════════════════╗
║ ║
║ Name Level Drives Capacity Status Bootable ║
║ RAID_Volume1 RAID0(Stripe) 2 223.5GB Normal Yes ║
║ ║
║ ║
╚══════════════════════════════════════════════════════════════════════════════╝
╔═══════════════════════════════════[ HELP ]═══════════════════════════════════╗
║
║ ║
║ ║
║ ║
║ Deleting a volume will destroy the volume data on the drive(s) and ║
║ cause any member disks to become available as non-RAID disks. ║
║ ║
║ ║
║
║ WARNING: EXISTING DATA WITHIN THIS VOULME WILL BE LOST AND NON-RECOVERABLE ║
║ ║
║ ║
║ ║
╚══════════════════════════════════════════════════════════════════════════════╝
[↑↓]Select [<ESC>]-Previous Menu [<DEL>]- Delete Volume 1
2. Select the volume and press the <Delete> key to delete the RAID volume and the following
prompt will appear:
User's Manual 37
Page 38

Intel RAID Option ROM
║
Intel(R) RAID for Serial ATA - RAID Configuration Utility 0 0
Copyright(C) 2003 Intel Corporation. All Rights Reserved. v3.0.0.2307 1
╔════════════════════════════[ DELETE ARRAY MENU ]═════════════════════════════╗
║ ╔════════════════════[ VOLUME DELETE VERIFICATION ]════════════════════╗ ║
║ ║ ║ ║
║ Na║ Are you sure you want to delete this volume? ║e ║
║ RA║ ALL DATA IN THE VOLUME WILL BE LOST!! ║s ║
║ ║ ║ ║
║ ║ Are you sure you want to delete volume “RAID_Volume1”? (Y/N) ║ ║
║ ║ ║ ║
║ ╚══════════════════════════════════════════════════════════════════════╝ ║
╚══════════════════════════════════════════════════════════════════════════════╝
╔═══════════════════════════════════[ HELP ]═══════════════════════════════════╗
║
║ ║
║ ║
║ ║
║ Deleting a volume will destroy the volume data on the drive(s) and ║
║ cause any member disks to become available as non-RAID disks. ║
║ ║
║ ║
║ ║
║ WARNING: EXISTING DATA WITHIN THIS VOULME WILL BE LOST AND NON-RECOVERABLE ║
║ ║
║ ║
║ ║
╚══════════════════════════════════════════════════════════════════════════════╝
[↑↓]Select [<ESC>]-Previous Menu [<DEL>]- Delete Volume 1
R
3. Confirm the volume deletion by pressing the <Y> key.
38 User's Manual
Page 39

Intel RAID Option ROM
║
║
R
12.3.4 Reset Disks to Non-RAID
Warning: By performing this operation, all data on the RAID drives and any internal RAID structu res will be lost.
4. Select option 3 ‘Reset Disks to Non-RAID’ and press the <Enter> key to delete the RAID volume
and remove any RAID structures from the drives and the following window will appear:
Intel(R) RAID for Serial ATA - RAID Configuration Utility 0 0
Copyright(C) 2003 Intel Corporation. All Rights Reserved. v3.0.0.2307 1
╔════════════════════════════════[ MAIN MENU ]═════════════════════════════════╗
║
║ ╔════════════════════════[ RESET ALL RAID DATA ]═══════════════════════╗ ║
║ ║ ║ ║
║ ║ Resetting all RAID data will remove any internal RAID structures ║ ║
║ ║ from all RAID disks, including disks with working volumes. These ║ ║
║ ║ structures are used to maintain the RAID volumes. By removing ║ ║
║ ║ these structures, the drive will revert back to a Non-RAID disk ║ ║
║ ║ that can then be used or reallocated to a new RAID volume. ║ ║
╚══║ ║════╝
╔══║ WARNING: Selecting “Yes” will cause all data on any RAID disk ║════╗
║ ║ (RAID Volume or Other RAID Disk) to be lost. ║ ║
║ ║ ║ ║
║ ║ Are you sure you want to reset all RAID data (Y/N): ║ ║
║ ║ ║le ║
║ ╚══════════════════════════════════════════════════════════════════════╝ ║
║ └ ST3120023AS 3KA0H0M0 Port1 111.7GB Normal
║ ║
║ Non-RAID Disks: ║
║ None defined. ║
║ ║
╚══════════════════════════════════════════════════════════════════════════════╝
[↑↓]-Select [ESC]-Exit [ENTER]-Select Menu 8
Note: Possible reasons to ‘Reset Disks to Non-RAID’ could include issues such as incompatible RAID
configurations or a failed volume or failed disk.
2. Confirm the selection by pressing the <Y> key.
User's Manual 39
Page 40

Intel RAID Option ROM
R
This page is intentionally left blank
40 User's Manual
Page 41

Installing the Intel Application Accelerator RAID Edition
R
13 Installing the Intel Application
Accelerator RAID Edition
13.1 Installation Caution
Caution: The Intel Application Accelerator RAID Edition driver may be used to operate the hard drive
from which the system is booting or a hard drive that contains important data. For this reason, you
cannot remove or un-install this driver from the system after installation; however, you will have
the ability to un-install all other non-driver components.
The following non-driver components can be un-installed:
• Intel Application Accelerator RAID Edition Utility
• Help Documentation
• Start Menu Shortcuts
• System Tray Icon Service
• RAID Monitor Service
13.2 Steps to Take Before Installing the Intel Application Accelerator RAID Edition
13.2.1 Resolve Conflicts in Device Manager
Before installing the Intel Application Accelerator RAID Edition, there should be NO conflicts
(e.g. yellow exclamation points or red X’s) in Device Manager under Hard Disk Controllers.
Device Manager can be accessed by going to: Start Button / Settings / Control Panel / System /
Device Manager. Often, installing the Intel® Chipset Software Installation Utility will resolve
conflicts where the operating system does not properly recognize the Intel device.
Please refer to Appendix A for additional information on the Intel Chipset Software Installation
Utility.
13.3 Obtaining and Installing the Intel Application Accelerator RAID Edition
The Intel Application Accelerator RAID Edition is most likely supplied on a CD-ROM that was
included with your motherboard or system.
User's Manual 41
Page 42

Installing the Intel Application Accelerator RAID Edition
If needed, the Intel Application Accelerator RAID Edition can also be downloaded from the
following Intel website: http://support.intel.com/support/go/iaa/tti_r.htm
R
The Intel Application Accelerator RAID Edition is available for supported operating systems
(see http://support.intel.com/support/chipsets/iaa_raid/supported.htm
) in both English
(iaarxx_enu.exe) and multi-language (iaarxx_multi.exe) versions. An included README.TXT
file covers topics such as system requirements, basic installation instructions, and advanced
installation instructions.
A Release Notes document is located at the following website:
http://appsr.intel.com/scripts-df/Product_Filter.asp?ProductID=961
A Known Compatibility Issues document is located at the following website:
http://support.intel.com/support/chipsets/iaa_raid/compat.htm
After the Intel Application Accelerator RAID Edition has been downloaded from the Intel website
to a known location on your hard drive, you need to run the file iaarxx_enu.exe (English version)
or iaarxx_multi.exe (multi-language). Running the file can be done by double-clicking on the file
name. The installation program should launch after you double-click on the file name. Click on
the “Next” button at the Welcome screen. Read the license agreement and click on the “Yes”
button to accept the license terms and continue. Click on the “Next” button to install the driver in
the default folder location. Click on the “Next” button to create the default Program Folder. The
driver files will now be installed. When finished installing, select the “Yes” button for the reboot
option and click on the “Finish" button to restart your computer. The Intel Application
Accelerator RAID Edition should now be installed.
Note: The instructions above assume that the Intel RAID Option ROM and BIOS have been configured
correctly and the RAID driver has been installed using the F6 installation method (see Section
11.2 titled ‘Installation Using F6 Method’ for additional information).
13.3.1 Installation Steps
After clicking on the .EXE file, installation will begin and the following screen will temporarily
appear:
42 User's Manual
Page 43

Installing the Intel Application Accelerator RAID Edition
R
13.3.2 Installation: Welcome Screen
Click on the ‘Next’ button after the following welcome window appears:
13.3.3 Installation: License Agreement
Carefully read through the license agreement in the following window and if you accept all the
terms, click on the ‘Yes’ button:
User's Manual 43
Page 44

Installing the Intel Application Accelerator RAID Edition
13.3.4 Installation: Choose Destination Location
Select the folder in the following window where you would like Setup to install the files and then
click on the ‘Next’ button:
R
13.3.5 Installation: Select Program Folder
Select a program folder in the following window where you would like Setup to add the program
icons:
44 User's Manual
Page 45

Installing the Intel Application Accelerator RAID Edition
R
13.3.6 Installation: Setup Status
The status of the Intel Application Accelerator RAID Edition Setup will then appear in the
following window:
User's Manual 45
Page 46

Installing the Intel Application Accelerator RAID Edition
13.3.7 Installation: InstallShield* Wizard Complete
Once installation is complete, the following window will appear:
R
46 User's Manual
Page 47

Confirming the Intel Application Accelerator RAID Edition is Installed
R
14 Confirming the Intel Application
Accelerator RAID Edition is
Installed
To confirm that the Intel Application Accelerator RAID Edition has been installed, complete the
following steps:
• Click on Start Button / All Programs
• Find the ‘Intel Application Accelerator RAID Edition’ program group
• Select the ‘Intel Application Accelerator’ shortcut
• The Intel Application Accelerator RAID Edition utility should be shown
If installation was done via have-disk, F6, or unattended installation methods, you can confirm
that the Intel Application Accelerator RAID Edition has been loaded by completing the following
steps:
For Windows* XP or Windows 2000
Note: The following instructions assume classic mode:
• Click on Start Button / Settings / Control Panel
• Double-click on the ‘System’ icon
• Select the 'Hardware' tab
• Select 'Device Manager' button
• Expand the 'SCSI and RAID Controllers' entry
• Right-click on the ‘Intel(R) 82801ER SATA RAID Controller’
• Select the 'Driver' tab
• Select th e 'Driver Details' button
• 'iaStor.sys' should be displayed in the window as the following image illustrates:
User's Manual 47
Page 48

Confirming the Intel Application Accelerator RAID Edition is Installed
R
This page is intentionally left blank
48 User's Manual
Page 49

Confirming Version of Intel Application Accelerator RAID Edition Inst
a
R
15 Confirming Version of Intel
Application Accelerator RAID
Edition Installed
There are two different ways to determine which version of the Intel Application Accelerator
RAID Edition is installed:
• Use the Intel Application Accelerator RAID Edition utility
• Locate the RAID driver (iaStor.sys) itself and view the file properties.
15.1 Using the Intel Application Accelerator RAID Edition Utility:
• Run the Intel Application Accelerator RAID Edition utility from the following Start Menu
path:
Start # All Programs # Intel Application Accelerator RAID Edition# Intel
Application Accelerator
• Click the ‘Device Information’ Tab
• ·Single left click the ‘Intel(R) 82801ER SATA RAID Controller’ item in the Devices tree
• Then look for a parameter in the Parameters list box titled ‘Driver Version’. This should have
a version number in the following format:
3.0.0.xxxx
15.2 RAID Driver File Properties:
• Lo cate the file “iaStor.sys” within the following path:
<System Root>\Windows\System32\Drivers
• Right click on “iaStor.sys” and select ‘Properties’
• Select the ‘Version’ tab
• Located at the top of this tab’s view should be a parameter call “File version”. Next to it is
the RAID Driver version. It should have a version number in the following format:
3.0.0.xxxx
User's Manual 49
Page 50

Confirming Version of Intel Application Accelerator RAID Edition Installed
R
This page is intentionally left blank
50 User's Manual
Page 51

Issues During Installation
R
16 Issues During Installation
16.1 Symptom: Incompatible Hardware
The following error message occurs during installation:
Resolution: This issue is resolved by installing the Intel Application Accelerator RAID Edition on
a system with a supported Intel chipset
(see http://support.intel.com/support/chipsets/iaa_raid/suppchip.htm
.
).
16.2 Symptom: Operating System Not Supported
The following error message occurs during installation:
Resolution: This issue is resolved by installing the Intel Application Accelerator RAID Edition on
a system with a supported Intel chipset
(see http://support.intel.com/support/chipsets/iaa_raid/suppchip.htm
.
)
Note: Note For Windows* XP and Windows 2000 Users: In order to successfully complete installation
of the Intel Application Accelerator RAID Edition with Windows* XP or Windows 2000, the
user must be logged on with Administrator rights.
User's Manual 51
Page 52

Issues During Installation
R
This page is intentionally left blank
52 User's Manual
Page 53

“RAID Ready”
R
17 “RAID Ready”
17.1 “RAID Ready” Definition
A "RAID Ready" system is a specific system configuration that enables a seamless migration
from a single non-RAID disk drive to a dual disk drive RAID 0 or RAID 1 array.
17.2 “RAID Ready” System Requirements
In order for a system to be considered “RAID Ready”, it must meet all of the following
requirements:
1. System with a supported Intel chipset (currently a chipset with an Intel® 82801ER I/O
Controller Hub) and one Serial ATA (SATA) hard drive
2. Motherboard BIOS that includes the Intel RAID Option ROM
3. Intel Application Accelerator RAID Edition
4. RAID Controller enabled in the BIOS
17.3 Steps on Setting Up a “RAID Ready” System
In order to set up a “RAID Ready” system, complete the following steps:
Note: The system must meet all the “RAID Ready” system requirements specified in Section 17.2.
1. Intel Application Accelerator RAID Edition driver is F6’d (during operating system
installation, you will be prompted to ‘Press F6 if you need to install a third party SCSI or
RAID driver’) or pre-installed on SATA Hard Drive (configured as Non-RAID Disk – also
known as RAID Ready Mode)
2. Intel Application Accelerator RAID Edition driver is installed from within operating system
to add Start Menu links and Intel Application Accelerator RAID Edition utility
17.4 Converting a “RAID Ready” System into RAID 0 or
RAID 1 System with Migration Feature
Note: The steps listed in this section assume that the operating system has been installed on an existing
Serial ATA hard drive and the required driver was installed during the operating system setup.
To turn a RAID Ready system into a RAID System, complete the following steps:
1. Physically add one Serial ATA hard drive in the system
2. Boot to Windows*, install the Intel Application Accelerator RAID Edition
3. Open the Intel Application Accelerator RAID Edition utility (Start/All Programs/Intel
Application Accelerator RAID Edition/Intel Application Accelerator)
User's Manual 53
Page 54

“RAID Ready”
Note: To ensure that non-Windows* partitions are kept intact, the migration to RAID 0 does not utilize
4. Create a RAID 0 or RAID 1 volume via the Intel Application Accelerator RAID Edition
utility and perform a ‘Create from Existing Disk’ migration (right-mouse click on ‘RAID
Volumes’ or select option under ‘RAID’ file menu)
5. When migration is complete, Reboot
6. Optional: Use 3rd party application or Windows* to create and format a new data partition on
unused space, if any (see Note below)
the extra space made available by adding the second hard drive. To take advantage of the extra
hard drive space you will need to do one of the following:
1. Create a new partition using Windows Disk Management (See Section 17.4.1 for
instructions)
or
5. Extend the partition to fill the rest of the available space. Windows does not natively include
tools to do this, but there are 3rd party software utilities to accomplish this such as
PartitionMagic* or Partition Commander*.
R
17.4.1 Creating a New Partition Using Windows* Disk Management
To create a new partition using Windows* Disk Management, complete the following steps:
Complete one of the following Step 1 tasks, then proceed with the remaining steps:
1a. Right-Click 'My Computer', select 'Manage'. In the Computer Management program window,
left-click 'Disk Management' in the program tree on the left (located under ‘Storage’
subsection).
or
1b Within the Control Panel (Start/Control Panel), double-click 'Administrative Tools'. In the
window that appears, double-click 'Computer Management'. In the Computer Management
program window, left-click 'Disk Management' in the program tree on the left (located under
‘Storage’ subsection).
2. Maximize the Computer Management program window for easier viewing.
3. In the Computer Management program window, you should see your RAID Volume
represented as a physical disk. Notice that the RAID Volume size is the size of the two Serial
ATA disks combined. At this point, you should see the partitions within the RAID Volume
that were originally on the single disk you used as your so urce. After the partitions, you
should see a gray area labeled 'Free Space'. This area will have to be partitioned and
formatted before it may be used.
54 User's Manual
Page 55

RAID Migration Instructions
R
18 RAID Migration Instructions
The Intel Application Accelerator RAID Edition offers the flexibility to upgrade from a single
Serial ATA (SATA) hard drive to a two drive RAID 0 or RAID 1 configuration when an
additional SATA hard drive is added to the system. This process will create a new RAID volume
from an existing disk. However, several important steps must be followed at the time the system
is first configured in order to take advantage of RAID when upgrading to a second SATA hard
drive:
1. BIOS must be configured for RAID before installing Windows* XP on the single SATA hard
drive. Refer to Section 8 and 10 to properly configure the BIOS.
2. Install the Intel Application Accelerator RAID Edition during Windows Setup. Refer to
Section 11 for instructions on installing the driver during Windows Setup.
3. Install the Intel Application Accelerator RAID Edition after the operating system is installed.
See Section 13.3 for where the Intel Application Accelerator RAID Edition can be
downloaded.
To create a volume from an existing disk, complete the following steps:
Warning: A ‘Create from Existing Disk’ operation will delete all existing data from the added disk and the
data cannot be recovered. It’s critical to backup all important data on the added disk before
proceeding. However, during the migration process, the data on the source disk is preserved.
User's Manual 55
Page 56

RAID Migration Instructions
After the Intel Application Accelerator RAID Edition has been successfully installed and the
system has rebooted, click on the Intel Application Accelerator shortcut link and the following
window will appear:
Note: The ‘Physical Disks’ listed in your system can differ from the following illustration.
R
56 User's Manual
Page 57

RAID Migration Instructions
R
18.1 Create RAID Volume from Existing Disk
To create a RAID volume from an existing disk, right-mouse click on ‘RAID Volumes’ and select
‘Create From Existing Disk’ to create a new RAID volume as illustrated below:
Note: Note: Creating a RAID volume from an existing disk can also be accomplished by clicking on the
‘RAID’ file menu, and then arrow down and click on 'Create Volume from Existing Disk'.
User's Manual 57
Page 58

RAID Migration Instructions
18.1.1 Step 1 of 3: Select Source Disk
For Step 1, select the source disk that you wish to use and then click ‘Next’:
Warning: It is very important to note which disk is the source disk (the one containing all of the information
to be migrated) and which one is the target disk. On a RAID Ready system, this can be
determined by making a note during POST of which port (e.g. Port 0 or Port 1) the single disk is
attached to. You can also use the Intel Application Accelerator RAID Edition utility before the
second disk is installed to verify the Port and serial number of the drive that contains all the data.
R
58 User's Manual
Page 59

RAID Migration Instructions
R
18.1.2 Step 2 of 3: Select the RAID Volume Name, RAID Level, and Strip Size
For Step 2, select the RAID volume name, RAID level, and strip size and then click ‘Next’:
RAID Volume Name:
A desired RAID volume name needs to be typed in where the ‘RAID_Volume1’ text currently
appears above. The RAID volume name has a maximum limit of 16 characters. The RAID
volume name must also be in English alphanumeric ASCII characters.
RAID Level:
Select the desired RAID level:
RAID 0 (Performance) – A volume optimized for performance will allow you to access your data
more quickly.
RAID 1 (Redundancy) – A volume optimized for data redundancy will provide you with a realtime duplicate copy of your data. Note: Only half of the available volume space will be available
for data storage.
Strip Sizes:
Select the desired strip size setting. As indicated, the optimal setting is 128KB. Selecting any
other option may result in performance degradation. Even though 128KB is the recommended
setting for most users, you should choose the strip size value which is best suited to your specific
RAID usage model. Additional details on the three most typical strip size settings are listed in
Section 18.1.3 titled ‘Strip Size Descriptions’.
User's Manual 59
Page 60

RAID Migration Instructions
18.1.3 Strip Size Descriptions
Strip Size Settings Descriptions
4KB For specialized usage models requiring 4KB strips
8KB For specialized usage models requiring 8KB strips
16KB Best for sequential transfers
32KB Good for sequential transfers
64KB Good general purpose strip size
128KB Best performance for most desktops and workstations
18.1.4 WARNINGS
Carefully read the next two dialog boxes that appear and decide if you wish to continue. Please
note that once you have selected ‘Migrate’ on Step 3 of 3, the Intel Application Accelerator RAID
Edition will have claimed the disks to be used in creating a new volume and this operation cannot
be undone. It is critical that you backup all important data before selecting ‘Yes’ to these dialog
boxes:
R
60 User's Manual
Page 61

RAID Migration Instructions
R
18.1.5 Step 3 of 3: Confirm Creation of New RAID Volume
For step 3, confirm the creation of the new RAID volume and then click ‘Migrate’:
18.2 Migration Process May Take Considerable Time to Complete
The migration process may take up to two hours to complete depending on the size of the disks
being used and the strip size selected. A dialog window will appear stating that the migration
process may take considerable time to complete and you must click ‘Yes’ in order to start the
migration. While you can still continue using your computer during the migration process, once
the migration process starts, it cannot be stopped. If the migration process gets interrupted and
your system is rebooted for any reason, it will pick up the migration process where it left off. You
will be provided with an estimated completion time once the migration process starts as illustrated
in the following example:
User's Manual 61
Page 62

RAID Migration Instructions
Note: The time remaining for your system can differ from the following example.
18.3 Successful Migration
If the migration process was completed successfully, the following dialog window will appear:
R
Note: You must reboot your system in order to use the full capacity of the new volume.
62 User's Manual
Page 63

Uninstalling the Intel Application Accelerator RAID Edition
R
19 Uninstalling the Intel Application
Accelerator RAID Edition
19.1 Uninstall Warning
Warning: CRITICAL WARNING: Removing the Intel Application Accelerator RAID Edition from a
system that has been configured as RAID will DELETE ALL EXISTING DATA from the RAIDcontrolled hard drive(s) and the data cannot be recovered. It is critical that you backup all
important data before proceeding.
Uninstalling the Intel Application Accelerator would render all data on any existing RAID
Volumes inaccessible and therefore it cannot be automatically uninstalled. It is recommended that
any RAID volume be deleted before disabling the Intel 82801ER SATA RAID Controller.
Disabling the Intel 82801ER SATA RAID Controller would re-enable the SATA controller and
the operating system would no longer use the Intel Application Accelerator RAID Edition driver.
For instructions on how to manually uninstall the Intel Application Accelerator RAID Edition,
please refer to Section 19.2 titled ‘Windows* XP / Windows 2000’.
19.2 Windows* XP / Windows 2000
To manually uninstall the Intel Application RAID Edition from your system, complete the
following steps:
Note: Important Note: All the data on the RAID-controlled hard drive(s) will be DELETED and will
not be accessible after completing these steps. Backup all important data before proceeding.
1. Reboot the system
2. Depending on your system configuration, complete one of the following set of tasks:
If System has Intel RAID Option ROM Installed:
a. Enter the Intel RAID Option ROM Setup by pressing the 'Ctrl' and 'i' (CTRL + i) keys
at the appropriate time during boot-up. (Note: If your system does not appear to have
Intel RAID Option ROM installed, skip to step '2d' below)
b. Once you have entered the Intel RAID Option ROM Setup, select menu option #3 to
'Reset disks to non-RAID'.
c. Exit the Intel Option ROM Setup
or
User's Manual 63
Page 64

Uninstalling the Intel Application Accelerator RAID Edition
If System Does Not Have Intel RAID Option ROM Installed:
d. Enter the system BIOS Setup (usually done by pressing a key such as 'F2' or 'Delete'
during boot-up)
e. Change the IDE configuration for the RAID-controlled hard drive(s) from 'RAID' to
'IDE'.
3. Delete any partitions on the hard drives that were previously connected to the RAID
controller
4. Reinstall the operating system
Note: If you experience any difficulties making these changes to the system BIOS, please contact the
motherboard manufacturer or your place of purchase for assistance.
R
64 User's Manual
Page 65

Unattended Installation Under Windows* XP / Windows 2000
R
20 Unattended Installation Under
Windows* XP / Windows 2000
To install the Intel Application Accelerator RAID Edition as outlined in the Microsoft* document
"Deployment Guide Automating Windows NT Setup," use the supplied TXTSETUP.OEM file
included in the application package and insert the lin es below into the UNATTEND.TXT file.
This method is available for Windows* XP. For Windows XP, the IASTOR.INF, IASTOR.SYS,
IASTOR.CAT, and TXTSETUP.OEM files need to first be extracted from the compressed .CAB
file. To extract these files, run 'C:\SETUP.EXE -A -P C:\<path>' as described in the ‘Advanced
Installation Instructions’ section of the README.TXT.)
Windows* XP / Windows 2000:
// Insert the lines below into the UNATTEND.TXT file
[MassStorageDrivers]
"Intel(R) 82801ER SATA RAID Controller" = OEM
[OEMBootFiles]
iaStor.inf
iaStor.sys
iaStor.cat
Txtsetup.oem
Place iaStor.inf, iaStor.sys, iaStor.cat, and Txtsetup.oem in the following folder:
<SystemRoot>:\i386\$OEM$\Textmode
User's Manual 65
Page 66

Unattended Installation Under Windows* XP / Windows 2000
R
This page is intentionally left blank
66 User's Manual
Page 67

Intel Application Accelerator RAID Edition Utility
R
21 Intel Application Accelerator RAID
Edition Utility
21.1 Description
The Intel Application Accelerator RAID Edition utility is a Windows*-based application that
provides management capabilities and detailed status information for storage devices and RAID
arrays.
21.2 Create Volume Manually
The Intel Application Accelerator RAID Edition offers the ability to create a RAID volume
manually. This option should be used if you are using a third bootable device such as an IDE or
SCSI hard drive – in addition to using two Serial ATA hard drives. One benefit of using a third
bootable device and creating a RAID volume manually is that the operating system is not located
on the RAID volume. Should something happen to the RAID volume, the operating system
should not be impacted.
Note: The ‘Create Volume Manually’ option is not selectable unless a third bootable device (such as an
IDE or SCSI hard drive) is installed in the system – in addition to using two Serial ATA hard
drives.
To manually create a RAID volume, right-mouse click on ‘RAID Volumes’ and select ‘Create
Manually’ to create a new RAID volume as illustrated below:
User's Manual 67
Page 68

Intel Application Accelerator RAID Edition Utility
R
Note: Manually creating a RAID volume can also be accomplished by clicking on the ‘RAID’ file
menu, and then arrow down and click on 'Create Volume Manually'.
68 User's Manual
Page 69

Intel Application Accelerator RAID Edition Utility
R
21.2.1 Step 1 of 2: Select the RAID Volume Name, RAID Level, and Strip Size
For Step 1, select the RAID volume name, RAID level, and strip size and then click ‘Next’:
RAID Volume Name:
A desired RAID volume name needs to be typed in where the ‘RAID_Volume1’ text currently
appears above. The RAID volume name has a maximum limit of 16 characters. The RAID
volume name must also be in English alphanumeric ASCII characters.
RAID Level:
Select the desired RAID level:
RAID 0 (Performance) – A volume optimized for performance will allow you to access your data
more quickly.
RAID 1 (Redundancy) – A volume optimized for data redundancy will provide you with a realtime duplicate copy of your data. Note: Only half of the available volume space will be available
for data storage.
Strip Sizes:
Select the desired strip size setting. As indicated, the optimal setting is 128KB. Selecting any
other option may result in performance degradation. Even though 128KB is the recommended
setting for most users, you should choose the strip size value which is best suited to your specific
RAID usage model. Additional details on the three most typical strip size settings are listed in
Section 21.2.2 titled ‘Strip Size Descriptions’.
User's Manual 69
Page 70

Intel Application Accelerator RAID Edition Utility
21.2.2 Strip Size Descriptions
Strip Size Settings Descriptions
4KB For specialized usage models requiring 4KB strips
8KB For specialized usage models requiring 8KB strips
16KB Best for sequential transfers
32KB Good for sequential transfers
64KB Good general purpose strip size
128KB Best performance for most desktops and workstations
21.2.3 WARNINGS
Warning: Carefully read the next two dialog boxes that appear and decide if you wish to continue. Please
note that once you have selected ‘Yes’ on the following two dialog boxes, the Intel Application
Accelerator RAID Edition will have claimed the disks to be used in creating a new volume and
this operation cannot be undone. It is critical that you backup all important data before selecting
‘Yes’ to these dialog boxes:
R
70 User's Manual
Page 71

Intel Application Accelerator RAID Edition Utility
R
21.2.4 Step 2 of 2: Confirm Creation of New RAID Volume
For Step 2, confirm the creation of the new RAID volume and then click ‘Create’:
21.3 Successful Creation
If the manual volume creation process was completed successfully, the following dialog window
will appear:
21.4 Disk and Volume Status Parameter Descriptions
The Intel Application Accelerator RAID Edition utility displays a wide variety of information
including the status of the physical disk parameters and the volume parameters. The status of the
physical disk parameters indicates the health of the disk while the status of the volume parameters
indicates the health of the RAID volume. Listed below are descriptions on the different disk and
volume parameters that could appear:
User's Manual 71
Page 72

Intel Application Accelerator RAID Edition Utility
21.4.1 Status Entries for Physical Disk Parameters:
R
Status
Indicates the health of the disk
Normal Disk is present and functioning as expected
Error Occurred Disk has exceeded its unrecoverable threshold.
Disk will continue to be accessed if it’s a member
of a RAID 0 volume.
SMART Event Disk has exceeded its recoverable error
threshold and is at risk of failure.
Missing Disk is not present.
Incompatible Version Disk has RAID meta-data on it but its version is
incompatible with the current version of RAID
software. Updated version might be needed in
order to resolve
21.4.2 Status Entries for Volume Parameters:
Status
Indicates the health of the RAID volume
Normal Volume data is fully accessible to host
Failed One or more disks are missing or have failed,
and the volume will complete all I/O requests
with a failing status.
Migrating A RAID volume topology (RAID level, strip size,
capacity, etc.) is changing
21.5 Generate and View a Report using the Intel Application Accelerator RAID Edition Utility
The Intel Application Accelerator RAID Edition utility allows you to generate and view a report.
Everything that appears for each device in your system (except for the Serial #'s), can be
generated into a report. This information can be very helpful if you need assistance from Intel
Customer Support.
To generate and view a report, simply arrow up and click on 'File' (located at the top left of the
window), arrow down to ‘Report’ and then over to the right and click on 'View' as illustrated in
the following example:
72 User's Manual
Page 73

Intel Application Accelerator RAID Edition Utility
R
Selecting ‘View’ option:
The report will be generated and you will automatically be taken to the ‘Rep ort’ tab where you
can view all the system information.
Selecting ‘Save’ option:
The report can be saved to a location on your hard drive and then viewed with a text viewer such
as Notepad* or WordPad*.
User's Manual 73
Page 74

Intel Application Accelerator RAID Edition Utility
21.6 Support Tab Information
The ‘Support’ tab contains links to different Intel Customer Support websites if you would like to
obtain information on any of the following topics related to the Intel Application Accelerator
RAID Edition:
• Top Technical Issues
• Knowledge Base
• Intel Application Accelerator RAID Edition Downloads
The following illustration shows an example of the ‘Support’ tab:
R
74 User's Manual
Page 75

Troubleshooting
R
22 Troubleshooting
Please refer to the following Intel Application Accelerator RAID Edition website for
troubleshooting information:
http://support.intel.com/support/chipsets/iaa_raid/index.htm
User's Manual 75
Page 76

Frequently Asked Questions (FAQs)
23 Frequently Asked Questions
(FAQs)
Please refer to the following Intel Application Accelerator RAID Edition website for Frequently
Asked Questions (FAQs):
R
http://support.intel.com/support/chipsets/iaa_raid/index.htm
76 User's Manual
Page 77

How to Identify the Intel Chipset
R
Appendix A How to Identify the Intel
Chipset
If you are unsure which Intel chipset is located in your computer, first check the documentation
that came with the computer for this information. If this is not successful, the Intel® Chipset
Identification Utility provides an easy way to identify the specific Intel chipset that is located on
your motherboard. The Intel Chipset Identification Utility can be downloaded from the following
Intel website:
http://support.intel.com/support/chipsets/inf/chipsetid.htm
If Windows* has properly identified your Intel chipset, you should be able to look at Device
Manager in Windows to identify your Intel chipset:
http://support.intel.com/support/chipsets/deviceman.htm
Note: If the above options do not provide the necessary information, a qualified professional may be
able to assist you in determining the chipset included in your system. A qualified professional
should be able to properly identify the chipset while taking all necessary precautions to safeguard
your system. (If you choose to take your system to a qualified professional, you will be
responsible for all associated costs).
Note: Important Note
The section below is for qualified and trained professionals only. Please do not follow the
instructions listed below unless you are a qualified and trained professional. Only qualified and
trained professionals should open a computer system.
Note: Some system manufacturers may void your warranty if you open the case. Check with the
manufacturer if you have any concerns about this before proceeding.
Note: Important Note: Please do not follow the instructions listed below or attempt to open a computer
system unless you are a qualified and trained professional.
Qualified and trained professionals shall take all necessary precautions to avoid damage to all
computer systems, such as but not limited to disconnecting the power before opening the case,
using proper electrostatic discharge (ESD) precautions (including ground straps, gloves, ESD
mats), having suitable facilities and proper tools and training.
Identifying the Intel chipset components located in your computer can usually be done by looking
at the motherboard for the chipset markings. Chipsets are comprised of multiple components and
the website listed below shows the combinations that make up the various Intel® 800 series of
chipsets.
Note: Intel strongly recommends that you do not try removing any heatsink attached to your chipset (if
present) in order to view the chipset markings.
Chipset Photo Examples
User's Manual 77
(see http://support.intel.com/support/chipsets/inf/identify.htm)
Page 78

Intel Chipset Software Installation Utility for Intel Chipsets
Appendix B Intel Chipset Software
Installation Utility for Intel Chipsets
B.1 Description
The Intel Chipset Software Installation Utility (formerly referred to as Intel INF Installation
Utility) for Intel chipsets was developed for updating certain versions of Windows. This utility
allows the operating system to correctly identify the Intel chipset components and properly
configure the system. The Intel Chipset Software Installation Utility installs specific Windows
INF files. The INF files inform the operating system about how to properly configure the chipset
for specific functionality, such as AGP, USB, Core PCI, and ISA PnP services.
For more details about the specific INF files that are updated, please refer to the README.TXT
file that is included with the Intel Chipset Software Installation Utility for Intel chip sets.
R
Note: It is important that your Intel chipset is properly configured prior to installing the Intel
Application Accelerator RAID Edition. If the Intel Chipset Software Installation Utility is needed,
it should always be installed prior to installing the Intel Application Accelerator RAID Edition.
F6 Installation Note: If you plan on installing the Intel Application Accelerator RAID Edition
using the F6 installation method (Section 11.2), you will not be able to install the Intel Chipset
Software Installation Utility first.
B.2 Obtaining the Intel Chipset Software Installation
Utility
The Intel Chipset Software Installation Utility for Intel chipsets can be downloaded from the
following Intel web site:
http://downloadfinder2.intel.com/scripts-df/Product_Filter.asp?ProductID=816
B.3 Confirming Installation of the Intel Chipset
Software Installation Utility
To confirm that the Intel Chipset Software Installation Utility in installed, please refer to the
instructions listed on the following Intel website:
http://support.intel.com/support/chipsets/inf/confirm.htm
78 User's Manual
Page 79

Intel Chipset Software Installation Utility for Intel Chipsets
R
B.4 Troubleshooting
After installing the Intel Chipset Software Installation Utility for Intel chipsets, certain symptoms
may be seen depending on the system configuration. Please refer to the following Intel Chipset
Software Installation Utility website for troubleshooting information:
http://support.intel.com/support/chipsets/inf/
User's Manual 79
Page 80

Serial ATA
Appendix C Serial ATA
C.1 Description
Serial ATA (SATA) is defined as the primary inside-the-box storage connection only, with no
outside-the-box implementation. It is a storage device-centric technology and does not support
other peripherals, such as cameras, scanners, or printers.
The Serial ATA 1.0 specification outlines the following benefits:
• Performance Headroom: SATA provides higher performance than equivalent ATA with
performance scaling from 150MB/sec at introduction to 300MB/sec for the second
generation, and ultimately forecasted to reach 600MB/sec during its anticipated 10-year
roadmap.
R
• Software Transparency with Legacy Parallel ATA: This enables a relatively easy transition to
the new technology.
• Lo w Cost: SATA is cost-competitive with equivalent Parallel ATA solutions, including hosts,
devices, and cabling in volume quantities.
C.2 Comparing Serial ATA versus Parallel ATA (IDE)
The table below compares Serial ATA (SATA) versus Parallel ATA (IDE):
Serial ATA (SATA) Parallel ATA (IDE)
Theoretical Transfer Rate
(over life of SATA)
Transfer Mode Generation 1 Transfer Modes PIO – UDMA-6
Data Cable 7-pin SATA Data Cable 40-pin, 80-conductor IDE
Max Data Cable Length 1 meter (39 inches) Max Data Cable Length
Power Cable SATA Power Cable Power Cable IDE Power Cable
Power Consumed 250 mV Power Consumed 5 V
The following illustrations show examples of SATA and IDE data cables:
150/300/600
MB/sec (forecast only)
Theoretical Transfer Rate 133MB/sec
80 User's Manual
Page 81

Serial ATA
R
C.3 System Requirements
To use Serial ATA (SATA), your system must meet ALL of the following requirements:
• SATA co mpatible lo gic either on the motherboard or on a Serial ATA adapter card
• SATA co mpatible BIOS
• SATA-aware device driver for the operating system
• Generation 1-compatible SATA device such as a hard drive
• A SATA data cab le
• A SATA power cable
C.4 Serial ATA Data Cable
Serial ATA (SATA) data cables are 7-pin cables. Either end of the SATA data cable can be
connected to the SATA hard drive or the connector on the motherboard. SATA data cables can be
up to 1 meter (39 inches) in length. The following illustration shows an example of a SATA data
cable:
User's Manual 81
Page 82

Serial ATA
C.5 Serial ATA Power Cable
Serial ATA power cables are usually 4 or 5-pin cables with 15-pin connectors. SATA power
cables currently use an IDE/ATAPI to SATA power adaptor. One end of the SATA power cable
is a typical 4-pin IDE/ATAPI power connector (which gets connected to an unused power cable
from the power supply) and the other end (15-pin connector) gets connected to the SATA hard
drive. The following illustration shows an example of a SATA power cable:
R
C.6 Are a Serial ATA Data and Power Cable Needed for
Serial ATA?
In order to take advantage of Serial ATA (SATA), SATA data and power cables are required.
These SATA cables have a new design configuration; you cannot use older 40-pin, 80-conductor
IDE or regular IDE power cables with SATA hard drives as they physically do not fit the SATA
devices.
C.7 Mixing/Matching Serial ATA Hard Drives with IDE
Hard Drives
If your motherboard has a supported Intel chipset and provides both IDE and Serial ATA
connections, you can use both Serial ATA and IDE hard drives in the system. Note that Serial
ATA hard drives use different data and power cables than IDE devices. In order to use both IDE
and Serial ATA hard drives in a RAID configuration, please refer to Section 21 . 2 titled ‘Create
Volume Manually’ for additional information.
C.8 Using IDE to Serial ATA Adaptors
Using IDE to Serial ATA adaptors (also referred to as “Serial ATA converter” or “device side
dongle”) to connect IDE hard drives to Serial ATA ports is not recommended. Intel recommends
that you only connect Serial ATA hard drives to Serial ATA ports. IDE to Serial ATA Adapters
are not recommended for use with Intel RAID Technology as these devices have not been
validated for use in Intel platforms. Intel does not provide support for configurations using IDE to
Serial ATA Adapters.
82 User's Manual
Page 83

Serial ATA
R
C.9 Theoretical Transfer Rates Associated with
Transfer Modes
The table below lists different transfer modes Serial ATA (SATA) devices support along with the
theoretical transfer rate. Please refer to the documentation that was bundled with your device or
contact the hardware manufacturer for more information about your specific device.
Note: This table contains theoretical transfer rates of SATA transfer modes supported by the Intel
82801ER I/O Controller Hub. Your actual transfer rates can vary from the information contained
in this table. In order to take advantage of Serial ATA, your system must meet specific
requirements. Please refer to Appendix C.3 for more information.
Table 1. Serial ATA Transfer Rates Associated With Transfer Modes
Mode Theoretical Transfer Rate (MB/s)
Generation 1 150MB/s
Note: Refer to the Glossary (Appendix D) for a definition of the terms ‘theoretical transfer rate’,
‘sustained transfer rate’, and ‘burst transfer rate’.
User's Manual 83
Page 84

Glossary
Appendix D Glossary
48-bit LBA Technology used with hard drives larger than 137GB
Array Roaming Ability to move a complete RAID array from one computer system to another
computer system and preserve the RAID configuration information and data
on that RAID array.
BIOS Basic Input/Output System
Block size Same term as ‘Strip size’: Grouping of data on a single physical disk within a
RAID Volume
Burst transfer rate Maximum burst rate of the drive. These short transfers usually account for a
small percentage of total transfer requests, mostly from the integrated
controller cache or buffer.
Create From Existing Disk Feature in the Intel Application Accelerator RAID Edition which allows
flexibility to upgrade from a single Serial ATA (SATA) hard drive to a two drive
RAID 0 configuration when an additional SATA hard drive is added to the
system without loss of data.
Disks Physical disks attached to a RAID controller
IDE Integrated Drive Electronics
IDE to Serial ATA Adaptor Also referred to as “Serial ATA converter” or “device side dongle.” Connects
IDE hard drive to Serial ATA port
ICH5R Intel 82801ER I/O Controller Hub
Intel® Option ROM Standard PnP option ROM that provides a pre-operating system user interface
for the Intel RAID implementation. Also allows boot order to be selected from
within the BIOSes setup utility.
Port0 Serial ATA port (connector) on a motherboard identified as Port0
Port1 Serial ATA port (connector) on a motherboard identified as Port1
POST Power-On Self Test
RAID Redundant Array of Independent Disks
RAID 0 Data striping Array. RAID 0 stripes the data across all the drives but doesn’t
utilize parity. This RAID level is designed for speed and is the fastest of the
RAID levels but provides the least protection.
RAID 1 Mirrored Disk Array. RAID 1 requires that each primary data disk have a
mirrored disk. The contents of the primary disk and the mirror disk are
identical. RAID 1 provides the best data protection but is slower than RAID
level 0. Note: Intel Application Accelerator RAID Edition version 3.0 does not
support RAID 1.
RAID Array A group of physical disk drives managed by either hardware, software, or a
combination of both
RAID Ready Term used to describe a system that an end-user can turn into a RAID system
by simply adding a second Serial ATA hard drive and invoking the migration
feature
R
84 User's Manual
Page 85

Glossary
R
RAID Volume A block of capacity, allocated from a RAID Array and arranged into a RAID
topology. The operating system sees a RAID Volume as a physical disk.
SCSI Small Computer System Interface
Serial ATA (SATA) New storage interface designed to replace parallel ATA (e.g. IDE technology).
SATA was designed for a variety reasons, including performance headroom,
cabling issues, and voltage tolerance requirements.
Strip Grouping of data on a single physical disk within a RAID Volume
Stripe The sum of all strips in a horizontal axis across physical disks within a RAID
Volume
Sustained transfer rate Rate at which the drive can transfer data sequentially from multiple tracks and
cylinders on the disk (closer to real-world file transfers)
Theoretical transfer rate Actual speed that the drive can read bits from the surface of the platter or
write bits to the surface of the platter (can be used to compare drives against
one another)
User's Manual 85
 Loading...