

Page 1
INSTALLING
THE
INBOARDTM
3861PC
- PERSONAL COMPUTER
NHANCEMENT
-===
===:Ji
1
inter
Page 2
REGISTRA TION CARD FOR
INBOAR[}rM
3861PC
-
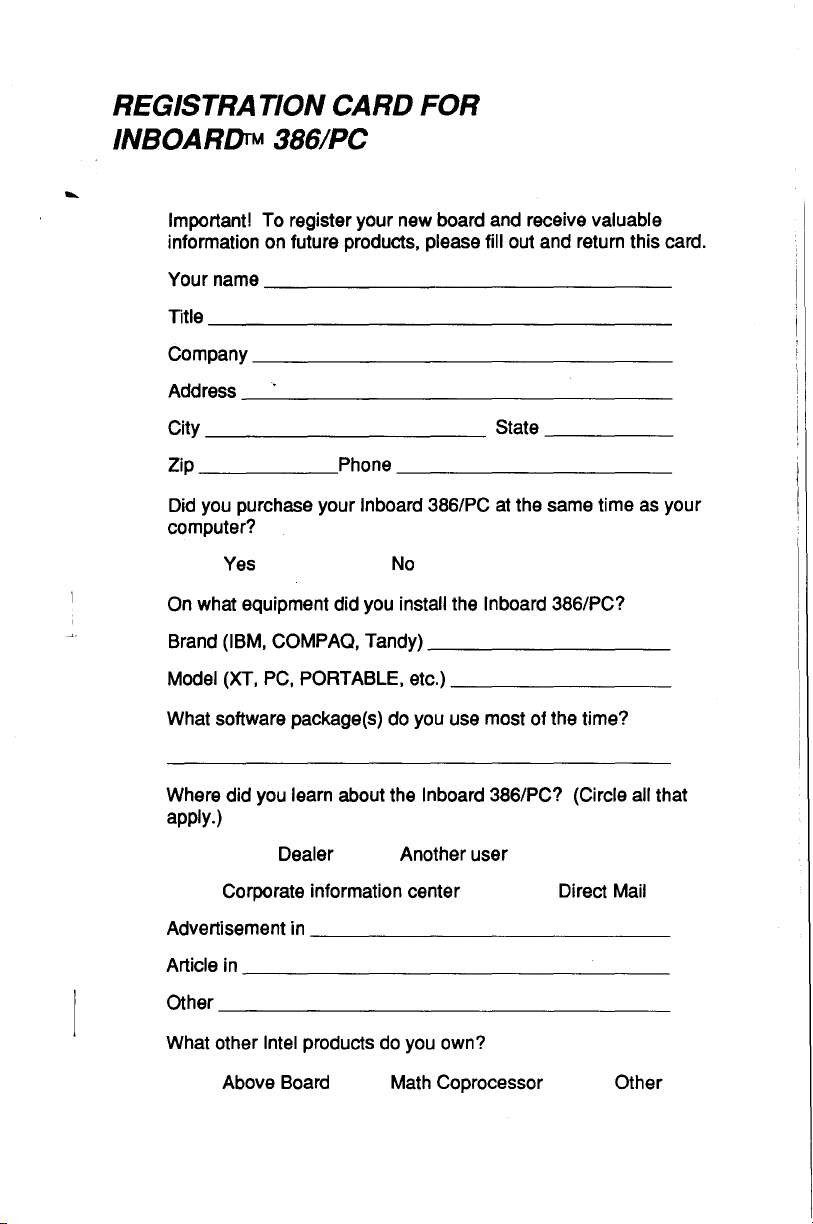
Important! To register your new board and receive valuable
information on future products, please fill out and return this card.
Yourname
Title
Company
Address
City
Zip
_____
Did you purchase your
computer?
On what equipment did you install the Inboard 386/PC?
Brand
Model (XT, PC, PORTABLE, etc.)
What software package(s) do you use most
_________________________
__________________________
_________________________
__________________________
___________
Phone
________________
Inboard 386/PC at the same time as
Yes
(IBM, COMPAQ, Tandy)
No
_________
_______
State
_______
of
the time?
__
_
___
_
__
_
your
_
_
Where did you
apply.)
Corporate information center Direct Mail
Advertisement in
Article in
Other
____________________________
What other Intel products do you own?
Above Board Math Coprocessor
learn about the Inboard 386/PC? (Circle all that
Dealer
_____________________
_________________________
Another
user
_
_
___
Other
Page 3

POSTAGE
INTHE
UNITED STATES
IF MAILED
NECESSARY
NO
I
II
MAIL
REPLY
11
..
,,1.1
1.1.
••
1
••
1.1
••
11.1
••
1.1.1
••
11
...
1
•••
1
..
11.1
97124-6497
BE PAID BY ADDRESSEE
BUSINESS
FIRST CLASS PERMIT NO. 79 HILLSBORO. OR USA
POSTAGE WILL
Intel Corporation
Building C03-07
PCEO Marketing
OR
NE Elam Young Parkway
Hillsboro,
5200
Page 4

WE'D
LIKE
YOUR OPINION
OF THIS
-
BOOK
Installing the InboardTM 3861PC
Personal Computer Enhancement
301420-001 A
We've tried to
Please
short of these objectives.
1 How
2 What inaccuracies did
3
4
useful was this book? (Circle the word that best describes
your opinion.)
Poor Average
Did
we
Did
you
make
use this form to let us know whether we've met or fallen
leave out any useful information? If
find the wording unclear or ambiguous? If so, where?
this book accurate, complete, and readable.
Good
you
find? (Please provide page numbers.)
so,
Excellent
what?
: !
Name:
Address:
Phone:
____________________
Now,
remove this page from the book and drop it
Thanks for taking the time to
fill
out this form.
in
the mail.
_
Page 5

UNITED STATES
IF MAILED
INTHE
NO POSTAGE
NECESSARY
MAIL
REPLY
11
••
1.1
•••
1.1
••
1.1.11111.1111.1111
••
1'1111
•••
11.1111
97124-6497
BE PAID BY ADDRESSEE
C03-06
BUSINESS
FIRST CLASS PERMIT NO. 79 HILLSBORO, OR USA
POSTAGE WILL
I ntel Corporation
Building
PCEO Publications
OR
Hillsboro,
5200 N E Elam You ng Parkway
Page 6

(
NOTE
1111111111111
Intel's limited warranty covers boards only as Intel delivers them. If you
your dealer
not
cover the additions. Furthermore,
installing
does
your
adds
it
in your computer
not
cover repair
memory chips
or
replacement. Intel recommends that you have
or
other accessories, this warranty will
or
while
authorized Intel dealer install this
if
you damage the
adding
accessories, this warranty
board
and
any
accessories.
board
or
while
(
FIVE-
YEAR
Intel
Corporation warrants this board
date
you
working order during these
board
Intel
your board
become Intel's property.
This
disaster,
To
the dealer
rather than delivering
transit.
the shipping charges.
INTEL
LIMITED
SUCH
MERCHANTABILITY,
WARRANTY
WARRANTIES
HOWEVER,
IMPLIED
TOYOU.
IF
OR
WILL INTEL
LOST
USE
HAS
SOME
CONSUMER
LIMITATIONS
WITH
UPON
purchased
at
no
furnishes warranty service
limited warranty does
misuse,
obtain warranty
from
You
PROVIDES
WARRANTY.
AS
WARRANTIES
WARRANTIES,
THIS
BOARD
REPLACEMENT,
SAVINGS,
OF
THIS
BEEN
STATES
SPECIFIC
THE
LIMITED
it
from
charge except
with
new
or incorrect installation.
whom
also
must
ARE
LIMITED
WHATSOEVER
SOME
IS
BE
LIABLE
LOST
BOARD
ADVISED
PROHIBIT
PRODUCTS.
MIGHT
LEGAL
STATE
as
or reconditioned
not
service,
deliver the board, along
you
bought
it
in
person,
use
the
ONLY
THE
OTHER
OF
ARE
EXCLUDED.
STATES
SO
NOT
IN
WORKING
AS
DESCRIBED
FOR
PROFITS,
OR
INABILITY
OF
SUCH
EXCLUSION
NOT
APPLY
RIGHTS,
IN
WHICH
WARRANTY
to
be
in
your authorized
five
years,
set
forth
on
an
cover repair
it.
you
original shipping container (or the equivalent)
WARRANTIES
WARRANTIES,
FITNESS
TO
FIVE
WILL
DO
NOT
SOME
OF
CONSEQUENTIAL
OR
LIABILITY
IF
YOU
LIVE
TO
AND
YOU
LIVE.
working order
Intel
Intel
below.
exchange
parts,
If
you
must
FOR A PARTICULAR
YEARS
COVER
ALLOW
ORDER,
ABOVE.
ANY
TO
YOU.
dealer.
will,
at
its
basis.
and
any
of
boards damaged
choose to ship the board
assume
SET
FORTH
EITHER
ALL
WARRANTIES
FROM
THIS
BOARD
TIME
THESE
LIMITATIONS
YOUR
UNDER
DAMAGES,
OTHER
DAMAGES,
USE
IT,
EVEN
OR
OTHER
OR
LIMITATION
IN
ONE
OF
THIS
YOU
WARRANTY
MAY
HAVE
for
five
If
the board
option, repair
Intel
may
replaced boards
with
the
THE
LIMITS
ONLY
THESE
repair or
by
proof
of
purchase
risk
of
damage
IN
THIS
EXPRESS
PURPOSE
SET
DATE
OF
BEYOND
TO
BE
MIGHT
REMEDY
NO
CIRCUMSTANCES
INCLUDING
CAUSED
IF
THE
DEALER
CLAIMS.
OF
DAMAGES
STATES,
PROVIDES
OTHERS,
years
fails
or
abuse,
to
FIVE·YEAR
OR
FORTH
PURCHASE.
IMPOSED
DEPENDING
from
to
be
replace
replace
or
parts
accident,
date,
your
dealer
or
loss
and
IMPLIED,
OR
IN
FIVE
YEARS.
NOT
APPLY
IS
REPAIR
ANY
BY
OR
FOR
THESE
YOU
the
in
the
to
in
pay
OF
THIS
NO
ON
THE
INTEL
Page 7

Page 8
INTEL INBOARf)rM 3861PC
SOFTWARE LICENSE
AGREEMENT
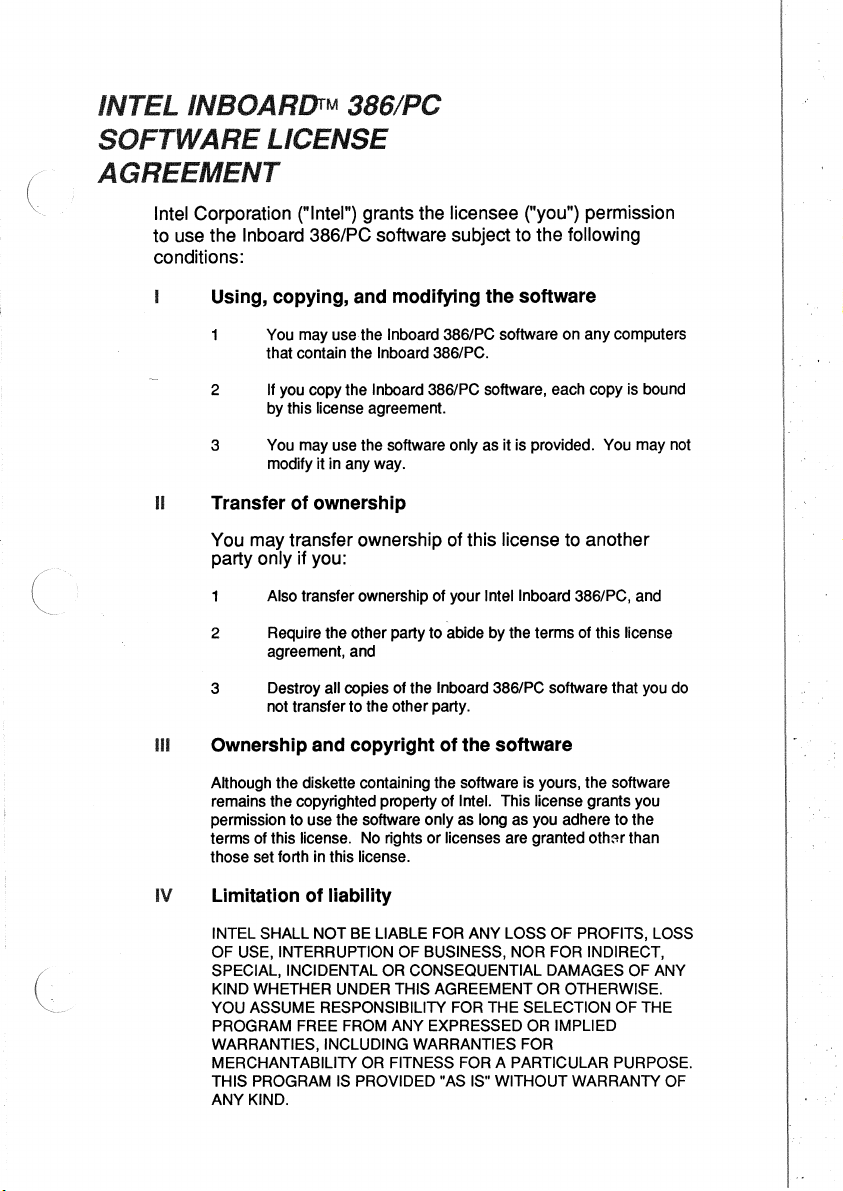
Intel Corporation ("Intel") grants the licensee ("you") permission
to use the
conditions:
Inboard 386/PC software subject to the following
Using, copying, and modifying the software
You may use the Inboard 386/PC software on any computers
that contain the
2 If you copy the Inboard 386/PC software, each copy is bound
by this
license agreement.
3 You may use the software
modify it in any way.
II
Transfer of ownership
Inboard
3861PC.
only as it is provided. You may not
You may transfer ownership of this license to another
party only if you:
Also transfer ownership of your Intel Inboard 386/PC, and
2 Require the other party to abide by the terms of this
agreement, and
3 Destroy all copies of the Inboard 386/PC software that you do
not transfer to the other party.
III Ownership and copyright of the software
Although the diskette containing the software is yours, the software
remains the copyrighted property of
permission to use the software only as long as you adhere to the
terms of this
those set forth in this
IV
Limitation of liability
license.
No
rights or licenses are granted othflr than
license.
Intel. This license grants you
license
INTEL SHALL NOT BE LIABLE FOR ANY LOSS OF PROFITS, LOSS
OF USE, INTERRUPTION OF BUSINESS, NOR FOR INDIRECT,
SPECIAL, INCIDENTAL OR CONSEQUENTIAL DAMAGES OF
KIND WHETHER UNDER THIS AGREEMENT OR OTHERWISE.
YOU ASSUME RESPONSIBILITY FOR THE SELECTION OF THE
PROGRAM FREE
WARRANTIES, INCLUDING WARRANTIES FOR
MERCHANTABILITY
THIS
PROGRAM
ANY KIND.
FROM ANY EXPRESSED OR IMPLIED
OR
FITNESS FOR A PARTICULAR PURPOSE.
IS
PROVIDED "AS IS" WITHOUT WARRANTY OF
ANY
Page 9
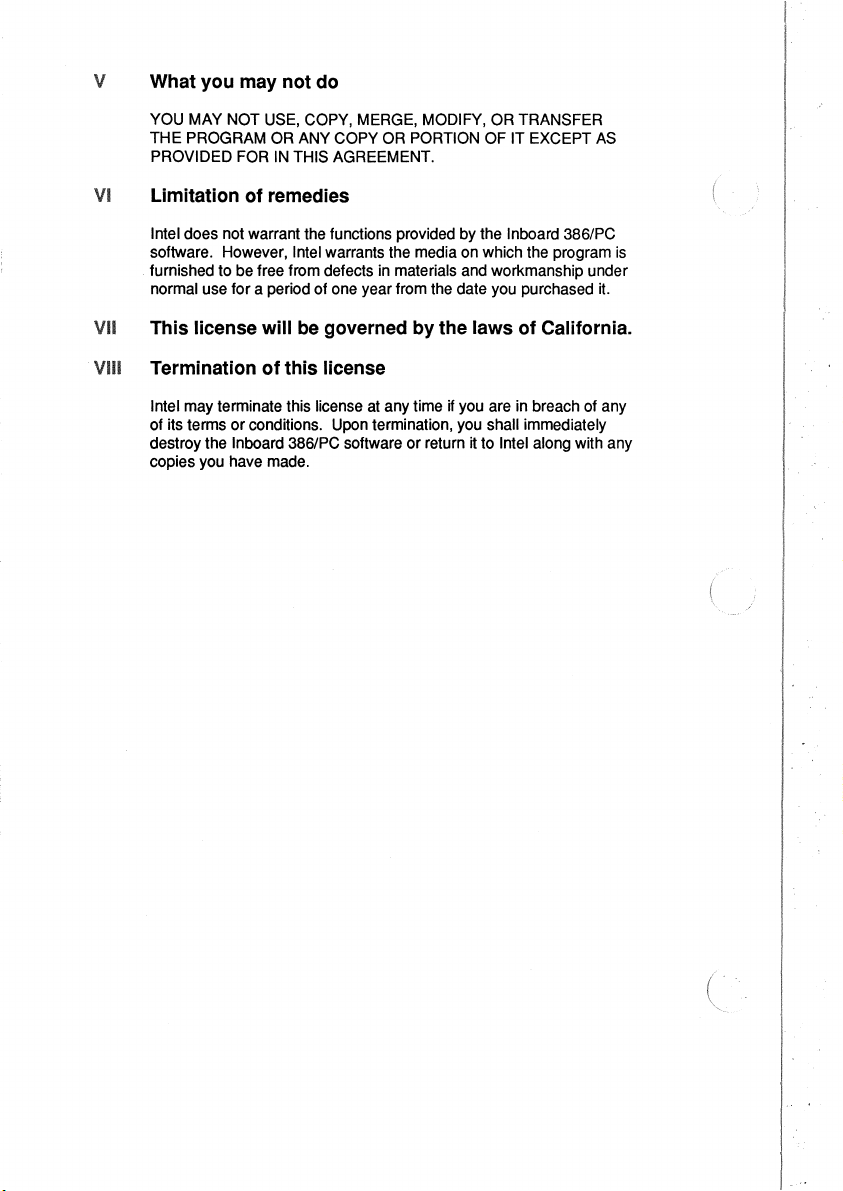
V What you may not do
YOU MAY NOT USE, COPY, MERGE, MODIFY, OR TRANSFER
THE
PROGRAM OR ANY COPY OR PORTION OF IT EXCEPT
PROVIDED FOR IN THIS AGREEMENT.
VI
Limitation of remedies
Intel does not warrant the functions provided by the Inboard 386/PC
software. However, Intel warrants the media on which the program is
furnished
normal use for a period of one year from the date you purchased it.
VII
This license will
VIII
Termination of this license
to
be free from defects in materials and workmanship under
be
governed by the laws of California.
AS
Intel may terminate this license at any time
of its terms
destroy the
copies you have made.
or
conditions. Upon termination, you shall immediately
Inboard 386/PC software
or
return
if
you are in breach of any
it
to Intel along with any
Page 10
INSTALLING
THE
INBOARDTM
386/PC
PERSONAL COMPUTER
NHANCEMENT
III
(
Copyright
Intel Corporation, 5200 NE Elam Young Parkway, Hillsboro, Oregon 97124-6497
(el
1987 Intel Corporation. All rights reserved.
Page 11
Fi
rst edition
Intel Corporation assumes no responsibility for errors that may appear in this
manual. Nor does Intel make any commitment to update the information
contained in this
This manual uses the following trademarks:
Above, Inboard, and Intel are trademarks of Intel Corporation.
1-2-3 and Symphony are trademarks of Lotus
IBM and XT are trademarks of International Business Machines Corporation.
AutoCAD is a
COMPAQ
Corporation.
CompuServe is a trademark of CompuServe, Incorporated.
CROSSTALK XVI
dBase
Javelin
Microsoft and
MultiMate is a trademark of MultiMate International, Incorporated.
Ready! is a trademark of Living Videotext, Incorporated.
Tandy is a trademark of Radio Shack.
and PORTABLE are trademarks of COMPAQ Computer
II
and Framework
is a trademark of Javelin Software Corporation.
December 1987
manual.
Development Corporation.
trademark of AutoDESK, Incorporated.
is a trademark of Microstuf, Incorporated.
II
are trademarks of Ashton-Tate, Incorporated.
XENIX are trademarks of Microsoft Corporation.
(
Page 12
(
CONTENTS
CHAPTER 1 INTRODUCTION
How
to save time using this book. . . . . . . . . . . . . . . . . . . .
InboardfM
InboardfM
Who
Turning
memory .
Which computers can use the
What's in the
Installation overview. . . . . . . . . . . . . . . . . . . . . . . . . . . . 1-4
Where to
3861PC
3861PC
can use extended memory? . . . . . . . . . . . . . . . . . . . 1-2
InboardfM
go
features . . . . . . . . . . . . . . . . . . . . . . .
options. . . . . . . . . . . . . . . . . . . . . . . . 1-2
3861PC
..................................
InboardfM
from here. . . . . . . . .
extended memory into expanded
InboardfM 386IPC? . . . . . . . .1-3
3861PC
box? . . . . . . . . . . . . . . . . 1-4
..
. . . . . . . . . . . . . . . . 1-5
1-1
1-1
1-3
CHAPTER 2
(
CHAPTER 3
IBM
PC
XT
INSTALLATION
Before
you
start. . . . . . . . . . . . . . . . . . . . . . . . . . . . . . . 2-1
Installation instructions. . . . . . . . . . . . . . . . . . . . . . . . . . .2-1
Preparing the computer. . . . . . . . . . . . . . . . . . . . . . . . . . 2-2
Removing the
Installing the InboarorM
Installing the InboarorM 3861PC. . . . . . . . . . . . . . . . . . . .2-11
Completing the installation. . . . . . . . . . . . . . . . . . . . . . .
A quick checklist. . . . . . . . . . . . . . . . . . . . . . . . . . . . . . 2-14
Where to
Before
you
Installation instructions. . . . . . . . . . . . . . . . . . . . . . . . . . .3-1
Preparing the computer. . . . . . . . . . . . . . . . . . . . . . . . . . 3-2
Removing the
Installing the
Installing the
Completing the installation. . . . . . . . . . . . . . . . . . . . . . .
A quick checklist. . . . . . . . . . . . . . . . . . . . . . . . . . . . . . 3-15
Where
8088
and
the 8087 .
3861PC
go
from here. . . . . . . . . . . . . . . . . . . . . . . . . . 2-14
IBM
PC
INSTALLATION
start. . . . . . . . . . . . . . . . . . . . . . . . . . . . . . .
8088
and
the 8087 .
InboarorM
InboarorM 3861PC. . . . . . . . . . . . . . . . . . . . 3-12
to
go
from here. . . . . . . . . . . . . . . . . . . . . . . . . . 3-15
3861PC
...................
cable .
cable. . . . . . . . . . . . . . . . .3-9
................
...................
2-6
2-9
2-13
3-1
3-6
.3-14
iii
Page 13
CHAPTER 4 COMPAQ PORTABLE
AND
PORTABLE PLUS
INSTALLATION
Before
you
start. . . . . . . . . . . . . . . . . . . . . . . . . . . . . . . 4-1
Installation instructions. . . . . . . . . . . . . . . . . . . . . . . . . . .4-2 (
Preparing the computer. . . . . . . . . . . . . . . . . . . . . .
Removing the 8088
Installing the InboardfM
Installing the InboardfM 3861PC. . . . . . . . . . . . . . . . . . . .4-11
Completing the installation. . . . . . . . . . . . . . . . . . . . . . . .4-13
A quick checklist. . . . . . . . . . . . . . . . . . . . . . . . . . . . . . 4-14
Where to
go
and
the
8087.
. . . . . . . . . . . . . . . . . . .4-4
3861PC
from here. . . . . . . . . . . . . . . . . . . . . . . . . . 4-14
cable .
...............
....
4-2
.4-7
CHAPTER 5 TANDY 1200 HD INSTALLATION
Before
you
start. . . . . . . . . . . . . . . . . . . . . . . . . . . . . . .
Installation instructions. . . . . . . . . . . . . . . . . . .
Preparing the computer. . . . . . . . . . . . . . . . . . . . . .
Removing the 8088
Installing the
Installing the
Completing the installation. . . . . . . . . . . . . . . . . . . . . . . .5-19
A quick checklist. . . . . . . . . . . . . . . . . . . . . . . . . . . . . . 5-19
Where to
go
and
the 8087 .
InboardfM
InboarcJfM
from here. . . . . . . . . . . . . . . . . . . . . . . . . . 5-20
3861PC
3861PC ....................
...................
cable .
..............
........
....
5-1
5-1
5-2
5-4
. 5-10
5-12
(.
CHAPTER 6 INSTALLING
THE
INBOAR[}rM 3861PC
AND
RUNNING
SOFTWARE
Inboarc:JfM
Installing the InboardfM
Using the InboardfM
Changing the InboardfM 3861PC's speed. . . . . . . . . . . . . . .6-3
Turning extended memory into expanded memory .
Displaying status. . . . . . . . . . . . . . . . . . . . . . . . . . . . . . .6-6
Checking the 80387 math coprocessor. . . . . . . . . . . . . . . . 6-6
Dynamic speed switching .
If
you
If
you
Where to
iv
3861PC
cached the hard disk. . . . . . . . . . . . . . . . . . . . . . . .
have problems. . . . . . . . . . . . . . . . . . . . . . . . . . . . 6-8
go
programs. . . . . . . . . . . . . . . . . . . . .
3861PC
3861PC
from here. . . . . . . . . . . . . . . . . . . . . . . . . . . 6-9
software. . . . . . . . . . . . . . .6-2
software. . . . . . . . . . . . . . . . .6-3
........................
........
..
6-1
6-5
6-7
6-7
C,
Page 14

v
Page 15

Page 16
c-
INTRODUCTION
1
If you're in a hurry to use the Inboard 386/PC, reading this
chapter can save you time.
can focus on the information you need.
It tells you what you can skip, so you
How
Chapter 1 Introduction
Chapter 2
Chapter 3
Chapter 4
Chapter 5 Tandy 1200 HD installation
to save time
Here's what you'll find
Summarizes the board's features and the accompanying
software. This chapter
information, a list of the box's contents, and an
installation overview. If you're familiar with the
Inboard 386/PC, skip this chapter.
IBM
PC
XT
IBM
PC
installation
COMPAQ
PORTABLE
(
Chapter 6 Installing
The appendixes cover specialized technical topics. You don't
need to read them unless one of the chapters advises you to.
The Glossary at the end of the manual defines many of the
technical terms.
If you're familiar with the Inboard 386/PC, and you're interested
only in installation instructions, turn to the chapter for your
computer.
and
using
in
this manual:
installation
using the
this
book
also contains compatibility
and
PORTABLE
InboarcJrM
PLUS
installation
3861PC software
InboardrM
The Inboard 386/PC takes your computer to the high
performance of the
Inboard 386/PC will do for your computer:
• Performance up to 10 times faster than
• 1 M byte of 32-bit high-performance memory --640K of
conventional and 256K of extended memory, with 128K reserved
for the system
INTRODUCTION
3861PC
BIOS.
features
Intel 80386 microprocessor. Here's what the
an
IBM
PC
alone.
1-1
Page 17
• Support for 80386-specific software.
• Enhanced hard disk performance.
• Compatibility with the Lotus/Intel/Microsoft (LIM) Expanded
Memory Specification (EMS) version
use your expanded memory boards (such as the
4.0 so you can continue to
Intel Above
Board).
• Software that turns extended memory on the Inboard 386/PC into
expanded memory (for users without expanded memory boards).
You can add two optional products to your Inboard 386/PC:
• Inboard 386/PC Piggyback Memory board -- for up to
an
additional 2M bytes of high-performance extended memory.
• 80387 math coprocessor -- performs floating-point arithmetic
eight times faster than the
Contact your
dealer for more information
8087 you may have
on
Inboard 386/PC
in
the computer.
options.
The Inboard 386/PC has 256K bytes of extended memory -- and
you can add up to 2M bytes more extended memory with
an
optional Inboard 386/PC Piggyback Memory board. You can use
extended memory for
programs (such as Framework
DOS's VDISK, specially written application
II
and AutoCAD), 80386 control
software, the Inboard 386/PC disk cache software, and the
Inboard 386/PC software for turning extended memory into
expanded memory.
Read Appendix A for more information
on
extended memory and
how it differs from conventional and expanded memory.
1-2
INTRODUCTION
Page 18
(
Turning
into
InboardrM 3861PC
expanded
The Inboard 386/PC comes with software (the ILlM386.SYS
program) to let you turn the Inboard 386/PC's extended memory
into expanded memory.
boards (such as the Above Board) you can use expanded
memory programs, such as 1-2-3
describes
memory
So even without expanded memory
installing and using this software.
extended
and
Symphony. Chapter 6
memory
Which
computers
the InboardrM 3861PC?
CAUTION
(
Install the Inboard 3861PC only in the computers listed below.
The Inboard 386/PC is designed to work in the following
computers:
• IBM PC (all models)
• IBM PC XT (all models except IBM PC XT/286)
• COMPAQ PORTABLE and PORTABLE PLUS
•
Tandy 1200 HD
The Inboard 386/PC isn't compatible with 8086-based computers,
such as the COMPAQ
••••••
can use
DESKPRO.
INTRODUCTION 1-3
Page 19
What's
in
the Inboar(jrM
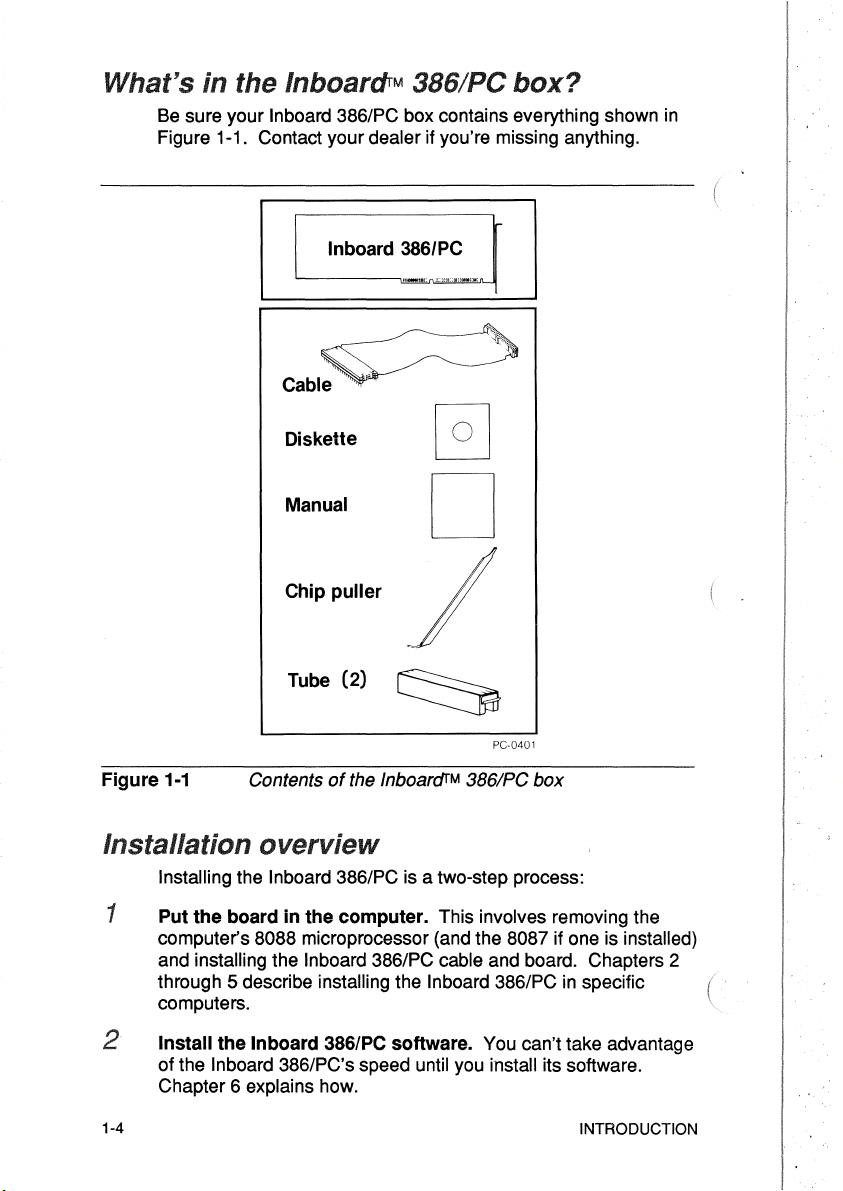
Be
sure your Inboard 386/PC box contains everything shown
Figure 1-1. Contact your dealer if you're missing anything.
3861PC
box?
in
Figure
1-1
Diskette
Manual
Chip
Tube (2)
Contents
Inboard
puller
of
the
InboarcJrM
386/PC
PC-0401
3861PC
box
Installing the Inboard 386/PC is a two-step process:
1
Put
the
board in
computer's 8088 microprocessor (and the 8087 if one is
and installing the Inboard 386/PC cable and board. Chapters 2
through 5 describe installing the Inboard 386/PC
computers.
Install
the
of the Inboard
Chapter 6 explains how.
1-4
the
computer. This involves removing the
Inboard 386/PC software. You can't take advantage
386/PC's speed until you install its software.
installed)
in
specific
INTRODUCTION
Page 20
After you've performed both steps, your Inboard 386/PC will
ready to use.
Installing the Inboard 386/PC isn't difficult --if you've installed
other boards and if you follow the directions exactly. If you're
comfortable working inside your computer, have your dealer
install the Inboard 386/PC.
be
not
Where
Table
to
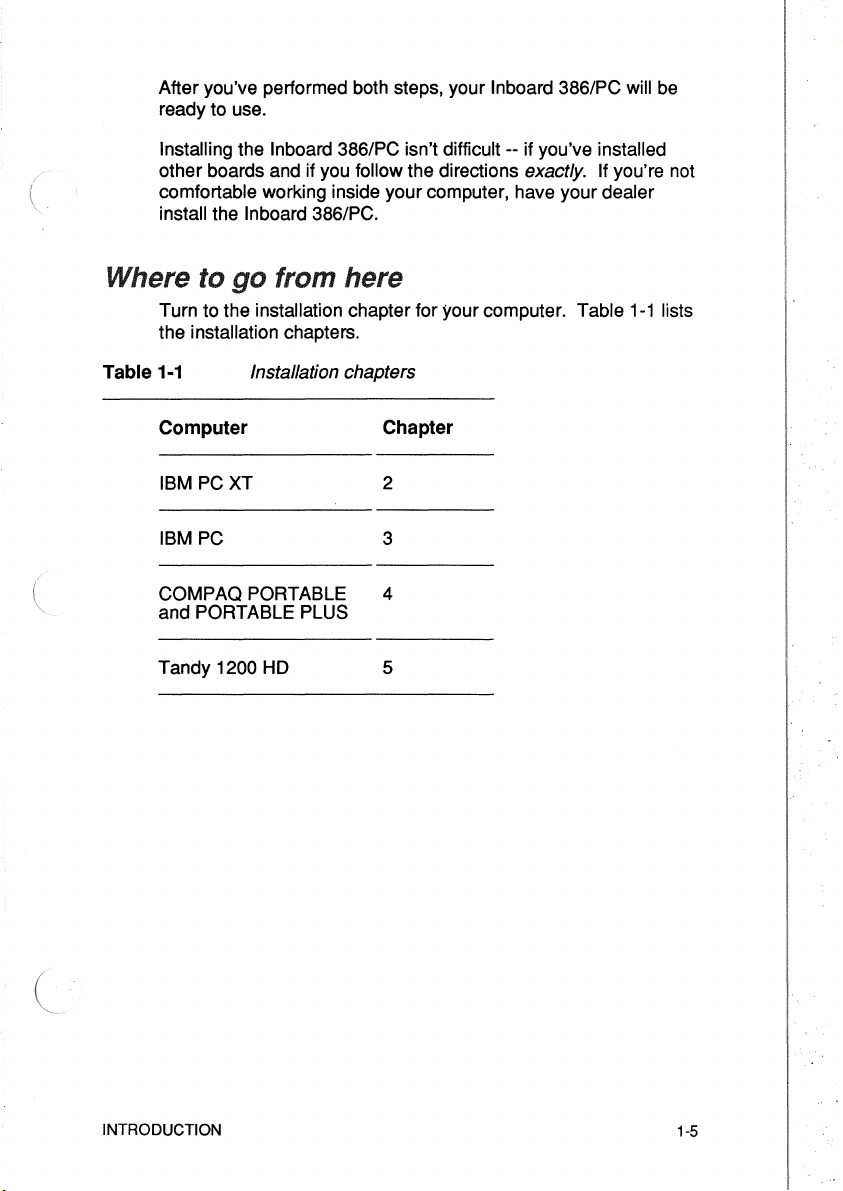
Turn to the installation chapter for your computer. Table
the installation chapters.
1-1
from here
Installation chapters
Computer Chapter
IBM
PCXT
IBM
PC
COMPAQ PORTABLE 4
and PORTABLE
Tandy 1200
PLUS
HD
2
3
5
1-1
lists
INTRODUCTION
1-5
Page 21

Page 22
(
2 IBM
This chapter contains instructions for installing the Inboard
386/PC in an
Before
The Inboard 386/PC has two optional products you can purchase
separately:
• Inboard 386/PC Piggyback Memory board
• 80387 math coprocessor
you
PC
IBM PC XT.
start
XT
INSTALLATION
If you have one
Inboard 386/PC before you begin the installation instructions
this chapter. The manual that comes with each option tells you
how.
NOTE"""""'"
It's always a
new
hardware
or
good
or
Installation instructions
This section contains instructions for installing the Inboard
an
IBM
........
and
you
can expect from skipping the directions is a major
CAUTION
l
386/PC in
Follow the steps in order -Skipping steps
The least
inconvenience.
Inboard 386/PC
Each step has a box beside it near the outside edge
To keep track of where you are, check off the box after you
complete each step.
Before you begin the installation, gather everything you'll need
your computer, the Inboard 386/PC, this manual, cable, chip
puller, plastic tubes, and a flat-blade screwdriver -- and arrange
them on a clean, dry work surface. (Having everything close will
reduce the risk of generating static electricity.)
both of these options, install them on your
idea to back up
software.
PC
XT computer.
your
hard
disk before adding
_
if
you
don't, you'll miss crucial steps.
skimming the instructions will
At
most, you'll ruin
and
your
computer.
an
expensive investment: the
not
save time.
of
in
the page.
--
IBM
PC
XT
INSTALLATION
2-1
Page 23
Preparing the computer
Perform the steps in this section to prepare your computer for the
installation.
1
o
Run your computer's diagnostic software before installing the
Inboard 386/PC to verify that the computer is working correctly.
Correct any error conditions before you install the Inboard
386/PC.
(
o
Computers can
daily operations. Sometimes these
new hardware
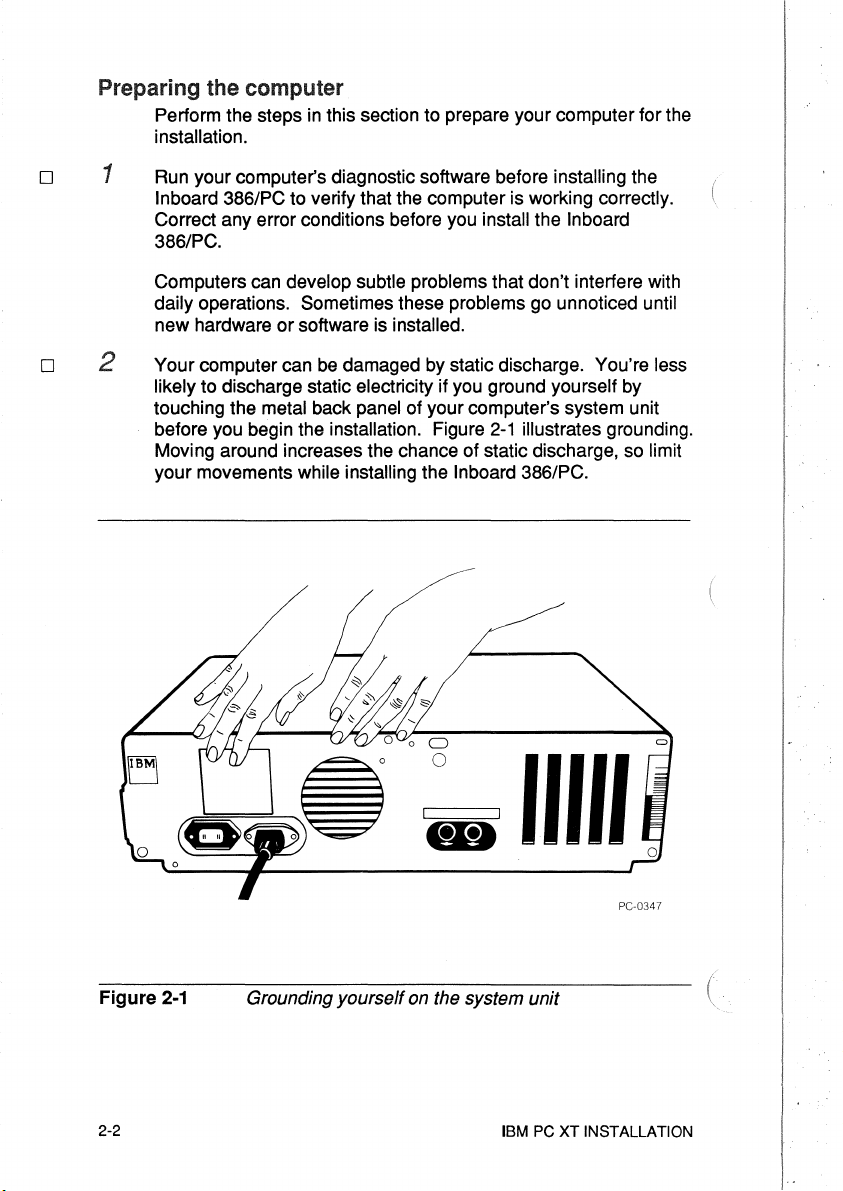
Your computer can
2
likely
to discharge static electricity if you ground yourself by
touching the
before you begin the
Moving around increases the chance of static discharge, so
your movements while installing the Inboard 386/PC.
develop subtle problems that don't interfere with
problems go unnoticed until
or
software is installed.
be
damaged by static discharge. You're less
metal back panel of your computer's system unit
installation. Figure
2-1
illustrates grounding.
limit
(
Figure
2-2
2-1
"'"
Grounding yourself on the system unit
IBM PC
PC-0347
XT
INSTALLATION
(
Page 24
Turn off the power switch on the system unit and any attached
3
equipment (such as your printer and screen), and
system unit's power cord from the
could electrocute yourself.
wall outlet. If you don't, you
o
unplug the
(
(
4
Remove the cover from the computer's system unit. (Refer to the
computer's Guide to Operations if you don't know how.)
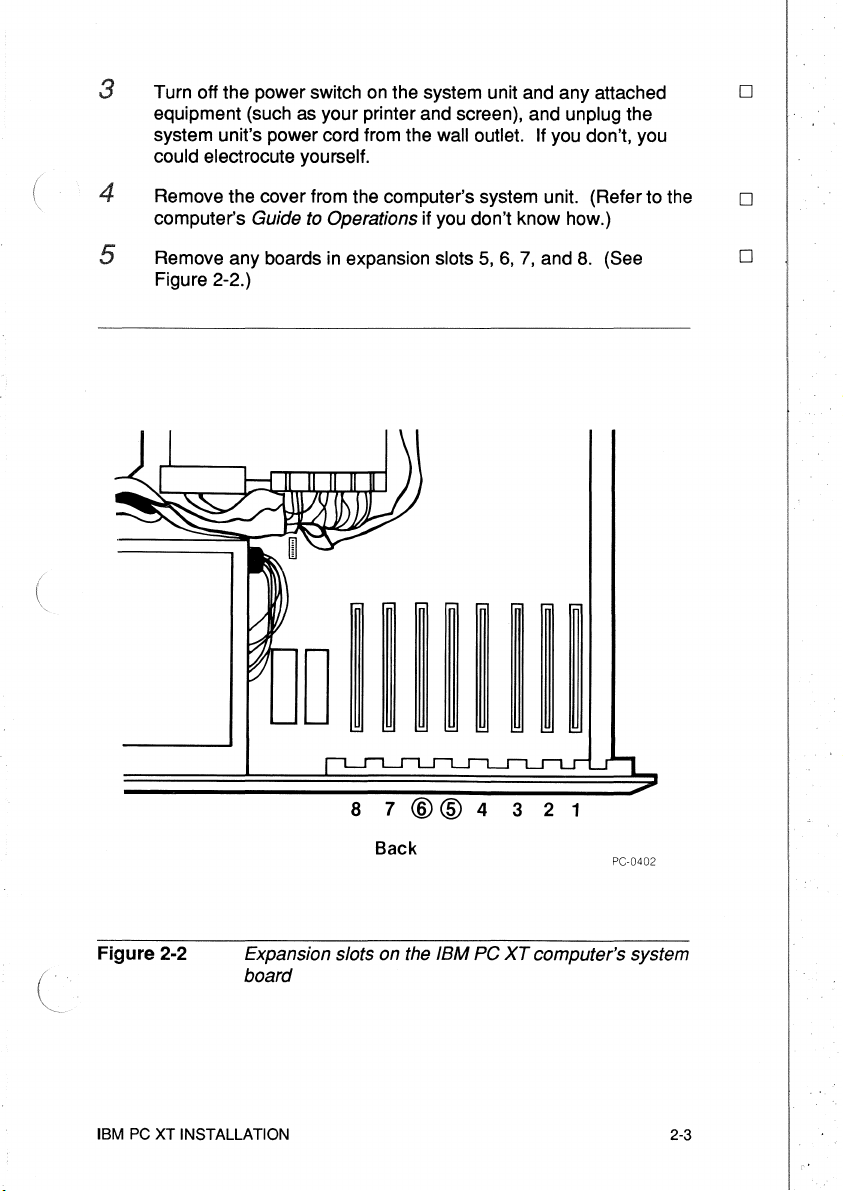
5
Remove any boards
Figure 2-2.)
in
expansion slots
5,6,7,
and 8. (See
o
o
Figure 2-2
IBM PC XT INSTALLATION
Expansion slots on the IBM PC
board
8 7
Back
@@
4 3 2 1
XT
computer's system
PC-0402
2-3
Page 25
CAUTION
The computer won't operate correctly
provides the same conventional memory address. This can
cause garbled data on disks (both floppy
programs read data from conventional memory
the disks.
if
more than one board
and
hard
disks) when
and
store it on
Protect the information on
conventional memory on the computer's system board
add-in memory board (such
the Inboard
memory,
board.
The rest
conventional memory
3861PC
you
don't need an additional conventional memory
of
this section explains how to disable other
your
disks
by
disabling the
as an Intel Above Board). Because
provides the full 640K bytes
in
the computer.
of
CAUTION
Use a ballpoint pen to set switches. Don't use a pencil because
the graphite
in
the lead could short-circuit the switches.
and
any
conventional
2-4
IBM PC
XT
INSTALLATION
Page 26
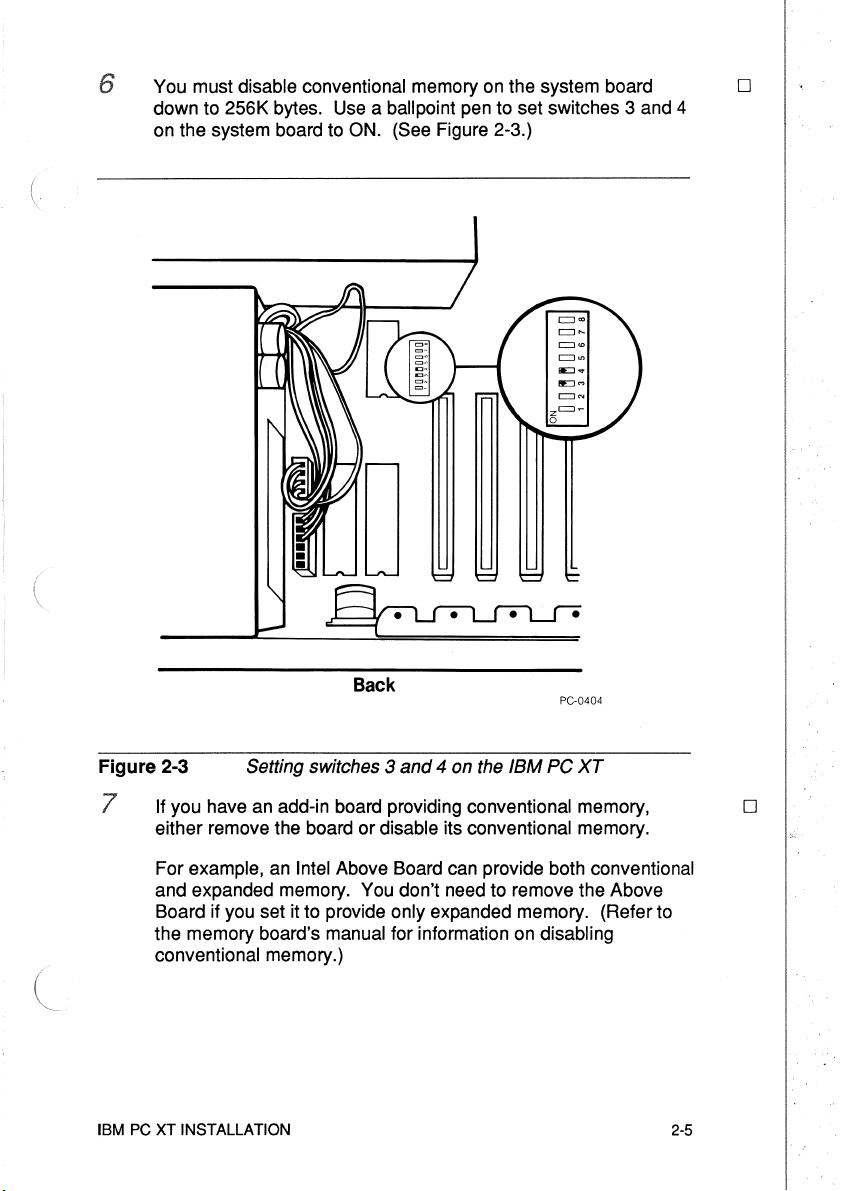
You must disable conventional memory on the system board
6
down to 256K bytes. Use a
on the system board to ON. (See Figure 2-3.)
ballpoint pen to set switches 3 and 4
o
Back
Figure 2-3 Setting switches 3
If you have an add-in board providing conventional memory,
7
either remove the board or disable its conventional memory.
For example, an Intel Above Board can provide both conventional
and expanded memory. You don't need to remove the Above
Board if you set it to provide only expanded memory. (Refer to
the memory board's manual for information on disabling
conventional memory.)
IBM PC
XT
INSTALLATION 2-5
and
4 on the IBM PC
PC-0404
XT
o
Page 27
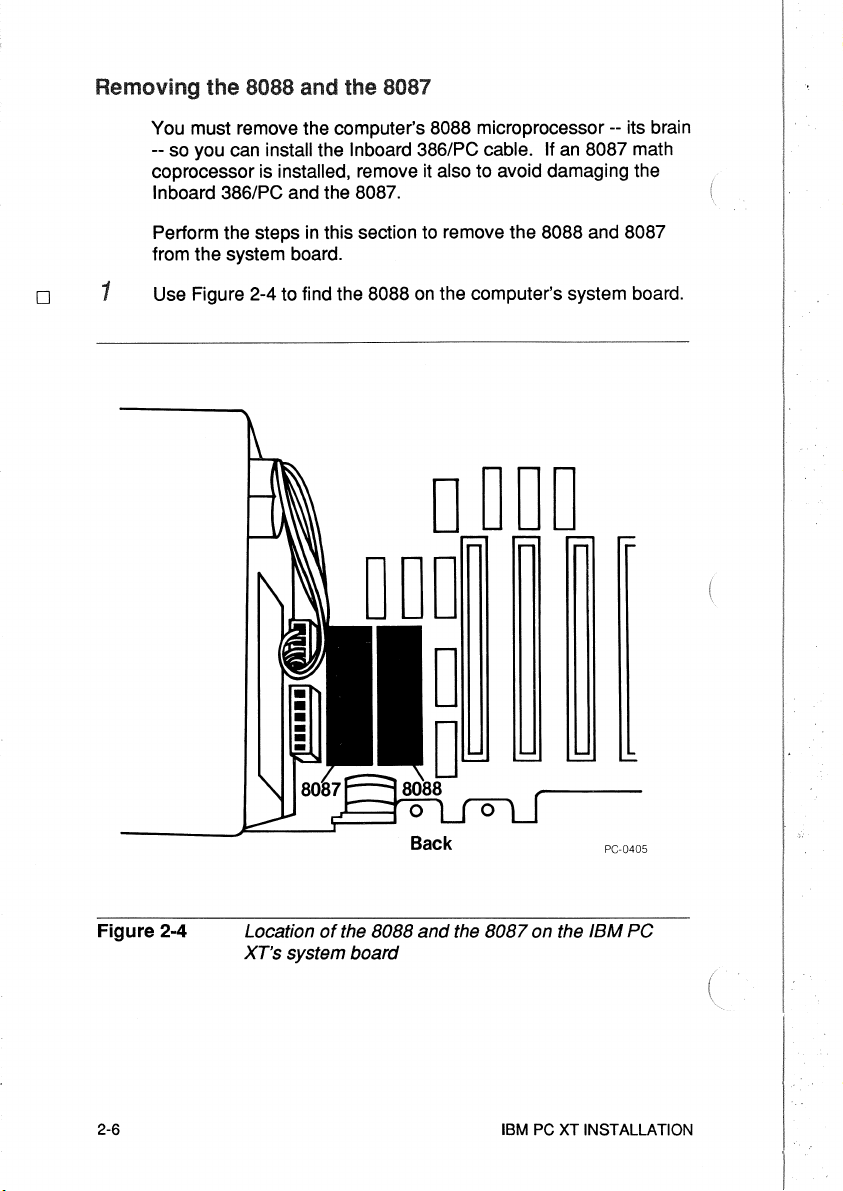
Removing the 8088
You must remove the computer's 8088 microprocessor -- its brain
-- so you can install the Inboard 386/PC cable. If
coprocessor is installed, remove it also to avoid damaging the
Inboard 386/PC and the 8087.
an
8087 math
o
Perform the steps
from the system board.
Use Figure 2-4 to find the
1
in
this section to remove the 8088 and 8087
8088
on
the computer's system board.
DODD
000
o
o
Figure 2-4
2-6
Location
XT's system board
of
the 8088
and
the
8087
on the
IBM PC XT INSTALLATION
PC-0405
IBM
PC
Page 28
(
(
\~
CAUTION
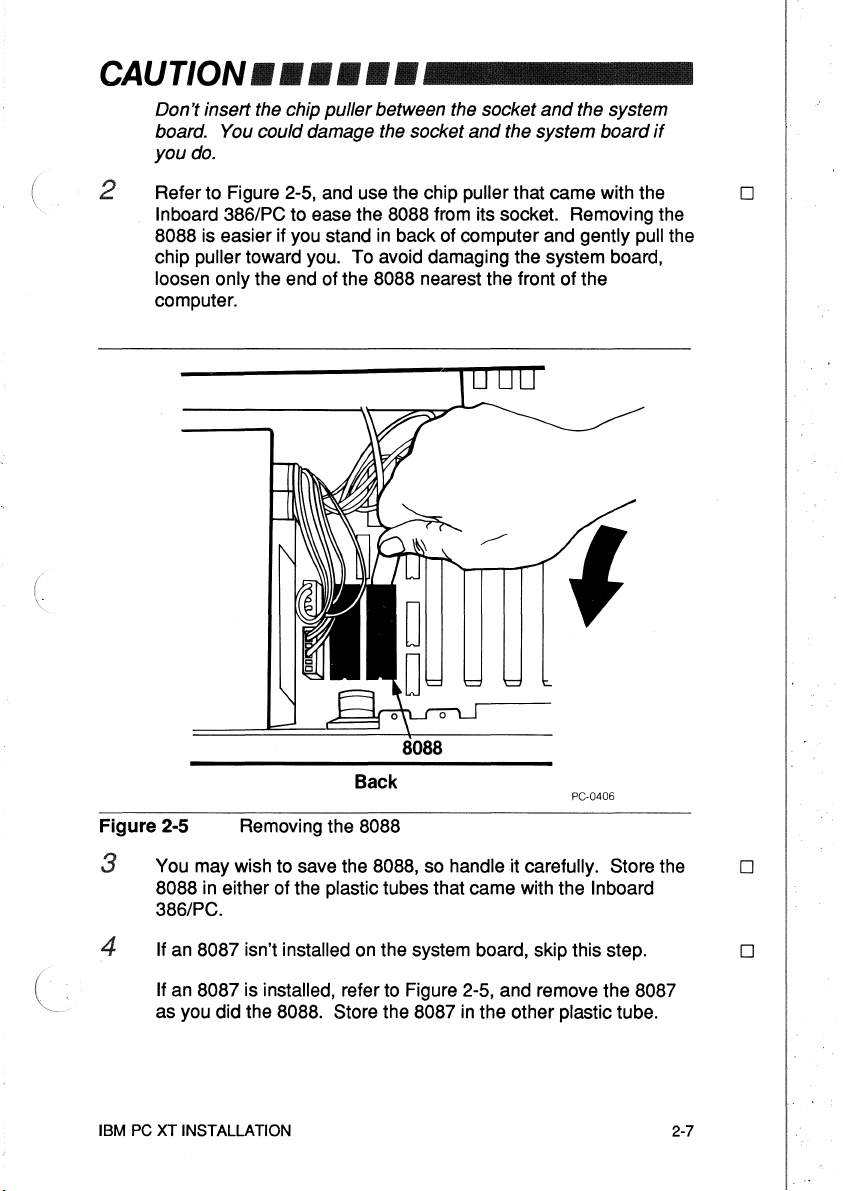
Don't insert the chip puller between the socket
board. You could damage the socket
you
Refer to Figure 2-5, and use the chip puller that came with the
2
Inboard 386/PC to ease the 8088 from its socket. Removing the
8088 is easier if you stand in back of computer and gently pull the
chip puller toward you. To avoid damaging the system board,
loosen only the end of the 8088 nearest the front of the
computer.
do.
••••••
and
the system
and
the system
board
if
o
Back
Figure 2-5
You may wish to save the 8088, so handle it carefully. Store the
3
8088 in either of the plastic tubes that came with the Inboard
386/PC.
4
If an 8087 isn't installed on the system board, skip this step.
If an 8087 is installed, refer to Figure 2-5, and remove the 8087
as you did the 8088. Store the 8087
IBM
PC
XT
Removing the 8088
in
the other plastic tube.
INSTALLATION 2-7
PC-0406
o
o
Page 29
o 5
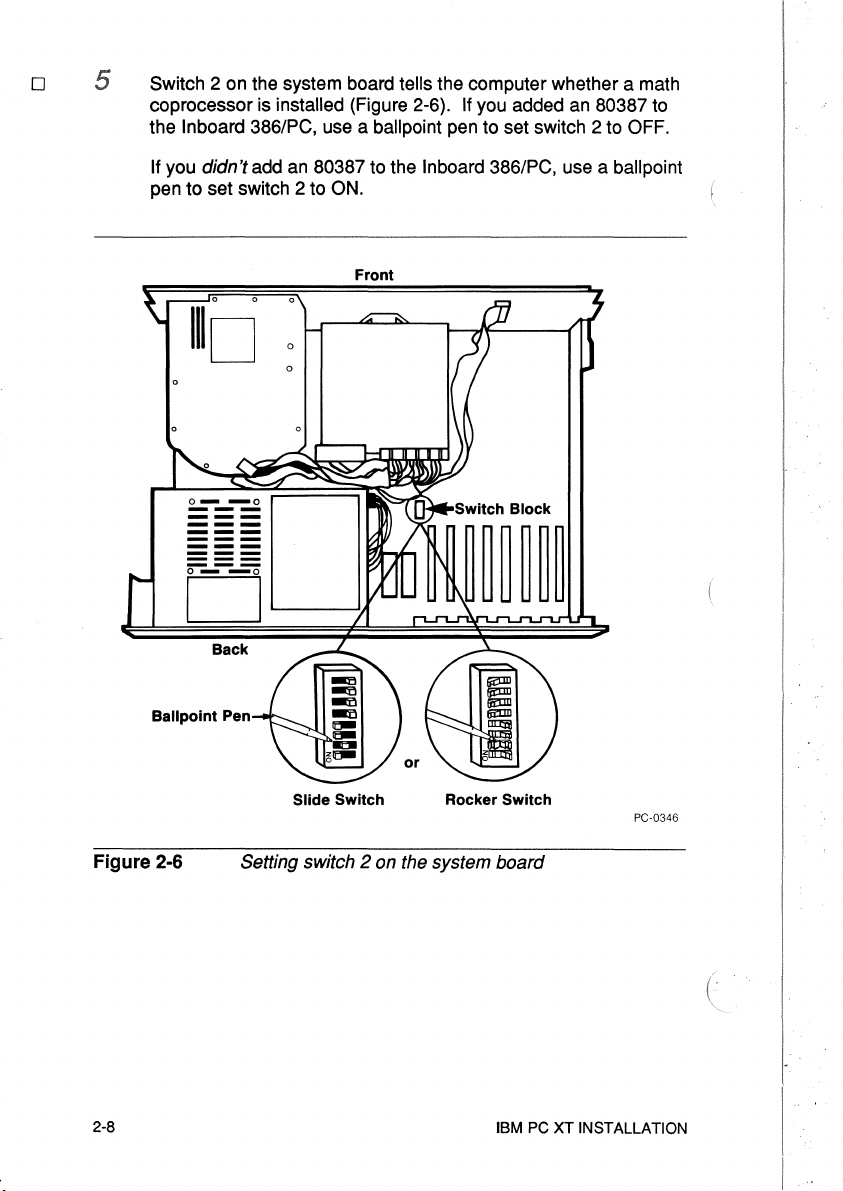
Switch 2 on the system board tells the computer whether a math
coprocessor is
the
Inboard 386/PC, use a ballpoint pen to set switch 2 to OFF.
If
you didn't add an 80387 to the Inboard 386/PC, use a ballpoint
pen to set switch 2 to ON.
o 0
installed (Figure 2-6). If you added an 80387 to
Front
Figure
1110
Back
2-6
o
o
Slide Switch Rocker Switch
Setting switch
2 on the system board
PC-0346
2-8
IBM PC XT INSTALLATION
Page 30
Perform the steps
cable
The
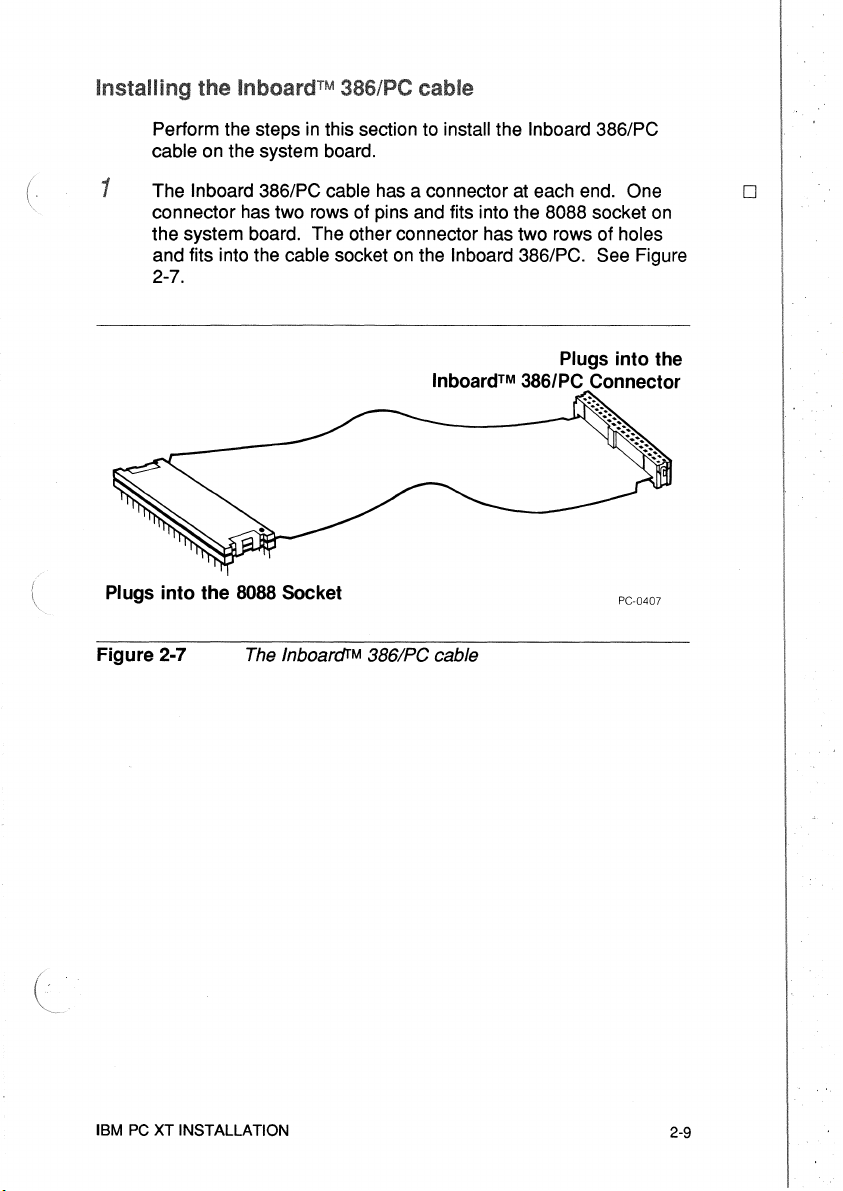
1
on
the system board.
Inboard 386/PC cable has a connector at each end. One
in
this section to install the Inboard 386/PC
connector has two rows of pins and fits into the 8088 socket
the system board. The other connector has two rows of holes
on
and fits into the cable socket
2-7.
the Inboard 386/PC. See Figure
Inboard™ 386/PC Connector
o
on
Plugs into the
Plugs into the 8088 Socket
Figure 2-7
IBM
PC
XT INSTALLATION
The
Inboarc/fM
3861PC
PC-0407
cable
2-9
Page 31
o
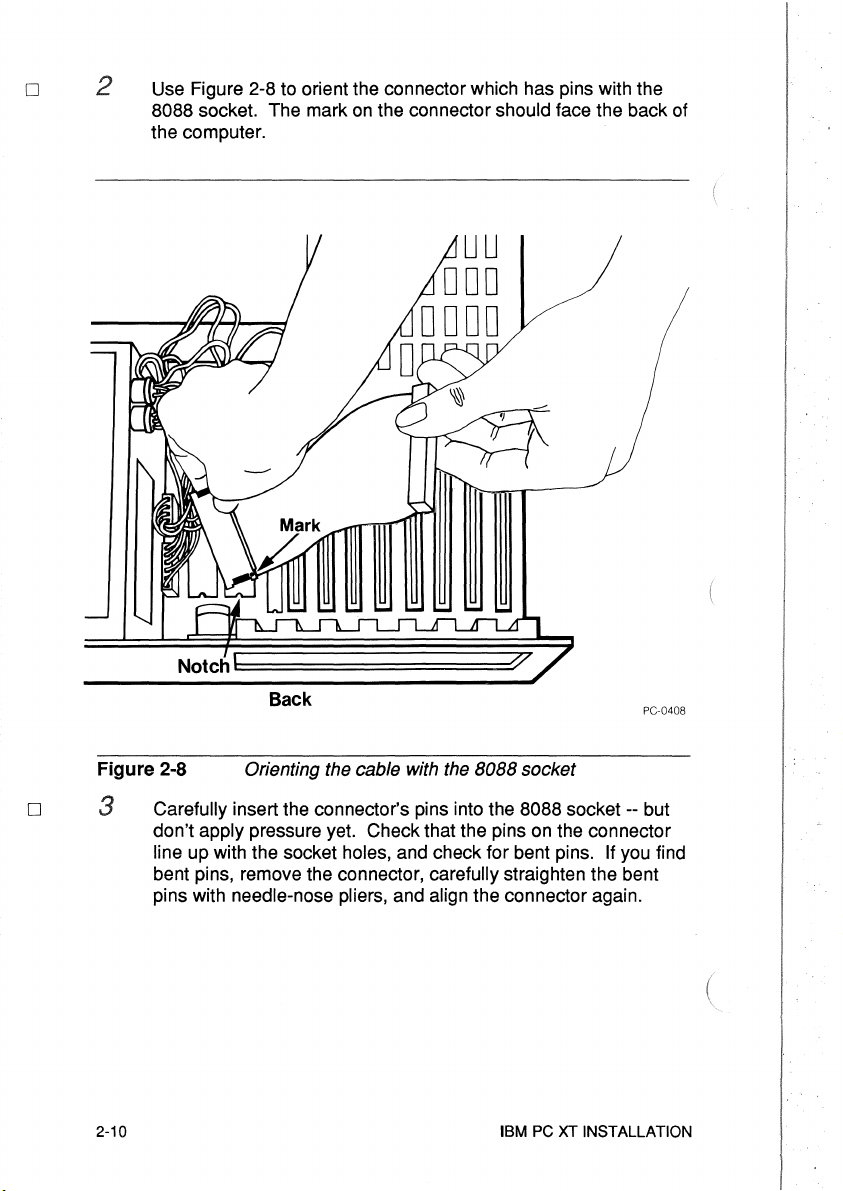
Use Figure 2-8 to orient the connector which has pins with the
on
8088 socket. The mark
the computer.
the connector should face the back of
o
Back
Figure 2-8 Orienting the cable with the 8088 socket
3
Carefully insert the connector's pins into the 8088 socket -- but
don't
apply pressure yet. Check that the pins on the connector
line up with the socket holes, and check for bent pins.
bent pins, remove the connector,
pins with
2-10
needle-nose pliers, and align the connector again.
carefully straighten the bent
IBM
PC
XT INSTALLATION
If
you find
Page 32

(
(
When the pins are properly aligned, apply gentle, even pressure
4
until the connector settles into the socket. Then apply firm
pressure on both ends of the connector until it will go no farther.
See Figure 2-9.
Figure 2-9 Installing the cable connector in the 8088 socket
o
Installing
1
NOTE
2
3
IBM
PC
the
InboardTM
Perform the steps
the computer.
Install the Inboard 386/PC in expansion slot 5
2 to find slots 5 and
3S6/PC
in
this section to install the Inboard 386/PC
or
6.
6.
•••••••••••••
Don't trap the cable when
cable over other boards to reach the Inboard
Replace the boards you removed from the computer. Be sure to
reconnect any of the boards' cables you disconnected.
Route the Inboard 386/PC cable over other boards to the Inboard
386/PC.
XT
INSTALLATION 2-11
you
replace the boards -- route the
3861PC.
in
Use Figure 2-
o
o
o
Page 33

o 4 Refer to Figure 2-10, and align the free end of the Inboard
386/PC cable with the cable connector on the Inboard 386/PC.
Figure 2-10 Aligning the cable with the InboanjrM 3861PC
connector
2-12
IBM
PC
XT INSTALLATION
PC-0410
Page 34

(
Support the Inboard 386/PC while applying even pressure to the
5
cable connector until the connector will go
Figure 2-11.
no
farther, as shown
in
D
(
Figure
2-11 Installing the cable on the Inboarcfr
M
Completing the Installation
Perform the steps
1
Replace
catch the
2
Reconnect the cables and plug the power cord into the outlet.
Turn on the computer. You should see the computer counting
3
memory. If it doesn't, refer to the next section.
IBM
PC
XT
the system unit's cover --
Inboard 386/PC cable.
INSTALLATION
in
this section to complete the installation.
be
sure the cover doesn't
PC-0411
3861PC
D
D
D
2-13
Page 35

quick
If you have any problems with your computer immediately after
installing the
• Is the power cord plugged into the wall outlet?
• Are the cables and cords attached correctly?
• Are the boards inside the computer properly seated and
reconnected?
• Did you disable conventional memory on the system by setting
switches 3 and 4 to ON?
computer still provide conventional memory? (When you turn
the power, the computer will beep -- SOS
short-short long-long-long short-short-short] -- if you haven't
disabled conventional memory on the computer's system board
or on another add-in board.)
• Is the Inboard 386/PC cable plugged into the 8088 socket and
not the 8087 socket?
• Is the Inboard 386/PC cable oriented correctly in the 8088 socket
on the system board and the socket
the cable connector's pins lined up with the 8088 socket? Are
the connectors pushed all the way into the sockets?
Inboard 386/PC, check the following items in order.
Do
any memory boards
in
the
on
in
Morse code [short-
on
the Inboard 386/PC? Are
• If an 8087 was installed
on
the system board, did you remove it?
• Did you set switch 2 correctly (OFF if an 80387 is installed and
ON if it isn't)?
If your computer doesn't work correctly after you've checked
these potential problems, turn to Appendix B for troubleshooting
advice.
Turn to Chapter 6 for instructions on installing and using the
Inboard 386/PC software.
2-14
IBM
PC
XT INSTALLATION
Page 36

c
..
3
IBM
This chapter contains instructions for installing the Inboard
386/PC
Before
Intel recommends your computer have a 125-watt or greater
power
requirements may vary, depending on the options you've added.
Talk with your dealer if you aren't sure.
The
separately:
PC INSTALLATION
in
an
IBM PC.
you
start
supply for running with Inboard 386/PC. Your exact power
Inboard 386/PC has two optional products you can purchase
Inboard
• 80387 math coprocessor
If you have one
Inboard 386/PC before you begin the installation instructions in
this chapter. The
how.
NOTE
It's always a
new
386/PC Piggyback Memory board
or
both of these options, install them
manual that comes with each option tells you
.................
good
idea to back up
hardware
or
software.
your
hard disk before adding
Installation instructions
This section contains instructions for installing the Inboard
386/PC in
CAUTION
Follow the steps in order --if
Skipping steps
The least
inconvenience.
Inboard
Each step has a box beside it near the outside edge of the page.
To keep track of where you are, check off the box after you
complete each step.
an
IBM PC computer.
••••••
you
don't, you'll miss crucial steps.
and
skimming the instructions will
you
can expect from skipping the directions is a major
At
3861PC
most, you'll ruin
and
your
computer.
an
expensive investment: the
on
..
not
save time.
your
IBM
PC
INSTALLATION
3-1
Page 37

o
Before you begin the installation, gather everything you'll need -your computer, the Inboard 386/PC, this manual, cable, chip
puller, plastic tubes, and a flat-blade screwdriver -- and arrange
them on a
reduce the risk of generating static electricity.)
clean, dry work surface. (Having everything close will
Preparing the computer
Perform the steps in this section to prepare your computer for the
installation.
1
Run your computer's diagnostic software to verify that the
computer is working correctly. Correct any error conditions
before you install the Inboard 386/PC.
o
Computers can
daily operations. Sometimes these problems go unnoticed until
new hardware or software is installed.
2
Your computer can
to discharge static electricity if you ground yourself by
likely
touching the
before you begin the
Moving around increases the chance of static discharge, so
your movements while installing the Inboard 386/PC.
develop subtle problems that don't interfere with
be
damaged by static discharge. You're less
metal back panel of your computer's system unit
installation. Figure
3-1
illustrates grounding.
limit
('
3-2
IBM
PC
(
INSTALLATION
Page 38

(
(
l
Figure
3-1
Grounding yourself
on
the
system unit
"'"
PC-0347
3 Turn off the power switch on the system unit and any attached
equipment (such as your printer and screen), and
system unit's power cord from the
could electrocute yourself.
wall outlet. If you don't, you
4 Remove the cover from the computer's system unit. (Ask your
dealer if you don't know how.)
unplug the
o
o
IBM
PC
INSTALLATION
3-3
Page 39

CAUTION
The computer won't operate correctly
provides the same conventional memory address. This can
cause
garbled
programs read data from conventional
the disks.
data on disks (both floppy
if
more than one
and
memory
hard
and
board
disks) when
store it on
o
Protect the information on
conventional memory on the computer's system
add-in
memory
the Inboard 386/PC provides the full
memory,
board.
The rest
conventional memory in the computer.
There are two types of IBM PCs,
have the
PC-1
and
you have.
board
you
don't
of
this section explains
letter "B" stamped
's don't. Use Figure 3-2 to determine which computer
your
disks
(such as
need
an
an additional conventional
on
the back panel of the system unit,
NOTE
Some technically advanced PC-1 users have
computers (replaced the
behave as
follow the instructions for
if
they're PC-2's.
ROM
BIOS). These
If
your
a PC-2.
Absent
Present
by
disabling the
board
Intel
Above
Board). Because
640K
bytes
of
conventional
memory
how
to disable
PC-1
's and PC-2's. PC-2's
PC-1 has been updated,
from
on
other
updated
updated
PC-1's
PC-2's
and
any
their
PC-1 's
i
1_
~
o =
~@~)
(/)
0 0
Figure
3-4
3·2 Distinguishing between
(/)
~
~~~~~
IBM
PC-1
and
PC-2
IBM
PC
(/j)
PC-0413
INSTALLATION
Page 40

CAUTION
Use a ballpoint pen
the graphite in the lead could short-circuit the switches.
You must reset the computer's memory switches (to 544K bytes
6
of conventional memory for the
conventional memory for the PC-2). Use a
switches 1 through 5
(IBM installed two kinds of switches
rocker switches. Figure 3-3 shows both.)
to
set switches. Don't use a pencil because
PC-1
and 640K bytes of
ballpoint pen to set
on
switch block 2 as shown
in
PCs: slide switches and
in
Figure 3-3.
o
PC-1
10FF
2
OFF
3
OFF
4
OFF
5 ON
Figure 3-3
7 If you have
Setting switches 1 through 5 on switch block 2
an
add-in board providing conventional memory,
either remove the board or disable its conventional memory.
For example,
and expanded memory.
Board if you set
the memory board's manual for information
an
Intel Above Board can provide both conventional
You don't need to remove the Above
it
to provide only expanded memory. (Refer to
on
conventional memory.)
disabling
PC-2
1 ON
2
OFF
3 ON
4
ON
5 OFF
PC·0414
o
IBM
PC
INSTALLATION
3-5
Page 41

Removing
the
8088 and the 8087
You must remove the computer's 8088 microprocessor -- its brain
-- so you can
coprocessor is installed, remove it also to avoid damaging the
Inboard 38G/PC and the 8087. (-
install the Inboard 38G/PC cable. If an 8087 math
o
Perform the steps
from the system board.
in
this section to remove the 8088 and 8087
1 Use Figure 3-4 to find the 8088
Back
on
the computer's system board.
PC-0444
Figure 3-4 Location
system board
CAUTION
Don't insert the chip puller between the socket
board. You could damage the socket
you
3-6
••••••
do.
of
the 8088
and
the
and
8087
on the
IBM
and
the system
the system
IBM PC INSTALLATION
board
PC's
if
(
Page 42
(
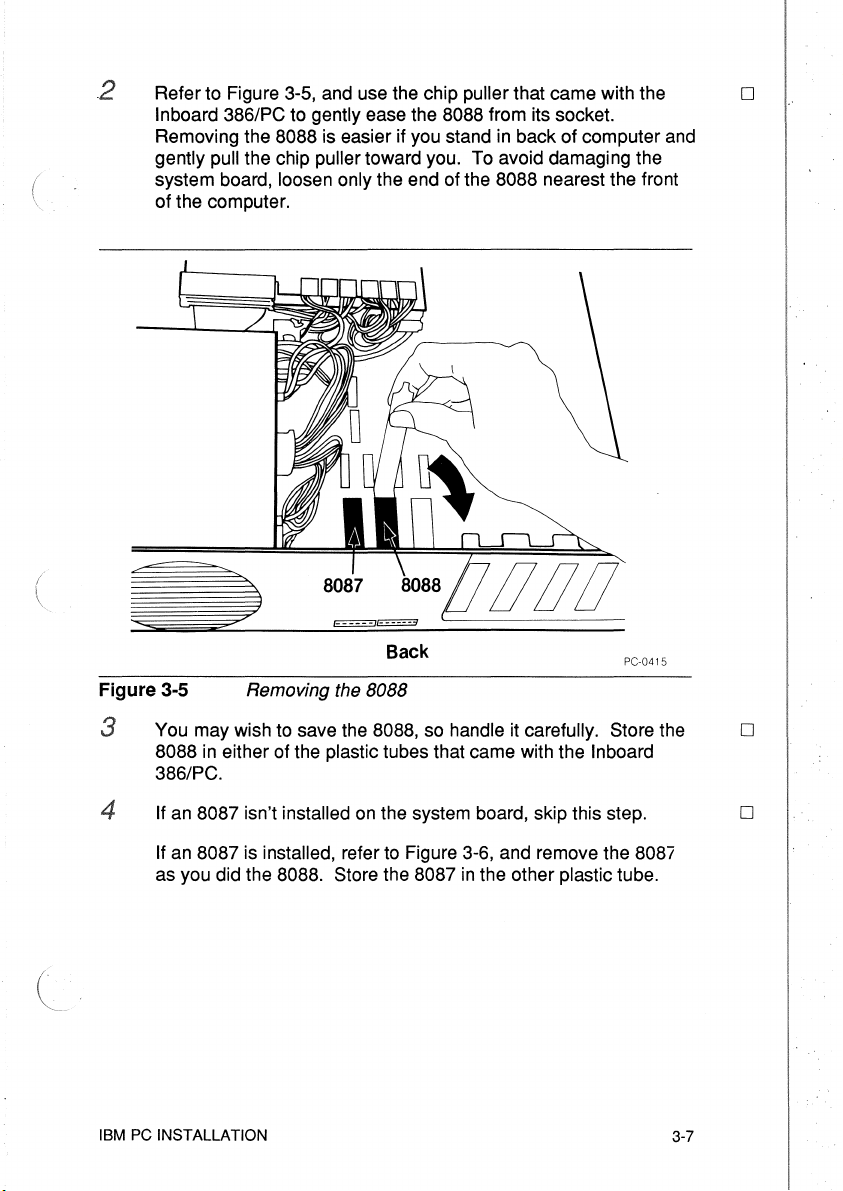
Refer to Figure 3-5, and use the chip puller that came with the
.2
Inboard 386/PC to gently ease the 8088 from its socket.
Removing the
gently pull the chip puller toward you. To avoid damaging the
system board,
of
the computer.
8088 is easier if you stand
loosen only the end
in
back
of
the 8088 nearest the front
of
computer and
D
(
8087
IEUv
Back
Figure 3·5 Removing the 8088
You may wish to save the 8088, so handle it carefully. Store the
3
8088
in
either of the plastic tubes that came with the Inboard
386/PC.
If an 8087 isn't installed on the system board, skip this step.
4
If an 8087 is installed, refer to Figure 3-6, and remove the 8087
as you did the 8088. Store the 8087
IBM PC INSTALLATION
in
the other plastic tube.
PC-041S
D
D
3-7
Page 43
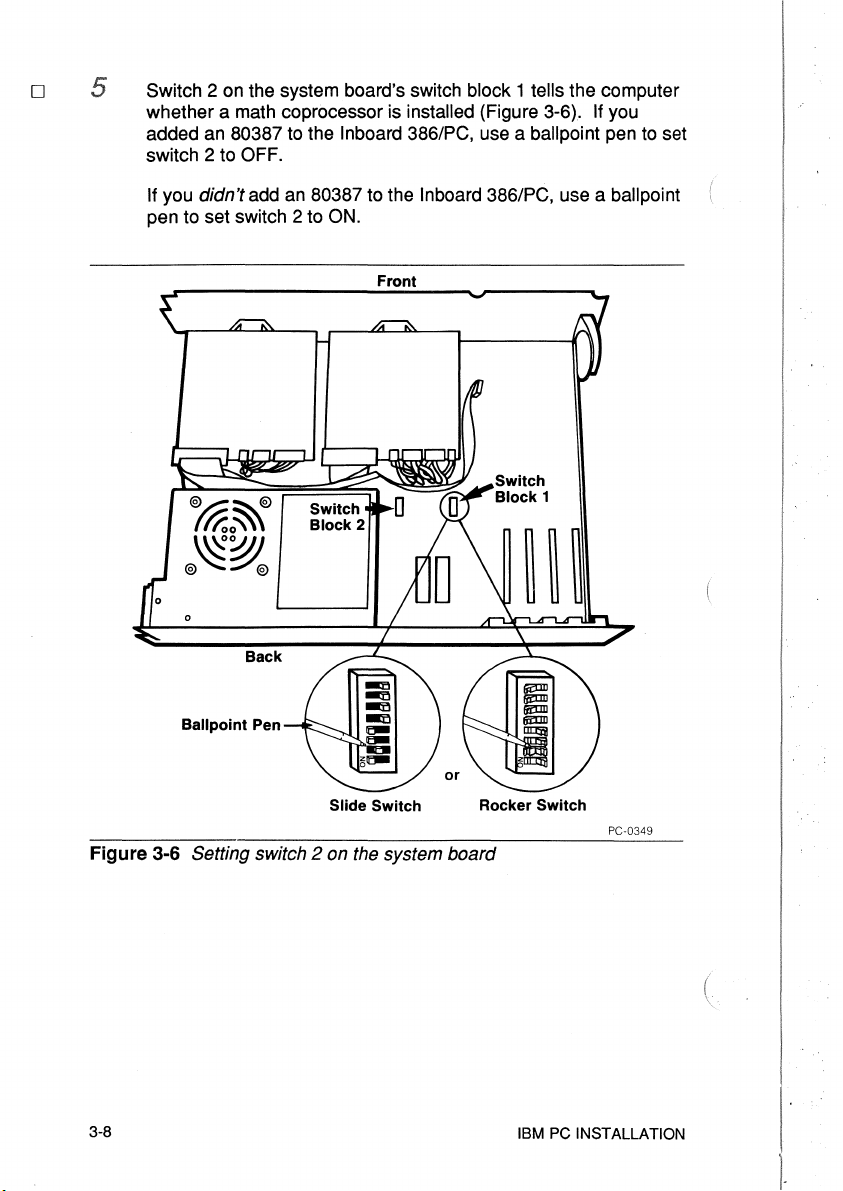
o
Switch 2 on the system board's switch block 1 tells the computer
5
whether a math coprocessor is installed (Figure 3-6). If you
added an
switch 2 to OFF.
If
you didn't add an 80387 to the Inboard 386/PC, use a ballpoint (
pen to set switch 2 to
80387 to the Inboard 386/PC, use a ballpoint pen to set
ON.
Slide Switch
Figure 3-6 Setting switch 2 on the system board
3-8
Rocker Switch
PC-0349
(
IBM PC INSTALLATION
Page 44

Perform the steps
cable
on
the system board.
in
this section to install the Inboard 386/PC
1
Inboard 386/PC cable has a connector at each end. One
The
connector has two rows of pins and fits into the 8088 socket
the system board. The other connector has two rows of holes
and fits into the cable socket
on
the Inboard 386/PC. See Figure
3-7.
Inboard™ 386/PC Connector
Plugs into the 8088 Socket
Figure 3-7
The Inboaf(jrM 3861PC cable
o
on
Plugs into the
PC-0407
IBM PC INSTALLATION
3-9
Page 45

o
2
Use
Figure 3-8 to orient the connector which
8088 socket.
the computer.
The
mark
on
the connector should face the back
has
pins with the
of
(
o
~
~OWDDD
o 0
o Mark
o
Back
Figure 3-8
3
Carefully insert thhe connector's pins into the 8088 socket --but
don't apply pressure
line up
bent pins,
pins with needle-nose pliers,
Orienting the cable with the 8088 socket
yet.
Check that the pins
with
the socket
remove
holes,
and
check for
the connector, carefully straighten the bent
and
align the connector again.
on
the connector
bent
pins. If
PC-0417
you
find
3-10
(
IBM PC INSTALLATION
Page 46
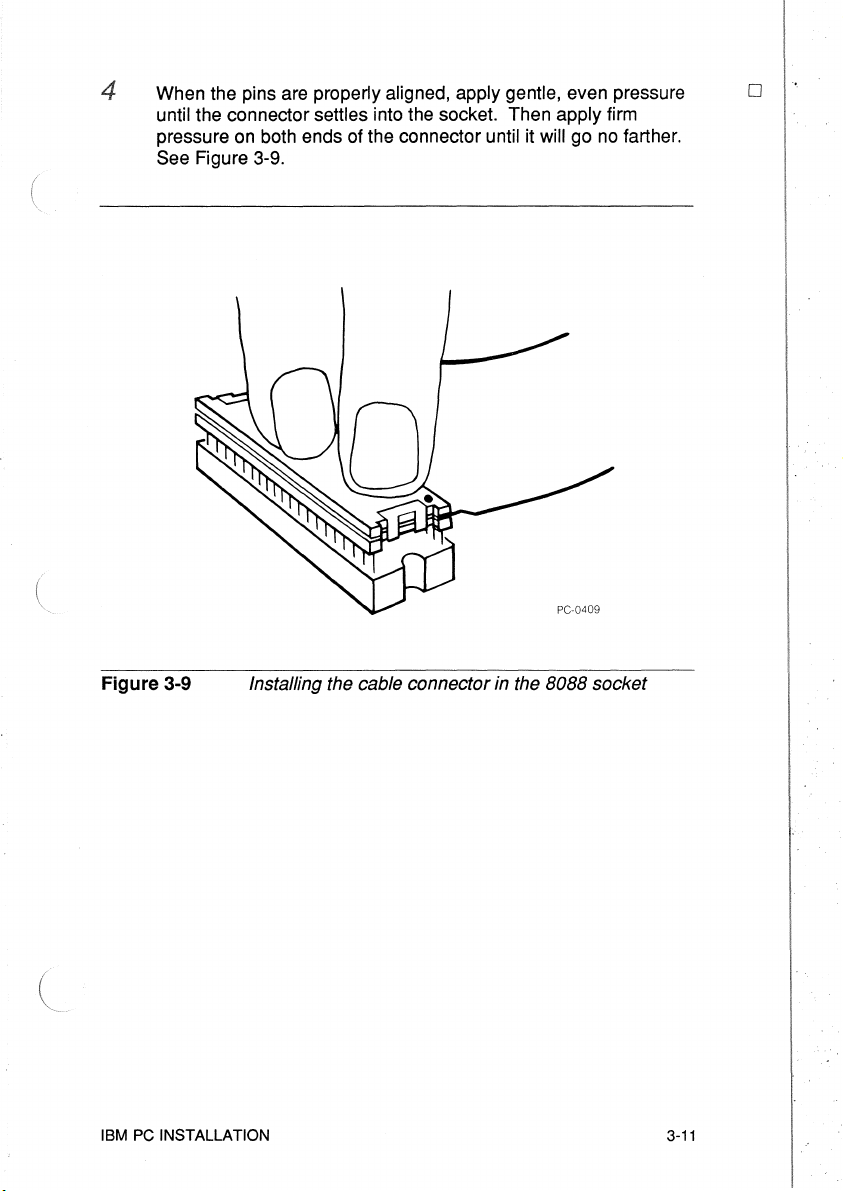
When the pins are properly aligned, apply gentle, even pressure
4
until the connector settles into the socket. Then apply firm
pressure on both ends of the connector until it will go no farther.
See Figure 3-9.
o
Figure 3-9 Installing the cable connector
IBM
PC
INSTALLATION
in
the 8088 socket
3-11
Page 47
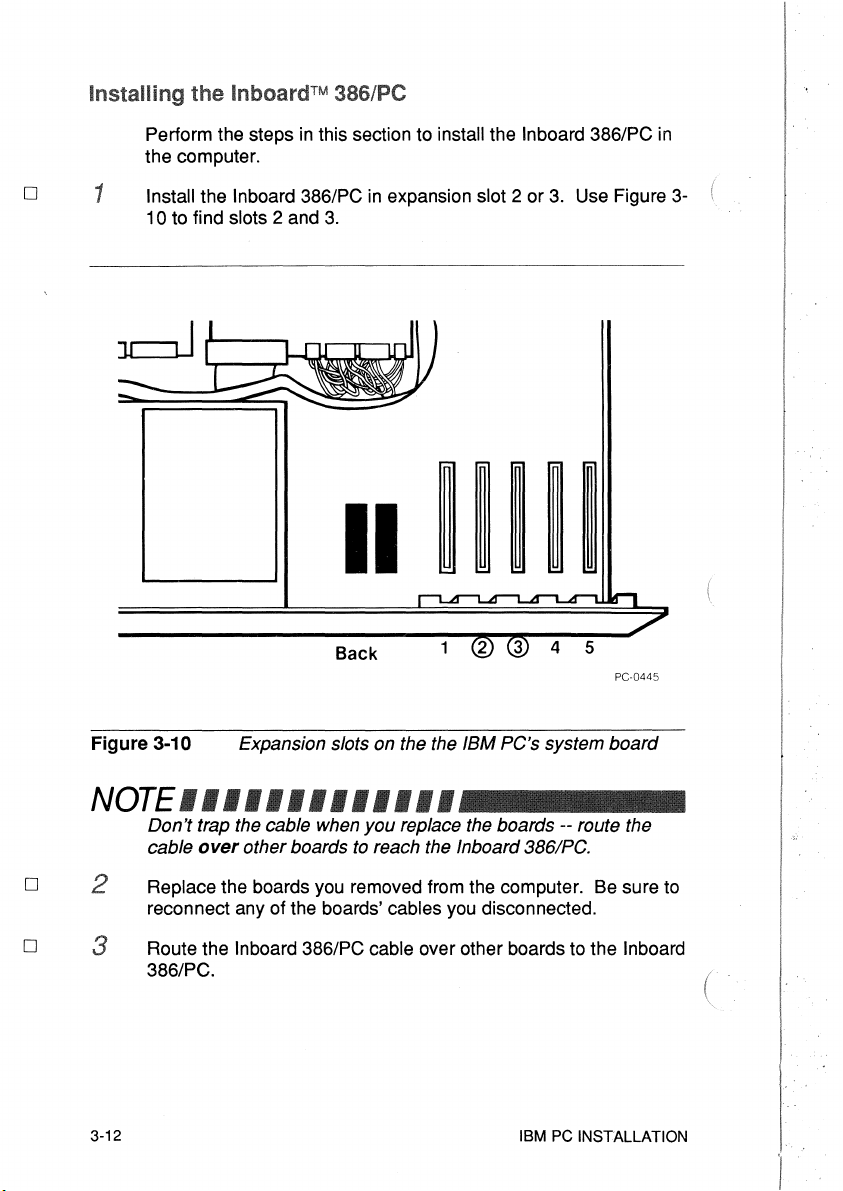
Installing the Inboard™ 3S6/PC
o
Perform the steps
the computer.
Install the Inboard 386/PC in expansion slot 2 or
1
10
to find slots 2 and
in
this section to install the Inboard 386/PC
3.
II
Back
3.
Use Figure 3- (
PC-0445
in
o
o
Figure
NOTE"""""'"
2
3
3-12
3-10 Expansion slots on the the IBM PC's system
Don't trap the cable when
over
cable
Replace the boards you removed from the computer. Be sure to
reconnect any of the boards'
Route the
386/PC.
other boards to reach the Inboard
Inboard 386/PC cable over other boards to the Inboard
you
replace the boards -- route the
3861PC.
cables you disconnected.
IBM PC INSTALLATION
board
(
Page 48
(
(
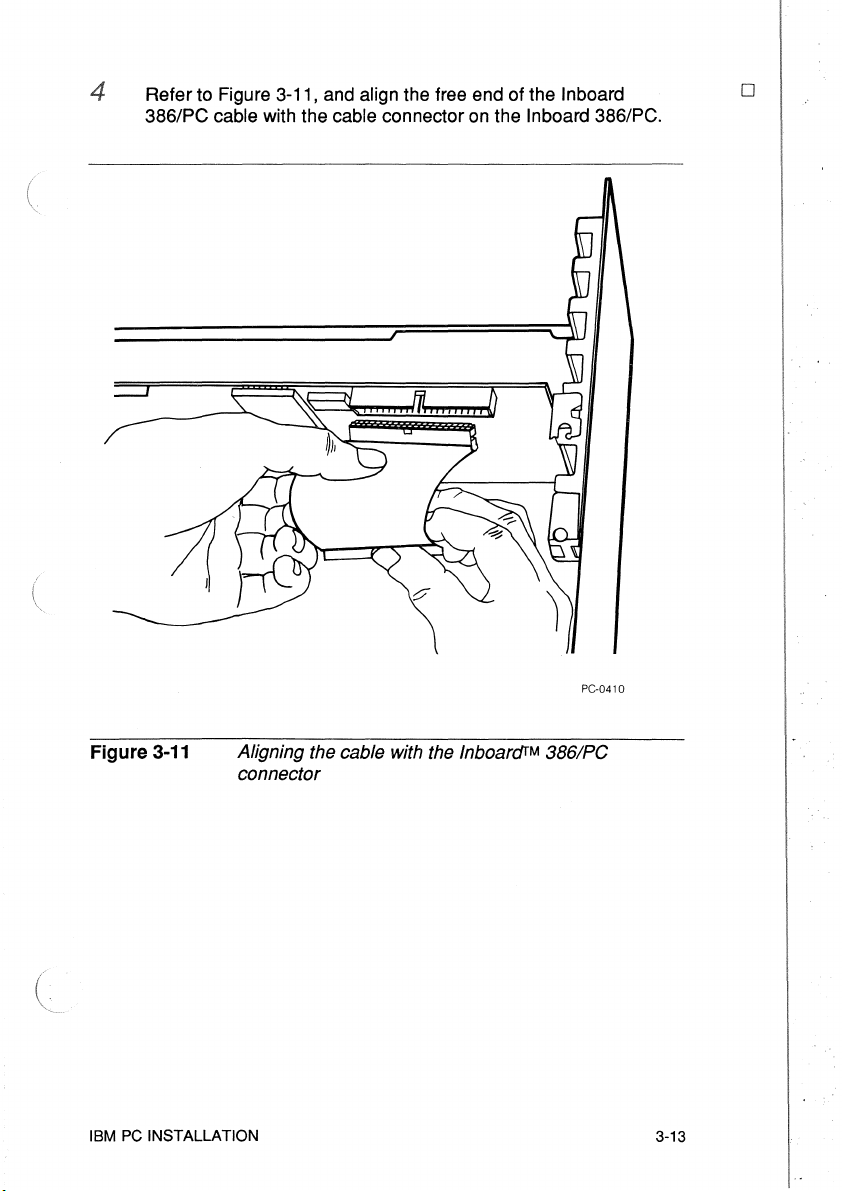
4 Refer to Figure 3-11, and align the free end of the Inboard
386/PC cable with the cable connector on the Inboard 386/PC.
o
Figure 3-11
IBM PC INSTALLATION
Aligning the cable
connector
with
the
Inboarcfi"M
PC-041
386/PC
0
3-13
Page 49

o
Support the Inboard 38G/PC while applying even pressure to the
5
cable connector until the connector will go no farther, as shown
Figure 3-12.
in
o
o
o
Figure 3-12 Installing
the
cable
on
the
Inboar(jrM
3861PC
Completing the Installation
Perform the steps
Replace
1
catch the Inboard 38G/PC cable.
Reconnect the cables and plug the power cord into the outlet.
2
3
Turn on the computer. The cursor should appear on the screen -
- start-up will take
memory on the Inboard 38G/PC.
If you have problems immediately after the installation, refer to
the next section.
3-14
the system unit's cover --
in
this section to complete the installation.
be
sure the cover doesn't
longer because the computer must count the
IBM PC INSTALLATION
'/-
-"
Page 50

If you have any problems with your computer immediately after
installing the Inboard 386/PC, check the following items
in
order.
• Is the power cord plugged into the wall outlet?
•
Are the cables and cords attached correctly?
• Are the boards inside the computer properly seated and
reconnected?
• Did you disable conventional memory on the system board by
setting switches 1 through 5
switch block 2?
Do
any memory
on
boards in the computer still provide conventional memory?
(When you turn
on
the power, the computer will beep -- SOS
Morse code [short-short-short long-long-long short-short-short]
if you haven't disabled conventional memory on the computer's
system board or
•
Is
the Inboard 386/PC cable plugged into the 8088 socket and
not the
8087 socket?
on
another add-in board.)
in
--
• Is the Inboard 386/PC cable oriented correctly
on the system board and the socket on the
the
cable connector's pins lined up with the 8088 socket? Are
the connectors pushed
• If an 8087 was installed
• Did you set switch 2
all the way into the sockets?
on
the system board, did you remove it?
on
switch block 2 correctly (OFF if an 80387
in
Inboard
is installed and ON if it isn't)?
If your computer doesn't work correctly after you've checked
these potential problems, turn to Appendix B for troubleshooting
advice.
Turn to Chapter 6 for instructions
on
installing and using the
Inboard 386/PC software.
IBM
PC
INSTALLATION
the 8088 socket
386/PC?
Are
3-15
Page 51

Page 52

COMPAQ
PORTABLE
AND
PORTABLE
This chapter contains instructions for installing the Inboard
386/PC in the COMPAQ PORTABLE and PORTABLE PLUS.
The Inboard 386/PC doesn't work
PLUS
in
the DESKPRO.
INSTALLATION
CAUTION
The
COMPAQ
conventional
is installed.
your
have
bytes (by changing a
install Inboard 3861PC.
These instructions will tell you to remove the 8087 (if one
installed). The 8087 socket
don't know how to move the disk drive, have your
8087 before you begin the installation.
the
Some
video and disk controller boards
taller than standard boards. The Inboard 386/PC cable in the
installation kit isn't long enough to reach over the tall boards.
your PORTABLE has tall boards, call Customer Support (the
number is
should
memory
If
your
dealer
in
Appendix
have no more than
on the system
COMPAQ
disable conventional
PROM
B)
256K
board
when
has been
on the system board) before
is
under the floppy disk drive. If you
and ask for the long cable.
upgraded
memory
in
early PORTABLEs are
bytes
of
Inboard
to
640K
down
to
256K
dealer remove
3861PC
bytes,
you
is
If
The Inboard 386/PC has two optional products you can purchase
separately:
• Inboard
• 80387 math coprocessor
If you have one or both of these options, install them
Inboard 386/PC before you begin the installation instructions
this chapter. The manual that comes with each option tells you
how.
386/PC Piggyback Memory board
NOTE
It's a/ways a
new
hardware
COMPAQ PORTABLE AND PORTABLE PLUS INSTALLATION
good
or
idea to
software.
back
up
your
hard
disk
before adding
on
your
in
4-1
Page 53
This section contains instructions for installing the Inboard
386/PC
computer.
in
a COMPAQ PORTABLE or PORTABLE PLUS
CAUTION
Follow
Skipping steps
inconvenience.
Each step has a box beside it near the outside edge of the page.
To keep track of where you are, check off the box after you
complete each step.
the steps in
least
you
The
Inboard 3861PC
can
order --if
and
skimming the instructions will
expect from skipping the directions is a
At
most,
and
your
you
don't,
you'll
you'll
ruin an expensive investment: the
computer.
miss crucial steps.
not
save time.
major
o
Before you begin the
your computer, the Inboard 386/PC, this manual, cable, chip
puller, plastic tubes, and COMPAQ screwdrivers -- and arrange
them on a
reduce the risk of generating static electricity.)
Perform the steps
installation.
1
Run your computer's diagnostic software to verify that the
computer is working
before you
Computers can develop subtle problems that don't interfere with
daily operations. Sometimes these problems go unnoticed until
new hardware
clean, dry work surface. (Having everything close will
install the Inboard 386/PC.
installation, gather everything you'll need
in
this section to prepare your computer for the
correctly. Correct any error conditions
or
software is installed.
--
4-2
COMPAQ PORTABLE AND PORTABLE PLUS INSTALLATION
Page 54

(
(
2 Your computer can be damaged by static discharge. You're less
likely to discharge static electricity if you ground yourself by
touching the metal side panel of your computer's system unit
4-1
before you begin the installation. Figure
Moving around increases the chance of static discharge, so limit
your movements while
installing the Inboard 386/PC.
illustrates grounding.
PC-0418
o
Figure
4
5
COMPAQ
4-1
3
Turn off the power switch on the system unit and any attached
equipment (such as your printer and screen), and unplug the
system unit's power cord from the wall outlet. If you don't, you
could electrocute yourself.
Remove the cover and the metal
unit.
Remove
PORTABLE
Grounding yourself on the system unit
grill from the computer's system
all the add-in boards
AND
PORTABLE PLUS INSTALLATION
in
the computer.
o
o
o
4-3
Page 55

CAUTION
The computer won't operate correctly
provides the same conventional memory address. This can
cause garbled data on disks (both floppy
programs read data from conventional memory
the disks.
Protect the information on
conventional memory on the computer's system board
add-in memory board (such as an Intel Above Board). Because
the Inboard 3861PC provides the full
memory,
board.
The rest
conventional memory
you
don't need an additional conventional memory
of
this section explains how to disable other
your
in
the computer.
disks
if
more than one board
and
hard disks) when
and
by
disabling the
640K
bytes
store
it
and
of
conventional
on
any
o
o
The
6
7
COMPAQ should have no more than 256K bytes of
conventional memory
386/PC
640K bytes, have your dealer disable conventional memory down
to 256K bytes (by changing a
before you install the
If you have an add-in board providing conventional memory,
either remove the board or disable its conventional memory.
For example, an
and expanded memory. You don't need to remove the Above
Board if you set it to provide only expanded memory. (Refer to
the memory board's manual for information on disabling
conventional memory.)
You must remove the computer's 8088 microprocessor
-- so you can install the Inboard 386/PC cable. If
coprocessor is installed, remove it also to avoid damaging the
Inboard 386/PC and the 8087.
Perform the steps
from the system board.
is installed. If your COMPAQ has been upgraded to
on
the system board when the Inboard
PROM on the system board)
Inboard 386/PC.
Intel Above Board can provide both conventional
an
in
this section to remove the 8088 and 8087
--
its brain
8087 math
4-4
COMPAQ PORTABLE AND PORTABLE PLUS INSTALLATION
Page 56

(
1
Use
Figure
4-2
to
find
the
8088
on
the
computer's
system
00
00
00
o
ooe
aOe
ooe
ooe
ooe
board.
Oe
o
(
Figure 4-2
CAUTION
COMPAQ
Don't
insert
board.
you
do.
PORTABLE
Location
PORTABLE's
••••••
the
chip
You
could
AND
of
the
system
puller
damage
PORTABLE
Back
8088
and
board
between
the
socket
PLUS
INSTALLATION
the
the
8087
socket
and
the
on
the
and
the
system
PC-0419
COMPAQ
system
board
if
4-5
Page 57

o
2 Refer to Figure 4-3, and use the chip puller that came with the
Inboard 386/PC to gently ease the 8088 from its socket.
Removing the
computer nearest the
you. To avoid damaging the system board,
8088 farthest from the side of the computer. (
of the
8088 is easier if you stand
8088 and gently pull the chip puller toward
on
the side of the
loosen only the end
I
0000000
0000
Back
o
o
Side
Figure
3
4
4-6
4-3
You may wish to save the 8088, so handle it carefully. Store the
8088
386/PC.
If an 8087 isn't installed
If an 8087 is installed, refer to Figure 4-3, and remove the 8087 (
as you did the
drive. Have your
how to move the floppy disk drive.) Store the 8087 in the other
plastic tube.
Removing the
in
either of the plastic tubes that came with the Inboard
8088. (The 8087 socket is under the floppy disk
dealer remove the 8087 for you if don't know
COMPAQ PORTABLE AI\ID PORTABLE PLUS INSTALLATION
8088
on
the system board, skip this step.
PC-0420
Page 58
CAUTION
Use a ballpoint pen
the graphite in the lead could short-circuit the switches.
••••••
to
set switches. Don't use a pencil because
(
"
(
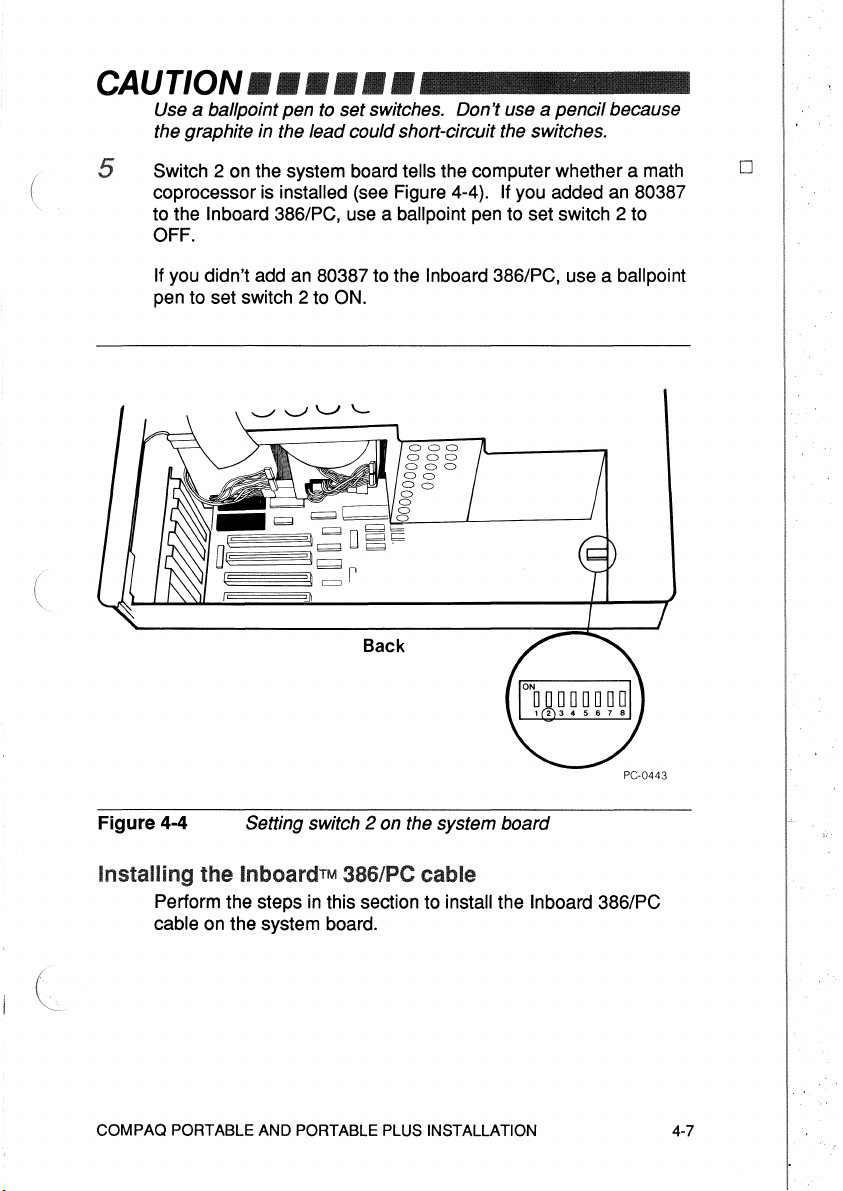
Switch 2 on the system board tells the computer whether a math
5
coprocessor is
to the Inboard 386/PC, use a ballpoint pen to set switch 2 to
OFF.
If you didn't add an 80387 to the Inboard 386/PC, use a ballpoint
pen to set switch 2 to ON.
installed (see Figure 4-4). If you added an 80387
Back
o
Figure
Installing
COMPAQ PORTABLE AND PORTABLE PLUS INSTALLATION 4-7
4-4
Perform the steps
cable on the system board.
Setting switch
the
InboardTM
2 on the system board
38S/PC cable
in
this section to install the Inboard 386/PC
Page 59

NOTE
Some
video
and
disk controller boards in early PORTABLEs are
taller than standard boards. The Inboard
installation kit isn't long enough to reach
your
PORTABLE
number
is
has tall boards, call Customer Support (the
in Appendix B)
and
3861PC cable in the
over
ask
for the long cable.
the tall boards.
If
o
1
The Inboard 386/PC cable has a connector
connector has two rows of pins and fits into the 8088 socket
the system board. The other connector has two rows of holes
on
and fits into the cable socket
the Inboard 386/PC. See Figure
at
each end. One
4-5.
Inboard™ 386/PC Connector
into
the
Plugs
Figure
4-5 The InboarcfrM 3861PC cable
8088 Socket
Plugs
into
on
the
4-8
COMPAQ PORTABLE AND PORTABLE PLUS INSTALLATION
Page 60
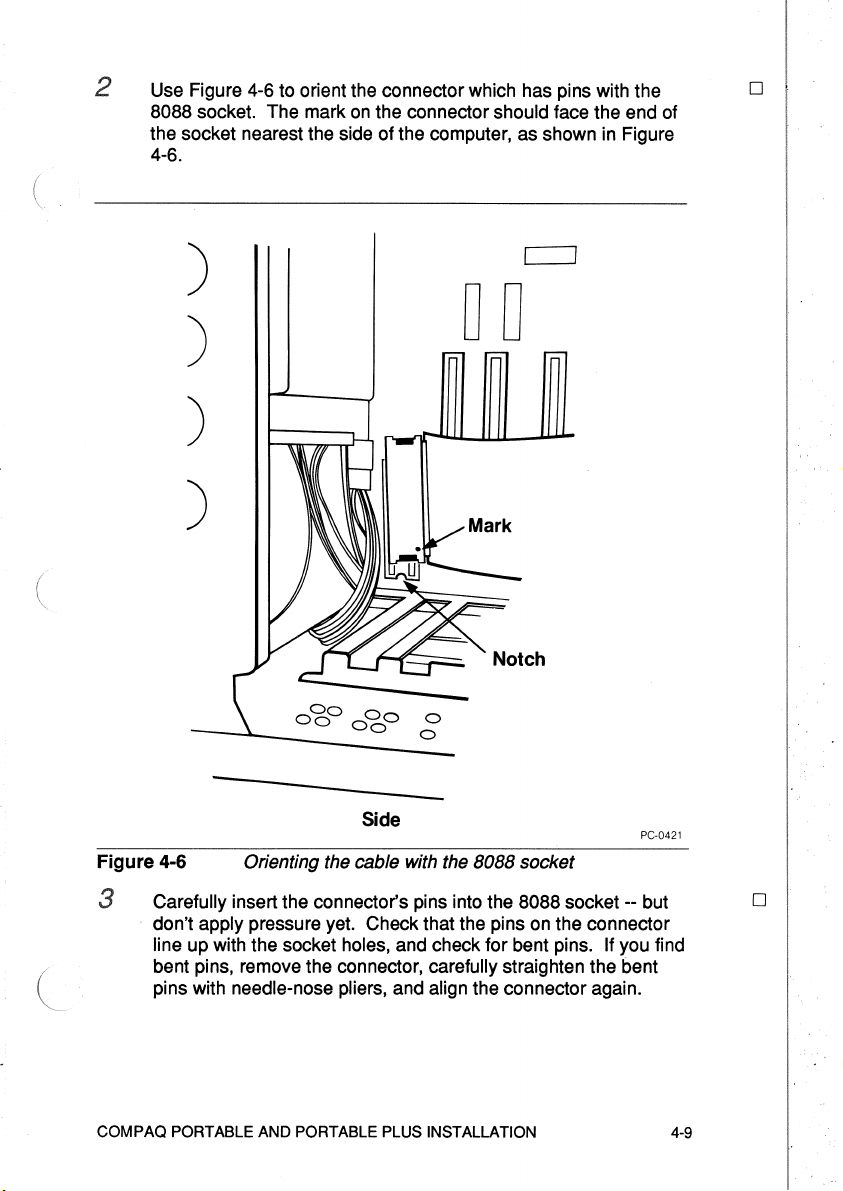
Use Figure
8088
the socket nearest the side of the computer, as shown
4-6.
4-6
to orient the connector which has pins with the 0
socket. The mark
on
the connector should face the end of
)
in
Figure
)
o 0
)
)
Side
Figure 4-6 Orienting the cable with the 8088 socket
3 Carefully insert the connector's pins into the
apply pressure yet. Check that the pins
don't
line up with the socket holes, and check for bent pins. If you find
bent pins, remove the connector,
pins with
needle-nose pliers, and align the connector again.
carefully straighten the bent
8088
socket --but
on
the connector
PC-0421
o
COMPAQ PORTABLE AND PORTABLE PLUS INSTALLATION
4-9
Page 61

o
When the pins are properly aligned, apply gentle, even pressure
4
until the connector settles into the socket. Then apply firm
pressure on both ends of the connector until it will go no farther.
See Figure 4-7.
(
\
Figure 4-7 Installing
4-10
COMPAQ PORTABLE AND PORTABLE PLUS INSTALLATION
the
cable connector
in
the
8088 socket
(
Page 62
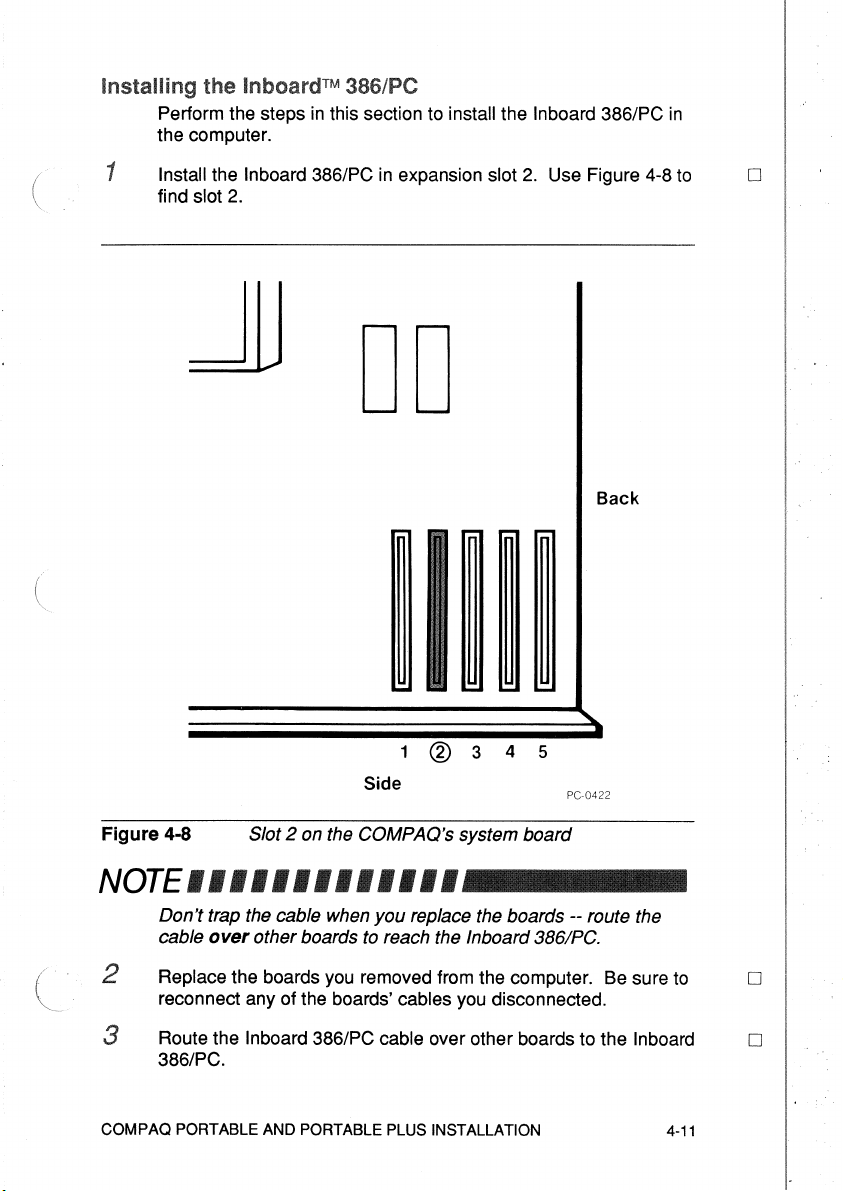
Perform the steps
the computer.
1
Install the Inboard 386/PC
find slot 2.
in
this section to install the Inboard
in
expansion slot
2.
386/PC
Use Figure 4-8
in
to
D
Figure 4-8
JlJ
Slot 2 on the COMPAQ's system board
DO
Side
NOTE
Don't trap the cable when
cable over other boards to reach the Inboard
you
Back
1 ® 3 4 5
PC-0422
replace the boards -- route the
3861PC.
Replace the boards you removed from the computer.
reconnect any of the boards' cables you disconnected.
Route the
3
386/PC.
COMPAQ PORTABLE AND PORTABLE PLUS INSTALLATION
Inboard 386/PC cable over other boards to the Inboard
Be
sure
to
4-11
D
D
Page 63
o
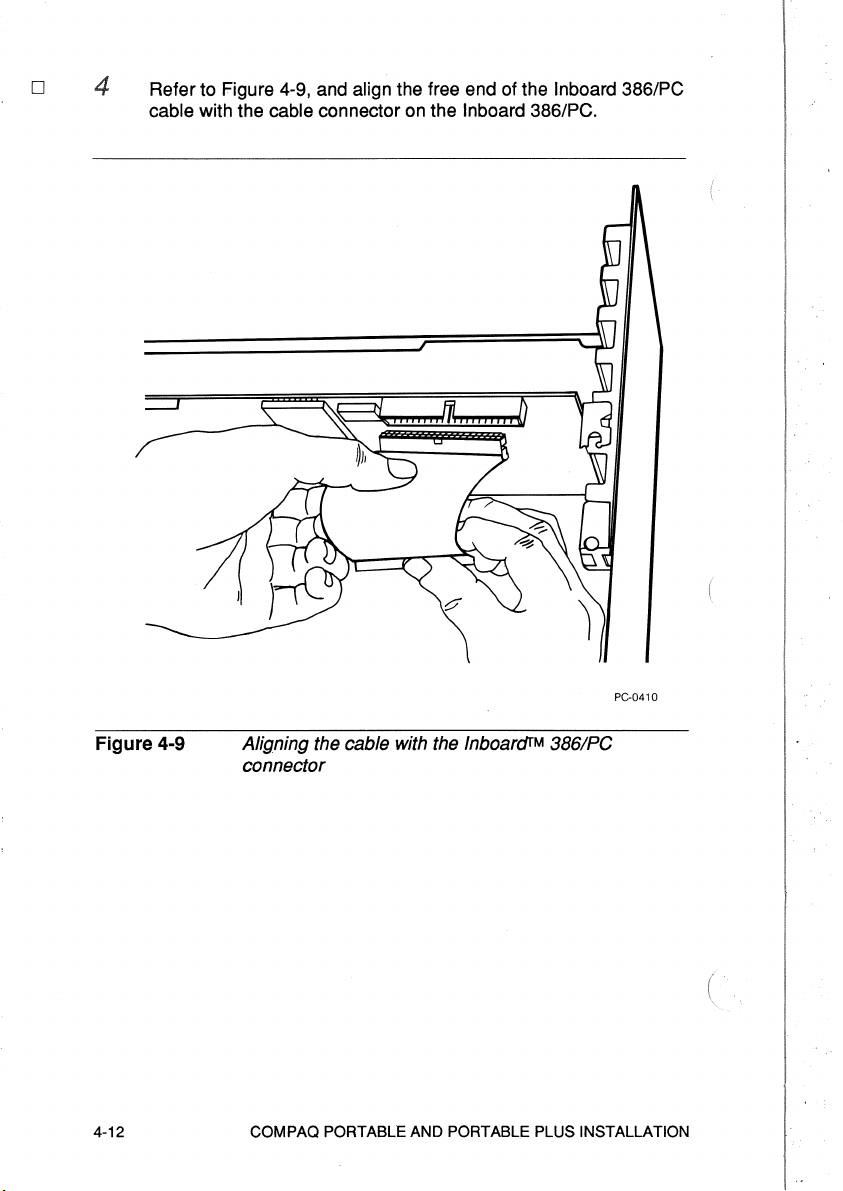
4 Refer to Figure 4-9, and align the free end of the Inboard 386/PC
cable
with the cable connector on the Inboard 386/PC.
Figure 4-9 Aligning the cable with the
connector
4-12
COMPAQ PORTABLE AND PORTABLE PLUS INSTALLATION
InboarcJfM
PC·0410
3861PC
Page 64

(
(
Support the Inboard 386/PC while applying even pressure to the
5
cable connector until the connector will go
Figure 4-10.
no
farther, as shown
o
in
Figure 4-10
Installing the cable connector
3861PC
on
the
Completing the Installation
Perform the steps
1
Replace the system unit's grill and cover -- be sure the grill
doesn't catch the
2
Reconnect the cables and plug the power cord into the outlet.
Turn on the computer. The cursor should appear on the
3
screen -- start-up will take longer because the computer must
count the memory
If you have problems immediately after the installation, refer to
the next section.
COMPAQ PORTABLE AND PORTABLE PLUS INSTALLATION
in
this section to complete the installation.
Inboard 386/PC cable.
on
the Inboard 386/PC.
Inboarc:Jr
M
o
o
o
4-13
Page 65

A
quick
checklist
If you have any problems with your computer immediately after
installing the Inboard 386/PC, check the following items in order.
• Is the power cord plugged into the wall outlet?
Are the cables and cords attached correctly?
•
•
Are the boards inside the computer properly seated and
reconnected?
• Do any boards
memory? (When you turn on the power, the computer will
beep -short-short-short] -- if you haven't disabled conventional memory
on the computer's system board or on another add-in board.)
• Is the Inboard 386/PC cable plugged into the 8088 socket and
not the 8087 socket?
• Is the Inboard 386/PC cable oriented correctly in the 8088 socket
on the system board and the socket on the
the
the connectors pushed all the way into the sockets?
• If an 8087 was installed on the system board, did you remove it?
• Did you set switch 2 correctly (OFF if an 80387 is installed and
ON if it isn't)?
If your computer doesn't work correctly after you've checked
these potential problems, turn to Appendix B for troubleshooting
advice.
SOS
cable connector's pins lined up with the 8088 socket? Are
in
the computer still provide conventional
in
Morse code [short-short-short long-long-long
Inboard 386/PC? Are
(
Where to
Turn to Chapter 6 for instructions
Inboard 386/PC software.
4-14
go
from here
COMPAQ PORTABLE AND PORTABLE PLUS INSTALLATION
on
installing and using the
(
Page 66

TANDY 1200
This chapter contains instructions for installing the Inboard
386/PC
The
separately:
in
a Tandy 1200 HD.
Inboard 386/PC has two optional products you can purchase
HD
INSTALLATION
• Inboard
• 80387 math coprocessor
If you have one or both
Inboard 386/PC before you begin the installation instructions
this chapter. The manual that comes with each option tells you
how.
386/PC Piggyback Memory board
of
these options, install them
NOTE
It's always a
new
hardware
This section contains instructions for installing the Inboard
386/PC
CAUTION
Follow the steps
Skipping steps
The least you can expect from skipping the directions is
inconvenience.
Inboard
Each step has a box beside it near the outside edge of the page.
To keep track of where you are, check off the box after you
complete each step.
good
idea to back up your
or
software.
in
a Tandy 1200 HD.
in
order --if
and
skimming the instructions will not save time.
At
most, you'll ruin an expensive investment: the
3861PC
and
your
you
don't, you'll miss crucial steps.
computer.
hard
disk before adding
on
your
in
a major
Before you begin the
your computer, the Inboard 386/PC, this manual, cable, chip
puller, plastic tubes, and a flat-blade screwdriver -- and arrange
on
them
reduce the risk of generating static electricity.)
TANDY 1200 HD INSTALLATION
a clean, dry work surface. (Having everything close will
installation, gather everything you'll need
--
5-1
Page 67

Perform the steps
installation.
in
this section to prepare your computer for the
D
D
Your computer can
1
likely
to discharge static electricity if you ground yourself by
touching the
before you begin the installation. Figure
Moving around increases the chance of static discharge, so
your movements while installing the Inboard 386/PC.
®
be
damaged by static discharge. You're less
metal side panel of your computer's system unit
5-1
illustrates grounding.
~n.
......
.@
'-----------~
c:::J
•
Figure
5-1
Turn off the power switch on the system unit and any attached
equipment (such
system unit's power cord from the
could electrocute yourself.
Grounding yourself on the system unit
as
your printer and screen), and unplug the
wall outlet. If you don't, you
limit
rwr..~
$
ffiJ
$
D
D
3
Remove the cover from the computer's system unit. (Refer to the
computer's User's Guide if you don't know
4
Remove all the boards
5-2
in
the computer.
hOw.)
TANDY 1200 HD INSTALLATION
Page 68

CAUTION
The computer won't operate correctly
provides the same conventional memory address. This can
cause garbled data on disks (both floppy
programs read data from conventional memory
the disks.
if
more than one board
and
hard
disks) when
and
store it on
Protect the information on
conventional memory on the computer's system board
add-in memory board (such as an Intel Above Board). Because
the Inboard 3861PC provides the full
memory,
board.
The rest
conventional memory in the computer.
you
don't need an additional conventional memory
of
this section explains
your
disks
by
disabling the
640K
how
to disable other
bytes
and
of
conventional
any
Tandy makes two kinds of 1200 HDs. One has seven expansion 0
slots for add-in boards, and the other has five slots. If your
computer has five
For a Tandy 1200
slots, skip this step and go to step
HD
with seven slots, jumper
JP1
on
6.
the
computer's system board specifies the amount of conventional
memory
on
Be
on
the system board. Use Figure 5-2 to find jumper
the computer's system board.
sure the jumper
on
JP1
encloses the two pins closest to the
JP1
front of the computer.
TANDY 1200 HD INSTALLATION
5-3
Page 69

o
000000000
~
1\
7·Slot Tandy 1200 HD
Figure 5-2 Jumper
DOD
0 0 0 0 0 0
DOD
DO
D~D
00000000
nnnnnnn
Back
JP1
on the computer's system board
JP 1
PC-0424
o
If you have an add-in board providing conventional memory,
6
either remove the board or disable its conventional memory.
For example,
and expanded memory.
Board if you set
the memory board's manual for information
conventional memory.)
You must remove the computer's 8088 microprocessor --its brain
--
so you can install the Inboard 386/PC cable. If
coprocessor
Inboard 386/PC and the 8087.
Perform the steps
from the system board.
5-4
an
Intel Above Board can provide both conventional
You don't need to remove the Above
it
to provide only expanded memory. (Refer to
on
disabling
an
is
installed, remove
in
this section to remove the 8088 and 8087
it
also to avoid damaging the
TANDY 1200 HD INSTALLATION
8087 math
Page 70

Use Figure 5-3 to find the 8088
1
on
the computer's system board.
D
D
7·Slot
5·Slot
Tandy
1200 HD
Tandy 1200 HD
8087
8087
8088
8088
Back
NDoDOrmoJJ~
u~
~II
Figure
TANDY 1200 HD INSTALLATION
5-3
Location
Tandy
1200 HD's system board
of
the 8088
and
the 8087 on the
PC-0425
5·5
Page 71

CAUTION
Don't insert the chip puller between the socket
board.
you
••••••
You could damage the socket
do.
_
and
and
the system board
the system
if
D
Refer to Figure 5-4, and use the chip puller that came with the
2
Inboard 386/PC to gently ease the 8088 from its socket.
For the
stand in front of the computer and
toward you. To avoid damaging the system board, loosen only
the end of the 8088 nearest the back of the computer.
For the
stand
toward you. To avoid damaging the system board, loosen only
the end of the 8088 nearest the front of the computer.
7-slot Tandy 1200 HD, removing the 8088 is easier if you
gently pull the chip puller
5-slot Tandy 1200 HD, removing the 8088 is easier if you
in
back of the computer and gently pull the chip puller
(
5-6
(
TANDY 1200 HD INSTALLATION
Page 72

7·Slot Tandy 1200 HD
8087
5·Slot Tandy 1200 HD
PC-0426
Figure 5-4 Removing the 8088
TANDY 1200 HD INSTALLATION 5-7
Page 73

o
o
You may wish to save the 8088, so handle it carefully. Store the
3
8088 in either of the plastic tubes that came with the Inboard
386/PC.
4
If an 8087 isn't installed
If an 8087 is installed, you must remove it. Refer to Figure 5-4,
and remove the
plastic tube.
other
8087 as you did the 8088. Store the 8087 in the
on
the system board, skip this step.
CAUTION
o
5
••••••
Use a ballpoint pen to set switches. Don't use a pencil because
the graphite in the lead could short-circuit the switches.
The system board has a switch to
math coprocessor is
this is switch
block
1.
ballpoint pen to set switch 2 to OFF.
If
you didn't add an 80387 to the Inboard 386/PC, use a ballpoint
pen to set switch 2 to ON.
2.
If you added
installed (Figure
For the 5-slot Tandy, this is switch 2
an
80387 to the Inboard 386/PC, use a
tell the computer whether a
5~5).
For the 7-slot Tandy,
on
switch
(.
5-8
(
TANDY 1200 HD INSTALLATION
Page 74
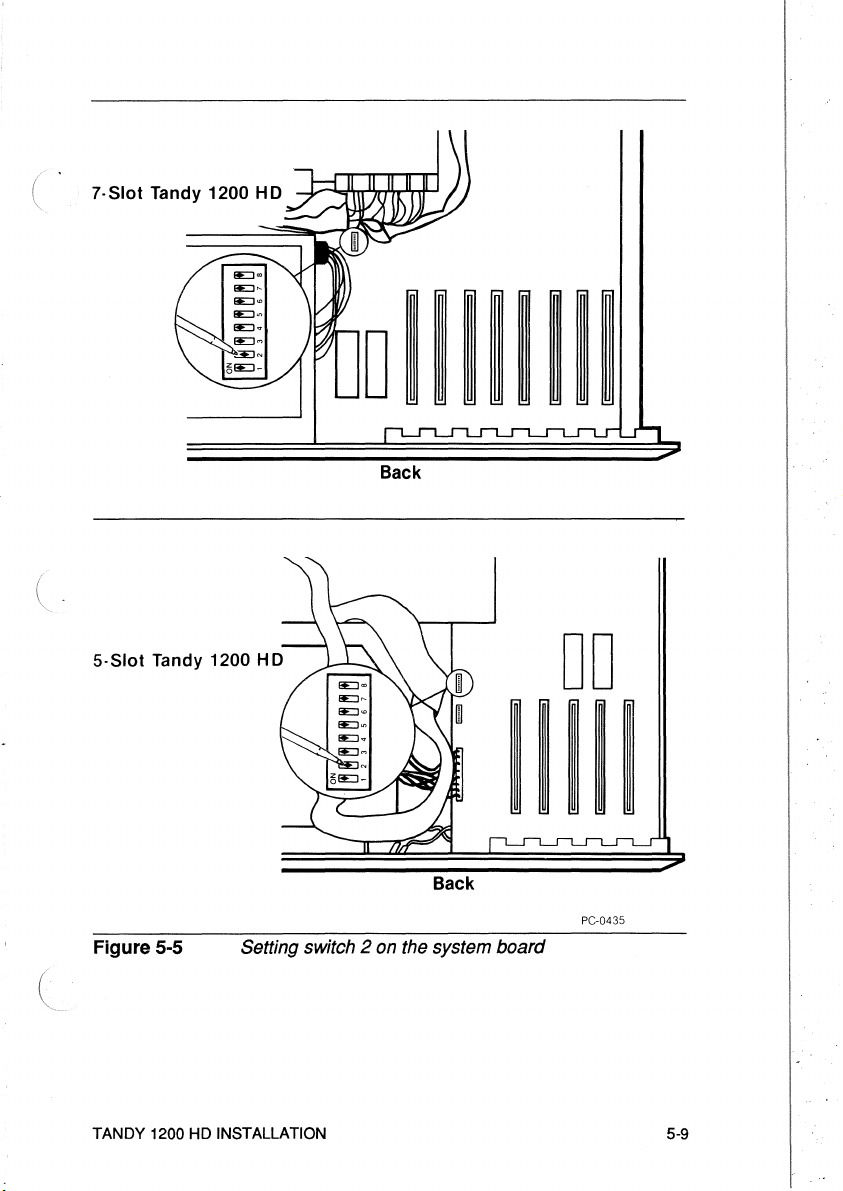
(.
'.
c-
7-510t Tandy
1200
HD
~~
5-5101
Tandy 1200 HD
Figure 5-5 Setting switch 2 on the system
(
TANDY 1200 HD INSTALLATION
DO
lun
Back
PC-0435
board
5-9
Page 75
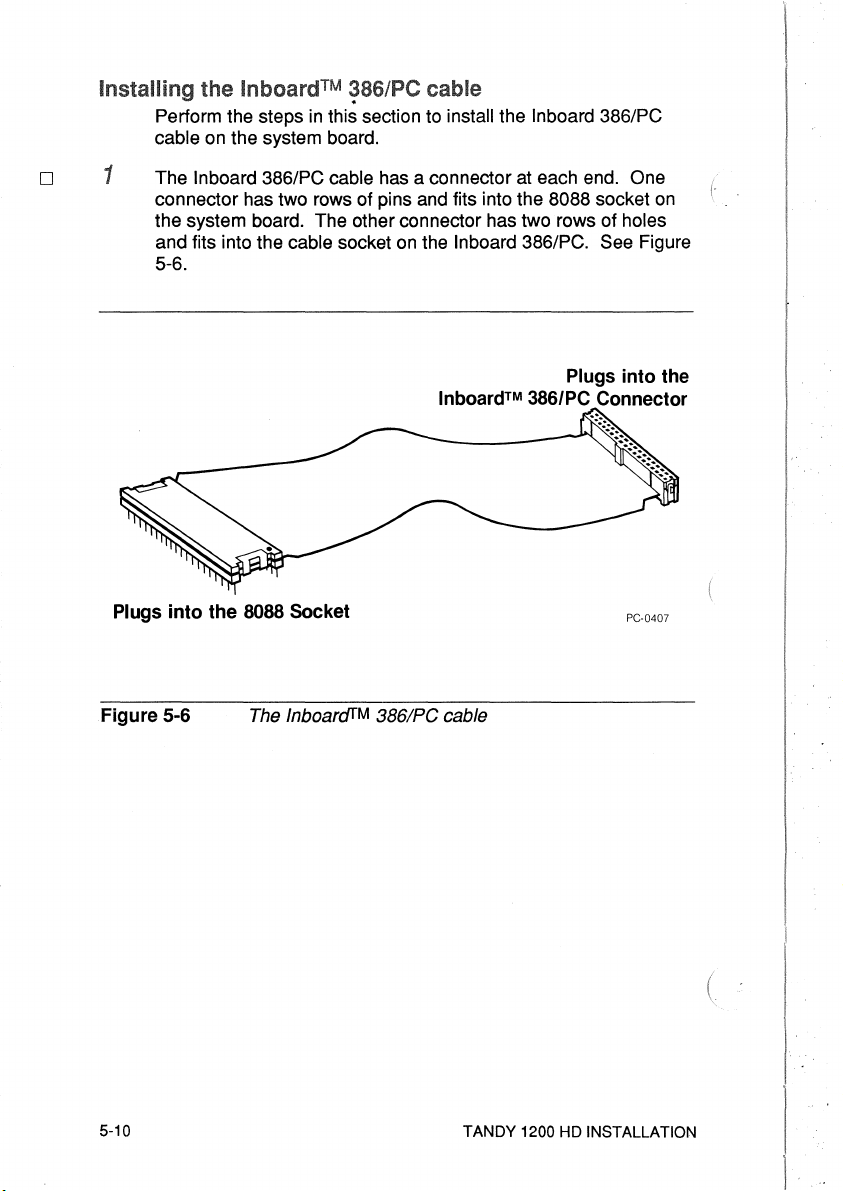
D
Perform the steps
in
this section to install the Inboard 386/PC
cable on the system board.
The
1
Inboard 386/PC cable has a connector at each end. One
connector has two rows of pins and fits into the 8088 socket
the system board. The other connector has two rows of holes
on
and fits into the cable socket
the Inboard 386/PC. See Figure
5-6.
Inboard™ 386/PC Connector
on
Plugs into the
Plugs into the 8088 Socket
Figure 5-6
5-10
The
InboarcJTM
3861PC
PC-0407
cable
TANDY 1200 HD INSTALLATION
Page 76

Use Figure 5-7 to orient the connector which has pins with the 0
8088
socket. The mark
on
the connector should face the back of
the computer.
7·510t Tandy 1200
HD
5·510t Tandy 1200 H D
Back
Back
Notch
PC-0427
Figure 5-7 Orienting the cable with the 8088 socket
TANDY 1200 HD INSTALLATION
5-11
Page 77

o
Carefully insert the connector's pins into the 8088 socket --but
3
don't apply pressure yet. Check that the pins
line up with the socket holes, and check for bent pins.
bent pins, remove the connector,
pins with needle-nose pliers, and align the connector again.
carefully straighten the bent
on
the connector
If you find
o
4
When the pins are properly aligned, apply gentle. even pressure
until the connector settles into the socket. Then apply firm
pressure
See Figure 5-8.
Figure 5-8
Perform the steps
the computer.
on
both ends of the connector until it will go
Installing the cable connector in the 8088 socket
InboardTM
'"'''''~/'''''
in
this section to install the Inboard
no
farther.
386/PC
in
5-12
TANDY 1200 HD INSTALLATION
Page 78
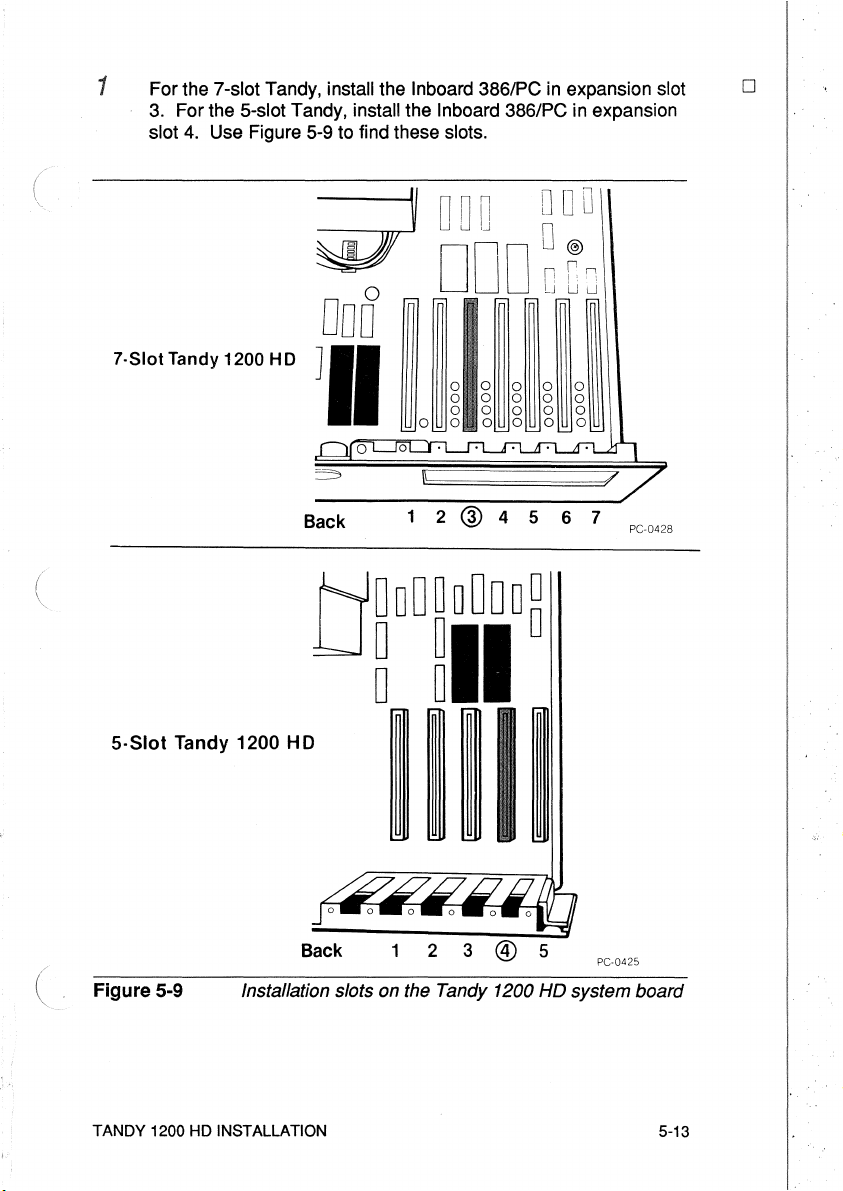
For the 7-slot Tandy, install the Inboard 386/PC
1
3.
For the 5-slot Tandy, install the Inboard 386/PC in expansion
slot 4. Use Figure 5-9 to find these slots.
in
expansion slot
o
7·510tTandy
5·510t Tandy
1200 HD
1200
Back
o
o
o
o 0
12@4567
000
000
000
o 0 0 0
0
0
0
PC-0428
NDoDOoDDD~
u~
H D
~II
Figure
TANDY
5-9
1200
Back 1 2 3
Installation slots on the Tandy 1200
HD
INSTALLATION
PC-0425
HD
system board
5-13
Page 79
For the 7-slot Tandy, follow the directions
For the 5-slot Tandy, follow the directions
the 5-slot Tandy" subsection.
in
the next subsection.
in
the "Installation
in
Installation in
the
7-slot
NOTE
Don't trap the cable when you replace the boards -- route the
cable
over other boards to reach the Inboard
o
1
Replace the boards you removed from the computer.
reconnect any of the boards' cables you disconnected.
o Route the Inboard 386/PC cable over other boards to the Inboard
386/PC.
3861PC.
Be
sure to
5-14 TANDY 1200
HD
INSTALLATION
Page 80

Refer to Figure 5-10, and align the free end of the Inboard
3
386/PC
cable with the cable connector
on
the Inboard 386/PC.
o
Figure 5-10
TANDY 1200 HD INSTALLATION
Aligning the cable with the InboardfM 3861PC
connector
PC-0410
5-15
Page 81

o
Support the Inboard 386/PC while applying even pressure to the
4
cable connector until the connector will go
Figure 5-11.
no
farther, as shown
in
PC-0411
Figure
5-16 TANDY 1200 HD INSTALLATION
5-11
Installing the cable on the InboardfM 3861PC
Page 82

Installation
in
the
5-slot
1 Because of the location of the 8088 socket, you must twist the D
cable to reach the
Figure 5-12.
5·Slol
Inboard 386/PC. Twist the cable as shown
Back
Tandy 1200
HD
PC-0415
in
Figure 5-12 Twisting the InboardfM 3861PC cable
(
TANDY 1200 HD INSTALLATION
5-17
Page 83

o
2 Refer to Figure 5-13, and align the free end of the Inboard
386/PC cable with the cable connector on the Inboard 386/PC.
o
Back
5·5101 Tandy 1200 HD
PC-0416
o
o
o
Figure 5-13
3
Support the Inboard 386/PC while applying even pressure to the
cable connector until the connector will go no farther, as shown
Figure 5-11.
Flatten the cable by gently pressing it against the Inboard
4
386/PC.
Replace the boards you removed from the computer. Be sure to
5
reconnect any of the board's cables you disconnected.
5-18
Aligning the cable with the InboardfM 3861PC
connector
TANDY 1200 HD INSTALLATION
in
)
Page 84

Completing the Installation
Perform the steps in this section to complete the installation.
Replace the system unit's cover -- be sure the cover doesn't
1
catch the
Reconnect the cables and plug the power cord into the outlet.
2
Turn on the computer. You should see the computer counting
3
memory.
A
quick
If you have any problems with your computer immediately after
installing the
• Is the power cord plugged into the wall outlet?
• Are the cables and cords attached correctly?
• Are the boards inside the computer properly seated and
reconnected?
• Did you disable conventional memory on the system board by
moving jumper
closest to the front of the computer?
computer
on the power, the computer
[short-short-short
haven't
board
Inboard 386/PC cable.
If it doesn't, refer to the next section.
checklist
Inboard 386/PC, check the following items in order.
JP1
on the system board to enclose the two pins
Is any memory board in the
still providing conventional memory? (When your turn
will beep -- SOS in Morse code
long-long-long short-short-shortj -- if you
disabled conventional memory on the computer's system
or
on another add-in board).
o
o
o
• Is the Inboard 386/PC cable plugged into the 8088 socket and
not the 8087 socket?
• Is the Inboard 386/PC cable oriented correctly in the 8088 socket
on the system board and the socket on the Inboard 386/PC? Are
the
cable connector's pins lined up with the 8088 socket? Are
the connectors pushed all the way into the sockets?
• If an 8087 was installed on the system board, did you remove it?
• Did you set switch 2 correctly (OFF if an 80387 is installed and
ON if it isn't)?
If your computer doesn't work correctly after you've checked
these potential problems, turn to Appendix B for troubleshooting
advice.
TANDY 1200 HD INSTALLATION 5-19
Page 85

Where to
Turn to Chapter 6 for instructions on installing and using the
Inboard 386/PC software.
go
from here
(
5-20
(
TANDY 1200 HD INSTALLATION
1
Page 86

INSTALLING AND RUNNING
(
(
THE
INBOARD™3861PC
6
SOFTWARE
This chapter explains installing
software.
functions:
• Dynamic speed switching.
• Extended
PC
1200
• Extended
• Turning
•
Up
Inboarc/rM
The Inboard 386/PC software diskette contains the following
Inboard
• INBRDPC.SYS provides features
Inboard 386/PC,
control
The
Inboard
memory
or
XT,
COMPAQ
HD.
memory
extended
to
four times faster
3861PC
386/PC programs:
keys,
and
386/PC software performs the following
support --not
PORTABLE
diagnostics.
memory
hard
programs
such
as
faster
system
and
available until
into
expanded
disk
and
extended
and
using
the
or
PORTABLE
memory.
screen performance.
to
let
you
get
memory,
screen
changing speed
performance.
Inboard 386/PC
now
on
the
IBM
PLUS,
or
Tandy
the
most
from
the
with
l
• ISTATPC.EXE displays the status of
• ICACHE.COM stores data
Inboard 386/PC
• ILlM386.SYS turns extended
• ILlM386.COM displays
computer, including
• ISPEEDPC.EXE changes
batch
file.
• CHKCOP.EXE verifies that
is
installed correctly.
• KEYBRDPC.EXE
ill-designed resident
vectors without chaining correctly.
INSTALLING
AND
memory
RUNNING
the
on
Inboard
is
for
use
programs
THE
INBOARDTM
so
speed
from
the
computer's hard disk
disk
reads
memory
status of
386/PC.
from
the
optional
with
European
that steal
386/PC SOFTWARE
the
INBRDPC.SYS settings.
are
faster.
into
expanded
all
the memory
the
DOS
80387
keyboard drivers
keyboard
memory.
in
the
prompt or
math
coprocessor
interrupt
in
from
a
and
6-1
Page 87

..
EMM.SYS version 4.0 lets you continue to use Above Boards for
expanded memory.
NOTE
•••••••••••
The Inboard 386/PC software works with
greater, except for ISPEEDPC.EXE, which works with
versions 3.0
The software diskette has
directory contains the SETBOARD.EXE program. This is
Above
SETBOARD.EXE only
286's
"Turning extended memory into expanded memory" later in this
chapter).
and
greater.
a directory called AB286. The AB286
Board
program,
or
PS/286's supplying expanded
not
if
you
an
Inboard 386/PC program. Use
have one
DOS
or
more Intel
memory
versions
(described in
InboardrM
Running the Inboard 386/PC's SETUP program is the easy way
to install the
questions SETUP asks
programs you need to your root directory and add command lines
(at your request) to the
All you do
does the rest.
If you prefer to select the programs and commands yourself, turn
to Appendix D
out the commands and their parameters is confusing and
consuming. Intel strongly recommends you use SETUP.
Inboard 386/PC software. Just answer the
--
it will copy the Inboard
CONFIG.SYS and AUTOEXEC.BAT files.
is
follow the instructions
--
but
be
forewarned that for most people figuring
in
this section, and SETUP
386/PC
2.0
DOS
Above
time-
and
an
Board
This section contains instructions for running SETUP. Each step
has a box beside
track of where you are, check off the box after you complete each
step.
it
near the outside edge of the page. To keep
NOTE
SETUP
you
(such
o
1
Make a backup copy of the Inboard 386/PC diskette. (Refer to
the
how to copy a diskette.)
6-2 INSTALLING AND RUNNING THE
restarts (warm boots) the computer when
have data that will
as in a
DOS manual that came with your computer if you don't know
RAM
disk), save
it
finishes.
be
lost when the computer is restarted
it
before
you
run SETUP.
INBOARDTM
386/PC SOFTWARE
If
Page 88

(
With your screen displaying the DOS prompt, insert the backup
2
copy of the Inboard 386/PC diskette into drive
installing the Inboard 386/PC software on a system diskette
rather than a hard disk, also insert the system diskette in drive
B.)
Select drive A as the default drive. Type:
3
A:
and press Enter.
A.
(If you will
o
be
o
(
"
To invoke the software, type:
4
SETUP
and press Enter.
Answer the questions SETUP asks.
S
If you told SETUP to add Inboard 386/PC commands to the
6
CONFIG.SYS and AUTOEXEC.BAT files, go to step 7.
If you want to edit these files yourself, add the command lines (in
order) from the
your
CONFIG.SYS file, and add the command lines (in any
order) from the
AUTOEXEC.BAT file. (Use any ASCII file editor, such as EDLIN,
to edit the
Restart the computer by
7
the CONFIG.SYS and AUTOEXEC.BAT files can't take effect
until you do.
Using
the
The following subsections describe using the Inboard 386/PC
software.
CONFIG.SYS file SETUP created to the top of
AUTOEXEC.BAT file SETUP created
CONFIG.SYS and AUTOEXEC.BAT files.)
InboardrM
preSSing
3861PC
Ctrt/Alt/Del. The commands
software
to
your
in
o
o
o
o
Changing
INSTALLING AND RUNNING THE
the
InboardTM
By default, the computer runs
386/PC is installed. The Inboard 386/PC software lets you
change the computer's operating speed in two ways: by typing
the ISPEEDPC command
keys. Use the
a batch file. Press the control keys any time, even while a
program is running.
ISPEEDPC command from the DOS prompt or
3S6/PC's speed
in
very fast speed when Inboard
or
by pressing a combination
INBOARDTM
3S6/PC SOFTWARE
of
control
in
6-3
Page 89

The following two subsections explain how to change speed.
If you're like most users, very fast speed and very slow speed are
all you'll ever need. But for the rare situation where neither of
these modes is right, Intel provides two additional speeds
The
ISPEEDPC
(described
in
Appendix D).
command
The ISPEEDPC command lets you switch between very slow
speed and very fast speed by entering the ISPEEDPC command
from the
from the
DOS prompt. You can enter the ISPEEDPC command
DOS prompt or from a batch file, not while an
application program is running.
The ISPEEDPC command has the following format:
ISPEEDPC n
where n is 1 (very slow)
or
4 (very fast).
To go to very fast speed, type:
ISPEEDPC 4
and press Enter.
To go to very slow speed, type:
ISPEEDPC 1
and press Enter.
left-ShiWCtrll Alt
You can change speed anytime using left-ShiftlCtrI/Alt, whether
you're at the DOS prompt or
To
go to very fast speed, simultaneously press the
the Ctrl key, the Alt key, and the 4 key. The computer will beep
four times.
To go to very slow speed, simultaneously press the
key, the Ctrl key, the Alt key, and the 1 key. The computer will
beep once.
in
a program.
left-Shift
left-Shift
key,
6-4 INSTALLING AND RUNNING THE
INBOARDTM
386/PC SOFTWARE
Page 90

Use the number keys above the keyboard, not on the keypad.
See Figure 6-1.
Figure
6-1
Speed-change keys
PC-0432
HINT"""""""""" ,
All
four keys must be held down together, but
four keys
the keys in the following order: Left-Shift first, then Gtrl
and
press
at
finally 1
10r4.
exactly the same time. For best results, hold down
or
4.
Don't release the first three keys until
.......
you
can't press
extended memory into expanded memory
If you already have
Above Board)
memory board
into expanded memory. You can't do both.
Intel recommends that you continue to use the Above Board.
Read Appendix
when the Inboard 386/PC is installed.
If
you already have
and choose to turn extended memory
expanded memory, you must do the following:
..
Remove the expanded memory board or reset it to not provide
expanded memory.
OIl
Delete the EMM.SYS file in your root directory.
INSTALLING AND RUNNING THE INBOARDTM 386/PC SOFTWARE
an
expanded memory board (such as an Intel
in
the computer, you can use either the expanded
orturn extended memory on the Inboard 386/PC
C to see what you must do to use Above Boards
an
expanded memory board
on
the Inboard 386/PC into
in
and
Alt,
you
the computer
6-5
Page 91
..
Delete the DEVICE=EMM.SYS command in your CONFIG.SYS
file.
..
Install the ILlM386.SYS program and edit the CONFIG.SYS file.
(If you told the SETUP program you wanted to reserve extended
memory for
ILlM386.SYS, this has been done for you. Refer to
Appendix D if you want to do it yourself.)
status
To display the status of all parameters for the
DEVICE=INBRDPC.SYS command (in the CONFIG.SYS file),
type:
ISTATPC
and press Enter.
The
display provides information only --you can't change the
settings from the display. (Edit the DEVICE=INBRDPC.SYS
command line
Appendix D describes
If you've installed ILlM386.SYS and want to display the status of
all the memory
386/PC, type:
ILIM386
in
the CONFIG.SYS file to change settings.
all the INBRDPC.SYS parameters.)
in
the computer, including memory on Inboard
and press Enter.
The
CHKCOP.EXE software tells you whether the optional 80387
math coprocessor is installed correctly on the Inboard 386/PC.
To use the CHKCOP software, type:
CHKCOP
and press Enter.
6-6 INSTALLING AND RUNNING THE
INBOARDTM
386/PC SOFTWARE
Page 92

sDE~ea
European keyboards and ill-designed resident programs that
steal keyboard interrupt vectors without chaining correctly won't
let you change speed by pressing Left-ShiftlCtrI/Altin. The
KEYBRDPC.EXE software solves this problem by reinstalling the
INBRDPC.SYS dynamic speed switching software. To use
KEYPRDPC.EXE, you must invoke it every time you turn
restart the computer. Type:
KEYBRDPC
and press Enter.
switching
on
or
HINT""
Consider adding the KEYBRDPC command to the
AUTOEXEC.BAT
KEYBRDPC.EXE whenever
using the disk containing the AUTOEXEC.BA T file.
KEYBRDPC.EXE to the AUTOEXEC.BA T file, use DOS's EDLIN
or
any
Don't worry about running programs or using keyboards that
don't need KEYBRDPC.
keyboards that don't need
CAUTION
Some
hard
resulting in corrupted data. Intel has verified
listed in Table D-6 won't corrupt the
programs
verified.
listed in Table 6-1,
Programs that use only conventional
corrupt the
disk
11111111111111111
file.
If
you
add
it,
DOS
will automatically invoke
you
turn on
other editor that can modify
It won't interfere with programs
it.
ASCII
or
restart the computer
files.
••••
ill-designed extended memory programs can write
disk cache
If
cache.
and
the file allocation table
may
not
cause problems,
you
want to use
be
hard
disk information stored in the
safe --
an
extended
back
hard
but
up
your
and
(if
it's been cached),
that
disk cache.
they
haven't been
memory
hard
disk first.
expanded
extended
the programs
program
end
of
To
add
Other
memory
memory
your
or
over
not
the
can't
INSTALLING AND RUNNING THE INBOARDTM 386/PC SOFTWARE
6-7
Page 93

Table
6-1
Well-designed extended memory programs
Application
AutoCAD AutoDesk
Framework
IBM Disk Cache* IBM
Software Carousel Softlogic Solutions
Super
Vcache* Golden Bow Systems
VDISK
*You can use only one disk caching program at a time. Although these disk
caching programs work with
ICACHE.COM (which was written especially for Inboard
you
have problems
Almost all programs
program, however, may need
trouble running a program, try the following solutions in order.
program
II
PC-Kwik* Multisoft
Inboard 386, Intel recommends you use
run
fine with Inboard 386/PC.
Company
Ashton Tate
IBM
3861PC)
An
special treatment. If you have
instead.
occasional
'"
Almost all application programs
copy-protected programs, though, can't
you get a message such as "Disk Error" or "Illegal Copy" when
your programs run
slow speed and then switch to very fast speed (by pressing Left-
ShiftlCtrl/Altl4) to
program in very
6-8 INSTALLING AND RUNNING THE INBOARDTM 386/PC SOFTWARE
in
very fast speed, load the program in very
run
it. If you still get errors, load and run the
slow speed.
run
fine
in
very fast speed. A few
run
in very fast speed. If
Page 94
• Reset any time-dependent parameters to compensate for the
computer's increased speed when
Inboard 386/PC is installed.
For example, turn off the MultiMate Advantage keyboard
accelerator. For CROSSTALK XVI, increase the time-out for the
dial tone and redial tone.
If these solutions don't fix the problem or you have problems with
your computer
software, turn to Appendix 8 for
immediately after installing the Inboard 386/PC
troubleshooting advice.
Now that you've
always.
The only difference you'll notice is the increased speed.
Enjoy!
installed the software, run your programs like
INSTALLING AND RUNNING
THE
INBOARDTM 386/PC
SOFTWARE
6-9
Page 95

Page 96

AYOUR
IBM PCs, IBM PC XTs, and PC-compatible computers can use
two kinds of memory:
386/PC gives you a third kind of memory previously available
on
only
describes the three kinds of memory.
Figure
types of memory.
3.25Mbytes
1M byte
IBM AT-compatible computers: extended. This appendix
A-1
960K
COMPUTER'S MEMORY
conventional and expanded. The Inboard
is a memory map that shows the location of the three
Extended
Memory
/
/
/
/
/
/
/
/
(
784K
640K
OK
Figure
'-
Conventional memory
l-
YOUR COMPUTER'S MEMORY
A-1
DOS manages conventional memory. Application programs that
run under
640K bytes of conventional memory, which your computer
has
uses instead of the much
computer's system board.
\
\
\
\
\
Conventional
Memory
Managed
by
DOS
PC-0434
Memory map
DOS use conventional memory. The Inboard 386/PC
slower conventional memory
on
the
A-1
Page 97

Conventional memory is limited to 640K bytes. The two ways to
get around the 640K-byte limitation are expanded memory and
extended memory.
Beyond conventional memory
Both expanded and extended memory provide memory beyond
640K bytes. The following sections explain the differences
between expanded memory and extended memory.
Expanded memory
Expanded memory is usable memory beyond DOS's 640K-byte
conventional memory limit. Expanded memory lets you use large
programs by accessing memory beyond 640K -- memory that
DOS can't reach. DOS application programs which conform to
Lotusl/nteVMicrosoft Expanded Memory Specification (such
the
as Symphony and 1-2-3) can use expanded memory.
You can also use expanded memory for RAM disks. (RAM disks
are described in the
Glossary.)
Physically,
(such as an
reserves some
but the rest of this address space is available. A 64K-byte page
frame in this
-- just as your computer screen can be a window into a
spreadsheet.
You can add expanded memory to your computer with
Above Boards. Each Above Board 286 and PS/286 can have up
to 2M bytes of memory. Both Above Boards accept an
Piggyback board that can add up to another 2M bytes.
The
diskette)
Chapter 6 describes installing and using the ILlM386.SYS
software.
expanded memory resides on an expansion board
Intel Above Board). As shown in Figure A-1, IBM (
of
the address space between 640K and 1 M byte,
available space is a window into expanded memory
ILlM386.SYS software (on the Inboard 386/PC software
lets you turn extended memory into expanded memory.
Extended memory
Extended memory (also called protected mode memory) is
memory above 1 M byte (1024K bytes).
A-2
YOUR COMPUTER'S MEMORY
large
Intel
optional
(
Page 98

The 80386 microprocessor (and the 80286) can access extended
memory
must be accessed through a page frame.) The
microprocessor can't access extended memory.
directly. (Contrast this with expanded memory, which
8088
(
You can't use extended memory
programs because extended memory is outside the range that
DOS manages. However, you can load DOS application
programs from a VDISK RAM disk
specially-written programs such as AutoCAD and Framework
use extended memory directly.
The ILlM386.SYS software (on the Inboard 386/PC software
diskette)
Chapter 6 describes
software.
The Inboard 386/PC has 256K bytes of extended memory. You
can add to up another 2M bytes with the
Piggyback Memory board.
lets you turn extended memory into expanded memory.
installing and using the ILlM386.SYS
directly to run DOS application
in
extended memory. And
II
optional Inboard 386/PC
YOUR COMPUTER'S
MEMORY
A-3
Page 99

(
(
Page 100

B TROUBLESHOOTING
This appendix lists the most common situations that can cause
the Inboard 386/PC to operate incorrectly. Read through the lists
of
symptoms in Table 8-1. When you find one(s) that resemble
(
the problem you're having, try the corresponding solutions.
Table 8-1 Symptoms
Symptom Action
and
actions
The computer doesn't
power
on when
on
the switch,
operating system prompt
doesn't appear on the
screen.
There's
on
operating system prompt.
a flashing cursor
the screen
you
or
but
turn
the
no
Check the following:
• The power cord is plugged into the
wall outlet.
• The cables and cords are attached
correctly.
• The boards inside the computer
are properly seated and
reconnected.
• The Inboard 386/PC cable is
installed
and not the 8087 socket.
• The Inboard 386/PC cable is
oriented correctly
8088 socket on the system board
and
the Inboard 386/PC.
The Inboard 386/PC cable
•
connectors are pushed all the
way into the 8088 socket and the
connector socket on the
Inboard 386/PC.
The cable's connector pins are
•
straight; remove the cable and
carefully straighten any pins that are
bent.
• The expansion slot
installed Inboard 386/PC may be
defective. Move the
386/PC to another slot.
Check the following:
• Wait a minute
takes a
when the Inboard 386/PC is
installed.
in
the 8088 socket
in
the
in
the connector socket on
in
which you've
Inboard
or
little longer to power up
two. The computer
TROUBLESHOOTING
B-1
 Loading...