

Page 1
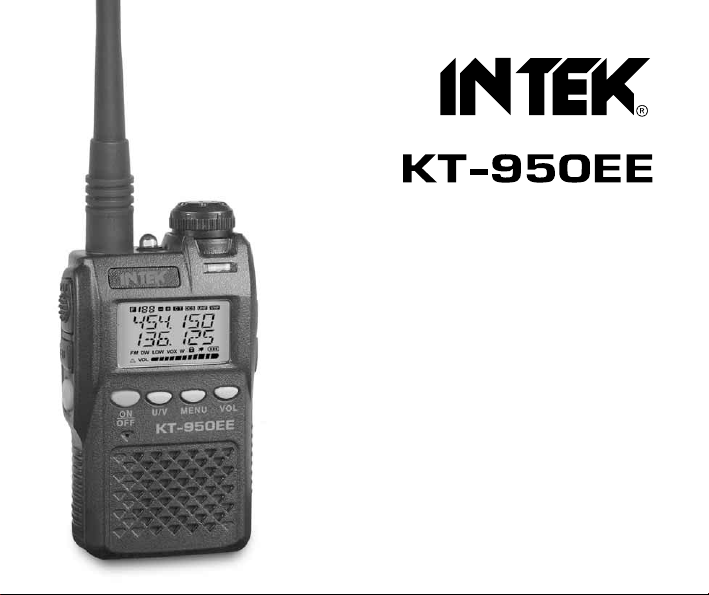
DUAL BAND AMATEUR RADIO
VHF / UHF FM POCKET SIZE
HANDHELD TRANSCEIVER
144-146 MHz / 99CH / 2W
430-440 MHz / 99CH / 2W
PC PROGRAMMABLE
INSTRUCTION MANUAL
Page 2
With the present declaration, we certify that the following products :
INTEK KT-950EE
comply with all the technical regulations applicable to the above mentioned products
in accordance with the EC Directives 2006/95/EC, 2004/108/EC, 99/5/EC.
Type of product : Amateur Radio Equipment VHF/UHF
Details of applied standards : EN 300 086-1 V1.3.1, EN 300-086-2 V1.2.1
EN 301 489-1 V1.8.1, EN 301 489-5 V1.3.1
EN 60950-1+A11
Manufacturer : INTEK S.R.L.
Via G. Marconi, 16
20090 Segrate, Italy
Tel. 39-02-26950451 / Fax. 39-02-26952185
E-mail : intek.com@intek-com.it
Notified Body : EMCCert Dr. Rasek
Boelwiese 5, 91320 Ebermannstadt
Germany
Identification Number : 0678
Contact Reference : Armando Zanni
Tel. 39-02-26950451 / Fax. 39-02-26952185
E-mail : intek.com@intek-com.it
Segrate, 04/11/2011 dr. Vittorio Zanetti
(C.E.O.)
DECLARATION OF CONFORMITY
EC Certificate of Conformity
(to EC Directive 2006/95, 2004/108, 99/5)
Declaration of Conformity
Page 3

SAFETY TRAINING INFORMATION
Your KT-950EE radio generates RF electromagnetic energy during transmit
mode. This radio is designed for and classified as "Occupational Use Only
",meaning it must be used only during the course of employment by individuals
aware of the hazards, and the ways to minimize such hazards.This radio is NOT
intended for use by the "General Population" in an uncontrolled environment.
warining
GENERAL DESCRIPTION
The transceiver is a micro-miniature multiband FM transceiver with extensive receive
frequency coverage, providing local-area two-way amateur communications along
with unmatched monitoring capability.
We appreciate your purchase of our transceiver, and encourage you to read this
manual thoroughly, and learn about many exciting features.
Electromagnetic Interfe rence/Compatibility
During transmissions, your radio generates RF energy that can possibly cause interference
with other devices or systems .To avoid such interference, turn off the radio in areas where
signs are posted to do so. DO NOT operate the transmitter in areas that are sensitive to
electromagnetic radiation such as hospitals, aircraft, and blasting sites.
Occupational/Cont rolled Use
The radio transmitter is used in situations in which persons are exposed as consequence
of their employment provided those persons are fully aware of the potential for exposure
and can exercise control over their exposure.
Page 4
NOTICE !
It is recommended to carefully read this owner’s manual before using the product. This will also help the user
to prevent using the radio in violation of the regulations valid in the country where the product is used, as well
as to avoid any possible interferences with other services.
NOTICE !
This transceiver has been factory programmed, in order to use the product immediately after purchase.
The programming includes the activation of channels/frequencies in the VHF and UHF FM Amateur
Bands, according to the technical rules in force for the use of this bands.
NOTICE !
This transceiver is programmable via PC, using the dedicated software and the PC interface cable
(optional items). Any programming or modification of the original default setting must be made by a
specialised technician or by an authorised service centre. Some functions of this transceiver might be
programmed in violation of the technical rules in force for the use of the VHF and UHF FM bands. It is the
user’s responsibility to check that any modification to the programming will be done in compliance with the
current regulations. Any modification to the product, alteration of the internal circuit, of the external structure
of the radio or any programming in violation of the current regulations will automatically void the product
certification and your right to use the product. INTEK S.R.L. declines any responsibility concerning any
modification of the product, made by the user or by a third party, after delivery of the product.
RoHS
0678
2002/95/EC
Page 5

- Refer service to qualified technicians only.
- Do not disassemble or modify the transceiver for any reason.
- Do not expose the transceiver under direct sunlight long or to extremely hot
condition.
- Do not place the transceiver on the unstable surface.
- Keep the transceiver out of dust, moisture, water.
- Do not operate the transceiver or charge the battery pack under explosive
conditions.
PRECAUTIONS
It is important that the operator is aware of and understands hazards common
to the operation of any transceiver.
SAFETY
WARNING
Please turn the transceiver off at the following locations:
In explosive atmospheres (inflammable gas, dust particles, metallic powders,
grain powders, etc.).
While taking on fuel or while parking at gasoline service stations.
Near explosives or blasting sites.
In medical institutes or aircrafts.
changes or modifications not expressly approved by the party responsible
for compliance could void the user’s authority to operate the equipment.
Page 6

CONTENTS
UNPACKING AND CHECKING EQUIPMENTS
INSTALLATION OF ACCESSORIES
BATTERY CHARGING
GETTING ACQUAINTED
OPERATION
ADVANCED OPERATION
ADDITIONAL FUNCTIONS AND SETTINGS
TROUBLESHOOTING GUIDE
SPECIFICATIONS
GENERAL INFORMATION 32
01
02
04
06
16
16
29
30
31
Page 7
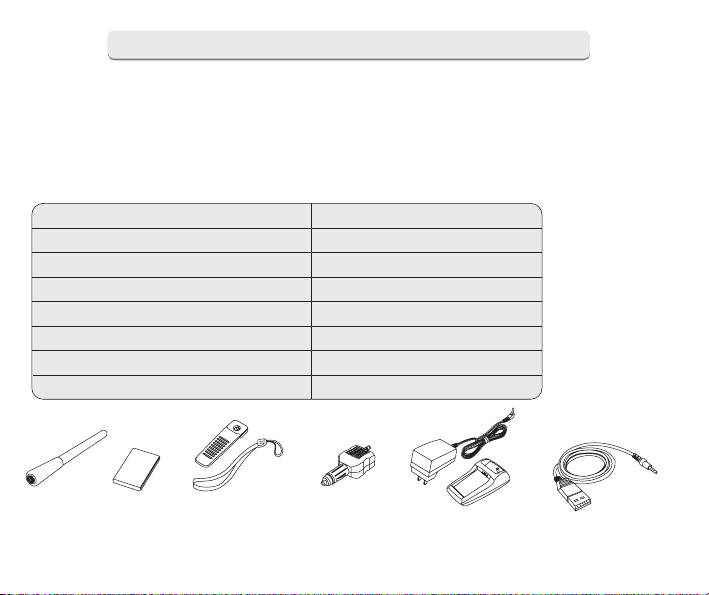
Antenna
Carefully unpack the transceiver. We recommend that you identify the items listed
in the following table before discarding the packing material. If any items are missing
or have been damaged during shipment, please contact the dealers immediately.
UNPACKING AND CHECKING EQUIPMENTS
Li-ion
Battery
Hand Strap
+ Belt Clip
Standard Accessories
ITEM
QUANTITY
1
Li-Ion Battery
Hand Strap + Belt Clip
12-24VDC Car Adaptor
Desk Charger
USB Charging Cable
1
1
1
1
User Manual
1
1
Dual Band Antenna
Car Adaptor
Desk Charger
USB Charging Cable
- 1 -
Page 8
Optional Accessories
- EM-950 External Earset-Microphone with tie clip
- CDKT-0950-USB Programming Kit (PC interface cable and software CD)
INSTALLATION OF ACCESSORIES
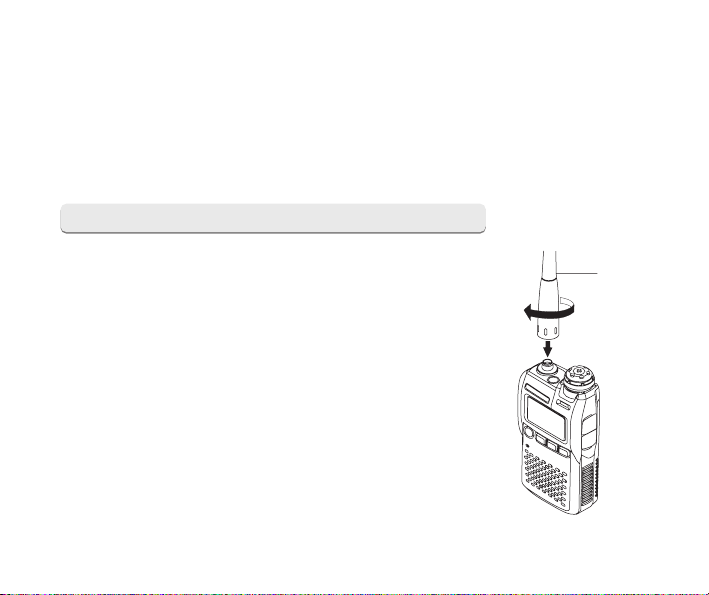
ANTENNA INSTALLATION
The supplied antenna provides good results over the entire
frequency range of the transceiver. However, for enhanced
based station medium-wave and shortwave reception, you may
wish to connect an external antenna, as the supplied antenna
is ver y smal l and can not be expecte d to provid e high
performance at these frequencies.
To install the supplied antenna, hold the bottom end of the
antenn a an d scre w it ont o the matin g connecto r on the
transceiver until it is snug. Do not over-tighten by use of extreme
force. (See PIC 1)
- 2 -
Antenna
PIC 1
Page 9
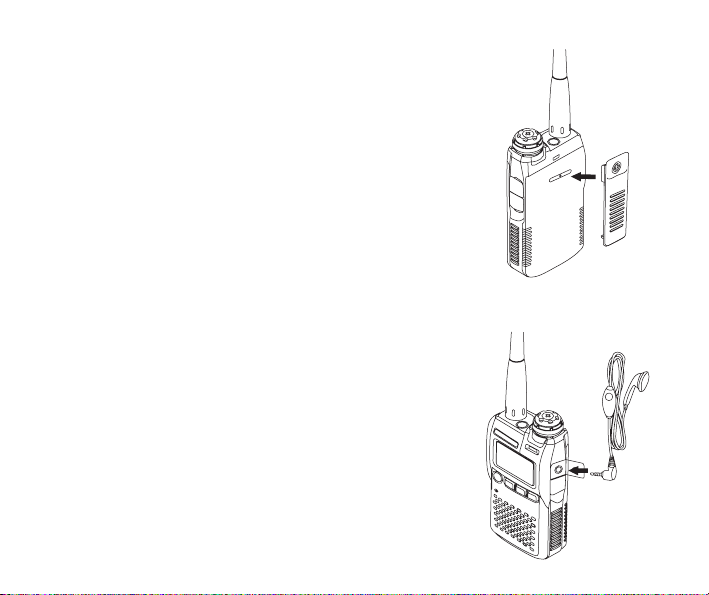
EXTERNAL EAR-MIC INSTALLATION
Insert the optional earset/microphone plugs into the
SP.&MIC. Jacks of the transceiver. (See PIC 3)
PIC 3
PIC 2
Note:
Never transmit without having an antenna connected.
When installing the supplied antenna, never hold the upper
part of antenna while screwing it onto the mating connector
on the transceiver.
If using an external antenna for transmission, ensure that
the SWR presented to the transceiver is 1.5:1 or lower, to
avoid excessive feed line loss.
BELT CLIP INSTALLATION
If necessary, install the belt clip into the location on the back
of the battery. (See PIC 2)
Note:
Do not use the glue to fasten the screw, while installing the
belt clip. Otherwise, the acrylic acid of the glue may damage
the battery panel.
- 3 -
Page 10
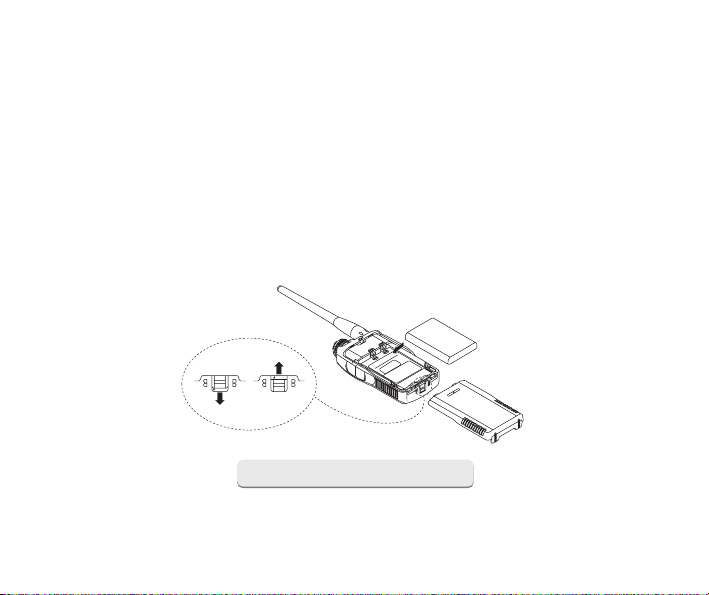
BATTERY PACK INSTALLATION
The battery pack is a high-performance Li-ion battery providing high capacity in a very
compact package. Under normal use, the battery may be used for approximately 400
charge cycles, after which operating time may be expected to decrease. If you have an
older battery that is displaying diminished capacity, you should replace the battery with a
new one. Installation of the battery is easy and quick:
1.Slide the Battery Cover to the Unlock position and then slide the Battery Cover toward
the bottom to remove it.
2.Install the battery into the Battery Compartment.
3.Replace the Battery Cover and then slide the Battery Cover Latch into the Lock position.
LOCK
UNLOCK
UNLOCK
LOCK
PIC 4
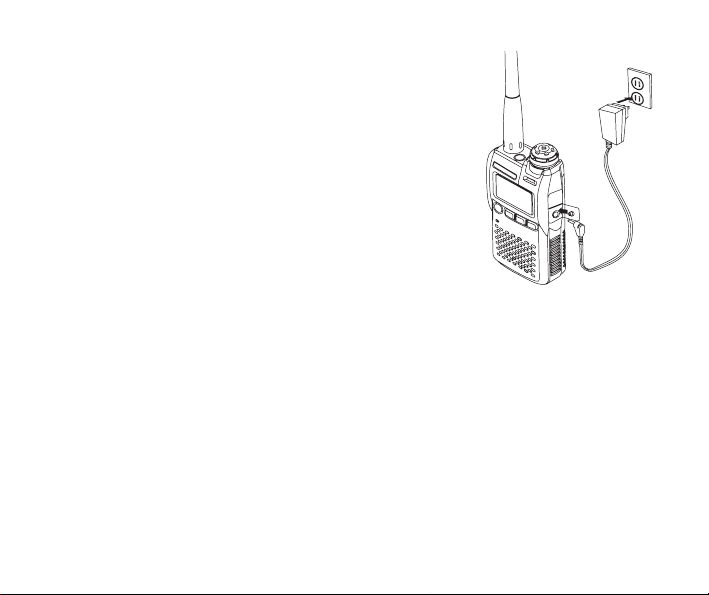
BATTERY CHARGING
If the battery has never been used, or its charge is depleted, it may be charged by connecting
the Battery Charger, as shown in the illustration, to the EXT DC Jack. If only 12-16 Volt DC
power
- 4 -
Page 11
Important Note:
1) Perform the battery charging where the ambient temperature range is +5° ~+35°.Charge
out of this range could cause damage to the battery pack.
2) If the charge is not completed in several hours, the battery may be deteriorated. Do not
attempt to forcibly charge the battery, please contact the dealer.
3) If you do not use the transceiver for a long time, remove the battery pack from the
transceiver, as battery leakage could cause damage to the transceiver and the battery pack.
4) While in storage, the charge will drain slightly over time and the battery should be recharged
50% each six months.
PIC 5
is available, the optional DC Adapter (with its cigarette lighter
plug) may also be used for charging the battery.
While the battery is being charged, the display will indicate
( See PIC 5) , this S-mete r will deflec t accordin g to the
charging status, and the TX/BUSY indicator will glow red.
When the charging is finished, the TX indicator will glow
green.
The charger is only designed for the charging of our battery,
and is not suitable for other purposes. Please be advised
that th e charge r may contribut e noise to TV and radi o
reception in the immediate vicinity, so we do not recommend
its use adjacent to such devices.
- 5 -
Page 12
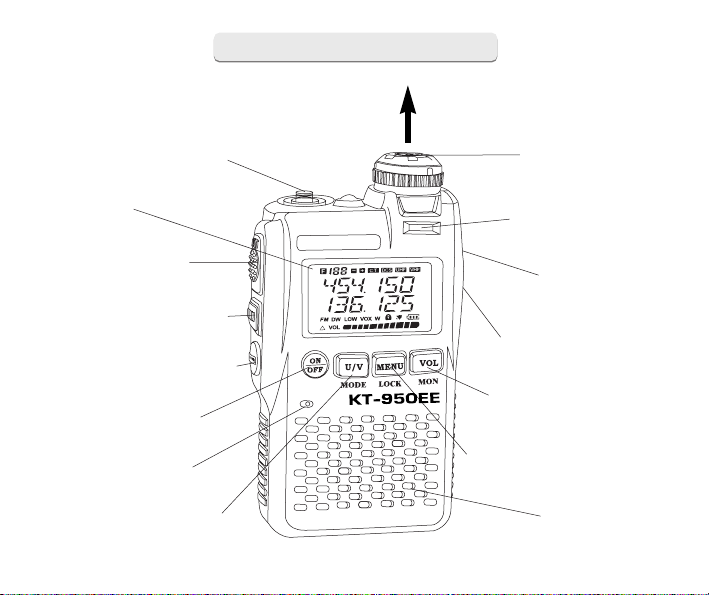
GETTING ACQUAINTED
PULL KNOB UP TO UNLOCK
ANTENNA Jack
LCD
PTT Switch
F/ALERT Switch
LAMP/FM Switch
ON/OFF Key
Microphone
U/V MODE Key Speaker
- 6 -
DIAL Knob
TX Indicator
SP. MIC.
EXT DC Jack
VOL/MON Key
MENU/LOCK Key
!
Page 13

THE DEFINITION OF THE CONTROL
[DIAL]Knob
[PTT]Switch
[VOL/MON]Key
[ON/OFF]
[F/ALERT]
[MENU/LOCK]
[UV/MODE]
[LAMP/FM]
F+[MENU/LOCK]
F+[UV/MODE]
F+[DIAL]
[VOL/MON]+ [DIAL]
The main tuning Dial is used for setting the operating frequency,
and is used for audio volume level, menu selections , and other
adjustments. To rotate this Dial knob, pull the knob to unlock the
mechanical dial lock, and then rotate the Dial knob.
Press this switch to transmit, and release it to receive, after your
transmission is completed.
Just press to activate the 'Alternate' key function, such as setting
Scanning, Memory Write Mode etc. Press and hold the switch to
activate the Alarm function.
Just press the key, entering into the MENU. Rotate the DIAL knob,
will see different functions setting under the MENU. Press and Hold
the key, activate the Key Lock or disable the Key Lock. (Note: After
the keypad is locked, the operations of the [F/ALERT], [UV MODE],
[LAMP/FM] will be invalid.)
Just press to switch the VFO UHF Mode and VHF Mode. Press
and Hold to switch frequency control between VFO and Memory
Systems.
Press and Hold the key to disable th e noise squelchin g action,
allowing you to hear very weak signals near the background noise
level.
Just press the key, then rotate the DIAL knob to adjust the audio
Press and hold this key for two seconds to toggle the transceiver's
power on and off.
Just press to light the Torch. Press and Hold to activate the FM Radio
Function.
Press the [F/ALERT], then press [MENU/LOCK], to Activate the Scanning
Function.
Press the [F/ALERT], then press [UV/MODE], to Activate the 'Memory
Write' mode (for memory channel storage).
Press [F/ALERT], then rotate the [DIAL] knob, to increase or decrease
the frequency at 1MHz.
Press [VOL/MON], then rotate the [DIAL] knob, to adjust the volume
level.
- 7 -
Page 14

LCD DISPLAY
The display icons appear when certain operations
are performed or certain specific features are
activated. It will help you to know the meaning
of the indicator and know how to set functions.
ICON DESCRIPTION
Secondary Keypad Active ( Press [F/ALERT] )
Operating Band Number or Memory Channel Number
CTCSS Operation
DCS Operation
UHF 400-470MHz
VHF 136-174MHz
FM Radio(87-108MHz)
Low/High Output Power
VOX Function Active
Wide/Narrow Bandwidth
Keypad Lock Active
Keypad Beeper ON
Battery Indicator
Repeater Shift Direction
Dual Watch Active
Audio Volume Level
- 8 -
Page 15

COMBINATION KEY FUNCTION
1750Hz Tone Calling:PTT+VOL/MONI for 1 second
Press and hold in the button PTT and VOL/MONI to enter the Tone
Calling Mode(1750Hz). The transceiver send out the signal (1750Hz). Release
the button VOL/MONI to exit.
Restore to Defaul t Factor y Setting:ON/OFF +
VOL/MON for 5 seconds
Press and hold the key
ON/OFF + VOL/MON ,then
Power ON, the transceiver will restore to the default factory
setting.
Factory Default Setting as:454.000MHz, No CTCSS/DCS,
Low Output power, Battery Save, Volume Level 5, SQ 5,
Key Tone ON, other settings OFF.
- 9 -
Page 16

MENU DESCRIPTION
Menu Item
1
2
3
4
5
6
7
8
9
10
11
12
13
14
15
16
17
18
19
Description
RXCODE
TXCODE
(Squelch)
SQL
(LCD Illumination)
LIGHT
(Keypad Beeper)
BEEP
VOX
(RF Output Power)
POWER
(Dual Watch/UHF&VHF)
DW
STEP
OFFSET
SHIFT
(Tail Tone Elimination)
STE
(Wide Band/Narrow Band)
W/N
(Battery Saver)
SAVE
(Time out Timer)
TOT
(Scan Mode)
SCANM
(Repeater Sound Response)
RELAYM
(Busy Channel Lock-out)
BCLO
(Priority Channel Scanning)
PRI
Settings
OFF'CTCSS, DCS
OFF'CTCSS, DCS
0---9
OFF/ON /Key
OFF--ON
OFF/1---9
HIGH/LOW
ON/OFF
5/6.25/10/12.5/20/25 KHz
0--37.995/0--69.995MHz
0/-/+
ON/OFF
WIDE/NARROW
ON/OFF
OFF/30/60/90/120/150/180S
TO/CO
ON/OFF
ON/OFF
ON/OFF
- 10 -
Page 17

Press MENU/LOCK , com e to MEN U
[01]RXCODE
MENU SETTING
Press MENU/LOCK , tur n clockwis e or
counterclockwis e DIAL , come to MENU
[02]TX CODE.
Pres s MENU/LOCK , tur n clockwis e or
counterclockwise
DIAL , come to MENU [03] SQL.
Press MENU/LOCK , tur n clockwis e or
counterclockwise
DIAL , come to MENU [04] LIGHT.
- 11 -
Page 18

Press MENU/LOCK , turn clockwis e or
counterclockwise
DIAL , come to MENU [05] BEEP.
MENU/LOCK , turn clockwis e or
Press
counterclockwise
DIAL , come to MENU [06] VOX.
Press MENU/LOCK , turn clockwis e or
counterclockwise
DIAL , come to MENU [07] POWER.
Pres s MENU/LOCK , turn clockwis e or
counterclockwise
DIAL , come to MENU [08] DW.
- 12 -
Page 19

Pres s MENU/LOCK , turn clockwis e or
counterclockwise
DIAL , come to MENU [12] STE.
Pres s
MENU/LOCK , tur n clockwis e or
counterclockwise
DIAL , come to MENU [11] SHIFT.
Pres s MENU/LOCK , turn clockwis e or
counterclockwise
DIAL , come to MENU [10] OFFSET.
Pres s
MENU/LOCK , tur n clockwis e or
counterclockwise
DIAL , come to MENU [09] STEP.
- 13 -
Page 20

Press MENU/LOCK , turn clockwis e or
counterclockwise
DIAL , come to MENU [13] W/N.
Pres s
counterclockwise
Pres s MENU/LOCK , turn clockwis e or
counterclockwise
Pres s MENU/LOCK , turn clockwis e or
counterclockwise
MENU/LOCK , tur n clockwis e or
DIAL , come to MENU[14] SAVE.
DIAL , come to MENU [15] TOT..
DIAL , come to MENU[16] SCANM.
- 14 -
Page 21

Pres s MENU/LOCK , turn clockwis e or
counterclockwise
DIAL , come to MENU [17] RELAYM.
Pres s MENU/LOCK , turn clockwis e or
counterclockwise
DIAL , come to MENU [18] BCLO.
- Press the key
UV/MODE confir m the setting , and EXIT the function s
setting.
- Battery Save, Time-out Limit, Width/Narro w, only be change d via program
software.
- Under the VFO mode, turn clockwise or counterclockwise DIAL to increase
or decrease the frequency.
Pres s MENU/LOCK , turn clockwis e or
counterclockwise
DIAL , come to MENU [19] PRI.
- 15 -
Page 22

OPERATION
POWER ON/OFF
1.Be sure the Battery Pack is installed, and the battery is fully
charged. Connect the antenna to the top panel ANTENNA jack.
2.Press and hold the key ON/OFF ,the current DC supply voltage
will appear on the LCD for 2 seconds, and beeps will be heard, the
display will resume its normal indication of the operating frequency.
3.To turn the transceiver off, press and hold the key
again for one second.
ON/OFF
ADJUSTING THE VOLUME LEVEL
Pull the DIAL knob to unlock the mechanical dial lock, then rotate the DIAL knob
after press the key
increased the volume level.
VOL/MON , to set the desired audio level. Clockwise rotation
ADVANCED OPERATION
RXCODE
You may sometimes want to hear calls from only specific persons or groups. In this case,
use the selective call allows you to ignore unwanted calls from other persons who are
using the same frequency.
Set the receiving signal according to the below instructions:
- 16 -
Page 23

1) Press MENU/LOCK , rotate the DIAL knob, come to
MENU [1]: RXCODE
2) Then press
U/V key, enter the set mode.
3) Clockwise or counterclockwise rotation of
DIAL knob to
select from OFF /67.0-754N, press
MENU/LOCK again, to
select the code (Positive or negative), such as 023N---023I.
NOTE:
[CTCSS:67Hz---254.1Hz(50 groups);
DCS:023N-754N(104 groups)]
4) Press
U/V key to save the setting and EXIT. Press
MENU/LOCK or PTT ,EXIT to normal operation.
TXCODE
Set the transmitting signal according to the below instructions:
1) Press
MENU/LOCK , rotate the DIAL knob, come to
MENU [2]: TXCODE
2) Then press
U/V key, enter the set mode.
3) Clockwise or counterclockwise rotation of
DIAL knob to
select from OFF / 67.0-754N, press
MENU/LOCK again,
to select the code (Positive or negative), such as
023N---023I.
- 17 -
Page 24

NOTE:
[CTCSS:67Hz---254.1Hz (50groups); DCS: 023N-754N(104 groups)]
4) Press
U/V key to save the setting and EXIT. Press
MENU/LOCK or PTT , EXIT to normal operation.
SQL (SQUELCH ADJUSTMENT)
Squelch System allows you to mute the background noise
when no signal being received. The Squelch system make
'Standby' operation more pleasant, and significantly reduces
battery current consumption. Please adjust the Squelch level
according to the following instructions:
1) Press MENU/LOCK , rotate the DIAL knob, come
to MENU [3]: SQL
2) Then press
SQL 5
3) Clockwise or counterclockwise rotation of DIAL knob
to adjust between 0/1/2/3/4/5/6/7/8/9 (Default Squelch
level as 5).
4) Select the level at which the background noise is just
eliminated when there is no signal. Press U/V key to save
the setting.
5) Press
operation.
U/V key, come to the default setting level
MENU/LOCK or PTT , EXI T to norma l
- 18 -
Page 25

LIGHT (LCD ILLUMINATION ON/KEY/OFF)
includes a reddish illumination lamp which aids in nighttime
operation. The red illumination yields clear viewing of the display
in a dark environment, with minimal degradation of your night
vision. Three options for activating the lamp are provided:
Key: Illuminates the LCD when any key pressed.
ON: Illuminates the LCD continuously.
OFF: Disables the LCD lamp.
Here is the procedure for setting up the Lamp mode:
1) Press
MENU/LOCK , rotate the DIAL knob, come to
MENU [4]: LIGHT.
2) Then press
U/V key to enter the set mode.
3) Clockwise or counterclockwise rotation of
DIAL knob
to set ON/OFF/KEy
4) Press
U/V key to save the setting.
5) Press
MENU/LOCK or PTT , EXIT to normal operation.
BEEP (KEYPAD BEEPER ON/OFF)
If the Keypad Beeper will inconvenience you (especially being
operated in the silent room), you may disable the Beeper according
to the following instructions:
Radio
- 19 -
Page 26

1) Press MENU/LOCK , rotate the DIAL knob, come to
MENU [5]: BEEP
2) Then press
3) Clockwise or counterclockwise rotation of
set ON/OFF
4) Press
5) Press
(ON-The beeper being activated, LCD displays icon. OFF-
The beeper being disabled.)
VOX (
VOICE OPERATED TRANSMISSION
VOX eliminate s the necessit y of manuall y switchin g to the
transmission Mode each time you want to transmit. The transceiver
automaticall y switche s to transmissio n mode when the VOX
circuitr y sense s tha t yo u have begu n speakin g into the
microphone. Please set according to the following instructions:
1) Press
MENU [6]: VOX
2) Then press
3) Clockwise or counterclockwise rotation of
set
OFF/1/2/3/4/5/6/7/8/9
:
4) Press
U/V key to enter the set mode.
DIAL knob to
U/V key to save the setting.
MENU/LOCK orPTT , EXIT to normal operation.
)
MENU/LOCK , rotate the DIAL knob, come to
U/V key to enter the set mode.
DIAL knob to
U/V key to save the setting.
- 20 -
Page 27

5) Press MENU/LOCK or PTT , EXIT to normal operation.
NOTE:
Grade 7-9: the Most Sensitive VOX Gain Level-Set under silent conditions.
Grade 4-6: th e Mediu m Sensitiv e VOX Gai n Level-Set under commo n
conditions.
Grade1-3: the Least Sensitive VOX Gain Level-Se t under too much noise
conditions.
When VOX function is activated, the LCD will display the
ICON 'VOX'.
POWER (HIGH/LOW RF OUTPUT POWER SELECTION)
Select the High/Low RF Output Power, please set according to the following
instructions:
1) Press
MENU/LOCK , rotate the DIAL knob, come to MENU [7]:
POWER
2) Then press
U/V key to enter the set mode.
3) Clockwise or counterclockwise rotation of DIAL knob to
set: HIGH/LOW
4) Press
U/V key to save the setting.
5) Press MENU/LOCK or PTT , EXIT to normal operation.
When set the LOW output power, the LCD will display the ICON
LOW , and
not display the ICON HIGH , when set the HIGH output power.
-
-
-
-
- 21 -
Page 28

DW (DUAL WATCH FEATURE)
The transceiver' s Scanning feature s includ e a two-channe l
scanning capability, which allows you to operate between UHF
channel and VHF channel in the VFO mode, while periodically
checking a user-defined channel for activity. If one channel is
received the signal, the scanner will pause on that channel.
Please activat e the DW feature according to the following
instructions:
1) Press
2) Then press
3) Clockwise or counterclockwise rotation of DIAL knob to set:OFF
4) Press
5) Press
MENU/LOCK , rotate the DIAL knob, come to
MENU [8]: DW
U/V key to enter the set mode.
(disables the Dual Watch feature)/ON (activates the
Dual Watch feature)
U/V key to save the setting.
MENU/LOCK or PTT , EXIT to normal operation.
STEP (Channel Spacing Selection)
Radio's frequency synthesizer provides the option of utilizing
channel steps of 5/6.25/10/12.5/25KHz per step (optional values
differ depending on the band selected). If you need to change the
channel step increments, the procedure to do is very easy.
- 22 -
Page 29

1) Press MENU/LOCK , rotate the DIAL knob, come to
MENU [9]: STEP
2) Then press
U/V key to enter the set mode.
3) Clockwise or counterclockwise rotation of
DIAL knob to
select the new frequency step size 5/6.25/10/12.5/20/25 KHz.
4) Press
U/V key to save the setting.
5) Press
MENU/LOCK or PTT , EXIT to normal operation.
OFFSET (Repeater Operation)
includes a number of features which make repeater
operation simple and enjoyable.
1) Press
MENU/LOCK , rotate the DIAL knob, come to
MENU [10]: OFFSET
2) Then press
U/V key to enter the set mode.
3) Clockwise or counterclockwise rotation of DIAL
knob to set
the offset frequency (0-37.995M/0---69.995M).
4) Press
U/V key to save the setting.
5) Press
MENU/LOCK or PTT , EXIT to normal operation.
SHIFT (Repeater Shifts)
Depending on the part of the band in which you are operating, the
repeater shift may be either
KT-950EE
- 23 -
Page 30

downward (-) or upward (+). One of these icons will appear at
the top of the LCD when repeater shifts have been enabled.
1) Press
2) Then press
3) Clockwise or counterclockwise rotation of
4) Press
5) Press
MENU/LOCK , rotate the DIAL knob, come
to MENU [11]: SHIFT
U/V key to enter the set mode.
DIAL knob
to select the repeater shifts: 0/-/+
U/V key to save the setting.
MENU/LOCK or PTT , EXIT to normal operation.
STE (Tail Tone Elimination)
To eliminat e the annoyin g audio caused by carrier wav e
disappearing after the transmitter ends the communication. You
should enable the Tail Tone Elimination. On the contrary, if you
want communication via the repeater, you should disable the
Tail Tone Elimination.
1) Press
2) Then press
3) Clockwise or counterclockwise rotation of
4) Press
5) Press
MENU/LOCK , rotate the DIAL knob, come to
MENU [12]: STE
U/V key to enter the set mode.
DIAL knob
to select the STE: ON/OFF
U/V key to save the setting.
MENU/LOCK or PTT , EXIT to normal operation.
- 24 -
Page 31

W/N (Wide/Narrow Band Selection)
1) Press MENU/LOCK , rotate the DIAL knob, come
to MENU [13]: W/N
2) Then press
U/V key to enter the set mode.
3) Clockwise or counterclockwise rotation of
DIAL knob to
select the WIDE/NARROW:
4) Press
U/V key to save the setting.
5) Press MENU/LOCK or PTT , EXI T to norma l
operation.
SAVE (Battery Saver)
The radio includes a useful Transmit Battery Saver, which will
automatically lower the power output level when the last signal
received was very strong. For example, when you are in the
immediate vicinity of a repeater station, there generally is no
reason to use the high power output in order to achieve full
quieting access to the repeater. With the transmit battery saver,
the automatic selection of Low Power operation conserves
battery drain significantly.
To activate the Transmit Battery Saver:
1) Press
MENU/LOCK , rotate the DIAL knob, come
to MENU [14]: SAVE
2) Then press
U/V key to enter the set mode.
- 25 -
Page 32

3) Clockwise or counterclockwise rotation of DIAL knob to
select the SAVE: ON/OFF
4) Press
5) Press
U/V key to save the setting.
MENU/LOCK or PTT , EXIT to normal operation.
TOT (Time-out Timer)
The TOT Feature provides a safety switch, which limits transmission time to
a preprogrammed value. This will conserve battery power by limiting the length
of transmissions . The TOT default is 180s. To adjust the timer, see the
instructions below:
1) Press
2) Then press
3) Clockwise or counterclockwise rotation of
4) Press
5) Press MENU/LOCK or PTT , EXIT to normal operation.
MENU/LOCK , rotate the DIAL knob, come to
MENU [15]: TOT
U/V key to enter the set mode.
DIAL knob
to select the TOT: OFF/30S/60S/90S/120S/150S/180S
U/V key to save the setting.
SCANM (Scan Mode)
Radio allows you to scan the memory channels, entire operating band
or a portion of that band.
to the station on that frequency if you like.
It will halt on signals encountered, so you can talk
- 26 -
Page 33

To select the scanning mode, please see below:
1) Press MENU/LOCK , rotate the DIAL knob, come to
MENU [16]: SCANM
2) Then press
U/V key to enter the set mode.
3) Clockwise or counterclockwise rotation of DIAL knob
to select the SCANM: TO/CO
4) Press
U/V key to save the setting.
5) Press
MENU/LOCK or PTT , EXIT to normal operation.
ELAYM (Repeater Sound Response)
When the feature is activated, the handheld transceiver will hear
the sound from the repeater, that means the handheld transceiver
is working via the repeater. Please see below to activate
the features:
1) Press
MENU/LOCK , rotate the DIAL knob,
come to MENU [17]: RELAYM
2) Then press
U/V key to enter the set mode.
3) Clockwise or counterclockwise rotation of
DIAL knob
to select the RELAYM: ON/OFF
4) Press
U/V key to save the setting.
5) Press
MENU/LOCK or PTT , EXIT to normal operation.
Radio comes with the Repeater Sound Response feature.
- 27 -
Page 34

BCLO (Busy Channel Lock-out)
The BCLO feature prevents the radio's transmitter from being activated
if a signal strong enough to break through the 'noise' squelch is present.
On a frequency where stations using different CTCSS or DCS codes
may be active . BCL O prevent s you from disruptin g thei r
communications accidentally (because your radio may be muted by
its own Tone Decoder). The default setting for the BCLO is OFF. The
below instruction is the procedure to activate the BCLO:
1) Press
MENU/LOCK , rotate the DIAL knob, come
to MENU [18]: BCLO
2) Then press
3) Clockwise or counterclockwise rotation of
U/V key to enter the set mode.
DIAL knob
to select the BCLO: ON/OFF
4) Press
5) Press
U/V key to save the setting.
MENU/LOCK or PTT , EXIT to normal operation.
PRI (Priority Channel Scanning)
1) Press MENU/LOCK button, then rotate the DIAL knob, coming
to MENU [19]: PRI.
2) Then press
3) Clockwise or counterclockwise rotation of
to set PRI:ON/OFF
4) Press
5) Press
U/V key to enter the setting mode.
DIAL knob
U/V key to save the setting.
MODE or PTT button to the normal operation.
- 28 -
Page 35

ADDITIONAL FUNCTIONS AND SETTINGS
MEMORY CHANNEL STORAGE (Memory Channels 01-99)
Store the Memory Channel according to the following instructions:
- Select the desired frequency while operating in the VFO mode. Be sure to set up any
desired CTCSS or DCS tones, as well as any repeater offset.
- Press
F/ALERT button, then press U/V key, Channel 01-99 will flash on the
LCD, rotate
DIAL knob to store the channel between channel 01-99.
- Press
U/V key to save the setting.
- Repeat the process above, to store other channels.
(Note: Repeater offset frequency should be set via programming software.)
EMERGENCY ALARM FEATURE
Press and hold the F/ALERT button about 1/2 seconds, come to the Emergency Alarm
Mode, emergency alarm will be heard, press
PTT button, EXIT to normal operation .
FM RADIO FUNCTION: L/R button on side for 2 seconds
1) Press and hold the button L/R , come to the FM Radio Mode.
2) Rotate the
DIAL knob to adjust the frequency. (The FM broadcast coverage is
87.0MHz to 108.0MHz, Frequency step as 100KHz).
3) Then press and hold the
L/R button, EXIT the FM Radio Mode.
4) Press and hold the U/V to switch the FM radio frequency mode and the FM
radio save channel mode.
Saving broadcast frequencies:
In broadcast VFO-Mode: 1.U/V for 3 seconds 2.Select a memory 3.U/V again
until the "Beep"
- 29 -
Page 36

1) Under the FM radio frequency mode, set the frequency you want to save.
2) Press the
on the LCD display, rotate the
3) Press the
In the FM radio mode, the communication between the transceivers is priority. That
means in the FM radio mode, when the signal come, the transceiver will automatically
exit the FM radio mode.
F/ALERT button, and then press the U/V button, 01-15 flashes
DIAL knob to save it.
U/V button to confirm saving.
FM RADIO SCANNING
In the FM Radio mode, press F/ALERT button, then press MENU/LOCK key
to scan the complete band. Clockwise or counterclockwise rotation of DIAL knob
to scan the band from low to high or from high to low. When searches the certain
channel, the scanning will stop at the channel. Rotate the DIAL knob, continuously
to scan from low to high or from high to low. Press any key to exit the scanning.
TROUBLESHOOTING GUIDE
PROBLEMS
No Power
Voltage Capacity
Quickly Goes Out
Can't Communicate
with Other Group
Members
Hear the Voice
from Other Groups
Check battery installation and/or replace batteries.
The battery life is over, replace new one.
Verify that the frequency and the CTCSS you are using are the same
as those of your group members.
Change your CTCSS for the channel. You also need the CTCSS
for all the radios in your group.
SOLUTIONS
- 30 -
Page 37

SPECIFICATIONS
General
Frequency VHF 144-146 MHz (136-174 MHz) (*)
Channels 99
Channel spacing 5, 6.25, 10, 12.5, 25 KHz
DC input voltage 3.7 VDC
Standard Battery 1500mAh
Operating temperature -20/+60°
Dimensions / Weight mm 47 x 81 x 23 (main body) / 130 gr.
Current Drain (Stand-By) ≤75mA
Receiver
Sensitivity (12dB Sinad) 0.2 µV
Audio output 500mW
Transmitter
RF output power 2W
Modulation F3E
Spurious & Harmonics in compliance with the R&TTE regulations
Maximum deviation ≤ +/- 5KHz / ≤ +/- 2.5KHz
Current Drain ≤1.4A
FM Radio
Frequency range 87.5 - 108 MHz WFM
(*) KT-950EX (INTERN. VERSION) 136-174 MHz / 400-470 MHz (not available for Europe)
UHF 430-440 MHz (400-470 MHz) (*)
- 31 -
Page 38

General Information
Important notice !
The use of VHF and UHF FM transceivers is subject to the regulations applied in the country
where the product has to be used. As regulations are usually subject to possible
modifications, please check the current regulations in your country with your dealer or local
supplier. INTEK does not take any responsibility for illegal use and operation of this product
not in accordance with the regulation of the country where the product is used.
User Information
in accordance with art. 13 of the Legislative Decree of 25th July 2005, no. 15 ”Implementation of Directives
2002/95/EC, 2002/96/EC and 2003/108/EC, relative to reduction of the use of hazardous substances in electrical and
electronic equipment, in addition to waste disposal”.
The crossed bin symbol shown on the equipment indicates that at the end of its working life the
product must be collected separately from other waste.
The user must therefore take the above equipment to the appropriate differentiated collection centres
for electronic and electro technical waste, or return it to the dealer when purchasing a new appliance of
equivalent type, in a ratio of one to one.
Appropriate differentiated waste collection for subsequent recycling, treatment and environment-friendly disposal
of the discarded equipment helps to prevent possible negative environmental and health effects and encourages
recycling of the component materials of the equipment.
Illegal disposal of the product by the user will be punished by application of the administrative fines provided for by
the legislative decree no. 22/1997 (article 50 and following of the legislative decree no. 22/1997).
- 32 -
Page 39

Notes
- 33 -
Page 40

 Loading...