

Page 1
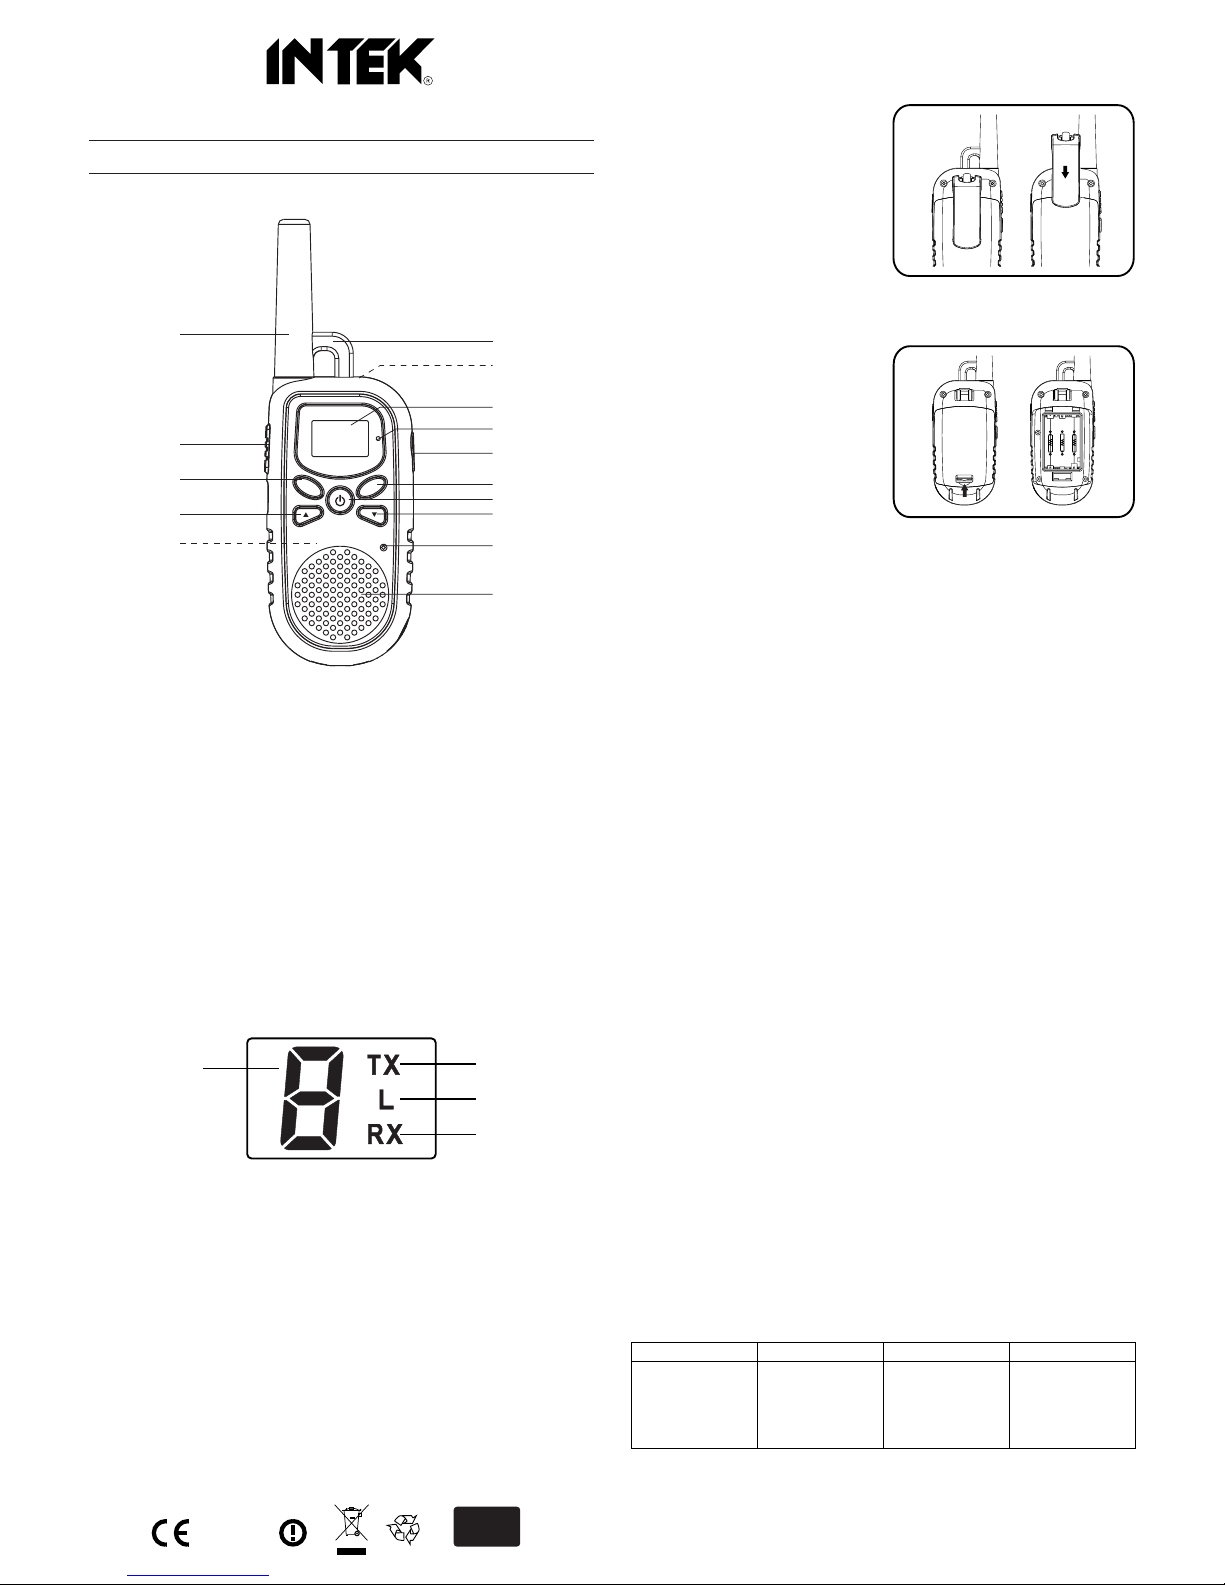
KEYS AND CONTROLS
1. High efficency antenna
2. PTT (Push-To-Talk) Key
3. S Key (SCAN)
4. UP Key
5. Battery Compartment
6. Hole for Necklace
7. Belt Clip
DISPLAY LCD
A. Alphanumeric Digit, indicates channel number and Volume level.
B. TX Icon, is lighted when radio is in transmit mode.
C. Low Power Icon, is lighted when transmitter is in Low Power mode.
D. RX Icon, is lighted when radio is in receive mode.
CONTENT OF PACKAGE
Please carefully check that the package contains the following items :
2 x Walkie-Talkie
2 x Belt Clip
2 x Necklace
1 x User Manual
BELT CLIP AND BATTERIES INSTALLATION
Remove belt clip before installing the batteries.
Removing and installing the Belt Clip
1) To remove the clip, pull the block tab
and slide the clip toward the up side
of the unit.
2) To install the clip, slide it down into
the slot situated on the rear side of
the unit, until the block system make
a click.
Battery installation
1) Release the battery cover latch
located on the rear side of the radio
and remove the battery cover.
2) Install 3 x 1.5V AAA alkaline batteries
and pay attention to the correct polarity
as indicated in the battery room.
3) Reinstall the battery cover and lock
the battery cover latch.
Low Battery Alert
When the battery level is low, an alert tone will be heard and the TX LED (9) will light up
in red color once every 15 seconds. Replace the batteries immediately.
Warning !
If you' re not going to use the unit for a long period of time (e.g. several weeks), please
take out the batteries.
BASIC OPERATION
Power ON/OFF
To power ON/OFF the unit, press and hold the ON-OFF/Menu Key (12), until the LCD
Display shows the "Self Test" screen and a dual-beep tone is emitted.
Adjusting Speaker Volume
1) Press UP Key (4) to increase the volume level.
2) Press DOWN Key (13) to decrease the volume level.
3) The volume level is indicated on LCD Display, from 1 to 8 (A).
Receiving a signal
Radio is continuously in RECEIVE mode when the unit is ON. During the reception of a
communication, the RX Icon (D) is lighted.
Transmitting a signal
1) Check the channel activity by using the MONITOR function (see related section).
Don' t transmit if current channel is busy.
2) Press and hold the PTT Key (2), holding the microphone (14) about 5 cm away
from your mouth and speak with normal voice. While transmitting, the TX LED (9)
and TX Icon (B) will light.
3) Release the PTT Key (2) at the end of communication. Radio will enter to RECEIVE
mode.
Note : to communicate between two or more radios, the operating channel must be the
same. Please refer to the CHANNEL / FREQUENCY TABLE.
ADDITIONAL FUNCTIONS
Main Channel selection
Radio has 8 PMR446 available channels.
To select the desired channel, please proceed as follow :
1) Press ON-OFF/Menu Key (12) until the Channel Number (A) will flash on LCD
Display (8).
2) Press UP (4) or DOWN (13) keys to select the desired channel.
3) Press PTT Key (2) to confirm the selection and exit the Menu mode.
CHANNEL / FREQUENCY TABLE
Walkie-Talkie PMR446 8 Channels
i-Talk T50
MENU
S
C
1
2
3
4
5
7
8
9
10
6
11
12
13
14
15
A
B
C
D
1313
RoHS
2002/95/EC
8. LCD Display
9. TX (Transmission) LED
10. Earset-Microphone jack.
11. C Key (CALL)
12. ON-OFF / Menu Key
13. DOWN Key
14. Buil-in microphone.
15. Built-in speaker.
CH
1
2
3
4
446.00625
446.01875
446.03125
446.04375
5
6
7
8
446.05625
446.06875
446.08125
446.09375
FREQ CH FREQ
Page 2

High / Low Power Selection
This function is very convenient to reduce the current drain and extend battery life when
communicating within short distance. To select the output power, please proceed as follow :
1) Press ON-OFF/Menu Key (12) twice to enter High/Low power page.
2) Press UP (4) or DOWN (13) keys to select the desired power level. The Low power
is indicated by L Icon (C).
3) Press PTT Key (2) to confirm the selection and exit the Menu mode.
Monitor Function
This function may be used to check any activity on the current channel before
transmitting or to listen to the weakest signals. To enable this function, press ONOFF/Menu key (12) three times; now you can listen to the background noise and adjust
the volume level. To disable MONITOR function, press again ON-OFF/Menu key (12).
Automatic Power Save
Radio includes an Automatic Power Save circuit designed to dramatically extend battery
life. If it senses no operation within 6 seconds, it automatically switched to APS mode.
The radio can still receive transmission in this mode.
Automatic Channel SCAN
This function allows automatic scanning of all channels. Press and hold S Key (3) for
about 1 second to enable this funcion. Radio will start channel scanning until an active
signal is detected. When a signal is detected, radio will stay on the occupied channel.
You can press PTT Key (2) to communicate on the active found channel or press UP (4)
or DOWN (13) keys to continue scanning.
Press and hold the S Key (3) about 1 second to exit SCAN mode.
CALL Tone Sending
This function can be used to alert other users when you are attemping to contact them.
Press C Key (11) to send Call tone for 3 seconds; TX LED (9) and TX Icon (B) will be
lighted during transmission.
SPECIFICATIONS
Channels 8 PMR446 Channels
Operating Frequency UHF 446.00625 - 446.09375 MHz
Power Source 3 x 1.5V Ni-MH AAA type alkaline battery
RF Output Power 0.5W ERP
Dimensions H160 x W56 X D41 mm
Weight gr. 115 (with batteries)
IMPORTANT INFORMATIONS
Important !
Changes or modifications to this product could void your authority to operate this unit. Your
radio is produced and factory set to transmit a regulated signal on an assigned frequency. It is
against the law to alter or adjust the settings inside the radio to exceed those limitations. Any
adjustment to your radio must be made by a qualified authorized technician or service.
To be safe and sure :
Never open the cabinet of your radio.
Never change or replace anything in your radio (except the battery).
Your radio might cause TV or radio interference even when it is operating properly. To
determine whether your radio is causing the interference, turn it off. If the interference goes
away, your radio is causing it. Try to eliminate the interference by moving your radio away
from the receiver. If you cannot eliminate the interference, stop using the radio.
Hazardous Environments :
Do not operate the radio in hazardous environments.
Care and Safety :
To clean the radio, use a soft cloth dampened with water. Do not use cleaners or solvents
because they can harm the body of the unit and leak inside, causing permanent damage. Use
a dry, lint-free cloth to clean the battery contacts. Do not submerge the unit in water or use
it on a wet environment. If the unit gets wet, turn it off and remove the battery immediately.
Dry the battery and the battery compartment with a soft cloth to minimize potential water
damage. Leave the battery compartment cover off overnight to ensure complete drying. Do
not use the radio until it is completely dry.
Battery Operation - Important Information
Dispose of battery in the proper manner, according to federal, state and local regulations that
apply in your area. A battery may leak electrolyte if it is mixed in a set with different battery
types, if inserted incorrectly, if disposed of in fire, or if an attempt is made to charge a battery
not intended to be charged. Discard leaky batteries immediately. Leaking batteries can cause
skin burns or other personal injury.
Notice ! Use of PMR446 Transceivers
This transceiver may be used in all the European countries and in some other countries as
well, according with the regulation of the country where the product is used.
PMR446 (8 channels) : Austria, Belgium, Czech Rep., Denmark, Finland, France, Germany,
Greece, Island, Irland, Italy, Luxembourg, Norway, Holland, Poland, Portugal, Spain, Sweden,
Switzerland, UK, Turkey
User Information
in accordance with art. 13 of the Legislative Decree of 25th July 2005, no. 15 ”Implementation
of Directives 2002/95/EC, 2002/96/EC and 2003/108/EC, relative to reduction of the use of
hazardous substances in electrical and electronic equipment, in addition to waste disposal”.
The crossed bin symbol shown on the equipment indicates that at the end of its
working life the product must be collected separately from other waste.
The user must therefore take the above equipment to the appropriate
differentiated collection centres for electronic and electro technical waste, or
return it to the dealer when purchasing a new appliance of equivalent type, in a
ratio of one to one.
Appropriate differentiated waste collection for subsequent recycling, treatment and
environment-friendly disposal of the discarded equipment helps to prevent possible negative
environmental and health effects and encourages recycling of the component materials of the
equipment.
Illegal disposal of the product by the user will be punished by application of the administrative
fines provided for by the legislative decree no. 22/1997 (article 50 and following of the
legislative decree no. 22/1997).
DECLARATION OF CONFORMITY
With the present declaration, we certify that the following products :
INTEK i-Talk T50
comply with all the technical regulations applicable to the above mentioned products
in accordance with the EC Directives 2006/95/EC, 2004/108/EC, 1999/5/EC.
Type of product : PMR 446 Transceiver
Details of applied standards : EN 300 296-2 V1.3.1
EN 301 489-1 V1.9.2, EN 304 489-5 V1.3.1
EN 60950-1:
2006+A11:2009+A1:2010+A12:2011
Manufacturer : INTEK S.R.L.
16 Via G. Marconi
20090 Segrate (Mi)
Tel. 02-26950451 / Fax 02-26952185
E-Mail intek.com@intek-com.it
Notified Body : Bay Area Compliance Laboratories Corp.
1274 Anvilwood Ave, Sunnyvale
CA 94089, USA
Identification Number : 1313
Contact Reference : Armando Zanni
Tel. 02-26950451 / Fax 02-26952185
E-Mail intek.com@intek-com.it
Segrate, 26-10-2012 dr. Vittorio Zanetti (C.E.O.)
DECLARATION OF CONFORMITY
EC Certificate of Conformity
(to EC Directive 2006/95, 2004/108, 99/5)
 Loading...