

Page 1
OWNER'S MANUAL
AMATEUR RADIO
MOBILE TRANSCEIVER
430-440 MHz UHF FM 45W
PC PROGRAMMABLE
AMATEUR RADIO
MOBILE TRANSCEIVER
144-146 MHz VHF FM 60W
PC PROGRAMMABLE
Page 2

Notice
RoHS
2002/95/EC
0678
NOTICE !
It is recommended to carefully read this owner’s manual before using the product. This will also help the user to prevent using the radio in violation of the regulations
valid in the country where the product is used, as well as to avoid any possible interferences with other services.
NOTICE !
This transceiver is programmable via PC, using the dedicated software and the PC interface cable (optional items). Any programming or modification of the
original default setting must be made by a specialised technician or by an authorised service centre. Some functions of this transceiver might be programmed in
violation of the technical rules in force for the use of the VHF and UHF FM bands. It is the user’s responsibility to check that any modification to the programming
will be done in compliance with the current regulations. Any modification to the product, alteration of the internal circuit, of the external structure of the radio or any
programming in violation of the current regulations will automatically void the product certification and your right to use the product. INTEK S.R.L. declines any
responsibility concerning any modification of the product, made by the user or by a third party, after delivery of the product.
NOTICE !
This transceiver has been factory programmed, in order to use the product immediately after purchase. The programming includes the activation of
channels/frequencies in the VHF and UHF FM Amateur Bands, according to the technical rules in force for the use of this bands.
Page 3

General Information
Thank you !
Thank you for choosing INTEK for your amateur radio applications. This user friendly transceiver will provide you with clear and reliable communications
and will keep your professional activities at peak efficiency. This transceiver incorporates the latest and most advanced technology, so you will be pleased
with its quality and its technical features.
Important notice !
The use of VHF and UHF FM transceivers is subject to the regulations applied in the country where the product has to be used. As regulations are usually
subject to possible modifications, please check the current regulations in your country with your dealer or local supplier. INTEK does not take any
responsibility for illegal use and operation of this product not in accordance with the regulation of the country where the product is used.
Safety notice
The user must know and understand the common risks related to the use of transceivers. Do not use the transceiver in environments at risk of explosion
(where there are gas, dusts, smokes, etc.). Do not use the transceiver in service areas or fuel stations, on board aircrafts, etc.
Cautions
Please observe the following precautions, in order to avoid causing fire, personal injuries or damage to the radio:
It is suggested that each transmitted message lasts a few minutes only, since very long transmissions at the maximum transmitter RF output power
may overheat the transmitter.
Do not alter or modify in any way your transceiver.
Do not expose the transceiver for a long time to direct sunlight and do not place it close to heat sources.
Do not expose the transceiver to excessively dusty or damp places, do not place it on unstable surfaces.
In case of anomalous smell or smoke that leaks out from the transceiver, turn it off immediately. Please contact an authorised service center.
Page 4

General Information
Important notice !
The use of VHF and UHF FM transceivers is subject to the regulations applied in the country where the product has to be used. As regulations are usually subject
to possible modifications, please check the current regulations in your country with your dealer or local supplier. INTEK does not take any responsibility for illegal
use and operation of this product not in accordance with the regulation of the country where the product is used.
User Information
in accordance with art. 13 of the Legislative Decree of 25th July 2005, no. 15 ”Implementation of Directives 2002/95/EC, 2002/96/EC and 2003/108/EC, relative to reduction of the use of hazardous
substances in electrical and electronic equipment, in addition to waste disposal”.
The crossed bin symbol shown on the equipment indicates that at the end of its working life the product must be collected separately from other waste.
The user must therefore take the above equipment to the appropriate differentiated collection centres for electronic and electro technical waste, or return it to the dealer when purchasing a new
appliance of equivalent type, in a ratio of one to one.
Appropriate differentiated waste collection for subsequent recycling, treatment and environment-friendly disposal of the discarded equipment helps to prevent possible negative environmental and health
effects and encourages recycling of the component materials of the equipment.
Illegal disposal of the product by the user will be punished by application of the administrative fines provided for by the legislative decree no. 22/1997 (article 50 and following of the legislative decree no.
22/1997).
Please observe the following precautions to prevent fire, personal injury, or transceiver damage:
Do not attempt to configure your transceiver while driving,it is dangerous.
This transceiver is designed for a 13.8V DC power supply. Don't use a 24V battery to power on the transceiver.
Do not place the transceiver in excessively dusty, humid or wet areas, nor unstable surfaces.
Please keep it away from interferential devices (such as TV, generator etc.)
Do not expose the transceiver to long periods of direct sunlight nor place it close to heating appliances.
If an abnormal odor or smoke is detected coming from the transceiver, turn OFF the power immediately. Contact a service station or your dealer.
Do not transmit with high output power for extended periods; the transceiver may overheat
Page 5
CONTENTS
..............................................1
Supplied Accessories/Optional Accessories .....................2
Supplied Accessories....................................................................... 2
Optional Accessories .......................................................................2
..................................................................3
Mobile Installation ............................................................................3
DC Power Cable Connection ........................................................... 4
Power Supply Voltage Display......................................................... 6
Antenna Connection ........................................................................6
Accessories Connections.................................................................7
..............................................................8
Front panel....................................................................................... 8
Rear panel .......................................................................................9
Display .............................................................................................9
Microphone ......................................................................................10
Working Mode
..................................................................11
Basic Operations .................................................................12
Switching the Power On/Off ............................................................ 12
Adjusting the Volume ...................................................................... 12
Switch between VFO and Channel mode .......................................12
Adjusting Frequency/Channel Through Selector Knob.................... 12
Receiving .........................................................................................12
Transmitting .....................................................................................12
Transmitting Tone-Pulse ..................................................................13
Transmitting
Optional Signaling ......................................................13
Channel Edit ....................................................................................13
Channel Delete ................................................................................13
Shortcut Operations............................................................. 14
Squelch Off/Squelch Off Momentary................................................14
Squelch Level Setup ........................................................................14
Frequency/Channel Scan ................................................................14
Channel Scan ..................................................................................14
CTCSS/DCS Encode and Decode Setup ........................................ 14
CTCSS Scan....................................................................................15
DCS Scan ........................................................................................15
High/Mid/Low Power Switch ............................................................15
Compander (Decrease the background noise and enhance audio
clarity .................................................................................................. 15
Offset Direction and Offset Frequency Setup .................................. 16
Keypad Lockout ...............................................................................16
Current Voltage Enquiry...................................................................16
Auto-Dialer Setup.............................................................................16
Transmitting Edited DTMF Tones in the Auto-dialer Memory........... 17
General Setting.....................................................................18
Frequency Channel Step Setup....................................................... 18
DTMF, DTMF ANI, 2Tone or 5Tone Signaling.................................. 18
Sending 2-Tone Call.........................................................................19
Sending 5-Tone Call.........................................................................19
Sending DTMF call ..........................................................................19
Signaling Combination Setup...........................................................19
Page 6
CONTENTS
HIGH/MID/LOW Power Selection ....................................................20
Band-width Selection .......................................................................20
TX OFF Setup.................................................................................. 21
Busy Channel Lockout ..................................................................... 21
Editing Channel Name ..................................................................... 21
Reverse TX/RX ................................................................................ 21
Talk Around ......................................................................................22
Voice Compander ...........................................................................22
Scrambler Setup (Encryption).......................................................... 22
Radio's DTMF SELF ID ENQUIRY .................................................22
Radio's 5TONE SELF ID ENQUIRY ...............................................23
Voice Prompt....................................................................................23
TOT (Time-out timer) .......................................................................23
APO (Auto power off)....................................................................... 23
DTMF Transmitting Time..................................................................24
Squelch Level Setup ........................................................................ 24
Scan Dwell Time Setup....................................................................24
LCD Backlight ..................................................................................24
Pilot Frequency ................................................................................ 25
Display Mode Setup......................................................................... 25
PIN Setup ........................................................................................25
Address List ....................................................................................26
Factory Default.................................................................................26
Microphone Operation .........................................................27
Function Setup By Microphone Keypad...........................................27
Squelch Level ..................................................................................27
Optional Signaling ........................................................................... 27
Scan Skip ........................................................................................ 28
Frequency/Channel Scan ...............................................................28
Busy Channel Lockout ..................................................................... 28
Reverse
TX/RX ................................................................................ 28
TOT (Time-out timer)........................................................................29
CTCSS/DCS Encode and Decode...................................................29
Talk Around .....................................................................................29
Voice Prompt....................................................................................29
HIGH/MID/LOW Power Selection ....................................................29
LCD Backlight .................................................................................30
XP system) ............................................................................31
Maintenance ..........................................................................32
Default Setting after Resetting (VHF)...............................................32
Default Setting after Resetting (UHF)...............................................32
Trouble Shooting..............................................................................32
Declaration of Conformity HR-200S ................................................36
Declaration of Conformity HR-400S ................................................36
.......................................................................33
Attached Chart...................................................................... 34
Declarations of Conformity .................................................36
Notes .....................................................................................37
50 groups CTCSS Tone Frequency(Hz) ..........................................34
1024 groups DCS Code................................................................... 34
Page 7
1
1
New and Innovative Features
Mobile Radios has nice housing, stoutness & stability, advanced and reliable functions, perfect & valuable. This amateur mobile radio especially
designs for drivers and it pursues company philosophy of innovation and practicality. More functions as follows:
Display on a large LCD with adjustable brightness, convenient for nighttime use.
There are Amateur operation mode and Professional
operation mode for option.
Distribute buttons reasonably, convenient for operation. Adopt superior quality material, better technology and high quality radiator to ensure
stable and durable operation.
Programming different CTCSS, DCS, 2Tone, 5Tone in per channel, rejecting extra calling from other radios.
200 programmable memorized channels, identified by editing name.
Various scan functions including CTCSS/DCS Scan function.
Using 5Tone to send Message, Emergency alarm, Call all, ANI, Remotely kill, Remotely Waken, etc.
Automatic
calling Identification function by DTMF--ANI or 5Tone--ANI .
Scramble function (Optional).
Compander function for decrease the background noise and enhance audio clarity, it can set compander ON/OFF per channel.
Different band width per channel,
25K for wide band, 20K for middle band ,or 12.5K for narrow band.
Theft alarm provides extra safety.
INTEK
Page 8
2
2
Supplied Accessories/Optional Accessories
Supplied Accessories
Optional Accessories
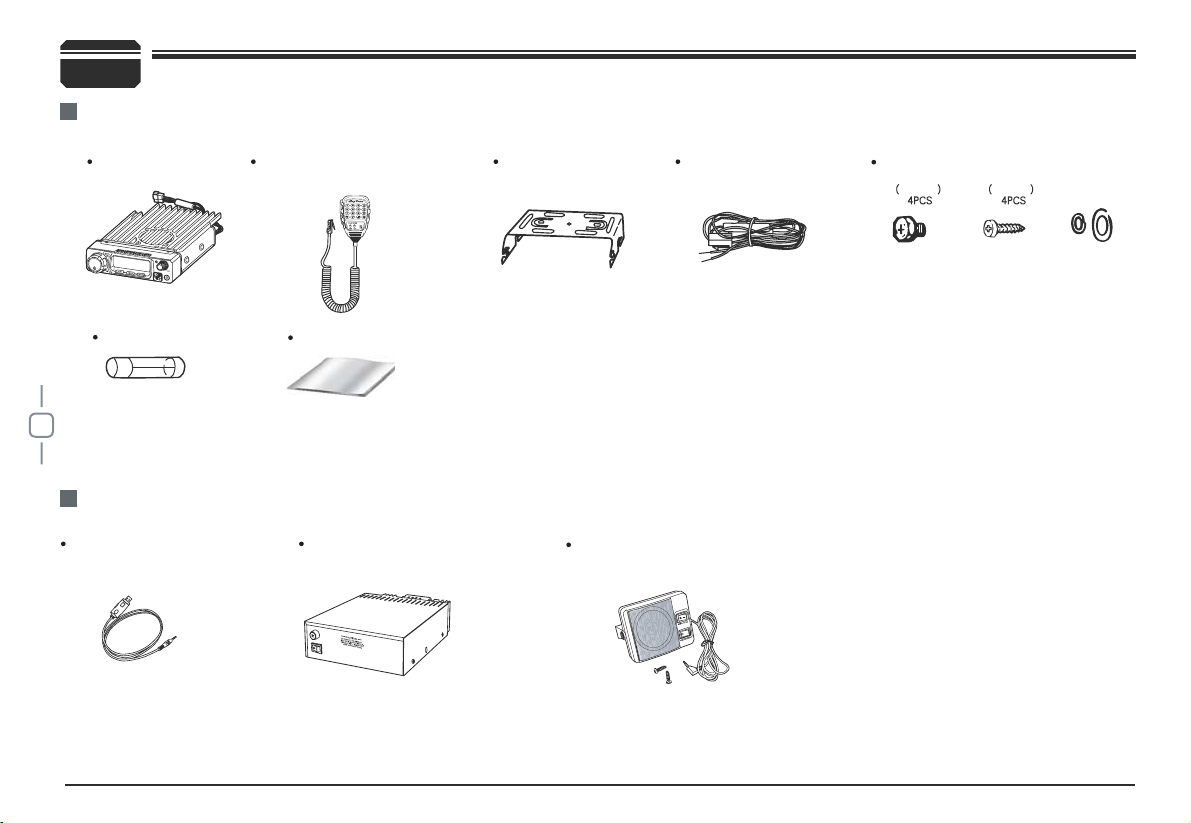
After carefully unpacking the transceiver, identify the items listed in the table below. We suggest you keep the box and packaging.
Transceiver
Spare Fuses
USB Programming
Cable (D-200)
Regulated Power
Supply (SPA-8230)
External Speaker
(FSP-10 / FSP-20 / FSP-30 / FSP-50)
User Manual
Microphone
(with DTMF keyboard)
Mobile Mounting
Bracket
DC Power Cable with
Fuse Holder
Hardware Kit for Bracket
Black screws
M4X8mm
Tapping screws
M5X8mm
S-Washer
Page 9
3
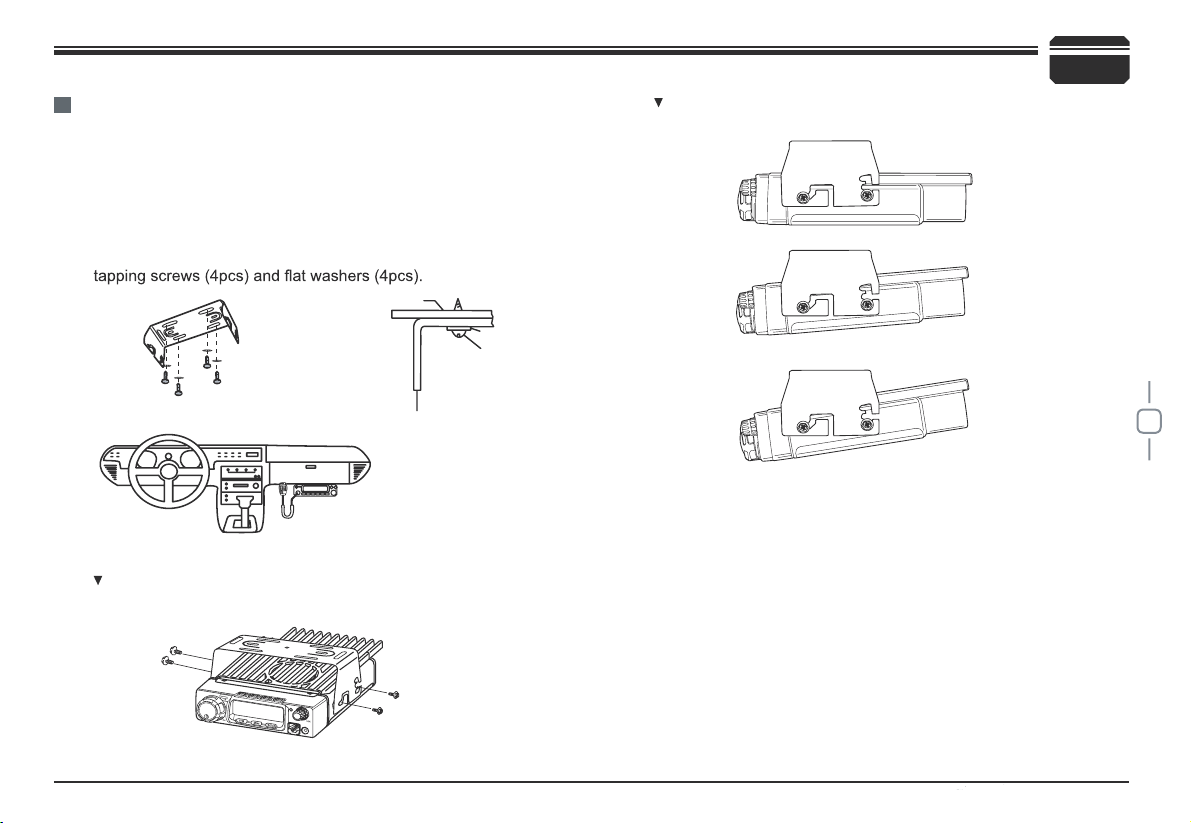
To install the transceiver, select a safe, convenient location inside your
vehicle that minimizes danger to your passengers and yourself while the
vehicle is in motion. Consider installing the unit at an appropriate position
so that knees or legs will not strike it during sudden braking of your
vehicle. Try to pick a well ventilated location that is shielded from direct
sunlight.
Install the mounting bracket in the vehicle using the supplied self-
1.
Position the transceiver, then insert and tighten the supplied
2.
hexagon SEMS screws.
Double check that all screws are tightened to prevent vehicle
vibration from loosening the bracket or transceiver.
3
Car body
Washer (M5)
Tapping screw
(M5x20mm)
Mounting bracket
Initial Installation
Mobile installation
Determine the appropriate angle of the transceiver, using the 3 screw
hole positions on the side of the mounting bracket.
Page 10
4
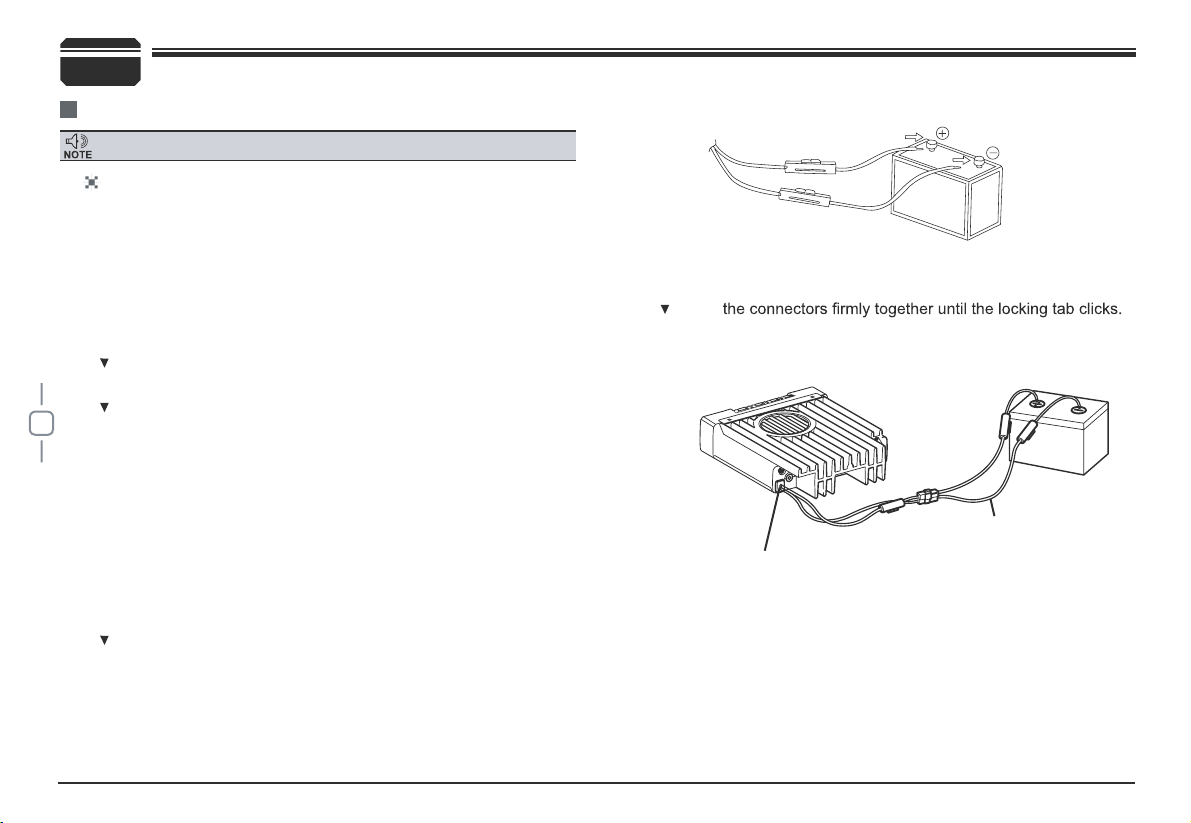
Connect the DC power cable to the transceiver's power supply
6.
connector.
Press
3
Red
Black
Ext. Power jack
DC power cable
Initial Installation
DC Power Cable Connection
Mobile Operation
The vehicle battery must have a nominal rating of 12V. Never
connect the transceiver to a 24V battery. Be sure to use a 12V
vehicle battery that has sufficient current capacity. If the current
to the transceiver is insufficient, the display may darken during
transmission, or transmitting output power may drop excessively.
Route the DC power cable supplied with the transceiver directly
1.
to the vehicle's battery terminals using the shortest path from the
transceiver.
We recommend you do not use the cigarette lighter socket as some
cigarette lighter sockets introduce an unacceptable voltage drop.
The entire length of the cable must be dressed so it is isolated from
heat, moisture, and the engine secondary (high voltage) ignition
system/ cables.
After installing cable, in order to avoid the risk of damp, please
2.
use heat-resistant tap to tie together with fuse box. Don't forget to
reinforce whole cable.
In order to avoid the risk of short circuit, please cut down
3.
connection with negative (-) of battery, then connect with radio.
Confirm the correct polarity of the connections, then attach the
4.
power cable to the battery terminals; red connects to the positive (+)
terminal and black connects to the negative (-) terminal.
Use the full length of the cable without cutting off excess even if the
cable is longer than required. In particular, never remove the fuse
holders from the cable.
Reconnect any wiring removed from the negative terminal.
5.
Locate the power input connector as close to the transceiver as possible.
Page 11
5
3
Red
Black
Regulated power supply (SPA-8230)
DC power cable with fuse holder
Regulated Power Supply
(SPA-8230)
Initial Installation
Before connecting the DC power to the transceiver, be sure to switch
the transceiver and the DC power supply OFF.
Do not plug the DC power supply into an AC outlet until you make all
connections.
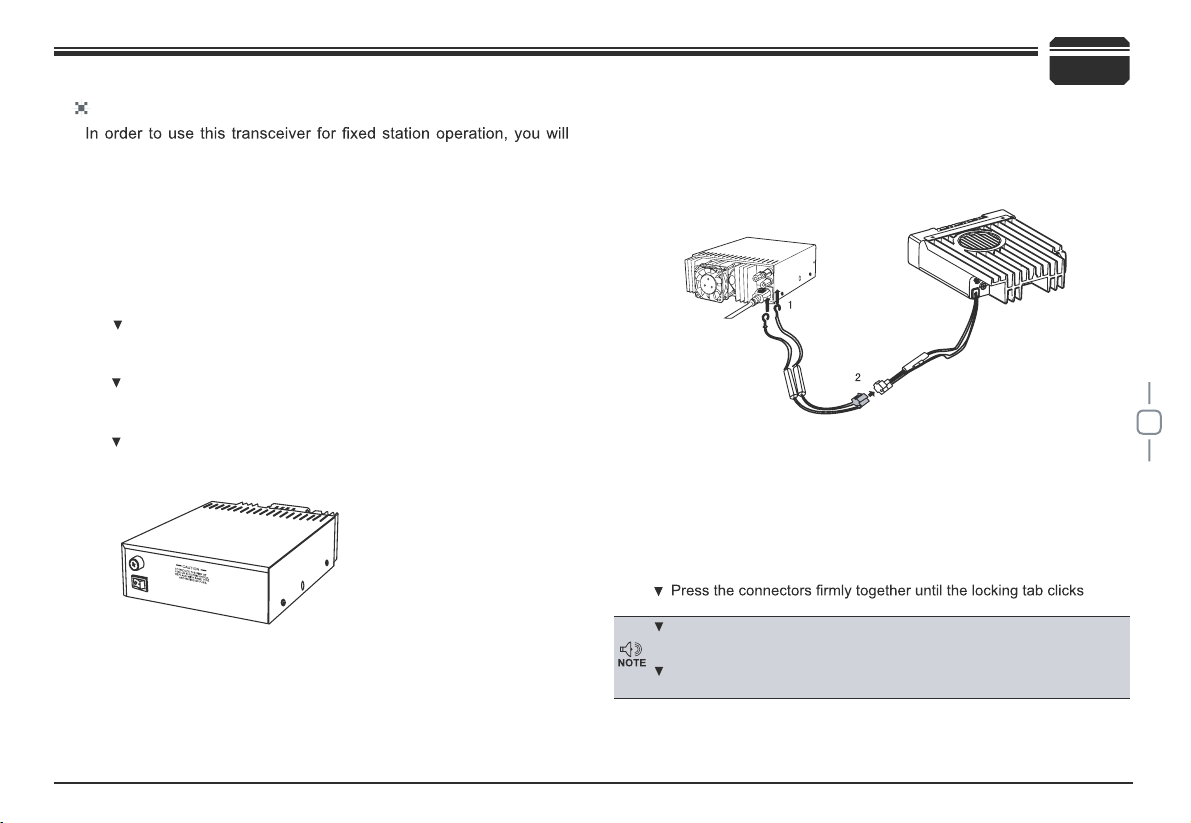
need a separate 13.8V DC power supply (not included), power
supply ( SPA-8230) as optional accessories. Please contact local
dealer to require.
The recommended current capacity of your power supply is 12A.
Connect the DC power cable to the regulated DC power supply
1.
and ensure that the polarities are correct. (Red: positive, Black:
negative).
Do not directly connect the transceiver to an AC outlet.
Use the supplied DC power cable to connect the transceiver to a
regulated power supply.
Do not substitute a cable with smaller gauge wires.
Connect the transceiver's DC power connector to the connector 2.on
the DC power cable.
.
Fixed Station Operation
Page 12
6
3
Initial Installation
Replacing Fuses
If the fuse blows, determine the cause, then correct the problem.
After the problem is resolved, replace the fuse. If newly installed fuses
continue to blow, disconnect the power cable and contact your authorized dealer or an authorized service center for assistance.
Only use fuses of the specified type and rating, otherwise the
transceiver could be damaged.
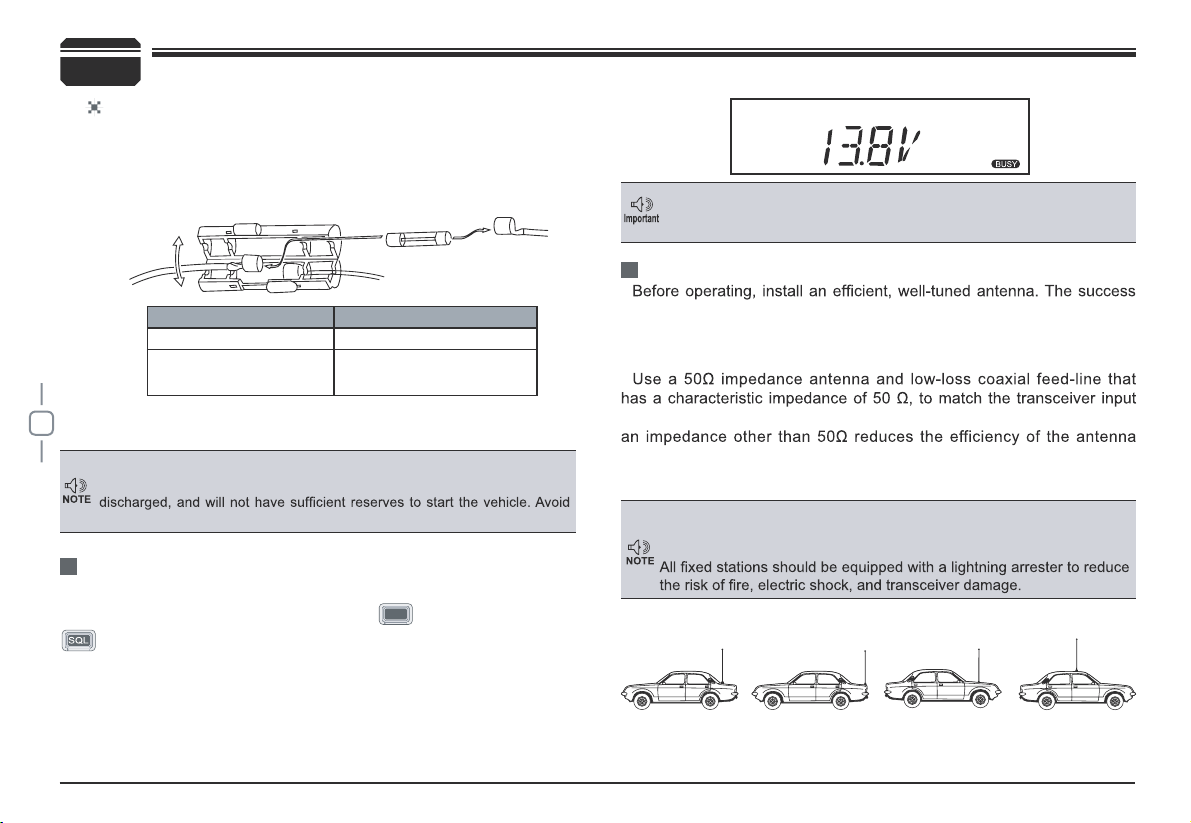
After connecting the transceiver to the power supply, the supply voltage
can be displayed on LCD by pressing the
FUN
key together with the
key.
The display immediately changes as the voltage supply changes, It
also displays voltage during transmission.
The transceiver will return to its normal operation when the power is
switched ON or repeat above operation.
of your installation will depend largely on the type of antenna and its
correct installation. The transceiver can give excellent results if the
antenna system and its installation are given careful attention.
impedance. Coupling the antenna to the transceiver via feed-lines having
system and can cause interference to nearby broadcast television
receivers, radio receivers, and other electronic equipment.
Fuse Location Fuse Current Rating
Transceiver 15A
Supplied Accessory DC
power cable
20A
If you use the transceiver for a long period when the vehicle battery is
not fully charged, or when the engine is OFF, the battery may become
using the transceiver in these conditions.
The range of displayed voltage is only from 7V to16V DC, because the
displayed value is estimated, please use a voltmeter when a more precise
reading is desired.
Power supply voltage Display
Antenna Connection
Transmitting without first connecting an antenna or other matched
load may damage the transceiver. Always connect the antenna to the
transceiver before transmitting.
The possible locations of antenna on a car are shown as following:
Page 13
7
3
FSP-30
FSP-30
Ground
Microphone
connector
Microphone
Antenna
External speaker (FSP-30)
Error
Initial Installation
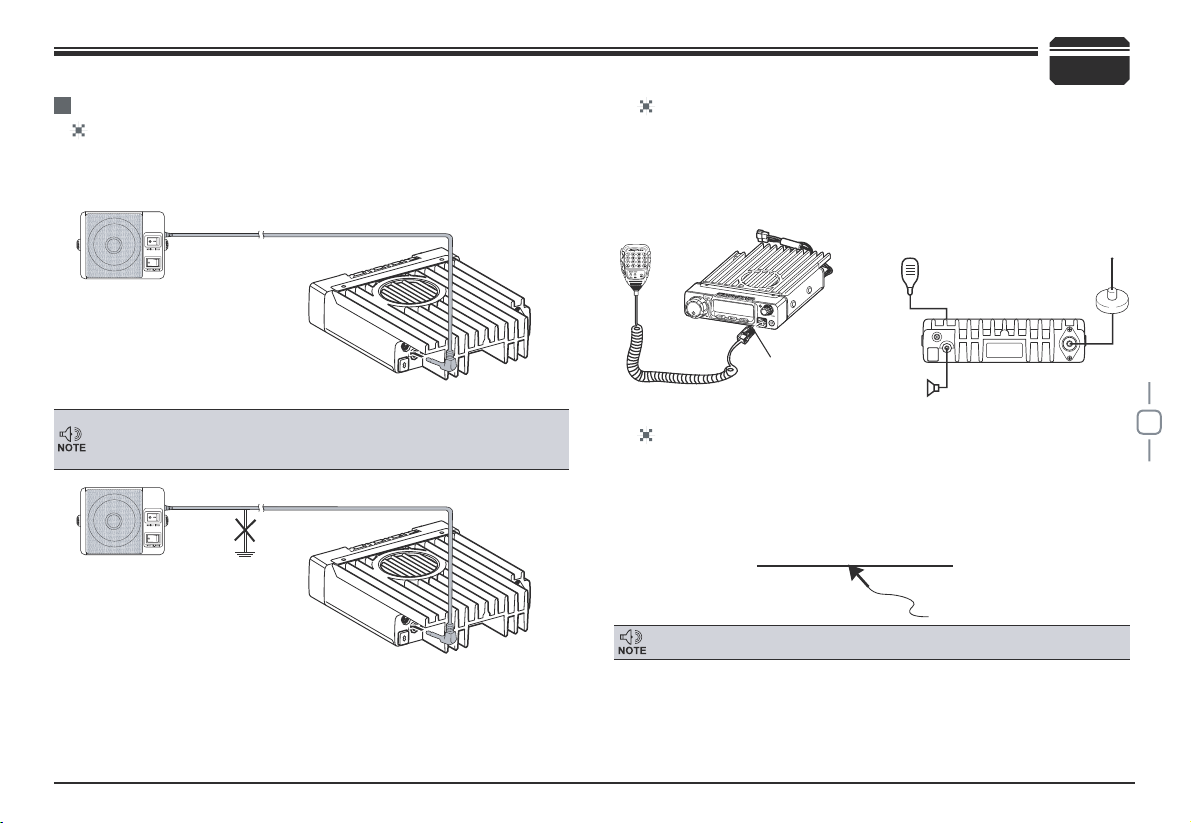
External Speaker
Microphone
PC Connecting
If you plan to use an external speaker, choose a speaker with an
mono (2-conductor) plug.
impedance of 8 Ohm. The external speaker jack accepts a 3.5 mm
For voice communications, connect a microphone equipped with
an 8-pin modular plug into the modular socket on the front of the
the
main unit. Press firmly on the pluguntil the locking tab clicks. Attach
supplied microphone hanger in an appropriate location using the
screws included in the screw set.
transceiver to your PC then using the optional programming cable
www.intek-radios.com
To utilize the software (free download), you must first connect the
(via Data socket ).
Please use the free software for programming.
External speaker adopt double port BTL, please care about the connecting
way. The speaker can not connect with the ground, otherwise the speaker
will be fault. The wrong connecting way as the following picture.
Ask your dealer about purchasing the optional Programming Cable.
Accessories Connections
Page 14
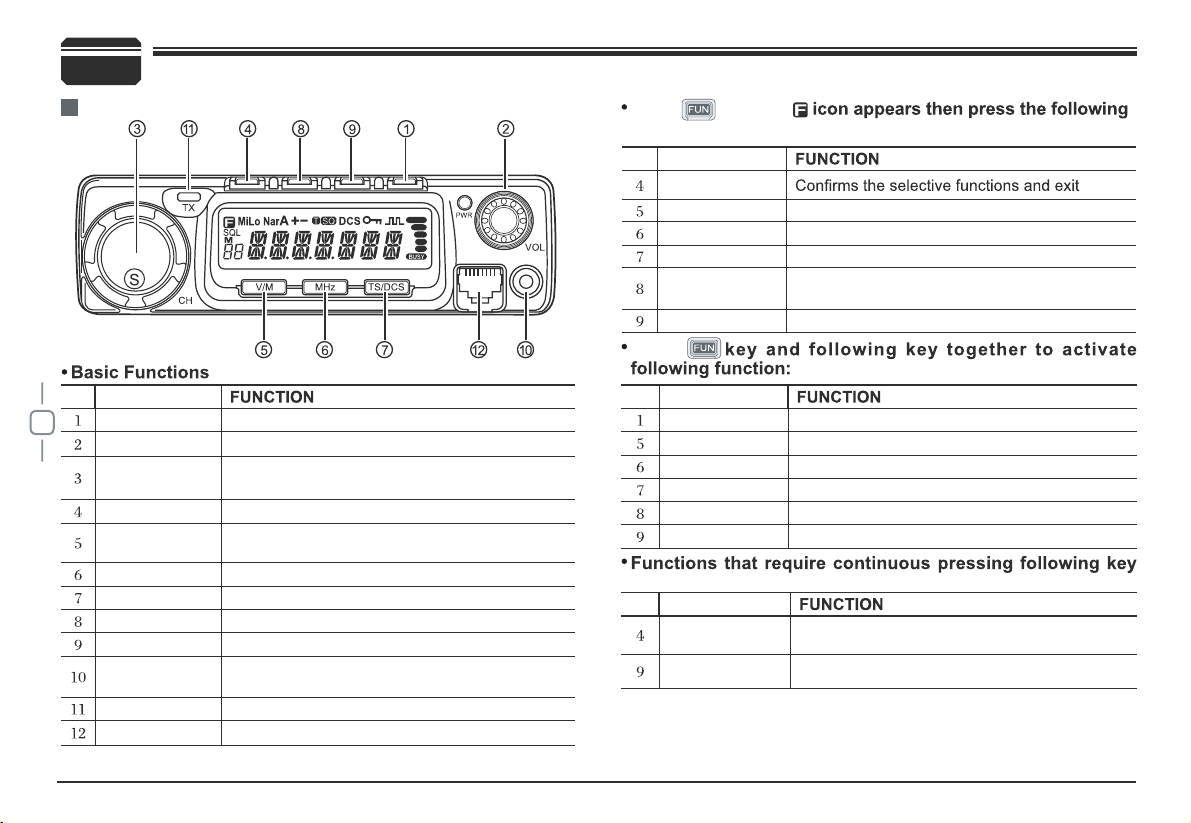
8
4
NO. KEY
Pow(Power) Power on/Off
VOL Adjust Volume Key
Main Dial
Change frequency, memory channel and scan
direction etc.
FUN/SET Function Key
V/M/MW
Switches between VFO mode and Channel
mode
MHz/SHIFT Step Size Key ( step:1MHz)
TS/DCS/LOCK Sets CTCSS and DCS value
CAL/H/L Call key
SQL/D Squelch off
Data Terminal
Data reading/writing, cloning and theft alarm
functions
TX lights during Transmitting
Mic.connector Microphone connection port
NO. KEY
FUN/SET
V/M/MW Stores data into channels
MHz/SHIFT Sets offset direction and offset frequency
TS/DCS/LOCK Sets Keypad lock function
CAL/ H/L
Switches between HI, MID and LOW power
transmission
SQL/D Compander mode on/off
NO. KEY
PWR Reset to factory default settings
V/M/MW Erase the memory
MHz/SHIFT Switches between Wide/ Narrow band
TS/DCS/LOCK Auto dialer
CAL/H/L
Enters clone data function mode
SQL/D Enters power supply voltage indication mode
NO. KEY
FUN/SET
Press and hold for 2s to enter the Setting
mode
SQL/D Monitor mode
Getting Acquainted
Front Panel
Press key until
key.
Press
to be activated
Page 15

9
4
21
NO. KEY
Ext. Power
Jack
Terminal for connecting an optional cable for
use with ignition key On/Off function.
The radio will auto power on when car is driving.
The radio will auto power off when car stops.
Ext.Speaker
Terminal
Terminal for optional external speaker mod. FSP-30
Antenna
Connector
NO. KEY
SQL
Squelch level.
M
In channel mode.
Indicates the channel number in channel mode.
Decimal point
Channel skip.
Decimal point
Indicates the decimal point of frequency and the
scanning function.
Indicates the frequency or memory name.
Signal is being received or monitor.
Signal strength of receiving and transmitting.
Compander.
Keypad lock .
DCS
Set DCS function.
Set CTCSS function.
+
_
Offset frequency direction.
Scramble.
A
Auto power off.
Nar
Narrow band.
LO
Low power.
Mi
Middle Power.
Pressing key.
3
Getting Acquainted
Display LCD
Rear Panel
3
1
2
13
10
11
12
14
4
5
6
7
8
9
15
16
17
18
19
13
Page 16

10
4
NO. KEY
UP Increase frequency ,channel number or setting value.
DOWN Decrease frequency, channel number or setting value.
PTT Press the PTT (Push-TO-Talk) key to transmit.
Number Key Input VFO frequency or DTMF dial out etc..
DTMF ON/
OFF
Switches between DTMF dialing or function operating.
LOCK Switch
Locks out the UP
Down Numerical keys and Function
keys.
MIC Speak here during transmission.
Microphone
MIC Connector Diagram(in the front view of connector)
Getting Acquainted
Page 17

11
5
According to practical application,you can set the radio works as
Amateur Transceiver mode or Professional Transceiver mode . There
are also 2 levels operation menu to set functions as you need. It is easy
and convenient (From No.1 to No. 15 are channel function setup,From
No.15 to No.29 are general setting setup).
1.
In PC software's "General
Setting"menu ,choose "Display Mode" to select Amateur
Transceiver mode or Professional Transceiver mode.
:Please refer to "Display Mode" in Page 24.
2.
Except setting as "CH" mode, others
considered as Amateur transceiver mode. Under this mode,press
key to switch between Channel mode and VFO mode .
Professional Transceiver Mode
3.
When
set display mode as "CH",it enters
into Professional Transceiver mode.At
this mode,except scan,other shortcut
operation can't operate.And from No.117 menu in function setting will be
auto-hidden,They should be set by
PC software.If there is corresponding
name for current channel,the LCD
will display current channel name
Otherwise,it shows current channel number. (As pic 4) (As pic 5)
Under every mode, from No. 18-29 menu in
4.
general setting can be
changed and saved.
C. :
This mode shows only frequency
on the display. Shortcut operation
and Channel setting will be
changed & stored as the latest
value permanently.Once the radio is
turned off or changed to new VFO frequency, the latest setting is
remained until next change.(As pic 3)
If transceiver programmed as professional transceiver mode and
locked,you can't return to amateur transceiver mode by manual
operation from general setting.
(Pic 1)
(Pic 2)
(Pic 4)
(Pic 5)
A. : When set display as"FR",it enters
into Frequency+Channel mode, new
setting of channel operation and
shortcut operation can be temporarily
used by user. Once the radio is
turned off or switched to another
channel, the temporary setting will be
erased and back to initial settings.(As pic 1)
B. : When set display as "NM",it enters
into Channel +Name Tag mode. At this mode, it will display
corresponding channel name when
the current channel is edited with
name. Otherwise, it will display
frequency + channel. Its operations
are the same as frequency + channel
mode.(As pic 2)
(Pic 3)
WORKING MODE (AMATEUR TRANSCEIVER OR PROFESSIONAL TRANSCEIVER)
Page 18

12
In standby, press key or Microphone's
key until appear , this indicates current
channel in channel mode. Repeat above
6
PWR KEY
Dial
Frequency
decrease
Frequency
increase
Volume Knob
Min
Volume
Max
Volume
Basic Operations
Adjusting The Volume
Switch between VFO and Channel mode
Switching the Power On/Off
Adjusting Frequency/Channel throught selector Knob
Receiving
according to the option selected during
installation Press the switch or turn the
ignition key to ACC (speed up) or ON (startup)
position to power on radio . Press the key
for 1s or turn the ignition key to OFF position
to turn off.
When the channel you are operating is
called, the screen shows
and field
intensity, in this way, you can hear the calling
from transmitting party.
Under frequency (VFO) mode, you can
1.
change the current frequency to the
desired one through selector knob; Turn
clockwise to increase frequency; turn
counterclockwise to decrease. Every
gear will increase or decrease one step.
Press
key, the decimal point of
Turn the VOL knob clockwise to increase
the audio level, counterclockwise to decrease.
During communication, volume can be adjusted more accurate.
5k, 6.25k, 8.33K,10k, 12.5k, 20k, 25k, 30k and 50k total nine step size
available for this radio.
If the transceiver has set at higher squelch level, it may fail to hear the calling.
operation to switch between Frequency mode
(VFO) and Channel mode.
frequency in screen will be auto-hidden. In this status,
turn selector
knob or Microphone [
/ ] key will increase or decrease
frequency quickly by 1MHz step .
Under channel mode, you can change the current channel to the
2.
desired one through selector knob, clockwise turn to the forward
channel, anticlockwise turn to the backward channel. In relative
working mode, Microphone's [
/ ] key has same
function for adjusting frequency and channel.
Transmitting
Press and hold key or press MIC's key to monitor for a while
Release
or press Mic's
key to return standby status,Then press and hold [PTT] key to speak
into microphone.
When the channel you are operating is called,the screen shows BUSY
and field intensity,you can't hear the calling from transmitting party,it
means current channel receives a matching carrier but unmatching
signaling(Refer to CTCSS/DCS encode and decode or Optional Signaling
setup).
Page 19

13
Basic Operations
Transmitting Tone-Pulse
Transmitting optional signaling
Press and hold [PTT] key, then press Microphone [ ] key to
transmit current selected tone-pulse signal.
Press and hold [PTT] key, then press Microphone
key or press
key in front panel or press Mic's key to transmit pre-stored and
selected DTMF/2Tone/5Tone optional signaling.
Channel Edit
Channel Delete
Under frequency mode (VFO), turn
1.
selector knob to select the desired
frequency or input frequency by MIC's
numeric keys.
Press
2.
key to enter CTCSS/DCS
signaling setup, turn selector knob to
select the desired signaling.
Press
3.
key, LCD appears ,
icon and current channel number,
Under channel mode, turn selector knob to select channel which
1.
you want to delete.
Press
2.
key and key together, current channel will be
deleted and emitted a prompt voice.
channel is deleted.
empty.
Turn selector knob to select the desired channel number to store.
4.
Press
5.
key, , icon and channel number disappears
and emit a prompt voice, thus the channel storage succeed.
6
Press and hold [PTT] key, LED lights RED and power intensity showed in
screen indicates it is transmitting, release to receive.
Please hold the microphone approximately 2.5-5.0cm from your lips,
and then speak into the microphone in your normal speaking voice to
get best timbre.
Page 20

14
7
Shortcut Operations
Squelch level Setup
Squelch OFF / Squelch OFF momentary
Frequency/Channel Scan
Channel Scan
CTCSS/DCS Encode and Decode setup
Setting the radio to a tight squelch level,you can avoid unwanted
signals or noise,but you may not receive a weak signal. Therefore,it will
be better for you to select the normal squelch level.
In frequency (VFO) mode, this function is designed to monitor signal
of every communicative frequency point of transceiver "step size" you
have set.
In channel mode, this function is designed to monitor signal in every
channel.
In channel mode,Press
1.
key for 1s to enter into channel scan
Repeatedly press
key to check whether
set CTCSS/DCS encode and decode in current
channel or not.
When LCD appears
1.
iron, it means
current channel with CTCSS encode,
s'enohporciM sserp ro bonk rotceles nrut
[
/ ] key to select desired
CTCSS encode.
When LCD appears
2.
and
iron, it
means current channel with CTCSS
encode and decode, turn selector knob
or press Microphone's [
/ ]
to select desired CTCSS code.
While standby, press
1.
key and turn
selector knob until LCD appears
and current squelch level
Turn selector knob or press MIC [
2.
/
] key to set desired squelch level.
Press any key except
3.
and
key to exit .
Frequency Scan
In VFO mode,press
1.
for 1s to enter
into frequency scan.
Turn selector knob or press Microphone [
2.
/ ] key to
change scan direction.
Press any key except
3.
and key to exit.
enohporciM sserp ro bonk rotceles nruT
2.
[ / ] key to change scan
direction.
Press any key except
3.
and key
to exit.
key programmed as Squelch Off or Squelch Off Momentary to
monitor the weak signal.
Squelch Off: Press
1.
key to disable squelch ,press
key
again to resume squelch.
Squelch Off Momentary: Press and hold
2.
key to disable
squelch,release
key to resume squelch.
The above functions should be set in programming software.
Page 21

15
7
Shortcut Operations
CTCSS SCAN
Repeatedly press key until LCD
displays
and icons ,then hold
key for 1S to enter into CTCSS scanning.
will stop for 15s then scan again.
Under channel mode,this operation can be temporarily used by user. Once
the radio is turned off or switched to another channel,the temporary setting
will be erased.
When LCD appears
3.
iron, it means current channe can be set
with DCS encode and decode together, turn selector knob or press
Microphone's [
/ ] to select desired DCS encode and
decode.
CTCSS:62.5-254.1, Total 51groups; DCS:000N-777I total 1024
4.
groups. N is positive code, I is inverse code.
Press any key except
5.
, and keys to return into
standby status.
Repeatedly press
key until LCD
displays DCS icons ,then hold
key for
a matching DCS signaling ,it will stop for 15s
then scan again.
compander function.
Press
key until LCD display iron,
then press
key to switch between high/
Mid/low power. The LCD appears:
None: Transmit in high power
: Transmit in middle power
: Transmit in low power
Compander function will decrease the background noise and enhance
audio clarity, especially in long range communication.
Press
1.
key, then press key to
turn on compander function, repeat
above operation again to turn off
HIGH/MID/LOW Power Switch
Compander (decrease the background noise and
enhance audio clarity)
When LCD appears
2.
iron, enable
compander in current channel.
When LCD doesn't display
3.
iron,
disable compander in current channel.
DCS SCAN
Page 22

16
Press key until LCD displays
1.
icon, then press key until, LCD
displays
icon, it indicates keypad
lockout function is valid.
This will automatically transmit pre-programmed and stored DTMF
tones. And they are often used to remote control electronic devices or
AUTOPATCH phone systems available on some repeater.
Press and hold
1.
key, then press key to enter the
auto-dialer enquiry mode, LCD displays current default data and
current group displayed on left. If no data in current group,it
shows"EMPTY".
Press and hold key, then press
1.
key, LCD displays current battery
voltage.
Repeat above operation to return into
2.
VFO or Channel mode
frequency.
When LCD displays " " icon, it indicates negative offset, which
4.
means transmitting frequency lower than receiving frequency.
Turn selector knob or Mic's [
5.
/ ] key to change offset
frequency, offset frequency changed as per stepping.
Press any key except
6.
and key to exit into standby.
Press
1.
key until the icon displays
on the LCD, then press key, LCD
displays offset direction and offset
frequency.
Repeatedly press key to select
2.
positive offset and negative offset.
When LCD displays " " icon, it indicates
3.
positive offset, which means transmitting
frequency higher than receiving
7
Repeater receives a signal(UP-LINK) on one frequency and retransmits on another frequency(DOWN-LINK). The difference between
these two frequencies is called the offset frequency. If the UP-LINK
frequency higher than DOWN-LINK frequency, the direction is positive, If
it is lower, the shift direction is negative.
Avoiding unintentional operation, this function will lock main keys, all
keys except ,
and key are invalid.
Keypad Lockout
Current Voltage ENQUIRY
Auto-Dialer Setup
Shortcut Operations
In voltage display mode, all functions and channel or frequency
selection are invalid.
This function will display Current Battery Voltage.
Repeat above operation,
2.
icon disappears, it indicates keypad
lockout function is invalid.
Under channel mode,this operation can be temporarily used by
user.
Once the radio is turned off or switched to another channel,the
temporary setting will be erased.
Offset direction and Offset Frequency setup
Page 23

17
Turn selector knob to choose group you
2.
desired. Total:16 group,01-16.
7
Shortcut Operations
Press
3.
key to enter into editing of
current group,press MIC's numeric
keys to set your desired data.
The display scrolls when the 7th digit
4.
is entered. The numbers 0-9, --, A-D, *
and # can be stored up to a total of 23
digits.
After editing,press PTT or
5.
key to send current group and store
edited DTMF signaling. Press
to exit and store.
Press
1.
key, then press key to
enter into auto-dialer enquiry
Turn selector knob to select desired
2.
transmitting group
Press PTT or
3.
key to transmit
current selected DTMF tones.
Transmitting Edited DTMF tones in the Auto-dialer memory
Page 24

18
Press
2.
/ key to choose No.01 menu, LCD displays îSTP--
125î
Turn selector knob to select the desired frequency channel step.
3.
Channel step: 5K,6.25K,8.33K,10K,12.5K,20K,25K,30K and 50K,
total 9 kinds.
Press
4.
Press and hold
1.
key for over 2s to
enter general setting menu.
Press and hold
1.
key for over 2s to enter general setting menu.
Press
2.
or to select the desired function option.
Turn selector knob to select the desired setup.
3.
Press
4.
Meanwhile,if you want to edit channel name or start up menu,press
or
to move forward or backward,Press to store and
exit.
Only in frequency (VFO) mode, this function is valid. Turn selector
knob to select frequency or frequency scanning which is restricted by
frequency step size.
8
General Setting
Frequency Channel Step Setup
This function is auto-hidden in channel mode.
DTMF, DTMF ANI, 2-Tone or 5-Tone signaling
DTMF/5Tone/2Tone signalling function as similarily as CTCSS/DCS.
Without receiving correspondent tone signalling, the speaker will remain
mute. DTMF and 5Tone signalling can be applied for other advanced
features such as ANI, PTT ID, group call, remotely stun,remotely kill,
waken,...etc. The signalling edition must be done through programming
software. Please refer to the HELP option in the programming software
to know how to operate these features.
Press and hold
1.
key for over 2s to
enter into general setting menu.
Press
2.
/ to choose No 2
menu,LCD displays"T-OFF" .
Turn selector knob to
3.
select the desired setup.
"DTMFî: the channel will be mute by a DTMF signal. The
speaker wonít be open until receiving a correspondent DTMF
signal. Hold "PTT" then press [UP] or press
directly to
transmit the pre-stored DTMF signaling.
In Profession transceiver mode,the functions from No.1 to No.17
will be auto-hidden.
In DTMF signaling mode,press
for 2s until LCD displays
"AN---",turn selector knob to select desired digit(the other party
ID).In this mode,press to confirm exist digit and move
cursor to next,press
to forward cursor.After editing,press
key to operate ANI call.
"2TONE": the channel will be mute
by a 2-Tone signal. The speaker
wonít be open until receiving a
correspondent 2-Tone signal.Hold
ìPTTî then press [UP] or press
directly to transmit the pre-stored
2-Tone signaling.
"5Tone": the channel will be mute
by a 5-Tone signal. The Speaker wonít be open until receiving
a correspondent 5-Tone signal. hold ìPTTî then press [UP] or
Page 25

19
8
Sending 5-Tone Call
Press
2.
/ key to choose
No.04 menu, LCD displays "5TON
XX","XX"indicates the group in the list.
Turn selector knob to select the desired
3.
sending 5TONE group,Press PTT to
transmit selected group.
Total:100groups,00-99,Default:00.
4.
Press
5.
General Setting
Content and name of 5TONE will be edited by programming
software.This radio only query edited group or name.If there is
corresponding name for 5TONE,this operation will display 5TONE
corresponding name.
Press
directly to transmit the pre-stored 5-Tone signaling.
In 5Tone signaling mode,press
for 2s until LCD displays
"AN---",turn selector knob to select desired digit(caller ID).In
this mode,press
next,press to forward cursor.After editing,press key to
operate ANI call.
Press
4.
Sending 2-Tone Call
Press and hold
1.
key for over 2s to enter general setting menu.
Press
2.
/ key to choose
No.03 menu, LCD displays "2TON
XX","XX"indicates the group in the list.
Turn selector knob to select the desired
3.
sending 2TONE group,Press PTT to
transmit selected group.
Total:32groups,00-31,Default:00.
4.
Press
5.
Content and name of 2TONE will be edited by programming
software.
This radio only query edited group or name.If there is
corresponding name for 2TONE,this operation will display 2TONE
corresponding name.
Press and hold
1.
key for over 2s to enter general setting menu
Sending DTMF call
Press and hold
1.
key for over 2s to enter general setting menu.
Press
2.
/ key to choose
No.05 menu, LCD displays "DTMF
XX","XX"indicates the group in the list.
Turn selector knob to select the desired
3.
sending DTMF group,Press PTT to
transmit selected group.
Total:16groups,00-16,Default:00.
4.
Press
5.
Signaling Combination setup
This function is to improve the level of protecting the radio against
receiving irrelative signal.
Page 26

20
8
Turn selector knob to select the desired
3.
combination
If select "SQ",it indicates you can hear the calling from caller when
receive a matching carrier.
If LCD displays "CTC",it indicates
you can hear the calling from caller
when receive a matching carrier and
CTCSS/DCS signaling .
If LCD displays "TON",it indicates
you can hear the calling from caller
dna reirrac gnihctam a eviecer nehw
DTMF/2TONE/5TONE signaling .
If LCD displays "C/T",it indicates
you can hear the calling from
caller when receive a matching
carrier and CTCSS/DCS and
DTMF/2TONE/5TONE signaling .
If LCD displays "C/T",it indicates you can hear the calling from
caller when receive a matching carrier and either SCD/SSCTC
DTMF/2TONE/5TONE signaling. .
Press
4.
HIGH/MID/LOW Selection
Press and hold
1.
key for over 2s to
enter general setting menu.
Press
2.
/ key to choose No.07
menu, LCD displaysîPOW--HIî.
Turn selector knob to select the desired
3.
setting.
HI: High TX Power
MI : Middle TX Power
LOW: Low TX Power
Press
4.
Band-width Selection
Select suitable bandwidth in accordance with different local conditions.
Press and hold
1.
key for over 2s to enter general setting menu.
Press
2.
/ key to choose No.08
menu, LCD displays"BAND--25".
Turn selector knob to select the desired
3.
setting.
25: band width is 25k(Wide band)
20: band width is 20k(Middle band)
12:band width is 12.5k(Narrow band)
Press
4.
Default:25(Wide Band)
5.
.
General Setting
Press and hold
1.
key for over 2s to
enter general setting menu.
Press
2.
/ key to choose No.06
menu, LCD displays "SPK--SQ".
This setting will be set together with adding optional signaling
and CTCSS/DCS.
Page 27

21
8
TX OFF Setup
Disable this function,it is invalid to press PTT,current channel only
works in RX mode.
Press and hold
1.
key for over 2s to enter general setting menu.
Press
2.
/ key to choose No.09 menu, LCD displays"TX-
ON".
Turn selector knob to select the desired
3.
setting .
On:In current channel,Press PTT to
transmit
OFF:In current channel,Press PTT is
invalid.
Press
4.
Busy Channel Lockout
BCLO is to disable transmitting while RX signal is received. Once the
channel is busy and you press PTT, the radio will beep as warning and
get back to receiving.
Press and hold
1.
key for over 2s to
enter general setting menu
Press
2.
/ key to choose No.10
menu, LCD displays"LOCK--OFF".
Turn selector knob to select the desired
3.
setting.
BU: Enable
BCLO, Carrier lockout, transmitting is inhibited when
current channel receives a matching carrier;press [PTT] to emit
error voice prompt and back to receiving status.
RL: Enable
BTLO, transmitting is inhibited when current channel
receives a matching carrier but dis-matching CTCSS/DCS.press
[PTT] to emit error voice prompt and back to receiving status.
OFF:
Busy channel lockout is disabled.It can transmit in any
receiving status.
Press
4.
Press and hold
1.
key for over 2s to
enter general setting menu.
Press
2.
/ key to choose No.11
Turn selector knob to select the desired letter,press
3.
key to
to
return forward edition.
After edition,press
4.
key to exit.
Reverse TX/RX
General Setting
Editing Channel Name
In Frequency (VFO) mode ,this function will be auto-hidden.
TX frequency turns to RX frequency & RX frequency changes to TX
frequency. The signaling will also be reversed if CTCSS/DCS signaling
exited in this channel.
Press and hold
1.
key for over 2s to enter general setting menu
Page 28

22
8
Press
2.
/ key to choose No.12
menu, LCD displays "REV--OF".
Turn selector knob to select the desired
3.
setting.
ON:Enable Frequency Reverse
OFF:Disable Frequency Reverse.
After edition,press
4.
key to exit.
Talk Around
Press
2.
/
key to choose No.14
menu, LCD displays "COMP--OFF".
Turn selector knob to select the desired
3.
setting.
ON:Enable compander
OFF:Disable compander
Press
4.
Scrambler setup (Encryption)
An analog voice inversion scrambler can be equipped as optionals.This
radios at same frequency will receive only disordered noises.
General Setting
By Talk Around function,you can directly communicate with other radios
in your group in case the repeater is not activated or when you are out of
the repeater range. The transceiver will transmit by RX frequency with its
CTCSS/DCS signaling.
Press and hold
1.
key for over 2s to
enter general setting menu.
Press
2.
/ key to choose No.13
menu, LCD displays "TALK--OF".
Turn selector knob to select the desired
3.
setting.
ON:Enable Talk Around
OFF:Disable Talk Around
After edition,press
4.
key to exit.
Voice Compander
Enable this function to reduce background noise and enhance audio
clarity, especially in long range communication.
Press and hold
1.
key for over 2s to enter general setting menu
Radio's DTMF self ID enquiry
This function is optional
Press and hold
1.
key for over 2s to
enter general setting menu.
Press
2.
/ key to choose No.16
Press and hold
1.
key for over 2s to enter general setting menu.
Press
2.
/ key to choose No.15
menu, LCD displays "SCR--OF".
Turn selector knob to select the desired
3.
setting.
ON:Enable Scrambler
OF:Disable Scrambler
Press
4.
Page 29

23
8
menu, LCD displays "D--XXX" XXX is radio's DTMF SELF ID.
Press
3.
Radio's 5TONE self ID enquiry
Press and hold
1.
key for over 2s to
enter general setting menu.
Press
2.
/ key to choose No.17
menu, LCD displays"F--XXXXX",
"XXXXX" is radio's 5TONE SELF ID.
Press
3.
Voice Prompt
The prompting tone provides confirmation of entry, error status or
malfunctions of the transceiver. You can enable or disable this function.
Press and hold
1.
key for over 2s to
enter general setting menu.
Press
2.
/ key to choose No.18
menu, LCD displays"BEEP--ON".
Turn selector knob to select the desired
3.
setting.
ON:Enable voice prompt
OFF:Disable voice prompt
Press
4.
TOT (Time-out timer)
The time-out timer limits the amount of transmitting time. When you
reach the time limit which has been programmed by your dealer, your
transmission will be cut off. In order to transmit again, you must release
PTT button to reset the timer.
Press and hold
1.
key for over 2s to enter general setting menu.
Press
2.
/ key to choose No.19
menu, LCD displays"TOT--3"
Turn selector knob to select the desired
3.
setting.
Timer:1-30min,each level 1min
OFF:Disable TOT
Press
4.
Once APO is activated, the radio will be automatically switched off
when the pre-set timer is running to end.
Press and hold
1.
key for over 2s to
enter general setting menu.
Press
2.
/ key to choose No.20
menu, LCD displays"APO--OFF".
Turn selector knob to select the desired
3.
setting.
30MIN:Auto power off after 30m
General Setting
Suggestion:Enable this function to check incorrect operation and
malfunctions.
Page 30

24
8
1HOUR:Auto power off after 1h
2HOUR:Auto power off after 2h
OFF:Disable Auto power off
Press
4.
DTMF Transmitting Time
Press and hold
1.
key for over 2s to
enter general setting.
Press
2.
/ key to choose No.21
menu, LCD displays"SPD--50".
Turn selector knob to select the desired setting.
3.
30/50/100/200/300/500, which indicates the time for sending each
DTMF signal & the interval between each DTMF being sent.
Press
4.
Squelch level Setup
Setting the radio to a tight squelch level, you can avoid unwanted
signals or noise, but you may not receive a weak signal. Therefore, it will
be better for you to select the normal squelch level
Press and hold
1.
key for over 2s to
enter general setting menu.
Press
2.
/ key to choose No.22
menu, LCD displays"SQL--04".
Turn selector knob to select the desired squelch level.
3.
OF-20 total 21,OF is min setting value(ON)
Press
4.
Scan Dwell Time Setup
There are 3 kinds of Scan Dwell Time for option.
Press and hold
1.
key for over 2s to
enter general setting menu.
Press
2.
/ key to choose No.23
menu, LCD displays"SCAN--TO".
Turn selector knob to select the desired
3.
Scan Dwell Time.
TO:it pauses 15s once scanning a
matching signal,then resume scan.
CO:it pauses once scanning a matching signal,signal disappeared
then resume scan.
SE:It stops once scanning a matching signal.
Press
4.
LCD Backlight
Press and hold
1.
key for over 2s to
enter general setting menu.
Press
2.
/ key to choose No.24
General Setting
Press ,then turn selector knob also can select the desired
squelch level.
If the transceiver has set at higher squelch level,it may fail to hear
the calling.If set at lower squelch level,the radio will be interfered.
Page 31

25
8
menu, LCD displays"LAMP--25"
Turn selector knob to select the desired LCD backlight brightness
3.
1-32 total 32 level backlight brightness.
Press
4.
Pilot Frequency
This function uses to start repeater .It needs a certain intensity Pilot
Frequency to start dormant repeater.As usual,no need to send pilot
frequency again once repeater started.
Press and hold
1.
key for over 2s to
enter general setting.
Press
2.
/ key to choose No.25
menu, LCD displays"TB--1750".
Turn selector knob to select the desired
3.
pilot frequency.
1750HZ:Pilot frequency1750HZ
2100HZ:Pilot frequency 2100HZ
1000HZ:Pilot frequency 1000HZ
1450HZ:Pilot frequency 1450HZ
Press
4.
Display Mode Setup
There are 3 different dispaly modes: Frequency+Channel mode,&
Channel mode&Channel+Name Tag mode, .
Press and hold
1.
key for over 2s to enter general setting menu.
Press
2.
/ key to choose No.26 menu, LCD
displays "DSP--FR".
Turn selector knob to select the desired
3.
mode.
FR:Frequency+Channel mode(Amateur
transceiver mode).
CH:Channel mode(Professional
transceiver mode).
NM:Channel+Name Tag mode(Amateur
transceiver mode),if channel not
named,it displays Frequency+Channel mode.
Press
4.
PIN Setup
Enable this function,you have to insert a matching PIN to enter
into normal status when radio is turned on.(Pin setup by programme
software).
Press and hold
1.
key for over 2s to
enter general setting menu.
Press
2.
/ key to choose No.27
menu, LCD displays "CODE-OF".
Turn selector knob to enable/disable
3.
Pin setup.
ON: Turn on Pin setup
OFF:Turn off Pin setup
Press
4.
This function will be auto-hidden if channel mode locked.(Refer to
programming software)
General Setting
Page 32

26
8
Address list
You store desired ID and corresponding ID name in address list.The
LCD displays ID corresponding name if radio received ANI calling and
Factory Default
If your radio seems to be malfunctioning, resetting the microprocessor
may solve the problem. When performing the reset, you may lose
memory data and stored information. Back up or write down important
data before performing the reset.
General Setting
Press and hold
1.
key for over 2s to
enter general setting menu.
Press
2.
/ key to choose No.29
menu, LCD displays"RESTORE".
Turn selector knob to select the desired
3.
operation.
rof tluafed yrotcaf emuseR:TCAF
channel,signaling and general setting.
SETUP:Return initial setup for No.18No 27 general setting menu.
Press
4.
Press and hold
1.
key for over 2s to
enter general setting menu.
Press
2.
/ key to choose No.28
menu, LCD displays"BOOK".
Press
3.
to enter into ID
setting,press
/ to select the
desired group (00-127,total is 128 group
ID).Turn selector knob to select desired
number,press
cursor to next edition,press to
clear out all digits.
After finishing edition,press
4.
to confirm and enter into
edition of current group's ID corresponding name.Turn selector
knob to select desired letter,press
to move cursor to next
edition,Press
to clear out all letters. 00-127,total 128 group
ID and corresponding ID name.
Press
5.
Step 3 and Step 4 operations to edit multi-ID and corresponding ID
name.
Press
6.
key to return into standby status.
Page 33

27
9
You can operate the transceiver by keypad or input desired frequency
or channel through the QHM-03 microphone (Note:In professional
transceiver mode,other keys are invalid except PTT,[
/ ,]
and ).
Keypad Lock
Pull down the slide switch to lock position,The lamp is turned off and
all of keypads is not work except PTT switch.
Transmitting DTMF By Microphone Keypad
Switches between VFO and channel mode
In standby,press key to switch between channel mode and
Frequency mode (VFO).
Short Calling
In standby,press to transmit the selected DTMF/2TONE/5TONE
in current channel.
Transmi tt ing DTMF Cod e:In standby,press
,LCD displays
DTMF data and group.Press [
/ ] key to select the
desired transmitting DTMF group,then Press PTT to transmit.
If no DTMF data in current group,LCD displays "EMPTY",press
key again and input desired DTMF code by keypad,press PTT to
transmit and store DTMF data.
Squelch Level
In standby,press
1.
,then press ,LCD displays "SQL" and
current squelch level.
Press
2.
/ to adjust the desired squelch level.(press
,then press ,turn selector knob also can adjust the desired
squelch level.
3.
Optional signaling
In standby,press ,then press to add
optional signaling,repeat above operation to
set DTMF,2TONE or 5TONE signaling.
When first bit of Exa byte in
frequency displays "D",it indicates
DTMF function enable.
When first bit of Exa byte in
frequency displays "T",it indicates
2Tone function enable.
Microphone Operation
Slide DTMF key to DTMF position, press and hold the [PTT] key,
transmitting the desired DTMF signaling by the numeric key directly.
(Note:Slide DTMF key to DTMF position,the keyboard is invalid in
standby ).
Function Setup By Microphone Keypad
Squelc h off:In standby, press key,
the squelch is disabled when
icon
, Press
again to enable
squelch and the
icon disappears.
PTT
DOWNUP
Lock
Speaker
Numeric Keys
DTMF ON/OFF
Page 34

28
9
Reverse TX/RX
TX frequency turns to RX frequency & RX
frequency changes to TX frequency. The
signaling will also be reversed if CTCSS/DCS
signaling exited in this channel.
In standby,press
1.
,then press ,LCD displays ìREVóOFî.
Press [
2.
/ ] to select the desired value.
ON:Enable Frequency Reverse
OFF:Disable Frequency Reverse
3.
In corresponding mode,press then press key to enter into
scanning.
In scanning mode,press
/ to change scan direction.
Busy Channel Lockout
BCLO is to disable transmitting while RX signal is received. Once the
channel is busy and you press PTT, the radio will beep as warning and
get back to receiving.
In standby,press
1.
,then press to enter into Busy Channel
Lockout.
Press [
2.
/ ] to select the desired value.
BU: Enable BCLO, Carrier lockout, transmitting is inhibited when
current channel receives a matching carrier;press [PTT] to emit error
voice prompt.
RL: Enable BTLO, transmitting is inhibited when current channel
receives a matching carrier but dis-matching CTCSS/DCS.press
[PTT] to emit error voice prompt It can transmit in any receiving
status.
OFF: Busy channel lockout is disabled.
3.
This function can be temporarily used in channel mode. Once the
radio is turned off or switched to another channel, the temporary
setting will be erased and back to initial settings.
Frequency/Channel scan
Scan Skip
When first bit of Exa byte in frequency displays "F",it
indicates 5Tone function enable.
This function can be temporarily used in Channel mode . Once the
radio is turned off or switched to another channel, the temporary
setting will be erased and back to initial settings.
This function can be temporarily used in Channel mode . Once
the radio is turned off or switched to another channel, the
temporary setting will be erased and back to initial settings.
Microphone Operation
In Channel mode,press then press ,decimal point displayed
between frequency's ten digit and unit digit,it means current channel is
scan skip. Repeat above operation to set scan or scan skip in current
channel.
decimal point displayed between frequency's ten digit and unit
1.
digit,it means current channel is scanned skip.
decimal point is not displayed between frequency's ten digit and
2.
unit digit,it means current channel is scanned.
Page 35

29
9
TOT (Time-out timer)
The time-out timer limits the amount of transmitting time. When you
reach the time limit which has been programmed by your dealer, your
transmission will be cut off. In order to transmit again, you must release
PTT button to reset the timer.
In standby,press
1.
,then press ìLCD displays "TOT-X".
Press [
2.
/ ] to select the desired value.
3.
CTCSS/DCS Encode and Decode
In standby,press
1.
,then press to enter into CTCSS/DCS
Encode and Decode.
Repeat above operation to set as below:
2.
LCD displays T icon,it indicates CTCSS encode set in current
channel.
LCD displays T and SQ icon,it indicates CTCSS encode and
decode set in current channel.
LCD displays DCS icon,it indicates DCS encode and decode set
in current channel.
In corresponding icon,press [
3.
/ ] to select the desired
CTCSS/DCS encode and decode.
Press
4.
`
Talk Around
This function can be temporarily used in Channel mode. Once the
radio is turned off or switched to another channel, the temporary
setting will be erased and back to initial settings.
By Talk Around function,you can directly communicate with other radios
in your group in case the repeater is not activated or when you are out of
the repeater range. The transceiver will transmit by RX frequency with its
CTCSS/DCS signaling.
In standby,press
1.
,then press key,LCD displays ìTALK --OF î.
Press [
2.
/ ] to select the desired setting .
ON:Enable Talk Around
OFF:Disable Talk Around
3.
This function can be temporarily used in Channel mode . Once the
radio is turned off or switched to another channel, the temporary
setting will be erased and back to initial settings.
Voice Prompt
The prompting tone provides confirmation of entry, error status or
malfunctions of the transceiver. You can enable or disable this function.
In standby,press
1.
,then press ,LCD displays "BEEP--XXî.
Press [
2.
/ ] to turn on/off BEEP voice prompt.
BEEPóOF :turn o ff voice prompt
BEEPóON :turn on voice prompt
Press number key to exit and store.
3.
HIGH/MID/LOW Power selection
In standby,press
1.
,then press ,LCD displays"POW-XX".
Press [
2.
/ ] to select the desired power.
Microphone Operation
Page 36

30
9
HI:High Power
MI:Middle Power
LOW:Low Power
Press number keys to exit and store.
3.
LCD Backlight
In standby status,press
1.
, then press LCD displays"LAMP-
XX" .
Press [
2.
/ ] to select desired backlight brightness(1-32
levels).
3.
Microphone Operation
Page 37

31
10
Programming Software Installing and Starting (in windows XP system)
Download the free PC programming software from www.intek-radios.com
then follow the installing instruction.
Install USB Cable Driver Program
(pic 1)
Click start menu in computer, under "ALL PROGRAMS" menu,
1.
choose and click "USB To Com port" on INTEK program, install
"USB To Com port" driver by indication.
Connect the optional USB Programming cable to USB port on PC
2.
anc connect the transceiver (see pic 1).
Double click on PC software shortcut or click the related icon in the
3.
start menu, choose serial com port as indicated then click OK to
start programming software.
According to instruction,select correct "COM Port", then click OK
4.
to start programming software.
Note:
Even in same computer,the selective COM Port is different
when USB cable connects with different USB port.
You shall install software before connecting the USB cable line. Switch
on transceiver before writing frequency.You had better not switch on or
off the power supply of transceiver when it is connected with computer,
otherwise, it will make transceiver unable to read or write frequency. In
this case, you have to turn off programming software, pull out USB cable.
then reinsert USB cable and open software, then rechoose COM Port,
it will turn into normal operation. Therefore, please connect transceiver
with computer after switching on the transceiver. Don't restart transceiver
power when it is connected with computer.
Page 38

32
11
DCS encode
and decode
-
VFO frequency 145.00MHz DCS code 023N
Memory channel
0-199 -
Output power HI
Offset direction
-
Key-lock setting OFF
Offset frequency 600KHz TOT OFF
Channel step 12.5KHz APO OFF
CTCSS encode and decode
-
Squelch Level 4
CTCSS frequency 88.5Hz
Default Setting after Resetting (VHF)
DCS encode
and decode
-
VFO frequency 435.00MHz DCS code 023N
Memory channel
0-199 -
Output power HI
Offset direction
-
Key-lock setting OFF
Offset frequency 5MHz
TOT OFF
Channel step 25KHz APO OFF
CTCSS encode and
decode
-
Squelch Level 4
CTCSS tone frequency 88.5Hz
Default Setting after Resetting (UHF)
Trouble Shooting
Problem Possible Causes and Potential Solutions
(a) Power is on, nothing
appears on Display.
+ and - polarities of power connection
are reversed. Connect red lead to plus
terminal and black lead to minus terminal of
DC power supply.
(b) Fuse is blown.
Check and solve problem resulting in blown
fuse and replace fuse with new fuse.
(c) Display is too dim.
Dimmer setting is "LAMP-L". Please make the
dimmer setting "LAMP-H".
(d) No sound comes from
speaker.
- Squelch is muted. Decrease squelch level.
- Tone or CTCSS/DCS squelch is active. Turn
CTCSS or DCS squelch off.
(e) Key and Dial do not
function.
Key-lock function is activated. Cancel Key-lock
function.
(i) Rotating Dial will not
change memory channel.
Transceiver is in CALL mode. Press the VFO
or memory mode.
(g) PTT key is pressed but
transmission does not occur.
- Microphone connection is poor. Connect
microphone properly.
- Antenna connection is poor. Connect antenna
properly.
Maintenance
Page 39

33
12
technology.
Specifications
SPECIFICATIONS
General
Frequency VHF 144-145.9975 MHz (136-174 MHz) (*) (HR-200S)
UHF 430-439.9950 MHz (400-490 MHz) (*) (HR-400S)
Channels 200
Channel spacing 25 KHz (Wide) / 20 KHz (Middle) / 12.5 KHz (Narrow)
Frequency Step 5 / 6.25 / 8.33 / 10 / 12.5 / 15 / 20 / 25 / 30 / 50 KHz
DC input voltage 13.8 VDC +/- 15%
Frequency Stability +/- 2.5 ppm
Current Drain 15A max.
Operating temperature -20/+60°
Dimensions 145 (W) x 47 (H) x 190 (L) mm
Weight 1.2 kg.
Receiver
Sensitivity (12dB Sinad) ≤ 0.25 µV (Wide) / ≤ 0.35 µV (Narrow)
Selectivity 70 dB (Wide) / 60 dB (Narrow)
Intermodulation >65dB (Wide) / >60dB (Narrow)
Audio output 2W
Transmitter
RF output power 60W / 25W / 10W (VHF) (HR-200S)
45W / 25W / 10W (UHF) (HR-400S)
Modulation FM
Spurious & Harmonics in compliance with the R&TTE regulations
Distorsion ≤ 5 %
(*) HR-200EX (INTERNATIONAL VERSION) 136-173.9975 MHz (not available for Europe)
(*) HR-400EX (INTERNATIONAL VERSION) 400-489.9950 MHz (not available for Europe)
Page 40

34
13
67.0 79.7 94.8 110.9 131.8 156.7 171.3 186.2 203.5 229.1
69.3 82.5 97.4 114.8 136.5 159.8 173.8 189.9 206.5 233.6
71.9 85.4 100.0 118.8 141.3 162.2 177.3 192.8 210.7 241.8
74.4 88.5 103.5 123.0 146.2 165.5 179.9 196.6 218.1 250.3
77.0 91.5 107.2 127.3 151.4 167.9 183.5 199.5 225.7 254.1
Attached Chart
50 groups CTCSS Tone Frequency (Hz) 1024 groups DCS Code
000 001 002 003 004 005 006 007
010 011 012 013 014 015 016 017
020 021 022 023 024 025 026 027
030 031 032 033 034 035 036 037
040 041 042 043 044 045 046 047
050 051 052 053 054 055 056 057
060 061 062 063 064 065 066 067
070 071 072 073 074 075 076 077
100 101 102 103 104 105 106 107
110 111 112 11 3 11 4 11 5 116 117
120 121 122 123 124 125 126 127
130 131 132 133 134 135 136 137
140 141 142 143 144 145 146 147
150 151 152 153 154 155 156 157
160 161 162 163 164 165 166 167
170 171 172 173 174 175 176 177
200 201 202 203 204 205 206 207
210 211 212 213 214 215 216 217
220 221 222 223 224 225 226 227
230 231 232 233 234 235 236 237
240 241 242 243 244 245 246 247
250 251 252 253 254 255 256 257
260 261 262 263 264 265 266 267
270 271 272 273 274 275 276 277
300 301 302 303 304 305 306 307
310 311 312 313 314 315 316 317
Page 41

35
13
320 321 322 323 324 325 326 327
330 331 332 333 334 335 336 337
340 341 342 343 344 345 346 347
350 351 352 353 354 355 356 357
360 361 362 363 364 365 366 367
370 371 372 373 374 375 376 377
400 401 402 403 404 405 406 407
410 411 412 413 414 415 416 417
420 421 422 423 424 425 426 427
430 431 432 433 434 435 436 437
440 441 442 443 444 445 446 447
450 451 452 453 454 455 456 457
460 461 462 463 464 465 466 467
470 471 472 473 474 475 476 477
500 501 502 503 504 505 506 507
510 511 512 513 514 515 516 517
520 521 522 523 524 525 526 527
530 531 532 533 534 535 536 537
540 541 542 543 544 545 546 547
550 551 552 553 554 555 556 557
560 561 562 563 564 565 566 567
570 571 572 573 574 575 576 577
600 601 602 603 604 605 606 607
610 611 612 613 614 615 616 617
620 621 622 623 624 625 626 627
630 631 632 633 634 635 636 637
640 641 642 643 644 645 646 347
650 651 652 653 654 655 656 657
660 661 662 663 664 665 666 667
670 671 672 673 674 675 676 677
700 701 702 703 704 705 706 707
710 711 712 713 714 715 716 717
720 721 722 723 724 725 726 727
730 731 732 733 734 735 736 737
740 741 742 743 744 745 746 747
750 751 752 753 754 755 756 757
760 761 762 763 764 765 766 767
770 771 772 773 774 775 776 777
N is positive code, I is negative code, total: 232groups.
Attached Chart
Page 42

36
14
Declarations of Conformity
With the present declaration, we certify that the following products :
INTEK HR-200S
comply with all the technical regulations applicable to the above mentioned products
in accordance with the EC Directives 2006/95/EC, 2004/108/EC, 99/5/EC.
Type of product : Amateur Radio Equipment VHF
Details of applied standards : EN 300 086-1, EN 300-086-2
EN 301 489-1, EN 301 489-5
EN 60950-1
Manufacturer : INTEK S.R.L.
Via G. Marconi, 16
20090 Segrate, Italy
Tel. 39-02-26950451 / Fax. 39-02-26952185
E-mail : intek.com@intek-com.it
Notified Body : EMCCert Dr. Rasek
Boelwiese 5, 91320 Ebermannstadt
Germany
Identification Number : 0678
Contact Reference : Armando Zanni
Tel. 39-02-26950451 / Fax. 39-02-26952185
E-mail : intek.com@intek-com.it
Segrate, 11-04-2012 dr. Vittorio Zanetti
(C.E.O.)
DECLARATION OF CONFORMITY
EC Certificate of Conformity
(to EC Directive 2006/95, 2004/108, 99/5)
With the present declaration, we certify that the following products :
INTEK HR-400S
comply with all the technical regulations applicable to the above mentioned products
in accordance with the EC Directives 2006/95/EC, 2004/108/EC, 99/5/EC.
Type of product : Amateur Radio Equipment UHF
Details of applied standards : EN 300 086-1, EN 300-086-2
EN 301 489-1, EN 301 489-5
EN 60950-1
Manufacturer : INTEK S.R.L.
Via G. Marconi, 16
20090 Segrate, Italy
Tel. 39-02-26950451 / Fax. 39-02-26952185
E-mail : intek.com@intek-com.it
Notified Body : EMCCert Dr. Rasek
Boelwiese 5, 91320 Ebermannstadt
Germany
Identification Number : 0678
Contact Reference : Armando Zanni
Tel. 39-02-26950451 / Fax. 39-02-26952185
E-mail : intek.com@intek-com.it
Segrate, 11-04-2012 dr. Vittorio Zanetti
(C.E.O.)
DECLARATION OF CONFORMITY
EC Certificate of Conformity
(to EC Directive 2006/95, 2004/108, 99/5)
Declaration of Conformity HR-200S Declaration of Conformity HR-400S
Page 43

37
15
Notes
Page 44

 Loading...