

Page 1
Contents
Getting Started
Compact Disc Changer
CDC-3.1
Instruction Manual
Important Safeguards .................2
Precautions...................................3
Features ........................................ 4
Preparation
Control Positions and Names......5
Supplied accessories...................5
Remote Controller ....................... 6
System Connections....................7
Operation
Playing CDs ..................................8
Using Memory Functions ...........14
Thank you for purchasing the Integra Compact Disc
Changer.
Please read this manual thoroughly before making
connections and plugging in the unit.
Following the instructions in this manual will enable
you to obtain optimum performance and listening
enjoyment from y our ne w Compact Disc Changer.
Please retain this manual for future reference.
Others
Troubleshooting Guide..............16
Specifications.............................16
CDC-3.1_ cover 09/05/2000, 4:23 PM1
Page 2
WARNING:
TO REDUCE THE RISK OF FIRE OR ELECTRIC SHOCK, DO
NOT EXPOSE THIS APPLIANCE TO RAIN OR MOISTURE.
CAUTION:
TO REDUCE THE RISK OF ELECTRIC SHOCK, DO NOT
REMOVE CO VER (OR BA CK). NO USER-SERVICEABLE PARTS
INSIDE. REFER SERVICING TO QUALIFIED SERVICE
PERSONNEL.
Important Safeguards
WARNING
RISK OF ELECTRIC SHOCK
DO NOT OPEN
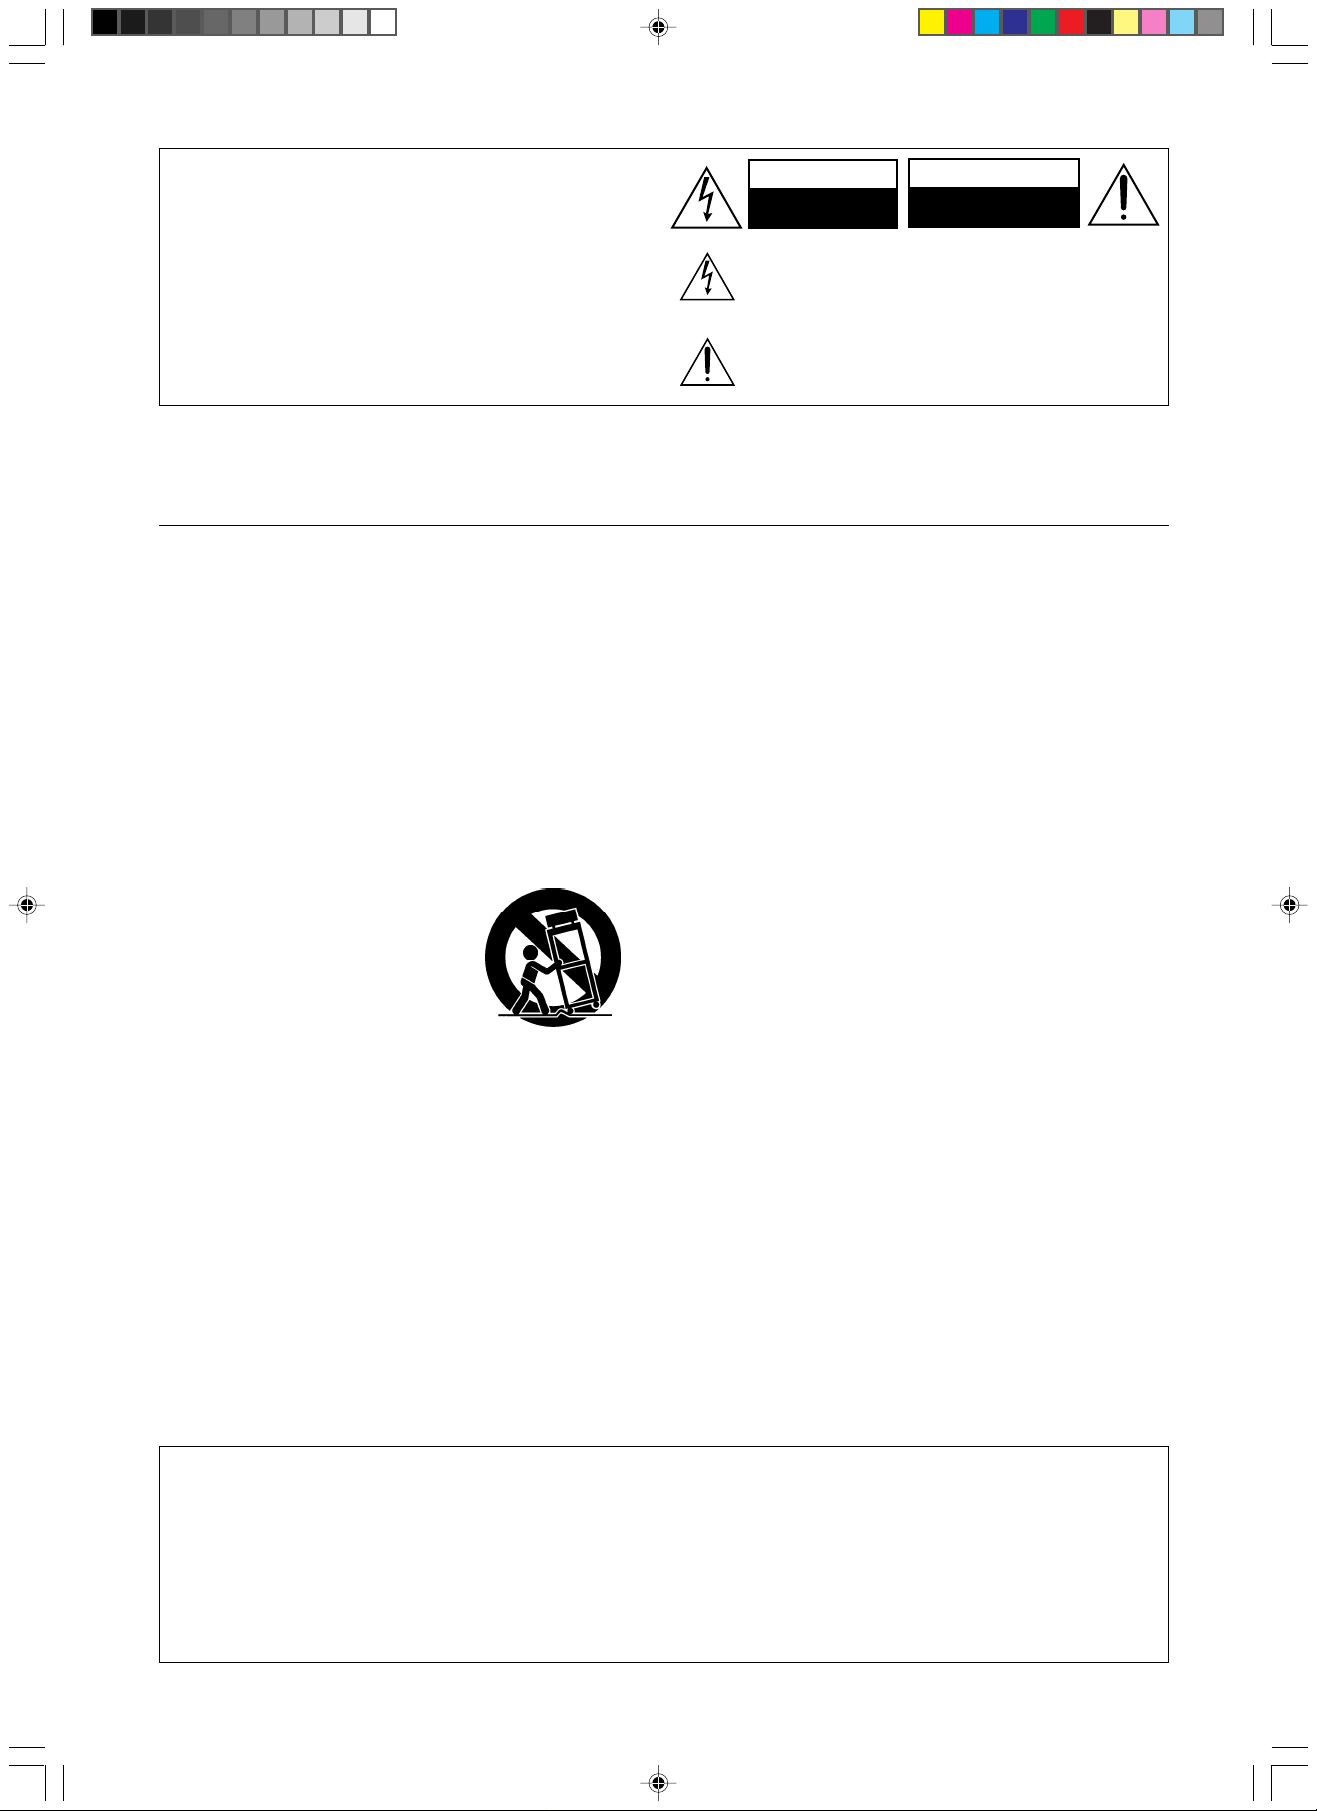
The lightning flash with arrowhead symbol, within an equilateral
triangle, is intended to alert the user to the presence of
uninsulated “dangerous voltage” within the product’s enclosure
that may be of suff icient magnitude to constitute a risk of electric
shock to persons.
The exclamation point within an equilateral triangle is intended
to alert the user to the presence of important operating and
maintenance (servicing) instructions in the literature
accompanying the appliance.
AVIS
RISQUE DE CHOC ELECTRIQUE
NE PAS OUVRIR
1. Read Instructions – All the safety and operating
instructions should be read before the appliance is
operated.
2. Retain Instructions – The safety and operating
instructions should be retained for future reference.
3. Heed Warnings – All w arnings on the appliance and in
the operating instructions should be adhered to.
4. Follow Instructions – All operating and use instructions
should be followed.
5. Water and Moisture – The appliance should not be used
near water – for example, near a bathtub, washbowl,
kitchen sink, laundry tub, in a wet basement, or near a
swimming pool, and the like.
6. Carts and Stands – The appliance should be used only
with a cart or stand that is
recommended by the
manufacturer.
6A.An appliance and cart
combination should be
moved with care. Quick
stops, excessive force, and
uneven surf aces may cause
the appliance and cart
combination to overturn.
7. Wall or Ceiling Mounting – The appliance should be
mounted to a wall or ceiling only as recommended
by the manufacturer.
8. Ventilation – The appliance should be situated so that
its location or position does not interfere with its proper
ventilation. For example, the appliance should not be
situated on a bed, sof a, rug, or similar surf ace that may
block the ventilation openings; or if placed in a built-in
installation, such as a bookcase or cabinet that may
impede the flow of air through the v entilation openings,
there should be free space of at least 5 cm (2 in.) and
an opening behind the appliance.
9. Heat – The appliance should be situated away from
heat sources such as radiators, heat registers , stoves,
or other appliances (including amplifiers) that produce
heat.
PORTABLE CART WARNING
S3125A
10.Power Sources – The appliance should be connected
to a power supply only of the type described in the
operating instructions or as marked on the appliance.
11.Polarization – If the appliance is provided with a
polarized plug having one blade wider than the other,
please read the following information:
The polarization of the plug is a safety feature. The
polarized plug will only fit the outlet one way. If the plug
does not fit fully into the outlet, try reversing it. If there is
still trouble, the user should seek the services of a
qualified electrician. Under no circumstances should
the user attempt to defeat the polarization of the plug.
12.Power -Cord Protection – P ow er-supply cords should be
routed so that they are not likely to be walked on or
pinched by items placed upon or against them, especially near plugs, convenience receptacles, and the
point where they exit from the appliance.
13.Cleaning – The appliance should be cleaned only as
recommended by the manufacturer.
14.Nonuse Periods – The power cord of the appliance
should be unplugged from the outlet when left unused
for a long period of time.
15.Object and Liquid Entry – Care should be taken so that
objects do not fall and liquids are not spilled into the
enclosure through openings.
16.Damage Requiring Service – The appliance should be
serviced by qualified service personnel when:
A. The power-supply cord or the plug has been dam-
aged; or
B. Objects have fallen, or liquid has been spilled into
the appliance; or
C.The appliance has been exposed to rain; or
D. The appliance does not appear to operate normally
or exhibits a marked change in performance; or
E. The appliance has been dropped, or the enclosure
damaged.
17.Servicing – The user should not attempt to service the
appliance beyond that described in the operating
instructions. All other servicing should be referred to
qualified service personnel.
This unit contains a semiconductor laser system and is
classified as a “CLASS 1 LASER PRODUCT”. So, to use this
model properly, read this Instruction Manual carefully. In
case of any trouble, please contact the store where you
purchased the unit. T o pre vent being exposed to the laser
beam, do not try to open the enclosure.
2
CDC-3.1_02-04 09/05/2000, 4:23 PM2
DANGER:
INVISIBLE LASER RADIATION WHEN OPEN AND INTERLOCK
F AILED OR DEFEATED . A V OID DIRECT EXPOSURE TO BEAM.
CA UTION:
THIS PRODUCT UTILIZES A LASER. USE OF CONTROLS OR
ADJUSTMENTS OR PERFORMANCE OF PROCEDURES
OTHER THAN THOSE SPECIFIED HEREIN MAY RESULT IN
HAZARDOUS RADIATION EXPOSURE.
Page 3
Precautions
For U.S. model
The laser is covered by a housing which prevents exposure during operation or maintenance. Ho wever , this product is classified as a Laser Product by CDRH (Center for
Devices and Radiological Health) which is a department
of the Food and Drug Administration. According to their
regulations 21 CFR section 1002.30, all manufactures who
sell Laser Products must maintain recor ds of written communications between the manuf acturer , dealers and customers concerning radiation safety. If y ou hav e any complaints about instructions or explanations affecting the use
of this product, please feel free to write to the address on
the back page of this manual. When you write us, please
include the model number and serial number of your unit.
In compliance with Federal Regulations, the certification,
identification and the period of manufacture are indicated on the rear panel.
FCC INFORMATION FOR USER
CAUTION:
The user changes or modifications not expressly approv ed
by the party responsible for compliance could void the
user’s authority to operate the equipment.
NOTE:
This equipment has been tested and found to comply with
the limits for a Class B digital device, pursuant to Part 15 of
the FCC Rules.
These limits are designed to provide reasonable protection against harmful interference in a residential installation. This equipment generates, uses and can radiate radio frequency energy and, if not installed and used in accordance with the instructions, may cause harmful interference to radio communications. However, there is no
guarantee that interference will not occur in a particular
installation. If this equipment does cause harmful interference to radio or television reception, which can be determined by turning the equipment off and on, the user is
encouraged to try to correct the interference by one or
more of the following measures:
• Reorient or relocate the receiving antenna.
• Increase the separation between the equipment and
receiver .
• Connect the equipment into an outlet on a circuit different from that to which the receiver is connected.
• Consult the dealer or an experienced radio/TV technician for help.
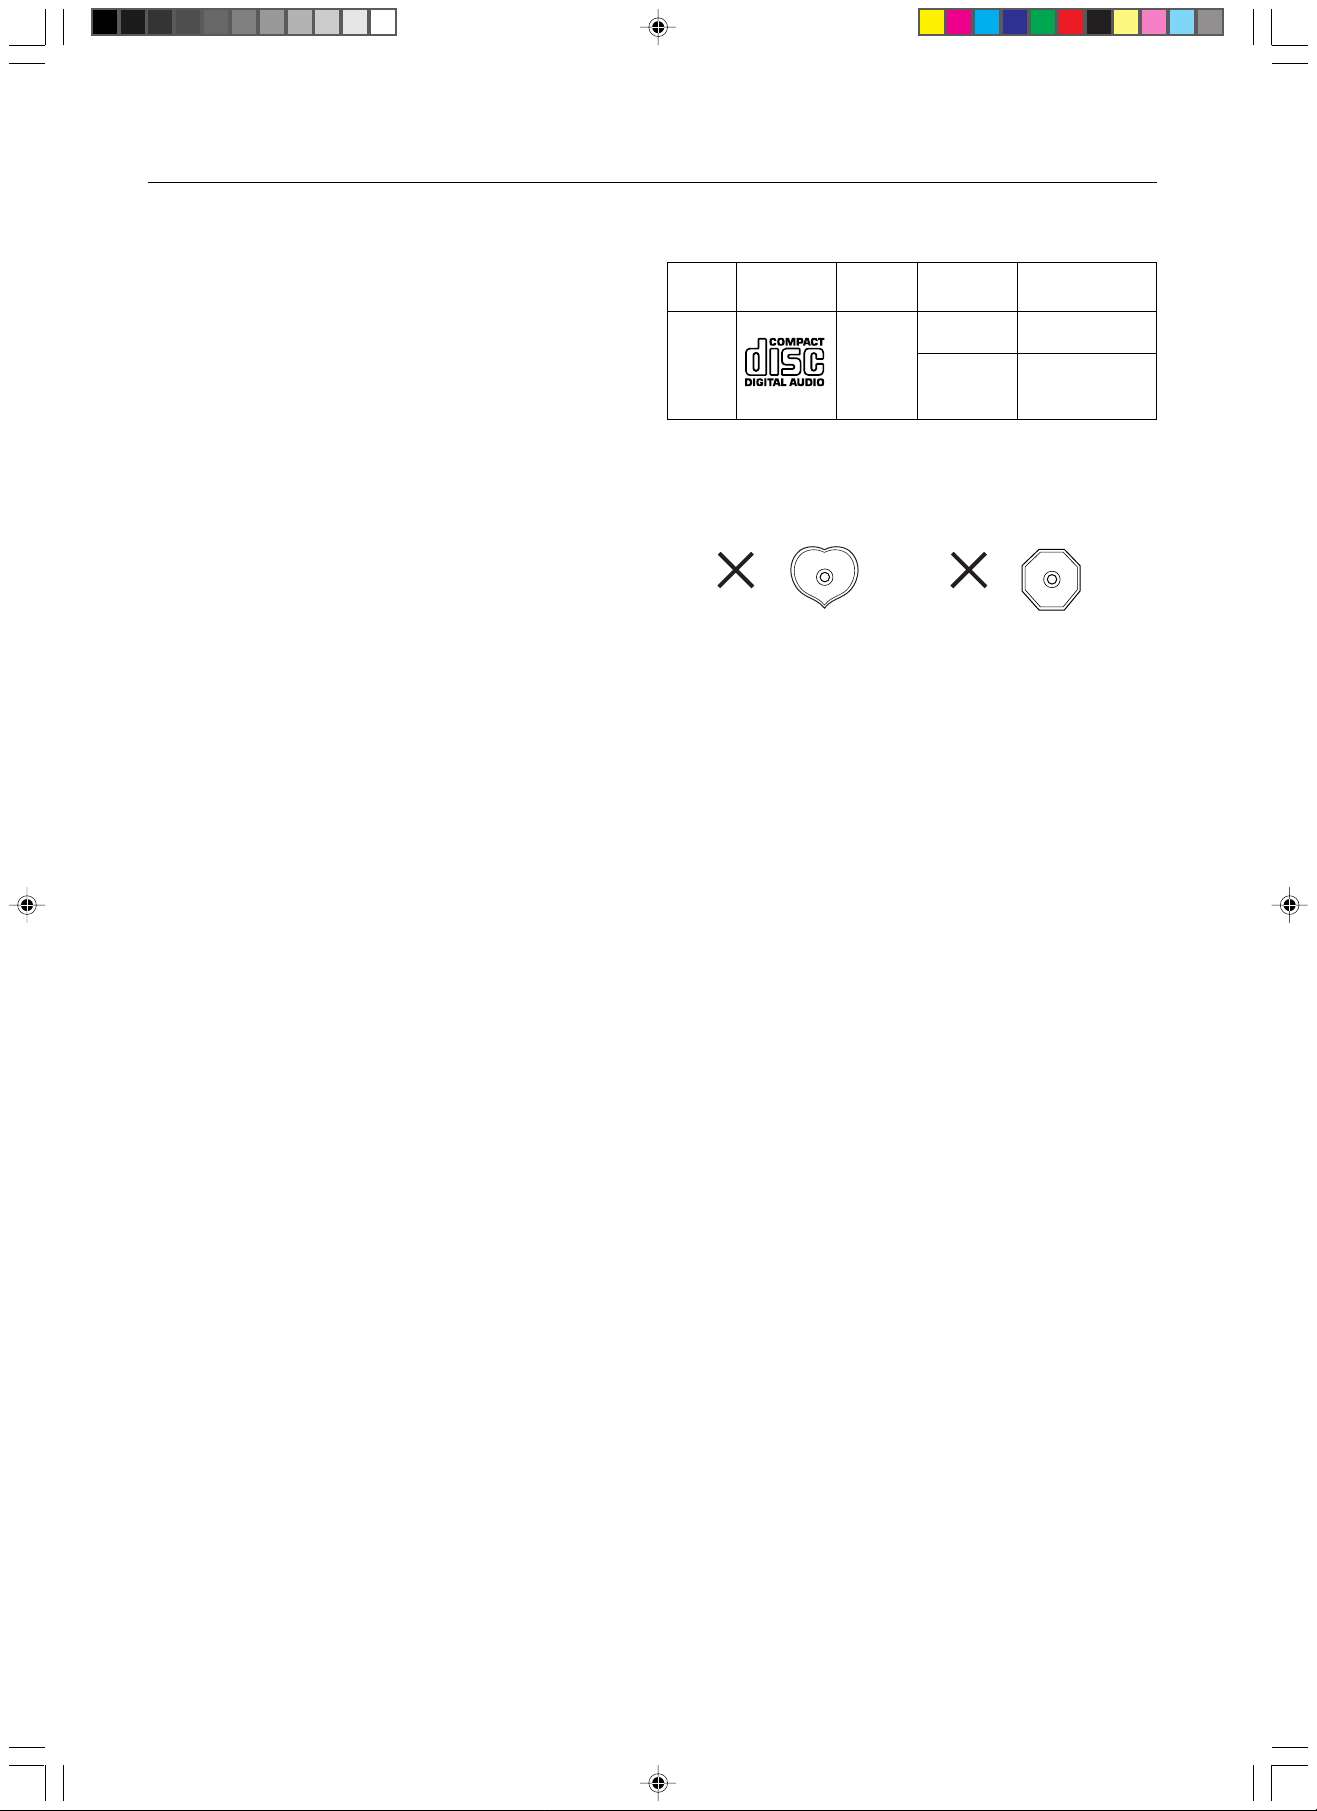
Playable Discs
This CD changer can play back the following discs.
Disc mark
Contents
Disc size
12 cm
Audio
CDs
Audio
8 cm
(CD single)
Y ou cannot play back discs other than those listed above.
Avoid using heart-shaped or octagonal discs. Playing
irregularly shaped discs may damage the internal mechanism of the CD changer.
AAA AAA AA AAAAA
AA AA AA
AAA AAAA AA
AA AA
AAA AA AAA A
AAA AA AA AA
Do not use discs on which adhesive from adhesive tape
or a disc label (if it is a rental disc) remains. Otherwise, you
may not be able to eject the discs or the CD changer
may become inoperative.
Maximum
playback time
74 minutes
20 minutes
AAA AAA AA AAAAA
AA AA AA
AAA AAAA AA
AA AA
AAA AA AAA A
AAA AA AA AA
For Canadian model
NOTE: THIS CLASS B DIGITAL APPARATUS COMPLIES WITH
CANADIAN ICES-003.
For models having a power cord with a polarized plug:
CAUTION: TO PREVENT ELECTRIC SHOCK, MATCH WIDE
BLADE OF PLUG TO WIDE SLOT, FULLY INSERT.
Modele pour les Canadien
REMARQUE: CET APPAREIL NUMÉRIQUE DE LA CLASSE B
EST CONFORME À LA NORME NMB-003 DU CANADA.
Sur les modèles dont la fiche est polarisée:
ATTENTION: POUR ÉVITER LES CHOCS ÉLECTRIQUES,
INTRODUIRE LA LAME LA PLUS LARGE DE LA FICHE DANS
LA BORNE CORRESPONDANTE DE LA PRISE ET POUSSER
JUSQU’AU FOND.
CDC-3.1_02-04 09/05/2000, 4:23 PM3
3
Page 4

Precautions
Features
1. Warranty Claim
Y ou can find serial number on the rear panel of this unit. In
case of warranty claim, please report this number.
2. Power
WARNING
BEFORE PLUGGING IN THE UNIT FOR THE FIRST TIME, READ
THE FOLLOWING SECTION CAREFULLY.
The voltage of the available pow er supply dif f ers according to country or region. Be sure that the power supply
voltage of the area where this unit will be used meets the
required voltage (e.g., AC 120 V, 60 Hz) written on the rear
panel.
3. Do not touch this unit with wet hands
Do not handle this unit or power cord when your hands
are wet or damp. If water or any other liquid enters the
case, take this unit to an authorized service center for inspection.
4. Location of this unit
Place this unit in a well-ventilated location.
Take special care to provide plenty of ventilation on all
sides of this unit especially when it is placed in an audio
rack. If ventilation is blocked, this unit may overheat and
malfunction.
Do not expose this unit to direct sunlight or heating units
as this unit’s internal temperature may rise and shorten
the life of the pickup.
Avoid damp and dusty places and places directly affected by vibrations from the speak ers. In particular , av oid
placing the unit on or above one of the speakers.
Be sure this unit is placed in a horizontal position. Never
place it on its side or on a slanted surface as it may malfunction.
Do not place near tuners or TV sets.
If placed next to a TV or tuner, it may cause reception
interference resulting in some noise in the TV or tuner output.
■ 6-disc carousel changer
■ Up to five discs to be changed without interrupting disc
in play
■ Next Selection function allows next track or disc to be
selected without interrupting current track playing
■ Single-bit PWM (Pulse Width Modulation) D/A converter
minimizes low-level linearity errors, eliminating loss of
detail during quiet passages
■ Proprietary AccuPulse Quartz system with Polysorb vir-
tually eliminates the possibility of clock-oscillator timing errors
■ 8-times oversampling
■ Fixed analog output
■ Display visible even when disc tray is out
■ Oversized power transformer
■ 6-mode repea t: Entire disc, All discs, Random tracks ,
Programmed tracks, Random memory, Single track
■ 3-mode time display: Ela pse, Remain, and Total Re-
main
compatible remote control
■
■ Disc Intro Scan function plays the first eight seconds of
each disc
■ Direct track or disc access via the remote controller
■ Optical dig ital output for direct connection to a DAT,
MD, or DSP receiver
5. Care
From time to time you should wipe the front and rear panels and the cabinet with a soft cloth. For heavier dir t,
dampen a soft cloth in a weak solution of mild detergent
and water , wring it out dry , and wipe off the dirt. Following
this, dry immediately with a clean cloth.
Do not use rough material, thinners, alcohol or other chemical solvents or cloths since these could damage the f inish
or remove the panel lettering.
6. Points to remember
If this unit is brought from a cold environment to a war m
one or is in a cold room that is quickly heated, condensation may form on the pickup, preventing proper operation. In this case, remove the disc and leave the power
ON for about one hour to remove the condensation.
When transporting this unit, be careful not to bump it.
Always close the disc tray when not loading or unloading
discs to protect delicate internal parts from dust.
4
Memory Preservation
This unit does not require memory preservation batteries. A built-in memory power back-up system pr eserves
the contents of memory during power failures and even
when the Power button is set to Off.
The Po w er button must be set to On in order to char ge
the back-up system. The memory preser vation period
after the unit has been turned off v aries depending on
climate and placement of the unit. On average,
memory contents are protected over a period of a few
weeks after the time the unit has been turned off. This
period is shorter when the unit is exposed to a very humid climate.
CDC-3.1_02-04 09/05/2000, 4:23 PM4
Page 5
Control Positions and Names
• If there is a protective film on the surface of the display that makes it difficult to read the display, remove it.
• For more information about the buttons and knobs, refer to the pages listed in the brackets ( [ ] ) below.
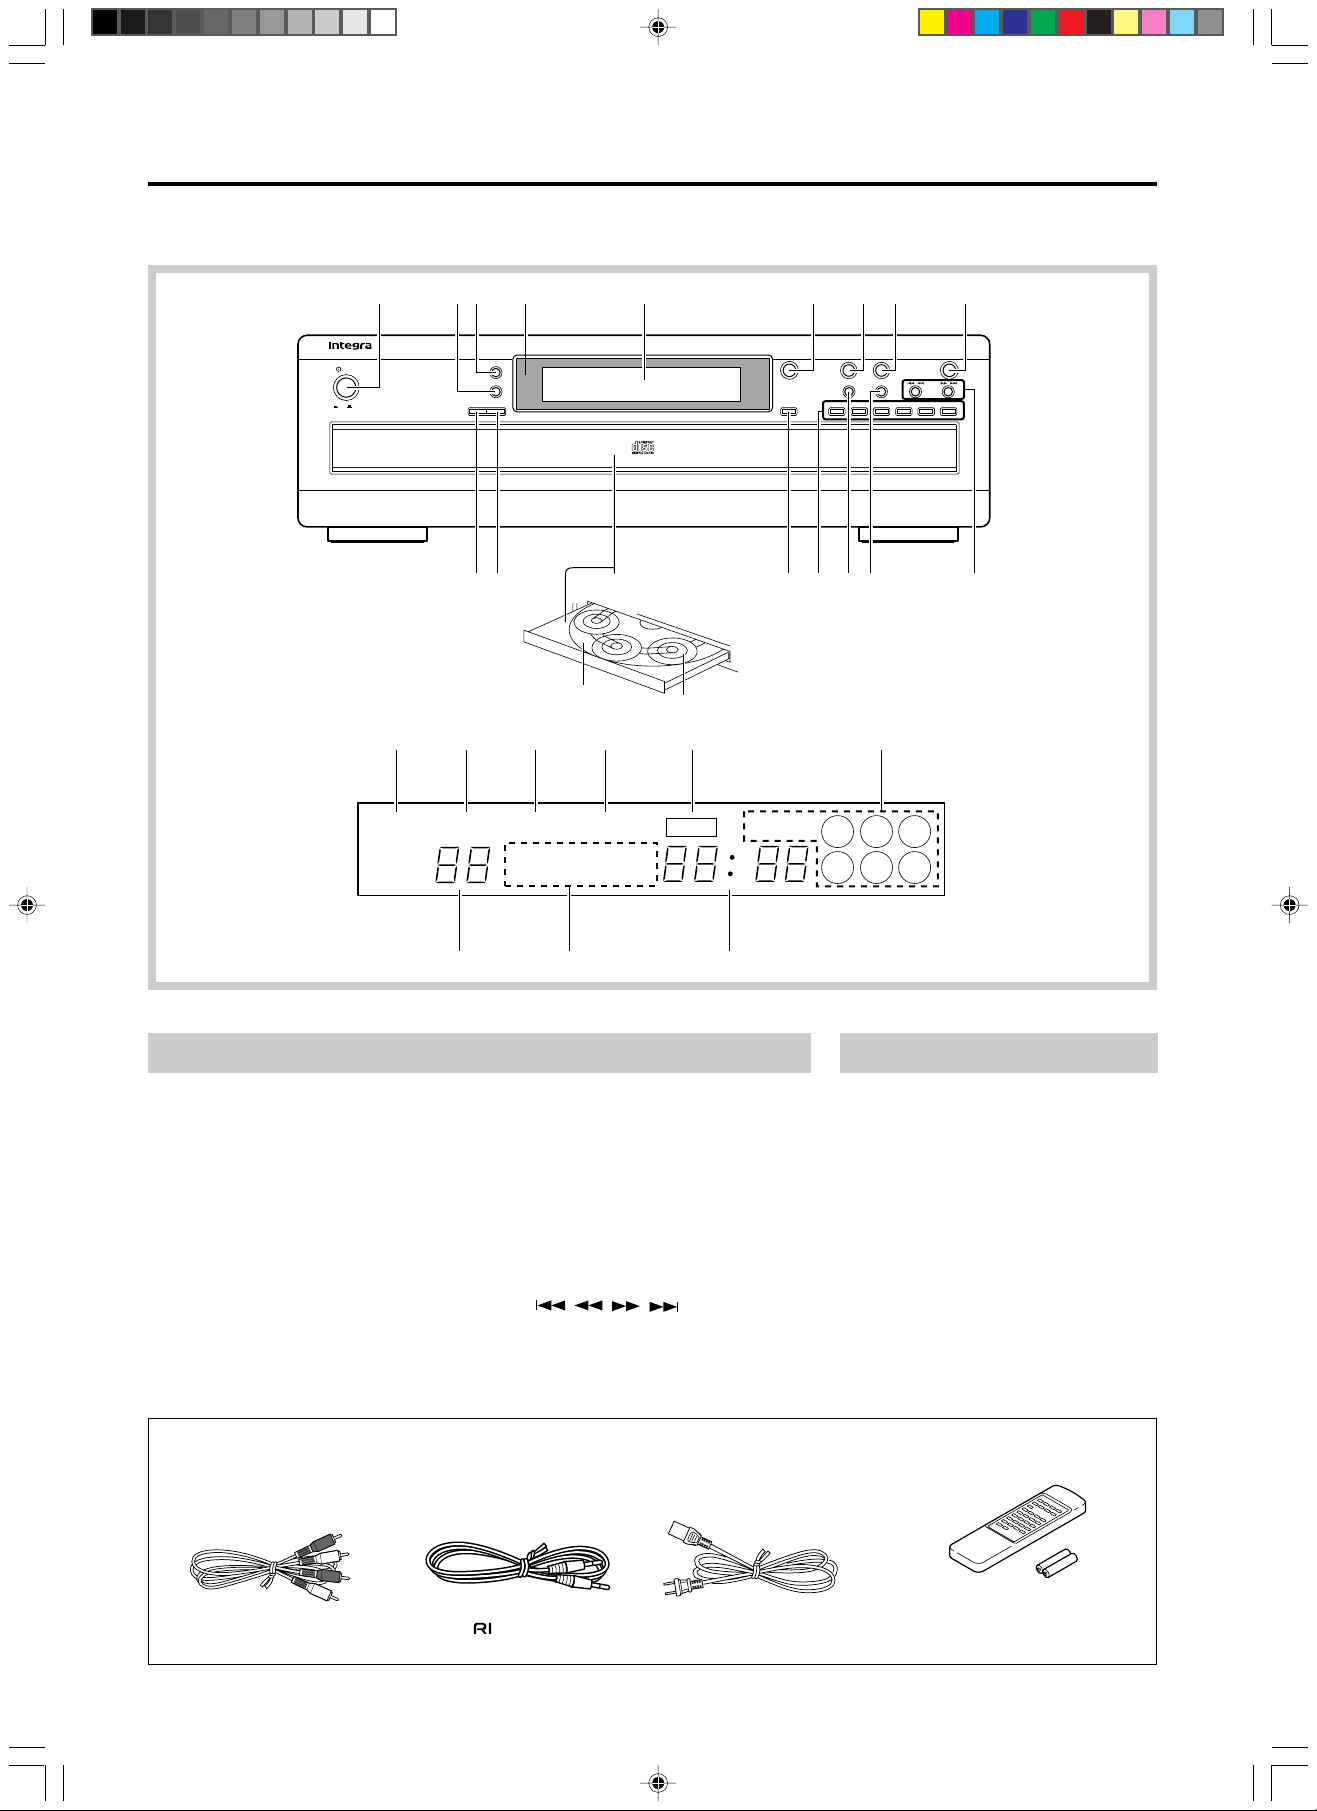
Front panel
Display
1234 5 6789
Power
On Off
6 DISC
Five CD Exchange Continuous Play
a
PAUSE REPEAT RANDOM MEMORY NEXT DISC No.
TRACK SINGLE ELAPSED
Next Selection
13
bcd
TOTAL REMAIN
14
Open/Close
Disc SkipMemory Clear Disc 1 Disc 2 Disc 3 Disc 4 Disc 5 Disc 6
Pause Stop
RandomDisplay
Repeat
/
fe
123
456
Play
/
CDC-3.1
191817161511 1210
g
Front panel
1. Power button [7]
2. Display button [9]
3. Next Selection button [12]
4. Remote control sensor [6]
5. Display
6. Open/Close button [8]
7. Pause button [9]
8. Stop button [9, 11]
9. Play button [8~10, 13, 14]
10. Memory button [14, 15]
12. Loading drawer
13. Carousel
14. Disc trays
15. Disc Skip buttons [8]
16. Direct play buttons
(Disc 1-Disc 6) [10, 12, 14]
17. Random button [13]
18. Repeat button [13]
19. Search/Skip buttons
( / , / ) [9~12, 14, 15]
11. Clear button [15]
Supplied accessories
Check that the following accessories are supplied with this unit.
ih
Display
a. PAUSE indicator
b. REPEAT indicator
c. RANDOM indicator
d. MEMORY indicator
e. NEXT indicator
f. Disc number indicator
g. TRACK number indicator
h. ELAPSED/REMAIN indicators
i. Time display
Audio connection cable x 1
CDC-3.1_05-07 09/05/2000, 4:24 PM5
cable x 1
Power cable x 1
Remote controller (RC-435C) x 1
Batteries (size AA, R6 or UM-3) x 2
5
Page 6
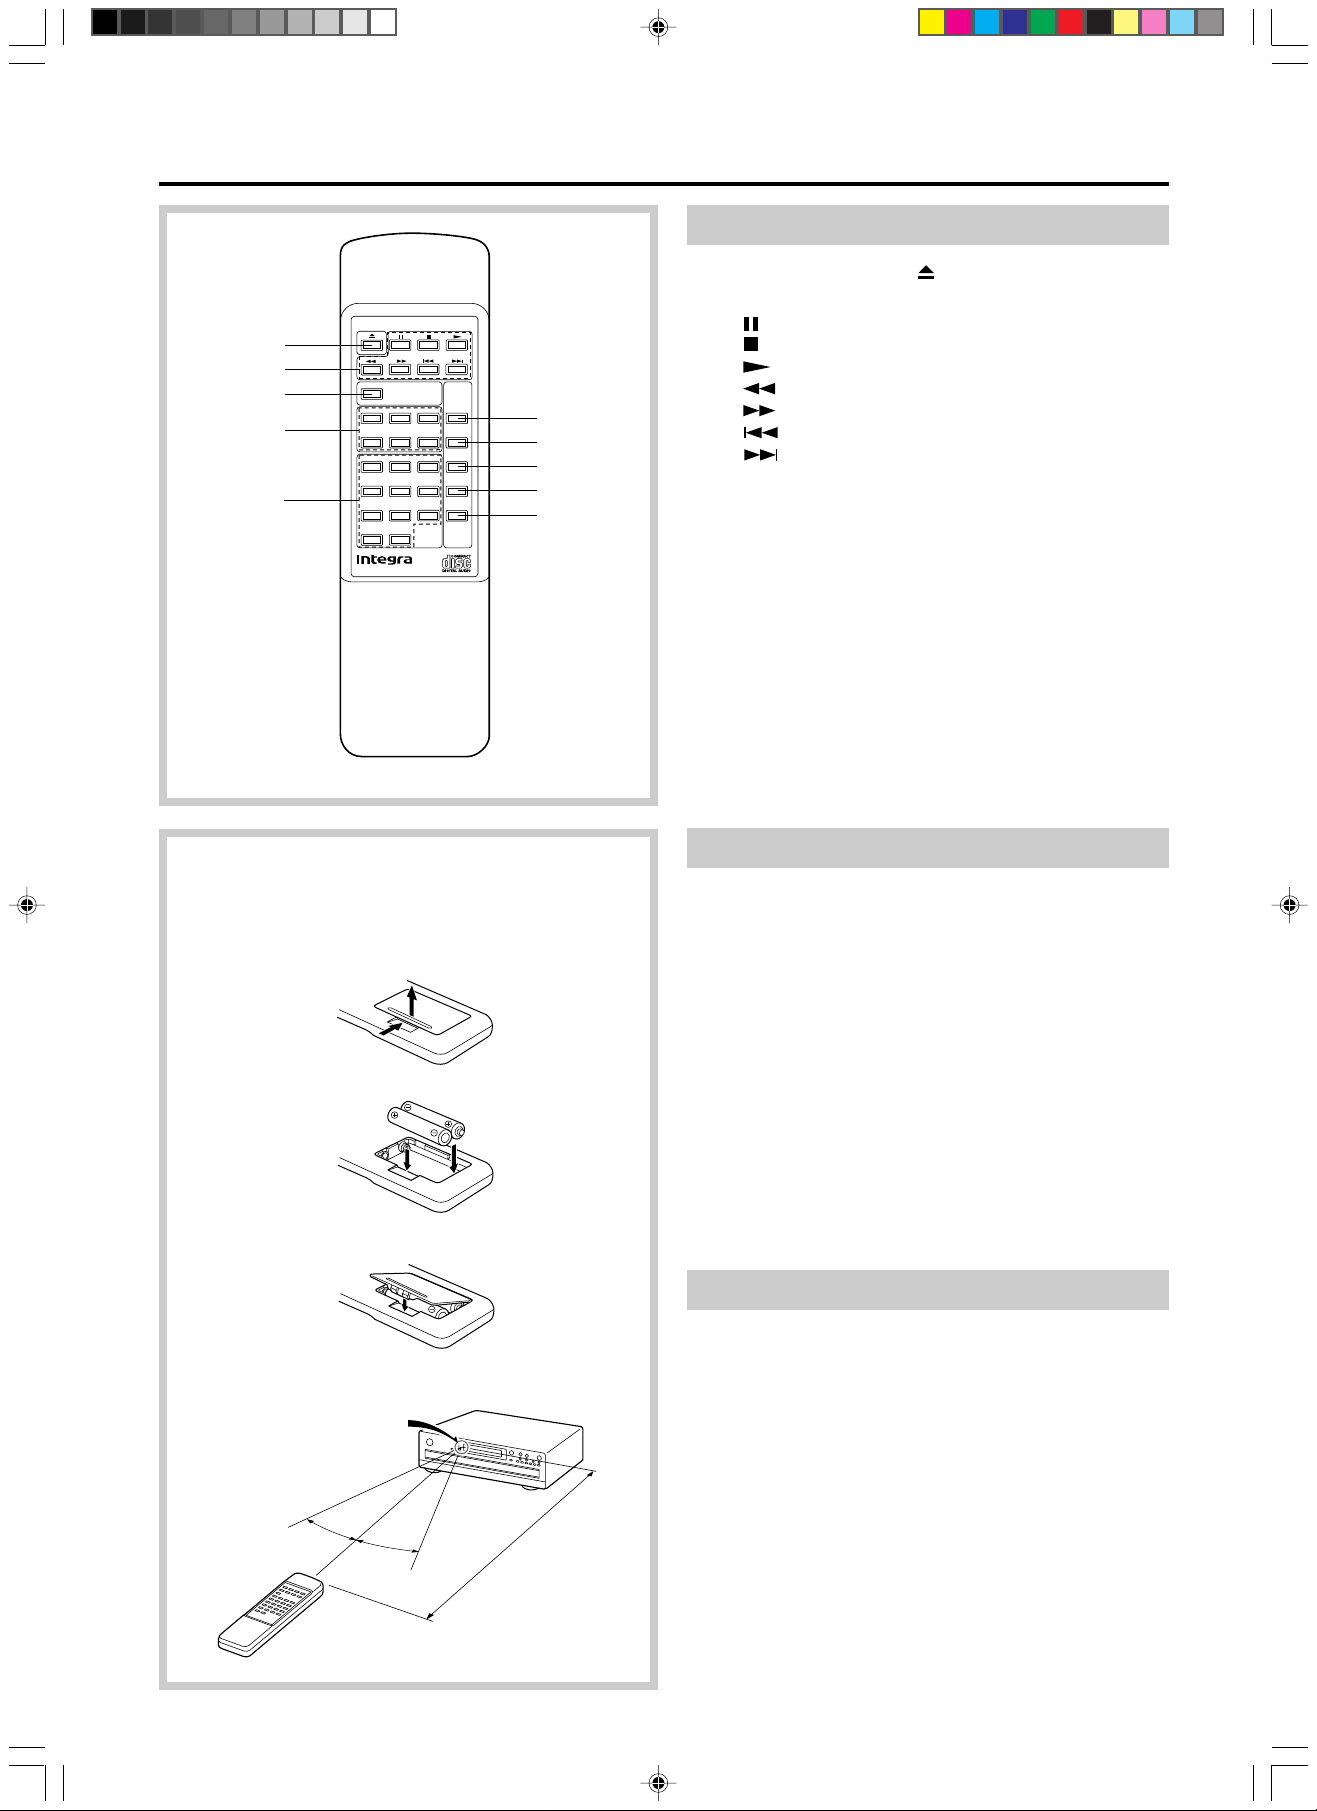
Remote Controller
1
2
3
4
5
NEXT SELECTION
DISC 1 DISC 2 DISC 3
DISC 4 DISC 5 DISC 6
123
456
789
+10 0
REMOTE CONTROLLER RC-435C
DISC
INTRO SCAN
RANDOM
REPEAT
MEMORY
CLEAR
6
7
8
9
10
Remote controller
1. Open/close button ( ) [8]
2. Operation buttons
: Pause button [9]
: Stop button [9, 11]
: Play button [8~10, 13, 14]
: Fast reverse button [9, 15]
: Fast forward button [9, 15]
: Reverse skip button [11, 14]
: Forward skip button [11, 14]
3. NEXT SELECTION button [12]
4. Direct play buttons
(DISC 1-DISC 6) [10, 12, 14]
5. Number buttons and +10 button [10, 12, 14]
6. DISC INTRO SCAN button [11]
7. RANDOM button [13]
8. REPEAT button [13]
9. MEMORY button [14, 15]
10. CLEAR button [15]
6
RC-435C
Insert the batteries into the remote controller
following the illustration below.
1
2
3
Remote control sensor
30°
30°
CDC-3.1
approx. 5 m
(16 feet)
Inserting the remote controller batteries
1. Remove the battery compartment cover b y opening
it as shown in the illustration.
2. Insert two AA (R6- or UM-3)-size batteries into the battery compartment. Carefully follow the polarity diagram (positive (+) and negativ e (–) symbols) inside the
battery compartment.
3. After batteries are installed and seated correctly, replace the compartment cover.
Notes:
• Do not mix new batteries with old batter ies or differ-
ent kinds of batteries.
• To avoid corrosion, remove the batteries if the remote
controller is not to be used for a long time.
•
Remove dead batteries immediately to avoid damage
from corrosion. If the remote contr oller doesn’t operate
smoothly , replace both the batteries at the same time.
• The life of the batteries supplied is a bout six months
but this will vary depending on usage.
Using the remote controller
Point the remote controller toward the remote control
sensor.
Notes:
• Place the unit away from strong light such as direct
sunlight or inverted fluorescent light which can prevent proper operation of the remote controller.
• Using another remote controller of the same type in
the same room or using the unit near equipment which
uses infrared rays may cause oper ational interference.
• Do not put any object such as a book on the remote
controller. The buttons of the remote controller may
be pressed by mistake and drain the batteries.
• Make sure the audio rack doors do not have colored
glass. Placing the unit behind such doors may prev ent
proper remote controller operation.
• If there is any obstacle between the remote controller
and the remote control sensor, the remote controller
will not operate.
CDC-3.1_05-07 09/05/2000, 4:24 PM6
Page 7
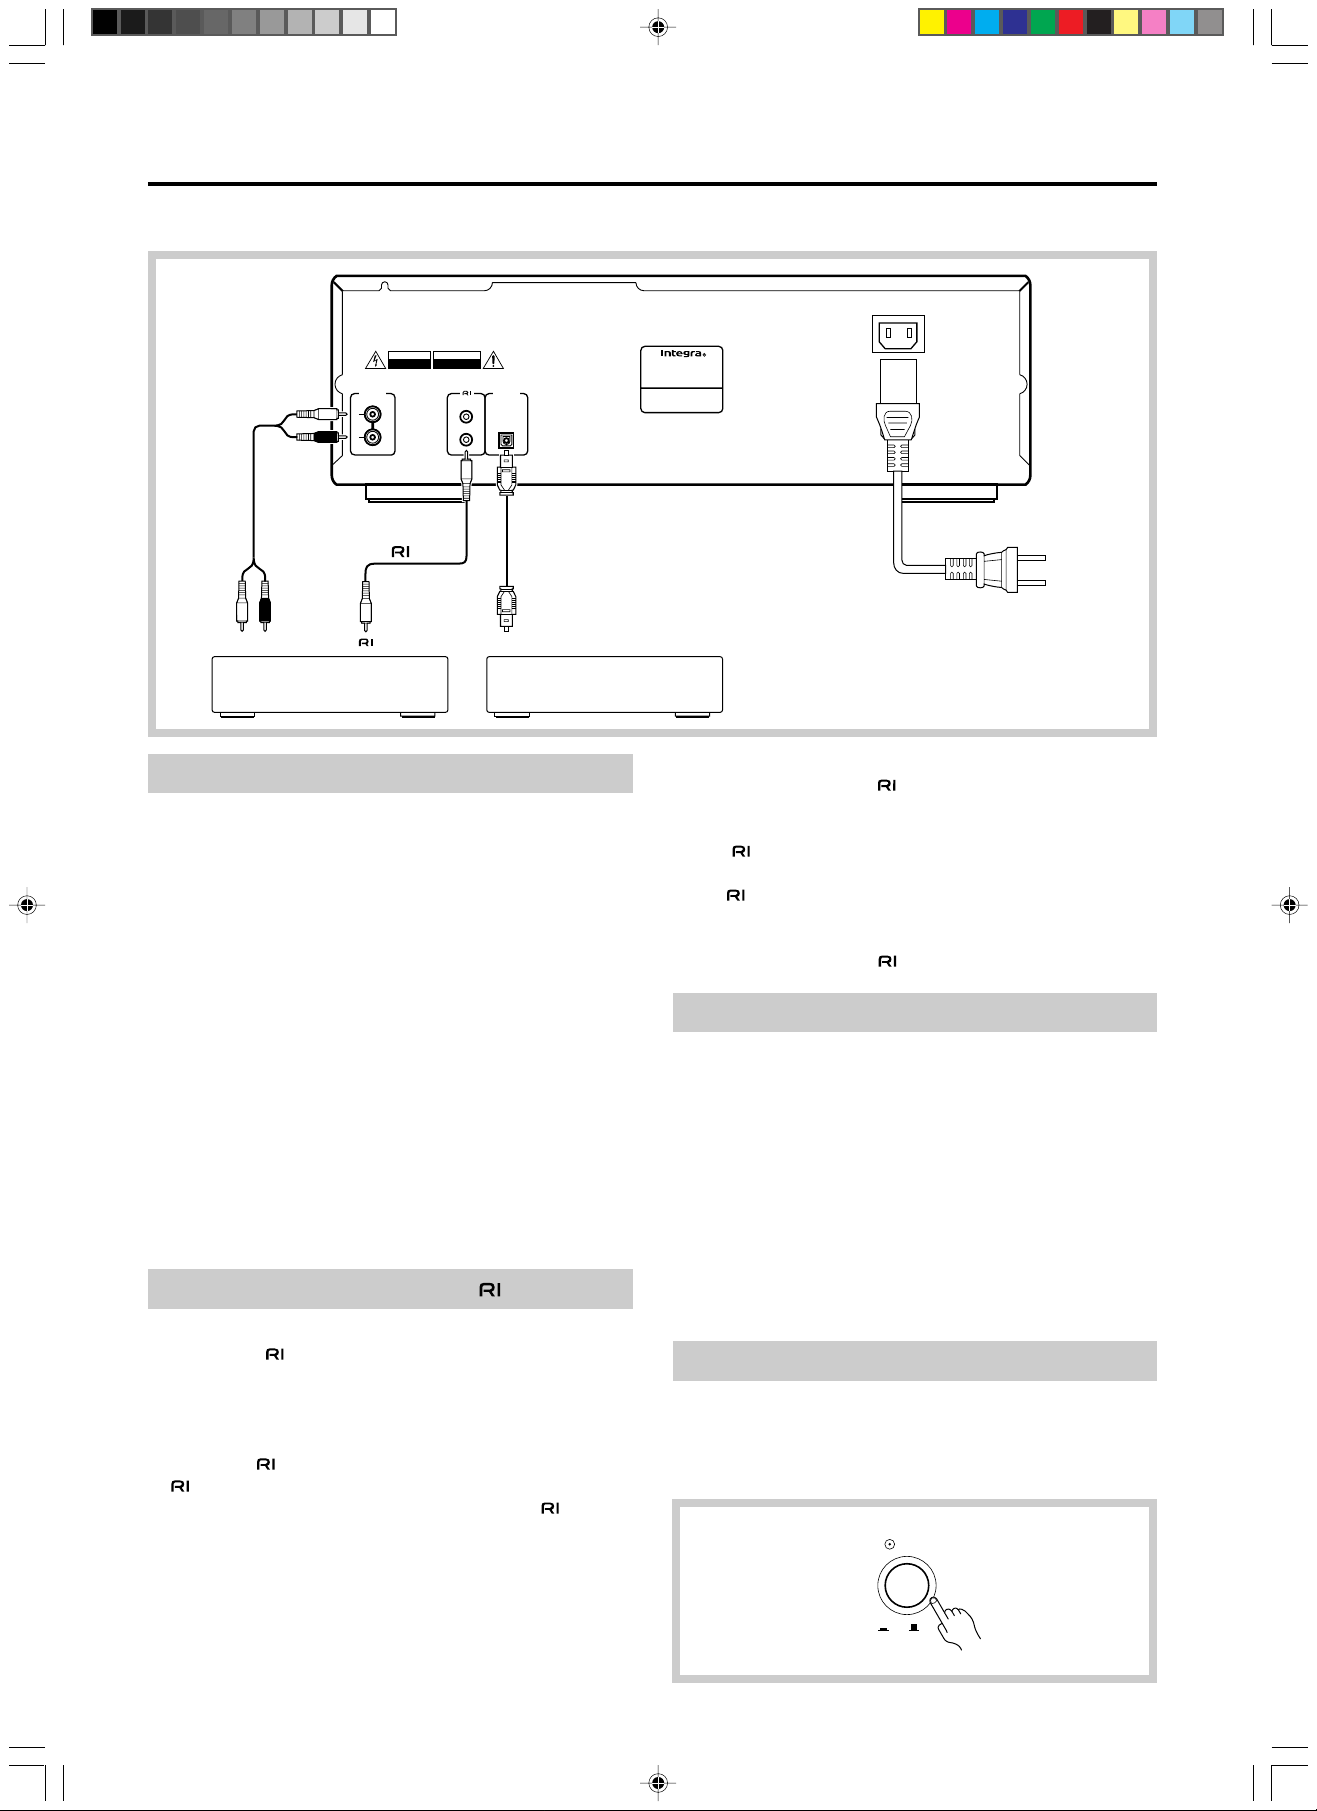
System Connections
Power
On Off
• On each pair of input or output jacks, the jack marked R corresponds to the right channel and the jack marked L
corresponds to the left channel.
AC INLET
AVIS
L
CD
Audio
connection
cable
R
Amplifier
L
R
ANALOG
OUTPUT
WARNING
RISK OF ELECTRIC SHOCK
DO NOT OPEN
cable
RISQUE DE CHOC ELECTRIQUE
NE PAS OUVRIR
REMOTE
CONTROL
Optical IN
D IG I TAL
OUTPUT
OPTICAL
Optical fiber
cable (not
included)
DAT, MD recorder or
Digital amplifier
COMPACT DISC CHANGER
MODEL NO.
CDC-3.1
To wall
outlet
Do not plug in the power
cable until all connections
have been made.
Connecting to an audio system
Tw o types of output jac ks are located on the rear panel.
Use the DIGITAL OUTPUT jack if you are connecting the
unit to audio equipment that supports a digital connection.
ANALOG OUTPUT jacks:
These are the most commonly used jacks. Connect these
jacks to the amplifier’s CD input jacks using the supplied
audio connection cable.
DIGITAL OUTPUT (optical) jack:
For digital recording, connect this jack to the digital input
jack of a Mini Disc recorder, a DAT deck, or other digital
equipment. If your amplifier has a digital input jack, connecting the DIGITAL OUTPUT jack to it will pr oduce a much
clearer and more dynamic sound.
• Terminal protection cap is attached to the digital jack.
Remove the cap when connecting the unit to other
digital equipment. When you are not using the digital
output jack, replace the cap.
• Refer to the amplifier’s instruction manual for connec-
tions.
Connections for remote control ( )
When connecting Integra/Onkyo products, it is necessary
to attach the
troller of the main component to control the entire system.
1. To use this CD changer with an amplifier (or receiver),
cassette tape deck, and tuner that include the a ppropriate
cable, plugged into the REMOTE CONTROL jacks.
2. As the exact connection sequence of the
unimportant, you can connect from the amplifier (or
receiver) to either the tuner, cassette tape deck, or
compact disc changer.
3. To operate correctly, the remote controller must point
toward the remote control sensor of the amplifier (or
receiver).
cable to be able to use the remote con-
jack, connect the components using the
cable is
Notes:
• The upper and lower REMOTE CONTROL jacks have
the same function.
• Remote controller operation is not possible when only
cable is connected – the audio connection
the
cables must also be connected.
• An cable equipped with a 3.5mm (1/8 in.) diam-
eter miniature two-conductor phone plug is included
with this unit and with every tuner and cassette tape
deck that utilizes the
jack.
Connecting a power cable
Before plugging in the unit, confirm that all connections
have been made properly.
1. Connect the outlet plug on the included pow er cable
to the AC INLET on the CDC-3.1.
2. Plug-in the other end of the cable to a wall AC outlet.
Notes:
• Do not use any power cable other than the included
cable. The included cable is designed for use only with
the CDC-3.1. Do not use it for any other device.
• Do not connect or disconnect the outlet plug from the
CDC-3.1 while the other end is plugged into the wall
AC outlet.
Turning on the unit
Press the Power button to the On position.
• When the power first turns on, the carousel rotates to
find a disc and stops automatically if there is a disc on
the disc tray.
7
CDC-3.1_05-07 09/05/2000, 4:24 PM7
Page 8
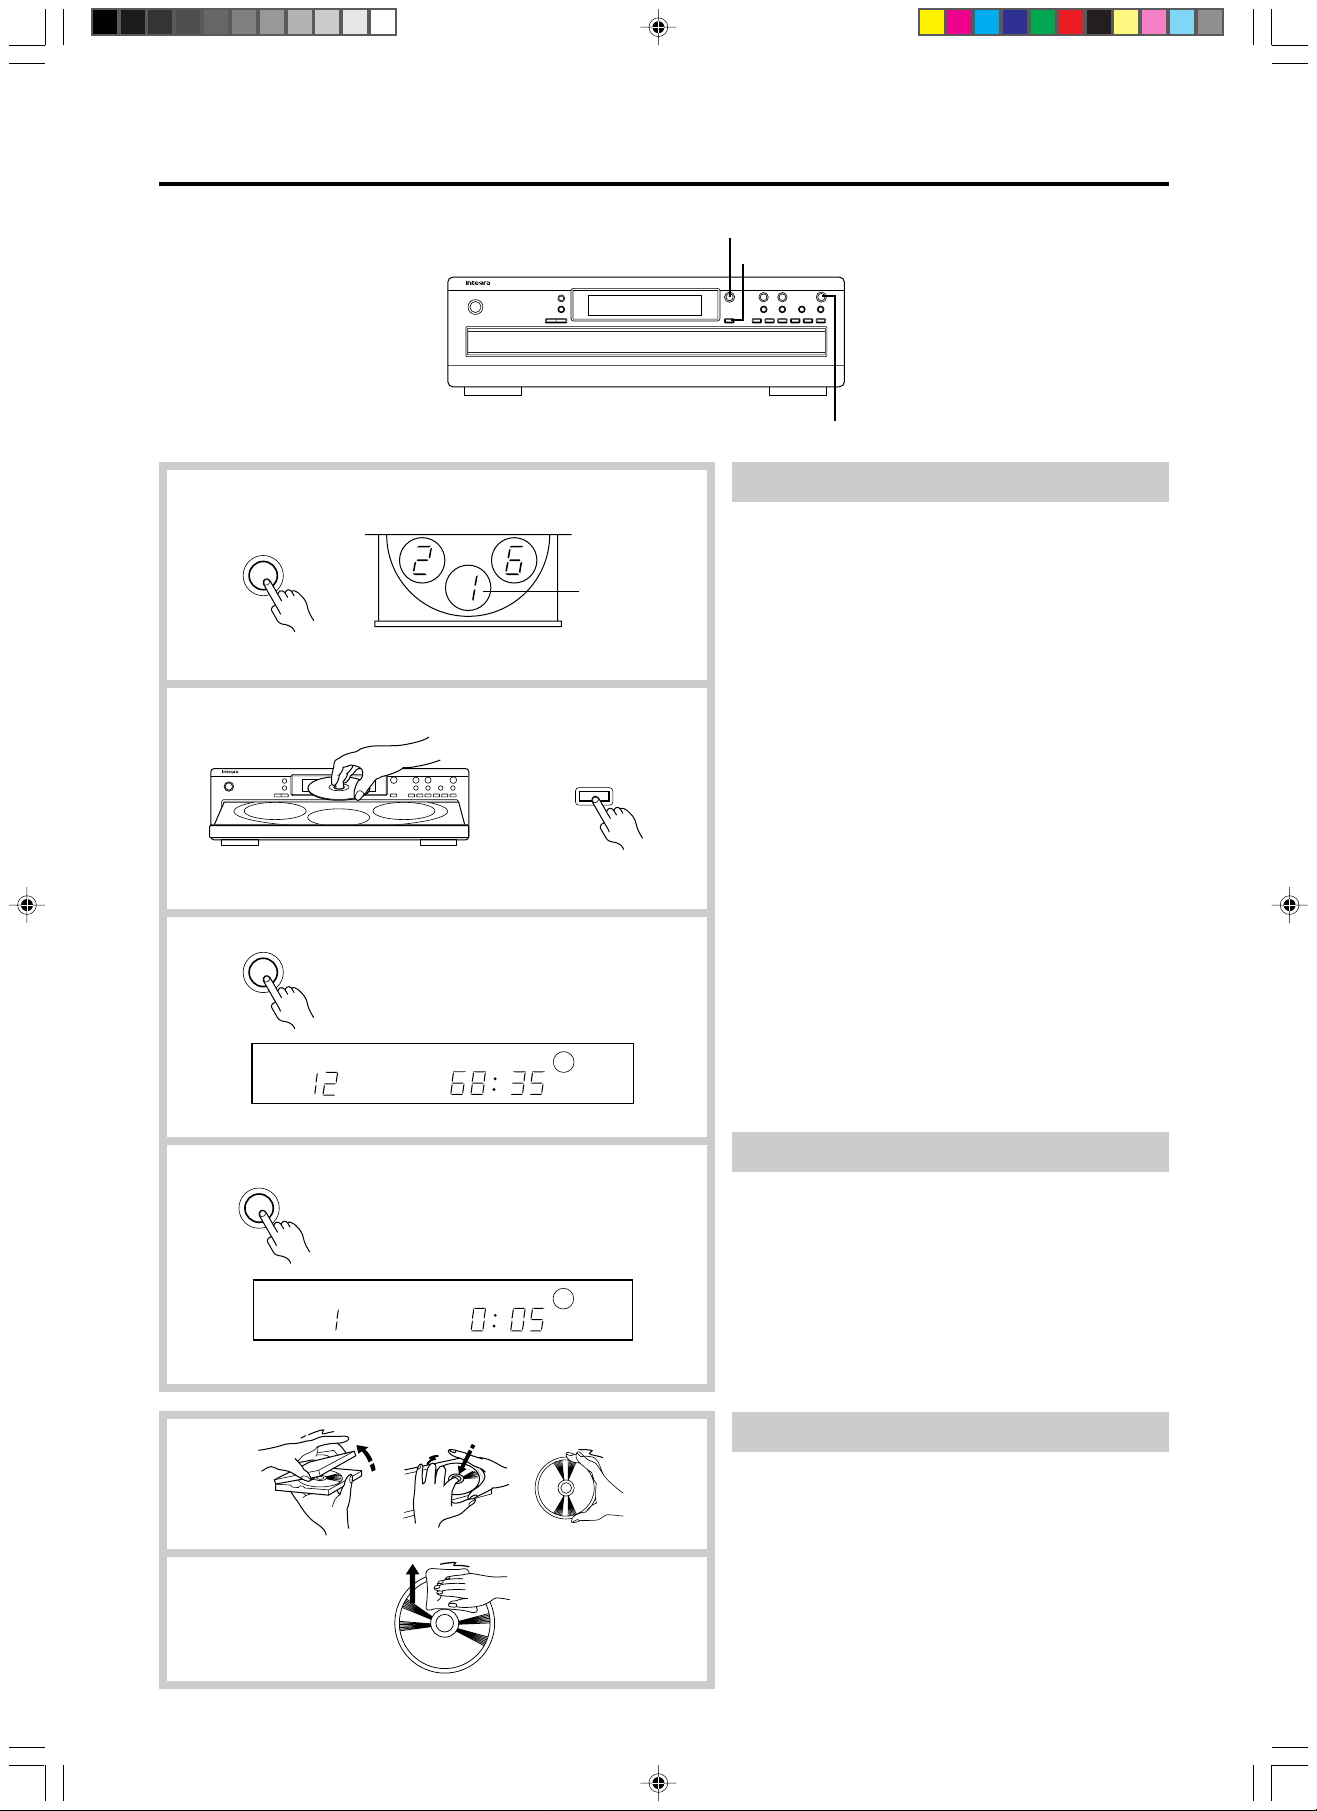
Playing CDs
1
Open/Close
2
Open/Close
3
TRACK
TOTAL REMAIN
DISC No.
Front disc tray
Disc Skip
123
4
1, 3
2
4
Normal playback
1. Press the Open/Close button to open the loading drawer.
2. Place the disc(s) in the disc trays with the label(s)
facing up.
• Pressing the Disc Skip button r otates the carousel
so that you can load disc(s) in other disc trays.
• The disc tr ay with the Disc Number marked by a
circle on the indicator will come to the front.
• The carousel usually rotates counter-clockwise.
However, it may sometimes rotate clockwise
when you press the Disc Skip button four times
repeatedly.
• If you place the discs in the disc trays and press
the Play button instead of the Open/Close button, the draw er will close, the carousel will rotate,
and the unit will start playing back the disc in the
front disc tray.
3. Press the Open/Close button again to close the
loading drawer.
When you close the loading drawer, the unit will
read the disc in the front disc tray and display
the number of tracks and the recording time in
the disc.
If there is no disc in this tray, the carousel rotates
until it finds a disc tray with a disc. Disc Numbers
with empty trays disappear from the display.
4. Press the Play button.
The unit will start playing back the disc from the
first track.
After the CD changer completes playing back all
discs on the carousel, the display returns to the
view shown in step 3.
8
4
1
2
Play
PAUSE
TRACK
SINGLE ELAPSED
DISC No.
123
4
Changing a disc during playback
1. Press the Open/Close button during playback.
2. Press the Disc Skip button.
The carousel will turn so that you can change a
disc other than the one that is playing.
3. Press the Open/Close button to close the loading drawer.
Note:
Y ou cannot select a ne w disc to play if the loading
drawer is open. When you finish changing discs,
close the loading drawer immediately.
Important notes on handling CDs
1. Carefully lift the disc from the disc case, making
sure to hold the disc by its edges or the hole in
the center.
You may use a dry, soft cloth to wipe dust and finger-
2.
prints from the surface of CDs. Do not use volatile agents
on discs, such as thinner or benzine. Also, do not use
conventional record cleaner or antistatic agents.
• Do not place a CD in direct sunlight or locations
subject to high humidity or low temperature.
• Do not store a CD in the CD changer tray for a
long period of time.
CDC-3.1_08-13 09/05/2000, 4:24 PM8
Page 9
Playing CDs
Pause
Stop
Display
Pause
Stop
/
/
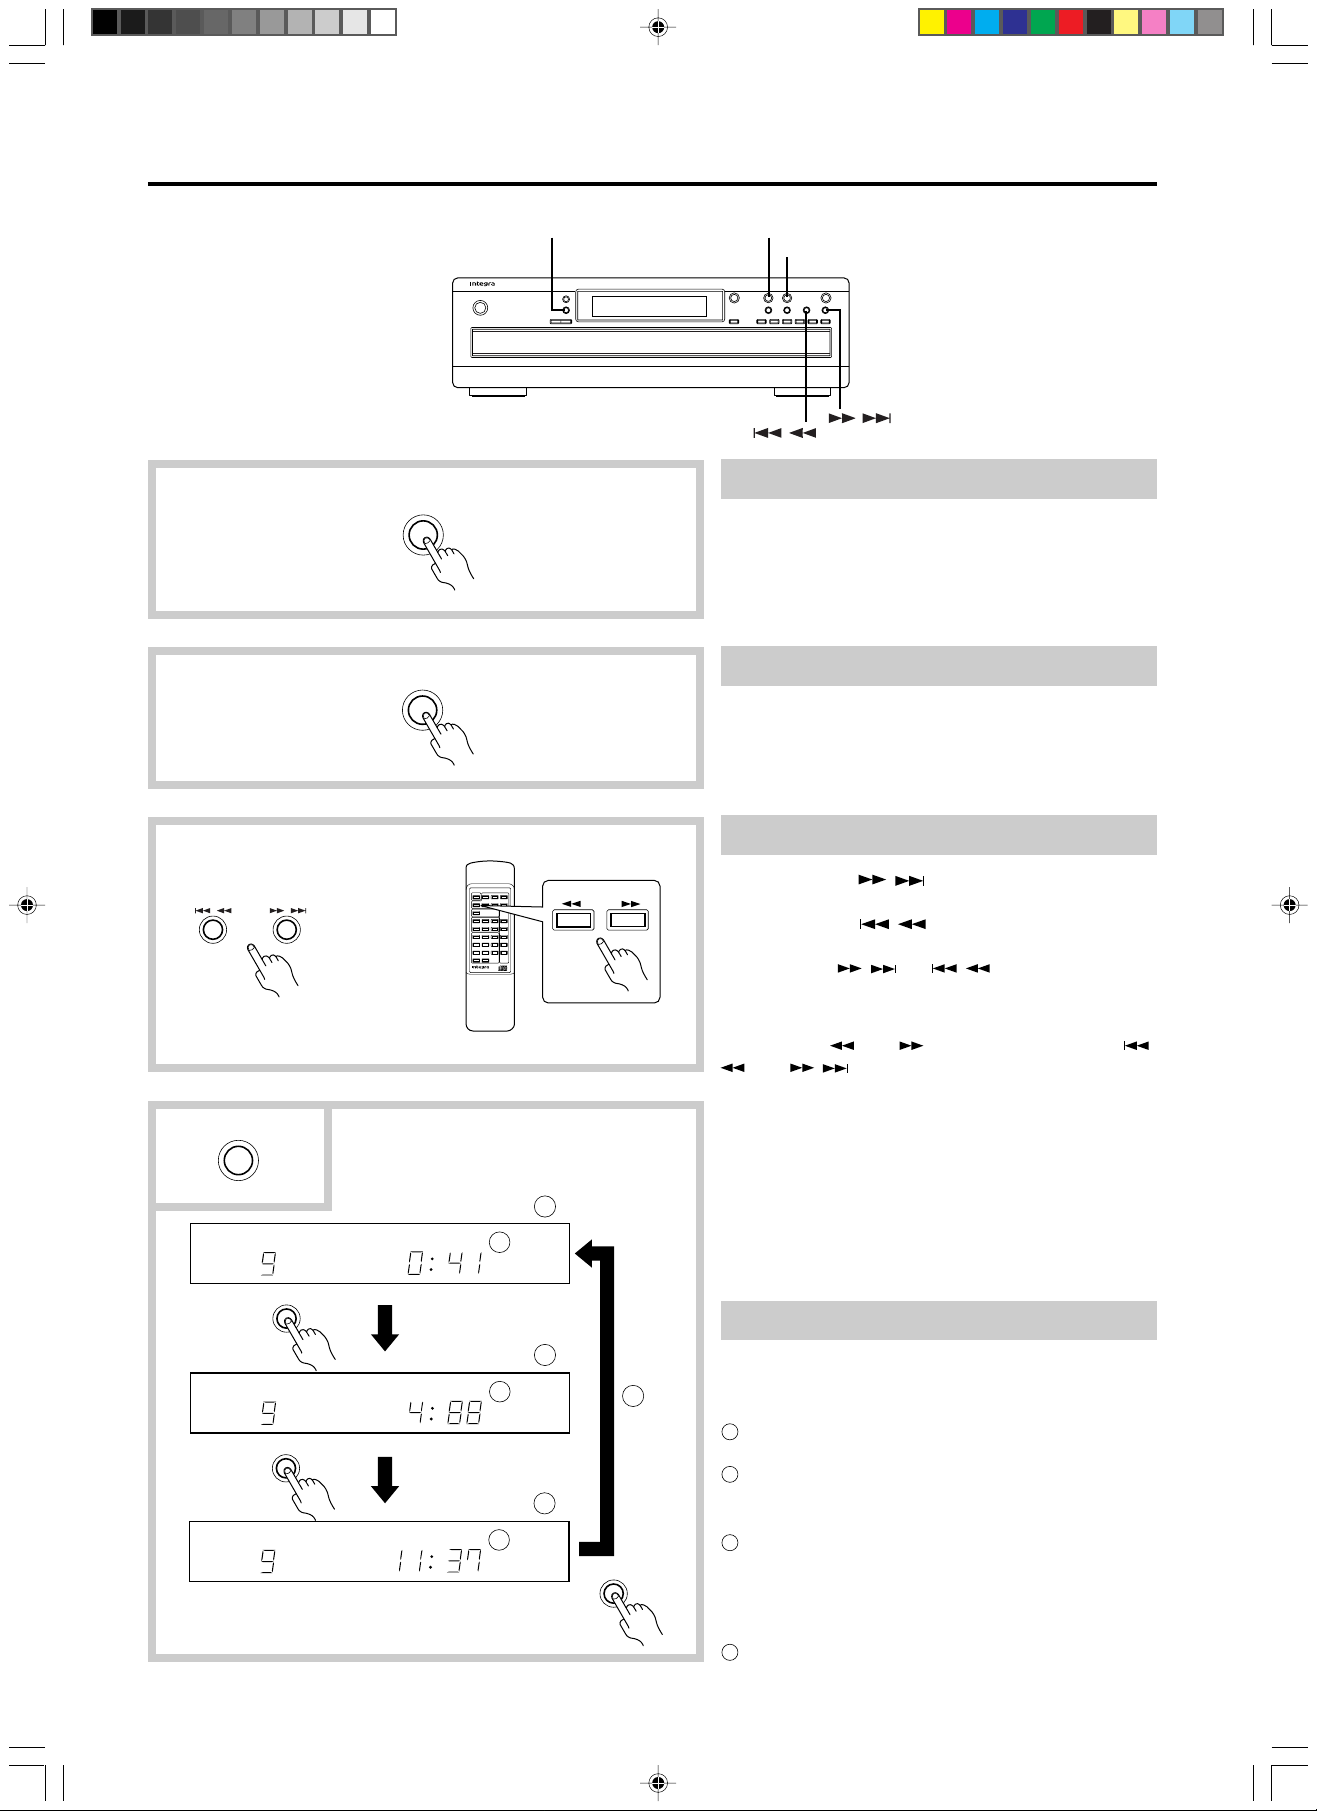
Stopping playback temporarily
Press the Pause button.
The P A USE indicator will light up. T o resume playback,
press the Play button, or press the Pause button
again. The CD changer starts playing again from
exactly the point at which it stopped.
Stopping playback
Press the Stop button.
• When you open the loading drawer , the disc that
was playing will be in the front disc tray.
//
Play
TRACK
TRACK
TRACK
SINGLE ELAPSED
Display
SINGLE
Display
REMAIN
REMAINTOTAL
DISC No.
DISC No.
DISC No.
REMOTE CONTROLLER RC-435C
123
456
123
456
123
456
Search play
Hold down the / button to fast forward the
current track during playback.
Hold down the / button to fast reverse the
current track during playback.
Release the
/ or / button when you
reach the point on the track you w ant to play back.
You can also use the remote controller to search
by using the
and buttons instead of the /
and / buttons.
• The unit starts fast forwarding at 10-times speed,
and after four seconds at 60-times speed.
• During the f ast f orward oper ation, you will hear a
cueing sound at low volume.
• When the end of the disc is reached, the unit will
a
b
d
c
Display
play back the next disc.
• If y ou locate the top of the disc, the unit will can-
cel the fast forward operation and start playing
back from the top of the disc (Track 1).
Checking the elapsed or remaining time
Press the Display button during playback.
The display changes each time you press the Display button.
a
SINGLE ELAPSED: Indicates how long the current
track has been playing.
b
SINGLE REMAIN: Indicates how much time is left
for the current track. For beyond the 20th track,
the unit displays “--: --”.
c
TOTAL REMAIN: Indicates how much time is left
for the entire disc to play. During memor y play,
this display indicates the playing time remaining
for the entire sequence of tracks programmed
into memory.
The display returns to SINGLE ELAPSED time dis-
d
play.
9
CDC-3.1_08-13 09/05/2000, 4:24 PM9
Page 10
Playing CDs
Play
Disc 1 Disc 2 Disc 3 Disc 4 Disc 5 Disc 6
REMOTE CONTROLLER RC-435C
//
REMOTE CONTROLLER RC-435C
DISC 1 DISC 2 DISC 3
DISC 4 DISC 5 DISC 6
123
456
789
+10 0
Play
/
/
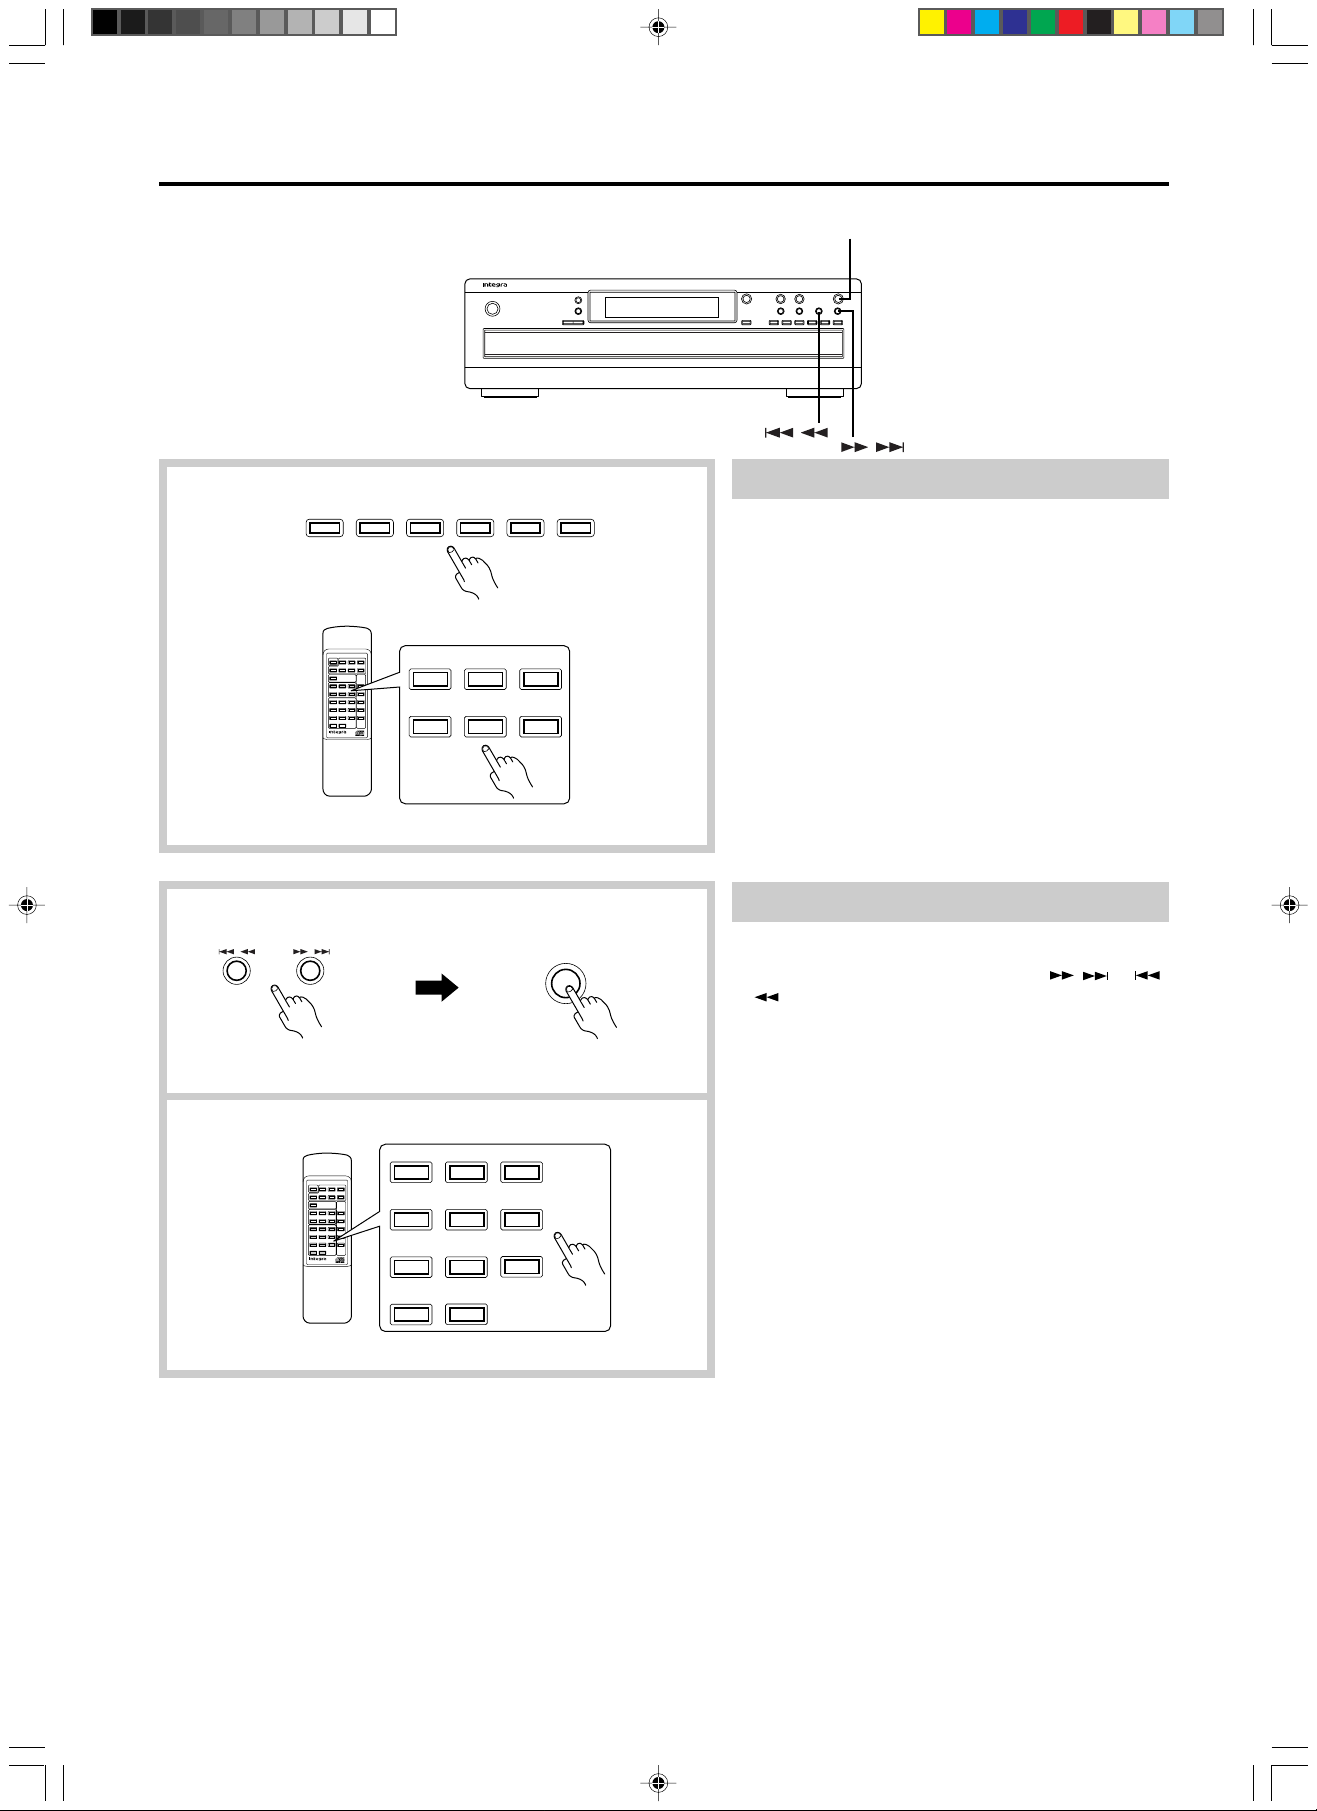
Starting playback from a given disc
Press the Direct Play button of a disc you wish to
play back (Disc 1-Disc 6) on the front panel or the
remote controller.
• The unit will play back the selected disc.
• If you press the Direct Play button (Disc 1-Disc 6)
during playback, the playback will be cancelled
and the unit will start playing back Trac k 1 of the
selected disc.
• If y ou press the Disc Skip button during playback,
the playback will be cancelled and the unit will
start playing back Trac k 1 of the next disc. (If the
playback of Disc 6 is cancelled, the unit will start
playing back Disc 1.)
• You can select a disc by pressing the Disc Skip
button while the playback is stopped. After you
select a disc, press the Play button to star t playback from T rack 1.
Starting playback from a given track
Using Skip buttons to select a playback track
1. While the unit is stopped, press the / or /
button to select a track.
• Do not hold down the button. Press it repeatedly.
• The TRACK number indicator will display the se-
lected track number.
2. Press the Play button.
• The unit will start playing back from the selected
track.
Using the number buttons to select a
playback track
1. Select the track number you wish to play back
using the number buttons.
The CD changer will start playing automatically.
You do not need to press the Play button.
• The +10 number button is used to select a track
with a number of 10 or higher. For example, to
select Track Number 30, press this button three
times, and then press 0.
• If you do not select a track, playback will start
from the first track on the selected disc.
10
CDC-3.1_08-13 09/05/2000, 4:24 PM10
Page 11
Playing CDs
//
Stop
TRACK
/
TRACK
/
TRACK
SINGLE
SINGLE
SINGLE
REMAIN
REMAIN
REMAIN
REMOTE CONTROLLER RC-435C
DISC No.
DISC No.
DISC No.
123
456
123
456
123
456
/
/
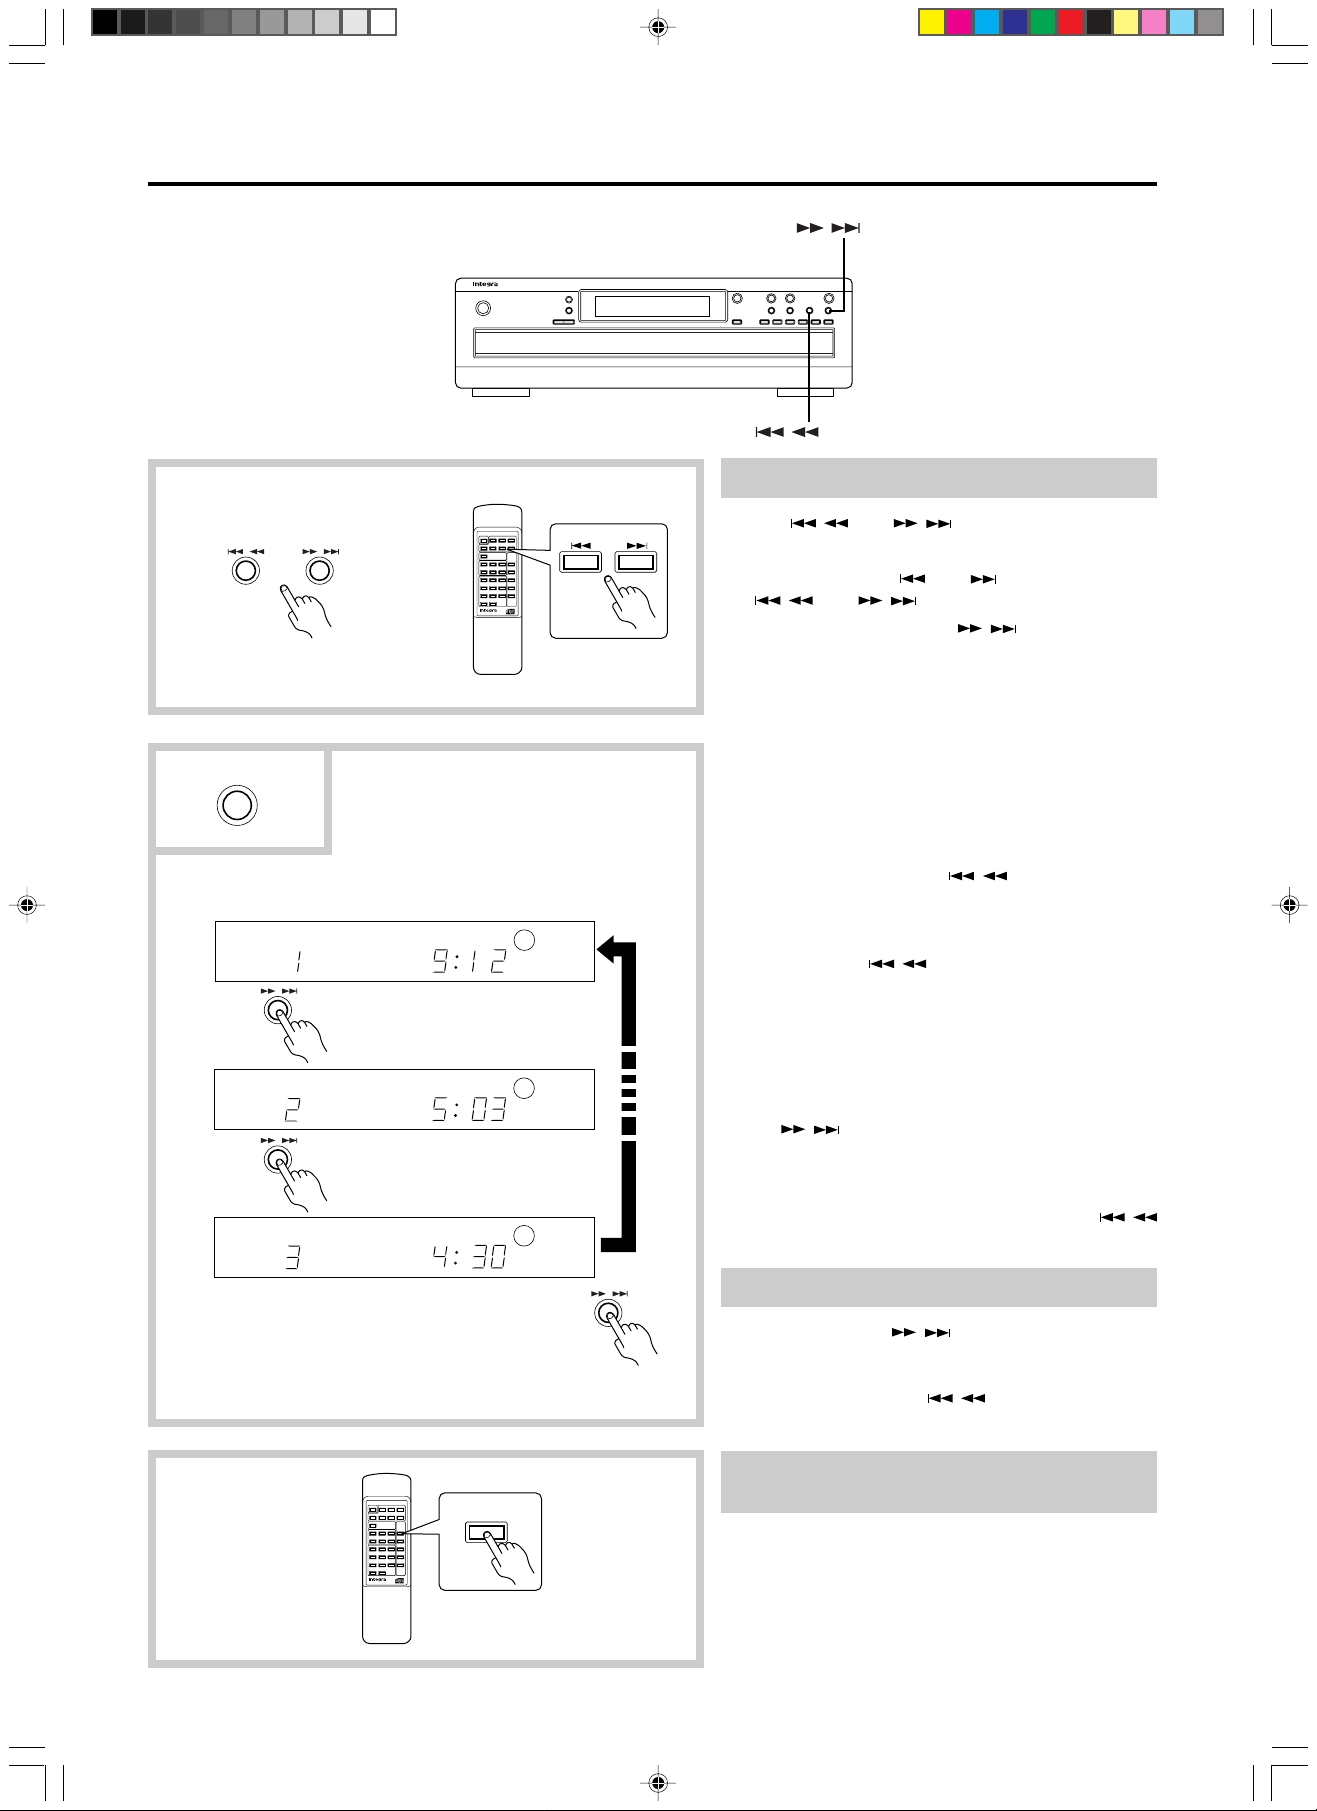
Skip playback
Use the / and / buttons.
You can also use the remote controller to operate
the unit by using the and buttons instead of
the
/ and / buttons.
During playback, press the
/ button.
The CD changer will stop playing the current Track
and will begin playing the next track from the beginning.
During memory playback (see “Using Memory Functions” on page 14), pressing this button will skip to
the top of the next memorized track or the next disc.
Pressing this button during random playback (see
“Playing back tracks at random” on page 13) will
stop the playback, and the unit will select the next
track at random and start playing it back.
During playback, press the
/ button.
The CD changer will return to the beginning of the
current track and will begin playing back the same
track again. To jump back to the previous track,
quickly press the / button again before playback begins.
During memory playback, pressing this button will
skip to the top of the previous track or disc.
Pressing this button during random playback will
locate the top of the current track, not the previous
track.
• The / button is disa bled when the unit is
playing back the last track of the disc or the last
stored track.
• When the fir st track of the disc (Track 1) or the
first stored track is being play ed back, the
button serves only to locate the top of the track.
/
Checking the playing time of a track
/
CDC-3.1_08-13 09/05/2000, 4:24 PM11
REMOTE CONTROLLER RC-435C
DISC
INTRO SCAN
When you press the / button, the display indicates the playing time of the next track, in the order of the tracks on the CD.
• When you press the / button, the display
shows the playing time of the previous track.
Continuously listening to the beginning of
discs (Disc intro scan)
The “disc intro scan” function is particularly useful
for quickly checking the contents of discs.
To activ ate this function, press the DISC INTRO SC AN
button on the remote controller.
The CD changer will play back only the beginning
of each disc for about eight seconds.
11
Page 12
Playing CDs
12
1
Next Selection
TRACK
2
Disc 1 Disc 2 Disc 3 Disc 4 Disc 5 Disc 6
TRACK
3
REMOTE CONTROLLER RC-435C
REMOTE CONTROLLER RC-435C
NEXT DISC No.
NEXT DISC No.
//
Next Selection
123
456
789
+10 0
1
NEXT SELECTION
123
456
123
456
3
2
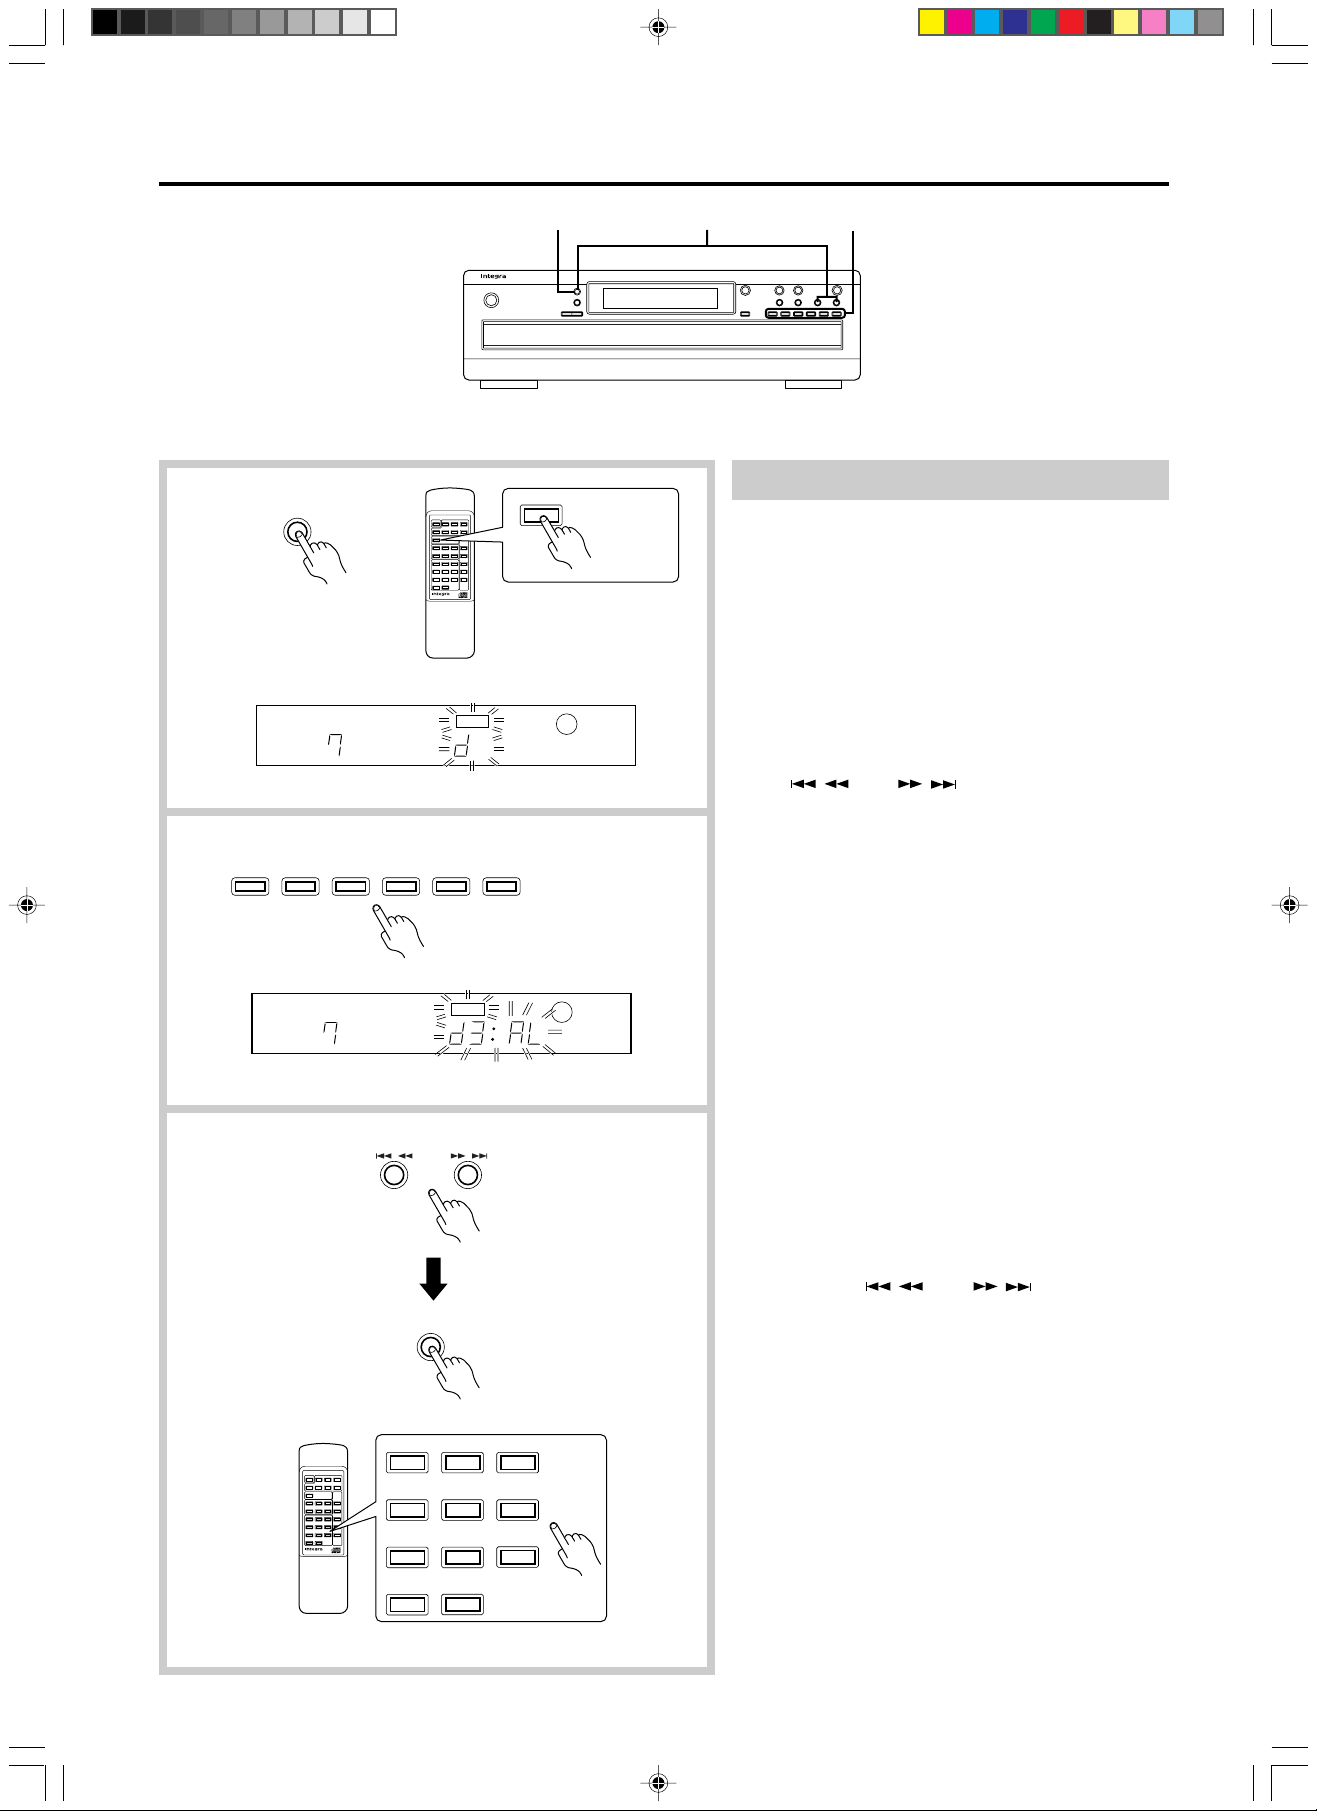
Selecting the next track to play back
This function enables you to select the next track or
disc to play back.
1. Press the Next Selection button during playback.
2. Select the disc you wish to play using the Direct
Play buttons (Disc 1-6).
•
Y ou can also use the Disc Skip button to select a disc.
• When you wish to play the entire disc, press the
Next Selection button at this point. (AL means all
tracks)
• If you do not select a disc within approximately
eight seconds, your disc selection will be cancelled. In this case, try Steps 1 and 2 again.
3. Select the track number you wish to play using
the
/ and / buttons and then press
the Next Selection button.
When the playback of the current track is complete, the selected track will play.
You can use the number buttons on the remote
controller to select a track number . In this case, you
do not need to press the Next Selection button.
• If y ou select an entire disc to play back, the unit
will first complete playback of the current disc,
then play back the selected disc. If you select a
track to play back, the unit will first complete playback of the current track, then play back the
selected track.
• You can use the Next Selection function during
memory playback, random playback, and
memory random playback (see “Using Memory
Functions” on page 14, and “Playing back tracks
at random” on page 13). In these cases, the unit
will first complete playback of the current track,
then start playing back the selected disc or track,
and the memory playback, random playback,
or memory random playback will be cancelled.
Notes:
• If after making your selection, you use the Disc
Skip button,
number buttons to change the track for playback, the settings will be cancelled.
•
The Next Selection function is effective only once
at a time. The function will be cancelled when the
selected disc or track starts playing back after
playback of the current disc or track is completed.
/ and / buttons, or the
• If you press the Stop button, the setting will be
cancelled.
To select another disc or track ...
Press the Next Selection button. The currently-selected disc or track number will flash on the panel.
You can change this number in the usual way.
To cancel the selection ...
Press the Next Selection button. The selected disc
or track number will flash on the panel. Press the
Clear button, and the selected disc or track will be
cancelled. Press the Next Selection button.
• The NEXT indicator will turn off.
CDC-3.1_08-13 09/05/2000, 4:24 PM12
Page 13
Playing CDs
Random
TRACK
TRACK SINGLE ELAPSED
RANDOM DISC No.
SINGLE ELAPSED
RANDOM DISC No.
RANDOM
REMOTE CONTROLLER RC-435C
123
456
123
456
Repeat
Random
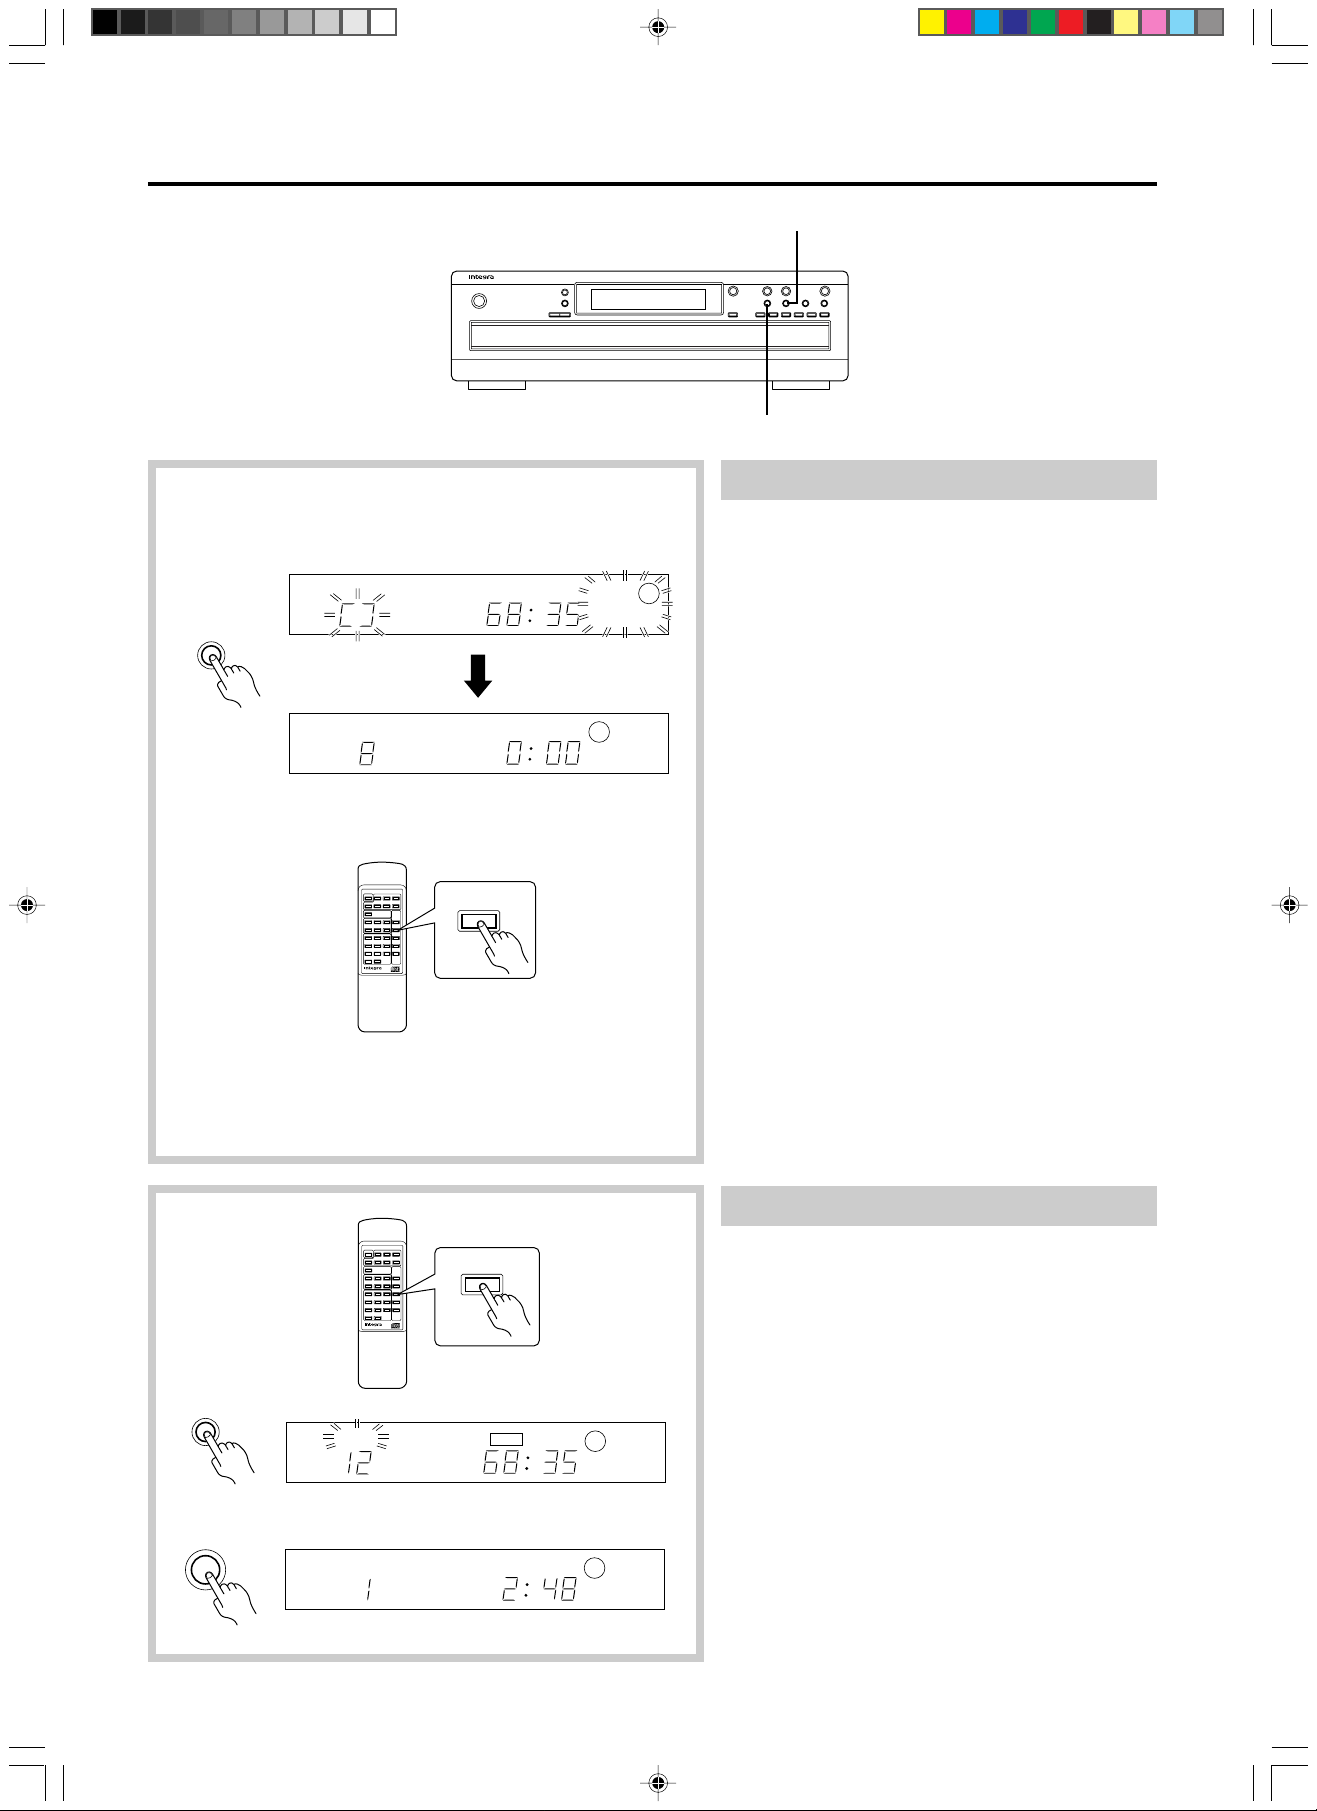
Playing back tracks at random
Press the Random button on the unit or the remote
controller to enter random mode.
The CD changer will play all tracks on all six discs at
random.
• To cancel random play, press the Stop or Ran-
dom button.
• The unit stops when it completes playback of all
tracks on all discs.
If you have pressed the Repeat button, the unit will
repeat playback of all tracks at r andom after it finishes playing all tracks once.
• During random playback, the Disc 1 - Disc 6 but-
tons, the Dis c Skip button, and the number but-
tons will be disabled.
• Discs can be exchanged during random play-
back. However, if you add a disc with a different
number of tracks, all tracks will be played back.
A disc that contains the same number of tracks
will not play back track numbers that have al-
ready been played. If a disc for which all tracks
have been played is exchanged, the new disc is
not played.
• Random mode can be operated together with
memory mode and repeat mode. Howev er , if the
whole disc is stored into memory and the disc is
selected, no other songs are played until the r an-
dom playback of tracks from this disc is com-
pleted. (Refer to “Using Memory Functions” on
page 14 for more infor mation on memor y play-
back.)
Repeat
REPEAT
TRACK
Play
REPEAT
TRACK
CDC-3.1_08-13 09/05/2000, 4:24 PM13
REMOTE CONTROLLER RC-435C
TOTAL REMAIN
SINGLE ELAPSED
REPEAT
NEXT
DISC No.
DISC No.
123
456
123
456
Repeating all tracks of all discs
1. Press the Repeat button on the unit or the remote
controller to enter the repeat mode.
The REPEAT indicator will light up.
2. Press the Play button.
All tracks from all discs inserted in the disc trays
will be played back repeatedly.
Repeat playback can be used with normal, ran-
dom, and memory playback modes (see “Using
Memory Functions” on page 14). You can press
this button either before or during playback.
3. To cancel the repeat mode, press the Repeat
button.
The REPEAT indicator goes off.
13
Page 14
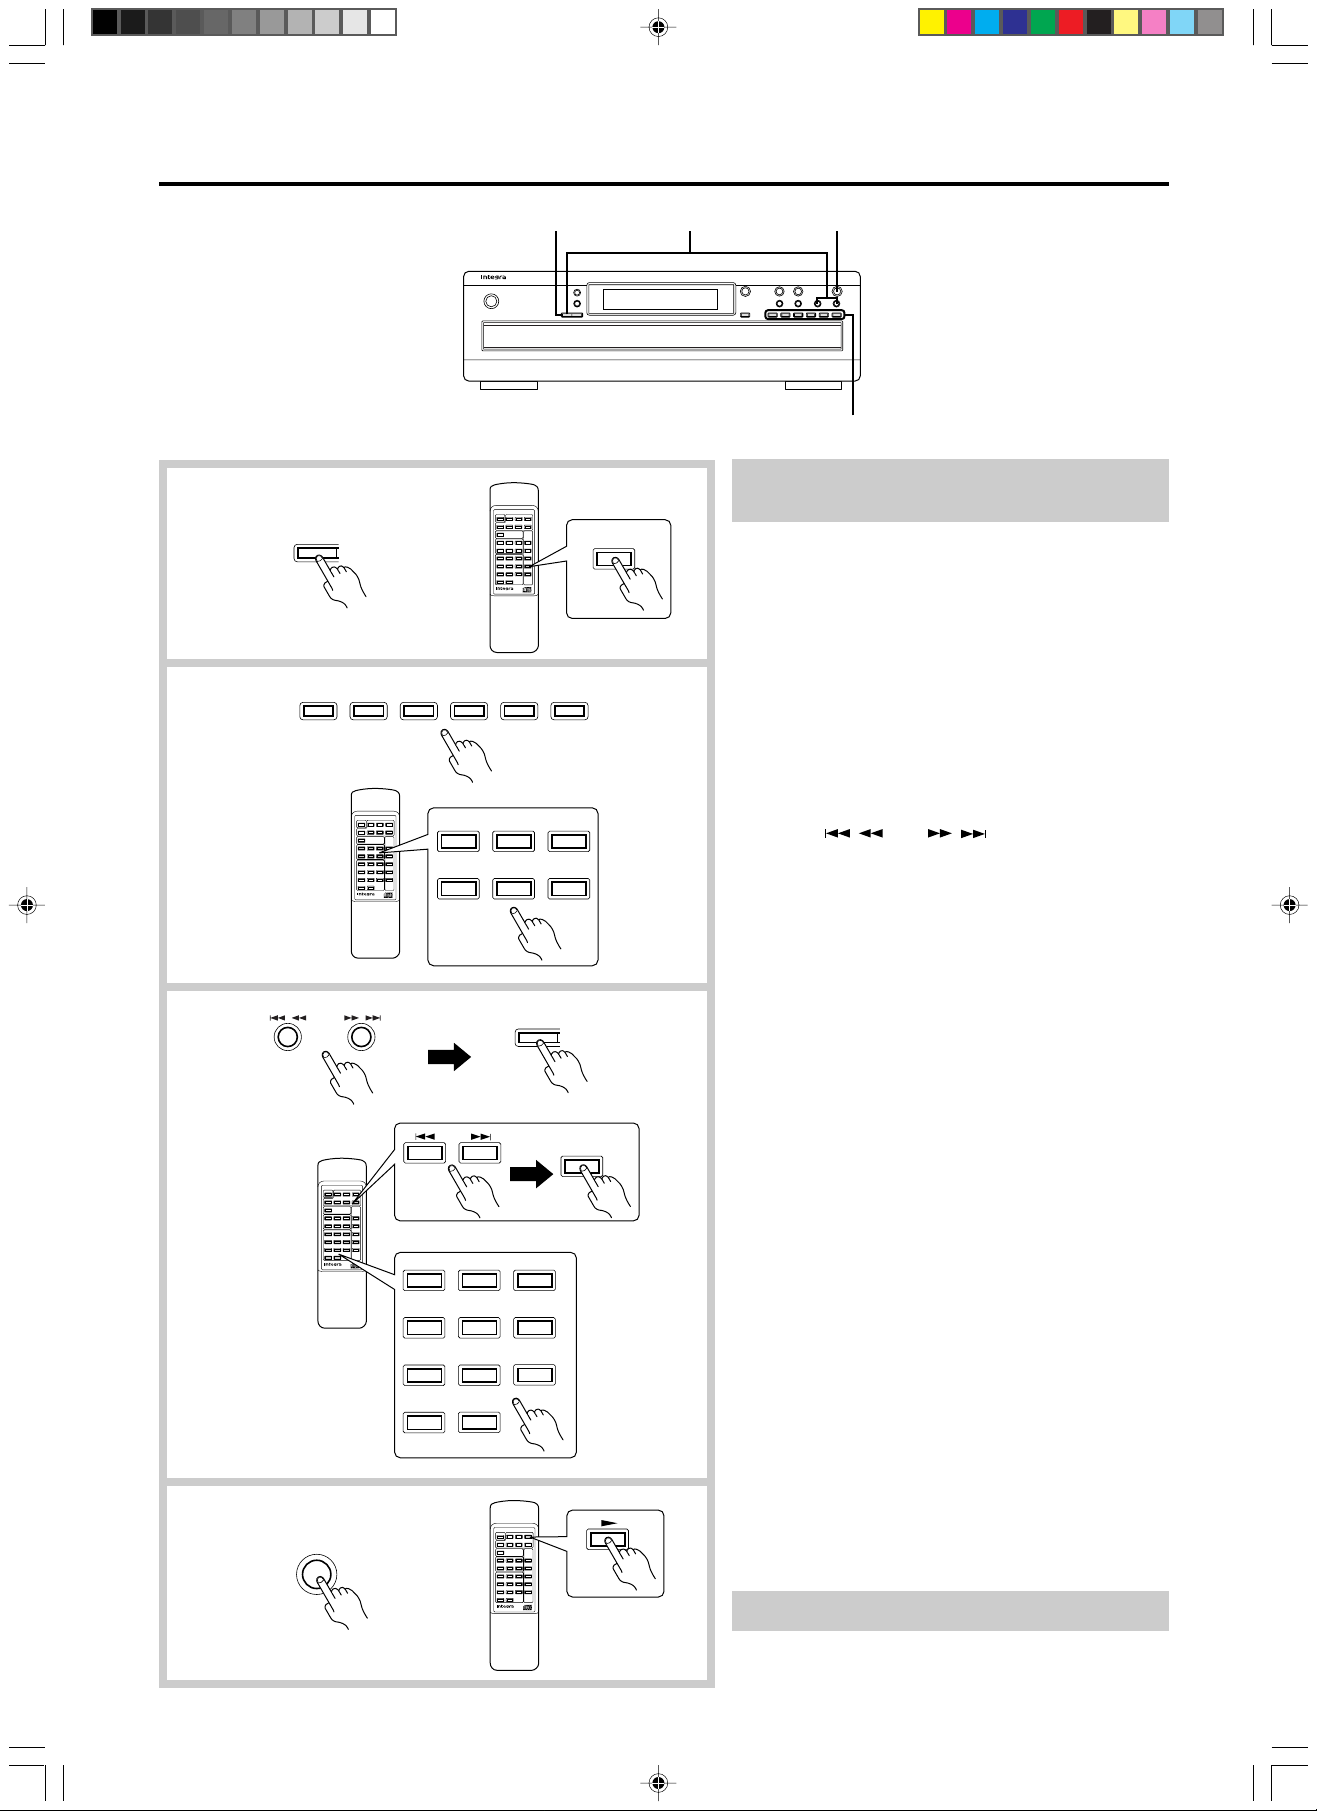
Using Memory Functions
1
2
3
4
Memory
REMOTE CONTROLLER RC-435C
Disc 1 Disc 2 Disc 3 Disc 4 Disc 5 Disc 6
DISC 1 DISC 2 DISC 3
DISC 4 DISC 5 DISC 6
REMOTE CONTROLLER RC-435C
//
REMOTE CONTROLLER RC-435C
+10 0
Play
123
456
789
Memory
MEMORY
MEMORY
3
41
2
Storing a program into memory and
playing it
Up to 40 tracks can be stored in memory.
1. Press the Memory button.
The MEMORY indicator will light up.
2. Select the desired disc using the Direct Play buttons (Disc 1-6).
• You may also use the Disc Skip button to select a
disc.
• If you wish to program the entire disc, select the
desired disc and press the Memory button. (“AL”
(all) appears.)
• To use the number buttons on the remote con-
troller to select the entire disc, press the “0” button.
3. Use the
/ and / buttons to select the
desired track, and then press the Memory button.
The selected tracks are stored in memory.
You can use the number buttons on the remote
controller to select a track number. In this case, you
do not need to press the Memory button.
• To store tracks on other discs into the memory,
repeat steps 2 and 3.
• Repeat Step 3 to select a track from the same
disc.
• If y ou attempt to select more than 40 tracks, “FULL ”
will flash on the time display to indicate that the
memory is full.
4. Press the Play button.
The CD changer will play the programmed tracks
in the order you selected.
• If y ou press the Memory button during playback,
the track being played will be stored in memory.
You can use the number buttons to program
more tracks.
• You will need to select a disc each time you wish
to program a track from a non-current disc.
Notes:
• If the total remaining time is more than 99 min-
utes 59 seconds or when the contents of the
memory extends to 2 or more discs, “--:--” will be
displayed.
• If a selected disc or track does not exist, the corre-
sponding indicator (disc or track) will light up and
the selection will be included in the program count,
but the selection(s) will be ignored and the subsequent disc or track in the progr am will play.
14
CDC-3.1_14-16 09/05/2000, 4:25 PM14
REMOTE CONTROLLER RC-435C
Stopping a memory playback
Press the Stop button.
Page 15
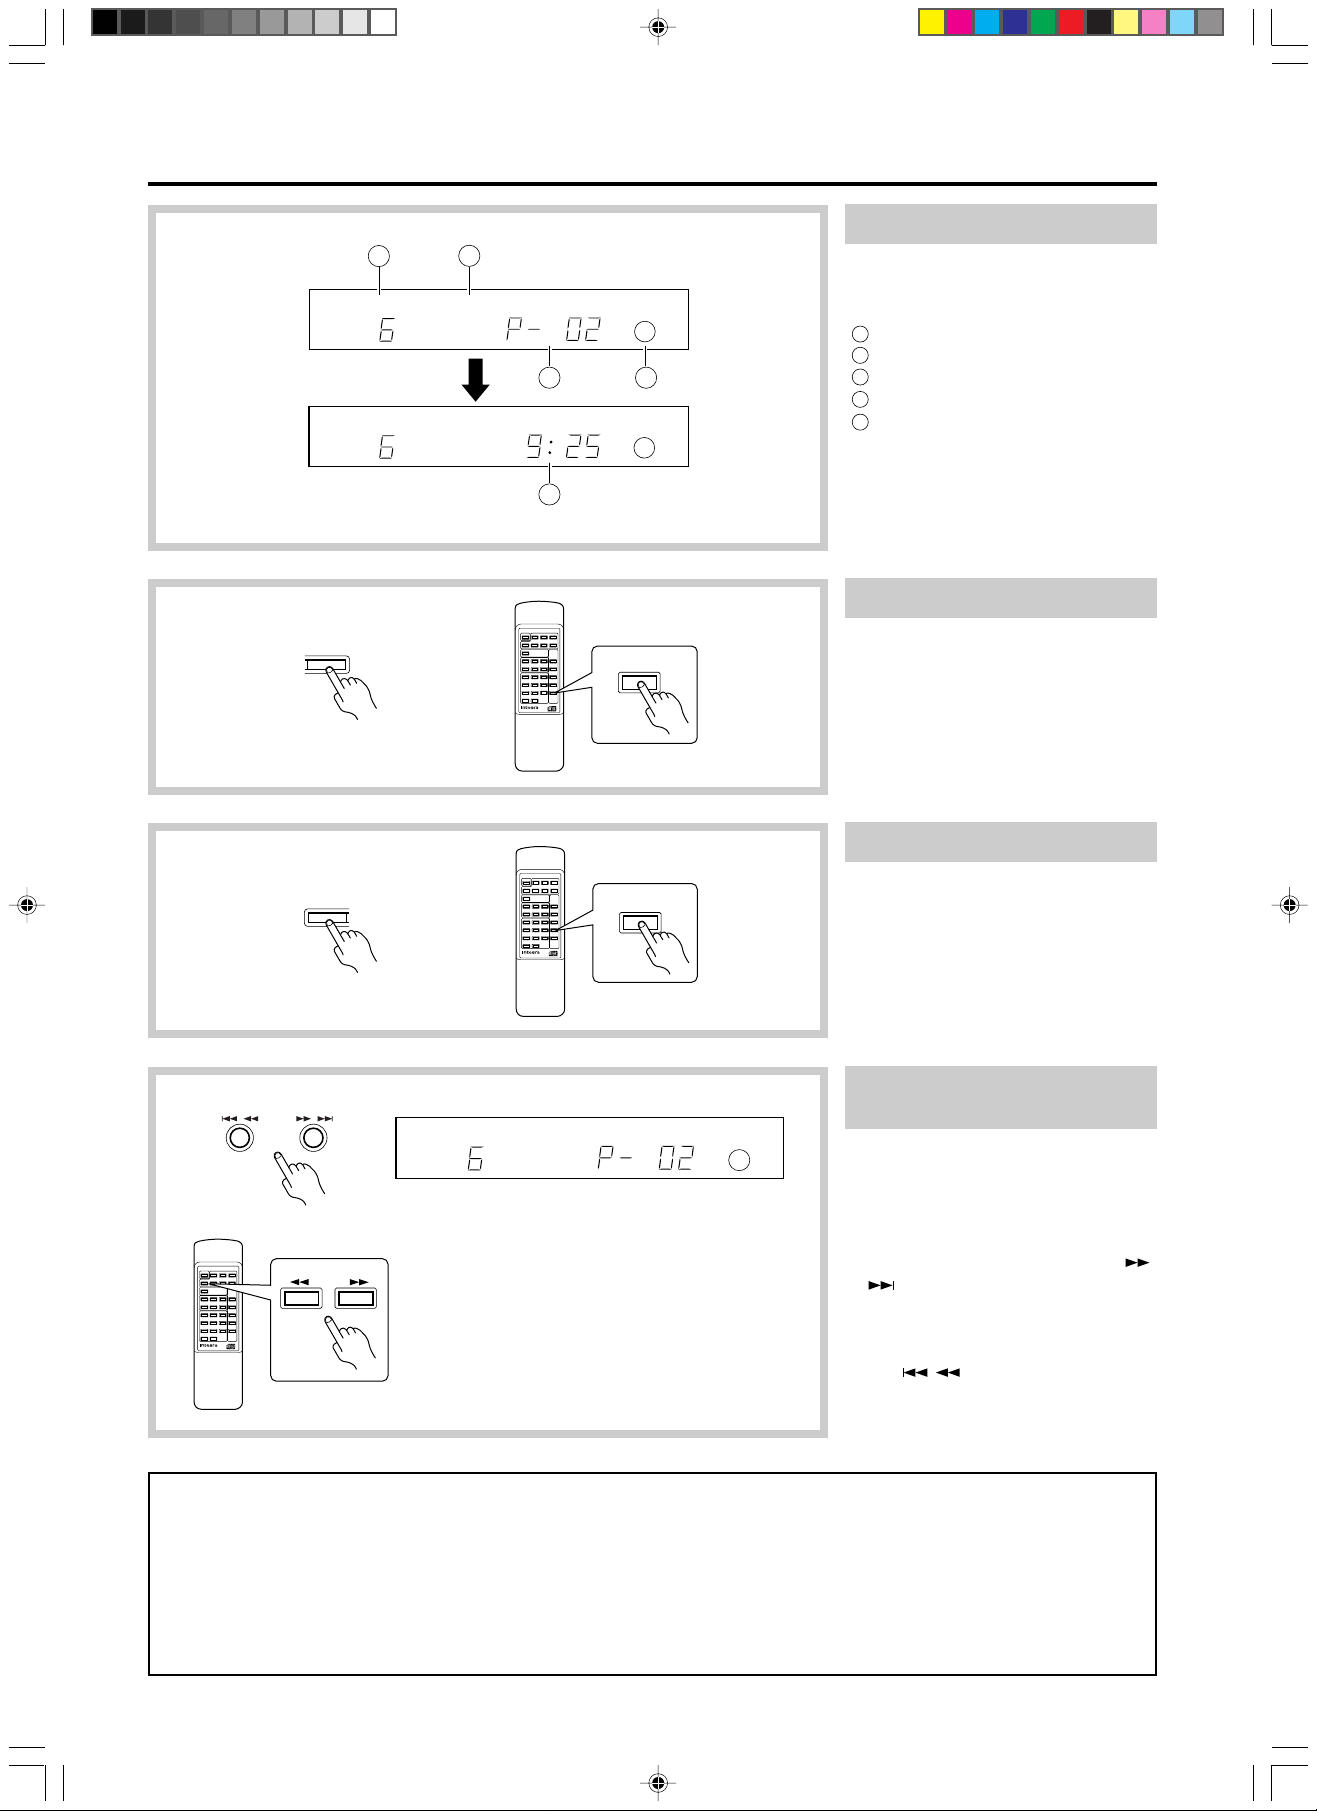
Using Memory Functions
a
TRACK
After two seconds
TRACK
MEMORY DISC No.
MEMORY DISC No.
REMAIN
TOTAL
Contents of the display
b
123
456
c
d
123
456
Example: When the sixth trac k of DISC
#5 is stored in memory as the second
track to play back (P-02).
a
Track number
b
MEMORY indicator
c
Program number
d
Disc Number
e
T otal number of stored pr ogr ams
e
Clearing the last track stored
//
REMOTE CONTROLLER RC-435C
Clear
Memory
TRACK
CLEAR
REMOTE CONTROLLER RC-435C
MEMORY
REMOTE CONTROLLER RC-435C
MEMORY DISC No.
123
456
Press the Clear button.
The last track stored in memory is
cleared.
Clearing the entire program
Press the Memory button to turn off
the MEMORY indicator.
The contents of memory are completely cleared.
Checking what is stored in
memory
1. First, if the CD changer is playing
in memory playback mode, press
the Stop button. The CD changer
will display the last program number stored in memory.
2.If you press and hold down the
button, the track numbers in
memory will appear in the display
in the order in which they were
stored. If y ou press and hold down
the / button, the track numbers will appear in the opposite order .
/
Notes about the time display
In the following cases, the time display may indicate “– – : – –” due to the memory limitations.
• If you switch to the remaining time display while the CD changer is playing the 21st or later song on the disc
• If you switch to the total remaining time display after storing the 21st or later song on the disc
• If you switch to the total remaining time display after the CD changer plays songs from memory for more than 99
minutes 59 seconds, or
• If you switch to the total remaining time display during random playback of a CD that contains 21 or more
songs.
CDC-3.1_14-16 09/05/2000, 4:25 PM15
15
Page 16
Troubleshooting Guide
Specifications
• No power.
Cause:
• A disc is loaded in the disc tray, but playback will not start.
Cause:
Cause:
Cause:
• No sound is heard.
Cause:
Cause:
• Disc playback skips.
Cause:
Cause:
Cause:
• Search time (when locating a specific track) is extremely
long.
Cause:
Cause:
• Track numbers cannot be stored in memory.
Cause:
Cause:
• Front panel controls function correctly, but remote controller
does not.
Cause:
Cause:
Because the unit contains a microcomputer to provide adv anced functions, it
may malfunction due to external noise or static electricity . If this happens, press
the Pow er button on the unit and then press it in again after about five seconds.
Power cable is not properly plugged into the AC
outlet.
Remedy:
Remedy:
Remedy:
Remedy:
Remedy:
Remedy:
Remedy:
Remedy:
Remedy:
Remedy:
Remedy:
Remedy:
Remedy:
Remedy:
Remedy:
Insert the power plug firmly.
A disc in the disc tray may be upside down.
Load the disc with the label facing upward.
The disc is dirty.
Clean the disc.
Moisture has accumulated inside the CD changer .
Remove the disc from the disc tr ay, place the
CD changer in a warm place, and leave the
power on for about one hour.
Connections may be incomplete or incorrect.
Check all cable connections. Insert all the
plugs firmly into the jacks.
The input selector switch on the amplifier may be
set incorrectly.
Set the switch to the proper position. See your
amplifier’s operating instructions for more in-
formation.
The disc is dirty.
Clean the disc.
A disc is scratched.
Replace the disc.
The CD changer is subject to being accidentally
bumped.
Place the CD changer in a more stable
location.
The disc is dirty.
Clean the disc.
The disc is scratched.
Replace the disc.
No disc in the tray.
Load a disc in the tray.
You hav e entered a trac k number that does not exist
on the disc.
Use only the track numbers that exist on the
disc.
No batteries in remote controller.
Insert batteries.
Batteries have worn out.
Replace batteries.
Signal readout system: Optical non-contact
Reading rotation: About 500 - 200 r.p.m.
(constant linear velocity)
Linear velocity: 1.2 - 1.4 m/s
Error correction system: Cross Interleave Reed-Solomon code
D/A converter: 1 bit PWM/ACCUPULSE
Sampling frequency: 352.8 kHz (8 times oversampling)
Number of channels: 2 (stereo)
Frequency response: 5 Hz - 20 kHz
Total harmonic distortion: 0.005% (at 1 kHz)
Dynamic range: 96 dB
Signal to noise ratio: 92 dB
Channel separation: 92 dB (at 1 kHz)
Wow and Flutter: Below threshold of measurability
Output level: 2 volts r.m.s.
Power consumption: 10 watts
Power supply: 120 V, 60 Hz
Dimensions (W × H × D): 435× 131× 433mm
(17-1/8" × 5-3/16" × 17-1/16")
Weight: 6.9 kg (15.2 lbs.)
Specifications and features are subject to change without notice.
Integra Division of
ONKYO U.S.A. CORPORATION
200 Williams Drive, Ramesy, N.J. 07446, U.S.A.
Tel: 201-825-7950 Fax: 201-825-8150 E-mail: [email protected]
Integra Division of
ONKYO CORPORATION
Sales & Product Planning Div. :
2-1, Nisshin-cho, Neyagawa-shi, OSAKA 572-8540, JAPAN
Tel: 072-831-8111 Fax: 072-833-5222
SN 29342934
CDC-3.1_14-16 09/05/2000, 4:25 PM16
Integra Division of
ONKYO U.S.A. CORPORATION
200 Williams Drive, Ramesy, N.J. 07446, U.S.A.
Tel: 201-825-7950 Fax: 201-825-8150 E-mail: [email protected]
Integra Division of
ONKYO CORPORATION
Sales & Product Planning Div. :
2-1, Nisshin-cho, Neyagawa-shi, OSAKA 572-8540, JAPAN
Tel: 072-831-8111 Fax: 072-833-5222
W0005-1
E
 Loading...