

Page 1
Contacts and Important Information
Use the spaces below to record important health and product information.
Doctor
o
Health Insurance
Name
Address
Telephone and Fax
Email Address
Nurse/Educator
Name
Address
Telephone and Fax
Email Address
Name
Address
Telephone Number(s)
Policy Number
Pharmacy
Name
Address
Telephone and Fax
Email Address
OmniPod System Start Date: ____________________________
PDM Model UST600 Serial Number: _____________________
Emergency Services:
Dial 911 (USA only; not available in all communities)
Insulet Corporation
9 Oak Park Drive, Bedford, MA 01730
Customer Care (24 hours/7 days): 800-591-3455
When calling from outside the United States: 781-457-5098
Customer Care Fax: 877-467-8538
Web site: MyOmniPod.com
Page 2

© 2013 Insulet Corporation. All rights reserved.
OmniPod is a registered trademark of Insulet Corporation.
U.S. Patent No. 6,740,059.
Third-party trademarks used herein are the trademarks of their respective owners.
15618-AW Rev A
Page 3

Contents
Introduction. . . . . . . . . . . . . . . . . . . . . . . . . . . . . . . . . . . . . . . . . . . . . . . . viii
About This User Guide . . . . . . . . . . . . . . . . . . . . . . . . . . . . . . . . . . . . . . . . . viii
Symbols . . . . . . . . . . . . . . . . . . . . . . . . . . . . . . . . . . . . . . . . . . . . . . . . . . . . viii
Conventions and Terms . . . . . . . . . . . . . . . . . . . . . . . . . . . . . . . . . . . . . . ix
Important Information . . . . . . . . . . . . . . . . . . . . . . . . . . . . . . . . . . . . . . . ix
Indication . . . . . . . . . . . . . . . . . . . . . . . . . . . . . . . . . . . . . . . . . . . . . . . . . . . . ix
Contraindications . . . . . . . . . . . . . . . . . . . . . . . . . . . . . . . . . . . . . . . . . . . . . x
Your Role: Safely Using the OmniPod System . . . . . . . . . . . . . . . . . . . xi
1 Your New OmniPod Insulin Management System . . . . . . . . . . 1
Insulin Delivery with the OmniPod System. . . . . . . . . . . . . . . . . . . . . . 1
How Does the OmniPod System Work? . . . . . . . . . . . . . . . . . . . . . . . . . 2
No tubing . . . . . . . . . . . . . . . . . . . . . . . . . . . . . . . . . . . . . . . . . . . . . . . . . . . . 2
Suggested bolus calculation . . . . . . . . . . . . . . . . . . . . . . . . . . . . . . . . . 2
Reference food library and carb presets . . . . . . . . . . . . . . . . . . . . . . 2
Record keeping. . . . . . . . . . . . . . . . . . . . . . . . . . . . . . . . . . . . . . . . . 3
Personalizing your System . . . . . . . . . . . . . . . . . . . . . . . . . . . . . . . . . . . 3
The Pod . . . . . . . . . . . . . . . . . . . . . . . . . . . . . . . . . . . . . . . . . . . . . . . . . . . . . . . . . 4
The Personal Diabetes Manager. . . . . . . . . . . . . . . . . . . . . . . . . . . . . . . . . 4
Buttons that program and control the OmniPod System . . . . . 5
Primary screens . . . . . . . . . . . . . . . . . . . . . . . . . . . . . . . . . . . . . . . . . . . . . . 6
Safety Features. . . . . . . . . . . . . . . . . . . . . . . . . . . . . . . . . . . . . . . . . . . . . . . . . . 8
Automatic priming, safety checks, and insertion . . . . . . . . . . . . . 8
Occlusion detection . . . . . . . . . . . . . . . . . . . . . . . . . . . . . . . . . . . . . . . . . . 8
Alerts and alarms. . . . . . . . . . . . . . . . . . . . . . . . . . . . . . . . . . . . . . . . . . . . . 8
2 Getting Started . . . . . . . . . . . . . . . . . . . . . . . . . . . . . . . . . . . . . . . . . . . . 9
The OmniPod Starter Kit . . . . . . . . . . . . . . . . . . . . . . . . . . . . . . . . . . . . . . . . 9
Set Up the Personal Diabetes Manager (PDM). . . . . . . . . . . . . . . . . . . 9
The Setup Wizard . . . . . . . . . . . . . . . . . . . . . . . . . . . . . . . . . . . . . . . . . . . . . . 10
Enter your PDM ID. . . . . . . . . . . . . . . . . . . . . . . . . . . . . . . . . . . . . . . . . . . 10
Select the ID screen color. . . . . . . . . . . . . . . . . . . . . . . . . . . . . . . . . . . . 11
Set date and time . . . . . . . . . . . . . . . . . . . . . . . . . . . . . . . . . . . . . . . . . . . 11
Enter basal settings. . . . . . . . . . . . . . . . . . . . . . . . . . . . . . . . . . . . . . . . . . 12
Enter BG goal. . . . . . . . . . . . . . . . . . . . . . . . . . . . . . . . . . . . . . . . . . . . . . . . 13
Set the suggested bolus calculator . . . . . . . . . . . . . . . . . . . . . . . . . . 13
Enter target blood glucose value. . . . . . . . . . . . . . . . . . . . . . . . . . . . 13
Enter minimum BG allowed for use in bolus calculation. . . . . 14
Enter insulin-to-carbohydrate ratio. . . . . . . . . . . . . . . . . . . . . . . . . . 14
Enter correction factor . . . . . . . . . . . . . . . . . . . . . . . . . . . . . . . . . . . . . . 15
Set reverse correction . . . . . . . . . . . . . . . . . . . . . . . . . . . . . . . . . . . . . . . 15
Enter the duration of insulin action. . . . . . . . . . . . . . . . . . . . . . . . . . 15
Select bolus increment and enter maximum bolus. . . . . . . . . . 16
Set extended bolus doses . . . . . . . . . . . . . . . . . . . . . . . . . . . . . . . . . . . 16
Set low reservoir advisory . . . . . . . . . . . . . . . . . . . . . . . . . . . . . . . . . . . 16
Set Pod expiration notification . . . . . . . . . . . . . . . . . . . . . . . . . . . . . . 16
3 Understanding and Adjusting Basal Rates . . . . . . . . . . . . . . . . 17
What Is a Basal Rate? . . . . . . . . . . . . . . . . . . . . . . . . . . . . . . . . . . . . . . . . . . . 17
iii
Page 4

Contents
Personalized Basal Programs . . . . . . . . . . . . . . . . . . . . . . . . . . . . . . . . . . . 17
Create a basal program. . . . . . . . . . . . . . . . . . . . . . . . . . . . . . . . . . . . . . 18
Enable an existing basal program . . . . . . . . . . . . . . . . . . . . . . . . . . . 20
Change, rename, copy, or delete a basal program . . . . . . . . . . . 21
Temporary Basal Rates and Presets . . . . . . . . . . . . . . . . . . . . . . . . . . . . . 23
What is a temporary basal rate? . . . . . . . . . . . . . . . . . . . . . . . . . . . . . 23
Enable a one-time temporary basal rate . . . . . . . . . . . . . . . . . . . . . 24
Cancel a one-time temporary basal rate . . . . . . . . . . . . . . . . . . . . . 25
Create a temporary basal preset. . . . . . . . . . . . . . . . . . . . . . . . . . . . . 25
Enable an existing temporary basal preset . . . . . . . . . . . . . . . . . . 26
Cancel an active temporary basal preset . . . . . . . . . . . . . . . . . . . . 27
Change, rename, or delete a temporary basal preset . . . . . . . . 27
Maximum Basal Rate . . . . . . . . . . . . . . . . . . . . . . . . . . . . . . . . . . . . . . . . . . . 28
What is the maximum basal rate?. . . . . . . . . . . . . . . . . . . . . . . . . . . . 28
Change the maximum basal rate . . . . . . . . . . . . . . . . . . . . . . . . . . . . 28
4 Understanding and Delivering Bolus Doses. . . . . . . . . . . . . . . 29
What Is a Bolus? . . . . . . . . . . . . . . . . . . . . . . . . . . . . . . . . . . . . . . . . . . . . . . . . 29
Bolus Dose Options . . . . . . . . . . . . . . . . . . . . . . . . . . . . . . . . . . . . . . . . . . . . 30
Suggested Bolus Calculator . . . . . . . . . . . . . . . . . . . . . . . . . . . . . . . . . . . . 30
How a suggested bolus is calculated . . . . . . . . . . . . . . . . . . . . . . . . 31
Deliver a Normal Bolus . . . . . . . . . . . . . . . . . . . . . . . . . . . . . . . . . . . . . . . . . 32
Deliver a bolus when suggested bolus calculator is On. . . . . . 32
Deliver a bolus manually (suggested bolus calc is Off). . . . . . . 34
Deliver an Extended Bolus. . . . . . . . . . . . . . . . . . . . . . . . . . . . . . . . . . . . . . 35
Deliver an extended bolus instead of a normal bolus. . . . . . . . 35
Cancel Active Boluses . . . . . . . . . . . . . . . . . . . . . . . . . . . . . . . . . . . . . . . . . . 36
Replace an Extended Bolus. . . . . . . . . . . . . . . . . . . . . . . . . . . . . . . . . . . . . 37
Bolus Presets . . . . . . . . . . . . . . . . . . . . . . . . . . . . . . . . . . . . . . . . . . . . . . . . . . . 38
Create a bolus preset . . . . . . . . . . . . . . . . . . . . . . . . . . . . . . . . . . . . . . . . 38
Enable an existing bolus preset. . . . . . . . . . . . . . . . . . . . . . . . . . . . . . 39
Change, rename, or delete a bolus preset . . . . . . . . . . . . . . . . . . . 39
Cancel an active bolus preset. . . . . . . . . . . . . . . . . . . . . . . . . . . . . . . . 40
Carb Presets . . . . . . . . . . . . . . . . . . . . . . . . . . . . . . . . . . . . . . . . . . . . . . . . . . . . 40
Create a carb preset . . . . . . . . . . . . . . . . . . . . . . . . . . . . . . . . . . . . . . . . . 40
Change or edit a carb preset. . . . . . . . . . . . . . . . . . . . . . . . . . . . . . . . . 41
Delete a carb preset . . . . . . . . . . . . . . . . . . . . . . . . . . . . . . . . . . . . . . . . . 42
Reference Food Library . . . . . . . . . . . . . . . . . . . . . . . . . . . . . . . . . . . . . . . . . 42
Access the reference food library . . . . . . . . . . . . . . . . . . . . . . . . . . . . 42
5 Using the Pod. . . . . . . . . . . . . . . . . . . . . . . . . . . . . . . . . . . . . . . . . . . . 44
The Pod Change Process . . . . . . . . . . . . . . . . . . . . . . . . . . . . . . . . . . . . . . . 44
Gather equipment and supplies . . . . . . . . . . . . . . . . . . . . . . . . . . . . . 45
Deactivate the current Pod . . . . . . . . . . . . . . . . . . . . . . . . . . . . . . . . . . 45
Fill a new Pod. . . . . . . . . . . . . . . . . . . . . . . . . . . . . . . . . . . . . . . . . . . . . . . . 47
Select the infusion site. . . . . . . . . . . . . . . . . . . . . . . . . . . . . . . . . . . . . . . 50
Prepare the infusion site. . . . . . . . . . . . . . . . . . . . . . . . . . . . . . . . . . . . . 52
Apply the new Pod . . . . . . . . . . . . . . . . . . . . . . . . . . . . . . . . . . . . . . . . . . 52
Insert cannula and begin insulin delivery . . . . . . . . . . . . . . . . . . . . 54
Check Pod Status. . . . . . . . . . . . . . . . . . . . . . . . . . . . . . . . . . . . . . . . . . . . . . . 57
Suspend Insulin Delivery . . . . . . . . . . . . . . . . . . . . . . . . . . . . . . . . . . . . . . . 57
Resume Insulin Delivery . . . . . . . . . . . . . . . . . . . . . . . . . . . . . . . . . . . . . . . . 59
Avoid Infusion Site Infections. . . . . . . . . . . . . . . . . . . . . . . . . . . . . . . . . . . 59
Get the Most From Your Pod. . . . . . . . . . . . . . . . . . . . . . . . . . . . . . . . . . . . 59
Avoid extreme temperatures . . . . . . . . . . . . . . . . . . . . . . . . . . . . . . . . 59
Water and your Pod . . . . . . . . . . . . . . . . . . . . . . . . . . . . . . . . . . . . . . . . . 60
iv
Page 5

Contents
Safe storage . . . . . . . . . . . . . . . . . . . . . . . . . . . . . . . . . . . . . . . . . . . . . . . . . 60
6 Using the Personal Diabetes Manager . . . . . . . . . . . . . . . . . . . . 61
The ID Screen . . . . . . . . . . . . . . . . . . . . . . . . . . . . . . . . . . . . . . . . . . . . . . . . . . 61
The Status Screen . . . . . . . . . . . . . . . . . . . . . . . . . . . . . . . . . . . . . . . . . . . . . . 61
Insulin gauge and display . . . . . . . . . . . . . . . . . . . . . . . . . . . . . . . . . . . 62
PDM settings . . . . . . . . . . . . . . . . . . . . . . . . . . . . . . . . . . . . . . . . . . . . . . . . 62
The System Setup Menu . . . . . . . . . . . . . . . . . . . . . . . . . . . . . . . . . . . . . . . 63
Reset the Date or Time . . . . . . . . . . . . . . . . . . . . . . . . . . . . . . . . . . . . . . . . . 63
Reset the time. . . . . . . . . . . . . . . . . . . . . . . . . . . . . . . . . . . . . . . . . . . . . . . 64
Reset the date . . . . . . . . . . . . . . . . . . . . . . . . . . . . . . . . . . . . . . . . . . . . . . . 64
Change Bolus and Basal Settings. . . . . . . . . . . . . . . . . . . . . . . . . . . . . . . 64
Bolus calcs. . . . . . . . . . . . . . . . . . . . . . . . . . . . . . . . . . . . . . . . . . . . . . . . . . . 65
Ratios/factors/targets . . . . . . . . . . . . . . . . . . . . . . . . . . . . . . . . . . . . . . . 66
Temp basal . . . . . . . . . . . . . . . . . . . . . . . . . . . . . . . . . . . . . . . . . . . . . . . . . . 68
Extended. . . . . . . . . . . . . . . . . . . . . . . . . . . . . . . . . . . . . . . . . . . . . . . . . . . . 68
Bolus increment. . . . . . . . . . . . . . . . . . . . . . . . . . . . . . . . . . . . . . . . . . . . . 68
Max bolus . . . . . . . . . . . . . . . . . . . . . . . . . . . . . . . . . . . . . . . . . . . . . . . . . . . 68
Max basal rate. . . . . . . . . . . . . . . . . . . . . . . . . . . . . . . . . . . . . . . . . . . . . . . 68
Alerts and Reminders . . . . . . . . . . . . . . . . . . . . . . . . . . . . . . . . . . . . . . . . . . 68
Set alerts and reminders . . . . . . . . . . . . . . . . . . . . . . . . . . . . . . . . . . . . 70
Change Blood Glucose Settings. . . . . . . . . . . . . . . . . . . . . . . . . . . . . . . . 72
Change BG goal limits. . . . . . . . . . . . . . . . . . . . . . . . . . . . . . . . . . . . . . . 72
Manage the blood glucose tags list . . . . . . . . . . . . . . . . . . . . . . . . . 72
Customize the Personal Diabetes Manager . . . . . . . . . . . . . . . . . . . . 73
Set PDM options . . . . . . . . . . . . . . . . . . . . . . . . . . . . . . . . . . . . . . . . . . . . 74
Set ID screen . . . . . . . . . . . . . . . . . . . . . . . . . . . . . . . . . . . . . . . . . . . . . . . . 74
Set PDM lock . . . . . . . . . . . . . . . . . . . . . . . . . . . . . . . . . . . . . . . . . . . . . . . . 75
Set the Screen time-out . . . . . . . . . . . . . . . . . . . . . . . . . . . . . . . . . . . . . 75
Set the Backlight time-out . . . . . . . . . . . . . . . . . . . . . . . . . . . . . . . . . . 75
Set Diagnostic Functions. . . . . . . . . . . . . . . . . . . . . . . . . . . . . . . . . . . . . . . 75
Diagnostic options . . . . . . . . . . . . . . . . . . . . . . . . . . . . . . . . . . . . . . . . . . 76
Set a Reminder to Vibrate . . . . . . . . . . . . . . . . . . . . . . . . . . . . . . . . . . . . . . 77
Get the Most from Your PDM. . . . . . . . . . . . . . . . . . . . . . . . . . . . . . . . . . . 77
Keep it handy . . . . . . . . . . . . . . . . . . . . . . . . . . . . . . . . . . . . . . . . . . . . . . . 77
Communicating with the Pod . . . . . . . . . . . . . . . . . . . . . . . . . . . . . . . 77
Water and your PDM . . . . . . . . . . . . . . . . . . . . . . . . . . . . . . . . . . . . . . . . 77
Avoid extreme temperatures. . . . . . . . . . . . . . . . . . . . . . . . . . . . . . . . 78
Electrical interference . . . . . . . . . . . . . . . . . . . . . . . . . . . . . . . . . . . . . . . 78
7 Entering Blood Glucose Information into Your PDM. . . . . . . 79
Entering Blood Glucose Readings Manually. . . . . . . . . . . . . . . . . . . . 79
Editing Tags . . . . . . . . . . . . . . . . . . . . . . . . . . . . . . . . . . . . . . . . . . . . . . . . . . . . 79
Blood Glucose Results and the Suggested Bolus
Calculator . . . . . . . . . . . . . . . . . . . . . . . . . . . . . . . . . . . . . . . . . . . . . . . . . . . . . . 81
8 Understanding Your Records . . . . . . . . . . . . . . . . . . . . . . . . . . . . . 82
Record Keeping . . . . . . . . . . . . . . . . . . . . . . . . . . . . . . . . . . . . . . . . . . . . . . . . 82
Special symbols in record screens . . . . . . . . . . . . . . . . . . . . . . . . . . . 82
Insulin Delivery Records. . . . . . . . . . . . . . . . . . . . . . . . . . . . . . . . . . . . . . . . 83
View insulin delivery records . . . . . . . . . . . . . . . . . . . . . . . . . . . . . . . . 83
Blood Glucose Records. . . . . . . . . . . . . . . . . . . . . . . . . . . . . . . . . . . . . . . . . 85
View single-day trends . . . . . . . . . . . . . . . . . . . . . . . . . . . . . . . . . . . . . . 85
View multiple-day trends. . . . . . . . . . . . . . . . . . . . . . . . . . . . . . . . . . . . 86
Alarm Records . . . . . . . . . . . . . . . . . . . . . . . . . . . . . . . . . . . . . . . . . . . . . . . . . 87
Carbohydrate Records . . . . . . . . . . . . . . . . . . . . . . . . . . . . . . . . . . . . . . . . . 87
All Records . . . . . . . . . . . . . . . . . . . . . . . . . . . . . . . . . . . . . . . . . . . . . . . . . . . . . 88
v
Page 6

Contents
User Information/Support. . . . . . . . . . . . . . . . . . . . . . . . . . . . . . . . . . . . . . 88
Add or change user information. . . . . . . . . . . . . . . . . . . . . . . . . . . . . 89
9 Living with Diabetes . . . . . . . . . . . . . . . . . . . . . . . . . . . . . . . . . . . . . 90
Your Role: Safely Using the OmniPod System. . . . . . . . . . . . . . . . . . . 90
Daily Diabetes Management Activities . . . . . . . . . . . . . . . . . . . . . . . . . 90
Check your blood glucose frequently. . . . . . . . . . . . . . . . . . . . . . . . 91
Inspect the infusion site daily. . . . . . . . . . . . . . . . . . . . . . . . . . . . . . . . 91
Prepare for Emergencies . . . . . . . . . . . . . . . . . . . . . . . . . . . . . . . . . . . . . . . 92
Water and Your Pod . . . . . . . . . . . . . . . . . . . . . . . . . . . . . . . . . . . . . . . . . . . . 92
Traveling and Vacationing. . . . . . . . . . . . . . . . . . . . . . . . . . . . . . . . . . . . . . 93
Plan for changing time zones. . . . . . . . . . . . . . . . . . . . . . . . . . . . . . . . 93
Take enough supplies . . . . . . . . . . . . . . . . . . . . . . . . . . . . . . . . . . . . . . . 93
Minimize airport security delays . . . . . . . . . . . . . . . . . . . . . . . . . . . . . 93
Keep supplies accessible . . . . . . . . . . . . . . . . . . . . . . . . . . . . . . . . . . . . 94
Avoid lows, highs, and DKA. . . . . . . . . . . . . . . . . . . . . . . . . . . . . . . . . . . . . 95
General precautions . . . . . . . . . . . . . . . . . . . . . . . . . . . . . . . . . . . . . . . . . 95
Hypoglycemia (Low Blood Glucose) . . . . . . . . . . . . . . . . . . . . . . . . . 95
To avoid hypoglycemia (low blood glucose). . . . . . . . . . . . . . . . . 96
To treat hypoglycemia (low blood glucose). . . . . . . . . . . . . . . . . . 96
Hyperglycemia (high blood glucose) . . . . . . . . . . . . . . . . . . . . . . . . 99
Diabetic ketoacidosis (DKA) . . . . . . . . . . . . . . . . . . . . . . . . . . . . . . . . 103
Handling Special Situations . . . . . . . . . . . . . . . . . . . . . . . . . . . . . . . . . . . 104
Sick days. . . . . . . . . . . . . . . . . . . . . . . . . . . . . . . . . . . . . . . . . . . . . . . . . . . . 104
Exercising, playing sports, or working hard . . . . . . . . . . . . . . . . . 104
X-rays, MRIs, and CT scans . . . . . . . . . . . . . . . . . . . . . . . . . . . . . . . . . . 105
Surgery or hospitalization . . . . . . . . . . . . . . . . . . . . . . . . . . . . . . . . . . 105
10 Alerts and Alarms . . . . . . . . . . . . . . . . . . . . . . . . . . . . . . . . . . . . . 106
Safety Checks . . . . . . . . . . . . . . . . . . . . . . . . . . . . . . . . . . . . . . . . . . . . . . . . . 106
Alarms. . . . . . . . . . . . . . . . . . . . . . . . . . . . . . . . . . . . . . . . . . . . . . . . . . . . . . . . . 106
Advisory Alarms . . . . . . . . . . . . . . . . . . . . . . . . . . . . . . . . . . . . . . . . . . . . 107
Hazard Alarms . . . . . . . . . . . . . . . . . . . . . . . . . . . . . . . . . . . . . . . . . . . . . . 107
Manual Shut-off of a Hazard Alarm . . . . . . . . . . . . . . . . . . . . . . . . . . . . 113
11 Communication Failures. . . . . . . . . . . . . . . . . . . . . . . . . . . . . . . 114
The Communication Process . . . . . . . . . . . . . . . . . . . . . . . . . . . . . . . . . . 114
Failure During Pod Activation or Operation . . . . . . . . . . . . . . . . . . . 114
Failure During Pod Deactivation. . . . . . . . . . . . . . . . . . . . . . . . . . . . . . . 116
Failure During Request for Status. . . . . . . . . . . . . . . . . . . . . . . . . . . . . . 117
Failure During Bolus Cancellation . . . . . . . . . . . . . . . . . . . . . . . . . . . . . 118
Appendix . . . . . . . . . . . . . . . . . . . . . . . . . . . . . . . . . . . . . . . . . . . . . . . . . 120
Pod Care and Maintenance. . . . . . . . . . . . . . . . . . . . . . . . . . . . . . . . . . . . 120
Storage . . . . . . . . . . . . . . . . . . . . . . . . . . . . . . . . . . . . . . . . . . . . . . . . . . . . . 120
Cleaning. . . . . . . . . . . . . . . . . . . . . . . . . . . . . . . . . . . . . . . . . . . . . . . . . . . . 120
Personal Diabetes Manager Care and Maintenance . . . . . . . . . . . 120
Storage . . . . . . . . . . . . . . . . . . . . . . . . . . . . . . . . . . . . . . . . . . . . . . . . . . . . . 120
Cleaning and disinfecting . . . . . . . . . . . . . . . . . . . . . . . . . . . . . . . . . . 121
Replacing Batteries . . . . . . . . . . . . . . . . . . . . . . . . . . . . . . . . . . . . . . . . . 122
If the PDM becomes submerged in water . . . . . . . . . . . . . . . . . . 123
If you drop the PDM . . . . . . . . . . . . . . . . . . . . . . . . . . . . . . . . . . . . . . . . 124
Storage and Supplies. . . . . . . . . . . . . . . . . . . . . . . . . . . . . . . . . . . . . . . . . . 124
Suggested Bolus Calculator Examples and Guidelines. . . . . . . . . 125
Meal bolus calculation. . . . . . . . . . . . . . . . . . . . . . . . . . . . . . . . . . . . . . 125
Insulin-on-board (IOB) calculation . . . . . . . . . . . . . . . . . . . . . . . . . . 125
Calculator guidelines . . . . . . . . . . . . . . . . . . . . . . . . . . . . . . . . . . . . . . . 128
vi
Page 7

Contents
OmniPod System Options and Settings . . . . . . . . . . . . . . . . . . . . . . . 129
Pod Specifications. . . . . . . . . . . . . . . . . . . . . . . . . . . . . . . . . . . . . . . . . . . . . 130
Accuracy Test Results. . . . . . . . . . . . . . . . . . . . . . . . . . . . . . . . . . . . . . . . . . 131
Flow rate error. . . . . . . . . . . . . . . . . . . . . . . . . . . . . . . . . . . . . . . . . . . . . . 131
Personal Diabetes Manager Specifications . . . . . . . . . . . . . . . . . . . . 132
OmniPod System Label Symbols. . . . . . . . . . . . . . . . . . . . . . . . . . . . . . 133
Personal Diabetes Manager Icons . . . . . . . . . . . . . . . . . . . . . . . . . . . . . 133
OmniPod System Notice Concerning Interference . . . . . . . . . . . . 134
Electromagnetic Compatibility. . . . . . . . . . . . . . . . . . . . . . . . . . . . . . . . 135
Customer Bill of Rights . . . . . . . . . . . . . . . . . . . . . . . . . . . . . . . . . . . . . . . . 139
Mission Statement . . . . . . . . . . . . . . . . . . . . . . . . . . . . . . . . . . . . . . . . . 139
Scope of Services. . . . . . . . . . . . . . . . . . . . . . . . . . . . . . . . . . . . . . . . . . . 139
Compliance . . . . . . . . . . . . . . . . . . . . . . . . . . . . . . . . . . . . . . . . . . . . . . . . 139
Supply Shipment. . . . . . . . . . . . . . . . . . . . . . . . . . . . . . . . . . . . . . . . . . . 139
Inquiries. . . . . . . . . . . . . . . . . . . . . . . . . . . . . . . . . . . . . . . . . . . . . . . . . . . . 139
CHAP Accredited . . . . . . . . . . . . . . . . . . . . . . . . . . . . . . . . . . . . . . . . . . . 139
Customer’s Bill of Rights and Responsibilities. . . . . . . . . . . . . . . 140
Limited Warranty for the Personal Diabetes Manager . . . . . . . . . 141
HIPAA Privacy Notice. . . . . . . . . . . . . . . . . . . . . . . . . . . . . . . . . . . . . . . . . . 142
Uses and Disclosures of Medical Information. . . . . . . . . . . . . . . 142
Your Rights . . . . . . . . . . . . . . . . . . . . . . . . . . . . . . . . . . . . . . . . . . . . . . . . . 144
Our Duties. . . . . . . . . . . . . . . . . . . . . . . . . . . . . . . . . . . . . . . . . . . . . . . . . . 145
What To Do If You Have a Problem or Question. . . . . . . . . . . . . 145
Glossary . . . . . . . . . . . . . . . . . . . . . . . . . . . . . . . . . . . . . . . . . . . . . . . . . . 146
Index . . . . . . . . . . . . . . . . . . . . . . . . . . . . . . . . . . . . . . . . . . . . . . . . . . . . . 152
vii
Page 8
Introduction
n About This User Guide
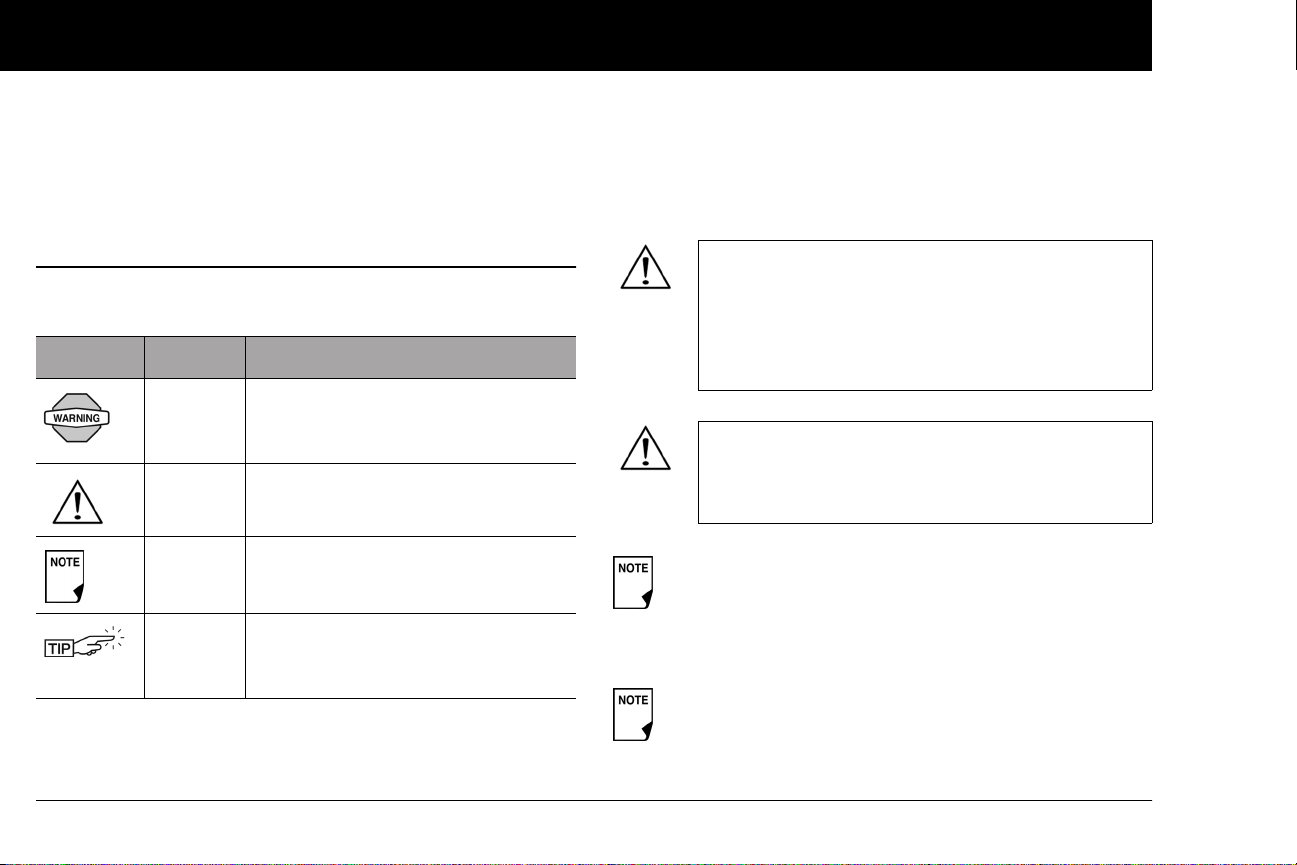
Symbols
Symbol Term Meaning
Warning
Caution
Note
Tip
viii
Describes potential serious adverse
reactions, or indicates conditions that
could cause death or serious injury.
Caution: Consult accompanying documents.
Provides helpful information.
Offers a suggestion for successful use
of the OmniPod
ment System.
®
Insulin Manage-
This User Guide is intended for use only with PDM
model UST600. To learn which version of the PDM
you have, turn it over. On the back of the PDM, look
for “UST600.” If you see it, this is the correct User
Guide. If you do not see “UST600” on the back of the
PDM, please call Customer Care.
This User Guide is periodically updated. Visit the
Customer Care section of MyOmniPod.com to see
the most recent version and to find other helpful
information.
Users should wash hands thoroughly with soap and
water after handling the meter, lancing device, or test
strips.
Reminder: Users should activate the PDM periodically to
confirm that there are no alerts or alarms that require a
response.
Page 9
Introduction
Screen displays shown in this User Guide are for illustrative
purposes only and should not be considered suggestions
for user settings. Consult with your healthcare provider to
determine the appropriate settings for you.
Conventions and Terms
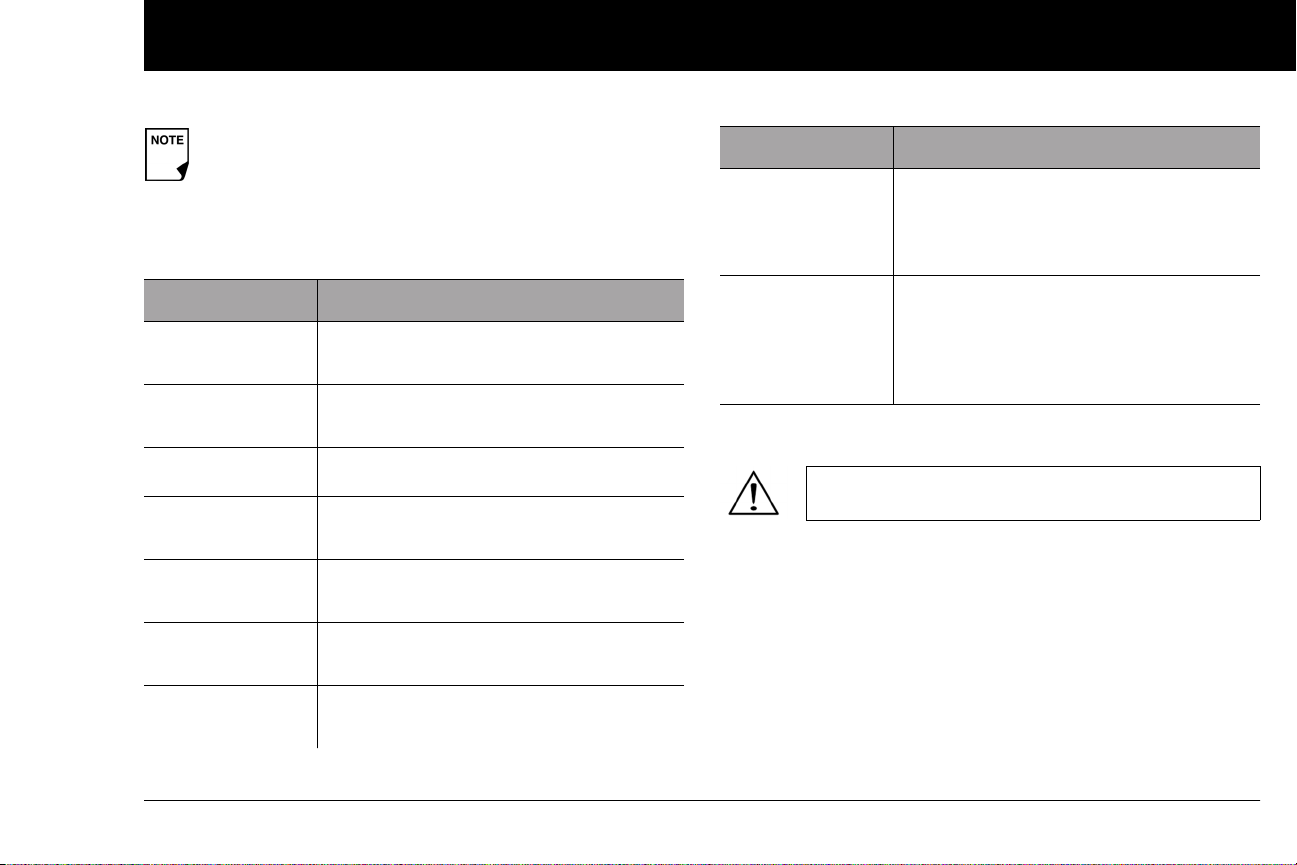
Convention/Term Meaning
Bold
Italics
Press
Hold
Menu
Screen
Button
Names of buttons, soft keys, menus, and
screens are in bold.
Words in italics are defined in the
Glossary at the end of this User Guide.
Press and release a button or soft key.
Keep pressing a button until its function is
complete.
A list of options on the PDM. Options allow
you to perform tasks.
Displays programming, operating, and
alarm/alert information.
A physical button on the PDM, such as the
Home/Power button.
Convention/Term Meaning
Icon
Soft keys
An image on the PDM screen that indicates a menu option or item of information. A table of screen icons appears in the
Appendices.
A row of three unlabeled buttons on the
PDM whose label or function appears on
the screen directly above the button. The
label changes depending on the task you
are performing.
Important Information
US Federal law restricts this device to sale by or on
the order of a physician.
Indication
The OmniPod® Insulin Management System is intended for subcutaneous (below the skin) delivery of insulin at set and variable
rates for the management of diabetes mellitus in persons requir-
ing insulin.
ix
Page 10

Introduction
Contraindications
Insulin pump therapy is NOT recommended for people who are
either:
• Unable to perform at least four (4) blood glucose tests per day
• Unable to maintain contact with their healthcare provider
• Unable to use the System according to instructions
The OmniPod System should NOT be used in a
hyperbaric chamber as there is a potential for an
explosion. There are active electronics inside the Pod
and PDM, and a hyperbaric chamber has high concentrations of oxygen.
The OmniPod System is designed to use rapid-acting U-100 insulin. The following U-100 rapid-acting
insulin analogs have been tested and found to be
safe for use in the Pod: Novolog®/NovoRapid®,
Humalog®, or Apidra®. Novolog® is compatible with
the OmniPod System for use up to 72 hours (3 days).
Before using a different insulin with the OmniPod
System, check the insulin drug label to make sure it
can be used with a pump. Refer to the insulin labeling and follow your healthcare provider’s directions
for how often to replace the Pod.
Not recommended for individuals with hearing
loss. Always verify ability to hear Pod/PDM alerts
and alarms.
The Pod and PDM may be affected by strong radiation or magnetic fields. Before having an X-ray, MRI,
or CT scan (or any similar test or procedure), remove
your Pod and put it and the PDM outside the treatment area. Check with your healthcare provider for
Pod removal guidelines.
Parts of the device are considered biohazardous and
can potentially transmit infectious diseases, even
after you have performed cleaning and disinfection.
If you are unable to use the System according to
instructions, you may be putting your health and
safety at risk. Talk with your healthcare provider if
you have questions or concerns about using the
System properly.
Please read all the instructions provided in this User
Guide before using the System.
x
Page 11
Introduction
If you are having symptoms that are not consistent
with your blood glucose test and you have followed
all instructions described in this User Guide, call your
healthcare professional.
n Your Role: Safely Using the OmniPod System
Pump therapy requires substantial caregiver involvement, especially among children. Work with your healthcare provider to
establish diabetes management guidelines and settings that
best fit your, or your child’s, needs. These may include:
Insulin-to-Carbohydrate (IC) Ratio: Number of grams of carbohydrate covered by one unit of insulin. For example, if your
insulin-to-carbohydrate ratio is 1:15, then you need to deliver one
unit of insulin to cover every fifteen grams of carbohydrate you
eat.
Correction or Sensitivity Factor: How much one unit of insulin
will lower blood glucose. For example, if your sensitivity factor is
50, one unit of insulin will lower your blood glucose by 50 mg/dL.
Target Blood Glucose Value: The blood glucose level you want
to achieve. For example, you may want to keep your blood glucose close to 100 mg/dL.
Duration of Insulin Action: The length of time that insulin
remains active and available in your body after a correction or
meal bolus.
Your individual needs influence the initial settings you and your
healthcare provider will enter into the Personal Diabetes Manager (PDM) during setup (see Chapter 2, Getting Started).
Your healthcare provider must help you enter these initial settings. Soon you will enter and change your own settings with
confidence and ease. The OmniPod System is more user-friendly
than most electronic devices you use every day. In fact, technology is what makes the OmniPod System so easy to use.
Your healthcare provider is a valuable resource. You will rely on
him or her for a lot of critical information about your OmniPod
System, especially during the first few weeks and months. When
you have questions about diabetes management after starting
on the OmniPod System, do not hesitate to talk with your healthcare provider. For nonmedical emergencies or for technical
questions about your OmniPod System setup or operation, you
can call Customer Care 24 hours a day, 7 days a week.
Customer Care (24 hours/7 days): 800-591-3455
When calling from outside the United States: 781-457-5098
Customer Care Fax: 877-467-8538
Web site: MyOmniPod.com
xi
Page 12
Introduction
Your healthcare provider will give you all the tools and training
you need to be successful with the OmniPod Insulin Management System. However, in the end, your success depends on
YOU. You must become actively involved in your own diabetes
management to enjoy the outstanding control, freedom, and
flexibility that is possible with the OmniPod System.
Being actively involved means:
• Frequently monitoring blood glucose levels
• Learning how to operate your OmniPod System and practicing proper techniques
• Visiting your healthcare provider
Do NOT attempt to use the OmniPod® Insulin Management System before you receive training from
your healthcare provider. Inadequate training could
put your health and safety at risk
xii
Page 13

CHAPTER 1
Your New OmniPod Insulin Management System
n Insulin Delivery with the OmniPod System
The OmniPod® Insulin Management System is an innovative
continuous insulin delivery system that provides all the proven
benefits of continuous subcutaneous insulin infusion (CSII) therapy
in a way no conventional insulin pump can. The System’s innovative design and features allows you to live your life—and
manage your diabetes—with unprecedented freedom, comfort,
convenience, and ease.
The long-term health benefits of better blood glucose control
are well known. Maintaining near-normal blood glucose levels
can help you live a longer, healthier life with fewer diabetesrelated complications. The OmniPod System also has many practical, everyday benefits, including convenience, freedom,
flexibility, and ease of use.
Continuous insulin delivery most closely mimics the insulin
release of a healthy pancreas. Since the landmark 10-year
Diabetes Control and Complications Trial (DCCT), the longterm health benefits of maintaining near-normal blood
glucose levels have been widely recognized.
Continuous insulin delivery at preset rates eliminates the need
for injections and the interruptions that come with them. In addition, with the OmniPod System, insulin delivery can be changed
with the press of a button to adapt to snacks or unexpected
changes in daily routine. The OmniPod System is a great option
for people with diabetes who require insulin.
The OmniPod System works much like the pancreas of a person
without diabetes by delivering insulin in two ways:
• A small, constant, background supply of insulin (called a basal
rate) is delivered automatically at a programmed rate, all day
and night.
• An extra dose of insulin (called a bolus) can be delivered
when you need it to match the carbohydrates in a meal or
snack or to correct a high blood glucose.
1
Page 14

Your New OmniPod Insulin Management System
1
n How Does the OmniPod System Work?
The Pod is a small, lightweight, self-adhesive device that you fill
with insulin and wear directly on your body. The Pod delivers
precise, personalized doses of insulin into your body through a
small flexible tube (called a cannula), based on instructions that
you program into its wireless companion, the Personal Diabetes
Manager. The cannula is inserted only once with each Pod.
The Personal Diabetes Manager (PDM) is a wireless, handheld
device that:
• Programs the Pod with your personalized insulin-delivery
instructions
• Wirelessly monitors the Pod’s operation
With just two parts, you’ll enjoy all the functionality and benefits
of continuous insulin delivery and blood glucose monitoring.
Plus you’ll enjoy the safety, convenience, and freedom of:
No tubing
There is no tubing connecting the Pod to the PDM. You wear the
Pod comfortably and discreetly under your clothes. You can carry
the PDM separately in a backpack, briefcase, or purse. With the
OmniPod Insulin Management System, you don’t have to worry
about snagging, tangling, or feeling tethered by tubing.
Suggested bolus calculation
Calculating bolus doses has never been easier. After you check
your blood glucose, enter your blood glucose value and the
carbs for your snack or meal. Based on your individual settings,
the System displays a suggested bolus dose. You can accept the
suggestion, change it, or cancel it.
Reference food library and carb presets
To make carbohydrate counting easier, the OmniPod System
includes a reference food library. You can look up the carbs and
other values for many standard food items. Foods are organized
alphabetically and by category.
2
Page 15

Your New OmniPod Insulin Management System
1
You can also enter your own favorite foods, snacks, or entire
meals as “carb presets.” Presets contain the grams of carbohydrate in the food item or meal. Next time you eat this same food,
you don’t have to count the carbs; just select your carb preset
and the System does the calculating for you. The System stores
up to 36 carb presets.
Automated cannula insertion
With the OmniPod System, you don’t have to insert the infusion
set manually or carry around a separate inserter. You simply press
a button on the PDM and the Pod’s automated insertion system
safely and consistently inserts the cannula beneath the skin, virtually pain free. It then begins delivering insulin according to
your programmed basal rate.
Record keeping
Another convenient part of the OmniPod System is record keeping. Paper charts are useful, but sometimes they can be
inconvenient to carry or use. The data storage system in the
Personal Diabetes Manager (PDM) displays up to 90 days’ worth
of information. This includes blood glucose readings, basal rates
and bolus doses, carbohydrates, and alarms.
Personalizing your System
You can personalize your OmniPod System in other ways, too:
• Enter and name basal programs
• Name and save temporary basal presets
• Add your own customized reminders
• Enter your name, phone number, doctor’s name and
number, and other emergency information
3
Page 16
Your New OmniPod Insulin Management System
1
n The Pod
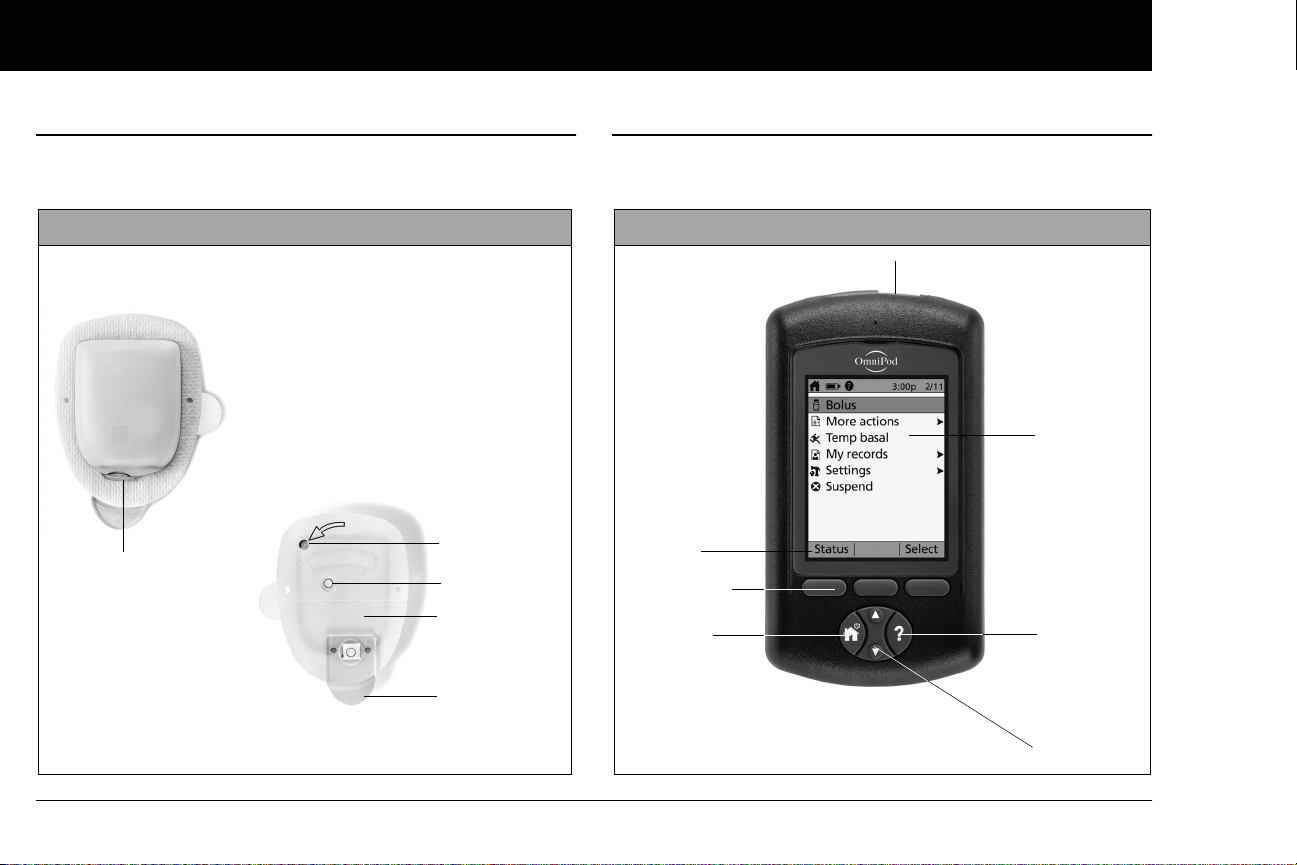
The Pod (Figure 1-1) is applied to your skin with an adhesive, similar to an adhesive bandage.
Figure 1-1
To p
Bottom
Fill port
Viewing window
Housing vent
Adhesive
backing
Needle cap
n The Personal Diabetes Manager
All Pod operations are programmed and controlled through the
Personal Diabetes Manager (PDM; Figure 1-2).
Figure 1-2
USB Port
LCD Screen
Soft Key
Label
Soft Keys
Home/
Power
User Info/
Support
Up/Down
Controller
4
Page 17
Your New OmniPod Insulin Management System
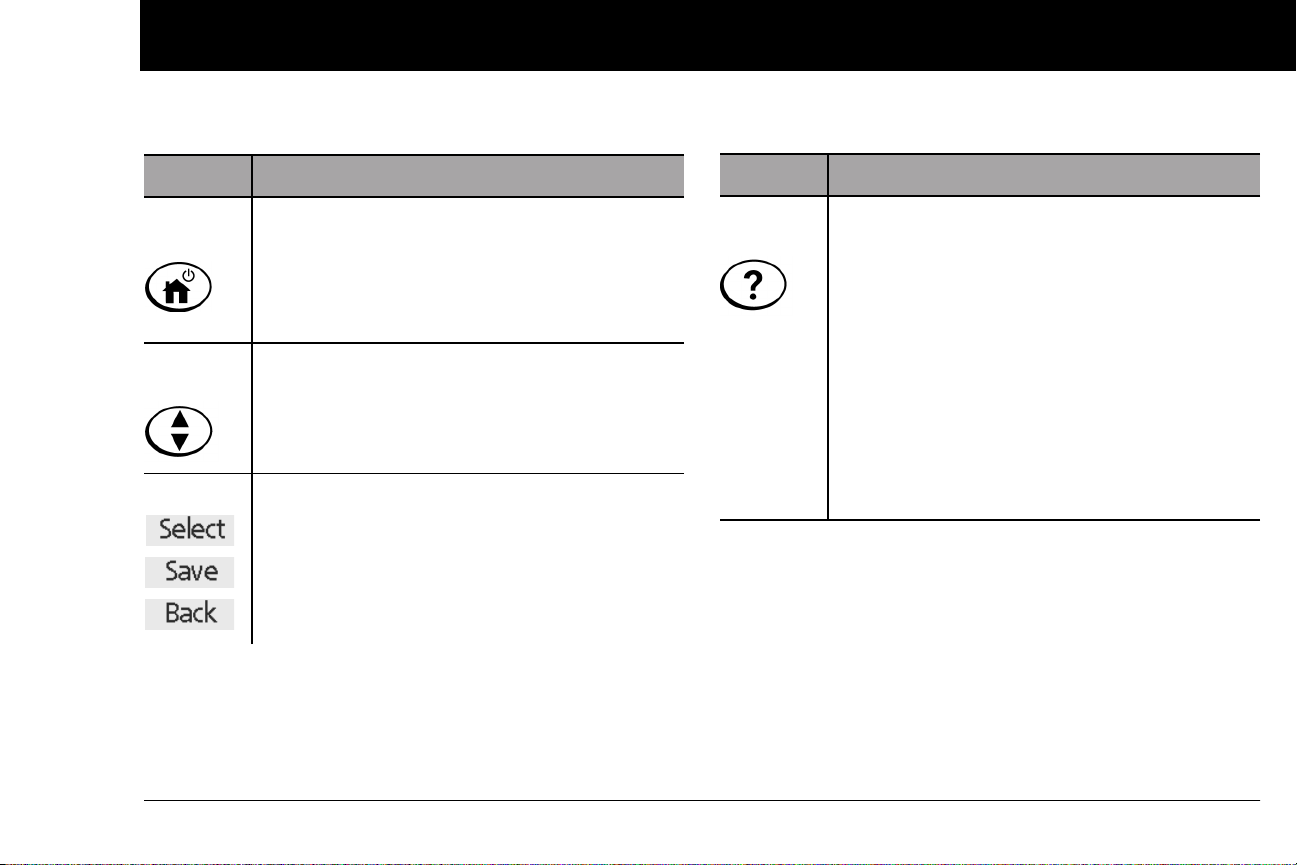
Buttons that program and control the OmniPod System
1
Button Action
Home/
Power
Up/Down
Controller
Soft Keys
Pressing and holding turns the PDM on and off.
When the PDM is on, pressing this button
(quickly/briefly) displays the Home screen, from
which you can choose a menu item or view the
Status screens (shown later in this chapter).
Pressing and releasing scrolls through a list of
available menu options or numbers, so you can
pick the one you want. Holding the button
scrolls faster.
Soft key labels and functions depend on the
menu or screen you are viewing. The label
appears on the screen directly above the physical button you press. Select, Save, and Back are
just three examples of the soft key labels on your
PDM.
Button Action
User Info/
Support
Pressing opens a User Info/Support screen that
displays additional information about the current screen you are viewing. The User Info/Sup-
port icon appears when additional information
can be viewed. It may be displayed at the top of
the screen, to the right of an event detail (such as
a suggested bolus), or to the right of a record
item (such as a BG history record). (See “Personal
Diabetes Manager Icons” in the Appendix).
In addition, pressing and holding this button for
2 seconds enables a “bright mode” on the PDM
screen.
5
Page 18
Your New OmniPod Insulin Management System
1
Primary screens
Messages on the screen either:
• Let you identify your PDM
• Tell you how the System is operating
• List menu choices
• Explain how to perform certain tasks
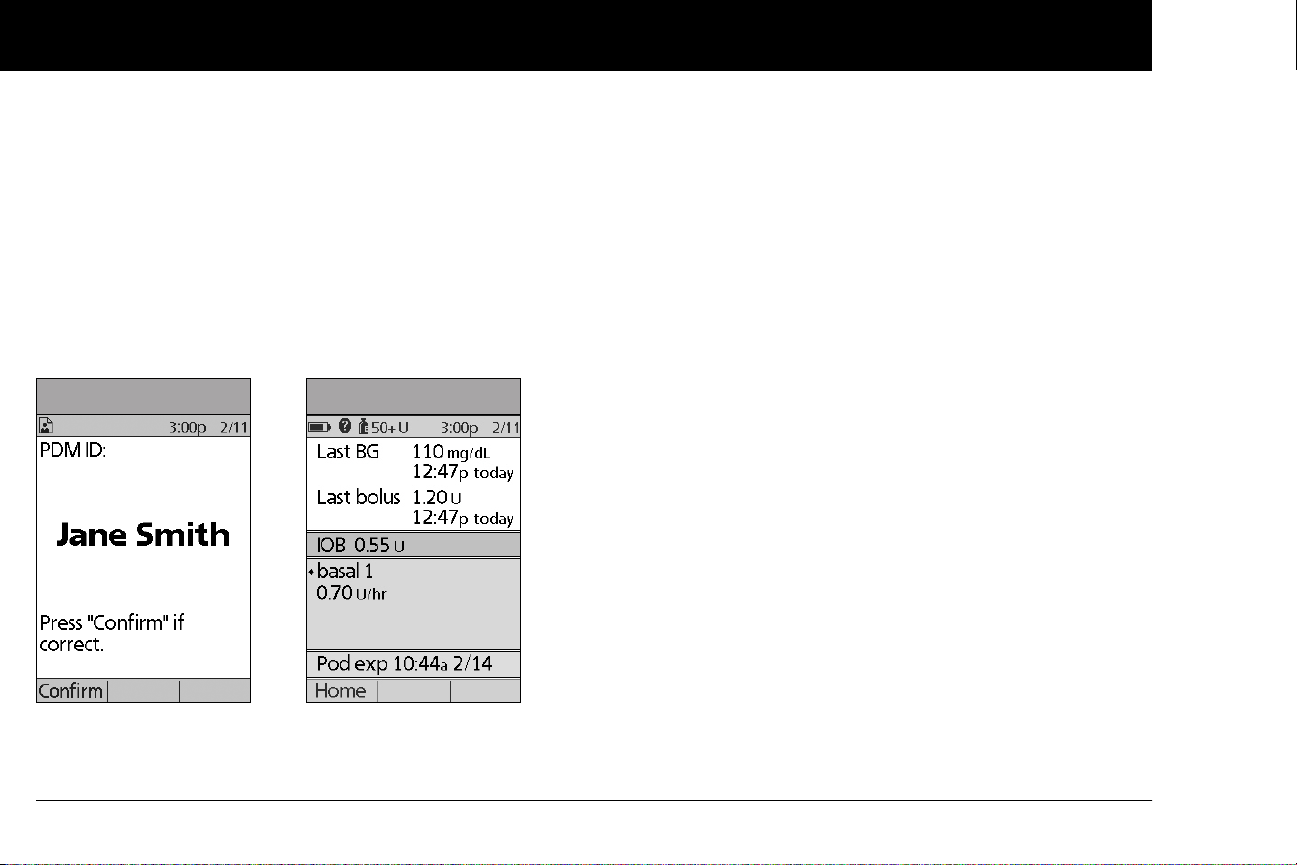
The System’s primary screens are the ID screen (Figure 1-3), the
Status screen (Figure 1-4), and the Home screen (Figure 1-6 on
the next page).
Figure 1-3 Figure 1-4
ID screen
The System displays an ID screen to make the PDM easy to
identify when you first turn it on. You can personalize the ID
screen by adding your name and choosing its color. (See Chapter
2, for details on customizing your PDM.) You must acknowledge
the ID screen before you can use the PDM. It is important that
you always identify the PDM as yours before you use it.
Status screen
Lists the System’s current operating status (Figure 1-4).
From top to bottom, the Status screen displays:
• Current date and time
• Battery life remaining
• Insulin remaining
• Time, date, and result of last blood glucose entered manually
• Time, date, and total amount of last bolus delivered
• Amount of Insulin on Board (IOB) will be displayed on
Status screen (if calculator in use)
• Name and rate of active basal program or temp basal
program
• “Ext bolus,” the amount of insulin, and the delivery time
remaining if an extended bolus is being delivered
• “INSULIN SUSPENDED” if insulin delivery has been
suspended
• Time and date of when the Pod will expire
6
Page 19
Your New OmniPod Insulin Management System
1
If a Pod has not yet been activated (during Pod changes),
the screen displays “No active Pod. Would you like to activate a Pod now?” (See Chapter 5, Using the Pod, for details
on activating a Pod.)
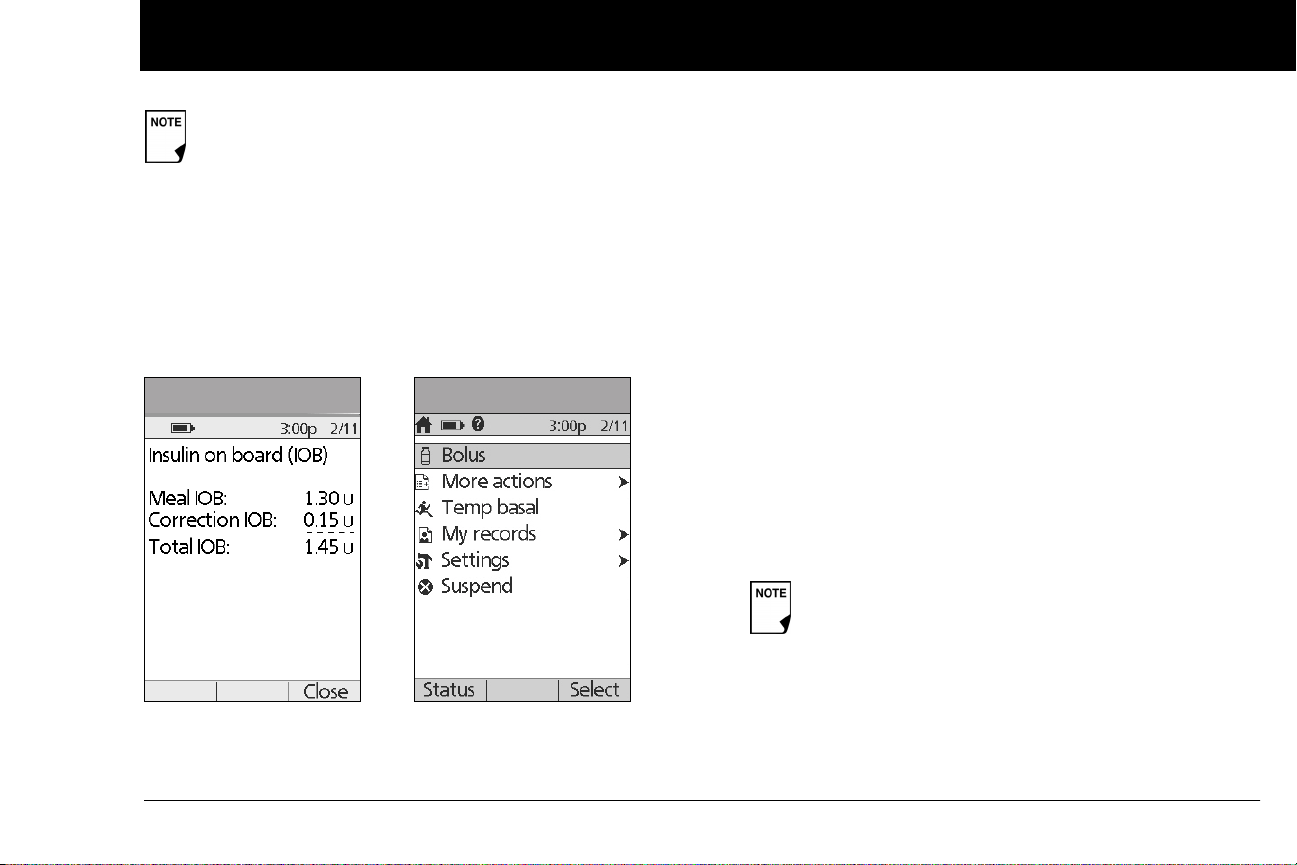
Status support screen
From the Status screen, press the User Info/Support button to
see details about the current insulin on board (IOB) in your
body (Figure 1-5). See page 31, for additional information
describing insulin on board (IOB).
Figure 1-5 Figure 1-6
Home screen
Lists all the major menus (Figure 1-6).
• Bolus menu to deliver bolus doses
• More actions menu to change the Pod, manually enter
blood glucose readings, and assign and edit tags for manually entered BG records that are less than 2 hours old.
• Temp basal menu to deliver temporary basal rates (This
submenu does not appear if temp basal is turned Off in
Settings.)
• My records menu to review insulin delivery, blood glucose
history, alarm history, carb history, and personal user information
• Settings menu to edit, enter, and name basal programs,
temp basal, carbohydrate and bolus presets, and to customize System settings
• Suspend menu to suspend, cancel, or resume insulin
delivery programs
You can go to the Status screen at any time by
pressing Status from the Home screen.
7
Page 20
Your New OmniPod Insulin Management System
1
n Safety Features
The OmniPod System’s state-of-the-art design includes the latest
safety technology. Its built-in safety features include:
Automatic priming, safety checks, and insertion
Every time you activate a new Pod, the System automatically
primes and performs a safety check on the Pod, then inserts
and primes the cannula (see Chapter 5, Using the Pod). Microprocessor technology makes it possible to complete thousands
of safety checks in only a few seconds.
The OmniPod System also performs safety checks on the PDM.
If it detects any problems in the PDM or the Pod—or in communication between them—it informs you with beeps and onscreen messages.
Occlusion detection
An occlusion is a blockage or interruption in insulin delivery. If
the OmniPod System detects an occlusion, it sounds a hazard
alarm and prompts you to deactivate and change your Pod (see
Chapter 5, Using the Pod).
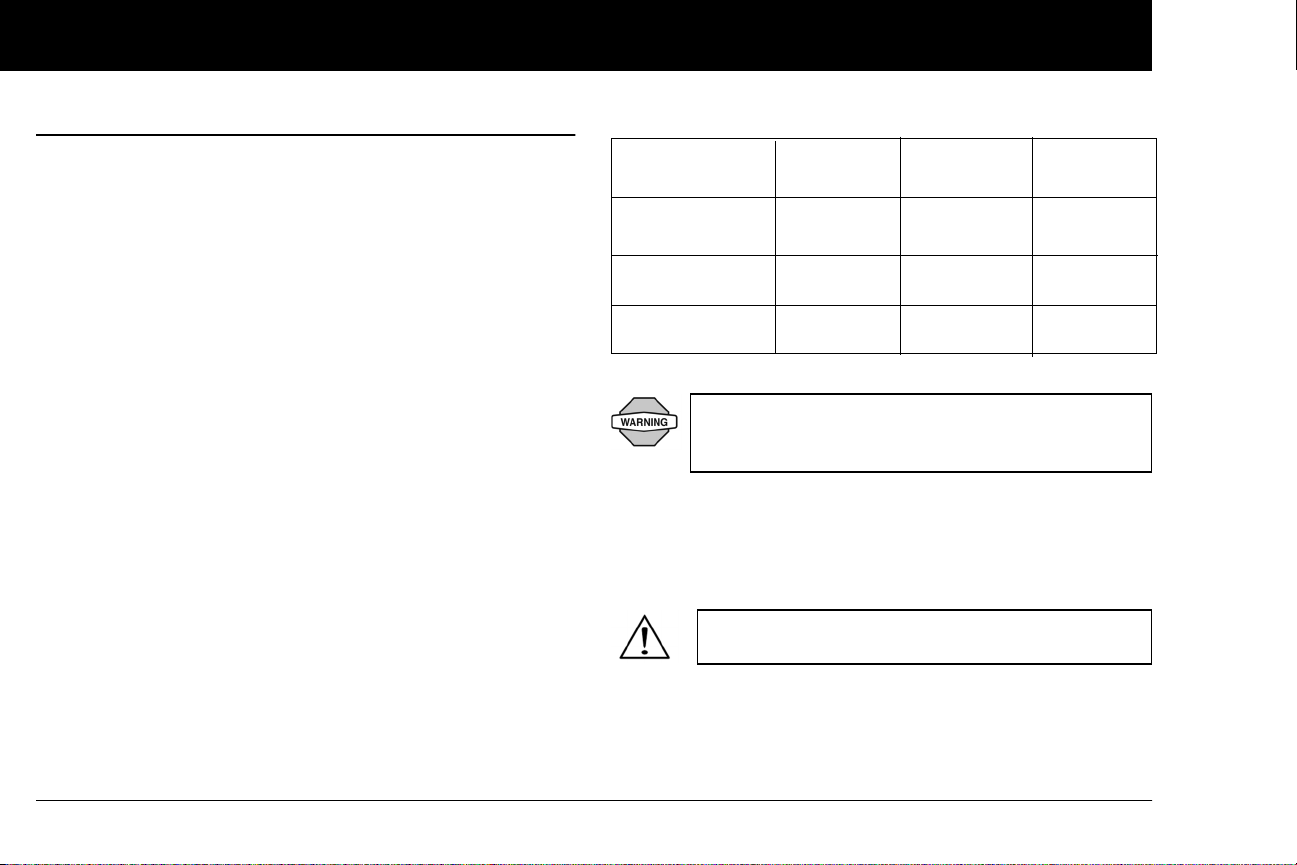
A hazard alarm sounds when an average of 3 to 5 units of missed
insulin occurs. This table depicts occlusion detection for 3 different situations when using U100 insulin (Table 1). If an occlusion is
cleared, a volume of insulin could be released. That volume
would not exceed 3.9 U.
If an occlusion is detected during an immediate bolus, the Pod
will alarm at the conclusion of the bolus.
Table 1:
5.00 U Bolus
1.00 U/hr basal
0.05 U/hr basal
Minimum
time
200 seconds
2.4 hr
48 hr
Typical
time
202 seconds
3.7 hr
74 hr
Maximum
time
300 seconds
5.0 hr
80 hr
(Pod expiration)
At very low flow rates checking your blood glucose
frequently may give you an early indication of an
occlusion (refer to Chapter 9, page 115).
Alerts and alarms
For your safety, the OmniPod System provides a range of alerts
and alarms to tell you that your attention is needed, or to warn
you of hazardous situations.
Confirm on ID screen - alerts/alarms do not show on
PDM until after ID screen is confirmed.
See Chapter 6, Using the Personal Diabetes Manager, for a
description of notifications and how to set them. See Chapter 10,
Alerts and Alarms, for a list of safety alarms built into the OmniPod System and how to respond to them.
8
Page 21
CHAPTER 2
Getting Started
n The OmniPod Starter Kit
Your initial shipment contains everything you need to begin
using the OmniPod System.
If you are a first-time OmniPod System user, you need to meet
with your healthcare provider for training and System setup
before using it. To get a head start on learning about your new
OmniPod System, review this User Guide. If you have a basic
understanding of the System in advance, you will get more out
of your training sessions.
After you unpack the Starter Kit, use the “Contents” label on the
sided of the box to make sure you have everything. Then complete the Warranty card and promptly mail it to us. Returning the
card allows us to contact you with important product updates or
Warranty information.
Do NOT use the OmniPod
System until you have been trained by your healthcare
provider. He or she will initialize the System based on
your individual needs. Inadequate training or improper
setup could put your health and safety at risk.
®
Insulin Management
Prepare and keep an emergency kit with you at all times
to quickly respond to any diabetes emergency. For
details, see Chapter 9, Living with Diabetes.
n Set Up the Personal Diabetes Manager (PDM)
Chapter 6 describes the PDM options in detail. The instructions
in this chapter are simplified to help you get started.
Turn on the PDM
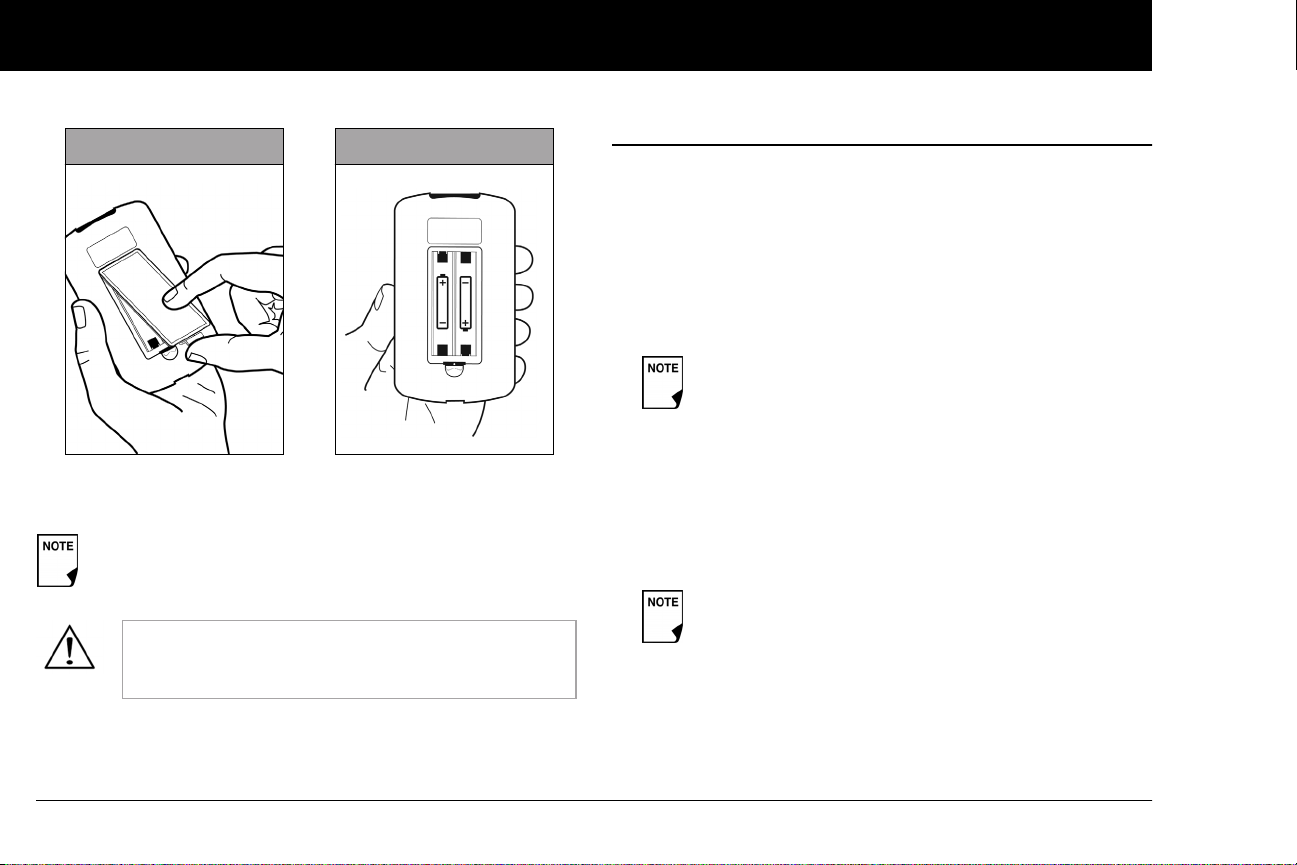
1. Open the battery compartment on the back of the PDM
by pushing the compartment latch and lifting upward
(Figure 2-1 on the next page). No special tools are necessary.
9
Page 22
Getting Started
2
Figure 2-1 Figure 2-2
2. Insert two (2) new AAA alkaline batteries into the compartment.
The diagram inside the compartment shows you which
direction to insert the batteries (Figure 2-2).
Do not use any other type of batteries than AAA
alkaline batteries to power the PDM. Never use old
or used batteries; the PDM may not work properly.
3. Replace the battery door.
4. Turn the PDM face up. The PDM has begun to power on automatically.
n The Setup Wizard
The first time you turn on the Personal Diabetes Manager, the
Setup Wizard comes on automatically. Although setup is easy
with the Wizard, if you are a first-time user, your healthcare provider must guide you through the process. Setup takes only a
few minutes and is easy to do:
• Use the Up/Down Controller buttons to increase or
decrease a number, or to move up or down a list.
Initial settings are “---” [blank] for target blood glucose
value, insulin-to-carbohydrate ratio, correction factor,
duration of insulin action, max basal rate, basal rate,
lower and upper BG goals, correct above value, min
BG, max bolus, low reservoir, and pod expiration.
• Press the Soft Key labeled Next, Select, Done, or Save to con-
tinue to the next screen.
• Press Back to return to the previous screen.
You can adjust these settings later as your needs
change or as you fine-tune your OmniPod System.
To get started, press Next on the Wizard's Welcome Screen to
begin setting up your PDM. It might be helpful to read each
screen out loud as you proceed.
10
Page 23
Getting Started
2
Enter your PDM ID
1. Use the Up/Down Controller buttons to scroll through the
list of characters. An up-and-down-arrow symbol on the
screen indicates the character you are changing.
2. Press the middle Soft Key (labeled with the right arrow) to
move the underscore to the next character.
3. Enter each character one at a time. For example, if you want
to enter your name, you might enter J, a, n, e, [space], S, m, i, t,
h. (A blank character or space is the first and last option in the
scrolling menu.)
4. Press Next.
Select the ID screen color
Use the Up/Down Controller buttons to choose a color, then
press Next.
Your ID and the chosen color will be displayed on an
identification (ID) screen that you must acknowledge
every time you turn on the PDM. Always be sure you
properly identify your PDM before using it.
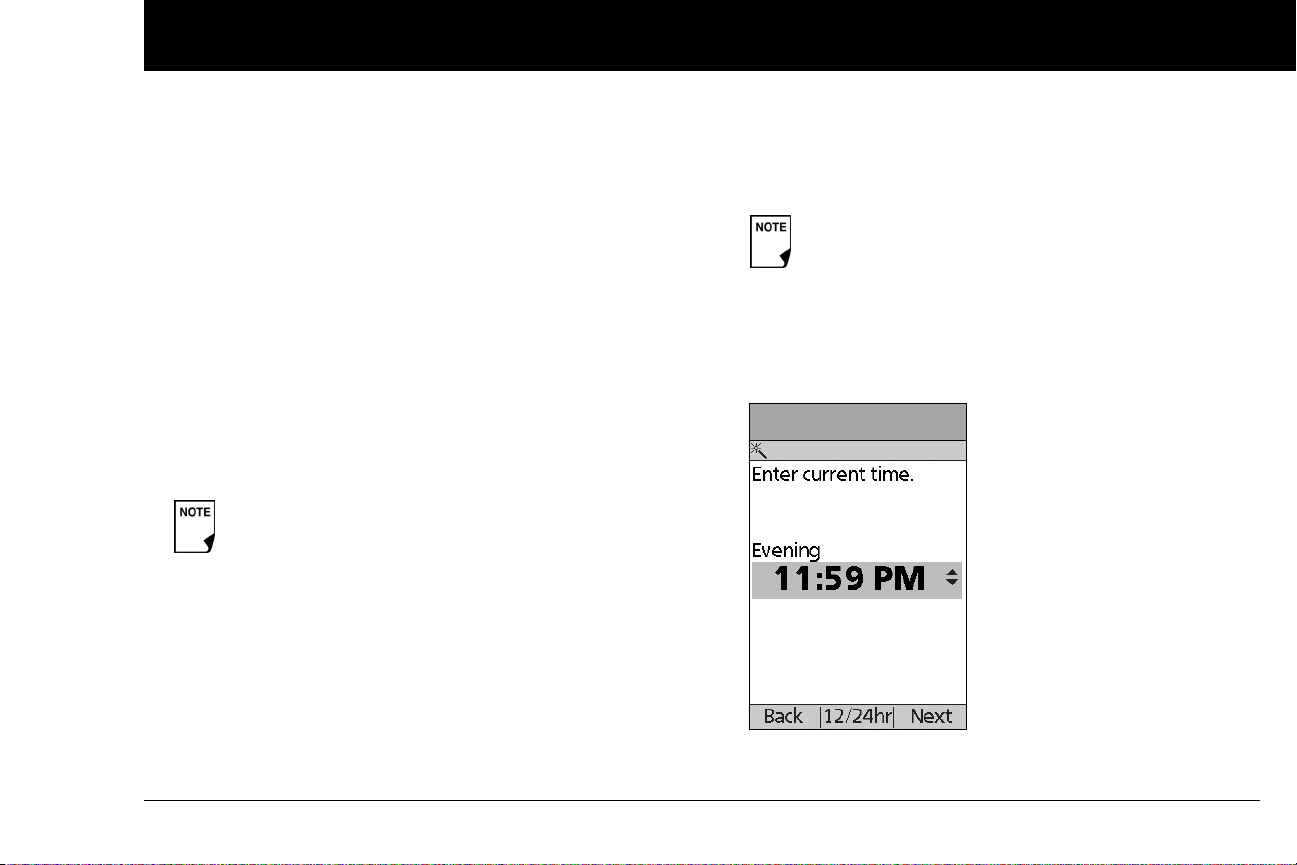
Set date and time
1. Use the Up/Down Controller buttons to increase or
decrease the time. (Press 12/24hr if you prefer a different
time format.) Then press Next (Figure 2-3).
12 Midnight – 5:59 AM: “Night”
6:00 AM – 11:59 AM: “Morning”
12 Noon – 5:59 PM: “Afternoon”
6:00 PM – 11:59 PM: “Evening”
On some screens, the time may show as "a" for
"AM" and "p" for "PM".
Figure 2-3
2. Enter the current year, then press Next.
11
Page 24
Getting Started
2
3. Choose the current month, then press Next.
4. Enter the current day of the month, then press Next.
5. Choose the date format you prefer, then press Next.
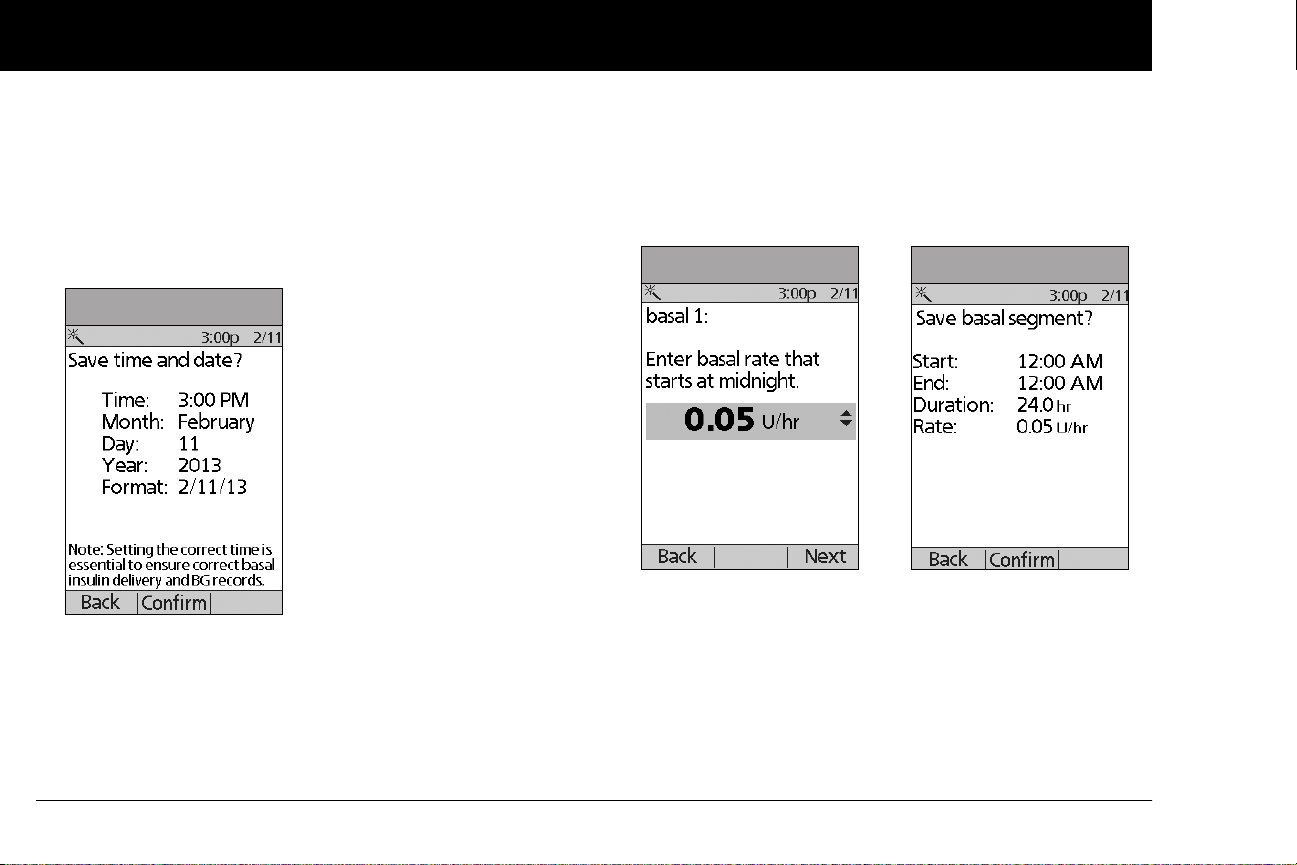
6. Press Confirm, to save the date and time settings (Figure 2-4
on the next page).
Figure 2-4
Enter basal settings
1. Choose a maximum basal rate, then press Next. (The default
maximum basal rate is 3 U/hr.)
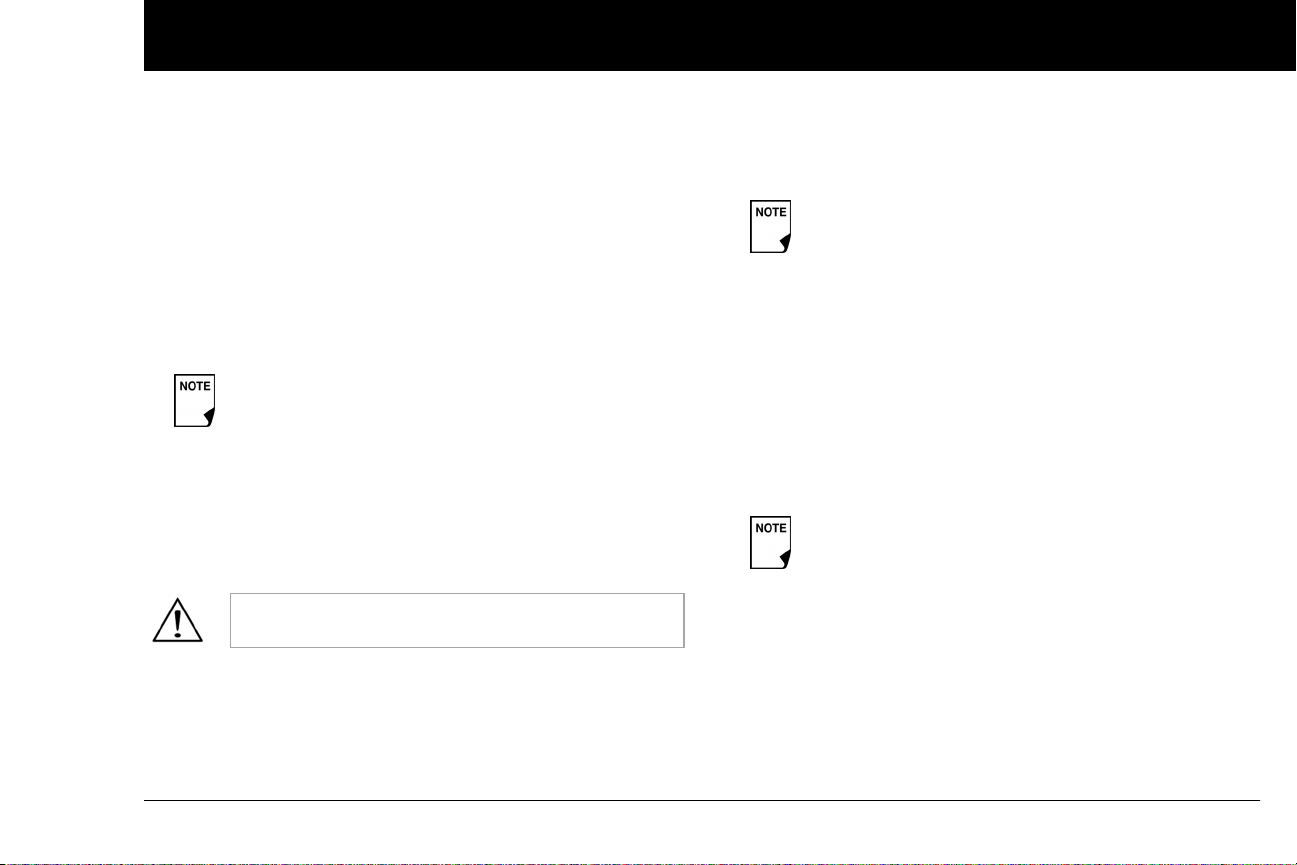
2. Enter initial basal rate that starts at midnight, then press Next
(Figure 2-5).
The initial basal program created with the Setup Wizard is
named basal 1. You can change the name in the Settings >
Basal Programs menu (see Chapter 3, Understanding and
Adjusting Basal Rates).
Figure 2-5 Figure 2-6
3. Press Confirm to accept the basal program you have set
(Figure 2-6).
4. Press Done to confirm the basal program shown on the
screen. To add more basal segments to the program, or to
change the rate shown, see Chapter 3, Understanding and
Adjusting Basal Rates.
12
Page 25
Getting Started
2
5. Press Save to accept the basal program you have set.
To see the basal program as a list, press List. To return to the
graphic view, press Graph.
6. Choose a temporary basal feature, then press Next. Choose
% to show temporary basal rates as a percent increase or
decrease of your current basal rate. Choose U/hr to show
temporary basal rates in units per hour. Or choose Off to turn
off the temporary basal feature. For details about setting temporary basal’s, see Chapter 3, Understanding and Adjusting
Basal Rates.
You can add up to 7 basal programs and set 24
segments per program.
Enter BG goal
1. Use the Up/Down Controller buttons to enter the lower
limit for your blood glucose (BG) goal, then press Next.
2. Enter the upper limit for your BG goal, then press Next.
3. Press Save to accept the BG goal.
Check with your healthcare provider before adjusting these settings.
Set the suggested bolus calculator
To set the suggested bolus calculator feature, choose On or Off,
then press Next
.
If the suggested bolus calculator is set to On, perform
the following steps. If set to Off, you will be prompted
to “Select bolus increment” and “Enter maximum
bolus.”
Enter target blood glucose value
1. Use the Up/Down Controller button to enter a target blood
glucose (BG) value, then press Next.
2. Use the Up/Down Controller buttons to enter the “correct
above” value or correction threshold (the BG value above
which you want the PDM to suggest a correction bolus), then
press Next. Press Confirm, then continue to step 3.
If the suggested bolus calculator is On, a correction
bolus will be suggested only when your BG is above
the value shown in brackets on the screen.
3. To save the target BG value, press Done. To change these set-
tings, select the segment you wish to change and press Edit.
You can define up to 8 target BG time segments. To enter
additional segments, choose [add new], then:
a. Press New.
b. Enter a start time for the target BG segment, then press
Enter.
13
Page 26
Getting Started
2
c. Enter an end time for the target BG segment, then press
Next.
d. Enter a target blood glucose value, then press Next.
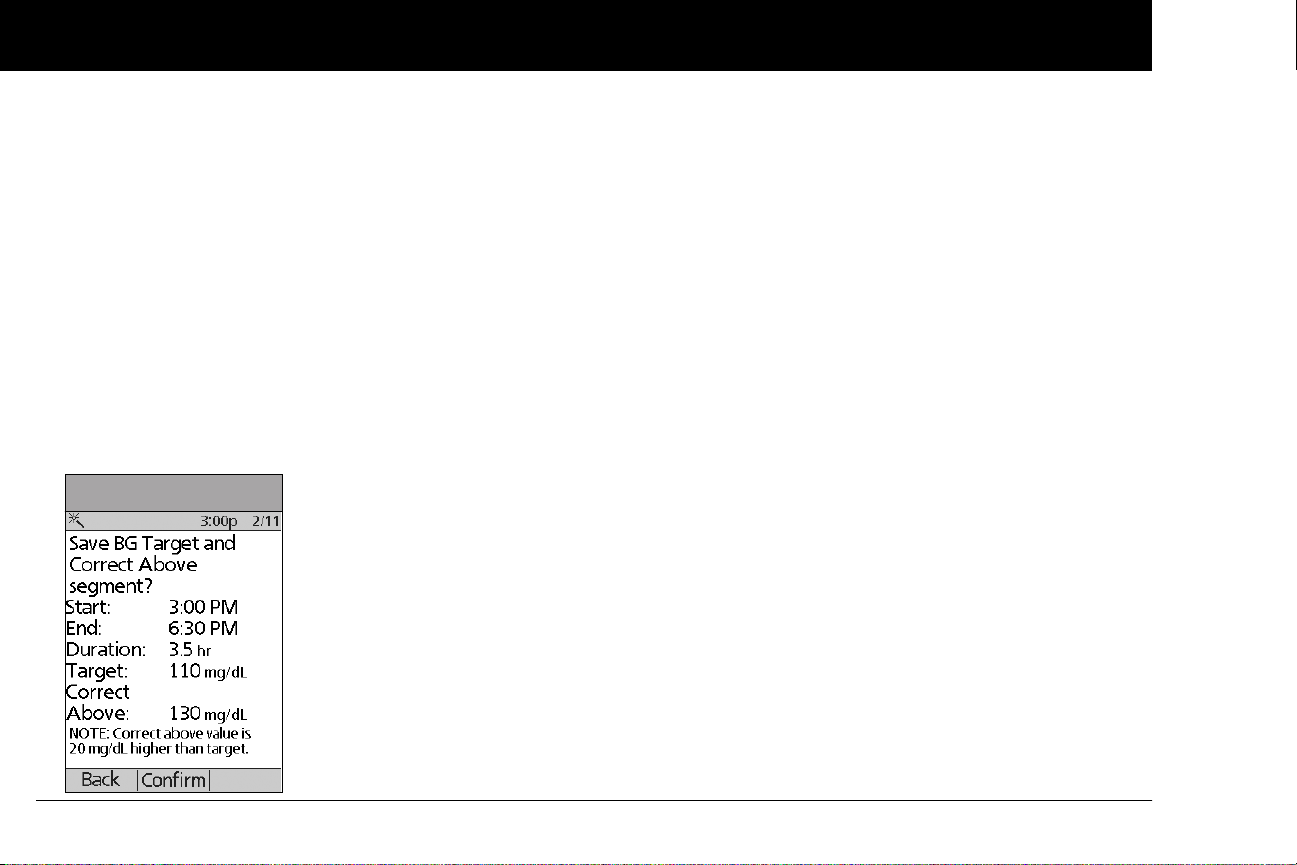
Use the Up/Down Controller buttons to enter the “cor-
rect above” value or “correction threshold” (the BG value
above which you want the PDM to suggest a correction
bolus), then press Next.
e. Press Confirm to accept the target BG profile you have set
(Figure 2-7)
f. When you have finished entering segments, press Done.
4.
Press Save to accept the target BG profile you have set. To see
the segments as a list, press List. To return to the graphic
view, press Graph.
Figure 2-7
Enter minimum BG allowed for use in bolus calculation
1. Use the Up/Down Controller buttons to enter a minimum
blood glucose value, below which the System will not calculate a suggested bolus. The values are in 1 mg/dL increments
and range from 50 to 70 mg/dL.
2. Press Next.
Enter insulin-to-carbohydrate ratio
1. Use the Up/Down Controller buttons to enter your insulin-
to-carbohydrate ratio, then press Next. (Insulin-to-carbohy-
drate ratio is the number of carbs covered by 1 unit of insulin.)
Press Confirm, then continue to step 2.
2. To save the ratio, press Done. To change the ratio, select the
segment you wish to change and press Edit.
You can define up to 8 insulin-to-carbohydrate time segments. To enter additional ratios, choose [add new], then:
a. Press New.
b. Enter a start time for the segment, then press Next.
c. Enter an end time for the segment, then press Next.
d. Enter the insulin-to-carb ratio for the new time segment,
then press Next.
e. Press Confirm to accept the IC ratio you have set.
f. To save the new ratio, press Done.
3. To see the ratios as a list, press List. To return to the graphic
view, press Graph.
14
Page 27
Getting Started
2
4. Press Save to accept the ratios you have set.
Enter correction factor
1. Use the Up/Down Controller buttons to enter how much
one unit of insulin decreases your blood glucose, then press
Next. Press Confirm, then continue to step 2.
2. To save the correction factor, press Done. To change the
factor, select the segment you wish to change and press Edit.
You can define correction factors for up to 8 time segments.
To enter additional correction factors, choose [add new],
then:
a. Press New.
b. Enter a start time for the segment, then press Next.
c. Enter an end time for the segment, then press Next.
d. Enter the correction factor, then press Next.
e. On the next screen, review the segment to ensure it
is correct, then press Confirm.
f. To save the new correction factor segment, press Done.
3. To see the factors as a list, press List. To return to the graphic
view, press Graph.
4. Press Save to accept the correction factors you have set.
Set reverse correction
1. To set reverse correction, use the Up/Down Controller
buttons to choose On or Off, then press Next.
If you enter carbs and reverse correction is On, the
System will subtract insulin from the suggested meal
bolus to compensate for a low blood glucose (below
the BG target you set). With reverse corrections Off,
the System will not subtract insulin from the suggested meal bolus dose due to a low BG. Follow your
healthcare provider’s recommendation to set
reverse correction On or Off.
Enter the duration of insulin action
1. Use the Up/Down Controller buttons to enter the duration
of insulin action (how long insulin lasts in your body), then
press Next.
The duration-of-insulin-action setting is used to
calculate the amount of insulin on board (IOB) from a
previous correction bolus or meal bolus when you
use the suggested bolus calculator.
15
Page 28
Getting Started
2
Select bolus increment and enter maximum bolus
1. Choose a bolus increment (how much each press of the
Up/Down Controller buttons will increase or decrease
a bolus amount)—either 0.05, 0.10, 0.50, or 1.00 units of
insulin—then press Next.
2. Choose the maximum bolus you can give at one time, then
press Next.
The maximum bolus default is 10 units. Check with
your healthcare provider before adjusting these settings.
Set extended bolus doses
To set the units for an extended bolus dose, choose % for per-
cent of the total bolus, or choose Units for units of insulin. To turn
off the extended bolus feature, choose Off. Then press Next.
Set low reservoir advisory
1. Choose the level of insulin in the reservoir at which the
PDM should give you an alarm. Choose from 10 to 50 units
in 5-unit increments, then press Next.
Set Pod expiration notification
1. Choose the number of hours before a Pod expires when the
PDM should give you a notification, then press Next. The
values are in 1-hour increments and range from 1 to 24 hours.
(The default is 4 hours.)
The PDM asks whether you want to activate a Pod.
• Press Ye s if you are ready to activate a new Pod. See Chapter
5, Using the Pod, to learn how to activate a new Pod.
• Press No if you do not want to activate a Pod at this time. The
PDM displays the Home screen.
You can press and hold the Power button to turn off the
PDM at any time during setup. Otherwise, it turns off
automatically after 5 minutes. If you do not complete the
entire setup within 60 minutes, when you turn on the
PDM again you will return to the beginning of the Setup
Wizard.
Your healthcare provider will help you fill and apply your first
Pod. The process is easy because on-screen messages walk you
through every step. Please refer to Chapter 5, Using the Pod, for
detailed instructions.
You may want to adjust the PDM screen time-out
and backlight time-out. For more information on
how to do this, see Chapter 6, Using the Personal
Diabetes Manager.
Use the form at the end of this User Guide to write
down all your settings from the Setup Wizard. If you
ever need to reset or replace your PDM, having
these settings handy will make setup very easy.
16
Page 29

CHAPTER 3
Understanding and Adjusting Basal Rates
n What Is a Basal Rate?
A basal rate is a small base or background amount of insulin that
is delivered, at a preset rate, continuously for a specified period of
time.
Even without eating, our bodies need a small, constant supply
of insulin for normal daily living. In people without diabetes, the
pancreas continuously delivers this basal insulin. For people
using the OmniPod
ics a healthy pancreas by delivering insulin at the rate that you’ve
programmed into the Personal Diabetes Manager (PDM).
Approximately 50% of a person’s total daily insulin dose
typically comes from basal insulin delivery; the remaining 50% typically comes from bolus doses (see Chapter 4,
Understanding and Delivering Bolus Doses).
n Personalized Basal Programs
Insulin needs vary throughout the day. Therefore, most people
set their basal rates to deliver slightly more or less insulin at
®
Insulin Management System, the Pod mim-
certain times. For example, one person may need to deliver a
higher rate of insulin during the early morning and a lower rate
during the late evening. A basal program describes the amount
of insulin to be delivered during an entire 24-hour period.
A basal program contains at least one basal rate for the 24-hour
period, but for most people it will be broken into several time
segments, or basal segments, each delivering a different rate of
insulin. A sample basal program with three basal segments
might be:
12:00 am–8:00 am 0.60 U/hr Between 12:00 am (midnight)
and 8:00 am, the Pod delivers
0.60 units of insulin per hour.
8:00 am–3:00 pm 0.80 U/hr Between 8:00 am and 3:00 pm,
the Pod delivers 0.80 units of
insulin per hour.
3:00 pm–12:00 am 0.70 U/hr Between 3:00 pm and 12:00 am
(midnight), the Pod delivers 0.70
units of insulin per hour.
17
Page 30
Understanding and Adjusting Basal Rates
3
In addition to normal daily changes, insulin needs can vary with
different routines or days of the week. For example, regular
school or workday routines may differ from weekend routines,
and insulin needs may differ, too. With your healthcare provider,
you will decide on the basal rates that best match your lifestyle
and insulin needs. You will enter at least one basal program (your
Basal 1 Program) into your PDM during the setup process (see
Chapter 2, Getting Started). You can add other programs later as
you fine-tune your System settings or when your needs change.
You can also create temporary basal presets to use on occasions
when you need to adjust your basal rate for a short period of
time. See “Temporary Basal Rates and Presets” later in this
chapter.
Create a basal program
The Personal Diabetes Manager can store up to 7 different basal
programs. Each program can contain 24 rates, programmed in
half-hour increments. Once you enter a basal program into the
PDM, you only need to press a few buttons to pick the program
you want. The Pod continues to deliver insulin at those rates until
you change that program or switch to another one.
Check with your healthcare provider before adjusting these settings.
1. On the Home screen, use the Up/Down Controller buttons
to choose Settings; then press Select.
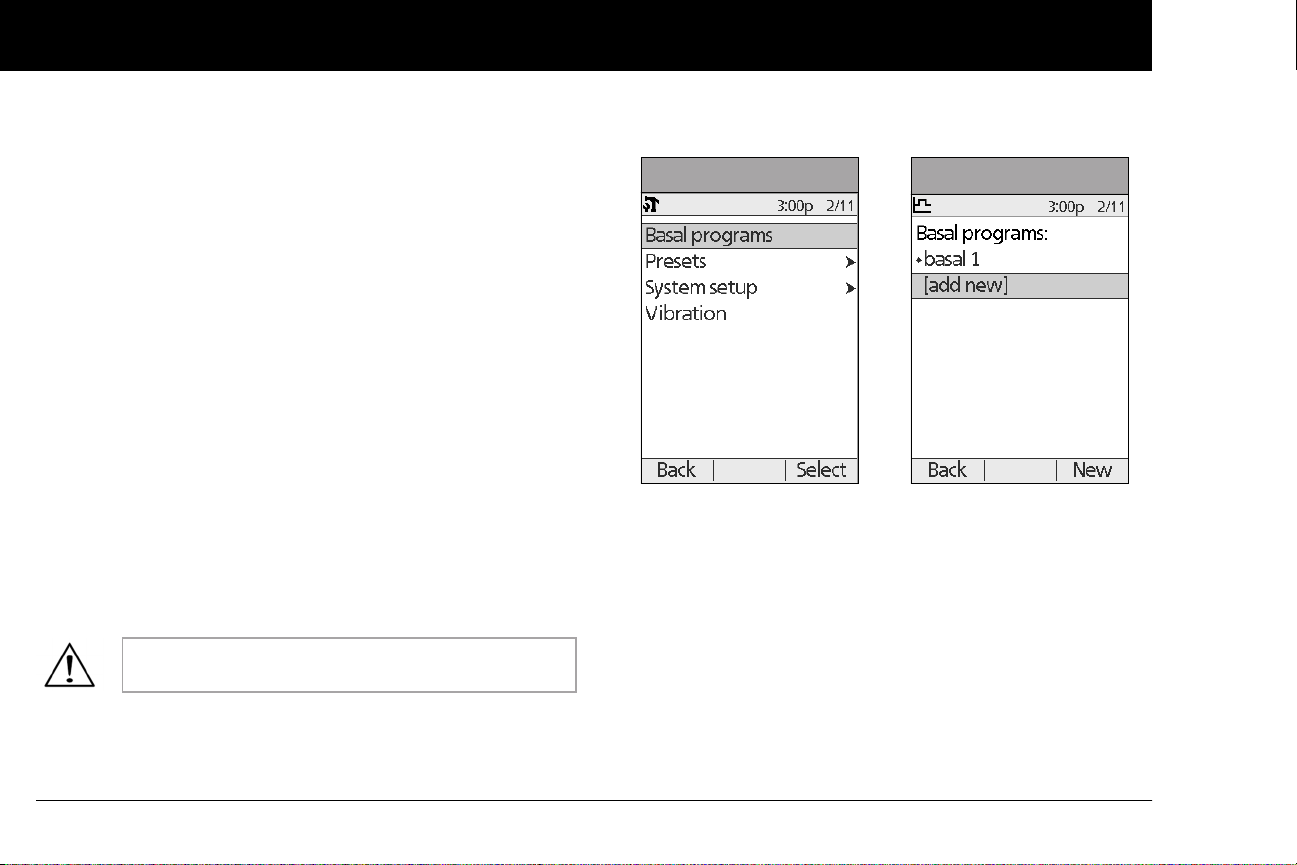
2. Choose Basal programs (Figure 3-1), then press Select.
Figure 3-1 Figure 3-2
3. Choose [add new] (Figure 3-2), then press New.
4. To use the default naming system, simply press Next. The
default naming system automatically assigns program
names in numerical order, such as basal 1, basal 2, basal 3.
If you want to give a different name to the program:
a. Press the Up/Down Controller buttons to scroll through
the list of characters. An up-and-down arrow symbol on
the screen indicates the character you are changing.
18
Page 31
Understanding and Adjusting Basal Rates
3
b. Press the middle Soft Key (labeled with the right arrow) to
move the underscore to the next character.
c. Enter each character one at a time. For example, if your
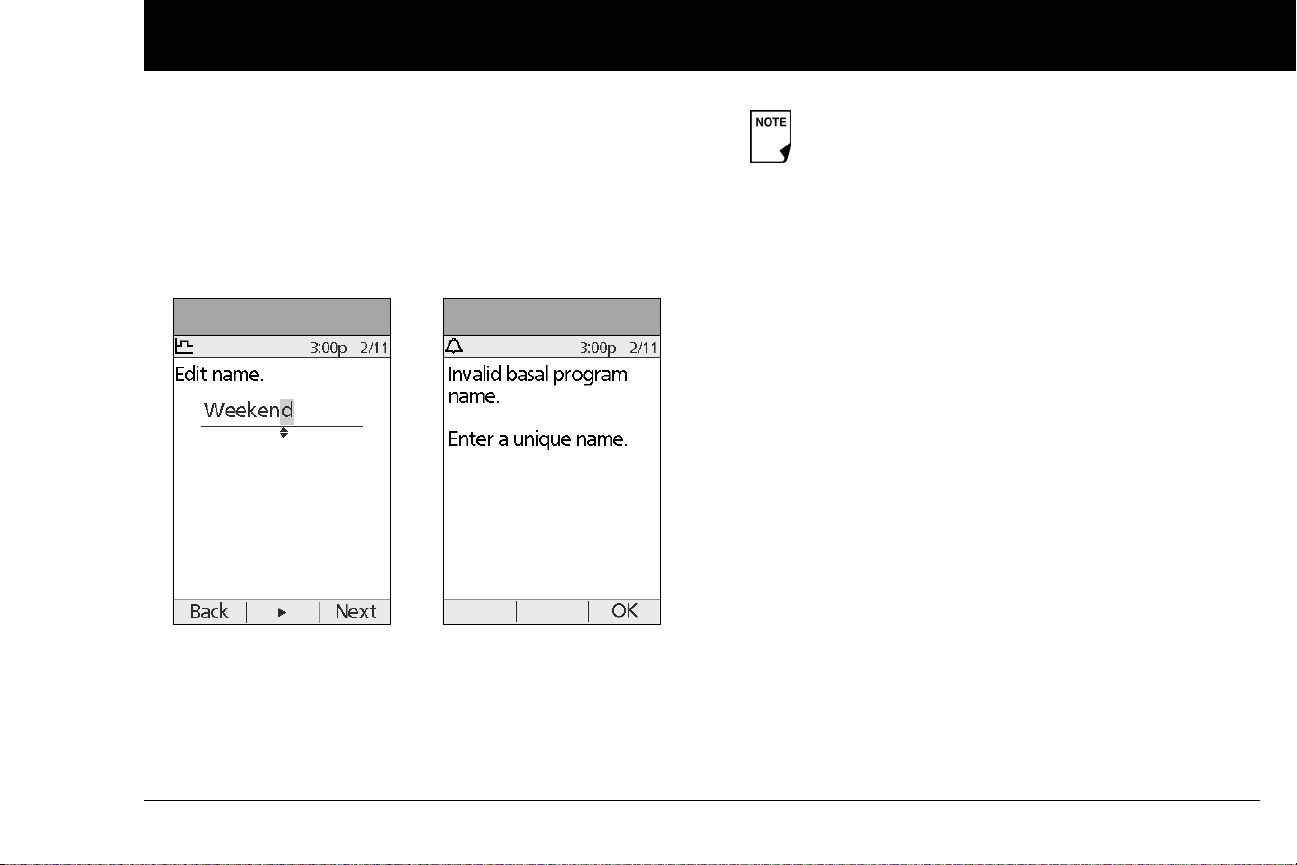
weekend schedule is different from your weekday schedule, you might enter W, e, e, k, e, n, d (Figure 3-3). (A blank
character or space is the first and last option in the scrolling menu.)
Figure 3-3 Figure 3-4
d. Press Next.
As a safety feature, the words “Invalid basal program
name” (Figure 3-4) appear if the name you entered
does not have at least one character or if the name is
being used for another basal program. Capitals and
lowercase letters are considered the same. Press OK
to return to the previous screen and enter a different
name.
5. Enter the rate, in U/hr, for the first basal segment (from 0.05 to
the maximum you entered during setup), then press Next.
6. On the next screen, review the segment to ensure it is
correct, then press Confirm.
7. Review the list showing your new basal program.
To use the same basal rate for the entire 24-hour program,
press Done and continue with step 7.
Or, to add basal segments and rates (for example, a higher
basal rate between 8:00 am and 3:00 pm):
a. Choose an existing basal segment, then press Edit.
Or, choose [add new], then press New.
b. Enter the start time (for example, 8:00 am), then press
Next. Basal segments are in 30-minute increments.
c. Enter the end time (for example, 3:00 pm), then press
Next.
d. Enter the rate for the new basal segment (for example,
0.80U/hr), then press Next.
19
Page 32
Understanding and Adjusting Basal Rates
3
Basal rates outside the changed segment do not
change.
e. Repeat steps a–d for each new segment and rate you
want, then press Done.
Press and hold the Power button to turn the screen
back on. In some cases, if it has been less than 5
minutes since the screen timed out, pressing the
Power button returns you to the same screen you
were using. If it has been longer than 5 minutes, the
PDM brings you to the Status screen.
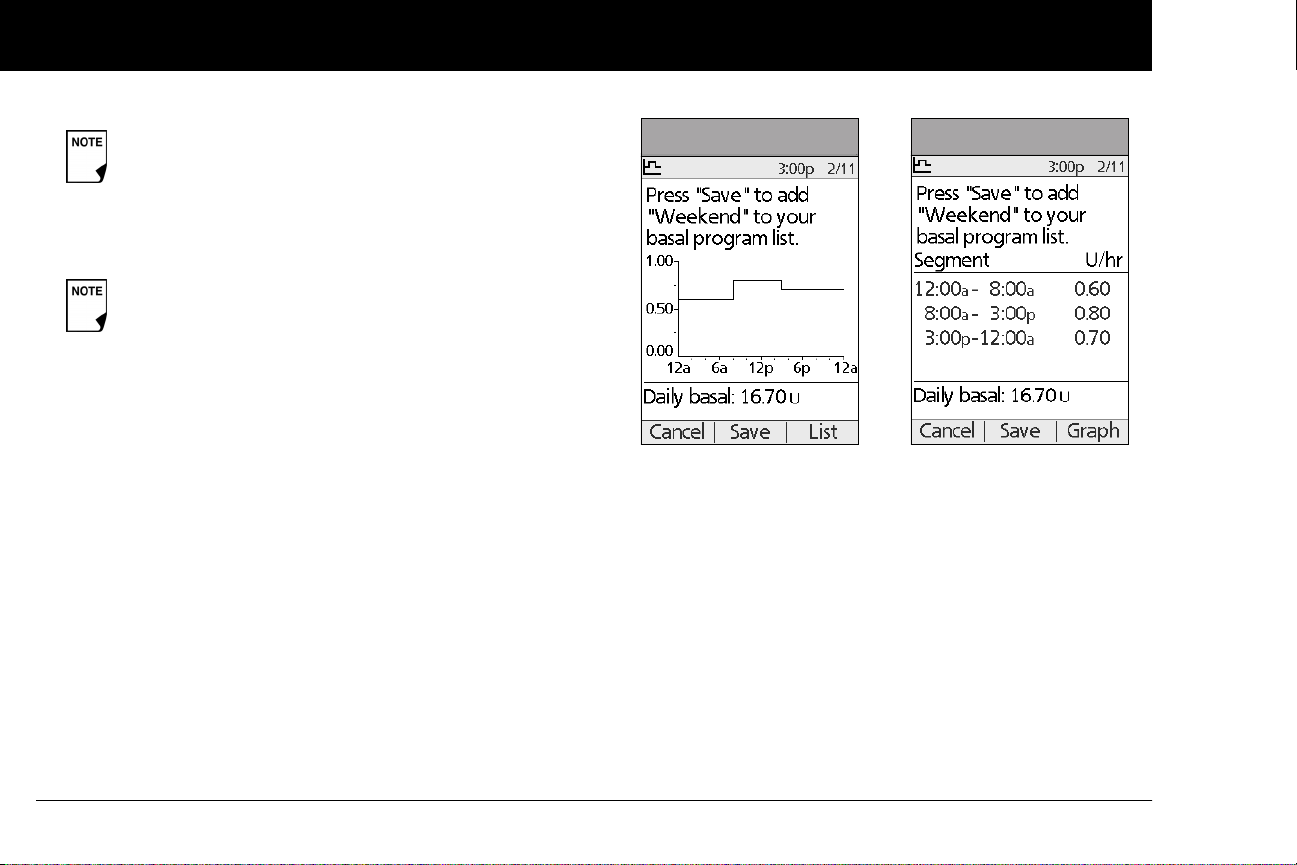
8. Review the graph of the new basal program (Figure 3-5).
9. To see the program as a list, press List (Figure 3-6). To see the
graph again, press Graph.
The total daily basal that will be delivered is shown at the
bottom of each “Basal programs” graph and list.
10. To add the program to the PDM’s memory, press Save.
Repeat steps 1 through 10 (above) for each basal program (up to
7 programs) you want to create.
Figure 3-5 Figure 3-6
Enable an existing basal program
1. On the Home screen, use the Up/Down Controller buttons
to choose Settings; then press Select.
2. Choose Basal programs, then press Select.
20
Page 33
Understanding and Adjusting Basal Rates
3
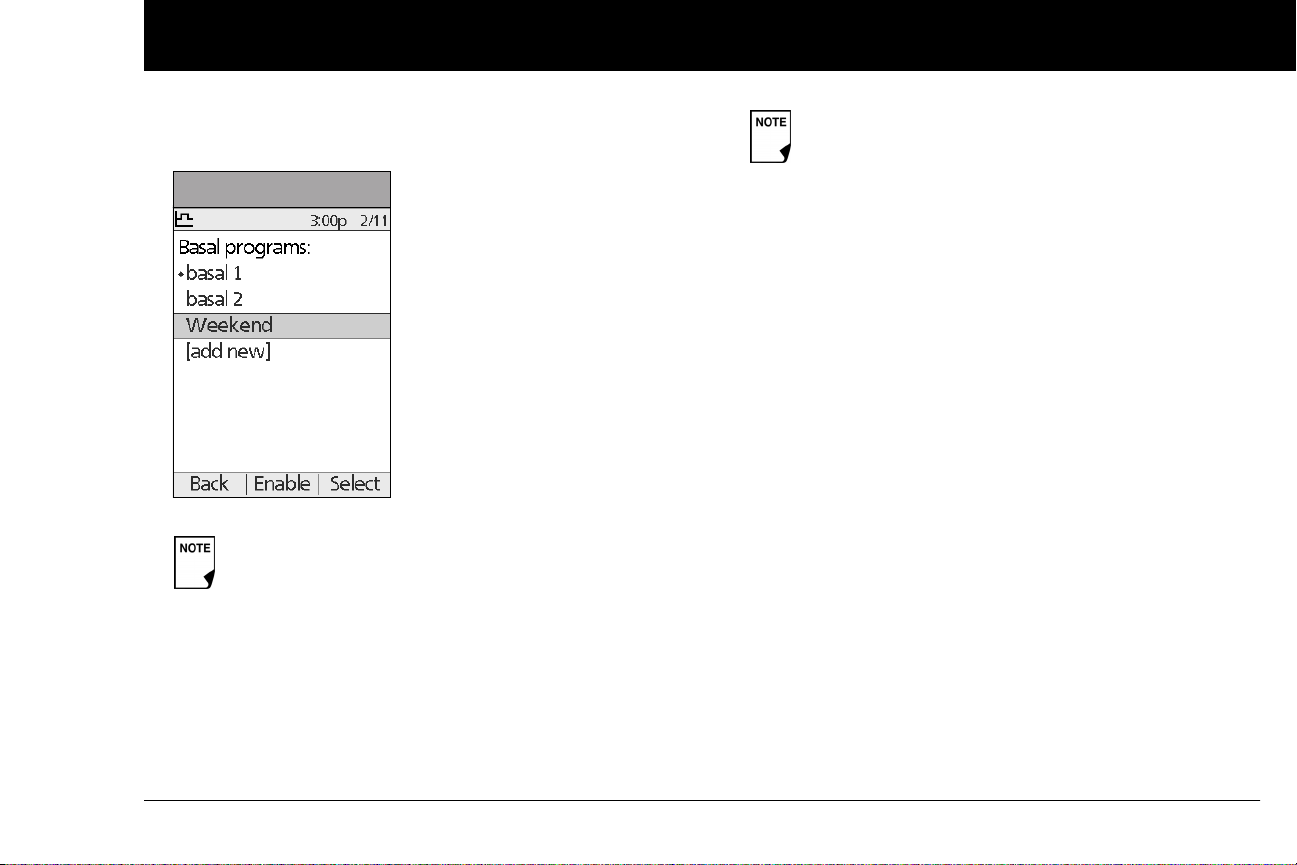
3. Choose the program you want from the list (Figure 3-7), then
press Enable.
Figure 3-7
A diamond icon (u) appears next to the program that
is active. You cannot select the active program to
enable it, because it is already running.
4. Press Enable again to start the selected basal program. If a
Pod is active, the PDM beeps to indicate that the chosen
basal program is running.
As a safety feature, you cannot enable a new basal
program while a temporary basal program is in process (see “Temporary Basal Rates and Presets” later in
this chapter); you must first cancel the active temporary basal program.
Change, rename, copy, or delete a basal program
1. On the Home screen, use the Up/Down Controller buttons
to choose Settings; then press Select.
2. Choose Basal programs, then press Select.
3. Choose a program from the list, then press Select.
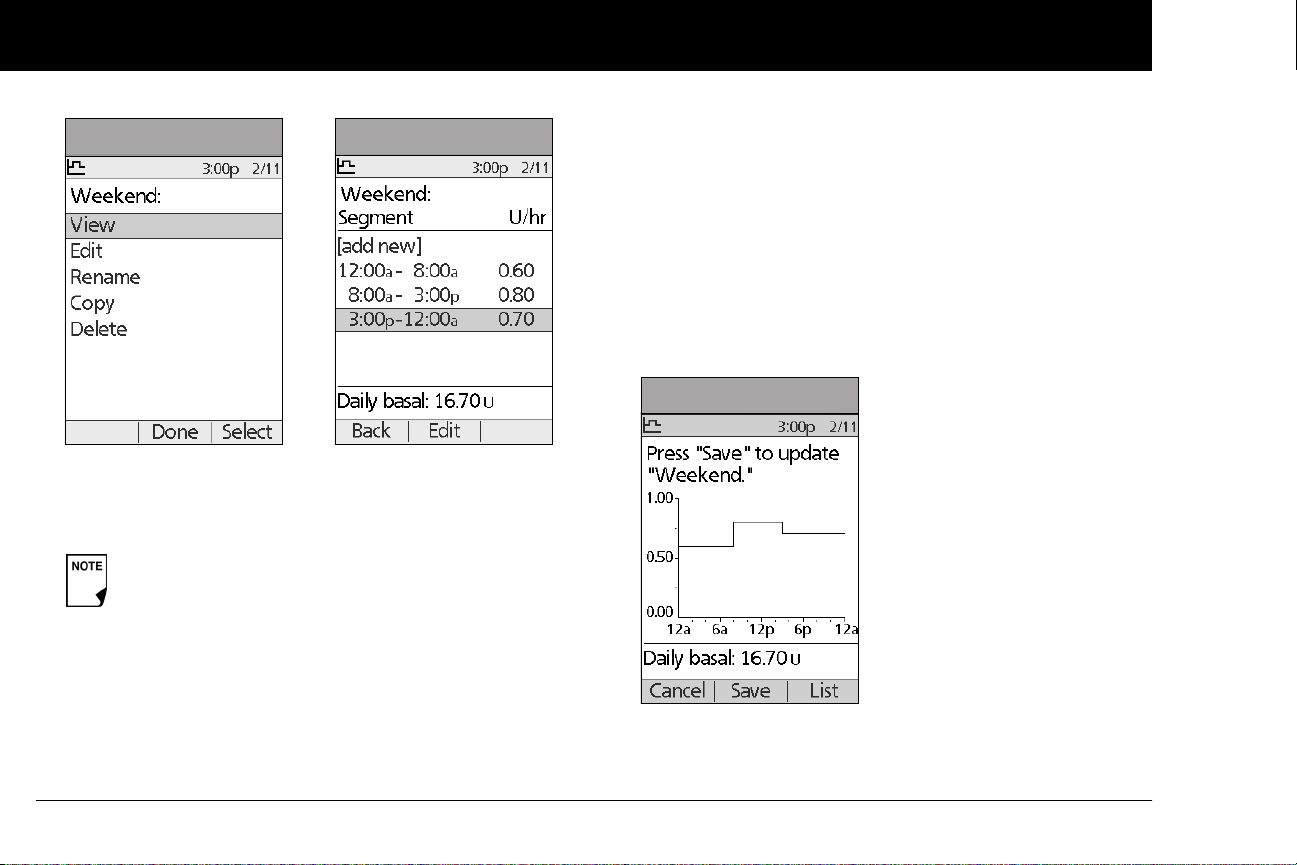
To view the segments of the basal program
1. Choose View, then press Select (Figure 3-8).
21
Page 34
Understanding and Adjusting Basal Rates
3
Figure 3-8 Figure 3-9
To edit or add a segment or rate in the basal program
1. Choose Edit, then press Select.
As a safety feature, you must suspend insulin delivery
before editing an active basal program (see Chapter
5, Using the Pod). Remember to resume delivery after
the edits are made.
2. Choose the segment to change, then press Edit (Figure 3-9).
Or, choose [add new], then press New.
3. Enter a start time for the segment you want to change, then
press Next.
4. Enter an end time for this segment, then press Next.
5. Enter a basal rate for the new segment, then press Enter.
6. Review this new segment for accuracy, then press Confirm.
7. To save the newly entered segment into the basal program,
press Save (Figure 3-10). If you want to make additional edits,
repeat steps 2–5.
Figure 3-10
8. To see the program as a list, press List. To see the graph again,
press Graph.
22
Page 35
Understanding and Adjusting Basal Rates
3
To rename a basal program
1. After choosing a program from the list, choose Rename, then
press Select.
2. Press the Up/Down Controller buttons to enter the charac-
ters that spell out the new name you want. Press the middle
soft key (labeled with the right arrow) to move the underscore to the next character, then press Save.
To copy a basal program
1. After choosing a program from the list, choose Copy, then
press Select.
2. Press the Up/Down Controller buttons to enter the charac-
ters that spell out the name you want for the copied program.
Press the middle soft key (labeled with the right arrow) to
move the underscore to the next character, then press Next.
3. To use the same basal program for the entire 24-hour period,
press Save.
To edit or add segments to the newly copied basal program, follow the steps under “To edit or add a segment or rate in the basal
program” earlier in this chapter.
Instead of suspending, changing, and then resuming
the active basal program, try this: Copy the active
program, rename it, make the changes, save it, then
enable it.
To delete a basal program
1. After choosing a program from the list, choose Delete and
then press Select.
2. Press Delete to permanently delete the program.
As a safety feature, you cannot delete the active basal
program.
n Temporary Basal Rates and Presets
What is a temporary basal rate?
A temporary basal rate lets you adjust your basal rate for a predetermined period of time.
On occasion, you may need to change the active basal rate for
only a short time. For example, if you are going cross-country
skiing for several hours, you may want to lower the basal rate
during and after you exercise. This is called a “one-time temporary basal rate.”
Some temporary changes are easy to predict and respond to.
They happen routinely and you may know from experience how
they affect your insulin needs. For example, you might take the
same exercise class twice a week for a few weeks or months, or
join a summer soccer league. For women, a monthly hormonal
change that affects blood glucose is an example of predictable
change. To easily handle predictable, short-term changes, you
can “preset” a temporary basal rate, so it is ready whenever you
need it. The PDM can remember up to 7 temporary basal presets.
23
Page 36
Understanding and Adjusting Basal Rates
3
You can set a temporary basal rate for a duration of 30 minutes to
12 hours. Once the time limit is reached, the Pod automatically
returns to the active basal program. Pod and PDM do not
need to be close to each other.
When using units per hour, the OmniPod System allows you to
set temporary basal rates from 0.0 U/hr, up to your max basal
rate. When using percent rate, you can set temporary basal rates
from Off to +95% of your active rate, as long as the temporary
rate is less than or equal to your max basal rate. Another limit
on the temp basal rate when configured in % is that the
rate cannot be decreased such that the resultant flow rate
will be less than 0.05U/hr. Example – if flow rate is 0.10U/hr,
you can’t create a temp basal decrease of 60%.
See the sections below on creating, enabling, cancelling, and
changing temporary basal presets.
Enable a one-time temporary basal rate
1. On the Home screen, use the Up/Down Controller buttons
to choose Temp basal, then press Select.
2. If you have created temp basal presets, choose [enter manu-
ally] from the list, then press Select.
If you have not created any temp basal presets, the PDM skips
this step.
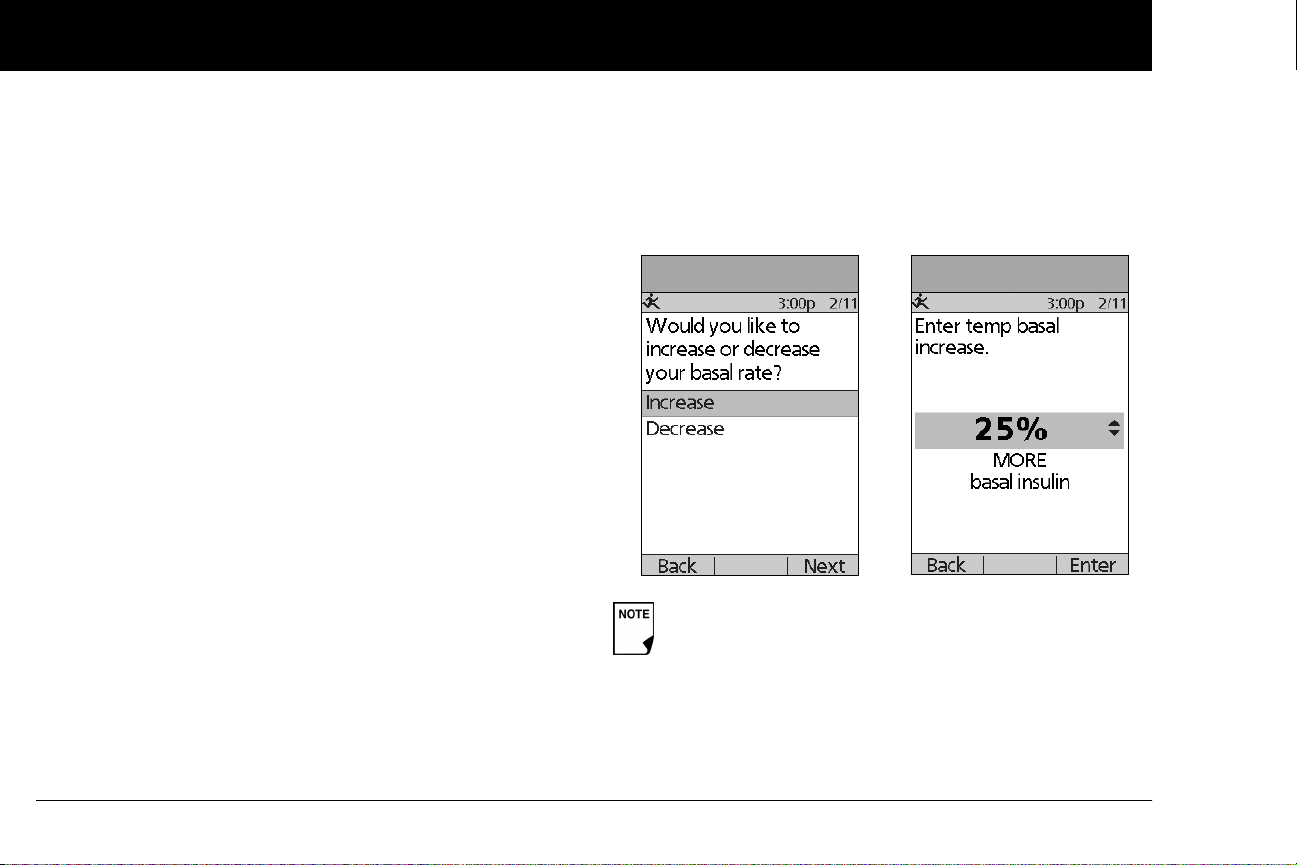
3. Choose Increase or Decrease your basal rate, then press
Next (Figure 3-11).
4. Enter the temporary basal rate, depending on how you
choose to show the rates or percent change, then press Enter
(Figure 3-12 shows an example of a temporary basal
increase. In this example, 25% MORE insulin will be
delivered).
Figure 3-11 Figure 3-12
During initial setup, you and your healthcare provider
either turned Off temporary basal rates, or chose to
show the rates as % or U/hr. To change this setting, see
Chapter 6, Using the Personal Diabetes Manager.
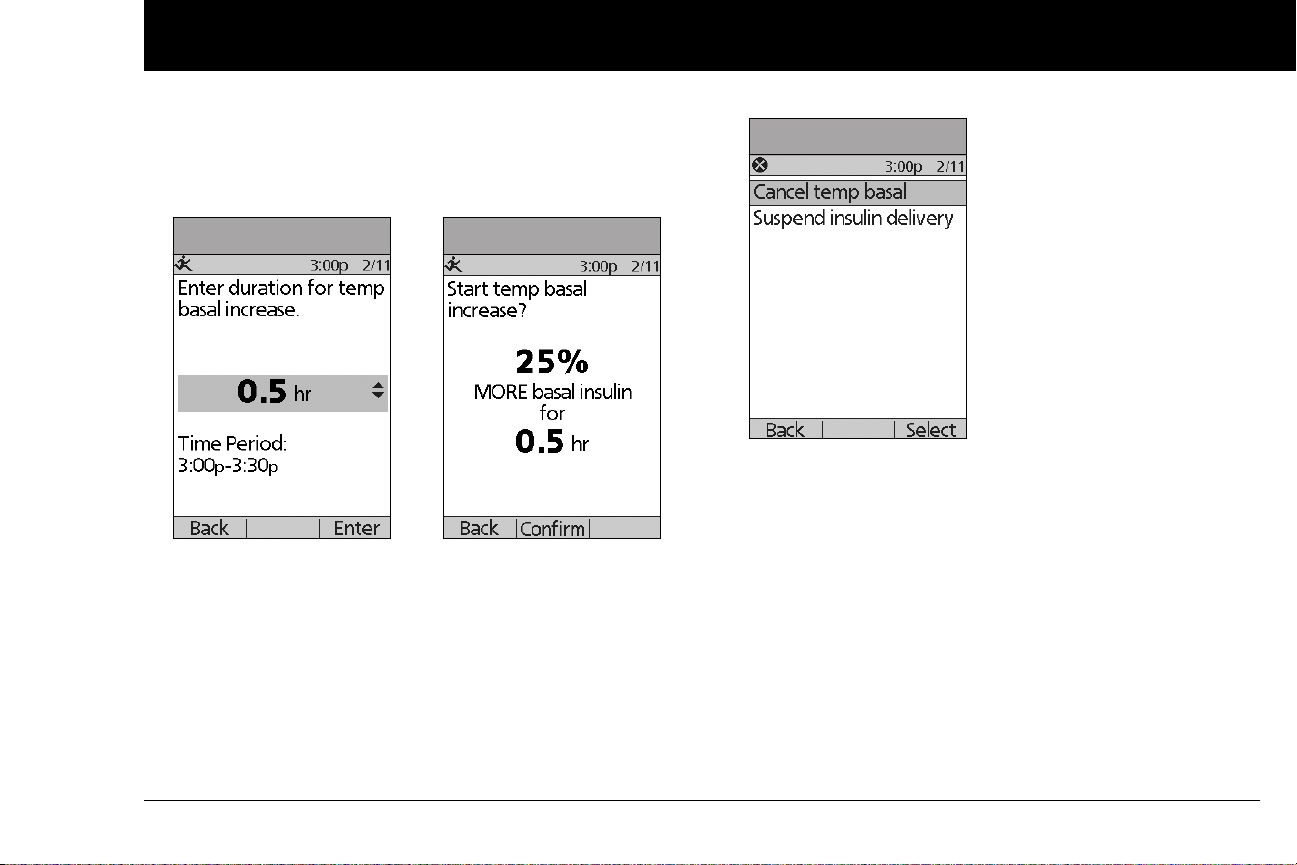
5. Enter the duration for the temporary rate, then press Enter
(Figure 3-13 on the next page).
24
Page 37
Understanding and Adjusting Basal Rates
3
6. Press Confirm to start the temporary basal rate shown on the
screen (Figure 3-14 – in this example, 25% more basal
insulin will be delivered for 0.5 hours). The Pod beeps to
indicate that the temporary basal rate is running.
Figure 3-13 Figure 3-14
Cancel a one-time temporary basal rate
1. On the Home screen, use the Up/Down Controller buttons
to choose Suspend/cancel, then press Select.
2. Choose Cancel temp basal (Figure 3-15), then press Select.
3. Press Confirm to cancel the temporary basal shown on the
screen.
Figure 3-15
Create a temporary basal preset
1. On the Home screen, use the Up/Down Controller buttons
to choose Settings, then press Select.
2. Choose Presets, then press Select.
3. Choose Temp basal presets, then press Select.
4. Choose [add new], then press New.
5. To use the OmniPod System’s default naming system, simply
press Next. The default naming system automatically assigns
program names in numerical order, such as temp basal 1,
temp basal 2, temp basal 3.
Or, to give a different name to the program:
25
Page 38
Understanding and Adjusting Basal Rates
3
a. Press the Up/Down Controller buttons to scroll through
the list of characters. An up-and-down arrow symbol on
the screen indicates the character you are changing.
b. Press the middle Soft Key to move the underscore to the
next character.
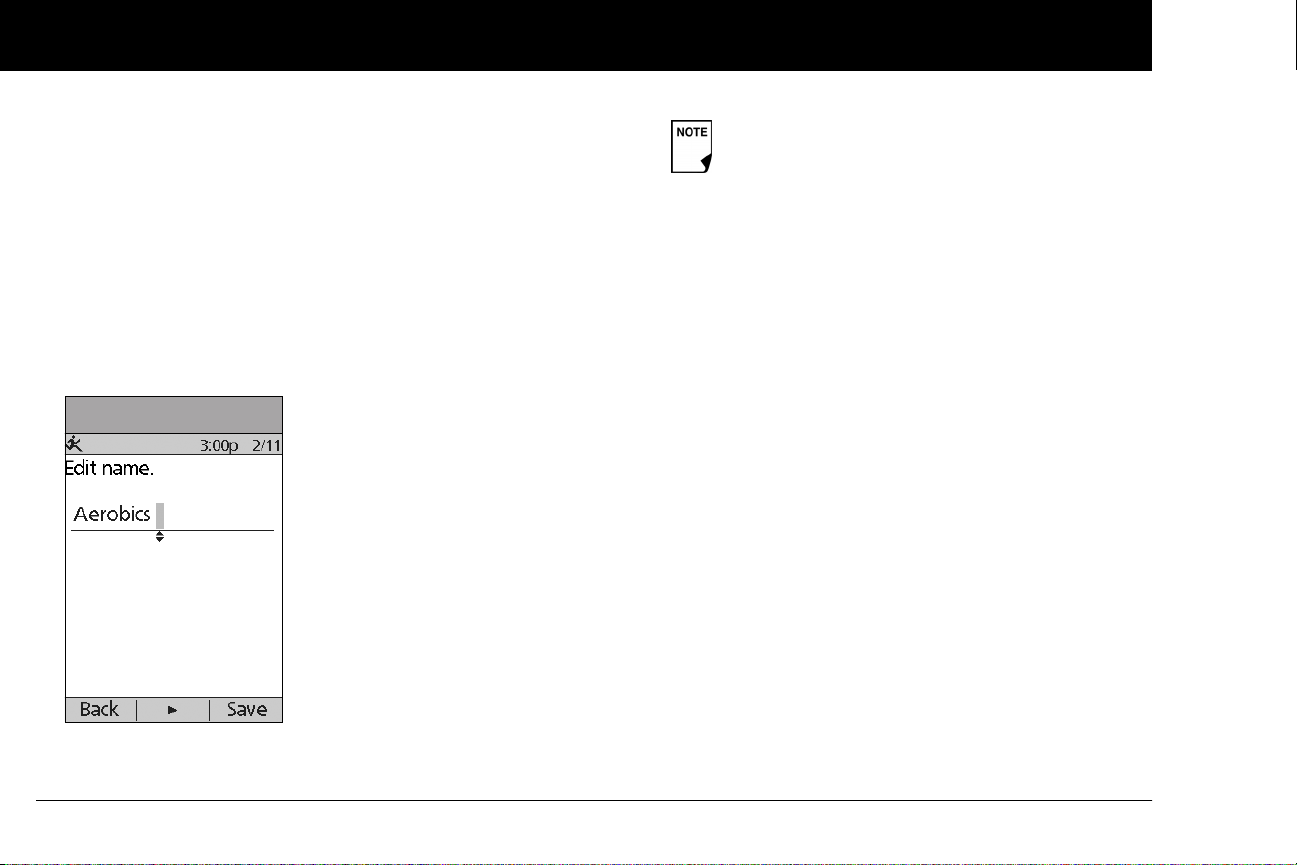
c. Enter each character one at a time. For example, if you
take an aerobics class two nights a week, you might enter
A, e, r, o, b, i, c, s (Figure 3-16). (A blank character or space is
the first and last option in the scrolling menu.)
d. Press Next.
Figure 3-16
Capitals and lowercase letters are considered the
same.
6. For a percent change, choose Increase or Decrease, then
press Next.
7. Enter the temporary basal rate (or percent change), then
press Next.
8. Enter the duration of the temporary basal rate, from 0.5 hours
to 12 hours, then press Next.
9. Review the temporary basal name, rate or % change, and
duration, then press Save to accept it.
Enable an existing temporary basal preset
1. On the Home screen, use the Up/Down Controller buttons
to choose Temp basal, then press Select.
2. Choose the temporary basal preset you want to use from the
list (Figure 3-17 on the next page), then press Select.
3. If you want, change the duration for the temporary rate, in
half-hour increments, then press Enter (Figure 3-18 on the
next page).
4. Press Confirm to begin the temporary basal rate shown on
the screen. The Pod beeps to indicate that the chosen temporary basal preset is running.
26
Page 39
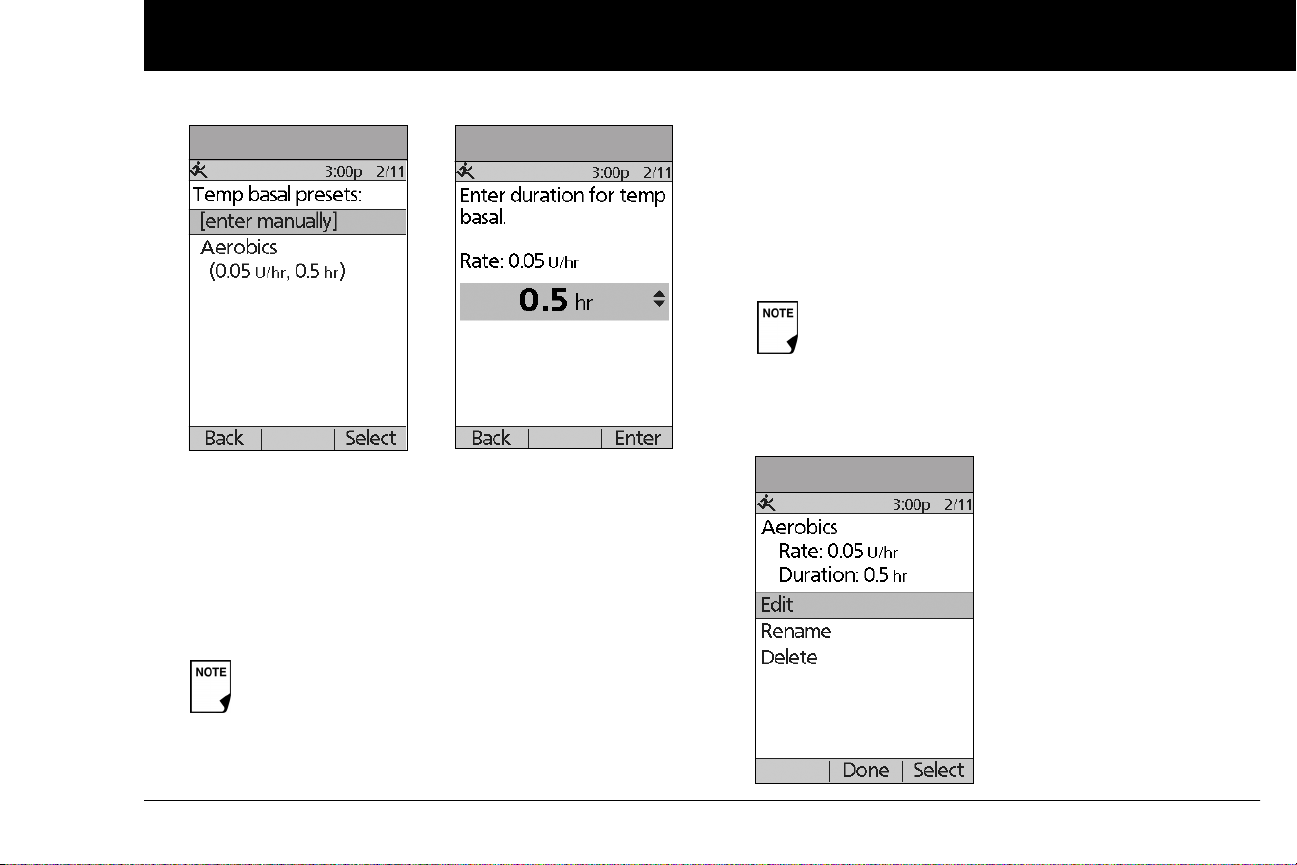
Understanding and Adjusting Basal Rates
3
Figure 3-17 Figure 3-18
Cancel an active temporary basal preset
1. On the Home screen, use the Up/Down Controller buttons
to choose Suspend/cancel;, then press Select.
2. Choose Cancel temp basal, then press Select.
3. Press Confirm to cancel the actively running temporary
basal preset.
If you suspend insulin delivery while a temp basal is
running, the temp basal will be cancelled when you
suspend.
Change, rename, or delete a temporary basal preset
1. On the Home screen, use the Up/Down Controller buttons
to choose Settings, then press Select.
2. Choose Presets, then press Select.
3. Choose Temp basal presets, then press Select.
4. Choose a temporary preset from the list, then press Edit.
You cannot edit, change, or delete a temporary basal
preset that is actively running.
To change a temporary basal preset
1. Choose Edit, then press Select (Figure 3-19).
Figure 3-19
27
Page 40

Understanding and Adjusting Basal Rates
3
2. Enter a new rate (or new percent change), for the preset, then
press Next.
3. Enter a new duration for the preset, then press Save.
4. Press Done.
To rename a temporary basal preset
1. Choose Rename, then press Select.
2. Press the Up/Down Controller buttons to enter the charac-
ters that spell out the name you want, then press Save.
3. Press Done.
To delete a temporary basal preset
1. Choose Delete, then press Select.
2. Press Delete to permanently delete the preset. Maximum
Basal Rate
n Maximum Basal Rate
What is the maximum basal rate?
The maximum basal rate is a safety feature that limits the basal
rate (U/hr) that the Pod can deliver. Once you enter it into the
PDM memory, the maximum applies to both regular basal programs and temporary basal rates.
You and your healthcare provider will enter an initial maximum
basal rate into your PDM during the setup process (see Chapter
2, Getting Started). You can change it later as you fine-tune your
System settings or when your needs change.
Change the maximum basal rate
1. On the Home screen, use the Up/Down Controller buttons
to choose Settings, then press Select.
2. Choose System setup, then press Select.
3. Choose Bolus/basal/calcs, then press Select.
4. Choose Max basal, then press Select.
5. Enter a new maximum basal rate, then press Enter.
28
Page 41
CHAPTER 4
Understanding and Delivering Bolus Doses
n What Is a Bolus?
A bolus is an extra dose of insulin, delivered when needed to:
• Match the carbohydrates (sugar content) in a meal or snack—
also known as a meal bolus
• Lower blood glucose when it gets too high—also known as a
correction bolus
This extra dose is in addition to the basal rate delivered throughout the day and night (see Chapter 3, Understanding and
Adjusting Basal Rates).
The size of a bolus dose depends on the current factors at the
time you deliver the bolus:
• Your blood glucose level
• Your insulin-to-carbohydrate ratio
• Your correction factor
• Your target blood glucose
• The amount of insulin on board (IOB) (active insulin) from pre-
vious meal and correction boluses
• Your correction threshold I (correct above threshold), the BG
level above which you would like to take insulin to reduce an
elevated blood glucose
• Your activity level
• The type and amount of food you eat
With the OmniPod System, it is easy to adapt to any situation.
With just a few button presses, you can adjust to unexpected or
changing insulin needs.
During setup, you entered bolus dose settings in the PDM
(see Chapter 2, Getting Started). You can adjust these settings
as you fine-tune your System or when your needs change (see
Chapter 6, Using the Personal Diabetes Manager).
Check with your healthcare provider before adjusting these settings.
29
Page 42
Understanding and Delivering Bolus Doses
4
n Bolus Dose Options
So that you can fully enjoy freedom and flexibility in your life, the
OmniPod System offers the following bolus dose options:
Suggested bolus calculator: When you want the System to
calculate your suggested bolus, based on your personal settings,
your current blood glucose, the amount of insulin still active in
your body from previous boluses, and the grams of carbohydrate (“carbs” for short) you are about to eat.
Normal bolus: When you need a dose of insulin right away to
cover a meal or snack you are about to eat or to reduce a high
blood glucose level
Extended bolus: When you are eating high-fat or high-protein
foods (which take longer to digest and are slower to affect blood
glucose).
When using the extended bolus function the user
should check their blood glucose levels more frequently to avoid hypoglycemia or hyperglycemia.
The bolus features in the OmniPod System are designed
for flexibility and convenience. You can easily transition
from a normal to an extended bolus with just a few
button presses.
n Suggested Bolus Calculator
The suggested bolus calculator lets the OmniPod System recommend your bolus based on your personal settings. To review or
adjust these settings—including turning the suggested bolus
calculator On or Off—see Chapter 6, Using the Personal Diabetes Manager.
If the suggested bolus calculator is turned On, the System
automatically calculates a bolus dose. If the suggested bolus
calculator is turned Off, you must enter a bolus amount
manually.
The suggested bolus calculator will display a suggested bolus dose based on the settings you have
programmed into the PDM. Check with your healthcare provider before using this feature or adjusting
these settings.
If a suggested bolus exceeds the max bolus you
have set, the suggested bolus screen displays
“Exceeds max bolus.” (Figure 4-1 on next page.) If you
select Extend or Enter, the following confirmation is
displayed “WARNING: Exceeds max bolus of nn.nn U.
Accept this bolus and temporarily override your
limit?” (Figure 4-2 on next page). Consult your
healthcare provider before changing the setting.
30
Page 43
Understanding and Delivering Bolus Doses
4
Figure 4-1 Figure 4-2
How a suggested bolus is calculated
The suggested bolus calculator estimates the suggested amount
for each bolus portion based on your personal settings and
inputs.
The settings used to calculate a suggested bolus are:
• Target BG
• Insulin-to-carbohydrate (IC) ratio
• Correction factor (CF)
• Duration of insulin action
The factors used to calculate a suggested bolus are:
• current BG
• carbs entered
• insulin on board (IOB)
A suggested bolus can have a correction bolus only, a meal bolus
only, or both.
Correction bolus: The correction bolus, as the name suggests,
“corrects” for a blood glucose (BG) level above your target BG
level.
Meal bolus: The meal bolus provides insulin for the carbohy-
drates you enter into the System.
Insulin on board (IOB): Insulin on Board (IOB) the amount of
insulin still working in your body from previous meal and correction boluses. The amount of time the insulin remains “on board”
or “active” depends on what you set for your duration of insulin
action.
The OmniPod System can only subtract insulin on board
(IOB) from a suggested bolus when the current BG is
known.
For formulas for each element of the suggested bolus calculation, detailed examples, and additional guidelines of how the
suggested bolus calculator works, see the Appendix.
31
Page 44
Understanding and Delivering Bolus Doses
4
n Deliver a Normal Bolus
Deliver a bolus when suggested bolus calculator is On
1. After you check your blood glucose, you will need to enter
your blood glucose manually. On the Home screen, choose
Bolus, then press Select. First, be sure to write down the
BG value on a piece of paper. Use the Up/Down Control-
ler buttons to enter your current BG value, then press Ye s if
you want this value to be used by the suggested bolus calculator. On the next screen, review the BG value you
entered to make sure it is correct, then press Confirm.
Figure 4-3
A blood glucose value is current for up to 10 minutes
after it is entered.
When your blood glucose result reads “HIGH” or
“LOW,” the suggested bolus calculator will be
disabled.
You can also enter a BG manually by choosing the
More actions menu, then choosing Add BG Read-
ing. See the end of Chapter 7, Entering Blood Glucose
Information into Your PDM.
2. If you are
next page). The Suggested Bolus screen appears (Figure 4-5
on the next page). Press Enter to accept the suggested bolus.
Or, if you wish, press the Up/Down Controller buttons to
increase or decrease the suggested bolus. Then press Enter
to accept the bolus.
not going to eat now, press No (Figure 4-4 on the
32
Page 45
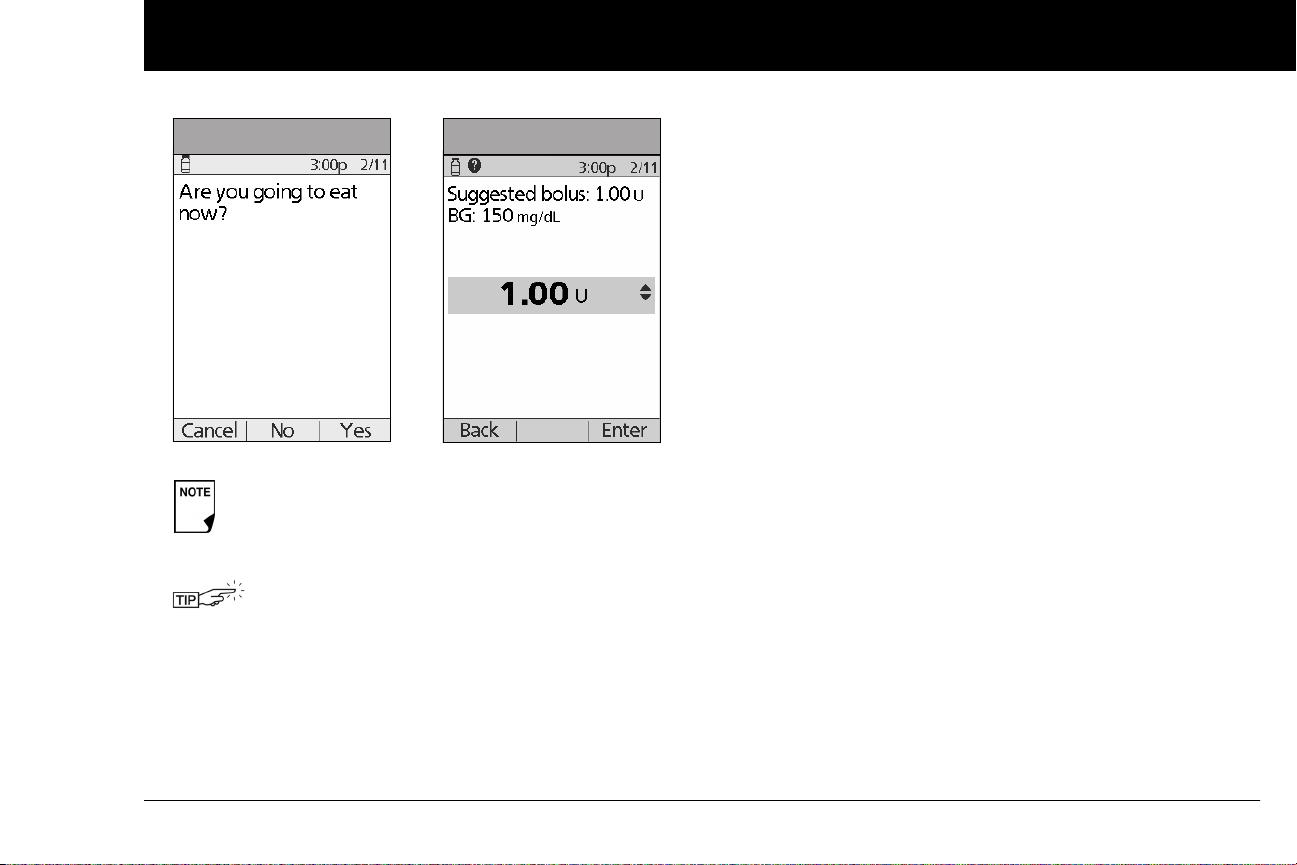
Understanding and Delivering Bolus Doses
4
Figure 4-4 Figure 4-5
In the Suggested Bolus screen (Figure 4-5), “adjusted
for Insulin on Board (IOB)” appears only when Insulin
on Board (IOB) is a factor in the calculation.
To view detailed information about the calculations used for this suggested bolus, press the User
Info/Support button and scroll through the information screens. Press Close to return to the
Suggested Bolus screen.
3. If you are going to eat now:
a. Press Ye s (Figure 4-4), enter the number of carbohydrates
you are about to eat, then press Enter.
b. On the next screen, review the BG and carb values to
make sure they are correct, and then press Confirm
(Figure 4-6 on the next page).
If you’ve previously entered a carb preset, then either:
• Use the Up/Down Controller buttons to choose
[enter manually], then press Select. Enter the number of carbohydrates that you are going to eat, then
press Enter.
• Use the Up/Down Controller buttons to choose
favorites, snacks, or meals. From there, select a carb
preset you have previously entered (see “Carb Presets”
later in this chapter), then press Select.
c. Press Enter to accept the suggested bolus (Figure 4-7 on
the next page).
Or press the User Info/Support (?) button to view calcula-
tion information used for this suggested bolus. Press
Close to return to the Suggested Bolus screen, then
press Enter.
33
Page 46
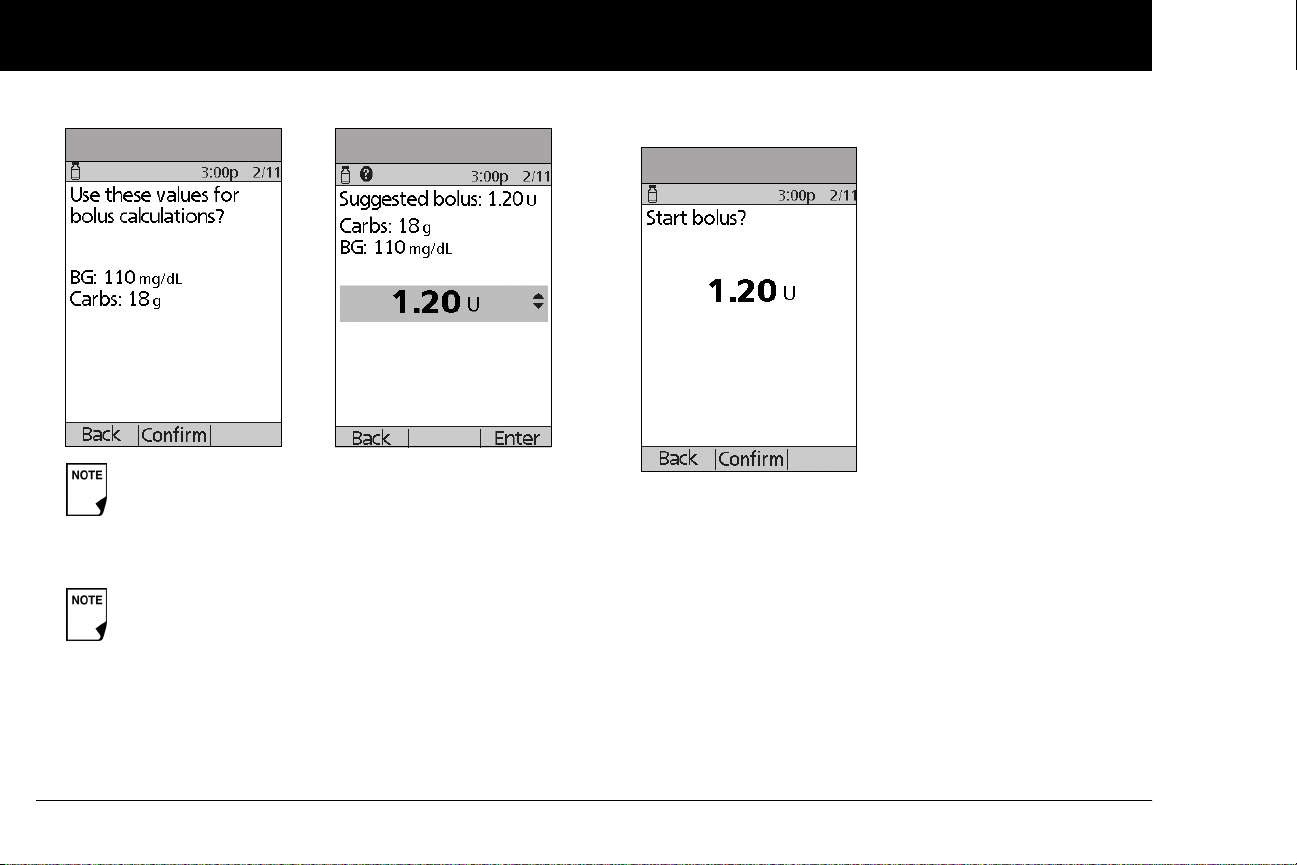
Understanding and Delivering Bolus Doses
4
Figure 4-6
If the reverse correction feature is turned On and if
your blood glucose level is below your target, the
System subtracts a correction amount from the meal
portion of the bolus.
If the reverse correction setting is turned Off, the
System does not subtract anything for a blood glucose level below your target.
4. If you have set the blood glucose reminder option to On and
you want to add a reminder:
a. Press Ye s .
b. Enter the time for the reminder, then press OK.
Figure 4-7
5. Press Confirm to begin the bolus delivery (Figure 4-8 below).
Figure 4-8
Deliver a bolus manually (suggested bolus calc is Off)
1. On the Home screen, use the Up/Down Controller buttons
to choose Bolus, then press Select.
2. Enter the number of units you want to deliver, then press
Enter.
3. If the blood glucose reminders feature is turned On, you can
now set a blood glucose reminder.
4. Press Confirm to begin the bolus delivery.
34
Page 47
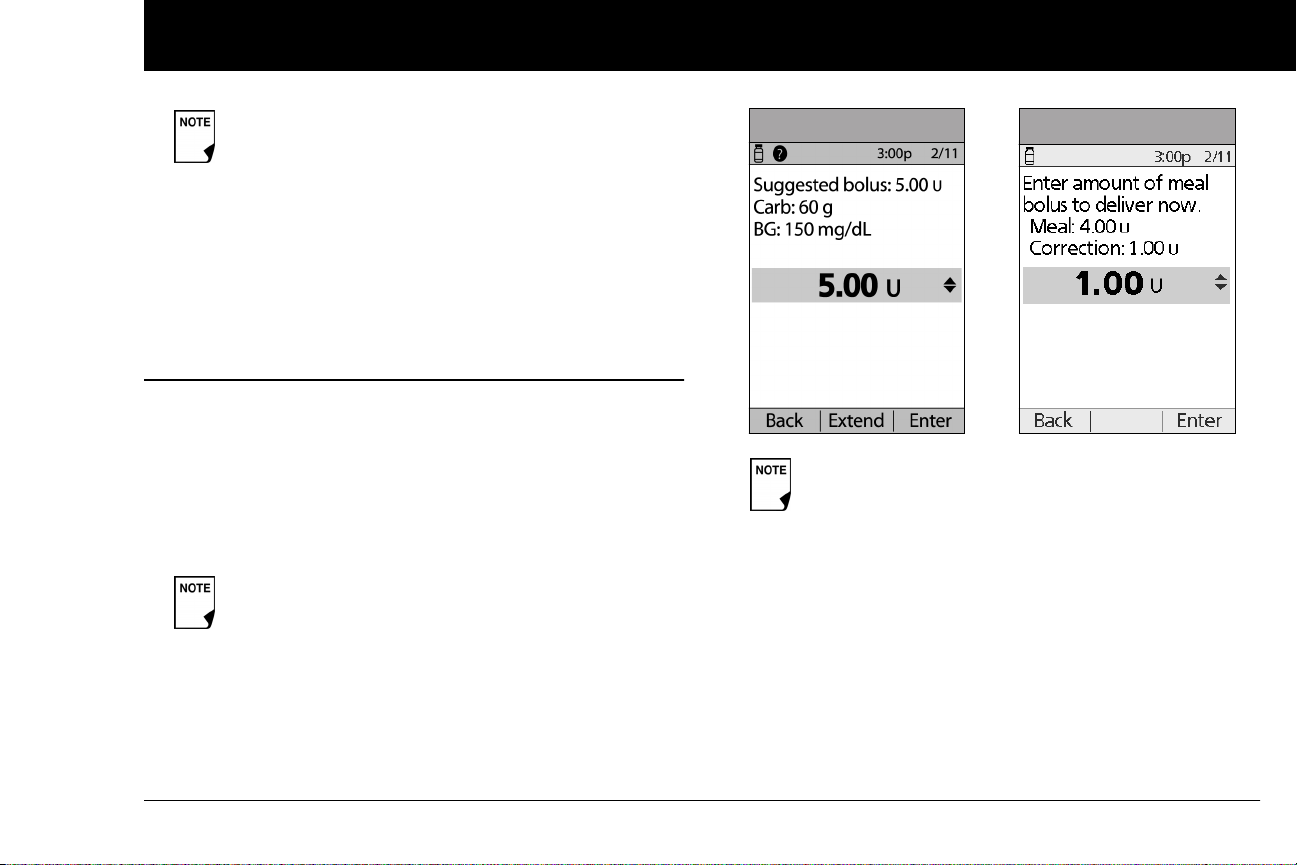
Understanding and Delivering Bolus Doses
4
As a safety feature, the OmniPod System only allows
you to give a bolus at or below the maximum bolus
dose you have set. See Chapter 6, Using the Personal
Diabetes Manager, for information on resetting your
maximum bolus dose. If suggested bolus calc is On,
you can enter a temporary manual override to make
an adjustment above your max bolus limit (Figure 4-1
and Figure 4-2). Consult your healthcare provider
before changing this setting.
n Deliver an Extended Bolus
The extended bolus feature lets the OmniPod System deliver
some (or no) insulin now and the remainder over a period of
time you choose.
Deliver an extended bolus instead of a normal bolus
1. After you get your suggested bolus, press Extend instead of
Enter (Figure 4-9).
If you have set the Extended bolus option to Off,
the PDM will not display the Extend Soft Key. For
information on turning this feature On and Off see
Chapter 6, Using the Personal Diabetes Manager.
Figure 4-9
To learn how to set extended boluses in percentages
or units, see Chapter 6, Using the Personal Diabetes
Manager.
3. Enter the time (up to 8 hours, in 30-minute increments) over
which to deliver the remainder of the bolus, then press Enter
(Figure 4-11 on the next page). In Figure 4-12 (on the next
page) you can see a detailed view of the extended bolus.
Figure 4-10
2. Enter the units of insulin or percentage of the bolus that you
want to take immediately (Figure 4-10), then press Enter.
35
Page 48
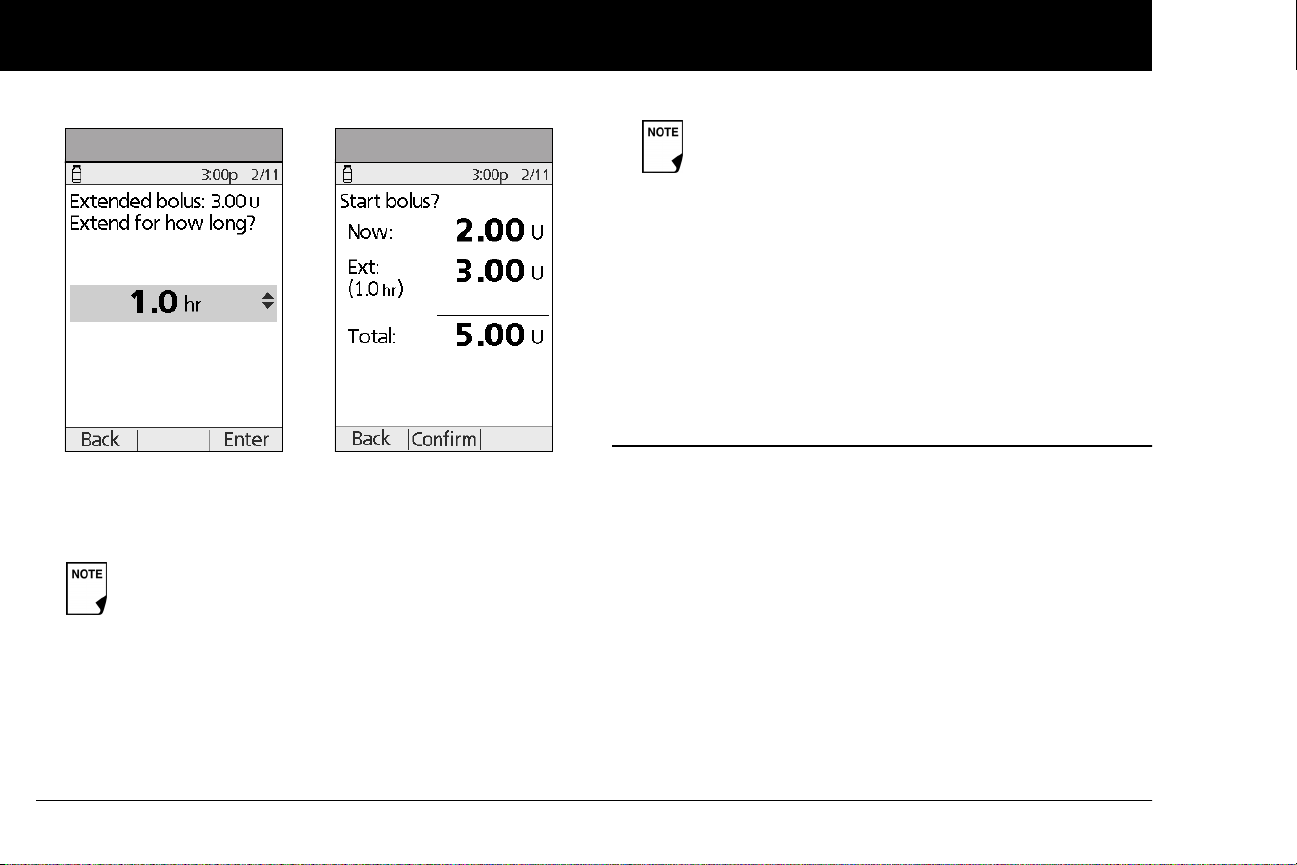
Understanding and Delivering Bolus Doses
4
Figure 4-11
4. If the blood glucose reminders feature is turned On, you
can now set a blood glucose reminder.
5. Press Confirm to begin the bolus delivery (Figure 4-12).
As a safety feature, you cannot deliver two extended
boluses at the same time. You can, however, cancel
the first extended bolus and replace it with another
(see “Replace an Extended Bolus” on page 37). You
can deliver a normal bolus while an extended bolus is
being delivered.
Figure 4-12
As a safety feature, the correction bolus is always
delivered first and cannot be extended. Only the
meal bolus can be extended. For example:
Total bolus = 5 units
Correction bolus: 1 unit
Meal bolus: 4 units
Deliver now = 2 units
correction bolus: 1 unit
meal bolus: 1 unit
Extend = 3 units
meal portion: 3 units
n Cancel Active Boluses
The OmniPod System is extremely flexible, so you can use it to
respond to your changing insulin needs. It is easy to cancel an
active bolus (one that is currently being delivered), even after
insulin delivery has started.
1. To check the Pod status, refer to page 57 for detailed instructions. The ID screen must be confirmed before you can check
Pod status. An on-screen message appears for as long as a
normal bolus is being delivered (Figure 4-13 on the next
page).
36
Page 49
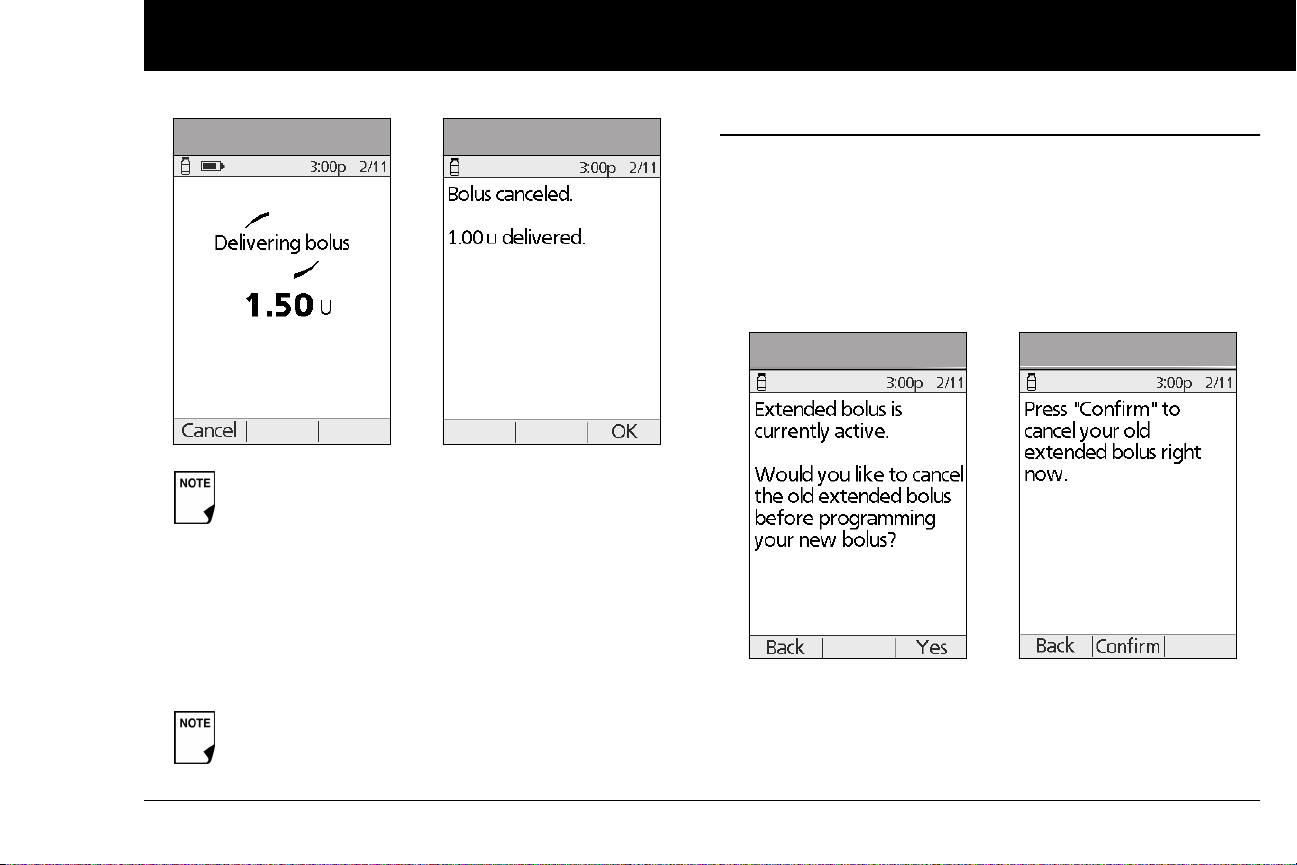
Understanding and Delivering Bolus Doses
4
Figure 4-13
If the bolus has already been completely delivered,
the “Delivering bolus” message and Cancel do not
appear, but the Status screen does appear.
2. Press Cancel.
The Pod beeps to confirm the bolus is cancelled. An on-screen
message tells you how much insulin was delivered before
you cancelled the bolus (Figure 4-14).
3. Press OK to return to the Status screen.
If your suggested bolus contains both a correction
bolus and a meal bolus, the correction bolus is always
delivered first.
Figure 4-14
n Replace an Extended Bolus
You can replace one extended bolus with another. The System
tells you how much of the first bolus has not yet been delivered.
1. After you see your suggested bolus, press Extend instead of
Enter (see Figure 4-9 on Page 35).
2. Press Ye s to cancel the active extended bolus (Figure 4-15).
Or press Back to return to the Suggested Meal Bolus screen.
Figure 4-15
3. Press Confirm (Figure 4-16).
4. The screen displays the amount of the old extended bolus
that has yet to be delivered (Figure 4-17 on the next page).
Press Next to return to the Suggested Meal Bolus screen.
Figure 4-16
37
Page 50
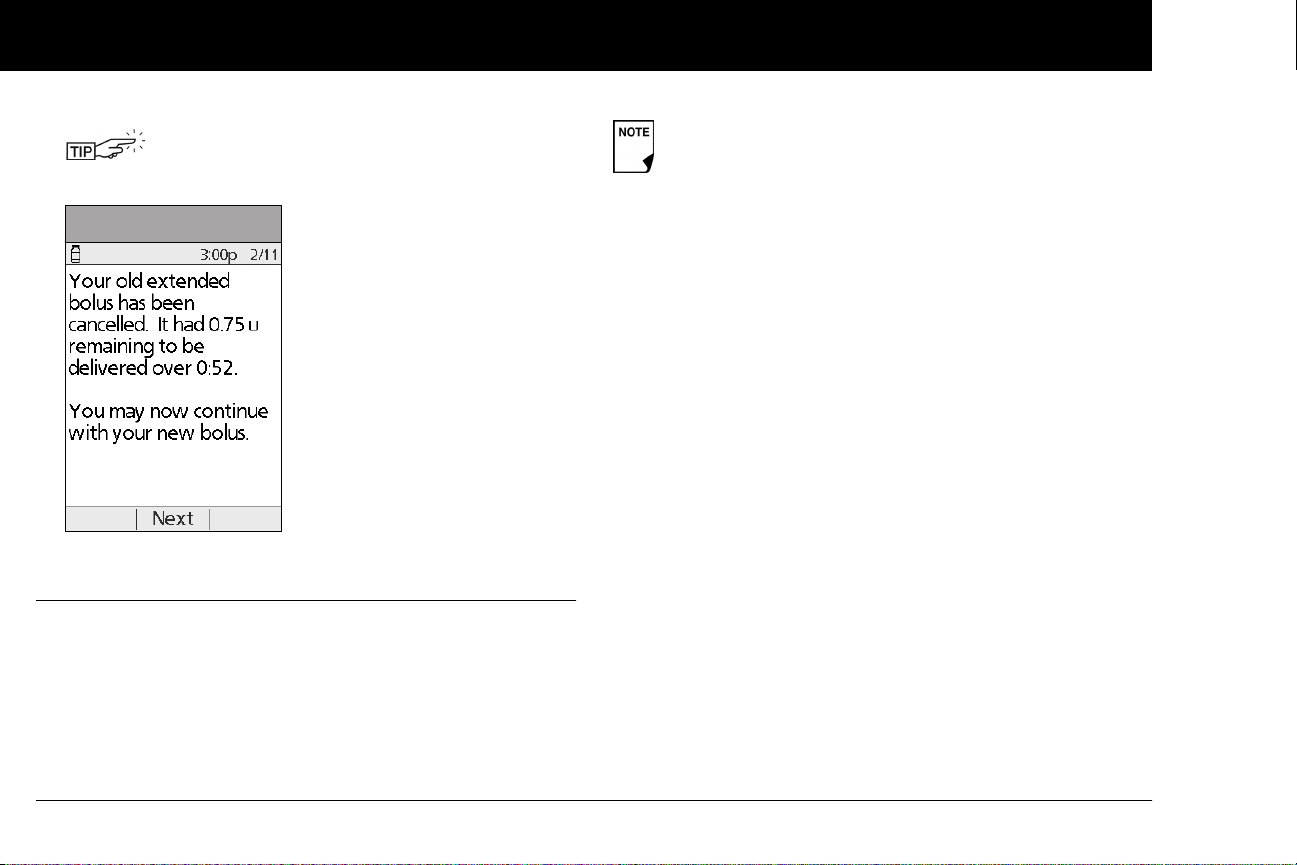
Understanding and Delivering Bolus Doses
4
You can add what remained of the old extended
bolus to the new one.
Figure 4-17
n Bolus Presets
Bolus presets are bolus amounts that you program for frequent
use. For example, if you often take the same bolus at lunchtime,
you can create a bolus preset for that amount and name it
“Lunch.”
Bolus presets are available only when the suggested
bolus calculator feature is turned Off. (If the suggested
bolus calculator is turned On, you can still use carb presets. See “Carb Presets” on Page 40.)
Create a bolus preset
1. On the Home screen use the Up/Down Controller buttons
to choose Settings; then press Select.
2. Choose Presets, then press Select.
3. Choose Bolus presets, then press Select.
4. Choose [add new], then press New.
5. To use the OmniPod System’s default naming system, simply
press Next. The default naming system automatically assigns
program names in numerical order, such as bolus 1, bolus 2,
bolus 3.
Or, to give a different name to the program:
a. Press the Up/Down Controller buttons to enter the char-
acters that spell the name you want. An up and down
arrow symbol on the screen indicates which character
you are changing.
b. Press the middle Soft Key (labeled with the right arrow) to
move the underscore to the next character.
c. Enter each character one at a time. For example, if you
frequently take the same bolus at lunchtime, you might
enter L, u, n, c, h (Figure 4-18 on the next page).
38
Page 51
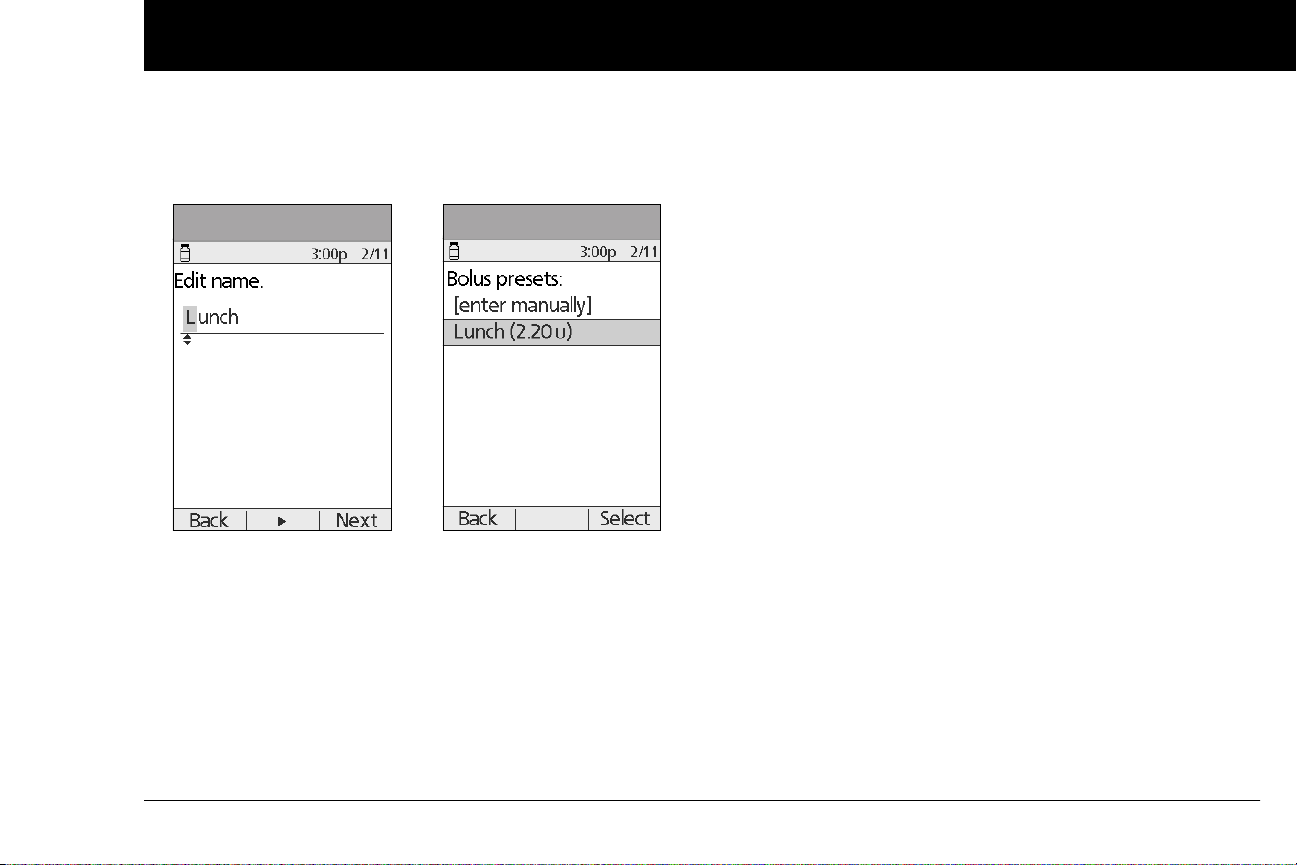
Understanding and Delivering Bolus Doses
4
d. Press Next.
6. Enter the new bolus preset amount, up to the maximum
bolus you entered during setup; then press Next.
Figure 4-18
7. Review the bolus preset name and amount, then press Save
to accept it.
Figure 4-19
Enable an existing bolus preset
1. On the Home screen, use the Up/Down Controller buttons
to choose Bolus; then press Select.
2. Choose the bolus preset you want to use from the list (Figure
4-19), then press Select.
3. Press Enter to confirm the bolus preset amount, or, if necessary, use the Up/Down Controller buttons to adjust the
bolus amount.
4. Press Confirm to deliver the bolus shown on the screen.
Change, rename, or delete a bolus preset
1. On the Home screen, use the Up/Down Controller buttons
to choose Settings, then press Select.
2. Choose Presets, then press Select.
3. Choose Bolus presets, then press Select.
4. Choose a preset from the list, then press Edit.
Change a bolus preset
1. Choose Edit, then press Select.
2. Enter a new insulin amount for the bolus, then press Save.
Rename a bolus preset
1. Choose Rename, then press Select.
2. Press the Up/Down Controller buttons to enter the charac-
ters that spell out the name you want, then press Next.
Delete a bolus preset
1. Choose Delete, and then press Select.
2. Press Delete to permanently delete the preset.
39
Page 52

Understanding and Delivering Bolus Doses
4
Cancel an active bolus preset
1. Press and hold the Power button to turn on the PDM (To
check the Pod status, refer to page 57 for detailed instructions. The ID screen must be confirmed before you can check
Pod status.), if it is not already on. An on-screen message
appears as long as a bolus is being delivered.
2. Press Cancel.
The Pod beeps to confirm the bolus is cancelled. An on-screen
message tells you how much insulin was delivered before
you cancelled the bolus.
3. Press OK to return to the Status screen.
For more details, see “Cancel Active Boluses” earlier in this
chapter.
n Carb Presets
Carb presets are favorite food items, snacks, or meals that you eat
frequently. After you enter these items, you can quickly select
one when entering carb amounts during the suggested bolus
calculator process.
Create a carb preset
1. On the Home screen, use the Up/Down Controller buttons
to choose Settings, then press Select.
2. Choose Presets, then press Select.
3. Choose Carb presets, then press Select.
4. Choose the category for this carb preset: (Favorites, Snacks,
or Meals), then press Select.
5. Choose [add new], then press New.
6. To use the OmniPod System’s default naming system, simply
press Next. The default naming system automatically assigns
program names in numerical order, such as carb preset 1,
carb preset 2, carb preset 3.
Or, to give a different name to the program:
a. Press the Up/Down Controller buttons to enter the char-
acters that spell the name you want. An up and down
arrow symbol on the screen indicates the character you
are changing.
b. Press the middle Soft Key (the right arrow) to move the
underscore to the next character.
c. Enter each character one at a time. For example, if you
frequently eat a breakfast consisting of plain low-fat
yogurt with blueberries, sweetener, and cinnamon, you
might enter
B, l, u, e, [space], Y, o, g, u, r, t (Figure 4-20 on the next page).
d. Press Next.
7. Enter the grams of carbohydrate in the meal, then press Next.
8. If you want, enter the grams of fiber, fat, and protein in the
meal, and the total calories. Press Next after each entry.
40
Page 53
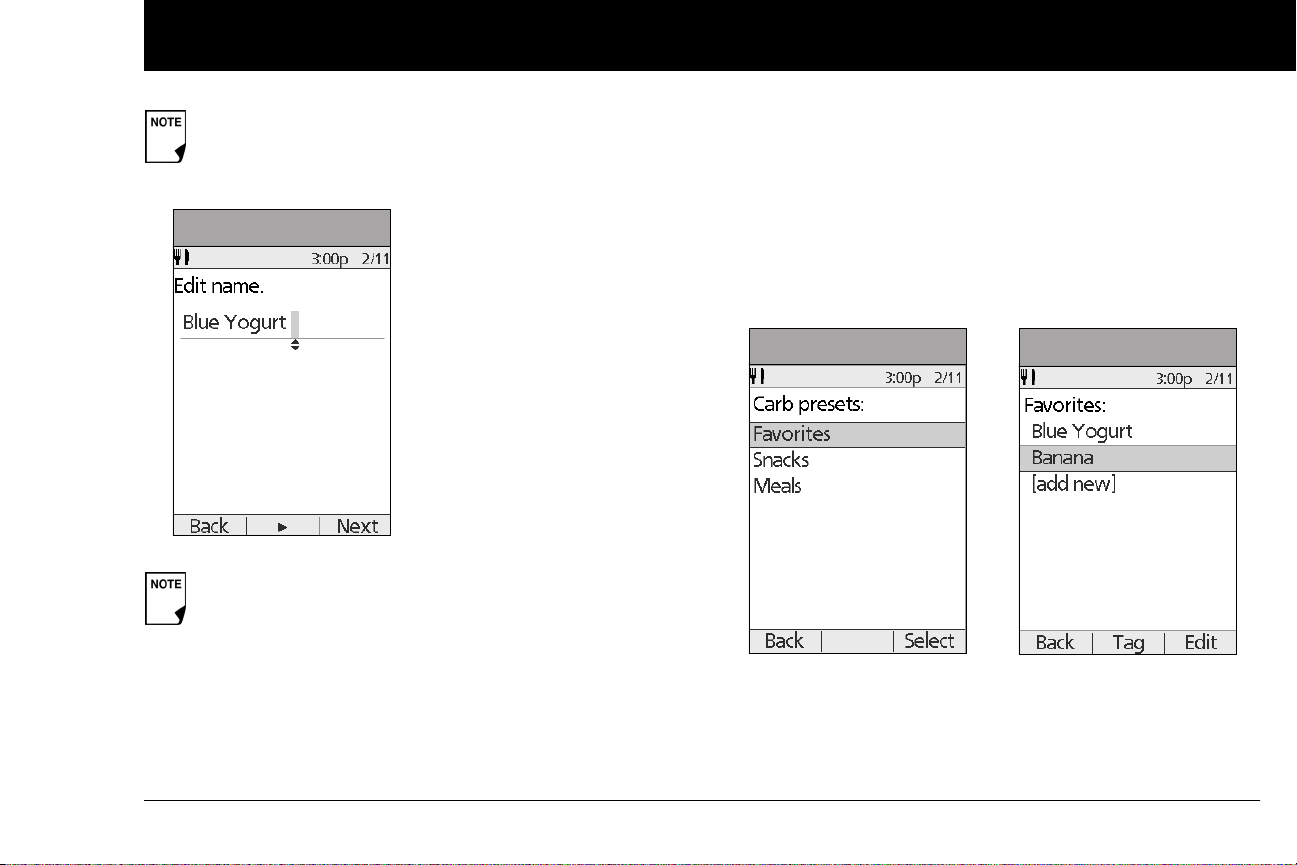
Understanding and Delivering Bolus Doses
4
These additional units are not required. If you prefer not
to enter them, simply press Next repeatedly to skip
through the screens.
Figure 4-20
If you do include grams of fiber in step 8 to the left, the
suggested bolus calculator uses carbs minus fiber. Alternatively, in step 7, you can enter the total grams of carbs
minus the fiber yourself. Your healthcare provider can
best advise you on how to make this entry.
9. Press Save to add the preset to the category.
Change or edit a carb preset
1. On the Home screen, use the Up/Down Controller buttons
to choose Settings, then press Select.
2. Choose Presets, then press Select.
3. Choose Carb presets, then press Select.
4. Choose the category of the preset you want to change, then
press Select (Figure 4-21).
Figure 4-21
Figure 4-22
To change the category for a carb preset
1. Choose the carb preset you want to move to another category, then press Ta g (Figure 4-22).
2. Choose a new category, then press Select.
41
Page 54
Understanding and Delivering Bolus Doses
4
To edit a carb preset
1. Choose the carb preset you want to change, then press Edit.
2. Press Edit again on the next screen.
3. To rename the carb preset, press the Up/Down Controller
buttons to enter the characters that spell out the name you
want, then press Next.
To “erase” characters, press either Up or Down until you reach
the end of the characters, which gives you the option to
choose a blank space.
4. Enter the grams of carbohydrate in the meal, then press Next.
5. If you want, enter the grams of fiber, fat, and protein in the
meal, and the total calories. Press Next after each entry.
These additional units are not required. If you prefer
not to enter them, simply press Next repeatedly to
skip through the screens.
6. Press Save to update the preset.
Delete a carb preset
1. On the Home screen, use the Up/Down Controller buttons
to choose Settings, then press Select.
2. Choose Presets, then press Select.
3. Choose Carb presets, then press Select.
4. Choose the category of the preset you want to change, then
press Select.
5. Choose the carb preset you want to delete, then press Edit.
6. Press Delete.
7. Press Delete again to permanently delete the preset.
n Reference Food Library
The Food Library is for reference only. (Food references contained in the library cannot be populated
and used for calculations.) Remember to write
down values from the food library on a piece of
paper to use them in the suggested bolus calculator.
The OmniPod System includes a reference library of over 1,000
common food items. The library shows each item’s grams or carbohydrate, fat, protein, and fiber values, and calories for a single
portion. You can use this information to determine the carbs for
a meal or snack you are going to eat. You can also use it to help
you create carb presets for your favorite meals.
The items in the food library are derived from the USDA database, USDA National Nutrient Database for Standard Reference.
Access the reference food library
1. On the Home screen, use the Up/Down Controller buttons
to choose More actions, then press Select.
2. Choose Food library, then press Select.
42
Page 55
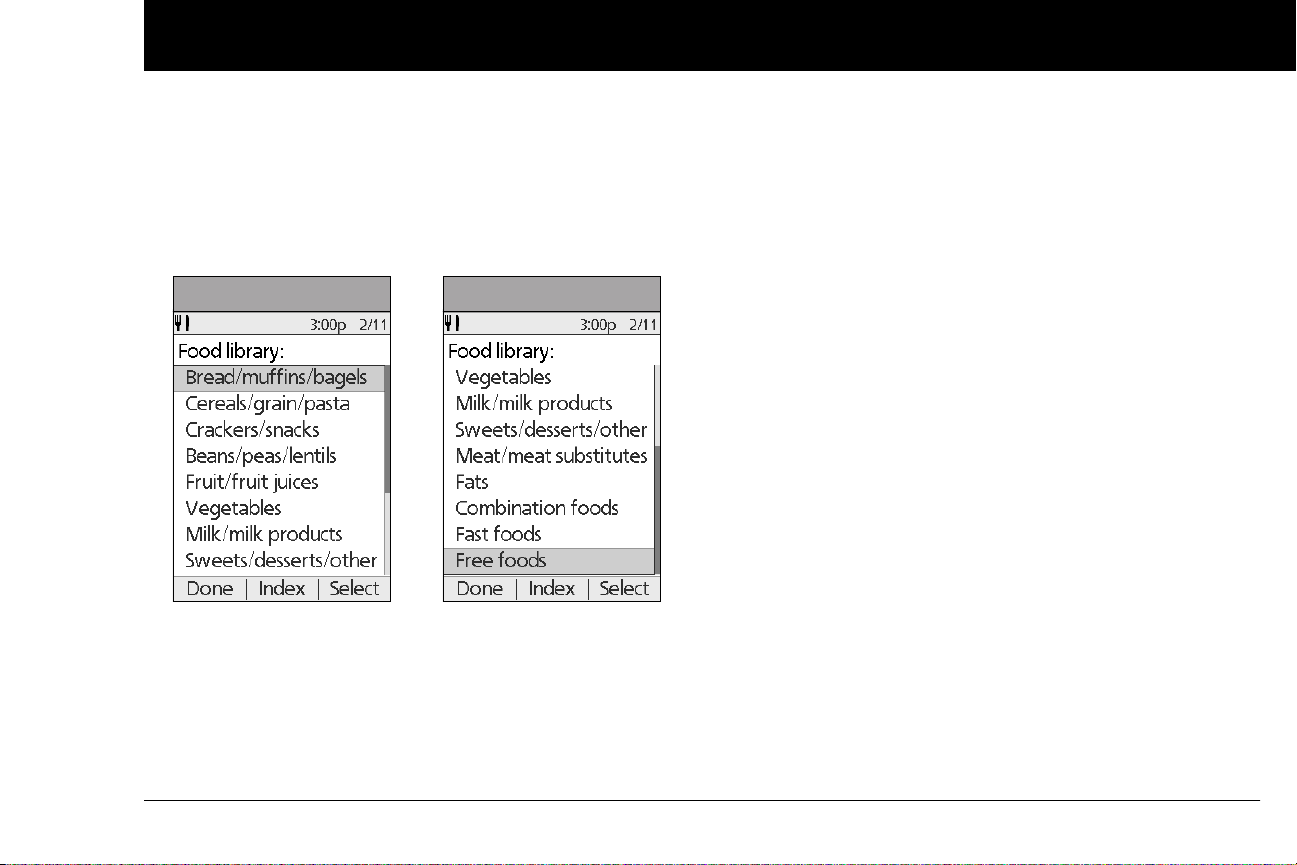
Understanding and Delivering Bolus Doses
4
The screen displays a list of main food categories (Figure 4-23a
and Figure 4-23b).
3. To choose directly from the food categories, choose a main
category, then press Select. Choose a subcategory, then
press Select. Choose a food item from the subcategory, then
press View.
Figure 4-23a
4. To choose from an alphabetical list of foods, press Index.
Enter the first letter of the food item, then press Select.
Choose a food item from the alphabetical list, then press
View.
Figure 4-23b
The screen displays the food item’s:
• Name
• Serving size
• Grams of carbohydrate, fiber, fat, and protein
• Total calories
5. Press OK to return to the list of main food categories.
43
Page 56

CHAPTER 5
Using the Pod
n The Pod Change Process
Replace the Pod at least once every 48–72 hours or up to
200 units of insulin (2–3 days). Refer to the insulin labeling and
follow your healthcare provider’s directions for how often to
replace your Pod. If you like, you can set the Personal Diabetes
Manager (PDM) to notify you when it is time to replace the Pod
(see Chapter 6, Using the Personal Diabetes Manager).
WARNINGS!
• Do NOT apply or use a Pod if the sterile packaging is open or
damaged, or if the Pod has been dropped after removal from
the package as this may increase the risk of infection. Pods
are sterile unless packaging has been opened or damaged.
• Do NOT apply or use a Pod if it is damaged in any way. A damaged Pod may not work properly.
• To minimize the possibility of site infection, do NOT apply a
Pod without first using aseptic technique. This means to:
44
• wash your hands
• clean the insulin vial with an alcohol prep swab
• clean the infusion site with soap and water or an alcohol
prep swab
• keep sterile materials away from any possible germs
• Do NOT use a Pod if you are sensitive to or have allergies to
acrylic adhesives, or have fragile or easily damaged skin.
• Check often to make sure the Pod and soft cannula are
securely attached and in place. A loose or dislodged cannula
may interrupt insulin delivery. Verify there is no wetness or
scent of insulin, which may indicate the cannula has dislodged.
• Do NOT apply a new Pod until you have deactivated and
removed the old Pod. A Pod that has not been deactivated
properly may continue to deliver insulin as programmed, putting you at risk of over infusion and possible hypoglycemia.
Page 57
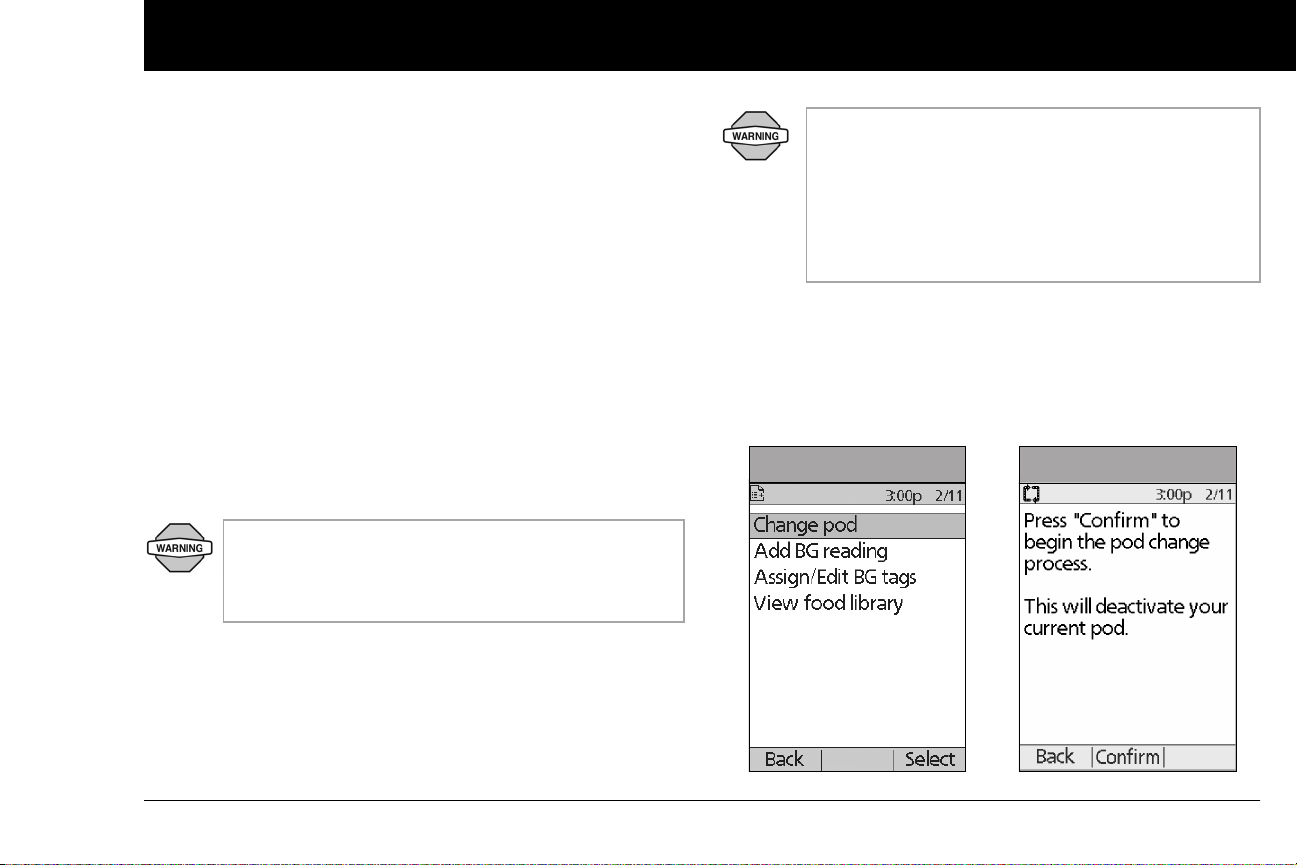
Using the Pod
5
• Because insulin Pods use only rapid-acting insulin, users are
at increased risk for developing hyperglycemia (high blood
glucose) if insulin delivery is interrupted. If it is untreated,
severe hyperglycemia can quickly lead to diabetic ketoacido-
sis (DKA). DKA can cause symptoms such as breathing difficulties, shock, coma, or death. If insulin delivery is interrupted for
any reason, you may need to replace the missing insulin usually with an injection of rapid-acting insulin. Ask your healthcare provider for instructions on handling interrupted insulin
delivery.
Gather equipment and supplies
Gather the following before you begin:
• A vial of rapid-acting U-100 insulin (See the warning on
page x of the Introduction for a list of insulin’s approved for
use in the OmniPod System.)
NEVER use insulin that is cloudy; it may be old or inactive. Failure to use rapid-acting U-100 insulin, or using
insulin that is expired or inactive, may lead to hyperglycemia or diabetic ketoacidosis (DKA).
• An unopened Pod
• An alcohol prep swab
If you are a first-time OmniPod System user, your
healthcare provider will guide you through the steps
for initializing and applying your first Pod. Do NOT
attempt to apply or use a Pod until you have been
trained by your healthcare provider. Use of the System with inadequate training or improper setup
could put your health and safety at risk.
Deactivate the current Pod
1. On the Home screen, use the Up/Down Controller buttons
to choose More actions, then press Select.
2. Choose Change Pod (Figure 5-1), then press Select.
3. Press Confirm (Figure 5-2) to deactivate the current Pod.
Figure 5-1
Figure 5-2
45
Page 58
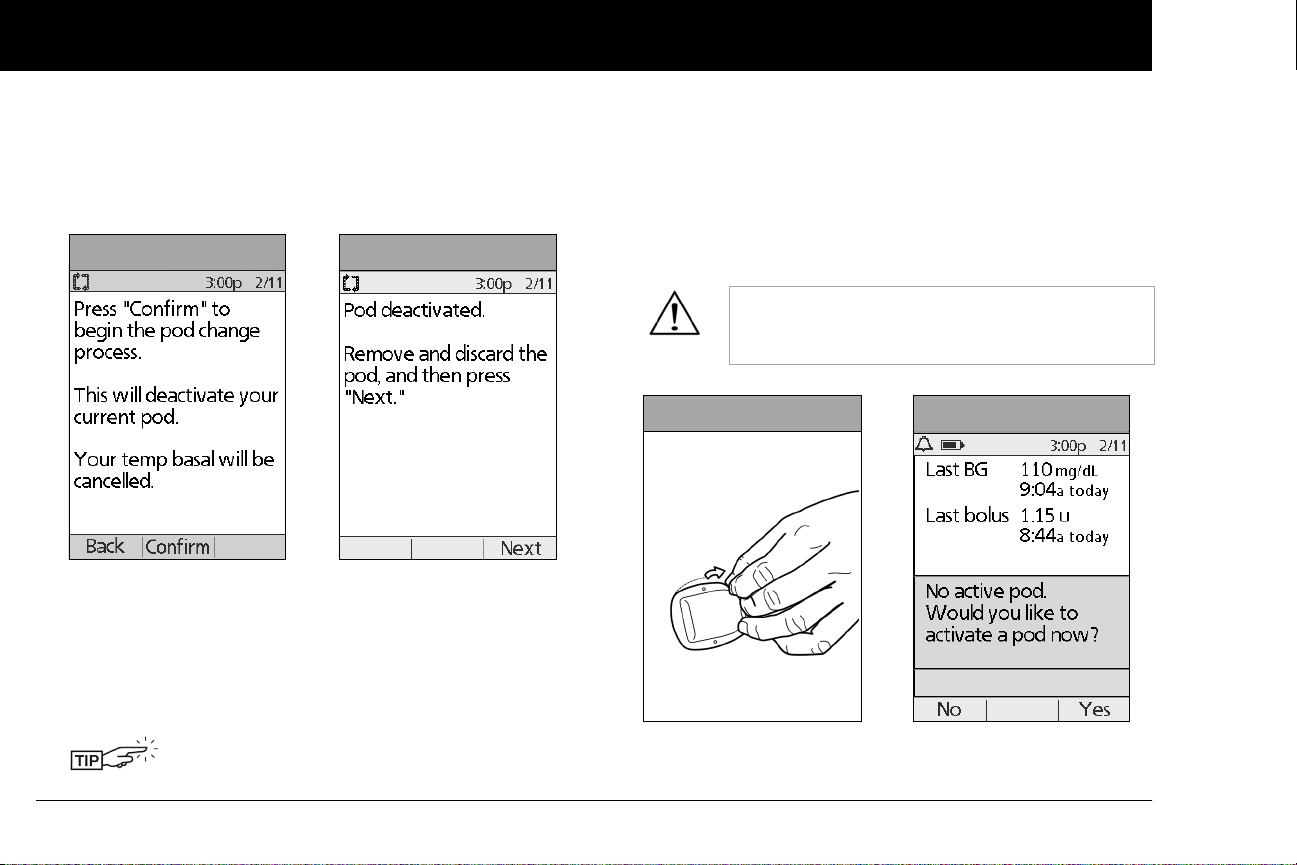
Using the Pod
5
4. If an extended bolus or temporary basal or both are actively
running, you will see a message similar to that shown in
Figure 5-3. Press Confirm to accept the cancellation.
Or press Back to return to the More actions menu.
Figure 5-3 Figure 5-4
5. After you press Confirm, you will see the message in
Figure 5-4.
To remove the old Pod:
a. Gently lift the edges of the adhesive tape from your skin
and remove the entire Pod (Figure 5-5).
Removing the Pod slowly will help to avoid
possible skin irritation.
b. Use soap and water to remove any adhesive that remains
on the skin or, if necessary, use an adhesive remover.
c. Discard the used Pod according to local waste disposal
regulations.
6. After removing the old Pod, press Next.
7. Press Ye s to fill and activate a new Pod (Figure 5-6).
.
Check the infusion site for signs of infection.
See “Avoid Infusion Site Infections” later in this
chapter.
Figure 5-5 Figure 5-6
46
Page 59
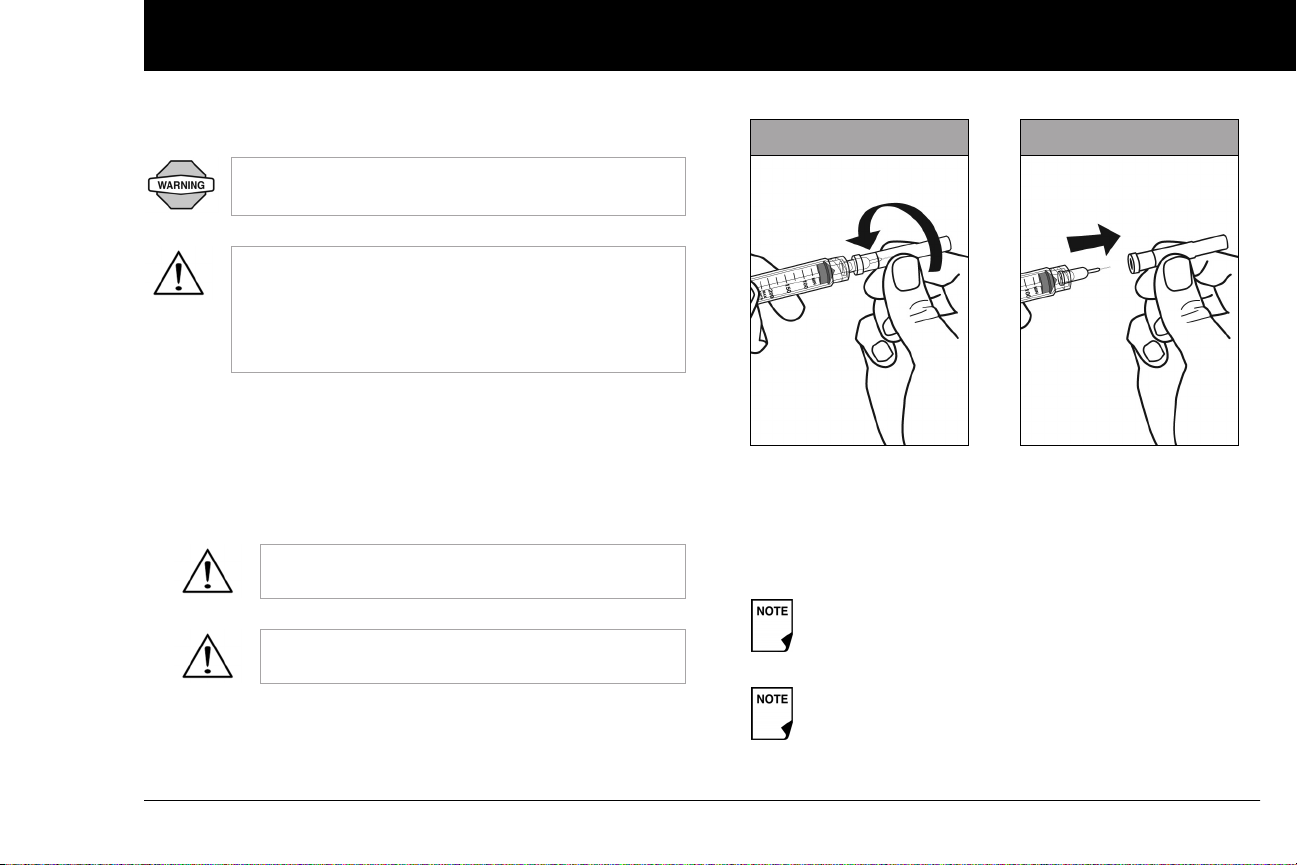
Using the Pod
5
Fill a new Pod
Before filling a Pod, ensure that no other Pods are
being activated within 24 inches of your PDM.
Before filling a Pod with insulin, ensure that the Pod
is above 50° Fahrenheit (10° Celsius). If the Pod has
been exposed to temperatures below 50° F (10° C),
then allow the Pod to be brought back to room temperature before filling it with insulin.
1. Use an alcohol prep swab to clean the top of the insulin vial,
then discard the prep swab.
2. Securely twist the fill needle onto the syringe (Figure 5-7).
3. Pull outward to remove the protective cap from the needle
(Figure 5-8). Save the cap; you will need it later.
Use care after removing the needle cap and
exposing the fill needle.
Only use room temperature insulin when filling
the Pod.
Figure 5-7 Figure 5-8
4. Determine the amount of insulin you need to insert into the
Pod. For example, if you will use this Pod for 48 hours, you
need enough insulin to last you 48 hours. Your healthcare
provider will help you determine the correct amount.
The Pod requires a minimum of 85 units of insulin to
begin operation.
The Pod can deliver up to 200 units of insulin.
47
Page 60
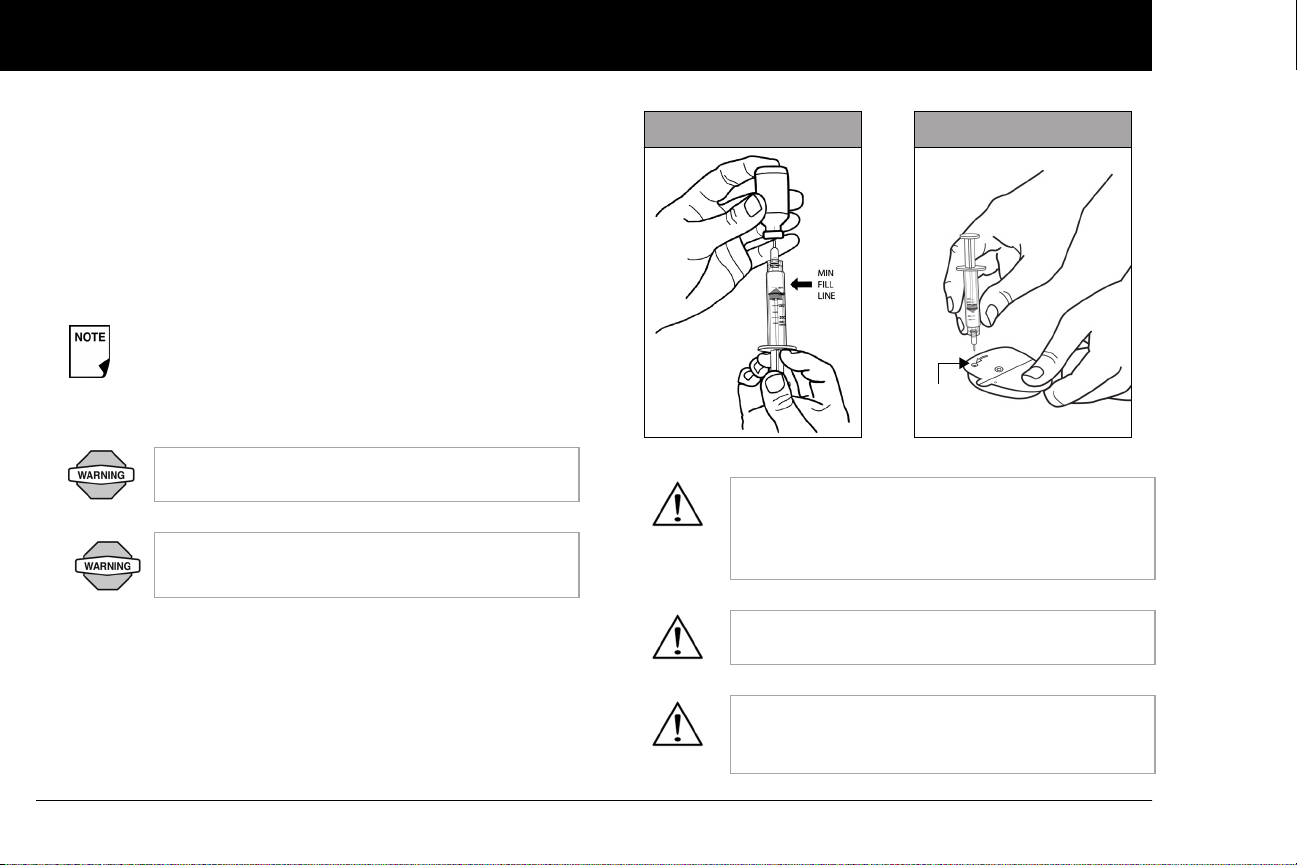
Using the Pod
5
5. Draw air into the syringe up to the amount of insulin you
want.
6. Insert the needle into the insulin vial and inject the air. This
makes it easier to withdraw insulin from the vial.
7. Turn the vial and syringe upside down. Withdraw insulin from
the vial into the syringe, expelling any and all air or air bubbles. Fill at least to the MIN (minimum) fill line (Figure 5-9).
Refer to the Care Giver Guide as an additional reference.
Any air bubbles present in the fill syringe could be
transferred into the reservoir during the fill process.
The pod does not purge air that is introduced into the
reservoir by way of the fill syringe.
Failure to expel air bubbles from the fill syringe
may result in interrupted insulin delivery.
Make sure there is no air in the syringe before
attempting to fill a Pod with insulin.
8. Remove the needle from the vial and insert it straight down
into the insulin fill port on the underside of the Pod
(Figure 5-10).
Figure 5-9 Figure 5-10
Fill
port
Be sure to only insert the fill syringe into the fill
port. Attempting to inject insulin into any other
location on the Pod may result in damage to the
Pod or loss of insulin.
To ensure proper fill, do not insert the fill syringe
at an angle into the fill port.
Do not use any other type of needle or filling
device besides the syringe provided with each
Pod.
48
Page 61
Using the Pod
5
9. Depress the syringe plunger to completely empty the insulin
into the Pod. The Pod will beep, indicating that the System is
ready to proceed to the next step.
NEVER use a Pod if you feel resistance when you
depress the plunger. This condition can result in
interrupted insulin delivery.
10. Remove the needle from the insulin fill port. The port is selfsealing; insulin will not leak after the needle is removed.
11. Place the protective cap back on the needle and remove the
needle from the syringe.
Do not insert the fill syringe into the fill port more
than once.
NEVER inject air into the fill port. Doing so may
result in unintended or interrupted insulin
delivery.
The fill syringe is intended for single use only and
should be used only with the OmniPod System.
12. After you fill the Pod, it will beep twice. After hearing the
beeps, PDM and Pod should be adjacent and touching,
either in or out of tray to ensure proper communication
during priming (Figure 5-11 on the next page). Press Next.
As a safety feature, the communication distance between the Pod and PDM is reduced during activation.
Once a Pod is primed and communicates with the
PDM, the full communication range is restored and
the Pod can receive commands only from that PDM.
13. The Pod will only beep if you have filled it with at least 85 units
of insulin. If you have filled the Pod with more than 85 units
and still do not hear the 2 beeps, please call Customer Care.
14. The System performs a series of safety checks and automatically primes the Pod (Figure 5-12 on the next page). Once
complete, the PDM beeps, letting you know that the priming
and safety checks were successful.
49
Page 62
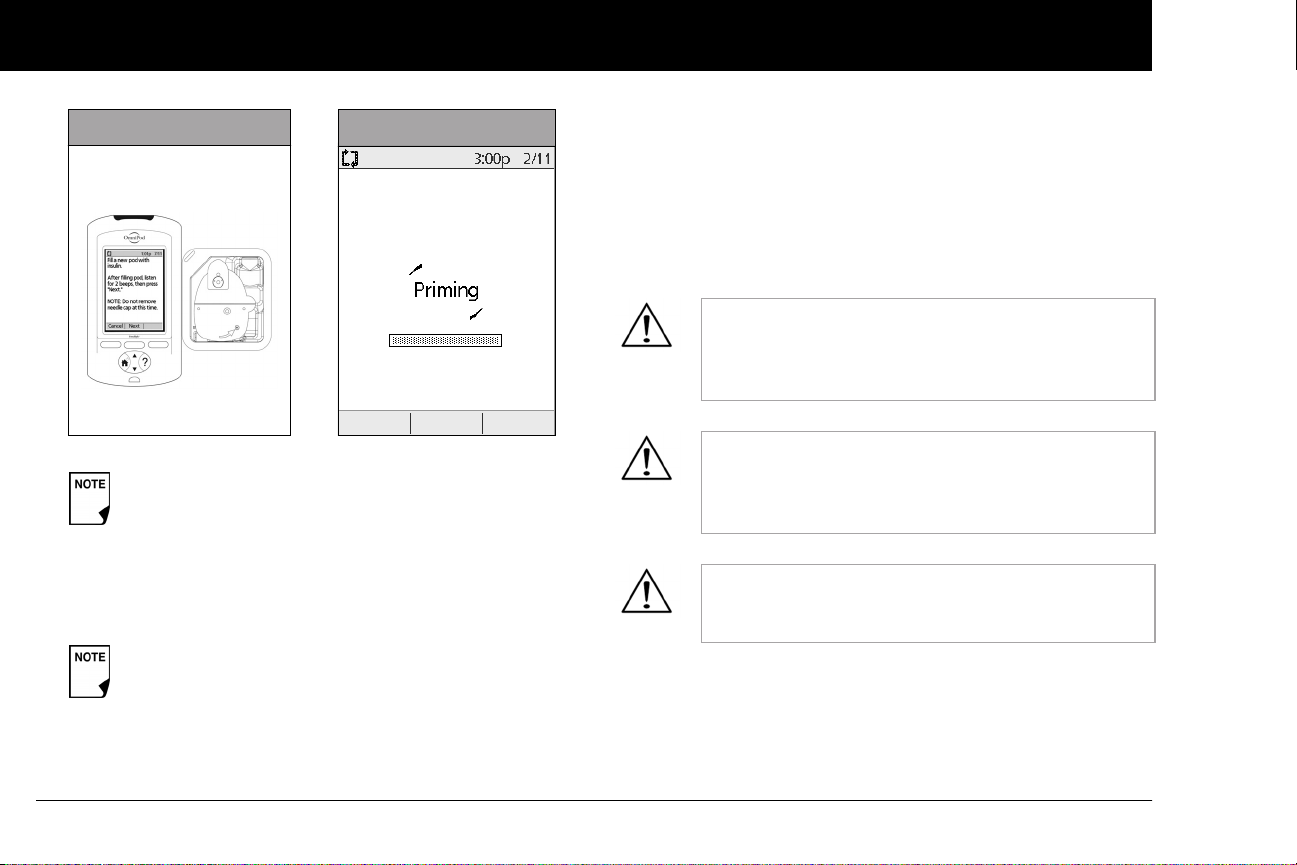
Using the Pod
5
Figure 5-11 Figure 5-12
After filling the Pod with insulin, you should complete
the Pod change process within 60 minutes. As a
reminder that the Pod has been filled, it will beep
every 5 minutes to indicate that time is passing. If you
do not set up the Pod within 60 minutes, you must
deactivate and discard it.
Once a Pod is activated and communicates with the
PDM, it can only receive commands from that PDM,
not from any other.
Select the infusion site
Before applying a new Pod, you must first select an appropriate
infusion site. Due to ease of access and viewing, the abdomen is
often used. Your healthcare provider may suggest other potential sites that, like the abdomen, typically have a layer of fatty
tissue, such as the hip, back of upper arm, upper thigh, or lower
back (Figure 5-13 and Figure 5-14 on the next page).
Avoid sites where belts, waistbands, or tight clothing
may rub against, disturb, or dislodge the Pod. Also
avoid sites where the Pod will be affected by folds of
skin.
Change the site each time you apply a new Pod. A
new infusion site should be at least 1" away from the
last site. (Using the same location repeatedly may
reduce insulin absorption.)
Do NOT apply the Pod within 2" of your navel or over
a mole, tattoo, or scar, where insulin absorption may
be reduced.
50
Page 63
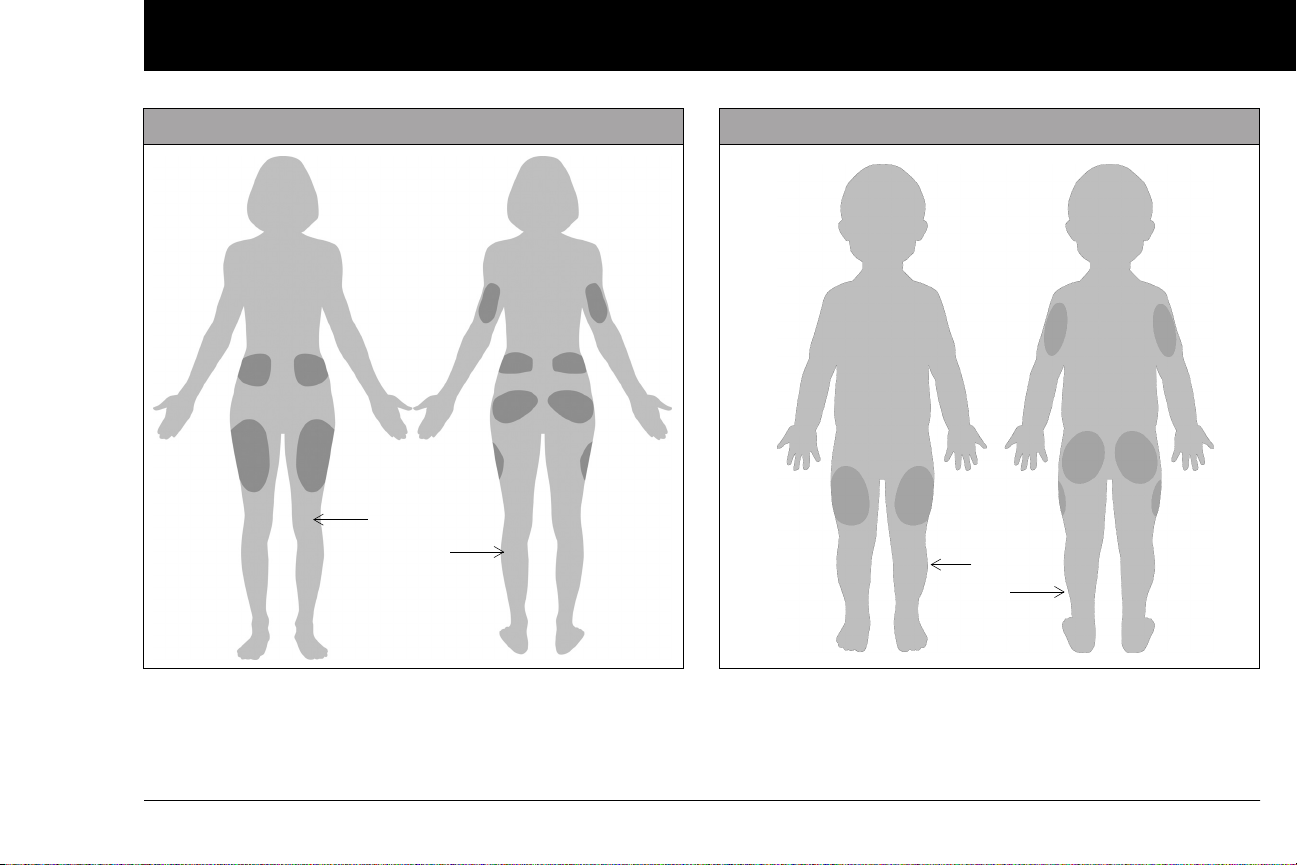
Using the Pod
5
Figure 5-13: Adult
Front
Back
Figure 5-14: Youth
Front
Back
51
Page 64
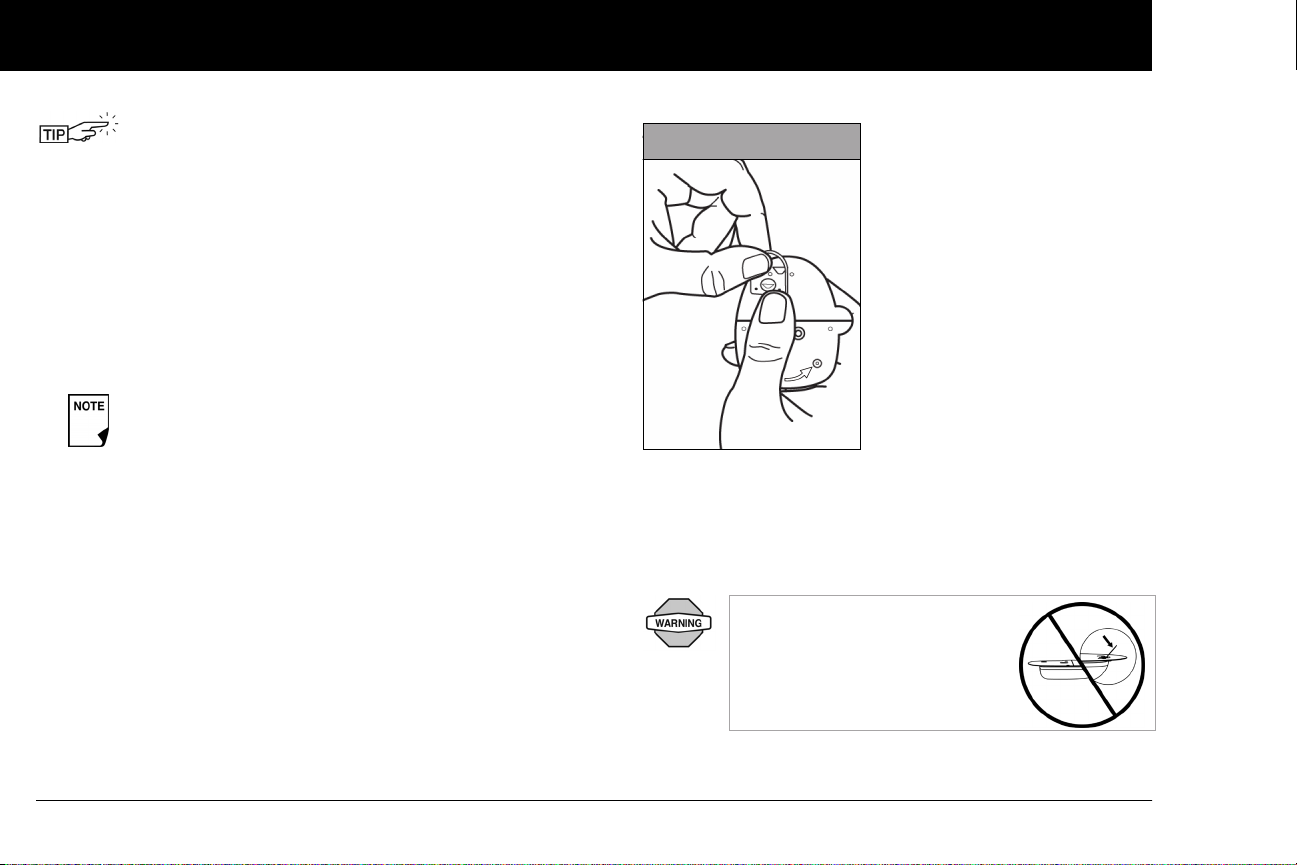
Using the Pod
5
To help avoid condensation from occurring in the
viewing window, make sure both your Pod and your
insulin are at room temperature.
Prepare the infusion site
You can reduce the risk of infection at the infusion site by follow-
ing aseptic technique and disinfecting the infusion site. Before
applying a new Pod, always:
1. Wash hands with soap and water.
2. Use soap to wash the infusion site.
Antibacterial soap may irritate skin, especially at the
infusion site. Ask your healthcare provider how to
treat any skin irritation.
Figure 5-15
3. Dry the site with a clean towel.
4. Use an alcohol prep swab to disinfect the infusion site. Start
at the center of the site and gently rub outward in a circular
motion.
5. Let the site air-dry thoroughly. Do not blow on the site to
dry it.
Apply the new Pod
Prepare the Pod for applying to your infusion site:
1. To remove the needle cap on the underside of the Pod, place
your thumb on the bottom (flat edge) of the needle cap and
pull it upwards (Figure 5-15). The needle cap will snap off.
52
2. Verify that the Pod is ready to be applied:
• Pod is clean and dry.
• Adhesive pad is intact and undamaged.
• Pod is intact and in its original condition.
Verify cannula does not extend
beyond adhesive backing once
needle cap is removed.
• If Pod is accidentally dropped, discard it; sterility may be
compromised.
Page 65
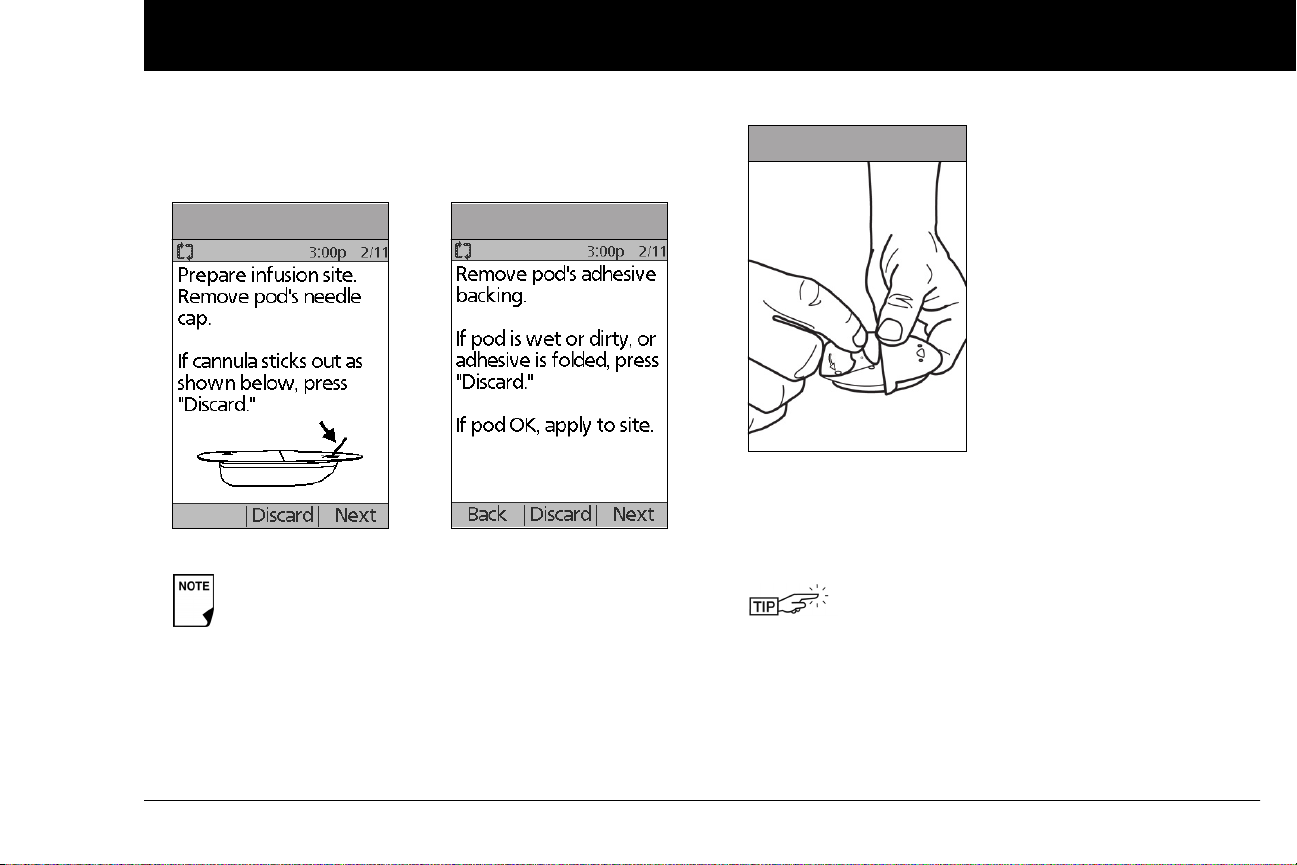
Using the Pod
5
• If you are unsure the Pod is ready to be applied to the site,
press “Discard” and do not use it (Figure 5-16 & Figure 5-
17). Select a new Pod.
Figure 5-16
Figure 5-13
Do not remove the needle cap until you are
instructed to do so by the PDM. When you remove
the needle cap, a drop of insulin may be visible at the
end of the cannula or in the well.
Figure 5-17
Figure 5-13
Figure 5-18
3. Using the pull tabs, remove and discard the white paper
backing from the adhesive tape (Figure 5-18).
4. Apply the Pod to the prepared infusion site. Press firmly to
secure it to your skin.
For the Pod to work best, apply it:
a. Crosswise or at a slight angle on your abdo-
men, hip, upper back, or buttocks (in Figure 519 on the next page)
b. Up and down or at a slight angle on your
upper arm or thigh (in Figure 5-19 on the next
page)
c. At least one inch away from the last site
53
Page 66
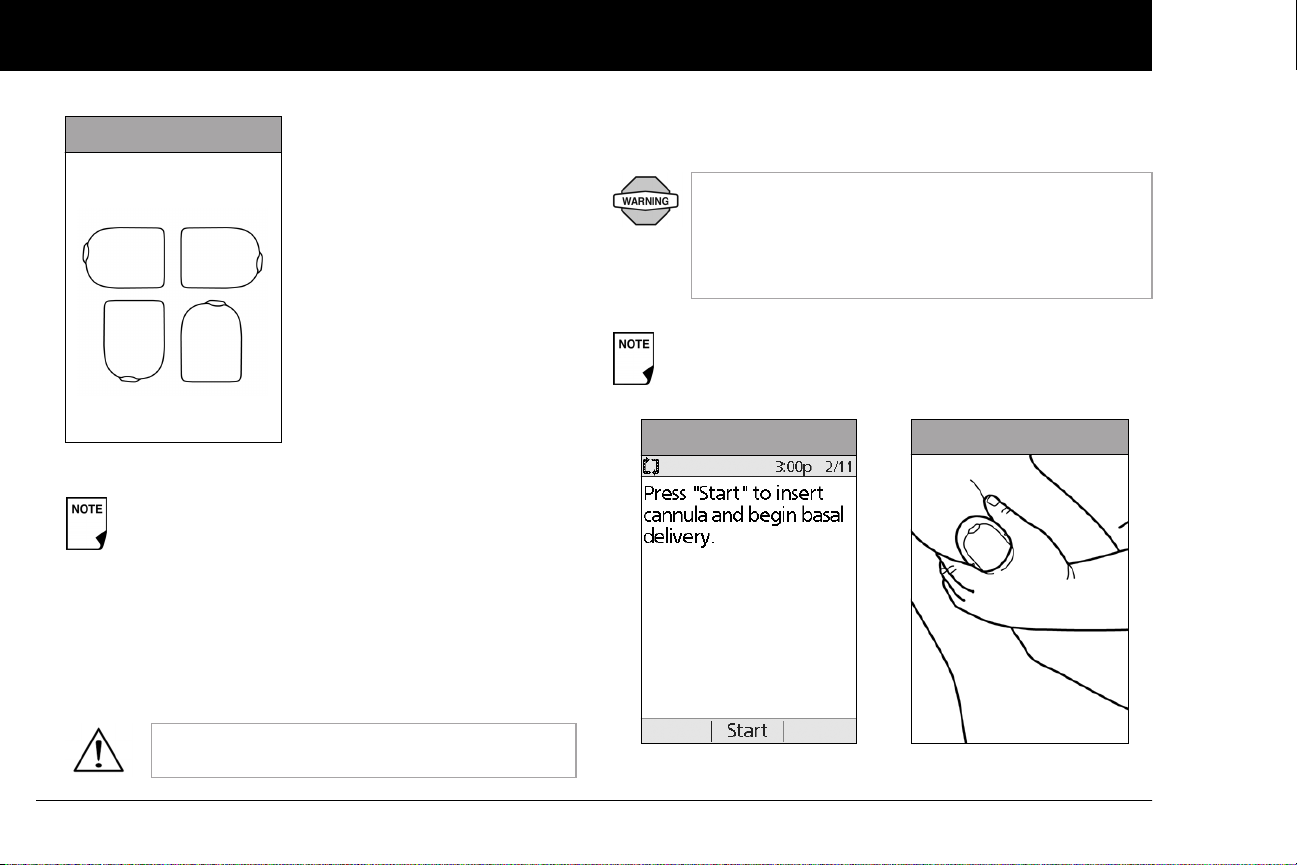
Using the Pod
5
Figure 5-19
Figure 5-13
a.
b.
The Pod’s adhesive keeps it securely in place for up to
3 days. However, if necessary, several products are
available to enhance adhesion. Ask your healthcare
provider about these products. Avoid getting body
lotion, creams, or oils near the infusion site; these
products may loosen the adhesive.
5. After you securely apply the Pod, press Next (Figure 5-15 on
page 52 & 5-16 on page 53).
The adhesive is designed for one-time use. Once
removed, a Pod cannot be reapplied.
Insert cannula and begin insulin delivery
1. To insert the soft cannula, press Start (Figure 5-20).
If you are applying a Pod in a place that does not have
a lot of fatty tissue or is very lean, pinch the skin
around the Pod (Figure 5-21) after you press Start
and hold it until the cannula inserts. Occlusions may
result in lean areas if you do not use this technique.
The soft cannula is tinted light blue.
Figure 5-20
Figure 5-21
54
Page 67
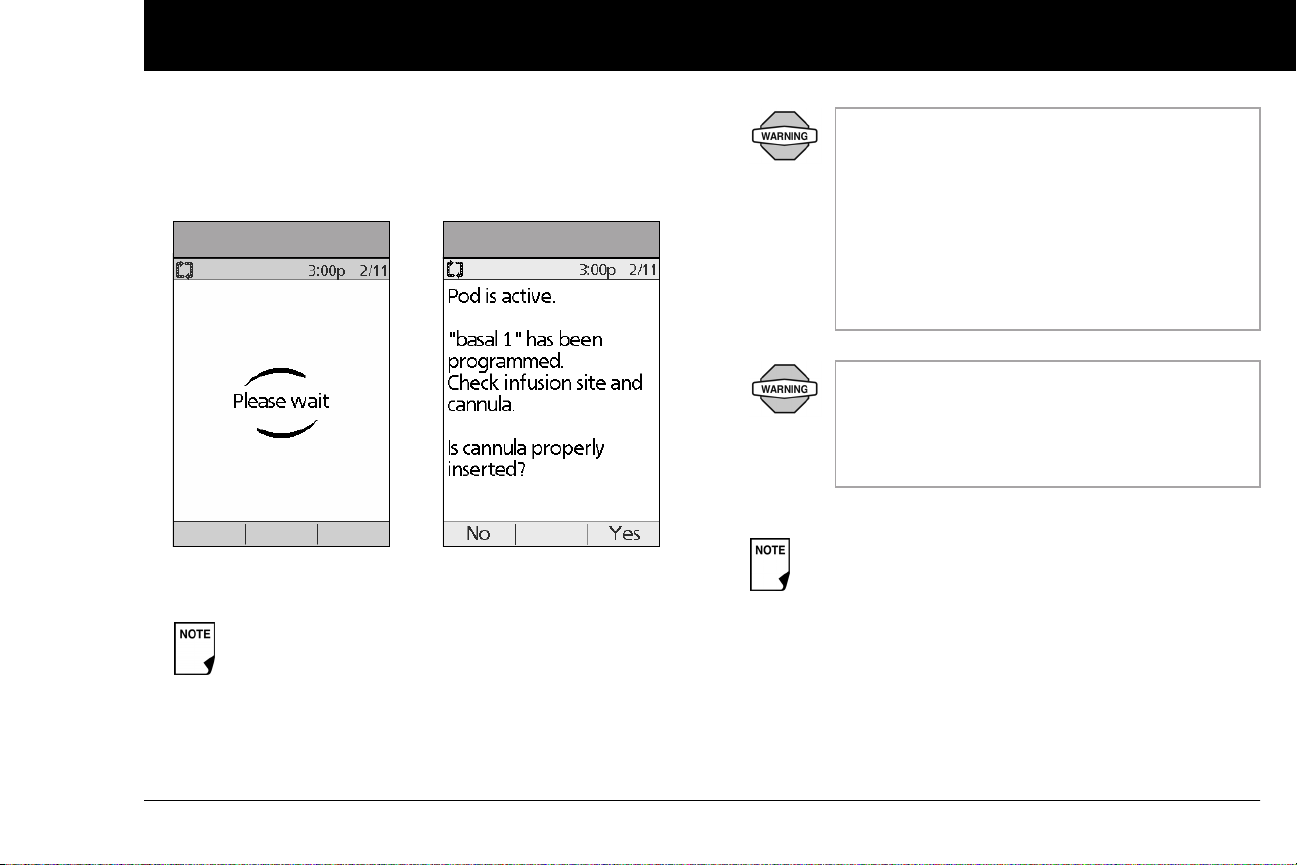
Using the Pod
5
The Pod automatically inserts the soft cannula below your skin. It
takes a few seconds to complete this process. Once the cannula
is inserted, the Pod delivers a prime bolus to fill the cannula with
insulin (Figure 5-22).
Figure 5-17
Figure 5-22
Once the soft cannula is inserted, the PDM indicates that the Pod
is active (Figure 5-23).
You will hear a click when the cannula inserts.
Figure 5-23
Check the infusion site after insertion to ensure
that the cannula was properly inserted. The PDM
will automatically remind you to check your
blood glucose 1.5 hours after each Pod
change (Figure 5-24 on the next page). If the
cannula is not properly inserted, hyperglycemia
may result. Verify there is no wetness or scent of
insulin, which may indicate the cannula has dislodged.
If you observe blood in the cannula, check your
blood glucose more frequently to ensure insulin
delivery has not been affected. If you experience
unexpected elevated blood glucose levels,
change your Pod.
To help avoid condensation from occurring in the
viewing window, make sure both your Pod and your
insulin are at room temperature. Condensation may
occur in the viewing window, due to perspiration.
55
Page 68
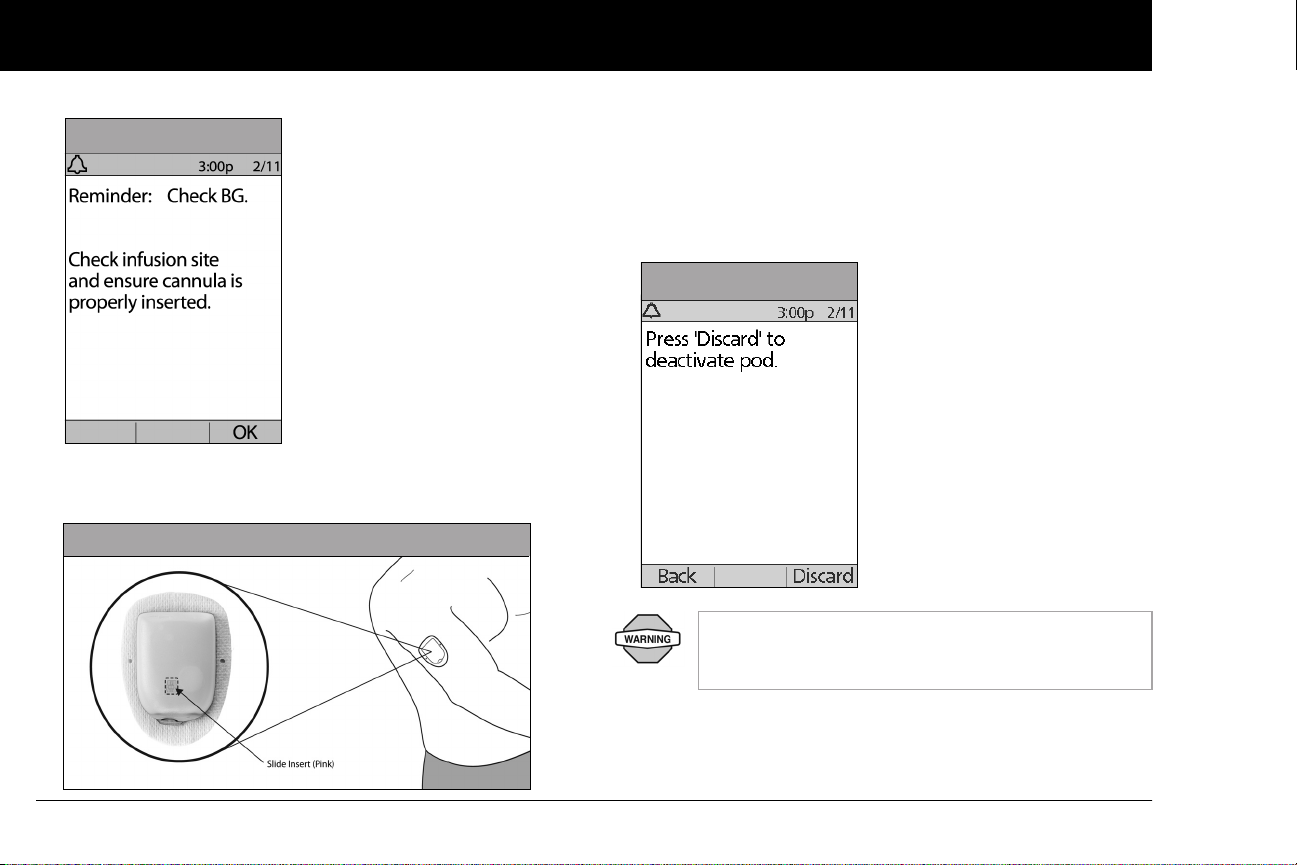
Using the Pod
5
Figure 5-24
When you see the pink slide insert in this position, it means that
the cannula is inserted (Figure 5-25).
Figure 5-25
2. Press Ye s if you can see that the cannula is properly inserted.
The PDM returns to the Status screen.
Press No if you see a problem with the cannula. The PDM
instructs you to deactivate the new Pod (Figure 5-26). Press
Discard to restart the process with a new Pod.
Figure 5-26
Figure 5-19
NEVER inject insulin (or anything else) into the
fill port while the Pod is on your body. Doing so may
result in unintended or interrupted insulin delivery.
56
Page 69
Using the Pod
5
n Check Pod Status
To check Pod status, if the PDM is turned Off, press and hold the
Power button to display the ID screen, then press Confirm to
display the Status screen. If the PDM is On, press Back until you
reach the Status screen. (If you press and hold the Power button, you will turn off the PDM instead.) Or, from the Home
screen, press Status.
The PDM automatically checks the status of the Pod. The PDM
then displays the current reservoir volume, PDM battery level,
last blood glucose, last bolus dose, active basal program, insulin
on board (IOB), and any alarm conditions. See Chapter 6, Using
the Personal Diabetes Manager, for details of what you see on
the Status screen.
Once a Pod is activated and communicates with the
PDM, it can only receive commands from that PDM,
not from any other.
If the Pod goes into hazard alarm condition and the PDM is
unable to communicate with it to turn off the alarm, you can turn
it off manually. See the end of Chapter 10, Alerts and Alarms, for
instructions.
n Suspend Insulin Delivery
Sometimes you may need to briefly stop insulin delivery (for
example, when editing an active basal program or changing the
time or date). The OmniPod System lets you suspend all insulin
delivery for up to 2 hours. While in suspension, the Pod beeps
once every 15 minutes, reminding you that insulin delivery is
suspended.
At any time during a suspension period, press Resume
to resume the basal program that is programmed for
that time.
Extended boluses and temporary basal rates will be cancelled when you suspend insulin delivery.
1. On the Home screen, use the Up/Down Controller buttons
to choose Suspend; then press Select.
2. Enter how long you want to stop all insulin delivery, from 30
minutes to 2 hours, in 30-minute increments (Figure 5-27 on
the next page), then press Enter.
3. Press Confirm to confirm that you want to halt all insulin
delivery (basal and bolus). The PDM beeps and an on-screen
message lets you know that insulin delivery is indeed suspended (Figure 5-28 on the next page).
The Pod beeps every 15 minutes until the end of the suspension period. The Status screen shows INSULIN SUSPENDED
until you resume insulin delivery (see “Resume Insulin Delivery” on page 59).
57
Page 70
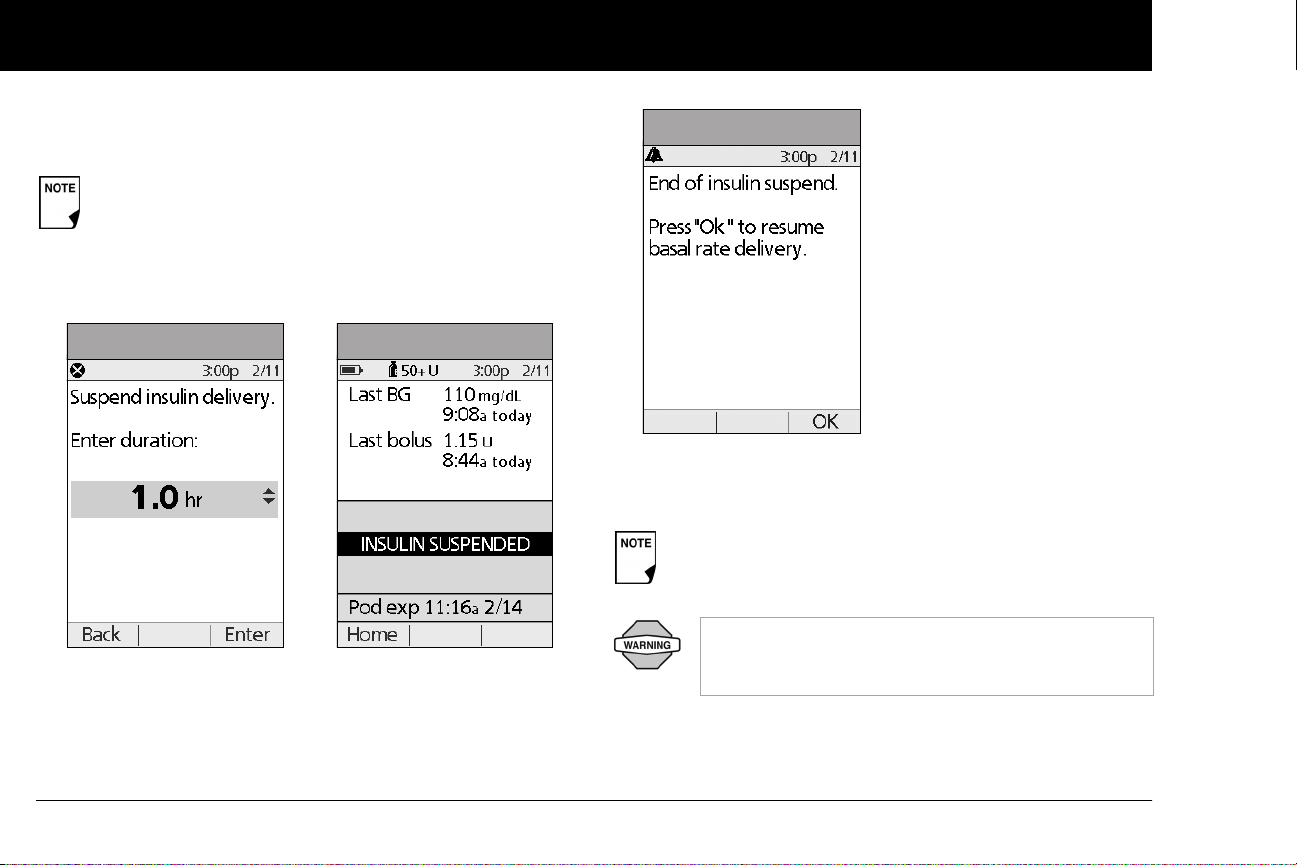
Using the Pod
5
4. At the end of the suspend time, a Pod Advisory alarm occurs
(Figure 5-28).
If a temporary basal or extended bolus is in process, the
menu item will read Suspend/cancel instead, and
options for cancelling these programs also appear in the
menu. If these options appear, choose Suspend insulin
delivery.
Figure 5-27
Figure 5-20
Figure 5-28
Figure 5-29
5. To resume your programmed basal rate, press OK
(Figure 5-29).
The Advisory alarm repeats every 15 minutes until you
press OK.
Insulin delivery will not resume until you press OK. If
you do not press OK to resume insulin delivery, you
could develop hyperglycemia (high blood glucose).
58
Page 71
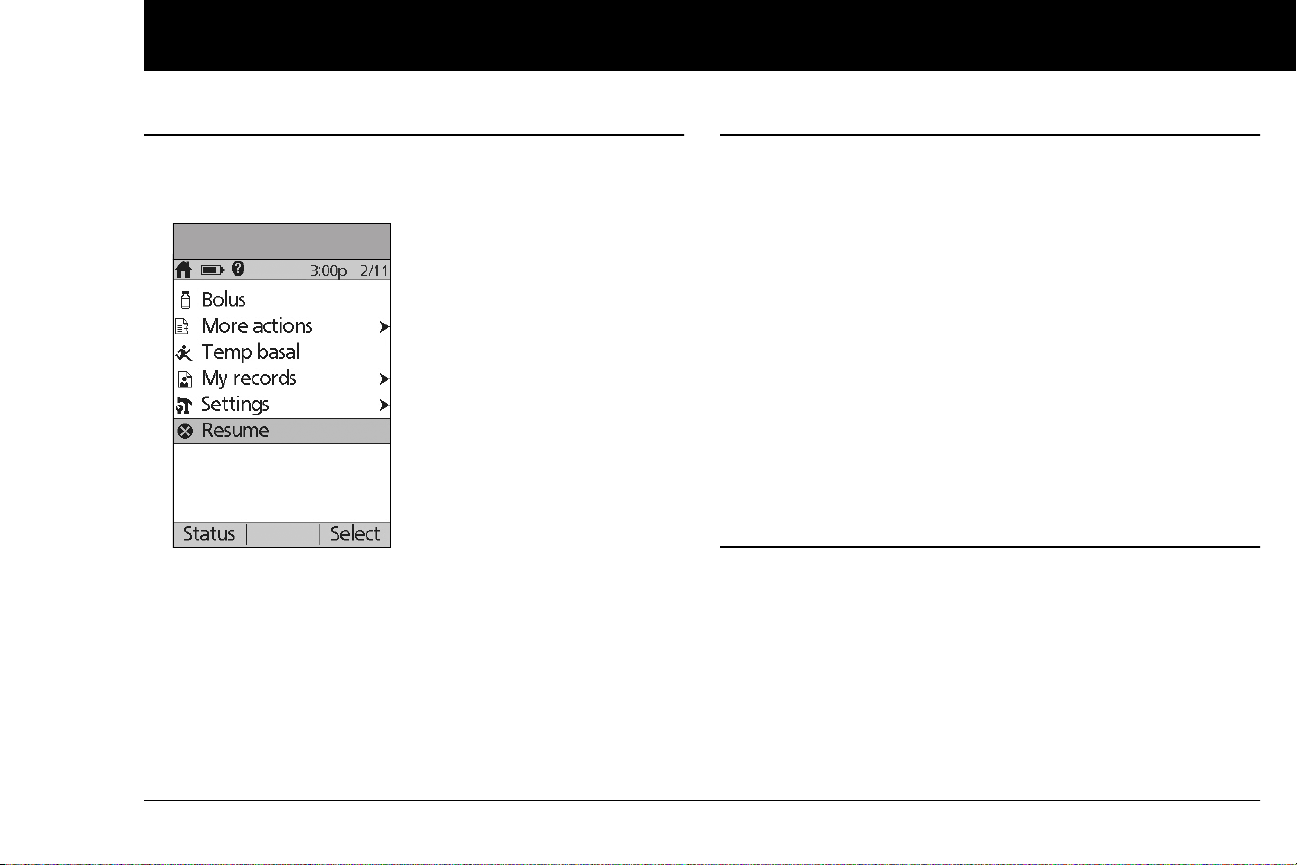
Using the Pod
5
n Resume Insulin Delivery
1. On the Home screen, use the Up/Down Controller buttons
to choose Resume (Figure 5-30), then press Select.
Figure 5-30
Figure 5-23
2. Press Confirm to restart the basal program for that time
segment.
n Avoid Infusion Site Infections
• Always wash your hands and use the aseptic technique to prepare the infusion site before applying a Pod.
• Do not apply a Pod to any area of the skin with an active
infection. If you are unsure whether to use a specific site, ask
your healthcare provider.
• At least once a day, use the Pod’s viewing window to check
the site for signs of infection and to confirm that the soft cannula is securely in place.
• Be aware of the signs of infection, including pain, swelling,
redness, discharge, or heat at the site. If you suspect an infection, immediately remove the Pod and apply a new one in a
different location. Then call your healthcare provider.
• Change the Pod as instructed by your healthcare provider.
n Get the Most From Your Pod
Avoid extreme temperatures
The Pod’s operating temperature is between 40° F and 98.6° F
(between 4.4° C and 37° C). Under normal circumstances, your
body temperature will keep the Pod well within this range.
59
Page 72
Using the Pod
5
Do NOT expose a Pod to direct sunlight for long periods of time. It is recommended that you remove your
Pod prior to using hot tubs, whirlpools, or saunas.
These conditions could expose the Pod to extreme
temperatures and may also affect the insulin inside
the Pod.
Remember to check your blood glucose levels frequently
before and after removing the Pod. Check with your
healthcare provider for guidelines on removing the Pod
for extended periods.
Insulin degrades at high temperatures and will
freeze near 32° F (0° C). Follow the insulin manufacturer’s instructions for use.
Water and your Pod
The Pod is waterproof up to a depth of 25 feet for up to 60 min-
utes (IPX8). After exposure to water, rinse off the Pod with clean
water and gently dry it with a towel.
Do not expose your Pod to water at depths greater
than 25 feet or for more than 60 minutes. Check
often to make sure the Pod and soft cannula are
securely attached and in place. If the cannula is not
properly inserted, hyperglycemia may result. Verify
there is no wetness or scent of insulin, which may
indicate the cannula has dislodged.
The PDM is not waterproof. Do not place it in or near
water.
Safe storage
Store unopened Pods in a cool, dry place. Extreme heat or cold
can damage Pods and cause them to malfunction. If Pods are
exposed to extreme temperatures, allow them to return to room
temperature before use.
Pods are sterile unless their packaging is opened or
damaged. Do NOT apply or use a Pod if its sterile
packaging is opened or damaged, or if the Pod has
been dropped after removal from the package as
this may increase the risk of infection or serious
injury.
60
Page 73
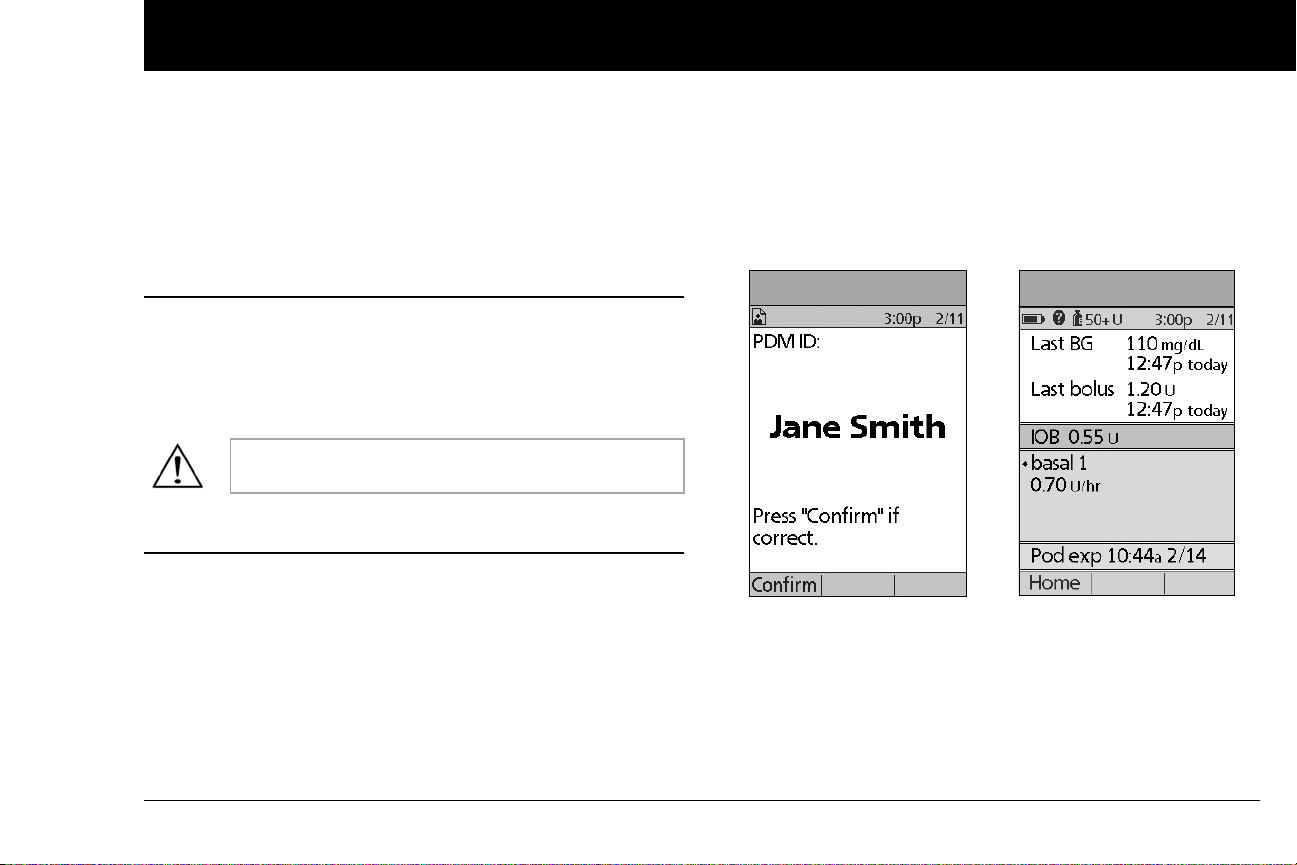
CHAPTER 6
Using the Personal Diabetes Manager
n The ID Screen
When you first turn on the PDM, it displays the identification (ID)
screen (Figure 6-1), which allows you to identify that the PDM is
yours. You can personalize the ID screen by adding your name
and choosing its color. You must acknowledge the ID screen
before you can use the PDM.
It is important that you always identify the PDM as
yours before you use it.
n The Status Screen
When a Pod is active and the PDM is turned on, the PDM estab-
lishes communication with the Pod to obtain a status check.
During the status check, the PDM collects information from the
Pod about bolus deliveries, active basal programs, and Pod expiration. The information obtained is then displayed in the status
screen, which shows the System’s current operating status.
Figure 6-1 Figure 6-2
The Status screen (Figure 6-2) displays:
• Current date and time
• Battery life remaining
• Insulin remaining
• Time, date, and result of last blood glucose entered manually
61
Page 74

Using the Personal Diabetes Manager
6
• Time, date, and total amount of last bolus delivered
• Amount of insulin on board (IOB), if suggested bolus calculator is in use
• Name and rate of active basal program or temp basal
program
• “Ext bolus,” the amount of insulin and the delivery time
remaining if an extended bolus is being delivered
• “INSULIN SUSPENDED” if insulin delivery has been
suspended
• Time and date when the Pod will expire
If a Pod has not yet been activated (as in during Pod
changes), the screen displays “No active Pod. Would you
like to activate a Pod now?” (See Chapter 5, Using the Pod,
for details on activating a Pod.)
Insulin gauge and display
One of the important icons on the Status screen is the insulin
gauge at the top of the screen. It indicates how much insulin is
left in the Pod’s reservoir. As the reservoir empties, the icon
changes to indicate the amount of insulin remaining.
Next to the insulin gauge, the PDM displays the number of units
remaining in the Pod. As long as more than 50 units remain, the
gauge displays “50+ U.” Once the reservoir volume drops to 50
units, the gauge counts down unit by unit. When the volume
falls below 5 units, the display changes to “LOW.”
Regularly checking the insulin gauge enables you
to plan Pod changes easily. For example, if you
know you will need approximately 20 units during
your work day and the insulin gauge shows only 17
units remaining, you can either take a new Pod with
you or change it before you leave for the day.
PDM settings
You can adjust the PDM settings to meet your individual needs.
1. From the Status screen, press Home.
2. Use the Up/Down Controller buttons to choose Settings,
then press Select.
3. Choose System setup, then press Select.
4. Choose an option from the System setup list, then press
Select (Figure 6-3 on the next page). Check with your health-
care provider before making any changes.
62
Page 75
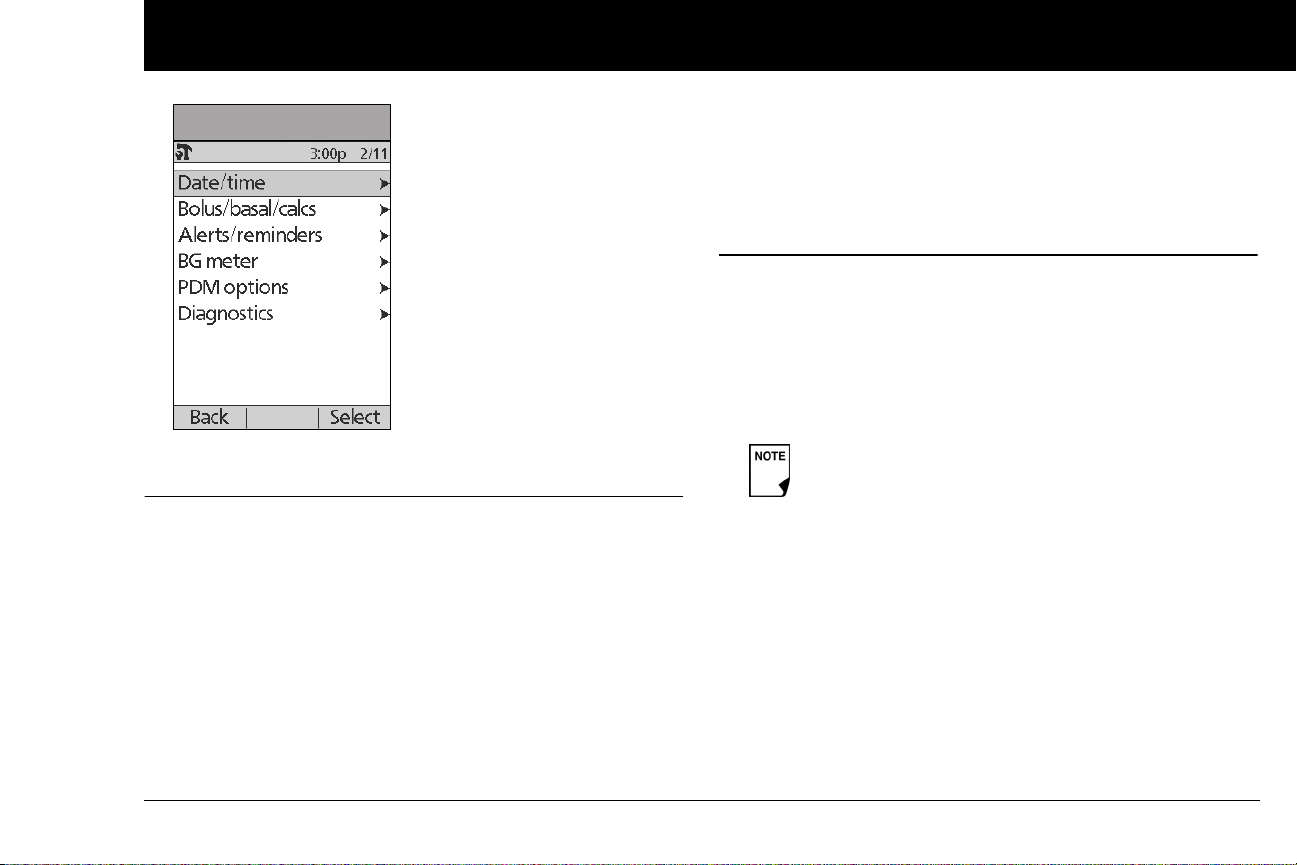
Using the Personal Diabetes Manager
6
Figure 6-3
n The System Setup Menu
The System setup menu lets you personalize the settings that
control the OmniPod System. These include:
• Date and time
• Bolus doses, basal rates, and bolus calculator settings
• Alerts and reminders
• Blood glucose tags
• PDM options
• Diagnostics
You and your healthcare provider entered initial System settings
using the Setup Wizard (see Chapter 2, Getting Started). After
setup, you can use the System setup menu to customize or
change those settings, as described in this chapter.
n Reset the Date or Time
Occasionally, you need to change date and time settings (for
example, to adjust for daylight savings time or after resetting the
PDM). As a safety feature, you can change date and time settings
only when the Pod is deactivated or when insulin delivery is suspended (see Chapter 5, Using the Pod).
1. Suspend insulin delivery.
If you are changing the Pod, you can reset the date or
time without suspending by changing the date or
time before activating the new Pod.
2. On the Home screen, use the Up/Down Controller buttons
to choose Settings; then press Select.
3. Choose System setup, then press Select.
4. Choose Date/time, then press Select.
5. Choose either Date or Time, then press Edit.
63
Page 76
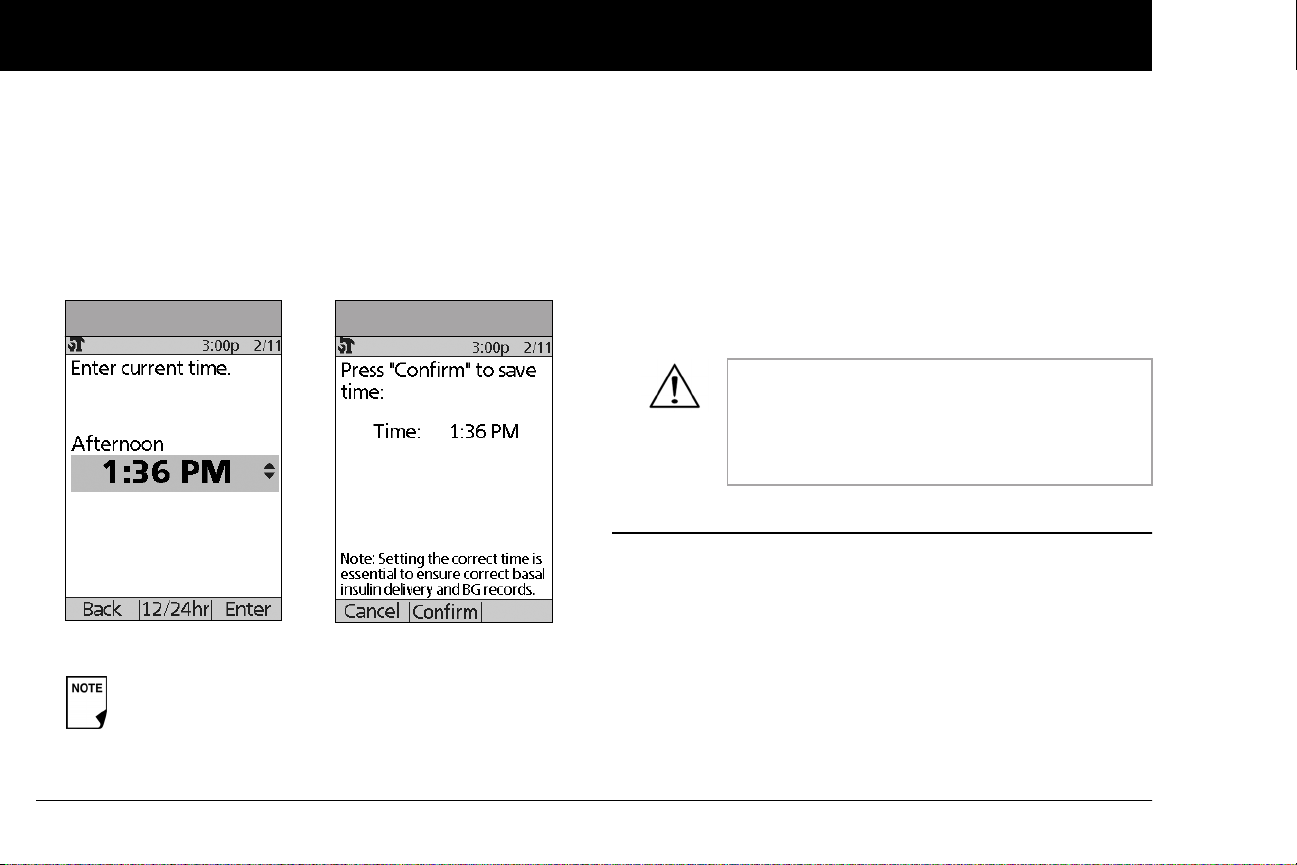
Using the Personal Diabetes Manager
6
Reset the time
1. To enter the current time, press the Up/Down Controller
buttons. Press and hold the button to increase or decrease
the time faster.
2. Press 12/24 hr to choose either a 12-hour or 24-hour clock,
then press Enter (Figure 6-4).
Figure 6-4 Figure 6-5
3. Press Confirm to accept the new time (Figure 6-5).
Setting the correct time is essential to ensure
correct basal insulin delivery and BG records.
Reset the date
1. Press the Up/Down Controller buttons to choose the cur-
rent year, then press Next.
2. Choose the current month, then press Next.
3. Choose the current day, then press Next.
4. Choose the date format to be displayed by the PDM, then
press Select.
5. Press Confirm to accept the new date and format.
If you suspended insulin delivery to change the
time or date, remember to resume insulin delivery. If you changed the time or date during the
Pod change process, remember to activate a new
Pod.
n Change Bolus and Basal Settings
You and your healthcare provider entered initial bolus and basal
System settings using the Setup Wizard. Using the System setup
menu, you can edit all the OmniPod System bolus and basal settings as your needs change. Check with your healthcare provider
before making any changes.
1. On the Home screen, use the Up/Down Controller buttons
to choose Settings, then press Select.
2. Choose System setup, then press Select.
64
Page 77
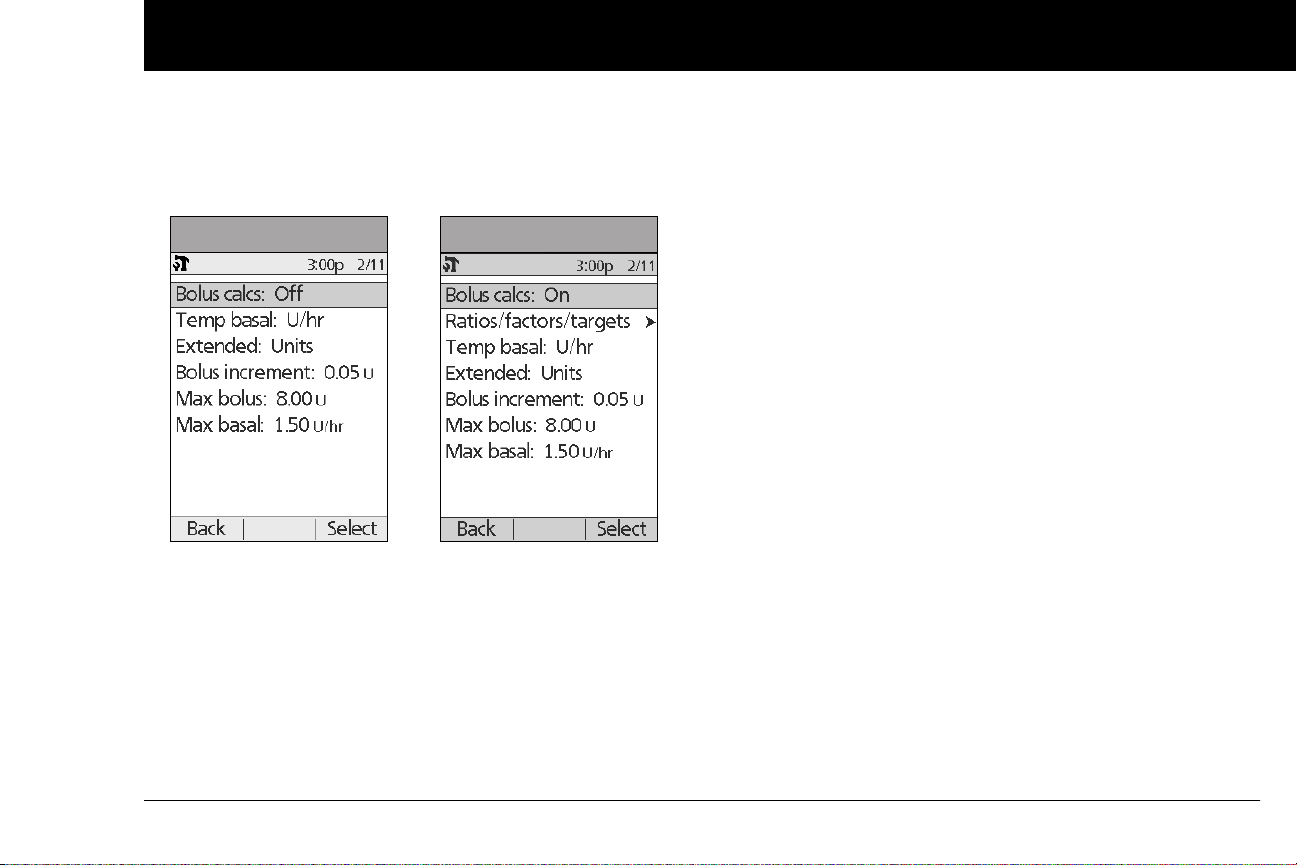
Using the Personal Diabetes Manager
6
3. Choose Bolus/basal/calcs, then press Select.
4. Choose one of the options (Figure 6-6a and Figure 6-6b), then
press Select. Each option is described below.
Figure 6-6a Figure 6-6b
Bolus calcs
When the suggested bolus calculator is turned Off and you want
to turn it On, press On and follow these steps:
1. Target BG and correct-above value—You can edit existing
time segments and add segments, up to a total of 8.
a. To edit an existing target BG time segment, choose the
segment, then press Edit. Use the Up/Down Controller
buttons to choose a new start time, end time, target BG
value, and correct-above value (correction threshold). Press
Next after each entry.
b. To add a segment, choose [add new], then press New.
Use the Up/Down Controller buttons to choose a start
time, end time, target BG value, and correct-above value
(correction threshold). Press Next after each entry.
c. When you have completed all the time segments you
want, press Done, then Save.
2. Min BG for calcs (minimum blood glucose value allowed for
calculating boluses)—Use the Up/Down Controller buttons
to enter a new minimum BG, then press Next.
3. Insulin-to-carb (IC) ratio—You can edit existing time segments and add segments, up to a total of 8.
a. To edit an existing IC ratio time segment, choose the seg-
ment, then press Edit (Figure 6-7 on next page). Use the
Up/Down Controller buttons to choose a new start time,
end time, and IC ratio. Press Next after each entry.
b. To add a segment, choose [add new], then press New.
Use the Up/Down Controller buttons to choose a start
time, end time, and IC ratio. Press Next after each entry.
c. When you have completed all time segments, press
Done, then Save.
65
Page 78
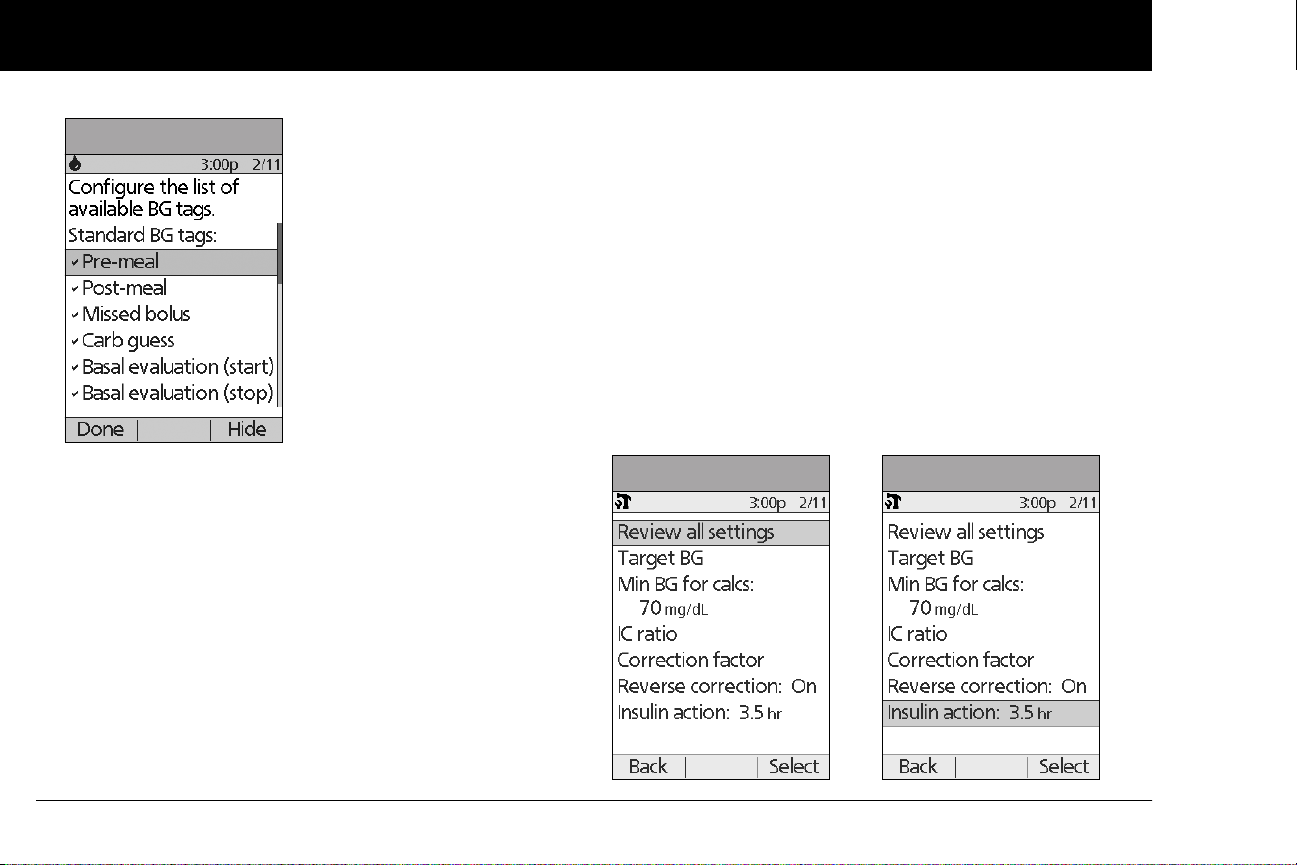
Using the Personal Diabetes Manager
6
Figure 6-7
4. Correction factor—You can edit existing time segments and
add segments, up to a total of 8.
a. To edit an existing correction factor time segment, choose
the segment, then press Edit. Use the Up/Down Control-
ler buttons to choose a new start time, end time, and correction factor. Press Next after each entry.
b. To add a segment, choose [add new], then press New.
Use the Up/Down Controller buttons to choose a start
time, end time, and correction factor. Press Next after
each entry.
c. When you have completed all time segments, press
Done, then Save.
5. Reverse correction—Choose On or Off, then press Next.
6. Insulin action (duration)—Use the Up/Down Controller
buttons to choose a duration of insulin action, then press
Done.
7. Press OK.
Ratios/factors/targets
When the suggested bolus calculator is turned On, you can view
and change all the settings using the Ratios/factors/targets
menu option. Choose Review all settings, then press Select
(Figure 6-8a) or choose one setting from the menu, then press
Select (Figure 6-8b). The steps are the same whether you choose
all settings or individual ones.
Figure 6-8a Figure 6-8b
66
Page 79

Using the Personal Diabetes Manager
6
When the suggested bolus calculator is turned Off, the
Ratios/factors/targets option does not appear in the
Bolus/basal/calcs menu.
1. Target BG and correct-above value—You can edit existing
segments and add segments, up to a total of 8.
a. To edit an existing target BG time segment, choose the
segment, then press Edit. Use the Up/Down Controller
buttons to choose a new start time, end time, target BG
value, and correct-above value (correction threshold).
Press Next after each entry.
b. To add a segment, choose [add new], then press New.
Use the Up/Down Controller buttons to choose a start
time, end time, target BG value, and correct-above value
(correction threshold). Press Next after each entry.
c. When you have completed all the time segments you
want, press Done, then Save.
2. Min BG for calcs (minimum blood glucose value allowed for
calculating boluses)—Use the Up/Down Controller buttons
to enter a new minimum BG, then press Enter.
3. Insulin-to-carb (IC) ratio—Number of grams of carbohy-
drate covered by one unit of insulin. You can edit existing
time segments and add segments, up to a total of 8.
a. To edit an existing IC ratio time segment, choose the seg-
ment, then press Edit. Use the Up/Down Controller
butons to choose a new start time, end time, and IC ratio.
Press Next after each entry.
b. Review the segment to ensure it is correct, then press
Confirm.
c. To add a segment, choose [add new], then press New.
Use the Up/Down Controller buttons to choose a start
time, end time, and IC ratio. Press Next after each entry.
d. When you have completed all time segments, press
Done, then Save.
4. Correction factor—You can edit existing time segments and
add segments, up to a total of 8.
a. To edit an existing correction factor time segment, choose
the segment, then press Edit. Use the Up/Down Control-
ler buttons to choose a new start time, end time, and correction factor. Press Next after each entry.
b. To add a segment, choose [add new], then press New.
Use the Up/Down Controller buttons to choose a start
time, end time, and correction factor. Press Next
each entry.
c. Review the segment to ensure it is correct, then press
Confirm.
d. When you have completed all time segments, press
Done, then Save.
5. Reverse correction—Choose On or Off, then press Select.
6. Insulin action (duration) or Insulin on Board (IOB)—Use
the Up/Down Controller buttons to choose a duration of
insulin action, then press Enter.
after
67
Page 80

Using the Personal Diabetes Manager
6
Temp basal
Choose %, U/hr, or Off to set the mode for temporary basal rates
and presets, then press Select.
Extended
Choose %, Units, or Off to set the mode for extended boluses,
then press Select.
Bolus increment
Choose 0.05, 0.10, 0.50, or 1.00 units for bolus increments, then
press Select.
Max bolus
Use the Up/Down Controller buttons to enter the maximum
bolus dose you can take, then press Enter.
Max basal rate
Use the Up/Down Controller buttons to enter the maximum
basal rate you can choose, then press Enter.
Some settings have preset defaults, but all settings
are changeable. See the Appendix for a list of System specifications, including preset default settings.
For additional details on bolus and basal settings,
see Chapter 3, Understanding and Adjusting Basal
Rates, and Chapter 4, Understanding and Delivering Bolus Doses.
n Alerts and Reminders
In addition to automatic safety alarms (see Chapter 10, Alerts and
Alarms), the OmniPod System offers a number of personal settings to help you manage your diabetes. These features are
optional. You can turn them on or off at any time, except for the
alerts. Those you can set at levels that you find convenient to
remind you to change your Pod.
Notifications you can use are:
BG (blood glucose) reminder: Reminds you to check your blood
glucose. Choose from On or Off. The default setting is Off. When
the reminder is on, the PDM asks you each time you enter a bolus
dose whether you want to set a BG reminder, and you can then
choose a time interval, in 30-minute increments.
Pod expiration: Reminds you when the Pod is nearing the 72hour expiration time. Choose a period from 1 to 24 hours before
expiration, in 1-hour increments. The default setting is 4 hours.
You will hear 2 sets of beeps every minute for 3 minutes. The
notification will repeat every 15 minutes until you press OK to
acknowledge it.
Low reservoir: Alerts you when insulin in the Pod reaches a certain level, so you can plan ahead to change the Pod. Choose a
level from 10 to 50 units, in 5-unit increments. The default setting
is 10 units.
68
Page 81
Using the Personal Diabetes Manager
6
The Low reservoir alert will escalate to an Empty reservoir hazard alarm when insulin is depleted. Be sure
to respond to the alert when it occurs.
Auto-off: Alerts you if the PDM does not receive a Pod status
within a predefined period of time. Obtain Pod status by pressing and holding the PDM’s Power button. Choose a time period
from 1 to 24 hours, in 1-hour increments, or choose Off. The
default setting is Off. Refer to page 57 to check Pod status and to
Confirm ID.
The Auto-off alert will escalate to a hazard alarm if
ignored and will result in the deactivation of your
active Pod. Be sure to respond to the alert when it
occurs.
This alert can be especially reassuring if you are prone to hypo-
glycemia unawareness. Ask your healthcare provider about
using this alert and where to set it.
If you use the Auto-off feature, always turn on the
PDM with the Power button before using the system.
This allows the PDM to obtain a Pod status. Refer to
page 57 to check Pod status and to Confirm ID.
between the times you specify. Choose On or Off and choose up
to 6 time segments.
Program reminders: Pod beeps when a program is in process
(see Chapter 3, Understanding and Adjusting Basal Rates; and
Chapter 4, Understanding and Delivering Bolus Doses, for
details). These include:
• Temporary basal in process
• Extended bolus in process
Choose On or Off. The default setting is On.
Confidence reminders: The Pod or PDM beeps in response to
your instructions, so you become familiar with the operation of
the OmniPod System and feel confident that you are getting the
insulin you need. These notifications include:
• Bolus delivery started
• Bolus delivery completed
• Extended bolus started
• Extended bolus completed
• Temporary basal rate started
• Temporary basal completed
Choose On or Off. The default setting is On.
Bolus reminders: Notifies you if you have not delivered a meal
bolus, manually or using the suggested bolus calculator,
FF
69
Page 82
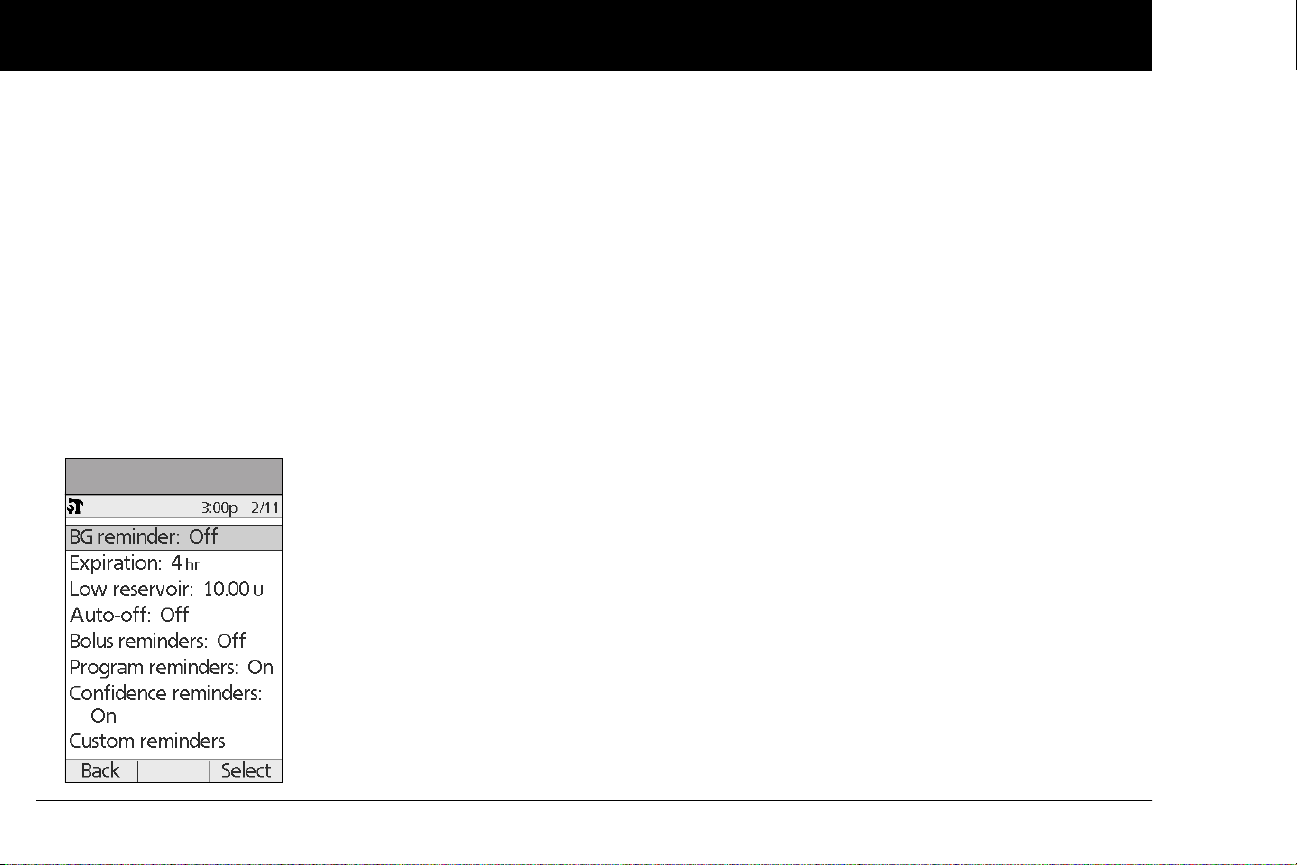
Using the Personal Diabetes Manager
6
Custom reminders: Displays text reminders that you enter, at
times that you select. You can choose to receive a notification
Daily, One time only, or Off. You can change or delete these
notifications at any time.
Set alerts and reminders
1. On the Home screen, use the Up/Down Controller buttons
to choose Settings, then press Select.
2. Choose System setup, then press Select.
3. Choose Alerts/reminders, then press Select.
4. Choose the option you want to set (Figure 6-9), then press
Select.
Figure 6-9
5. For all except Bolus reminders and Custom reminders,
choose the desired option or set the desired value, then press
Select or Enter.
6. For Bolus reminders
• Use the Up/Down Controller buttons to choose On or
Off, then press Select.
• If you chose On, you are taken to a new screen where you
can add, edit or delete reminders:
To add a Bolus reminder
a. Use the Up/Down Controller buttons to choose [add
new], then press New.
b. Choose a start time, then press Next.
c. Choose an end time, then press Save.
To edit a Bolus reminder
a. Choose the bolus reminder you wish to edit, then
press Edit.
b. Choose Edit, then press Select.
c. Enter a new start time, then press Next.
d. Enter a new end time, then press Save.
70
Page 83
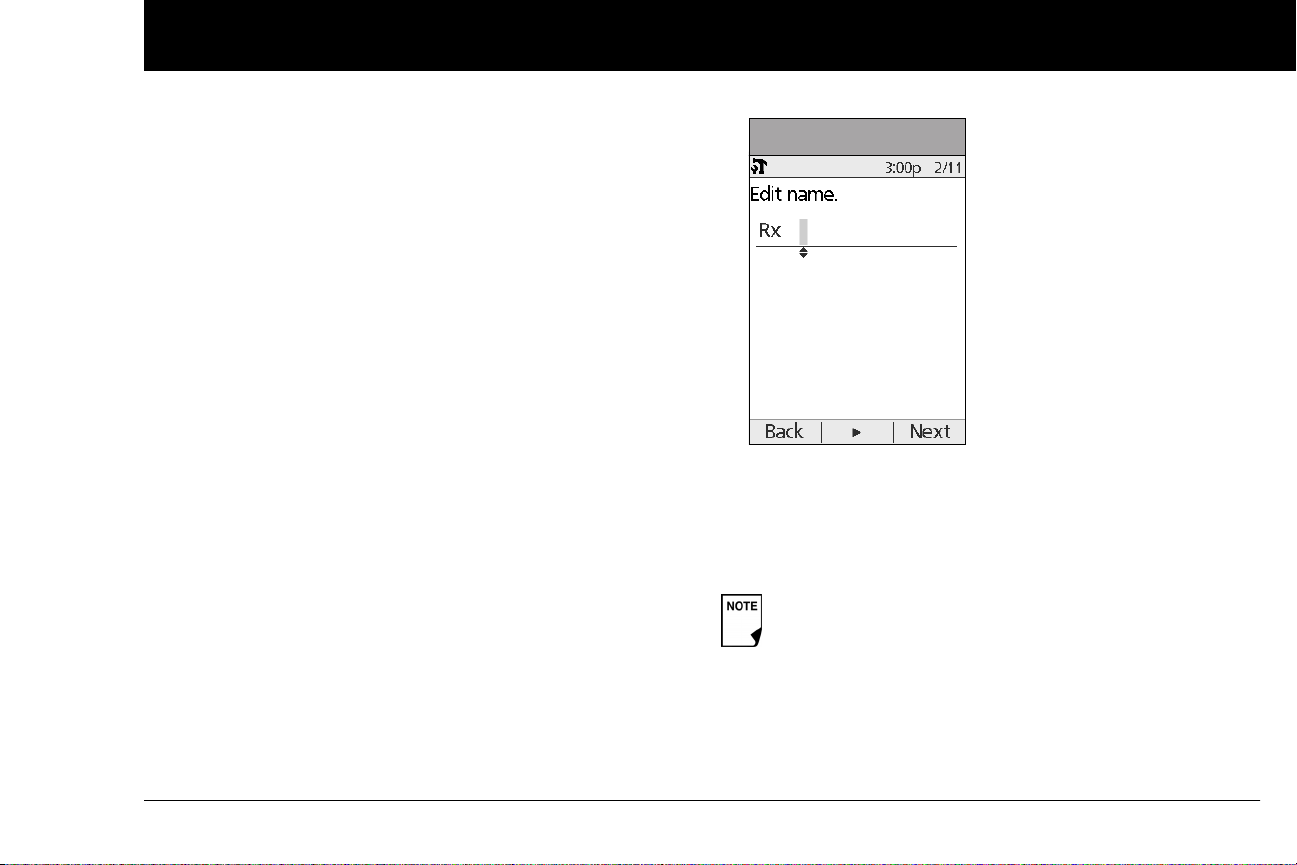
Using the Personal Diabetes Manager
6
To delete a Bolus reminder
a. Choose the bolus reminder you wish to delete, then
press Edit.
b. Choose Delete then press Select.
c. Press Delete to remove the bolus reminder.
7. For Custom reminders
• Use the Up/Down Controller buttons to choose [add
new], then press New.
• To use the OmniPod System’s default naming system, simply press Next. The default naming system automatically
assigns names in numerical order, such as alert 1, alert 2,
alert 3.
If you want to give a different name to the reminder:
a. Use the Up/Down Controller buttons to scroll
through the list of characters. An up-and-down arrow
symbol on the screen indicates the character you are
changing.
b. Press the middle Soft Key (the right arrow) to move the
underscore to the next character.
c. Enter each character one at a time. For example, for a
reminder to pick up a prescription, you might enter
R, x (Figure 6-10). (A blank character or space is the first
and last option in the scrolling menu.)
Figure 6-10
d. Press Next.
• Enter the time of day for the reminder, in 30-minute increments, then press Next.
• Choose Daily, One time only, or Off, then press Select.
Custom reminders will repeat every 15 minutes until
acknowledged.
71
Page 84
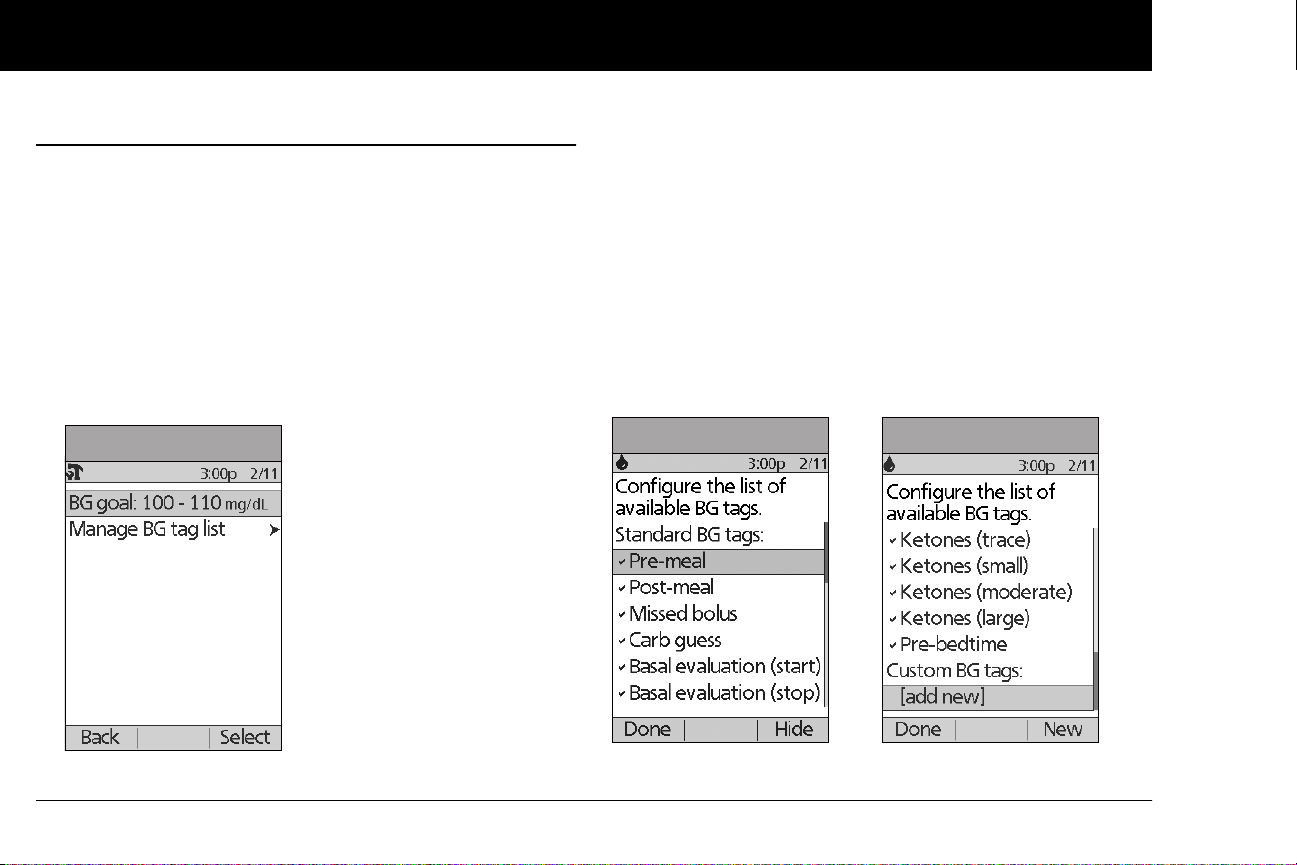
Using the Personal Diabetes Manager
6
n Change Blood Glucose Settings
You can adjust blood glucose (BG) meter settings:
• BG goal lower and upper limits (for BG history)
• Manage BG tags list
1. On the Home screen, use the Up/Down Controller buttons
to choose Settings, then press Select.
2. Choose System setup, then press Select.
3. Choose BG meter, then press Select.
4. Choose the setting you want to change (Figure 6-11), then
press Select.
Figure 6-11
Change BG goal limits
To change the BG goal limits, press Edit, change either or both
values, then press Save.
Manage the blood glucose tags list
You can create up to 15 custom blood glucose tags and hide any
of the standard tags you do not plan to use. Standard BG tags are
shown first on the screen (Figure 6-12a), followed by custom
tags, and then [add new] (Figure 6-12b). For more information
about tagging BG readings, see Chapter 7, Entering Blood Glucose Information into Your PDM.
Figure 6-12a Figure 6-12b
72
Page 85

Using the Personal Diabetes Manager
6
1. To hide or show a standard BG tag, choose the tag, and press
Show (if it is marked as hidden) or Hide.
Tags you choose to show will be check marked; hidden ones
will not be.
2. To add a custom tag, choose [add new] at the end of the list
of custom tags, then press New.
In the Edit name screen, either:
a. Press Save to save the new tag with the default name,
custom tag1, custom tag2, and so on; or
b. Use the Up/Down Controller buttons to choose letters
and numbers for a name, followed by the middle Soft Key
(the right arrow) to move forward one space. Then press
Save.
3. To delete a custom tag, choose the tag, press Delete, then
press Delete again. Or press Cancel to leave the tag
unchanged.
n Customize the Personal Diabetes Manager
Additional options let you customize how the PDM operates:
ID screen: Identify your PDM by adding your name and choosing
a color. The options you set will be shown on the ID screen every
time you turn on the PDM.
PDM lock: “Locks” the buttons on the PDM. The default setting is
Off. This safety feature can help avoid accidentally changing
basal rates or giving boluses.
Screen time-out: The screen turns off after a time interval that
you set, which occurs if you have not pressed any buttons on the
PDM. This setting preserves battery power by turning off the
screen when you are not using it. Set it at the lowest setting to
maximize battery life. The ID screen must be confirmed before
you can check Pod status.
Press and hold the Power button to turn the screen back
on. In some cases, if it has been less than 5 minutes since
the screen timed out, pressing the Power button returns
you to the same screen you were using. If it has been longer than 5 minutes, the PDM brings you to the Status
screen. To check the Pod status, refer to page 57 for
detailed instructions.
73
Page 86
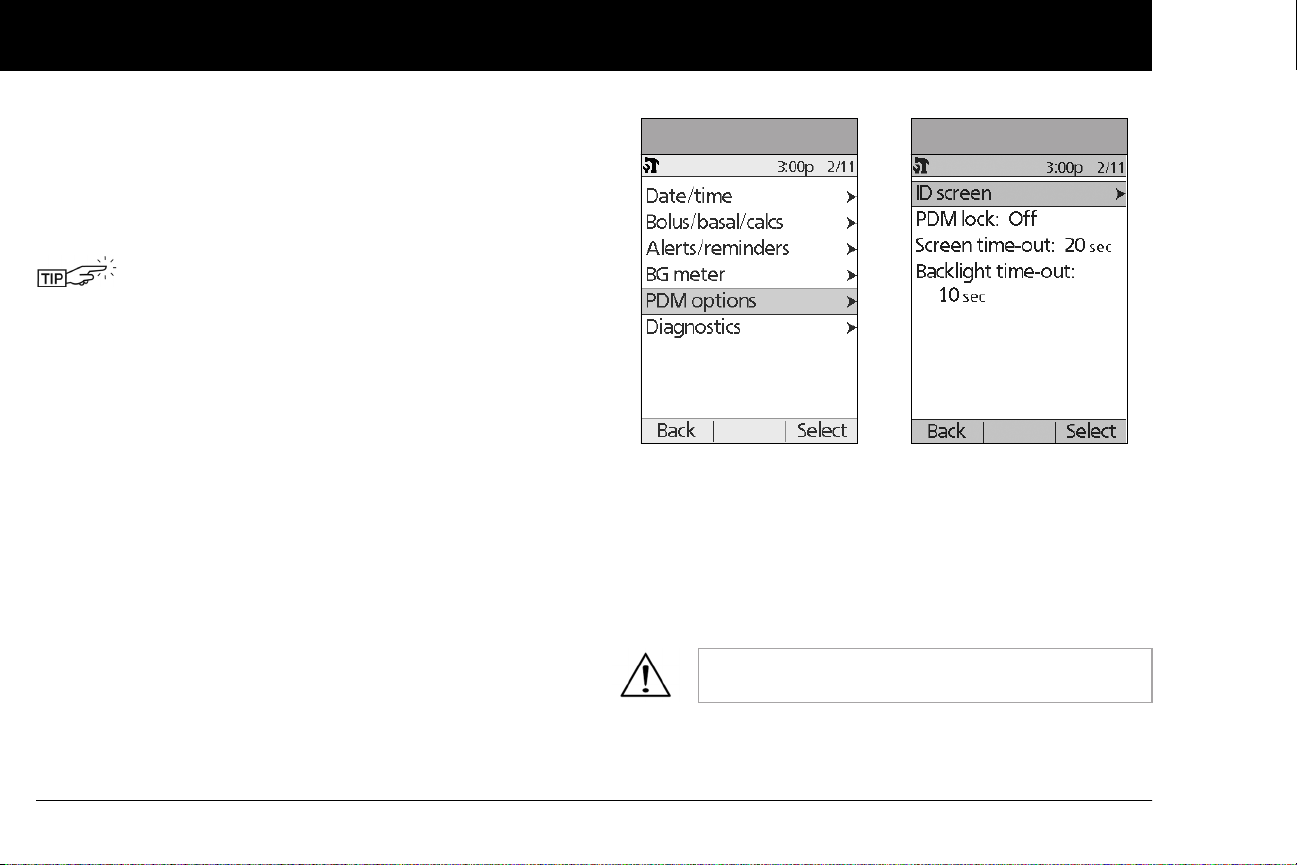
Using the Personal Diabetes Manager
6
Backlight time-out: The backlight is on by default while you are
using the PDM. The time-out setting dims the backlight and
causes the screen to dim when you have not used it within the
time interval that you set. Set at the lowest setting to maximize
battery life.
For extra brightness on the PDM screen, press and
hold the User Info/Support button (?) for 2 seconds.
This enables a “bright mode.” The screen will remain
in this mode until the PDM times out or you turn it off.
To preserve battery life, use this feature only when
necessary.
Set PDM options
1. On the Home screen, use the Up/Down Controller buttons
to choose Settings, then press Select.
2. Choose System setup, then press Select.
3. Choose PDM options (Figure 6-13), then press Select.
4. Choose one of the options (Figure 6-14), then press Select.
Set ID screen
To change the ID:
1. Choose ID, then press Select.
2. Press the Up/Down Controller buttons to scroll through the
list of characters. An up-and-down arrow symbol on the
screen indicates the character you are changing.
Figure 6-13 Figure 6-14
3. Press the middle Soft Key (labeled with the right arrow) to
move the underscore to the next character.
4. Enter each character one at a time. For example, if you want
to enter your name, you might enter J, a, n, e, [space], S, m, i, t,
h. (A blank character or space is the first and last option in the
scrolling menu.)
5. Press Save.
As a safety feature, an ID must be entered to enable
the PDM to be identified.
74
Page 87
Using the Personal Diabetes Manager
6
To change the ID screen color:
1. Choose Screen color, then press Select.
2. Use the Up/Down Controller buttons to choose a color, then
press Select.
Set PDM lock
Choose On or Off, then press Select.
If you choose On, other PDM options and most
other soft keys are locked and will not respond to
button presses. To use them, you must first set PDM
lock to Off.
Set the Screen time-out
Choose a time interval, then press Select.
When the screen times out and goes black, turn it on again by
pressing the Home/Power button.
Set the Backlight time-out
Choose a time interval, then press Select.
When the screen dims, turn it on again by pressing any button.
The PDM will ignore the usual command and re-light the screen.
The lowest setting will drain the battery the least.
n Set Diagnostic Functions
The Diagnostics screen allows you to instantly confirm how the
System is working or to completely update settings entered during setup (see Chapter 2, Getting Started). Options include:
Check alarms: Confirms that all alarms work properly when
needed. When you select this function, the PDM beeps and
vibrates, then the Pod beeps. This function cannot be executed
unless insulin delivery is suspended.
If the PDM fails to beep, immediately call Customer
Care. If a Pod is active and fails to beep, change the
Pod immediately (see Chapter 5, Using the Pod).
Continuing to use the System in these situations
may put your health and safety at risk.
Reset PDM (soft reset): Restores all settings in the PDM to the
factory defaults.
Resetting the PDM deletes all basal programs, temp
basal presets, carb presets, bolus presets, and all suggested bolus settings. Before you use this feature
and delete these settings, be sure you have a written
record of the information you need. History records
will not be deleted.
As a safety feature, you cannot reset the PDM when a
Pod is active. You must first deactivate the Pod.
75
Page 88
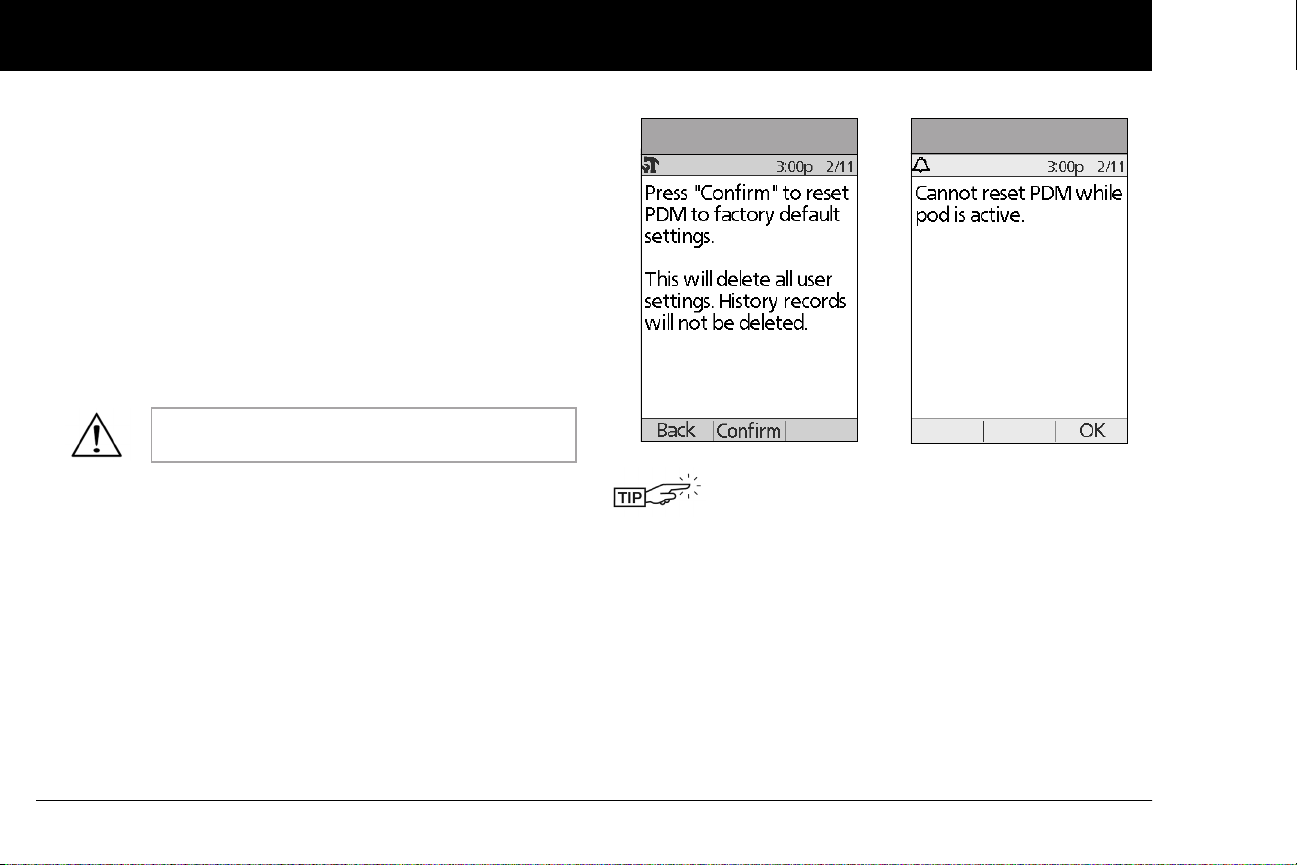
Using the Personal Diabetes Manager
6
Diagnostic options
1. On the Home screen, use the Up/Down Controller buttons
to choose Settings, then press Select.
2. Choose System setup, then press Select.
3. Choose Diagnostics, then press Select.
To check alarms
1. Choose Check alarms, then press Select.
2. Press OK. The PDM beeps three times and vibrates three
times. If a Pod is active, it beeps three times then sounds the
alarm tone for 5 seconds.
Be sure to check the alarm function at every Pod
change.
To reset the PDM
1. Choose Reset PDM, then press Select.
2. If the Pod is deactivated, the PDM asks for confirmation and
reminds you that you will lose all user settings (Figure 6-15).
Press Confirm to reset the PDM.
If the Pod is still active, you will be unable to reset the PDM
(Figure 6-16). Press OK to return to the Diagnostics menu.
Figure 6-15 Figure 6-16
Use the form at the end of this User Guide to write
down all your settings from the Setup Wizard. If you
ever need to reset your PDM, having these settings
handy will make setup very easy.
76
Page 89
Using the Personal Diabetes Manager
6
n Set a Reminder to Vibrate
For certain reminders, you can choose vibration instead of beeps
or vibration followed by beeps, instead of only beeps. If you activate it, the PDM will vibrate for:
• Blood Glucose reminders
• Missed Bolus reminders
• Custom reminders
• “No active Pod” reminders
The PDM cannot be set to vibrate for hazard or advisory
alarms.
To change the type of notification
1. Use the Up/Down Controller buttons to choose Settings,
then press Select.
2. Choose Vibration, then press Select.
3. Choose Vibrate, Vibrate then beep, or Off (beep only), then
press Select. (Vibrate then beep means the PDM will repeat
the reminder twice using vibration. After that, it uses beeps.)
Or press Back to return to the Settings menu.
n Get the Most from Your PDM
Keep it handy
Wireless communication technology means you don’t have to
keep the PDM right next to the Pod for the Pod to work. Once
you set your basal program, the Pod continues to deliver your
basal program 24 hours a day, regardless of the location of the
PDM. However, you still need the PDM to deliver a bolus, change
the basal rate, and so on. You can store the PDM conveniently
inside an article of clothing (like a shirt pocket) or put it discreetly
into a drawer, briefcase, or purse.
Communicating with the Pod
When you use the PDM to communicate with the Pod, hold the
PDM within 5 feet (1.5 meters) of the Pod.
Water and your PDM
Do NOT use IV Prep wipes, alcohol swabs, soap,
detergent, or solvents to clean the screen or any
other part of the PDM. The PDM is NOT waterproof.
Do NOT immerse it or place it in or near water.
77
Page 90
Using the Personal Diabetes Manager
6
Avoid extreme temperatures
Extreme operating temperatures can affect PDM batteries and
interfere with System operation. Avoid using the PDM in temperatures below 40°F (4.4°C) or above 104°F (40°C).
Do not store or leave the PDM where it may be
exposed to extreme temperatures, such as inside a
car. Extreme heat or cold can cause the device to
malfunction.
Electrical interference
The PDM is designed to withstand normal radio interference and
electromagnetic fields. However, as with all wireless communication technology, certain operating conditions can interrupt
communication. For example, electric appliances such as microwave ovens and electric machinery located in manufacturing
environments may cause interference. In most cases, interruptions are easy to resolve (see Chapter 11, Communication
Failures).
Only connect a USB cable to your PDM when downloading data to a computer. Other PDM functions are
disabled while a USB cable is connected, and the
PDM cannot communicate with the Pod.
When you connect a USB cable to the PDM, only use
a cable that is less than or equal to 9 feet (2.7 meters)
in length.
78
Page 91

CHAPTER 7
Entering Blood Glucose Information into Your PDM
n Entering Blood Glucose Readings Manually
You can enter blood glucose readings into the PDM.
1. On the Home screen, use the Up/Down Controller buttons
to choose More actions, then press Select.
2. Choose Add BG reading, then press Select.
3. Use the Up/Down Controller buttons to enter the BG read-
ing from your separate meter.
To enter a “LOW” reading, press the Up/Down
Controller buttons down until you reach the minimum value (20); then press down one more time.
To enter a “HIGH” reading, press up until you reach
the maximum value (500); then press up one more
time.
4. Press Ta g to assign a tag to the reading. Press OK when fin-
ished.
5. Press Next when finished or press Cancel to return to the
More actions menu without saving the reading.
6. Review the BG value and tags, then press Confirm to save, or
press Back to make adjustments.
n Editing Tags
Within 2 hours of a blood glucose reading, you can remove or
change a tag or add one.
1. On the Home screen, use the Up/Down Controller buttons
to choose More actions, then press Select.
2. Choose Assign/Edit BG tags, then press Select.
3. Use the Up/Down Controller buttons to choose a reading,
then press Tag (Figure 7-1). A User Info/Support icon (?) is
shown to the right of any reading to which you have already
assigned one or two tags.
Or press Done to return to the More actions menu.
79
Page 92
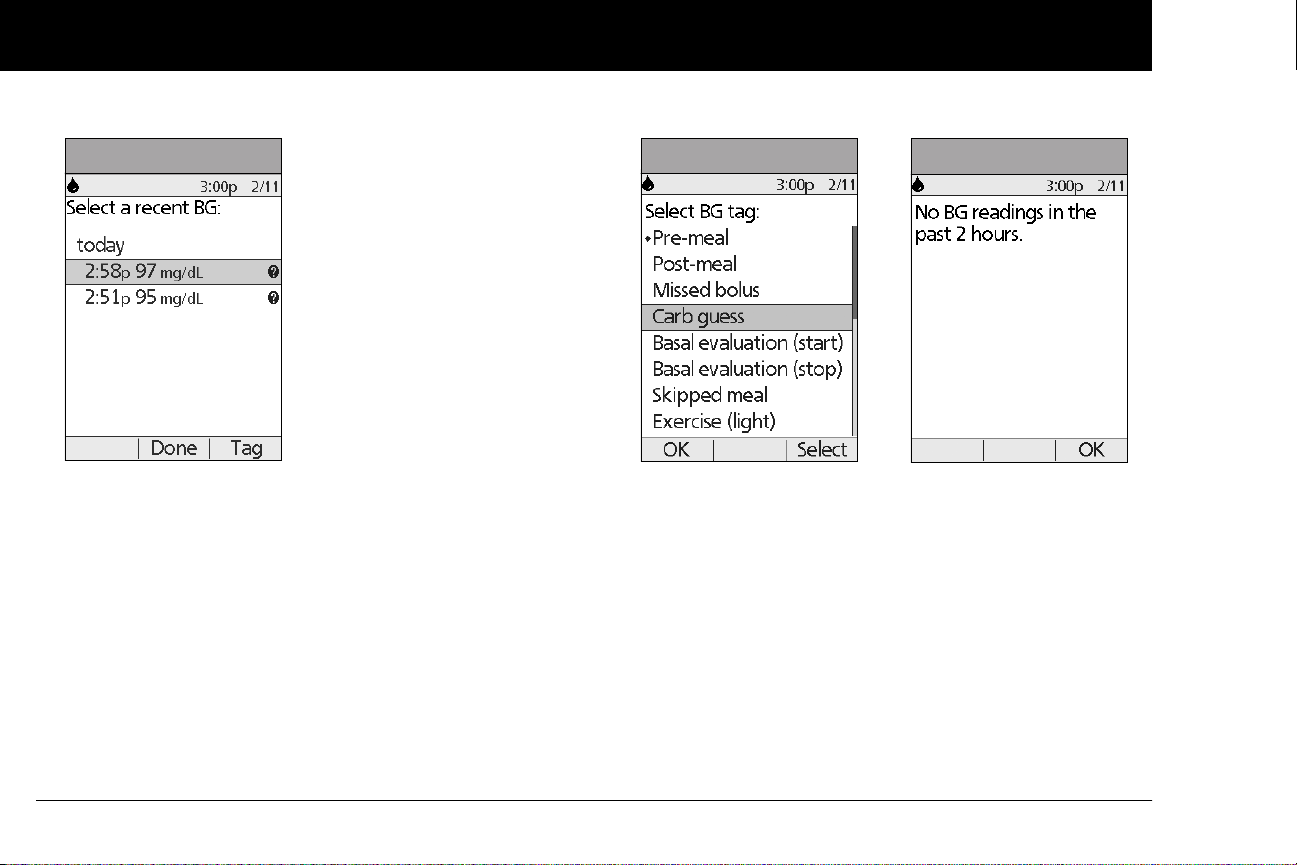
Entering Blood Glucose Information into Your PDM
7
Figure 7-1
4. Use the Up/Down Controller buttons to choose the first tag
you want, then press Select (Figure 7-2). A diamond icon
appears next to selected tags, as in “Pre-meal” in the figure. You
can select up to two tags for each BG reading.
Figure 7-2
5. To remove a selected tag, highlight it and press Clear. (The
soft key changes from Select to Clear when you highlight
the tag.)
6. Press OK to return to the list of readings.
7. If no BG readings have been entered into the PDM within the
past 2 hours, you will see the screen in Figure 7-3. Press OK to
return to the More actions menu.
To learn how to manage your list of tags and to add custom tags,
see “Manage the blood glucose tags list” in Chapter 6, Using the
Personal Diabetes Manager.
Figure 7-3
80
Page 93
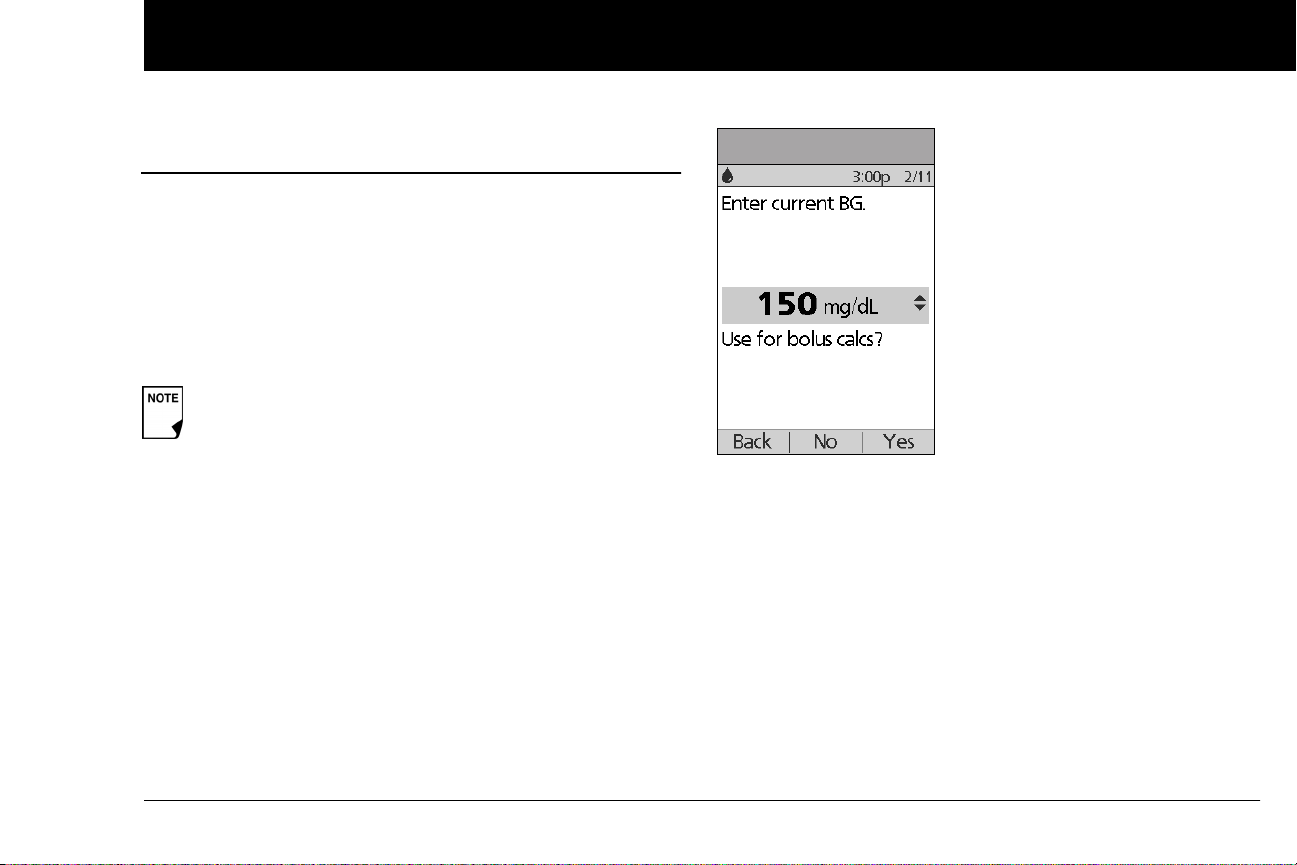
Entering Blood Glucose Information into Your PDM
7
n Blood Glucose Results and the Suggested Bolus
Calculator
If the suggested bolus calculator feature is turned on, you can
use your stored blood glucose value with it.
1. Press the Home key to return to the main menu.
2. Use the Up/Down Controller buttons to choose Bolus, then
press Select.
See “Suggested Bolus Calculator” in Chapter 4, Understanding
and Delivering Bolus Doses.
If you use the suggested bolus calculator within 10
minutes after you store a BG reading, that BG value will be
used as the default value in the suggested bolus calculator process (Figure 7-4).
The BG result is stored in the System’s history, whether suggested
bolus calculator is turned On or Off. (See “Blood Glucose
Records” in Chapter 8, Understanding Your Records.)
Figure 7-4
81
Page 94
CHAPTER 8
Understanding Your Records
n Record Keeping
Record keeping is an important part of successful diabetes man-
agement. The Personal Diabetes Manager (PDM) helps simplify
this task. It automatically stores records of insulin delivery history,
blood glucose readings, alarms and carbohydrates. The PDM can
store over 5,000 records or approximately 90 days’ worth of information. Once the memory is full, new information begins to
replace the oldest information.
If the PDM batteries run out, date and time are at risk.
Do NOT remove the old batteries until you have new
ones on hand. The PDM protects data in the memory for up to 2 hours after the batteries run out or are
removed.
82
Special symbols in record screens
In the record screens, you may encounter several special symbols:
Records with a question-mark symbol next to them have
additional information available. To see this information, use
the Up/Down Controller buttons to highlight the record,
then press the User Info/Support button to view details
about that record.
The record for this item has been “lost.”
If the PDM can no longer communicate with an
active Pod, then you must activate a new Pod. The
PDM may not be able to communicate with the
active Pod because of signal interference or because
you have discarded the Pod. If you change the Pod
without getting a Status update, any “unconfirmed”
records will be “lost.” If this occurs, the PDM will not
display insulin totals for any day containing “lost”
records.
Page 95
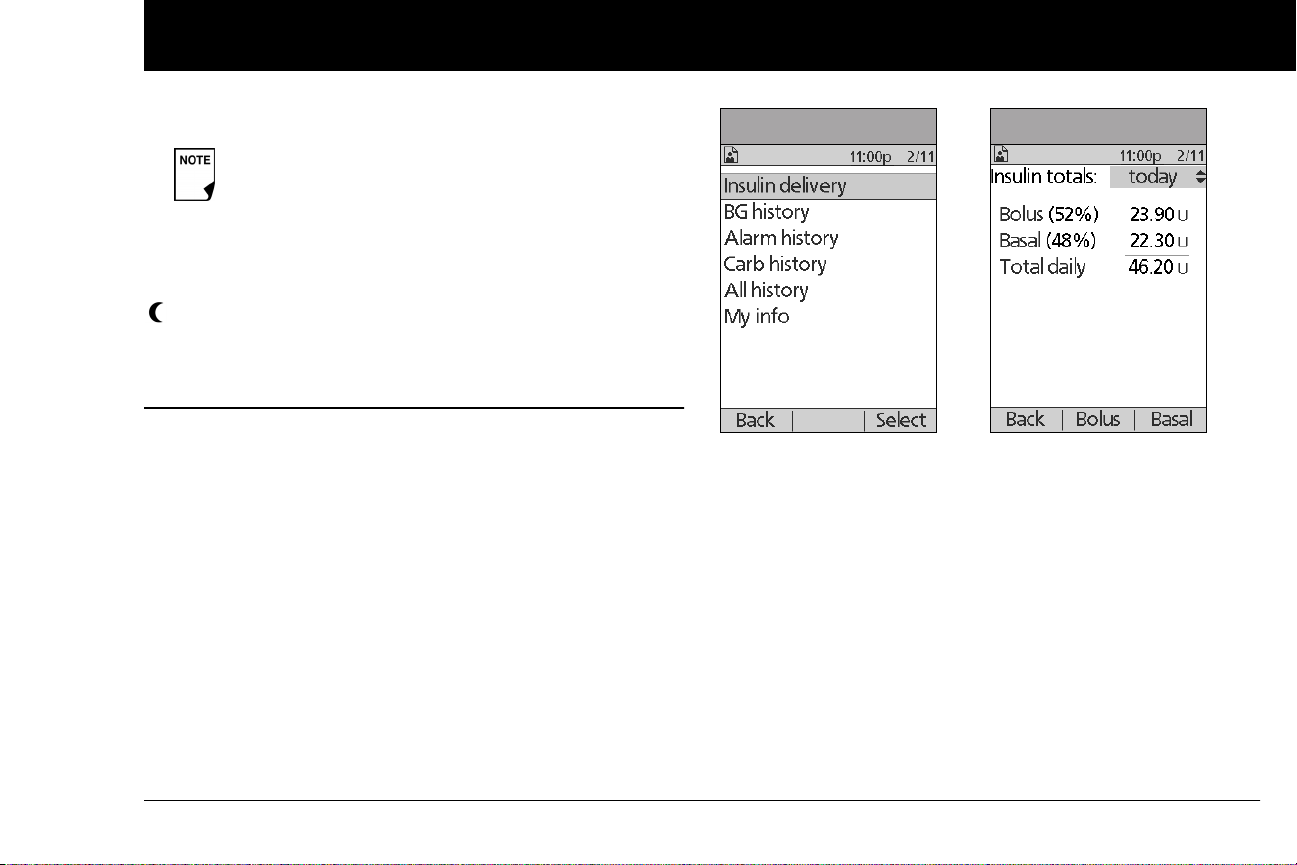
Understanding Your Records
8
4 The record for this item is “unconfirmed.”
When you power on the PDM, it will request a status
update from the active Pod and then update the
insulin history. If the PDM does not receive a status
update from the Pod, the PDM will update history
with “unconfirmed” records. The next time the PDM
receives a status update, it will update these records.
This insulin delivery item spans midnight. The date given
is the start date.
n Insulin Delivery Records
The PDM stores:
• Basal rates (including any rate changes and temporary basals)
• Bolus doses (both normal and extended)
• Dates, times and how long insulin delivery was suspended,
and dates and times when it was resumed
• Total daily doses (basal plus boluses) by date
View insulin delivery records
1. On the Home screen, use the Up/Down Controller buttons
to choose My records, then press Select.
2. Choose Insulin delivery, then press Select (Figure 8-1).
Figure 8-1 Figure 8-2
The PDM displays a summary of today’s information,
including total boluses delivered, total basal amount delivered and total daily dose delivered (Figure 8-2). Press the
Up/Down Controller buttons to view the summary for
previous days.
Wherever you see the ? symbol, press the User Info/Support
button to see additional information.
3. To review your basal history by day, press Basal.
The display shows the basal deliveries that have occurred for
the current day, most recent first (Figure 8-3 on the next
page). The active basal rate or program is indicated by a diamond icon (u).
83
Page 96
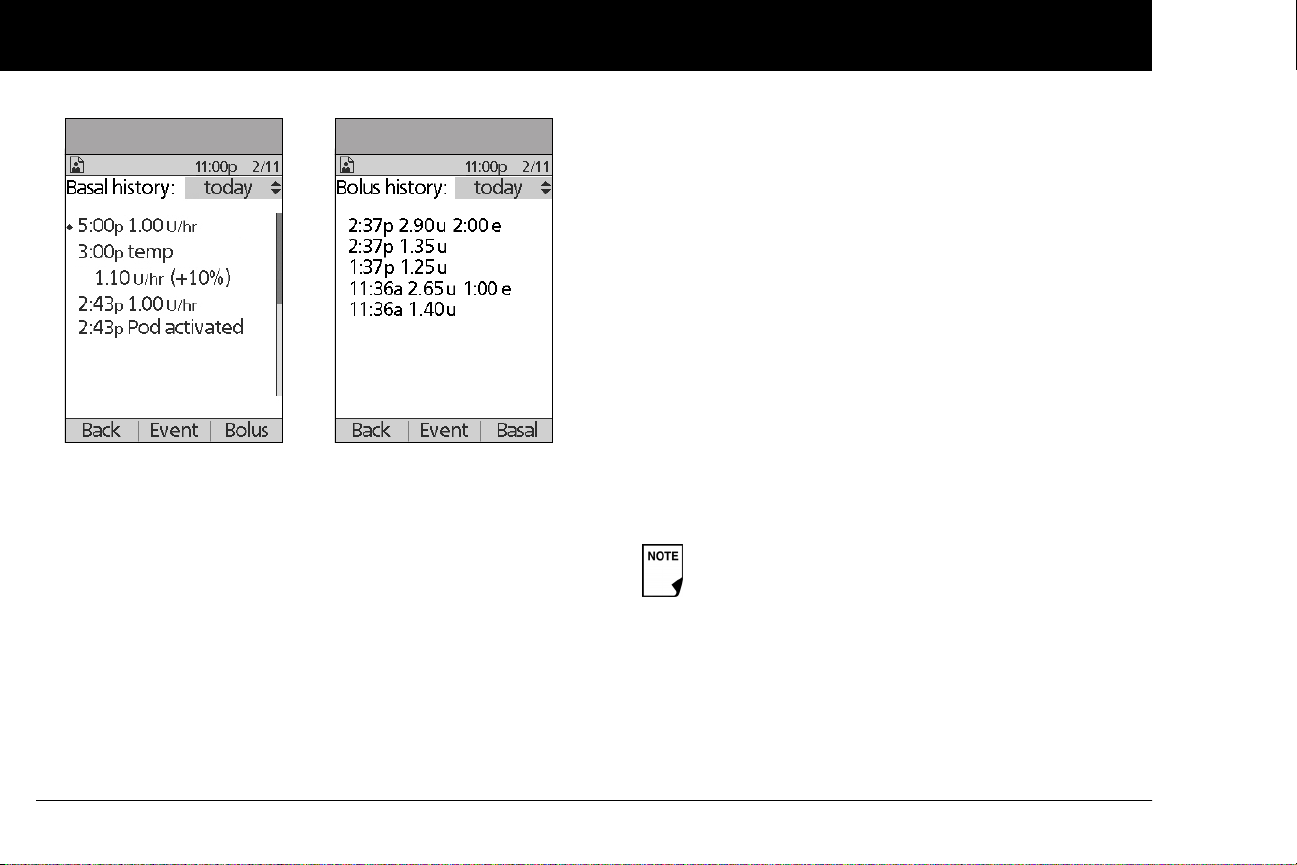
Understanding Your Records
8
Figure 8-3 Figure 8-4
For a temporary basal program, the display shows the %
adjustment that have been made to the default basal rate
(active or current). So, in Figure 8-3, “1.10 temp U/hr (+10%)”
means that you delivered a temporary basal of 1.10 units per
hour, which was 10% more than the default basal. (Notice
that two hours later, the basal rate returns to the default.)
Also, the “Pod activated” entry shows what time you applied
a new Pod.
Press the Up/Down Controller buttons for earlier or later
dates.
Press Event to use the Up/Down Controller buttons to scroll
through the list of information on the screen. Choose a
record, then press the User Info/Support button to view
details about that record. Record details may include insulin
delivery, that was interrupted due to a Pod alarm, Pod deactivation, or user cancellation. The screen shows the amount of
the bolus or basal that remained undelivered.
4. Press Day to return to dates.
5. To review your bolus history by day, press Bolus.
The display indicates whether the bolus was normal or
extended (marked “e” in Figure 8-4). Normal and extended
boluses are displayed separately even if they were programmed at the same time. Extended boluses are shown
with time and duration. If an extended bolus is active, a diamond icon (u) appears next to it. If a bolus was cancelled,
only the amount delivered before cancellation is shown.
The amount shown after cancellation may be in 0.05
unit increments, even though you may have programmed the bolus increment to be in 0.10 units.
Press the Up/Down Controller buttons for different dates.
Press Event to use the Up/Down Controller buttons to scroll
through the list of information on the screen. Press Day to
return to dates.
84
Page 97
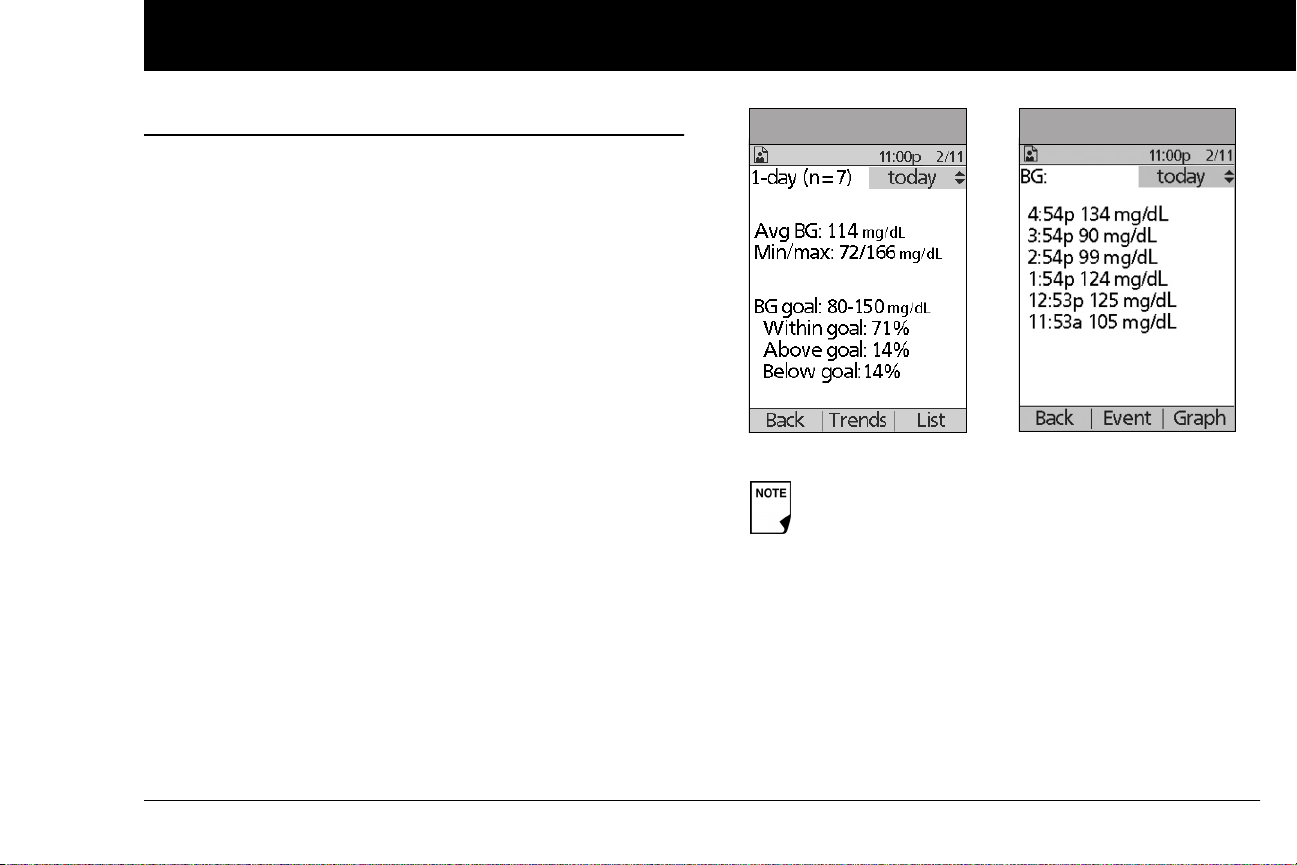
Understanding Your Records
8
n Blood Glucose Records
The PDM stores blood glucose records for the past 90 days. You
can choose to view individual readings, single-day trends with
individual readings, or trends for the previous 7, 14, 30, 60 or 90
days.
View single-day trends
1. On the Home screen, use the Up/Down Controller buttons
to choose My records, then press Select.
2. Choose BG history, then press Select.
The PDM displays the current-day trends first (Figure 8-5),
including:
• Number of days and number of blood glucose
readings (n)
• Average blood glucose (Avg BG)
• Lowest and highest blood glucose (Min/max)
• The BG goal you have set
• Percentage of readings within the BG goal
• Percentage of readings above the BG goal
• Percentage of readings below the BG goal.
Figure 8-5 Figure 8-6
LOW and HIGH readings are included in the number
of BG readings (n), but not in calculations or averages.
3. Press List to see a list of the current day’s readings
(Figure 8-6).
85
Page 98
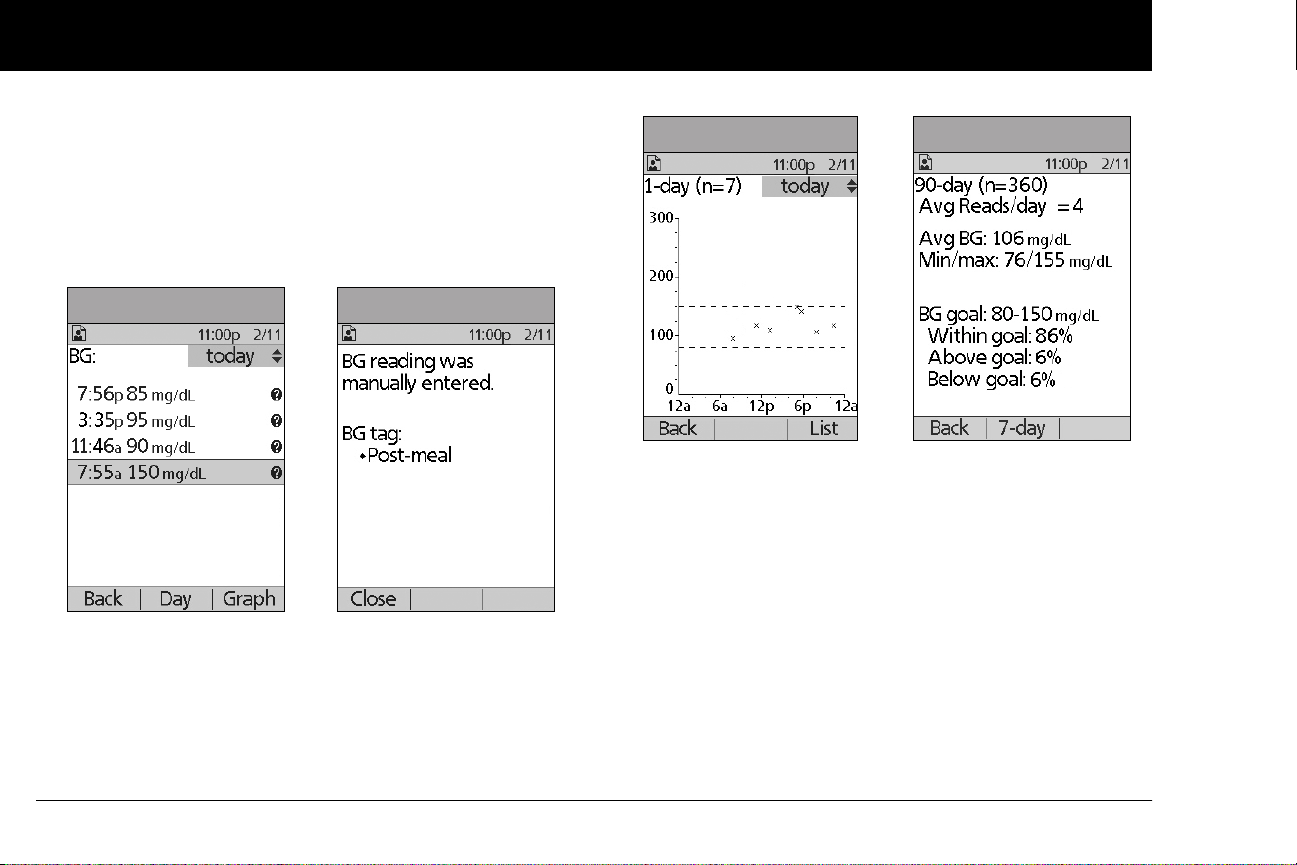
Understanding Your Records
8
In the List view, press Event to select individual readings.
Readings with a question mark icon (?) next to them have
additional information available (Figure 8-7). To see this information, use the Up/Down Controller buttons to choose the
reading. Then press the User Info/Support button to view
details about that reading (Figure 8-8).
Figure 8-7 Figure 8-8
4. Press Close to return to the List view.
5. Press Graph to see a graph of the data (Figure 8-9).
View multiple-day trends
1. On the Home screen, use the Up/Down Controller buttons
to choose My records, then press Select.
Figure 8-9 Figure 8-10
2. Choose BG history, then press Select.
3. Press Trends to display blood glucose data for the past 7
days.
4. Continue pressing the middle soft key to view trends for the
previous 14, 30, 60 and 90 days.
5. The PDM displays the same details for multiple days as for
single days, plus the average number of BG measurements
taken per day (Figure 8-10).
For the 7-, 14- and 30-day trends, press Graph to see a graph
of the trends (Figure 8-11 on the next page). Graphs are not
available for 60- or 90-day trends. Press Stats to return to the
detail view.
86
Page 99
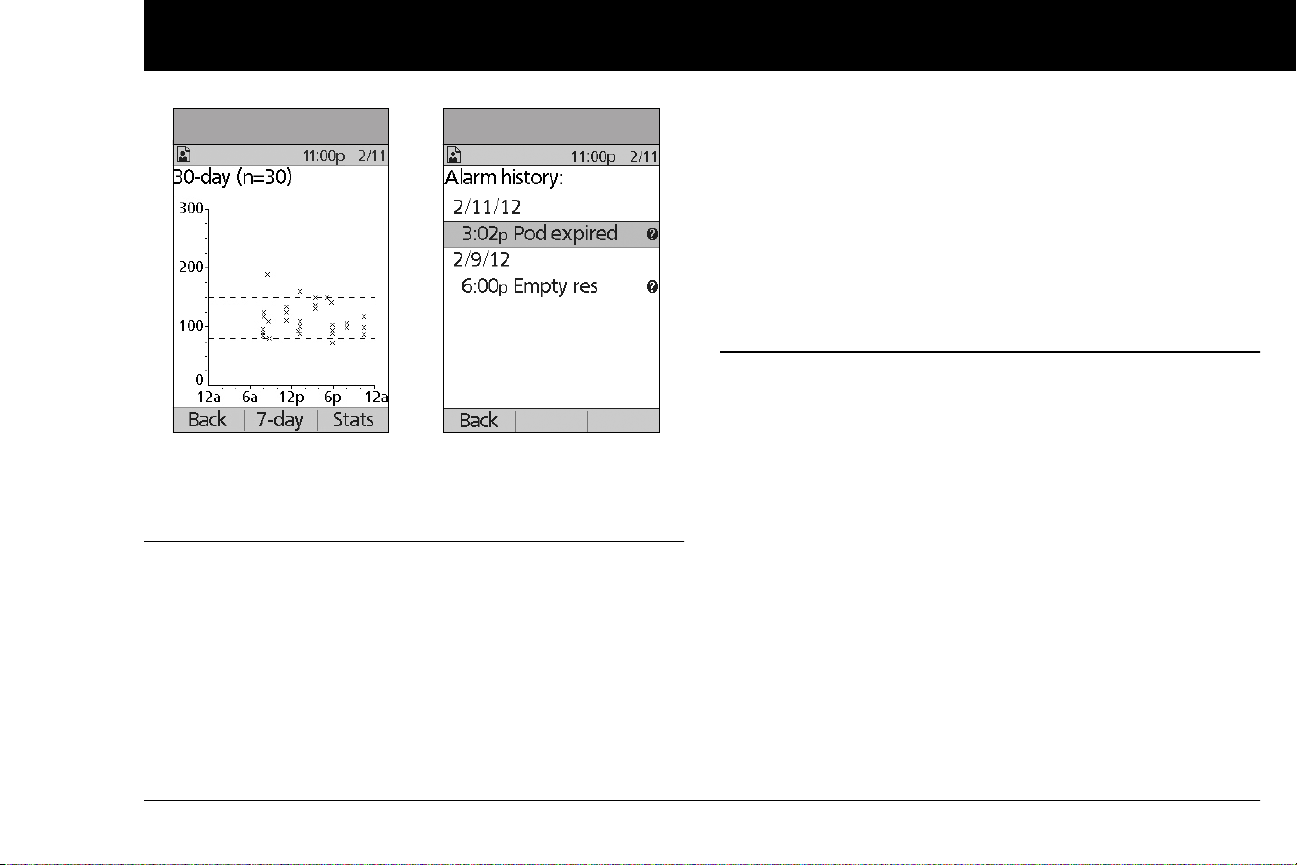
Understanding Your Records
8
Figure 8-11 Figure 8-12
6. Press Back to return to the single-day trends.
n Alarm Records
The PDM lists the entire alarm history for the OmniPod System.
The PDM can store over 90 days’ worth of alarm records.
1. On the Home screen, use the Up/Down Controller buttons
to choose My records, then press Select.
2. Choose Alarm history, then press Select.
The PDM displays the date, time, and type of each alarm
(Figure 8-12).
3. Press the Up/Down Controller buttons to see additional
screens.
4. Choose an alarm record, then press User Info/Support to
see more information.
n Carbohydrate Records
The PDM displays the records of carbohydrates you have
entered.
1. On the Home screen, use the Up/Down Controller buttons
to choose My records, then press Select.
2. Choose Carb history, then press Select.
The PDM displays the date, time and grams of carbohydrate
you have entered (Figure 8-13 on the next page).
3. Press the Up/Down Controller buttons to see additional
days.
Press Event to use the Up/Down Controller buttons to scroll
through the list of information on the screen. Press Day to
use the Up/Down Controller buttons for dates.
87
Page 100
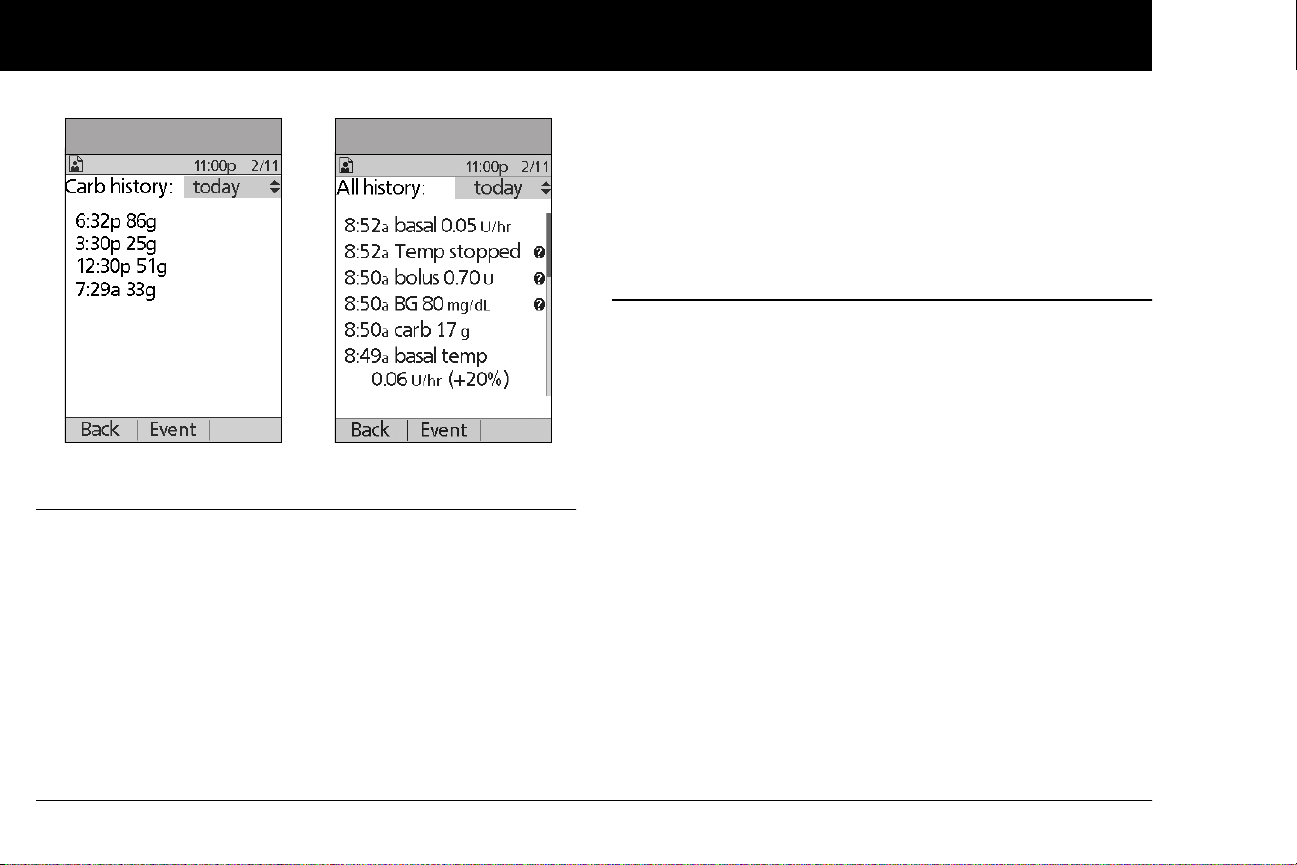
Understanding Your Records
8
Figure 8-13 Figure 8-14
n All Records
The PDM displays the combined insulin delivery, blood glucose,
alarm and carbohydrate records.
1. On the Home screen, use the Up/Down Controller buttons
to choose My records, then press Select.
2. Choose All history, then press Select.
The PDM displays all history for the most recent date (Figure
8-14).
3. Press the Up/Down Controller buttons to see additional
days.
Press Event to use the Up/Down Controller buttons to scroll
through the list of information on the screen. Press Day to
use the Up/Down Controller for dates.
n User Information/Support
You or your healthcare provider may have entered personal
contact information during your start-up visit. To view this information, press the User Info/Support button (to the right of the
Power button) while on the Home screen. Or follow the steps
below to view the information. You can add or change the user
information at any time.
You may want to include your name, address, phone, e-mail
address, emergency contact and phone, doctor’s or healthcare
provider’s name and phone, prescription numbers or other
information.
The user information screen also displays product information
for your OmniPod System (make, model, serial number). You cannot change this information.
88
 Loading...