

Instrumentarium Dental Express Imaging Plate System User Manual

ENGLISH
EXPRESS™ Origo
Digital Intraoral Imaging Plate System
User Manual
209638 rev. 4


Copyright Code: 209638 rev 4 Date: March 4, 2014
Copyright © 3/4/14 by Instrumentarium Dental.
All rights reserved.
EXPRESS™ / INSTRUMENTARIUM DENTAL™ / IDOT™
are common law trademarks of
Instrumentarium Dental, PaloDEx Group Oy.
Documentation, trademark and the software are
copyrighted with all rights reserved. Under the copyright
laws the documentation may not be copied, photocopied,
reproduced, translated, or reduced to any electronic
medium or machine readable form in whole or part, without
the prior written permission of Instrumentarium Dental.
The original language of this manual is English.
Instrumentarium Dental reserves the right to make
changes in specification and features shown herein, or
discontinue the product described at any time without
notice or obligation. Contact your Instrumentarium Dental
representative for the most current information.
EXPRESS™ Origo
Manufacturer Instrumentarium Dental, PaloDEx Group Oy
Nahkelantie 160 (P.O. Box 20)
FI-04300 Tuusula
FINLAND
Tel. +358 10 270 2000
Fax. +358 10 270 2230
For service, contact your local distributor.

EXPRESS™ Origo

Table of Contents
1 Introduction..................................................................................................................1
1.1 Unit with accessories ............................................................................................ 1
1.2 System setup ........................................................................................................ 2
1.3 Controls and indicators ......................................................................................... 3
2 Basic use......................................................................................................................7
2.1 Preparing the imaging plates ................................................................................ 9
2.2 Positioning and exposure.................................................................................... 10
2.3 Processing the imaging plates ............................................................................ 11
3 Advanced use ............................................................................................................ 13
3.1 EXPRESS™ Origo setup options ....................................................................... 13
3.1.1 Status ....................................................................................................... 13
3.1.2 Image Scanning ....................................................................................... 14
3.1.3 Using the dental chart .............................................................................. 14
3.1.4 Resolution ................................................................................................ 14
3.1.5 Image Processing - Noise Filtering .......................................................... 14
3.1.5.1 Retrieve last image....................................................................14
3.1.6 Scanner Unit Serial number .....................................................................15
3.2 Settings ............................................................................................................... 15
3.3 Workflow ............................................................................................................. 16
3.3.1 Readout start............................................................................................16
3.3.2 Plate eject mode ...................................................................................... 18
3.4 Power options ..................................................................................................... 18
3.5 Occlusal 4C projection imaging (not included in delivery) ............................... 19
4 Accessories introduction..........................................................................................21
4.1 Hygiene accessories ...........................................................................................21
4.2 Imaging plates..................................................................................................... 22
4.3 Imaging plate storage box................................................................................... 22
4.4 Holders................................................................................................................23
4.5 Occlusal projection imaging with Occlusal 4C start-up kit and accessories........ 23
4.6 Microfibre cloth.................................................................................................... 23
4.7 Imaging plate care............................................................................................... 24
4.8 Imaging plate cleaning ........................................................................................ 25
5 Introduction to imaging plate technique ................................................................. 27
5.1 Imaging plate....................................................................................................... 27
5.2 Hygiene accessories ...........................................................................................28
5.3 Processing .......................................................................................................... 29
5.4 Background radiation .......................................................................................... 30
5.5 Light .................................................................................................................... 31
6 Installation of the imaging plate system ................................................................. 33
6.1 Positioning the unit.............................................................................................. 33
6.2 Connecting the unit to a network......................................................................... 34
6.3 Install the Application software............................................................................ 35
rev i

6.4 Accessing the unit from the software .................................................................. 36
6.4.1 Direct connection method (uses the unit s/n)........................................... 36
6.4.2 IP method (using the unit static address)................................................. 37
6.4.3 EXPRESS Share...................................................................................... 38
6.5 Other devices ......................................................................................................39
7 Troubleshooting ........................................................................................................ 41
7.1 Error images........................................................................................................ 41
7.1.1 Improper use of the hygiene accessories and imaging plates ................. 41
7.1.2 Application errors ..................................................................................... 42
7.1.3 Imaging plate wearing .............................................................................. 45
7.2 Error messages................................................................................................... 46
8 Other information ......................................................................................................47
8.1 Quality control ..................................................................................................... 47
8.2 Unit care.............................................................................................................. 47
8.3 Unit cleaning ....................................................................................................... 47
8.4 Disinfecting the unit............................................................................................. 48
8.5 Maintenance........................................................................................................ 48
8.6 Repair.................................................................................................................. 48
8.7 Disposal .............................................................................................................. 48
9 Technical specifications ........................................................................................... 49
9.1 Unit...................................................................................................................... 49
9.2 System requirements and connections ............................................................... 51
9.3 Imaging plate specifications ................................................................................ 52
9.4 Hygiene bag specifications ................................................................................. 53
9.5 Electromagnetic Compatibility (EMC) tables....................................................... 54
10 Symbols and labeling................................................................................................ 59
10.1 Symbols .............................................................................................................. 59
10.2 Main label............................................................................................................ 60
10.3 Warnings and precautions .................................................................................. 61
ii rev

1 Introduction
1. ON/OFF key
2. START key
3. Display
4. Imaging plate collector
5. Plate slot and plate carrier
6. Power supply
CAUTION:
Only use the power supply delivered
with the unit or an approved spare
power supply supplied by an authorized distributor (See chapter Technical Specifications).
7. Documentation and
imaging application software media
8. Hygiene accessories
9. Imaging plates
10. Imaging plate storage box
10
8
9
7
6
3
2
1
5
4
INSTRUMENTARIUM DENTAL™ EXPRESS™ Origo
system is intended to be used by dentist and other
qualified dental professionals to process x-ray images
exposed to the imaging plates from the intraoral complex of
the skull.
1.1 Unit with accessories
1 Introduction
209638 rev 4 Instrumentarium Dental 1
1 Introduction
1
2
3
4
5
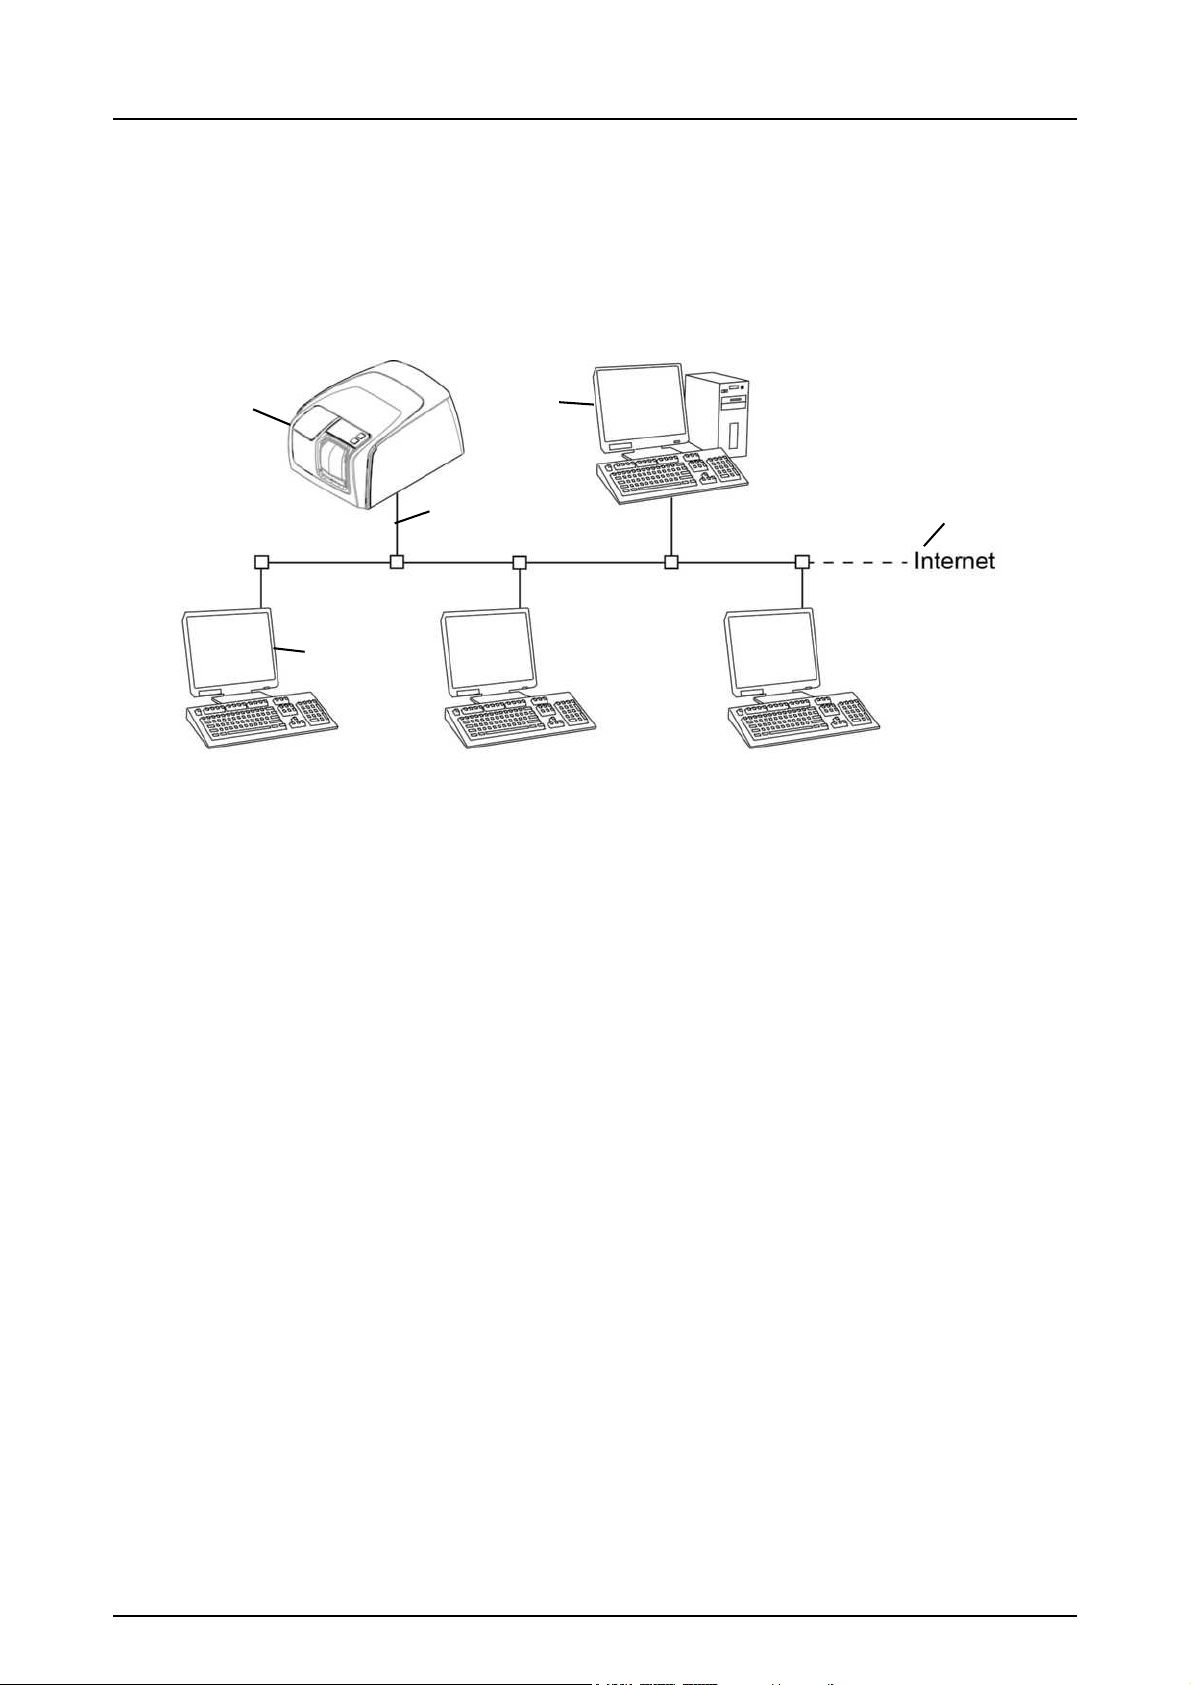
1.2 System setup
An example of a typical system set up in a local area
network (LAN).
1. EXPRESS™ Origo unit
2. Ethernet cable
3. Workstation (WS) computer (not included) containspatient data, images and a license server
4. Internet connection (optional, recommended)
5. Optional workstation (WS) computers (not included)
For more options and details of installing and setting up the
EXPRESS™ Origo system see chapters 6 Installation of
the imaging plate system and 9 Technical specifications.
2 Instrumentarium Dental 209638 rev 4
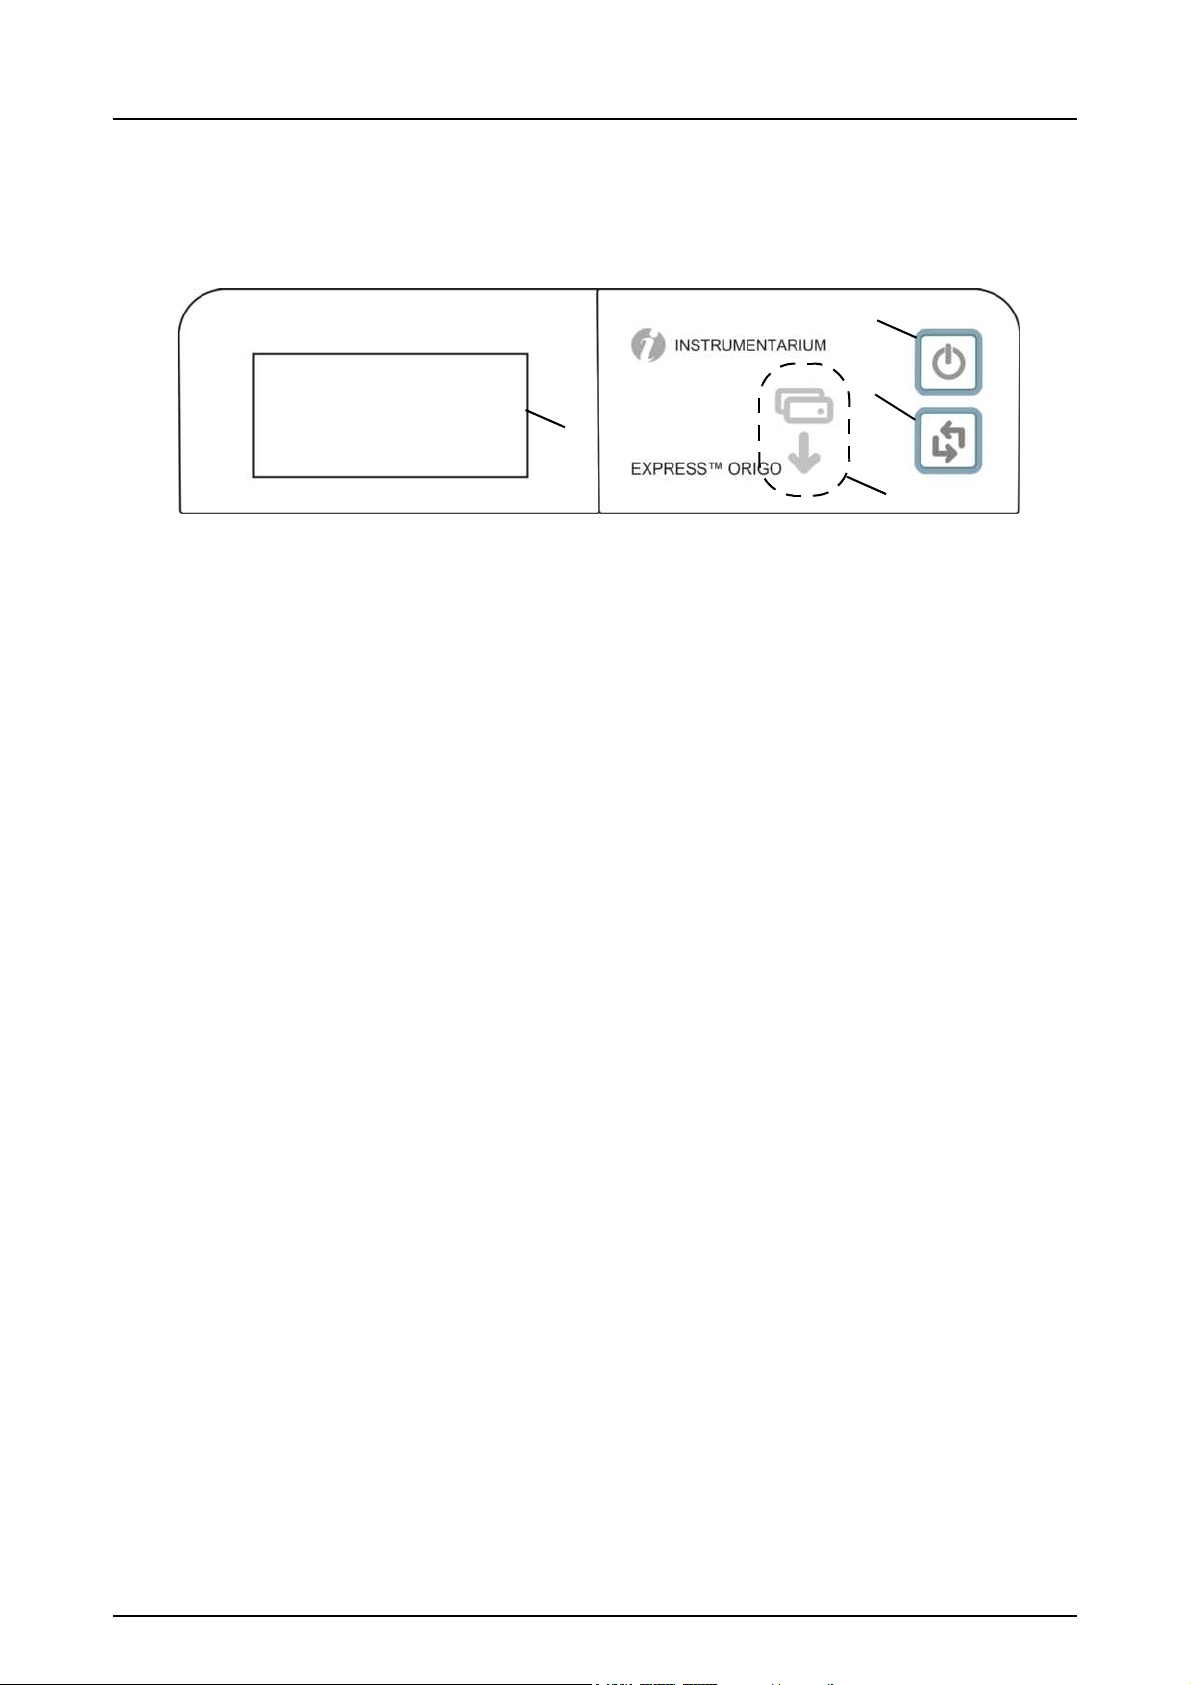
1.3 Controls and indicators
4
1
2
3
Control panel layout
1. ON/OFF key
2. START key
3. Plate feeding indicator
4. Status display
1 Introduction
ON/OFF key
• Press ON/OFF key to turn the unit on.
• Press and hold for 3 seconds to turn the unit off.
• They key has a light when the unit is on.
• The light is softly blinking when the unit is in a stand
by mode.
• Press the ON/OFF key or the START key to wake
the unit.
START key
• Use the start key to wake the unit from the stand by
mode or
• to start processing in the manual mode or to cancel
(skip) the 2nd plate in the Occlusal 4C mode.
• to access startup screen-information (IP, serial
number) when the scanner is not reserved by any
user.
209638 rev 4 Instrumentarium Dental 3
1 Introduction
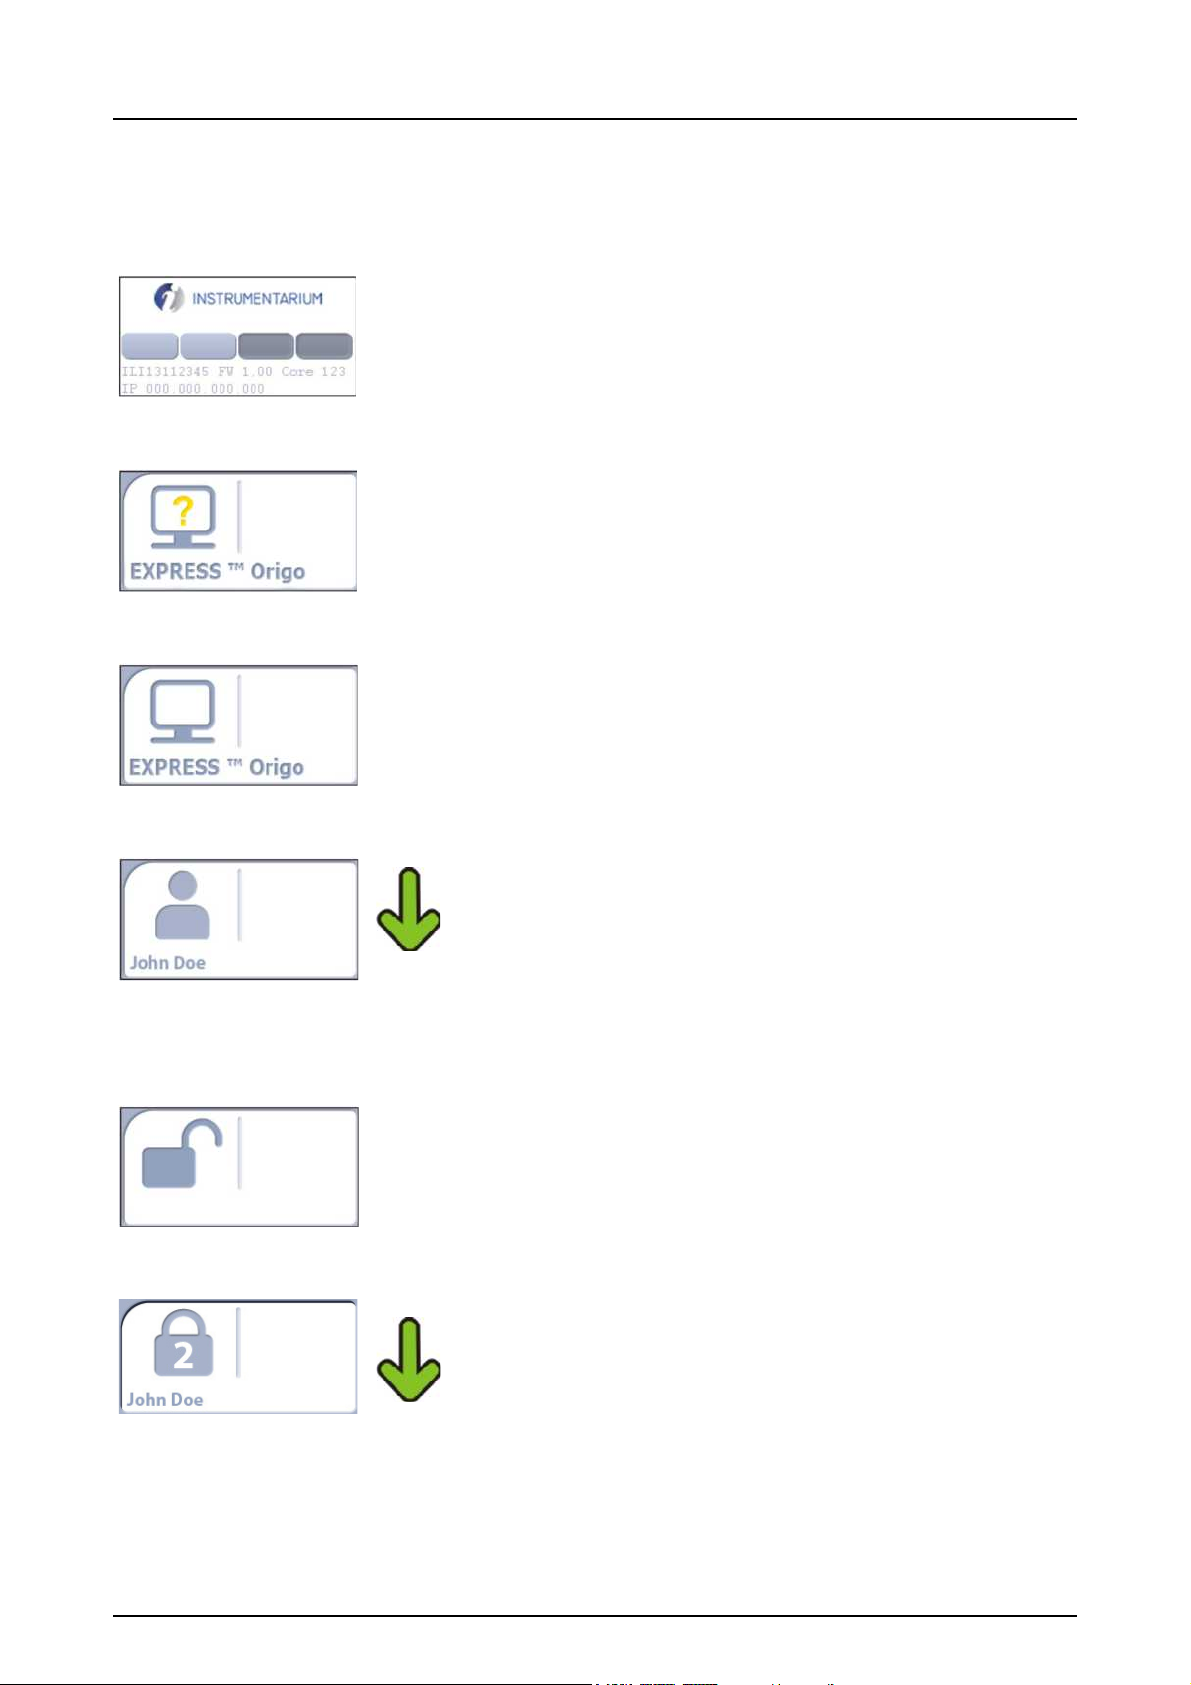
Display and plate feeding indicators
Startup
During startup the unit serial number, IP address and
other information will appear on the unit display.
Waiting dental imaging software
Software not open, not ready or waiting for user action.
Device name is displayed.
Software active
Unit has a connection to a software. Device not in use.
Express Share reservation
The unit has been reserved using Express Share. The
workstation identifier is shown in the padlock. The name
of the current patient is shown.
The green plate feeding indicator is showing readiness
for plate insert.
Express Share ready
Unit has a connection to a software using Express
Share.
The unit is not reserved by any workstation in the system.
Unit is activated
The unit is activated for image processing. The name of
the current patient is shown.
The green plate feeding indicator is showing readiness
for plate insert.
4 Instrumentarium Dental 209638 rev 4
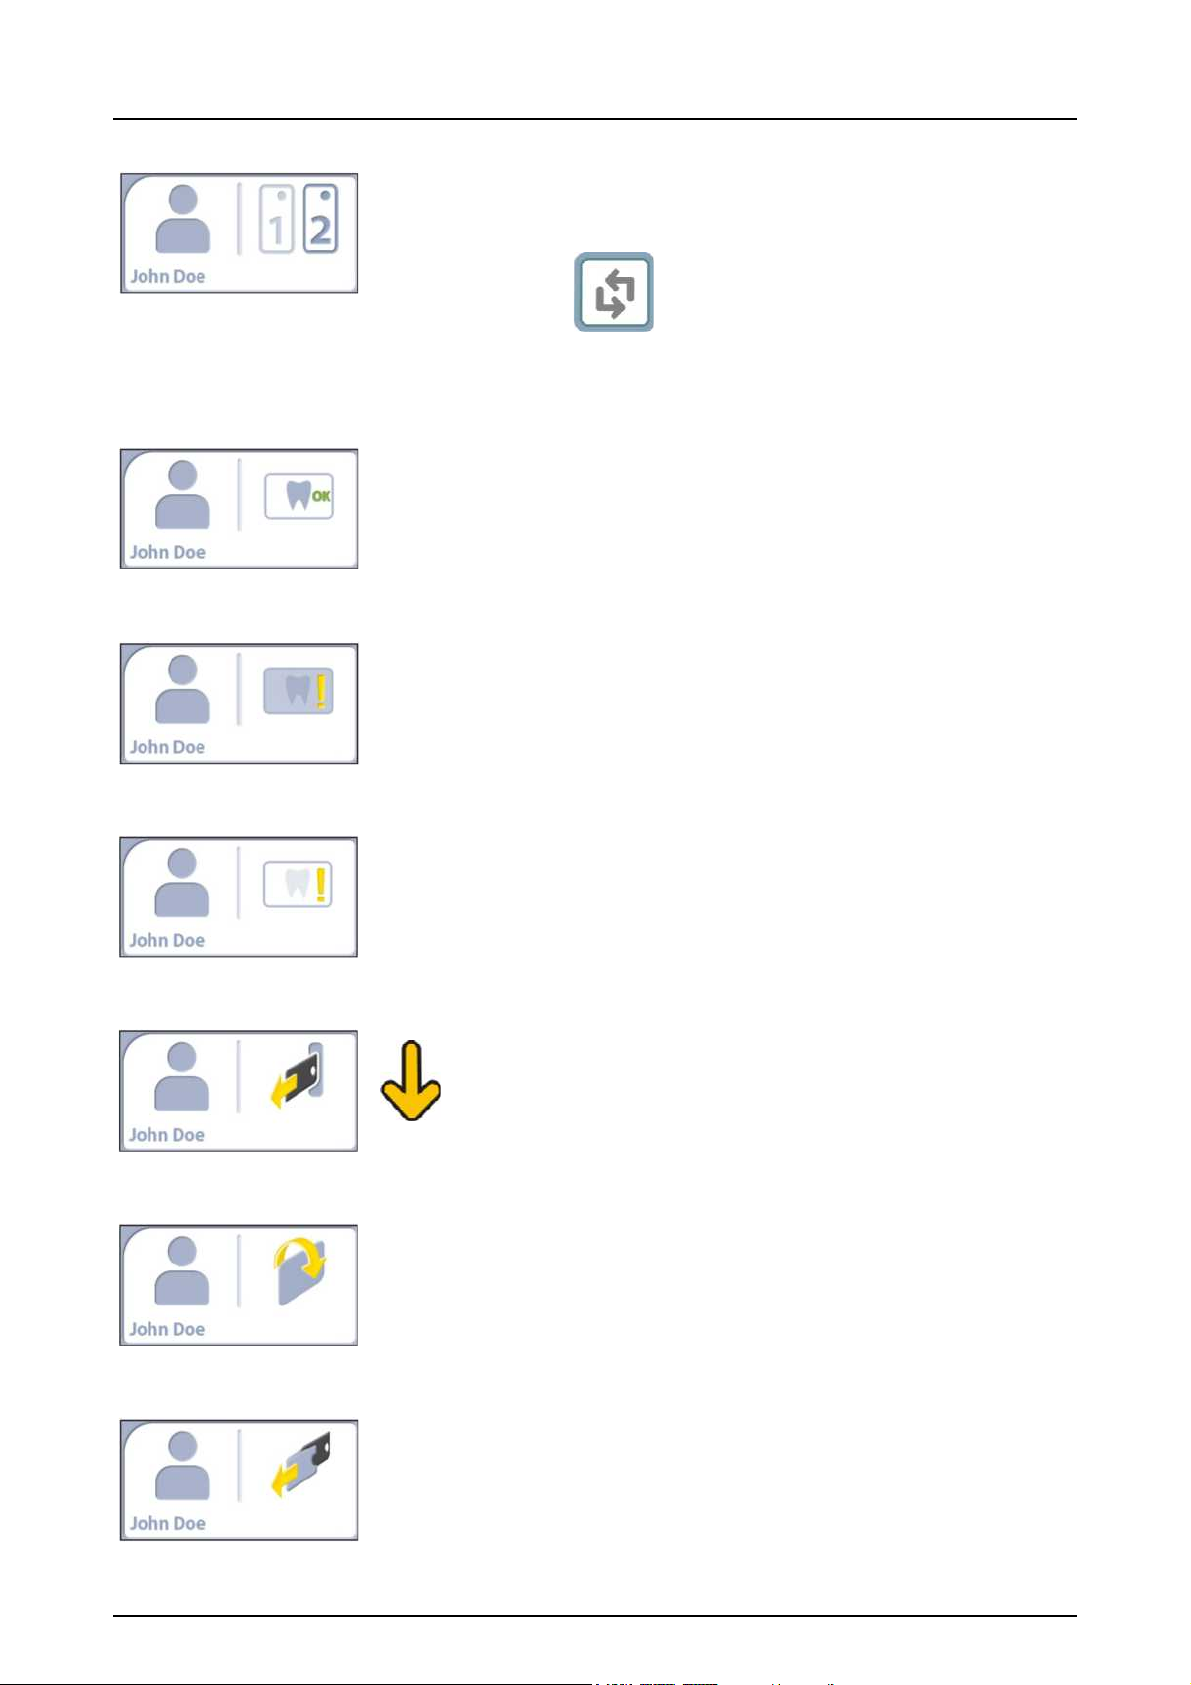
1 Introduction
Press
to treat the first plate as a single size 3
image.
Insert 2nd plate
Insert the second plate of the Occlusal 4C format.
Image processing complete
Exposure level OK.
Image processing complete
Image considered over exposed. Check exposure settings.
Image processing complete
Image considered under exposed. Check exposure settings.
Remove plate
Remove the imaging plate from the plate carrier.
Rotate the plate
Rotate the imaging plate. Light blue side to the left.
Remove cover
Remove the hygienic cover gently leaving the imaging
plate in the plate carrier.
209638 rev 4 Instrumentarium Dental 5
1 Introduction
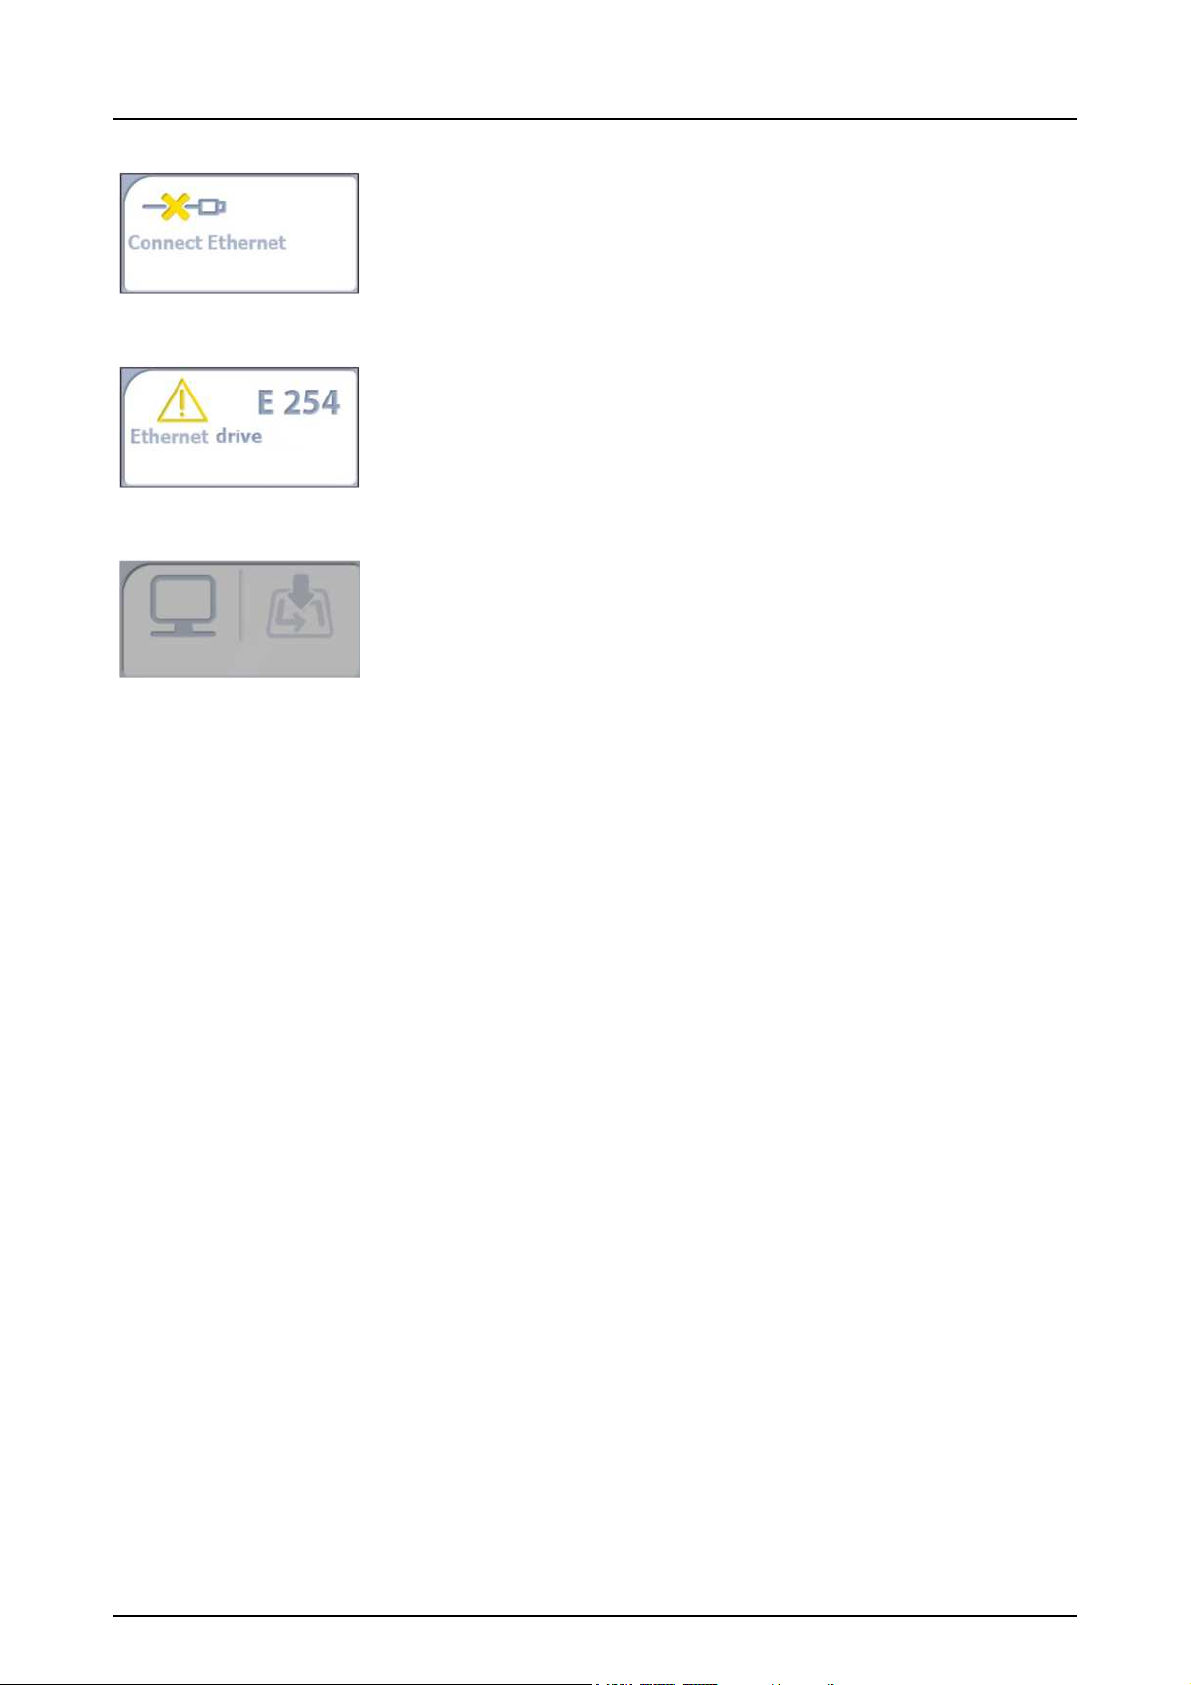
Unit disconnected
Missing ethernet connection. Check the connectors, cables and the network.
Error
Error ID and a short description is displayed. Contact
service.
Press START
Press the START button to wake the unit from a standby
mode.
6 Instrumentarium Dental 209638 rev 4
2 Basic use
1
2
5
4
3
6
2 Basic use
Prepare imaging plates.
See chapter 2.1 for more information.
Activate the EXPRESS™ Origo from the imaging
application.
Refer to the application software manual for more
information.
Position and exposure.
See chapter 2.2 for more information.
209638 rev 4 Instrumentarium Dental 7
2 Basic use
1
2
3
4
5. Process the imaging plate.
See chapter 2.4 for more information.
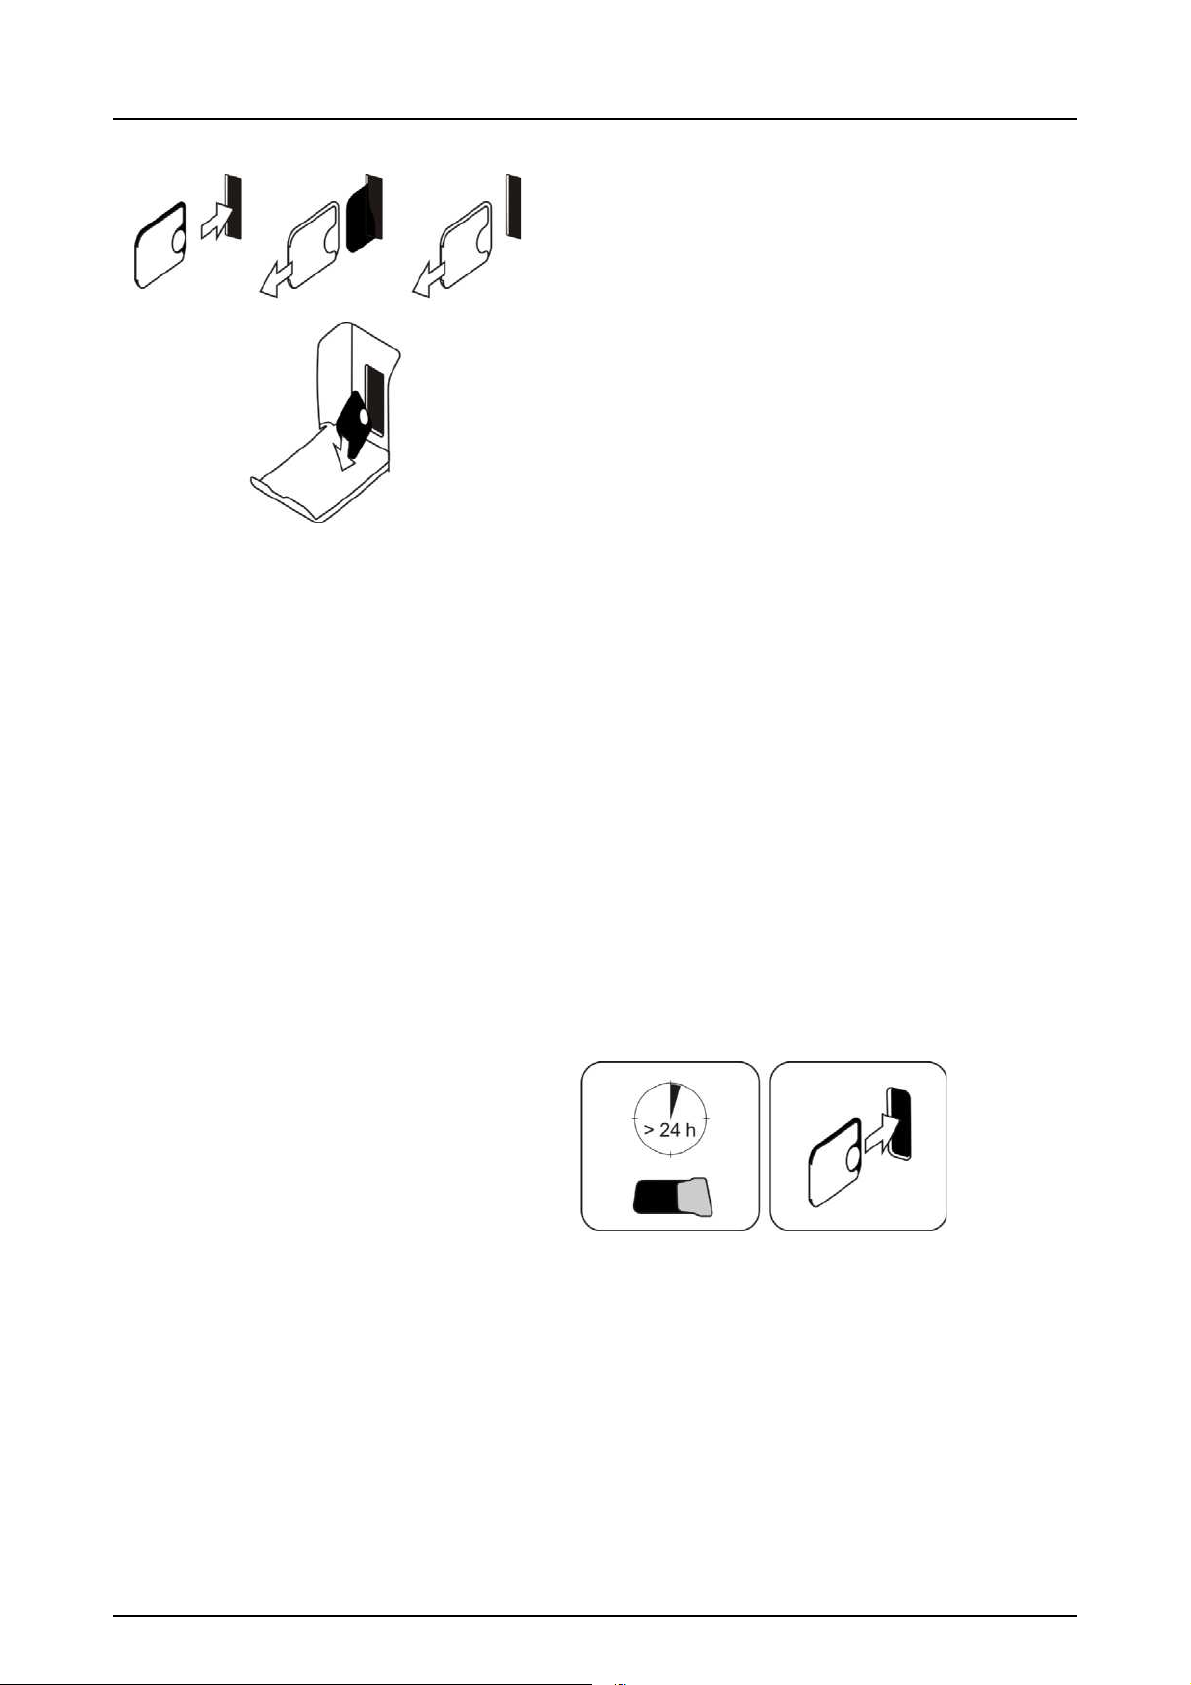
Caution! Process unexposed imaging plates to erase
potentially accumulated background radiation when
• Taking new imaging plates into use.
• Imaging plates have been packaged and unused
for more than 24 hours.
• Imaging plates have stored in dark (not exposed to
ambient light) susceptible for background radiation
for more than 24 hours.
This will remove any potential fogging due to collected
natural background radiation.
8 Instrumentarium Dental 209638 rev 4
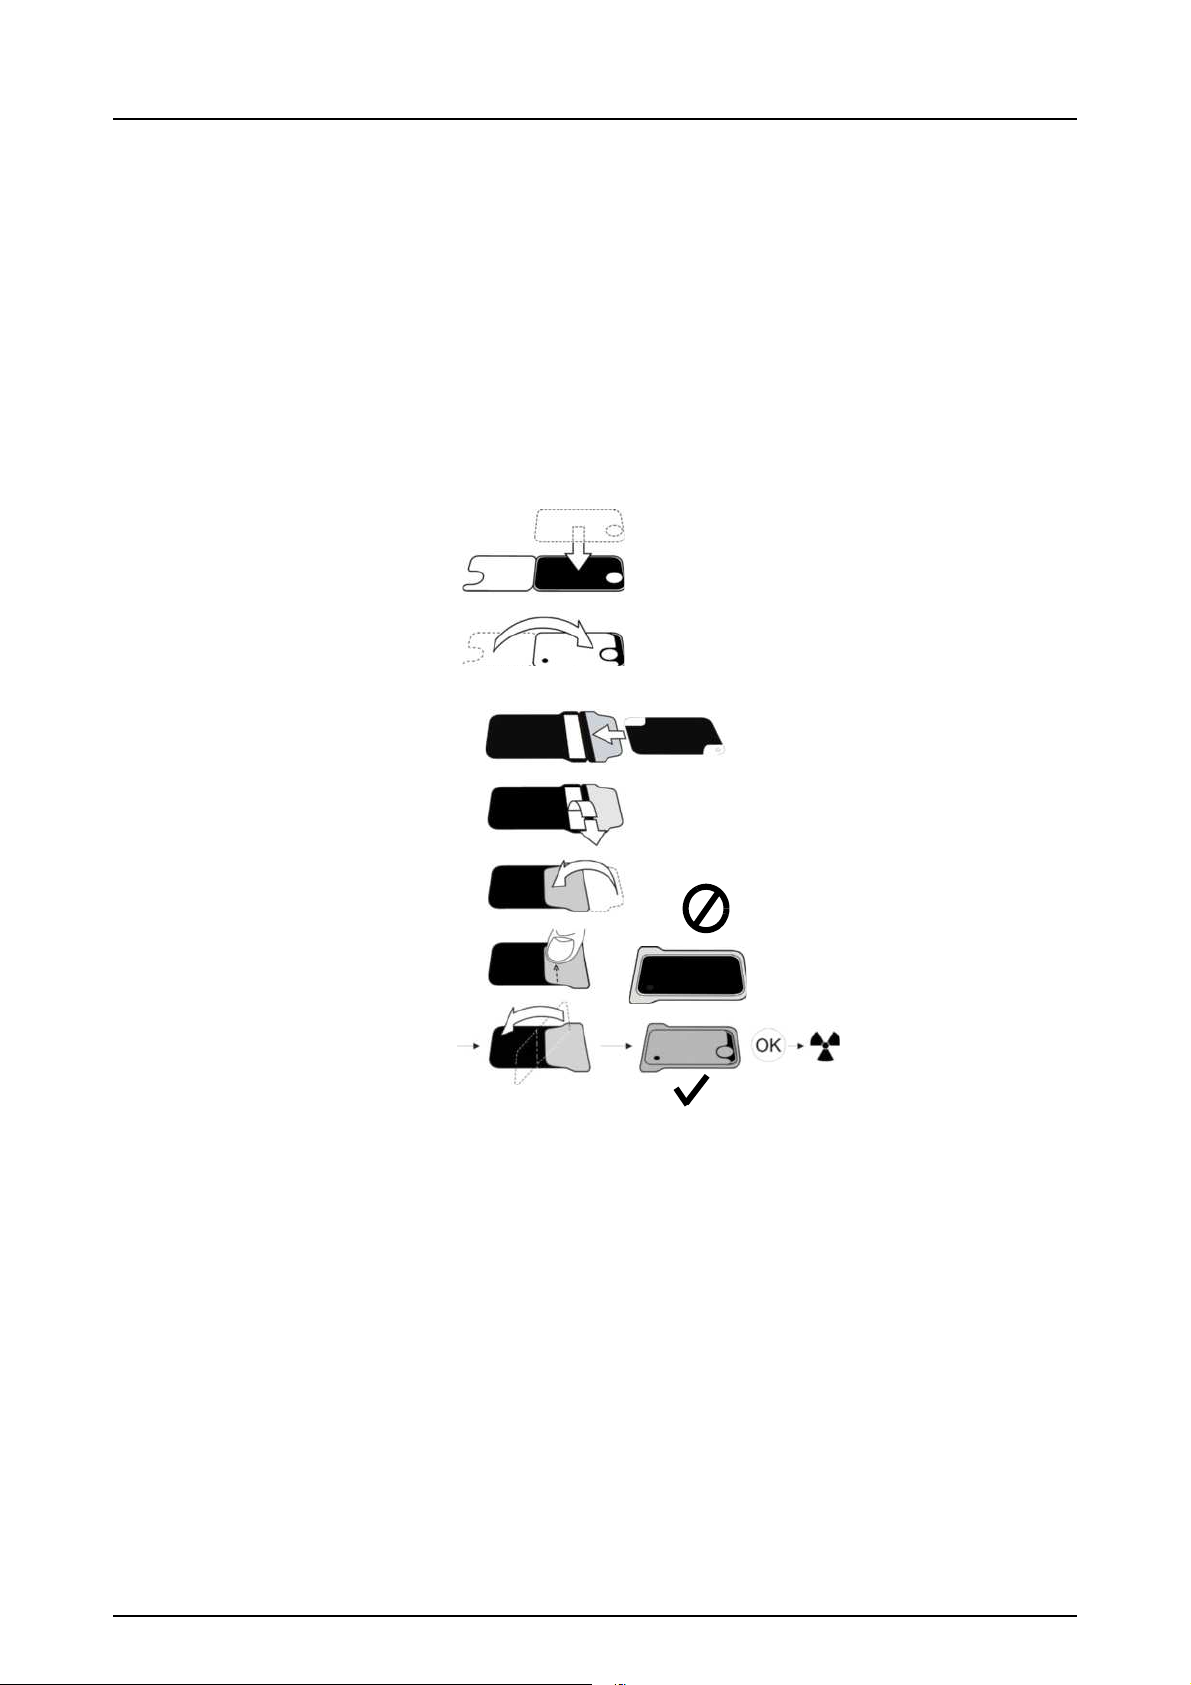
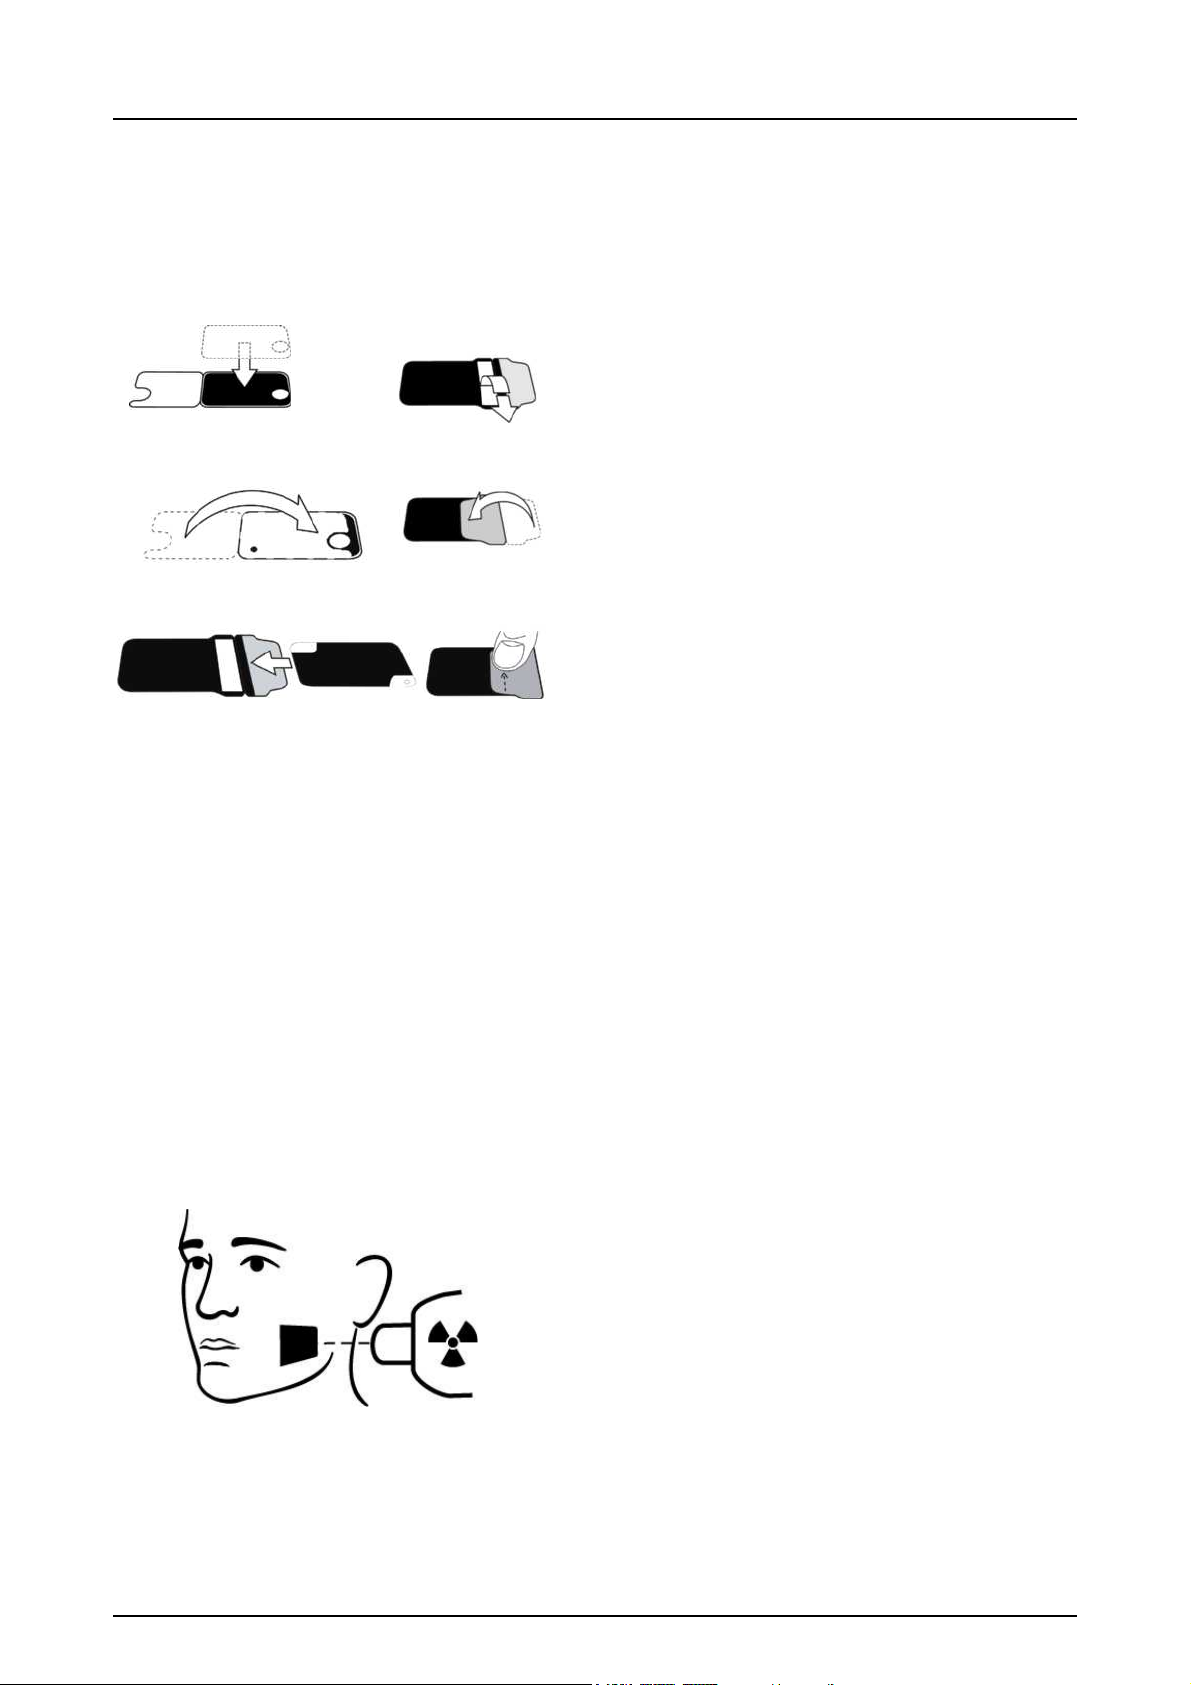
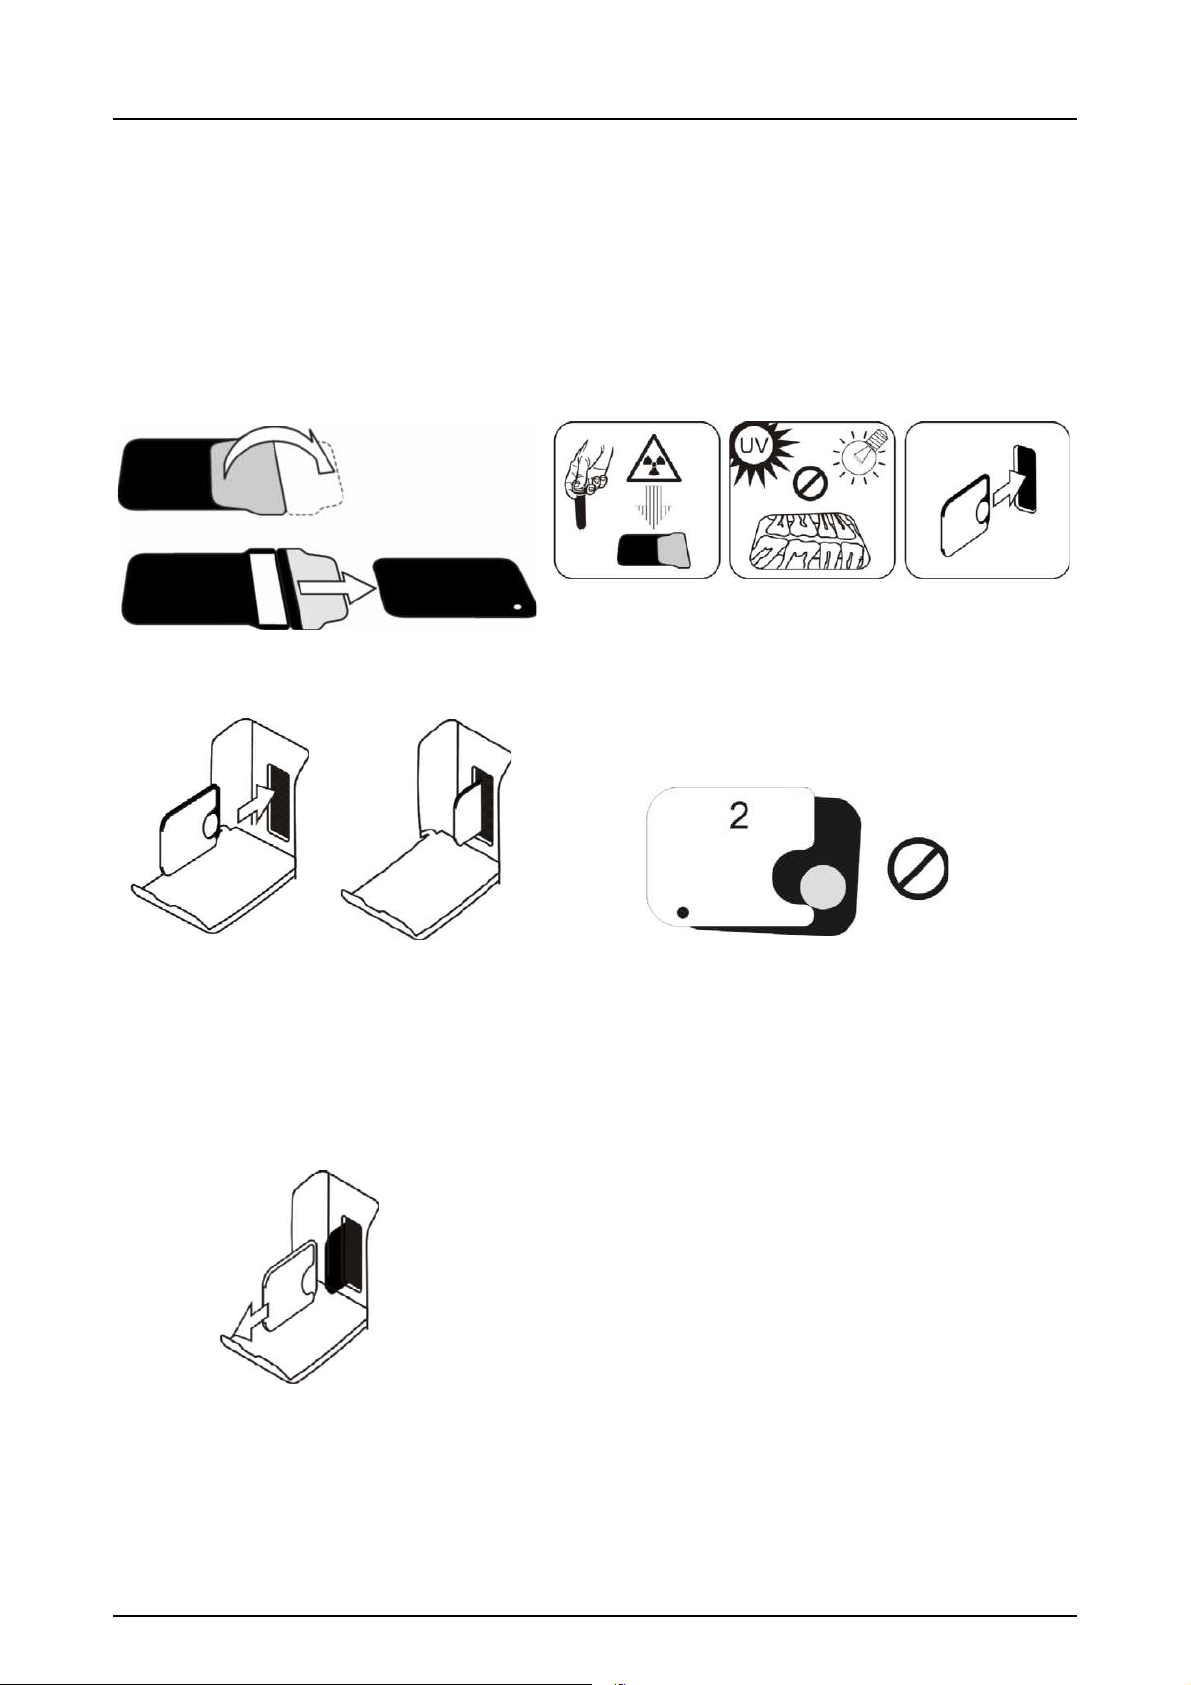
2.1 Preparing the imaging plates
Apply Instrumentarium Dental protective cover and
package the plates into the original Instrumentarium Dental
hygiene bag.
Seal the bag properly.
Observe the orientation of the plates, cover and the bag.
Active side of the imaging plate has a light blue color.
2 Basic use
Note! Keep the imaging plates packed max. 24 hours before using. Packaged plates accumulate radiation from the
background. Plates can be erased by reading the plate.
209638 rev 4 Instrumentarium Dental 9

2 Basic use
2.2 Positioning and exposure
Position the imaging plate according to the anatomical
area of interest. Holders (petitioners) are recommended for
the best positioning accuracy. See the chapter 4.4 Holders,
for more information.
Apply X-ray according to the anatomical area of interest
and on the intraoral X-ray tube in use.
Find guidelines of exposure times in seconds for a
standard DC X-ray unit in the table below.
Correct exposure settings depend on the X-ray unit type in
use. For an AC-unit or for a low tube current (i.e. portable
X-ray) apply higher exposure times.
10 Instrumentarium Dental 209638 rev 4
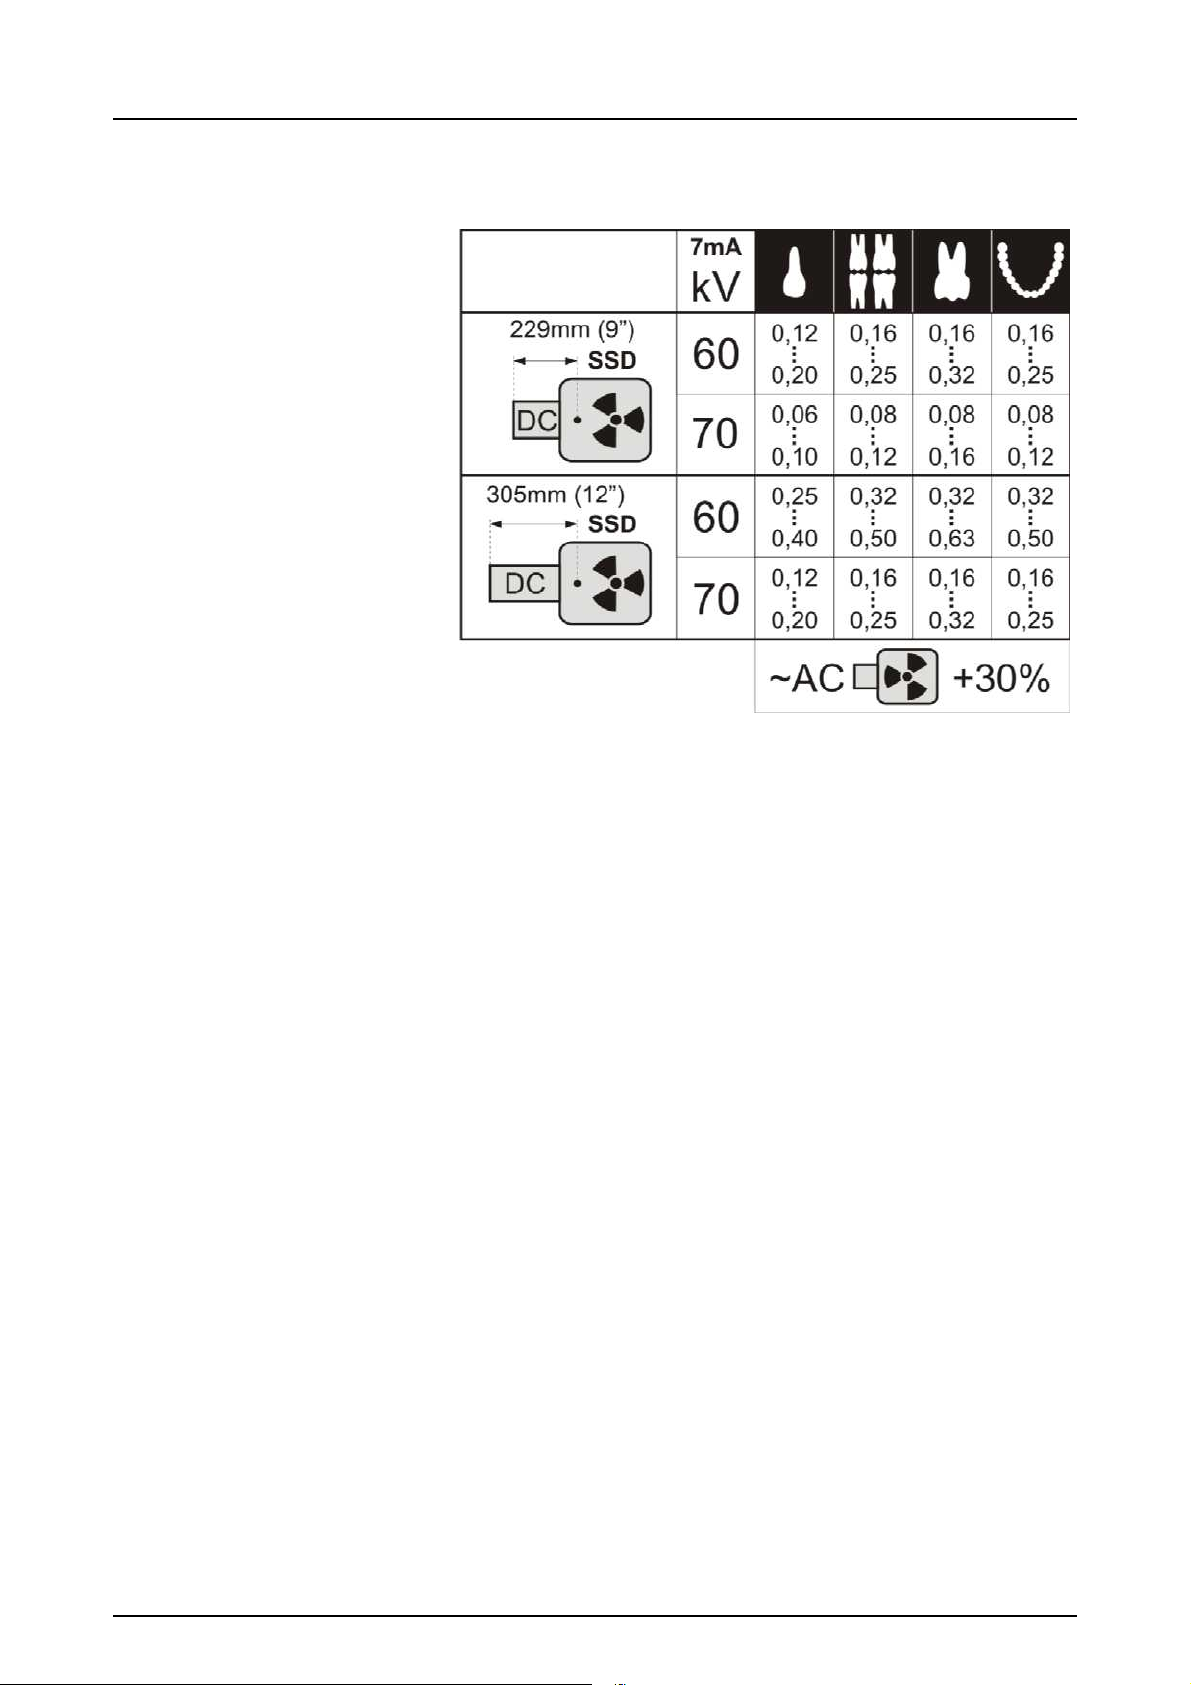
2 Basic use
Exposure factors close to F-speed film are often
appropriate.
209638 rev 4 Instrumentarium Dental 11
2 Basic use
2.3 Processing the imaging plates
Unpack and process the imaging plates immediately after
unpacking.
Note! Ambient light harms the image information
when not protected by the EXPRESS™ protective
cover.
Insert the imaging plate with the cover.
Note! Do not partially slide the imaging plate from
the cover. You can place the plate with cover and
leave it to the plate carrier. Unit will not start the
processing before removing the cover.
Remove the cover.
12 Instrumentarium Dental 209638 rev 4
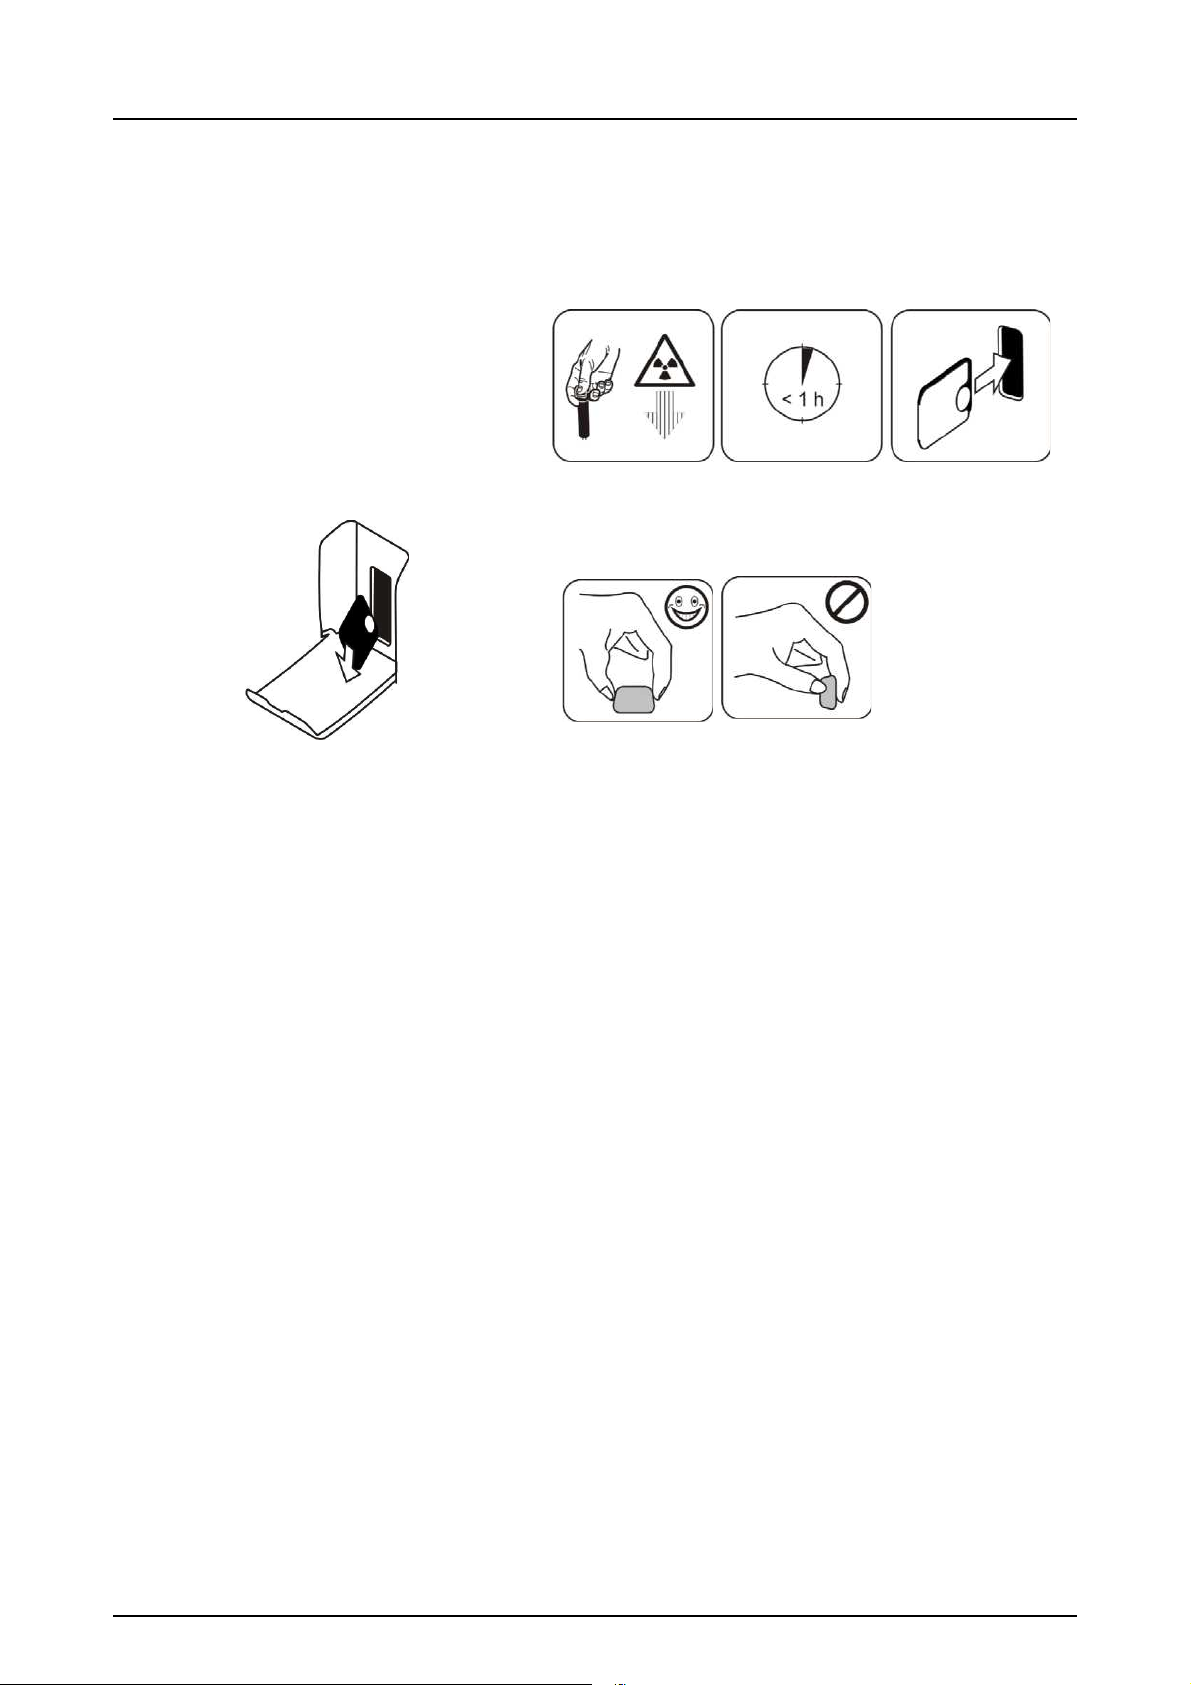
2 Basic use
The image appears on the imaging application
screen.
Note! Process within one hour after exposure.
Processed imaging plate is ready to be packed
and exposed again.
209638 rev 4 Instrumentarium Dental 13

2 Basic use
14 Instrumentarium Dental 209638 rev 4
3 Advanced use
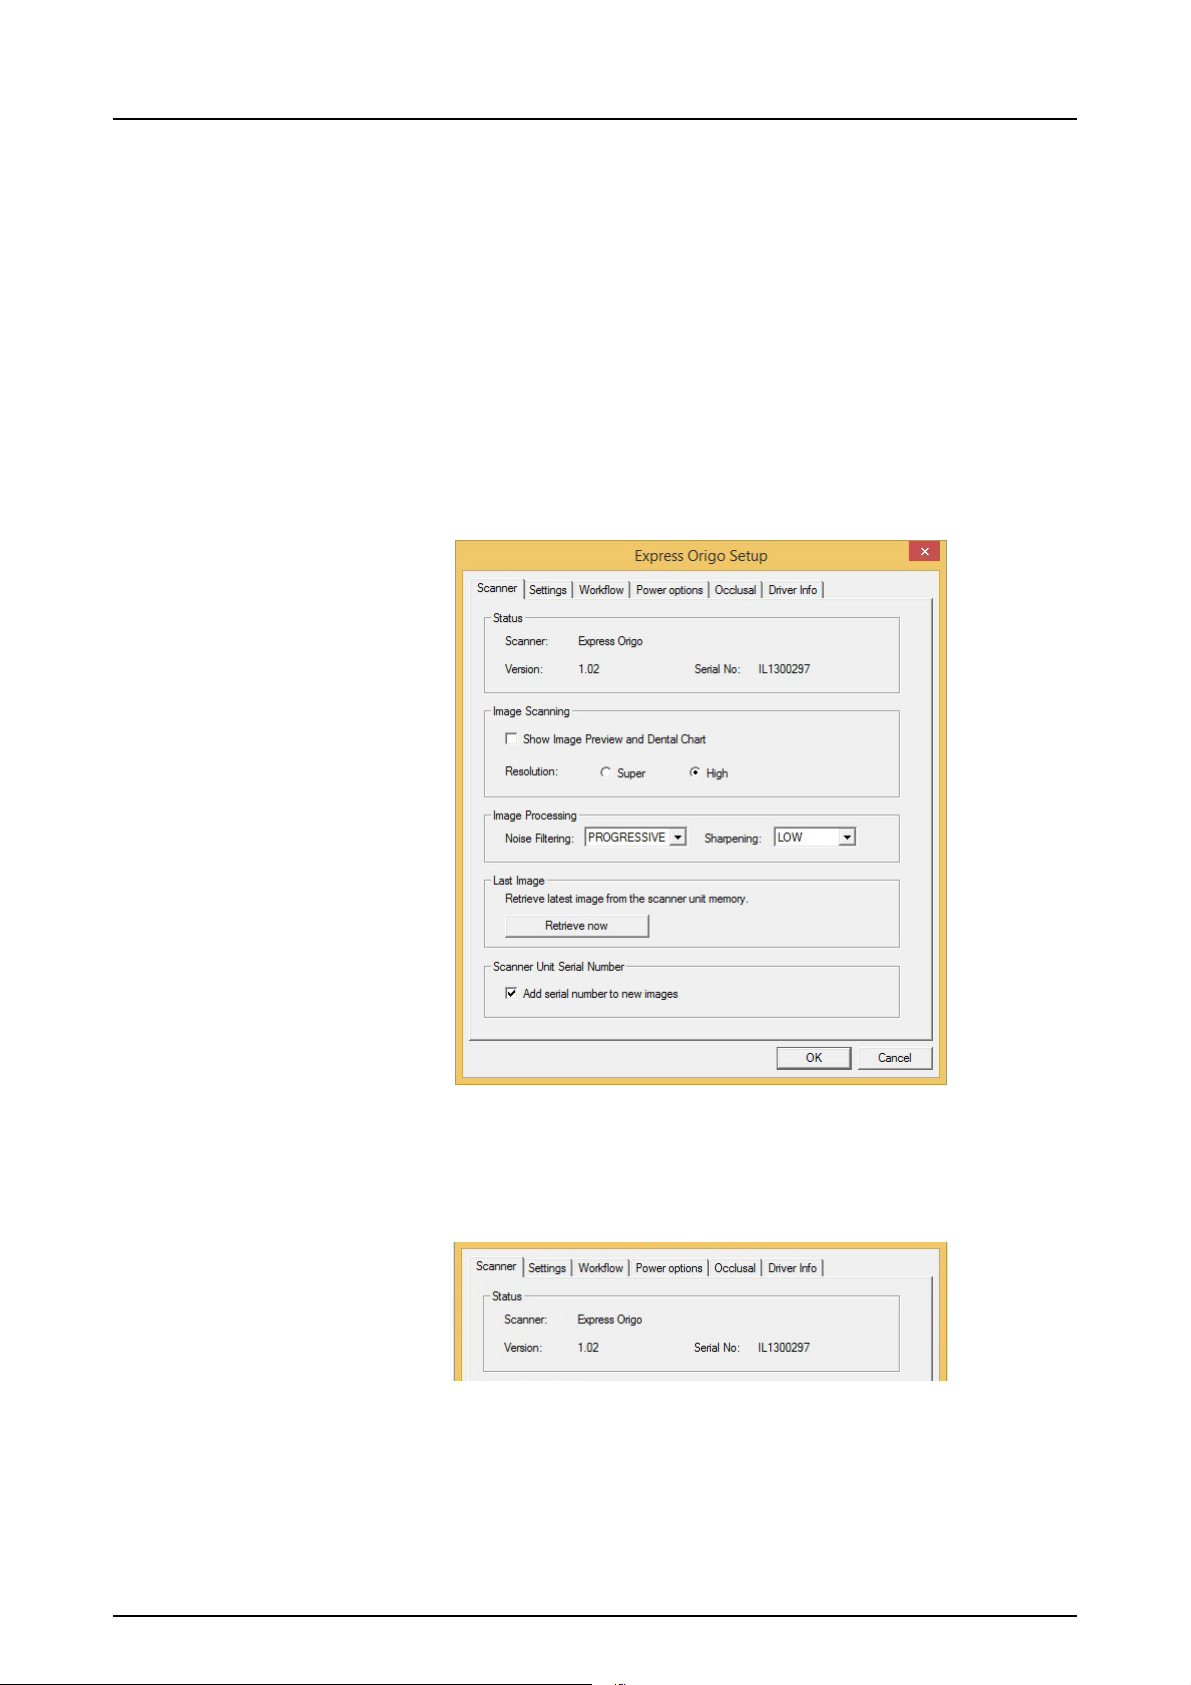
3.1 EXPRESS™ Origo setup options
The EXPRESS™ Origo setup options allow you to
configure the EXPRESS™ Origo to the user’s clinical
preferences.
From the imaging application software you are using select
unit Setup/Scanner page (for more instruction on how to
access setup page review application software manual).
3 Advanced use
3.1.1 Status
Shows the scanner type, firmware version and unit serial
number.
209638 rev 4 Instrumentarium Dental 13
 Loading...