

Instrumentarium Dental Cliniview Installation Manual

ENGLISH
CLINIVIEW™ 10.2.2
Installation Manual
209804 rev. 2
(209805 A5)


Copyright Code: 209804 rev 2 Date: April 25, 2013
Copyright © 4/25/13 by Instrumentarium Dental, PaloDEx
Group Oy.
All rights reserved.
INSTRUMENTARIUM DENTAL™/ CLINIVIEW™ are
common law trademarks of Instrumentarium Dental,
PaloDEx Group Oy.
ORTHOPANTOMOGRAPH®/ ORTHOCEPH® are
registered trademarks of Instrumentarium Dental, PaloDEx
Group Oy.
Documentation, trademark and the software are
copyrighted with all rights reserved. Under the copyright
laws the documentation may not be copied, photocopied,
reproduced, translated, or reduced to any electronic
medium or machine readable form in whole or part, without
the prior written permission of Instrumentarium Dental.
CLINIVIEW™ 10.2.2
The original language of this manual is English.
Instrumentarium Dental reserves the right to make
changes in specification and features shown herein, or
discontinue the product described at any time without
notice or obligation. Contact your Instrumentarium Dental
representative for the most current information.
Manufacturer Instrumentarium Dental, PaloDEx Group Oy
Nahkelantie 160 (P.O. Box 20)
FI-04300 Tuusula
FINLAND
Tel. +358 10 270 2000
Fax. +358 10 270 2230
For service, contact your local distributor.

CLINIVIEW™ 10.2.2

Table of Contents
1 Introduction..................................................................................................................1
1.1 General ................................................................................................................. 1
1.2 Manufacturer’s liability........................................................................................... 2
1.3 Abbreviations ........................................................................................................ 3
1.4 System requirements ............................................................................................ 4
1.4.1 Minimum system requirements for the software client ............................... 4
1.4.2 Minimum system requirements for the software database......................... 6
1.4.3 Minimum system requirements for Reco Server ........................................ 8
1.5 The software specifications................................................................................... 9
1.6 The software compatibility table.......................................................................... 12
2 Software installation..................................................................................................13
2.1 Standalone ..........................................................................................................18
2.2 Small network...................................................................................................... 21
2.2.1 Small network server................................................................................ 21
2.2.2 Small network viewing workstation .......................................................... 25
2.3 Network system................................................................................................... 30
2.3.1 Network database .................................................................................... 30
2.3.2 Simple Database installation.................................................................... 30
2.3.3 Existing Database Installation (EDBI) ...................................................... 35
2.3.4 Network modality workstation .................................................................. 43
2.3.5 Network modality workstation with DICOM .............................................. 47
2.3.6 Standalone License Server ...................................................................... 52
2.4 Standalone with Volumetric Tomography ........................................................... 53
3 Licensing CLINIVIEW™............................................................................................. 61
3.1 Important licensing information ........................................................................... 61
3.2 Licensing CLINIVIEW™ standalone ..................................................................62
3.2.0.1 Trial period activation................................................................. 70
3.2.1 Licensing CLINIVIEW™ network ............................................................. 71
3.2.1.1 Activating CLINIVIEW™ network license .................................. 71
3.2.1.2 Configuring workstations to use CLINIVIEW™ network license 72
3.2.2 License Manager...................................................................................... 73
4 Driver installation ...................................................................................................... 77
4.1 Device drivers .................................................................................................... 77
4.2 NVIDIA drivers .................................................................................................... 77
4.3 OPD/OCD PCI® driver installation......................................................................77
4.3.1 PCI driver update ..................................................................................... 81
4.3.2 Uninstalling the driver............................................................................... 83
4.4 Sigma .................................................................................................................. 84
4.5 Intraoral camera installation ................................................................................ 84
4.5.1 Video Format dialogs ............................................................................... 86
4.5.2 Video Source dialog ................................................................................. 87
4.5.3 Video Input dialog .................................................................................... 88
4.5.4 Link the software to Intra camera event ................................................... 89
rev i

5 Configuring DICOM ................................................................................................... 91
5.1 General page ...................................................................................................... 92
5.1.1 DICOM License number........................................................................... 93
5.1.2 Retired Command Elements .................................................................... 93
5.2 SOP Class configuration .....................................................................................93
5.3 Worklist configuration.......................................................................................... 95
5.3.1 WorkList SCP Box ................................................................................... 96
5.3.2 Search for worklist items by date ............................................................. 97
5.3.3 Modalities Box .........................................................................................97
5.3.4 Scheduled Station .................................................................................... 97
5.3.5 Worklist Page buttons ............................................................................. 98
5.3.6 Other options............................................................................................ 99
5.4 Storage and Storage Commitment configuration .............................................. 101
5.4.1 Storage page - Destinations .................................................................. 102
5.4.2 Storage page -Attributes List buttons .................................................... 106
5.4.3 Storage Commitment settings................................................................ 108
5.5 Print configuration ............................................................................................. 110
5.5.1 Print page - Destinations ....................................................................... 111
5.5.2 Print page - Attributes List buttons ........................................................ 114
5.6 Query / Retrieve configuration .......................................................................... 115
5.6.1 Query options.........................................................................................117
5.6.2 The Log Files and Performance pages .................................................. 119
5.7 Storage SCP ..................................................................................................... 119
5.8 Log File and Performance Settings................................................................... 121
5.9 Glossary ...........................................................................................................124
5.10 The software DICOM SOP Classes .................................................................. 126
6 Software database ................................................................................................... 127
6.1 Changing the software database location ......................................................... 127
6.1.1 Changing database location by uninstalling local database using ......... 127
6.1.2 Changing database location by modifying ODBC alias.......................... 128
6.1.3 Changing updated Standalone database to Network database............. 129
6.2 Database backup and restore ...........................................................................129
6.2.1 Making instant backup from the software database............................... 130
6.2.2 Restoring the software database from the backup................................. 131
6.3 Restoring database to a new installation and/or location.................................. 132
6.3.1 How to restore a database to another installation or new location......... 132
6.3.2 How to reconfigure Database connection (ODBC) ................................133
6.4 Renaming Database Computer......................................................................... 134
6.4.1 Configuring the file server ...................................................................... 134
6.4.2 Modifying Datasource.ini........................................................................134
6.4.3 Modifying Already Installed Clients to Use New Database Computer ... 135
7 Upgrading the software...........................................................................................137
7.1 Upgrade from CLINIVIEW™ 7.1.0 or newer ..................................................... 137
7.2 Upgrade from CLINIVIEW™ 7.0.2 or older ....................................................... 141
8 Adding features .......................................................................................................143
8.1 Adding devices..................................................................................................143
8.2 Enabling SmartNav in the software...................................................................144
8.3 Adding options .................................................................................................. 145
ii rev

8.3.1 Adding options using Advanced modify ................................................. 145
8.3.2 Adding options using Add-ons ............................................................... 147
9 Uninstalling .............................................................................................................. 149
9.1 Uninstalling the software ................................................................................... 149
10 CLINIVIEW™ Manager............................................................................................. 151
10.1 Login ................................................................................................................. 151
10.2 Archiving ........................................................................................................... 152
10.2.1 Create archive........................................................................................152
10.2.2 Restore archive ......................................................................................153
10.3 Images ..............................................................................................................154
10.3.1 Remove archived ...................................................................................154
10.3.1.1 Settings....................................................................................155
10.3.1.2 Image folder location ...............................................................156
10.3.1.3 Report, Exposure statistics ...................................................... 156
10.4 Database...........................................................................................................159
10.4.1 User Management.................................................................................. 159
10.4.1.1 Database backup..................................................................... 160
10.4.1.2 Trash ....................................................................................... 161
10.4.1.3 System Logs ............................................................................162
10.4.1.4 Search logs.............................................................................. 163
10.5 File Server Configuration .................................................................................. 164
10.6 License..............................................................................................................164
11 Using practice management interface...................................................................165
11.1 Introduction ....................................................................................................... 165
11.2 How to use CLINIVIEW.ini ................................................................................ 168
11.3 Interface to access image information ..............................................................169
12 Software license ...................................................................................................... 171
rev iii

rev iv

1 Introduction
1.1 General
CLINIVIEW™ (hereafter called “the software”) is a
complete solution for digital image acquisition, processing,
viewing and storing. The software supports
INSTRUMENTARIUM DENTAL™ Sigma, Sigma M and
Snapshot intraoral sensors, Express, Orthopantomograph
OP30, OP300, OP100 D, OP200 D and Orthoceph
OC100 D and OC200 D digital units, KaVo Scan eXam™,
Pan eXam™ and Pan eXam™ Plus digital units, and
intraoral video cameras. Images can also be imported from
other digital sources. The software stores images and
patient information in a SQL database and provides tools
for image archiving.
1 Introduction
®
®
This installation manual covers the installation of the
software Standard and DICOM versions. The user manual
describes how to use the software. See the equipment
manuals before installing or using the equipment. See the
Windows manuals for further information about the
Windows environment.
With the software you can perform the following
operations, assuming that all the equipment is ready for
use:
- Create a new patient and store patient information
in a database.
- Capture and store digital X-ray images with exposure values from the device.
- Capture and store intraoral photographs.
- Export and import digital images.
- Process images to enhance their diagnostic value
with dental specific tools.
- Analyse the image with application specific measurement tools.
- Build an environment with multiple workstations
using a database shared over a network.
- Printing images and image information.
- Capture 3D images and launch 3rd party image
analyzing and planning tools
209804 rev 2 Instrumentarium Dental 1

1 Introduction
The software allows to import and export image files.
Supported file formats are D32, JPG, JPG2000, TIF, BMP
and PNG. D32 is Instrumentarium’s proprietary own file
format. Images can be saved in the database in PNG (16
bit) or JPG formats (12 bit).
The software can be used in a network environment. If the
software is installed in several computers, the patient and
image database can be shared and used from different
workstations.
We recommend to read this manual before installing and
using the software.
1.2 Manufacturer’s liability
As a manufacturer, we can only assume liability for safe
and reliable operation of this software when the PC
software is installed and used according to the software
installation and user manuals.
Note! Safe and reliable usage of the product requires that
the user has read and understood the instructions and restrictions given in the manual.
2 Instrumentarium Dental 209804 rev 2

1.3 Abbreviations
PC Personal computer
HD Hard disk
Hz Hertz; cycles per second
MHz Megahertz, millions of cycles per
CPU Central processing unit (comput-
RAM Random access memory
MB Megabytes
GB Gigabytes
1 Introduction
second
er)
CCD Charge-coupled device
DVD-RW Digital Versatile Disc (re-writa-
ble)
PCI Peripheral Component Intercon-
nect
DAT Digital audio tape
MOD Magneto optical drive
USB Universal Serial Bus
VfW Video for Windows, a video for-
mat supported by the software
Intraoral Camera interface.
WDM Windows Driver Model, a video
format supported by the software Intraoral Camera interface.
WLAN Wireless Local Area Network
209804 rev 2 Instrumentarium Dental 3

1 Introduction
1.4 System requirements
The below requirements are the minimum required to
install and use the software for basic 2D imaging. When
using the software together with an imaging unit, please
refer to the unit installation manual for additional
requirements. 3D units specifically have additional
computer requirements not listed below.
1.4.1 Minimum system requirements for the
software client
Operating System
(OS)
Memory (RAM) At least 1 GB (32-bit OS) or
Processor 2 GHz Pentium 4 or better
Windows XP Professional
SP3 (32-bit)
Windows Vista Business/
Ultimate/Enterprise SP2
(32 or 64-bit)
Windows 7 Professional/
Ultimate/Enterprise SP1
(32 or 64-bit)
Windows 8 Pro/
Enterprise (32 or 64-bit)
Windows Server 2008
SP2* (32-bit)
Windows Server 2008
SP2* (64-bit)
*requires installation of Desktop
Experience
2 GB (64-bit OS)
Hard disk 8 GB free space
DVD-ROM DVD-ROM for installation
Keyboard Yes
Mouse Yes
Network card 10/100/1000 Mb/s Ethernet
Monitor 19" or larger recommended,
capable of 1280 x 1024 resolution, 24-bit color, or better
PCI slot PCI slot for OP capture card in
OP acquisition PC
USB port USB port for Sigma, Sigma M
and Snapshot
4 Instrumentarium Dental 209804 rev 2

WLAN WLAN for Sigma M
1 Introduction
CB3D additional
See the device manuals.
requirements
Other software Anti-virus software is recom-
mended to protect the system
from viruses.
Other device Device to support archive media
VT additional
requirements
At least 2 GB RAM
Display adapter supporting the
following:
OpenGL 2.0 (or higher)
Texture3D OpenGL
extension
128 MB video RAM
(dedicated, not shared)
209804 rev 2 Instrumentarium Dental 5

1 Introduction
1.4.2 Minimum system requirements for the
software database and SQL Server
Operating system
(OS)
Windows XP Professional
SP3 (32-bit)
Windows Vista Business/
Ultimate/Enterprise SP2
(32 or 64-bit)
Windows 7 Professional/
Ultimate/Enterprise SP1
(32 or 64-bit)
Windows 8 Pro/Enterprise
(32 or 64-bit)
Windows Server 2003 SP2
(32-bit)*
Windows Server 2008 SP2
(32-bit)
Windows Server 2008 R2
SP1
Windows Server 2008 SP2
(64-bit)
Windows Server 2012
(64-bit)
*requires Windows Server 2003
hotfix (KB925336) before
the software installation.
Supported SQL
Server versions
SQL Server 2005 SP2
(32-bit x86 edition)
Express/Standard/
Workgroup/Enterprise
SQL Server 2008 with
SP1 (32-bit x86 edition)
Express/Standard/
Workgroup
SQL Server 2008 R2
(32-bit x86 edition)
Express/Standard/
Workgroup
SQL Server 2012
(32-bit x86 edition)
Express/Standard/
Workgroup
Memory (RAM) At least 1 GB (32-bit OS) or
2 GB (64-bit OS)
Processor 2 GHz Pentium 4 or better
Monitor No special requirements
6 Instrumentarium Dental 209804 rev 2

1 Introduction
DVD-ROM DVD-ROM
Hard disk 8 GB free space
Pan / ceph images 4 GB /1000 panorama or
cephalometric images
Express 2 GB/1000 images
Snapshot sensor
DIGORA® Toto
Standard resolution mode:
1.3 GB/1000 images
High resolution mode:
4 GB/1000 images
OP300 100 GB/1000 CB3D study
Volumetric Tomogra-
37 GB / 1000 VT Studies
phy images
Other software Anti-virus software is recom-
mended to protect the system
from viruses.
Backup A suitable backup system is re-
quired for safeguarding patient
data and images. Backup is
solely the responsibility of the
end-user. The manufacturer
takes no responsibility for backup of user-created data and images.
209804 rev 2 Instrumentarium Dental 7

1 Introduction
1.4.3 Minimum system requirements for
Reco Server
Operating system
(OS)
Windows XP Professional
SP3 (32-bit)
Windows Vista Business/
Ultimate/Enterprise SP2
(32 or 64-bit)
Windows 7 Professional/
Ultimate/Enterprise SP1
(32 or 64-bit)
Windows Server 2003 SP2
(32-bit)*
Windows Server 2008 SP2
(32-bit)
Windows Server 2008 R2
SP1
Windows Server 2008 SP2
(64-bit)
Windows Server 2012
*requires Windows Server 2003
hotfix (KB925336) before
the software installation.
Processor 2 GHz Pentium 4 or better
Memory (RAM) At least 1 GB (32-bit OS) or
2 GB (64-bit OS)
Note! If the audio card is installed, speakers are needed to
hear the signal.
Note! In the case of installation in Windows Server 2003,
Windows Server 2003 hotfix (KB925336) must be installed
first, before installation can be started.
Pentium
®
is a registered trademark of Intel Corp.,
Windows® is a registered trademark of Microsoft Corp.
Other product and company names mentioned herein may
be trademarks and if so, registered and/or unregistered
trademarks, of their respective owners.
For safe and reliable system performance, you need to
arrange an appropriate backup procedure; meaning that
you regularly back up the system and store the labelled
back up media in a safe place. The end-user is solely
responsible for backing up all data.
8 Instrumentarium Dental 209804 rev 2

1.5 The software specifications
APPLICATION SOFTWARE:
PRODUCT NAME CLINIVIEW™
1 Introduction
Image acquisition
modalities
OP100 D
OC100 D
OP200 D
OC200 D
OP30
OP300
Express
Volumetric Tomography
Sigma
Snapshot
Sigma M
KaVo Pan eXam
Pan eXam Plus
Scan eXam
TWAIN-compatible
scanners and digital
cameras
Video acquisition devices
VfW format
WDM format
Patient database Microsoft SQL Server 2008 R2
SP1 Express/Workgroup/
Standard/Enterprise Editions
Image storage Local or network
Password security Yes
Imaging procedures
(pan/ceph):
See Volumetric Tomography
User Manual, User program
Chapter in OP100 D, OP200
D, OP300 and OP30 User
Manual.
Imaging procedures
(intraoral):
Series Mount exposure
(an optional feature)
Single exposure
Imaging procedures
See OP300 User Manual
(3D):
209804 rev 2 Instrumentarium Dental 9

1 Introduction
Image processing Brightness & Contrast
Zoom
Move
Noise Reduction
Edge enhancement
Embossment
Invert
Mirror
Rotate
Sharpen
Unsharp mask
Pseudocolor
Isodensity color
Optimize contrast (low,
medium, high)
Gamma correction
adjustments
Equalized histogram,
logarithmic histogram, linear
histogram
Note! CB3D 3D images require 3rd party viewing and/or
planning software.
Overlay graphics Text, Line, Free hand, Angle,
Rectangle, Circle, Arrow,
Region of Interest tools,
Implant tools,
Drag or Erase graphics,
Edit graphics, Save graphics
Note! CB3D 3D images require 3rd party viewing and/or
planning software.
Measurements Length
Calibration
Angle
Free Angle
Note! CB3D images require
3rd party viewing and/or planning software.
Image Printing MS Windows compatible
printers
DICOM Printers
(CLINIVIEW™ DICOM)
Multi-image printing
Free print layout design
Image information printing
Image archiving CLINIVIEW™
manager application
10 Instrumentarium Dental 209804 rev 2

1 Introduction
Image dynamics/
grayscales
12-bit/4096 (capture)
16-bit/64k (process &
handling)
8-bit/256 (display)
Image storage mode 16-bit enhanced
File formats PNG (16-bit), JPG (12-bit),
TIFF
File compression PNG (lossless),
JPG (100% - 60% quality),
TIFF (lossless)
Typical file size Panoramic
About 2-4 MB (PNG 16 bits)
Intraoral Sigma
0.4-1.6 MB (PNG 16 bits)
Intraoral Sigma M
3-5 MB (PNG 16 bits)
Import/Export file
formats
Intraoral Snapshot
3-5 MB (PNG 16 bits)
Cephalometric
3-5 MB (PNG 16 bits)
CB3D- 60-350 MB
Intra Express
0.3-2 MB (PNG 16 bits)
VT projection series 11 images
8 MB (PNG 16 bits)
VT slice series
30 MB (MNG 16 bits)
BMP, D32, PNG, JPG, TIF, DICOM, JPG2000, MNG
209804 rev 2 Instrumentarium Dental 11

1 Introduction
1.6 The software compatibility table
Windows
XP
OP100 D
Windows
Vista
32-bit
Windows
Vista
64-bit
Windows 7
32-bit
Windows 7
64-bit
Windows 8
32-bit
Windows 8
64-bit
xx
s/n 0-89999
OP100 D
xxxxxxx
s/n 90000 ->
OP200 Dxxxxxxx
OP200 D with
xxxxxxx
SmartNav
OP30 xxxxxxx
OP300 xxxxxx
Sigma (USB) x x x x
Sigma M
xxxxxxx
(WLAN)
Snapshot
xxxxxxx
(USB)
Expressxxxxxxx
KaVo Pan
xxxxxxx
eXam
KaVo Pan
xxxxxx
eXam Plus
KaVo
xxxxxxx
Scan eXam
OPD/OCD image capturing requires PCI-driver version
2.3.4.7830 or later, which is included on the installation
media.
Windows
®
2000, Windows® XP Professional and
Windows® Vista Business, Windows® Vista Ultimate,
Windows® Vista Enterprise, Windows® 7 Professional,
Windows® 7 Ultimate, Windows® 7 Enterprise, Windows® 8
Pro are registered trademarks of Microsoft Corp.
Note! Refer chapter 1.4 for details about service packs.
12 Instrumentarium Dental 209804 rev 2
2 Software installation
Software installation requires at a minimum a database for
patient and image data, client software for image
capturing, processing and viewing, at least one imaging
device (imaging plate reader, intra-oral sensor or extra-oral
x-ray unit) and license server. These software
components can be installed in one workstation
(standalone) or separate workstations (network
installation) depending on the system needed.
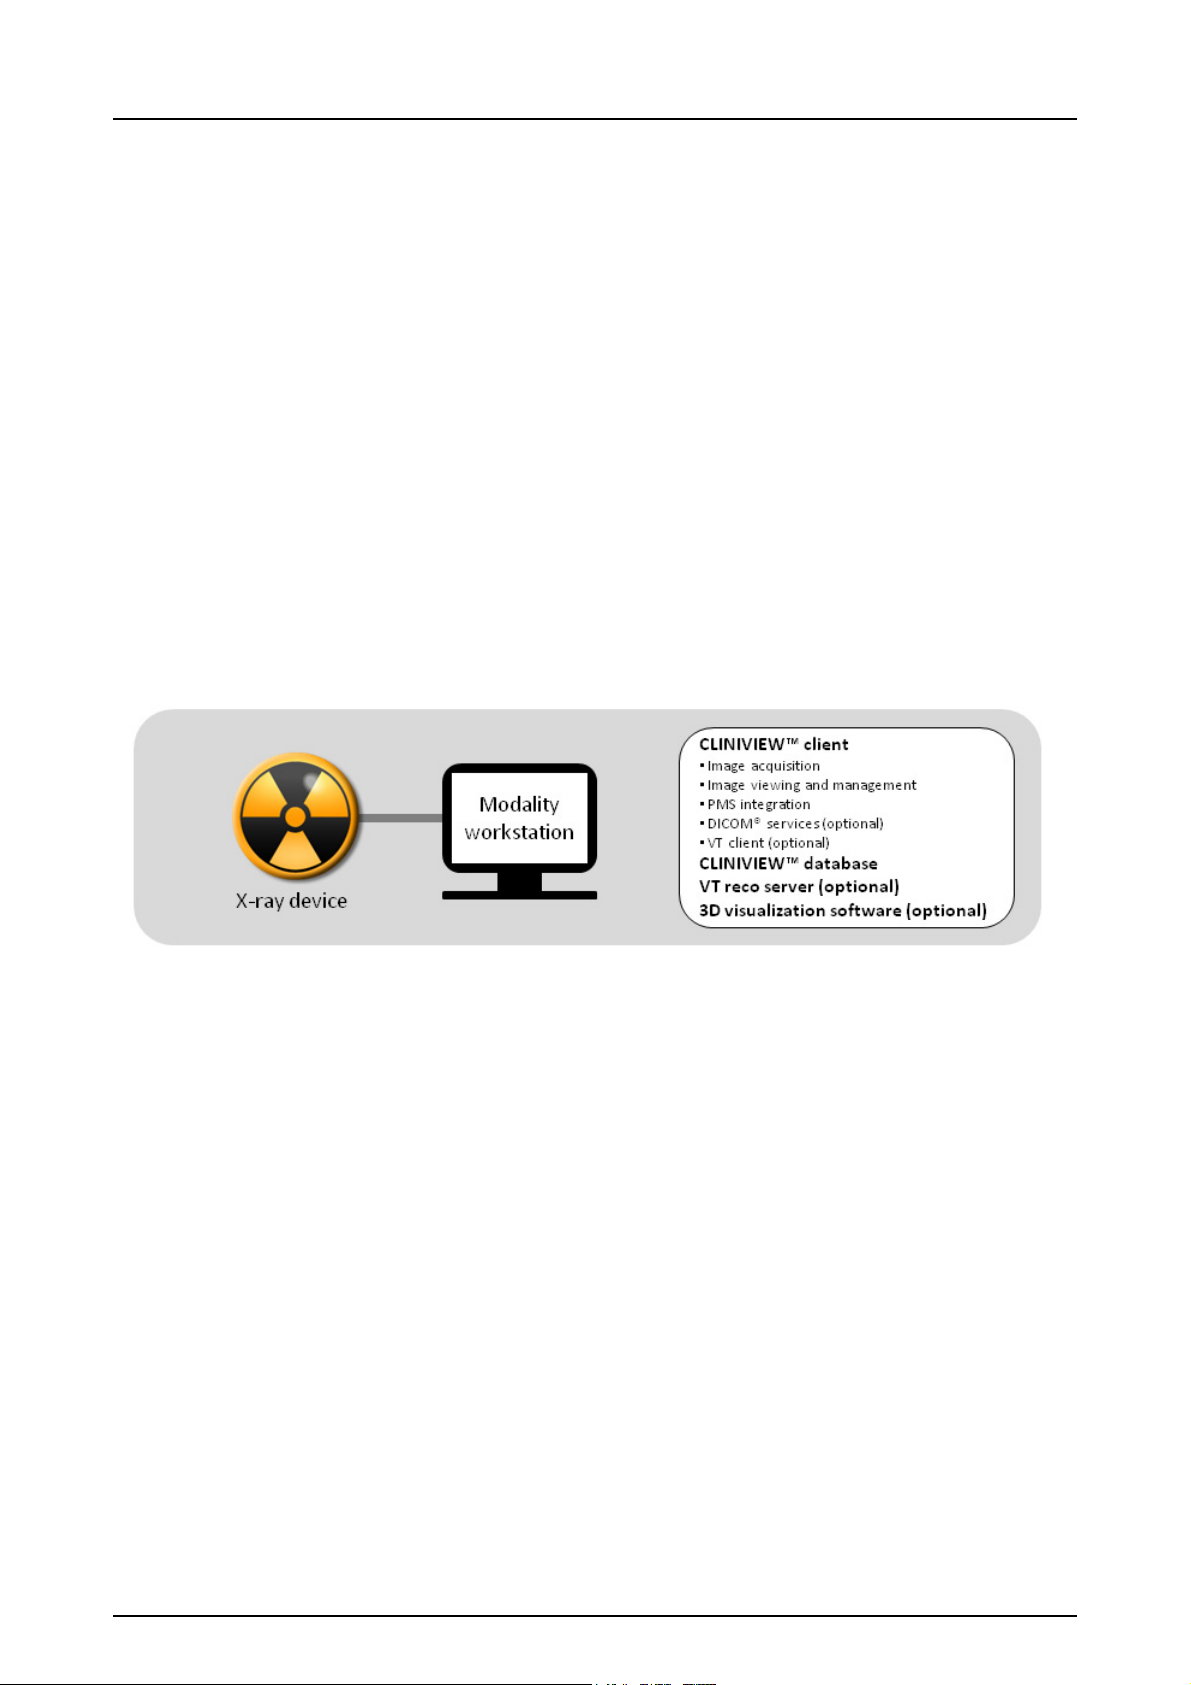
Standalone
In a standalone system all software components are
installed in the same workstation connected to the imaging
device.
See chapter 2.1 to install a standalone system.
2 Software installation
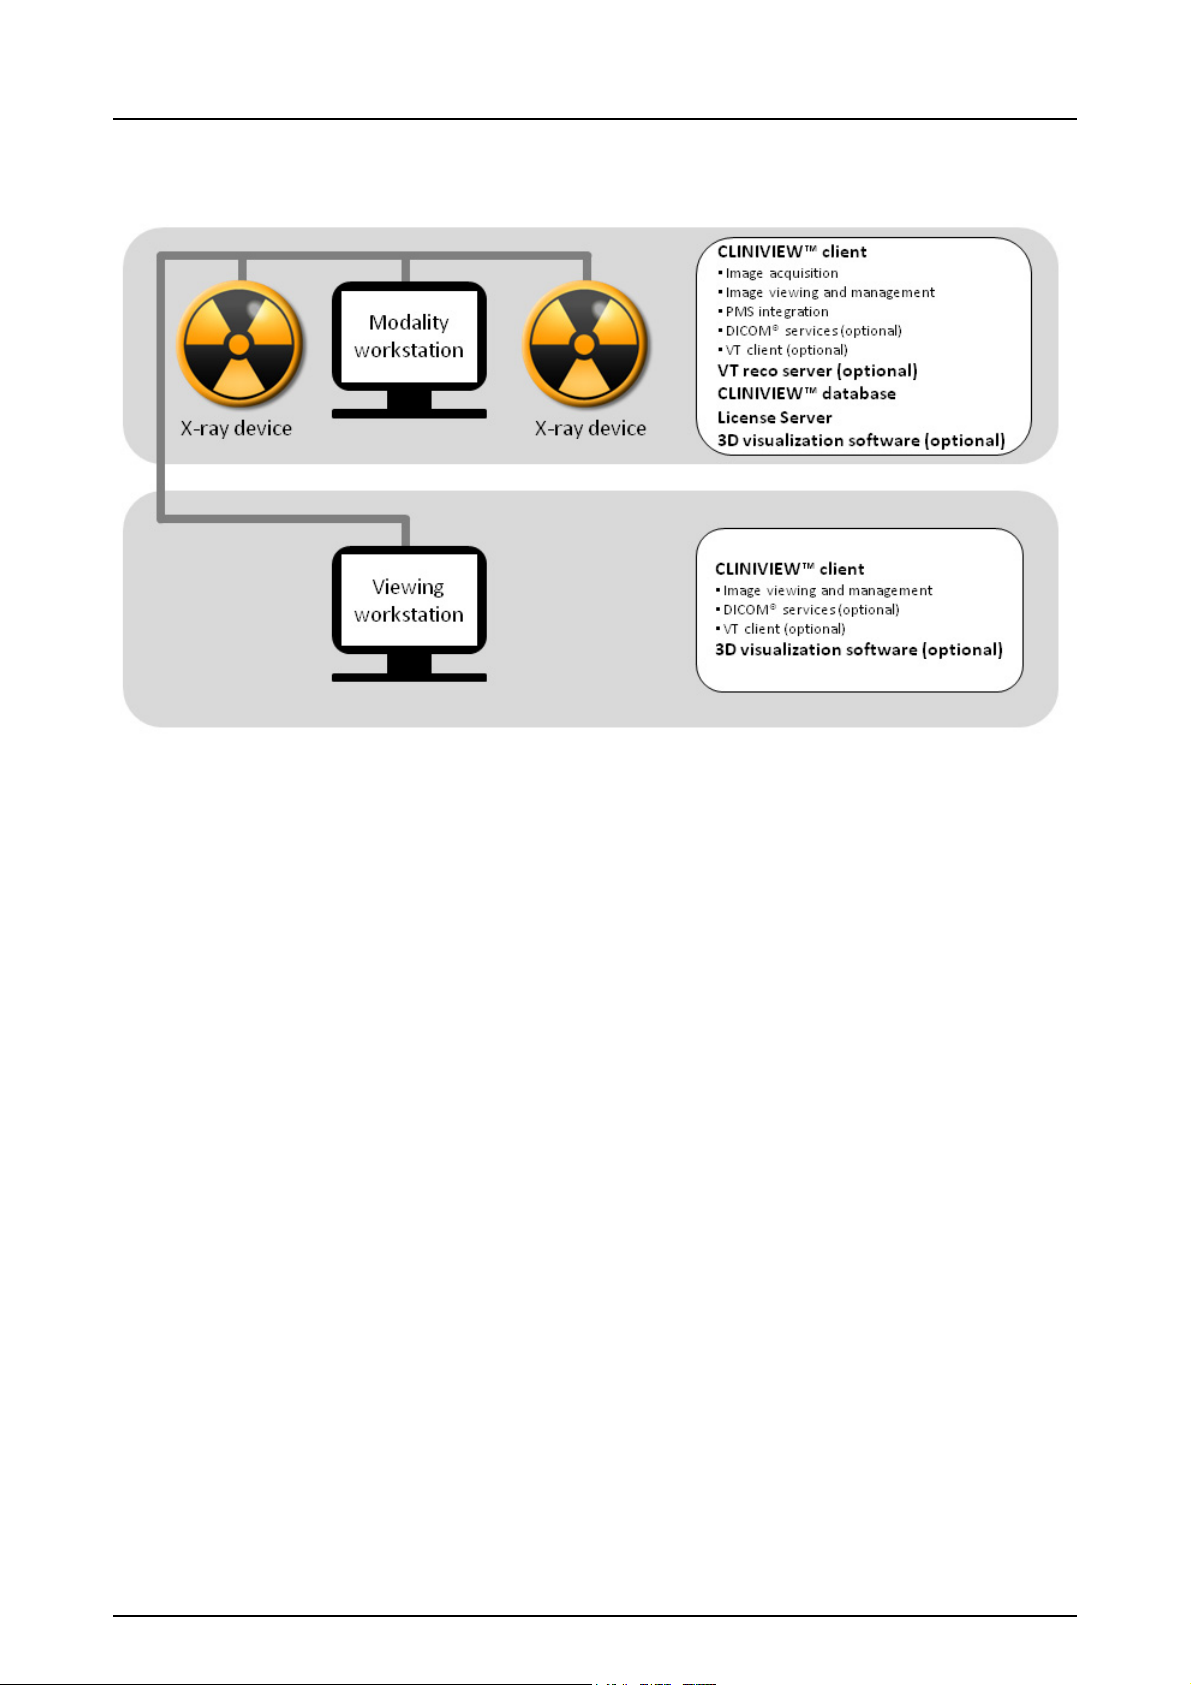
Small Network
A small network system has one modality workstation
connected to at least one imaging device for image
capturing and viewing stations for image viewing and
diagnosis. In a small network system the modality
workstation also acts as a database server, storing all
image data in the CLINIVIEW™ database and providing
access to the image data for viewing workstations. If
network licenses are used, the license server is typically
installed in the modality workstation.
Note! If network licenses are used, the license server computer must be running at all times to provide licenses to other workstations in the network.
209804 rev 2 Instrumentarium Dental 13
2 Software installation
See chapter 2.2 to install a small network system.
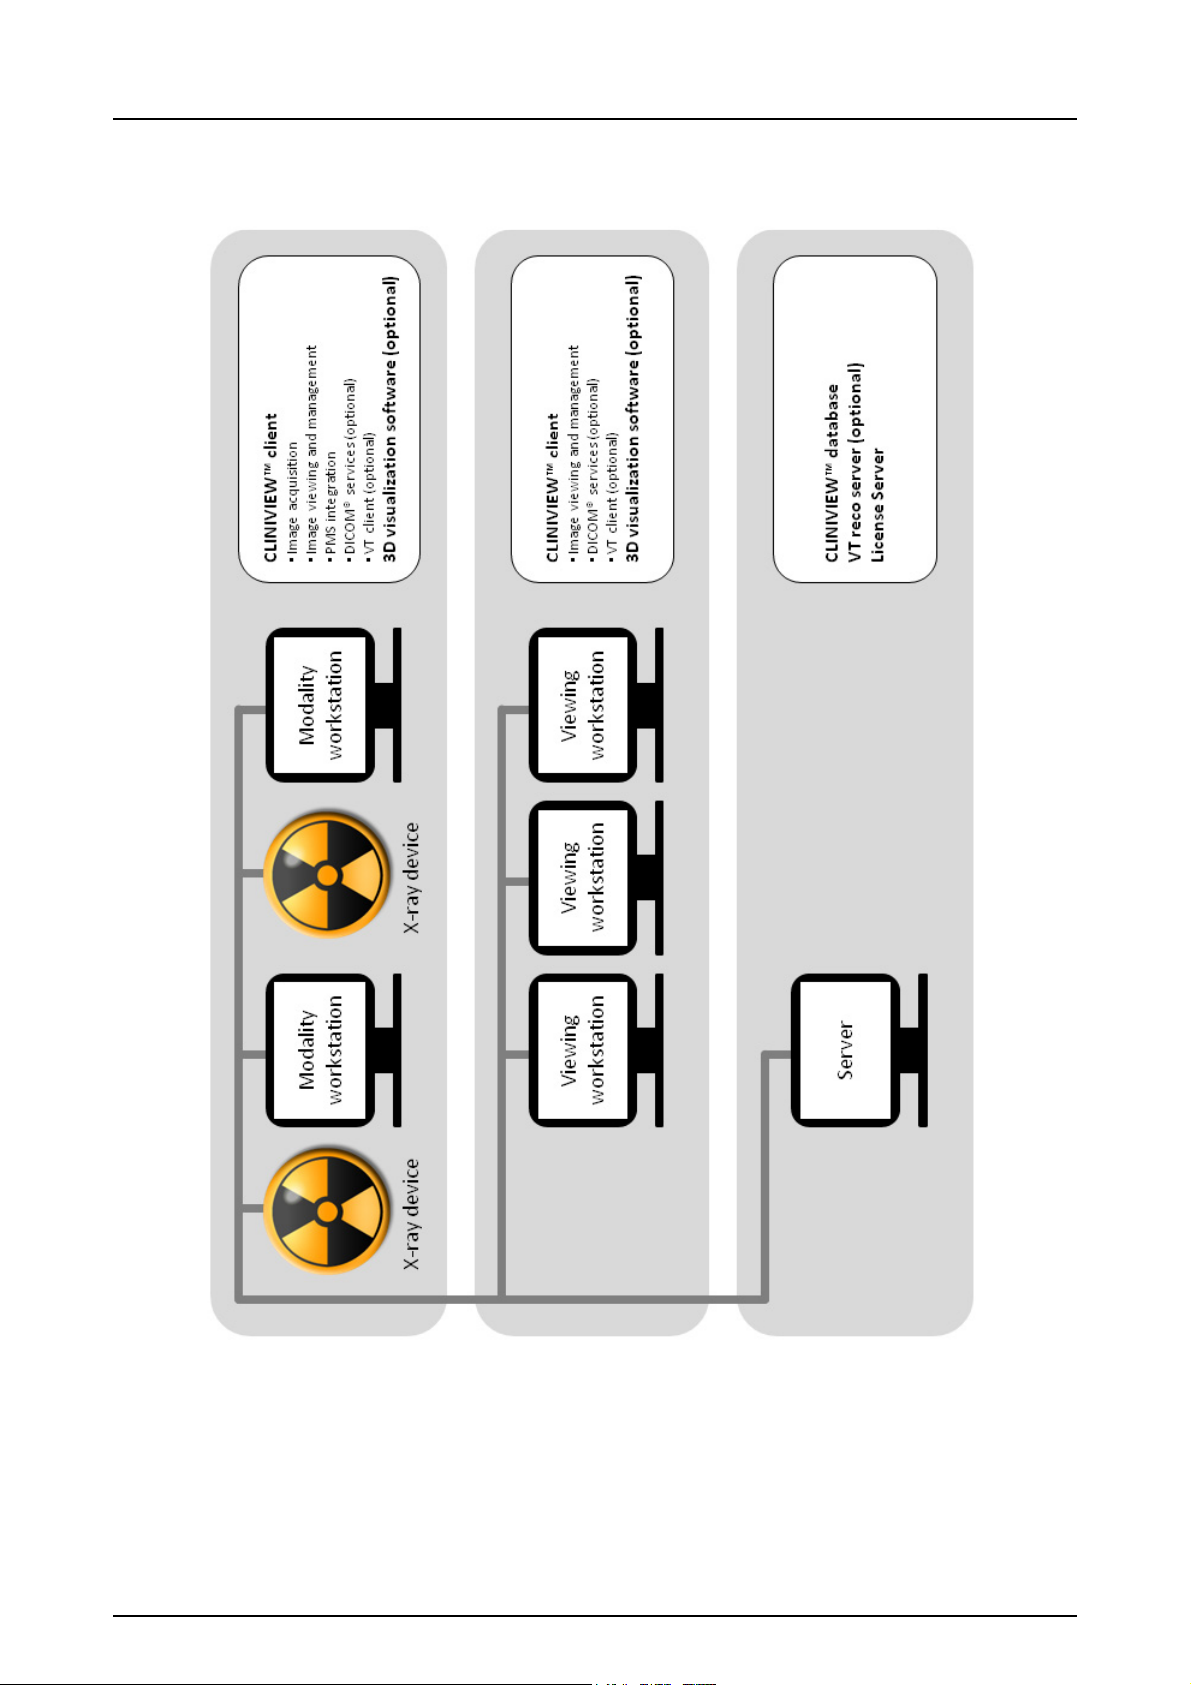
Network
In larger network environments such as imaging centers,
large dental clinics or hospitals, the software components
can be installed in multiple workstations with a dedicated
server. The database is typically installed in a dedicated
server with a server operating system. A network
installation has multiple modality workstations connected
to several imaging devices for image capturing and may
also have multiple dedicated viewing stations for image
viewing and diagnosis. If network licenses are used, the
license server is installed at the server.
Note! The license server computer must be running at all
times to provide licenses to other workstations in the network.
14 Instrumentarium Dental 209804 rev 2
2 Software installation
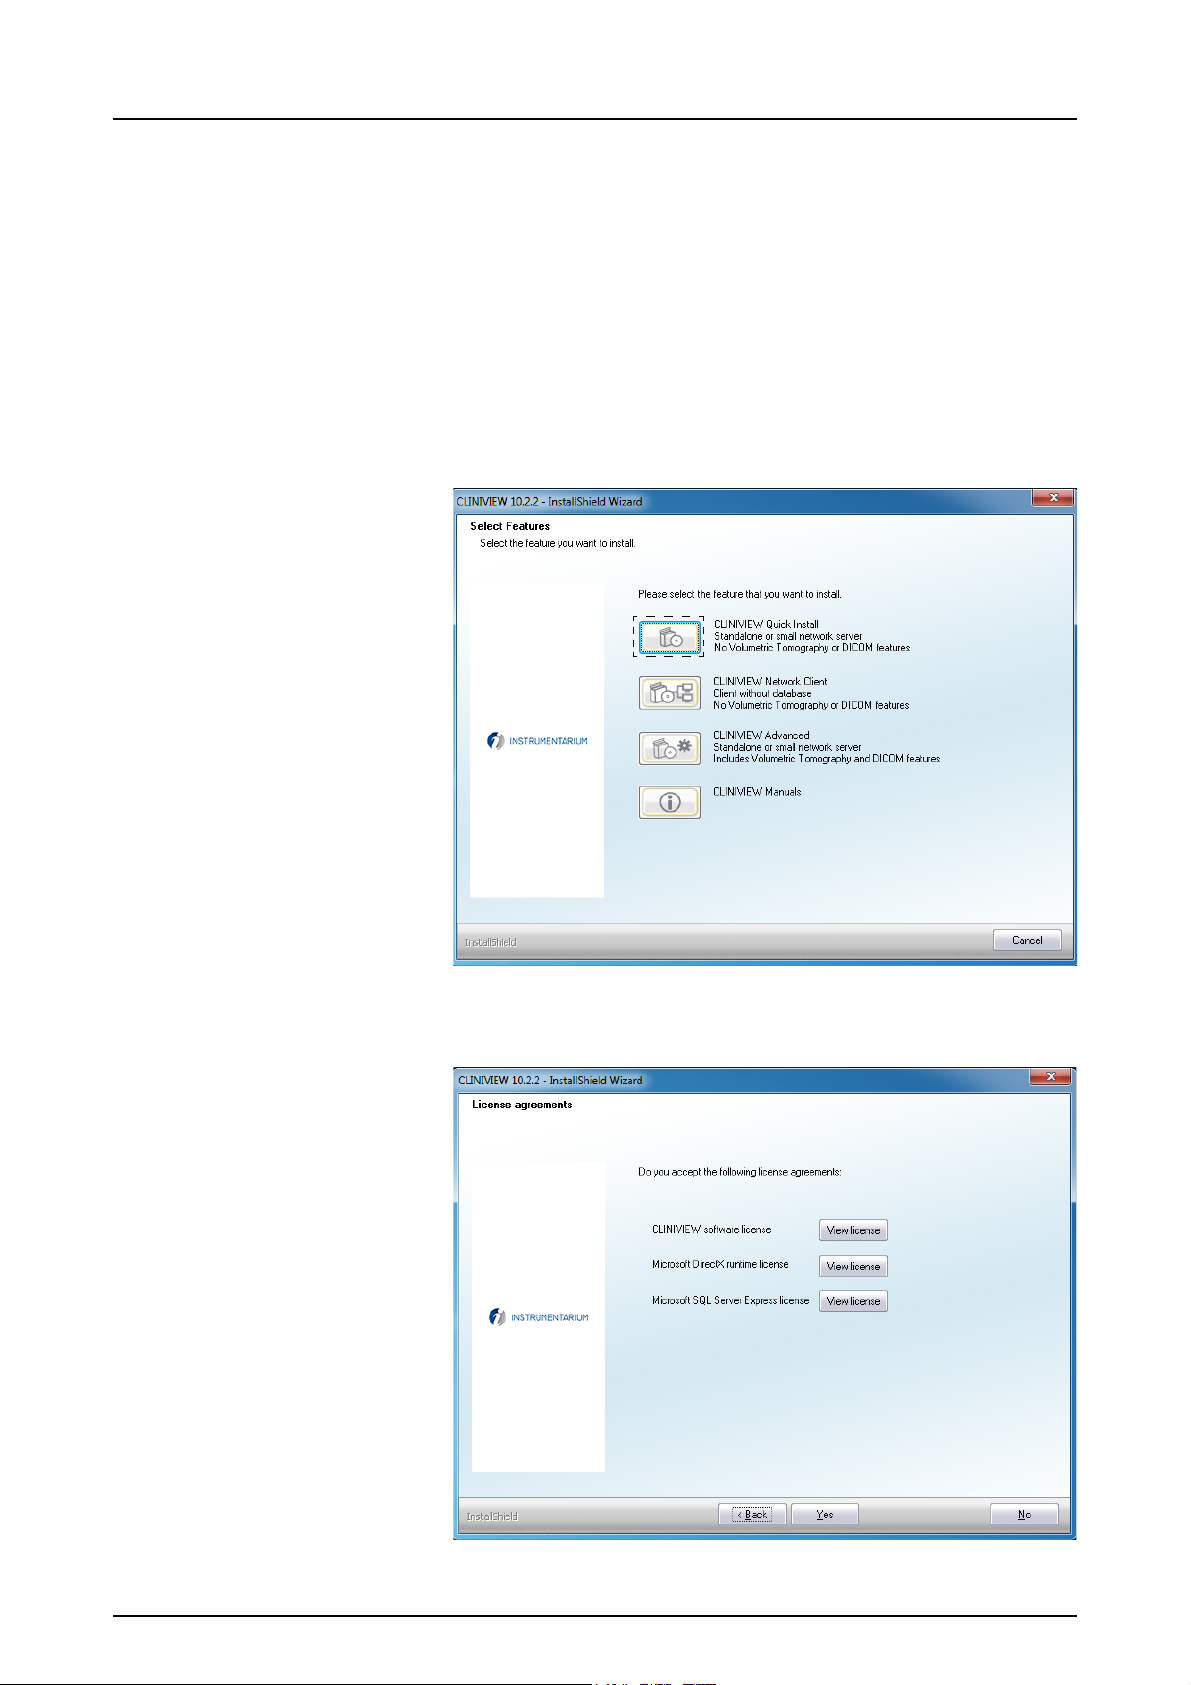
Installation options
There are three installation options available: Quick,
Network and Advanced.
209804 rev 2 Instrumentarium Dental 15

2 Software installation
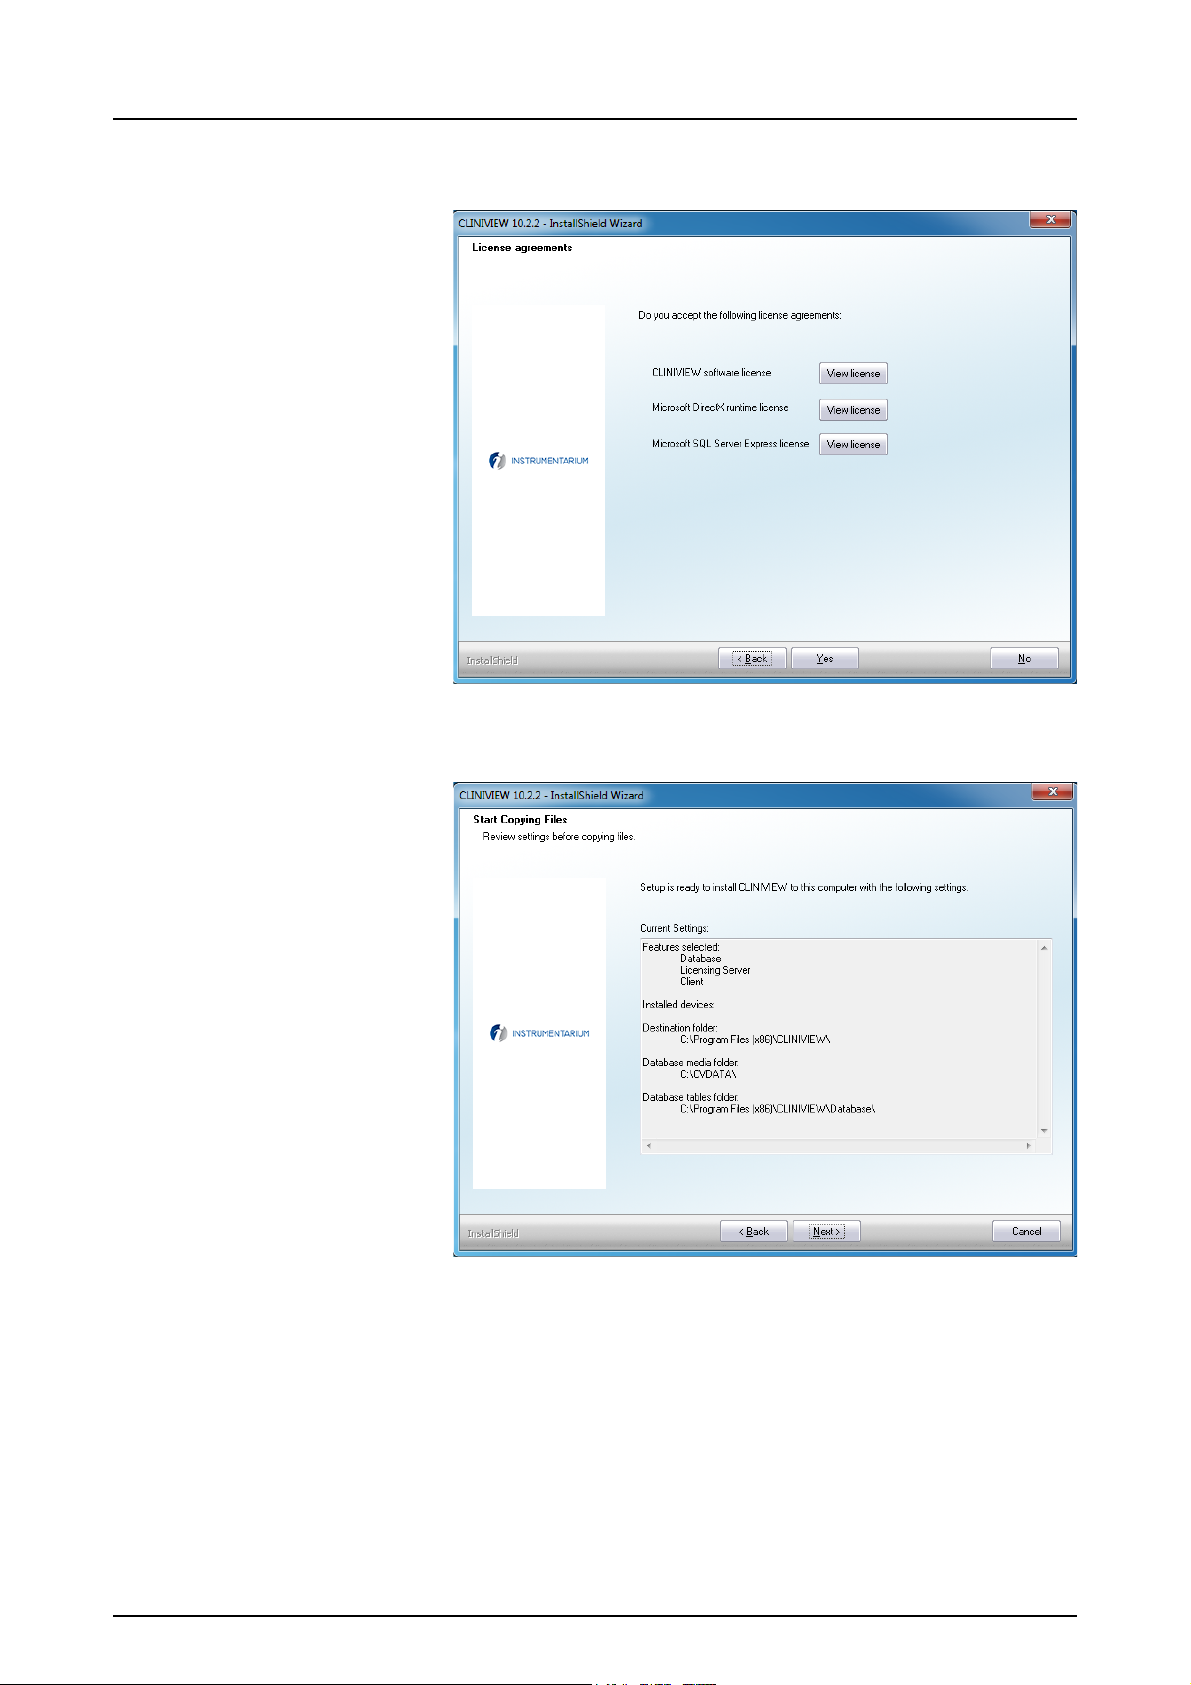
Quick install is an easy option to install software for a
standalone workstation or a small network modality
workstation. It includes software for image capturing,
processing and storing (software client), image acquisition
drivers, image database and local license server. Quick
installation performs a default software installation.
Note! Quick installation does not include DICOM features
and Volumetric Tomography features. These can be installed later as Add-ons.
Network Client is an easy option to install software clients
in a network environment. This options installs software to
its default location and creates a database connection to a
local database in the network. This install option includes
software for image capturing, processing and storing
(software client), imaging drivers and database connection
settings. Network software installation does not include
DICOM and Volumetric Tomography features these
features can be installed later as Add-ons.
Note! Network install does not include DICOM or VT features. DICOM and VT features can be installed later as Addons.
Advanced option allows a more customized software
installation. Advanced should be selected when
preselected features in Quick and Network Client
installations are not appropriate.
Quick and Network Client and install options are
configured to cover most typical installation scenarios.
Together with the Advanced option it is possible to
configure the installation for any installation environment.
Note! Software installation may require you to restart your
computer to complete the installation. Please save all open
documents and close all running programs prior to starting
installation.
Note! Do not install any of the software components to external hard disks.
Note! SQL Server installation requires that the Windows
user account (login) name and the workstation name are
different. If the same name is used for both, installation of
SQL Server will not succeed.
16 Instrumentarium Dental 209804 rev 2

2 Software installation
Note! Installation creates required Firewall settings automatically when image database components or License
Server is installed.
Note! Make sure that there are no pending or ongoing Windows updates when starting software installation or updates.
Display settings for the software
The Windows display settings may have to be changed if
the display is difficult to read after the software installation.
The display settings can be changed in the Windows
Control Panel.
The recommended Windows display settings are:
• Desktop area at least 1024 x 768 pixels
• Color quality/Colors: Highest (32 bit)
209804 rev 2 Instrumentarium Dental 17
2 Software installation
2.1 Standalone
1. Insert software DVD into DVD-ROM drive.
2. If the InstallShield Wizard does not appear after a few
moments, browse to the software DVD and doubleclick CLINIVIEWSetup.exe to begin installation.
Note! If the User Account Control window appears,
you must allow changes to continue installation.
3. Select CLINIVIEW Quick Install.
4. Review the license agreements and click Yes to accept
the license terms and continue with the installation.
18 Instrumentarium Dental 209804 rev 2
2 Software installation
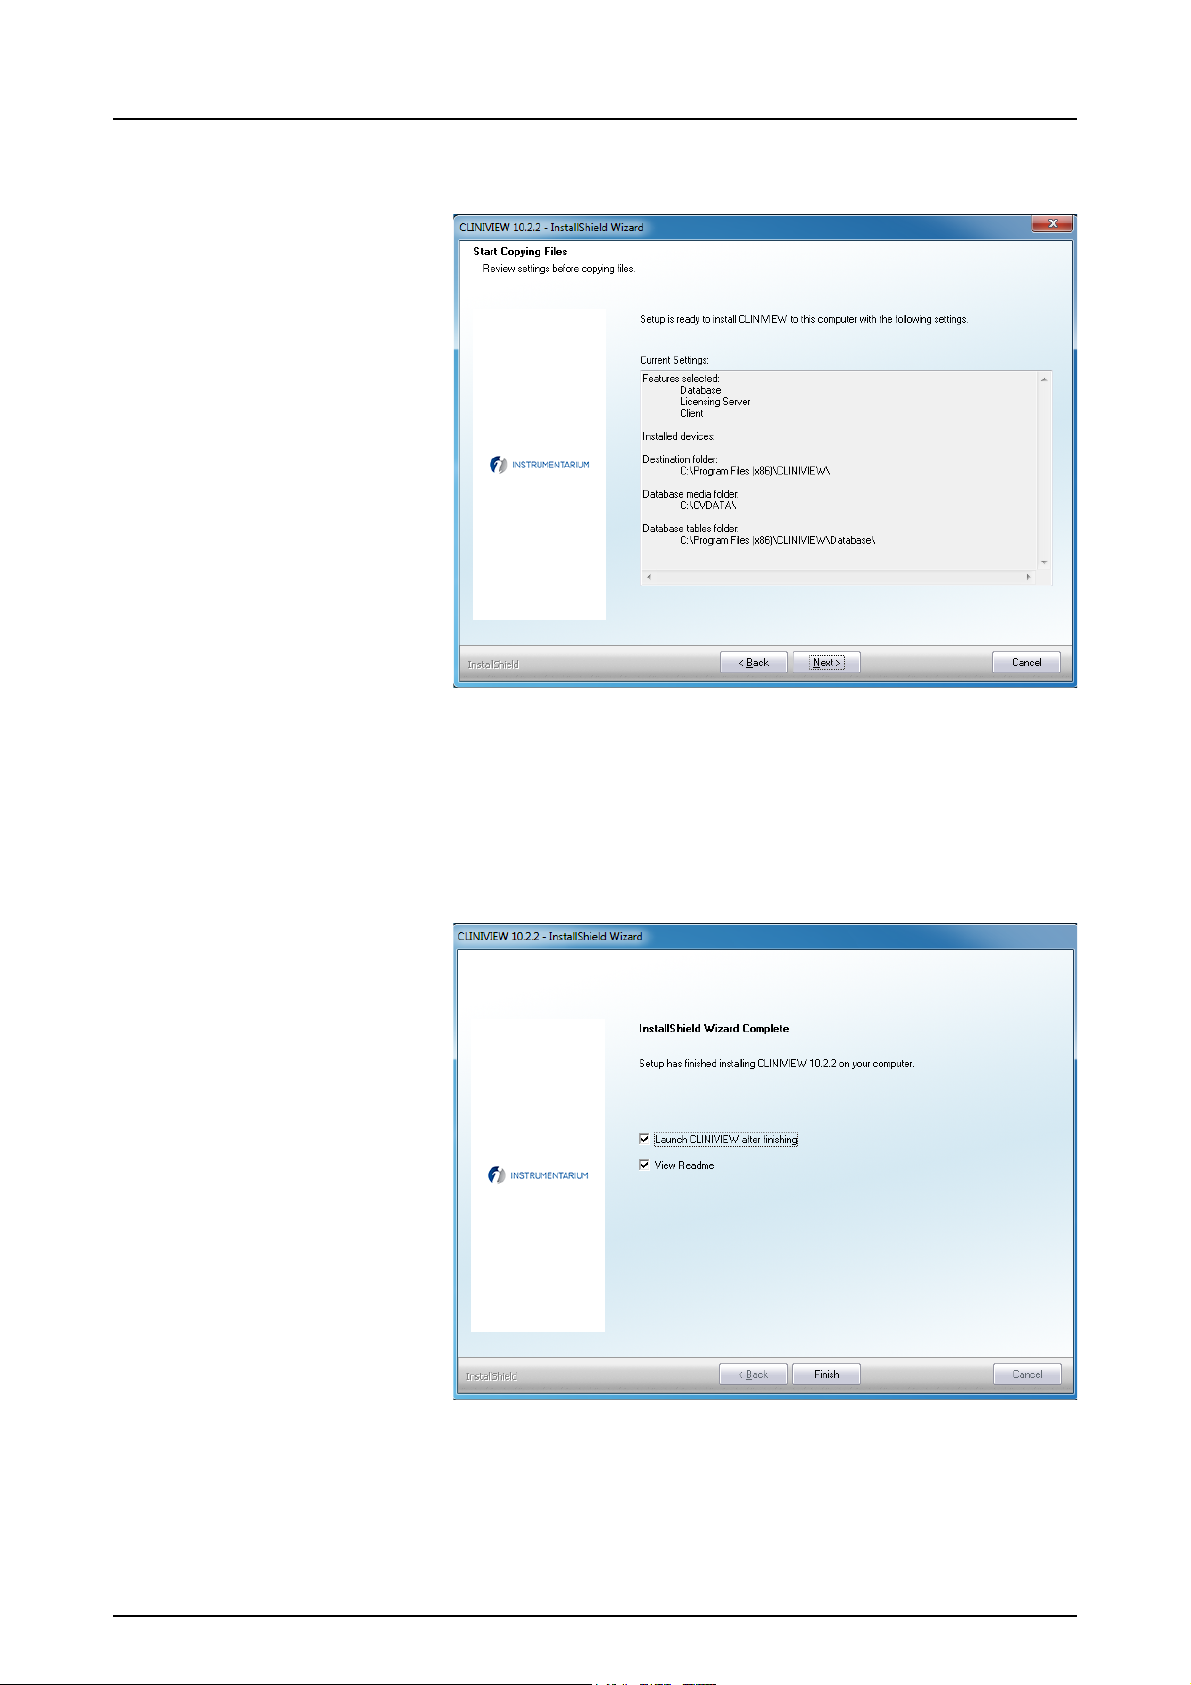
5. Review the installation settings and click Next to start
installation process.
Note! License Server will always be installed when
using Quick installation.
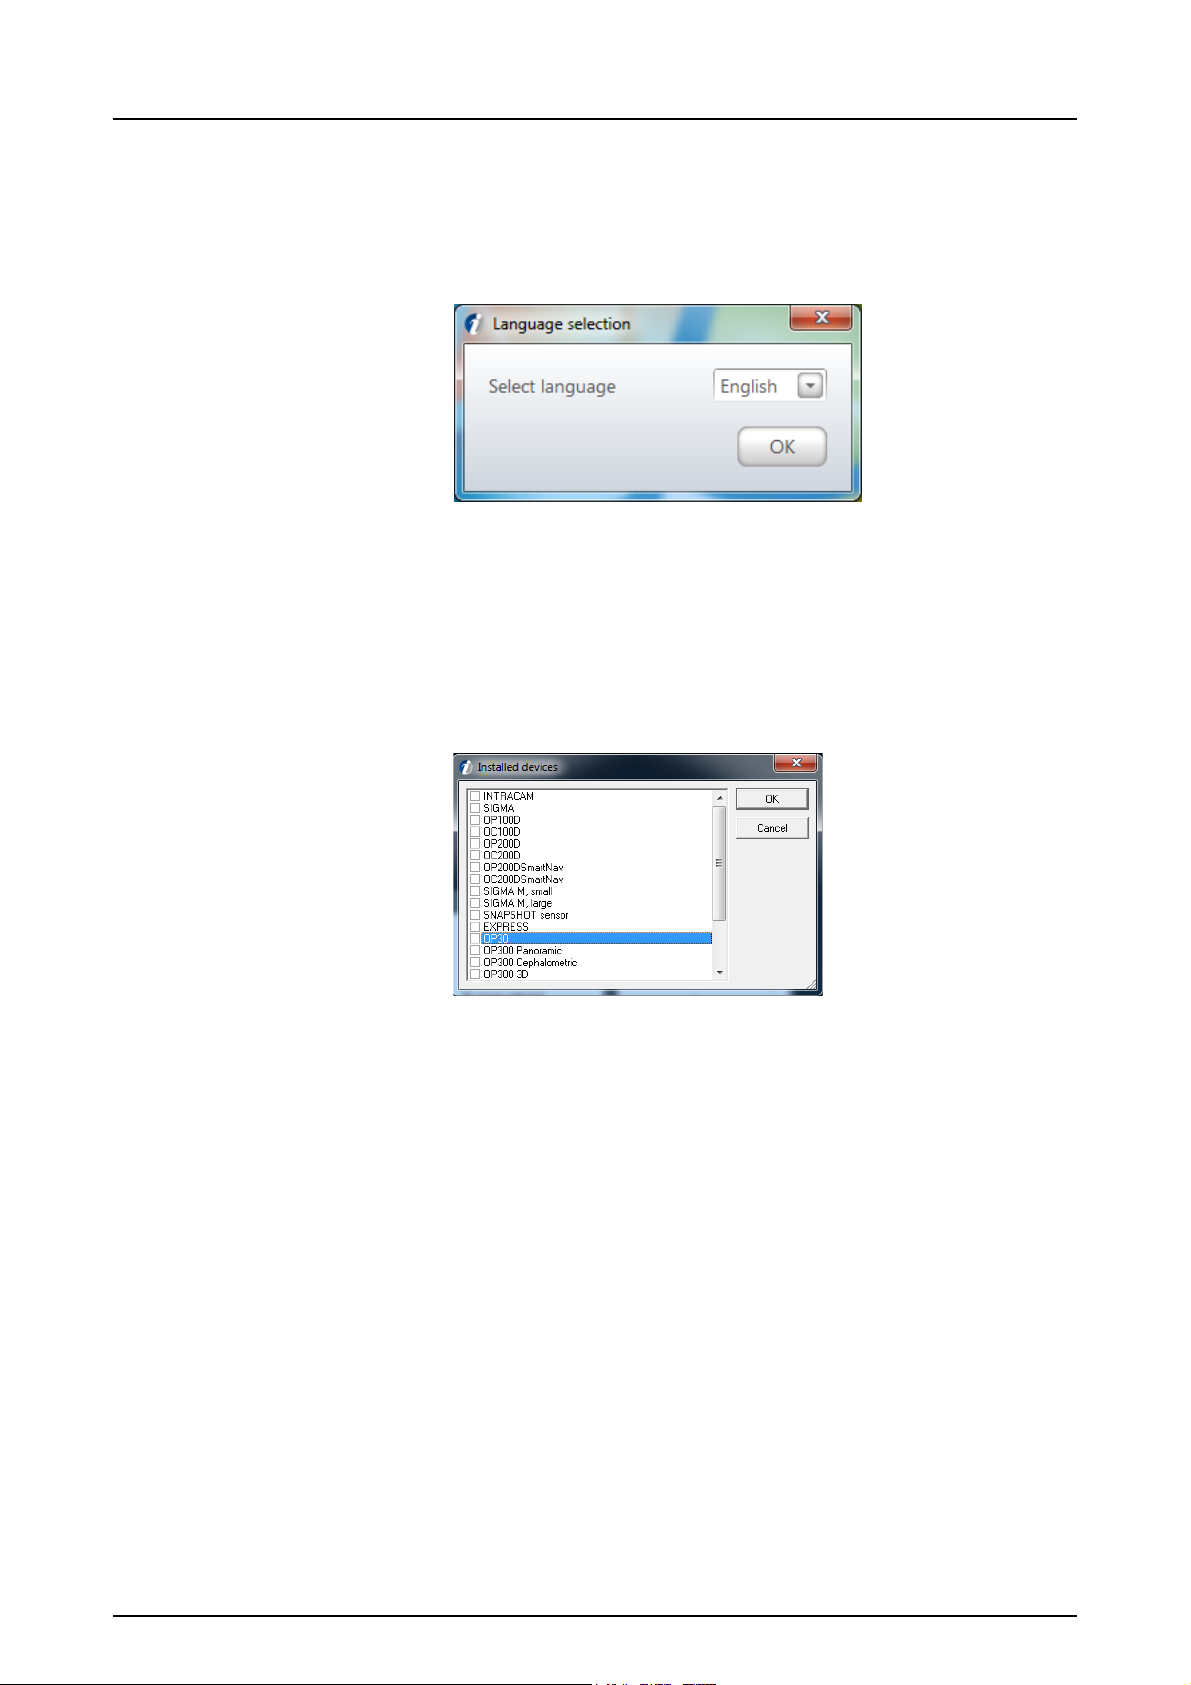
6. Wait until installation is completed and click Finish to
view the software release info (Readme) and start the
software.
Note! Software installation will take several minutes
depending on the computer.
209804 rev 2 Instrumentarium Dental 19
2 Software installation
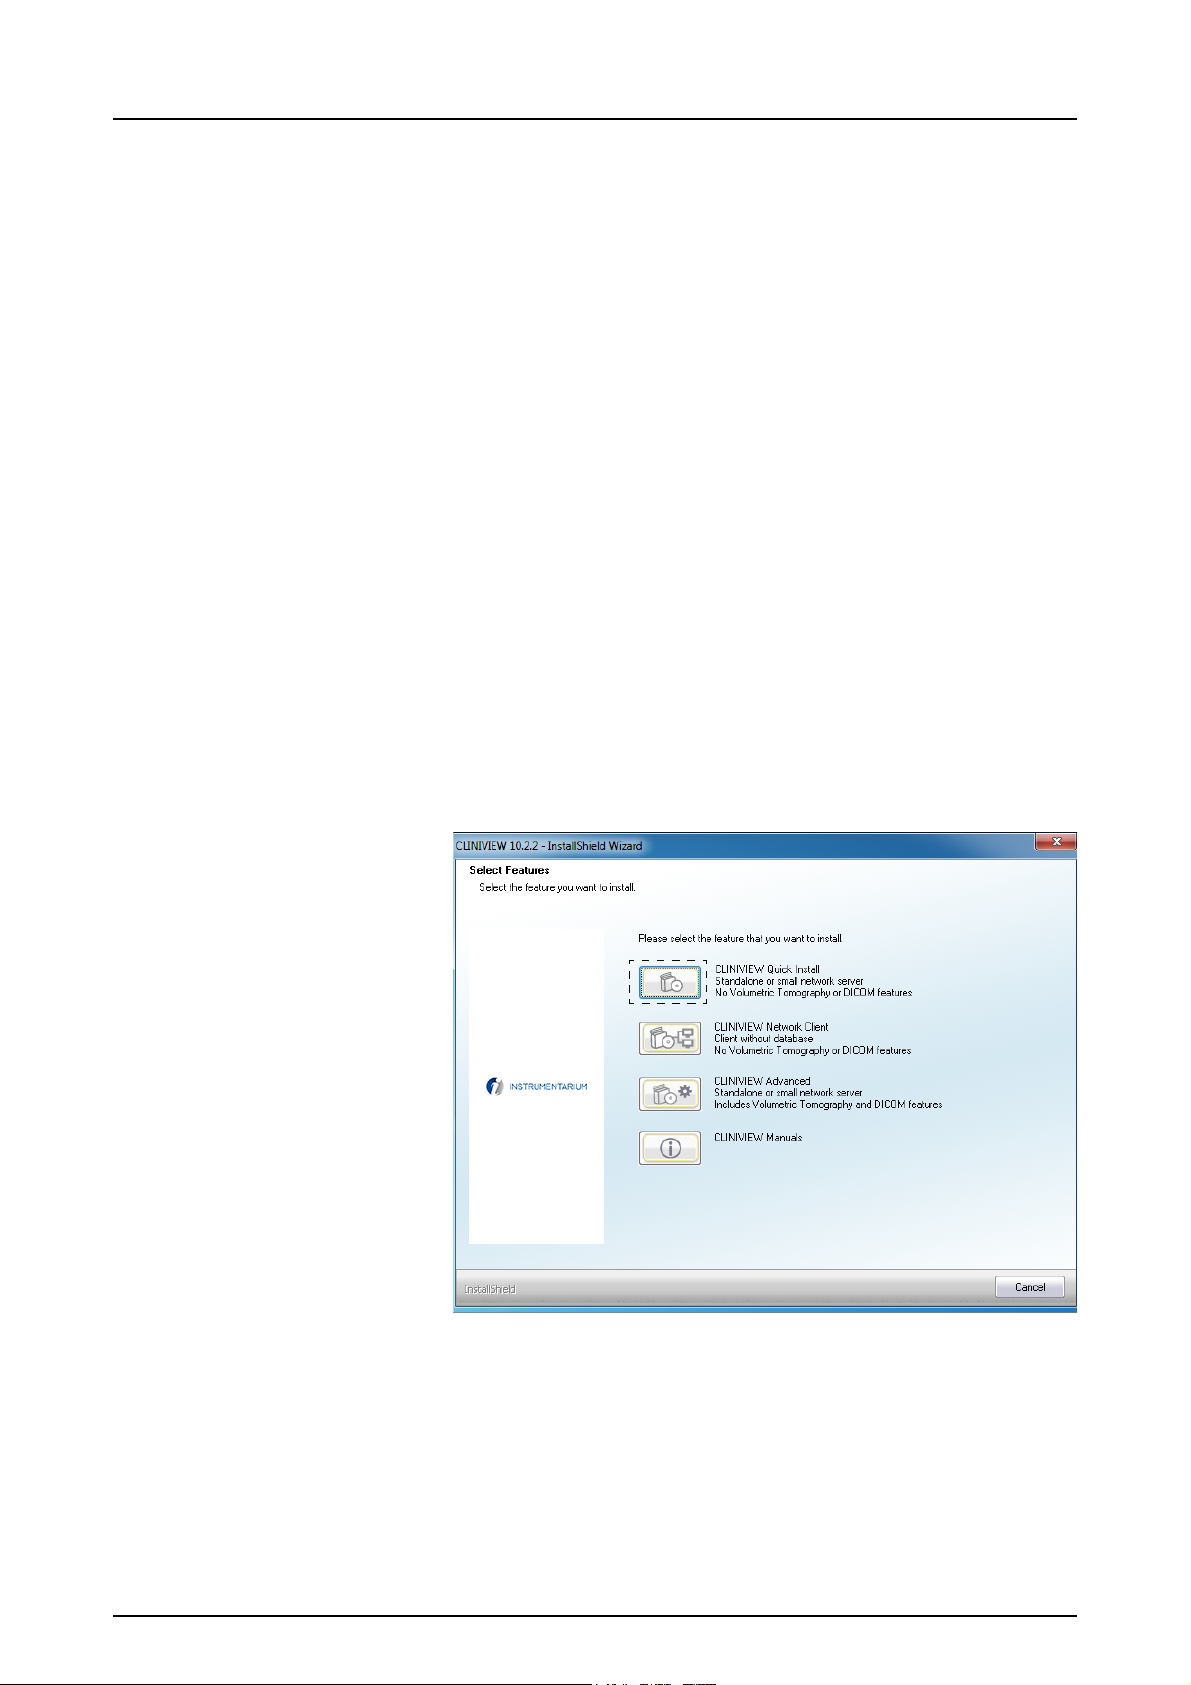
7. Select default language for the software and click OK
to continue.
Note! Software language can be changed at any time
within the software from the Tools menu, Languages.
8. To activate the license, select Activate Workstation li-
cense. See Chapter 3.2 Licensing CLINIVIEW™ software standalone.
9. The installed devices window will be displayed. Select
the devices to be connected to this workstation and
click OK to enable the devices
10. If the selected device requires a gain file, the software
will prompt to open the GainInstaller tool. Browse to the
location of the gain file(s) and install them using the
GainInstaller tool.
Note! Only certain devices require a gain file.
11. Software is ready for use and a patient named Calibra-
tion Patient will be created and opened. This patient
can be used to store all calibration images for the installed device(s).
12. Test installation by acquiring an image according to de-
vice user manual or quick guide.
13. Configure the desired user settings for the software.
See User manual General Settings chapter for details.
20 Instrumentarium Dental 209804 rev 2
14. If the software with be used with a Cone Beam 3D de-
vice, install a 3D visualization software. Launch options
for the 3D visualization software can be configured on
the Tools menu, Cone Beam 3D Settings.
15. If the software will be used with a Cone Beam 3D de-
vice, install a 3D visualization software. Launch options
for the 3D visualization software can be configured on
the Tools menu, Cone Beam 3D Settings.
2.2 Small network
2.2.1 Small network server
1. Insert software DVD into DVD-ROM drive.
2. If the InstallShield Wizard does not appear after a few
moments, browse to the software DVD and doubleclick CLINIVIEWSetup.exe to begin installation.
2 Software installation
Note! If the User Account Control window appears,
you must allow changes to continue installation.
3. Select CLINIVIEW Quick Install.
209804 rev 2 Instrumentarium Dental 21
2 Software installation
4. Review the license agreements and click Yes to accept
the license terms and continue with the installation.
5. Review the installation settings and click Next to start
installation process.
Note! License Server will always be installed when
using Quick installation.
22 Instrumentarium Dental 209804 rev 2
 Loading...