INSTRUMAX SNIPER 30 Manual
Operating manual
Laser distance meter
INSTRUMAX SNIPER 30
WWW.INSTRUMAXTOOLS.COM
2
4
1 


 5
5
2 |
6 |
3
7
en
Table of contents
1. Safety Instructions. . . . . . . . . . . . . . . . . . . . . . . . . . . . . 3 2. Start up. . . . . . . . . . . . . . . . . . . . . . . . . . . . . . . . . . . . . 4 3. Menu functions. . . . . . . . . . . . . . . . . . . . . . . . . . . . . . . 4 4. Measurements . . . . . . . . . . . . . . . . . . . . . . . . . . . . . . . 5 5. Functions. . . . . . . . . . . . . . . . . . . . . . . . . . . . . . . . . . . . 5 6. Message codes. . . . . . . . . . . . . . . . . . . . . . . . . . . . . . . 6 7. Techical data. . . . . . . . . . . . . . . . . . . . . . . . . . . . . . . . . .7 8. Measuring conditions. . . . . . . . . . . . . . . . . . . . . . . . . . . . . 7 9. Warranty . . . . . . . . . . . . . . . . . . . . . . . . . . . . . . . . . . . . .9 10. Exceptions from responsibility. . . . . . . . . . . . . . . . . . . . . 9
Appendix 1- “Warranty card”
Congratulations on the purchase of laser distance meter INSTRUMAX SNIPER 30!
Permitted use
·Measuring distances
·Computing functions, e.g. areas, volumes, Pythagorean calculation
The safety regulations and instructions along with the operating manual should be read carefully before initial operation.The person responsible for the instrument must ensure that equipment is used in accordance with the instructions. This person is also accountable for the deployment of personnel and for their training and for the safety of the equipment when in use.
SAFETY INSTRUCTION Prohibited use
Please follow up instructions given in operating manual.
Do not use instrument in explosive environment (filling station, gas equipment, chemical production and so on).
Do not remove warning labels or safety instructions.
3
Do not open instrument housing, do not change it’s construction or modification.
Do not stare at beam. Laser beam can lead to eye injury (even from greater distances).
Do not aim laser beam at persons or animals.
Opening of the equipment by using tools (screwdrivers, etc.), as far as not specifically permitted for certain cases.
Inadequate safety precautions at the surveying site (e.g. when measuring on the roads, construction sites and so on).
Use the instrument in the places where it could be dangerous: on the air transport, near manufacturers, production facilities, in the places where the work of laser distance meter can lead to the harmful effects on people or animals.
Laser classification
The instrument is a laser class 2 laser product with power < 1 mW and wavelength 635 nm. Laser is safety in ordinary conditions of usage.
4
START UP
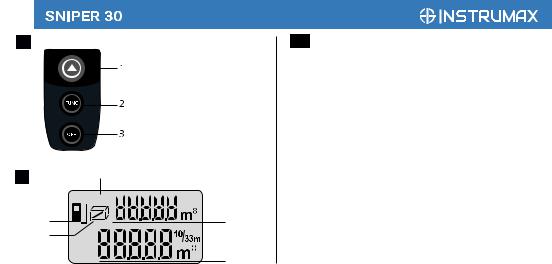
Keypad
1)ON / Measure / Continious measurements/ Selecting units
2)Area / Volume / Pythagorean measure / Reference
setting
3) Clear / OFF
Display
1)Laser ON
2)Reference (front/rear)
3)Area / volume/ Pythagorean
4)Battery level
5)Units
6)Line 1
7)Main line 2
Inserting / Replacing Batteries
Remove the battery cover, insert the battery correctly. Pay attention to correct polarity. Close the battery compartment. Replace the battery when symbol constantly blinks in the display. Batteries should be removed in case of danger of corro-
sion, ift he device will not be used for a long time.
MENU FUNCTIONS Swtich on and off
Press the button (1) to switch on the instrument and laser. The device also switches off automatically after 3 minutes of inactivity i.e. no key is pressed within that interval.
To switch off the instrument press and hold button (3) for about 2 sec.
Clear-Key
Press button (3) to cancel the last action.
Reference setting
Default reference setting is from the rear of the device. Press and hold button (2) for more than 2 sec to set the reference: the front or the rear. You will see the reference symbol (2) on the display.
Selecting Units
Instrument is switched ON. Press and hold button (1) for 8 sec. Selected unit will be shown on the display (ft/m). When
you switch ON the instrument again DO NOT press and hold button (1) for 8 sec if you don’t want to change the units of measurement.
MEASUREMENTS
Single distance measurement
Press and hold button (1) for 2 sec to activate the laser. When in continuous laser mode, press this button to trigger the distance measurement directly. The instrument will give acoustical signal. The result is displayed immediately.
Continuous Measurement
Press and hold the button (1) for about 2 seconds to start continuous measuring.
FUNCTIONS Area
Press the button (2) once.The symbol “area” is displayed.
Press button (1) to take the first measurement (for example, length). Measured value is displayed in the second line. Press button (1) to take the second measurement (for example, width). Measured value is displayed in the second
5
line. The result of measured area is displayed in the first line.
Volume
For volume measurements, press button (2) twice until the indicator for volume measurement appears on the display.
Press button (1) to take the first measurement (for example, length). Measured value is displayed in the second line. Press button (1) to take the second measurement (for example, width). Measured value is displayed in the second line. Press button (1) to take the third measurement (for example, height). Measured value is displayed in the second line. The volume value will be displayed in the first line.
Indirect measurement
Pythagorean measurement is used in the condition that the objective needing to be measured is covered or
has no effective reflecting surface and can’t be measured directly.
Indirect measurement – determing a distance using 2 auxilary measurements
This function is used when height and distance can’t be mea-

6
sured directly. |
|
|
|
|
|
INFO |
CAUSE |
REMEDY |
|
Press button (2) 3 times. The symbol “triangle” is displayed. |
|
|||
|
|
|
|
|
The distance to be measured is blinking in the symbol triangle. |
|
204 |
Data overflow |
Repeat procedure |
Press button (1) to take distance measuring (hypothenuse of |
|
|
|
|
|
205 |
Measurement |
Use the meter in distance allowed |
|
triangle). The result is displayed in the second line. This mea- |
|
|||
surement can be taken in the indirect measurement function. |
|
|
range transfinite |
|
Press and hold button (1) for 2 sec. After second pressure |
|
|
|
|
of the button (1) value is fixed. The second distance to be |
|
252 |
Temperature too |
Let device cool down |
measured is blinking in the symbol triangle. Press button (1) |
|
|
high |
|
to take distance measuring. There is a right angle between |
|
253 |
Temperature too low |
Warm device up |
laser beam and the length you need to measure. The result of |
|
|||
|
|
|
|
|
|
255 |
Receiver signal is |
Measure target point with stronger |
|
the measurement is displayed in the second line. The result |
|
|||
of the function is displayed in the first line. |
|
|
too weak |
reflector |
MESSAGE CODES |
|
|
|
|
|
256 |
Received signal too |
Measure target point with weaker |
|
All message codes are displayed with either “Info”. Following |
|
|
strong |
reflector |
mistakes can be corrected. |
|
206 |
Pythagorean mea- |
Re-measure and ensure the hypot- |
|
|
|
surement violation |
enuse is |
|
|
|
|
greater than right angle edge |
|
|
|
|
|
|
|
258 |
Initialization error |
Switch on – off the instrument |
|
|
|
|
|
|
|
|
|
|
TECHNICAL DATA
Range, without target, |
0.05 to 30 |
m |
|
|
|
Accuracy, mm |
±2* |
|
|
Smallest unit displayed |
1 mm |
|
|
Laser class |
2 |
|
|
Laser type |
635 nm, <1 mW |
|
|
IP rating |
IP 54 |
|
|
Automatic switch off |
3 minutes of inactivity |
|
|
Battery life, 2 x AAA |
> 5000 measurements |
|
|
Dimensions, mm |
110х38х23 |
|
|
Weight |
100 g |
|
|
7
Temperature range: |
|
Storage |
-20º to +60º |
Operating |
-10º to +40º |
* In favourable conditions (good target surface properties, room temperature).
Maximum deviation occurs under unfavorable conditions such as bright sunlight or when measuring to poorly reflecting or very rough surfaces.
MEASURING CONDITIONS
Measuring range
The range is limited to 30 m. It could be bigger when measuring at night, at dusk and when the target is shadowed. Use a target plate to increase the measurement range during daylight or if the target has a bad reflection.
Measuring Surfaces
Measuring errors can occur when measuring toward colorless liquids (e.g. water) or dust free glass, styrofoam or sim
8
ilar semi-permeable surfaces. Aiming at high gloss surfaces deflects the laser beam and measurement errors can occur. Against non-reflective and dark surfaces the measuring time can be increased.
PRECAUTIONS
Please, handle the instrument with care. Avoid viabrations, hits, water, effect of heat. During transportation put the instrument into the soft bag.
Note: the instrument should be dry!
Care and cleaning
Do not immerse the instrument in water. Wipe off dirt with a damp, soft cloth. Do not use aggressive cleaning agents or solutions.
Specific reasons for erroneous measuring results
-Measurements through glass or plastic windows;
-Dirty laser emitting window;
-After instrument has been dropped or hit. Please check the accuracy;
-Large fluctuation of temperature: if instrument will be used in cold areas after it has been stored in warm
areas (or the other way round) please wait some minutes before carrying out measurements;
-Against non-reflective and dark surfaces, colorless surfaces and so on.
Electromagnetic acceptability (EMC)
It cannot be completely excluded that this instrument will disturb other instruments (e.g. navigation systems); will be disturbed by other instruments (e.g. intensive electromagnetic radiation nearby industrial facilities or radio transmitters).
Laser classification
INSTRUMAX Sniper 30 projects visible laser beam from the front part of the instrument. The instrument is a laser class 2 laser product according to DIN IEC 6082 5-1:2007. It is deflects the laser beam and measurement errors can occur. Against non-reflective and dark surfaces the measuring time can be increased.

Warranty
This product is warranted by the manufacturer to the original purchaser to be free from defects in material and workmanship under normal use for a period of one (1) year from the date of purchase. During the warranty period, and upon proof of purchase, the product will be repaired or replaced (with the same or similar model at manufactures option), without charge for either parts of labour.
In case of a defect please contact the dealer where you originally purchased this product. The warranty will not apply to this product if it has been misused, abused or altered. Without limiting the foregoing, leakage of the battery, bending or dropping the unit are presumed to be defects resulting from misuse or abuse.
Exceptions from responsibility
The user of this product is expected to follow the instructions given in operators’ manual.
Although all instruments left our warehouse in perfect condition and adjustment the user is expected to carry out periodic checks of the product’s accuracy and general perfor-
9
mance. The manufacturer, or its representatives, assumes no responsibility of results of a faulty or intentional usage or misuse including any direct, indirect, consequential damage, and loss of profits. The manufacturer, or its representatives, assumes no responsibility for consequential damage, and loss of profits by any disaster (earthquake, storm, flood ...), fire, accident, or an act of a third party and/or a usage in other than usual conditions.
The manufacturer, or its representatives, assumes no responsibility for any damage, and loss of profits due to a change of data, loss of data and interruption of business etc., caused by using the product or an unusable product. The manufacturer, or its representatives, assumes no responsibility for any damage, and loss of profits caused by usage other thsn explained in the users’ manual.
The manufacturer, or its representatives, assumes no responsibility for damage caused by wrong movement or action due to connecting with other products.

WARRANTY DOESN’T EXTEND TO FOLLOWING CASES:
1.If the standard or serial product number will be changed, erased, removed or wil be unreadable.
2.Periodic maintenance, repair or changing parts as a result of their normal runout.
3.All adaptations and modifications with the purpose of improvement and expansion of normal sphere of product application, mentioned in the service instruction, without tentative written agreement of the expert provider.
4.Service by anyone other than an authorized service center.
5.Damage to products or parts caused by misuse, including, without limitation, misapplication or nrgligence of the terms of service instruction.
6.Power supply units, chargers, accessories, wearing parts.
7.Products, damaged from mishandling, faulty adjustment, maintenance with low-quality and non-standard materials, presence of any liquids and foreign objects inside the product.
8.Acts of God and/or actions of third persons.
9.In case of unwarranted repair till the end of warranty period because of damages during the operation of the product, it’s transportation and storing, warranty doesn’t resume.
For more information you can visit our website WWW.INSTRUMAXTOOLS.COM
WARRANTY CARD
Name and model of the product |
_____________________________ |
Serial number |
________________date of |
sale_______________________ |
|
Name of commercial organization _____________________stamp of commercial organization
Warranty period for the instrument explotation is 12 months after the date of original retail purchase.
During this warranty period the owner of the product has the right for free repair of his instrument in case of manufacturing defects.
Warranty is valid only with original warranty card, fully and clear filled
(stamp or mark of thr seller is obligatory).
Technical examination of instruments for fault identification which is under the warranty, is made only in the authorized service center. In no event shall manufacturer be liable before the client for direct or consewuential damages, loss of profit or any other damage which occur in the result of the instrument outage.
The product is received in the state of operability, without any visible damages, in full completeness. It is tested in my presence. I have no complaints to the product quality. I am familiar with the conditions of qarranty service and i agree.
purchaser signature _______________________________
Before operating you should read service instruction!
If you have any questions about the warranty service and technical support contact seller of this product
ru
Содержание
1. Инструкция по безопасной эксплуатации прибора. . . . . . . . . . . . . . . . . . . . . . . . . . . .11
2. Начало работы. . . . . . . . . . . . . . . . . . . . . . . . . . . . . . . 12 3. Функции меню. . . . . . . . . . . . . . . . . . . . . . . . . . . . . . . .13 4. Измерения. . . . . . . . . . . . . . . . . . . . . . . . . . . . . . . . . . .13 5. Функции. . . . . . . . . . . . . . . . . . . . . . . . . . . . . . . . . . . . . 14 6. Предупреждения на дисплее. . . . . . . . . . . . . . . . . . . . . .15 7. Технические характеристики. . . . . . . . . . . . . . . . . . . . . .16 8. Условия измерений. . . . . . . . . . . . . . . . . . . . . . . . . . . .17
9. Гарантия. . . . . . . . . . . . . . . . . . . . . . . . . . . . . . . . . . . . .18 10. Освобождение от ответственности. . . . . . . . . . . . . . .19
Приложение 1 - “Гарантийный талон”
11
Поздравляем Вас с приобретением лазерного дальномера INSTRUMAX SNIPER 30!
Назначение инструмента
Лазерный дальномер INSTRUMAX SNIPER 30 позволит Вам:
- измерять расстояния дистационно, - вычислять функции площади, объема, расстояния по теореме Пифагора
Руководство пользователя должно быть тщательно изучено перед тем, как Вы начнете измерения. Лицо, ответственное за прибор, должно удостовериться, что все пользователи лазерного дальномера следуют данному Руководству.
ИНСТРУКЦИЯ ПО БЕЗОПАСНОЙ ЭКСПЛУАТАЦИИ ПРИБОРА Запрещается:
Использованиеприборанепоинструкцииииспользование, выходящее за пределы разрешенных операций; Использование прибора во взрывоопасной среде (АЗС, газовое оборудование, химическое производство и т.д.);
12
Вывод прибора из строя и удаление с прибора предупредительных и указательных надписей; Вскрытие прибора с помощью инструментов (отверток и т.д.), изменение конструкции прибора или его модификация; Намеренное ослепление лазером третьих лиц, прямое
наведение прибора на солнце; Смотреть на лазерный луч;
Ненадлежащие меры безопасности на участке проведения геодезиической съемки (например, при проведении измерений на дорогах, строительных площадках и т.д.); Использование прибора в местах, где это может быть
потенциально опасно: на воздушном транспорте, вблизи производств и технологических объектов, в местах, где работа дальномера может привести к вредному воздействию на людей или животных.
Классификация лазерного прибора
Класс лазера 2. Мощность излучения менее 1 mW. Длина волны лазера 635 нм.
Лазер является безопасным в нормальных условиях эксплуатации и в поддающихся прогнозированию ситуациях.
НАЧАЛО РАБОТЫ
Клавишная панель
1)Кнопка включения/измерения/трекинг/выбор ед. измерения
2)Площадь/объем/косвенные измерения
(по теореме Пифагора/ выбор точки отсчета) 3) Стереть/выключить
Дисплей
1)Лазер включен
2)Точка отсчета (верхний край/ нижний край)
3)Вычисление площадь/объем/косвенные измерения (по теореме Пифагора)
4)Индикация заряда батареи
5)Единица измерения
6)Строка 1
7)Основная строка 2
 Loading...