

Page 1

VORTEXTM PLUS
10 Litre Air Fryer Oven
Getting Started Guide
2 Important Safeguards
6 Product, Parts & Accessories
7 Getting Started
9 Control Panel
12 Cooking
14 Rotisserie Cooking
17 Care, Cleaning & Storage
18 Warranty
20 Contact Information
Full Manual, How-to Videos and Recipes available online at instantpot.com.au
Register your product today at instantpot.com.au/support/register
Page 2

IMPORTANT SAFEGUARDS
Read thi s manual carefu lly and complet ely, and retain for fu ture referenc e.
Failure to a dhere to safety i nstruction s may result in ser ious injury.
At Instant Brands™ your safety always comes rst. The Instant™ Vortex™ Plus family was
designed with your safety in mind, and we mean business. Visit instantpot.com.au to learn
about this appliance’s safety mechanisms.
When using electrical appliances, basic safety precautions should always be followed:
1. READ ALL INSTRUCTIONS, SAFEGUARDS, AND WARNINGS
BEFORE OPERATING THE APPLIANCE. FAILURE TO FOLLOW THESE
SAFEGUARDS AND INSTRUCTIONS MAY RESULT IN INJURY AND/OR
PROPERTY DAMAGE.
2. The appliance’s outer surfaces may become hot during use. Do not
touch hot surfaces. Wear proper hand protection when handling
hot components. Extreme caution must be used when moving the
appliance. Let the appliance cool to room temperature before handling
or moving.
3.
CAUTION
To protect against the risk of electrical shock, do
not immerse power cord, plug, or the appliance in water or other liquid.
4. Do not rinse the appliance under tap.
5. The cooking chamber contains electrical components. To avoid
electrical shock, do not put liquid of any kind into the cooking chamber.
6. This appliance is NOT to be used by children or by persons with
reduced physical, sensory, or mental capabilities. Close supervision
is necessary when this appliance is used near children and these
individuals. Children should not use or play with this appliance.
7. Unplug from the outlet when not in use, as well as before adding or
removing parts or accessories, and before cleaning. To unplug, grasp
the plug and pull from the outlet. NEVER pull on the power cord.
8. Avoid making contact with moving parts.
9. Inspect the appliance and power cord regularly. Do not operate
any appliance with a damaged cord or plug or after the appliance
malfunctions, or is dropped or damaged in any manner.
For assistance, contact the Customer Care Team at
[email protected] or on 1800 251 643 or 02 9317 1000.
WARNING
2
Page 3

Read thi s manual carefu lly and complet ely, and retain for fu ture referenc e.
Failure to a dhere to safety i nstruction s may result in ser ious injury.
10. Do not use any accessories or attachments not authorised by
Instant Brands™. The use of attachments not recommended by
the manufacturer, may cause a risk of injury, re or electric shock.
11. For household countertop use only. Do not use outdoors. Not for
commercial use.
12. Do not place the appliance on any kind of stovetop, or in a heated
oven; heat from an external source will damage the appliance.
13. Do not let power cord contact hot surfaces or open ame, including
a stovetop.
14. Do not use appliance for anything other than intended use.
15. Proper maintenance is recommended after each use. Refer to Care,
Cleaning & Storage. Let the appliance cool to room temperature
before cleaning or storage.
16.
CAUTION
Spilled food can cause serious burns. A short
power-supply cord is provided to reduce the hazards resulting from
grabbing, entanglement and tripping. Keep appliance and cord away
from children. Never drape cord over edge of table or counter, never
use power outlet below counter, and never use with an extension cord.
17. Do not attempt to repair, replace, alter, or modify components of the
appliance. This may cause electric shock, re and/or injury, and will
void the warranty.
18. Do not tamper with any of the safety mechanisms.
19. Do not use the appliance in electrical systems other than 220-240V~
50-60Hz for Australia and New Zealand. Do not use with power
converters or adapters.
20. Do not overll the appliance or accessories. Overlling may cause food
to contact the heating element, which may result in re and/or personal
injury.
21. Do not cover the cooling vents while the appliance is in operation.
Doing so will prevent even cooking and may cause damage to the appliance.
22. Never pour oil into the cooking chamber. Fire and personal injury
could result.
WARNING
3
Page 4

IMPORTANT SAFEGUARDS
Read thi s manual carefu lly and complet ely, and retain for fu ture referenc e.
Failure to a dhere to safety i nstruction s may result in ser ious injury.
23.
While cooking, the internal temperature of the appliance reaches several
hundred degrees. To avoid personal injury, never place unprotected
hands inside the appliance until it has cooled to room temperature.
24. When cooking, do not place the appliance against a wall or against
other appliances. Leave at least 13 cm of free space on the back, sides,
and above the appliance. Do not operate the appliance on or near
combustible materials such as tablecloths and curtains. Do not place
anything on top of the appliance.
25. When in operation, hot air is released through the cooling vents. Keep
your hands and face at a safe distance from the cooling vents and take
extreme caution when removing the accessories from the appliance.
26. Should the unit emit black smoke, press Cancel and unplug the
appliance immediately. Wait for smoking to stop before opening the
door, then clean the appliance thoroughly.
27. Do not leave the appliance unattended while in use.
28. Never connect this appliance to an external timer switch or separate
remote-control system.
29. Use extreme caution when removing hot accessories from the cooking
chamber or disposing of hot grease.
30. Oversized foods and/or metal utensils must not be inserted into the
cooking chamber as they may cause risk of re and/or personal injury.
31. Do not store any materials, other than the included accessories, in the
cooking chamber when not in use.
32. Do not place any combustible materials in the cooking chamber, such
as paper, cardboard, plastic, Styrofoam or wood.
33. Do not use appliance accessories in any other appliance including
microwave ovens, toaster ovens, convection or conventional ovens,
ceramic, electric, induction or gas cooktops, or outdoor grills.
34.
CAUTION
contaning hot oil or other hot liquids.
Use extreme caution when moving an appliance
SAVE THESE INSTRUCTIONS.
WARNING
4
Page 5

Read thi s manual carefu lly and complet ely, and retain for fu ture referenc e.
Failure to a dhere to safety i nstruction s may result in ser ious injury.
WARN ING
To avoid injury, read and understand instruction manual before using this machine.
WARN ING
Electr ical shock ha zard. Use grou nded outlet onl y. D O NOT remove ground . DO NOT use an adapter. DO N OT use an extensio n cord. Failure to
follow instructions can cause electrical shock and/or serious injury.
WARN ING
THE FAILU RE TO FOLLOW ANY OF THE IMPO RTANT SA FEGUARDS AND T HE IMPORTANT IN STRUCTIONS FO R SAFE USE IS A
MISUS E OF YOUR APPLIA NCE THAT CAN VOID YOUR WA RRANT Y AND CREATE THE R ISK OF SERIOU S INJURY.
Special Cord Set Instructions
As per safety requirements, a short power supply cord is provided to reduce the hazards
resulting from grabbing, entanglement and tripping.
This appliance has a 3-prong grounding plug. To reduce the risk of electric shock, plug
the power cord into a grounded (earthed) electrical outlet that is easily accessible.
Product Specifications
Model:
Vortex Plus 10
1400-1600W
220-240V~
50-60Hz
10 Litres 7.7 kg cm: 33.6L x 33.6W x 36.5H
Find Your Model Name and Serial Number
Find both of these on the rating label on the back of the air fryer oven, near the
power cord.
WARNING
5
Page 6

Product, Parts & Accessories
Before using your new air fryer oven, make sure that everything is present and
accounted for.
Air Fryer Oven
Air Vents (Rear)
Control Panel
Heating Element (Interior)
Oven Door
Cooking Chamber (Interior)
Power Cord (Rear)
Accessories
Cooking Tray (x2)
Lid
Rotisserie Basket
Open/Close Indicator
Rotisserie Lift
Illustrations in this document are for reference only and may differ from the actual product.
Always refer to the actual product.
6
Rotisserie Fork (x2)
Setting Screw (x2)
Drip Pan
Rotisserie Spit
Page 7

Getting Started
Initial Setup
"No one is born a great cook; one learns by doing." – Julia Child
1. Pull that Instant™ Vortex™ Plus Air Fryer Oven out of the box!
2. Remove all the packaging material from in and around the oven, and make sure to
remove all the accessories from inside the oven chamber.
Don’t remove the safety warning stickers or the rating label from the air fryer oven.
3. You may be tempted to put the air fryer oven on your stovetop — but don’t do it!
Place it on a stable, level surface, away from combustible material and external heat
sources. Do not place your Vortex Plus on top of another appliance.
Make sure to leave at least 13 cm of space above and around all sides of the
appliance.
4. Follow the Care, Cleaning & Storage instructions to wash your new air fryer oven
before using it.
Read the Important
Safeguards before using
the appliance. Failure
to read and follow those
instructions for safe use
may result in damage
to the appliance,
property damage or
personal injury.
WARNING
Do not place the
appliance on a stovetop,
on another appliance,
or in a heated oven.
Heat from an external
source will damage
the appliance.
To avoid the risk of re,
property damage, and/
or personal injury, do not
place anything on top of
the appliance, and do not
block the air vents.
7
Page 8

Getting Started
Initial Test Run
Do you have to do the test run? No — but getting to know the ins and outs of your Instant™
Vortex™ Plus Air Fryer Oven prepares you for success in the kitchen! Take a few minutes to
get to know how this baby works.
Stage 1: Setting up the air fryer oven
for cooking
This section does not cover Rotisserie
set up or cooking.
See Rotisserie Cooking: Rotisserie
Accessories for details.
1. Open the oven door.
Place the drip pan on the bottom of
the cooking chamber.
Close the door.
2. Connect the power cord to a 220-240V
power source.
The air fryer oven is in standby mode
and the display shows OFF.
3. Touch Air Fry.
4. Use the + / − Time keys to adjust the
cook time to 20 minutes (00:20).
5. Touch Start to begin!
The display shows On while the air
fryer oven preheats.
The rst few times you use your air fryer
oven you may notice a strong plastic
smell. This is normal, non-toxic, and
goes away quickly.
Stage 2: "Cooking" (...but not really, this is
just a test!)
1. When the air fryer oven reaches the
perfect temperature, the display shows
Add Food.
Do not add food during the initial
test run.
2. Open the oven door.
Carefully insert both cooking trays
into the preheated cooking chamber.
Close the oven door.
The display alternates to show the
cooking time and temperature.
3. Part way through cooking, the display
shows turn Food.
Wait 10 seconds for the program to
resume automatically, or, open and
close the oven door to pause and
resume the program manually.
4. The display counts down the last
minute of cooking in seconds.
When the Smart Program completes,
the display shows End and the fan
blows for a little while to help cool
the air fryer oven.
5. Touch Cancel to return to standby
mode and start cooking for real!
If you forget this last step, the air fryer
oven will beep to remind you about it
after 5, 30, and 60 minutes.
CAUTION
The air fryer oven and air frying accessories will be hot during and after cooking.
To avoid the risk of burn injury, DO NOT touch hot surfaces with unprotected hands.
8
Page 9
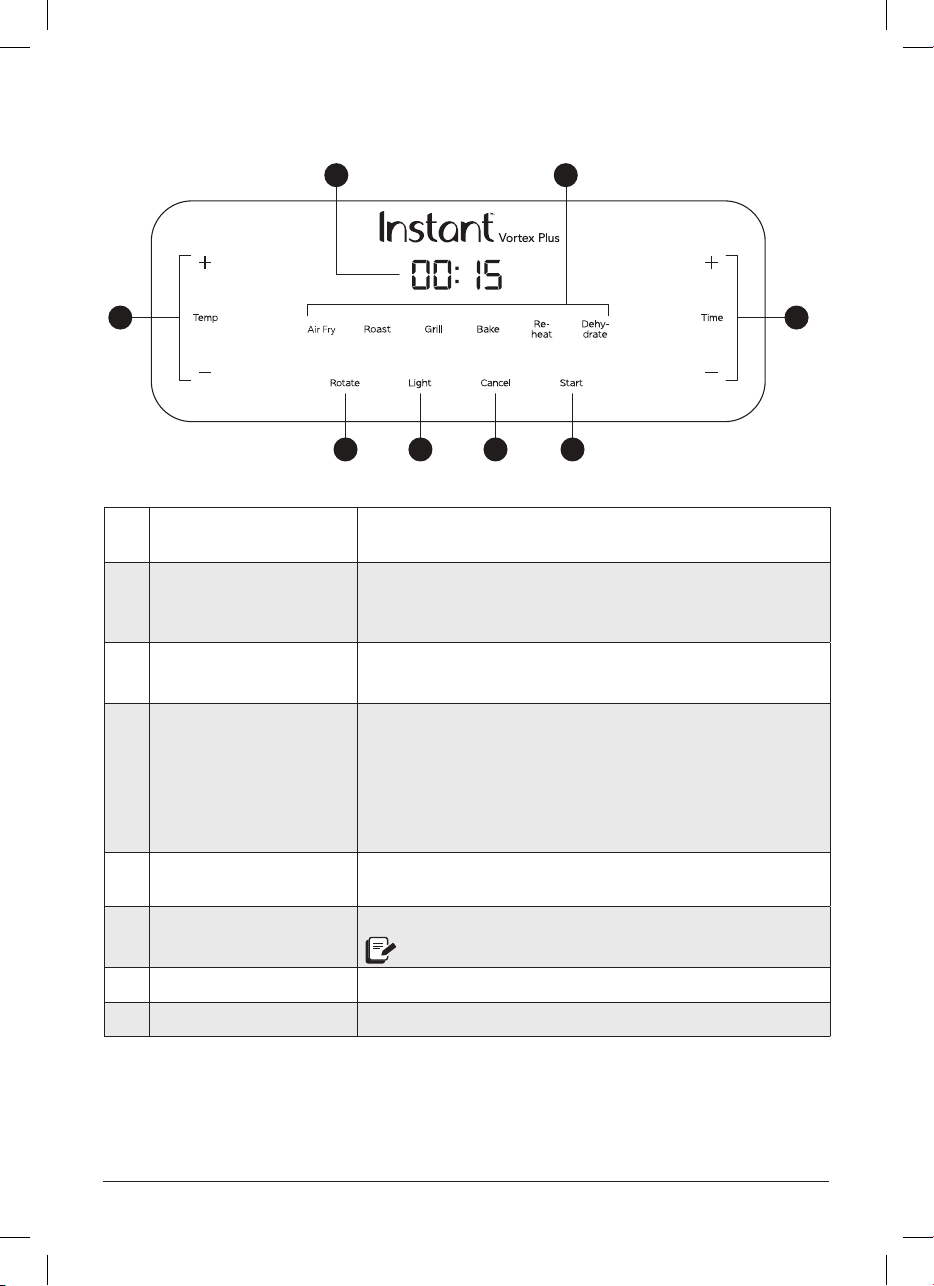
Control Panel
1 4
2
1 Time/Temperature Display
2 + / − Temp
3 + / − Time
4 Smart Programs
5 Rotate
5
6
Alternates to show the cooking time, the set temperature,
reminder messages and error messages.
Use the + / − Temp keys if you want to adjust the cooking
temperature.
Touch and hold the key to scroll quickly.
Use the + / − Time keys if you want to adjust the cooking time.
Touch and hold the key to scroll quickly.
• Air Fry
• Roast
• Grill
• Bake
• Reheat
• Dehydrate
Touch Rotate during Air Fry or Roast Smart Programs to start
and stop the rotisserie rotation.
7 8
3
6 Light
7 Cancel Touch Cancel to stop a smart program at any time.
8 Start Touch Start to begin a selected smart program.
Touch Light to turn the oven light on and off.
The oven light turns off automatically after 2 minutes.
Find full instructions for use online at instantpot.com.au.
Illustrations in this document are for reference only and may differ from the actual product.
Always refer to the actual product.
9
Page 10
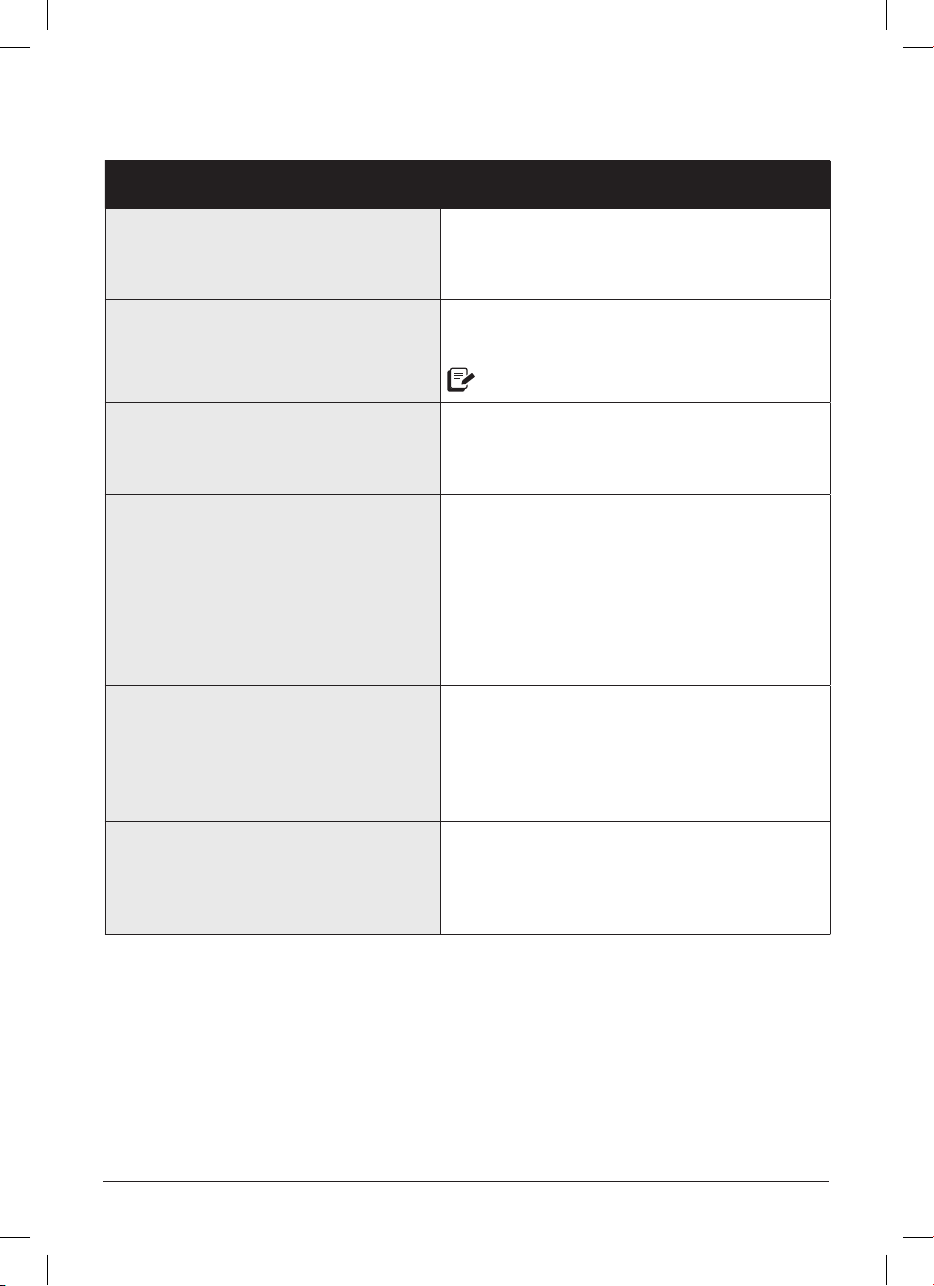
Settings
To do this... Do this!
Touch any key or open and close the oven
Wake the air fryer oven
Turn sounds on and off
Change temperature scale (ºC / ºF)
Save a custom cooking time
door. The display shows OFF to let you know
that it's in standby mode and ready for action.
In standby mode, touch and hold both − keys
(beneath Time and Temp) for 5 seconds.
Error alerts cannot be silenced.
Touch and hold both the + and − Temp
keys until the display indicates ºC or ºF. The
temperature is displayed in the unit indicated.
Pre-set cooking times and temperatures
can be changed to create your own custom
settings.
Select a smart program, then use the + / −
Temp and Time keys to make adjustments
as you like. Touch Start to save changes to
memory.
Reset an individual smart program
Reset all smart programs
10
In standby mode, touch and hold the smart
program key you want to reset (for example:
Air Fry) for 5 seconds. The cooking time
and temperature for that Smart Program
is restored to the factory default settings.
In standby mode, touch and hold both +
keys (above Temp and Time) for 5 seconds.
All Smart Programs are restored to default
settings.
Page 11
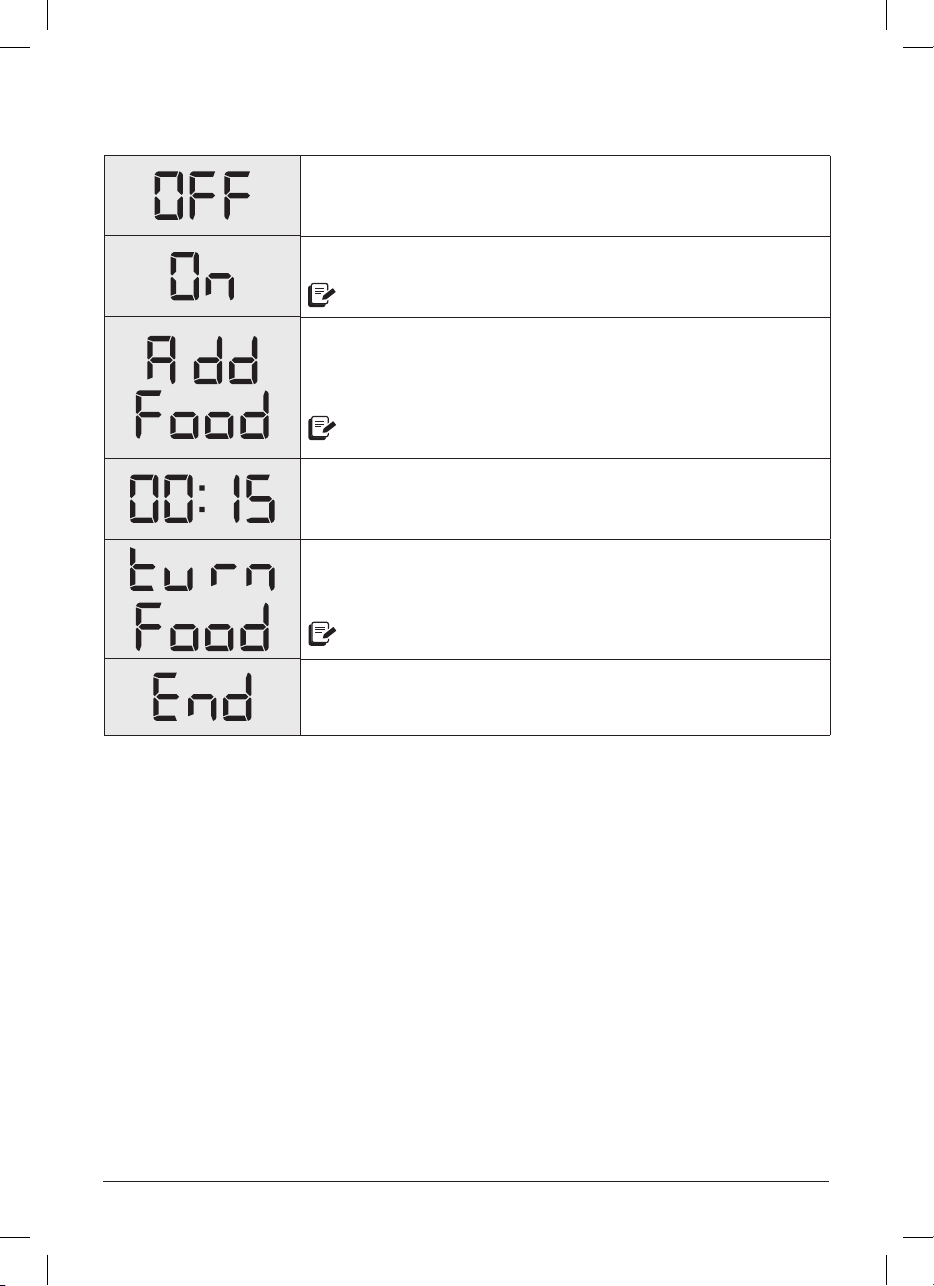
Status Messages
The air fryer oven is in standby mode.
A smart program is in the Preheat stage.
This message appears to let you know that the air fryer oven
has reached the perfect cooking temperature and food can be
added (if it hasn’t been already).
The display shows the cooking time and on-screen messages.
Food is ready to be turned or tossed, as recommended
by your recipe.
The Smart Program has nished.
Not applicable to Reheat and Dehydrate.
Not applicable to Reheat and Dehydrate.
Only applies to Air Fry and Roast.
11
Page 12

Cooking
Cooking in the Instant™ Vortex™ Plus Air Fryer Oven is quick and easy — food goes in,
crispy deliciousness comes out!
Find full instructions for use and cooking time tables online at instantpot.com.au or
download the free Instant Pot app for fun, easy to follow recipes.
Cooking Accessories
The non-stick cooking trays are perforated for airow and should be used for most foods,
like wings and cauliower bites.
The non-stick drip pan doubles as a at cooking tray when you’re baking cookies,
or cooking fragile food like sh, and lled-foods like jalapeno poppers or cheese-
stuffed chicken.
You can place food right on the cooking tray(s) or the drip pan, or, in/on any oven-safe
cookware on the cooking tray.
For information on the rotisserie accessories, see Rotisserie Cooking: Rotisserie
Accessories.
Air Fry, Roast, Grill and Bake
These programs give your meals all the rich, crispy avor of deep frying with little to
no oil, so you can say, “See ya!” to the greasy mess and extra calories! The presets are
a starting point that you can experiment with to get the results you prefer.
12
Smart
Program
Air Fry
Roast
Grill
Bake
Default Time Time Range
18 minutes
(00:18)
40 minutes
(00:40)
8 minutes
(00:08)
30 mins
(00:30)
1 minute to 1 hour
(00:01 to 01:00)
1 minute to 1 hour
(00:01 to 01:00)
1 to 40 minutes
(00:01 to 00:40)
1 minute to 1 hour
00:01 to 01:00
Default
Temperature
205°C 82 to 205°C
193°C 82 to 205°C
205°C Not adjustable
185°C 82 to 205°C
Temperature
Range
Notes
For all your
favourite deep-fried
meals, like fries,
cauliower bites,
wings, nuggets
and more.
Ideal for vegetable
dishes, beef, lamb,
pork, poultry
and more.
Direct top-down
heating, perfect for
melting cheese on
French onion soup,
nachos and more.
Light and uffy
cakes and pastries,
scalloped potatoes
and more.
Page 13
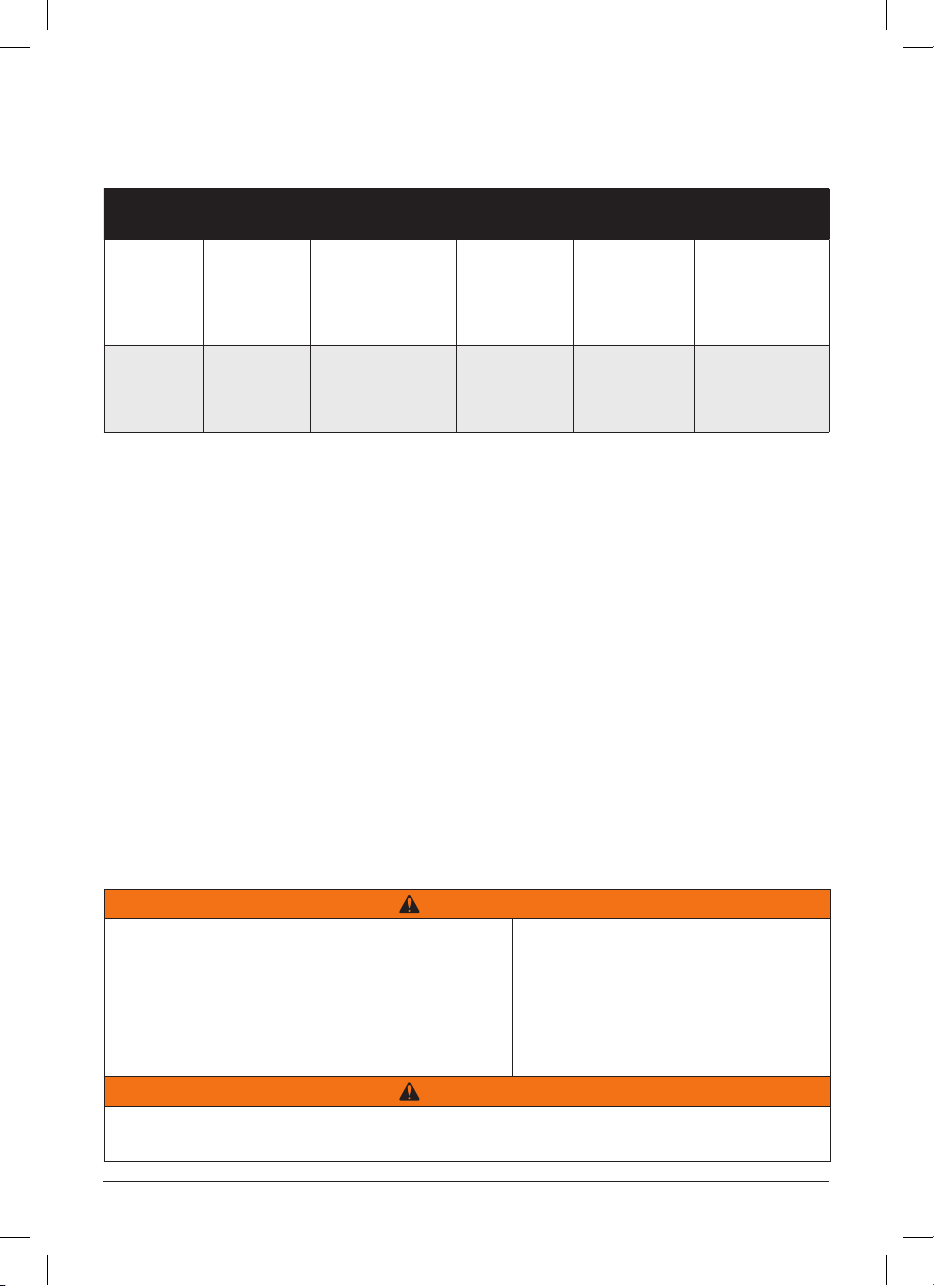
Cooking
Dehydrate and Reheat
Smart
Program
Dehydrate
Reheat
Default Time Time Range
7 hours
(07:00)
10 minutes
(00:10)
1 to 72 hours
(01:00 to 72:00)
1 to 60 minutes
(00:01 to 01:00)
Default
Temperature
49°C 35 to 79°C
138°C 49 to 182°C
Temperature
Range
Notes
Perfect for
homemade
dried fruit and
vegetables, jerky
and more.
Reheat leftovers
without
overcooking
or drying out.
CAUTION
The air fryer oven and air frying accessories
will be hot during and after cooking. Do not
touch hot surfaces with unprotected hands.
Allow all items to cool to room temperature,
then clean them according to Care, Cleaning
To avoid burn injury, always
use proper hand protection and
exercise extreme caution when
adding or removing food from the
hot cooking chamber.
& Storage instructions.
CAUTION
To avoid the risk of re and/or property damage, do not spray oil into the cooking
chamber.
13
Page 14
Rotisserie Cooking
The Instant™ Vortex™ Plus Air Fryer Oven is equipped with EvenCrisp™ technology for
simple rotisserie-style cooking with delicious results.
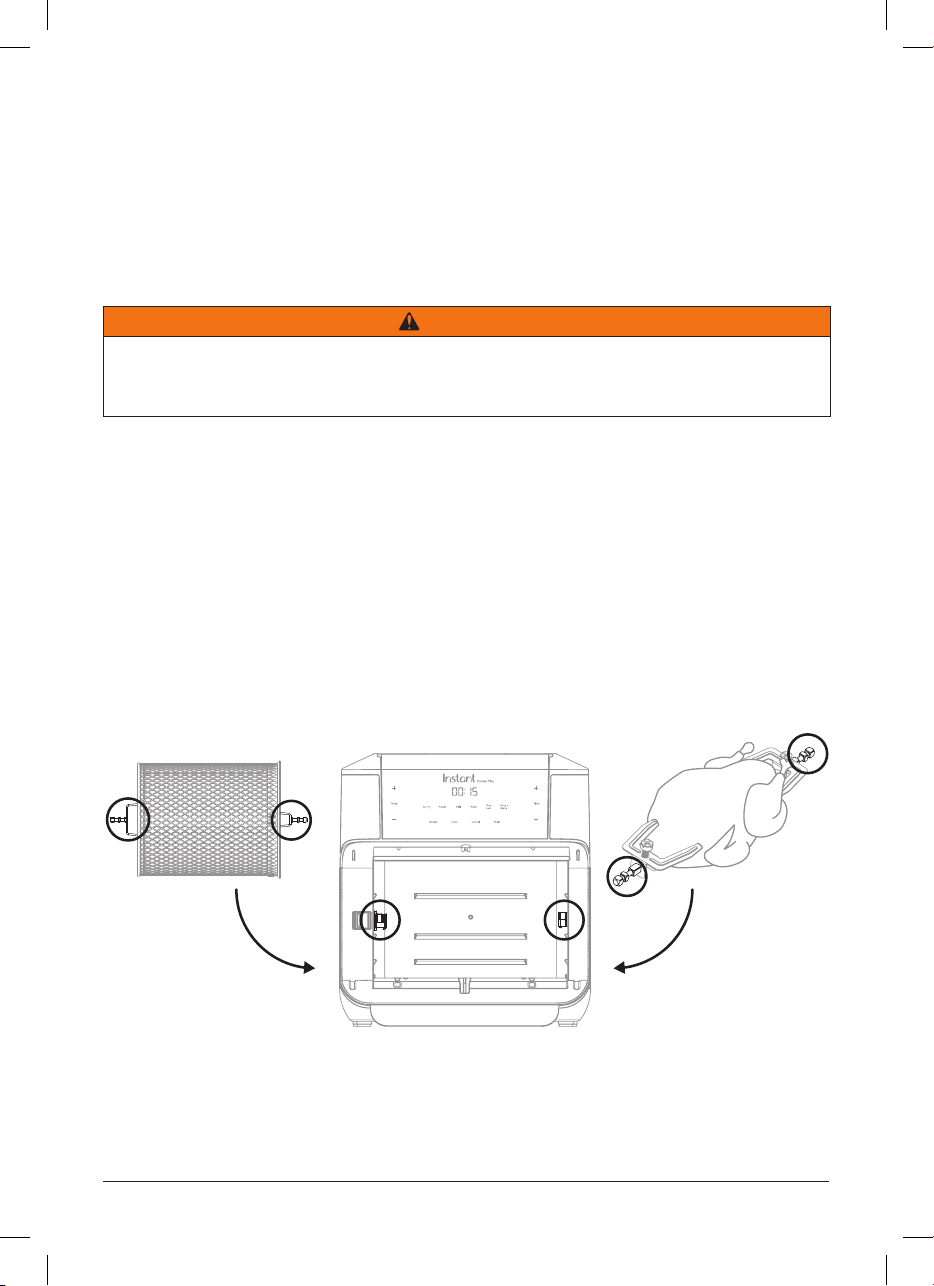
Always insert rotisserie accessories and food items into the cooking chamber before
preheating the air fryer oven.
Find the full manual and instructions for use online at instantpot.com.au.
CAUTION
Read the instructions below to make sure the rotisserie accessories are installed
correctly. Failure to follow these steps could result in irreparable damage to the
rotisserie catch.
Rotisserie Accessories
The rotisserie basket is perforated to allow maximum airow for the perfect tumble-fried
all-over crisp.
The rotisserie spit and forks are perfect for roasting whole chicken, tenderloin
and much more.
Stage 1: Setting up the rotisserie accessories
Follow the steps in Rotisserie Cooking: Rotisserie Accessories to prepare your food.
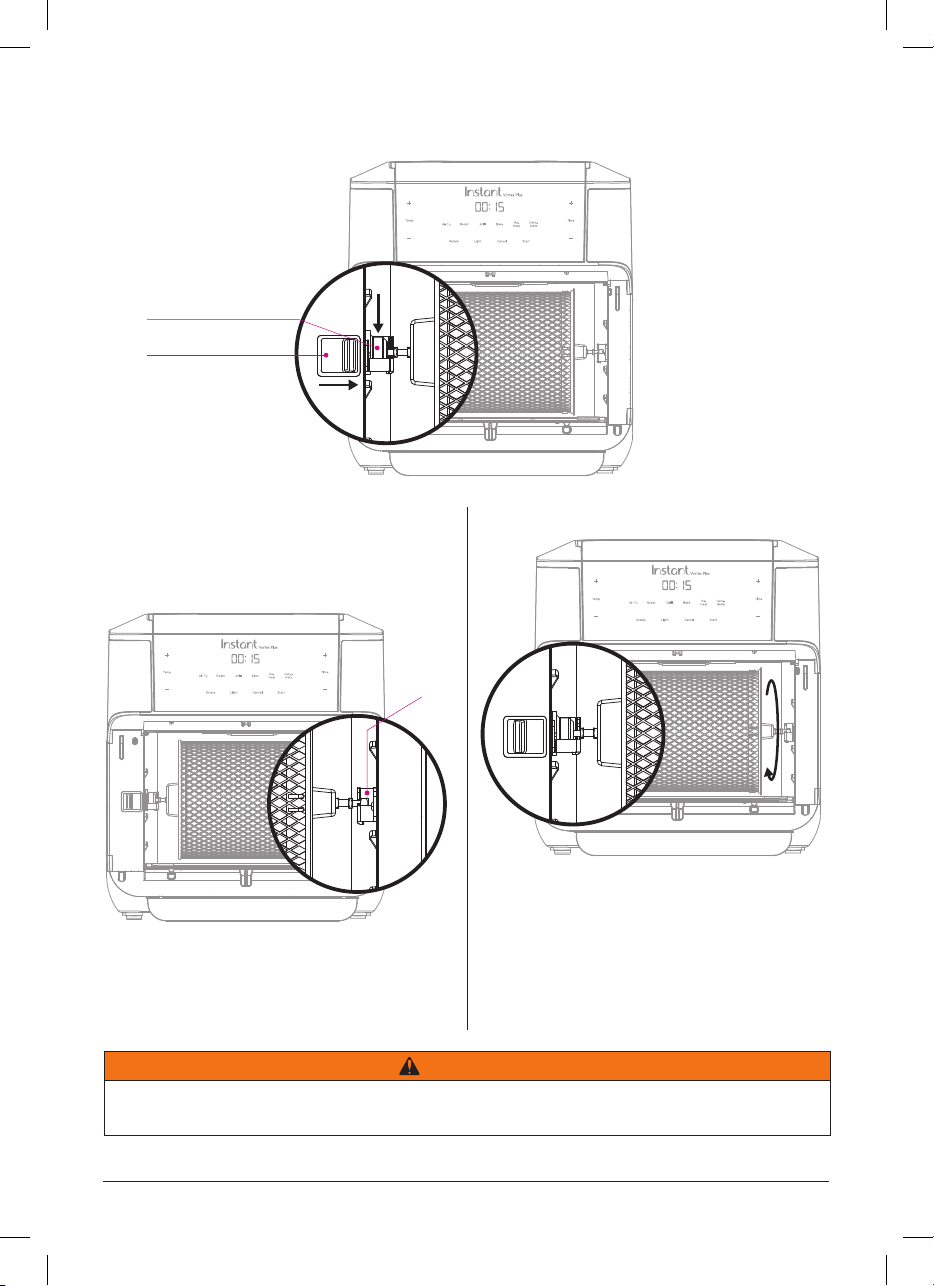
1. Open the oven door and slide the rotisserie accessory onto the guides in the
cooking chamber.
2. Move the red rotisserie catch lever to the right and hold it in position. Notice that
the rotisserie catch inside the cooking chamber withdraws slightly when you move
the lever.
14
Page 15
Rotisserie Cooking
Rotisserie Catch
Rotisserie Catch Lever
3. Align the left side of the accessory
with the hole in the rotisserie catch,
and set the right end of the accessory
in the notch on the right.
Notch
4. Release the rotisserie catch lever.
5.
Rotate the accessory in place to make
that it’s being held securely. The
rotisserie catch inside should move
with the accessory — if it does not move,
keep rotating the accessory until the
rotisserie catch “catches” it completely.
6. Close the oven door.
CAUTION
Read these instructions carefully to ensure you are using the rotisserie properly.
Failure to follow these steps could result in damage to the rotisserie catch.
15
Page 16
Rotisserie Cooking
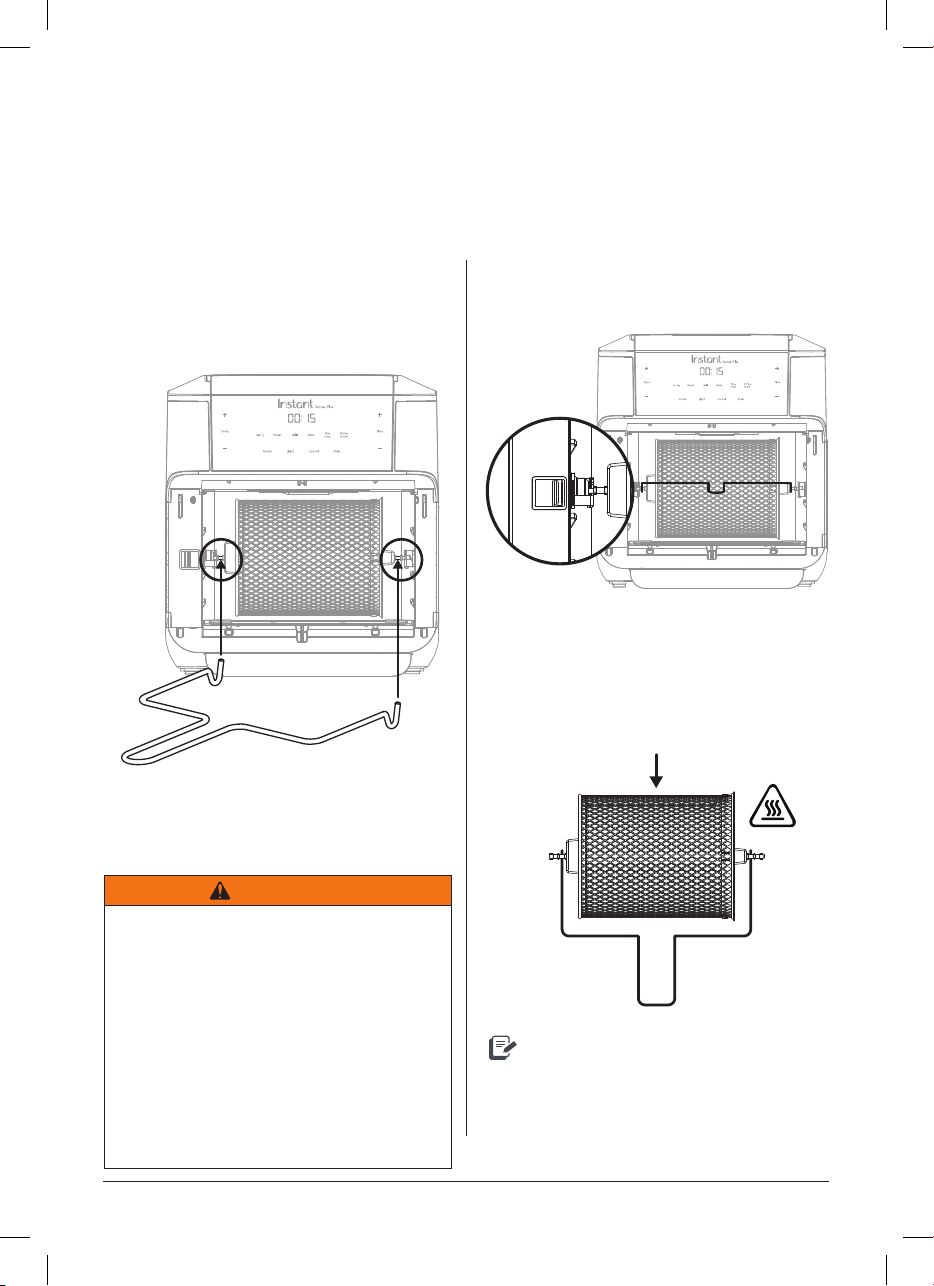
Stage 2: Removing the accessories
The rotisserie basket and rotisserie spit are installed and removed the same way,
but backwards!
1. Open the oven door.
2. Position the hooks on the rotisserie lift
beneath the left and right arms of the
accessory.
3. Move the rotisserie catch lever to the
right and hold it in position to release
the accessory.
4. Pull the accessory towards you, then
release the rotisserie catch lever.
5. Carefully remove the accessory from
the cooking chamber and place it on
a secure, heat-resistant surface.
CAUTION
The air fryer oven and rotisserie
accessories will be hot during
and after cooking. Always use the
rotisserie lift to remove rotisserie
accessories and exercise extreme
caution when removing food from the
hot cooking chamber. Always use
proper hand protection when handling
and/or disassembling hot rotisserie
accessories.
16
Make sure to place it somewhere
it won't roll away on you!
Page 17

Care, Cleaning & Storage
Clean your air fryer oven and accessories after each use.
Always unplug the air fryer oven and let it cool to room temperature before cleaning.
Never use harsh chemical detergents, scouring pads, or powders on any of the parts
or components.
Let all surfaces dry thoroughly before use, and before storage.
Part or Accessory Cleaning Method and Notes
Dishwasher safe.
Drip Pan
Cooking Trays
Rotisserie Basket
Rotisserie
Spit, Forks and
Screws
Rotisserie Lift
Removable Door
Cooking
Chamber
Exterior
Power Cord
Some discolouration may occur after machine washing, but this will not affect the cooker’s safety or performance.
To avoid risk of electrical
shock and personal injury:
- Do not immerse the
appliance in water.
- Do not rinse the
appliance under a tap.
- Do not wet prongs of
the power cord.
• Remove for cleaning.
• To prevent smoking, make sure grease and food debris is fully removed.
• The drip pan has a non-stick coating. Avoid using metal utensils when cleaning.
Dishwasher safe.
• The cooking trays have a non-stick coating. Avoid using metal utensils when cleaning.
Dishwasher safe.
• For best results, use a bristled brush rather than a sponge or cloth.
Dishwasher safe.
• Disassemble before cleaning.
• If machine washing, place small parts in washable mesh bag.
Dishwasher safe.
• Clean as needed.
Door can only safely be removed when appliance has cooled down.
Clean with a damp cloth and mild dish soap.
• Remove the door for cleaning. Open the door with left hand only, to an angle of 45
degrees, grab left hand side of door and pull gently to the right.
• Allow the door to air dry completely before reinstalling, otherwise the glass may
experience clouding.
Clean with a damp cloth and mild dish soap.
• Always check the heating coil and cooking chamber walls for oil spatter and food debris,
and clean as needed.
• Ensure the heating coil is dry before turning on the air fryer oven.
• To remove baked-on grease and food residue from the cooking chamber, spray with a
mixture of baking soda and vinegar and wipe clean with damp cloth. For stubborn stains,
allow the mixture to sit on the affected area for several minutes before scrubbing clean.
Clean with a damp cloth and mild dish soap.
• After cleaning, wipe down with a dry cloth to prevent streaking.
Clean with a damp cloth and mild dish soap.
• Clean as needed.
WARNING
Without proper cleaning,
food and grease splatter
may build up around the
heating element, causing
the risk of smoke, re, and
personal injury.
If you see or smell
smoke, touch Cancel,
unplug the appliance, and
allow it to cool. Follow
instructions above to
clean the appliance and
accessories.
17
Page 18

Limited Warranty
This L imited Warr anty is iss ued by Corell e Brands (Aus tralia) Pt y Ltd (Corelle Brands Australia) and is eff ective fo r one year from t he
date of o riginal con sumer purcha se. Proof of or iginal purch ase date and re turn of your a ppliance is re quired to obt ain serv ice under
this Limite d. Return of yo ur appliance t o us will be done i n accordanc e with our ins tructi ons only. Prov ided that this appli ance is
oper ated and main tained in acc ordance wi th writt en operati ng instru ctions at tached t o or furnish ed with the ap pliance or pu blished
oper ating inst ructio ns on www.in stantpo t.com.au, C orelle Bran ds Austra lia will, in it s sole and excl usive discretio n, either: (i) r epair
defec ts in mate rials or work manship; or (ii) replac e the applian ce. In the even t that your app liance is repl aced, the Li mited Warra nty
on the re placement a ppliance wi ll expire 12 month s from the date of orig inal consume r purchase.
We remin d you the appliance you p urchased i s for person al use only (not co mmercial us e).
Any modi cation/alteration or at tempted modication/alteration to yo ur appliance will void this Limited War rant y, unless such
modication/alterat ion or attempt ed modicat ion/al teration was ex pressly authorized by a Corelle Brands Au stralia Represent ative
in writing.
This Limited War rant y only covers Core lle Brands Australia’s applia nces /products an d is not exte nded to any ot her appliances,
produ cts, equ ipment, com ponents, or devi ces that you us e or may use in con junctio n with the Cor elle Brands A ustrali a’s appliance s.
To claim und er this Limi ted Warrant y:
1. Contact Cor elle Brands Aust ralia at:
9C Commerc ial Road, Kin gsgrove, NSW, 2208
Email: [email protected]
2. Provide a d escript ion of the appliance yo u believe has m alfunct ioned due to defec tive par ts or workmanship .
3. If it is ne cessar y for the appliance to b e sent to Corelle Bran ds Austra lia for repair o r replaceme nt, Corelle B rands
Austr alia will sen d you a pre-pai d shipping la bel and you mus t send the ap pliance and yo ur dated sales rece ipt to Corelle
Brands A ustralia a long with th e appliance. I f you do not have y our dated sal es receipt , please adv ise Corelle B rands
Austr alia in advan ce, and Corell e Brands Aus tralia wil l attempt to v erify yo ur purchase.
4. If Corel le Brands Aus tralia de termines t hat the appli ance has malf unction ed due to defec tive par ts or work manship, and
is covere d under this Li mited Warranty, Corelle B rands Aus tralia will repair an d return the a ppliance, or s end you a
replace ment appliance, at Co relle Brands Aust ralia’s cos t.
5. Any repaired or re placed appliance w ill be covered by this L imited Warr anty for th e remainder of t he original warranty
period o r ninety (90) d ays followin g your receip t of the replac ement or repaired app liance, whic hever is grea ter.
6. If Corelle Br ands Aus tralia conr ms the appliance has not malf unctione d due to defec tive part s or workmanship, and/or
is in working order, or if proof of purchase is no t veried, Corelle Brands Australia reser ves the right to return the
applian ce to you at your pr e-paid cos t. If this co st is not met , Corelle Bra nds Austr alia reser ves the righ t to dispose o f the
applian ce after 45 da ys’ notice to y ou.
Limitation and Exclusions
To the maxi mum extent p ermitted by law, th e maximum lia bility of Corelle B rands Australi a, if any, for any all egedly defe ctive app liance
or par t shall in no circums tances exceed the p urchase price of a com parable rep lacement ap pliance or part of the same a ge.
This Limited Warranty does not cover:
1. Damage re sulting from ac ciden t, modi cat ion/al teration (unless expr essl y authorized by a Corelle Bra nds Aus tralia
Represe ntative in w riting), misuse, a buse, negle ct, unrea sonable use , use contra ry to the wri tten ope rating ins tructions
atta ched to or fur nished wit h the applian ce or publish ed operat ing instructi ons on www. instantp ot.com.a u, normal wear
and tear, commercia l use, improp er assembl y by you or anyone, d isassembly by you o r anyone, repa ir by you or anyon e,
failure to prov ide reasonabl e and necessar y maintenance, force majeure event includin g but not limi ted to re, ood, act s
of God;
2. Repairs w here your appliance i s used for oth er than norma l, persona l use or when it is u sed in a manner t hat is contr ary
to the wri tten ope rating ins tructi ons atta ched to or fur nished wit h the applian ce or publish ed operat ing instructi ons on
www.instantpot.com.au ; or
3. Use of unauthorize d part s and acce ssor ies, or repairs to pa rt s and sys tems res ulting from unauthor ized repairs or
modica tions/alte rati ons made to your appliance.
The cos t of repair or r eplacemen t under these exclud ed circums tances sha ll be borne by you. Our goods co me with guar antees
that c annot be exclu ded under th e Australian Cons umer Law. You are en titled to a re placement o r refund for a ma jor failure a nd
compe nsation fo r any other reas onably fore seeable lo ss or damage. You ar e also entit led to have the g oods repai red or replac ed if
the go ods fail to be of a cceptabl e quality an d the failur e does not amou nt to a major fai lure.
Distr ibuted by Corelle B rands (Aus tralia) Pt y Ltd.
9c Comme rcial Road, K ingsgrove, N SW, 2208. 1800 251 643 o r (02) 9317 100 0.
Email: [email protected]
Warranty
18
Page 19

THIS PAGE HAS BEEN INTENTIONALLY LEFT BLANK.
19
Page 20

©2021 Corelle Brands (Australia) Pty Ltd.
Distributed by Corelle Brands (Australia) Pty Ltd.
9c Commercial Road, Kingsgrove, NSW, 2208, Australia
Register your product today at:
instantpot.com.au/support/register
Contact Customer Care:
Ph 1800 251 643 or 02 9317 1000
instantpot.com.au
© 2021 Corelle Brands (Australia) Pty Ltd.
886-0310-51
 Loading...