

Page 1
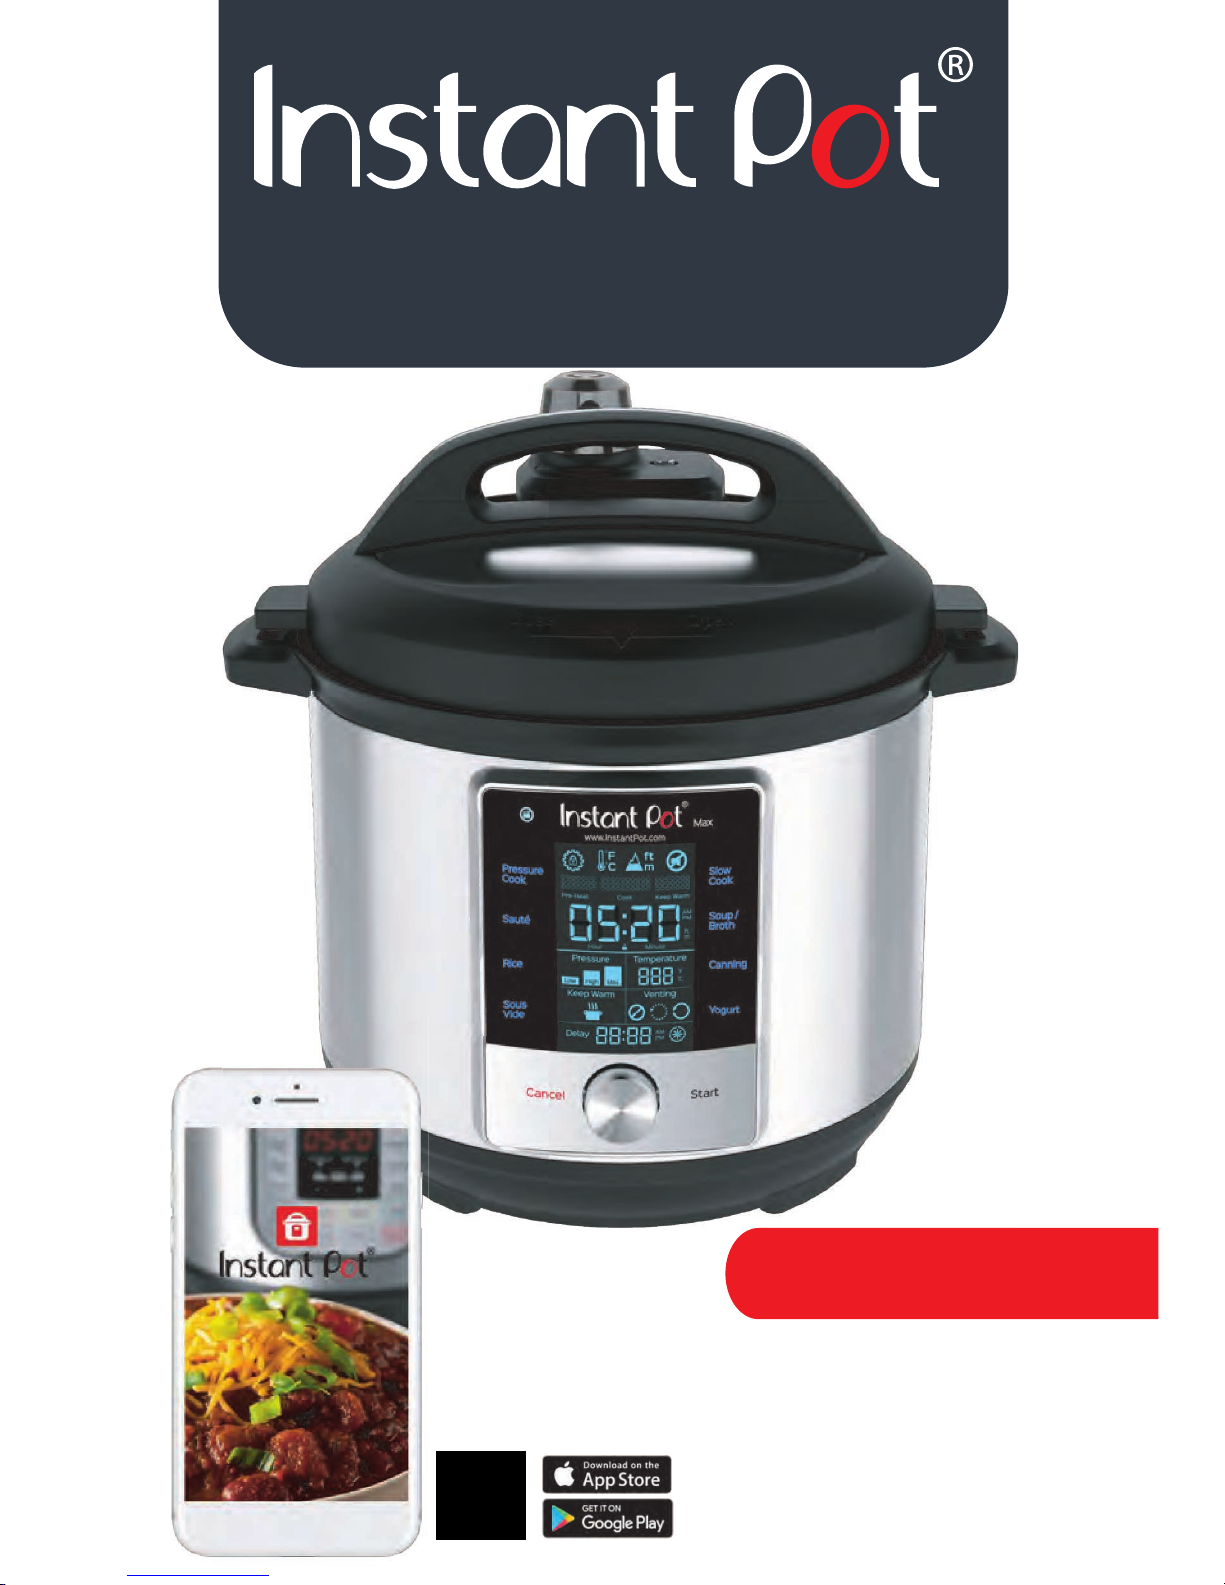
User Manual
Max
Series
Instant Pot® Free Recipe App
• 500+ Free Recipes
• New User Tips
• Getting Started Videos
Page 2

Welcome to the World of
Robert J. Wang
Founder, CEO
Thank you for selecting an Instant Pot® smartcooker! Our vision for
Instant Pot
®
is to provide you with the right tools to enhance your food
preparation experience. Our smartcookers are designed to save you
time, replace a number of appliances, and prepare healthy and tasty
meals in a safe, convenient and dependable way.
We partner with chefs, authors, and bloggers to compile a collection of
recipes that we hope you enjoy! As well, for over 500+ additional
recipes, videos and more, download the Instant Pot
®
Recipe App.
Happy Instant Pot
®
Cooking!
Cooking!
Page 3

Welcome
Important Safeguards 1 - 4
Product Specifications 5
Detachable Cord
What’s Included 6
Overview
Lid Structure 7
Cooker Base Structure 8
Getting Started 9 - 11
Controls & Features 12
Venting Methods 13
Initial Test Run (15 psi Water Test) 14 - 15
System Settings & Time 16
Operation Field
Delay Start 17
Usage Tips 18
Smart Programs & Advanced Features
Pressure Cook 19
NutriBoost™ 20
Canning 21 - 23
Sauté 24
Slow Cook 25
Sous Vide 26 - 27
Yogurt 28
Care & Cleaning 29
Troubleshooting 30 - 31
Warranty 32 - 33
Notes 34
Index 35 - 36
Please read the manual carefully and retain for future use.
Table of Contents
1
Page 4

IMPORTANT SAFEGUARDS
2
IMPORTANT SAFEGUARDS
When using electrical appliances, basic safety precautions should always be
followed:
1. READ ALL INSTRUCTIONS.
2. Do not touch hot surfaces. Only use side handles for carrying or moving.
3. Close supervision is necessary when the appliance is used near children.
4. Do not place the appliance on or in close proximity to a hot gas or electric
burner, or a heated oven; heat from an external source will damage the
appliance.
5. Extreme caution must be used when moving the appliance
containing hot liquids. Do not move the appliance when it is under pressure.
6. Do not use appliance for anything other than intended use.
7. This appliance cooks under pressure. Improper use may result in scalding
injury. Make certain the appliance is properly closed before operating.
Please see the "Getting Started" section.
8. Do not fill the appliance over 2/3 full. When cooking foods that expand
during cooking such as rice or dried vegetables, do not fill the appliance
over 1/2 full. Over filling may cause a risk of clogging the vent pipe and
developing excess pressure. Please see the ”Pressure Cooking” section.
9. Be aware that certain foods, such as applesauce, cranberries, pearl barley,
oatmeal or other cereals, split peas, noodles, macaroni, rhubarb, or
spaghetti can foam, froth, and sputter, and clog the anti-block shield, the
steam release valve/handle, float valve or the steam release pipe. These
foods should not be cooked in a pressure cooker. When cooking these
types of foods, follow instructions in a trusted recipe.
10. Before each use, check the steam release valve/handle, steam release pipe,
anti-block shield and float valve for clogging.
11. Do not open the appliance until the appliance has cooled and all internal
pressure has been released. If the float valve is still up and/or the lid is
difficult to open, this indicates that the appliance is still pressurized – do not
force it open. Any pressure in the appliance can be hazardous. Please see
the "Getting Started" section for instructions to safely remove lid.
12. Do not use this appliance for pressure frying with oil.
13. To protect against electrical shock, do not immerse the power
cord, plugs, or appliance in water or other liquid.
Read and save these safety guidelines.
When using pressure cookers, basic safety precautions
should always be followed.
WARNING
2
CAUTION
CAUTION
Page 5

14. Always attach plug to appliance first, then plug cord into the wall outlet. To
disconnect, turn appliance “off”, then remove plug from wall outlet.
15. Unplug from outlet when not in use and before cleaning. Allow to cool
before putting on or taking off parts, and before cleaning or storage.
16. Do not operate any appliance with a damaged cord or plug, or after the
appliance malfunctions or has been damaged in any manner. Contact
Customer Care.
17. The use of accessory attachments not recommended by the appliance
manufacturer may cause injuries.
18. Do not use outdoors. Not for commercial use. For household use only.
19. Do not let power cord hang over edge of table or counter, or touch hot
surfaces.
20. Intended for countertop use only. Keep the appliance on a stable,
heat-resistant platform. Do not place on anything that may block the vents
on the bottom of the appliance.
21. Spilled food can cause serious burns. Keep appliance and cord
away from children. Never drape cord over edge of counter, never use
outlet below counter, and never use with an extension cord.
22. Before inserting the inner pot into the appliance, wipe the outer surface of
the inner pot and cooking element to confirm they are dry and free of food
debris.
23. Do not attempt to repair, replace, or modify components of the appliance, as
this may cause electric shock, fire or injury, and will void the warranty.
24. Do not use near water or flame. Please keep out of direct sunlight.
25. Do not lean over or place your hands or face over the steam release
valve/handle or float valve when the appliance is in operation or has residual
pressure. Do not touch the metal portion of the lid when the appliance is in
operation; this could result in injury.
26. Do not cover or obstruct the steam release valve/handle and float valve with
cloth or other objects. Obstructing the steam release valve/handle and float
valve can create a safety issue and may cause injury.
27. When cooking meat with skin (e.g. sausage with casing), the skin can swell
when heated. Do not pierce the skin as long as it is swollen; this could result
in scalding injury.
IMPORTANT SAFEGUARDS
3
Read and save these safety guidelines.
When using pressure cookers, basic safety precautions
should always be followed.
WARNING
Page 6
28. Turn the appliance off if steam escapes from the steam release
valve/handle or float valve in a steady stream for longer than 3 minutes.
There may be residual pressure in the appliance. Allow the appliance to cool
naturally or release all excess pressure before opening. Please see the
“Troubleshooting” section.
29. Turn the appliance off if steam escapes from the sides of the lid and ensure
sealing ring is properly installed. Please see the “Getting Started” section.
30. Do not tamper with any of the safety mechanisms.
31. Do not use appliance in electrical systems other than 120V/60Hz for North
America. Do not use with power converters or adapters.
32. When pressure cooking food with a doughy or thick texture, or a high fat/oil
content, contents may splatter when opening the lid. Please follow recipe
instructions for pressure release method. Once steam is fully released,
gently shake the appliance and then release the steam again, if necessary,
before removing the lid.
33. This appliance should not be used by children; by individuals whose
physical, sensory or mental abilities may prevent safe use of the appliance;
or by individuals with limited knowledge of how to use the appliance. Close
supervision is needed when using this appliance near these individuals.
34. SAVE THESE INSTRUCTIONS.
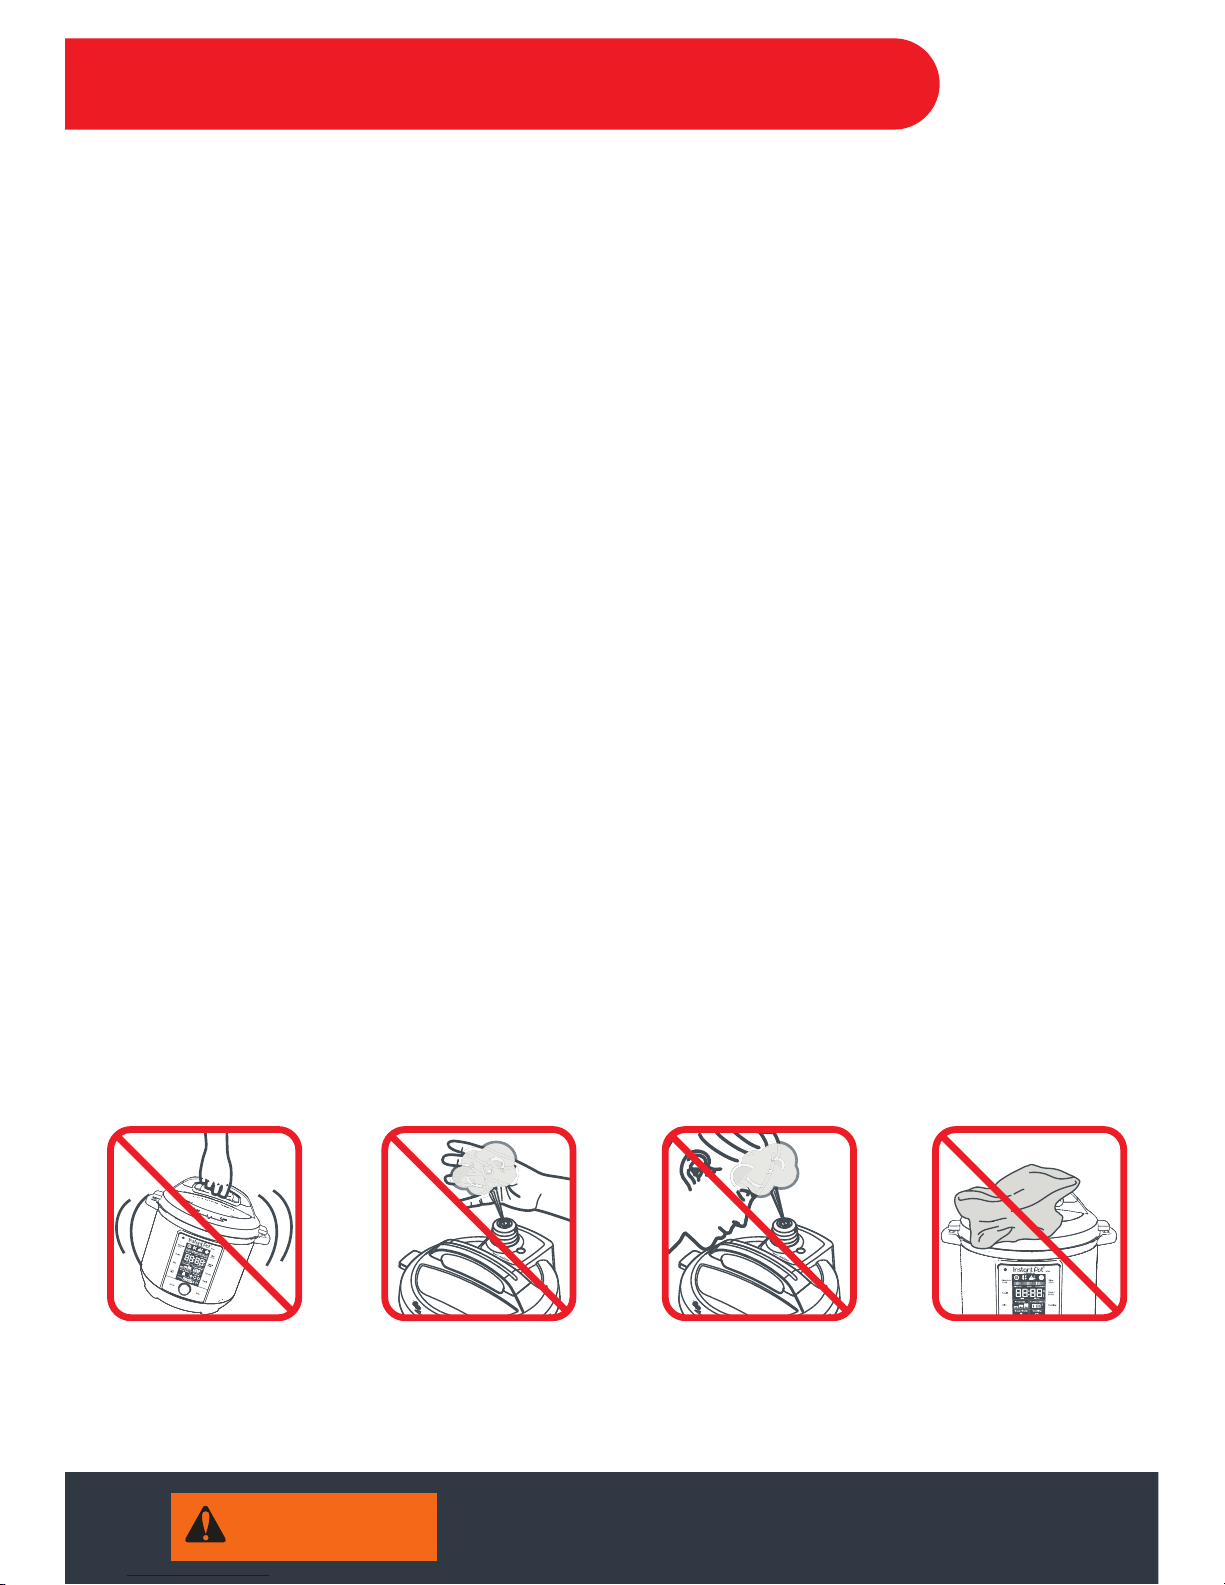
IMPORTANT SAFEGUARDS
0
Do not lean over the steam
release cover at any time during
cooking or releasing pressure.
2
0
Do not cover or
obstruct the steam
release cover.
2
4
Read and save these safety guidelines.
When using pressure cookers, basic safety precautions
should always be followed.
WARNING
Do not move the cooker
during a cooking
operation. Always carry
the cooker by the side handles.
While the cooker is in
operation or releasing
pressure, do not place unprotected
skin over the steam release cover.
Page 7
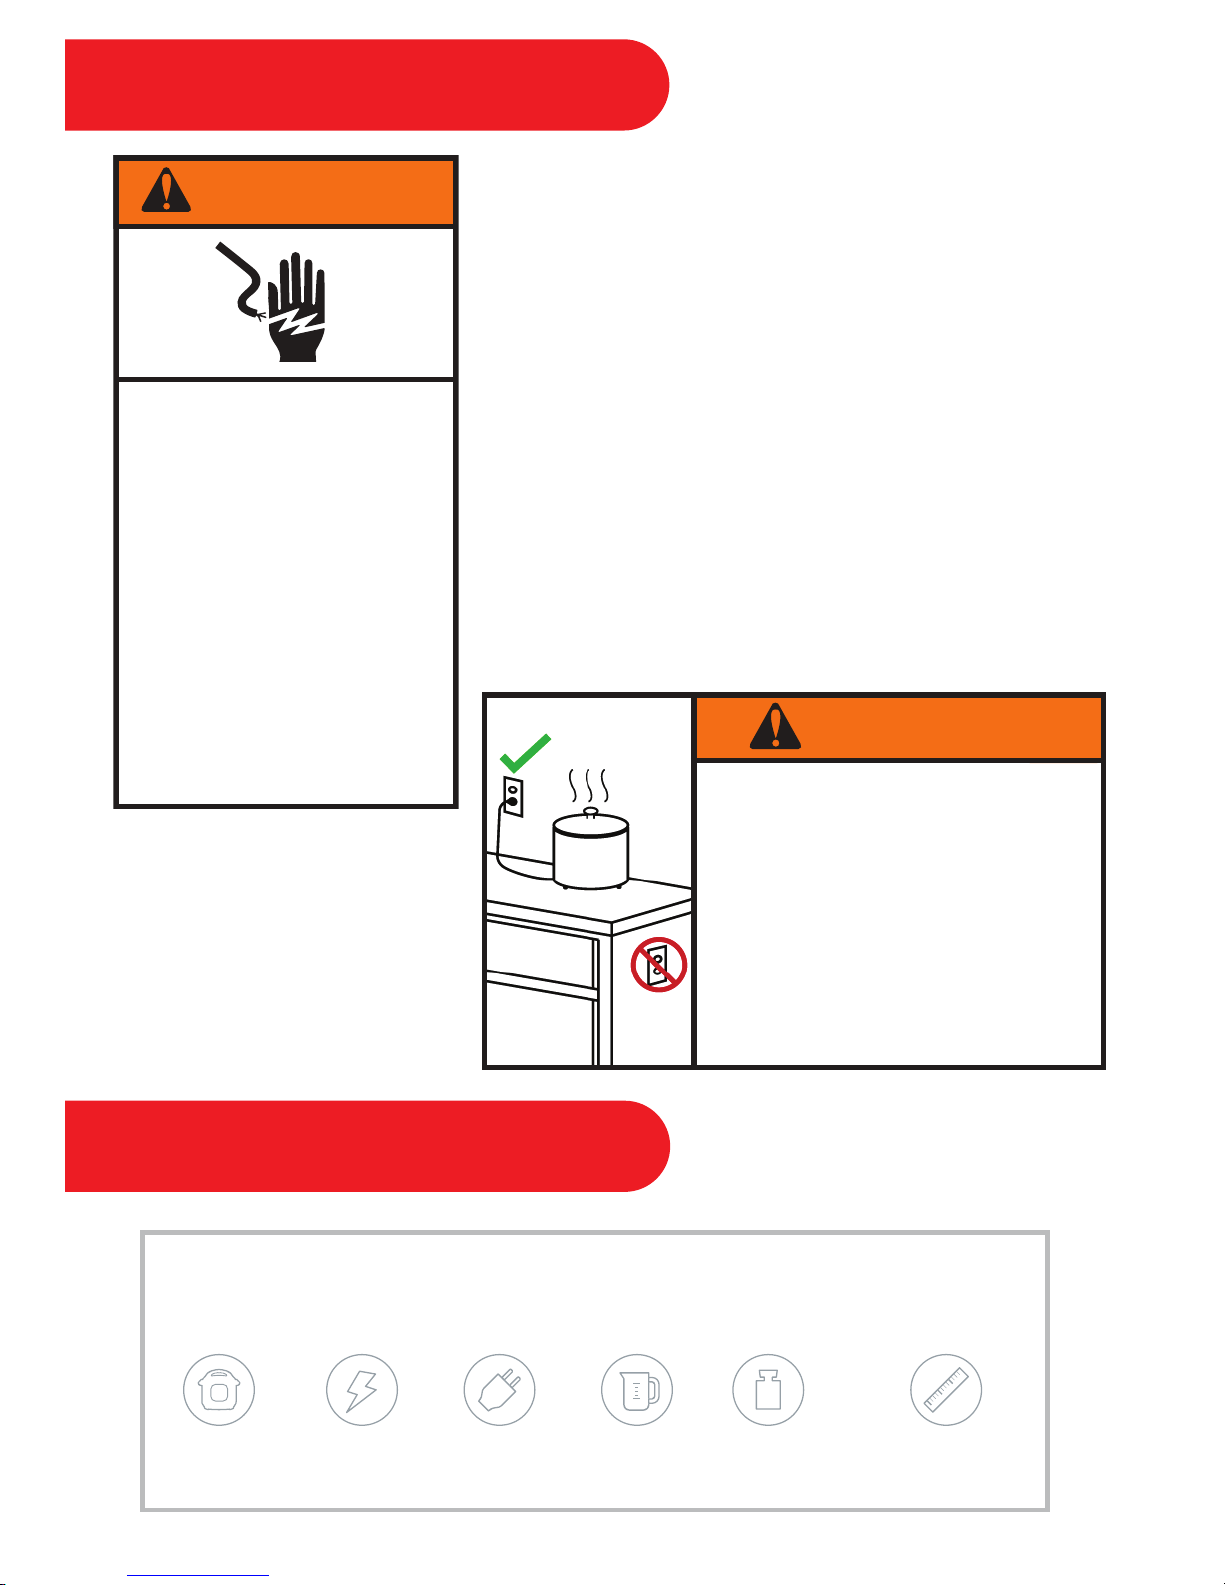
Product Specifications
13.25 lbs
120V – 60Hz
1100 W
13.8"L x 13.8"W x 13"H
5
Detachable Cord
The length of the detachable power cord (35 in / 0.89 m) is as
per UL safety requirement.
This smartcooker has a 3-prong grounding plug which protects
those who use the smartcooker from electric shock, as well as
protecting the smartcooker from power surges.
To avoid the risk of electric shock, first tightly secure the power
cord to the base power socket, then plug the power cord into a
grounded electrical outlet that is easily accessible.
Remove the cord when not in use. Only use Instant Pot
®
authorized power cords.
Note: Ensure the plug is pushed into the socket fully; the loose contact
could cause the risk of sparks.
Electrical Shock Hazard
Plug into a grounded
3 prong outlet.
Do not remove
ground prong.
Do not use an adapter.
Do not use an
extension cord.
Failure to follow these
instructions can result
in death, fire, or
electrical shock.
Spilled food can cause serious burns.
Keep appliance & cord away from
children.
NEVER:
• Drape cord over edge of
counter.
• Use outlet below counter.
• Use extension cord.
WARNING
WARNING
Page 8
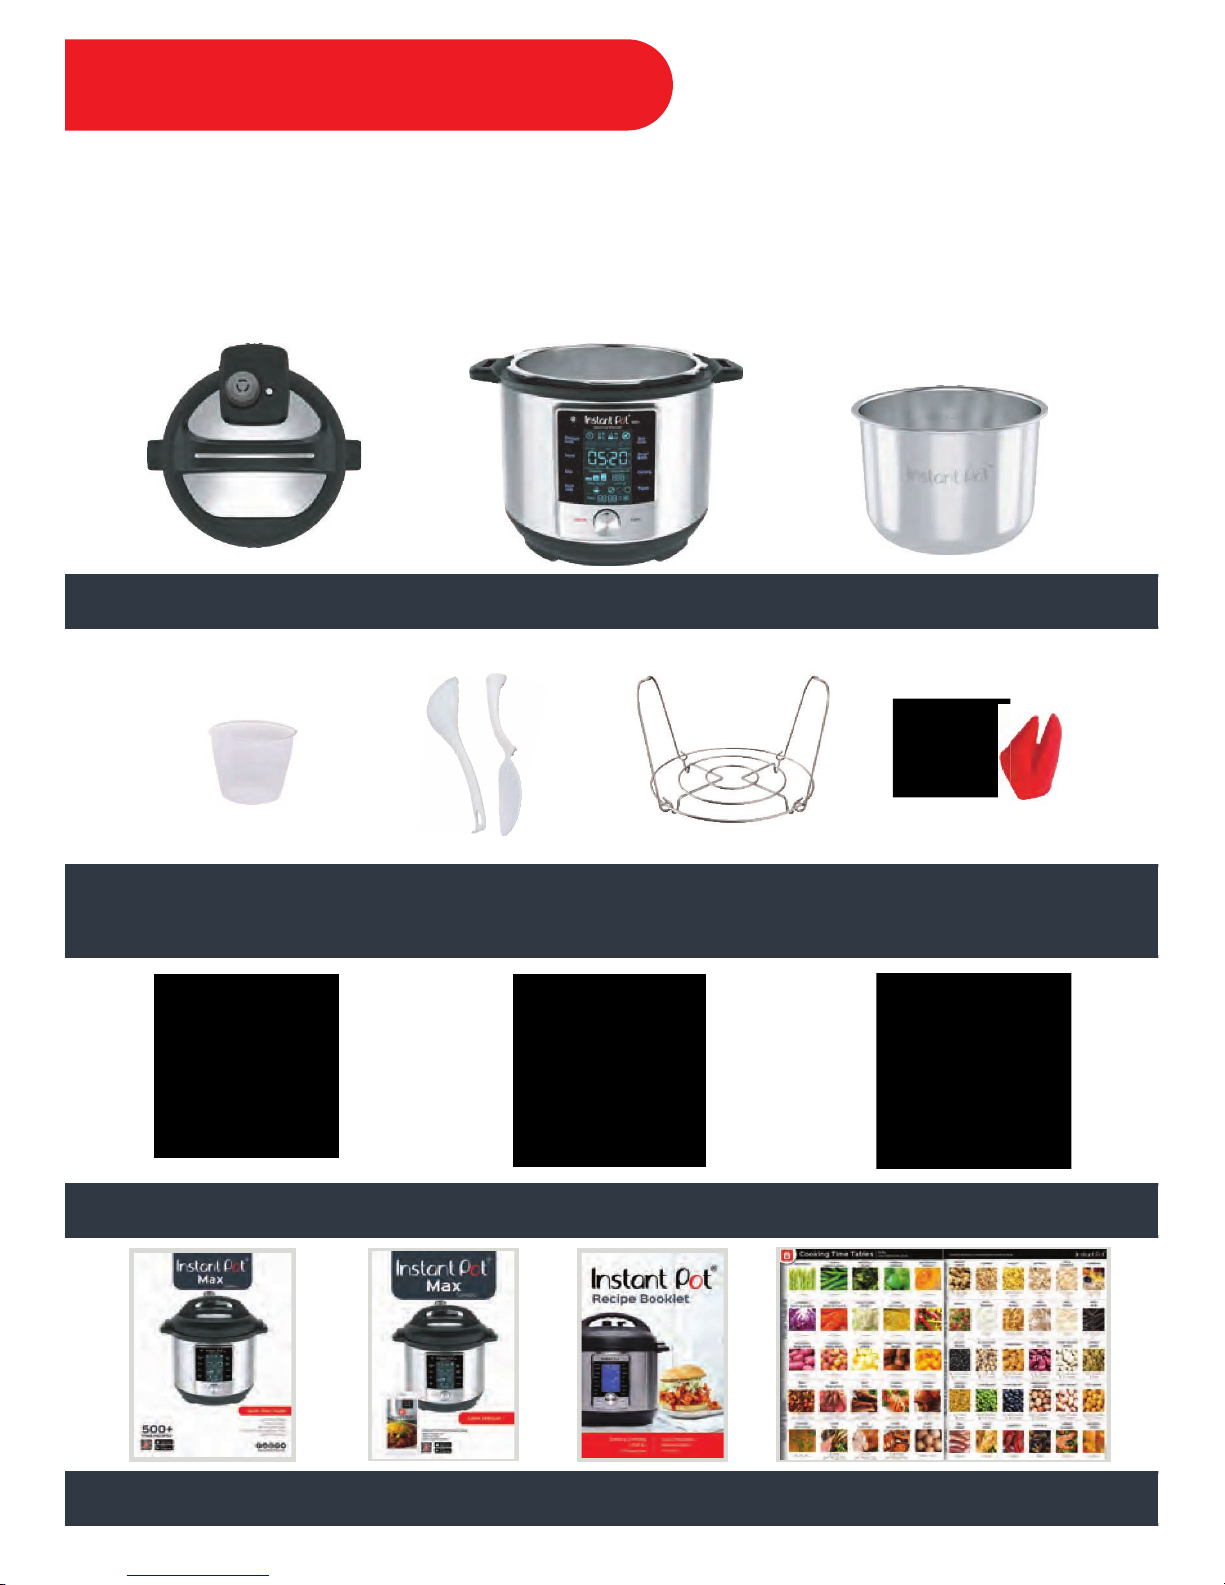
What’s Included
Before using your new Instant Pot® Max, please remove all items from the box and read over all
instructions carefully. Pay special attention to Important Safeguards and operation instructions,
in order to avoid personal injury and/or property damage.
Please see the “Unboxing” tutorial video at: www.InstantPot.com/faq/instant-pot-help-video/
Cooker BaseLid Inner Pot
Silicone
Mini Mitts
Rice
Measuring
Cup
Steam Rack
with Handles
Soup Spoon
& Rice Paddle
Silicone Sealing Ring
(currently installed within lid)
Condensation Collector
6
Detachable
Power Cord
Manual
Quick Start Guide
Recipe Book Cooking Time Tables
Page 9
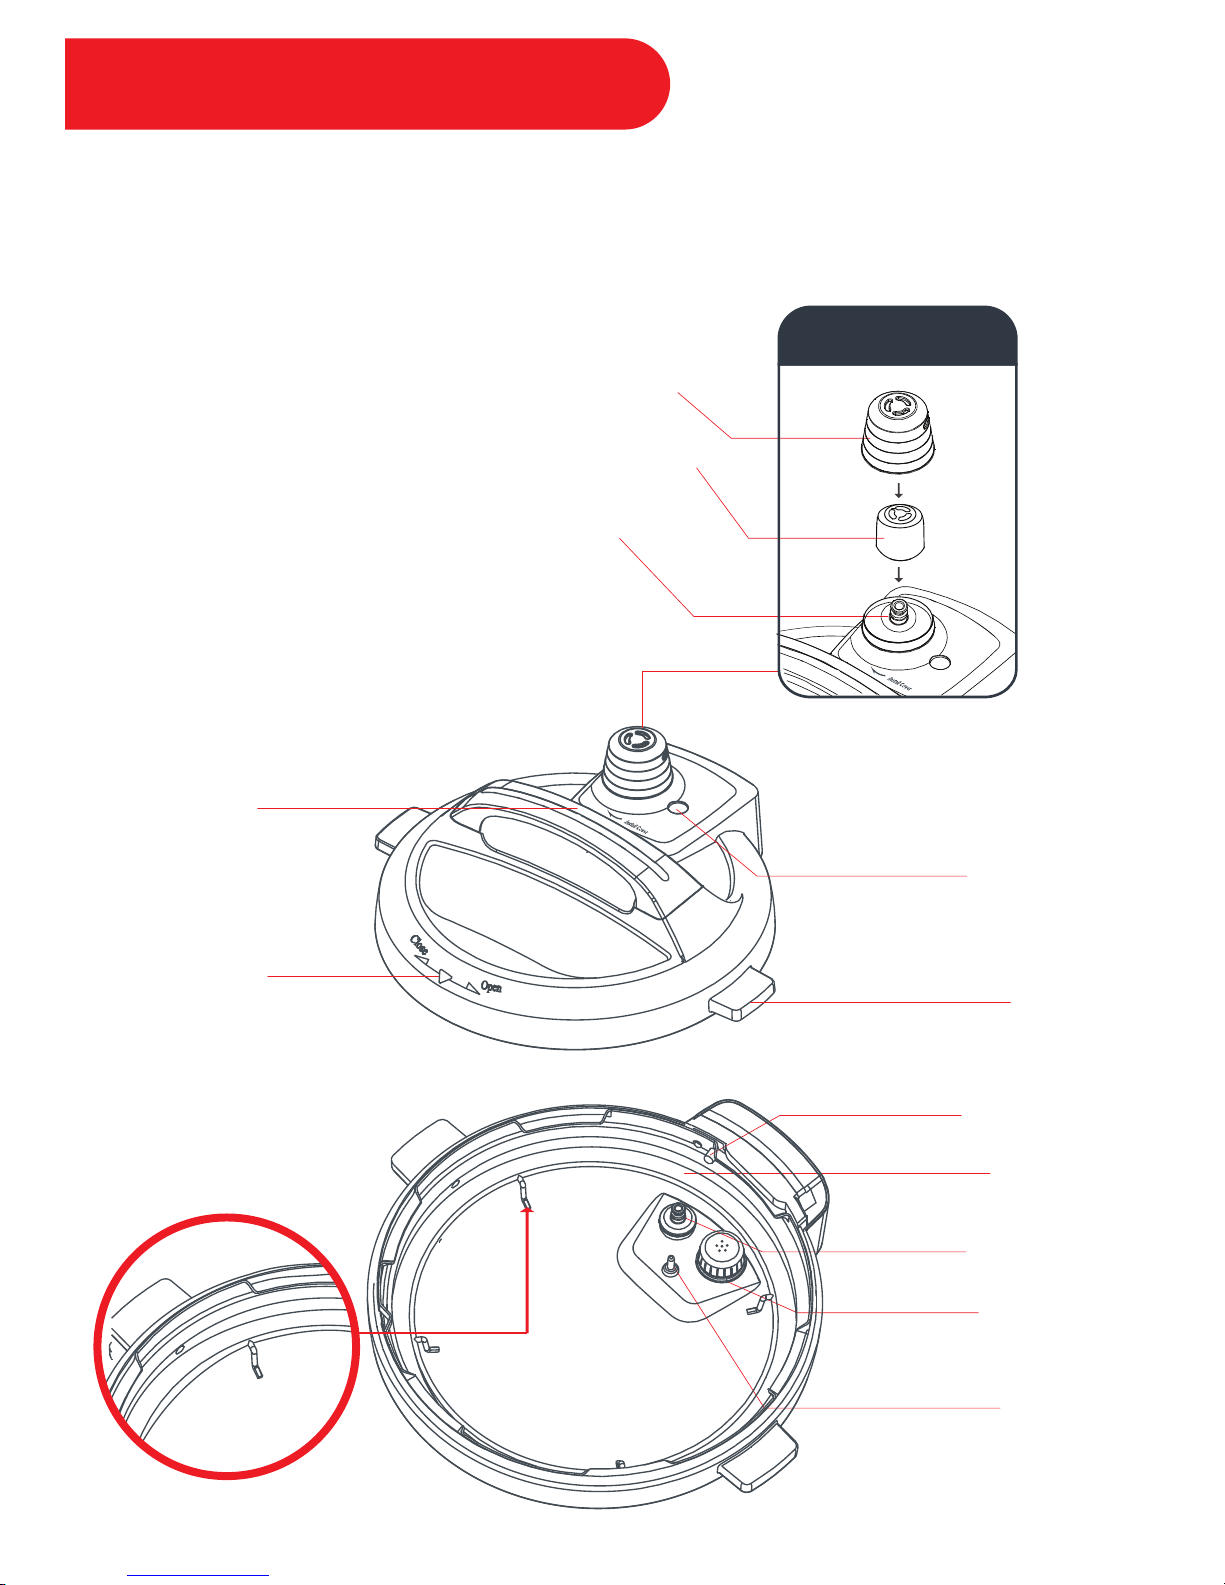
Lid Structure
When attached to the base, the lid becomes powered, enabling an automated venting process
to occur during and after cooking. This technology also enables the thermal sensor to transmit
the temperature readings to the cooker base for precision cooking.
Lid Position
Marker
Lid Handle
Lid Fin
Steam Release Cover
Steam Release Valve
Steam Release Pipe
Float Valve
Locking Pin
Sealing Ring
Rack
Thermal
Sensor
Float Valve
Silicone Cap
Anti-Block
Shield
Silicone
Sealing Ring
Steam Release
Assembly
7
Page 10
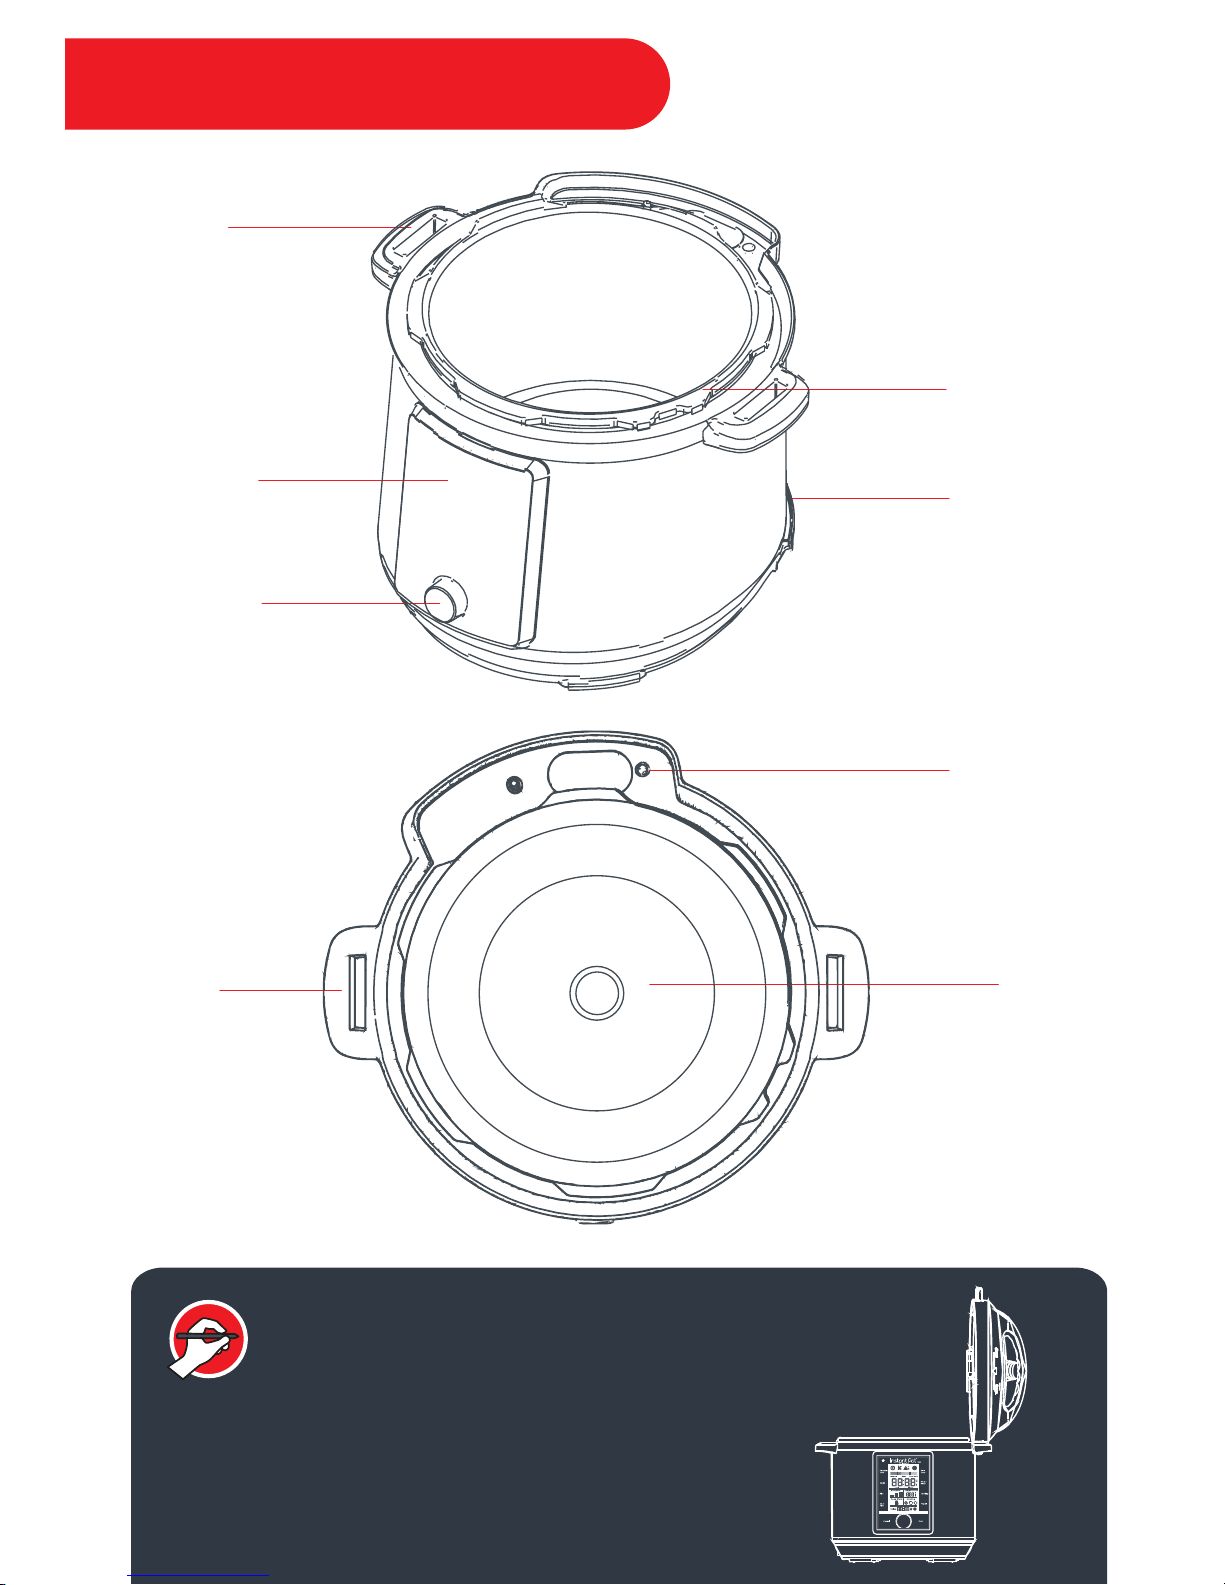
Cooker
Handle
LCD Touch
Screen
Central Dial
Heating
Element
Stainless Steel
Outer Pot
Base
Power Socket
Cooker
Handle
Condensation
Drain Hole
Cooker Base Structure
8
INSTANT TIP: The Cooker Handles are also a Lid Holder
The lid has been designed with lid fins that fit
perfectly inside the right and left handed cooker
handles.
Page 11
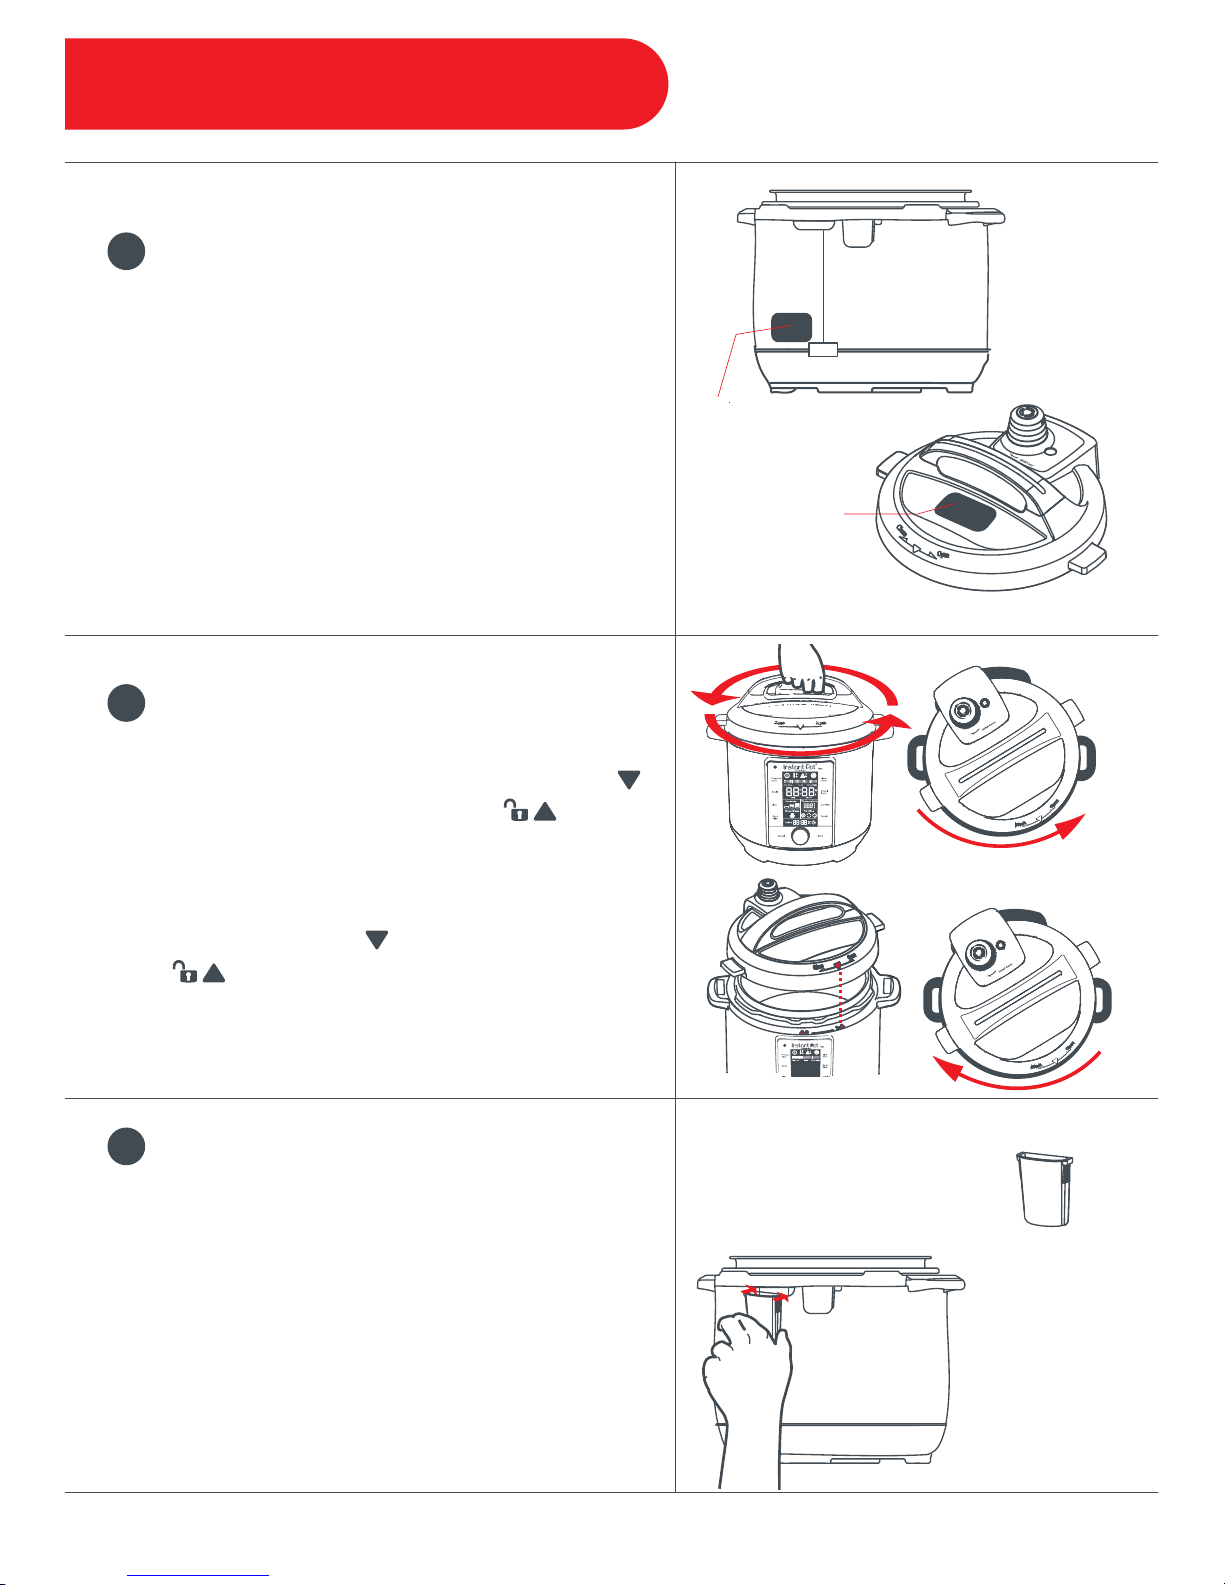
Getting Started
Remove all packaging materials and accessories
from in and around the pressure cooker, and
verify that all parts are accounted for.
Read all safeguards and instructions. Remove
all warning cards and hanging tags after
reading. Do not remove safety warning sticker
placed on top of the lid and back of cooker base.
Safety Warning
Sticker
Rating Label
The condensation collector has a groove on
either side that fits over the condensation
collector tabs on the cooker base. Align the
condensation collector grooves over the tabs
and push the condensation collector into place.
The condensation collector captures any
condensation that develops during cooking and
should be cleaned after each use.
Condensation
Collector
3
Install the Condensation Collector
1
Read Safeguards & Remove Tags
9
To Open:
To Close:
To Open: Remove the lid by gripping the handle
and turning the lid counter-clockwise until the
symbol on the lid is aligned to the symbols
on the cooker base. Lift the lid up from the cooker
base.
To Close: Align the symbol on the lid to the
symbols on the rim of the cooker base,
then turn the lid clockwise until the lid fins line up
over the cooker base handles.
2
Open & Close the Lid
Page 12
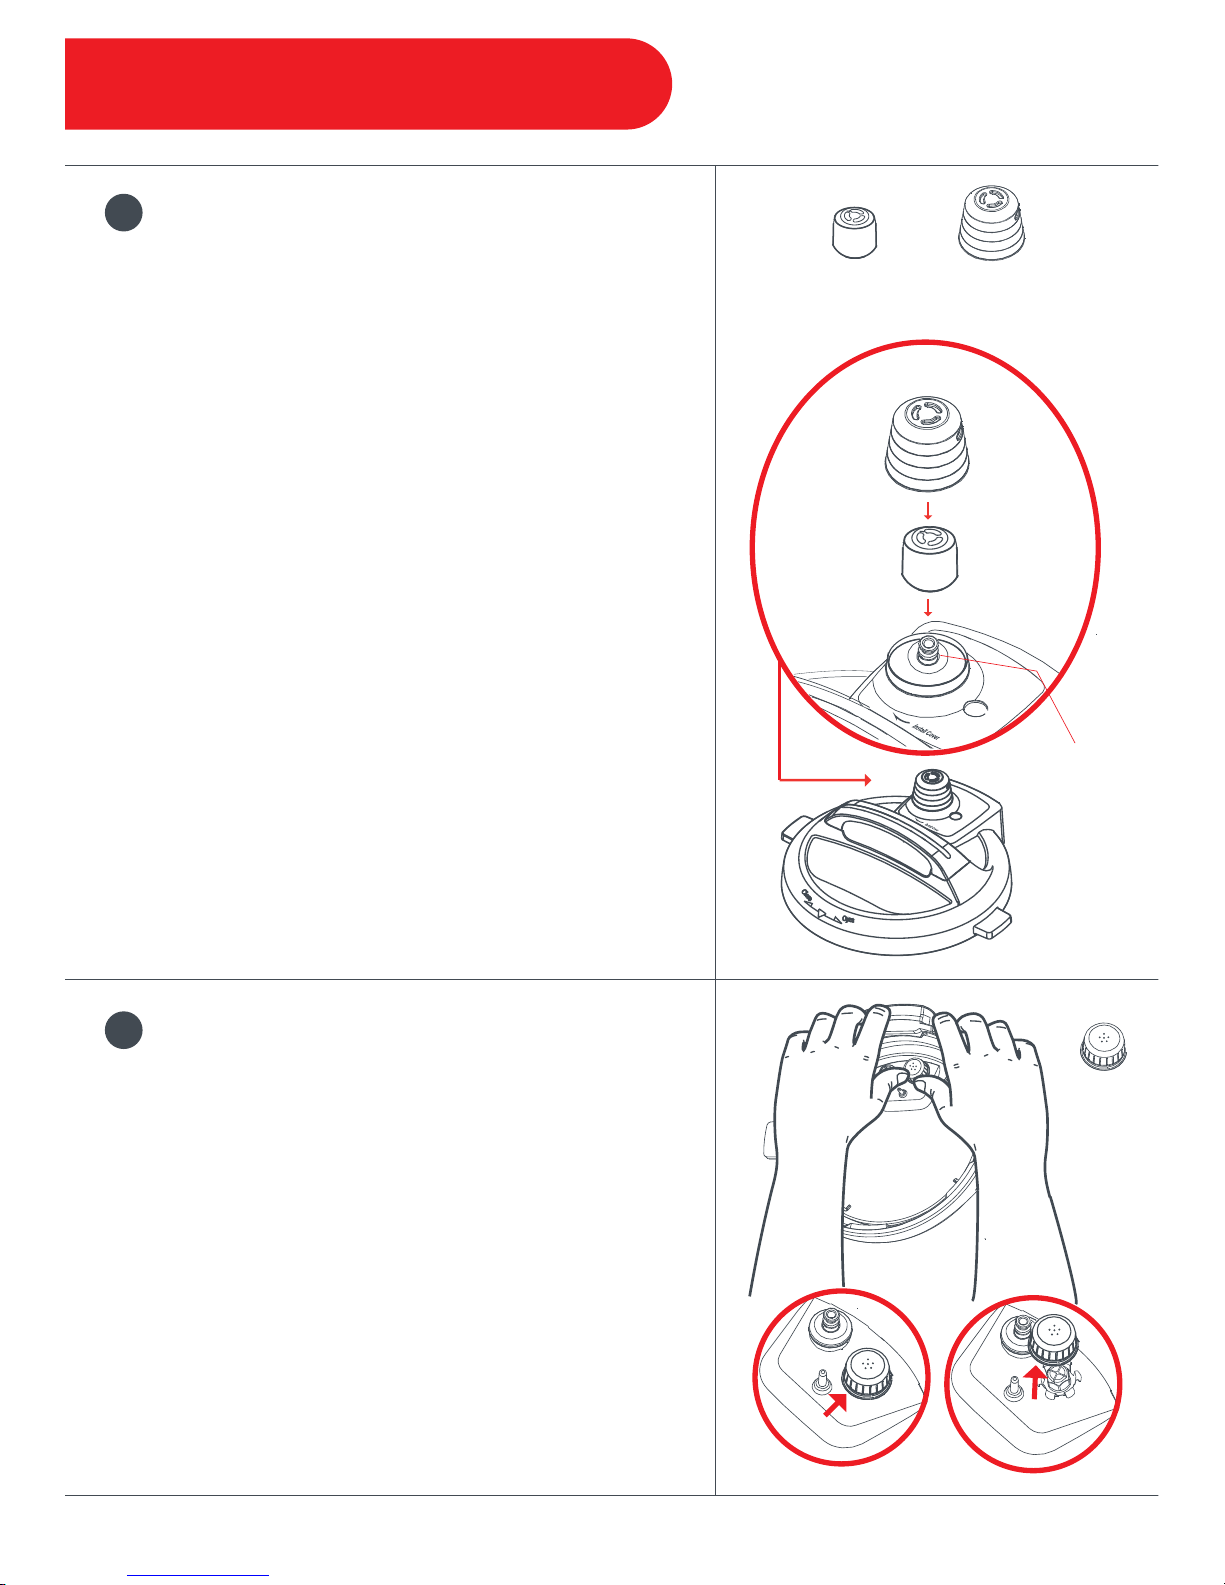
Getting Started
Remove the Steam Release Cover: Turn the
steam release cover counter-clockwise until it can
be pulled off from the lid.
Remove the Steam Release Valve: Pull the
steam release valve up and off the steam
released pipe.
Install the Steam Release Valve: Place the
steam release valve onto the steam release pipe
and press down.
Install the Steam Release Cover: Place the
steam release cover over the steam release
valve and turn the steam release cover clockwise
until it locks securely in place.
Note: The steam release valve will pop into place, but
will fit loosely when it is seated properly in place—this is
required for proper function. You should feel some
resistance as you remove or install the steam release
valve. This part should be inspected and cleaned
frequently, especially after cooking the foamy foods.
4
Steam Release
Cover
Steam Release
Valve
Steam Relase
Pipe
Remove & Install the
Steam Release Assembly
To remove: Grip the lid like a steering wheel. Using
your thumbs for leverage, press firmly against the
side of the anti-block shield (pressing towards the
side of the lid and up) until it pops off. The anti-block
shield will snap off of the prongs underneath.
To install: Press the anti-block shield over the prongs
and press down until it snaps into place.
Note: The anti-block shield prevents food particles from
clogging the steam release pipe. These fine particles can
become trapped underneath the shield and prevent
pressure regulation. The anti-block shield should be
removed for regular cleaning.
Anti-Block
Shield
5
Remove & Install the Anti-Block Shield
10
Page 13
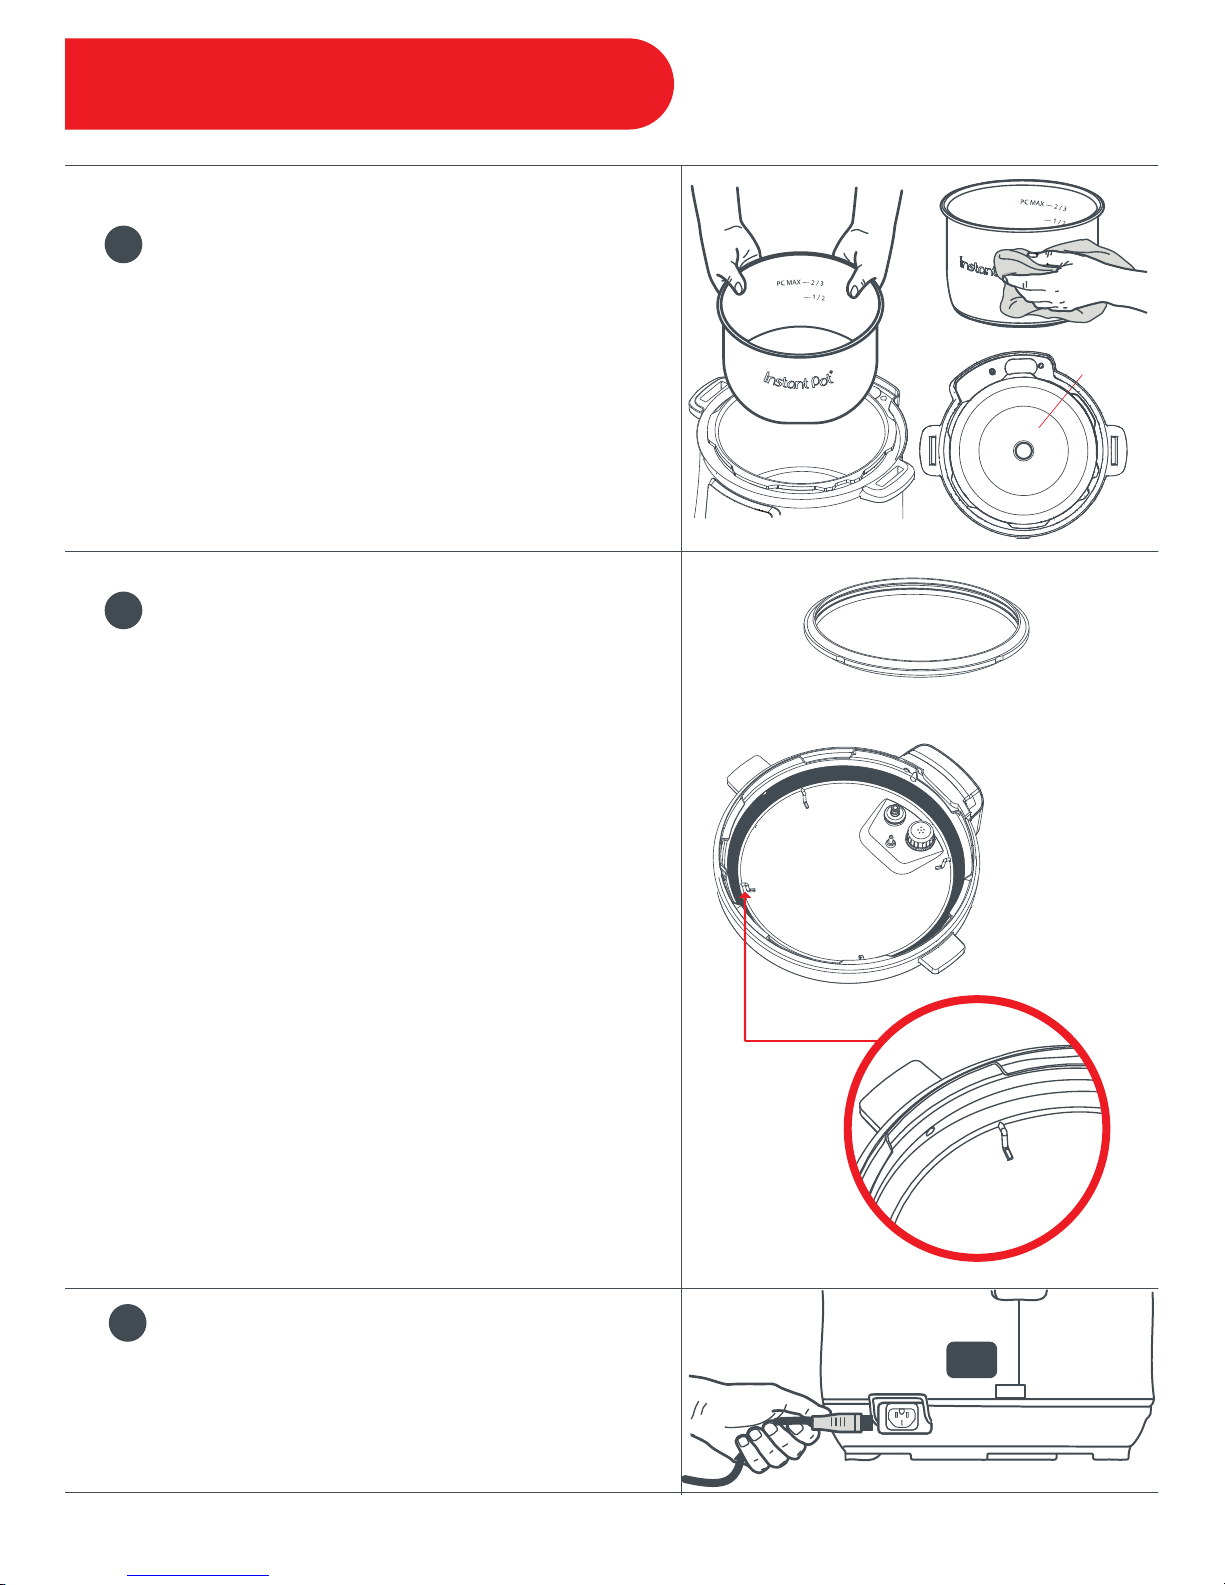
Getting Started
Remove the inner pot from the cooker base —
always ensure that the inner pot’s exterior is
clean and dry, and that the heating element is
free of food debris.
Always check that the element is clean and in
good condition before use.
Check that the sealing ring is sitting snuggly
behind the sealing ring rack. When installed, the
sealing ring creates an airtight seal between the
lid and the cooker base. The sealing ring must
always be in place on the sealing ring rack during
use.
To remove: Pull the sealing ring out from behind
the sealing ring rack and set it aside.
To install: Place the sealing ring over the sealing
ring rack, and use your thumbs to press it into
place.
Note: Inspect the sealing ring rack. It should be centered
in the lid and the same height all the way around. Do not
attempt to repair a deformed ring rack. Always check for
cracks, wear, or deformations in your sealing ring prior to
cooking.To prolong the life of your sealing ring, do not
remove it from the lid unless necessary for cleaning.
Secure the power cord into the base power socket
before connecting to a 120V power source. The
pressure cooker will remain in standby mode when
plugged in but not in operation.
6
Remove & Clean the Inner Pot
7
Check the Sealing Ring &
Sealing Ring Rack
8
Secure the Power Cord
Heating
Element
Sealing Ring
Sealing
Ring Rack
11
Page 14
Slow
Cook
Soup /
Broth
Canning
Pressure
Cook
Sauté
Rice
Sous
Vide
Yogurt
Cancel Start
Max
ft
Hour Minute
ft
m
Pressure
Temperature
Keep Warm Venting
Delay
Pre-Heat Cook
Keep Warm
Controls & Features
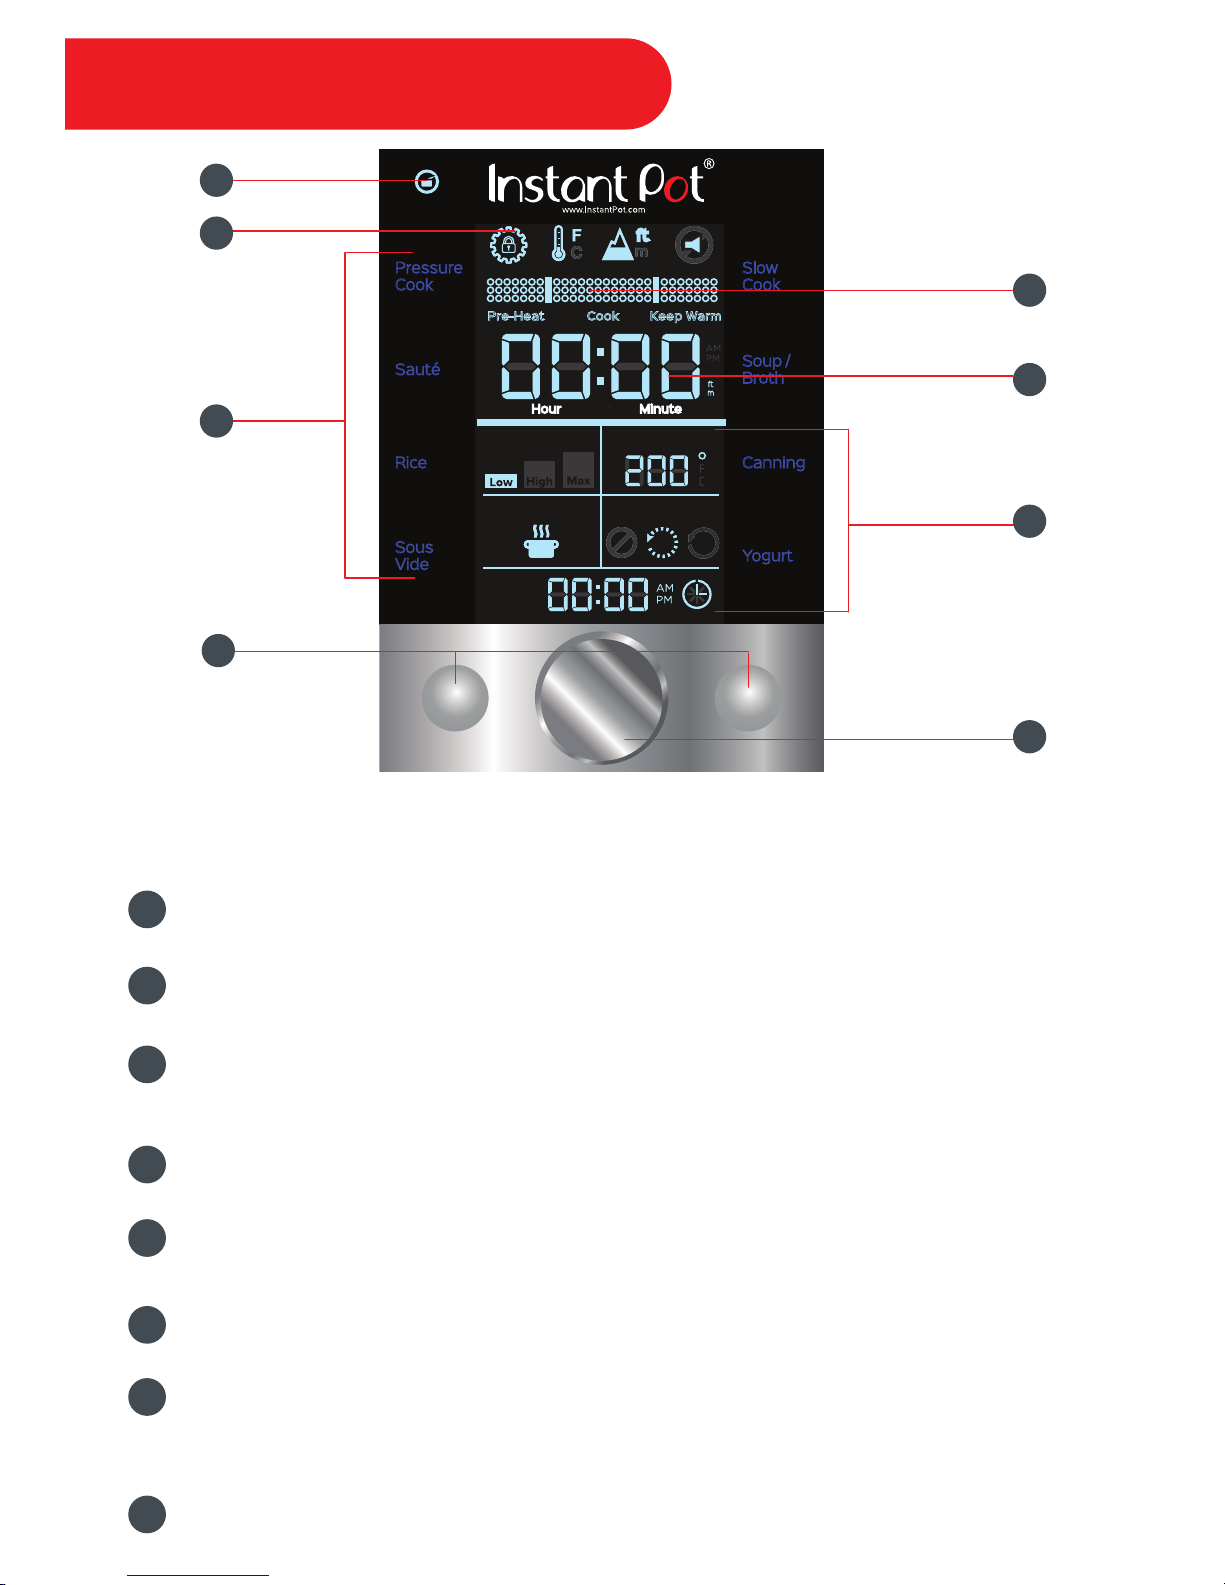
The LCD touch screen control panel of your Instant Pot® Max
is divided into 8 functions:
Smart Programs: [Pressure Cook], [Sauté], [Rice], [Sous Vide], [Slow Cook],
[Soup/Broth], [Canning], Manual [Keep Warm], and [Yogurt]
3
System Settings: System Settings Lock / Unlock, Temperature displays in
Fahrenheit or Celsius, Altitude adjustment in feet or meters, and Sound ON/OFF
2
Cooking Progress Indicator: Real-time cooking temperature display and
cooking progress, including Pre-heat, Cook, and Keep Warm status
5
Local Time & Cooking Display: Standby Mode: 12-hour AM / PM clock
In-Program Time: ‘hour’ and ‘minute’
6
Smart Program Settings: Pressure (Low / High / Max), Temperature (Low / High
/ Custom), [Keep Warm], Venting Options (Natural Release, Pulse Release, and Quick
Release), [Delay Start]
7
Pressure Indicator: The icon will be lit when the pressure cooker is still under
pressure, indicating that the lid is locked and cannot be removed
1
Central Dial: Turn the central dial to adjust the time, temperature, altitude, etc.
8
4
Control Keys: [Cancel] and [Start]
3
4
8
7
6
5
2
1
12
Page 15
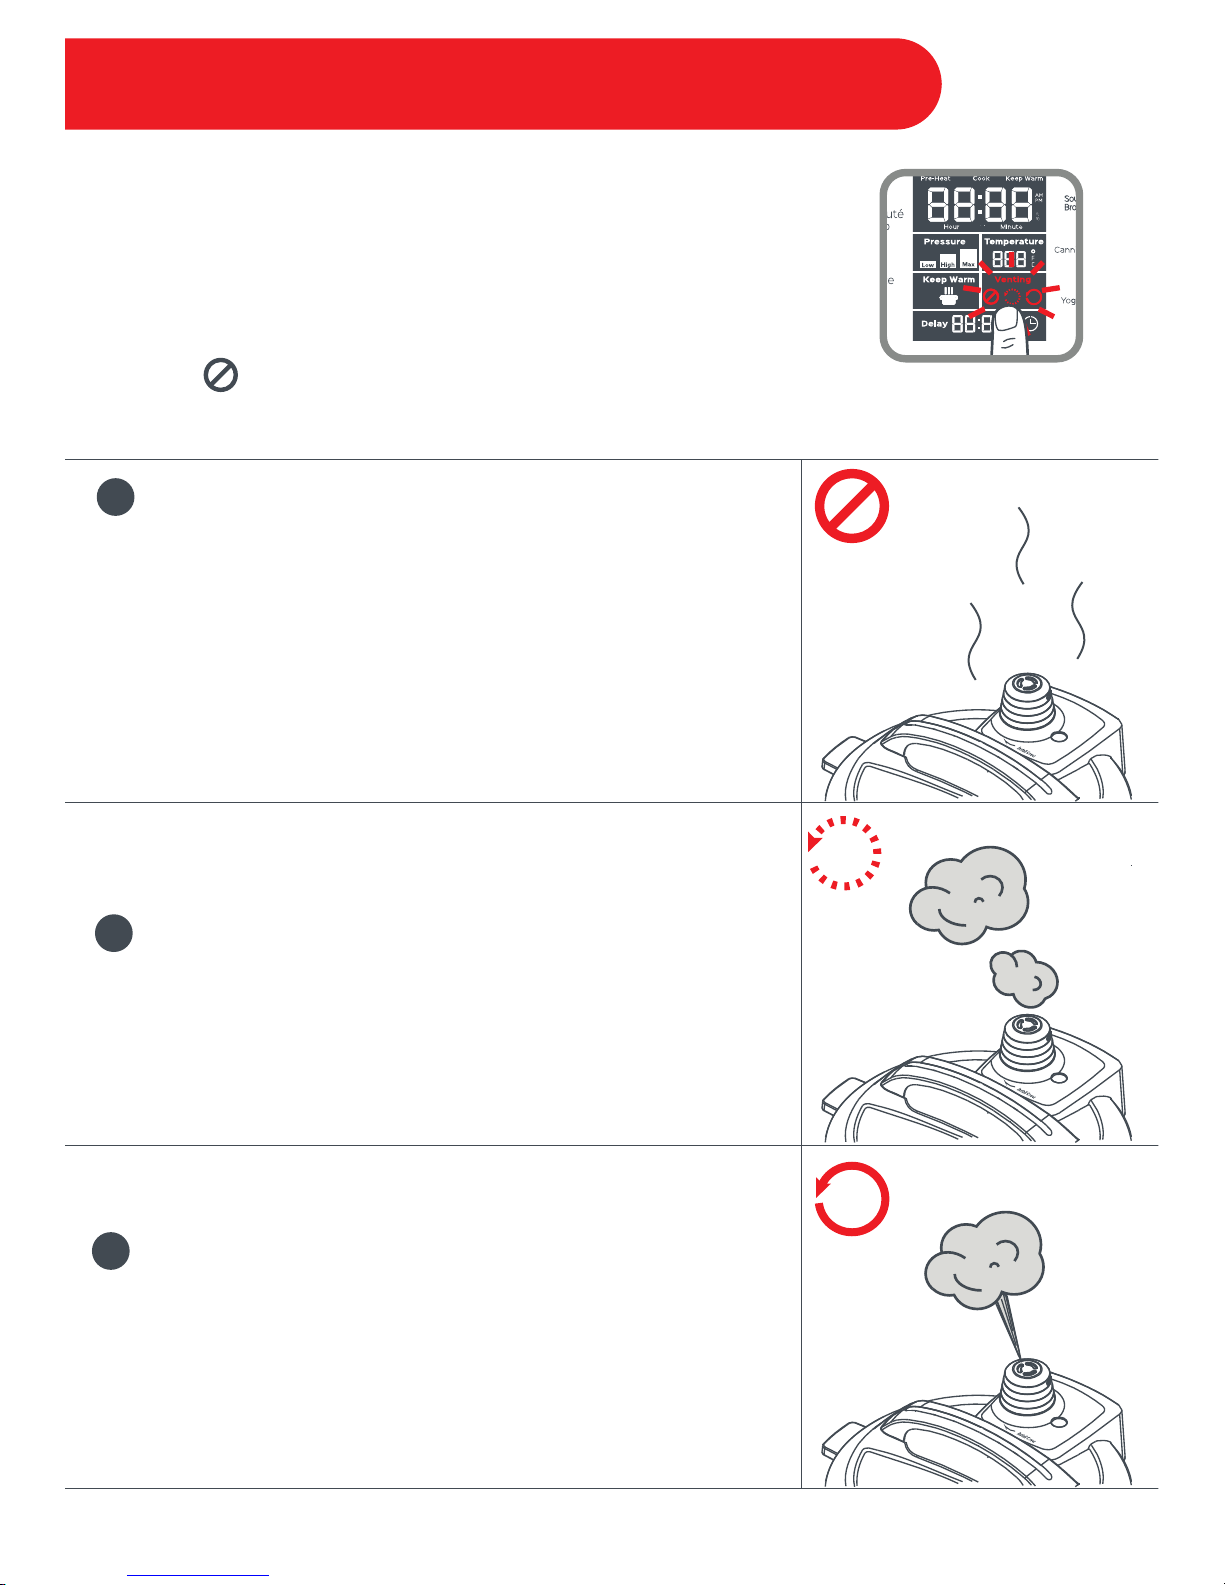
Venting Methods
This setting allows the pressure cooker to dissipate heat and
pressure naturally. This method must be used when cooking
food that is thick or starchy, such as soups, stews or chilies, as
well as food that expands, such as beans and grains. It is also
commonly used when cooking clear broths, as it allows for the
liquid to cool while undisturbed, resulting in crystal clarity.
Note: Depressurization time will vary, based upon the volume of food/liquid and a
variety of other factors.
1
Natural Release (NR)
This method of venting releases incremental bursts of steam
at precisely programmed intervals.
2
Pulse Release (PR)
A short warning burst followed by a continuous stream of
steam will be released. This method is most commonly used
when cooking vegetables, fish, eggs or other foods that may
overcook during NR or PR.
3
Quick Release (QR)
Your pressure cooker has an automated venting system, which can be
activated for pressure cooking programs when desired. The default
venting method is Natural Release.
To stop or pause once a venting method has begun, touch the
[Venting] field and the pressure cooker will automatically return to
NR .
There are 3 methods to release pressure:
13
Page 16
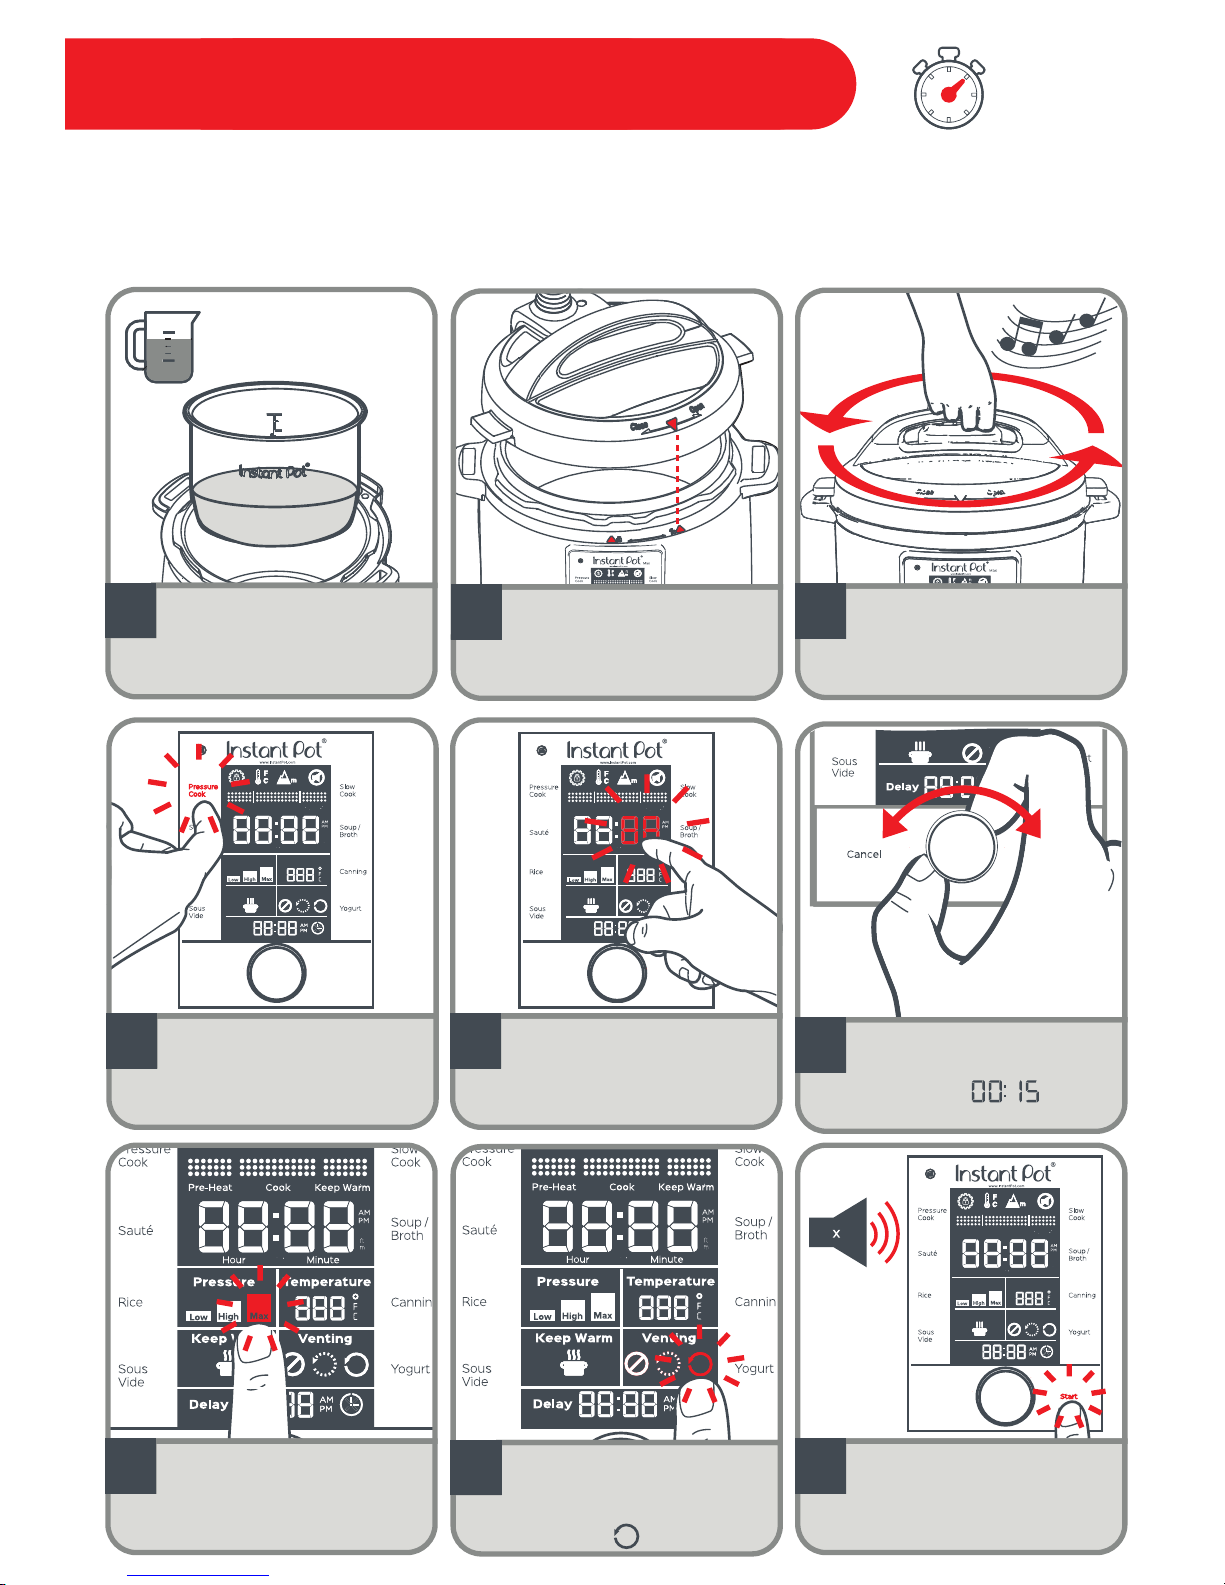
Initial Test Run ( 15 psi Water Test)
Below is a short test to run prior to cooking your first meal. This will check for proper functionality of
your Instant Pot
®
. If you’ve never used a pressure cooker before, this is a great opportunity to get a
feel for exactly what you should expect when cooking with your Instant Pot
®
Max.
~30
MINS.
14
Cancel
Start
Max
ft
Hour Minute
ft
m
Pressure
Temperature
Keep Warm Venting
Delay
Pre-Heat Cook
Keep Warm
5
Touch [Minute] to
adjust the cook time.
Cancel
Start
Max
ft
Hour Minute
ft
m
Pressure
Temperature
Keep Warm Venting
Delay
Pre-Heat Cook
Keep Warm
4
Touch [Pressure Cook].
6
Turn the central dial to
adjust the cook time to
15 minutes .
3
Turn the lid clockwise to
close until a jingle
sounds.
2
Line up the unlock
arrow on the cooker
base with the arrow on
the lid.
x3
PC MAX 2/3
1/2
1
Add 3 cups (750 mL) of
water to the inner pot.
8
Touch [Venting] to toggle
between auto-venting
options NR, PR, and QR.
Select QR .
7
Touch [Pressure] to
toggle between Low,
High, and Max. Select
Max.
Cancel
Start
Max
ft
Hour Minute
ft
m
Pressure
Temperature
Keep Warm Venting
Delay
Pre-Heat Cook
Keep Warm
9
Touch [Start] to begin
cooking. 3 beeps will
sound.
3
Page 17
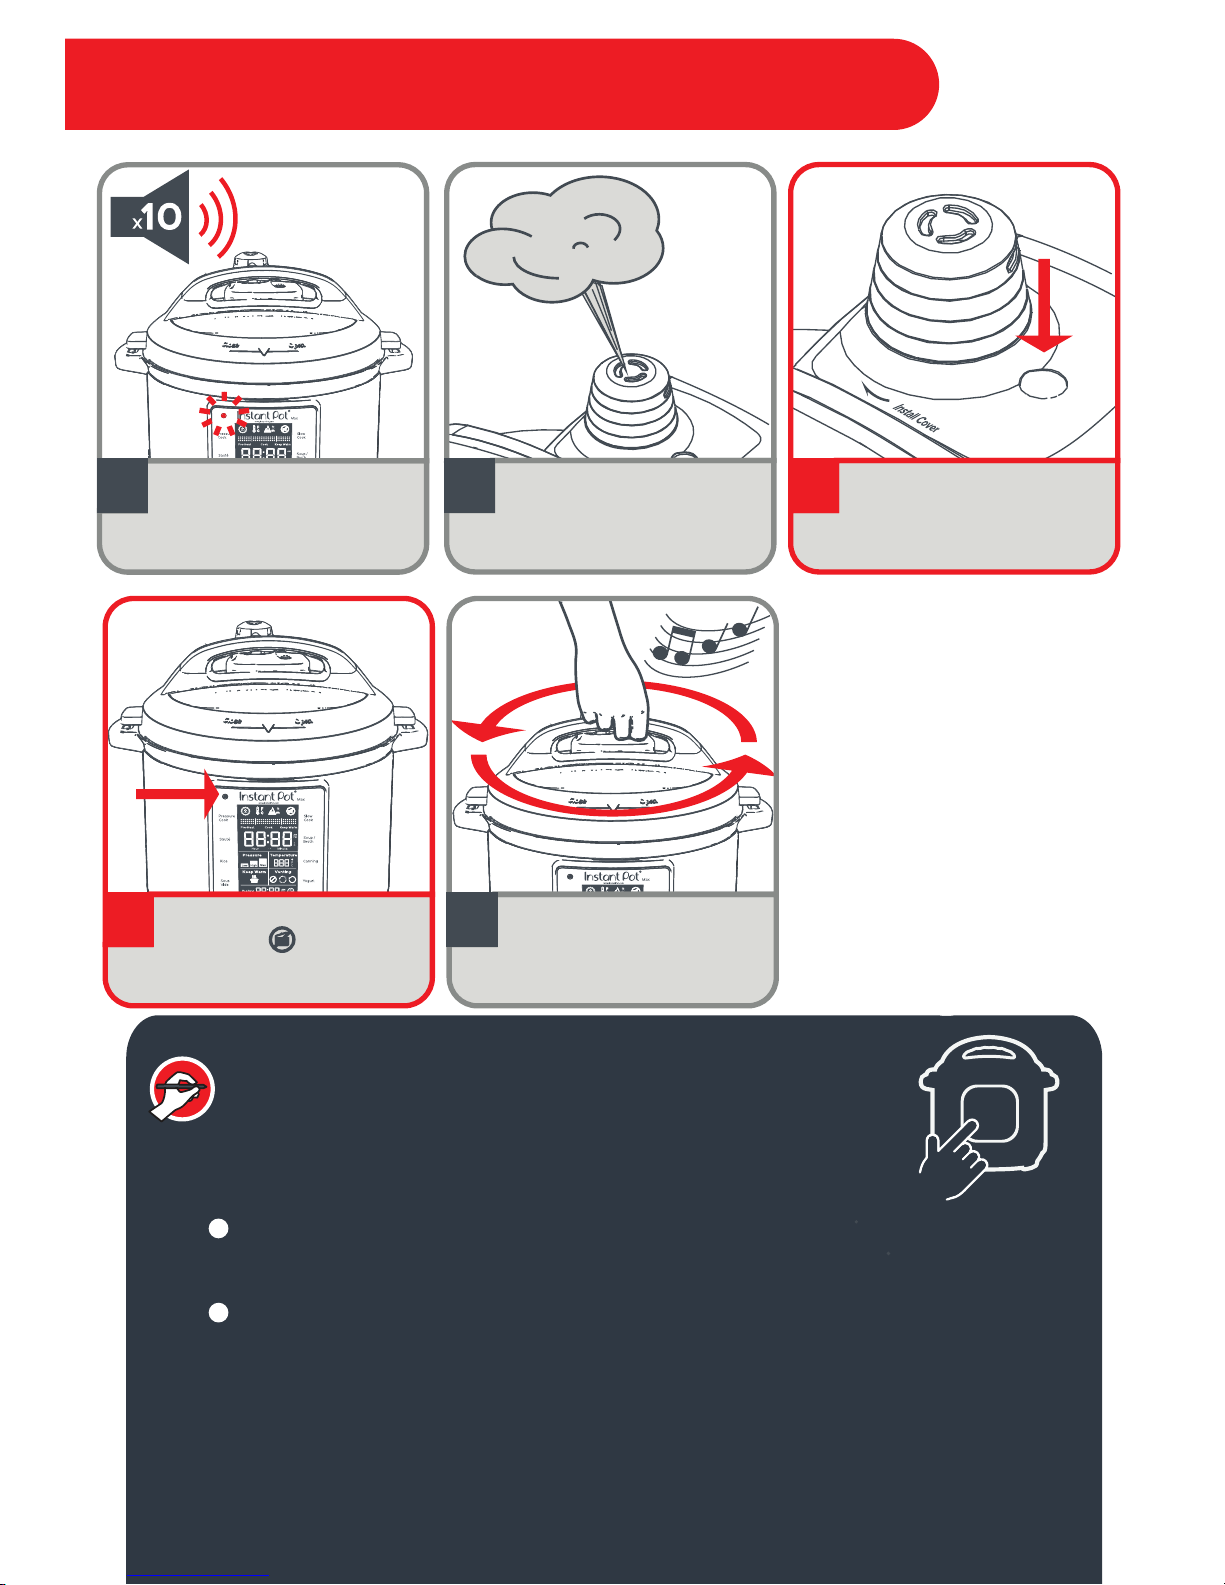
Initial Test Run ( 15 psi Water Test)
INSTANT TIP: Making On-the-Fly Changes
You can make on-the-fly changes during the cook cycle
of any Smart Program.
Touch the field you want to change: [Pressure], [Temperature], [Keep Warm] or
[Venting] and then make the adjustment by toggling to the correct setting.
Touch the [Start] key or wait 5 seconds for a beep to sound. The cook cycle will
resume.
Within the [Sauté], [Yogurt], and Manual [Keep Warm] Smart Programs, on-the-fly
temperature changes are limited to Low and High options. To select and adjust a
Custom setting, touch [Cancel], then re-key in your desired cooking commands. In the
[Temperature] field, you may toggle between Low and High freely, but you will not
have the option to adjust to a Custom temperature setting. To select a Custom
setting, touch [Cancel], then re-key in your desired cooking commands.
15
1
2
The float valve will drop
to indicate the pressure
has been fully released.
11 12
A short warning burst
followed by a continuous
stream of steam will be
released.
10
When the Smart Program
has completed, 10 beeps
will sound.
14
Turn the lid counter
clockwise to open until a
jingle sounds.
Once the Pressure
Indicator has turned
OFF you may open the
lid.
13
Page 18

System Settings & Time
Adjust the System Settings:
The system settings will remain on your display so you always know which ones are in effect. To
change your system settings, touch the icon (when in standby mode) and note that the
padlock symbol disappears . This means that your system settings are “unlocked”, and you
can now alter them as you wish.
Switch Between Celcius (C) & Fahrenheit (F):
Touch the icon to toggle between Celsius (°C) or Fahrenheit (°F). The symbol that is flashing
indicates your current selection.
Adjust Altitude Display:
Touch the icon to toggle between feet (ft) or meters (m). The symbol that is flashing
indicates your current selection. Once the unit has been selected, turn the central dial to adjust
the altitude. Set your present altitude on the smartcooker before setting the cook time. The
smartcooker will adjust the cook time automatically based on your altitude settings.
Turn Sound ON & OFF:
Touch the icon to toggle the Sound ON or Sound OFF . Error code alerts cannot be
silenced.
Set Local Time:
To set the local time, touch the ‘hour’ field, then turn the central dial to adjust. Next, touch the
‘minute’ field and turn the central dial to adjust. If you scroll past , the AM/PM will switch
automatically.
Lock the System Settings:
Touch the icon to lock in your selections. If you do not lock your settings, no changes will be
saved. If you do not wish to save your settings, touch the [Cancel] key (or wait 10 seconds and
the settings will return to the previous selection).
Factory Reset (Specific Smart Program):
When the pressure cooker is in standby mode, touch the Smart Program to be reset. Touch and
hold the [Cancel] key for 2-3 seconds until a beep sounds.
Factory Reset (All Settings):
When the pressure cooker is in standby mode, touch and hold the [Cancel] key for 2-3 seconds
until a beep sounds.
ft
16
Page 19
Cancel
Start
Max
ft
Hour Minute
ft
m
Pressure
Temperature
Keep Warm Venting
Delay
Pre-Heat Cook
Keep Warm
Cancel
Start
Max
ft
Hour Minute
ft
m
Pressure
Temperature
Keep Warm Venting
Delay
Pre-Heat Cook
Keep Warm
Cancel
Start
Max
ft
Hour Minute
ft
m
Pressure
Temperature
Keep Warm Venting
Delay
Pre-Heat Cook
Keep Warm
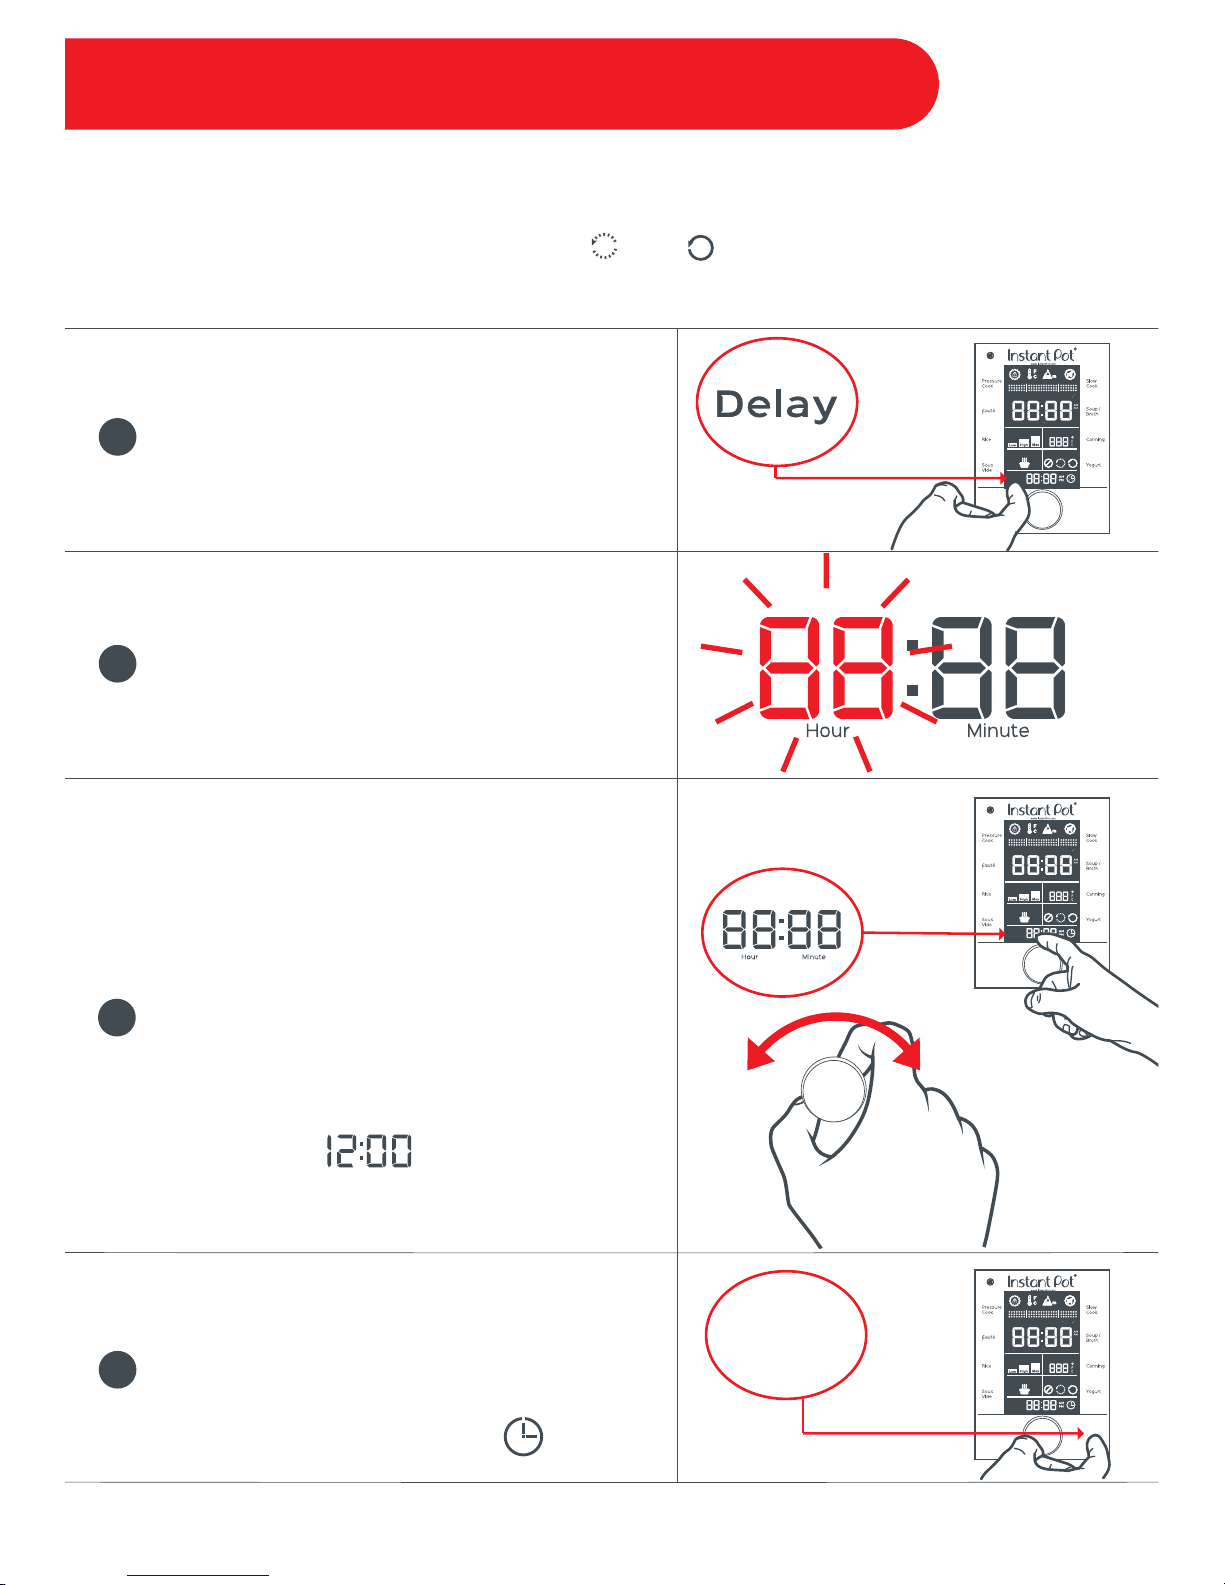
Operation Field - Delay Start
To set a [Delay] cook timer, touch the [Delay]
field.
Once the ‘hour’ field or ‘minute’ field is flashing,
the pressure cooker is ready to be customized.
Note: the delay start time will be based upon the programmed
local time and does not function as a count-down timer.
Touch the ‘hour’ field and turn the central dial to
select the desired hour value.
Touch the ‘minute’ field and turn the central dial
to select the desired minute value.
To adjust AM/PM, turn the central dial until the
display rolls past .
1
2
3
Touch the [Start] key to start the delay cooking
process.
When the [Delay] function is active, a second
hand will tick around the clock icon.
4
Start
17
The setting [Delay Start] can be applied to all Smart Programs with the exception of [Sauté],
Manual [Keep Warm], and [Yogurt]. The [Delay Start] setting is not recommended to be used in
conjunction with the Auto Venting feature (PR or QR ) when cooking thick or foamy foods.
The liquid may cause spattering during the cooking process.
Page 20

Usage Tips
• For all pressure cooking programs [Pressure Cook], [Rice],
[Soup/Broth], and [Canning], the total amount of pre-cooked food and
liquid in the inner pot should not exceed the PC MAX—2/3.
• For food that expands during cooking, the inner pot should not be filled higher than the —
1/2 line.
• Certain food (such as applesauce, cranberries, pearl barley, oatmeal, split peas, noodles,
etc.) can foam, froth, or spatter, and can clog the steam release pipe and/or steam release
valve. Extreme caution must be used when cooking and venting these foods—the inner
pot should not be filled higher than the — 1/2 line.
• When pressure cooking food with a doughy or thick texture, or a high fat/oil content,
contents may spatter when opening the lid. Please follow recipe instructions for pressure
release method. Once pressure is fully released, gently rock the cooker back and forth on
its feet, then if necessary, release the steam again before removing the lid.
• Replace the silicone sealing ring every 12-18 months, as it may become less effective over
time.
• Always ensure that the steam release valve, steam release cover, steam release pipe,
anti-block shield, and float valve are clean and free of food particles and residue before
cooking.
• There needs to be at least 1½ cups (375 mL) of liquid in the inner pot (unless otherwise
specified in your recipe), so enough steam can be generated to pressurize the unit.
• Acceptable liquids include water, broth, stock, wine, beer, fruit juice, vegetable juice,
thin cooking sauces, etc. Liquid must have a high water content.
• Oils and oil-based sauces do not have enough water content to bring the pressure
cooker to pressure.
• Thick sauces should be diluted, keeping in mind that some of the added liquid will be
turned into steam for pressurization—sauces should be fairly thin in consistency
before cooking begins.
• The time it takes the pressure cooker to pressurize and depressurize will depend on a
variety of factors. For this reason, the pre-heat cycle may take up to 40 minutes.
• Frozen food will take a longer amount of time to pressurize.
• When cooking meat with skin (e.g. sausage with casing), the skin can swell when heated.
Do not pierce the skin as long as it is swollen; this could result in scalding injury.
18
INSTANT TIP: Sweet & Savory Sealing Rings
It is recommended to use separate sealing rings when cooking sweet and
savory dishes. nstant Pot
®
sealing rings are an integral part of product safety.
Only use Instant Pot
®
authorized sealing rings, designed specifically for use in
Instant Pot
®
pressure cookers.
Visit www.store.instantpot.com to purchase.
Page 21

Steps to Pressure Cook
Add ingredients to the inner pot and place the inner pot into the cooker base.
Place the lid on the cooker base and turn it clockwise to close it.
Connect the power cord. The LCD will display OFF, indicating that the pressure cooker is in
standby mode.
Touch the desired Smart Program key: [Soup/Broth], [Rice], [Canning], or [Pressure Cook].
Touch the ‘hour’ field to select it, then turn the central dial to adjust the time to the desired
hour. Repeat the process to adjust the ‘minute’ field.
Touch the [Pressure] key to toggle between Low, High, and Max pressure and select the desired
pressure.
Touch the [Keep Warm] field to turn the setting ON or OFF .
Touch the [Venting] field to toggle between the venting options: NR , PR , QR , and select
the desired venting method.
Touch the [Start] key and the Smart Program will begin. The pressure cooker will beep 3 times.
Depending on the amount of food and its temperature, the pre-heat cycle may take up to 40
minutes. As the cooker heats up and pressure builds, the float valve will rise on its own. When
working pressure is reached, the cooker will enter the cooking cycle and the LCD will display the
remaining cooking time.
When cooking is finished, the pressure cooker will either remain in [Keep Warm] mode or standby
mode displaying OFF.
The pressure will be released as initially selected in the [Venting] step: NR , PR , QR .
Ensure the float valve is down and the Pressure Indicator is OFF before opening the lid.
Smart Program - Pressure Cook
The following pressure cooking programs are available: [Soup/Broth], [Rice], [Canning], or
[Pressure Cook].
1
2
3
4
5
6
7
8
9
10
11
12
13
INSTANT TIP: [Pressure Cook] & [Manual] Keys
Perform the Same Function
The [Pressure Cook] key on the Instant Pot® Max and the [Manual] key on other
models are interchangeable.
19
Page 22
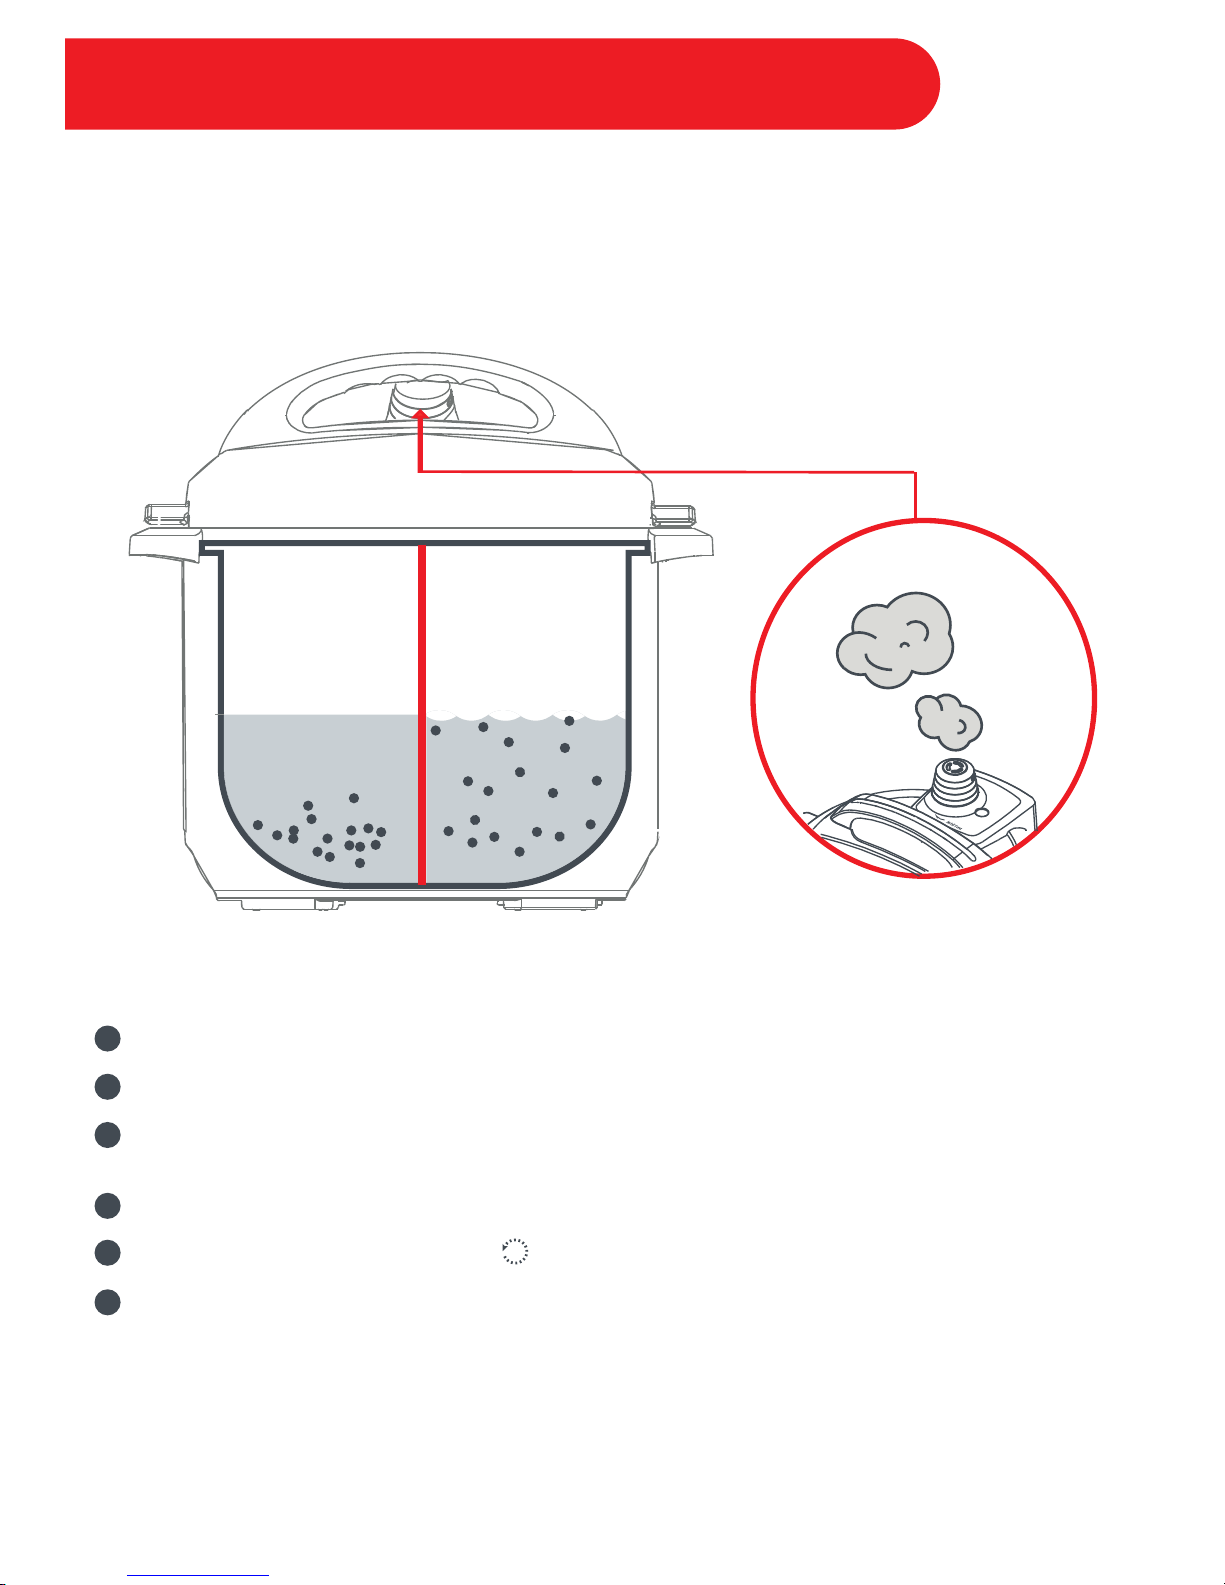
Advanced Feature - NutriBoost™
When enabled, the NutriBoost™ setting creates internal movement during the [Rice] and
[Soup/Broth] Smart Programs. The intermittent bursts of steam from the steam release valve during
the "Cook" cycle, create a boiling motion effect. This feature is ideal for soup and bone broth as it
breaks down food adding nutrition, flavor, and taste. It is also great when cooking a risotto as it
provides superior flavors.
20
Steps to activating the NutriBoost™ feature:
Follow “Steps to Pressure Cook” 1-3 outlined on the previous page.
Touch the [Soup/Broth] or [Rice] key.
Touch the 'minute' field to select it, then turn the central dial to adjust the time as desired. Repeat
the process to adjust the ‘hour’ field.
Touch the [Pressure] field to toggle between Low, High, and Max. Select the desired setting.
Touch the [Venting] field to select PR to activate NutriBoost™.
Touch the [Start] key to begin the cook cycle. NutriBoost™ is an automated setting and will
activate automatically throughout the cook cycle of the Smart Program.
Note: Do not activate NutriBoost™ when cooking starchy and foamy food such as porridge, oatmeal, etc., to avoid spattering of
liquid. This advanced venting feature should be closely monitored when cooking. Deactivate NutriBoost™ by touching the [Venting]
field if you see food content coming out of the steam release cover.
1
2
3
4
5
6
During
Pressure
Cooking
When
NutriBoost™
is Enabled
Page 23
Canning - Getting Started
The [Canning] Smart Program built-in to your Instant Pot® Max is a pressure cooking function
based on traditional canning principles. When proper canning processes are followed and
sufficient temperatures are achieved for a sustained period of time, canning is considered an
economical way to preserve quality food at home. Enjoy the results of home canning with your
family and friends!
Recipes must be closely followed when canning. Modifying cooking times,
ingredients or temperatures can be dangerous. Use the exact time, temperature/pressure and
method specified in the recipe to protect the food from harmful bacteria, molds, and enzymes.
Read and carefully follow the instructions provided in the USDA’s Complete Guide to Home
Canning.
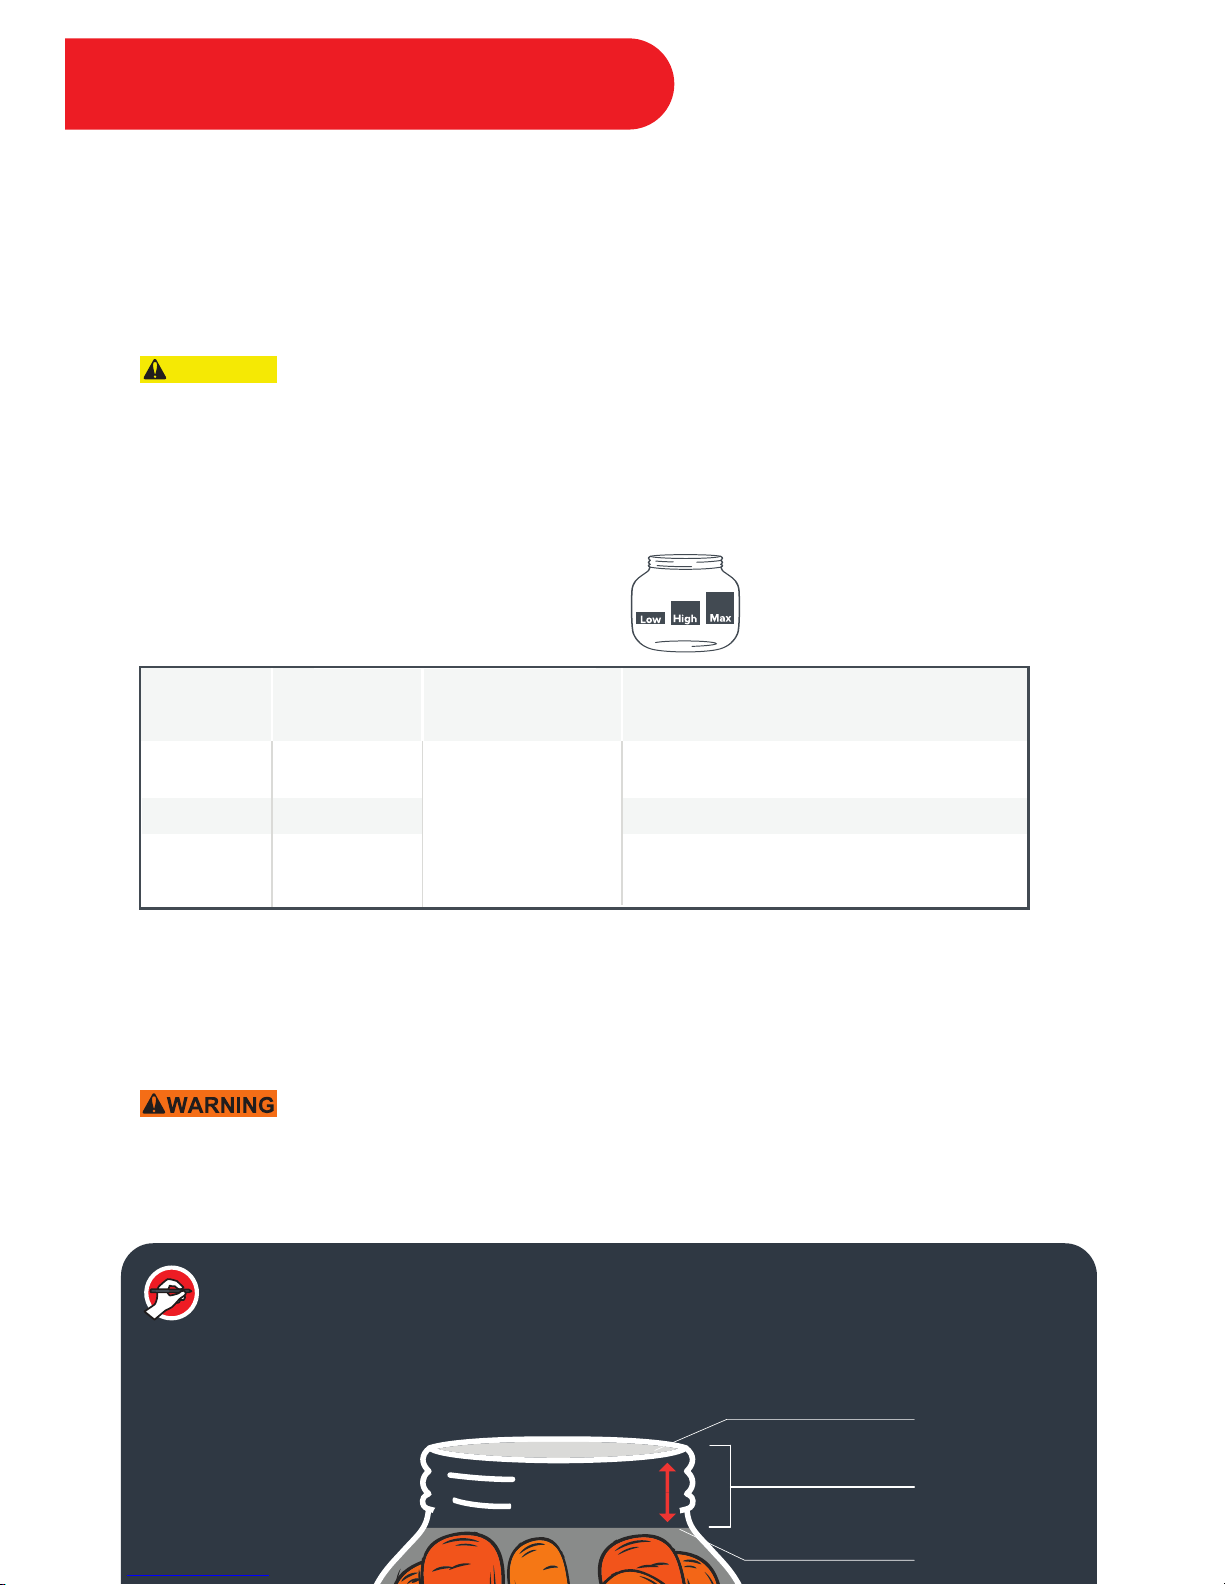
The [Canning] Smart Program includes 3 settings:
Altitude: Water boils at lower temperatures as altitude increases. Lower temperatures are less
effective for killing bacteria. Ensure the proper altitude level is set on the pressure cooker before
starting to pressure can. Depending upon the altitude level setting, the pressure cooker will
adjust the temperature and pressure accordingly.
Improper canning may cause preserves to spoil, which may result in sickness. Do
not pressure can at altitudes above 1500m (4800ft). Please refer to the USDA’s Complete
Guide to Home Canning for procedures and limitations:
http://nchfp.uga.edu/publications/publications_usda.html
21
Setting
Low
High
Max
Pressure Time Range
00:01 - 08:00
6.5 psi
12.3 psi
15 psi
Examples of Ingredients
High-acid fruit, fruit sauces, jams, chutney
Vegetarian sauces, high-acid vegetables
Low-acid foods and meats; sauces and
soups containing meat
CAUTION
INSTANT TIP: Ensure 1” (2.5 cm) of Headspace within the Jar
The space between the jarred food and the lid is referred to as the Headspace. This
may vary between recipes, but it is recommended to leave a maximum 1” (2.5 cm) of
headspace between the level of liquid and lid.
Headspace
Level of Liquid
Lid
1” (2.5 cm)
Page 24

Canning - Sterilizing Jars
All food used for canning should be poured into sterile, empty jars. Always check your jars, lids,
and seals for chips and other imperfections. Sterilization of jars should occur just before filling.
Excess contact with the air should be avoided for safe canning.
Steps to Sterilization before Canning
Wash the jars and rinse thoroughly.
Ensure there are no cracks or imperfections in the jars or lids.
Place the inner pot into the cooker base, then put the steam rack in the bottom of the inner pot.
Place the jars on the steam rack. The pressure cooker will hold up to 4 x 16 oz. (500 mL) jars.
Fill the inner pot with 3 cups (750 mL) of warm water.
Place the lid on the cooker base and turn it clockwise to close it.
Connect the power cord. The LCD will display OFF, indicating that the pressure cooker is in
standby mode.
Touch the [Canning] key.
Touch the ‘Minute’ field to select it, then turn the central dial to adjust the time to 10 minutes.
Ensure that the ‘hour’ field displays ‘00’, otherwise touch the ‘hour’ field and turn the central dial
until the display shows ‘00’. The display will read: .
Touch the [Pressure] field to toggle between Low, High, and Max pressure. Select Low Pressure.
The display will read: .
Touch the [Venting] field to toggle between the venting options, and select QR .
Touch the [Start] key and the Smart Program will begin. The pressure cooker will beep 3 times.
1
2
3
4
5
6
7
8
9
10
11
12
22
INSTANT TIP: Pressure Cook with the Steam Rack
When pressure cooking, use the steam rack to lift your food
out of the cooking liquid. This will help distribute heat
evenly and prevent the leeching of nutrients.
Page 25
Canning - Pressure Canning
Steps to Pressure Canning
To begin, select a recipe that has been pre-tested and approved for pressure canning. Though
ingredients may vary, the process will be the same.
Fill warm, sterilized canning jars with food, following the directions in the recipe for required
headspace.
Using a clean, flexible, nonporous spatula, gently press inward between the food and the jar to
remove any trapped air bubbles.
Place a clean lid on top of the jar and then add a screw band. Turn clockwise and hand tighten in
place. Do not over-tighten.
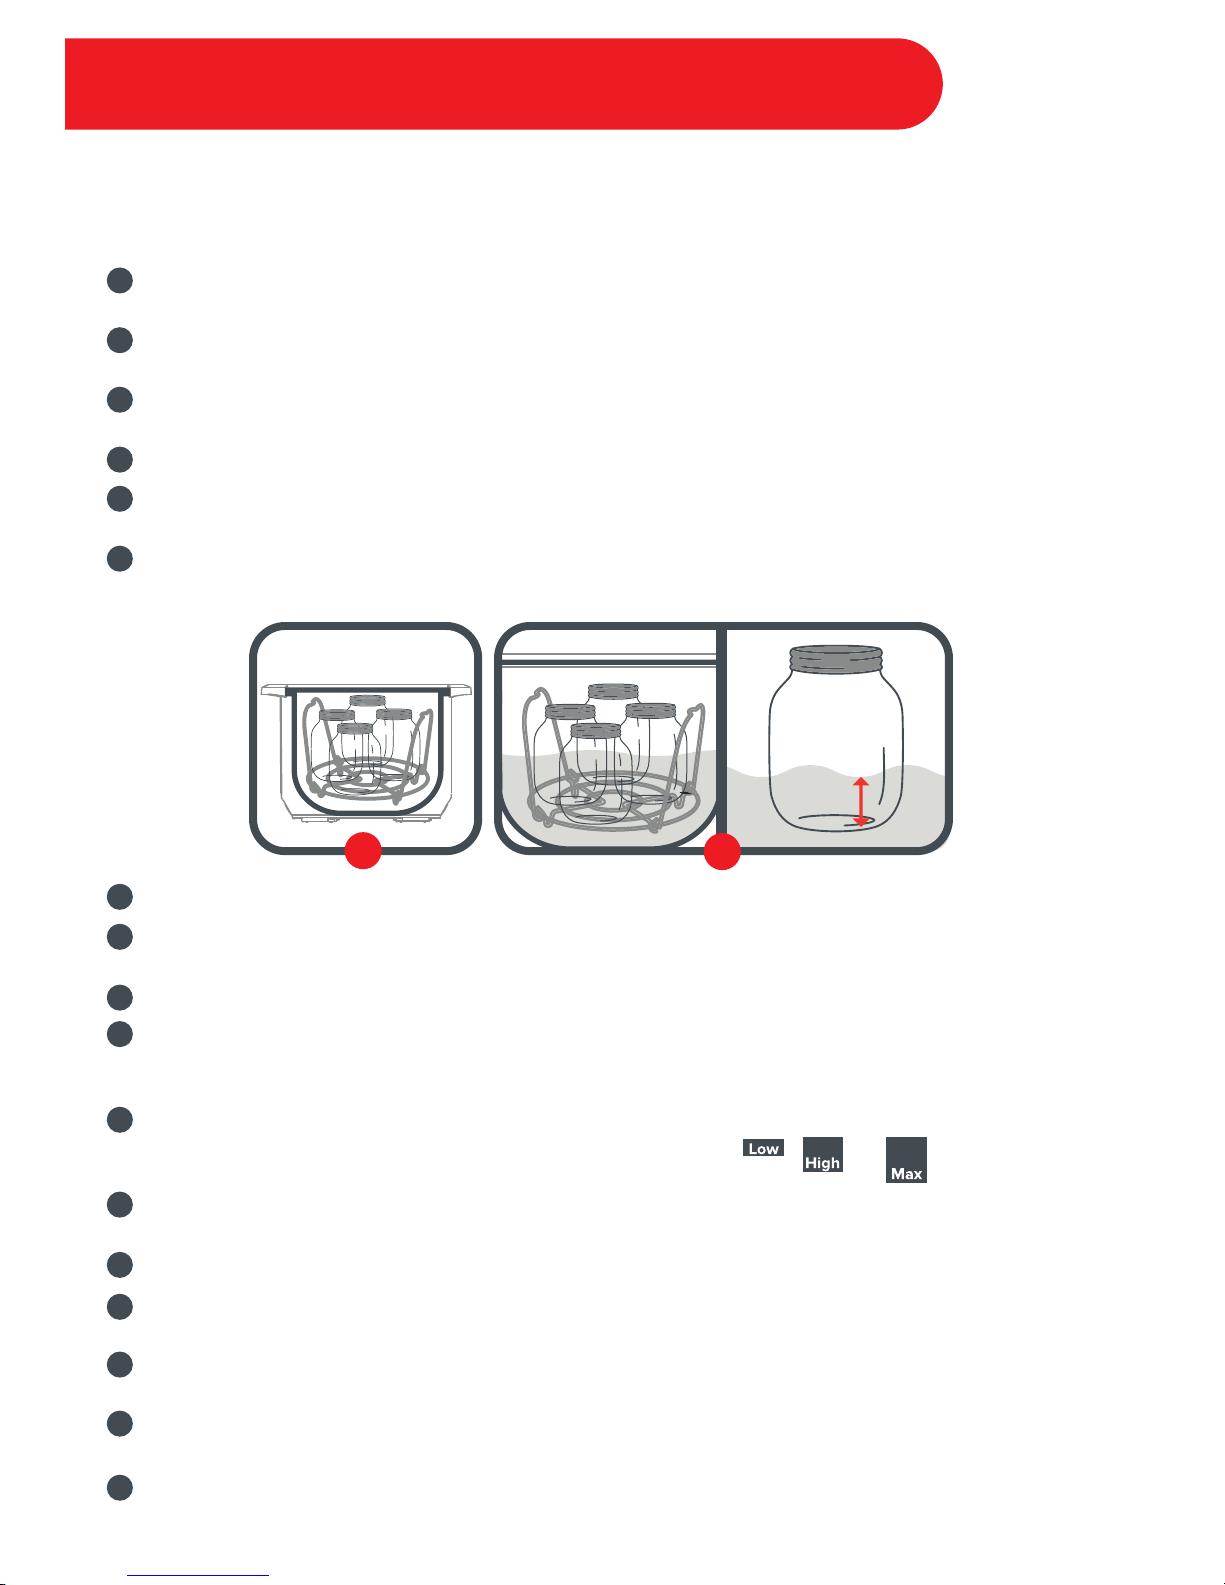
Place the inner pot into the cooker base, then put the steam rack at the bottom of the inner pot.
Place the filled and sealed jars on the steam rack. The pressure cooker will hold up to 4 x 16 oz.
jars.
Pour hot water into the inner pot until the water level reaches 1/4 of the way up the sides of the
jars, approximately 6 cups (1.5 L / 48 oz) of water.
Place the lid on the cooker base and turn it clockwise to close it.
Connect the power cord. The LCD will display OFF, indicating that the pressure cooker is in
standby mode.
Touch the [Canning] key.
Touch the ‘minute’ field to select it, then turn the central dial to adjust the time as determined by
the recipe. Touch the ‘hour’ field to select it, then turn the central dial to adjust the time as
determined by the recipe.
Touch the [Pressure] key to toggle between Low, High, and Max pressure, select desired
pressure needed for your canning recipe. The display will read , , or depending
upon the level selected.
Touch the [Venting] field to toggle between the venting options, and select the venting method
required for your canning recipe.
Touch the [Start] key and the Smart Program will begin. The pressure cooker will beep 3 times.
When the cook time has counted down, the pressure cooker will beep 10 times to signal that the
Smart Program has completed.
The pressure cooker will release pressure automatically using the method that was previously
selected.
Open the lid by turning counter-clockwise and lifting. Ensure the float valve is down and the
Pressure Indicator is OFF before opening the lid.
Using canning tongs and oven mitts, remove the hot jars and place them on a heat resistant
surface and allow to cool to room temperature for 12 to 24 hours.
1
2
3
4
5
6
7
8
9
10
11
12
13
14
15
16
17
MIN. WATER LEVEL
1/4 Height of Jar
23
5
6
Page 26
Steps to Sauté
Due to the high temperatures used during this Smart Program, DO NOT use the
lid with the [Sauté] Smart Program.
Connect the power cord. The LCD will display OFF, indicating that the pressure cooker is in
standby mode.
Touch the [Sauté] key.
Touch the ‘minute’ field to select it, then turn the central dial to adjust the time as determined by
the recipe.
Touch the [Temperature] field to toggle between Low, High and Custom. If you would like to set
a precise temperature, select Custom. The display will read ; turn the central dial to adjust.
The display will read when the inner pot has been heated to the selected temperature.
Add the ingredients to the inner pot and begin sautéing.
If the ingredients have been sautéed to the desired doneness before the time expires, simply
touch [Cancel] to end the [Sauté] Smart Program.
Note: If you add food ingredients before the inner pot has reached the desired temperature, your display may
never read ‘Hot’, but this doesn’t mean you can’t start cooking. To test if the inner pot has reached sizzling
temperature, sprinkle a few drops of water into the inner pot. If it sizzles right away, you’re ready to start! If
not, give it another few minutes to heat up.
Smart Program - Sauté
The [Sauté] Smart Program is a non-pressure cooking function, and works like a frying pan — as a
fantastic way to caramelize onions or sear meat before cooking.
Note: This Smart Program has a maximum set time of 30 minutes to protect against overheating. You
may see the display switch between ‘On’ and ‘Hot’ — this is normal, and means that your element is
working to maintain the temperature.
1
2
3
4
5
6
7
INSTANT TIP: Deglaze after Sautéing
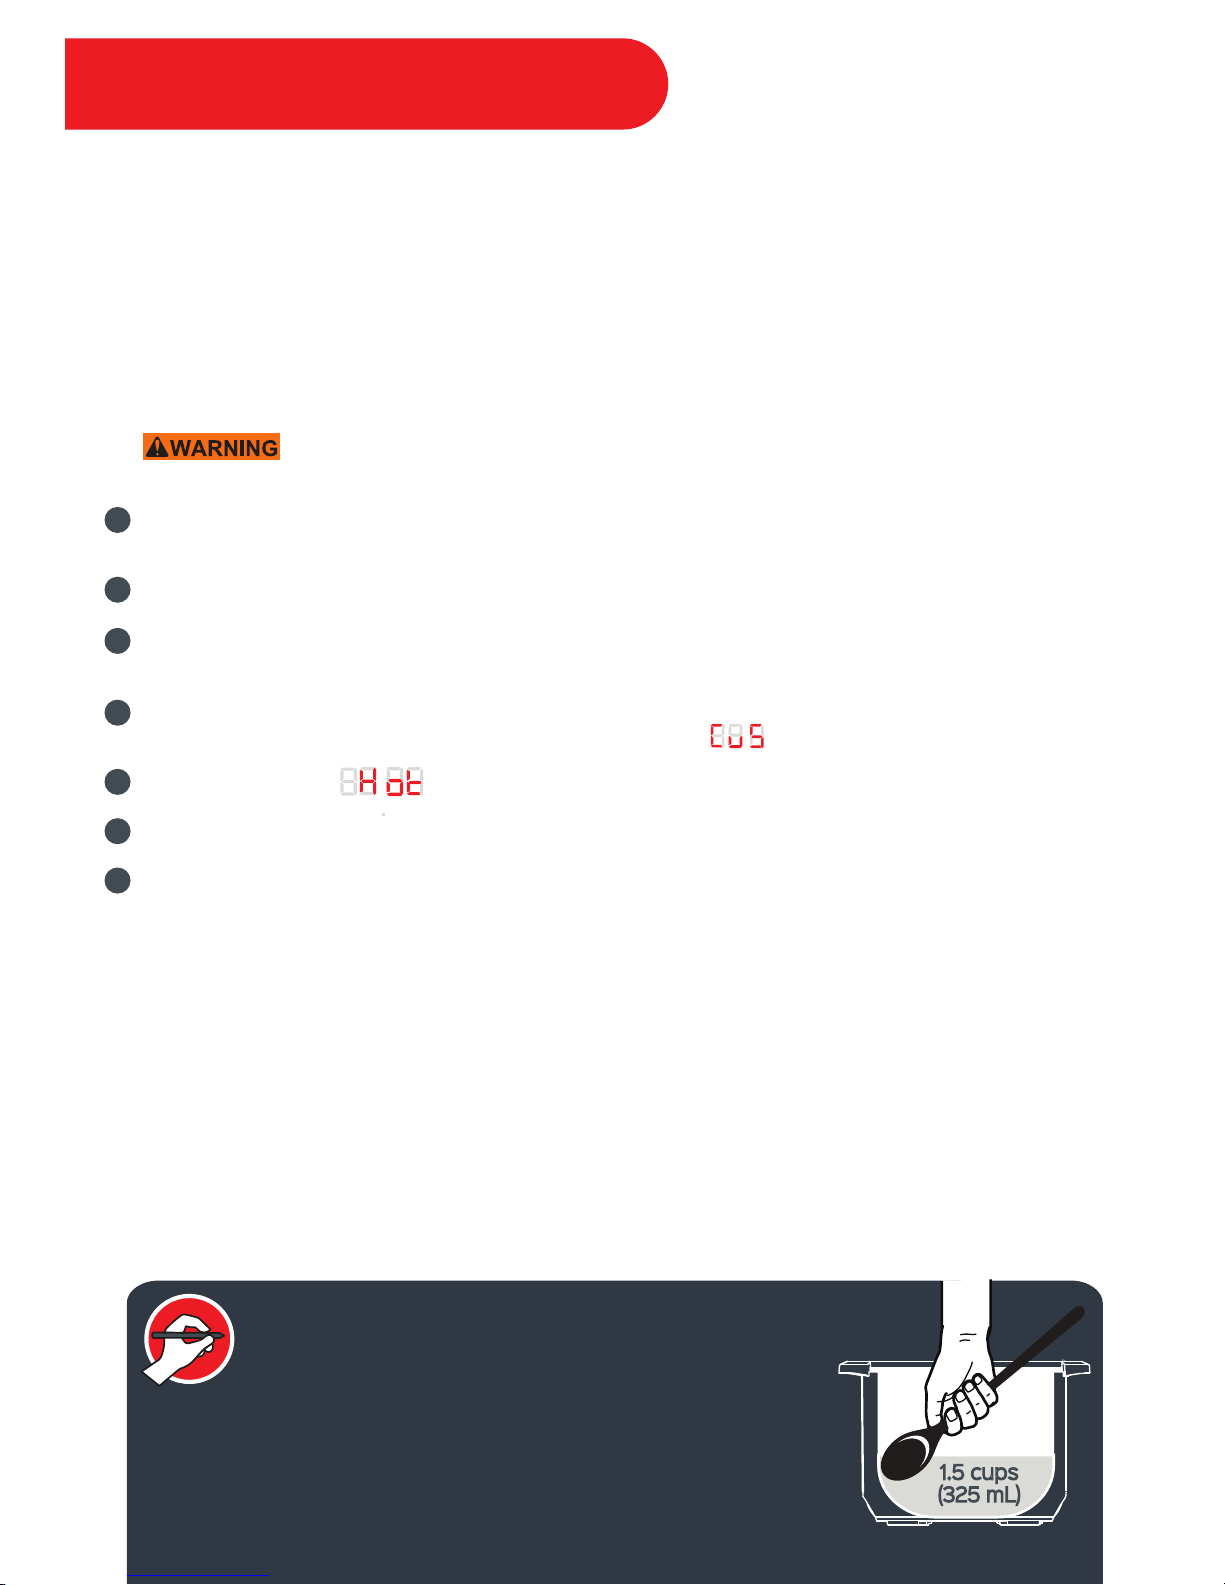
After sautéing, remove ingredients and add 1.5 cups
(325 mL / 12 oz) of liquid to the inner pot.
Gently scrape up the bits and pieces on the bottom, and use
this liquid to pressure cook with. This technique is called
“deglazing” and will give your recipe extra depth of flavor.
1.5 cups
(325 mL)
24
Page 27

The [Slow Cook] Smart Program is comparable to the cooking process of traditional slow cookers.
This means that although Low and High settings will reach the same peak temperature, the
amount of time it takes to reach the temperature on the High setting will be faster than on the
Low setting. Dependent upon the desired cook time, the user can choose the appropriate
setting.
Smart Program - Slow Cook
Steps to Slow Cook
Add ingredients to the inner pot and place the inner pot into the cooker base.
Place the lid on the cooker base and turn it clockwise to close it.
Connect the power cord. The LCD will display OFF, indicating that the pressure cooker is in
standby mode.
Touch the [Slow Cook] key.
Touch the ‘hour’ field to select it, then turn the central dial to adjust the time as desired. Repeat
the process to adjust the ‘minute’ field if necessary.
Touch the [Temperature] field to toggle between Low and High.
Touch the [Keep Warm] field to turn the setting ON or OFF.
Touch the [Start] key and the Smart Program will begin. The pressure cooker will beep 3 times.
1
2
3
4
5
6
7
8
INSTANT TIP: Instant Pot® Glass Lid
Visit www.store.instantpot.com to purchase a glass lid
for easy monitoring of the cooking progress.
25
Page 28

The term “Sous Vide” is French for ‘Under Vacuum’ and refers to the process of vacuum sealing
food, bringing it to a very precise temperature, and maintaining that temperature for a period of
time to achieve high quality, consistently delicious results. Sous Vide cooking is synonymous with
superior taste and gourmet quality.
The [Sous Vide] Smart Program offers a customizable setting which allows you to choose a
precise cooking temperature from a range of 25°C ~ 90°C / 77°F ~ 194°F, ideal for Sous Vide
cooking.
Smart Program - Sous Vide
Steps to Sous Vide
Fill the inner pot 2/3 full of water for optimal temperature control.
Insert the inner pot into the cooker base and place the lid on the cooker base and turn it clockwise
to close it.
Touch the [Sous Vide] key.
Touch the ‘hour’ field to select it, then turn the central dial to adjust the time to desired
hour value. Repeat the process to adjust the ‘minute’ field.
Touch the [Temperature] field and use the central dial to increase or decrease the temperature.
Touch the [Start] key to begin the Smart Program. The pressure cooker will beep 3 times.
While the pressure cooker heats, season your food as desired. Then place the ingredients into
vacuumed sealed pouches. Separate single servings of food within individual pouches. Remove
as much air as possible from the pouches and seal tightly.
Once the set water temperature has been reached the pressure cooker will beep. Open the lid
and immerse the sealed pouch(es) into the inner pot. The contents of the pouches should be
submerged below the water level.
Place the lid on the cooker base and turn clockwise to close.
Let the cooking begin! For long cooking times, check periodically to make sure the water level
remains above the sealed pouches. If you need to add water, heat it on the stovetop or in the
kettle to approximately the same temperature as the water in the container to avoid cooling the
water.
Once your cooker has completed cooking, use a pan to sear or brown the meat to your
preference. It is recommended to use a pan, browning torch or barbeque.
1
2
3
4
5
6
7
8
9
10
11
INSTANT TIP: Sous Vide Enhances the Natural Flavors & Taste
Use the highest-quality and freshest ingredients available when cooking
sous vide. The food cooks in its own juice. You want to make sure the
juice has the best possible flavor. When seasoning with salt, it is better
to use a little less than you would to season foods cooked by traditional
methods, especially with meats, poultry, and fish.
26
Page 29

27
Sous Vide - Cooking Guidelines
The following provides general guidelines to setting the temperatures and times for your sous
vide cooking. You can always make adjustments according to your personal preferences.
Food
Cooking
Temperature
Cooking
Time
(Minimum)
Cooking
Time
(Maximum)
Thickness
Tender Cuts:
Tenderloin, cutlets,
sirloin, rib eye,
rump, T-bone
Tougher Cuts:
Blade, chuck,
shoulder, shanks,
game meats.
50 °C / 122 °F
54 °C / 129 °F
56 °C / 133 °F
60 °C / 140 °F
50 °C / 122 °F
1 hour
1 hour
1 hour
1 hour
8 hours
4 hours
4 hours
4 hours
4 hours
18 hours
2-5 cm/ ½”- 2”
4-6 cm/ 1½“- 2½”
Rare
Medium rare
Medium
Well done
Cooking
Outcome
Beef
Belly
Ribs
Chops
82 °C / 180 °F
59 °C / 138 °F
56 °C / 133 °F
10 hours
10 hours
2 hours
22 hours
22 hours
10 hours
3-6 cm / 1”- 2½”
2-3 cm / ½”- 1½”
2-4 cm / ½”- 2”
Pork
Chops 52 °C / 126 °F
55 °C / 131 °F
60 °C / 140 °F
1 hour
2 hours
1 hour
3 hours
5 hours
4 hours
2-4 cm / ½”- 2” Rare
Medium rare
Medium
Lamb
Chicken:
- breast with bone
- breast without bone
- thigh with bone
- thigh without bone
- legs
Duck Breast
82 °C / 180 °F
64 °C / 146 °F
82 °C / 180 °F
64 °C / 146 °F
82 °C / 180 °F
64 °C / 146 °F
2 hours
1 hour
2 hours
1 hour
2 hours
2 hours
7 hours
5 hours
7 hours
4 hours
7 hours
4 hours
3-5 cm / 1”- 2”
3-5 cm / 1“- 2”
3-5 cm / 1“- 2”
3-5 cm / 1“- 2”
5-7 cm / 2 - 3”
3-5 cm / 1“- 2”
2-3 cm / ½”- 1”
62 °C / 144 °F
66 °C / 150 °F
68 °C / 155 °F
73 °C / 164 °F
45 mins
45 mins
45 mins
45 mins
Runny
Just set
Medium
Soft boiled
Eggs
85 °C / 185 °F
85 °C / 185 °F
1 hour
45 mins
Fruit & Vegetables
Vegetables
Fruits
3 hours
2 hours
45 °C / 113 °F
50 °C / 122 °F
55 °C / 131 °F
60 °C / 140 °F
60 °C / 140 °F
60 °C / 140 °F
45 mins
45 mins
45 mins
30 mins
1 hour
30 mins
Fish & Seafood
Fish
Shrimp
Lobster Tail
Scallops
Very lightly
cooked
Lightly cooked
Medium
Poultry
Page 30

Smart Program - Yogurt
The [Yogurt] Smart Program is a non-pressure cooking function with 3 settings:
Boil, Yogurt, and Custom. The Custom setting will allow users to make different
types of customized fermented dairy and non-dairy recipes.
Steps to Making Yogurt - fresh, dairy-based yogurt
Pasteurization
a. Add milk to the inner pot. Place the lid on the cooker base and
turn it clockwise to close it.
b. Touch the [Yogurt] key.
c. Touch the [Temperature] field to toggle between Boil, Yogurt, and Custom.
Select Boil temperature.
d. Touch the [Start] key to begin the Smart Program.
e. Milk must reach a minimum of 161 °F (71 °C) for pasteurization to occur.
Adding Culture
a. Remove the lid and allow it to cool to just below 110 °F (43 °C). To speed up the cool down
process, remove the inner pot and place it on a wire rack.
b. Add the starter culture as indicated by the starter culture instructions.
Fermentation
a. Place the lid on the cooker base and turn it clockwise to close it.
b. Touch the [Yogurt] key.
c. Touch the [Temperature] field to toggle between Boil, Yogurt, and Custom. Select Yogurt.
d. The Yogurt temperature setting will default to 8 hours. Touch the 'hours' field and turn the
central dial to adjust. The longer the fermentation, the tangier the yogurt will taste. If you
wish to customize both the fermentation time and temperature, select Custom.
e. Touch the [Start] key to begin the Smart Program.
Note: using more than 1 gallon / 3 L of fluid may cause a delay in initial pasteurization, and may require a
second pasteurization cycle in order to ensure that the correct temperatures are reached.
1
2
3
INSTANT TIP: Use Instant Pot® Yogurt Cups
Visit our online store for single serve yogurt cups that hold up under
pressure.
www.store.instantpot.com
You will
require a
thermometer
to make
yogurt.
28
Page 31
Part
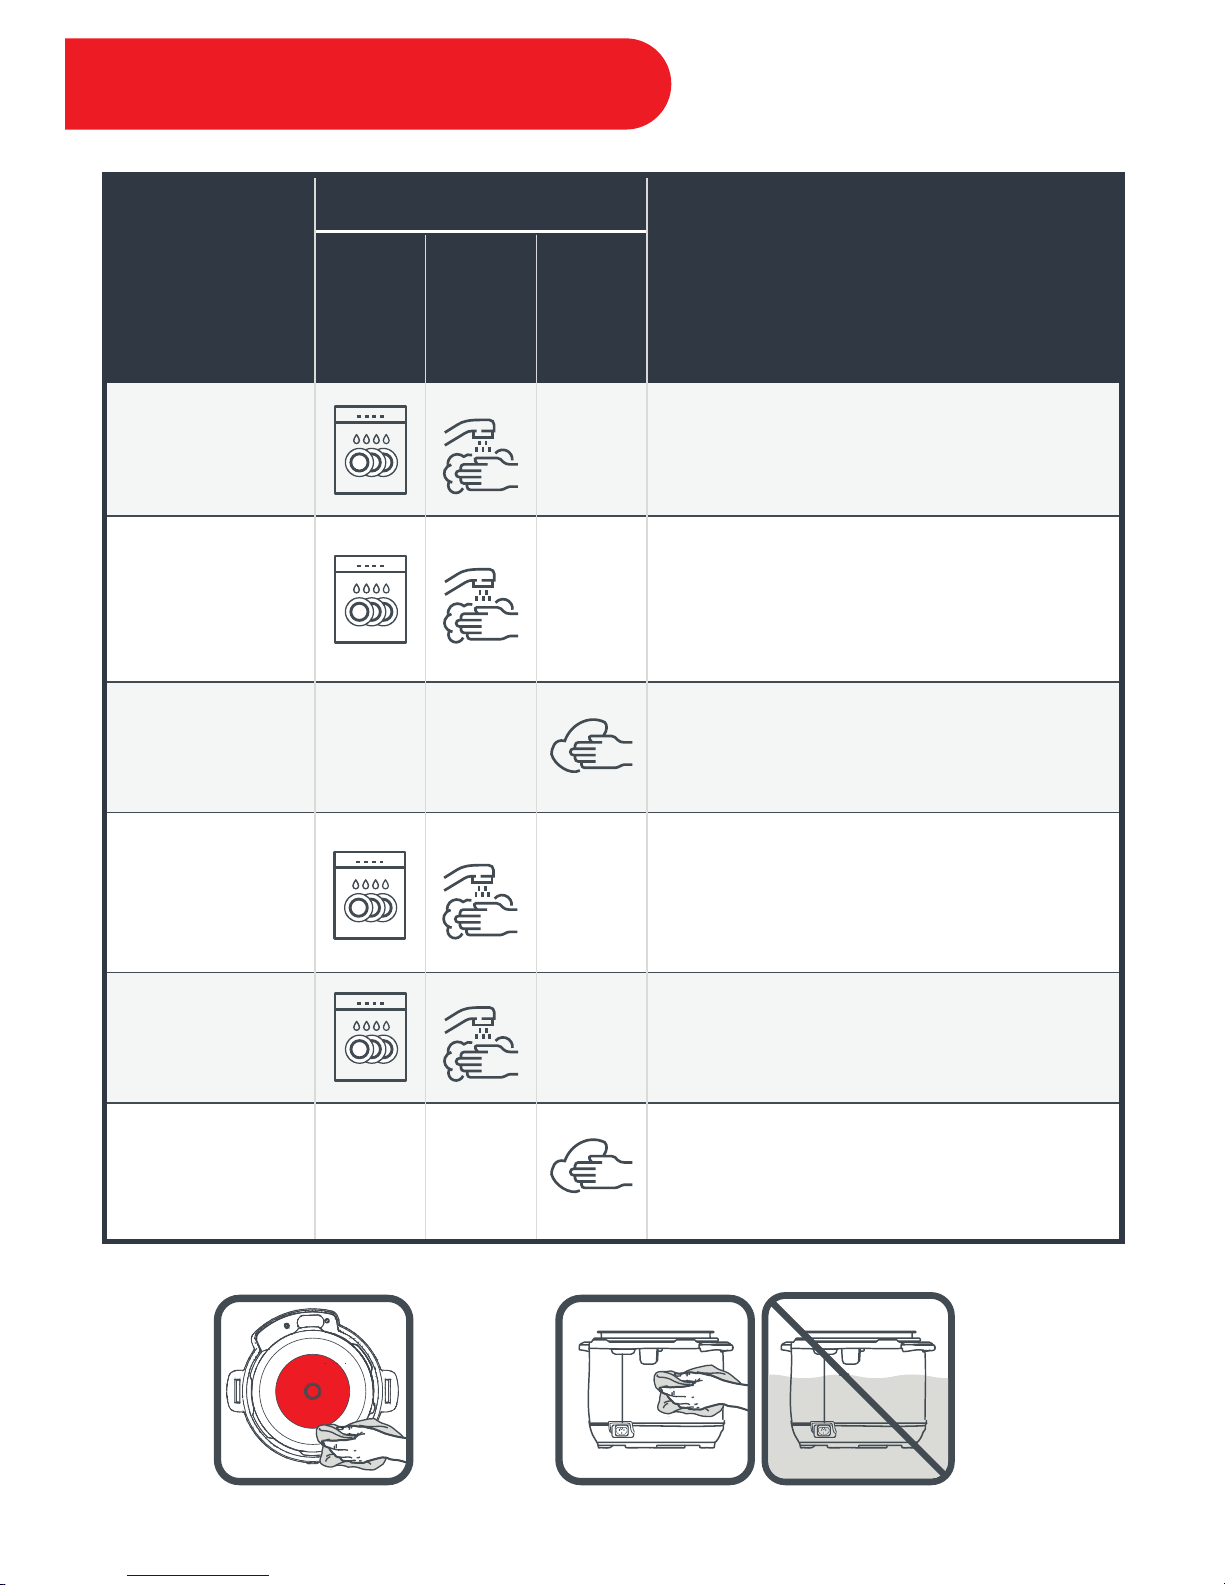
Dishwasher
Safe
Cleaning Method
Hand Wash
(submerged)
Wipe Clean
(damp cloth)
Cleaning Tip
Accessories
• steam rack
• soup spoon
• rice paddle
• rice measuring cup
• silicone mini mitts
Small Parts
• anti-block shield
• sealing ring
• steam release valve cover
• steam release valve
• float valve
• float valve silicone cap
• condensation collector
Detachable
Cord
Inner Pot
Lid
Cooker Base
• Never use harsh chemical detergents, scouring pads, or
powders on any of the unit’s parts or components
• Do not use abrasive cleaners or scouring pads on the inner
pot
• More acute hard water staining may require a vinegar
dampened sponge and some scrubbing to remove
• If there is tough or burned food residue at the bottom, soak in
hot water for a few hours for easy cleaning
• Do not clean the prongs of the detachable cord
• Do not submerge the detachable cord in water
• Ensure to remove all the small parts before dishwashing
• Wash with hot water and mild dish soap and allow to air dry
• To drain water from the lid after dishwashing, grasp the lid
handle and hold the lid vertically over a sink, then turn it 360°—
such as turning a steering wheel
• Wipe the condensation collecting rim and empty the
condensation collector after each use
• Never use harsh chemical detergents, scouring pads, or
powders on any of the unit’s parts or components
• All small parts should be removed once every few cooking
cycles for routine cleaning, and any time there is visible food
debris
• Store sealing rings in a well ventilated area to decrease the
residual odor of flavourful meals
Care & Cleaning
DO NOT immerse the cooker base in
water or attempt to cycle through dishwasher.
Ensure the heating element
remains dry at all times.
29
Page 32
Add requisite minimum 1.5 cups (375mL/12oz)
of a thin liquid to inner pot
Too little liquid in inner pot
Steam gushes
from steam
release valve
when venting is
not activated
Troubleshooting
If you should have any questions or concerns related to your pressure cooker or other Instant
Pot
®
products or recipes, please contact the Customer Care Team:
• Online: www.support.instantpot.com/
• Email: [email protected]
• Telephone: 1-800-828-7280
The issues in the following tables do not always indicate a faulty pressure cooker. Please
examine the cooker carefully, and be prepared to answer some basic troubleshooting questions
when contacting the Customer Care Team.
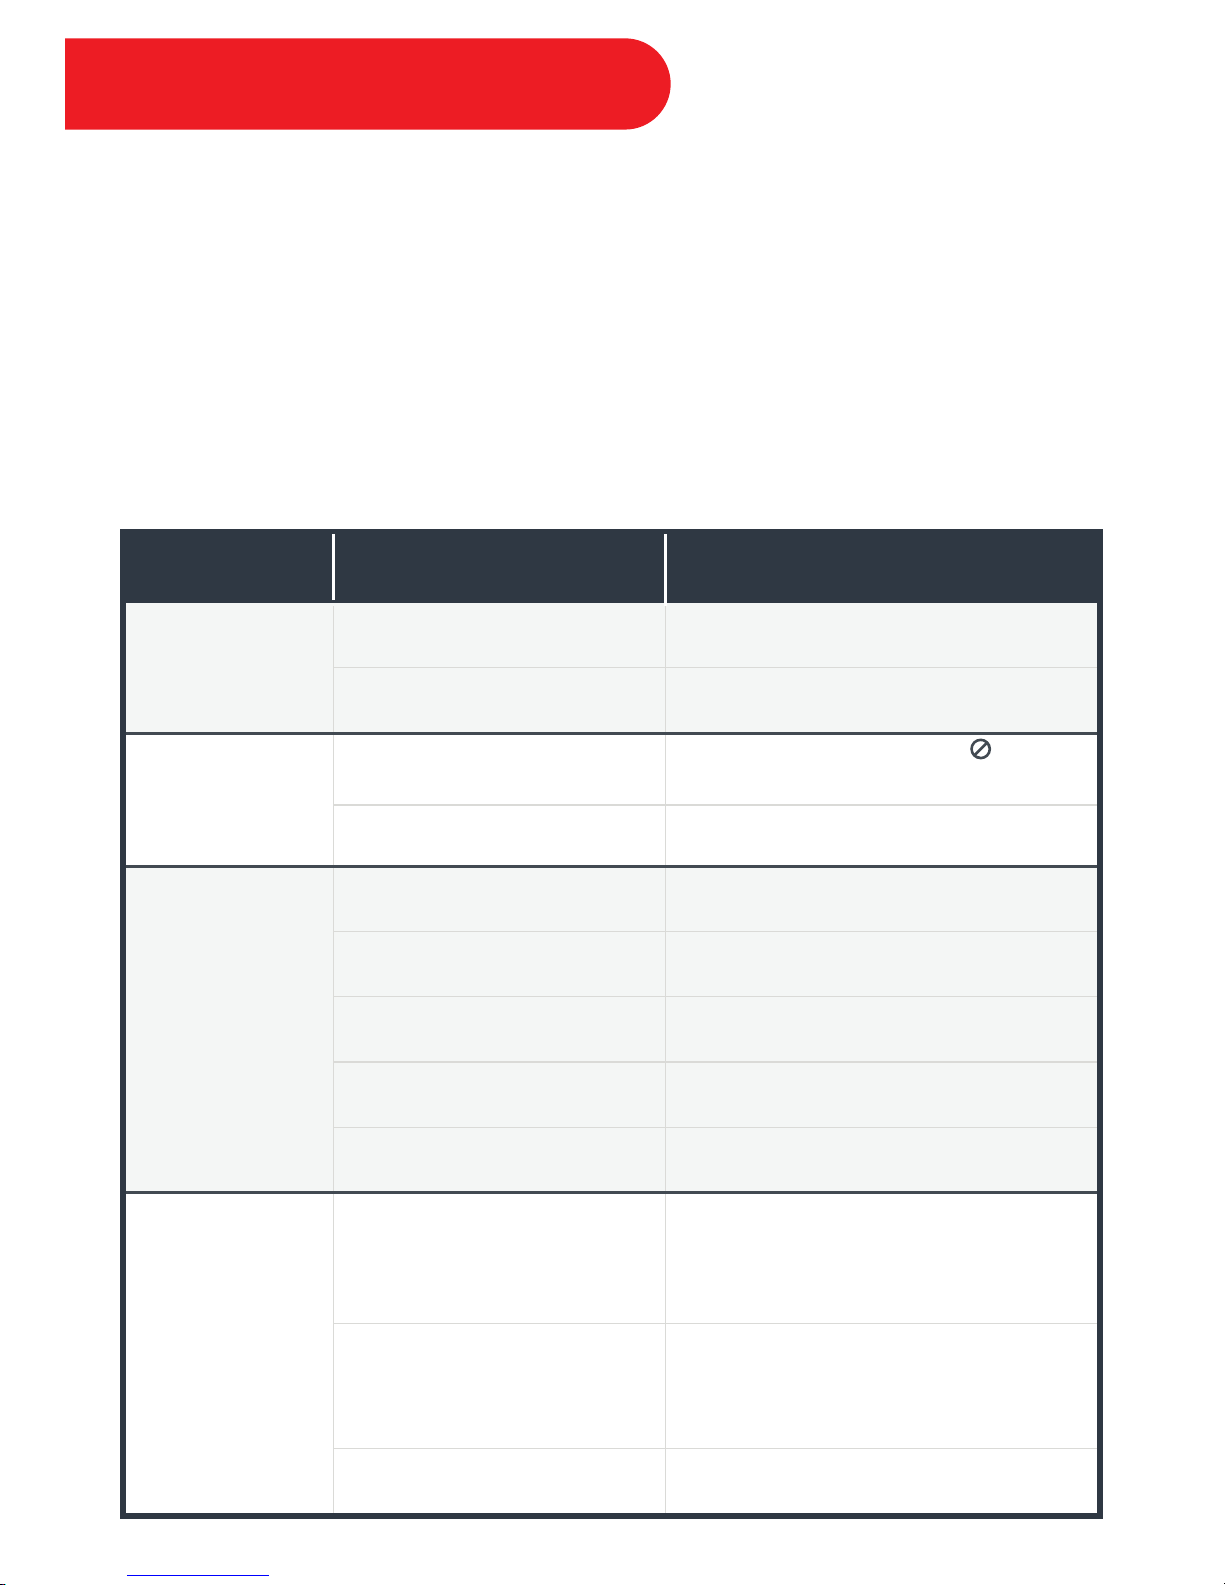
Problem Possible Reason Solution
Difficulty closing
the lid
Sealing ring not seated properly
Adjust sealing ring, ensure it is fully seated
behind ring rack
Gently press the float valve down
Float valve stuck in popped-up
position
Cooker is still under pressure
Ensure the pressure has released fully
Install the sealing ring
Replace the sealing ring
Remove the sealing ring and check for this.
Contact the Customer Care Team online
Clean the sealing ring
Contact the Customer Care Team online
Open then close the lid again
Float valve stuck in popped-up
position
No sealing ring in lid
Remove steam release cover and steam
release valve, check for internal food debris;
re-seat parts
Steam release valve not seated
properly
Sealing ring damaged
Ring rack is warped or off-centre
Food particles attached to ring
Lid not closed properly
Pressure sensor control failure
Difficulty opening
the lid
Steam leaks from
side of lid
30
Touch [Venting] field, select NR . If
pressure has not fully released after 60
minutes contact the Customer Care Team.
Page 33

Occasional
clicking or light
cracking sound
Troubleshooting
Problem Possible Reason Solution
Float valve does
not rise
Food debris on float valve or
surrounding area
Remove float valve from lid, clean float valve,
silicone cap, and surrounding area on lid
Replace the float valve
Float valve silicone cap worn out
Too little liquid in inner pot
Add requisite minimum 1.5 cups
(375 mL) of a thin liquid to inner pot
Open and close the lid completely
Ensure detachable power cord is plugged
tightly into base power socket. Try the
cooker on other outlets
Contact the Customer Care Team
This is normal; no action required. The
clicking sound is the result of the power relay
working.
Wipe bottom side of inner pot before placing
on element
Float valve obstructed by
lid-locking mechanism
Bad power connection or
no power
Lights flash and
error code
appears on
screen
Contact the Customer Care Team
C1, C2, C6, C6H, C6L, E1, E2, E5,
E6, E11, E12, E13, E14, E15, E16, E17,
E18, and E19
Cooker’s electrical fuse has blown
Expanding pressure board under
changing temperatures
Bottom of inner pot is wet
No power to unit
Lights flash and
error code
appears on
screen
Remove and reposition inner pot in cooker
base
Add a higher volume of food and water to
the inner pot
C5: Inner pot is not seated
properly
Minor steam
leaking/hissing
from steam
release valve
during cooking
cycle
This is normal; no action required
Regulating excess pressure
cooking cycle
Self-diagnosed
Warning Displays
Make sure the lid is closed properly. Do not
use the lid during the Sauté Smart Program
The word “Lid” is displayed
because lid is not used properly
The word “PrSE” is displayed
because of excess pressure.
The words “Food burn” is
displayed
The word “noPr” is displayed
because there is not enough
pressure
Stir food to avoid burning and add water as
necessary
Add a minimum 1.5 cups (375 mL) of a thin
liquid to the inner pot
31
Press the [Cancel] key and allow the cooker
to cool for 60 minutes. Contact the Customer
Care Team if pressure is not fully released.
Page 34

32
Limited Warranty
This Limited Warranty is effective for one year from the date of original consumer purchase. Proof of original
purchase date and, if requested by an authorized representative of Double Insight Inc (“DI”), return of your
appliance, is required to obtain service under this Limited Warranty. Provided that this appliance is operated and
maintained in accordance with written instructions attached to or furnished with the appliance, DI will, in its sole
and exclusive discretion, either: (i) repair defects in materials or workmanship or (ii), replace the appliance. In the
event that your appliance is replaced, the Limited Warranty on the replacement appliance will expire 12 months
from the date of original consumer purchase.
This Limited Warranty extends only to the original purchaser and use of the appliance in the United
States of America and Canada. This warranty does not cover units that are used outside of the United
States of America and Canada.
Any modification or attempted modification to your appliance may interfere with the safe operation of the
appliance and will void this Limited Warranty. This Limited Warranty does not apply in respect of any appliance or
any part thereof that has been altered or modified from its factory settings unless such alterations or
modifications were expressly authorized by a DI representative.
Limitation and Exclusions
The liability of DI, if any, for any allegedly defective appliance or part shall in no circumstances exceed the
purchase price of a comparable replacement appliance.
This Limited Warranty does not cover:
1. Damage resulting from accident, alteration, misuse, abuse, neglect, unreasonable use, use contrary to the
operating instructions, normal wear and tear, commercial use, improper assembly, disassembly, failure to provide
reasonable and necessary maintenance, fire, flood, acts of God or repair by anyone unless directed by a DI
Representative;
2. Repairs where your appliance is used for other than normal, single-family household use or when it is used in a
manner that is contrary to published user or operator instructions; or
3. Use of unauthorized parts and accessories, or repairs to parts and systems resulting from unauthorized repairs
or modifications made to this appliance.
The cost of repair or replacement under these excluded circumstances shall be borne by you.
Disclaimer of Implied Warranties
EXCEPT AS EXPRESSLY PROVIDED HEREIN AND TO THE EXTENT PERMITTED BY LAW, DI MAKES NO
WARRANTIES, CONDITIONS OR REPRESENTATIONS, EXPRESS OR IMPLIED BY STATUTE, USAGE, CUSTOM OF
TRADE OR OTHERWISE WITH RESPECT TO THE APPLIANCES OR PARTS COVERED BY THIS WARRANTY,
INCLUDING BUT NOT LIMITED TO, WARRANTIES, CONDITIONS, OR REPRESENTATIONS OF WORKMANSHIP,
MERCHANTABILITY, MERCHANTABLE QUALITY, FITNESS FOR A PARTICULAR PURPOSE OR DURABILITY.
Some states or provinces do not allow for the exclusion of implied warranties of merchantability or fitness, so this
limitation may not apply to you. In these states and provinces, you have only the implied warranties that are
expressly required to be provided in accordance with applicable law.
Disclaimer of Representations Outside of Warranty
DI makes no representation about the quality, durability, or need for service or repair of this appliance other than
the representations contained in this warranty.
Limitation of Remedies; Exclusion of Incidental and Consequential Damage
YOUR SOLE AND EXCLUSIVE REMEDY UNDER THIS LIMITED WARRANTY SHALL BE APPLIANCE REPAIR OR
REPLACEMENT AS PROVIDED HEREIN. DI SHALL NOT BE LIABLE FOR INCIDENTAL OR CONSEQUENTIAL
DAMAGES ARISING OUT OF OR IN CONNECTION WITH THE USE OR PERFORMANCE OF THE APPLIANCE OR
DAMAGES WITH RESPECT TO ANY ECONOMIC LOSS, PERSONAL INJURY, LOSS OF PROPERTY, LOSS OF
REVENUES OR PROFITS, LOSS OF ENJOYMENT OR USE, COSTS OF REMOVAL, INSTALLATION OR OTHER
CONSEQUENTIAL DAMAGES OF WHATSOEVER NATURE.
Warranty
Page 35

Warranty
33
Warranty
You the buyer may have other rights and remedies under your state’s or province’s applicable laws, which are in
addition to any right or remedy which may be available under this limited warranty. In these states and provinces,
DI will only be liable to you for damages that it is expressly required to be liable to you under applicable law.
Warranty Registration
Please visit www.instantpot.com/support/register/ to register your new Instant Pot® and validate your warranty
within thirty (30) days of purchase. You will be asked to provide the store name, date of purchase and model
number (found on the base of your Appliance) along with your name and address. The registration will enable us
to keep you up to date with product developments, recipes and contact you in the unlikely event of a product
safety notification. By registering, you acknowledge that you have read and understand the instructions for use,
and warnings set forth in the accompanying instructions.
Warranty Service
To obtain service under this warranty, please contact our Customer Service Department by phone at
1-800-828-7280 or by email to [email protected]. You can also create a support ticket online at
www.InstantPot.com/support. If we are unable to resolve the problem, you may be asked to send your
appliance to the Appliance Service Department for quality inspection.
DI is not responsible for shipping costs related to warranty service, save and except for shipping costs associated
with the return of your appliance from Canada or within the 48 contiguous states and the District of Columbia of
the United States of America, as provided herein. When returning your appliance, please include your name,
address, phone number, proof of the original purchase date as well as a description of the problem you are
encountering with the appliance.
Page 36

34
Notes
Page 37

Index
35
Acceptable Liquids 18
Adding Culture 28
Adjust Altitude 12, 16, 24
Anti-Block Shield 2, 7, 10, 29
Base Power Socket 8, 31
Canning – Sterilizing Jars 2, 22
Celsius to Fahrenheit 16
Central Dial 8, 12
Clock / Set Local Time 12, 16
Condensation Collector 6, 9
Condensation Collector Tabs 9
Condensation Drain Hole 8
Control Panel 12
Cooker Base 6, 8, 9, 10, 11, 29
Cooker Handles 2, 8
Cooking and Local Time Display 16
Cooking Progress Indicator 12
Customer Care Team 30
Deglaze 24, 31
Delay Start 12, 17
Detachable Power Cord 3, 5, 6, 11, 31
Dimensions 5
Error Code 31
Factory Reset (All Settings) 16
Factory Reset (Specific Smart Programs) 16
Fermentation 28
Fill Level Indicators 18
Float Valve 2, 3, 7, 15, 29, 30, 31
Food Pouches 26
Glass Lid 25
Headspace 21
Heating Element 3, 8, 11
Important Safeguards 2-4
Initial Test Run 14, 15
Inner Pot 3, 6, 11, 18
Keep Warm Program 12, 16
LCD Touch Screen 8, 12
Lid 6, 7
Lid Fins 7, 8
Lid Handle 7
Lid Locking Pin 7
Lid Position Markers 7, 9
Limited Warranty 32, 33
Low Pressure Canning 22
Manual 6
Max Pressure Canning 21, 22, 23
Model 5
Natural Release 13
NutriBoost™ 20
On-the-fly Changes 15
Pasteurization 28
Pressure Indicator 12, 15
Pressure Level Field 12
Pulse Release 13
Quick Release 13
Quick Start Guide 6
Rating Label 9
Recipe Book 6
Rice Measuring Cup 6
Rice Paddle 6
Sealing Ring Rack 7, 11
Silicone Mini Mitts 6, 29
Silicone Sealing Ring 4, 6, 7, 11, 18, 29, 30
Smart Program Keys 12
Sound On / Off 12
Soup Spoon 6
Sous Vide 26, 27
Stainless Steel Outer Pot 8
Start Program Key 12
Steam Rack with Handles 6
Steam Release Pipe 7, 10
Steam Release Valve 7, 10
System Settings 12
Temperature Field 12
Temperature Sensor 7
Troubleshooting 30, 31
L
M
N
O
P
Q
R
S
T
A
B
C
D
E
F
G
H
I
K
Page 38

36
Index
Stainless Steel Outer Pot 8
Start Program Key 12
Steam Rack with Handles 6
Venting Methods 13
Venting Fields 12
Venting System 10
Voltage 5
Warranty 32, 33
Water Test 14-15
Wattage 5
Weight 5
Yogurt 28
S
V
W
Y
Page 39
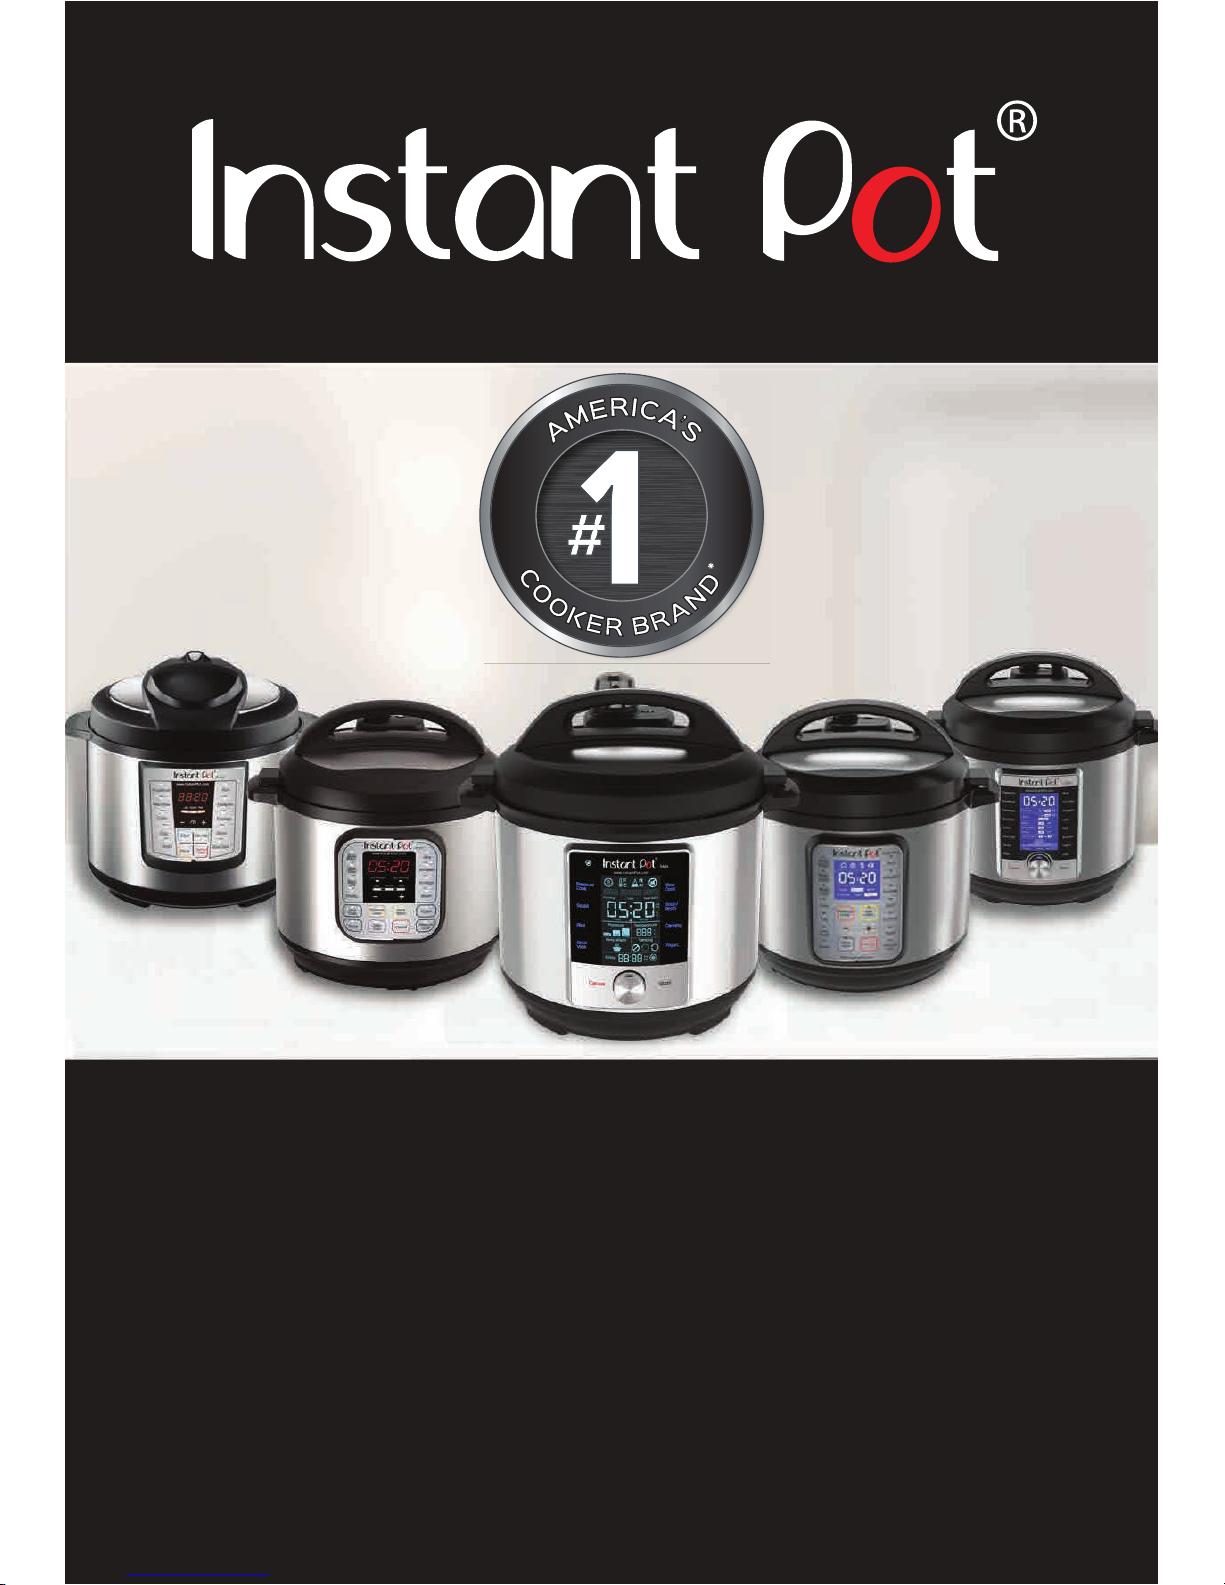
The Instant Pot® Products
Tools for a New Lifestyle
*The NPD Group Inc., Retail Tracking Service, Cookers Category, Dollar Sales, USA &
Canada, Latest 52 Wks ending Dec, 2017.
Duo Plus
3, 6, 8 Quart
Lux
3, 6, 8 Quart
Duo
3, 6, 8 Quart
Ultra
3, 6, 8 Quart
Max
6 Quart
Page 40

Instant Pot® Company
11 - 300 Earl Grey Dr. Suite 383
Ottawa, Ontario
K2T 1C1
Canada
Telephone: +1 800 828-7280
Web: www.instantpot.com
US & Canada Email: [email protected]
Download Free Recipe App below:
To enhance your experience with Instant Pot
®
,
join the official Instant Pot
®
Community:
facebook.com/groups/instantpotcommunity
US & Canada Email: [email protected]
Copyright © 2018 Instant Pot
®
Company
@instantpot
@Theinstantpot
@instantpotofficial
@instantpot
@instantpot
606-0101-01
 Loading...