

Page 1
Ace
User Manual
Free Recipe App
Page 2
Welcome to the World of
Robert J. Wang
Founder, CEO
Thank you for selecting an appliance from the Instant Brands™ family!
Our vision is to provide you with the right tools to enhance your food
preparation experience. Our appliances are designed to save you time,
replace a number of kitchen devices, and prepare healthy and tasty
meals in a convenient and dependable way.
Happy Cooking!
Page 3

Important Safeguards 1
What’s Included 4
Product Overview 5
Product Specifications 5
Control Panel 6
Blending Programs Guidelines 8
Getting Started 9
Blending Programs
Manual Blending 12
Blending Dry Ingredients 12
Cold Blending 13
Hot Blending 16
Food Tamping 19
Non-Dairy Milk Making 20
Soy 21
Rice 22
Nut 23
Oat 24
Blending Tips 25
Care & Cleaning 26
Pulse Cleaning 27
Deep Cleaning 28
Troubleshooting 29
Warranty 31
Read the manual carefully and retain for future use.
1
Table of Contents
Page 4

2
When using electrical appliances, basic safety precautions should
always be followed, including the following:
1. READ ALL INSTRUCTIONS.
2. Do not touch hot surfaces. Handle with care and always use handle
on side for carrying.
3. To protect against electrical shock, fire, or personal
injury, do not immerse power cord, plug, or blender base in water or
other liquid.
4. This appliance should not be used by children; by individuals whose
physical, sensory or mental abilities may prevent safe use of the
appliance; or by individuals with limited knowledge of how to use
the appliance. Close supervision is needed when using this
appliance near these individuals.
5. Close supervision is necessary when any appliance is used by or near
children. Children should be supervised to ensure they do not play
with the appliance.
6. Touch Cancel, then unplug from the outlet when not in use, before
assembling or disassembling parts and before cleaning. To unplug,
grasp the plug and pull from the outlet. Never pull from the power
cord.
7. Do not operate any appliance with a damaged cord or plug or after
the appliance malfunctions, or is dropped or damaged in any
manner.
8. Do not use any accessories or attachments not authorized by Instant
Brands Inc. The use of attachments not recommended by the
manufacturer, such as canning jars, may cause a risk of injury to
persons.
9. For household countertop use only. Do not use outdoors. Not for
commercial use.
10. Do not let cord contact hot surface, including the stove.
Read and save these safety guidelines.
Failure to adhere to these safety guidelines
may result in serious injury.
WARNING
1
IMPORTANT SAFEGUARDS
CAUTION
1
Page 5

2
11. Do not place the appliance on or in close proximity to a hot gas or
electric burner, or a heated oven; heat from an external source will
damage the appliance.
12. Extreme caution must be used when moving the appliance
containing hot liquids.
13. Do not use appliance for other than intended use.
14. This product is not designed to deep fry.
15. To avoid spill or splatter, do not fill the pitcher beyond measurement
indicators.
16. Pitcher will be hot after cooking. Allow sufficient
cooling down time before handling or serving. Keep hands away
from hot glass and use side handle for carrying. Failure to comply
may result in scalding or serious injury.
17. Proper maintenance is recommended after each use. Refer to “Care
& Cleaning”. Allow the unit to cool before cleaning the appliance.
18. Spilled food can cause serious burns. Keep appliance
and cord away from children. Never drape cord over edge of
counter and never use power outlet below counter.
19. A short power-supply cord is provided to reduce risks resulting from
becoming entangled in or tripping over a long cord.
20. A detachable power-supply extension cord may be used with
caution. If an extension cord is used, note the following:
• The marked electrical rating of the extension cord should be at
least as great as the electrical rating of the appliance;
• The extension cord should be a 3-prong grounding plug;
• The extension cord should not drape over the counter top or
table top where it can be pulled by children or tripped over.
21. Do not attempt to repair, replace, alter, or modify components of the
appliance, as this may cause electric shock, fire or injury, and will
void the warranty.
Read and save these safety guidelines.
Failure to adhere to these safety guidelines
may result in serious injury.
WARNING
1
IMPORTANT SAFEGUARDS
CAUTION
CAUTION
2
Page 6

2
22. Do not tamper with any of the safety mechanisms.
23. Do not use unit in electric systems other than 120V~60Hz for North
America. Do not use with power converters or adapters.
24. Always operate blender with lid in place. The lid and/or lid cap
should only be removed when the blender is OFF or Paused, in
order to add ingredients to the pitcher or use the food tamper.
25. Avoid contact with moving parts. Never remove or rock the
pitcher/lid during operation.
26. Keep hands and utensils out of pitcher while blending to reduce
the risk of severe injury to persons or damage to the blender. The
food tamper included with purchase may be used, but must only
be used when the blender is not running.
27. Blades are sharp. Avoid contact with moving blades. Use caution
when cleaning.
28. Do not operate the blender while the pitcher is empty.
29. Lid cap must be in place when using hot blending
programs, or when blending hot contents. Spray, steam, or spatter
may cause scalding burns. Do not overfill pitcher. Always begin
blending at the lowest speed setting. Keep hands away from lid
openings to prevent burns.
30. Do not leave appliance unattended while in use.
31. Do not leave foreign objects in the blender, as this may damage
the blades and other components of the blender. Failure to
remove foreign objects from blender may cause injury.
32. Lids and tampers are not interchangeable between
different blenders.
SAVE THESE INSTRUCTIONS.
Read and save these safety guidelines.
Failure to adhere to these safety guidelines
may result in serious injury.
WARNING
1
IMPORTANT SAFEGUARDS
CAUTION
CAUTION
3
Page 7
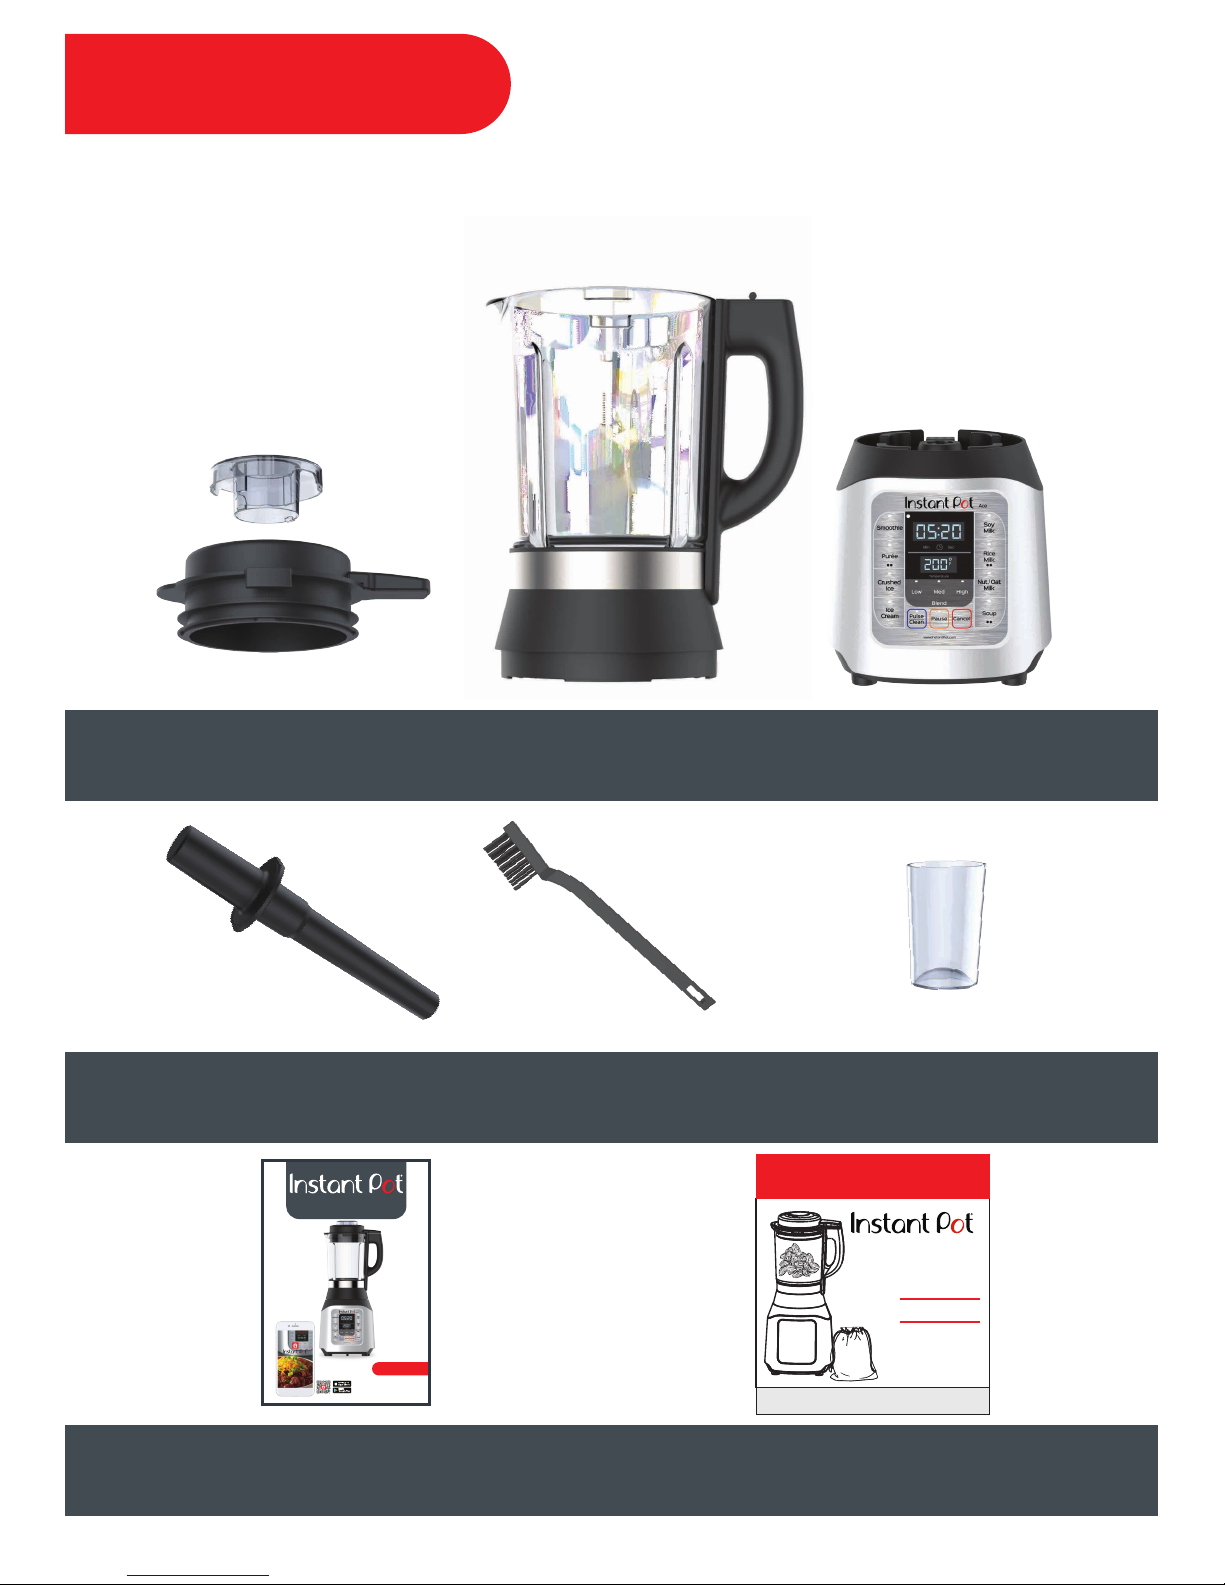
Before using your new Instant Pot Ace, please remove all items from
the box and read over all instructions carefully.
Glass PitcherLid Base
Food Tamper Cleaning Brush
User Manual
What’s Included
150 mL / 5 oz
Measuring Cup
Strainer Bag
4
Strainer Bag
Food Safe Bag with Drawstring
in: 11.75 x 7.75
cm: 29.85 x 19.69
LINT-FREE MATERIAL
VELVETY SMOOTH
FILTERED MILK
REUSABLE &
MACHINE WASHABLE
Ace
User Manual
Free Recipe App
Page 8
Temperature
Min Sec
Ace
1200
1400
ml
1000
800
1250
1500
1750
ml
1000
750
Soup
Cold
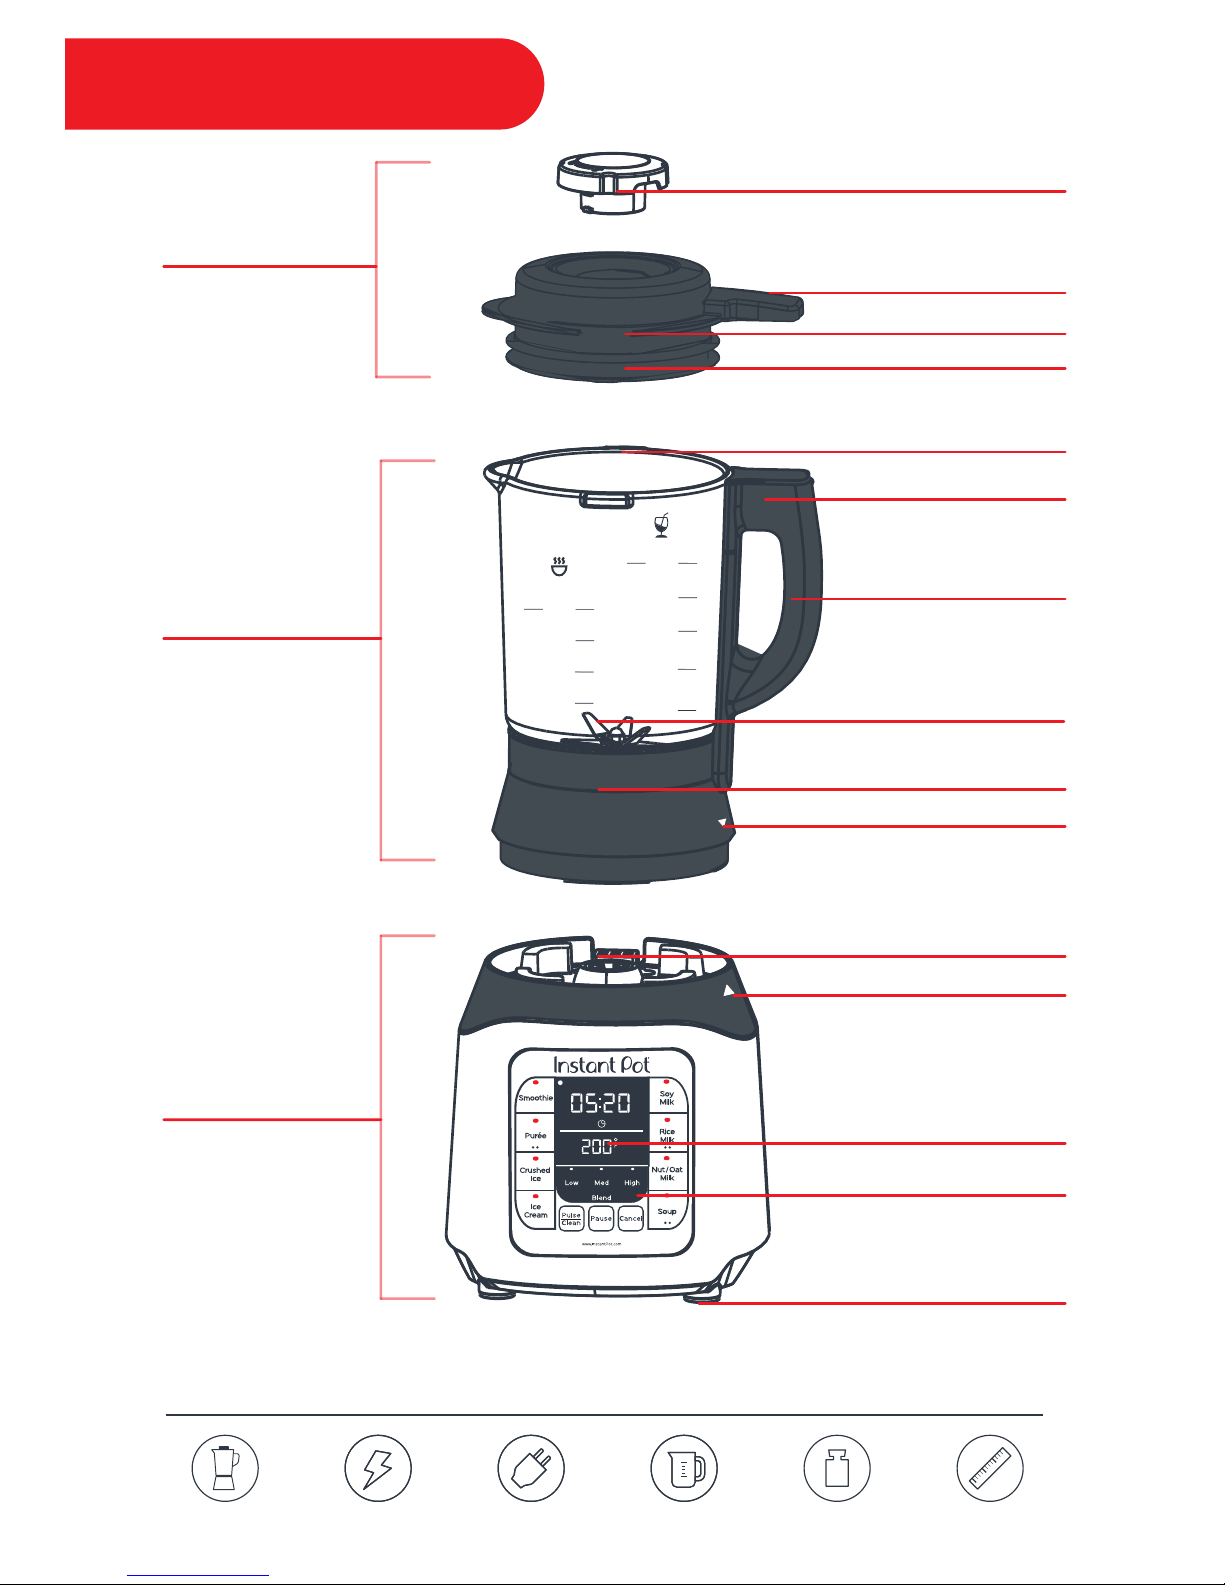
Product Overview
Product Specifications
Handle
Safety Lock
Lid Brace Catch
Lid Cap
Safety Lock
Lid Brace
Black Silicone Seal
8 Stainless
Steel Blades
Stainless Steel
Blade Coupler
Position Indicator
Position Indicator
Concealed
Heating Element
Non-Slip Foot Pads
Control Panel
Real-Time Cooking
Temperature Display
Blender Base
Glass Pitcher
Lid
5
11.7 lb
5.3 kg
700W Blending
600W Heating
120V ~ 60Hz 60 Ounces
1.75 Litres
in: 19.2H x 9.2W
cm: 48.7H x 23.4W
Model: Ace 60
Page 9
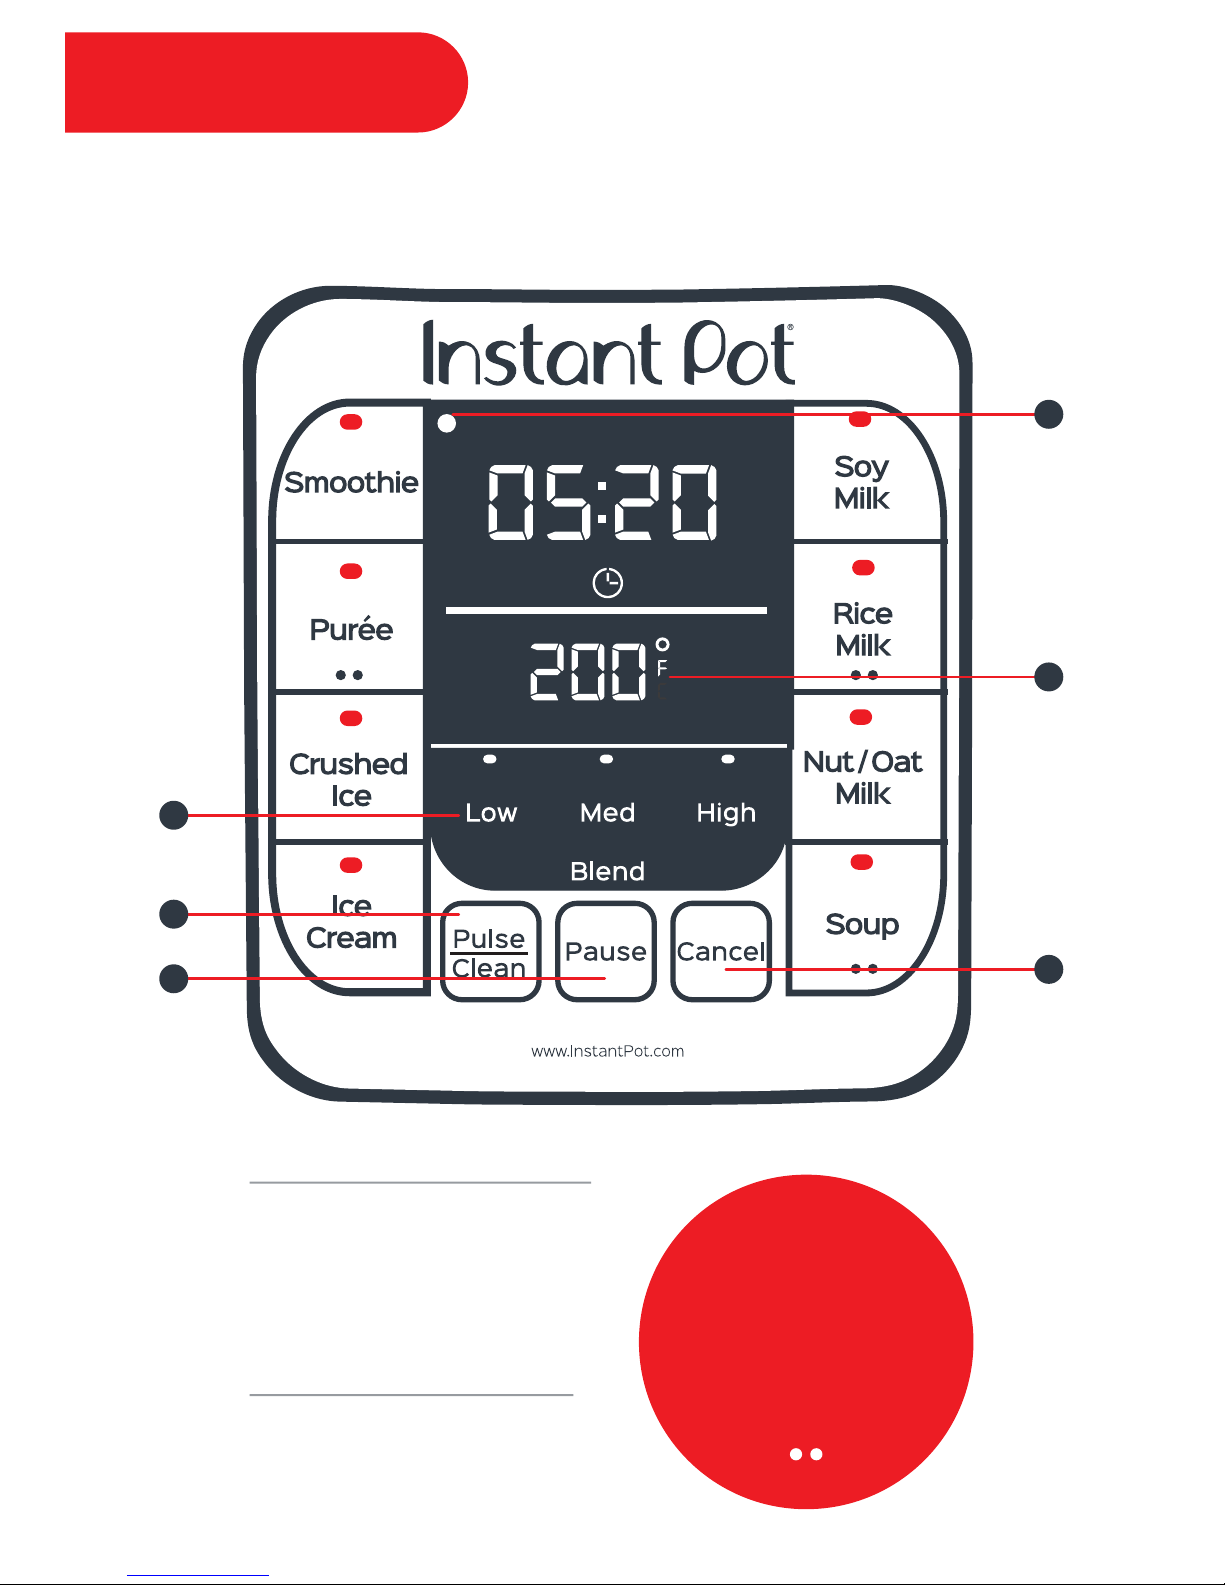
Temperature
Min Sec
Ace
Control Panel
Cold Blending Programs
Smoothie
Crushed Ice
Ice Cream
Nut / Oat Milk
Hot Blending Programs
• • Purée
Soy Milk
• • Rice Milk
• • Soup
The control panel on your Instant Pot Ace is comprised of an LED display, Manual
Blending Keys, Hot & Cold Blending Programs keys, and Control keys.
Blending
Program keys
with 2 dots can
toggle between
2 options.
6
1
4
3
2
5
6
Page 10

7
1
Manual Blending Keys
Low / Med / High: 3 manual blending speeds
Within 5 seconds, blender will beep 3 times and begin blending
at the selected speed.
2
Temperature: Fahrenheit & Celsius
To change the displayed temperature from °F to °C:
1. Press Cancel to ensure the blender is in Standby mode.
2. Press and hold Pause for 5 seconds — blender will beep
once and display the selected temperature.
3
Pulse / Clean
Short bursts of blending, ideal to break up larger chunks of food
or for cleaning.
Within 5 seconds, blender will beep 3 times and begin blending
in short bursts. Refer to “Care & Cleaning” for more information.
4
Pause
Pauses the blending program at any time. Useful when adding ingredients
mid-program. When selected, you will see -P- on the display.
Press again to resume the program.
Note: If the lid is removed during blending, the blender will automatically
Pause the program. When ready to resume, press the Pause key again.
5
Cancel
Stop the blending program at any time.
When selected, blender will return to Standby mode and will
display "OFF".
6
Error Indicator
If the blender encounters an error, the error indicator will blink and the
error code will be displayed.
Page 11

Blending Programs Guidelines
Programs Time Foods
Fresh or frozen fruits, berries,
seeds, yogurt & more
Frozen fruits or berries, liquid
Designed to crush ice
Almond, oat, cashew, pumpkin
seed, flax, hazelnut, hemp
Hard vegetables – carrots, onion,
Brussels sprouts
Soft fruits & vegetables –
tomatoes, spinach
Brown rice milk
White rice milk
Creamy soup
Chunky soup (blending disabled)
Soy milk
1:38
(Minutes : Seconds)
1:20
0:30
4:36
2:56
0:24
23:30
8:30
22:44
20:00
28:30
Smoothie
Ice Cream
Crushed Ice
Nut / Oat Milk
Puree
Rice Milk
Soy Milk
Soup
Cold Blending Programs
Hot Blending Programs
8
Page 12
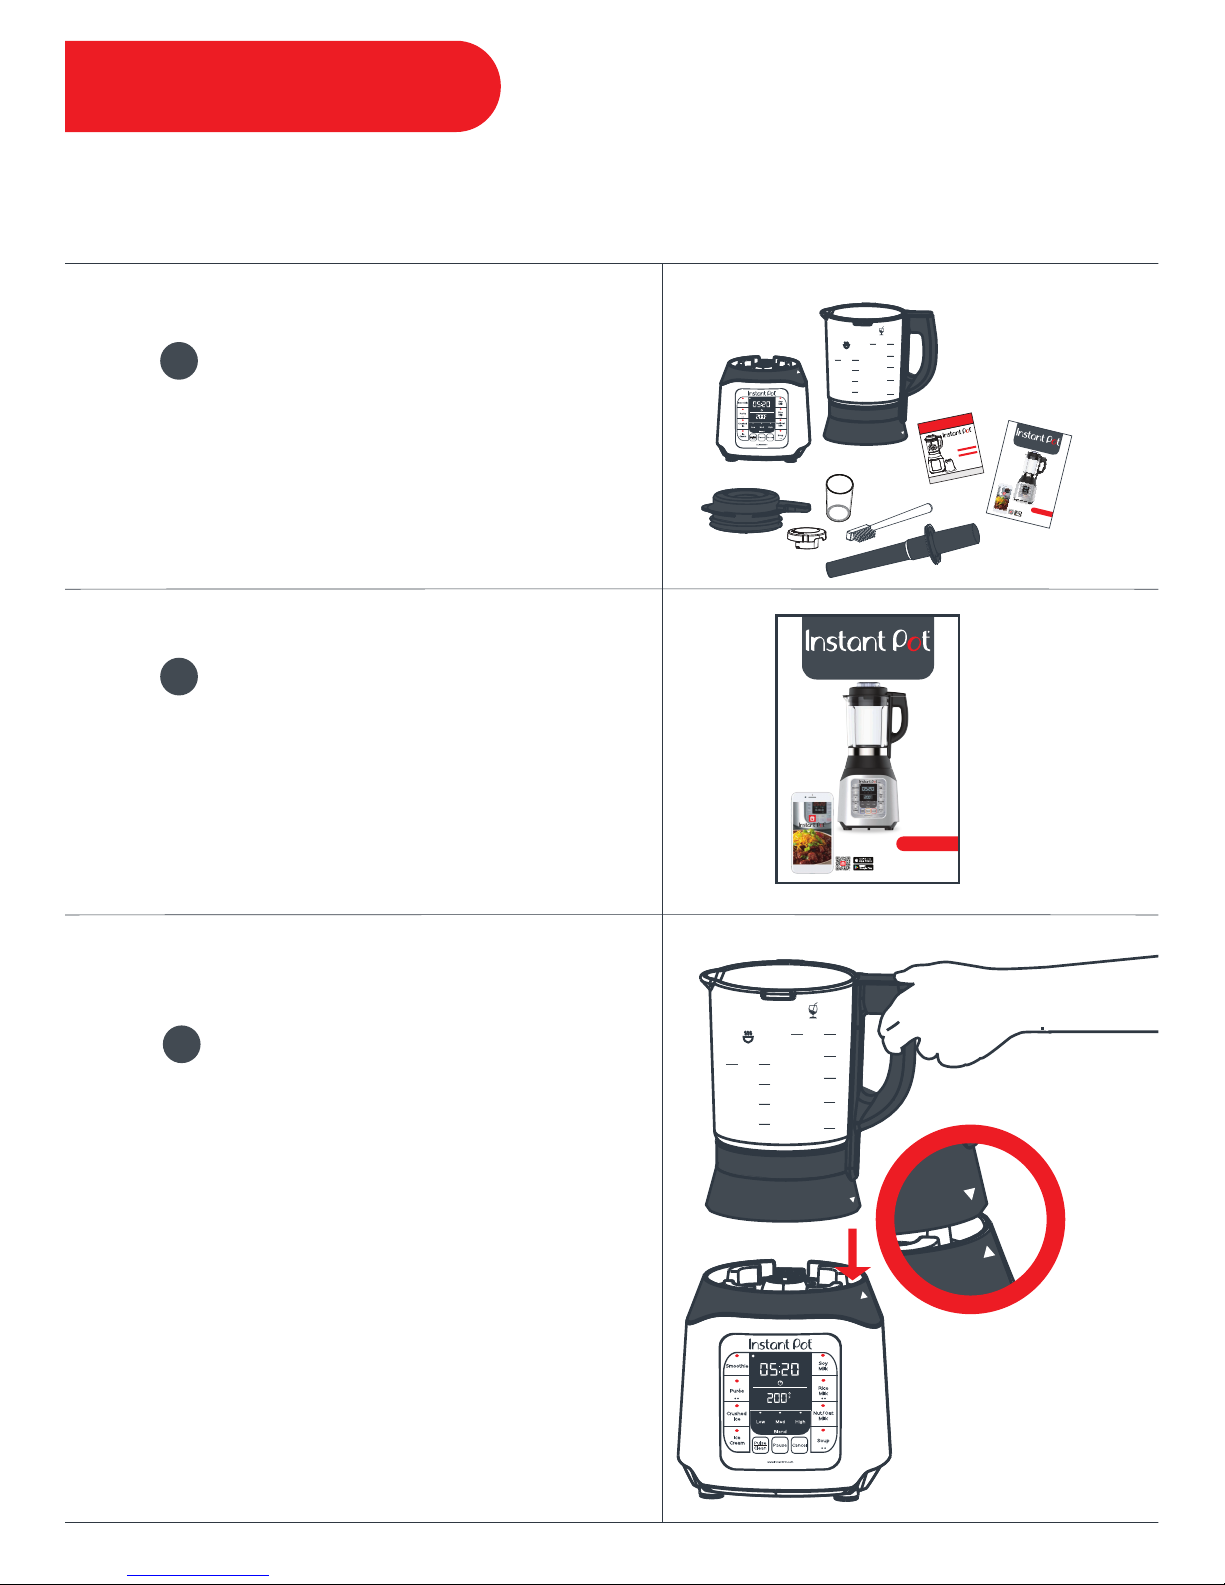
Temperature
Min Sec
Ace
1200
1400
ml
1000
800
1250
1500
1750
ml
1000
750
Soup
Cold
Getting Started
Unbox
Remove all packaging material from
in and around the blender.
1
Read Material
Read manual carefully and
completely and save for
reference.
2
Set Up Blender
Place the pitcher on the blender
base by aligning the position
indicator near the bottom of the
pitcher to the position indicator near
the top of the base.
Note: The handle will point directly to
the right.
3
9
Before using your Instant Pot Ace, clean the pitcher and lid
using the following steps.
1200
1400
ml
1000
800
1250
1500
1750
ml
1000
750
Soup
Cold
Ace
User Manual
Free Recipe App
Temperature
Min Sec
Ace
Ace
User Manual
Free Recipe App
Strainer Bag
Food Safe Bag with Drawstring
in: 11.75 x 7.75
cm: 29.85 x 19.69
LINT-FREE MATERIAL
VELVETY SMOOTH
FILTERED MILK
REUSABLE &
MACHINE WASHABLE
Page 13
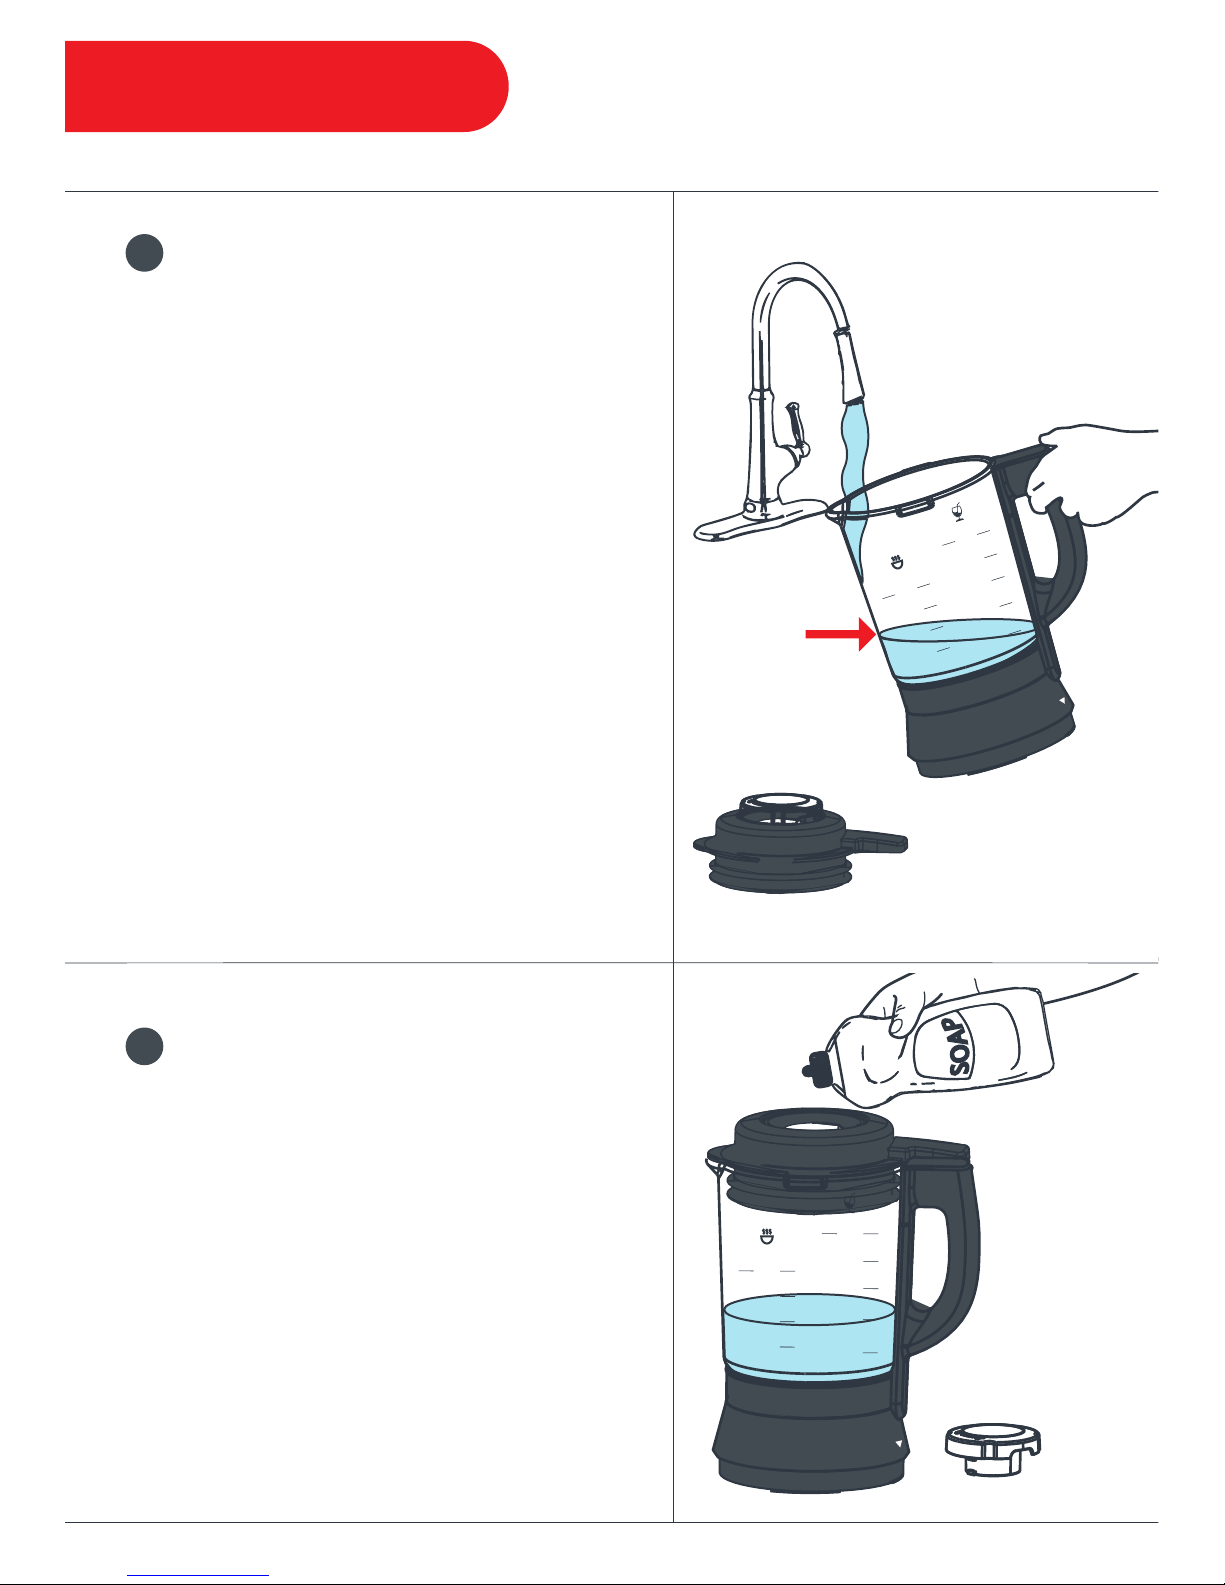
Getting Started
Fill the Pitcher with Water
Turn the lid counter-clockwise and lift to
remove the lid from the pitcher.
When the lid is removed from the pitcher
the display will indicate "Lid".
When the pitcher is removed from the
blender base the display will remain
blank.
Add 1000mL of hot water to the pitcher.
Place the lid on the pitcher and turn
clockwise until the safety locks are
aligned.
4
Add Dish Soap
Turn the lid cap counter-clockwise to
remove the lid cap from the lid.
Add a few drops of dish soap to the
pitcher.
Fit the lid cap into the lid and turn it
clockwise until it is secure.
5
10
1200
1400
ml
1000
800
1250
1500
1750
ml
1000
750
Soup
Cold
1200
1400
ml
1000
800
1250
1500
1750
ml
1000
750
Soup
Cold
Page 14
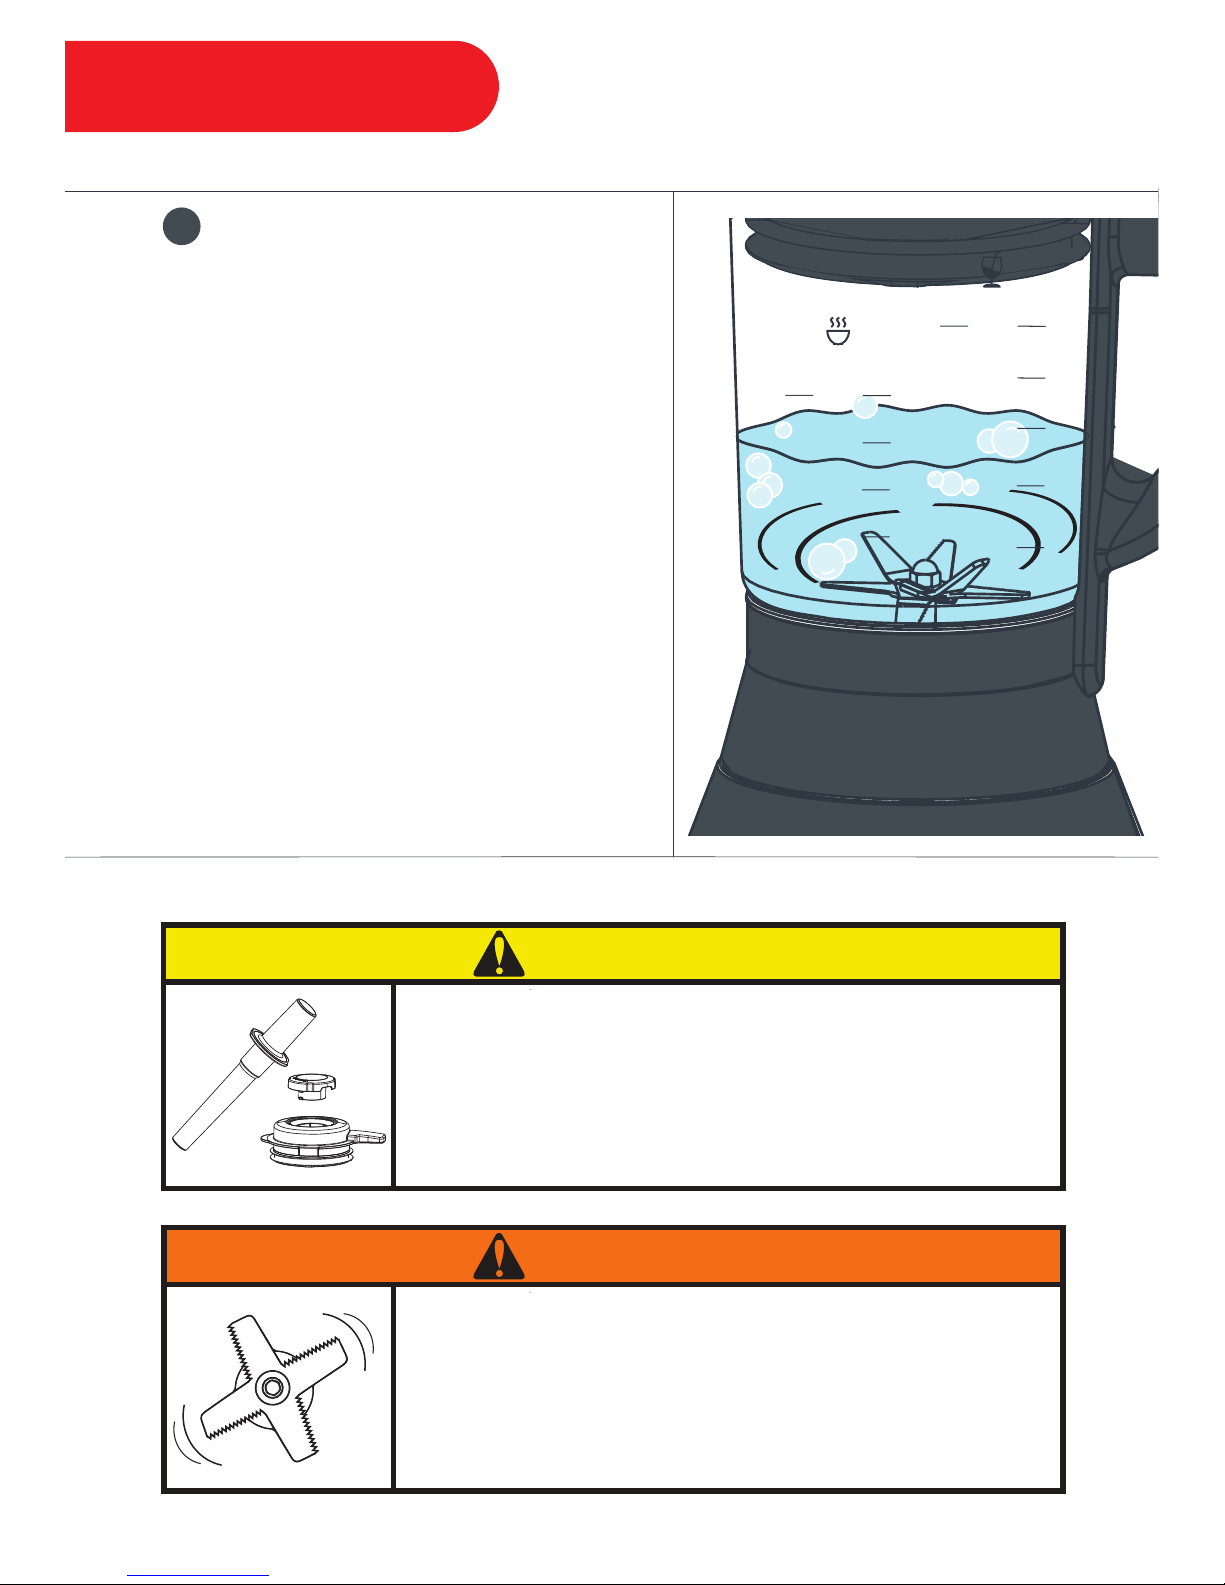
Getting Started
Select Program
Press Pulse/Clean.
The blender will run 4 cycles of
blending at high speed for 10
seconds, pausing for 4 seconds
between pulses.
Discard soapy water after the last
cycle has completed and rinse with
clear water.
Start blending!
6
11
Lids and tampers are not interchangeable between
different blender models.
Only use the accessories and small parts included
with purchase.
CAUTION
Do not reach into pitcher while blender is in use.
Rotating blades can cause damage and serious injury. Do not
put hands, spatulas, or any other utensil into the pitcher while
the blender is running.
WARNING
1200
1400
ml
1000
800
1250
1500
1750
ml
1000
750
Soup
Cold
Page 15
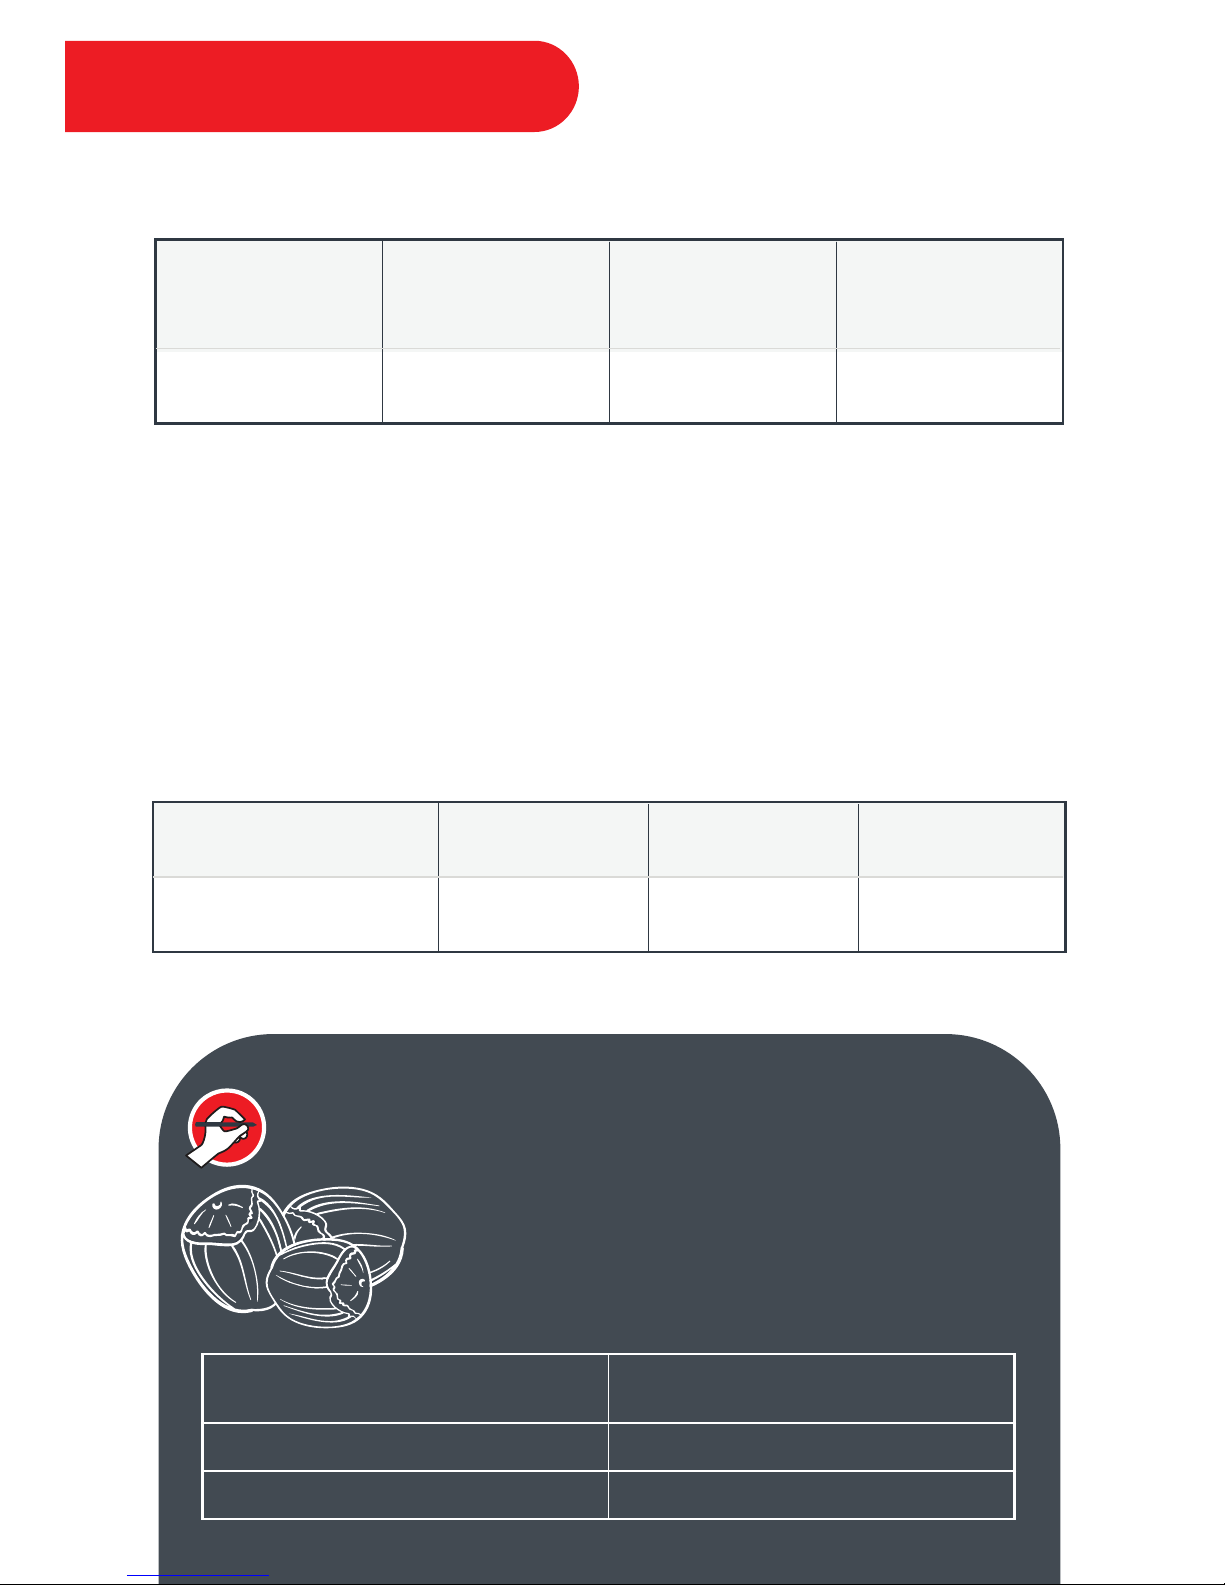
Blending Programs
Manual Blending
*Minimum and maximum content guidelines are general recommendations by
Instant Brands Inc. For more specific instruction, please refer to a trusted recipe.
Select Low / Med / High to choose your desired blending speed. After 5
seconds the blender will beep 3 times and begin blending. You may change
your blending speed at any time without interrupting the blending cycle.
The blender will automatically stop blending after 3 minutes to prevent
overheating. To continue blending, reselect a blending speed.
Blending Speed
Display 2 5 8
Low Med
High
Minimum*
Liquid
Maximum
*
Cold Contents
Maximum
*
Hot Contents
Maximum
*
Dry Contents
1/4 cup / 60mL / 2oz 1600mL / 54oz 1400mL / 48oz 1000mL / 32oz
INSTANT TIP: Blending Dry Ingredients
When blending dry goods, make sure the
pitcher, lid, and blades are completely dry.
As ingredients break down, you may increase
the blending speed.
Size of Dry Ingredient Manual Blending Speed
Larger than ½ inch / 1.25 cm Med
Smaller than ½ inch / 1.25 cm High
12
Page 16
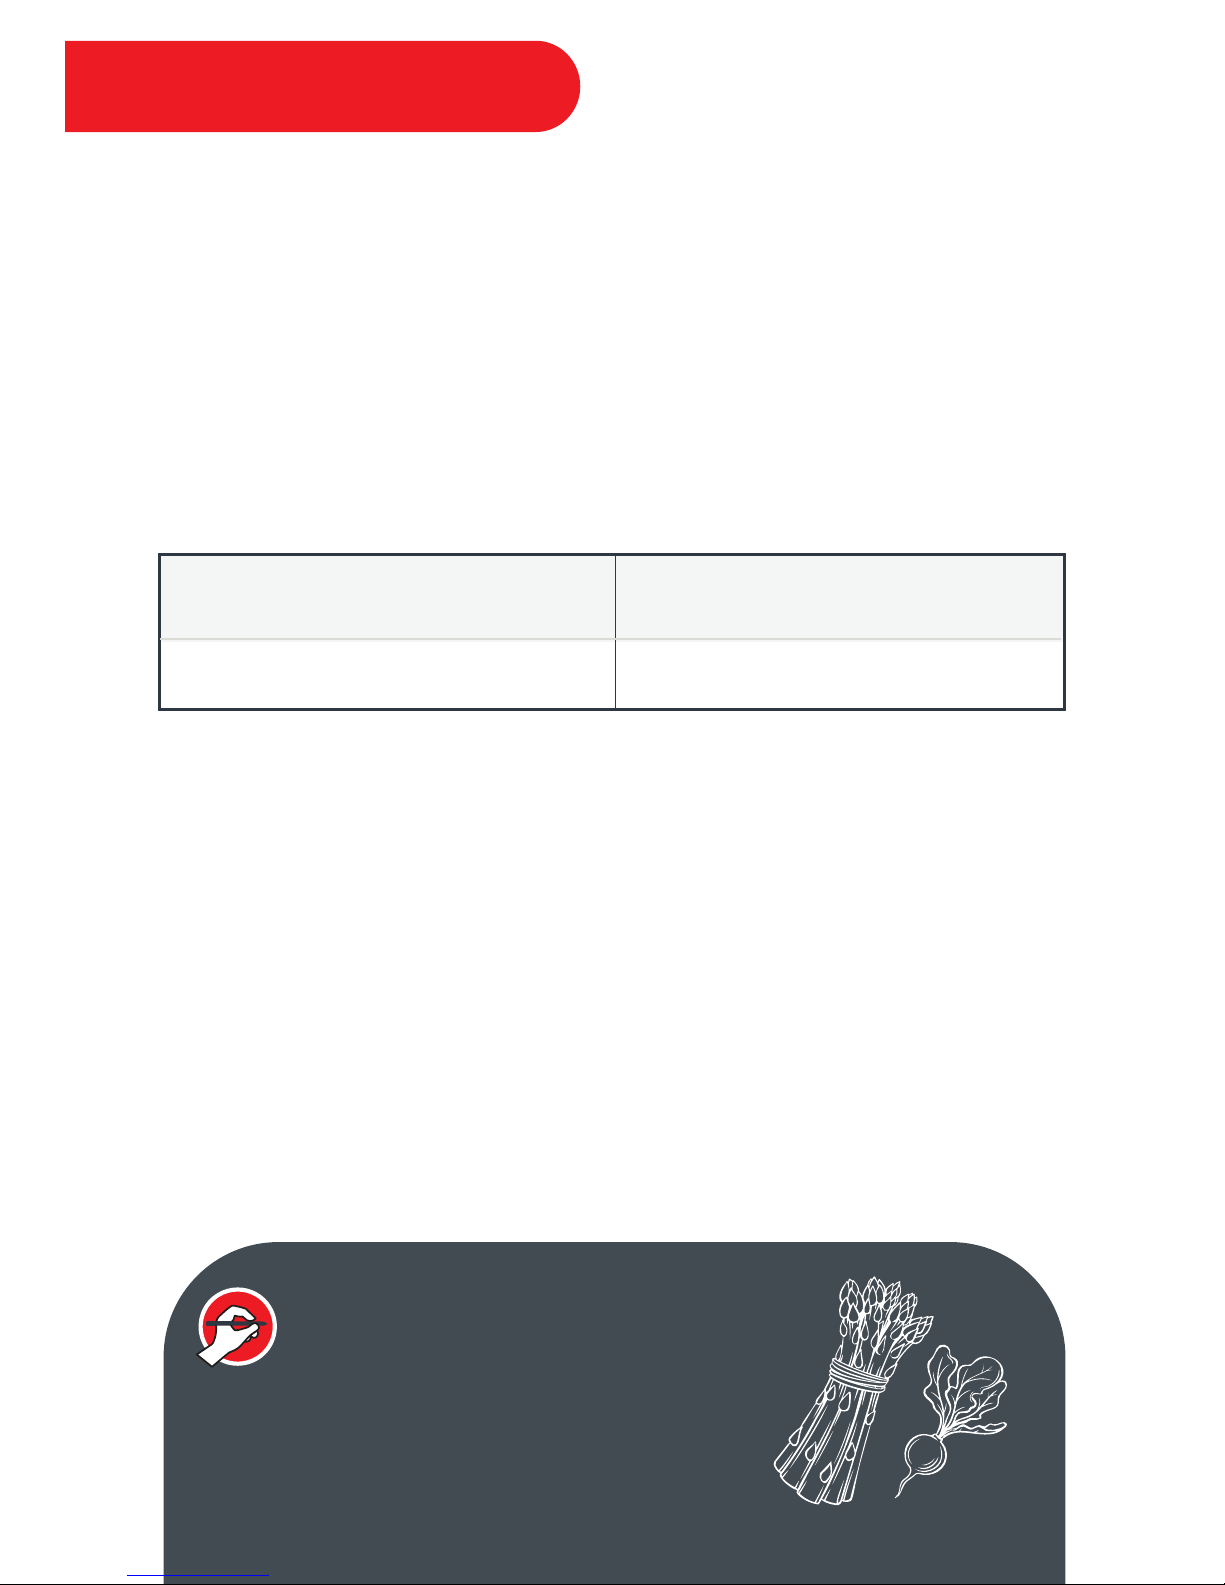
INSTANT TIP: Extra Blend
Some food ingredients take longer to
break down than others. Run a manual
blending program after adding firm or
woody ingredients.
Cold Blending
Cold blending programs blend at different intervals throughout the
countdown, breaking down frozen fruits & vegetables, nuts, seeds, oats, and
more.
Use these programs to create smoothies, to crush ice for summer drinks, and
to create frozen yogurt and small-batch ice cream.
*Minimum and maximum content guidelines are general recommendations
by Instant Brands Inc. For more specific instruction, please refer to a trusted
recipe.
13
Minimum* Liquid
Maximum
*
Cold Contents
1/4 cup (60mL / 2oz) 1600mL / 54oz
Blending Programs
Page 17
Temperature
Min Sec
Ace
1200
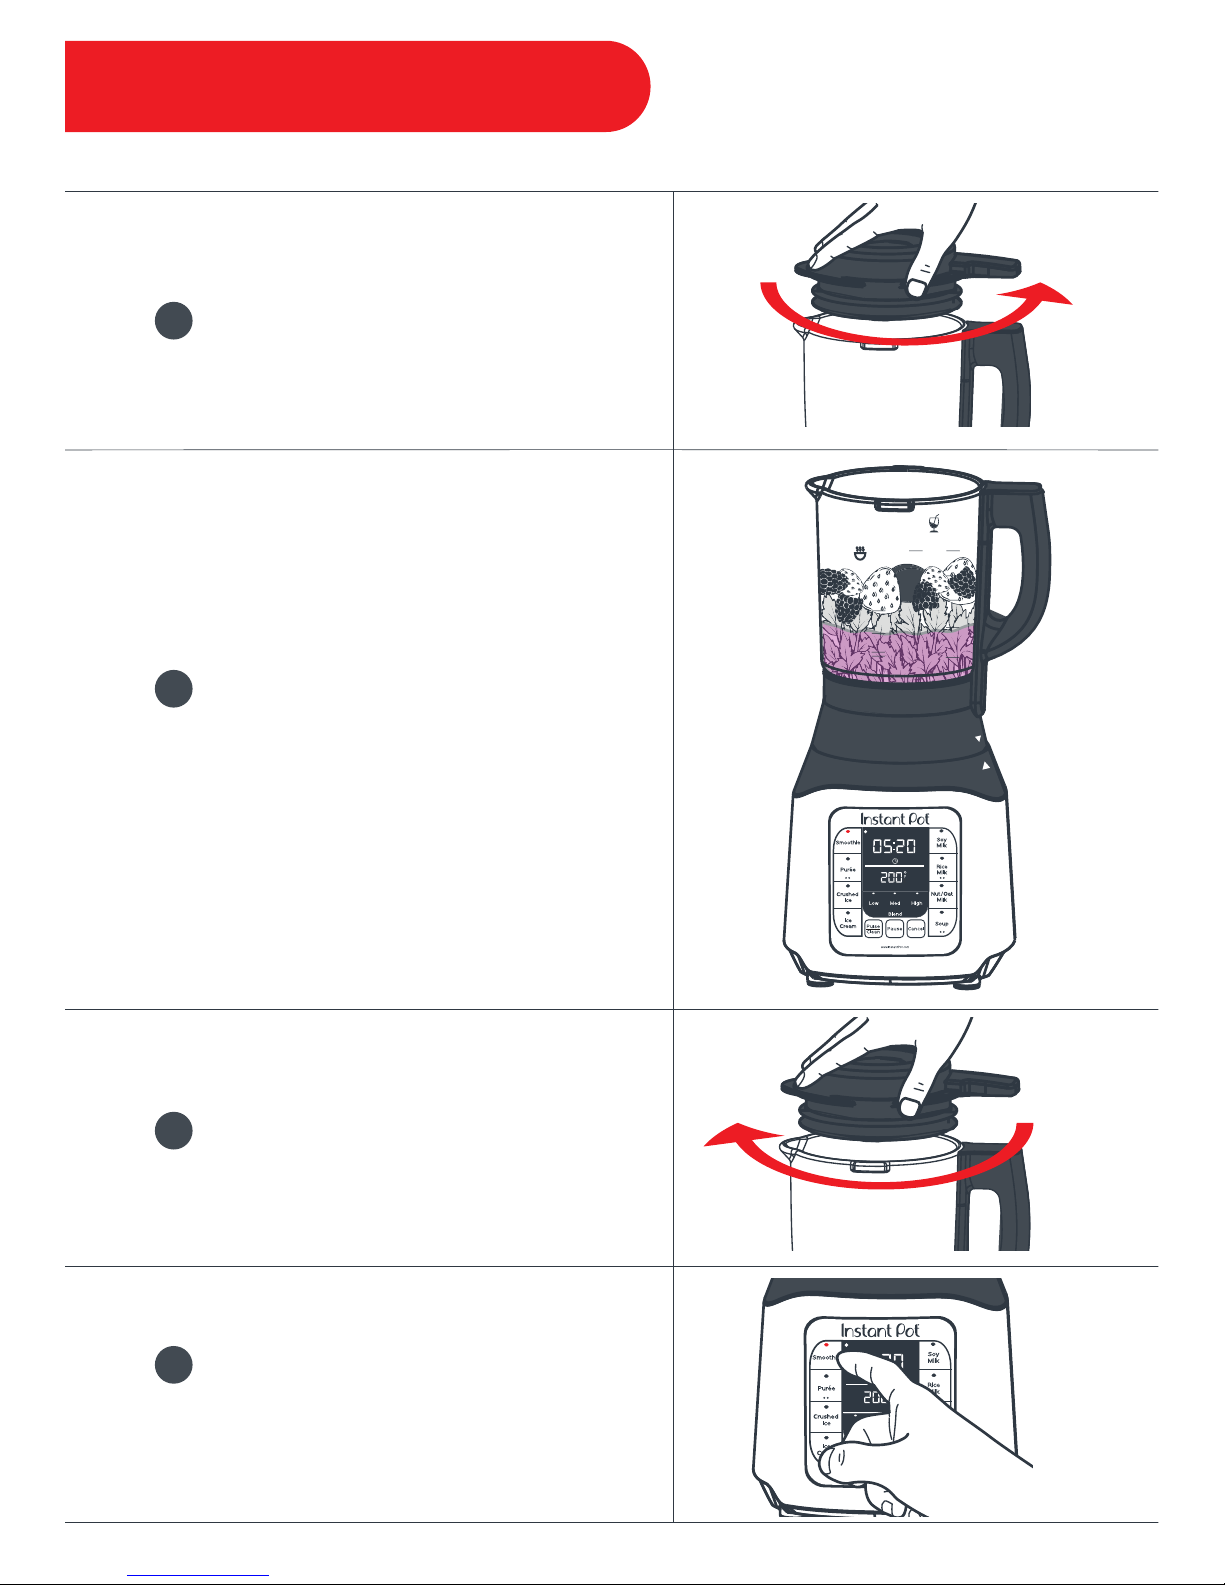
Steps to Cold Blending
Remove the lid from the pitcher.
1
“Stack” recipe ingredients in
the pitcher. Refer to “Stacking
Smoothies”.
2
Secure the lid to the pitcher.
3
Select your desired cold
blending program
(ex: Smoothie).
4
14
Temperature
Min Sec
Ace
1200
1400
ml
1000
800
1250
1500
1750
ml
1000
750
Soup
Cold
Page 18
Temperature
Min Sec
1200
1400
ml
1000
800
1250
1500
1750
ml
1000
750
Soup
Cold
Temperature
Min Sec
Ace
1200
1400
ml
1000
800
1250
1500
1750
ml
1000
750
Soup
Cold
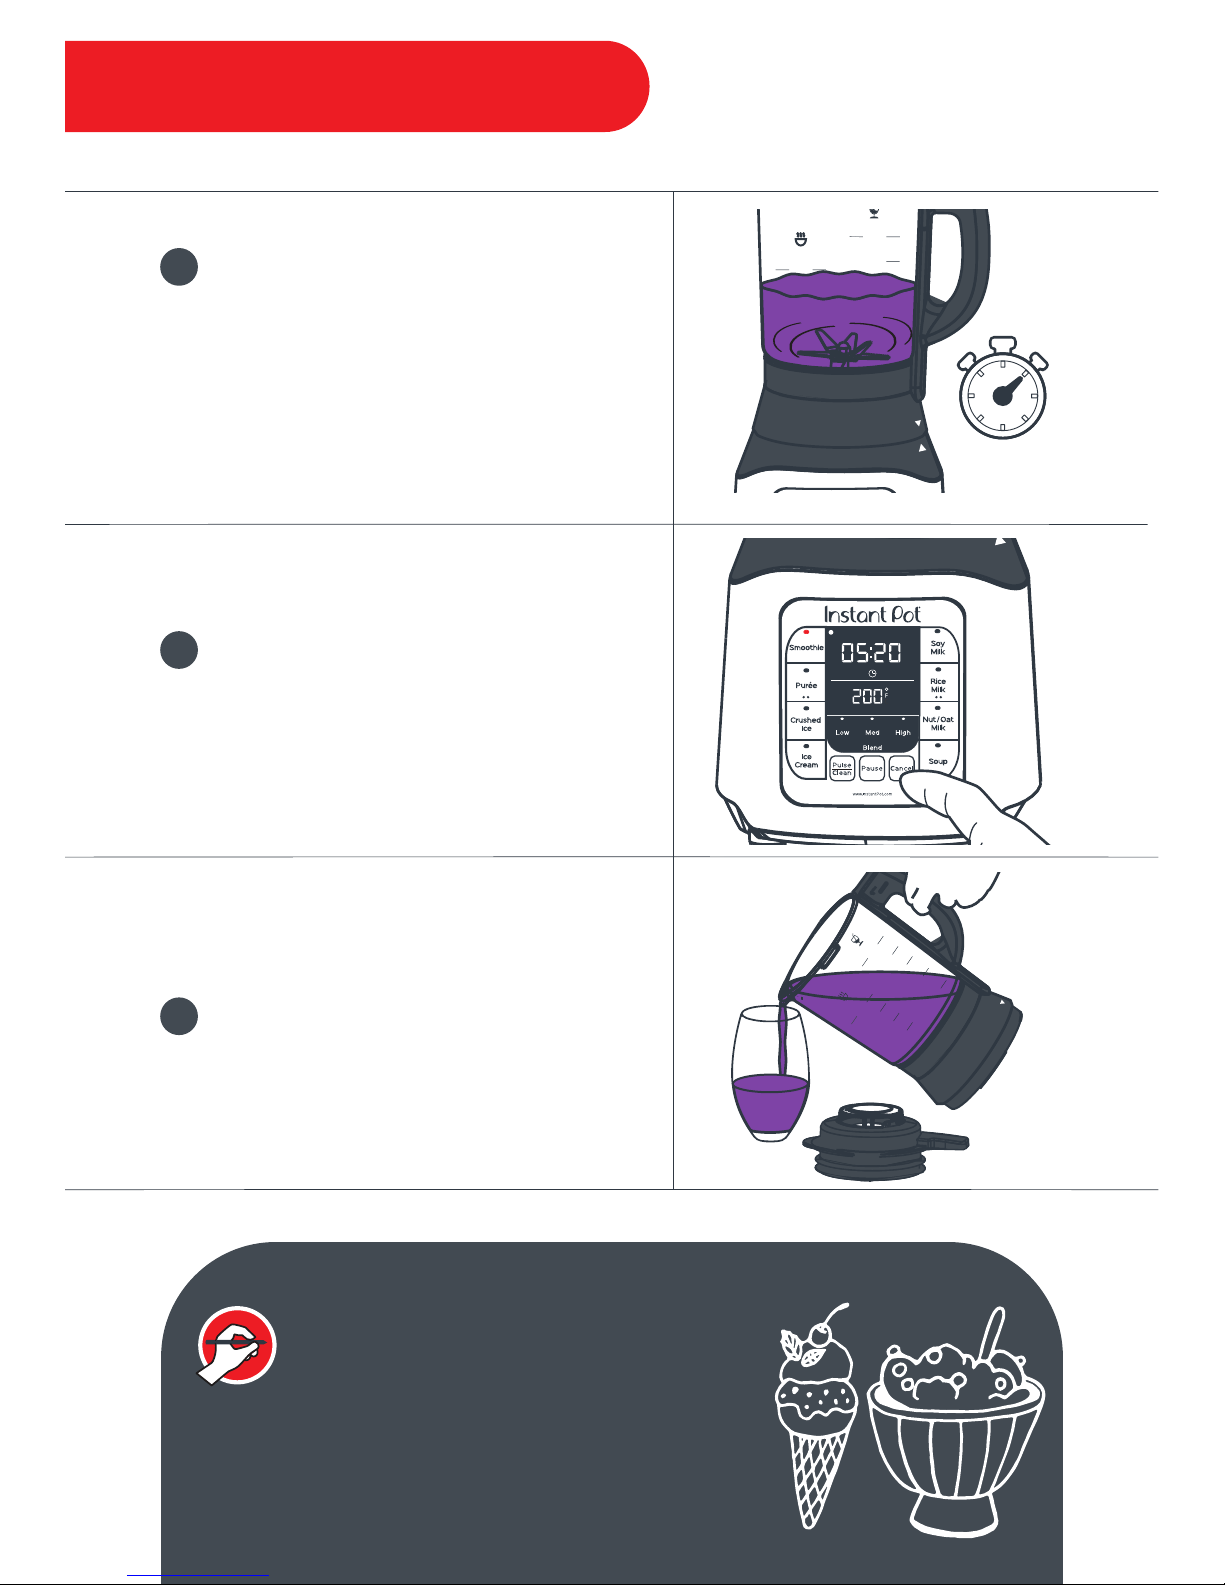
After 5 seconds the blender
will beep 3 times and begin.
The blades will pulse
intermittently as the timer
counts down.
5
Press Cancel to stop blending,
or wait for the countdown
to complete.
6
Remove lid, pour, and serve.
7
15
INSTANT TIP: Thick Blend
When blending thick contents,
do not fill the pitcher higher than
1000mL to avoid overheating the motor.
Steps to Cold Blending
Page 19
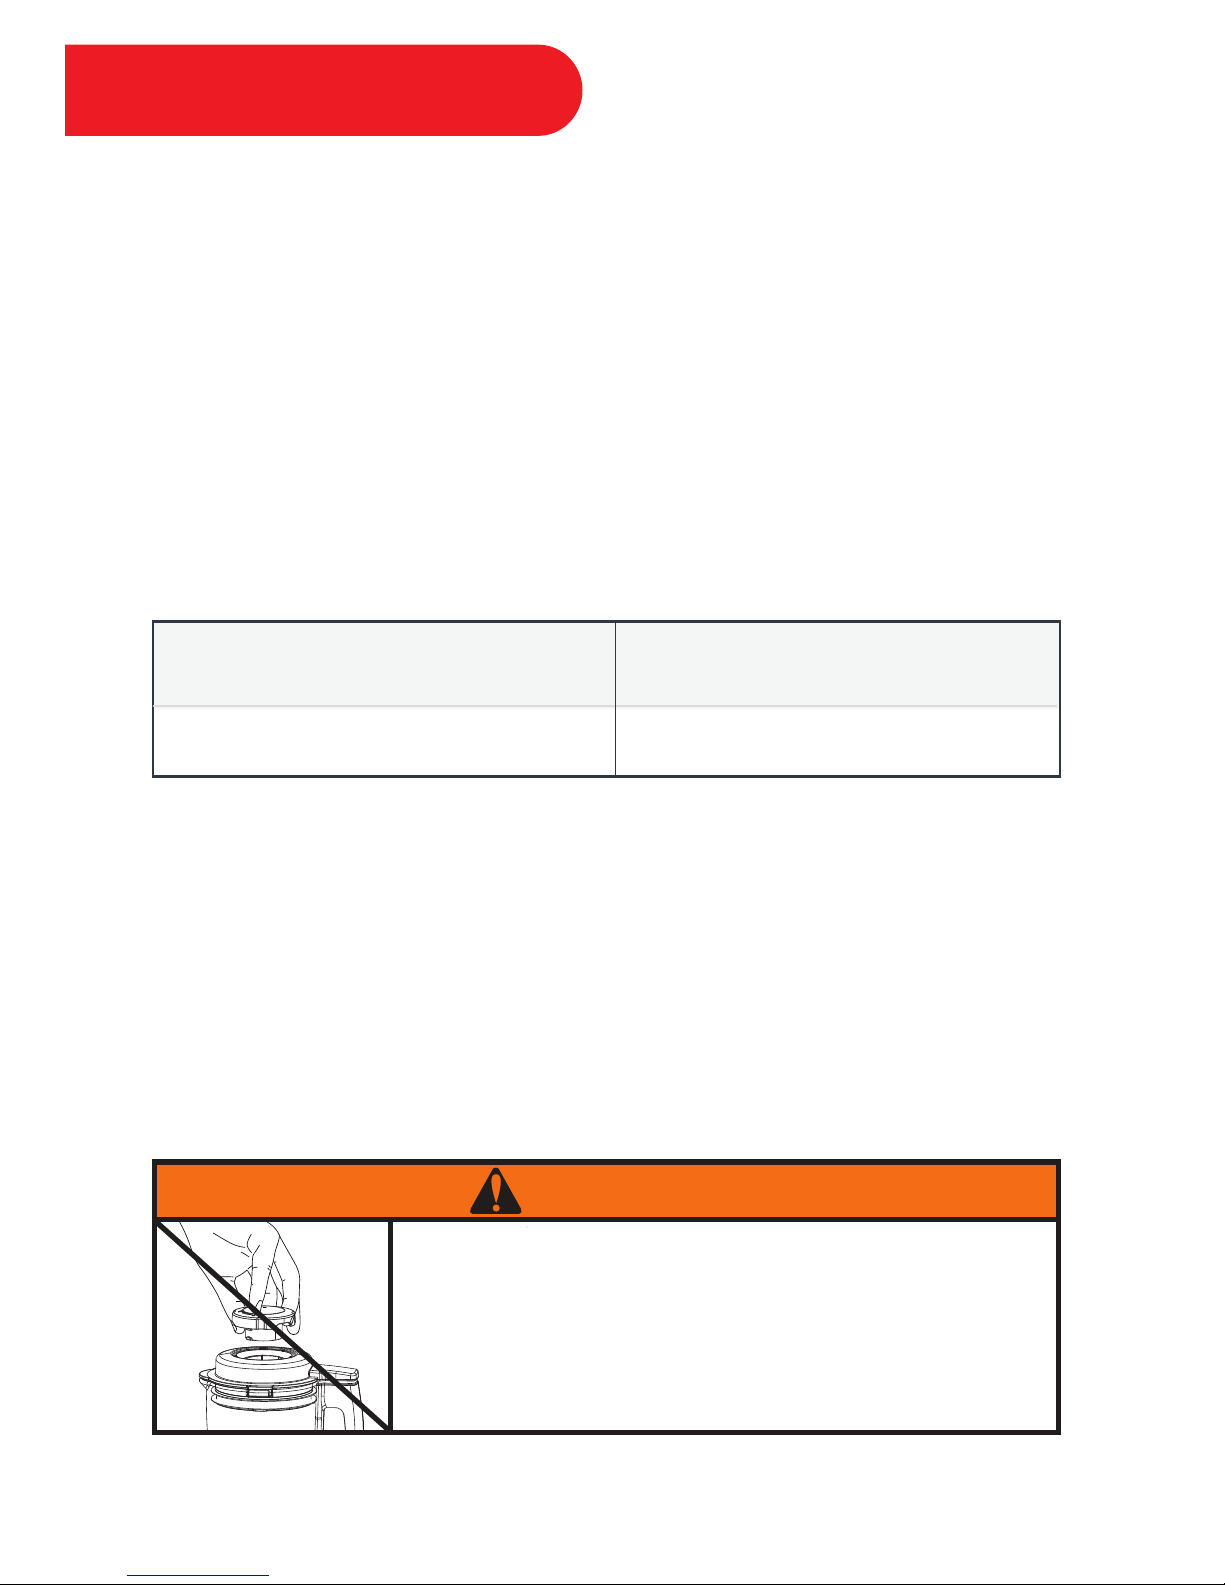
Hot Blending
Hot blending programs combine boiling and blending for optimal one-pitcher
performance or meals. The Instant Pot Ace is capable of cooking ingredients
from fresh, as well as blending pre-steamed or cooked ingredients into soups,
purées, baby food and more.
These programs apply a gentle-blending start, then add an intermittent
quick-stir motion to agitate food contents throughout the cooking program.
Minimum Liquid
Maximum Hot Contents
1/4 cup (60mL / 2oz)
1400mL / 48oz
16
Blending Programs
Removing the lid cap when blending hot contents may result in
scalding injury.
Turn the blender OFF and remove the lid completely before
attempting to tamp hot contents.
WARNING
Page 20
Temperature
Min Sec
Ace
Temperature
Min Sec
Ace
1200
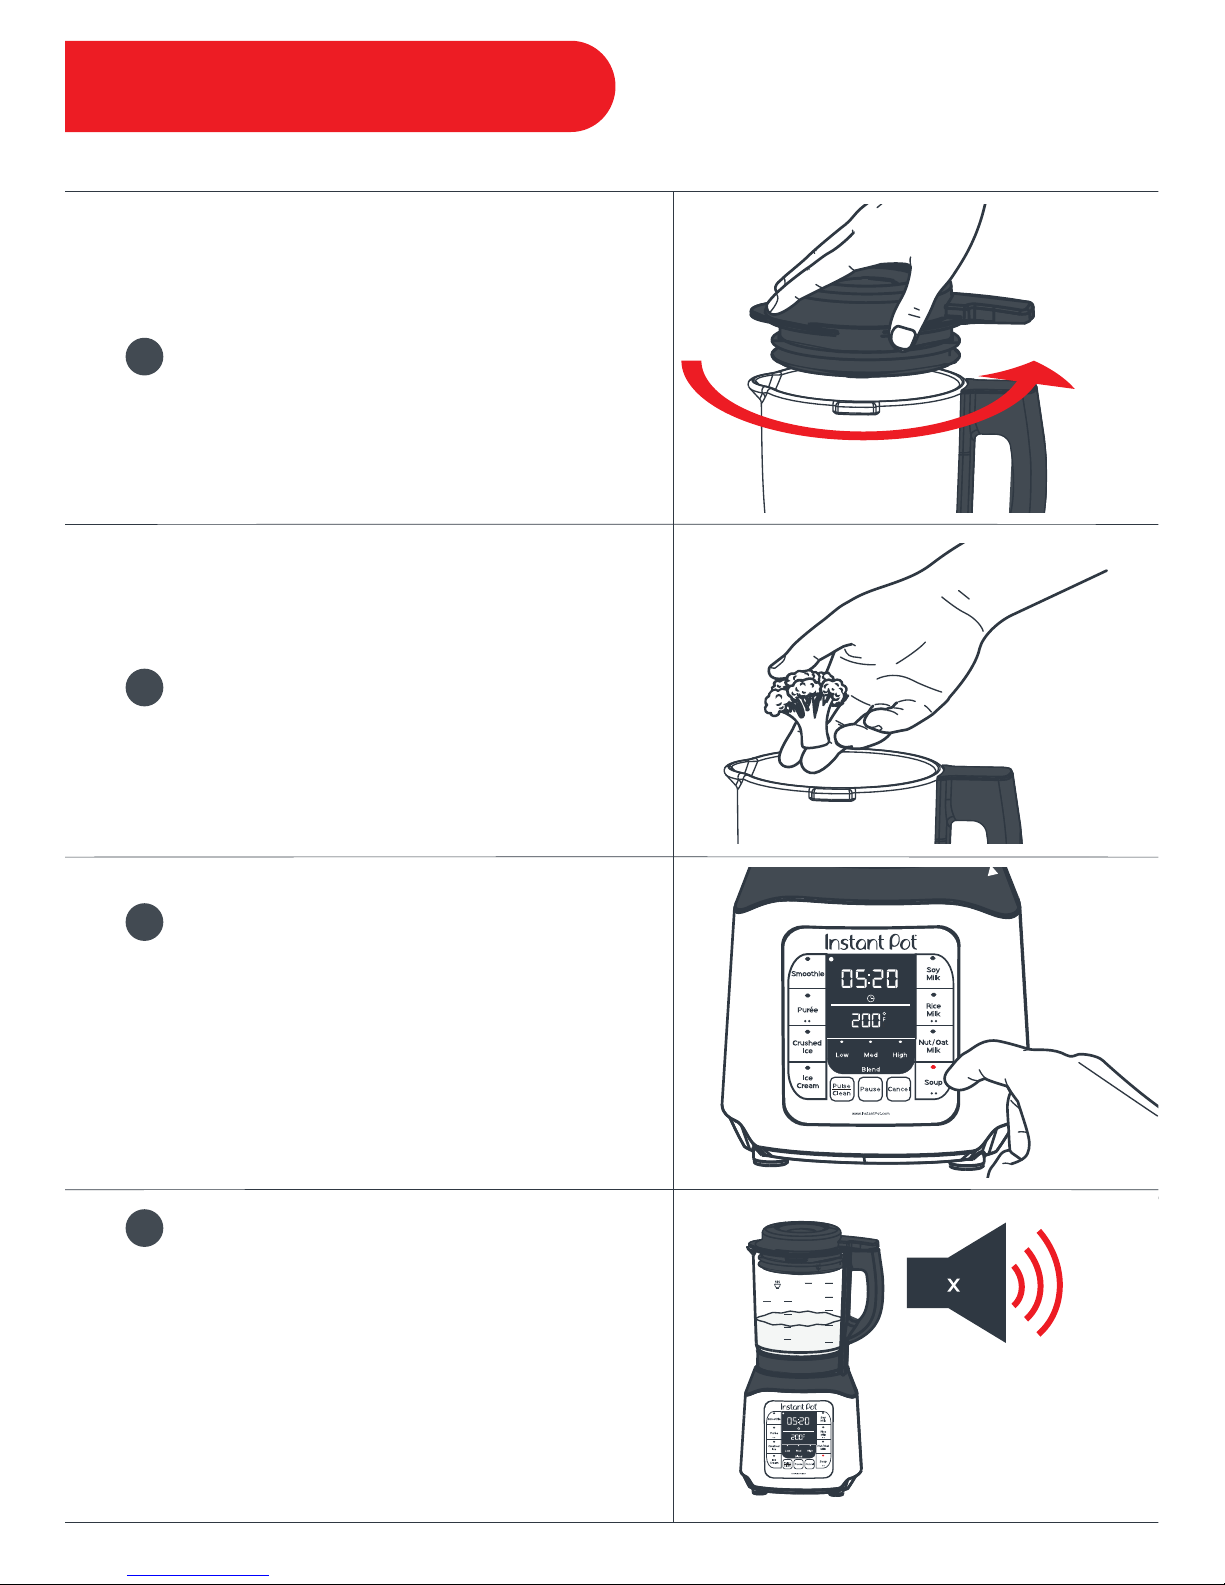
Steps to Hot Blending
Remove the lid from the pitcher.
1
Fill the pitcher with recipe ingredients.
Secure the lid to the pitcher.
2
Select your desired hot blending
program (ex: Soup).
If applicable, press the same key again to
toggle between options 2 and 1. Refer to
"Blending Program Guidelines".
3
After 5 seconds the blender will beep 3
times and begin.
The display will indicate real-time
temperature as the contents heat. The
cook time countdown will begin once
the target temperature is reached.
4
17
3
1200
1400
ml
1000
800
1250
1500
1750
ml
1000
750
Soup
Cold
Page 21
Temperature
Min Sec
1200
1400
ml
1000
800
1250
1500
1750
ml
1000
750
Cold
1200
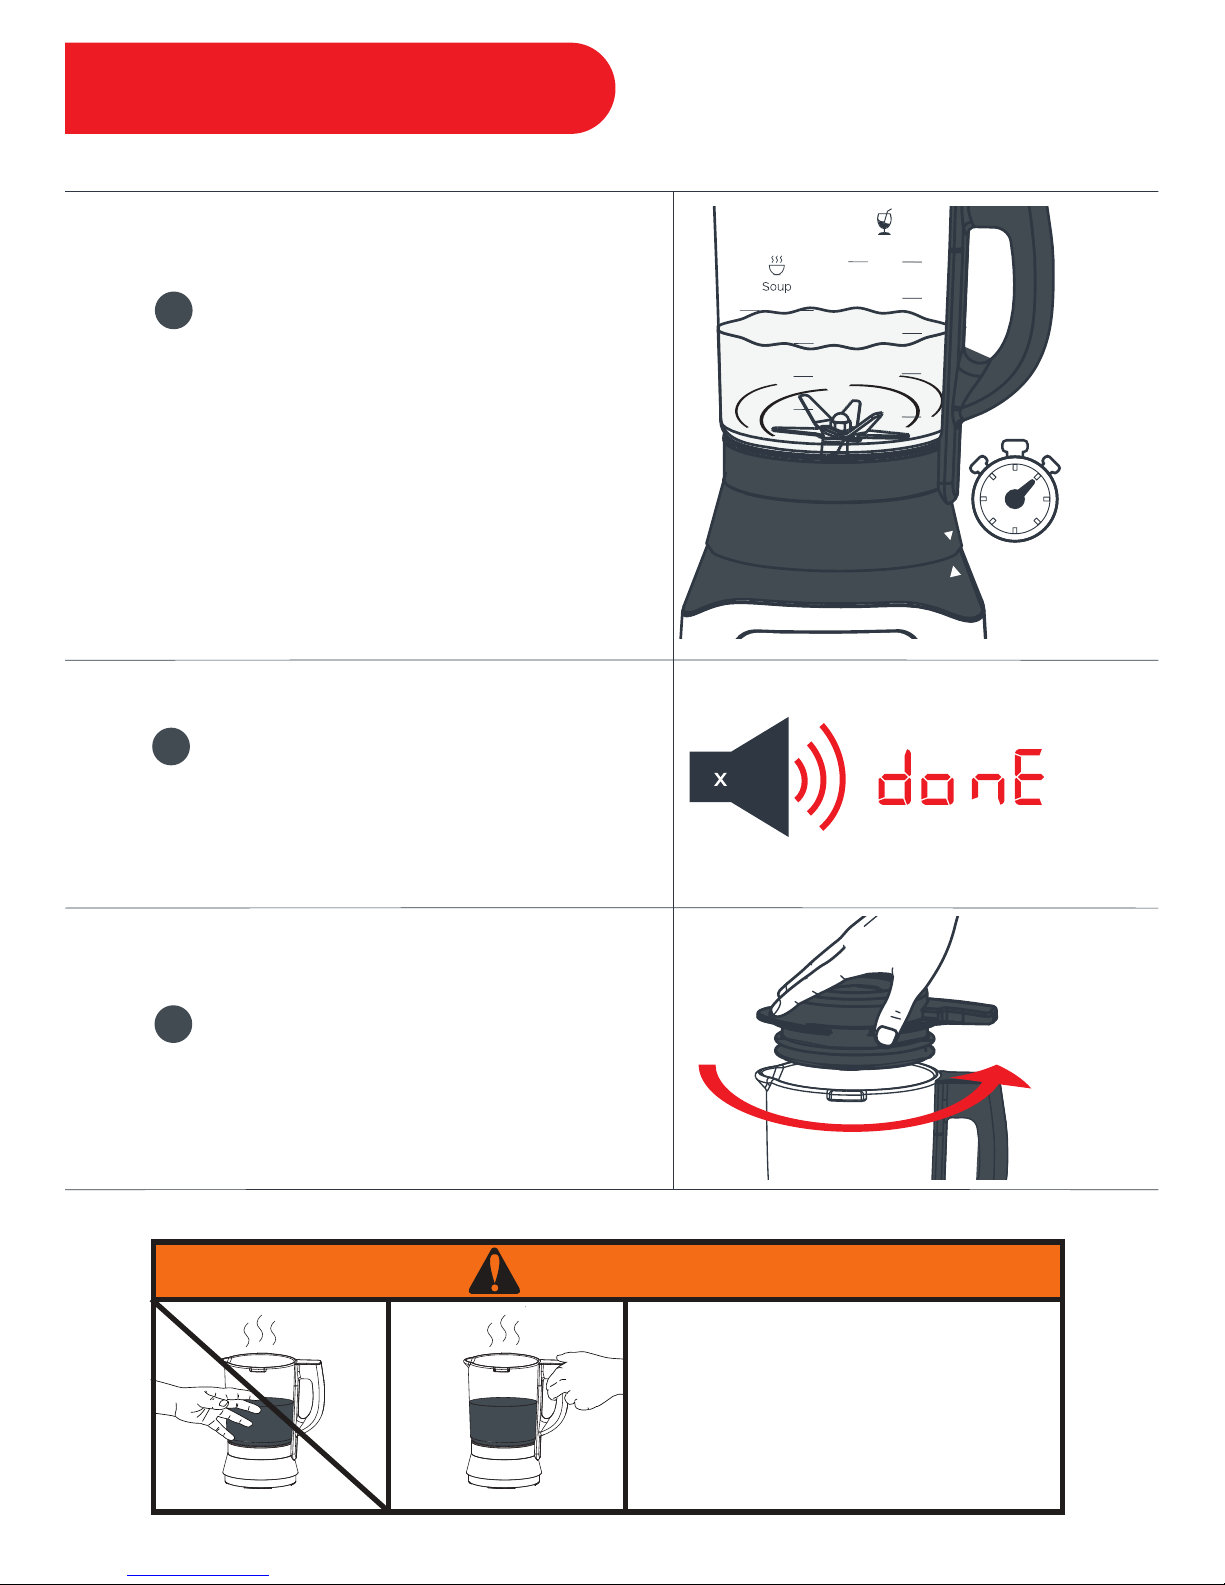
The blades will pulse intermittently as
the blender heats as well as
throughout the countdown.
Note: You may see the temperature drop
after the blender pulses and the hot
contents move to the top; this is normal.
5
When the program has completed,
the blender will beep 10 times and
the display will show “donE”.
6
Carefully remove the lid, pour
and serve.
7
The pitcher will be hot during and after
cooking. To avoid burns, do not touch
the hot glass pitcher.
Use the handle on the side of the
pitcher to carry and pour.
WARNING
10
18
Steps to Hot Blending
Page 22
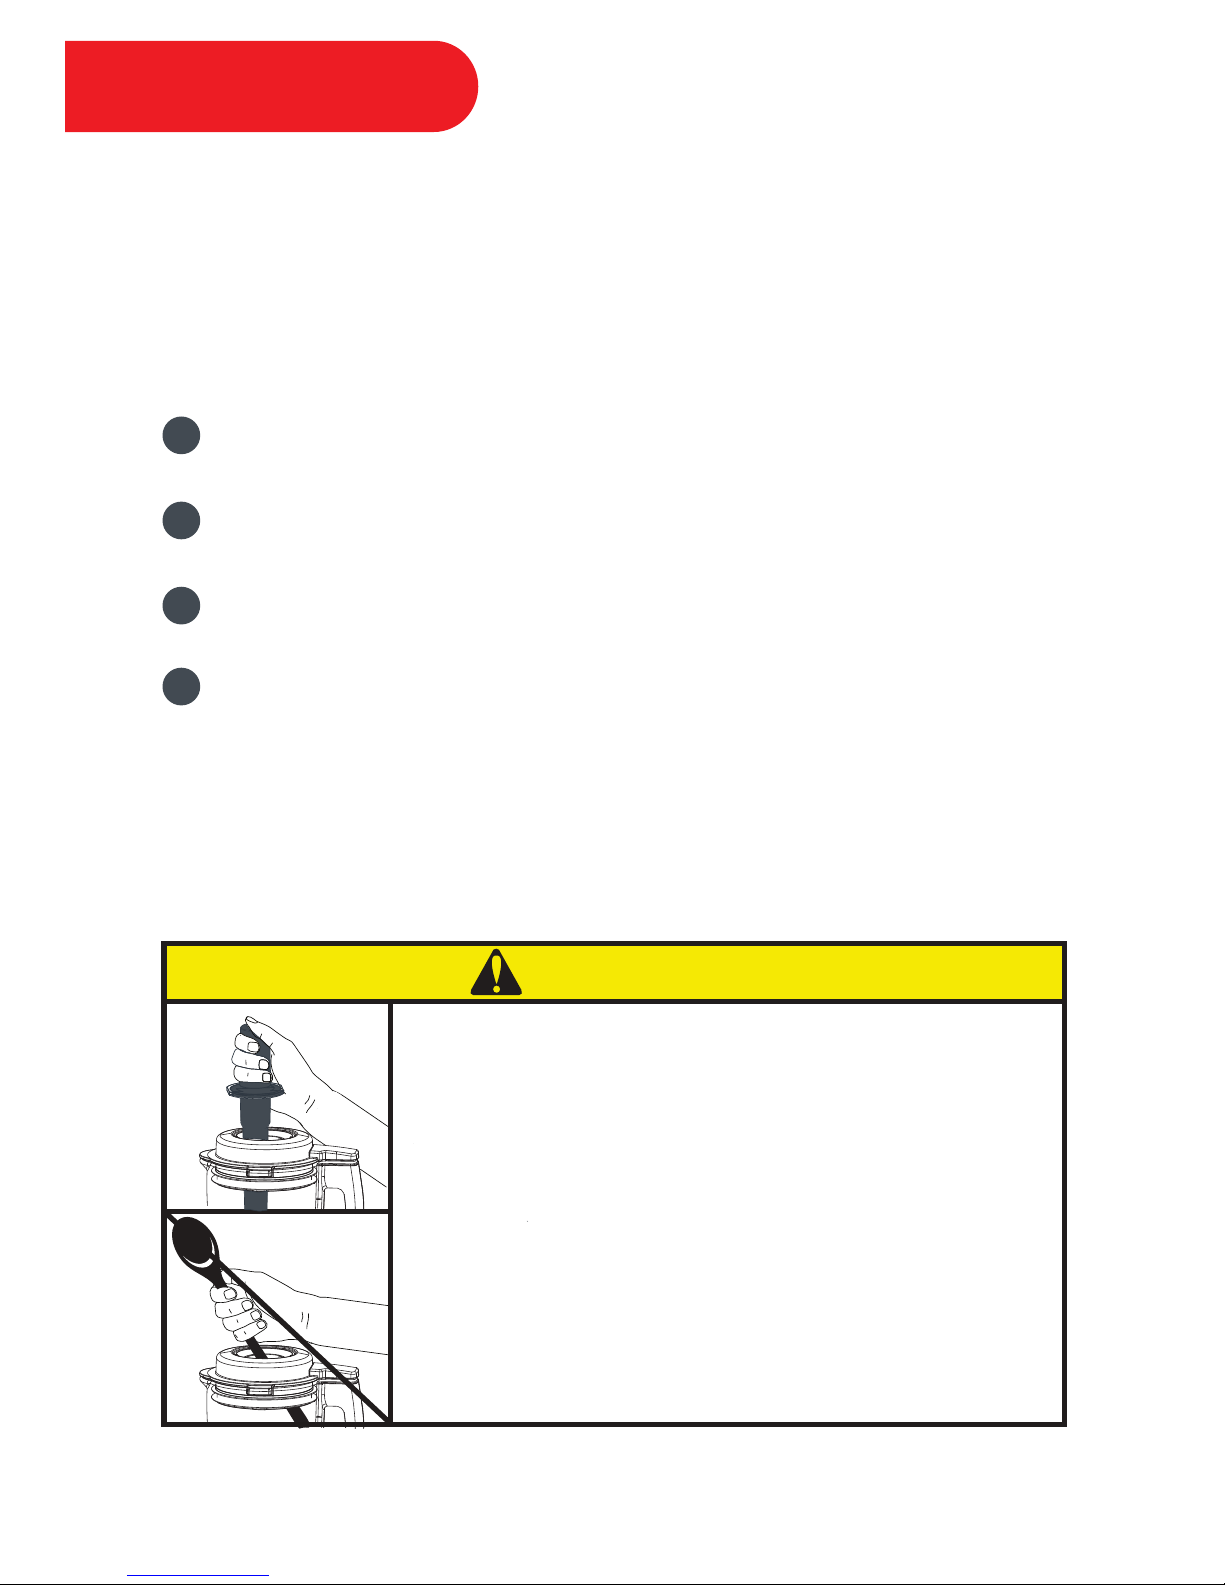
The food tamper may be used when blending cold food and liquid
ingredients. Use the tamper to push food from the sides of the pitcher, or
release air bubbles that may form during blending.
Steps to Tamping Ingredients
Pause the blending program.
Remove the lid cap from the lid.
Insert the food tamper through the opening.
Push food down from the sides of the pitcher towards the blades.
Note: The guard near the top of the tamper prevents the tamper from coming into
contact with the blades. When inserted through the hole in the lid, the food tamper
should not contact the blades from any angle.
Food Tamping
19
1
2
3
4
Rotating blades can cause damage or personal injury.
Only use the food tamper included with your blender.
Do not reach into the pitcher with hands or utensils while the
blender is running.
CAUTION
Page 23
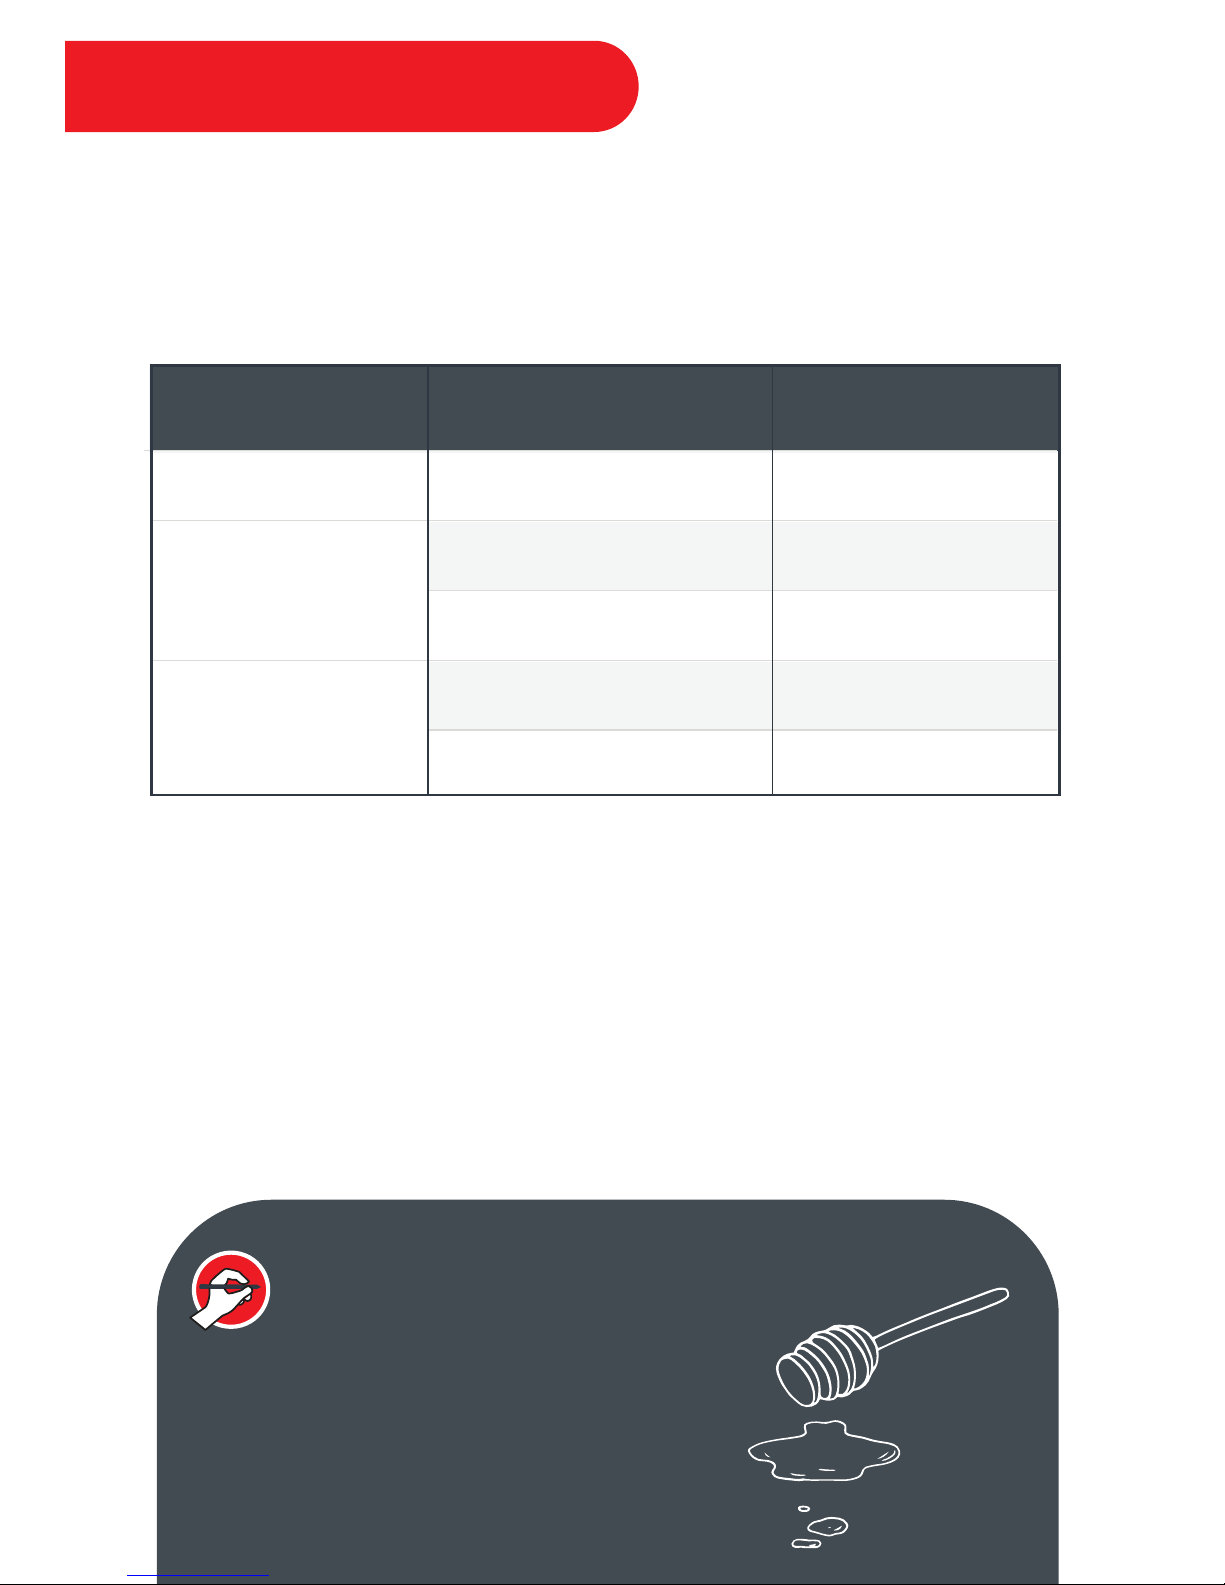
INSTANT TIP: Experiment with Flavors
Pitted dates, maple syrup, agave,
stevia, and honey may be added along
with the recipe ingredients to sweeten
your beverage.
Use the fill lines indicated on the 150 mL / 5 oz measuring cup included with
your blender when measuring grains, nuts, and seeds.
Non-Dairy Milk Making Guide
Use these proportions as a base. If you prefer to make less, simply adjust the
ingredients proportionally.
Non-Dairy Milk Making
Milk Program
Dry Grain / Nut / Seed
Soy
3/4 cup (112g) soybeans
Rice
1/2 cup (75g) brown rice
1/2 cup (75g) white rice
Nut / Oat
1 cup (150g) nuts
1 cup (150g) oats
Water
1400 mL / 48 oz
1400 mL / 48 oz
1400 mL / 48 oz
1400 mL / 48 oz
1400 mL / 48 oz
20
Page 24
Temperature
Min Sec
Ace
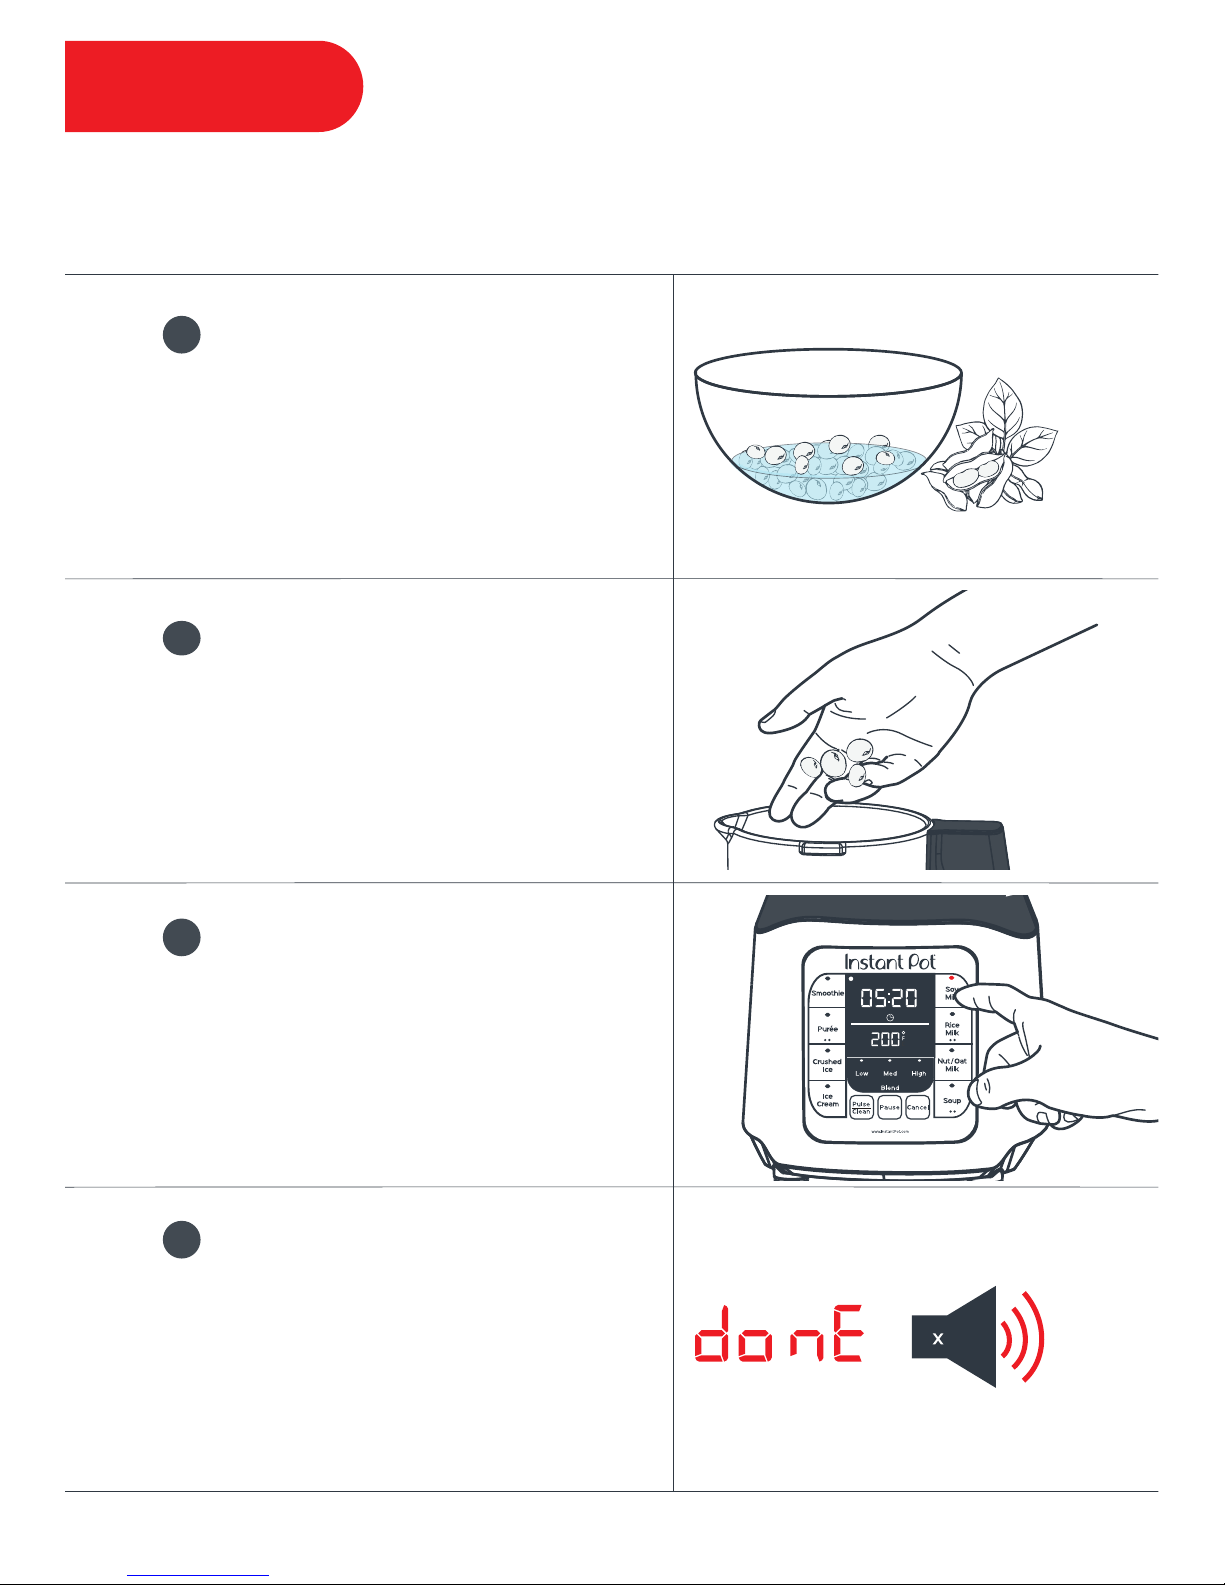
Soy Milk
You can soak soybeans in water
for up to 1 hour.
Strain, discard soaking water and
rinse with clear water — remove
any skins if desired.
1
Remove the lid from the pitcher.
Add soybeans and water to
the pitcher.
Secure the lid to the pitcher.
2
Select Soy Milk program.
After 5 seconds, the blender will
beep 3 times, and the countdown
will begin once the target
temperature is reached.
3
When the program has completed,
the blender will beep 10 times and
display will show “donE”.
Optionally, remove the lid and filter
beverage through the strainer bag.
4
21
Refrigerate up to 4 days.
You Will Need...
• 150 mL / 5 oz measuring cup
• Strainer Bag
• Optional: 500mL / 16oz warm water for soaking
• 3/4 cup (112g) soybeans
• 1400mL / 48oz water for blending
10
Page 25
Temperature
Min Sec
Ace
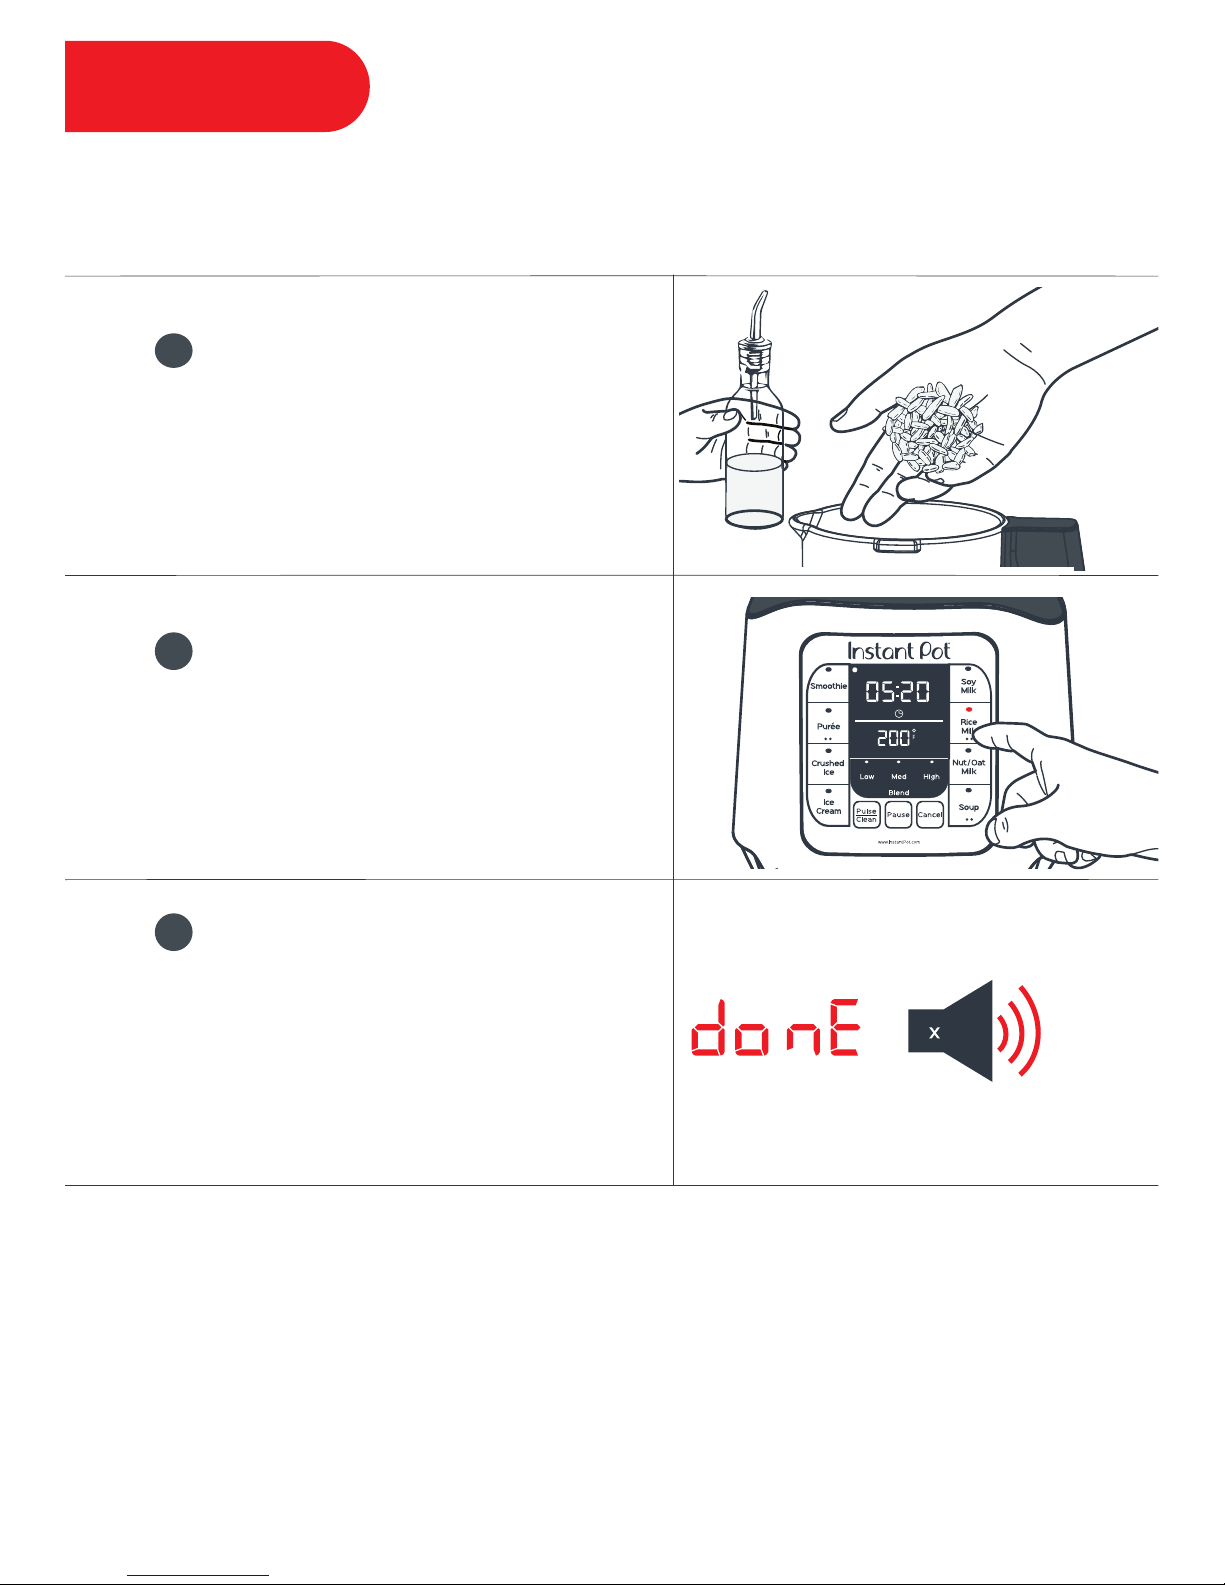
Rice Milk
Remove the lid from the pitcher.
Add rice, oil and water to the pitcher.
Secure the lid to the pitcher.
1
Select Rice Milk program.
Toggle to:
White rice press once
Brown rice press twice
2
When the program has completed,
the blender will beep 10 times and
display will show “donE”.
Optionally, remove the lid and filter
beverage through the strainer bag.
3
Refrigerate up to 4 days.
You Will Need...
• 150 mL / 5oz measuring cup
• Strainer Bag
• 1/2 cup (75g) white or brown rice
• 1400mL / 48oz water for blending
• 1 tsp (5mL) of your favorite cooking oil
10
22
Page 26
Temperature
Min Sec
Ace
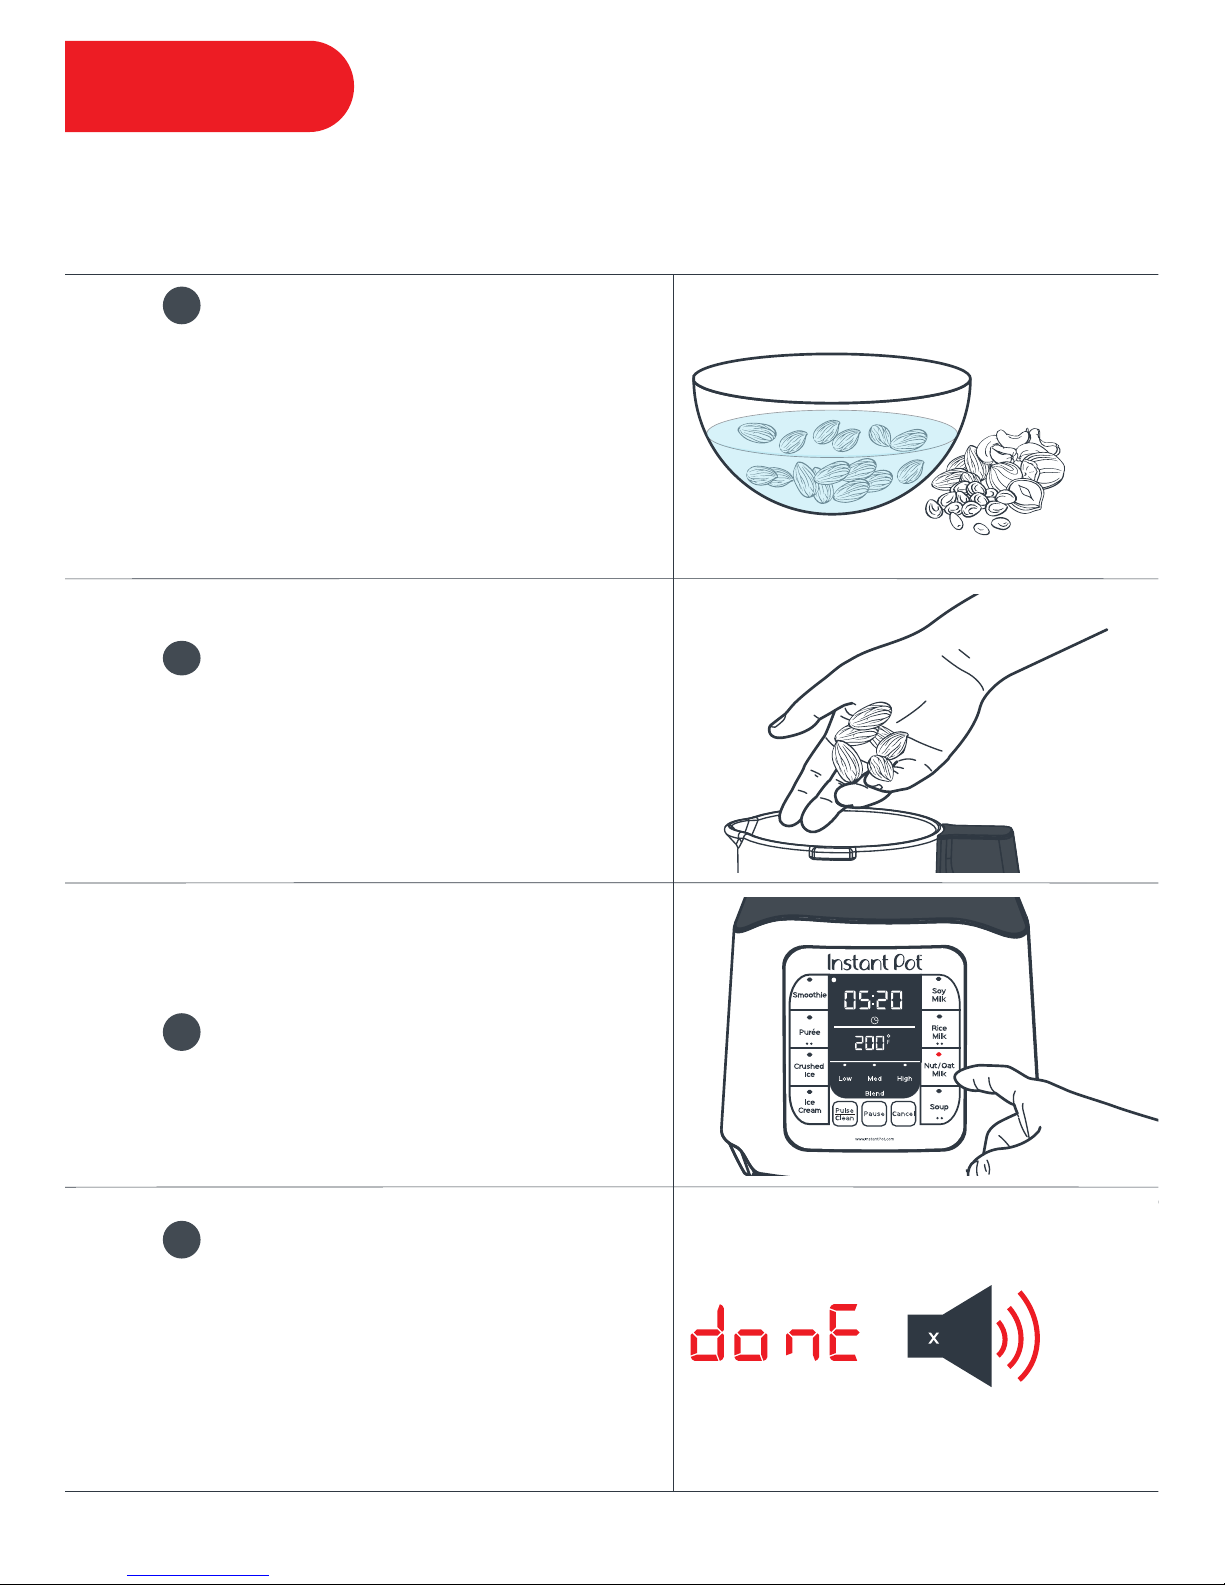
Nut Milk
We recommend soaking nuts or
seeds in water for at least 1 hour, up
to 24 hours.
Strain, discard soaking water and
rinse with clear water—remove any
skins or husks if desired.
1
Remove the lid from the pitcher.
Add recipe ingredients to the pitcher.
Secure the lid to the pitcher.
2
Select Nut / Oat Milk program.
3
When the program has completed,
the blender will beep 10 times and
display will show “donE”.
Optionally, remove the lid and filter
beverage through the strainer bag.
4
23
Refrigerate up to 4 days.
You Will Need...
• 150 mL / 5oz measuring cup
• Strainer Bag
• Optional: 500mL / 16oz warm water for soaking
• 1 cup (150g) nuts or seeds of choice
• 1400mL / 48oz water for blending
10
Page 27
Temperature
Min Sec
Ace
1200
1400
ml
1000
800
1250
1500
1750
ml
1000
750
Soup
Cold
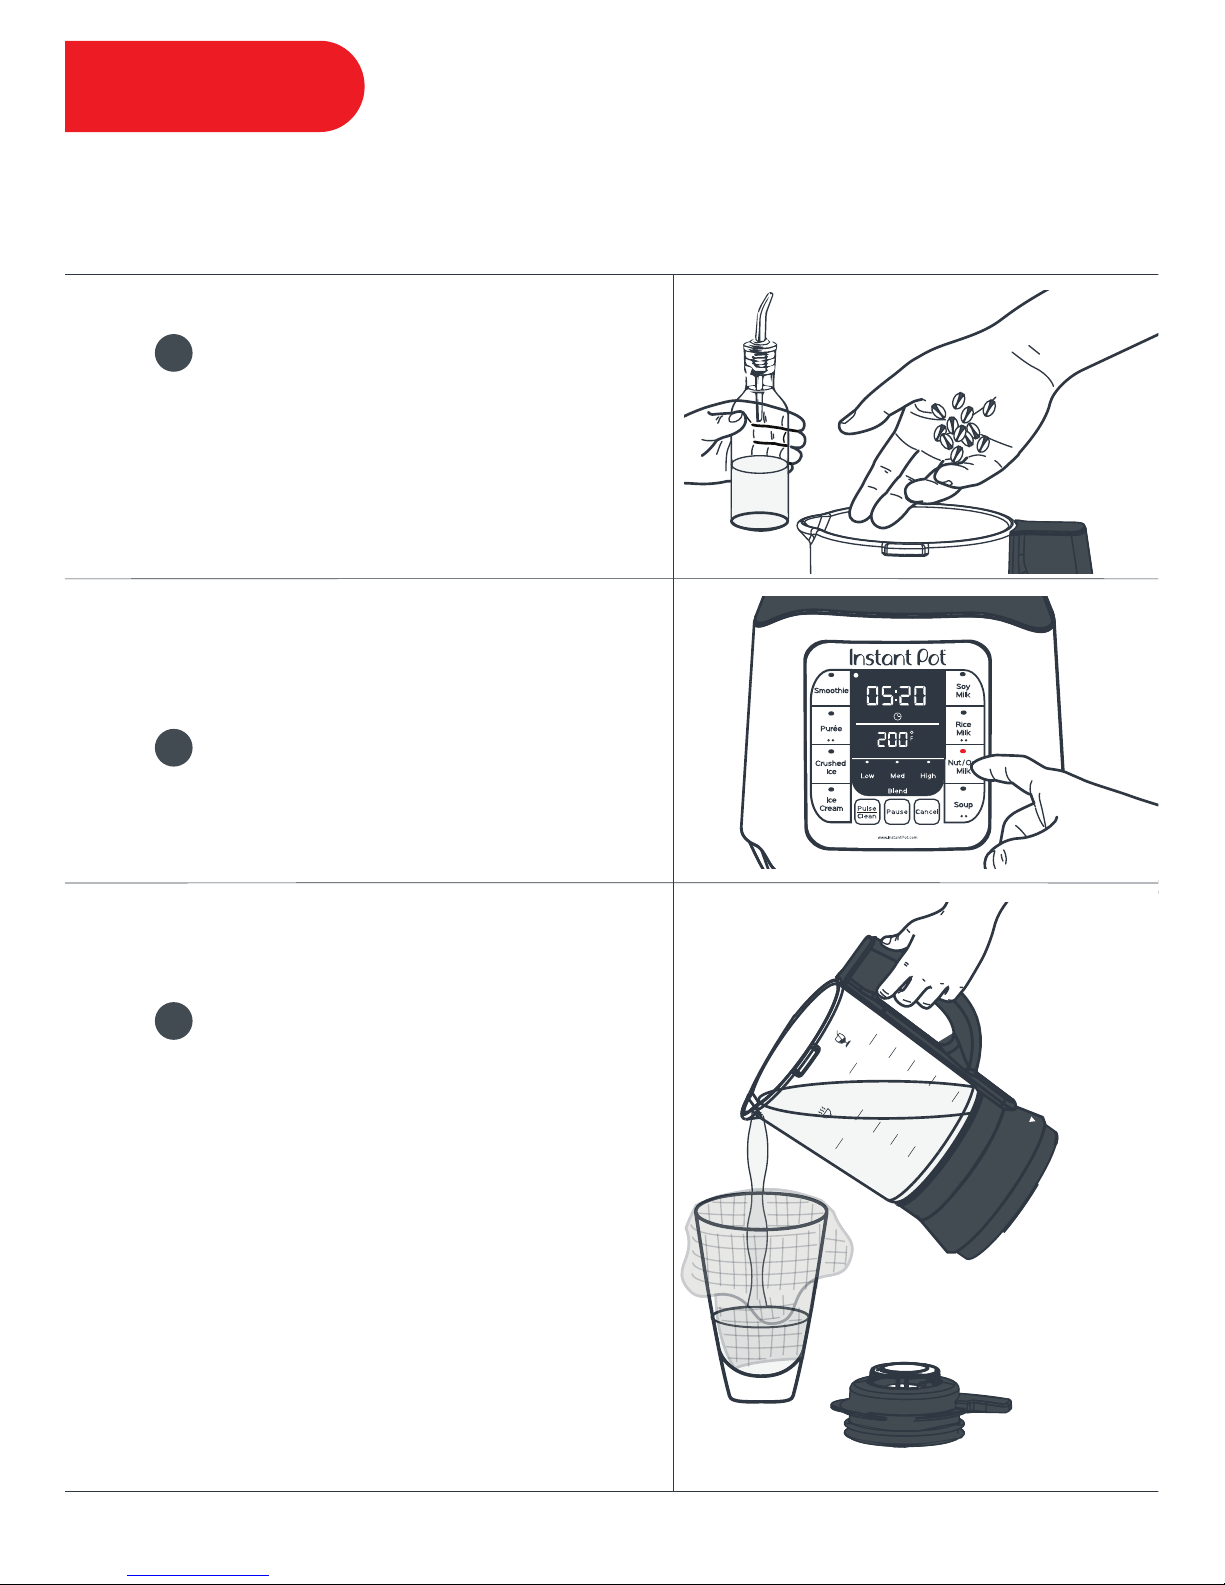
Oat Milk
Remove the lid from the pitcher.
Add oats, oil, and water to the pitcher.
Secure the lid to the pitcher.
1
Select Nut / Oat Milk program.
2
When the program has completed,
the blender will beep 10 times and
display will show “donE”.
Optionally, remove the lid and filter
your beverage through the
strainer bag.
Chill and serve.
4
Refrigerate up to 4 days.
You Will Need...
• 150 mL / 5oz measuring cup
• Strainer Bag
• 1 cup (150g) rolled or steel cut oats
• 1400mL / 48oz water for blending
• 1 tsp (5mL) of your favorite cooking oil
24
Page 28

Blending Tips
25
Blending Tips
• Lightly toasting dry oats before blending gives them a more
robust flavor.
• Soak nuts and seeds before blending. The longer the soak, the
creamier the texture!
• Vanilla, cinnamon, salt, coconut or cocoa powder are all delicious
additions, and may be added to flavor the milk before straining.
Stacking Smoothies
When blending cold
ingredients, the order in
which ingredients are
placed in the pitcher
may affect the
blender’s performance.
It is best to add the liquid
ingredients first and then
add the dry
ingredients after.
Liquids
Fresh Fruit, Nuts & Seeds
Frozen Fruit & Ice Cubes
Powder & Sweetener
(protein, fiber, etc.)
Leafy Greens
(with ribs and woody stems removed)
Soft Ingredients
(yogurt, nut butter, tofu, etc.)
Page 29
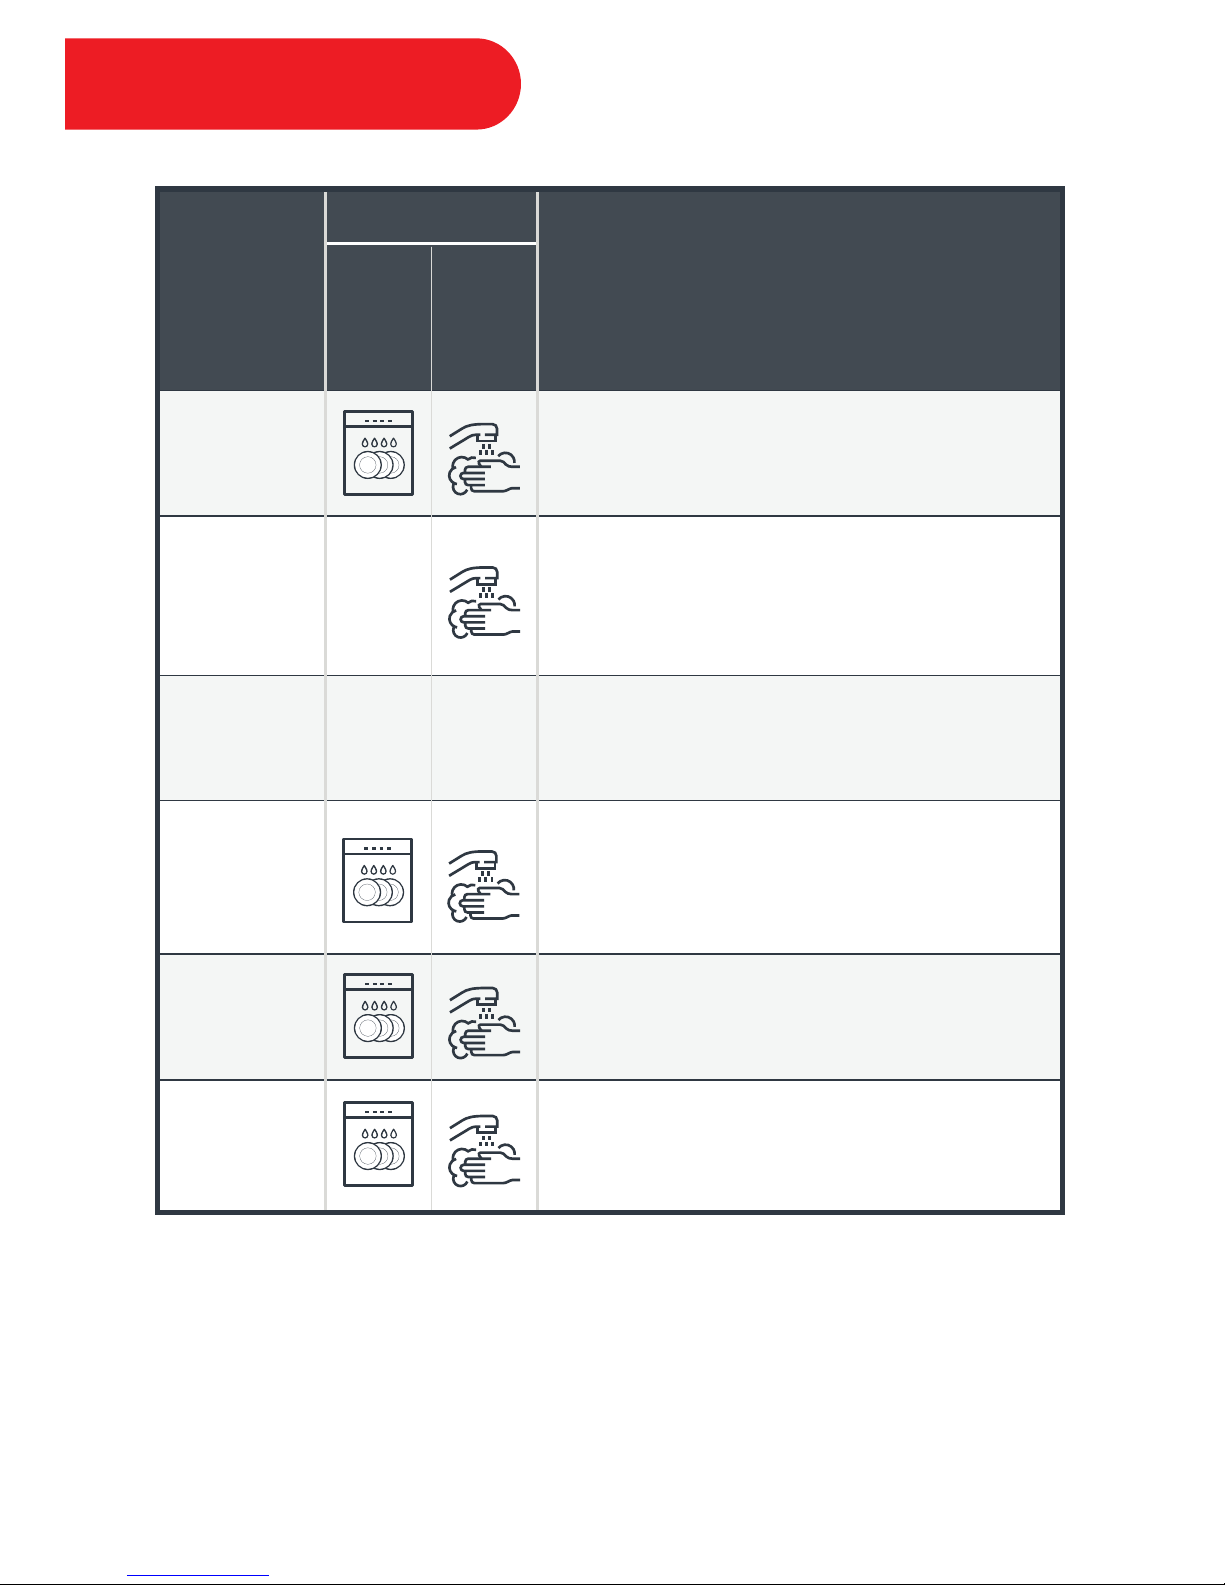
• Clean the blender, parts, and accessories after each use.
• Do not use harsh chemicals, scouring pads or other abrasive cleaners.
• When the blender is in storage or not in use, do not fold the power cord.
• Make sure the base of the pitcher is dry and clean before placing it on the
blender base.
• Do not store foods in the pitcher.
Care & Cleaning
Part
Dishwasher
Safe
Cleaning Method
Hand Wash
Cleaning Tip
If dishwashing, place in top rack.
Unplug and wipe clean with a soft, damp cloth.
Remove lid cap from lid when cleaning.
Remove black silicone seal from lid periodically
for cleaning.
Lid & Lid Cap
Glass Pitcher
Blender Base
150 mL / 5 oz
Measuring
Cup
&
Food Tamper
Strainers
Cleaning
Brush
Turn inside out when cleaning, and spread open
to dry.
Use to clean under blades in pitcher.
Do not wet bottom side of the pitcher.
26
Page 30
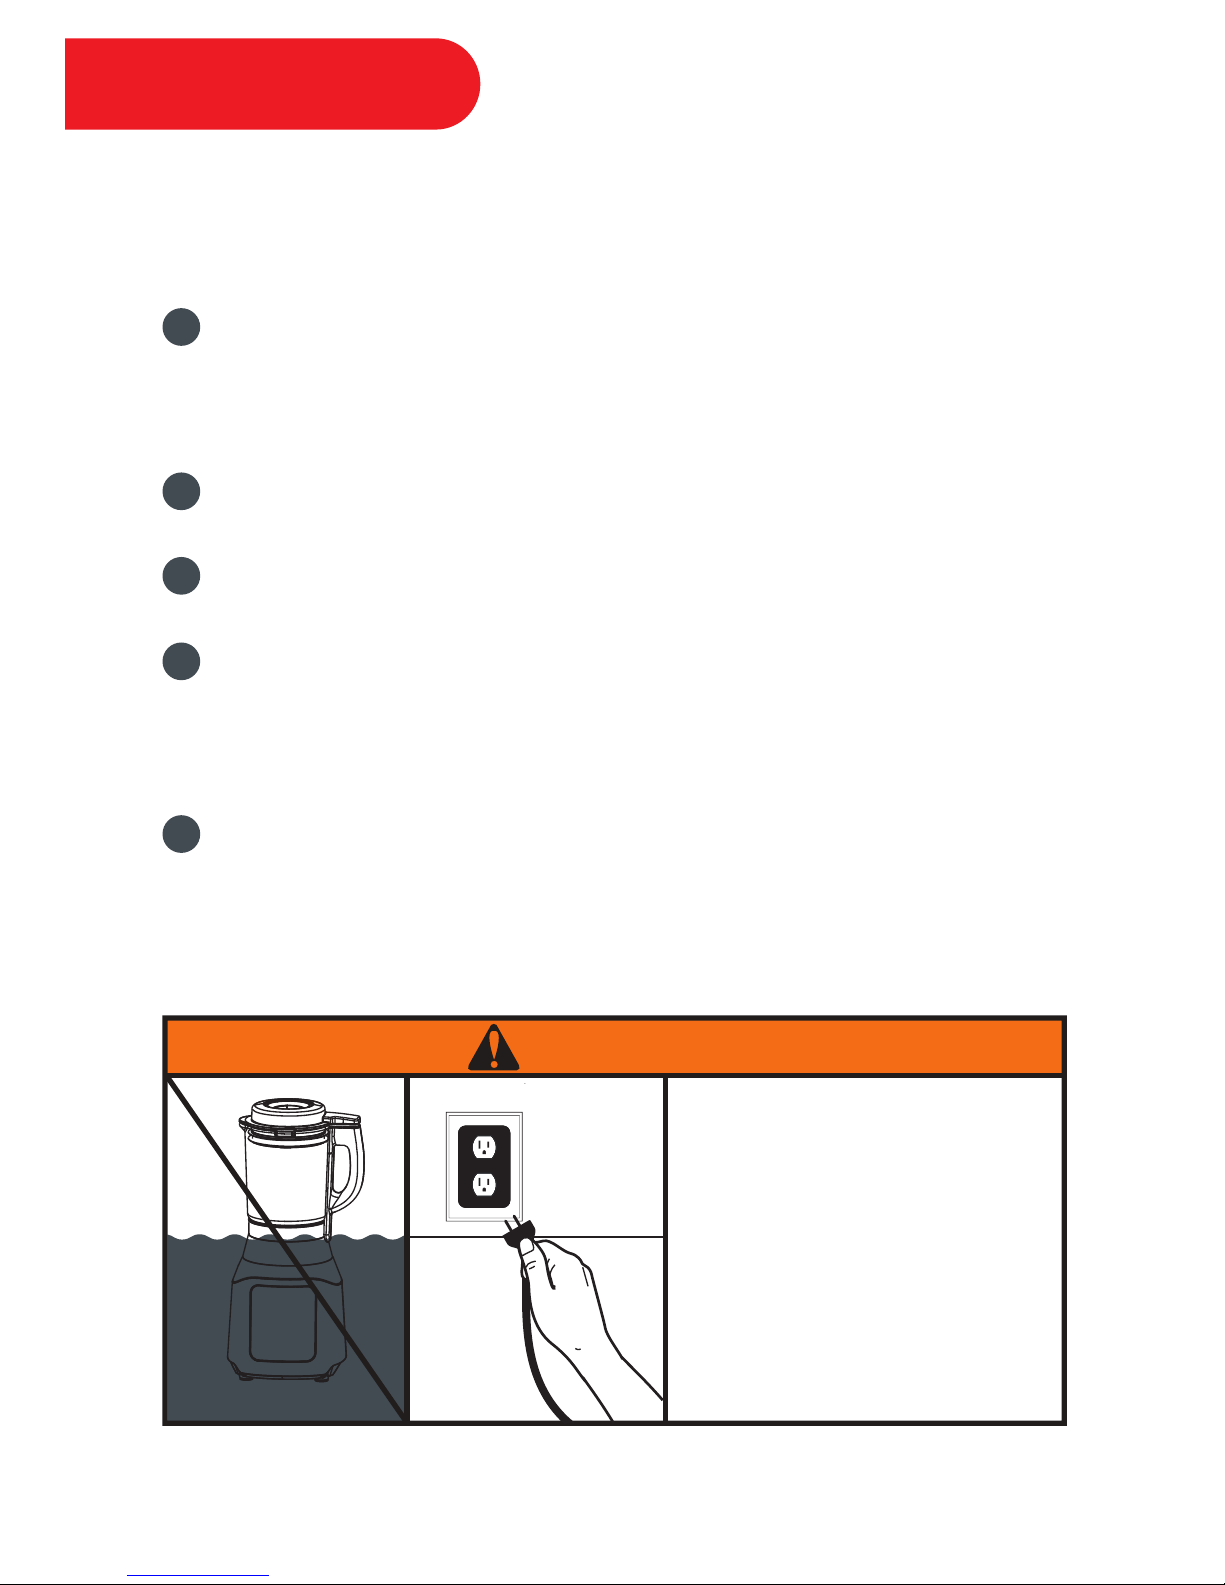
Pulse Cleaning
27
Use the Pulse/Clean function to remove superficial food debris and residue
from your pitcher.
Remove the lid from the pitcher.
Fill the pitcher with 1000mL / 34 oz of hot water.
Secure the lid to the pitcher.
Press Pulse/Clean to lift the majority of food contents.
Discard dirty water after the last Pulse cycle has completed.
Fill the pitcher with 1000mL / 34 oz quart of hot water and a squirt of dish
soap, and press Pulse/Clean. Discard dirty water after the last cycle has
completed.
Rinse with warm, clear water.
The blender, pitcher, and base
have electrical components and
may cause risk of shock if wet.
To avoid the risk of damage to
persons or property, do not
submerge the blender base in
water or attempt to cycle
through the dishwasher.
WARNING
1
2
3
4
5
Page 31
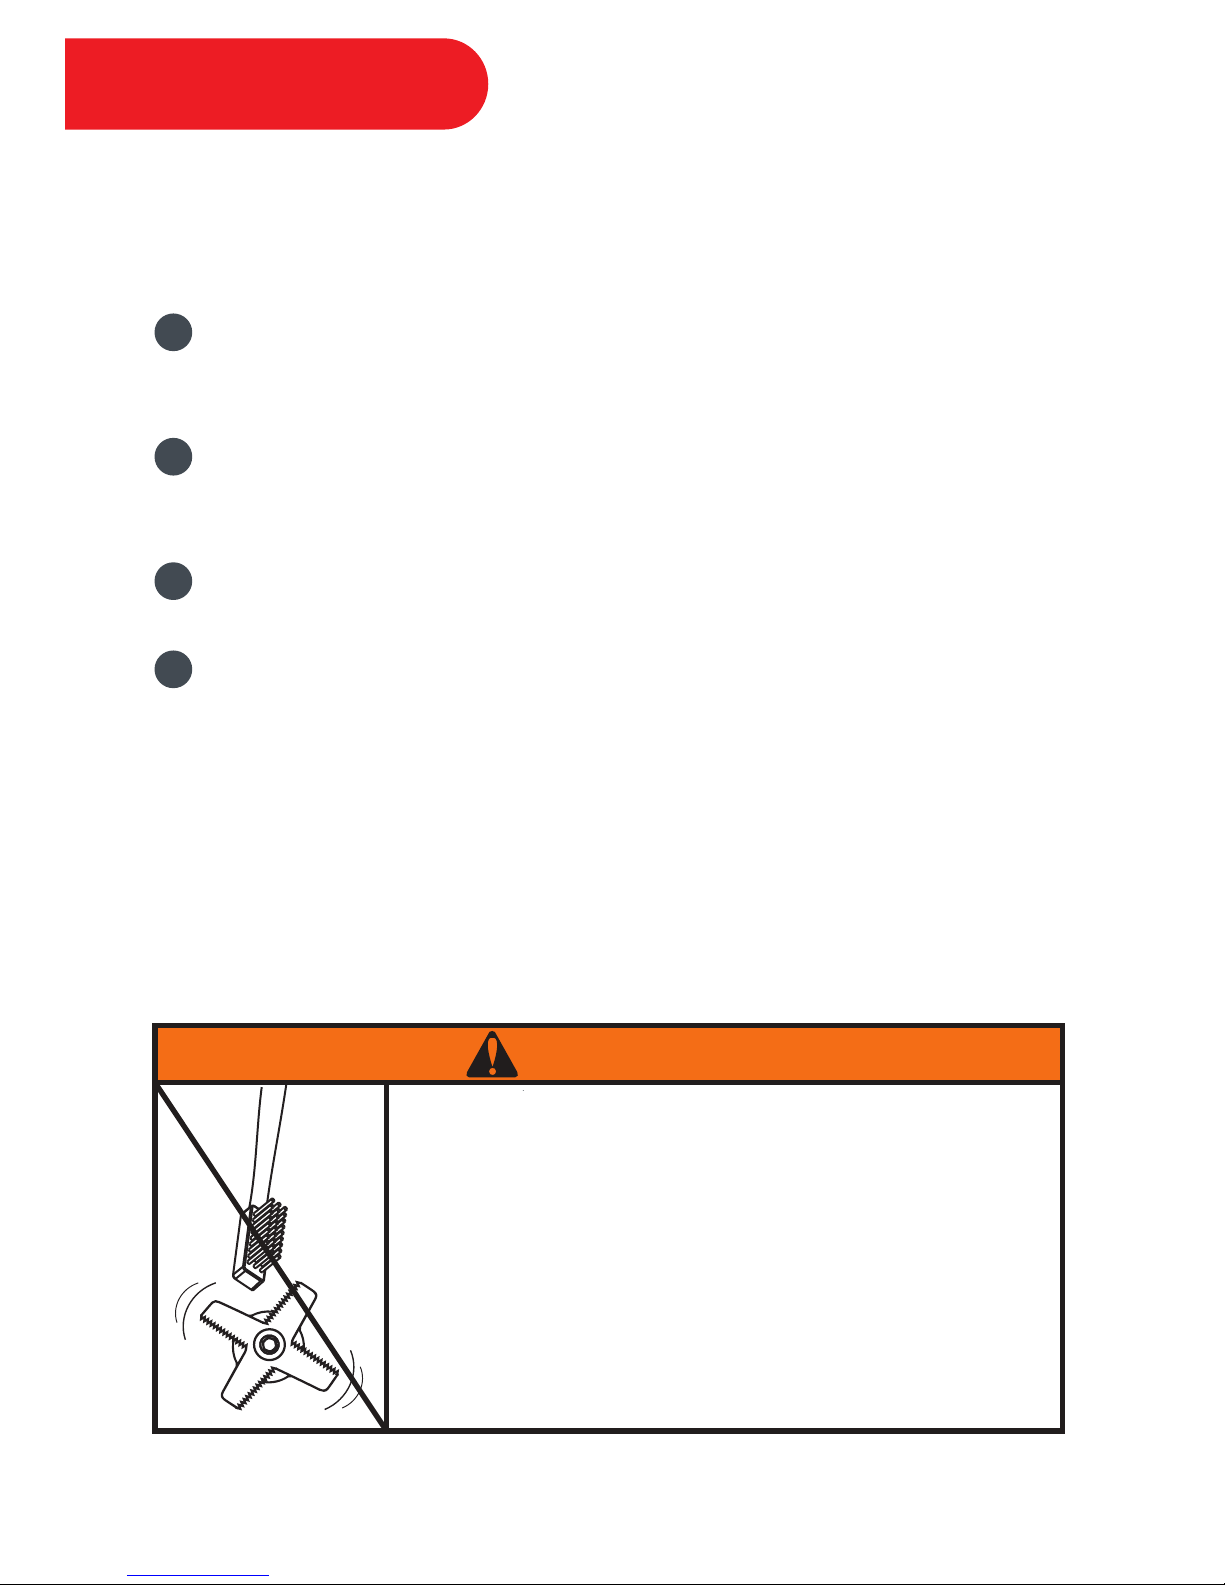
Blades are sharp.
To avoid the risk of severe injury, unplug blender before
inserting cleaning brush into pitcher.
WARNING
Deep Cleaning
Minerals in water may deposit at the bottom of the pitcher. Periodic deep
cleaning will ensure the longevity of the blender.
Add 1 cup (250mL / 8 oz) of white vinegar or citric acid, and 1 cup
(250mL / 8 oz) of warm water to the pitcher.
Allow the solution to sit for at least an hour, then press the
Pulse/Clean key.
Empty the solution from the pitcher and rinse with warm, clear water.
For stubborn stains, unplug the blender and add 1 cup (250mL / 8 oz) of
white vinegar to the pitcher, then scrub with a sponge. Repeat this
process as necessary.
1
2
3
4
28
Page 32

The issues in the following tables do not always indicate a faulty blender.
Please examine your blender carefully.
If you require support, please contact the Instant Pot® Customer Care Team:
• Online: www.support.instantpot.com
• Live Chat: www.instantpot.com/#Chat
• Email: [email protected]
• Call: 1.800.828.7280
Register your Instant Brands™ product here:
www.instantpot.com/support/register
Troubleshooting
29
Problem
Error Indicator blinks
and error code
appears on display
Possible
Reason
Contents stop
blending (unit still
powered ON)
Contents are too
thick
Solution
• Add liquid to recipe
• Use the food tamper to agitate contents
• Use Pulse/Clean function
• Remove and re-seat pitcher
• Add thin liquid to pitcher
• Use the food tamper to
ease blending of thicker foods
Blender will
not power ON
Power cord not
fully inserted into
outlet
Fuse has blown
• Ensure the cord is plugged fully
into a 120V outlet
• Check blender on a different outlet
Contact the Customer Care Team
E01
Motor
overheated; may
have run for too
long
Remove pitcher from base and wait a few
minutes for motor to cool
Ingredients may
be too thick
Page 33

30
Problem
Possible
Reason
Solution
• Remove and re-seat pitcher
• Contact the Customer Care Team
E02 Thermostat
has failed
Remove and reposition the lid on the
pitcher
Error code “Lid”
appears on screen
Lid is not secure
• Remove and re-seat pitcher
• Add liquid when using a cooking
function
E03 Dry heat
in pitcher
• No action needed; this can occur on
first use It is normal and is harmless
Smokey smell on
initial use
First heating of
protective
non-toxic
substance that
was applied to
element during
manufacturing
Use Pulse/Clean to prevent
over-blending
Results are too watery
Food is
over-processed
Reduce liquid in recipe
Too much liquid
Troubleshooting
Error Indicator blinks
and error code
appears on display
Page 34

Warranty
31
Limited Warranty
This Limited Warranty is effective for one year from the date of original consumer purchase. Proof
of original purchase date and, if requested by an authorized representative of Instant Brands Inc.
(“Instant Brands”), return of your appliance, is required to obtain service under this Limited
Warranty. Provided that this appliance is operated and maintained in accordance with written
instructions attached to or furnished with the appliance, Instant Brands will, in its sole and exclusive
discretion, either: (i) repair defects in materials or workmanship; or (ii) replace the appliance. In the
event that your appliance is replaced, the Limited Warranty on the replacement appliance will
expire 12 months from the date of original consumer purchase.
This Limited Warranty extends only to the original purchaser and use of the appliance in the
United States of America and Canada. This warranty does not cover units that are used outside of
the United States of America and Canada.
Any modification or attempted modification to your appliance may interfere with the safe
operation of the appliance and will void this Limited Warranty. This Limited Warranty does not
apply in respect of any appliance or any part thereof that has been altered or modified unless such
alterations or modifications were expressly authorized by an Instant Brands representative.
Limitation and Exclusions
The liability of Instant Brands, if any, for any allegedly defective appliance or part shall in no
circumstances exceed the purchase price of a comparable replacement appliance.
This Limited Warranty does not cover:
1. Damage resulting from accident, alteration, misuse, abuse, neglect, unreasonable use, use
contrary to the operating instructions, normal wear and tear, commercial use, improper assembly,
disassembly, failure to provide reasonable and necessary maintenance, fire, flood, acts of God or
repair by anyone unless directed by an Instant Brands Representative;
2. Repairs where your appliance is used for other than normal, personal use or when it is used in a
manner that is contrary to published user or operator instructions; or
3. Use of unauthorized parts and accessories, or repairs to parts and systems resulting from
unauthorized repairs or modifications made to this appliance.
The cost of repair or replacement under these excluded circumstances shall be borne by you.
Page 35

Disclaimer of Implied Warranties
EXCEPT AS EXPRESSLY PROVIDED HEREIN AND TO THE EXTENT PERMITTED BY LAW, INSTANT
BRANDS MAKES NO WARRANTIES, CONDITIONS OR REPRESENTATIONS, EXPRESS OR IMPLIED,
BY STATUTE, USAGE, CUSTOM OF TRADE OR OTHERWISE WITH RESPECT TO THE APPLIANCES
OR PARTS COVERED BY THIS WARRANTY, INCLUDING BUT NOT LIMITED TO, WARRANTIES,
CONDITIONS, OR REPRESENTATIONS OF WORKMANSHIP, MERCHANTABILITY, MERCHANTABLE
QUALITY, FITNESS FOR A PARTICULAR PURPOSE OR DURABILITY.
Some states or provinces do not allow for the exclusion of implied warranties of merchantability or
fitness, so this limitation may not apply to you. In these states and provinces, you have only the
implied warranties that are expressly required to be provided in accordance with applicable law.
Limitation of Remedies; Exclusion of Incidental and Consequential Damage
YOUR SOLE AND EXCLUSIVE REMEDY UNDER THIS LIMITED WARRANTY SHALL BE APPLIANCE
REPAIR OR REPLACEMENT AS PROVIDED HEREIN. INSTANT BRANDS SHALL NOT BE LIABLE FOR
INDIRECT, INCIDENTAL OR CONSEQUENTIAL DAMAGES ARISING OUT OF OR IN CONNECTION
WITH THE USE OR PERFORMANCE OF THE APPLIANCE OR DAMAGES WITH RESPECT TO ANY
ECONOMIC LOSS, PERSONAL INJURY, LOSS OF PROPERTY, LOSS OF REVENUES OR PROFITS,
LOSS OF ENJOYMENT OR USE, COSTS OF REMOVAL, INSTALLATION OR OTHER INDIRECT,
INCIDENTAL OR CONSEQUENTIAL DAMAGES OF ANY NATURE OR KIND.
Warranty Registration
Please visit www.instantpot.com/support/register to register your new Instant Brands™ appliance
and validate your warranty within thirty (30) days of purchase. You will be asked to provide the store
name, date of purchase, model number (found on the back of your appliance) and serial number
(found on the bottom of your appliance) along with your name and email address. The registration
will enable us to keep you up to date with product developments, recipes and contact you in the
unlikely event of a product safety notification. By registering, you acknowledge that you have read
and understand the instructions for use, and warnings set forth in the accompanying instructions.
Warranty Service
To obtain service under this warranty, please contact our Customer Service Department by phone at
1-800-828-7280 or by email to [email protected]. You can also create a support ticket online
at www.instantpot.com/support. If we are unable to resolve the problem, you may be asked to send
your appliance to the Service Department for quality inspection. Instant Brands is not responsible for
shipping costs related to warranty service, save and except for shipping costs associated with the
return of your appliance from Canada or within the 48 contiguous states and the District of Columbia
of the United States of America, as provided herein. When returning your appliance, please include
your name, mailing address, email address, phone number, and proof of the original purchase date
as well as a description of the problem you are encountering with the appliance.
32
Warranty
Page 36
670-0101-62
@instantpot
@theinstantpot
@instantpotofficial
@instantpot
@instantpot
Copyright © 2018 Instant Brands
™
Inc.
www.facebook.com/groups/instantpotcommunity
Join the Official Instant Pot Community
Download Free Recipe App:
Telephone: 1.800.828.7280
Web: www.InstantPot.com
Store: www.Store.InstantPot.com
US & Canada Email: [email protected]
Instant Brands Inc.
11 - 300 Earl Grey Dr. Suite 383
Ottawa, Ontario
K2T 1C1
Canada
 Loading...