

Page 1
Point-of-Use Water Heater
Owner’s Manual
Installation, Care & Use
Instalacion, Cuidado & Uso
Installation, Sion & Utilisation
The Emerson logo is a trademark and
service mark of Emerson Electric Co.
1.800.558.5700
www.insinkerator.com
© 2007 InSinkErator, a division of
43969 Rev. A Printed in USA Emerson Electric Co. All Right Reserved.
Page 2
3
W152
Definitions:
Standby Heat Loss. Measure of how well the tank is insulated. Use a Kilowatt Hour meter and measure power
consumed in a 24 hour period for a full tank at normal operating temperature and no water being added.
First Hour Rating. Measure how much hot water can be delivered over a one hour period, with a 140
˚
F tank
water temperature and 60
˚
F incoming water temperature.
Usable Hot Water. Measure of how cold incoming water mixes with the stored hot water. Start with hot tank.
Draw water at 1/2 GPM until water temperature drops 25%. Measure amout of water drawn. Repeat for
1 GPM and 2 GPM.
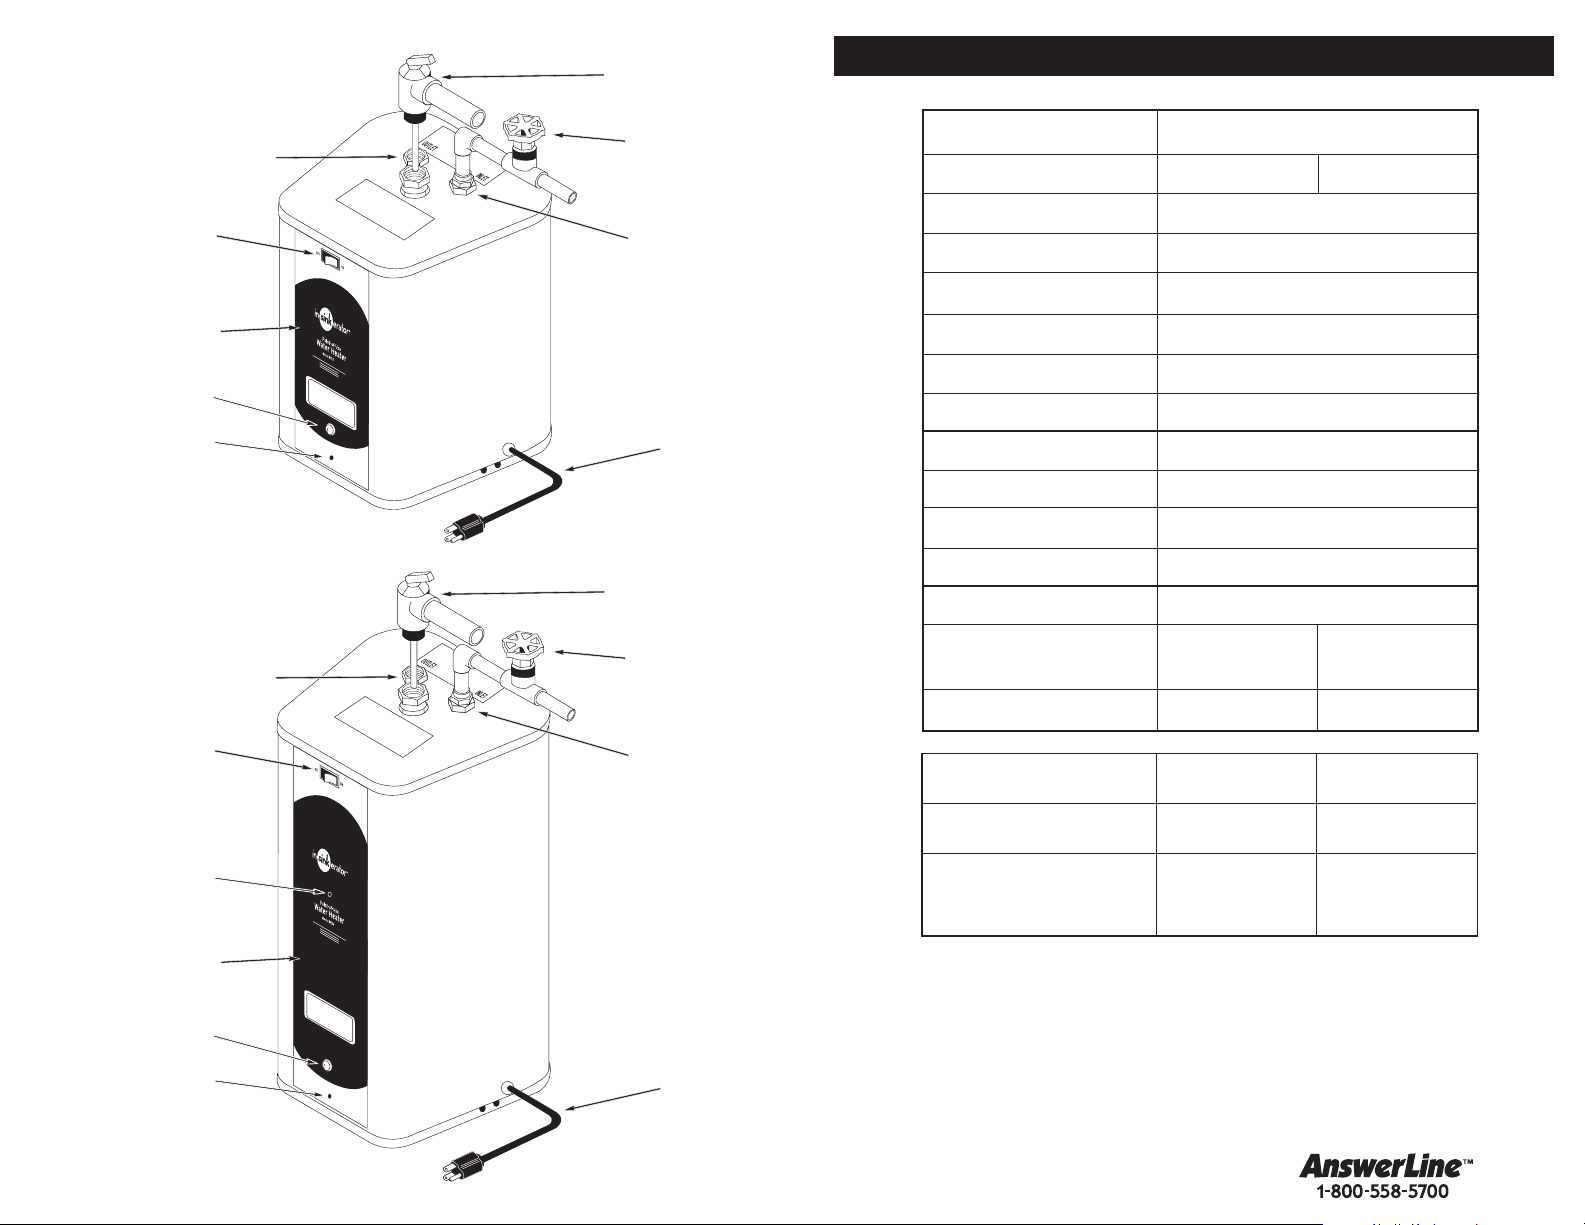
SPECIFICATIONS
2
*must be InSinkErator compatible copper with bronze base
(PRE-INSTALLED ON SOME MODELS)
T & P VALVE
W152 W154
ACCESS SCREW
W154
HOT WATER OUTLET
(½" NPT FEMALE)
ON-OFF
SWITCH
ACCESS COVER
DRAIN SCREW
HOT WATER OUTLET
(½" NPT FEMALE)
ON-OFF
SWITCH
COLD WATER INLET VALVE
(NOT SUPPLIED)
COLD WATER INLET
(½" NPT FEMALE)
3½' CORD
(PRE-INSTALLED ON SOME MODELS)
T & P VALVE
COLD WATER INLET VALVE
(NOT SUPPLIED)
COLD WATER INLET
(½" NPT FEMALE)
Tank Construction
Tank Volume
Voltage
Heating Capacity
Element Type
Temperature Range
Operating Pressure
Thermostat Type
Power Cord
Water Connections
Pressure Relief Connection
Drain
Insulation
Overall Dimesions
Shipping Weight
Standby Heat Loss
120˚F (75˚F Ambiet)
Bronze
2.5 gallons
120 volts
1500 watts
Replaceable copper/bronze*
110˚F - 170˚F
150 psi (max.)
Resettable
3 1/2 ft. cord and grounded plug
1/2" NPT female
3/4" NPT female
1/4" Screw Fitting
High Efficiency EPS meets U.L. 94 HF-1
13.5" H
10.4" D
10.7" W
18 lb.
0.25 KWHr
4 gallons
20.2" H
10.4" D
10.7" W
23 lb.
0.50 KWHr
ACCESS SCREW
ACCESS COVER
First Hour Rating
80˚F Rise
Usable Hot Water
(25% Temp. Drop)
1/2 GPM
1 GPM
2 GPM
8.6 gallon
2.0 gallon
1.62 gallon
1.25 gallon
10.4 gallon
3.0 gallon
3.0 gallon
3.0 gallon
DRAIN SCREW
ACCESS SCREW
3½' CORD
Page 3
5
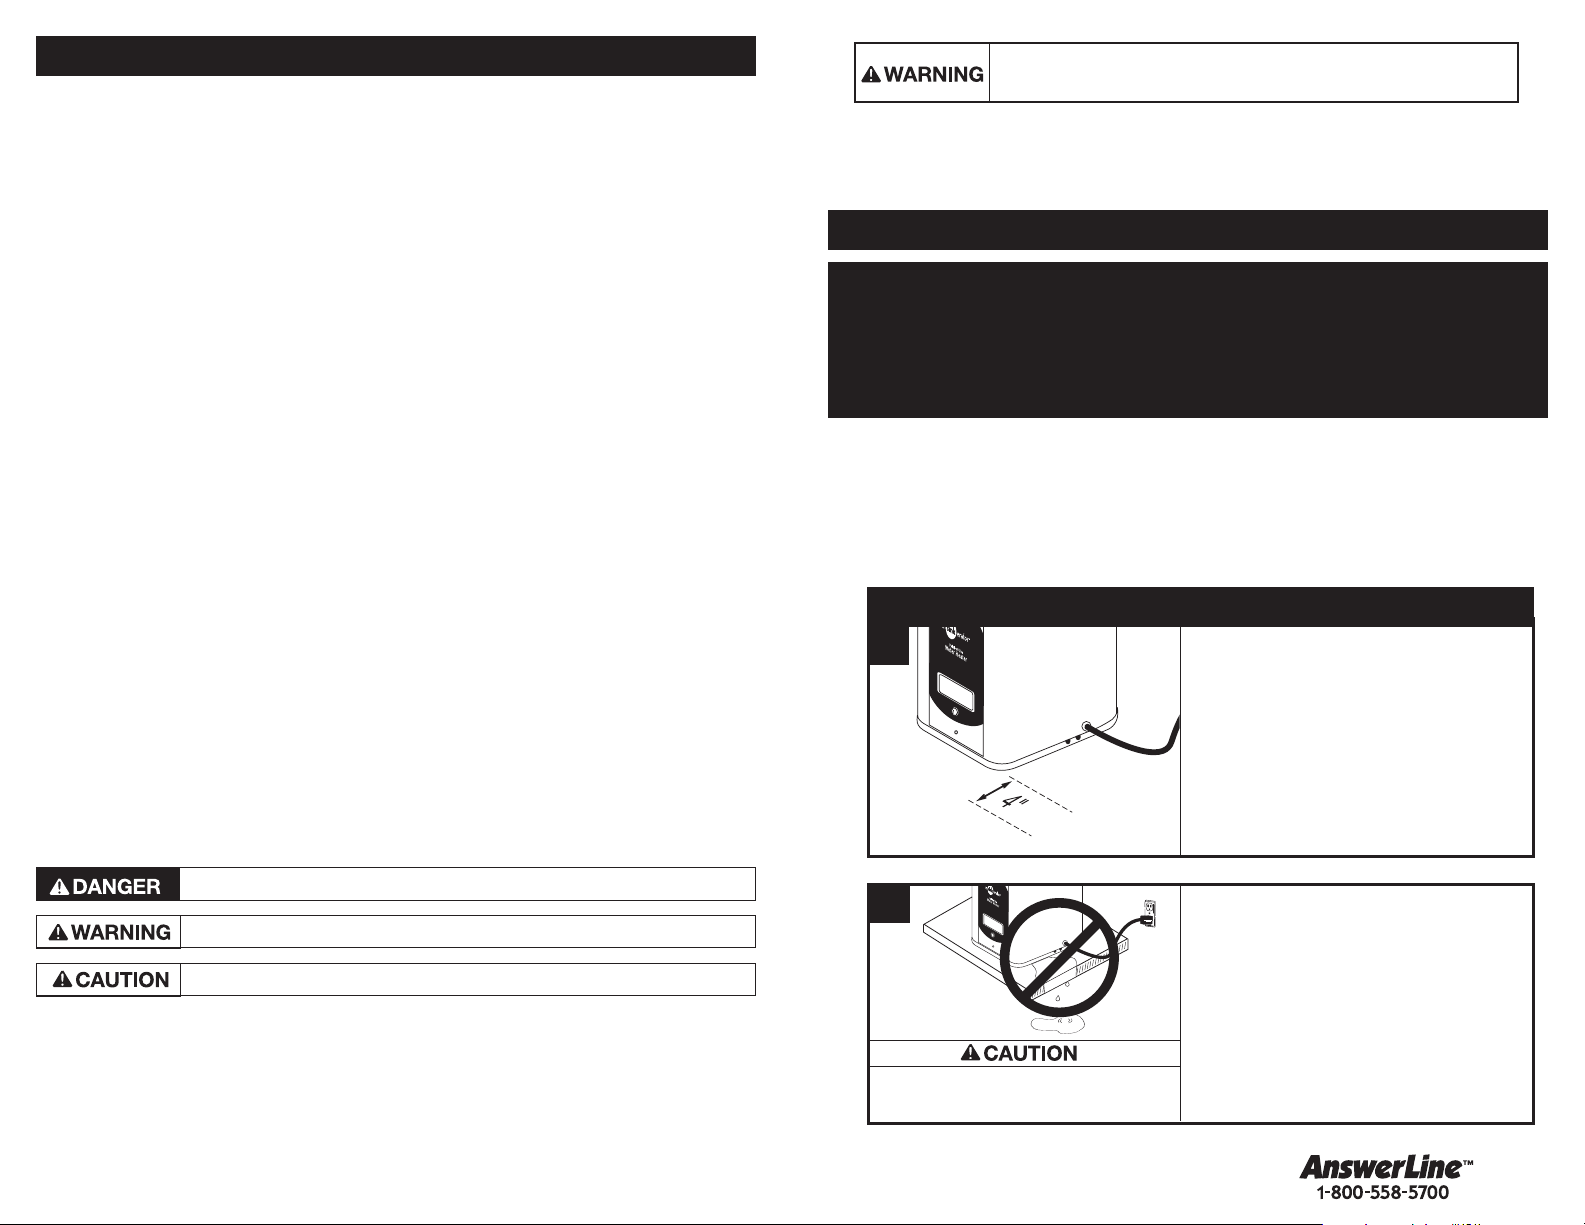
PREPARATION
INSTALLATION PROCESS STARTS HERE
■ Ensure power switch located at the
front-top of tank is in off position.
■ Identify location for water heater tank.
■ Check to make sure there is proper
clearance in front of heater to allow
for draining the tank and for access
to replaceable parts such as the
thermostat, heater and relief valve.
■ Locate heater in an area where
leakage of the tank or connections
will not result in damage to the
area adjacent or to lower floors of
the structure.
■ When such locations cannot be
avoided, a suitable drain pan piped
to an adequate drain should be
installed under the heater (available
from your distributor).
1
A
B
Property Damage: If the heater becomes immersed in
water, the heater should be examined by a competent
service person before it is placed back in operation.
Equipment You May Need:
Equipment Required:
■ Adjustable wrench
■ Level
■ Pencil
■ Tape Measure
■ Phillips and flat blade screwdrivers
■ T & P valve
(Pre-installed on some models)
■ Support blocks
■ Drain pan
■ Teflon tape
WHAT YOU NEED TO GET STARTED
Personal Injury: Failure to follow these instructions can result in serious
personal injury or death.
The installation must conform to these instructions, the local code authority having jurisdiction
and the requirements of power company. In the absence of code requirements follow NFPA-70,
The National Electrical Code, which may be ordered from: American Standards Institute, 1430
Broadway, New York, NY 10018.
4
An imminently hazardous situation, which, if not avoided, will result in death or serious injury.
A potentially hazardous situation, which, if not avoided, could result in death or serious injury.
A potentially hazardous situation, which, if not avoided, may result in minor or moderate injury.
■ This heater must only be installed or serviced by qualified persons with ability equivalent to
that of a licenced tradesman in the field involved.
■ For your satisfaction and safety, read all instructions, cautions, warnings and dangers before installing
or using this water heater.
■ Unit must be installed indoors.
■ Make sure that all electrical wiring and plumbing connections conform to local codes. Consult local
code and national electrical code for proper installation.
■ This water hearter is an electrical device and must be properly grounded, fused and connected to the
correct line voltage. Connect only to properly grounded outlet (see page 10).
■ Install or locate this water heater only in accordance with the provided installation instructions. Do not
operate the heater in rooms, garages or other area
s where gasoline or other flammable liquids or
engine driven vehicles or eqipment are stored, operate or repaired. Flammable vapors are heavy and
travel along the floor and may be ignited by the electric heater causing fire or explosion.
■ Use this water heater only for its intended use as described in this manual.
■ This heater is a pressure vessel and must have a T & P (Temperature & Pressure) valve installed.
■ Do not use an extension cord set with this water heater. If no receptacle is available adjacent to the
water heater, contact a qualified electrician to have one properly installed.
■ Do not operate this water heater if it has a damaged cord or plug, if it is not working properly or if it
has been damaged or dropped.
■ Flammable items, pressurized containers or any other potential fire hazardous articles must never be
placed on or adjacent to the heater. Open containers of flammable material should not be stored or
used in the same room with the heater.
■ Protect heater from freezing. Water left in the tank allowed to freeze will expand and damage the tank.
Disconnect power and drain tank to prevent damage (see page 11).
■ Do not attempt to operate this heater with cold water shutoff valve closed. Disconnect power if shutoff
valve is closed.
■ This water heater should be serviced only by qualified service personnel. Contact nearest authorized
service facility for examination, repair or adjustments.
WHAT YOU SHOULD KNOW BEFORE YOU BEGIN
When using electrical appliances,basic safety precautions to reduce the risk of fire, electric shock or
injury to person should be followed, including:
Keep this warranty and manual near the heater for future reference
whenever maintenance adjustment or service is required.
Definition of symbols in this instruction manual:
Minimum
Clearance
4"
Page 4

7
The W154 model is designed for floor
mounting only.
■
Select a spot to mount water heater
vertically, with water connection
at the top.
■
Water heater must be located within
3-1/2 ft. of a grounded 120-volt
electrical outlet.
■ Ensure cabinet floor is strong
enough to hold the weight of a full
heater. The model W154 tank
holds 4 gallons and weighs
45 lbs. when full.
■ It is recommended the water heater
be raised off the cabinet floor
several inches using suitable
support blocks to allow drainage of
tank (not supplied).
2
B
Property Damage: Do not connect the electrical
power until the tank is full of water. Failure to
comply will burn out the heating element.
Property Damage: Do not connect the electrical
power until the tank is full of water. Failure to
comply will burn out the heating elements.
6
2
■ Ensure wall or cabinet is strong
enough to hold the weight of a full
heater. The model W152 tank holds
2-1/2 gallons and weights 34 lbs.
when full.
Continue with “Step C” if wall mounting.
■ Hold tank in the position to be
mounted and mark with a pencil
the top and center for the tank on the
wall (mount to wall stud or
added 2x4).
■ Measure down 1-1/2" and mount the
metal mounting bracket using two
screws provided.
■ Hang the water heater from the
mounting bracket using the two slots
in the back of the tank jacket.
The W152 model is designed for wall or
floor mounting.
■ Select a spot to mount water heater
vertically, with water connection at
the top.
■ Water heater must be located within
3-1/2 ft. of a grounded 120-volt
electrical outlet.
B
C
3½"
A
MOUNTING THE TANK - W152
A
MOUNTING THE TANK - W154
3½"
(full tank)
34 lbs.
(full tank)
45 lbs.
Page 5

Personal Damage: Never operate the heater with the
cold water inlet valve closed or before filling with water
per the filling instructions. Failure to do so will cause
damage and can void element warranty.
9
■
Check all connections to ensure they
are tight and that there are no leaks.
■
Plug 3-1/2 ft. water heater power cord
into a grounded 120 volt A.C. three pin
receptacle. Ensure that it is protected
by a 15 to 20 Amp fuse and is
grounded in accordance with all local
codes and ordinances.
■ The water heater electrical switch
is located at the front-top of tank.
■ Power the tank by pushing switch
to “ON” position.
5
B
A
CONNECTING TO ELECTRICAL SUPPLY
4
B
A
■
Locate the hot water drain screw at
the front-bottom of the tank.
■
Ensure the screw is tight by turning
clockwise with a screwdriver.
■ Open a nearby hot water faucet to
permit air to escape.
■ Fully open the cold water inlet valve,
filling the heater and piping.
■ Leave “hot” faucet open until good
flow of water occurs (evacuates air
in lines).
■ Close hot water faucet.
FILLING THE TANK
Heater is not to be hard wired.
■ T & P valve comes included and
pre-installed on some InSinkErator
models. Consult local codes and
regulations for proper installation
and use of required T & P valve.
■ T & P valve is available through your
InSinkErator dealer.
C
■
Locate the cold water inlet identified
INLET.
■
Ensure the dip tube, supplied to carry
cold water from the tank top to the
bottom, is in the cold water inlet.
■ Connect the cold water line to the
1/2" NPT female fitting on the top of
the heater (use Teflon tape on
threaded connections).
3
B
A
This is a bronze tank. When connecting to
galvanized pipe, always use a dielectric
union to reduce corrosion due to galvanic
action between dissimilar metals.
CONNECTING TO WATER SUPPLY
8
■
Locate the hot water outlet identified
OUTLET.
■
Connect the hot water line to the 1/2
"
NPT female fitting on the top of the
tank (use Teflon tape on threaded
connections).
■
When tightening, grip the tank fittings
with a wrench to minimize stress.
T & P VALVE
(PRE-INSTALLED ON SOME MODELS)
Page 6

11
10
This appliance must be grounded. In the event of a malfunction or breakdown, grounding
provides a path of least resistance for electric current to reduce the risk of electric shock.This
appliance is equipped with a cord having an equipment grounding conductor and a grounding plug.
The plug must be plugged into a three pin receptacle that is properly installed and grounded in
accordance with all local codes and ordinances. Have a licensed electrician check for ground
continuity of the electrical supply system to insure proper grounding of the water heater.
Temperature and Pressure Relief Valve. This valve must be marked with a maximum set
pressure not to exceed the marked maximum working pressure of the water heater. Install the
valve into an opening provided and marked for this purpose in the water heater, and orient it or
provide tubing so that any discharge from the valve will exit only within 6 inches above or at any
distance below the structural floor and cannot contact any live electrical part. This discharge
opening must not be blocked or reduced in size under any circumstances.
Check the metal tag on the relief valve and compare it to the heater’
s rating plate. Pressure
rating of relief valve must not exceed the working pressure shown on the rating plate of the
heater and the A.G.A. hourly Btu rated temperature steam discharge capacity of the relief valve
shall not be less than the input rating of the heater. No valve is to be placed between the relief
valve and tank. Do not plug the relief valve.
The drain line connected to the valve must not contain a reducing coupling or other restriction
and should terminate near a suitable drain to prevent water damage during valve operation.
Discharge line shall be installed to allow complete drainage of both the valve and line. Do not
thread, plug or cap the end of the drain line.
Property Damage: To reduce the risk of excessive pressures and temperatures
in this water heater install temperature and pressure protective equipment
required by local codes but not less than a combination temperature and
pressure relief valve certified by a nationally recognized testing laboratory that maintains periodic
inspection of production of listed equipment or materials,as meeting the requirements for Relief
Valves and Automatic Gas Shutoff Devices for Hot Water Supply Systems,ANSI Z21.22.
Personal Injury: “Insulation Blankets” are available for external use on
electric water heaters. But are not recommended by InSinkErator.
Property Damage: Hydrogen gas can be produced in a hot water system
served by this heater that has not been used for a long period of time
(generally two weeks or more). Hydrogen gas is extremely flammable. To
reduce the risk of injury under these conditions, it is recommended that the hot water faucet
connected to the hot water system be opened for several minutes before using any electrical
appliance. If hydrogen is present, there will probably be an unusual sound such as air escaping
through the pipe as the water begins to flow. There should be no smoking or open flame near
the faucet at the time it is open.
If you choose to ignore our recommendations and install an insulated blanket on this heater
you must adhere to the following precautions in order to prevent serious injury or death to
yourself or others: (1)The junction box, external wiring, thermostats or heating elements
on electric
water heaters must not be covered; (2)The temperature-pressure relief valve must not be covered;
(3)Operating instructions,installation or safety related labels must not be covered; (4)The American
National Standards & Federal Laws pertaining to water heaters require that instructions and safety
labels remain on the water heater proper. Do not remove instructions or safety labels from the
heater; (5)InSinkErator will not be liable for any incident resulting from the use of insulation
blankets; (6)Water and/or condensate can collect in an insulation blanket. InSinkErator will not be
liable for any rust or corrosion damage caused by the installation of insulation blankets.
CARE AND USE
Anytime the water heater is not used for extended
periods of time, unplug and drain unit. If it is below
freezing you will need to unplug the unit and drain it.
■
Disconnect power from unit.
■
Turn on “hot” faucet until water runs cool.
■
Shut off cold water supply to heater.
■
Leave hot faucet open to bleed off water pressure.
■
Remove drain screw from front-bottom of tank with
screw driver.
■
Drain water from tank into suitable container.
■
Leave the drain screw open during shut down.
■
Close hot water faucet.
■
To place back in working order, follow
filling instructions.
SEASONAL STORAGE/DRAINAGE
Periodically drain the tank to help prevent sediment buildup.
See draining instructions.
The temperature and pressure relief valve should be
checked periodically to ensure it operates properly. Lift the
level at the top of the valve to see if the valve opens and
closes properly.
MAINTENANCE
Check the things you can do yourself:
■
Be sure water heater is plugged firmly into
appropriate receptacle or is properly electrically
connected in some other manner.
■
Be sure fuses and circuit breakers are in good order.
■
Reread instruction booklet to assure that you are
using correct operation procedure.
■
Many unnecessary service calls result in the service
agent doing what the owner can do for himself.
Call InSinkErator or visit our website for
information or for the location of the authorized
service center nearest you. The toll free number is
1-(800)-588-5700, or visit our website at
www.insinkerator.com
Write to us if a satisfactory solution is not
reached. Our address is:
InSinkErator
Service Department
4700 21st Street
Racine, Wisconsin 53406 USA
Heating element has a thermostat which is factory set at
120˚F (49˚F) unless specified differently by
state requirements.
■
Turn off the heater electrical supply.
■
Unplug power cord.
■
Remove front panel.
■
Move temperature indicator on thermostat to
desired temperatures.
■
Replace panel, plug in power cord and turn on heater
electrical supply.
A non-adjustable high temperature limit control operates
before steam temperatures are reached. The high limit is
in the same area as the thermostat and must be reset.
Property Damage: Because the
high limit operates only when
abnormally high water
temperatures are present, it is important that a service
agent be contacted to determine the reason for the high
limit operation before resetting the high limit.
ADJUSTING THE THERMOSTAT
Personal Injury: The consumer
product safety commission
recommends temperatures of
130˚F or lower setting the temperature higher will
increase the risk of scald injury.
Personal Injury: The water
passing out of the valve during
this check may be extremely hot.
Collect discharge in appropriate containers.
WHAT TO DO IF SOMETHING GOES WRONG
Page 7

13
12
Limited Residential Water Heater Warranty
5-Year Limited Warranty Against Tank Leakage. InSinkErator warrants that the bronze tank in
your InSinkErator water heat will not leak due to defects in material or workmanship for a period
of five (5) years after date of original installation. If during this five-year period, the tank leaks due
to any such defect, InSinkErator will provide a replacement bronze tank at no charge, subject to
the limitations listed below. This warranty applies only to units manufactured after April 1, 1993.
Limitations. Replacement tanks will be made available through InSinkErator factory authorized
service agencies. After the one-year full warranty on the water heater has expired, InSinkErator will
not: offer free replacement of any parts other than the bronze tank; pay for the labor to inspect or
install the replacement bronze tank or to repair, replace or re-install any other parts of the water
heater; offer any additional warranty on a replacement bronze tank beyond the unexpired portion
of this limited warranty and pay for any permits required for installing a replacement bronze tank.
Conditions and Exceptions. This limited warranty shall apply only if: the water heater is ins
talled
according to the installation instructions provided by InSinkErator and in accordance with local
plumbing, building and electrical codes; the water heater has a properly installed and rated
temperature and pressure relief valve, certified by the American Gas Association; the water
pressure in the tank has not exceeded the working pressure shown on the tank label; the tank is
used in a non-corrosive and non-contaminated atmosphere and has been used only with potable
water; The water heater has been installed in the continental United States, including Hawaii and
Alaska and the water heater is installed in a single family residence or other light usage area.
Any accident to the water heater, any misuse (including having been operated without water in
the tank) or abuse (including freezing) and any alterations, modifications or attempts to repair tank
leaks by person other than authorized InSinkErator service representative
s, will void the warranty.
Service Information. To obtain service under this warranty, call toll free: 1-800-558-5700 and we
will provide you with the name and location of your nearest factory authorized service agency.
Disclaimer and Exclusion. Any and all implied warranties, whether or merchantability, fitness for
particular purpose or otherwise, relating to this warranty against tank leakage are limited in
duration to the term of this warranty. InSinkErator will not be responsible for any incidental or
consequential damages, including but not limited to water damage, loss of use of the bronze tank,
loss or damage to other personal property or personal injury. Some states do not allow limitations
on how long an implied warranty lasts, so the above limitation may not apply to you. Also, some
States do not allow the exclusion or limitation of incidental or consequential damages, so the
above limitation or exclusion may not apply to you.
Your Rights. This warranty gives you specific legal rights, and you may have other rights which
vary from State to State.
For Your Records.
Model Number
Serial Number
Date Installed
Proof of purchase and/or installation must be presented with your warranty claim; otherwise
the beginning of the warranty period will be deemed the date of manufacture of the water
heater.
Water Heater: 1-year warranty
Tank: 5-year warranty on bronze tank
Full Residential Water Heater Warranty
Full One-Year Warranty. InSinkErator warrants that the water heater will be free from defects
in material or workmanship for a period of one (1) year after date of original installation. If
during this one-year period, the water heater is found to have any such defect, InSinkErator
will repair or replace it at no charge.
Limitations. The warranty on any replacement water heater furnished under this warranty will
be limited to the unexpired term of this warranty.
Conditions and Exceptions. This warranty shall apply only if: the water heater is installed
according to the installation instructions provided by us and in accordance with local
plumbing, building and electrical codes; the water heater has a properly installed and rated
temperature and pressure relief valve, certified by the American Gas Association; the water
pressure in the tank has not exceeded the working pressure shown on the tank label; the tank
is used in a non-corrosive and non-contaminated atmosphere and has been used only with
potable water and the water heater has been installed in the continental United States
,
including Hawaii and Alaska. Any accident to the water heater, any misuse (including having
been operated without water in the tank) or abuse (including freezing) and any alterations,
modifications or attempts to repair tank leaks by person other than authorized InSinkErator
service representatives, will void the warranty.
Service Information. To obtain service under this warranty, call toll free: 1-800-558-5700
and we will provide you with the name and location of your nearest factory authorized
service agency.
Disclaimer and Exclusions. There are no other express warranties, written or oral.
InSinkErator shall not be responsible for any incidental or consequential damages, including
but not limited to water damage, lose of use of the unit, loss or damage to other personal
property or personal injury. Some states do not allow the exclusive or limitation of incidental
or consequential damages, so the above limitation or exclusion may not apply to you. This
warranty gives you specific legal rights, and you may have other rights which vary from
State to State.
WARRANTY INFORMATION
Page 8
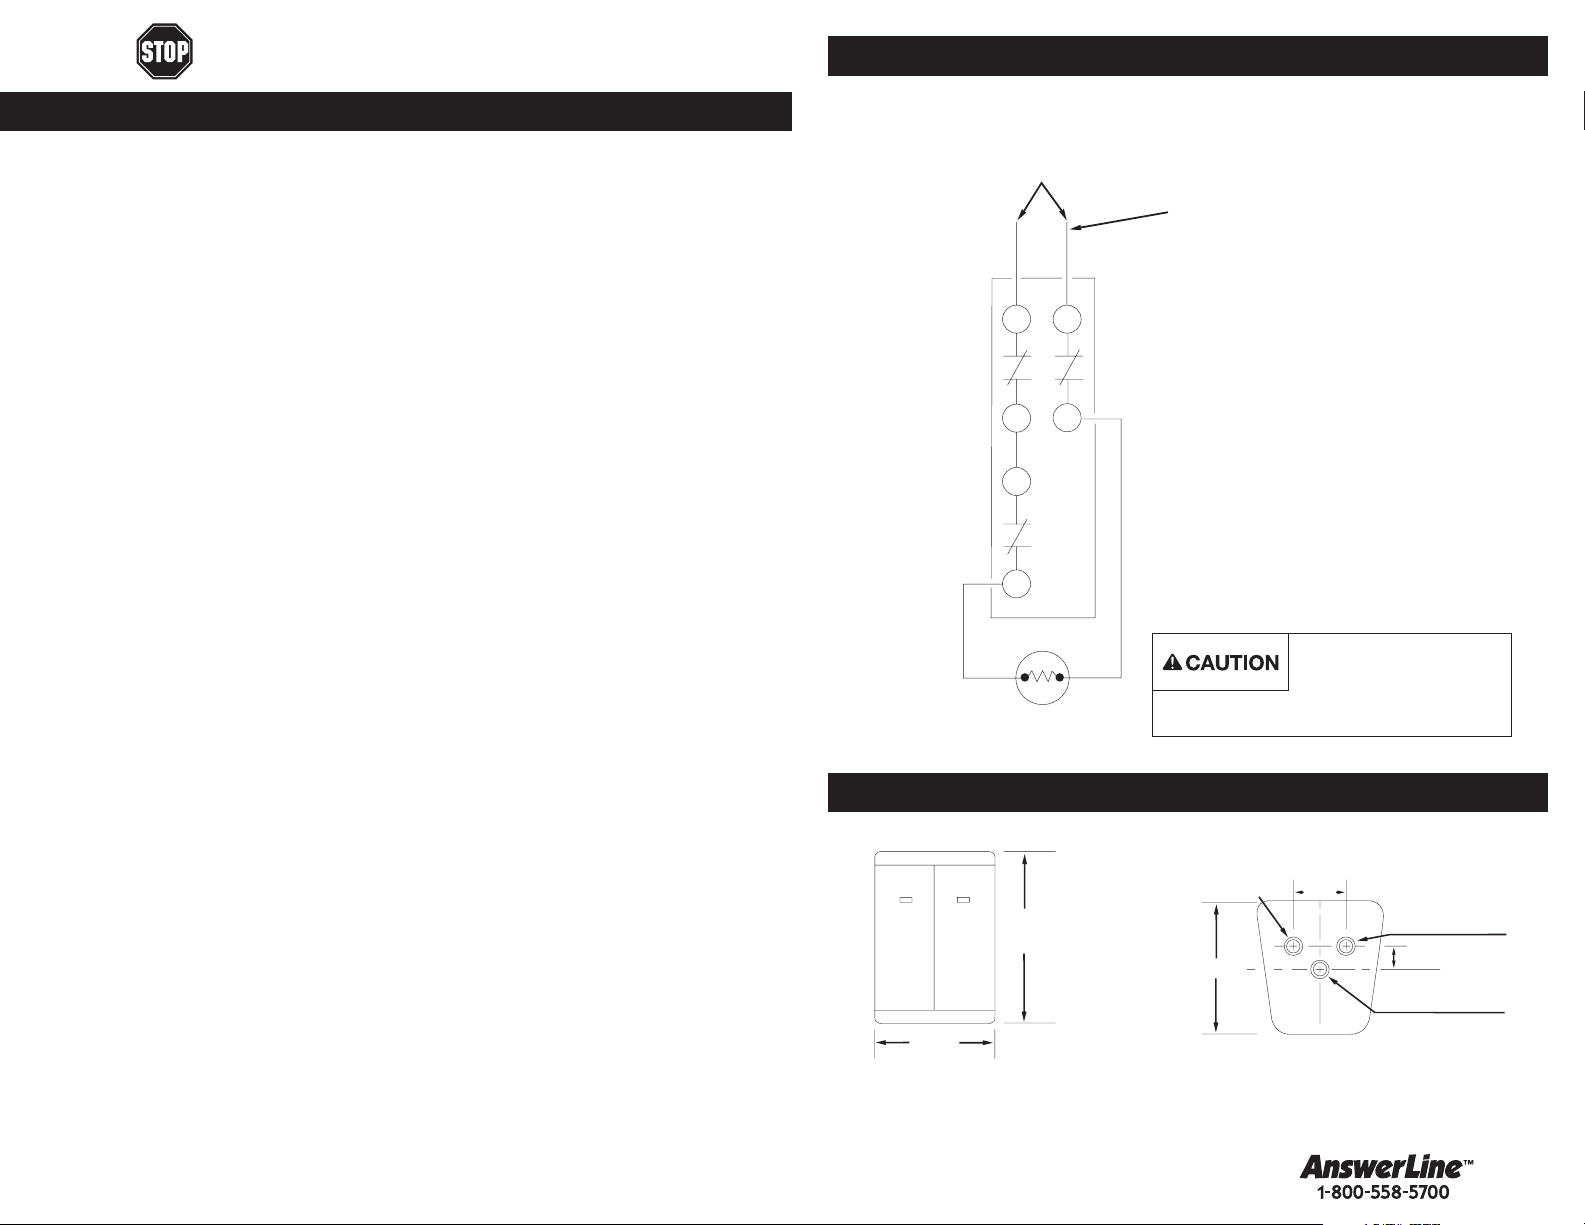
WIRING DIAGRAM
HEATER DIMENSIONS
15
Personal Injury: The cord of this
heater must be used with a properly
grounded outlet to insure proper
safety and operation. Do not use a 3 prong to a 2 prong
adapter.Water heater is not to be hard wired.
14
If you are still experiencing trouble call the AnswerLine™1-800-558-5700.
Please read Troubleshooting Guide and/or visit
www.insinkerator.com before calling AnswerLine
™
Always remove the power cord from its receptacle before servicing the heater.
If the heater stops working:
■
Check the circuit breaker supplying power to the outlet where the heater is installed.
If the circuit breaker has tripped:
■
Have the circuit checked by an electrician to determine if the circuit is overloaded or if a short exists.
If the circuit breaker has not tripped:
■
Remove the power cord from its receptacle.
■
Remove the thermostat cover on the front of the heater.
■
Inspect the heater for any frayed or loose elctrical connections.
■
Push the red “reset” button at the top of the thermostat compartment.
■
If the button “clicks” when pushed, something has caused the heater to overheat. Leave power cord unplugged and
contact your service agency.
■
If the button does not “click” when pushed, the element has probably burned out and should be replaced. Contact
your service agency.
If the water over heats, or if steam is released from the relief valve:
■
Unplug the power cord immediately.
■
Allow tank to cool.
■
Remove the cover on the front of the heater and check that the thermostat is seated firmly against the front of the tank
and that the mounting bracket is snug, but not over tightened.
■
If there are any continued signs of overheating, disconnect the power and contact a qualified service person.
Relief Valve Operation:
■
If the relief valve weeps or drips hot water, contact a qualified service person. If a check valve is installed in the hot water
line, an expansion tank must be properly installed.
TROUBLESHOOTING
BLACK
HIGH LIMIT
SINGLE THROW
THERMOSTAT
3 WIRE POWER CORD
110-120 VAC
(HOT)
1
24
1
2
ELEMENT
WHITE
(NEUTRAL)
3
IMPORTANT:
WHITE SIDE OF CORD
TO THIS TERMINAL
10-1/2''
HOT OUTLET
(1/2'' NPT FEMALE)
20-5/8'' (W154)
13-1/2'' (W152)
10-1/4''
3-1/8''
COLD INLET
(1/2'' NPT FEMALE)
1-1/2''
T & P VALVE BOSS
3/4'' NPT FEMALE
 Loading...