

Insignia NS-UZ17XSS9, NS-UZ17XWH7-C Quick Setup Manual
QUICK SETUP GUIDE
Wi-Fi Connected
17 / 21 Cu. Ft.
Upright Freezer
NS-UZ17XWH7 / NS-UZ21XWH7 /
NS-UZ17XSS9 / NS-UZ17XWH7-C
PACKAGE CONTENTS
• 17 or 21 cubic foot upright freezer with Wi-Fi connection
• Door handle, screws, and hex wrench
• Quick Setup Guide
FIND YOUR USER GUIDE ONLINE!
Go to www.insigniaproducts.com, enter your model in the search box, then press ENTER. Next to
Features, click Support & Downloads, then next to User Guide, click the language you want.
SETTING UP YOUR FREEZER
Before using your freezer
• Remove the exterior and interior packing.
• Let the freezer stand upright for approximately
two hours before connecting it to power.
• Wipe the inside.
• When moving your freezer, do not tilt it beyond
45° from upright.
Finding a suitable location
• This freezer is designed to be free standing only,
and should not be recessed or built-in.
• Place your freezer on a oor that is strong enough
to support the freezer when it is fully loaded.
• If your freezer is located too far from your Wi-Fi
router, the signal may be too weak for a good
connection. If that’s the case, a Wi-Fi range
extender should improve connectivity.
• Allow 7.9 inches (20 cm) of space between the
sides of the freezer and the walls, 3.9 inches (10
cm) between the back of the freezer and the wall,
and 11.8 inches (30 cm) between the top of the
freezer and the ceiling.
• If you locate the freezer next to a xed wall, allow
sucient space on the hinge side for the door to
swing open.
• Locate the freezer away from direct sunlight and
sources of heat, such as a stove, heater, or radiator.
Direct sunlight may aect the acrylic coating and
heat sources may increase electrical consumption.
Extremely cold temperatures may also prevent the
freezer from performing properly.
• Avoid locating the freezer in moist areas.
Leveling your freezer
• If the feet are not adjusted during installation, the
doors may not close or seal properly, causing
cooling, frost, or moisture problems.
• To level your freezer, rotate the leveling feet
clockwise (to raise) the freezer or
counter-clockwise (to lower). The front of the
freezer should be slightly higher than the back.
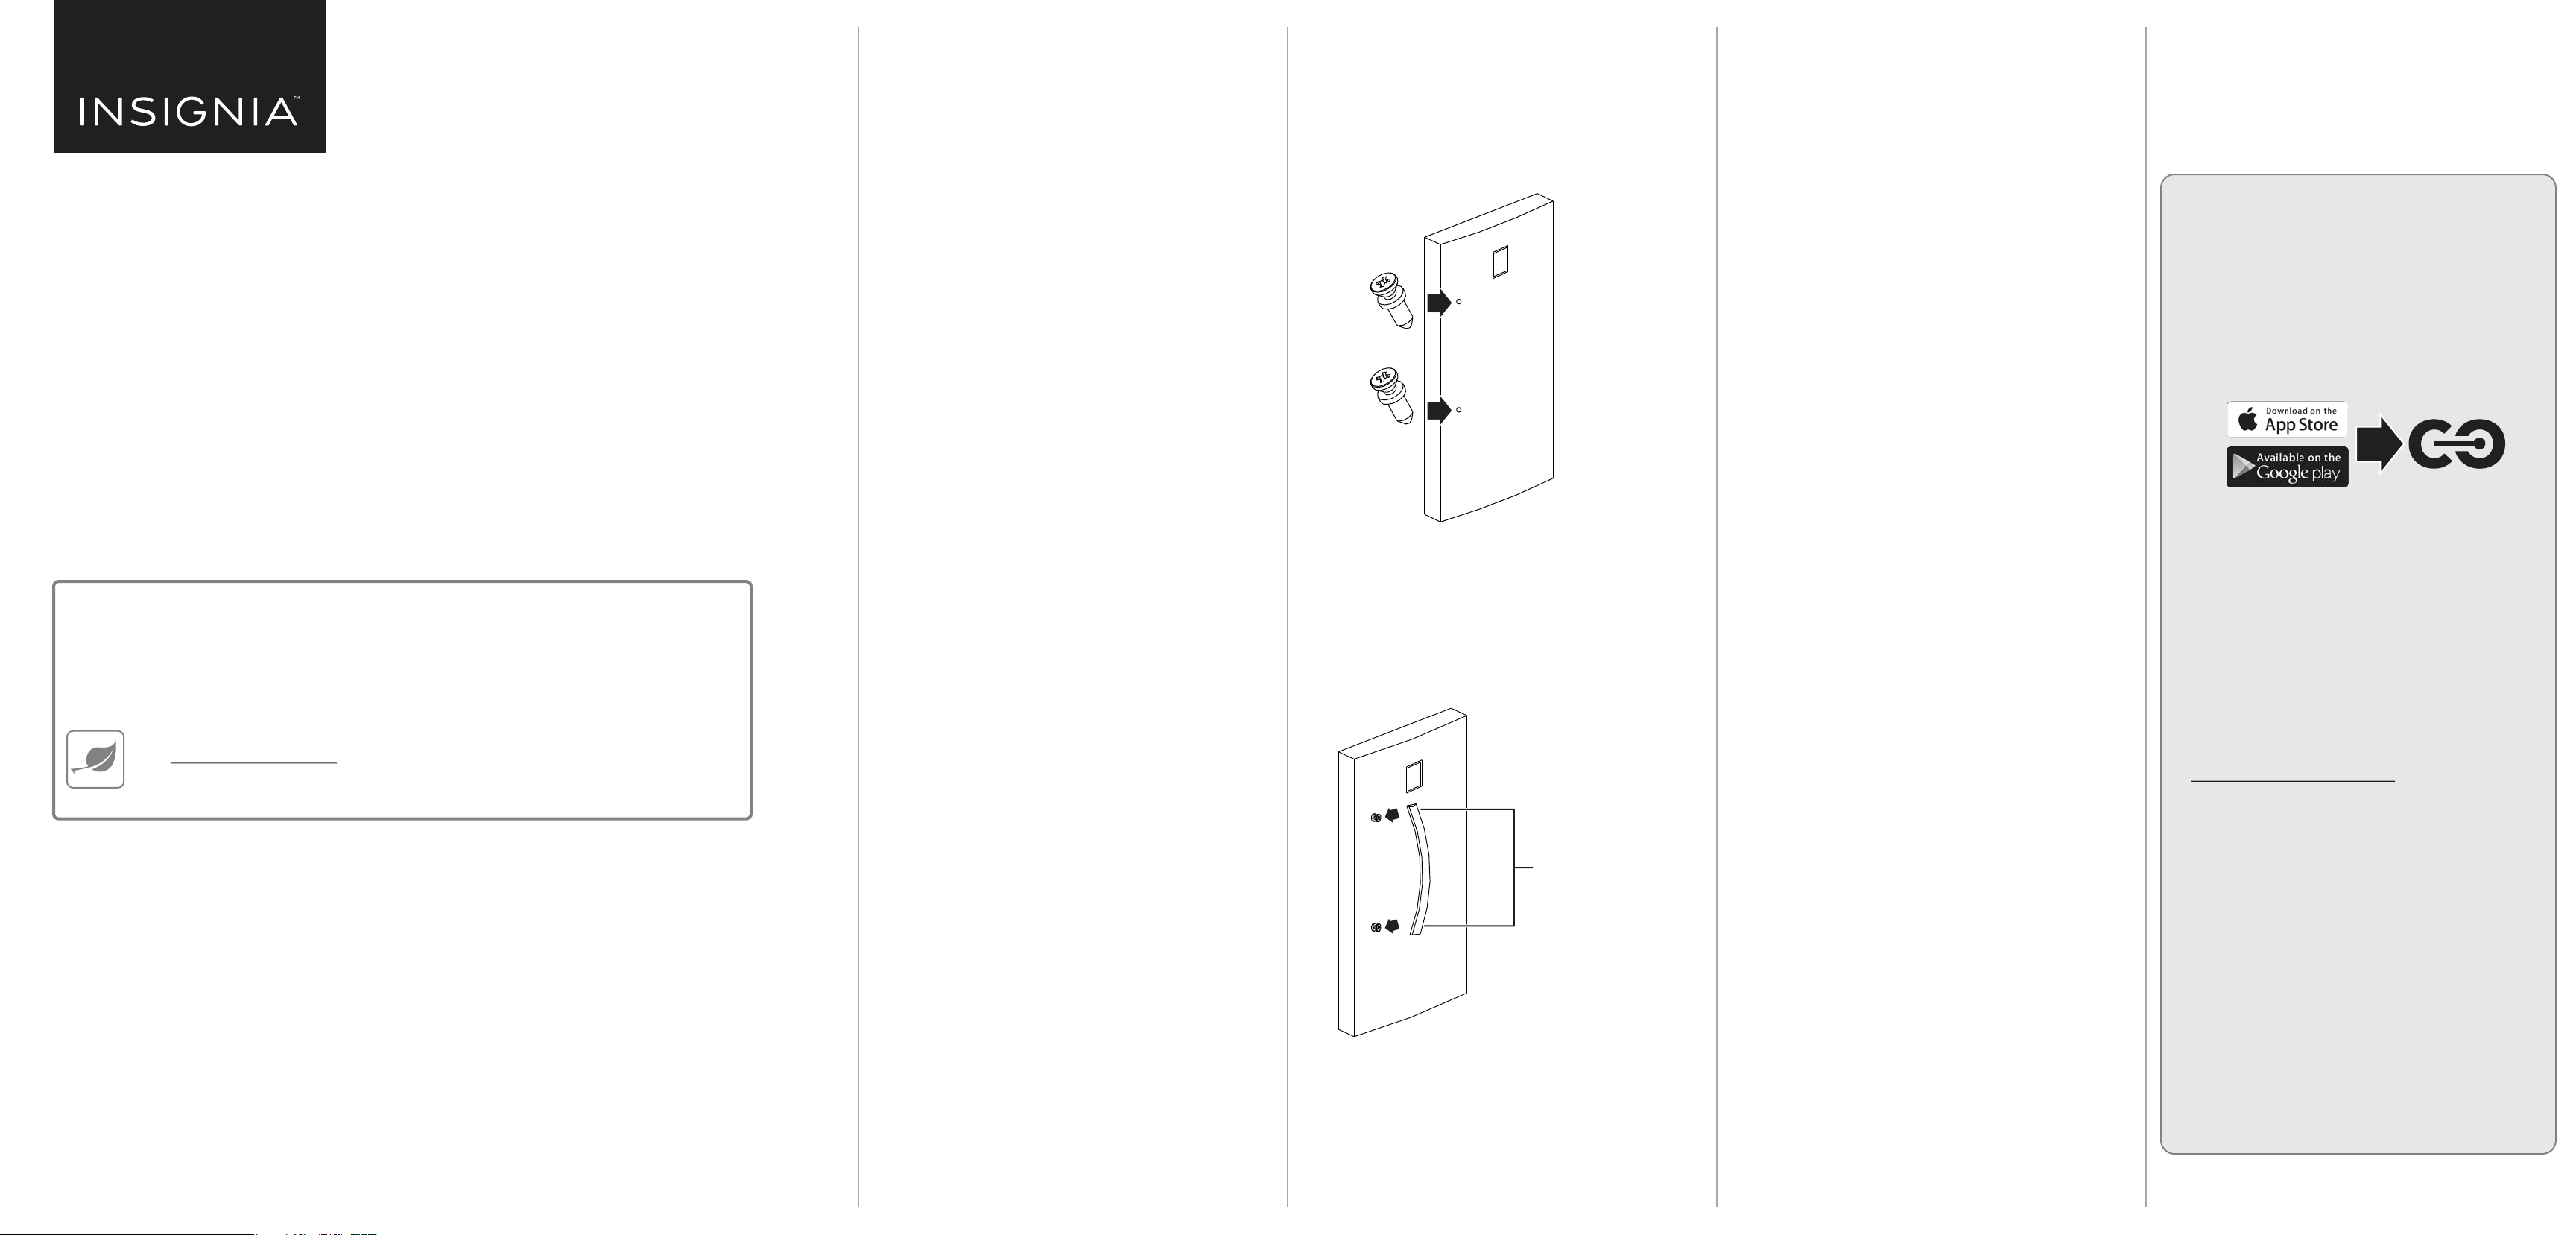
Installing the door handle
1 Unplug the freezer.
2 Screw the extended-head screws into the door
holes with a Phillips screwdriver. Do not
overtighten. The screw heads should extend above
the surface of the door.
3 Loosen the hex screws on the top and bottom of
the handle with the hex wrench (provided) so that
you can t the handle over the extended head
screws in the door.
Hex screws are here.
Extra hex screws are provided.
4 Place the door handle over the heads of the
screws, then tighten the hex screws.
USING YOUR FREEZER
1 Plug in your freezer. Wait for 30 minutes, then
open the freezer door to determine if the freezer
is working properly.
2 Press and hold the Lock button for three
seconds, then + or – to set the temperature
inside the freezer. A beep sounds when the
maximum or minimum temperatures are
reached.
Using the Lock button
• To prevent accidental activation, the control
panel automatically locks after 30 seconds of
inactivity. To use the control panel, press and
hold the Lock button for three seconds.
Switching between Freezer and Refrigerator
modes
This freezer has an advanced design feature that
lets you change it from a freezer to a refrigerator.
You can only use the control panel to switch
modes. You cannot use the Insignia Connect App
to switch modes.
1 Press and hold the Lock button for three
seconds.
2 Press and hold the Freezer/Fridge button for
three seconds. The panel beeps and the indicator
changes to the new mode.
Quick Freezing foods
• The quick freeze mode lowers the temperature
below the normal operating temperature to
quickly freeze foods. You can only use the control
panel to quick freeze foods. You cannot use the
Insignia Connect App.
1 Press and hold Lock for three seconds.
2 Press the Quick Freeze button to enter quick
freeze mode. The blue snowake turns on.
• The quick freeze mode turns o after three hours
if the temperature falls below -13° F (-25° C). If
the temperature does not fall below -13° F (-25°
C), the quick freeze mode turns o after 24 hours.
You can press the button a second time to exit
quick freeze mode.
Switching between Fahrenheit and Celsius
Using the control panel on the freezer
1 Press and hold Lock for three seconds to unlock
the control panel.
2 Press and hold + and – for three seconds to
switch settings.
INTRODUCING THE INSIGNIA
CONNECT APP
Download the Insignia Connect app to use
additional features such
as open-door and temperature alerts.
App download is optional – your freezer
works normally without it!
APP FEATURES
• Simple setup requires no additional hardware or
hubs
• Adjust temperature and Quick Freeze
notications from your phone or tablet
• Insignia Connect app keeps you in control
wherever you are
SYSTEM REQUIREMENTS
• Home Wi-Fi network
• Insignia Connect app (free download at
connect.bestbuy.com/setup)
The Insignia Connect app tracks status information for all
your smart home devices in one place. Signing into a Best
Buy account is required for remote access and to keep
your data secure.
• To control this HomeKit-enabled accessory, iOS
10.3.2 or later is recommended.
Compatibility: iOS 10.3.2 or later
Android 6.0.1 Marshmallow or later
SETTING UP YOUR CONNECTED FREEZER
1 Connect your mobile device to a Wi-Fi network.
2 Type connect.bestbuy.com/setup in the search
bar of your device’s browser and follow the
on-screen instructions to download the app.
3 Open your app and follow the on-screen
instructions to complete setup.
Before using your new product, please read these instructions to prevent any damage.
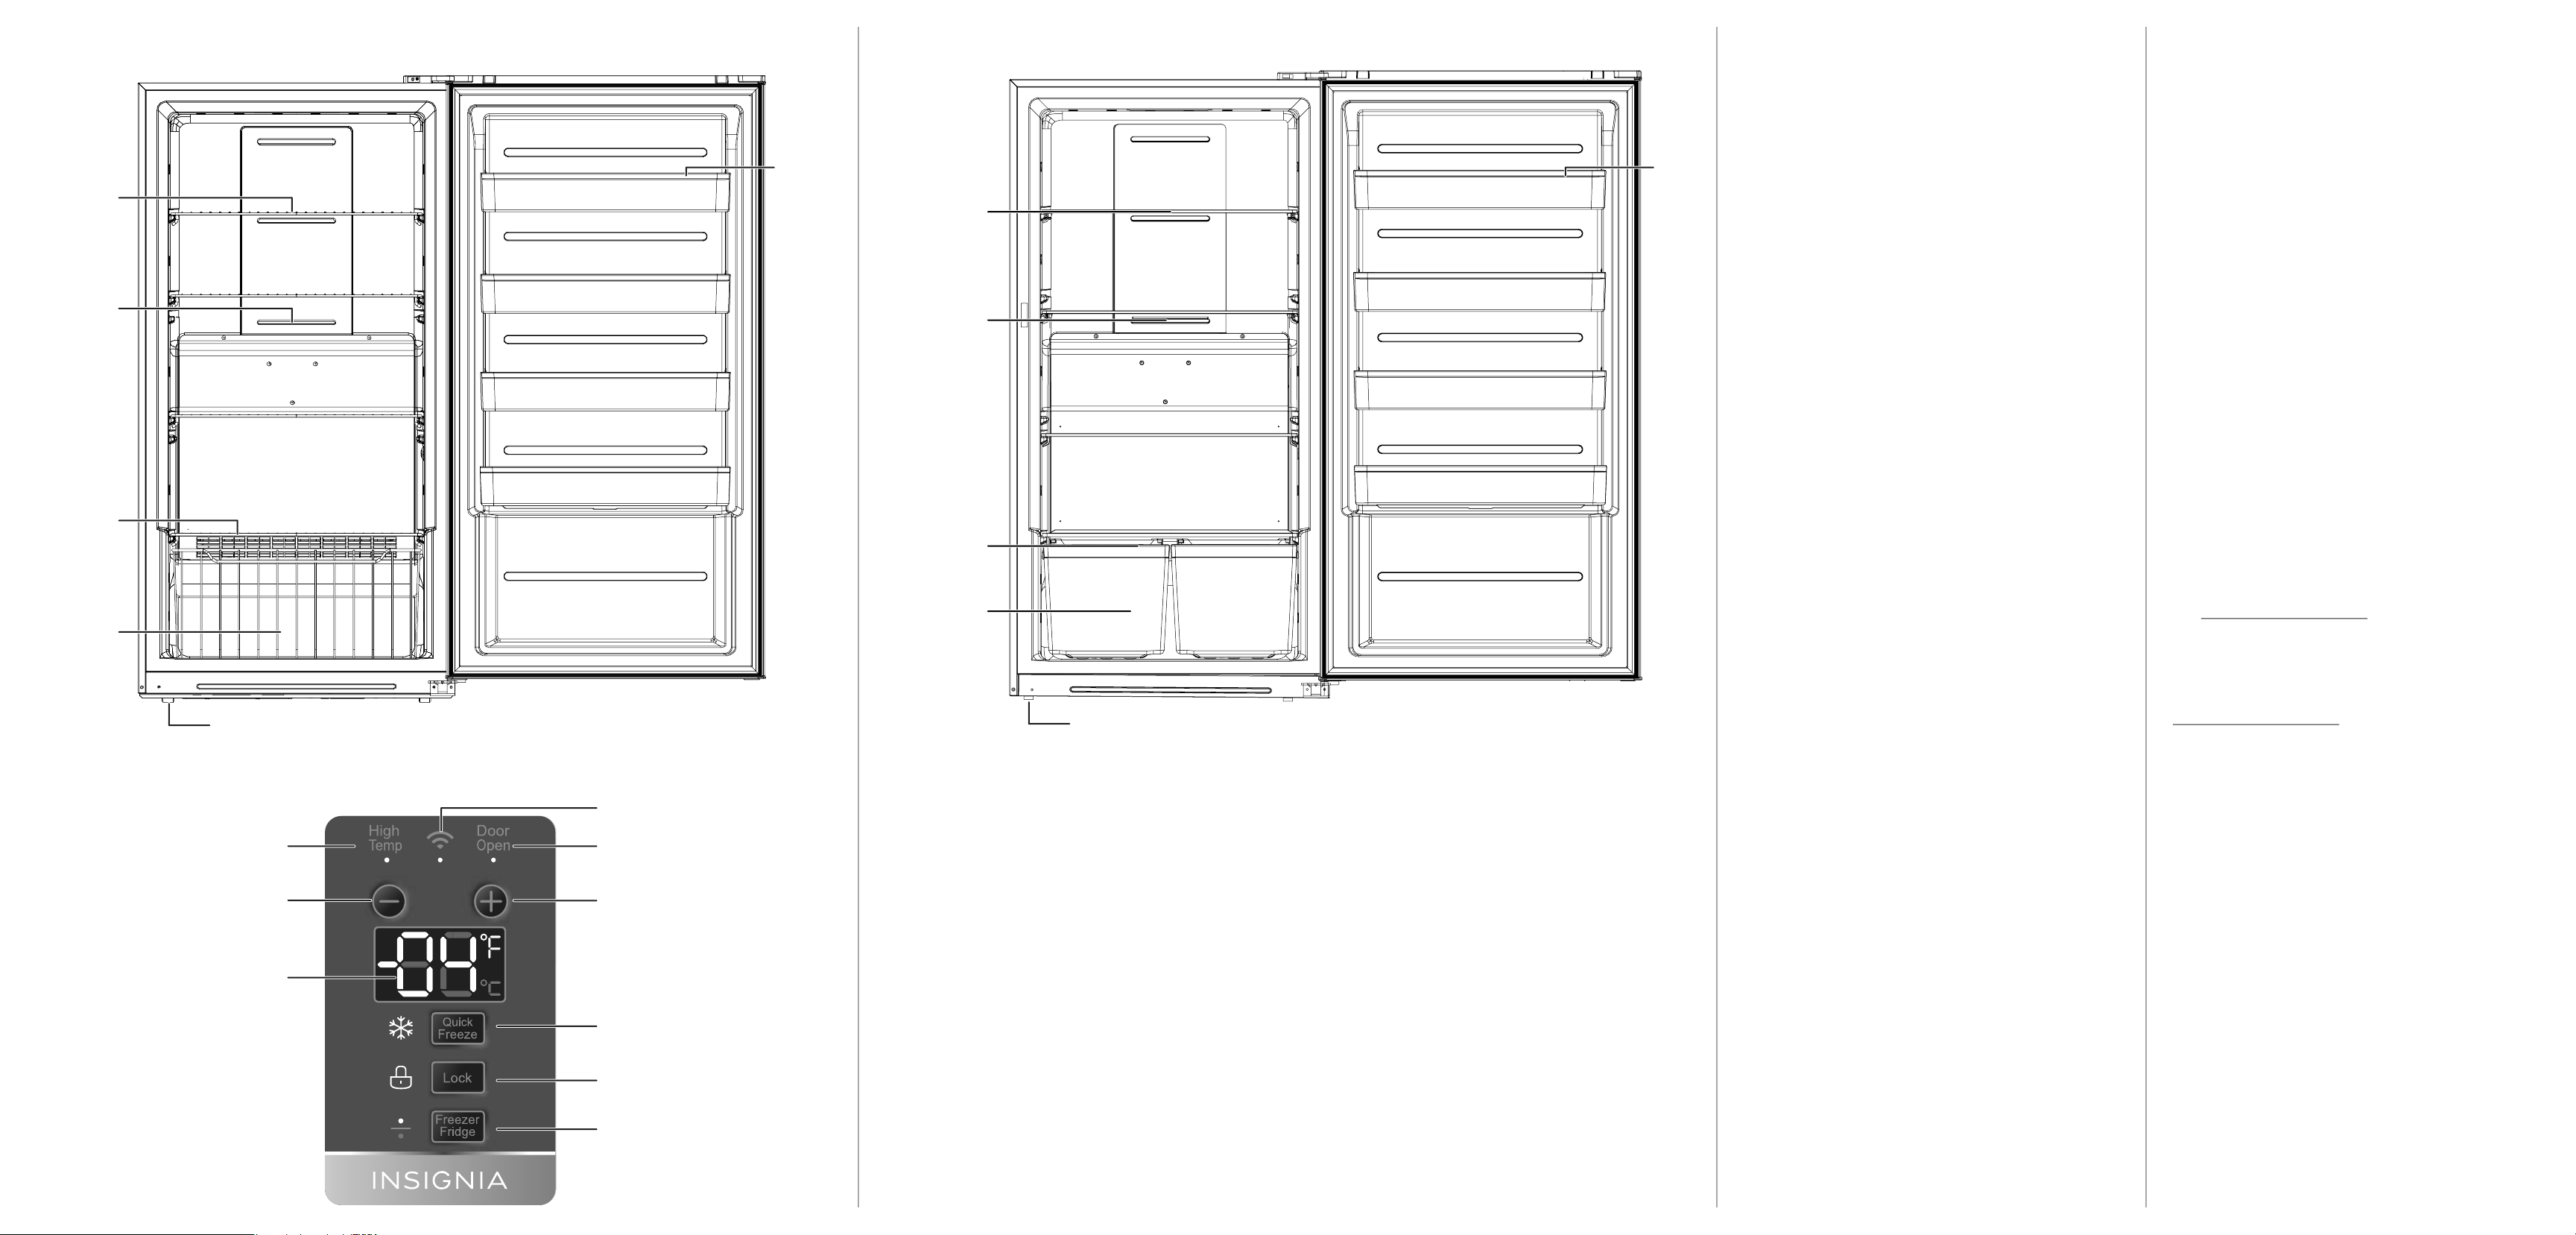
FEATURES
Interior (NS-UZ17XWH7 & NS-UZ21XWH7)
Interior (NS-UZ17XSS9)
Door tray Door tray
TROUBLESHOOTING
For troubleshooting information see your online
User Guide.
SPECIFICATIONS
For specications see your online User Guide.
22 If the supply cord is damaged, it must be replaced by the
manufacturer, its service agent or similarly qualied
person in order to avoid a hazard.
23 Risk of child entrapment. Before you throw away your old
freezer:
1) Take o the doors
2) Leave the shelves in place so that children may not
easily climb inside
Wire shelf
Air ow outlet
Air ow inlet
Wire drawer
Touch pad controls
Leveling feet (2 - bottom front)
Wheels (2 - bottom back)
High temperature indicator/alert
Lower temperature button
Temperature indicator
Glass shelf
Air ow outlet
Air ow inlet
Plastic drawer
Image is for reference only. Your freezer may dier slightly. Image is for reference only. Your freezer may dier slightly.
Leveling feet (2 - bottom front)
Wheels (2 - bottom back)
Wi-Fi indicator
Door open indicator/alarm
Raise temperature button
Quick freeze button
Control Panel Lock/Unlock button
Freezer/Fridge mode button
SAFETY INFORMATION
1 Read these instructions.
2 Keep these instructions.
3 Heed all warnings.
4 Follow all instructions.
5 Do not use this appliance near water.
6 Clean only with damp cloth.
7 Do not block any ventilation openings. Install in
accordance with the manufacturer’s instructions.
8 Do not install near any heat sources such as radiators, heat
registers, stoves, or other apparatus that produce heat.
9 Do not defeat the safety purpose of the polarized or
grounding-type plug. A polarized plug has two blades with
one wider than the other. A grounding type plug has two
blades and a third grounding prong. The wide blade or the
third prong are provided for your safety. If the provided
plug does not t into your outlet, consult an electrician for
replacement of the obsolete outlet.
10 Protect the power cord from being walked on or pinched
particularly at plugs, convenience receptacles, and the
point where they exit from the appliance.
11 Do not attempt to modify or extend the power cord of this
appliance.
12 Unplug this appliance during lightning storms or when it
will not be used for long periods of time.
13 Make sure that the available AC power matches the voltage
requirements of this appliance.
14 Do not handle the plug with wet hands. This could result in
an electric shock.
15 Unplug the power cord by holding the plug, never by
pulling the cord.
16 Do not turn the appliance on or o by plugging or
unplugging the power cord.
17 Refer all servicing to qualied service personnel. Servicing
is required when the appliance has been damaged in any
way, such as the power-supply cord or plug is damaged,
liquid has been spilled or objects have fallen into the
appliance, the appliance has been exposed to rain or
moisture, does not operate normally, or has been dropped.
18 To reduce the risk of re or electric shock, do not expose
this appliance to rain, moisture, dripping, or splashing, and
no objects lled with liquids should be placed on top of it.
19 Do not use extension cords or ungrounded (two prong)
adapters.
20 This appliance is not intended for use by persons (including
children) with reduced physical, sensory or mental
capabilities, or lack of experience and knowledge, unless
they have been given supervision or instruction concerning
use of the appliance by a person responsible for their
safety.
21 Children should be supervised to ensure that they do not
play with the appliance.
Grounding requirement
This freezer must be grounded. This freezer is equipped with
a cord having a grounding wire with a grounding plug. The
plug must be inserted into an outlet that is properly installed
and grounded. Improper use of the grounding plug can
result in a risk of electric shock.
Consult a qualied electrician or service person if the
grounding instructions are not completely understood, or if
doubt exists as to whether the freezer is properly grounded.
LEGAL NOTICES
lf at any time in the future you should need to dispose of this
product, note that waste electrical products should not be
disposed of with household waste. Recycle where facilities
exist. Check with your Local Authority or retailer for recycling
advice. (Waste Electrical and Electronic Equipment Directive)
Owing to continuous improvement, no prior notice will be
given regarding changes on features and specications.
ONEYEAR LIMITED WARRANTY
Visit www.insigniaproducts.com for details.
CONTACT INSIGNIA:
For customer service, call 1-877-467-4289 (U.S. and Canada)
or 01-800-926-3000 (Mexico)
www.insigniaproducts.com
INSIGNIA is a trademark of Best Buy and its aliated companies
Distributed by Best Buy Purchasing, LLC
7601 Penn Ave South, Richeld, MN 55423 U.S.A.
©2018 Best Buy. All rights reserved.
Made in China
V5 ENGLISH 18-0625
 Loading...