

Page 1

LCD TV
TV ACL | TV con Pantalla LCD
NS-LCD26F/NS-LCD32F/NS-CL26C
Page 2
Insignia NS-LCD26F/
(
)
NS-LCD32F/
NS-CL26C LCD TV
static electricity charges. Section 810 of the
National Electrical Code provides information on
proper grounding of the mast and supporting
structure, grounding of the lead-in wire to an
antenna discharge unit, size of the grounding
conductors, location of the antenna discharge
unit, connection to grounding electrodes, and
requirements for the grounding electrode.
Contents
Welcome. . . . . . . . . . . . . . . . . . . . . . . . . . . . . . . . . .3
Safety information. . . . . . . . . . . . . . . . . . . . . . . . . . .3
Features . . . . . . . . . . . . . . . . . . . . . . . . . . . . . . . . . .5
Accessories . . . . . . . . . . . . . . . . . . . . . . . . . . . . . . . . . 5
Front and side views . . . . . . . . . . . . . . . . . . . . . . . . . . 5
Rear view - connectors . . . . . . . . . . . . . . . . . . . . . . . . 6
Remote control . . . . . . . . . . . . . . . . . . . . . . . . . . . . . . 6
Setting up your TV . . . . . . . . . . . . . . . . . . . . . . . . . .7
Installing the remote control batteries . . . . . . . . . . . . . 7
Using the remote control . . . . . . . . . . . . . . . . . . . . . . . 7
Connecting to video sources . . . . . . . . . . . . . . . . . . . . 7
Using your TV. . . . . . . . . . . . . . . . . . . . . . . . . . . . . .9
Turning the power on and off. . . . . . . . . . . . . . . . . . . . 9
Changing the volume . . . . . . . . . . . . . . . . . . . . . . . . . 9
Changing the video source . . . . . . . . . . . . . . . . . . . . . 9
Changing channels . . . . . . . . . . . . . . . . . . . . . . . . . . . 9
Programming channels into memory. . . . . . . . . . . . . . 9
Displaying status information . . . . . . . . . . . . . . . . . . 10
Setting the sleep timer. . . . . . . . . . . . . . . . . . . . . . . . 10
Viewing closed captions . . . . . . . . . . . . . . . . . . . . . . 10
Setting parental controls . . . . . . . . . . . . . . . . . . . . . . 10
Using the DVD player (NS-CL26C only) . . . . . . . . .12
Playing a DVD . . . . . . . . . . . . . . . . . . . . . . . . . . . . . . 12
Playing a CD . . . . . . . . . . . . . . . . . . . . . . . . . . . . . . . 13
Playing a Kodak picture CD or JPEG disc. . . . . . . . . 14
Customizing TV settings. . . . . . . . . . . . . . . . . . . . .14
Opening and navigating the on-screen menus . . . . . 14
Using the on-screen menu . . . . . . . . . . . . . . . . . . . . 14
On-screen menus . . . . . . . . . . . . . . . . . . . . . . . . . . . 15
Customizing DVD player settings . . . . . . . . . . . . . .16
Using the setup menu . . . . . . . . . . . . . . . . . . . . . . . . 16
Changing DVD settings . . . . . . . . . . . . . . . . . . . . . . . 16
Customizing DVD player settings . . . . . . . . . . . . . .16
Maintaining . . . . . . . . . . . . . . . . . . . . . . . . . . . . . . .17
Specifications . . . . . . . . . . . . . . . . . . . . . . . . . . . . .18
Legal Notices . . . . . . . . . . . . . . . . . . . . . . . . . . . . .18
1 Year Limited Warranty . . . . . . . . . . . . . . . . . . . . .19
Français. . . . . . . . . . . . . . . . . . . . . . . . 21
Español . . . . . . . . . . . . . . . . . . . . . . . . 23
Welcome
Congratulations on your purchase of a
high-quality Insignia product. Your new TV
represents the state of the art in television
design, and is designed for reliable and
trouble-free performance.
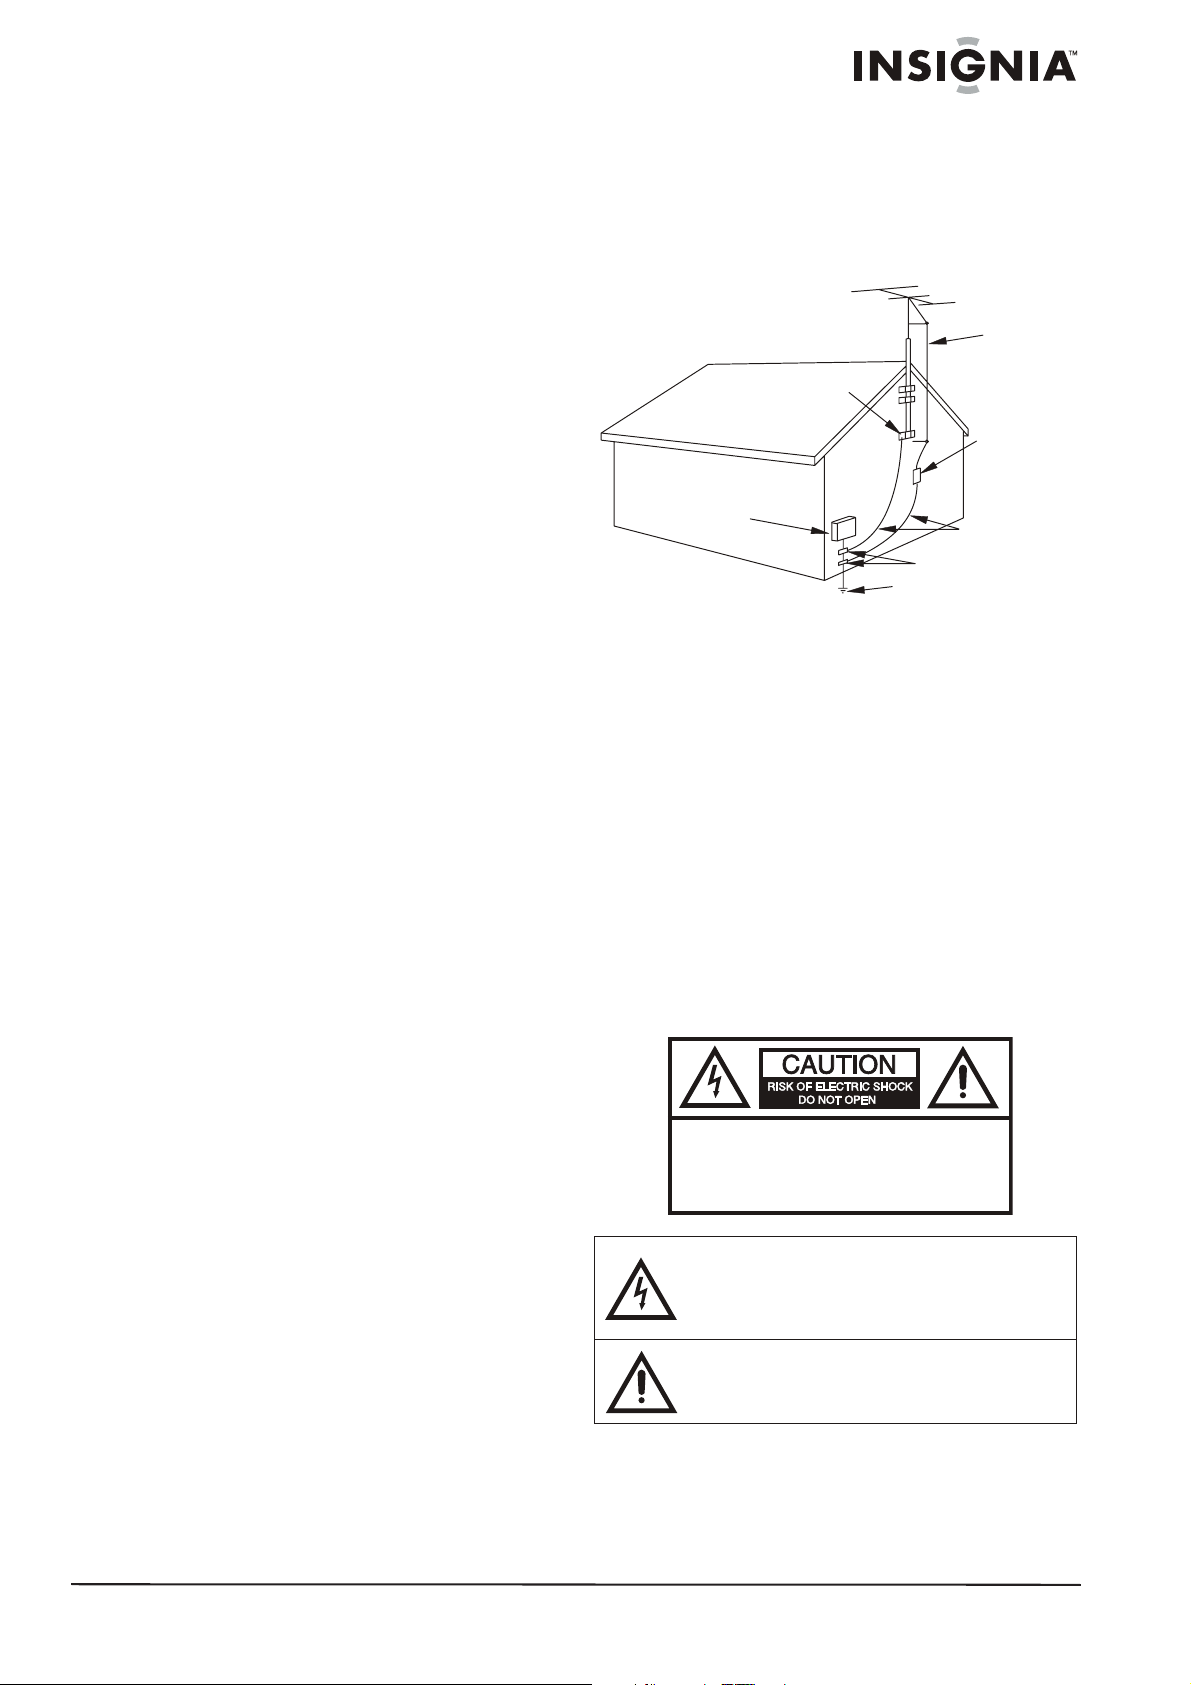
Safety information
EXAMPLE OF ANTENNA GROUNDING AS SPECIFIED
BY NATIONAL ELECTRICAL CODE (NEC)
GROUND
CLAMP
ELECTRIC
SERVICE
EQUIPMENT
GROUND CLAMPS
POWER SERVICE GROUNDING
ELECTRODE SYSTEM
NEC ART 250, PART H
• For added protection during a lightning
storm, or when the product is left unattended
and unused for long periods of time, unplug it
from the power outlet and disconnect the
antenna. This will prevent damage to the
equipment due to lightning and power line
surges.
• An outside antenna system should not be
located near overhead power lines or other
electric light or power circuits, or where it can
fall into such power lines or circuits. When
installing an outside antenna system,
extreme care should be taken to keep from
touching such power lines or circuits,
because contact with them can be fatal.
Risk of shock
To prevent fire or shock hazard, do not expose
this appliance to rain or moisture.
CAUTION:
ELECTRIC
COVER
PARTS INSIDE. REFER SERVICING
QUALIFIED SERVICE PERSONNEL.
The lightning flash with arrowhead symbol, within an
equilateral triangle is intended to alert the user to the
presence of uninsulated dangerous voltage within the
product’s enclosure that may be of sufficient magnitude
to constitute a risk of electric shock.
The exclamation point within an equilateral triangle is
intended to alert the user to the presence of important
operating and maintenance (servicing) instructions in the
literature accompanying the appliance.
TO REDUCE THE RISK OF
SHOCK, DO NOT REMOVE
(OR BACK). NO USER-SERVICEABLE
ANTENNA
LEAD-IN
WIRE
ANTENNA
DISCHARGE UNIT
(NEC SECTION 810-20)
GROUNDING CONDUCTORS
(NEC SECTION 810-21)
TO
Antenna connections
If an outside antenna is connected to the
television equipment, make sure that the
antenna system is grounded to provide
protection against voltage surges and built-up
www.insignia-products.com
3
Page 3

Insignia NS-LCD26F/NS-LCD32F/NS-CL26C LCD TV
Warning
Do not overload wall outlets. Overloaded wall outlets,
loose or damaged wall outlets, overloaded extension
cords, frayed power cords, or damaged or cracked
wire insulation are dangerous. Any of these conditions
could result in electric shock or fire. Periodically
examine the cord of your TV, and if its appearance
indicates damage or deterioration, unplug it,
discontinue use of the TV, and have the cord replaced
with an exact replacement part by an authorized
servicer.
Protect the power cord from physical or mechanical
abuse, such as being twisted, kinked, pinched, closed
in a door, or walked upon. Pay particular attention to
plugs, wall outlets, and the point where the cord exits
the TV.
To prevent electric shock, do not use this polarized
plug with an extension cord, receptical, or other outlet
unless the blades can be fully inserted to prevent
blade exposure.
Caution
Your TV should not be exposed to water (dripping or
splashing) and no objects filled with liquids, such as
vases, should be placed on the apparatus.
Important Safety Instructions
1 Read these instructions.
2 Keep these instructions.
3 Heed all warnings.
4 Follow all instructions.
5 Do not use this apparatus near water.
6 Clean only with dry cloth.
7 Do not block any ventilation openings. Install
in accordance with the manufacturer's
instructions.
8 Do not install near any heat sources such as
radiators, heat registers, stoves, or other
apparatus (including amplifiers) that produce
heat.
9 Do not defeat the safety purpose of the
polarized or grounding-type plug. A polarized
plug has two blades with one wider than the
other. A grounding type plug has two blades
and a third grounding prong. The wide blade
or the third prong are provided for your safety.
If the provided plug does not fit into your
outlet, consult an electrician for replacement
of the obsolete outlet.
10 Protect the power cord from being walked on
or pinched particularly at plugs, convenience
receptacles, and the point where they exit
from the apparatus.
11 Only use attachments/accessories specified
by the manufacturer.
12 Use only with the cart,
stand, tripod, bracket, or
table specified by the
manufacturer, or sold
with the apparatus.
When a cart is used,
use caution when
moving the cart/apparatus combination to
a v o i d i n j u r y f r o m t i p - o v e r .
13 Unplug this apparatus during lightning storms
or when unused for long periods of time.
14 Refer all servicing to qualified service
personnel. Servicing is required when the
apparatus has been damaged in any way,
such as power-supply cord or plug is
damaged, liquid has been spilled or objects
have fallen into the apparatus, the apparatus
has been exposed to rain or moisture, does
not operate normally, or has been dropped.
The apparatus shall not be exposed to dripping
or splashing and no objects filled with liquids,
such as vases, shall be placed on the apparatus.
The AC power plug is used as the disconnect
device, it must be readily available during normal
use.
4
www.insignia-products.com
Page 4
Insignia NS-LCD26F/NS-LCD32F/NS-CL26C LCD TV
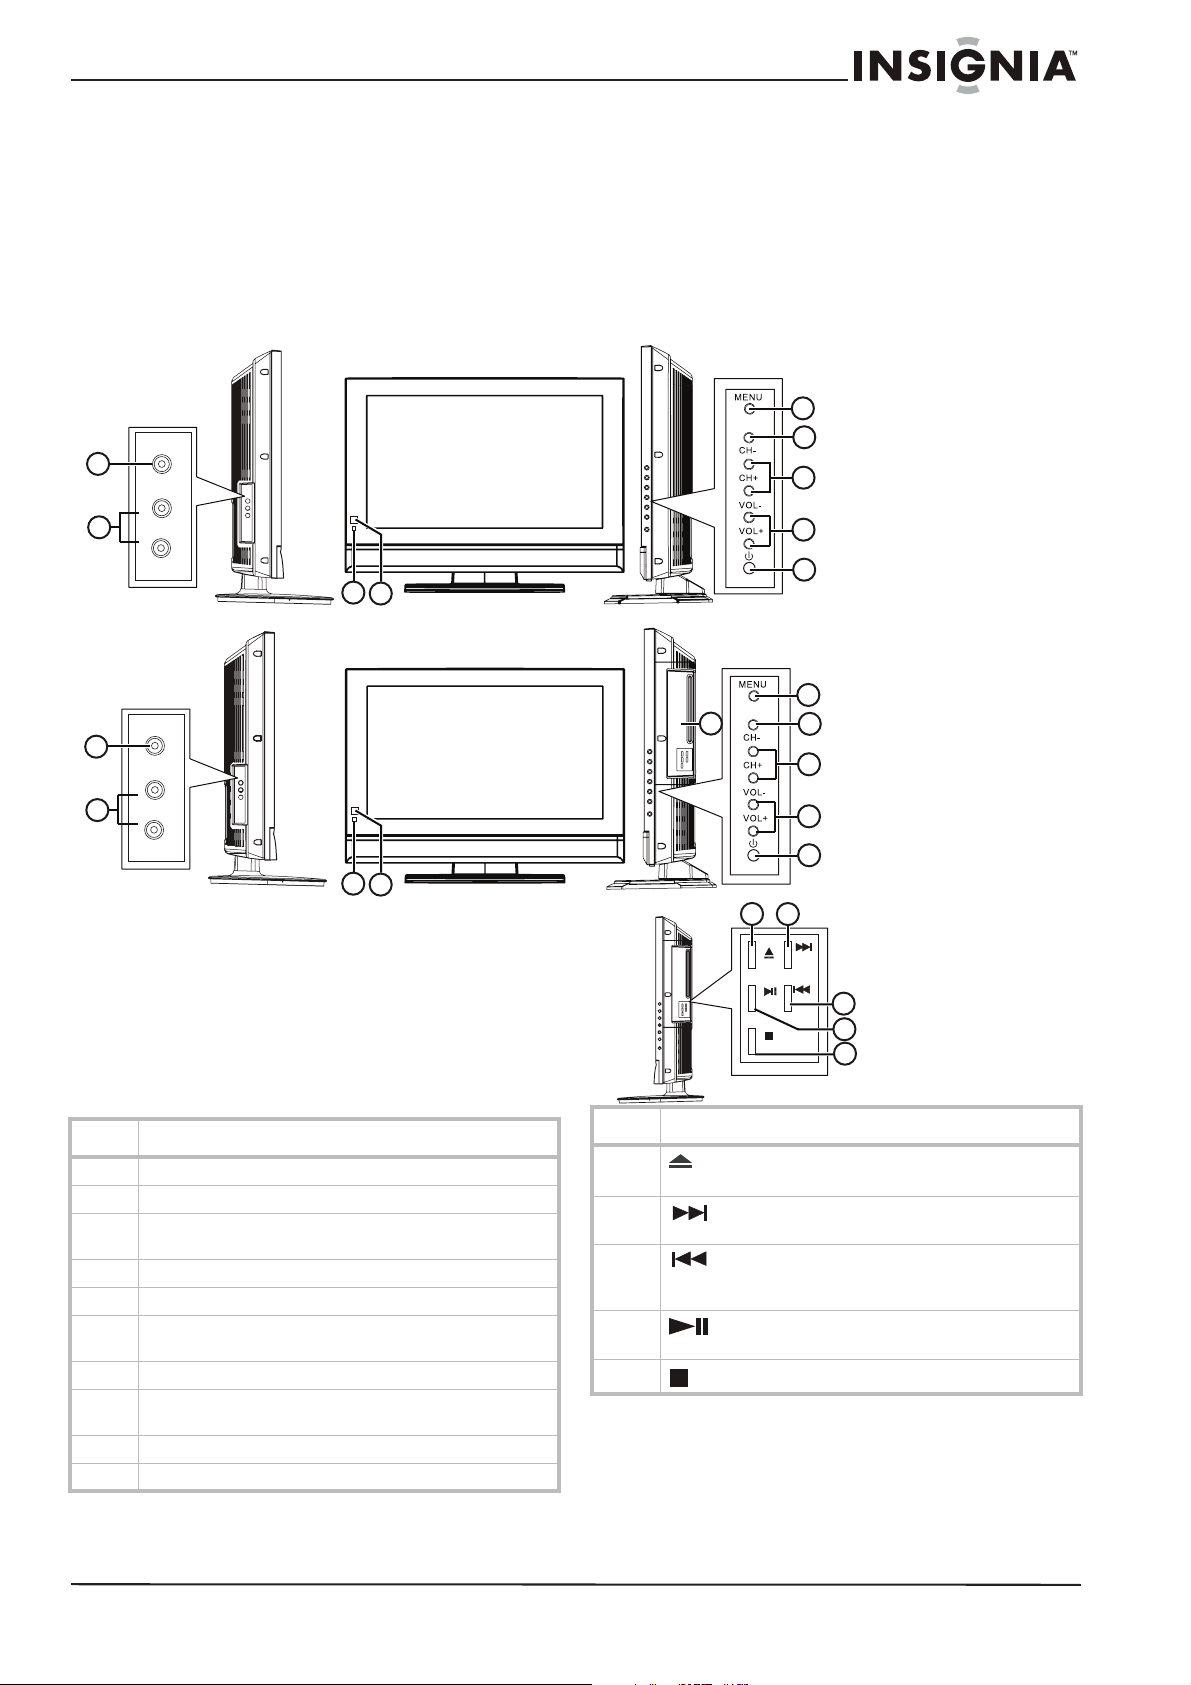
Features
Accessories
Make sure that the following accessories are
provided in the packaging:
• Remote control
• Batteries (two - AA)
• User Guide
NS-LCD26F and NS-LCD32F
VIDEO
1
R
AUDIO
2
L
3
4
NS-CL26C
Front and side views
5
TV/AV
6
7
8
9
VIDEO
1
R
AUDIO
2
L
4
3
Item Description
1 VIDEO output jack
2 Right and Left AUDIO output jacks
3 Power Indicator LED. Turns green when the TV is turned
4 Remote sensor. Receives signals from the remote control.
5 MENU button. Press to open the main on screen menu.
6 INPUT button. Press to select the AV signal input between
7 CH -/+ buttons. Press to change the channel.
8 VOL -/+ buttons. Press to decrease or increase the
9 POWER button. Press to turn on and turn off the TV.
10 DVD player (NS-CL26C only)
on and turns yellow when the TV is in standby mode.
TV, AV1, AV2, S-VIDEO, YPBPR, VGA, HDMI, and DVD.
volume.
TV/AV
10
11
kcaBdr
a
w
o
Tl
e
b
aL
Item Description
11
12
13
14
15
Open/Close button. Press to open or close the disc
tray.
NEXT button. Press to go to the next chapter or
track. Press again to skip forward by chapter or track.
PREV button. Press to go to the beginning to the
current chapter or track. Press again to skip back by
chapter or track.
PLAY/PAUSE button. Press to play the disc, press
again to pause playback.
STOP button. Press to stop DVD and CD playback.
12
OPEN/CLOSE
PLAY/PAUSE
STOP
5
6
7
8
9
NEXT
PREV
13
14
15
www.insignia-products.com
5
Page 5
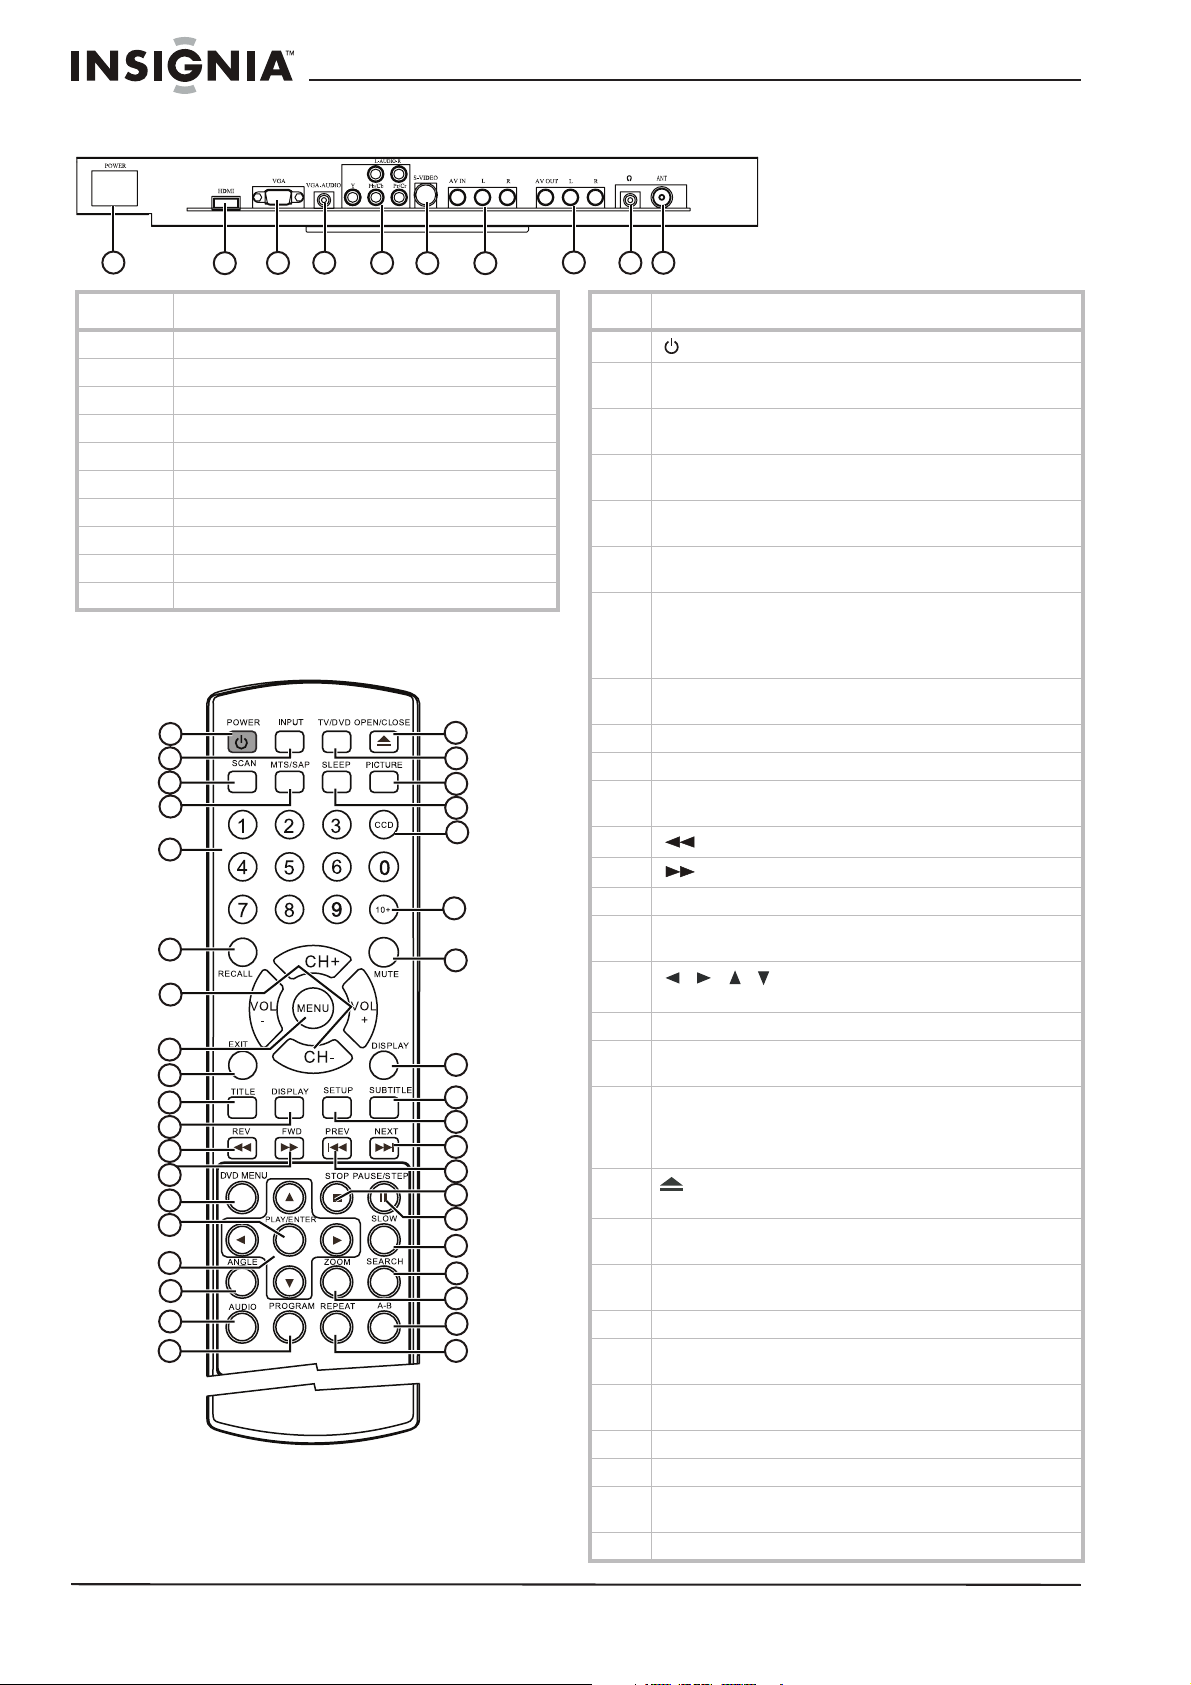
Rear view - connectors
Insignia NS-LCD26F/NS-LCD32F/NS-CL26C LCD TV
1
2
4
3
5
6
7
Item Description
1 Power input jack
2 HDMI input jack
3 VGA (D-sub) input jack
4 VGA audio input jack
5 Component (YPbPr) and Audio (L and R) input jacks
6 S-Video input jack
7 AV IN Composite video/audio input jacks
8 AV OUT Composite video/audio output jacks
9 Headphone jack
10 RF (75 ohm) antenna connector
Remote control
1
2
3
4
5
6
7
8
9
10
11
12
13
14
15
16
17
18
19
20
21
22
23
24
25
26
27
28
29
30
31
32
33
34
35
36
37
38
8
10
9
Item Description
1
2 INPUT button. Press to select the AV signal input between
3 SCAN button. Press to scan through memorized TV
4 MTS/SAP button. Press to select Stereo, Mono, or SAP
5 Number buttons: Press to directly enter channel numbers,
6 RECALL button. While in TV mode, press to return to the
7 CH +/- buttons. Press to skip to the previous or next
8 MENU button. Press to open the TV menu. Press again to
9 EXIT button. Press to turn off the on screen display.
10 TITLE button. Press to display the current DVD title.
11 DISPLAY button. Press to show information about the DVD
12
13
14 DVD MENU button. Press to open the DVD root menu.
15 PLAY/ENTER button. Press to begin disc playback, or in
16
17 ANGLE button. Press to change the DVD viewing angle.
18 AUDIO button. Press to change the DVD audio language/
19 PROGRAM button. Press to enter DVD program mode. In
20
21 TV/DVD button. Press to switch between the current inputs
22 PICTURE button. Press to cycle through the picture modes
23 SLEEP button. Press to set the sleep timer.
24 CCD button. Press to select Close Captions modes while in
25 10+ button. If the track or channel number is over 10, press
26 MUTE button. Press to mute the sound.
27 DISPLAY button. Press to show TV channel information.
28 SUBTITLE button. Press repeatedly until the subtitle
29 SETUP button. Press to open the DVD Setup menu.
POWER button. Press to turn the TV on and off.
TV, AV, S-VIDEO, PC, COMPONENT, and DVD.
channels.
mode.
DVD chapter numbers, and CD track numbers.
previous channel.
channel while in TV mode. In other modes (except DVD
mode), press to change to TV mode.
VOL+/- buttons. Press to change the volume.
exit.
playing.
REV button. Press to fast reverse a DVD.
FWD button. Press to fast forward a DVD.
menu mode to confirm your selections.
/// cursor buttons: Press to navigate in on
screen menus.
options.
CD mode, pressing this button switches between “Folder”
and “Filelist.” Folder means play the tracks in current folder,
and Filelist means play all tracks on the disk.
OPEN/CLOSE button. Press to open or close the disc
tray.
and DVD.
(Personal, Standard, Mild, and Fresh).
TV, DVD, AV, or S-VIDEO mode.
this button once, then a button 1-9.
language you want is selected.
6
www.insignia-products.com
Page 6
Insignia NS-LCD26F/NS-LCD32F/NS-CL26C LCD TV
Item Description
30
31
32
33
34 SLOW button. Press to decrease the DVD playback speed.
NEXT button. Press to go to the next chapter or
track. Press again to skip forward by chapter or track.
PREV button. Press to go to the previous chapter or
track. Press again to skip back by chapter or track.
STOP button. Press to stop DVD and CD playback.
PAUSE/STEP button. Press to pause DVD playback.
Press again to step through a DVD one frame at a time.
Setting up your TV
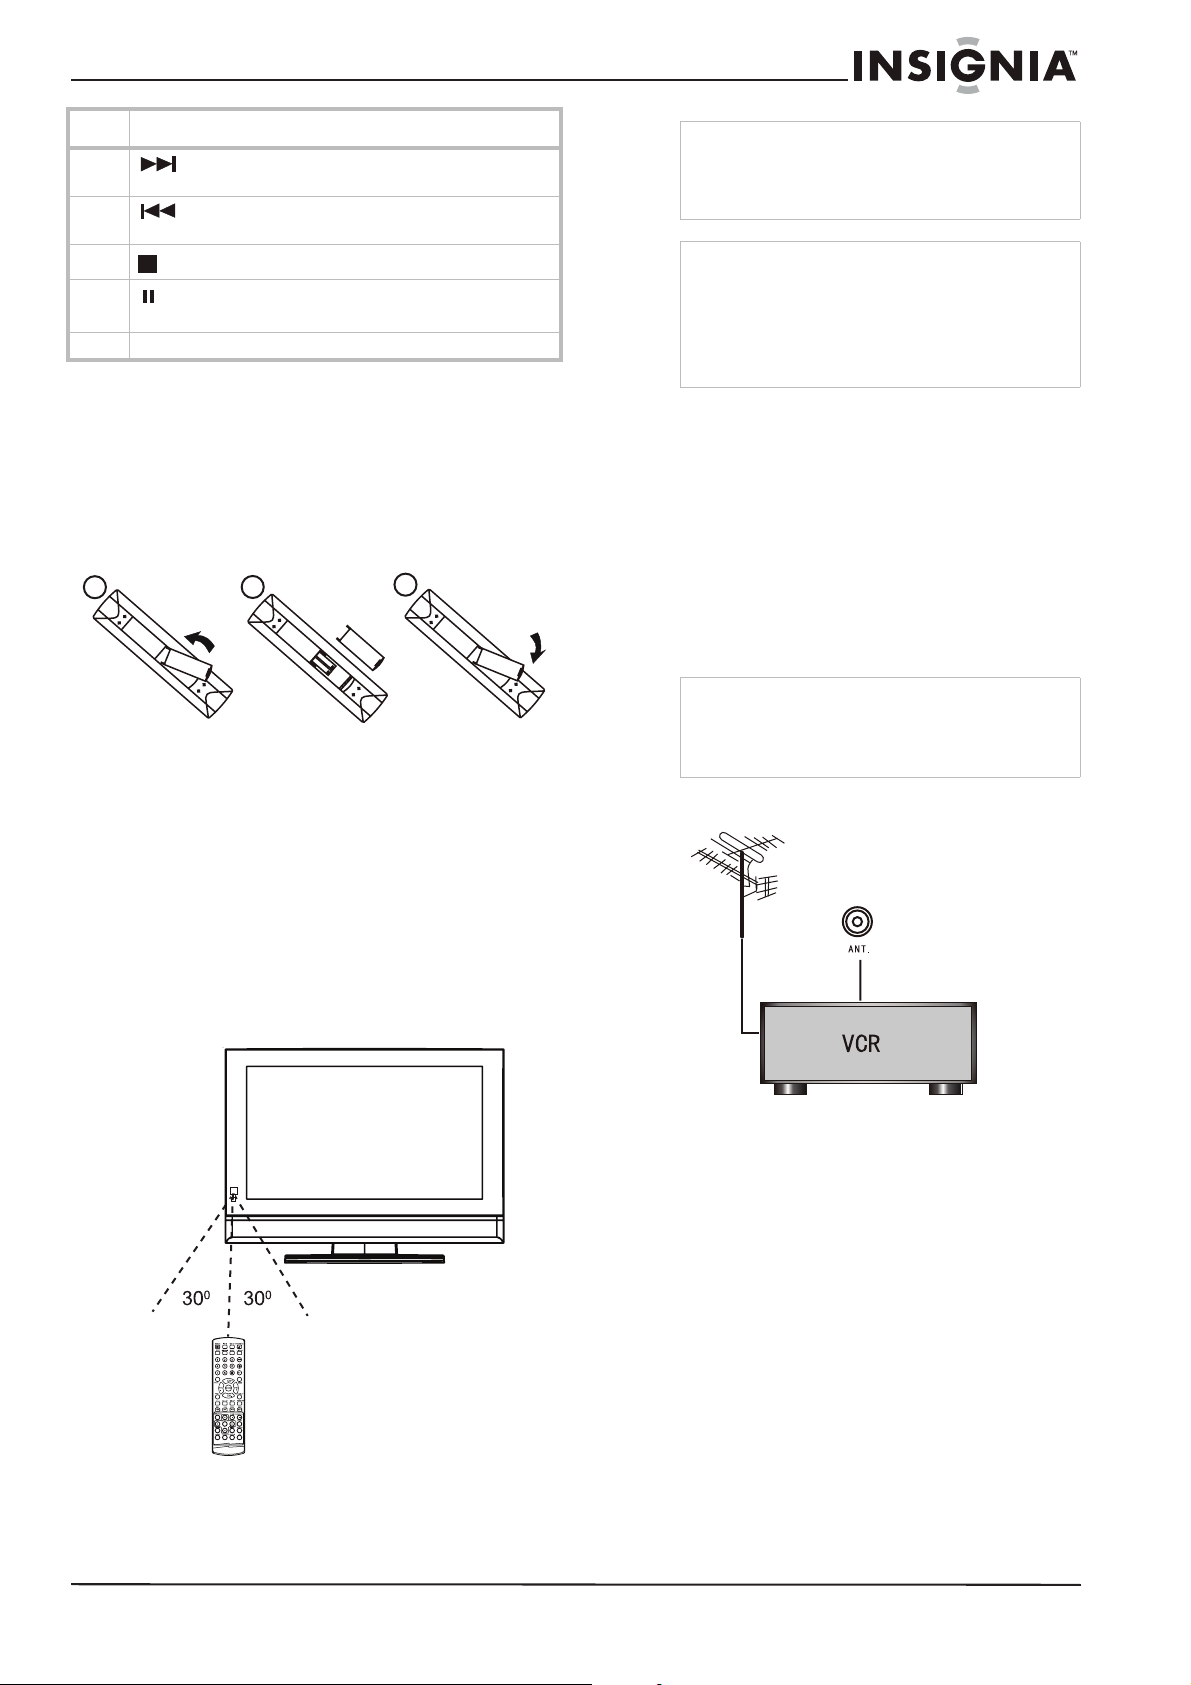
Installing the remote control batteries
To install the batteries:
1 Open the battery compartment (1) on the
back of the remote control.
1
2
2 Insert the two AA batteries (2)(provided) into
the battery compartment. Make sure that the
(+) and (-) symbols on the batteries match
the diagram inside the compartment.
3 Close the battery compartment (3).
3
Note
Objects between the remote control and the
sensor may weaken the remote control’s IR signal.
Range can be diminished by direct sunlight
shining on the TV’s IR sensor.
Cautions
Do not expose the remote control to liquids, direct
sunlight, or shock.
The remote control may not work correctly if the
TV’s IR sensor is under direct sunlight or strong
lighting. In these cases, change the angle of the
lighting or the TV screen, or operate the remote
control closer to the IR sensor.
Connecting to video sources
Connecting to an antenna or cable/satellite
receiver
To connect an external antenna or cable/
satellite receiver:
1 Connect the antenna cable from an antenna
or cable/satellite receiver to the antenna input
jack on the TV.
2 Press the INPUT button to set the TV’s signal
input to TV.
Notes
• To improve picture quality in a poor signal area,
you can purchase and install a signal amplifier.
• To split the signal from an antenna, you will
need a 2-way signal splitter.
Connecting to a VCR
Using the remote control
To use the remote control:
• Point it directly at the TV, within a 30° angle of
the IR sensor on the front of the TV, and
within 20 feet.
To connect your TV to a VCR:
1 Turn off the TV and the VCR (or other
source).
2 Connect an RF cable to the VCR, then to the
ANT. jack on the back of the TV.
3 Connect RCA audio cables to the VCR’s
audio output jacks, then to the AV IN L and R
jacks on the back of the TV.
4 Turn on the TV and the VCR.
5 Press the INPUT button to set the TV’s signal
input to TV.
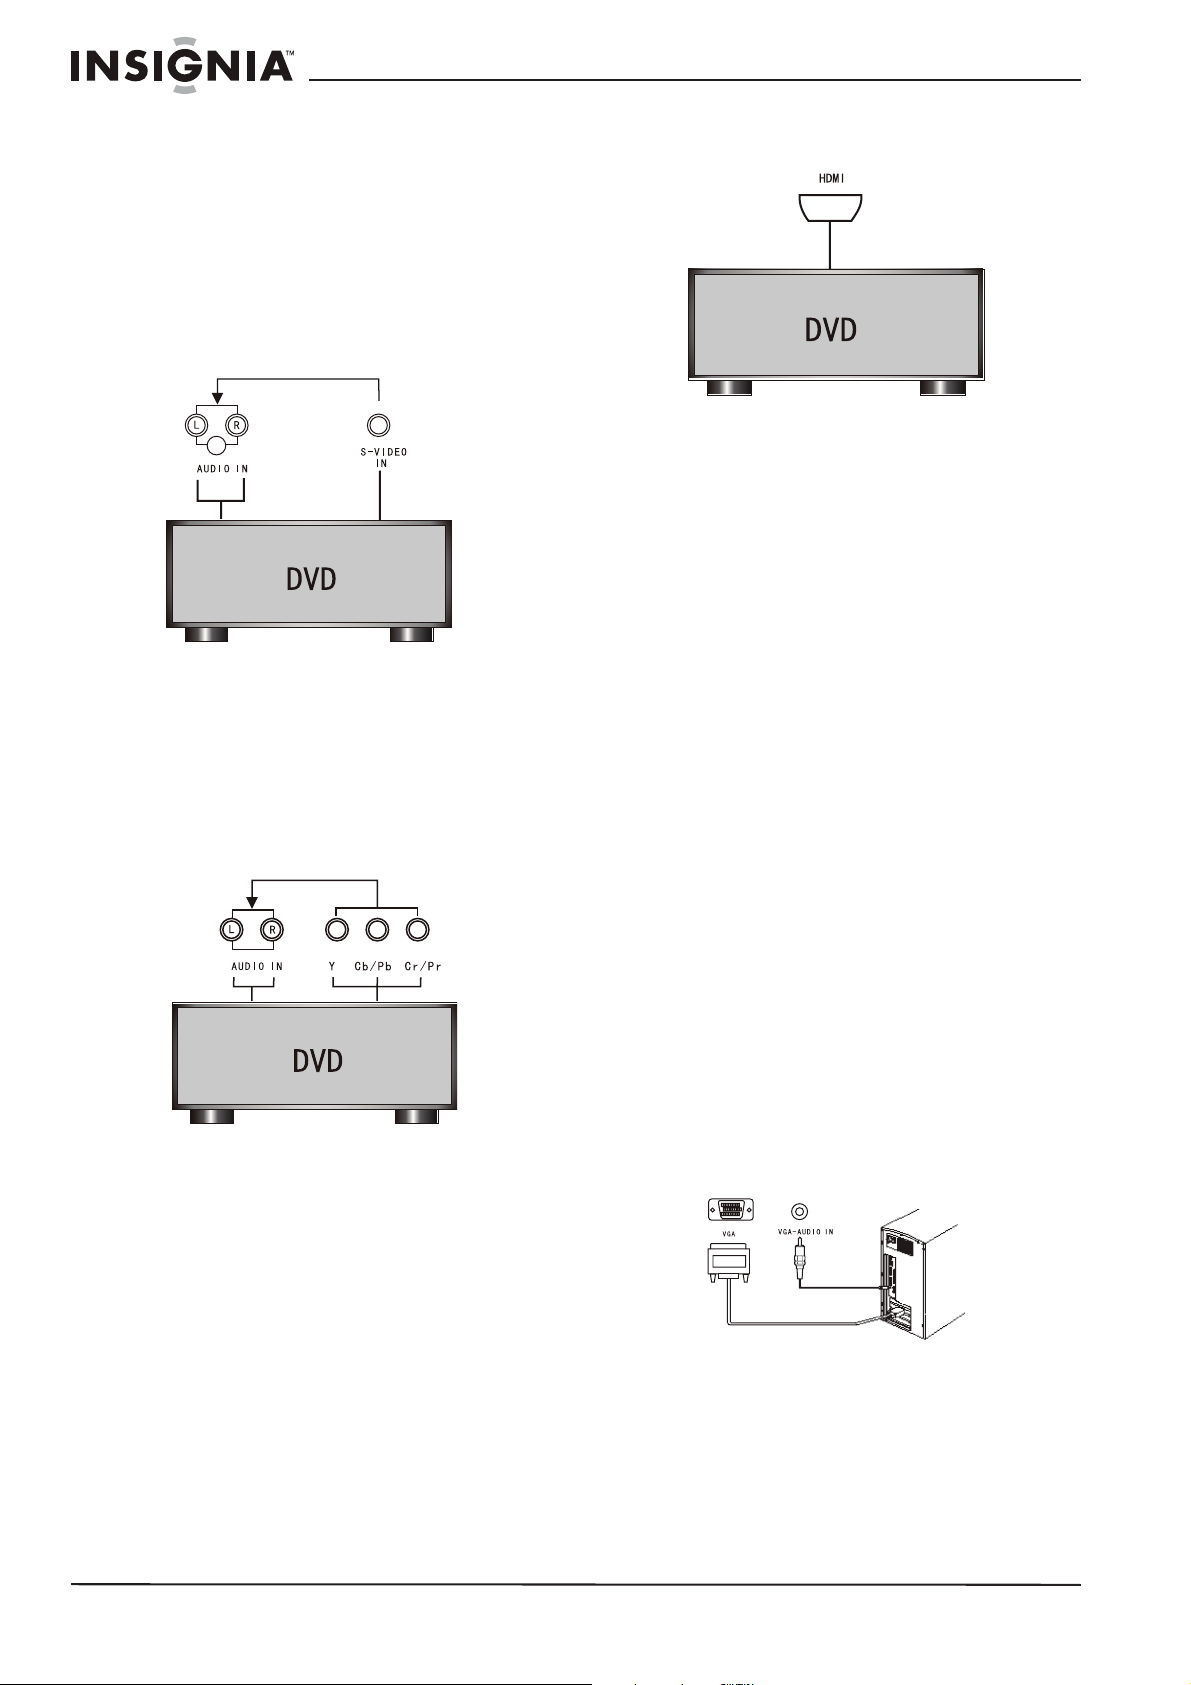
Connecting to a DVD or other video source
To connect your TV to a DVD or other video
source:
1 Turn off the TV and the DVD (or other
source).
www.insignia-products.com
7
Page 7
Insignia NS-LCD26F/NS-LCD32F/NS-CL26C LCD TV
2 Connect RCA video and audio cables from
the DVD player to the VIDEO and AUDIO IN
jacks on the back of your TV.
• Yellow - Video
• White - Audio left
• Red - Audio right
- OR Connect an S-Video cable and audio cables
from the DVD player to the S-VIDEO and
AUDIO IN (L and R) jacks on the back of your
TV.
• White - Audio left
• Red - Audio right
- OR Connect RCA cables to the DVD’s
COMPONENT VIDEO Out jacks and the
AUDIO OUT jacks (L and R), then to the
COMPONENT IN jacks (Y, Cb/Pb, and Cr/Pr)
and the AUDIO IN (L and R) jacks on the
back of the TV.
3 Press the INPUT button to set the TV’s signal
input to HDMI.
Connecting to a cable box
To connect your TV to a cable box with an RF
cable:
1 Turn off the TV and the cable box.
2 Connect a 75 ohm RF cable from the cable
box to the ANT. jack on the back of your TV.
3 Set the cable box output switch to channel 3
or 4, then tune your TV to the same channel.
4 Turn on the TV and the cable box.
5 Change channels at the cable box or with the
cable box remote.
To connect your TV to a cable box with a AV
cables:
1 Turn off the TV and the cable box.
2 Connect RCA video and audio cables from
the cable box to the VIDEO and AUDIO IN
jacks on the back of your TV.
• Yellow - Video
• White - Audio left
• Red - Audio right
3 Turn on the TV and the cable box.
4 Press the INPUT button to set the TV’s signal
input to AV or S-VIDEO.
5 Change channels at the cable box or with the
cable box remote.
3 Turn on the TV and the VCR.
4 Press the INPUT button to set the TV’s signal
input to S-VIDEO or YPBPR (as
appropriate).
To connect your TV to a DVD player with an
HDMI cable:
1 Turn off the TV and the DVD player.
2 Connect an HDMI cable to the HDMI output
jack on the DVD player, then connect it to the
HDMI jack on your TV.
8
Connecting to a computer
To connect a computer video source to the
VGA jacks:
1 Connect a VGA cable from the computer to
the VGA jack on the TV.
2 Connect a male-to-male audio cable from the
computer to the PC AUDIO IN port on the TV.
3 Turn on the TV, then turn on the PC.
Press the INPUT button to set the TV’s signal
4
input to VGA.
www.insignia-products.com
Page 8

Insignia NS-LCD26F/NS-LCD32F/NS-CL26C LCD TV
Using your TV
Turning the power on and off
To turn the power on and off:
1 Press the POWER button on the front panel
of the TV or on the remote control. The
POWER indicator turns green.
2 To turn off the TV, press the POWER button
again. The screen image disappears and the
POWER indicator turns yellow (standby
status).
Note
A small amount of electric power is consumed
even when the power is turned off.
Changing the volume
You can change the volume using the TV’s front
panel or the remote control.
To change the volume:
1 Press VOL+ or VOL- .
2 Press MUTE on the remote control to mute
the sound, and press it again (or the VOL+ or
VOL- ) to restore the sound.
To enter a channel number directly:
• Press the number buttons on the remote
control.
To switch between two channels:
1 Press RECALL to change from the currently
tuned channel to the previous channel.
2 Press RECALL again to change back to the
originally tuned channel.
Changing the picture mode
To change the picture mode:
• Press PICTURE on the remote control to
cycle through the following modes:
• STANDARD–normal mode
• SOFT–softens the image
• USER–set the image effect you want
• BRIGHT–suitable for sports images
Programming channels into memory
To select the channel source:
1 Press MENU on the TV or remote control,
then press VOL- or VOL+ to access the
TUNER menu. The TUNER menu opens.
Changing the video source
Your TV supports multiple video sources.
To select the video source:
• Press the INPUT button to select from the
following input modes:
•TV
•AV1
•AV2
•S-VIDEO
•YPBPR
• VGA
• HDMI
•DVD
The name of the input source appears on the
screen when it is selected.
Notes on HDMI
• HDMI™ - The HDMI logo and High-Definition
Multimedia Interface is a trademark or registered
trademark of HDMI Licensing.
• This TV can receive HDMI.
• This TV supports the HDCP (High-bandwidth
Digital Contents Protection) protocol for 720×480p,
1280×720p, and 1920×1080i resolution.
• When connected to a source device (DVD player,
set top box, or PC) supporting the Auto HDMI
function, the output resolution of the source device
will be set automatically to 1280×720p. If the
source device does not support Auto HDMI, you
must set the output resolution appropriately. For
best picture quality, adjust the DVD player, set top
box output resolution to 1280×720p, or the PC
graphics card output to 1280×768, 60 Hz.
• If the source device has HDMI output, no audio
connection is necessary.
2 Press CH- or CH+ to select CH.SOURCE,
then press VOL- or VOL+ to choose CATV or
AIR.
To automatically program channels into
memory:
1 Press MENU on the TV or remote control,
then press VOL- or VOL+ to access the
TUNER menu. The TUNER menu opens.
Changing channels
To change channels:
• Press CH+ or CH-.
2 Press CH- or CH+ to select AUTO SCAN,
then press VOL- or VOL+ to begin searching.
www.insignia-products.com
9
Page 9

Insignia NS-LCD26F/NS-LCD32F/NS-CL26C LCD TV
3 The TV searches and memorizes all
channels on the selected antenna input
available in your area.
4 To stop the auto scan, press MENU.
To edit programmed channels:
1 Press MENU on the TV or remote control,
then press VOL- or VOL+ to access the
TUNER menu. The TUNER menu opens.
2 Press CH- or CH+ to select EDIT
PROGRAM, then press VOL- or VOL+ to
enter the sub-menu. The Edit Program
sub-menu opens.
Displaying status information
To display status information:
• Press the DISPLAY button. Your TV displays
status information, such as the channel
number or signal source.
Setting the sleep timer
The sleep timer lets you select the amount of
time before your TV turns off automatically.
To set the sleep timer:
• Press the SLEEP button on the remote
control repeatedly until the time duration you
want is shown on the screen. Options
include:
• SLEEP 240 MIN
• SLEEP 180 MIN
• SLEEP 120 MIN
• SLEEP 90 MIN
• SLEEP 60 MIN
• SLEEP 45 MIN
• SLEEP 30 MIN
• SLEEP 15 MIN
• SLEEP 10 MIN
•SLEEP 5 MIN
•SLEEP 0
3 Press CH- or CH+ to select the channel.
Then you can:
• Rename the channel by pressing the
VOL+ button.
• Skip the channel by pressing the VOL-
button.
• Delete the channel by pressing the CH+
button
• Copy the channel by pressing the CH-
button
4 To cancel the action, press the VOL- button.
Viewing closed captions
To view closed captions:
• Press the CCD button to toggle the closed
captions on or off.
Setting parental controls
Your TV has a V-chip that lets you control the
type of programs your children can watch.
Parental controls include two ratings: MPAA
(based on age) and TV Parental Guidelines
(based on content and age). A TV program may
have an MPAA or TV Parental Guidelines rating,
so you should set controls for both ratings.
Before you can select ratings, you need to set up
a parental controls password.
To set up a password:
1 Press MENU on the TV or remote control,
then press VOL- or VOL+ to select the
FUNCTION menu. The FUNCTION menu
opens.
10
www.insignia-products.com
Page 10

Insignia NS-LCD26F/NS-LCD32F/NS-CL26C LCD TV
2 Press CH- or CH+ to select PARENT
CONTROL, then press VOL- or VOL+. The
Password box opens.
3 Press the number buttons to enter 0000 (the
default initial password). The PA R E NT
CONTROL menu opens.
4CH- or CH+ to select CHANGE PASSWORD,
then press VOL- or VOL+. The Password
Change box opens.
Setting the Parental Control level
To set the Parental Control level:
1 Press MENU on the TV or remote control,
then press VOL- or VOL+ to select the
FUNCTION menu. The FUNCTION menu
opens.
2CH- or CH+ to select PARENT CONTROL,
then press VOL- or VOL+. The Password box
opens.
5 Press the number buttons to enter a new
password. You are asked to enter the new
password again.
6 Press the number buttons to enter the new
password again, to confirm.
Caution
Write down your password and save it for future
use.
Note
If you forget your password, enter 0000 for the old
password, then enter a new password. This
password always remains valid for resetting your
password.
3 Press the number buttons to enter 0000 (the
default initial password). The PARENT
CONTROL menu opens.
4CH- or CH+ to select the option you want to
set, then press VOL- or VOL+ to change the
setting.
5 Press MENU to close the menu.
TV Parental Guidelines ratings
Rating Description
NONE or NR Not rated.
TV-Y All children.
TV-Y7 Children over seven years of age.
TV-G General audiences.
TV-PG Parental guidance suggested.
TV-14 Parents strongly cautioned.
TV-MA Mature audiences only.
www.insignia-products.com
11
Page 11
Insignia NS-LCD26F/NS-LCD32F/NS-CL26C LCD TV
Some of the age-based TV Parental Guidelines
ratings also have PG Content-based ratings.
Rating Description
FV FANTASY VIOLENCE.
D DIALOG
L LANGUAGE.
SSEX
V VIOLENCE.
American MPAA (Movie) ratings
Rating Description
NONE or NR Not rated.
G General audiences.
PG Parental guidance suggested. Some
material may not be suitable for
children.
PG 13 Parental guidance strongly suggested.
Some material may not be suitable for
children under 13 years of age.
R Restricted. Not suitable for children
under 17 years of age unless
accompanied by a parent or guardian.
NC 17 Not suitable for children under 17
years of age.
X Adults only.
Canadian MPAA (Movie) ratings
Rating Description
E Exempt - includes news, sports,
documentaries, talk shows.
C* Children (English)
G** Children (French)
8+** Children 8 years and above (French)
C8+* Children 8 years and above (English)
G* General audience (English)
PG Parental guidance suggested.
13+** 13 years old and above (French)
14+* 14 years old and above (English)
16+** 16 years old and above (French)
18+ Adult programming
OFF No controls
* Can. English only
** Can. French only
4 Place the DVD in the disc tray, then press
OPEN/CLOSE to close the disc tray. The
DVD player reads the DVD and displays the
opening menu.
5 Press the and buttons to highlight
menu items, and PLAY/ENTER on the
remote, to select.
6 Press PLAY/ENTER to begin playback.
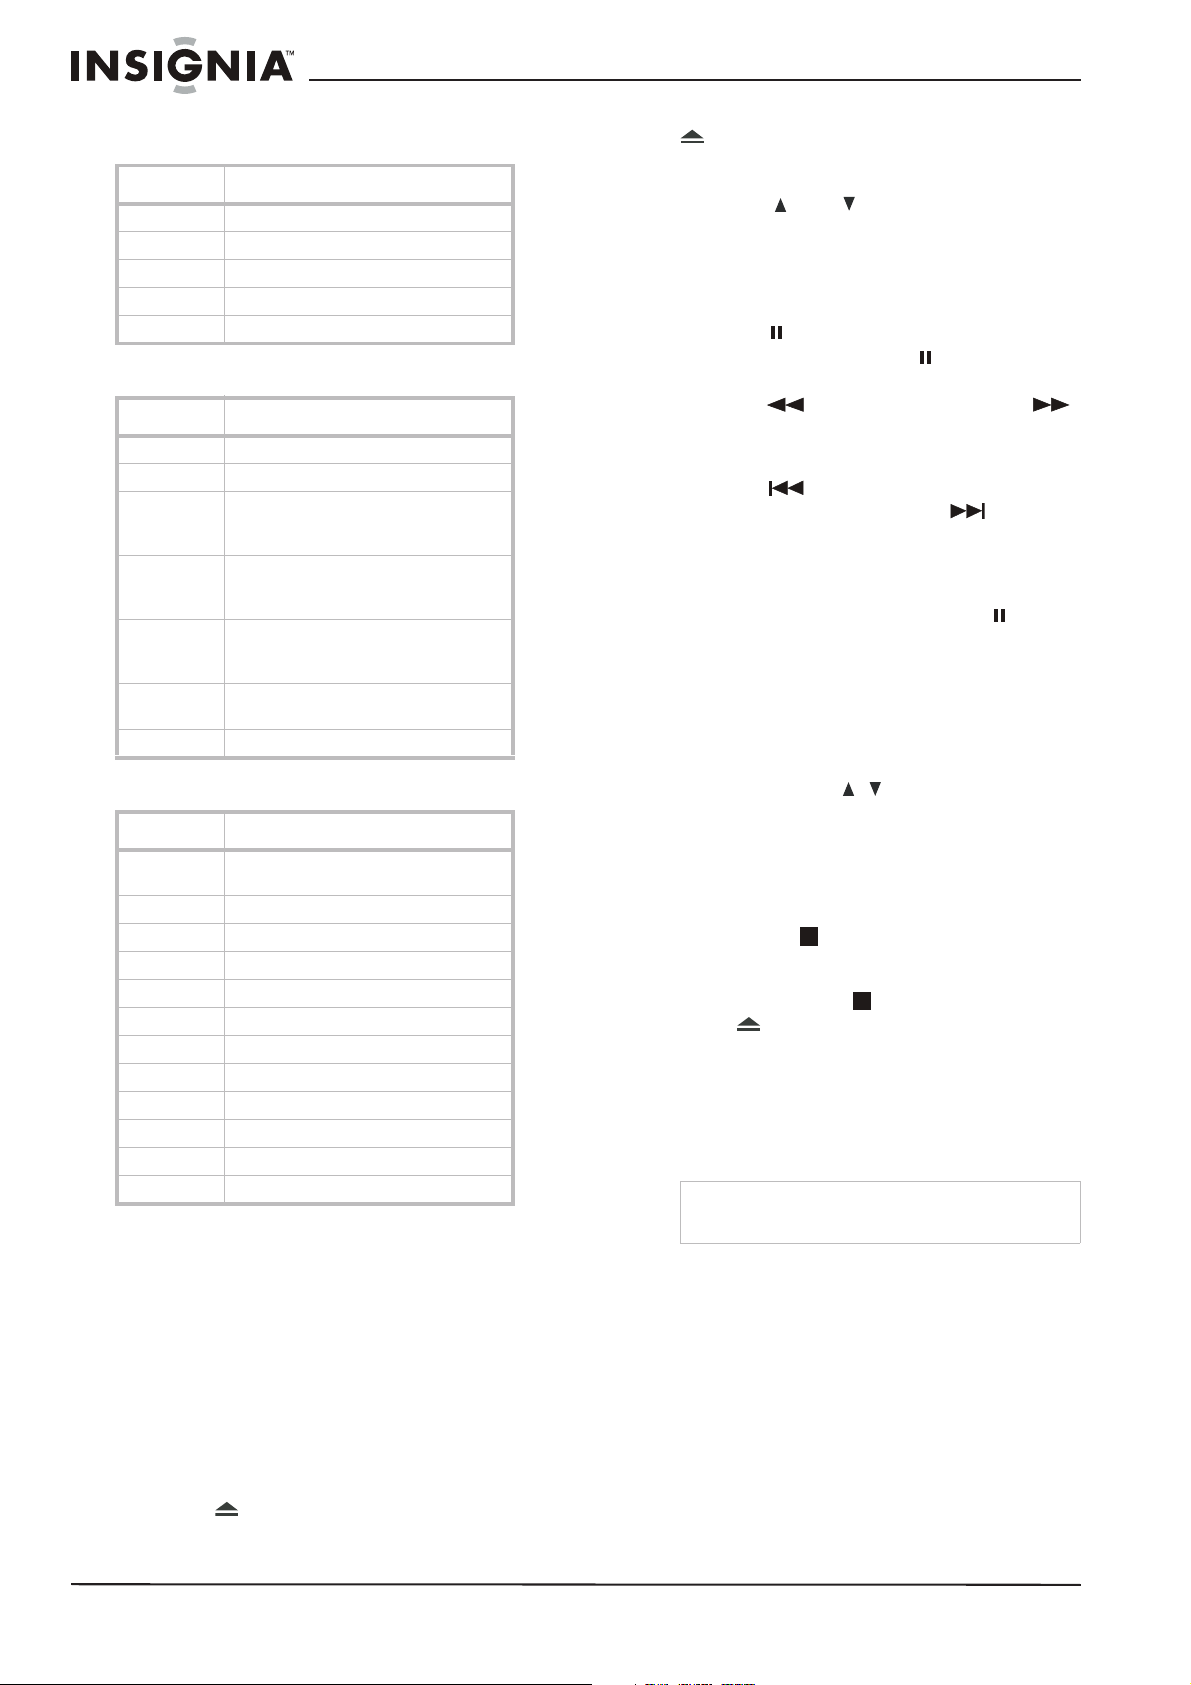
7 During playback:
• Press PAUSE/STEP on the remote to
pause playback. Press PAUSE/STEP
on the remote again to resume playback.
• Press to fast review, and press
to fast forward. Each time you press the
fast reverse or fast forward button, the
speed changes.
• Press to skip to the beginning of the
current chapter, and press to skip to
the next chapter. Press repeatedly to
continue skipping back or forward.
• To advance a movie frame by frame,
press PAUSE/STEP button, then press
again. Each time you press the
PAUSE/STEP button, the movie advances
by one frame.
• Press the SLOW button to play the disc in
slow motion, then press PLAY/ENTER to
resume normal playback.
• To search for a specific scene, press
SEARCH to open the SEARCH menu,
then press the button to select the
item you want (for DIVX, CD, or MP3
press the SEARCH button several times
to select the item you want). Press the
number buttons or navigation buttons to
indicate the scene you want, then press
ENTER to confirm.
• Press the (stop) button to stop
playback. Press PLAY/ENTER to resume
normal playback. To completely stop DVD
playback, press (stop) twice.
8 Press OPEN/CLOSE to remove the DVD.
Accessing the root DVD menu
To access the root DVD menu:
1 Press DVD MENU on the remote control.
2 Select and change the options you want.
Note
This function is not available on DVDs with
multi-layer menus.
Displaying DVD information
Using the DVD player
(NS-CL26C only)
Playing a DVD
To play a DVD:
1 Press POWER to turn on the TV.
2 Press TV/DVD to select DVD.
3 Press OPEN/CLOSE to open the disc
tray.
12
To display DVD information:
• Press DISPLAY on the remote control
repeatedly to cycle through
Title Remain, Chapter Elapsed, Chapter
Remain, and Display Off.
Selecting the subtitle language
If the DVD was created with subtitles, you can
change the subtitle language.
To change the subtitle language:
1 Press SUBTITLE repeatedly until the desired
language is selected.
www.insignia-products.com
Title Elapsed,
Page 12

Insignia NS-LCD26F/NS-LCD32F/NS-CL26C LCD TV
2 To remove subtitles, press SUBTITLE until
“Off” appears on the screen.
Note
Changing the subtitle language using this method
only affects the DVD currently being played. When
the DVD is removed or the player is turned off, the
subtitle language reverts to the language setting
specified through the DVD player’s main menu.
Tip
The subtitle language can also be changed
through the DVD player’s main menu or the DVD’s
own subtitle settings.
Using repeat play
You can repeat chapters, titles, or the entire DVD
using Repeat play.
Note
Other options are available for CD, MP3, or DIVX
discs.
To repeat a segment:
1 While a DVD is playing, press REPEAT to
scroll through the options:
• Chapter (repeats the current chapter)
• Title (repeats the current title)
• All (repeats all content on the DVD)
2 To stop repeat playback, do one of the
following:
• Press REPEAT until “ALL” disappears
from the screen.
• Press STOP twice.
• Eject the DVD.
To repeat selected parts of a DVD:
1 Set a starting point by pressing A-B.
2 Set an end point by pressing A-B again.
3 The player plays from point A to point B.
4 To stop the repeat function, press A-B again.
Changing the camera angle
Some DVDs contain multiple angles of a scene
or sequence. If the DVD has only one angle, this
feature does not work.
To change the camera angle:
1 Press ANGLE repeatedly until the desired
camera angle is selected.
2 To resume normal playback, press ANGLE
until the original angle is selected.
Magnifying the image
You can enlarge or reduce the display image
while the DVD is playing or while it is paused.
To magnify the image:
1 While a DVD is playing, press ZOOM. The
image is magnified 2×. Continue pressing
ZOOM to magnify the image 3×, then 4×.
• While the image is magnified, press the
and buttons to move the
picture on the screen.
2 To return to normal picture size, press ZOOM
until the picture returns to normal.
Program play
To play chapters and titles in a custom order, you
can create a playback program.
To program playback:
1 Press PROGRAM while a disc is playing to
enter Program mode.
2 Press the number buttons on the remote
control to enter the title and chapter you want
to play first. The title and chapter number you
entered appears in the box.
3 The cursor jumps to the next spot in the
program list section. Make sure the box is
highlighted and enter your next title and
chapter.
4 Continue adding titles and chapters until your
program is finished.
5 Highlight START, then press PLAY/ENTER to
start playing the program.
6 To stop the programmed playback, press
STOP twice during program play.
Changing the audio options
If the DVD was created with multiple language
tracks (recorded in different languages), or
multiple sound options, you can temporarily
change the DVD player’s Audio settings.
To change the audio options:
1 Press AUDIO. The OSD shows the current
audio setting.
2 If multiple audio options are available, press
AUDIO again to select the next audio track.
Note
This feature only works if the DVD was created
with multiple audio tracks. When you choose an
audio language, you only temporarily override the
audio language setting in the DVD player’s main
menu.
Allow a three second interval between selections.
Tip
The audio language can also be changed through
the DVD player’s main menu or the DVD’s own
audio settings.
Playing a CD
To play a CD:
1 Press POWER to turn on the player.
2 Press TV/DVD to select DVD.
3 Press OPEN/CLOSE to open the disc
tray.
4 Place the CD in the disc tray, then press
OPEN/CLOSE to close the disc tray. The
DVD player begins playing the CD.
5 Press PLAY/ENTER to begin playback.
6 During playback:
• Press PAUSE/STEP on the remote to
pause playback. Press PAUSE/STEP
on the remote again to resume playback.
• Press to fast review, and press
to fast forward.
• Press to skip to the previous track,
and press to skip to the next track.
Press repeatedly to continue skipping
back or forward.
• To completely stop CD playback, press
(stop).
7 Press OPEN/CLOSE to remove the CD.
www.insignia-products.com
13
Page 13

Insignia NS-LCD26F/NS-LCD32F/NS-CL26C LCD TV
Using repeat play
You can repeat tracks or the entire CD using
repeat play.
To use repeat play:
1 While the CD is playing, press REPEAT to
scroll through the options:
• Single - (play current track)
• Repeat One - (repeat current track)
• Repeat Folder - (repeat current folder)
• Folder - (play current folder)
2 To stop repeat playback, do one of the
following:
• Press REPEAT until “Folder” disappears
from the screen.
• Press STOP twice.
• Eject the CD.
Changing the audio mode
To change the audio output of a
multi-channel CD:
• During CD playback, press AUDIO. The
setting changes each time you press the
button:
• Mono Left
• Mono Right
• Mix-Mono
•Stereo
Selecting a track for playback
To select a specific track for playback:
• After you load a CD into the player, and after
the player finishes reading the disc, press the
number buttons to enter the track number,
then press PLAY/ENTER to play the track.
Tip
If the track number is under 10, press buttons 1-9
to select it. If the track number is 10, press 10+
once, then button 0 to select it. If the track number
is over 10, press 10+ once, then a button 1-9.
• To completely stop disc playback, press
STOP twice.
7 Press OPEN/CLOSE to remove the disc.
Magnifying the image
You can enlarge or reduce the display image
while the disc is playing or while it is paused.
To magnify the image:
1 While a disc is playing, press ZOOM. The
image is magnified 2×. Continue pressing
ZOOM to magnify the image 3×, then 4×.
• While the image is magnified, press the
and buttons to move the
picture on the screen.
2 To return to normal picture size, press ZOOM
until the picture returns to normal.
Playing an MP3 disc
To play a MP4 disc:
1 Press POWER to turn on the player.
2 Press TV/DVD to select DVD.
3 Press OPEN/CLOSE to open the disc
tray.
4 Place the disc in the disc tray, then press
OPEN/CLOSE to close the disc tray. The
disc navigation menu opens.
5 Press to select the folder you want,
then press PLAY/ENTER to enter the folder.
6 Press to select the file you want, then
press PLAY/ENTER to see the file.
7 Press to go to the previous menu.
Note
This DVD player plays most MPEG4 encoded
discs, but some discs with the MPEG4 logo are
not encoded by MPEG technology and will not
play well in this player.
Customizing TV settings
Playing a Kodak picture CD or JPEG disc
To play a Kodak picture CD or JPEG disc:
1 Press POWER to turn on the player.
2 Press TV/DVD to select DVD.
3 Press OPEN/CLOSE to open the disc
tray.
4 Place the disc in the disc tray, then press
OPEN/CLOSE to close the disc tray. The
disc navigation menu opens.
5 Press to select the file you want, then
press PLAY/ENTER to confirm. The
slideshow begins.
6 During playback:
• Press PAUSE/STEP on the remote, to
stop the picture and press PLAY/ENTER
resume normal play.
• Press to skip to the previous track,
and press to skip to the next track.
Press repeatedly to continue skipping
back or forward.
14
www.insignia-products.com
Opening and navigating the on-screen
menus
Using the on-screen menu
Your TV has an on-screen menu system that lets
you adjust TV settings, such as video and audio
settings.
To use the on-screen menu:
1 Press MENU on the TV or remote control,
then press VOL- or VOL+ to access the
menu you want.
2 PressCH- or CH+ to select the menu item,
then press VOL- or VOL+ to adjust/change
that item or go to the sub-menu for that item.
3 Press MENU to close the on-screen menu.
Page 14

Insignia NS-LCD26F/NS-LCD32F/NS-CL26C LCD TV
On-screen menus
On-screen
menu
TUNER CH.SOURCE–Selects the TV antenna source
PICTURE PICTURE MODE–Lets you select one of four
SOUND SOUND–Selects an audio equalization mode
Options
(AIR or CATV).
CH.NUM.–The current channel selected. Press
CH+/CH- to change the setting.
SKIP–Setting this to ON causes the current
channel (see CHANNEL above) to be skipped
on the channel list. You can select a skipped
channel by inputting the channel number using
the number buttons.
FINE TUNE–Use to manually adjust tuning to
improve image and sound quality. Do not use
unless reception is poor.
AUTO SCAN–Automatically sets up a list of the
channels available in your area for the antenna
type selected. For more information, see
“Programming channels into memory” on
page 9.
EDIT PROGRAM–Lets you rename, skip,
delete, or copy a channel.
preset picture modes, including STANDARD,
SOFT, USER, or BRIGHT.
CONTRAST–Increases the picture level to
adjust the white areas of the picture. Decreases
the picture level to adjust the black areas of the
picture. (0 ~ 100)
BRIGHTNESS–Increases the brightness to add
more light to dark areas of the picture.
Decreases the brightness to add more dark to
light areas of the picture. (0 ~ 100)
TINT–Change settings from green (0) to red
(100).
COLOR (saturation)–Lets you increase or
decrease the color saturation of the picture. (0
~ 100)
SHARPNESS–Increases the sharpness for a
cleaner and clearer image. Decreases the
sharpness for a smoother picture. (0~100)
COLOR TEMP–Adjusts the overall color of the
picture. (NORMAL, COOL, COOLER, WARMER,
or WARM)
ZOOM–Lets you choose the picture size.
(ZOOM, CINEMA, WIDE, or NORMAL).
for the TV sound (STANDARD, NEWS, USER,
or MUSIC)
BALANCE–Adjusts the right and left speaker
volumes.
AVC–Automatic Volume Control. Reduces the
effect of high volume by limiting volume peaks
across all channels.
EQUALIZER–Lets you change the sound
equalizer settings.
SURROUND–Lets you select a preset surround
sound setting. (ROOM,
VALLEY)
DIGITAL BASS–Lets you turn digital bass on or
off to adjust the low sounds (bass).
THEATER, OFF
, or
On-screen
menu
FUNCTION LANGUAGE–Selects the language for the
TIMER SLEEP TIMER–Lets you set the sleep timer to
Options
on-screen display (OSD).
BLUE SCREEN–Sets the option to turn on the
blue screen if there is no signal for three
seconds.
OSD SETTING–Lets you set the duration and
opacity of the on-screen display.
IMAGE POSITION–Lets you adjust the
horizontal and vertical position of the picture.
In VGA mode you can adjust the phase of the
PC image to remove horizontal distortion and
sharpen characters and adjust the LCD to
match the PC input source clock frequency.
ADVANCE–Lets you adjust the quality and
expressive force of the image. Available options
include:
• AAA–Presets to change the brightness,
contrast, and arrangement of the image.
(ON, SPLIT, MOVE, and ZOOM)
• CTI–Turn this on to restrain color bleed
over from one image to another.
• LT I–Turn this on to optimize the
brightness of the image.
• DLC–Turn this on to optimize the depth
of the image.
• SKIN–Turn this on to optimize the skin
tones of the image.
• DNR–Set this to control image noise.
(OFF, WEAK, MEDIUM, and STRONG)
CCD MODE–Selects the CCD Mode. Options
include:
• CCD ON MUTE
•ON
•OFF
CLOSED CAPTION–Selects the Closed Caption
type for viewing.
• OFF–Turns off Closed Captioning
• CC1–Turns on Closed Captioning in the
primary language of your area
• CC2-CC4–Turns on other modes of
video-related broadcast information in a
secondary language.
• Te xt1–Turns on the program guide
provided by broadcasters.
• Text2-Text4–Turns on other types of
information provided by broadcasters.
PARENTAL CONTROL–Accesses V-chip
controls. For more information, see “Setting
parental controls” on page 10.
turn off the TV after a preselected interval.
CLOCK–Lets you set the clock, which is shown
when the DISPLAY button is pressed.
TIME OFF–Lets you set a specific time for the
TV to turn off.
BOOK TIME–Lets you set a specific time to
watch a program.
BOOK CHAN.–Lets you set a specific channel
to watch in the Book Time you set.
www.insignia-products.com
15
Page 15
Insignia NS-LCD26F/NS-LCD32F/NS-CL26C LCD TV
Customizing DVD player
settings
Using the setup menu
Use your remote control to navigate the setup
menu, where you can configure DVD player
settings.
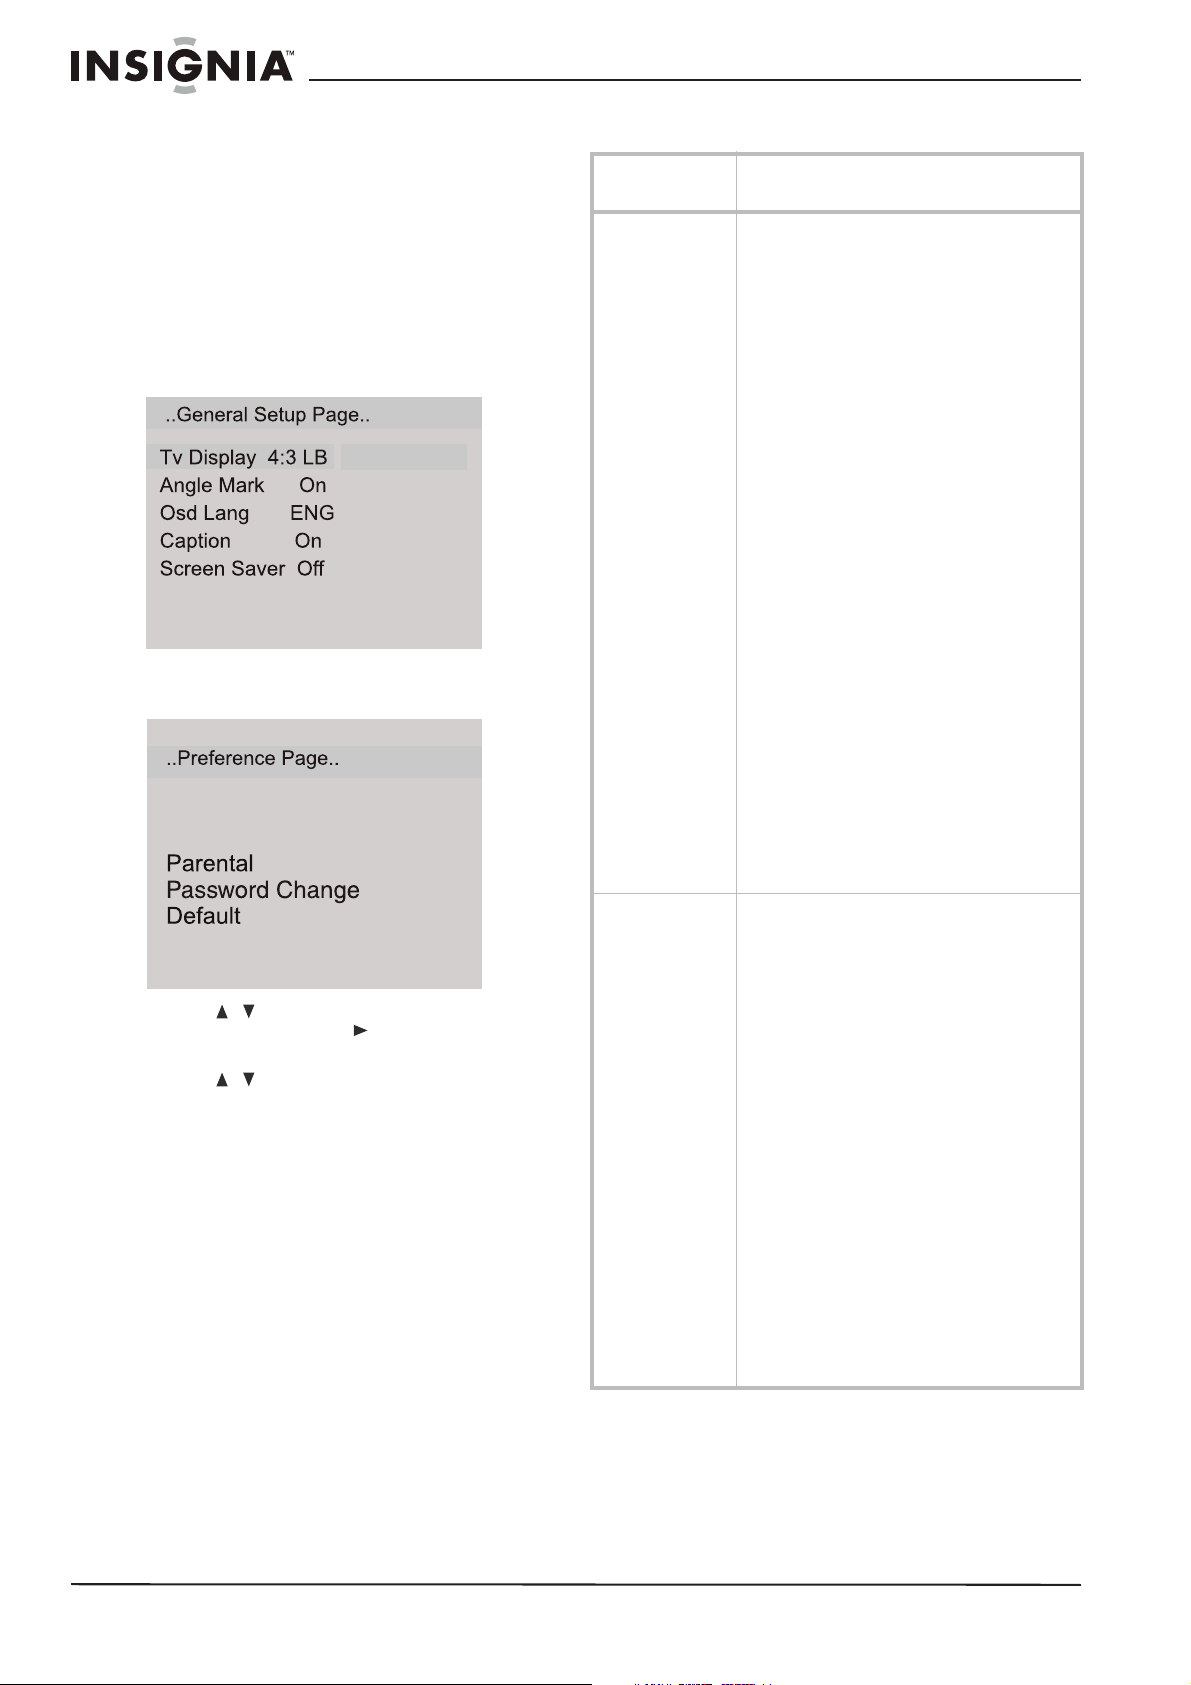
To open and navigate the Setup menu:
1 Press SETUP on the remote control. The
General Setup Page opens.
4:3/Ps
4:3/Lb
16:9
Hdcd
Last Memory
2 Press SETUP again. The Preference Page
opens.
3 Press to highlight a selection or
submenu, then press to enter the
submenu or show the options available.
4 Press to select the option/setting you
want, then press PLAY/ENTER to confirm.
5 To exit the Setup menu, press SETUP.
Off
On
Changing DVD settings
On-screen
menu
GENERAL SETUP TV DISPLAY–Sets the aspect ratio of the TV
PREFERENCE
(only available
when no disc is in
the player)
Options
display.
• 4:3/PS (Pan and Scan - may be used
with external TVs) Widescreen images
are shown on the screen, but with some
parts automatically cut off the ends.
• 4:3/LB (Letter Box - use with internal
TV) Widescreen images are shown on
the screen with black bars on the top
and bottom of the screen.
• 16:9 (may be used with external TVs)
Widescreen images fill the entire
screen.
ANGLE MARK–Lets you turn the Angle option
On or Off. If you set this to On, you can use the
ANGLE button on the remote to select an
alternate viewing angle on the DVD.
OSD Lang.–Lets you select the language for
the On Screen Display (OSD).
CAPTION–Lets you turn the caption On or Off.
SCREEN SAVER–Lets you turn on the screen
saver, which displays when the DVD player is
idle for more than three minutes.
Hdcd–Lets you set Hdcd to "OFF","1X","2X" to
switch the CD play mode between "Normal
CD","HDCD with 44.1K","HDCD with 88.2K". You
can play normal CDs when "HDCD" is set to off.
You can play 44.1K CDs when HDCD is set to
1X, and 88.2K CDs when HDCD is set to 2X to
enhance the audio quality.
Last Memory–Lets you turn the last memory
option On or Off. When set to On, the DVD
player remembers the chapter that you were
viewing when you turn the DVD player off and
starts the DVD at that chapter when you turn
the DVD player back on.
TV TYPE–Lets you select the TV output type.
Options include:
• MULTI (Auto)–Set to this option
•NTSC
•PAL
PARENTAL–Lets you set Parental Controls for
watching DVDs. Initial password is 1234
Options include:
•Off
•1 Kid Safe
•2 g
•3 Pg
•4 Pg 13
•5 Pgr
•6 R
•7 Nc 17
• 8 Adult
PASSWORD CHANGE–Lets you change the
password used to set or change Parental
Controls. The initial password is 1234. Use the
number buttons to enter, then confirm the new
password.
Note: If you forget your password, enter 1369.
DEFAULT–Resets all settings (except Parental
Controls and the password) to factory default.
Press ENTER to confirm.
16
www.insignia-products.com
Page 16
Insignia NS-LCD26F/NS-LCD32F/NS-CL26C LCD TV
Troubleshooting
Please check the following items before calling
for service:
Problem Solution
No picture or
sound.
Picture is OK, but
no sound.
No picture Make sure that the TV is working properly.
Sound is OK, but no
color.
The picture has
overlapped images.
Picture has “snow.” Check the antenna and its connection. If there
Stripes on picture. Check for interference from other electronic
Remote control
does not work.
Image is not clear. In VGA mode, adjust the PHASE control.
Image is not
centered.
Bad sound quality Make sure that the audio output mode is set
The TV doesn’t
operate normally
Notes
• If the problem is not fixed after you check the above
• You may hear a snapping sound from the TV
• Do not let the TV remain on static images for long
Check all cable connections.
Make sure that the TV is plugged in and turned
on.
Make sure that electricity is available at the AC
power outlet.
Check the volume level and mute settings.
Switch to another channel to determine if the
station is the problem.
Press the INPUT button to select TV input.
Make sure the color system is set correctly.
Check the color control and adjust it.
Check the program’s color features, because it
may be a black and white movie.
Make sure that the antenna is installed
correctly. If not, adjust the antenna toward the
broadcasting station.
are problems, correct them. If all connections
are tight, the problem may be with a faulty
antenna or cable.
Check whether car traffic or neon signs
disturb the image.
devices, such as radios and televisions, and
keep magnetic or electronic devices away
from the TV.
Change the batteries in the remote control.
Remove any obstacles between the TV’s IR
sensor and the remote control.
Adjust the Horizontal or Vertical control.
correctly.
Make sure that the audio connection between
the unit and amplifier (if used) is secure.
Disconnect the power plug for ten seconds,
then reconnect it.
If the problem persists, contact Insignia or
your dealer for help.
items, do not attempt to remove the back cover by
yourself.
occasionally. This is normal and is caused by
temperature changes in the operating environment
and does not affect the operation of the TV.
periods of time because it can result in permanent
residual images on the screen. If this situation
occurs, the TV may recover automatically after 12
hours if you change to dynamic programming.
Maintaining
Handling and cleaning the TV
Shipping the TV
Please save the original shipping carton and
packing materials. If you need to ship the TV, for
maximum protection, re-pack the it as it was
originally packed at the factory.
Keeping the exterior surfaces clean
Do not use volatile liquids such as insecticide
•
spray near the TV.
• Do not leave rubber or plastic products in contact
with the TV for a long period of time because they
can leave marks on the surface.
Cleaning the case
• To clean the player, use a soft, dry cloth. If
the surfaces are extremely dirty, use a soft
cloth lightly moistened with a mild detergent
solution.
• Do not use strong solvents such as alcohol,
benzine, or thinner, as these might damage
the surface of the player.
Maintaining the TV
TV is a high-tech, precision device. If the
This
optical pick-up lens and disc drive parts are dirty
or worn, the picture quality could be diminished.
Depending on the operating environment,
regular inspection and maintenance are
recommended after every 1,000 hours of use.
For details, please contact your nearest
authorized service center.
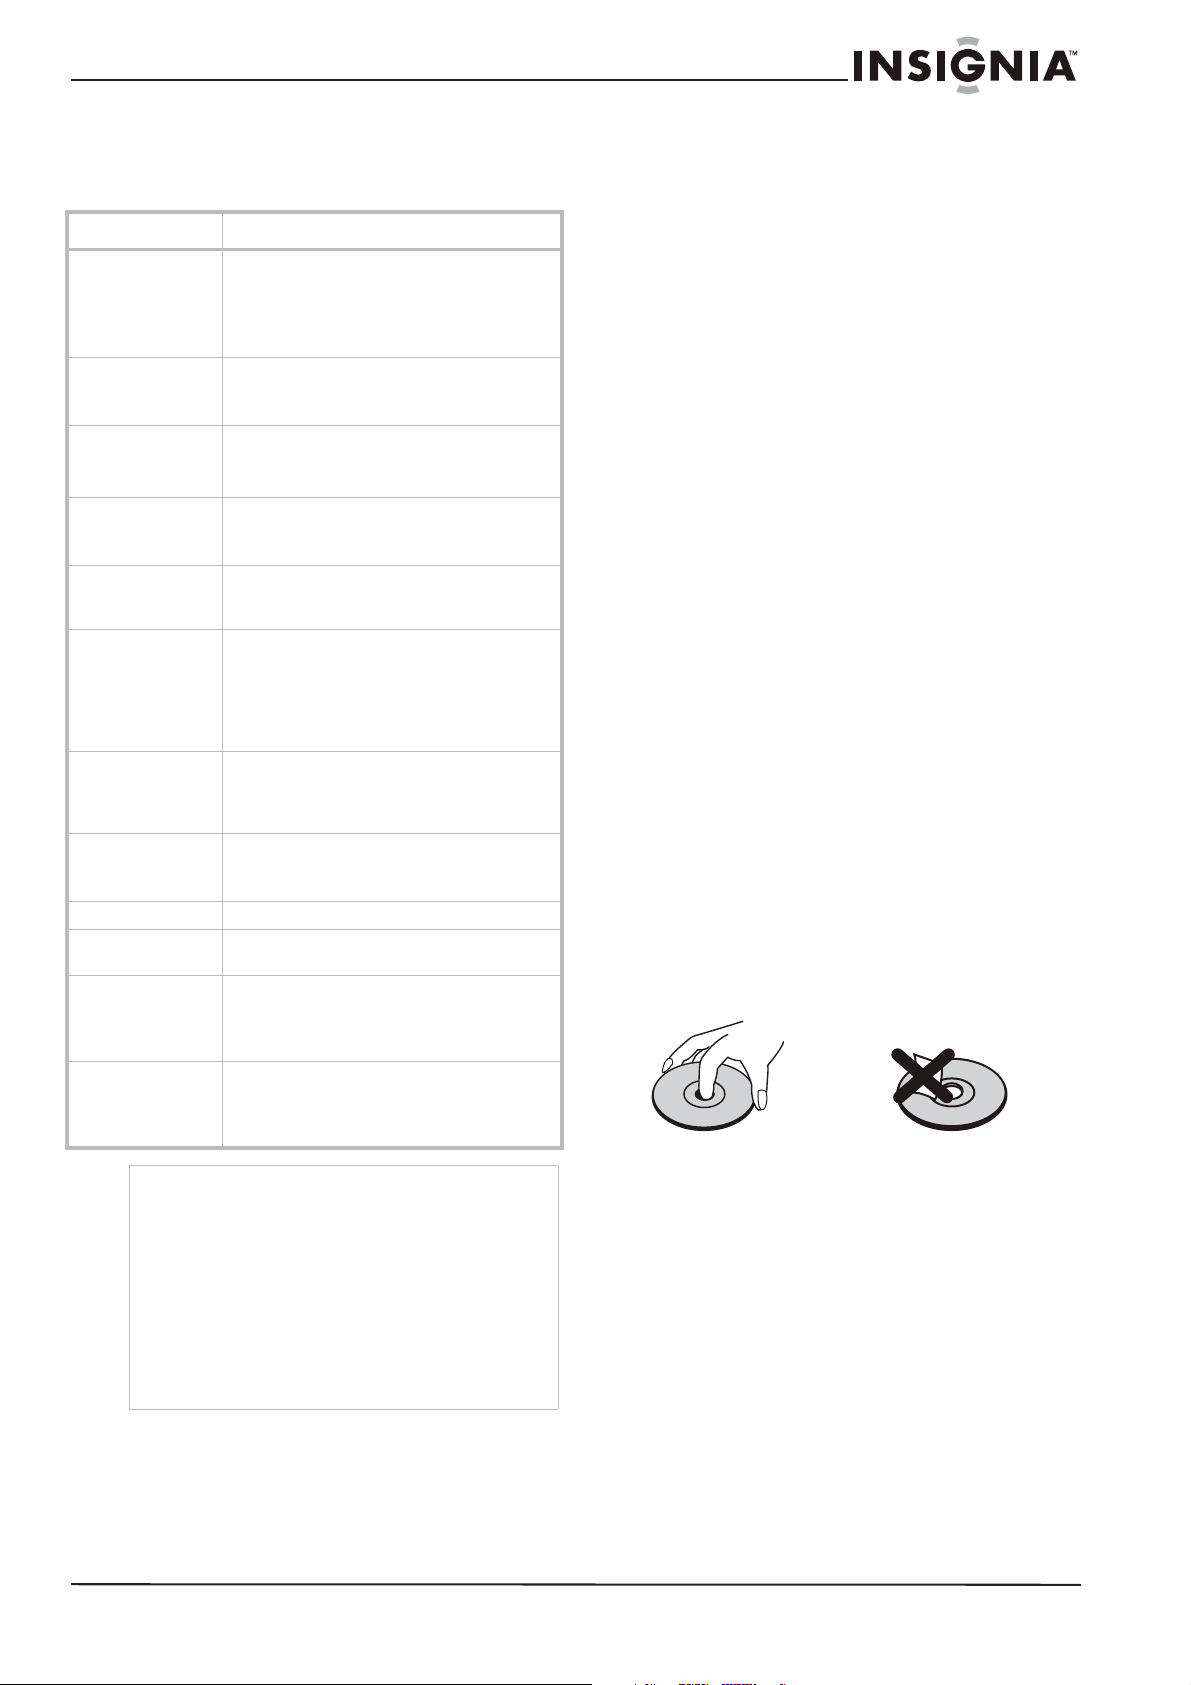
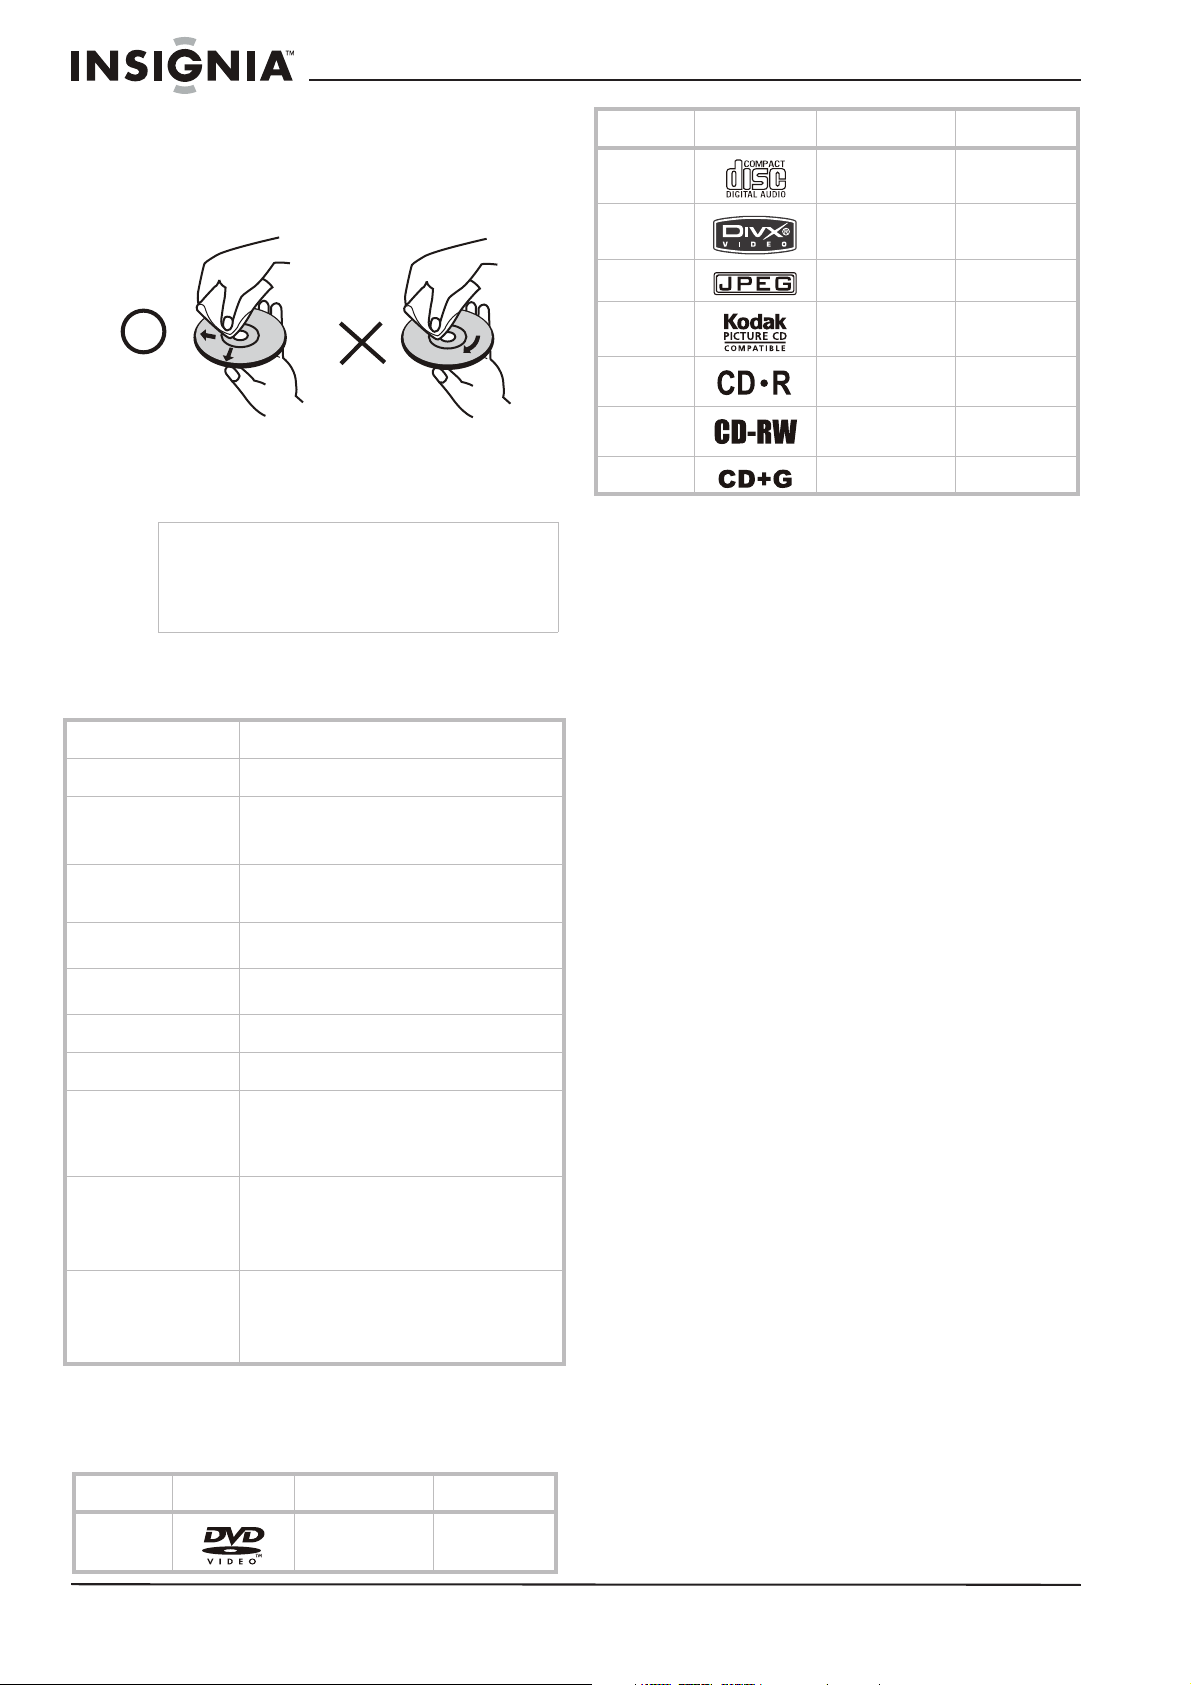
Care and handling of discs
Handling discs
Do not touch the playback side of the disc. Hold
the disc by the edges so that fingerprints do not
get on the surface. Never stick paper or tape on
the disc.
Storing discs
After playing, store the disc in its case. Do not
expose the disc to direct sunlight or sources of
heat and never leave it in a parked car exposed
to direct sunlight.
www.insignia-products.com
17
Page 17
Insignia NS-LCD26F/NS-LCD32F/NS-CL26C LCD TV
Cleaning discs
Fingerprints and dust on the disc can cause
poor picture quality and sound distortion. Before
playing, clean the disc with a clean cloth. Wipe
the disc from the center out.
Do not use strong solvents such as alcohol,
benzine, thinner, commercially available
cleaners, or anti-static spray intended for older
vinyl records.
Note
Never operate this product immediately after
moving it from a cold location to a warm location.
Leave it for two or three hours without operating it.
If you use this product in such a situation, it may
damage tapes, discs, or internal parts.
Specifications
Model
Screen type
Viewable angle
Picture and sound
system
Video input
YPb/Pr
Power
NS-LCD26F/NS-LCD32F/NS-CL26C
A-si TFT active matrix
160° H and 150° V - NS-LCD26F and
NS-CL26C
170° H and 170° V - NS-LCD32F
NTSC (AV)
Mono
CVBS, S-VIDEO, YPb/Pr, YCb/Cr, VGA,
HDMI
Composite, 480i/p, 576i, 720p, 1080i,
1080p
See rating plate on TV
Discs Label Contents Dimension
CD Audio 12 cm
MPEG-4 Audio + Video
(moving picture)
JPEG Video (picture) 12 cm
KODAK CD Video (picture) 12 cm
CD-R Audio or Video
(moving picture)
CD-RW Audio or Video
(moving picture)
CD+G Audio (picture) 12 cm
12 cm
12 cm
12 cm
Legal Notices
Copyright
© 2007 Insignia. Insignia and the Insignia logo are
trademarks of Best Buy Enterprise Services, Inc. Other
brands and product names are trademarks or
registered trademarks of their respective holders.
Specifications and features are subject to change
without notice or obligation.
For service and support call (877) 467-4289.
Power consumption
Dimensions
(W×D×H)
Environmental
Accessories
See rating plate on TV
26.8 × 8.6 × 20.6 inches (68.1 × 22.0 ×
52.3 cm) - NS-LCD26F and NS-CL26C
32 × 10 × 24.2 inches (81.3 × 25.5 ×
61.4 cm) - NS-LCD32F
Working temp: 41° F~95° F (+5° C~+35° C)
Working humidity: 20%-80%
Storage temp: 5° F~113° F (-15° C~+45° C)
Storage humidity: 5%-90%
Remote control
Batteries (two - AA)
User Guide
Power cord
Playable discs
The following discs, and only the following discs,
can be played in the DVD player.
Discs Label Contents Dimension
DVD Audio + Video
(moving picture)
18
12 cm
www.insignia-products.com
Page 18

Insignia NS-LCD26F/NS-LCD32F/NS-CL26C LCD TV
1 Year Limited Warranty
Insignia Products (“Insignia”) warrants to you, the
original purchaser of this new LCD TV (“Product”), that
the Product shall be free of defects in the original
manufacture of the material or workmanship for a period
of one (1) year from the date of your purchase of the
Product (“Warranty Period”). This Product must be
purchased from an authorized dealer of Insignia brand
products and packaged with this warranty statement.
This warranty does not cover refurbished Product. If you
notify Insignia during the Warranty Period of a defect
covered by this warranty that requires service, terms of
this warranty apply.
HOW LONG DOES THE COVERAGE LAST?
The Warranty Period lasts for 1 year (365 days) from the
date you purchased the Product. The purchase date is
printed on the receipt you received with the Product.
WHAT DOES THIS WARRANTY COVER?
During the Warranty Period, if the original manufacture of
the material or workmanship of the Product is
determined to be defective by an authorized Insignia
repair center or store personnel, Insignia will (at its sole
option): (1) repair the Product with new or rebuilt parts;
or (2) replace the Product at no charge with new or
rebuilt comparable products or parts. Products and parts
replaced under this warranty become the property of
Insignia and are not returned to you. If service of
Products or parts are required after the Warranty Period
expires, you must pay all labor and parts charges. This
warranty lasts as long as you own your Insignia Product
during the Warranty Period. Warranty coverage
terminates if you sell or otherwise transfer the Product.
HOW TO OBTAIN WARRANTY SERVICE?
If you purchased the Product at a retail store location,
take your original receipt and the Product to the store
you purchased it from. Make sure that you place the
Product in its original packaging or packaging that
provides the same amount of protection as the original
packaging. If you purchased the Product from an online
web site, mail your original receipt and the Product to the
address listed on the web site. Make sure that you put
the Product in its original packaging or packaging that
provides the same amount of protection as the original
packaging.
To obtain in-home warranty service for a television with a
screen 25 inches or larger, call 1-888-BESTBUY. Call
agents will diagnose and correct the issue over the
phone or will have an Insignia-approved repair person
dispatched to your home.
WHERE IS THE WARRANTY VALID?
This warranty is valid only to the original purchaser of the
product in the United States and Canada.
WHAT DOES THE WARRANTY NOT COVER?
This warranty does not cover:
• Customer instruction
• Installation
• Set up adjustments
• Cosmetic damage
• Damage due to acts of God, such as lightning
strikes
• Accident
• Misuse
• Abuse
• Negligence
• Commercial use
• Modification of any part of the Product, including
the antenna
• Plasma display panel damaged by static
(non-moving) images applied for lengthy periods
(burn-in).
This warranty also does not cover:
• Damage due to incorrect operation or maintenance
• Connection to an incorrect voltage supply
• Attempted repair by anyone other than a facility
authorized by Insignia to service the Product
• Products sold as is or with all faults
• Consumables, such as fuses or batteries
• Products where the factory applied serial number
has been altered or removed
REPAIR REPLACEMENT AS PROVIDED UNDER THIS
WARRANTY IS YOUR EXCLUSIVE REMEDY.
INSIGNIA SHALL NOT BE LIABLE FOR ANY
INCIDENTAL OR CONSEQUENTIAL DAMAGES FOR
THE BREACH OF ANY EXPRESS OR IMPLIED
WARRANTY ON THIS PRODUCT, INCLUDING, BUT
NOT LIMITED TO, LOST DATA, LOSS OF USE OF
YOUR PRODUCT, LOST BUSINESS OR LOST
PROFITS. INSIGNIA PRODUCTS MAKES NO OTHER
EXPRESS WARRANTIES WITH RESPECT TO THE
PRODUCT, ALL EXPRESS AND IMPLIED
WARRANTIES FOR THE PRODUCT, INCLUDING, BUT
NOT LIMITED TO, ANY IMPLIED WARRANTIES OF
AND CONDITIONS OF MERCHANTABILITY AND
FITNESS FOR A PARTICULAR PURPOSE, ARE
LIMITED IN DURATION TO THE WARRANTY PERIOD
SET FORTH ABOVE AND NO WARRANTIES,
WHETHER EXPRESS OR IMPLIED, WILL APPLY
AFTER THE WARRANTY PERIOD. SOME STATES,
PROVINCES AND JURISDICTIONS DO NOT ALLOW
LIMITATIONS ON HOW LONG AN IMPLIED
WARRANTY LASTS, SO THE ABOVE LIMITATION MAY
NOT APPLY TO YOU. THIS WARRANTY GIVES YOU
SPECIFIC LEGAL RIGHTS, AND YOU MAY ALSO
HAVE OTHER RIGHTS, WHICH VARY FROM STATE
TO STATE OR PROVINCE TO PROVINCE.
Contact Insignia:
For customer service please call 1-877-467-4289
www.insignia-products.com
INSIGNIA™ is a trademark of Best Buy Enterprise
Services, Inc.
Distributed by Best Buy Purchasing, LLC.
Insignia, 7601 Penn Avenue South, Richfield, Minnesota,
U.S.A.
www.insignia-products.com
19
Page 19

2007
2007
2007
 Loading...