

Insignia NS-LCD26-09CA User Manual

User Guide | Guide de l’utilisateur
26" LCD TV 720p | Téléviseur ACL de 26 po 720p
NS-LCD26-09CA


Insignia NS-LCD26-09CA
26" LCD TV 720p
Contents
Introduction . . . . . . . . . . . . . . . . . . . . . . . . . . . . . . . . . . . . . . . . . . . . . . . . . . . . . . . . . . . . . . . . . 1
Safety information . . . . . . . . . . . . . . . . . . . . . . . . . . . . . . . . . . . . . . . . . . . . . . . . . . . . . . . . . . . . 3
Features. . . . . . . . . . . . . . . . . . . . . . . . . . . . . . . . . . . . . . . . . . . . . . . . . . . . . . . . . . . . . . . . . . . . 4
Front. . . . . . . . . . . . . . . . . . . . . . . . . . . . . . . . . . . . . . . . . . . . . . . . . . . . . . . . . . . . . . . . . . . . . . . . . . . . .4
Back . . . . . . . . . . . . . . . . . . . . . . . . . . . . . . . . . . . . . . . . . . . . . . . . . . . . . . . . . . . . . . . . . . . . . . . . . . . . . 4
Remote control. . . . . . . . . . . . . . . . . . . . . . . . . . . . . . . . . . . . . . . . . . . . . . . . . . . . . . . . . . . . . . . . . . . . .5
Setting up your TV . . . . . . . . . . . . . . . . . . . . . . . . . . . . . . . . . . . . . . . . . . . . . . . . . . . . . . . . . . . . 6
Installing remote control batteries . . . . . . . . . . . . . . . . . . . . . . . . . . . . . . . . . . . . . . . . . . . . . . . . . . . . . . 6
Connecting your TV to a power outlet . . . . . . . . . . . . . . . . . . . . . . . . . . . . . . . . . . . . . . . . . . . . . . . . . . . 6
Connecting an outside antenna . . . . . . . . . . . . . . . . . . . . . . . . . . . . . . . . . . . . . . . . . . . . . . . . . . . . . . . . 6
Connecting cable TV . . . . . . . . . . . . . . . . . . . . . . . . . . . . . . . . . . . . . . . . . . . . . . . . . . . . . . . . . . . . . . . .6
Connecting an HDMI device. . . . . . . . . . . . . . . . . . . . . . . . . . . . . . . . . . . . . . . . . . . . . . . . . . . . . . . . . . . 7
Connecting a component video device. . . . . . . . . . . . . . . . . . . . . . . . . . . . . . . . . . . . . . . . . . . . . . . . . . . 7
Connecting an S-Video device . . . . . . . . . . . . . . . . . . . . . . . . . . . . . . . . . . . . . . . . . . . . . . . . . . . . . . . . . 8
Connecting a composite video device . . . . . . . . . . . . . . . . . . . . . . . . . . . . . . . . . . . . . . . . . . . . . . . . . . .8
Connecting a VCR for recording. . . . . . . . . . . . . . . . . . . . . . . . . . . . . . . . . . . . . . . . . . . . . . . . . . . . . . . .9
Connecting a computer . . . . . . . . . . . . . . . . . . . . . . . . . . . . . . . . . . . . . . . . . . . . . . . . . . . . . . . . . . . . .10
Connecting headphones . . . . . . . . . . . . . . . . . . . . . . . . . . . . . . . . . . . . . . . . . . . . . . . . . . . . . . . . . . . . 10
Using your TV . . . . . . . . . . . . . . . . . . . . . . . . . . . . . . . . . . . . . . . . . . . . . . . . . . . . . . . . . . . . . . 11
Turning your TV on or off . . . . . . . . . . . . . . . . . . . . . . . . . . . . . . . . . . . . . . . . . . . . . . . . . . . . . . . . . . . . 11
Selecting the TV signal source. . . . . . . . . . . . . . . . . . . . . . . . . . . . . . . . . . . . . . . . . . . . . . . . . . . . . . . .11
Setting up the channel list . . . . . . . . . . . . . . . . . . . . . . . . . . . . . . . . . . . . . . . . . . . . . . . . . . . . . . . . . . .11
Changing TV channels. . . . . . . . . . . . . . . . . . . . . . . . . . . . . . . . . . . . . . . . . . . . . . . . . . . . . . . . . . . . . . 11
Selecting the video input source . . . . . . . . . . . . . . . . . . . . . . . . . . . . . . . . . . . . . . . . . . . . . . . . . . . . . . 12
Adjusting the volume . . . . . . . . . . . . . . . . . . . . . . . . . . . . . . . . . . . . . . . . . . . . . . . . . . . . . . . . . . . . . . .12
Displaying status information . . . . . . . . . . . . . . . . . . . . . . . . . . . . . . . . . . . . . . . . . . . . . . . . . . . . . . . . .12
Selecting a picture mode . . . . . . . . . . . . . . . . . . . . . . . . . . . . . . . . . . . . . . . . . . . . . . . . . . . . . . . . . . . .12
Adjusting the backlight . . . . . . . . . . . . . . . . . . . . . . . . . . . . . . . . . . . . . . . . . . . . . . . . . . . . . . . . . . . . . . 12
Reducing video noise. . . . . . . . . . . . . . . . . . . . . . . . . . . . . . . . . . . . . . . . . . . . . . . . . . . . . . . . . . . . . . .12
Improving the video image . . . . . . . . . . . . . . . . . . . . . . . . . . . . . . . . . . . . . . . . . . . . . . . . . . . . . . . . . . .13
Adjusting the color temperature . . . . . . . . . . . . . . . . . . . . . . . . . . . . . . . . . . . . . . . . . . . . . . . . . . . . . . . 13
Selecting the aspect ratio . . . . . . . . . . . . . . . . . . . . . . . . . . . . . . . . . . . . . . . . . . . . . . . . . . . . . . . . . . . .13
Selecting the audio mode . . . . . . . . . . . . . . . . . . . . . . . . . . . . . . . . . . . . . . . . . . . . . . . . . . . . . . . . . . . .13
Selecting the on-screen menu language . . . . . . . . . . . . . . . . . . . . . . . . . . . . . . . . . . . . . . . . . . . . . . . .14
Setting the sleep timer . . . . . . . . . . . . . . . . . . . . . . . . . . . . . . . . . . . . . . . . . . . . . . . . . . . . . . . . . . . . . .14
Turning the blue screen on or off . . . . . . . . . . . . . . . . . . . . . . . . . . . . . . . . . . . . . . . . . . . . . . . . . . . . . .14
Selecting the menu transparency. . . . . . . . . . . . . . . . . . . . . . . . . . . . . . . . . . . . . . . . . . . . . . . . . . . . . .14
Selecting the closed captioning mode . . . . . . . . . . . . . . . . . . . . . . . . . . . . . . . . . . . . . . . . . . . . . . . . . .15
Viewing closed captioning . . . . . . . . . . . . . . . . . . . . . . . . . . . . . . . . . . . . . . . . . . . . . . . . . . . . . . . . . . .15
Setting parental controls. . . . . . . . . . . . . . . . . . . . . . . . . . . . . . . . . . . . . . . . . . . . . . . . . . . . . . . . . . . . . 15
Maintaining. . . . . . . . . . . . . . . . . . . . . . . . . . . . . . . . . . . . . . . . . . . . . . . . . . . . . . . . . . . . . . . . . 16
Cleaning your TV . . . . . . . . . . . . . . . . . . . . . . . . . . . . . . . . . . . . . . . . . . . . . . . . . . . . . . . . . . . . . . . . . .16
Troubleshooting . . . . . . . . . . . . . . . . . . . . . . . . . . . . . . . . . . . . . . . . . . . . . . . . . . . . . . . . . . . . . 16
Wall-mounting your TV. . . . . . . . . . . . . . . . . . . . . . . . . . . . . . . . . . . . . . . . . . . . . . . . . . . . . . . . 17
Specifications. . . . . . . . . . . . . . . . . . . . . . . . . . . . . . . . . . . . . . . . . . . . . . . . . . . . . . . . . . . . . . . 17
One-year limited warranty . . . . . . . . . . . . . . . . . . . . . . . . . . . . . . . . . . . . . . . . . . . . . . . . . . . . . 19
Français. . . . . . . . . . . . . . . . . . . . . . . . . . . . . . . . . . . . . . . . . . . . . . . . . . . . . . 21
Introduction
Congratulations on your purchase of a high-quality Insignia product. Your NS-LCD26-09CA represents the
state of the art in LCD TV design and is designed for reliable and trouble-free performance.
www.insignia-products.com
1
f
It makes a difference how and where you use
As you enjoy your new product, keep
The issue
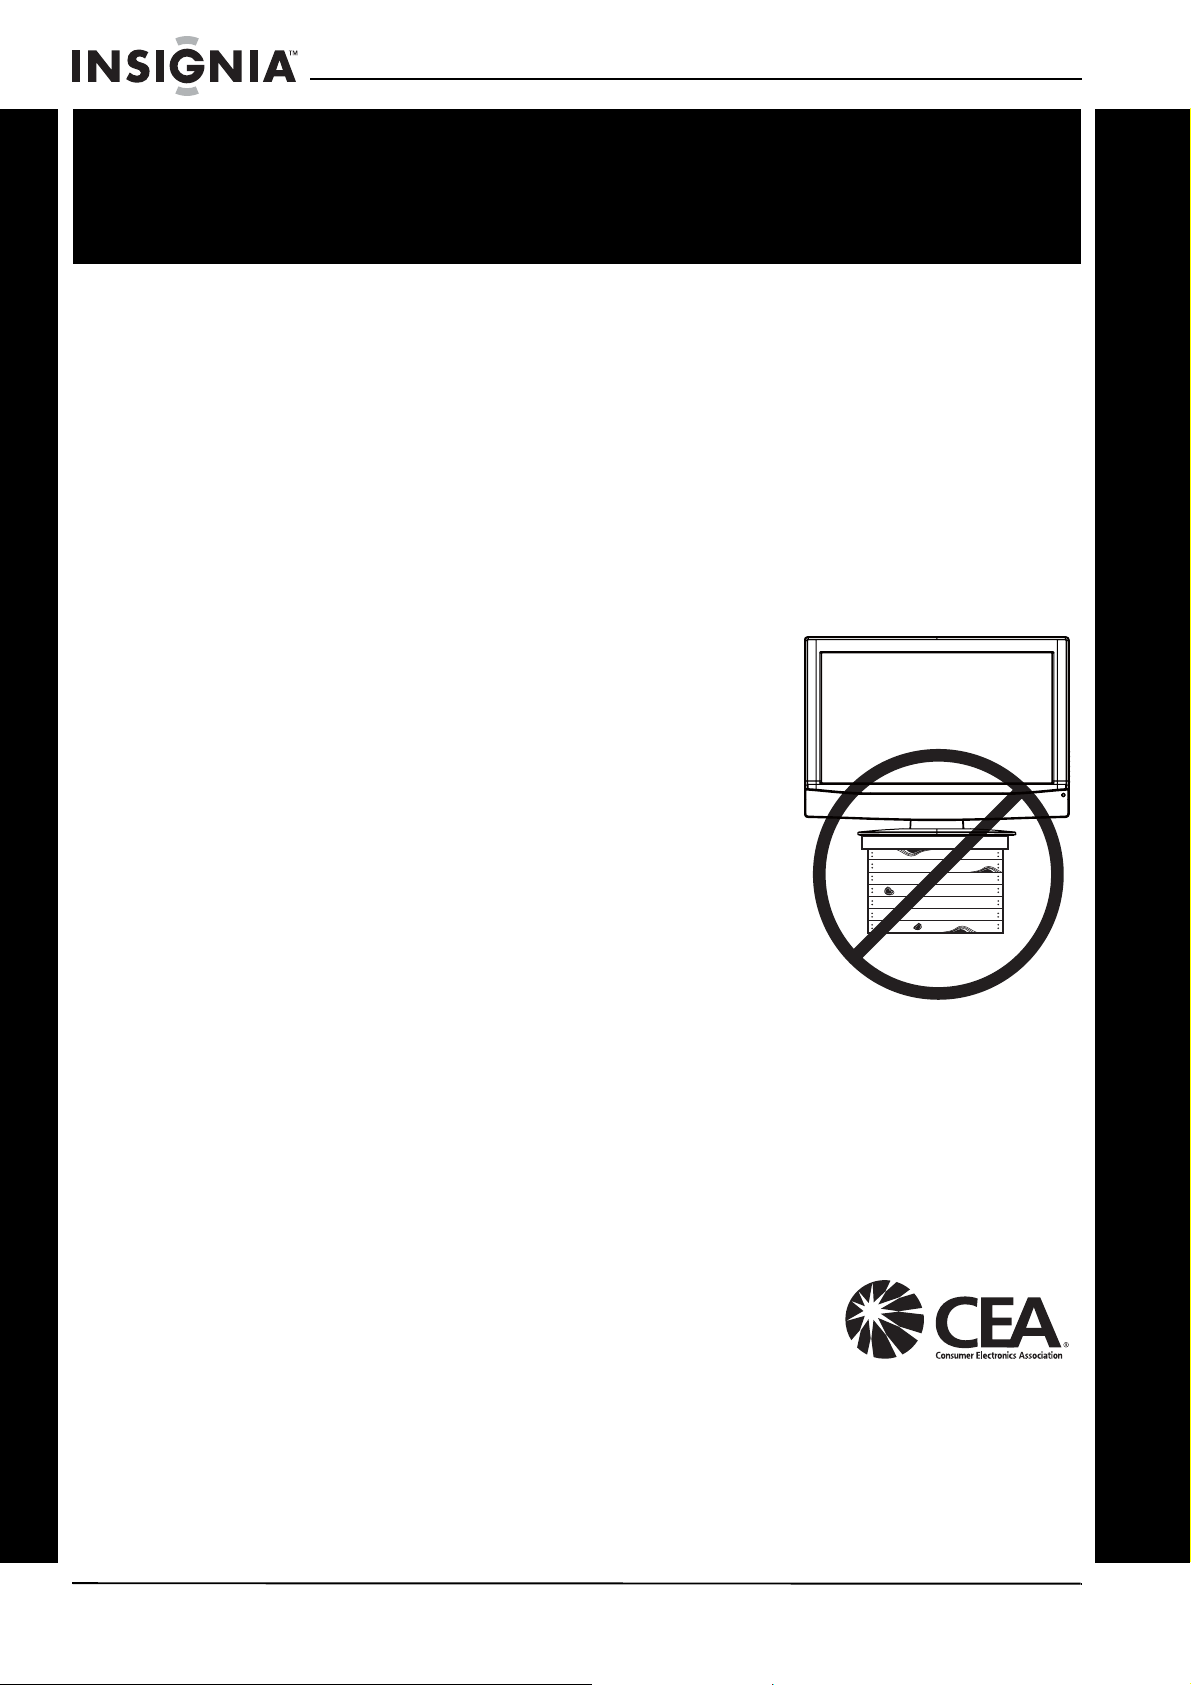
The home theater entertainment experience is a growing trend, and larger TVs are
popular purchases. However, TVs are not always supported on the proper stands or
installed according to the manufacturer’s recommendations. We and the consumer
electronics industry are committed to making home entertainment enjoyable and safe.
TVs that are inappropriately placed on dressers, bookcases, shelves, desks,
speakers, chests, or carts may fall over and cause injury.
Tune into safety
• One size of TV stand does not fit all. Use only a TV
stand rated for the weight of your TV.
• Carefully read and understand all enclosed
instructions for proper use of this product.
• Don’t let children to climb on or play with
entertainment system furniture and TVs.
• Don’t place TVs on furniture that can easily be used
as steps, such as a chest of drawers.
• Remember that children can become excited while
watching a program, especially on a “larger-than-life”
TV. Make sure that you place or install the TV where it
cannot be pushed, pulled over, or knocked down.
• Make sure that you route all cords and cables so that
they cannot be pulled or grabbed by curious children.
Insignia NS-LCD26-09CA 26" LCD TV 720p
CHILD SAFETY
your flat panel display
these safety tips in mind
Wall mounting
If you decide to wall mount your TV, always:
• One size of wall mount does not fit all. Use only a wall mount rated for the weight
of your TV and that has been recommended by this TV manufacturer, listed in this
manual, or otherwise listed by an independent laboratory (such as UL, CSA, or
ETL) as suitable for your TV.
• Follow all instructions supplied by the TV and wall mount manufacturers.
• If you have any doubts about your ability to safely wall mount your TV, get help
from a professional installer.
• Make sure that the wall where you are mounting the TV is
appropriate. Some wall mounts are not designed to be
mounted to walls backed with steel studs or cinder blocks.
If you are unsure, ask a professional installer.
• TVs can be heavy. At least two people are required for safe wall mount
installation.
2
www.insignia-products.com
Insignia NS-LCD26-09CA 26" LCD TV 720p
Safety information
Caution
To prevent electric shock, match the wide blade on the power
cord plug to the wide slot on an electric outlet. If the plug does
not fit, consult a licensed electrician to replace the obsolete
outlet. Do not modify the power cord plug, or you will defeat
this safety feature.
This symbol indicates that dangerous voltage
constituting a risk of electric shock is present
within your TV. This label is located on the back
of your TV.
This symbol indicates that there are important
operating and maintenance instructions in the
literature accompanying your TV.
Warning
Your TV contains tin-lead solder and a fluorescent lamp
containing a small amount of mercury. Disposal of these
materials may be regulated for environmental reasons. For
disposal or recycling information, contact your local authorities
or the Electronic Industries Alliance at www.eia.org.
Important safety instructions
1 Read these instructions.
2 Keep these instructions.
3 Heed all warnings.
4 Follow all instructions.
5 Do not use your TV near water.
6 Clean the cabinet with a dry cloth only.
7 Do not block any ventilation openings. Install
in accordance with the manufacturer’s
instructions.
8 Do not install near any heat sources such as
radiators, heat registers, stoves, or other
apparatus (including amplifiers) that produce
heat.
9 Do not defeat the safety purpose of the
polarized or grounding-type plug. A polarized
plug has two blades with one wider than the
other. A grounding type plug has two blades
and a third grounding prong. The wide blade
or the third prong is provided for your safety.
If the provided plug does not fit into your
outlet, consult an electrician for replacement
of the obsolete outlet.
10 Protect the power cord from being walked on
or pinched particularly at plugs, convenience
receptacles, and the point where they exit
from your TV.
11 Only use attachments or accessories
specified by the manufacturer.
12 Use only with a cart, stand,
tripod, bracket, or table
specified by the manufacturer.
13 Unplug your TV during lightning
storms or when unused for long
periods of time.
14 Refer all servicing to qualified service
personnel.
Servicing is required when your TV has been
damaged in any way, such as the
power-supply cord or plug is damaged, liquid
has been spilled or objects have fallen into
your TV, your TV has been exposed to rain or
moisture, does not operate normally, or has
been dropped.
15 Do not overload wall outlets. Overloaded wall
outlets, loose or damaged wall outlets,
extension cords, frayed power cords, or
damaged or cracked wire insulation are
dangerous. Any of these conditions could
result in electric shock or fire. Periodically
examine the cord of your TV, and if its
appearance indicates damage or
deterioration, unplug it, discontinue use of
your TV, and have the cord replaced with an
exact replacement part by an authorized
service person. Protect the power cord from
physical or mechanical abuse, such as being
twisted, kinked, pinched, closed in a door, or
walked upon. Pay particular attention to
plugs, wall outlets, and the point where the
cord exits your TV.
16 Ensure that you connect the earth ground
wire to prevent possible electric shock. If
grounding methods are not possible, have a
qualified electrician install a separate circuit
breaker. Do not try to ground the unit by
connecting it to telephone wires, lightening
rods, or gas pipes.
17 The main plug is the disconnecting device.
The plug must remain readily operable.
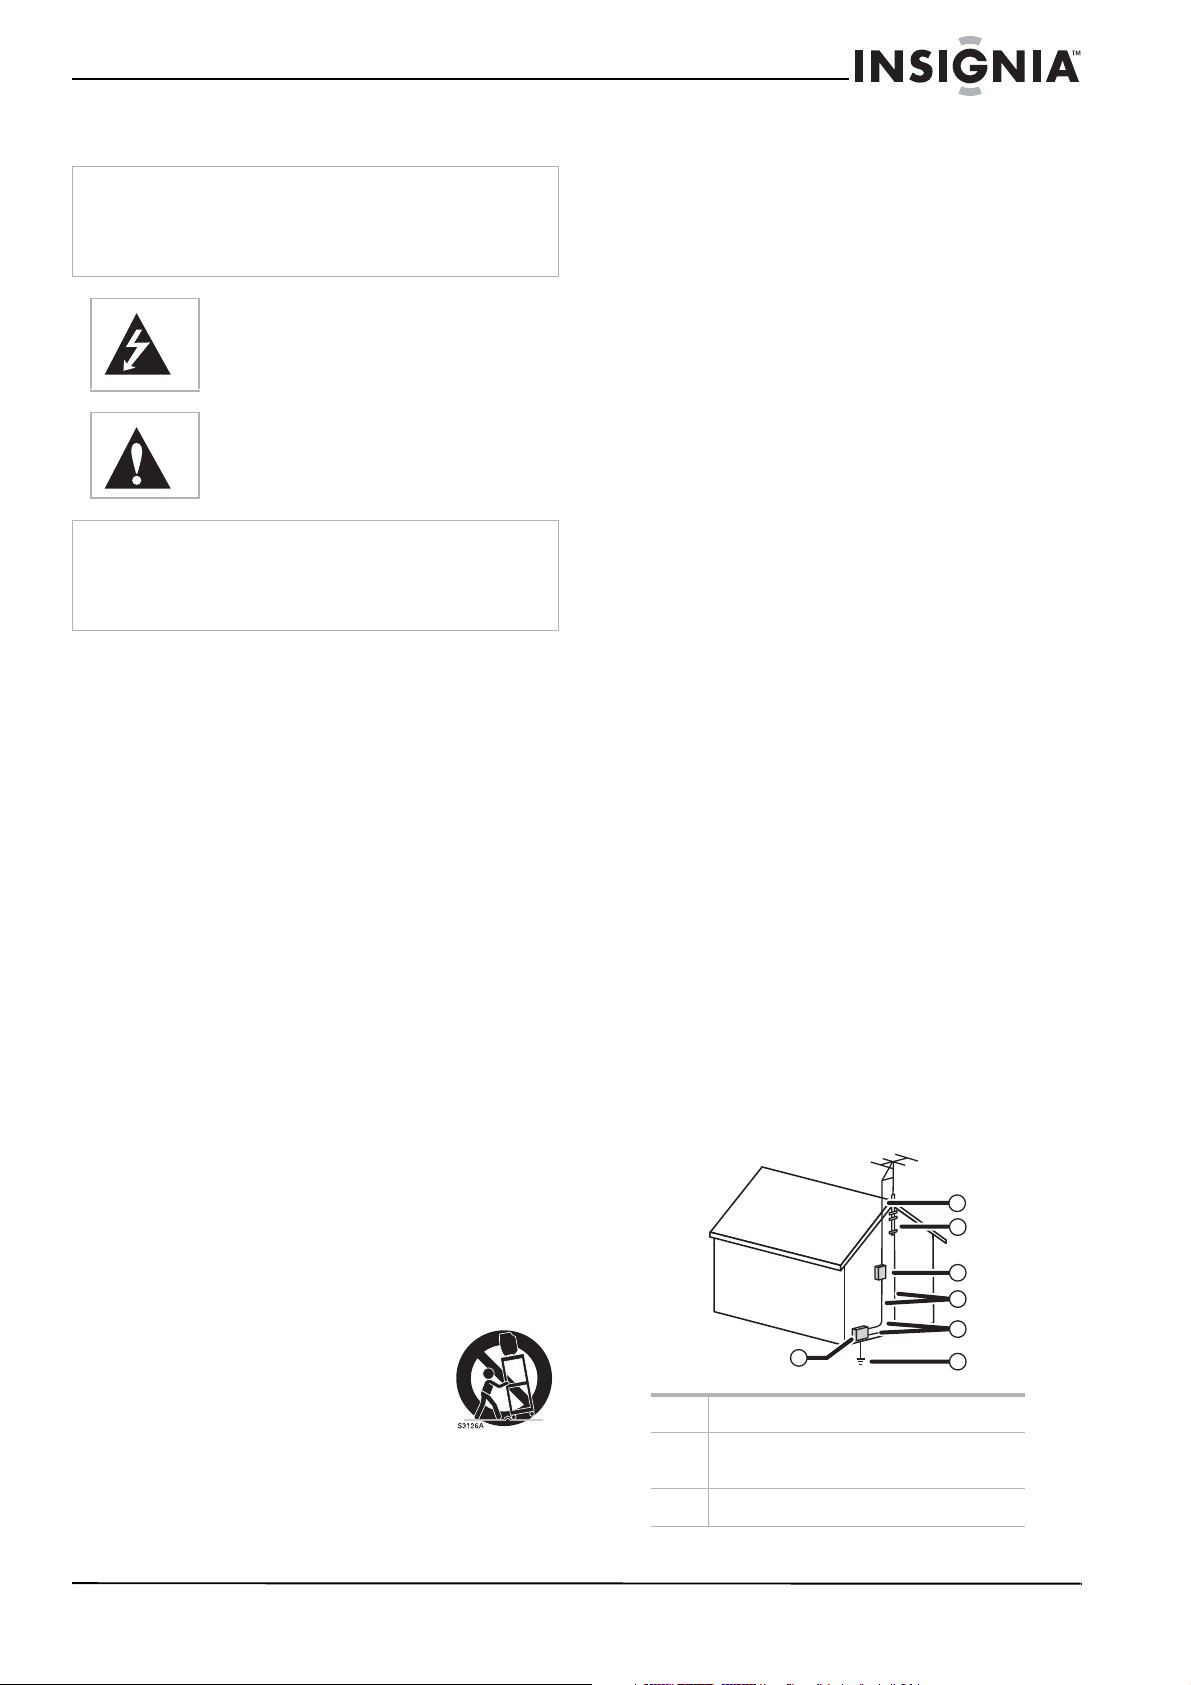
Outdoor antenna grounding
If an outside antenna or cable system is
connected to your TV, make sure that the
antenna or cable system is grounded to provide
some protection against voltage surges and
built-up static charges. Article 810 of the
National Electrical Code, ANSI/NFPA No. 70,
provides information with respect to correct
grounding of the mast and supporting structure,
grounding of the lead-in wire to an antenna
discharge unit, size of grounding conductors,
location of the antenna-discharge unit,
connection to grounding electrodes, and
requirements for the grounding electrode.
7
6
5
4
3
1
1 Electric service equipment
2 Power service grounding electrode
system
2
3 Ground clamps
www.insignia-products.com
3
Insignia NS-LCD26-09CA 26" LCD TV 720p
4 Grounding conductors
5 Antenna discharge unit
6 Grounding clamp
7 Antenna lead-in wire
Note to CATV system installer
This reminder is provided to call the CATV
system installer’s attention to Article 820-40 of
the NEC that provides guidelines for correct
grounding and in particular, specifies that the
cable ground must be connected to the
grounding system of the building as close to the
point of cable entry as practical.
Mobile telephone warning
To avoid interference with your TV picture and
sound, operating problems, or even damage,
keep your cordless and cellular telephones away
from the TV.
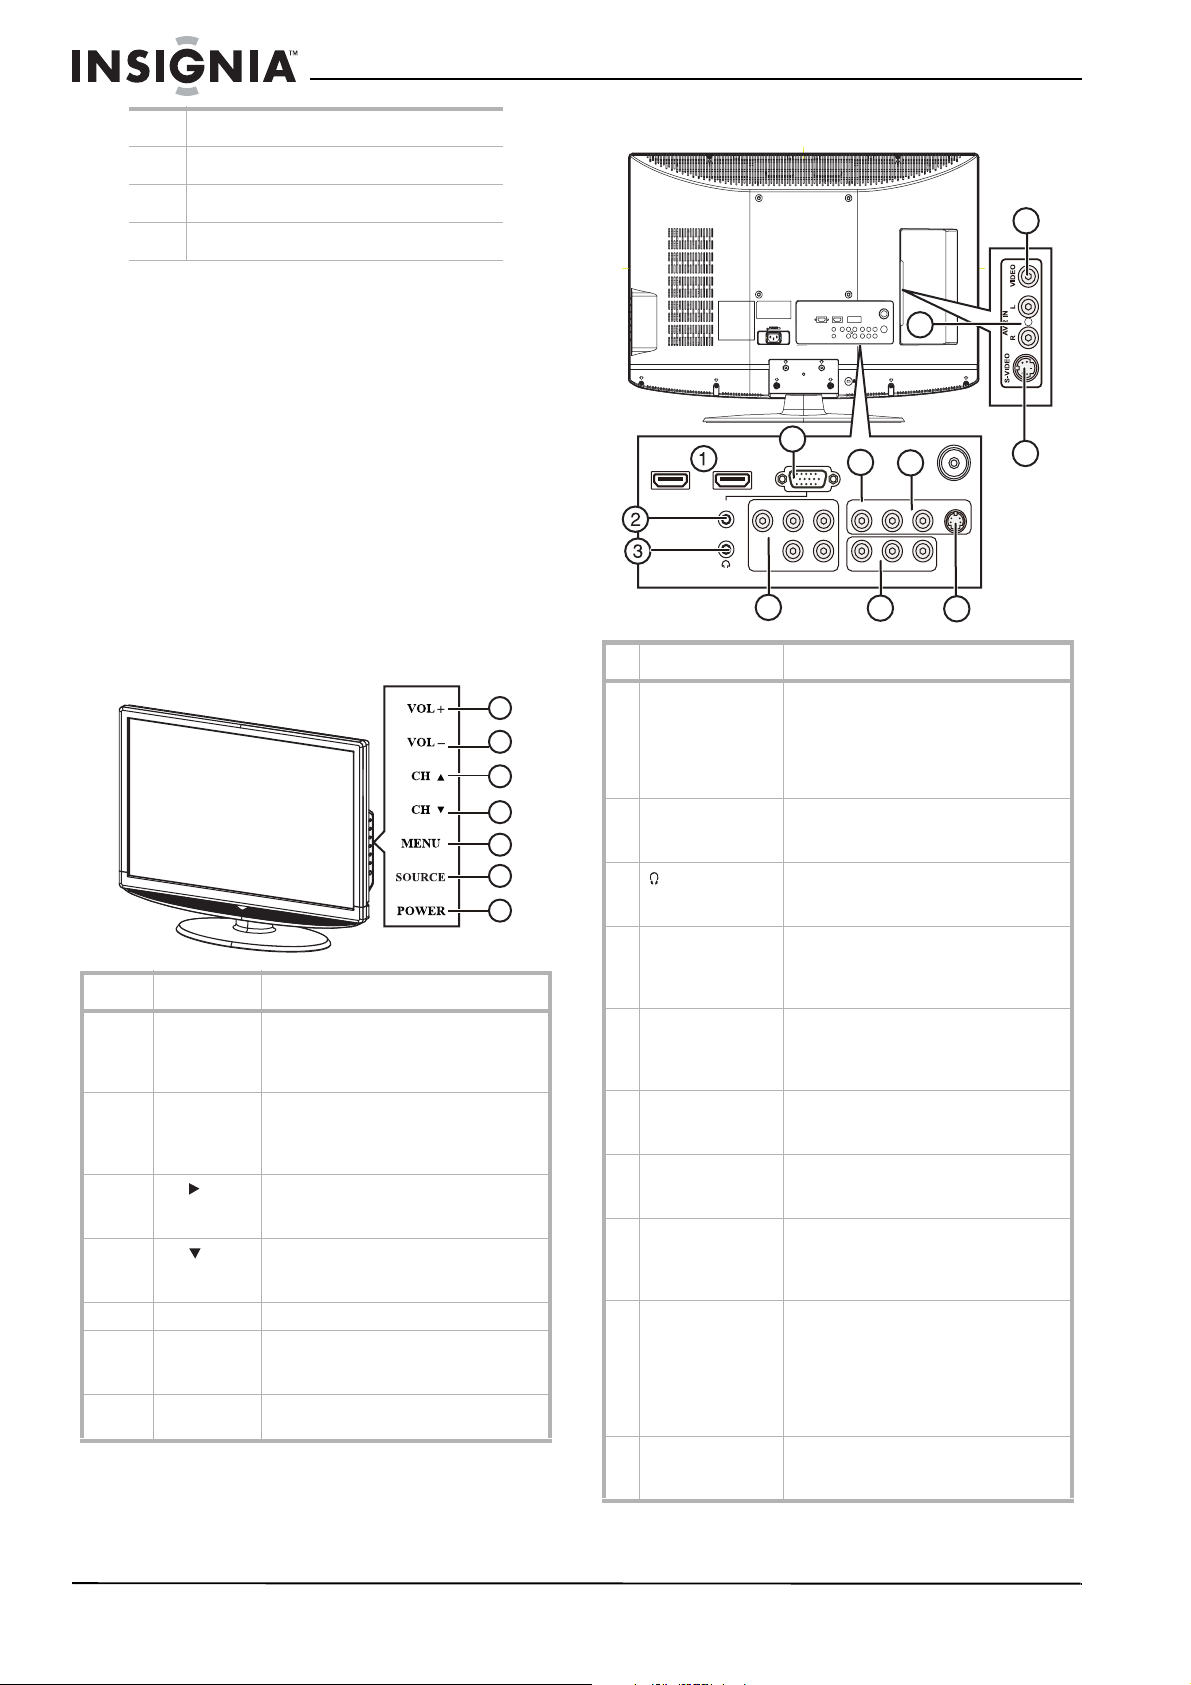
Features
Front
1
2
3
4
5
6
7
# Button Description
1 VOL+ Press to increase the volume. In Menu
2 VOL– Press to decrease the volume. In Menu
3
4
CH
CH
5 MENU Press to show the on-screen menu.
6 SOURCE Press to cycle through the available
7 POWER Press to turn on your TV or put it into
mode, functions as the right arrow to
go to the next menu or increase a
setting.
mode, functions as the left arrow to go
to a previous menu or decrease a
setting.
Press to go to the next higher channel.
In Menu mode, functions as the up
arrow.
Press to go to the next lower channel.
In Menu mode, functions as the down
arrow.
input sources. In Menu mode,
functions as the ENTER button.
Standby mode.
Back
12
11
7
PC IN
HDMI 2
HDMI 1
VGA
8
9
750
AV 1 IN
S-VIDEORLVIDEOPrPbYAUDIO
RLVIDEORL
AV OUTCOMPONENT
4
5
6
# Jack Description
1 HDMI 1/HDMI 2 Connect HDMI devices to these jacks.
2 PC IN AUDIO Connect the audio for a computer to
3
(headphone)
4 COMPONENT Connect a component video device to
5 AV OUT Connect a VCR for recording to these
6 AV 1 IN S-VIDEO Connect an S-Video device to this jack.
7 PC IN VGA Connect the video for a computer to
8 AV 1 IN VIDEO Connect a composite video device to
9 AV 1 IN L and R
audio
10 AV 2 IN S-VIDEO Connect an S-Video device to this jack.
You can connect a DVI device to either
of these jacks by using an
HDMI-to-DVI adapter. For more
information, see “Connecting an HDMI
device” on page 7.
this jack. For more information, see
“Connecting a computer” on page 10.
Connect headphones to this jack. For
more information, see “Connecting
headphones” on page 10.
these jacks. For more information, see
“Connecting a component video
device” on page 7.
jacks. For more information, see
“Connecting a VCR for recording” on
page 9.
For more information, see “Connecting
an S-Video device” on page 8.
this jack. For more information, see
“Connecting a computer” on page 10.
this jack. For more information, see
“Connecting a composite video device”
on page 8.
Connect the audio for the composite or
S-Video device connected to the AV 1
IN VIDEO or AV 1 IN S-VIDEO jack. For
more information, see “Connecting a
composite video device” on page 8 or
“Connecting an S-Video device” on
page 8.
For more information, see “Connecting
an S-Video device” on page 8.
10
4
www.insignia-products.com
Insignia NS-LCD26-09CA 26" LCD TV 720p
# Jack Description
11 AV 2 IN L and R
audio
12 AV 2 IN VIDEO Connect a composite video device to
Connect the audio for the composite or
S-Video device connected to the AV 2
IN VIDEO or AV 2 IN S-VIDEO jack. For
more information, see “Connecting a
composite video device” on page 8 or
“Connecting an S-Video device” on
page 8.
this jack. For more information, see
“Connecting a composite video device”
on page 8.
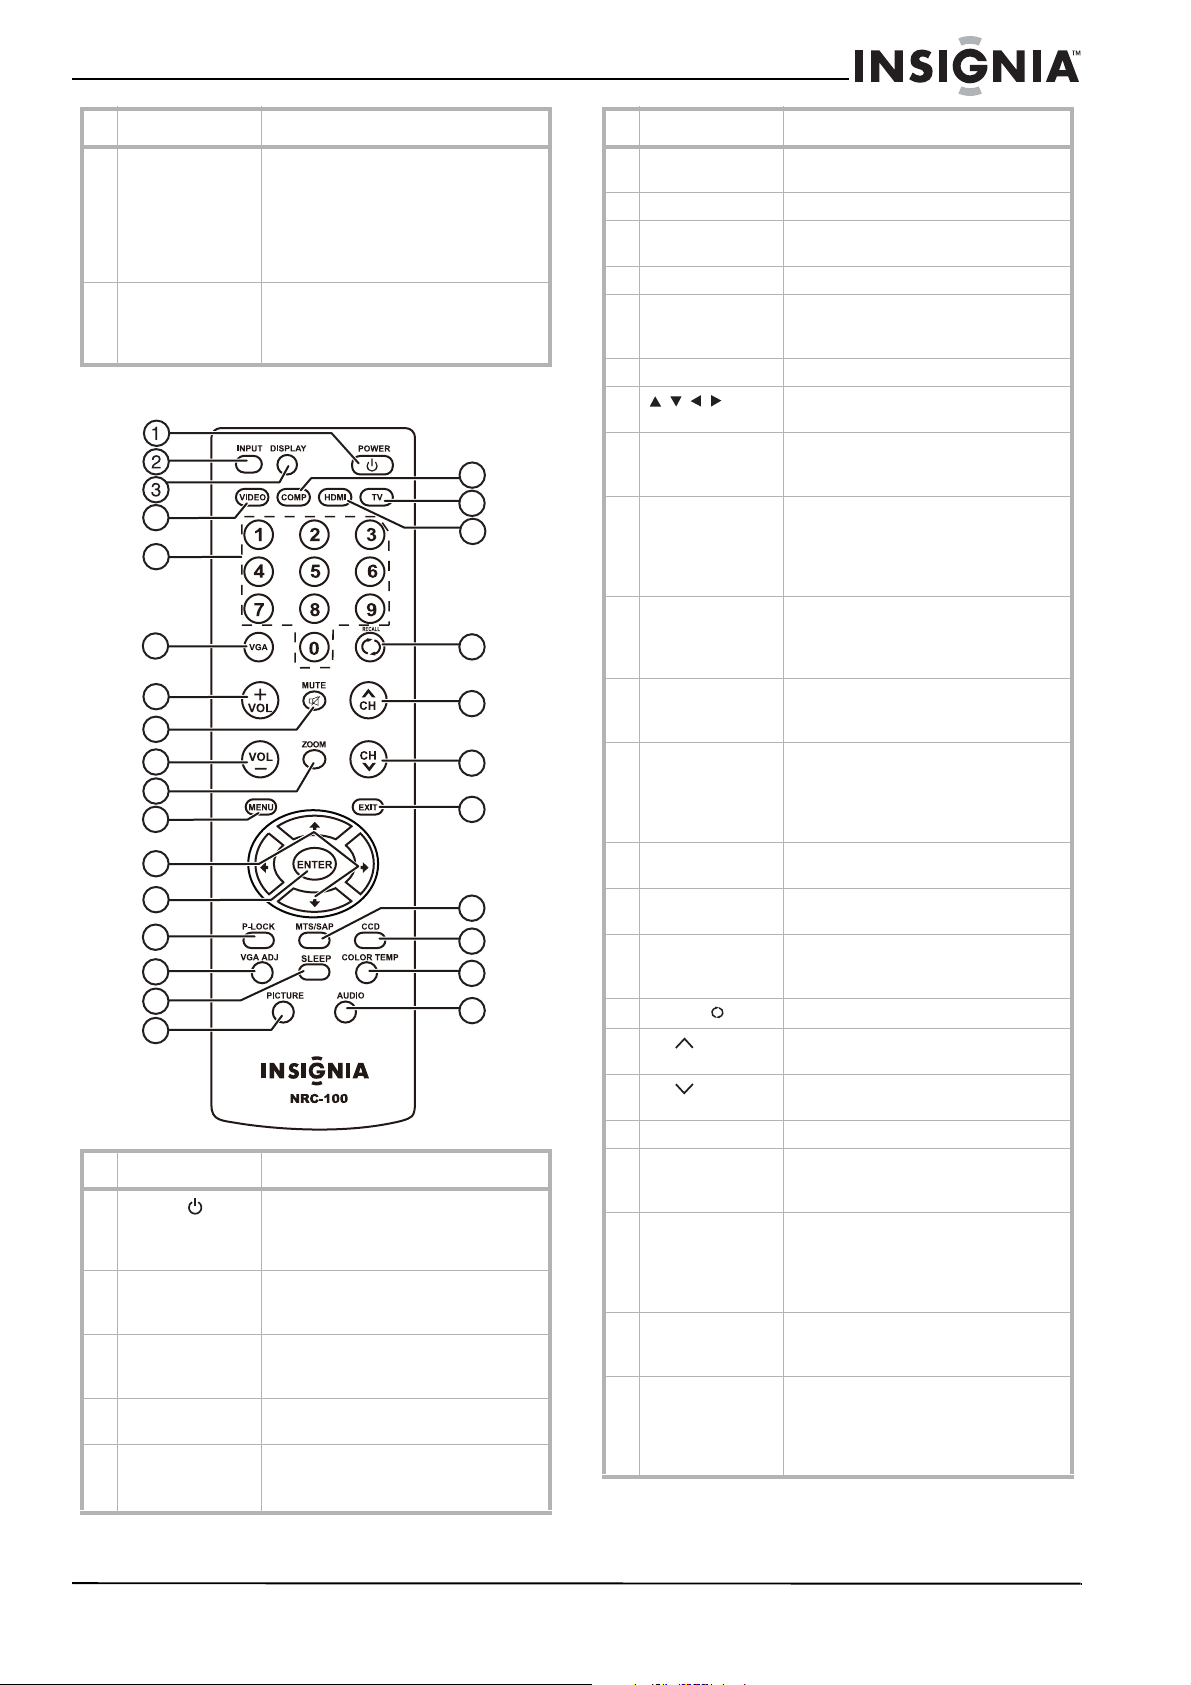
Remote control
18
4
5
6
7
8
9
10
11
12
13
14
15
16
17
# Button Description
1
POWER
2 INPUT Press to select the video input source.
3 DISPLAY Press to display status information.
4 VIDEO Press to toggle between S-Video and
5 Numbers Press to enter channel numbers.
Press to turn on your TV or put it into
Standby mode. For more information,
see “Turning your TV on or off” on
page 11.
For more information, see “Selecting
the video input source” on page 12.
For more information, see “Displaying
status information” on page 12.
composite video input source modes.
In the on-screen menu, press to enter
the parental control password.
19
20
21
22
23
24
25
26
27
28
# Button Description
6 VGA Press to select a connected computer
7 VOL+ Press to increase the volume.
8 MUTE Press to turn off the sound. Press
9 VOL– Press to decrease the volume.
10 ZOOM Press to select the aspect ratio. For
11 MENU Press to open the on-screen menu.
12 Press to move up, down, left, or right
13 ENTER Press to confirm changes or turn
14 P-LOCK Press to open the password box. After
15 VGA ADJ Press to open the VGA adjustment
16 SLEEP Press to set the sleep timer. For more
17 PICTURE Press to select a picture mode. You
18 COMP Press to select a connected component
19 TV Press to select your TV as the video
20 HDMI Press to select a device connected to
21
RECALL
22
CH
23
CH
24 EXIT Press to close the on-screen menu.
25 MTS/SAP Press to select the sound mode. You
26 CCD Press to turn closed captioning on or
27 COLOR TEMP Press to adjust the color temperature.
28 AUDIO Press to select the audio mode. You
as the video input source.
again to turn the sound back on.
more information, see “Selecting the
aspect ratio” on page 13.
in the on-screen menu.
options on or off in the on-screen
menu.
you enter the password, you can adjust
parental controls. For more
information, see “Setting parental
controls” on page 15.
menu. You can select Auto adjust,
H position, V position, Clock, or
Phase.
information, see “Setting the sleep
timer” on page 14.
can select STANDARD, MILD, VIVID,
or PERSONAL. For more information,
see “Selecting a picture mode” on
page 12.
video device as the video input source.
input source.
the HDMI 1 or HDMI 2 jacks as the
video input source.
Press to go to the previous channel.
Press to go to the next channel in the
channel list.
Press to go to the previous channel in
the channel list.
can select MONO, STEREO, or SAP
(secondary audio program).
off. You can select CC OFF, CC ON, or
CC ON WHEN MUTE. For more
information, see “Viewing closed
captioning” on page 15.
For more information, see “Adjusting
the color temperature” on page 13.
can select MUSIC, THEATER,
PERSONAL, or VOICE. For more
information, see “Selecting the audio
mode” on page 13.
www.insignia-products.com
5
Insignia NS-LCD26-09CA 26" LCD TV 720p
Using the remote control
To use the remote control:
• Point the remote control towards the remote
sensor on the front of your TV.
Notes
• Do not expose the remote control to shock or
liquids.
• Do not use the remote control in an area with
high humidity.
• Do not place the remote control in direct
sunlight.
• Do not place objects, such as furniture,
between the remote control and the remote
sensor.
• The remote control may not work if direct
sunlight or bright light shines on the remote
sensor. Either move your TV or change the
angle at which you use the remote control.
Setting up your TV
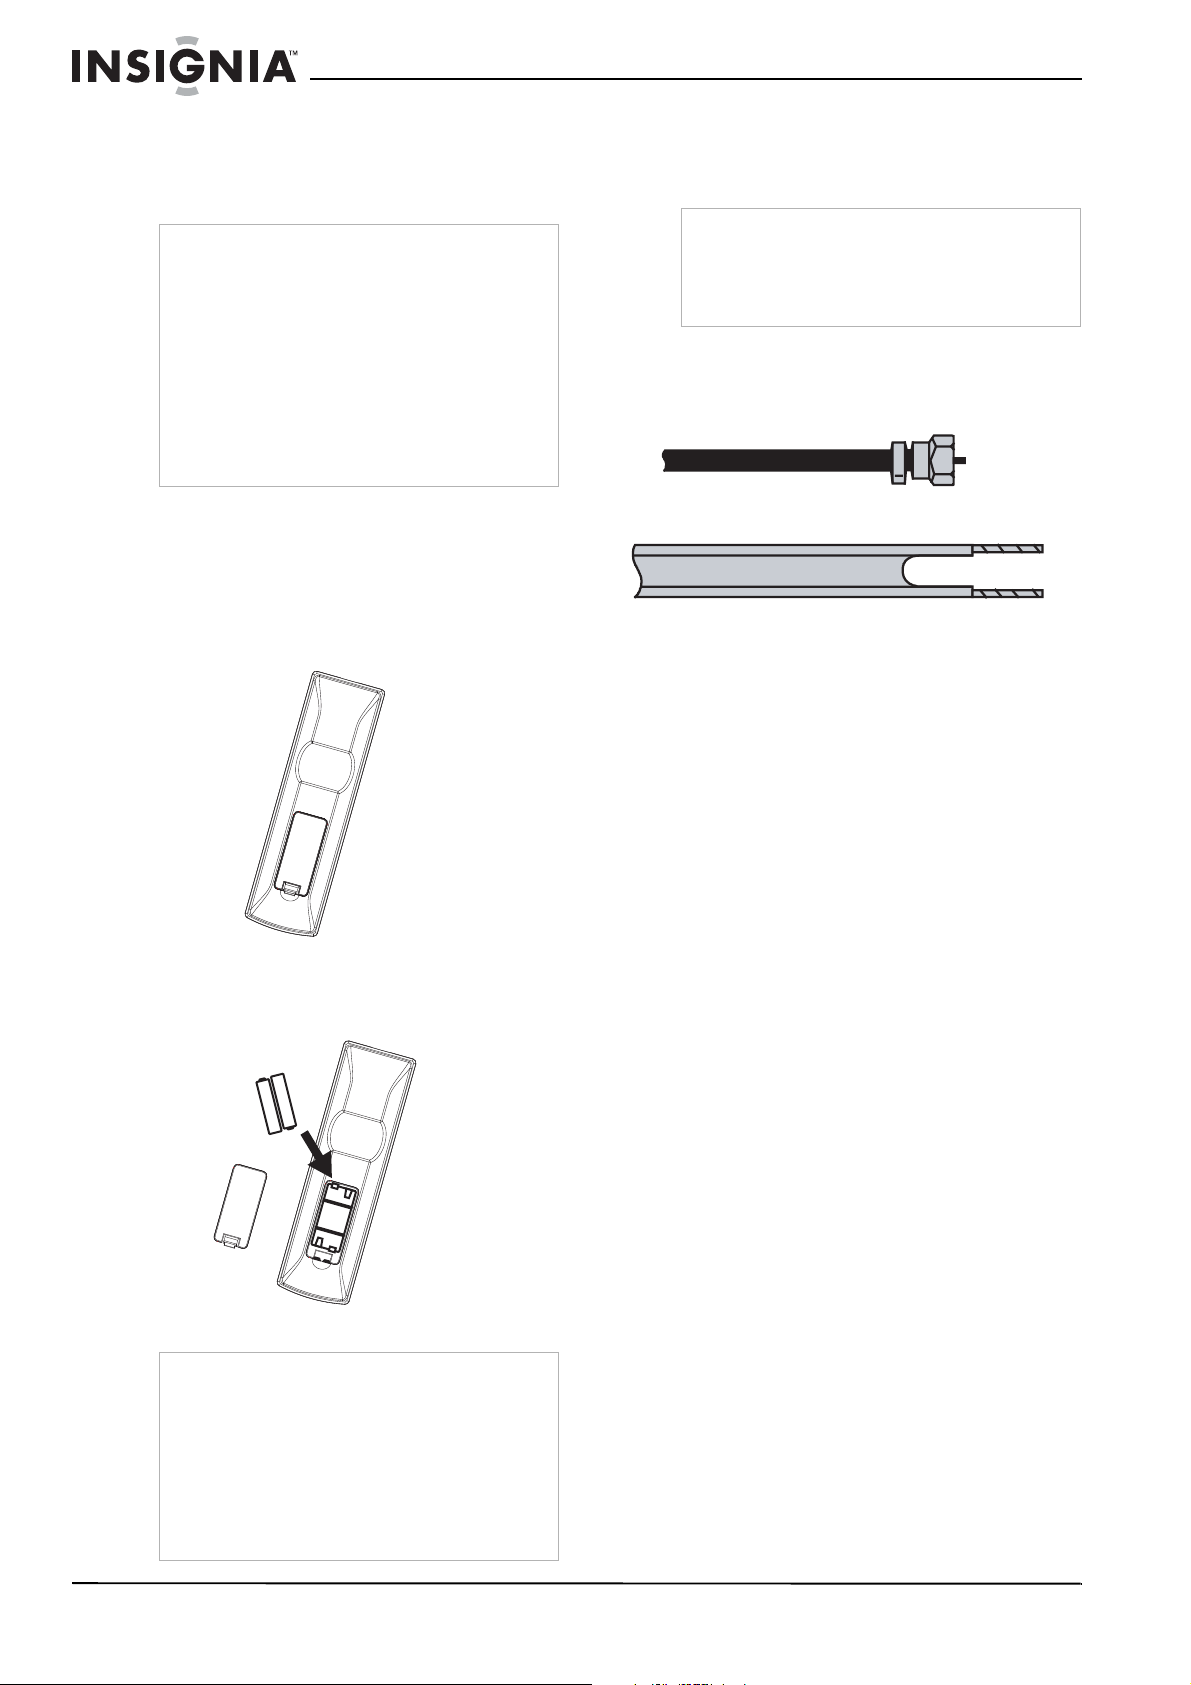
Installing remote control batteries
To install the remote control batteries:
1 Push down on the latch to remove the battery
cover.
Connecting your TV to a power outlet
To connect your TV to a power outlet:
• Plug the power cord into a power outlet.
Notes
• Make sure that you use the correct type of
power. See the label on your TV.
• If you do not intend to use your TV for an
extended period of time, unplug the power cord
from the power outlet.
Connecting an outside antenna
Antenna cables come in two types: 75 ohm and
300 ohm.
75 ohm cable
300 ohm cable
• If your antenna cable has a 75 ohm
connector, connect the cable to the coaxial
jack on the back of your TV.
• If your antenna cable has a 300 ohm
connector, connect the cable to a
300-75 ohm adapter (not included), connect
the adapter to a 75 ohm cable, then connect
the other end of the 75 ohm connector to the
coaxial jack on the back of your TV.
2 Insert two AAA batteries into the battery
compartment. Make sure that you match the
+ and – symbols on the batteries with the +
and – symbols in the battery compartment.
3 Replace the cover.
Notes
• Do not mix batteries of different types.
• Do not mix old and new batteries.
• Remove batteries when the charge is depleted.
• Battery chemicals can cause a rash. If the
batteries leak, clean the battery compartment
with a cloth. If chemicals touch your skin, wash
immediately.
• If the remote control is not going to be used for
an extended period of time, remove the
batteries.
Connecting cable TV
Your TV has a 75 ohm jack for connecting
cable TV.
Some cable TV providers scramble the signals
for “premium” (pay) channels. To view these
channels, you need a converter/descrambler
box.
If you do not have a converter/descrambler box,
you can connect your cable TV directly to your
TV. If you have a converter/descrambler box, you
can connect your cable TV using an RF switch
(not supplied). For more information about
connecting a converter/descrambler box, contact
your cable TV provider.
To connect cable TV without a
converter/descrambler box:
1 Connect one end of a 75 ohm cable to the
coaxial jack on the back of your TV.
2 Connect the other end of the cable to the
cable TV wall outlet.
6
www.insignia-products.com
Insignia NS-LCD26-09CA 26" LCD TV 720p
2
750
AUDIO
N
A
Pb
RLR
L
V
O
S
O
V
O
750
AUDIO
H
1
N
AV OU
A
2
R
L
V
O
S
O
V
O
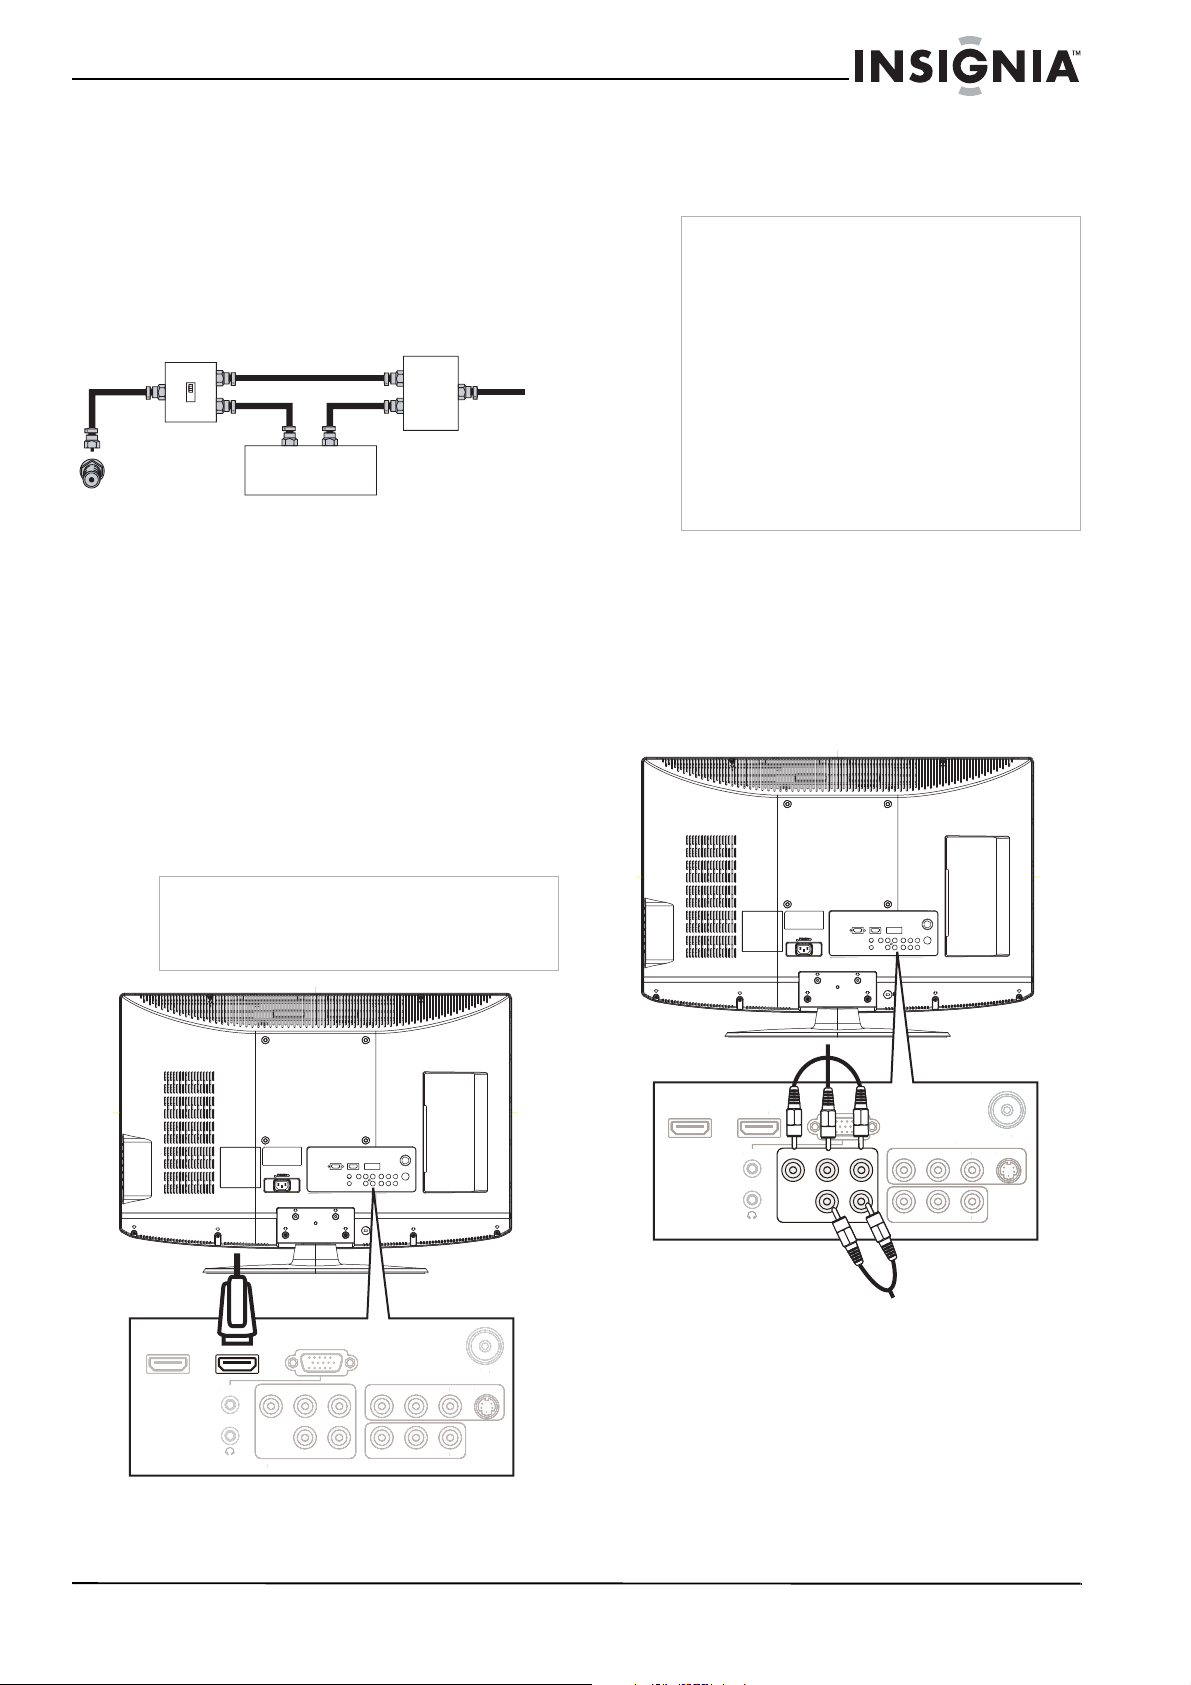
To connect cable TV with a
converter/descrambler box:
• Use the following illustration to connect a
converter/descrambler box. (The RF switch
and the signal splitter are not provided.)
Set the RF switch to the A position to tune to
unscrambled channels using your TV remote
control. Set the RF switch to the B position to
tune to scrambled channels using the
converter/descrambler controls.
RF switch
A
B
Out
TV
Cable converter/descrambler box
Two-set signal splitter
In
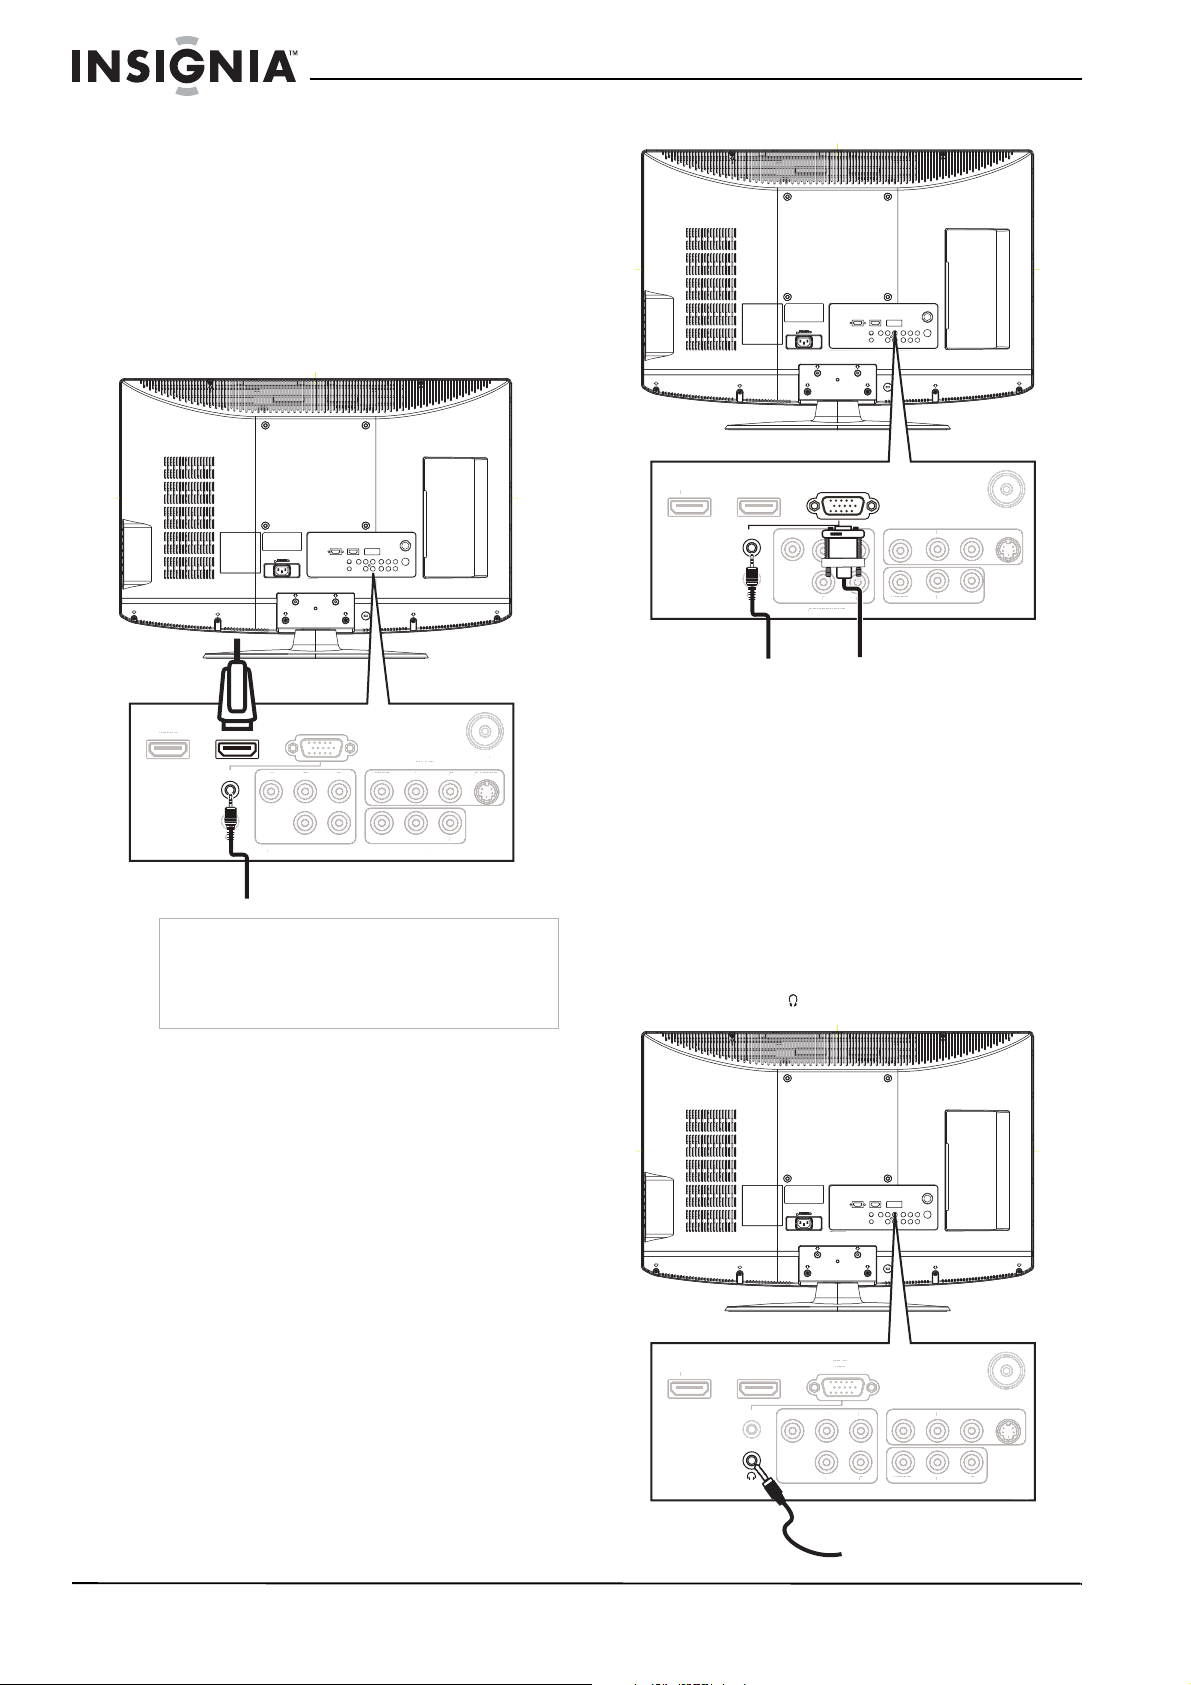
Connecting an HDMI device
Your TV has two HDMI jacks. You can connect
an HDMI device to either jack.
An HDMI connection provide the best video
image.
HDMI is the leading new standard for digital
video and audio interconnection. You can
connect HDMI devices such as a set-top box,
DVD-R or DVD player, or DVI-equipped device
such as a computer.
2 Connect the other end of the cable to the
HDMI OUT jack on the video device.
3 Press HDMI repeatedly to select the HDMI
display mode.
Note
Your TV supports HDCP (High-bandwidth Digital
Content Protection).This is a system for protecting
DVD content output through a DVI connection
from being copied. It provides a secure digital link
between a video source (such as DVD player or
computer) and your TV. Content is encrypted at
the source device to prevent unauthorized copies
from being made.
Digital devices from different manufacturers may
have different output standards.Your TV may not
be able to display the video output from these
devices correctly.
If your TV does not detect the signal from the
HDMI device, turn off the HDMI device, then turn it
on again.
To get an optimal video image, that you set your
DVD player to 1280 × 720p @ 60 Hz.
Connecting a component video device
A component video connection provides a better
video image than an S-Video or composite video
connection.
To connect a component video device:
1 Connect one end of a component video cable
(not included) to the Y, Pb, and Pr jacks on
the back of your TV.
To connect any HDMI device:
1 Connect one end of an HDMI cable (not
included) to the HDMI 1 or HDMI 2 jack on
the back of your TV.
Note
To connect a DVI device such as a computer,
connect an HDMI to DVI adapter to the HDMI
cable, then connect the DVI end of the cable to the
DVI device.
HDMI cable
PC IN
PC I
VGA
HDMI 2
HDMI
HDMI 1
VG
AV 1 IN
IDE
IDE
AV OUTCOMPONENT
750
S-VIDEORLVIDEOPrPbYAUDIO
-VIDE
RLVIDEORL
Component
video cable
PC I
PC IN
VG
HDMI
HDMI 2
HDMI 1
DMI
VGA
AV 1 IN
IDE
IDE
AV OUTCOMPONENT
750
S-VIDEORLVIDEOPrPbYAUDIO
-VIDE
RLVIDEORL
T
Audio cable
2 Connect the other end of the cable to the
COMPONENT OUT video jacks on the video
device.
3 Connect an audio cable to the COMPONENT
L and R audio jacks on the back of your TV.
4 Connect the other end of the cable to the left
and right AUDIO OUT jacks on the video
device.
5 Turn on your TV, then press SOURCE on the
front of your TV or INPUT on the remote
control repeatedly to select Component.
www.insignia-products.com
7
Insignia NS-LCD26-09CA 26" LCD TV 720p
750
Pb
AUDIO
H
1
PC IN
OUT
COMPO
A
2
RLR
L
O
O
A
O
H
N
A
C
T
GA
Pb
RLR
V
O
Connecting an S-Video device
Your TV has two S-Video jacks. You can connect
an S-Video device to either jack.
An S-Video connection provides a better video
image than a composite video connection.
To connect an S-Video device:
1 Connect an S-Video cable (not included) to
the AV IN 1 S-VIDEO or AV IN 2 S-VIDEO
jack on the back of your TV.
AV IN 1 S-VIDEO
2 Connect the other end of the cable to the
S-VIDEO OUT jack on the video device.
3 Connect an audio cable to the AV IN 1 L
and R audio or AV IN 2 L and R audio jacks,
depending on which S-VIDEO jack you used.
4 Connect the other end of the audio cable to
the AUDIO OUT jacks on the video device.
5 Turn on your TV, then press SOURCE on the
front of your TV or INPUT on the remote
control repeatedly to select S-Video1 or
S-Video2.
Connecting a composite video device
Your TV has two composite (standard) video
jacks. You can connect a video device to either
jack.
A composite video connection provides a good
video image.
To connect a composite video device:
1 Connect a composite video cable to the
AV IN 1 VIDEO or AV IN 2 VIDEO jack on
the back of your TV.
AV IN 1 VIDEO
HDMI 2
HDMI
HDMI 1
DMI
AV IN 2 S-VIDEO
PC IN
VGA
VG
AV 1 IN
VIDE
VIDE
NENT
AV
AV OUTCOMPONENT
750
S-VIDEORLVIDEOPrPbYAUDIO
RLVIDEORL
S-Video
cable
Audio cable
PC IN
PC I
VGA
OMPONEN
V
RLVIDEORL
Audio
cable
750
S-VIDEORLVIDEOPrPbYAUDIO
Video
cable
AV 1 IN
L
IDE
V OUT
AV OUTCOMPONENT
HDMI 2
HDMI 2
UDI
HDMI 1
DMI 1
Audio cable
S-Video cable
8
www.insignia-products.com
Insignia NS-LCD26-09CA 26" LCD TV 720p
750
A
O
N
N
C
T
GA
Pb
R
L
S
O
V
O
AV IN 2 VIDEO
Video cable
Audio cable
2 Connect the other end of the cable to the
VIDEO OUT jack on the device.
3 Connect an audio cable to the AV IN 1 L
and R audio or AV IN 2 L and R audio jacks,
depending on which VIDEO jack you used.
4 Connect the other end of the cable to the
AUDIO OUT jacks on the device.
5 Turn on your TV, then press SOURCE on the
front of your TV or INPUT on the remote
control repeatedly to select AV1 or A-V2.
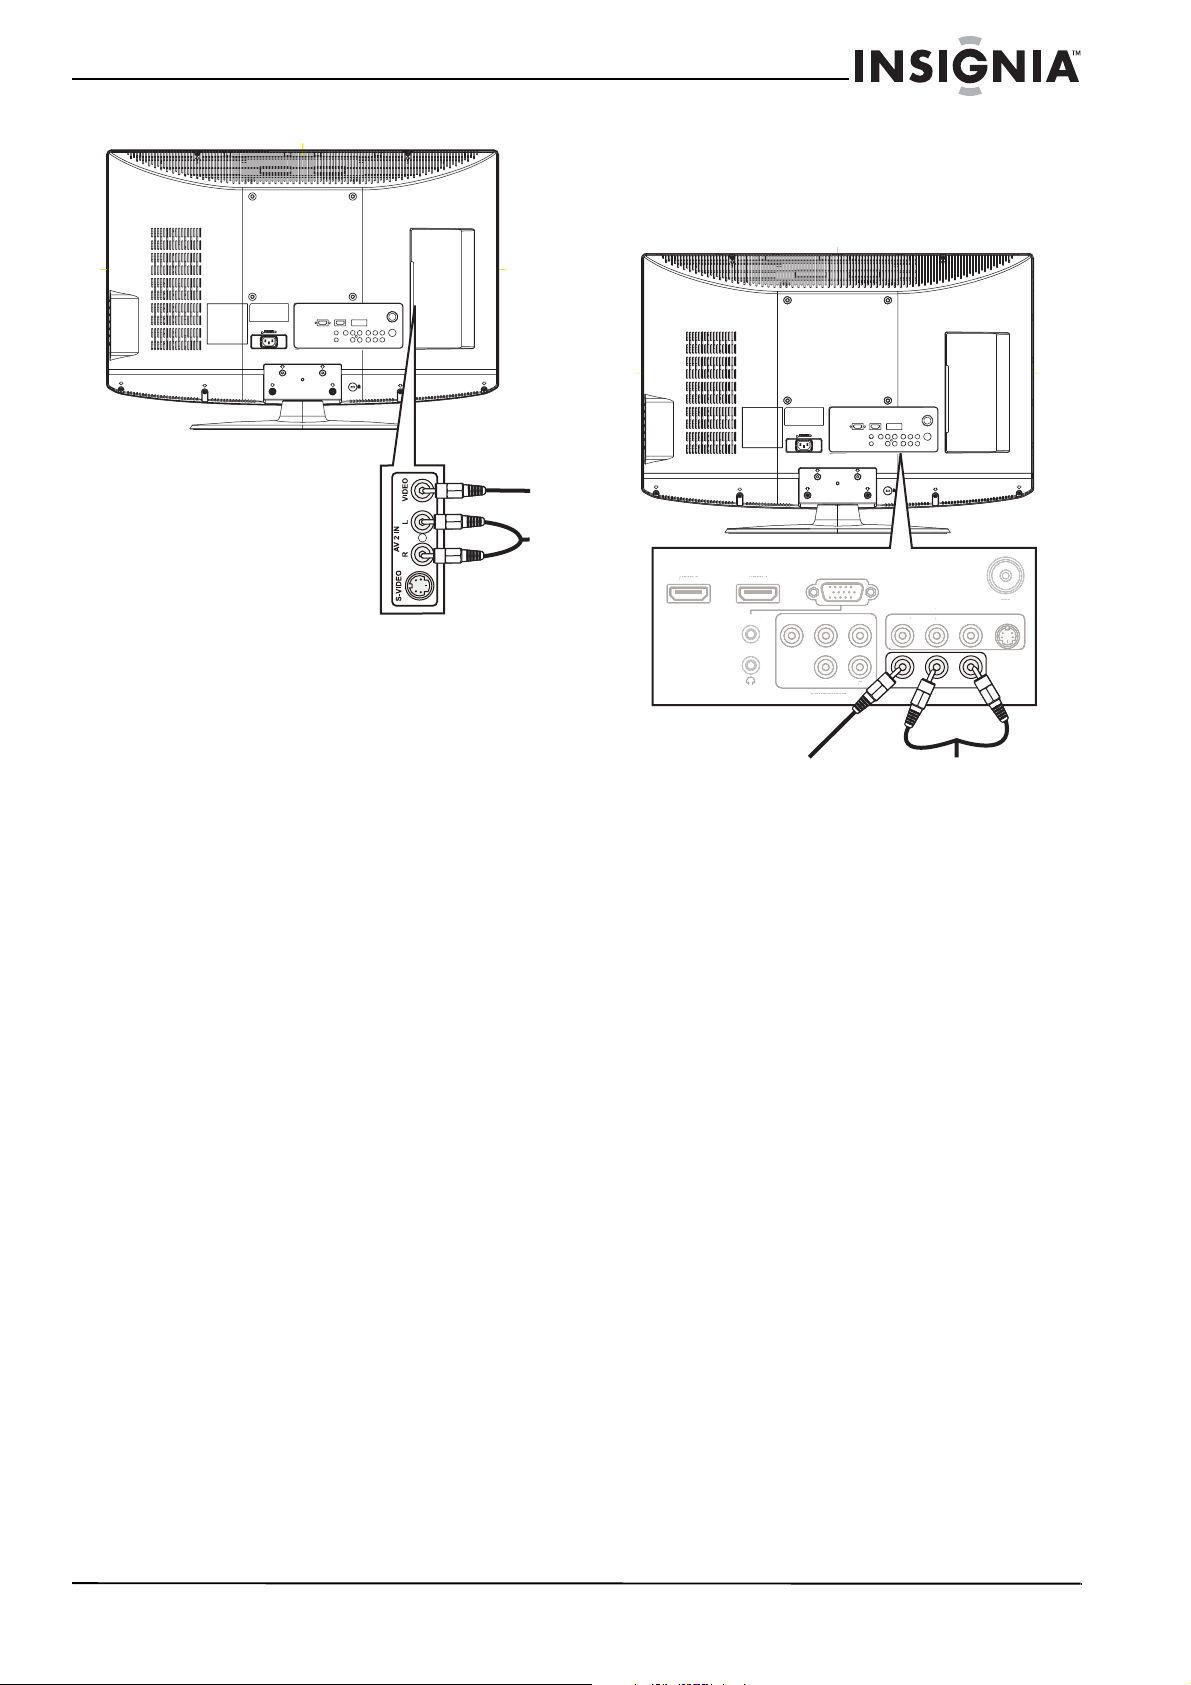
Connecting a VCR for recording
To connect a VCR for recording:
1 Connect one end of a composite (standard)
video cable to the AV OUT VIDEO jack on
the back of your TV.
PC IN
PC I
VGA
OMPONEN
V
AV 1 I
AV 1 IN
IDE
AV OUTCOMPONENT
Audio cable
UDI
HDMI 1
DMI 1
HDMI 2
HDMI 2
Video cable
2 Connect the other end of the cable to the
VIDEO IN jack on the VCR.
3 Connect an audio cable to the AV OUT L and
R jacks on the back of your TV.
4 Connect the other end of the cable to the
AUDIO IN jacks on the VCR.
5 Turn on your TV, press SOURCE on the front
of your TV or INPUT on the remote control
repeatedly to select TV, then tune to the
channel you want to record.
6 Turn on the VCR, insert a videotape, then
press the record button on the VCR.
750
-VIDE
S-VIDEORLVIDEOPrPbYAUDIO
RLVIDEORL
www.insignia-products.com
9
Insignia NS-LCD26-09CA 26" LCD TV 720p
2
750
Pb
N
A
RLR
L
V
O
S
O
V
O
750
Pb
H
1
OUT
2
L
R
L
S
O
O
2
750
Pb
AUDIO
H
1
PC IN
OUT
COMPO
A
RLR
L
O
S
O
O
Connecting a computer
You can connect a computer to your TV using
the HDMI 1, HCMI 2, or PC IN VGA jack.
To connect a computer:
1 Connect an HDMI cable (not included) to the
HDMI 1 or HDMI 1 jack or connect a VGA
cable (not included) to the PC IN VGA jack
on the back of your TV.
HDMI 2
HDMI cable
PC IN
PC I
VGA
HDMI 2
HDMI
HDMI 1
VG
IDE
IDE
Audio cable (DVI connection only)
AV 1 IN
AV OUTCOMPONENT
PC IN VGA
PC IN
YAUDIO
COMPONENT
COMPONENT
VGA
VIDE
VIDEOPrPb
VIDEO
VIDEORL
AV 1 IN
AV
AV OUT
PrPb
R
750
-VIDE
S-VIDEORL
RL
HDMI 2
HDMI
HDMI 1
DMI
VGA cableAudio cable
2 Connect the other end of the cable to the
HDMI or VGA jack on the computer.
3 Connect an audio cable to the PC IN AUDIO
750
-VIDE
S-VIDEORLVIDEOPrPbYAUDIO
jack on the back of your TV.
4 Connect the other end of the cable to the
AUDIO OUT jack on the computer.
5 Turn on your TV, then press SOURCE on the
RLVIDEORL
front of your TV or INPUT on the remote
control repeatedly to select HDMI1, HDMI2,
or VGA.
Note
If you connect your TV to an HDMI jack on the
computer, you do not need to connect an audio
cable. If you connect your TV to a DVI jack on the
computer using an HDMI-to-DVI adapter, you
need to connect an audio cable.
Connecting headphones
To connect headphones:
• Plug the headphone cable into the
headphone jack on the back of your TV.
PC IN
VGA
HDMI 2
HDMI
HDMI 1
DMI
VG
NENT
Headphone cable
AV 1 IN
VIDE
VIDE
AV
AV OUTCOMPONENT
750
-VIDE
S-VIDEORLVIDEOPrPbYAUDIO
RLVIDEORL
10
www.insignia-products.com
Insignia NS-LCD26-09CA 26" LCD TV 720p
Using your TV
Turning your TV on or off
To turn on your TV:
1 Connect the power cord to your TV and to a
power outlet. Your TV enters standby mode,
and the power indicator lights red.
2 Press POWER . Your TV turns on and the
power indicator turns blue.
3 Press POWER again to return your TV to
standby mode. The power indicator turns red.
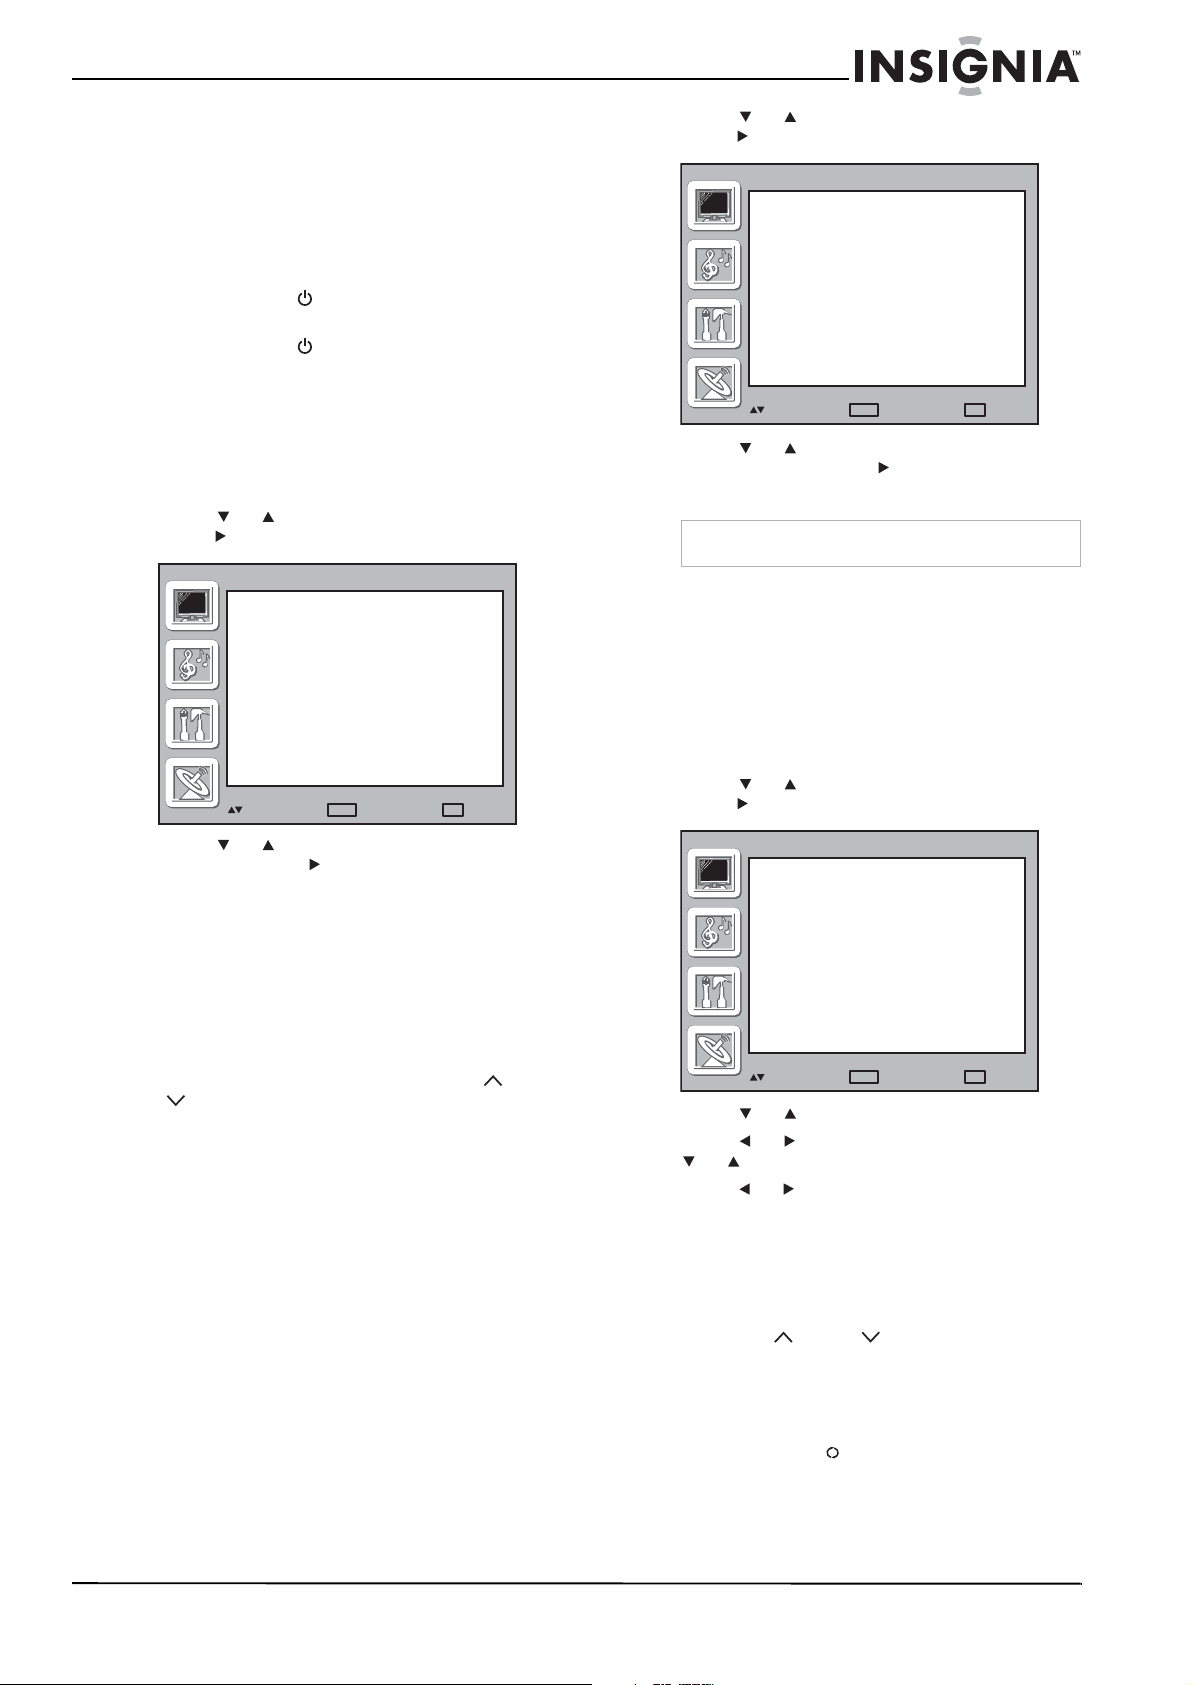
Selecting the TV signal source
To select the TV signal source:
1 Press MENU. The on-screen menu opens
with VIDEO highlighted.
2 Press or to highlight SETUP, then
press . The
SETUP
SETUP
PROGRAM NO.
AIR/CABLE
AUTO SEARCH
SKIP
menu opens.
2
CABLE
ON
2 Press or to highlight SETUP, then
press . The
SETUP
SETUP
PROGRAM NO.
AIR/CABLE
AUTO SEARCH
SKIP
: SELECT
menu opens.
2
CABLE
ON
ENTER
: ENTER
EXIT
: EXIT
3 Press or to highlight AUTO SEARCH,
then press ENTER or to start the channel
search.
Note
To stop the search, press EXIT
.
Manually adding or deleting channels from the
channel list
After you create a channel list using the AUTO
SEARCH option, you can manually add or
delete channels from the channel list.
ENTER
: SELECT
: ENTER
3 Press or to highlight AIR/CABLE, then
press ENTER or to select AIR (antenna) or
CABLE.
4 Press MENU or EXIT to close the menu.
Setting up the channel list
After you set your TV signal source (see
“Selecting the TV signal source” on page 11),
you need to set up the channel list. When you
set up the channel list, your TV searches for all
available channels in your area and stores a list
of these channels. When you press CH or
CH , your TV skips the channels that do not
have a signal.
Automatically setting up channels
To automatically set up the channel list:
1 Press MENU. The on-screen menu opens
with VIDEO highlighted.
EXIT
: EXIT
To add or delete channels:
1 Press MENU. The on-screen menu opens
with VIDEO highlighted.
2 Press or to highlight SETUP, then
press . The
SETUP
SETUP
PROGRAM NO.
AIR/CABLE
AUTO SEARCH
SKIP
: SELECT
3 Press or to highlight PROGRAM NO.
4 Press or to select a channel, then press
or to select SKIP.
5 Press or to select ON (viewable) or OFF
(not viewable).
6 Press MENU or EXIT to close the menu.
Changing TV channels
menu opens.
2
CABLE
ON
ENTER
: ENTER
EXIT
: EXIT
To change TV channels:
1 Press CH or CH to go the next or
previous channel in the channel list.
2 Press the number buttons to enter a channel
number. For example, to go to channel 83,
press 8, then press 3.
3 Press RECALL to go to the previous
channel.
www.insignia-products.com
11
Insignia NS-LCD26-09CA 26" LCD TV 720p
Selecting the video input source
To select the video input source:
• With your TV turned on, press SOURCE on
the front of your TV or INPUT on the remote
control repeatedly. You can select:
•TV
•AV1
•AV2
•S-Video1
•S-Video2
• Component
• HDMI1
• HDMI2
•VGA
Press VIDEO to switch between composite
(AV1 and AV2) and S-Video1 and S-Video2.
Adjusting the volume
To adjust the volume:
• Press VOL – or VOL + to decrease or
increase the volume.
• Press MUTE to turn off the sound. Press
MUTE again to turn the sound back on.
Displaying status information
To display status information:
• Press DISPLAY. Your TV displays status
information, such as the channel number or
signal source.
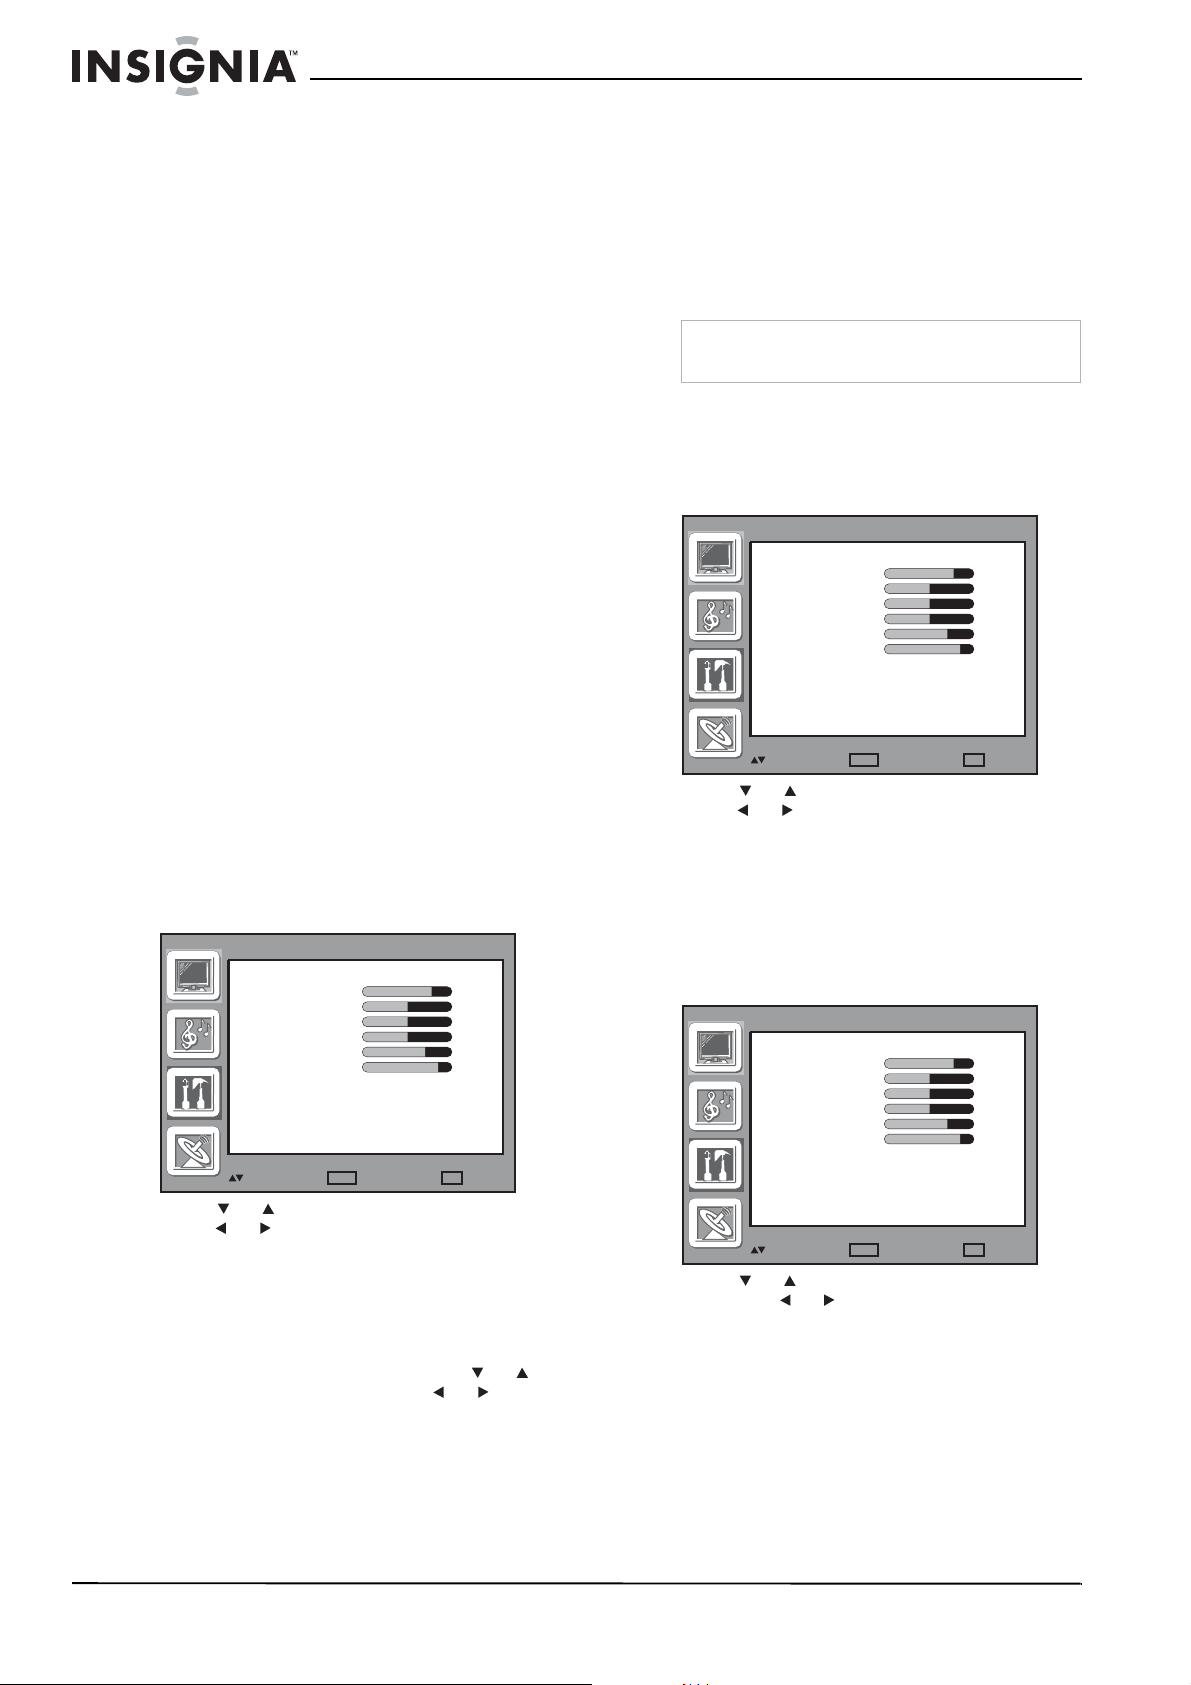
Selecting a picture mode
To select a picture mode:
1 Press MENU. The on-screen menu opens
with VIDEO highlighted.
VIDEO
PRESET PERSONAL
CONTRAST
BRIGHTNESS
SATURATION
TINT
SHARPNESS
BACKLIGHT
EDGE ENHANCE
NOISE REDUCTION
COLOR TEMPERATURE
: SELECT
2 Press or to highlight PRESET, then
press or to select a picture mode. You
can select:
• STANDARD
•MILD
• VIVID
• PERSONAL
3 If you selected PERSONAL, press or to
highlight an option, then press or to
adjust the option. You can adjust:
• CONTRAST—Adjusts the contrast
between the dark and light parts of the
image. The range is 0 to 100.
• BRIGHTNESS—Adjusts the background
brightness. The range is 0 to 100.
ENTER
HIGH
OFF
COOL
: ENTER
EXIT
80
50
50
50
7
9
: EXIT
• SATURATION—Adjusts the color
saturation. The range is 0 to 100.
• TINT—When using the NTSC color
system, adjusts the color. The range is 0
to 100. (The NTSC color system is used
in the United States and Canada.)
• SHARPNESS—Adjusts the image
sharpness. The range is 0 to 10.
4 Press MENU or EXIT to close the menu.
Note
You can also press PICTURE to select a picture
mode.
Adjusting the backlight
To adjust the backlight:
1 Press MENU. The on-screen menu opens
with VIDEO highlighted.
VIDEO
PRESET PERSONAL
CONTRAST
BRIGHTNESS
SATURATION
TINT
SHARPNESS
BACKLIGHT
EDGE ENHANCE
NOISE REDUCTION
COLOR TEMPERATURE
: SELECT
2 Press or to select BACKLIGHT, then
press or to adjust the backlight. The
range is 0 to 10.
3 Press MENU or EXIT to close the menu.
Reducing video noise
To reduce video noise:
1 Press MENU. The on-screen menu opens
with VIDEO highlighted.
VIDEO
PRESET PERSONAL
CONTRAST
BRIGHTNESS
SATURATION
TINT
SHARPNESS
BACKLIGHT
EDGE ENHANCE
NOISE REDUCTION
COLOR TEMPERATURE
: SELECT
2 Press or to select NOISE REDUCTION,
then press or to select HIGH, MID, LOW,
or OFF.
3 Press MENU or EXIT to close the menu.
ENTER
ENTER
HIGH
OFF
COOL
: ENTER
HIGH
OFF
COOL
: ENTER
EXIT
EXIT
80
50
50
50
7
9
: EXIT
80
50
50
50
7
9
: EXIT
12
www.insignia-products.com
Insignia NS-LCD26-09CA 26" LCD TV 720p
Improving the video image
To improve the video image:
1 Press MENU. The on-screen menu opens
with VIDEO highlighted.
VIDEO
PRESET PERSONAL
CONTRAST
BRIGHTNESS
SATURATION
TINT
SHARPNESS
BACKLIGHT
EDGE ENHANCE
NOISE REDUCTION
COLOR TEMPERATURE
: SELECT
ENTER
HIGH
OFF
COOL
: ENTER
2 Press or to select EDGE ENHANCE,
then press or to select HIGH, LOW, or
OFF.
3 Press MENU or EXIT to close the menu.
Adjusting the color temperature
To adjust the color temperature:
1 Press MENU. The on-screen menu opens
with VIDEO highlighted.
VIDEO
PRESET PERSONAL
CONTRAST
BRIGHTNESS
SATURATION
TINT
SHARPNESS
BACKLIGHT
EDGE ENHANCE
NOISE REDUCTION
COLOR TEMPERATURE
: SELECT
2 Press or to select COLOR
TEMPERATURE, then press or to select
COOL, WARM, or STANDARD.
3 Press MENU or EXIT to close the menu.
Note
You can also press COLOR TEMP to adjust the
color temperature.
ENTER
HIGH
OFF
COOL
: ENTER
EXIT
EXIT
80
50
50
50
7
9
: EXIT
80
50
50
50
7
9
: EXIT
Selecting the aspect ratio
To select the aspect ratio:
1 Press MENU. The on-screen menu opens
with VIDEO highlighted.
2 Press or to highlight OPTION, then
press . The
OPTION
OPTION
LANGUAGE ENGLISH
IMAGE SIZE
SLEEP TIMER
BLUE SCREEN
TRANSPARENT
CLOSED CAPTION
PARENTAL CONTROL
RESET
: SELECT
ENTER
3 Press or to highlight IMAGE SIZE, then
press or to select an aspect ratio. You
can select:
•WIDE
•ZOOM
•CINEMA
•NORMAL
Note
Available options may vary depending on the
video input source.
4 Press MENU or EXIT to close the menu.
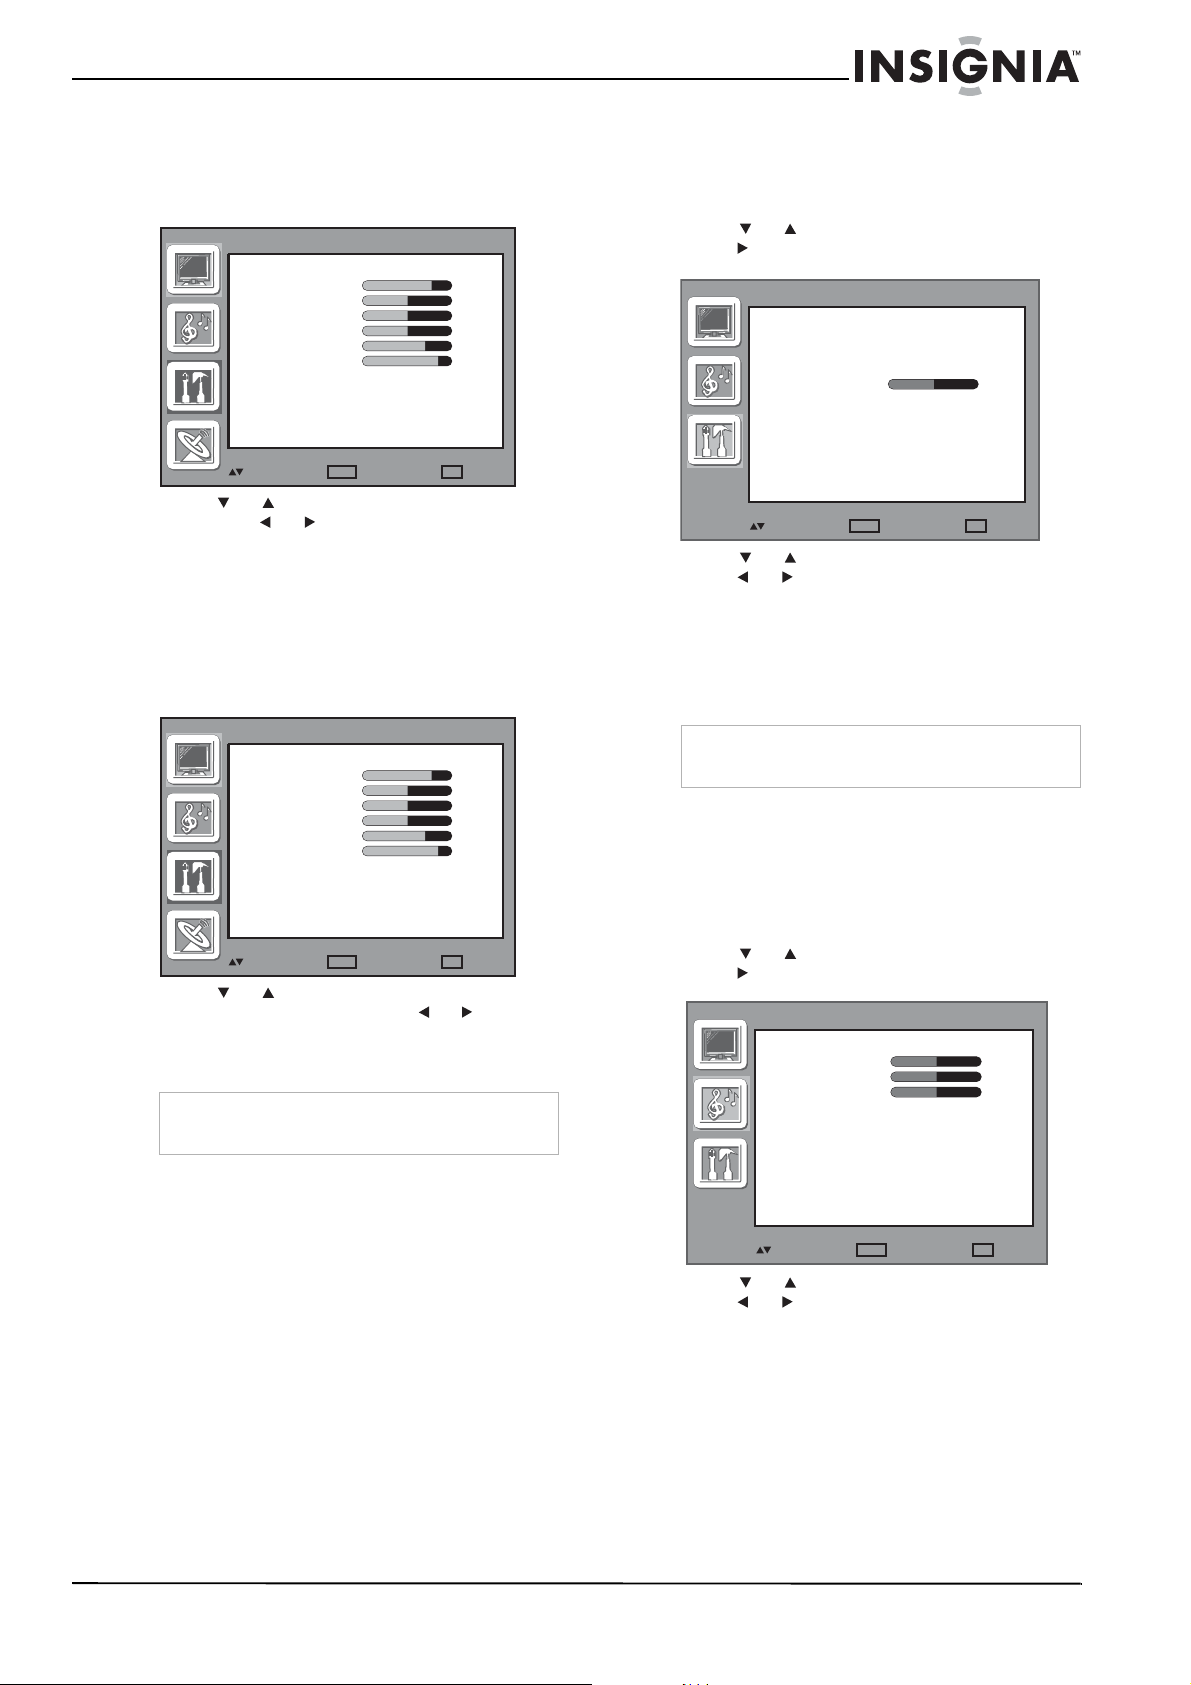
Selecting the audio mode
To select the audio mode:
1 Press MENU. The on-screen menu opens
with VIDEO highlighted.
2 Press or to highlight AUDIO, then
press . The
AUDIO
AUDIO
PRESET PERSONAL
BALANCE
BASS
TREBLE
menu opens.
menu opens.
WIDE
OFF
ON
CC 1
: ENTER
EXIT
4
: EXIT
10
10
10
3 Press or to highlight PRESET, then
press or to select an audio mode. You
can select:
•VOICE
•MUSIC
•THEATER
• PERSONAL
www.insignia-products.com
: SELECT
ENTER
: ENTER
EXIT
: EXIT
13
 Loading...