

Page 1

User Guide | Guide de l’utilisateur | Guía del Usuario
27” Flat Screen TV
TV Écran Plat de 27 po | TV de Pantalla Planade 27 pulgadas
NS-FTV27
Page 2
Welcome
Congratulations on your purchase of a high quality
Insignia product. Your NS-FTV27 represents the state
of the art in television design, and is designed for
reliable and trouble-free performance.
Contents
Introduction. . . . . . . . . . . . . . . . . . . . . . . . . . . . . . . .1
Safety information. . . . . . . . . . . . . . . . . . . . . . . . . . .1
Features . . . . . . . . . . . . . . . . . . . . . . . . . . . . . . . . . .3
Setting up your television . . . . . . . . . . . . . . . . . . . . .5
Using your television. . . . . . . . . . . . . . . . . . . . . . . .10
Specifications . . . . . . . . . . . . . . . . . . . . . . . . . . . . .17
Troubleshooting . . . . . . . . . . . . . . . . . . . . . . . . . . .17
Regulatory Statements. . . . . . . . . . . . . . . . . . . . . .18
Warranty. . . . . . . . . . . . . . . . . . . . . . . . . . . . . . . . .19
Français. . . . . . . . . . . . . . . . . . . . . . . . . 21
Español . . . . . . . . . . . . . . . . . . . . . . . . . 45
Introduction
This manual explains how to correctly install,
operate, and get the best performance from your
television. Read this user guide carefully before
installing your television, then keep it near your
television for quick reference.
Verify that the box contains:
• Color television
• Remote control
•
User Guide
If any item is missing or damaged, contact
Insignia at (877) 467-4289. Keep the box and
packing materials so that you can store or
transport your television.
Universal remote control
If you purchase a universal remote control from
your local retailer, contact the remote
manufacturer for the required programming
code.
TV/Cable mode selection
When shipped from the factory, the TV/CABLE
menu option is set to the CABLE (Cable
Tele vision) mode. If you are not using Cable TV,
set this menu option to the TV position.
Safety information
CAUTION:
ELECTRIC
COVER
PARTS INSIDE. REFER SERVICING
QUALIFIED SERVICE PERSONNEL.
W ARNING:
TO REDUCE THE RISK OF FIRE OR ELECTRIC
SHOCK, DO NOT EXPOSE THIS TV TO RAIN OR
MOISTURE.
TO REDUCE THE RISK OF
SHOCK, DO NOT REMOVE
(OR BACK). NO USER-SERVICEABLE
TO
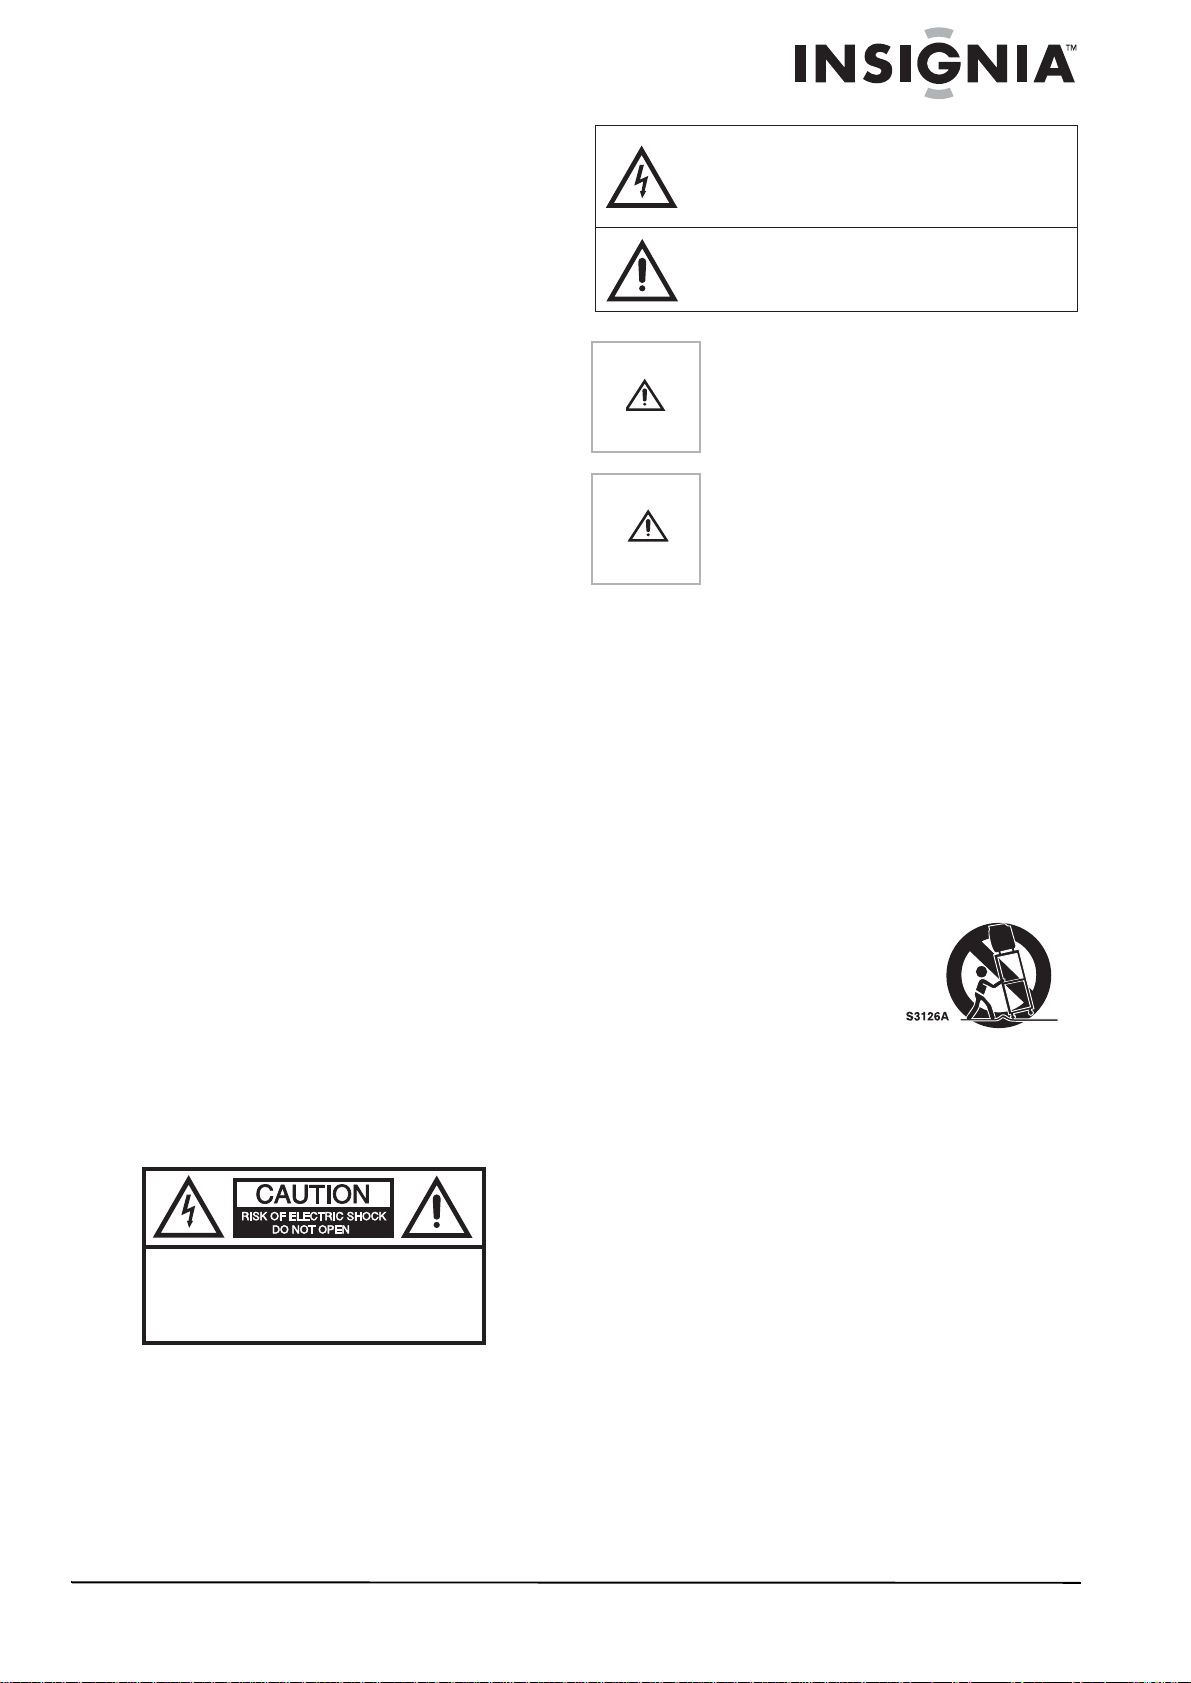
The lightning flash with arrowhead symbol, within an
equilateral triangle is intended to alert the user to the
presence of uninsulated dangerous voltage within the
product’s enclosure that may be of sufficient magnitude
to constitute a risk of electric shock.
The exclamation point within an equilateral triangle is
intended to alert the user to the presence of important
operating and maintenance (servicing) instructions in the
literature accompanying the appliance.
Caution
Caution
Changes or modifications not expressly
approved by the party responsible for
compliance with the FCC Rules could void
the user's authority to operate this
equipment.
To prevent electric shock, do not use this
polarized plug with an extension cord,
receptacle, or other outlet unless the blades
can be fully inserted to prevent blade
exposure.
Important safeguards
• Read all of these instructions.
• Save these instructions for later use.
• Unplug this television from the power outlet
before cleaning. Use a dry cloth for cleaning.
Do not use liquid cleaners or aerosol
cleaners.
• To avoid hazards, use only attachments
recommended by the television
manufacturer.
• Do not use this television near water, such as
near a bathtub, sink, or swimming pool.
• Do not place this
television on an
unstable cart, stand,
or table. The
television may fall,
causing serious injury
to a child or adult, and
serious damage to
the television.
• Slots and openings in the sides, back, and
bottom are provided for ventilation, to ensure
reliable operation of the television, and to
protect it from overheating.
These openings must not be blocked or
covered. The openings should never be
blocked by placing the television on a bed,
sofa, rug, or other soft surface. This television
should never be placed near or over a
radiator or heat register.
This television should not be placed in a
built-in installation, such as a bookcase,
unless proper ventilation is provided.
• This television should be operated only from
the type of power source indicated on the
marking label. If you are not sure of the
power supplied to your home, consult your
television dealer or local power company.
• This television is equipped with a polarized
alternating-current line plug (a plug having
one blade wider than the other). This plug fits
into the power outlet only one way. This is a
safety feature. If you are unable to insert the
plug fully into the outlet, try reversing the
Portable Cart Warning
(symbol provided by
RETAC)
www.insignia-products.com
1
Page 3

NS-FTV27 27-inch Flat Stereo Color TV
plug. If the plug should still fail to fit, contact
your electrician to replace your obsolete
outlet. Do not defeat the safety purpose of
the polarized plug.
• Do not allow anything to rest on the power
cord, and do not locate this television where
the cord may be stepped on.
• Follow all warnings and instructions marked
on the television.
• If an outside antenna or cable system is
connected to the television, be sure the
antenna or cable system is grounded so as to
provide some protection against voltage
surges and built-up static charges. Article
810 of the National Electrical Code,
ANSI/NFPA 70, provides information with
regard to proper grounding of the mast and
supporting structure, grounding of the lead-in
wire to an antenna discharge unit, size of
grounding conductors, location of
antenna-discharge unit, connection to
grounding electrodes, and requirements for
the grounding electrode.
7
6
5
4
3
1
2
Reference Grounding component
1 Electric service equipment
2 Power service grounding
3 Ground clamp
4 Grounding conductors (NEC
5 Antenna discharge unit (NEC
6 Ground clamp
7 Antenna lead-in wire
• Use No. 10 AWG (5.3 mm
8AWG (8.4mm
(1.0 mm
electrode system
(NEC Art 250, Part H)
Section 81 0-21)
Section 81 0-20)
2
2
2
) copper-clad steel or bronze
) aluminum, No. 17 AWG
) copper, No.
wire, or larger, as a ground wire.
• Secure antenna lead-in and ground wires
to house with stand-off insulators spaced
from 4-6 feet (1.22 -1.83 m) apar t.
• Mount antenna discharge unit as close as
possible to where lead-in enters house.
• Use jumper wire not smaller than No. 6A
WG (13.3 mm
2
) copper, or the equivalent,
when a separate antenna-grounding
electrode is used. See ANSI/NFPA70.
• An outside antenna system should not be
located in the vicinity of overhead power
circuits, or where it can fall into such power
lines or circuits. When installing an outside
antenna system, extreme care should be
taken to keep from touching such power lines
or circuits as contact with them might be fatal.
• For added protection for this television during
a lightning storm, or when it is left unattended
and unus ed for lon g pe riods of t ime , un plu g it
from the power outlet and disconnect it from
the antenna or cable system. This prevents
damage to the television due to lightning and
power line surges.
• Do not overload wall outlets and extension
cords, because overloading can cause a fire
or electric shock.
• Never push objects of any kind into this
television through slots in the case, as they
may touch dangerous voltage points or short
out parts that could result in a fire or electric
shock. Never spill liquid of any kind on the
television.
• Do not attempt to service this television
yourself, because opening or removing
covers may expose you to dangerous
voltages or other hazards. Refer all servicing
to qualified service technicians.
• Unplug this television from the wall outlet and
refer servicing to qualified service
technicians under the following conditions:
• When the power cord or plug is damaged
or frayed.
• If liquid has been spilled into the
television.
• If the television has been exposed to rain
or water.
• If the television does not operate normally
by following the operating instructions.
Adjust only those controls that are
covered by the operating instructions,
because incorrect adjustment of other
controls may result in damage and often
requires extensive work by a qualified
technician to restore normal operation.
• If the television has been dropped or the
case has been damaged.
• When the television exhibits a distinct
change in performance.
• When replacement parts are required, be
sure the service technician has used
replacement parts specified by the
manufacturer that have the same
characteristics as the original part.
Unauthorized substitutions may result in fire,
electric shock, or other hazards.
• Upon completion of any service or repairs to
this television, ask the service technician to
perform routine safety checks to determine
that the television is safe to operate.
Note to cable television system installer
This reminder is provided to call the cable
television system installer’s attention to Section
820 40 of the NEC which provides guidelines for
proper grounding and, in particular, specifies
that the cable ground shall be connected to the
grounding system of the building, as close to the
point of cable entry as practical.
2
www.insignia-products.com
Page 4
NS-FTV27 27-inch Flat Stereo Color TV
Features
• High quality picture—Horizontal resolution
more than 500 lines exceeds Super VHS
(400 lines) or Laser Disc (430 lines) in
resolution.
• Compatibility with a wide range of audio
outputs.
• Digital audio jack (coaxial)—When a
component with a built-in Dolby Digital*
decoder is connected, Dolby Digital sound
can produce the effect of being in a movie
theater or a concert hall.
• Integrated digital tuner—You can view
digital broadcasting without using a Digital
TV Set-Top Box.
• Closed caption decoder with full text
mode—Displays text captions or full screen
text on the screen for hearing impaired
viewers.
• Picture adjustments using the remote
control—The on-screen display allows
precise remote control adjustment of
brightness, contrast, color, tint, and
sharpness.
• Programmable TV sleep timer—Operable
from the remote control, the television can be
programmed for up to 120 minutes to turn off
automatically.
• V-Chip—The V-Chip function can read the
rating of a television program or movie
content if the program is encoded with this
information. The V-chip allows you to set a
restriction level.
• Stereo/SAP reception—This television is
designed to receive stereo and second audio
program (SAP) broadcasts where available.
• S-Video/Component video jacks—A VCR,
DVD player, satellite receiver, or other
audio/video component can be connected to
this television.
• Video input jacks—This television is
equipped with three (3) types of video input
jacks. The component video in jacks and
S-video in jack enable you to watch the DVD
player or the video devices with a high quality
picture.
• On-Screen 3-language display—You can
select one of three languages—English,
Spanish, or French—for on-screen
programming.
* Manufactured under license from Dolby
Laboratories. “Dolby” and the double-D symbol
are trademarks of Dolby Laboratories.
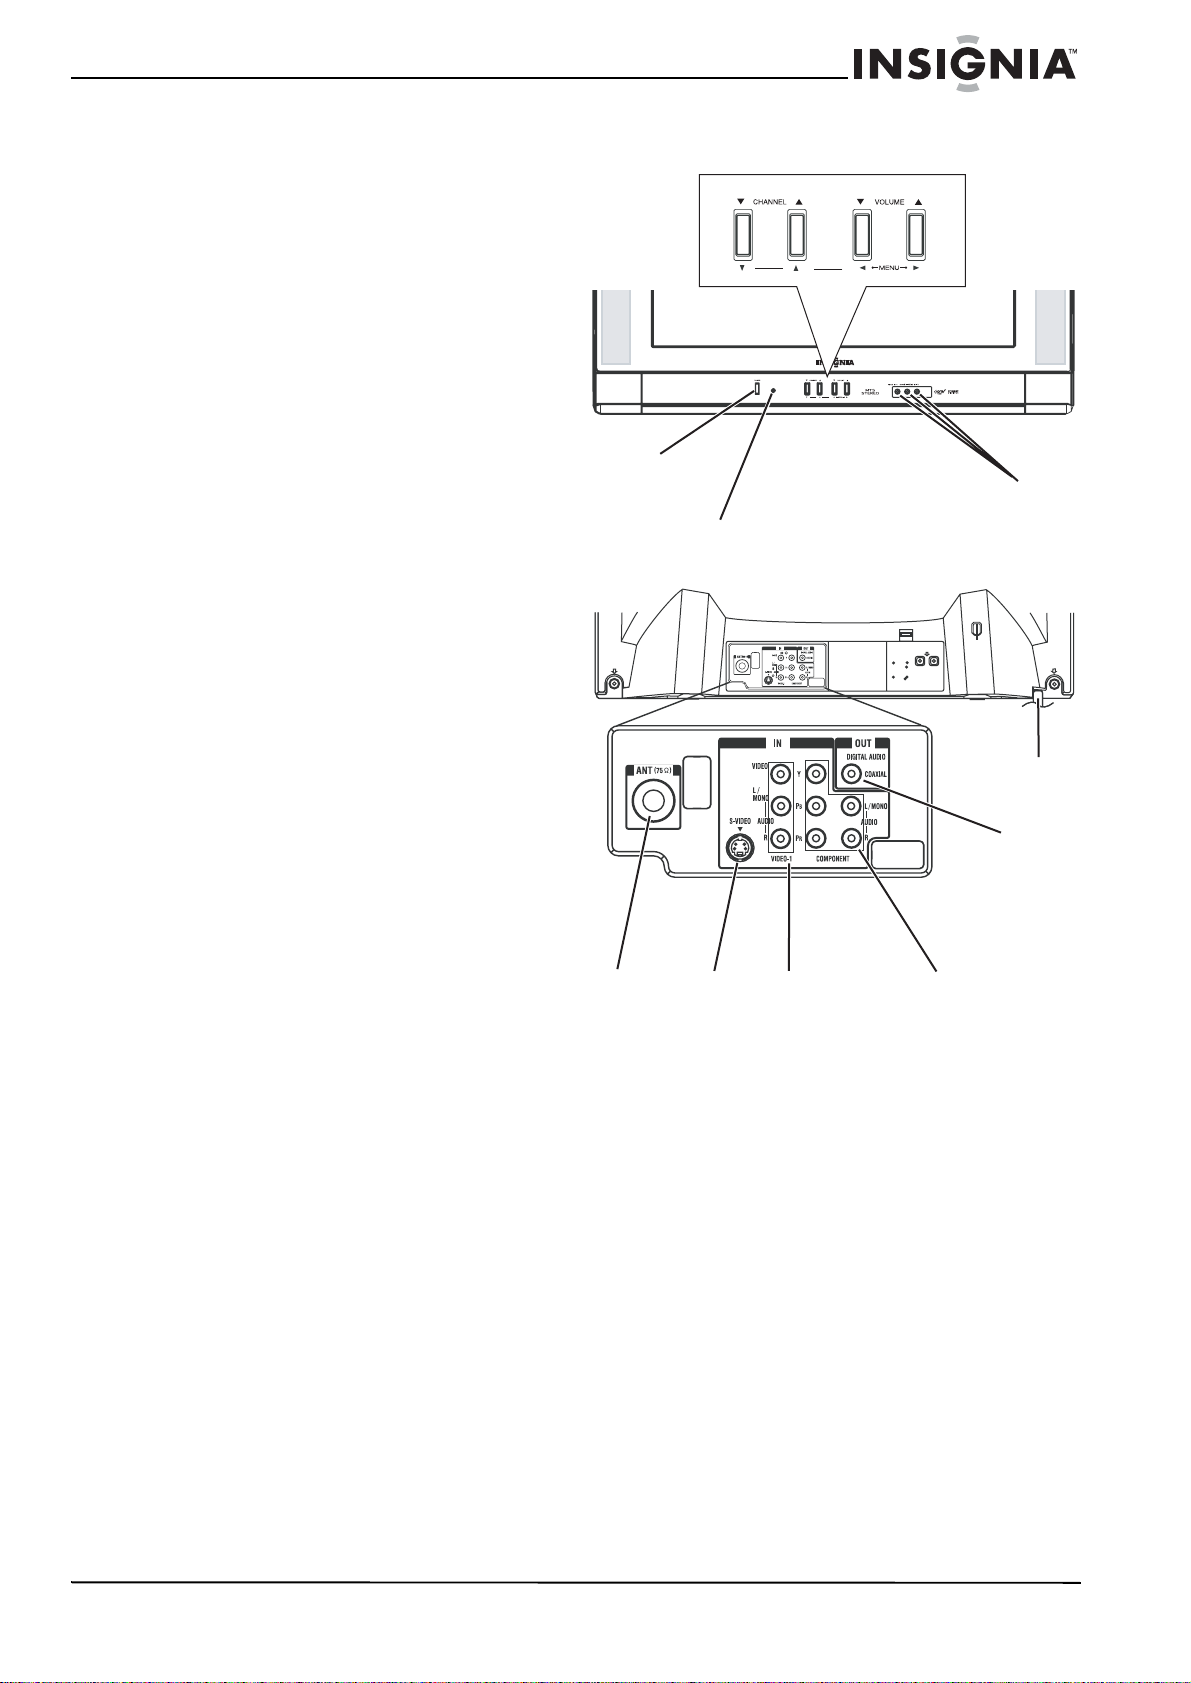
Parts and functions
Front
POWER button
Remote sensor
Rear
RF IN
(VHF/
UHF)
jack
S-VIDEO
IN jack
AUDIO (L/R)/VIDEO
IN jacks (VIDEO1)
AUDIO (L/R)/VIDEO
IN jacks (VIDEO2)
AC power
cord
COAXIAL
DIGITAL
AUDIO
OUT jack
COMPONENT
IN jacks
www.insignia-products.com
3
Page 5
NS-FTV27 27-inch Flat Stereo Color TV
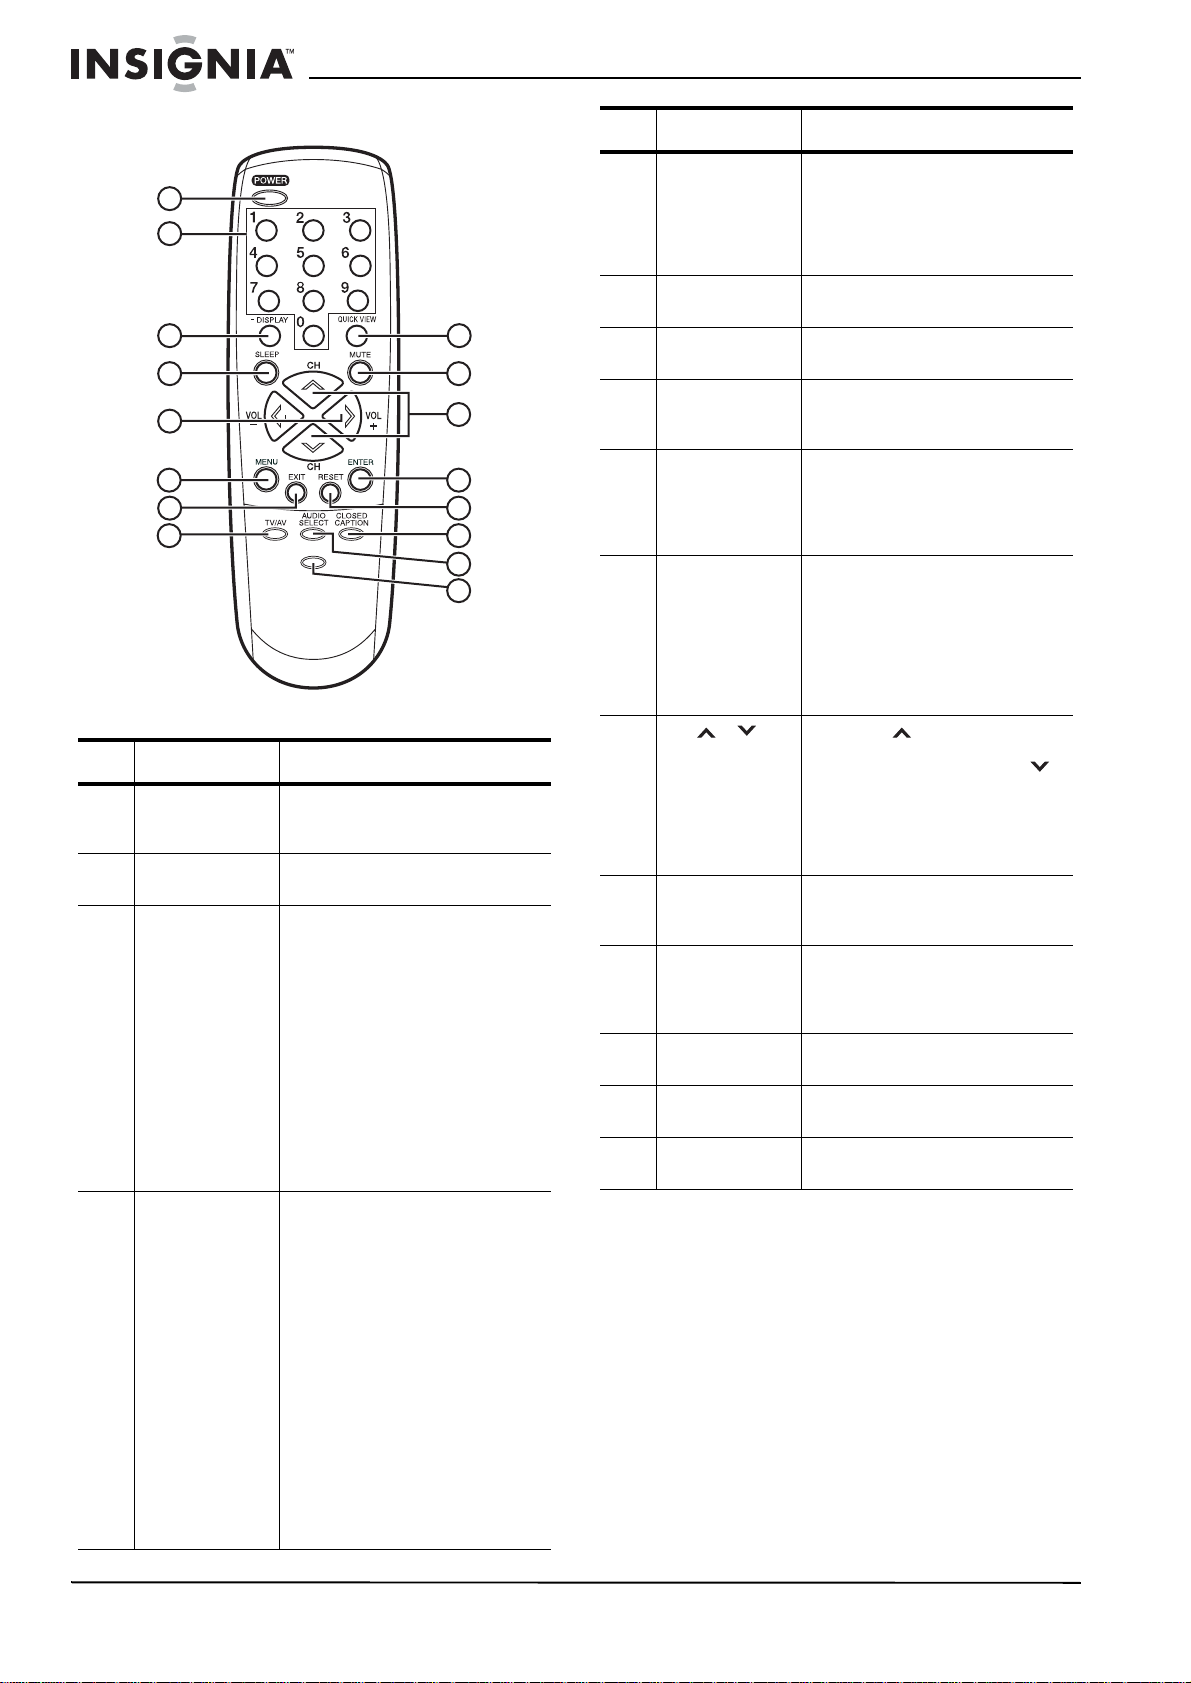
Remote control
1
2
3
4
5
6
7
8
Identifying buttons
Button Description
1 POWER Press to turn the television on.
2 Direct channel
selection (0-9)
3 -/DISPLAY When the televis ion is rec ei vin g
4 SLEEP To set the television to turn off
/
9
10
11
12
13
PICTURE
SIZE
14
15
16
Press again to turn the
television off.
Use to directly go to any
channel.
an analog signal, press this
button to display the current
information on-screen. When
the television is receiving a
digital signal, press this button
once to display the digital
information on-screen. Press
this button a second time to
display the analog information
on-screen. To remove the
display from the screen, press
this button again. This button is
also the - button used wh en
selecting digital channels.
after a preset amount of time,
press the SLEEP button. The
clock counts up ten minutes
each time the button is pressed
in the order of 0h00m,
0h10m,...1h50m, 2h00m. After
the sleep time is programmed,
the display disappears then
reappears momentarily every
ten minutes to remind you the
sleep timer function is
operating. To confirm the sleep
time setting, press the SLEEP
button once and the remaining
time is momentarily displayed.
To cancel sleep time, press the
SLEEP button repeatedly until
the display turns to 0h00m.
Button Description
5 VOL + / - Press the + button to increase
6 MENU Press to display the menu
7 EXIT Press to remove the menu
8 TV/AV Press this button to display the
9 QUICK VIEW Press this button to go back to
10 MUTE To turn off the sound, press this
11 CH / Press the button to change
12 ENTER Press to enter or select
13 RESET Press to reset the picture and
14 CLOSED
CAPTION
15 AUDIO
SELECT
16 PICTURE SIZE Press this button to change the
the volume level. Press the button to decrease the volume
level. Use these buttons to
select the desire d setting during
the menu screen operation.
screen function.
screen.
SOURCE SELECTION menu to
select the video input source.
the previously viewed channel.
Press this button again to return
to the channel you were
watching.
button once. The television is
silenced and the symbol MUTE
appears on the screen. The
muting feature can be tu rned off
by pressing the MUTE button
again or one of the VOL + or buttons.
to a higher numbered channel
set into memory. Press the
button to change to a lower
numbered channel set into
memory. Use to select the
desired setting during menu
operation.
operations while in the
on-screen menu.
sound adjustments to their
factory preset positions while in
the on-screen menu.
Press this button to display the
CLOSED CAPTION menu.
Press this button to display the
AUDIO menu.
picture size.
4
www.insignia-products.com
Page 6

NS-FTV27 27-inch Flat Stereo Color TV
Setting up your television
Connecting your television to AC power
Use the AC polarized cord provided for operation
on AC. Insert the AC plug into a standard 120V
60Hz polarized AC outlet.
AC outlet
Wider hole
and blade
Polarized AC plug (one
blade is wider than the
other.)
Notes
Installing batteries in the remote control
Before using the remote control, you must install
batteries. Use two AAA size batteries (not
supplied). The batteries may last about one year
depending on how much the remote control is
used. For best performance, we recommend the
batteries should be replaced on a yearly basis,
or when the remote operation becomes erratic.
Do not mix old and new batteries or different
types.
• Never connect the AC plug to other
than the specified voltage (120V
60 Hz). Use the attached power cord
only.
• If the polarized A C cord does not fit into
a non-polarized A C ou tlet, do not file or
cut the blade. It is y our respo nsibili ty to
have an electrician replace the
obsolete outlet.
• If you cause a static discharge when
touching the television and the
television fails to work, unplug the
televisi on from th e AC outlet, the n p lug
it back in. The television should work
normally.
2 Install two AAA batteries (not supplied).
3 Replace the battery compartment cover.
Battery precautions
Follow these precautions when using batteries in
this remote control:
• Use only the size and type of batteries
specified.
• Make sure to follow the correct polarity when
installing the batteries as indicated in the
battery compartment. Reversed batteries
may damage the device.
• Do not mix different types of batteries
together (such as alkaline and carbon-zinc)
or old batteries with fresh ones.
• If the remote is not to be used for a long
period of time, remove the batteries to
prevent damage or injury from possible
battery leakage.
• Do not try to recharge batteries that are not
intended to be recharged. These batteries
can overheat and rupture (follow battery
manufacturer's directions).
Connecting to an antenna
If you are using an indoor or outdoor antenna,
follow the instructions that correspond to your
antenna system. If you are using a cable
television service, see “Connecting to cable
television” on page 6.
Combination VHF/UHF antenna (single 75 ohm cable or 300 ohm twin-lead wire)
To install batteries in the remote control:
1 Open the battery compartment cover.
75 ohm
coaxial
cable
1 Connect the 75 ohm cable from the
combination VHF/UHF antenna to the RF IN
jack.
2 If your combination VHF/UHF antenna has a
300 ohm twin-lead wire, you may need to use
a 300-75 ohm matching transformer.
www.insignia-products.com
RF IN jack
300-75 ohm
matching
transformer
RF IN jack
5
Page 7

NS-FTV27 27-inch Flat Stereo Color TV
Combination VHF/UHF antenna (separate VHF and UHF 300 ohm twin-lead wires)
RF IN jack
Combiner
UHF 300 ohm
300-75 ohm
matching
transformer
VHF 300 ohm
1 Connect the UHF 300 ohm twin-lead wire to
the combiner (not supplied).
2 Connect the VHF 300 ohm twin-lead wire to
the 300-75 ohm matching transformer.
3 Attach the transformer to the combiner, then
attach the combiner to the RF IN jack.
Separate VHF/UHF antennas (75 ohm VHF cable and 300 ohm UHF twin-lead wires)
RF IN jack
VHF 75 ohm
For basic cable service not requiring a
converter/descrambler box, connect the 75 ohm
coaxial cable directly to the RF IN jack on the
back of the television.
For subscribers to scrambled cable television service
Incoming
75 ohm
cable TV
cable
Converter/Descrambler
75 ohm
cable
to TV
1 If you subscri be to a cable television service
which requires the use of a
converter/descrambler box, connect the
incoming 75 ohm coaxial cable to the
converter/descrambler box.
2 Using another 75 ohm coaxial cable, connect
the output jack of the converter/descrambler
box to the RF IN jack on the television. Follow
the connections shown above.
3 Set the television to the output channel of the
converter/descrambler box (usually ch annel
3 or 4) and use the converter/descrambler
box to select channels.
For subscribers to unscrambled basic cable television service with scrambled premium channels
Incoming
75 ohm
cable TV
cable
Converter/
Descrambler
Splitter
A/B
Switch
75 ohm
cable
to TV
RF IN
jack
RF IN
jack
Combiner
UHF 300 ohm
1 Connect the VHF 75 ohm cable and UHF
300 ohm twin-lead wire to the combiner.
2 Attach the combiner to the RF IN jack.
Connecting to cable television
This television has an extended tuning range
and can tune most cable channels without using
a cable television converter box. Some cable
television companies o ffer
channels
in which the signal is scrambled.
Descrambling these signals for normal viewing
requires the use of a descrambler device which
is generally provided by the cable television
company.
For subscribers to basic cable television service
75 ohm
coaxial
cable
premium pay
RF IN jack
If you subscri be to a cable television service in
which basic channels are unscrambled and
premium channels require the use of a
converter/descrambler box, you may wish to use
a signal splitter and an A/B switch box (available
from the cable television company or an
electronics supply store). Follow the connections
shown above. With the switch in the B position,
you can directly tune any nonscrambled
channels on your television. With the switch in
the A position, tune your television to the output
of the converter/descrambler box (usually
channel 3 or 4) and use the
converter/descrambler box to tune scrambled
channels.
Connecting to other equipment
The exact arrangement you use to interconnect
various video and audio components to the
television is dependent on the model and
features of each component. Check the owner's
manual provided with each component for the
location of video and audio inputs and outputs.
The following connection diagrams are offered
as suggestions. Y ou may need to modify them to
accommodate your par ti cula r as sortment of
components. The diagrams are intended to
show component video and audio
interconnections only.
6
www.insignia-products.com
Page 8

NS-FTV27 27-inch Flat Stereo Color TV
Selecting the video input source
Press TV/AV to view a signal from another
device connected to your television, such as a
VCR or DVD play er. You can select ANT,
VIDEO1, VIDEO2 (on the front panel), or
COMPONENT depending on which input jacks
you used to connect your devices.
Pressing TV/AV on the remote control displays
the current signal source (press TV/AV again or
0-3 to change).
Connecting the television to a VCR
Note
When the S-video cord and the video cord
are connected to eac h jack a t the same tim e,
the S-video cord takes precedence over the
video cord.
Connecting the television to a DVD player or satellite receiver
If your DVD player or satellite receiver has an
S-Video out jack, connect cords as shown.
To Audio/
Video OUT
Audio/
Video
cord (not
supplied)
To Audio/
Video IN
Connecting the television to a VCR with an S-Video cord
If you connect a VCR with a S-VIDEO cord to
the S-VIDEO IN jack on the rear of the television,
you must also connect the audio cords to the
AUDIO IN jacks on the rear of the television. The
S-VIDEO cord only carries the video signal. The
audio signal is separate.
To S-Video
OUT
S-Video
cord (not
supplied)
To S-Video IN
To Audio
OUT
Audio cord
(not supplied)
To Audio
IN
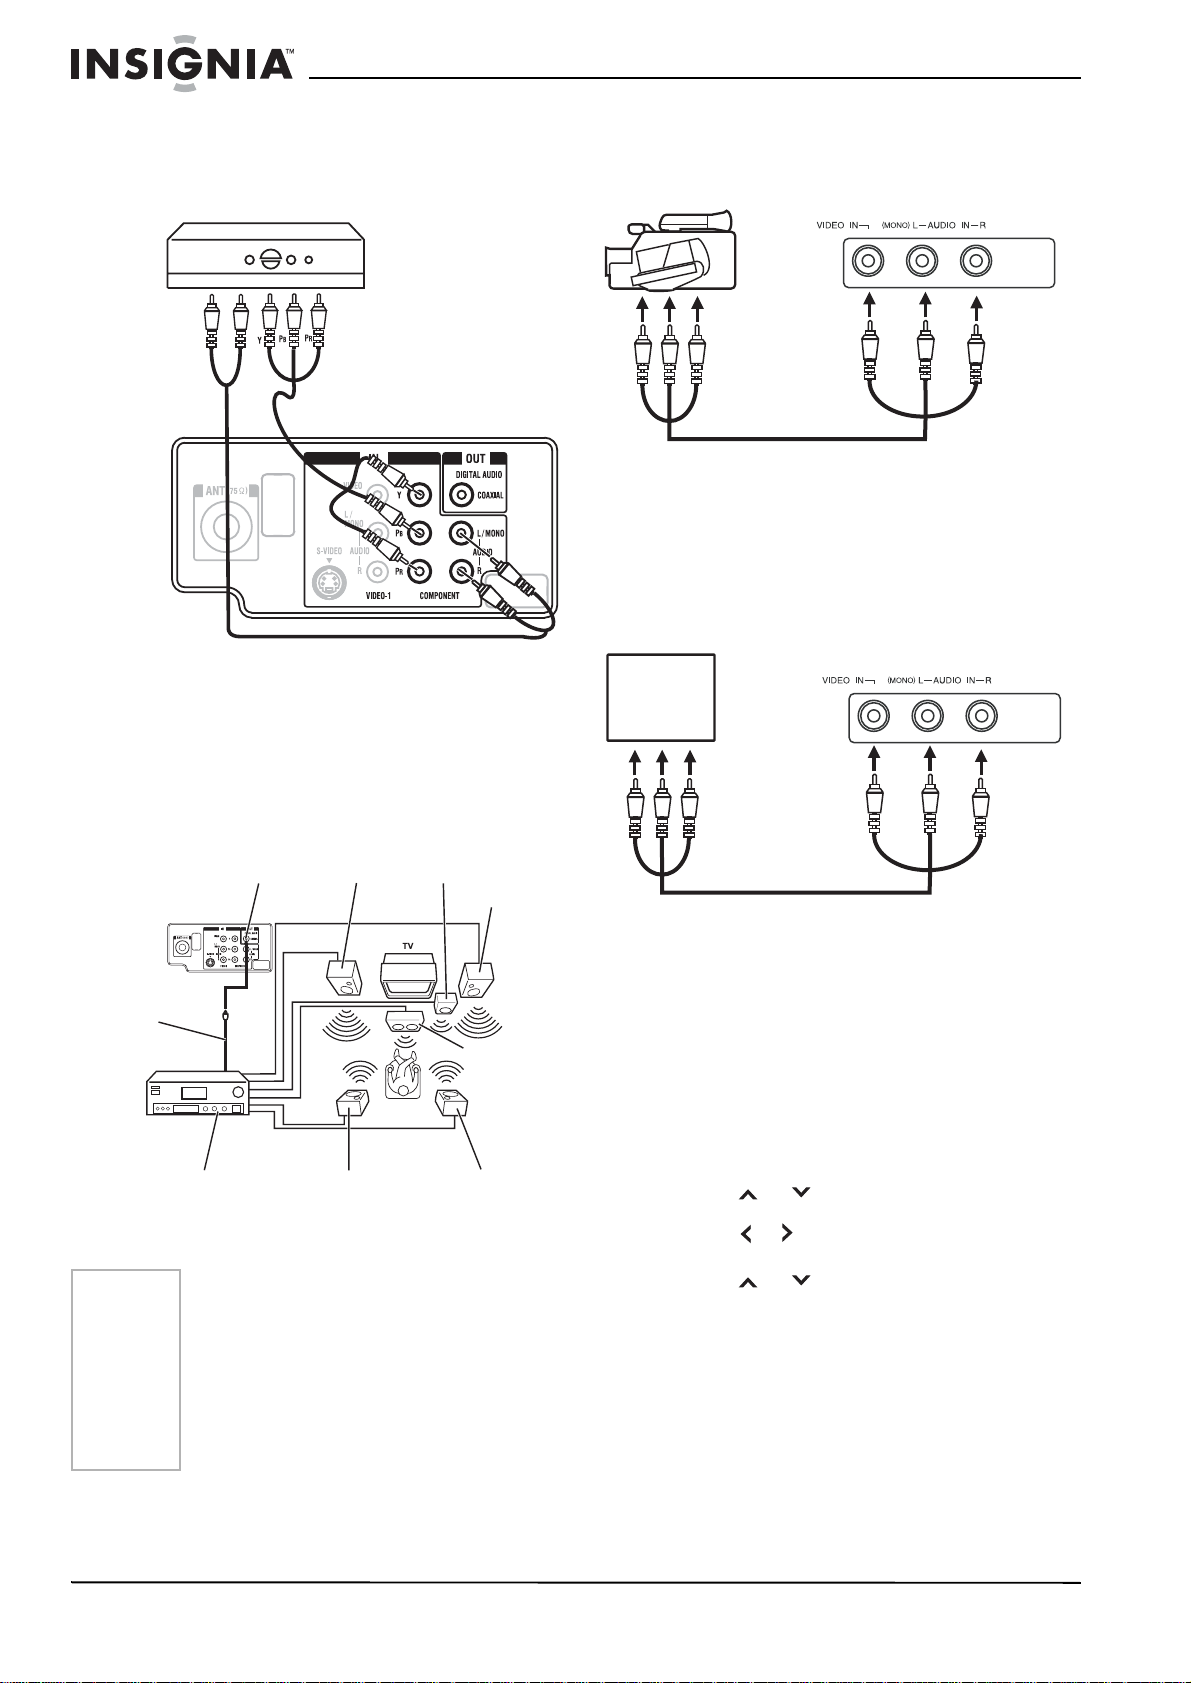
Connecting the television to a DVD player with component video
If your DVD player has component video out
jacks, connect your television to a DVD player
using a component video cord. It can greatly
enhance picture quality and per forman ce.
To Audio
OUT
To Component
OUT
To S-Video
OUT
S-Video
cord (not
supplied)
To Audio
IN
To S-Video
IN
To Audio
OUT
Audio cord
(not supplied)
Rear of the TV
Audio
cord (not
supplied)
To COMPONENT
IN
Note
This television is only capable of displaying
480i interlaced signal when connected to a
digital devi ce with com ponen t video ou tpu ts.
If you input a 480p, 720p, or 1080i signal to
the component video inputs, COMPONENT
is displayed on a black screen. If
COMPONENT appears, set the digital
device's component output to 480i.
www.insignia-products.com
Video cord
(not supplied)
7
Page 9
NS-FTV27 27-inch Flat Stereo Color TV
Connecting the television to a DTV receiver or set-top box
If you connect a DTV receiver/set-top box,
connect your television to it by using a
component video cord.
To Audio
OUT
Audio
cord (not
supplied)
To COMPONENT
IN
To Component
OUT
Video cord
(not supplied)
Using an AV amplifier with built-in digital surround
If you are using an amplifier with built-in digital
surround sound as follows, you can enjoy
various audio systems including Dolby Digital
Surround audio that sounds just like the movie.
Connect an AV amplifier with built-in Dolby
Digital decoder as shown below.
Front
Coaxial Digital
Audio Output
Coaxial
digital
cable
(not
supplied)
to
Coaxial
Digital
Audio
Input
AV Amplifier with
built-in digital
surround decoder
as listed above
Notes
• When you make the connection above,
on the AV amplifier, do not set DOLBY
DIGIT AL to DOLBY DIGITAL ON. If you
do, a loud noise emits from the
speakers possibly causing damage to
your hearing or to the speakers.
• This TV is not compatible wi th DTS
audio. There will be no sound output if
connected to an AV amplifier with a
built-in DTS decoder.
Speaker
(Left)
Surround Speaker
(Left)
Subwoofer
Front
Speaker
(Right)
Center
Speaker
Surround
Speaker
(Right)
Connecting the television to a camcorder
To play back from a camcorder, connect the
camcorder to the television as shown.
Front of the TV
To Audio/Video
OUT
Audio/Video cord
(not supplied)
Connecting the television to a video game console
The television can also be used as a display
device for many video games. However, due to
the wide variety of signals generated by these
devices and subsequent connection variations
required, they have not all been included in the
suggested connection diagrams. You'll need to
consult each component's owner's manual for
additional informa tio n.
Front of the TV
Video
Game
Console
To Audio/Video
OUT
Audio/Video cord
(not supplied)
Starting setup
The STARTING SETUP menu appears the first
time you turn on the television, and helps you
select the menu language, specify the
TV/CABLE setting, and program your channels
automatically.
To complete initial television setup:
1 Make sure that the antenna or cable
television system is connected.
2 Press POWER. The starting setup function
begins and the language setup menu
appears on the screen.
3 Press
language, then press ENTER.
4 Press
ENTER.
5 Press
ENTER.
If you se lect CANCEL and press ENTER, the
STARTING SETUP stops and changes to the
television screen.
The AUTO SETUP starts. After the
STARTING SETUP is completed, the
television channel appears on the screen.
Depending on the reception condition, it may
take approximately ten minutes to complete
memorizing digital cable channels.
or to select your desired
or TV or CABLE, then press
or to select START, then press
8
www.insignia-products.com
Page 10

NS-FTV27 27-inch Flat Stereo Color TV
Note
If you press EXIT in the process of AUTO
SETUP, the STARTING SETUP stops and
changes to the television screen.
• When you make a menu selection, your
changes occur immediately. You do not
have to press EXIT to see your changes.
• When you are finished programming the
menus, press EXIT.
Using the menu
To access the menu using the TV buttons:
Press both of the volume
and buttons at the
same time. The menu screen appears
To access the menu using the remote control:
Press MENU. The menu screen appears.
To select a setting using the TV buttons:
Use the channel
buttons.
and
and buttons and volume
To select a setting using the remote control:
Use the channel
and buttons and volume
and buttons.
Setting the language
You can choose from three different languages
(English, French, and Spanish) for the on-screen
displays.
To select a menu language:
1 Press MENU. The menu screen appears.
Note
If no buttons are pressed for more than 15
seconds, the me nu s creen re turns to normal
television operation automatically.
2 Press or to select SETUP menu.
3 Press
or to select LANGUAGE.
4 Press or to select the desired language:
English (ENGLISH), French (FRANÇAIS),
or Spanish (ESPAÑOL).
5 Press EXIT to return to the normal screen.
Memorizing channels
This television is equipped with a channel
memory feature which allows channels to skip
up or down to the next channel set into memory,
skipping over unwanted channels. Before
selecting channels, they must be programmed
into the television’s memory. This tele vision can
receive up to 250 VHF/UHF channels and 500
cable television channels.
To use this television with an antenna, set the
TV/CABLE menu option to the TV mode. When
shipped from the factory, this menu option is in
the CABLE mode.
Selecting TV or cable
To select TV or cable input:
1 Press MENU. The menu screen appears.
2 Press
3 Press
4 Press
• TV—VHF/UHF channels
• CABLE—Cable television channels
5 Press EXIT to return to the normal screen.
or to select the SETUP menu.
or to select TV/CABLE.
or to select TV or CABLE.
Note
It may take a few seconds for a digital
channel picture to appear on screen after
being selected.
Cable chart
The following chart is typical of many cable
system channel allocations. The number on the
top is the number on the television. The number
or letter on the bottom is the corresponding
cable channel.
Automatic memory tuning
To automatically memorize channels:
1 Press MENU. The menu screen appears.
2 Press or to select the SETUP menu,
then press
or to select AUTO CH
MEMORY.
3 Press or . The television begins
memorizing all of the channels available in
your area.
Depending on the reception condition, it may
take approximately ten minutes to complete
memorizing digital cable channels.
Note
Some new channels may be added. You
should complete the AUTO CH MEMORY
procedure periodically.
Adding and deleting channels
To add or delete channels:
1 Press MENU. The menu screen appears.
2 Press or to select the SETUP menu,
then press
or to select ADD/DELETE.
3 Press or . The ADD/DELETE menu
appears.
4 Press
or to select ADD/DELETE, then
press .
5 Select the desired channel to be memorized
or deleted using
or .
6 Press or to select ADD or DELETE.
7 Repeat step 5-6 for other channels you want
to add or delete, then press ENTER.
8 Press EXIT to return to the normal screen.
Note
To return from the ADD/DELETE menu to
the SETUP menu, select SETUP MENU,
then press or .
To add digital channels:
1 Select the digital channel you want to add
using the direct channel selection (number)
buttons.
2 Press MENU. The menu screen appears.
3 Press or to select the SETUP menu,
then press
or to select ADD/DELETE.
4 Press or . The ADD/DELETE menu
appears.
www.insignia-products.com
9
Page 11
NS-FTV27 27-inch Flat Stereo Color TV
5 Press or to select ADDING
CHANNEL, then press or .
6 Press EXIT to return to the normal screen.
7 Repeat step 1-6 for other digital channels you
want to add.
Using clear all
All channels can be deleted from the channel
memory.
To clear all channels from memory:
1 Press MENU. The menu screen appears.
2 Press or to select the SETUP menu,
then press
or to select ADD/DELETE.
3 Press or . The ADD/DELETE menu
appears.
4 Press
or to select CLEAR ALL, then
press or .
Using your television
Notes
To use the television:
1 Press POWER to turn on the television.
2 Adjust the volume level by pressing VOL +
3 Set the TV/CABLE menu option to the
4 Press the direct channel selection buttons to
Selecting analog channels
Channels Press
1-9 Press 0 twice, then 1-9 as needed.
10-99 Press 0, then the remaining 2 digits.
100-125 Press the 3 digits i n ord er. Example,
Selecting digital channels
Press the first 3 digits, then press the
–/DISPLAY button, followed by the remaining
3digits.
Example, to select channel 015-001, press 0 1 5
– 0 0 1.
Note the following:
• If a channel is selected with only audio
• If you select a channel with no
broadcast signal, the sound is
automatically muted.
• If a station you are viewing stops
broadcasting, the television
automatically shuts itself off after 15
minutes.
or –. The volume level is indicated on the
screen by green bars. As the volume level
increases, so do the number of bars. If the
volume decreases, the number of green bars
also decreases.
appropriate position (see “Selecting TV or
cable” on page 9).
select the channel.
Example: to select channel 2, press
0 0 2.
Example, to sel ect channel 12, press
0 1 2.
to select channel 120, press 1 2 0.
content, “AUDIO ONLY” will be displayed on
the screen.
• If a channel is selected with a weak digital
signal, “DIGITAL CHANNEL SIGNAL
STRENGTH IS LOW” will be displayed on the
screen.
• If a channel is selected to which you have not
subscribed, “DIGITAL CHANNEL IS
SCRAMBLED” will be displayed on the
screen.
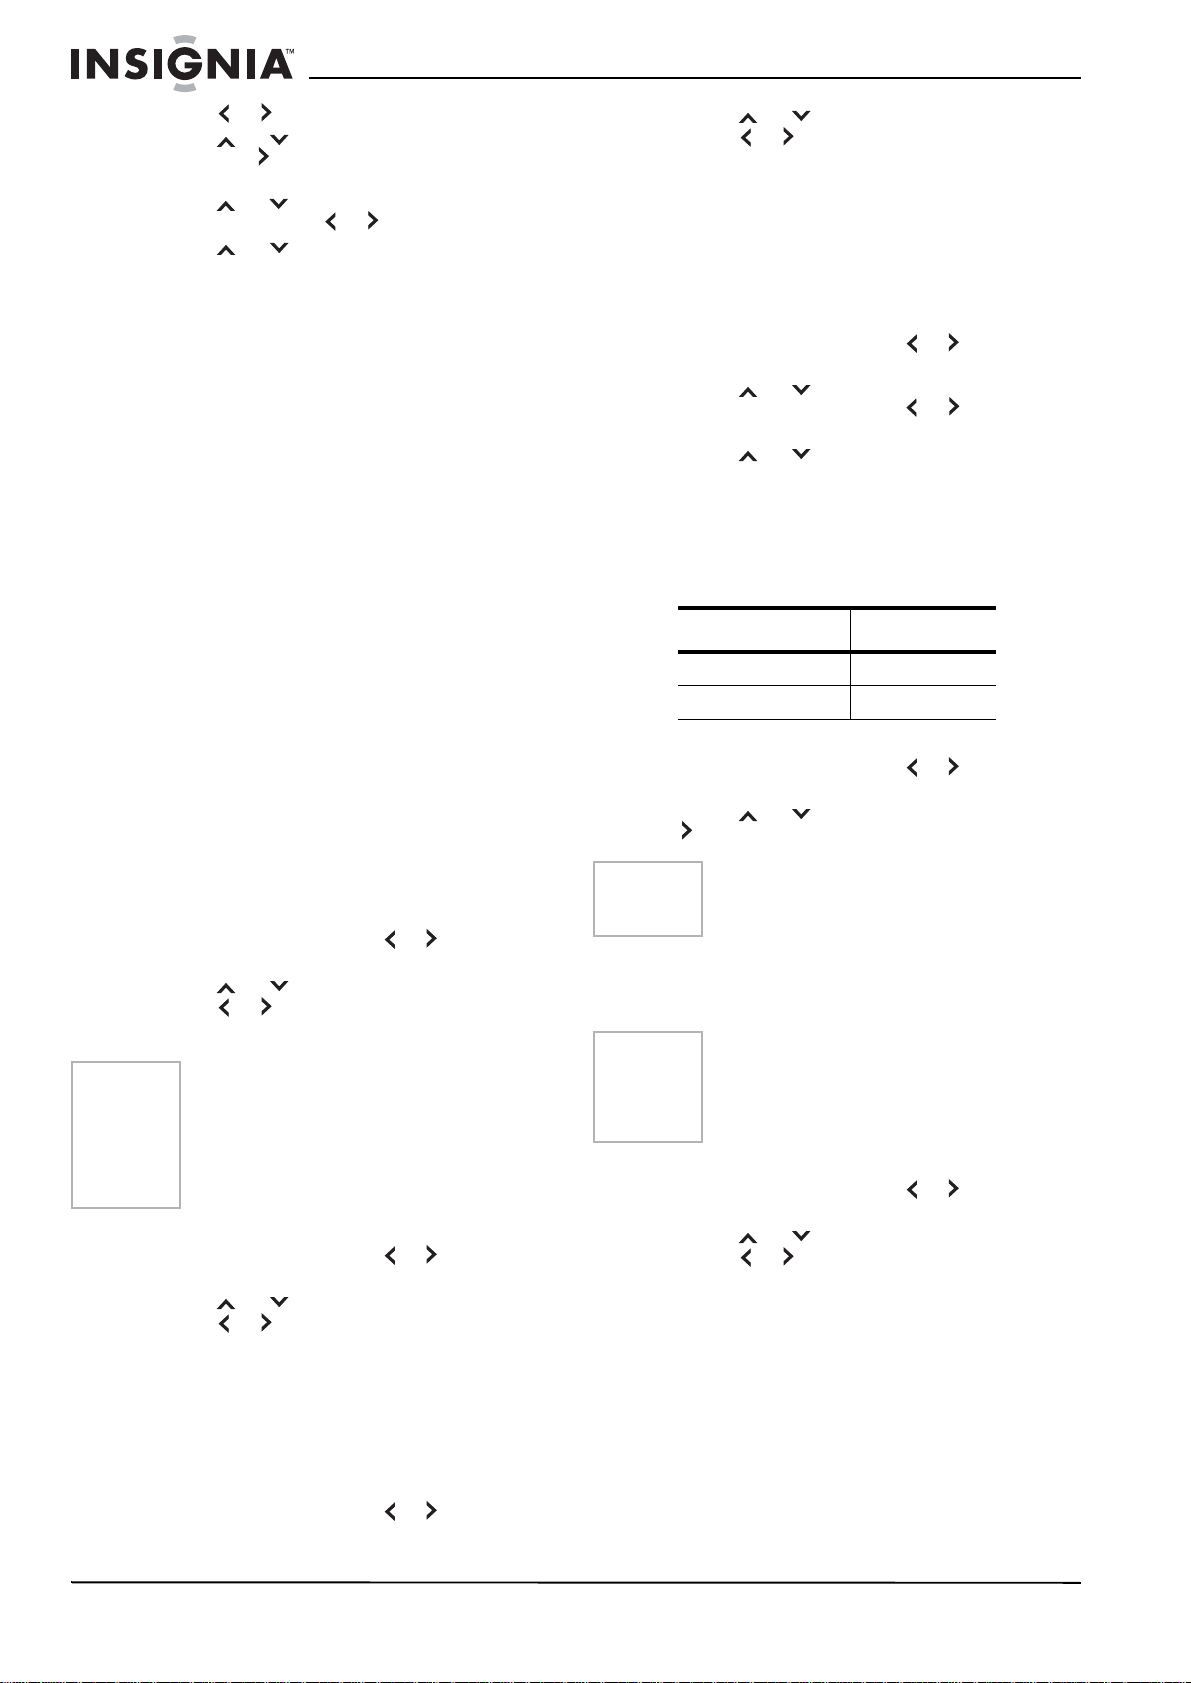
TV Cable
VHF
2-13
UHF
14-69
VHF
2-13
STD/HRC/IRC
14-36 (A) (W)
37-59 (AA) (WW)
60-85 (AAA) (ZZZ)
86-94 (86) (94)
95-99 (A-5) (A-1)
100-125 (100) (125)
01 (5A)
Seeking channels
To seek the next channel:
Press and release CH
or . The channel
automatically stops at the next channel set into
memory.
For proper operation, before seeking channels,
they should be set into the memory. See
“Memorizing channels” on page 9.
Viewing information
Note
The screen automatically returns to normal
TV operation after 10 seconds.
To view program informat ion:
1 Press -/DISPLAY to display the current
information on the screen.
When the television receives a digital signal,
the digital information appears:
• Broadcast program name
• Station name
• Remaining time
• Audio language
• Program name
• V-Chip rating
•V-Chip mark
• Closed caption mark
When the television receives an analog
signal, -/DISPLAY shows only analog
information.
2 Press -/DISPLAY again. The analog
information appears.
•Clock
• Channel number or video mode selected
• Channel label (if preset)
• Stereo or SAP (second audio program)
audio status
• Content rating
• On timer, Off timer, Sleep time (if preset)
• Picture size
3 Press -/DISPLAY again to clear the call
display.
10
www.insignia-products.com
Page 12
NS-FTV27 27-inch Flat Stereo Color TV
Viewing the previous channel
The QUICK VIEW button allows you to go back
to the last channel viewed. Press QUICK VIEW
again to return to the last channel you were
watching.
Muting the volume
Press MUTE to turn off the sound. The
television’s sound is silenced and MUTE
appears on the screen. The sound can be
switched back on by pressing this button again
or by pressing one of the VOL + or – buttons.
Using sleep
To set the television to turn off after a preset
amount of time, press SLEEP on the remote
control. The clock counts up ten (10) minutes for
each press of the SLEEP button (0h00m,
0h10m, ...1h50m, 2h00m).
After the sleep time is programmed, the display
appears briefly every ten minutes to remind you
that the sleep timer is operating. To confirm the
sleep timer setting, press SLEEP and the
remaining time is displayed for a few seconds. To
cancel the sleep timer, press SLEEP repeatedly
until the display turns to 0h00m.
Setting the V-Chip
An age limitation can be set to restrict children
from viewing or hearing violent scenes or
pictures that you may choose to exclude. The
restriction applies to TV rating and movie rating
if this data is transmitted. You may set this
restriction separately. To use the V-Chip
function, you must set a password.
Notes
Setting a password
To set a password:
1 Press MENU. The menu screen appears.
2 Press or to select the LOCKS menu.
3 Press
4 Select and enter a password (4 digits) using
5 Enter the same password again to confirm,
Setting the V-Chip
To set the V-Chip:
1 Press MENU. The menu screen appears.
• The V - Ch ip fun cti on is activated only
on programs and input sources that
have the rating signal.
• It may take several minutes to
complete the initial V-Chip setup.
• The V-CHIP SET (DTV) will only be
selectable when the TV receives a
digital broadcast using the new rating
system. Currently, some stations are
still not providing this signal. If the
signal is not provided, V-CHIP SET
(DTV) function will not be available.
• If you forget the pas sword, contact
Customer Service at 1-877-467-4289
for assistance. Your original remote
control is required.
• To avoid forgetting the password, write
it down and keep it in a safe place.
or to display the password
entering mode.
the number buttons (0-9), then press ENTER.
then press ENTER.
The password is now set and the V-Chip
menu appears on the screen.
2 Press or to select the LOCKS menu.
3 Press
or to display the password
entering mode. Use number buttons (0-9) to
enter your password, then press ENTER.
The LOCKS menu appears.
4 Press or to select V-CHIP SET, then
press . The
5 Press
V-CHIP SET
or to select TV RATING, then
menu appears.
press or to display the desired rating.
OFF—TV RATING is not set
TV-Y—All children
TV-Y7—7 years old and above
TV-G—General audience
TV-PG—Parental guidance
TV-14—14 years old and above
TV-MA—17 years old and above
When you select TV-Y7, TV-PG, TV-14, or
TV- MA, press -/DISPLAY to further define the
rating. Press
or to select the desired
rating you want. Press or to select the
setting ON or OFF.
6 Press or to select MOVIE RATING,
then press . The
RATING
menu appears.
7 Press or to select the rating, then
press or to select ON or OFF for each
rating.
G—All ages
PG—Parental guidance
PG-13—Parental guidance less than 13
years old
R—Under 17 years old parental guidance
suggested
NC-17—17 years old and above
X—Adult only
8 Press MENU twice to return to the
menu, then press or to select V-CHIP.
9 Press or to select ON. Your settings are
now set into memory.
10 Press EXIT to return to the normal screen.
Watching a protected show
To watch a program that is blocked by the V-Chip:
1 Press MUTE.
2 Enter the password, then press ENTER.
After you enter the password correctly, the
protection is temporarily overridden. If the
television is turned off, or if the channel is
changed, the V-Chip restriction is reactivated.
Changing the password
To change the password:
1 Press MENU. The menu screen appears.
2 Press or to select the LOCKS menu.
3 Press
or to display the password
entering mode. Use the number buttons (0-9)
to enter your password, then press ENTER.
The LOCKS menu appears.
4 Press
or to select NEW PASSWORD,
then press or .
5 Enter a new password using the number
buttons (0-9), then press ENTER.
LOCKS
www.insignia-products.com
11
Page 13

6 Enter the same password again to confirm,
then press ENTER.
7 Press EXIT to return to the normal screen.
Locking channels
With the CH LOCK fe atur e, y ou ca n loc k specif ic
channels. You cannot tune locked channels
unless you clear the setting. You can choose to
lock up to 12 television channels.
Note
After programming CH LOCK, change the
channel before turning off the television.
Failu re to do s o cancel s the prog ramm ing f or
channels lock ed using this procedure.
To lock channels:
1 Use the number buttons (0-9) to display the
television channel you wish to lock.
2 Press MENU, then press or to display
the LOCKS menu.
3 Press
or to display the password
entering mode.
4 Use the number buttons (0-9) to enter your
password, then press ENTER. The LOCKS
menu appears.
5 Press
or to highlight CH LOCK and
press or to display the CH LOCK menu.
6 Press or to select the following:
• SET– to set the channel as one to be
locked, then press ENTER.
• CLEAR– to clear all channels from the list
of locked channels, then press ENTER.
7 Repeat steps 1 through 6 to lock other
channels. When you have finished locking
channels, press EXIT to return to normal
viewing.
If you try to tune a locked channel, the
television does not display it, but displays the
nearest unlocked channel.
Unlocking channels
To unlock locked channels:
1 Press MENU, then press or to display
the LOCKS menu.
2 Press
or to display the password
entering mode.
3 Use the number buttons (0-9) to enter your
password, then press ENTER. The LOCKS
menu appears.
4 Press
or to highlight CH LOCK and
press or to display the CH LOCK menu.
5 Press or to highlight CLEAR and clear
all channels from the list of locked channels.
6 Press ENTER.
7 Press EXIT to return to normal viewing.
Locking the video inputs
With the VIDEO LOCK feature, you can lock out
the input sources (VIDEO1, VIDEO2,
COMPONENT) and channels 3 and 4. You
cannot select the input sources with the TV/AV
button or channel buttons unless you clear the
setting.
NS-FTV27 27-inch Flat Stereo Color TV
Note
After programming VIDEO LOCK, change
the channel or press the TV/AV button
before turning off the te le visi on. F ailu re to do
so cancels the prog ra mming f or vid eo in puts
locked using this procedure.
To lock video inputs:
1 Press MENU. The menu screen appears.
2 Press or to select the LOCKS menu.
3 Press
or to display the password
entering mode. Use the number buttons (0-9)
to enter your password, then press ENTER.
The LOCKS menu appears.
4 Press
or to highlight VIDEO LOCK.
5 Press or to select:
• OFF: Unlocks all video sources.
• VIDEO: Locks VIDEO1, VIDEO2,
COMPONENT sources.
• VIDEO +: Locks VIDEO1, VIDEO2,
COMPONENT, channel 3, and channel 4.
Use this option if you use the antenna
terminal to play a video tape.
6 Press EXIT to return to normal viewing.
Unlocking the video inputs
To unlock locked video inputs:
1 Use the number buttons (0-9) to display the
television channel you wish to lock.
2 Press MENU, then press or to display
the LOCKS menu.
3 Press
or to display the password
entering mode.
4 Use the number buttons (0-9) to enter your
password, then press ENTER. The LOCKS
menu appears.
5 Press
or to highlight VIDEO LOCK and
press or to highlight OFF.
6 Press EXIT to return to normal viewing.
Locking the fron t panel
You can lock the front panel buttons to prevent
your settings from being changed accidentally.
When the front panel lock is ON, all control
buttons on the television front panel (except
POWER) will not operate.
To lock the front panel:
1 Press MENU. The menu screen appears.
2 Press or to select the LOCKS menu.
3 Press
or to display the password
entering mode. Use the number buttons (0-9)
to enter your password, then press ENTER.
The LOCKS menu appears.
4 Press
or to select FRONT PANEL
LOCK and press or to select ON. If a
button on the front panel is pressed, the
message NOT AVAILABLE appears.
5 Press EXIT to return to normal viewing.
Unlocking the front panel
To unlock the front panel:
1 Press and hold VOLUME on the front
panel of the television for about ten seconds
until the message FRONT PANEL
LOCK:OFF appears on the screen.
-OR-
12
www.insignia-products.com
Page 14

NS-FTV27 27-inch Flat Stereo Color TV
Press MENU. The menu screen appears.
2 Press or to select the LOCKS menu.
3 Press
or to display the password
entering mode. Use the number buttons (0-9)
to enter your password, then press ENTER.
The LOCKS menu appears.
4 Press
or to select FRONT PANEL
LOCK and press or to select OFF.
5 Press EXIT to return to normal viewing.
Labeling channels
Channel labels appear over the channel number
display each time you turn on the television,
select a channel, or press -/DISPLAY. You can
choose any four characters to identify a channel.
Note
To return from CH LABEL menu to the
OPTION menu, select OPTION MENU, then
press or .
To label channels:
1 Select a channel you want to label.
2 Press MENU, then press or to select the
OPTION menu.
3 Press
or to select CH LABEL, then
press or . The CH LABEL menu
appears.
4 Press
or to select SET/CLEAR.
5 Press or to select SET.
6 Press ENTER to sel ect LABEL, then press
or to enter a character in the first space.
Press the button repeatedly until the
character you want appears on the screen.
The characters rotation as follows:
–
SPACE+
When the character want appears, press
ENTER. Repeat this step to enter the rest of
the characters. If you would like a blank
space in the label name, you must choose
the empty space from the list of characters,
or a dash appears in that space. When you
finish inputting the label name, press
ENTER.
7 Press EXIT to return to the normal screen.
8 Repeat steps 1- 7 for other channels. You
can assign a label to each channel.
Erasing channel labels
To erase a channel label:
1 Select a channel with a label which you want
to erase.
2 Press MENU, then press or to select the
OPTION menu.
3 Press
press or to display the CH LABEL
menu.
4 Press
5 Press or to select CLEAR, then press
ENTER.
6 Press EXIT to return to the normal screen.
or to select CH LABEL, then
or to select SET/CLEAR.
Setting the clock
You must set the clock correctly for the ON/OFF
TIMER to activate at the correct time.
Note
After a power failure or disconnection of the
power, the clock settings will be lost. In this
case, reset the present time.
To set the clock:
1 Press MENU, then press or to select the
SETUP menu.
2 Press
or to select CLOCK SET, then
press or . The CLOCK SET menu
appears.
3 Press or to set the MONTH, then press
.
4 Set the DAY, YEAR, and TIME as in step 3.
After setting the date and time, the clock
begins functioning automatically.
5 Press EXIT to return to the normal screen.
Setting the On Timer
This feature allows you to have the television
automatically turn on at a predetermined time. If
you program the on timer to DAILY, the television
turns on every day at the same time to the same
channel.
EXAMPLE: Turning on the television to channel
12 at 7:30 AM, daily.
Notes
To set the On Timer:
1 Set the clock, if you have not already done so
2 Press MENU.
3 Press or to select the OPTION menu.
4 Press
5 Press or to select SET, then press
6 Press
7 Press
8 Set the minutes and startup channel.
9 Press or to select DAIL Y, then press
10 Press EXIT to return to the normal screen.
• The televisi on auto ma t ic al ly turns off
about one hour after the ON TIMER
turns on if no OFF TIMER has been
set. To continue watching the
televisio n, pres s an y b utton to cancel
the one hour automatic shut off.
• If a station being viewed stops
broadcasting, the television
automatically shuts itself off after 15
minutes.
• To cancel the ON TIMER, select
CLEAR. Press EXIT to return to the
normal screen.
• After a power failure or disconnection
of the power, the timer settings will be
lost.
• To return from the ON/OFF TIMER
menu to OPTION menu, select
OPTION MENU, then press or .
(see “Setting the clock” on page 13).
or to select ON/OFF TIMER.
ENTER. The ON/OFF TIMER menu appears.
or to select ON TIMER, then
press to enter the setting for the ON
TIMER.
or to set the hour, then press .
Note if the hour is AM or PM and choose the
setting you want.
ENTER.
www.insignia-products.com
13
Page 15
Setting the off timer
This feature allows you to have the television
turn off automatically at a predetermined time. If
you program the off timer to DAILY, the television
turns off every day at the same time.
NS-FTV27 27-inch Flat Stereo Color TV
Notes
• If a station being viewed stops
broadcasting, the television
automatically shuts itself off after 15
minutes.
• To confirm th e ON/OFF TIMER, press
-/DISPLAY to indicate the program on
the screen.
• To return from ON/OFF TIMER menu
to the OPTION menu, select OPTION
MENU, then press or .
To set the off ti m er:
1 Set the clock, if you have not already done so
(see “Setting the clock” on page 13).
2 Press MENU.
3 Press or to select the OPTION menu.
4 Press
or to select ON/OFF TIMER.
5 Press or to select SET, then press
ENTER. The ON/OFF TIMER menu appears.
6 Press
or to select OFF TIMER, then
press to ente r the set tin g for the OFF
TIMER.
7 Press
or to set the hour, then press .
Note if the hour is AM or PM and choose the
setting you want.
8 Press
or to set the minutes and press
or to select DAIL Y, then press ENTER.
Note
To cancel the OFF TIMER, press or to
select CLEAR after this step, then press
ENTER.
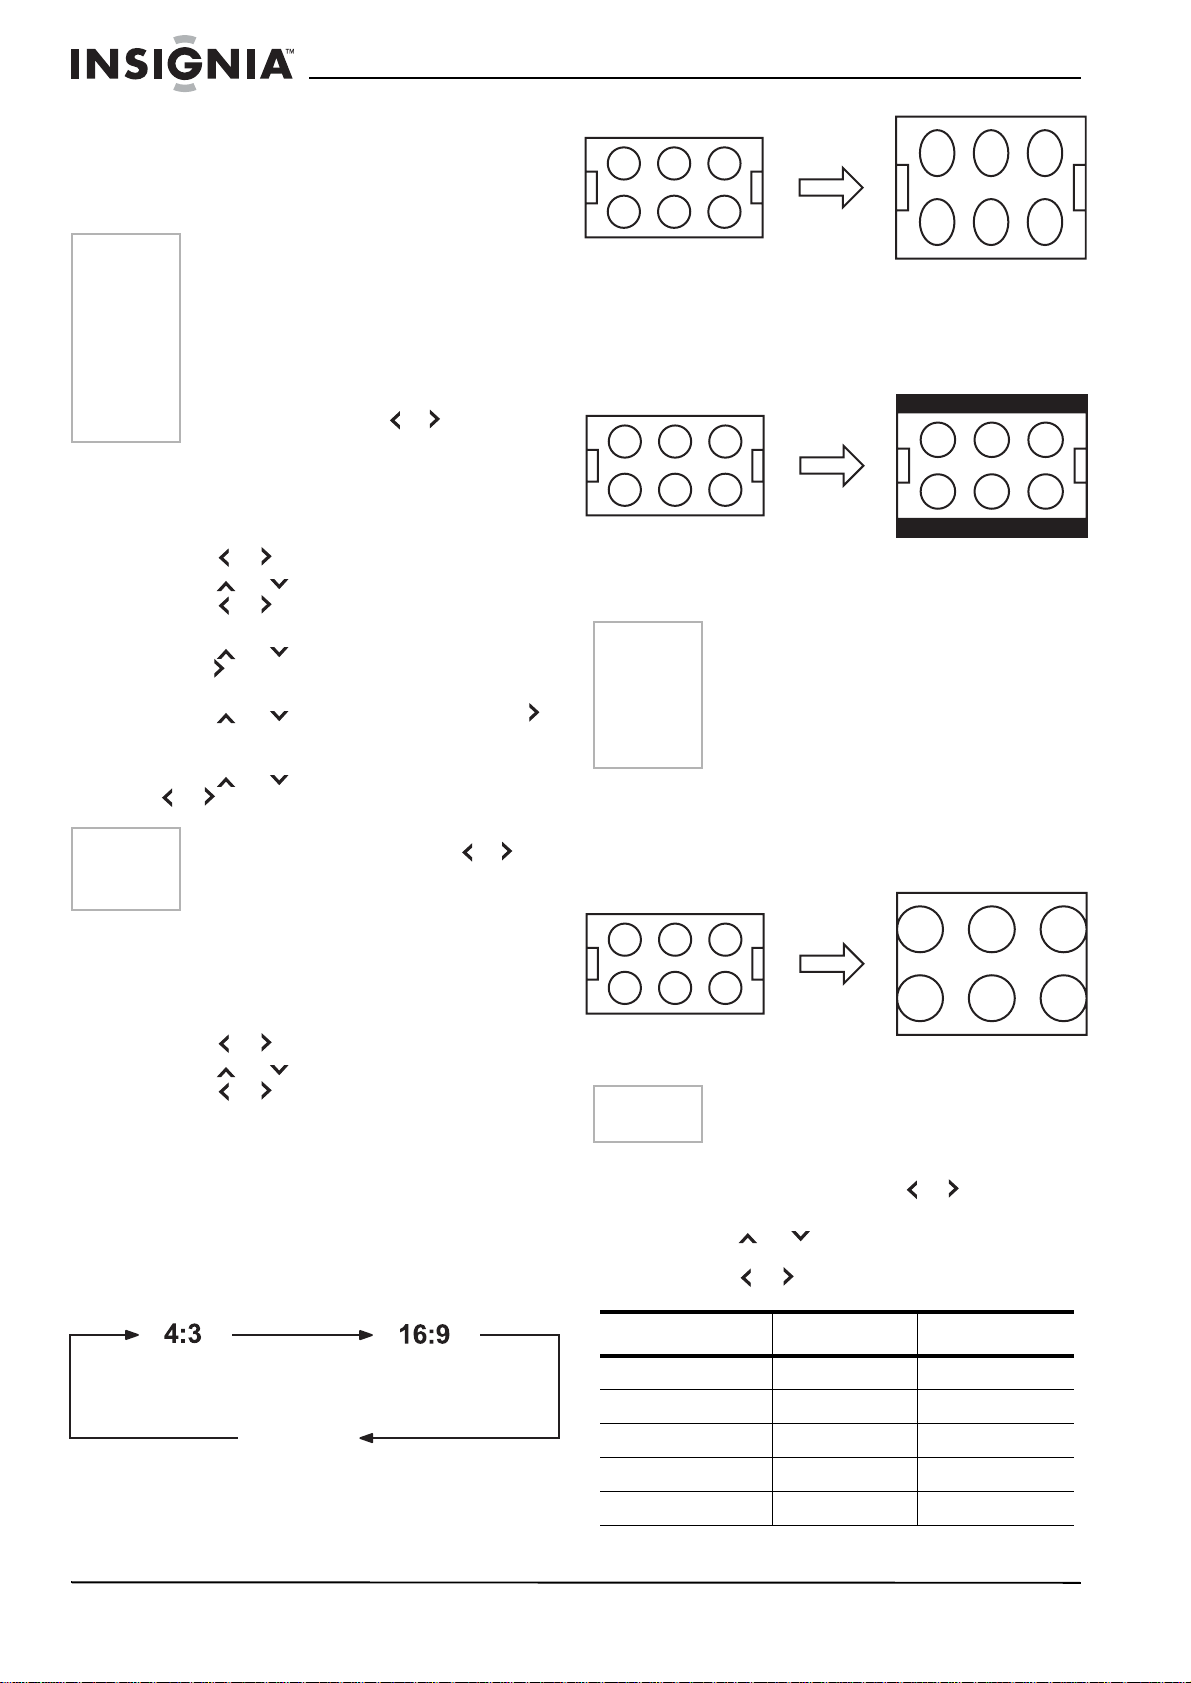
If receiving a 4:3 format program, the image is
displayed in its originally formatted proportion.
16:9 picture size
This image displays the size of standard 16:9
with black bars at the top and bottom.
If receiving a 4:3 format program, the image is
displayed with black bars at the top and bottom
and stretched wider.
Note
If a fixed black bar remains on the screen for
long periods of time, the image can become
permanently engrained in the screen and
cause subtle but permanent ghost images.
Never leave your television on for long
periods of time while it is displaying these
images.
ZOOM picture size (for 16:9 format programs)
The entire picture is uniformly enlarged—it is
stretched the same amount both wider and taller
(retains its original proportion). The right and left
edges of the picture may be hidden.
9 Press EXIT to return to the normal screen.
Enable or disable the ON/OFF TIMER function
To turn on or turn of the On/Off Timer:
1 Press MENU.
2 Press or to select the OPTION menu.
3 Press
or to select ON/OFF TIMER.
4 Press or to select ON or OFF.
ON: Timer setting is enabled.
OFF: Timer setting is disabled.
5 Press EXIT to return to the normal screen.
Setting the picture size
You can view 480i format programs in three
picture sizes—4:3, 16:9 and ZOOM.
You can change the picture size by pressing the
PICTURE SIZE button on the remote control.
ZOOM
4:3 picture size
To fill the screen, the top and bottom edges are
extended more widely , although the center of the
picture remains near the former ratio.
Adjusting the picture
Note
To adjust the picture:
1 Press MENU, then press or to select the
2 Press
3 Press or to ad ju st the settin g.
Item < >
BRIGHTNESS decrease increase
CONTRAST decrease increase
COLOR paler color brilliant co lor
TINT reddish tint greenish tint
SHARPNESS softer picture clearer picture
The CONTRAST default setting is set to
maximum at the factory.
PICTURE menu.
or to select the item you want to
adjust.
14
www.insignia-products.com
Page 16

NS-FTV27 27-inch Flat Stereo Color TV
4 After modifying your desired setting, press
EXIT to return to normal screen.
Resetting your picture adjustment
The RESET function returns your picture quality
adjustments to the following factory settings:
Item Value
BRIGHTNESS center (25)
CONTRAST max (50)
COLOR center (25)
TINT center (0)
SHARPNESS center (25)
1 Press MENU, then press or to select the
PICTURE menu.
2 Press
or to select RESET, then press
.
Note
When you press RESET in the PICTURE
menu, the picture adjustments return to the
factory preset le vels.
Controlling closed captioning
This television has the capability to decode and
display closed captioned television programs.
Closed capti oning displa ys t e xt on the screen for
hearing-impaired viewers or translates and
displays text in another language.
Captions: This closed caption mode displays
text on the screen in English or another
language. Generally, closed captions in English
are transmitted on C1 and closed captions in
other languages are transmitted on C2.
Text: The text closed caption mode usually fills
½ of the screen with a programming schedule or
other information.
Notes
• If the program or v ideo yo u select is not
closed-captioned, no captions display
on-screen.
• If text is not available in your viewing
area, a black rect angle may appear
on-screen. If this happens, set the
closed caption feature to OFF.
• When selecting closed captions, the
captioning delays about ten seconds.
• If no caption signal is received, no
captions appear, but the television
remains in the caption mode.
• Misspellings or unusual characters
may occasi onally a ppear durin g closed
captioning. This is normal with closed
captioning, especially with live
programs. This is because during live
programs, captions are also entered
live. These transmissions do not allow
time for editing.
• When captions are being displayed,
on-screen displays, such as volume
and mute, may be seen but may
interfere with closed captions.
• Some cable television systems and
copy protection systems may interfere
with the closed captioned signal.
• If using an indoor antenna or if
television reception is very poor, the
closed caption decoder may not
appear or may appear with strange
characters or misspelled words. In this
case, adjust the antenna for better
reception or use an outdoor antenna.
To turn on closed captions:
1 Tune the television to the desired program.
2 Press MENU, then press or to display
the SETUP menu.
3 Press
or to sele ct CL OSED CAPTION.
When an analog signal is received, you can
choose C1, C2, T1, T2, and OFF.
When a digital signal is received, you can
choose from CS1, CS2, CS3, CS4, CS5,
CS6, C1, C2, C3, C4, T1, T2, T3, T4, and
OFF.
Notes
4 Press or to select the desired closed
caption mode.
Note
To turn the closed caption feature off, select
OFF.
5 Press EXIT to return to the normal screen.
Adjusting closed captioning
Closed capt ions a re fa ctory preset . How ev er you
can adjust them individually. This feature is
designed to customize digital captions only.
Note
To adjust closed captioning:
1 Press MENU. The menu screen appears.
www.insignia-products.com
Do not set the closed captio n TEXT COLOR
and BACKGROUND COLOR the same, or
you will not be able to see the text.
• Depending on the broadcast signal,
some analog captions functi on with a
digital broadcast signal.
• This screen can be displayed by
pressing CLOSED CAPTION.
15
Page 17
NS-FTV27 27-inch Flat Stereo Color TV
2 Press or to select the SETUP menu.
3 Press
or to select CC ADVANCED,
then press . The CC ADVANCED menu
appears.
4 Press
or to sel e ct th e it em you want t o
adjust, then press or .
5 Press
or to select the setting, then
press ENTER.
You can select from among the following
items and parameters.
• TEXT SIZE: AUTO, SMALL, STANDARD,
LARGE
• TEXT TYPE: A UT O , DEFAULT , MONO W.
SERIF, PROP. W. SERIF, MONO W/O
SERIF, PROP. W/O SERIF, CASUAL,
CURSIVE, SMALL CAPITALS
• TEXT COLOR: AUTO, BLACK, WHITE,
RED, GREEN, BLUE, YELLOW,
MAGENTA, CYAN
• TEXT EDGE: AUTO, NONE, RAISED,
DEPRESSED, UNIFORM, LEFT DROP
SHADOW, RIGHT DROP SHADOW
• BA CKGROUND COLOR: A UT O , BLA CK,
WHITE, RED, GREEN, BLUE, YELLOW,
MAGENTA, CYAN
6 Press EXIT to return to the normal screen.
Selecting Stereo/Second A udio Pr ogr am (SAP)
The multi-channel TV sound (MTS) feature
provides high-fidelity stereo sound. MTS also
can transmit a second audio program (SAP)
containing a second language or other audio
information. When the television receives a
stereo or SAP broadcast, the word STEREO or
SAP displays on-screen every time you turn the
television on, change the channel, or press
-/DISPLAY.
To select Stereo/Second Audio Program:
1 Press MENU, then press or to select the
AUDIO menu.
2 Press
or to select MTS.
3 Press or to select STR (Stereo).
4 Press EXIT to return to the normal screen.
Notes
• Generally, you can leave your
television in stereo mode because the
television automatically outputs the
type of sound being broadcast (stereo
or mono).
• If the stereo sound is noisy, select
MONO to reduce the noise.
To listen to a second audio program (SAP):
1 Press MENU, then press or to select the
AUDIO menu.
2 Press
or to select MTS.
3 Press or to select SAP.
The television speakers output the second
audio program instead of normal audio.
Selecting the digital output
You can choose the format of the digital audio
output signal.
2 Press
or to select DIGITAL OUTPUT.
3 Press or to select PCM or DOLBY
DIGITAL.
4 Press EXIT to return to the normal screen.
Selecting the audio language
When two or more audio languages are included
in a digital signal, you can select one of the
audio languages.
To select the audio language:
1 Press MENU, then press or to select the
AUDIO menu.
2 Press
or to select AUDIO
LANGUAGE, then press or to display
the AUDIO LANGUAGE menu.
3 Press
or to select your desired
language, then press ENTER.
4 Press EXIT to return to the normal screen.
Resetting your audio adjustments
The RESET function returns the audio
adjustments to the following factory settings:
Item Value
MTS STEREO
DIGITAL OUT PUT PCM
To reset the audio adjustments:
1 Press MENU, then press or to select the
AUDIO menu.
2 Press
or to select RESET, then press
.
Note
When you press RESET in the AUDIO
menu, the audio adjustments return to the
factory preset levels.
Checking the digital signal strength
This television allows you to view the digital
signal meter for digital channels.
Notes
To check the digital signal strength:
1 Press MENU, then press or to select the
2 Press
3 Press or to check the digital-signal
4 Press EXIT to return to the normal screen.
• The signa l meter feature is not
available for analog chan nel s .
• After four minutes, the SIGNAL
METER screen returns to normal
television-operation automatically.
SETUP menu.
or to select SIGNAL METER.
strength.
To select the digital output:
1 Press MENU, then press or to select the
AUDIO menu.
16
www.insignia-products.com
Page 18

NS-FTV27 27-inch Flat Stereo Color TV
Specifications
Design and specifications are subject to change
without notice.
Power supply AC 120V, 60 Hz
Power Consumption
Operation 110 Watts
Standby 3 Watts
Chassis Construction
Weight 88.2 lbs. (40.0 kg)
Width 29-1/8 inches (740 mm)
Height 22-5/8 inches (575 mm)
Depth 19-7/16 inches (494.5 mm)
Inputs
VIDEO 1 V (p-p)/75 ohms
AUDIO –8 dBm/50k ohms
S-VIDEO Y: 1 V (p-p), 75 ohms
C: 0.286 V (p-p), 75 ohms
COMPONENT Y: 1 V (p-p), 75 ohms
PR: 0.7 V (p-p), 75 ohms
PB: 0.7 V (p-p), 75 ohms
Output
DIGITAL AUDIO 0.5 V (p-p), 75 ohms
Other
Antenna input VHF/UHF/CABLE In 75 ohm
coaxial
Picture tube 27 inches (676.0 mm diagonal)
Tuner type Quartz PLL frequency
synthesized
Receiving channels VHF 2-13
UHF 14-69
CABLE TV 14-36 (A)-(W)
37-59 (AA)-(WW)
60-85 (AAA)-(ZZZ)
86-94 (86)-(94)
95-99 (A-5)-(A-1)
100-125 (100)-(125)
01 (5A)
Speakers 1-13/16 inches (45.7 mm) x
3-7/8 inches (99.1 mm), 8 ohm
x 2
Sound output power 1.0 W + 1.0 W
Troubleshooting
Use the following checklist for troubleshooting
when you have problems with your television.
Consult your local dealer or service outlet if
problems persist. Be sure all connections are
properly made when using with other units.
Problem Solution
Television does not
operate.
Poor sound or no
sound.
Poor picture or no
picture.
Poor reception on
some channels.
Poor color or no
color.
Picture wobbles or
drifts.
Digital
broadcasting
screen problem.
No CATV
reception.
Horizontal or
diagonal bars on
screen.
• Make sure the power cord is
plugged in.
• Try another AC outlet.
• Power is off. Check fuse or
circuit breaker.
• Unplug television for an hour,
then plug it back in.
• Station or cable experiencing
problems. Tune to another
station.
• Check sound adjustments
(volume and mute).
• Check for sources of possible
interference.
• Station or cable experiencing
problems. Tune to another
station.
• Make sure chan nels are set in to
memory.
• Check antenna or cable
connections. Adjust the
antenna.
• Check for sources of possible
interference.
• Check picture control
adjustments.
• Station or cable experiencing
problems. Tune to another
station.
• Make sure chan nels are set in to
memory.
• Station is weak. Adjust the
antenna to receive the desired
station.
• Check for sources of possible
interference.
• Station or cable experiencing
problems. Tune to another
station.
• Make sure chan nels are set in to
memory.
• Check picture control
adjustments.
• Check antenna or cable
connections. Adjust the
antenna.
• Check for sources of possible
interference.
• Station or cable experiencing
problems. Tune to another
station.
• Make sure chan nels are set in to
memory.
• Cable company is scrambling
signal.
• Adjust antenna.
• Check digital signal strength.
• Check all cable connections.
•Set TV/CABLE menu option to
the CABLE mode.
• Station or cable system
problems. Try another station.
• Check antenna connections.
• Adjust or re-direct antenna.
• Check for sources of possible
interference.
www.insignia-products.com
17
Page 19
NS-FTV27 27-inch Flat Stereo Color TV
Problem Solution
No reception abo ve
channel 13.
No remote
operation.
Television shuts off. • No broadcast on tuned station.
Closed Caption is
not activated.
• Make sure the TV/CABLE
menu option is in the
appropriate mode.
• If using an antenna, check the
UHF antenna connections.
• Batteries are weak, dead, or
inserted incorrect ly.
• Remote is out of range. Move
closer to television (within 15
feet).
• Make sure the remote is aimed
at the sensor.
• Confirm there are no
obstructions between the
remote and the television.
• Make sure the power cord is
plugged in.
• Sleep timer is set.
• Power interrupted.
• Television station experiencing
problems or program is not
closed captioned. Try another
channel.
• Check cable connection or
VHF/UHF antenna. Reposition
or rotate antenna.
• Set closed caption decoder in
the menu.
Canadian Notice
This Class B digital apparatus meets all
requirements of the Canadian
Interference-Causing Equipment Regulations.
Avis Canadien
Cet appareil numérique de la Class B respecte
toutes les exigences du Règlement sur le
matériel brouilleur du Canada.
© 2006 Insignia. Insignia and the Insignia logo are
trademarks of Best Buy Enterprise Services, Inc. Other
brands and product names are trademarks or
registered trademarks of their respective holders.
Specifications and features are subject to change
without notice or obligation.
Display is not
shown in your
language.
• Select correct language in the
menu options.
Regulatory Statements
Federal Communications Commission Radio Frequency Interference Statement
This equipment has been tested and found to
comply with the limits for a Class B digital
device, pursuant to Part 15 of the FCC Rules.
These limits are designed to provide reasonable
protection against harmful interference in a
residential installation. This equipment
generates, uses, and can radiate radio
frequency energy and, if not installed and used
in accordance with the instructions, may cause
harmful interference to radio communications.
However, there is no guarantee that interference
will not occur in a particular installation. If this
equipment does cause harmful interference to
radio or television reception, which can be
determined by turning the equipment off and on,
the user is encouraged to try to correct the
interference by one or more of the following
measures:
• Reorient or relocate the receiving antenna.
• Increase the separation between the
equipment and receiver.
• Connect the equipment to an outlet on a
circuit different from that to which the receiver
is connected.
• Consult the dealer or an experienced radio or
television technician for help.
Caution
18
Any changes or modifications not expressly
approved by the party responsible for
compliance coul d void the user’s authority to
operate the equipment.
www.insignia-products.com
Page 20

NS-FTV27 27-inch Flat Stereo Color TV
Warranty
1-year limited warranty
Insignia Products (“Insignia”) warrants to you, the original
purchaser of this new 27” Flat Screen TV (“Product”), that
the Product shall be free of defects in the original
manufacture of the material or workmanship for a period of
one (1) year from the date of your purchase of the Product
(“Warranty Period”). This Product must be purchased from
an authorized dealer of Insignia brand products and
packaged with this warranty statement. This warranty does
not cover refurbished Product. If you notify Insignia during
the Warranty Period of a defect cov ered by this warranty that
requires service, terms of this warranty apply.
How long does the coverage last?
The Warranty Period lasts for 1 year (365 days) from the date
you purchased the Product. The purchase date is printed on
the receipt you received with the Product.
What does this warranty cover?
During the Warranty Period, if the original manufacture of the
material or workmanship of the Product is determined to be
defective by an authorized Insignia repair center or store
personnel, Insignia will (at its sole option): (1) repair the
Product with new or rebuilt parts; or (2) replace the Product
at no charge with new or rebuilt comparable products or
parts. Products and parts replaced under this warranty
become the property of Insignia and are not returned to you.
If service of Products or parts are required after the Warranty
Period expires, you must pay all labor and parts charges.
This warranty lasts as long as you own your Insignia Product
during the Warranty Period. Warranty coverage terminates if
you sell or otherwise transfer the Product.
How to obtain warranty service?
If you purchased the Product at a retail store location, take
your original receipt and the Product to the store you
purchased it from. Make sure that you place the Product in
its original packaging or packaging that provides the same
amount of protection as the original packaging. If you
purchased the Product from an online web site, mail your
original receipt and the Product to the address listed on the
web site. Make sure that you put the Product in its original
packaging or packaging that provides the same amount of
protection as the original packaging.
Where is the warranty valid?
This warranty is valid only to the original purchaser of the
product in the United States and Canada.
What does the warranty not cover?
This warranty does not cover:
• Customer instruction
• Installation
• Set up adjustments
• Cosmetic damage
• Damage due to acts of God, such as lightning strikes
• Accident
•Misuse
•Abuse
• Negligence
• Commercial use
• Modification of any part of the Product, including the
antenna
This warranty also does not cover:
• Damage due to incorrect operation or maintenance
• Connection to an incorrect voltage supply
• Attempted repair by anyone other than a facility
authorized by Insignia to service the Product
• Products sold as is or with all faults
• Consumables, such as fuses or batteries
• Products where the factory applied serial number has
been altered or removed
REPAIR REPLACEMENT AS PROVIDED UNDER THIS
WARRANTY IS YOUR EXCLUSIVE REMEDY. INSIGNIA
SHALL NOT BE LIABLE FOR ANY INCIDENTAL OR
CONSEQUENTIAL DAMAGES F OR THE BREA CH OF ANY
EXPRESS OR IMPLIED WARRANTY ON THIS PRODUCT,
INCLUDING, BUT NOT LIMITED T O , LOST D ATA, LOSS OF
USE OF YOUR PRODUCT, LOST BUSINESS OR LOST
PROFITS. INSIGNIA PR ODUCTS MAKES NO OTHER
EXPRESS WARRANTIES WI T H RE SP EC T TO THE
PRODUCT, ALL EXPRESS AND IMPLIED WARRANTIES
FOR THE PRODUCT, INCLUDING, BUT NOT LIMITED TO,
ANY IMPLIED WARRANTIES OF AND CONDITIONS OF
MERCHANTABILITY AND FITNESS FOR A PARTICULAR
PURPOSE, ARE LIMITED IN DURATION TO THE
WARRANTY PERIOD SET FOR T H ABOVE AND NO
WARRANTIES, WHETHER EXPRESS OR IMPLIED, WILL
APPLY AFTER THE WARRANTY PERIOD. SOME STATES,
PROVINCES AND JURISDICTIONS DO NO T ALLOW
LIMITATIONS ON HOW LONG AN IMPLIED WARRANTY
LASTS, SO THE AB OVE LIMITATION MAY NOT APPLY TO
YOU. THIS WARRANTY GIVES YOU SPECIFIC LEGAL
RIGHTS, AND YOU MAY ALSO HAV E OTHER RIGHTS,
WHICH VARY FROM STATE TO STATE OR PROVINC E TO
PROVINCE.
www.insignia-products.com
19
Page 21

NS-FTV27 27-inch Flat Stereo Color TV
20
www.insignia-products.com
Page 22

NS-FTV27 27-inch Flat Stereo Color TV
Bienvenue
Félicitations d’avoir acheté ce produit In signia de
grande qualité. Le modèle NS-FTV27 représente la
dernière avancée technologique dans la conception de
téléviseur et a été conçu pour des performances et une
fiabilité exceptionnelles.
Table des matières
Introduction. . . . . . . . . . . . . . . . . . . . . . . . . . . . . . .21
Information sur la sécurité . . . . . . . . . . . . . . . . . . .21
Fonctionnalités . . . . . . . . . . . . . . . . . . . . . . . . . . . .23
Configuration du téléviseur. . . . . . . . . . . . . . . . . . .25
Fonctionnement du téléviseur . . . . . . . . . . . . . . . .30
Spécifications . . . . . . . . . . . . . . . . . . . . . . . . . . . . .39
Problèmes et solutions . . . . . . . . . . . . . . . . . . . . . .40
Déclarations réglementaires. . . . . . . . . . . . . . . . . .40
Garantie . . . . . . . . . . . . . . . . . . . . . . . . . . . . . . . . .43
Introduction
Ce manuel explique comment installer
correctement, faire fonctionner et obtenir les
meilleures perf ormances de ce téléviseur. Lire
ce guide de l’utilisateur avec attention avant
d’installer le téléviseur et le conserver à
proximité de ce dernier pour pouvoir s’y référer
rapidement.
Vérification du contenu du carton d’expédition :
• Téléviseur en couleurs
• Télécommande
•
Guide de l’utilisateur
Si un article manque ou est endommagé,
contacter Insignia au (877) 467-4289. Conserver
le carton et le matériel d’emballage afin de
pouvoir ranger ou transporter correctement le
téléviseur.
Télécommande universelle
Si une télécommande universelle est achetée
auprès d’un détaillant local, contacter le
fabricant pour obtenir le code de programmation
nécessaire.
Sélection du mode TV/Câble
Au départ de l'usine, l’option de menu
TV/CÂBLE est réglée sur le mode CABLE
(Télévision par câble). Si l’appareil n’est pas
raccordé à la télévision par câble, régler cette
option de menu sur TV.
Information sur la sécurité
CAUTION:
ELECTRIC
COVER
PARTS INSIDE. REFER SERVICING
QUALIFIED SERVICE PERSONNEL.
AVERTISSEMENT :
AFIN D’ÉVITER UN INCENDIE OU UN CHOC
ÉLECTRIQUE, CET APPAREIL NE DOIT PAS ÊTRE
EXPOSÉ À L’HUMIDITÉ OU À DE L'EAU.
TO REDUCE THE RISK OF
SHOCK, DO NOT REMOVE
(OR BACK). NO USER-SERVICEABLE
TO
The lightning flash with arrowhead symbol, within an
equilateral triangle is intended to alert the user to the
presence of uninsulated dangerous voltage within the
product’s enclosure that may be of sufficient magnitude
to constitute a risk of electric shock.
The exclamation point within an equilateral triangle is
intended to alert the user to the presence of important
operating and maintenance (servicing) instructions in the
literature accompanying the appliance.
Précaution Tous changements ou modifications qui ne
Précaution Pour éviter les chocs électriques, ne pas
seraient pas expressément approuvés par
les responsables des règles FCC
pourraient rendre nul le droit de l’utilisateur
d’utiliser cet équipement.
utiliser la prise polarisée avec une prise de
rallonge ou d’autres prises à moins que les
plots ne s’y enfoncent entièrement.
Importantes mesures de sécurité
• Lire l’intégralité de ces instructions.
• Ces instructions doivent être conservées
pour une utilisation ultérieure.
• Débrancher le téléviseur de la prise de
courant avant tout nettoyage. Utiliser un
chiffon sec pour le nettoyage. Ne pas utiliser
de nettoyants liquides ou en aérosol.
• Pour écarter tous dangers, n’utiliser que des
accessoires recommandés par le fabricant
du téléviseur.
• Ne pas utiliser ce téléviseur à proximité de
l’eau (baignoire, évier ou piscine).
• Ce téléviseur ne doit
pas être placé sur
une table, une
étagère ou un chariot
instables. Le
téléviseur peut dans
sa chute blesser
sérieusement un
enfant ou un adulte et
être gravement
endommagé.
• Les fentes et ouvertures sur les côtés, au dos
et au bas du boîtier sont prévues pour la
ventilation, pour assurer un fonctionnement
fiable du téléviseur et le protéger contre toute
surchauffe.
Ces ouvertures ne doivent être ni bloquées ni
obstruées. Elles ne doivent jamais être
bloquées en installant le téléviseur sur un lit,
un sofa, une moquette ou toute autre surface
semblable. Ce téléviseur ne doit jamais être
positionné à proximité ou sur un radiateur, ou
une bouche de chauffage.
Il ne doit pas non plus être installé dans un
meuble encastré comme une bibliothèque,
sauf si une ventilation adéquate est installée.
• Ce téléviseur doit fonctionner conformément
à la source d’alimentation indiquée sur les
étiquettes. En cas d’incertitude sur la tension
d'alimentation de la maison, consulter le
revendeur ou la compagnie d'électricité.
Avertissement sur la
table roulante
(symbole fourni par
RETAC)
www.insignia-products.com
21
Page 23

NS-FTV27 27-inch Flat Stereo Color TV
• Ce téléviseur est équipé d'une prise de
courant CA polarisée (à deux plots, un plus
large que l'autre). Cette fiche ne s'insère
dans une prise murale que d'une seule façon.
Il s'agit d'une caractéristique de sécurité. S’il
est impossible d’introduire à fond la fiche
dans la prise murale, essayer de retourner la
prise. Si la fiche ne s'adapte toujours pas à la
prise murale, contacter un électricien afin
qu’il remplace la prise inadéquate. Ne pas
chercher à modifier le dispositif de sécurité
de la prise polarisée.
• Le cordon d’alimentation de ce téléviseur ne
doit pas se trouver dans un lieu de passage
et aucun objet ne doit reposer dessus.
• Respecter tous les avertissements et
instructions apposés sur le téléviseur.
• Si l'appareil est connecté à une antenne
extérieure ou à un réseau câblé, s'assurer
que l'antenne ou la connexion au réseau
câblé est mise à la terre afin de bénéficier
d'une certaine protection contre les sautes
de courant et les charges électrostatiques
L'article 810 du Code national de l’électricité
(CNE), ANSI/NFPA 70, fournit des
informations relatives à la mise à la terre
correcte du mât et du support, la mise à la
terre du fil conducteur de l’antenne à l’unité
de décharge de l’antenne, la taille des
conducteurs de mise à la terre,
l’emplacement de l’unité de décharge de
l’antenne, la connexion aux conducteurs de
terre ainsi que les normes en matière de
prise de terre.
7
6
5
4
3
1
Référence
1 Équipement de la compagnie
2 Système de mise à la terre de s
3 Serre-fil de mise à la terre
4 Conducteurs de mise à la terre
5 Unité de décharge de l’an tenne
6 Serre-fil de mise à la terre
7 Fil conducteur de l’antenne
Composant de mise à la
terre
d'électricité
électrodes de la compagnie
d’électricité
(CNE Art 250, Part H)
(CNE, Section 810-21)
(CNE, Section 810-20)
2
• Utiliser des fils en cuivre n° 10 AWG
(5,3 mm
(8,4 mm
n° 17 AWG (1,0 mm
2
), en aluminium n° 8 AWG
2
), en acier cuivré ou en bronze
2
) ou plus gros
comme fils de terre.
• Raccorder le fil conducteur de l’antenne
et les fils de terre à la maison au moyen
d’isolateurs muraux espacés de 1,22 à
1,83 m (4 à 6 pieds).
• Monter le fil conducteur de l’antenne
aussi près que possible du point d’entrée
de la maison.
• Utiliser un cavalier d'au moins la taille d'un
fil de cuivre n° 6A WG (13,3 mm
2
) ou
équivalent lorsqu’un conducte ur de terre
d’antenne séparé est utilisé. Voir
ANSI/NFPA70.
• L’antenne externe ne doit pas être située près
de lignes électrique s aériennes ni à un
emplacement où elle pourrait tomber sur de
tels circuits ou lignes électriques. Lors de
l'installation d'une antenne externe, faire très
attention de ne pas toucher de telles lignes
électriques ou circuits car tout contact peut
être mortel.
• Pour protéger le téléviseur pendant un orage
ou s’il se trouve inutilisé et sans surveillance
pendant de longues périodes, le débrancher
de la prise murale et débrancher l'antenne ou
la connexion au réseau câblé. Ceci évitera
d’endommager l'appareil en cas de foudre et
de variations de tension du secteur.
• Les prises murales et les rallonges ne
doivent pas être surchargées, ce qui pourrait
provoquer des risques d'incendie ou de choc
électrique.
• N’enfoncer en aucun cas un objet dans les
ouvertures du boîtier du téléviseur qui
pourrait entrer en contact avec des tensions
dangereuses ou provoquer un court-circuit à
l'origine d'un incendie ou d'un choc
électrique. Ne jamais répandre un liquide sur
le téléviseur.
• L’utilisateur ne doit pas essayer de réparer ce
téléviseur lui-même, en effet son ouverture
ou le démontage des couvercles peut
l’exposer à des tensions dangereuses et à
d'autres dangers. Toutes les réparations
doivent être effectuées par du personnel
qualifié.
• Débrancher ce téléviseur de la prise murale
et utiliser les services d’un technicien qualifié
dans les conditions suivantes :
• Lorsque le cordon d’alimentation est
effiloché ou la prise endommagée.
• Si un liquide a été répandu sur le
téléviseur.
• Si le téléviseur a été exposé à la pluie ou
à l’eau.
• Si le téléviseur fonctionne anormalement
en appliquant les instructions d’utilisation.
Ne régler que les commandes décrites
dans les instructions d’utilisation ; en effet,
un réglage incorrect d’autres commandes
pourrait provoquer des détériorations
entraînant souvent d'importantes
réparations par un technicien qualifié afin
de rétablir un fonctionnement normal.
22
www.insignia-products.com
Page 24

NS-FTV27 27-inch Flat Stereo Color TV
• Si le téléviseur est tombé ou si le boîtier a
été endommagé.
• Détérioration marquée des performances
du téléviseur.
• Si des pièces doivent être remplacées,
s’assurer que le technicien a utilisé des
pièces spécifiées par le fabrican t ayant les
mêmes caractéristiques que celles d’origine.
Toute substitution par des pièces non
autorisées peut provoquer un incendie, un
choc électrique ou d'autres dangers.
• Les réparations ou la maintenance ayant été
effectuées, demander au technicien de
réaliser les contrôles de sécurité de routine
afin de déterminer que ce téléviseur peut
fonctionner sans danger.
Avis à l'installateur de TV câblée
Le présent avis a pour objet de rappeler à
l'installateur de systèmes de câblodistribution
que l'article 820 40 du Code national de
l'électricité (CNE) contient des
recommandations relatives à la mise à la terre
de l'appareil et, en particulier, stipule que la terre
du câble doit être connectée au système de
mise à la terre de l'immeuble, aussi prêt que
possible du point d'entrée du câble.
Fonctionnalités
• Réception stéréo/SAP – Le téléviseur est
conçu pour recevoir des émissions diffusées
en stéréo et avec une deuxième trame
sonore (SAP), si disponibles.
• Prises S-Vidéo/vidéo à composantes – Il
est possible de brancher à cet appareil un
magnétoscope, un lecteur de DVD, un
récepteur satellite ou une autre composante
audio-vidéo.
• Prises d’entrée vidéo – Ce téléviseur est
équipé de trois types de prises d'entrée
vidéo. Les prises d'entrée vidéo à
composantes et la prise d'entrée S-Vidéo
permettent de regarder le lecteur de DVD ou
les périphériques vidéo avec une image de
haute qualité.
• Affichage à l'écran en 3 langues – La
programmation à l'écran peut s'effectuer en
anglais, en espagnol ou en français.
* Fabriqué sous licence de Dolby Laboratories. «
Dolby » et le symbole à double D sont des
marques de commerce de Dolby Laboratories.
Pièces et fonctionnalités
Avant
• Une image de haute qualité – la résolution
horizontale de plus de 500 lignes dépasse
celle du Super VHS (400 lignes) ou du
disque laser (430 lignes).
• Compatible avec une large gamme de sorties
audio.
• Prise audio numérique (coaxiale) –
Lorsqu'un composant avec un décodeur
Dolby Digital intégré est connecté, le son
Dolby Digital peut donner l'impression que
l'on se trouve dans une salle de cinéma ou
de concer t..
• Syntoniseur numérique intégré – Il est
possible de visualiser des émissions
numériques sans utiliser un décodeur de TV
numérique.
• Décodeur de sous-titres avec mode plein
texte – Affiche des sous-titres codés ou du
texte sur la totalité de l'écran pour que les
téléspectateurs malentendants.
• Réglages de l'image à l'aide de la
télécommande – L'affichage à l'écran
permet un réglage précis au moyen de la
télécommande de la luminosité, du contraste,
de la couleur, de la teinte et de la netteté.
• Arrêt différé programmable du téléviseur
– À partir de la télécommande, il est possible
de programmer le téléviseur pour qu'il
s'éteigne automatiquement après une
période maximale de 120 minutes.
• Puce antiviolence (V-Chip) – La puce
antiviolence peut lire la classification d'une
émission TV ou d'un film si l'émission
concernée est encodée avec cette
information. La puce antiviolence permet à
l’utilisateur de définir un niveau de
restrictions.
Touche POWER
(Mise sous/hors
tension)
Capteur de la télécommande
Arrière
Prise
RF IN
[Entrée
RF]
(VHF/
UHF)
Prise
d'entrée
S-VIDEO
(S-Vidéo)
Prises d’entrée AUDIO L/R
(Audio G/D) et VIDEO (VIDEO2)
Prise COAXIAL
DIGITAL AUDIO
OUT (Sortie
audio coaxiale
numérique)
Prises d’entrée
AUDIO L/R (Audio
G/D) et VIDEO
(VIDEO1)
Prises
COMPONENT
IN (Entrées
vidéo à
composantes)
Cordon
d’alimentation
CA
www.insignia-products.com
23
Page 25

NS-FTV27 27-inch Flat Stereo Color TV
Télécommande
1
2
3
4
5
6
7
8
Identification des touches
/
PICTURE
Touche Description
4 ARRÊT
DIFFÉRÉ
9
10
11
12
13
SIZE
14
15
16
5 VOL +/- Appuyer sur la touche + pour
Pour que le téléviseur s'éteigne
après une durée déterminée,
appuyer sur la touche SLEEP
(Arrêt différé) de la
télécommande. L’horloge
compte10 minutes maximum
chaque fois que la touche est
appuyée selon la séquence
0h00m, 0h10m,...1h50m, 2h00m.
Quand l'arrêt différé a été
programmé, l'affichage disparaît
puis réapparaît brièv emen t toutes
les dix minutes pour ra ppeler que
le temporisateur d'arrêt
automatique fonctionne. Pour
confirmer le réglage du
temporisateur d'arrêt
automatique, appuyer sur la
touche SLEEP (Arrêt différé) et le
temps restant s'affiche
brièvement à l’écran. Pour
annuler l’arrêt différé, appuyer de
façon répétée sur la touche
SLEEP (Arrêt différé) jusqu'à
l'affichage de « 0h00m ».
augmenter le volume. Appuyer
sur la touche - pour diminuer le
volume. Utiliser ces touches pour
sélectionner le réglage souhaité
dans les menus d’écran.
Touche Description
1 MISE SOUS
TENSION
2 Sélection
directe des
canaux (0-9)
3 -/AFFICHAGE Lorsque le téléviseur reçoit un
Appuyer sur cette touche pour
mettre l’appareil sous tension.
Appuyer de nouveau sur cette
touche pour mettre l’app areil hors
tension.
Pour se rendre directement à un
canal quelconque.
signal analogique, appuyer sur
cette touche pour afficher les
informations y afférentes.
Lorsque le téléviseur reçoit un
signal numérique, appuyer une
fois sur cette touche pour afficher
les données numériques y
afférentes. Appuyer une
deuxième fois sur cette touche
pour afficher les données
analogiques. Pour annuler cet
affichage, appu yer de nouv eau de
cette touche. Cette touche est
également la touche - utilisée
pour la sélection de canaux
numériques.
6 MENU Pour afficher la fonction de menu
7 QUITTER Pour annuler l’écran de menu.
8 TV/AV Appuyer sur cette touche pour
9 AFFICHAGE
RAPIDE
10 SOURDINE Appuyer une fois sur cette touche
11 CH / Appuyer sur la touche pour
d’écran.
afficher le menu SOURCE
SELECTION (Sélection source)
et sélectionner la source d’entrée
vidéo.
Appuyer sur cette touche pour
retourner au canal syntonisé
précédemment. Appuy er de
nouveau sur cette touche pour
retourner au canal antérieur.
pour éteindre le s on. Le télévis eur
est mis en sourdin e et le symbole
MUTE apparaît sur l’écran. La
fonction de mise e n sourdin e peut
être désactivée en appuyant de
nouveau sur MUTE ou sur la
touche VOL + ou - .
syntoniser le canal mé mo risé au
numéro le plus éle vé. Appuyer s ur
la touche pour syntoniser le
canal mémorisé au numéro le
plus bas. Utiliser cette touche
pour sélectionner le réglage
souhaité lors de l’affichage du
menu.
24
12 ENTRÉE Appuyer sur cette touche pour
saisir ou sélectionner des
opérations lorsque le menu
d'écran est affiché.
13 RÉINITIALISER Appuyer sur cette touche pour
rétablir les param ètres d’ image et
de son préréglés en usine.
www.insignia-products.com
Page 26

NS-FTV27 27-inch Flat Stereo Color TV
Touche Description
14 SOUS-TITRES
CODÉS
15 SÉLECTION
AUDIO
16 TAILLE DE
L’I MAGE
Permet d'afficher le menu
CLOSED CAPTION (Sous-titres
codés).
Appuyer sur cette touche pour
afficher le menu AUDIO.
Appuyer sur cette touche pour
modifier la taille de l’image.
Configuration du téléviseur
Connexion du téléviseur à l’alimentation CA
Utiliser le cordon CA polarisé fourni pour le
fonctionnement sur CA. Insérer la prise du
cordon d’alimentation CA dans une prise secteur
CA polarisée standard de 120 V 60 Hz.
Prise murale CA
T rou et plot
plus large
Pour installer les piles dans la télécommande :
1 Ouvrir le couvercle du compartiment des
piles.
2 Placer deux piles AAA (non fournies).
Prise du cordon CA
polarisée (à deux plots,
un plus large que l'autre).
Remarques : • Ne jamais connecter la prise du
cordon CA à une tension autre que
celle spécif iée (120 V 60 Hz).
N’utiliser que le cordon
d’alimentation fourni.
• Si la prise CA polarisée n’entre pas
dans une prise secteur CA non
polarisée, ne pas limer ou
sectionner le plot l arge. Il incom be à
l'utilisateur de faire remplacer la
prise secteur obsolète par un
électricien.
• Si une décharge d’électricité
statique se produit quand le
téléviseur est touché et que celui-ci
cesse de fonct ionner, débrancher le
téléviseur de la prise secteur CA,
puis le rebrancher. Il devrait alors
fonctionner normalement.
Installation des piles dans la télécommande
Les piles doivent être installées dans la
télécommande pour pouvoir l’utiliser. Utiliser
deux piles de type AAA (non fournies). Les piles
durent environ un an en fonction de la fréquence
d’utilisation de la télécommande. Pour un
fonctionnement optimal, il est recommandé de
remplacer les piles annuellement ou quand le
fonctionnement de la télécommande devient
intermittent. Ne pas mélanger des piles neuves
avec des anciennes ou de types différents.
3 Replacer le couvercle du compartiment des
piles.
Précautions relatives aux piles
Observer ces précautions pour l’utilisation des
piles avec la télécommande :
• N’utiliser que la taille et le type de pile
spécifiés.
• S'assurer de respecter la polarité correcte
indiquée dans le compartiment des piles lors
de leur installation. L'inversion accidentelle
des piles peut endommager l’appareil.
• Ne pas mélanger différents types de pile
(alcalines ou au carbone-zinc par exemple) ni
des piles usagées avec des piles neuves.
• Si la télécommande ne doit pas être utilisée
pendant une période prolongée, retirer les
piles afin d'éviter tout épanchement d'acide
éventuel pouvant provoquer des dommages
ou des blessures.
• Ne pas essayer de recharger des piles qui ne
sont pas conçues pour cela. Elles peuvent
surchauffer et exploser (respecter les
instructions du fabricant des piles).
Raccordement à une antenne
Pour utiliser une antenne intérieure ou
extérieure, sui vre les i ns tructio ns co rresp ond ant
au système d'antenne. Pour utiliser un service
de télévision par câble, voir “Raccordement à un
système de câblodistribution” voir page 26.
www.insignia-products.com
25
Page 27

NS-FTV27 27-inch Flat Stereo Color TV
Antenne combinée VHF/UHF (câble unique de 75 ohms ou ligne bifilaire de 300 ohms)
Câble
coaxial
75 ohms
Prise RF IN
Transformateur
compatible de
300 à 75 ohms
Prise RF IN
1 Connecter le câble de 75 ohms de l’antenne
combinée VHF/UHF à la prise RF IN.
2 Si l’antenne combinée VHF/UHF a une ligne
bifilaire de 300 ohms, l’utilisation d’un
transformateur compatible de 300 à 75 ohms
peut être nécessaire.
Antenne combinée VHF/UHF (VHF et UHF séparés avec lignes bifilaires de 300 ohms)
Prise RF IN
Mélangeur
UHF 300 ohms
Transformateur
compatible de
300 à 75 ohms
VHF 300 ohms
1 Connecter la ligne bifilaire UHF de 300 ohms
au mélangeur (non fourni).
2 Connecter la ligne bifilaire VHF de 300 ohms
à un transformateur compatible de 300 à 75
ohms.
3 Relier le transformateur au mélangeur, puis
relier le mélangeur à la prise RF IN.
Antennes séparées VHF/UHF (câble VHF de 75 ohms et ligne bifilaire UHF de 300 ohms)
Prise RF IN
Raccordement à un système de câblodistribution
Ce téléviseur est doté d’une gamme de
syntonisation étendue, qui lui permet de
syntoniser la majorit é des can aux câblés sans
utiliser un décodeur de TV câblée. Certains
câblo-opérateurs proposent des « canaux par
abonnement » pour lesquels le signal est
brouillé. Le décodage de ces signaux pour une
visualisation normale nécessite l’utilisation d’un
décodeur qui est en général fourni par le
câblo-opérateur.
Pour les abonnés au service de TV câblée de base
Câble
coaxial
75 ohms
Pour le service de base ne nécessitant pas de
décodeur/décrypteur, connecter le câble coaxial
de 75 ohms directement à la prise RF IN à
l’arrière du téléviseur.
Pour les abonnés au service de TV câblée cryptée
Câble de
75 ohms
d'entrée de
TV câblée
Décodeur/décrypteur
1 En cas d'abonnement à un service de TV
câblée qui nécessite l’utilisation d’un
décodeur/décrypteur, connecter le câble
coaxial de 75 ohms à l’entrée au
décodeur/décrypteur.
2 Avec un autre câble coaxial de 75 ohms,
connecter la prise de sortie du
décodeur/décrypteur à la prise RF IN du
téléviseur. Se reporter aux connexions
illustrées ci -d es sus.
3 Régler le téléviseur sur le canal de sortie du
décodeur/décrypteur (3 ou 4 habituellement)
et utiliser le décodeur/décrypteur pour
sélectionner les canaux.
Pour les abonnés au service câblé de base en clair avec canaux par souscription
Prise RF IN
Câble de 75
ohms au
téléviseur
Prise RF IN
Mélangeur
UHF 300
1 Connecter le câble VHF de 75 ohms et la
ligne bifilaire UHF de 300 ohms au
mélangeur.
2 Relier le mélangeur à la prise RF IN.
26
Câble de
VHF 75 ohms
75 ohms
d'entrée de
TV câblée
www.insignia-products.com
Décodeur/décrypteur
Répartiteur
Commutateur A/B
Câble de
75 ohms
au
téléviseur
Prise
RF IN
Page 28

NS-FTV27 27-inch Flat Stereo Color TV
En cas d’abonnement à un service de TV câblée
dans lequel les canaux de base sont en clair et
les canaux par souscription nécessitent un
décodeur/décrypteur, il peut être judicieux
d’utiliser un répartiteur et un commutateur A/B
(disponible auprès du câblo-opérateur ou d’un
magasin d’accessoires électroniq ues). Se
reporter aux connexions illustrées ci-dessus.
Avec le commutateur en position B, il est
possible d’accéder directement aux canaux non
cryptés du téléviseur. Avec le commutateur en
position A, régler le télévi seur sur le signal du
décodeur/décrypteur (canal 3 ou 4
habituellement) et utiliser alors le
décodeur/décrypteur pour syntoniser les canaux
cryptés.
Connexions à d'autres équipements
La configuration exacte à utiliser pour connecter
divers composants vidéo et audio au téléviseur
dépend du modèle et des fonctions de chaque
composan t. Consulter le manuel du propriétaire
fourni avec chaque composant pour localiser les
entrées et sorties vidéo et audio.
Les schémas de connexion suivants sont offerts
à titre de suggestions. Il pourra être nécessaire
de les modifier pour répondre aux besoins d'une
sélection particulière de composants. Les
schémas sont destinés à illustrer uniquement les
connexions audio et vidéo à composantes.
Sélection de la source d’entrée vidéo
Appuyer sur TV/AV pour afficher un signal
provenant d'un autre périphérique connecté au
téléviseur, tel qu'un magnétoscope ou un lecteur
de DVD. Les sélections possibles sont ANT,
VIDEO1, VIDEO2 (sur le panneau avant) ou
COMPONENT (Vidéo à composantes), suivant
les prises d'entrée utilisées pour connecter les
périphériques.
Une pression de la touche TV/AV de la
télécommande affiche la source actuelle du
signal (appuyer de nouveau sur TV/AV ou sur
0-3 pour changer).
Connexion du téléviseur à un magnétoscope
Connexion du téléviseur à un magnétoscope avec un câble S-Vidéo
Pour connecter un magnétoscope avec un câble
S-Vidéo à la prise S-VIDEO IN (entrée S-Vidéo)
au dos du téléviseur, il faut aussi connecter les
câbles audio aux prises AUDIO IN (entrée
Audio) au dos du téléviseur. Le câble S-Vidéo
transporte uniquement le signal vidéo. Le signal
audio est séparé.
Vers
S-Video
OUT (Sortie
S-Vidéo)
Câble
S-Vidéo
(non
fourni)
Vers S-VIDEO IN
(Entrée S-Vidéo)
Remarque En cas de connexion simultanée du câble
S-vidéo et du câble vidéo à leurs prises
respectives, le câble S-vidéo prend la
priorité sur le câble vidéo.
Vers Audio
OUT (Sortie
audio)
Câble audio
(non fourni)
Vers Audio IN (Entrée audio)
Arrière du téléviseur
Connexion du téléviseur à un lecteur de DVD ou à un récepteur satellite
Si le lecteur de DVD ou le récepteur satellite
comporte une prise de sortie S-vidéo, connecter
les câbles comme indiqué.
Câble
audio/vidéo
(non fourni)
Vers
Audio/Video
OUT (Sortie s
audio/vidéo)
V ers Au dio/ Video IN (Entrées
audio-vidéo)
Vers
S-Video
OUT
(Sortie
S-Vidéo)
Câble
S-Vidéo
(non
fourni)
V er s S-VIDEO IN (Entrée S-Vidé o)
www.insignia-products.com
Vers Audio OUT
(Sortie audio)
Câble audio
(non fourni)
Vers Audio IN (Entrée audio)
27
Page 29

NS-FTV27 27-inch Flat Stereo Color TV
)
Connexion du téléviseur à un lecteur de DVD avec vidéo à composantes
Si le lecteur de DVD comporte des prises de
sortie vidéo à composantes, connecter le
téléviseur à un lecteur de DVD à l'aide d'un
câble vidéo à composantes. Cela peut améliorer
considérablement la qualité de l'image et les
performances de l'appareil.
Vers Audio
OUT (Sortie
audio)
Câble audio
(non fourni)
Vers COMPONENT IN (Entrées vidéo à composantes
V ers Component OUT
(Sorties vidéo à
composantes)
Câble vidéo
(non fourni)
Utilisation d'un amplificateur AV avec son ambiophonique numérique intégré
En utilisant comme suit un amplificateur avec
son ambiophonique numérique intégré, il est
possible de profiter de divers systèmes audio, y
compris du son ambiophonique Dolby Digital qui
permet de se croire dans une salle de cinéma.
Connecter un amplificateur AV avec décodeur
numérique Dolby intégré comme indiqué
ci-dessous.
Sortie audio
numérique coaxiale
Câble
numérique
coaxial
(non fourni)
à l'entrée
audio
numérique
coaxiale
Amplificateur AV
avec décodeur
ambiophonique
numérique intégré
Haut-parleur
avant
(gauche)
Haut-parleur
d’ambiance
(gauche)
Caisson
d’extrêmes
graves
Haut-parleur
avant (droit)
Haut-parleur
central
Haut-parleur
d’ambiance
(droit)
Remarque Ce téléviseur n’affiche que des signaux
entrelacés 480i lorsqu’il est connecté un
dispositif numérique avec sortie vidéo à
composantes. Si un signal de 480p, 720p
ou 1080i est transmis aux entrées vidéo à
composantes, COMPONENT
(Composantes) s’affiche sur un écran noir.
Si COMPONENT s’affiche, régler la sortie
numérique du dispositif sur 480i.
Connexion du téléviseur à un récepteur /décodeur DTV
Pour connecter un récepteur/décodeur DTV, le
relier au téléviseur à l'aide d'un câble vidéo à
composantes.
Vers Audio
OUT (Sortie
audio)
Câble audio
(non fourni)
V ers Component
OUT (Sorties vidéo
à composantes)
Câble vidéo
(non fourni)
Remarques : • Pour effectuer la connexion
ci-dessus, ne pas régler DOLBY
DIGITAL sur DOLBY DIGITAL ON
(Marche) sur l'amplificateur AV.
Sinon, les haut-parleurs émettront
un bruit intense pouvant
éventuellement endommager l'ouïe
de l'utilisateur ou les haut-parleurs.
• Ce téléviseur n'est pas compati ble
avec l'audio DTS. Il ne se produira
aucune sortie sonore s'il est
connecté à un amplifi cateur A V av ec
un décodeur DTS intégré.
Connexion du téléviseur à un magnétoscope
Pour lire à partir d'un caméscope, connecter
celui-ci au téléviseur comme illustré.
Av ant du télé viseur
Vers Audio/Video
OUT (Sorties
audio/vidéo)
Câble audio /vidéo
(non fourni)
28
Vers COMPONENT IN (Entrées vidéo à
composantes)
www.insignia-products.com
Page 30

NS-FTV27 27-inch Flat Stereo Color TV
Connexion du téléviseur à une console de jeux vidéo
Le téléviseur peut être utilisé en tant qu'écran
d'affichage pour de nombreux jeux vidéo.
Cependant, compte tenu du large éventail de
signaux générés par ces dispositifs et des
variations de connexion requises, ceux-ci n’ont
pas tous été inclus dans les schémas de
connexion suggérés. Consulter le manuel du
propriétaire de chaque composant pour de plus
amples informations.
Avant du téléviseur
Console
de jeux
vidéo
Vers Audio/Video
OUT (Sorties
audio/vidéo)
Câble audio/vidé o
(non fourni)
Starting Setup (Configuration au démarrage)
Le menu STARTING SETUP s’affiche la
première fois que le téléviseur est mis sous
tension ; il permet de sélectionner la langue du
menu, de spécifier le réglage TV/Câble et de
programmer automatiquement les canaux
disponibles.
• Les changements sont effectifs
immédiatement en cas de sélection d'un
élément de menu. Appuyer sur EXIT pour
visionner les changements.
• Une fois la programmation des menus
terminée, appuyer sur EXIT.
Utilisation du menu
Pour accéder au menu à l’aide des commandes du téléviseur :
Appuyer simultanément sur les touches volume
et . L’écran de menu s’affiche sur l’écran.
Pour accéder au menu à l’aide de la télécommande :
Appuyer sur MENU. L’écran de menu s’affiche.
Pour sélectionner un paramètre à l’aide des commandes du téléviseur :
Utiliser les touches Canal
touches volume
et .
et ainsi que les
Pour sélectionner un paramètre à l’aide de la télécommande :
Utiliser les touches Canal
et ainsi que les
touches volume et .
Paramétrage de la langue
Sélectionner l’une des trois langues disponibles
(anglais, français et espagnol) pour l’affichage à
l’écran.
Pour compléter la configuration initiale du téléviseur :
1 S’assurer que l’antenne ou le système de TV
câblée est bien connecté.
2 Appuyer sur la touche POWER (Mise sous
tension). La fonction de configuration au
démarrage est activée et le menu de
paramétrage de la langue s'affiche sur
l'écran.
3 Appuyer sur
ou pour sélectionner la
langue souhaitée puis appuyer sur ENTER
(Entrée).
4 Appuyer sur
ou pour sélectionner TV ou
CABLE, puis appuyer sur ENTER (Entré e ).
5 Appuyer sur
ou pour sélectionner
START (Démarrer) puis appuyer sur ENTER.
Si la touche CANCEL (Annuler) est
sélectionnée et la touche ENTER appuyée,
STARTING SETUP s’arrête et l’écran de
télévision s’affiche.
La fonction AUTO SET UP (Configuration
automatique) démarre. Une fois que la
configuration automatique est terminée, un
canal de TV s’affiche à l’écran.
La mémorisation complète des canaux de
câblodiffusion numérique peut prend re près
de 10 minutes, en fonction des conditions de
réception.
Remarque Si la touche EXIT (Quitter) est appuyée au
cours de la configuration automatique, la
configuration au démarrage s’arrête et
l’écran de TV s’affiche.
Pour sélectionner une langue de menu :
1 Appuyer sur MENU. L’écran de menu
s’affiche.
Remarque Si aucun bouton n’est appuyé p end ant plu s
de 15 secondes, l’écran de menu cède la
place automatiquement à l’écran de
télévision normal.
2 Appuyer sur ou pour sélectionner le
menu SETUP (Configuration).
3 Appuyer sur
ou pour sélectionner
LANGUAGE (Langue).
4 Appuyer sur ou pour sélectionner la
langue souhaitée : English (ENGLISH),
French (FRANÇAIS) ou Spanish
(ESPAÑOL).
5 Appuyer sur EXIT pour revenir à l’écran
normal.
Mémorisation des canaux
Ce téléviseur est équipé d'un dispositif de
mémorisation des canaux qui permet de passer
aux canaux suivants ou précédents en mémoire
en sautant les canaux non souhaités. Les
canaux doivent être mémorisés dans la mémoire
du téléviseur avant de pouvoir sélectionner un
canal particulier. Le téléviseur peut capter
jusqu'à 250 canaux VHF/UHF et 500 canaux
câblés.
Pour utiliser le téléviseur avec une antenne,
régler l'option de menu TV/CABLE sur le mode
TV. Au départ de l'usine, cette option de menu
est préréglée sur le mode CABLE.
www.insignia-products.com
29
Page 31

NS-FTV27 27-inch Flat Stereo Color TV
Sélection de TV ou Câble
Pour sélectionner le mode TV ou le mode Câble :
1 Appuyer sur MENU. L’écran de menu
s’affiche.
2 Appuyer sur
ou pour sélectionner le
menu SETUP (Configuration).
3 Appuyer sur
ou pour sélectionner
TV/CABLE.
4 Appuyer sur
ou pour sélectionner TV ou
CABLE.
• TV – Canaux VHF/UHF
• CABLE – Canaux de câblodiffusion
5 Appuyer sur EXIT pour revenir à l’écran
normal.
Remarque L'image d' un can al numérique sélectionné
peut prendre quelques secondes pour
s'afficher sur l'écran.
Tableau de Câblodiffusion
Le tableau suivant récapitule l’agencement
typique des canaux de nombreux systèmes de
câblodiffusion. Le chiffre en haut est celui
apparaissant sur l’écran de TV. Le chiffre ou la
lettre en bas est le canal de câblodiffusion
correspondant.
Syntonisation automatique en mémoire
Pour la mémorisation automatique des canaux :
1 Appuyer sur MENU. L’écran de menu
s’affiche.
2 Appuyer sur ou pour sélectionner le
menu SETUP (Configuration) puis appuyer
sur
ou pour sélectionner AUTO CH
MEMORY (Mémorisation automatique des
canaux).
3 Appuyer sur ou . L'appareil commence à
mémoriser tous les canaux disponibles
localement.
La mémorisation complète des canaux de
câblodiffusion numérique peut prend re près
de 10 minutes, en fonction des conditions de
réception.
Remarque Des canaux supplémentaires sont ajoutés
parfois à la liste. Effectuer la procé dure
AUTO CH MEMORY périodiquement.
Ajout et suppression de canaux
4 Appuyer sur
ou pour sélectionner
ADD/DELETE, puis appuyer sur .
5 Sélectionner le canal souhaité à mémoriser
ou à supprimer à l’aide de
ou de .
6 Appuyer sur ou pour sélectionner ADD
ou DELETE.
7 Répéter l'étape 5-6 pour les autres canaux à
ajouter ou à supprimer, puis appuyer sur
ENTER (Entrée).
8 Appuyer sur EXIT pour revenir à l’écran
normal.
Remarque Pour revenir du menu ADD/DELETE
(Ajouter/Supprimer) au menu SETUP
(Configuration), sé lectionner SETUP MENU
(Menu de configuration), puis appuyer sur
ou .
Pour ajouter des canaux numériques :
1 Sélectionner le canal numérique à ajouter à
l'aide des touches numériques de choix
direct de canal.
2 Appuyer sur MENU. L'écran de menu
s'affiche.
3 Utiliser ou pour sélectionner le menu
SETUP (Configura tion), puis ut iliser
ou pour sélectionner ADD/DELETE
(Ajouter/Supprimer).
4 Utiliser ou pour sélectionner Le menu
ADD/DELETE s'affiche.
5 Utiliser
ou pour sélectionner ADDING
CHANNEL (Ajout de canal), puis utiliser
ou .
6 Appuyer sur EXIT (Quitter) pour revenir à
l'écran normal.
7 Répéter les étapes 1 à 6 pour chaque ajout
complémentaire de canal.
Fonction CLEAR ALL (Effacer tout)
Il est possible d’effacer tous les canaux de la
mémoire.
Pour effacer tous les canaux de la mémoire :
1 Appuyer sur MENU. L'écran de menu
s'affiche.
2 Utiliser ou pour sélectionner le menu
SETUP (Configura tion), puis ut iliser
pour sélectionner ADD/DELETE
(Ajouter/Supprimer).
3 Utiliser ou . Le menu ADD/DELETE
s'affiche.
4 Appuyer sur
ou pour sélectionner
CLEAR ALL (Effacer tout), puis appuyer sur
ou .
Fonctionnement du téléviseur
ou
ou
Pour ajouter ou supprimer des canaux :
1 Appuyer sur MENU. L’écran de menu
s’affiche.
2 Appuyer sur ou pour sélectionner le
menu SETUP (Configuration) puis appuyer
sur
ou pour sélectionner
ADD/DELETE (Ajouter/Supprimer).
3 Appuyer sur ou . Le menu ADD/DELETE
s’affiche sur l’écran.
30
Remarques : • Si le canal sélectionné ne diffuse
aucune émission, le son est
automatiquement mis en sourdine.
• Si le canal sélectionné arrête de
diffuser, le téléviseur s'arrête
automatiquement après 15
minutes.
www.insignia-products.com
Page 32

NS-FTV27 27-inch Flat Stereo Color TV
Pour utiliser le téléviseur :
1 Appuyer sur POWER (Mise sous tension)
pour mettre l’appareil sous tension.
2 Régler le volume en appuyant sur VOL +
ou –. Le volume sonore est indiqué à l'écran
par des barres vertes. Lorsque le volume
sonore augmente, le nombre de barres
augmente. Si le volume diminue, le nombre
de barres vertes diminue également.
3 Mettre l’option de menu TV/CABLE dans la
position appropriée (voir “Sélection de TV ou
Câble” voir page 3 0) .
4 Appuyer sur les touches de sélection directe
des canaux pour sélectionner le canal
souhaité.
Sélection des canaux analogiques
Canaux Appuyer
1-9 Appuyer deux fois sur « 0 » puis sur
10-99 Appuyer sur « 0 » puis sur les deux
100-125 Appuyer sur les 3 chiffres dans
1 à 9 selon le besoin. Ex emple : pour
sélectionner le canal 2, appuyer sur
0 0 2.
derniers chiffres. Par exemple, pour
sélectionner le canal 12, appuy er sur
0 1 2.
l’ordre. Par exemple, pour
sélectionner le canal 120, appuyer
sur 1 2 0.
Sélection de canaux numériques
Appuyer sur les 3 premiers chiffres, puis
appuyer sur la touche –/DISPLAY, puis sur les
trois derniers chiffres.
Par exemple, pour sélectionner le canal
015-001, appuyer sur 0 1 5 – 0 0 1.
Noter les conditions suivantes:
• Si le canal sélectionné a uniquement un
contenu audio, le message « AUDIO ONLY »
(Uniquement audio) s'affichera à l'écran.
• Si le canal sélectionné a un signal numérique
faible, le message « DIGITAL CHANNEL
SIGNAL STRENGTH IS LOW » (Force du
signal du canal numérique faible) s'affichera
sur l'écran.
• Si le canal sélectionné ne fait pas partie de
l'abonnement au service, le message «
DIGITAL CHANNEL IS SCRAMBLED »
(Canal numérique crypté) s'affichera à
l'écran.
TV Câble
VHF
2-13
UHF
14-69
VHF
2-13
STD/HRC/IRC
14-36 (A) (W)
37-59 (AA) (WW)
60-85 (AAA) (ZZZ)
86-94 (86) (94)
95-99 (A-5) (A-1)
100-125 (100) (125)
01 (5A)
Recherche de canaux
Pour trouver le canal suivant :
Appuyer brièvement sur la touche CH
ou .
La recherche s’arrête automatiquement sur le
canal mémorisé suivant.
Pour des résultats corrects, les canaux doivent
être mémorisés avant d’effectuer une recherche.
Voir “Mémorisation des canaux” voir page 29.
Visualisation de l’information
Remarque L'écran revient automatiquement en mode
TV normal après 10 secondes.
Pour afficher des informations sur les programmes :
1 Appuyer sur -/DISPLAY pour afficher les
informations disponibles sur l’écran.
Lorsque le téléviseur reçoit un signal
numérique, les informations numériques
apparaissent :
• Nom de l'émission diffusée
• Nom de la station
• Temps restant
• Langue de l’audio
• Nom de l'émission
• Classification de la puce antiviolence
(V-Chip)
• Symbole de la puce antiviolence
• Symbole du sous-titrage codé
Lorsque le téléviseur reçoit un signal
analogique, -/DISPLAY (Affichage) montre
seulement les informations analogiques.
2 Appuyer de nouveau sur -/DISPLAY. Les
informations analogiques suivantes
s’affichent sur l’écran :
• Horloge
• Numéro du canal ou mode vidéo
sélectionné
• Étiquette du canal (si préréglé)
• État audio : stéréo ou SAP (deuxième
trame sonore)
• Classification par cont enu
• On timer (Temporisateur de mise en
marche automatique), Off timer
(Temporisateur d'arrêt automatique),
Sleep time (Durée avant l’arrêt différé) (si
préréglée)
• Taille de l'image
3 Appuyer de nouveau sur -/DISPLAY
(Affichage) pour effacer l’affichage.
Visualisation du canal précédent
La touche QUICK VIEW (Affichage rapide)
permet de retourner au dernier canal visionné.
Appuyer de nouveau sur QUICK VIEW pour
revenir au dernier canal visionné.
Mise en sourdine du volume
Appuyer sur MUTE (Sourdine) pour couper le
son. Le téléviseur est mis en sourdine et le
symbole MUTE apparaît sur l’écran. Pour rétablir
le son, appuyer de nouveau sur cette touche ou
appuyer sur la touche VO L + ou –.
www.insignia-products.com
31
Page 33

NS-FTV27 27-inch Flat Stereo Color TV
Utilisation de la fonction Sleep (Arrêt différé)
Pour que le téléviseur s'éteigne après une durée
prédéterminée, appuyer sur la touche SLEEP
(Arrêt différé) de la télécommande. L’horloge
compte 10 minutes au maximum à chaque
pression sur la touche SLEEP (0h00m, 0h10m,
...1h50m, 2h00m).
Quand l'arrêt différé a été programmé,
l'affichage apparaît brièvement toutes les dix
minutes pour rappeler que le temporisateur
d'arrêt automatique fonctionne. Pour confirmer
le réglage du temporisateur d'arrêt automatique,
appuyer sur la touche SLEEP (Arrêt différé) et l e
temps restant s'affiche pendant quelques
secondes. Pour annuler l’arrêt différé, appuyer
de façon répétée sur la touche SLEEP (Arrêt
différé) jusqu'à l'affichage de « 0h00m ».
Configuration du Contrôle parental (Puce antiviolence)
Il est possible d'empêcher la visualisation de
certaines émissions de télévision afin d'éviter
que les enfants d’une certaine tranche d’âge ne
puissent voir ou entendre des scènes violentes
ou des images jugées comme inappropriées. La
restriction s'applique aux classifications des
émissions TV et des films, si ces données sont
transmises. Il est possible de définir cette
restriction séparément. Pour utiliser la fonction
de puce antiviolence, commencer par
enregistrer un mot de passe.
Remarques : • La fonct ion de puce antiv iolen ce es t
Configuration du mot de passe
Pour configurer un mot de passe :
1 Appuyer sur MENU. L’écran de menu
s’affiche.
2 Appuyer sur ou pour sélectionner le
menu LOCKS (Verrouillage enfant).
3 Appuyer sur
de saisie du mot de passe.
activée uniquement sur les
émissions et sources d'ent rée qui
comprennent un signal de
classification.
• La configuration init ia le de la puc e
antiviolence (V-Chip) peut prendre
quelques minutes.
• La fonction V-CHIP SET (DTV)
(Configuration de la puce
antiviolence [DTV]) ne pourra être
sélectionnée que si le téléviseur
reçoit une émission numérique
utilisant le nouveau système de
classification. À l'heure actuelle,
certaines stations ne fournissent
pas encore ce signal. Si le signal
n'est pas disponible, la fonction
V-CHIP SET (DTV) ne le sera pas
non plus.
• En cas d'oubli du mot de passe,
contacter le service à la clie ntèle a u
1-877-467-4289 pour assis tance. La
télécommande d'origine sera
requise.
• Pour éviter d'oublier le mot de
passe, il est recommandé de le
noter par écrit et de le garder en li eu
sûr.
ou pour accéder au mode
4 Sélectionner et saisir un mot de passe (à
quatre chiffres) à l’aide des touches
numériques (0-9), puis app uyer sur ENTER
(Entrée).
5 Saisir de nouveau le même mot de passe
pour confirmer puis appuyer sur ENTER.
Le mot de passe est défini et le menu V -Chip
(Puce antiviolence) s’affiche sur l’écran.
Configuration du Contrôle parental (Puce antiviolence)
Configuration de la puce antiviolence (V-Chip) :
1 Appuyer sur MENU. L’écran de menu
s’affiche.
2 Appuyer sur ou pour sélectionner le
menu LOCKS (Verrouillage enfant).
3 Appuyer sur
ou pour accéder au mode
de saisie du mot de passe. Saisir le mot de
passe à l’aide des touches numériques (0-9)
puis appuyer sur ENTER. Le menu LOCKS
(Verrouillage enfant) s’affiche sur l’écran.
4 Appuyer sur
ou pour sélectionner
V- CHIP SET (Configuration de la puce
antiviolence), puis sur . Le menu
SET
s'affiche.
5 Appuyer sur
ou pour sélectionner TV
V-CHIP
RATING (Classification TV), puis appuyer sur
ou pour sélectionner la classification
souhaitée.
OFF – la fonction TV RATING n’est pas
activée.
TV-Y – Tous les enfants
TV-Y7 – enfants de 7 ans et plus
TV-G – Tout public.
TV-PG – Surveillance parentale suggérée.
TV-14 – 14 ans et plus
TV-MA – 17 ans et plus
Pour la séle ction de TV-Y7, TV-P G, TV-14 ou
de TV-MA, appuyer sur -/DISPLA Y pour
définir la classification plus précisément.
Appuyer sur
ou pour sélectionner la
classification souhaitée. Appuyer sur ou
pour sélectionner le paramètre ON (Activé)
ou OFF (Désactivé).
6 Appuyer sur
ou pour sélectionner
MOVIE RATING (Classification des films),
puis appuyer sur . Le menu
RATING
(Classification) s'affiche.
7 Appuyer sur
ou pour sélectionner la
classification, puis sur ou pour
sélectionner ON (Activé) ou OFF (Désactiv é)
pour chaque classification.
G – Tous âges
PG – Surveillance parentale suggérée.
PG-13 – Surveillance parentale suggérée
pour les moins de 13 ans
R – le contrôle parental est suggéré pour les
enfants de moins de 17 ans
NC-17 – 17 ans et plus
X – Pour adultes uniquement.
8 Appuyer deux fois sur MENU pour re venir à
l'écran
LOCKS
(Verrouillage), puis sur ou
pour sélectionner V-CHIP (Puce
antiviolence).
32
www.insignia-products.com
Page 34

NS-FTV27 27-inch Flat Stereo Color TV
9 Appuyer sur ou pour sélectionner ON
(Activation). Les paramètres ainsi définis
sont désormais enregistrés en mémoire.
10 Appuyer sur EXIT pour revenir à l’écran
normal.
Visionnement d’une émission sujette au contrôle parental
Pour visionn er un pr ogra mme qui e st b loqué par la puce antiviolence :
1 Appuyer sur MUTE (Mise en sourdine).
2 Entrer le mot de passe puis appuyer sur
ENTER (Entrée).
Si le mot de passe est entré correctement, la
protection est temporairement levée. Si le
téléviseur est éteint ou si le canal est changé,
la restriction de la puce antiviolence est
rétablie.
Modification du mot de passe
Pour changer le mot de passe :
1 Appuyer sur MENU. L’écran de menu
s’affiche.
2 Appuyer sur ou pour sélectionner le
menu LOCKS (Verrouillage enfant).
3 Appuyer sur
ou pour accéder au mode
de saisie du mot de passe. Saisir le mot de
passe à l’aide des touches numériques (0-9)
puis appuyer sur ENTER. Le menu LOCKS
(Verrouillage enfant) s’affiche sur l’écran.
4 Appuyer sur
ou pour sélectionner
NEW PASSWORD (Nouveau mot de passe),
puis appuyer sur ou .
5 Saisir un nouveau mot de passe à l’aide des
touches numériques (0-9) puis appuyer sur
ENTER (Entrée).
6 Saisir de nouveau le même mot de passe
pour confirmer puis appuyer sur ENTER.
7 Appuyer sur EXIT pour revenir à l’écran
normal.
Verrouillage de canaux
Il est possible de verrouiller l’accès à ces canaux
spécifiques à l’aide de la fonction CH LOCK
(Verrouillage enfant). Il n’est pas possible de
syntoniser des canaux verrouillés à moins
d'effacer le paramètre de verrouillage. Il est
possible de verrouiller jusqu’à 12 canaux de TV.
Remarque Après avoir programmé la fonction CH
Pour verrouiller des canaux :
1 Utiliser les touches numériques (0-9) pour
2 Appuyer sur MENU puis sur ou pour
3 Appuyer sur
4 Saisir le mot de passe à l’aide des touches
LOCK, changer de canal ava nt d’éteindre le
téléviseur. Le non-respect de cette
consigne a pour effet d'annuler la
programmation de verrouillage des canaux
au moyen de cette procédure.
afficher le canal de TV à verrouiller.
afficher le menu LOCKS (Verrouillage).
ou pour accéder au mode
de saisie du mot de passe.
numériques (0-9) puis appuyer sur ENTER.
Le menu LOCKS (Verrouillage enfant)
s’affiche sur l’écran.
5 Appuyer sur
ou pour mettre en
surbrillance CH LOCK (Verrouillage enfant)
et appuyer sur ou pour afficher le menu
CH LOCK.
6 Appuyer sur ou pour sélectionner les
éléments suivants :
• SET (Paramétrer) – pour paramétrer le
verrouillage du canal, puis appuyer sur
ENTER.
• CLEAR (Effacer) – pour effacer tous les
canaux de la liste des canaux verrouillés,
puis appuyer sur ENTER.
7 Répéter les étapes 1 à 6 pour verrouiller
d'autres canaux. Quand le verrouillage de
canaux est terminé, appuyer sur EXIT pour
revenir à un visionnement normal.
Si tentative est faite de syntoniser un canal
verrouillé, le téléviseur ne l'affiche pas mais
syntonise le canal non verrouillé le plus
proche.
Déverrouillage de canaux
Pour déverrouilles des canaux :
1 Appuyer sur MENU puis sur ou pour
afficher le menu LOCKS (Verrouillage).
2 Appuyer sur
ou pour accéder au mode
de saisie du mot de passe.
3 Saisir le mot de passe à l’aide des touches
numériques (0-9) puis a ppu yer sur ENTER.
Le menu LOCKS (Verrouillage enfant)
s’affiche sur l’écran.
4 Appuyer sur
ou pour mettre en
surbrillance CH LOCK (Verrouillage enfant)
et appuyer sur ou pour afficher le menu
CH LOCK.
5 Appuyer sur ou pour mettre en
surbrillance CLEAR (Effacer) et effacer tous
les canaux de la liste des canaux verrouillés.
6 Appuyer sur ENTER (Entrée).
7 Appuyer sur EXIT (Quitter) pour revenir au
mode de visualisation normal.
Verrouillage des entrées vidéo
Grâce à la fonction VIDEO LOCK (Verrouillage
vidéo), il est possible de verrouiller les sources
d’entrée (VIDEO1, VIDEO2, COMPONENT) et
les canaux 3 et 4. Il est alors impossible de
sélectionner les sources d’entrée avec la touche
TV/AV ou les touches de canaux à moins
d’effacer le paramètre.
Remarque Après avoir programmé la fonction VIDEO
Pour verrouiller des entrées vidéo :
1 Appuyer sur MENU. L’écran de menu
2 Appuyer sur ou pour sélectionner le
3 Appuyer sur
LOCK, changer de canal ou appuyer sur la
touche TV/AV a vant d’éteindre le télé vise ur.
Le non-respect de cette consigne a pour
effet d'annuler la programmation de
verrouillage des entrée s vidé o au mo y e n de
cette procédure.
s’affiche.
menu LOCKS (Verrouillage enfant).
ou pour accéder au mode
de saisie du mot de passe. Saisir le mot de
passe à l’aide des touches numériques (0-9)
puis appuyer sur ENTER. Le menu LOCKS
(Verrouillage enfant) s’affiche sur l’écran.
www.insignia-products.com
33
Page 35

NS-FTV27 27-inch Flat Stereo Color TV
4 Appuyer sur ou pour mettre en
surbrillance VIDEO LOCK (Verrouillage
vidéo).
5 Appuyer sur ou pour sélectionner :
• OFF : Pour déverrouiller toutes les
sources vidéo.
• VIDEO (Vidéo) : Pour verrouiller les
sources VIDEO1, VIDEO2 et
COMPONEN T (Composantes).
• VIDEO + : Pour verrouiller VIDEO1,
VIDEO2, COMPONENT, canal 3 et canal
4. Choisir cette option en cas d’utilisation
de la borne d’antenne pour la lectur e
d’une cassette vidéo.
6 Appuyer sur EXIT (Quitter) pour revenir au
mode de visualisation normal.
Déverrouillage des entrées vidéo
Pour déverrouiller des entrées vidéo :
1 Utiliser les touches numériques (0-9) pour
afficher le canal de TV à verrouiller.
2 Appuyer sur MENU puis sur ou pour
afficher le menu LOCKS (Verrouillage).
3 Appuyer sur
de saisie du mot de passe.
4 Saisir le mot de passe à l’aide des touches
numériques (0-9) puis appuyer sur ENTER.
Le menu LOCKS (Verrouillage enfant)
s’affiche sur l’écran.
5 Appuyer sur
surbrillance VIDEO LOCK (Verrouillage
vidéo) puis appuyer sur ou pour mettre
en surbrillance OFF (Désactivé).
6 Appuyer sur EXIT (Quitter) pour revenir au
mode de visualisation normal.
ou pour accéder au mode
ou pour mettre en
Verrouillage du panneau avant
Il est possible de verrouiller les touches du
panneau avant pour éviter toute modification
accidentelle des paramètres. Lorsque le
verrouillage du panneau avant est activé (ON),
aucune des touches de commande du panneau
avant du téléviseur (à l'exception de POWER
[Mise sous tension]) ne fonctionne.
Pour verrouiller le panneau avant :
1 Appuyer sur MENU. L’écran de menu
s’affiche.
2 Appuyer sur ou pour sélectionner le
menu LOCKS (Verrouillage enfant).
3 Appuyer sur
de saisie du mot de passe. Saisir le mot de
passe à l’aide des touches numériques (0-9)
puis appuyer sur ENTER. Le menu LOCKS
(Verrouillage enfant) s’affiche sur l’écran.
4 Appuyer sur
FRONT PANEL LOCK (Verrouillage du
panneau avant) et appuyer sur ou pour
sélectionner ON (Activé). En cas d’appui sur
une touche du panneau avant, le message
NOT AVAILABLE (Non disponible) apparaît
sur l’écran.
5 Appuyer sur EXIT (Quitter) pour revenir au
mode de visualisation normal.
ou pour accéder au mode
ou pour sélectionner
Déverrouillage du panneau avant
Pour déverrouiller le panneau avant :
1 Appuyer sans relâcher sur la touche
VOLUME du panneau avant du téléviseur
pendant 10 secondes jusqu'à ce que le
message FRONT PANEL LOCK:OFF
(Panneau avant déverrouillé) s’affiche sur
l’écran.
- OU Appuyer sur MENU. L’écran de menu
s’affiche.
2 Appuyer sur ou pour sélectionner le
menu LOCKS (Verrouillage enfant).
3 Appuyer sur
de saisie du mot de passe. Saisir le mot de
passe à l’aide des touches numériques (0-9)
puis appuyer sur ENTER. Le menu LOCKS
(Verrouillage enfant) s’affiche sur l’écran.
4 Appuyer sur
FRONT PANEL LOCK (Verrouillage du
panneau avant) et appuyer sur ou pour
sélectionner OFF (Désactivé).
5 Appuyer sur EXIT (Quitter) pour revenir au
mode de visualisation normal.
ou pour accéder au mode
ou pour sélectionner
Étiquetage des canaux
Une étiquette de canal apparaît au-dessus du
numéro du canal à chaque fois que le téléviseur
est allumé, qu'un canal est sélectionné ou que la
touche -/DISPLAY (Affichage) est enfoncée.
N'importe quelle combinaison de quatre
caractères peut être sélectionnée pour identifier
un canal.
Remarque Pour repasser du menu CH LABEL
Pour étiqueter des canaux :
1 Sélectionner un canal à étiqueter.
2 Appuyer sur MENU puis sur ou pour
3 Appuyer sur
4 Appuyer sur
5 Appuyer sur ou pour sélectionner SET
6 Appuyer sur ENTER pour sélectionner
(Étiquette de canal) au menu OPTION,
sélectionner OPTION MENU (Menu
Option), puis appuyer sur ou .
sélectionner le menu OPTION.
ou pour sélectionner CH
LABEL (Étiquette de canal) puis appuyer sur
ou . Le menu CH LABEL s’affiche sur
l’écran.
ou pour sélectionner
SET/CLEAR (Paramétrer/Effacer).
(Paramétrer).
LABEL (Étiquette), puis appuyer sur ou
pour entrer un caractère dans le premier
espace. Appuyer plusieurs fois sur la touche
jusqu’à ce que le caractère souhaité
apparaisse sur l’écran.
La rotation des caractères est la suivante :
–
SPACE+
34
www.insignia-products.com
Page 36

NS-FTV27 27-inch Flat Stereo Color TV
Lorsque le caractère voulu apparaît, appuyer
sur ENTER. Répéter cette étape pour entrer
le reste d es caractères. Pour obtenir un
espace vierge dans l'intitulé de l'étiquette,
choisir l'espace vier ge dan s la liste des
caractères, sinon un tiret apparaîtra à sa
place. Quand la saisie du nom de l'étiquette
est terminée, appuyer sur ENTER.
7 Appuyer sur EXIT pour revenir à l’écran
normal.
8 Répéter les étapes 1 à 7 pour les autres
canaux. Il est possible d’attribuer une
étiquette à chaque canal.
Effacement des étiquettes de canaux
Pour effacer une étiquette de canal :
1 Sélectionner un canal dont l’étiquette doit
être effacée.
2 Appuyer sur MENU puis sur ou pour
sélectionner le menu OPTION.
3 Appuyer sur
ou pour sélectionner CH
LABEL (Étiquette de canal) puis appuyer sur
ou pour afficher le menu CH LABEL.
4 Appuyer sur
ou pour sélectionner
SET/CLEAR (Paramétrer/Effacer).
5 Appuyer sur ou pour sélectionner
CLEAR (Effacer), puis appuyer sur ENTER
(Entrée).
6 Appuyer sur EXIT pour revenir à l’écran
normal.
Réglage de l’horloge
L'horloge doit être correctement réglée pour que
le ON/OFF TIMER (Temporisateur de
marche/arrêt) remplisse sa fonction à l'heure
correcte.
Remarque Après une panne d'électricité ou si le
téléviseur est débranché, les réglages de
l’horloge seront perdus. Dans un tel cas,
régler l’heure actuelle.
Pour régler l'horloge :
1 Appuyer sur MENU puis sur ou pour
sélectionner le menu SETUP (Configuration).
2 Appuyer sur
ou pour sélectionner
CLOCK SET (Réglage de l’horloge), puis
appuyer sur ou . Le menu CLOCK SET
(Réglage de l’horloge) s’affiche sur l’écran.
3 Appuyer sur ou pour régler MONTH
(Mois), puis appuyer sur .
4 Régler DA Y (Jour), YEAR (Année) et TIME
(Heure) comme à l’étape 3.
Une fois la date et l'heure réglés, l'horloge
commence à fonctionner automatiquement.
5 Appuyer sur EXIT pour revenir à l’écran
normal.
Réglage du temporisateur de mise en marche (On Timer)
Grâce à cette fonction, le téléviseur s’allume
automatiquement à une heure prédéterminée. Si
ON TIMER (Temporisateur de mise en marche)
est programmé sur DAILY (Quotidiennement), le
téléviseur se met sous tension tous les jours, à
la même heure et sur le même canal.
EXEMPLE : Mise sous tension du téléviseur sur
le canal 12, à 7 h 30 (7:30 AM) et
quotidiennement.
Rem arques : • Le téléviseur s'éteint
automatiquement environ 1 heure
après l'act ivation de ON TIMER
(Temporisateur de mise en marche
automatique) si aucun OFF TIMER
(T emporisateur d'arrêt autom atique)
n'a été configuré. Pour continuer à
regarder la télévision, appuyer sur
une touche quelconque pour
annuler l'arrêt automatique au bout
d'une heure.
• Si le canal sélectionné arrête sa
diffusion, le téléviseur s'arrête
automatiquement a prè s 15 minutes.
• Pour annuler ON TIMER,
sélectionner CLEAR (Effacer).
Appuyer sur EXIT pour revenir à
l’écran normal.
• Après une panne d'électricité ou si
le téléviseur est débranché, les
paramètres du temporisateur seront
perdus.
• Pour revenir du menu ON/OFF
TIMER (Temporisateur de
marche/arrêt) au menu OPTION,
sélectionner OPTION MENU (Menu
Option), puis appuyer sur ou .
Pour régler le temporisateur de mise en marche automatique (ON TIMER) :
1 Régler l’horloge, si cela n’est pas déjà fait
(voir “Réglage de l’horloge” voir page 35).
2 Appuyer sur MENU.
3 Appuyer sur ou pour sélectionner le
menu OPTION.
4 Appuyer sur
ou pour sélectionner
ON/OFF TIMER (Temporisateur de mise en
marche/arrêt).
5 Appuyer sur ou pour sélectionner SET
(Paramétrer), puis appuyer sur ENTER
(Entrée). Le menu ON/OFF TIMER
(Temporisateur de marche/arrêt) s’affiche.
6 Appuyer sur
ou pour sélectionner ON
TIMER (Temporisateur de mise en marche)
puis appuyer sur pour saisir le paramètre
de la fonction ON TIMER.
7 Appuyer sur
ou pour régler l’heure,
puis appuyer sur . Vérifier si l’heure est AM
ou PM et choisir le paramètre souhaité.
8 Régler les minutes et le canal au démarrage.
9 Appuyer sur ou pour sélectionner DAIL Y
(Quotidi enneme nt), pu is ap puy er sur ENTER
(Entrée).
10 Appuyer sur EXIT pour revenir à l’écran
normal.
Réglage du temporisateur d'arrêt
Grâce à cette fonction, le téléviseur s’éteint
automatiquement à une heure prédéterminée. Si
OFF TIMER (Temporisateur d’arrêt) est
programmé sur DAIL Y (Quotidiennement), le
téléviseur se met hors tension tous les jours à la
même heure.
www.insignia-products.com
35
Page 37

Remarques : • Si le canal sélectionné arrête sa
diffusion, le téléviseur s'arrête
automatiquement après 15
minutes.
• Pour confirmer les réglages du
temporisateur de marche/arrêt
(ON/OFF TIMER), appuyer sur
-/DISPLAY (Affichage) pour
indiquer le programme à l’écran.
• Pour revenir du menu ON/OFF
TIMER (Tem po risateu r de
marche/arrêt) au menu OPTION,
sélectionner OPTION MENU (Menu
Option), puis appuyer sur ou .
NS-FTV27 27-inch Flat Stereo Color TV
5 Appuyer sur EXIT pour revenir à l’écran
normal.
Réglage de la taille de l'image
Il est possible de visionner les émissions au
format 480i format dans trois tailles d'image :
4:3, 16:9 et ZOOM.
Pour modifier la taille d'image, appuyer sur la
touche PICTURE SIZE (Taille d’image) de la
télécommande.
Pour régler le temporisateur d’arrêt automatique :
1 Régler l’horloge, si cela n’est pas déjà fait
(voir “Réglage de l’horloge” voir page 35).
2 Appuyer sur MENU.
3 Appuyer sur ou pour sélectionner le
menu OPTION.
4 Appuyer sur
ou pour sélectionner
ON/OFF TIMER (Temporisateur de mise en
marche/arrêt).
5 Appuyer sur ou pour sélectionner SET
(Paramétrer), puis appuyer sur ENTER
(Entrée). Le menu ON/OFF TIMER
(Temporisateur de marche/arrêt) s’affi ch e.
6 Appuyer sur
ou pour sélectionner OFF
TIMER (Temporisateur d’arrêt) puis appuyer
pour saisir le paramètre de la fonction
sur
OFF TIMER.
7 Appuyer sur
ou pour régler l’heure,
puis appuyer sur . Vérifier si l’heure est AM
ou PM et choisir le paramètre souhaité.
8 Appuyer sur
ou pour régler les mi nutes
et appuyer sur ou pour sélectionner
DAIL Y (Quotidiennement), puis appuyer sur
ENTER (Entrée).
Remarque Pour annuler le temporisateur d'arrêt
automatique (OFF TIMER), appuyer sur
ou pour sélectionner CLEAR (Effacer)
après cette étape , puis appu y er sur ENTER
(Entrée).
9 Appuyer sur EXIT pour revenir à l’écran
normal.
Activation/Désactivation de la fonction ON/OFF TIMER (Temporisation de mise en marche/arrêt)
Pour activer ou désactiver le temporisateur de mise en marche/arrêt :
1 Appuyer sur MENU.
2 Appuyer sur ou pour sélectionner le
menu OPTION.
3 Appuyer sur
ON/OFF TIMER (Temporisateur de mise en
marche/arrêt).
4 Appuyer sur ou pour sélectionner ON
(Activation) ou OFF (Désactivation).
ON : Le paramètre de temporisation est
activé.
OFF : Le paramètre de temporisation est
désactivé.
ou pour sélectionner
ZOOM
Image au format 4:3
Pour remplir l’écran, les bords supérieur et
inférieur sont étirés davantage, quoique le
centre de l’image reste très proche de son
format antérieur.
En cas de réception d’une émission au format
4:3, l’image est affichée dans les proportions de
son format d'origine.
Image au format 16:9
Cette image s’affiche au format standard 16:9
avec des bandes noires dans la partie
supérieure et inférieure de l’écran.
En cas de réception d’une émission au format
4:3, l’image s’affiche avec des bandes noires
dans la partie supérieure et inférieure de l’écran
; elle est également davantage étirée.
Remarque Si une barre noire fixe reste affichée sur
l’écran pendant de longues périodes,
l’image risque de s'incruster en
permanence sur l'écran et de causer des
images fantômes subtiles mais
permanentes. Ne jamais laisser le
téléviseur en marche pendant de longues
périodes si de telles images sont affichées.
Image au format ZOOM (pour des émissions au format 16:9)
L’image toute entièr e est ag ra ndi e un iformément
: elle est étirée dans la même proportion en
largeur et en hauteur (et conserve ses
proportions d'origine). Les bords gauche et droit
de l'image peuvent être cachés.
36
www.insignia-products.com
Page 38

NS-FTV27 27-inch Flat Stereo Color TV
Réglage de l’image
Remarque Le contraste par défaut est réglé au
Pour régler l’image :
1 Appuyer sur MENU puis sur ou pour
2 Appuyer sur
3 Appuyer sur ou pour ajuster le réglage.
Élément < >
BRIGHTNESS
(Luminosité)
CONTRAST
(Contraste)
COLOR (Couleurs) couleurs plus
TINT (Teinte) teinte rougeâtre teinte verdâtre
SHARPNESS
(Netteté)
4 Après avoir modifié le paramètre souhaité,
maximum en usine.
sélectionner le menu PICTURE (Image).
ou pour sélectionner
l’élément à régler.
diminuer augmenter
diminuer augmenter
pâles
image plus
douce
couleurs
brillantes
image plus nette
appuyer sur EXIT (Quitter) pour revenir à un
visionnement nor ma l.
Réinitialisation des réglages de l'image
La fonction RESET (Réinitialisation) ramène les
réglages de qualité de l'image aux paramètres
d'usine suivants :
Élément Valeur
BRIGHTNESS
(Luminosité)
CONTRAST
(Contraste)
COLOR (Couleurs) centre (25)
TINT (Teinte) centre (0)
SHARPNESS
(Netteté)
1 Appuyer sur MENU puis sur ou pour
sélectionner le menu PICTURE (Image).
2 Appuyer sur
RESET (Réinitialiser) puis appuyer sur .
Remarque Si la touche RESET est appuyée dans le
menu PICTURE, les réglages de l’image
retournent à leurs paramètres d’usine.
centre (25)
maxi (50)
centre (25)
ou pour sélectionner
Contrôle des sous-titres codés
Ce téléviseur a la capacité de décoder et
d'afficher des émissions télévisées en
sous-titres codés. La fonction de sous-titres
codés affiche le texte à l'écran pour les
téléspectateurs malentendants, ou traduit et
affiche le texte dans une autre langue.
Sous-titres codés :Ce mode codé des
sous-titres affiche le texte à l'écran en anglais ou
dans une autre langue. Généralement, les
sous-titres codés en anglais sont transmis sur
C1 et les sous-titres dans d'autres langues sont
transmis sur C2.
Te xte :Le mode texte des sous-titres codés
remplit généralement la moitié de l'écran avec
un calendrier de programmation ou d'autres
informations.
Remarques : • Si l'émission ou la vidéo
sélectionnée n'a pas de sous-titres
codés, aucun sous-titre ne s'affiche
à l'écran.
• Si le texte n' est pa s dis ponib le dans
une zone de réception particulière,
un rectangle noir pourra apparaître
à l'écran. Si cela se produit, régler
la fonction de s sous-titre s codés sur
OFF (Désactivée).
• Lorsque la fonction des sous-titres
codés est sélectionnée, les
sous-titres apparaissent au bout
d'environ 10 secondes.
• Si aucun signal de sous-titrage
codé n’est reçu, l’écran n’affiche
aucun sous-titre mais le téléviseur
continue à fonctionner en mode de
sous-titrage codé.
• Des fautes d'orthographe ou des
caractères bizarre s peuvent
occasionnellement apparaître dans
les sous-titres codés. Ceci est
normal pour les sous-titres codés,
particulièrement lorsqu’il s’agit
d’émissions en direct. La raison en
est que les sous-titres sont saisis
également en direct. Ces
transmissions ne donnent pas le
temps de procéder à une relecture.
• Lorsque les sous-titres codés sont
affichés, les affichages à l'écran,
tels que le volume et la sourdine,
peuvent être visibles mais peuvent
se superposer aux sous-titres
codés.
• Certains systèmes de TV câblée et
certains systèmes de protection
contre la copie peuvent gêner la
réception des sous-titres codés.
• En cas d'utilisation d'une antenne
intérieure ou si la réception TV est
très médiocre, il est possible que le
décodeur de sous-titres
n'apparaisse pas ou apparaisse
avec de s caractères biz arres ou des
mots mal orthographiés. Dans ce
cas, ajuster l'antenne pour obtenir
une meilleure réception ou utiliser
une antenne extérieure .
Pour activer l’option de sous-titres codés :
1 Syntoniser le téléviseur sur l'émission
souhaitée.
2 Appuyer sur MENU puis sur ou pour
afficher le menu SETUP (Configuration).
www.insignia-products.com
37
Page 39

NS-FTV27 27-inch Flat Stereo Color TV
3 Appuyer sur ou pour sélectionner
CLOSED CAPTION (Sous-titres codés)
Si le signal reçu est analogique, les choix
possibles sont : C1, C2, T1, T2 et OFF
(Désactivé).
Si le signal reçu est numérique, les choix
possibles sont : CS1, CS2, CS3, CS4, CS5,
CS6, C1, C2, C3, C4, T1, T2, T3, T4 et OFF
(Désactivé).
Remarques : • En fonction du signal reçu, certains
sous-titres analogiqu es fonctionnent
avec des transmissions
numériques.
• Il est possible d’ afficher cet écr an en
appuyant sur CLOSED CAPTION
(Sous-titres codés).
4 Appuyer sur ou pour sélectionner le
mode de sous-titres codé s souhaité.
Remarque Pour désactiver les sous-titres codés,
sélectionner OFF.
5 Appuyer sur EXIT pour revenir à l’écran
normal.
Réglage des sous-titres codés
Les sous-titres codés sont paramétrés en usine.
Il est toutefois possible de les ajuster
individuellement. Cette option de
personnalisation ne s'applique qu’aux seuls
sous-titres numériques.
Remarque Ne pas choisir la même c ouleur pou r le te xte
Pour ajuster les sous-titres codés :
1 Appuyer sur MENU. L’écran de menu
2 Appuyer sur ou pour sélectionner le
3 Appuyer sur
4 Appuyer sur
5 Appuyer sur
(TEXT COLOR) et l'arrière-plan
(BACKGROUND COLOR) des sous-titres
codés ; le texte ne pourrait être lu.
s’affiche.
menu SETUP (Configuration).
ou pour sélectionner CC
ADVANCED (Sous-titres codés avancés),
puis appuyer sur . Le menu CC
ADVANCED s’affiche à l’écran.
ou pour sélectionner
l’élément à ajuster, puis appuyer sur ou .
ou pour sélectionner le
paramètre puis appuyer sur ENTER (Entrée).
Sélectionner parmi les éléments et
paramètres suivants :
• TEXT SIZE (Taille du texte). AUTO,
SMALL (petite), STANDARD, LARGE
(grande)
• TEXT TYPE (Police de caractères).
AUTO, DEFAULT (par défaut), MONO W.
SERIF (espacement fixe avec
empattement), PROP. W. SERIF
(espacement proportionnel avec
empattement), MONO W/O SERIF
(espacement fixe sans empattement),
PROP. W/O SERIF (espacement
proportionnel sans empattement),
CASUAL (courant), CURSIVE, SMALL
CAPITALS (p eti te cap itales )
• TEXT COLOR (Couleur du texte) :
AUTO, BLACK (noir), WHITE (blanc),
RED (rouge), GREEN (vert), BLUE (bleu),
YELLOW (jaune), MAGENTA, CYAN
• TEXT EDGE (Bord du texte) : AUTO,
NONE (aucun), RAISED (surélevé),
DEPRESSED (enfoncé), UNIFORM
(uniforme), LEFT DROP SHADOW
(ombre avec dénivelé à gauche), RIGHT
DROP SHADOW (ombre avec dénivelé à
droite)
• BACKGROUND COLOR (Couleur de
fond) : AUTO, BLACK (noir), WHITE
(blanc), RED (rouge), GREEN (vert),
BLUE (bleu), YELLOW (jaune),
MAGENTA, CYAN
6 Appuyer sur EXIT pour revenir à l’écran
normal.
Sélection de Stereo/Second Audio Program (SAP) [Stéréo/Seconde trame sonore]
La fonction de transmission multivoie de signaux
sonores en télévision (MTS) fournit un son
stéréo haute fidélité. MTS peut aussi transmettre
une deuxième trame sonore (SAP) contenant
une deuxième langue ou d'autres informations
audio. Lorsque le téléviseur reçoit une émission
diffusée en stéréo ou avec une deuxième trame
sonore, le mot STEREO ou SAP apparaît à
l'écran lorsque le téléviseur est allumé, à chaque
changement de canal et à chaque appui sur la
touche -/DISPLAY (Affichage).
Pour sélectionner St ereo/Second A udio Pr ogram (SAP) :
1 Appuyer sur MENU, puis sur ou pour
sélectionner le menu AUDIO.
2 Appuyer sur
ou pour sélectionner
MTS.
3 Appuyer sur ou pour sélectionner STR
(Stéréo).
4 Appuyer sur EXIT pour revenir à l’écran
normal.
Remarques : • En général, le tél évise ur peut res ter
en mode stéréo, étant donné qu'il
reproduit automatiquement le type
de son diffusé (stéréo ou mono).
• Si le son stéréo comporte des
parasites, sélectionner MONO pour
réduire les parasites.
Pour écouter une deuxième trame sonore (SAP) :
1 Appuyer sur MENU, puis sur ou pour
sélectionner le menu AUDIO.
2 Appuyer sur
ou pour sélectionner
MTS.
3 Appuyer sur ou pour sélectionner SAP.
Les haut-parleurs émettent la deuxième
trame sonore au lieu du signal audio normal.
Sélection de la sortie numérique
Il est possible de choisir le format du signal de
sortie audio numérique.
Pour sélectionner la sortie numérique :
1 Appuyer sur MENU, puis sur ou pour
sélectionner le menu AUDIO.
2 Appuyer sur
DIGITAL OUTPUT (Sortie numérique)
ou pour sélectionner
38
www.insignia-products.com
Page 40

NS-FTV27 27-inch Flat Stereo Color TV
3 Appuyer sur ou pour sélectionnerPCM
ou DOLBY DIGITAL.
4 Appuyer sur EXIT pour revenir à l’écran
normal.
Sélection de la langue audio
Lorsque que plusieurs langues audio sont
incluses dans un signal numérique, il est
possible de sélectionner une des langues audio.
Pour sélectionner la langue audio :
1 Appuyer sur MENU, puis sur ou pour
sélectionner le menu AUDIO.
2 Appuyer sur
ou pour sélectionner
AUDIO LANGUAGE (Langue audio) puis
appuyer sur ou pour afficher le menu
AUDIO LANGUAGE.
3 Appuyer sur
ou pour sélectionner la
langue souhaitée puis appuyer sur ENTER
(Entrée).
4 Appuyer sur EXIT pour revenir à l’écran
normal.
Réinitialisation des réglages audio
La fonction RESET (Réinitialisation) restaure les
réglages audio aux paramètres d'usine
suivants :
Élément Valeur
MTS STEREO
DIGITAL OUT PUT
(Sortie numérique)
(Stéréo)
PCM
Pour réinitialiser les réglages audio :
1 Appuyer sur MENU, puis sur ou pour
sélectionner le menu AUDIO.
2 Appuyer sur
ou pour sélectionner
RESET (Réinitialiser) puis appuyer sur .
Remarque Si la touche RESET (Réinitialiser) est
appuyée dans le m enu AUDIO, les réglages
audio retournent à leurs paramètres
d’usine.
Vérification de la puissance du signal numérique
Ce téléviseur permet d'afficher la puissance du
signal numérique pour les canaux numériques.
Remarques : • La fonction de mesure du signal
Pour vérifier la puissance du signal numérique :
1 Appuyer sur MENU puis sur ou pour
sélectionner le menu SETUP (Configuration).
2 Appuyer sur
SIGNAL METER (Mesure du signal).
3 Appuyer sur ou pour vérifier la
puissance du signal numérique.
4 Appuyer sur EXIT pour revenir à l’écran
normal.
n'est pas disponi ble pour le s canaux
analogiques.
• Après quatre minutes , l' écran
SIGNAL METER (Mesure du
signal) revient automatiquement au
fonctionn eme nt normal du
téléviseur.
ou pour sélectionner
Spécifications
La conception et les spécifications sont sujettes
à modifications sans avis préalable.
Alimentation 120 V CA, 60 Hz
Consommation
Fonctionnement 110 W
Attente 3 W
Sur châssis
Poids 88,2 b (40 kg)
Largeur 29 pouces 1/8 (740 mm)
Hauteur 22 pouces 5/8 (575 mm)
Profondeur 19 pouces 7/16 (494,5 mm)
Entrées
VIDÉO 1 V (c-c)/75 ohms
AUDIO – 8 dBm/50 kohms
S-VIDÉO Y : 1 V (c-c), 75 ohms
C : 0,286 V (c-c), 75 ohms
COMPOSANTE Y : 1 V (c-c), 75 ohms
PR : 0,7 V (c-c), 75 ohms
PB : 0,7 V (c-c), 75 ohms
Sortie
AUDIO NUMÉRIQUE 0,5 V (c-c), 75 ohms
Autres
Entrée Antenne Entrée VHF/UHF/CÂBLE 75
Tube à image 27 po (676 mm en diagonal)
Type de syntoniseur Synthétiseur à quartz et à
Canaux de réception VHF 2 à 13
Haut-parleurs 1 pouces 13/16 (45,7 mm) x 3
Puissance de sortie du
son
ohms coaxiale
boucle de calage en phase
UHF 14 à 69
CÂBLE 14 à 36 (A)-(W)
37 à 59 (AA)-(WW)
60 à 85 (AAA)-(ZZZ)
86-94 (86)-(94)
95 à 99 (A-5)-(A-1)
100-125 (100)-(125)
01 (5A)
pouces 7/8 (99,1 mm), 8 ohms
x 2
1 W + 1 W
www.insignia-products.com
39
Page 41

NS-FTV27 27-inch Flat Stereo Color TV
Problèmes et solutions
Utiliser la liste de vérification suivante pour
identifier et résoudre les problèmes qui peuvent
survenir avec le téléviseur. Si le problème
persiste, consulter le revendeur local ou un
centre de services. Lors d'une utilisation avec
d'autres appareils, vérifier que toutes les
connexions sont correctes.
Problème Solution
Le téléviseur ne
fonctionne pas.
Pas de son ou son
médiocre.
Pas d’image ou
image médiocre.
Mauvaise réception
sur certains
canaux
Pas de couleur ou
couleur médiocre
• Vérifier que le cordon
d'alimentation est branché.
• Essayer une autre prise
secteur.
• L’appareil est hors tension.
Vérifier le fusible ou le
disjoncteur.
• Débrancher le téléviseur
pendant une heure, puis le
rebrancher.
• Problème a u niveau de la
station de TV ou du
câblodiffuseur. Syntoniser une
autre station.
• Vérifier les réglages du son
(volume et sourdine).
• Vérifier s'il existe des sources
possibles d’interférences.
• Problème a u niveau de la
station de TV ou du
câblodiffuseur. Syntoniser une
autre station.
• S’assurer que les canaux sont
enregistrés en mémoire.
• Vérifier les connexion s du
réseau câblé ou de l’antenne.
Régler l’antenne.
• Vérifier s'il existe des sources
possibles d’interférences.
• Vérifier les réglages du cont rôle
de l’image.
• Problème a u niveau de la
station de TV ou du
câblodiffuseur. Syntoniser une
autre station.
• S’assurer que les canaux sont
enregistrés en mémoire.
• La réception est faible. Ajuster
l’antenne pour recevoir la
station souhaitée.
• Vérifier s'il existe des sources
possibles d’interférences.
• Problème a u niveau de la
station de TV ou du
câblodiffuseur. Syntoniser une
autre station.
• S’assurer que les canaux sont
enregistrés en mémoire.
• Vérifier les réglages du cont rôle
de l’image.
• Vérifier les connexion s du
réseau câblé ou de l’antenne.
Régler l’antenne.
• Vérifier s'il existe des sources
possibles d’interférences.
Problème Solution
L’image tremble ou
dérive.
Problèmes à
l'écran lor s d'une
émission
numérique.
Pas de réception
de réseau câblé.
Barres horizontales
ou diagonales sur
l'écran
Pas de réception
au-delà du canal
13.
La télécommande
ne fonctionne pas.
Le téléviseur
s’éteint.
Les sous-titres
codés ne sont pas
activés
L'affichage n'est
pas dans la langu e
souhaitée.
• Problème au niveau de la
station de TV ou du
câblodiffuseur. Syntoniser une
autre station.
• S’assurer que les canaux sont
enregistrés en mémoire.
• Le câblo-opérateur brouille le
signal.
• Régler l’antenne.
• Vérifier la puissance du signal
numérique.
• Vérifier toutes les connexions
du réseau câblé.
• Régler l’option de menu
TV/CABLE sur le mode
CABLE.
• Problème au niveau de la
station de TV ou du
câblodiffuseur. Essayer une
autre station.
• Vérifier les connexions de
l'antenne.
• Régler ou ajuster la direction de
l'antenne.
• Vérifier s'il existe des sources
possibles d’interférences.
• Vérifier que l'option du menu
TV/CABLE est dans le mode
approprié.
• En cas d'utilisation d'une
antenne, vérifie r les c onne xions
à l'antenne UHF.
• Les piles sont f aib les, mortes ou
insérées incorrectement.
• La télécommande est hors de
portée. Rapprocher la
télécommande du téléviseur (à
moins de 15 pieds).
• Veiller à ce que la
télécommande soit po intée vers
le capteur .
• Vérifier qu'il n'existe aucun
obstacle entre la téléc ommande
et le téléviseur.
• Vérifier que le cordon
d'alimentation est branché.
• Aucune émission n'est diffusée
par la station syntonisée.
• Le temporisateur d’arrêt
automatique est activé.
• Panne de courant.
• La station de télévision a des
problèmes ou le progr am m e
diffusé n’est pas sous-titré.
Essayer un autre canal.
• Vérifier la connexion au réseau
câblé ou à l'antenne VHF/UHF.
Repositionner ou pivoter
l’antenne.
• Régler le décodeur de
sous-titres dans le menu.
• Sélectionner la langue correcte
dans les options du menu.
40
www.insignia-products.com
Page 42

NS-FTV27 27-inch Flat Stereo Color TV
Déclarations réglementaires
Déclaration sur les interférences aux
fréquences radioélectriques de la Commission
fédérale des communications (FCC) des
États-Unis
Cet équipement a été testé et déclaré conforme
aux limitations prévues dans le cadre de la
catégorie B des appareils numériques, définie
par l’article 15 du règlement de la FCC. Ces
limites ont été établies pour fournir une
protection raisonnable contre les interférences
nuisibles lors d’une installation résidentielle. Cet
équipement génère, utilise et diffuse des ondes
radio et, s’il n’est pas installé et utilisé
conformément aux instructions dont il fait l’objet,
il peut provoquer des interférences indésirables
avec les communications radio. Cependant, il
n’est pas possible de garantir qu’aucune
interférence ne se produira dans une installation
particulière. Si cet équipement cause des
interférences gênant la réception d'ondes radio
ou télévisées (déterminé en éteignant et en
rallumant l’équipement), il est recommandé que
l’utilisateur tente de corriger le problème en
appliquant au moins l'une des mesures
suivantes :
• Réorienter ou déplacer l’antenne réceptrice.
• Augmenter la distance entre l’équipement et
le récepteur.
• Brancher l’équipement sur la prise électrique
d’un circuit différent de celui auquel le
récepteur est relié.
• Contacter le revendeur ou un technicien
radio/télévision qualif ié pou r toute
assistance.
Précaution Tout changement ou modifi ca tio n non
expressément approuvé par la partie
responsable de la conformité pourrait
annuler l’au torisation pour l’utilisateur de
faire fonctionner cet équipement.
Avis canadien
Cet appareil numérique de classe B satisfait
toutes les exigences du Règlement canadien sur
le matériel brouilleur.
Avis canadien
Cet appareil numérique de la Class B respecte
toutes les exigences du Règlement sur le
matériel brouilleur du Canada.
© 2006 Insignia. Insignia et le logo Insignia sont des
marques de commerce de Best Buy Ente rprise
Services, Inc. Les autres noms de marques et de
produits mentionnés sont des marques de commerce
ou des marques déposées de leurs propriétaires
respectifs. Les spécifications et caractéristiques sont
susceptibles d’être modifiées sans préavis.
www.insignia-products.com
41
Page 43

NS-FTV27 27-inch Flat Stereo Color TV
42
www.insignia-products.com
Page 44

NS-FTV27 27-inch Flat Stereo Color TV
Garantie
Garantie limitée d’un an
Insignia Products (“Insignia”) garantit au premier acheteur de
ce TV Écran Plat de 27 po neuf (“Produit”), qu’il est exempt
de vices de fabrication et de main-d’œuvre à l’origine, pour
une période d’un (1) an à partir de la date d’achat du Produit
(“Période de garantie”). Ce produit doit avoir été acheté chez
un revendeur agréé des produits de la marque Insignia et
emballé avec cette déclaration de garant ie. Cette gar antie ne
couvre pas les Produits remis à neuf. Les conditions de la
présente garantie s’appliquent à tout Produit pour lequel
Insignia est notifié, pendant la Période de garantie, d’un vice
couvert par cette garantie qui nécessite une réparation.
Quelle est la durée de la couverture ?
La Période de garantie dure 1 an (365 jours) à compter de la
date d’achat de ce Produit. La date d’achat est imprimée sur
le reçu fourni avec le Produit.
Que couvre cette garantie ?
Pendant la Période de garantie, si un vice de matériau ou de
main-d’œuvre d'origine est détecté sur le Produit par un
service de réparation agréé par Insignia ou le personnel du
magasin, Insignia (à sa seule discrétion) : (1) réparera le
Produit en utilisant des pièces détachées neuves ou remises
à neuf ; ou (2) remplacera le Produit par un produit ou des
pièces neuves ou remises à neuf de qualité comparable. Les
produits et pièces remplacés au titre de cette garantie
deviennent la propriété d’Insignia et ne sont pas retournés à
l’acheteur. Si les Produits ou pièces nécessitent une
réparation après l’expiration de la Période de garantie,
l’acheteur devra payer tous les frais de main d’œuvre et les
pièces. Cette garantie reste en vigueur tant que l’acheteur
reste propriétaire du Produit Insignia pendant la Période de
garantie. La garantie prend fin si le Produit est revendu ou
transféré d’une quelconque façon que ce soit à tout autre
propriétaire.
Comment obtenir une réparation sous garantie ?
Si le Produit a été acheté chez un détaillant, le rapporter
accompagné du reçu original chez ce détaillant. S’assurer
de remettre le Produit dans son emballage d’origine ou dans
un emballage qui procure la même qualité de protection que
celui d’origine. Si le Produit a été acheté en ligne, l’expédier
accompagné du reçu original à l’adresse indiquée sur le site
Web. S’assurer de remettre le Produit dans son emballage
d’origine ou dans un emballage qui procure la même qualité
de protection que celui d’origine.
Où cette garantie s’applique-t-elle ?
Cette garantie ne s’applique qu’à l’acheteur original du
Produit aux États-Unis et au Canada.
Ce qui n’est pas couvert par cette garantie limitée
La présente garantie ne couvre pas :
• la formation du client ;
• l'installation ;
• les réglages de configuration ;
• les dommages esthétiques ;
• les dommages résultants de catastrophes naturelles
telles que la foudre ;
• les accidents ;
• une utilisation inadaptée ;
• une manipulation abusive ;
• la négligence ;
• une utilisation commerciale ;
• la modification de tout ou partie du Produit, y compris
l’antenne.
La présente garantie ne couvre pas non plus :
• les dommages ayant pour origine une utilisation ou une
maintenance défectueuse ;
• la connexion à une source électrique dont la tension est
inadéquate ;
• Toute réparation effectuée par quiconque autre qu’un
service de réparation agréé par Insignia pour la
réparation du Produit
• les Produits vendus en l’état ou hors service ;
• les consommables tels que les fusibles ou les piles ;
• les produits dont le numéro de série usine a été altéré
ou enlevé du Produit.
LA RÉPARATION OU LE REMPLACEMENT, TELS
QU’OFFERTS PAR LA PRÉSENTE GARANTIE,
CONSTITUENT LE SEUL RECOURS DE L’ACHETEUR.
INSIGNIA NE SAURAIT ÊTRE TENU POUR
RESPONSABLE DE DOMMAGES ACCESSOIRES OU
CONSÉCUTIFS, RÉSULTANT DE L’INEXÉCUTION D'UNE
GARANTIE EXPRESSE OU IMPLICITE SUR CE PR ODUIT,
Y COMPRIS, SANS S’Y LIMITER , LA PE RTE DE
DONNÉES, L’IMPOSSIBILITÉ D’UTILISER LE PRODUIT,
L’INTERRUPTION D’ACTIVITÉ OU LA PERTE DE
PROFITS. INSIGNIA PRODUCTS N’OCTROIE AUCUNE
AUTRE GARANTIE EXPRESSE RELA TIVE À CE PRODUIT
; TOUTES LES GARANTIES EXPRESSES OU IMPLICITES
POUR CE PRODUIT, Y COMPRIS MAIS SANS
LIMITATION, TOUTE GARANTIE DE QUALITÉ
MARCHANDE, D'ADÉQUATION À UN BUT PARTICULIER,
SONT LIMITÉES À LA PÉRIODE DE GARANTIE
APPLICABLE TELLE QUE DÉC R I TE CI-D ESSUS ET
AUCUNE GARANTIE EXPRESSE OU IMPLICITE, NE
S’APPLIQUERONT APRÈS LA PÉRIODE DE GARANTIE.
CERTAINS ÉTATS ET PROVINCES NE RECONNAISSENT
PAS LES LIMITATIONS DE LA DURÉE DE VALIDITÉ DES
GARANTIES IMPLICITES. PAR CONSÉQUENT, LES
LIMITATIONS SUSMENTIONNÉES PEUVENT NE PAS
S'APPLIQUER À L’ACHETEUR ORIGINAL. LA PRÉSENTE
GARANTIE DONNE À L'ACHETEUR DES GARANTIES
JURIDIQUES SPÉCIFIQUES ; IL PEUT AUSSI
BÉNÉFICIER D'AUTRES GARANTIES QU I VARIENT D'UN
ÉTAT OU D'UNE PRO V INCE À L'AUTRE.
www.insignia-products.com
43
Page 45

NS-FTV27 27-inch Flat Stereo Color TV
44
www.insignia-products.com
Page 46

NS-FTV27 27-inch Flat Stereo Color TV
Bienvenido
Felicitaciones por su compra de un producto Insignia
de alta calidad. Su NS-FTV27 representa el más
moderno diseño de televisores, y está concebido para
brindar un rendimiento confiable y sin problemas.
Contenido
Introducción . . . . . . . . . . . . . . . . . . . . . . . . . . . . . .45
Información de seguridad. . . . . . . . . . . . . . . . . . . .45
Características . . . . . . . . . . . . . . . . . . . . . . . . . . . .47
Configuración de su televisor . . . . . . . . . . . . . . . . .49
Uso de su televisor. . . . . . . . . . . . . . . . . . . . . . . . .55
Especificaciones. . . . . . . . . . . . . . . . . . . . . . . . . . .63
Solución de problemas. . . . . . . . . . . . . . . . . . . . . .64
Declaraciones reglamentarias . . . . . . . . . . . . . . . .65
Garantía . . . . . . . . . . . . . . . . . . . . . . . . . . . . . . . . .67
Introducción
Este manual explica como instalar, operar, y
obtener el mejor rendimiento de su televisor
correct amente. Lea esta guía del usuario
detalladamente antes de instalar su televisor,
luego guárdela cerca del televisor para una
referencia rápida.
Verifique que la caja contenga lo siguiente:
• Televisor a colores
• Control remoto
•
Guía del usuario
Si algún artículo falta o está dañado,
comuníquese con Insignia llamando al (877)
467-4289. Guarde la caja y los materiales de
embalaje en caso de que necesite almacenar o
transportar su televisor.
Control remoto universal
Si compra un control remoto universal de su
distribuidor local, comuníquese con el fabricante
del control remoto para obtener el código de
programación requerido.
Selección del modo de TV/Cable
Cuando se envía de fábrica, la opción del menú
TV/CABLE está establecida en el modo CABLE
(Televisión por cable). Si no va a usar TV por
cable, establezca esta opción de menú en la
posición TV.
Información de seguridad
CAUTION:
ELECTRIC
COVER
PARTS INSIDE. REFER SERVICING
QUALIFIED SERVICE PERSONNEL.
ADVERTENCIA:
PARA REDUCIR EL RIESGO DE INCENDIO O
CHOQUE ELÉCTRICO, NO EXPONGA ESTE TV A
LA LLUVIA O HUMEDAD.
TO REDUCE THE RISK OF
SHOCK, DO NOT REMOVE
(OR BACK). NO USER-SERVICEABLE
TO
The lightning flash with arrowhead symbol, within an
equilateral triangle is intended to alert the user to the
presence of uninsulated dangerous voltage within the
product’s enclosure that may be of sufficient magnitude
to constitute a risk of electric shock.
The exclamation point within an equilateral triangle is
intended to alert the user to the presence of important
operating and maintenance (servicing) instructions in the
literature accompanying the appliance.
Cuidado
Cuidado
Cualquier cambio o modificación que no
esté aprobado expresamente por la parte
responsable por el cumplimiento con el
reglamento de FCC puede anular la
autoridad del usuario para operar el equipo.
Para evitar choques el éctricos, no utilice el
enchufe polarizado con una extensión,
receptáculo u otro tomacorriente a menos
que pueda insertar completamente las
clavijas para prevenir la exposición de las
espigas.
Medidas de seguridad importantes
• Lea todas estas instrucciones.
• Guarde estas instrucciones para un uso
futuro.
• Desconecte este televisor del tomacorriente
antes de limpiarlo. Use un paño seco para
limpiar. No use limpiadores líquidos o en
aerosol.
• Para evitar peligros, use sólo los accesorios
recomendados por el fabricante del televisor.
• No use este televisor cerca del agua, por
ejemplo cerca de una bañera o fregadero, o
cerca de una piscina.
• No coloque este
producto en un
carro , base, o mesa
inest able. El
televisor puede
caerse, causando
daño a un niño o
adulto, y daños
graves al equipo.
• Las ranuras y aberturas en los lados, la parte
posterior e inferior se proveen para
ventilación, para asegurar la operación
confiable del televisor, y para protegerlo
contra el sobrecalentamie nto.
Estas aberturas no se deben bloquear ni
cubrir. Las aberturas nunca se deben
bloquear si se coloca el televisor en una
cama, un sofá, una alfombra u otra superficie
suave. Este televisor nunca se debe colocar
cerca o sobre un radiador.
Este televisor no se debe colocar en una
instalación integrada, tal como en un librero,
a menos que se provea una ventilación
apropiada.
• Este televisor debe funcionar únicamente
con el tipo de fuente de energía indicada en
la etiqueta de marca. Si no esta seguro del
tipo de fuente de energía en su casa,
consulte con el vendedor de su televisor o la
compañía de energía local.
Advertencia sobre
carro portátil
(símbolo proporcio nado
por RETAC)
www.insignia-products.com
45
Page 47

NS-FTV27 27-inch Flat Stereo Color TV
• Este televisor está equipado con un enchufe
polarizado de corriente alterna (un enchufe
que tiene una espiga más ancha que la otra).
Este enchufe se conecta en el tomacorriente
de una sola forma. Esta es una característica
de seguridad. Si no puede insertar
completamente el enchufe en el
tomacorriente, intente darle vuelta al
enchufe. Si el enchufe todavía no entra,
contacte a su electricista para que reemplace
el tomacorriente obsoleto. No anule el
propósito de seguridad del conector a tierra
polarizado.
• No permita que nada se coloque sobre el
cable de alimentación, y no coloque este
televisor donde éste puede ser pisado.
• Siga todas las advertencias e instrucciones
marcadas en el televisor.
• Sí una antena externa o un sistema de cable
esta conectado al televisor, asegurarse de
que la antena o el sistema de cable esta
conectado a tierra, para proveer una
protección contra sobre voltajes y la
acumulación de cargas estáticas. El artículo
810 del código nacional eléctrico,
ANSI/NFPA 70- 19 84 pro porc io na
información con respecto a la conexión a
tierra del poste y la estructura de soporte, la
conexión a tierra del alambre principal de
una unidad de descarga de antena, el
tamaño de los conductores de la conexión a
tierra y la conexión del electrodo de conexión
a tierra.
7
6
5
4
3
1
2
Referencia Componente de conexión a tierra
1 Equipo de servic io eléctrico
2 Sistemas de electrodos de tierra para el
3 Abrazad era de tierra
4 Conectores de conexión a tierra (NEC
5 Unidad de descarga de antena (NEC
6 Abrazad era de tierra
7 Cable conductor de entrada de antena
servicio de alimentación eléctrica
(NEC Art. 250, Parte H)
SECCIÓN 810-21)
SECCIÓN 810-20)
• Use como cable de tierra, un cable calibre
No. 10 AWG (5.3 mm
No. 8 AWG (8.4 mm
No. 17 AWG (1.0 mm
2
) de cobre,
2
) de aluminio,
2
) de bronce o acero
con revestimiento de cobre, o de calibre
mayor.
• Asegure a la casa los cables conductor
de entrada de antena y de tierra usando
aisladores separadores con 4 a 6 pies
(1.22 -1.83 m) de separación.
• Monte la unidad de descarga de antena
tan cerca como sea posible al lugar
donde entra a la casa el conductor de
entrada.
• Use un cable de empalme de calibre no
menor que No. 6A WG (13.3 mm
2
) de
cobre o equivalente, cuando use un
electrodo de conexión a tierra-antena
separado. Consulte ANSI/NFPA70.
• Un sistema de antena externa no debe de
ubicarse en las inmediaciones de circuitos de
alimentación eléctrica o donde pueda caer
sobre dichos circuitos o líneas de
alimentación. Al instalar un sist ema de
antena externa, se debe tener cuidado
extremo para no tocar los circuitos o líneas
de alto voltaje ya que el contacto con ellos
podría ser fatal.
• Para protección adicional de este televisor
durante una tormenta con relámpagos, o
cuando no se use durante largos periodos,
desconéctelo del tomacorriente y
desconéctelo de la antena o el sistema de
cable. Esto evitará daños al televisor debido
a sobretensión en la línea de energía o por
relámpagos.
• No sobrecargue los tomacorrientes y los
cables de extensión ya que una sobrecarga
puede causar incendio o choque eléctrico.
• Nunca inserte objetos de ningún tipo en este
televisor a través de las ranuras del gabinete,
ya que estos pueden tocar puntos de voltaje
peligrosos o hacer corto circuito con otros
componentes que pueden resultar en
incendio o choque eléctrico. Nunca derrame
líquidos de ninguna clase dentro del
televisor.
• No trate de reparar este televisor usted
mismo, ya que abrir o quitar las cubiertas
puede exponerlo a voltajes peligrosos u otros
peligros. Solicite todas las reparaciones al
personal de servicio calificado.
• Desconecte este televisor del tomacorriente
y solicite la reparación a los técnicos de
servicio calificados bajo las sigui entes
condiciones:
• Cuando el cable de alimentación o el
enchufe se dañen.
• Si se ha derramado líquido dentro del
televisor.
• Si el televisor ha sido expuesto a la lluvia
o al agua.
• Si el televisor no funciona normalmente
aún siguiendo las instrucciones de
operación siguientes. Ajuste únicamente
los controles que están cub ie rtos en las
instrucciones de operación, ya que el
ajuste incorrecto de otros controles puede
resultar en daño y frecuentemente
requerirá trabajo intensivo de un técnico
calificado para restaurar la operación
normal del producto.
• Si el televisor se ha dejado caer o se ha
dañado el gabinete.
46
www.insignia-products.com
Page 48

NS-FTV27 27-inch Flat Stereo Color TV
• Cuando el televisor exhibe un cambio
significativo en el rendimiento.
• Cuando se necesitan repuestos, asegúrese
de que el técnico de reparación use
repuestos especificados por el fabricante o
que tengan las mismas características que la
parte original. Las substituciones no
autorizadas pueden resultar en incendio,
choque eléctrico u otros peligros.
• Después de completar la reparación de este
televisor, pida al técnico de servicio que
realice verificaciones de seguridad para
determinar que el televisor se encuentra en
una condición de operación apropiada.
Nota para el instalador del sistema de televisión
Este recordatorio se proporciona para que el
instalador del sistema de televisión por cable
preste atención a la Sección 820 40 del NEC el
cual proporciona pautas para una correcta
conexión a tierra y, en particular, especifica que
la conexión a tierra del cable debe estar
conectada al sistema de tierra de la edificación,
tan cerca al punto de entrada del cable como
sea práctico.
Características
• Imagen de alta calidad—La resolución
horizontal de más de 500 líneas excede la
del Super VHS (400 líneas) o del disco láser
(430 líneas).
• Compatibilidad con un amplio rango de
salidas de audio.
• Conector de audio digital
(coaxial)—Cuando un componente con un
decodificador Dolby Digital* está cone ct ado,
el sonido Dolby Digital puede producir el
efecto de estar en un cine o sala de
conciertos.
• Sintonizador digital integrado—Usted
puede ver programas digitales sin usar una
caja de TV por cable digital.
• Decodificador de subtítulos con modo de
texto completo—Muestra subtítulos
codificados o texto completo en pantalla para
personas con discapacidad auditiva.
• Ajustes de imagen usando el control
remoto—La visualización en pantalla
permite realizar ajustes precisos mediante el
control remoto del brillo, contraste, color, tinte
y nitidez.
• Te mporizador de apagado automático del
televisor—Puede operarse mediante el
control remoto, y el televisor puede
programarse para que se apague
automáticamente en un lapso de hasta 120
minutos.
• V-Chip—La función V-Chip puede leer la
clasificación de contenido de un programa o
película de televisión si el programa está
codificado con esta información. El V-chip le
permite establecer un nivel de restricción.
• Recepción estéreo/SAP—Este televisor
está diseñado para recibir transmisiones de
programas en estéreo y segundo audio
(SAP), donde están disponibles.
• Conectores de S-Video/video de
componentes—Puede conectarse a este
televisor un reproductor de DVD, VCR,
receptor de satélite u otro componente de
audio/video.
• Conectores de entrada de video—Este
televisor está equipado con tres (3) tipos de
conectores de entrada de video. Los
conectores de entrada de video de
componente y entrada de S-video le
permiten usar el reproductor de DVD o los
dispositivos de video con una imagen de alta
calidad.
• Visualización en pantalla en 3
idiomas—Puede seleccionar uno de tres
idiomas: inglés, español o francés, para la
programación en línea.
* Fabricado con licencia de Dolby Laboratories.
"Dolby" y el símbolo de la doble D son marcas
registradas de Dolby Laboratories.
Partes y funciones
Frente
Botón POWER
(encendido)
Sensor del control
remoto
Vista Posterior
Conector
RF IN
(VHF/ UHF)
(Entrada RF
(VHF/UHF))
Conector de
S-VIDEO IN
(entrada de
S-Video)
Conectores AUDIO (L/R)/VIDEO
IN (VIDEO2) (Entrada de audio
(I/D)/video (Video 2))
Cable de
alimentación
de CA
Conector
COAXIAL
DIGITAL AUDIO
OUT (Salida de
audio digital
coaxial)
Conectores
AUDIO
(L/R)/VIDEO IN
(VIDEO1)
(Entrada de
Audio (I/D)/vide o
(video 1)
Conectores
COMPONENT
IN (Entrada de
componentes)
www.insignia-products.com
47
Page 49

NS-FTV27 27-inch Flat Stereo Color TV
Control remoto
1
2
3
4
5
6
7
8
Identificación de botones
Botón Descripción
1 POWER (Botón
de encendido)
2 Selección
directa de
canales (0-9)
3 -/DISPLAY
(Visualización)
/
Presione para encender el
televisor. Presione nuevamente
para apagar el televisor.
Úselos para ir directamente a
cualquier canal.
Cuando el televisor está
recibiendo una seña l analógic a,
presione este botón para
mostrar en pantalla la
información actual. Cuando el
televisor está recibiendo una
señal digital, presione est e
botón una vez para mostrar en
pantalla la información digital.
Presione este botón por
segunda vez para mostrar la
información analógica en
pantalla. Para eliminar la
visualización de la pantalla,
presione nue vamente este
botón. Este botón tamb ién es el
botón - usado al seleccionar
canales digitales.
PICTURE
SIZE
9
10
11
12
13
14
15
16
Botón Descripción
4 SLEEP
(Apagado
automático)
5 VOL + / - Presione el botón + para
6 MENU (Menú) Presione para mostrar la
7 EXIT (Salir) Presione para eliminar la
8 TV/AV Presione este botón para
9 QUICK VIEW
(Vista rápida)
10 MUTE
(Silenciar)
Para estab lecer el tele visor par a
que se apague después de un
tiempo determinado, presione
SLEEP (Apagado automático).
El reloj cuenta prog resivamente
diez minutos cada vez que se
presiona el botón, en el orden
de 0h00m, 0h10m,...1h50m,
2h00m. Después de progra ma r
el intervalo del temporizador de
apagado automátic o, l a pantalla
desaparece y luego reaparece
brevemente cada diez minutos
para recordarle que el
temporizador de apagado
automático está funcionando.
Para confirmar la selección del
tiempo de apagado autom ático,
presione el botón SLEEP
(Apagado automático) una vez
y se mostrará brevemente el
tiempo restante. Para cancelar
el temporizador de apagado
automático, pres io ne el botó n
SLEEP (Apagado automático)
repetidamente hasta que la
pantalla muestre 0h00m.
aumentar el nivel del volumen.
Presione el botón - para reducir
el nivel del volumen. Use estos
botones para seleccionar el
ajuste deseado durante la
operación de la pantalla del
menú.
función de la pantalla del menú.
pantalla del menú.
mostrar el menú SOURCE
SELECTION (Selección de
fuente) para selecciona r la
fuente de entrada de video.
Presione este botón para
regresar al último canal que
sintonizó. Presione este botón
nuev amente para regresar al
canal que estaba viendo.
Para desactivar el sonido,
presione este botón una vez. Se
desactiva el s onido de l televisor
y aparece el símbolo MUTE
(SILENCIAR) en la pantalla. La
función de silenciamiento
puede desactivars e
presionando el botón MUTE
nuev amen te o el botón VOL + o
- .
48
11 CH / Presione el botón para
cambiar a un cana l c on núm ero
superior establecido en la
memoria. Presione el botón
para cambiar a un canal con
número inferior establecido en
la memoria. Úselo para
seleccionar el ajuste deseado
durante la operación del menú.
www.insignia-products.com
Page 50

NS-FTV27 27-inch Flat Stereo Color TV
Botón Descripción
12 ENTER
(Ingresar)
13 RESET
(Restablecer)
14 CLOSED
CAPTION
(Subtítulos
codificados)
15 AUDIO
SELECT
(Selección de
audio)
16 PICTURE SIZE
(Tamaño de
imagen)
Presione para entrar o
seleccionar operaciones
mientras está en el menú de
pantalla.
Presione para restablecer los
ajustes de imagen y sonido a
sus posiciones
preseleccionadas en la fábrica,
mientras está en el menú de
pantalla.
Presione para mostrar el menú
CLOSED CAPTION (subtítulos
codificados)
Presione este botón pa ra
mostrar el menú AUDIO
Presione este botón pa ra
cambiar el tamaño de la
imagen.
Configuración de su televisor
Conexión de su televisor a la alimentaci ón CA
Use el cable de CA polarizado proporcionado
para la operación con CA. Inserte el enchufe de
CA en el tomacorriente de CA polarizado de 120
V 60 Hz.
Ranura y
espiga
ancha
Salida de CA
Instalación de las pilas en el control remoto
Antes de usar el control remoto, debe de instalar
la pilas. Use dos pilas tamaño AAA (no
proporcionadas). Las pilas pueden durar hasta
un año dependiendo de cuanto se use el control
remoto. Para obtener el mejor rendimiento,
recomendamos reemplazar las pilas cada año, o
cuando el control remoto empieza a funcionar
erráticamente. No mezcle pilas viejas y nuevas o
de diferentes tipos.
Para instalar las pilas en el control remoto:
1 Abra el compartimiento de las pilas.
2 Instale dos pilas AAA (no proporcionadas).
Notas
Enchufe de CA polarizado
(una espiga es más ancha
que la otra.)
• Nunca conecte el e nchuf e de CA a ot ro
voltaje que no sea el es pecificado (1 20
V, 60 Hz). Use solamente el cable de
alimentación proporcionado.
• Si el cable de CA no entra en un
tomacorriente de C A no polarizado, no
lime ni corte la espiga. Es
responsabilidad del usuario conseguir
un electricista para que reemplace el
tomacorriente obsolet o.
• Si causa una descarga estática
cuando se toque el televisor y éste
deja de funcionar, desconéctelo del
tomacorriente CA, luego conéctelo de
nuevo. El televisor debería funcionar
como normalmente.
3 Vuelva a colocar la cubierta del
compartimiento de las pilas.
Precauciones relacionad a s a las pilas
Siga estas precauciones cuando use pilas en
este control remoto:
• Use sólo el tamaño y tipo de pilas
especificados.
• Asegúrese de respetar la polar id ad cor rec ta
al instalar las pilas, según lo indicado junto al
compartimiento de las pilas. Si invierte las
pilas puede causar daño al dispositivo.
• No combine di ferentes tipos de pilas (por ej.,
alcalinas y carbón-zinc), ni tampoco pilas
usadas con nuevas.
• Si el dispositivo no se usará por un periodo
de tiempo extensivo, se deben extraer las
pilas para evitar daños o lesiones causadas
por el posible derrame del ácido de las
mismas.
• No intente recargar pilas que no están
diseñadas para ser recargadas. Estas pilas
se pueden sobrecalentar y partirse (siga las
indicaciones del fabricante de las pilas).
www.insignia-products.com
49
Page 51

NS-FTV27 27-inch Flat Stereo Color TV
s
Conexión a una antena
Si va a usar una antena para interiores o
exteriores, siga las instrucciones
correspondientes al sistema de antena. Si va a
usar un servicio de televisión por cable, vea
“Conexión a tel evisión por cable” on la
paginá 50.
Antena combinada VHF/UHF (cable simple de 75 ohmios o cable de dos conductores de 300 ohmios)
Cable
coaxial
de 75
ohmios
Conector RF IN
Transformador
de empalme de
300-75 ohmios
1 Conecte el cable de 75 ohmios proveniente
de la antena de VHF/UHF combinada al
conector RF IN.
2 Si su antena combinada VHF/UHF tiene un
cable de dos conductores de 300 ohmios,
quizás necesite usar un transformador de
empalme de 300-75 ohmios.
Antena de VHF/UHF combinada (cables de dos conductores separados de VHF y UHF de 300 ohmios)
Conector RF IN
Transformador
de empalme de
300-75 ohmios
Conector
RF IN
Antenas separadas VHF/UHF (cable de 75 ohmios
de VHF y cable de dos conductores de 300 ohmios
de UHF)
Conector RF IN
VHF de 75 ohmio
Combinador
UHF de 300 ohmios
1 Conecte el cable de 75 ohmios de VHF y el
cable de dos conductores de 300 ohmios de
UHF al combinador.
2 Conecte el combinador al conector RF IN.
Conexión a televisió n por cable
Este televisor tiene un amplio rango de
sintonización y puede sintonizar la mayoría de
canales de cable sin usar la caja convertidora de
televisión por cable. Algunas compañías de
televisión por cable ofrecen
especial
que tienen la señal está codificada.
Para descodificar estas señales para una
visualización normal es necesario usar un
dispositivo decodificador generalmente
proporcionado por la compañía de televisión por
cable.
Para los abonados al servicio básico de televisión por cable
canales de pago
Combinador
UHF de 300 ohmios
VHF de 300 ohmios
1 Conecte el cable dedos conductores de 300
ohmios de UHF al combinador (no
suministrado).
2 Conecte el cable de dos conductores de 300
ohmios de VHF a un transformador de
empalme de 300-75 ohmios.
3 Conecte el transformador al combinador,
luego conecte el combinador al conector RF
IN.
Cable
coaxial de
75 ohmios
Conector RF IN
Para el servicio de cable básico que no requiere
convertidor/caja decodificadora, conecte el
cable coaxial de 75 ohmios al conector RF IN
situado en la parte posterior del televisor.
Para los abonados al servicio codificado de televisión por cable
Cable de
entrada de
75 ohmios
de TV por
cable
Convertidor/decodificador
Cable
de 75
ohmios
al TV
Conector RF IN
1 Si usted es un abonado al servicio de
televisión por cable que requiere el uso de un
convertidor/caja decodificadora, conecte el
cable coaxial de entrada de 75 ohmios al
convertidor/caja decodificadora.
2 Usando otro cable coaxial de 75 ohmios,
conecte el conector de salida del
convertidor/caja decodificadora al conector
RF IN del televisor. Siga las conexiones
mostradas anteriormente.
50
www.insignia-products.com
Page 52

NS-FTV27 27-inch Flat Stereo Color TV
3 Establezca el televisor en el canal de salida
del convertidor/caja decodificadora
(generalmente canal 3 ó 4) y use el
convertidor/caja decodificadora para
seleccionar los canales.
Para los abonados al servicio codificado básico de
televisión por cable con canales de pago especial
codificados.
Cable de
entrada de
75 ohmios
de TV por
cable
Convertidor/d
ecodificador
Divisor
Conmutador de A/B
Cable
de 75
ohmios
al TV
Conector
RF IN
Si usted es un abonado a un servicio de
televisión por cable en el cual los canales
básicos están descodificados y los canales de
pago especial requieren el uso de una caja de
convertidor/decodificador, quizás le convenga
usar un divisor de señal y una caja de
conexiones A/B (disponible a través de la
compañía de televisión por cable o en una
tienda de artículos electrónicos). Siga las
conexiones mostradas anteriormente. Con el
conmutador en la posición B, puede sintonizar
directamente en su televisor cualquier canal no
codificado. Con el conmutador en la posición A,
sintonice su televisor en la salida de la caja del
convertidor/decodificador (generalmente el
canal 3 ó 4) y use la caja del
convertidor/decodificador para sintonizar los
canales codificados.
Conexión a otros equipos
La configuración exacta para interconectar
diversos componentes de video y audio al
televisor depende del modelo y de las
características de cada componente. Revise el
manual del propietario proporcionado con cada
componente para ubicar las entradas y salidas
de video y audio.
Los siguientes diagramas de conexión se
ofrecen como sugerencias. Es posible que tenga
que modificarlos para alojar su conjunto
particul ar de compon entes. Los diagramas
están diseñados para mostrar sólo las
interconexiones de video y audio de
componentes.
Selección de la fuente de entrada de video
Presione TV/AV para ver una señal de otro
dispositivo conectado a su televisor, tal como un
VCR o reproductor de DVD . Puede seleccionar
ANT, VIDEO1, VIDEO2, (en el panel frontal) o
COMPONENT dependiendo de los conectores
de entrada usados para conectar sus
dispositivos.
Conexión del televisor a un VCR
A Audio/Video
OUT (Salida de
audio/video)
Cable de audio/video (no
suministrado)
A Audio/ Video IN
(Entrada de audio/video)
Conexión del televisor a un VCR con un cable de S-Video
Si conecta un VCR con un cable de S-Video al
conector S-VIDEO IN situado en la parte
posterior del TV, también debe conectar los
cables de audio a los conectores AUDIO IN
situados en la parte posterior del televisor. El
cable de S-VIDEO sólo transmite la señal de
video. La señal de audio es separada.
A S-Video
OUT
(Salida de
S-Video)
Cable de
S-Video (no
suministrado)
A S-Video IN (Entrada
de S-Video)
A Audio OUT
(Salida de audio)
Cable de audio (no
suministrado)
A Audio IN (Entrada de audio)
Parte posterior del
televisor
Al presionar TV/AV en el control remoto verá la
fuente de señal actual (presione
TV/AVnuevamente o 0-3 para cambiar).
www.insignia-products.com
Nota
Cuando el cable de S-video y el cable de
video están conectados a sus respectivos
conectores simultáneamente, el cable de
S-video tiene precedencia sobre el cable de
video.
Conexión del televisor a un reproductor de DVD o receptor de satélite
Si su reproductor de DVD o receptor de satélite
tiene un conector de salida de S-Video, conecte
los cables como se muestra.
51
Page 53

NS-FTV27 27-inch Flat Stereo Color TV
e
A S-Video
OUT
(Salida de
S-Video)
Cable de
S-Video (no
suministrado)
A Audio OUT
(Salida de audio)
Cable de audio ( no
suministrado)
A Audio IN (Entrada de audio)
A S-Video IN (Entrada de S-Video)
Conexión del televisor a un reproductor de DVD con video de componente
Si su reproductor de DVD tiene conectores de
salida de video de componentes, conecte el
televisor a un reproductor de DVD usando un
cable de video de componente. Esto puede
mejorar considerablemente el rendimiento y la
calidad de la imagen.
A Audio
OUT
(Salida de
audio)
Cable de
audio (no
suministrado)
A COMPONENT IN (Entrada de component
A Component OUT
(Salida de componente)
Cable de video (no
suministrado)
Uso de un amplificador AV con sonido envolvente digital integrado
Si usa un amplificador con sonido envolvente
digital integrado como sigue, puede disfrutar
varios sistemas de audio, inclusive audio Dolby
Digital Surround con sonido similar al del cine.
Conecte un amplificador de AV con
decodificador Dolby Digital incorporado, como
se muestra a continuación.
A Audio
OUT (Salida
de audio)
Cable de
audio (no
suministrado)
Nota
Este televisor sólo puede transmitir salidas
entrelazadas 480i cuando está conectado a
un dispositiv o digit al co n sal ida s de video de
componentes. Si ingresa una señal 480p,
720p o 1080i a las entradas de video de
componentes, aparecerá COMPONENT
(Componente) en una pantalla negra. Si
aparece COMPONENT (Componente),
establezca la salida de componente del
dispositivo en 480 i.
A Component OUT
(Salida de componente)
Cable de video
(no suministrad o)
A COMPONENT IN (Entrada
de componente)
Conexión del televisor a un receptor de DTV o caja de televisión por cable
Si va a conectar un receptor de DTV/caja de TV
por cable, conecte el televisor a éste usando un
cable de video de componente.
Salida coaxial de
audio digital
Cable digital
coaxial (no
suministrado)
a entrada de
audio digital
coaxial
Amplificador AV con
decodificador de s onido
envolvente digital
integrado como se
indica anteriormente
Notas
• Al hacer la conexión anterior, en el
• Esta televisión no es compatible con
Altavoz
delantero
(izquierdo)
Altavoz de sonido
envolvente
(izquierdo)
amplificador de AV, no establezca
DOLBY DIGITAL en DOLBY DIGITAL
ON. Si lo hace, los altavoces emitir án
un ruido fuerte que puede causar daño
a su sentido del oído o a los altavoces.
audio DTS. No habrá salida de sonido
si se conecta a un amplificador A V con
decodificador DTS integrado.
Altavoz
para
graves
Altavoz de
sonido
envolvente
(derecho)
Altavoz
delantero
(derecho)
Altavoz
central
52
www.insignia-products.com
Page 54

NS-FTV27 27-inch Flat Stereo Color TV
Conexión del televisor a una cámara de video
Para reproducir desde una cámara de video,
conecte la cámara de video al televisor como se
muestra.
Parte frontal del telev is or
A Audio/Video
OUT (Salida de
audio/video)
Cable de audi o/video
(no suministrado)
Conexión del televisor a una consola de juegos de video
El televisor también puede usarse como
dispositivo de visualización para muchos juegos
de video. Sin embargo, debido a la amplia
variedad de señales generadas por estos
dispositivos y las subsiguientes variaciones de
conexión requeridas, todas no se han incluido
en los diagramas de conexión sugeridos. Para
obtener información adicional, debe consultar el
manual del propietario de cada componente.
Parte frontal del televisor
Consola
de juegos
de video
A Audio/Video
OUT (Salida de
audio/video)
Cable de audio /video
(no suministrado)
Configuración inicial
El menú STARTING SETUP (Configuración
inicial) aparece la primera vez que usted
enciende el televisor, y le ayuda a seleccionar el
idioma de los menús, especificar el ajuste de
TV/CABLE y programar sus canales
automáticamente.
Para completar la configuración inicial del televisor:
1 Asegúrese de que esté conectado el sistema
de antena o televisión por cable.
2 Presione el botón POWER (Encendido).
Comienza la función de configuración de
inicio y aparece el menú de configuración de
idioma en la pantalla.
3 Presione
deseado, luego presione ENTER.
4 Presione
CABLE, luego presione ENTER (Ingresar)
5 Presione
(Iniciar), luego presione ENTER (Ingresar).
Si selecciona CANCEL (Cancelar) y
presiona ENTER (Ingresar), la Configuración
inicial se detiene y cambia a la pantalla de
televisión.
o para seleccionar el idioma
o para seleccionar TV o
o para seleccionar START
Comienza AU T O S ETUP (Configuración
automática). Cuando concluye la
Configuración inicial, el canal de televisión
aparece en la pantalla.
Dependiendo de la condición de recepción,
puede requerirse aproximadamente diez
minutos para completar la memorización de
los canales de cable digital.
Nota
Si selecciona EXIT (Salir) en el proceso de
Configuración automática, se detiene la
Configuración inicial y cambia a la pantalla
de televisión.
• Cuando usted hace una selección del
menú, los cam bios ocurren
inmediatamente. No tiene que presionar
EXIT (Salir) para ver los cambios.
• Cuando haya terminado de programar los
menús, presione EXIT (Salir).
Uso del menú
Para acceder al menú usando los botones del TV:
Presione los dos botones de volumen
y
simultáneamente. Aparecerá la pan talla del
menú.
Para acceder al menú usando el control remoto:
Presione MENU. Aparecerá la pantalla del
menú.
Para seleccionar un ajuste usando los botones del menú:
Use los botones de canal
de volumen
y .
y y los botones
Para seleccionar un ajuste usando el control remoto:
Use los botones de canal
y y los botones
de volumen y .
Cómo establecer el idioma
Puede elegir entre tres idiomas diferentes
(inglés, francés y español) para la visualización
en pantalla.
Para seleccionar el idioma de los menús:
1 Presione MENU. Aparecerá la pantalla del
menú.
Nota
2 Presione o para seleccionar el menú
3 Presione
4 Presione o para seleccionar el idioma
5 Presione el botón EXIT (Salir) para regresar
Si no se presiona ningún botón por más de
15 segundos, la pantalla del menú regresa
automáticamente a la operación normal del
televisor.
SETUP (Configuración).
o para seleccionar
LANGUAGE (Idioma).
deseado: English (ENGLISH), French
(FRANÇAIS), o Spanish (ESPAÑOL).
a la pantalla normal.
www.insignia-products.com
53
Page 55

NS-FTV27 27-inch Flat Stereo Color TV
Memorización de canales
Este televisor está equipado con una función de
memoria de canales que permite saltar canales
hacia arriba o hacia abajo al siguiente canal
definido en la memoria. Antes de seleccionar los
canales, éstos deben programarse en la
memoria del televisor. Este televisor puede
recibir hasta 250 canales VHF/UHF y 500
canales de televisión por cable.
Para usar su TV con antena, establezca la
opción del menú TV/CABLE en el modo TV.
Cuando se envía de la fábrica, esta opción del
menú está en el modo CABLE.
Selección de TV o cable
Para seleccionar entrada de televisión o cable:
1 Presione MENU. Aparecerá la pantalla del
menú.
2 Presione el botón
menú SETUP (Configuración).
3 Presione
o para seleccionar
TV/CABLE.
4 Presione
o para seleccionar TV o
CABLE.
• TV—Canales VHF/UHF
• CABLE—Canales de televisión por cable
5 Presione el botón EXIT (Salir) para regresar
a la pantalla normal.
o para seleccionar el
Nota
Algunos canales pueden añadirse. Usted
debe realizar el procedimiento AUTO CH
MEMORY (Memoria autom. de canales)
periódicamente.
Agregar y borrar canales
Para agregar o borrar canales:
1 Presione MENU. Aparecerá la pantalla del
menú.
2 Presione o para seleccionar el menú
SETUP (Configuración), luego presione
para seleccionar ADD/DELETE
(Añadir/eliminar)
3 Presione o . Aparece el menú
ADD/DELETE (Añadir/eliminar).
4 Presione
o para seleccionar
ADD/DELETE (Añadir/Eliminar), luego
presione .
5 Seleccione el canal deseado que se va a
memorizar o eliminar usando
6 Presione o para seleccionar ADD
(Añadir) o DELETE (Eliminar).
7 Repita los pasos 5-6 para los otros canales
que desea añadir o eliminar, luego presione
ENTER (Ingresar).
8 Presione el botón EXIT (Salir) para regresar
a la pantalla normal.
o
o .
Nota
Es posible que se demore unos segundos
para que la imagen del canal digital
aparezca en la pantalla después de
seleccionarla.
Tabla de canales de cable
La siguiente tabla es típica para muchas
designaciones de canales de cable. El número
en la parte superior es el número en la
televisión. El número o letra en la parte inferior
es el canal de cable correspondiente.
Sintonización automática en la memoria
Para memorizar automáticamente los canales:
1 Presione MENU. Aparecerá la pantalla del
menú.
2 Presione o para seleccionar el menú
SETUP (Configuración), luego presione
para seleccionar AUTO CH MEMORY
(Memoria autom. canales)
3 Presione o . El televisor comenzará a
memorizar todos los canales disponibles en
su área.
Dependiendo de la condición de recepción,
puede requerirse aproximadamente diez
minutos para completar la memorización de
los canales de cable digital.
Nota
Para regresar del menú ADD/DELETE
(Añadir/eliminar) al menú SETUP
(Configuración), seleccione SETUP MENU
(Menú de configuración), luego presione
o .
Para agregar canales digitales:
1 Seleccione el canal digital que desea
agregar usando los botones de selección
directa (numéricos).
2 Presione MENU (Menú). Aparecerá la
pantalla del menú.
3 Presione o para seleccionar el menú
SETUP (Configuración), luego presione
para seleccionar ADD/DELETE
(Añadir/Eliminar)
4 Presione o para seleccionar. Aparece el
menú ADD/DELETE (Añadir/eli min ar ).
5 Presione
CHANNEL (Agregar Canal), luego presione
o .
6 Presione EXIT (Salir) para regresar a la
pantalla normal.
7 Repita los pasos 1-6 para los otros canales
o
digitales que desea agregar.
Uso de la función Borrar todos
Todos los canales pueden eliminarse de la
memoria de canales.
Para borrar todos los canales de la memoria:
1 Presione MENU. Aparecerá la pantalla del
menú.
2 Presione o para seleccionar el menú
SETUP (Configuración), luego presione
para seleccionar ADD/DELETE
(Añadir/Eliminar).
3 Presione o . Aparece el menú
ADD/DELETE (Añadir/Eliminar).
o
o para seleccionar ADDING
o
54
www.insignia-products.com
Page 56

NS-FTV27 27-inch Flat Stereo Color TV
4 Presione o para seleccionar CLEAR
ALL (Borrar todos), luego presione o .
Uso de su televisor
Notas
Para usar el televisor:
1 Presione POWER para encender el televisor.
2 Ajuste el nivel de volumen presionando VOL
3 Establezca la opción del menú TV/CABLE
4 Presione los botones de selección directa de
Selección de canales analógicos
Canales Presione
1-9 Presione 0 dos veces, luego 1-9 según
10-99 Presione 0, luego los 2 dígitos restantes.
100-125 Presione los 3 dígitos en orde n. Por
Selección de canales digitales
Presione los primeros 3 dígitos, luego presione
el botón –/DISPLAY (-/Visualización), seguido
de los 3 dígitos restantes.
Por ejemplo, para seleccionar el canal 015-001,
presione 0 1 5 – 0 0 1.
Observe lo siguiente:
• Si se selecciona un canal sólo con contenido
• Si se selecciona un canal con una señal
• Si se selecciona un canal al que no se ha
TV Cable
VHF
2-13
• Si selecciona un canal que no tiene
señal de transmisión, el sonido se
silencia automáticamente.
• Si una estación que está viendo
detiene la transmisión, el televisor
automáticamente se apaga después
de 15 minutos.
+ o –. El nivel de volumen se indica en la
pantalla mediante barras de color verde. A
medida que aumenta el nivel del volumen,
aumenta el número de barras. Si se
disminuye el volumen, también disminuye el
número de barras de color verde.
en la posición apropiada (vea “Selección de
TV o cable” on la paginá 54).
canales para seleccionar el canal.
sea necesario. Ejemplo: Para seleccionar
el canal 2, presione 0 0 2.
Por eje mplo , para sel eccionar el c anal 12,
presione 0 1 2.
ejemplo, para seleccionar el canal 120,
presione 1 2 0.
audio, aparecerá "AUDIO ONLY" (Sólo audio)
en la pantalla.
digital débil, aparecerá "DIGITAL CHANNEL
SIGNAL STRENGTH IS LOW" (La intensidad
de la señal del canal digital es baja) en la
pantalla.
suscrito, aparecerá "DIGITAL CHANNEL IS
SCRAMBLED" (Canal digital está codificado)
en la pantalla.
VHF
2-13
TV Cable
UHF
14-69
STD/HRC/IRC
14-36 (A) (W)
37-59 (AA) (WW)
60-85 (AAA) (ZZZ)
86-94 (86) (94)
95-99 (A-5) (A-1)
100-125 (100) (125)
01 (5A)
Búsqueda de canales
Para buscar el siguiente canal:
Presione y suelte CH
o . El canal se
detiene automáticam ente en el siguiente canal
establecido en la memoria.
Para una correcta operación, antes de buscar
los canales, estos deben establecerse en la
memoria. Vea “Memorización de canales” on la
paginá 54.
Cómo ver la información
Nota
La pantalla regresa automáticamente al
funcionamiento de TV normal después de
10 segundos.
Para ver la información sobre la programación:
1 Presione -/DISPLAY (-/Visualización) para
ver la información actual en la pantalla.
Cuando el televisor recibe una señal digital,
aparecerá la información digital.
• Nombre de programa de transmisión
• Nombre de estación
• Tiempo restante
• Idioma de audio
• Nombre del programa
• Clasificación de V-Chip
• Marca de V-Chip
• Marca de subtítulos codificados
Cuando el televisor recibe una señal
analógica, DISPLAY (-/Visualiza ci ón)
muestra sólo información analógica.
2 Presione el botón -/DISPLAY
(-/Visualización) de nuevo. Aparece la
información analógica:
• Reloj
• Número de canal o modo de video
seleccionado
• Etiqueta de canal (si está predefinido)
• Estado de audio estéreo o SAP (segundo
programa de audio)
• Clasificación de contenido
• Temporizador de encendido,
temporizador de apagado, temporizador
de apagado automático (si están
predefinidos)
• Tamaño de imagen
3 Presione -/DISPLAY (-/Visualización)
nuevamente para borrar la pantalla de
llamada.
www.insignia-products.com
55
Page 57

NS-FTV27 27-inch Flat Stereo Color TV
Para ver el canal anterior
El botón QUICK VIEW (Visualización rápida) le
permite regresar al último canal sintonizado.
Presione QUICK VIEW (Visualización rápida)
nuevamente para regresar al último canal que
estaba viendo.
Silenciamiento del volumen
Presione MUTE (Silenciar) para desactivar el
sonido. Se desactiva el sonido del televisor y
aparece MUTE (Silenciar) en la pantalla. El
sonido puede activarse nuevamente
presionando este botón otra vez o presionando
cualquiera de los botones VOL + o –.
Uso de la función de apagado automático
Para establecer su televisor para que se apague
después de un tiempo determinado, presione
SLEEP (Apagado automático) en el control
remoto. El reloj cuenta progresivamente diez
(10) minutos cada vez que se presiona el botón
SLEEP (Apagado automático) (0h00m, 0h10m,
...1h50m, 2h00m).
Después de programar el intervalo del
temporizador de apagado automático, la
pantalla aparece brevemente cada diez minutos
para recordarle que el temporizador de apagado
automático está funcionando. Para confirmar el
ajuste del temporizador de apagado automático,
presione SLEEP (Apagado automático) y el
tiempo restante aparecerá por unos segundos.
Para cancelar el temporizador de apagado
automático, presione el botón SLEEP
repetidamente hasta que la pantalla muestre
0h00m.
Ajuste del Chip-V
Puede establecer limitaciones por edad para
evitar que los niños vean o escuchen escenas
violentas o imágenes que usted desea excluir.
La restricción se aplica a las clasificaciones de
TV y de películas, si estos datos son
transmitidos. Usted puede establecer esta
restricción por separado. Para usar la función
V-Chip, debe establecer una contraseña.
Notas
Establecimiento de una contraseña
Para establecer una contraseña:
1 Presione MENU. Aparecerá la pantalla del
• La función V-Chip se activa sólo en los
programas y fuentes de entrada que
tienen la señal de clasific ación.
• Puede ser que tarde v arios min utos en
completar la configuración inicial del
Chip-V.
• La opción V-CHIP SET (DTV) sólo se
podrá seleccionar cuando el televisor
recibe una transmisión digital que use
el nuevo sistema de clas ificación.
Actualmente, algunas estaciones
todavía no proveen esta señal. Si no
se provee la señal , la función V-CHIP
SET (DTV) no estará disponible.
• Si se olvidó de su contraseña,
comuníquese con Servicio al cliente al
1-877-467-4289 para obtener ayuda.
Necesitará su control remoto original.
• Para evitar olvidarse de la contra seña,
escríbala en una hoja de papel y
guárdela en un lugar seguro.
menú.
2 Presione o para seleccionar el menú
LOCKS (Bloqueos).
3 Presione
o para entrar al modo de
introducción de contraseña.
4 Seleccione e introduzca una contraseña (de
4 dígitos), usando los botones de números
(0-9), luego presione ENTER (Ingresar).
5 Introduzca la misma contraseña, luego
presione ENTER (Ingresar).
Ahora la contraseña está establecida y
aparece el menú V-Chip en la pantalla.
Ajuste del Chip-V
Para ajustar el V-Chip:
1 Presione MENU. Aparecerá la pantalla del
menú.
2 Presione o para seleccionar el menú
LOCKS (Bloqueos).
3 Presione
o para entrar al modo de
introducción de contraseña. Use los botones
de números (0-9) para introducir su
contraseña, luego presione ENTER
(Ingresar). Apar ece el menú LOCKS
(Bloqueos).
4 Presione
o para seleccionar V-CHIP
SET (Configuración de V-Chip) luego
presione . El menú
5 Presione
o para seleccionar TV
V-CHIP SET
RATING (Clasificación de TV), luego
presione o para mostrar la clasificación
deseada.
OFF—La TV RATING no está establecida
TV-Y—Todos los niños
TV-Y7—Niños de 7 años y mayores
TV-G—Audiencia general.
TV-PG—Guía paternal
TV-14—Niños de 14 años y mayores
TV-MA—Niños de 17 años y mayores
Cuando seleccione TV-Y7, TV-PG, TV-14 o
TV -MA , pres ione -/DISPLAY (-/Visualización)
para definir más detalladamente la
clasificación. Presione
o para
seleccionar la clasificación deseada.
Presione o para seleccionar el ajuste
ON (Activado) u OFF (Desactivado).
6 Presione
o para seleccionar MOVIE
RATING (Clasificación de Películas) luego
presione . El menú
RATING
(Clasificación)
aparecerá.
7 Presione
o para seleccionar la
clasificación, luego presione o para
seleccionar ON (Activar) o OFF (Desactivar)
para cada clasificación.
G—Todas las edade s
PG—Guía paternal
PG-13—Guía paternal para niños menores
de 13 años
R—Menores de 17 años, guía paternal
recomendada
NC-17—Niños de 17 años y mayores
X—Solo para adultos
8 Presione MENU (Menú) dos veces para
regresar al menú (Bloqueos), luego presione
o para seleccionar V-CHIP.
aparecerá.
56
www.insignia-products.com
Page 58

NS-FTV27 27-inch Flat Stereo Color TV
9 Presione o para seleccionar ON. Sus
selecciones ahora están establecidas en la
memoria.
10 Presione el botón EXIT (Salir) para regresar
a la pantalla normal.
Para ver un programa protegido
Para ver un progra ma bloqueado por la función V-Chip:
1 Presione MUTE (Silenciar).
2 Introduzca la contraseña, luego presione
ENTER (Ingresar).
Después de ingresar la contraseña
correctamente, la protección se anula
temporalmente. Si se apaga el televisor o si
se cambia de canal, se reactiva la restricción
V-Chip.
Cómo cambiar la contraseña
Para cambiar la contraseña:
1 Presione MENU. Aparecerá la pantalla del
menú.
2 Presione o para seleccionar el menú
LOCKS (Bloqueos).
3 Presione
o para entrar al modo de
introducción de contraseña. Use los botones
de números (0-9) para introducir su
contraseña, luego presione ENTER
(Ingresar). Aparece el menú LOCKS
(Bloqueos).
4 Presione
o para seleccionar NEW
PASSWORD (Nueva contraseña), luego
presione o .
5 Introduzca una contraseña, usando los
botones de números (0-9), luego presione
ENTER (Ingresar).
6 Introduzca la misma contraseña, luego
presione ENTER (Ingresar).
7 Presione el botón EXIT (Salir) para regresar
a la pantalla normal.
Cómo bloquear los canales
Con la función CH LOCK (Bloqueo de canales),
usted puede bloquear canales específicos. No
podrá sintonizar los canales bloqueados a
menos que borre el ajuste. Puede elegir
bloquear hasta 12 canales de televisión.
Nota
Para bloquear canales:
1 Use los botones de números (0-9) para
2 Presione MENU, luego presione o para
3 Presione
4 Use los botones de números (0-9) para
Después de programar la función CH LOCK
(Bloqueo de canales) , cambie el c anal ante s
de apagar el televisor. Si no lo hace, se
cancela la programación para los canales
bloqueados usando este procedimiento.
mostrar el canal de televisión que desea
bloquear.
mostrar el menú LOCKS (Bloqueos).
o para entrar al modo de
introducción de contraseña.
introducir su contraseña, luego presione
ENTER (Ingresar). Aparece el menú LOCKS
(Bloqueos).
5 Presione
o para resaltar CH LOCK
(Bloqueo de canal) y presione o para
mostrar el menú CH LOCK (Bloqueo de
canales).
6 Presione o para seleccionar lo siguiente:
• SET (Establecer) – para establecer el
canal como bloqueado, luego presione
ENTER (Ingresar).
• CLEAR (Borrar) – para borrar todos los
canales de la lista de canales
bloqueados, luego presione ENTER
(Ingresar).
7 Repita los pasos 1 a 6 para bloquear otros
canales. Cuando haya terminado de
bloquear canales, presione EXIT (Salir) para
regresar a la visualización normal.
Si trata de sintonizar un canal bloqueado, el
televisor no lo mostrará, pero mostrará en su
lugar el canal más cercano no bloqueado.
Cómo desbloquear canales
Para desbloquear canales:
1 Presione MENU, luego presione o para
mostrar el menú LOCKS (Bloqueos).
2 Presione
o para entrar al modo de
introducción de contraseña.
3 Use los botones de números (0-9) para
introducir su contraseña, lueg o presi one
ENTER (Ingresar). Aparece el menú LOCKS
(Bloqueos).
4 Presione
o para resaltar CH LOCK
(Bloqueo de canal) y presione o para
mostrar el menú CH LOCK (Bloqueo de
canales).
5 Presione o para resaltar CLEAR
(Borrar) y borre todos los canales de la lista
de canales bloqueados.
6 Presione ENTER (Ingresar).
7 Presione EXIT (Salir) para regresar a la
visualización normal.
Bloqueo de entradas de video
Con la función VIDEO LOCK (Bloqueo de
video), usted puede bloquear las fuentes de
entrada (VIDEO1, VIDEO2, COMPONENT) y
los canales 3 y 4. No podrá seleccionar las
fuentes de entrada con el botón TV/AV ni con
los botones de canales a menos que borre la
selección.
Nota
Para bloquear entradas de vide o:
1 Presione MENU. Aparecerá la pantalla del
2 Presione o para seleccionar el menú
3 Presione
Después de programar VIDEO LOCK
(Bloqueo de video), cambie el can al o
presione el botón TV/AV antes de apagar el
televisor. Si no lo hace, se cancela la
programación para las entradas de video
bloqueadas usando este procedimiento.
menú.
LOCKS (Bloqueos).
o para entrar al modo de
introducción de contraseña. Use los botones
de números (0-9) para introducir su
contraseña, luego presione ENTER
(Ingresar). Apar ece el menú LOCKS
(Bloqueos).
www.insignia-products.com
57
Page 59

NS-FTV27 27-inch Flat Stereo Color TV
4 Presione o para resaltar VIDEO LOCK
(Bloqueo de video).
5 Presione o para seleccionar:
• OFF (Desactivado): Desbloquea todas las
fuentes de video.
• VIDEO: Bloquea las fuentes VIDEO1,
VIDEO2, COMPONENT.
• VIDEO +: Bloquea VIDEO1, VIDEO2,
COMPONENT, canal 3 y canal 4. Use
esta opción si utiliza el terminal de antena
para reproducir una cinta de video.
6 Presione EXIT (Salir) para regresar a la
visualización normal.
Desbloqueo de las entradas de video
Para desbloquear entra das de video b loque adas:
1 Use los botones de números (0-9) para
mostrar el canal de televisión que desea
bloquear.
2 Presione MENU, luego presione o para
mostrar el menú LOCKS (Bloqueos).
3 Presione
introducción de contraseña.
4 Use los botones de números (0-9) para
introducir su contraseña, luego presione
ENTER (Ingresar). Aparece el menú LOCKS
(Bloqueos).
5 Presione
(Bloqueo de video) y presione o para
resaltar OFF (Desactivado).
6 Presione EXIT (Salir) para regresar a la
visualización normal.
o para entrar al modo de
o para resaltar VIDEO LOCK
Bloqueo del panel frontal
Usted puede bloquear los botones del panel
frontal para evitar un cambio accidental de los
ajustes. Cuando el bloqueo del panel frontal
está en posición ON (Activado), todos los
botones de control situados en el panel frontal
del TV (excepto POWER) no funcionarán.
Para bloquear el panel frontal:
1 Presione MENU. Aparecerá la pantalla del
menú.
2 Presione o para seleccionar el menú
LOCKS (Bloqueos).
3 Presione
introducción de contraseña. Use los botones
de números (0-9) para introducir su
contraseña, luego presione ENTER
(Ingresar). Aparece el menú LOCKS
(Bloqueos).
4 Presione
PANEL LOCK (Bloqueo de panel frontal) y
presione o para seleccionar ON
(Activado). Si presiona un botón en el panel
frontal, aparece el mensaje NOT
AVAILABLE (No disponible).
5 Presione EXIT (Salir) para regresar a la
visualización normal.
o para entrar al modo de
o para seleccionar FRONT
Cómo desbloquear el panel frontal
Para desbloquear el panel frontal:
1 Presione y mantenga presionado VOLUME
en el panel frontal del televisor por
aproximadamente diez segundos, hasta que
aparezca el mensaje FRONT PANEL
LOCK:OFF (Bloqueo de panel frontal:
Desactivado) en la pantalla.
- O BIEN Presione MENU. Aparecerá la pantalla del
menú.
2 Presione o para seleccionar el menú
LOCKS (Bloqueos).
3 Presione
introducción de contraseña. Use los botones
de números (0-9) para introducir su
contraseña, luego presione ENTER
(Ingresar). Apar ece el menú LOCKS
(Bloqueos).
4 Presione
PANEL LOCK (Bloqueo de panel frontal) y
presione o para seleccionar OFF
(Desactivado).
5 Presione EXIT (Salir) para regresar a la
visualización normal.
o para entrar al modo de
o para seleccionar FRONT
Etiquetas de canal
Las etiquetas de canal aparecen sobre la
visualización del número de canal cada vez que
usted enciende el televisor, selecciona una
canal o presiona -/DISPLAY (-/Visualización).
Puede elegir cuatro caracteres para identificar
un canal.
Nota
Para etiquetar canales:
1 Seleccione el canal que desea identificar.
2 Presione MENU, luego presione o para
3 Presione
4 Presione
5 Presione o para seleccionar SET
6 Presione ENTER para seleccionar LABEL
Para regresar del menú CH LABEL
(Etiqueta de canal) al menú OPTION
(Opción), seleccio ne OPTION MENU, (Menú
de opciones) o .
seleccionar el menú OPTION (Opción).
o para seleccionar CH
LABEL (Etiqueta de canal), luego presione
o . Aparece el menú CH LABEL
(Etiqueta de canal).
o para seleccionar
SET/CLEAR (Establecer/Borrar)
(Establecer).
(Etiqueta), luego presione o para
introducir un carácter en el primer espacio.
Presione el botón repetidamente hasta que
aparezca el carácter des ead o en la pantal la .
La rotación de caracteres es como sigue:
–
58
SPACE+
www.insignia-products.com
Page 60

NS-FTV27 27-inch Flat Stereo Color TV
Cuando aparezca el carácter deseado,
presione ENTER (Ingresar). Repita este
paso para introducir los demás caracteres. Si
desea un espacio en blanco en el nombre de
la etiqueta, debe seleccionar el espacio en
blanco de la lista de caracteres, de lo
contrario aparecerá una guión en dicho
espacio. Cuanto termine de ingresar el
nombre de la etiqueta, presione ENTER
(Ingresar).
7 Presione el botón EXIT (Salir) para regresar
a la pantalla normal.
8 Repita los pasos 1- 7 para otros canales.
Puede asignar una etiqueta a cada canal.
Cómo borrar etiquetas de canales
Para borrar una etiqueta de canal:
1 Seleccione un canal con una etiqueta que
desea borrar.
2 Presione MENU, luego presione o para
seleccionar el menú OPTION (Opción).
3 Presione
o para seleccionar CH
LABEL (Etiqueta de canal), luego presione
o para mostrar el menú CH LABEL
(Etiqueta de canal).
4 Presione
o para seleccionar
SET/CLEAR (Establecer/Borrar)
5 Presione o para seleccionar CLEAR
(Borrar), luego presione ENTER (Ingresar).
6 Presione el botón EXIT (Salir) para regresar
a la pantalla normal.
Ajuste del reloj
Debe establecer correctamente el reloj para que
el ON/OFF TIMER (temporizador de
encendido/apagado) se active a la hora
correcta.
Nota
Después de una interrupción o descon exión
de la alimentació n eléctrica, se perder án los
ajustes del reloj. En este caso, restablezca
la hora actual.
Para establecer el reloj:
1 Presione MENU, luego presione o para
seleccionar el menú SETUP (Configuración).
2 Presione
o para seleccionar CLOCK
SET (Establecimiento del reloj), luego
presione o . Aparece el menú CLOCK
SET (Establecimiento del reloj).
3 Presione o para establecer el MONTH
(MES), luego presione .
4 Establezca el DAY (DÍA), YEAR (AÑO) y
TIME (HORA) como en el paso 3.
Después de establecer la fecha y la hora, el
reloj comenzará a funcionar
automáticamente.
5 Presione el botón EXIT (Salir) para regresar
a la pantalla normal.
Ajuste del temporizador de encendido
Esta función permite encender su televisor
automáticamente a una hora predeterminada. Si
programa el temporizador de encendido en
DAIL Y (Diariamente), el televisor se enciende
todos los días a la misma hora en el mismo
canal.
EJEMPLO: Encender el televisor en el canal 12
a las 7:30 a.m. diariamente.
Notas
• El televisor se apagará
automáticamente aproximadamente 1
hora después de que se active el
temporizador de encendido, si no se
ha establecido el temporizador de
apagado. Para continuar viendo
televisión, presione cualquier botón
para cancelar la desactivación
automática de una hora.
• Si una estación que está viendo
detiene la transmisi ón, el televisor
automáticamente se apaga después
de 15 minutos.
• Para cancelar el temporizador de
encendido, seleccione CLEAR
(Borrar). Presione el botón EXIT (Sal ir)
para regresar a la pantalla normal.
• Después de una interrupción o
desconexión de la alimentación
eléctrica, se perderán los ajustes del
temporizador.
• Para regresar del menú ON/OFF
TIMER (Temporizador de
encendido/apaga do) a l m en ú OPTION
(Opción), seleccione OPTION MENU
(Menú de opciones), luego pre sione
o .
Para ajustar el temporizador de encendido:
1 Ajuste el reloj, si todavía no lo ha hecho (vea
“Ajuste del reloj” on la paginá 59).
2 Presione MENU.
3 Presione o para seleccionar el menú
OPTION (Opción).
4 Presione
o para seleccionar ON/OFF
TIMER (Temporizador de
encendido/apagado).
5 Presione o para seleccionar SET
(Establecer), luego presione ENTER
(Ingresar). Aparece el menú ON/OFF TIMER
(Temporizador de encendido/apagado).
6 Presione
o para seleccionar ON
TIMER (Temporizador de encendido), luego
presione
para ingresar el ajuste para el
temporizador de encendido.
7 Presione
o para establecer la hora,
luego presione . Fíjese si la hora es AM o
PM y elija el ajuste deseado.
8 Establezca los minutos y el canal de puesta
en marcha.
9 Presione o para seleccionar DAIL Y
(Diariamente), luego presione ENTER
(Ingresar).
10 Presione el botón EXIT (Salir) para regresar
a la pantalla normal.
Establecimiento del temporizador de apagado
Esta función permite apagar su televisor
automáticamente a una hora predeterminada. Si
programa el temporizador de apagado en DAILY
(Diariamente), el televisor se apaga todos los
días a la misma hora en el mismo canal.
www.insignia-products.com
59
Page 61

Notas
• Si una estación que está viendo
detiene la transmisión, el televisor
automáticamente se apaga después
de 15 minutos.
• Para confirmar los ajustes del
temporizador de encendido/apagado,
presione -/DISPLAY (-/Visualización)
para mostrar el programa en la
pantalla.
• Para regresar del menú ON/OFF
TIMER (Temporizador de
encendido/apaga do) al menú OPTION
(Opción), seleccione OPTION MENU
(Menú de opciones), luego pre sione
o .
Para ajustar el temporizador de apagado:
1 Ajuste el reloj, si todavía no lo ha hecho (vea
“Ajuste del reloj” on la paginá 59).
2 Presione MENU.
3 Presione o para seleccionar el menú
OPTION (Opción).
4 Presione
o para seleccionar ON/OFF
TIMER (Temporizador de
encendido/apagado).
5 Presione o para seleccionar SET
(Establecer), luego presione ENTER
(Ingresar). Aparece el menú ON/OFF TIMER
(Temporizador de encendido/apagado).
6 Presione
o para seleccionar OFF
TIMER (Temporizador de apagado), luego
presione para ingresar el ajuste para el
temporizador de apagado.
7 Presione
o para establecer la hora,
luego presione . Fíjese si la hora es AM o
PM y elija el ajuste deseado.
8 Presione
o para establecer los minutos
y presione o para seleccionar DAILY
(Diariamente), luego presione ENTER
(Ingresar).
NS-FTV27 27-inch Flat Stereo Color TV
5 Presione el botón EXIT (Salir) para regresar
a la pantalla normal.
Establecimiento del tamaño de la imagen
Puede ver programas con formato 480i en tres
tamaños de imagen—4:3, 16:9 y ZOOM.
Puede cambiar el tamaño de la imagen
presionando el botón PICTURE SIZE (Tamaño
de imagen) en el control remoto.
ZOOM (Aumentar)
Tamaño de imagen 4:3
Para llenar la pantalla, los bordes superior e
inferior están extendidos más ampliamente,
mientras que el centro de la imagen permanece
cerca de la relación anterior.
Si está recibiendo un programa con formato 4:3,
la imagen se muestra en su proporción de
formateo original.
Tamaño de imagen 16:9
Esta imagen muestra el tamaño 16:9 estándar
con barras negras en la parte superior e inferior.
Nota
Para c anc el ar el OFF TIMER (Temporizador
de apagado), presione o para
seleccionar CLEAR (Borrar) después de
este paso, luego presione ENTER
(Ingresar).
9 Presione el botón EXIT (Salir) para regresar
a la pantalla normal.
Habilitación o inhabilitación de la funci ón ON/OFF TIMER (Temporizador de encendido/apagado)
Para activar o desactivar el temporizador de encendido/apagado:
1 Presione MENU.
2 Presione o para seleccionar el menú
OPTION (Opción).
3 Presione
TIMER (Temporizador de
encendido/apagado).
4 Presione o para seleccionar ON
(Activado) u OFF (Desactivado).
ON (Activado): El ajuste del temporizador
está habilitado:
OFF (Desactivado): El ajuste del
temporizador está inhabilitado.
o para seleccionar ON/OFF
Si está recibiendo un programa con formato 4:3,
la imagen aparece con barras negras en la parte
superior e inferior y extendida a lo ancho.
Nota
Si una barra negra pe rmanece en la pantalla
por largos períodos de tiempo, la imagen
puede fijarse permanentemente en la
pantalla y causar imágenes fantasmas
sutiles pero permanentes. Nunca deje el
televisor en c endido por la rgos períodos de
tiempo mientras muestra estas imágenes.
Tamaño de imagen ZOOM (aumentada) (para programas con formato 16:9 )
La imagen completa se amplía uniformemente;
se extiende por igual a lo ancho y a lo largo
(retiene su proporción original). Los bordes
derecho e izquierdo de la imagen pueden estar
ocultos.
60
www.insignia-products.com
Page 62

NS-FTV27 27-inch Flat Stereo Color TV
Ajuste de la imagen
Nota
Para ajustar la imagen:
1 Presione MENU, luego presione o para
2 Presione
3 Presione o para ajustar la selección.
Elemento < >
BRIGHTNESS (Brillo) disminuir aumentar
CONTRAST (Contraste) disminuir aumentar
COLOR color más
TINT (Tinte) tinte rojizo tinte verdoso
SHARPNESS (Nitidez) imagen más
4 Después que haya modificado el ajuste
El ajuste predeterminado del contraste se
establece en su valor máximo en la fábrica.
seleccionar el menú PICTURE (Imagen).
o para seleccionar el
elemento que desea ajustar.
pálido
suave
color más
brillante
imagen más
clara
deseado, presione EXIT (Salir) para regresar
a la pantalla normal.
Restablecimiento de los ajustes de la imagen
La función RESET (Restablecer) regresa los
ajustes de calidad de la imagen a los siguientes
ajustes de fábrica:
Elemento Valor:
BRIGHTNESS (Brillo) centro (25)
CONTRAST
(Contraste)
COLOR centro (25)
TINT (Tinte) centro (0)
SHARPNESS (Nitidez) centro (25)
máx (50)
1 Presione MENU, luego presione o para
seleccionar el menú PICTURE (Imagen).
2 Presione
o para seleccionar RESET
(Restablecer), luego presione .
Nota
Cuando usted presiona RESET
(Restablecer) en el menú PICTURE
(Imagen), los ajus tes de la i ma gen reg re sa n
a los valores predefinidos en la fábrica.
Control de los subtítulos codificados
Este televisor tiene la capacidad de decodificar y
mostrar programas de televisión con subtítulos
codificados. Los subtítulos codificados muestran
texto en la pantalla para las personas con
dificultad auditiva, o traduce y muestra el texto
en otro idioma.
Subtítulos codificados:Este modo de
subtítulos codificados muestra texto en la
pantalla en inglés o en otro idioma.
Generalmente, los subtítulos codificados en
inglés se transmiten en C1 y los subtítulos
codificados en otros idiomas se transmiten en
C2.
Texto:El modo de Subtítulos codificados de
texto generalmente llena la mitad de la pantalla
con información de programación u otro tipo de
información.
Notas
• Si el programa o video seleccionado no
tiene subtítulos codificados, éstos no
aparecerán en la pantalla.
• Si el texto no está disponible en su área
de visualización, puede aparecer un
rectángulo negro en la pantalla. Si esto
sucede, establezca la función Closed
Captions (Subtítulos co dificado s) en OFF
(Desactivado).
• Cuando seleccione subtítulos
codificados, éstos aparecen con un
retardo de aproximadamente diez
segundos.
• Si no se recibe la señal de subtítulos
codificados, estos no aparecen, pero el
televisor permanece en el modo de
subtítulos codificados.
• De vez en cuando pueden aparecer
errores de ortografía o caracteres
inusuales durante la transmisión con
subtítulos codificados. Esta es una
característica normal de los subtítulos
codificados, especialmente con
programas en vivo. Esto se debe a que
durante los programas en vivo, los
subtítulos codificados también se
introducen en vivo. Estas transmisiones
no permiten tiempo para edición.
• Cuando se muestran subtítulos
codificados, pueden verse
visualizaciones en pantalla como
volumen y silenciamiento, pero estos
pueden interfe rir con los subt ítul os
codificados.
• Algunos sistemas de televisión por cable
y sistemas de protección de copia
pueden interfe rir con la señal de los
subtítulos codificados.
• Si usa una antena de interiores o si la
recepción de televisión es deficiente, el
decodificador de subtítulos quizás no
aparezca o puede aparecer con
caracteres e x tr años o palabras con
errores de ortografía. En este caso,
ajuste la antena para una mejor
recepción o use una antena de
exteriores.
Para activar los subtítulos codificados:
1 Sintonice el televisor en el programa
deseado.
2 Presione MENU, luego presione o para
mostrar el menú SETUP (Configuración).
3 Presione
o para seleccionar CLOSED
CAPTION (Subtítulos codificados).
Cuando se recibe una señal analógica,
puede elegir C1, C2, T1, T2 y OFF.
Cuando se recibe una señal digital, usted
puede elegir entre CS1, CS2, CS3, CS4,
CS5, CS6, C1, C2, C3, C4, T1, T2, T3, T4 y
OFF (Desactivado).
www.insignia-products.com
61
Page 63

Nota
• Dependiendo de la señal de
transmisión, algunos subtítulos
analógicos codificados funcionan con
una señal de difusión digita l.
• Esta pantalla puede mostrarse
presionando CLOSED CAPTION
(Subtítulos codificados).
4 Presione o para seleccionar el modo de
subtítulos codificados deseado.
Nota
Para desactivar la función de subtítulos
codificados, seleccione OFF (Desactivado).
5 Presione el botón EXIT (Salir) para regresar
a la pantalla normal.
Ajuste de los subtítulos codificados
Los subtítulos codificados son predefinidos en la
fábrica. Sin embargo, puede ajustarlos
individualmente. Esta función está diseñada
para personalizar subtítulos codificados digitales
solamente.
Nota
Para ajustar los subtítulos codificados:
1 Presione MENU. Aparecerá la pantalla del
2 Presione o para seleccionar el menú
3 Presione
4 Presione
5 Presione
No establezca el color del texto (TEXT
COLOR) y el color del fondo
(BACKGROUND COLOR) de los subtítulos
igual, o no podrá ver el texto.
menú.
SETUP (Configuración).
o para seleccionar CC
ADVANCED (Subtítulos codificados
avanzados), luego presione . Aparece el
menú CC ADVANCED (Subtítulos
codificados avanzados).
o para seleccionar el
elemento que desea ajustar, luego presione
o .
o para seleccionar el ajuste,
luego presione ENTER (Ingresar).
Puede seleccionar entre los siguientes
elementos y parámetros.
• TEXT SIZE (Tamaño de texto): AUTO,
SMALL (Pequeño), STANDARD
(Estándar), LARGE (Grande)
• TEXT TYPE (Tipo de texto): AUTO
(Automático), DEFAULT
(Predeterminado), MONO W. SERIF
(Mono con serif), PROP. W.SERIF (Prop.
Con serif), MONO W/O SERIF (Mono sin
serif), PROP. W/O SERIF (Prop. Sin serif),
CASUAL, CURSIVE (Cursiva), SMALL
CAPITALS (M ayúsculas pequeñ as)
• TEXT COLOR (Color de texto): AUTO,
BLACK (Negro), WHITE (Blanco), RED
(Rojo), GREEN (Verde), BLUE (Azul),
YELLOW (Amarillo), MAGENTA, CYAN
(Turquesa)
• TEXT EDGE (Borde del texto): AUTO,
NONE (Ninguno), RAISED (Alto relieve),
DEPRESSED (bajo relieve), UNIFORM
(Uniforme), LEFT DROP SHADOW
(Sombra izquierda), RIGHT DROP
SHADOW (Sombra derecha)
NS-FTV27 27-inch Flat Stereo Color TV
• BACKGROUND COLOR (Color de
fondo): AUTO, BLACK (Negro), WHITE
(Blanco), RED (Rojo), GREEN (Verde),
BLUE (Azul), YELLOW (Amarillo),
MAGENTA, CYAN (Turquesa)
6 Presione el botón EXIT (Salir) para regresar
a la pantalla normal.
Selección de estéreo/segundo programa de audio (SAP):
La función de sonido de TV multicanales (MTS)
proporciona sonido estéreo de alta fidelidad.
MTS también puede transmitir un segundo
programa de audio (SAP) que contiene un
segundo idioma u otra información de audio.
Cuando el TV recibe una transmisión en estéreo
o SAP, la palabra STEREO (Estéreo) o SAP
(SAP) aparece en la pantalla cada vez que
usted enciende el televisor, cambia de canal o
presiona -/DISPLAY (-/Visualización).
Para seleccionar estéreo/segundo progra ma de audio:
1 Presione MENU, luego presione o para
seleccionar el menú AUDIO.
2 Presione
o para seleccionar MTS.
3 Presione o para seleccionar STR
(Estéreo).
4 Presione el botón EXIT (Salir) para regresar
a la pantalla normal.
Notas
• Generalmente puede dejar el televisor
en el modo etéreo porque el televisor
automáticamente es tablece la sa lida del
tipo de sonido transmitido (estéreo o
monofónico).
• Si el sonido estéreo es ruidoso,
seleccione MONO para reducir el ruido.
Para escuchar un segundo programa de audio (SAP):
1 Presione MENU, luego presione o para
seleccionar el menú AUDIO.
2 Presione
o para seleccionar MTS.
3 Presione o para seleccionar SAP.
Los altavoces del televisor efectúan la salida
del segundo programa de audio en lugar del
audio normal.
Selección de la salida digital
Puede seleccionar el formato de la señal de
salida de audio digital.
Para seleccionar la salida digital:
1 Presione MENU, luego presione o para
seleccionar el menú AUDIO.
2 Presione
o para seleccionar DIGITAL
OUTPUT (Salida digital).
3 Presione o para seleccionar PCM o
DOLBY DIGITAL.
4 Presione el botón EXIT (Salir) para regresar
a la pantalla normal.
Selección del idioma del audio
Cuando dos o más idiomas de audio están
incluidos en una señal digital, puede seleccionar
uno de los idiomas de audio.
62
www.insignia-products.com
Page 64

NS-FTV27 27-inch Flat Stereo Color TV
Para seleccionar el idioma de audio:
1 Presione MENU, luego presione o para
seleccionar el menú AUDIO.
2 Presione
o para seleccionar AUDIO
LANGUAGE (Idioma de audio), luego
presione o para mostrar el menú AUDIO
LANGUAGE (Idioma de audio).
3 Presione
o para seleccionar el idioma
deseado, luego presione ENTER (Ingresar).
4 Presione el botón EXIT (Salir) para regresar
a la pantalla normal.
Restablecimiento de los ajustes de audio
La función RESET (Restablecer) regresa los
ajustes de audio a los siguientes ajustes de
fábrica:
Elemento Valor:
MTS STEREO (Estéreo)
DIGITAL OUTPUT
(Salida digital)
Para restablecer los ajustes de audio:
1 Presione MENU, luego presione o para
seleccionar el menú AUDIO.
2 Presione
(Restablecer), luego presione .
Nota
Cuando usted presiona RESET
(Restablecer) en el menú AUDIO, los
ajustes de audio regresan a los valores
predefinidos en la fábrica.
PCM
o para seleccionar RESET
Especificaciones
El diseño y las especificaciones están sujetos a
cambio sin aviso previo.
Fuente de alimentación CA 120 V, 60 Hz
Consumo de energía
Operación 110 Vatios
Standby 3 Vatios
Chasis
Peso 88.2 lbs. (40 kg)
Anchura: 29-1/8 pulgadas (740 mm)
Altura 22-5/8 pulgadas (575 mm)
Profundidad 19-7/16 pulgadas (494.5 mm)
Entradas
VIDEO 1 V (p-p)/75 ohmios
AUDIO – 8 dBm/50 kohmios
S-VIDEO Y: 1 V (p-p), 75 ohmios
C: 0.286 V (p-p), 75 ohmios
COMPONENTE Y: 1 V (p-p), 75 ohmios
PR: 0.7 V (p-p), 75 ohmios
PB: 0.7 V (p-p), 75 ohmios
Salida
Verificación de la intensidad de la señal digital
Este televisor le permite ver el medidor de señal
digital para los canales digitales.
Notas
Para verificar la intensidad de la señal digital:
1 Presione MENU, luego presione o para
2 Presione
3 Presione o para verificar la intensidad
4 Presione el botón EXIT (Salir) para regresar
• La función de medidor de señal no
está disponible para los canales
analógicos.
• Después de cuatro minut os, la p antalla
SIGNAL METER (Medidor de señal)
regresa a la operación de televisión
normal automáticamente .
seleccionar el menú SETUP (Configuración).
o para seleccionar SIGNAL
METER (Medidor de señal)
de la señal digital.
a la pantalla normal.
AUDIO DIGITAL 0.5 V (p-p), 75 ohmios
Otros
Entrada de antena VHF/UHF/CABLE, 75 ohmios
Tubo de imagen 27 pulgadas (676 mm
Tipo de sintonizador Frecuencia Quartz PLL
Canales de recepción VHF 2-13
Altavoces 1-13/16 pulgadas (45.7 mm) x
Potencia de la salida de
sonido
coaxial
diagonal)
sintetizada
UHF 14-69
CABLE TV 14-36 (A)-(W)
37-59 (AA)-(WW)
60-85 (AAA)-(ZZZ)
86-94 (86)-(94)
95-99 (A-5)-(A-1)
100-125 (100)-(125)
01 (5A)
3-7/8 pulgadas (99.1 mm), 8
ohmios x 2
1 W + 1 W
www.insignia-products.com
63
Page 65

NS-FTV27 27-inch Flat Stereo Color TV
Solución de problemas
Use la siguiente lista de verificación para
resolver problemas que surjan con su televisor.
Consulte con su distribuidor local o
establecimiento de servicio si el problema
persiste. Asegúrese de que todas las
conexiones estén hechas correctamente cuando
use otras unidades.
Problema Solución
El televisor no
funciona.
Sonido defectuoso
o no hay sonido.
Imagen
insatisfactoria o no
hay imagen.
Recepción
deficiente en
algunos canales.
Color
insatisfactorio o no
hay color.
• Asegúrese de que el cable de
alimentación esté enchufado.
• Pruebe con otro tomacorriente
de CA.
• La alimentación está
desconectada. Re vis e el fusib le
o el interruptor automático.
• Desenchufe el tel ev isor por una
hora, luego enchúfelo
nuevamente.
• La estación o el sistema de
cable tiene un problema.
Sintonice otra estación.
• Verifique los ajustes del sonid o
(volumen y silenciamiento).
• Verifique las posibl es fuen tes
de interferencia .
• La estación o el sistema de
cable tiene un problema.
Sintonice otra estación.
• Asegúrese de que los canales
están establecidos en la
memoria.
• Revise la anten a o las conexión
del sistema de cable. Ajuste la
antena
• Verifique las posibl es fuen tes
de interferencia .
• V erif iqu e los aju ste s de con t rol
de la imagen.
• La estación o el sistema de
cable tiene un problema.
Sintonice otra estación.
• Asegúrese de que los canales
están establecidos en la
memoria.
• La estación está débil. Aju ste la
antena para recibir la estación
deseada.
• Verifique las posibl es fuen tes
de interferencia .
• La estación o el sistema de
cable tiene un problema.
Sintonice otra estación.
• Asegúrese de que los canales
están establecidos en la
memoria.
• V erif iqu e los aju ste s de con t rol
de la imagen.
• Revise la anten a o las conexión
del sistema de cable. Ajuste la
antena
• Verifique las posibl es fuen tes
de interferencia .
Problema Solución
Imagen inestable o
dispersa.
Problema de
pantalla con
transmisión digital
No hay recepc ión
de CATV.
Barras horizontales
o diagonales en la
pantalla.
No hay recepc ión
en los canales
superiores al 13.
El control remoto
no funciona.
El televisor se
apaga.
Los subtítulos
codificados no
están activados.
La visualizació n no
se muestra en su
idioma
• La estación o el sistema de
cable tiene un problema.
Sintonice otra estación.
• Asegúrese de que los canales
están establecidos en la
memoria.
• La compañía del servicio de
cable está codificando la señal.
• Ajuste la antena.
• Verifique la intensidad de la
señal digital
• Compruebe todas las
conexiones del sistema de
cable.
• Establezc a la opción del menú
TV/CABLE en el modo CABLE.
• La estación o el sistema de
cable tiene un problema.
Pruebe otra estación.
• Verifique las conexiones de la
antena.
• Ajuste o redirija la antena.
• Verifique las posible s fuen tes
de interferencia.
• Asegúrese de que la opción del
menú TV/CABLE está
establecida en el modo
apropiado.
• Si está usando una antena,
revise las conexiones de la
antena UHF.
• Las pilas están bajas o
agotadas, o se insertaron
incorrectamente.
• El control remoto está fuera de
rango. Muévalo más cerca al
televisor (a una distancia de 15
pies).
• Asegúrese de que el control
remoto apunte hacia el sensor.
• Confirme que no hayan
obstrucciones entre el control
remoto y el televisor.
• Asegúrese de que el cable de
alimentación esté enchufado.
• No hay transmisión en la
estación sintonizada.
• El temporizador de apagado
automático está establecido.
• Interrupción de la alimentación
eléctrica.
• La estación de televisión tiene
problemas o el programa no
ofrece subtítulos codificad os.
Pruebe otro canal.
• Revise la conexión del cable o
la antena VHF/UHF. Cambie la
posición o gire la antena.
• Establezca el decodificador de
subtítulos en el menú.
• Seleccione el idioma correcto
en las opciones del menú.
64
www.insignia-products.com
Page 66

NS-FTV27 27-inch Flat Stereo Color TV
Declaraciones reglamentarias
Declaración de la Comisión Federal de Comunicaciones sobre la interferencia de frecuencias de radio
Este equipo ha sido sometido a pruebas y se ha
determinado que satisface los límites
establecidos para clasificarlo como dispositivo
digital de Clase B de acuerdo con la Parte 15 del
reglamento FCC. Estos límites se han
establecido para proporcionar una protecci ón
razonable contra interferencias perjudiciales en
una instalación residencial. Este equipo genera,
usa y puede emitir energía de radiofrecuencia.
Sí no se instala y usa de acuerdo con las
instrucciones, este aparato puede causar
interferencias perjudiciales a las
comunicaciones de radio. Sin embargo, no se
garantiza que no ocurrirá interferencia en una
instalación particular. Si el equipo causa
interf er enci as pe rj udi cial es en la rec epc ión d e la
señal de radio o televisión, lo cual puede
comprobarse encendiéndolo y apagándolo
alternativamente, se recomi enda al usuar io
corregir la interferencia mediante uno de los
siguientes procedimientos:
• Cambie la orientación o la ubicación de la
antena receptora.
• Aumente la distancia entre el equipo y el
receptor.
• Conectar el equipo a un tomacorriente de un
circuito distinto de aquel al que esta
conectado el receptor.
• Solicitar consejo al distribuidor o a un técnico
experto en radio o televisión para obtener
ayuda.
Cuidado
Cualquier cambio o modificación que no
este aprobada expresamente por la parte
responsable por el cumplimiento puede
anular la aut oridad del usu ario para oper ar el
equipo.
Notificación canadiense
Este aparato digital de la Clase B cumple todos
los requisitos del Reglamento Canadiense sobre
Equipos que Causan Interferencias.
Avis Canadien
Cet appareil numérique de la Class B respecte
toutes les exigences du Règlement sur le
matériel brouilleur du Canada.
© 2006 Insignia. Insignia y el logotipo de Insignia son
marcas de comercio de Best Buy Enterprise Services,
Inc. Otra s marcas y nombres de productos son
marcas de comercio o marcas registradas de sus
dueños respectivos. Las especificaciones y
características están sujetas a cambio sin aviso previo
u obligación.
www.insignia-products.com
65
Page 67

NS-FTV27 27-inch Flat Stereo Color TV
66
www.insignia-products.com
Page 68

NS-FTV27 27-inch Flat Stereo Color TV
Garantía
Garantía Limitada de 1 Año
Insignia Products (“Insignia”) le garantiza a usted, el
comprador original de este nuevo TV de P antalla Planade 27
pulgadas (“Producto”), que éste se encontrará libre de
defectos de material o de mano de obra en su fabricación
original por un periodo de un (1) año a partir de la fecha de
compra del Producto (“Período de Garantía”). Este producto
debe ser comprado en un distribuidor autorizado de
productos de la marca Insignia y empacado con esta
declaración de garantía. Esta garantía no cubre Productos
reacondicionados. Si notifica a Insignia durante el Período
de Garantía sobre un defecto cubierto por esta garantía que
requiere reparación, los términos de esta garantía se
aplican.
¿Cuánto dura la garantía?
El Período de Garantía dura por 1 año (365 días) a partir de
la fecha en que compró el Producto. La fecha de compra se
encuentra impresa en el recibo que recibió con el Producto.
¿Qué es lo que cubre esta garantía?
Durante el Período de Garantía, si un centro de reparación
autorizado de Insignia concluye que la fabricación original
del material o la mano de obra del Producto se encuentran
defectuosos, Insignia (cómo su opción exclusiva): (1)
reparará el Producto con repuestos nuevos o
reacondicionados; o (2) reemplazará el Producto sin cargo
con uno nuevo o con uno reacondicionado con repuestos
equivalentes. Los Productos y repuestos reemplazados bajo
esta garantía se volverán propiedad de Insignia y no se le
regresarán a usted. Si se requiere la reparación de
Productos o partes después de que se vence el Período de
Garantía, usted deberá pagar todos los costos de mano de
obra y de repuestos. Esta garantía estará vigente con tal que
usted sea el dueño de su Producto Insignia durante el
periodo de garantía. El alcance de la garantía se termina si
usted vende o transfiere el Producto.
¿Cómo se obtiene la reparación de garantía?
Si ha comprado el Producto en una tienda de ventas, lleve
su recibo original y el Producto a la tienda en donde lo
compró. Asegúrese de que vuelva a colocar el Producto en
su empaque original o en un empaque que provea la misma
protección que el original. Si compró el Producto en un sitio
Web, envíe por correo su recibo original y el Producto a la
dirección postal listada en el sitio Web. Asegúrese de
colocar el Producto en su empaque original o en un
empaque que provea la misma protección que el original.
¿En dónde es válida la garantía?
Esta garantía sólo es válida al comprador original del
Producto en los Estados Unidos y en Canadá.
¿Qué es lo que no cubre la garantía?
Esta garantía no cubre:
• Formación del cliente
• Instalación
• Ajuste de configuración
• Daños cosméticos
• Daños debido a actos de la naturaleza, tal cómo rayos
• Accidentes
• Mal uso
•Abuso
• Negligencia
• Uso comercial
• Modificación de alguna parte del Producto, incluyendo
la antena
Esta garantía tampoco cubre:
• Daño debido al uso o mantenimiento incorrecto
• La conexión a una fuente de voltaje incorrecta
• El intento de reparación por alguien que no sea una
compañía autorizada por Insignia para reparar el
Producto
• Productos vendidos tal cual (en el estado en que se
encuentran) o con todas sus fallas
• Productos consumibles, tal cómo fusibles o baterías
• Productos en los cuales el número de serie asignado
en la fábrica ha sido alterado o removido.
LA REPARACIÓN O REEMPLAZO SEGÚN LO PROVISTO
BAJO ESTA GARANTÍA ES SU ÚNICO RECURSO.
INSIGNIA NO SERÁ RESPONSABLE POR DAÑOS
INCIDENTALES O CONSECUENTES DEBIDO AL
INCUMPLIMIENTO DE CUALQUIER GARANTÍA EXPRESA
O IMPLÍCITA RELACIONADA CON ESTE PRODUCTO,
INCLUYENDO, PERO SIN LIMITARSE A ELLO, PÉRDIDA
DE DATOS, IMPOSIBILIDAD DE USO DE SU PRODUCTO,
PÉRDIDA DE NEGOCIO O LUCRO CESANTE. INSIGNIA
NO CONCEDE NINGUNA OTRA GARANTÍA EXPRESA
CON RESPECTO AL PRODUCTO; TODAS LAS
GARANTÍAS EXPRESAS E IMPLÍCITAS DE ESTE
PRODUCTO, INCLUYENDO PERO SIN LIMITARSE A,
CUALQUIER GARANTÍA IMPLÍCITA DE O CONDICIONES
DE COMERCIALIZACIÓN O IDONEIDAD PARA UN USO
PARTICULAR, ESTÁN LIMITADAS EN DURACIÓN AL
PERÍODO DE GARANTÍA DECLARADO
ANTERIORMENT E Y NINGUNA GARANTÍA YA SEA
EXPRESA O IMPLÍCITA SE APLICARÁ DESPUÉS DEL
PERÍODO DE GARANTÍA. ALGUNOS ESTADOS,
PROVINCIAS Y JURISDICCIONES NO PERMITEN
RESTRICCIONES EN CUANTO A LA DURACIÓN DE UNA
GARANTÍA IMPLÍCITA, ASÍ QUE LA REST R ICCIÓN
ANTERIOR PUEDE NO APLI CAR S E EN SU C AS O. ESTA
GARANTÍA LE DA DERECHOS LEGALES ESPECÍFICOS,
Y USTED PUEDE POSEER OTROS DERECHOS QUE
VARÍAN DE ESTADO A ESTADO, O PROVINCIA A
PROVINCIA.
www.insignia-products.com
67
Page 69

NS-FTV27 27-inch Flat Stereo Color TV
68
www.insignia-products.com
Page 70

NS-FTV27 27-inch Flat Stereo Color TV
www.insignia-products.com
69
Page 71

NS-FTV27 27-inch Flat Stereo Color TV
70
www.insignia-products.com
Page 72

Distributed by Insignia™ Products
Distribué par Insignia™ Products
Distribuido por Insignia™ Products
7601 Penn Avenue South,
Richfield, MN USA 55423-3645
www.Insignia-Products.com
All rights reserved. All other products and brand names are trademarks of their respective owners.
Tous droits réservés. Tous les autres produits ou noms de marques sont des marques de commerce qui appartiennent à leurs proprié taires respectifs.
Todos los derechos reservados. Todos los demás productos y marcas son marcas comerciales registradas de sus respectivos dueños .
© 2006 Insignia™ Products
© 2006 produits Insignia™
© 2006 productos Insignia™
 Loading...