

Page 1

User Guide | Guide de l’utilisateur
DVD-R/DVD-RW
DVD Recorder| Graveur de DVD
NS-FSDVDR
Page 2

Insignia NS-FSDVDR
DVD recorder
Contents
Introduction . . . . . . . . . . . . . . . . . . . . . . . . . . . . . .1
Safety information . . . . . . . . . . . . . . . . . . . . . . . . .1
Features. . . . . . . . . . . . . . . . . . . . . . . . . . . . . . . . .4
Recording. . . . . . . . . . . . . . . . . . . . . . . . . . . . . . . . . 4
Editing . . . . . . . . . . . . . . . . . . . . . . . . . . . . . . . . . . . 4
Playback. . . . . . . . . . . . . . . . . . . . . . . . . . . . . . . . . . 4
Others. . . . . . . . . . . . . . . . . . . . . . . . . . . . . . . . . . . . 5
Accessories . . . . . . . . . . . . . . . . . . . . . . . . . . . . . . . 5
Front. . . . . . . . . . . . . . . . . . . . . . . . . . . . . . . . . . . . . 5
Back . . . . . . . . . . . . . . . . . . . . . . . . . . . . . . . . . . . . . 5
Front panel display. . . . . . . . . . . . . . . . . . . . . . . . . . 6
Remote control. . . . . . . . . . . . . . . . . . . . . . . . . . . . . 7
Setting up your recorder . . . . . . . . . . . . . . . . . . . .8
Installing remote control batteries . . . . . . . . . . . . . . 8
Connecting an antenna or cable/satellite box . . . . . 9
Connecting to your TV using component cables (best
picture). . . . . . . . . . . . . . . . . . . . . . . . . . . . . . . . . 10
Connecting to your TV using an S-Video cable (better
picture). . . . . . . . . . . . . . . . . . . . . . . . . . . . . . . . . 10
Connecting to your TV using composite cables (basic
connection) . . . . . . . . . . . . . . . . . . . . . . . . . . . . . 10
Connecting your TV with an RF modulator . . . . . . 11
Connecting the basic audio . . . . . . . . . . . . . . . . . . 11
Connecting to an audio system . . . . . . . . . . . . . . . 11
Connecting to an external source. . . . . . . . . . . . . . 12
Selecting basic options . . . . . . . . . . . . . . . . . . . .12
Setting up the first time. . . . . . . . . . . . . . . . . . . . . . 12
Scanning for channels . . . . . . . . . . . . . . . . . . . . . . 13
Changing channels. . . . . . . . . . . . . . . . . . . . . . . . . 14
Adding or deleting channels. . . . . . . . . . . . . . . . . . 13
Setting the audio channel. . . . . . . . . . . . . . . . . . . . 14
Automatically setting the clock . . . . . . . . . . . . . . . . 14
Manually setting the clock . . . . . . . . . . . . . . . . . . . 14
Turning Daylight Saving Time on or off . . . . . . . . . 15
Selecting the TV aspect ratio . . . . . . . . . . . . . . . . . 15
Displaying status information . . . . . . . . . . . . . . . . . 16
Playing DVDs and CDs . . . . . . . . . . . . . . . . . . . .16
Playable discs . . . . . . . . . . . . . . . . . . . . . . . . . . . . 16
Color television standards . . . . . . . . . . . . . . . . . . . 16
Region codes . . . . . . . . . . . . . . . . . . . . . . . . . . . . . 16
Playing a DVD or CD . . . . . . . . . . . . . . . . . . . . . . . 16
Playing a DVD formatted in Video or VR mode . . . 17
Controlling disc playback . . . . . . . . . . . . . . . . . . . . 17
Selecting a chapter, title, or track. . . . . . . . . . . . . . 18
Searching on a disc . . . . . . . . . . . . . . . . . . . . . . . . 18
Using rapid play . . . . . . . . . . . . . . . . . . . . . . . . . . . 18
Using the DVD disc menu . . . . . . . . . . . . . . . . . . . 18
Using the DVD title menu. . . . . . . . . . . . . . . . . . . . 18
Enlarging the screen image . . . . . . . . . . . . . . . . . . 19
Adding markers . . . . . . . . . . . . . . . . . . . . . . . . . . . 19
Using repeat play . . . . . . . . . . . . . . . . . . . . . . . . . . 19
Creating a playback loop . . . . . . . . . . . . . . . . . . . . 20
Using random play . . . . . . . . . . . . . . . . . . . . . . . . . 20
Programming a playback list . . . . . . . . . . . . . . . . . 20
Using subtitles . . . . . . . . . . . . . . . . . . . . . . . . . . . . 20
Switching the audio soundtrack or channel . . . . . . 21
Turning surround sound on and off . . . . . . . . . . . . 21
Turning the camera angle feature on or off . . . . . . 22
Switching camera angles . . . . . . . . . . . . . . . . . . . . 22
Reducing audio noise. . . . . . . . . . . . . . . . . . . . . . . 22
Selecting the audio language. . . . . . . . . . . . . . . . . 22
Selecting the disc menu language . . . . . . . . . . . . . 23
Selecting the Setup menu language . . . . . . . . . . . 23
Using the screen saver. . . . . . . . . . . . . . . . . . . . . . 23
Adjusting the brightness of the front panel display. 24
Adjusting the PCM audio feature . . . . . . . . . . . . . . 24
Adjusting Dolby Digital audio . . . . . . . . . . . . . . . . . 25
Using Dynamic Range Control . . . . . . . . . . . . . . . . 25
Using progressive scan . . . . . . . . . . . . . . . . . . . . . 26
Selecting the still mode . . . . . . . . . . . . . . . . . . . . . 26
Setting parental controls . . . . . . . . . . . . . . . . . . . . 26
Recording DVDs . . . . . . . . . . . . . . . . . . . . . . . . .27
Preparing to record . . . . . . . . . . . . . . . . . . . . . . . . 27
Formatting a blank DVD. . . . . . . . . . . . . . . . . . . . . 29
Reformatting a DVD. . . . . . . . . . . . . . . . . . . . . . . . 29
Recording a program. . . . . . . . . . . . . . . . . . . . . . . 30
Using One-Touch recording. . . . . . . . . . . . . . . . . . 31
Setting up a timer recording. . . . . . . . . . . . . . . . . . 31
Cancelling or correcting a timer program recording 32
Checking a timer recording in progress . . . . . . . . . 32
Stopping a timer recording in progress . . . . . . . . . 32
Troubleshooting timer recordings . . . . . . . . . . . . . 32
Recording from an external device . . . . . . . . . . . . 33
Protecting a DVD . . . . . . . . . . . . . . . . . . . . . . . . . . 33
Finalizing a DVD . . . . . . . . . . . . . . . . . . . . . . . . . . 33
Automatically finalizing a DVD. . . . . . . . . . . . . . . . 34
Editing DVDs . . . . . . . . . . . . . . . . . . . . . . . . . . . .34
Deleting titles (Video mode). . . . . . . . . . . . . . . . . . 34
Deleting titles (VR mode/Original list) . . . . . . . . . . 35
Deleting titles (VR mode/Playlist). . . . . . . . . . . . . . 35
Editing title names (Video mode). . . . . . . . . . . . . . 36
Editing title names (VR mode) . . . . . . . . . . . . . . . . 37
Adding or deleting chapter marks (Video mode) . . 38
Adding or deleting chapter marks (VR mode) . . . . 39
Protecting titles (VR mode/Original list) . . . . . . . . . 40
Un-protecting a title (VR mode/Original list). . . . . . 40
Dividing a title (VR mode/Playlist) . . . . . . . . . . . . . 41
Combining titles (VR mode/Playlist). . . . . . . . . . . . 41
Adding titles to the Playlist (VR mode). . . . . . . . . . 42
Deleting a Playlist . . . . . . . . . . . . . . . . . . . . . . . . . 42
Deleting parts of titles (VR mode) . . . . . . . . . . . . . 43
Adding thumbnail labels to titles . . . . . . . . . . . . . . 43
Maintaining. . . . . . . . . . . . . . . . . . . . . . . . . . . . . .44
Servicing . . . . . . . . . . . . . . . . . . . . . . . . . . . . . . . . 44
Cleaning the cabinet . . . . . . . . . . . . . . . . . . . . . . . 44
Handling discs . . . . . . . . . . . . . . . . . . . . . . . . . . . . 44
Cleaning discs . . . . . . . . . . . . . . . . . . . . . . . . . . . . 44
Cleaning the disc lens . . . . . . . . . . . . . . . . . . . . . . 44
Testing the remote control . . . . . . . . . . . . . . . . . . . 44
Troubleshooting . . . . . . . . . . . . . . . . . . . . . . . . . .44
Power. . . . . . . . . . . . . . . . . . . . . . . . . . . . . . . . . . . 44
Picture . . . . . . . . . . . . . . . . . . . . . . . . . . . . . . . . . . 44
Sound. . . . . . . . . . . . . . . . . . . . . . . . . . . . . . . . . . . 45
Remote control. . . . . . . . . . . . . . . . . . . . . . . . . . . . 45
Playback . . . . . . . . . . . . . . . . . . . . . . . . . . . . . . . . 46
Recording,timer recording,editing . . . . . . . . . . . . . 46
Miscellaneous . . . . . . . . . . . . . . . . . . . . . . . . . . . . 47
Error messages . . . . . . . . . . . . . . . . . . . . . . . . . . . 48
Specifications . . . . . . . . . . . . . . . . . . . . . . . . . . . .49
Language codes . . . . . . . . . . . . . . . . . . . . . . . . .49
Legal notices . . . . . . . . . . . . . . . . . . . . . . . . . . . .50
90-day limited warranty . . . . . . . . . . . . . . . . . . . .51
Français . . . . . . . . . . . . . . . . . . . . . . . .53
Introduction
Congratulations on your purchase of a
high-quality Insignia product. Your NS-FSDVDR
represents the state of the art in DVD recorder
design and is designed for reliable and
trouble-free performance.
Safety information
CAUTION
RISK OF ELECTRIC SHOCK
DO NOT OPEN
This symbol indicates that dangerous voltage
constituting a risk of electric shock is present
within your recorder. This label is located on the
back of your recorder.
www.insignia-products.com
1
Page 3

Insignia NS-FSDVDR DVD recorder
This symbol indicates that there are important
operating and maintenance instructions in the
literature accompanying your recorder.
Warning
Your recorder employs a laser. Only a qualified
service person should remove the cover or
attempt to service this device, due to possible eye
injury.
Warning
Visible and invisible laser radiation when open
and interlock defeated. Do not stare into beam.
Caution
Use of controls, adjustments, or performance of
procedures other than those specified herein may
result in hazardous radiation exposure.
Note
The laser is located inside, near the deck
mechanism.
Warning
To prevent fire or shock hazard, do not plug the
power adapter into an extension cord, receptacle,
or other outlet unless the blades can be fully
inserted to prevent blade exposure.
Warning
To reduce the risk of fire or electric shock, do not
expose your recorder to rain or moisture.
1 Read instructions—All the safety and
operating instructions should be read before
you use your recorder.
2 Retain instructions—The safety and
operating instructions should be retained for
future reference.
3 Heed warnings—All warnings on your
recorder and in the operating instructions
should be adhered to.
4 Follow instructions—All operating and use
instructions should be followed.
5 Cleaning—Unplug your recorder from the
power outlet before cleaning. Do not use
liquid cleaners or aerosol cleaners. Use a
damp cloth for cleaning.
Exception: A product that is meant for
uninterrupted service, and that for some
specific reason, such as the possibility of the
loss of an authorization code for a CATV
converter, is not intended to be unplugged by
the user for cleaning or any other purpose,
may exclude the reference to unplugging the
appliance in the cleaning description.
6 Attachments—Do not use attachments not
recommended by the product manufacturer
as they may cause hazards.
7 Water and moisture—Do not use your
recorder near water, such as near a bath tub,
wash bowl, kitchen sink, or laundry tub, in a
wet basement, or near a swimming pool.
8 Accessories—Do not place
your recorder on an unstable
cart, stand, tripod, bracket, or
table. Your recorder may fall,
causing serious injury to a child
or adult, and serious damage to
your recorder. Use only with a cart, stand,
tripod, bracket, or table recommended by the
manufacturer, or sold with your recorder. Any
mounting of your recorder should follow the
manufacturer’s instructions and should use a
mounting accessory recommended by the
manufacturer. An appliance and cart
combination should be moved with care.
Quick stops, excessive force, and uneven
surfaces may cause your recorder and cart
combination to overturn.
9Ventilation—Slots and openings in the
cabinet are provided for ventilation, to ensure
reliable operation of your recorder, and to
protect it from overheating. These openings
must not be blocked or covered. The
openings should never be blocked by placing
your recorder on a bed, sofa, rug, or other
similar surface. Your recorder should not be
placed in a built-in installation such as a
bookcase or rack unless proper ventilation is
provided or the manufacturer’s instructions
have been adhered to.
10 Power sources—Your recorder should be
operated only from the type of power source
indicated on the marking label. If you are not
sure of the type of power supply to your
home, consult your appliance dealer or local
power company.
11 Grounding or polarization—Your recorder
is equipped with a polarized
alternating-current line plug (a plug having
one blade wider than the other). This plug will
fit into the power outlet only one way. This is
a safety feature. If you are unable to insert
the plug fully into the outlet, try reversing the
plug. If the plug should still fail to fit, contact
your electrician to replace your obsolete
outlet. Do not defeat the safety purpose of
the polarized plug.
12 Power cord protection—Power supply
cords should be routed so that they are not
likely to be walked on or pinched by items
placed upon or against them. Pay particular
attention to cords at plugs, convenience
receptacles, and the point where they exit
from the appliance.
2
www.insignia-products.com
Page 4
Insignia NS-FSDVDR DVD recorder
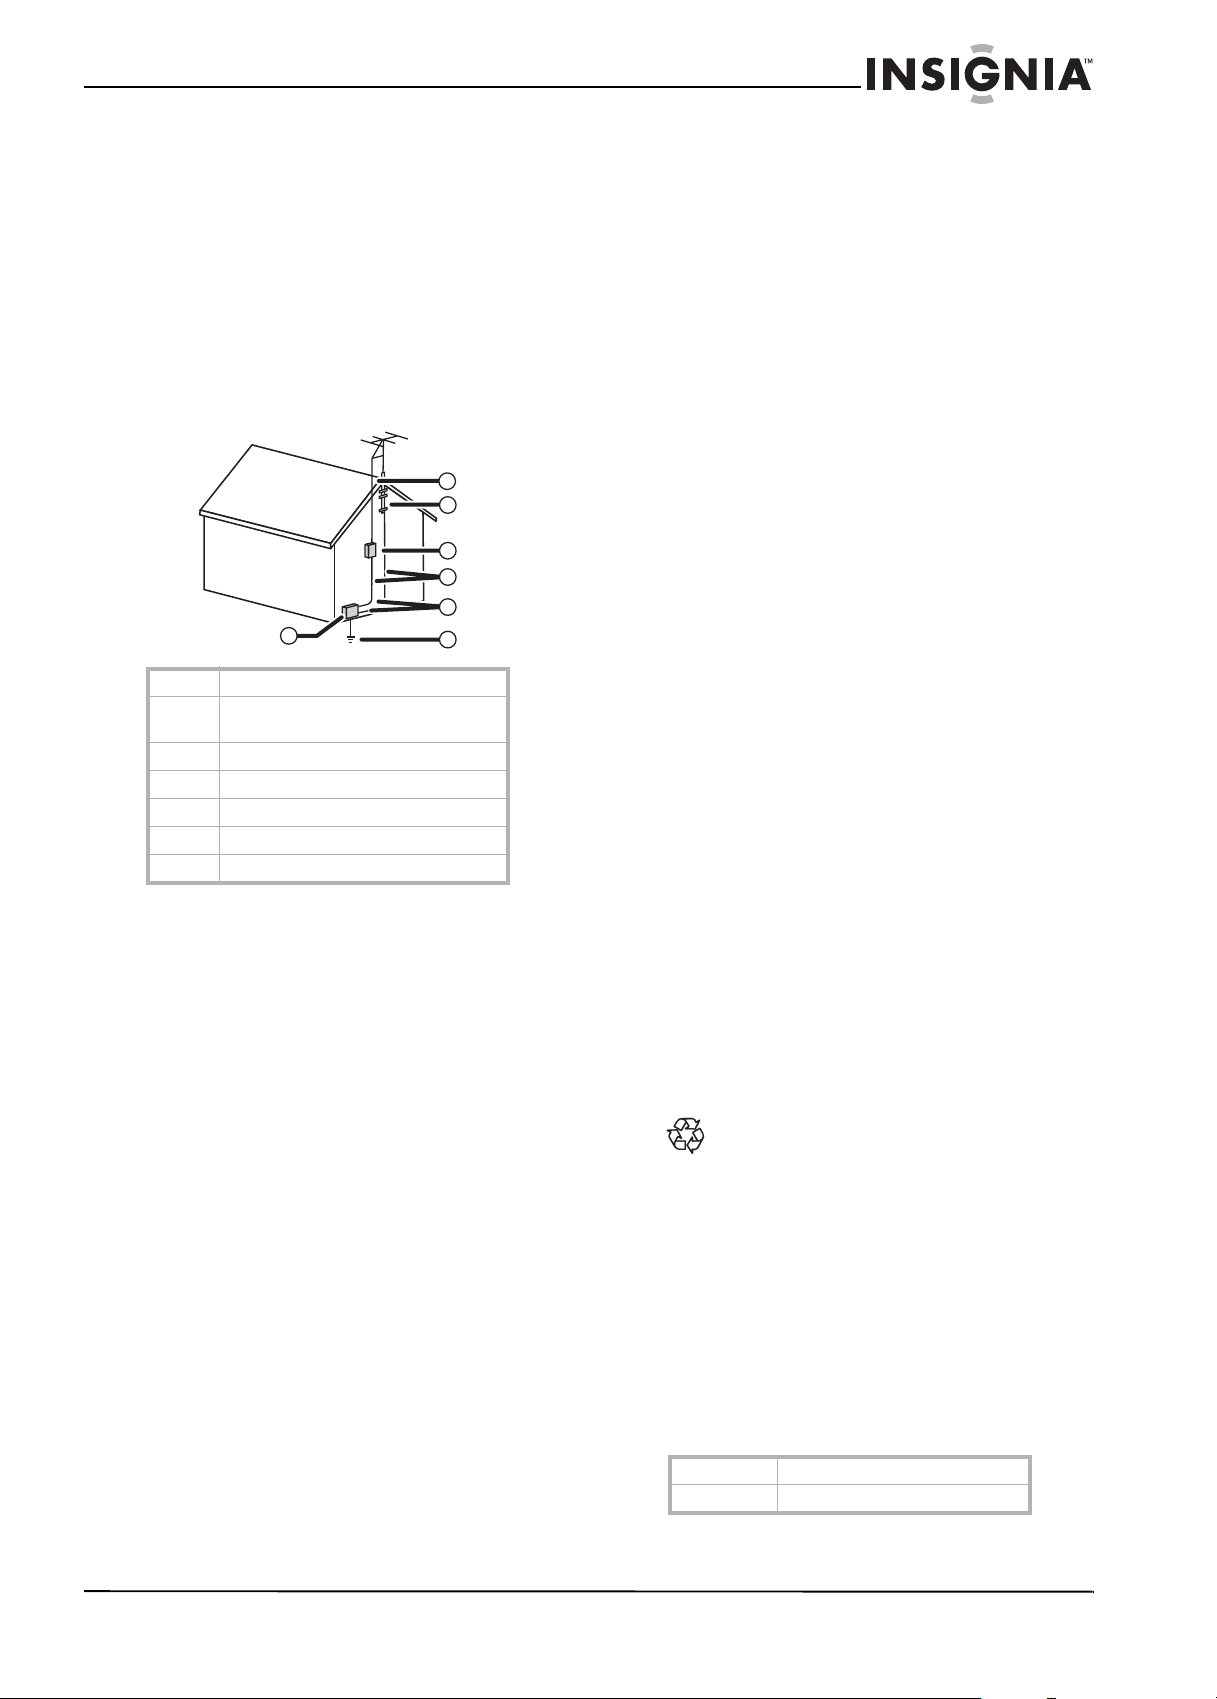
13 Outdoor antenna grounding—If an outside
antenna or cable system is connected to your
recorder, make sure that the antenna or
cable system is grounded so as to provide
some protection against voltage surges and
built-up static charges. Article 810 of the
National Electrical Code, ANSI/NFPA No. 70,
provides information with regard to proper
grounding of the mast and supporting
structure, grounding of the lead-in wire to an
antenna discharge unit, size of grounding
conductors, location of the
antenna-discharge unit, connection to
grounding electrodes, and requirements for
the grounding electrode.
7
6
5
4
3
1
1 Electric service equipment
2 Power service grounding electrode
system
3 Ground clamps
4 Grounding conductors
5 Antenna discharge unit
6 Grounding clamp
7 Antenna lead-in wire
2
14 Lightning—For added protection for your
recorder during a lightning storm, or when it
is left unattended and unused for long
periods of time, unplug it from the power
outlet and disconnect the antenna or cable
system. This will prevent damage to your
recorder due to lightning and power-line
surges.
15 Power lines—An outside antenna system
should not be located in the vicinity of
overhead power lines or other electric lights
or power circuits, or where it can fall into such
power lines or circuits. When installing an
outside antenna system, extreme care
should be taken to keep from touching such
power lines or circuits because contact with
them might be fatal.
16 Overloading—Do not overload power
outlets and extension cords, because this
can result in a risk of fire or electric shock.
17 Object and liquid entry—Never push
objects of any kind into your recorder through
any openings, because they may touch
dangerous voltage points or short out parts
that could result in a fire or electric shock.
Never spill liquid of any kind on your
recorder.
18 Servicing—Do not attempt to service your
recorder yourself, because opening or
removing covers may expose you to
dangerous voltage or other hazards. Refer all
servicing to qualified service personnel.
19 Damage requiring service—Unplug your
recorder from the power outlet and refer
servicing to qualified service personnel under
the following conditions:
• When the power-supply cord or plug is
damaged.
• If liquid has been spilled, or objects have
fallen into your recorder.
• If your recorder has been exposed to rain
or water.
• If your recorder does not operate normally
by following the operating instructions.
Adjust only those controls that are
covered by the operating instructions,
because an improper adjustment of other
controls may result in damage and will
often require extensive work by a qualified
technician to restore your recorder to its
normal operation.
• If your recorder has been dropped or
damaged in any way.
• When your recorder exhibits a distinct
change in performance which indicates a
need for service.
20 Replacement parts—When replacement
parts are required, make sure that the service
technician has used replacement parts
specified by the manufacturer or have the
same characteristics as the original part.
Unauthorized substitutions may result in fire,
electric shock, or other hazards.
21 Safety check—Upon completion of any
service or repairs to your recorder, ask the
service technician to perform safety checks
to determine that your recorder is in proper
operating condition.
22 Heat—Your recorder should be situated
away from heat sources such as radiators,
heat registers, stoves, or other products
(including amplifiers) that produce heat.
23 Do not place your recorder on furniture that is
capapble of being tilted by a child or an adult
leaning, pulling, standing, or climbing on it. If
your recorder falls, it can cause serious injury
or even death.
Recycling
Your recorder’s packaging materials are
recyclable and can be reused. Dispose of
any materials in accordance with your
local recycling regulations.
Batteries should never be thrown away or
incinerated, but should disposed of in
accordance with your local regulations
concerning chemical wastes. You can dispose of
used batteries at a collection point for used up
batteries or special waste. Contact your local
authorities for details.
Model and serial numbers
Your recorder’s model and serial numbers are
on the back of your recorder. Record these
numbers and retain them for future reference.
Model No.
Serial No.
www.insignia-products.com
3
Page 5

Insignia NS-FSDVDR DVD recorder
Installation location
For safety and optimum performance of your
recorder:
• Install your recorder in a horizontal and
stable position.
• Do not place anything directly on top of your
recorder.
• Do not place your recorder directly on top of
the TV.
• Shield your recorder from direct sunlight and
keep it away from sources of intense heat.
• Avoid dusty or humid places.
• Avoid places with insufficient ventilation for
proper heat dissipation.
• Do not block the ventilation holes on the
sides of your recorder.
• Avoid locations subject to strong vibration or
strong magnetic fields.
Warning
Do not handle the power cord with wet hands.
Do not pull on the power cord when disconnecting
it from an AC power outlet. Grasp it by the plug.
If, by accident, water is spilled on your recorder,
unplug the power cord immediately and take your
recorder to an authorized service technician.
Condensation
Condensation may occur inside your recorder
when it is moved from a cold place to a warm
place, after heating a cold room, or under
conditions of high humidity. Do not use your
recorder for at least 2 hours until its inside gets
dry.
Copyright technology
Unauthorized copying, broadcasting, public
performance, and lending of discs are
prohibited.
Your recorder incorporates copyright protection
technology that is protected by U.S. patents and
other intellectual property rights. Use of this
copyright protection technology must be
authorized by Macrovision
®
, and is intended for
home and other limited viewing uses only unless
otherwise authorized by Macrovision. Reverse
engineering or disassembly is prohibited.
Progressive scan output
Not all high definition television sets are fully
compatible with your recorder and may cause
artifacts to be displayed in the picture. In case of
picture problems with 525 progressive scan
output, we recommend that you switch the
connection to the “standard definition” output. If
there are questions regarding your TV set’s
compatibility with this 525p recorder, please
contact our customer service center.
Features
Recording
DVD formats—Record to DVD-R (writable
once) and DVD-RW (rewritable) media.
Programmed recording—Schedule as many
as eight programs, including daily or weekly
sessions, up to a month in advance.
One-touch timed recording—Press a single
button repeatedly to increase recording time
from 30 minutes up to 8 hours.
Automatic chapter markers and title
menus—Chapter markers are created
automatically, before recording even begins.
Create title menus automatically when the DVD
is finalized in Video mode (after recording is
finished).
Automatic playlist making—(VR mode) Create
a temporary playlist from an original title that you
can edit as needed. The original title is not
changed.
Automatic finalizing (Video mode)—Finalize
the discs after all programmed recordings are
complete or when the DVD is full.
Left channel stereo recording—Record the
sound of the left channel monaural input as left
and right channels automatically (for LINE 2
input only).
Playback on standard DVD players—Discs
recorded in Video mode can be played on
regular DVD players, including computer DVD
drives compatible with DVD-Video playback.
(You will first need to finalize the discs recorded
in Video mode in order to play them in other
DVD players).
Note
DVD-Video format (Video mode) is a new format
for recording on DVD-RWs and DVD-Rs that was
approved by the DVD Forum in 2000. Adoption of
this format is optional for manufacturers of DVD
playback devices and there are DVD-Video
players, DVD-ROM drives, and other DVD
playback devices that do not play DVD-RWs or
DVR-Rs recorded in the DVD-Video format.
Editing
Custom titles—Delete, rename, combine, or
split titles.
Custom playlist—Use the original playlist or
edit the titles however you want.
Custom chapter markers—Set or clear chapter
markers at any place you want.
Custom thumbnails—Select any frame as a
scene’s thumbnail in the title list.
Title protection—Prevents the editing or
erasing of titles.
Playback
Theater-like surround sound—Connect to a
Dolby Digital-compatible amplifier or decoder,
and you can experience superb surround sound
(from supported video discs).
Quick search—Find any point within a movie.
You can search by title, chapter, or time.
4
www.insignia-products.com
Page 6

Insignia NS-FSDVDR DVD recorder
Custom play order—Play titles and chapters in
the order on the original DVD, or create your
own custom playlist.
Virtual surround system—Enjoy surround
sound-like audio through a two-channel stereo
system.
Others
Progressive scan system—Unlike
conventional interlaced scanning, the
progressive scan system provides less flickering
and images in higher resolution than that of
traditional TV signals.
Accessories
• Remote control with two AA batteries
• RF cable
• Audio/video cables
•User Guide
•
Quick Start
guide
Front
OPEN/CLOSE CHANNEL REV FWD STOP PLAY POWER
REC/OTRREC SPEED
S-VIDEO VIDEO AUDIO
# Component Description
8 PLAY button Press to start or resume
9 POWER button Press to turn your recorder
10 Remote control sensor Receives signals from the
11 REC SPEED button Press to select the recording
12 REC/OTR button Press to start recording.
13 S-VIDEO (LINE2) input
jack
14 VIDEO (LINE2) input jack Connect the video on an
15 AUDIO L/R (LINE2) input
R
L
jacks
playback. You can also press
this button to turn on your
recorder.
on or off.
If you have a timer program
scheduled, press to put your
recorder in standby mode.
remote control. Do not
block.
speed.
Press repeatedly to start a
One-Touch Timer recording.
For more information, see
“Using One-Touch
recording” on page 31.
Connect an S-Video device
to this jack.
external device to this jack
with a standard A/V cable.
Connect the audio on an
external device to these
jacks with a standard A/V
cable.
# Component Description
1 Disc tray Place a disc (label side up) in
2 Display Displays status information.
3
OPEN/CLOSE button
4
CHANNEL /
CHANNEL buttons
5
REV button
6
FWD button
7
STOP button
this tray to play back or
record.
For more information, see
“Front panel display” on
page 6.
Press to open or close the
disc tray. You can also press
this button to turn on your
recorder.
Press to go to the previous
or next channel.
In playback mode, press to
skip to the previous chapter
or track. Press and hold for
1.5 seconds to fast reverse.
In pause mode, press to go
backward one frame at a
time. Press and hold for 1.5
seconds to play backward
slowly.
In playback mode, press to
skip to the next chapter or
track. Press and hold for 1.5
seconds to fast forward.
In pause mode, press to go
forward one frame at a time.
Press and hold for 1.5
seconds to play forward
slowly.
Press to stop playback or
recording.
Back
Caution
Do not touch the pins inside the jacks.
Electrostatic discharge (static electricity) may
permanently damage your recorder.
Note
Your recorder does not have an RF modulator. If
your TV does not have A/V, S-Video, or
component jacks, see “Connecting your TV with
an RF modulator” on page 11.
COMPONENT
VIDEO IN
VIDEO OUTPUT
IN
IN
L
OUT
R
AUDIO IN
ANTENNA
(L1)
# Component Description
1 ANTENNA IN jack Connect an outside antenna
2 VIDEO IN (L1) jack Connect the video on an
3 VIDEO OUT jack Connect a TV or other video
4 Power cord Plug this cord into a power
5 ANTENNA OUT jack Connect your TV to this jack.
VIDEO OUT
S-VIDEO
Y
DIGITAL AUDIO OUTPUT
OUT
PCM / BITSTREAM
L
B
PB/C
R
PR/C
R
COAXIAL
AUDIO OUT
or cable TV to this jack.
external device to this jack
with a standard A/V cable.
device to this jack.
outlet.
www.insignia-products.com
5
Page 7

Insignia NS-FSDVDR DVD recorder
# Component Description
6 AUDIO IN (L1) jacks Connect the audio on an
7 S-VIDEO IN (L1) jack Connect an S-Video device
8 S-VIDEO OUT jack Connect a TV, A/V receiver,
9 COMPONENT VIDEO
OUTPUT jacks
10 AUDIO OUT jacks Connect the audio on an
11 COAXIAL DIGITAL
AUDIO OUTPUT jack
external device to these
jacks with a standard A/V
cable.
to this jack.
or another device to this
jack.
Connect a TV to these jacks
with a component video
cable.
external device to these
jacks with a standard A/V
cable.
Connect a Dolby Digital
decoder or digital sound
system to this jack.
Front panel display
# Indicator Description
7 Time Displays status informtion.
For example:
• When no disc is in
the disc tray, displays
the channel number.
• When a recordable
disc is in the disc
tray, displays the
remaining recordable
time.
• When a disc is
recording, displays
the elapsed recording
time.
•When an OTR is
occuring, displays
the remaining
recording time.
• When your recorder
is in standby mode or
menu mode, displays
the current time.
8Chapter mark C—Appears when indicating
a chapter number.
9 Recording speed Indicates the current
recording speed.
10 P.SCAN Appears when progress scan
is turned on.
11 Title or track mark T—Appears when indicating
a title or track number.
The front panel display also displays messages
to indicate the following status information:
# Indicator Description
1Disc type CD—Appears when an audio
2 Current status
3 Timer recorder
4 Recording REC—Appears when a
5 PM Appears when the clock is
6Repeat mode REPEAT—Appears when
CD is in the disc tray.
DVD—Appears when a DVD
is in the disc tray.
DVD R—Appears when a
DVD-R is in the disc tray.
DVD RW—Appears when a
DVD-RW is in the disc tray.
—Appears when playback
is paused.
—Appears when a disc is
playing.
—Appears when a timer
program recording is in
progress. Flashes when all
timer program recordings
have been completed or
when a program cannot be
recorded for some reason.
recording is in progress.
displayed after 12:00 noon.
your recorder is in repeat
mode.
Appears when
your recorder is
turned on.
Appears when
your recorder is
turned off.
Appears when the
disc tray is open.
Appears when the
disc tray is
closing.
Appears when
your recorder is
reading a disc.
Appears when
your recorder is
writing to disc.
6
www.insignia-products.com
Page 8

Insignia NS-FSDVDR DVD recorder
Remote control
POWER
ZOOM
ABC
.@/:
1
2
JKL
GHI
4
5
TUV
PQRS
7
8
DISPLAY
SPAC E
0
MENU/LIST
TOP MENU
REC SPEED
REV
x1.3/0.8
REC/OTR
# Button Description
1 POWER Press to turn your recorder on or
2 ZOOM During playback, press to enlarge
3 Number buttons Press to select channel numbers.
4 DISPLAY Press to open or close the
5 TOP MENU Press to open the DVD Title
6 MENU/LIST Press to open the Disc menu.
7 Press to select items or settings.
8
9 REC SPEED Press to select the recording
REV
OPEN/CLOSE
TIMER
PROG.
DEF
3
CH
MNO
6
WXYZ
REPEAT
9
CLEAR
SETUP
RETURN
ENTER
PLAY
FWD
PAU SESKIP SKIP
CM SKIP
STOP
off.
If you have a timer program
recording scheduled, press to put
your recorder in standby mode.
the image on the screen.
During disc playback, press to
select a title, chapter, or track.
In the Setup menu, press to enter
values for settings or the parental
control password.
on-screen menu.
menu.
In VR mode, press to toggle
between the Original list and the
Playlist.
In playback mode, press to fast
reverse.
In pause mode, press to play
backward slowly.
speed.
# Button Description
10 ×1.3/0.8 In playback mode, press to play
11 REC/OTR Press to start recording. Press
12
13
14
SKIP
PAUSE
OPEN/CLOSE
15 TIMER PROG. Press to open the Timer
16
17
CH
CH
18 REPEAT Press to open the Repeat menu.
19 SETUP Press to open the one-screen
20 CLEAR Press to:
21 ENTER Press to confirm actions or select
22
23
RETURN
FWD
24 PLAY Press to start or resume
back in a slightly faster or slower
speed while playing the audio
normally. This feature is only
available if the disc was recorded
in Dolby Digital format. For more
information, see “Using rapid
play” on page 18.
repeatedly to start a One-Touch
Timer recording. For more
information, see “Using
One-Touch recording” on
page 31.
In playback mode, press to skip
to the previous chapter or track.
In pause mode, press to go
backward on a DVD one frame at
a time.
Press to pause playback or
recording. Press PLAY to
resume playback or recording.
Press to open or close the disc
tray. You can also press this
button to turn on your recorder.
Programming list.
Press to go to the next channel in
the channel list.
Press to go to the previous
channel in the channel list.
From this menu you can repeat a
DVD title, DVD chapter, an entire
disc, or create a playback loop.
menu system.
In DVD playback mode, press for
more than three seconds to
switch the progressive scan mode
to the interlaced mode.
Note: To use progressive scan,
you must connect the TV using
the component jacks. If the TV
does not have component jacks,
connect the TV using the A/V
jacks, and switch to interlaced
mode.
• Clear the password fields
after you enter a password
• Cancel CD programming
• Clear a selected marker
number in the marker
setup mode
• Delete a program entered
in the Timer Programming
list
menu items.
Press to go to the previous menu.
In playback mode, press to fast
forward.
In pause mode, press to play
forward slowly.
playback. You can also press this
button to turn on your recorder.
www.insignia-products.com
7
Page 9
Insignia NS-FSDVDR DVD recorder
POWE
R
D
IS
P
LAY
RECSPE
ED
C
L
E
A
R
CM
S
K
IP
S
K
I
P
RE
C
P
A
U
SE
P
E
N
TER
R
E
C
M
O
N
I
T
OR
OPEN
/
CL
O
S
E
TIM
ER
PROG
.
M
ENU
P
L
A
Y
LI
T
O
P
M
E
N
U
/
OR
I
G
IN
A
L
S
PAC
E
1
2
3
4
5
6
7
8
9
0
F
WD
S
T
OP
P
L
A
Y
RE
V
C
H
.@
/
:
ABC
D
EF
GH
I
J
KL
M
NO
P
Q
R
S
TU
V
W
X
Y
Z
# Button Description
25
SKIP
26 CM SKIP During playback, press to skip
27
STOP
In playback mode, press to skip
to the next chapter or track.
In pause mode, press to go
forward on a DVD one frame at a
time.
forward 30 seconds. Each time
you press this button, the skip
interval increases by 30 seconds.
You can skip forward as much as
180 seconds (6 button presses).
Press to stop playback or
recording.
Setting up your recorder
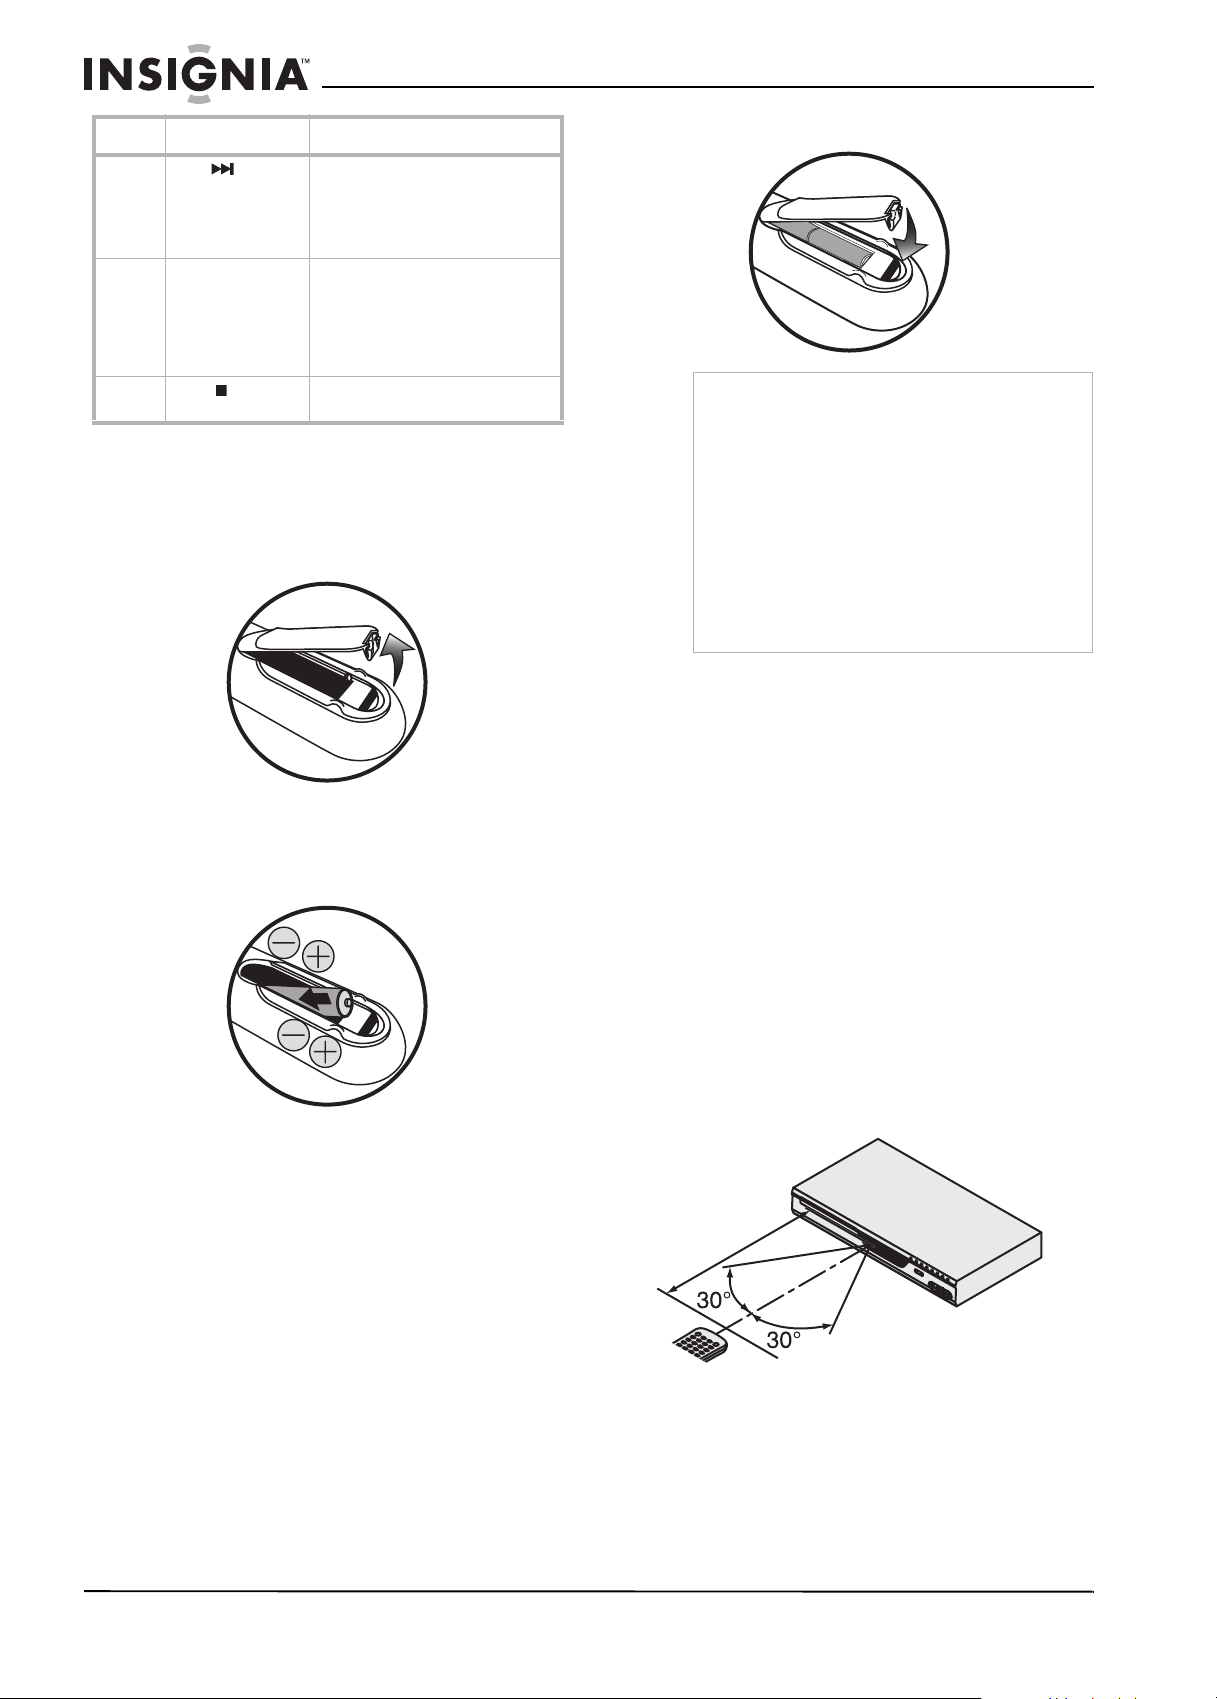
Installing remote control batteries
To install remote control batteries:
1 Open the battery compartment cover.
2 Insert two AA batteries into the battery
compartment. Make sure that you match the
+ and – symbols on the batteries with the +
and – symbols inside the battery
compartment.
3 Close the battery compartment cover.
Notes
• Do not mix new and old batteries.
• Do not use different kinds of batteries together.
Although they may look similar, different
batteries may have different voltages.
• Make sure that the + and – symbols on the
batteries match the + and – symbols in the
battery compartment.
• Remove batteries if you do not plan to use the
remote for a month or more.
• Dispose of used batteries according to the
hazardous waste regulations in your area.
• Do not recharge, short-circuit, heat, burn, or
disassemble batteries. Batteries contain acid
which can cause a rash or burn.
Using the remote control
• Make sure that there is no obstacle between
the remote control and the remote control
sensor on the front of your recorder.
• Remote operation may become unreliable if
strong sunlight or fluorescent light is shining
on the remote sensor of your recorder.
• Remote control for different devices can
interfere with each other. Avoid using a
remote control for another device too close to
your recorder.
• Replace the batteries when you notice a
decrease in the operating range of the
remote control.
• The maximum operable ranges from the unit
are:
• Line of sight: About 23 feet (7 m)
• Either side of the center: About 16 feet
(5 m) within 30°
• Above: About16 feet (5 m) within 15°
• Below: About 10 feet (3 m) within 30°
O
PE
N
/C
L
OSE C
HA
N
N
ELR
EV
R
E
C S
F
PE
W
D
ED
REC/O
ST
O
P
T
R
P
L
AY
P
OWE
R
S
-V
ID
E
O
VIDEO
L
AUD
IO
R
8
www.insignia-products.com
Page 10
Insignia NS-FSDVDR DVD recorder
UDIO
VIDEO INID
L
R
U
VIDEO OUTID
(L1)
O
OU
S
O
T
V
Y
/C
P
R/CR
R
DIGI
UDIO OUTPUT
M
C
O
L
(L1)
OUT
VIDEO IN
L
R
DIGI
T
AL
A
UDIO O
PCM /
C
O
L
UDIO OUT
VIDEO OUTID
OUT
O
T
V
UT
B/CB
P
R/CR
N
VIDEO IN
L
R
DIGI
T
AL
A
UDIO OUTPU
PCM /
C
O
U
T
VIDEO OUTID
OU
S
O
COMPO
T
V
UT
B/CB
P
R/CR
Connecting an antenna or cable/satellite
box
Note to CATV system installer
This reminder is provided to call the CATV system
installer’s attention to Article 820-40 of the NEC
that provides guidelines for correct grounding and
in particular, specifies that the cable ground must
be connected to the grounding system of the
building as close to the point of cable entry as
practical.
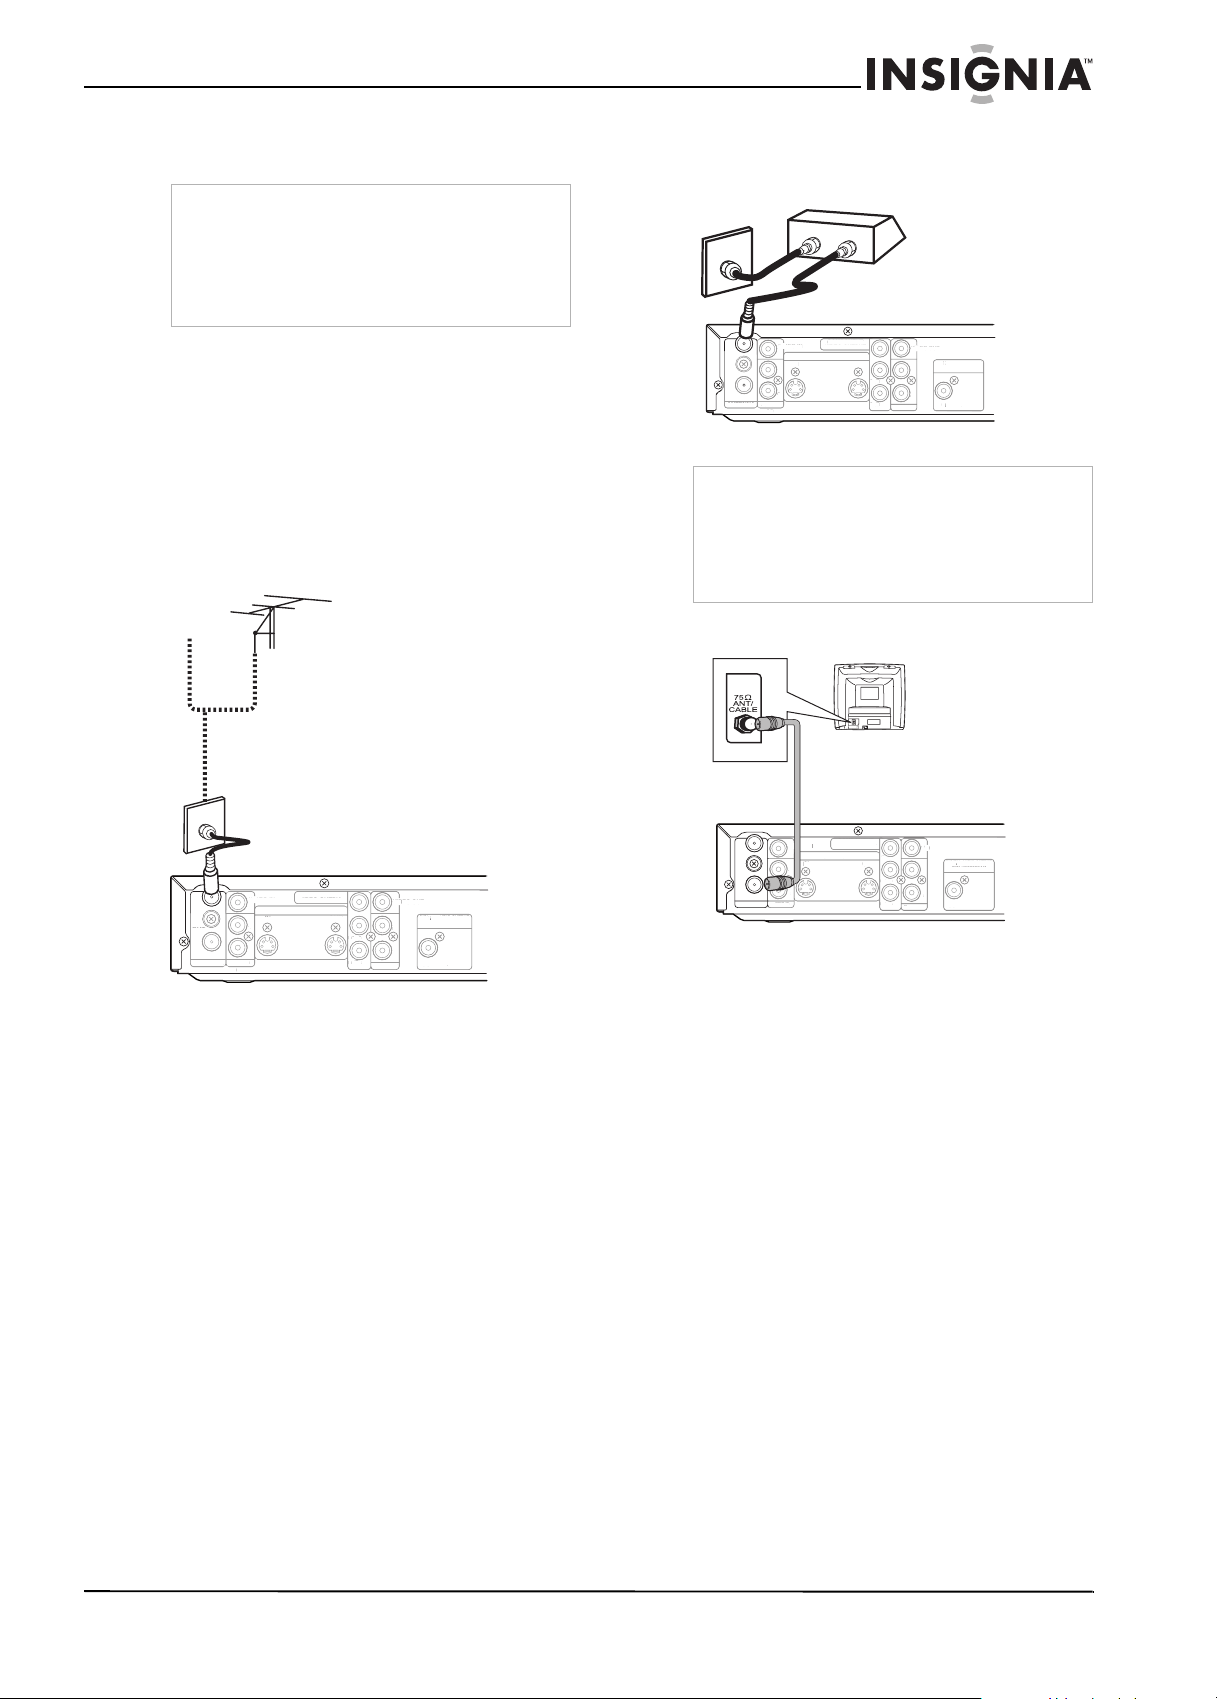
To connect an antenna through your
recorder to your TV:
1 Disconnect the 75 ohm antenna cable from
the back of your TV.
2 Connect the 75 ohm antenna cable from the
antenna wall outlet to the ANTENNA IN jack
on your recorder.
3 Connect the ANTENNA OUT jack on your
recorder to the ANT IN jack on your TV using
a 75 ohm RF cable.
Cable or antenna
3 Connect the ANTENNA OUT jack on your
recorder to the ANT IN jack on your TV using
a 75 ohm RF cable.
VIDEO IN
L
R
IN
S-VIDEO
S-VIDE
IN
IN
Cable or satellite box
OUT
75 ohm RF cables
COMPONEN
COMPONENT
IDEO OUTP
VIDEO OUTPUT
Y
OUT
B
PB/C
PR/C
R
AUDIO OUT
Back of recorder
VIDEO OUT
DIGITAL AUDIO OUTPUT
PCM / BITSTREAM
L
R
COAXIAL
AXIA
Back of TV
BITSTREAM
UTPUT
Antenna wall outlet
IN
OUT
ANTENNA
Notes
• You can record an unscrambled channel by
• You cannot record one channel while watching
Connecting your recorder to your TV
AUDIO IN
UDIO IN
(L1)
selecting the channel on the cable box or
satellite box. Make sure that the cable box or
satellite box is turned on.
another channel.
Antenna wall outlet
75 ohm RF cable
Back of recorder
IN
OUT
UT
ANTENNA
AUDIO IN
VIDEO OUTPUT
S-VIDEO
-VIDE
IN
L
R
IN
(L1)
OUT
VIDEO OUT
Y
T
B
PB/C
PR/C
R
AUDIO OUT
DIO OUT
L
R
DIGITAL AUDIO OUTPUT
PCM / BITSTREAM
PCM / BITSTREA
COAXIAL
AXIA
COMPONEN
COMPONENT
VIDEO IN
IDEO OUTPUT
To connect a cable or satellite box through
your recorder to your TV:
1 Disconnect the 75 ohm cable connected to
the cable or satellite box from the back on
your TV.
2 Connect the 75 ohm cable from the cable or
satellite box to the ANTENNA IN jack on your
recorder.
IN
OUT
ANTENNA
AUDIO IN
UDIO I
VIDEO IN
L
R
(L1)
75 ohm RF
cable
COMPONENT
VIDEO OUTPUT
IDEO OUTP
S-VIDEO
-VIDE
IN
IN
Back of recorder
NEN
OUT
VIDEO OUT
Y
T
L
B
PB/C
R
PR/C
R
AUDIO OUT
DIO OU
DIGITAL AUDIO OUTPUT
T
BITSTREAM
PCM / BITSTREAM
COAXIAL
www.insignia-products.com
9
Page 11
Insignia NS-FSDVDR DVD recorder
A
UDIO OU
VIDEO OUTID
L
DIG
TALA
UDIO OUTPUT
PCM /
M
C
O
UDIO
VIDEO INID
L
OUT
OUT
S
O
UDIO
VIDEO INID
L
A
UDIO OU
VIDEO OUTID
I
OUT
S
O
COMPO
T
UT
B
/
B
P
R/CR
DIG
TALA
UDIO OUTPU
M
C
O
UDIO
VIDEO INID
L
(
I
T
OUT
S
O
COMPO
T
UT
Y
B
/
B
P
R/CR
DIG
TALA
UDIO OUTPUT
PCM /
M
C
O
UDIO IN
Connecting to your TV using component
cables (best picture)
Note
The method you use to connect your TV depends
on the type of jacks your TV has.
To connect your recorder to your TV using
component video cables:
• Connect component video cables (not
provided) from the COMPONENT VIDEO
OUTPUT jacks (Y, Pb/Cb, Pr/Cr) on your
recorder to the COMPONENT VIDEO IN
jacks (Y, Pb/Cb, Pr/Cr) on the back of your
TV.
Back of TV
Back of recorder
IN
IN
L
OUT
R
AUDIO IN
IN
ANTENNA
(L1)
VIDEO IN
COMPONENT
VIDEO IN
Y
B/CB
P
P
R/CR
COMPONENT
VIDEO OUTPUT
S-VIDEO
-VIDE
Y
IN
OUT
PB/C
PR/C
B
R
R
AUDIO OUT
Component video
cables
VIDEO OUT
DIGITAL AUDIO OUTPUT
I
BITSTREA
PCM / BITSTREAM
L
COAXIAL
T
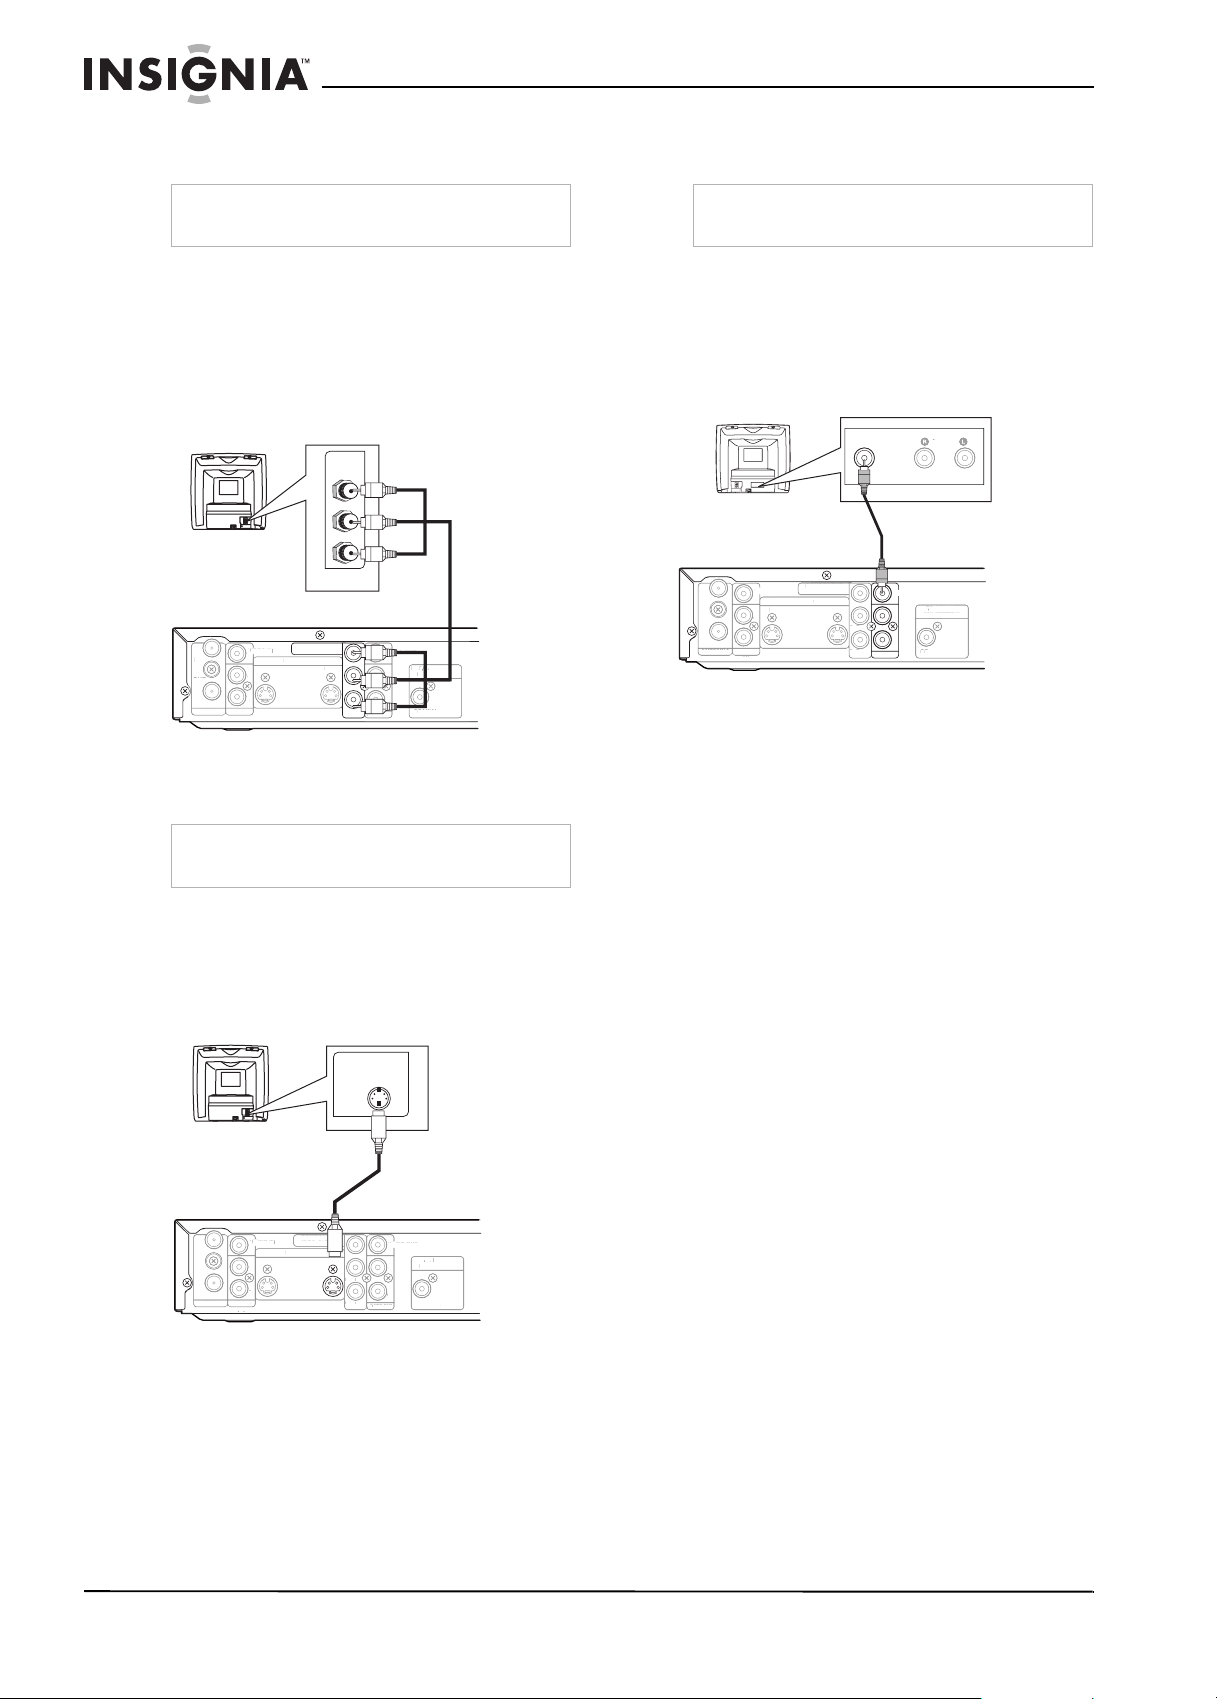
Connecting to your TV using composite
cables (basic connection)
Note
The method you use to connect your TV depends
on the type of jacks your TV has.
To connect your recorder to your TV using a
composite video cable:
• Connect the composite video cable (yellow
connectors - provided) from the VIDEO OUT
jack on your recorder to the VIDEO IN jack
on the back of your TV.
Back of TV
AUDIO INVIDEO
Composite video cable
Back of recorder
COMPONENT
IN
IN
OUT
OU
ANTENNA
AUDIO IN
VIDEO IN
L
R
R
IN
(L1)
L1)
NEN
VIDEO OUTPUT
VIDEO OUTP
S-VIDEO
-VIDE
OUT
N
IN
VIDEO OUT
Y
PB/C
C
PR/C
DIGITAL AUDIO OUTPUT
I
BITSTREA
PCM / BITSTREAM
L
B
R
R
AUDIO OUT
COAXIAL
Connecting to your TV using an S-Video
cable (better picture)
Note
The method you use to connect your TV depends
on the type of jacks your TV has.
To connect your recorder to your TV using
an S-Video cable:
• Connect an S-Video cable (not provided)
from the S-VIDEO OUT jack on your recorder
to the S-VIDEO IN jack on the back of your
TV.
S-VIDEO IN
Back of TV
S-Video cable
Back of recorder
NEN
COMPONENT
VIDEO IN
VIDEO OUTP
IN
N
OUT
ANTENNA
AUDIO IN
VIDEO OUTPUT
S-VIDEO
-VIDE
OUT
N
IN
L
R
IN
(L1)
VIDEO OUT
Y
PB/C
C
PR/C
DIGITAL AUDIO OUTPUT
I
T
PCM / BITSTREAM
PCM / BITSTREA
L
L
B
R
R
AUDIO OUT
COAXIAL
T
10
www.insignia-products.com
Page 12

Insignia NS-FSDVDR DVD recorder
D
T
P
M
C
O
AXIAL
A
UDIO
VIDEO INID
L
VIDEO OUTID
(
I
T
OUT
S
O
COMPO
T
UT
B
/
B
P
/C
N
(L1)
U
N
VIDEO IN
L
R
N
VIDEO OUTID
T
S
C
P
B/CB
P
R
/
R
TALA
T
M
C
O
A
Connecting your TV with an RF modulator
If your TV does not have A/V, S-Video, or
component jacks, you can connect your TV
using an RF modulator (not supplied). Your
recorder does not have a built-in RF modulator.
Note
This connection provides the poorest picture
quality of the connections shown in this guide. If
your TV has A/V input jacks, see “Connecting to
your TV using composite cables (basic
connection)” on page 10.
Note
The method you use to connect your TV depends
on the type of jacks your TV has.
To connect your recorder to your TV using
an RF modulator:
1 Disconnect the 75 ohm antenna cable from
the back of your TV.
2 Connect the 75 ohm antenna cable from the
antenna wall outlet to the ANTENNA IN jack
on your recorder. If the antenna input jack of
your TV is already being used, disconnect
the RF cable from your TV.
3 Connect the ANTENNA OUT jack on your
recorder to the RF modulator (usually
marked ANT IN) using a 75 ohm RF cable.
4 Connect the RF modulator to your TV using
another 75 ohm RF cable.
5 Connect the AUDIO/VIDEO output jacks on
your recorder to the AUDIO/VIDEO input
jacks of your RF modulator using
Audio/Video cables.
6 Set the RF modulator’s channel 3/4 switch to
either 3 or 4, whichever TV channel is least
used in your area. If the RF modulator has a
modulator/antenna switch, set it according to
the RF modulator’s manual.
7 Turn on your TV and switch it to the same
channel as you set on the RF modulator
(3 or 4).
For more details, follow the instructions supplied
with the RF modulator.
Connecting the basic audio
To connect the audio signal from your
recorder to your TV:
• Connect audio cables (provided) from the
AUDIO OUT jacks (left-white and right-red)
on your recorder to the AUDIO IN jacks on
the back of your TV.
R L
Back of TV
Audio cables
COMPONENT
VIDEO OUTPUT
VIDEO OUTP
S-VIDEO
-VIDE
(L/R)
NEN
OUT
VIDEO OUT
Y
Y
PB/C
C
PR/C
DIGITAL AUDIO OUTPUT
IGI
UDIO OUTPU
CM / BITSTREA
PCM / BITSTREAM
L
B
R
R
COAXIAL
AUDIO OUT
Back of recorder
VIDEO IN
IN
L
OU
OUT
R
R
AUDIO IN
IN
ANTENNA
NTENNA
(L1)
L1)
N
IN
Connecting to an audio system
You can connect your recorder to a standard
stereo system or to a Dolby Digital decoder, MD
deck, or DAT deck. All devices should be turned
off when you change connections.
Notes
• Playing a DVD using incorrect settings can
generate noise distortion and can also damage
the speakers.
• The audio source on a disc in a Dolby Digital
Multi-channel surround format cannot be
recorded as digital sound by an MD or DAT
deck.
To connect the audio signal from your
recorder to an audio system:
• Connect audio cables (provided) from the
AUDIO OUT jacks (left-white and right-red)
on your recorder to the AUDIO IN jacks on
the back of your stereo system.
Stereo system
Cable or antenna
or
Antenna cable
Antenna wall outlet
Back of recorder
VIDEO IN
IN
IN
L
OUT
R
AUDIO IN
ANTENNA
(L1)
ANT IN
AC 120V
RF modulator
(not provided)
VIDEO OUTPUT
S-VIDEO
COMPONENT
RF cable
OUT
Y
PB/C
B
PR/C
R
AUDIO OUT
Back of TV
RF cable
Audio/Video
cables (provided)
VIDEO OUT
L
R
TO TV NI OEDIVLENNAHC AUDIO IN
RL3 4
www.insignia-products.com
Audio cable
Audio cables
(L/R)
OMPONENT
COMPONENT
VIDEO IN
VIDEO OUTPUT
IN
I
OUT
OUT
AUDIO IN
Video cable
ANTENNA
VIDEO OUTPUT
S-VIDEO
-VIDEO
IN
I
L
R
DIO I
(L1)
VIDEO OUT
Y
OUT
OU
PB/C
PR/C
DIGITAL AUDIO OUTPUT
DIGI
UDIO OUTPU
PCM / BITSTREA
PCM / BITSTREAM
L
B
R
R
C
AUDIO OUT
COAXIAL
XIAL
Back of recorder
- OR -
11
Page 13
Insignia NS-FSDVDR DVD recorder
N
(L1)
UDIO IN
VIDEO IN
L
R
N
UDIO OU
VIDEO OUTID
T
S
C
P
B/CB
P
R
/
R
VIDEO OUT
D
T
M
C
O
A
L
• Connect an audio coaxial digital cable (not
provided) from the DIGITAL AUDIO
OUTPUT jack on your recorder to the
DIGITAL AUDIO IN jack on the back of your
digital audio device, such as a Dolby Digital
decoder, MD deck, or DAT deck.
Digital audio device
VIDEO IN
IN
I
OUT
OUT
ANTENNA
ANTENNA
AUDIO IN
IN
I
L
R
(L1)
Back of recorder
VIDEO OUTPUT
VIDEO OUTPUT
S-VIDEO
-VIDEO
OMPONENT
COMPONENT
OUT
OU
COAXIAL
Audio coaxial
digital cable
VIDEO OUT
Y
PB/C
PR/C
C
DIGITAL AUDIO OUTPUT
PCM / BITSTREAM
L
B
R
R
COAXIAL
AUDIO OUT
T
Connection Setting
PCM Dolby Digital
If the device is connected to the
component jacks and is compatible
with Dolby Digital.
If the device is not connected to the
component jacks or is not
compatible with Dolby Digital.
For an MD or DAT deck. - PCM
- Stream
-PCM
See “Adjusting Dolby Digital audio” on page 25.
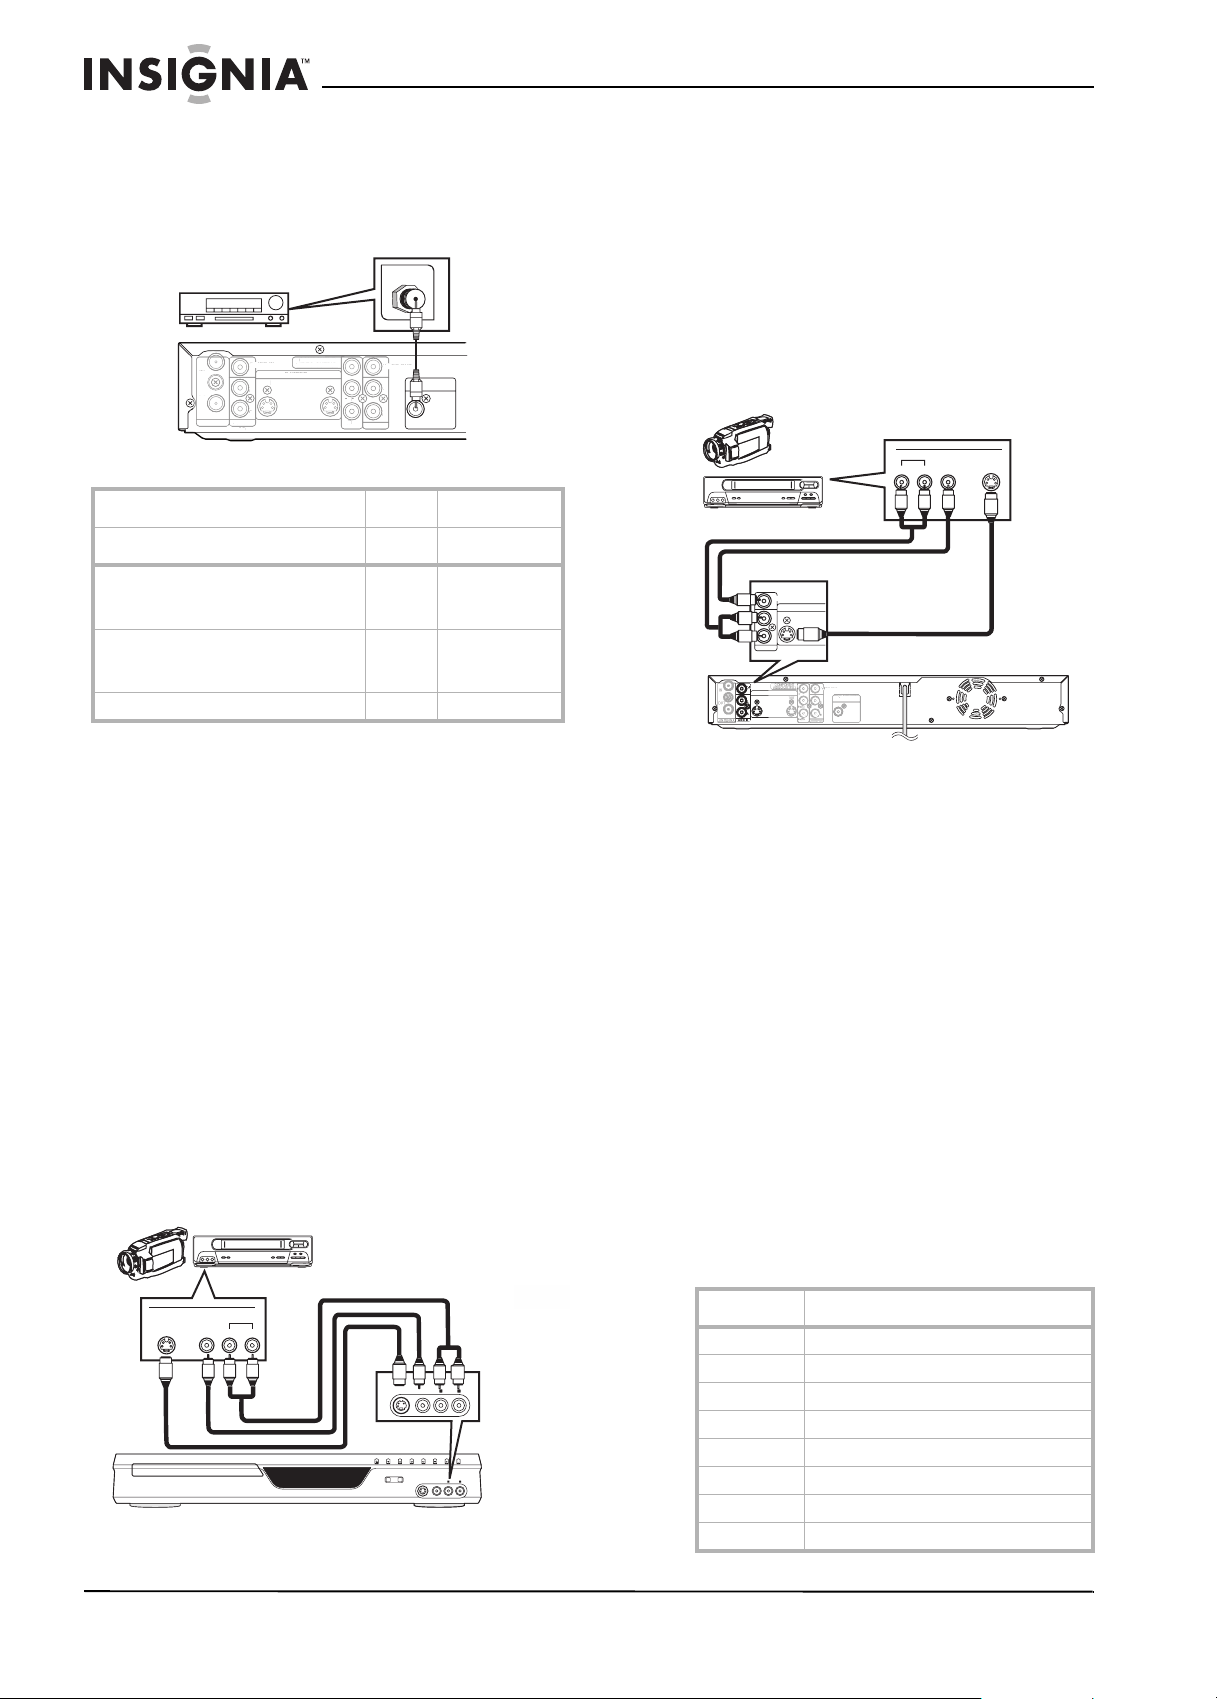
Connecting to an external source
You can connect an external source to your
recorder by using either the LINE2 (Front) or
LINE1 (Rear) input jacks.
When connecting an external source to the
monaural output to this unit, use AUDIO L jack
of LINE2 (Front).
Use commercially available S-Video or video
cable and an audio cable for this connection.
To connect an external source to the front
jacks on your recorder:
1 Connect a video cable or S-Video cable (not
both) from the OUTPUT jacks on the external
source (such as a VCR or camcorder) to the
appropriate INPUT jack on the front of your
recorder.
2 Connect audio cables (L/R) from the AUDIO
OUT jacks on the external source to the
AUDIO IN jacks on the front of your recorder.
External source
Audio cables (L/R)
OUTPUT
VIDEOS- VIDEO AUDIO
RL
R
L
Video or
S-Video
cables
Front of recorder
S-VIDEO VIDEO AUDIO
OPEN/CLOSE CHANNEL REV FWD STOP PLAY POWER
REC/OTRREC SPEED
S-VIDEO VIDEO AUDIO
R
L
3 Select the correct video source by pressing
002 (Line2/front jacks) on the remote control.
To connect an external source to the rear
jacks on your recorder:
1 Connect a video cable or S-Video cable (not
both) from the OUTPUT jacks on the external
source (such as a VCR or camcorder) to the
appropriate INPUT jack on the back of your
recorder.
2 Connect audio cables (L/R) from the AUDIO
OUT jacks on the external source to the
AUDIO IN jacks on the back of your recorder.
External source
OUTPUT
VIDEO S -VIDEOAUDIO
LR
Video or S-Video
VIDEO OUT
DIGITAL AUDIO OUTPUT
IGI
UDIO OUTPU
PCM / BITSTREAM
PCM / BITSTREA
COAXIAL
XIA
cables
Audio
cables
(L/R)
VIDEO IN
S-VIDEO
IN
L
R
AUDIO IN
VIDEO IN
S-VIDEO
IN
L
R
AUDIO IN
(L1)
Back of recorder
3 Select the correct video source by pressing
001 (Line1/back jacks) on the remote control.
Selecting basic options
Setting up the first time
The first time you turn on your recorder, you are
prompted to select initial settings.
To set up the first time:
1 Make sure that your recorder is connected to
a TV and that the power cord is plugged into
a power outlet.
2 Press POWER to turn on your recorder.
3 Turn on the TV, then select the TV input
source for the jacks your recorder is
connected to.
The following table lists some of the more
common TV brands and their input sources.
For more information, see the guide that
came with the TV.
TV video input sources
Brand Input source
Admiral AUX
Curtis Mathis LINE1, LINE2, 00, 90, 91, 92, 93
GE INPUT, TV/VCR, 00, 90, 91, 92, 93
Hitachi INPUT, AUX
JVC VIDEO, VIDEO1, VIDEO2, VIDEO3
Kenwood AUX
LXI-Series 00
Magnavox AUX CHANNEL
12
www.insignia-products.com
Page 14

Insignia NS-FSDVDR DVD recorder
Brand Input source
Panasonic TV/VIDEO
RCA INPUT, TV/VCR, 00, 90, 91, 92, 93
Samsung TV/VIDEO
Sanyo VIDEO
Sharp 00
Sony VIDEO1, VIDEO2, VIDEO3
Tos hi ba T V/GA ME
Zenith 00
When you have selected the correct input
source, the
Initial Setting
English
Français
Español
Initial Setting
screen opens.
4 Press or to select the on-screen menu
language, then press ENTER. You can select
English, Français, or Español.
5 Press ENTER. Your recorder starts
searching for channels available in your area.
Your recorder stores the channel information
in the channel list. When the search is
complete, the
Initial Setting
Clock Setting
Clock Setting
screen opens.
6 Press ENTER, then go to Step 3 in “Manually
setting the clock” on page 14 and complete
the rest of the task to set the clock.
Scanning for channels
When you turn on your recorder for the first time,
it automatically scans for channels available in
your area. Your recorder stores the channel
information in the channel list.
When you press CHANNEL or CHANNEL
(on the front of your recorder) or CH or CH
(on the remote control), your recorder goes to
the next higher or lower channel in the channel
list. Your recorder skips channels that do not
have a signal.
You do not need to scan for channels unless:
• You change the type of TV connection. For
example, you change from an outside
antenna to cable TV.
• More channels become available.
• You move your recorder to a new viewing
area.
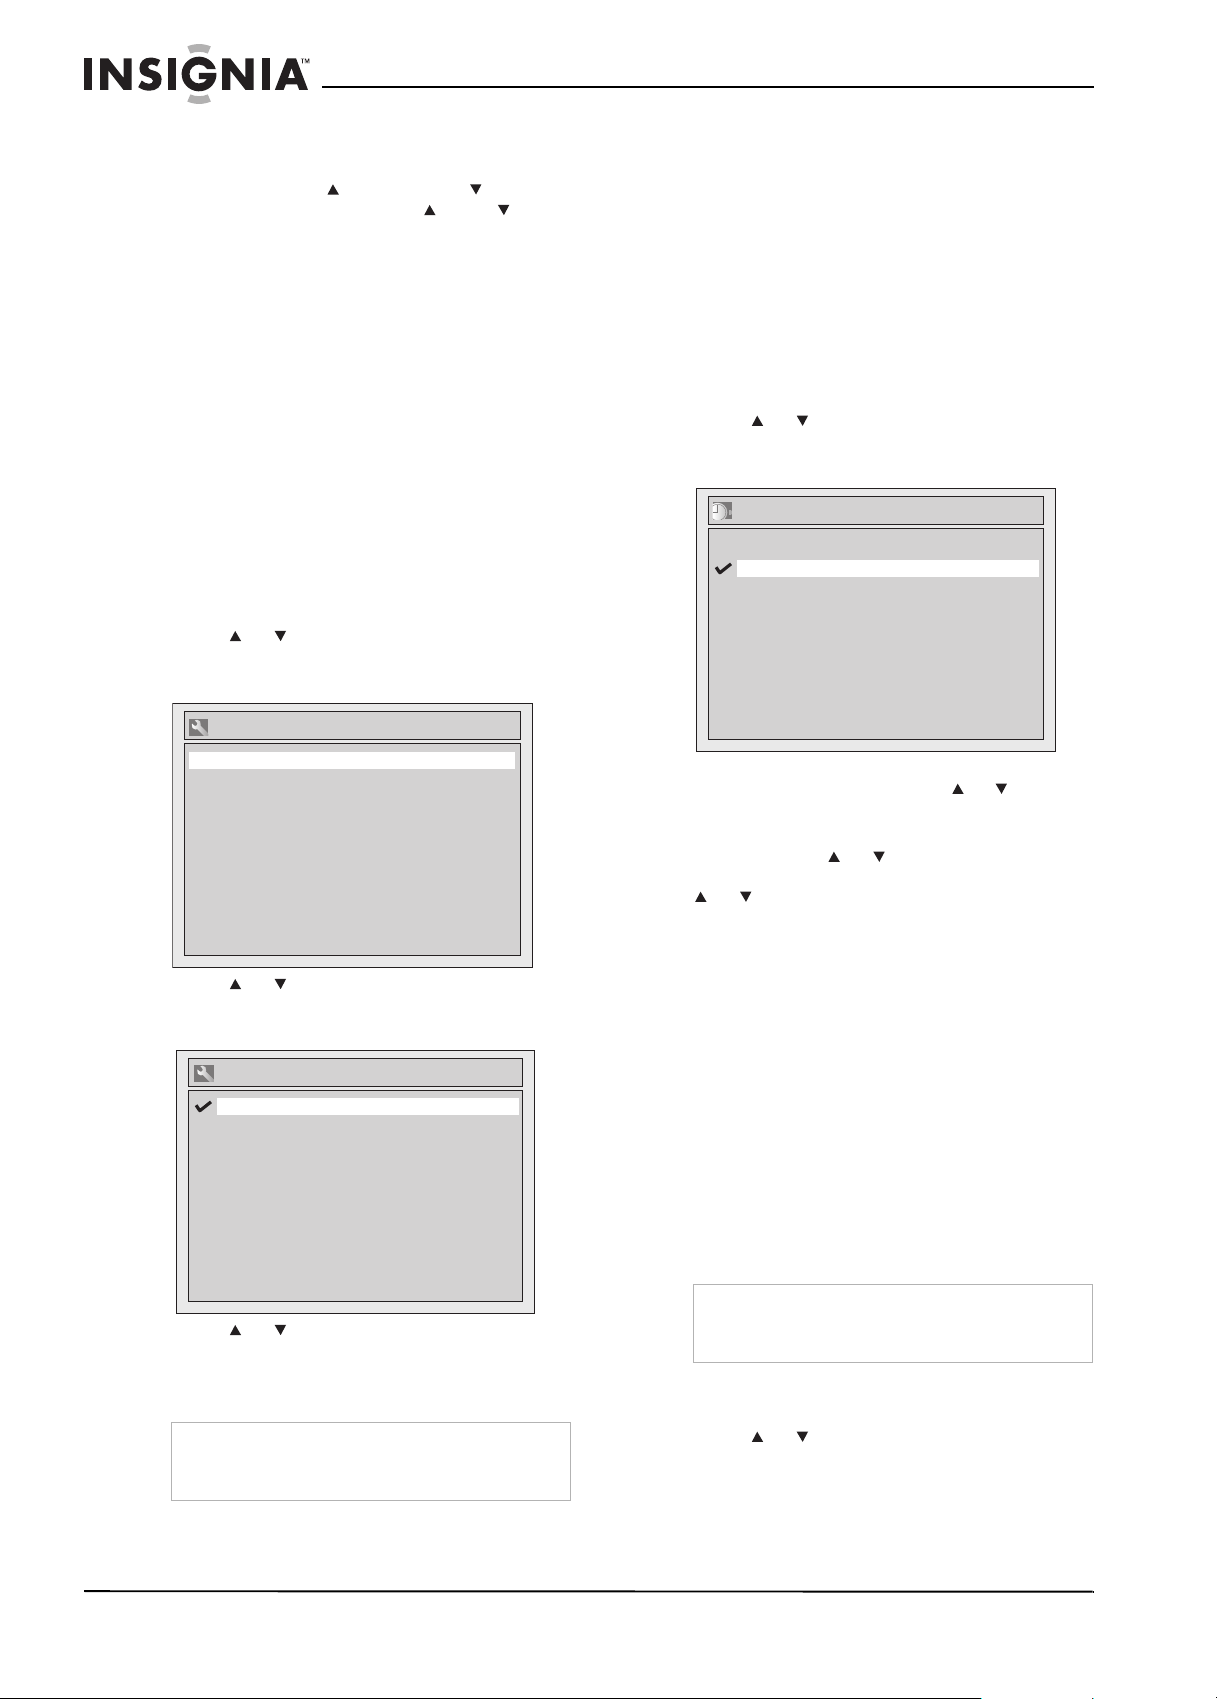
To scan for channels:
Setup
1 Press SETUP. The
Setup
Required Setting
Playback
Display
Recording
Clock
Channel
Disc
menu opens.
2 Press or to select Channel, then press
ENTER. The
Channel
menu opens.
3 Press or to select Auto Preset, then
press ENTER. Your recorder starts scanning
for channels in your area.
4 When the scan is complete, press SETUP to
close the menu.
To stop the scan before it is complete, press
RETURN or SETUP.
Note
If you stop the scan before it is complete,
channels that have not been scanned are not
stored in the channel list.
Adding or deleting channels
You can add channels that were skipped
because of a weak signals to the channel list, or
you can delete channels you do not want from
the channel list.
To add or delete channels:
1 Press SETUP. The
2 Press or to select Channel, then press
ENTER. The
3 Press or to select Manual Preset, then
press ENTER. The
opens.
Manual Preset
Setup
Channel
Manual Preset
CH 2
Add
Delete
menu opens.
menu opens.
screen
4 Press CH or CH to select a channel in the
channel list, or press or to select a
channel that is not in the channel list.
5 Press or to select Add or Delete, then
press ENTER.
6 Press SETUP to close the menu.
www.insignia-products.com
13
Page 15
Insignia NS-FSDVDR DVD recorder
Changing channels
To change channels:
• Press CHANNEL or CHANNEL (on the
front of your recorder) or CH or CH (on
the remote control) to go to the next or
previous channel in the channel list.
• Press the number buttons for the channel
number. If you want a one-digit channel
number, you must press 0, then press the
number. For example, to select channel 5,
press 0, then press 5.
If you want a two-digit or three-digit channel
number, press the numbers for the channel.
For example, to select channel 21, press 2,
then press 1. If you want channel 117, press
1, press 1, then press 7.
Setting the audio channel
You can select the audio channel for the audio
output from the TV. Stereo is the default setting.
To set the audio channel:
1 Press SETUP. The
2 Press or to select Required Setting,
then press ENTER. The
menu opens.
Setup
menu opens.
Required Setting
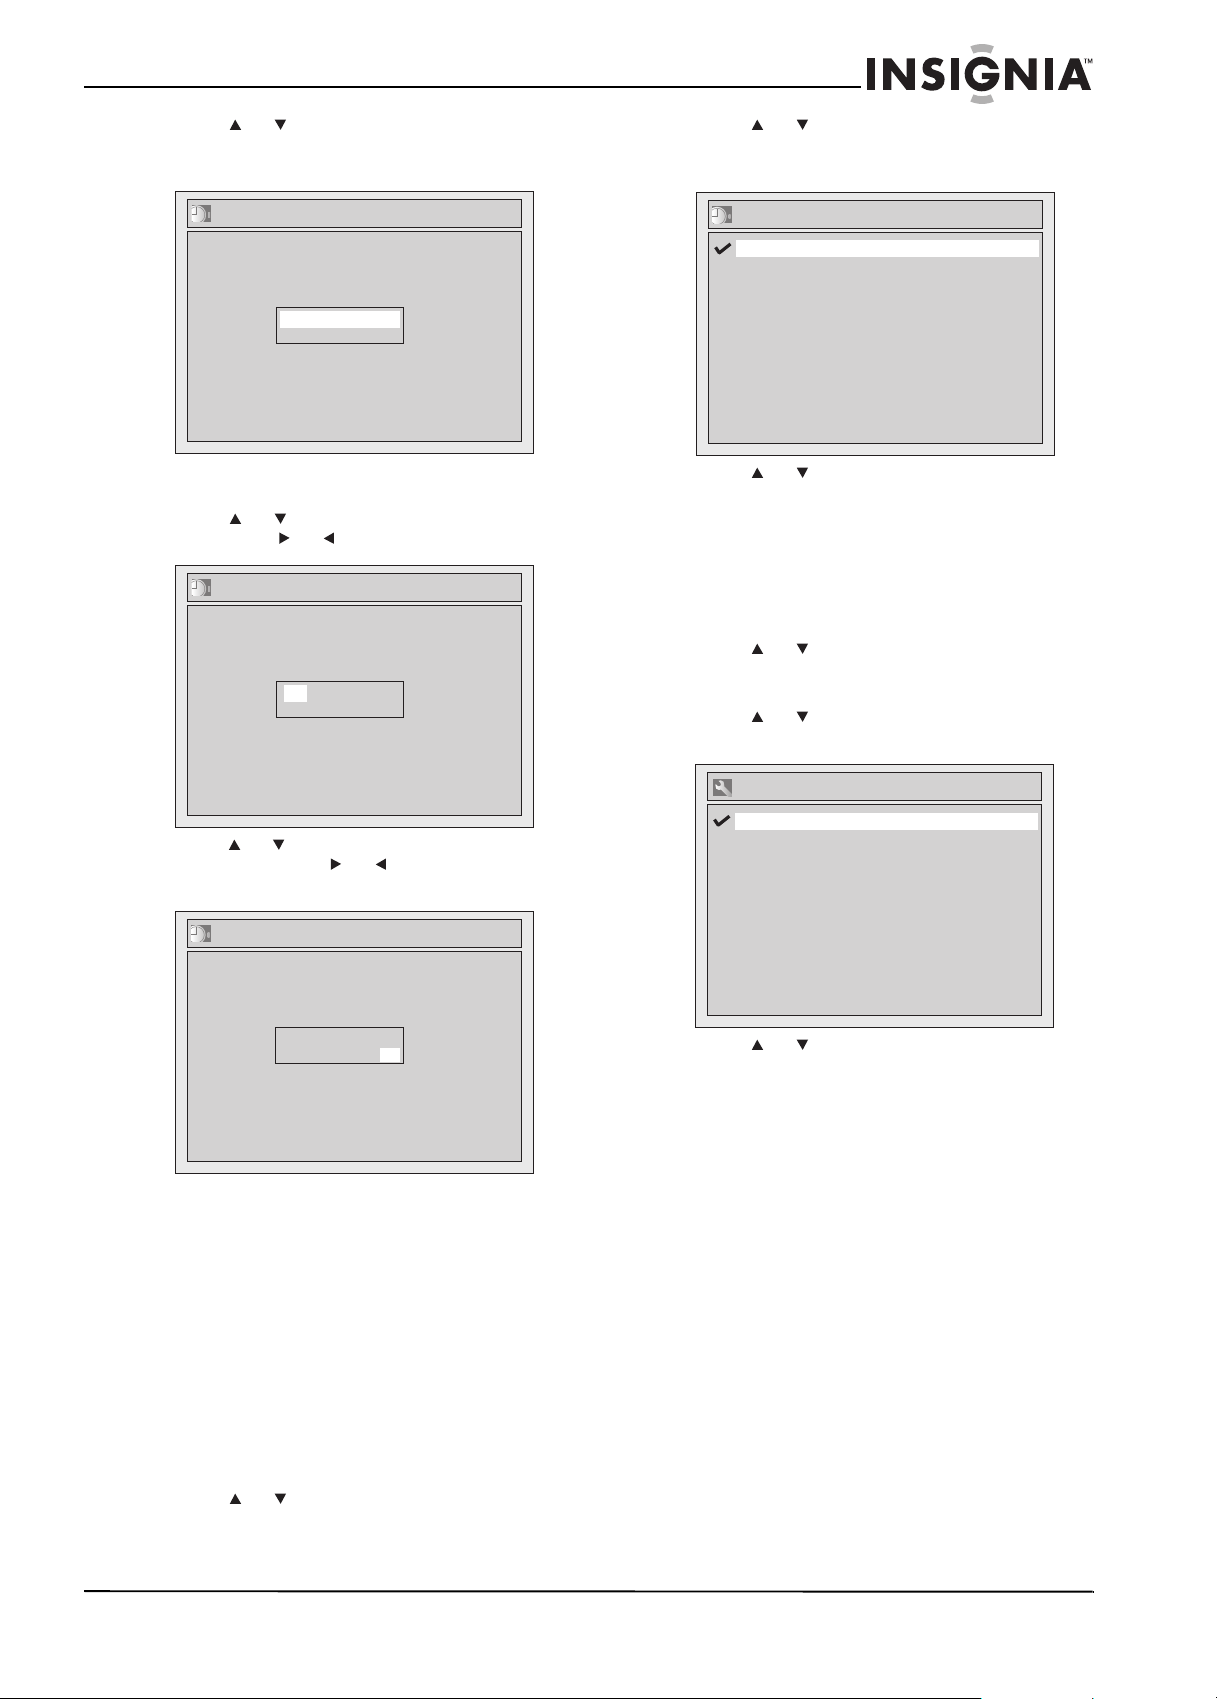
Automatically setting the clock
When you turn on your recorder for the first time,
it automatically prompts you to set the clock.
You do not need to set the clock unless you
move your recorder to a different time zone.
To automatically set the clock:
1 Make sure that your TV is connected to an
antenna, direct cable TV, cable box, or
satellite box.
2 If you are using a cable box or satellite box,
tune the box to the local PBS channel.
Setup
3 Press SETUP. The
4 Press or to select Auto Clock Setting,
then press ENTER. The
screen opens.
Auto Clock Setting
OFF
Auto
Manual
menu opens.
Auto Clock Setting
Required Setting
Select Video
TV Aspect
TV Audio Select
4:3 Letter Box
Stereo
3 Press or to select TV Audio Select,
then press ENTER. The
TV Audio Select
screen opens.
TV Audio Select
Stereo
SAP
4 Press or to select Stereo or SAP, then
press ENTER. Stereo outputs the main
audio. SAP outputs the secondary audio
program, if available.
Note
If you select SAP, then record a program that has
a secondary audio program, your recorder only
records the secondary audio program.
5 If you do not know the channel number for
your local PBS station, press or to select
Auto, then press ENTER.
Or, if you know your local PBS channel
number, press or to select Manual,
press ENTER, press the number buttons or
or to enter the PBS channel number,
then press ENTER.
6 Press SETUP to close the menu.
7 Press POWER to turn off your recorder, and
leave it off for several minutes. Your recorder
can only set the time automatically when it is
off. Searching for the time setting may take
several minutes.
8 Press POWER to turn on your recorder.
The clock is set automatically based on time
information from your local PBS station. If the
time setting is incorrect, see “Manually
setting the clock” on page 14.
Manually setting the clock
If the displayed time is incorrect, you need to
manually set the clock.
Note
If you set the clock manually, the setting will be
lost if power fails or you unplug your recorder for
more than 30 seconds.
To manually set the clock:
Setup
1 Press SETUP. The
2 Press or to select Clock, then press
ENTER.
menu opens.
14
www.insignia-products.com
Page 16
Insignia NS-FSDVDR DVD recorder
3 Press or to select Clock Setting, then
press ENTER. The
Clock Setting
screen
opens.
Clock Setting
---- / -- / ---- ( ---- )
-- : -- --
4 Press ENTER. The default date and time
appears.
5 Press or to select the month, day, or
year. Press or to move from field to field.
Clock Setting
JAN/ 01 / 2008(TUE)
12: 00 AM
3 Press or to select Daylight Saving
Time, then press ENTER. The
Saving Time
Daylight Saving Time
ON
OFF
screen opens.
4 Press or to select ON or OFF, then
Press ENTER.
5 Press SETUP to close the menu.
Selecting the TV aspect ratio
To select the TV aspect ratio:
1 Press SETUP. The
2 Press or to select Required Setting,
then press ENTER. The
menu opens.
3 Press or to select TV Aspect, then
press ENTER. The
Setup
Required Setting
TV Aspect
Daylight
menu opens.
screen opens.
6 Press or to select the hour, minutes, and
AM or PM. Press or to move from field
to field.
Clock Setting
JAN/ 01 / 2008(TUE)
12: 00 AM
7 Press ENTER.
8 Press SETUP to close the menu.
Turning Daylight Saving Time on or off
When the Daylight Saving Time option is turned
on, your recorder automatically moves the clock
forward one hour at 2:00 a.m. on the second
Sunday in March and moves the clock backward
one hour at 2:00 a.m. on the first Sunday in
November.
The default setting is ON.
TV A
spect
4:3 Letter Box
4:3 Pan & Scan
16:9 Wide
4 Press or to select the aspect ratio, then
press ENTER. You can select:
• 4:3 Letter Box—(Default) If you have a
standard TV and select this setting, the
full image appears on the screen with
black bars on the top and bottom.
• 4:3 Pan & Scan–If you have a standard
TV and select this setting, the image fills
the screen with the sides of the image
cropped.
• 16:9 Wide—If you have a wide-screen
TV, select this setting.
5 Press SETUP to close the menu.
To turn Daylight Saving Time on or off:
Setup
1 Press SETUP. The
menu opens.
2 Press or to select Clock, then press
Clock
ENTER. The
menu opens.
www.insignia-products.com
15
Page 17

Insignia NS-FSDVDR DVD recorder
Displaying status information
To display status information:
• While a disc is playing, press DISPLAY.
Information about the disc is displayed.
1 Indicates the disc type and format mode.
2 Indicates the channel number.
3 Indicates the title number, chapter number,
and elapsed playing time.
4 Indicates the current active feature. Icons
mean:
—Search
—Audio
—Subtitle
—Angle (except VR mode)
—Repeat
—Marker
—Noise Reduction
—Zoom
—Surround
5 Indicates current disc mode, for example
stop mode.
6 Indicates the recording mode and possible
recording time left.
Playing DVDs and CDs
Playable discs
Discs that have the following logos will play on
the this recorder. Other disc types are not
guaranteed to play.
Disc Logo
DVD-VIDEO
DVD-RW (VIDEO/VR mode)
DVD-R (VIDEO mode)
CD-DA (AUDIO CD)
CD-RW (CD-DA FORMAT)
CD-R (CD-DA FORMAT)
MP3
WMA WMA
Color television standards
DVDs are recorded in different color television
standards throughout the world. The most
common standard is NTSC (used primarily in the
United States and Canada).
This recorder uses the NTSC system, so DVDs
you play must be recorded in same system. You
cannot play DVDs recorded in other color
system.
Region codes
This recorder has been designed to play only
those DVDs encoded for Region One (1) or ALL.
A DVD labeled for a specific region can only play
on a DVD player configured with the same
region code. You cannot play DVDs that are
labeled for other regions.
Look for the globe symbols on DVD cases (the
number inside the globe refers to the region of
the world). If these region symbols do not
appear on your DVD case, you cannot play the
DVD in this recorder.
Playing a DVD or CD
The following instructions are for playing a
pre-recorded DVD that you buy or an audio CD.
To play a DVD formatted in Video or VR mode,
see “Playing a DVD formatted in Video or VR
mode” on page 17.
MP3
16
To play a DVD or CD:
1 Turn on the TV and your recorder.
2 On the TV, select the video source that your
recorder is connected to. For a list of
common video sources by TV brand, see “TV
video input sources” on page 12.
3 Press OPEN/CLOSE to open the disc tray.
4 Insert a DVD into the tray with the label
facing up.
www.insignia-products.com
Page 18

Insignia NS-FSDVDR DVD recorder
5 Press OPEN/CLOSE to close the disc tray.
Your recorder reads the DVD. This may take
a while.
6 If the disc does not automatically start
playing, press PLAY .
Playing a DVD formatted in Video or VR
mode
To play a DVD formatted in Video or VR
mode:
1 Turn on the TV and your recorder.
2 On the TV, select the video source that your
recorder is connected to. For a list of
common video sources by TV brand, see “TV
video input sources” on page 12.
3 Press OPEN/CLOSE to open the disc tray.
4 Insert a DVD into the tray with the label
facing up.
5 Press OPEN/CLOSE to close the disc tray.
Your recorder reads the DVD. This may take
a while.
6 Press TOP MENU to open the DVD title
menu.
If the DVD is formatted in Video mode, the
following menu opens:
Title List
If the Video mode DVD has been finalized,
the following screen opens:
Title Menu
1 JAN/22/06 12:55AM CH10
2 JAN/30/06 11:00PM CH8
3 FEB/10/06 9:00PM CH10
4 FEB/28/06 11:00AM CH6
5 FEB/28/06 10:00PM CH8
Note
If the DVD is formatted in VR mode, you can press
MENU/LIST to toggle between the list of original
recordings or the playlist of recordings.
XP
XP
LP
LP
EP
7 Press or to select the title you want
to play, then press ENTER or PLAY .
8 If you pressed ENTER in the previous step,
press or to select Play, then press
ENTER.
9 To stop playback, press STOP .
10 Make sure that you remove the disc before
you turn off your recorder.
Controlling disc playback
1 2 3
JAN/ 1/06 1:00AM CH12 XP
4 5 6
If the DVD is formatted in VR mode, the
following menu opens:
Playlist
1 2 3
JAN/ 1/06 1:00AM CH12 XP
4 5 6
To control disc during playback:
• To pause playback, press PAUSE . Press
PLAY to resume playback.
• To stop playback, then resume playback at
the point where you stopped, press STOP ,
then press PLAY when you are ready to
start playback.
• To stop playback and start playing at the
beginning of the DVD, press STOP twice,
then press PLAY .
• To fast-forward, press FWD . Each time
you press this button, the fast-forward speed
increases from 2× to 20× to 40×. For CDs,
the fast-forward speed is 8×.
• To fast-reverse, press REV . Each time
you press this button, the fast-reverse speed
increases from 5× to 20× to 40×. For CDs,
the fast-reverse speed is 8×.
• To skip commercials, press CM SKIP. Each
time you press this button, the DVD skips
forward 30 seconds. You can skip forward a
maximum of 180 seconds (6 button presses).
• To play forward step by step or frame by
frame, press PAUSE , then press SKIP .
Each time you press SKIP the DVD
advances one step or frame. Press PLAY
to resume normal playback.
• To play backward step by step or frame by
frame, press PAUSE , then press SKIP.
Each time you press SKIP the DVD
reverses one step or frame. Press PLAY to
resume normal playback.
• To play forward slowly, press PAUSE , then
press FWD . Each time your press this
button, the slow-forward speed increase from
1/16× to 1/8× to 1/3×. Press PLAY to
resume normal playback.
www.insignia-products.com
17
Page 19

Insignia NS-FSDVDR DVD recorder
• To play backward slowly, press PAUSE ,
then press REV . Each time you press
this button, the slow-reverse speed increases
from 1/16× to 1/8× to 1/4×.
• To skip to the next chapter, title, or track,
press SKIP . You can also use the Display
menu to select a chapter, title, or track. For
more information, see “Selecting a chapter,
title, or track” on page 18.
• To skip to the previous chapter, title, or track,
press SKIP . You can also use the Display
menu to select a chapter, title, or track. For
more information, see “Selecting a chapter,
title, or track” on page 18.
Selecting a chapter, title, or track
To select a chapter, title, or track:
1 During playback, press DISPLAY. The
Display
DVD
menu opens.
Display
menu
DVD-Video1 1 0:00:00
4 Press or or the number buttons to enter
the time you want to search, then press
ENTER.
Note
Time search is only available in the currently
playing track or title.
Using rapid play
If a DVD is recorded in the Dolby Digital format,
you can play the DVD at a slightly faster or
slower than normal speed. During rapid play, the
sound continues to play.
To use rapid play:
1 During playback, press ×1.3/0.8. Playback
continues at about 0.8 times the normal
speed.
2 Press ×1.3/0.8 again. Playback continues
at about 1.3 times the normal speed.
3 Press ×1.3/0.8 again. Playback returns to
normal speed.
Note
You cannot change the audio language during
rapid play.
Rapid play may not always work for an entire
DVD.
During rapid play, the audio is in PCM format.
CD
Display
menu
2 To select a title or track, press or to
select , then press ENTER. The number
next to is highlighted.
Or, to select a chapter, press or to
select , press ENTER, then press to
select .
3 Press or or the number buttons to select
a chapter, title, or track number, then press
ENTER. Your recorder goes to the chapter,
title, or track you selected.
Note
During CD playback, you can press the number
buttons to select a track without opening the
Display
menu.
Searching on a disc
To search on a disc:
1 During playback, press DISPLAY. The
Display
2 Press or to select , then press
ENTER.
3 Press to move to the number next to . If
time search is not available on the disc,
and the displayed time do not appear.
menu opens.
Using the DVD disc menu
Audio CD10:00:00
Some DVDs have a disc menu that lets you
select viewing options, such as subtitle
languages or chapter selection.
To use the DVD disc menu:
1 During playback, press MENU/LIST. If the
DVD has a disc menu, the menu opens. If the
DVD does not have a disc menu, appears
on the screen.
2 Press , or to select an option, then
press ENTER. Repeat this step, as
necessary, to complete your selection. With
some options you may need to press a
number button to make a selection.
3 If the disc menu does not close automatically,
press MENU/LIST.
Using the DVD title menu
Some DVDs have a title menu that lets you
select the title you want to play.
To use the DVD title menu:
1 Press TOP MENU. If the DVD has a title
menu, the menu opens. If the DVD does not
have a title menu, appears on the screen.
2 Press , or to select an option, then
press ENTER. Repeat this step, as
DVD-Video1 1 0:00:00
necessary, to complete your selection. With
some options you may need to press a
number button to make a selection.
3 If the disc menu does not close automatically,
press TOP MENU.
18
www.insignia-products.com
Page 20

Insignia NS-FSDVDR DVD recorder
Enlarging the screen image
To enlarge the screen image:
1 During playback, press ZOOM. The zoom
menu opens.
1.2
1.5
2.0
2 Press or to select the enlargement
factor, then press ENTER. The zoom area is
displayed.
For CDs, the following list opens:
Audio CD1 0:00:00
1
---
2
---
3
DVD-Video1 1 0:00:00
---
4
---
5
---
6
---
3 Press or to select an empty marker
number. When playback reaches the place
you want to mark, press ENTER.
4 When you have finished adding markers,
press DISPLAY to close the menu.
5 To return to a marker during playback, press
DISPLAY, open the marker list, press or
to select the marker you want, then press
ENTER.
6 To delete a marker, press DISPLAY, open
the marker list, press or to select the
marker you want to delete, then press
CLEAR.
Note
You can add as many as six markers.
• All markers are deleted when you:
• Open the disc tray
• Turn off your recorder
• Start a recording
• Change from Original mode to Playlist mode on
a VR-formatted DVD.
3 Press , or to navigate around the
image.
4 To resume normal playback, press ZOOM,
then select ×1.0.
Adding markers
If you want to quickly return to a screen on a
DVD or a track on a CD, you can add a marker.
To add a marker:
1 During playback, press DISPLAY. The
Display
2 Press or to select , then press
ENTER. The marker list opens.
For DVDs, the following list opens:
menu opens.
1
---
2
---
3
---
4
---
5
---
6
---
Using repeat play
To use repeat play:
1 During playback, press REPEAT. The
Repeat
DVD-Video menu
DVD-Video1 1 0:00:00
CD menu
DVD-Video1 1 0:00:00
2 Press or to select the repeat option you
want, then press ENTER. You can select:
• OFF—Turns off the repeat function.
• Title—Repeats the current DVD title.
• Chapter—Repeats the current DVD
• All—Repeats the entire disc.
menu opens.
DVD-Video1 1 0:00:00
OFF
Title
Chapter
A - B
Audio CD1 0:00:00
OFF
Track
All
A-B
chapter.
www.insignia-products.com
19
Page 21

Insignia NS-FSDVDR DVD recorder
• A-B—Repeats a playback loop you
create. For more information, see
“Creating a playback loop” on page 20.
• Track—Repeats the current track.
Creating a playback loop
To create a playback loop:
1 During playback, press REPEAT. The
Repeat
menu opens.
2 Press or to select A-B, then press
ENTER.
3 When playback reaches the starting point for
your playback loop, press ENTER.
4 When playback reaches the ending point for
your playback loop, press ENTER.
5 To cancel the playback loop, press REPEAT,
then select OFF.
Using random play
To use random play:
1 Press SETUP. The
Setup
2 Press or to select CD Playback Mode,
then press ENTER.
3 Press or to select Random Play, then
press ENTER. Your recorder plays the CD
tracks in random order.
4 To stop random play, press STOP twice.
Note
You cannot use random play with DVDs.
Programming a playback list
To program a playback list:
1 Press SETUP. The
2 Press or to select CD Playback Mode,
then press ENTER.
3 Press or to select Program Play, then
press ENTER. The
opens.
Setup
Program Play
menu opens.
menu opens.
screen
4 Press or or press the number buttons to
select a track number.
Program Play
09
-- -- -- -- -- -- -- -- --
-- -- -- -- -- -- -- -- -- --
-- -- -- -- -- -- -- -- -- --
-- -- -- -- -- -- -- -- -- --
-- -- -- -- -- -- -- -- -- --
5 Press ENTER or to move to the next track
field.
Note
If you want to remove a track, highlight the track
number, then press CLEAR.
6 Repeat Step 4 and Step 5 to add additional
tracks to your playback list. You can add as
many as 50 tracks.
7 Press PLAY to start playback.
8 To cancel the playback loop, press STOP
twice.
Note
You cannot create a playback loop with DVDs.
Using subtitles
Many DVDs are recorded with one or more
subtitle languages. You can turn subtitles on and
off and select a subtitle language, if available.
To use subtitles:
1 During playback, press DISPLAY. The
Display
menu opens.
DVD-Video1 1 0:00:00
0:06:11Tot al
20
Program Play
--
-- -- -- -- -- -- -- -- --
-- -- -- -- -- -- -- -- -- --
-- -- -- -- -- -- -- -- -- --
-- -- -- -- -- -- -- -- -- --
-- -- -- -- -- -- -- -- -- --
0:00:00Tot al
2 Press or to select . The
opens.
3 Press or to select a language or OFF
(turns off subtitles), then press ENTER. A
four-digit code may appear in the list of
subtitle languages. This code represents a
language. For more information, see
“Language codes” on page 49.
Note
www.insignia-products.com
Subtitle
DVD-Video1 1 0:00:00
OFF
1.English
2.Japanese
Some DVDs let you select a subtitle language
from the DVD disc menu only. Press TOP MENU
or MENU/LIST to open the DVD disc menu.
You can also select the subtitle language from the
Setup
menu. Select Playback, Language,
Subtitle, then select the language.
menu
Page 22
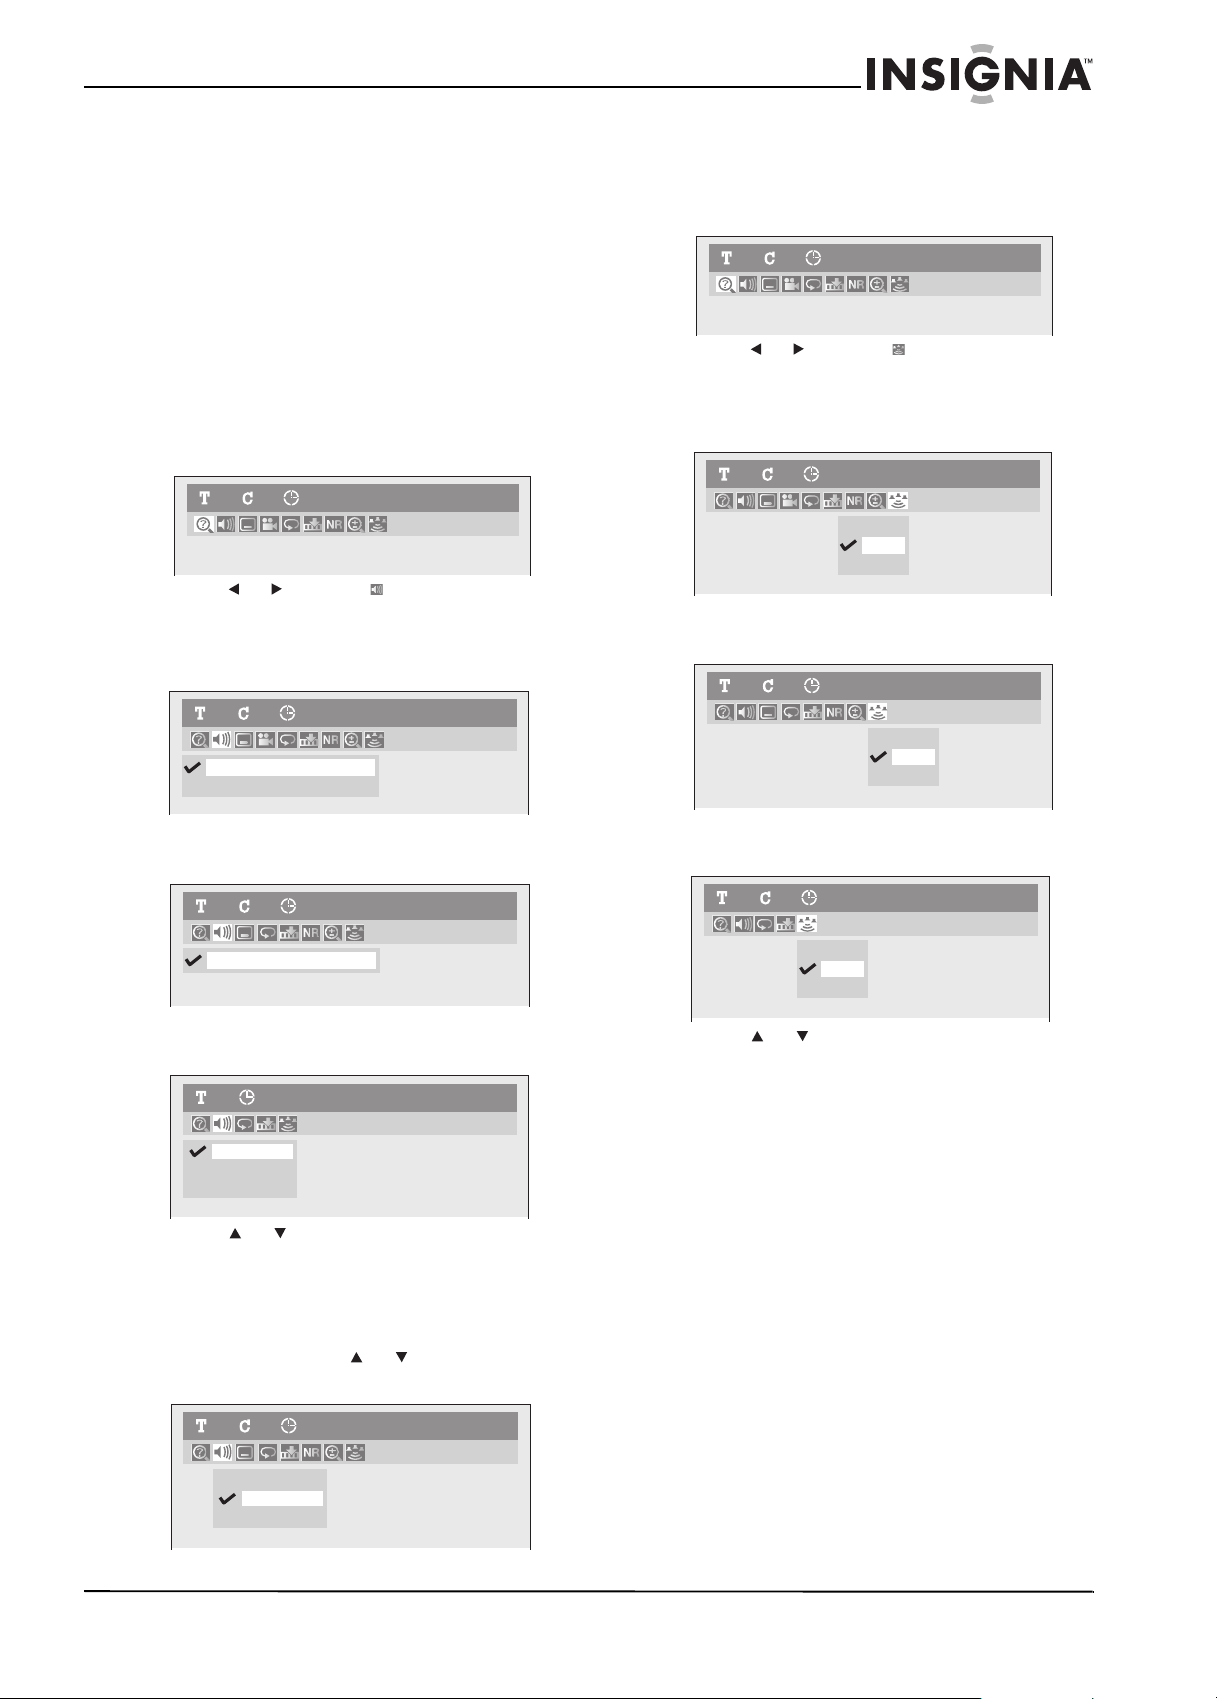
Insignia NS-FSDVDR DVD recorder
Switching the audio soundtrack or
channel
A DVD-Video may be recorded with two or more
soundtracks, which are often in different
languages. You can switch soundtracks during
playback.
With a DVD-RW recorded in VR mode, you can
switch to main (L), sub audio (R), or a mix of
both (L/R).
When playing audio CDs you can switch
between stereo, left channel only, or right
channel only.
To switch the audio soundtrack or channel:
1 During playback, press DISPLAY. The
Display
2 Press or to select , then press ENTER.
The audio menu opens.
DVD-Video
menu opens.
DVD-Video1 1 0:00:00
DVD-Video 1 1 0:00:00
1.Dolby Digital 5.1ch English
2.Dolby Digital 2ch Japanese
Turning surround sound on and off
To turn surround sound on or off:
1 During playback, press DISPLAY. The
Display
2 Press or to select , then press ENTER.
The surround menu opens.
DVD Video
DVD-RW VR
menu opens.
1 1 0:00:00
DVD-Video1 1 0:00:00
DVD-Video1 1 0:00:00
OFF
Type 1
Type 2
DVD-RW
VR Playlist
OFF
Type 1
Type 2
DVD-RW VR mode
DVD-RW1 1 0:00:00
VR Playlist
1.Dolby Digital Dual L/R
Audio CD
Audio CD1 0:00:00
1. L/R
2. L
3. R
3 Press or to select a soundtrack or audio
channel, then press ENTER.
For a DVD Video, the soundtrack changes.
For an audio CD, the audio channel changes.
4 For DVD-RW in VR mode, the audio channel
menu opens. Press or to select the
audio channel, then press ENTER.
1 1 0:00:00
1. L/R
2. L
3. R
DVD-RW
VR Playlist
Audio CD
Audio-CD1 1 0:00:00
OFF
Type 1
Type 2
3 Press or to select OFF, Type 1, or
Type 2.
• OFF—Turns off surround sound
• Type 1—Natural effect
• Type 2—Emphasized effect
www.insignia-products.com
21
Page 23
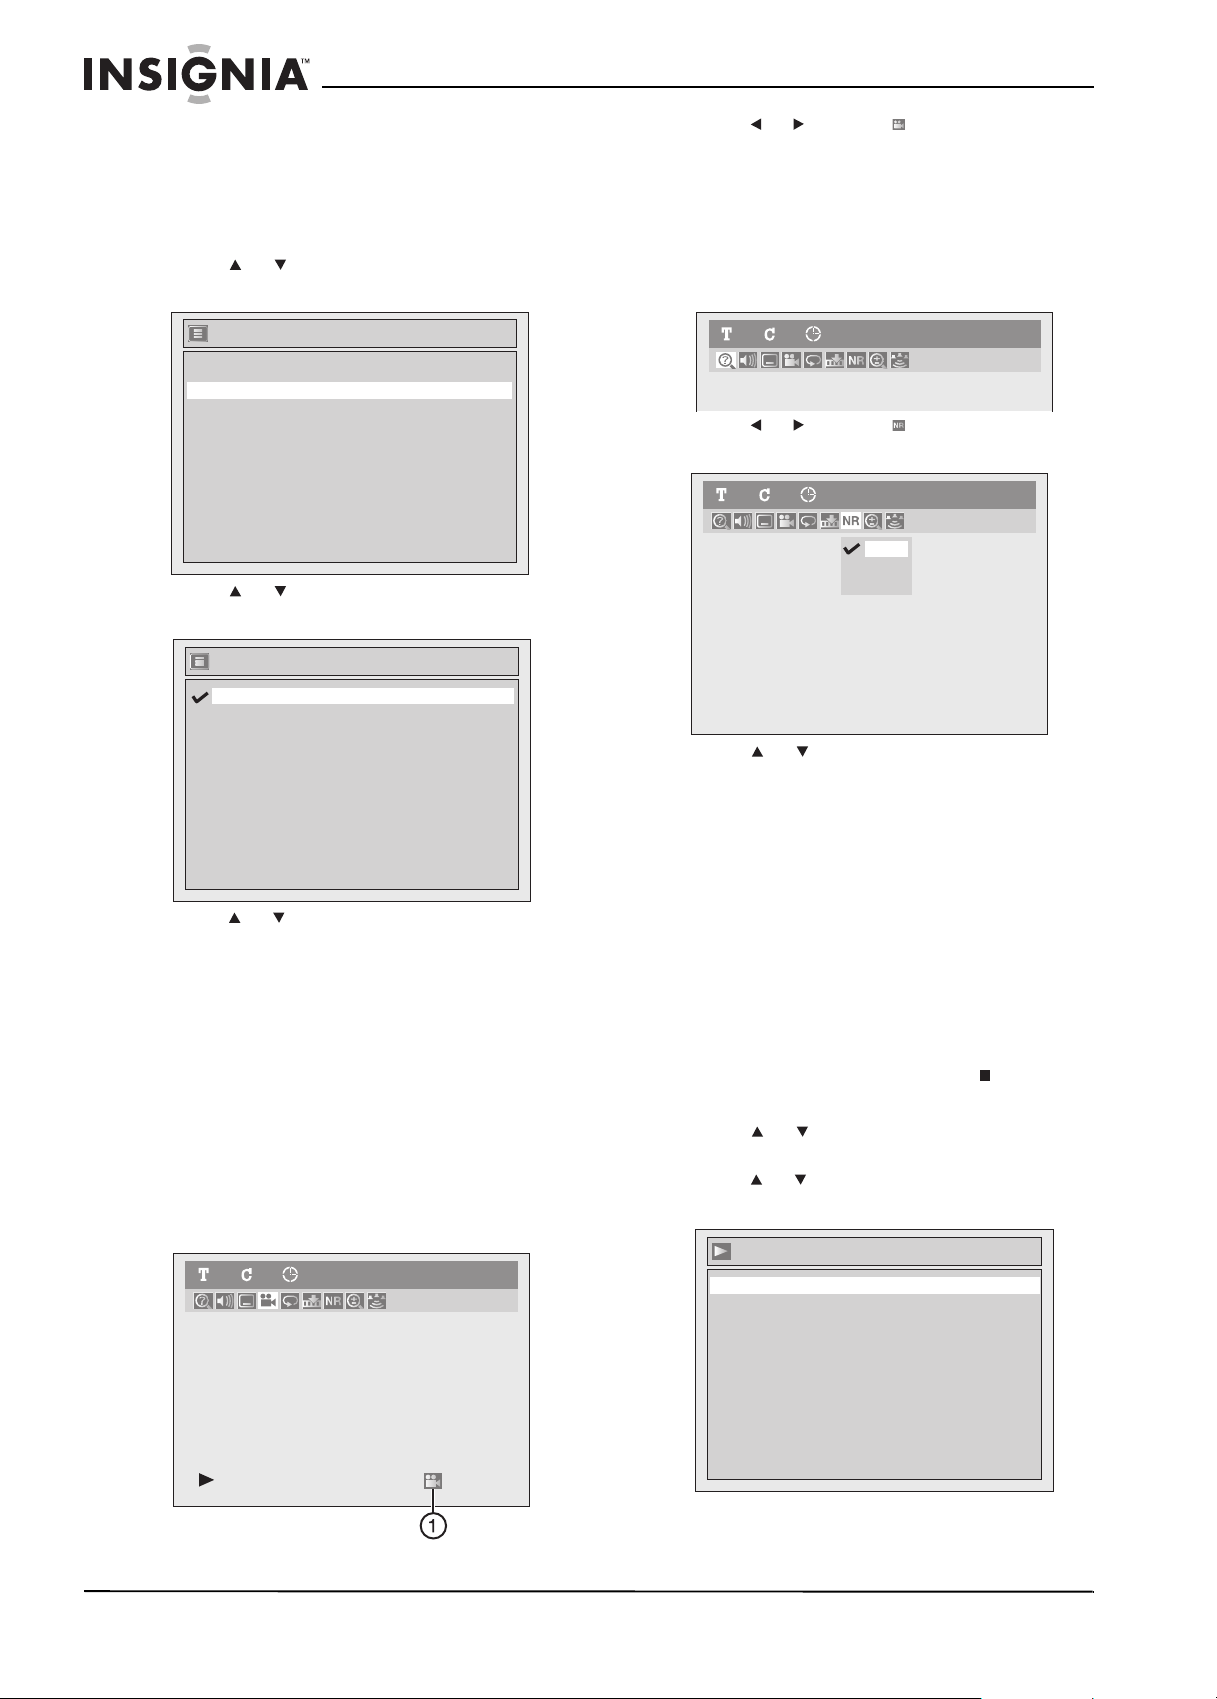
Insignia NS-FSDVDR DVD recorder
Turning the camera angle feature on or off
Some DVDs have scenes shot from two or more
angles.
To turn the camera angle feature on or off:
1 Press SETUP. The
2 Press or to select Display, then press
ENTER. The
Display
OSD LanguageEnglish
Angle Icon ON
Screen Saver
FL Dimmer
3 Press or to select Angle Icon, then
press ENTER. The
Angle Icon
ON
OFF
Display
Setup
menu opens.
menu opens.
10 minutes
Bright
Angle Icon
screen opens.
2 Press or to select , then press ENTER.
Each time you press ENTER, the angle
changes.
Reducing audio noise
To reduce audio noise:
1 During playback, press DISPLAY. The
Display
2 Press or to select , then press ENTER.
The noise reduction menu opens.
menu opens.
DVD-Video1 1 0:00:00
DVD-Video1 1 0:00:00
OFF
Type 1
Type 2
4 Press or to select ON or OFF. When this
feature is turned off, the angle icon appears
on the
Display
menu. When this feature is
turned on, the angle icon does not appear
even if the DVD has multiple camera angles.
Switching camera angles
Some DVDs have scenes shot from two or more
angles.
To switch camera angles:
1 During playback, press DISPLAY. The
Display
angles are available, the angle icon (1)
appears on the bottom right corner of the
screen during playback.
menu opens. If multiple camera
DVD-Video1 1 0:00:00
3 Press or to select OFF, Type 1, or
Type 2.
• OFF—Select this option if the DVD has
little or no audio noise.
• Type 1 and Type 2—Select one of these
options if the DVD was recorded at a slow
speed, such as SLP or SEP. Type 2 is the
most effective for reducing audio noise.
4 Press SETUP to close the menu.
Selecting the audio language
Some DVDs are recorded with more than one
audio language.
To select the audio language:
1 If a DVD is playing, press STOP .
Setup
2 Press SETUP. The
3 Press or to select Playback, then press
ENTER. The
Playback
4 Press or to select Language, then press
ENTER. The
Language
Language
menu opens.
menu opens.
menu opens.
hsilgnEuneM csiD
lanigirOoiduA
FFOeltitbuS
22
www.insignia-products.com
Page 24

Insignia NS-FSDVDR DVD recorder
5 Press or to select Audio, then press
ENTER. The
Language - Audio
Original
English
French
Spanish
Other
Language - Audio
menu opens.
6 Press or to select a language, then
press ENTER. If you select Other, you must
enter a four-digit code for the language you
want. For a list of language codes, see
“Language codes” on page 49.
7 Press SETUP to close the menu.
Note
You can only select languages recorded on the
DVD.
You may not be able to change the audio
language on some DVDs.
Selecting the disc menu language
To select the disc menu language:
1 If a DVD is playing, press STOP .
Setup
2 Press SETUP. The
3 Press or to select Playback, then press
ENTER. The
Playback
4 Press or to select Language, then press
ENTER. The
Language
menu opens.
menu opens.
menu opens.
6 Press or to select a language, then
press ENTER.
7 Press SETUP to close the menu.
Selecting the Setup menu language
To select the Setup menu language:
1 If a disc is playing, press STOP .
Setup
2 Press SETUP. The
3 Press or to select Display, then press
ENTER. The
Display
OSD LanguageEnglish
Angle Icon ON
Screen Saver
FL Dimmer
Display
4 Press or to select OSD Language, then
press ENTER. The
opens.
SD Language
O
English
Français
Español
menu opens.
menu opens.
10 minutes
Bright
OSD Language
menu
Language
hsilgnEuneM csiD
lanigirOoiduA
FFOeltitbuS
5 Press or to select Disc Menu, then
press ENTER. The
Language - Disc Menu
menu opens.
Language - Audio
Original
English
French
Spanish
Other
5 Press or to select a language, then
press ENTER.
6 Press SETUP to close the menu.
Using the screen saver
When the screen saver feature active, a screen
saver turns on after a specified amount of time to
protect your TV screen from image burn-in.
To use the screen saver:
1 If a disc is playing, press STOP .
Setup
2 Press SETUP. The
menu opens.
www.insignia-products.com
23
Page 25

Insignia NS-FSDVDR DVD recorder
3 Press or to select Screen Saver, then
press ENTER. The
Screen Saver
screen
opens.
Screen Saver
OFF
5 minutes
10 minutes
15 minutes
30 minutes
4 Press or to select a screen saver option.
If you select OFF, the screen saver never
turns on. If you select a time, the screen
saver turns on after the same image is on the
TV screen for the amount of time you
selected.
5 Press SETUP to close the menu.
Adjusting the brightness of the front panel
display
5 Press or to select the brightness level. If
you select Auto, the front panel display is
brighter when your recorder is turned on and
dimmer when it is turned off.
6 Press SETUP to close the menu.
Adjusting the PCM audio feature
The audio setting only affects the audio during
DVD playback.
To adjust the PCM audio feature:
1 If a DVD is playing, press STOP .
Setup
2 Press SETUP. The
3 Press or to select Playback, then press
ENTER. The
Playback
4 Press or to select Audio, then press
ENTER. The
Audio
Digital Out
Dynamic Range Control ON
Audio
menu opens.
menu opens.
menu opens.
To adjust the brightness of the front panel
display:
1 If a disc is playing, press STOP .
Setup
2 Press SETUP. The
menu opens.
3 Press or to select Display, then press
ENTER. The
Display
OSD LanguageEnglish
Angle Icon ON
Screen Saver
FL Dimmer
Display
menu opens.
10 minutes
Bright
4 Press or to select FL Dimmer, then
press ENTER. The
FL Dimmer
screen
opens.
FL Dimmer
Auto
Bright
Dark
5 Press or to select Digital Out, then
press ENTER. The
Audio - Digital Out
screen
opens.
Audio - Digital Out
zHk84MCP
maertSlatigiD ybloD
6 Press or to select PCM, then press
ENTER. The
Digital Out - PCM
screen
opens.
Digital Out - PCM
48kHz
96kHz
24
www.insignia-products.com
Page 26

Insignia NS-FSDVDR DVD recorder
7 Press or to select an option, then press
ENTER.
• 48kHz—Select this option if your amplifier
or decoder is not compatible with 96 kHz
PCM. With this setting, 96 kHz sound is
output at 48 kHz.
• 96kHz—Select this option if your amplifier
or decoder is compatible with 96 kHZ
PCM.
8 Press SETUP to close the menu.
Adjusting Dolby Digital audio
If your recorder is connected to a Dolby Digital
sound system, you can adjust the audio.
To adjust the Dolby Digital audio:
1 If a DVD is playing, press STOP .
Setup
2 Press SETUP. The
3 Press or to select Playback, then press
ENTER. The
Playback
4 Press or to select Audio, then press
ENTER. The
Audio
Digital Out
Dynamic Range Control ON
Audio
menu opens.
menu opens.
menu opens.
6 Press or to select Dolby Digital, then
press ENTER. The
Digital Out - Dolby Digital
screen opens.
Digital Out - Dolby Digital
PCM
Stream
7 Press or to select an option, then press
ENTER.
• PCM—Select this option if your amplifier
or decoder is not compatible with Dolby
Digital. Dolby Digital audio is converted
into PCM (2-channel) audio.
• Stream—Select this option if your
amplifier or decoder is compatible with
Dolby Digital audio.
8 Press SETUP to close the menu.
Note
When playing a DVD-RW recorded in VR mode:
If the audio source on a DVD is Dolby Digital
format, set Dolby Digital to PCM so that you can
switch to main (L), sub audio (R), or a mix of both
(L/R) with your amplifier or decoder.
5 Press or to select Digital Out, then
press ENTER. The
Audio - Digital Out
screen
opens.
Audio - Digital Out
zHk84MCP
maertSlatigiD ybloD
Using Dynamic Range Control
The Dynamic Range Control feature
compresses the range between the loudest and
softest sounds.
To use Dynamic Range Control:
1 If a DVD is playing, press STOP .
Setup
2 Press SETUP. The
3 Press or to select Playback, then press
ENTER. The
Playback
4 Press or to select Audio, then press
ENTER. The
Audio
Digital Out
Dynamic Range Control ON
Audio
menu opens.
menu opens.
menu opens.
www.insignia-products.com
25
Page 27

Insignia NS-FSDVDR DVD recorder
5 Press or to select Dynamic Range
Control, then press ENTER. The
Dynamic Range Control
Audio - Dynamic Range Control
ON
OFF
screen opens.
6 Press or to select ON or OFF.
7 Press SETUP to close the menu.
Using progressive scan
If your TV is compatible with progressive scan,
you can turn on progressive scan for higher
definition video images than you get with a
standard TV.
Note
Your TV must be connected the component jacks
on your recorder.
To use progressive scan:
1 If a DVD is playing, press STOP .
Setup
2 Press SETUP. The
3 Press or to select Playback, then press
ENTER. The
Playback
4 Press or to select Video, then press
ENTER. The
Video
5 Press or to select Progressive, then
press ENTER.
6 Press or to select ON or OFF. A
confirmation screen opens.
7 Press or to select Yes or No.
8 If you selected Yes, within 15 seconds select
Yes again, then press ENTER.
9 Press SETUP to close the menu.
menu opens.
menu opens.
screen opens.
Audio -
5 Press or to select Still Mode, then press
ENTER.
6 Press or to select a still mode, then
press ENTER. You can select:
• Auto—Your recorder automatically
selects the best still mode.
• Field—Provides flicker-free images.
• Frame—Provides higher resolution
images.
7 Press SETUP to close the menu.
Note
A “frame” is one complete video image made up of
two fields. NTSC video has 30 frames per second.
Setting parental controls
You can set parental controls to prevent specific
types of DVD movies from playing.
Rating levels
Level Description
All Parental controls are not turned on. All discs will
8 [Adult] All discs will play.
7 [NC-17] Not suitable for anyone under 17.
6 [R] Not suitable for anyone under 17 unless
5 [PGR] Parental guidance recommended.
4 [PG13] Not suitable for anyone under 13.
3 [PG] Parental guidance suggested.
2 [G] General audiences.
1 [Kid Safe] Suitable for all children.
play.
supervised by a parent or adult guardian.
To set parental controls:
1 If a DVD is playing, press STOP .
Setup
2 Press SETUP. The
menu opens.
3 Press or to select Playback, then press
ENTER. The
Playback
menu opens.
4 Press or to select Parental Lock, then
press ENTER. The
Parental Lock
opens.
screen
Note
If your TV is compatible with progressive scan
(525p/480p), you must connect your TV to the
component jacks on your recorder.
If your TV is not compatible with progressive scan,
connect your TV to the A/V jacks on your recorder
and turn cable off and set progressive scan off or
press and hold SETUP for more than three
seconds during DVD playback.
Selecting the still mode
You can select the video quality of still images
(when your recorder is paused).
To select the still mode:
1 If a DVD is playing, press STOP .
Setup
2 Press SETUP. The
menu opens.
3 Press or to select Playback, then press
ENTER. The
Playback
menu opens.
4 Press or to select Video, then press
Video
ENTER. The
menu opens.
26
Parental Lock
All
8
7
6
5
4
3
2
1
www.insignia-products.com
Page 28
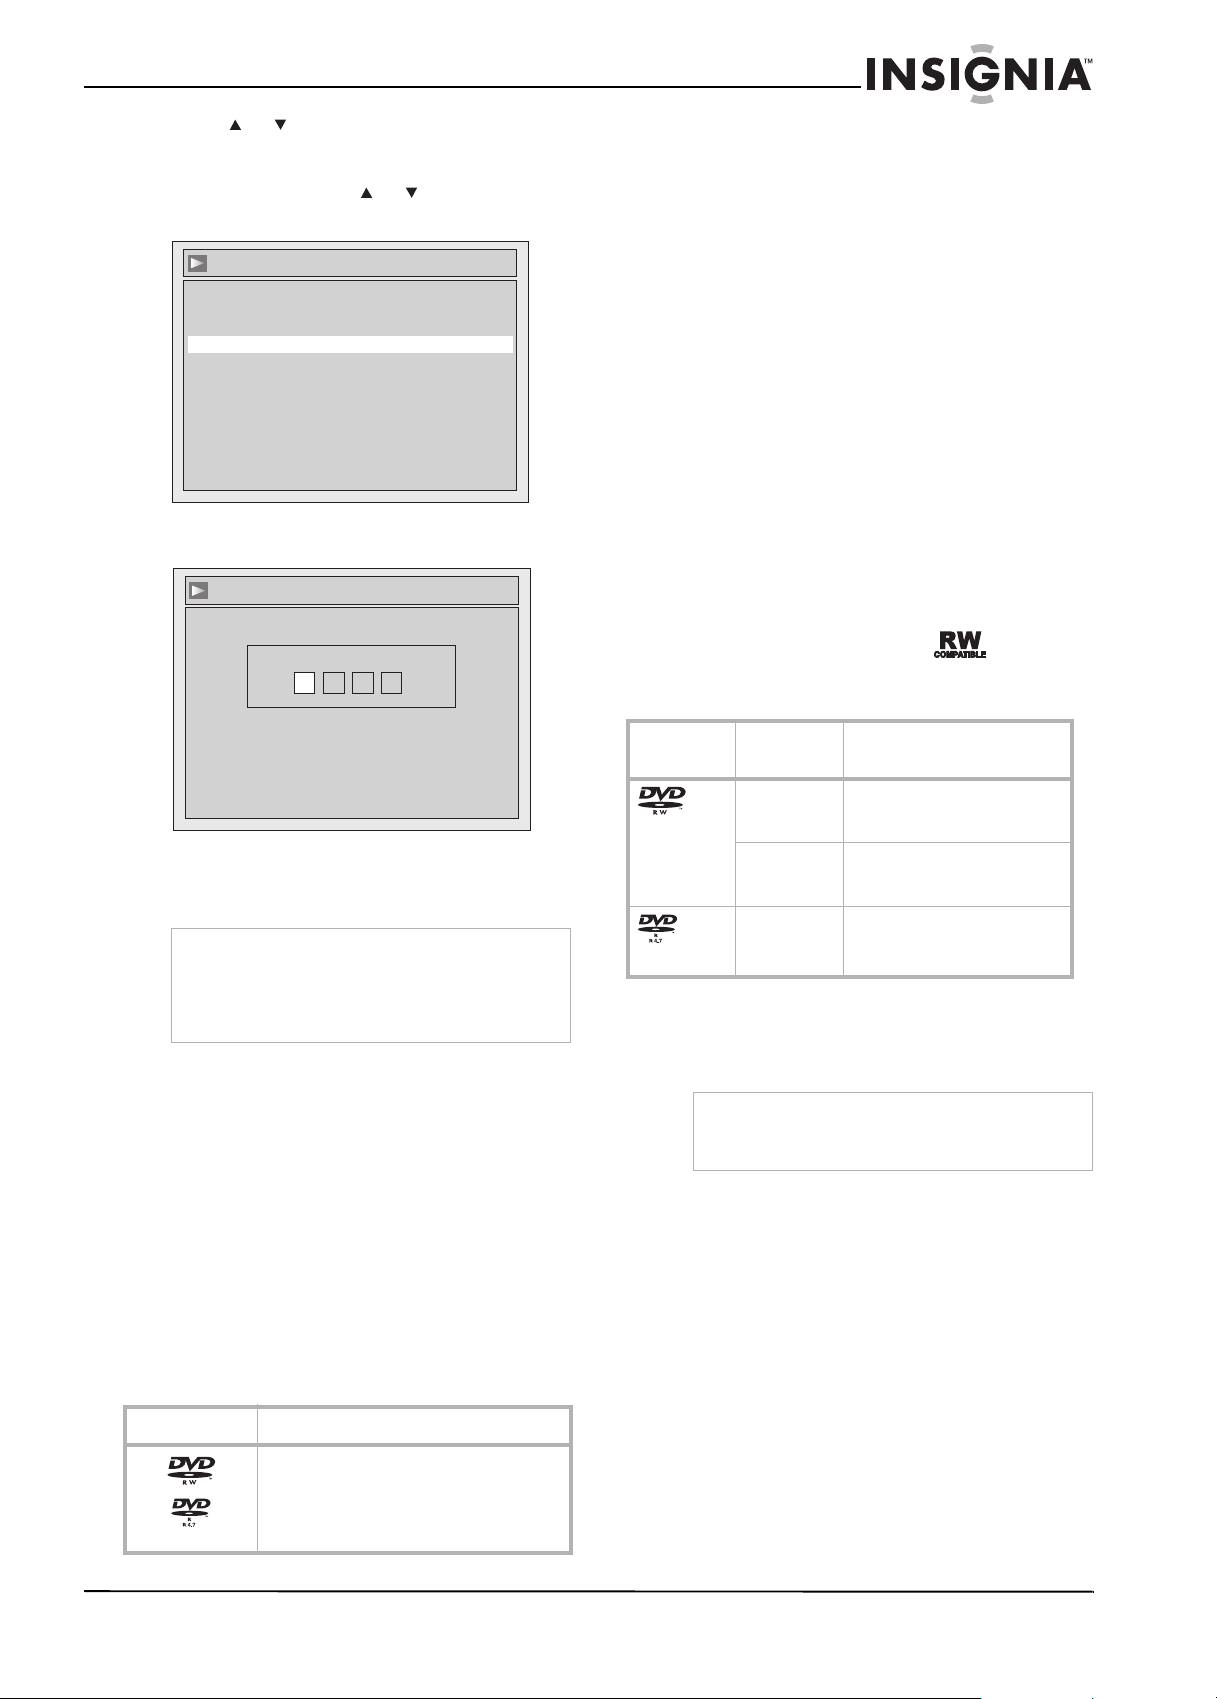
Insignia NS-FSDVDR DVD recorder
5 Press or to select the rating level you
want, then press ENTER.
If you have not set a password, the following
screen opens. Press or to select Yes,
then press ENTER.
Parental Lock
Change Password?
Yes
No
If you have already set a password, the
following screen opens:
Parental Lock
Password Input
----
• To ensure the best recording quality, we
strongly recommend the following discs:
• Any DVD-R 8
×
• MAXELL DVD-R 16×
• MAXELL DVD-RW 4× discs
• Other discs that have been tested and are
proven to be compatible with this recorder:
• VERBATIM DVD-R 8
×
• VERBATIM DVD-RW 2×
• MAXELL DVD-R 16×
• JVC DVD-RW 4
×
Recording modes
• Video mode is the same recording format as
DVD movies purchased in stores, so you can
play them in most DVD players. To play in all
remaining types of DVD players, you must
finalize
the DVD (see “Finalizing discs” on
page 28). Until the DVD is finalized, you can
play, record additional content, or edit DVDs
recorded in Video mode.
• VR (Video Recording) mode is a basic
recording format for DVD-RW. You can
record and edit repeatedly.
Only DVD players with the logo are
capable of playing DVD-RWs recorded in VR
mode.
6 Press the number buttons to enter a four-digit
password, then press ENTER.
7 Press SETUP to close the menu.
Note
Press CLEAR to erase incorrect numbers.
If you forget the password or want to reset the
parental lock to the default settings, enter 4737 as
the password. The old password is cleared and
the parental rating is reset to All.
Recording DVDs
Preparing to record
Before you record a DVD, read the information
in this section.
Recordable DVD formats
This recorder can record to DVD-Rs and
DVD-RWs.
• DVD-Rs can only be recorded once, and
cannot be erased. DVD-Rs can be recorded
only in Video mode.
• DVD-RWs can be recorded and erased many
times. DVD-RWs can be recorded in either
Video mode or VR mode.
DVD type
DVD-RW
DVD-R
Recording
format
Video mode • Playing
VR mode • Playing
Video mode • Playing
Functions
• Limited recording
• Limited editing
• Recording
• Original/Playlist editing
• Limited recording
• Limited editing
Recording speeds
You can select one of six recording speeds.
Maximum recording time depends on the
selected recording speed and DVD size.
Note
DVDs recorded in SLP or SEP speed on this
recorder may not be playable on some DVD
players.
Logo Attributes
8 cm/12 cm, single-sided, single-layer
DVD
Approx. max. recording time (SEP mode):
• 600 minutes (4.7 GB) (for 12 cm)
• 180 minutes (1.4 GB) (for 8 cm)
www.insignia-products.com
27
Page 29
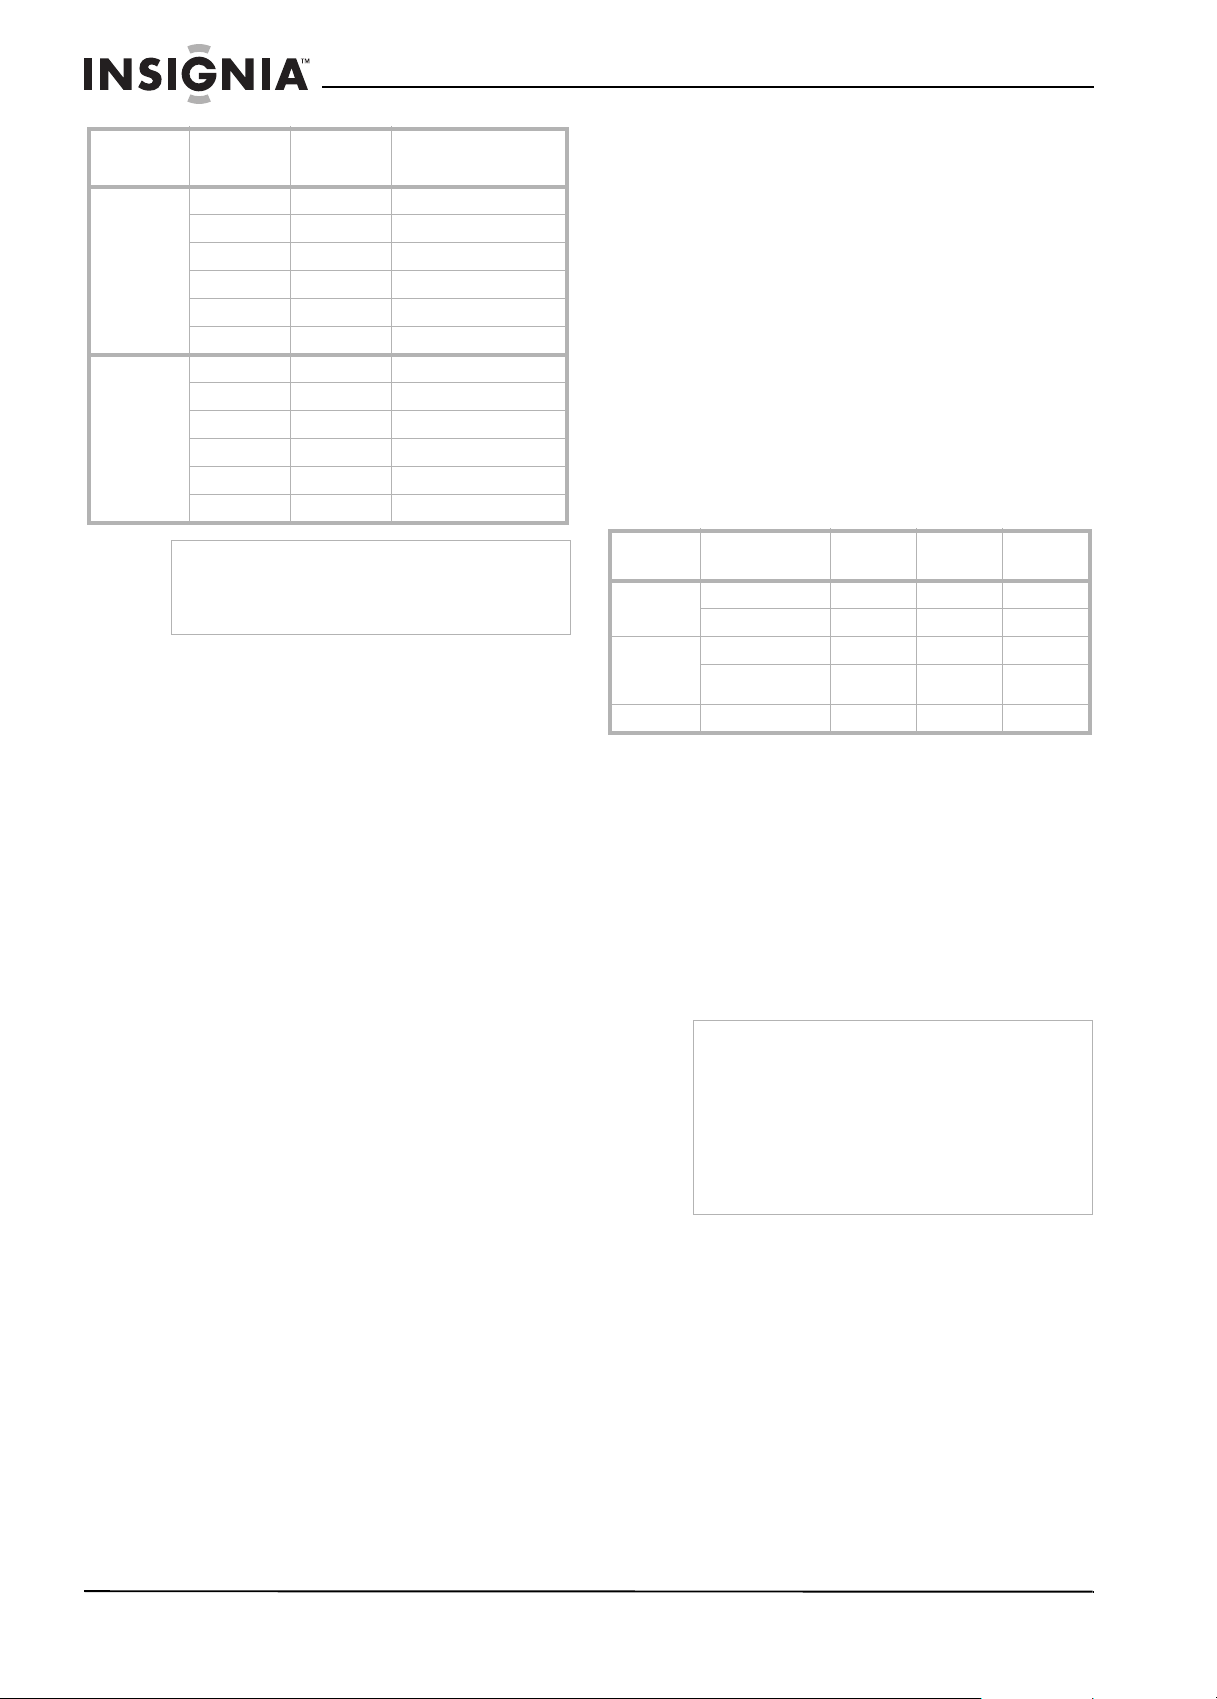
DVD size
8cm
12 cm
Recording
speed
XP (1H) 18 min. + + + + + +
SP (2H) 36 min. + + + + +
LP (4H) 72 min. + + + +
EP (6H) 108 min. + + +
SLP (8H) 144 min. + +
SEP (10H) 180 min. +
XP (1H) 60 min. + + + + + +
SP (2H) 120 min. + + + + +
LP (4H) 240 min. + + + +
EP (6H) 360 min. + + +
SLP (8H) 480 min. + +
SEP (10H) 600 min. +
Recording
time
Video/ audio quality
Insignia NS-FSDVDR DVD recorder
What is “CPRM”?
CPRM means “Content Protection for
Recordable Media.” CPRM is a copy protection
system that uses scrambling technology to allow
only a single copy of “copy-once” programs to be
recorded.
This recorder is CPRM compatible, which
means that you can record copy-once broadcast
programs, but you cannot make additional
copies of those recordings. CPRM recordings
can be made only on DVD-RWs formatted in VR
mode, and CPRM recordings can only be played
on DVD players that are specifically compatible
with CPRM.
Information on copy control
Some satellite broadcasts include
copy-protected information. For recording these,
refer to the following guidelines:
Tip
The recording time are estimates and actual
recording time may differ. In general, the audio
and video quality gets poorer as the recording
time becomes longer.
Restrictions
• Your recorder cannot record CDs.
• Discs may not play if damaged, dirty, or if the
player’s lens is dirty or has condensation.
• Discs recorded using a computer may not
play in this recorder, even if the disc was
recorded in a compatible format. See your
DVD recording software documentation for
detailed information on DVD recording
formats.
• Discs recorded in Video mode on this
recorder cannot record additional content
using other recorders.
• A DVD-RW formatted using this recorder
cannot be recorded to using other recorders.
• Because this recorder records video using
VBR (variable bit rate), depending on the
picture you are recording, the actual
remaining time for recording may be a little
less than the remaining time displayed on the
screen.
• You cannot record copy-protected video
using this recorder. Copy-protected video
includes DVD movies and some satellite
broadcasts.
If copy-protected material is encountered
during a recording, recording pauses or stops
automatically and an error message appears
on the screen.
• Video that is “copy-once only” can be
recorded using only a DVD-RW in VR mode
with CPRM (see “What is “CPRM”?” on page
28).
• When recording a TV broadcast or video
through an external input, you can display
copy control information on the screen.
DVD type
DVD-RW
VR mode
DVD-RW
Video
mode
DVD-R v2.0 Y -- --
Format
v1.1, 1.2 Y -- -v1.1, 1.2 CPRM Y Y -v1.1, 1.2 Y -- -v1.1, 1.2 CPRM Y -- --
Copy-
free
Copy- once
prohibited
Finalizing discs
After recording, you must finalize the DVD in
order to play it on other DVD players. For more
information, see “Finalizing discs” on page 28.
After finalizing:
• DVD-RWs and DVD-Rs (Video mode) cannot
record more content or be edited. When a
DVD-RW or DVD-R (Video mode) is
finalized, the Title menu is created
automatically.
• DVD-RW (VR mode) can record more
content and be edited.
Note
Dolby® Digital Recording lets you record
high-quality video with stereo sound on recordable
DVDs. The technology, when utilized instead of
PCM recording, also saves recordable DVD
space, allowing for higher video resolution or
extended recording time on each DVD.
DVDs created using Dolby Digital Recording will
play back on all DVD-Video players. This is true
when the players are compatible with actual
recordable DVDs.
Copy-
28
www.insignia-products.com
Page 30

Insignia NS-FSDVDR DVD recorder
Formatting a blank DVD
To format a blank DVD:
1 Press SETUP. The
2 Press or to select Disc, then press
Disc
ENTER. The
Disc
Format
Finalize
Disc Protect OFF ON
3 Press or to select Format, then press
ENTER. The
Format
Start
Format Mode Video mode
menu opens.
Format
Setup
menu opens.
menu opens.
7 Insert a blank DVD in the disc tray.
Formatting starts automatically and a
progress screen opens. Formatting is
complete when the progress bar reaches
100%.
%09gnittamroF
Notes
• DVD-Rs are always formatted in Video mode.
You cannot format a DVD-R in VR mode.
• You cannot mix two format types on the same
DVD-RW. If you insert a formatted disc, you
cannot change the format unless you
completely reformat the disc, which erases all
data on the disc.
• You cannot record to DVD+Rs or DVD+RWs. If
you insert a DVD+R or DVD+RW, “Disc Error?”
appears on the screen.
• When you record to a DVD-RW formatted in
VR mode, a playlist is created automatically.
• When you record to a DVD, a blank chapter
may be added to the end of the recording
depending on how much space is left on the
DVD.
4 Press or to select Format Mode, then
press ENTER. The
Format-Format Mode
screen opens.
Format - Format Mode
Video mode
VR mode
Video mode
DVD Player Compatibility mode.
VR mode
Editing possibility mode.
5 Press or to select Video mode or
VR mode (DVD-RWs only), then press
ENTER.
6 Press SETUP to close the menu.
Reformatting a DVD
To reformat a DVD:
1 Press SETUP. The
2 If you want to change the formatting mode,
complete Step 2 through Step 5 in “To format
a blank DVD:” on page 29, then press
RETURN to return to the
3 Press or to select Format. The
menu opens.
Format
Start
Format Mode Video mode
Setup
menu opens.
Setup
menu.
Format
www.insignia-products.com
29
Page 31

Insignia NS-FSDVDR DVD recorder
4 Press or to select Start, then press
ENTER. A confirmation screen opens.
Format
Start
Format mode Video mode
Are you sure?
Yes
No
5 Press or to select Yes, then press
ENTER. Formatting starts automatically and
a progress screen opens. Formatting is
complete when the progress bar reaches
100%.
6 Press REC SPEED to select a recording
speed.
XP 0:58
7 Press CH or CH or press the number
buttons to select the channel you want to
record.
CH 12
gnittamroF
6 Press SETUP to close the menu.
Recording a program
To record a program:
1 Make sure that you have formatted a DVD.
For more information, see “Formatting a
blank DVD” on page 29 or “Reformatting a
DVD” on page 29.
2 If the TV program you want to record
broadcasts stereo and SAP, select which
soundtrack you want to record. Your recorder
can only record one soundtrack. For more
information, see “Setting the audio channel”
on page 14.
3 Press OPEN/CLOSE to open the disc tray.
4 Insert a formatted DVD into the tray with the
label facing up.
5 Press OPEN/CLOSE to close the disc tray.
Your recorder reads the disc. This may take
a while.
%09
8 Press REC/OTR to start the recording. A
appears on the screen for five seconds.
9 To pause the recording, press PAUSE . To
start recording again, press PAUSE or
REC/OTR.
10 To stop the recording, press STOP .
Notes
• Recording starts as soon as you press
REC/OTR and continues until the DVD is full or
you press STOP.
• If you have not set the clock, the date and time
of the recording do not appear in the Original
list or the Playlist.
• You cannot mix two format types on the same
DVD-RW. If you insert a formatted disc, you
cannot change the format unless you
completely reformat the disc, which erases all
data on the disc.
• You cannot change the recording speed during
a recording.
• You can pause the recording, change
channels, then continue recording a different
channel to the same DVD.
30
www.insignia-products.com
Page 32

Insignia NS-FSDVDR DVD recorder
Using One-Touch recording
You can quickly set the amount of time you want
your recorder to record before it stops recording
and goes into standby mode.
To use One-Touch recording:
1 Press OPEN/CLOSE to open the disc tray.
2 Insert a formatted DVD with enough space
for the recording into the tray, with the label
facing up.
3 Press OPEN/CLOSE to close the disc tray.
Your recorder reads the disc. This may take
a while.
4 Press REC SPEED to select a recording
speed.
5 Press CH or CH or press the number
buttons to select the channel you want to
record.
6 Press REC/OTR repeatedly to select the
amount of time you want to record. Each time
you press the button, the recording time
increases by 30 minutes up to 8 hours.
Recording begins immediately. When the
recording is complete, your recorder stops
recording and goes into standby mode.
7 To change the amount of recording time,
press REC/OTR repeatedly until the time you
want appears.
8 To cancel the recording before the time runs
out, press STOP .
Notes
Press DISPLAY to view the remaining recording
time.
You cannot pause a One-Touch recording.
Setting up a timer recording
You can schedule as many as eight recordings
within a month. You can also schedule daily and
weekly recordings.
To set up a time recording:
1 Make sure that the clock is set. For more
information, see “Automatically setting the
clock” on page 14 or “Manually setting the
clock” on page 14.
2 Insert a formatted disc into the disc tray, then
close the tray.
3 Press TIMER PROG. The
Programming
screen opens.
Timer
4 Press or to select a program number,
then press ENTER.
Timer Programming
Date Start End CH Speed
1. --:-- --:-- L1
JAN/01
2. ---
3. ---
4. ---
5 Press or to enter the recording Date,
then press .
Timer Programming
Date Start End CH Speed
1. JAN/01 --:-- L1
2. ---
3. ---
4. ---
12:57AM
6 Press or to enter the Start time, then
press .
7 Press or to enter the End time, then
press .
Timer Programming
Date Start End CH Speed
1. JAN/01 12:57AM 1:57AM
2. ---
3. ---
CH 8
8 Press or to select the channel number,
then press . To record from an external
device, select L1 (Line1) or L2 (Line2).
Timer Programming
Date Start End CH Speed
1.
---
2. ---
3. ---
4. ---
9 Press or to select a recording speed.
www.insignia-products.com
Timer Programming
Date Start End CH Speed
1. JAN/01 12:57AM 1:57AM CH 8 1H
2. ---
31
Page 33

Insignia NS-FSDVDR DVD recorder
10 Make sure that the information you entered is
correct, then press ENTER. The timer
recording is added to the schedule.
11 To add another timer recording to the
schedule, repeat Step 3 through Step 10.
12 Press TIMER PROG. or SETUP to close the
menu.
13 Press POWER. The icon appears on the
front panel display.
Tips
• If power fails or your recorder is unplugged for
more than 30 seconds, the clock setting and all
timer programming is lost.
• If a DVD is not in the disc tray, flashes and
your recorder cannot record. In some cases,
appears momentarily near the recording start
time. Insert a recordable DVD.
• When all timer recordings are completed,
flashes. To play or eject the recorded DVD,
press POWER first, then press PLAY or
OPEN/CLOSE .
• During a timer recording or when your recorder
is in standby waiting for a timer recording to
start, you cannot use many of the remote
control or front panel buttons. To make these
buttons available, cancel the timer recording or
timer standby ( disappears).
• To cancel the timer standby mode, press
POWER.
• When the start and the end times are the
same, the length of the recording is set for 24
hours. When your recorder reaches the end of
the recording, it turns itself off.
• When the programmed start and end times are
earlier than the current time, the setting is not
accepted and the entry is deleted from the list
of recordings.
• If the start time is earlier and the end time is
later than the current time, the recording will
start right after you turn off the power.
Overlapping timer recordings
If you schedule two timer recordings with
overlapping times, the first recording you
schedule takes priority.
For example, if you schedule program A to
record between 8:00 p.m. and 10:00 p.m., then
schedule program B for the same time, your
recorder records program A instead of
program B.
If you schedule program A to record between
8:00 p.m. and 10:00 p.m., then schedule
program B to record between 9:00 p.m. and
11:00 p.m., your recorder records program A. At
10:00 p.m., your recorder starts recording the
second half of program B.
If you schedule program A to record between
8:00 p.m. and 10:00 p.m., then schedule
program B to record between 10:00 p.m. and
11:00 p.m., your recorder records program A,
then records program B. The first few seconds of
program B may not record because it takes a
few seconds (no more than 30) for your recorder
to switch from one program to another.
Note
If more than one minute of a recording is not
recorded, the error message E40 appears next to
the recording on the
Timer Programming
screen.
Cancelling or correcting a timer program
recording
To cancel or correct a timer recording:
1 Press POWER. The icon disappears from
the front panel display.
2 Press TIMER PROG. The
Programming
Timer Programming
Date Start End CH Speed
1. JAN/01 12:57AM 1:57AM CH 8 1H
2. ---
screen opens.
Timer
3 To cancel a timer recording, press or to
select the recording you want to cancel, then
press CLEAR.
4 To correct a timer recording, press or to
select the recording you want to correct, then
press ENTER. Press or to select
the item you want to correct, then enter the
correct information.
5 Press TIMER PROG. to close the menu.
6 Press POWER to return to standby mode.
Checking a timer recording in progress
To check a timer recording in progress:
• Press TIMER PROG. The
Programming
screen opens, and the
Timer
recording in progress is highlighted in red.
Stopping a timer recording in progress
To stop a timer recording in progress:
• Press STOP on the front panel. Pressing
STOP on the remote control will not stop
the recording.
Troubleshooting timer recordings
If a timer recording does not record correctly, an
error message appears on the
Programming
screen next to the recording that
did not work.
Timer Programming
Date Start End CH Speed
JAN/01 12:57AM 1:57AM CH 8 E22
*
2. ---
3. ---
4. ---
5. ---
6. ---
7. ---
8. ---
Error messages
E1-E22
E37-E39
E23-E24 Unrecordable disc
E25-E28 Copy-protected program
E29 DVD is protected.
E30 DVD is full
Recording error other than those listed
in this table
Timer
32
www.insignia-products.com
Page 34

Insignia NS-FSDVDR DVD recorder
E31-E32 DVD already contains 99 titles
E33 DVD already contains 999 chapters
E34 No space on the DVD for control
E35 PCA full
E36 DVD formatted in Video mode has
E40 Some portion has not been recorded
E41 Power failed
E42 No DVD in the tray at the recording
(maximum number)
(maximum number)
information
already been finalized
because of program overlapping.
Recording did not start on time.
time
Recording from an external device
To record from an external device, you need to
select the video source in the
record.
To select the video source in the
menu:
1 Make sure that the external device, such as a
VCR or camcorder, is connected to your
recorder.
2 Press SETUP. The
Setup
3 Press or to select Required Setting,
then press ENTER. The
menu opens.
4 Press or to select Select Video, then
press ENTER. The
Select Video
opens.
Select Video
Setup
menu, then
Setup
menu opens.
Required Setting
menu
6 If the external device is connected to the
jacks on the back of your recorder, press 001
on the remote control or press
CHANNEL or CHANNEL on the front of
your recorder to select L1.
Or, if the external device is connected to the
jacks on the front of your recorder, press 002
on the remote control or press
CHANNEL or CHANNEL on the front of
your recorder to select L2.
7 Press REC SPEED to select a recording
speed.
8 Press REC/OTR on the front of your
recorder. Your recorder starts recording.
9 Start playback on the external device.
10 Press STOP to stop the recording.
Protecting a DVD
To avoid accidentally recording, editing, or
erasing a DVD, you can protect the DVD.
nI oediV )raeR( 1L
nI oediV )tnorF( 2L
Note
The DVD protection feature only works with DVDs
formatted in VR mode.
To protect a DVD:
1 Press SETUP. The
Setup
menu opens.
2 Press or to select Disc, then press
Disc
ENTER. The
menu opens.
3 Press or to select
Disc Protect OFF ON, then press ENTER.
Disc Protect OFF ON
The
Disc Protect OFF ON
Yes
No
screen opens.
5 Press or to select L1 (Rear) or
L2 (Front), then press ENTER. The
Video L1 (Rear)
or
Select Video L2 (Front)
Select
screen opens.
6 Press or to select Video In (if the device
is connected to the A/V jacks) or S-Video In
(if the device is connected to the S-Video
jack), then press ENTER.
7 Press SETUP to close the menu.
To record from an external device:
1 Turn on the TV and your recorder.
2 On the TV, select the video source that your
recorder is connected to. For a list of
common video sources by TV brand, see “TV
video input sources” on page 12.
3 Press OPEN/CLOSE to open the disc tray.
4 Insert a formatted DVD with enough space
for the recording into the tray with the label
facing up.
5 Press OPEN/CLOSE to close the disc tray.
Your recorder reads the DVD. This may take
a while.
4 Press or to select Yes, then press
ENTER. The DVD is protected.
Note
To remove DVD protection, select No in Step 4.
Finalizing a DVD
After you have recorded a DVD, you can finalize
it so you can play it on another DVD player.
Notes
• Finalizing a DVD formatted in Video mode may
take as long as 15 minutes. Finalizing a DVD
formatted in VR mode may take as long as one
hour.
• The more blank space on a DVD, the long it
takes to finalize.
• Do not unplug the power cord or turn off your
recorder while finalizing a DVD.
To finalize a DVD:
Setup
1 Press SETUP. The
2 Press or to select Disc, then press
Disc
ENTER. The
menu opens.
menu opens.
www.insignia-products.com
33
Page 35

Insignia NS-FSDVDR DVD recorder
3 Press or to select Finalize, then press
ENTER. The
Finalize
Yes
No
Finalize
screen opens.
4 Press or to select Yes, then press
ENTER. Finalizing starts automatically and a
progress screen opens. Finalizing is
complete when the progress bar reaches
100%.
To cancel finalizing of a DVD-RW:
1 During the finalization process, press
STOP . A confirmation message opens.
Note
After finalizing has started, you may not be able to
cancel.
If you press STOP and appears, you cannot
stop finalizing because the process has begun.
If you select No in Step 4, press ENTER or
RETURN to continue finalizing.
2 Press or to select Recording, then
press ENTER. The
Recording
3 Press or to select Auto Finalize, then
press ENTER. The
Auto Finalize
opens.
Auto Finalize
End of Timer Rec
4 Press or to select Disc Full or End of
Timer Rec, then press ENTER. An option
screen opens.
5 Press or to select ON, then press
ENTER.
6 Press SETUP to close the menu.
Editing DVDs
Deleting titles (Video mode)
To delete a title:
1 Press TOP MENU. The
opens.
Title List
menu opens.
menu
FFOlluF csiD
OFF
screen
Do you want to cancel ?
Yes No
2 Press or to select Yes, then press
ENTER.
Notes
• Finalizing a DVD in Video mode automatically
creates title menus.
• After you finalize a DVD in Video mode, you
cannot edit the recording or add new ones.
• When you insert a finalized DVD-RW, the
menu opens with the Undo Finalize option.
Select this option, then press ENTER to
un-finalize the DVD.
Automatically finalizing a DVD
You can automatically finalize a DVD formatted
in Video mode when all timer recordings are
complete.
Title List
1 2 3
JAN/ 1/06 1:00AM CH12 XP
4 5
%5gnizilaniF
2 Press or to select a title, then press
ENTER. An option screen opens.
Title List
Disc
Play
Edit
JAN/ 1/06 1:00AM CH12 XP
4 5 6
2 3
Note
You cannot automatically finalize a DVD formatted
in VR mode.
To automatically finalize a DVD:
1 Press SETUP. The
34
Setup
menu opens.
www.insignia-products.com
Page 36

Insignia NS-FSDVDR DVD recorder
3 Press or to select Edit, then press
ENTER. The edit menu opens.
Title List
Title Delete
1
Edit Title Name
Chapter Mark
JAN/ 1/06 1:00AM CH12 XP
0:00:59
4 Press or to select Title Delete, then
press ENTER. A confirmation screen opens.
Title List - Title Delete
Yes
1
No
JAN/ 1/06 1:00AM CH12 XP
0:00:59
To delete a title:
1 Press TOP MENU, then press MENU/LIST to
change from the Playlist to the Original list.
2 Press or to select a title, then press
ENTER. An option screen opens.
Original
Play
Edit
JAN/ 1/06 1:00AM CH12 XP
4 5 6
2 3
3 Press or to select Edit, then press
ENTER. The
Original
Original
menu opens.
Title Delete
1
Scene Delete
Edit Title Name
Chapter Mark
Index Picture
Protect
5 Press or to select Yes, then press
ENTER. The title is deleted.
6 Press RETURN , then press RETURN
or STOP to close the menu.
Deleting titles (VR mode/Original list)
When you record a DVD in VR mode, your DVD
player creates an Original list and a Playlist of
the titles on the DVD. You can delete titles from
the Original list, but when you do, the title is
erased from the DVD. If you want to skip the title
during playback, but do not want to erase the
title completely, you need to delete the title from
the Playlist. For more information, see “Deleting
titles (VR mode/Playlist)” on page 35.
Caution
If you delete a title from the Original list, the title is
erased from the DVD. You cannot restore the title.
JAN/ 1/06 1:00AM CH12 XP
4 Press or to select Delete, then press
ENTER. A confirmation screen opens.
Original - Title Delete
Yes
1
No
JAN/ 1/06 1:00AM CH12 XP
5 Press or to select Yes, then press
ENTER. The title is deleted.
6 Press RETURN , then press RETURN
or STOP to close the menu.
Deleting titles (VR mode/Playlist)
Deleting a title from the Playlist does not delete
the title from the DVD. If you want to completely
erase the title, you need to delete it from the
Original list. For more information, see “Deleting
titles (VR mode/Original list)” on page 35.
0:00:59
0:00:59
To delete a title:
1 Press TOP MENU, then press MENU/LIST to
switch to the Playlist. The
appears.
www.insignia-products.com
Playlist
screen
35
Page 37

Insignia NS-FSDVDR DVD recorder
2 Press or to select a title, then press
ENTER. An option screen opens.
Playlist
Play
Edit
JAN/ 1/06 1:00AM CH12 XP
4 5 6
2 3
3 Press or to select Edit, then press
ENTER. The
Playlist
JAN/ 1/06 1:00AM CH12 XP
Playlist
menu opens.
Title Delete
1
Scene Delete
Edit Title Name
Chapter Mark
Index Picture
Title Dividing
Title Combining
0:00:59
Editing title names (Video mode)
To edit a title name:
1 Press TOP MENU. The
opens.
Title List
1 2 3
JAN/ 1/06 1:00AM CH12 XP
4 5
2 Press or to select a title, then press
ENTER. An option screen opens.
Title List
Play
Edit
JAN/ 1/06 1:00AM CH12 XP
4 5 6
Title List
2 3
screen
4 Press or to select Title Delete, then
press ENTER. A confirmation screen opens.
Playlist - Title Delete
Yes
1
No
JAN/ 1/06 1:00AM CH12 XP
0:00:59
5 Press or to select Yes, then press
ENTER. Another confirmation screen opens.
Playlist - Title Delete
Are you sure?
1
Yes
No
JAN/ 1/06 1:00AM CH12 XP
Wait for a moment.
3 Press or to select Edit, then press
ENTER. The edit menu opens.
Title List
Title Delete
1
Edit Title Name
Chapter Mark
JAN/ 1/06 1:00AM CH12 XP
0:00:59
4 Press or to select Edit Title Name, then
press ENTER. The
Title List-Edit Title Name
screen opens.
Title List - Edit Title Name
ABC
1
abc
123
@! ?
36
6 Press or to select Yes, then press
ENTER. The title is deleted.
7 Press RETURN or STOP to close the
menu.
www.insignia-products.com
M
0:00:59
1—Character set
2—Character entry area
Page 38

Insignia NS-FSDVDR DVD recorder
5 Press or to select a character, then
press ENTER. The character appears in the
character entry area.
You can also use the number buttons to
enter characters. For more information, see
the table following this task.
6 Continue adding characters then pressing
ENTER until you complete the title. You can
add as many as 30 characters.
7 If you need to erase a character, press
CLEAR. The last character you entered is
erased. If you need to erase a character
before the last character, press CLEAR
repeatedly. You will have to re-enter the
characters you deleted.
8 After you finish entering the title, press
ENTER. A confirmation screen opens.
Title List - Edit Title Name
Yes
1
No
MY FAVORITE
0:00:59
9 Press or to select Yes, then press
ENTER. Your title name is saved. This may
take a while.
10 Press RETURN , then press RETURN
or STOP to close the menu.
Button
1st
press
0 space space 0 space
1 symbol
mode
2 ABC abc 2 Back to ABC
3 DEF def 3 Back to DEF
4 GHI ghi 4 Back to GHI
5 JKL jkl 5 Back to JKL
6 MNO mno 6 Back to MNO
7 PQRS pqrs 7 Back to PQRS
8 TUV tuv 8 Back to TUV
9 WXYZ wxyz 9 Back to WXYZ
2nd
press
symbol
mode
3rd
press
4th press
1 (symbol mode)
! ” # $ % & ’ ( ) *
+ , - . / : ; < = > ?
@ [ ] ^ _ { | }
Editing title names (VR mode)
Use these instructions to edit titles on either the
Playlist or Original list. Illustrations show the
Playlist.
To edit a title name:
1 Press TOP MENU, then press MENU/LIST to
select the Playlist or Original list.
2 Press or to select a title, then press
ENTER. An option screen opens.
Playlist
Play
Edit
JAN/ 1/06 1:00AM CH12 XP
4 5 6
3 Press or to select Edit, then press
ENTER. The
Playlist
JAN/ 1/06 1:00AM CH12 XP
Playlist
4 Press or to select Edit Title Name, then
press ENTER. The
screen opens.
Playlist - Edit Title Name
M
• 1—Character set
• 2—Character entry area
5 Press or to select a character, then
press ENTER. The character appears in the
character entry area.
You can also use the number buttons to
enter characters. For more information, see
the table following this task.
6 Continue adding characters then pressing
ENTER until you complete the title. You can
add as many as 30 characters.
2 3
menu opens.
Title Delete
1
Scene Delete
Edit Title Name
Chapter Mark
Index Picture
Title Dividing
Title Combining
Playlist-Edit Title Name
ABC
1
abc
123
@! ?
0:00:59
0:00:59
www.insignia-products.com
37
Page 39

Insignia NS-FSDVDR DVD recorder
7 If you need to erase a character, press
CLEAR. The last character you entered is
erased. If you need to erase a character
before the last character, press CLEAR
repeatedly. You will have to re-enter the
characters you deleted.
8 After you finish entering the title, press
ENTER. A confirmation screen opens.
Playlist - Edit Title Name
Yes
1
No
MY FAVORITE
Wait for a moment.
9 Press or to select Yes, then press
ENTER. Your title name is saved. This may
take a while.
10 Press RETURN , then press RETURN
or STOP to close the menu.
Button
1st
press
0 space space 0 space
1 symbol
mode
2 ABC abc 2 Back to ABC
3 DEF def 3 Back to DEF
4 GHI ghi 4 Back to GHI
5 JKL jkl 5 Back to JKL
6 MNO mno 6 Back to MNO
7 PQRS pqrs 7 Back to PQRS
8 TUV tuv 8 Back to TUV
9 WXYZ wxyz 9 Back to WXYZ
2nd
press
symbol
mode
3rd
press
4th press
1 (symbol mode)
! ” # $ % & ’ ( ) *
+ , - . / : ; < = > ?
@ [ ] ^ _ { | }
Adding or deleting chapter marks (Video
mode)
You can add chapter marks to each title. If the
title is longer than five minutes, you can add
additional chapter marks at a time interval you
select.
To add a chapter mark:
1 Press TOP MENU. The
opens.
Title List
1 2 3
JAN/ 1/06 1:00AM CH12 XP
4 5
2 Press , or to select a title, then press
ENTER. An option screen opens.
Title List
Play
Edit
JAN/ 1/06 1:00AM CH12 XP
4 5 6
3 Press or to select Edit, then press
ENTER. The edit menu opens.
Title List
Title List
2 3
1
screen
Title Delete
Edit Title Name
Chapter Mark
38
JAN/ 1/06 1:00AM CH12 XP
0:00:59
www.insignia-products.com
Page 40

Insignia NS-FSDVDR DVD recorder
4 Press or to select Chapter Mark, then
press ENTER. The
Title List - Chapter Mark
screen opens.
Title List - Chapter Mark
OFF
1
5 minutes
10 minutes
15 minutes
30 minutes
60 minutes
JAN/ 1/06 1:00AM CH12 XP
0:00:59
5 Press or to select a time interval, then
press ENTER. A confirmation screen opens.
Title List - Chapter Mark - 5 minutes
Yes
1
No
JAN/ 1/06 1:00AM CH12 XP
0:00:59
6 Press or to select Yes, then press
ENTER. The chapter markers are added.
This may take a while.
7 Press RETURN , then press RETURN
or STOP to close the menu.
8 To delete the chapter markers, select OFF,
then press ENTER. All chapter markers
except the Chapter 1 marker are deleted.
Note
• You cannot select a time interval that is longer
than the title.
• The actual interval between chapter marks
may be slightly longer or shorter than the time
interval you specified.
Adding or deleting chapter marks (VR
mode)
You can add chapter marks to each title. If the
title is longer than five minutes, you can add
additional chapter marks at a time interval you
select.
Use these instructions to add or delete chapter
marks on either the Playlist or Original list.
Illustrations show the Playlist.
1 Press TOP MENU, then press MENU/LIST to
select the Playlist or Original list.
2 Press , or to select a title, then press
ENTER. An option screen opens.
To add or delete a chapter mark:
Playlist
Play
Edit
JAN/ 1/06 1:00AM CH12 XP
4 5 6
2 3
3 Press or to select Edit, then press
ENTER. The
Playlist
JAN/ 1/06 1:00AM CH12 XP
Playlist
menu opens.
Title Delete
1
Scene Delete
Edit Title Name
Chapter Mark
Index Picture
Title Dividing
Title Combining
0:00:59
4 Press or to select Chapter Mark, then
press ENTER. An option screen opens.
Playlist - Chapter Mark - Add
Yes
1
No
Chapter 2/ 2
JAN/ 1/06 1:00AM CH12 XP
0:00:59
5 Press SKIP , SKIP , REV ,
FWD , PLAY , and PAUSE to find the
place in the title where you want to add a
chapter mark.
Or, press SKIP or SKIP to select a
chapter mark you want to delete.
6 Press or to select Add or Delete, then
press ENTER. A confirmation screen opens.
7 Press or to select Yes, then press
ENTER. The chapter mark is added or
deleted. This may take a while.
8 Press RETURN twice, then press
RETURN or STOP to close the menu.
www.insignia-products.com
39
Page 41

Insignia NS-FSDVDR DVD recorder
Protecting titles (VR mode/Original list)
To prevent accidentally editing or erasing titles,
you can protect them on the Original list.
To protect a title:
1 Press TOP MENU, then press MENU/LIST to
change from the Playlist to the Original list.
2 Press , or to select a title, then press
ENTER. An option screen opens.
Original
Play
Edit
JAN/ 1/06 1:00AM CH12 XP
4 5 6
3 Press or to select Edit, then press
ENTER. The
Original
JAN/ 1/06 1:00AM CH12 XP
Original
4 Press or to select Protect, then press
ENTER. An option screen opens.
Original - Protect
2 3
menu opens.
Title Delete
1
Scene Delete
Edit Title Name
Chapter Mark
Index Picture
Protect
0:00:59
OFF ON
1
Un-protecting a title (VR mode/Original
list)
To un-protect a title:
1 Press TOP MENU, then press MENU/LIST to
change from the Playlist to the Original list.
2 Press or to select a title, then press
ENTER. An option screen opens.
Original
Play
Edit
JAN/ 1/06 1:00AM CH12 XP
4 5 6
3 Press or to select Edit, then press
ENTER. The
Original
JAN/ 1/06 1:00AM CH12 XP
Original
4 Press or to select Protect, then press
ENTER. An option screen opens.
Original - Protect
2 3
menu opens.
Title Delete
1
Scene Delete
Edit Title Name
Chapter Mark
Index Picture
Protect
0:00:59
ON OFF
1
40
JAN/ 1/06 1:00AM CH12 XP
0:00:59
5 Make sure that OFF ON appears, then press
ENTER. If ON OFF appears, the title is
already protected. The title is protected. This
may take a while.
6 Press RETURN , then press RETURN
or STOP to close the menu.
Note
If you want to protect the entire DVD, see
“Protecting a DVD” on page 33.
www.insignia-products.com
JAN/ 1/06 1:00AM CH12 XP
0:00:59
5 Make sure that ON OFF appears, then press
ENTER. If OFF ON appears, the title is
already un-protected. The title is
un-protected. This may take a while.
6 Press RETURN , then press RETURN
or STOP to close the menu.
Page 42

Insignia NS-FSDVDR DVD recorder
Dividing a title (VR mode/Playlist)
You can divide a title into two titles.
To divide a title:
1 Press TOP MENU, then press MENU/LIST to
change from the Original list to the Playlist.
2 Press or to select a title, then press
ENTER. An option screen opens.
Playlist
Play
Edit
JAN/ 1/06 1:00AM CH12 XP
4 5 6
3 Press or to select Edit, then press
ENTER. The
Playlist
JAN/ 1/06 1:00AM CH12 XP
Playlist
2 3
menu opens.
Title Delete
1
Scene Delete
Edit Title Name
Chapter Mark
Index Picture
Title Dividing
Title Combining
0:00:59
Combining titles (VR mode/Playlist)
You can combine two titles into one title.
To combine titles:
1 Press TOP MENU, then press MENU/LIST to
change from the Original list to the Playlist.
2 Press or to select a title, then press
ENTER. An option screen opens.
Playlist
Play
Edit
JAN/ 1/06 1:00AM CH12 XP
4 5 6
3 Press or to select Edit, then press
ENTER. The
Playlist
JAN/ 1/06 1:00AM CH12 XP
Playlist
2 3
menu opens.
Title Delete
1
Scene Delete
Edit Title Name
Chapter Mark
Index Picture
Title Dividing
Title Combining
0:00:59
4 Press or to select Title Dividing, then
press SKIP , SKIP , REV , FWD ,
PLAY , and PAUSE to find the place in the
title where you want to divide the title.
5 Press ENTER. A confirmation screen opens.
The reviewer said the icon
Playlist - Title Dividing
Yes
1
No
JAN/ 1/06 1:00AM CH12 XP
0:00:59
6 Press or to select Yes, then press
ENTER. The title is divided. This may take a
while.
Note
Both title names are identical, and index pictures
are reset to the first scene.
7 Press RETURN or STOP to close the
menu.
4 Press or to select Title Combining,
then press ENTER. The
Combining
screen opens. The title you
Playlist - Title
selected is grayed out, and the frame for the
next title is yellow.
5 Press , or to select a title, then press
ENTER.
Playlist - Title Combining
1 2 3
1 +
JAN/ 1/06 1:00AM CH12 XP
www.insignia-products.com
41
Page 43

Insignia NS-FSDVDR DVD recorder
6 Press or to select another title, then
press ENTER. A confirmation screen opens.
Playlist - Title Combining
1 2 3
1 + 2
Yes No
7 Press or to select Yes, then press
ENTER. The two titles are combined into
one. This may take a while.
8 Press RETURN or STOP to close the
menu.
Note
The first title you select will come first in the
combined title, and the second title will come
second.
If one of the two titles that make up a combined
title is deleted, the combined title is also deleted.
Adding titles to the Playlist (VR mode)
You can add titles to the Playlist.
To add a title to the Playlist:
1 Press TOP MENU, then press MENU/LIST to
change from the Original list to the Playlist.
The
Playlist - Add New Title
Next to the last title in the Playlist is an option
box with the Add New Title and Delete
Playlist options.
screen opens.
2 Press , or to select Add New Title,
then press ENTER. The title you added
appears as the last title. This may take a
while.
Note
For information about deleting a title from the
Playlist, see “Deleting titles (VR mode/Playlist)” on
page 35.
Playlist - Add New Title
1
JAN/ 1/06 1:00AM CH12 XP
4
Wait for a moment.
3 Press RETURN or STOP to close the
menu.
Deleting a Playlist
To delete a Playlist:
1 Press TOP MENU, then press MENU/LIST to
change from the Original list to the Playlist.
The Playlist opens. Next to the last title in the
Playlist is an option box with the Add New
Title and Delete Playlist options.
Playlist - Add New Title
1 2 3
2
5
3
Playlist - Add New Title
1 2 3
Add New
Title
Delete
Playlist
Add New
Title
Delete
Playlist
2 Press or to select Delete Playlist,
then press ENTER. A confirmation screen
opens.
Playlist
Are you sure?Are you sure?
4
Wait for a moment.
2
5
Yes No
Add New
Delete
Playlist
31
Title
3 Press ENTER. YES or NO appears.
4 Press or to select Yes, then press
ENTER. “Are you sure?” appears.
42
www.insignia-products.com
Page 44

Insignia NS-FSDVDR DVD recorder
5 Press or to select Yes, then press
ENTER. The Playlist is deleted. This may
take a while. An empty Playlist screen opens.
Playlist
Add New
Title
Delete
Playlist
6 Press RETURN or STOP to close the
menu.
Deleting parts of titles (VR mode)
Use these instructions to delete parts of a title
from the Original list or Playlist.
To delete parts of a title:
1 Press TOP MENU, then press MENU/LIST to
select Original or Playlist.
2 Press or to select a title, then press
ENTER. An option box appears on the
Playlist.
3 Press or to select Edit, then press
ENTER. The
Playlist
menu opens.
6 Press SKIP , SKIP , REV ,
FWD , PLAY , and PAUSE to select
the end of the section you want to delete,
then press ENTER. A preview view bar
appears at the bottom of the screen. The
total and elapsed time for the title appears,
and the section you selected is red.
Start point End point
Original
Edited
7 Press ENTER to start the preview.
8 Press or to select Delete, then press
ENTER. A confirmation screen appears.
Playlist - Scene Delete
Yes
1
No
JAN/ 1/06 1:00AM CH12 XP
0:00:59
Playlist
Title Delete
1
Scene Delete
Edit Title Name
Chapter Mark
Index Picture
Title Dividing
Title Combining
JAN/ 1/06 1:00AM CH12 XP
0:00:59
4 Press or to select Scene Delete, then
press ENTER. The
Playlist - Scene Delete
screen opens.
Playlist - Scene Delete
Start
1
End
Preview
Delete
JAN/ 1/06 1:00AM CH12 XP
0:00:59
5 Press SKIP , SKIP , REV ,
FWD , PLAY , and PAUSE to select
the beginning of the section you want to
delete, then press ENTER.
9 Press or to select Yes, then press
ENTER. Another confirmation screen
appears.
10 Press or to select Yes, then press
ENTER. The part of the title you selected is
deleted. This may take a while.
11 Press RETURN , then press RETURN
or STOP to close the menu.
Adding thumbnail labels to titles
You can add a thumbnail label to a title in the
Original list or Playlist to make the title easier to
identify.
To add a thumbnail label to a title:
1 Press TOP MENU, then press MENU/LIST to
select Original or Playlist.
2 Press , or to select a title, then press
ENTER. An option box appears on the
Playlist.
3 Press or to select Edit, then press
ENTER. The
Playlist
JAN/ 1/06 1:00AM CH12 XP
Playlist
or
Original
Title Delete
1
Scene Delete
Edit Title Name
Chapter Mark
Index Picture
Title Dividing
Title Combining
menu opens.
0:00:59
www.insignia-products.com
43
Page 45

Insignia NS-FSDVDR DVD recorder
4 Press or to select Index Picture, then
press ENTER. A confirmation screen opens.
Playlist - Index Picture
Yes
1
No
JAN/ 1/06 1:00AM CH12 XP
5 Press or to select Yes, then press
ENTER. The thumbnail label is added to the
title. This may take a while.
6 Press RETURN , then press RETURN
or STOP to close the menu.
Maintaining
Servicing
• Refer to relevant topics in “Troubleshooting”
on page 44 before returning your recorder.
• If your recorder quits working, do not try to
repair the problem by yourself. There are no
user serviceable parts inside. Turn off your
recorder, unplug the power plug, and contact
authorized service personnel.
Cleaning the cabinet
Use a soft cloth slightly moistened with a mild
detergent solution. Do not use a solution
containing alcohol, spirits, ammonia, or abrasive
cleaners. They may damage the cabinet.
Handling discs
• To keep a disc clean, do not touch the play
side (non-label side) of the disc.
• Do not attach paper or tape to the disc.
• Keep the disc away from direct sunlight or
heat sources.
• Store the disc in a disc case after you remove
it from your recorder.
Cleaning discs
• Before playback, wipe the disc outwards from
the center with clean cloth.
0:00:59
Cleaning the disc lens
If you tried the solutions in the troubleshooting
section, and your recorder still does not work
correctly, the laser optical pickup lens may be
dirty. Contact authorized service personnel for
inspection and cleaning of the pickup lens.
Testing the remote control
If the remote control does not work correctly, you
can test the remote control’s signal with an AM
radio or a digital camera (including a cellular
phone camera).
To test the remote control signal with an AM
radio:
1 Tune to an AM radio to a frequency with no
broadcasting.
2 Point the remote control at the radio, then
press any button. If radio sound flutters, the
remote control is working.
To test the remote control signal with a
digital camera:
• Point the remote control at the digital camera,
then press and hold any button. If you see a
light in the camera view finder, the remote
control is working.
Troubleshooting
Power
Problem Solution
The power does not turn on. • Make sure that the AC power
Picture
Problem Solution
There is no picture. • Make sure that all cables are
cord is connected securely.
• If power has failed, check the
breaker.
connected securely.
• Make sure that no cables are
damaged.
•If the
• Make sure that the TV is
• If the TV is connected with
• Change the video input on the
Setup
the TV screen, press
RETURN to close the
menu.
connected correctly. For more
information, see “Setting up
your recorder” on page 9.
the S-VIDEO or A/V jacks,
make sure that your recorder
is set to interlaced mode.
During DVD playback, press
and hold SETUP for more
than three seconds.
TV so a picture appears on
the screen. For a list of video
inputs for TV brands, see “TV
video input sources” on
page 12.
menu appears on
44
www.insignia-products.com
Page 46

Insignia NS-FSDVDR DVD recorder
Problem Solution
Picture has noise or snow. • The disc is dirty or flawed.
TV program picture does not
fill the screen.
TV program picture is
distorted.
Cannot change TV channels. • If you are using an antenna,
Playback picture is distorted. • Make sure that your recorder
Playback or TV program
from connected equipment
is distorted.
Clean the DVD or try another
DVD. For cleaning
information, see “Cleaning
discs” on page 44.
• If the video signal passes
through a VCR to get to your
TV or if your recorder is
connected to a TV/VCR
combination, the copy
protection on some DVDs
could affect picture quality.
Connect your recorder
directly to the TV or connect
your recorder using the
S-Video jack on the TV.
• Try a different channel.
• Re-scan for channels. For
more information, see
“Scanning for channels” on
page 13.
• If you are using an antenna,
adjust the antenna.
• Adjust the TV picture. For
more information, see the TV
user guide.
• Place your recorder and TV
farther apart.
• Place the TV and any
“bunched” antenna cables
farther apart.
• Replace the video cables with
a higher quality cable.
make sure that it is connected
correctly and securely.
• Check the remote control
batteries and replace if
necessary.
is not too close to devices
that may cause electrical
interference, such as a cell
phone.
• If the playback output from a
DVD player, VCR, or tuner
goes through your recorder
before it reaches the TV, the
copy protection on some
DVDs could affect picture
quality. Re-connect the device
directly to the TV.
Sound
Problem Solution
There is no sound. • The disc is dirty or flawed.
Sound has static. • The disc is dirty or flawed.
No DTS sound is output. • Your recorder is not
Clean the disc or try another
disc. For cleaning
information, see “Cleaning
discs” on page 44.
• Make sure that all cables are
connected correctly and
securely.
• Make sure that none of the
cables are damaged.
• Make sure that you have
selected the correct input
source on the audio system.
• Make sure that your recorder
is not in pause mode,
fast-forward, fast-reverse,
slow-forward, or
slow-reverse mode.
• Make sure that the audio
settings are correct. For more
information, see “Setting the
audio channel” on page 14.
Clean the disc or try another
disc. For cleaning
information, see “Cleaning
discs” on page 44.
compatible with DTS sound.
Remote control
Problem Solution
The remote control does not
work.
• Make sure that there is not an
obstacle between the remote
control and the remote
control sensor on the front of
your recorder.
• Make sure that the remote
control batteries are good.
• Test the remote control to
make sure it is working. For
more information, see
“Testing the remote control”
on page 44.
• Make sure the antenna or
cable TV is connected
correctly and securely.
www.insignia-products.com
45
Page 47

Insignia NS-FSDVDR DVD recorder
Playback
Problem Solution
The disc does not play. • Make sure that there is a disc
Playback image freezes for a
second.
The DVD does not start
playback from the
beginning.
The disc starts playback
automatically.
Some functions, such as
stop, search, or slow
playback, do not work.
Cannot change the
soundtrack language.
Cannot change the subtitle
language or cannot turn off
subtitles.
in the disc tray.
• Make sure that the disc is not
blank.
• Make sure that the disc is in
the disc tray with the label
facing up.
• Your DVD player cannot play
certain discs, such as
CD-ROMs.
• The DVD’s region code must
be 1 or All. Your recorder’s
region code is 1. The region
code is usually on the DVD or
DVD packaging.
• If moisture has condensed
inside your recorder, remove
the disc and leave your
recorder turned on for about
two hours until the moisture
evaporates.
• If the DVD was recorded on
another recorder, make sure
that the DVD was finalized. If
the DVD has not been
finalized, your DVD player
cannot play it.
• When playing a two-layered
DVD, the picture may freeze
for a second or two when
your recorder switches from
the first layer to the second
layer. This is not a
malfunction.
• If you stop playback by
pressing STOP , then press
PLAY , your recorder begins
playback at the point where
you stopped. To start
playback at the beginning of
the DVD, press STOP twice,
then press PLAY .
• Some DVDs display the title
menu as soon as you insert
them.
• Some discs are programmed
to start playback
automatically.
• Depending on the disc, you
may not be able to perform all
functions. Check the disc’s
documentation.
• Not all DVDs have multiple
languages.
• Some DVDs only let you
change the language from the
DVD menu. Open the DVD
menu, then select a language,
if available.
• Not all DVDs have subtitles.
• Some DVDs only let you
select a subtitle language
from the DVD menu. Open
the DVD menu, then select a
subtitle language, if available.
• Some DVDs do not let you
turn off subtitles.
Problem Solution
Cannot change the angle. • Not all DVDs have multiple
angles recorded on them.
• The current portion of the
DVD may not contain a
multi-angle view. The angle
may change when the
multi-angle portion is played.
• The DVD may prohibit
changing angles.
• Try changing the angle using
the DVD’s menu.
Recording,timer recording,editing
Problem Solution
The channel cannot be
changed from the channel
you are currently recording.
Recording does not start
immediately after you press
REC/OTR.
Nothing was recorded, even
though you set the timer
correctly.
Recording does not stop
immediately after you press
STOP .
Timer recording was not
completed or did not start
from the beginning.
• Set the TV’s input to TV.
• There is no unused DVD-R or
DVD-RW inserted in the
recorder. After inserting a
recordable DVD-RW, it takes
a while for your recorder to
automatically format it.
• There was a power failure
during recording.
• The recorder’s internal clock
stopped due to a power
failure that lasted for more
than 30 seconds. See
“Automatically setting the
clock” on page 14.
• Disconnect the AC power
cord from the AC power
outlet, then connect it again.
• The program contains copy
protection that restricts
copying.
• The timer setting overlapped
with another setting that was
set later or that has priority.
• It takes a few seconds for the
recorder to input DVD data
before recording can stop.
• The timer setting overlapped
with another setting that was
set previously or that has
priority.
• There was not enough space
on the DVD.
46
www.insignia-products.com
Page 48

Insignia NS-FSDVDR DVD recorder
Miscellaneous
Problem Solution
The recorder does not
operate correctly.
The disc tray does not open
when you press
OPEN/CLOSE .
“Repairing” appears on the
TV screen.
Repairing
• Static electricity can cause
the recorder to operate
abnormally. Unplug the
recorder, then plug it in again.
• It can take a few seconds for
the disc tray to open after you
have recorded or edited a
DVD.
• If there is a power failure or
the recorder is unplugged
during recording, finalizing,
formatting, or editing, a repair
process begins automatically
after you turn the recorder
back on. This process can
take from several minutes to
several hours.
• To cancel the repair process,
press OPEN/CLOSE on the
front panel, then select Yes
with the left or right arrows
and press ENTER. The disc
tray automatically opens. The
DVD may not work if you
cancel the repair process.
Do you want to cancel a repairing process ?
When selecting “Yes”, the disc may not be
usable.
Yes No
Repairing
www.insignia-products.com
47
Page 49

Error messages
Error message Cause Solution
Disc Error
-- Please eject the disc. --
Playback may not be available on
this Disc.
Region Error
-- Please eject the disc. --
Playback is not authorized in your
region.
Parental Lock On
The current selected parental level
prohibits playback.
Recording Error
This program is not allowed to be
recorded.
Recording Error
This program is not recordable in
Video mode.
Recording Error
You cannot record on this disc.
Recording Error
This program is not allowed to be
recorded on this disc.
Recording Error
This disc is protected and not
recordable.
Recording Error
Disc is full.
(No area for new recording)
Recording Error
You cannot record more than 99
titles on one disc.
(The maximum is 99)
Recording Error
You cannot record more than 999
chapters on one disc.
(The maximum is 999)
Recording Error
You cannot record on this disc as
Control Information is full.
Recording Error
You cannot record on this disc as
Power Calibration Area is full.
Recording Error
The disc is already finalized.
• An unplayable disc is inserted in
the recorder.
• The disc is upside down.
• The DVD has a different region
code than the recorder, so the
recorder will not play the DVD.
• The parental control level that
you have set up in the recorder
prevents playback.
• The recorder encountered a
copy-protected program.
• You are trying to record a
copy-once program onto a
DVD-RW in Video mode.
• You are trying to record onto a
DVD which is not recordable, or
the DVD status is not compatible
with the recording requirements.
•The DVD is dirty.
• The DVD is damaged.
• You are trying to record the
copy-once program onto a
DVD-RW which is not
compatible with CPRM.
• You are trying to record on a
protected DVD (set in the
menu).
• You are trying to record on a
DVD which has no space left for
recording.
• You are trying to record more
than 99 titles on a DVD.
• You are trying to record more
than 999 chapters on a VR mode
DVD-RW DVD.
• This DVD has no space to write
the control information when
recording or deleting contents.
• When editing has been done
repeatedly, the control
information area can fill up, even
though the recording area has
enough space.
• When recordings are performed
repeatedly onto an unstable
DVD, this area can fill up.
• Every time you insert a DVD for
recording, more of the DVD’s
working area is used up. If you
do this frequently, you may not
be able to record a full 99 titles.
• You are trying to record onto a
DVD that has already been
finalized.
Disc
• Insert a standard disc in the recorder. See “Playable
• Insert the disc with the label facing up.
• Insert a compatible DVD (region codes 1 or ALL) into
• Check the Parental lock setting (see Setting parental
• You cannot record copy-protected programs.
• Set the format to VR mode (see “Formatting a blank
• Insert a recordable DVD and make sure that the DVD
• Clean the DVD with a cleaning cloth.
• Replace the DVD.
• Insert a DVD-RW in VR mode (ver.1.1 or 1.2
• Release the Disc Protect setting in the
• Insert a recordable DVD with enough recording
• Delete unnecessary titles. See “Deleting titles (Video
• Delete unnecessary chapter markers. See “Adding or
• Delete unnecessary titles. See “Deleting titles (Video
• Insert a new DVD.
• Release the finalization for this DVD (see “Finalizing a
Insignia NS-FSDVDR DVD recorder
discs” on page 16.
your recorder.
controls” on page 26) and change if necessary.
DVD” on page 29).
status satisfies the recording requirements.
compatible with CPRM).
Disc
(see “Protecting a DVD” on page 33).
space.
mode)” on page 34 or “Deleting titles (VR
mode/Original list)” on page 35.
deleting chapter marks (Video mode)” on page 38.
mode)” on page 34 or “Deleting titles (VR
mode/Original list)” on page 35.
DVD” on page 33).
menu
48
www.insignia-products.com
Page 50

Insignia NS-FSDVDR DVD recorder
Specifications
General
System DVD-Video, DVD-RW/R, CD-DA,
Power requirements AC 120 V, 60 Hz
Power consumption 20 W (standby: 2.8 W)
Weight 5.1 lbs (2.3 kg)
Dimensions (W × H × D) 17 3/16” × 2 5/8” × 9 5/8”
Operating temperature 41ºF to 104ºF (5ºC to 40ºC)
Operating humidity Less than 80% (no condensation)
TV format NTSC
Recording
Recording format • Video Recording format
Recordable discs DVD-R and DVD-RW
Video recording format
Sampling frequency
Compression format
Audio recording format
Sampling frequency
Compression format
Tuner
Receivable channels
VHF
UHF
CATV
Input/Output
VHF/UHF antenna
input/output
Video input
Input level
Jacks
Video output
Output level
Jack
S-Video input
Y (luminance)–Input level
C (color)–Input level
Jack
S-Video output
Y (luminance)–Input level
C (color)–Input level
Jack
Component video output
Output level
Jacks
Audio input
During audio input
Jacks
CD-RW/R
(435 × 66 × 244 mm)
(DVD-RW only)
• Video format (DVD-RW,
DVD-R)
13.5 MHz
MPEG
48 kHz
Dolby Digital
2-13h
14-69h
C1-C125
VHF/UHF at 75 ohms
Input 1 (rear), 2 (front)
1 Vp-p (75 ohms)
RCA jacks
Output 1 (rear)
1 Vp-p (75 ohms)
RCA jack
Input 1 (rear), 2 (front)
1 Vp-p (75 ohms)
286 mVp-p (75 ohms)
4-pin mini DIN
Output 1 (rear)
1 Vp-p (75 ohms)
286 mVp-p (75 ohms)
4-pin mini DIN
Output 1 (rear)
Y: 1.0 Vp-p (75 ohms), Pb/Cb, Pr/Cr:
0.7 Vp-p (75 ohms)
RCA jacks
Input 1 (rear), 2 (front) L/R
2V rms (Input impedance: more than
22k ohms)
RCA jacks
Audio output
During audio output
Jacks
Digital audio output
Output level
Jack
Output 1 L/R (rear)
2V rms (Output impedance: less than
1k ohm)
RCA jacks
Output 1 (rear) coaxial
500 mVp-p (75 ohms)
RCA jack
Language codes
Language Code # Language Code #
Abkhazian 4748 Lingala 5860
Afar 4747 Macedonian 5857
Afrikaans 4752 Malagasy 5953
Albanian 6563 Malay 5965
Ameharic 4759 Malayalam 5958
Arabic 4764 Maltese 5966
Armenian 5471 Maori 5955
Assamese 4765 Marathi 5864
Aymara 4771 Moldavian 5961
Azerbaijani 4772 Mongolian 5960
Bashkir 4747 Nauru 6047
Basque 5167 Nepali 6051
Bengali; Bangla 4860 Norwegian 6061
Bhutani 5072 Oriya 6164
Bihari 4854 Oromo (Afan) 6159
Bislama 4855 Panjabi 6247
Breton 4864 Pashto, Pushto 6265
Bulgarian 4853 Persian 5247
Burmese 5971 Polish 6258
Byelorussian 4851 Portuguese 6266
Cambodian 5759 Quechua 6367
Catalan 4947 Rhaeto-Romance 6459
Chinese 7254 Romanian 6461
Corsican 4961 Russian 6467
Croatian 5464 Samoan 6559
Czech 4965 Sangho 6553
Danish 5047 Sanskrit 6547
Dutch 6058 Scots Gaelic 5350
English 5160 Serbian 6564
Esperanto 5161 Serbo-Croatian 6554
Estonian 5166 Sesotho 6566
Faroese 5261 Setswana 6660
Fiji 5256 Shona 6560
Finnish 5255 Sindhi 6550
www.insignia-products.com
49
Page 51

Insignia NS-FSDVDR DVD recorder
Language Code # Language Code #
French 5264 Singhalese 6555
Frisian 5271 Siswat 6565
Galician 5358 Slovak 6557
Georgian 5747 Slovenian 6558
German 5051 Somali 6561
Greek 5158 Spanish 5165
Greenlandic 5758 Sudanese 6567
Guarani 5360 Swahili 6569
Gujarati 5367 Swedish 6568
Hausa 5447 Tagalog 6658
Hebrew 5569 Tajik 6653
Hindi 5455 Tamil 6647
Hungarian 5467 Tatar 6666
Icelandic 5565 Telugu 6651
Indonesian 5560 Thai 6654
Interlingua 5547 Tibetan 4861
Legal notices
DHHS and FDA safety certification
This product is made and tested to meet safety standards of
the FCC, requirements and compliance with safety
performance of the U.S. Department of Health and Human
Services, and also with FDA Radiation Performance
Standards 21 CFR Subchapter J.
Canada ICES-003 statement
This Class B digital apparatus complies with Canadian
ICES-003.
Copyright
Manufactured under license from Dolby Laboratories.
“Dolby” and the double-D symbol are trademarks of Dolby
Laboratories.
Interlingue 5551 Tigrinya 6655
Inupiak 5557 Tonga 6661
Irish 5347 Tsonga 6665
Italian 5566 Turkish 6664
Japanese 5647 Turkmen 6657
Javanese 5669 Twi 6669
Kannada 5760 Ukrainian 6757
Kashmiri 5765 Urdu 6764
Kazakh 5757 Uzbek 6772
Kinyarwanda 6469 Vietnamese 6855
Kirghiz 5771 Volapük 6861
Kirundi 6460 Welsh 4971
Korean 5761 Wolof 6961
Kurdish 5767 Xhosa 7054
Laothian 5861 Yiddish 5655
Latin 5847 Yoruba 7161
Latvian, Lettish 5868 Zulu 7267
Lithuanian 5866
50
www.insignia-products.com
Page 52

Insignia NS-FSDVDR DVD recorder
90-day limited warranty
Insignia Products (“Insignia”) warrants to you, the original
purchaser of this new NS-FSDVDR (“Product”), that the
Product shall be free of defects in the original manufacture of
the material or workmanship for a period of 90 days from the
date of your purchase of the Product (“Warranty Period”).
This Product must be purchased from an authorized dealer
of Insignia brand products and packaged with this warranty
statement. This warranty does not cover refurbished
Product. If you notify Insignia during the Warranty Period of a
defect covered by this warranty that requires service, terms
of this warranty apply.
How long does the coverage last?
The Warranty Period lasts for 90 days from the date you
purchased the Product. The purchase date is printed on the
receipt you received with the Product.
What does this warranty cover?
During the Warranty Period, if the original manufacture of the
material or workmanship of the Product is determined to be
defective by an authorized Insignia repair center or store
personnel, Insignia will (at its sole option): (1) repair the
Product with new or rebuilt parts; or (2) replace the Product
at no charge with new or rebuilt comparable products or
parts. Products and parts replaced under this warranty
become the property of Insignia and are not returned to you.
If service of Products or parts are required after the Warranty
Period expires, you must pay all labor and parts charges.
This warranty lasts as long as you own your Insignia Product
during the Warranty Period. Warranty coverage terminates if
you sell or otherwise transfer the Product.
How to obtain warranty service?
If you purchased the Product at a retail store location, take
your original receipt and the Product to the store you
purchased it from. Make sure that you place the Product in
its original packaging or packaging that provides the same
amount of protection as the original packaging. If you
purchased the Product from an online web site, mail your
original receipt and the Product to the address listed on the
web site. Make sure that you put the Product in its original
packaging or packaging that provides the same amount of
protection as the original packaging.
To obtain in-home warranty service for a television with a
screen 25 inches or larger, call 1-888-BESTBUY. Call
agents will diagnose and correct the issue over the phone or
will have an Insignia-approved repair person dispatched to
your home.
Where is the warranty valid?
This warranty is valid only to the original purchaser of the
product in the United States and Canada.
What does the warranty not cover?
This warranty does not cover:
• Customer instruction
• Installation
• Set up adjustments
• Cosmetic damage
• Damage due to acts of God, such as lightning strikes
• Accident
•Misuse
• Abuse
• Negligence
• Commercial use
• Modification of any part of the Product, including the
antenna
• Plasma display panel damaged by static (non-moving)
images applied for lengthy periods (burn-in).
This warranty also does not cover:
• Damage due to incorrect operation or maintenance
• Connection to an incorrect voltage supply
• Attempted repair by anyone other than a facility
authorized by Insignia to service the Product
• Products sold as is or with all faults
• Consumables, such as fuses or batteries
• Products where the factory applied serial number has
been altered or removed
REPAIR REPLACEMENT AS PROVIDED UNDER THIS
WARRANTY IS YOUR EXCLUSIVE REMEDY. INSIGNIA
SHALL NOT BE LIABLE FOR ANY INCIDENTAL OR
CONSEQUENTIAL DAMAGES FOR THE BREACH OF ANY
EXPRESS OR IMPLIED WARRANTY ON THIS PRODUCT,
INCLUDING, BUT NOT LIMITED TO, LOST DATA, LOSS
OF USE OF YOUR PRODUCT, LOST BUSINESS OR LOST
PROFITS. INSIGNIA PRODUCTS MAKES NO OTHER
EXPRESS WARRANTIES WITH RESPECT TO THE
PRODUCT, ALL EXPRESS AND IMPLIED WARRANTIES
FOR THE PRODUCT, INCLUDING, BUT NOT LIMITED TO,
ANY IMPLIED WARRANTIES OF AND CONDITIONS OF
MERCHANTABILITY AND FITNESS FOR A PARTICULAR
PURPOSE, ARE LIMITED IN DURATION TO THE
WARRANTY PERIOD SET FORTH ABOVE AND NO
WARRANTIES, WHETHER EXPRESS OR IMPLIED, WILL
APPLY AFTER THE WARRANTY PERIOD. SOME
STATES, PROVINCES AND JURISDICTIONS DO NOT
ALLOW LIMITATIONS ON HOW LONG AN IMPLIED
WARRANTY LASTS, SO THE ABOVE LIMITATION MAY
NOT APPLY TO YOU. THIS WARRANTY GIVES YOU
SPECIFIC LEGAL RIGHTS, AND YOU MAY ALSO HAVE
OTHER RIGHTS, WHICH VARY FROM STATE TO STATE
OR PROVINCE TO PROVINCE.
Contact Insignia:
For customer service please call 1-877-467-4289
www.insignia-products.com
Distributed by Best Buy Purchasing, LLC
7601 Penn Avenue South, Richfield, Minnesota, U.S.A.
55423-3645
© 2008 Best Buy Enterprise Services, Inc.
All rights reserved. INSIGNIA is a trademark of Best Buy
Enterprise Services, Inc. Registered in some countries. All
other products and brand names are trademarks of their
respective owners.
www.insignia-products.com
51
Page 53

Insignia NS-FSDVDR DVD recorder
52
www.insignia-products.com
Page 54

Graveur de DVD
Insignia NS-FSDVDR
Table des matières
Introduction . . . . . . . . . . . . . . . . . . . . . . . . . . . . .53
Informations sur la sécurité . . . . . . . . . . . . . . . . .54
Fonctionnalités. . . . . . . . . . . . . . . . . . . . . . . . . . .56
Enregistrement. . . . . . . . . . . . . . . . . . . . . . . . . . . . 56
Édition . . . . . . . . . . . . . . . . . . . . . . . . . . . . . . . . . . 57
Lecture . . . . . . . . . . . . . . . . . . . . . . . . . . . . . . . . . . 57
Autres. . . . . . . . . . . . . . . . . . . . . . . . . . . . . . . . . . . 57
Accessoires . . . . . . . . . . . . . . . . . . . . . . . . . . . . . . 57
Face avant . . . . . . . . . . . . . . . . . . . . . . . . . . . . . . . 57
Face arrière . . . . . . . . . . . . . . . . . . . . . . . . . . . . . . 58
Affichage de la face avant . . . . . . . . . . . . . . . . . . . 58
Télécommande. . . . . . . . . . . . . . . . . . . . . . . . . . . . 60
Installation de l’enregistreur/graveur . . . . . . . . . .61
Installation des piles de la télécommande . . . . . . . 61
Connexion d'une antenne ou d'un décodeur
câble/satellite. . . . . . . . . . . . . . . . . . . . . . . . . . . . 62
Connexion au téléviseur à l'aide des câbles à
composantes (image optimale) . . . . . . . . . . . . . . 63
Connexion du téléviseur à l'aide d'un câble S-Vidéo
(meilleure image). . . . . . . . . . . . . . . . . . . . . . . . . 63
Connexion au téléviseur à l'aide des câbles composites
(image de base). . . . . . . . . . . . . . . . . . . . . . . . . . 64
Connexion du téléviseur avec un modulateur RF . 64
Connexions de l'audio de base . . . . . . . . . . . . . . . 64
Connexion à un système audio . . . . . . . . . . . . . . . 65
Connexion à une source externe . . . . . . . . . . . . . . 65
Sélection des options de base . . . . . . . . . . . . . . .66
Configuration lors de la première utilisation . . . . . . 66
Balayage des canaux . . . . . . . . . . . . . . . . . . . . . . . 66
Changement de canal . . . . . . . . . . . . . . . . . . . . . . 67
Ajout ou suppression de canaux . . . . . . . . . . . . . . 67
Réglage du canal audio . . . . . . . . . . . . . . . . . . . . . 67
Réglage automatique de l’horloge . . . . . . . . . . . . . 68
Réglage manuel de l’horloge . . . . . . . . . . . . . . . . . 68
Activer ou désactiver l’heure avancée.. . . . . . . . . . 69
Sélection du format d'écran du téléviseur . . . . . . . 69
Affichage des informations d'état . . . . . . . . . . . . . . 70
Lecture de DVD et de CD . . . . . . . . . . . . . . . . . .70
Disques compatibles . . . . . . . . . . . . . . . . . . . . . . . 70
Standard de téléviseurs couleur. . . . . . . . . . . . . . . 70
Codes régionaux . . . . . . . . . . . . . . . . . . . . . . . . . . 70
Lecture d’un DVD ou d’un CD . . . . . . . . . . . . . . . . 71
Lecture d'un DVD formaté en mode vidéo ou VR . 71
Contrôle de la lecture du disque. . . . . . . . . . . . . . . 71
Sélection d'un chapitre, d'un titre ou d'une piste . . 72
Recherche sur un disque . . . . . . . . . . . . . . . . . . . . 72
Utilisation de la lecture à vitesse variable . . . . . . . 72
Utilisation du menu du disque DVD . . . . . . . . . . . . 73
Utilisation du menu titre du DVD . . . . . . . . . . . . . . 73
Agrandissement de l’image affichée . . . . . . . . . . . 73
Ajout de signets . . . . . . . . . . . . . . . . . . . . . . . . . . . 73
Lecture en boucle. . . . . . . . . . . . . . . . . . . . . . . . . . 74
Programmation d’une lecture en boucle programmée74
Utilisation de la lecture aléatoire . . . . . . . . . . . . . . 74
Programmation d'une liste de lecture. . . . . . . . . . . 74
Utilisation des sous-titres . . . . . . . . . . . . . . . . . . . . 75
Changement de bande sonore ou de canal . . . . . . 75
Son ambiophonique activé ou désactivé . . . . . . . . 76
Fonctionnalité des angles de prise de vues activée ou
désactivée . . . . . . . . . . . . . . . . . . . . . . . . . . . . . . 76
Changement de l’angle de prise de vues. . . . . . . . 77
Réduction des parasites audio. . . . . . . . . . . . . . . . 77
Sélection de la langue audio . . . . . . . . . . . . . . . . . 77
Sélection de la langue du menu disque . . . . . . . . . 78
Sélection de la langue du menu de configuration . 78
Utilisation de l’économiseur d’écran. . . . . . . . . . . . 78
Réglage de la luminosité de l'affichage du panneau
avant . . . . . . . . . . . . . . . . . . . . . . . . . . . . . . . . . . 79
Réglage de la fonction de l'audio PCM . . . . . . . . . 79
Réglage de l'audio Dolby Digital . . . . . . . . . . . . . . 80
Utilisation de la commande de portée dynamique. 81
Utilisation du balayage progressif . . . . . . . . . . . . . 81
Sélection du mode arrêt sur image . . . . . . . . . . . . 81
Configuration des contrôles parentaux . . . . . . . . . 82
Enregistrement de DVD . . . . . . . . . . . . . . . . . . . .83
Préparation à l'enregistrement. . . . . . . . . . . . . . . . 83
Formatage d’un DVD vierge . . . . . . . . . . . . . . . . . 85
Reformatage d’un DVD . . . . . . . . . . . . . . . . . . . . . 85
Enregistrement d'un programme . . . . . . . . . . . . . . 86
Utilisation de la fonction d'enregistrement immédiat
(OTR) . . . . . . . . . . . . . . . . . . . . . . . . . . . . . . . . . 87
Programmation d'un enregistrement ultérieur . . . . 87
Annulation ou correction d'un enregistrement
programmé . . . . . . . . . . . . . . . . . . . . . . . . . . . . . 89
Vérification d'un enregistrement programmé en cours
89
Arrêt d'un enregistrement programmé en cours . . 89
Problèmes relatifs aux enregistrements programmés89
Enregistrement à partir d'un périphérique externe. 89
Protection d’un DVD . . . . . . . . . . . . . . . . . . . . . . . 90
Finalisation d’un DVD . . . . . . . . . . . . . . . . . . . . . . 90
Finalisation automatique d’un DVD . . . . . . . . . . . . 91
Modifications des DVD. . . . . . . . . . . . . . . . . . . . .91
Suppression de titres (mode Vidéo). . . . . . . . . . . . 91
Suppression de titres (mode VR/liste de lecture). . 93
Suppression de titres (mode VR/liste de lecture). . 93
Modification du nom des titres (mode Vidéo). . . . . 94
Modification du nom des titres (mode VR). . . . . . . 95
Ajout ou suppression de signets de chapitre (mode
Vidéo) . . . . . . . . . . . . . . . . . . . . . . . . . . . . . . . . . 96
Ajout ou suppression de signets de chapitre (mode VR)
97
Protection des titres (mode VR/liste originale). . . . 97
Suppression de la protection d'un titre (mode VR/liste
originale) . . . . . . . . . . . . . . . . . . . . . . . . . . . . . . . 98
Division d'un titre (mode VR/liste de lecture). . . . . 99
Combinaison de titres (mode VR/liste de lecture) . 99
Ajout de titres à la liste de lecture (mode VR) . . . 100
Suppression d'une liste de lecture . . . . . . . . . . . . 101
Suppression de parties de titres (mode VR) . . . . 101
Ajouter des vignettes aux titres . . . . . . . . . . . . . . 102
Entretien. . . . . . . . . . . . . . . . . . . . . . . . . . . . . . .102
Réparation . . . . . . . . . . . . . . . . . . . . . . . . . . . . . . 102
Nettoyage du boîtier. . . . . . . . . . . . . . . . . . . . . . . 102
Manipulation des disques . . . . . . . . . . . . . . . . . . 103
Nettoyage des disques . . . . . . . . . . . . . . . . . . . . 103
Nettoyage de la lentille optique . . . . . . . . . . . . . . 103
Vérification de la télécommande . . . . . . . . . . . . . 103
Problèmes et solutions. . . . . . . . . . . . . . . . . . . .103
Alimentation électrique. . . . . . . . . . . . . . . . . . . . . 103
Image. . . . . . . . . . . . . . . . . . . . . . . . . . . . . . . . . . 103
Son. . . . . . . . . . . . . . . . . . . . . . . . . . . . . . . . . . . . 104
Télécommande . . . . . . . . . . . . . . . . . . . . . . . . . . 104
Lecture. . . . . . . . . . . . . . . . . . . . . . . . . . . . . . . . . 105
Enregistrement, enregistrement programmé, montage
105
Divers. . . . . . . . . . . . . . . . . . . . . . . . . . . . . . . . . . 106
Messages d’erreur. . . . . . . . . . . . . . . . . . . . . . . . 107
Spécifications . . . . . . . . . . . . . . . . . . . . . . . . . . .109
Codes de langue . . . . . . . . . . . . . . . . . . . . . . . .109
Avis juridiques . . . . . . . . . . . . . . . . . . . . . . . . . .110
Garantie limitée de 90 jours. . . . . . . . . . . . . . . .111
Introduction
Félicitations d’avoir acheté ce produit Insignia de
haute qualité. Le modèle NS-FSDVDR
représente la dernière avancée technologique
dans la conception de graveurs de DVD et a été
conçu pour des performances et une fiabilité
exceptionnelles.
Page 55

Graveur de DVD Insignia NS-FSDVDR
Informations sur la sécurité
ATTENTION
RISQUE DE CHOC ÉLECTRIQUE
NE PAS OUVRIR
Ce symbole indique qu'une tension dangereuse,
constituant un risque de choc électrique, est
présente dans cet appareil. Cette étiquette est
située au dos de l’appareil.
Ce symbole indique que d'importantes
instructions concernant le fonctionnement et la
maintenance figurent dans la documentation qui
accompagne cet appareil.
Avertissement
Cet appareil utilise un laser. Seul un technicien
qualifié doit retirer le capot ou entreprendre une
réparation sur cet appareil, compte tenu du risque
de lésions oculaires.
Avertissement
Émission de rayon laser visible et invisible en cas
d’ouverture ou de dispositif de verrouillage
défectueux. Ne pas regarder directement le
rayonnement laser.
Attention
L'utilisation de commandes ou de réglages ou de
performance de procédures autres que celles
spécifiées dans les présentes pourrait entraîner
une exposition dangereuse aux radiations.
Remarque
Le laser est situé à l’intérieur, près du mécanisme
du lecteur.
Avertissement
Afin de réduire les risques d’incendie et de choc
électrique, ne pas utiliser l'adaptateur
d'alimentation avec une rallonge ou une autre
prise d’alimentation, sauf si les plots peuvent s’y
enfoncer entièrement sans être exposés.
Avertissement
Afin de réduire le risque d’incendie et de choc
électrique, ne pas exposer l’appareil à la pluie ou
l’humidité.
1 Lire les instructions — Lire toutes les
instructions de sécurité et de fonctionnement
avant d’utiliser l’appareil.
2 Conserver les instructions – Les
instructions relatives à la sécurité et au
fonctionnement doivent être conservées pour
référence ultérieure.
3 Respecter les avertissements – Observer
tous les avertissements figurant sur l'appareil
et dans les instructions de fonctionnement.
4 Observer les instructions – Observer
toutes les instructions relatives au
fonctionnement et à l'utilisation de l'appareil.
5 Nettoyage – Débrancher l'appareil de la
prise secteur avant tout nettoyage. Ne pas
utiliser de nettoyants liquides ou en aérosol.
Utiliser un chiffon humide pour le nettoyage.
Exception : Dans le cas d'un produit qui est
destiné à un service ininterrompu et qui, pour
une raison spécifique (comme par exemple
le risque de perdre un code d'autorisation
pour un convertisseur de TV câblée) ne doit
pas être débranché par l'utilisateur pour le
nettoyage ou pour toute autre raison, la
référence au débranchement de l'appareil
peut ne pas figurer dans la description du
nettoyage.
6 Périphériques – Ne pas utiliser de
périphériques qui ne sont pas recommandés
par le fabricant du produit et qui pourraient
être dangereux.
7 Eau et humidité – Ne pas utiliser cet
appareil à proximité de l’eau, par exemple, à
côté d’une baignoire, d'un lavabo, d'un évier,
d’un bac à laver, dans une cave humide ou à
côté d’une piscine.
8 Accessoires – Ne pas placer
l’appareil sur une table roulante,
un pied, un trépied, un support
ou une table. L'appareil peut
dans sa chute blesser
sérieusement un enfant ou un
adulte et être gravement endommagé.
N’utiliser qu’avec la table roulante, le pied, le
trépied, le support ou la table recommandés
par le fabricant ou vendus avec l’appareil.
Tout montage de l'appareil doit observer les
instructions du fabricant, notamment la
recommandation de ce dernier en matière
d'accessoire de montage. Pour une
installation sur un meuble à roulettes,
déplacer l’ensemble avec précaution. Un
arrêt brusque, l’utilisation d’une force
excessive et des surfaces irrégulières
risquent de déstabiliser l’ensemble et de le
renverser.
9Ventilation – Les fentes et ouvertures du
boîtier sont prévues pour la ventilation, pour
assurer un fonctionnement fiable de
l’appareil et le protéger contre toute
surchauffe. Ces ouvertures ne doivent être ni
bloquées ni obstruées. Elles ne doivent
jamais être bloquées en installant l'appareil
sur un lit, un sofa, une moquette ou toute
autre surface semblable. Ne pas installer
l'appareil dans un meuble encastré comme
une bibliothèque ou sur une étagère, sauf si
une ventilation adéquate a été prévue ou si
les instructions du fabricant ont été
respectées.
10 Sources d’alimentation – Cet appareil doit
fonctionner conformément à la source
d’alimentation indiquée sur la plaque
signalétique. En cas d’incertitude sur la
tension d'alimentation électrique de la
maison, consulter le revendeur ou la
compagnie d'électricité.
54
www.insignia-products.com
Page 56

Graveur de DVD Insignia NS-FSDVDR
11 Mise à la terre ou polarisation – Cet
appareil est équipé d'une prise de courant
CA polarisée (à deux plots, un plus large que
l'autre). Cette fiche ne s'insère dans une
prise secteur que d'une seule façon. Il s'agit
d'un dispositif de sécurité. S’il est impossible
d’introduire à fond la fiche dans la prise
secteur, essayer de retourner la prise. Si la
fiche ne s'adapte toujours pas à la prise
secteur, contacter un électricien afin qu'il
remplace la prise inadéquate. Ne pas
chercher à modifier le dispositif de sécurité
de la prise polarisée.
12 Protection du cordon d’alimentation — Le
cordon d’alimentation doit être acheminé de
façon à ce qu’on ne puisse marcher dessus
ou qu’il soit pincé par des objets placés
dessus. Prêter particulièrement attention aux
points de branchement du cordon à la prise
secteur, aux barres multiprises et à l’endroit
d’où le cordon sort de l’appareil.
13 Mise à la terre d’une antenne extérieure –
Si l’appareil est connecté à une antenne
extérieure ou à un réseau câblé, s'assurer
que l'antenne ou la connexion au réseau
câblé est mis à la terre afin de bénéficier
d'une certaine protection contre les sautes de
courant et les charges électrostatiques
L'article 810 du Code national de l’électricité
(CNE), ANSI/NFPA Nº 70, fournit des
informations relatives à la mise à la terre
correcte du mât et du support, la mise à la
terre du fil conducteur de l’antenne à l’unité
de décharge de l’antenne, la taille des
conducteurs de mise à la terre,
l’emplacement de l’unité de décharge de
l’antenne, la connexion aux conducteurs de
terre ainsi que les normes en matière de
prise de terre.
7
6
5
4
3
1
1 Équipement de la compagnie
d'électricité
2 Système de mise à la terre des
électrodes de la compagnie
d’électricité
3 Serre-fils de mise à la terre
4 Conducteurs de mise à la terre
5 Unité de décharge de l’antenne
6 Serre-fil de mise à la terre
7 Fil conducteur de l’antenne
2
14 Foudre – Pour protéger l’appareil pendant
un orage ou s’il se trouve inutilisé et sans
surveillance pendant de longues périodes, le
débrancher de la prise secteur et débrancher
l'antenne ou la connexion au réseau câblé.
Ceci évitera d’endommager l’appareil en cas
de foudre et de variations de tension du
secteur.
15 Lignes électriques – l'antenne externe ne
doit pas être située près de lignes électriques
aériennes ou d'autres circuits d'alimentation
et électriques, ni à un emplacement où elle
pourrait tomber sur de tels circuits ou lignes
électriques. Lors de l'installation d'une
antenne extérieure, faire très attention de ne
pas toucher de telles lignes électriques ou
circuits car tout contact peut être mortel.
16 Surcharge – Les prises secteur et les
rallonges ne doivent pas être surchargées,
cela pourrait provoquer des risques
d'incendie ou de choc électrique.
17 Pénétration de liquides et d'objets – Ne
jamais enfoncer un objet quelconque dans
les ouvertures l'appareil, car il pourrait entrer
en contact avec des tensions dangereuses
ou provoquer un court-circuit à l'origine d'un
incendie ou d'un choc électrique. Ne jamais
répandre un liquide sur l’appareil.
18 Réparation – L’utilisateur ne doit pas
essayer de réparer cet appareil lui-même; en
effet son ouverture ou le démontage des
couvercles peut l’exposer à des tensions
dangereuses et à d'autres dangers. Toutes
les réparations doivent être réalisées par un
personnel qualifié.
19 Dommages requérant des réparations –
Débrancher l'appareil de la prise secteur et
utiliser les services d’un technicien qualifié
dans les conditions suivantes :
• Lorsque le cordon d’alimentation ou la
fiche sont endommagés;
• Si un liquide a été répandu ou des objets
sont tombés dans l’appareil.
• Si l’appareil a été exposé à la pluie ou à
l’eau.
• Si l’appareil fonctionne anormalement en
appliquant les instructions d’utilisation. Ne
régler que les commandes décrites dans
les instructions d’utilisation; en effet, le
réglage incorrect d’autres commandes
pourrait provoquer des dégâts, entraînant
souvent d'importantes réparations par un
technicien qualifié pour rétablir le
fonctionnement normal de l’appareil;
• Si l’appareil est tombé ou s’il est
endommagé de quelque façon que ce
soit.
• Lorsque l’appareil présente d’importantes
modifications de ses performances, il doit
être réparé.
20 Pièces de rechange – Si des pièces doivent
être remplacées, vérifier que le technicien
utilise des pièces spécifiées par le fabricant
ayant les mêmes caractéristiques que celles
d’origine. Toute substitution par des pièces
non autorisées peut provoquer un incendie,
un choc électrique ou d'autres dangers.
www.insignia-products.com
55
Page 57

Graveur de DVD Insignia NS-FSDVDR
21 Contrôle de sécurité – Les réparations ou la
maintenance ayant été effectuées, demander
au technicien de réaliser les contrôles de
sécurité de routine afin de déterminer si
l’appareil est en bon état de fonctionnement.
22 Chaleur – Installer l'appareil à l’écart de
sources de chaleur, telles que radiateurs,
bouches de chaleur, fours ou autres
appareils (y compris les amplificateurs) qui
produisent de la chaleur.
23 Ne pas mettre l'appareil sur un meuble qui
pourrait basculer si un enfant ou un adulte
s'appuyait contre lui, le tirait vers soi, se
tenait debout sur lui ou y grimpait. S'il
tombait, l'appareil pourrait provoquer des
blessures graves, voire mortelles.
Recyclage
Le matériel d'emballage de cet appareil
est recyclable et réutilisable. Pour la mise
au rebut de matériaux, observer la
réglementation locale en matière de recyclage.
Les piles ne doivent jamais être mises au rebut
ni incinérées, mais éliminées de façon conforme
aux réglementations locales concernant les
déchets chimiques. Éliminer les piles usagées
en les confiant à un site de collecte de batteries
usagée ou de déchets dangereux. Contacter les
autorités locales pour plus de renseignements.
Numéros de série et de modèle
Les numéros de série et de modèle figurent au
dos de l'appareil. Prendre note de ces numéros
et les conserver pour toute référence ultérieure.
Nº de modèle
Nº de série
Où installer l'appareil
Pour des performances optimales et la sûreté de
l'appareil :
• Installer l'appareil dans une position
horizontale et stable.
• Ne rien placer directement sur le dessus de
l’appareil.
• Ne pas placer l'appareil directement sur le
dessus du téléviseur.
• Protéger l'appareil des rayons directs du
soleil et le garder à l'abri des sources de
chaleur intense.
• Éviter les endroits poussiéreux ou humides.
• Éviter les endroits où la ventilation est
insuffisante pour assurer une dissipation
correcte de la chaleur.
• Ne pas obstruer les orifices de ventilation
latéraux de l'appareil.
• Éviter les endroits soumis à de forte
vibrations ou à des champs magnétiques
élevés.
Avertissement
Ne pas manipuler le cordon d'alimentation avec
les mains mouillées.
Ne pas tirer sur le cordon d'alimentation pour le
débrancher d'une prise secteur CA. Saisir la fiche.
Si, par accident, de l'eau est renversée sur
l'appareil, débrancher immédiatement le cordon
d'alimentation et confier la réparation de l'appareil
à un technicien agréé.
Condensation
Une condensation d'humidité peut se produire à
l'intérieur de l'appareil lorsqu'il est transporté
d'un endroit froid à un endroit chaud, lorsqu'une
pièce froide est réchauffée ou dans des
conditions d'humidité élevée. Ne pas utiliser
l'appareil pendant au moins deux heures,
jusqu'à complète évaporation de l'humidité à
l'intérieur.
Technologie protégée par le droit d'auteur
La copie, la diffusion, la représentation publique
et le prêt non autorisés de disques sont interdits.
Cet appareil incorpore des technologies
protégées par le droit d'auteur qui font l'objet de
brevets aux États-Unis et par d'autres droits de
propriété intellectuelle. L’utilisation de cette
technologie protégée par le droit d’auteur doit
être autorisée par Macrovision
MD
; cette
technologie est destinée à un usage domestique
et limité, sauf en cas d’autorisation spéciale de
Macrovision. La rétro-ingénierie ou le
démontage sont interdits.
Sortie pour balayage progressif
Les téléviseurs à haute définition ne sont pas
tous entièrement compatibles avec ce produit,
ce qui peut être source de défauts sur l’image.
En cas de défauts d'image avec une sortie de
balayage progressif de 525 lignes, Insignia
recommande d'établir la connexion à la sortie de
définition standard. Pour toute question relative
à la compatibilité d'un téléviseur avec ce graveur
de DVD 525p, contacter le centre de service à la
clientèle.
Fonctionnalités
Enregistrement
Formats de DVD compatibles—DVD-R
(inscriptible une seule fois) et DVD-RW
(réinscriptible).
Enregistrement programmé — Il est possible
de programmer l'enregistrement de huit
émissions, par jour ou à échéance d'une
semaine ou d'un mois.
Enregistrement différé par une seule touche
— Appuyer plusieurs fois sur une seule touche
pour augmenter la durée d'enregistrement de
30 minutes à 8 heures.
Signets de chapitres automatiques et menus
de titre — Les signets de chapitres sont créés
automatiquement, avant même le début de
l'enregistrement. Les menus de titres sont créés
automatiquement lorsqu'un disque DVD est
finalisé en mode Vidéo (l'enregistrement
terminé)
Création d'une liste de lecture automatique
— (mode VR [Enregistrement vidéo]). Permet de
créer une liste de lecture temporaire à partir d'un
titre original, laquelle liste étant éditable selon le
besoin. Le titre d'origine n'est pas modifié.
Finalisation automatique (mode Vidéo) —
Permet de finaliser un disque après
enregistrement de toutes les émissions
programmées ou lorsqu'un disque DVD est
plein.
56
www.insignia-products.com
Page 58

Graveur de DVD Insignia NS-FSDVDR
Enregistrement stéréo du canal gauche —
Permet d'enregistrer automatiquement l'entrée
mono du canal gauche comme entrées des
canaux gauche et droit (entrée ligne LINE 2
uniquement).
Lecture sur lecteurs DVD standard — Il est
possible de lire un disque enregistré en mode
Vidéo sur les lecteurs DVD standard, y compris
les lecteurs DVD d'ordinateurs qui sont
compatibles avec la lecture de disques
DVD-Vidéo. (Les disques enregistrés en mode
Vidéo doivent être finalisés avant de pouvoir les
lire sur d'autres lecteurs DVD.)
Remarque
Le format DVD-Vidéo format (mode Vidéo) est un
nouveau format d'enregistrement sur les disques
DVD-RW et DVD-R qui a été approuvé par le DVD
Forum en 2000. L'adoption de ce format est
optionnelle pour les fabricants de dispositifs de
lecture de DVD et certains lecteurs DVD-Vidéo,
DVD-ROM et autres dispositifs de lecture de DVD
sont incompatibles avec les disques DVD-RW et
DVR-R enregistrés dans le format DVD-Vidéo.
Édition
Titres personnalisés — Permet d'effacer, de
renommer, de combiner ou de diviser des titres.
Liste de lecture personnalisée — Permet
d'utiliser la liste de lecture originale ou d'éditer
les titres à volonté.
Signets de chapitres personnalisés — Permet
de définir ou d'effacer des signets de chapitres à
volonté.
Vignettes personnalisées — Permet de
sélectionner n'importe quelle image comme
vignette dans la liste des titres.
Protection des titres — Permet d'empêcher
l'édition ou l'effacement des titres.
Lecture
Son ambiophonique de salle de cinéma —
Permet de se connecter à un amplificateur ou un
décodeur compatible avec Dolby Digital et de
faire l'expérience d'un son ambiophonique hors
pair (à partir d'un disque vidéo de format
compatible).
Recherche rapide — Permet de visualiser
n'importe quelle scène d'un film. Effectuer au
choix une recherche par titre, par chapitre ou par
durée.
Ordre de lecture personnalisé — Permet de
lire les titres et chapitres dans l'ordre du disque
DVD original ou créer une liste de lecture
personnalisée.
Système ambiophonique virtuel — Permet de
faire l'expérience d'un audio
quasi-ambiophonique avec une chaîne stéréo à
deux canaux.
Autres
Format de balayage progressif — À la
différence du balayage entrelacé conventionnel,
le format de balayage progressif offre un
scintillement moindre et une résolution d'image
plus haute que les signaux TV traditionnels.
Accessoires
• Télécommande avec deux piles AA
•Câble RF
• Câbles audio-vidéo
• Guide de l’utilisateur
• Guide d'
Installation rapide
Face avant
OPEN/CLOSE CHANNEL REV FWD STOP PLAY POWER
REC/OTRREC SPEED
L
R
S-VIDEO VIDEO AUDIO
# Composant Description
1 Plateau à disque Placer un disque (étiquette
2 Affichage Affichage des informations
3 Touche OUVRIR/FERMER Permet d’ouvrir ou de fermer
4
Touches CANAL /
CANAL
5
Touche REV
6 Touche AVANCE RAPIDE En mode lecture, permet de
7
Touche ARRÊT
vers le haut) sur le plateau
pour la lecture ou
l'enregistrement.
d'état. Pour plus
d’informations, voir
« Affichage de la face
avant » à la page 58.
le plateau à disque. Il est
également possible de
mettre l'appareil sous
tension en appuyant sur
cette touche.
Permet de passer au canal
suivant ou de revenir au
précédent.
En mode lecture, permet de
revenir au chapitre
précédent ou à la piste
précédente. Appuyer sans
relâcher pendant 1,5
secondes pour une
recherche rapide en arrière.
En mode Pause, appuyer sur
cette touche pour revenir en
arrière une image à la fois.
Appuyer sans relâcher
pendant 1,5 secondes pour
une lecture arrière lente.
passer au chapitre ou à la
piste suivante. Appuyer sans
relâcher pendant 1,5
secondes pour une
recherche rapide en avant.
En mode Pause, appuyer sur
cette touche pour une
lecture vers l'avant image
par image. Appuyer sans
relâcher pendant 1,5
secondes pour une lecture
avant au ralenti.
Permet d’interrompre la
lecture ou l’enregistrement.
www.insignia-products.com
57
Page 59

Graveur de DVD Insignia NS-FSDVDR
# Composant Description
8 Touche LECTURE Pour commencer ou
9 Touche MARCHE/ARRÊT Permet d'allumer ou
10 Capteur de
télécommande
11 Touche VITESSE
D'ENREGISTREMENT
12 Touche
ENREGISTREMENT
IMMÉDIAT
13 Prise d'entrée S-VIDEO
(LINE2) [S-Vidéo LINE2)
14 Prise d'entrée VIDEO
(LINE2) [Vidéo LINE2)
15 Prises d’entrée AUDIO
G/D (LINE2)
reprendre la lecture. Il est
également possible de
mettre l'appareil sous
tension en appuyant sur
cette touche.
d'éteindre l’appareil.
En cas de programmation
d'un enregistrement différé,
appuyer sur cette touche
pour mettre l'appareil en
mode d'attente.
Reçoit les signaux de la
télécommande. Ne pas
obstruer la transmission des
signaux.
Permet de sélectionner une
vitesse d’enregistrement.
Permet de commencer
l’enregistrement. Appuyer
plusieurs fois sur cette
touche pour commencer un
Enregistrement différé par
une seule touche
(One-Touch Timer). Pour
plus d’informations, voir
« Utilisation de la fonction
d'enregistrement immédiat
(OTR) » à la page 87.
Connecter un périphérique
S-Vidéo à cette prise.
Connecter la vidéo d'un
périphérique externe à cette
prise à l'aide d'un câble
audio-vidéo (A/V) standard.
Connecter l'audio d'un
périphérique externe à ces
prises à l'aide d'un câble
audio-vidéo (A/V) standard.
# Composant Description
1 Prise d’entrée
d’antenne (ANTENNA
IN)
2 Prise d'entrée vidéo
(G1) [VIDEO IN (L1)]
3 Prise de sortie vidéo
(VIDEO OUT)
4 Cordon d’alimentation Brancher le cordon
5 Prise de sortie
d'antenne (ANTENNA
OUT)
6 Prises d'entrée audio
(G1) [AUDIO IN (L1)]
7 Prise d'entrée S-Vidéo
(G1) [S-VIDEO IN (L1)]
8 Prise de sortie S-Vidéo
(S-VIDEO OUT)
9 Prises de sortie vidéo à
composantes
(COMPONENT VIDEO
OUTPUT)
10 Prises de sortie audio
(AUDIO OUT)
11 Prise de sortie audio
numérique coaxiale
(COAXIAL DIGITAL
AUDIO OUTPUT)
Pour connecter l'appareil à
la TV câblée ou à une
antenne externe.
Connecter la vidéo d'un
périphérique externe à cette
prise à l'aide d'un câble
audio-vidéo (A/V) standard.
Prise de connexion d’un
téléviseur ou d’un autre
périphérique vidéo.
d’alimentation sur une prise
secteur.
Brancher un téléviseur sur
cette prise.
Connecter l'audio d'un
périphérique externe à ces
prises à l'aide d'un câble
audio-vidéo (A/V) standard.
Connecter un périphérique
S-Vidéo à cette prise.
Connecter un téléviseur, un
récepteur audio-vidéo (A/V)
ou un autre périphérique à
cette prise.
Connecter un téléviseur à
ces prises à l'aide d'un câble
vidéo à composantes.
Connecter l'audio d'un
périphérique externe à ces
prises à l'aide d'un câble
audio-vidéo (A/V) standard.
Connecter un décodeur
Dolby Digital ou un système
audio numérique à cette
prise.
Face arrière Affichage de la face avant
Attention
Ne pas toucher les broches à l'intérieur des
prises. Les décharges électrostatiques (électricité
statique) peuvent provoquer des dommages
permanents à l’appareil.
Remarque
Ce graveur n'est pas équipé d'un modulateur RF.
Si le téléviseur ne comporte pas de prises
composantes (components), S-Video (S-Vidéo)
ou A/V (Audio-vidéo), voir « Connexion du
téléviseur avec un modulateur RF » à la page 64.
# Témoin Description
IN
OUT
ANTENNA
1 Type de disque CD — S'affiche lorsqu'un
COMPONENT
VIDEO IN
VIDEO OUTPUT
S-VIDEO
IN
L
R
AUDIO IN
(L1)
VIDEO OUT
Y
DIGITAL AUDIO OUTPUT
OUT
PCM / BITSTREAM
L
B
PB/C
R
PR/C
R
COAXIAL
AUDIO OUT
CD audio se trouve sur le
plateau à disque.
DVD — S'affiche lorsqu'un
DVD se trouve sur le plateau
à disque.
DVD R — S'affiche
lorsqu'un DVD-R se trouve
sur le plateau à disque.
DVD RW — S'affiche
lorsqu'un DVD-RW se trouve
sur le plateau à disque.
58
www.insignia-products.com
Page 60

Graveur de DVD Insignia NS-FSDVDR
# Témoin Description
2 État actuel
3 Enregistrement
programmé
4 Enregistrement REC(Enregistrement) —
5 PM S'affiche lorsque l'heure
6 Mode Répétition REPEAT (Répétition) —
7 Heure Affichage d'informations
8 Signet de chapitre C — S'affiche pour indiquer
9 Vitesse
d'enregistrement
10 P.SCAN S'affiche lorsque la fonction
11 Signet de piste ou de
titre
— S'affiche lorsque la
lecture s'arrête
momentanément.
— S'affiche lorsqu'un
disque est en cours de
lecture.
— S'affiche lorsque
l'enregistrement programmé
d'une émission est en cours.
Clignote lorsque tous les
enregistrements
programmés ont été
effectués ou lorsqu'une
émission ne peut pas être
enregistrée pour une raison
quelconque.
S'affiche lorsqu'un
enregistrement est en cours.
indiquée est postérieure à
midi (12:00 noon).
S'affiche lorsque l'appareil
est en mode Répétition.
d'état. Par exemple :
• Le numéro de canal
est affiché lorsque le
plateau à disque ne
contient aucun
disque.
• La durée
d'enregistrement
disponible restante
est affichée lorsque le
plateau à disque
contient un disque
inscriptible.
• La durée
d'enregistrement
écoulée s'affiche
lorsque
l'enregistrement d'un
disque est en cours.
• La durée
d'enregistrement
restante s'affiche
lorsqu'un
Enregistrement
immédiat (OTR) est
en cours.
• L'heure actuelle
s'affiche lorsque
l'appareil est en
mode Attente ou en
mode Menu.
un numéro de chapitre.
Indique la vitesse
d'enregistrement actuelle.
de balayage progressif est
activée.
T — S'affiche pour indiquer
un numéro de piste ou de
chapitre.
La face avant affiche également des messages
pour signaler les informations d'état suivantes :
S'affiche quand
l’appareil est mis
sous tension.
S'affiche quand
l’appareil est mis
hors tension.
S'affiche lorsque
le plateau à disque
est ouvert.
S'affiche lorsque
le plateau à disque
est fermé.
S'affiche lorsque
l'appareil lit un
disque.
S'affiche pendant
l'écriture vers un
disque.
www.insignia-products.com
59
Page 61

Graveur de DVD Insignia NS-FSDVDR
Télécommande
POWER
ZOOM
ABC
.@/:
1
2
JKL
GHI
4
5
TUV
PQRS
7
8
DISPLAY
SPAC E
0
MENU/LIST
TOP MENU
REC SPEED
REV
x1.3/0.8
REC/OTR
# Touche Description
1 MARCHE/ARRÊT Permet d'allumer ou d'éteindre
2 ZOOM Au cours de la lecture, appuyer
3 Touches
4 AFFICHAGE Permet d'afficher ou de fermer le
5 MENU PRINCIPAL Appuyer sur cette touche pour
6 MENU/LISTE Permet d’afficher le menu Disque
7 Permet de sélectionner des
numériques
OPEN/CLOSE
TIMER
PROG.
DEF
3
CH
MNO
6
WXYZ
REPEAT
9
CLEAR
SETUP
RETURN
ENTER
PLAY
FWD
PAU SESKIP SKIP
CM SKIP
STOP
l’appareil.
En cas de programmation d'un
enregistrement différé, appuyer
sur cette touche pour mettre
l'appareil en mode d'attente.
sur cette touche pour agrandir
l'image sur l'écran.
Permettent de sélectionner les
numéros de canaux.
Permettent de sélectionner un
titre, un chapitre ou une piste au
cours de la lecture d'un disque.
Dans le menu de configuration
(Setup), permettent de saisir les
valeurs de paramètres ou le mot
de passe de contrôle parental.
menu d’écran.
ouvrir le menu de titre du DVD.
(Disk)
En mode d'Enregistrement vidéo
(VR), permet d'alterner entre la
liste originale (Original list) et la
liste de lecture (Playlist).
options ou des paramètres.
# Touche Description
8 RETOUR RAPIDE En mode de lecture (Playback),
9VITESSE
D'ENREGISTREM
ENT
10 ×1.3/0.8 En mode Lecture (Playback),
11 ENREGISTREMEN
T IMMÉDIAT
12
13
SAUT
PAUSE
14 OUVRIR/FERMER Permet d’ouvrir ou de fermer le
15 PROGRAMMATIO
N DIFFÉRÉE
16
17
CH
CH
18 RÉPÉTITION Permet d’afficher le menu
permet d'activer le retour rapide.
En mode Pause, permet une
lecture arrière lente.
Permet de sélectionner une
vitesse d’enregistrement.
permet d'obtenir une lecture
légèrement plus rapide ou plus
lente, tout en préservant une
lecture audio normale. Cette
fonction n'est disponible que si le
disque a été enregistré dans le
format Dolby Digital. Pour plus
d’informations, voir « Utilisation
de la lecture à vitesse variable » à
la page 72.
Permet de commencer
l’enregistrement. Appuyer
plusieurs fois sur cette touche
pour commencer un
Enregistrement différé par une
seule touche (One-Touch Timer).
Pour plus d’informations, voir
« Utilisation de la fonction
d'enregistrement immédiat
(OTR) » à la page 87.
En mode lecture, permet de
revenir au chapitre précédent ou à
la piste précédente.
En mode Pause, appuyer sur cette
touche pour revenir en arrière sur
un disque DVD, une image à la
fois.
Appuyer sur cette touche pour
interrompre momentanément la
lecture ou l'enregistrement.
Appuyer sur PLAY (Lecture)
pour reprendre la lecture ou
l'enregistrement.
plateau à disque. Il est également
possible de mettre l'appareil sous
tension en appuyant sur cette
touche.
Permet d'accéder à la liste des
enregistrements différés.
Permet d’aller au canal suivant de
la liste des canaux.
Permet d’aller au canal précédent
de la liste des canaux.
Répétition (Repeat). Depuis ce
menu, il est possible de répéter
un titre, un chapitre ou un disque
DVD entier, ou une lecture en
boucle.
60
www.insignia-products.com
Page 62

Graveur de DVD Insignia NS-FSDVDR
# Touche Description
19 CONFIGURATION Permet d’accéder au menu
20 EFFACER Permet de :
21 ENTRÉE Permet de confirmer des
22
23 AVANCE RAPIDE En mode Lecture (Playback),
24 LECTURE Pour commencer ou reprendre la
25
26 SAUT DES
27
RETOUR
SAUT
ANNONCES
PUBLICITAIRES
ARRÊT
d’écran.
En mode de lecture de disque
DVD, appuyer pendant plus de
trois secondes pour passer du
mode de Balayage progressif au
mode Entrelacé.
Remarque°: Pour utiliser le
balayage progressif, connecter le
téléviseur à l'aide des prises
Composantes. Si le téléviseur
n'est pas doté de prises
Composantes, connecter le
téléviseur à l'aide des prises
Audio-vidéo (A/V), puis basculer
en mode Entrelacé (Interlaced).
• Effacer les champs de
saisie du mot de passe
après l'avoir saisi.
• Annuler la programmation
d'un CD.
• Effacer un numéro de
signet sélectionné en
mode de configuration des
signets.
• Effacer une émission
figurant dans la liste des
enregistrements différés
(Timer Programming List).
décisions ou de sélectionner des
éléments de menus.
Permet de revenir au menu
précédent.
permet l'avance rapide.
En mode Pause, permet une
lecture avant lente.
lecture. Il est également possible
de mettre l'appareil sous tension
en appuyant sur cette touche.
En mode lecture, permet de
passer au chapitre ou à la piste
suivante.
En mode Pause, appuyer sur cette
touche pour aller en avant sur un
disque DVD, une image à la fois.
Pendant la lecture, permet
d'avancer de 30 secondes dans la
lecture. La durée du saut
augmente de 30 secondes à
chaque pression de la touche. Il
est possible d'avancer d'un total
de 180 secondes dans la lecture
(six pressions sur la touche).
Permet d’interrompre la lecture
ou l’enregistrement.
Installation de
l’enregistreur/graveur
Installation des piles de la télécommande
Pour installer les piles de la télécommande :
1 Ouvrir le couvercle du compartiment des
piles.
2 Insérer deux piles AA dans le compartiment.
Veiller à ce que les pôles + et – des piles
coïncident avec les repères + et – figurant à
l'intérieur du compartiment.
3 Replacer le couvercle du compartiment des
piles.
Remarques
• Ne pas mélanger des piles neuves et usagées.
• Ne pas mélanger des piles de types différents.
Même si des piles paraissent extérieurement
similaires, des piles différentes peuvent avoir
des tensions différentes.
• Veiller à ce que les pôles + et – des piles
coïncident avec les repères + et – figurant à
l'intérieur du compartiment.
• Retirer les piles s'il n'est pas prévu d'utiliser la
télécommande pendant un mois ou plus.
• Mettre les piles usées au rebut conformément
à la réglementation locale sur les déchets
dangereux.
• Ne pas recharger, mettre en court-circuit,
chauffer, brûler ni ouvrir des batteries. Les
batteries contiennent de l'acide qui peut
provoquer des démangeaisons ou des
brûlures.
www.insignia-products.com
61
Page 63

Graveur de DVD Insignia NS-FSDVDR
POWE
R
D
IS
P
LAY
RECSPE
ED
C
L
E
A
R
CM
S
K
IP
S
K
I
P
RE
C
P
A
U
SE
P
E
N
TER
R
E
C
M
O
N
I
T
OR
OPEN
/
CL
O
S
E
TIM
ER
PROG
.
M
ENU
P
L
A
Y
LI
ST
T
O
P
M
E
N
U
/
OR
I
G
IN
A
L
S
PAC
E
1
2
3
4
5
6
7
8
9
0
F
WD
S
T
OP
P
L
A
Y
RE
V
C
H
.@
/
:
ABC
D
EF
GH
I
J
KL
M
NO
P
Q
R
S
TU
V
W
X
Y
Z
UDIO
VIDEO INID
L
R
U
VIDEO OUTID
(L1)
O
OU
S
O
T
V
Y
/C
P
R/CR
R
DIGI
UDIO OUTPUT
M
C
O
L
Utilisation de la télécommande
• Vérifier qu'il n'existe aucun obstacle entre la
télécommande et le capteur à l'avant de
l'appareil
• La télécommande peut ne pas fonctionner
correctement en cas de lumière solaire
directe ou fluorescente sur le capteur de
l'appareil.
• Les télécommandes de périphériques
différents peuvent brouiller leurs signaux
respectifs. Ne pas utiliser la télécommande
d'un autre périphérique trop près de
l'appareil.
• Remplacer les piles lorsque la portée de la
télécommande diminue sensiblement.
• Les portées maximales de la télécommande
sont les suivantes :
• Ligne de mire : Environ 23 pi (7 m)
• De chaque côté de l'axe de l'appareil :
Environ 16 pi (5 m) de 0 à 30°
• Du dessus : Environ 16 pi (5 m) entre 0 et
15°
• Du dessous : Environ 10 pi (3 m) de 0 à
30°
Connexion d'une antenne ou d'un
décodeur câble/satellite
Avis à l'installateur de TV câblée
Le présent avis a pour objet de rappeler à
l'installateur de systèmes de télévision par câble
que l'article 820-40 du Code national de
l'électricité contient des recommandations
relatives à la mise à la masse de l'appareil et, en
particulier, stipule que la masse du câble doit être
connectée au système de mise à la terre de
l'immeuble, aussi près que possible du point
d'entrée du câble.
Pour connecter une antenne du graveur au
téléviseur :
1 Déconnecter le câble de l'antenne de 75
ohms de l'arrière du téléviseur.
2 Connecter le câble d'antenne de 75 ohms de
la prise d'antenne murale à la prise d'entrée
antenne (ANTENNA IN) du graveur.
3 Connecter la prise de sortie antenne
(ANTENNA OUT) du graveur à la prise
d'entrée antenne (ANT IN) du téléviseur à
l’aide d’un câble RF de 75 ohms.
Câble ou antenne
O
PE
N
/C
L
OSE CH
A
N
N
EL R
EV
R
E
C SPE
F
W
D
ED
REC/O
ST
O
P
T
R
P
LAY
P
OWE
R
S-V
ID
E
O
VID
EO
L
AUD
IO
R
Prise d'antenne murale
Câble RF de 75 ohms
Arrière du graveur
IN
OUT
UT
ANTENNA
AUDIO IN
VIDEO OUTPUT
S-VIDEO
-VIDE
IN
L
R
IN
(L1)
OUT
VIDEO OUT
Y
T
B
PB/C
PR/C
R
AUDIO OUT
DIO OUT
L
R
DIGITAL AUDIO OUTPUT
PCM / BITSTREAM
PCM / BITSTREA
COAXIAL
AXIA
COMPONEN
COMPONENT
VIDEO IN
IDEO OUTPUT
Pour connecter un décodeur câble ou
satellite à travers le graveur au téléviseur :
1 Déconnecter le câble de 75 ohms connecté
au décodeur câble ou satellite de l'arrière du
téléviseur.
2 Connecter le câble d'antenne de 75 ohms du
décodeur câble ou satellite à la prise d'entrée
antenne (ANTENNA IN) du graveur.
62
www.insignia-products.com
Page 64

Graveur de DVD Insignia NS-FSDVDR
(L1)
OUT
VIDEO IN
L
R
DIGI
T
AL
A
UDIO O
PCM /
C
O
L
UDIO OUT
VIDEO OUTID
OUT
O
T
V
UT
P
B/CB
P
R/CR
N
VIDEO IN
L
R
DIGI
T
AL
A
UDIO OUTPU
PCM /
C
O
U
T
VIDEO OUTID
OU
S
O
COMPO
T
V
UT
B/CB
P
R/CR
A
UDIO OU
VIDEO OUTID
DIG
TALA
UDIO OUTPUT
PCM /
M
C
O
UDIO
VIDEO INID
L
IN
OUT
OUT
S
O
UDIO
VIDEO INID
L
A
UDIO OU
VIDEO OUTID
I
OUT
S
O
COMPO
T
UT
Y
B
/
B
P
R/CR
DIG
TALA
UDIO OUTPU
M
C
O
3 Connecter la prise de sortie antenne
(ANTENNA OUT) du graveur à la prise
d'entrée antenne (ANT IN) du téléviseur à
l’aide d’un câble RF de 75 ohms.
Prise d'antenne murale
IN
OUT
ANTENNA
Remarques
• Il est possible d'enregistrer un canal non
brouillé en sélectionnant le canal sur le
décodeur câble ou satellite. Vérifier que le
décodeur câble ou satellite est sous tension.
• Il n'est pas possible d'enregistrer un canal et
de regarder simultanément un autre canal.
Connexion du graveur à un téléviseur
Décodeur câble ou satellite
IN
Câbles RF de 75 ohms
COMPONEN
COMPONENT
VIDEO IN
IDEO OUTP
VIDEO OUTPUT
S-VIDEO
S-VIDE
IN
IN
L
R
AUDIO IN
UDIO IN
(L1)
Arrière du graveur
OUT
OUT
VIDEO OUT
Y
PB/C
PR/C
B
R
L
R
AUDIO OUT
Arrière du
téléviseur
DIGITAL AUDIO OUTPUT
UTPUT
BITSTREAM
PCM / BITSTREAM
COAXIAL
AXIA
Connexion au téléviseur à l'aide des
câbles à composantes (image optimale)
Remarque
La méthode utilisée pour connecter le téléviseur
dépend du type de prise dont il est doté.
Pour connecter le graveur au téléviseur à
l'aide des câbles vidéo à composantes :
• Connecter les câbles vidéo à composantes
(non fournis) des prises de sortie vidéo à
composantes [COMPONENT VIDEO
OUTPUT] (Y, Pb/Cb, Pr/Cr) du graveur aux
prises d'entrée vidéo à composantes
[COMPONENT VIDEO IN] (Y, Pb/Cb, Pr/Cr)
à l'arrière du téléviseur.
Arrière du
téléviseur
Arrière du graveur
VIDEO IN
IN
IN
L
OUT
R
AUDIO IN
IN
ANTENNA
(L1)
COMPONENT
VIDEO IN
Y
B/CB
P
P
R/CR
COMPONENT
VIDEO OUTPUT
S-VIDEO
-VIDE
Y
IN
OUT
PB/C
PR/C
VIDEO OUT
L
B
R
R
AUDIO OUT
Câbles pour vidéo
à composantes
DIGITAL AUDIO OUTPUT
I
BITSTREA
PCM / BITSTREAM
COAXIAL
T
IN
OUT
ANTENNA
AUDIO IN
VIDEO IN
L
R
UDIO I
(L1)
Câble RF de
75 ohms
Arrière du graveur
COMPONENT
VIDEO OUTPUT
IDEO OUTP
S-VIDEO
-VIDE
IN
IN
Connexion du téléviseur à l'aide d'un câble
S-Vidéo (meilleure image)
NEN
VIDEO OUT
Y
OUT
T
PB/C
PR/C
DIGITAL AUDIO OUTPUT
T
BITSTREAM
PCM / BITSTREAM
L
B
R
R
COAXIAL
AUDIO OUT
DIO OU
Remarque
La méthode utilisée pour connecter le téléviseur
dépend du type de prise dont il est doté.
Pour connecter le graveur au téléviseur à
l'aide d'un câble S-Vidéo :
• Connecter un câble S-Vidéo (non fourni) de
la prise de sortie S-Vidéo (S-VIDEO OUT) du
graveur à la prise d'entrée S-Vidéo (S-VIDEO
IN) à l'arrière du téléviseur.
S-VIDEO IN
Arrière du
téléviseur
Câble S-Vidéo
Arrière du graveur
NEN
COMPONENT
VIDEO IN
VIDEO OUTP
IN
N
OUT
ANTENNA
AUDIO IN
VIDEO OUTPUT
S-VIDEO
-VIDE
OUT
N
IN
L
R
IN
(L1)
VIDEO OUT
Y
PB/C
C
PR/C
DIGITAL AUDIO OUTPUT
I
T
PCM / BITSTREAM
PCM / BITSTREA
L
L
B
R
R
AUDIO OUT
COAXIAL
T
www.insignia-products.com
63
Page 65

Graveur de DVD Insignia NS-FSDVDR
UDIO
VIDEO INID
L
(
I
T
OUT
S
O
COMPO
T
UT
Y
B
/
B
P
R/CR
DIG
TALA
UDIO OUTPUT
PCM /
M
C
O
UDIO IN
D
T
P
M
C
O
AXIAL
A
UDIO
VIDEO INID
L
VIDEO OUTID
(
I
T
OUT
S
O
COMPO
T
UT
B
/
B
P
/C
Connexion au téléviseur à l'aide des
câbles composites (image de base)
Remarque
La méthode utilisée pour connecter le téléviseur
dépend du type de prise dont il est doté.
Pour connecter le graveur au téléviseur à
l'aide des câbles vidéo composites :
• Connecter le câble vidéo composite
(connecteurs jaunes - fournis) de la prise de
sortie vidéo (VIDEO OUT) du graveur à la
prise d'entrée vidéo (VIDEO IN) à l'arrière du
téléviseur.
Arrière du
téléviseur
AUDIO INVIDEO
Câble vidéo composite
Arrière du graveur
COMPONENT
IN
IN
OUT
OU
ANTENNA
AUDIO IN
VIDEO IN
L
R
R
IN
(L1)
L1)
NEN
VIDEO OUTPUT
VIDEO OUTP
S-VIDEO
-VIDE
N
IN
OUT
VIDEO OUT
Y
PB/C
C
PR/C
DIGITAL AUDIO OUTPUT
I
BITSTREA
PCM / BITSTREAM
L
B
R
R
COAXIAL
AUDIO OUT
6 Positionner le commutateur de canaux 3/4 du
modulateur RF sur 3 ou 4, en fonction du
canal TV qui est le moins utilisé dans la zone
de réception. Si le modulateur RF a un
commutateur modulateur/antenne, le régler
suivant les recommandations du manuel du
modulateur RF.
7 Mettre le téléviseur en marche et le
syntoniser sur le même canal sur lequel a été
réglé le modulateur RF (3 ou 4).
Pour plus d'informations, observer les
instructions fournies avec le modulateur RF.
Câble ou antenne
or
Câble d'antenne
Prise d'antenne murale
Arrière du graveur
VIDEO IN
IN
IN
L
OUT
R
AUDIO IN
ANTENNA
(L1)
ANT IN
AC 120V
Modulateur RF
(non fourni)
VIDEO OUTPUT
S-VIDEO
COMPONENT
Câble RF
Y
OUT
PB/C
B
PR/C
R
AUDIO OUT
VIDEO OUT
L
R
TO TV NI OEDIVLENNAHC AUDIO IN
Câble audio/vidéo
(fourni)
Câble audio
RL3 4
Câble vidéo
Connexion du téléviseur avec un
modulateur RF
Si le téléviseur n'a pas de prises A/V, S-Vidéo
ou à composantes, il est possible de connecter
le téléviseur en utilisant un modulateur RF (non
fourni). Le graveur n'intègre pas de modulateur
RF.
Remarque
Cette connexion fournie la qualité d'image la plus
médiocre de toutes les connexions illustrées dans
ce guide. Si le téléviseur a des prises d'entrée
A/V, voir « Connexion au téléviseur à l'aide des
câbles composites (image de base) » à la page
64.
Remarque
La méthode utilisée pour connecter le téléviseur
dépend du type de prise dont il est doté.
Pour connecter le graveur au téléviseur en
utilisant un modulateur RF :
1 Déconnecter le câble de l'antenne de 75
ohms de l'arrière du téléviseur.
2 Connecter le câble d'antenne de 75 ohms de
la prise d'antenne murale à la prise d'entrée
antenne (ANTENNA IN) du graveur. Si la
prise d'entrée de l'antenne du téléviseur est
déjà utilisée, déconnecter le câble RF du
téléviseur.
3 Connecter la prise de sortie antenne
(ANTENNA OUT) du graveur au modulateur
RF (en général marquée ANT IN) à l’aide
d’un câble RF de 75 ohms.
4 Connecter le modulateur RF au téléviseur
avec un autre câble RF de 75 ohms.
5 Connecter les prises de sortie audio/vidéo
(AUDIO/VIDEO) du graveur aux prises
audio/vidéo (AUDIO/VIDEO) du modulateur
RF avec les câbles audio/vidéo.
Câble RF
Arrière du
téléviseur
Connexions de l'audio de base
Pour connecter le signal audio du graveur au
téléviseur :
• Connecter les câbles audio (fournis) des
prises de sortie audio (AUDIO OUT)
[gauche/blanc et droit/rouge) du graveur aux
prises d'entrée audio (AUDIO IN) à l'arrière
du téléviseur.
R L
Arrière du
téléviseur
Câbles audio
COMPONENT
VIDEO OUTPUT
VIDEO OUTP
S-VIDEO
-VIDE
(G/D)
NEN
OUT
VIDEO OUT
Y
Y
PB/C
C
PR/C
DIGITAL AUDIO OUTPUT
IGI
UDIO OUTPU
CM / BITSTREA
PCM / BITSTREAM
L
B
R
R
COAXIAL
AUDIO OUT
Arrière du graveur
VIDEO IN
IN
L
OU
OUT
R
R
AUDIO IN
IN
ANTENNA
NTENNA
(L1)
L1)
N
IN
64
www.insignia-products.com
Page 66

Graveur de DVD Insignia NS-FSDVDR
N
(L1)
U
N
VIDEO IN
L
R
N
VIDEO OUTID
T
S
C
B/CB
P
R
/
R
TALA
T
M
C
O
A
N
(L1)
UDIO IN
VIDEO IN
L
R
N
UDIO OU
VIDEO OUTID
T
S
C
P
B/CB
P
R
/
R
Connexion à un système audio
Il est possible de connecter le graveur à un
système stéréo standard ou à un décodeur
Dolby Digital, un lecteur MD ou un lecteur DAT.
Tous les périphériques doivent être mis hors
tension en cas de changement de connexion.
Remarques
• Une lecture de DVD avec des réglages
incorrects peut générer une distorsion du son
et peut également endommager les
haut-parleurs.
• La source audio provenant d'un disque au
format ambiophonique multicanal Dolby Digital
ne peut pas être enregistrée en tant que son
numérique par un lecteur MD ou DAT.
Pour connecter le signal audio du graveur à
un système audio :
• Connecter les câbles audio (fournis) des
prises de sortie audio (AUDIO OUT)
[gauche/blanc et droit/rouge) du graveur aux
prises d'entrée audio (AUDIO IN) à l'arrière
du système stéréo.
Système stéréo
Câbles audio
(G/D)
OMPONENT
COMPONENT
VIDEO IN
VIDEO OUTPUT
IN
I
OUT
OUT
ANTENNA
AUDIO IN
VIDEO OUTPUT
S-VIDEO
-VIDEO
IN
I
L
R
DIO I
(L1)
Arrière du graveur
- OU -
• Connecter un câble audio numérique coaxial
(non fourni) de la prise de sortie audio
numérique (DIGITAL AUDIO OUTPUT) du
graveur à la prise d'entrée audio numérique
(DIGITAL AUDIO IN) à l'arrière du
périphérique audio numérique, tel qu'un
décodeur Dolby, un lecteur MD ou DAT.
Périphérique audio
numérique
OMPONENT
COMPONENT
VIDEO IN
VIDEO OUTPUT
IN
I
OUT
OUT
ANTENNA
ANTENNA
AUDIO IN
VIDEO OUTPUT
S-VIDEO
-VIDEO
IN
I
L
R
(L1)
Arrière du graveur
OUT
OU
VIDEO OUT
Y
OUT
OU
PB/C
PR/C
Y
B
PB/C
PR/C
R
C
DIGITAL AUDIO OUTPUT
DIGI
UDIO OUTPU
PCM / BITSTREA
PCM / BITSTREAM
L
B
R
R
C
AUDIO OUT
AUDIO OUT
R
VIDEO OUT
L
T
COAXIAL
DIGITAL AUDIO OUTPUT
PCM / BITSTREAM
COAXIAL
COAXIAL
XIAL
Câble audio
numérique coaxial
Connexion à une source externe
Il est possible de connecter une source externe
au graveur en utilisant les prises d'entrée de
ligne 2 [LINE2] (Avant) ou 1 [LINE1] (Arrière).
En cas de connexion d'une source externe à la
sortie monophonique de cet appareil, utiliser la
prise audio gauche (AUDIO L) de la ligne 2
[LINE2] (Avant).
Utiliser un câble S-Vidéo ou vidéo disponible
dans le commerce et un câble audio pour cette
connexion.
Pour connecter une source externe aux
prises avant du graveur :
1 Connecter un câble vidéo ou S-Vidéo (mais
pas les deux) des prises de sortie (OUTPUT)
de la source externe (telle qu’un
magnétoscope ou un caméscope) à la prise
d’entrée (INPUT) appropriée à l’avant du
graveur.
2 Connecter les câbles audio (G/D) des prises
de sortie audio (AUDIO OUT) de la source
externe aux prises d’entrée audio (AUDIO
IN) à l’avant du graveur.
Source externe
Câbles audio (G/D)
OUTPUT
VIDEOS- VIDEO AUDIO
RL
Câbles
vidéo ou
S-Vidéo
Avant du graveur
3 Sélectionner la source vidéo correcte en
appuyant sur 002 (Prises ligne2/avant) de la
télécommande.
Pour connecter une source externe aux
prises arrière du graveur :
1 Connecter un câble vidéo ou S-Vidéo (mais
pas les deux) des prises de sortie (OUTPUT)
de la source externe (telle qu’un
magnétoscope ou un caméscope) à la prise
d’entrée (INPUT) appropriée à l'arrière du
graveur.
S-VIDEO VIDEO AUDIO
OPEN/CLOSE CHANNEL REV FWD STOP PLAY POWER
REC/OTRREC SPEED
S-VIDEO VIDEO AUDIO
R
L
R
L
Connexion Configuration
PCM Dolby Digital
Si le périphérique est connecté à des
prises à composantes et est
compatible Dolby Digital.
Si le périphérique n'est pas connecté
à des prises à composantes ou n'est
pas compatible Dolby Digital.
Pour un lecteur MD ou DAT. - PCM
- En continu
-PCM
Voir « Réglage de l'audio Dolby Digital » à la
page 80.
www.insignia-products.com
65
Page 67

Graveur de DVD Insignia NS-FSDVDR
VIDEO OUT
D
T
M
C
O
2 Connecter les câbles audio (G/D) des prises
de sortie audio (AUDIO OUT) de la source
externe aux prises d’entrée audio (AUDIO
IN) à l’arrière du graveur.
Source externe
OUTPUT
VIDEO S -VIDEOAUDIO
LR
Câbles vidéo ou
S-Vidéo
DIGITAL AUDIO OUTPUT
IGI
UDIO OUTPU
PCM / BITSTREAM
PCM / BITSTREA
COAXIAL
XIA
Arrière du graveur
Câbles
audio
(G/D)
VIDEO IN
S-VIDEO
IN
L
R
AUDIO IN
VIDEO IN
IN
L
R
AUDIO IN
(L1)
VIDEO OUT
S-VIDEO
3 Sélectionner la source vidéo correcte en
appuyant sur 001 (Prises ligne1/arrière) de la
télécommande.
Sélection des options de
base
Configuration lors de la première
utilisation
La première fois que le graveur est mis en
service, l’utilisateur est invité à sélectionner les
paramètres d’installation.
Pour configurer l’appareil lors de la première
utilisation :
1 Vérifier que le graveur est connecté à un
téléviseur et que le cordon d’alimentation est
branché sur une prise secteur.
2 Appuyer sur POWER (Marche/Arrêt) pour
mettre le graveur en marche.
3 Mettre le téléviseur sous tension, puis
sélectionner la source d’entrée du téléviseur
à laquelle vont être connectées les prises du
graveur.
Le tableau ci-après reprend quelques unes
des marques de téléviseurs les plus
répandues et leurs sources d’entrée. Pour
plus d’informations, se reporter à la
documentation livrée avec le téléviseur.
Sources d’entrée vidéo du téléviseur
Marque Source d’entrée
Admiral AUX
Curtis Mathis LINE1 (Ligne 1), LINE2, (Ligne 2), 00,
GE INPUT (Entrée), TV/VCR
Hitachi INPUT (Entrée), AUX
JVC VIDEO (Vidéo), VIDEO1, VIDEO2,
Kenwood AUX
LXI-Series 00
90, 91, 92, 93
(Magnétoscope), 00, 90, 91, 92, 93
VIDEO3
Marque Source d’entrée
Magnavox AUX CHANNEL (Canal auxiliaire)
Panasonic TV/VIDEO (Téléviseur/vidéo)
RCA INPUT (Entrée), TV/VCR
(Magnétoscope), 00, 90, 91, 92, 93
Samsung TV/VIDEO (Téléviseur/vidéo)
Sanyo VIDEO (Vidéo)
Sharp 00
Sony VIDEO1 (Vidéo 1), VIDEO2, VIDEO3
Toshiba TV/GAME (Téléviseur/jeux)
Zenith 00
Quand la source d’entrée correcte a été
sélectionnée, l’écran
Initial Setting
(Paramètres initiaux) s’affiche.
Initial Setting
English
Français
Español
4 Appuyer sur ou pour sélectionner la
langue des menus d’écrans, puis appuyer
sur ENTER (Entrée). Choisir entre English
(anglais), French (français) ou Spanish
(espagnol).
5 Appuyer sur ENTER (Entrée). Le graveur
commence la recherche des canaux
disponibles dans la zone. Le graveur
enregistre l'information sur les canaux dans
la liste des canaux. Une fois la recherche
terminée, l'écran
Clock Setting
l'horloge) s'affiche.
Initial Setting
Clock Setting
6 Appuyer sur ENTER (Entrée), puis aller à
l'étape 3 de la rubrique « Réglage manuel de
l’horloge » à la page 68 et terminer le
processus pour régler l'horloge.
Balayage des canaux
Quand le graveur est mis en service pour la
première fois, il recherche automatiquement les
canaux qui sont disponibles dans la zone. Le
graveur enregistre l'information sur les canaux
dans la liste des canaux.
En appuyant sur CHANNEL (Canal) ou
CHANNEL (à l’avant du graveur) ou CH ou
CH (de la télécommande), le graveur va au
canal suivant ou précédent dans la liste des
canaux. Le graveur saute les canaux qui n'ont
pas de signal.
Il n'est pas nécessaire d'effectuer le balayage
des canaux sauf si :
• le type de connexion du téléviseur est
modifié. Par exemple, passage d'une
antenne extérieure à la TV câblée.
• des canaux supplémentaires sont
disponibles.
• le graveur est déplacé dans une autre zone
de visualisation.
(Réglage de
66
www.insignia-products.com
Page 68

Graveur de DVD Insignia NS-FSDVDR
Pour rechercher des canaux :
1 Appuyer sur SETUP (Configuration). Le
Setup
menu
Setup
Required Setting
Playback
Display
Recording
Clock
Channel
Disc
s’affiche.
2 Appuyer sur ou pour sélectionner
Channel (Canal), puis appuyer sur ENTER
(Entrée). Le menu
Channel
(Canal) s’affiche.
3 Appuyer sur ou pour sélectionner Auto
Preset (Préréglage automatique), puis
appuyer sur ENTER (Entrée). Le graveur
commence la recherche des canaux
disponibles dans la zone.
4 Quand la recherche est terminée, appuyer
sur SETUP (Configuration) pour fermer le
menu.
Pour arrêter la recherche avant qu'elle soit
terminée, appuyer sur RETURN (Retour)
ou SETUP (Configuration).
4 Appuyer sur CH ou CH pour sélectionner
un canal dans la liste des canaux ou appuyer
sur ou pour sélectionner un canal qui
n'est pas dans la liste des canaux.
5 Appuyer sur ou pour sélectionner Add
(Ajouter) ou Delete (Supprimer) , puis
appuyer sur ENTER (Entrée).
6 Appuyer sur SETUP pour fermer le menu.
Changement de canal
Pour changer de canal :
• Appuyer sur CHANNEL (Canal) ou
CHANNEL (à l'avant du graveur) ou
CH ou CH (de la télécommande), pour
aller au canal suivant ou précédent dans la
liste des canaux.
• Utiliser les touches numériques pour saisir le
numéro du canal. Pour un numéro de canal à
un seul chiffre, appuyer sur 0, puis saisir le
chiffre. Par exemple, pour sélectionner le
canal 5, appuyer sur 0, puis sur 5.
Pour saisir un numéro de canal à deux ou
trois chiffres, appuyer sur ces chiffres. Par
exemple, pour sélectionner le canal 21,
appuyer sur 2, puis sur 1. Pour le canal 117,
appuyer sur 1, puis sur 1 et 7.
Réglage du canal audio
Il est possible de sélectionner le canal audio de
la sortie audio du téléviseur. Stéréo (Stereo) est
le paramètre par défaut.
Remarque
Si la recherche est interrompue avant la fin, les
canaux qui n'ont pas été balayés ne sont pas
enregistrés dans la liste des canaux.
Ajout ou suppression de canaux
Il est possible d'ajouter à la liste des canaux
ceux qui ont été sautés en raison d'un signal
faible ; il est aussi possible d’en supprimer de la
liste.
Pour ajouter ou supprimer des canaux :
1 Appuyer sur SETUP (Configuration). Le
menu
Setup
s’affiche.
2 Appuyer sur ou pour sélectionner
Channel (Canal), puis appuyer sur ENTER
(Entrée). Le menu
3 Appuyer sur ou pour sélectionner
Manual Preset (Préréglage manuel), puis
appuyer sur ENTER (Entrée). L’écran
Manual Preset
Manual Preset
Channel
(Canal) s’affiche.
(Préréglage manuel) s’affiche.
CH 2
Add
Delete
Pour régler le canal audio :
1 Appuyer sur SETUP (Configuration). Le
menu
Setup
s’affiche.
2 Appuyer sur ou pour sélectionner les
réglages requis (Required Setting), puis
appuyer sur ENTER (Entrée). Le menu des
réglages requis (
Required Settings
)
s’affiche.
Required Setting
Select Video
TV Aspect
TV Audio Select
4:3 Letter Box
Stereo
www.insignia-products.com
67
Page 69

Graveur de DVD Insignia NS-FSDVDR
3 Appuyer sur ou pour sélectionner TV
Audio Select (Sélection de l'audio du
téléviseur), puis sur ENTER (Entrée). L'écran
de sélection de l'audio du téléviseur (
Audio Select
TV Audio Select
Stereo
SAP
) s'affiche.
4 Appuyer sur ou pour sélectionner
Stereo (Stéréo) ou (Deuxième trame
sonore), puis sur ENTER (Entrée). Stereo
est la sortie de l'audio principal. SAP diffuse
une trame sonore secondaire, si disponible.
Remarque
En cas de sélection de la deuxième trame sonore
(SAP), si le programme enregistré à une trame
sonore secondaire, le graveur n'enregistrera que
cette trame sonore secondaire.
Réglage automatique de l’horloge
Lors de la première mise en service du graveur il
invite automatiquement l'utilisateur à régler
l'horloge. Il n'est pas nécessaire de régler
l'horloge sauf en cas de déplacement du graveur
dans un fuseau horaire différent.
Pour régler automatiquement l’horloge :
1 Vérifier que le téléviseur est connecté à une
antenne, à la TV câblée en direct, à un
décodeur câble ou satellite.
2 En cas d'utilisation d'un décodeur câble ou
satellite, syntoniser le décodeur sur le canal
local PBS.
3 Appuyer sur SETUP (Configuration). Le
4 Appuyer sur ou pour sélectionner le
Setup
menu
s’affiche.
réglage automatique de l'horloge (Auto
Clock Setting), puis sur ENTER (Entrée).
L’écran
Auto Clock Setting
(Réglage
automatique de l'horloge) s’affiche.
Auto Clock Setting
OFF
Auto
Manual
TV
5 Si le numéro de canal de la station locale
PBS n'est pas connu, appuyer sur ou
pour sélectionner Auto, puis sur ENTER.
Ou, si le numéro de canal PBS local PBS est
connu, appuyer sur ou pour sélectionner
Manual (Manuel), appuyer sur ENTER,
utiliser les touches numériques ou ou
pour saisir le numéro de canal PBS, puis
appuyer sur ENTER.
6 Appuyer sur SETUP (Configuration) pour
fermer le menu.
7 Appuyer sur POWER (Marche/Arrêt) pour
mettre le graveur hors tension pendant
plusieurs minutes. Le graveur ne peut régler
l'heure automatiquement que lorsqu'il est
hors tension. La recherche de l'heure pour le
réglage peut prendre plusieurs minutes.
8 Appuyer sur POWER (Marche/Arrêt) pour
mettre le graveur en marche.
L’horloge est réglée automatiquement en en
fonction de l'information sur l'heure fournie
par la station locale PBS. Si le réglage de
l'heure est incorrect, voir « Réglage manuel
de l’horloge » à la page 68.
Réglage manuel de l’horloge
Si l'heure affichée est incorrecte, l'horloge doit
être réglée manuellement.
Remarque
If en cas de réglage manuel de l'horloge, il sera
perdu en cas de panne de courant ou si le graveur
est débranché pendant plus de 30 secondes.
Pour régler l’horloge manuellement :
1 Appuyer sur SETUP (Configuration). Le
2 Appuyer sur ou pour sélectionner Clock
3 Appuyer sur ou pour sélectionner Clock
4 Appuyer sur ENTER (Entrée). La date et
Setup
menu
s’affiche.
(Horloge), puis appuyer sur ENTER (Entrée).
Setting (Réglage de l'horloge), puis appuyer
sur ENTER (Entrée). L’écran
(Réglage de l'horloge) s’affiche.
Clock Setting
---- / -- / ---- ( ---- )
-- : -- --
l'heure par défaut s'affichent.
Clock settings
68
www.insignia-products.com
Page 70

Graveur de DVD Insignia NS-FSDVDR
5 Appuyer sur ou pour sélectionner le
mois, le jour où l'année. Appuyer sur ou
pour passer d'un champ à un autre.
Clock Setting
JAN/ 01 / 2008(TUE)
12: 00 AM
6 Appuyer sur ou pour sélectionner
l'heure, les minutes et AM ou PM. Appuyer
sur ou pour passer d'un champ à un
autre.
Clock Setting
JAN/ 01 / 2008(TUE)
12: 00 AM
4 Appuyer sur ou pour sélectionner ON
(Activée) ou OFF (Désactivée).
5 Appuyer sur SETUP pour fermer le menu.
Sélection du format d'écran du téléviseur
Pour sélectionner le format d'écran du
téléviseur
1 Appuyer sur SETUP (Configuration). Le
2 Appuyer sur ou pour sélectionner les
3 Appuyer sur ou pour sélectionner TV
Setup
menu
s’affiche.
réglages requis (Required Setting), puis
appuyer sur ENTER (Entrée). Le menu des
réglages requis (
Required Settings
)
s’affiche.
Aspect (Format d'écran), puis sur ENTER.
L’écran
TV A
4:3 Letter Box
4:3 Pan & Scan
16:9 Wide
TV Aspect
spect
(Format d'écran) s’affiche.
7 Appuyer sur ENTER (Entrée).
8 Appuyer sur SETUP pour fermer le menu.
Activer ou désactiver l’heure avancée.
Quand l'option de l'heure avancée est activée, le
graveur avance l'horloge d'une heure à deux
heures du matin le deuxième dimanche de mars
et recule l'horloge d'une heure à deux heures du
matin le premier dimanche de novembre.
La valeur par défaut est On (Activé).
Pour activer ou désactiver l’heure avancée.
1 Appuyer sur SETUP (Configuration). Le
2 Appuyer sur ou pour sélectionner Clock
3 Appuyer sur ou pour sélectionner
Setup
menu
s’affiche.
(Horloge), puis appuyer sur ENTER (Entrée).
Clock
Le menu
(Horloge) s’affiche.
Daylight Saving Time (Heure avancée),
puis appuyer sur ENTER. L'écran de l'heure
avancée (
Daylight Saving Time
ON
OFF
Daylight Saving Time
) s'affiche.
4 Appuyer sur ou pour sélectionner le
format d'écran, puis appuyer sur ENTER
(Entrée). Sélections possibles :
• 4:3 Letter Box (Boîte aux lettres 4 :3) —
(Paramètre par défaut) Si ce paramètre
est sélectionné avec un téléviseur
standard, l'image s'affiche à l'écran avec
des bandes noires dans la partie
supérieure et inférieure.
• 4:3 Pan & Scan (Recadrage automatique
4:3) – Si ce paramètre est sélectionné
avec un téléviseur standard, l’image
remplit l’écran mais les côtés sont
tronqués.
• 16:9 Wide (Panoramique 16:9) — Si le
téléviseur a un écran panoramique,
utiliser ce paramètre.
5 Appuyer sur SETUP pour fermer le menu.
www.insignia-products.com
69
Page 71

Graveur de DVD Insignia NS-FSDVDR
Affichage des informations d'état
Pour afficher les informations d’état :
• Pendant la lecture d'un disque, appuyer sur
DISPLAY (Affichage). L’information sur le
disque s’affiche.
1 Indique le type de disque et le mode de
format.
2 Indique le numéro de canal.
3 Indique le numéro du titre et du chapitre,
ainsi que la durée de lecture écoulée.
4 Indique la fonctionnalité active
actuellement. Les icônes signifient :
— Recherche
— Audio
— Sous-titres
— Angle (sauf en mode VR)
Lecture de DVD et de CD
Disques compatibles
Les disques revêtus des logos ci-après peuvent
être utilisés avec ce graveur. L’utilisation
d’autres disques, n’est pas garantie.
Disque Logo
DVD-VIDÉO
DVD-RW (mode VIDÉO/VR)
DVD-R (mode VIDÉO)
CD-DA (CD AUDIO)
CD-RW (FORMAT CD-DA)
CD-R (FORMAT CD-DA)
MP3
WMA WMA
Standard de téléviseurs couleur
Les DVD sont enregistrés suivant divers
standard de téléviseurs couleur disponibles
dans le monde. Le standard le plus courant est
NTSC (utilisé principalement aux États-Unis et
au Canada).
Ce graveur utilise le standard NTSC, aussi les
DVD doivent être enregistrés selon ce système.
Il n’est pas possible de reproduire des DVD
enregistrés suivant un autre standard.
MP3
— Répétition
— Signet
— Réduction du bruit
— Zoom
— Ambiophonie
5 Indique le mode du disque actuel, par
exemple le mode arrêt.
6 Indique le mode d’enregistrement et
éventuellement la durée restante
d’enregistrement.
Codes régionaux
Ve graveur a été conçu pour reproduire
uniquement les DVD encodés pour la région un
(1) ou ALL (Toutes).
Un DVD conçu pour une région spécifique ne
peut être reproduit que par un lecteur DVD
codifié pour la même région. Il est impossible de
lire des DVD qui portent la marque d’une autre
région.
Regarder les symboles du globe sur les boîtiers
des DVD (le numéro à l’intérieur du globe
correspond à la région du monde). Si ces
symboles de région ne sont pas sur le boîtier du
DVD, il n’est pas possible de reproduire le DVD
avec ce graveur.
70
www.insignia-products.com
Page 72

Graveur de DVD Insignia NS-FSDVDR
Lecture d’un DVD ou d’un CD
Les instructions qui suivent s'appliquent à un
DVD préenregistré acheté en magasin ou à un
CD audio.
Pour reproduire un DVD formaté en mode vidéo
ou VR, voir « Lecture d'un DVD formaté en
mode vidéo ou VR » à la page 71.
Pour la lecture d’un DVD ou d’un CD :
1 Mettre le téléviseur et le graveur sous
tension.
2 Sur le téléviseur, sélectionner la source vidéo
à laquelle le graveur est connecté. Pour une
liste des sources vidéo les plus communes
par marque de téléviseurs, voir « Sources
d’entrée vidéo du téléviseur » à la page 66.
3 Appuyer sur OPEN/CLOSE (Ouvrir/fermer)
pour ouvrir le plateau à disque.
4 Insérer un DVD dans le plateau à disque,
avec l’étiquette tournée vers le haut.
5 Appuyer sur OPEN/CLOSE (Ouvrir/fermer)
pour fermer le plateau à disque. Le graveur
identifie le DVD. Cela peut prendre un certain
temps.
6 Si la lecture ne commence pas
automatiquement, appuyer sur PLAY
(Lecture).
Si le DVD est formaté en mode VR, le menu
suivant s'affiche :
Playlist
1 2 3
JAN/ 1/06 1:00AM CH12 XP
4 5 6
Si le mode vidéo du DVD a été finalisé,
l'écran suivant s'affiche :
Title Menu
1 JAN/22/06 12:55AM CH10
2 JAN/30/06 11:00PM CH8
3 FEB/10/06 9:00PM CH10
4 FEB/28/06 11:00AM CH6
5 FEB/28/06 10:00PM CH8
XP
XP
LP
LP
EP
Lecture d'un DVD formaté en mode vidéo
ou VR
Pour reproduire un DVD formaté en mode
vidéo ou VR :
1 Mettre le téléviseur et le graveur sous
tension.
2 Sur le téléviseur, sélectionner la source vidéo
à laquelle le graveur est connecté. Pour une
liste des sources vidéo les plus communes
par marque de téléviseurs, voir « Sources
d’entrée vidéo du téléviseur » à la page 66.
3 Appuyer sur OPEN/CLOSE (Ouvrir/fermer)
pour ouvrir le plateau à disque.
4 Insérer un DVD dans le plateau à disque,
avec l’étiquette tournée vers le haut.
5 Appuyer sur OPEN/CLOSE (Ouvrir/fermer)
pour fermer le plateau à disque. Le graveur
identifie le DVD. Cela peut prendre un certain
temps.
6 Appuyer sur TOP MENU (Menu principal)
pour ouvrir le menu titre du DVD.
Si le DVD est formaté en mode vidéo, le
menu suivant s'affiche :
Title List
1 2 3
JAN/ 1/06 1:00AM CH12 XP
4 5 6
Remarque
Si le DVD est formaté en mode VR, il est possible
d'appuyer sur MENU/LIST (Menu/Liste) pour
alterner entre la liste des enregistrements
originaux et les enregistrements de la liste de
lecture.
7 Appuyer sur ou pour sélectionner le
titre souhaité, puis sur ENTER (Entrée) ou
PLAY (Lecture).
8 Si ENTER a été appuyé lors de l'étape
précédente, appuyer sur ou pour
sélectionner Play, puis sur ENTER.
9 Pour arrêter la lecture, appuyer sur STOP
(Arrêt).
10 Prendre soin de retirer le disque avant
d'éteindre le graveur.
Contrôle de la lecture du disque
Pour contrôler la lecture du disque :
• Pour arrêter momentanément la lecture,
appuyer sur PAUSE . Appuyer sur PLAY
(Lecture) pour reprendre la lecture.
• Pour arrêter la lecture, puis la reprendre à
partir de ce point, appuyer sur STOP
(Arrêt), puis sur PLAY (Lecture) pour la
reprendre.
• Pour arrêter la lecture et la recommencer à
partir du début du DVD, appuyer deux fois
sur STOP , puis sur PLAY .
• Pour une avance rapide, appuyer sur
FWD . Chaque fois que cette touche est
appuyée, la vitesse de l'avance rapide
s'accroît de 2, 20, 40 fois la vitesse normale.
Pour les CD la vitesse de l'avance rapide est
de 8 fois la vitesse normale.
www.insignia-products.com
71
Page 73

Graveur de DVD Insignia NS-FSDVDR
• Pour un retour rapide, appuyer sur REV .
Chaque fois que cette touche est appuyée, la
vitesse du retour rapide s'accroît de 2, 20, 40
fois la vitesse normale. Pour les CD la
vitesse du retour rapide est de 8 fois la
vitesse normale.
• Pour sauter les publicités, appuyer sur CM
SKIP. Chaque fois que cette touche est
appuyée, le DVD saute les 30 secondes qui
suivent. Il est possible de sauter au
maximum les prochaines 180 secondes
(appuyer six fois sur la touche).
• Pour une lecture avant étape par étape ou
image par image, appuyer sur PAUSE , puis
sur SKIP (Saut). Chaque fois que la
touche saut (SKIP) est appuyée le DVD
avance d'une étape ou d'une image. Appuyer
sur PLAY (Lecture) pour revenir au mode
de lecture normal.
• Pour une lecture arrière étape par étape ou
image par image, appuyer sur PAUSE , puis
sur SKIP (Saut) . Chaque fois que la
touche saut (SKIP) est appuyée le DVD
avance d'une étape ou d'une image. Appuyer
sur PLAY (Lecture) pour revenir au mode
de lecture normal.
• Pour une lecture avant au ralenti, appuyer
sur PAUSE , puis sur FWD . Chaque fois
que cette touche est appuyée, la vitesse de
l'avance au ralenti s'accroît d'un facteur 1/16,
1/8, 1/3. Appuyer sur PLAY (Lecture) pour
revenir au mode de lecture normal.
• Pour une lecture arrière au ralenti, appuyer
sur PAUSE , puis sur REV . Chaque fois
que cette touche est appuyée, la vitesse de
la lecture arrière au ralenti s'accroît d'un
facteur 1/16, 1/8, 1/3.
• Pour sauter au chapitre, titre ou piste suivant,
appuyer sur SKIP (Saut) . il est aussi
possible d'utiliser le menu Affichage (Display)
pour sélectionner un chapitre, titre ou piste.
Pour plus d’informations, voir « Sélection
d'un chapitre, d'un titre ou d'une piste » à la
page 72.
• Pour sauter au chapitre, titre ou piste
précédant, appuyer sur SKIP (Saut) . il est
aussi possible d'utiliser le menu Affichage
(Display) pour sélectionner un chapitre, titre
ou piste. Pour plus d’informations, voir
« Sélection d'un chapitre, d'un titre ou d'une
piste » à la page 72.
Sélection d'un chapitre, d'un titre ou d'une
piste
Pour sélectionner un chapitre, un titre ou une
piste
1 Pendant la lecture du disque, appuyer sur
DISPLAY (Affichage). Le menu
(Affichage) s'ouvre.
Display
Menu d'affichage (
Display
) du CD
Audio CD10:00:00
2 pour sélectionner un titre ou une piste,
appuyer sur ou pour sélectionner ,
puis sur ENTER (Entrée). Le chiffre à côté de
est mis en surbrillance.
Ou, pour sélectionner un chapitre, appuyer
sur ou pour sélectionner et sur
ENTER, puis sur pour sélectionner .
3 Appuyer sur ou ou les touches
numériques pour sélectionner un numéro de
chapitre, de titre ou de piste, puis appuyer
sur ENTER (Entrée). Le graveur va au
chapitre, au titre ou à la piste sélectionnée.
Remarque
Pendant la lecture d'un CD, il est possible
d'appuyer sur les touches numériques pour
sélectionner une piste sans avoir à ouvrir le menu
Affichage (
Display
).
Recherche sur un disque
Pour effectuer une recherche sur un disque :
1 Pendant la lecture du disque, appuyer sur
DISPLAY (Affichage). Le menu
Display
(Affichage) s'ouvre.
DVD-Video1 1 0:00:00
2 Appuyer sur ou pour sélectionner ,
puis appuyer sur ENTER (Entrée).
3 Appuyer sur pour passer au chiffre à côté
de . Si la recherche en fonction de la durée
n'est pas disponible sur le disque, et
l'affichage de l'heure n'apparaissent pas.
4 Appuyer sur ou ou les touches
numériques pour saisir la durée à
rechercher, puis appuyer sur ENTER
(Entrée).
Remarque
La recherche en fonction de la durée n'est
disponible que pour la piste où le titre en cours de
lecture.
Utilisation de la lecture à vitesse variable
Si un DVD est enregistré au format Dolby
Digital, il est possible de le reproduire à une
vitesse légèrement inférieure ou supérieure à la
vitesse normale. Pendant la lecture à vitesse
variable, le son continu d'être émis.
72
Menu d'affichage (
Display
) du DVD
DVD-Video1 1 0:00:00
Pour utiliser la lecture à vitesse variable :
1 Pendant la lecture, appuyer sur ×1.3/0.8.
La lecture continue à environ 0,8 fois la
vitesse normale.
2 Appuyer de nouveau sur 1.3/0.8. La lecture
continue à environ 1.3 fois la vitesse
normale.
www.insignia-products.com
Page 74

Graveur de DVD Insignia NS-FSDVDR
3 Appuyer de nouveau sur 1.3/0.8. La lecture
revient à la vitesse normale.
Remarque
Il n'est pas possible de modifier la langue audio
pendant une lecture à vitesse variable.
La lecture à vitesse variable ne fonctionne pas
toujours pour la totalité du DVD.
Pendant la lecture à vitesse variable, l'audio est
au format PCM.
Utilisation du menu du disque DVD
Certains DVD ont un menu disque qui permet la
sélection d'options de visualisation, telles que la
langue des sous-titres ou la sélection de
chapitre.
Pour utiliser le menu disque du DVD :
1 Pendant la lecture, appuyer sur MENU/LIST
(Menu/Liste). Si le DVD a un menu disque, il
s’affiche. Si le DVD n'a pas de menu disque,
s'affiche à l'écran.
2 Appuyer sur , ou pour sélectionner
une option, puis sur ENTER (Entrée).
Recommencer cette étape, autant que
nécessaire, pour terminer la sélection. Avec
certaines options, il peut être nécessaire
d'utiliser les touches numériques pour
effectuer une sélection.
3 Si le menu du disque ne se ferme pas
automatiquement, appuyer sur MENU/LIST.
Utilisation du menu titre du DVD
Certains DVD ont un menu titre qui permet de
sélectionner le titre à reproduire.
2 Appuyer sur ou pour sélectionner le
facteur d'agrandissement, puis sur ENTER
(Entrée). La zone de zoom est affichée.
3 Appuyer sur ou pour se déplacer
sur l’image.
4 Pour reprendre la lecture normale, appuyer
sur ZOOM, puis sélectionner ×1.0.
Ajout de signets
Pour retourner rapidement à l'écran d'un DVD
ou à la piste d'un CD, il est possible d'ajouter un
signet.
Pour ajouter un signet :
1 Pendant la lecture du disque, appuyer sur
DISPLAY (Affichage). Le menu
(Affichage) s'ouvre.
DVD-Video1 1 0:00:00
Display
Pour accéder au menu titre du DVD :
1 Appuyer sur TOP MENU (Menu principal). Si
le DVD a un menu titre, il s’affiche. Si le DVD
n'a pas de menu titre, s'affiche à l'écran.
2 Appuyer sur ou pour sélectionner
une option, puis sur ENTER (Entrée).
Recommencer cette étape, autant que
nécessaire, pour terminer la sélection. Avec
certaines options, il peut être nécessaire
d'utiliser les touches numériques pour
effectuer une sélection.
3 Si le menu du disque ne se ferme pas
automatiquement, appuyer sur TOP MENU.
Agrandissement de l’image affichée
Pour agrandir l’image affichée :
1 Pendant la lecture, appuyer sur ZOOM. Le
menu zoom s'affiche.
DVD-Video1 1 0:00:00
1.2
1.5
2.0
2 Appuyer sur ou pour sélectionner ,
puis appuyer sur ENTER (Entrée). La liste
des signets s’affiche.
Pour les DVD, la liste suivante s'affiche :
DVD-Video1 1 0:00:00
1
---
2
---
3
---
4
---
5
---
6
---
Pour les CD, la liste suivante s'affiche :
Audio CD1 0:00:00
1
---
2
---
3
---
4
---
5
---
6
---
3 Appuyer sur ou pour sélectionner un
numéro de signet non utilisé. Quand la
lecture atteint l'endroit à repérer par un
signet, appuyer sur ENTER.
4 Quand l'ajout de signets est terminé, appuyer
sur DISPLAY pour fermer le menu.
www.insignia-products.com
73
Page 75

Graveur de DVD Insignia NS-FSDVDR
5 Pour revenir à un signet pendant la lecture,
appuyer sur DISPLAY, ouvrir la liste des
signets, appuyer sur ou pour
sélectionner le signet souhaité, puis appuyer
sur ENTER (Entrée).
6 Pour supprimer un signet, appuyer sur
DISPLAY, ouvrir la liste des signets,
appuyer sur ou pour sélectionner le
signet à supprimer, puis sur ENTER
(Entrée).
Remarque
Il est possible d'ajouter jusqu'à six signets.
• Tous les signets sont supprimés quand :
• le plateau à disque est ouvert ;
• le graveur est mis hors tension ;
• un enregistrement commence ;
• lors du passage du mode original au mode liste
de lecture sur un DVD au format VR.
Lecture en boucle
Pour effectuer une lecture en boucle :
1 Pendant la lecture, appuyer sur REPEAT
(Répéter). Le menu
s’affiche.
Menu de DVD-Vidéo
Repeat
OFF
Title
Chapter
A - B
(Répéter)
DVD-Video1 1 0:00:00
Programmation d’une lecture en boucle
programmée
Pour programmer une lecture en boucle :
1 Pendant la lecture, appuyer sur REPEAT
(Répéter). Le menu
Repeat
(Répéter)
s’affiche.
2 Appuyer sur ou pour sélectionner A-B,
puis sur ENTER (Entrée).
3 Quand la lecture atteint le point de départ de
la lecture en boucle programmée, appuyer
sur ENTER.
4 Quand la lecture atteint le point final de la
lecture en boucle programmée, appuyer sur
ENTER.
5 Pour annuler la lecture en boucle
programmée, appuyer sur REPEAT, puis
sélectionner OFF (Désactivée).
Utilisation de la lecture aléatoire
Pour utiliser le mode de lecture aléatoire :
1 Appuyer sur SETUP (Configuration). Le
2 Appuyer sur ou pour sélectionner CD
3 Appuyer sur ou pour sélectionner
4 Pour arrêter la lecture aléatoire, appuyer
Setup
menu
s’affiche.
Playback Mode (Mode de lecture du CD),
puis sur ENTER.
Random Play (Lecture aléatoire), puis sur
ENTER. L’appareil commence la lecture des
pistes du CD en ordre aléatoire.
deux fois sur STOP (Arrêt).
Menu de CD
Audio CD1 0:00:00
OFF
Track
All
A-B
2 Appuyer sur ou pour sélectionner
l'option de répétition souhaitée, puis appuyer
sur ENTER (Entrée). Sélections possibles :
• Off (Désactivé) — Désactive la fonction
de répétition.
• Title (Titre) — Pour répéter le titre du
DVD en cours.
• Chapter (Chapitre) — Pour répéter le
chapitre du DVD en cours.
• All (Tout) — Permet de répéter tout le
disque
• A-B —Permet la répétition d'une boucle
programmée —. Pour plus d’informations,
voir « Programmation d’une lecture en
boucle programmée » à la page 74.
• Track (Piste) — Pour répéter la piste en
cours.
Remarque
La lecture aléatoire n'est pas disponible avec les
DVD.
Programmation d'une liste de lecture
Pour programmer une liste de lecture :
1 Appuyer sur SETUP (Configuration). Le
2 Appuyer sur ou pour sélectionner CD
3 Appuyer sur ou pour sélectionner
Setup
menu
s’affiche.
Playback Mode (Mode de lecture du CD),
puis sur ENTER.
Program Play (Lecture programmée), puis
sur ENTER. L’écran de programmation de la
lecture (
Program Play
Program Play
--
-- -- -- -- -- -- -- -- --
-- -- -- -- -- -- -- -- -- --
-- -- -- -- -- -- -- -- -- --
-- -- -- -- -- -- -- -- -- --
-- -- -- -- -- -- -- -- -- --
) s’affiche.
0:00:00Tot al
74
www.insignia-products.com
Page 76

Graveur de DVD Insignia NS-FSDVDR
4 Appuyer sur ou ou sur les touches
numériques pour sélectionner un numéro de
piste.
Program Play
09
-- -- -- -- -- -- -- -- --
-- -- -- -- -- -- -- -- -- --
-- -- -- -- -- -- -- -- -- --
-- -- -- -- -- -- -- -- -- --
-- -- -- -- -- -- -- -- -- --
5 Appuyer sur ENTER (Entrée) pour passer au
champ de la piste suivante.
Remarque
Pour supprimer une piste, mettre en surbrillance
le numéro de piste, puis appuyer sur CLEAR
(Supprimer).
6 Répéter les étapes 4 et 5 pour ajouter des
pistes supplémentaires à la liste de lecture. Il
est possible d'ajouter jusqu'à 50 pistes.
7 Appuyer sur PLAY pour commencer la
lecture.
8 Pour annuler la lecture en boucle, appuyer
deux fois sur STOP (Arrêt).
Remarque
La programmation de la lecture en boucle n'est
pas disponible avec les DVD.
Utilisation des sous-titres
De nombreux DVD sont enregistrés avec une ou
plusieurs langues de sous-titres. Il est possible
d'activer (On) ou de désactiver (Off) des
sous-titres et de sélectionner la langue des
sous-titres, si disponible.
Pour utiliser les sous-titres :
1 Pendant la lecture du disque, appuyer sur
DISPLAY (Affichage). Le menu
(Affichage) s'ouvre.
0:06:11Tot al
Display
3 Appuyer sur ou pour sélectionner une
langue ou sur OFF (désactive les
sous-titres), puis sur ENTER (Entrée). Un
code à quatre chiffres peut s'afficher dans la
liste des langues de sous-titres. Ce code
représente une langue. Pour plus
d’informations, voir « Codes de langue » à la
page 109.
Remarque
Certains DVD ne permettent de sélectionner une
langue de sous-titres qu'à partir du menu disque
du DVD. Appuyer sur TOP MENU (Menu
principal) ou sur MENU/LIST (Menu/Liste) pour
ouvrir le menu disque du DVD.
La sélection de la langue des sous-titres reste
toujours possible dans le menu
(Configuration). Sélectionner Playback (Lecture),
Language (Langue), Subtitle (Sous-titres), puis
sélectionner la langue.
Setup
Changement de bande sonore ou de canal
Un DVD-Vidéo peut être enregistré avec deux
bandes sonores ou plus, qui sont souvent dans
des langues différentes. Il est possible de
changer de bande sonore pendant la lecture.
Avec un DVD-RW enregistré en mode VR, il est
possible d'utiliser la bande principale (L) [G],
audio secondaire (R) [D] ou un mixage des deux
(L/R) [G/D].
Lors de la lecture de CD audio il est possible
d'alterner entre stéréo, canal gauche
uniquement ou canal droit uniquement.
Pour changer de bande sonore ou de canal :
1 Pendant la lecture du disque, appuyer sur
DISPLAY (Affichage). Le menu
(Affichage) s'ouvre.
2 Appuyer sur ou pour sélectionner ,
puis appuyer sur ENTER (Entrée). Le menu
audio s’affiche.
DVD-Vidéo
Display
DVD-Video1 1 0:00:00
DVD-Video1 1 0:00:00
2 Appuyer sur ou pour sélectionner . Le
menu
Subtitle
(Sous-titres) s’affiche.
DVD-Video1 1 0:00:00
OFF
1.English
2.Japanese
www.insignia-products.com
DVD-Video 1 1 0:00:00
1.Dolby Digital 5.1ch English
2.Dolby Digital 2ch Japanese
DVD-RW en mode VR
DVD-RW1 1 0:00:00
VR Playlist
1.Dolby Digital Dual L/R
75
Page 77

Graveur de DVD Insignia NS-FSDVDR
CD audio
Audio CD1 0:00:00
1. L/R
2. L
3. R
3 Appuyer sur ou pour sélectionner une
bande sonore ou un canal audio, puis sur
ENTER (Entrée).
Pour un DVD-Vidéo, la bande sonore
change.
Pour un CD audio, le canal audio change.
4 Pour un DVD-RW en mode VR, le menu du
canal audio s'affiche. Appuyer sur ou
pour sélectionner le canal audio, puis sur
ENTER (Entrée).
1 1 0:00:00
1. L/R
2. L
3. R
DVD-RW
VR Playlist
Son ambiophonique activé ou désactivé
Pour activer ou désactiver le son
ambiophonique :
1 Pendant la lecture du disque, appuyer sur
DISPLAY (Affichage). Le menu
(Affichage) s'ouvre.
DVD-Video1 1 0:00:00
Display
CD audio
Audio-CD1 1 0:00:00
OFF
Type 1
Type 2
3 Appuyer sur ou pour sélectionner OFF
(Activé) Type 1 ou Type 2.
• OFF (Désactivé) — Désactive le son
ambiophonique
• Type 1 — Effet normal
• Type 2 — Effet amplifié
Fonctionnalité des angles de prise de vues
activée ou désactivée
Certains DVD ont des prises de vues à partir de
deux angles ou plus.
Pour activer ou désactiver la fonctionnalité
des angles de prise de vues :
1 Appuyer sur SETUP (Configuration). Le
menu
Setup
s’affiche.
2 Appuyer sur ou pour sélectionner
Display (Affichage), puis sur ENTER
(Entrée). Le menu
s'ouvre.
Display
OSD LanguageEnglish
Angle Icon ON
Screen Saver
FL Dimmer
Display
(Affichage)
10 minutes
Bright
2 Appuyer sur ou pour sélectionner ,
puis appuyer sur ENTER (Entrée). Le menu
du son ambiophonique s’affiche.
DVD-Vidéo
DVD-Video1 1 0:00:00
OFF
Type 1
Type 2
DVD-RW en mode VR
1 1 0:00:00
OFF
Type 1
Type 2
DVD-RW
VR Playlist
3 Appuyer sur ou pour sélectionner Angle
Icon (Icône des angles), puis sur ENTER
(Entrée). L’écran
Angle Icon
ON
OFF
Angle Icon
s’affiche.
4 Appuyer sur ou pour sélectionner ON
(Activé) ou OFF (Désactivé). Quand cette
fonctionnalité est désactivée, l'icône des
angles apparaît dans le menu de l'affichage
Display
(
). Quand cette fonctionnalité est
activée, l'icône des angles ne s'affiche pas
même si le DVD a plusieurs angles de prise
de vues.
76
www.insignia-products.com
Page 78

Graveur de DVD Insignia NS-FSDVDR
Changement de l’angle de prise de vues
Certains DVD ont des prises de vues à partir de
deux angles ou plus.
Pour changer les angles de prise de vues :
1 Pendant la lecture du disque, appuyer sur
DISPLAY (Affichage). Le menu
(Affichage) s'ouvre. Si plusieurs angles de
prise de vues sont disponibles, l'icône des
angles (1) s'affiche dans le coin inférieur droit
de l'écran pendant la lecture.
2 Appuyer sur ou pour sélectionner ,
puis appuyer sur ENTER (Entrée). L'angle
change à chaque fois que la touche ENTER
(Entrée) est appuyée.
Display
DVD-Video1 1 0:00:00
Sélection de la langue audio
Sur certains DVD, plusieurs langues audio sont
enregistrées.
Pour sélectionner la langue audio :
1 Si un DVD est en cours de lecture, appuyer
sur STOP (Arrêt).
2 Appuyer sur SETUP (Configuration). Le
3 Appuyer sur ou pour sélectionner
4 Appuyer sur ou pour sélectionner
Setup
menu
s’affiche.
Playback (Lecture), puis appuyer sur
ENTER (Entrée). Le menu
Playback
(Lecture) s'affiche.
Language (Langue), puis sur ENTER
(Entrée). Le menu des langues (
s’affiche.
Language
FFOeltitbuS
Language
hsilgnEuneM csiD
lanigirOoiduA
)
Réduction des parasites audio
Pour réduire les parasites audio :
1 Pendant la lecture du disque, appuyer sur
DISPLAY (Affichage). Le menu
(Affichage) s'ouvre.
2 Appuyer sur ou pour sélectionner ,
puis appuyer sur ENTER (Entrée). Le menu
pour réduire les parasites s'affiche.
OFF
Type 1
Type 2
3 Appuyer sur ou pour sélectionner OFF
(Désactivé) Type 1 ou Type 2.
• OFF (Désactivé) — Sélectionner cette
option si le DVD a peu ou pas de
parasites audio.
• Type 1 et Type 2 — Sélectionner une de
ces options si le DVD a été enregistré à
une vitesse ralentie telle que SLP ou
SEP. Type 2 est le mode le plus efficace
pour réduire les parasites audio.
4 Appuyer sur SETUP pour fermer le menu.
Display
DVD-Video1 1 0:00:00
DVD-Video1 1 0:00:00
5 Appuyer sur ou pour sélectionner
Audio, puis appuyer sur ENTER (Entrée). Le
Language - Audio
menu
s’affiche.
Language - Audio
Original
English
French
Spanish
Other
(Langue audio)
6 Appuyer sur ou pour sélectionner une
langue, puis appuyer sur ENTER (Entrée). Si
Other (Autre) est sélectionné, il est
nécessaire de saisir un code à quatre chiffres
pour la langue souhaitée. Pour une liste des
codes de langue, voir « Codes de langue » à
la 109.
7 Appuyer sur SETUP pour fermer le menu.
Remarque
Seules les langues enregistrées sur le DVD
peuvent être sélectionnées.
Sur certains DVD n'est pas possible de changer la
langue audio.
www.insignia-products.com
77
Page 79
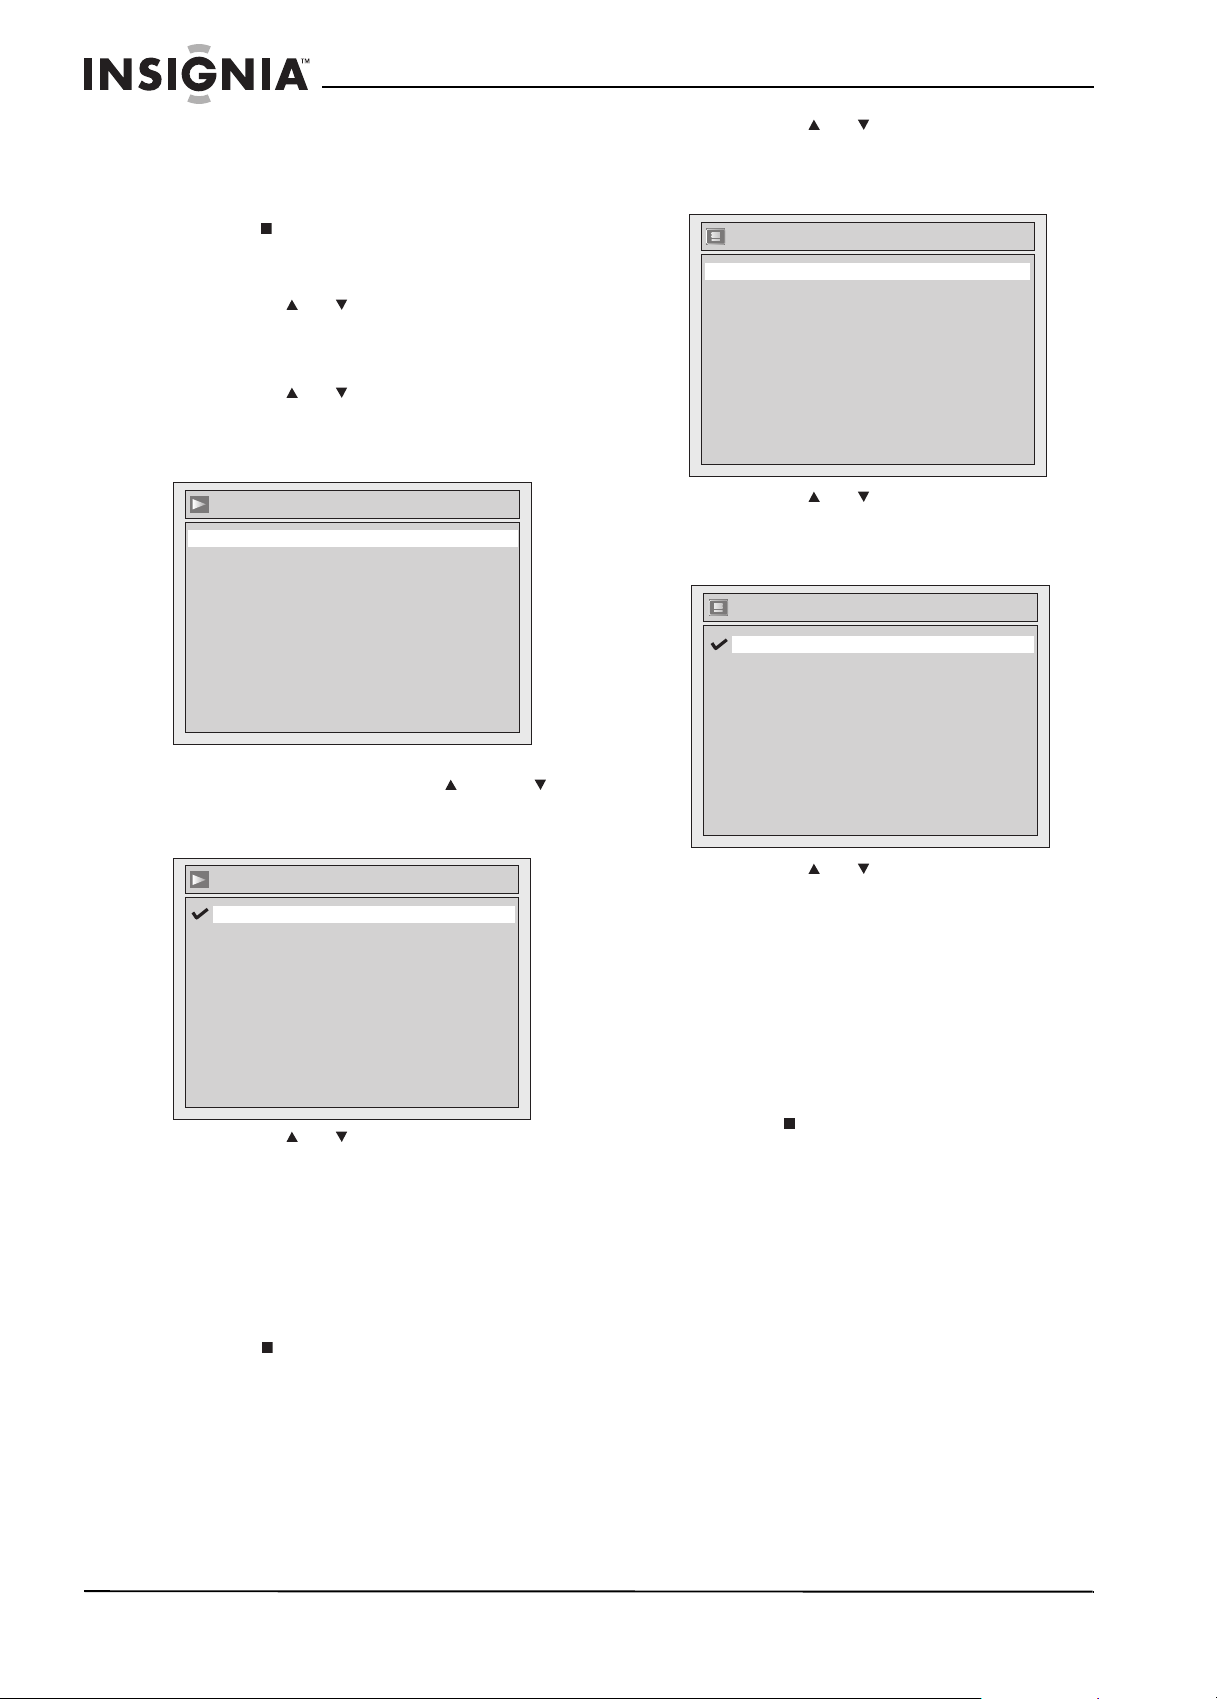
Graveur de DVD Insignia NS-FSDVDR
Sélection de la langue du menu disque
Pour sélectionner la langue du menu
disque :
1 Si un DVD est en cours de lecture, appuyer
sur STOP (Arrêt).
2 Appuyer sur SETUP (Configuration). Le
3 Appuyer sur ou pour sélectionner
4 Appuyer sur ou pour sélectionner
Setup
menu
s’affiche.
Playback (Lecture), puis appuyer sur
ENTER (Entrée). Le menu
Playback
(Lecture) s'affiche.
Language (Langue), puis sur ENTER
(Entrée). Le menu des langues (
Language
s’affiche.
Language
hsilgnEuneM csiD
lanigirOoiduA
FFOeltitbuS
3 Appuyer sur ou pour sélectionner
Display (Affichage), puis sur ENTER
(Entrée). Le menu
Display
(Affichage)
s'ouvre.
Display
OSD LanguageEnglish
Angle Icon ON
Screen Saver
FL Dimmer
10 minutes
Bright
)
4 Appuyer sur ou pour sélectionner OSD
Language (Langue OSD), puis sur ENTER
(Entrée). Le menu de la langue OSD (
Language
) s’affiche.
SD Language
O
English
Français
Español
OSD
5 Appuyer sur ou pour sélectionner Disc
Menu (Menu disque), puis sur ENTER
(Entrée). Le menu
Language - Disc Menu
(Langue du menu disque) s’affiche.
Language - Audio
Original
English
French
Spanish
Other
6 Appuyer sur ou pour sélectionner une
langue, puis appuyer sur ENTER (Entrée).
7 Appuyer sur SETUP pour fermer le menu.
Sélection de la langue du menu de
configuration
Pour sélectionner la langue du menu de
configuration
1 Si un disque est en cours de lecture, appuyer
sur STOP (Arrêt).
2 Appuyer sur SETUP (Configuration). Le
Setup
menu
s’affiche.
5 Appuyer sur ou pour sélectionner une
langue, puis appuyer sur ENTER (Entrée).
6 Appuyer sur SETUP pour fermer le menu.
Utilisation de l’économiseur d’écran
Quand l'économiseur d'écran est activé, il
devient actif après une certaine période
spécifiée pour protéger l'écran du téléviseur de
l'effet d'image rémanente.
Pour utiliser l'économiseur d'écran :
1 Si un disque est en cours de lecture, appuyer
sur STOP (Arrêt).
2 Appuyer sur SETUP (Configuration). Le
menu
Setup
s’affiche.
78
www.insignia-products.com
Page 80

Graveur de DVD Insignia NS-FSDVDR
3 Appuyer sur ou pour sélectionner
Screen Saver (Économiseur d'écran), puis
sur ENTER (Entrée). Le menu de
l'économiseur d'écran (
Screen Saver
)
s'affiche.
Screen Saver
OFF
5 minutes
10 minutes
15 minutes
30 minutes
4 Appuyer sur ou pour sélectionner une
option pour l'économiseur d'écran. Si OFF
(Désactivé), l'économiseur d'écran ne sera
jamais actif. Si une durée est sélectionnée,
l'économiseur d'écran devient actif dès que
la même image reste affichée sur le
téléviseur pendant la durée sélectionnée.
5 Appuyer sur SETUP pour fermer le menu.
Réglage de la luminosité de l'affichage du
panneau avant
Pour régler la luminosité de l'affichage du
panneau avant :
1 Si un disque est en cours de lecture, appuyer
sur STOP (Arrêt).
2 Appuyer sur SETUP (Configuration). Le
Setup
menu
3 Appuyer sur ou pour sélectionner
Display (Affichage), puis sur ENTER
(Entrée). Le menu
s'ouvre.
s’affiche.
Display
(Affichage)
4 Appuyer sur ou pour sélectionner FL
Dimmer (Gradateur), puis sur ENTER. Le
menu du gradateur (
FL Dimmer
Auto
Bright
Dark
FL Dimmer
) s'affiche.
5 Appuyer sur ou pour sélectionner le
niveau de luminosité. Si Auto est
sélectionné, l'affichage du panneau avant et
plus lumineux quant au graveur est mis sous
tension est moins lumineux quand il est mis
en tension.
6 Appuyer sur SETUP pour fermer le menu.
Réglage de la fonction de l'audio PCM
Le réglage de l'audio n'a d'effet que pendant la
lecture d'un DVD.
Pour régler la fonction de l'audio PCM
1 Si un DVD est en cours de lecture, appuyer
sur STOP (Arrêt).
2 Appuyer sur SETUP (Configuration). Le
3 Appuyer sur ou pour sélectionner
4 Appuyer sur ou pour sélectionner
Setup
menu
s’affiche.
Playback (Lecture), puis appuyer sur
ENTER (Entrée). Le menu
Playback
(Lecture) s'affiche.
Audio, puis appuyer sur ENTER (Entrée). Le
Audio
menu
s’affiche.
Display
OSD LanguageEnglish
Angle Icon ON
Screen Saver
FL Dimmer
10 minutes
Bright
Audio
Digital Out
Dynamic Range Control ON
www.insignia-products.com
79
Page 81

Graveur de DVD Insignia NS-FSDVDR
5 Appuyer sur ou pour sélectionner
Digital Out (Sortie numérique), puis sur
ENTER. L'écran de la sortie de l'audio
numérique (
Audio - Digital Out
Audio - Digital Out
) s'affiche.
zHk84MCP
maertSlatigiD ybloD
6 Appuyer sur ou pour sélectionner PCM,
puis sur ENTER (Entrée). L'écran de la sortie
numérique PCM (
Digital Out - PCM
48kHz
96kHz
Digital Out - PCM
) s'affiche.
4 Appuyer sur ou pour sélectionner
Audio, puis appuyer sur ENTER (Entrée). Le
menu
Audio
s’affiche.
Audio
Digital Out
Dynamic Range Control ON
5 Appuyer sur ou pour sélectionner
Digital Out (Sortie numérique), puis sur
ENTER. L'écran de la sortie de l'audio
numérique (
Audio - Digital Out
Audio - Digital Out
) s'affiche.
zHk84MCP
maertSlatigiD ybloD
7 Appuyer sur ou pour sélectionner une
option, puis appuyer sur ENTER (Entrée).
• 48 kHz — Sélectionner cette option si
l'amplificateur ou le décodeur n'est pas
compatible avec la fonction PCM à
96 kHz. Si ce paramètre est sélectionné,
le son à 96 kHz est émis à 48 kHz.
• 96 kHz — Sélectionner cette option si
l'amplificateur ou le décodeur est
compatible avec la fonction PCM à
96 kHz.
8 Appuyer sur SETUP pour fermer le menu.
Réglage de l'audio Dolby Digital
Si le graveur est connecté à un système audio
Dolby Digital, il est possible de régler l'audio.
Pour régler l'audio Dolby Digital :
1 Si un DVD est en cours de lecture, appuyer
sur STOP (Arrêt).
2 Appuyer sur SETUP (Configuration). Le
Setup
menu
3 Appuyer sur ou pour sélectionner
Playback (Lecture), puis appuyer sur
ENTER (Entrée). Le menu
(Lecture) s'affiche.
s’affiche.
Playback
6 Appuyer sur ou pour sélectionner Dolby
Digital, puis sur ENTER. L'écran de la sortie
numérique Dolby Digital (
Digital
) s'affiche.
Digital Out - Dolby Digital
PCM
Stream
Digital Out - Dolby
7 Appuyer sur ou pour sélectionner une
option, puis appuyer sur ENTER (Entrée).
• PCM — Sélectionner cette option si
l'amplificateur ou le décodeur n'est pas
compatible avec la fonction Dolby Digital.
L'audio Dolby Digital est converti au mode
PCM (2 canaux).
• Stream (Continue) — Sélectionner cette
option si l'amplificateur ou le décodeur est
compatible avec l'audio Dolby Digital.
80
www.insignia-products.com
Page 82

Graveur de DVD Insignia NS-FSDVDR
8 Appuyer sur SETUP pour fermer le menu.
Remarque
Lors de la lecture d'un DVD-RW enregistré en
mode VR :
Si la source audio d'un DVD est au format Dolby
Digital, régler Dolby Digital sur PCM afin de
pouvoir basculer l'amplificateur ou le décodeur
entre principal (L) [G], audio secondaire (R) [D] ou
un mixage des deux (L/R) [G/D].
Utilisation de la commande de portée
dynamique.
La commande de portée dynamique permet de
compresser la gamme entre les sons les plus
élevés et les plus bas.
Pour utiliser la commande de portée
dynamique :
1 Si un DVD est en cours de lecture, appuyer
sur STOP (Arrêt).
2 Appuyer sur SETUP (Configuration). Le
3 Appuyer sur ou pour sélectionner
4 Appuyer sur ou pour sélectionner
Setup
menu
s’affiche.
Playback (Lecture), puis appuyer sur
ENTER (Entrée). Le menu
Playback
(Lecture) s'affiche.
Audio, puis appuyer sur ENTER (Entrée). Le
Audio
menu
Audio
Digital Out
Dynamic Range Control ON
s’affiche.
Utilisation du balayage progressif
Si le téléviseur est compatible avec le balayage
progressif, il est possible d'activer cette fonction
pour obtenir une meilleure qualité de l'image
vidéo que celle d'un téléviseur standard.
Remarque
Le téléviseur doit être connecté aux prises à
composantes du graveur.
Pour utiliser le balayage progressif :
1 Si un DVD est en cours de lecture, appuyer
sur STOP (Arrêt).
2 Appuyer sur SETUP (Configuration). Le
menu
Setup
s’affiche.
3 Appuyer sur ou pour sélectionner
Playback (Lecture), puis appuyer sur
ENTER (Entrée). Le menu
(Lecture) s'affiche.
4 Appuyer sur ou pour sélectionner Video
(Vidéo), puis appuyer sur ENTER (Entrée).
Video
L’écran
s’affiche.
5 Appuyer sur ou pour sélectionner
Progressive (Balayage progressif), puis sur
ENTER (Entrée).
6 Appuyer sur ou pour sélectionner ON
(Activé) ou OFF (Désactivé). Un écran de
confirmation s'affiche.
7 Appuyer sur ou pour sélectionner Yes
(Oui) ou No (Non).
8 Si Yes est sélectionné, sélectionner de
nouveau dans les 15 secondes Yes, puis
appuyer sur ENTER (Entrée).
9 Appuyer sur SETUP pour fermer le menu.
Playback
5 Appuyer sur ou pour sélectionner
Dynamic Range Control (Commande de la
portée dynamique), puis sur ENTER L'écran
de la commande de la portée dynamique de
l'audio (
Audio - Dynamic Range Control
)
s'affiche.
Audio - Dynamic Range Control
ON
OFF
6 Appuyer sur ou pour sélectionner ON
(Activé) ou OFF (Désactivé).
7 Appuyer sur SETUP pour fermer le menu.
Remarque
Si le téléviseur est compatible avec le balayage
progressif (525p/480p), connecter le téléviseur
aux prises à composantes du graveur.
Si le téléviseur n'est pas compatible avec le
balayage progressif, connecter le téléviseur aux
prises A/V du graveur, désactiver le câble et le
balayage progressif ou maintenir appuyée la
touche SETUP pendant plus de trois secondes
pendant la lecture du DVD.
Sélection du mode arrêt sur image
Il est possible de sélectionner la qualité vidéo de
l'arrêt sur image (quand le graveur est arrêté
momentanément).
Pour sélectionner le mode arrêt sur image :
1 Si un DVD est en cours de lecture, appuyer
sur STOP (Arrêt).
2 Appuyer sur SETUP (Configuration). Le
3 Appuyer sur ou pour sélectionner
4 Appuyer sur ou pour sélectionner Video
5 Appuyer sur ou pour sélectionner Still
Setup
menu
s’affiche.
Playback (Lecture), puis appuyer sur
ENTER (Entrée). Le menu
Playback
(Lecture) s'affiche.
(Vidéo), puis appuyer sur ENTER (Entrée).
Video
Le menu
(Vidéo) s’affiche.
Mode (Mode arrêt sur image), puis sur
ENTER.
www.insignia-products.com
81
Page 83

Graveur de DVD Insignia NS-FSDVDR
6 Appuyer sur ou pour sélectionner un
mode d'arrêt sur image, puis sur ENTER
(Entrée). Sélections possibles :
• Auto — Le graveur sélectionne
automatiquement le meilleur mode d'arrêt
sur image.
• Field (Champ) — Fournit des images
stables.
• Frame (Image) — Fournit des images de
plus haute résolution.
7 Appuyer sur SETUP pour fermer le menu.
Remarque
Un « frame » (image) est une image vidéo
complète constituée de deux champs. La vidéo
NTSC affiche 30 images par seconde.
Configuration des contrôles parentaux
Il est possible de régler les contrôles parentaux
pour interdire la reproduction de certains types
spécifiques de films DVD.
Niveaux de classification
Niveau Description
All
(Tous)
8 [Adult] [Adultes] Tous les disques peuvent être
7 [NC-17] Non recommandé pour les moins de 17
6 [R] Non recommandé pour les moins de 17 ans
5 [PGR] Surveillance parentale recommandée.
4 [PG13] Non recommandé pour les moins de 13
3 [PG] Surveillance parentale suggérée.
2 [G] Tous publics.
1 [Kid Safe] (Pour enfants) Approprié pour les
Les contrôles parentaux ne sont pas activés.
Tous les disques peuvent être reproduits.
reproduits.
ans.
ou accompagnement par un adulte requis.
ans.
enfants de tous âges.
4 Appuyer sur ou pour sélectionner
Parental Lock (Verrouillage parental), puis
sur ENTER. Le menu
Parental lock
(Verrouillage parental) s’affiche.
Parental Lock
All
8
7
6
5
4
3
2
1
5 Appuyer sur ou pour sélectionner le
niveau de classification souhaité, puis
appuyer sur ENTER (Entrée).
Si aucun mot de passe n’a été configuré,
l’écran suivant s’affiche. Appuyer sur ou
pour sélectionner Yes (Oui) puis sur ENTER
(Entrée).
Parental Lock
Change Password?
Yes
No
Si un mot de passe a déjà été configuré,
l’écran suivant s’affiche :
Parental Lock
Pour configurer les contrôles parentaux :
1 Si un DVD est en cours de lecture, appuyer
sur STOP (Arrêt).
2 Appuyer sur SETUP (Configuration). Le
Setup
menu
s’affiche.
3 Appuyer sur ou pour sélectionner
Playback (Lecture), puis appuyer sur
ENTER (Entrée). Le menu
Playback
(Lecture) s'affiche.
Password Input
----
6 Utiliser les touches numériques pour saisir
un mot de passe à quatre chiffres, puis
appuyer sur ENTER (Entrée).
7 Appuyer sur SETUP pour fermer le menu.
Remarque
Appuyer sur CLEAR (Effacer) pour effacer les
chiffres corrects.
En cas d’oubli du mot de passe ou pour
réinitialiser le contrôle parental sur les paramètres
par défaut, saisir le mot de passe 4737. L’ancien
mot de passe est effacé el le contrôle parental est
réinitialisé sur All (Tous).
82
www.insignia-products.com
Page 84

Graveur de DVD Insignia NS-FSDVDR
Enregistrement de DVD
Préparation à l'enregistrement
Avant d'enregistrer un DVD, lire les informations
de cette section.
Formats de DVD inscriptibles
Ce graveur peut effectuer des enregistrements
sur des DVD-R et des DVD-RW.
• Les DVD-R ne peuvent être enregistrés
qu'une fois et ne peuvent pas être effacés.
Les disques DVD-R ne peuvent être utilisés
que pour un enregistrement en mode Vidéo.
• Il est possible d'enregistrer et d'effacer de
nombreuses fois les disques DVD-RW. Les
DVD-RW peuvent être utilisés pour un
enregistrement en mode Vidéo ou en mode
VR.
Logo Attributs
DVD monocouche, simple face, de
8cm/12cm
Durée d'enregistrement maximale
approximative (mode SEP) :
• 600 minutes (4,7 Go) (pour 12 cm)
• 180 minutes (1,4 Go) (pour 8 cm)
• Pour garantir la meilleure qualité
d'enregistrement, il est fortement
recommandé d'utiliser les disques suivants :
• N'importe quel DVD-R 8
• MAXELL DVD-R 16×
• MAXELL DVD-RW 4×
• Autres disques qui ont été testés et se sont
montrés compatibles avec ce graveur :
• VERBATIM DVD-R 8
• VERBATIM DVD-RW 2×
• MAXELL DVD-R 16×
• JVC DVD-RW 4
×
Modes d’enregistrement
• Le mode Vidéo est le même format
d'enregistrement que les films DVD achetés
en magasin, donc les DVD enregistrés dans
ce mode peuvent être lus par la plupart des
lecteurs DVD. Pour permettre la lecture dans
tous les autres types de lecteurs DVD, il faut
finaliser
le DVD (voir « Finalisation des
disques » à la page 84). Tant que le DVD
n'est pas finalisé, il est possible de lire,
d'enregistrer du contenu supplémentaire ou
de modifier un DVD enregistré en mode
Vidéo.
• Le mode VR (enregistrement vidéo) est un
format d'enregistrement de base pour les
DVD-RW. Il permet un nombre illimité
d'enregistrements et de modifications.
×
×
Seuls les lecteurs DVD portant le logo
sont capables de lire des DVD-RW
enregistrés en mode VR.
Type de
DVD
DVD-RW
DVD-R
Format
d’enregistrement
Mode Vidéo • Lecture
Mode VR • Lecture
Mode Vidéo • Lecture
Fonctions
• Enregistrement
limité
• Modifications
limitées
• Enregistrement
• Modification de
la liste
originale/liste de
lecture
• Enregistrement
limité
• Modifications
limitées
Vitesses d'enregistrement
Six vitesses d'enregistrements sont disponibles.
La durée maximale d'enregistrement dépend de
la vitesse d'enregistrement sélectionnée et de la
taille du DVD.
Remarque
Les DVD enregistrés en vitesse SLP ou SEP sur
ce graveur peuvent ne pas être lisible sur certains
lecteurs DVD.
Taille
du
DVD
8cm
12 cm
Vitesse
d'enregistrement
XP (1H) 18 min + + + + + +
SP (2H) 36 min + + + + +
LP (4H) 72 min + + + +
EP (6H) 108 min + + +
SLP (8H) 144 min + +
SEP (10H) 180 min +
XP (1H) 60 min + + + + + +
SP (2H) 120 min + + + + +
LP (4H) 240 min + + + +
EP (6H) 360 min + + +
SLP (8H) 480 min + +
SEP (10H) 600 min +
Conseil
Les durées d'enregistrement sont des estimations
et les durées d'enregistrement véritables peuvent
être différentes. En général, la qualité audio et
vidéo se dégrade à mesure que la durée
d'enregistrement s'allonge.
Durée
d'enregistrement
Qualité
vidéo/audi
o
Limitations
• Le graveur ne peut pas enregistrer des CD.
• La lecture des disques peut être impossible
s'ils sont endommagés, sales, ou si la lentille
du lecteur est sale ou couverte de
condensation.
www.insignia-products.com
83
Page 85

Graveur de DVD Insignia NS-FSDVDR
• Un disque enregistré sur un ordinateur peut
ne pas être lisible dans ce graveur, même si
le disque a été enregistré dans un format
compatible. Voir la documentation du logiciel
d'enregistrement de DVD pour obtenir des
informations détaillées sur les formats
d'enregistrement de DVD.
• Il est impossible d'enregistrer du contenu
supplémentaire à l'aide d'autres graveurs sur
des disques enregistrés en mode Vidéo sur
ce graveur.
• Un DVD-RW formaté avec ce graveur ne
peut pas être utilisé pour effectuer un
enregistrement avec un autre graveur.
• Étant donné que ce graveur enregistre la
vidéo avec un débit binaire variable (VBR),
suivant l'image enregistrée, la durée restante
effective pour l'enregistrement peut être
légèrement inférieure à la durée restante
affichée à l'écran.
• Il n’est pas possible d’enregistrer avec ce
graveur une source vidéo dont le contenu est
protégé par les droits d’auteur. Les sources
vidéo protégées comprennent les films sur
DVD ainsi que certaines émissions par
satellite.
Si un matériau protégé par les droits d’auteur
est détecté pendant un enregistrement,
celui-ci se met en pause ou s’arrête
automatiquement et un message d’erreur
s’affiche à l’écran.
• Une source vidéo étiquetée « copy-once only
» (ne copier qu’une seule fois) ne peut être
enregistrée qu’à l’aide d’un DVD-RW en
mode VR prenant en charge le dispositif de
protection du contenu des supports
enregistrables « CPRM » (Contents
Protection for Recordable Media) (voir
« Qu'est-ce que « CPRM » ? » à la page 84).
• Lors de l'enregistrement d'une émission
télévisée ou d'une source vidéo par
l'intermédiaire d'une entrée externe, il est
possible d'afficher à l'écran des informations
de contrôle de la copie.
Qu'est-ce que « CPRM » ?
CPRM est l’acronyme de « Content Protection
for Recordable Media ». CPRM est un système
de protection des droits d’auteur qui utilise une
technologie de brouillage pour ne permettre
l'enregistrement que d'une seule copie des
programmes limités à une copie unique.
Ce graveur de DVD est compatible CPRM, ce
qui signifie qu’il est possible d’enregistrer des
émissions limitées à une copie unique, mais qu’il
est alors impossible d'effectuer une nouvelle
copie de ces enregistrements. Les
enregistrements CPRM ne peuvent être
effectués que sur des disques DVD-RW
formatés en mode VR; les enregistrements
CPRM ne peuvent être lus que sur des lecteurs
DVD qui sont spécifiquement compatibles avec
le dispositif CPRM.
Informations concernant le contrôle de copie
Certaines émissions par satellite comprennent
des informations protégées par les droits
d'auteur. Pour enregistrer celles-ci, se reporter
aux recommandations suivantes :
Type de
DVD
DVD-RW
Mode VR
DVD-RW
Mode
Vidéo
DVD-R v2.0 O -- --
Format
v1.1, 1.2 O -- -v1.1, 1.2 CPRM O O -v1.1, 1.2 O -- -v1.1, 1.2 CPRM O -- --
Copie
libre
Copie
unique
Finalisation des disques
Après l'enregistrement, il faut finaliser le DVD
pour pouvoir le lire sur d'autres lecteurs DVD.
Pour plus d’informations, voir « Finalisation des
disques » à la page 84.
Après la finalisation :
• Les DVD-RW et DVD-R (mode Vidéo) ne
peuvent plus être utilisés pour enregistrer un
contenu supplémentaire, ni être modifiés.
Lorsqu'un DVD-RW ou un DVD-R (mode
Vidéo) est finalisé, le menu des titres est créé
automatiquement.
• Un DVD-RW (mode VR) peut enregistrer du
contenu supplémentaire et être modifié.
Copie
interdite
84
Remarque
www.insignia-products.com
L'enregistrement DolbyMD Digital permet
d'enregistrer un signal vidéo de haute qualité avec
un son stéréo sur des DVD inscriptibles. La
technologie, lorsqu'elle est utilisée au lieu d'un
enregistrement PCM, économise également de la
place sur les DVD inscriptibles, permettant une
résolution vidéo plus élevée ou une durée
d'enregistrement plus longue sur chaque DVD.
Les DVD créés au moyen d'un enregistrement
Dolby Digital peuvent être lus sur tous les lecteurs
DVD-Vidéo. Ceci est vrai lorsque les lecteurs sont
compatibles avec les DVD inscriptibles
eux-mêmes.
Page 86

Graveur de DVD Insignia NS-FSDVDR
Formatage d’un DVD vierge
Pour formater un DVD vierge :
1 Appuyer sur SETUP (Configuration). Le
2 Appuyer sur ou pour sélectionner Disc
3 Appuyer sur ou pour sélectionner
Setup
menu
s’affiche.
(Disque), puis appuyer sur ENTER (Entrée).
Disc
Le menu
Disc
Format
Finalize
Disc Protect OFF ON
(Disque) s’affiche.
Format, puis appuyer sur ENTER (Entrée).
Le menu
Start
Format Mode Video mode
Format
Format
s’affiche.
7 Insérer un DVD vierge dans le plateau à
disque. Le formatage démarre
automatiquement et un écran de progression
s'affiche. Le formatage est terminé lorsque la
barre de progression atteint 100 %.
%09gnittamroF
Remarques
• Les disques DVD-R sont toujours formatés en
mode Vidéo. Il n'est pas possible de formater
un DVD-R en mode VR.
• Il n'est pas possible de mélanger deux types de
format sur le même DVD-RW. Si un disque
formaté est inséré, il est impossible de changer
le format à moins de reformater complètement
le disque, ce qui efface toutes les données sur
le disque.
• Il est impossible d'enregistrer sur des DVD+R
ou des DVD+RW. Si un disque DVD+R ou
DVD+RW est inséré, « Disc Error? » (« Erreur
de disque ? ») s'affiche à l'écran.
• Lors d'un enregistrement sur un DVD-RW
formaté en mode VR, une liste de lecture est
automatiquement créée.
• Lors d'un enregistrement sur un DVD, un
chapitre vierge peut être ajouté à la fin de
l'enregistrement, suivant l'espace libre qui
reste sur le DVD.
4 Appuyer sur ou pour sélectionner
Format Mode (Mode de format), puis
appuyer sur ENTER (Entrée). L’écran
Format-Format Mode
(Format-Mode de
format) s’ouvre.
Format - Format Mode
Video mode
VR mode
Video mode
DVD Player Compatibility mode.
VR mode
Editing possibility mode.
5 Appuyer sur ou pour sélectionner Video
mode (Mode Vidéo) ou VR mode (mode VR)
(DVD-RW uniquement), puis appuyer sur
ENTER (Entrée).
6 Appuyer sur SETUP pour fermer le menu.
Reformatage d’un DVD
Pour reformater un DVD :
1 Appuyer sur SETUP (Configuration). Le
2 Pour changer le mode de formatage,
3 Appuyer sur ou pour sélectionner
Setup
menu
s’affiche.
exécuter les étapes 2 à 5 de la section
« Pour formater un DVD vierge : », à la page
85, puis appuyer sur RETURN (Retour)
pour revenir au menu
Format. Le menu
Format
Start
Format Mode Video mode
Setup
Format
(Configuration).
s’affiche.
www.insignia-products.com
85
Page 87

Graveur de DVD Insignia NS-FSDVDR
4 Appuyer sur ou pour sélectionner Start
(Démarrer), puis appuyer sur ENTER
(Entrée). Un écran de confirmation s'affiche.
Format
Start
Format mode Video mode
Are you sure?
Yes
No
5 Appuyer sur ou pour sélectionner Yes
(Oui), puis appuyer sur ENTER (Entrée). Le
formatage démarre automatiquement et un
écran de progression s'affiche. Le formatage
est terminé lorsque la barre de progression
atteint 100 %.
6 Appuyer sur REC SPEED (Vitesse
d'enregistrement) pour sélectionner une
vitesse d’enregistrement.
XP 0:58
7 Appuyer sur CH ou CH , ou appuyer sur
les touches numériques, pour sélectionner le
canal à enregistrer.
CH 12
gnittamroF
6 Appuyer sur SETUP (Configuration) pour
fermer le menu.
Enregistrement d'un programme
Pour enregistrer une émission télévisée :
1 Vérifier qu'un DVD a été formaté. Pour plus
d’informations, voir « Formatage d’un DVD
vierge » à la page 85 ou « Reformatage d’un
DVD » à la page 85.
2 Si l'émission télévisée à enregistrer diffuse
en stéréo et en SAP, sélectionner la piste
sonore à enregistrer. Le graveur ne peut
enregistrer qu'une seule piste sonore. Pour
plus d’informations, voir « Réglage du canal
audio » à la page 67.
3 Appuyer sur OPEN/CLOSE (Ouvrir/fermer)
pour ouvrir le plateau à disque.
4 Insérer un DVD formaté sur le plateau avec
l'étiquette sur le dessus.
5 Appuyer sur OPEN/CLOSE (Ouvrir/fermer)
pour fermer le plateau à disque. Le graveur
identifie le disque. Ceci peut prendre un
certain temps.
8 Appuyer sur REC/OTR (Enregistrement
%09
immédiat) pour commencer l'enregistrement.
Un s’affiche à l’écran pendant cinq
secondes.
9 Pour arrêter momentanément
l’enregistrement, appuyer sur PAUSE . Pour
reprendre l’enregistrement, appuyer sur
PAUSE ou REC/OTR (Enregistrement
immédiat).
86
www.insignia-products.com
Page 88

Graveur de DVD Insignia NS-FSDVDR
10 Pour arrêter l'enregistrement, appuyer sur
STOP (Arrêt).
Remarques
• L'enregistrement commence dès que la touche
REC/OTR (Enregistrement immédiat) est
appuyée et continue jusqu'à ce que le DVD soit
plein ou que la touche STOP (Arrêt) soit
appuyée.
• Si l'horloge n'a pas été réglée, la date et l'heure
de l'enregistrement n'apparaissent pas dans la
liste originale, ni dans la liste de lecture.
• Il n'est pas possible de mélanger deux types de
format sur le même DVD-RW. Si un disque
formaté est inséré, il est impossible de changer
le format à moins de reformater complètement
le disque, ce qui efface toutes les données sur
le disque.
• Il n'est pas possible de changer la vitesse
d'enregistrement au cours d'un enregistrement.
• Il est possible d'arrêter momentanément
l'enregistrement, de changer de canal, puis de
continuer à enregistrer un canal différent sur le
même DVD.
Utilisation de la fonction d'enregistrement
immédiat (OTR)
Il est possible de définir rapidement la durée
pendant laquelle le graveur enregistrera avant
d'arrêter l'enregistrement et de se mettre en
mode d'attente.
8 Pour annuler l'enregistrement avant que la
durée soit écoulée, appuyer sur STOP
(Arrêt).
Remarques
Appuyer sur DISPLAY (Affichage) pour afficher la
durée d’enregistrement restante.
Il n'est pas possible d'arrêter momentanément un
OTR (enregistrement immédiat).
Programmation d'un enregistrement
ultérieur
Il est possible de programmer jusqu'à huit
enregistrements sur une période d'un mois. Il est
également possible de programmer des
enregistrements quotidiens et hebdomadaires.
Pour programmer un enregistrement
ultérieur :
1 Vérifier que l’horloge est réglée. Pour plus
d’informations, voir « Réglage automatique
de l’horloge » à la page 68 ou « Réglage
manuel de l’horloge » à la page 68.
2 Insérer un disque formaté dans le plateau à
disque et fermer le plateau.
3 Appuyer sur TIMER PROG. (Enregistrement
programmé). L’écran
(Enregistrement programmé) s’affiche.
Timer Programming
Pour utiliser la fonction d'enregistrement
immédiat (OTR) :
1 Appuyer sur OPEN/CLOSE (Ouvrir/fermer)
pour ouvrir le plateau à disque.
2 Insérer un DVD formaté disposant de
suffisamment de place pour l'enregistrement
sur le plateau, avec l'étiquette sur le dessus.
3 Appuyer sur OPEN/CLOSE (Ouvrir/fermer)
pour fermer le plateau à disque. Le graveur
identifie le disque. Ceci peut prendre un
certain temps.
4 Appuyer sur REC SPEED (Vitesse
d'enregistrement) pour sélectionner une
vitesse d’enregistrement.
5 Appuyer sur CH ou CH , ou appuyer sur
les touches numériques, pour sélectionner le
canal à enregistrer.
6 Appuyer de façon répétée sur REC/OTR
(Enregistrement immédiat) pour sélectionner
la durée d’enregistrement souhaitée. Chaque
fois que la touche est appuyée, la durée
d'enregistrement augmente de 30 minutes,
jusqu'à un maximum de 8 heures.
L'enregistrement commence immédiatement.
Quand l'enregistrement est terminé, le
graveur arrête d'enregistrer et se met en
mode d'attente.
7 Pour changer la durée d'enregistrement,
appuyer de façon répétée sur REC/OTR
(Enregistrement immédiat) jusqu'à ce que la
durée souhaitée s'affiche.
Timer Programming
Date Start End CH Speed
1.
---
2. ---
3. ---
4. ---
4 Appuyer sur ou pour sélectionner le
numéro du programme, puis sur ENTER
(Entrée).
Timer Programming
Date Start End CH Speed
1. --:-- --:-- L1
JAN/01
2. ---
3. ---
4. ---
5 Appuyer sur ou pour entrer la Date de
l'enregistrement, puis appuyer sur .
Timer Programming
Date Start End CH Speed
1. JAN/01 --:-- L1
2. ---
3. ---
4. ---
12:57AM
www.insignia-products.com
87
Page 89

Graveur de DVD Insignia NS-FSDVDR
6 Appuyer sur ou pour entrer l'heure de
début (Start), puis appuyer sur .
7 Appuyer sur ou pour entrer l'heure de fin
(End), puis appuyer sur .
Timer Programming
Date Start End CH Speed
1. JAN/01 12:57AM 1:57AM
2. ---
3. ---
CH 8
8 Appuyer sur ou pour sélectionner le
numéro de canal, puis appuyer sur . Pour
enregistrer à partir d’un périphérique externe,
sélectionner L1 (Ligne1) ou L2 (Ligne2).
Timer Programming
Date Start End CH Speed
1. JAN/01 12:57AM 1:57AM CH 8 1H
2. ---
9 Appuyer sur ou pour sélectionner une
vitesse d’enregistrement.
10 Vérifier que les informations entrées sont
correctes, puis appuyer surENTER (Entrée).
L'enregistrement programmé est ajouté au
programme.
11 Pour ajouter un autre enregistrement
programmé au programme, répéter les
étapes 3 à 10.
12 Appuyer sur TIMER PROG. (Enregistrement
programmé) ou SETUP (Configuration) pour
fermer le menu.
13 Appuyer sur POWER (Marche/Arrêt). L’icône
s’affiche sur l'affichage du panneau avant.
Conseils
• En cas de panne de courant, ou si le graveur
est débranché pendant plus de 30 secondes,
le réglage de l'horloge et tous les
enregistrements programmés sont perdus.
• En l’absence de DVD dans le plateau à disque,
clignote et le graveur ne peut pas
enregistrer. Dans certains cas, s'affiche
momentanément à côté de l'heure de début de
l'enregistrement. Insérer un DVD inscriptible.
• Lorsque tous les enregistrements programmés
sont terminés, clignote. Pour lire ou éjecter
le DVD enregistré, appuyer d'abord sur
POWER (Marche/Arrêt), puis sur PLAY
(Lecture) ou OPEN/CLOSE (Ouvrir/Fermer).
• Lors d'un enregistrement programmé, ou
lorsque le graveur est en veille en attendant le
début d'un enregistrement programmé, de
nombreuses touches de la télécommande ou
du panneau avant ne peuvent pas être
utilisées. Pour que ces touches soient
disponibles, annuler l'enregistrement
programmé ou sortir du mode d'attente d'un
enregistrement programmé ( disparaît).
• Pour annuler le mode d'attente
d'enregistrement programmé, appuyer sur
POWER (Marche/Arrêt).
• Lorsque les heures de début et de fin sont les
mêmes, la durée de l'enregistrement
programmé est de 24 heures. Lorsque le
graveur atteint la fin de l'enregistrement, il
s'éteint.
• Lorsque les heures de début et de fin
programmées sont antérieures à l'heure
actuelle, le programme n'est pas accepté et
l'entrée est supprimée de la liste des
enregistrements.
• Si l'heure de début est antérieure et l'heure de
fin est postérieure à l'heure actuelle,
l'enregistrement commence dès la mise hors
tension de l'appareil.
Chevauchement d'enregistrements programmés
Si les horaires de deux enregistrements
programmés se chevauchent, le premier
enregistrement programmé est prioritaire.
Par exemple, si le programme A est programmé
pour enregistrer de 20 h 00 à 22 h 00, puis que
le programme B est programmé pour la même
heure, le graveur enregistre le programme A au
lieu du programme B.
Si le programme A est programmé pour
enregistrer de 20 h 00 à 22 h 00, puis que le
programme B est programmé pour enregistrer
de 21 h 00 à 23 h 00, le graveur enregistre le
programme A. À 22 h 00, le graveur commence
à enregistrer la deuxième moitié du programme
B.
88
www.insignia-products.com
Page 90

Graveur de DVD Insignia NS-FSDVDR
Si le programme A est programmé pour
enregistrer de 20 h 00 à 22 h 00, puis que le
programme B est programmé pour enregistrer
de 22 h 00 à 23 h 00, le graveur enregistre le
programme A, puis enregistre le programme B.
Il est possible que les premières secondes du
programme B ne soient pas enregistrées, étant
donné qu'il faut quelques secondes (pas plus de
30) pour que le graveur passe d'un programme
à un autre.
Remarque
Si plus d'une minute d'un enregistrement n'est pas
enregistrée, le message d'erreur E40 s'affiche en
face de l'enregistrement sur l'écran
Programming
(Enregistrement programmé).
Timer
Annulation ou correction d'un
enregistrement programmé
Pour annuler ou corriger un enregistrement
programmé :
1 Appuyer sur POWER (Marche/Arrêt). L’icône
disparaît de l'affichage du panneau avant.
2 Appuyer sur TIMER PROG. (Enregistrement
programmé). L’écran
Timer Programming
(Enregistrement programmé) s’affiche.
Timer Programming
Date Start End CH Speed
1. JAN/01 12:57AM 1:57AM CH 8 1H
2. ---
3 Pour annuler un enregistrement programmé,
appuyer sur ou pour sélectionner
l'enregistrement à annuler, puis appuyer sur
CLEAR (Effacer).
4 Pour corriger un enregistrement programmé,
appuyer sur ou pour sélectionner
l'enregistrement à corriger, puis appuyer sur
ENTER (Entrée). Appuyer sur ou
pour sélectionner l'élément à corriger, puis
entrer les informations correctes.
5 Appuyer sur TIMER PROG. (Enregistrement
programmé) pour fermer le menu.
6 Appuyer sur POWER (Marche/Arrêt) pour
revenir en mode d'attente.
Vérification d'un enregistrement
programmé en cours
Pour vérifier un enregistrement programmé
en cours :
• Appuyer sur TIMER PROG. (Enregistrement
programmé). L'écran
Timer Programming
(Enregistrement programmé) s'ouvre et
l'enregistrement en cours s'affiche en
surbrillance en rouge.
Arrêt d'un enregistrement programmé en
cours
Pour arrêter un enregistrement programmé
en cours :
• Appuyer sur STOP (Arrêt) sur le panneau
avant. Le fait d'appuyer sur la touche STOP
(Arrêt) de la télécommande n'arrêtera pas
l'enregistrement.
Problèmes relatifs aux enregistrements
programmés
Si un enregistrement programmé ne se déroule
pas correctement, un message d'erreur s'affiche
sur l'écran
Timer Programming
(Enregistrement
programmé) en face de l'enregistrement
défectueux.
Timer Programming
Date Start End CH Speed
JAN/01 12:57AM 1:57AM CH 8 E22
*
2. ---
3. ---
4. ---
5. ---
6. ---
7. ---
8. ---
Messages d’erreur
E1-E22
E37-E39
E23-E24 Disque non inscriptible
E25-E28 Programme protégé contre la copie
E29 Le DVD est protégé.
E30 Le DVD est plein
E31-E32 Le DVD contient déjà 99 titres (nombre
E33 Le DVD contient déjà 999 chapitres
E34 Plus de place sur le DVD pour les
E35 PCA pleine
E36 Ce DVD formaté en mode Vidéo a déjà
E40 Une partie n'a pas été enregistrée en
E41 Une panne de courant a eu lieu
E42 Pas de DVD sur le plateau à l'heure de
Erreur d'enregistrement autre que
celles indiquées dans ce tableau
maximum)
(nombre maximum)
informations de contrôle
été finalisé
raison d'un chevauchement de
programmes. L'enregistrement n'a pas
commencé à l'heure.
l'enregistrement
Enregistrement à partir d'un périphérique
externe
Pour enregistrer à partir d'un périphérique
externe, il faut sélectionner la source vidéo dans
le menu
Pour sélectionner la source vidéo dans le
menu
1 Vérifier qu'un périphérique externe, tel qu’un
2 Appuyer sur SETUP (Configuration). Le
3 Appuyer sur ou pour sélectionner
Setup
(Configuration), puis enregistrer.
Setup
(Configuration) :
magnétoscope ou un caméscope, est
connecté au graveur.
Setup
menu
(Configuration) s’affiche.
Required Setting (Réglage requis), puis sur
ENTER (Entrée). Le menu
Required Setting
(Réglage requis) s’affiche.
www.insignia-products.com
89
Page 91

Graveur de DVD Insignia NS-FSDVDR
4 Appuyer sur ou pour sélectionner Select
Video (Sélectionner la vidéo), puis appuyer
sur ENTER (Entrée). Le menu
Select Video
(Sélectionner la vidéo) s’affiche.
Select Video
nI oediV )raeR( 1L
nI oediV )tnorF( 2L
5 Appuyer sur ou pour sélectionner L1
(Rear) (L1 [Arrière]) ou L2 (Front) (L2
[Avant]), puis appuyer sur ENTER (Entrée).
L'écran
la vidéo L1 [Arrière]) ou
(Front)
Select Video L1 (Rear)
(Sélectionner
Select Video L2
(Sélectionner la vidéo L2 [Avant])
s'affiche.
6 Appuyer sur ou pour sélectionner
l'entrée Vidéo (Video In) (si le périphérique
est connecté aux prises A/V) ou l'entrée
S-Vidéo (S-Video In) (si le périphérique est
connecté à la prise S-Video), puis appuyer
sur ENTER (Entrée).
7 Appuyer sur SETUP (Configuration) pour
fermer le menu.
Pour enregistrer à partir d’un périphérique
externe :
1 Mettre le téléviseur et le graveur sous
tension.
2 Sur le téléviseur, sélectionner la source vidéo
à laquelle est connecté le graveur. Pour une
liste des sources vidéo courantes par
marque de téléviseur, voir « Sources
d’entrée vidéo du téléviseur », page 66.
3 Appuyer sur OPEN/CLOSE (Ouvrir/fermer)
pour ouvrir le plateau à disque.
4 Insérer un DVD formaté disposant de
suffisamment de place pour l'enregistrement
sur le plateau, avec l'étiquette sur le dessus.
5 Appuyer sur OPEN/CLOSE (Ouvrir/fermer)
pour fermer le plateau à disque. Le graveur
identifie le DVD. Ceci peut prendre un certain
temps.
6 Si le périphérique externe est connecté aux
prises au dos du graveur, appuyer sur 001
sur la télécommande ou appuyer
CHANNEL ou CHANNEL à l'avant du
graveur pour sélectionner L1.
Ou, si le périphérique externe est connecté
aux prises à l'avant du graveur, appuyer sur
002 sur la télécommande ou appuyer
CHANNEL ou CHANNEL à l'avant du
graveur pour sélectionner L2.
7 Appuyer sur REC SPEED (Vitesse
d'enregistrement) pour sélectionner une
vitesse d’enregistrement.
8 Appuyer sur REC/OTR (Enregistrement
immédiat) sur le devant du graveur. Le
graveur commence l'enregistrement.
9 Commencer la lecture sur le périphérique
externe.
10 Appuyer sur STOP (Arrêt) pour arrêter
l'enregistrement.
Protection d’un DVD
Pour éviter d'enregistrer, de modifier ou
d'effacer accidentellement un DVD, il est
possible de protéger le DVD.
Remarque
La fonction de protection des DVD fonctionne
uniquement avec les DVD formatés en mode VR.
Pour protéger un DVD :
1 Appuyer sur SETUP (Configuration). Le
menu
2 Appuyer sur ou pour sélectionner Disc
(Disque), puis appuyer sur ENTER (Entrée).
Le menu
3 Appuyer sur ou pour sélectionner
Disc Protect OFF ON (Protection de disque
désactivée/activée), puis appuyer sur
ENTER (Entrée). L'écran
OFF ON
désactivée/activée) s'affiche.
Disc Protect OFF ON
Yes
No
4 Appuyer sur ou pour sélectionner Yes
(Oui), puis appuyer sur ENTER (Entrée). Le
DVD est protégé.
Remarque
Pour supprimer la protection du DVD, sélectionner
No (Non) à l'étape 4.
Finalisation d’un DVD
Une fois l'enregistrement d'un DVD terminé,
celui-ci peut être finalisé afin d'être lisible sur un
autre lecteur DVD.
Remarques
• La finalisation d'un DVD formaté en mode
• Plus il y a d'espace vierge sur un DVD, plus il
• Ne pas débrancher le cordon d'alimentation ni
Pour finaliser un DVD :
1 Appuyer sur SETUP (Configuration). Le
menu
2 Appuyer sur ou pour sélectionner Disc
(Disque), puis appuyer sur ENTER (Entrée).
Le menu
Setup
(Configuration) s’affiche.
Disc
(Disque) s’affiche.
Disc Protect
(Protection de disque
Vidéo peut prendre jusqu'à 15 minutes. La
finalisation d'un DVD formaté en mode VR peut
prendre jusqu'à une heure.
faut de temps pour le finaliser.
éteindre le graveur pendant la finalisation d'un
DVD.
Setup
(Configuration) s’affiche.
Disc
(Disque) s’affiche.
90
www.insignia-products.com
Page 92

Graveur de DVD Insignia NS-FSDVDR
3 Appuyer sur ou pour sélectionner
Finalize (Finaliser), puis appuyer sur ENTER
(Entrée). L’écran
Finalize
(Finalisation)
s’affiche.
Finalize
Yes
No
4 Appuyer sur ou pour sélectionner Yes
(Oui), puis appuyer sur ENTER (Entrée). La
finalisation démarre automatiquement et un
écran de progression s'affiche. La finalisation
est terminée lorsque la barre de progression
atteint 100 %.
Pour annuler la finalisation d'un DVD-RW :
1 Pendant le processus de finalisation,
appuyer sur STOP (Arrêt). Un message de
confirmation s'affiche.
Finalisation automatique d’un DVD
Il est possible de finaliser automatiquement un
DVD formaté en mode Vidéo une fois que tous
les enregistrements programmés sont terminés.
Remarque
Il n'est pas possible de finaliser automatiquement
un DVD formaté en mode VR.
Pour finaliser automatiquement un DVD :
1 Appuyer sur SETUP (Configuration). Le
menu
Setup
(Configuration) s’affiche.
2 Appuyer sur ou pour sélectionner
Recording (Enregistrement), puis appuyer
sur ENTER (Entrée). Le menu
(Enregistrement) s’affiche.
3 Appuyer sur ou pour sélectionner Auto
Finalize (Finalisation automatique), puis
appuyer sur ENTER (Entrée). Le menu
Finalize
(Finalisation automatique) s’affiche.
Auto Finalize
End of Timer Rec
Recording
FFOlluF csiD
OFF
Auto
Remarque
Une fois la finalisation commencée, il peut être
impossible de l'annuler.
Si la touche STOP (Arrêt) est appuyée et que
s'affiche, la finalisation ne peut pas être arrêtée
parce que le processus a commencé.
Si l'option No (Non) est sélectionnée à l'étape 4,
appuyer sur ENTER (Entrée) ou RETURN
(Retour) pour continuer la finalisation.
Do you want to cancel ?
Yes No
%5gnizilaniF
2 Appuyer sur ou pour sélectionner Yes
(Oui), puis appuyer sur ENTER (Entrée).
Remarques
• La finalisation d'un DVD en mode Vidéo crée
automatiquement des menus de titres.
• Après avoir finalisé un DVD en mode Vidéo, il
n'est plus possible de modifier les
enregistrements, ni d'en ajouter de nouveaux.
• Lors de l'insertion d'un DVD-RW finalisé, le
menu
Disc
Undo Finalize (Annuler la finalisation).
Sélectionner cette option, puis appuyer sur
ENTER (Entrée) pour annuler la finalisation du
DVD.
(Disque) s'affiche avec l'option
4 Appuyer sur ou pour sélectionner Disc
Full (Disque plein) ou End of Timer Rec (Fin
des enregistrements programmés), puis
appuyer sur ENTER (Entrée). Un écran
d'options s'affiche.
5 Appuyer sur ou pour sélectionner ON
(Activée), puis appuyer sur ENTER (Entrée).
6 Appuyer sur SETUP (Configuration) pour
fermer le menu.
Modifications des DVD
Suppression de titres (mode Vidéo)
Pour supprimer un titre :
1 Appuyer sur TOP MENU (Menu principal).
L'écran
Title List
Title List
JAN/ 1/06 1:00AM CH12 XP
(Liste de titres) s'affiche.
1 2 3
4 5
www.insignia-products.com
91
Page 93

Graveur de DVD Insignia NS-FSDVDR
2 Appuyer sur ou pour sélectionner
un titre, puis appuyer sur ENTER (Entrée).
Un écran d'options s'affiche.
Title List
Play
Edit
JAN/ 1/06 1:00AM CH12 XP
4 5 6
2 3
3 Appuyer sur ou pour sélectionner Edit
(Modifier), puis appuyer sur ENTER (Entrée).
Le menu de modification s'affiche.
Title List
Title Delete
1
Edit Title Name
Chapter Mark
Suppression de titres (mode VR/liste
originale)
Lors de l'enregistrement d'un DVD en mode VR,
le lecteur DVD crée une liste originale et une
liste de lecture des titres figurant sur le DVD. Il
est possible de supprimer des titres de la liste
originale, mais, ce faisant, le titre est effacé du
DVD. Pour sauter le titre lors de la lecture, mais
ne pas l'effacer complètement, il faut le
supprimer de la liste de lecture. Pour plus
d’informations, voir « Suppression de titres
(mode VR/liste de lecture) » à la page 93.
Attention
Si un titre est supprimé de la liste originale, il est
effacé du DVD. Il n'est pas possible de restaurer
le titre.
Pour supprimer un titre :
1 Appuyer sur TOP MENU (Menu principal),
puis sur MENU/LIST (Menu/Liste) pour
passer de la liste de lecture à la liste
originale.
2 Appuyer sur ou pour sélectionner
un titre, puis appuyer sur ENTER (Entrée).
Un écran d'options s'affiche.
Original
JAN/ 1/06 1:00AM CH12 XP
0:00:59
4 Appuyer sur ou pour sélectionner Title
Delete (Supprimer titre), puis appuyer sur
ENTER (Entrée). Un écran de confirmation
s'affiche.
Title List - Title Delete
Yes
1
No
JAN/ 1/06 1:00AM CH12 XP
0:00:59
5 Appuyer sur ou pour sélectionner Yes
(Oui), puis appuyer sur ENTER (Entrée). Le
titre est supprimé.
6 Appuyer sur RETURN (Retour), puis sur
RETURN (Retour) ou STOP (Arrêt) pour
fermer le menu.
Play
Edit
JAN/ 1/06 1:00AM CH12 XP
4 5 6
2 3
3 Appuyer sur ou pour sélectionner Edit
(Modifier), puis appuyer sur ENTER. Le
Original
menu
Original
JAN/ 1/06 1:00AM CH12 XP
s’affiche.
1
Title Delete
Scene Delete
Edit Title Name
Chapter Mark
Index Picture
Protect
0:00:59
92
www.insignia-products.com
Page 94

Graveur de DVD Insignia NS-FSDVDR
4 Appuyer sur ou pour sélectionner
Delete (Supprimer), puis appuyer sur
ENTER (Entrée). Un écran de confirmation
s'affiche.
Original - Title Delete
Yes
1
No
JAN/ 1/06 1:00AM CH12 XP
0:00:59
5 Appuyer sur ou pour sélectionner Yes
(Oui), puis appuyer sur ENTER (Entrée). Le
titre est supprimé.
6 Appuyer sur RETURN (Retour), puis sur
RETURN (Retour) ou STOP (Arrêt) pour
fermer le menu.
Suppression de titres (mode VR/liste de
lecture)
La suppression d'un titre dans la liste de lecture
ne supprime pas le titre du DVD. Pour effacer
complètement le titre, il faut le supprimer de la
liste originale. Pour plus d’informations, voir
« Suppression de titres (mode VR/liste
originale) » à la page 92.
Pour supprimer un titre :
1 Appuyer sur TOP MENU (Menu principal),
puis sur MENU/LIST (Menu/Liste) pour
passer à la liste de lecture. L'écran
(Liste de lecture) s'affiche.
2 Appuyer sur ou pour sélectionner
un titre, puis appuyer sur ENTER (Entrée).
Un écran d'options s'affiche.
Playlist
Playlist
3 Appuyer sur ou pour sélectionner Edit
(Modifier), puis appuyer sur ENTER (Entrée).
Le menu
Playlist
Playlist
JAN/ 1/06 1:00AM CH12 XP
(Liste de lecture) s’affiche.
1
Title Delete
Scene Delete
Edit Title Name
Chapter Mark
Index Picture
Title Dividing
Title Combining
0:00:59
4 Appuyer sur ou pour sélectionner Title
Delete (Supprimer titre), puis appuyer sur
ENTER (Entrée). Un écran de confirmation
s'affiche.
Playlist - Title Delete
Yes
1
No
JAN/ 1/06 1:00AM CH12 XP
0:00:59
5 Appuyer sur ou pour sélectionner Yes
(Oui), puis appuyer sur ENTER (Entrée). Un
autre écran de confirmation s'affiche.
Playlist - Title Delete
Are you sure?
1
Yes
No
Play
Edit
JAN/ 1/06 1:00AM CH12 XP
4 5 6
2 3
www.insignia-products.com
JAN/ 1/06 1:00AM CH12 XP
Wait for a moment.
6 Appuyer sur ou pour sélectionner Yes
(Oui), puis appuyer sur ENTER (Entrée). Le
titre est supprimé.
7 Appuyer sur RETURN (Retour) ou sur
STOP (Arrêt) pour fermer le menu.
93
Page 95

Graveur de DVD Insignia NS-FSDVDR
Modification du nom des titres (mode
Vidéo)
Pour modifier un nom de titre :
1 Appuyer sur TOP MENU (Menu principal).
L'écran
2 Appuyer sur ou pour sélectionner
un titre, puis appuyer sur ENTER (Entrée).
Un écran d'options s'affiche.
3 Appuyer sur ou pour sélectionner Edit
(Modifier), puis appuyer sur ENTER (Entrée).
Le menu de modification s'affiche.
Title List
Title List
JAN/ 1/06 1:00AM CH12 XP
Title List
Play
Edit
JAN/ 1/06 1:00AM CH12 XP
Title List
(Liste de titres) s'affiche.
1 2 3
4 5
4 5 6
2 3
Title Delete
1
Edit Title Name
Chapter Mark
4 Appuyer sur ou pour sélectionner Edit
Title Name (Modifier nom de titre), puis
appuyer sur ENTER (Entrée). L'écran
List-Edit Title Name
(Liste de
Title
titres-Modification du nom des titres)
s'affiche.
Title List - Edit Title Name
ABC
1
abc
123
@! ?
M
0:00:59
1—Jeu de caractères
2—Zone d'entrée de caractères
5 Appuyer sur ou pour sélectionner
un caractère, puis appuyer sur ENTER
(Entrée). Le caractère s'affiche dans la zone
d'entrée de caractères.
Il est aussi possible d’utiliser les touches
numériques pour entrer des caractères. Pour
de plus amples informations, se reporter au
tableau faisant suite à cette tâche.
6 Continuer d'ajouter des caractères et
d'appuyer sur ENTER (Entrée) jusqu'à ce
que le titre soit complet. Il est possible
d'ajouter jusqu'à 30 caractères.
7 S'il est nécessaire d'effacer un caractère,
appuyer sur CLEAR (Effacer). Le dernier
caractère entré est effacé. S'il est nécessaire
d'effacer un caractère antérieur au dernier
caractère, appuyer sur CLEAR (Effacer) de
façon répétée. Il faudra entrer de nouveau
les caractères supprimés.
8 Une fois le titre entré, appuyer sur ENTER
(Entrée). Un écran de confirmation s'affiche.
Title List - Edit Title Name
Yes
1
No
94
JAN/ 1/06 1:00AM CH12 XP
0:00:59
MY FAVORITE
0:00:59
9 Appuyer sur ou pour sélectionner Yes
(Oui), puis appuyer sur ENTER (Entrée). Le
nom du titre est enregistré. Ceci peut prendre
un certain temps.
www.insignia-products.com
Page 96

Graveur de DVD Insignia NS-FSDVDR
10 Appuyer sur RETURN (Retour), puis sur
RETURN (Retour) ou STOP (Arrêt) pour
fermer le menu.
Touche
1e
pression2epression
0 espace espace 0 espace
1 mode
symbole
mode
symbole
2 ABC abc 2 Retour à ABC
3 DEF def 3 Retour à DEF
4 GHI ghi 4 Retour à GHI
5 JKL jkl 5 Retour à JKL
6 MNO mno 6 Retour à MNO
7 PQRS pqrs 7 Retour à PQRS
8 TUV tuv 8 Retour à TUV
9 WXYZ wxyz 9 Retour à WXYZ
3e
pression4epression
1 (mode symbole)
! ” # $ % & ’ ( ) *
+ , - . / : ; < = > ?
@ [ ] ^ _ { | }
Modification du nom des titres (mode VR)
Utiliser ces instructions pour modifier les titres
de la liste de lecture ou de la liste originale. Les
illustrations montrent la liste de lecture.
Pour modifier un nom de titre :
1 Appuyer sur TOP MENU (Menu principal),
puis sur MENU/LIST (Menu/Liste) pour
sélectionner la liste de lecture ou la liste
originale.
2 Appuyer sur ou pour sélectionner
un titre, puis appuyer sur ENTER (Entrée).
Un écran d'options s'affiche.
Playlist
Play
Edit
JAN/ 1/06 1:00AM CH12 XP
4 5 6
2 3
4 Appuyer sur ou pour sélectionner Edit
Title Name (Modifier nom de titre), puis
appuyer sur ENTER (Entrée). L'écran
Playlist-Edit Title Name
(Liste de
lecture-Modification du nom des titres)
s'affiche.
Playlist - Edit Title Name
ABC
1
abc
123
@! ?
M
0:00:59
• 1—Jeu de caractères
• 2—Zone d'entrée de caractères
5 Appuyer sur ou pour sélectionner
un caractère, puis appuyer sur ENTER
(Entrée). Le caractère s'affiche dans la zone
d'entrée de caractères.
Il est aussi possible d’utiliser les touches
numériques pour entrer des caractères. Pour
de plus amples informations, se reporter au
tableau faisant suite à cette tâche.
6 Continuer d'ajouter des caractères et
d'appuyer sur ENTER (Entrée) jusqu'à ce
que le titre soit complet. Il est possible
d'ajouter jusqu'à 30 caractères.
7 S'il est nécessaire d'effacer un caractère,
appuyer sur CLEAR (Effacer). Le dernier
caractère entré est effacé. S'il est nécessaire
d'effacer un caractère antérieur au dernier
caractère, appuyer sur CLEAR (Effacer) de
façon répétée. Il faudra entrer de nouveau
les caractères supprimés.
8 Une fois le titre entré, appuyer sur ENTER
(Entrée). Un écran de confirmation s'affiche.
Playlist - Edit Title Name
Yes
1
No
3 Appuyer sur ou pour sélectionner Edit
(Modifier), puis appuyer sur ENTER (Entrée).
Le menu
Playlist
Playlist
JAN/ 1/06 1:00AM CH12 XP
(Liste de lecture) s’affiche.
1
Title Delete
Scene Delete
Edit Title Name
Chapter Mark
Index Picture
Title Dividing
Title Combining
0:00:59
www.insignia-products.com
MY FAVORITE
Wait for a moment.
9 Appuyer sur ou pour sélectionner Yes
(Oui), puis appuyer sur ENTER (Entrée). Le
nom du titre est enregistré. Ceci peut prendre
un certain temps.
95
Page 97

Graveur de DVD Insignia NS-FSDVDR
10 Appuyer sur RETURN (Retour), puis sur
RETURN (Retour) ou STOP (Arrêt) pour
fermer le menu.
Touche
1e
pression2epression3epression4epression
0 espace espace 0 espace
1 mode
symbole
2 ABC abc 2 Retour à ABC
3 DEF def 3 Retour à DEF
4 GHI ghi 4 Retour à GHI
5 JKL jkl 5 Retour à JKL
6 MNO mno 6 Retour à MNO
7 PQRS pqrs 7 Retour à PQRS
8 TUV tuv 8 Retour à TUV
9 WXYZ wxyz 9 Retour à WXYZ
mode
symbole
1 (mode symbole)
! ” # $ % & ’ ( ) *
+ , - . / : ; < = > ?
@ [ ] ^ _ { | }
Ajout ou suppression de signets de
chapitre (mode Vidéo)
Il est possible d’ajouter des signets de chapitre à
chaque titre. Si le titre dure plus de cinq minutes,
il est possible d'ajouter des signets de chapitre
supplémentaires à un intervalle sélectionné.
Pour ajouter un signet de chapitre :
1 Appuyer sur TOP MENU (Menu principal).
L'écran
Title List
(Liste de titres) s'affiche.
3 Appuyer sur ou pour sélectionner Edit
(Modifier), puis appuyer sur ENTER (Entrée).
Le menu de modification s'affiche.
Title List
Title Delete
1
Edit Title Name
Chapter Mark
JAN/ 1/06 1:00AM CH12 XP
0:00:59
4 Appuyer sur ou pour sélectionner
Chapter Mark (Signet de chapitre), puis
appuyer sur ENTER (Entrée). L'écran
List - Chapter Mark
(Liste de titres - Signet de
Title
chapitre) s'affiche.
Title List - Chapter Mark
OFF
1
5 minutes
10 minutes
15 minutes
30 minutes
60 minutes
JAN/ 1/06 1:00AM CH12 XP
0:00:59
Title List
1 2 3
JAN/ 1/06 1:00AM CH12 XP
4 5
2 Appuyer sur ou pour sélectionner
un titre, puis appuyer sur ENTER (Entrée).
Un écran d'options s'affiche.
Title List
Play
Edit
JAN/ 1/06 1:00AM CH12 XP
4 5 6
2 3
5 Appuyer sur ou pour sélectionner un
intervalle, puis sur ENTER (Entrée). Un
écran de confirmation s'affiche.
Title List - Chapter Mark - 5 minutes
Yes
1
No
JAN/ 1/06 1:00AM CH12 XP
0:00:59
6 Appuyer sur ou pour sélectionner Yes
(Oui), puis appuyer sur ENTER (Entrée). Les
signets de chapitre sont ajoutés. Ceci peut
prendre un certain temps.
7 Appuyer sur RETURN (Retour), puis sur
RETURN (Retour) ou STOP (Arrêt) pour
fermer le menu.
96
www.insignia-products.com
Page 98

Graveur de DVD Insignia NS-FSDVDR
8 Pour supprimer les signets de chapitre,
sélectionner OFF (Désactivé), puis appuyer
sur ENTER (Entrée). Tous les signets de
chapitre, à l'exception du signet du chapitre
1, sont supprimés.
Remarque
• Il n'est pas possible de sélectionner un
intervalle plus long que le titre.
• L'intervalle effectif entre les signets de chapitre
peut être légèrement plus long ou plus court
que l'intervalle spécifié.
Ajout ou suppression de signets de
chapitre (mode VR)
Il est possible d’ajouter des signets de chapitre à
chaque titre. Si le titre dure plus de cinq minutes,
il est possible d'ajouter des signets de chapitre
supplémentaires à un intervalle sélectionné.
Utiliser ces instructions pour ajouter ou
supprimer des signets de chapitre sur la liste de
lecture ou la liste originale. Les illustrations
montrent la liste de lecture.
Pour ajouter ou supprimer un signet de
chapitre :
1 Appuyer sur TOP MENU (Menu principal),
puis sur MENU/LIST (Menu/Liste) pour
sélectionner la liste de lecture ou la liste
originale.
2 Appuyer sur ou pour sélectionner
un titre, puis appuyer sur ENTER (Entrée).
Un écran d'options s'affiche.
Playlist
Play
Edit
JAN/ 1/06 1:00AM CH12 XP
4 5 6
2 3
4 Appuyer sur ou pour sélectionner
Chapter Mark (Signet de chapitre), puis
appuyer sur ENTER (Entrée). Un écran
d'options s'affiche.
Playlist - Chapter Mark - Add
Yes
1
No
Chapter 2/ 2
JAN/ 1/06 1:00AM CH12 XP
0:00:59
5 Appuyer sur SKIP (Sauter), SKIP
(Sauter), REV (Arrière), FWD
(Avant), PLAY (Lecture) et PAUSE pour
trouver l'endroit du titre où un signet de
chapitre doit être ajouté.
Ou appuyer sur SKIP (Sauter) ou
SKIP (Sauter) pour sélectionner un signet
de chapitre à supprimer.
6 Appuyer sur ou pour sélectionner Add
(Ajouter) ou Delete (Supprimer), puis
appuyer sur ENTER (Entrée). Un écran de
confirmation s'affiche.
7 Appuyer sur ou pour sélectionner Yes
(Oui), puis appuyer sur ENTER (Entrée). Le
signet de chapitre est ajouté ou supprimé.
Ceci peut prendre un certain temps.
8 Appuyer deux fois sur RETURN (Retour),
puis sur RETURN (Retour) ou STOP
(Arrêt) pour fermer le menu.
Protection des titres (mode VR/liste
originale)
Pour éviter de modifier ou d'effacer
accidentellement des titres, il est possible de les
protéger dans la liste originale.
3 Appuyer sur ou pour sélectionner Edit
(Modifier), puis appuyer sur ENTER (Entrée).
Le menu
Playlist
Playlist
JAN/ 1/06 1:00AM CH12 XP
(Liste de lecture) s’affiche.
1
Title Delete
Scene Delete
Edit Title Name
Chapter Mark
Index Picture
Title Dividing
Title Combining
0:00:59
www.insignia-products.com
Pour protéger un titre :
1 Appuyer sur TOP MENU (Menu principal),
puis sur MENU/LIST (Menu/Liste) pour
passer de la liste de lecture à la liste
originale.
2 Appuyer sur ou pour sélectionner
un titre, puis appuyer sur ENTER (Entrée).
Un écran d'options s'affiche.
Original
Play
Edit
JAN/ 1/06 1:00AM CH12 XP
4 5 6
2 3
97
Page 99

Graveur de DVD Insignia NS-FSDVDR
3 Appuyer sur ou pour sélectionner Edit
(Modifier), puis appuyer sur ENTER (Entrée).
Le menu
Original
Original
JAN/ 1/06 1:00AM CH12 XP
s’affiche.
1
Title Delete
Scene Delete
Edit Title Name
Chapter Mark
Index Picture
Protect
0:00:59
4 Appuyer sur ou pour sélectionner
Protect (Protéger), puis appuyer sur ENTER
(Entrée). Un écran d'options s'affiche.
Original - Protect
OFF ON
1
Suppression de la protection d'un titre
(mode VR/liste originale)
Pour supprimer la protection d'un titre :
1 Appuyer sur TOP MENU (Menu principal),
puis sur MENU/LIST (Menu/Liste) pour
passer de la liste de lecture à la liste
originale.
2 Appuyer sur ou pour sélectionner
un titre, puis appuyer sur ENTER (Entrée).
Un écran d'options s'affiche.
Original
Play
Edit
JAN/ 1/06 1:00AM CH12 XP
4 5 6
3 Appuyer sur ou pour sélectionner Edit
(Modifier), puis appuyer sur ENTER (Entrée).
Le menu
Original
2 3
s’affiche.
JAN/ 1/06 1:00AM CH12 XP
0:00:59
5 Veiller à ce que OFF ON (Désactivé/Activé)
apparaisse, puis appuyer sur ENTER
(Entrée). Si ON OFF (Activé/Désactivé) est
affiché, le titre est déjà protégé. Le titre est
protégé. Ceci peut prendre un certain temps.
6 Appuyer sur RETURN (Retour), puis sur
RETURN (Retour) ou STOP (Arrêt) pour
fermer le menu.
Remarque
Pour protéger la totalité du DVD, voir « Protection
d’un DVD » à la page 97.
Original
Title Delete
1
Scene Delete
Edit Title Name
Chapter Mark
Index Picture
Protect
JAN/ 1/06 1:00AM CH12 XP
0:00:59
4 Appuyer sur ou pour sélectionner
Protect (Protéger), puis appuyer sur ENTER
(Entrée). Un écran d'options s'affiche.
Original - Protect
ON OFF
1
JAN/ 1/06 1:00AM CH12 XP
0:00:59
98
5 Veiller à ce que ON OFF (Activé/Désactivé)
apparaisse, puis appuyer sur ENTER
(Entrée). Si OFF ON (Désactivé/Activé) est
affiché, le titre est déjà non protégé. Le titre
est non protégé. Ceci peut prendre un certain
temps.
6 Appuyer sur RETURN (Retour), puis sur
RETURN (Retour) ou STOP (Arrêt) pour
fermer le menu.
www.insignia-products.com
Page 100
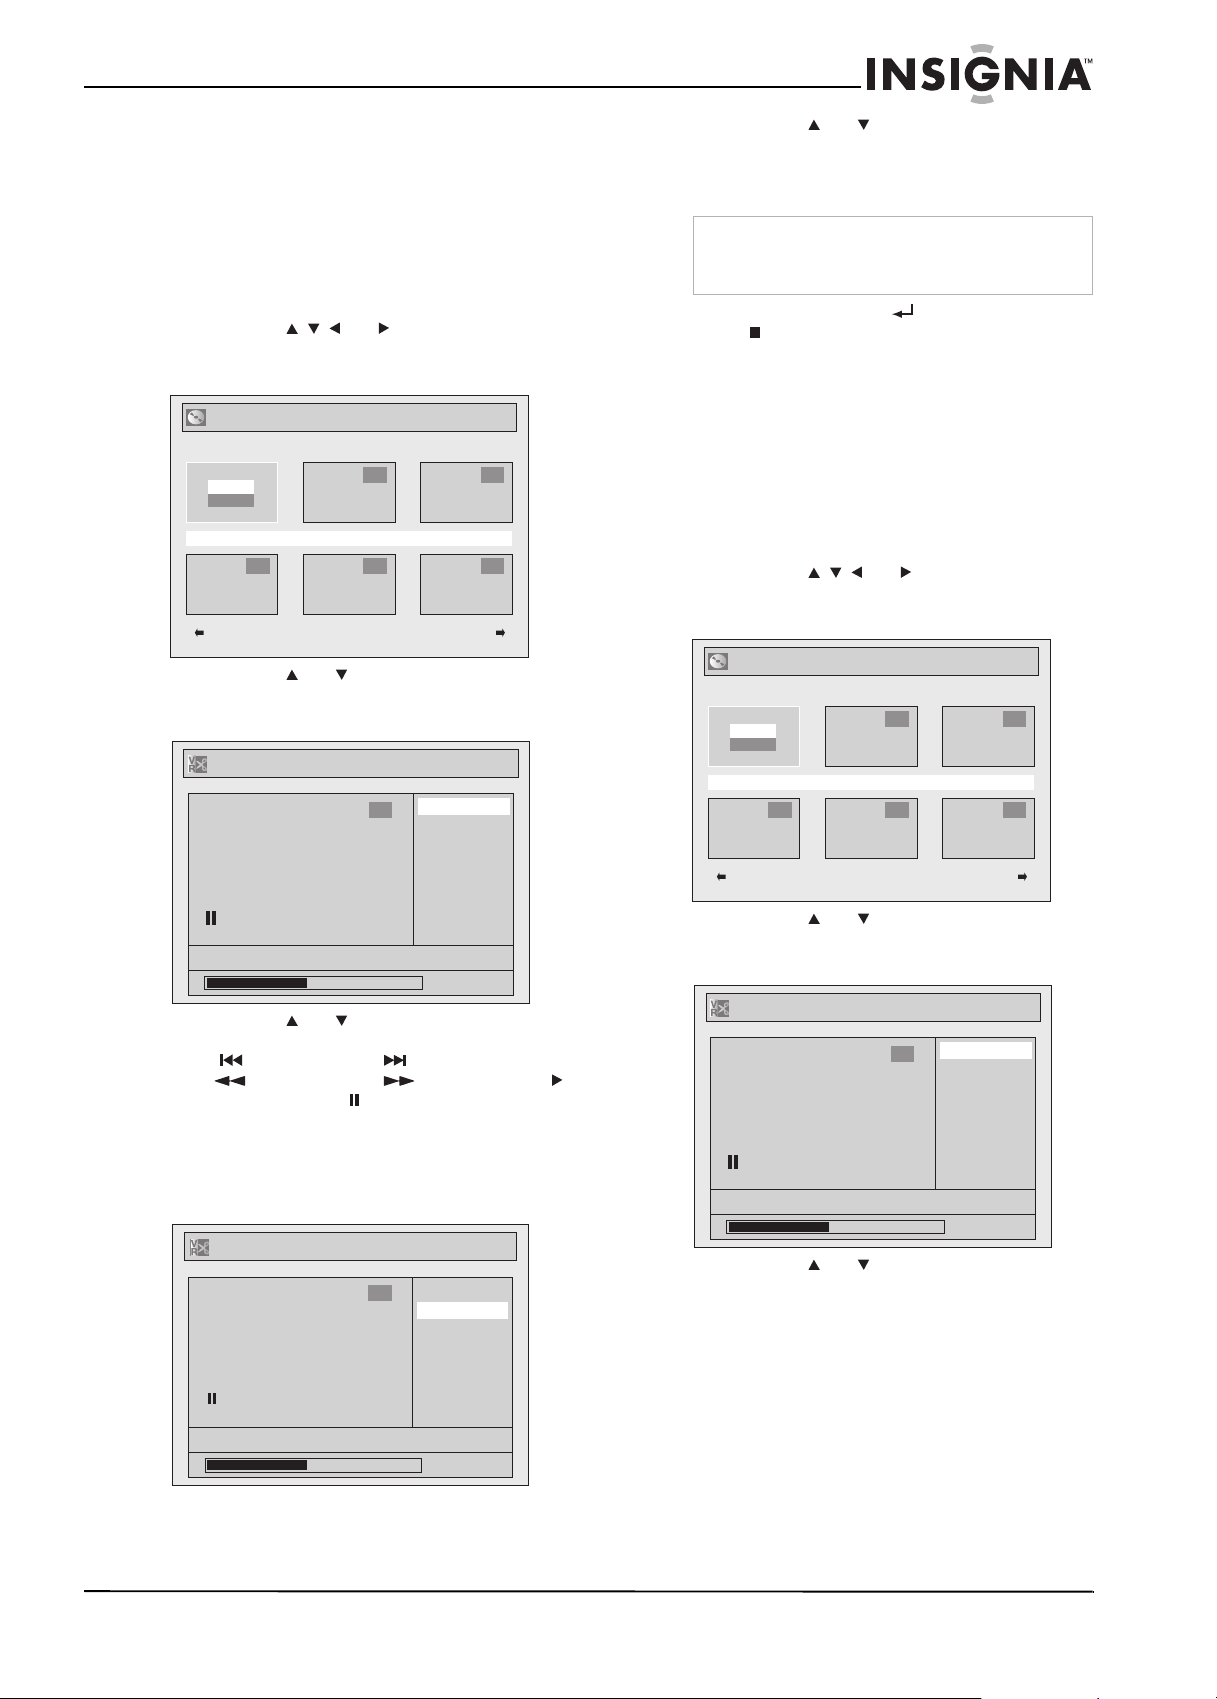
Graveur de DVD Insignia NS-FSDVDR
Division d'un titre (mode VR/liste de
lecture)
Il est possible de diviser un titre en deux.
Pour diviser un titre :
1 Appuyer sur TOP MENU (Menu principal),
puis sur MENU/LIST (Menu/Liste) pour
passer de la liste originale à la liste de
lecture.
2 Appuyer sur ou pour sélectionner
un titre, puis appuyer sur ENTER (Entrée).
Un écran d'options s'affiche.
Playlist
Play
Edit
JAN/ 1/06 1:00AM CH12 XP
4 5 6
3 Appuyer sur ou pour sélectionner Edit
(Modifier), puis appuyer sur ENTER (Entrée).
Le menu
Playlist
Playlist
JAN/ 1/06 1:00AM CH12 XP
4 Appuyer sur ou pour sélectionner Title
Dividing (Division de titre), puis appuyer sur
SKIP (Sauter), SKIP (Sauter),
REV (Arrière), FWD (Avant), PLAY
(Lecture) et PAUSE pour trouver l'endroit
du titre où opérer la division.
5 Appuyer sur ENTER (Entrée). Un écran de
confirmation s'affiche.
The reviewer said the icon
Playlist - Title Dividing
2 3
(Liste de lecture) s’affiche.
Title Delete
1
Scene Delete
Edit Title Name
Chapter Mark
Index Picture
Title Dividing
Title Combining
0:00:59
Yes
1
No
6 Appuyer sur ou pour sélectionner Yes
(Oui), puis appuyer sur ENTER (Entrée). Le
titre est divisé. Ceci peut prendre un certain
temps.
Remarque
Les noms des deux titres sont identiques, et la
première scène est utilisée en tant qu'image
d'indexation pour les deux titres.
7 Appuyer sur RETURN (Retour) ou sur
STOP (Arrêt) pour fermer le menu.
Combinaison de titres (mode VR/liste de
lecture)
Il est possible de combiner deux titres en un.
Pour combiner des titres :
1 Appuyer sur TOP MENU (Menu principal),
puis sur MENU/LIST (Menu/Liste) pour
passer de la liste originale à la liste de
lecture.
2 Appuyer sur ou pour sélectionner
un titre, puis appuyer sur ENTER (Entrée).
Un écran d'options s'affiche.
Playlist
Play
Edit
JAN/ 1/06 1:00AM CH12 XP
4 5 6
3 Appuyer sur ou pour sélectionner Edit
(Modifier), puis appuyer sur ENTER (Entrée).
Le menu
Playlist
Playlist
JAN/ 1/06 1:00AM CH12 XP
4 Appuyer sur ou pour sélectionner Title
Combining (Combinaison de titres), puis
appuyer sur ENTER (Entrée). L'écran
- Title Combining
Combinaison de titres) s'affiche. Le titre
sélectionné s'affiche en grisé et le cadre du
titre suivant est jaune.
2 3
(Liste de lecture) s’affiche.
Title Delete
1
Scene Delete
Edit Title Name
Chapter Mark
Index Picture
Title Dividing
Title Combining
0:00:59
Playlist
(Liste de lecture -
JAN/ 1/06 1:00AM CH12 XP
0:00:59
www.insignia-products.com
99
 Loading...