

Page 1

User Guide | Guide de l’ utilisateur | Guí a del Usuario
Television | Téléviseur | Televisor
NS-F20TV
Page 2

Page 3
Insignia NS-F20TV
Television
Contents
Introduction . . . . . . . . . . . . . . . . . . . . . . . . . . . . . .3
Safety information . . . . . . . . . . . . . . . . . . . . . . . . .3
Features. . . . . . . . . . . . . . . . . . . . . . . . . . . . . . . . .5
Setting up your television. . . . . . . . . . . . . . . . . . . .7
Using your television . . . . . . . . . . . . . . . . . . . . . . .9
Maintaining. . . . . . . . . . . . . . . . . . . . . . . . . . . . . .18
Troubleshooting . . . . . . . . . . . . . . . . . . . . . . . . . .18
Specifications. . . . . . . . . . . . . . . . . . . . . . . . . . . .19
Warranty. . . . . . . . . . . . . . . . . . . . . . . . . . . . . . . .21
Français. . . . . . . . . . . . . . . . . . . . . . . . 22
Español . . . . . . . . . . . . . . . . . . . . . . . . 44
Introduction
Congratulations on your purchase of a
high-quality Insignia product. Your NS-F20TV
represents the state of the art in television
design, and is designed for reliable and
trouble-free performance.
Safety information
Warning
To reduce the risk of fire or electric shock, do not expose your
television to rain or moisture.
Warning
For continued safety, replace safety critical components only
with manufacturer’s recommended parts (refer to service
literature).
Electric shock warning
CAUTION
Risk of Electric Shock
Do Not Open
Warning
T o reduce the risk of electric shock, do not remove the cover or
back. There are no user-serviceable parts inside. Refer
servicing to qualified service personnel.
This lightning flash with the arrowhead symbol
within an equilateral triangle is intended to alert the
user to the presence of uninsulated dangerous
voltage within the television’s enclosure that may
be of sufficient magnitude to constitute a risk of
electric shock to persons.
The exclamation point within an equilateral triangle
is intended to alert the user to the presence of
important operating and maintenance (servicing)
instructions in the literature accompanying the
television.
• Do not use your television near water, such
as near a bathtub, sink, or swimming pool.
Do not expose your television to dripping or
splashing, and do not place any objects filled
with liquids (such as vases) on the television.
• Use a dry cloth for cleaning. Do not use liquid
cleaners or aerosol cleaners.
• Do not block any ventilation openings. Install
your television in accordance with the
manufacturer’s instructions.
• Do not install near any heat sources such as
radiators, heat registers, stoves, or other
apparatus (including amplifiers) that produce
heat.
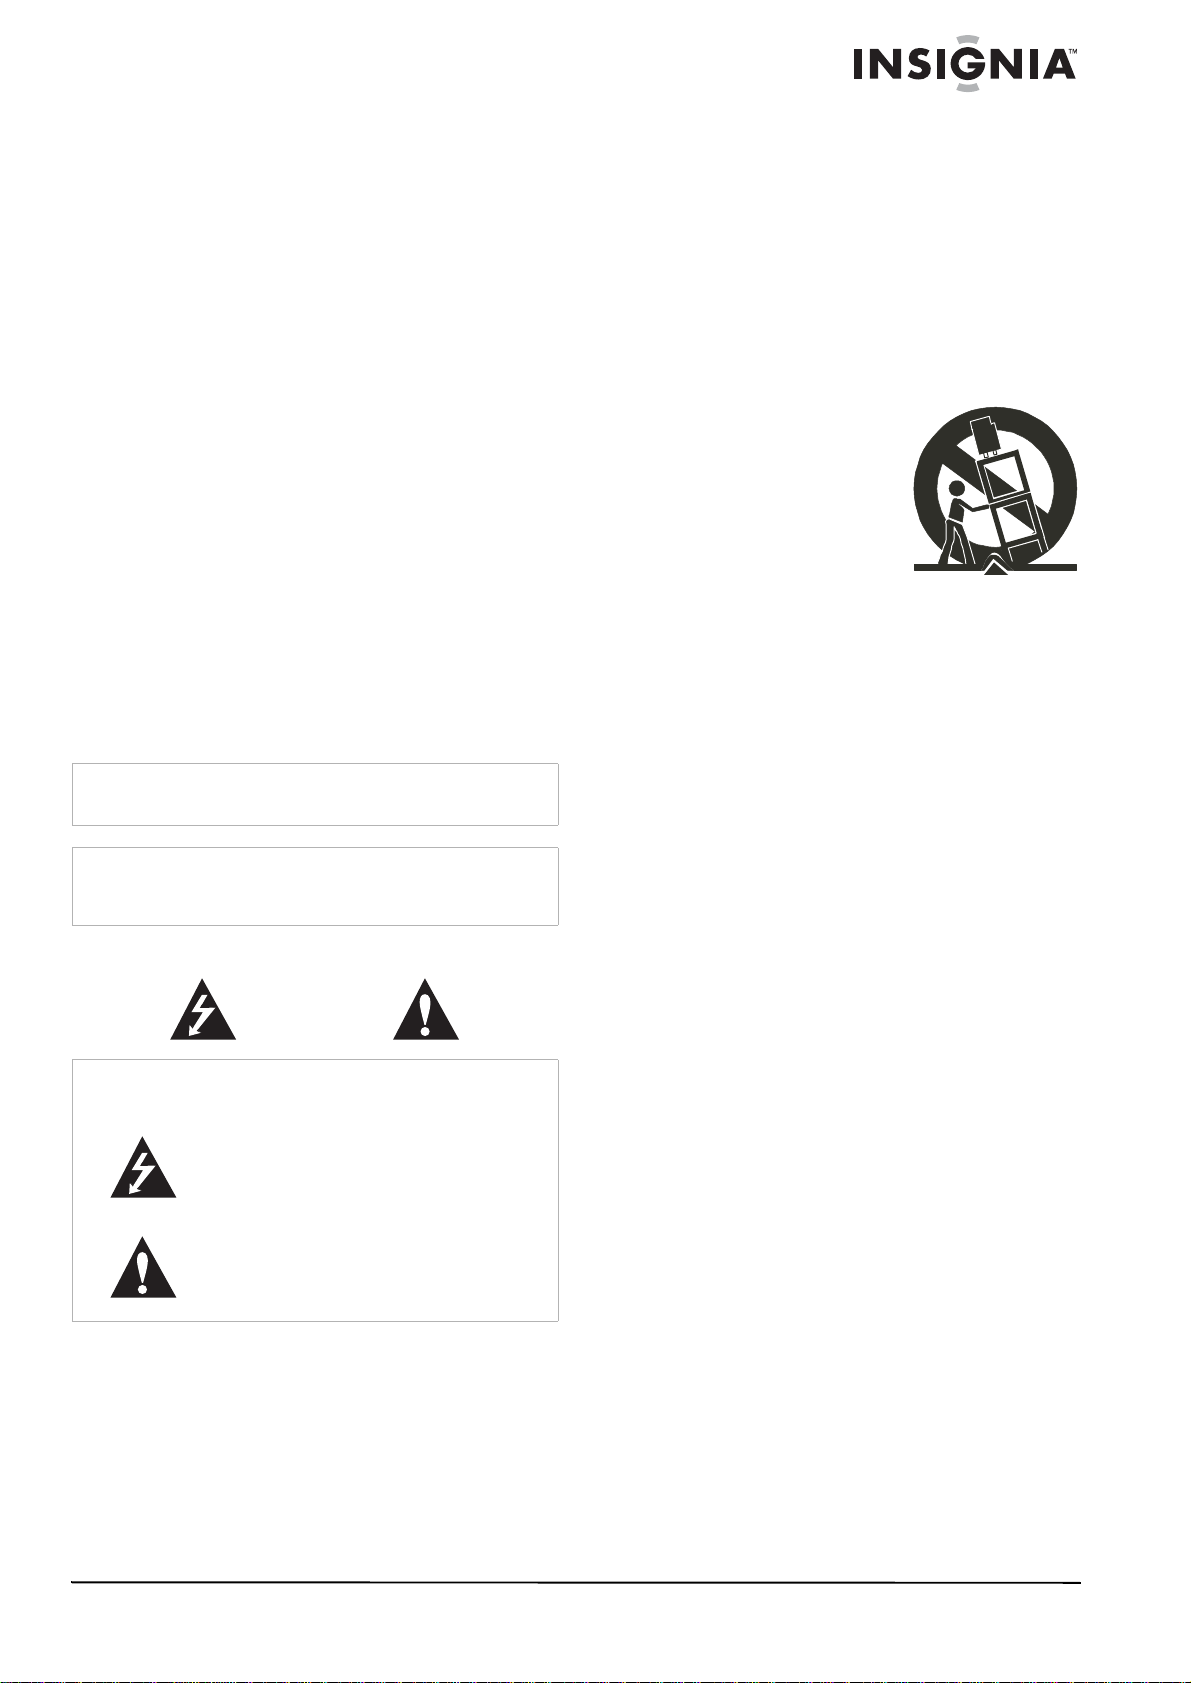
• Do not place your
television on an unstable
cart, stand, or table. Y our
television may fall,
causing serious injury to
a child or adult, and
serious damage to your
television. Use your
television only with a
cart, stand, tripod,
bracket, or table sold with your television.
• Never attempt to move the television unless
the AC power cord has been disconnected.
• Slots and openings in the sides, back, and
bottom are provided for ventilation, to ensure
reliable operation of your television, and to
protect it from overheating.
• These openings must not be blocked or
covered. The openings should never be
blocked by placing your television on a bed,
sofa, rug, or other soft surface. Your
television should never be placed near or
over a radiator or heat register.
• Your television should not be placed in a
built-in installation, such as a bookcase,
unless proper ventilation is provided.
• Do not defeat the safety purpose of the
polarized or grounding-type plug. A polarized
plug has two blades with one wider than the
other. A grounding type plug has two blades
and a third grounding prong. The wide blade
or the third prong are provided for your safety.
If the provided plug does not fit into your
outlet, consult an electrician for replacement
of the obsolete outlet.
• Your television should be operated only from
the type of power source indicated on the
marking label. If you are not sure of the
power supplied to your home, ask your local
power company.
• Do not let anything rest on the power cord,
and do not locate your television where the
cord may be stepped on.
Important safeguards
• Read these instructions.
• Keep these instructions for later use.
• Follow all warnings and instructions.
• To avoid hazards, use only attachments
recommended by your television
manufacturer.
www.insignia-products.com
3
Page 4

Insignia NS-F20TV Television
• If an outside antenna or cable system is
connected to your television, make sure that
the antenna or cable system is grounded to
provide some protection against voltage
surges and built-up static charges. Article
810 of the National Electrical Code,
ANSI/NFPA 70, provides information with
regard to proper grounding of the mast and
supporting structure, grounding of the lead-in
wire to an antenna discharge unit, size of
grounding conductors, location of
antenna-discharge unit, connection to
grounding electrodes, and requirements for
the grounding electrode.
7
6
5
4
3
1
2
Reference Grounding component
1 Electric service equipment
2 Power service grounding
3 Ground clamp
4 Grounding conductors (NEC
5 Antenna discharge unit (NEC
6 Ground clamp
7 Antenna lead-in wire
• Use No. 10AWG (5.3 mm
No. 8AWG (8.4 mm
No. 17AWG (1.0 mm
electrode system
(NEC Art 250, Part H)
Section 81 0-21)
Section 81 0-20)
2
2
) copper,
) aluminum,
2
) copper-clad steel
or bronze wire, or larger, as a ground wire.
• Secure the antenna lead-in and ground
wires to the house with stand-off
insulators spaced from 4-6 feet
(1.22-1.83 meter) apart.
• Mount the antenna discharge unit as
close as possible to where the lead-in
enters the house.
• Use a jumper wire not smaller than
No. 6AWG (13.3 mm
2
) copper, or the
equivalent, when a separate
antenna-grounding electrode is used. See
ANSI/NFPA70.
• For added protection for your television
during a lightning storm, or when it is left
unattended and unused for long periods of
time, unplug it from the power outlet and
disconnect it from the antenna or cable
system. This prevents damage to your
television due to lightning and power line
surges.
• An outside antenna system should not be
located in the vicinity of overhead power
circuits, or where it can fall into such power
lines or circuits. When installing an outside
antenna system, extreme care should be
taken to keep from touching such power lines
or circuits as contact with them might be fatal.
• Do not overload power outlets and extension
cords because overloading can cause a fire
or electric shock.
• Never push objects of any kind into your
television through slots in the case because
they may touch dangerous voltage points or
short out parts that could result in a fire or
electric shock. Never spill liquid of any kind
on your television.
• Do not attempt to service your television
yourself because opening or removing covers
may expose you to dangerous voltages or
other hazards. Refer all servicing to qualified
service technicians.
• Unplug your television from the power outlet
and refer servicing to qualified service
technicians under the following conditions:
• When the power cord or plug is damaged
or frayed.
• If liquid has been spilled into your
television.
• If your television has been exposed to rain
or water.
• If your television does not operate
normally by following the operating
instructions. Adjust only those controls
that are covered by the operating
instructions because incorrect adjustment
of other controls may result in damage
and often requires extensive work by a
qualified technician to restore normal
operation.
• If your television has been dropped or the
case has been damaged.
• When your television exhibits a distinct
change in performance.
• When replacement parts are required, make
sure that the service technician uses
replacement parts specified by the
manufacturer that have the same
characteristics as the original part.
Unauthorized substitutions may result in fire,
electric shock, or other hazards.
• Upon completion of any service or repairs to
your television, ask the service technician to
perform routine safety checks to determine
that your television is safe to operate.
Note to cable television system installer
This reminder is provided to call the cable
television system installer’s attention to Section
820 40 of the NEC which provides guidelines for
proper grounding and, in particular, specifies
that the cable ground shall be connected to the
grounding system of the building, as close to the
point of cable entry as practical.
4
www.insignia-products.com
Page 5

Insignia NS-F20TV Television
Features
Television
Front
1
2
4
3
Item Description
1 Power button—Press to turn the television on or off.
2 Remote sensor—Point the remote control at this sensor to
control the television.
3 Indicator—Glows green when the power is turned on.
4 INPUT bu tton—Press to select the input source.
5 MENU button—Press to access the on-screen menu.
6 VOL- button—Press to adjust the volume down or to
adjust a menu item.
7 VOL+ button—Press to adjust the volume up or to adjust a
menu item.
8 CH- button—Press to adjust the channel down or to select
a menu item.
9 CH+ button—Press to adjust the channel up or to select a
menu item.
6
5
7 8
9
Back
1
2
7
6
5
3
4
Item Description
1 A V2 input (VIDEO, AUDIO L, AUDIO R)—Connect a video
2 Headphone jack—Connect a headphone to t his jack.
3 Antenna input—Connect cable or sa tellite televisio n, an
4 COMPONENT input (Y, C
5 S-VIDEO input—Connect a v ideo source using this jack.
6 A V1 input (VIDEO, AUDIO L, AUDIO R)—Connect a video
7 AV output (VIDEO, AUDIO L, AU DIO R)—Con nect a video
and audio source, such as a camcorder, video game
console, or DVD player, using these jacks.
outside antenna, or rabb it ears to this jack.
B, CR, AUDIO L, AUDIO R)—
Connect a video and aud io source, such as a DVD player,
using these jacks. Component video provides the highest
quality picture.
Audio is not transmitted through the S-VIDEO cable.
and audio source, such as a video game console or DVD
player, using these jacks.
and audio device, such as a VCR or stereo, using these
jacks.
www.insignia-products.com
5
Page 6
Insignia NS-F20TV Television
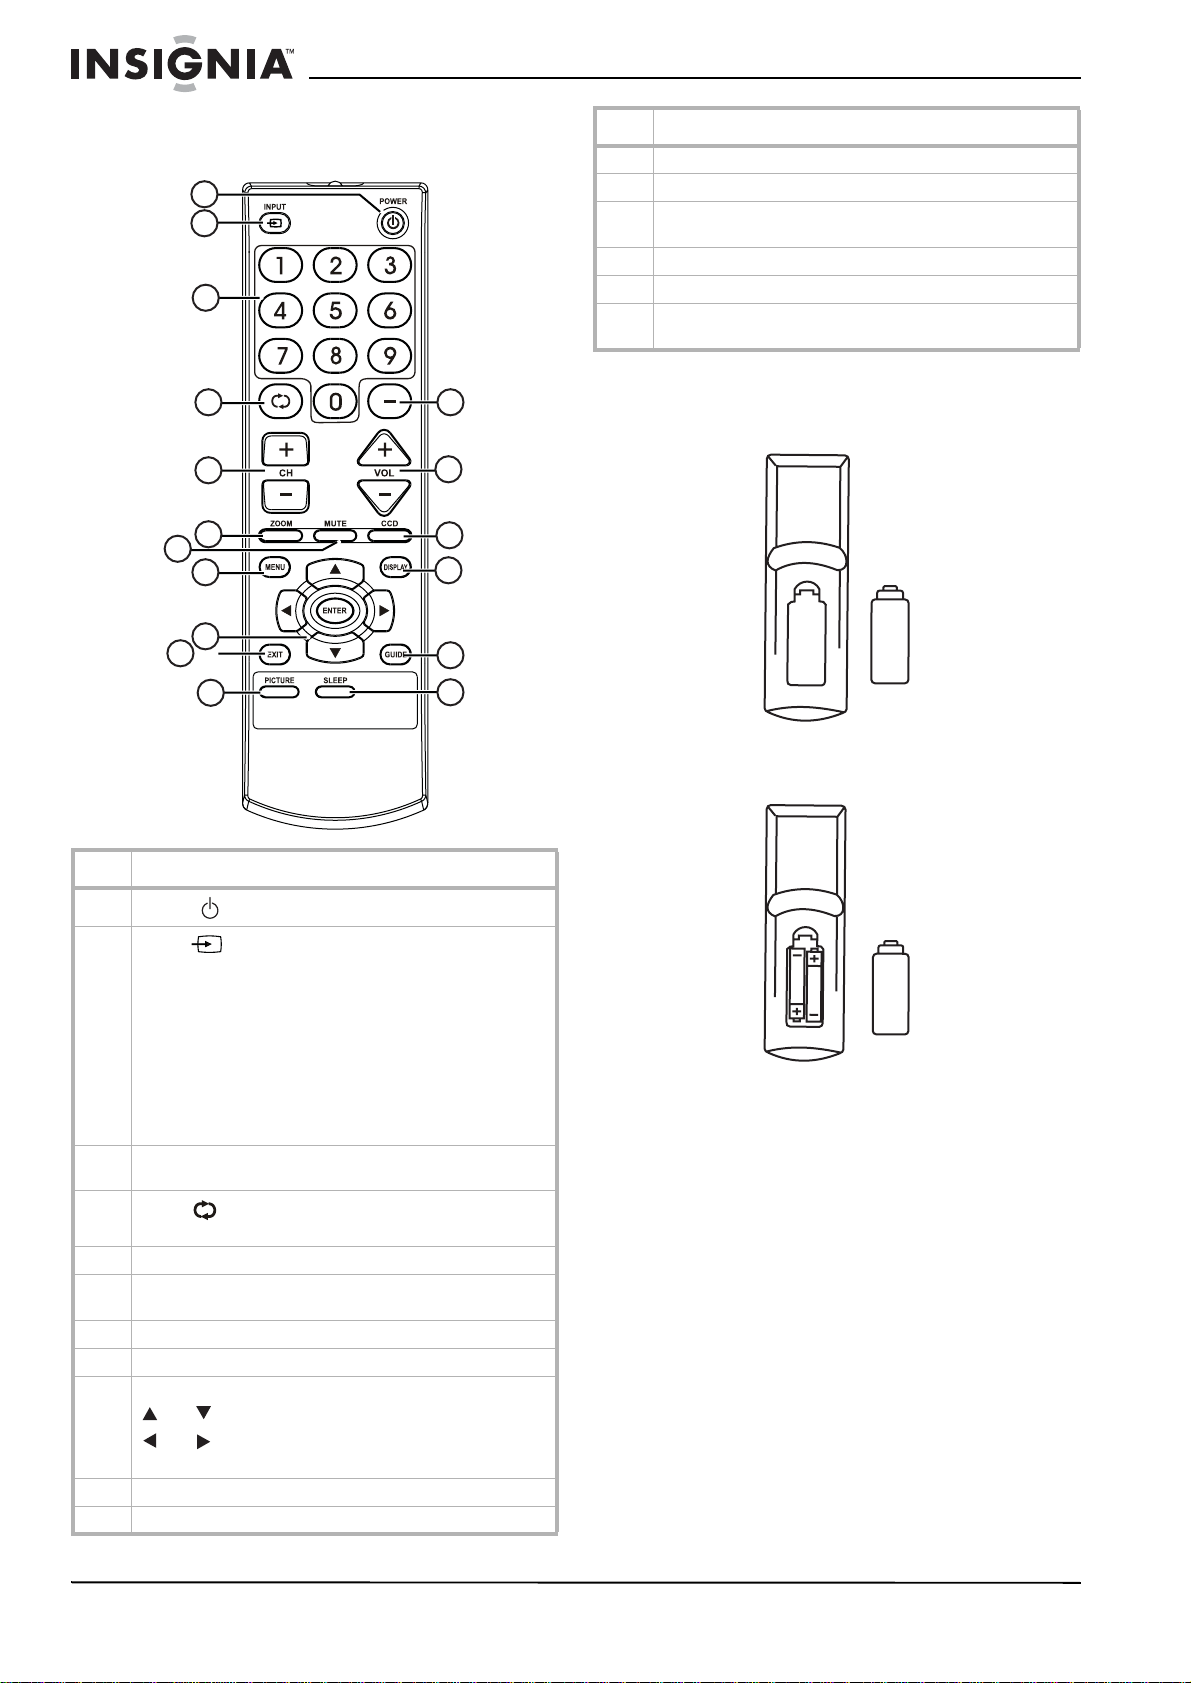
Remote Control
Buttons
1
2
3
4
5
6
7
8
9
10
11
17
16
15
14
13
12
Item Description
12 SLEEP—Press to set the sleep timer.
13 GUIDE—Press to display the progra m guide.
14 DISPLAY—Press to display the channel status or sign al
information.
15 CCD—Press to turn the closed caption display on or off.
16 VOL+/- —Press to adjust the volume up or down.
17 Dash - —Press to enter a pr ogram number for multiple
program (digital) channels (exa mple: 2-1).
Installing batteries
To install batteries in the remote control:
1 Remove the battery cover.
Item Description
1
POWER —Press to turn the television on or off.
2
INPUT —Press to select the input source. Options
include:
• TV—watch television through the antenna
• AV1—watch a DVD, video game, or camcorder
playback from a device connected to the AV1 or
S-VIDEO input terminals.
• AV2—watch a DVD, video game, or camcorder
playback from a device connected to the AV2 input
terminals.
• COMPONENT—watch a DVD from a DVD player
connected to the component input terminals.
3 Direct channel selector/number buttons—Press to select a
channel or enter a password.
4
Return —Press to return to the previously viewed
channel.
5 CH+/- —Press to adjust the channel up or down.
6 ZOOM—Press to change the picture size in DTV (digital
TV) mode. This button is not active in analog TV mode.
7 MUTE—Press to mute the sound.
8 MENU—Press to access the Menu main page.
9 Menu navigation buttons:
and —Press to move up or down in the menu.
and —Press to move left or right in the menu or to
adjust a menu setting.
10 EXIT—Press to exit the menu.
11 PICTURE—Press to select the picture mode.
2 Insert two AAA batteries. Place the batteries
with their terminals corresponding to the +
and - indications in the battery compartment.
6
www.insignia-products.com
Page 7
Insignia NS-F20TV Television
3 Replace the battery cover.
Warning
• Do not try to recharge alkaline batteries as they
are not intended to be recharged.
• Use only the size and type of batteries
specified. Do not mix different types of
batteries together or old batteries with fresh
ones.
• Remove the batteries when the remote control
will not be used for a long period of time or
when the batteries are worn out.
• Do not throw the batteries into a fire. Dispose
of used batteries per local regulations.
• Do not drop, dampen, or disassemble the
remote control.
Using the remote control
Setting up your television
Unpacking your television
Your box includes the following:
• One television
• One remote control
• This User Guide
Locating the television
Set up the television in a room where direct light
will not fall upon the screen. Total darkness or a
reflection on the picture screen may cause
eyestrain. Soft and indirect lighting is
recommended for comfortable viewing.
Connecting your television to an antenna, cable television, or satellite dish
Wall antenna
socket or cable
or satellite feed
Note
RF Coaxial Cable (75 ohm)
Antenna users: Optimum color reception requires
a good signal and generally means that an
outdoor antenna must be used. The exact type
and position of the antenna depends upon your
particular area.
Bronze Wire
Antenna Input
15 feet (5 m)
Note
• The remote control may not operate if there is
an obstacle between the television and the
remote control.
• The remote control may not operate the
television correctly when direct sunlight, an
incandescent or fluorescent lamp, or any other
strong light shines on the television’s remote
sensor.
Caution
• We recommend that a 75-ohm coaxial cable be
used to eliminate interference and noise which
may occur due to radio wave conditions.
• The antenna cable should not be bundled with
the power cord.
• If the antenna cannot be installed correctly,
contact your dealer for assistance.
Connecting video and audio equipment
This television provides two groups of A V input
terminals and one group of component input
terminals for connecting to a VCR, a DV D player
a video game console, or other video equipment.
Before connecting your equipment, refer to the
owner's manual of the equipment to be
connected.
Connecting using the side AV input terminals
The side AV terminals are easy to access and
should be used for equipment that you connect
and disconnect frequently, such as a camcorder
or portable DVD player.
To Video
Signal
Y = Yellow (video)
W = White (audio L)
R = Red (audio R)
output
To Audio
outputs
T o conne ct using the si de AV input ter minals:
1 Connect the audio and video cables between
the Audio (L,R) and Video terminals on the
television and the video equipment.
www.insignia-products.com
7
Page 8
Insignia NS-F20TV Television
2 Press the INPUT button on the remote
control repeatedly until AV2 appears on the
screen.
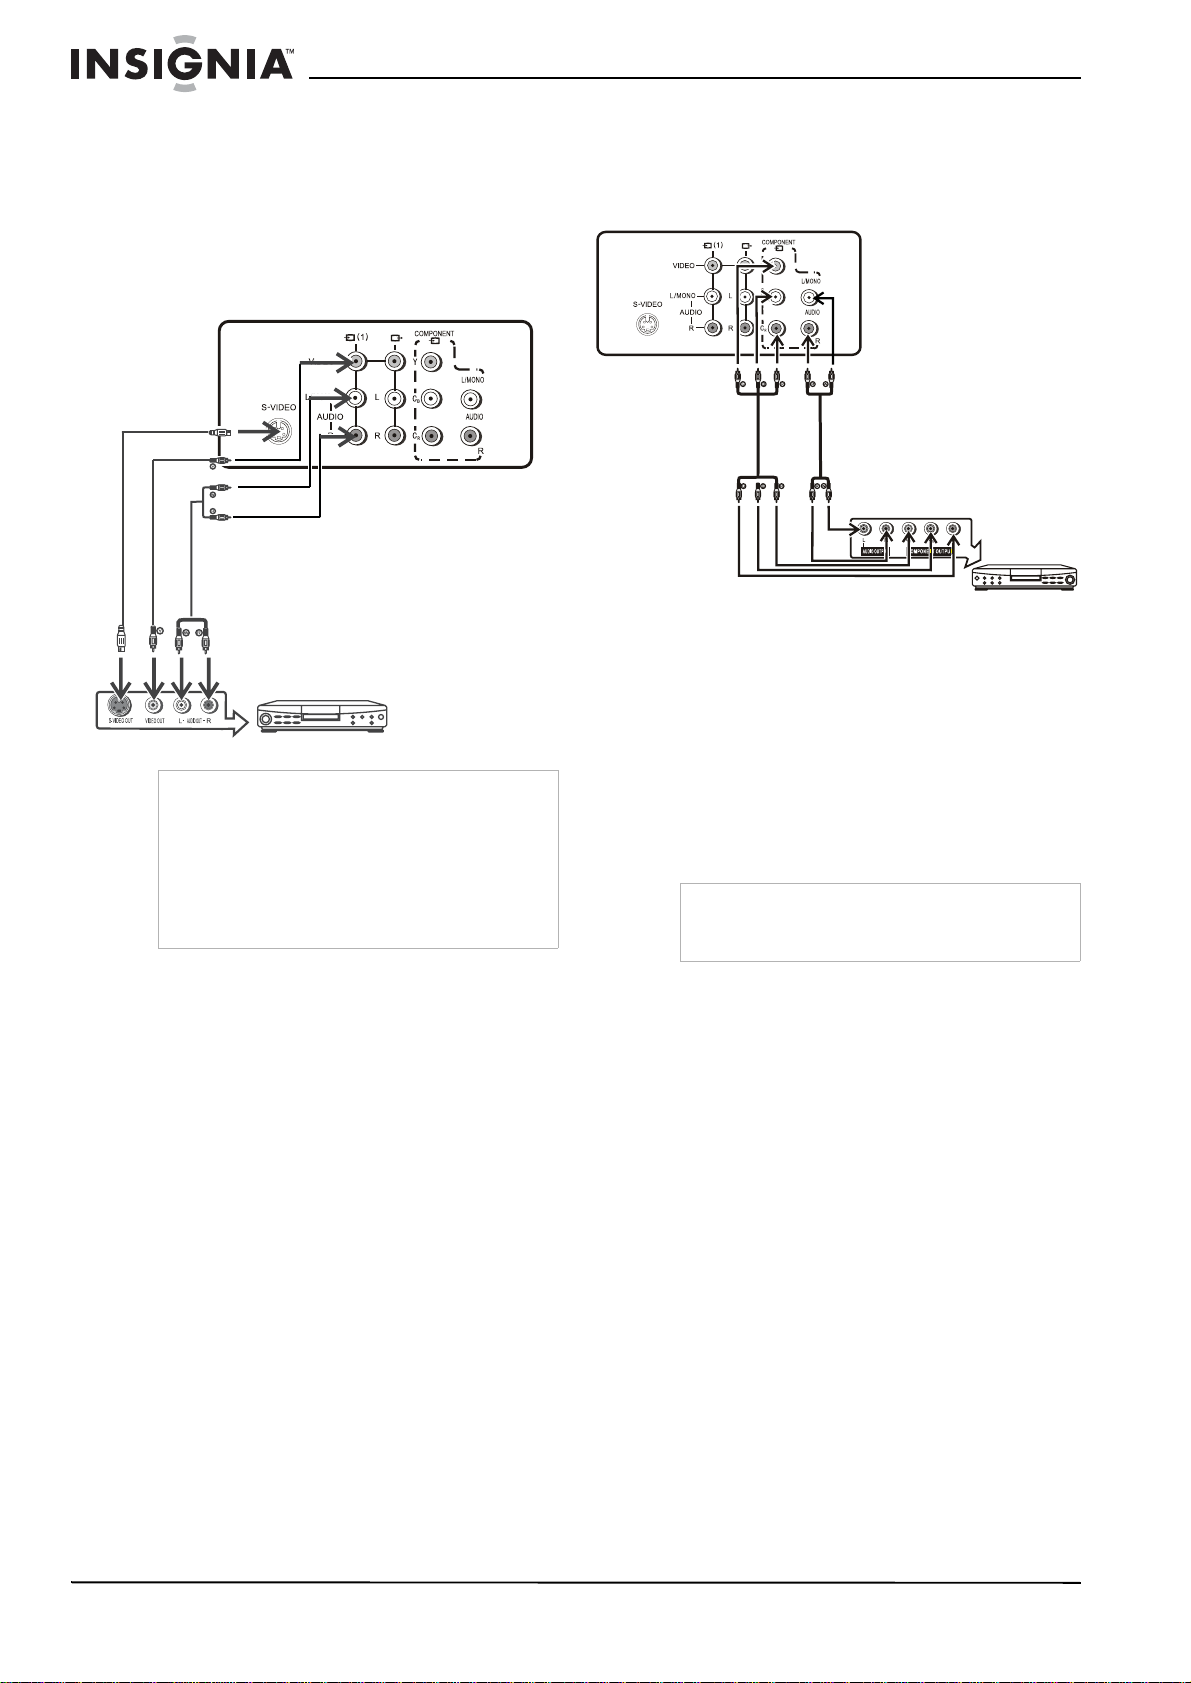
Connecting using the rear AV input terminals
The rear AV terminals are harder to access than
the side terminals and should be used for
equipment that remains connected to the
television, such as a VCR, DVD player, or video
game console.
To S-video input
To Video input
To Audio inputs
Y = Yellow (video)
W = White (audio L)
To S-video output
To Video output
To Audio outputs
Video Equipment
Note
For better quality video, use the S-Video terminal if
your source supports it.
S-video input uses the same circuit as AV1. The
S-VIDEO terminal overrides the AV1 terminal.
When using both the S-video and AV1 inputs, the
S-video signal is automatically selected and the
message on your screen displays SVIDEO. To
view a AV1 signal, disconnect the S-video
connection.
R = Red (audio R)
To connect using the rear AV input terminals:
1 Connect the audio and video cables between
the Audio (L,R) and Video terminal on the
television and the video equipment.
2 Press the INPUT button on the remote
control repeatedly until AV1 appears on the
screen.
Connecting using the component terminals
Use the component terminals to connect a DVD
player that supports this type of output.
Component video provides the highest picture
quality.
W = White (audio L)
Video Cable
R = Red (audio R, C
G = Green (Y)
B = Blue (CB)
Audio Cable
R)
To connect using the component terminals:
1 Connect the component video cable between
the Y, C
B, and CR input terminals on the
television and the Y, CB, and CR output
terminals on the DVD player.
2 Connect the audio cable between the audio
input terminals on the television and audio
output terminals on the DVD player.
3 Press the INPUT button on the remote
control repeatedly until COMPONENT
appears on the screen.
Note
This television can only receive YC
not YPBPR signal through the COMPONENT
input.
BCR signal but
DVD Player
8
www.insignia-products.com
Page 9

Insignia NS-F20TV Television
Connecting using the AV output terminals
You can connect an audio system to the AV
output terminals on the back of the television to
enjoy a high-quality sound from the audio
system. You can also connect the AV output
terminals to a VCR to record a program.
To Video output
To Audio
outputs
Y = Yellow (video)
W = White (audio L)
R = Red (audio R)
To Video input
To Audio inputs
VCR for Recording Audio System
To Audio inputs
To connect using the AV output terminals:
• Connect the audio and video cables between
the Audio (L,R) and Video output terminals
on the television and the Audio (L,R) and
Video input terminals on the video
equipment.
Using your television
Turning the television on and off
Turning the television on
To turn the television on:
1 Insert the AC plug into an AC outlet.
If no picture appears and the Standby
indicator lights up, then the television is in
Standby mode.
Warning
To prevent electric shock, do not use a (polarized)
plug with an extension cord receptacle or other
outlet unless the blades can be fully inserted.
Note
The AC plug supplied with the television is
polarized to help minimize the possibility of
electric shock. If the AC plug does not fit into a
nonpolarized AC outlet, do not file or cut the wide
blade. It is the user's responsibility to have an
electrician replace the obsolete outlet.
2 Press the Power button on the television
or on the remote control and the television
turns on.
Turning the television off
To turn the television off:
1 Press the Power button on the television
or on the remote control and the television
turns off.
2 Unplug the power cord from the power outlet
if you do not intend to use your television for
an extended period of time.
Note
The television can turn off automatically by using
the Sleep timer function (needs to be set in
advance).
If there is no input signal for 15 minutes, the
television can turn off automatically (only in TV
mode).
After you turn off the television, you should wait at
least five seconds to turn the television on again.
Using the menus
This television has a menu system that appears
on the screen. This system makes it convenient
and fast to use features on the television. You
can also display the status of television features
while watching a program.
Main Menu Sub Menu
Picture Contrast
Brightness
Color
Tint
Sharpness
P.Lock Parental Lock
•Lock
• Ratings Locks
•MPAA Rating
•TV Rating
• Canada English
• Canada French
Change Password
Clock On Timer
Clock
DST
Auto Clock
Zone
Preset Auto Program
• Antenna
•Start
Ch Setup
•Ch No
•Skip
• Label*
• Dig Signal*
Extra Closed Caption
•CC Display
•CC Setting
•CC Type
•CC Mode*
• CC Cust omer*
Menu Language
Audio Language
Note
• Items marked with * do not appear in all
modes.
• Some menu items are grayed out and are not
selectable.
www.insignia-products.com
9
Page 10

Insignia NS-F20TV Television
To use the menu:
1 With the television turned on, press MENU to
display the main menu.
2 Press or button to select a menu.
3 Press or button to enter the menu.
4 Within the menu, press or to select an
item and press or to adjust its value or
enter a sub-menu.
5 Press MENU to return to the previous menu.
-ORPress EXIT to exit the main menu and return
to your program.
Note
To more clearly introduce the menu operations,
this manual provides a description based on
navigating the menus with the remote control.
The illustrations and on-screen displays in this
manual are for explanation purposes (some are
enlarged, others cropped) and may vary slightly
from the actual ones.
Displaying the information banner
The information banner displays status
information such as the channel number and the
signal source. Depending on the mode, different
information is displayed. In DTV mode, more
information (such as channel number and
channel name, and signal resolution) can be
displayed.
Note
The channel labels are automatically assigned
and cannot be changed by users.
To display the information banner:
• Press the DISPLAY button and the
information banner appears.
Using the program guide
You can obtain program broadcasting time and
program name from the program guide.
Note
The guide only works with digital channels.
To display the program guide:
1 Press GUIDE on the remote control to
display guide information.
Watching AV programs
This television provides two groups of AV input
terminals and one group of component input
terminals to connect to a VCR, DVD, game
console, or other video equipment.
To watch a video program using the AV
inputs:
• Press INPUT repeatedly until you see the
appropriate input indicator on the screen.
The order of the inputs are as follows:
• AV1—Rear AV jacks plus S-video
• AV2—Side AV jacks
• COMPONENT—Component jacks
• TV—Antenna jack
Note
For better quality video, use the S-Video terminal if
your source supports it.
S-video input uses the same circuit as AV1. The
S-VIDEO terminal overrides the AV1 terminal.
When using both the S-video and AV1 inputs, the
S-video signal is automatically selected and the
message on your screen displays SVIDEO. To
view a AV1 signal, disconnect the S-video
connection.
Switching from AV to TV
To switch from AV to TV :
• Press INPUT repeatedly until the television
program appears on the screen.
2 Press or to scroll the page if there are
two or more pages.
Setting up your television stations
When you turn on the television for the first time,
you should perform an auto program to set up
the stations on your television.
To set up your television stations:
1 With the television turned on, press MENU to
display the main menu.
2 Press or to select PRESET.
3 Press or to enter the Preset menu.
4 Press or to select AUTO PROGRAM.
10
www.insignia-products.com
Page 11

Insignia NS-F20TV Television
5 Press or to enter the Auto Program sub
menu.
6 Press or to select ANTENNA.
7 Press or to select AIR or CABLE.
In AIR mode, the television receives antenna
signals. In CABLE mode the television
receives cable television programs. Select:
• AIR—If using a VHF/UHF antenna.
• CABLE—If using cable television or a
satellite dish. If you have any questions
about these settings, contact your dealer.
8 Press to select START.
9 Press or to start Auto Program.
The television begins to search and memorize
all available programs. It may take a f e w minutes
to finish searching.
Note
The television first memorizes analog programs.
After all available analog programs have been
memorized, it begins to memorize DTV programs.
During analog program memorizing, you can
press MENU to stop the process. The television
then starts memorizing DTV programs. If you want
to stop DTV program memorizing, press MENU
again.
Skipping unwanted channels
After saving channels into memory, you can skip
unwanted channels so that only the channels
you want to watch are selected with the CH+/buttons.
To skip unwanted channels:
1 Go to the Preset menu.
Checking DTV signal strength
You can check the strength of your DTV signal
and determine whether you need to adjust your
antenna or digital cable input. The stronger the
signal strength, the less likely you are to
experience picture degradation.
To check DTV signal strength:
1 Go to the Preset menu.
2 Press or to select CH SETUP.
3 Press or to enter the CH SETUP menu.
The bottom line on the CH SETUP menu
shows the signal strength for the current DTV
channel.
Selecting channels
You can use one of three methods to select a
channel:
• Use the number pad.
• Use the CH+ and CH- buttons.
• Use the previous channel button.
Using the number pad
To go to a specific channel number:
• Press the number buttons (0-9) and the
dash (-) button, then wait for the television
to change channels, or press ENTER to
go immediately to that channel.
For example, if you want to select channel
8-3, press 8-3 on the remote control.
(Make sure that you press the buttons
within three seconds of each other, or t he
channel won’t be entered correctly.)
2 Press or to select CH SETUP.
3 Press or to enter the CH SETUP menu.
4 Press or to select CH NO.
5 Press or to select a channel number.
6 Press to select SKIP.
7 Press or to select ON.
The channel will be skipped when you
browse through channels using the CH+/buttons.
Tip
To restore a skipped channel, use the number
buttons to select the skipped channel, then repeat
the previous steps and set SKIP to OFF.
www.insignia-products.com
Note
In some situations, virtual channel numbers do not
correspond to physical frequencies.
Using the CH+ and CH- buttons
To browse through the channels:
• Press:
• CH+ to browse up the channels.
• CH- to browse down the channels.
Using the previous channel button
To switch between two channels:
• Press the previous channel button to
switch between the current channel and the
previous channel.
11
Page 12
Insignia NS-F20TV Television
Information about USA channel numbering
• The ATSC PSIP channel uses a two part
channel number which includes:
• a major channel number
• a minor channel number
Note
Example: Channel 5-1. The “5” is the major
channel number and the “1” is the minor channel
number.
• In the US, in most locations the major
channel number is the same for both analog
and digital channels (It is equal to the NTSC
channel number for existing broadcasters.)
• In the US, a minor channel number of zero is
used for a broadcaster's analog channel.
Channel Numbering Example
• Original NTSC channels for Des Moines, IA:
5, 8, 11, 13, and 17.
• Possible NTSC + ATSC channels for Des
Moines, IA: 5-0, 8-0, 11-0, 13-0, and 17-0
(channel numbers for existing analog
channels) and 5-1, 5-2, 8-1, 8-2, 8-3, 8-4,
and 13-1 (channel numbers for digital
channels).
Controlling the sound
Using the VOL+ and VOL- buttons
Press:
• VOL+ to increase the volume.
• VOL- to decrease the volume.
Using the MUTE button
To mute the sound:
• Press MUTE on the remote.
To resume the sound:
• Press MUTE on the remote.
-ORPress VOL+.
Note
If you mute the sound, the color of VOLUME
displayed on the screen turns red. After resuming
the sound, the color of VOLUME displayed on the
screen turns green.
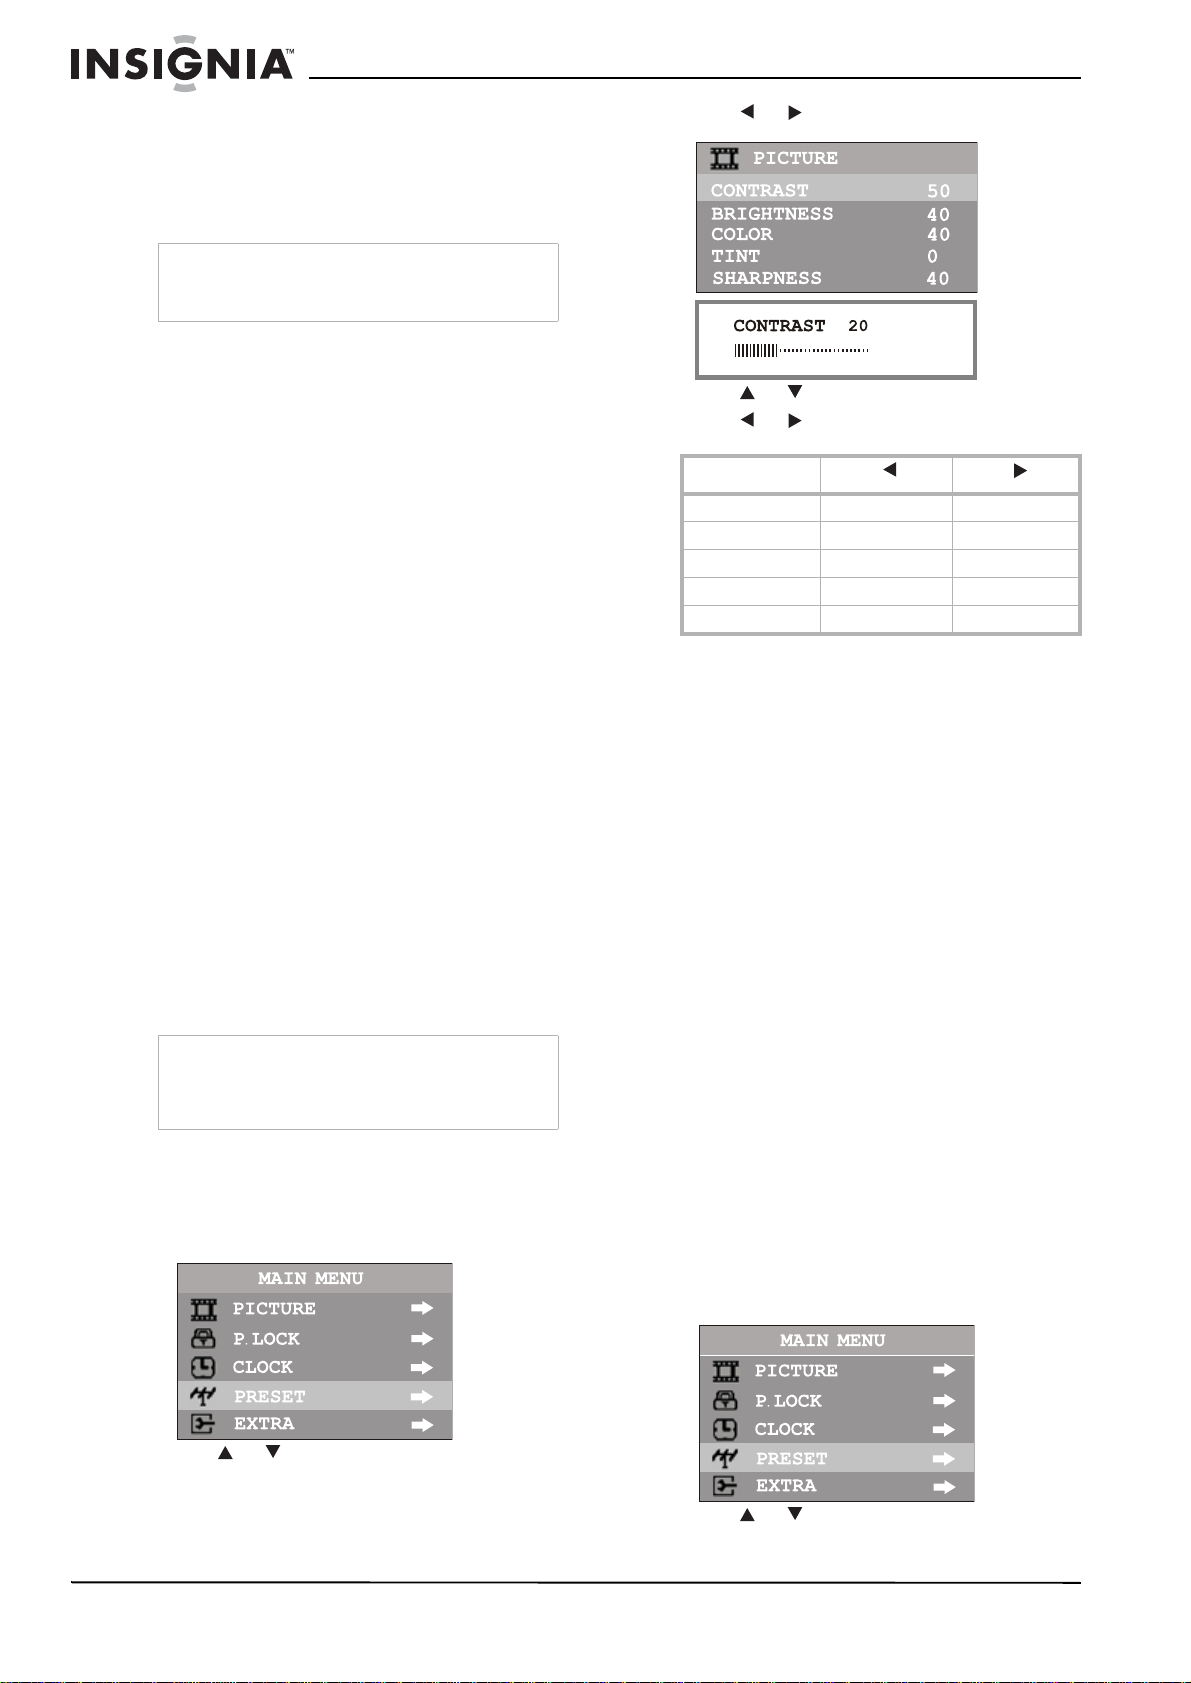
Adjusting the picture
To adjust the picture:
1 With the television turned on, press MENU to
display the main menu.
3 Press or to enter the Picture menu.
4 Press or to select a setting to adjust.
5 Press or to adjust the setting.
Setting Press Press
Contrast weaker stronger
Brightness darker lighter
Color paler deeper
Tint purplish greenish
Sharpness softer sharper
Selecting a picture mode
There are three preset picture modes (Standard,
Dynamic, and Soft) and one user-set picture
mode (Personal).
To select a picture mode:
1 Press PICTURE on the remote control.
2 Select from one of the following:
• STANDARD—Select for a normal picture.
• DYNAMIC—Select for a bright and
dynamic picture.
• SOFT—Select for a finely detailed picture.
• PERSONAL—Select to create your own
picture mode.
Changing picture size
You can change the picture size (aspect ratio)
according to your video signal type or personal
preference. This can only be done in DTV mode
when the video signal type is in 16:9 format.
To change the picture size:
Press ZOOM to select the desired picture size
(aspect ratio). Y ou can select between NORMAL
and ZOOM.
Using the clock
To enter the clock menu:
1 With the television turned on, press MENU to
display the main menu.
12
2 Press or to select PICTURE.
2 Press or to select CLOCK.
www.insignia-products.com
Page 13

Insignia NS-F20TV Television
3 Press or to enter the Clock menu.
Setting up the clock automatically
• With the Auto Clock function turned on, the
time is set automatically from a digital
channel signal.
To set up the clock automatically:
1 Go to the Clock menu.
2 Press or to select AUTO CLOCK.
3 Press or to turn the Auto Clock function
on.
4 Press or to select ZONE.
5 Press or to select your viewing area
time zone.
6 Press or to sel ect DST, then press or
to turn Daylight Saving Time on or off,
depending on your location.
Setting up the clock manually
• If current time setting is wrong by using the
auto clock function, reset the clock manually.
• If the television loses power, the clock setting
you have made will be cleared.
To set up the clock manually:
1 Go to the Clock menu.
2 Press or to select AUTO CLOCK.
• The television must be in standby mode for
the on timer to work.
• If the television loses power, the timer setting
is cleared.
To turn the television on automatically:
1 Go to the Clock menu.
2 Press or to select ON TIMER.
3 Press VOL+ to select AM or PM.
4 Use the number buttons to enter the time you
want the television to turn on.
5 Press Power to switch the television to
Standby mode. At the preset time, the
television turns on automatically.
Turning the television off automatically
You can set the sleep timer by using the SLEEP
button o n the rem ote contr ol. With ev ery press of
this button the sleep time changes as follows:
• 0 Minute
• 5 Minutes
• 10 Minutes
• ...
• 180 Minutes
• 240 Minutes
For example, you would like the television to
automatically turn off in 60 minutes. Press
SLEEP repeatedly until the screen displays 60
MINUTE.
To cancel the sleep timer, press SLEEP
repeatedly until the screen displays 0 MINUTE.
Changing system settings
To change system settings:
1 With the television turned on, press MENU to
display the main menu.
3 Press or to turn the Auto Clock function
off.
4 Press or to select CLOCK.
5 Press VOL+ to select AM or PM.
6 Use the number buttons to enter the current
time.
Turning the television on automatically
• The on timer function operates only if the
current time has been set.
2 Press or to select EXTRA.
3 Press or to enter the EXTRA menu.
www.insignia-products.com
13
Page 14
Insignia NS-F20TV Television
Selecting the OSD menu language
To change the OSD menu language:
1 Go to the EXTRA menu.
2 Press or to select MENU LANGUAGE.
3 Press or to select a different menu
language.
Selecting an audio language
DTV can simultaneously transmit many audio
tracks (for example, simultaneous translations of
the program in several foreign languages). The
availability of these optional audio tracks
depends upon the program.
To select an audio language:
1 Go to the EXTRA menu.
2 Press or to select AUDIO LANGUAGE.
3 Press or to select a different audio
language.
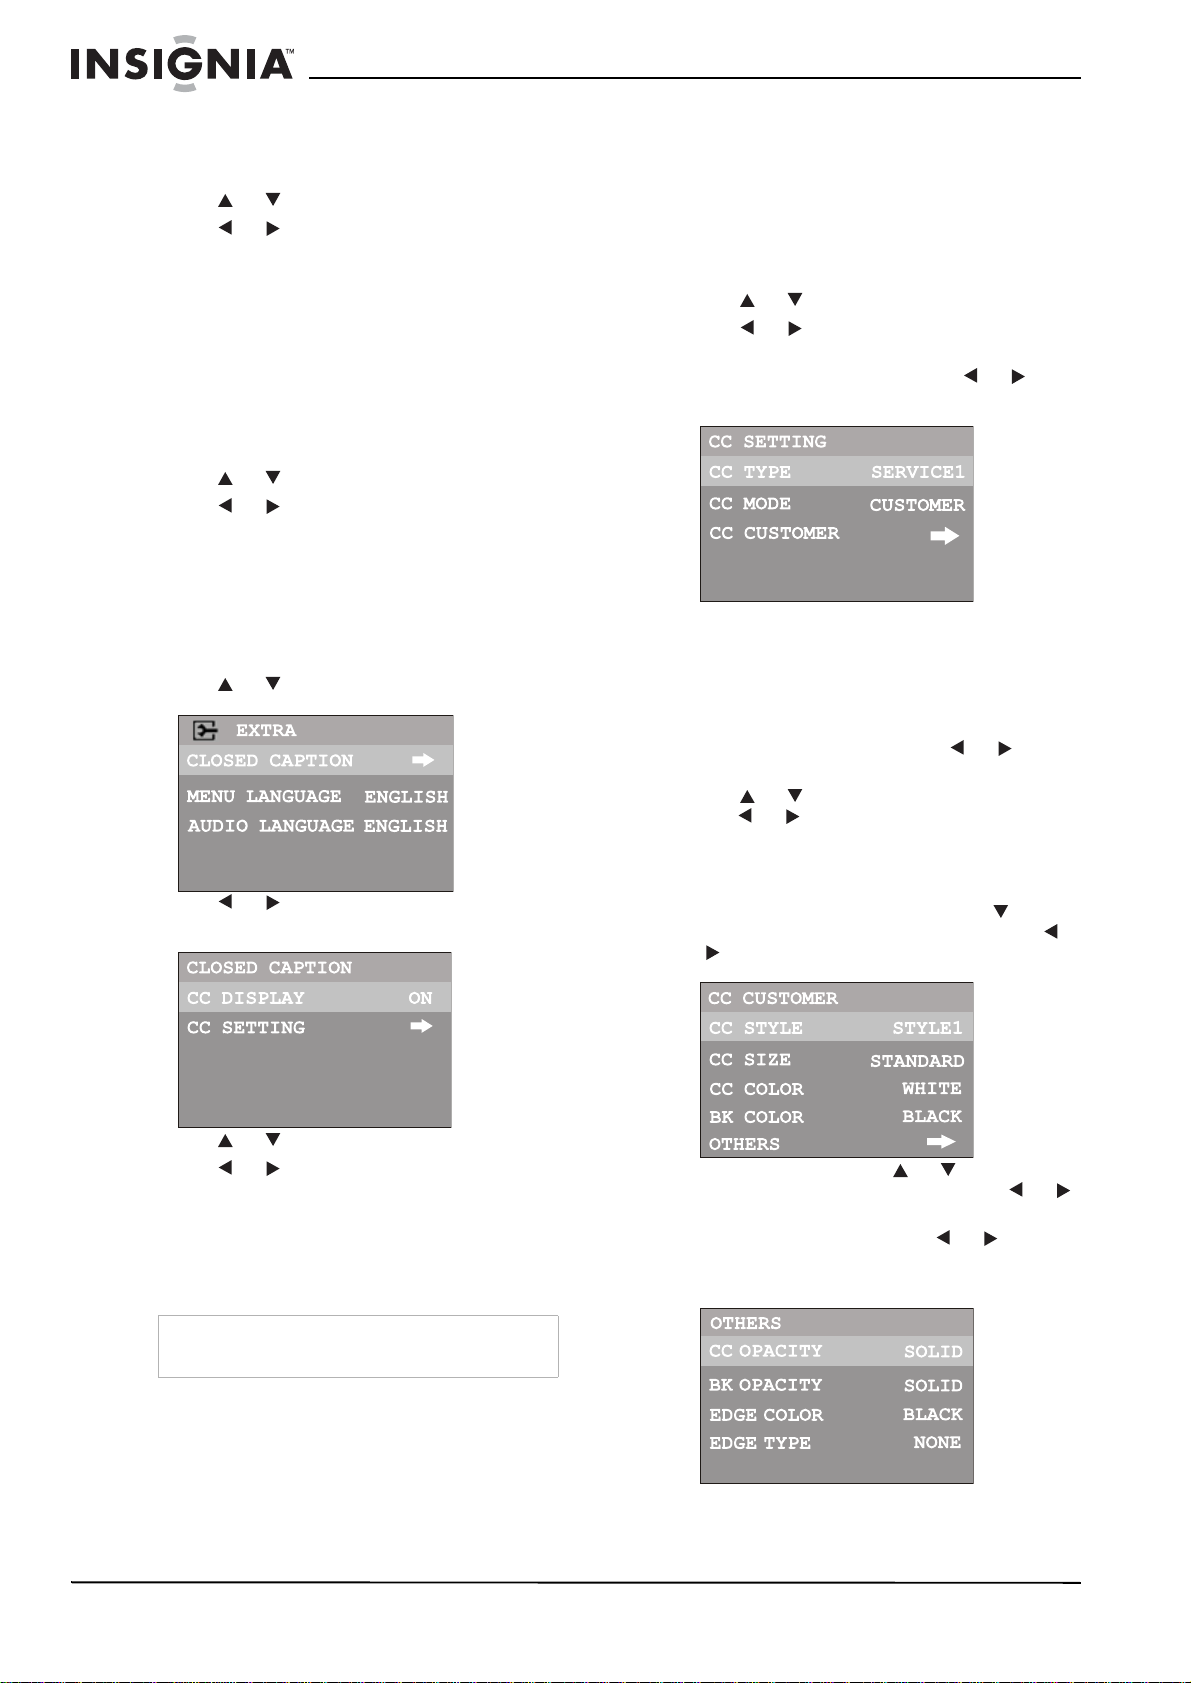
Setting up Closed Captioning
Turning Closed Captioning on or off
To turn Closed Captioning on or off:
1 Go to the EXTRA menu.
2 Press or to select CLOSED CAPTION.
3 Press or to enter the CLOSED
CAPTION menu.
Select a caption type for displaying captioning
information. Analog captions display information
on the screen (usually the program dialog). Text
from digital modes displays information, usually
at the bottom of the screen, and is used for a
data service (generally not program related).
To select the caption type:
1 Go to the CLOSED CAPTION menu.
2 Press or to select CC SETTING.
3 Press or to enter the CC SETTING
menu.
4 Highlight CC TYPE, then press or to
select the caption type.
Customizing digital Closed Captions
You can customize the digital Closed Captions
that appear on your screen.
To customize the digital Closed Captions:
1 Navigate to the CLOSED CAPTION menu,
highlight CC SETTING, press or to
enter the menu.
2 Press or to highlight CC MODE, then
press or to select CUSTOMER.
If you do not want to customize the digital
closed captions, select BROADCAST, and
the captions will be shown as broadcast.
3 After selecting CUSTOMER, press button
to highlight CC CUSTOMER, then press
or to enter the menu.
4 Press or to select CC DISPLAY.
5 Press or to select from the following
options:
• ON—shows the captions all of the time.
• CC MUTE—shows the captions only
when the sound is muted.
• OFF—turns off the closed caption.
Tip
You can also press the CCD button to select CCD
ON, CCD OFF, or CCD MUTE.
Selecting the caption type
Captions and text, if provided by the
broadcaster, are available for both digital and
analog channels.
14
4 Within the menu, press or to select the
item you want to change, then press or
to customize the setting to your preference.
Select OTHERS, then press or to enter
the next-level menu and customize more
settings.
You can change the following settings:
CC STYLE—Sets a style for the words.
www.insignia-products.com
Page 15

Insignia NS-F20TV Television
CC SIZE—Sets the size of the words.
CC COLOR—Sets a color for the text.
BK COLOR—Sets a background color.
CC OPACITY—Sets the opacity of the text
color.
BK OPACITY—Sets the opacity of the
background color.
EDGE COLOR—Sets a color for the edges.
EDGE TYPE—Sets an edge type.
5 Press EXIT to return to television viewing, or
press MENU to return to the previous menu.
Using the parental controls
Parental control enables parents to prevent their
children from watching inappropriate material on
the television. Parental control reads the ratings
for programming (except for news, sports,
unedited movies on premium cable, and
Emergency System signals), then denies access
to progr amming if the pr ogra m's rat ing mee ts the
limitations you select.
To enter the P.LOCK menu:
1 With the television turned on, press MENU to
display the main menu.
3 Press or to highlight NEW
PASSWORD, then use the number buttons to
enter a new password.
4 Enter the password again to confirm. Your
new password has been created.
Caution
Write down your password and save it for future
use.
Resetting a forgotten password
If you forget the password and you find that you
cannot enter the P.LOCK menu, you can reset
the password and then change it again.
To reset a forgotten password:
1 With the television turned on, press MENU to
display the main menu.
2 Press or to select P.LOCK.
3 Press or to enter the P.LOCK menu.
4 Enter the password to enter the P.LOCK
menu. The initial password is 0000 and it can
be changed at any time.
Setting the initial P.LOCK password
To use the parental controls, you must first set
your password.
To set up the P.LOCK password:
1 Use the pa ss word t o ente r the P.LOCK menu.
The initial password is 0000.
2 Press or to highlight CHANGE
PASSWORD, then press or to enter the
menu.
2 Press or to select P.LOCK.
3 Press or to enter the P.LOCK menu.
4 Enter the super password to enter the
P.LOCK menu. The super password is 1397.
After you finish entering the super password,
the SET CODE character appears.
5 Enter a new password (four-digit). The SET
CODE character changes to P.LOCK, the old
password has been cleared, and this new
password has been created.
Note
The super password 1397 will always work to
reset a password.
Turning on parental controls
To enable the blocking scheme you set up, you
must set PARENTAL LOCK to ON.
To turn on parental controls:
1 Use the password to enter the P.LOCK menu.
www.insignia-products.com
15
Page 16
Insignia NS-F20TV Television
2 Highlight PARENTAL LOCK, then press
or to enter the menu.
3 Highlight LOCK, then press or to set
the item to ON to enable the blocking
scheme.
Note
If you want to disable the blocking scheme, set
LOCK to OFF.
Setting up MPAA ratings
To set up MPAA ratings:
1 Use the password to enter the P.LOCK menu.
2 Highlight PARENTAL LOCK, then press
or to enter the menu.
5 Press or to select the rating, then press
or to either block or view the rating.
MPAA Movie Ratings:
• G—General audience
• PG—Parental guidance sugge ste d
• PG-13—Ages13 years and up
• R—Restricted viewing. Parental guidance
is suggested for children under the age of
17
• NC-17—Adults 18 years and up
•X—Adult
Example: If you set the rating level to PG-13:
G and PG movies are available and PG-13,
R, NC-17, and X are blocked.
6 Press EXIT to return to television viewing, or
press MENU to return to the previous menu.
Setting up TV ratings
TV ratings include two components: a general
criteria (age-based) and a detailed criteria
(content-based).
To set up TV ratings:
1 Use the password to enter the P.LOCK menu.
2 Highlight PARENTAL LOCK, then press
or to enter the menu.
16
3 Highlight RATINGS LOCKS, then press or
to enter the RATINGS LOCKS menu.
4 Highlight MPAA RATING, then press or
to enter the MPAA RATING submenu.
www.insignia-products.com
3 Highlight RATINGS LOCKS, then press or
to enter the RATINGS LOCKS menu.
4 Highlight TV RATING, then press or to
enter the TV RATING submenu.
Page 17
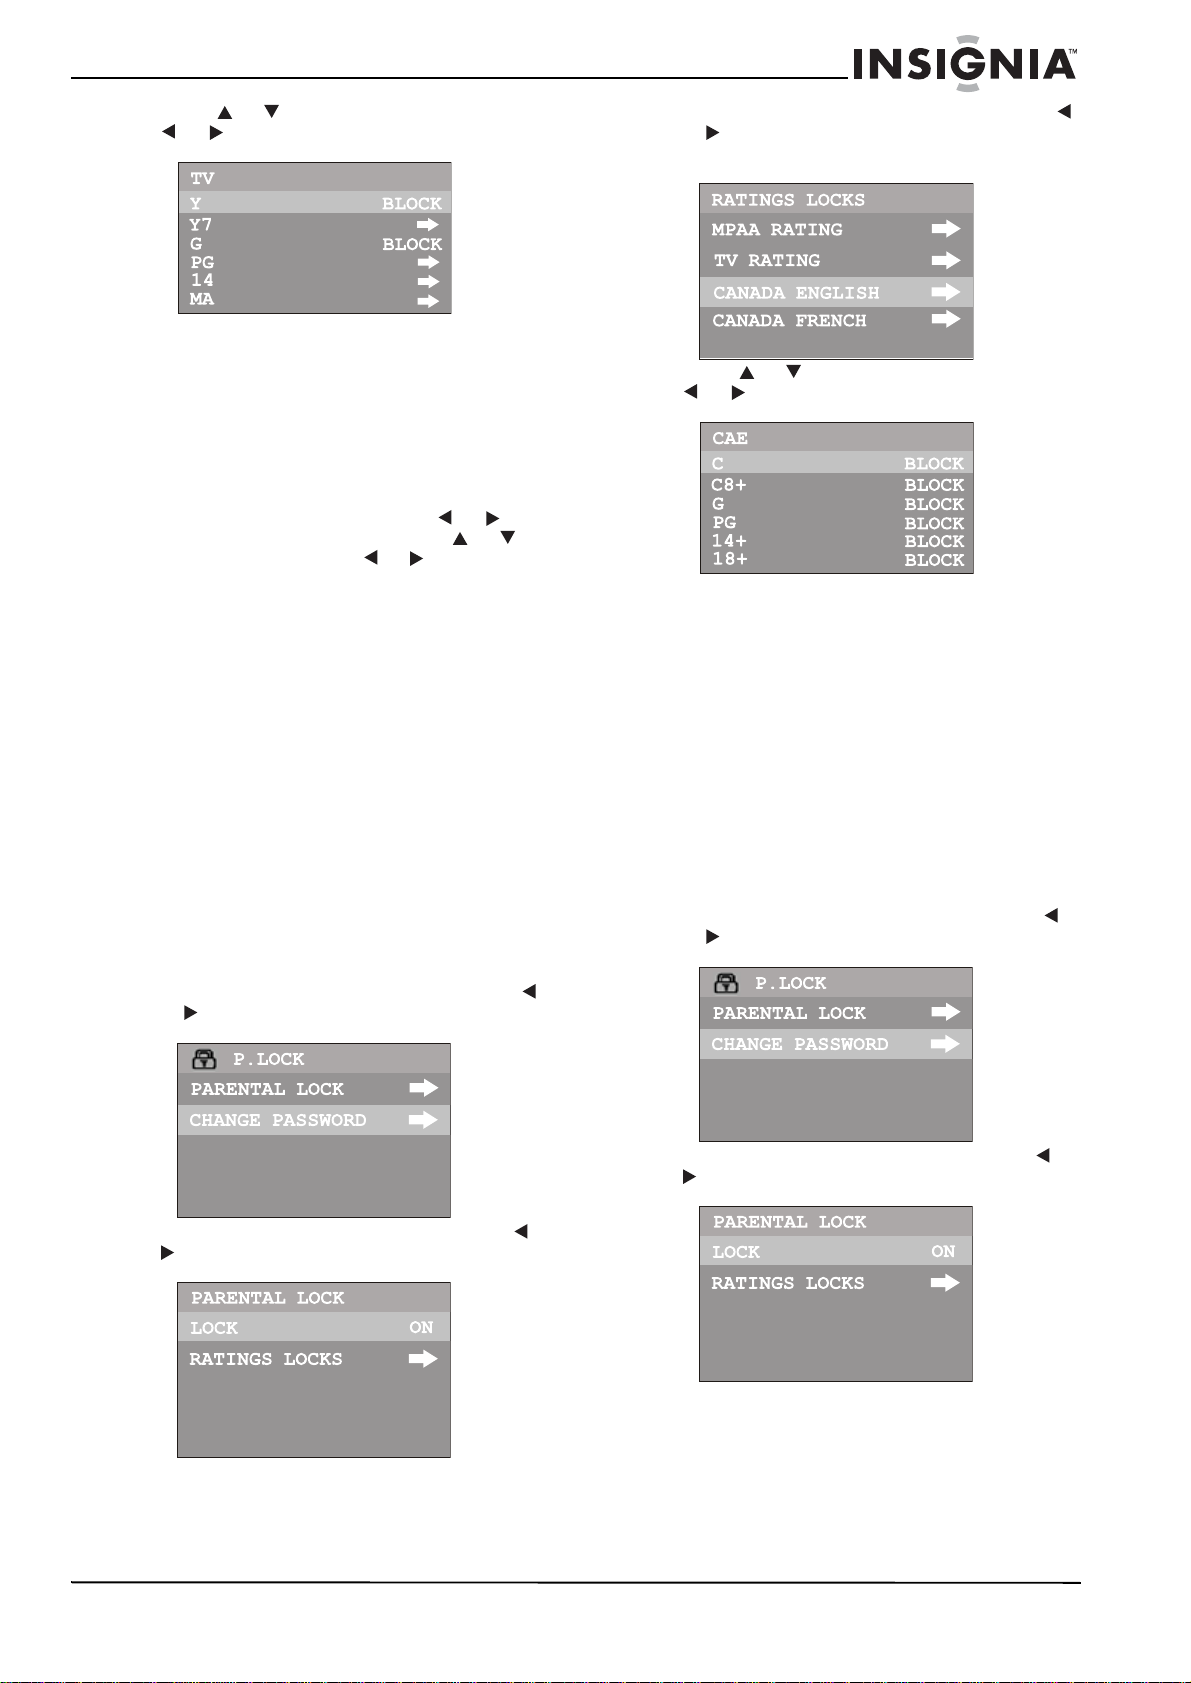
Insignia NS-F20TV Television
5 Press or to select the rating, then press
or to either block or view the rating.
TV Ratings:
• TV-Y—All chil dren
• TV-Y7—Ages 7 years and up
• TV-G—General audience
• TV-PG—Parental guidance suggested
• TV-14—14 years and up
• TV-MA—Mature audience
6 If the rating includes content-based ratings,
highlight this rating, then press or to
enter the next-level menu. Press or to
select the rating, press or to either block
or view the rating.
Content-based ratings:
• FV: fantasy violence—applies only to
TV-Y7
• V: Violence—applies to TV-PG, TV-14,
and TV-MA
• S: Sex scenes—applies to TV-PG, TV - 14,
and TV-MA
• L: adult language—applies to TV-PG,
TV-14, and TV-MA
• D: sexual dialogue—applies to TV -PG and
TV-14
7 Press EXIT to return to television viewing, or
press MENU to return to the previous menu.
Setting up Canadian English ratings
To set up Canadian English ratings:
1 Use the password to enter the P.LOCK menu.
2 Highlight PARENTAL LOCK, then press
or to enter the menu.
4 Highlight CANADA ENGLISH, then press
or to enter the CANADA ENGLISH
submenu.
5 Press or to select the rating, then press
or to either block or view the rating.
Canadian English Ratings:
• C—Children.
• C8+—Children 8 years and older.
• G—General programming, suitable for all
audiences.
• PG—Parental guidance.
• 14+—Viewers 14 years and older.
• 18+—Adult programming.
6 Press EXIT to return to television viewing, or
press MENU to return to the previous menu.
Setting up Canadian French ratings
To set up Canadian French ratings:
1 Use the password to enter the P.LOCK menu.
2 Highlight PARENTAL LOCK, then press
or to enter the menu.
3 Highlight RATINGS LOCKS, then press or
to enter the RATINGS LOCKS menu.
www.insignia-products.com
3 Highlight RATINGS LOCKS, then press or
to enter the RATINGS LOCKS menu.
17
Page 18
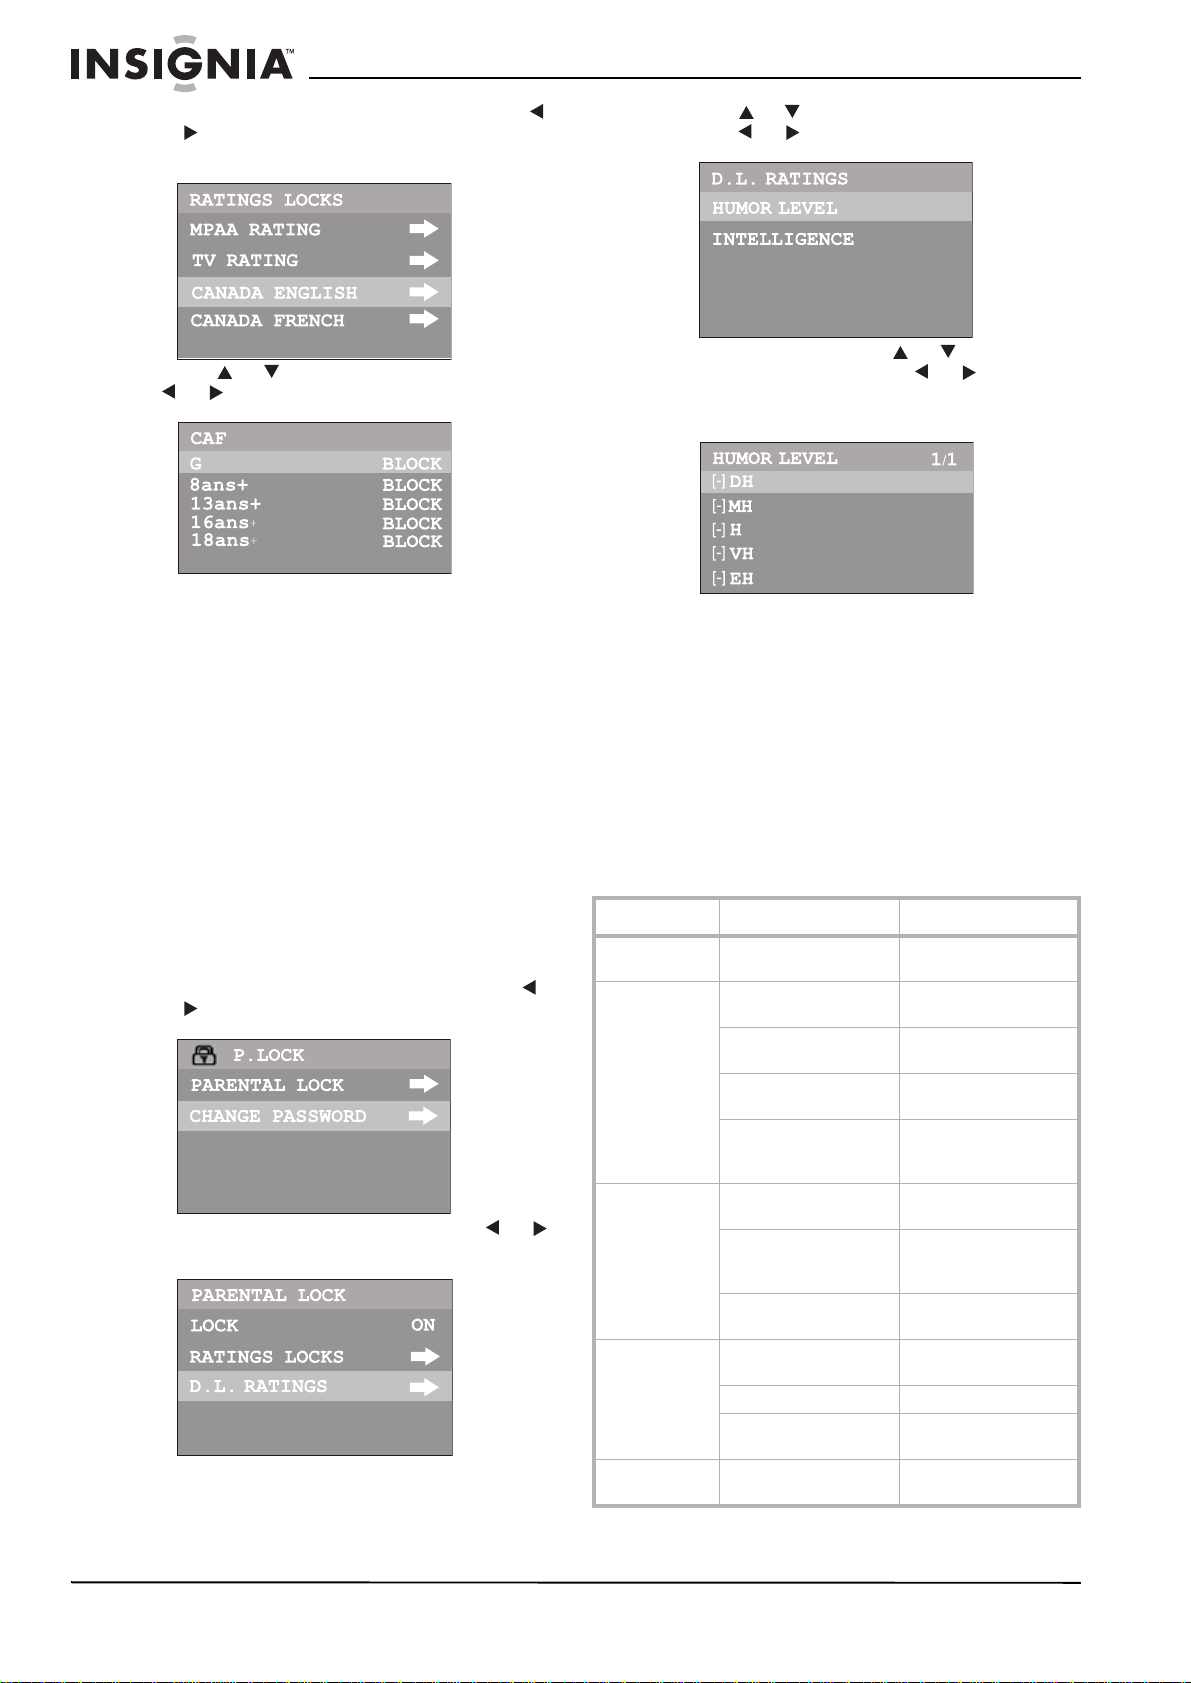
Insignia NS-F20TV Television
4 Highlight CANADA FRENCH, then press
or to enter the CANADA FRENCH
submenu.
5 Press or to select the rating, then press
or to either block or view the rating.
Canadian French Ratings:
• G—Children.
• 8 ans+—Children 8 years and older.
• 13 ans+—Children 13 years and older.
• 16 ans+—Viewers 16 years and older.
• 18 ans+—Adult programm ing.
6 Press EXIT to return to television viewing, or
press MENU to return to the previous menu.
Setting up RRT5 criteria ratings
If the broadcasting program uses RRT5 (Rating
Region Table-Region 5) criteria rating in
accordance with the FCC Rules, its rating can be
downloaded to this television and can be used
for parental controls.
To set up RRT5 criteria ratings:
1 Use the password to enter the P.LOCK menu.
2 Highlight PARENTAL LOCK, then press
or to enter the menu.
3 Highlight D.L. RATINGS, then press or
to enter the D.L. RATINGS menu.
4 Press or to select the desired item, then
press or to enter the menu.
5 Within the menu, press or to select the
desired rating, then press or to block
the rating or view. Press ENTER to scroll
page if there are more than one menu page.
6 Press EXIT to return to television viewing, or
press MENU to return to the previous menu.
Maintaining
To prevent fire or shock hazard, disconnect your
television from the AC power source when
cleaning. The exterior of the television may be
cleaned with a dust cloth. Use caution when
cleaning and wiping the plastic parts. Mild soap
and a soft, damp cloth may be used.
Troubleshooting
Symptom P ossibl e cause Possible solution
No power The AC power cord is
Poor or no
picture
Picture wobbles
or drifts
No cable
reception
No reception
above CH13
not connected.
TV station is
experiencing problems.
Picture control is not
adjusted.
Possible local
interference.
Antenna/cable
connector is not
connected.
TV station experiencing
problems.
Cable TV channel is
scrambled.
Possible local
interference.
Cable not connected. Check all cable
Air/Cable set to Air. Set Air/Cable to Cable.
Cable TV service
interrupted.
Air/Cable set to Air. Set Air/Cable to Cable.
Connect the AC power
cord to an AC outlet.
T ry an other channel.
Check picture cont rol
adjustments.
Check for source of
reception disturbance.
Check cable connection
or VHF/UHF an t e n na.
T ry an other channel.
A cable box needs to be
used to receive this
channel.
Check for source of
reception disturbance.
connections.
Contact your cable TV
company.
18
www.insignia-products.com
Page 19
Insignia NS-F20TV Television
Symptom P ossibl e cause Possible solution
Poor or no
sound
Television shuts
off
Closed
Captioning not
working
Remote control
does not
operate
Parental control
not working
correctly.
TV station experiencing
problems.
MUTE button is
pressed.
Possible local
interference.
Antenna/cable
connector is not
connected.
Volume is set to
minimum.
Sleep timer is set Set sleep timer to OFF.
TV signal is weak. Check cable or
TV station experiencing
problems or program is
not closed capt io ne d.
Close captioning is not
turned on.
The remote control is
not aimed at the
sensor.
Distance is too far or
too much light in the
room.
There is an obstacle in
the path of the beam.
The batteries are weak. Replace the batteries.
The batteries are not
inserted correctly.
Parental control is set
to OFF.
News or sports event
being broadcast.
Ratings not set. Set rat ings.
Try another channel.
Press MUTE button
again.
Check for source of
reception di sturbance.
Check cable connection
of VHF/UHF antenna.
Increase the volume.
VHF/UHF antenna.
Try another channel.
Press the CCD button.
Aim the remote control
at the remote sensor.
Operate the remote
within 15 feet of the
television or reduce the
light in the room.
Clear the path of the
beam.
Reinsert the batteries.
Set parental cont rol to
ON.
Parental control does
not work with news or
sporting events.
Reception disturbances
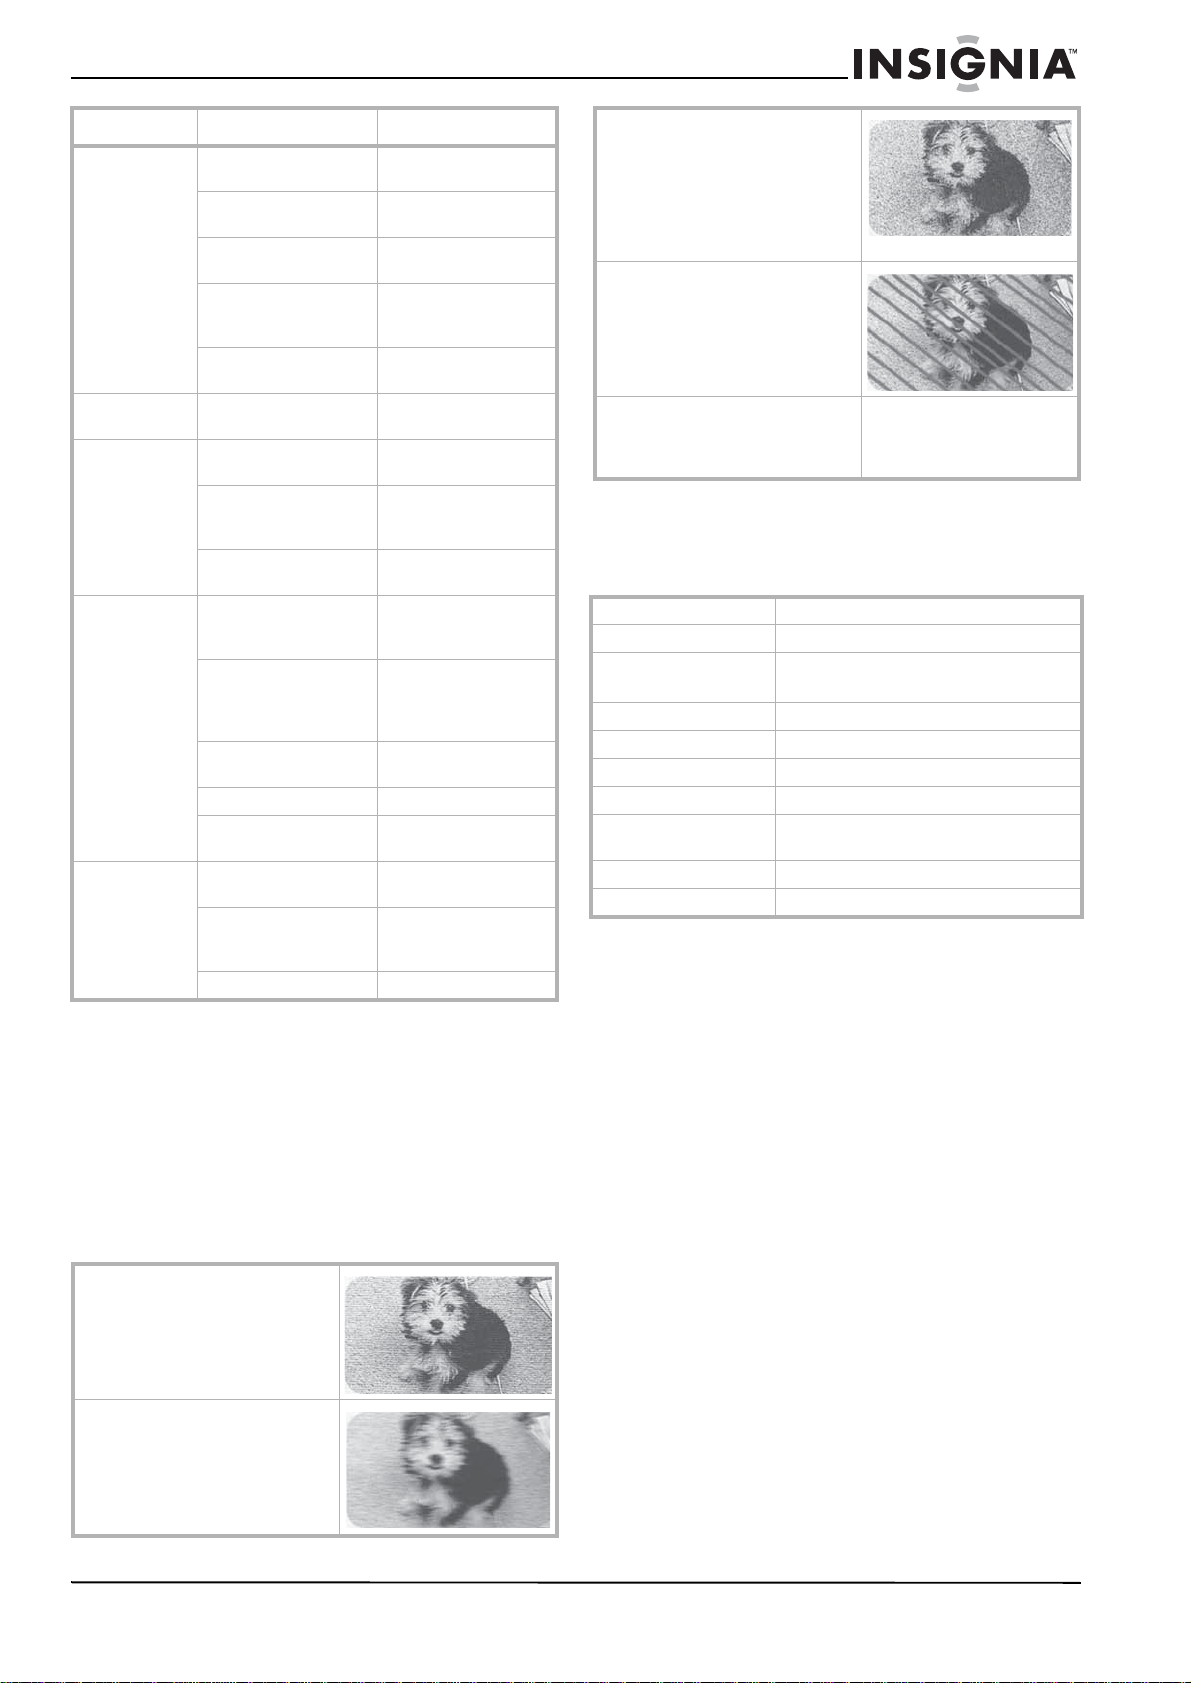
Most types of television interference can be
remedied by adjusting the height and position of
the VHF/UHF antenna. Outdoor antennas are
recommended for best results if not using cable
or satellite. The most common types of television
interference are shown below. If one of these
symptoms appear when the television is
connected to a Cable TV system, the
disturbance may be caused by the local cable
company broadcast.
IGNITION: Black spots or horizontal
streaks may appear, picture may
flutter or drift. Usually caused by
interference from automobile
ignition systems, neon lamps,
electric drills and other electric
appliances.
GHOSTS: Ghosts are caused by the
television signal f ollowing two
paths. One is the direct path and the
other is reflected from tall building s,
hills, or other obj ects. Chan ging the
direction or position of the antenna
may improve the reception.
SNOW: If your receiver is located in
the fringe area of a television station
where the signal is weak, your
picture may be marred by the
appearance of small dots. When the
signal is extremely weak, it may be
necessary to install an external
antenna to improve the picture.
RADIO FREQUENCY
INTERFERENCE: This interference
produces moving ripples or
diagonal streaks, and in so me
cases, causes loss of contrast in the
picture.
PICTURE SIZE VARIATION: A slight
picture size variation is no rmal
when you adjust the CONT RA ST or
BRIGHTNESS setting.
Specifications
Design and specifications are subject to change
without notice.
Power Supply AC 120V, 60Hz
Power Consumption 75 W
Dimensions (W x H x D) 23.2” X 18.0” X 18.7”
(590 mm x 457 mm x 475 mm)
Weight 48.5 lbs (22 kg)
CRT 20" (508 mm)
Audio Output 3W x 2
TV System NTSC-M, ATSC
Channel Coverage VHF 2-13, UHF 14-69, CATV 1-125,
Antenna Impedan c e 75 ohm
Accessory R emote control
CADTV 1-135, DTV 2-69
Legal notices
FCC Part 15
This device complies with Part 15 of the FCC Rules.
Operation of this product is subject to the following two
conditions: (1) this device may not cause harmful
interference, and (2) this device must accept any interference
received, including interference that may cause undesired
operation.
This equipment has been tested and found to comply within
the limits for a class B digital device, pursuant to Part 15 of
the FCC Rules. These limits are designed to provide
reasonable protection against harmful interference in a
residential installation. This equipment generates, uses, and
can radiate radio frequency energy and, if not installed and
used in accordance with the instructions, may cause harmful
interference to radio communications. Howev er, there is no
guarantee that interference will not occur in a particular
installation. If this equipment does cause harmful
interference to radio or television reception, which can be
determined by turning the equipment off and on, the user is
encouraged to try to correct the interference by one or more
of the following measures:
• Reorient or relocate the receiving antenna.
• Increase the separation between the equipment and
receiver.
• Connect the equipment into an outlet on a circuit
different from that to which the receiver is connected.
• Consult the dealer or an experienced technician for
help.
www.insignia-products.com
19
Page 20

FCC warning
Changes or modifications not expressly approved by the
party responsible for compliance with the FCC Rules could
void the user’s authority to operate this equipment.
DHHS and FDA safety certification
This product is made and tested to meet safety standards of
the FCC, requirements and compliance with safety
performance of the U.S.Departme nt of Health and Human
Services, and also with FDA Radiation Performance
Standards 21 CFR Subchapter J.
Canada ICES-003 statement
This Class B digital apparatus complies with Canadian
ICES-003.
RSS 310 statement
To reduce potential radio interference to other users, the
antenna type and its gain should be so chosen that the
equivalent isotropically radiated power (e.i.r.p.) is not more
than that permitted for successful communication.
Copyright
© 2007 Insignia. Insignia and the Insignia logo are
trademarks of Best Buy Enterprise Services, Inc. Other
brands and product names are trademarks or registered
trademarks of their respective holders. Specifications and
features are subject to change without notice or obligation.
For service and support call (877) 467-4289.
Insignia NS-F20TV Television
20
www.insignia-products.com
Page 21

Insignia NS-F20TV Television
Warranty
1-year limited warranty
Insignia Products (“Insignia”) warrants to you, the original
purchaser of this new NS-F20TV (“Product”), that the
Product shall be free of defects in the original manufacture of
the material or workmanship for a period of one (1) year from
the date of your purchase of the Product (“Warranty Period”).
This Product must be purchased from an authorized dealer
of Insignia brand products and packaged with this warranty
statement. This warranty does not cover refurbished
Product. If you notify Insignia during the Warranty Period of a
defect covered by this warranty that requires service, terms
of this warranty apply .
How long does the coverage last?
The Warranty Period lasts for 1 year (365 days) from the date
you purchased the Product. The purchase date is printed on
the receipt you received with the Product.
What does this warranty cover?
During the Warranty Period, if the original manufacture of the
material or workmanship of the Product is determined to be
defective by an authorized Insignia repair center or store
personnel, Insignia will (at its sole option): (1) repair the
Product with new or rebuilt parts; or (2) replace the Product
at no charge with new or rebuilt comparable products or
parts. Products and parts replaced under this warranty
become the property of Insignia and are not returned to you.
If service of Products or parts are required after the Warranty
Period expires, you must pay all labor and parts charges.
This warranty lasts as long as you own your Insignia Product
during the Warranty Period. Warranty coverage terminates if
you sell or otherwise transfer the Product.
How to obtain warranty service?
If you purchased the Product at a retail store location, take
your original receipt and the Product to the store you
purchased it from. Make sure that you place the Product in
its original packaging or packaging that provides the same
amount of protection as the original packaging. If you
purchased the Product from an online web site, mail your
original receipt and the Product to the address listed on the
web site. Make sure that you put the Product in its original
packaging or packaging that provides the same amount of
protection as the original packaging.
Where is the warranty valid?
This warranty is valid only to the original purchaser of the
product in the United States and Canada.
What does the warranty not cover?
This warranty does not cover:
• Customer instruction
• Installation
• Set up adjustments
• Cosmetic damage
• Damage due to acts of God, such as lightning strikes
• Accident
•Misuse
•Abuse
• Negligence
• Commercial use
• Modification of any part of the Product, including the
antenna
This warranty also does not cover:
• Damage due to incorrect operation or maintenance
• Connection to an incorrect voltage supply
• Attempted repair by anyone other than a facility
authorized by Insignia to service the Product
• Products sold as is or with all faults
• Consumables, such as fuses or batteries
• Products where the factory applied serial number has
been altered or removed
REPAIR REPLACEMENT AS PROVIDED UNDER THIS
WARRANTY IS YOUR EXCLUSIVE REMEDY. INSIGNIA
SHALL NOT BE LIABLE FOR ANY INCIDENTAL OR
CONSEQUENTIAL DAMAGES F OR THE BREA CH OF ANY
EXPRESS OR IMPLIED WARRANTY ON THIS PRODUCT,
INCLUDING, BUT NOT LIMITED T O , LOST D ATA, LOSS OF
USE OF YOUR PRODUCT, LOST BUSINESS OR LOST
PROFITS. INSIGNIA PR ODUCTS MAKES NO OTHER
EXPRESS WARRANTIES WI T H RE SP EC T TO THE
PRODUCT, ALL EXPRESS AND IMPLIED WARRANTIES
FOR THE PRODUCT, INCLUDING, BUT NOT LIMITED TO,
ANY IMPLIED WARRANTIES OF AND CONDITIONS OF
MERCHANTABILITY AND FITNESS FOR A PARTICULAR
PURPOSE, ARE LIMITED IN DURATION TO THE
WARRANTY PERIOD SET FORT H ABOVE AND NO
WARRANTIES, WHETHER EXPRESS OR IMPLIED, WILL
APPLY AFTER THE WARRANTY PERIOD. SOME STATES,
PROVINCES AND JURISDICTIONS DO NO T ALLOW
LIMITATIONS ON HOW LONG AN IMPLIED WARRANTY
LASTS, SO THE AB OVE LIMITATION MAY NOT APPLY TO
YOU. THIS WARRANTY GIV ES YOU SPECIFIC LEGAL
RIGHTS, AND YOU MAY ALSO HAVE OTHER RIGHTS,
WHICH VARY FROM STA T E TO STATE OR PROVINCE T O
PROVINCE.
www.insignia-products.com
21
Page 22

Téléviseur Insignia NS-F20TV
Téléviseur Insignia
NS-F20TV
Table des matières
Introduction . . . . . . . . . . . . . . . . . . . . . . . . . . . . .22
Informations sur la sécurité . . . . . . . . . . . . . . . . .22
Fonctionnalités. . . . . . . . . . . . . . . . . . . . . . . . . . .24
Configuration du téléviseur . . . . . . . . . . . . . . . . .26
Fonctionnement du téléviseur . . . . . . . . . . . . . . .28
Entretien. . . . . . . . . . . . . . . . . . . . . . . . . . . . . . . .39
Problèmes et solutions. . . . . . . . . . . . . . . . . . . . .39
Spécifications. . . . . . . . . . . . . . . . . . . . . . . . . . . .40
Garantie. . . . . . . . . . . . . . . . . . . . . . . . . . . . . . . .43
Introduction
Félicitati ons d’ av oir ac heté ce produit Insign ia de
haute qualité. Le modèle NS-F20TV représente
la dernière avancée technologique dans la
conception de téléviseur et a été conçu pour des
performances et une fiabilité exceptionnelles.
Informations sur la sécurité
Attention
Afin de réduire le risque d’incendie ou de choc électrique, ne
pas exposer l’appareil à la pluie ou l’humidité.
Attention
Afin d’assurer la pérennité des dispositifs de sécurité de
l’appareil, ne remplacer les composants essentiels qu’avec
des pièces recommandées par le fabricant (consulter la
documentation d’entretien).
Avertissement sur le risque de choc électrique
ATTENTION
Risque de choc
électrique
Ne pas ouvrir
Attention
Afin de réduire le risque de choc électrique, ne pas enlever le
couvercle (ou le panneau arrière). Aucune pièce interne ne
peut être réparée par l'utilisateur. Confier l’entretien à du
personnel qualifié.
Importantes mesures de sécurité
• Lire ces instructions.
• Ces instructions doivent être conservées
• Respecter les avertissements et les
• Pour écarter tous dangers, n’utiliser que des
Le symbole d’un éclair à l’intérieur d’un triangle est
destiné à alerter l'utilisateur de la présence d'une
tension dangereuse non isolée à l’intérieur de
l’appareil dont la puissance est suffisante pour
présenter un risque de choc électrique.
Le point d’exclamation à l’intérieur d’un triangle
équilatéral est destiné à alerter l’utilisateur de la
présence d’instructions importantes sur le
fonctionnement et sur la maintenance (entretien)
dans la documentation accompagnant l’appareil.
pour une utilisation ultérieure.
instructions.
accessoires recommandés par le fabricant
de l'appareil.
• Ne pas utiliser cet appareil à proximité de
l’eau (baignoire, évier ou piscine). L’appareil
ne doit pas être exposé à des éclaboussures
ou des gouttes d’eau et ne poser dessus
aucun objet rempli de liquide, tel qu’un vase.
• Utiliser un chiffon sec pour le nettoyage. Ne
pas utiliser de nettoyants liquides ou en
aérosol.
• Ne pas obstruer les ouvertures d’aération.
Installer l’appareil conformément aux
instructi ons du fabricant.
• Installer l’appareil à l’écart de sources de
chaleur, telles que radiateurs, bouches de
chaleur, fours ou autres appareils (y compris
les amplificateurs) qui produisent de la
chaleur.
• Ne pas placer cet
appareil sur une table,
une étagère ou un
chariot instables.
L'appareil peut dans sa
chute blesser
sérieusement un enfant
ou un adulte et être
gravement endommagé.
N’utiliser l'appareil
qu’avec la table roulante, le pied, le trépied,
le support ou la table vendus avec lui.
• Ne jamais déplacer l’appareil sans d’abord
débrancher le cordon d’alimentation CA.
• Les fentes et ouvertures sur les côtés, au dos
et au bas du boîtier sont prévues pour la
ventilation, pour assurer un fonctionnement
fiable de l'appareil et le protéger contre toute
surchauffe.
• Ces ouvertures ne doivent être ni bloquées ni
obstruées. Elles ne doivent jamais être
bloquées en installant l'appareil sur un lit, un
sofa, une moquette ou toute autre surface
semblable. L’appareil ne doit jamais être
positionné à proximité ou sur un radiateur, ou
une bouche de chauffage.
• Il ne doit pas non plus être installé dans un
meuble encastré tel qu’une bibliothèque, sauf
si une ventilation adéquate est installée.
• Ne pas chercher à modifier le dispositif de
sécurité de la prise polarisée ou de type mise
à la terre. Une prise polarisée comporte deux
plots, un plus large que l'autre. Une prise de
type mise à la terre est composée de deux
plots et d’un troisième de mise à la terre. Ce
troisième plot, large ou rond a été prévu pour
la sécurité de l’utilisateur. Si la prise fournie
ne rentre pas dans la prise secteur, faire
appel à un électricien pour qu’il remplace
cette dernière qui est obsolète.
• Cet appareil doit fonctionner conformément à
la source d’alimentation indiquée sur les
étiquettes. En cas d’incertitude sur la tension
d'alimentation de la maison, consulter la
compagnie d'électricité.
• Aucun objet ne doit reposer sur le cordon
d’alimentation et l'appareil ne doit pas être
installé dans un endroit où le cordon serait
sur un lieu de passage.
22
www.insignia-products.com
Page 23

Téléviseur Insignia NS-F20TV
• Si l'appareil est connecté à une antenne
extérieure ou à un réseau câblé, vérifier que
l'antenne ou la connexion au réseau câblé
est mise à la terre afin de bénéficier d'une
certaine protection contre les sautes de
courant et les charges électrostatiques.
L'article 810 du Code national de l’électricité
(CNE), ANSI/NFPA 70, fournit des
informations relatives à la mise à la terre
correcte du mât et du support, la mise à la
terre du fil conducteur de l’antenne à l’unité
de décharge de l’antenne, la taille des
conducteurs de mise à la terre,
l’emplacement de l’unité de décharge de
l’antenne, la connexion aux conducteurs de
terre ainsi que les normes en matière de
prise de terre.
7
6
5
4
3
1
Référence
1 Équipement de la compagnie
2 Système de mise à la terre de s
3 Serre-fil de mise à la terre
4 Conducteurs de mise à la terre
5 Unité de décharge de l’an tenne
6 Serre-fil de mise à la terre
7 Fil conducteur de l’antenne
Composant de mise à la
terre
d'électricité
électrodes de la compagnie
d’électricité
(CNE Art. 250, Section H)
(CNE, Section 810-21)
(CNE, Section 810-20)
2
• Utiliser des fils en cuivre n° 10 AWG
(5,3 mm
AWG (8,4 mm
ou en bronze n° 17 AWG (1 mm
2
), des fils en aluminium n° 8
2
), des fils en acier cuivré
2
) ou plus
gros comme fil de masse.
• Raccorder le fil conducteur de l’antenne
et les fils de masse à la maison au moyen
d’isolateurs muraux espacés de 1,22 à
1,83 m (4 à 6 pieds).
• Monter le fil conducteur de l’antenne
aussi près que possible du point d’entrée
de la maison.
• Utiliser un cavalier d'au moins la taille d'un
fil de cuivre n° 6 AWG (13,3 mm
2
) ou
équivalent lorsqu’un conducteur de terre
d’antenne séparé est utilisé. Voir
ANSI/NFPA70.
• Pour protéger l'appareil pendant un orage ou
s’il se trouve inutilisé et sans surveillance
pendant de longues périodes, le débrancher
de la prise secteur et débrancher l'antenne
ou la connexion au réseau câblé. Ceci évitera
d’endommager l'appareil en cas de foudre et
de variations de tension du secteur.
• L’antenne externe ne doit pas être située près
de lignes électrique s aériennes ni à un
emplacement où elle pourrait tomber sur de
tels circuits ou lignes électriques. Lors de
l'installation d'une antenne externe, faire très
attention de ne pas toucher de telles lignes
électriques ou circuits car tout contact peut
être mortel.
• Les prises d’alimentation et les rallonges ne
doivent pas être surchargées, ce qui pourrait
provoquer des risques d'incendie ou de choc
électrique.
• N’enfoncer en aucun cas un objet dans les
ouvertures du châssis de l'appareil qui
pourrait entrer en contact avec des tensions
dangereuses ou provoquer un court-circuit à
l'origine d'un incendie ou d'un choc
électrique. Ne jamais répandre un liquide sur
l’appareil.
• L’utilisateur ne doit pas essayer de réparer ce
téléviseur lui-même. En effet, son ouverture
ou le démontage des couvercles peut
l’exposer à des tensions dangereuses et à
d'autres dangers. Toutes les réparations
doivent être effectuées par du personnel
qualifié.
• Débrancher cet appareil de la prise
d’alimentation et utiliser les services d’un
technicien qualifié dans les conditions
suivantes :
• Lorsque le cordon d’alimentation est
effiloché ou la prise endommagée.
• Si un liquide a été répandu sur l'appareil.
• Si l’appareil a été exposé à la pluie ou à
l’eau.
• Si l’appareil fonctionne anormalement en
appliquant les instructions d’utilisation. Ne
régler que les commandes décrites dans
les instructions d’utilisation. En effet, un
réglage incorrect d’autres commandes
pourrait provoquer des détériorations
entraînant souvent d'importantes
réparations par un technicien qualifié afin
de rétablir un fonctionnement normal.
• Si le téléviseur est tombé ou si le boîtier a
été endommagé.
• Détérioration marquée des performances
de l'appareil.
• Si des pièces doivent être remplacées,
s’assurer que le technicien a utilisé des
pièces de rechange spécifiées par le
fabricant qui ont les mêmes caractéristiques
que les pièces d’origine. Toute substitution
par des pièces non autorisées peut
provoquer un incendie, un choc électrique ou
d'autres dangers.
• Les réparations ou la maintenance ayant été
effectuées, demander au technicien de
réaliser les contrôles de sécurité de routine
afin de déterminer que cet appareil peut
fonctionner sans danger.
www.insignia-products.com
23
Page 24

Téléviseur Insignia NS-F20TV
Avis à l'installateur de TV câblée
Le présent avis a pour objet de rappeler à
l'installateur de systèmes de câblodistribution
que l'article 820 40 du Code national de
l'électricité (CNE) contient des
recommandations relatives à la mise à la terre
de l'appareil et, en particulier, stipule que la terre
du câble doit être connectée au système de
mise à la terre de l'immeuble, aussi prêt que
possible du point d'entrée du câble.
Fonctionnalités
Téléviseur
Face avant
1
Face arrière
7
6
1
2
5
3
4
2
4
6
5
7 8
9
3
Élément Description
1 Touche d’alimentation — Permet de mettre le
2 Capteur de télécommande — Pointer la télécommande
3 Voyant — S’allume en vert lorsque l’appareil est sous
4 ENTRÉE — Permet de sélectionner la source d’entrée.
5 Touche MENU — Permet d’accéder au menu d'écran.
6 Touche VOL- — Permet de diminuer le volume ou de
7 Touche VOL+ — Permet d’augmenter le volume ou de
8 Touche CH- — Permet de revenir au canal précédent
9 Touche CH + — Permet de revenir au canal suivant ou
téléviseur sous ou hors tension.
en direction de ce capteur pour contrôler le téléviseur.
tension.
régler une optio n du me nu.
régler une optio n du me nu.
ou de sélectionner une option du menu.
de sélectionner une option du menu.
Élément Description
1 Entrée AV2 (VIDÉO, AUDIO G, AUDIO D) — Connecter
2 Prise de casque d'écoute — Connecter un casque
3 Entrée antenne — Connecter l e câble ou la télévision pa r
4 Entrée COMPOSANTES (Y, C
5 Entrée S-VIDÉO — Connecter une source vidéo à cette
6 Entrée AV1 (VIDÉO, AUDIO G, AUDIO D) — Connecter
7 Sortie AV (VIDÉO, AUDIO G, AUDIO D) — Connecter un
une source vidéo ou audio, comme un caméscope, une
console de jeux vidéo ou un lecteur de DVD en utilisant
ces prises.
d'écoute à cette prise.
satellite, une antenne extérieure ou une antenne en
oreilles de lapin à cette prise.
B, CR, AUDIO G, AUDIO D) —
Connecter une source vidéo et audio, comme un lecteur
de DVD, à ces prises. La vidéo à composantes fournit une
image de qualité supéri eure.
prise. Le son n’est pas transmis par un câble S-VIDÉO.
une source vidéo ou audio, comme une console de jeux
vidéo ou un lecteur de DVD à ces prises.
appareil vidéo et au dio, c omm e un magn ét osc ope ou une
chaîne stéréo, à ces prises.
24
www.insignia-products.com
Page 25

Téléviseur Insignia NS-F20TV
Télécommande
Touches
1
2
3
4
5
6
7
8
9
10
11
17
16
15
14
13
12
Élément Description
9 Touches de navigati on dans le menu :
et — Permet de se déplacer parmi les options
du menu.
et — Permet de se déplacer vers la gauche ou
vers la droite da ns le menu ou pour en régler un
paramètre.
10 SORTIE — Permet de sortir du menu.
11 IMAGE — Permet de sélectionner le mode d'image.
12 ARRÊT DIFFÉRÉ — Permet de régler l'arrêt différé.
13 GUIDE — Permet d’afficher le guide des programmes.
14 AFFICHAGE — Permet d’afficher l'état du canal ou des
informations sur le signal.
15 CCD — Permet d’activer ou de désactiver l'affichage
des sous-titres codés.
16 VOL+/- — Permet d’augmenter ou de d iminuer le
volume.
17 Trait — Permet d’introduir e le numéro d'un
programme pour des canaux à pr ogrammes multiples
(numériques) (exemple : 2-1).
Installation des piles
Pour installer les piles dans la télécommande
:
1 Retirer le couvercle du compartiment des
piles.
Élément Description
1
2
3 Touches de sélection directe d'un canal/d'un numéro
4
5 CH+/- — Permet d’aller au canal supérieur ou inférieur.
6 ZOOM — Permet de modifier la taille de l'image en
7 SOURDINE — Permet de mettre le son en sourdine.
8 MENU — Permet d’accéder à la page principale du
MARCHE/ARRÊT — Permet de mettre le téléviseur
sous ou hors tension .
ENTRÉE — Permet de sélectionner la source
d’entrée. Les options incluent :
• TV — regarder la t élévision transmise par
l'antenne
• AV1 — regarder un DVD, un jeu v idé o ou l ire un
caméscope depuis un pé riphérique connecté
sur les entrées AV1 ou S-VIDÉO.
• AV2 — regarder un DVD, un jeu v idé o ou l ire un
caméscope depuis un dispositif connecté sur
les entrées AV2.
• COMPOSANTES — regarder un DVD sur un
lecteur de DVD connecté sur les prises d'entrée
composantes.
— Permettent de sélectionner un canal ou de saisir un
mot de passe.
Retour — Permet de revenir au canal
précédemment sélectionné.
mode DTV (télévision numérique). Cette touche est
désactivée en mode de tél évision analogique.
menu.
2 Insérer deux piles de type AAA. Positionner
les piles pour que les bornes correspondent
aux indications (+) et (–) du compartiment
des piles.
www.insignia-products.com
25
Page 26

Téléviseur Insignia NS-F20TV
3 Remettre le couvercle du compartiment des
piles.
Attention
• Ne pas essayer de recharger des piles
alcalines, elles ne sont pas conçues pour cela.
• N’utiliser que la taille et le type de piles
spécifiés. Ne pas mélanger différents types de
pile ni des piles usagées avec des piles
neuves.
• Retirer les piles si la télécommande ne doit pas
être utilisée pendant une longue période ou
lorsque les piles sont mortes.
• Ne pas jeter les piles au feu. Mettre au rebut
les piles usagées conformément à la
réglementation locale.
• Ne pas faire tomber, mouiller ni désassembler
la télécommande.
Utilisation de la télécommande
Configuration du téléviseur
Déballage du téléviseur
L'emballage doit comprendre ce qui suit :
• Un téléviseur
• Une télécommande
• Ce Guide de l’utilisateur
Emplacement du téléviseur
Installer le téléviseur dans une pièce où la
lumière solaire n'atteint pas directement l'écran.
L'obscurité totale ou une réflexion sur l'écran
peut provoquer une fatigue oculaire. Une lumière
douce et indirecte est recommandée pour le
confort des yeux.
Connexion de l'antenne, de la télévision par câble ou d'une parabole sur le téléviseur
Prise murale
d'antenne, ou
alimentation par
câble ou satellite
Remarque
Câble coaxial HF (75 ohms)
Aux utilisateurs d'une antenne extérieure : Une
bonne réception en couleur nécessite un bon
signal et signifie généralement qu'une antenne
extérieure est obligatoire. Le type exact et la
position de l'antenne dépendent de l'emplacement
géographique.
Câble en bronze
Entrée de l'antenne
15 pieds (5 m)
Remarque
• La télécommande peut ne pas fonctionner en
présence d'un obstacle entre le téléviseur et la
télécommande.
• La télécommande peut ne pas faire fonctionner
correctement le téléviseur en présence d'une
lumière solaire directe, d'une source lumineuse
incandescente ou fluorescente, ou de
puissants reflets lumineux sur le capteur de la
télécommande du téléviseur.
Précautions
• Il est recommandé d'utiliser un câble coaxial de
75 ohms pour éliminer les interférences et les
parasites pouvant se produire en raison des
conditions de propagation radioélectrique.
• Le câble d'antenne et le câble d'alimentation ne
doivent pas être groupés.
• Si l'antenne ne peut pas être correctement
installée, contacter le revendeur.
Connexion d'un équipement audio et vidéo
Ce téléviseur fournit deux groupes de prises
d'entrée AV et un groupe de prises d'entrée en
composantes pour connecter un magnétoscope,
un lecteur de DVD , une console de jeux vidéo ou
tout autre équipement vidéo.
Avant de connecter l'équipement, se reporter au
manuel du propriétaire de l'équipement à
connecter.
Connexion en utilisant les prises latérales d'entrée AV
Les prises d'entrée latérales sont d'accès facile
et doivent être utilisées pour des équipements
qui sont régulièrement connectés et
déconnectés comme un caméscope ou un
lecteur de DVD portable.
26
www.insignia-products.com
Signal
Y = Jaune (vidéo)
W = Blanc (audio G)
R = Rouge (audio D)
Vers la
sortie vidéo
Vers le s
sorties audio
Page 27

Téléviseur Insignia NS-F20TV
Pour une connexion utilisant les prises
latérales d'entrée AV :
1 Connecter les câbles audio et vidéo entre les
prises Audio (G, D) et Vidéo sur le téléviseur
et sur l'équipement vidéo.
2 Appuyer plusieurs fois sur INPUT (Entrée) de
la télécommande jusqu'à ce que AV2
s’affiche à l'écran.
Connexion en utilisant les prises arrière d'entrée AV
Les prises arrière AV sont plus difficiles à
atteindre que les prises latérales et doivent être
utilisées pour des équipements qui restent
connectés sur le téléviseur, comme un
magnétoscope, un lecteur de DVD ou une
console de jeux vidéo.
Vers l’entrée
S-Vidéo
Vers l’entrée vidéo
Vers les entrées audio
Y = Jaune (vidéo)
W = Blanc (audio G)
Vers la sortie S-Vidéo
Vers les sorties audio
Vers la sorti e v i d é o
Équipement vidéo
R = Rouge (audio D)
Connexion utilisant les prises composantes
Utiliser les prises composantes pour connecter
un lecteur de DVD compatible avec ce type de
sortie. La vidéo à composantes fournit une
image de qualité supérieure.
W = Blanc (audio G)
R = Rouge (audio D, C
G = Vert (Y)
B = Bleu (CB)
Câble audio
Câble vidéo
Lecteur de DVD
Pour une connexion utilisant les prises
composantes :
1 Connecter le câble de la vidéo à
composantes entre les prises d’entrée Y, C
et CR sur le téléviseur et les prises de sortie
Y, C
B et CR sur le lecteur de DVD.
2 Connecter le câble audio entre les prises
d’entrée audio du téléviseur et les prises de
sortie audio du lecteur de DVD.
3 Appuyer plusieurs fois sur INPUT (Entrée) de
la télécommande jusqu'à ce que
COMPONENT (Composantes) s’affiche à
l'écran.
R)
B
Remarque
Pour obtenir une meilleure vidéo, utiliser la prise
S-Vidéo si la source la prend en charge.
L’entrée S-Vidéo utilise le même circuit que AV1.
La prise S-VIDEO surpasse la prise AV1. En
utilisant à la fois la prise S-Vidéo et la prise AV1,
le signal S-Vidéo est automatiquement
sélectionné et le message sur l'écran affiche
SVIDEO. Pour visualiser un signal AV1,
débrancher la connexion S-Vidéo.
Pour une connexion utilisant les prises
arrière d'entrée AV :
1 Connecter les câbles audio et vidéo entre les
prises Audio (G, D) et Vidéo sur le téléviseur
et sur l'équipement vidéo.
2 Appuyer plusieurs fois sur INPUT (Entrée) de
la télécommande jusqu'à ce que AV1
s’affiche à l'écran.
Remarque
Ce téléviseur peut seulement recevoir un signal
BCR et non pas un signal YPBPR par l’entrée
YC
COMPOSANTES.
www.insignia-products.com
27
Page 28

Téléviseur Insignia NS-F20TV
Connexion utilisant les prises de sortie AV
Il est possible de raccorder un système audio
aux prises de sortie AV à l'arrière du téléviseur
pour bénéficier d'un son de haute qualité du
système audio. Il est aussi possible de raccorder
les prises de sortie AV à un magnétoscope pour
enregistrer un programme.
Vers la sortie
vidéo
Vers les
sorties
audio
Y = Jaune (vidéo)
W = Blanc (audio G)
R = Rouge (audio D)
Vers l’entrée vidéo
Vers les entrées audio
Vers les entrées audio
2 Appuyer sur Power (Marche/Arrêt) du
téléviseur ou de la télécommande pour
mettre l’appareil sous tension.
Mise hors tension du téléviseur
Pour mettre le téléviseur hors tension :
1 Appuyer sur Power (Marche/Arrêt) du
téléviseur ou de la télécommande pour
mettre l’appareil hors tension.
2 Débrancher l’appareil de la prise secteur
lorsqu'il ne doit pas être utilisé pendant une
durée prolongée.
Remarque
Le téléviseur s'éteint automatiquement si la
fonction Arrêt différé est activée (doit être réglée à
l’avance).
En l’absence de signal d’entrée pendant 15
minutes, le téléviseur s’éteint automatiquement
(seulement en mode TV).
Une fois qu’il est éteint, un délai minimum de cinq
secondes est nécessaire avant de remettre le
téléviseur en marche.
Utilisation des menus
Cet appareil a un système de menus qui
s’affiche à l’écran. Ce système permet d’utiliser
facilement et rapidement les fonctionnalités de
l’appareil. Il est aussi possible d’afficher l'état
des fonctionnalités du téléviseur tout en
regardant une émission.
Magnétoscope pour l’enregistrement Système audio
Pour une connexion en utilisant les prises de
sortie AV :
• Connecter les câbles audio et vidéo entre les
prises de sortie Audio (G, D) et Vidéo sur le
téléviseur et les prises d’entrée Audio (G, D)
et Vidéo sur l'équipement vidéo.
Fonctionnement du téléviseur
Mise sous et hors tension du téléviseur.
Mise sous tension du téléviseur
Pour mettre le téléviseur sous tension :
1 Insérer la fiche CA dans une prise secteur
CA.
Le téléviseur est en mode STANDBY
(Attente) si aucune image n'apparaît à l'écran
et si le témoin s'allume.
Attention
Pour éviter les chocs électriques, ne pas utiliser la
prise polarisée avec une prise de rallonge ou
d’autres prises à moins que les plots ne s’y
enfoncent entièrement.
Remarque
La prise CA fournie avec l’appareil est polarisée
afin de minimiser les risques de choc électrique.
Si la prise CA n’entre pas dans une prise murale
CA non polarisée, ne pas limer ou sectionner le
plot large. Il incombe à l'utilisateur de faire
remplacer la prise murale obsolète par un
électricien.
Menu principal Sous-menu
Picture (Image) Contrast (Contraste)
Brightness (Luminosité)
Color (Cou leur)
Tint (Teinte)
Sharpness (Netteté)
P.Lock (Co ntrôle
parental)
Clock (Horloge) On Timer (Temporisateur activé)
Preset (Préréglage) Auto Program (Programmation
Parental Lock (Contrôle parental)
• Lock (Verrouill age)
• Ratings Locks (Contrôle des
classifications)
•MPAA Rating
(Classification MPAA des
films)
• TV Rati ng (Classification
des émissions diffusées)
• Canada English (Canada
anglophone)
• Canada French (Canada
francophone)
Change Password (Modifier le mot
de passe)
Clock (Horloge)
DST (Heure avancée)
Auto Clock (Horloge automatique)
Zone (Fuseau horaire)
automatique)
• Antenna (Antenne)
• Start (Démarrer)
Ch Setup (Configuration de s canaux)
• Ch No (Numéro de canal)
•Skip (Saut)
• Label* (Étiquette)
• Dig Signal* (Signal
numérique)
28
www.insignia-products.com
Page 29

Téléviseur Insignia NS-F20TV
Menu principal Sous-menu
Extra (Autres
fonctions)
Remarque
• Les éléments marqués avec un *
• Les éléments du menu qui sont en grisé ne
n'apparaissent pas dans tous les modes.
peuvent pas être sélectionnés.
Closed Caption (Sous-titres codés
[STC])
• CC Disp lay (Affichage des
STC)
• CC Setting (Configuration des
STC)
• CC Type (Type de STC)
• CC Mode* (Mode de STC)
• CC Customer* (STC
personnalisés)
Menu language (Langue des menus)
Audio Language (Langue audio)
Pour utiliser le menu :
1 Mettre le téléviseur en marche et appuyer sur
MENU pour afficher le menu principal.
• COMPONENT — Prises pour
composantes
• TV — Prise d’antenne
Remarque
Pour obtenir une meilleure vidéo, utiliser la prise
S-Vidéo si la source la prend en charge.
L’entrée S-Vidéo utilise le même circuit que AV1.
La prise S-VIDEO surpasse la prise AV1. En
utilisant à la fois la prise S-Vidéo et la prise AV1,
le signal S-Vidéo est automatiquement
sélectionné et le message sur l'écran affiche
SVIDEO. Pour visualiser un signal AV1,
débrancher la connexion S-Vidéo.
Passage du mode AV au mode TV
Pour passer du mode AV au mode TV :
• Appuyer plusieurs fois sur INPUT (Entrée)
jusqu’à ce que le programme de télévision
s’affiche à l’écran.
Affichage de la bannière d'information
La bannière d'information affiche des
informations d'état comme le numéro du canal et
la source du signal. Différentes informations
sont affichées en fonction du mode. En mode
TVN, plus d’informations (telles que le numéro et
le nom du canal et la résolution du signal)
peuvent être affichées.
2 Appuyer sur ou pour sélectionner un
menu.
3 Appuyer sur ou pour accéder au menu.
4 Dans le menu, appuyer sur ou pour
sélectionner une option et ensuite sur ou
pour régler le paramètre ou pour accéder
à un sous-menu.
5 Appuyer sur MENU pour revenir au menu
précédent.
- OU Appuyer sur EXIT (Quitter) pour sortir du
menu principal et revenir à l’émission.
Remarque
Pour introduire clairement les fonctions du menu,
ce manuel fournit une description basée sur la
navigation des menus avec la télécommande.
Les illustrations et menus d’écran dans ce manuel
servent strictement à donner une explication
(certains sont agrandis, d'autres réduits) et
peuvent donc différer de l’actuel.
Visualisation de programmes AV
Ce téléviseur fournit deux groupes de prises
d'entrée AV et un groupe de prises d'entrée
composantes pour connecter un magnétoscope,
un lecteur de DVD , une console de jeux vidéo ou
tout autre équipement vidéo.
Pour visualiser un programme vidéo à partir
des entrées AV :
• Appuyer plusieurs fois sur INPUT (Entrée)
jusqu’à ce que l’indicateur d'entrée approprié
s’affiche à l’écran. Les entrées s’affichent
dans l’ordre suivant :
• AV1 — Prises AV arrière plus S-Vidéo
• AV2 — Prises A V latérales
Remarque
Les étiquettes de canaux sont automatiquement
attribuées et ne peuvent donc pas être modifiées
par l'utilisateur.
Pour afficher la bannière d'information :
• Appuyer sur DISPLAY (Affichage) et la
bannière d'information s'affiche.
Utilisation du guide des programmes
Il est possible d’obtenir l'heure de diffusion et le
nom de l’émission à partir du guide des
programmes.
Remarque
Le guide ne fonctionne qu'avec les canaux
numériques.
Pour afficher le guide des programmes :
1 Appuyer sur GUIDE de la télécommande
pour afficher l’information du guide.
2 Appuyer sur ou pour faire défiler les
pages si il en existe plus de deux.
Configuration des stations de télévision
Lors de la première mise sous tension du
téléviseur, une recherche automatique des
programmes doit être réalisée pour déterminer
les stations auxquelles le téléviseur a accès.
Pour configurer les stations de télévision :
1 Mettre le téléviseur en marche et appuyer sur
MENU pour afficher le menu principal.
www.insignia-products.com
29
Page 30

Téléviseur Insignia NS-F20TV
2 Appuyer sur ou pour sélectionner
PRESET (Préréglage).
3 Appuyer sur ou pour accéder au menu
Preset (Préréglage).
4 Appuyer sur ou pour sélectionner AUTO
PROGRAM (Programmation automatique).
5 Appuyer sur ou pour accéder au
sous-menu Auto Program (Programmation
automatique).
6 Appuyer sur ou pour sélectionner
ANTENNA (Antenne).
Le téléviseur commence la recherche et met en
mémoire tous les programmes disponibles. Ceci
peut prend quelques minutes.
Remarque
Le téléviseur met d’abord en mémoire les
programmes analogiques. Une fois que tous les
programmes analogiques disponibles sont mis en
mémoire, le téléviseur commence à mémoriser les
programmes TVN. Pendant la mémorisation des
programmes analogiques, il est possible
d’appuyer sur MENU pour arrêter la recherche. Le
téléviseur commence alors la mémorisation des
programmes TVN. Pour arrêter la mémorisation
des programmes TVN, appuyer de nouveau sur
MENU.
Saut des canaux non souhaités
Après avoir enregistré les canaux dans la
mémoire, il est possible de sauter ceux qui ne
sont pas nécessaires pour que seuls les canaux
retenus puissent être sélectionnés avec les
touches CH+/-.
Pour sauter les canaux non souhaités :
1 Accéder au menu Préréglage.
7 Appuyer sur ou pour sélectionner AIR
(Réception hertz i enn e) ou CABLE (TV
câblée).
En mode AIR (Réception hertzienne),
l’appareil reçoit les signaux captés par
l'antenne. En mode CABLE (TV câblée),
l’appareil reçoit les programmes de la
télévision câblée. Sélectionner :
• AIR (Réception hertzienne) — En cas
d’utilisation d’une antenne VHF/UHF.
• CABLE (TV câblée) — En cas d’utilisation
de la télévision par câble ou d’une
parabole sur le téléviseur. Pour toute
question concernant ces réglages,
contacter le revendeur.
8 Appuyer sur pour sélectionner STAR T
(Démarrer).
9 Appuyer sur ou pour lancer la
programmation automatique.
2 Appuyer sur ou pour sélectionner CH
SETUP (Configuration des canaux).
3 Appuyer sur ou pour accéder au menu
CH SETUP (Configuration des canaux).
4 Appuyer sur ou pour sélectionner CH
NO (Numéro de canal).
5 Appuyer sur ou pour sélectionner un
numéro de canal.
6 Appuyer sur pour sélectionner SKIP
(Sauter le canal).
7 Appuyer sur ou pour sélectionner ON
(Activé).
Le canal sera sauté lors d’une navigation
dans les canaux au moyen des touches
CH+/-.
Conseil
Pour rétablir un canal sauté, utiliser les touches
numériques pour sélectionner le canal supprimé,
puis répéter les étapes précédentes et régler
SKIP (Sauter le canal) sur OFF (Désactivé).
Vérification de la puissance du signal TVN
Il est possible de vérifier la puissance du signal
TVN pour déterminer si un ajustement de
l'antenne ou de l'entrée du câble numérique est
nécessaire. Plus puissant sera le signal et moins
l'image sera dégradée.
30
www.insignia-products.com
Page 31

Téléviseur Insignia NS-F20TV
Pour vérifier la puissance du signal TVN :
1 Accéder au menu Préréglage.
2 Appuyer sur ou pour sélectionner CH
SETUP (Configuration des canaux).
3 Appuyer sur ou pour accéder au menu
CH SETUP (Configuration des canaux).
La dernière ligne dans le menu de
Configuration des canaux affiche la
puissance du signal TVN actuel.
Sélection des canaux
Choisir l’une des trois méthodes suivantes pour
sélectionner un canal :
• Utiliser le pavé numérique.
• Utiliser les touches CH+ et CH-.
• Utiliser la touche Canal précédent .
Utilisation du pavé numérique
Pour sélectionner un numéro de canal
spécifique :
• Appuyer sur les touches numériques (0 à
9) et sur (-), puis attendre que le
téléviseur change de canal, ou appuyer
sur ENTER (Entrée) pour aller
directement à ce canal.
Par exemple, pour sélectionner le canal
8-3, appuyer sur 8-3 de la télécommande
(prendre soin d'appuyer sur les touches
sans que l'intervalle dépasse trois
secondes sinon le canal ne sera pas
correct ement entr é).
Remarque
Dans certaines situations, les numéros virtuels
des canaux ne correspondent pas à des
fréquences réellement utilisées.
Utilisation des touches CH+ et CH-
Pour naviguer parmi les canaux :
• Appuyer sur :
• CH+ pour une recherche croissante des
canaux.
• CH- pour une recherche décroissante des
canaux.
Utilisation de la touche canal précédent
• un numéro de canal mineur
Remarque
Exemple : Canal 5-1. Le « 5 » représente le
numéro de canal majeur et le « 1 » le numéro de
canal mineur.
• Dans la plupart des endroits aux États-Unis,
le numéro de canal majeur est le même pour
les canaux analogiques et numériques (il est
le même que celui du canal NTSC des
télédiffuseurs existants).
• Aux États-Unis, le chiffre 0 d'un canal mineur
est utilisé pour le canal analogique des
télédiffuseurs.
Exemple sur la numérotation des canaux
• Les canaux NTSC d'origine pour Des
Moines, Iowa, sont les suivants : 5, 8, 11, 13
et 17.
• Les canaux NTSC + ATSC possibles pour
Des Moines, Iowa, sont les suivants : 5-0,
8-0, 11-0, 13-0 et 17-0 (numéro de canal des
canaux analogiques existants) et 5-1, 5-2,
8-1, 8-2, 8-3, 8-4 et 13-1 (numéro de canal
des canaux numériques).
Contrôle du son
Utilisation des touches VOL+ et VOL-
Appuyer sur :
• VOL + pour augmenter le volume sonore.
• VOL- pour diminuer le volume sonore.
Utilisation de la touche MUTE (Sourdine)
Pour mettre le son en sourdine :
• Appuyer sur MUTE (Sourdine) de la
télécommande.
Pour rétablir le son :
• Appuyer sur MUTE (Sourdine) de la
télécommande.
- OU Appuyer sur VOL+.
Remarque
Si le son est mis en sourdine, la couleur du
VOLUME affichée à l’écran devient rouge. Si le
son est mis en sourdine, la couleur du VOLUME
affichée à l’écran devient verte.
Réglage de l’image
Pour régler l’image :
1 Mettre le téléviseur en marche et appuyer sur
MENU pour afficher le menu principal.
Pour basculer entre deux canaux :
• Appuyer sur canal Précédent pour passer
du canal actuel au canal précédent.
Informations sur la numérotation des canaux aux États-Unis
• Le canal A TSC/PSIP utilise une numérotation
en deux parties qui comprend :
• un numéro de canal majeur
www.insignia-products.com
2 Appuyer sur ou pour sélectionner
PICTURE (Image).
31
Page 32

Téléviseur Insignia NS-F20TV
3 Appuyer sur ou pour accéder au menu
Picture (Image).
4 Appuyer sur ou pour sélectionner un
paramètre à modifier.
5 Appuyer sur ou pour régler le
paramètre.
Paramètre
Contrast
(Contraste)
Brightness
(Luminosité)
Color (Couleur) paler (plus pâle) deeper (plus
Tint (Teinte) purplish
Sharpness
(Netteté)
Appuyer sur Appuyer sur
weaker (plus
faible)
darker (plus
sombre)
(violacé)
softer (plus
douce)
Sélection du mode de l’image
Il existe trois modes de préréglages de l’image
(Standard, Dynamic et Soft) [Standard,
dynamique et doux] et un mode d’image
configurable par l’utilisateur (Personal).
Pour sélectionner le mode de l’image :
1 Appuyer sur PICTURE (Image) de la
télécommande.
2 Sélectionner l’un des paramètres suivants :
• STANDARD — Pour une image normale.
• DYNAMIC (Dynamique) — Pour une
image brillante et dynamique.
• SOFT(Doux) — Pour une image finement
détaillée.
• PERSONAL (Personnalisé) — Pour créer
le mode d’image souhaité.
Réglage de la taille de l'image
Il est possible de changer la taille de l’image
(format d’écran) en fonction du type de signal
vidéo ou des préférences personnelles. Ce
changement peut seulemen t être effectué en
mode TVN quand le type de signal vidéo est au
format 16:9.
Pour modifier la taille de l'image :
Appuyer sur ZOOM pour sélectionner la taille
d'image souhaitée (format d’écran). Il est
possible de sélectionner entre NORMAL et
ZOOM.
stronger (plus
intense)
lighter (plus
claire)
profonde)
greenish
(verdâtre)
sharper (plus
accentuée)
Fonctionnement de l’horloge
Pour accéder au menu de l’horloge :
1 Mettre le téléviseur en marche et appuyer sur
MENU pour afficher le menu principal.
2 Appuyer sur ou pour sélectionner
CLOCK (Horloge).
3 Appuyer sur ou pour accéder au menu
Clock (Horloge).
Configuration automatique de l’horloge
• Quand la fonction horloge automatique est
activée, l’heure est réglée automatiquement
à partir d’un signal numérique de canal.
Pour régler automatiquement l’horloge :
1 Accéder au menu Horloge.
2 Appuyer sur ou pour sélectionner
AUTO CLOCK (Horloge automatique).
3 Appuyer sur ou pour activer la fonction
Horloge automatique.
4 Appuyer sur ou pour sélectionner
ZONE (Fuseau horaire).
5 Appuyer sur ou pour sélectionner le
fuseau horaire souhaité.
6 Appuyer sur ou pour sélectionner DST
(Heure avancée), puis sur ou pour
activer ou désactiver l’heure avancée, selon
la zone de localisation.
Réglage manuel de l’horloge
• Si le réglage de l'heure en cours est erroné,
réinitialiser manuellement l'horloge.
• Si le téléviseur n'est plus alimenté, les
réglages de l'horloge sont effacés.
Pour régler l’horloge manuellement :
1 Accéder au menu Horloge.
32
www.insignia-products.com
Page 33

Téléviseur Insignia NS-F20TV
2 Appuyer sur ou pour sélectionner
AUTO CLOCK (Hor lo ge automatique).
3 Appuyer sur ou pour désactiver la
fonction Horloge automatique.
4 Appuyer sur ou pour sélectionner
CLOCK (Horloge).
5 Appuyer sur VOL+ pour sélectionner AM
(Heure du matin) ou PM (Heure de
l’après-midi).
6 Utiliser les touches numériques pour saisir
l’heure actuelle.
Mise sous tension automatique du téléviseur
• La fonction du temporisateur de mise sous
tension fonctionne seulement si l’heure
actuelle est réglée.
• Le téléviseur doit être en mode attente pour
activer le temporisateur de mise sous
tension.
• Si le téléviseur n'est plus alimenté, le réglage
du temporisateur est effacé.
• 180 minutes
• 240 minutes
Par exemple, pour mettre l’appareil hors tension
automatiquement au bout de 60 minutes.
Appuyer plusieurs fois sur SLEEP (Arrêt différé)
jusqu’à ce que l’écran affiche 60 MINUTES.
Pour annuler l’arrêt différé, appuyer plusieurs
fois sur SLEEP (Arrêt différé) jusqu'à ce que
l’écran affiche 0 MINUTE.
Modifications des paramètres du système
Pour modifier les paramètres du système :
1 Mettre le téléviseur en marche et appuyer sur
MENU pour afficher le menu principal.
2 Appuyer sur ou pour sélectionner
EXTRA (Autres fonctions).
3 Appuyer sur ou pour accéder au menu
EXTRA (Autres fonctions).
Pour la mise sous tension automatique du
téléviseur :
1 Accéder au menu Horloge.
2 Appuyer sur ou pour sélectionner ON
TIMER (Temporisateur de mise sous
tension).
3 Appuyer sur VOL+ pour sélectionner AM
(Heure du matin) ou PM (Heure de
l’après-midi).
4 Utiliser les touches numériques pour saisir
l'heure à laquelle le téléviseur est mis sous
tension.
5 Appuyer sur Power (Marche/Arrêt) pour
mettre le téléviseur en mode Standby
(Attente). Le téléviseur se met
automatiquement en marche à l’heure
prédéterminée.
Mise hors tension automatique du téléviseur
Appuyer sur SLEEP (Arrêt différé) de la
télécommande pour régler l’arrêt différé. La
durée de l’arrêt différé change à chaque
pression de cette touche de la façon suivante :
• 0 minute
• 5 minutes
• 10 minutes
• ...
Sélection de la langue du menu OSD.
Pour changer la langue du menu OSD :
1 Accéder au menu EXTRA (Autres fonctions).
2 Appuyer sur ou pour sélectionner
MENU LANGUAGE (Langue des menus).
3 Appuyer sur ou pour choisir une langue
de menu différente.
Sélection d’une langue audio
La TVN peut transmettre simultanément de
nombreuses pistes audio (par exemple des
traductions simultanées du programme en
plusieurs langues étrangères). La disponibilité
de ces pistes audio optionnelles dépend du
programme.
Pour sélectionner une langue audio :
1 Accéder au menu EXTRA (Autres fonctions).
2 Appuyer sur ou pour sélectionner
AUDIO LANGUAGE (Langue audio).
3 Appuyer sur ou pour choisir une langue
audio différente.
Réglage des Sous-titres codés
Activation et désactivation des Sous-titre s codés (STC)
Pour activer ou désactiver les STC :
1 Accéder au menu EXTRA (Autres fonctions).
www.insignia-products.com
33
Page 34

Téléviseur Insignia NS-F20TV
2 Appuyer sur ou pour sélectionner
CLOSED CAPTION (Sous-titres codés).
3 Appuyer sur ou pour accéder au menu
CLOSED CAPTION (STC).
4 Appuyer sur ou pour sélectionner CC
DISPLAY (Affichage des STC).
5 Appuyer sur ou pour sélectionner une
des options suivantes :
• ON (Activé) — Affiche les STC en
permanence.
• CC MUTE (STC en mode sourdine) —
Affiche les STC seulement quand le son
est mis en sourdine.
• OFF (Désactivé) — Désactive les STC.
Conseil
Il est possible d’appuyer sur CCD (STC) pour
sélectionner CCD ON (STC activés), CCD OFF
(STC désactivés) ou CCD MUTE (STC en mode
sourdine).
4 Mettre CC TYPE (Type de STC) en
surbrillance puis appuyer sur ou pour
choisir le type de STC.
Personnalisation des Sous-titres codés numériques
Il est possible de personnaliser les STC
numériques qui apparaissent à l'écran.
Pour personna liser les STC numériques :
1 Naviguer vers le menu CLOSED CAPTION
(STC), mettre CC SETTING (Configuration
des STC) en surbrillance puis appuyer sur
ou pour accéder au menu.
2 Appuyer sur ou pour mettre CC MODE
(Mode de STC) en surbrillance , puis sur
ou pour choisir CUSTOMER
(Personnalisé).
Pour annuler les STC personnalisés,
sélectionner BROADCAST (Émission) et les
STC seront affichés tels quels par l’émission.
3 Après avoir sélectionné CUSTOMER
(Personnalisé), appuyer sur pour mettre
CC CUSTOMER (STC personnalisés) en
surbrillance , puis sur ou pour accéder
au menu.
Sélection du type de sous-titres codés
Le texte et les sous-titres, s'ils sont fournis par
l'émetteur, sont disponibles à la fois pour les
canaux numériques et analogiques.
Sélectionner un type de sous-titre codé
permettant d'afficher les informations de
sous-titres codés. Les STC analogiques
affichent des informations à l'écran
(généralement le dialogue de l’émission). Le
texte des modes numériques affiche des
informations, généralement en partie inférieure
de l'écran, qui sont utilisées pour un service de
données (généralement sans rapport avec
l’émission).
Pour sélectionner le type de sous-titres
codés :
1 Accéder au menu CLOSED CAPTION
(STC).
2 Appuyer sur ou pour sélectionner CC
SETTING (Configuration des STC).
3 Appuyer sur ou pour accéder au menu
CC SETTING (Configuration des STC).
4 Dans le menu, appuyer sur ou pour
sélectionner l’option devant être modifié, puis
sur ou pour personnaliser le réglage.
Sélectionner OTHERS (Autres) et appuyer
sur ou pour accéder au menu suivant et
personnaliser d'autres réglages.
Il est possible de modifier les réglages
suivants :
CC STYLE (Style de STC) — Permet de
définir le style des mots.
CC SIZE (Taille des STC) — Permet de
définir la taille des mots.
CC COLOR (Couleur des STC) — Permet de
définir la couleur du texte.
34
www.insignia-products.com
Page 35

Téléviseur Insignia NS-F20TV
BK COLOR (Couleur de l’arrière-plan) —
Permet de définir la couleur de l’arrière-plan.
CC OPACITY (Transparence des STC) —
Permet de définir la transparence de la
couleur du texte.
BK OPACITY (Transparence de
l’arrière-plan) — Permet de définir la
transparence de la couleur de l'arrière-plan.
EDGE COLOR (Couleur de la bordure) —
Permet de définir une couleur pour les
bordures.
EDGE TYPE (Type de bordure) — Permet de
définir un type de bordure.
5 Appuyer sur EXIT (Quitter) pour revenir en
mode TV ou sur MENU pour revenir au menu
précédent.
Utilisation du contrôle parental
Le contrôle parental permet aux parents
d’empêcher leurs enfants d'accéder à des
programmes télévisés inappropriés. La fonction
contrôle parental vérifie les classifications de la
programmation (sauf les journaux télévisés, les
émissions sportives, les films non édités sur les
chaînes premium et les signaux du Système de
radiodiffusion d’urgence) puis refuse l'accès à
l'émission si sa classification atteint les
limitations sélectionnées.
Pour accéder au menu P.LOCK (Contrôle
parental) :
1 Mettre le téléviseur en marche et appuyer sur
MENU pour afficher le menu principal.
2 Appuyer sur ou pour mettre CHANGE
PASSWORD (Modifier le mot de passe) en
surbrillance puis sur ou pour accéder
au menu.
3 Appuyer sur ou pour mettre NEW
PASSWORD (Nouveau mot de passe) en
surbrillance puis utiliser les touches
numériques pour saisir un nouveau mot de
passe.
4 Saisir de nouveau le mot de passe pour
confirmation. Le nouveau mot de passe a été
créé.
Précautions
Prendre note du mot de passe et en conserver
trace pour référence ultérieure.
2 Appuyer sur ou pour sélectionner
P.LOCK (Co ntrôl e parenta l) .
3 Appuyer sur ou pour accéder au menu
P.LOCK (Contrôle parental).
4 Saisir le mot de passe pour accéder au menu
Contrôle parental. Le mot de passe initial est
0000 mais il peut être modifié à tout moment.
Configuration du mot de passe initial pour le Contrôle parental
Pour utiliser la fonction de contrôle parental, il
faut tout d’abord définir le mot de passe.
Pour configurer le mot de passe du Contrôle
parental :
1 Utiliser le mot de passe pour accéder au
menu Contrôle parental. Le mot de passe par
défaut est 0000.
Réinitialisation d’un mot de passe oublié
Si le mot de passe est oublié et le menu du
Contrôle pare ntal es t inaccess ible , il e st possib le
de le réinitialiser en le modifiant de nouveau.
Pour réinitialiser un mot de passe oublié :
1 Mettre le téléviseur en marche et appuyer sur
MENU pour afficher le menu principal.
2 Appuyer sur ou pour sélectionner
P.LOCK (Contrôle parental).
3 Appuyer sur ou pour accéder au menu
P.LOCK (Contrôl e par enta l).
4 Saisir le mot de passe clé pour accéder au
menu Contrôle parental. Le mot de passe clé
est 1397.
Après avoir saisi le mot de passe clé, le
caractère SET CODE (Réglage du code)
apparaît.
www.insignia-products.com
35
Page 36

Téléviseur Insignia NS-F20TV
5 Saisir un nouveau mot de passe (quatre
chiffres). Le caractère SET CODE (Réglage
du code) se remet à P.LOCK (Contrôle
parental), l’ancien mot de passe est effacé et
un nouveau a été crée.
Remarque
Le mot de passe clé 1397 fonctionnera toujours
pour réinitialiser un mot de passe.
Activation du contrôle parental
Pour activer le schéma d’interdiction qui a été
défini, il faut régler PARENTAL LOCK (Contrôle
parental) sur ON (Activ é).
Pour activer le contrôle parental :
1 Utiliser le mot de passe pour accéder au
menu Contrôle parental.
2 Mettre PARENT AL LOCK (Contrôle parental)
en surbrillance et appuyer sur ou pour
accéder au menu.
3 Mettre RATINGS LOCKS (Contrôle des
classificati ons) en surbrill ance et appuy er su r
ou pour accéder au menu RATINGS
LOCKS .
4 Mettre MPAA RATING (Class if ic ati on MPAA)
en surbrillance et appuyer sur ou pour
accéder au sous-menu MPAA RATING .
5 Appuyer sur ou pour choisir la
classification, puis sur ou pour interdire
ou autoriser la classification sélectionnée.
3 Mettre LOCK (V errouillage) en surbrillance et
appuyer sur ou pour régler l'option sur
ON (Activé) afin d'activer le schéma
d’interdiction.
Remarque
Pour désactiver l’interdiction, régler LOCK
(Verrouillage) sur OFF (Désactivé).
Définition des classifications MPAA
Pour configurer les classifications MPAA :
1 Utiliser le mot de passe pour accéder au
menu Contrôle parental.
2 Mettre PARENT AL LOCK (Contrôle parental)
en surbrillance et appuyer sur ou pour
accéder au menu.
Classification des films MPAA :
•G — Tout public
• PG — Surveillance parentale suggérée
• PG-13 — Interdit aux moins de 13 ans
• R — 18 ans et plus. Surveillance
parentale suggérée pour les enfants de
moins de 17 ans
• NC-17 — Interdit aux moins de 18 ans
• X — Adultes seulement
Exemple : Si le niveau de classification est
réglé sur PG-13 : Les films classifiés G et PG
sont accessibles et ceux classifiés PG-13, R,
NC-17 et X sont bloqués.
6 Appuyer sur EXIT (Quitter) pour revenir en
mode TV ou sur MENU pour revenir au menu
précédent.
Configuration des classifications TV
La classification TV se compose de deux parties
: des critères généraux (fondés sur l'âge) et des
critères détaillés (fondés sur le contenu).
36
Pour configurer les classifications TV :
1 Utiliser le mot de passe pour accéder a u
menu Contrôle parental.
www.insignia-products.com
Page 37

Téléviseur Insignia NS-F20TV
2 Mettre PARENT AL LOCK (Contrôle parental)
en surbrillance et appuyer sur ou pour
accéder au menu.
3 Mettre RATINGS LOCKS (Contrôle des
classifications) en surbrillance et appuyer sur
ou pour accéder au menu RATINGS
LOCKS .
4 Mettre TV RATIN G (Classification TV) en
surbrillance et appuyer sur ou pour
accéder au sous-menu TV RATING .
• V : Violence — s’applique à TV-PG, TV -14
et TV-MA
• S : Sex scenes (scènes à caractère
sexuel) — s’applique à TV-PG, TV-14 et
TV-MA
• L : Adult language (Vulgarités) —
s’applique à TV-PG, TV-14 et TV-MA
• D : Sexual dialogue (dialogue à caractère
sexuel) — s’applique à TV-PG et TV-14
7 Appuyer sur EXIT (Quitter) pour revenir en
mode TV ou sur MENU pour revenir au menu
précédent.
Configuration des classifications pour le Canada anglophone
Pour configurer les classifications du
Canada anglophone :
1 Utiliser le mot de passe pour accéder a u
menu Contrôle parental.
2 Mettre PARENTAL LOCK (Contrôle parental)
en surbrillance et appuyer sur ou pour
accéder au menu.
5 Appuyer sur ou pour choisir la
classification, puis sur ou pour bloquer
ou débloquer la classification sélectionnée.
Classification des programmes TV :
• TV-Y — Tous les enfants
• TV-Y7 — Interdit aux moins de 7 ans
• TV-G — Tout public
• TV-PG — Surveillance parentale
suggérée
• TV-14 — Interdit aux moins de 14 ans
• TV-MA — Adultes seulement
6 Si la classification est relative au contenu, la
mettre en surbrillance et appuyer sur ou
pour accéder au menu suivant. Appuyer
sur ou pour choisir la classification, puis
sur ou pour bloquer ou débloquer la
classification sélectionnée.
Classifications en fonction du contenu :
• FV : Fantasy violence (Violence fictive) —
s’applique seulement à TV-Y7
3 Mettre RATINGS LOCKS (Contrôle des
classificati ons) en surbrill ance et appuy er su r
ou pour accéder au menu RATINGS
LOCKS .
4 Mettre CANADA ENGLISH (Canada
anglophone) en surbrillance et appuyer sur
ou pour accéder au sous-menu
CANADA ENGLISH .
www.insignia-products.com
37
Page 38

Téléviseur Insignia NS-F20TV
5 Appuyer sur ou pour choisir la
classification, puis sur ou pour bloquer
ou débloquer la classification sélectionnée.
Classifications du Canada anglophone :
•C — Enfants.
• C8+ — Enfants de 8 ans et plus.
• G — Programmation générale destinée à
tous les publics.
• PG – Surveillance parentale suggérée.
• 14+ — Spectateurs de 14 ans et plus.
• 18+ — Adultes seulemen t.
6 Appuyer sur EXIT (Quitter) pour revenir en
mode TV ou sur MENU pour revenir au menu
précédent.
Configuration des classifications du Canada francophone
Pour configurer les classifications du
Canada francophone :
1 Utiliser le mot de passe pour accéder au
menu Contrôle parental.
2 Mettre PARENT AL LOCK (Contrôle parental)
en surbrillance et appuyer sur ou pour
accéder au menu.
4 Mettre CANADA FRENCH (Canada
francophone) en surbrillance et appuyer sur
ou pour accéder au sous-menu
CANADA FRENCH .
5 Appuyer sur ou pour choisir la
classification, puis sur ou pour bloquer
ou débloquer la classification sélec ti onn ée.
Classifications du Canada francophone :
• G – Enfants.
• 8 ans+ — Enfants de 8 ans et plus.
• 13 ans+ — Spectateurs de 13 ans et plus.
• 16 ans+ — Spectateurs de 16 ans et plus.
• 18 ans+ — Adultes seulement.
6 Appuyer sur EXIT (Quitter) pour revenir en
mode TV ou sur MENU pour revenir au menu
précédent.
Configuration des classifications sur les critères RRT5
3 Mettre RATINGS LOCKS (Contrôle des
classifications) en surbrillance et appuyer sur
ou pour accéder au menu RATINGS
LOCKS .
Si l’émission émise utilise la classification selon
les critères RRT5 (Rating Region Table-Region
5) conformément aux règles édictées par le
FCC, cette classification peut être téléchargée
sur ce téléviseur et utilisée pour les contrôles
parentaux.
Pour configurer les classifications sur les
critères RRT5 :
1 Utiliser le mot de passe pour accéder a u
menu Contrôle parental.
2 Mettre PARENTAL LOCK (Contrôle parental)
en surbrillance et appuyer sur ou pour
accéder au menu.
38
www.insignia-products.com
Page 39

Téléviseur Insignia NS-F20TV
3 Mettre D.L. RATINGS (Classifications
téléchargeables) en surbrillance et appuyer
sur ou pour accéder au menu D.L.
RATINGS.
4 Appuyer sur ou pour sélectionner
l'option souhaitée, puis sur ou pour
accéder au menu.
5 Dans le menu, appuyer sur ou pour
choisir la classification, puis sur ou pour
bloquer ou débloquer la classification
sélectionnée. Appuyer sur ENTER (Entrée)
pour faire défiler les pages s'il existe plus
d'une page menu.
6 Appuyer sur EXIT (Quitter) pour revenir en
mode TV ou sur MENU pour revenir au menu
précédent.
Entretien
Afin de réduire les risques d’incendie et de choc
électrique, débrancher l’appareil de la source
d’alimentation CA avant de procéder au
nettoyage. Nettoyer la surface extérieure du
téléviseur avec un chiffon à poussière selon le
besoin. Prendre des précautions pour nettoyer
et essuyer les pièces en plastique. Un savon
doux et un chiffon doux et humide peuvent être
utilisés.
Problèmes et solutions
Anomalie Cause é ventuelle Solu t ion possible
Pas
d’alimentation
Le cordon
d’alimentation CA n’est
pas connecté.
Brancher le cordon
d’alimentation CA sur
une prise secteur CA.
Anomalie Cause éventuelle Solution possible
Pas d’image ou
image médiocre
L ’image tremble
ou dérive
Pas de
réception de
réseau câblé.
Pas de
réception
au-delà du
canal 13.
Pas de son ou
son médiocre
Le téléviseur
s’éteint
Les sous-titres
codés ne
s’affichent pas
La chaîne de télévision
a des problèmes.
Le contrôle de l’image
n’est pas réglé.
Interférences locales
possibles.
Le connecteur de
l’antenne/du réseau
câblé n'est pas
branché.
La station de télévision
a des problèmes.
La chaîne de télévision
par câble est cryptée .
Interférences locales
possibles.
Le câble n’est pas
connecté.
Réception
hertzienne/T V câ b l é e
réglée sur Réception
hertzienne.
Service de télévision
par câble interrompu.
Réception
hertzienne/T V câ b l é e
réglée sur Réception
hertzienne.
La chaîne de télévision
a des problèmes.
La touche MUTE
(Sourdine) est
enfoncée.
Interférences locales
possibles.
Le connecteur de
l’antenne/du réseau
câblé n'est pas
branché.
Le volume est réglé au
minimum.
L ’ arrêt différé est activé . Régler l’arrê t d ifféré sur
Le signal TV est faible. Vérifier le réseau câblé
La station de télévision
a des problèmes ou le
programme diffus é n'a
pas de sous-titres
codés.
Les sous-titres codés
ne sont pas activés.
Essayer un autre canal.
Vérifier les réglages du
contrôle de l’image.
Vérifier la source de
brouillage de la
réception.
Vérifier la connexion au
réseau câblé ou à
l'antenne VHF/UHF.
Essayer un autre canal.
Un décodeur doit êt re
utilisé pour recevoir
cette chaî n e.
Vérifier la source de
brouillage de la
réception.
Vérifier les connexions
de tous les câbles.
Régler Réception
hertzienne/T V câ b l é e
sur TV câblée.
Contacter la société de
télévision par câble.
Régler Réception
hertzienne/T V câ b l é e
sur TV câblée.
Essayer un autre canal.
Appuyer de nouveau
sur MUTE (Sourdine).
Vérifier la source de
brouillage de la
réception.
Vérifier la connexion du
réseau câblé à
l'antenne VHF/UHF.
Augmenter le volume.
« OFF » (Désactivé).
ou l'antenne VHF/UHF.
Essayer un autre canal.
Appuyer sur CCD.
www.insignia-products.com
39
Page 40

Téléviseur Insignia NS-F20TV
Anomalie Cause é ventuelle Solu t ion possible
La
télécommande
ne fonctionne
pas
Le contrôle
parental ne
fonctionne pas
correctement.
La télécommande n’est
pas orientée ver s le
capteur.
La distance est trop
grande ou l'éclairage de
la pièce est excessif.
Un obstacle est placé
sur la trajectoire du
rayon.
Les piles sont faibles. Remplacer les piles.
Les piles ne sont pas
correctement insérées.
Le contrôle parental est
désactivé.
Journaux ou
évènements sportifs en
cours de diffusion.
Les classifications ne
sont pas réglées.
Orienter la
télécommande vers le
capteur de
télécommande.
Utiliser la
télécommande dans un
rayon de 15 pieds (4,5
m) ou réduire le niveau
d’éclairage de la pièce.
Dégager la trajectoire
du rayon.
Réinsérer les piles.
Régler le contrôle
parental sur « ON »
(Activé)
Le contrôle par e nta l ne
fonctionne pas avec les
journaux télévi sés ou
les événements
sportifs.
Régler les
classifications.
Perturbations de la réception
La plupart des types de perturbation du
téléviseur peuvent être remédiés en réglant la
hauteur et la position de l’antenne VHF/UHF.
Des antennes externes sont recommandées
pour obtenir les meilleurs résultats si le câble ou
la TV par satellite ne sont pas utilisés. Les types
de défauts d’affichage les plus courants sur un
téléviseur sont illustrés ci-dessous. Si un de ces
symboles s’affiche lorsque le téléviseur est
connecté au réseau câblé, la perturbation peut
être provoquée par le câblodistributeur local.
ALLUMAGE : Des points noirs ou
des stries horizontales peuvent
apparaître, l’image peut scintiller ou
dériver. Habituellement causé par
les interférenc es des circuits
d’allumage de véhicule, d’éclairage
par néon, des perceuses électriques
et d’autres appareils élect riques.
FANTÔMES : Les fantômes sont
causés par un signal de télévision
qui suit deux trajectoires. Une est la
trajectoire directe et l’autre est
réfléchie depuis de s bâ tim e n t s, des
collines ou d’aut r es objets élevés.
La modificatio n de la direction ou de
l’emplacement de l’antenne peut
améliorer la réception.
NEIGE : Si le récepteur est placé
dans la zone de décrochage d’une
chaîne de télévi sion où le signal est
faible, l’image peut être déparée par
l’apparence de petits p oints.
Lorsque le signal est très faible, il
peut être nécessaire d’installer une
antenne externe pour améliorer
l’image.
BROUILLAGE RADIOÉLECTR IQUE :
Cette interférence produit des
ondulations mouvantes ou des
stries diagonales et, dan s certains
cas, cause une perte de contraste
de l’image.
VARIATION DE LA TAILLE DE
L ’IMA GE : Une lég ère var iation de la
taille de l’imag e es t no rm al e lors d u
réglage du CONTRASTE et de la
LUMINOSITÉ.
Spécifications
La conception et les spécifications sont sujettes
à modifications sans avis préalable.
Alimentation 120 V CA, 60 Hz
Consommation 75 W
Dimensions (L x H x P) 23,2 po x 18 po x 18,7 po
(590 mm x 457 mm x 475 mm)
Poids 48,5 lb (22 kg)
Tube cathodique 20 po (508 mm)
Sortie audio 3 W x 2
Standard TV NTSC-M, ATSC
Canaux accessibles VHF 2 à 13, UHF 14 à 69, CATV 1 à 125,
Impédance de l’antenne 75 ohms
Accessoire Télécommande
CADTV 1 à 135, TVN 2 à 69
Avis juridiques
FCC article 15
Cet appareil est conforme à l’article 15 du règlement de la
FCC. Son utilisation est soumise aux deux conditions
suivantes : (1) Cet appareil ne doit pas provoquer
d’interférences dangereuses et (2) il doit accepter toute
interférence reçue, y compris celles risquant d’engendrer un
fonctionnement indésirable.
Cet équipement a été mis à l’essai et déclaré conforme aux
limites prévues pour un appareil numérique de classe B,
définies dans la section 15 de la réglementation FCC. Ces
limites ont été établies pour fournir une protection
raisonnable contre les interférences indésirables lors d’une
installation résidentielle. Cet équipement génère, utilise et
diffuse des ondes radio et, s’il n’est pas installé et utilisé
conformément aux instructions dont il fait l’objet, il peut
provoquer des interférences indésirables avec les
communications radio. Cependant, il n'est pas possible de
garantir qu’aucune interférence ne se produira pour une
installation particulière. Si cet équipement produit des
interférences importantes lors de réceptions radio ou
télévisées, qui peuvent être détectées en éteignant puis en
rallumant l’appareil, essayer de corriger l’interférence au
moyen de l’une ou de plusieurs des mesures suivantes :
• Réorienter ou déplacer l’antenne réceptrice.
• Augmenter la distance entre l’équipement et le
récepteur.
• Brancher l’équipement sur la prise secteur d’un circuit
différent de celui auquel le récepteur est relié.
• Contacter le revendeur ou un technicien qualifié pour
toute assistance.
40
www.insignia-products.com
Page 41

Téléviseur Insignia NS-F20TV
Avertissement de la FCC
Tous changements ou modifications qui ne seraient pas
expressément approuvés par les responsables de
l’application des règles FCC pourraient rendre nul le droit de
l’utilisateur d’utiliser cet équipement.
Certification relative à la sécurité du DHHS et de la FDA
Ce téléviseur a été fabriqué et testé pour satisfaire aux
normes de sécurité de la FCC, aux exigences et règles de
conformité du Ministère de la santé des États-Unis
(U.S. Dépar tement of Health and Human Ser v ices), ainsi
qu’aux normes d’irradiation 21 CFR, section de chapitre J de
la FDA.
Déclaration NMB-003 du Canada
Cet appareil numérique de la classe B est conforme à la
norme NMB-003 du Canada.
Déclaration RSS 310
Pour éviter que les interférences radio éventuelles affectent
d’autres utilisateurs, le type d’antenne et son gain doivent
être choisis afin que la puissance isotrope rayonnée
équivalente (p.i.r.e.) ne soit pas supérieure aux limites
permises, permettant des communications parfaites.
Droits d’auteurs
© 2007 Insignia. Insignia et le logo Insignia sont des
marques de commerce de Best Buy Enterprise Services,
Inc. Les autres noms de marques et de produits mentionnés
sont des marques de commerce ou des marques déposées
de leurs propriétaires respectifs. Les spécifications et
caractéristiques sont susceptibles d’être modifiées sans
préavis.
Pour l’assistance technique, appeler le (877) 467-4289.
www.insignia-products.com
41
Page 42

Téléviseur Insignia NS-F20TV
42
www.insignia-products.com
Page 43

Téléviseur Insignia NS-F20TV
Garantie
Garantie limitée d’un an
Insignia Products (« Insignia ») garantit au premier acheteur
de ce NS-F20TV neuf (« Produit »), qu’il est exempt de vices
de fabrication et de main-d’œuvre à l’origine, pour une
période d’un (1) an à partir de la date d’achat du Produit («
Période de garantie »). Ce Produit doit avoir été acheté chez
un revendeur agréé des produits de la marque Insignia et
emballé avec cette déclaration de garant ie. Cette gar antie ne
couvre pas les Produits remis à neuf. Les conditions de la
présente garantie s’appliquent à tout Produit pour lequel
Insignia est notifié pendant la Période de garantie, d’un vice
couvert par cette garantie qui nécessite une réparation.
Quelle est la durée de la couverture?
La Période de garantie dure 1 an (365 jours) à compter de la
date d’achat de ce Produit. La date d’achat est imprimée sur
le reçu fourni avec le Produit.
Que couvre cette garantie?
Pendant la Période de garantie, si un vice de matériau ou de
main-d’œuvre d'origine est détecté sur le Produit par un
service de réparation agréé par Insignia ou le personnel du
magasin, Insignia (à sa seule discrétion) : (1) réparera le
Produit en utilisant des pièces détachées neuves ou remises
à neuf; ou (2) remplacera le Produit par un produit ou des
pièces neuves ou remises à neuf de qualité comparable. Les
produits et pièces remplacés au titre de cette garantie
deviennent la propriété d’Insignia et ne sont pas retournés à
l’acheteur. Si les Produits ou pièces nécessitent une
réparation après l’expiration de la Période de garantie,
l’acheteur devra payer tous les frais de main-d’œuvre et les
pièces. Cette garantie reste en vigueur tant que l’acheteur
reste propriétaire du Produit Insignia pendant la Période de
garantie. La garantie prend fin si le Produit est revendu ou
transféré d’une quelconque façon que ce soit à tout autre
propriétaire.
Comment obtenir une réparation sous garantie?
Si le Produit a été acheté chez un détaillant, le rapporter
accompagné du reçu original chez ce détaillant. Prendre
soin de remettre le Produit dans son emballage d’origine ou
dans un emballage qui procure la même qualité de
protection que celui d’origine. Si le Produit a été acheté en
ligne, l’expédier accompagné du reçu original à l’adresse
indiquée sur le site Web. Prendre soin de remettre le Produit
dans son emballage d’origine ou dans un emballage qui
procure la même qualité de protection que celui d’origine.
Où cette garantie s’applique-t-elle?
Cette garantie ne s’applique qu’à l’acheteur original du
Produit aux États-Unis et au Canada.
Ce qui n’est pas couvert par cette garantie limitée
La présente garantie ne couvre pas :
• la formation du client;
• l'installation;
• les réglages de configuration;
• les dommages esthétiques;
• les dommages résultants de catastrophes naturelles
telles que la foudre;
• les accidents;
• une utilisation inadaptée;
• une manipulation abusive;
• la négligence;
• une utilisation commerciale;
• la modification de tout ou partie du Produit, y compris
l’antenne.
La présente garantie ne couvre pas non plus :
• les dommages ayant pour origine une utilisation ou une
maintenance défectueuse;
• la connexion à une source électrique dont la tension est
inadéquate;
• toute réparation effectuée par quiconque autre qu’un
service de réparation agréé par Insignia pour la
réparation du Produit;
• les Produits vendus en l’état ou hors service;
• les consommables tels que les fusibles ou les piles;
• les produits dont le numéro de série usine a été altéré
ou enlevé.
LA RÉPARATION OU LE REMPLACEMENT, TELS
QU’OFFERTS PAR LA PRÉSENTE GARANTIE,
CONSTITUENT LE SEUL RECOURS DE L’ACHETEUR.
INSIGNIA NE SAURAIT ÊTRE TENU POUR
RESPONSABLE DE DOMMAGES ACCESSOIRES OU
CONSÉCUTIFS, RÉSULTANT DE L’INEXÉCUTION D'UNE
GARANTIE EXPRESSE OU IMPLICITE SUR CE PR ODUIT,
Y COMPRIS, SANS S’Y LIMITER , LA PE RTE DE
DONNÉES, L’IMPOSSIBILITÉ D’UTILISER LE PRODUIT,
L’INTERRUPTION D’ACTIVITÉ OU LA PERTE DE
PROFITS. INSIGNIA PRODUCTS N’OCTROIE AUCUNE
AUTRE GARANTIE EXPRESSE RELATIVE À CE
PRODUIT; TOUTES LES GARANTIES EXPRESSES OU
IMPLICITES POUR CE PRODUIT, Y COMPRIS MAIS SANS
LIMITATION, TOUTE GARANTIE DE QUALITÉ
MARCHANDE, D'ADÉQUATION À UN BUT PARTICULIER,
SONT LIMITÉES À LA PÉRIODE DE GARANTIE
APPLICABLE TELLE QUE DÉC R I TE CI-D ESSUS ET
AUCUNE GARANTIE EXPRESSE OU IMPLICITE NE
S’APPLIQUERA APRÈS LA PÉRIODE DE GARANTIE.
CERTAINS ÉTATS ET PROVINCES NE RECONNAISSENT
PAS LES LIMITATIONS DE LA DURÉE DE VALIDITÉ DES
GARANTIES IMPLICITES. PAR CONSÉQUENT, LES
LIMITATI O N S SUSMENTIONNÉES PE U VENT NE PAS
S'APPLIQUER À L’ACHETEUR ORIGINAL. LA PRÉSENTE
GARANTIE DONNE À L'ACHETEUR DES GARANTIES
JURIDIQUES SPÉCIFIQUES; IL PEUT A USSI BÉNÉFICIER
D'AUTRES GARANTIES QUI VARIENT D'UN ÉTAT OU
D'UNE PROVINCE À L'AUTRE.
www.insignia-products.com
43
Page 44

Televisor Insignia NS-F20TV
Televisor Insignia
NS-F20TV
Contenido
Introducción . . . . . . . . . . . . . . . . . . . . . . . . . . . . .44
Información de seguridad . . . . . . . . . . . . . . . . . .44
Características. . . . . . . . . . . . . . . . . . . . . . . . . . .46
Preparación de su televisor . . . . . . . . . . . . . . . . .48
Uso de su televisor . . . . . . . . . . . . . . . . . . . . . . .50
Mantenimiento . . . . . . . . . . . . . . . . . . . . . . . . . . .61
Localización y corrección de fallas . . . . . . . . . . .61
Especificaciones . . . . . . . . . . . . . . . . . . . . . . . . .62
Garantía. . . . . . . . . . . . . . . . . . . . . . . . . . . . . . . .65
Introducción
Felicitaciones por su compra de un producto de
alta calidad de Insignia. Su NS-F20TV
representa el más moderno diseño de
televisores y está concebido para brindar un
rendimiento confiable y sin problemas.
Información de seguridad
Advertencia
Para reducir el riesgo de incendio o choque eléctrico, no
exponga su televisor a la lluvia o humedad.
Advertencia
Para mantener la seguridad, reemplace los componentes
esenciales de seguridad sólo con las piezas recom endadas
por el fabricante (consulte la documentación sobre
reparaciones).
Advertencia de choque eléctrico
CUIDADO
Riesgo de choque
eléctrico
No abra la unidad
Advertencia
Para reducir el riesgo de choque eléctrico, no retire la cubierta
o la parte posterior. No existen partes reparables por el
usuario en el interior. Para realizar reparaciones, acuda al
personal de servicio calificado.
eléctrico para las personas.
Medidas de seguridad importantes
• Lea estas instrucciones.
• Guarde estas instrucciones para un uso
• Siga todas las advertencias y las
Este símbolo de relámpago que termina en punta
de flecha y se encuentra dentro de un triángulo
equilátero tiene por finalidad alertar al usuario de
la presencia de voltaje peligroso sin aislamiento en
el interior del televisor que podría tener potencia
suficiente para constituir riesgo de choque
El signo de admiración que se encuentra dentro de
un triángulo equilátero tiene por finalidad alertar al
usuario de la presencia de importantes
instrucciones de operación y mantenimiento
(servicio) en la literatura que se incluye con el
televisor.
futuro.
instrucciones.
• Para evitar peligros, use sólo los accesorios
recomendados por el fabricante de su
televisor.
• No use su televisor cerca del agua, por
ejemplo cerca de una bañera o fregadero, o
cerca de una piscina. No exponga su
televisor al goteo o salpique y no coloque
objetos llenos de líquidos (tal cómo vasijas)
sobre su televisor.
• Use un paño seco para limpiar. No use
productos de limpieza líquidos o en aerosol.
• No bloquee ninguna abertura de ventilación.
Instale su televisor de acuerdo a las
instrucciones del fabricante.
• No instale la unidad cerca de fuentes de
calor tales como radiadores, estufas u otros
aparatos (por ejemplo amplificadores) que
produzcan calor.
• No coloque su televisor
en un carro, base, o
mesa inestable. Su
televisor puede caerse,
causando daño grave a
un niño o adulto, y
daños graves a su
televisor. Use su
televisor solo con un
carro, base, trípode,
soporte o mesa que se venda con su
televisor.
• Nunca intente mover el televisor a menos
que el cable de alimentación de CA se ha
desconectado.
• Las ranuras y aberturas en los lados, la parte
posterior e inferior se proveen para
ventilación, para asegurar la operación
confiable de su televisor, y para protegerlo
contra el sobrecalentamie nto.
• Estas aberturas no se deben bloquear ni
cubrir. Las aberturas nunca se deben
bloquear si se coloca su televisor en una
cama, un sofá, una alfombra u otra superficie
suave. Su televisor nunca se debe colocar
cerca o sobre un radiador o calefactor.
• Su televisor no se debe colocar en una
instalación integrada, tal como en un librero,
a menos que se provea una ventilación
apropiada.
• No anule el propósito de seguridad del
enchufe con polarización o con conexión a
tierra. Un enchufe polarizado tiene dos
espigas una más ancha que la otra. Un
enchufe del tipo de conexión a tierra tiene
dos espigas y una tercera clavija de tierra. La
espiga ancha o tercera clavija se
proporcionan para su seguridad. Si el
enchufe proporcionado no entra en el
tomacorriente, consulte con un electricista
para reemplazar el tomacorr i ent e obso leto.
• Su televisor debe funcionar únicamente con
el tipo de fuente de energía indicada en la
etiqueta de marca. Si no esta seguro de la
alimentación eléctrica suministrada en su
casa, consulte con su compañía de energía
local.
• No permita que nada se coloque sobre el
cable de alimentación, y no coloque su
televisor donde el cable pueda ser pisado.
44
www.insignia-products.com
Page 45

Televisor Insignia NS-F20TV
• Si una antena exterior o un sistema de cable
esta conectado a su televisor, verifique que
la antena o el sistema de cable esta
conectado a tierra, para proveer una
protección contra sobrevoltajes y la
acumulación de cargas estáticas. El artículo
810 del código nacional eléctrico,
ANSI/NFPA 70-19 84 propor cio na
información con respecto a la conexión a
tierra del poste y la estructura de soporte, la
conexión a tierra del alambre principal de
una unidad de descarga de antena, el
tamaño de los conductores de la conexión a
tierra y la conexión del electrodo de conexión
a tierra.
7
6
5
4
3
1
Referencia
1 Equipo de servicio eléctrico
2 Sistemas de electrodos de
3 Abrazadera de tierra
4 Conectores de conexión a
5 Unidad de descarga de antena
6 Abrazadera de tierra
7 Cable conductor de entrada de
Componente de conexión
a tierra
tierra para el servicio de
alimentación eléctrica
(NEC Art. 250, Parte H)
tierra (NEC Sección 810-21)
(NEC Sección 810-20)
antena
2
• Como cable de tierra use un cable de
cobre No. 10 AWG (5.3 mm
aluminio No. 8 AWG (8.4 mm
2
), uno de
2
) o uno de
bronce o de acero con revestimiento de
cobre No. 17 AWG (1.0 mm
2
) o más
grande.
• Asegure a la casa los cables conductores
de entrada de antena y de conexión a
tierra usando aisladores separadores
espaciados con 4 a 6 pies (1.22 - 1.83 m)
de separación.
• Monte la unidad de descarga de antena
tan cerca como sea posible al lugar
donde entra a la casa el conductor de
entrada.
• Use un cable de empalme de cobre con
calibre de por lo menos No. 6 AWG
(13.3 mm
2
) o equivalente, cuando use un
electrodo de conexión a tierra separado
para la antena. Consulte ANSI/NFPA70.
• Para protección adicional de su televisor
durante una tormenta con relámpagos, o
cuando no se use durante largos periodos,
desconéctelo del tomacorriente y de la
antena o el sistema de cable. Esto evitará
daños a su televisor debido a sobretensión
en la línea de energía o por relámpagos.
• No debe se existir un sistema de antena
exterior en las inmediaciones de circuitos de
alimentación eléctrica o donde pueda caer
sobre dichos circuitos o líneas de
alimentación. Al instalar un sistema de
antena exterior, se debe tener cuidado
extremo para no tocar los circuitos o líneas
de alimentación ya que el contacto con ellos
podría ser fatal.
• No sobrecargue los tomacorrientes ni los
cables de extensión ya que una sobrecarga
puede causar incendio o choque eléctrico.
• Nunca inserte objetos de ningún tipo en su
televisor a través de las ranuras del gabinete,
ya que estos pueden tocar puntos de voltaje
peligrosos o hacer corto circuito con otros
componentes que pueden resultar en
incendio o choque eléctrico. Nunca derrame
líquidos de ninguna clase sobre su televisor.
• No trate de reparar su televisor usted mismo,
ya que abrir o quitar las cubiertas puede
exponerlo a voltajes peligrosos u otros
peligros. Solicite todas las reparaciones al
personal de servicio calificado.
• Desconecte su televisor del tomacorriente y
solicite la reparación a los técnicos de
servicio calificados bajo las siguientes
condiciones:
• Cuando el cable de alimentación o el
enchufe se dañen.
• Si se ha derramado líquido dentro de su
televisor.
• Si su televisor ha sido expuesto a la lluvia
o al agua.
• Si su televisor no funciona normalmente
aún siguiendo las instrucciones de
operación. Ajuste únicamente los
controles que están cubiertos en las
instrucciones de operación, ya que el
ajuste incorrecto de otros controles puede
resultar en daño y frecuentemente
requerirá trabajo intensivo de un técnico
calificado para restaurar la operación
normal del producto.
• Si su televisor se ha dejado caer o se ha
dañado el gabinete.
• Cuando su televisor exhiba un cambio
significativo en el rendimiento.
• Cuando se necesitan repuestos, asegúrese
de que el técnico de reparación use
repuestos especificados por el fabricante o
que tengan las mismas características que la
pieza original. Las substituciones no
autorizadas pueden resultar en incendio,
choque eléctrico u otros peligros.
• Después de completar la reparación de su
televisor, pida al técnico de servicio que
realice verificaciones de seguridad para
determinar que su televisor se encuentra en
una condición de operación segura.
www.insignia-products.com
45
Page 46

Televisor Insignia NS-F20TV
Nota para el instalador del sistema de televisión
Este recordatorio se proporciona para que el
instalador del sistema de televisión por cable
preste atención a la Sección 820 40 del NEC el
cual proporciona pautas para una correcta
conexión a tierra y, en particular, especifica que
la conexión a tierra del cable debe estar
conectada al sistema de tierra de la edificación,
tan cerca al punto de entrada del cable como
sea práctico.
Características
Televisor
Vista frontal
1
Vista Posterior
7
6
5
1
2
3
4
2
4
6
5
7 8
9
3
Elemento Descripción
1 Botón de encendido—Permite encender o apag ar el
2 Sensor del control remoto—Apunte el control remoto
3 Indicador—Se ilumina color verde cua ndo la unidad
4 Botón ENTRADA—Presione repetidamente para
5 Botón MENÚ—Permite acceder al menú de pantalla.
6 Botón VOL-—Permite bajar el volumen o ajustar un
7 Botón VOL+—Permite subir el volumen o ajustar un
8 Botón CANAL-—Permite seleccionar un canal más
9 Botón CANAL+—Permite sel eccionar un canal más
televisor.
a este sensor para controlar el televisor.
se encuentra encendida.
seleccionar la fuente de entrada.
elemento del menú.
elemento del menú.
bajo o un elemento del menú.
alto o un elemento del menú.
Elemento Descripción
1 Entrada AV2 (VIDEO, AUDIO L, AUDIO R)—Conecte
2 Toma de auriculares—Conecte auri c u lares a este
3 Entrada de antena—Conecte el cable o televisión por
4 Entrada COMPONENTE (Y, C
5 Entrada S-VIDEO—Conecte una fuente de video
6 Entrada AV1 (VIDEO, AUDIO L, AUDIO R)—Conecte
7 Salida AV (VIDEO, AUDIO L, AUDIO R)—Conecte un
una fuente de vi de o y audio, tal cómo una cámara de
video, una consola de videojuegos o un reproductor
de DVD, usando estos tomas.
toma.
satélite, una antena exterior o interi or a este toma.
B, CR, AUDIO L, AUDIO
R)— Conecte una fuente de video y de audio, tal
cómo un reproduct or de DVD, usando estos tomas.
Video de componentes provee la calidad de imagen
más alta.
usando este toma. No se tr ansmite audio a través del
cable S-VIDEO.
una fuente de video y audio, tal cómo una consola de
videojuegos o un reproductor de D VD, usando estos
tomas.
equipo de video y audio, tal cómo un VCR o un
estéreo, usando estos tomas.
46
www.insignia-products.com
Page 47

Televisor Insignia NS-F20TV
Control remoto
Botones
1
2
3
4
5
6
7
8
9
10
11
17
16
15
14
13
12
Elemento Descripción
9 Botones de navegación del menú:
y —Permiten moverse hacia arriba y abajo en el
menú.
y —Permiten moverse hacia la izquierda o
derecha en el menú o ajustar un ajuste del menú.
10 SALIR— Pe rmite salir del menú.
11 IMAGEN—Permite seleccionar el modo de imagen.
12 APAGADO AUTOMÁTICO—Permite con figurar el
temporizador de apagado automático.
13 GUÍA—Permite mostrar la guía de programación.
14 VISUALIZACIÓN—Permite mostrar el estado del canal
o información de la señal.
15 CCD—Permite activar o desactivar los subtítulos
optativos.
16 VOL+/- —Permite subir o bajar el volumen.
17 Guión - —Permite ingresar un número de programa
para canales (digitales) de programas múltiples (por
ejemplo: 2-1).
Instalación de las pilas
Para instalar pilas en el control remoto:
1 Quite la cubierta de la pilas.
Elemento Descripción
1
2
3 Botones numéricos/de selección di recta de
4
5 CANAL+/- —Permite sin tonizar canal es superiores o
6 ZOOM—Permite cambiar el tamaño de la imagen en el
7 SILENCIAR—Permite silenciar el sonido.
8 MENÚ—Permite accede r a la página principal del
ENCENDIDO —Permite encender o apagar el
televisor.
ENTRADA — Perm ite seleccionar la fuente de la
señal de entrada. La s opciones incluyen:
• TV— vea televisión a través de la antena
• AV1—vea un DVD, un videojuego o una
cámara de video desde un equipo conectado a
las terminales de entrada AV1 o S-VIDEO.
• AV2—vea un DVD, un videojuego o una
cámara de video desde un equipo conectado a
las terminales de entrada AV2.
• CO MPO NENT—vea un DVD desde un
reproductor de DVD conectado a las terminales
de entrada de compone ntes.
canales—Permiten sele ccionar un canal o ingresar
una contraseña.
Retorno —Permite regresar al último canal que se
sintonizó.
inferiores.
modo DTV (TV digital). Este botón no está activo en el
modo de TV analógico.
menú
2 Inserte dos pilas AAA. Coloque las pilas con
los terminales correspondientes a las
indicaciones + y – en el compartimiento de
las pilas).
www.insignia-products.com
47
Page 48

Televisor Insignia NS-F20TV
3 Vuelva a colocar la cubierta de las pilas.
Advertencia
• No intente recargar pilas alcalinas ya que no
están diseñadas para ser recargadas.
• Use sólo el tamaño y tipo de pilas
especificados. No combine tipos diferentes de
pilas ni pilas nuevas con pilas usadas.
• Extraiga las pilas si el control remoto no se va
a usar por un período de tiempo extendido , o si
las pilas están agotadas.
• No tire las pilas al fuego. Deseche las pilas
gastadas de acuerdo con los reglamentos
locales.
• No deje caer, ni humedezca ni desarme el
control remoto.
Uso del control remoto
Preparación de su televisor
Desempaque de su televisor
Su caja incluye lo siguiente:
• Un televisor
•Un control remoto
• Esta guía del usuario
Ubicación del televisor
Coloque el televisor en una habitación donde no
caiga luz directa sobre la pantalla. La oscuridad
total o un reflejo en la pantalla, pueden causar
cansancio de los ojos. Para ver televisión
cómodamente, se recomienda luz suave e
indirecta.
Conexión de su televisor a una antena, televisión por cable o satélite
Toma de pared
para antena,
cable o satélite
Nota
Cable coaxial de RF (75 ohmios)
Usuarios de antena: La recepción óptima de color
requiere una buena señal y generalmente
significa que se debe usar una antena exterior. El
tipo exacto y la posición de la antena dependen
de su área en particular.
Cable de bronce
Entrada de antena
15 pies (5 m)
Nota
• Puede ser que el control remoto no pueda
operar si hay un obstáculo entre el televisor y
el control remoto.
• Puede ser que el control remoto no opere el
televisor correctamente cuando se encuentra
bajo luz solar directa, una lámpara
incandescente o fluorescente, o cualquier otra
luz fuerte que brille sobre el sensor del control
remoto.
Cuidado
• Le recomendamos que use un cable coaxial de
75 ohmios para eliminar la interferencia y el
ruido que pueden ocurrir debido a las
condiciones de la onda de radio.
• El cable de la antena no se debe amarrar con
el cable de alimentación.
• Si la antena no se puede instalar
correctamente, póngase en contacto con su
distribuidor para obtener ayuda.
Conexión de equipo de video y audio
Este televisor provee dos grupos de terminales
de entrada de AV y un grupo de terminales de
entrada de componentes para conectar un VCR,
un reproductor de DVD, una consola de
videojuegos u otro equipo de video.
Antes de conectar su equipo, refiérase al
manual del usuario del equipo que se conectará.
Conexión usando las terminales de entrada de AV laterales
Las terminales de AV laterales son fáciles de
acceder y deberán ser usadas por equipos que
conectará y desconectará frecuentemente, tal
cómo una cámara de video o un reproductor de
DVD portátil.
A la salida
de video
Señal
48
www.insignia-products.com
Y = Amarillo (video)
W = Blanco (audio izq.)
R = Rojo (audio der.)
A las salidas
de audio
Page 49

Televisor Insignia NS-F20TV
Para hacer la conexión usando las
terminales de entrada de AV laterales:
1 Conecte los cables de audio y video entre las
terminales de audio (izq. y der.) y de video en
el televisor y las del equipo de video.
2 Presione INPUT en el control remoto
repetidamente hasta que el indicador AV2
aparezca en la pantalla.
Conexión usando los terminales de entrada AV posteriores
Las terminales de AV laterales son más difíciles
de acceder que las terminales laterales y
deberán ser usadas con equipos que se
mantienen conectados al televisor, tal cómo un
VCR, un reproductor de DVD o una consola de
videojuegos.
A la entrada de
S-video
A la entrada de video
A las entradas de audio
Y = Amarillo (video)
W = Blanco (audio izq.)
A la salida de S-video
A las salidas de audio
A la salida de video
Equipo de video
Nota
Para obtener una mejor calidad de video, puede
usar el terminal S-video si su fuente lo acepta.
La entrada S-Video usa el mismo circuito que
AV1. La terminal S-VIDEO tiene prioridad sobre la
terminal AV1. Cuando use las entradas S-video y
AV1, la señal de S-video se selecciona
automáticamente y el mensaje en su pantalla
muestra SVIDEO. Para ver una señal de la
entrada AV1, desconecte la conexión de S-video.
R = Rojo (audio der.)
Conexión usando las terminales de componentes
Use las terminales de componentes para
conectar un reproductor de DVD que soporta
este tipo de salida. Video de componentes
provee la calidad de imagen más alta.
W = Blanco (audio izq.)
R = Rojo (audio
izquierdo, C
G = Verde (Y)
Cable de audio
Cable de video
R)
Reproductor de DVD
Para hacer la conexión usando las
terminales de componentes:
1 Conecte el cable de video de componentes
entre las terminales de entrada Y, C
B, y CR
en el televisor y las terminales Y , CB, y CR en
el reproductor de DVD.
2 Conecte el cable de audio entre los
terminales de entrada de audio del televisor y
los terminales de salida de audio del
reproductor de DVD.
3 Presione INPUT en el control remoto
repetidamente hasta que el indicador
COMPONENT (Componentes) aparezca en
la pantalla.
Nota
Este televisor sólo puede recibir señales YC
pero no señales YPBPR en la entrada
COMPONENT.
BCR
Para hacer la conexión usando las
terminales de entrada de AV posteriores:
1 Conecte los cables de audio y video entre la
terminal de audio (izq. y der.) y de video en el
televisor y las del equipo de video.
2 Presione INPUT en el control remoto
repetidamente hasta que el indicador AV1
aparezca en la pantalla.
www.insignia-products.com
49
Page 50

Televisor Insignia NS-F20TV
Conexión usando las terminales de salida de AV
Puede conectar un sistema de audio a los
terminales de salida AV situados en la parte
posterior del televisor para disfrutar un sonido
de alta calidad por medio del sistema de audio.
También puede conectar los terminales de
salida AV al VCR para grabar un programa.
A la salida de
video
A las
salidas de
audio
Y = Amarillo (video)
W = Blanco (audio izq.)
R = Rojo (audio der.)
A la entrada de video
A las entradas de audio
A las entradas de audio
2 Presione Power (Encendido) en el
televisor o en el control remoto y el televisor
se encenderá.
Apagado del televisor
Para apagar el televisor:
1 Presione Power en el televisor o en el
control remoto y el televisor se apagará.
2 Si no piensa usar su televisor por un período
de tiempo extendido, desenchufe el cable de
alimentación del tomacorriente eléctrico.
Nota
El televisor se puede apagar automáticamente
usando la función del temporizador de apagado
automático (se necesita configurar de antemano).
Si no se recibe una señal de entrada por 15
minutos, el televisor se puede apagar solo
(únicamente en el modo de TV).
Después de apagar el televisor, deberá esperar
por lo menos cinco segundos para encender el
televisor de nuevo.
Uso de los menús
Este televisor tiene un sistema de menú que
aparece en la pantalla. Este sistema permite
usar de manera rápida y conveniente las
funciones en el televisor. También puede
mostrar el estado de las funciones del televisor
mientras ve un programa.
VCR para grabar Sistema de audio
Para hacer la conexión usando las
terminales de salida AV:
• Conecte los cables de audio y video entre las
terminales de salida de audio (izq. y der.) y
de video del televisor y las terminales de
entrada de audio (izq. y der.) y de video del
equipo de video.
Uso de su televisor
Encendido y apagado del televisor
Encendido del televisor
Para encender el televisor:
1 Conecte el enchufe de CA en un
tomacorriente de CA.
Si no aparece ninguna imagen y se ilumina el
indicador Standby, el televisor está en el
modo de suspensión.
Advertencia
Para evitar choques eléctricos, no utilice un
enchufe polarizado con un cable de extensión,
receptáculo u otro tomacorriente a menos que
pueda insertar completamente las clavijas.
Nota
El enchufe de CA suministrado con el televisor
está polarizado para ayudar a reducir la
posibilidad de choque eléctrico. Si el enchufe de
CA no entra en un tomacorriente de CA no
polarizado, no reduzca con lima ni corte la clavija
ancha. Es responsabilidad del usuario conseguir
un electricista para que reemplace el
tomacorriente obsoleto.
Menú Principal Submenú
Picture (Image n) Contrast (Contraste)
Brightness (Brillo)
Color
Tint (Tono)
Sharpness (Nitidez)
P.Lock Parental Lock (Bloqueo de los
padres)
• Lock (Bloqueo)
• Ratings Locks (Bloqueos de
clasificaciones)
•MPAA Rating
(Clasificación MPAA)
• TV Rating (Clasificación de
TV)
• Canada English (Canadá
anglófono)
• Canada French (Canadá
francófono)
Change Password (Cambiar
contraseña)
Clock (Reloj) On Timer (Temporizador de
encendido)
Clock (Reloj)
DST (Hora de verano)
Auto Clock (Reloj automático)
Zone (Zona)
Preset (Predefinido) Auto Program (Programación
automática)
• Antenna (Antena)
• Start (Inicio)
Ch Setup (Configuración de can ales)
• Ch No (No. de canal)
• Skip (Saltar)
• Label* (Etiqueta)
• Dig Signal* (Señal digital)
50
www.insignia-products.com
Page 51

Televisor Insignia NS-F20TV
Menú Principal Submenú
Extra Closed Caption (Subtítulos
Nota
• Elementos marcados con * no aparecen en
todos los modos.
• Algunos elementos del menú se muestran con
color gris y no se pueden seleccionar.
optativos)
• CC Display (Visualización de
subtítulos optativos)
• CC Setting (Configuración de
subtítulos optativos)
• CC Type (Tipo de
subtítulos optativos)
• CC Mode* (Modo de
subtítulos optativos)
• CC Customer* (Cliente de
subtítulos optativos)
Menu Language (Idioma del menú)
Audio Language ( Idioma del audio)
Para usar el menú:
1 Con el televisor encendido, presione MENU
para mostrar el menú principal.
• AV1—Tomas de AV posteriores más
S-video
• AV2—Tomas de AV laterales
• COMPONENT—Tomas de componentes
• TV—Toma de antena
Nota
Para obtener una mejor calidad de video, use el
terminal S-video si su fuente lo soporta.
La entrada S-Video usa el mismo circuito que
AV1. La terminal S-VIDEO tiene prioridad sobre la
terminal AV1. Cuando use las entradas S-video y
AV1, la señal de S-video se selecciona
automáticamente y el mensaje en su pantalla
muestra SVIDEO. Para ver una señal de la
entrada AV1, desconecte la conexión de S-video.
Conmutación de AV a TV
Para cambiar de AV a TV:
• Presione INPUT repetidamente hasta que el
programa de televisión aparezca en la
pantalla.
Visualización del titular de información
El titular de información muestra la información
de estado tal cómo el número de canal y la
fuente de la señal. Dependiendo del modo, se
muestra diferente información. En el modo DTV,
se puede mostrar más información (tal cómo el
número de canal, el nombre del canal y la
resolución de la señal).
2 Presione o para seleccionar un menú.
3 Presione o para ingresar al menú.
4 Dentro del menú, presione o para
seleccionar un elemento y presione o
para ajustar su valor o para ingresar a un
submenú.
5 Presione MENU para retornar al menú
anterior.
- O Presione EXIT para salir del menú principal y
retornar a su programa.
Nota
Para introducir de forma más clara las
operaciones de los menús, este manual
proporciona una descripción basada en la
navegación de los menús con el control remoto.
Las ilustraciones y las visualizaciones de pantalla
que se encuentran en este manual se
proporcionan con fin de explicación (algunas se
aumentan, otras se recortan) y pueden variar
ligeramente con respecto a las actuales.
Viendo programas de AV
Este televisor provee dos grupos de terminales
de entrada de AV y un grupo de terminales de
entrada de componentes para conectar un VCR,
un reproductor de DVD, una consola de
videojuegos u otro equipo de video.
Para ver un programa de v ideo usando las
entradas AV:
• Presione INPUT repetidamente hasta que
vea el indicador de entrada apropiado en la
pantalla. El orden de las entradas es el
siguiente:
Nota
Las etiquetas de canal se asignan
automáticamente y no pueden ser cambiadas por
los usuarios.
Para mostrar el titular de información:
• Presione DISPLAY y aparecerá el titular de
información.
Uso de la guía de programación
Puede obtener la hora de transmisión de un
programa y el nombre del programa desde la
guía de programación.
Nota
La guía funciona sólo con canales digitales.
Para mostrar la guía de programación:
1 Presione GUIDE en el control remoto para
mostrar la información de la guía.
2 Presione o para desplazar la página si
hay dos o más páginas.
Configuración de sus estaciones de televisión
Cuando encienda el televisor por primera vez,
deberá realizar una programación automática
para configurar las estaciones en su televisor.
www.insignia-products.com
51
Page 52

Televisor Insignia NS-F20TV
Para configurar las estaciones de su
televisor:
1 Con el televisor encendido, presione MENU
para mostrar el menú principal.
2 Presione o para seleccionar PRESET.
3 Presione o para seleccionar el menú
Preset (Predefinido).
4 Presione o para seleccionar AUTO
PROGRAM (Programación Automática).
El televisor comienza a buscar y memorizar
todos los programas disponibles. Puede tomar
unos minutos para terminar de buscar.
Nota
El televisor memoriza primero los programas
analógicos. Después de que se han memorizado
todos los programas analógicos, comenzará a
memorizar los programas digitales (DTV). Durante
la memorización de programas analógicos, puede
presionar MENU para detener el proceso. El
televisor comenzará a memorizar los programas
de DTV. Si desea detener la memorización de
programas de DTV, presione MENU de nuevo.
Omisión de canales no deseados
Después de guardar los canales en la memoria,
puede saltarse los canales no deseados, de
manera que sólo los canales que desea ver
estén seleccionados con los botones CH+ y
CH-.
Para omitir canales no deseados:
1 Diríjase al menú Preset (Predefinido).
5 Presione o para ingresar al submenú
Auto Program (Programación automática).
6 Presione o para seleccionar ANTENNA
(Antena).
7 Presione o para seleccionar AIR o
CABLE.
En el modo AIR (Aire), el televisor recibe
señales de la antena. En el modo CABLE el
televisor recibe programas de televisión por
cable. Seleccione:
• AIR (Aire)—Si usa la antena de
VHF/UHF.
• CABLE—Si usa televisión por cable o
satélite. Si tiene alguna pregunta con
respecto a estos ajustes, póngase en
contacto con su distribuidor.
8 Presione para seleccionar START
(Comienzo).
9 Presione o para seleccionar Auto
Program (Programación Automática).
2 Presione o para seleccionar CH
SETUP (Configuración de canales).
3 Presione o para seleccionar el menú
CH SETUP (Configuración de canales).
4 Presione o para seleccionar CH NO
(Número de canales).
5 Presione o para seleccionar un número
de canal.
6 Presione para seleccionar SKIP (Saltar).
7 Presione o para seleccionar ON
(Activado).
El canal será omitido cuando navegue por
los canales usando los botones CH+/-.
Consejo
Para restaurar un canal omitido, use los botones
numéricos para seleccionar el canal omitido y
repita los pasos anteriores y configure SKIP
(Omitir) cómo OFF (Desactivado).
Verificaci ón de la intensidad de la señal de DTV
Puede revisar la intensidad de su señal de DTV
y determinar si necesita ajustar su antena o la
entrada de cable digital. Mientras más fuerte es
la señal, es menos probable que experimente
una degradación de imagen.
52
www.insignia-products.com
Page 53

Televisor Insignia NS-F20TV
Para verificar la intensidad de la señal de
DTV:
1 Diríjase al menú Preset (Predefinido).
2 Presione o para seleccionar CH
SETUP (Configuración de can ale s) .
3 Presione o para seleccionar el menú
CH SETUP (Configuración de canales).
La línea inferior del menú CH SETUP
(Configuración de canales) muestra la
intensidad de la señal del canal de DTV
actual.
Selección de canales
Puede utilizar los siguientes tres métodos para
seleccionar un canal.
• Use el teclado numérico.
• Use los botones CH+ y CH- buttons.
• Use el botón del canal anterior .
Usando el teclado numérico
Para ir a un número de canal especifico:
• Presione los botones numéricos (0-9) y el
guión (-) y espere para que el televisor
cambie de canales o presione ENTER
para ir inmediatamente a ese canal.
Por ejemplo, si desea ver el canal 8-3,
presione 8-3 en el control remoto.
(Asegúrese de presionar los botones
dentro de tres segundos de cada uno, o el
canal no se ingresará correctamente.)
• un número de canal menor
Nota
Ejemplo: Canal 5-1. El “5” es el número de canal
mayor y el “1” es el número de canal menor.
• En los Estados Unidos, en la mayoría de
lugares el número de canal mayor es el
mismo para los canales analógicos y los
digitales (Es el mismo que el número de
canal NTSC de las estaciones transmisoras
actuales)
• En los Estados Unidos, el número de canal
menor cero se usa para el canal analógico
de una estación transmisora.
Ejemplo de Numeración de Canal
• Los canales NTSC originales NTSC para
Des Moines, Iowa: 5, 8, 11, 13 y 17.
• Canales NTSC + ATSC posibles para Des
Moines, Iowa: 5-0, 8-0, 11-0, 13-0, y 17-0
(números de canal para los canales
analógicos existentes) y 5-1, 5-2, 8-1, 8-2,
8-3, 8-4, y 13-1 (números de canal para los
canales digitales).
Control del sonido
Uso de los botones VOL+ y VOL-
Presione:
• VOL + para subir el volumen.
• VOL- para bajar el volumen.
Uso del botón MUTE
Para silenciar el sonido:
• Presione MUTE en el control remoto.
Para reanudar el sonido:
• Presione MUTE en el control remoto.
- O Presione VOL+.
Nota
In algunas situaciones, los números de canal
virtuales no corresponden a las frecuencias
físicas.
Usando los botones CH+ y CH-
Para examinar los canales:
• Presione:
• CH+ para examinar los canales hacia
arriba.
• CH- para examinar los canales hacia
abajo.
Uso del botón del canal anterior
Para alternar entre dos canales:
• Presione para alternar entre el canal
actual y el último canal sintonizado.
Información acerca de la numeración de canales estadounidenses
• El canal de PSIP de A TSC usa un número de
canal de dos partes, las que incluyen:
• un número de canal mayor
Nota
Si silencia el sonido, el indicador VO LUME
(Volumen) mostrado en la pantalla se vuelve color
rojo. Después de restaurar el sonido, el indicador
VOLUME (Volumen) mostrado en la pantalla se
vuelve color verde.
Ajuste de la imagen
Para ajustar la imagen:
1 Con el televisor encendido, presione MENU
para mostrar el menú principal.
2 Presione o para seleccionar PICTURE
(Imagen).
www.insignia-products.com
53
Page 54

Televisor Insignia NS-F20TV
3 Presione o para ingresar al menú
Picture (Imagen).
4 Presione o para ajustar un control.
5 Presione o para ajustar la selección.
Ajuste Presione Presione
Contrast
(Contraste)
Brightness
(Brillo)
Color más pálido más profundo
Tint (Tono) purpúreo verdoso
Sharpness
(Nitidez)
más débil m ás fue rte
más oscuro más cl aro
más suave más nítido
Selección del modo de imagen
Hay tres modos de imagen predefinidos
(Standard [Estándar], Dynamic [Dinámico] y Soft
[Suave]) y un modo de imagen establecido por
el usuario (Personal).
Para seleccionar un modo de imagen:
1 Presione PICTURE en el control remoto.
2 Seleccione uno de los siguientes:
• STANDARD (Estándar)—Seleccione para
una imagen normal.
• DYNAMIC (Dinámico)—Seleccione para
una imagen brillante y dinámica.
• SOFT (Suave)—Seleccione para una
imagen finamente detallada.
• PERSONAL—Seleccione para crear su
propio modo de imagen.
Uso del reloj
Para ingresar al menú del reloj:
1 Con el televisor encendido, presione MENU
para mostrar el menú principal.
2 Presione o para seleccionar CLOCK
(Reloj).
3 Presione o para ingresar al menú Clock
(Reloj).
Ajuste automático del reloj
• Con la función Auto Clock (Reloj automático)
activada, la hora se ajusta automáticamente
basada en la señal de un canal digital.
Para ajustar automáticamente el reloj:
1 Diríjase al menú Clock (Reloj).
2 Presione o para seleccionar AUTO
CLOCK (Reloj Automático).
3 Presione o para activar la función Auto
Clock (Reloj automático).
Cambio de tamaño de la imagen
Puede cambiar el tamaño de la imagen (relación
de aspecto) de acuerdo al tipo de la señal de
video o su preferencia personal. Esto sólo se
puede hacer en el modo DTV cuando el tipo de
señal de video se encuentra en el formato 16:9.
Para cambiar el tamaño de la imagen:
Presione ZOOM para seleccionar el tamaño de
imagen (relación de aspecto) deseado. Puede
seleccionar entre NORMAL y ZOOM.
54
4 Presione o para seleccionar ZONE
(Zona).
5 Presione o para seleccionar su área y
zona horaria.
6 Presione o para seleccionar DST (Hora
de verano), luego presione o para
activar o desactivar la hora de verano,
dependiendo de su ubicación.
Ajuste manual del reloj
• Si la hora actual no es la correcta cuando se
usa la función de reloj automático, restaure el
reloj manualmente.
• Si el televisor pierde la alimentación, el
ajuste del reloj que realizó se borrará.
Para ajustar el reloj manualmente:
1 Diríjase al menú Clock (Reloj).
www.insignia-products.com
Page 55

Televisor Insignia NS-F20TV
2 Presione o para seleccionar AUTO
CLOCK (Reloj Automático).
3 Presione o para desactivar la función
Auto Clock (Reloj automático).
4 Presione o para seleccionar CLOCK
(Reloj).
5 Presione VOL+ para seleccionar AM o PM.
6 Utilice lo s botones numéricos para ingresar
la hora actual.
Encendido automático del televisor
• La función del temporizador de encendido
funciona solamente si la hora actual se ha
configurado.
• El televisor debe encontrarse en el modo de
suspensión para que funcione el
temporizador de encendido.
• Si el televisor pierde la alimentación, los
ajustes del temporizador se borrarán.
Por ejemplo, le gustaría que el televisor se
apague automáticamente en 60 minutos.
Presione SLEEP repetidamente hasta que la
pantalla muestre 60 MINUTE (60 minutos).
Para cancelar el temporizador de apagado
automático, presione SLEEP repetidamente
hasta que la pantalla muestre 0 MINUTE (0
minutos).
Cambio de los ajustes del sistema
Para cambiar los ajustes del sistema:
1 Con el televisor encendido, presione MENU
para mostrar el menú principal.
2 Presione o para seleccionar EXTRA.
3 Presione o para ingresar al menú
EXTRA.
Para encender el televisor automáticamente:
1 Diríjase al menú Clock (Reloj).
2 Presione o para seleccionar ON TIMER
(Temporizador de encendido).
3 Presione VOL+ para seleccionar AM o PM.
4 Utilice lo s botones numéricos para ingresar
la hora a la que desea que se encienda el
televisor.
5 Presione Power (Encendido) para
cambiar el televisor al modo de suspensión.
A la hora prefijada, el televisor se encenderá
automáticamente.
Apagado automático del televisor
Puede configurar el temporizador de apagado
automático usando SLEEP en el control remoto.
Cada vez que presione este botón, el lapso de
tiempo del temporizador de apagado automático
cambia de la siguiente manera:
• 0 minutos
• 5 minutos
• 10 minutos
• ...
• 180 minutos
• 240 minutos
Selección del idioma del menú de pantalla (OSD).
Para cambiar el idioma del menú de pantalla:
1 Diríjase al menú EXTRA.
2 Presione o para seleccionar MENU
LANGUAGE (Idioma de menú).
3 Presione o para seleccionar otro idioma
del menú.
Selección un idioma de audio
La televisión digital (DTV) puede transmitir
simultáneamente varias pistas de audio (por
ejemplo, traducciones simultáneas del programa
en idiomas extranjeros). La disponibilidad de
estas pistas de audio opcional depende del
programa.
Para seleccionar un idioma de audio:
1 Diríjase al menú EXTRA.
2 Presione o para seleccionar AUDIO
LANGUAGE (Idioma de audio).
3 Presione o para seleccionar otro idioma
de audio.
Configuración de subtítulos optativos
Activación o desactivación de subtítulos optativos
Para activar o desactiv ar los subtítulos
optativos:
1 Diríjase al menú EXTRA.
www.insignia-products.com
55
Page 56

Televisor Insignia NS-F20TV
2 Presione o para seleccionar CLOSED
CAPTION (Subtítulos optativos).
3 Presione o para ingresar al menú
CLOSED CAPTION (Subtítulos optativos).
4 Presione o para seleccionar CC
DISPLAY (Visualización de subtítulos
optativos).
5 Presione o para seleccionar entre las
siguientes opciones:
• ON (Activado)—muestra los subtítulos
optativos todo el tiempo.
• CC MUTE (Subtítulos optativos en
silencio)—muestra los subtítulos optativos
sólo cuando se silencia el sonido.
• OFF (Desactivado)—desactiva los
subtítulos optativos.
4 Resalte CC TYPE (Tipo de subtítulos
optativos) luego presione o para
seleccionar el tipo de subtítulos optativos.
Personalización de los subtítulos optativos digitales
Puede personalizar los subtítulos optativos
digitales que aparecen en su pantalla.
Para personalizar los subtítulos optativos
digitales:
1 Navegue al menú CLOSED CAPTION
(Subtítulos optativos), resalte CC SETTING
(Configuración de subtítulos optativos),
presione o para ingresar al menú.
2 Presione o para resaltar CC MODE
(Modo de subtítulos optativos), luego
presione o para seleccionar
CUSTOMER (Cliente).
Si no desea personalizar los subtítulos
optativos digitales, seleccione BROADCAST
(Transmisión) y los subtítulos se mostrarán
tal cómo se transmiten.
3 Después de seleccionar CUSTOMER,
presione para resaltar CC CUSTOMER, y
presione o para ingresar al menú.
Consejo
También puede presionar CCD para seleccionar
CCD ON (Subtítulos optativos activados), CCD
OFF (Subtítulos optativos desactivados), o CCD
MUTE (Subtítulos optativos en silencio).
Selección del tipo de subtítulos optativos
Los subtítulos y el texto, si se proveen por la
estación transmisora, están disponibles en los
canales digitales y analógicos.
Seleccione un tipo de subtítulos optativos para
mostrar información subtitulada. Los subtítulos
analógicos muestran información en la pantalla
(normalmente el diálogo del programa). El texto
de los modos digitales muestra información,
normalmente en la parte inferior de la pantalla, y
es usado para un servicio de información
(generalmente no relacionada con el programa).
Para seleccionar el tipo de subtítulos
optativos:
1 Diríjase al menú CLOSED CAPTION
(Subtítulos optativos).
2 Presione o para seleccionar CC
SETTING (Configuración de subtítulos
optativos).
3 Presione o para ingresar al menú CC
SETTING (Configuración de subtítulos
optativos).
4 Dentro del menú, presione o para
seleccionar el elemento que desea cambiar,
y presione o para personalizar el ajuste
según su preferencia.
Seleccione OTHERS (Otros) y presione o
para ingresar al menú del siguiente nivel
para personalizar más ajustes.
Puede cambiar los siguientes ajustes:
CC STYLE—Establece un estilo para las
palabras.
CC SIZE—Establece el tamaño de las
palabras.
CC COLOR—Establece un color para el
texto.
56
www.insignia-products.com
Page 57

Televisor Insignia NS-F20TV
BK COLOR—Ajusta el color del fondo.
CC OPACITY—Establece la opacidad del
color del texto.
BK OPACITY—Establece la opacidad del
color de fondo.
EDGE COLOR—Establece un color para los
bordes.
EDGE TYPE—Establece el tipo de borde.
5 Presione EXIT para regresar a ver televisión,
o presione MENU para volver al menú
anterior.
Uso del control de los padres
El control de los padres permite que los padres
impidan que sus hijos vean programas
inapropiados en la televisión. El control de los
padres lee las clasificaciones de los programas
(excepto noticias, deportes, películas no
editadas transmitidas por canales especiales de
cable y señales del sistema de emergencia),
luego niega el acceso a la programación si la
clasificación del programa reúne las limitaciones
que seleccionó.
Para ingresar al menú P.LOCK (Bloqueo de
los padres):
1 Con el televisor encendido, presione MENU
para mostrar el menú principal.
2 Presione o para resaltar CHANGE
PASSWORD (Cambiar contraseña), luego
presione o para ingresar al menú.
3 Presione o para resaltar NEW
PASSWORD (Contraseñ a nueva), luego use
los botones numéricos para ingresar una
contraseña nueva.
4 Ingrese nuevamente la contraseña nueva
para confirmarla. Su contraseña nueva ha
sido creada.
2 Presione o para seleccionar P.LOCK
(Bloqueo de los padres).
3 Presione o para ingresar al menú
P.L O CK .
4 Ingrese la contraseña para ingresar al menú
P.LOCK. La contraseña inicial es 0000 y se
puede cambiar en cualquier momento.
Configuración de la contraseña inicial de bloqueo de los padres
Para usar los controles de los padres, primero
debe configurar la contraseña.
Para configurar la contraseña de bloqueo de
los padres:
1 Use la contraseña para ingresar al menú de
bloqueo de los padres. La contraseña inicial
es 0000.
Cuidado
Escriba su contraseña y guárdela para uso futuro.
Restauración de una contraseña olvidada
Si se le olvida su contraseña y no puede
ingresar al menú de bloqueo de los padres,
puede restaurar la contraseña y cambiarla de
nuevo.
Para restaurar una contraseña olvidada:
1 Con el televisor encendido, presione MENU
para mostrar el menú principal.
2 Presione o para seleccionar P.LOCK
(Bloqueo de los padres).
3 Presione o para ingresar al menú
P.L O CK .
4 Ingrese la contraseña maestra para ingresar
al menú P.LOCK. La contraseña maestra es
1397.
Después de ingresar la contraseña maestra,
aparecerá el indicador SET CODE
(Establecer códig o ) .
www.insignia-products.com
57
Page 58

Televisor Insignia NS-F20TV
5 Ingrese la contraseña nueva (cuatro dígitos).
El indicador SET CODE cambia por P.LOCK,
se borrará la contraseña antigua y se creará
esta contraseña nueva.
Nota
La contraseña maestra 1397 siempre funcionará
para restaurar una contraseña.
Activación de los controles de los padres
Para activar el esquema de bloqueo que ha
configurado, deberá configurar PARENTAL
LOCK (Bloqueo de los padres) cómo ON
(Activado).
Para activar los controles de los padres:
1 Use la contraseña para ingresar al menú
P.L O CK .
2 Resalte PARENTAL LOCK (Bloqueo de los
padres) y presione o para ingresar al
menú.
3 Resalte RATINGS LOCKS (Bloqueos de
clasificaciones), y presione o para
ingresar el menú RATINGS LOCKS
(Bloqueos de clasificaciones).
4 Resalte MPAA RA TING (Clasificaci ón MPAA)
y presione o para ingresar al submenú
MPAA RATING (Clasificación MPAA).
5 Presione o para seleccionar la
clasificación y presione o para bloquear
o permitir la clasificación.
3 Resalte LOCK (Bloqueo) y presione o
para configurar el elemento cómo ON
(Activado) para activar el esquema de
bloqueo.
Nota
Si desea desactivar el esquema de bloqueo,
configure LOCK (Bloquear) cómo OFF
(Desactivado).
Configuración de las clasificaciones MPAA
Para configurar las clasificaciones MPAA:
1 Use la contraseña para ingresar al menú
P.L O CK .
2 Resalte PARENTAL LOCK (Bloqueo de los
padres) y presione o para ingresar al
menú.
Clasificación de pelícu las de MPAA:
• G—Público en general
• PG—Guía de los padres recomendada
• PG-13—13 años y más
• R—Visión restr i ngi da. Se re co mi enda la
guía de los padres para menores de 17
años
• NC-17—Adultos de 18 años y más
•X—Adultos
Ejemplo: Si establece el nivel de clasificación
en PG-13: Las películas G y PG estarán
disponibles y se bloquearán las películas
PG-13, R, NC-17 y X.
6 Presione EXIT para regresar a ver televisión,
o presione MENU para volver al menú
anterior.
Configuración de las clasificaciones de TV
Las clasificaciones de TV incluyen dos
componentes: Un criterio general (basado en la
edad) y un criterio detallado (basado en el
contenido).
58
Para configurar las clasificaciones de TV:
1 Use la contraseña para ingresar al menú
P.L O CK .
www.insignia-products.com
Page 59

Televisor Insignia NS-F20TV
2 Resalte PARENTAL LOCK (Bloqueo de los
padres) y presione o para ingresar al
menú.
3 Resalte RATINGS LOCKS (Bloqueos de
clasificacione s), y pres ion e o para
ingresar el menú RATINGS LOCKS .
4 Resalte TV RATING (Clasificación de TV) y
presione o para ingresar al submenú
TV RATING .
• V: Violencia—se aplica a TV-PG, TV-14 y
TV-MA
• S: Escenas sexuales—se aplica a TV-PG,
TV-14 y TV-MA
• L: Lenguaje adulto—se aplica a TV-PG,
TV-14 y TV-MA
• D: Diálogo sexual—se aplica a TV-PG y
TV-14
7 Presione EXIT para regresar a ver televisión,
o presione MENU para volver al menú
anterior.
Configuración de las clasificaciones para el Canadá anglófono
Para configurar las clasificaciones para el
Canadá anglófono:
1 Use la contraseña para ingresar al menú
P.L O CK .
2 Resalte PARENTAL LOCK (Bloqueo de los
padres) y presione o para ingresar al
menú.
5 Presione o para seleccionar la
clasificación y presione o para bloquear
o permitir la clasificación.
Clasificaciones de TV:
• TV-Y—Todos los niños
• TV-Y7—7 años y mayores
• TV-G—Audiencia general
• TV-PG— Guía de los padres
recomendada
• TV-14—14 años y mayores
• TV-MA—Audiencia madura
6 Si la clasificación incluye clasificaciones
basadas en contenido, resalte esta
clasifica c i ó n y pr es io ne o para ingresar
al menú del siguiente nivel. Presione o
para seleccionar la clasificación y presione
o para bloquear o permitir la
clasificación.
Clasificaciones basadas en contenido:
• FV: Violencia de fantasía—se aplica sólo
a TV-Y7
3 Resalte RATINGS LOCKS (Bloqueos de
clasificaciones), y presione o para
ingresar el menú RATINGS LOCKS .
4 Resalte CANADA ENGLISH (Canadá
anglófono) y presione o para ingresar al
submenú CANADA ENGLISH .
5 Presione o para seleccionar la
clasificación y presione o para bloquear
o permitir la clasificación.
Clasificaciones para el Canadá anglófono:
www.insignia-products.com
59
Page 60

Televisor Insignia NS-F20TV
• C—Niños.
• C8+—Niños de 8 años o mayores.
• G—Programación general, apropiada
para todas las audiencias.
• PG—Guía de los padres.
• 14+—Televidentes de 14 años y mayores.
• 18+—Programación para adultos.
6 Presione EXIT para regresar a ver televisión,
o presione MENU para volver al menú
anterior.
Configuración de clasificaciones para el Canadá francófono
Para configurar la clasificación del Canadá
francófono:
1 Use la contraseña para ingresar al menú
P.L O CK .
2 Resalte PARENTAL LOCK (Bloqueo de los
padres) y presione o para ingresar al
menú.
• 8 ans+—Niños de 8 años y mayores.
• 13 ans+—Niños de 13 años y mayores.
• 16 ans+—Televidentes de 16 años y
mayores.
• 18 ans+ —Programación para adultos.
6 Presione EXIT para regresar a ver televisión,
o presione MENU para volver al menú
anterior.
Configuración de las clasificaciones del criterio RRT5
Si el programa transmitido usa el criterio de
clasificación RRT5 (Tabla de clasificación de
región-Región 5) de acuerdo al reglamento de la
FCC, su clasificación puede ser descargada a
este televisor y puede ser usada para los
controles de los padres.
Para configurar las clasificaciones del
criterio RRT5:
1 Use la contraseña para ingresar al menú
P.L O CK .
2 Resalte PARENTAL LOCK (Bloqueo de los
padres) y presione o para ingresar al
menú.
3 Resalte RATINGS LOCKS (Bloqueos de
clasificacione s), y pres ion e o para
ingresar el menú RATINGS LOCKS .
4 Resalte CANADA FRENCH (Canadá
francófono) y presione o para ingresar
al submenú CANADA FRENCH .
5 Presione o para seleccionar la
clasificación y presione o para bloquear
o permitir la clasificación.
3 Resalte D.L. RATINGS (Descargar
clasificaciones) y presione o para
ingresar al menú D.L RATINGS.
4 Presione o para seleccionar el
elemento que guste y presione o para
ingresar al menú.
60
Clasificaciones para el Canadá francófono:
• G—Niños.
www.insignia-products.com
Page 61

Televisor Insignia NS-F20TV
5 Dentro del menú, presione o para
seleccionar la clasificación deseada y
presione o para bloquearla o permitirla.
Presione ENTER para desplazar la página si
hay más de una página de menú.
6 Presione EXIT para regresar a ver televisión,
o presione MENU para volver al menú
anterior.
Mantenimiento
Para evitar el peligro de incendio o choque,
desconecte su televisor de la fuente de
alimentación de CA durante la limpieza. El
exterior del televisor puede limpiarse con un
trapo. Tenga cuidado cuando limpie las piezas
de plástico. Puede usar un paño suave y
húmedo, y jabón suave.
Localización y corrección de fallas
Síntoma Causa probable Solución probable
La unidad no
enciende
Imagen
insatisfac toria o
no hay imagen
Imagen
inestable o
dispersa
No hay
recepción de
cable
No hay
recepción en
los canales
superiores al
13.
El cable de
alimentación de CA no
está conectado.
Problemas con la
estación de TV
El control de imagen no
está ajustado.
Posible inter ferencia
local.
El conector de la
antena/cable no está
conectado.
Problemas en la
estación de TV
Canal de TV por cable
codificado.
Posible inter ferencia
local.
No está conectado el
cable.
Air/Cable está
configurad o có m o A ir
(Aire).
Servicio de TV por
cable interrumpido.
Air/Cable está
configurad o có m o A ir
(Aire).
Conecte el cable de
alimentación de CA a
un tomacorriente de
CA.
Pruebe con otro canal .
Verifique los ajustes de
control de la imagen.
Compruebe si hay
interferenci a c on la
fuente de rece pción.
Revise la conexión del
cable o la antena
VHF/UHF.
Pruebe con otro canal .
Necesita usar una caja
de cable para recibir
este canal.
Compruebe si hay
interferenci a c on la
fuente de rece pción.
Compruebe todas las
conexiones de los
cables.
Configure Air/Cable
cómo Cable.
Comuníquese con su
compañía de servicio
de TV por cable.
Configure Air/Cable
cómo Cable.
Síntoma Causa probabl e Solución probable
Sonido
deficiente o no
hay sonido
El televisor se
apaga
No funcionan
los subtítulos
optativos.
El control
remoto no
funciona
El control de los
padres no
funciona
correctamente.
Problemas en la
estación de TV
Presionó el botón
MUTE.
Posible interferencia
local.
El conector de la
antena/cable no está
conectado.
El control de volumen
esta en el nivel mínimo.
El temporizador de
apagado automático
está configur a do
La señal de televisión
es débil.
La estación de
televisión tiene
problemas o el
programa no ofrece
subtítulos optat ivos.
Los subtítulos
optativos no están
activados.
El control remo to no
está apuntando al
sensor.
La distancia es excesiva
o hay demasiada luz en
la habitación.
Existe un obstác ulo en
la trayectoria del ha z.
Las pilas están bajas. R eemplace las pilas.
Las pilas no están
insertadas
correctamente.
El control de los pa dres
está desactivado (OFF).
Se está transmitiendo
un programa de
noticias o deportes.
No se han establecido
las clasificaciones.
Pruebe con otro canal .
Presione MUTE
nuevamente.
Compruebe si hay
interferenci a co n la
fuente de recepción.
Revise la conexión de
cable de la antena
VHF/UHF.
Suba el volumen.
Configure el
temporizador de
apagado automático
cómo OFF
(Desactivado).
Revise el cable o la
antena VHF/UHF.
Pruebe con otro canal .
Presione el botón CCD.
Apunte el control
remoto al sensor del
control remoto.
Utilice el control
remoto dentro de 15
pies del televisor o
reduzca la luz en la
habitación.
Deje libre la trayectoria
del haz.
Reinserte las pilas.
Configure el control de
los padres cómo
encendido (ON).
El control de los pa dres
no funciona c on
programas de noticias
o deportes.
Ajuste las
clasificaciones.
www.insignia-products.com
61
Page 62

Televisor Insignia NS-F20TV
Interferencias con la recepción
La mayoría de problemas de interferencias de
televisión pueden solucionarse ajustan do la
altura y posición de la antena VHF/UHF. Si no
utiliza cable ó satélite, se recomienda usar
antenas para exteriores. Los tipos más comunes
de interferencias de televisión se indican a
continuación. Si uno de estos síntomas aparece
cuando el televisor está conectado a un sistema
de TV por cable, la interferencia puede ser
causada por la transmisión de la compañía de
servicio de cable local.
IGNICIÓN: Pueden aparecer zonas
negras o rayas horizontales, la
imagen puede vibrar o dispersarse.
Generalmente la causa es
interferencia de sistemas de
ignición de automóviles, lámparas
de neón, taladros eléctricos y otros
equipos eléctricos.
FANTASMAS: Los fantasmas
pueden aparecer cuando la señal de
televisión sigue dos trayectorias.
Una es la trayectoria directa y la otra
es reflejo de edificios altos, colinas
u otros objetos. Cambiar la
dirección o posición de la antena
puede mejorar la recepción.
NIEVE: Si su receptor está ubicado
en el área límite de una estación de
televisión donde la señal es débil, la
imagen puede ser afectada por
puntos peque ños. Cuando la señal
es sumamente débil, puede ser
necesario instalar una ant ena
externa para mejorar la imagen.
INTERFERENCIA DE FRECUENCIA
DE RADIO: Esta interferencia
produce ondas móviles o rayas
diagonales, y en algunos casos
causa la pérdida de contraste en la
imagen.
Avisos legales
FCC Parte 15
Este dispositivo satisface la parte 15 del reglamento FCC.
La operación de este producto está sujeta a las dos
condiciones siguientes: (1) Este dispositivo no puede causar
interferencia dañina, y (2) este dispositivo debe aceptar
cualquier interferencia recibida incluyendo interferencias que
puedan causar una operación no deseada.
Este equipo ha sido sometido a prueba y se ha determinado
que satisface los límites establecidos para ser clasificado
como dispositivo digital de la Clase B de acuerdo con la
Parte 15 del reglamento FCC. Estos límites se han
establecido para proporcionar una protección razonable
contra interferencias perjudiciales en una instalación
residencial. Este equipo genera, usa y puede emitir energía
de radiofrecuencia. Sí no se instala y usa de acuerdo con las
instrucciones, este aparato puede causar interferencias
perjudiciales a las comunicaciones de radio. Sin embargo,
no se garantiza que no ocurrirá interferencia en una
instalación particular. Si el equipo causa interferencias
perjudiciales en la recepción de la señal de radio o
televisión, lo cual puede comprobarse encendiéndolo y
apagándolo alternativamente, se recomienda al usuario
corregir la interferencia mediante uno de los siguientes
procedimientos:
• Cambie la orientación o la ubicación de la antena
receptora.
• Aumente la distancia entre el equipo y el receptor.
• Conecte el equipo a un tomacorriente de un circuito
distinto de aquel al que está conectado el receptor.
• Solicite consejo al distribuidor o a un técnico calificado
para obtener ayuda.
VARIACIÓN EN EL TAMAÑO DE LA
IMAGEN: Una ligera variación en el
tamaño de la imagen es normal
cuando usted ajusta CONT RAST
(Contraste) o BRIGHTNESS (Brillo).
Especificaciones
El diseño y las especificaciones están sujetos a
cambio sin aviso previo.
Fuente de alimentación CA 120 V, 60 Hz
Consumo de energía 75 W
Dimensiones (Ancho x
Alto x Profundidad):
Peso 48.5 lb (22 kg)
CRT 20" (508 mm)
Salida de audio 3 W x 2
Sistema de TV NTSC-M, ATSC
Cobertura de canale s VHF 2-13, UHF 14-69, CATV 1-125,
Impedancia de la antena 75 ohmios
Accesorio Control remoto
23.2” x 18.0” x 18.7”
(590 mm x 457 mm x 475 mm)
CADTV 1-135, DTV 2-69
62
www.insignia-products.com
Page 63

Televisor Insignia NS-F20TV
Advertencia de la FCC
Cualquier cambio o modificación que no esté aprobado
expresamente por la parte responsable por el cumplimiento
con el reglamento de FCC puede anular la autoridad del
usuario para operar el equipo.
Certificación de seguridad de DHHS y FDA
Este reproductor está hecho y probado para cumplir con los
estándares de seguridad de los requisitos del FCC y con el
rendimiento de seguridad del
Departamento Estadounidense de Salud y Servicios
Humanos, y también con los estándares de rendimiento de
radiación del FDA 21 CFR, subcapítulo J.
Declaración del ICES-003 de Canadá
Este aparato digital de Clase B cumple con el ICES-003
canadiense.
Declaración RSS 310
Para reducir el potencial de interferencia de radio a otros
usuarios, el tipo de antena y su ganancia deben ser elegidos
de tal forma que la potencia radiada equivalente (EIRP) no
sea más que la permitida para una comunicación exitosa.
Derechos de reproducción
© 2007 Insignia. Insignia y el logotipo de Insignia son
marcas de comercio de Best Buy Enterprise Services, Inc.
Otras marcas y nombres de productos son marcas
comerciales o marcas registradas de sus dueños
respectivos. Las especificaciones y características están
sujetas a cambio sin aviso previo u obligación.
Para reparación y soporte llame al (877) 467-4289.
www.insignia-products.com
63
Page 64

Televisor Insignia NS-F20TV
64
www.insignia-products.com
Page 65

Televisor Insignia NS-F20TV
Garantía
Garantía limitada de un año
Insignia Products (“Insignia”) le garantiza a usted, el
comprador original de este nuevo NS-F20TV (“Producto”),
que éste se encontrará libre de defectos de material o de
mano de obra en su fabricación original por un periodo de un
(1) año a partir de la fecha de compra del Producto (“Período
de Garantía”). Este Producto debe ser comprado en un
distribuidor autorizado de productos Insignia y empacado
con esta declaración de garantía. Esta garantía no cubre
Productos reacondicionados. Si notifica a Insignia durante el
Período de Garantía sobre un defecto cubierto por esta
garantía que requiere reparación, los términos de esta
garantía se aplican.
¿Cuánto dura la garantía?
El Período de Garantía dura por 1 año (365 días) a partir de
la fecha en que compró el Producto. La fecha de compra se
encuentra impresa en el recibo que recibió con el Producto.
¿Qué es lo que cubre esta garantía?
Durante el Período de Garantía, si un centro de reparación
autorizado de Insignia concluye que la fabricación original
del material o la mano de obra del Producto se encuentran
defectuosos Insignia (cómo su opción exclusiva): (1)
reparará el Producto con repuestos nuevos o
reacondicionados; o (2) reemplazará el Producto con uno
nuevo o con uno reacondicionado con repuestos
equivalentes. Los Productos y repuestos reemplazados bajo
esta garantía se volverán propiedad de Insignia y no se le
regresarán a usted. Si se requiere la reparación de
Productos o partes después de que se vence el Período de
Garantía, usted deberá pagar todos los costos de mano de
obra y de repuestos. Esta garantía estará vigente con tal que
usted sea el dueño de su producto Insignia durante el
periodo de garantía. El alcance de la garantía se termina si
usted vende o transfiere el producto.
¿Cómo se obtiene la reparación de garantía?
Si ha comprado el Producto en una tienda de ventas, lleve
su recibo original y el Producto a la tienda en donde lo
compró. Asegúrese de que vuelva a colocar el Producto en
su empaque original o en un empaque que provea la misma
protección que el original. Si compró el Producto en un sitio
Web, envíe por correo su recibo original y el Producto a la
dirección postal listada en el sitio Web. Asegúrese de
colocar el Producto en su empaque original o en un
empaque que provea la misma protección que el original.
¿En dónde es válida la garantía?
Esta garantía sólo es válida al comprador original del
producto en los Estados Unidos y en Canadá.
¿Qué es lo que no cubre la garantía?
Esta garantía no cubre:
• Capacitación del cliente
• Instalación
• Ajuste de configuración
• Daños cosméticos
• Daños debido a actos de la naturaleza, tal cómo rayos
• Accidentes
• Mal uso
•Abuso
• Negligencia
• Uso comercial
• Modificación de alguna parte del Producto, incluyendo
la antena
Esta garantía tampoco cubre:
• Daño debido al uso o mantenimiento incorrecto
• La conexión a una fuente de voltaje incorrecta
• El intento de reparación por alguien que no sea una
compañía autorizada por Insignia para reparar el
Producto
• Productos vendidos tal cual (en el estado en que se
encuentran) o con todas sus fallas
• Productos consumibles, tal cómo fusibles o baterías
• Productos en los cuales el número de serie asignado
en la fábrica ha sido alterado o removido.
EL REEMPLAZO DE REP ARACIÓN SEGÚN PROVISTO
BAJO ESTA GARANTÍA ES SU ÚNICO RECURSO.
INSIGNIA NO SERÁ RESPONSABLE POR DAÑOS
INCIDENTALES O CONSECUENTES DEBIDO AL
INCUMPLIMIENTO DE CUALQUIER GARANTÍA EXPRESA
O IMPLÍCITA RELACIONADA CON ESTE PRODUCTO ,
INCLUYENDO PERO SIN LIMITARSE A LA PÉRDIDA DE
INFORMACIÓN, LA PÉRDIDA DE NEGOCIOS O DE
GANANCIAS. INSIGNIA PRODUCTS NO HACE NINGUNA
OTRA GARANTÍA EXPRESA E IMPLÍCITA RELACIONADA
A ESTE PRODUCTO, INCLUYENDO PER O SIN
LIMITARSE A, CUALQUIER GARANTÍ A IMPLÍCITA DE O
CONDICIONES DE COMERCIALIZACIÓN O IDONEIDAD
PARA UN USO PARTICULAR, ESTÁN LIMITADAS EN
DURACIÓN AL PERÍODO DE GARANTÍA DECLARADO
ANTERIORMENT E Y NINGUNA GARANTÍA YA SEA
EXPRESA O IMPLÍCITA SE APLICARÁ DESPUÉS DEL
PERÍODO DE GARANTÍA. ALGUNOS ESTADOS,
PROVINCIAS Y JURISDICCIONES NO PERMITEN
RESTRICCIONES EN CUANTO A LA DURACIÓN DE UNA
GARANTÍA IMPLÍCITA, ASÍ QUE LA RE ST R ICCIÓN
ANTERIOR PUEDE NO APLICARSE EN SU CASO. ESTA
GARANTÍA LE DA DERECHOS LEGALES ESPECÍFICOS,
Y USTED PUEDE POSEER OTROS DERECHOS QUE
VARÍAN DE ESTADO A ESTADO, O DE PROVINCIA A
PROVINCIA.
www.insignia-products.com
65
Page 66

Televisor Insignia NS-F20TV
66
www.insignia-products.com
Page 67

Televisor Insignia NS-F20TV
www.insignia-products.com
67
Page 68

Distributed by Insignia™ Products
Distribué par Insignia™ Products
Distribuido por Insignia™ Products
7601 Penn Avenue South
Richfield, MN USA 55423-3645
www.Insignia-Products.com
© 2007 Insignia™ Products
All rights reserved. All other products and brand names are trademarks of their respective owners.
© 2007 produits Insignia™
Tous droits réservés. T ous les autres produits ou noms de marques sont des marques de commerce qui appartiennent à leurs propriétaires respectifs.
© 2007 productos Insignia™
Todos los derechos reservados. Todos los demás productos y marcas son marcas comerciales de sus respectivos dueños.
R1
 Loading...