

Page 1

Two-Way Radio | Radio Bidireccional
NS-F1112
Page 2

Page 3

Insignia NS-F111 2 Two-Way Radio
Contents
Introduction . . . . . . . . . . . . . . . . . . . . . . . . . . . . . . . . . . . . . . . .1
Features . . . . . . . . . . . . . . . . . . . . . . . . . . . . . . . . . . . . . . . . . . 2
Setting up your radio. . . . . . . . . . . . . . . . . . . . . . . . . . . . . . . . .5
Using your radio . . . . . . . . . . . . . . . . . . . . . . . . . . . . . . . . . . . .7
Maintaining your radio. . . . . . . . . . . . . . . . . . . . . . . . . . . . . . .14
Troubleshooting. . . . . . . . . . . . . . . . . . . . . . . . . . . . . . . . . . . .15
Specifications . . . . . . . . . . . . . . . . . . . . . . . . . . . . . . . . . . . . .15
Español. . . . . . . . . . . . . . . . . . . . . . . . . . . . . . . . . 22
Introduction
Congratulations on your purchase of a high-quality Ins ig nia produ ct .
Your NS-F1112 represents the state of the art in two-way radio design
and is designed for reliable and trouble-free performance.
This guide explains how to correctly operate and get the best
performance from your radio. Read this user guide carefully before
using your radio, then keep it with your radio for quick reference.
Verify that the packaging contains:
• 2 two-way radios
• 2 belt clips
• Dual desk charger
• AC adapter
• User guide
If any item is missing or damaged, contact Insignia at
(877) 467-4289. Keep the box and packing materials so that you can
store or transport your radio.
www.insignia-products.com
1
Page 4

Features
• 22 channels
• Channel scan
• Auto squelch
• Auto battery save
• Keypad lock
• Roger beep
• Microphone/Headphone jacks
• Five call alerts
• 121 Privacy codes
• 3 levels of VOX
• NOAA weather radio
• Weather alert
•Backlit display
• Silent operation
•Monitor
Insignia NS-F1112 Two-Way Radio
2
www.insignia-products.com
Page 5
Insignia NS-F1112 Two-Way Radio
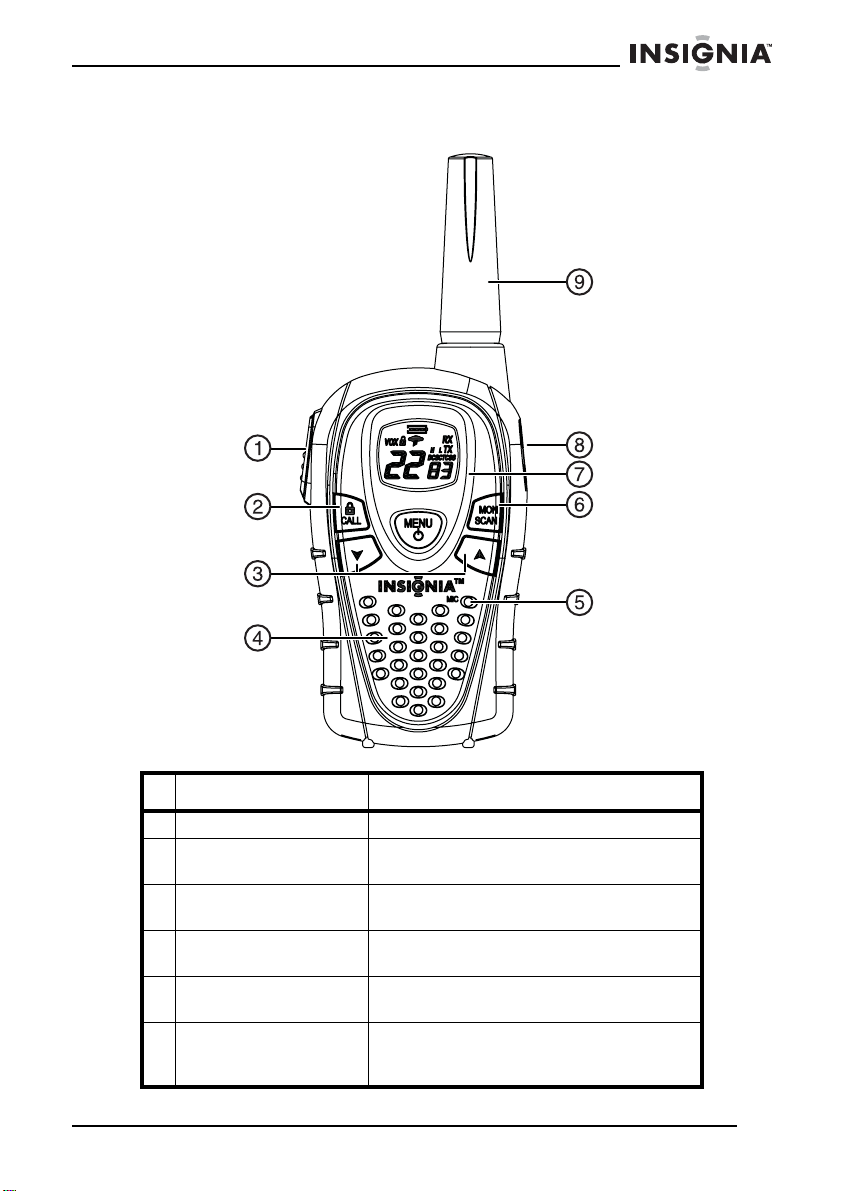
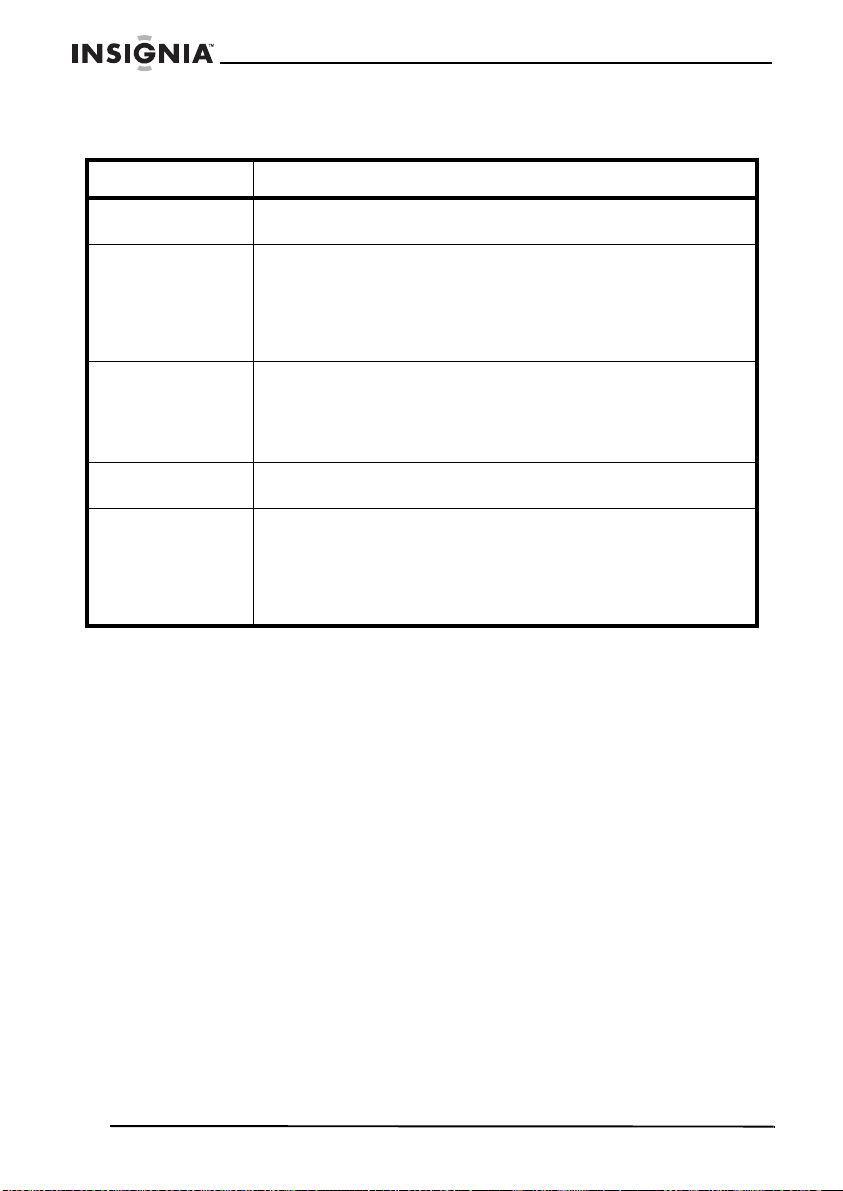
Controls and buttons
Component Description
1 PTT button • Press and hold to transmit.
2 Call/Lock button • Press to send a call alert signal.
• Press and hold to lock the key pad.
3 Up and Down button • Adjust the volume up and down.
• Make adjustment in the me n u.
4 Speaker Provides sound when e xternal spea k ers
are not plugged in.
5 Microphone Talk into the microphone while pressing
the PTT button.
6 Monitor/Scan button • Press to scan.
• Press and hold to monitor channel
activity.
www.insignia-products.com
3
Page 6

7 Power/Menu button • Press to access the menu.
8 External speaker/
9 Antenna Sends and receives the radio signals.
Display
Insignia NS-F1112 Two-Way Radio
Component Description
• Press and hold to turn on or turn
off the radio.
microphone jacks
Plug in an external speaker and
microphone or headset.
2
1
10
3
4
8
9
6
5
7
Indicator Indicates
1 Key pad lock Key lock is turned on.
2 Battery level The battery level.
3 Receive The radio is receiving a
4 Transmit The radio is sending a
5 Transmit power level The transmit power setting.
6 Privacy code (CTCSS/DCS) The privacy code setting.
7 Privacy code (oF
8 Channel The channel (1-22 on
~38/oF~83 The user privacy code
transmission.
transmission.
setting.
GMRS/FRS band or 1-10 on
WX band).
4
www.insignia-products.com
Page 7
Insignia NS-F1112 Two-Way Radio
Indicator Indicates
9 NOAA weather (WX) band The radio is switched to
10 VOX VOX is active.
Setting up your radio
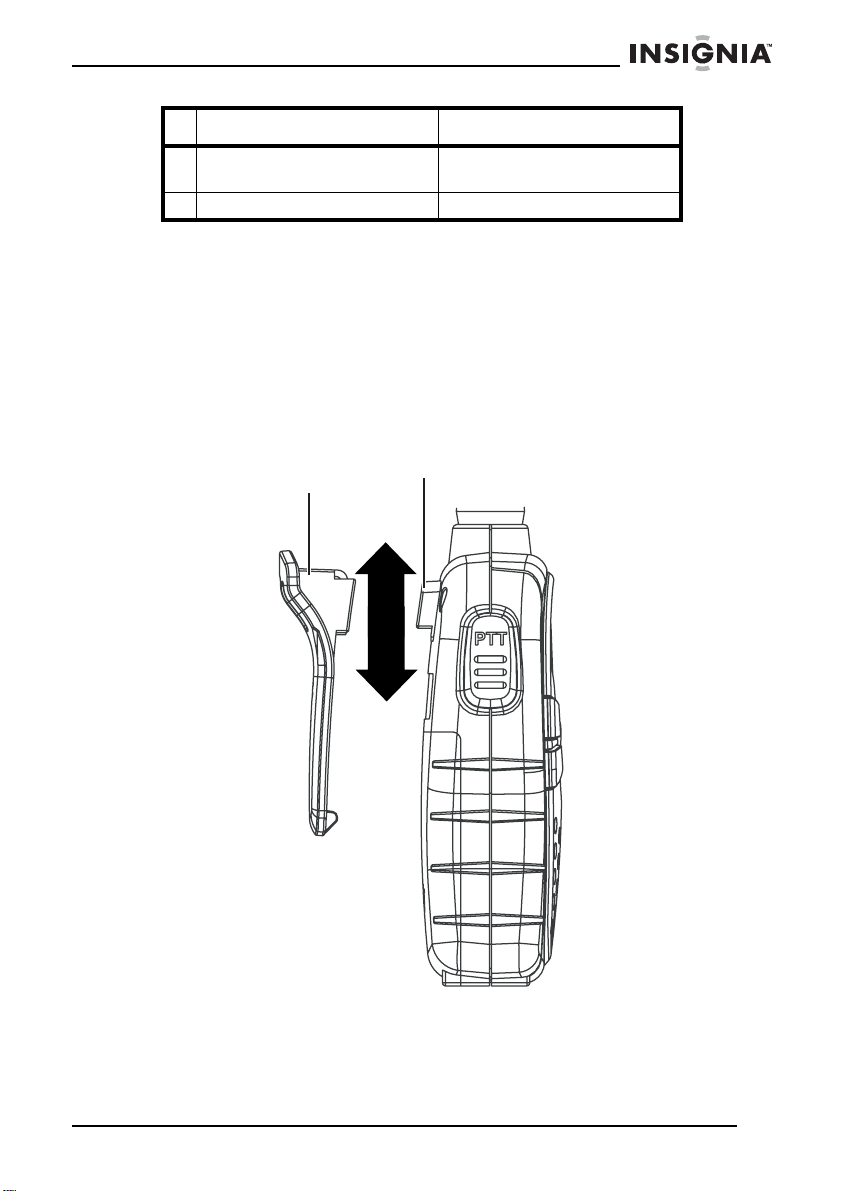
Installing the belt clip
To install the belt clip:
• Slide the clip up into the slot on the back of the radio until the
belt clip latch clicks.
weather radio mode.
Belt clip
lock tab
To remove the belt clip:
• Gently slide the belt clip down toward the bottom of the radio.
Belt clip latch
www.insignia-products.com
5
Page 8
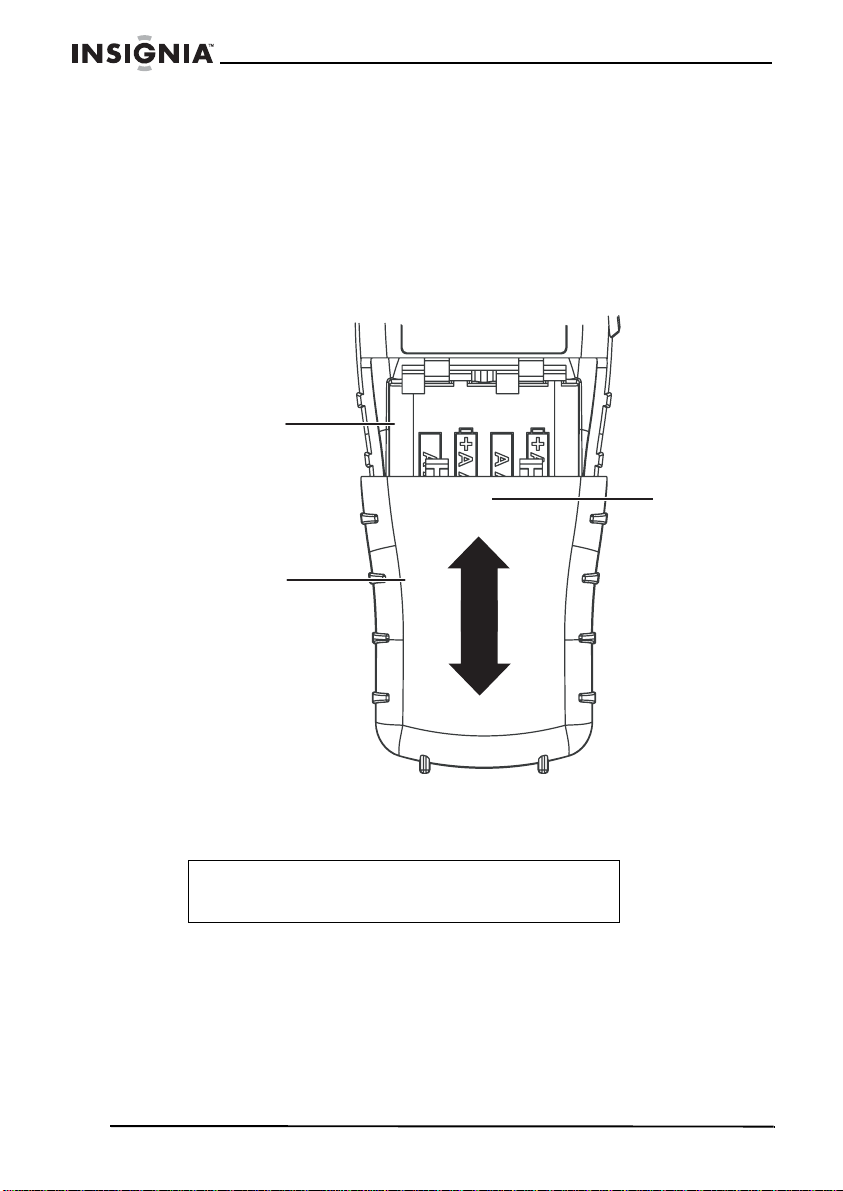
Installing Batteries
Your radio operates with either four AAA alkaline batteries or an NiMH
rechargeable battery pack.
To install the batteries:
1 Remove the belt clip by sliding it off of the radio.
2 Remove the battery cover by pressing down on the top center and
sliding it down from the radio.
Battery
compartment
Battery
compartment
cover
Insignia NS-F1112 Two-Way Radio
Press here
and push
down to open
3 Insert four AAA batteries or the battery pack. Make sure that the +
and – symbols on the batteries or battery pack align with the + and
– symbols in the battery compartment.
Caution
Installing the batteries incorrectly will prevent the radio
from operating and can damage the radio.
4 Replace the battery cover.
5 Replace the belt clip.
6
www.insignia-products.com
Page 9

Insignia NS-F1112 Two-Way Radio
Charging the battery pack
Your radio can use a rechargeable NiMH battery pack which can be
recharged by inserting the AC adapter into the radio charge jack or by
using the optional AC desktop charger. Initial charge time is 24 hours.
Charge time is about 12 hours thereafter. Charge the battery pack
when the low battery icon flashes on the display. Remove the radio
from the charger when the battery pack is charged.
To charge the battery pack using the optional desktop charger:
1 Connect the AC adapter into an AC wall outlet.
2 Insert the adapter jack into the desktop charger jack.
3 Place the radio into the desktop charger slot. The desktop charger
lights up to indicate the battery pack is charging.
Caution
Use only the batteries or the NiMH battery pack as
indicated in this manual.
Do not attempt to charge alkaline batteries or any
batteries or battery packs other than the ones
indicated in this manual. This may cause leakage and
damage the radio.
For long term storage of the radio, turn off the radio
and remove the batteries.
Using the battery level indicator
Your radio has a battery level indicator that shows the battery level.
The greater the number of bars visible, the stronger the battery level.
When the battery level is low, the indicator does not have any bars
and flashes to indicate your batteries should be replaced or
recharged.
Using your radio
Turning the radio on and off
To turn the radio on or off:
• Press the Power/Menu button for more than three seconds.
While the radio is turning on, you will hear 2 beeps with
different tones. The LCD briefly displays all icons and shows
the last channel selected.
www.insignia-products.com
7
Page 10

Adjusting the volume
To adjust the volume:
• Press the Up button to increase the volume.
• Press the Down button to decrease the volume.
Communicating
To communicate, all radios in your group must be set to the same
channel and privacy code.
To transmit messages:
• Press and hold the PTT button and speak in a normal voice
into the microphone. For maximum clarity, hold the radio two to
three inches from your mouth. The TX icon appears
continuously on the display when transmitting.
To receive messages:
• Release the PTT button. The RX icon appears on the display
when your radio is receiving a transmission.
Note
Your radio is designed to give you maximum range
under the following conditions:
•Over water
• In rural areas without obstructions
• In flat areas where you can see the other person
To get the maximum range from your radio:
• Use fresh or fully charged batteries
• Use a GMRS channel. FRS channels are restricted
by the FCC.
• Set the radio to use Hi power.
Insignia NS-F1112 Two-Way Radio
Monitoring
Using the monitor function, you can hear noise so you can adjust the
volume level of the radio when it is not receiving a signal. You can
also use the monitor function to check for any activity on the current
channel before transmitting.
To turn the monitor function on and off:
• Hold down the Monitor/Scan button for three seconds.
8
www.insignia-products.com
Page 11

Insignia NS-F1112 Two-Way Radio
Using a call alert
Your radio can transmit a call alert for a fixed length of time.
To send a call alert:
• Press the Call/Lock button. The TX icon appears while
transmitting a call alert. The alert can be heard on the speaker.
To choose a call alert:
1 Press the Power/Menu button until a CA icon appears
accompanied by the current call alert setting.
2 Use the Up or Down button to select one of the five alerts.
3 Press the PTT button to save your selection.
Scanning
Your radio can scan all of the 22 channels to check for any activity.
When you are scanning, the SCAN icon appears on the display.
To scan for activity:
• Press the Monitor/Scan button. Your radio scans each of the
22 channels and stops on any active channel for about four
seconds before resuming the scan.
To stop scanning:
• Press the Monitor/Scan button.
To stop scanning on a channel and transmit:
• Press the PTT button to transmit on an active channel.
To resume scanning:
• Press the Monitor/Scan button.
Locking the keypad
Lock the keypad to avoid accidentally changing the radio settings.
To lock the keypad:
• Press Call/Lock for four seconds. The Key Lock icon appears
on the display. When the keypad is locked, the PTT button and
the Call/Lock buttons are active.
To unlock the keypad:
• Press the Call/Lock button for four seconds.
www.insignia-products.com
9
Page 12
Changing channels
Your radio has 22 channels available.
To change channels:
1 With the radio on, press the Power/Menu button until the current
channel segment flashes.
2 Use the Up or Down button to change the channel.
3 Press the PTT button to save the new channel.
Setting pr ivacy code s
Your radio has 121 privacy codes available. You can select a different
privacy code for each channel.
To select a privacy code for the current channel:
1 Press the Power/Menu button twice.
2 Press the Up or Down buttons to select one of the 38 CTCSS
privacy codes.
-OR-
Press the Power/Menu button again and the Up or Down button
to select one of the 83 DCS privacy codes. The Privacy Code icon
on the display indicates whether you set your privacy code in
CTCSS or DCS mode.
3 Press the PTT button to confirm the selection.
Insignia NS-F1112 Two-Way Radio
Note
If you select any CTCSS privacy code, any pre-selected
DCS privacy code is cancelled and vice-versa. Selecting a
privacy code of oF disables the privacy feature. To
communicate between two radios, all radios in your group
must be set to the same channel and privacy code
selections.
Selecting the transmit (TX) power level
Your radio has two power level settings.
To select the power level on channels 1~7 and 15~22:
1 Press the Power/Menu button until a Pr icon appears blinking on
the display.
2 Press the Up or Down buttons to select TRANSMIT POWER
LEVEL icon (H: Hi/L: Lo).
10
www.insignia-products.com
Page 13

Insignia NS-F1112 Two-Way Radio
3 Press the PTT button to confirm the selection.
Notes
When the PTT button is pressed during the low battery level
condition, the TX Power automatically switches from Hi(H)
to Lo(L) level.
You cannot adjust the power setting on the FRS channels
(8~14). They are set to Low power per FCC regulations.
Setting the VOX level
Your radio has 3 VOX level settings: (oF/1/2/3).
To set VOX:
1 Press the Power/Menu button until the display shows VOX
blinking and on the right of the CHANNEL NUMBER display, an
oF icon appears.
2 Select 1, 2, or 3 by pressing the Up or Down buttons, then
pressing the PTT key.
VOX is more sensitive on the 1 setting than on the 3 setting.
To turn VOX off:
1 Press the Power/Menu button until the display shows VOX
blinking and on the right of the CHANNEL NUMBER display , a 1,2
or 3 icon appears.
2 Select oF by pressing the Up or Down button, then pressing the
PTT key.
Adjusting the roger beep tone
Whenever you release the PTT button, a roger beep tone may be
transmitted to let your friends know you are finished talking.
To turn the roger beep tone on:
1 Press Power/Menu button until the rb icon appears on the display.
2 Press the Up or Down button to set the roger beep tone on.
3 Press PTT to save your selection.
To turn the roger beep tone off:
1 Press the Power/Menu button until the display shows the rb icon
blinking, while on the right of the rb, an on icon appears.
2 Select oF by pressing the Up or Down buttons, then pressing the
PTT button.
www.insignia-products.com
11
Page 14

Using silent operation mode
Your radio has a silent operation mode. In this mode, all beeps and
tones are disabled.
To turn the silent operation mode on:
1 Press the Power/Menu button until the display shows a bP icon
and on the right of the bP icon, an on icon appears.
2 Select oF by pressing the Up or Down buttons, then pressing the
PTT or Power/Menu button.
To turn the silent operation mode off:
1 Press the Power/Menu button until the display shows a bP icon
and on the right of the bP icon, an oF icon appears.
2 Select on by pressing the Up or Down buttons, then pressing the
PTT or Power/Menu button.
Using NOAA weather radio
Your radio has a NOAA weather radio function that lets you receive
weather reports from designated NOAA stations.
To turn the NOAA weather (WX) radio on:
1 Press the Power/Menu button until the WX Band icon appears
and an oF icon appears.
2 Select on by pressing the Up or Down button, then pressing the
Power/Menu button to confirm. The d ispla y sho ws the current WX
band channel setting and the WX band icon.
3 While in WX band mode, press the Power/Menu button once,
then press the Up or Down button to select one of the 10 NOAA
weather (WX) band channels.
Insignia NS-F1112 Two-Way Radio
12
To turn the NOAA WEATHER RADIO off:
• Press the PTT button. The current GMRS/FRS radio setting is
displayed and the WX BAND icon goes off.
www.insignia-products.com
Page 15

Insignia NS-F1112 Two-Way Radio
Using weather alert
Your radio has a NOAA weather alert function that lets you
automatically receive weather alerts from designated NOAA stations.
To turn the NOAA weather (WX) alert on:
1 Press the Power/Menu button twice while in WX Band. The
display shows an AL icon, while on the right of the AL icon, a
blinking oF icon appears.
2 Select on by pressing the Up or Down buttons, then pressing the
PTT or Power/Menu button. The radio returns to WX band and
the WX band icon blinks.
If the radio receives a weather alert signal from a designated
NOAA station while in GMRS/FRS radio mode, the radio beeps for
ten seconds while an AL and In icon appear on the display and
the radio automatically goes to WX band.
If you press any of the buttons while the radio is beeping and it is in
GMRS/FRS radio mode, the radio automatically goes to WX band.
To turn the NOAA weather (WX) alert off:
1 Press the Power/Menu button twice while in WX band. The
display shows an AL icon, while on the right of the AL icon, a
blinking on icon appears.
2 Select oF by pressing the Up or Down buttons, then pressing the
PTT or Power/Menu button.
www.insignia-products.com
13
Page 16

Insignia NS-F1112 Two-Way Radio
Using an external speaker and microphone or headset
Your radio can be used with an optional external speaker and
microphone or headset.
To use an external speaker and microphone or headset:
1 Insert the plug( s) into the sp eaker and microph one jacks.
Jacks
2 Place the earbud into your ear and adjust the microphone to the
level you want.
Maintaining your radio
• Do not use alcohol or cleaning solutions to clean the radio.
• Do not immerse the radio in water.
• Use a soft damp cloth to clean the radio.
• Dry the radio with a dry lint-free cloth should it get wet.
• Turn off the radio and remove the batteries during long-term
storage.
14
www.insignia-products.com
Page 17

Insignia NS-F1112 Two-Way Radio
Troubleshooting
Problem Solution
No power • Check the battery installation
Cannot rece ive
messages
Radio is not
responding to
button presses
Display is dim • Recharge or replace the batteries.
Charger not
functioning
• Replace the batteries
• Make sure that the radios have the same channel and
privacy code settings.
• Make sure that you are within range of the other
transceivers.
• Buildings and other obstructions may interfere with your
communication.
• Make sure that the key lock is not on.
• Radio might need to be reset. Turn the radio off then on.
• Make sure that the accessory microphone is set
properly.
• Contacts on the bottom of the radio may require
cleaning.
• Make sure that the outl et that the char ger is plugged int o
is functioning properly.
• Check that the batteries are installed into the radio
properly.
Specifications
Specification
Channels: 22 channels
Privacy codes: 121
NOAA weather (WX) band channels: 10
Operating Frequency: UHF 462.5500 ~467.7125 MHz
Power Source: four AAA alkaline or 4.8 V rechargeable Ni-MH battery
pack
GMRS/FRS Frequency Chart (MHz)
Channel number Channel f requency
1 462.5625
2 462.5875
3 462.6125
4 462.6375
www.insignia-products.com
15
Page 18

Insignia NS-F1112 Two-Way Radio
Channel number Channel f requency
5 462.6625
6 462.6875
7 462.7125
8 467.5625
9 467.5875
10 467.6125
11 467.6375
12 467.6625
13 467.6875
14 467.7125
15 462.5500
16 462.5750
17 462.6000
18 462.6250
19 462.6500
20 462.6750
21 462.7000
22 462.7250
Channels 8-14 are low-power FRS license free channels.
NOAA Weather (WX) Radio Frequency Chart (MHz)
Channel number Channel f requency
1162.550
2162.400
3162.475
4162.425
5162.450
6162.500
7162.525
8161.650
9161.775
10 163.275
Channels 8, 9, and 10 are designated Canadian Marine frequencies.
16
www.insignia-products.com
Page 19

Insignia NS-F1112 Two-Way Radio
Privacy Codes Frequency Chart (MHz)
Privacy codes can be programmed for use on any channel.
Code Frequency
167.0
271.9
374.4
477.0
579.7
682.5
785.4
888.5
991.5
10 94.8
11 97.4
12 100.0
13 103.5
14 107.2
15 110.9
16 114.8
17 118.8
18 123.0
19 127.3
20 131.8
21 136.5
22 141.3
23 146.2
24 151.4
25 156.7
26 162.2
27 167.9
28 173.8
29 179.9
30 186.2
31 192.8
32 203.5
www.insignia-products.com
17
Page 20

Insignia NS-F1112 Two-Way Radio
Code Frequency
33 210.7
34 218.1
35 225.7
36 233.6
37 241.8
38 250.3
DCS Privacy Code Chart
Privacy codes can be programmed for use on any channel.
No. Code No. Code No. Code
1 023 29 174 57 445
2 025 30 205 58 464
3 026 31 223 59 465
4 031 32 226 60 466
5 032 33 243 61 503
6 043 34 244 62 506
7 047 35 245 63 516
8 051 36 251 64 532
9 054 37 261 65 546
10 065 38 263 66 565
11 071 39 265 67 606
12 072 40 271 68 612
13 073 41 306 69 624
14 074 42 311 70 627
15 114 43 315 71 631
16 115 44 331 72 632
17 116 45 343 73 654
18 125 46 346 74 662
19 131 47 351 75 664
20 132 48 364 76 703
21 134 49 365 77 712
22 143 50 371 78 723
23 152 51 411 79 731
18
www.insignia-products.com
Page 21

Insignia NS-F1112 Two-Way Radio
No. Code No. Code No. Code
24 155 52 412 80 732
25 156 53 413 81 734
26 162 54 423 82 743
27 165 55 431 83 754
28 172 56 432
www.insignia-products.com
19
Page 22

FCC
Insignia NS-F1112 Two-Way Radio
Warning
This equipment may generate or use radio frequency
energy. Changes or modifications to this equipment
may cause harmful interference unless the
modifications are expressly approved in this manual.
The user could lose the authority to operate this
equipment if an unauthorized change or modification is
made.
Warning
Exposure To Radio Frequency Energy
Your Insignia radio is designed to comply with the
following national and international standards and
guidelines regarding exposure of human beings to
radio frequency electromagnetic energy:
• United States Federal Communications
Commission, Code of Federal Regulations: 47 CFR
part 2 sub-part J
• American National Standards Institute (ANSI)/
Institute of Electrical & Electronic Engineers (IEEE)
C95. 1-1992
• Institute of Electrical and Electronic Engineer (IEEE)
C95. 1-1999 Edition
• National Council on Radiation Protection and
Measurements (NCRP) of the United States, Report
86, 1986
• International Commission on Non-lonizing Radiation
Protection (ICNIRP) 1998
To control your exposure and ensure compliance with
the general population or uncontrolled environment
exposure limits, transmit no more than 50% of the
time. The radio generates measurable RF energy
exposure only when transmitting.
20
www.insignia-products.com
Page 23

Insignia NS-F1112 Two-Way Radio
Regulatory informa tion: FCC Part 15
This equipment has been tested and found to comply
with the limits for a Class B digital device, pursuant to
Part 15 of the FCC Rules. These limits are designed to
provide reasonable protection against harmful
interference when the radio is operated in a residential
installation. This radio generates, uses, and can
radiate radio frequency energy and, if not installed and
used in accordance with this manual, may cause
harmful interference to radio communications.
However, there is no guarantee that interference will
not occur in a particular installation. If this radio does
cause harmful interference to radio or television
reception, which can be determined by turning the
radio off and on, the user is encouraged to try to
correct the interference by one or more of the following
measures:
• Reorient or relocate the receiving antenna.
• Increase the separation between the radio and
receiver.
• Consult the dealer or an experienced radio
technician for help.
GMRS License
The NS-F1112 operates on GMRS (General Mobile
Radio Service) frequencies which require an FCC
(Federal Communications Commission) license. You
must be licensed prior to operating on channels 1 - 7 or
15 - 22, which comprise the GMRS channels of the
NS-F1112. Serious penalties could result for
unlicensed use of GMRS channels, in violation of FCC
rules, as stipulated in the Communications Act's
Sections 501 and 502 (amended).
You will be issued a call sign by the FCC which should
be used for station identification when operating the
radio on GMRS channels. You should also cooperate
by engaging in permissible transmissions only,
avoiding channel interference with other GMRS users,
and being prudent with the length of their transmission
time.
To obtain a license or ask questions about the license
application, contact the FCC at 1-888-CALL FCC or go
to the FCC's website: www.fcc.gov/services/personal/
generalmobile/licensing.html
Legal notices
© 2006 Insignia. Insignia and the Insignia logo are trademarks of Best Buy Enterprise
Services, Inc. Other brands and product names are trademarks or registered
trademarks of their respective holders. Specifications and features are subject to
change without notice or obligation.
For service and support call (877) 467-4289.
www.insignia-products.com
21
Page 24

NS-F1112 de Insignia
Contenido
Introducción . . . . . . . . . . . . . . . . . . . . . . . . . . . . . . . . . . . . . . 22
Características . . . . . . . . . . . . . . . . . . . . . . . . . . . . . . . . . . . .23
Preparación de su radio . . . . . . . . . . . . . . . . . . . . . . . . . . . . .27
Uso de su radio. . . . . . . . . . . . . . . . . . . . . . . . . . . . . . . . . . . . 29
Mantenimiento de su radio . . . . . . . . . . . . . . . . . . . . . . . . . . . 37
Localización y Corrección de Fallas . . . . . . . . . . . . . . . . . . . .38
Especificaciones . . . . . . . . . . . . . . . . . . . . . . . . . . . . . . . . . . .38
Introducción
Felicitaciones por su compra de un producto de alta calidad de
Insignia. Su NS-F1112 representa el más moderno diseño de radios
bidireccionales y está concebido para brindar un rendimiento
confiable y sin problemas.
Esta guía explica cómo operar correctamente y obtener el mejor
rendimiento de su radio. Lea esta guía del usuario cuidadosamente
antes de instalar su radio, luego guárdela cerca de su radio para una
referencia rápida.
Verifique que el paquete contenga lo siguiente:
• 2 radios bidireccionales
• 2 clips de cinturón
• Cargador doble de escritorio
• Adaptador de CA
• Guía del usuario
Si algún artículo falta o está dañado, comuníquese con Insignia al
(877) 467-4289. Guarde la caja y los materiales de empaque en caso
de que necesite almacenar o transportar su radio.
Radio Bidireccional NS-F1112 de Insignia
Radio Bidireccional
22
www.insignia-products.com
Page 25

Radio Bidireccional NS-F1112 de Insignia
Características
• 22 canales
• Rastreo de canales
• Silenciador automático
• Ahorro automático de batería
• Bloqueo de teclado
• Roger beep (Pitido Roger)
• Tomas para micrófono/auriculares
• Cinco alertas de llamada
• 121 Códigos de privacidad
• 3 niveles de VOX
•Radio NOAA
• Alerta meteorológica
• Resistente al agua
• Pantalla retroiluminada
• Operación silenciosa
•Monitor
www.insignia-products.com
23
Page 26

Controles y botones
Radio Bidireccional NS-F1112 de Insignia
24
Componente Descripción
1 Botón PTT • Mantenga presionado para
2 Botón Llamar/
Bloquear
3 Botón Arriba y Abajo • Sube y baja el volumen.
4 Altavoz Provee sonido cuando no se han
5 Micrófono Hable con el mic rófono mientras
transmitir.
• Presione para enviar una señal de
alerta de llamada.
• Mantenga presionado para
bloquear el teclado.
• Hace ajus tes en el menú .
conectado altavoces externos.
presiona el botón PTT (Presione para
Hablar).
www.insignia-products.com
Page 27

Radio Bidireccional NS-F1112 de Insignia
Componente Descripción
6 Botón Monitorear/
Rastrear
7 Botón Encendido/
Menú
8 Tomas para altavoz
externo/micrófono
9 Antena Envía y recibe las señales de radio.
• Presione para rastrear.
• Mantenga presionado para
monitorear la actividad del canal.
• Presione para acceder el menú.
• Mantenga presionado para
encender o apagar el radio.
Conecte un altavoz externo y un
micrófono o auricular.
Pantalla
2
1
10
3
4
8
9
6
5
7
Indicador Indica
1 Bloqueo de teclado El bloqueo de teclado está
2 Nivel de batería El nivel de batería.
3 Recibir El radio está recibiendo una
4 Transmitir El radio está enviando una
5 Nivel de potencia de
transmisión
6 Código de privacidad
(CTCSS/DCS)
activo.
transmisión.
transmisión.
El ajuste de la potencia de
transmisión.
El ajuste del código de
privacidad.
www.insignia-products.com
25
Page 28

Radio Bidireccional NS-F1112 de Insignia
Indicador Indica
7 Código de privacidad
(oF~38/oF~83
8 Canal El canal (1-22 en la banda
9 Banda de radio NOAA (WX) El radio se encuentra en el
10 Transmisión Operada por
Voz (VOX)
El ajuste del código de
privacidad del usuario.
GMRS/FRS o 1-10 en la
banda WX).
modo de radio NOAA.
La función VOX está activa.
26
www.insignia-products.com
Page 29

Radio Bidireccional NS-F1112 de Insignia
Preparación de su radio
Instalación del clip de cinturón
Para instalar el clip de cinturón:
• Deslice el clip en la ranura en la parte de atrás del radio hasta
que el seguro del clip de cinturón hace clic.
Lengüeta
de bloqueo
del clip de
cinturón
Seguro del clip
de cinturón
Para remover el clip de cinturón:
• Cuidadosamente deslice el clip de cinturón hacia la parte de
abajo del radio.
Instalación de las Pilas
Su radio funciona ya sea con cuatro pilas alcalinas AAA o con una
batería NiMH recargable.
www.insignia-products.com
27
Page 30

Radio Bidireccional NS-F1112 de Insignia
Para instalar las pilas:
1 Remueva el clip de cinturón deslizándolo fuera del radio.
2 Remueva la cubierta de la batería presionando hacia abajo la
parte superior central y deslizándola hacia abajo del radio.
Compartimiento
compartimiento
de pilas
Cubierta del
de pilas
Presione
aquí y
empuje hacia
abajo para
abrir
3 Inserte cuatro pilas AAA o la batería recargable. V erifique que los
símbolos + y – en las pilas o la batería recargable correspondan
con los símbolos + y – en el compartimiento de las pilas.
Cuidado
Instalar las pilas incorrectamente evitará que el radio
funcione y puede dañar el radio.
4 Vuelva a colocar la cubierta de las pilas.
5 Vuelva a colocar el clip de cinturón.
Carga de la batería
Su radio puede usar una batería NiMH recargable el cual puede ser
recargado si se inserta el adaptador de CA en el toma de carga del
radio o si se usa el adaptador de CA de escritorio opcional. El tiempo
de carga inicial es de 24 horas. A partir de entonces, el tiempo de
carga será de 12 horas. Cargue la batería cuando el icono low
battery (batería baja) parpadee en la pantalla. Retire el radio del
cargador cuando la batería esté cargada.
28
www.insignia-products.com
Page 31

Radio Bidireccional NS-F1112 de Insignia
Para cargar la batería con el cargador de escritorio opcional:
1 Conecte el adaptador de CA en un tomacorriente de CA.
2 Inserte el toma adaptador en el toma del cargador de escritorio.
3 Coloque el radio en la ranura del cargador de escritorio. El
cargador de escritorio se iluminará para indicar que la batería se
está cargando.
Cuidado
Utilice solo las pilas o la batería NiMH que se indican
en este manual.
No intente cargar pilas alcalinas o cualquier otras pilas
o baterías que no sean las indicadas en este manual.
Esto puede causar goteos y daños al radio.
Para un almacenamiento de largo plazo del radio,
apáguelo y saque las pilas.
Uso del indicador de nivel de batería
Su radio cuenta con un indicador de nivel de batería que muestra el
nivel de la batería. Mientras más barras estén visibles, más fuerte
será el nivel de la batería. Cuando el nivel de la batería es bajo, el
indicador no tendrá ninguna barra y parpadeará para indicar que se
deben reemplazar las pilas o recargar la batería.
Uso de su radio
Encendido y apagado del radio
Para encender o apagar el radio:
• Presione el botón Power/Menu (Encendido/Menú) por más de
tres segundos.
Mientras el radio esté encendido, escuchará 2 pitidos de
diferentes tonos. La pantala LCD mostrará brevemente todos
los iconos y el último canal seleccionado.
Ajuste del volumen
Para ajustar el volumen:
• Presione el botón Up (Arriba) para subir el volumen.
• Presione el botón Down (Abajo) para bajar el volumen.
www.insignia-products.com
29
Page 32

Comunicación
Para comunicarse, todos los radios en su grupo deben estar en el
mismo canal y el mismo código de privacidad.
Para transmitir mensajes:
• Mantenga presionado el botón PTT (Presione para Hablar) y
hable por el micrófono con una voz normal. Para mayor
claridad, sostenga el radio a dos o tres pulgadas de su boca.
El icono TX aparece en la pantalla continuamente cuando se
transmite.
Para recibir mensajes:
• Suelte el botón PTT (Presione para Hablar). El icono RX
aparece en la pantalla cuando el radio está recibiendo una
transmisión.
Nota
Su radio está diseñado para darle el rango máximo
bajo las siguientes condiciones:
• Sobre agua
• En áreas rurales sin obstrucciones
• En áreas planas donde puede ver la otra persona
Para obtener el rango máximo de su radio:
• Utilice pilas nuevas o completamente cargadas
• Use un canal GMRS. Los canales FRS están
restringidos por la FCC.
• Ajuste el radio para usar la potencia alta.
Radio Bidireccional NS-F1112 de Insignia
Monitoreo
Por medio de la función de monitoreo, puede escuchar ruido para
que pueda ajustar el nivel de volumen del radio cuando no está
recibiendo una señal. También puede usar la función de monitoreo
para verificar que no hay actividad en el canal actual antes de
transmitir.
Para activar y desactivar la función de monitoreo:
• Mantenga presionado el botón Monitor/Scan (Monitorear/
30
Rastrear) por tres segundos.
www.insignia-products.com
Page 33

Radio Bidireccional NS-F1112 de Insignia
Uso de la alerta de llamada
Su radio puede transmitir una alerta de llamada por un periodo de
tiempo fijo.
Para enviar una alerta de llamada:
• Presione el botón Call/Lock (Llamar/Bloquear). El icono TX
aparece mientras se transmite una alerta de llamada. La alerta
puede escucharse en el altavoz.
Para elegir una alerta de llamada:
1 Presione el botón Power/Menu (Encendido/Menú) hasta que el
icono CA aparezca acompañado del ajuste actual de alerta de
llamada.
2 Utilice el botón Up (Arriba) o Down (Abajo) para seleccionar una
de cinco alerta s.
3 Presione el botón PTT (Presione para Hablar) para guardar su
selección.
Rastreo
Su radio puede rastrear todos los 22 canales para ver si hay alguna
actividad. Cuando se realice el rastreo, el icono SCAN (Rastrear)
aparece en la pantalla.
Para rastrear por actividad:
• Presione el botón Monitor/Scan (Monitorear/Rastrear). Su
radio rastrea cada uno de los 22 canales y se detiene en
cualquier canal activo por cuatro segundos antes de reanudar
el rastreo.
Para dejar de rastrear:
• Presione el botón Monitor/Scan (Monitorear/Rastrear).
Para dejar de rastrear en un canal y transmitir:
• Presione el botón PTT (Presione para Hablar) para transmitir
en un canal activo.
Para reanudar el rastreo:
• Presione el botón Monitor/Scan (Monitorear/Rastrear).
www.insignia-products.com
31
Page 34

Bloqueo del teclado
Bloquee el teclado para evitar que se cambien los ajustes del radio
accidentalmente.
Para bloquear el teclado:
• Presione el botón Call/Lock (Llamar/Bloquear) por cuatro
segundos. El icono Key Lock (Bloqueo de Teclas) aparecerá
en la pantalla. Cuando el teclado está bloqueado, el botón PTT
(Presionar para Hablar) y el Call/Lock (Llamar/Bloquear)
están activos.
Para desbloquear el teclado:
• Presione el botón Call/Lock (Llamar/Bloquear) por cuatro
segundos.
Cambio de canales
Su radio tiene 22 canales disponibles.
Para cambiar los canales:
1 Con el radio encendido, presione el botón Power/Menu
(Encendido/Menú) hasta que el segmento del canal actual
parpadee.
2 Presione el botón Up (Arriba) o Down (Abajo) para cambiar el
canal.
3 Presione el botón PTT (Presione para Hablar) para guardar el
canal nuevo.
Radio Bidireccional NS-F1112 de Insignia
Ajuste de los códigos de privacidad
Su radio tiene 121 códigos de privacidad disponibles. Puede
seleccionar un código de privacidad diferente para cada canal.
Para seleccionar un código de privacidad para el canal actual:
1 Presione el botón Power/Menu (Encendido/Menú) dos veces.
2 Presione el botón Up (Arriba) o Down (Abajo) para seleccionar
uno de los 38 código de privacidad CTCSS.
- O -
Presione nuevamente el botón Power/Menu (Encendido/Menú) y
el botón Up (Arriba) o Down (Abajo) para seleccionar uno de los
83 códigos de privacidad DCS. El icono Privacy Code (Código de
Privacidad) en la pantalla indica si seleccionó su código de
privacidad en el modo CTCSS o DCS.
32
www.insignia-products.com
Page 35

Radio Bidireccional NS-F1112 de Insignia
3 Presione el botón PTT (Presione para Hablar) para confirmar la
selección.
Nota
Si selecciona cualquier código de privacidad CTCSS,
cualquier código de privacidad DCS preseleccionado se
cancelará y viceversa. La selección de un código de
privacidad oF deshabilita la función de privacidad. Para
comunicarse entre dos radios, todos los radios en su grupo
deben seleccionar en el mismo canal y el mismo código de
privacidad.
Selección del nivel de potencia de transmisión (TX)
Su radio tiene dos ajustes del nivel de potencia.
Para seleccionar el nivel de potencia en los canales 1~7 y 15~22:
1 Presione el botón Power/Menu (Encendido/Menú) hasta que el
icono Pr parpadee en la pantalla.
2 Presione el botón Up (Arriba) o Down (Abajo) para seleccionar el
icono TRANSMIT POWER LEVEL [Nivel de Potencia de
Transmisión] (H: Hi (Alto)/L: Lo (Bajo)].
3 Presione el botón PTT (Presione para Hablar) para confirmar la
selección.
Notas
Cuando el botón PTT (Presione para Hablar) se presiona
durante una condición de nivel de batería bajo, la potencia
de transmisión TX se cambia automáticamente del nivel
Hi(H) [Alto] a Lo(L) [Bajo].
No puede ajustar el nivel de potencia de los canales FRS
(8~14). Estos están limitados a potencia baja por el
reglamento FCC.
Ajuste del nivel de VOX
Su radio tiene 3 ajustes del nivel de VO X. (oF/1/2/3).
Para ajustar el nivel de VOX:
1 Presione el botón Power/Menu (Encendido/Menú) hasta que la
pantalla muestra VOX parpadeando a la derecha del indicador de
NÚMERO DE CANAL, y aparezca el icono oF.
2 Seleccione 1, 2 ó 3 presionando los botones Up (Arriba) o Down
(Abajo) y luego presionando el botón PTT (Presion ar Para
Hablar).
La función VOX es más sensible en el ajuste 1 que en el 3.
www.insignia-products.com
33
Page 36

Radio Bidireccional NS-F1112 de Insignia
Para apagar la función VOX:
1 Presione el botón Power/Menu (Encendido/Menú) hasta que la
pantalla muestra VOX parpadeando a la derecha del indicador de
NÚMERO DE CANAL, aparecerá el icono 1, 2 ó 3.
2 Seleccione oF presionando el botón Up (Arriba) o Down (Abajo) y
presione el botón PTT (Presione para Hablar).
Ajuste del tono de pitido Roger
Cada vez que suelte el botón PTT (Presione para Hablar), se puede
transmitir un tono de pitido Roger para hacer saber a sus amigos que
ya terminó de hablar.
Para activar el tono de pitido Roger:
1 Presione el botón Power/Menu (Encendido/Menú) hasta que el
icono rb parpadee en la pantalla.
2 Presione el botón Up (Arriba) o Down (Abajo) para activar o
desactivar el tono de pitido Roger.
3 Presione el botón PTT (Presione para Hablar) para guardar su
selección.
Para desactivar el tono de pitido Roger:
1 Presione el botón Power/Menu (Encendido/Menú) hasta que la
pantalla muestra el icono rb parpadeando y a la derecha de rb
aparecerá el icono on (Encendido).
2 Seleccione oF presionando el botón Up (Arriba) o Down (Abajo) y
presione el botón PTT (Presione para Hablar).
Uso del modo de operación silencioso
Su radio cuenta con un modo de operación silencioso. En este modo,
se deshabilitan todos los pitidos y tonos.
Para activar el modo de operación silencioso:
1 Presione el botón Power/Menu (Encendido/Menú) hasta que la
pantalla muestra el icono bP con a su derecha el icono on
(Activado).
2 Seleccione oF presionando los botones Up (Arriba) o Down
(Abajo) y luego presione el botón PTT (Presionar Para Hablar) o
Power/Menu (Encendido/Menú).
Para desactivar el modo de operación silencioso:
1 Presione el botón Power/Menu (Encendido/Menú) hasta que la
pantalla muestra el icono bP con a su derecha el icono oF
(Desactivado).
34
www.insignia-products.com
Page 37

Radio Bidireccional NS-F1112 de Insignia
2 Seleccione on (Activado) presionando los botones Up (Arriba) o
Down (Abajo) y luego presione el botón PTT (Presionar Para
Hablar) o Power/Menu (Encendido/Menú).
Uso del radio NOAA
Su radio cuenta con la función de radio NOAA que le permite recibir
reportes del tiempo de estaciones NOAA asignadas.
Para activar el radio NOAA (WX):
1 Presione el botón Power/Menu (Encendido/Menú) hasta que
aparezca el icono WX Band (Banda WX) y el icono oF.
2 Seleccione on presionando el botón Up (Arriba) o Down (Abajo) y
presione el botón Power/Menú (Encendido/Menú). La pantalla
muestra el ajuste del canal actual de la banda WX y el icono de la
banda WX.
3 Mientras se encuentra en el modo de banda WX, presione el
botón Power/Menu (Encendido/Menú) una vez y luego presione
el botón Up (Arriba) o Down (Abajo) para seleccionar uno de los
10 canales de la banda NOAA (WX).
Para desactivar el RADIO NOAA:
• Oprima el botón PTT (Presione para Hablar). El ajuste actual
del radio GMRS/FRS se muestra y el icono de la BANDA WX
se apaga.
Uso de la alerta meteorológica
Su radio cuenta con una función de alerta meteorológica que le
permite recibir automáticamente alertas meteorológicas de
estaciones NOAA asignadas.
Para activar la alerta meteorológica NOAA (WX):
1 Presione dos veces el botón Power/Menu (Encendido/Menú)
mientras se encuentre en la banda WX. La pantalla muestra un
icono AL y a su derecha parpadea un icono oF (Desactivado).
2 Seleccione on (Activado) presionando los botones Up (Arriba) o
Down (Abajo) y luego presione el botón PTT (Presionar Para
Hablar) o Power/Menu (Encendido/Menú). El radio regresa a la
banda WX y el icono de banda WX parpadea.
Si el radio recibe una señal de alerta meteorológica de una
estación NOAA asignada mientras se encuentra en el modo de
radio GMRS/FRS, el radio pitará por diez segundos al mismo
tiempo que los iconos AL e In aparecen en la pantalla y el radio
cambiará automáticamente a la banda WX.
www.insignia-products.com
35
Page 38

Radio Bidireccional NS-F1112 de Insignia
Si presiona cualquiera de los botones mientras el radio se encuentra
pitando y se encuentra en el modo de radio GMRS/FRS, el radio
cambiará automáticamente a la banda WX.
Para desactivar la alerta meteorológica NOAA (WX):
1 Presione dos veces el botón Power/Menu (Encendido/Menú)
mientras se encuentre en la banda WX. La pantalla muestra un
icono AL y a su derecha parpadea un icono on (Activado).
2 Seleccione oF (Desactivado) presionando los botones Up (Arriba)
o Down (Abajo) y luego presione el botón PTT (Presionar Para
Hablar) o Power/Menu (Encendido/Menú).
36
www.insignia-products.com
Page 39

Radio Bidireccional NS-F1112 de Insignia
Uso de un altavoz externo y un micrófono o auricular
Su radio puede ser usado con un altavoz externo opcional y un
micrófono o auricular.
Para usar un altavoz externo y un micrófono o auricular:
1 Inserte los conectores en los tomas del altavoz y el micrófono.
Tomas
2 Coloque el auricular en su oído y ajuste el micrófono al nivel que
desea.
Mantenimiento de su radio
• No utilice alcohol o soluciones de limpieza para limpiar el
radio.
• No sumerja el radio en agua.
• Utilice un paño húmedo para limpiar el radio.
• Seque el radio con un paño seco, libre de pelusa si se llega a
mojar.
• Apague el radio y saque las pilas durante periodos de
almacenamiento extendidos.
www.insignia-products.com
37
Page 40
Radio Bidireccional NS-F1112 de Insignia
Localización y Corrección de Fallas
Problema Solución
La unidad no
enciende
No puede recibir
mensajes
El radio no
responde cuando
se presionan los
botones
La pantalla casi no
se ve
El cargador no
funciona
• Verifique la instalación de la pila
• Reemplace las pilas
• Verifique que los radios tienen el mismo ajuste de canal
y código de privacidad.
• V erifi que que se enc uentr a dentr o de l rang o de lo s ot ros
transmisores-receptores.
• Edificios y otras obstrucciones pueden interferir con su
communication.
• Verifique que el bloqueo de teclado no está activado.
• Quizás se tenga que reiniciar el ra dio. Apague y
encienda el radio.
• Verifique que el micrófono accesorio está configurado
correctamente.
• Reemplace o recargue las pilas.
• Los contactos en la parte inferior del radio pueden
necesitar limpieza.
• Verifique que el tomacorriente en el que se conecta el
cargador está funcionando bien.
• Verifique que las pilas están instaladas correctamente
en el radio.
Especificaciones
Especificación
Canales: 22 canales
Códigos de privacidad : 121
Canales de la banda de radio NOAA (WX): 10
Frecuencia de Operación: UHF 462.5500 ~ 467.7125 MHz
Fuente de alimentación: Cuatro pilas alcalinas AAA o una batería
recargable de NiMH de 4.8 V
38
www.insignia-products.com
Page 41

Radio Bidireccional NS-F1112 de Insignia
Ta blas de Frecuencias GMRS/FRS (MHz)
Número de
canal
1 462.5625
2 462.5875
3 462.6125
4 462.6375
5 462.6625
6 462.6875
7 462.7125
8 467.5625
9 467.5875
10 467.6125
11 467.6375
12 467.6625
13 467.6875
14 467.7125
15 462.5500
16 462.5750
17 462.6000
18 462.6250
19 462.6500
20 462.6750
21 462.7000
22 462.7250
Frecuencia de
canal
Los canales 8-14 son canales libres de licencia FRS de baja
potencia.
www.insignia-products.com
39
Page 42

Radio Bidireccional NS-F1112 de Insignia
Tabla de Frecuencias de la Radio NOAA [WX] (MHz)
Número de
canal
1162.550
2162.400
3162.475
4162.425
5162.450
6162.500
7162.525
8161.650
9161.775
10 163.275
Frecuencia de
canal
Los canales 8,9 y 10 están asignados para frecuencias marítimas
canadienses.
Tabla de Frecuencias de Códigos de Privacidad (MHz)
Se puede programar los códigos de privacidad para uso con
cualquier canal.
Código Frecuencia de
167.0
271.9
374.4
477.0
579.7
682.5
785.4
888.5
991.5
10 94.8
11 97.4
12 100.0
13 103.5
40
www.insignia-products.com
Page 43

Radio Bidireccional NS-F1112 de Insignia
Código Frecuencia de
14 107.2
15 110.9
16 114.8
17 118.8
18 123.0
19 127.3
20 131.8
21 136.5
22 141.3
23 146.2
24 151.4
25 156.7
26 162.2
27 167.9
28 173.8
29 179.9
30 186.2
31 192.8
32 203.5
33 210.7
34 218.1
35 225.7
36 233.6
37 241.8
38 250.3
www.insignia-products.com
41
Page 44

Radio Bidireccional NS-F1112 de Insignia
Tabla de los Códigos de Privacidad DCS
Se puede programar los códigos de privacidad para uso con
cualquier canal.
No. Código No. Código No. Código
1 023 29 174 57 445
2 025 30 205 58 464
3 026 31 223 59 465
4 031 32 226 60 466
5 032 33 243 61 503
6 043 34 244 62 506
7 047 35 245 63 516
8 051 36 251 64 532
9 054 37 261 65 546
10 065 38 263 66 565
11 071 39 265 67 606
12 072 40 271 68 612
13 073 41 306 69 624
14 074 42 311 70 627
15 114 43 315 71 631
16 115 44 331 72 632
17 116 45 343 73 654
18 125 46 346 74 662
19 131 47 351 75 664
20 132 48 364 76 703
21 134 49 365 77 712
22 143 50 371 78 723
23 152 51 411 79 731
24 155 52 412 80 732
25 156 53 413 81 734
26 162 54 423 82 743
27 165 55 431 83 754
28 172 56 432
42
www.insignia-products.com
Page 45

Radio Bidireccional NS-F1112 de Insignia
FCC
Advertencia
Este equipo podría generar o usar energía de
radiofrecuencia. Los cambios o modificaciones que se
realicen a este equipo podrían causar interferencia
perjudicial a menos que las modificaciones estén
expresamente autorizadas en este manual. El usuario
podría perder la autoridad de operar este equipo si se
realiza un cambio o modificación no autorizada.
Advertencia
Exposición a la Energía de Radio Frecuencia
Su radio Insignia está diseñado para cumplir con los
siguientes estándares nacionales e internacionales y
las pautas relacionadas con la exposición de seres
humanos a la energía electromagnetica de radio
frecuencia:
• Comisión de Comunicación Federal de los Estados
Unidos, Código de Normas Federales: 47 CFR parte
2 subparte J
• Instituto Nacional de Estándares de los EE. UU.
(ANSI)/Instituto de Ingenieros Eléctricos y
Electrónicos (IEEE) C95. 1-1992
• Instituto de Ingenieros Eléctricos y Electrónicos
(IEEE) C95. Edición 1-1999
• Consejo Nacional sobre la Medición y Protección
contra la Radiación (NCRP) de los EE. UU., Reporte
86, 1986
• International Commission on Non-lonizing Radiation
Protection (ICNIRP) 1998
Para controlar su exposición y asegurar la
conformidad con con la población en general o los
limites no controlados de exposición del ambiente,
favor no transmitir más de 50% del tiempo. La radio
genera una exposición a la energía de radiofrecuencia
que se puede medir, unicamente durante la
transmisión.
www.insignia-products.com
43
Page 46

Radio Bidireccional NS-F1112 de Insignia
Información reglamenta ria : FCC Parte 15
Este equipo ha sido sometido a pruebas y se ha
determinado que satisface los límites establecidos
para clasificarlo como dispositivo digital de Clase B de
acuerdo con la Parte 15 del reglamento FCC. Estos
límites están diseñados para proporcionar una
protección razonable contra interferencias dañinas
cuando el radio funciona en un ambiente residencial.
Este radio genera, utiliza y puede irradiar energía de
radiofrecuencia y, si no es instalado y utilizado de
acuerdo a las instrucciones, puede causar
interferencias perjudiciales en las comunicaciones de
radio. Sin embargo, no se garantiza que no ocurrirá
interferencia en una instalación particular. Si este radio
causa interferencias perjudiciales en la recepción de la
señal de radio o televisión, lo cual puede comprobarse
encendiéndolo y apagándolo alternativamente, se
recomienda al usuario corregir la interferencia
mediante uno de los siguientes procedimientos:
• Cambie la orientación o la ubicación de la antena
receptora.
• Aumente la distancia entre el radio y el receptor.
• Solicite consejo al distribuidor o a un técnico de
radio calificado para obtener ayuda.
Licencia GMRS
El NS-F1112 funciona en las frecuencias GMRS
(Servicio de Radio Móvil General), lo que requiere una
licencia de la FCC (Comisión Federal de
Comunicaciones de los EE. UU.). Debe de obtener
una licencia antes de operar en los canales 1 - 7 ó 15 22, lo que incluye los canales GMRS del NS-F1112.
Penalidades serias pueden resultar por el uso sin
licencia de los canales GMRS, en violación del
reglamento de la FCC, cómo se estipula en el Acta de
Comunicaciones, Secciones 501 y 502 (corregida).
Se le otorgará un rotulo de llamada por la FCC el que
se utilizará para la identificación de la estación cuando
se opere el radio en los canales GMRS. También
deberá cooperar al realizar sólo transmisiones
permitidas, al evitar GMRS la interferencia de canales
con otros usuarios de GMRS, y al ser prudente con la
duración del tiempo de su transmisión.
Para obtener una licencia o hacer preguntas
relacionadas con la aplicación para licencias, póngase
en contacto con la FCC al 1-888-CALL FCC o visite el
sitio web de la FCC: www.fcc.gov/services/personal/
generalmobile/licensing.html
Avisos legales
© 2006 Insignia. Insignia y el logotipo de Insignia son marcas de comercio de Best Buy
Enterprise Services, Inc. Otras marcas y nombres de productos son marcas
comerciales o marcas registradas de sus dueños respectivos. Las especificaciones y
características están sujetas a cambio sin aviso previo u obligación.
Para reparación y soporte llamar al (877) 467-4289.
44
www.insignia-products.com
Page 47

Page 48

Distributed by Insignia™ Products
Distribué par Insignia™ Products
Distribuido por Insignia™ Products
7601 Penn Avenue South,
Richfield, MN USA 55423-3645
www.Insignia-Products.com
All rights reserved. All other products and brand names aretrademarks of their respective owners.
Tous droits réservés. Tous les autres produits ou noms de marques sont des marques de commerce qui appartiennent à leurs propriétaires respectifs.
Todos los derechos reservados. Todos los demás productos y marcas son marcas comerciales de sus respectivos dueños.
© 2006 Insignia™ Products
© 2006 produits Insignia™
© 2006 productos Insignia™
 Loading...