

Digital to Analog
Converter Box
NS-DXA3
User Guide
Before using your new product, please read these instructions to pr event any damage.

Table of Contents
Welcome 3
Safety information 3
Important safety information 4
Features 6
Package contents 6
Front 6
Back 7
Remote control 8
Installing the remote control batteries 9
Setting up your converter box 9
Connecting with an HDMI cable (best) 9
Connecting with an AV cable (better) 10
Connecting with an RF (coaxial)cable (good) 11
Setting initialsetup options 12
Using your converter box 15
Turning your converter box on or off 15
Changing channels 15
Opening the guide 15
Adding or removing a favorite channel 15
Using analog pass-through 16
Running a channel scan 16
NS-DXA3
Using the setup menu 17
Settings menu 17
User menu 19
Resetting your converter box 20
Troubleshooting 20
Specifications 22
Legal Notices 23
FCC Statement 23
Open Source Software Notice 23
Warranty 24
www.insigniaproducts.com
2
Digital to Analog ConverterBox
Welcome
Congratulations on your purchase of a high-quality Insignia product. Your
NS-DXA3 represents the state of the art in digital to analog converter box
design and is designed for reliable and trouble-free performance.
Safety information
CAUTION
RISK OF ELECTRIC SHOCK
DO NOT OPEN
CAUTION: T O REDUCE THE RISK OF ELECTRIC SHOCK DO NOT REMOVE
THE COVER (OR BACK). NO USER-SERVICEABLE PARTS INSIDE. REFER
SERVICING T O QUALIFIED SERVICE PERSONNEL.
The lightning flash with arr owhead symbolwithin a triangle is intended to alert you to
the presence of uninsulated dangerous voltage within your converter box’s
enclosure that may be of sufficient magnitude to constitute risk of electric shock to
persons.
The exclamation point within a triangle is intended to alert you to the presence of
important operating and maintenance (servicing) instructions in the literature
accompanying your converter box.
WARNING: To prevent fire or electric shockhazard, do not expose your converter box to rain or
moisture.
WARNING: Do not install your converter box in a confined space such as a bookcase or similar
unit.
WARNING: Do not block any ventilation openings. Install in accordance with the manufacturer’s
instructions. Slots and openings in the cabinet are provided for ventilation and to ensure reliable
operation of your converter box and to protect it from overheating.
The openings should never be blocked by placing your converter box on a bed, sofa, rug, or
other similar surface. Your converter box should not be placed in a built-in installation such as a
bookcase or r ackunlessproper ventilation is provided or the manufacturer 's instructionshave
been adhered to.
CAUTION: Your converter box should not be exposed to water (dripping or splashing) and no
objectsfilled with liquids, such as vases, should be placed on it.
POWER ADAPTER WARNING: T he manufacturer s of most appliancesr ecommend that their
appliance be placed on a dedicated circuit—a single outlet circuitwhich powers only that
appliance and has no additional outlets or branch circuits.
Overloaded power outlets, loose or damaged wall outlets, extension cords, frayed power cords,
or damaged or cracked wire insulation are dangerous. Any of these conditionscould result in
electricshockor fire. Periodically examine the power adapter of your converter box, and if its
appearance indicates damage or deterioration, unplug it, discontinue use of your converter box,
and have the power adapter replaced with an exact replacement part by an authorized service
personnel.
Protect the power adapter from physical or mechanicalabuse, such as being twisted, kinked,
pinched, closed in a door , or walked upon. Pay particular attention to plugs, wall outlets, and the
point wher e the power adapter cord exitsyour converter box.
To disconnect the main power from your converter box, unplug the power adapter from the
power outlet. When installing your converter box, make sure that the plug is easilyaccessible.
www.insigniaproducts.com
3

NS-DXA3
IMPORTANT SAFETY INFORMATION
1. Read these instructions.
2. Keep these instructions.
3. Heed all warnings.
4. Follow all instructions.
5. Do not use your converter box near water.
6. Clean only with a dry cloth.
7. Do not blockany ventilation openings. Install in accordance with the manufacturer's
instructions.
8. Do not install near any heat sources such as radiators, heat registers, stoves, or other
apparatus(including amplifiers) that produces heat.
9. Protect the power cord from being walked on or pinched particularly at plugs, convenience
receptacles, and the point where it exits from the apparatus.
10. Only use attachments or accessoriesspecified by the manufacturer.
11. Unplug your converter box during lightning storms or when unused for long per iodsof time.
12. Refer allservicing to qualified service personnel. Servicing isrequired when your converter
box has been damaged in any way, such as when the power cord or plug is damaged, liquid
has been spilled or objects have fallen into your converter box, your converter box has been
exposed to rain or moisture, does not operate normally, or has been dropped.
WARNING
Electric shock hazard
To reduce the risk of fire or electric shock, do not r emove any cover or expose the device to r ain
or moisture. No user-serviceable parts are inside. Refer servicing to qualified service technicians.
Lightning
For added protection for your deviceduring a lightning storm, or when it is left unattended and
unused for long periods of time, unplug it from the power outlet and disconnect any antenna or
cable system. This helps prevent property damage and personal injury from lightning and power
line surges.
Power lines
An outside antenna system should not be located in the vicinityof overhead power lines or other
electriclight or power circuits, or where it can fall into such power lines or circuits. When installing
an outside antenna system, extreme care should be taken to keep from touching such power
linesor circuits as contact with them might be fatal.
Servicing
These servicing instructionsare for use byqualified service personnel only. To reduce the risk of
electricshock, do not perform any servicing other than that contained in the operating
instructionsunless you are qualified to do so.
www.insigniaproducts.com
4
2
1
3
4
5
6
7
Digital to Analog ConverterBox
CAUTION
Damage requiring service
Unplug this converter box from the power outlet and refer servicing to qualified service personnel
under the following conditions:
l When the power supply cord or plug isdamaged or frayed.
l If liquid has been spilled or objects have fallen into your converter box.
l If your converter box has been exposed to rain or water.
l If your converter box does not operate normally by following the operating instructions.
Adjust only those controls that are covered by the operating instructionsbecause incorrect
adjustment of other controls may result in damage and will often require extensive work by
a qualified technician to restore your converter box to its normal operation.
l If your converter box has been dropped or damaged in any way.
l When your converter box exhibitsa distinct change in perfor mance.
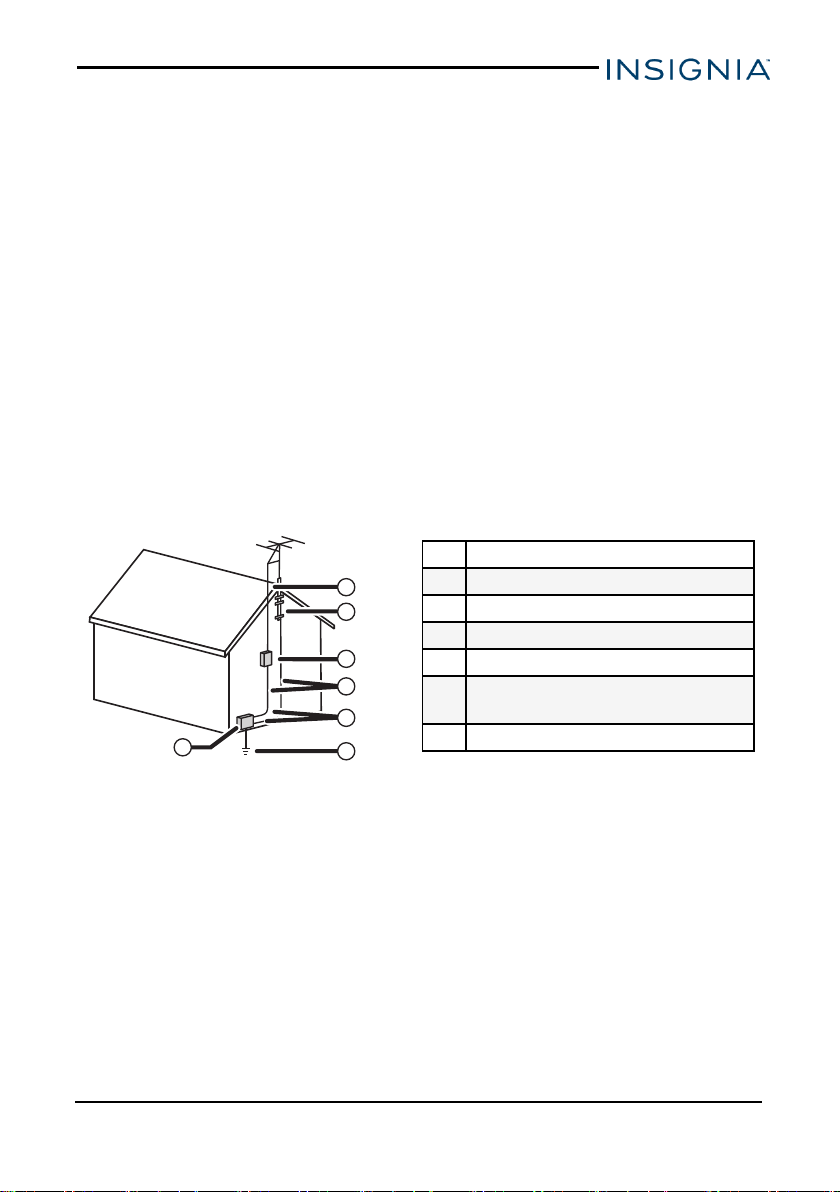
Outdoor antenna grounding
If an outside antenna or cable system isconnected to your converter box, make sure that the
antenna or cable system is grounded to provide some pr otection against voltage surges and
built-up static charges. Article 810 of the National ElectricalCode, ANSI/NFPA No. 70, provides
information with respect to correct gr ounding of the mast and supporting structure, grounding of
the lead-in wire to an antenna discharge unit, size of grounding conductors, location of the
antenna-discharge unit, connection to grounding electrodes, and requirements for the
grounding electrode.
1 Antenna lead-in wire
2 Grounding design
3 Antenna discharge unit
4 Grounding conductors
5 Ground clamps
Power service grounding electrode
6
system
7 Electronicservice equipment
Note to CATV system installer
Article 820 of the NationalElectrical Code, ANSI/NFPANo. 40 provides guidance for correct
grounding. Specifically, it states that the cable ground must be connected to the grounding
system of the building as close to the point of cable entry as practical.
www.insigniaproducts.com
5
Features
PACKAGE CONTENTS
l Converter box
l Remote control and batteries (2 AA)
l AC adapter
l Coaxial cable
l Quick Setup Guide
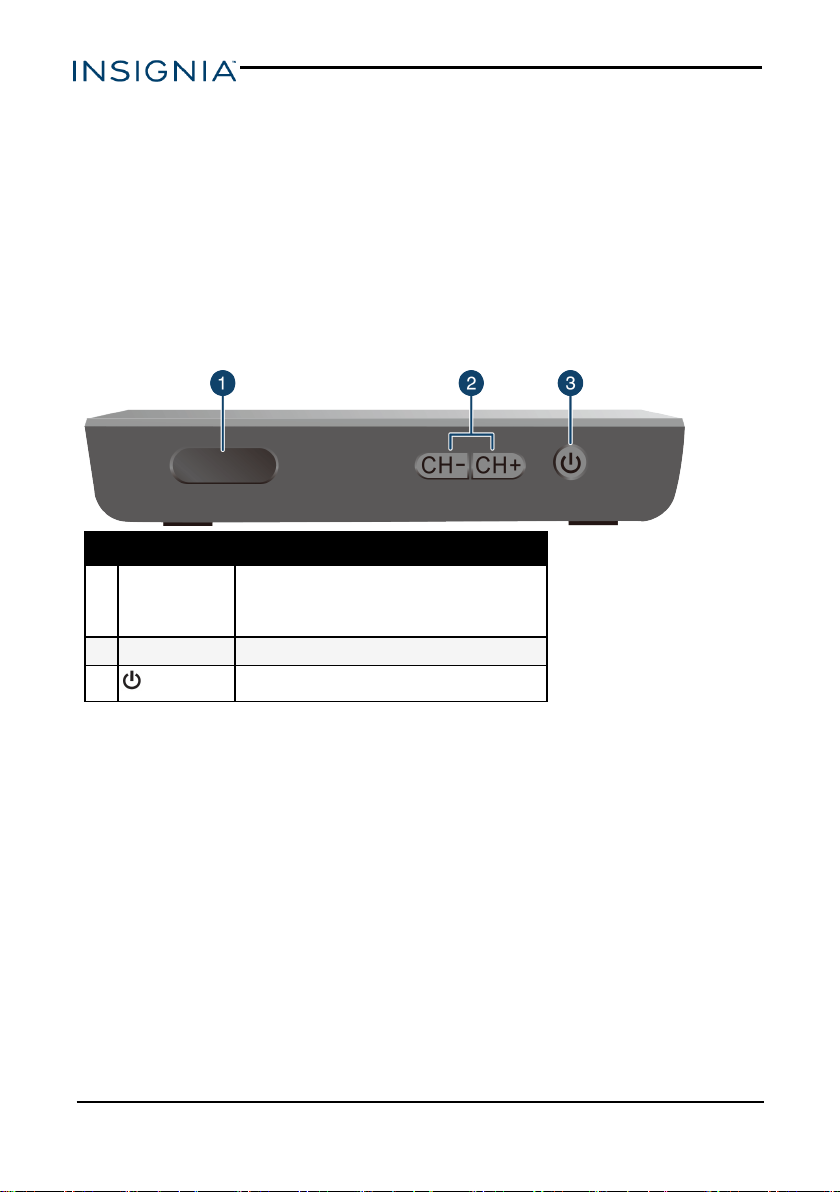
FRONT
No. Component Description
Lights when your converter box has power.
1 Power indicator
2 CH-/CH+ Press to scan through memorized channels.
3
(power)
Red—Standbymode
Green—On mode
Turn the converter box on or off.
NS-DXA3
www.insigniaproducts.com
6
Digital to Analog ConverterBox
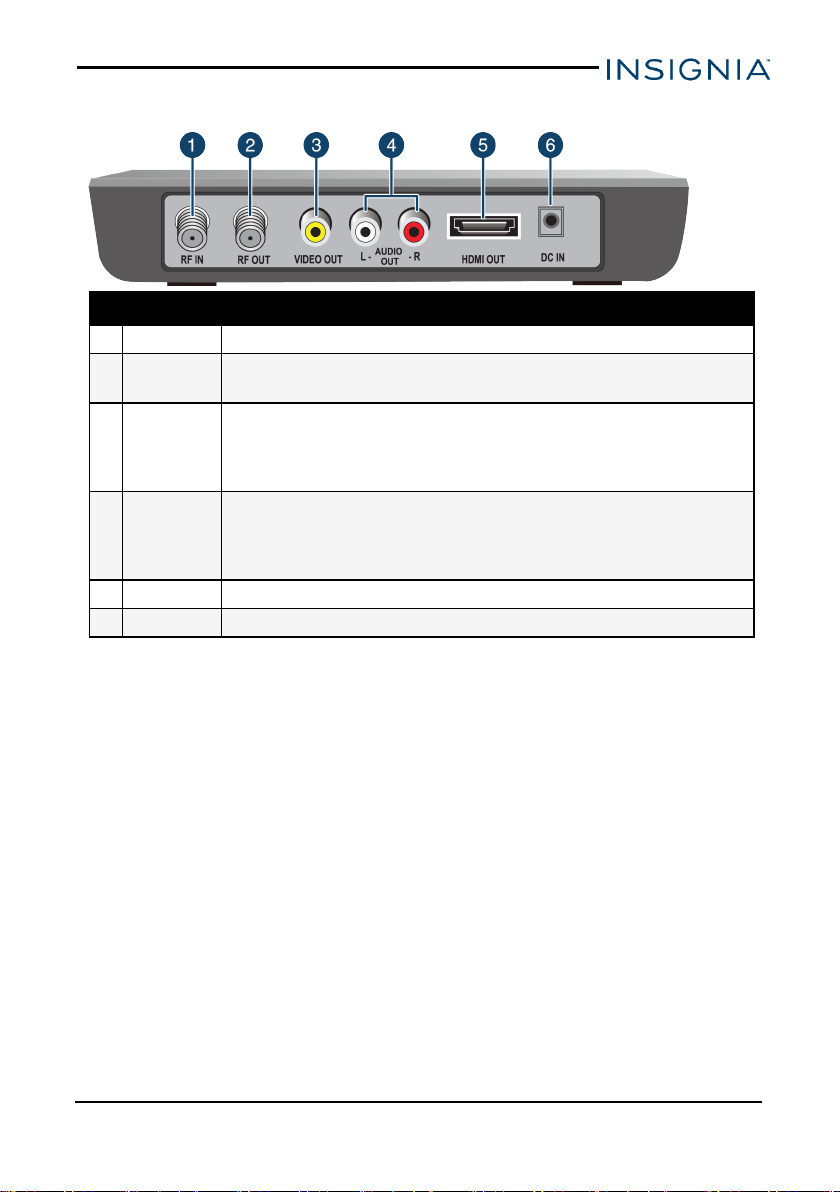
BACK
No. Component Description
1 RF IN Connect this jack to your antenna.
2 RFOUT
3 VIDEOOUT
AUDIO OUT
4
L/R
5 HDMIOUT Connect an HDMI cable from this port to an HDMI IN port on your T V.
6 DC IN Connect the AC power adapter to this jack.
If your TV does not have HDMIor A/V jacks, connect this jack to the
Antenna INjack on your TV.
Connect a yellow AV cable from this jackto the AV IN jack (yellow) on your
TV.
Note: If your TV doesnot have AV jacks, connect your TV to the HDMI OUT
(best) or RFOUT (good) jack.
Connect thesejacks to the corresponding AUDIO IN L/R (red/white) jacks
on your TV.
Note: If your TV doesnot have AV jacks, connect your TV to the HDMIOUT
(best) or RF OUT (good) jack.
www.insigniaproducts.com
7
NS-DXA3
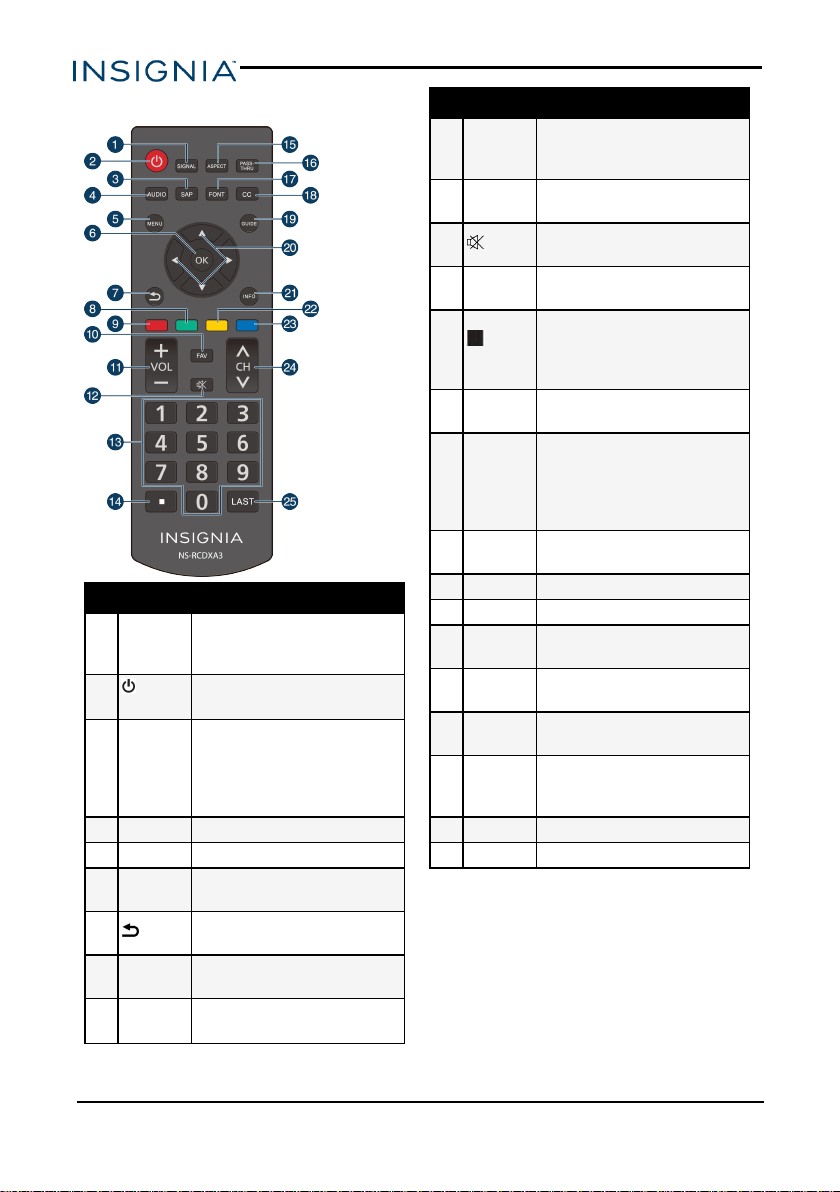
REMOTE CONTROL
No. Button Description
1 SIGNAL
2
(power)
3 SAP
4 AUDIO Open text-to-speech settings.
5 MENU Open the on-screen menu.
6 OK
7
Green
8
button
Red
9
button
Displayyour antenna signal
strength for the current
channel.
Turn the converter box on or
off.
Turn on second audio
program and listen to
English-language
programming in other
languages.
Select a highlighted menu
item.
Go back one levelin the onscreen menu.
Switch to the System options
in the on-screen menu.
Switch to RRT (Rating
Region Table).
No. Button Description
10 FAV
11 VOL +/-
12
13 Numbers
14
channel)
15 ASPECT
PASS-
16
THRU
17 FONT
18 CC Turn on closed captioning.
19 GUIDE Open the Program Guide.
20 ▲▼◄►
21 INFO
Yellow
22
button
Blue
23
button
24 CH ▲/▼ Change channels.
25 LAST Return to the last channel.
Switch to a favorite channel
through the Program Guide
in the on-screen menu.
Increase or decrease the
volume.
Turn off the sound. Press
(mute)
again to restore the sound.
Enter a channel number or
parental control password.
Enter a sub-channel number.
For example, to enter sub-
(sub-
channel 2.1, press 2, press
this button, then press 1.
Adjust the aspect ratio of the
video output.
By-pass the converter box so
that your TV will function as it
did without the converter box
(receiving analog channels
only).
Access the CC FONT (closed
captioning font) menu.
Navigate through the onscreen menus.
Displayinformation about the
current progr am.
Switch to the User options in
the on- screen menu.
Change the PIN in the Lock
settingsof the on-screen
menu.
www.insigniaproducts.com
8
Digital to Analog ConverterBox
Installing the remote control batteries
1. Press the tab on the battery cover, then remove the cover.
2. Insert two AA batteries (included). Make sure that the direction of the +
and – symbols on the batteries match the + and – symbols in the battery
compartment.
3. Replace the battery cover.
Setting up your converter box
You can connect your converter box with HDMI (not included), AV (not
included), or coaxial (included) cables. You must connect an antenna to your
converter box.
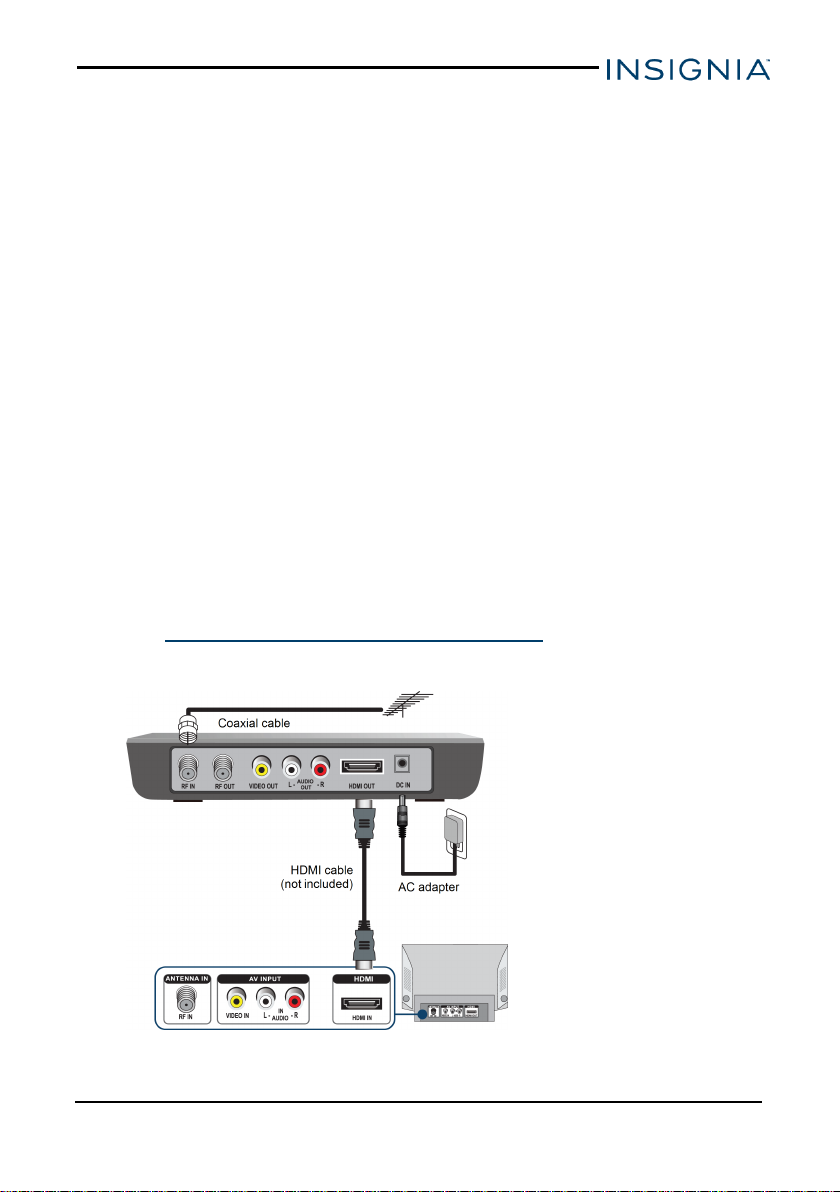
CONNECTING WITH AN HDMI CABLE (BEST)
An HDMI connection provides the best video and audio quality.
1. Connect your existing antenna cable to the RF IN jack on the converter
box. You may need to remove the antenna cable from the back of your TV
and connect it to the converter box.
2. Connect an HDMI cable (not included) from the converter box’s HDMI
OUT port to your TV’s HDMI IN port.
3. Connect the AC adapter from the DC IN jack to a power outlet.
4. See Setting initial setup options (on page12) to finish setting up your
converter.
www.insigniaproducts.com
9
 Loading...