

USER GUIDE
Full HD Dual Camera
Dash Cam
NS-DCDCHH2
Before using your new product, please read these instructions to prevent any damage.

Contents
Introduction . . . . . . . . . . . . . . . . . . . . . . . . . . . . . . . . . . . . . . . . . . . . . . . . . . . . . . . . . . . . . . . . . . . . . . . . . . . . . . . . . . . . . . . . . 2
IMPORTANT SAFEGUARDS . . . . . . . . . . . . . . . . . . . . . . . . . . . . . . . . . . . . . . . . . . . . . . . . . . . . . . . . . . . . . . . . . . . . . . . . . . . . 2
Features . . . . . . . . . . . . . . . . . . . . . . . . . . . . . . . . . . . . . . . . . . . . . . . . . . . . . . . . . . . . . . . . . . . . . . . . . . . . . . . . . . . . . . . . . . . . .2
Package contents . . . . . . . . . . . . . . . . . . . . . . . . . . . . . . . . . . . . . . . . . . . . . . . . . . . . . . . . . . . . . . . . . . . . . . . . . . . . . . . . . . . . . . . . . . . . . . . . 3
Components . . . . . . . . . . . . . . . . . . . . . . . . . . . . . . . . . . . . . . . . . . . . . . . . . . . . . . . . . . . . . . . . . . . . . . . . . . . . . . . . . . . . . . . . . . . . . . . . . . . . . 3
Installing your dash cam . . . . . . . . . . . . . . . . . . . . . . . . . . . . . . . . . . . . . . . . . . . . . . . . . . . . . . . . . . . . . . . . . . . . . . . . . . . . . . 4
Using your dash cam . . . . . . . . . . . . . . . . . . . . . . . . . . . . . . . . . . . . . . . . . . . . . . . . . . . . . . . . . . . . . . . . . . . . . . . . . . . . . . . . . 5
Formatting a MicroSD memory card . . . . . . . . . . . . . . . . . . . . . . . . . . . . . . . . . . . . . . . . . . . . . . . . . . . . . . . . . . . . . . . . . . . . . . . . . . . . . . 5
Manually turning your dash cam off and on . . . . . . . . . . . . . . . . . . . . . . . . . . . . . . . . . . . . . . . . . . . . . . . . . . . . . . . . . . . . . . . . . . . . . . . 5
Understanding loop recording . . . . . . . . . . . . . . . . . . . . . . . . . . . . . . . . . . . . . . . . . . . . . . . . . . . . . . . . . . . . . . . . . . . . . . . . . . . . . . . . . . . . 5
Recording an emergency video . . . . . . . . . . . . . . . . . . . . . . . . . . . . . . . . . . . . . . . . . . . . . . . . . . . . . . . . . . . . . . . . . . . . . . . . . . . . . . . . . . . 5
Taking photos . . . . . . . . . . . . . . . . . . . . . . . . . . . . . . . . . . . . . . . . . . . . . . . . . . . . . . . . . . . . . . . . . . . . . . . . . . . . . . . . . . . . . . . . . . . . . . . . . . . . 5
Downloading files to a computer . . . . . . . . . . . . . . . . . . . . . . . . . . . . . . . . . . . . . . . . . . . . . . . . . . . . . . . . . . . . . . . . . . . . . . . . . . . . . . . . . 6
Menu options and settings . . . . . . . . . . . . . . . . . . . . . . . . . . . . . . . . . . . . . . . . . . . . . . . . . . . . . . . . . . . . . . . . . . . . . . . . . . . . . . . . . . . . . . . 6
On-screen displays . . . . . . . . . . . . . . . . . . . . . . . . . . . . . . . . . . . . . . . . . . . . . . . . . . . . . . . . . . . . . . . . . . . . . . . . . . . . . . . . . . . . . . . . . . . . . . . 8
Navigating in the on-screen display (OSD) . . . . . . . . . . . . . . . . . . . . . . . . . . . . . . . . . . . . . . . . . . . . . . . . . . . . . . . . . . . . . . . . . . . . . . . 13
Troubleshooting . . . . . . . . . . . . . . . . . . . . . . . . . . . . . . . . . . . . . . . . . . . . . . . . . . . . . . . . . . . . . . . . . . . . . . . . . . . . . . . . . . . .13
Specifications . . . . . . . . . . . . . . . . . . . . . . . . . . . . . . . . . . . . . . . . . . . . . . . . . . . . . . . . . . . . . . . . . . . . . . . . . . . . . . . . . . . . . . .14
ONE-YEAR LIMITED WARRANTY . . . . . . . . . . . . . . . . . . . . . . . . . . . . . . . . . . . . . . . . . . . . . . . . . . . . . . . . . . . . . . . . . . . . . .15
Introduction
Congratulations on your purchase of a high-quality Insignia product. Your NS-DCDCHH2 represents the state of the art in
dash cam design and is designed for reliable and trouble-free performance.
IMPORTANT SAFEGUARDS
• Always read the safety instructions and online User Guide carefully.
• Do not drop or allow forceful impacts to your dash cam, or install it in locations exposed to heavy vibrations.
• Do not disassemble or modify your dash cam in any way. Disassembly or modification may not only void the warranty,
but may also cause damage.
• Do not use or store your dash cam in damp locations. Liquid entering your dash cam may cause damage or lead to fires
or electric shock.
• Do not operate in extreme heat conditions. If your vehicle is parked in a hot sunny climate, let your vehicle cool down
before using your dash cam.
Features
• 1080p resolution on front and rear-facing cameras
• 148-degree wide-angle lens
•2.0" LCD display
• G-force sensor automatically starts recording on impact
• Built-in microphone to capture audio
• Loop recording overwrites the oldest footage and prevents you from running out of storage
• Enhanced night vision
• MicroSD card expandable to 256 GB (card is not included)
2
www.insigniaproducts.com
Package contents
Back Side
Top Fr ont
• Full HD Dual Camera Dash Cam
• USB cable (11.8 ft. (3.6 m))
•Vehicle power adapter
• Mounting bracket with suction cup
•Quick Setup Guide
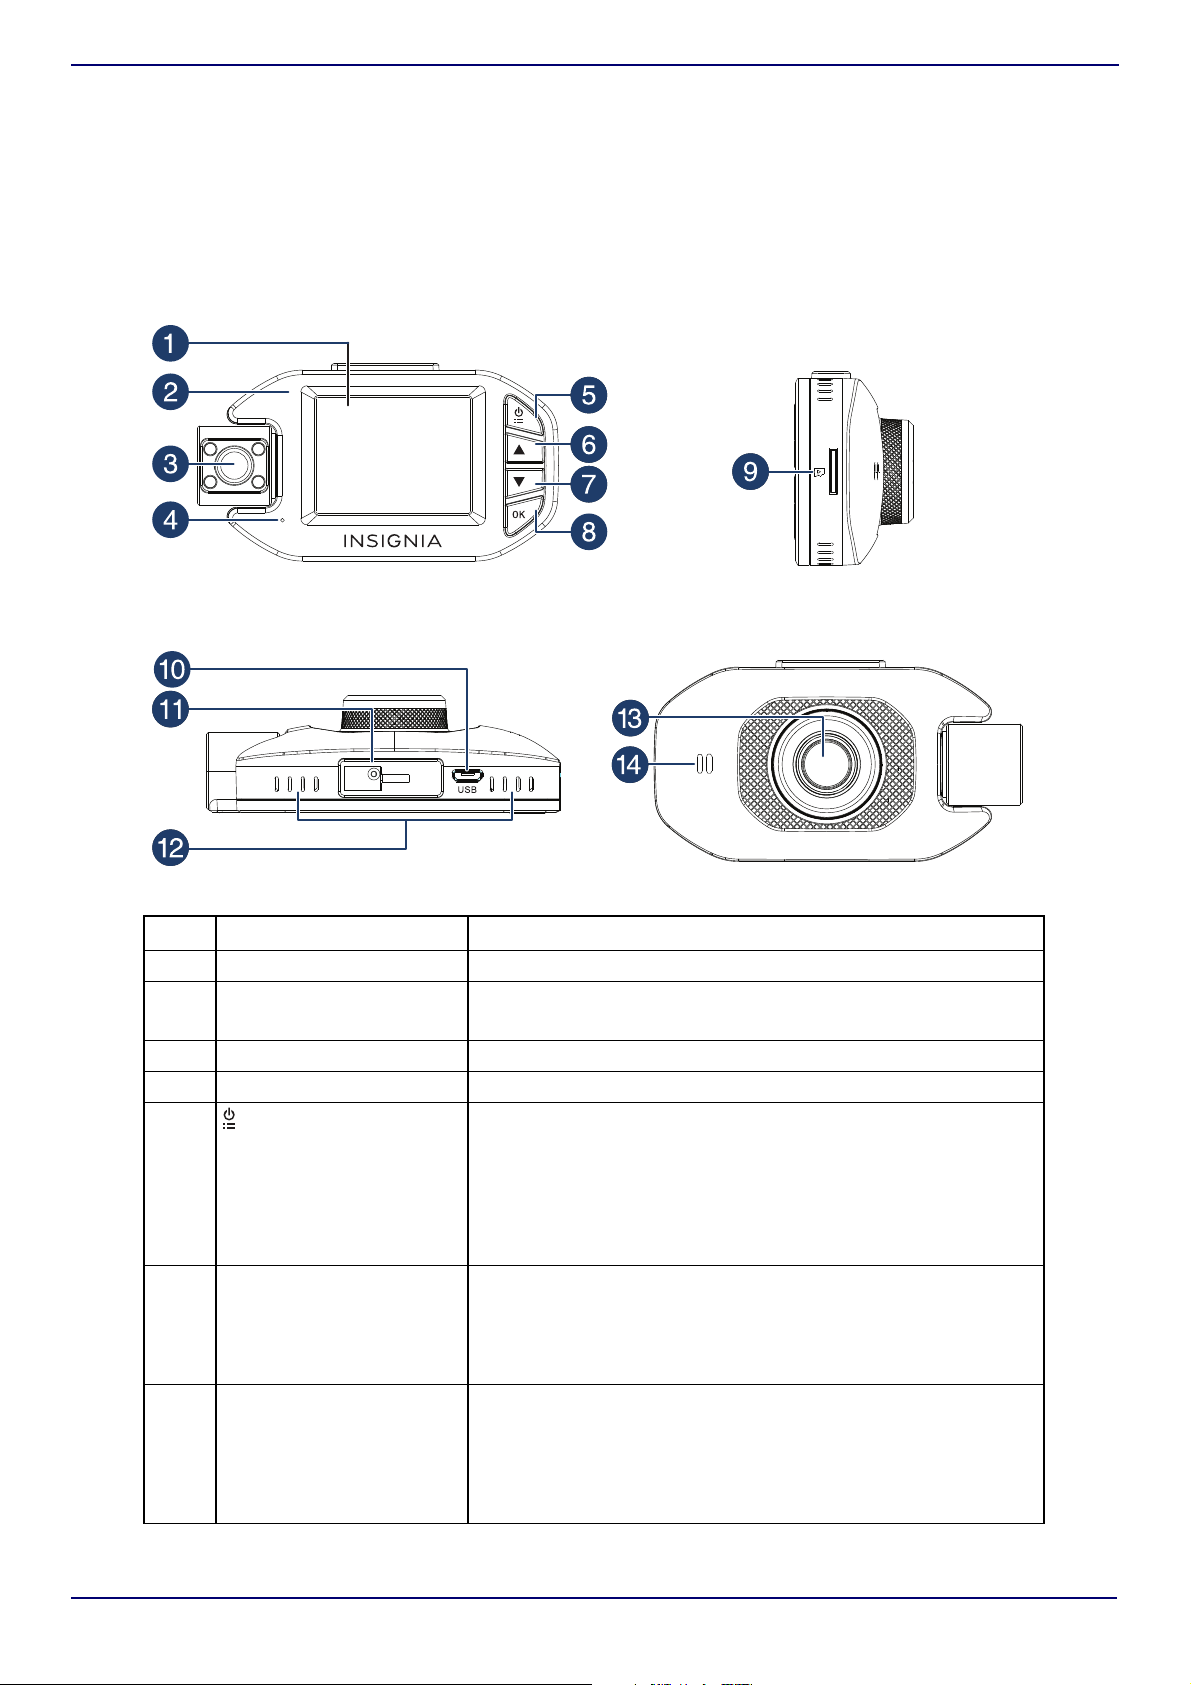
Components
NS-DCDCHH2
# ITEM DESCRIPTION
1 Screen 2.0-inch screen
2 Indicator LED
3Rear lens HD camera
4 Microphone Captures audio when turned on.
5 (power/set button)
6
(up) button
7
(down) button
• Lights solid blue when you turn on your dash cam.
• Blinks red when recording video.
• Press to manually turn your dash cam on. Press and hold for
two seconds to turn your dash cam off.
Note: Your d a s h cam a u tomatic a l ly turns on when you start
your vehicle.
• When your dash cam is not recording, press to go to the
System Setting screen.
• In recording mode, press to start an emergency recording.?
• In menu mode, press to move up.
• When your dash cam is either recording or not recording, press
to enter camera mode, then press again to take a photo.
• In the playlist, press to move up.
• In playback mode, press to delete a video or photo.
• When your dash cam is recording, press to mute the audio.
• In menu mode, press to move down.
• In playback mode, press to select a playback file.
• When your dash cam is not recording, press to open a list of
the files on your memory card.
• In playback mode, press to view the previous video or photo.
www.insigniaproducts.com
3
#ITEM DESCRIPTION
8 OK button
9 MicroSD card slot Insert a MicroSD card (8 GB to 256 GB) (not included) in this slot to
10 Micro USB jack Connect a micro USB cable to this jack to power the dash cam or to
11 Suction cup mount Attach the dash cam to this mount.
12 Ventilation openings Let air into your dash cam to keep it cool. Do not block.
13 Front lens HD camera
14 Speaker Plays sound from your dash cam.
Installing your dash cam
• In live camera mode, press to start or stop recording.
• In playback mode, press to start or stop playback.
• In playback mode, press q to open a list of files on your
memory card. Select a file for playback, then press OK to start
playback.
• On the Formatting screen, press to start formatting the
microSD card.
• In menu mode, press to confirm a selection.
• In emergency video mode, press to exit.
•On the Restore Default Settings screen, press to restore all
settings to the factory settings.
store video files and photos. You must have a formatted card
inserted to record or playback. See Formatting a MicroSD memory
card on page 5.
download files to a computer.
Note: Use a card with 8 GB to 256 GB of memory. We recommend using a card with the highest memory capacity available.
Higher memory capacity lets you record more.
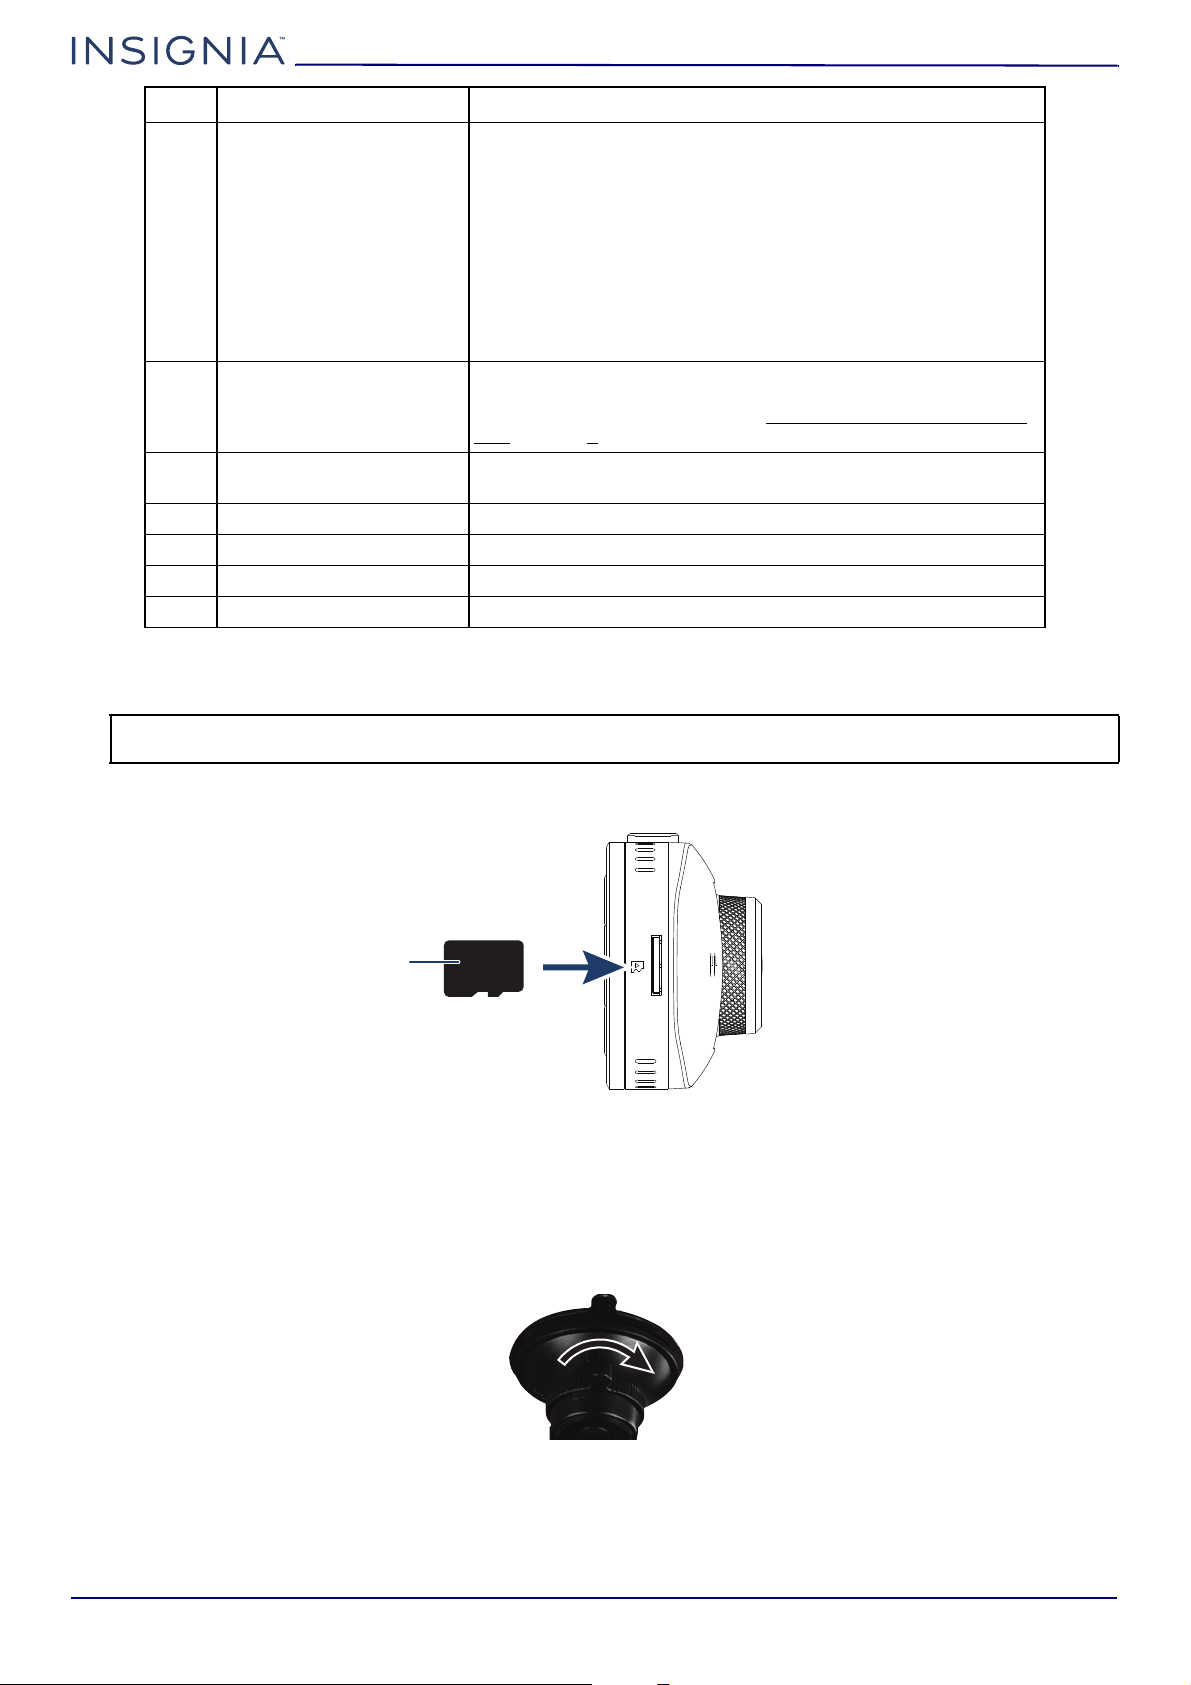
1 Insert a MicroSD memory card (8 GB to 256 GB memory capacity) (not included) in the MicroSD card slot.
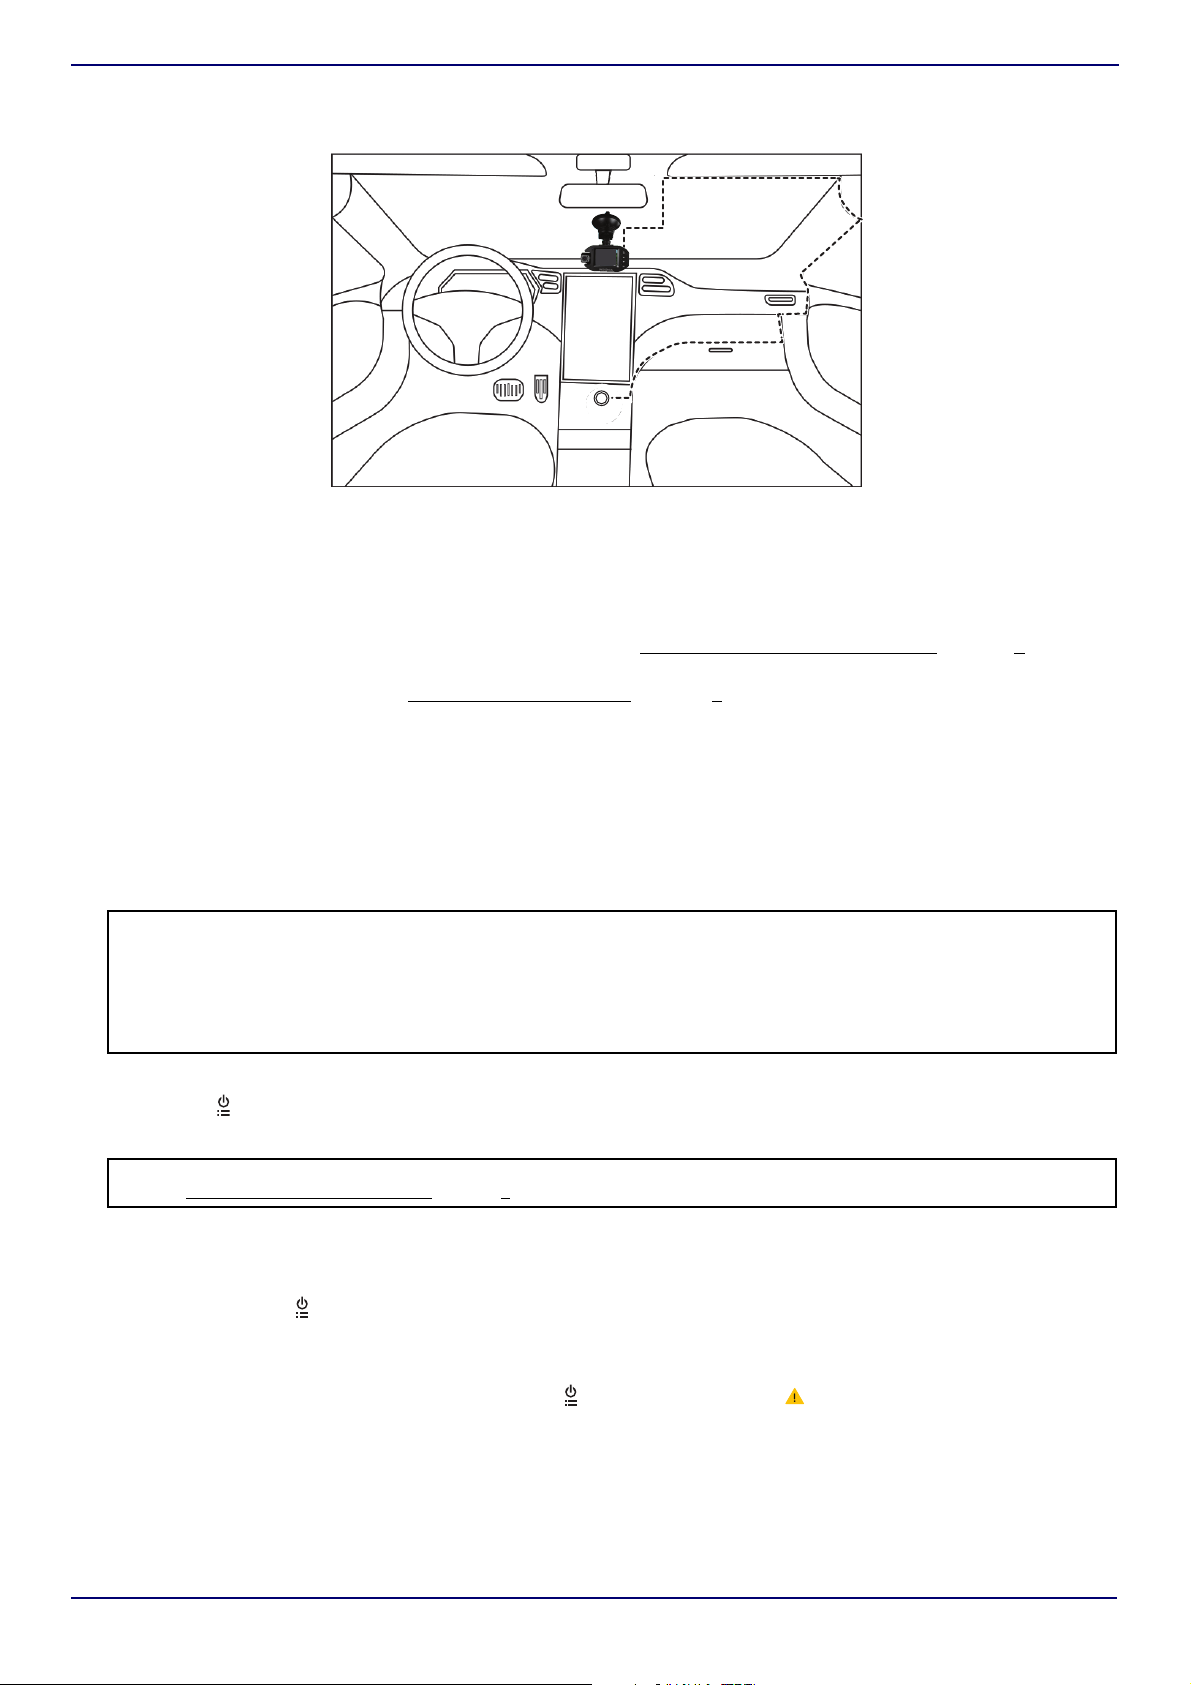
2 Clean and thoroughly dry the windshield area where you want to mount your dash cam.
3 Insert and slide the mounting bracket on the suction cup into the mounting slot on the top of your dash cam.
4 Peel the protective film from the mounting bracket and the dash cam lenses.
5 Position the suction cup on the center of the windshield, below the rear view mirror, then move the mounting bracket
switch clockwise until you hear a click.
4
www.insigniaproducts.com
NS-DCDCHH2
12V 180W
6 Connect the provided USB cable to the USB jack on your dash cam, then thread the cable from your dash cam, around
the outer edge of the windshield, and to a 12V vehicle power socket.
7 Plug the cable into the vehicle power adapter, then plug the adapter into the power socket and turn on your vehicle.
Your dash cam starts automatically.
8 Rotate the mounting bracket to adjust the viewing angle as needed.
9 Follow the on-screen prompts to set up your dash cam. Make sure that you format the memory card during setup. If
the card is not formatted, it may not record or play back. See Formatting a MicroSD memory card
on page 5.
When you turn on your dash cam for the first time, you are prompted to enter basic setup information, such as
Language, Year, Month, Day. See Menu options and settings
on page 6.
Your dash cam uses this information when creating file names and when displaying time stamps. Subsequent startups
go directly to the video screen.
Using your dash cam
Formatting a MicroSD memory card
You must format a memory card before you can use it in your dash cam. If the card isn’t formatted, your dash cam may not
be able to record or save.
Note: The first time you insert a new SD card into your dash cam, the screen will prompt you with one of the following error messages
if there is an issue with the card:
• CARD ERROR Replace SD Card - indicates that the new card is not available to your dash cam (the card may be incompatible or
damaged). Remove the SD card and replace it with another. Only SD cards between 8 and 256 GB should be used.
or
• CARD ERROR FORMAT Card in Camera - indicates that the formatting on the new card is not compatible with your dash cam. Use
the Format tool to format the card. This will delete all of the information on your dash cam, so please save your files first.
1 Make sure that your dash cam is turned on and not in recording mode.
2 Press the (power/set) button. The on-screen display opens.
3 Press the
CAUTION: When you format a memory card, it erases all the data on the card. Make sure that you backup any recordings you want to
save. See Downloading files to a computer on page 6.
Manually turning your dash cam off and on
Your dash cam turns on automatically when you turn on your vehicle. You can manually turn your dash cam off, then turn
it back on.
• Press and hold the (power/set) button to turn your dash cam off. Press this button again to turn it back on.
Understanding loop recording
When the MicroSD memory card is full, your dash cam continuously overwrites the oldest footage recorded. To protect a
specific video clip against being overwritten, press the (power/set) button. The (emergency recording) icon appears
on the screen. You can also protect files on the playback screen in video playback mode.
(up) or (down) button to select Format, then press the OK button,
www.insigniaproducts.com
5
 Loading...