

Page 1

g
Insignia
NS-DA1G/IS-DA2G Digital Music Player
Français
Contents
Welcome
Safety information
Features
Package contents
System requirements
Controls and connections
Display information
Setting up your music player
Installing the battery
Charging the battery
Connecting headphones
Installing the Best Buy Rhapsody software
Using your player
Turning your player on and off
Changing the volume
Locking the buttons
Navigating the on-screen menus
Playing music files
Getting more music
Copying music files to your player
Deleting files
Disconnecting the player
Listening to FM radio
Viewing photos
Changing settings
Maintaining your player
Care and cleaning
Updating the firmware
Troubleshooting and FAQ
Getting help
Troubleshooting and FAQ
Specifications
Legal notices
User Guide
Español
Page 2

Welcome
g
Congratulations on your purchase of a high-quality Insignia product. Your NS-DA1G or NS-DA2G
represents the state of the art in digital media players and is designed for reliable and trouble-free
performance. You can use your music player to play digital music files and listen to FM radio, and
you can carry it with you anywhere.
Safety information
Warnings
Read, keep, and follow all instructions. Heed all warnings.
•
Only use attachments and accessories approved by Insignia.
•
Turn down the volume before turning on your MP3 player and avoid using it at a high
•
volume. Permanent hearing loss may occur if earphones or headphones are used at
high volume. Reduced volume also extends battery life.
Do not use headphones or earphones while driving, cycling, or operating any motorized
•
vehicle. This may create a traffic hazard and may be illegal in your area.
To reduce the chance of electrical shock, do not use or operate this device near moist
•
environments.
Protect the power cord from being walked on or pinched.
•
Unplug the player during lightning storms or when unused for long periods of time.
•
Risk of explosion, damage, or battery leakage if the battery is incorrectly replaced
•
incorrectly or replaced by an incorrect type. Dispose of used batteries according to
local regulations.
Clean only with a dry cloth.
•
Do not defeat the safety purpose of the polarized-type plug. A polarized plug has two
•
blades with one wider than the other. The wide blade is provided for your safety. When
the provided plug does not fit into your power outlet, consult an electrician for
replacement of the obsolete outlet.
Do not disassemble the player to access internal components (except for the battery)
•
under any circumstances.
Features
Plays MP3, WMA, secure WMA, and Audible audio file formats.
•
Displays JPG photos.
•
Backlit LCD supports several languages and displays album art and song information.
•
Digital FM radio tuner allows you to access local radio stations. The radio also
•
memorizes up to 20 of your favorite radio stations.
Five preset equalizer settings to optimize playback for normal, rock, jazz, classical, and
•
pop music. You can also set a custom equalizer setting for a total of six to choose
from.
Sophisticated music library sorting lets you browse the music in your player by artist,
•
album, song title, genre, and playlist.
A-B Repeat lets you select any starting and end points during playback, so you can
•
repeatedly play that segment. This feature is especially helpful while learning
languages and words to songs.
High-speed mini USB 2.0 port for fast and easy file transfers.
•
Page 3
Supports Microsoft WMDRM 10 technology.
g
•
Fully compatible with Rhapsody and Napster-To-Go music services.
•
Easy-to-use menus
•
Upgradeable firmware to keep your music player up to date
•
Replaceable, rechargeable battery.
•
Package contents
•
•
•
•
•
•
•
•
•
System requirements
Insignia digital music player
Rechargeable lithium ion battery
Earphones
Mini USB 2.0 cable
Quick Start Guide
CD (contains Best Buy Rhapsody software and this online user guide)
Carrying case
Music offer
Warranty card
To transfer music from your computer to your music player, your computer must have the
following minimum system requirements:
Windows XP
•
Pentium-class CPU or equivalent
•
One available USB 2.0 port
•
Windows Media Player 10 (You can download Windows Media Player 10 from Microsoft
•
at: www.microsoft.com/windows/windowsmedia/download/default.asp)
64 MB memory
•
Active Internet connection (128+ Kbps broadband recommended)
•
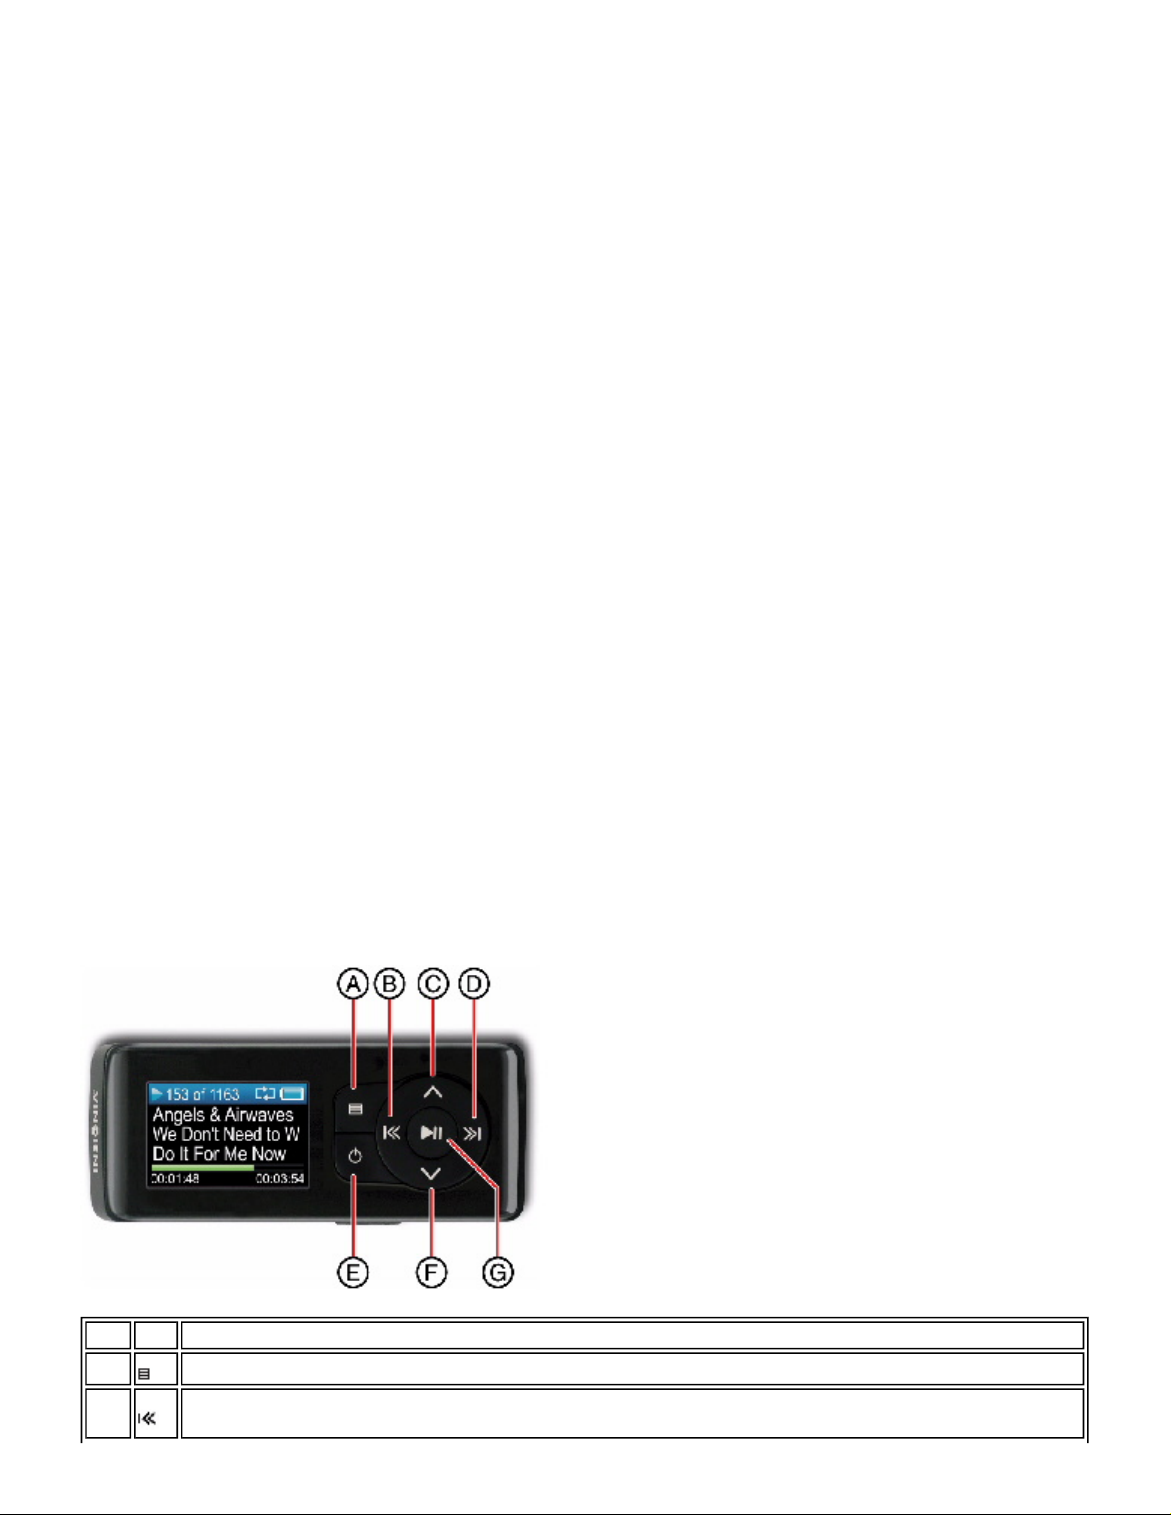
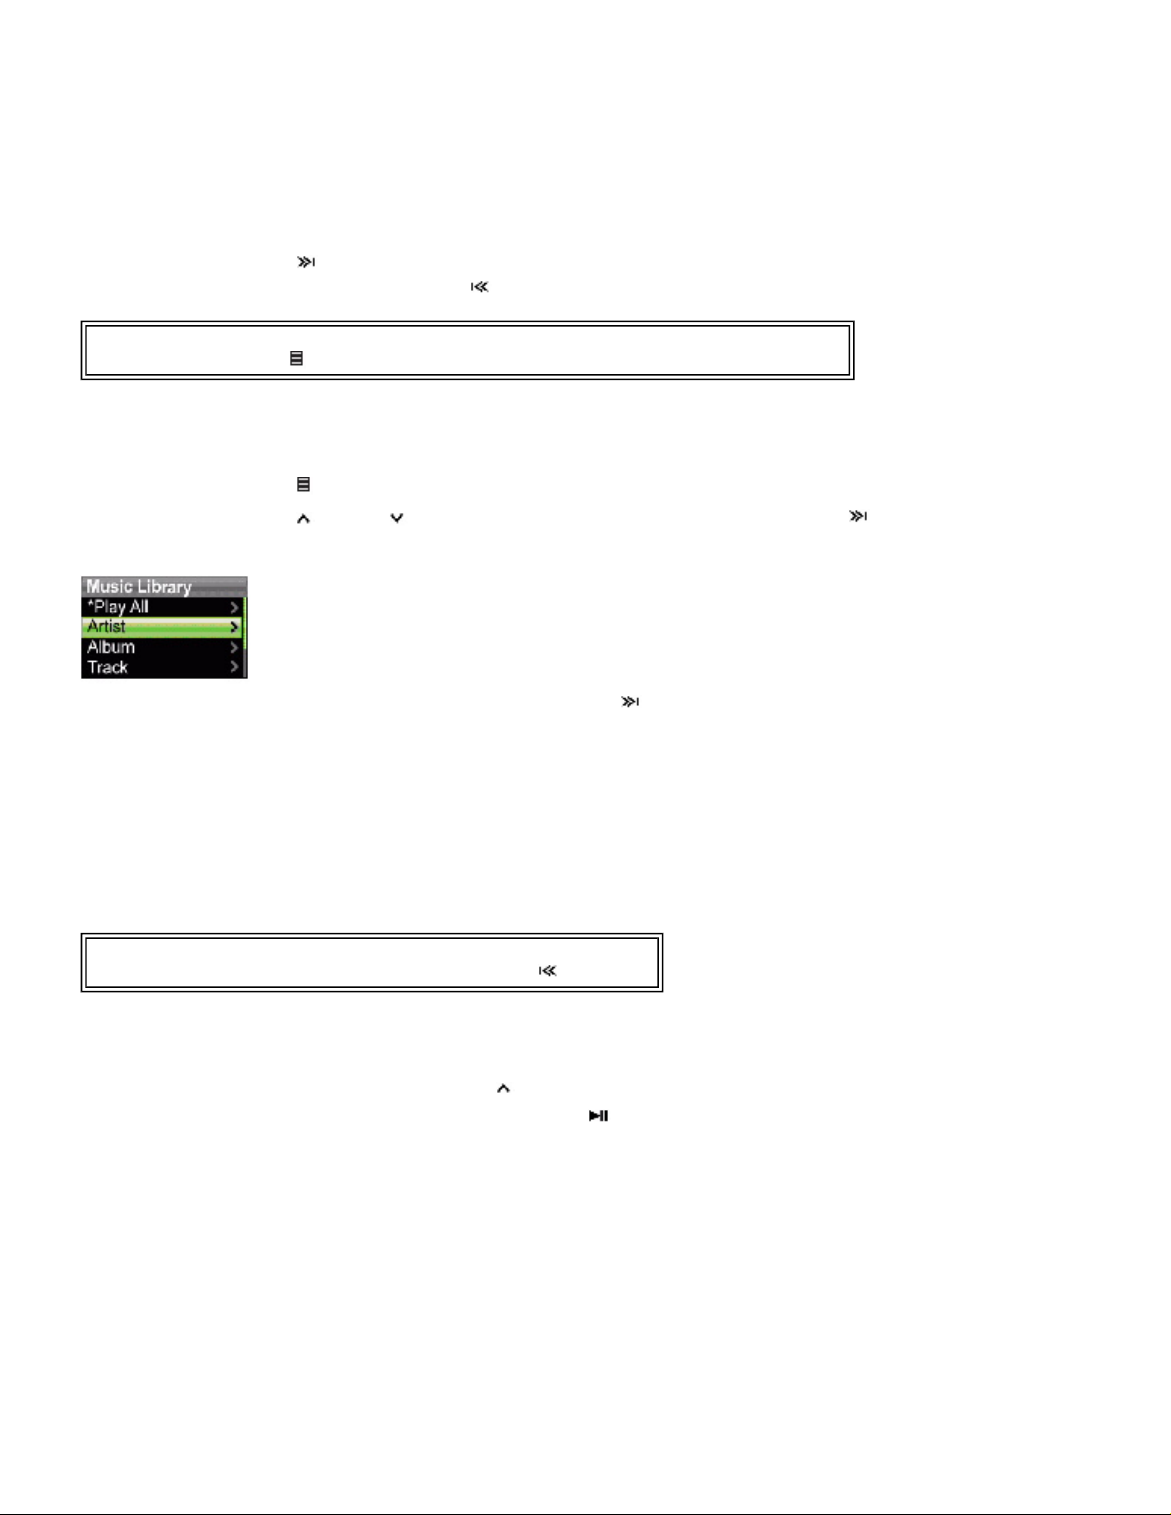
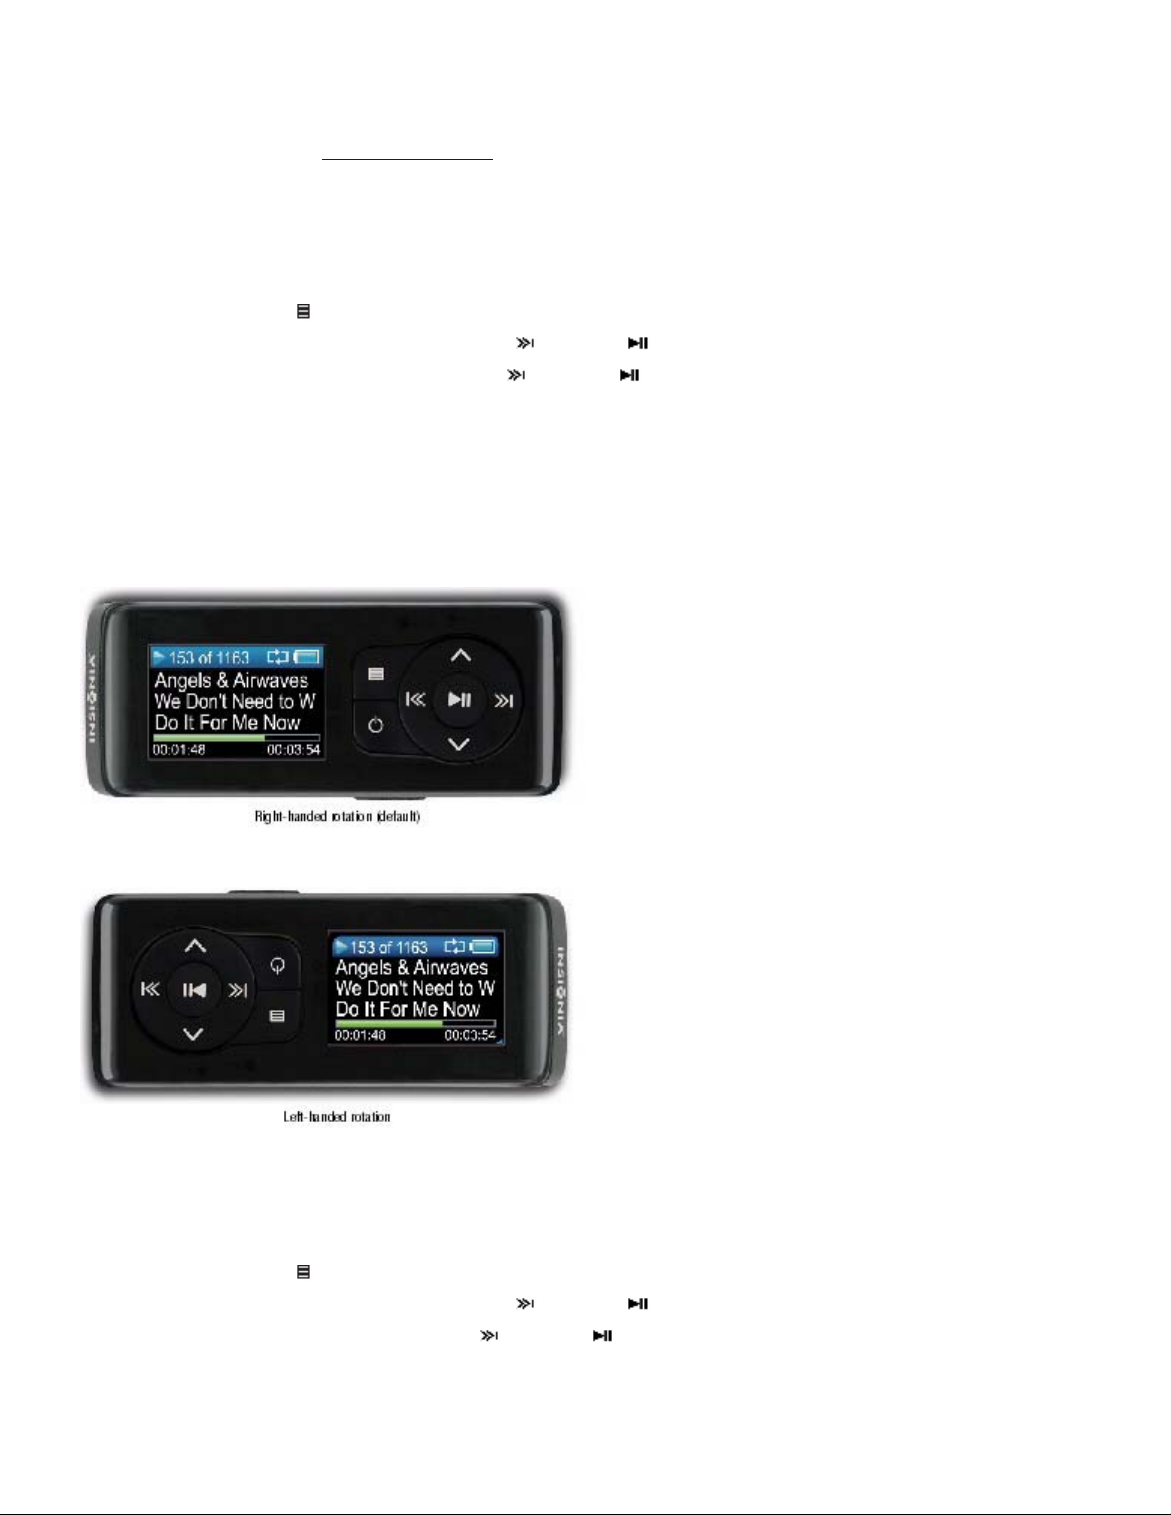
Controls and connections
Front
Item Icon Function
A
B
Menu--Opens the on-screen menu for selecting songs and changing settings.
Rewind/Skip Back--Press to restart the current track, and press repeatedly to skip to previous tracks. Press and
hold to rewind. In FM radio mode, press to change frequencies.
Page 4
C
g
D
E
F
G
Up--Press to scroll up through lists or change radio frequency presets.
Fast Forward/Skip/Next--Press to skip to the next track. Press and hold to fast forward. In menus, press to open
the next submenu or setting. In FM radio mode, press to change frequencies.
Power--Press and hold to turn on the player. Press and hold again to turn off.
Down--Press to scroll down through lists or change radio frequency presets.
Play/Pause/Select--Press to play or pause playback. In menus, press to select. In FM radio mode, press and hold
to change audio mode.
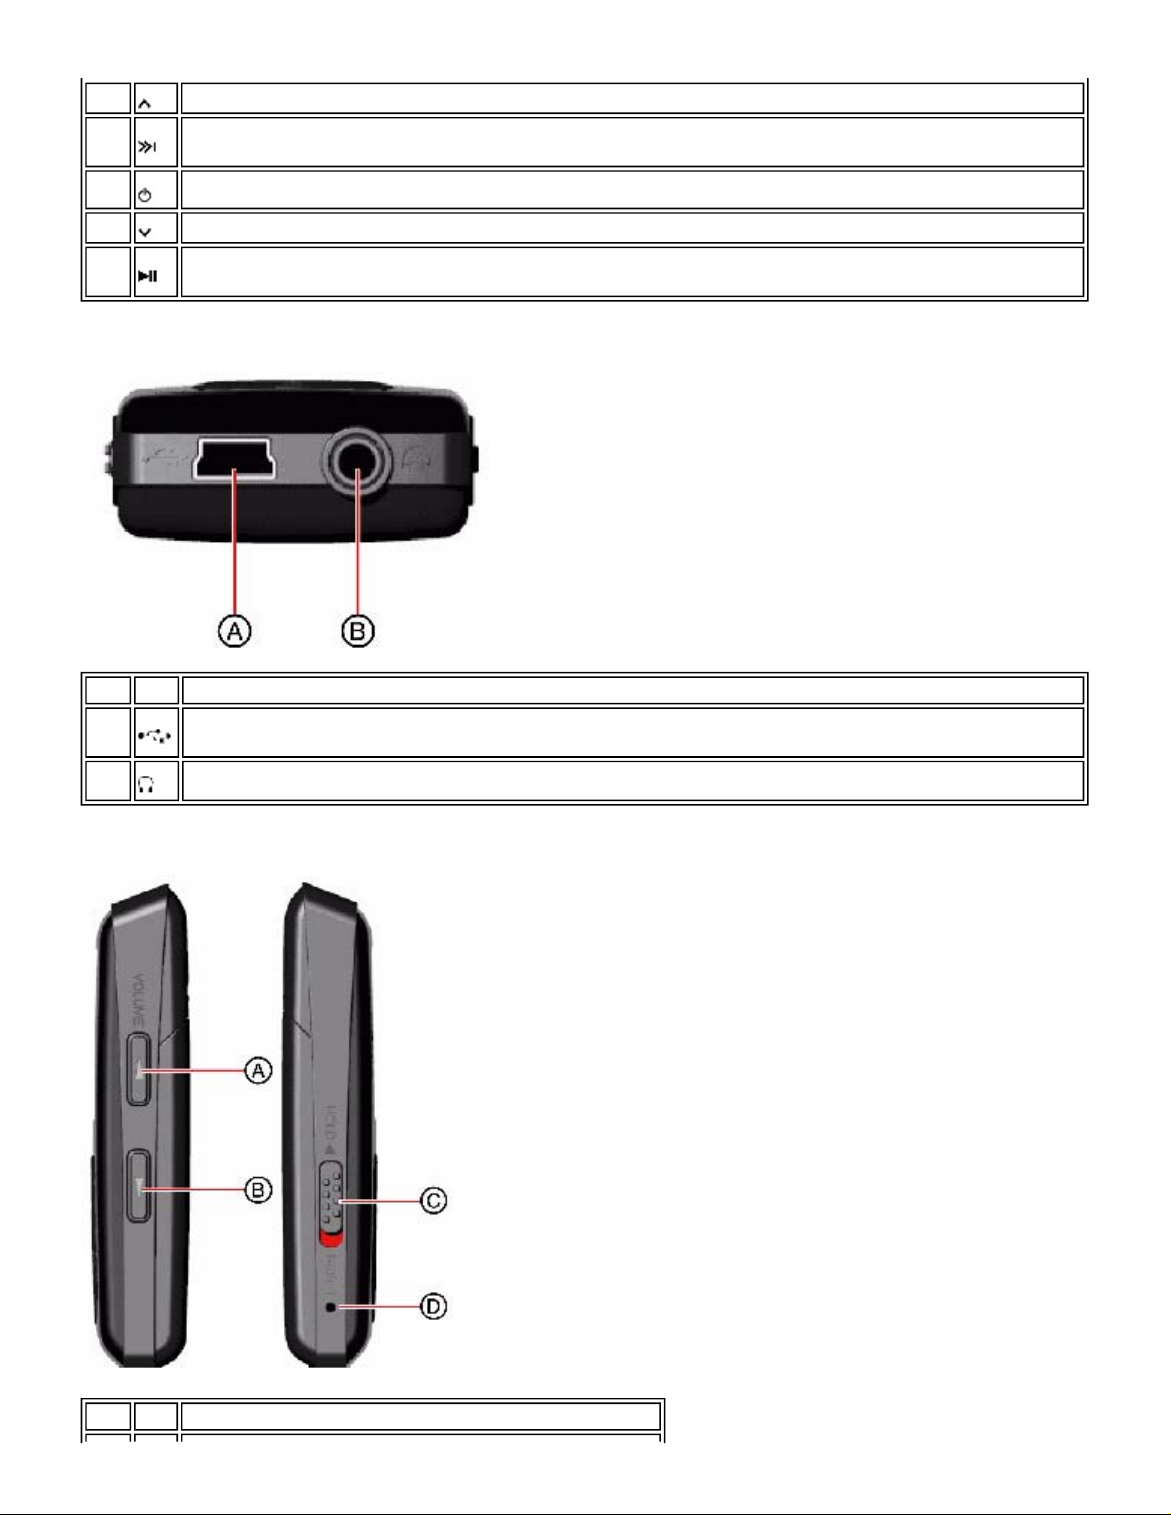
Bottom
Item Icon Function
A
B
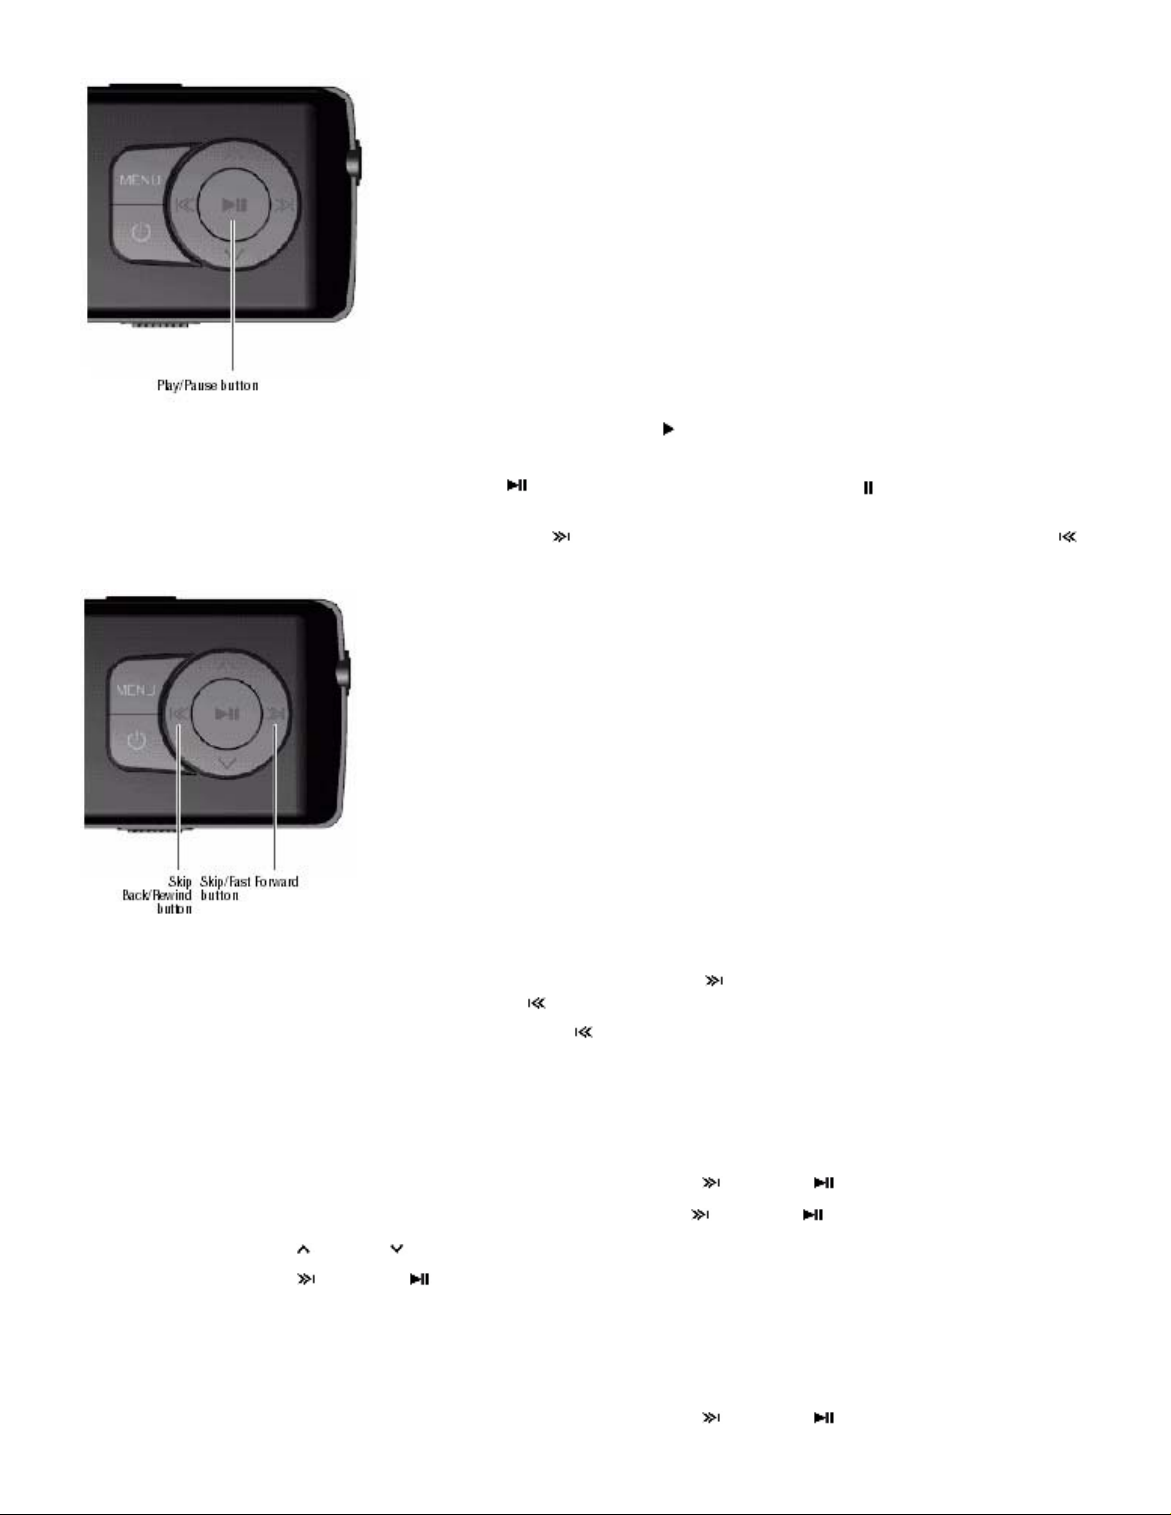
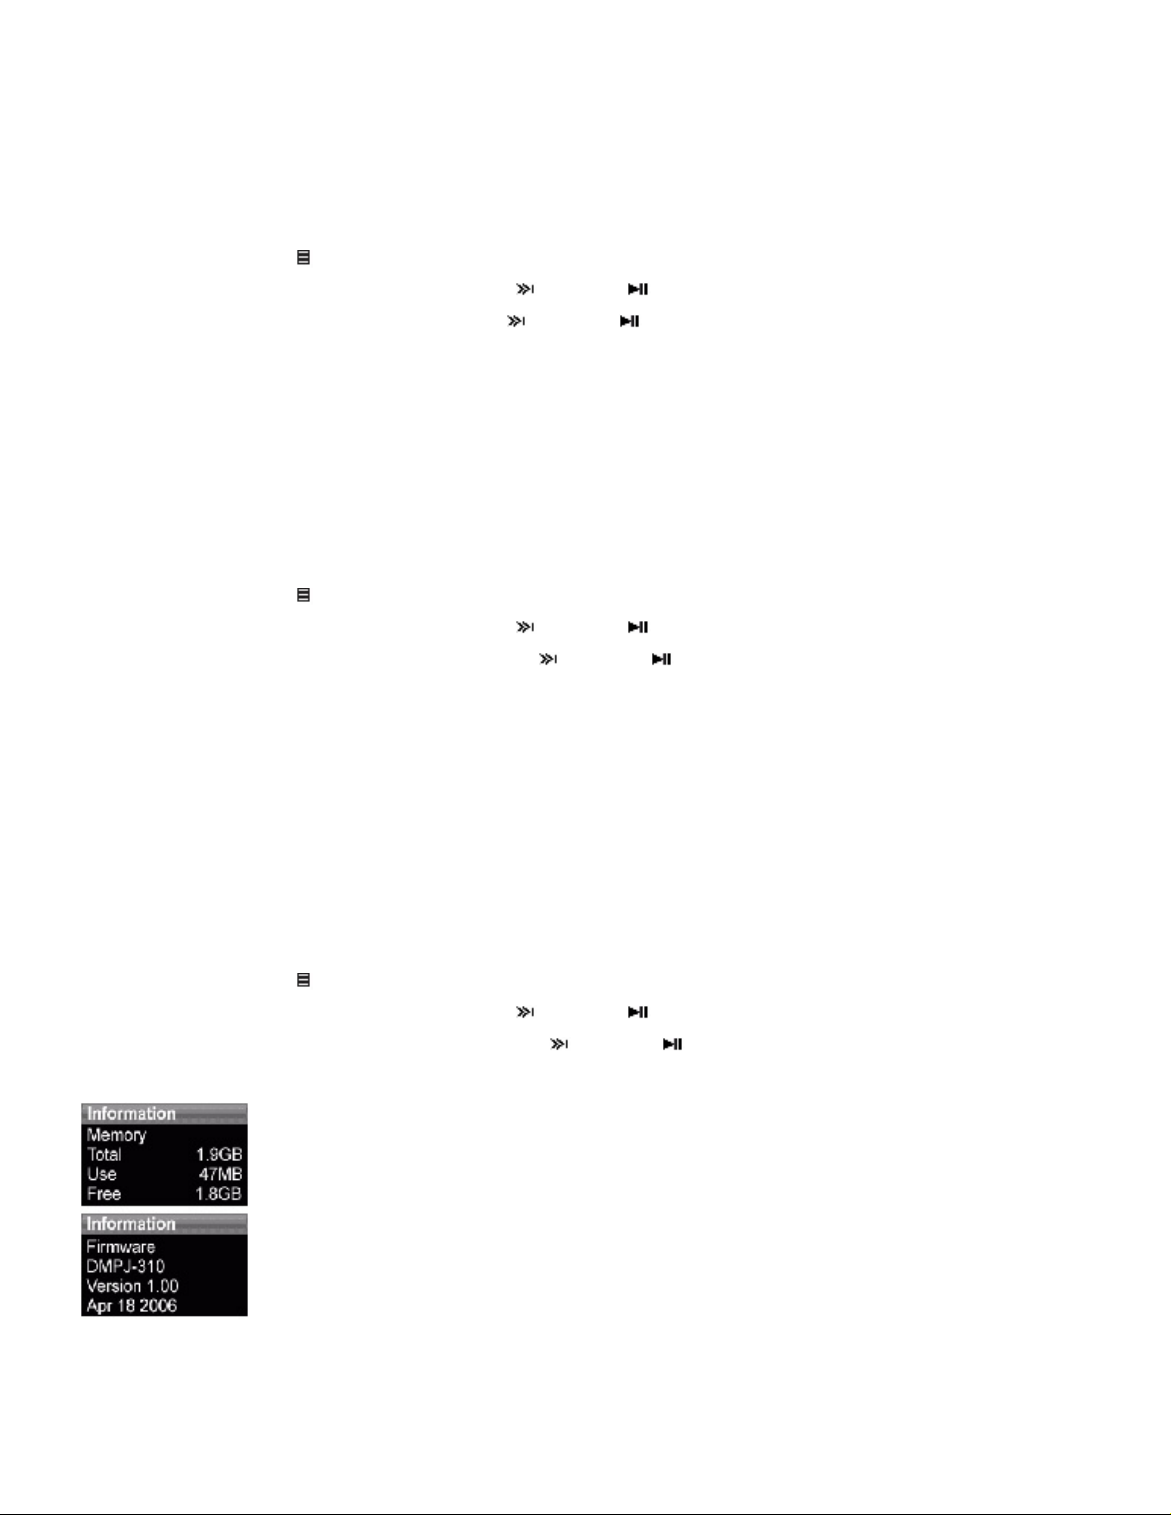
Sides
Mini USB 2.0 port--Connect the USB cable to this port and your computer to charge the player and transfer
files.
Earphone jack--Connect earphones or headphones to this jack.
Item Icon Function
Page 5
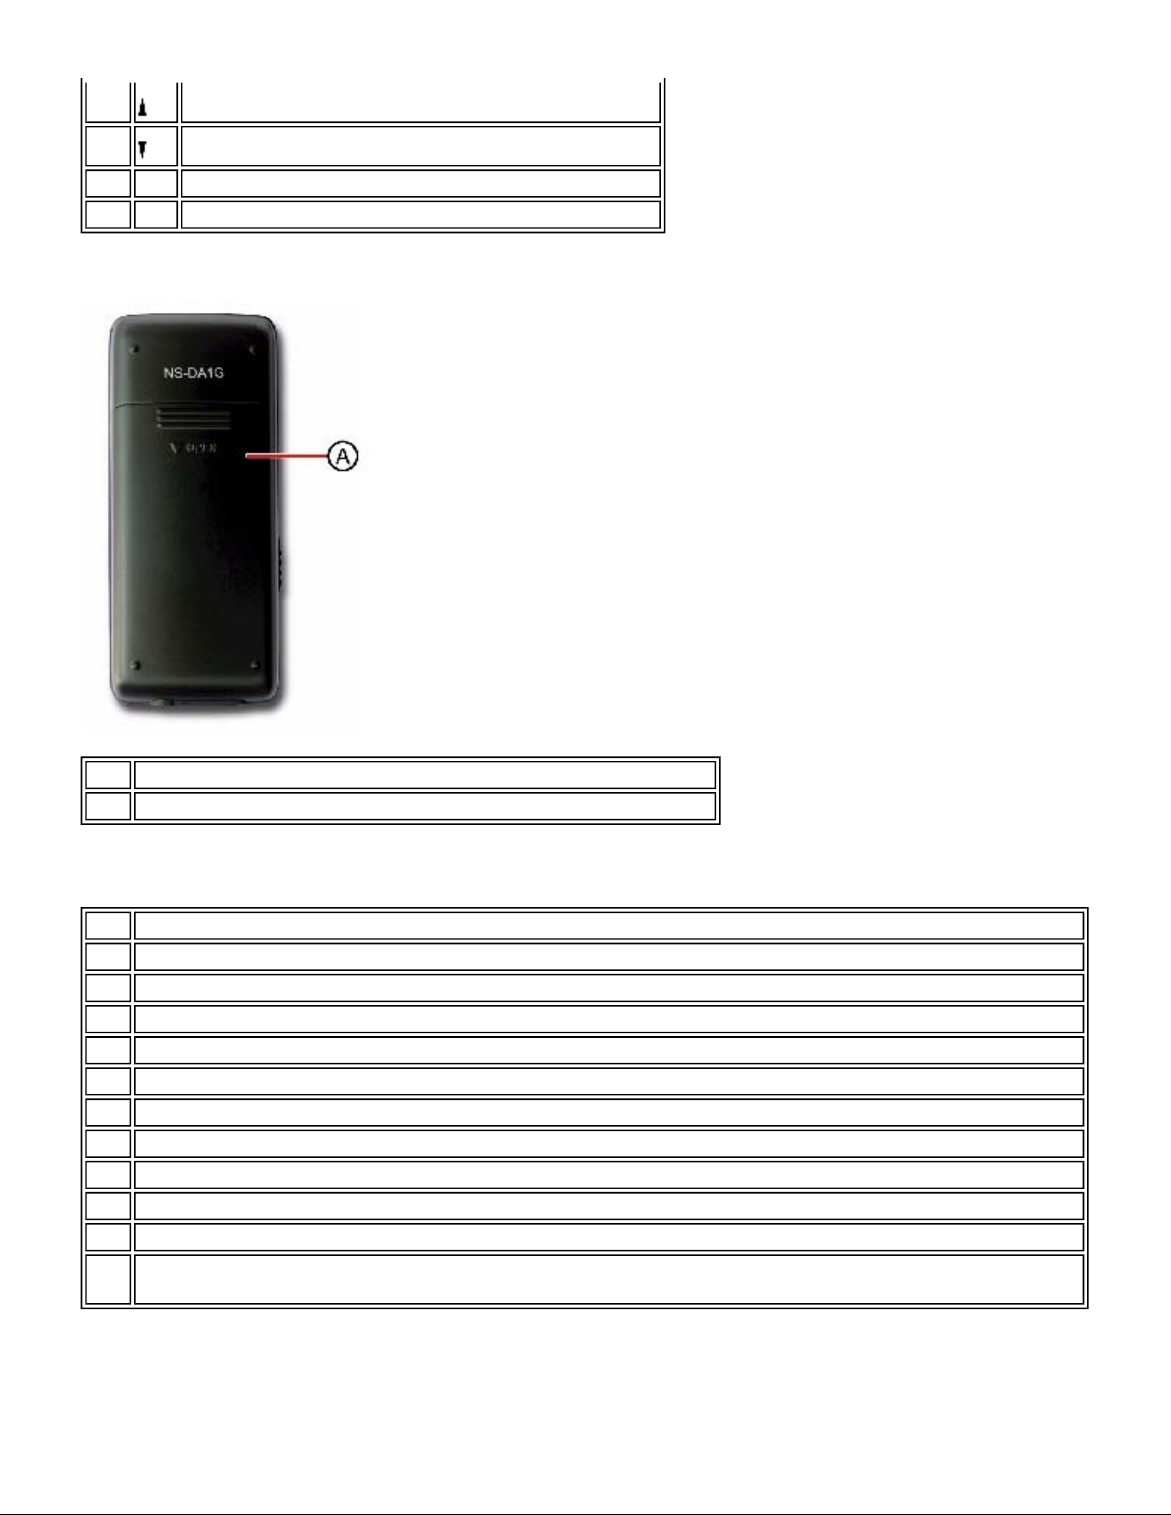
y
A
g
B
C
D
Back
Volume up--Press to increase volume.
Volume down--Press to decrease volume.
HOLD switch--Slide to disable all buttons.
RESET button--Insert a pointed object to restart the player.
Item Function
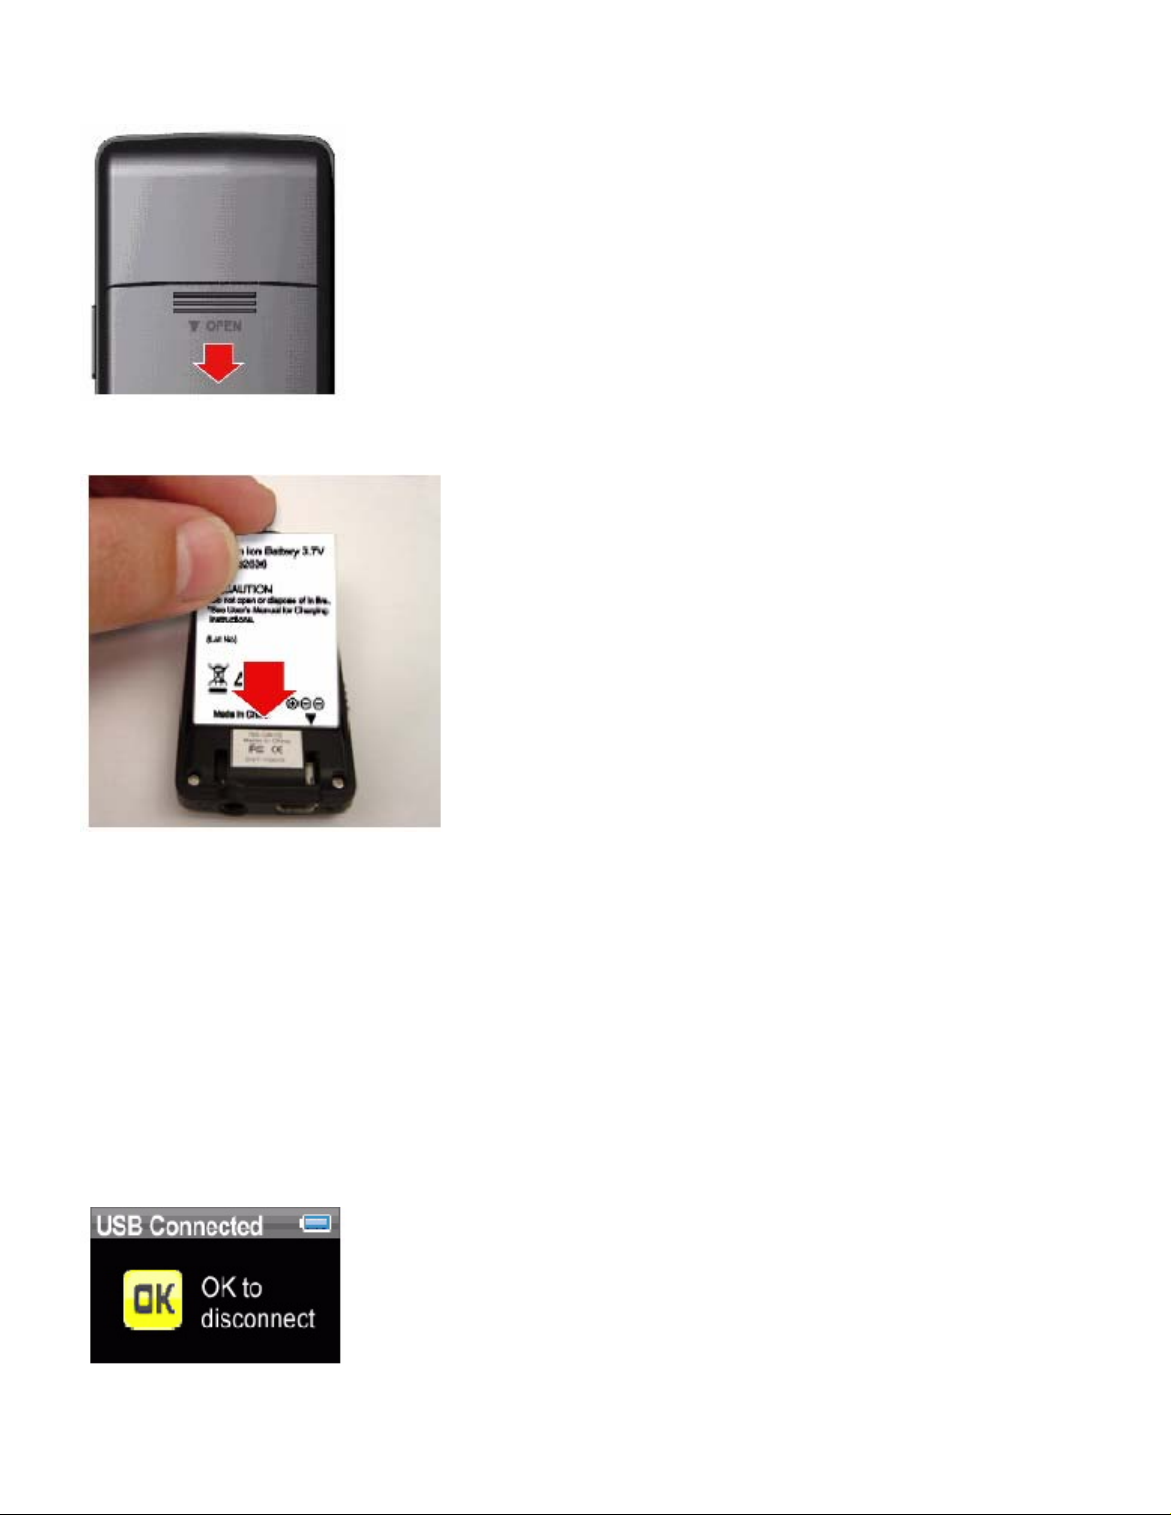
Battery cover--Remove the battery cover to insert or change the battery.
A
Display information
Item Function
Status--Displays whether a track is playing or paused.
A
File number--Lists the track number currently playing.
B
Repeat icon--Indicates the current Repeat setting.
C
Battery icon--Indicates the battery's power level.
D
Artist name--Displays the artist name of the current track.
E
Album name--Displays the album name of the current track.
F
Track name--Displays the track title of the current track.
G
Progress bar--Displays the progress of the song.
H
Play time--Displays the elapsed time of the current track.
I
Total time--Displays the length of the current track.
J
Volume (not shown)--Displays the current volume setting. Appears on the display only when the volume buttons are
pressed.
Setting up your music player
Installing the batter
Page 6
Slide off the battery cover on the back of the music player.
g
1.
Press the battery into the battery compartment, then slide it into place. The battery should fit
2.
snugly.
Slide the battery cover on until it snaps into place.
3.
Charging the battery
Charge the battery whenever you aren't using the player to make sure it's always fully charged.
The battery charges in about two hours. A fully charged battery provides up to 18 hours of
continuous playback, depending on the brightness and display time of the backlight, and the
volume levels.
To charge the battery:
1.
2.
Turn on your computer.
Connect the supplied mini USB 2.0 cable to the mini USB jack on the player and a
standard USB jack on your computer. When the cable is connected correctly, the
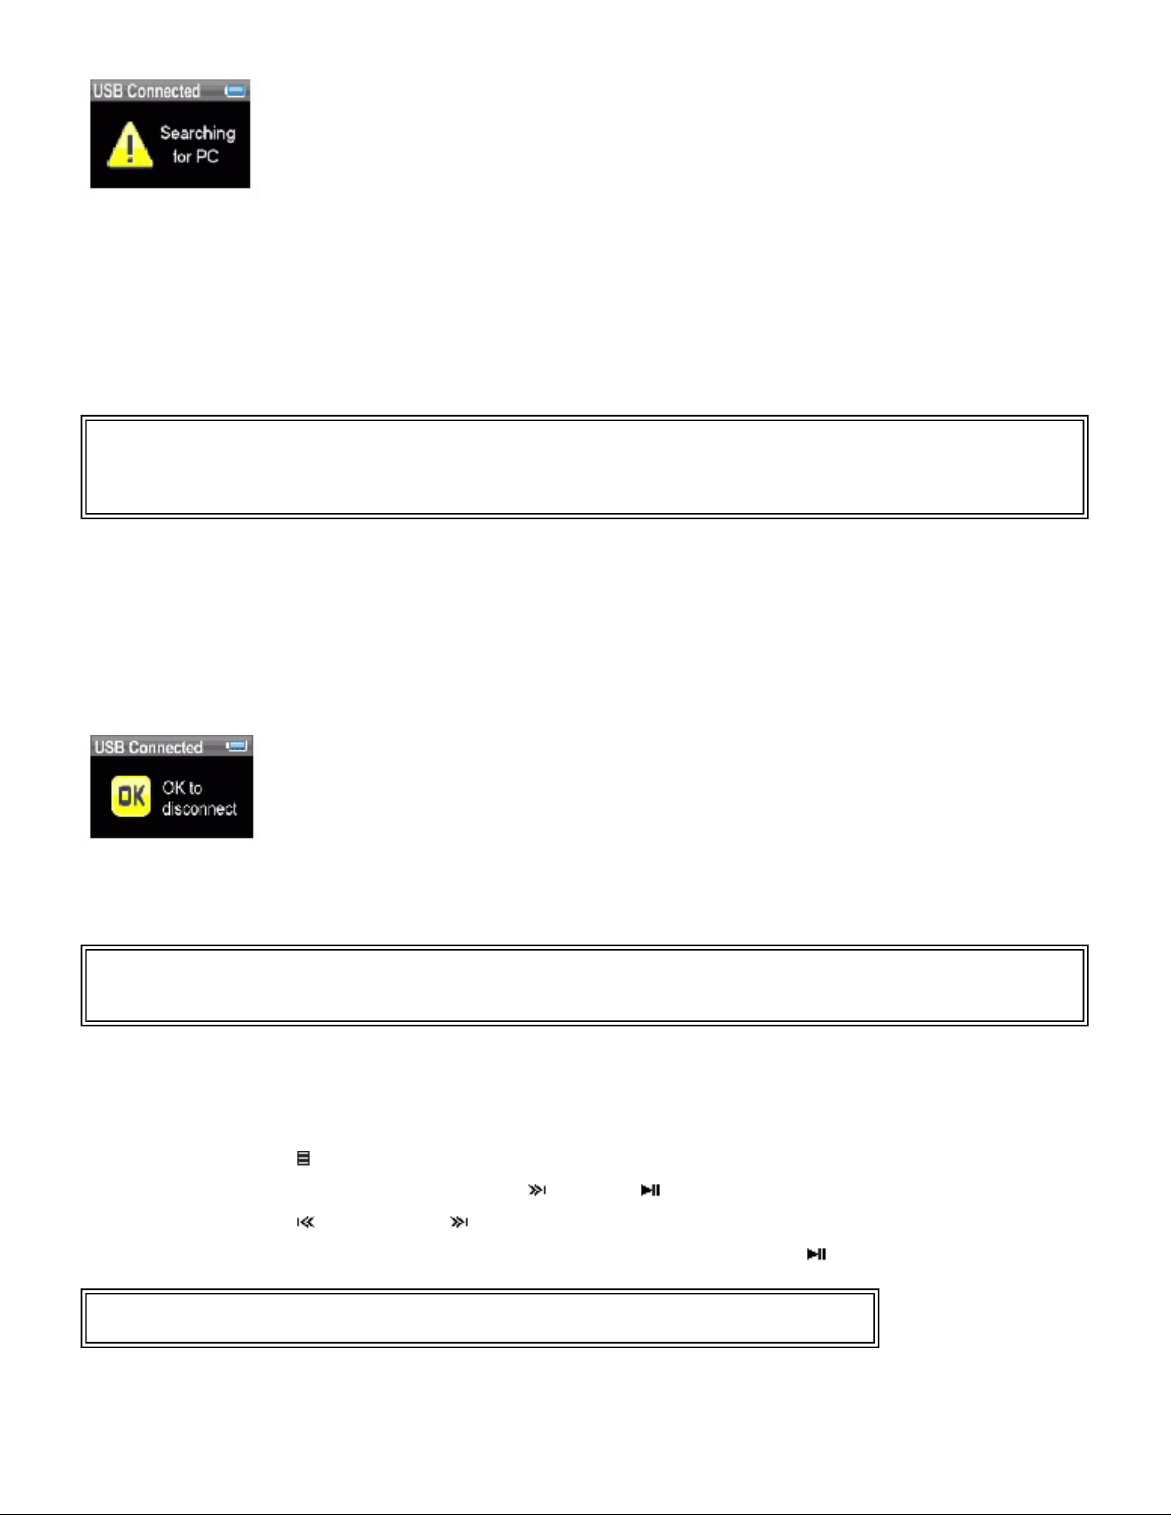
player begins recharging its battery using the USB connection, and the message "OK
to disconnect" appears on the player.
As the battery charges, the blue battery icon shows an animation of being filled from right to
left, to illustrate that the battery is charging.
Page 7
g
After the player is fully charged, the battery icon turns green, indicating a full charge.
Connecting headphones
You can use any headphones with a standard 1/16" stereo audio plug.
To connect headphones:
Plug headphones or the provided earphones into the earphone/headphone jack on the
•
Note
To use the FM radio, you must have the provided earphones connected, because they act as the FM
antenna. To substitute for the earphones, you can use any headphones with unshielded wires.
music player.
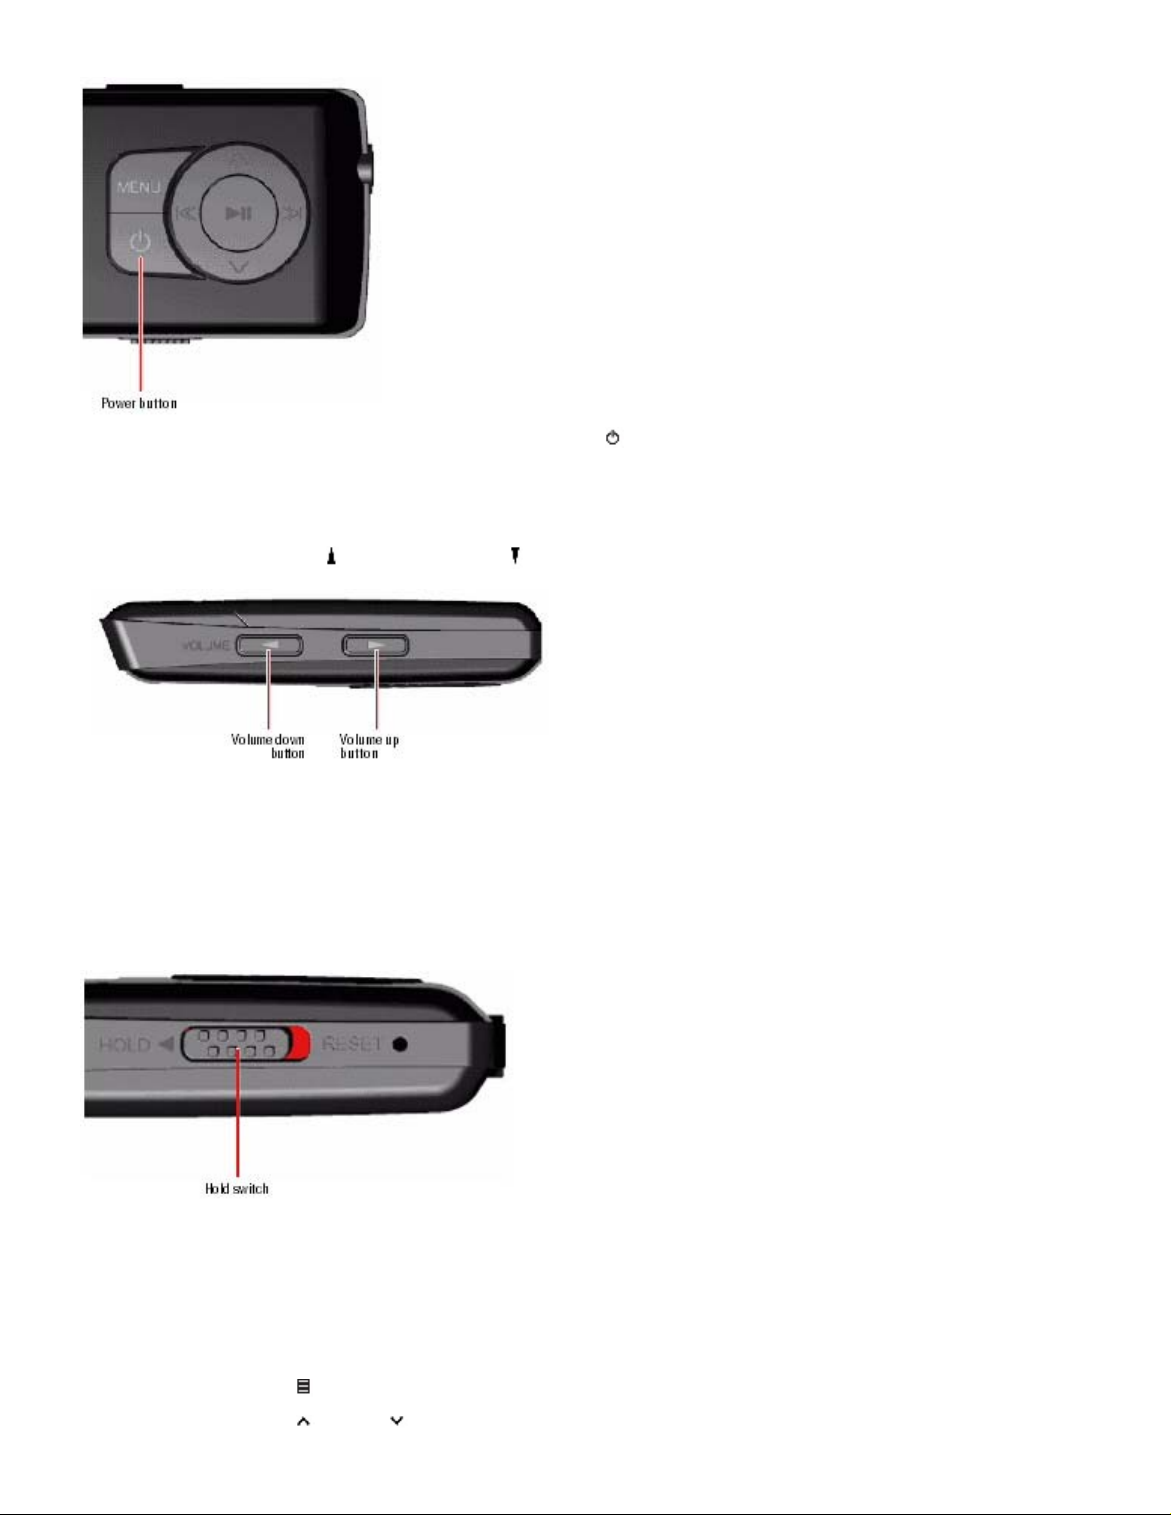
Installing the Best Buy Rhapsody software
To install the software:
Insert the Insignia software CD into your computer's CD drive. The software installation program
1.
starts.
-ORIf the installation program doesn't start automatically, double-click
desktop, double-click the CD drive that contains the Insignia CD, then double-click the file
rhapsodybestbuy.exe
Follow the on-screen instructions to finish the installation.
2.
Tip
For iTunes Drag and Drop support, use File & Folder (MSC) USB mode. Your Insignia MP3 player will only
play iTunes MP3 files that you drag and drop from iTunes. For information on changing USB modes, "See
Manually changing the USB mode".
Using your player
Turning your player on and off
To turn your player on and off:
Press and hold (Power)
1.
. The software installation program starts.
.
My Computer
on your
Page 8
2.
g
To turn off your player, press and hold (Power) again.
Changing the volume
To change the volume:
Press the (Volume Up) and (Volume Down) buttons.
•
Locking the buttons
You can prevent accidental button operation by locking the buttons.
To lock the buttons:
Slide the
1.
position appears on the screen.
HOLD
switch in the direction of the arrow. An image of the hold button in the HOLD
To unlock the buttons, slide the
2.
Navigating the on-screen menus
Use the on-screen menu to play music and change settings.
To navigate the on-screen menu:
1.
2.
Press (Menu). The main menu opens.
Press (Up) or (Down) to highlight one of the following menu items:
HOLD
switch away from the arrow.
Page 9
•
g
•
•
•
•
Music
FM Radio
Music Library
FM Settings
Settings
3.
Tip
Press and hold the (Menu) button to return to the menu you were last navigating.
Press (Next). The submenu of the item you selected opens. To navigate backwards
from a submenu, press (Previous).
Playing music files
To play music:
1.
2.
Press (Menu).
Press (Up) or (Down) to highlight Music Library, then press (Next). The music
library opens.
Highlight one of the following options, then press (Next) to open that category:
3.
•
Play All
•
Artist
•
Album
from an album to your player, that album name will appear in this list.
•
Track
•
Playlist
•
Tip
To navigate backwards from a submenu, press (Previous).
Select the content to play, then select
4.
Genres
tracks starting with a specific track, select that track within the category. The player switches to
the Now Playing view, which displays information on the track currently playing.
To display album art (if available), press (Up). The album art appears on the left of the display.
If your selection does not begin to play, press (Play/Pause).
5.
--Plays all tracks on the player.
--Lists all tracks arranged alphabetically by artist.
--Lists all tracks arranged alphabetically by album. Even if you copied only one track
--Lists all tracks arranged alphabetically by track title.
--Lists all tracks arranged alphabetically by playlist.
--Lists all tracks arranged alphabetically by genre.
Play All
to play all the tracks in that selection. To play all
Page 10
A
g
The track begins playing, and the play status icon ( ) appears in the upper left corner of the
display.
To pause playback, press (Play/Pause). The pause status icon ( ) appears in the upper
•
left corner of the screen.
To skip to the next track, press (Skip/Fast Forward). To skip to a previous track, press
•
(Skip Back/Rewind) repeatedly.
To fast forward the current track, press and hold (Skip/Fast Forward). To rewind the
•
current track, press and hold Skip Back/Rewind).
To restart the current track, press (Skip Back/Rewind) once.
•
Randomizing playback
You can play the tracks you selected in random order.
To play tracks in random order:
1.
2.
3.
4.
In the Settings menu, select
In the Audio menu, select
Shuffle
Press (Up) or (Down) to choose On or
, then press (Next) or (Play/Pause).
Audio
, then press (Next) or (Play/Pause).
Off
Press (Next) or (Play/Pause) to save your setting. The shuffle icon appears on the
Now Playing screen next to the battery icon.
Repeating tracks
To repeat tracks:
1.
In the Settings menu, select
, then press (Next) or (Play/Pause).
udio
.
Page 11
2.
g
3.
4.
In the Audio menu, select
Repeat
Press (Up) or (Down) until you select
track), or
Off
.
, then press (Next) or (Play/Pause).
(repeat all tracks),
All
(to repeat a single
One
Press (Next) or (Play/Pause) to save your setting. The Repeat 1 or Repeat All icon
appears on the Now Playing screen next to the battery icon.
Repeating segments of a track
You can use A-B repeat to repeatedly play a segment of a track. You must first enable A-B
repeat.
To enable A-B repeat:
1.
2.
3.
4.
5.
Press (Menu). The main menu opens.
Press (Up) or (Down) to highlight
Press (Up) or (Down) to highlight
Press (Up) or (Down) to highlight
(Play/Pause).
Settings
Audio
A-B repeat
Press (Up) or (Down) to highlight On or
, then press (Next) or (Play/Pause).
, then press (Next) or (Play/Pause).
, then press (Next) or
, then press (Next) to select. The
Off
message "Use the down button (V) to activate A-B" appears, then the Audio Setting
menu opens again.
6.
To repeat an audio segment:
During playback, press (Down) to mark the start of the playback loop. The Repeat icon on the
1.
display shows an "A."
Press (Menu) to return to the Now Playing screen.
Press (Down) again to mark the end of the playback loop. The Repeat icon on the display
2.
shows an "AB" and the player repeats that audio segment indefinitely.
Press (Down) again to cancel the repeating loop.
3.
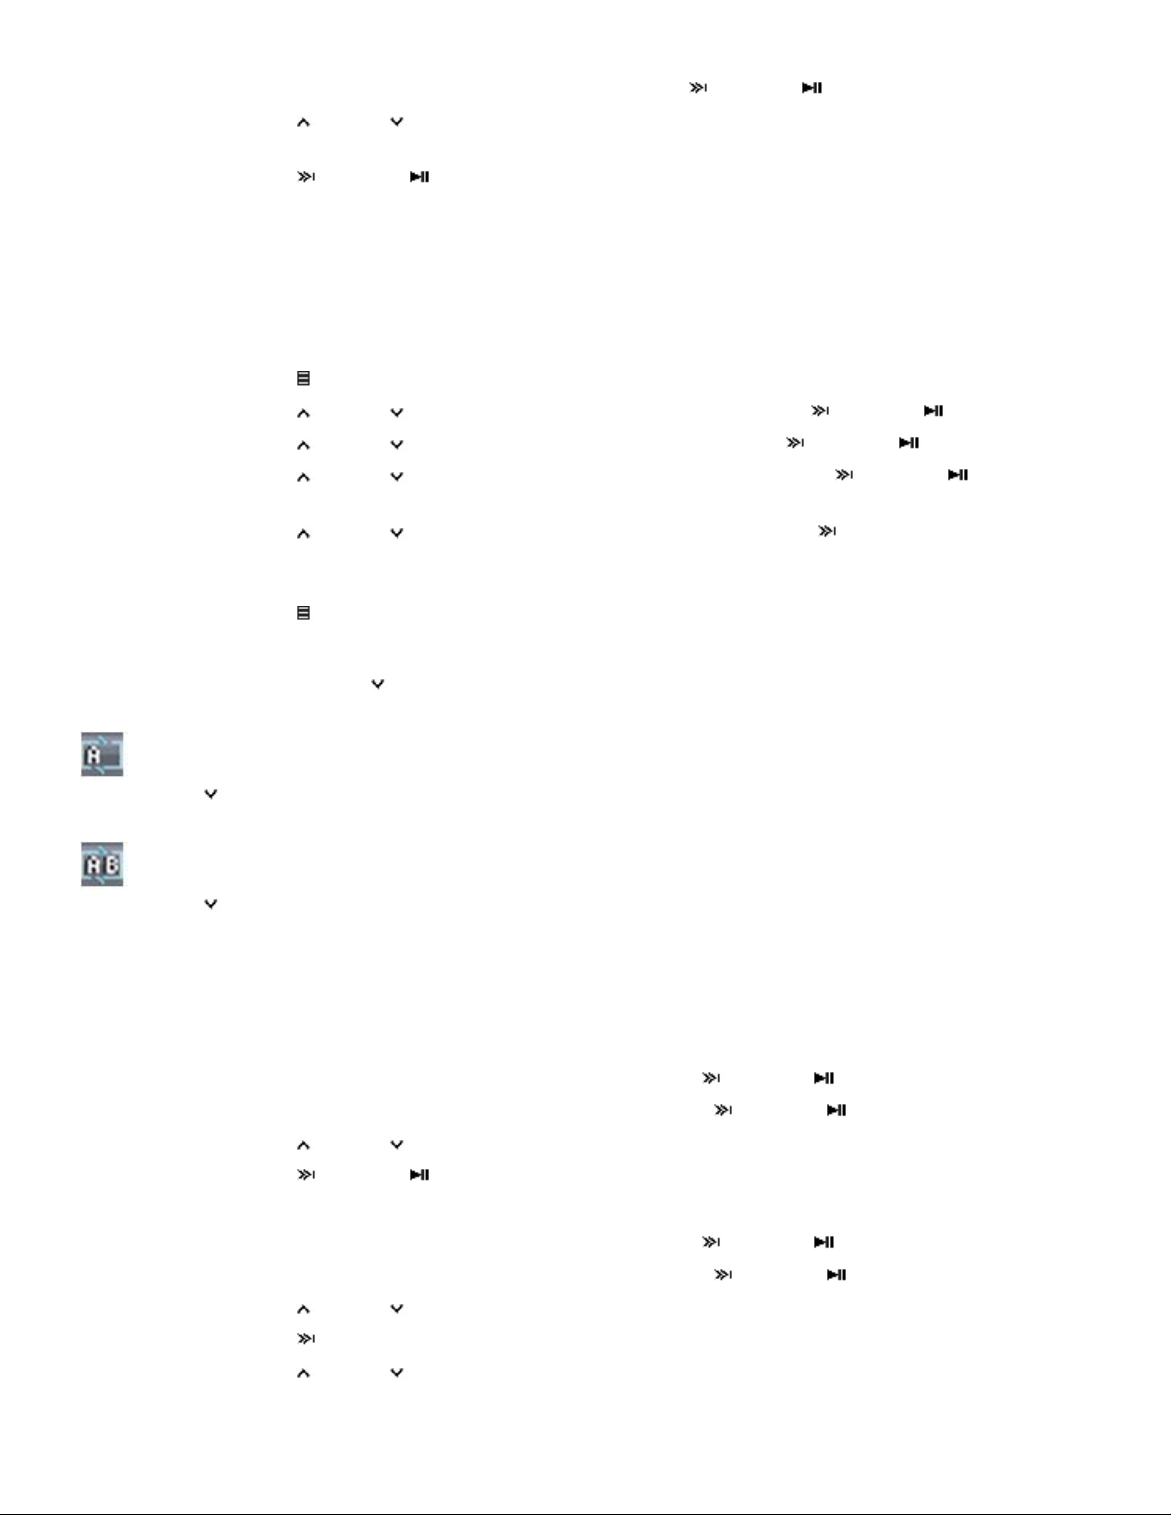
Using the equalizer
Six equalizer settings are available, and five are preprogrammed: Normal, Rock, Jazz, Classic,
and Pops. The User setting lets you customize the equalizer to your preference.
To select a pre-programmed equalizer setting:
1.
2.
3.
4.
To change the equalizer's custom setting:
1. In the Settings menu, select
2.
3.
4.
5.
In the Settings menu, select
In the Audio menu, select
Audio
Equalizer
Press (Up) or (Down) to select the equalizer setting you want.
Press (Next) or (Play/Pause) to save your new settings.
Audio
In the Audio menu, select
Equalizer
Press (Up) or (Down) to select the
Press (Next) to move the cursor to the first equalizer setting dial.
Press (Up) or (Down) to adjust the setting. Repeat this step to adjust each
remaining dial.
, then press (Next) or (Play/Pause).
, then press (Next) or (Play/Pause).
, then press (Next) or (Play/Pause).
, then press (Next) or (Play/Pause).
Custom
setting.
Page 12
g
Press (Play/Pause) to save your new settings.
6.
Getting more music
Your music player already contains some music files, but you can get more music from your own
music CDs and from the Internet.
Getting music from CDs and the Internet to your music player involves two steps:
1.
2.
Getting more music on your computer
Getting music from CDs
To rip a CD:
Click
1.
opens.
Rip a CD (create files of the music on the CD) or download music files from the Internet.
Select the files to copy and copy them to your player.
Start
,
All Programs
,
Best Buy Rhapsody
,
Best Buy Rhapsody
. Best Buy Rhapsody
Put a music CD in the CD drive. Rhapsody lists the tracks on the right side of the screen. If you
2.
are connected to the Internet, the list shows the track names.
Click
3.
under the
Import CD
My Library
. Rhapsody creates MP3 files from the music tracks on the CD and lists them
folder.
For information on transferring your music files to your music player, "See Copying music files
to your player".
Page 13
Getting music from Rhapsody
g
To buy and download music files from the Internet:
1.
Click
opens.
Start
,
All Programs
,
Best Buy Rhapsody
,
Best Buy Rhapsody
In the
2.
Search
click Go . Any matches that Rhapsody finds are displayed on the screen.
box, type the name of the artist or album you want to download music for, then
. Best Buy Rhapsody
3.
Decide which tracks or albums you want to buy, then click
want.
4.
Follow the on-screen directions to finish the purchase. The music files are added to your
Tip
Rhapsody music library.
You can also use other digital music management programs to get music files from the Internet. See the
program's online help for more information.
Tip
For iTunes Drag and Drop support, use File & Folder (MSC) USB mode. Your Insignia MP3 player will only
play iTunes MP3 files that you drag and drop from iTunes. For information on changing USB modes, "See
Manually changing the USB mode."
Copying music files to your player
Copying files using Rhapsody
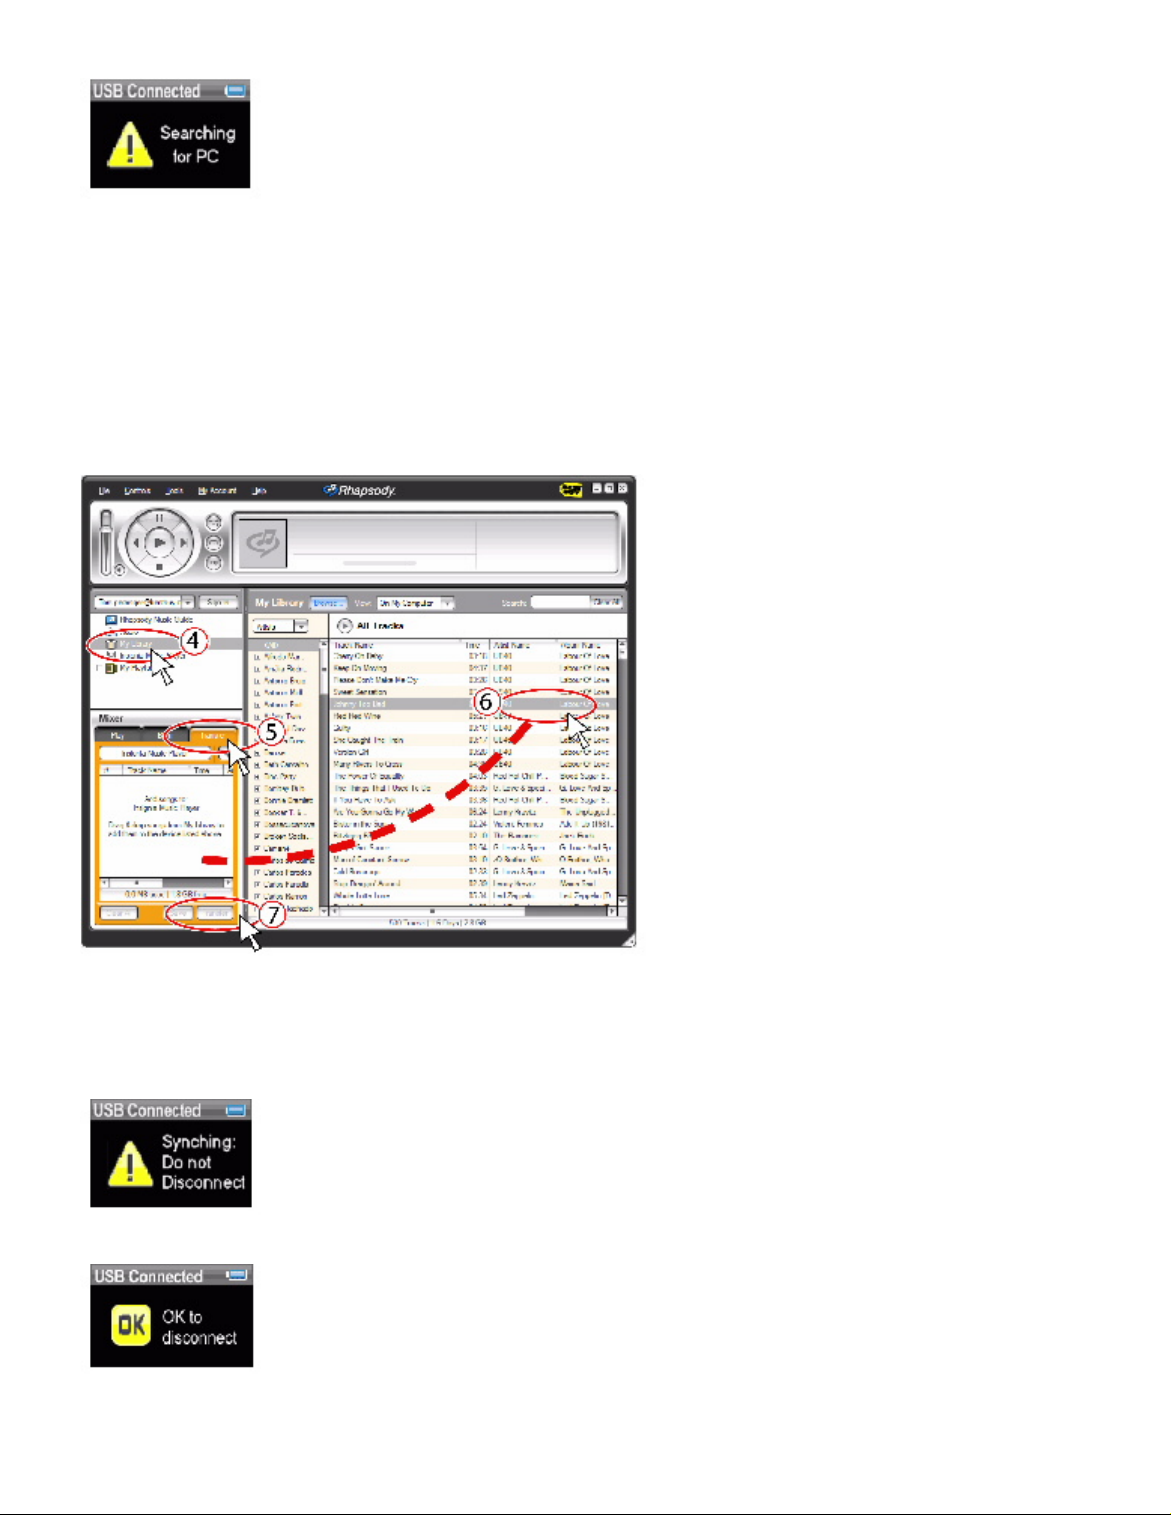
To copy files from your computer to the music player using Rhapsody:
1.
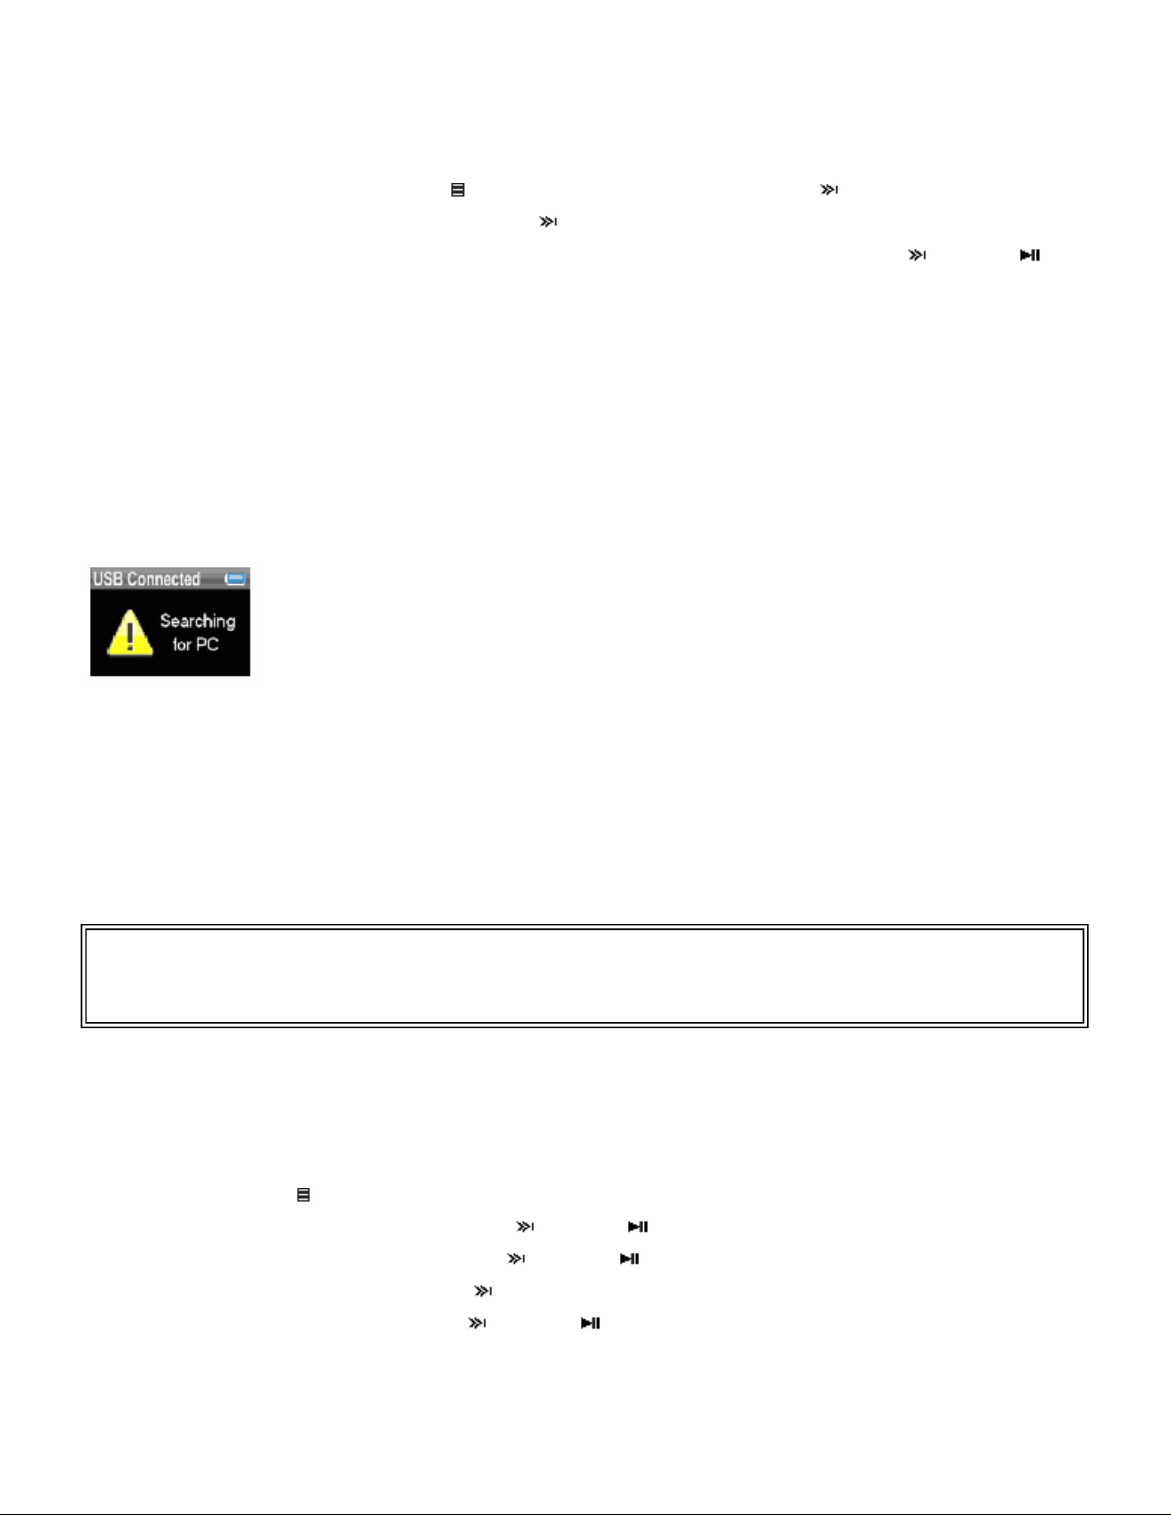
Connect the USB cable to a USB port on your computer and the mini USB port on your
player. The message "Searching for PC" appears on the player.
next to the music you
BUY
Page 14
g
Your computer detects the player, and adds the player as a new device ("Insignia Music
Player") in the My Computer list of drives in Windows.
2.
Click
Rhapsody opens.
3.
Close any popup windows that open.
4.
Click
in the right side of the screen.
5.
Click the
graphic).
,
Start
All Programs
My Library
Transfer
,
Best Buy Rhapsody
,
Best Buy Rhapsody
. Best Buy
in the list of content types. Your entire library of digital music appears
tab in the lower left area of the Rhapsody window (#5 in the following
6.
Click and drag files from the library to the
7.
When you have dragged all files that you want to copy to the transfer list, click the
Transfer
button (#7 in the graphic). The files are copied to your player. The message
Transfer
"Synching: Do not Disconnect" appears on the player.
list. (#6 in the above graphic).
When the copying is complete, the message "OK to disconnect" appears on the player.
8.
Unplug the USB cable from your computer and your player.
Page 15
Copying files using Windows Explorer
g
To copy music files from your computer to your player using Windows Explorer:
1.
2.
3.
On your player, press (Menu), select Settings , then press (Next).
Select
USB Mode
Highlight
Media Manager
, then press (Next).
(Play/Pause) to save the setting.
Use
•
•
Media Manager
any other file formats to the
display). Depending on which media manager software (such as Rhapsody, Windows Media
Player, and many others) you use, the name of the subfolders may be different than "Media"
and "Data."
Use
folder. The player will still only play MP3 and WMA files.
File & Folder
(MSC) mode to copy folders and any format of files to the player's root
(MTP) or
File & Folder
(MSC), then press (Next) or
(MTP) mode to you copy WMA and MP3 files to the
folder (you cannot see the Data folder using the player's
Data
4.
Connect your player to the computer using the provided USB cable. The message "Searching
for PC" appears on the player.
1.
2.
3.
Tip
To select multiple files, press and hold
select an entire range of files, click the file at the top of the range, press and hold
then click the file at the bottom of the range.
On your computer, click
Start
,
My Computer
, then double-click the folder where your
music files are.
Open
My Computer
Player
drive. (When your computer detected the player, it added the player as a new
again to open another window, then open the
device called "Insignia Music Player" in the My Computer list of drives in Windows.)
Click and drag the music files from your computer to the player:
If your player is in Media Manager (MTP) mode, copy them to the
If your player is in File & Folder (MSC) mode, copy them to the root folder on the player.
on your keyboard while clicking the files with your mouse. To
Ctrl
Media
Insignia Music
folder on the player.
Media
on your keyboard,
Shift
folder, and
Deleting files
When the copying is complete, the message "OK to disconnect" appears on the player.
4.
Unplug the USB cable from your computer and your player.
To delete files from your player using the on-screen menu:
1.
2.
3.
4.
5.
To delete files from your player using your computer:
1.
Press (Menu). The main menu opens.
Select
Select
Select
Select
Settings
System
Erase All
Yes
, then press (Next) or (Play/Pause).
, then press (Next) or (Play/Pause).
, press (Next).
, then press (Next) or (Play/Pause). All media files are deleted.
Connect the USB cable to a USB port on your computer and the mini USB port on your
player. The message "Searching for PC" appears on the player.
Page 16
g
Your computer detects the player, and adds the player as a new device ("Insignia Music
Player") in the My Computer list of drives in Windows.
1.
2.
3.
Tip
To select multiple files, press and hold
select an entire range of files, click the file at the top of the range, press and hold
then click the file at the bottom of the range.
Click
Double-click the
Start
, then click
My Computer
Insignia Music Player
.
device, then open the
Find the files you want to delete, click to select them, then press
keyboard. The files are deleted.
Ctrl
on your keyboard while clicking the files with your mouse. To
Media
Shift
folder.
Delete
on your
on your keyboard,
Disconnecting the player
After you have connected the player to a computer for recharging or music transfer, you need to
safely disconnect the player.
To safely disconnect the player from your computer:
When the player displays the message "OK to disconnect," unplug the USB cable from
•
the player and the computer.
Listening to FM radio
You can listen to FM radio broadcasts on your player.
Note
To use the FM radio, you must have the provided earphones connected, because they act as the FM
antenna. To substitute for the earphones, you can use any headphones with unshielded wires.
Tuning the radio
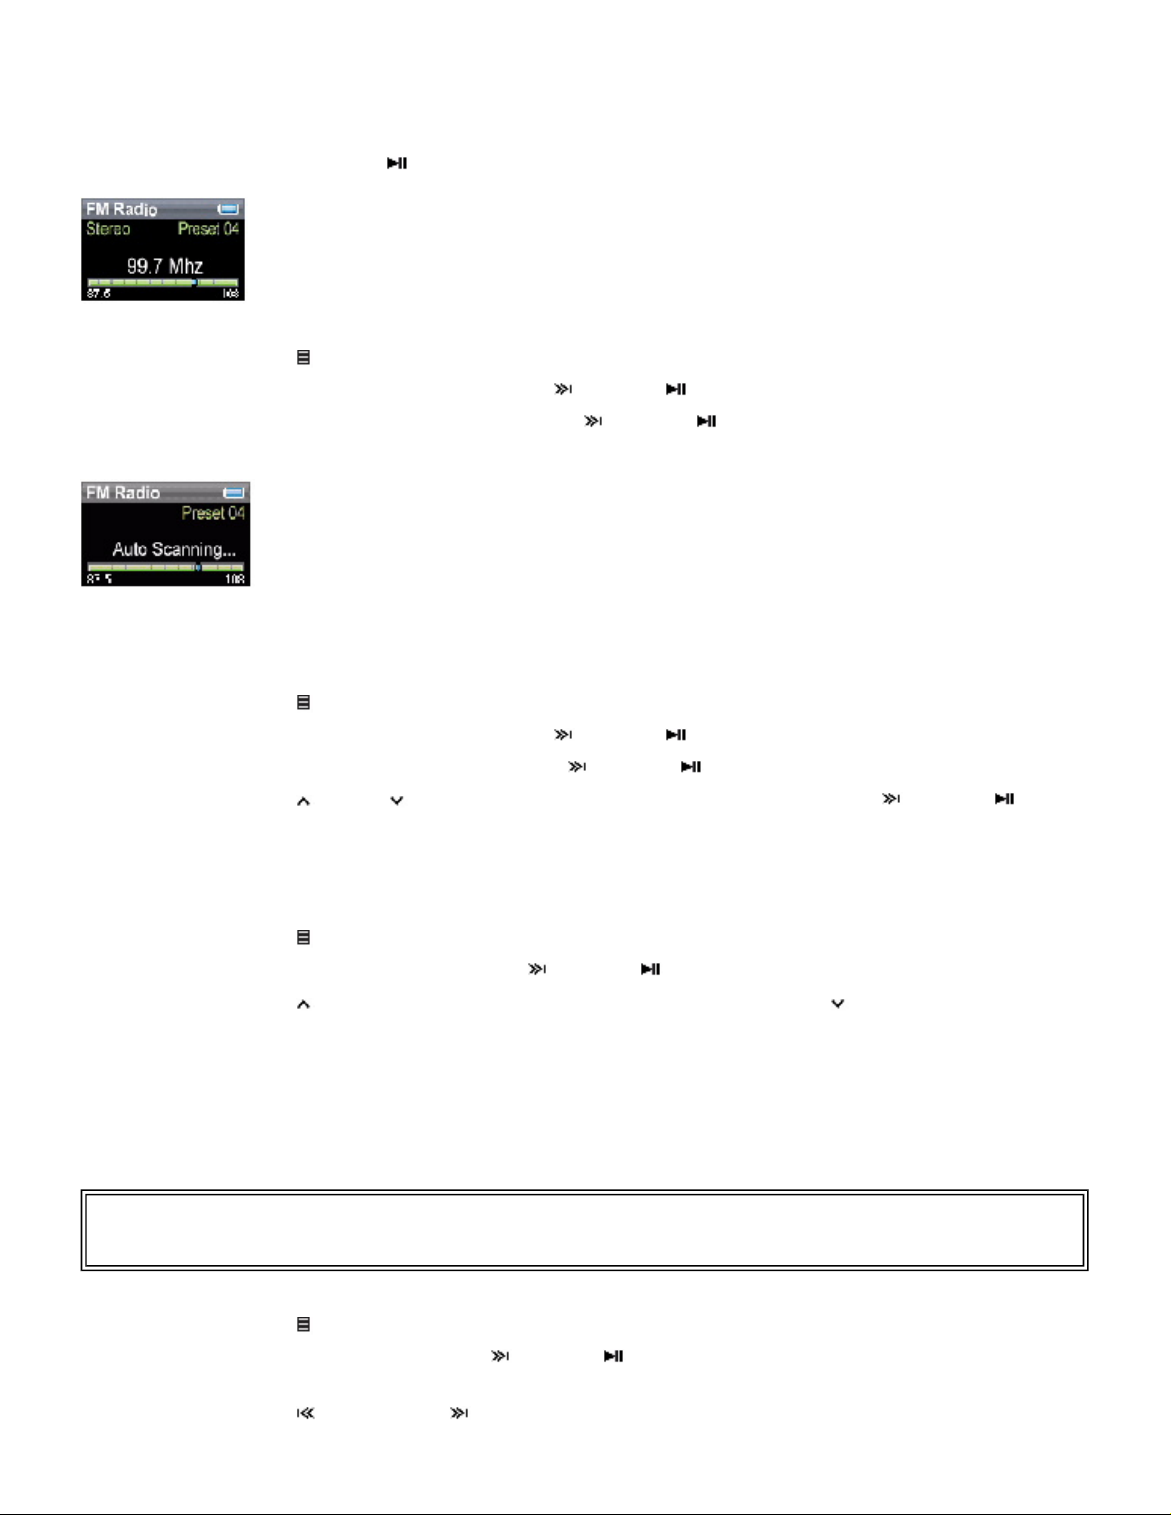
To tune to an FM radio station:
1.
2.
3.
4.
5.
Tip
Mono mode can help reduce static when listening to stations that have a weak signal.
Plug your earphones into the earphone jack.
Press (Menu). The main menu opens.
Select
Press (Previous) or (Next) to change the frequency in increments of 100 KHz.
To change between Stereo and Mono audio modes, press (Play/Pause).
FM Radio
, then press (Next) or (Play/Pause).
Setting station presets
Station presets let you quickly access your favorite frequencies.
Page 17
To set station presets manually:
A
g
1.
2.
Tune to an FM radio station frequency.
Press and hold (Play/Pause). The station is added as a preset.
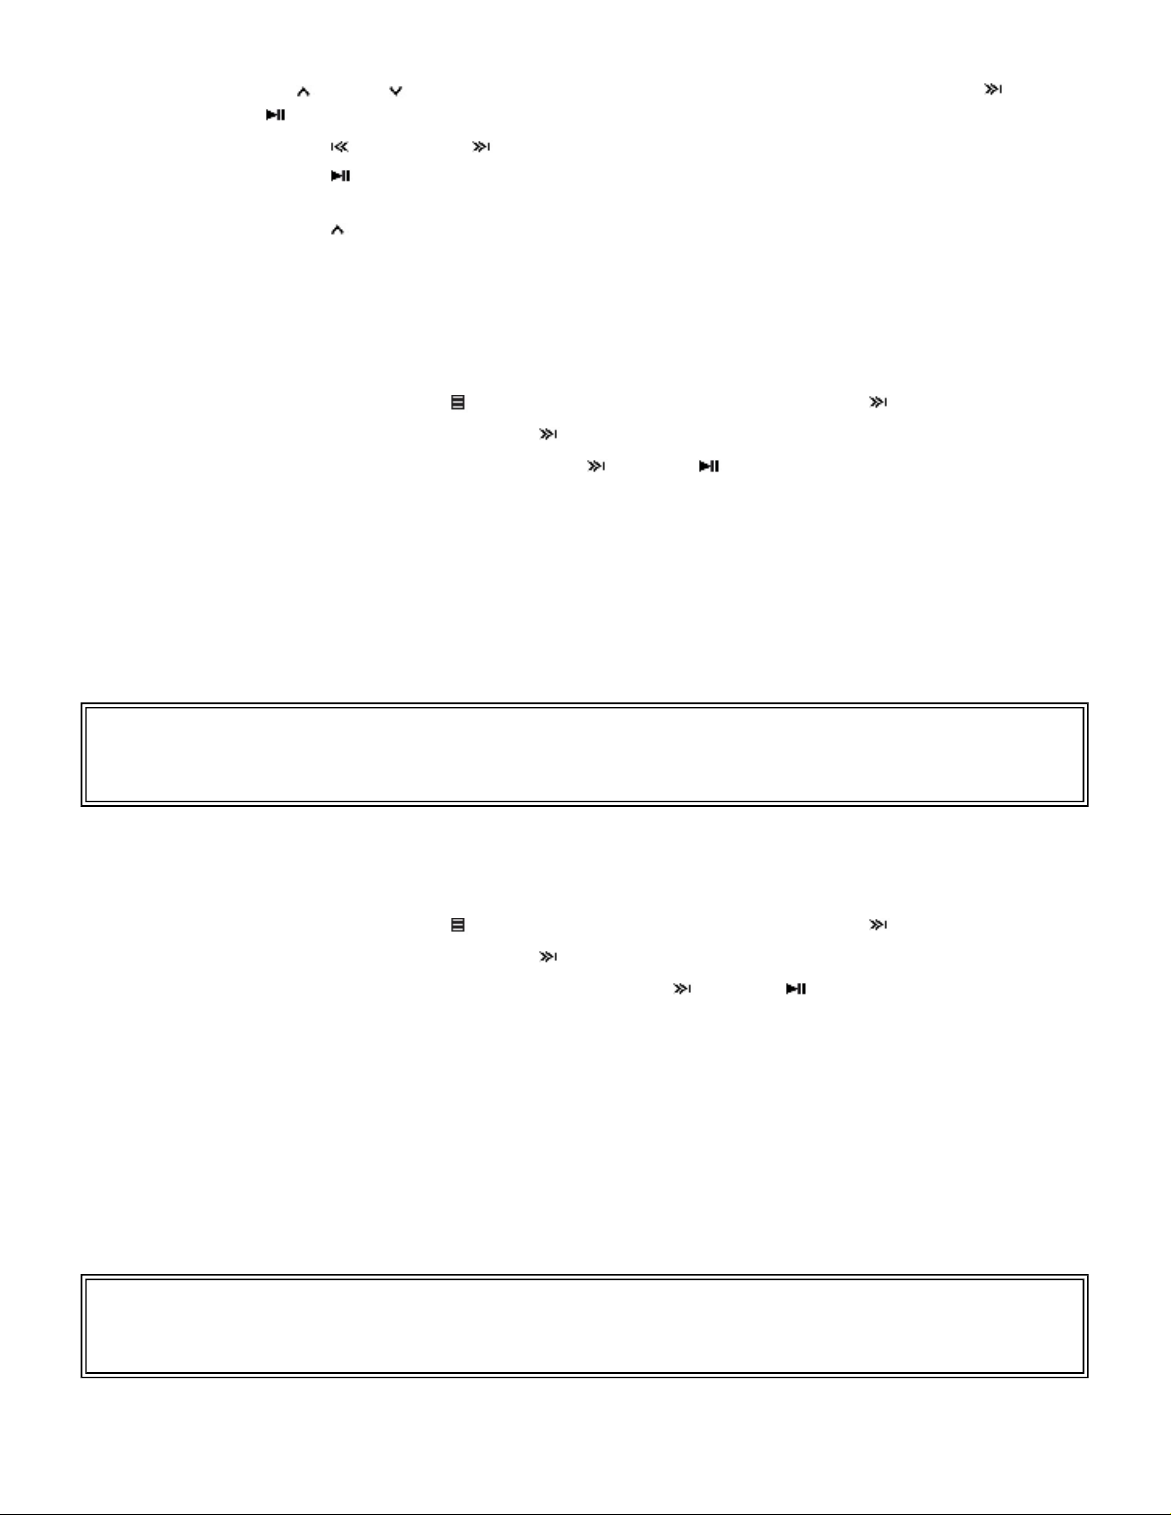
To set station presets automatically:
1.
2.
3. Select
Press (Menu). The main menu opens.
Select
FM Settings
Auto Scanning
radio range and flashes the message "Auto Scanning."
While scanning, the player automatically adds a preset for any local strong stations until all 20
preset channels have been set.
To delete station presets:
1.
2.
3.
4.
Press (Menu). The main menu opens.
Select
Select
FM Settings
Preset Delete
Press (Up) or (Down) to select the preset to delete, then press (Next) or
(Play/Pause). The preset is deleted.
, then press (Next) or (Play/Pause).
, then press (Next) or (Play/Pause). The player scans the
, then press (Next) or (Play/Pause).
, then press (Next) or (Play/Pause).
ccessing station presets
To access station presets:
1.
2.
3.
Press (Menu). The main menu opens.
Select
Press (Up) to access the previous preset channel, or press (Down) to access the
next preset channel.
Viewing photos
FM Radio
, then press (Next) or (Play/Pause).
Your player can display JPG and JPEG photos. No other photo formats are supported. To display
non-JPG/JPEG photos, you must first convert them to JPG or JPEG using photo editing software
on your computer.
Tip
The larger the photo file, the longer the time it takes to view it. To size photos for theplayer's screen (and
reduce their file size), resize copies of them to 128 x 80 using photo editing software on your computer.
To view photos:
1. Press (Menu). The main menu opens.
2.
3.
Select
appears.
Photo
, then press (Next) or (Play/Pause). A list of available photos
Press (Previous) or (Next) to view the previous or next list of photos.
Page 18
g
4.
Press (Up) or (Down) to select the select the photo to display, then press (Next)
or (Play/Pause). The photo displays full screen.
Press (Previous) or (Next) to skip forward and backward.
•
Press (Play/Pause) to enter zoom mode, then press the direction buttons to pan the
•
image.
•
Press (Up) to rotate the photo 90°.
Copying photos to your player
The method you use to copy photos from your computer to your player depends on the USB
mode your player is set to.
To copy photos from your computer to your player using File & Folder (MSC) USB mode:
1. On your player, press (Menu), then select Settings , then press (Next).
2.
3.
4.
5.
6.
7.
Tip
To select multiple files, press and hold
select an entire range of files, click the file at the top of the range, press and hold
then click the file at the bottom of the range.
Select
USB Mode
Highlight
File & Folder
, then press (Next).
, then press (Next) or (Play/Pause) to save the setting.
Connect your player to the computer using the provided USB cable. The message
"Searching for PC" appears on the player.
On your computer, click
photo files are.
Open
My Computer
Player
drive.
again to open another window, then open the
Start
,
My Computer
, then double-click the folder where your
Insignia Music
Click and drag the photo files from your computer to the player's root folder.
on your keyboard while clicking the files with your mouse. To
Ctrl
on your keyboard,
Shift
When the copying is complete, the message "OK to disconnect" appears on the player.
Unplug the USB cable from your computer and your player.
8.
To copy photos from your computer to your player using Media Manager (MTP) USB mode:
1.
2.
3.
4.
5.
6.
7.
Tip
To select multiple files, press and hold
select an entire range of files, click the file at the top of the range, press and hold
then click the file at the bottom of the range.
On your player, press (Menu), then select Settings , then press (Next).
Select
USB Mode
Highlight
setting.
Media Manager
, then press (Next).
(MTP), then press (Next) or (Play/Pause) to save the
Connect your player to the computer using the provided USB cable. The message
"Searching for PC" appears on the player.
On your computer, click
photo files are.
Open
My Computer
Player
drive.
again to open another window, then open the
Start
,
My Computer
Click and drag the photo files from their current location to the
Insignia Music Player
drive.
Ctrl
on your keyboard while clicking the files with your mouse. To
, then double-click the folder where your
Insignia Music
Media
on your keyboard,
Shift
When the copying is complete, the message "OK to disconnect" appears on the player.
Unplug the USB cable from your computer and your player.
8.
folder on your
Page 19
Deleting photos
f
g
To delete photos, "See Deleting files".
Changing settings
Changing brightness, rotation, and backlight settings
To change the brightness, rotation, and backlight settings:
1.
2.
3.
4.
Brightness
Rotation
player easier. Default is
Backlight
Press (Menu). The main menu opens.
Select
Select
Settings
Display
Change any of the following settings:
--Changes the brightness of the backlit screen.
--Rotates the screen and flips the button functions to make left-handed use of the
--Changes the length of time that the backlight stays on after you press a button.
, then press (Next) or (Play/Pause).
, then press (Next) or (Play/Pause). The Display menu opens.
Right Handed
.
The backlight may noticeably decrease battery life if it is left on for long periods of time.
Changing power off and sleep settings
To change the power off and sleep settings:
1.
2. Select
3.
4.
Power Off
Press (Menu). The main menu opens.
Settings
Select
Time
Change any of the following settings:
--Adjusts the length of time without any button presses that the player waits before
automatically turning off. You can select
, then press (Next) or (Play/Pause).
, then press (Next) or (Play/Pause). The Time menu opens.
or a time up to ten minutes.
Of
Page 20
--Changes the length of time the player waits before automatically turning off,
g
g
Sleep
regardless of button presses or other activity. You can select 30-minute time increments up to
120 minutes.
Erasing all files and restoring factory defaults
To erase all files and change all settings to factory defaults:
1.
2.
3.
Press (Menu). The main menu opens.
Select
Select
Settings
System
, then press (Next) or (Play/Pause).
, then press (Next) or (Play/Pause). The System menu opens.
4. Change any of the following settings:
Erase All
System Init
Manually changing the USB mode
--Erases all music files from the player.
--Resets all player settings to the factory defaults.
The music player can use two USB modes, Media Manager (MTP, the default) mode and File &
Folder (MSC) mode.
To manually change the USB mode:
1.
2.
3.
4.
Media Manager
File & Folder
Press (Menu). The main menu opens.
Select
Select
opens.
Settings
USB Mode
Select any of the following settings:
, then press (Next) or (Play/Pause).
, then press (Next) or (Play/Pause). The USB Mode menu
(MTP)--Optimum setting for using the player as a music player.
(MSC)--Optimum setting for using the player as a file storage device, and
required for using iTunes Drag and Drop Support.
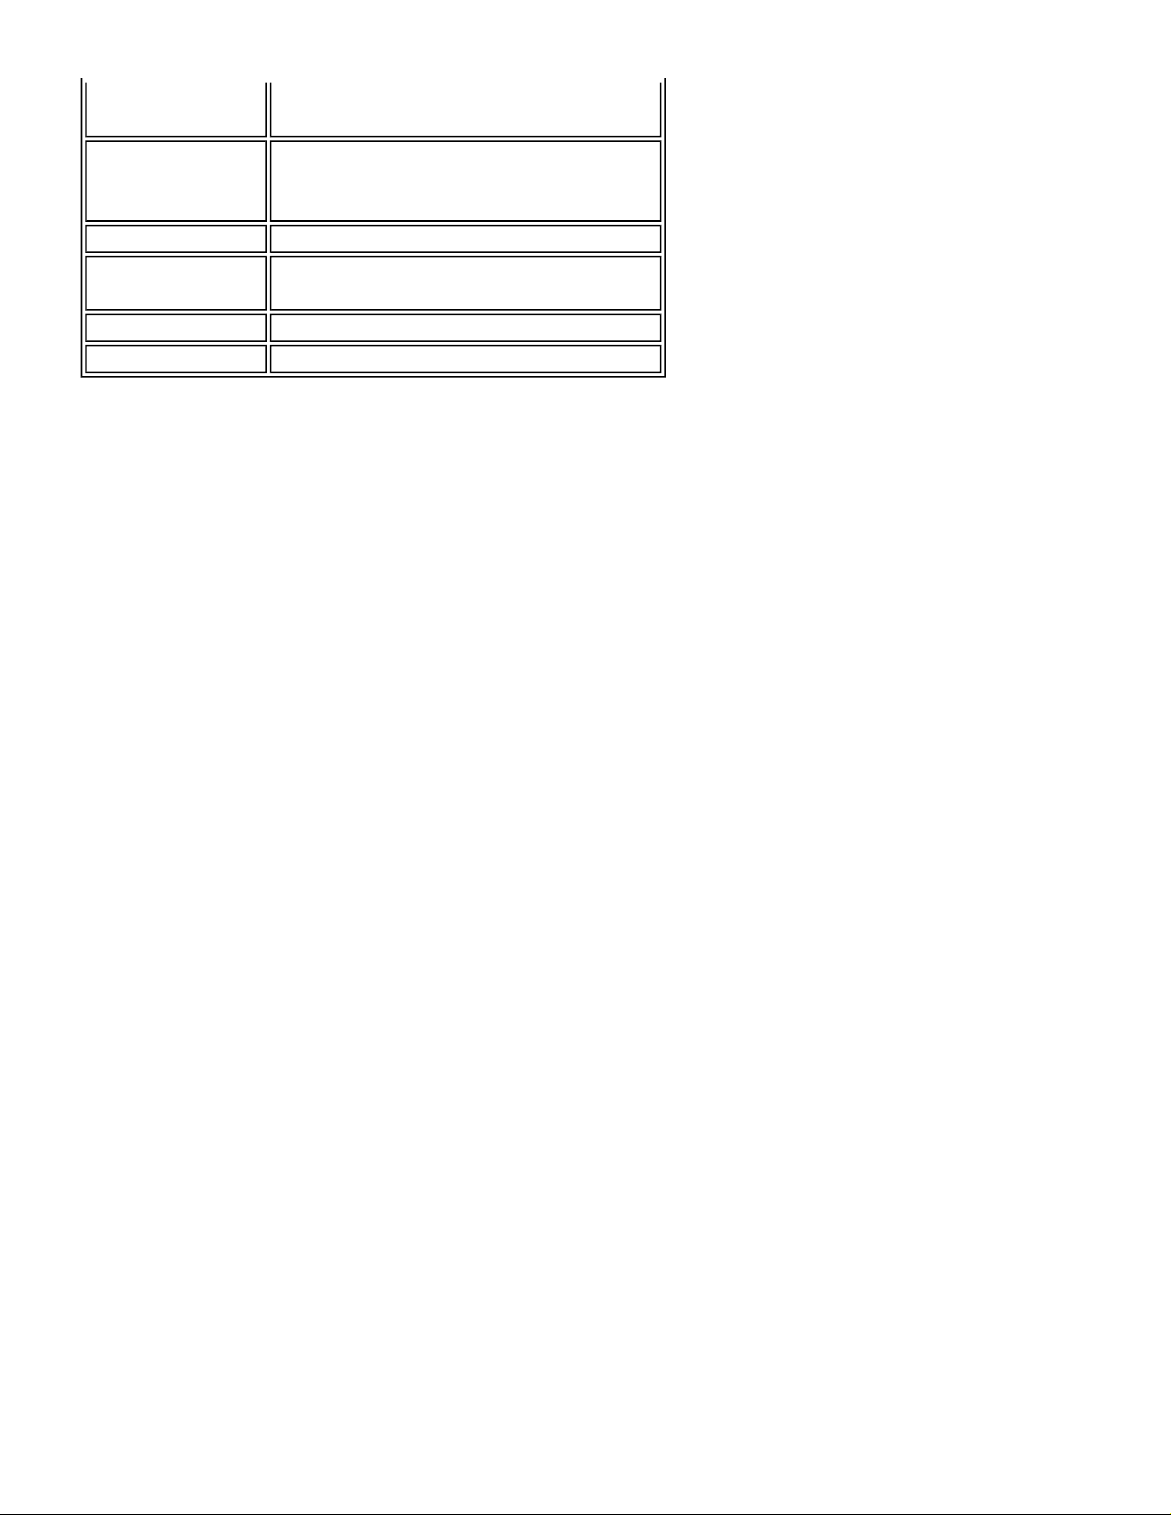
Viewing system information
Your player can tell you its total memory, used memory, available memory, and other system
information.
To view system information:
1.
2.
3.
Press (Menu). The main menu opens.
Select
Select
Settings
Information
, then press (Next) or (Play/Pause).
, then press (Next) or (Play/Pause). The Information screen
opens, displaying memory use, firmware version, and date.
Maintaining your player
Care and cleanin
Page 21

Periodically clean your player by using a damp washcloth dampened with only water, or
g
•
lens-cleaning papers dampened with water or isopropyl (rubbing) alcohol.
Make sure that you don't get the player wet.
•
Keep your player away from hot environments, such as on top of a vehicle dashboard, a
•
window sill, or a heat register.
Avoid carrying your player in a pocket that contains metallic items, which can scratch
•
and damage the player.
Avoid carrying your player in a pocket or compartment that is dirty. Dirt, dust, and lint
•
can damage the player.
As much as possible, keep your player in its protective carrying case.
•
Update the firmware occasionally to make sure that you have the latest version and
•
product features.
Updating the firmware
To update the firmware:
1.
2.
3.
On the Internet, connect your Web browser to www.insignia-products.com, then search
for the music player firmware update.
Follow the online instructions to download the updated firmware files. Make sure that
you take note of where the file is saved to.
Make sure that your music player is in File & Folder (MSC) USB mode. For instructions
on changing the USB mode, "See Manually changing the USB mode
4.
5. Open
6.
7.
Warning
Installing new firmware will automatically delete all content from device.
Troubleshooting and FAQ
On your computer, click
saved the firmware update file to.
My Computer
Player
drive.
again to open another window, then open the
Start
,
My Computer
Click and drag the firmware file from your computer to the Data folder on your music
player.
When the file finishes copying, unplug USB cable. The player automatically detects and
installs the new firmware.
".
, then double-click the folder where you
Insignia Music
How do I copy files to the player?
In File & Folder (MSC) mode, you can copy files to the player the same way you copy files to a
hard drive or flash memory drive. In Media Manager (MTP) mode, you can use Rhapsody,
Windows Media Player, or other digital music managers to transfer files to your player. For more
information, "See Copying music files to your player
" and "See Manually changing the USB
mode."
Which file formats does the player support?
This player supports MP3, WMA, and secure WMA audio formats, and JPG and JPEG photo
formats. Any other formats must be converted to a supported format before being copied to your
player.
What is MTP?
Media Transfer Protocol (MTP, or Media Manager mode) is a protocol for connecting portable
devices to a Windows XP computer and synchronizing digital media content between those
devices.
Page 22

When I copy files to the player using Windows Explorer, what folder should I copy them to?
g
In Media Manager (MTP) mode, copy them to the
Media
folder on the player. In File & Folder
(MSC) mode, you can copy them to the root directory.
Some of my music files are on my player, but cannot be played. When I select them, a different
song begins to play. What is wrong?
You may not have purchased the rights to play the song on an additional device. To test this, try
to play a song that you have copied from an older CD and converted to MP3 format. If you can
play that song but not the song that doesn't play, then you need to purchase the rights to play the
song.
Why should I update the firmware?
You should always update the player to the latest firmware to make sure that it works correctly
and has the latest features. For more information, "See Updating the firmware
How do I copy a CD to my player?
".
First you must rip the CD using a digital music manager like Best Buy Rhapsody or Windows
Media Player. After the songs are on your computer, copy the songs to the player using Windows
Explorer or a digital music manager. For more information, "See Copying music files to your
player."
Why does my player display a message that says "Unknown artist/album"?
This message usually appears when the music file doesn't contain artist or album information
(incomplete ID3 tags). See the documentation or online help of your digital music manager for
instructions on adding that information to your music files.
Getting help
Contacting technical support
Before you contact technical support, review the Troubleshooting and FAQ section to see if your
question is already answered there.
If you have questions about the use or features of your player, call Technical Support at 1-800699-9218 or (877) 467-4289, or fill out an online support request at:
www.bestbuy.com/support.asp
Get additional online help at:
www.insignia
www.bestbuy.com/mp3
www.geeksquad.com
Learn more
-products.com
On the Internet, you can use a Web search site to find information on the following topics*:
"Ripping CDs"
•
"Downloading music"
•
"Downloading MP3s"
•
"MP3 music"
•
"MP3 copyright law"
•
*Best Buy Enterprise Services, Inc. does not maintain and is not responsible for the content of Web pages you find using these search
terms.
Specifications
Page 23
Ports and connections
g
Display
Battery Replaceable, rechargeable lithium ion
Supported formats
Dimensions 0.54 x 1.34 x 3.09 inches (13.7 x 34 x 78.5 mm)
Weight 1.2 oz. (34 g)
Mini USB 2.0
Earphones/Headphones
OLED LCD
262,000 colors
128 x 80 pixels
Audio: MP3, WMA, Secure WMA
Photo: JPG/JPEG
Legal notices
Compliance statements
This device complies with Part 15 of the FCC Rules. Operation of this product is subject to the following two
conditions: (1) this device may not cause harmful interference, and (2) this device must accept any interference
received, including interference that may cause undesired operation.
This equipment has been tested and found to comply with the limits for a Class B digital device, pursuant to Part
15 of the FCC Rules. These limits are designed to provide reasonable protection against harmful interference in a
residential installation. This equipment generates, uses, and can radiate radio frequency energy and, if not
installed and used in accordance with the instructions, may cause harmful interference to radio communications.
However, there is no guarantee that interference will not occur in a particular installation. If this equipment does
cause harmful interference to radio or television reception, which can be determined by turning the equipment off
and on, the user is encouraged to try to correct the interference by one or more of the following measures:
Reorient or relocate the receiving antenna.
•
Increase the separation between the equipment and receiver.
•
Connect the equipment into an outlet on a circuit different from that to which the receiver
•
is connected.
Ask the dealer or an experienced radio/TV technician for help.
•
Copyright
© 2006 Insignia. Insignia and the Insignia logo are trademarks of Best Buy Enterprise Services, Inc. Other brands
and product names are trademarks or registered trademarks of their respective holders. Specifications and
features are subject to change without notice or obligation.
Page 24

g
Insignia
Lecteur de musique numérique IS-DA1G/IS-
DA2G
Guide de l’utilisateur
Table des matières
Bienvenue
Informations
Fonctionnalités
Contenu de l’emballage
Configuration système requise
Commandes et connexions
Information
Installation du lecteur de musique
Installation de la batterie
Recharge de la batterie
Connexion du
Installation du logiciel Best Buy Rhapsody
Fonctionnement du lecteur
Mise en marche et arrêt du lecteur
Réglage du
Verrouillage des touches
Navigation
Lecture de
Transfert de
Copie des fichiers de musique sur le lecteur
Suppression de fichiers
Déconnexion
Écoute de la
Visionnement
Modification des paramètres
Entretien du lecteur
Entretien et nettoyage
Mise à
Problèmes et solutions et FAQ
Comment obtenir de l’aide
Problèmes et solutions et FAQ
Spécifications
légaux
Avis
sur la sécurité
sur l’affichage
casque d’écoute
volume
dans les menus d’écrans
fichiers de musique
musique
du lecteur
radio FM
de photos
niveau du microprogramme
Bienvenue
Félicitations d’avoir acheté ce produit Insignia de haute qualité. Les modèles NS-DA1G et NSDA2G représentent la dernière avancée technologique dans la conception de lecteurs
Page 25

multimédias numériques et ont été conçus pour des performances et une fiabilité exceptionnelles.
g
Il est possible d'utiliser cet appareil pour reproduire des fichiers de musique numérique et écouter
la radio FM ; il peut en outre être transporté n'importe où.
Informations sur la sécurité
Avertissements
z Lire et observer toutes les instructions. Respecter tous les avertissements.
z N'utiliser que des périphériques et accessoires spécifiés par Insignia.
z Baisser complètement le volume avant la mise en marche du lecteur de MP3 et éviter de
l'utiliser à un volume sonore élevé. Une perte permanente de l’ouïe peut intervenir si les
écouteurs ou le casque d’écoute sont utilisés à volume élevé. Un volume réduit permet
d’économiser la charge de la batterie.
z Ne pas utiliser les casques d’écoute ou écouteurs en conduisant, en faisant de la bicyclette
ou en utilisant un véhicule motorisé. Cela pourrait créer un danger pour la circulation, et
c'est illégal dans beaucoup d'endroits.
z Pour réduire les risques de choc électrique, ne pas utiliser cet appareil dans un
environnement humide.
z Protéger le cordon d'alimentation afin d'éviter qu'on marche dessus ou qu'il soit pincé.
z Débrancher l'appareil pendant des orages ou quand il n'est pas utilisé pendant une période
prolongée.
z Si la batterie n'est pas insérée correctement ou replacée par le même type, il existe un
risque d'explosion de dommage ou de fuite. Mettre au rebut les batteries usées,
conformément à la réglementation locale.
z Nettoyer uniquement avec un chiffon sec.
Ne pas chercher à modifier le dispositif de sécurité de la prise polarisée. Une prise
z
polarisée comporte deux plots, un plus large que l'autre. Le plot le plus large a été prévu
par mesure de sécurité. Si la prise fournie ne s'insère pas dans la prise secteur, faire
appel à un électricien pour qu'il remplace cette dernière qui est obsolète.
z Ne démonter en aucun cas le lecteur pour accéder aux composants internes (sauf la
batterie).
Fonctionnalités
z Lecture des formats de fichiers audio MP3, WMA, WMA sécurisé et Audible.
Affichage des photos JPG.
z
z L'écran ACL rétroéclairé affiche plusieurs langues ainsi que l'information sur la chanson et
la couverture du disque.
z Le syntoniseur de la radio numérique FM permet l'accès aux stations locales. La radio
mémorise également jusqu'à 20 stations radio préférées.
z Cinq réglages d'égalisateur préréglés permettent l'optimisation de la lecture pour les
modes de musique normal, rock, jazz, classique et pop. Il est aussi possible de
personnaliser le réglage de l'égalisateur parmi six possibilités.
z La recherche élaborée de la bibliothèque de musique permet d'afficher la musique
enregistrée dans le lecteur, par artiste, album, titre de chanson, genre et liste de lecture.
z La répétition A-B permet la sélection de n’importe quel point de départ et de fin pendant la
lecture, permettant ainsi une lecture en boucle du segment sélectionné. Cette
fonctionnalité est particulièrement commode pour apprendre des langues et des mots à
Page 26

partir de chansons.
g
z Port mini USB 2.0 à haute vitesse pour des transferts de fichiers faciles et rapides.
z Compatible avec la technologie Microsoft WMDRM 10.
z Compatibilité totale avec les services de musique Rhapsody et Napster-To-Go.
z Menus faciles d’utilisation
z Microprogramme pouvant être mis à niveau afin que le lecteur ne soit pas obsolète
z Batterie rechargeable et remplaçable.
Contenu de l'emballage
z Lecteur de musique numérique Insignia
z Batterie au lithium rechargeable
z Écouteurs
z Câble USB 2.0 à mini connecteur
z Guide de mise en service rapide
z CD (contient le logiciel Best Buy Rhapsody et ce guide de l'utilisateur en ligne)
z Étui de transport
z Offre de musique
z Carte de garantie
Configuration système requise
Pour transférer de la musique de l'ordinateur sur le lecteur de musique, l'ordinateur doit être
équipé au minimum de :
z Windows XP
z Unité centrale pour Pentium ou équivalent
z Un port USB 2.0 disponible
z Windows Media Player 10 (il est possible de le télécharger sur le site de Microsoft :
www.microsoft.com/windows/windowsmedia/download/default.asp)
z 64 Mo de mémoire
z Une connexion Internet (à haute vitesse de128 Kbps ou plus recommandée)
Commandes et connexions
Face avant
Page 27

g
Élément Icône Fonction
A
B
C
D
E
F
G
Menu – Permet d'afficher les menus d'écran pour la sélection de chansons et la modification des
paramètres.
Retour rapide/Retour arrière – Pour recommencer la piste en cours et en appuyant de façon répétée, pour
retourner à des pistes précédentes. La maintenir appuyée pour un retour rapide. En mode radio FM, permet
de changer de fréquence.
Haut – Permet de faire défiler de façon croissante la liste ou de changer de fréquence radio préréglée.
Avance rapide/Suivant – Permet d'aller à la piste suivante. La maintenir appuyée pour une avance rapide.
Dans les menus, permet d'accéder au sous-menu ou réglage suivant. En mode radio FM, permet de
changer de fréquence.
Marche/Arrêt – La maintenir appuyée pour mettre le lecteur en marche. L'appuyer de nouveau pour
l’arrêter.
Bas – Permet de faire défiler de façon décroissante la liste ou de changer de fréquence radio préréglée.
Lecture/Pause/Sélection – Permet de commencer ou d'arrêter momentanément la lecture. Dans les menus,
l'appuyer pour sélectionner. En mode radio FM, la maintenir appuyée pour changer de mode audio.
Partie inférieure
Élément Icône Fonction
A
B
Port mini USB 2.0 – Connecter le câble USB à ce port et à l'ordinateur pour recharger le lecteur et
transférer des fichiers.
Prise pour écouteurs – Connecter les écouteurs ou le casque d'écoute à cette prise.
Côtés
Page 28

g
Élément Icône Fonction
A
B
C
D
Partie arrière
Hausse du volume – Permet d'augmenter le volume sonore.
Baisse du volume – Permet de diminuer le volume sonore.
Commutateur de verrouillage – Le faire glisser pour désactiver toutes les touches.
Touche de RÉINITIALISATION – Insérer un objet pointu pour redémarrer le lecteur.
Élément Fonction
A
Couvercle de la batterie – Retirer le couvercle pour insérer ou changer la batterie.
Page 29

Information à l'écran
g
Élément Fonction
A
B
C
D
E
F
G
H
I
J
État – Affiche l'état d’une piste : lecture ou pause.
Numéro de fichier – Indique le numéro de la piste en cours de lecture.
Icône de répétition – Affiche le réglage actuel de la fonction répétition.
Icône de la batterie – Indique le niveau de charge de la batterie.
Nom de l'artiste – Affiche le nom de l'artiste de la piste en cours.
Nom de l'album – Affiche le nom de l'album de la piste en cours.
Nom de la piste – Affiche le titre de la piste en cours.
Barre de progression – Affiche la progression de la lecture de la chanson.
Durée de lecture – Affiche la durée écoulée de la piste en cours.
Durée totale – Affiche la durée de la piste en cours.
Volume (non-illustré) – Affiche le réglage actuel du volume. Ne s'affiche que lorsque les touches du volume sont
appuyées.
Installation du lecteur de musique
Installation de la batterie
1. Faire glisser le couvercle de la batterie situé à l'arrière de l'appareil.
Page 30

2. Insérer la batterie dans le compartiment, puis remettre le couvercle. La batterie doit s'insérer
g
sans difficultés.
3. Remettre le couvercle du compartiment jusqu'à ce qu’un déclic se fasse entendre.
Recharge de la batterie
Recharger la batterie quand le lecteur est inutilisé, afin quelle soit toujours chargée
complètement. La batterie se recharge en deux heures environ. Une batterie complètement
chargée permet jusqu'à 18 heures de lecture en continu, en fonction du niveau de luminosité et
de la durée d'utilisation du rétroéclairage, ainsi que du niveau du volume.
Pour charger la batterie :
1. Mettre l'ordinateur sous tension.
2. Connecter le câble mini USB 2.0 fourni au connecteur mini du lecteur et la prise USB standard à
l'ordinateur. Quand le câble est connecté correctement, le lecteur commence à
recharger la batterie à l'aide de la connexion USB et le message « OK to
disconnect » (OK pour la déconnexion) s'affiche sur le lecteur.
Au fur et à mesure que la batterie se recharge, l'cône bleue de la batterie se remplit en temps
réel de la gauche vers la droite pour illustrer que la batterie se recharge.
Quand le lecteur est totalement chargé, l'icône de la batterie devient vert, indiquant une
charge complète.
Connexion du casque d'écoute
Il est possible d'utiliser n'importe quel type de casque d'écoute doté d'un connecteur audio stéréo
Page 31

standard de 1/16 po (1,6 mm).
g
Pour connecter le casque d'écoute :
z Brancher le casque d'écoute ou les écouteurs fournis sur la prise prévue à cet effet de
l'appareil.
Remarque
Pour pouvoir utiliser la radio FM, les écouteurs fournis doivent être connectés, car ils font également fonction
d'antenne FM. Pour remplacer les écouteurs, il est possible d'utiliser n'importe quel type de casque d'écoute
avec fils non blindés.
Installation du logiciel Best Buy Rhapsody
Pour installer le logiciel :
1. Insérer le CD Insignia dans le lecteur de l'ordinateur. L'interface d'installation du logiciel démarre.
- OU Si l'interface d'installation ne démarre pas automatiquement, sur le bureau
double-cliquer sur
Poste de travail
, double-cliquer sur le lecteur de CD qui
contient le CD Insignia, puis double-cliquer sur le fichier
RhaposdyBestBuy.exe
. L'interface d'installation du logiciel démarre.
2. Suivre les instructions à l'écran afin de procéder à l'installation.
Conseil
Pour la compatibilité avec la fonction glisser-déplacer de iTunes, utiliser le mode USB File & Folder [Fichiers
et dossier] (MSC). Le lecteur de MP3 Insignia ne reproduira que les fichiers MP3 de iTunes qui ont fait l'objet
d'un glisser-déplacer de iTunes. Pour toute information sur la façon de modifier les modes USB, « Aller à
Modification manuelle du mode
USB ».
Fonctionnement du lecteur
Mise en marche et arrêt du lecteur
Pour mettre le lecteur sous et hors tension :
1. Maintenir enfoncée la touche (Marche/Arrêt)
Page 32

g
2. Pour éteindre l'appareil, maintenir appuyée de nouveau La touche Marche/Arrêt (Power).
Réglage du volume
Pour régler le volume :
z Appuyer sur (hausse du volume) et (baisse du volume).
Verrouillage des touches
Il est possible d'empêcher l'appui accidentel sur une touche en verrouillant celles-ci.
Pour verrouiller les touches :
1. Faire glisser le commutateur
du commutateur de verrouillage en position HOLD s'affiche à l'écran.
2. Pour déverrouiller les touches, faire glisser le commutateur de verrouillage
la flèche.
Navigation dans les menus d'écran
HOLD
(Verrouillage) dans la direction de la flèche. Une illustration
HOLD
à l'opposé de
Page 33

Utiliser le menu d'écran pour reproduire de la musique et modifier les paramètres.
g
Pour naviguer dans les menus d'écran :
1. Appuyer sur (Menu). Le menu principal s'affiche.
2. Appuyer sur (Haut) ou (Bas) pour mettre en surbrillance l'un des éléments de menu suivant :
{
Music (Musique)
{
FM Radio (Radio FM)
{
Music Library (Bibliothèque de musique)
{
FM Settings (Paramètres FM)
{
Réglages
3. Appuyer sur (Suivant). Le sous-menu de l'élément sélectionné s'affiche. Pour revenir au menu
précédent à partir d'un sous-menu, appuyer sur (Précédent).
Conseil
Maintenir appuyée la touche (Menu) pour revenir au menu antérieur.
Lecture de fichiers de musique
Pour reproduire de la musique :
1. Appuyer sur (Menu).
2. Appuyer sur (Haut) ou (Bas) pour sélectionner
puis appuyer sur (Suivant). La bibliothèque de musique s'affiche.
Music Library
(Bibliothèque de musique),
3. Mettre en surbrillance l'une des options suivantes, puis appuyer sur (Suivant) pour accéder à
cette catégorie :
{
Play All
{
Artist
{
Album
{
Track
{
Playlist
{
Genres
Conseil
Pour revenir au menu précédent à partir d'un sous-menu, appuyer sur (Précédent).
4. Sélectionner le contenu à reproduire, puis sélectionner
(Reproduire tout) – L'appareil reproduit toutes les pistes.
(Artiste) – Affiche toutes les pistes par artiste et par ordre alphabétique.
– Affiche toutes les pistes par album et par ordre alphabétique. Même si
une seule piste d'un album a été copiée sur l'appareil, le nom de cet album
s'affiche dans la liste.
(Piste) – Affiche toutes les pistes par titre de piste et par ordre
alphabétique.
(Liste de lecture) – Affiche toutes les pistes par liste de lecture et par
ordre alphabétique.
– Affiche toutes les pistes par genre et par ordre alphabétique.
Play All
pour reproduire toute les pistes
de cette sélection. Pour reproduire toutes les pistes à partir d'une piste spécifique,
sélectionner cette piste dans la catégorie.
L'appareil affiche alors l'écran Now Playing (Reproduction actuelle), qui indique
l'information sur la piste en cours de lecture.
{ Pour afficher la couverture du disque (si disponible), appuyer sur (Haut). La
couverture du disque s'affiche sur la gauche de l'écran.
Page 34

5. Si la reproduction de la sélection ne commence pas, appuyer sur (Lecture/Pause).
A
g
La lecture de la piste commence et l'icône d'état de la lecture ( ) s'affiche dans le coin
supérieur gauche de l'écran.
z Pour arrêter momentanément la lecture, appuyer sur (Lecture/Pause). L'icône ( ) de l'état
pause s'affiche dans le coin supérieur gauche de l'écran.
z Pour aller à la piste suivante, appuyer sur (Suivant/Avance rapide). Pour revenir à une piste
antérieure, appuyer de façon répétée sur (Précédent/Retour rapide).
z Pour une avance rapide de la piste en cours, maintenir appuyé (Suivant/Avance rapide). Pour
z Pour recommencer la piste actuelle, appuyer une fois sur (Précédent/Retour rapide).
Lecture aléatoire
un retour rapide de la piste actuelle, maintenir appuyé (Précédent/Retour rapide).
Il est possible de reproduire les pistes sélectionnées en ordre aléatoire.
Pour reproduire les pistes en ordre aléatoire
1. Dans le menu Settings (Paramètres), sélectionner
, puis appuyer sur (Suivant) ou
udio
Page 35

(Lecture/Pause).
g
2. Dans le menu Audio, sélectionner
Shuffle
(Lecture aléatoire), puis appuyer sur (Suivant) ou
(Lecture/Pause).
3. Appuyer sur (Haut) ou (Bas) pour sélectionner On (Activé) ou
(Désactivé).
Off
4. Appuyer sur (Lecture/Pause) pour enregistrer la configuration. L'icône de la lecture aléatoire
s'affiche sur l'écran Now Playing (Reproduction actuelle) à côté de l'icône de la batterie.
Répétition de pistes
Pour répéter des pistes :
1. Dans le menu Settings (Paramètres), sélectionner
Audio
, puis appuyer sur (Suivant) ou
(Lecture/Pause).
2. Dans le menu Audio, sélectionner
Repeat
(Lecture en boucle), puis appuyer sur (Suivant) ou
(Lecture/Pause).
3. Appuyer sur (Haut) ou (Bas) pour sélectionner
(pour répéter une piste) ou
(Désactivé).
Off
(pour répéter toutes les pistes),
All
One
4. Appuyer sur (Suivant) ou (Lecture/Pause) pour enregistrer la configuration. L'icône Repeat
1 (Répéter 1) ou Repeat All (Répéter tout) s'affiche sur l'écran Now Playing
(Reproduction actuelle) à côté de l'icône de la batterie.
Répétition partielle d'une piste
Il est possible d'utiliser la répétition de A à B pour répéter en continu une piste partiellement. La
fonction répéter A-B doit être activée au préalable.
Pour activer la répétition A-B :
1. Appuyer sur (Menu). Le menu principal s'affiche.
2. Appuyer sur (Haut) ou (Bas) pour sélectionner
Settings
(Paramètres), puis appuyer sur
(Suivant) ou (Lecture/Pause).
3. Appuyer sur (Haut) ou (Bas) pour sélectionner
Audio
, puis appuyer sur (Suivant) ou
(Lecture/Pause).
4. Appuyer sur (Haut) ou (Bas) pour sélectionner
A-B repeat
(Répétition A-B), puis appuyer
sur (Suivant) ou (Lecture/Pause).
5. Appuyer sur (Haut) ou (Bas) pour mettre en surbrillance On ou
(Activé ou Désactivé),
Off
puis appuyer sur (Suivant) pour sélectionner. Le message « Use the down button (V)
to activate A-B » (Utiliser la touche bas (V) pour activer A-B) s'affiche, puis le menu de
configuration de l'audio s'affiche de nouveau.
6. Appuyer sur (Menu) pour revenir à l'écran Now Playing (Reproduction actuelle).
Pour répéter un segment audio :
1. Pendant la lecture, appuyer sur (Bas) pour marquer le point de départ de la lecture en
boucle.L'icône de répétition affiche un « A ».
2. Appuyer sur (Bas) pour marquer la fin du segment pour la lecture en boucle. L'icône de
répétition affiche AB et l'appareil reproduit en boucle ce segment.
Page 36

3. Appuyer sur (Bas) pour annuler la lecture en boucle.
A
y
g
Utilisation de l'égalisateur
Six réglages d'égalisateur sont disponibles et cinq sont programmés : Normal, Rock, Jazz,
Classic (Classique) et Pop. Le réglage utilisateur, permet à ce dernier de personnaliser
l'égalisateur à son goût.
Pour sélectionner un réglage d’égalisateur pré-programmé :
1. Dans le menu Settings (Paramètres), sélectionner
Audio
, puis appuyer sur (Suivant) ou
(Lecture/Pause).
2. Dans le menu Audio, sélectionner
Equalizer
(Égalisateur), puis appuyer sur (Suivant) ou
(Lecture/Pause).
3. Appuyer sur (Haut) ou (Bas) pour sélectionner le réglage d'égalisateur souhaité.
4. Appuyer sur (Suivant) ou (Lecture/Pause) pour enregistrer les nouveaux paramètres.
Pour modifier le réglage d'égalisateur personnalisé :
1. Dans le menu Settings (Paramètres), sélectionner
Audio
, puis appuyer sur (Suivant) ou
(Lecture/Pause).
2. Dans le menu Audio, sélectionner
Equalizer
(Égalisateur), puis appuyer sur (Suivant) ou
(Lecture/Pause).
3. Appuyer sur (Haut) ou (Bas) pour sélectionner le réglage
Custom
(Personnalisé).
4. Appuyer sur (Suivant) pour déplacer le curseur sur la première barre de réglage d'égalisateur.
Appuyer sur (Haut) ou (Bas) pour ajuster le réglage. Répéter cette étape pour
régler chaque barre.
5. Appuyer sur (Lecture/Pause) pour enregistrer les paramètres.
Transfert de musique
L'appareil est livré avec quelques fichiers de musique, mais il est possible d'en ajouter à partir de
CD et de l’Internet.
Le transfert de musique de CD et de l'Internet sur l’appareil se fait en deux étapes :
1. Extraire le contenu d’un CD (créer des fichiers de musique à partir du CD) ou télécharger des
fichiers à partir de l’Internet.
2. Sélectionner les fichiers et les copier sur l’appareil.
Transfert de musique sur l’ordinateur
Transfert de musique à partir de CD
Pour extraire le contenu d'un CD :
1. Cliquer sur
(Démarrer),
Start
ll Programs
(Tous les programmes),
Best Buy Rhapsod
,
Best
Page 37

Buy Rhapsody
g
. L'application Best Buy Rhapsody s'ouvre.
2. Mettre un CD audio dans le lecteur de CD. Rhapsody affiche les pistes sur le côté droit de
l'écran. En cas de connexion à l'Internet, la liste indique les noms des pistes.
3. Cliquer sur
musique du CD et les place dans le dossier
Import CD
(Importer un CD). Rhapsody crée des fichiers MP3 à partir des pistes de
My Library
(Bibliothèque).
Pour toute information relative au transfert de fichiers de musique sur l'appareil, « Aller à
Copie des fichiers de musique sur le lecteur ».
Transfert de musique à partir de Rhapsody
Pour acheter et télécharger des fichiers de musique sur l'Internet :
1. Cliquer sur
Buy Rhapsody
Start
(Démarrer),
. L'application Best Buy Rhapsody s'ouvre.
All Programs
(Tous les programmes),
2. Dans la zone de texte
Search
(Rechercher), saisir le nom de l'artiste ou de l'album dont la
musique va être téléchargée, puis cliquer sur Go (Exécuter). Tous les fichiers
correspondants trouvés par Rhapsody sont affichés sur l'écran.
Best Buy Rhapsody, Best
Page 38

g
3. Sélectionner les pistes ou album à acquérir, puis cliquer sur
(Acheter) à côté de la musique
BUY
souhaitée.
4. Suivre les instructions à l'écran afin de finaliser la transaction. Les fichiers de musique sont
ajoutés à la bibliothèque de musique Rhapsody.
Conseil
Il est aussi possible d’utiliser d'autres applications de gestion de musique pour se procurer de la musique sur
l'Internet. Pour toute information complémentaire, se reporter à l'aide en ligne de l’application.
Conseil
Pour la compatibilité avec la fonction glisser-déplacer de iTunes, utiliser le mode USB File & Folder [Fichiers
et dossier] (MSC). Le lecteur de MP3 Insignia ne reproduira que les fichiers MP3 de iTunes qui ont fait l'objet
d'un glisser-déplacer de iTunes. Pour toute information relative à la modification des modes USB, « Aller à
Modification manuelle du
Copie des fichiers de musique sur le lecteur
Copie de fichiers à l'aide de Rhapsody
Pour copier des fichiers de musique de l'ordinateur sur l'appareil avec Rhapsody :
modeUSB ».
1. Brancher le câble USB sur un port USB de l'ordinateur et sur le port mini USB du lecteur. Le
message « Searching for PC » (Recherche du PC) s'affiche sur le lecteur.
L'ordinateur détecte le lecteur et l'ajoute en tant que nouveau périphérique («
Insignia Music Player ») à la liste des lecteurs sous « My Computer » (Poste de
travail) de Windows.
2. Cliquer sur
Buy Rhapsody
(Démarrer),
Start
All Programs
(Tous les programmes),
. L'application Best Buy Rhapsody s'ouvre.
Best Buy Rhapsody, Best
3. Fermer toutes fenêtres contextuelles qui s'ouvrent.
4. Cliquer sur
My Library
(Bibliothèque) dans la liste des types de contenu. La bibliothèque
complète de musique numérique s'affiche sur le côté droit de l'écran.
5. Cliquer sur l'onglet
Rhapsody (n° 1 sur le graphique ci-dessous).
Transfer
(Transfert) dans la partie inférieure gauche de la fenêtre de
Page 39

g
6. Cliquer et faire glisser les fichiers de la bibliothèque dans la Transfer list (Liste de transfert). (n° 2
sur le graphique ci-dessus).
7. Quand tous les fichiers à copier ont été mis dans la liste de transfert, cliquer sur le bouton
Transfer
(n° 3 du graphique). Les fichiers sont copiés sur l'appareil. Le message
« Synching: Do not Disconnect » (Synchronisation : Ne pas déconnecter) s'affiche sur le
lecteur.
Une fois la copie terminée, le message « OK to disconnect » (OK pour la
déconnexion) s'affiche sur le lecteur.
8. Débrancher le câble USB de l'ordinateur et du lecteur.
Copie de fichiers à l’aide de l'Explorateur Windows
Pour copier des fichiers de musique de l'ordinateur sur l'appareil à l'aide de l’Explorateur
Windows :
1. Sur le lecteur, appuyer sur (Menu), sélectionner
Settings
(Paramètres), puis appuyer sur
(Suivant).
2. Sélectionner
3. Sélectionner
USB Mode
Media Manager
(mode USB) puis appuyer sur (Suivant).
[Gestionnaire de multimédias] (MTP) ou
File & Folder
[Fichiers et
dossiers] (MSC), puis appuyer sur (Suivant) ou (Lecture/Pause) pour enregistrer
les paramètres.
{ Utiliser le mode
Media Manager
(MTP) pour copier des fichiers WMA et MP3
Page 40

dans le dossier
g
le dossier Data [Données] (il n'est pas possible de voir le dossier
utilisant l'affichage de l'appareil). En fonction du type de logiciel utilisé pour la
gestion de multimédias (tels que Rhapsody, Lecteur Windows Media et bien
d’autres), le nom des sous-dossiers peut différer de « Media » et « Data ».
{ Utiliser le mode
format de fichier dans le dossier racine de l'appareil. L'appareil ne reproduira
toutefois que les fichiers MP3 et WMA.
(Multimédias) et tout autre type de format de fichier dans
Media
File & Folder
(MSC) pour copier des dossiers et tout autre
Data
en
4. Connecter le lecteur à l'ordinateur à l'aide du câble USB fourni. Le message « Searching for PC
» (Recherche du PC) s'affiche sur le lecteur.
5. Sur l'ordinateur, cliquer sur
(Démarrer),
Start
My Computer
(Poste de travail), puis double-
cliquer sur le dossier où sont les fichiers de musique.
6. Ouvrir de nouveau
Music Player
My Computer
. (quand l'ordinateur avait détecté l'appareil, il l'avait ajouté comme
afin d'ouvrir une autre fenêtre, puis ouvrir le lecteur I
Insignia
nouveau périphérique appelé « Insignia Music Player » dans la liste des lecteurs du
poste de travail de Windows).
7. Cliquer et faire glisser les fichiers de musique de l'ordinateur vers l'appareil :
{ Si l'appareil est en mode Media Manager (MTP), les copier dans le dossier
de l'appareil.
Media
{ Si l'appareil est en mode File & Folder (MSC), les copier dans le dossier racine
de l'appareil.
Conseil
Pour sélectionner plusieurs fichiers, maintenir la touche
cliquant sur les fichiers avec la souris. Pour sélectionner une série de fichiers, cliquer sur le
fichier en tête de la série, appuyer sur la touche
enfoncée, puis cliquer sur le fichier au bas de la série.
Une fois la copie terminée, le message « OK to disconnect » (OK pour la
déconnexion) apparaît sur le lecteur.
8. Débrancher le câble USB de l'ordinateur et du lecteur.
Suppression de fichiers
Pour supprimer des fichiers du lecteur à partir du menu d'écran :
1. Appuyer sur (Menu). Le menu principal s'affiche.
2. Sélectionner
3. Sélectionner
4. Sélectionner
5. Sélectionner
Settings
System
Erase All
Yes
multimédias sont supprimés.
Pour supprimer des fichiers du lecteur à partir de l'ordinateur :
(Paramètres), puis appuyer sur (Suivant) ou (Lecture/Pause).
(Système), puis appuyer sur (Suivant) ou (Lecture/Pause).
(Effacer tout), puis appuyer sur (Suivant).
(Oui), puis appuyer sur (Suivant) ou (Lecture/Pause). Tous les fichiers
du clavier enfoncée tout en
Ctrl
(Maj) du clavier et la maintenir
Shift
1. Brancher le câble USB sur un port USB de l'ordinateur et sur le port mini USB du lecteur. Le
message « Searching for PC » (Recherche du PC) s'affiche sur le lecteur.
Page 41

g
2. L'ordinateur détecte le lecteur et l'ajoute en tant que nouveau périphérique (« Insignia Music
Player ») à la liste des lecteurs sous « My Computer » (Poste de travail) de Windows.
3. Cliquer sur Start (Démarrer), puis sur
4. Double-cliquer sur le périphérique
Insignia Music Player
My Computer
(Poste de travail).
, puis ouvrir le dossier
Media
(Multimédias)
5. Rechercher les fichiers à supprimer, cliquer sur ces fichiers pour les sélectionner puis appuyer
sur la touche
Conseil
Pour sélectionner plusieurs fichiers, maintenir la touche
fichiers avec la souris. Pour sélectionner une série de fichiers, cliquer sur le fichier en tête de la série,
appuyer sur la touche
série.
Delete
(Maj) du clavier et la maintenir enfoncée, puis cliquer sur le fichier au bas de la
Shift
(Supprimer) du clavier. Les fichiers sont supprimés.
du clavier enfoncée tout en cliquant sur les
Ctrl
Débranchement du lecteur
Après avoir branché le lecteur sur un ordinateur pour recharge ou transfert de musique, il importe
de débrancher le lecteur en toute sécurité.
Pour débrancher le lecteur de l'ordinateur en toute sécurité :
z Lorsque le lecteur affiche le message « OK to disconnect » (OK pour la déconnexion),
débrancher le câble USB du lecteur et de l'ordinateur.
Écoute de la radio FM
Il est possible d'écouter des émissions radio FM sur le lecteur.
Remarque
Pour pouvoir utiliser la radio FM, les écouteurs fournis doivent être connectés, car ils font également fonction
d’antenne FM. Pour remplacer les écouteurs, il est possible d'utiliser n'importe quel type de casque d'écoute
avec fils non blindés.
Réglage de la radio
Pour syntoniser une station radio FM :
1. Brancher les écouteurs sur la prise prévue à cet effet.
2. Appuyer sur (Menu). Le menu principal s'affiche.
3. Sélectionner
FM Radio
4. Appuyer sur (Précédent) ou (Suivant) pour modifier la fréquence par incréments de 100
KHz.
(Radio FM), puis appuyer sur (Suivant) ou (Lecture/Pause).
Page 42

5. Pour basculer entre les modes audio Stereo (Stéréo) et Mono, appuyer sur (Lecture/Pause).
A
M
g
Conseil
Le mode Mono peut faciliter la réduction du bruit de fond lorsque le signal de la station syntonisée est faible.
Mémorisation de stations
La fonction de mémorisation de stations permet d'accéder rapidement aux stations favorites.
Pour mémoriser des stations favorites manuellement :
1. Syntoniser une station radio FM.
2. Maintenir enfoncée la touche (Lecture/Pause). La station est désormais mémorisée.
Pour mémoriser des stations favorites automatiquement :
1. Appuyer sur (Menu). Le menu principal s'affiche.
2. Sélectionner
(Lecture/Pause).
3. Sélectionner
(Lecture/Pause). Le lecteur balaye les fréquences et clignote le message « Auto
Scanning » (Balayage automatique).
FM Settings
Auto Scanning
(Paramètres FM), puis appuyer sur (Suivant) ou
(Balayage automatique), puis appuyer sur (Suivant) ou
Pendant le balayage, le lecteur ajoute toute station radio locale à signal fort à la liste des
stations mémorisées pour un total maximum de 20 stations.
Pour supprimer des stations mémorisées :
1. Appuyer sur (Menu). Le menu principal s'affiche.
2. Sélectionner
FM Settings
(Lecture/Pause).
3. Sélectionner
Preset Delete
(Lecture/Pause).
4. Appuyer sur (Haut) ou (Bas) pour sélectionner la station mémorisée à supprimer, puis
appuyer sur (Suivant) ou (Lecture/Pause). La station mémorisée a été supprimée.
ccès aux stations mémorisées
Pour accéder aux stations mémorisées :
(Paramètres FM), puis appuyer sur (Suivant) ou
e (Supprimer station mémorisée) puis appuyer sur (Suivant) ou
1. Appuyer sur (Menu). Le menu principal s'affiche.
2. Sélectionner
F
Radio
(Radio FM), puis appuyer sur (Suivant) ou (Lecture/Pause).
Page 43

3. Appuyer sur (Haut) pour accéder à la station radio mémorisée précédente ou appuyer sur
r
g
(Bas) pour accéder à la station radio mémorisée suivante.
Visionnement de photos
Ce lecteur peut afficher des photos aux formats JPG et JPEG. Il n'est compatible avec aucun
autre format. Pour afficher des photos de formats autres les formats JPG/JPEG, il faut tout
d'abord les convertir en JPG ou JPEG à l'aide du logiciel d'édition photo de l'ordinateur.
Conseil
Plus la taille du fichier photo est importante, plus longue est la durée d'ouverture du fichier. Pour modifier la
taille des photos (et la taille du fichier photo) en proportion de celle de l'écran, redimensionner des copies
des fichiers originaux au format 128 8 80 à l'aide du logiciel d'édition photo de l'ordinateur.
Pour afficher des photos :
1. Appuyer sur (Menu). Le menu principal s'affiche.
2. Sélectionner
Photo
disponibles s'affiche :
3. Appuyer sur (Précédent) ou (Suivant) pour afficher la série précédente ou suivante de
photos.
4. Appuyer sur (Haut) ou (Bas) pour sélectionner la photo à afficher, puis appuyer sur
(Suivant) ou (Lecture/Pause). La photo s'affiche aux dimensions de l'écran.
puis appuyer sur (Suivant) ou (Lecture/Pause). Une liste des photos
z Appuyer sur (Précédent) ou (Suivant) pour une recherche avant ou arrière.
z Appuyer sur (Play/Pause) pour activer le mode zoom puis appuyer sur les touches
directionnelles pour se déplacer sur l'image.
z Appuyer sur (Haut) pour pivoter la photo à 90°.
Copie de photos sur le lecteur
La méthode à utiliser pour copier des photos de l'ordinateur au lecteur varie en fonction du mode
USB sur lequel le lecteur est réglé.
Pour copier des photos de l'ordinateur au lecteur en utilisant le mode USB File & Folder [Fichiers et
Dossier] (MSC) :
1. Sur le lecteur, appuyer sur (Menu), puis sélectionner
Settings
(Paramètres) et appuyer
ensuite sur (Suivant).
2. Sélectionner
3. Surligner
File & Folder
USB Mode
(mode USB) puis appuyer sur (Suivant).
(Fichiers et Dossier) puis appuyer sur (Suivant) ou
(Lecture/Pause).pour enregistrer les paramètres.
4. Connecter le lecteur à l'ordinateur à l'aide du câble USB fourni. Le message « Searching for PC
» (Recherche du PC) s'affiche sur le lecteur.
5. Sur l'ordinateur, cliquer sur
(Démarrer),
Start
My Computer
(Poste de travail), puis double-clique
sur le dossier où se trouvent les fichiers photos.
6. Ouvrir de nouveau
Music Player
7. Cliquer et faire glisser les fichiers photos de l'ordinateur dans le répertoire racine du lecteur.
My Computer
.
afin d'ouvrir une autre fenêtre, puis ouvrir le lecteur
Insignia
Conseil
Page 44

Pour sélectionner plusieurs fichiers, maintenir la touche
g
cliquant sur les fichiers avec la souris. Pour sélectionner une série de fichiers, cliquer sur le
fichier en tête de la série, appuyer sur la touche
enfoncée, puis cliquer sur le fichier au bas de la série.
Shift
du clavier enfoncée tout en
Ctrl
(Maj) du clavier et la maintenir
Une fois la copie terminée, le message « OK to disconnect » (OK pour la
déconnexion) apparaît sur le lecteur.
8. Débrancher le câble USB de l'ordinateur et du lecteur.
Pour copier des photos de l'ordinateur au lecteur en utilisant le mode USB Media Manager
[Gestionnaire de multimédias] (MTP) :
1. Sur le lecteur, appuyer sur (Menu), puis sélectionner
Settings
(Paramètres) et appuyer
ensuite sur (Suivant).
2. Sélectionner
3. Surligner
Media Manager
USB Mode
(mode USB) puis appuyer sur (Suivant).
(MTP) puis appuyer sur (Suivant) ou (Lecture/Pause) pour
enregistrer les paramètres.
4. Connecter le lecteur à l'ordinateur à l'aide du câble USB fourni. Le message « Searching for PC
» (Recherche du PC) s'affiche sur le lecteur.
5. Sur l'ordinateur, cliquer sur
(Démarrer),
Start
My Computer
(Poste de travail), puis double-
cliquer sur le dossier où se trouvent les fichiers photos.
6. Ouvrir de nouveau
Music Player
My Computer
.
7. Cliquer et faire glisser les fichiers photos de leur emplacement actuels dans le dossier
(Multimédias) du lecteur
Conseil
Pour sélectionner plusieurs fichiers, maintenir la touche
cliquant sur les fichiers avec la souris. Pour sélectionner une série de fichiers, cliquer sur le
fichier en tête de la série, appuyer sur la touche
enfoncée, puis cliquer sur le fichier au bas de la série.
afin d'ouvrir une autre fenêtre, puis ouvrir le lecteur
Insignia Music Player
.
du clavier enfoncée tout en
Ctrl
(Maj) du clavier et la maintenir
Shift
Insignia
Media
Une fois la copie terminée, le message « OK to disconnect » (OK pour la
déconnexion) apparaît sur le lecteur.
8. Débrancher le câble USB de l'ordinateur et du lecteur.
Suppression de photos
Pour supprimer des photos, « Aller à Suppression de fichiers ».
Modifications des paramètres
Modification des paramètres de luminosité, de rotation et de rétroéclairage
Pour modifier les paramètres de luminosité, de rotation et de rétroéclairage :
1. Appuyer sur (Menu). Le menu principal s'affiche.
2. Sélectionner
3. Sélectionner
Settings
Display
(Paramètres), puis appuyer sur (Suivant) ou (Lecture/Pause).
(Affichage), puis appuyer sur (Suivant) ou (Lecture/Pause). Le menu
Display (Affichage) s'ouvre.
4. Modifier l'un des paramètres suivants :
Brightness
Rotation
(Luminosité) – Permet de modifier la luminosité de l'écran rétroéclairé.
– Permet de pivoter l'écran et de retourner les fonctions des boutons afin de faciliter
Page 45

l'utilisation du lecteur aux gauchers. La configuration par défaut s'applique aux droitiers (
g
g
Handed
Backlight
).
(Rétroéclairage) – Permet de modifier la durée d'activation du rétroéclairage après
Right
avoir appuyé sur un bouton. Le rétroéclairage peut raccourcir sensiblement la durée de la
batterie s'il est activé pendant de longues périodes.
Modifications des paramètres de mise hors tension et d’arrêt différé
Pour modifier les paramètres de mise hors tension et d’arrêt différé :
1. Appuyer sur (Menu). Le menu principal s'affiche.
2. Sélectionner
3. Sélectionner
Settings
Time
(Paramètres), puis appuyer sur (Suivant) ou (Lecture/Pause).
(Durée), puis appuyer sur (Suivant) ou (Lecture/Pause). Le menu Time
(Durée) s'affiche.
4. Modifier l'un des paramètres suivants :
Power Off
(Mise hors tension) – Permet de régler la durée d'attente avant que lecteur ne se
mette automatiquement hors tension si aucune touche n'est appuyée. Il est possible de
sélectionner
(Arrêt différé) – Permet de modifier la durée d'attente pour l'arrêt différé du lecteur, que
Sleep
(Arrêt) ou une durée de 10 minutes au maximum.
Off
des boutons aient été appuyés ou non ou quelle que soit l'activité. Il est possible de
sélectionner des incréments de 30 minutes jusqu'à un maximum de 120 minutes.
Effacement de tous les fichiers et restauration des valeurs par défaut
Pour effacer tous les fichiers et restaurer les paramètres à leurs valeurs par défaut :
1. Appuyer sur (Menu). Le menu principal s'affiche.
2. Sélectionner
Settin
(Paramètres), puis appuyer sur (Suivant) ou (Lecture/Pause).
s
Page 46

3. Sélectionner
A
g
System
(Système), puis appuyer sur (Suivant) ou (Lecture/Pause). Le menu
System (Système) s'affiche.
4. Modifier l'un des paramètres suivants :
Erase All
System Init
(Effacer tout) – Permet d'effacer tous les fichiers de musique du lecteur.
(Réinitialisation Système) – Permet de réinitialiser tous les paramètres du lecteur
à leurs valeurs par défaut.
Modification manuelle du mode USB.
Le lecteur de musique peut utiliser deux modes USB, Media Manager (MTP, le mode par défaut)
et le mode File & Folder (MSC).
Pour modifier manuellement le mode USB :
1. Appuyer sur (Menu). Le menu principal s'affiche.
2. Sélectionner
3. Sélectionner
Settings
USB Mode
(Paramètres), puis appuyer sur (Suivant) ou (Lecture/Pause).
(mode USB) puis appuyer sur (Suivant) ou (Lecture/Pause). Le
menu USB Mode s'affiche.
4. Modifier l'un des paramètres suivants :
Media Manager
Media Manager [Gestionnaire de multimédias] (MTP) – Paramètre optimal
pour l'utilisation de l'appareil comme lecteur de musique.
File & Folder
[Fichiers et Dossier] (MSC) – Paramètre optimal pour l'utilisation du lecteur
comme dispositif de stockage de fichiers ; requis pour l'utilisation de iTunes Drag et Drop
Support.
ffichage des informations système
Il est possible d'afficher la mémoire totale, la mémoire utilisée, la mémoire disponible et d'autres
informations système du lecteur.
Pour afficher les informations système :
1. Appuyer sur (Menu). Le menu principal s'affiche.
2. Sélectionner
3. Sélectionner
Settings
Information
(Paramètres), puis appuyer sur (Suivant) ou (Lecture/Pause).
(Informations) puis appuyer sur (Suivant) ou <> (Lecture/Pause).
L'écran Information s'ouvre, affichant la mémoire utilisée, la version du microprogramme
et la date.
Entretien du lecteur
Entretien et nettoyage
Page 47

z Nettoyer périodiquement le lecteur en utilisant un gant de toilette humidifié à l'eau ou du
g
papier lentille humidifié à l'eau ou à l'alcool isopropylique (alcool à friction).
z Veiller à ne pas mouiller le lecteur.
z Garder le lecteur à l'écart de la chaleur (sous le pare-brise d'un véhicule, un appui de
fenêtre ou devant une bouche de chauffage).
z Éviter de transporter le lecteur dans une poche contenant des objets métalliques qui
pourraient rayer ou endommager le lecteur.
z Éviter de transporter le lecteur dans une poche ou un compartiment sale. La saleté, la
poussière et les peluches peuvent endommager le lecteur.
z Autant que possible, garder le lecteur dans son étui protecteur.
z Mettre à niveau le microprogramme régulièrement pour être sûr de bénéficier de la
dernière version et des dernières fonctionnalités.
Mise à niveau du microprogramme
Pour mettre le microprogramme à niveau :
1. Sur l'Internet, connecter le navigateur Web à l'adresse www.insignia-products.com, puis
rechercher la mise à niveau du microprogramme de lecteur de musique.
2. Suivre les instructions en ligne pour télécharger les fichiers mis à niveau du microprogramme.
Prendre note de l'emplacement où les fichiers ont été enregistrés.
3. Vérifier que le lecteur de musique est en mode USB File & Folder (MSC). Pour des instructions
sur la modification du mode USB, « Aller à Modification manuelle
4. Sur l'ordinateur, cliquer sur
(Démarrer),
Start
My Computer
(Poste de travail), puis double-
cliquer sur le dossier où se trouve le fichier de mise à niveau du microprogramme.
5. Ouvrir de nouveau
Music Player
My Computer
.
afin d'afficher une autre fenêtre, puis ouvrir le lecteur
6. Cliquer et faire glisser le fichier du microprogramme de l'ordinateur dans le dossier de données
du lecteur de musique.
7. Lorsque la copie du fichier est terminée, débrancher le câble USB. Le lecteur détecte et installe
automatiquement le nouveau microprogramme.
du mode USB ».
Insignia
Avertissement
L'installation d'un nouveau microprogramme efface automatiquement tout ce que contient le périphérique.
Problèmes et solutions et FAQ
Comment copier des fichiers sur le lecteur ?
En mode File & Folder (MSC), il est possible copier des fichiers sur le lecteur de la même façon
que des fichiers sont copiés sur un disque dur ou sur le lecteur d'une mémoire flash. En mode
Media Manager (MTP), il est possible d’utiliser Rhapsody, Windows Media Player ou d'autres
gestionnaires de musique numérique pour transférer des fichiers sur le lecteur de musique. Pour
plus de renseignements, « Aller à Copie des fichiers de musique sur le lecteur
Modification manuelle du mode USB ».
Quels formats de fichiers sont pris en charge par le lecteur ?
Ce lecteur prend en charge les formats audio MP3, WMA, le format audio WMA sécurisé et les
formats photos JPG et JPEG. Tous les autres formats doivent être convertis en un format
compatible avant de pouvoir être copiés sur le lecteur.
Qu'est-ce que MTP ?
» et « Aller à
Page 48

Media Transfer Protocol (MTP ou mode Media Manager) est un protocole de connexion de
g
périphériques portatifs à un ordinateur Windows XP et de synchronisation du contenu multimédia
numérique entre ces périphériques.
Pour la copie de fichiers sur le lecteur à l'aide de Windows Explorer, quel dossier faut-il utiliser ?
En mode Media Manager (MTP), les copier dans le dossier
Media
(Multimédias) du lecteur. En
mode File & Folder (MSC), il est possible de les copier dans le répertoire racine.
Certains des fichiers de musique sont sur le lecteur mais ils ne sont pas reproduits. Lorsqu'ils sont
sélectionnés, la lecture d'une chanson différente commence. Que se passe-t-il ?
Les droits de reproduire la chanson sur un périphérique supplémentaire n'ont peut-être pas été
achetés. Pour en avoir le cœur net, essayer de lire une chanson copiée d'un CD ancien et
convertie au format MP3. Si cette chanson peut être reproduite mais non pas la chanson illisible,
c'est que les droits de reproduction de cette chanson doivent être achetés.
Pourquoi mettre à niveau le microprogramme ?
Il faut toujours mettre à niveau le microprogramme du lecteur avec la dernière version disponible
pour s'assurer de son fonctionnement correct et bénéficier des fonctionnalités les plus récentes.
Pour plus d'informations, consulter « Aller à
Comment copier un CD sur le lecteur ?
Mise à niveau du microprogramme ».
Il faut d'abord extraire le CD à l'aide d'un gestionnaire de musique comme Best Buy Rhapsody ou
Windows Media Player. Une fois les chansons sur l'ordinateur, les copier sur le lecteur à l'aide de
l'Explorateur Windows ou d'un gestionnaire de musique numérique. Pour plus de
renseignements, « Aller à Copie des fichiers de
musique sur le lecteur ».
Pourquoi le lecteur affiche-t-il le message « Unknown artist/album » (Artiste/album inconnu) ?
Le message s'affiche généralement lorsque le fichier de musique ne contient pas d'informations
d'album ou d'artiste (étiquettes ID3 incomplètes). Consulter la documentation ou l'aide en ligne du
gestionnaire de musique numérique pour des instructions concernant l'ajout d'informations aux
fichiers de musique.
Comment obtenir de l'aide
Contacter le service de support technique
Avant de contacter le support technique, Aller à Problèmes et solutions et FAQ pour vérifier s'il
existe une réponse à la question.
Pour toutes questions concernant le fonctionnement ou les caractéristiques du lecteur, contacter
le Support technique au numéro 1-800-699-9218 ou (877) 467-4289, ou remplir une demande de
support en ligne à l'adresse :
www.bestbuy.com/support.asp
Pour obtenir une aide supplémentaire en ligne, aller sur les sites :
www.insignia-products.com
www.bestbuy.com/mp3
www.geeksquad.com
Pour en savoir plus
Sur l'Internet, utiliser un moteur de recherche Web pour obtenir des informations sur les rubriques
suivantes* :
z Extraction de CD
z Téléchargement de musique
z Téléchargement de fichiers MP3
Page 49

z Musique MP3
g
z Législation sur les droits d'auteur relative au format MP3
*Best Buy Enterprise Services, Inc. ne gère ni n'est responsable du contenu des pages Web trouvées en utilisant ces termes de
recherche.
Spécifications
Ports et connexions
Mini USB 2.0
Casques d'écoute et écouteurs
ACL OLED
Affichage
262 000 couleurs
128 8 80 pixels
Batterie Remplaçable, rechargeable, au lithium-ion
Formats compatibles
Audio : MP3, WMA, WMA sécurisé
Photo : JPG/JPEG
Dimensions 13,7 8 34 8 78,5 mm (0,54 8 1,34 8 3,09 po)
Poids 34 g (1,2 oz)
Avis juridiques
Déclarations de conformité
Cet appareil est conforme à l’article 15 du règlement de la FCC. Son utilisation est soumise aux deux conditions
suivantes : (1) Cet appareil ne doit pas provoquer d'interférence dangereuses et (2) il doit accepter toute
interférence reçue, y compris celles risquant d'engendrer un fonctionnement indésirable.
Cet équipement a été testé et déclaré conforme aux limitations prévues dans le cadre de la catégorie B des
appareils numériques, définies par l’article 15 du règlement de la FCC. Ces limites ont été établies pour fournir
une protection raisonnable contre les interférences indésirables lors d'une installation résidentielle. Cet
équipement génère, utilise et diffuse des ondes radio et, sil n'est pas installé et utilisé conformément aux
instructions dont il fait l'objet, il peut provoquer des interférences indésirables avec les communications radio.
Cependant, il n'est pas possible de garantir qu'aucune interférence ne se produira dans une installation
particulière. Si cet équipement produit des interférences importantes lors de réceptions radio ou télévisées, qui
peuvent être détectées en éteignant puis en rallumant l'appareil, essayer de corriger l'interférence au moyen de
l'une ou de plusieurs des mesures suivantes :
z Réorienter ou déplacer l'antenne réceptrice.
z Augmenter la distance entre l'équipement et le récepteur.
z Brancher l'équipement sur la prise électrique d'un circuit différent de celui auquel le
récepteur est relié.
z Contacter le revendeur ou un technicien radio/télévision qualifié.
Droits d'auteurs
© 2006 Insignia. Insignia et le logo Insignia sont des marques de commerce de Best Buy Enterprise Services, Inc.
Les autres noms de marques et de produits mentionnés sont des marques de commerce ou des marques
déposées de leurs propriétaires respectifs. Les spécifications et caractéristiques sont susceptibles d'être
modifiées sans préavis.
Page 50

g
Reproductor
de música digital IS-DA1G/IS-DA2G
Guía del usuario
Contenido
Bienvenido
Información
Características
Contenido del paquete
Requisitos
Controles y conexiones
Información
Configuración del reproductor de música
Instalación de la batería
Carga de la batería
Conexión de
Instalación del software Best Buy Rhapsody
Uso del reproductor
Cómo encender y apagar el reproductor
Cómo cambiar
Cómo bloquear los botones
Cómo navegar
Cómo reproducir archivos de música
Cómo obtener
Cómo copiar
Cómo borrar
Cómo
Cómo escuchar la radio en FM
Cómo
Cómo cambiar los ajustes
Cómo mantener su reproductor
Cuidado y limpieza
Cómo
Solución de problemas y Preguntas más frecuentes
Cómo obtener ayuda
Solución de problemas y Preguntas más frecuentes
Especificaciones
Avisos
de seguridad
del sistema
de pantalla
los auriculares
el volumen
por los menús de pantalla
más música
archivos de música a su reproductor
archivos
desconectar el reproductor
visualizar fotografías
actualizar el firmware
legales
Bienvenido
Felicitaciones por su compra de un producto de alta calidad de Insignia. Su unidad NS-DA1G o
NS-DA2G representa el más moderno diseño de reproductor digital de multimedia y está
concebida para brindar un rendimiento confiable y sin problema. Puede usar su reproductor de
música para reproducir archivos digitales de música y escuchar la radio en FM, y lo puede llevar
Page 51

consigo a cualquier lugar.
g
Información de seguridad
Advertencias
z Lea, guarde y siga todas las instrucciones. Preste atención a todas las advertencias.
z Use sólo aditamentos y accesorios aprobados por Insignia.
z Baje el volumen antes de encender su reproductor MP3 y evite usarlo con el volumen alto.
Puede ocurrir una pérdida permanente del oído si los audífonos o auriculares se usan
con un volumen alto. El volumen bajo también prolonga la duración de la batería.
z No utilice audífonos o auriculares mientras conduce un vehículo, monta en bicicleta u
opera cualquier vehículo motorizado. Esto puede crear un peligro en tráfico y podría ser
ilegal en su área.
z Para reducir la posibilidad de choque eléctrico, no utilice ni opere este dispositivo cerca de
entornos húmedos.
Proteja el cable de la electricidad para que no lo pisen o prensen.
z
z Desconecte el reproductor durante tormentas de rayos o cuando no se utilice por un
periodo de tiempo extendido.
z Riesgo de explosión, daño o fuga de la batería si ésta se reemplaza de manera incorrecta
o por el tipo de batería incorrecto. Deseche las baterías usadas de acuerdo con los
reglamentos locales.
z Limpie únicamente con un paño seco.
z No anule el propósito de seguridad del tipo de enchufe polarizado. Un enchufe polarizado
tiene dos espigas una más ancha que la otra. La espiga ancha se proporciona para su
seguridad. Cuando el enchufe proporcionado no entra en el tomacorriente, consulte con
un electricista para reemplazar el tomacorriente obsoleto.
No desarme el reproductor para acceder a los componentes internos (excepto la batería)
z
bajo ninguna circunstancia.
Características
z Reproduce archivos en formato MP3, WMA, WMA seguro y archivo de audio.
z Muestra fotos en JPG.
z La pantalla de LCD retroiluminada soporta varios idiomas y muestra la portada del álbum e
z El sintonizador de radio en FM digital le permite acceder a emisoras de radio locales. La
z Cinco ajustes de ecualizador predefinidos para optimizar la reproducción de música
La clasificación sofisticada de la biblioteca musical le permite ver la música en su
z
z A-B Repeat (Repetición A-B) le permite seleccionar cualquier punto de inicio y fin durante
z Puerto mini USB 2.0 de alta velocidad para transferencias de archivos rápidas y fáciles.
z Soporta la tecnología Microsoft WMDRM 10.
información sobre las canciones.
radio también memoriza hasta 20 de sus emisoras de radio favoritas.
normal, rock, jazz, clásica y pop. También puede fijar un ajuste personalizado del
ecualizador para un total de seis entre los que elegir.
reproductor por artista, álbum, título de canción, género y lista de reproducción.
la reproducción para que pueda reproducir repetidamente ese segmento. Esta
característica es especialmente útil al aprender idiomas y las letras de las canciones.
Page 52

z Totalmente compatible con los servicios de música Rhapsody y Napster-To-Go.
g
z Menús fáciles de usar
Firmware actualizable para mantener su reproductor de música al día.
z
Batería recargable y reemplazable.
z
Contenido de la caja
z Reproductor de música digital Insignia
z Batería de litio ión recargable
z Audífonos
z Cable para mini USB 2.0
z Guía de inicio rápido
z CD (contiene el software Best Buy Rhapsody y esta guía del usuario en línea)
z Estuche de transporte
z Oferta de música
z Tarjeta de garantía
Requisitos de sistema
Para transferir música de su computadora a su reproductor, su computadora debe
z Windows XP
z CPU Pentium o equivalente
Un puerto USB 2.0 disponible
z
z Reproductor de Windows Media 10 (Puede descargar el Reproductor de Windows Media
10 del sitio www.microsoft.com/windows/windowsmedia/download/default.asp)
z Memoria de 64 MB
z Conexión a Internet active (se recomienda banda ancha de 128+ Kbps)
Controles y conexiones
Vista Frontal
Elemento Icono Función
A
Menú – Abre el menú de la pantalla para seleccionar canciones y cambiar los ajustes
Page 53

B
g
C
D
E
F
G
Vista Inferior
Rebobinar/Saltar hacia atrás – Presione para volver a empezar la canción actual y presione Mantenga
presionado para rebobinar. En el modo de radio en FM, presione para cambiar las frecuencias.
Arriba – Presione para recorrer hacia arriba las listas o cambiar los valores predefinidos de frecuencia de
radio.
Adelanto rápido/Saltar/Siguiente – Presione para saltar a la canción siguiente. Presione y sostenga para
avanzar rápidamente. En los menús, presione para abrir el siguiente submenú o ajuste. En el modo de
radio en FM, presione para cambiar las frecuencias.
Encendido – Presione y sostenga para encender el reproducto r. Presione y sost enga de nuevo para
apagarlo.
Abajo – Presione para recorrer hacia abajo las listas o cambiar los valores predefinidos de frecuencia de
radio.
Reproducir/Pausar/Seleccionar – Presione para reproducir o detener momentáneamente la reproducción.
En los menús, presione para seleccionar. En el modo de radio en FM, presione y sostenga para cambiar el
modo audio.
Elemento Icono Función
A
B
Puerto mini USB 2.0 – Conecte el cable USB a este puerto en su computadora para cargar el reproductor
y transferir archivos.
Conector de audífonos – Conecte los audífonos o auriculares a este conector.
Vistas laterales
Page 54

g
Elemento Icono Función
A
B
C
D
Vista Posterior
Volumen arriba -- Presione para subir el volumen.
Volumen abajo --Presione para bajar el volumen.
Interruptor de Bloqueo – Deslice para desactivar todos los botones.
Botón de restablecimiento – Introduzca un objeto puntiagudo para reiniciar el reproductor.
Elemento Función
A
Cubierta del compartimiento de las baterías – Retirar la cubierta para introducir o cambiar la batería.
Page 55

Información de pantalla
g
Elemento Función
A
B
C
D
E
F
G
H
I
J
Estado – Muestra si una canción está reproduciendo o está en pausa.
Número de archivo – Lista el número de pista que se está reproduciendo en el momento.
Icono de repetición – Indica el ajuste de repetición actual.
Icono de batería – Indica el nivel de potencia de la batería.
Nombre del artista – Muestra el nombre del artista de la pista actual.
Nombre del álbum – Muestra el nombre del álbum de la pista actual.
Nombre de la pista – Muestra el título de la pista actual.
Barra de progreso – Muestra el progreso de la canción.
Tiempo de reproducción – Muestra el tiempo transcurrido de la pista actual.
Tiempo total – Muestra la duración de la pista actual.
Volumen (no aparece) – Muestra el ajuste actual del volumen. solamente en la pantalla cuando se presionan los
botones de volumen.
Preparación del reproductor de música
Instalación de la batería
1. Deslice y retire la cubierta del compartimiento de las baterías en la parte posterior del
reproductor de música.
Page 56

g
2. Presione la batería en el compartimiento, y deslícela para que quede en su sitio. La batería debe
quedar ajustada.
3. Deslice la cubierta del compartimiento de las baterías para que encaje en su sitio.
Carga de la batería
Cargue la batería siempre que no esté usando el reproductor para asegurarse de que esté
siempre La batería se carga en unas dos horas. Una batería totalmente cargada brinda hasta 18
horas de reproducción continua, dependiendo del brillo y visualización del tiempo de la
retroiluminación, y los niveles de volumen.
Para cargar la batería:
1. Encienda la computadora.
2. Conecte el cable mini USB 2.0 al conector mini USB en el reproductor y a un conector USB
estándar en su computadora. Cuando el cable está conectado correctamente, el
reproductor empieza a cargar su batería usando la conexión USB, y aparece en el
reproductor el mensaje “OK to disconnect” (Se puede desconectar).
A medida que la batería se carga, el icono azul de la batería muestra un dibujo animado que
se llena de derecha a izquierda, para ilustrar que la batería está cargando.
Page 57

g
Una vez que el reproductor está totalmente cargado, el icono de la batería se vuelve de color
verde, indicando una carga completa.
Conexión de audífonos
Puede usar cualquier audífono con un enchufe audio estéreo estándar de 1/16 de pulg.
Para conectar los audífonos:
z Enchufe los audífonos o los auriculares proporcionados en el conector de
auriculares/audífonos del reproductor.
Nota
Para usar la radio en FM, debe tener los auriculares proporcionados conectados, porque actúan de antena
de FM. Para sustituir por los auriculares, puede usar cualquier audífono con cables sin protección.
Instalación del software Best Buy Rhapsody
Para instalar el software:
1. Inserte el CD de software Insignia en la unidad de CD de su computadora. El programa de
instalación del software comienza.
- O Si el programa de instalación no comienza automáticamente, haga doble clic
en
My Computer
(Mi PC) en su escritorio, haga doble clic en la unidad de CD
que contiene el CD Insignia, después doble clic en el archivo
rhapsodybestbuy.exe
. El programa de instalación del software comienza.
2. Siga las instrucciones de pantalla para terminar la instalación.
Consejo
Para soporte de Arrastrar y soltar iTunes, use el modo USB File & Folder (MSC). Su reproductor MP3
Insignia solamente reproducirá archivos MP3 iTunes que arrastre y suelte de iTunes. Para información
sobre cómo cambiar modos USB, consulte “Ver Cómo cambiar manualmente el modo
Uso del reproductor
USB”
Page 58

Cómo encender y apagar el reproductor
g
Para encender y apagar el reproductor:
1. Presione y mantenga presionado el botón (Encendido).
2. Para apagar el reproductor, presione y mantenga presionado de nuevo el botón (Encendido).
Cómo cambiar el volumen
Para cambiar el volumen:
z Presione los botones (Volumen Arriba) y (Volumen Abajo).
Bloqueo de los botones
Puede evitar la operación accidental de los botones bloqueándolos.
Para bloquear los botones:
1. Deslice el botón
del botón de bloqueo en la posición HOLD (Bloqueo).
HOLD
(Bloqueo) en la dirección de la flecha. En la pantalla aparece una imagen
Page 59

g
2. Para desbloquear los botones, deslice el interruptor
HOLD
(Bloqueo) en dirección opuesta a la
flecha.
Cómo navegar por los menús de pantalla.
Use el menú de pantalla para reproducir música y cambiar los ajustes.
Para navegar por los menús de pantalla.
1. Presione (Menú). Se abrirá el menú principal.
2. Presione (Arriba) o (Abajo) para resaltar uno de los siguientes elementos del menú:
{
Music (Música)
{
Radio FM
{
Music Library (Biblioteca de música)
{
FM Settings (Ajustes FM)
{
Settings (Selecciones)
3. Presione (Siguiente) Se abre el submenú del elemento que ha seleccionado. Para navegar
hacia atrás desde un submenú, presione (Anterior).
Consejo
Presione y mantenga presionado el botón (Menú) para volver al menú por el que estaba
Cómo reproducir archivos de música
Para reproducir música:
1. Presione (Menú).
2. Presione (Arriba) o (Abajo) para resaltar
presione (Siguiente). Se abre la biblioteca de música.
3. Resalte una de las siguientes opciones, después presione (Siguiente) para abrir esa
categoría:
{
Play All
{
Artist
{
Album
{
Track
Music Library
(Biblioteca de música), después
(Reproducir todo) – Reproduce todas las pistas en el reproductor.
(Artista) – Lista todas las pistas en orden alfabético por artista.
(Álbum) – Lista todas las pistas en orden alfabético por álbum. Aunque
sólo haya copiado una pista de un álbum a su reproductor, el nombre de ese
álbum aparecerá en esta lista.
(Pista) – Lista todas las pistas en orden alfabético por título de la pista.
Page 60

{
g
Playlist
(Lista de reproducción) – Lista todas las pistas en orden alfabético por
lista de reproducción.
{
Genres
(Géneros) – Lista todas las pistas en orden alfabético por género.
Consejo
Para navegar hacia atrás desde un submenú, presione (Anterior).
4. Seleccione el contenido a reproducir, después seleccione
Play All
(Reproducir todo) para
reproducir todas las pistas en esa selección. Para reproducir todas las pistas
empezando por una específica, seleccione esa
El reproductor cambia a la vista Now Playing (Reproduciendo ahora), que
muestra la información de la pista que se está reproduciendo ahora.
{ Para mostrar la portada del álbum (si la hay), presione (Arriba). La portada
del álbum aparece a la izquierda de la pantalla.
5. Si su selección no empieza a reproducir, presione (Reproducir/Pausar).
La pista empieza a reproducir y el icono de estado de la reproducción ( ) aparece en la
esquina izquierda superior de la pantalla.
z Para detener momentáneamente la reproducción, presione (Reproducir/Pausar). Aparece el
icono del estado de pausa ( ) en la esquina izquierda superior de la pantalla.
z Para saltar a la pista siguiente, presione (Saltar/Avance rápido). Para saltar a una pista
anterior, presione varias veces (Saltar hacia atrás/Rebobinar)
Page 61

z Para avanzar rápidamente por la pista actual, presione y mantenga presionado
g
(Saltar/Avance rápido). Para rebobinar la pista actual, presione y mantenga presionado
(Saltar hacia atrás/Rebobinar).
z Para volver a empezar la pista actual, presione (Saltar hacia atrás/Rebobinar) una vez.
Reproducción aleatoria
Puede reproducir las pistas que ha seleccionado en orden aleatorio.
Para reproducir las pistas en orden aleatorio
1. En el menú Settings (Ajustes), seleccione
Audio
, después presione (Siguiente) o
(Reproducir/Pausa).
2. En el menú Audio, seleccione
Shuffle
(Mezclar), después presione (Siguiente) o
(Reproducir/Pausa).
3. Presione Presione (Arriba) o (Abajo) para elegir On (Activado) o
(Desactivado).
Off
4. Presione (Siguiente) o (Reproducir/Pausar) para guardar el ajuste. Aparece el icono de
mezclar en la pantalla Now Playing (Reproduciendo ahora) junto al icono de batería.
Reproducir pistas
Para repetir pistas:
1. En el menú Settings (Ajustes), seleccione
Audio
, después presione (Siguiente) o
(Reproducir/Pausa).
2. En el menú Audio, seleccione
Repeat
(Repetir), después presione (Siguiente) o
(Reproducir/Pausa).
3. Presione (Arriba) o (Abajo) hasta que seleccione
una pista individual) o
(Desactivado).
Off
(Todas las pistas),
All
[Una] (repetir
One
4. Presione (Siguiente) o (Reproducir/Pausar) para guardar el ajuste. Aparece el icono de
Repetir 1 o Repetir todas en la pantalla Now Playing (Reproduciendo ahora) junto al
icono de batería.
Repetir segmentos de una pista
Puede utilizar A-B repeat (Repetición A-B) para reproducir repetidamente un segmento de una
pista. Primero tiene que activar A-B repeat (Repetición A-B).
Page 62

Para activar A-B repeat (Repetición A-B):
g
1. Presione (Menú). Se abrirá el menú principal.
2. Presione (Arriba) o (Abajo) para resaltar
Settings
(Ajustes), después presione
(Siguiente) o (Reproducir/Pausar).
3. Presione (Arriba) o (Abajo) para resaltar
Audio
, después presione (Siguiente) o
(Reproducir/Pausar).
4. Presione (Arriba) o (Abajo) para resaltar
A-B repeat
(Repetición A-B), después presione
(Siguiente) o (Reproducir/Pausar).
5. Presione (Arriba) o (Abajo) para resaltar On (Activado) o
(Desactivado), después
Off
presione (Siguiente) para seleccionar. Aparece el mensaje "Use the down button (V)
to activate A-B” (Use el botón Abajo (V) para activar A-B), después el menú Audio
Setting (Ajustes de audio) se abre de nuevo.
6. Presione (Menú) para regresar a la pantalla Now Playing (Reproduciendo ahora).
Para repetir un segmento de audio:
1. Durante la reproducción, presione (Abajo) para marcar el principio del bucle de reproducción.
El icono Repeat (Repetición) en la pantalla muestra una “A”.
2. Presione (Abajo) de nuevo para marcar el final del bucle de repetición. El icono Repeat en la
pantalla muestra una “AB” y el reproductor repite ese segmento de audio
indefinidamente.
3. Presione (Abajo) para cancelar el bucle de repetición.
Cómo usar el ecualizador
Hay disponibles seis ajustes de ecualizador, y cinco están preprogramados: Normal, Rock, Jazz,
Clásica, y Pops. El ajuste User (Usuario) le permite personalizar el ecualizador según su
preferencia.
Para seleccionar un ajuste de ecualizador preprogramado:
1. En el menú Settings (Ajustes), seleccione
Audio
, después presione (Siguiente) o
(Reproducir/Pausa).
2. En el menú Audio, seleccione
Equalizer
(Ecualizador), después presione (Siguiente) o
(Reproducir/Pausa).
3. Presione (Arriba) o (Abajo) para seleccionar el ajuste de ecualizador que quiere.
4. Presione (Siguiente) o (Reproducir/Pausar) para guardar el nuevo ajuste.
Para cambiar el ajuste personalizado del ecualizador:
1. En el menú Settings (Ajustes), seleccione
Audio
, después presione (Siguiente) o
(Reproducir/Pausa).
2. En el menú Audio, seleccione
Equalizer
(Ecualizador), después presione (Siguiente) o
(Reproducir/Pausa).
3. Presione (Arriba) o (Abajo) para seleccionar el ajuste
Custom
(Personalizado).
Page 63

4. Presione (Siguiente) para mover el cursor al primer punto de ajuste del ecualizador. Presione
g
(Arriba) o (Abajo) para ajustar la configuración. Repita este paso para ajustar cada
5. Presione (Reproducir/Pausar) para guardar el nuevo ajuste.
Cómo obtener más música
Su reproductor de música ya contiene algunos archivos de música, pero puede obtener más
música de sus propios CD de música y de Internet .
Para obtener música de CD y de Internet a su reproductor hay que realizar dos pasos:
1. Extraer pistas de un CD (crear archivos de la música del CD) o descargar archivos de música de
Internet.
2. Seleccione los archivos que va a copiar y cópielos en su reproductor.
Cómo obtener más música en su computadora
Obtener música de CD
Para extraer pistas de un CD:
1. Haga clic en
Buy Rhapsody
Start
(Iniciar),
Best Buy Rhapsody se abre.
All Programs
(Todos los programas),
Best Buy Rhapsody, Best
2. Ponga un CD de música en la unidad de CD. Rhapsody lista las pistas en el lado derecho de la
pantalla. Si está conectado a Internet, la lista muestra los nombres de las pistas.
3. Haga clic en
CD y hace una lista de ellas en la carpeta
Import CD
(Importar CD) Rhapsody crea archivos MP3 de pistas de música en el
My Library
(Mi biblioteca).
Para obtener información sobre cómo transferir archivos de música a su reproductor de
música, vea “Cómo copiar archivos de música a su reproductor
”.
Page 64

Obtener música de Rhapsody
g
Para comprar y descargar archivos de música de Internet:
1. Haga clic en
Start
Buy Rhapsody
2. En la casilla de
descargar la música, después haga clic en Go (Ir). Cualquier coincidencia que
Rhapsody encuentre aparece en la pantalla.
(Iniciar),
Search
All Programs
(Todos los programas),
Best Buy Rhapsody, Best
Best Buy Rhapsody se abre.
(Búsqueda) escriba el nombre del artista o el álbum del que quiere
3. Decida qué pistas o álbumes quiere comprar, después haga clic en
(Comprar) al lado de la
BUY
música que desea.
4. Siga las instrucciones de pantalla para terminar la compra. Los archivos musicales se añaden a
su biblioteca de música Rhapsody.
Consejo
También puede utilizar otros programas de administración de música digital para obtener archivos musicales
de Internet. Para obtener más información, consulte a ayuda en línea del programa.
Page 65

Consejo
g
Para soporte de Arrastrar y soltar iTunes, use el modo USB File & Folder (MSC). Su reproductor MP3
Insignia solamente reproducirá archivos MP3 iTunes que arrastre y suelte de iTunes. Para información
sobre cómo cambiar modos USB, consulte “Ver Cómo cambiar manualmente el modo
Cómo copiar archivos de música a su reproductor
Copiar archivos usando Rhapsody
Para copiar archivos de su computadora al reproductor de música usando Rhapsody:
USB”
1. Conecte el cable USB al puerto USB de su computadora y al puerto mini USB de su reproductor.
Aparece en el reproductor el mensaje “Searching for PC” (Buscando PC).
Su computadora detecta el reproductor y lo añade como un nuevo dispositivo
(“Insignia Music Player”) en la lista de unidades de My Computer en Windows.
2. Haga clic en
Buy Rhapsody
Start
(Iniciar),
Best Buy Rhapsody se abre.
All Programs
(Todos los programas),
Best Buy Rhapsody, Best
3. Cierre cualquier ventana que se abra.
4. Haga clic en
My Library
(Mi biblioteca) en la lista de contenidos. Toda su biblioteca de música
digital aparece en el lado derecho de la pantalla.
5. Haga clic en la ficha
(No. 1 en el gráfico).
Transfer
(Transferir) en el área inferior izquierda de la ventana Rhapsody
6. Haga clic y arrastre los archivos de la biblioteca a la lista de transferencia. (No. 2 en el gráfico
anterior).
7. Cuando haya arrastrado todos los archivos que desee copiar a la lista de transferencia, haga clic
en el botón
Transfer
(Transferir) (No. 3 en el gráfico). Los archivos se copian a su
Page 66

reproductor. El mensaje “Synching: Do not Disconnect" (Sincronizando: no desconectar) aparece
g
en el reproductor.
Cuando se haya terminado de copiar, el mensaje “OK to disconnect” (Se puede
desconectar) aparece en el reproductor.
8. Desenchufe el cable USB de su computadora y su reproductor.
Copiar archivos usando el Explorador de Windows
Para copiar archivos de música de su computadora al reproductor usando el Explorador de
Windows:
1. En el reproductor, presione (Menú), seleccione
Settings
(Ajustes), después presione
(Siguiente).
2. Seleccione
3. Resalte
Media Manager
USB Mode
(Modo USB), después presione (Siguiente)
(MTP) o
File & Folder
[Archivo y carpeta] (MSC), después presione
(Siguiente) o (Reproducir/Pausar) para guardar el ajuste.
{ Utilice el modo
carpeta
(No se puede ver la carpeta Data usando la pantalla del reproductor). Según
del software de administración de medios que use (como Rhapsody,
Windows Media Player y muchos otros) el nombre de
{
Use el modo
cualquier otro formato de archivos a la carpeta raíz del reproductor. El
reproductor todavía reproducirá solamente archivos MP3 y WMA.
{ Conecte su reproductor a la computadora usando el cable USB suministrado.
Media Manager
, y cualquier otro formato de archivo a la carpeta
Media
File & Folder
(MTP) para copiar archivos WMA y MP3 a la
[Archivo y carpeta] (MSC) para copiar carpetas y
Aparece en el reproductor el mensaje “Searching for PC” (Buscando
PC).
4. En su computadora haga clic en
Start
(Iniciar),
My Computer
(Mi PC), después haga doble clic
en la carpeta donde se encuentran sus archivos de música.
5. Vuelva a abrir
Player
My Computer
. (Cuando su computadora detectó el reproductor lo añadió como un nuevo
para abrir otra ventana, después abra la unidad
Insignia Music
dispositivo llamado “Insignia Music Player” en la lista de unidades de My Computer
6. Haga clic y arrastre los archivos de música desde su computadora a su reproductor.
{ Si su reproductor está en el modo Media Manager (MTP), cópielos a la carpeta
en el reproductor.
Media
{ Si su reproductor está en el modo File & Folder [Archivo y carpeta] (MSC),
Data
[Datos]
Page 67

g
Consejo
Para seleccionar archivos múltiples, presione y sostenga la tecla
mientras hace clic en los archivos con el ratón. Para seleccionar toda la gama de archivos,
haga clic en el archivo en la parte superior de la gama, presione y sostenga la tecla
el teclado, y después haga clic en el archivo al final de la gama.
cópielos a la carpeta raíz en
Cuando se haya terminado de copiar, el mensaje “OK to disconnect” (Se puede
desconectar) aparece en el reproductor.
7. Desenchufe el cable USB de su computadora y su reproductor.
Cómo borrar archivos
Para borrar archivos de su reproductor usando el menú de pantalla:
1. Presione (Menú). Se abrirá el menú principal.
2. Seleccione
3. Seleccione
4. Seleccione
5. Seleccione
los archivos de multimedia.
Settings
System
Erase All
Yes
(Ajustes), después presione (Siguiente) o (Reproducir/Pausa).
(Sistema), después presione (Siguiente) o (Reproducir/Pausa).
(Borrar todos), después presione (Siguiente)
(Sí), después presione (Siguiente) o (Reproducir/Pausa). Se borran todos
en su teclado
Ctrl
Shift
en
Para borrar archivos de su reproductor usando su computadora:
1. Conecte el cable USB al puerto USB de su computadora y al puerto mini USB de su reproductor.
Aparece en el reproductor el mensaje “Searching for PC” (Buscando PC).
2. Su computadora detecta el reproductor y lo añade como un nuevo dispositivo (“Insignia Music
Player”) en la lista de unidades de My Computer en Windows.
3. Haga clic en Start (Iniciar), después haga clic en
4. Haga doble clic en el dispositivo
Insignia Music Player
My Computer
, después abra la carpeta
(Mi PC).
Media
.
5. Encuentre los archivos que desea borrar, haga clic para seleccionarlos, después presione
Delete
Consejo
Para seleccionar archivos múltiples, presione y sostenga la tecla
archivos con el ratón. Para seleccionar toda la gama de archivos, haga clic en el archivo en la parte superior
de la gama, presione y sostenga la tecla
gama.
(Borrar) en su teclado. Los archivos se borran.
en su teclado mientras hace clic en los
Ctrl
en el teclado, y después haga clic en el archivo al final de la
Shift
Cómo desconectar el reproductor
Después de haber conectado el reproductor de una computadora para recargarlo o transferir
música, necesita desconectar el reproductor de manera segura.
Para desconectar de manera segura el reproductor de la computadora:
z Cuando el reproductor muestra el mensaje “OK to disconnect” (Se puede desconectar),
Page 68

desenchufe el cable USB del reproductor y de la computadora.
g
Cómo escuchar la radio en FM
Puede escuchar la transmisiones de radio en FM en su reproductor.
Nota
Para usar la radio en FM, debe tener los auriculares proporcionados conectados, porque actúan de antena
de FM. Para sustituir por los auriculares, puede usar cualquier audífono con cables sin protección.
Sintonización de la radio
Para sintonizar una emisora de radio en FM:
1. Enchufe sus auriculares en el conector para auriculares.
2. Presione (Menú). Se abrirá el menú principal.
3. Seleccione
FM Radio
4. Presione (Anterior) o (Siguiente) para cambiar la frecuencia en incrementos de 100 KHz.
5. Para cambiar entre los modos Stereo y Mono, presione (Reproducir/Pausar).
(Radio FM), después presione (Siguiente) o (Reproducir/Pausa).
Consejo
El modo Mono puede ayudar a reducir el sonido estático al escuchar emisoras que tienen una señal débil.
Cómo establecer emisoras predefinidas
Las emisoras predefinidas le permiten acceder fácilmente a sus frecuencias favoritas.
Para establecer emisoras predefinidas manualmente:
1. Sintonice a una frecuencia de emisora de radio en FM.
2. Presione y mantenga presionado el botón (Reproducir/Pausar). La emisora se añade como
predefinida.
Para establecer emisoras predefinidas automáticamente:
1. Presione (Menú). Se abrirá el menú principal.
2. Seleccione
3. Seleccione
(Reproducir/Pausa). El reproductor rastrea el rango de la radio y parpadea el mensaje
“Auto Scanning” (Rastreo automático).
FM Settings
Auto Scanning
(Ajustes FM), después presione (Siguiente) o (Reproducir/Pausa).
(Rastreo automático), después presione (Siguiente) o
Page 69

g
Mientras rastrea, el reproductor añade automáticamente una emisora predefinida por cada
emisora con señal potente hasta que los 20 canales predefinidos se hayan ajustado.
Para borrar emisoras predefinidas:
1. Presione (Menú). Se abrirá el menú principal.
2. Seleccione
3. Seleccione
FM Settings
Preset Delete
(Reproducir/Pausa).
4. Presione (Arriba) o (Abajo) para seleccionar la emisora predefinida que desea borrar,
después presione (Siguiente) o (Reproducir/Pausa). La emisora predefinida se ha
borrado.
Cómo acceder a emisoras predefinidas
Para acceder a emisoras predefinidas:
1. Presione (Menú). Se abrirá el menú principal.
2. Seleccione
FM Radio
3. Presione (Arriba) para acceder al canal prefinido anterior, o presione (Abajo) para acceder
al canal predefinido siguiente.
(Ajustes FM), después presione (Siguiente) o (Reproducir/Pausa).
(Borrar predefinidos), después presione (Siguiente) o
(Radio FM), después presione (Siguiente) o (Reproducir/Pausa).
Cómo ver fotos
Su reproductor puede mostrar fotos JPG y JPEG. No se soporta ningún otro formato. Para
mostrar fotos que no sean en formato JPG/JPEG, debe convertirlas primero a JPG o JPEG
usando el software para editar fotos en su computadora.
Consejo
Cuanto mayor sea el archivo de fotos, más tiempo se tardará en verlo. Para adaptar el tamaño de fotos a la
pantalla del reproductor (y reducir el tamaño del archivo), cambie el tamaño de las copias a 128 8 80 usando
el software para editar fotos en su computadora.
Para ver fotos:
1. Presione (Menú). Se abrirá el menú principal.
2. Seleccione
Photo
lista de las fotos disponibles.
3. Presione (Anterior) o (Siguiente) para ver la lista de fotos anterior o siguiente.
4. Presione (Arriba) o (Abajo) ara seleccionar la foto que quiere ver, después presione
(Siguiente) o (Reproducir/Pausar). La foto se visualiza en toda la pantalla.
z Presione (Anterior) o (Siguiente) para saltar hacia adelante o hacia atrás.
z Presione (Reproducir/Pausar) para entrar en el modo de ampliación, después presione los
(Foto), después presione (Siguiente) o (Reproducir/Pausa). Aparece una
botones de dirección para recorrer la imagen.
z Presione (Arriba) para girar la foto 90º.
Page 70

Cómo copiar fotos a su reproductor
g
El método que utilice para copiar fotos de su computadora a su reproductor depende del modo
USB que haya fijado en su reproductor.
Para copiar fotos de su computadora a su reproductor usando el modo File & Folder [Archivo y
carpeta] (MSC):
1. En el reproductor, presione (Menú), después seleccione
Settings
(Ajustes), después presione
(Siguiente).
2. Seleccione
3. Resalte
File & Folder
USB Mode
(Modo USB), después presione (Siguiente)
(Archivo y carpeta), después presione (Siguiente) o
(Reproducir/Pausar) para guardar el ajuste.
4. Conecte su reproductor a la computadora usando el cable USB suministrado. Aparece en el
reproductor el mensaje “Searching for PC” (Buscando PC).
5. En su computadora haga clic en
Start
(Iniciar),
My Computer
(Mi PC), después haga doble clic
en la carpeta donde se encuentran sus archivos de fotos.
6. Vuelva a abrir
Player
My Computer
.
para abrir otra ventana, después abra la unidad
Insignia Music
7. Haga clic y arrastre los archivos de fotografías desde su computadora a la carpeta raíz del
reproductor.
Consejo
Para seleccionar archivos múltiples, presione y sostenga la tecla
mientras hace clic en los archivos con el ratón. Para seleccionar toda la gama de archivos,
haga clic en el archivo en la parte superior de la gama, presione y sostenga la tecla
el teclado, y después haga clic en el archivo al final de la gama.
en su teclado
Ctrl
Shift
Cuando se haya terminado de copiar, el mensaje “OK to disconnect” (Se puede
desconectar) aparece en el reproductor.
8. Desenchufe el cable USB de su computadora y su reproductor.
en
Para copiar fotos de su computadora a su reproductor usando el modo USB Media Manager (MTP):
1. En el reproductor, presione (Menú), después seleccione
Settings
(Ajustes), después presione
(Siguiente).
2. Seleccione
3. Resalte
Media Manager
USB Mode
(Modo USB), después presione (Siguiente)
[Administrador del medio] (MTP), después presione (Siguiente) o
(Reproducir/Pausar) para guardar el ajuste.
4. Conecte su reproductor a la computadora usando el cable USB suministrado. Aparece en el
reproductor el mensaje “Searching for PC” (Buscando PC).
5. En su computadora haga clic en
Start
(Iniciar),
My Computer
(Mi PC), después haga doble clic
en la carpeta donde se encuentran sus archivos de fotos.
6. Vuelva a abrir
My Computer
Player
.
7. Haga clic y arrastre los archivos de foto desde su ubicación actual a la carpeta de
unidad
Consejo
Insignia Music Player
Para seleccionar archivos múltiples, presione y sostenga la tecla
mientras hace clic en los archivos con el ratón. Para seleccionar toda la gama de archivos,
haga clic en el archivo en la parte superior de la gama, presione y sostenga la tecla
el teclado, y después haga clic en el archivo al final de la gama.
para abrir otra ventana, después abra la unidad
.
en su teclado
Ctrl
Insignia Music
en su
Media
Shift
en
Page 71

Cuando se haya terminado de copiar, el mensaje “OK to disconnect” (Se puede
g
desconectar) aparece en el reproductor.
8. Desenchufe el cable USB de su computadora y su reproductor.
Cómo borrar fotos
Para borrar fotos, “Ver Cómo borrar fotos”.
Cómo cambiar ajustes
Cómo cambiar los ajustes de brillo, rotación y retroiluminación
Para cambiar los ajustes de brillo, rotación y retroiluminación:
1. Presione (Menú). Se abrirá el menú principal.
2. Seleccione
3. Seleccione
Settings
Display
abre el menú Display (Pantalla).
4. Cambiar cualquiera de los siguientes ajustes:
(Ajustes), después presione (Siguiente) o (Reproducir/Pausa).
(Pantalla), después presione (Siguiente) o (Reproducir/Pausa). Se
Brightness
Rotation
uso del reproductor con la mano izquierda. El sistema predeterminado es
(Brillo) – Cambia el brillo de la pantalla retroiluminada.
(Rotación) – Gira la pantalla e invierte las funciones de los botones para facilitar el
Right Handed
(Mano derecha).
Backlight
(Retroiluminación) – Cambia la duración en que la retroiluminación está encendida
después de que se presiona un botón. La retroiluminación puede notablemente disminuir la
duración de la batería si se deja encendida durante períodos largos de tiempo.
Cómo cambiar los ajustes de apagado y apagado automático
Page 72

Para cambiar los ajustes de apagado y apagado automático:
g
1. Presione (Menú). Se abrirá el menú principal.
2. Seleccione
3. Seleccione
Settings
Time
(Ajustes), después presione (Siguiente) o (Reproducir/Pausa).
(Tiempo), después presione (Siguiente) o (Reproducir/Pausa). Se abre el
menú Time (Tiempo).
4. Cambiar cualquiera de los siguientes ajustes:
Power Off
(Apagado) – Ajuste la duración de tiempo sin presionar ningún botón que el
reproductor espera antes de apagarse automáticamente. Puede seleccionar
un tiempo de hasta diez minutos.
(Apagado automático) – Cambia la duración de tiempo que el reproductor espera antes
Sleep
de apagarse automáticamente, independientemente de que se presionen botones u otro tipo
de actividades. Puede seleccionar incrementos de 30 minutos hasta 120 minutos.
Cómo borrar todos los archivos y restaurar los valores predeterminados en la fábrica
Para borrar todos los archivos y restaurar los valores predeterminados en la fábrica:
1. Presione (Menú). Se abrirá el menú principal.
2. Seleccione
3. Seleccione
Settings
System
(Ajustes), después presione (Siguiente) o (Reproducir/Pausa).
(Sistema), después presione (Siguiente) o (Reproducir/Pausa). Se
abre el menú System (Sistema).
4. Cambiar cualquiera de los siguientes ajustes:
Erase All
System Init
(Borrar todo) – Borra todos los archivos de música del reproductor.
(Inicialización del sistema) – Restablece todos los ajustes del reproductor a los
valores predeterminados en la fábrica.
Cómo cambiar manualmente el modo USB
(Activado) o
Off
El reproductor de música puede usar dos modos USB, Media Manager (MTP, el predeterminado)
y el modo File & Folder (MSC).
Para cambiar manualmente el modo USB
1. Presione (Menú). Se abrirá el menú principal.
2. Seleccione
3. Seleccione
Settings
USB Mode
(Ajustes), después presione (Siguiente) o (Reproducir/Pausa).
(Modo USB), después presione (Siguiente) o (Reproducir/Pausa).
Se abre el menú USB Mode.
4. Seleccionar cualquiera de los siguientes ajustes:
Media Manager
File & Folder
(MTP) – Ajuste óptimo para usar el reproductor como reproductor de música.
(MSC)—Ajuste óptimo para usar el reproductor como dispositivo para
almacenar archivos, y requerido para usar soporte de arrastrar y soltar iTunes.
Cómo ver la información del sistema
Su reproductor puede indicarle su memoria total, memoria usada, memoria disponible y otra
información del sistema.
Para ver la información del sistema:
Page 73

1. Presione (Menú). Se abrirá el menú principal.
g
2. Seleccione
3. Seleccione
Settings
System
(Ajustes), después presione (Siguiente) o (Reproducir/Pausa).
(Sistema), después presione (Siguiente) o <> (Reproducir/Pausa). Se
abre la pantalla de Información, que muestra el uso de la memoria, la versión de
firmware y la fecha.
Cómo mantener su reproductor
Cuidado y limpieza
z Limpie periódicamente su reproductor usando un paño humedecido con agua o papeles
para limpiar lentes humedecidos con agua o alcohol isopropílico.
z Asegúrese de no mojar el reproductor.
z Mantenga el reproductor alejado de entornos calientes, como la parte superior del tablero
de instrumentos de un vehículo, un alféizar o una salida de calor.
z Evite transportar el reproductor en un bolsillo que contenga elementos metálicos, que
podrían rayar y dañar el reproductor.
z Evite transportar el reproductor en un bolsillo o compartimiento que esté sucio. Suciedad,
polvo y pelusa pueden dañar el reproductor.
z Siempre que sea posible, mantenga el reproductor en su estuche de transporte.
z Actualice el firmware ocasionalmente para asegurarse de que tenga la última versión y
características del producto.
Cómo actualizar el firmware
Para actualizar el firmware:
1. En Internet, conecte su navegador de Web a , después busque la actualización de firmware para
el reproductor de música.
2. Siga las instrucciones en línea para descargar los archivos de actualización de firmware.
Asegúrese de anotar dónde guarda el archivo.
3. Asegúrese de que su reproductor de música esté en el modo USB File & Folder (MSC). Para
obtener instrucciones sobre cómo cambiar el modo USB, “Ver Cómo cambiar
manualmente el modo USBe
4. En su computadora haga clic en
en la carpeta donde guardó el archivo de actualización de firmware.
5. Vuelva a abrir
Player
6. Haga clic y arrastre el archivo de firmware de su computadora a la carpeta Data (Datos) en su
reproductor de música.
My Computer
.
”
Start
(Iniciar),
My Computer
(Mi PC), después haga doble clic
para abrir otra ventana, después abra la unidad
Insignia Music
Page 74

7. Cuando se acabe de copiar el archivo, desenchufe el cable USB. El reproductor detecta e instala
g
automáticamente el nuevo firmware.
Advertencias
Al instalar el nuevo firmware se borra automáticamente todo el contenido del dispos itivo .
Solución de problemas y Preguntas más frecuentes
¿Cómo copio archivos al reproductor?
En el modo File & Folder (MSC), puede copiar archivos al reproductor de la misma manera que
copia archivos al disco duro o a la unidad de memoria flash. En el modo Media Manager (MTP),
puede usar Rhapsody, Windows Media Player u otros administradores de música digital para
transferir archivos a su reproductor. Para obtener más información, Ver Cómo copiar archivos de
música a su reproductor" y "Ver Cómo cambiar manualmente el modo USB”.
¿Qué formatos de archivo soporta el reproductor?
Este reproductor soporta archivos en formato audio MP3, WMA, WMA seguro y formatos de foto
JPG y JPEG. Cualquier otro formato se debe convertir a un formato compatible antes de copiarlo
a su reproductor.
¿Qué es MTP?
Media Transfer Protocol [Protocolo de transferencia multimedia] (MTP o modo de administración
de multimedia) es un protocolo para conectar dispositivos portátiles a una computadora con
Windows XP y sincronizar el contenido de multimedia digital entre esos dispositivos.
Cuando copio archivos a un reproductor usando Windows Explorer, ¿a qué carpeta debo
copiarlos?
En el modo Media Manager (MTP), cópielos a la carpeta
Media
en el reproductor. En el modo
File & Folder (MSC), puede copiarlos al directorio raíz.
Algunos de mis archivos de música están en mi reproductor pero no los puedo reproducir. Cuando
los selecciono, empieza a reproducir una canción diferente. ¿Qué ocurre?
Es posible que no haya comprado los derechos para reproducir la canción en un dispositivo
adicional. Para comprobar esto, intente reproducir una canción que haya copiado de un CD
antiguo y convertido a formato MP3. Si puede reproducir esa canción pero no la canción que no
reproducir, entonces necesita comprar los derechos para reproducir la canción.
¿Por qué debo actualizar el firmware?
Siempre debe actualizar el reproductor con el último firmware para asegurarse de que funcione
correctamente y tenga las más modernas características. Para obtener más información, Ver
Cómo actualizar el firmware”.
¿Cómo copio un CD a mi reproductor?
Primero debe extraer pistas del CD usando un administrador de música digital como Best Buy
Rhapsody o el Reproductor de Windows Media Después de que las canciones estén en su
computadora, copie las canciones al reproductor usando Windows Explorer o un administrador
de música digital. Para obtener más información, Ver Cómo copiar archivos de música a su
reproductor”.
¿Por qué mi reproductor muestra un mensaje que indica “Unknown artist/album” (Artista/álbum
desconocido)?
Este mensaje generalmente aparece cuando el archivo de música no contiene información sobre
el artista o álbum (etiquetas ID3 incompletas). Consulte la documentación o ayuda en línea de su
administrador de música digital para obtener instrucciones sobre cómo añadir esa información a
sus archivos musicales.
Page 75

Cómo obtener ayuda
A
g
Cómo contactar con el departamento de soporte técnico.
Antes de contactar al departamento de soporte técnico, Ver Solución de problemas y Preguntas
más frecuentes” para ver si su pregunta ya ha sido respondida.
Si tiene preguntas acerca del uso o características de su reproductor, llame al departamento de
soporte técnico al 1-800-699-9218 o (877) 467-4289, o rellene una solicitud de soporte en línea
en:
www.bestbuy.com/support.asp
Obtenga ayuda adicional en línea en:
www.insignia-products.com
www.bestbuy.com/mp3
www.geeksquad.com
prenda más
En Internet, usted puede usar un sitio de búsqueda en la web para encontrar información sobre
los siguientes temas*:
z “Extraer pistas de un CD”
z “Descargar música”
z “Descargar MP3s”
z “Música MP3”
z “Ley de derechos de reproducción de MP3”
*Best Buy Enterprise Services, Inc. no mantiene ni es responsable del contenido de las páginas web que usted encuentre utilizando
estos términos de búsqueda..
Especificaciones
Puertos y conexiones
Pantalla
Batería Reemplazable, recargable de litio ión
Formatos soportados
Dimensiones 0.54 8 1.34 8 3.09 pulgadas (13.7 8 34 8 78.5 mm)
Peso 1.2 oz. (34 g)
Mini USB 2.0
Auriculares/audífonos
OLED LCD
262.000 colores
128 8 80 píxeles
Audio: MP3, WMA, WMA seguro
Foto: JPG/JPEG
Avisos legales
Declaraciones de cumplimiento
Este dispositivo satisface la parte 15 del reglamento FCC. La operación de este producto está sujeta a las dos
condiciones siguientes: (1) Este dispositivo no puede causar interferencia dañina, y (2) este dispositivo debe
aceptar cualquier interferencia recibida incluyendo interferencias que puedan causar una operación no deseada.
Este equipo ha sido sometido a pruebas y se ha determinado que satisface los límites establecidos para
clasificarlo como dispositivo digital de Clase B de acuerdo con la Parte 15 del reglamento FCC. Estos límites se
Page 76

han establecido para proporcionar una protección razonable contra interferencias perjudiciales en una instalación
g
residencial. Este equipo genera, usa y puede emitir energía de radiofrecuencia. Sí no se instala y usa de acuerdo
con las instrucciones, este aparato puede causar interferencias perjudiciales a las comunicaciones de radio.
Sin embargo, no se garantiza que no ocurrirá interferencia en una instalación particular. Si el equipo causa
interferencias perjudiciales en la recepción de la señal de radio o televisión, lo cual puede comprobarse
encendiéndolo y apagándolo alternativamente, se recomienda al usuario corregir la interferencia mediante uno
de los siguientes procedimientos:
z Cambie la orientación o la ubicación de la antena receptora.
z Aumente la distancia entre el equipo y el receptor.
z Conecte el equipo a un tomacorriente de un circuito distinto de aquél al que está
conectado el receptor.
z Solicite consejo al distribuidor o a un técnico experto en radio/TV para obtener ayuda.
Derechos de Reproducción
© 2006 Insignia. Insignia y el logotipo de Insignia son marcas de comercio de Best Buy Enterprise Services, Inc.
Otras marcas y nombres de productos son marcas registradas de sus respectivos dueños. Las especificaciones y
características están sujetas a cambio sin aviso previo u obligación.
 Loading...