

Insignia NS-CT1DC8 User Manual
Dash Camera
NS-CT1DC8
USER GUIDE
Before using your new product, please read these instructions to prevent any damage.

Contents
Introduction . . . . . . . . . . . . . . . . . . . . . . . . . . . . . . . . . . . . . . . . . . . . . . . . . . . . .2
Important safety instructions . . . . . . . . . . . . . . . . . . . . . . . . . . . . . . . . . . . . .3
Features . . . . . . . . . . . . . . . . . . . . . . . . . . . . . . . . . . . . . . . . . . . . . . . . . . . . . . . . .3
Installing your dash camera . . . . . . . . . . . . . . . . . . . . . . . . . . . . . . . . . . . . . .5
Using your dash camera . . . . . . . . . . . . . . . . . . . . . . . . . . . . . . . . . . . . . . . . . .6
Downloading files from your dash camera . . . . . . . . . . . . . . . . . . . . . . . . 7
Using the OSD (On-screen Display) . . . . . . . . . . . . . . . . . . . . . . . . . . . . . . .8
Troubleshooting . . . . . . . . . . . . . . . . . . . . . . . . . . . . . . . . . . . . . . . . . . . . . . . .12
Specifications . . . . . . . . . . . . . . . . . . . . . . . . . . . . . . . . . . . . . . . . . . . . . . . . . . .13
Legal notices. . . . . . . . . . . . . . . . . . . . . . . . . . . . . . . . . . . . . . . . . . . . . . . . . . . .13
ONE-YEAR LIMITED WARRANTY . . . . . . . . . . . . . . . . . . . . . . . . . . . . . . . . . .14
Package contents . . . . . . . . . . . . . . . . . . . . . . . . . . . . . . . . . . . . . . . . . . .3
Main features . . . . . . . . . . . . . . . . . . . . . . . . . . . . . . . . . . . . . . . . . . . . . . .4
Charging your dash camera . . . . . . . . . . . . . . . . . . . . . . . . . . . . . . . . .6
Turning on your dash camera . . . . . . . . . . . . . . . . . . . . . . . . . . . . . . .6
Initially setting up your dash camera . . . . . . . . . . . . . . . . . . . . . . . . 6
Recording video with your dash camera . . . . . . . . . . . . . . . . . . . . . 7
Taking still pictures with your dash camera . . . . . . . . . . . . . . . . . .7
Understanding loop recording . . . . . . . . . . . . . . . . . . . . . . . . . . . . . .7
Using emergency recording . . . . . . . . . . . . . . . . . . . . . . . . . . . . . . . . .7
Using the video screen . . . . . . . . . . . . . . . . . . . . . . . . . . . . . . . . . . . . . .8
Using the Menu Set screen . . . . . . . . . . . . . . . . . . . . . . . . . . . . . . . . .10
Using the Video screen. . . . . . . . . . . . . . . . . . . . . . . . . . . . . . . . . . . . .11
Introduction
Congratulations on your purchase of a high-quality Insignia product. Your
NS-CT1DC8 represents the state of the art in dash camera design and is
designed for reliable and trouble-free performance.
www.insigniaproducts.com
2

Important safety instructions
• Always read the safety instructions and User Guide carefully. Keep the User
Guide for future reference.
• Do not drop or allow forceful impacts to the product, or install it in
locations exposed to heavy vibrations.
• Do not disassemble or modify the product in any way. Disassembly or
modification may void the warranty and cause damage.
• Do not use or store the product in damp locations. Liquid entering the
product may cause damage or lead to fires or electric shock.
Features
• 1080p Full HD recording
• 2.7-inch LCD display
• Built-in G-sensor
• 130 degree wide-angle lens
• Built-in microphone
•Memory card slot
•Micro USB interface
Package contents
•Dash camera
• Suction mount
• Car adaptor
•USB cable
•Quick Setup Guide
Dash Camera
www.insigniaproducts.com
3
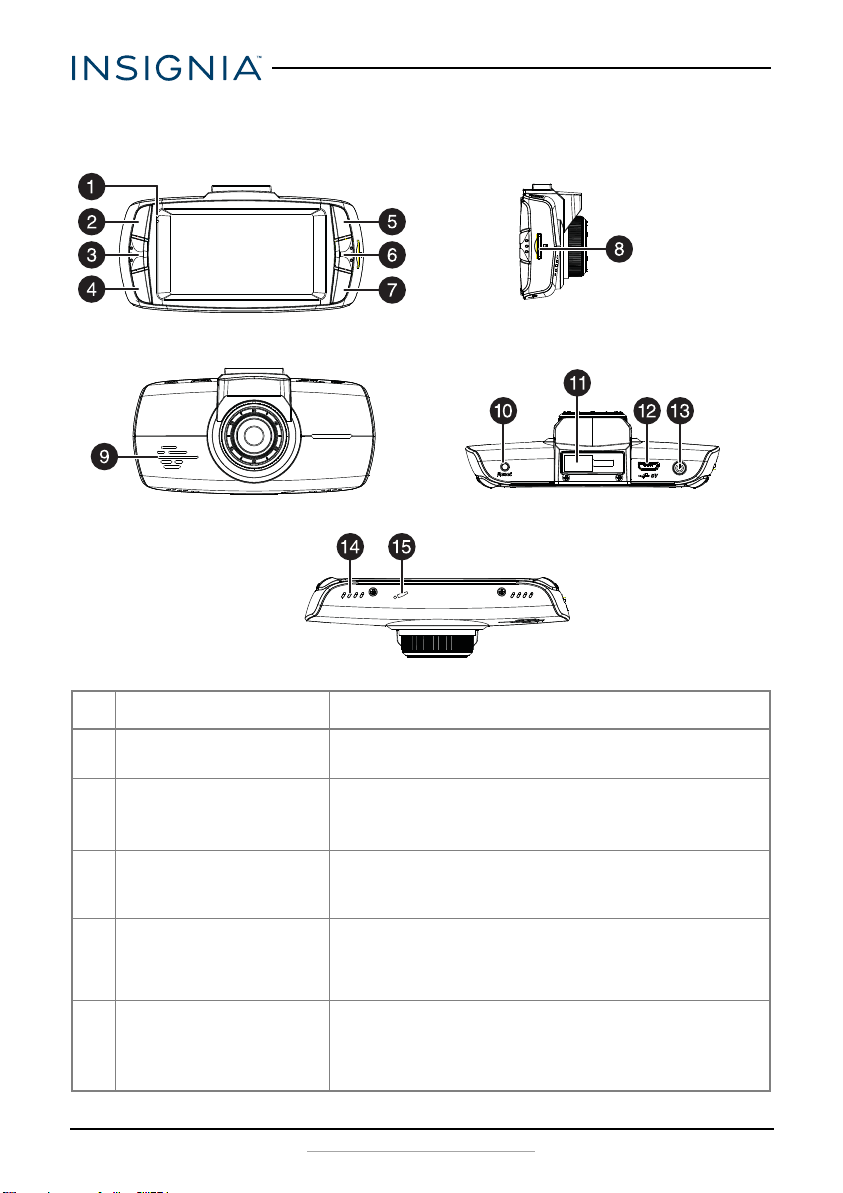
Main features
Back
Side
Front
To p
Bottom
NS-CT1DC8
# ITEM DESCRIPTION
1 Indicator LED Blue solid - Power on
Red blinking - Video recording.
2 Camera button In camera mode, press to take pictures.
In video playback mode, press to delete the current file.
In loop recording mode, press to take pictures.
3 Menu button Press to switch between the System Settings screen,
4 SOS video/file button While recording, press to enter the emergency video
5 Up/WDR/OSD button In loop recording mode, press to turn off the display.
4
Function Settings screen, and the video interface.
In replay mode, press to return to the previous page.
interface. During playback, press to enable or close the
video recording. When not recording, press to enter the
playback file interface.
In stop mode, press to turn WDR (Wide Dynamic
Recording) on or off.
In OSD mode, press to go to the previous page.
www.insigniaproducts.com
Dash Camera
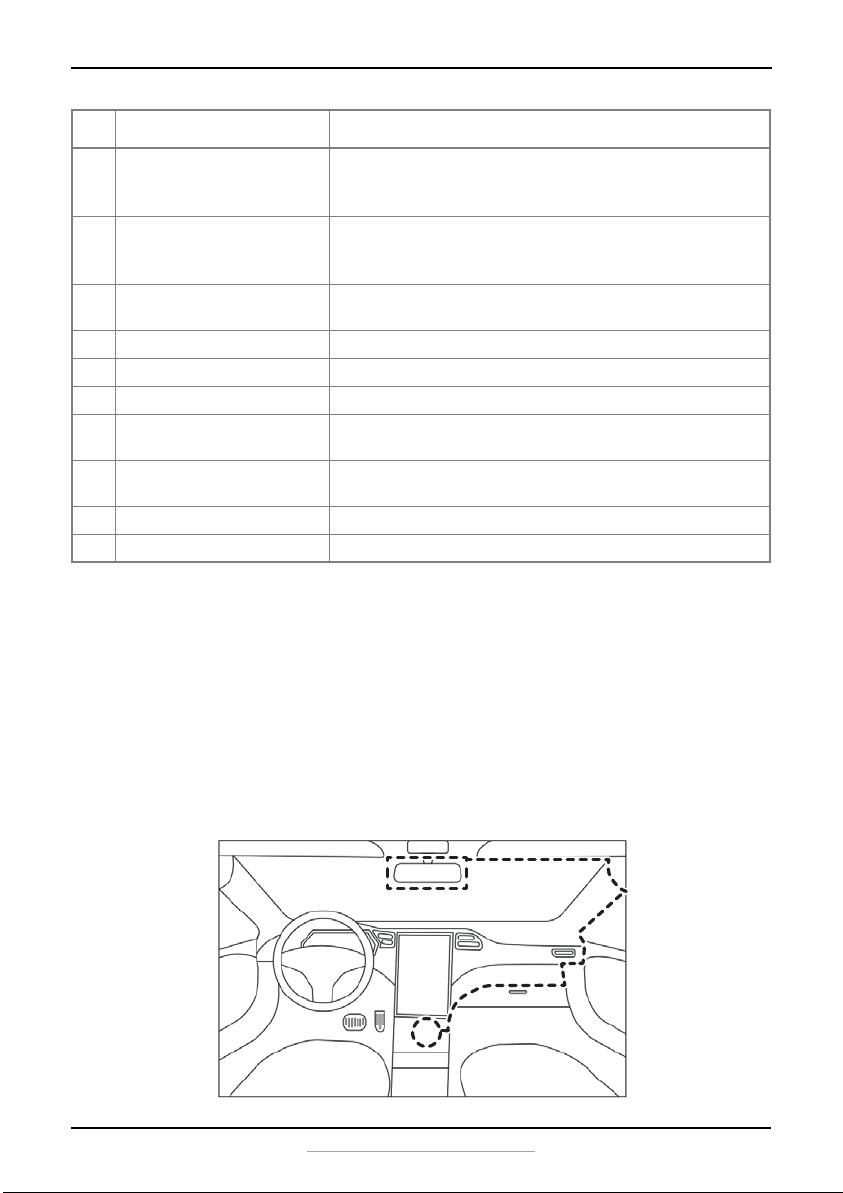
Recommend to layout USB cable
# ITEM DESCRIPTION
6 Turn on/off video
recording/OK button
7 Turn on/off sound
recording/
Down button
8 MicroSD card slot Add a MicroSD memory card (8GB to 32GB) to this slot for
9 Speaker Plays sound from the device.
10 Reset button Press to reset your dash camera.
11 Suction cup mount Attach the suction cup to this mount.
12 Mini USB jack Connect a USB cable to this jack to charge the dash
13 Power button Press to turn on the dash camera. Press and hold for two
14 Vents Provide airflow for the dash camera.
15 Microphone Allows you to record voice-over comments.
While recording, press to stop recording. In stop mode,
press to begin recording.
In OSD mode, press to confirm selection.
Press to turn the sound recording on or off.
In OSD mode, press to go to the next page.
additional on-board memory.
camera or to download files to a computer.
seconds to turn off the dash camera.
Installing your dash camera
1 Attach the dash camera to the suction mount (provided).
2 Install the suction mount onto your car’s front windshield, then adjust the
dash camera to the proper angle for recording.
3 Plug the USB cable micro SD connector into the dash camera.
4 Plug the other end of the USB cable into the car charger (provided).
5 Plug the car charger into a 12V car socket.
www.insigniaproducts.com
5
 Loading...