

Page 1
Quick Setup Guide
NS-CNV43 GPS
Congratulations on your purchase of a high-quality
Insignia product. Your GPS is designed for reliable and
trouble-free performance. Use this guide for initial setup.
See your User Guide for more information.
Package contents
• 4.3" GPS
• Car DC power adapter
• USB cable
• Mounting bracket
• Mounting cradle
• Micro SD memory card
• SIM card
• User Guide
• Quick Setup Guide
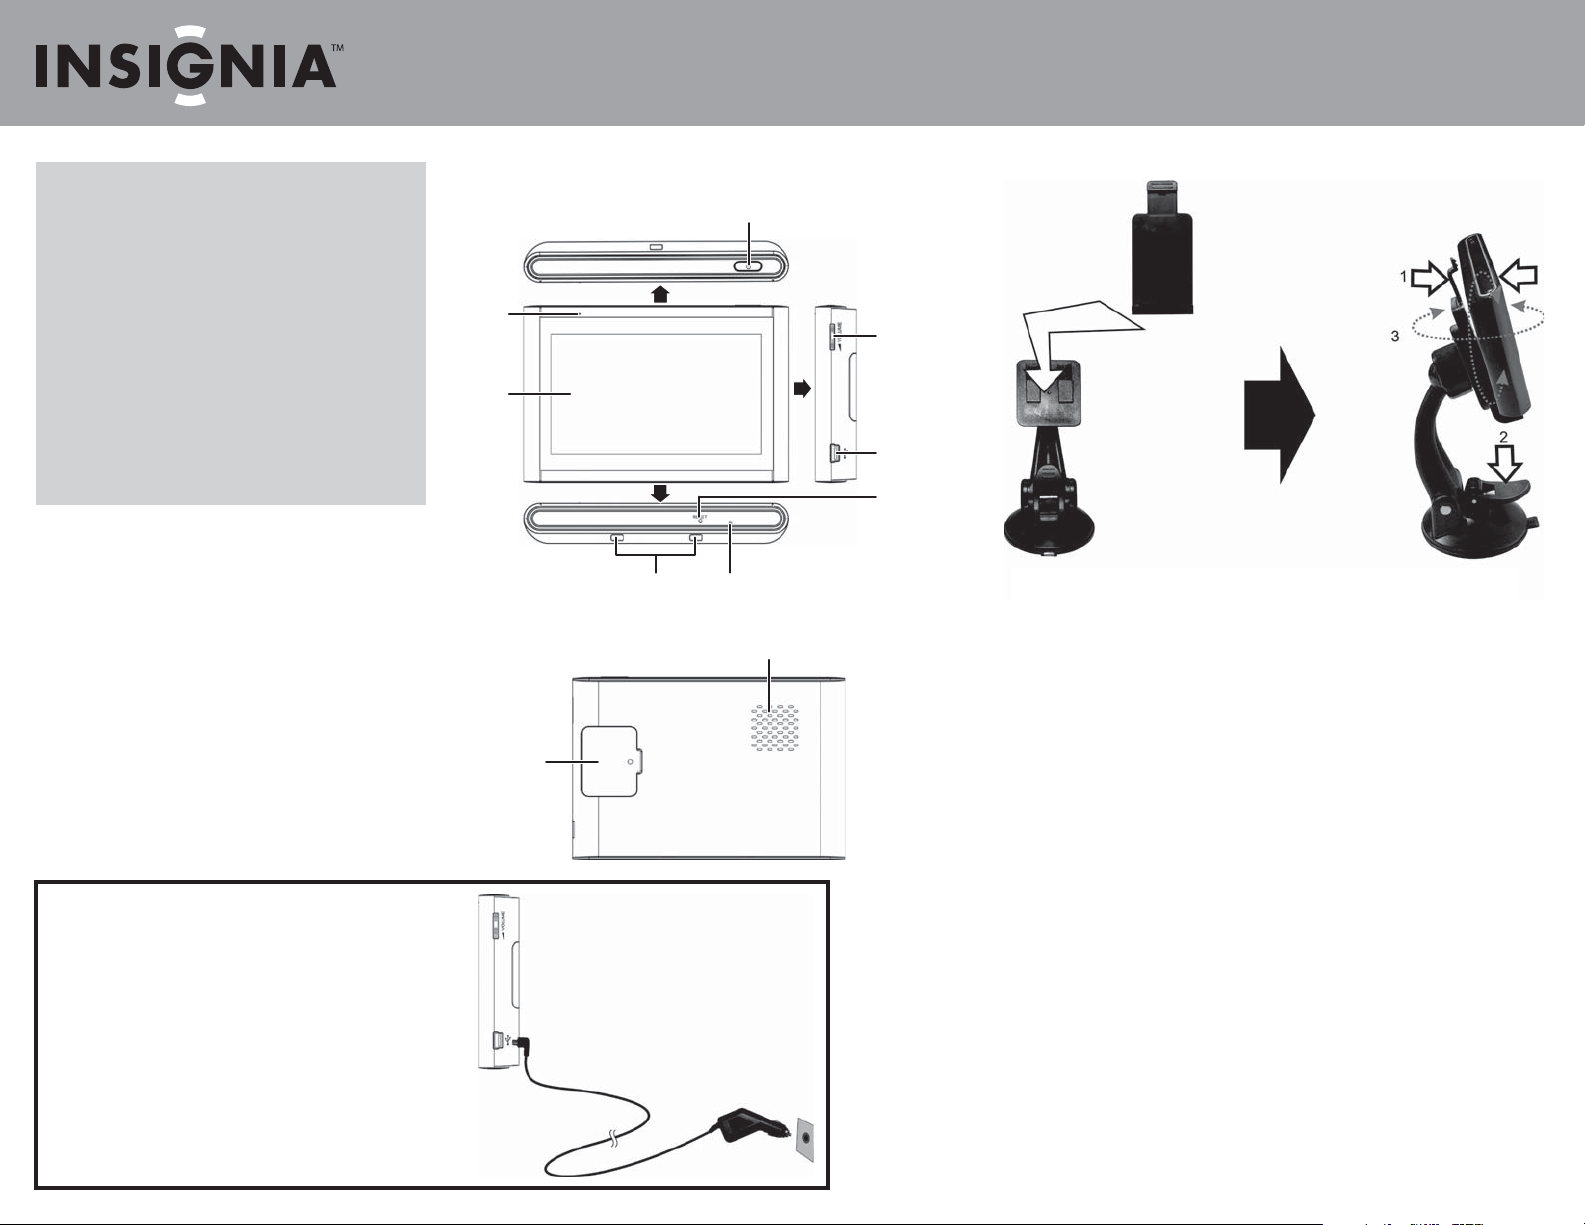
indicator
Setting up your GPS
Charging the battery
Your GPS comes with a built-in rechargeable battery.
Fully charge the battery before using the GPS for the rst
time. Charging time is normally about three hours. A
fully charged battery delivers about two hours of use.
See “Connecting power to your GPS” below.
Micro SD and
SIM card cover
Connecting power to your GPS
Connecting to a cigarette lighter socket
CAUTION: Disconnect the GPS from the DC power adapter when
starting the vehicle.
• Plug the USB connector on the DC power adapter into the USB
port on the side of the GPS, then plug the DC plug into the
vehicle’s 12-24V DC accessory socket (cigarette lighter socket).
Features
Front and side panels
Charge
LCD
screen
Back panel
slots
cigarette lighter
Power button
MicrophoneMounting
Speaker
socket
Actual product may vary from image shown.
Volume
control
USB port
Reset
button
Fig. 1 Fig. 2
Mounting your GPS in a vehicle
WARNING: The assembly must not be mounted so that it impairs the driver’s view of the road.
Make sure that your car’s airbags are not obstructed by the GPS.
Use the supplied mounting bracket and cradle to mount your GPS in a vehicle.
1 Slide the mounting cradle onto the end of the mounting bracket to secure it.
2 Set the bottom edge of the GPS onto the mounting cradle. Then push the retaining
bracket at the top of the mounting cradle (1) toward the GPS unit. To remove the
unit, push the retaining bracket at the top of the mount cradle toward the back of
the GPS.
3 Lift the suction cup lever, then press the suction cup to the windshield. Press down
on the suction cup lever (2) to secure the bracket to the windshield.
4 Rotate the mounted GPS (3) to a comfortable viewing position.
Page 2
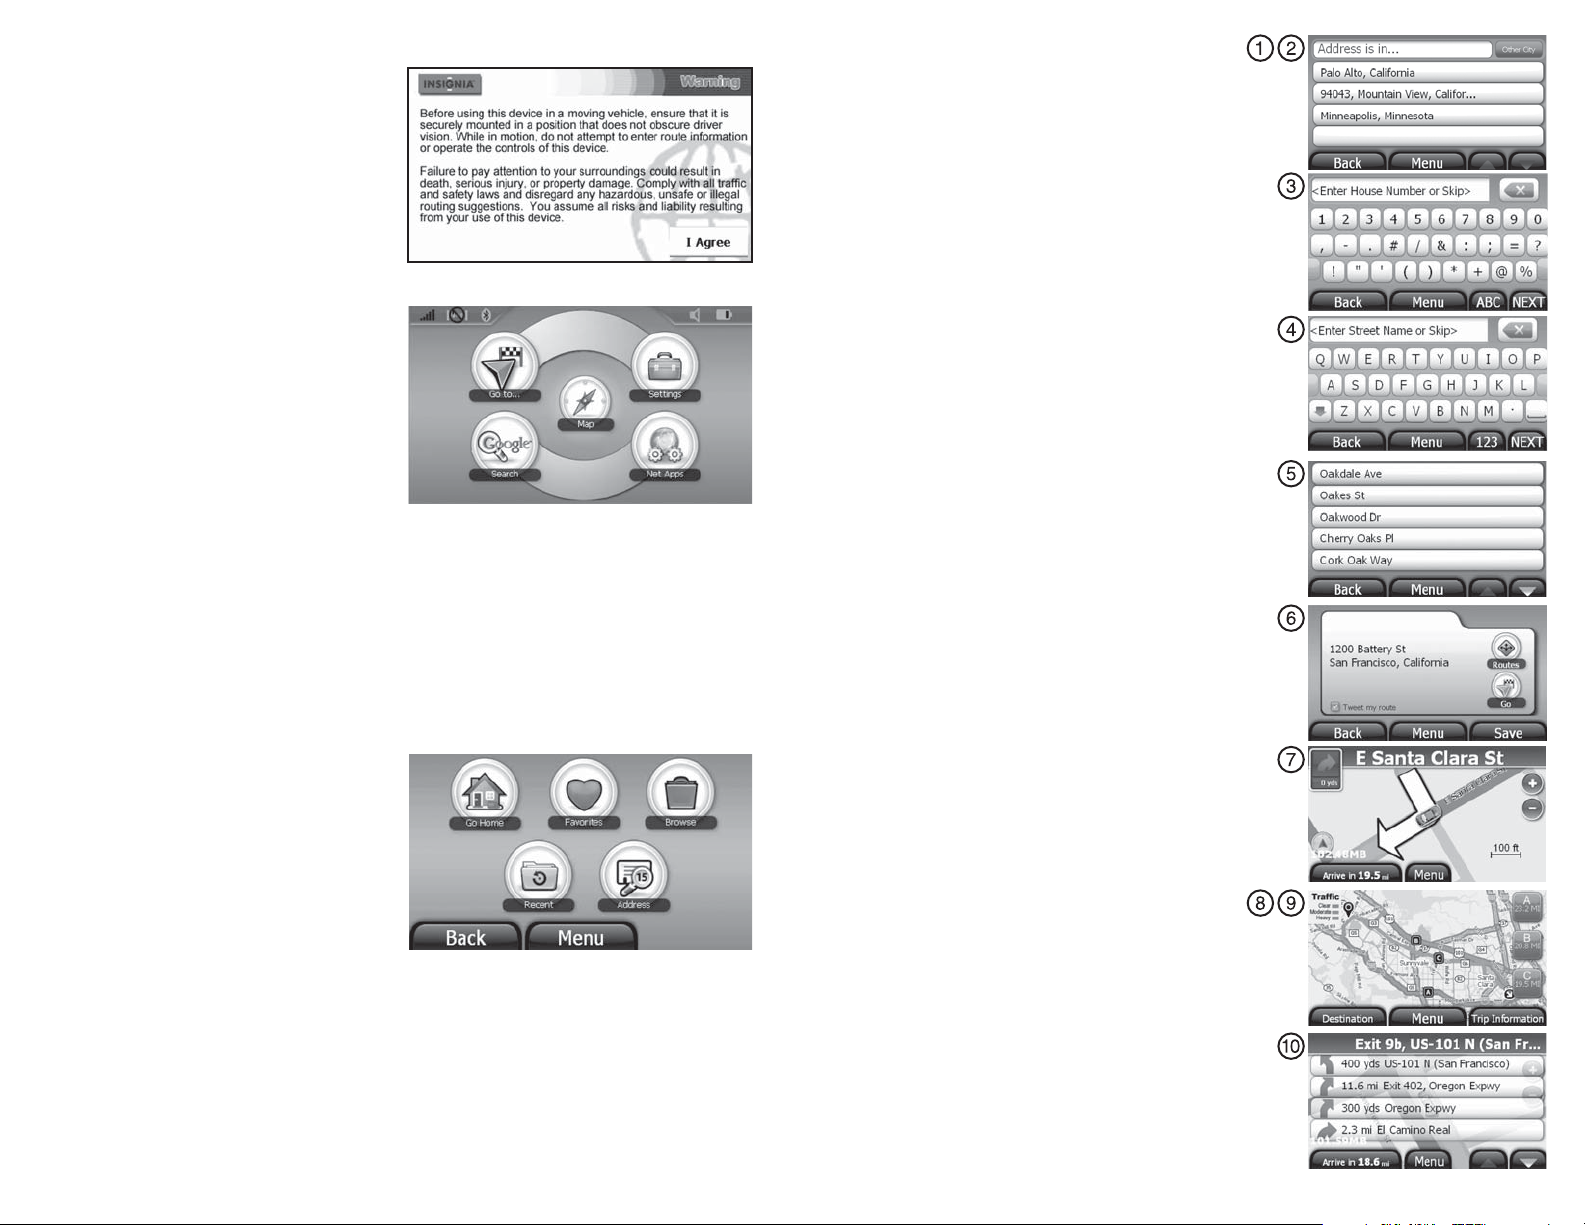
Getting started
Using your GPS
1 Turn on the GPS. A splash screen appears for
a few seconds, then the Safety Warning appears.
2 To continue using the GPS, touch I Agree at the
bottom right of the screen. The Main menu opens.
Using the Main menu
From the Main menu you can see where you are,
nd a route to a place of interest, or change settings.
• To see where you are, touch Map.
• To nd a route, touch Go to, then touch Address.
A keypad opens. Enter an address. The GPS
automatically calculates the best route choice to
direct you to that address. See “Creating a route
to an address” in your User Guide.
• To change settings, touch the Settings icon at the top right corner of the screen. To learn more about
these settings, see “Setting up your GPS device preferences” in your User Guide.
• To look up directions and phone numbers to restaurants, theaters, public services, etc., touch
Google Search. For more information on how to search, see “Using Google Search ”
• To use the subscription services Trac Alerts, GasBuddy, and Twitter, touch Net Apps.
Using the Go to menu
• Go Home — touch to calculate a route to your
home address from wherever you are.
To learn more about setting your home address,
see your User Guide.
• Favorites — touch to get directions from your
location to places you have saved as Favorites.
• Browse — touch to search by categories, for
example, restaurants, theaters, parks, and more.
• Recent — touch to navigate to your most recent destinations without having to enter them again.
• Address — touch to navigate to an address or intersection near the address.
Creating a route to an address
1 Touch Go to, then Address. The city in which you are located is
displayed, along with cities to which you have recently navigated.
If this is the rst time you are using the GPS, only the name of the
city of your current GPS location is shown.
2 Touch the name of the city to which you want to navigate, then the
Enter House Number keypad displays.
3 Enter the house number.
- OR To go to a city that is not listed, touch Other city to open the
Enter City name keypad, then enter the name of the city you want
and touch Next. The Enter House Number keypad opens, then
touch Next.
4 Enter the name of the street. After entering a few characters, the
GPS displays a list of street names that include those characters.
5 Touch the street name you want. If the street name is not on the list,
touch the back arrow and re-enter the street name, then touch Next.
6 The address card for your destination displays.
7 Touch Go. The GPS calculates your route. When the calculation is
complete, the route is highlighted on the map view and the voice
prompts begin.
8 Touch Routes for alternate directions to your destination. When the
calculation is complete, a map opens showing three highlighted
routes, the time, and the distance to your destination.
Touch the route button that you want to follow. The route is
highlighted, the My Car icon shows your starting location, and voice
prompts begin.
9 Touch the Destination button to zoom in on the destination, then
touch the Back button to zoom back out.
10 To view turn-by-turn directions, touch the green arrow button at the
top left of the map view.
© 2009 Best Buy Enterprise Services, Inc. All rights reserved. INSIGNIA is a trademark of Best Buy Enterprise Services, Inc. Registered in some countries. All other products and brand names are trademarks of their respective owners.
ENGLISH 09-0697
 Loading...