

Page 1

User Guide
3.5” Connected GPS
NS-CNV10
Page 2

Page 3

NS-CNV10
Insignia NS-CNV10
3.5” Connected GPS
Contents
Congratulations on your new Insignia GPS. . 1
Safety information . . . . . . . . . . . . . . . . . . 3
Features . . . . . . . . . . . . . . . . . . . . . . . . . 5
Setting up your GPS . . . . . . . . . . . . . . . . . 9
Using your GPS . . . . . . . . . . . . . . . . . . . .16
Home screen . . . . . . . . . . . . . . . . . . . .18
Main menu . . . . . . . . . . . . . . . . . . . . .19
Following traffic incident alerts . . . . . . .44
Setting up your preferences. . . . . . . . . .48
Troubleshooting. . . . . . . . . . . . . . . . . . . .59
Specifications . . . . . . . . . . . . . . . . . . . . .62
Legal notices. . . . . . . . . . . . . . . . . . . . . .62
One-Year Limited Warranty . . . . . . . . . . . .67
Congratulations on your new Insignia GPS
Congratulations on your purchase of the Insignia GPS –
a car navigation device that makes an enjoyable
experience out of driving anywhere. The Insignia GPS
incorporates a range of technology to provide all the
information you need on the road and to help you on your
way.
www.insignia-products.com
1
Page 4

NS-CNV10
Many of the features of the Insignia GPS are described
in more detail later in this manual, however some key
features of the device include:
Connected navigation: Allows you to connect to the
Internet and provides updated and real time searches
including street addresses, businesses, recreation parks,
and other points of interest.
Real-time traffic information: Has built-in intelligence
that knows where you are travelling. The Insignia GPS is
constantly downloading traffic data and provides the
most up-to-date traffic information available. If it
recognizes that there may be long delays, it provides you
with the option to choose an alternate route.
Search and browse: Can search locations on Google
search or browse lists for points of interest locally or at
your destination.
Updated gas prices: Can search gasbuddy.com for
updated information about gas prices where you are and
along your route.
Services included with this device
One year of data connectivity service (365 days) is
included with the purchase of this device. This service
starts the first time you power on your device and gives
you access to:
• Real-Time Traffic
• Google Local Search
• Send an Address wireless to your GPS device
• Map updates in Best Buy stores at the Geek
Squad bench. These will be available up to 4
times per year.
Insignia reserves the right, at it's discretion, to limit
excessive data usage on any device. After this service
expires, customers will be able to renew this service for
an annual fee. This will be available on
www.bestbuy.com.
2
www.insignia-products.com
Page 5
NS-CNV10
Note
Customers must renew their subscription
within 1 year after the expiration of their
service.
Safety information
Caution
To reduce the risk of electric shock and of
damaging this GPS device, do not remove the
back cover of this device. Please refer all
service questions to qualified service
personnel
Power supply
Plug the supplied AC adapter into the USB port on the
side of your GPS. Plug the two-prong end of the AC
power cord to an 100-240 V power outlet. If you have
difficulty inserting the plug, turn it over and reinsert it. If
your GPS will not be used for a long time, disconnect the
plug from the outlet.
Note
Before plugging the power cord into an AC
outlet, make sure that all the connections have
been made.
www.insignia-products.com
3
Page 6

Caution
These servicing instructions are for use by
qualified service personnel only. To reduce the
risk of electric shock, do not perform any
servicing other than that contained in the
operating instructions unless you are qualified
to do so. To reduce the risk of fire or electric
shock, do not expose this apparatus to rain or
moisture.
Important safety instructions
1) Read these instructions.
2) Keep these instructions.
3) Heed all warnings.
4) Follow all instructions.
5) Do not use this apparatus near water.
6) Clean only with a damp cloth.
7) Do not block any of the ventilation openings. Install in
accordance with the manufacturer's instructions.
8) Do not install near any heat sources such as radiators,
heat registers, stoves, or other apparatus (including
amplifiers) that produce heat.
9) Do not defeat the safety purpose of the polarized or
grounding-type plug. A polarized plug has two blades
with one wider than the other. A grounding type plug has
two blades and a third grounding prong. The wide blade
or the third prong is provided for your safety. When the
provided plug does not fit into your outlet, consult an
electrician for replacement of the obsolete outlet.
10) Protect the power cord from being walked on or
pinched, particularly at plugs, convenience receptacles,
and the point where they exit from the apparatus.
11) Only use attachments and accessories specified by
the manufacturer.
NS-CNV10
4
www.insignia-products.com
Page 7

NS-CNV10
12) Unplug this apparatus during lightning storms or
when unused for long periods of time.
13) Refer all servicing to qualified service personnel.
Servicing is required when the apparatus has been
damaged in any way, such as power-supply cord or plug
is damaged, liquid has been spilled, or objects have
fallen into the apparatus, the apparatus has been
exposed to rain or moisture, does not operate normally,
or has been dropped.
14) This apparatus shall not be exposed to dripping or
splashing liquids.
Features
Warning
Failure to avoid the following potentially
hazardous situations may result in injury or
property damage.
The unit is designed to provide you with route
suggestions. It does not reflect road closures
or road conditions, traffic congestion, weather
conditions, or other factors that may affect
safety or timing while driving.
Use the unit only as a navigational aid. Do not
attempt to use the unit for any purpose
requiring precise measurement of direction,
distance, location, or topography. This product
should not be used to determine ground
proximity for aircraft navigation.
Included
• 3.5” GPS unit
• AC adapter
• Car adapter
•USB cable
www.insignia-products.com
5
Page 8
• Mounting bracket
• Mounting cradle
• Touch pen
• User Guide
• SD memory card
•SIM card
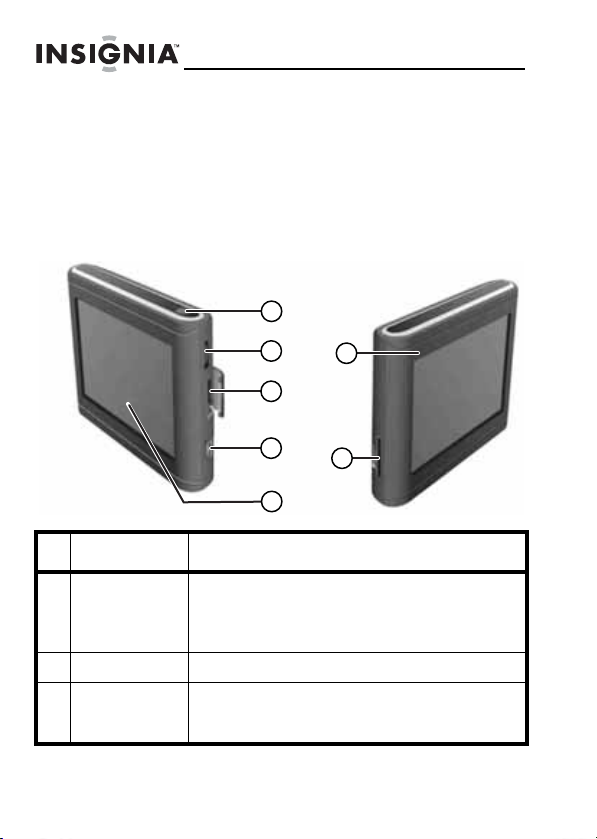
Side panel
NS-CNV10
1
2
6
3
4
7
5
# Component Description
1 Power button Press for three seconds to turn the GPS on or
2 Volume control Turn to adjust the volume of the speaker.
3 SIM card slot Contains a SIM card designed to receive
6
off.
Press for one second to enter or exit standby
mode.
real-time messages and display them on the
LCD screen. Do not remove.
www.insignia-products.com
Page 9
NS-CNV10
# Component Description
4 USB port Plug the AC or car adapter into this port to
5 LCD screen Displays GPS information.
6 Battery charge
indicator
7 SD card slot Contains an SD card which includes the
power or charge the GPS.
Turns red when the battery is charging and
turns green when the battery is fully charged.
software for the normal operation of your GPS.
Do not remove.
www.insignia-products.com
7
Page 10
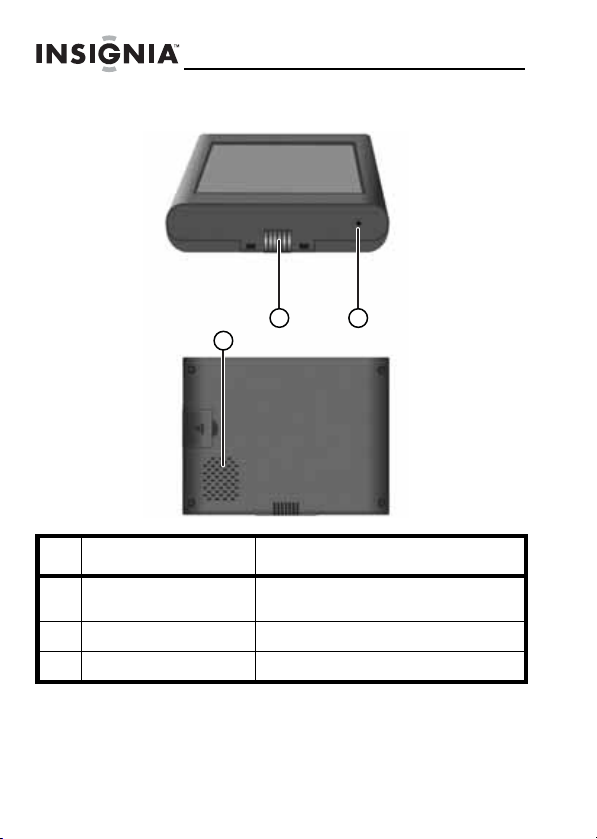
Bottom and back panels
Bottom
NS-CNV10
1
3
Back
# Component Description
1 Contact grooves Provides contacts to charge your
2 Reset button (hole) Press to reset your GPS.
3 Speaker Provides audio information.
8
www.insignia-products.com
GPS through the mounting cradle.
2
Page 11
NS-CNV10
Setting up your GPS
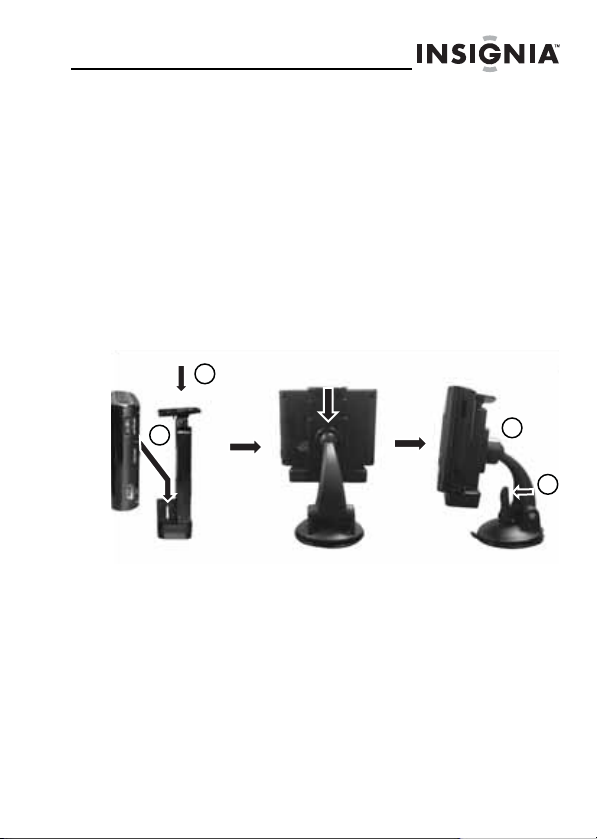
Mounting your GPS in a car
When you use your GPS in a car, you can use the
supplied mounting accessories (mounting bracket and
cradle).
To mount your GPS in a car:
Set the bottom edge of the GPS onto the mount
1
cradle (1), then press down on the top edge of the
cradle (2) and pivot the top of the GPS into the
cradle.
2
1
4
2 Push the mount cradle and GPS assembly into the
mounting bracket.
3 Lift the suction fastener, place the assembly on the
desired location, then press down the fastener (3) to
secure it to the surface.
www.insignia-products.com
3
9
Page 12

NS-CNV10
4 Rotate the knob (4) to adjust the unit to the proper
position.
Warning
You must not mount your GPS in a position
that impairs the driver’s view of the road.
Make sure that your car’s airbags are not
obstructed by the GPS.
Attention California and Minnesota drivers:
California Vehicle Code Section 26708 and
Minnesota Statute 2005, Section 169.71
prohibit suction mounts on car windshields,
side, or rear windows, as they can obstruct the
driver's clear view.
10
www.insignia-products.com
Page 13
NS-CNV10
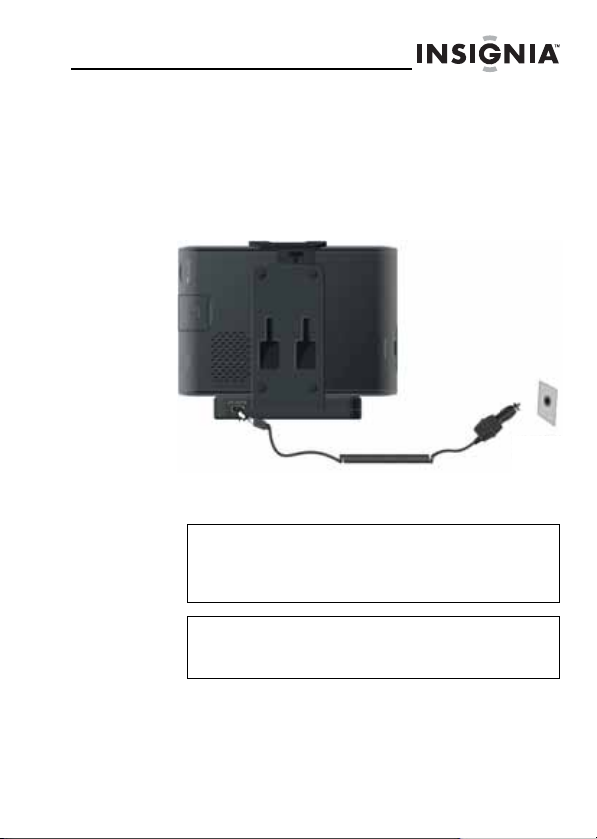
Connecting the power
Connecting the mounting cradle
To connect the mounting cradle:
Plug the USB connector on the car adapter into the
1
USB port on the back of the mounting cradle.
Mounting cradle with
GPS installed
2 Plug the other end of the car adapter into the 12 V
cigarette lighter socket.
Caution
Disconnect the GPS from the car adapter
when you start your car to prevent damage
from a possible power surge.
Note
Make sure that your GPS and the mounting
cradle are connected correctly.
In addition to the mounting cradle, you can also charge
your GPS by plugging it into a wall outlet (with an AC
adapter), plugging it directly into your car’s cigarette
lighter socket, or by connecting it to your computer.
Car cigarette
lighter socket
www.insignia-products.com
11
Page 14
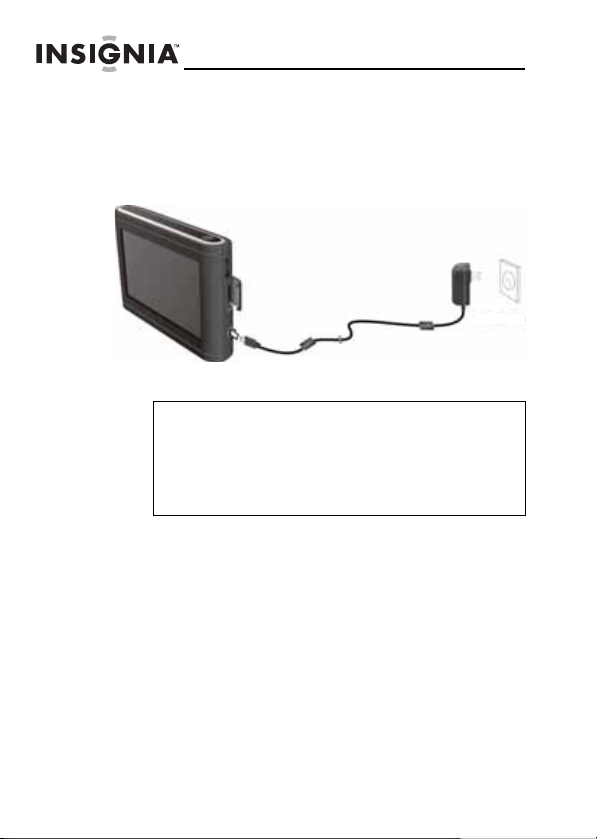
Connecting the AC adapter
To connect the AC adapter:
Plug the USB connector on the AC adapter into the
1
USB port on the right side of your GPS.
2 Plug the AC plug into a grounded AC power outlet.
Notes
Make sure that you turn off your GPS before
unplugging it.
The LCD screen is brighter when you use the
AC adapter than when the GPS is on battery
power.
NS-CNV10
100/240 V AC
12
www.insignia-products.com
Page 15
NS-CNV10
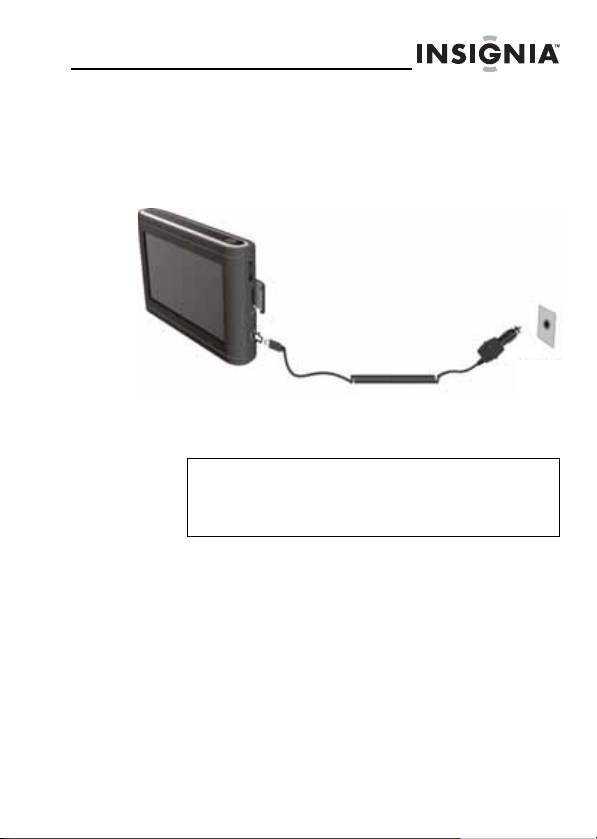
Connecting the car adapter
To connect the car adapter:
Plug the USB connector on the car adapter into the
1
USB port on the right side of your GPS.
2 Plug the other end of the car adapter into the 12 V
cigarette lighter socket.
Caution
Disconnect the GPS from the car adapter
when you start your car to prevent damage
from a possible power surge.
Car cigarette
lighter socket
www.insignia-products.com
13
Page 16
NS-CNV10
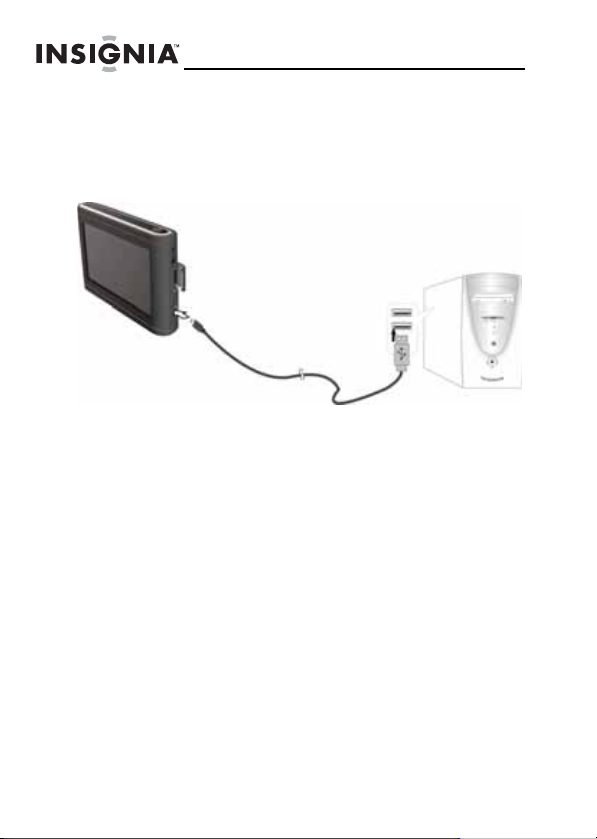
Charging your GPS with a computer
To charge your GPS with a computer:
• Plug one end of a USB cable into your GPS,
then plug the other end into your computer.
USB cable
Computer
14
www.insignia-products.com
Page 17

NS-CNV10
Understanding the rechargeable battery
Your portable GPS comes with a built-in rechargeable
battery. Charge the battery fully before initial use.
Charging time is normally about four hours. A fully
charged battery delivers about two hours of use.
Warning
Danger of explosion if the battery is incorrectly
replaced. Replace only with the same or
equivalent type.
Cautions
You must use one of the adapters provided
with your GPS to charge the battery.
Do not expose the batteries to excessive heat,
such as direct sunlight or fire.
The rechargeable battery should only be used
and charged when temperatures are between
32°-100°F.
Maintain well-ventilated conditions around
your GPS to avoid overheating. Don’t put the
GPS on a bed, sofa, or anything that may
block ventilation.
When the battery is weak, an indication
appears on the LCD screen. The GPS
automatically powers off shortly thereafter.
www.insignia-products.com
15
Page 18
Using your GPS
To turn on your GPS for the first time:
1
Turn on your GPS. When you turn on the device for
the first time, the Time zone screen opens after a few
seconds.
Note
The screens shown in this guide may be
different than the ones you see on your GPS
depending on the firmware version.
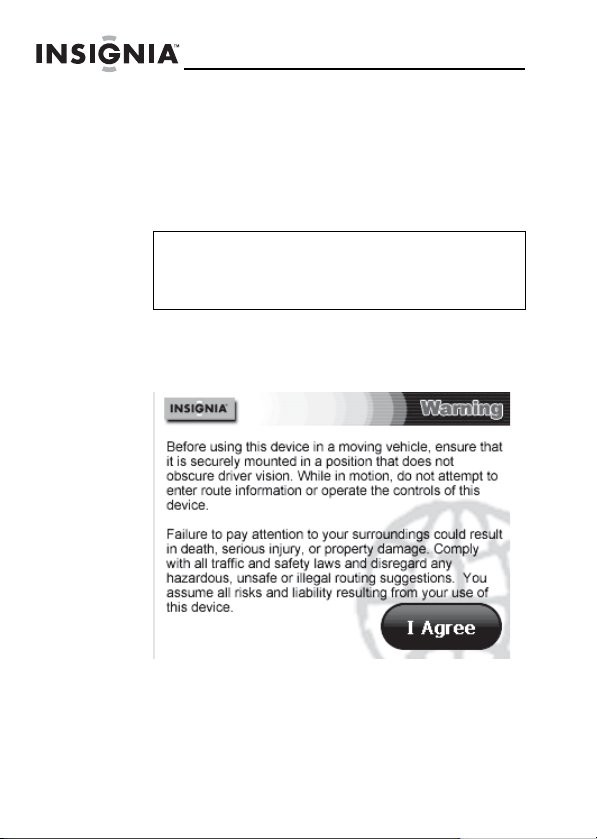
2 Touch the time zone where you are currently located,
then touch OK. A splash screen appears for a few
seconds, then the Safety Warning appears. Be sure
you understand these warnings.
NS-CNV10
16
3 To continue on to the device features, touch I Agree
at the bottom right of the screen. The Home screen
opens. To learn more about what is on this screen,
see “Home screen” on page 18.
www.insignia-products.com
Page 19

NS-CNV10
From the Home screen, you can do the following:
• To see where you are, touch Map.
• To find a route to a place of interest, touch Go
to...
4 To set your device preferences, touch the Settings
icon in the top right corner of the screen. If you would
like to learn about the GPS settings and
configurations, see “Setting up your preferences” on
page 48.
If you are not sure of the available options and would
like technical assistance, contact Insignia technical
support.
www.insignia-products.com
17
Page 20
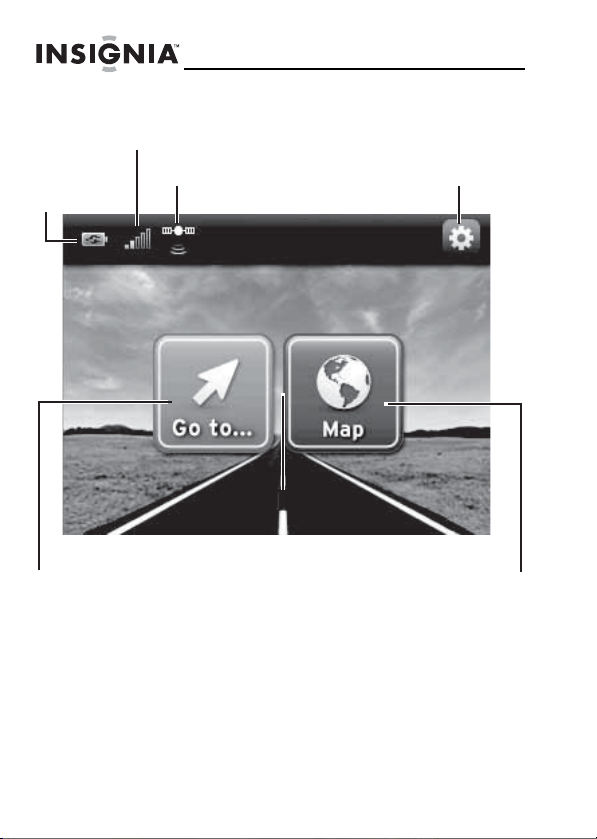
Home screen
NS-CNV10
Wireless network strength
Battery
charge
Go to Main Menu
GPS signal active
Go to Settings
and Preferences
View current
map location
18
www.insignia-products.com
Page 21
NS-CNV10
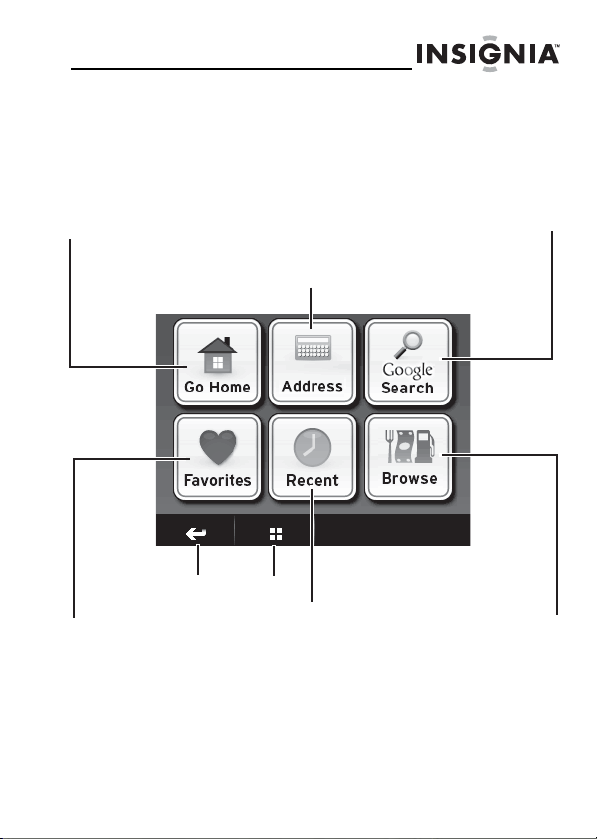
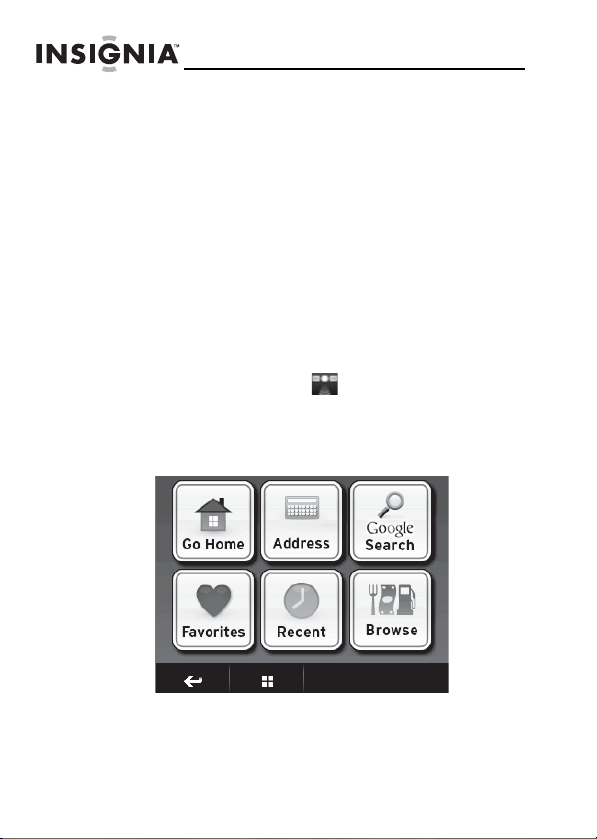
Main menu
The Main menu lets you set up a route to a destination in
your city, in another city, or in another state. Destinations
can include restaurants, gas stations, parks, hospitals, or
many other common public locales.
Navigate to your
home
Search Google for
points of interest
Navigate to an address,
street, or intersection
Go to your
Favorites list
Return to
previous
screen
You can also do the following from the Main menu:
Return to
Home
Go to recent
screen
addresses
• After you set your home address, you can
calculate a route to Go Home from where you
are.
Browse Google and
GasBuddy.com
information
www.insignia-products.com
19
Page 22
• Navigate to an Address when you enter it or an
intersection near the address.
• Check Google Search for directions to points of
interest such as restaurants, theaters, and public
services.
• Get directions from your location to places you
have saved as Favorites.
• Review your most Recent routes without having
to enter them again.
• Check Browse to search categories by name,
including Google and GasBuddy information.
Creating a route to an address
The route to your destination address is based on your
current GPS location. Make sure that your GPS is in
clear view of the sky. The GPS icon on the home page
shows the signal is active .
To create a route to an address:
Touch Go to .. on the
1
opens.
Home
screen. The
NS-CNV10
Main menu
20
www.insignia-products.com
Page 23

NS-CNV10
Touch Address. The city in which you are located is
2
displayed, along with cities to which you have
recently navigated. If this is the first time you are
using your GPS, only the name of the city of your
current GPS location is shown.
3 To go to another city, touch Other city to open the
Enter city keypad, then enter the name of the city
you want.
www.insignia-products.com
21
Page 24

NS-CNV10
4 Touch the name of the city where you want to
navigate. The House Number keypad opens.
Backspace
22
Return to the
Home screen
ack to the
revious screen
5 Enter the house number, then touch Next. The Enter
Street Name keypad opens.
Space bar
Go to the
alphabetic
keypad
Go to the Enter
street name
keypad
www.insignia-products.com
Page 25

NS-CNV10
Enter the name of the street. After entering a few
6
characters, your GPS shows a list of street names
that include those characters.
7 Touch the street name you want. If the street name is
not on the list, touch the back arrow and re-enter the
street name, then touch Next. The address card for
your destination opens.
8 Touch Go. Your GPS calculates your route. When it
is complete, the route is highlighted on the map.
View and voice prompts begin.
-OR-
www.insignia-products.com
23
Page 26

NS-CNV10
To view alternate routes, touch Routes on the
address card.
Note
To check alternate routes while following a
route, touch the Home screen button from the
map view screen. Touch Routes on the Home
screen.
Three routes are displayed, each indicating distance
and time. This lets you choose the shortest distance
or shortest time.
The color of the route option box corresponds to the
color of the route on the map. Touch the destination
pointer at the bottom right of the screen to zoom
in to the destination.
9 Touch the route you want to follow. Your GPS
calculates your route. When it is complete, the route
is highlighted on the map.
24
www.insignia-products.com
Page 27

NS-CNV10
View and voice prompts begin.
Distance to next
maneuver. Touch to
view turn-by-turn
directions.
Highlighted
route
Icon
representing
your vehicle
Zoom in
Touch the Up/Down
arrows to see:
- Distance to destination
- Estimated arrival time
- Time to destination
Touch and drag the screen to scroll around the map.
Return to the
Home screen
This screen also shows
traffic alerts (if available)
Zoom out
www.insignia-products.com
25
Page 28

10 To view turn-by-turn directions, touch the distance to
next maneuver button at the top left of the map view.
Creating a route to an intersection
If you know the intersecting street names and not the
exact address of your destination, you can enter an
intersection to get routing instructions.
To create a route to an intersection:
Touch Go to .. on the Home screen. The Main menu
1
opens.
NS-CNV10
26
www.insignia-products.com
Page 29

NS-CNV10
Touch Address. The city in which you are located is
2
displayed, along with cities to which you have
recently navigated. If this is the first time you are
using your GPS, only the name of the city of your
current GPS location is shown.
3 To navigate to another city, touch Other city. The
Enter City keypad opens. Enter the name of the city
you want. A list of cities opens that includes the
same characters you entered.
4 Touch the name of the city where you want to
navigate. The Enter House Number keypad opens.
www.insignia-products.com
27
Page 30

NS-CNV10
5 Touch Skip at the bottom right of the screen, the
Enter street name keypad opens.
6 Enter the street name or a special venue, for
example Oak, then touch Next. A list of streets with
the same characters opens.
-OR-
If you do not enter a street name, touch Skip at the
bottom right of the screen. A list of street names in
the city opens.
28
www.insignia-products.com
Page 31

NS-CNV10
Touch the up or down arrows at the bottom of the
7
screen to scroll through the list, then touch a street
name on the list. The
opens.
Where on street?
screen
8 Touch Intersection to display street names that
intersect the street of your destination.
9 Touch Go to... or Routes on the address card that
opens, to get directions.
www.insignia-products.com
29
Page 32

NS-CNV10
Creating a route to a city in another state
To create a route to a city in another state:
Start as you would to create a route to an address by
1
touching the Address button on the Main menu. A
list of cities to which you have created routes opens.
30
2 Touch Other city in the upper right corner. The
screen opens showing your origin state.
is in ...
3 Touch Other state in the upper right corner. The
Enter State Name keypad opens.
www.insignia-products.com
City
Page 33

NS-CNV10
Type in the name of the state to which you want to
4
create a route. A list of states that includes those
characters opens.
5 Touch the name of the state you want. A keypad
opens.
6 Type the name of the city you want. A list of cities
that includes those characters opens.
7 Touch the name of the city you want.
8 Follow Steps 3 through 8 in “Creating a route to an
address” on page 20, or touch Skip and follow the
steps for “Creating a route to an intersection” on
page 26.
www.insignia-products.com
31
Page 34

Stopping a route in progress
To stop a route in progress:
From the map view, touch the Home screen button
1
at the bottom of the screen.
2 When the
Tip
Home screen
To view altenate routes while a route is in
progress, touch Routes.
opens, touch Stop.
Resuming a route after stopping
To resume a route after stopping:
Touch Go to ... on the Home screen, then touch
1
Recent on the Main menu. A list of your recent
addresses opens.
2 Touch the destination you want on the list. The
address card for that destination opens.
3 Touch Go or Routes to start directions.
NS-CNV10
32
www.insignia-products.com
Page 35

NS-CNV10
Setting your home address
Setting your home address can save you time
re-entering this information. Later, when you want to
navigate home from a new location, you can touch Go on
the Home screen, Go Home on the Main menu, then, on
the address card, touch Go to... or Routes for your
routing instructions.
To set your home address:
1
Touch Go to .. on the Home screen. The
opens.
Main
menu
2 Touch Go Home. The
opens. Do one of the following:
• Touch Save current location to save your
current GPS location as your home.
• Touch Type address to enter a state, city, house
number and street as your home.
• Touch Choose from Favorites to select an
address from your list of Favorites.
• Touch Choose from Recents to select an
address from a list of recent destinations to
which you have created routes.
Home is not yet saved
www.insignia-products.com
screen
33
Page 36

NS-CNV10
3 When the address card opens with your home
address, touch Save at the bottom of the screen.
The button changes to Delete. Touch Delete if you
want to cancel this address.
4 Touch the Home screen button or the back arrow
to exit this screen and continue your route creation.
Adding or removing an address on your Favorites list
You can save your favorite destinations when the
address card opens.
To add a destination to your Favorites list:
1
Create a route to an address by following Steps 1
through 5 in “Creating a route to an address” on
page 20).
2 When the
bottom right of the screen. The keypad opens.
Address Card
opens, touch Save at the
34
3 Type in the name you want to identify your favorite,
then touch Next.
-OR-
www.insignia-products.com
Page 37

NS-CNV10
When you have searched for this location by name,
for example a business, the name displays in the
entry field. Touch Next at the bottom of the screen to
save the name on the keypad.
4 When the address card opens, touch the back arrow
or the Home screen button at the bottom of the card.
-OR-
Touch Go or Routes to get directions.
Sorting your favorites
You can sort your favorites by:
• New web addresses on top (addresses that are
found as a result of a search)
• Most used
• A-Z (alphabetically)
To remove or change an address on your
Favorites list:
Touch Go to .. on the
1
opens.
Home
screen. The
Main menu
www.insignia-products.com
35
Page 38

NS-CNV10
2 Touch Favorites. The
3 Touch the favorite you want to remove or change.
The address card for that destination opens.
Favo rites
list opens.
4 Touch Edit at the bottom of the card. A rename or
delete screen opens.
5 Touch Delete Favorite, then touch the back arrow to
save your change. The destination is deleted from
your Favorites list.
- OR Touch Rename Favorite. A keypad opens.
36
www.insignia-products.com
Page 39

NS-CNV10
Enter the new name, then touch Next. The address
6
card opens with the new name.
7 Touch the Home screen button or the back arrow to
save your change.
Navigating to or from favorites or recent destinations
You can save some steps when finding a route to a
favorite or a recent destination.
1 Go to the Main menu, then touch Favorites or
Recent. The list of favorites you have saved or a list
of the destinations to which you have created routes
opens.
2 Touch the name of the destination you want for
directions. The address card for that destination
opens.
3 Touch Go or Routes to view the map or choose a
route and start directions.
Using Google Search
You can use Google Search to find any type of
destination or venue. If the Search button does not
display "Google," the wireless network signal is not
available and your GPS searches only the on-board
directory on the device itself.
www.insignia-products.com
37
Page 40

NS-CNV10
To use Google Search:
Go to the Main menu, then touch Google Search.
1
The search keypad opens.
2 Enter the name of your destination, for example,
Stanford University, then touch Search. The
screen opens.
is in...
Search
38
3 Touch Area near me now for locations near your
current GPS location.
-ORTouch a city name on the list.
www.insignia-products.com
Page 41

NS-CNV10
-OR-
Touch Other city to type the name of the city.
A list opens with destination name similar to your
search. The names are sorted by "relevant" the
Google ranking for search items.
Note
The distances shown are linear distances, "as
the crow flies," not driving distances.
4 Continue your search by selecting or typing the city
or state of your destination. A list of destination
names in that city or state opens.
www.insignia-products.com
39
Page 42

NS-CNV10
5 Touch the destination you want. The address card
opens for the destination.
6 Touch Go or Routes for directions. A map showing
the highlighted route to that destination opens. The
map also shows time and distance to the destination.
40
7 Touch the destination point icon to zoom in on the
destination, then press Back to zoom back out.
www.insignia-products.com
Page 43

NS-CNV10
Using Browse
Touch Browse to locate points of interest such as
restaurants, lodging, things to do, and public services by
Google, or to real-time gas prices by GasBuddy.
To use Browse:
1
Touch Go to .. on the
opens.
2 Touch Browse to view restaurants, lodging, things to
do, public services, or gas prices. The browse
screen opens.
Home
screen. The
Main menu
www.insignia-products.com
41
Page 44

NS-CNV10
3 Touch the category you want, for example Food. A
list of food specialties opens.
42
4 Touch the type of food you want. The
screen opens showing cities to which you have
recently created routes.
www.insignia-products.com
Search is in
Page 45

NS-CNV10
Touch the city you want to search to view the list of
5
restaurants. A list of restaurants fitting the criteria
you selected opens.
6 Touch Sort to open a screen that lets you sort the list
alphabetically, by distance, relevance, or popularity.
-OR-
Touch the name of the restaurant you like. The
address card for the restaurant opens.
7 Touch Go or Routes to navigate to your selected
destination, or you can touch the back arrow to
return to the list of restaurants and choose another.
Sending directions from Google Maps to your GPS device
You can send directions you find on your computer from
Google Maps to your GPS device.
To send directions to your GPS device:
Find the directions to your destination on Google
1
Maps.
www.insignia-products.com
43
Page 46

NS-CNV10
2 Click Send at the top right of the Google map. A
window opens that lets you choose where you want
to send the directions.
3 Select GPS, then select “Insignia” as the Brand.
4 Enter the email address that you assigned to your
GPS device (see “Setting your e-mail address” on
page 56).
5 Click Send. After a few minutes your device notifies
you that new addresses have arrived.
6 Touch Yes to view the new addresses. The address
or addresses display on your Favorites list.
-OR-
Touch No to return to the screen you were previously
viewing.
Following traffic incident alerts
Your GPS can alert you about upcoming traffic
slow-downs and incidents on your route, such as special
events, road construction, and accidents.
44
www.insignia-products.com
Page 47

NS-CNV10
To receive alerts, touch the Go button on the address
card for your destination when you start your journey.
When the device detects a traffic slow-down or incident,
and there is a significant change in your estimated time
of arrival (ETA), a voice prompt announces “Traffic
ahead. A detour is available,” or “Traffic ahead. There is
no better way to go.” Depending on what you are viewing
when the device detects a traffic alert, the
announcement sequence and messages are slightly
different.
Detour alert while viewing the map
On the map view, the bottom right corner indicates that
the device is checking traffic. If incidents are not
detected, no traffic is shown on that portion of the
screen.
When the device detects an incident and a detour is
available, you receive a voice alert and the alert at
bottom right corner of the map becomes the View detour
button.
To view the detour route:
Touch View detour. The map opens with the detour
1
route.
2 Touch Take detour to begin directions, the detour
route view, voice prompts, and maneuvers list
around the incident. The distance (linear distance) to
the detour displays at the top of the map.
-OR-
Touch Cancel to return to the map and continue on
your current route.
www.insignia-products.com
45
Page 48

NS-CNV10
If you do not make a selection within three seconds,
the screen times out and returns to your current
route.
To check alternate routes around the
incident:
1
On the map view, touch the home screen button at
the bottom. The screen opens and displays the
additional Stop and Routes buttons.
2 Touch the Routes button. The device calculates
alternate routes then displays them.
Traffic Alert while viewing a screen other than the map
When the device detects an incident while you are
viewing a screen other than the map view, for example
Search or Browse, and a detour is available, you receive
a voice alert and the Traffic alert message displays.
To view the detour route:
Touch Ye s. The map opens with the detour route.
1
-ORTouch No to ignore the alert, close the message, and
return to the screen you were previously viewing.
2 Touch Take detour to begin directions, the detour
route view, voice prompts, and maneuvers list
around the incident.
-ORTouch Cancel to return to the map and continue on
your current route.
If you do not make a selection within three seconds,
the screen times out and returns to your current
route.
46
www.insignia-products.com
Page 49

NS-CNV10
To check alternate routes around the
incident:
1
On the map view, touch the home screen button at
the bottom. The screen opens and displays the
additional Stop and Routes buttons.
2 Touch the Routes button. The device calculates
alternate routes then displays them.
Traffic alert while viewing the Directions list
When you are checking turn-by-turn maneuvers on the
Directions list and the device detects a traffic incident,
and a detour is available, you receive a voice alert and
the Traffic alert message displays.
To view the detour route follow the steps in “Detour aler t
while viewing the map” on page 45.
To check alternate routes around the incident follow the
steps in “To check alternate routes around the incident:”
on page 46.
www.insignia-products.com
47
Page 50

Incident without change to ETA
When you are checking turn-by-turn directions on the
device and it detects a traffic slow-down or incident that
does not change your ETA, the incident displays on your
Directions list. A voice alert announces “Traffic ahead.
There is no better way to go.”
To view the type of incident, touch the incident on the
Directions list. The screen displays the type of incident
and any available details.
Setting up your preferences
You can customize the way the screen appears and set
control functions to accommodate the way you use your
GPS.
To set up the features described in this
section:
Touch the preference settings icon in the upper
1
right corner on the
opens.
Home
screen. The
NS-CNV10
Settings menu
48
www.insignia-products.com
Page 51

NS-CNV10
Touch the down arrow to display additional settings.
2
3 Touch the button for the setting you want to make,
then select a setting in that menu.
4 To save your new setting, you can touch the back
arrow and return to the preferences menu, touch the
Home screen button to return to the Home screen, or
touch the map button to return to the map view.
www.insignia-products.com
49
Page 52

Changing the map view
You can view the map as 3D or 2D and you can set the
heading or compass direction on the map view.
To change the Map View:
Touch the Map View button. The map view selection
1
screen opens.
2 Touch the option you want. A sample of your
selection displays on the right. Options include:
• car up—The top of the map view always
represents the direction you are heading. The
screen is in 2D, which appears as if you are
looking straight down (perpendicular) at the
map.
• north up—the top of the map view is always
north.
• 3D—The map appears in perspective as though
a horizon is in the distance. This is the factory
default setting. The top of the map view
represents the direction you are heading.
3 Touch the back arrow to save your changes and view
the settings menus, touch the world icon to save your
changes and return to the map view, or touch the
Home screen button to view the Home screen.
NS-CNV10
50
www.insignia-products.com
Page 53

NS-CNV10
Setting day or night color palette
To set the day or night color palette:
Touch the Day/Night button. The
1
Palette
screen opens.
2 Touch the option you want. A sample of your
selection displays on the right. Options include:
• Auto—Automatically switches the Day and Night
colors according to the time of day at your
current GPS location. When a GPS signal is not
available, your GPS changes from Night Mode to
Day Mode at 8 a.m. and from Day Mode to Night
Mode at 8 p.m. automatically.
• Day—Day colors are displayed with a light
background and street names in black text.
• Night—Night colors provide contrasting colors
that are easier to see in the dark. For night, the
map view has a dark background, and street
names in white text.
3 Touch the back arrow to save your changes and view
the settings menus, touch the world icon to save your
changes and return to the map view, or touch the
Home screen button to view the Home screen.
Select Color
www.insignia-products.com
51
Page 54

Changing the screen brightness
You can change the brightness of the screen using the
knob on the side of the GPS or you can change it from
Settings
the
To set the screen brightness from the
Settings menu:
1
2 Touch the scale to adjust the brightness. You see a
3 Touch any button at the bottom to exit this screen
menu.
Touch the Brightness button. The
opens.
preview of the setting as you touch each level on the
scale.
and save your choice.
NS-CNV10
Brightness
menu
52
www.insignia-products.com
Page 55

NS-CNV10
Setting conditions to avoid
You can choose to avoid or include any or all of the
following road conditions when your GPS calculates your
route.
To choose conditions to avoid:
Touch the Avoid... button. A list of road conditions
1
opens.
2 Touch the checkbox next to the condition you want to
avoid (the factory setting is no options). Choices
include:
•U Turns
• Highways
•Dirt Roads
•Toll Roads
•Ferries
3 Touch any button at the bottom to exit this screen
and save your choice.
Picking an icon for your car
You can choose a custom icon to represent your car on
the GPS screen.
To choose an icon for your car:
Touch the My Car button. A list of car icons opens.
1
2 Touch the check box next to the icon you want.
Choices include:
•Fun
• Sport
•Minivan
• Sedan
• Geek Squad
• Pointer (arrow-like symbol)
3 Touch any button at the bottom to exit this screen
and save your choice.
www.insignia-products.com
53
Page 56

Setting the background
You can choose the wallpaper you want to display on the
Home screen background.
To choose a background (wallpaper) for
your screen:
Touch the Wallpaper button. A list of background
1
options opens.
2 Touch the button for the background you want. You
see a preview of the setting as you touch selection.
Choices include:
•Road
• Clouds
• Daisy
• Flowers
3 Touch any button at the bottom of the screen to exit
and save your choice.
NS-CNV10
54
www.insignia-products.com
Page 57

NS-CNV10
Viewing status
To view your status:
• Touch the Status button. The
opens showing your current GPS, Cellular and
Bluetooth status. You can also check the status
of system information such as modem status,
available disk space, available RAM, SIM card
information, and so on.
Setting the language and units
To set the language and units of your
GPS:
Touch the Language & Units button. The
1
& Units
screen opens.
2 Touch this button to set spoken language for voice
prompts and the language for text display. Currently,
English is the only available language and the
distance units are miles.
3 Select the distance units (miles or kilometers) from
the list by touching the appropriate button.
4 Touch any button to exit this screen and save your
changes.
Setting the time
To set the time on your GPS:
Touch the Time button. The
1
2 Touch the button of your choice to make the setting.
Options include:
• Format—12 hour clock or 24 hour clock
• Zone—Time zone
• Daylight Savings—On or Off
3 Touch any button to exit this screen and save your
changes.
Time
Status
screen
Language
menu opens.
www.insignia-products.com
55
Page 58

Clearing your lists
To clear your lists:
Touch the Clear My Lists button to remove
1
information that you have saved in your Favorites list
and the Recent list. You can select one or both on
the menu.
2 Touch Yes to clear the list.
Restoring settings
To restore your GPS to factory default
settings:
• Touch the Restore Settings button to return all
settings to the original factory settings. When
you are prompted, touch Yes to restore the
settings.
Setting your e-mail address
You can send directions you find on your computer from
Google Maps to your GPS device as described in
“Sending directions from Google Maps to your GPS
device on page 43.
NS-CNV10
56
www.insignia-products.com
Page 59

NS-CNV10
To set your e-mail address:
Touch the @ Mail button on the preferences menu.
1
The My E-mail address screen opens.
2 Touch Set. The Select an email id keypad opens.
3 Enter the E-mail ID you want to use. It should include
6 to 30 letters and numbers.
4 Touch Check at the bottom right of the keypad to see
if the ID is available. If it is, you receive a message:
Checking availability... <YourID> is available.
5 Touch OK to return to the My E-Mail Address setting
screen, then touch the back arrow or the home
screen button to exit the screen.
If you have not used enough characters for your ID,
you receive a message:
Check availability... Letters num between 6 and 30.
6 Touch OK to return to the keypad and enter another
ID, then touch Check.
www.insignia-products.com
57
Page 60

NS-CNV10
Viewing information about your GPS
To view information about your GPS:
Touch the About button to view the following
1
information:
• Device name and model number
•Device ID
• Software version
•Audio version
• Map version
• Traffic version
• GPS software version
• Copyright
2 Touch the up and down arrows to scroll through the
items.
Viewing legal information
To view legal settings:
• Touch the Legal button to view legal, safety, and
software license agreements.
58
www.insignia-products.com
Page 61

NS-CNV10
Troubleshooting
Important
Make sure that your GPS has a clear view of
the sky. It needs GPS satellite signals to
function correctly.
Also, make sure that your GPS is fully
charged. For information on charging the
battery, see “Understanding the rechargeable
battery” on page 15.
You might see the following alerts when you use your
GPS:
This alert indicates that your GPS is not receiving a
signal. Move it to a location where the signal is stronger,
then touch OK.
www.insignia-products.com
59
Page 62

Searching Google screen continues to
display
The “connected” functions, such as Search, Browse, and
alternate routes might be slow to display results. It is
possible that you are in a location where the cellular
signal is weak. Check the wireless network strength
indicator on the home screen. If it is weak, you need to
move to an area where you can receive a stronger
signal.
Important
Be sure that your device is in clear view of the
sky. The device needs a GPS signal to
function properly.
Cannot connect to the network
If you have a persistent problem connecting to the
network and the wireless network signal is strong. Check
to make sure the SD card in you device is seated
correctly. Press in to remove it and then press it in to
re-seat it.
General troubleshooting
Take the steps described in the table below to solve
simple problems with your GPS before contacting
customer service.
If you suspect something is wrong with this GPS, or if
problems persist, immediately turn the power off and
disconnect the power connector from the unit and
NS-CNV10
60
www.insignia-products.com
Page 63

NS-CNV10
consult your service center or a qualified technician.
Never try to repair the unit yourself because it is
dangerous to do so.
Problem Cause Solution
You cannot turn
on the GPS
There is no
sound
The GPS
cannot receive
satellite signals
or cannot orient
itself
The GPS has
intermittent or
unstable
reception.
The adapter is not
connected correctly.
The battery is dead. Recharge the battery.
The volume may be
turned down or
turned off.
Satellite reception
may be obstructed
by tall buildings or
blocked by a metal
enclosure.
Static or other
external interference
may cause the GPS
to malfunction.
The battery is dead. Recharge the battery.
Satellite reception
may be obstructed
by tall buildings or
blocked by a metal
enclosure.
The GPS is vibrating
excessively.
The system
software is having a
problem.
Connect the adapter
correctly.
Turn on or turn up the
volume.
Make sure that the GPS is
located in an open area.
Press the reset button or
unplug the GPS, then plug
it back in to reset it.
Make sure that the GPS is
located in an open area.
Secure the GPS firmly.
Turn the GPS off, then
back on.
www.insignia-products.com
61
Page 64

NS-CNV10
Specifications
TFT screen size 3.5 inches
Frequency response 20 Hz ~ 20 kHz
Audio signal-to-noise ratio ≥ 65dB
Audio distortion or noise ≤ -20dB (1 kHz)
Channel separation ≥ 70dB (1 kHz)
Dynamic range ≥ 80dB (1 kHz)
Power AC 100-240 V ~ 50/60 Hz: DC 12 V
Power consumption < 8 W
Temperature operating range 14° to 131° F (-10° to +55° C)
Dimensions GPS - 4.0 × 3.21 × 0.9 inches
Weight About 6 ounces (0.17 kg)
(101.6 × 81.5 × 23 mm)
Legal notices
FCC Part 15
This device complies with Part 15 of the FCC Rules. Operation of
this product is subject to the following two conditions: (1) this
device may not cause harmful interference, and (2) this device
must accept any interference received, including interference that
may cause undesired operation.
This equipment has been tested and found to comply within the
limits for a class B digital device, pursuant to Part 15 of the FCC
Rules. These limits are designed to provide reasonable
protection against harmful interference in a residential
installation. This equipment generates, uses, and can radiate
radio frequency energy and, if not installed and used in
accordance with the instructions, may cause harmful interference
62
www.insignia-products.com
Page 65

NS-CNV10
to radio communications. However, there is no guarantee that
interference will not occur in a particular installation. If this
equipment does cause harmful interference to radio or television
reception, which can be determined by turning the equipment off
and on, the user is encouraged to try to correct the interference
by one or more of the following measures:
• Reorient or relocate the receiving antenna.
• Increase the separation between the equipment and
receiver.
• Connect the equipment into an outlet on a circuit different
from that to which the receiver is connected.
• Consult the dealer or an experienced technician for help.
FCC warning
Changes or modifications not expressly approved by the party
responsible for compliance with the FCC Rules could void the
user’s authority to operate this equipment.
Legal patents
For use under US patents 5,161,886; 5,963,956;
6,081,803; 6,092,076; 6,122,593; 6,163,749; 6,192,312;
6,192,314; 6,199,013; 6,212,474; 6,249,742;6,278,942;
6,298,303; 6,317,683; 6,324,472; 6,330,858; 6,336,111;
6,438,561; 6,487,497; 6,470,287; 6,502,033; 6,631,321;
6,647,269; 6,678,611; 6,704,648; 7,035,869 and other
patents pending.
End user license agreement
PLEASE READ THE FOLLOWING TERMS AND CONDITIONS
CAREFULLY BEFORE INSTALLING OR USING THE
SOFTWARE OR ANY ACCOMPANYING DOCUMENTATION
(COLLECTIVELY, THE "SOFTWARE").
THE TERMS AND CONDITIONS OF THIS END USER
LICENSE AGREEMENT ("AGREEMENT") GOVERN USE OF
THE SOFTWARE. IF YOU DO NOT ACCEPT ALL THE TERMS
OF THIS AGREEMENT, THEN DECARTA IS UNWILLING TO
LICENSE THE SOFTWARE TO YOU. IF YOU INSTALL OR USE
THE SOFTWARE, THEN YOU HAVE INDICATED THAT YOU
UNDERSTAND THIS AGREEMENT AND ACCEPT ALL OF ITS
TERMS.
www.insignia-products.com
63
Page 66

NS-CNV10
1. Grant of License. Subject to your compliance with the
terms and conditions of this Agreement, deCarta and/or its
licensors grants you a non-exclusive and non-transferable license
to install and use the executable form of Software on a single
device, solely for your personal, non-commercial use. deCarta
and/or its licensors reserves all rights in the Software not
expressly granted to you in this Agreement.
2. Restrictions. Except as expressly specified in this
Agreement, you may not: (a) copy or modify the Software; (b)
transfer, sublicense, lease, lend, rent or otherwise distribute the
Software to any third par ty; or (c) make the functionality of the
Software available to multiple users through any means,
including, without, limitation, by uploading the Software to a
network or file-sharing service or through any hosting, application
services provider, service bureau or any other type of services.
You acknowledge and agree that por tions of the Software,
including, without limitation, the source code and the specific
design and structure of individual modules or programs,
constitute or contain trade secrets of deCarta and its licensors.
Accordingly, you agree not to disassemble, decompile or
otherwise reverse engineer the Software, in whole or in part, or
permit or authorize a third party to do so, except to the extent
such activities are expressly permitted by law notwithstanding
this prohibition.
3. Ownership. The Software is licensed, not sold. You own the
media (if any) on which the Software is recorded, but deCarta
and/or its licensors retains ownership of the Software, including
all intellectual property rights therein. The Software is protected
by United States copyright law and international treaties. You
will not delete or in any manner alter the copyright, trademark,
and other proprietary rights notices or markings appearing on the
Software as delivered to you.
4. Ter m. This Agreement remains effective until terminated. You
may terminate it at any time by destroying all copies of the
Software in your possession or control. This Agreement will
automatically terminate without notice if you breach any term of
this Agreement. Upon termination, you must promptly destroy all
copies of the Software in your possession or control.
5. Government Users. The Software and
Documentation are "commercial computer software" and
"commercial computer software documentation", respectively, as
such terms are used in FAR 12.212. Any use, duplication or
disclosure of the Software or the Documentation by or on behalf
of the U.S. Government is subject to restrictions as set forth in
this Agreement. Manufacturer is deCarta.
64
www.insignia-products.com
Page 67

NS-CNV10
6. Export Law. You agree to comply fully with all U.S. export
laws and regulations to ensure that neither the Software nor any
technical data related thereto nor any direct product thereof are
exported or re-expor ted directly or indirectly in violation of, or
used for any purposes prohibited by, such laws and regulations.
7. No Warranty. THE SOFTWARE IS PROVIDED "AS
IS", WITHOUT WARRANTY OF ANY KIND. DECARTA
EXPRESSLY DISCLAIMS ALL WARRANTIES AND
CONDITIONS, EXPRESS OR IMPLIED, INCLUDING ANY
IMPLIED WARRANTIES AND CONDITIONS OF
MERCHANTABILITY, FITNESS FOR A PARTICULAR
PURPOSE AND NONTNFRTNGEMENT, AND ANY
WARRANTIES AND CONDITIONS ARISPNG OUT OF
COURSE OF DEALING OR USAGE OF TRADE. NO
ADVICE OR INFORMATION, WHETHER ORAL OR WRITTEN,
OBTAINED FROM DECARTA OR ELSEWHERE WILL CREATE
ANY WARRANTY OR CONDITION NOT EXPRESSLY STATED
IN THIS AGREEMENT.
8. Limitation of Liability. DECARTA AND OR ITS
LICENSOR'S TOTAL LIABILITY TO YOU FROM ALL CAUSES
OF ACTION AND UNDER ALL THEORIES OF LIABILITY WILL
BE LIMITED TO AND WILL NOT EXCEED THE AMOUNTS
PAID TO DECARTA BY YOU FOR THE SOFTWARE. IN NO
EVENT WILL DECARTA BE LIABLE TO YOU FOR ANY
SPECIAL, INCIDENTAL, EXEMPLARY, PUNITIVE OR
CONSEQUENTIAL DAMAGES (INCLUDING LOSS OF USE,
DATA, BUSINESS OR PROFITS) OR FOR THE COST OF
PROCURING SUBSTITUTE PRODUCTS ARISING OUT OF OR
IN CONNECTION WITH THIS AGREEMENT OR THE USE OR
PERFORMANCE OF THE SOFTWARE, WHETHER SUCH
LIABILITY ARISES FROM ANY CLAIM BASED UPON
CONTRACT, WARRANTY, TORT (INCLUDING
NEGLIGENCE), STRICT LIABILITY OR OTHERWISE, AND
WHETHER OR NOT DECARTA HAS BEEN ADVISED OF THE
POSSIBILITY OF SUCH LOSS OR DAMAGE. THE
FOREGOING LIMITATIONS WILL SURVIVE AND APPLY EVEN
IF ANY LIMITED REMEDY SPECIFIED IN THIS AGREEMENT
IS FOUND TO HAVE FAILED OF ITS ESSENTIAL PURPOSE.
www.insignia-products.com
65
Page 68

NS-CNV10
66
www.insignia-products.com
Page 69

NS-CNV10
One-Year Limited Warranty
Insignia Products (“Insignia”) warrants to you, the original
purchaser of this new NS-CNV10 (“Product”), that the Product
shall be free of defects in the original manufacture of the material
or workmanship for a per iod of one (1) year from the date of your
purchase of the Product (“Warranty Period”). This Product must
be purchased from an authorized dealer of Insignia brand
products and packaged with this warranty statement. This
warranty does not cover refurbished Product. If you notify
Insignia during the Warranty Period of a defect covered by this
warranty that requires ser vice, terms of this warranty apply.
How long does the coverage last?
The Warranty Period lasts for 1 year (365 days) from the date you
purchased the Product. The purchase date is printed on the
receipt you received with the Product.
What does this warranty cover?
During the Warranty Period, if the original manufacture of the
material or workmanship of the Product is determined to be
defective by an authorized Insignia repair center or store
personnel, Insignia will (at its sole option): (1) repair the Product
with new or rebuilt parts; or (2) replace the Product at no charge
with new or rebuilt comparable products or parts. Products and
parts replaced under this warranty become the property of
Insignia and are not returned to you. If service of Products or
parts are required after the Warranty Period expires, you must
pay all labor and parts charges. This warranty lasts as long as
you own your Insignia Product during the Warranty Period.
Warranty coverage terminates if you sell or otherwise transfer the
Product.
How to obtain warranty service?
If you purchased the Product at a retail store location, take your
original receipt and the Product to the store you purchased it
from. Make sure that you place the Product in its original
packaging or packaging that provides the same amount of
protection as the original packaging. If you purchased the
Product from an online web site, mail your original receipt and the
Product to the address listed on the web site. Make sure that you
www.insignia-products.com
67
Page 70

put the Product in its original packaging or packaging that
provides the same amount of protection as the or iginal
packaging.
To obtain in-home warranty service for a television with a screen
25 inches or larger, call 1-888-BESTBUY. Call agents will
diagnose and correct the issue over the phone or will have an
Insignia-approved repair person dispatched to your home.
Where is the warranty valid?
This warranty is valid only to the original purchaser of the product
in the United States, Canada, and Mexico.
What does the warranty not cover?
This warranty does not cover:
• Customer instruction
• Installation
• Set up adjustments
• Cosmetic damage
• Damage due to acts of God, such as lightning strikes
• Accident
•Misuse
•Abuse
• Negligence
• Commercial use
• Modification of any part of the Product, including the
antenna
• Plasma display panel damaged by static (non-moving)
images applied for lengthy periods (burn-in).
This warranty also does not cover:
• Damage due to incorrect operation or maintenance
• Connection to an incorrect voltage supply
• Attempted repair by anyone other than a facility authorized
by Insignia to service the Product
• Products sold as is or with all faults
• Consumables, such as fuses or batteries
• Products where the factory applied serial number has been
altered or removed
REPAIR REPLACEMENT AS PROVIDED UNDER THIS
WARRANTY IS YOUR EXCLUSIVE REMEDY. INSIGNIA SHALL
NOT BE LIABLE FOR ANY INCIDENTAL OR CONSEQUENTIAL
DAMAGES FOR THE BREACH OF ANY EXPRESS OR
IMPLIED WARRANTY ON THIS PRODUCT, INCLUDING, BUT
NOT LIMITED TO, LOST DATA, LOSS OF USE OF YOUR
NS-CNV10
68
www.insignia-products.com
Page 71

NS-CNV10
PRODUCT, LOST BUSINESS OR LOST PROFITS. INSIGNIA
PRODUCTS MAKES NO OTHER EXPRESS WARRANTIES
WITH RESPECT TO THE PRODUCT, ALL EXPRESS AND
IMPLIED WARRANTIES FOR THE PRODUCT, INCLUDING,
BUT NOT LIMITED TO, ANY IMPLIED WARRANTIES OF AND
CONDITIONS OF MERCHANTABILITY AND FITNESS FOR A
PARTICULAR PURPOSE, ARE LIMITED IN DURATION TO THE
WARRANTY PERIOD SET FORTH ABOVE AND NO
WARRANTIES, WHETHER EXPRESS OR IMPLIED, WILL
APPLY AFTER THE WARRANTY PERIOD. SOME STATES,
PROVINCES AND JURISDICTIONS DO NOT ALLOW
LIMITATIONS ON HOW LONG AN IMPLIED WARRANTY
LASTS, SO THE ABOVE LIMITATION MAY NOT APPLY TO
YOU. THIS WARRANTY GIVES YOU SPECIFIC LEGAL
RIGHTS, AND YOU MAY ALSO HAVE OTHER RIGHTS, WHICH
VARY FROM STATE TO STATE OR PROVINCE TO PROVINCE.
Contact Insignia:
For customer service please call 1-877-467-4289
www.insignia-products.com
Distributed by Best Buy Purchasing, LLC
7601 Penn Avenue South, Richfield, Minnesota, U.S.A.
55423-3645
© 2008 Best Buy Enterprise Services, Inc.
All rights reserved. INSIGNIA is a trademark of Best Buy
Enterprise Services, Inc. Registered in some countries. All other
products and brand names are trademarks of their respective
owners.
www.insignia-products.com
69
Page 72

ENGLISH
08-1416
www.insignia-products.com (877) 467-4289
Distributed by Best Buy Purchasing, LLC
7601 Penn Avenue South, Richfield, MN USA 55423-3645
All rights reserved. INSIGNIA is a trademark of Best Buy Enterprise Services, Inc.
All other products and brand names are trademarks of their respective owners.
© 2008 Best Buy Enterprise Services, Inc.
Registered in some countries.
 Loading...