

Page 1

G
User Guide
Clock Radio with Voice Command
NS-CLVR01
Page 2

Insignia NS-CLVR01
Clock Radio with Voice Command
Contents
Introduction. . . . . . . . . . . . . . . . . . . . . . . . . . . . . . . . . . . . . . . .3
Safety information. . . . . . . . . . . . . . . . . . . . . . . . . . . . . . . . . . .3
Features . . . . . . . . . . . . . . . . . . . . . . . . . . . . . . . . . . . . . . . . . .5
Setting up your clock radio . . . . . . . . . . . . . . . . . . . . . . . . . . . .7
Using your clock radio. . . . . . . . . . . . . . . . . . . . . . . . . . . . . . .10
Using voice commands. . . . . . . . . . . . . . . . . . . . . . . . . . . . . .10
Using manual buttons. . . . . . . . . . . . . . . . . . . . . . . . . . . . . . .13
Troubleshooting. . . . . . . . . . . . . . . . . . . . . . . . . . . . . . . . . . . . 17
Maintaining . . . . . . . . . . . . . . . . . . . . . . . . . . . . . . . . . . . . . . .18
Specifications . . . . . . . . . . . . . . . . . . . . . . . . . . . . . . . . . . . . .18
Legal notices. . . . . . . . . . . . . . . . . . . . . . . . . . . . . . . . . . . . . .19
90-day limited warranty. . . . . . . . . . . . . . . . . . . . . . . . . . . . . .21
Introduction
Congratulations on your purchase of a high-quality Insignia product.
Your NS-CLVR01 represents the state of the art in clock radio design
and is designed for reliable and trouble-free performance.
Safety information
CAUTION:
ELECTRIC
COVER
PARTS INSIDE. REFER SERVICING
QUALIFIED SERVICE PERSONNEL.
TO REDUCE THE RISK OF
SHOCK, DO NOT REMOVE
(OR BACK). NO USER-SERVICEABLE
The lightning flash with arrowhead symbol
within an equilateral triangle is intended to
alert you to the presence of uninsulated
dangerous voltage within your clock radio’s
enclosure that may be of sufficient
magnitude to constitute a risk of electric
shock.
www.insigniaproducts.com
TO
3
Page 3

Insignia NS-CLVR01 Clock Radio with Voice Command
The exclamation point within an equilateral
triangle is intended to alert you to the
presence of important operating and
maintenance (servicing) instructions in the
literature accompanying your clock radio.
1) Read these instructions.
2) Keep these instructions.
3) Heed all warnings.
4) Follow all instructions.
5) Do not use this apparatus near water.
6) Clean only with a dry cloth.
7) Do not block any ventilation openings. Install in accordance with
the manufacture's instructions.
8) Do not install near any heat source, such as radiators, heat
registers, stoves, or other apparatus (including amplifiers) that
produce heat.
9) Do not defeat the safety feature of the polarized or grounding-type
plug. A polarized plug has two blades and a third grounding prong.
The wide blade or the third prong are provided for your safety. If the
provided plug does not fit into your outlet. Consult an electrician for
replacement of the obsolete outlet.
10) Protect the power cord from being walked on or pinched,
particularly at plugs, convenience receptacles, and the point where
they exit the clock radio.
11) Only use attachments/accessories specified by the manufacturer.
12) Use only with the cart, stand, tripod, bracket, or table specified by
the manufacturer, or sold with the apparatus. When a cart is used,
use caution when moving the cart/apparatus combination to avoid
injury from tip-over.
13) Unplug this clock radio during lightning storms or when unused
for long periods of time.
14) Refer all servicing to qualified service personal. Servicing is
required when the clock radio has been damaged in any wa y, such as
the power cord or plug is damaged, liquid has been spilled or objects
have fallen into the clock radio, the clock radio has been exposed to
rain or moisture, does not operate normally, or has been dropped.
15) Do not expose your clock radio to dripping or splashing liquids,
and no objects filled with liquids should be placed on it.
16) Excessive sound pressure from earphones and headphones can
cause hearing loss.
4
www.insigniaproducts.com
Page 4
Insignia NS-CLVR01 Clock Radio with Voice Command
17) The AC adapter is used as the disconnect device and it shall
remain readily operable during use. In order to disconnect the clock
radio, the AC adapter should be removed from the AC power outlet
completely.
18) The batteries (battery pack and batteries installed) should not be
exposed to excessive heat, such as sunshine, fire, or similar heat
sources.
Note
Read Rating Labels on the bottom of the system for power
input and other safety information.
Features
Note
Voice commands are recognized in English only.
Package contents
Your clock radio includes the following items:
• Clock radio
• AC power adapter
• User Guide
• Quick Setup Guide
• AAA alkaline batteries (3)
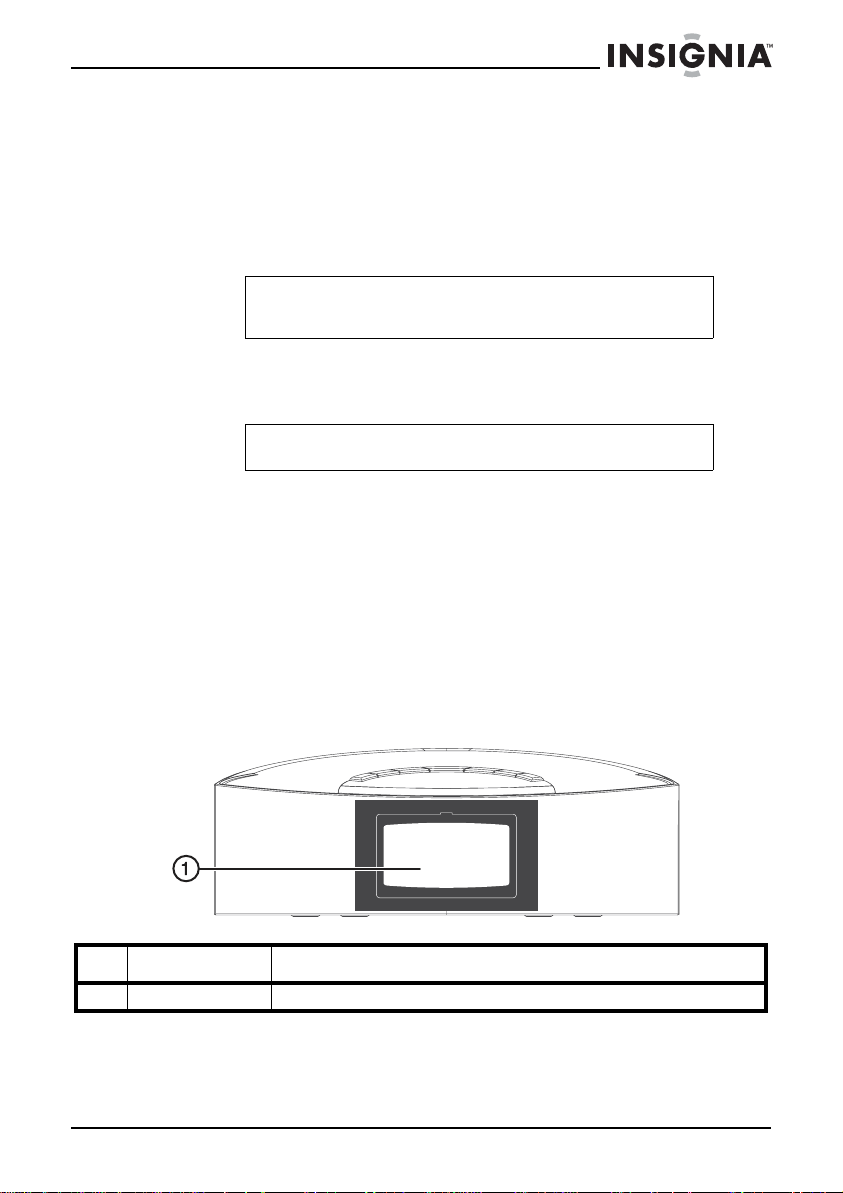
Front view
# Feature Description
1 LCD display Provides information about the clock radio functions.
www.insigniaproducts.com
5
Page 5
Insignia NS-CLVR01 Clock Radio with Voice Command
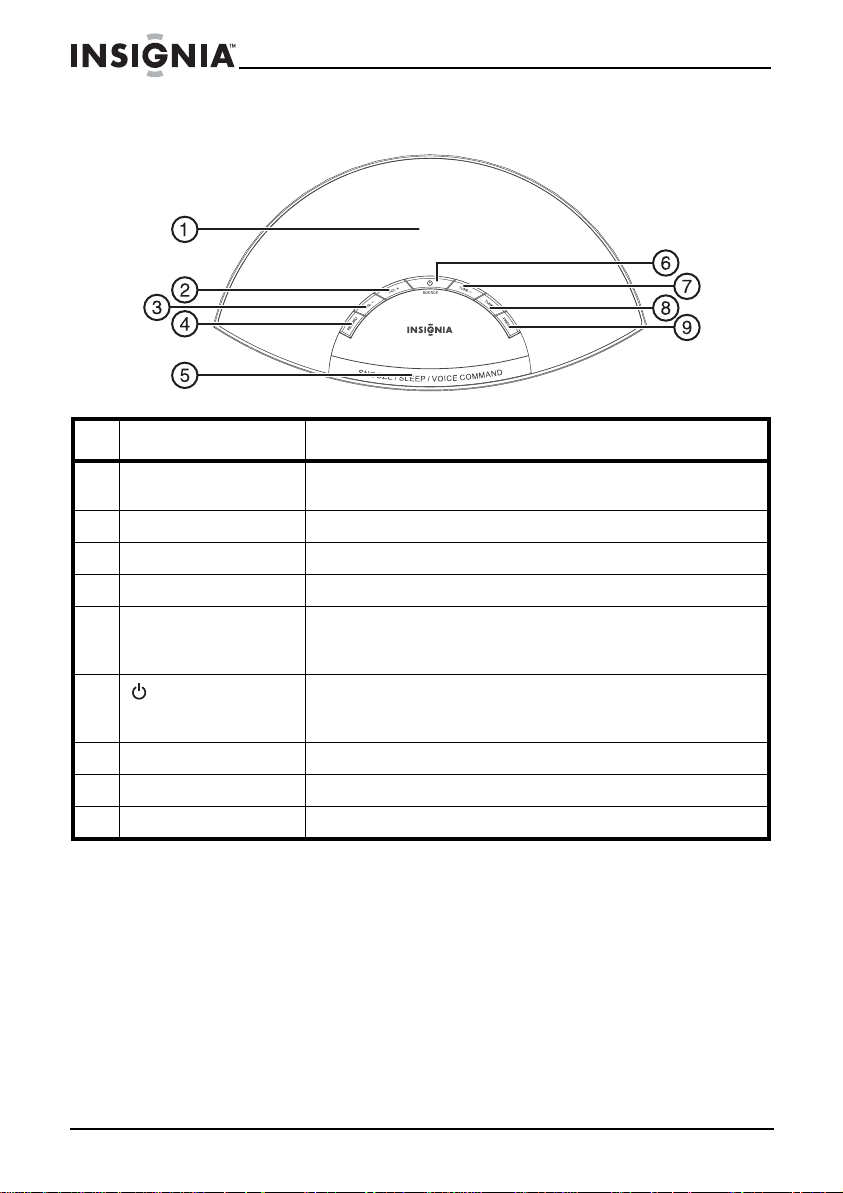
Top view
# Feature Description
1 Speakers and
microphone
2 Volume + button Press to increase the volume of the clock radio.
3 Volume – button Press to decrease the volume of the clock radio.
4 RECORD button Press to record the preset station names.
5 SNOOZE/SLEEP/
VOICE COMMAND
BUTTON
6 /SOURCE button Press and hold to turn the clock radio on or off. When the
7 Tune – button Press to tune or scan the radio to a lower frequency.
8 Tune + button Press to tune or scan the radio to a higher frequency.
9 PRESET button Press repeatedly to recall preset stations.
Produces the sound (speakers) and receives voice
commands (microphone).
Press to start the voice commands, or press and hold to
set the sleep timer. When the alarm is sounding, press to
temporarily turn off the alarm (snooze).
radio is on, repeatedly press to cycle through AM, FM,
and Aux in.
6
www.insigniaproducts.com
Page 6
Insignia NS-CLVR01 Clock Radio with Voice Command
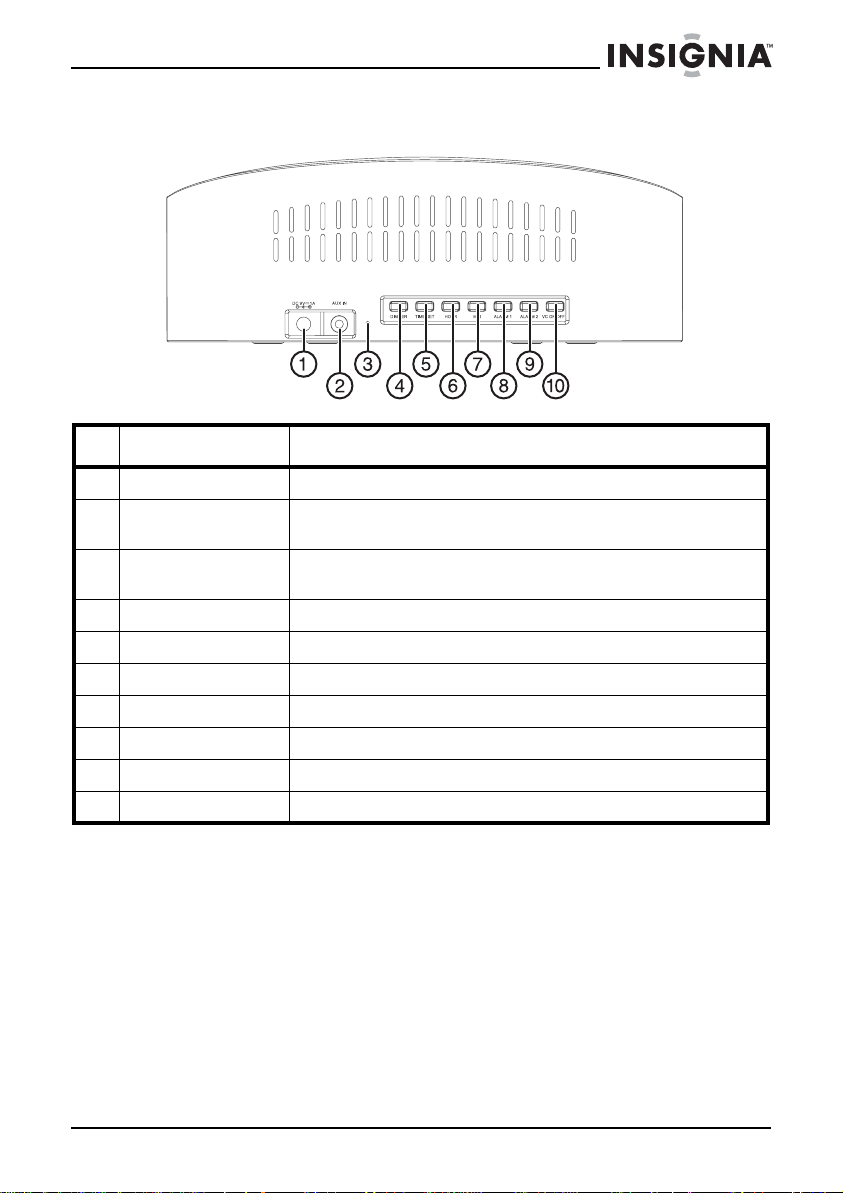
Back view
# Feature Description
1 DC in jack Connect the AC power adapter here.
2 AUX in jack Connect a cable from an external audio source to this jack
3 FM antenna (wire) Uncoil and extend this wire antenna to improve FM radio
4 Dimmer button Press to adjust the backlight of the LCD.
5 Time set button Press and hold to enter the time set mode.
6 Hour button Press to set the hour.
7 Minute button Press to set the minutes.
8 Alarm 1 button Press and hold to select Alarm 1 and change the setting.
9 Alarm 2 button Press and hold to select Alarm 2 and change the setting.
10 VC ON/OFF button Press turn the voice command function on or off.
to hear the sound through your clock radio.
reception.
Setting up your clock radio
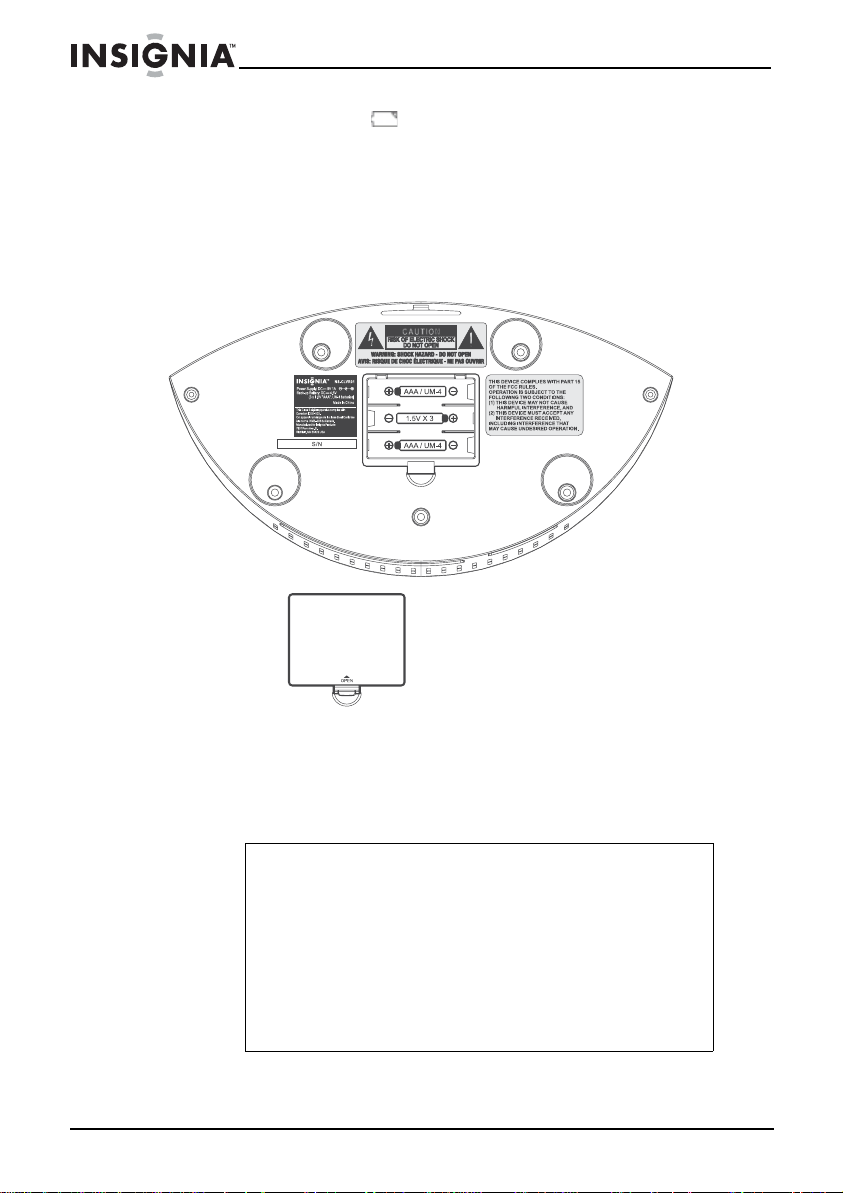
Installing the backup batteries
The clock radio uses a backup battery system to maintain clock and
alarm settings in the event of a power failure. If the backup batteries
have been installed and a power failure occurs or the AC cord is
accidentally disconnected, the display will not remain lit, but the
current time and alarm time settings (the alarm will not sound) will be
temporarily maintained. Otherwise, you must reset the time and alarm
settings.
www.insigniaproducts.com
7
Page 7
Insignia NS-CLVR01 Clock Radio with Voice Command
A battery indicator icon will appear on the display if the batteries
are low.
Make sure the AC cord is connected. Otherwise all settings may be
lost during battery replacement.
To install the backup batteries:
1 Open the battery compartment cover located on the bottom of
your clock radio.
2 Insert three “AAA” batteries, checking that the polarity (+ and -
ends of the batteries) matches the drawing inside the battery
compartment. We recommend the use of alkaline batteries for
longer life.
3 Close the battery compartment cover.
Warnings
• Do not recharge, short, disassemble, or heat the
batteries, or dispose of in a fire.
• Dispose of battery in the proper manner, according to
federal, state, and local regulations.
• Remove the batteries when the charge is depleted.
• Battery chemicals can cause a rash. If the batteries leak,
clean the battery compartment with a cloth. If chemicals
touch your skin, wash immediately.
• Do not mix different types of batteries.
• Do not try to recharge non-rechargable batteries.
8
www.insigniaproducts.com
Page 8

Insignia NS-CLVR01 Clock Radio with Voice Command
Making connections
Connecting the AC power adapter
Make sure that the AC power outlet matches the AC adapter’s power
specifications (110 V ~ 60 Hz) prior to plugging in the adapter.
To conne c t the AC adapter:
1 Plug the small DC power connector into the DC IN 9V jack on the
back of your clock radio.
2 Plug the AC adapter into an AC power outlet.
Note
• Remove both the DC plug and the AC-IN plug to
disconnect the AC power adapter when not in use.
• Use only the supplied AC power adapter to power your
clock radio. (DC 9V, 1A )
Connecting an external sound source
You can listen to an external sound source, such as a CD, MD, or
non-docking iPod
To listen to an external sound source:
1 Make sure that your clock radio is turned off.
2 Connect the external sound source to the AUX IN jack on the back
of your clock radio using a stereo 3.5mm plug cord (not supplied).
3 Press and hold the
your clock radio.
4 Press the
the display.
5 Start playback on the external sound source, then adjust the
volume to a comfortable level. Control playback on the external
audio device.
®
, on your clock radio.
/SOURCE button for tw o seconds to turn on
/SOURCE button repeatedly until “AUX” appears on
Setting the clock
You can also set the clock using voice commands. See “Using voice
commands” on page 10.
To set the clock:
1 Press and hold the TIME SET button on the back of your clock
radio. The time blinks on the LCD.
2 Press MIN (minute) to set the minutes and HOUR to set the hours.
Make sure that you set AM/PM correctly.
3 Press TIME SET again. The clock is set.
www.insigniaproducts.com
9
Page 9

Insignia NS-CLVR01 Clock Radio with Voice Command
Using your clock radio
Note
Voice commands are recognized in English only.
Turning your clock radio on and off
To turn your clock radio on and off:
1 Press and hold
turns on.
2 Press DIMMER on the back of your clock radio to set the display
backlight of the LCD to a comfortable level.
3 Press and hold
standby mode.
/SOURCE for two seconds. Your clock radio
/SOURCE again to switch your clock radio to
Using voice commands
Tips
• Keep the background fairly quiet.
• Speak clearly and in a normal tone.
• Give correct commands (refer to command list below).
• Do not give commands when the clock radio is speaking.
• Speak near the microphone located on the top of the
clock radio.
10
Note
When the clock radio is waiting for your commands, always
respond within three seconds. If no response is received
from you within this time, the clock will reply “Sorry, I did not
recognize your command.” The clock radio will revert to
standby mode if it asks this more than two times. You will
hear “Sorry, I am having trouble understanding you. Please
try again later” before it quits.
To use voice commands:
1 To activate the voice interactive commands, make sure that the
voice control button on the bac k of the clock radio is set to on (the
“VC” indicator appears on the LCD display).
2 Say “Voice Command” to the clock radio or press the SNOOZE/
SLEEP/VOICE COMMAND button. The clock will respond “What
can I do for you?.”
www.insigniaproducts.com
Page 10

Insignia NS-CLVR01 Clock Radio with Voice Command
3 Say any of the following commands for the function y ou want, then
follow the voice prompts carefully:
Command The Radio Responds What’s Next
Time The current time is - -: - - (AM/PM) The clock tells you the current time.
Set Time Please say the current time
Alarm Please say alarm one or alarm two Say “one” or “two.”
Set Alarm Please say alarm one or alarm two. Say “one” or “two. ”
including AM or PM.
The time is now set to - -: - - (AM/
PM).
I am sorry, please sa y current time,
for example six fifteen AM.
Sorry, I am having trouble
understanding you. Please try
again later.
Alarm one (or two) is set to - - : - (AM/PM).
The alarm is On. The alarm sound
is (Radio/Buzzer). Do you want to
turn it off?
Alarm one is now turned off. If the instruction is “No” or “Cancel, ”
Please say the alarm time
including AM/PM.
Alarm one (or two) is set to - -:- (AM/PM).
Please say confirm or reset. If you say “confirm,” the clock radio
Please say buzzer alarm or radio
alarm.
The alarm sound is radio. The alarm is set.
Note
If you would like to change the alarm time after you have already stated the
time, when the clock radio asks “Please say confirm or reset,” you should say
“reset.” The clock radio will ask “Please say the alarm time including AM or
PM.” Yo u can also say “Cance l” if you do not want to continue the alarm
setting.
Say the time you want to set.
If the clock radio failed to
understand the time stated, it will
give an example of how to say it
correctly.
If the clock still does not recognize
what you say after three tries, it will
respond again.
Try again later.
The clock radio will also tell you if
the alarm is on or off, as well as the
existing alarm sound set.
You may either answer “Yes,” “No,”
or “Cancel.” If you say “Yes,” the
clock radio will confirm.
the clock radio will quit the alarm
setting mode and your previous
setting will be kept as it is.
Say the alarm time you want.
The clock radio will ask for
confirmation.
will continue.
To wake to radio, say “radio alarm”
and the clock radio will confirm.
www.insigniaproducts.com
11
Page 11

Insignia NS-CLVR01 Clock Radio with Voice Command
Command The Radio Responds What’s Next
Sleep Time To set sleep time, please say 90,
75, 60, 45, 30, 15 minutes or
Cancel.
The timer is set to - - minutes to
turn off.
Note
If you set the sleep timer with a voice command when the clock radio i s in
standby mode, after the sleep time setting is finished the clock radio will
change to radio mode by asking “Please say FM or AM”. It will then tune to
the last played station in the band that you selected.
Radio Please say FM or AM. Say “FM” or “AM.”
Please say the station name. Say the station name.
Sorry, I am having trouble
understanding you. Please try
again later.
Note
If the clock radio still cannot recognize the station name you have given after
three tries, it will say “Sorry, I am having trouble understanding you. Please try
again later.” The clock radio will then return to the last station played.
Help You can say Time , Set time, Alarm,
Set alarm, Sleep time, Radio, Help
or Cancel. To record or change a
radio station name, first select the
station using the Preset button,
then press the record button.
What can I do for you.
Say the sleep time interval you
want. The clock radio will set the
sleep time for you.
The sleep icon (zzZ) appears on
the display and the sleep time will
display for five seconds and then
return to the previous mode.
Note: You must have recorded a
station name for this to work. See
“To record a preset name” on page
13.
If the clock radio recognizes the
station name successfully, the cloc k
radio will display the station
frequency on the screen and tune
to that station.
If the clock radio does not
recognize the station name, it will
inform you.
Say the command for the help you
want.
Cancel (None) This command cancels voice
commands. If there is no response
received from you after three
seconds, the clock radio will go to
standby mode automatically.
12
www.insigniaproducts.com
Page 12

Insignia NS-CLVR01 Clock Radio with Voice Command
To record a preset name
To record a preset name:
1 Press and hold the
your clock radio.
2 Press the
/SOURCE button repeatedly to select the AM or FM
band.
3 Press PRESET repeatedly until you reach the station you want to
record.
4 Press the RECORD button. The clock radio will respond “Please
say the station name.”
5 Speak the name you want to set for that particular preset station,
for example “News Station.”
6 The clock radio responds “Please repeat station name.”
7 Speak the name again.
To confirm that the setting was successful, the clock radio will
reply, “Thank you. Station name recorded for station preset (__).”
The radio will then switch to radio mode.
Note
• If the name is too similar to the name of other preset
stations set earlier, the clock will suggest that you choose
a different name by saying “The name is too similar to
existing station name, please choose a different name
and try again.”
• If the setting is not successful, the clock radio will state
“Training failure, please try again.” You are allowed two
tries.
/SOURCE button for tw o seconds to turn on
Using manual buttons
Setting and using the alarm
You can also set the alarm using voice commands. See “Using voice
commands” on page 10.
To set the alarm:
1 Press and hold the ALARM 1 or ALARM 2 button (depending on
which alarm you want to set) until the display blinks
www.insigniaproducts.com
.
13
Page 13

Insignia NS-CLVR01 Clock Radio with Voice Command
2 Press HOUR to set the hour you want to wake up, then press MIN
(minute) to set the minute. Make sure you set AM/PM correctly.
3 Briefly press ALARM 1 or ALARM 2 again to save the setting.
The display stops blinking.
Note
When the unit is in radio or AUX mode, if no key is pressed
within 10 seconds, the clock radio returns to the current
clock automatically.
To set the alarm to buzzer or radio:
1 Press ALARM 1 or ALARM 2 repeatedly to select radio or buzzer .
As you press the button, the radio or buzzer icon appears on the
display.
To turn the alarm off:
1 If the alarm is on, press any button (except SNOOZE/SLEEP/
VOICE COMMAND) to turn off the alarm. The alarm will be set for
the next day.
2 If you do not want to set the alarm for the next day, press
ALARM 1 or ALARM 2 until “ALARM 1” or “ALARM 2” indicator
disappears from the display.
14
To use the snooze feature:
1 While the alarm is sounding, press the SNOOZE/SLEEP/VOICE
COMMAND button. The SNOOZE indicator appears on the
display.
2 To cancel snooze (the alarm will not turn back on), press
ALARM 1 or ALARM 2 (depending on the alarm set). The
SNOOZE indicator disappears from the display.
www.insigniaproducts.com
Page 14

Insignia NS-CLVR01 Clock Radio with Voice Command
3 Press ALARM 1 or ALARM 2 repeatedly to select from alarm off
(the alarm will not be set for the next day), or alarm on buzzer or
radio (the alarm will be set for the next day).
Note
If set to Radio or Buzzer, the alarm automatically turns on
for 20 minutes, then shuts off.
To set the sleep timer:
1 Turn on the radio.
2 Press and hold the SNOOZE/SLEEP/VOICE COMMAND button
for two seconds until the sleep indicator “zzZ” appears on the
display. “15” also appears on the display, indicating that the radio
will turn off in 15 minutes.
3 Press the SNOOZE/SLEEP/VOICE COMMAND repeatedly to
increase the sleep timer in 15 minute increments up to 90 minutes.
The radio automatically turns off after the selected interval.
4 After you set the sleep timer, the real time is shown on the display.
Press and hold SNOOZE/SLEEP/VOICE COMMAND again to
show the remaining sleep time for five seconds.
5 To cancel the sleep timer, press SNOOZE/SLEEP/VOICE
COMMAND repeatedly until “OFF” shows on the display.
Playing the radio
To play the radio:
1 Press and hold the
your clock radio.
• Press the
FM band.
• If you are listening to FM, uncoil and e xtend the FM antenna on
the back of your clock radio and move it around to improve
reception.
-OR-
• If you are listening to AM, turn the radio slightly to improve
reception.
/SOURCE button for tw o seconds to turn on
/SOURCE button repeatedly to select the AM or
www.insigniaproducts.com
15
Page 15

Insignia NS-CLVR01 Clock Radio with Voice Command
• Press TUNE + or TUNE – to tune the radio to a higher or lower
frequency.
• Press the VOLUME + or VOL UME – buttons to increase or
decrease the volume. Adjust the volume to a comfortable level.
• Press and hold TUNE + or TUNE – for more than one second
to scan to a higher or lower frequency. The radio automatically
scans to the next station.
2 Press and hold the
Using radio station presets
Your clock radio can store five AM and five FM station presets.
To store radio station presets:
1 Press and hold the
your clock radio.
2 Press the
band.
3 Press TUNE + or TUNE – to tune the radio to a desired station.
4 Press and hold the PRESET button for two seconds. “P01” flashes
on the display.
/SOURCE button repeatedly to select the AM or FM
/SOURCE button to turn off your clock radio.
/SOURCE button for tw o seconds to turn on
5 Press TUNE + or TUNE – to select the preset number for the
station.
6 Press the PRESET button again to store the station as a preset.
7 Repeat steps 3 to 6 to store as many as five AM presets and five
FM presets.
Recalling radio station presets
To recall radio station presets:
16
1 Press and hold the
your clock radio.
2 Press the
band.
/SOURCE button repeatedly to select the AM or FM
www.insigniaproducts.com
/SOURCE button for tw o seconds to turn on
Page 16

Insignia NS-CLVR01 Clock Radio with Voice Command
3 Press the PRESET button repeatedly to select the preset station
you want.
Note
You can also recall presets using voice commands if a name
is recorded for the preset station. See “Using voice
commands” on page 10.
Troubleshooting
Problem Cause/Solution
No power • Make sure that the AC power adapter is fully inserted into the
No sound from
the speakers
Static or noise
when playing
the radio
The sound is
distorted
The clock radio
gets warm after
extended play
at high volume
levels
The clock radio
does not
respond when I
give a
command
The clock radio
does not hear
my commands
The clock radio
cannot
recognize my
commands
AC power outlet.
• Make sure that the AC power outlet is working.
Make sure that the volume level is set correctly.
• Make sure that the station is tuned correctly and that the station
has a good signal.
• Try another station.
• If you are playing an AM station, rotate the clock radio to
improve the reception.
• If you are playing an FM station, extend the antenna wire to
improve the reception.
• Make sure that the volume level is not set too high.
• Make sure that the material on the sound source is not
distorted. Try a different external sound source.
This is normal.
Make sure that the VC ON/OFF button on the back of the clock radio
is turned On. When it is On, you should see the VC icon on the
display.
You cannot give a command while the clock radio is on. Avoid
background noise when talking to this clock radio as well.
Depending on the ambient noise and how you speak, there may be
times when the radio will not understand your commands. If this
happens, just repeat the commands (see below regarding
pronunciation), the clock radio should respond properly.
www.insigniaproducts.com
17
Page 17

Insignia NS-CLVR01 Clock Radio with Voice Command
Problem Cause/Solution
The clock radio
confuses
numbers when
setting the time
or alarm
The clock
resets to
“12:00”
No sound from
an external
sound source
This is common in English. For example, it is common to confuse
nine and five. Try again. Speak loud and clear near the MIC on top of
the clock radio.
Note: Always pronounce “0” as “oh” instead of “zero.” For example, if you
want to set the time at 11:05 PM, you should say “Eleven oh five PM.”
The back-up batteries are not installed correctly, not installed, or
dead. Check or replace the back-up batteries. And then set the clock
again.
Make sure the external device is connected correctly and the clock
radio is in AUX mode.
Maintaining
Cleaning your clock radio
To clean your clock radio, follow these guidelines:
• Use a soft, clean cloth moistened with plain, luke-warm water
to clean the exterior of your clock radio.
• Do not let liquid drip into the inside of your clock radio.
• For stubborn stains, use a soft cloth dampened with a weak
solution of mild detergent and water. Dry your clock radio
immediately afterwards with a clean cloth. Do not use abrasiv e
clothes, thinners, alcohol, or other chemical solvents, because
they may damage the finish or remove the panel lettering.
Specifications
Specifications are subject to change without notice.
Frequency range Bands: FM and AM
Range: FM - 87.5~107.9 MHz (200 KHz steps)
Station presets FM - 5
AM - 5
External connections 3.5 mm stereo
Volume 0-16 levels
Speakers 2 x 2” - 4 ohm full range
2W x 2 RMS
18
www.insigniaproducts.com
AM - 530~1710 KHz (10 KHz steps)
Page 18

Insignia NS-CLVR01 Clock Radio with Voice Command
Power AC power adapter - 110V 60 Hz to 9V,1A
DC - 3 x AAA batteries for memory backup
Legal notices
FCC Part 15
This device complies with Part 15 of the FCC Rules. Operation of this product is
subject to the following two conditions: (1) this device may not cause harmful
interference, and (2) this device m ust accept any interference received, including
interference that may cause undesired operation.
This equipment has been tested and found to comply within the limits for a class B
digital device, pursuant to Part 15 of the FCC Rules. These limits are designed to
provide reasonable protection against harmful interference in a residential installation.
This equipment generates, uses, and ca n radiate radio frequency energy and, if not
installed and used in accordance with the instructions, may cause harmful interference
to radio communications. However, there is no guarantee that interference will not
occur in a particular installation. If this equipment does cause harmful interference to
radio or television reception, which can be determined by turning the equipment off and
on, the user is encouraged to try to correct the interference by one or more of the
following measures:
• Reorient or relocate the receiving antenna.
• Increase the separation between the equipment and receiver.
• Connect the equipment into an outlet on a circuit different from that to which the
receiver is connected.
• Consult the dealer or an experienced technician for help.
FCC warning
Changes or modifications not expressly approved by the party responsible for
compliance with the FCC Rules could void the user’s authority to operate this
equipment.
ICES-003 Class B Notice
This Class B digital apparatus complies with Canadian ICES-003.
Cet appareil numérique de la classe B est conforme à la norme NMB-003 du Canada.
www.insigniaproducts.com
19
Page 19

Insignia NS-CLVR01 Clock Radio with Voice Command
20
www.insigniaproducts.com
Page 20

Insignia NS-CLVR01 Clock Radio with Voice Command
90-day limited warranty
Insignia Products (“Insignia”) warrants to you, the original purchaser of this new
NS-CLVR01 (“Product”), that the Product shall be free of defects in the original
manufacture of the material or workmanship for a period of 90 days from the date of
your purchase of the Product (“Warranty Period”). This Product must be purchased
from an authorized dealer of Insignia brand products and packaged with this warranty
statement. This warranty does not cover refurbished Product. If you notify Insignia
during the Warranty Period of a defect covered by this warranty that requires service,
terms of this warranty apply.
How long does the coverage last?
The Warranty Period lasts for 90 days from the date you purchased the Product. The
purchase date is printed on the receipt you received with the Product.
What does this warranty cover?
During the Warranty Period, if the original manufacture of the material or workmanship
of the Product is determined to be defective by an authorized Insignia repair center or
store personnel, Insignia will (at its sole option): (1) repair the Product with new or
rebuilt parts; or (2) replace the Product at no charge with new or rebuilt comparable
products or parts. Products and parts replaced under this warranty become the
property of Insignia and are not returned to you. If service of Products or parts are
required after the Warranty Period expires, you must pay all labor and parts charges.
This warranty lasts as long as you own your Insignia Product during the Warranty
Period. Warranty coverage terminates if you sell or otherwise transfer the Product.
How to obtain warranty service?
If you purchased the Product at a retail store location, take your original receipt and the
Product to the store you purchased it from. Make sure that you place the Product in its
original packaging or packaging that provides the same amount of protection as the
original packaging. If you purchased the Product from an online web site, mail your
original receipt and the Product to the address listed on the web site. Make sure that
you put the Product in its original packaging or packaging that provides the same
amount of protection as the original packaging.
To obtain in-home warranty service for a television with a screen 30 inches or larger,
call 1-888-BESTBUY. Call agents will diagnose and correct the issue over the phone or
will have an Insignia-approved repair person dispatched to your home.
Where is the warranty valid?
This warranty is valid only to the original purchaser of the product in the United States,
Canada, and Mexico.
What does the warranty not cover?
This warranty does not cover:
• Customer instruction
• Installation
• Set up adjustments
• Cosmetic damage
• Damage due to acts of God, such as lightning strikes
•Accident
•Misuse
•Abuse
• Negligence
•Commercial use
www.insigniaproducts.com
21
Page 21

Insignia NS-CLVR01 Clock Radio with Voice Command
• Modification of any part of the Product, including the antenna
• Plasma display panel damaged by static (non-moving) images applied for lengthy
periods (burn-in).
This warranty also does not cover:
• Damage due to incorrect operation or maintenance
• Connection to an incorrect voltage supply
• Attempted repair by anyone other than a facility authorized by Insignia to service
the Product
• Products sold as is or with all faults
• Consumables, such as fuses or batteries
• Products where the factory applied serial number has been altered or removed
REPAIR REPLACEMENT AS PROVIDED UNDER THIS WARRANTY IS YOUR
EXCLUSIVE REMED Y. INSIGNIA SHALL NOT BE LIABLE FOR ANY INCIDENTAL
OR CONSEQUENTIAL DAMAGES FOR THE BREACH OF ANY EXPRESS OR
IMPLIED WARRANTY ON THIS PRODUCT, INCLUDING, BUT NOT LIMITED TO,
LOST DATA, LOSS OF USE OF YOUR PRODUCT, LOST BUSINESS OR LOST
PROFITS. INSIGNIA PRODUCTS MAKES NO OTHER EXPRESS WARRANTIES
WITH RESPECT TO THE PRODUCT, ALL EXPRESS AND IMPLIED WARRANTIES
FOR THE PRODUCT, INCLUDING, BUT NOT LIMITED TO, ANY IMPLIED
WARRANTIES OF AND CONDITIONS OF MERCHANTABILITY AND FITNESS FOR
A PARTICULAR PURPOSE, ARE LIMITED IN DURATION TO THE WARRANTY
PERIOD SET FORTH ABOVE AND NO WARRANTIES, WHETHER EXPRESS OR
IMPLIED, WILL APPLY AFTER THE WARRANTY PERIOD. SOME STATES,
PROVINCES AND JURISDICTIONS DO NOT ALLOW LIMITATIONS ON HOW LONG
AN IMPLIED WARRANTY LASTS, SO THE ABOVE LIMITATION MAY NOT APPLY TO
YOU. THIS WARRANTY GIVES YOU SPECIFIC LEGAL RIGHTS, AND YOU MAY
ALSO HAVE OTHER RIGHTS, WHICH VARY FROM STATE TO STATE OR
PROVINCE TO PROVINCE.
Contact Insignia:
For customer service please call 1-877-467-4289
www.insigniaproducts.com
Distributed by Best Buy Purchasing, LLC
7601 Penn Avenue South, Richfield, Minnesota, U.S.A. 55423-3645
© 2010 BBY Solutions, Inc.
All rights reserved. INSIGNIA is a trademark of BBY Solutions, Inc. Registered in some
countries. All other products and brand names are trademarks of their respective
owners.
22
www.insigniaproducts.com
Page 22

www.insigniaproducts.co m (877) 467-428 9
Distributed by Best Buy Purchasing, LLC
7601 Penn Avenue South, Richfield, MN USA 55423-3645
All rights reserved. INSIGNIA is a trademark of BBY Solutions, Inc. Registered in some countries.
All other products and brand names are trademarks of their respective owners.
© 2010 BBY Solutions, Inc.
ENGLISH
10-0138
 Loading...