

Page 1

User Guide
Digital Clock Radio with FM
NS-CLOPP1
Before using your new product, please read these instructions to prevent any damage.
Page 2

Contents
Introduction . . . . . . . . . . . . . . . . . . . . . . . . . . . . . . . . . . . . . . . . . . . . . . . . . . . . .2
Important safety instructions . . . . . . . . . . . . . . . . . . . . . . . . . . . . . . . . . . . . .3
Features . . . . . . . . . . . . . . . . . . . . . . . . . . . . . . . . . . . . . . . . . . . . . . . . . . . . . . . . .4
Setting up your radio. . . . . . . . . . . . . . . . . . . . . . . . . . . . . . . . . . . . . . . . . . . . .7
Using your radio . . . . . . . . . . . . . . . . . . . . . . . . . . . . . . . . . . . . . . . . . . . . . . . . .8
Specifications . . . . . . . . . . . . . . . . . . . . . . . . . . . . . . . . . . . . . . . . . . . . . . . . . . .13
Legal notices. . . . . . . . . . . . . . . . . . . . . . . . . . . . . . . . . . . . . . . . . . . . . . . . . . . .13
90-day limited warranty - Insignia . . . . . . . . . . . . . . . . . . . . . . . . . . . . . . .14
Insignia NS-CLOPP1 Digital Clock Radio with FM
Insignia NS-CLOPP1
Digital Clock Radio with FM
Top buttons . . . . . . . . . . . . . . . . . . . . . . . . . . . . . . . . . . . . . . . . . . . . . . . .4
Back . . . . . . . . . . . . . . . . . . . . . . . . . . . . . . . . . . . . . . . . . . . . . . . . . . . . . . . . 5
LCD . . . . . . . . . . . . . . . . . . . . . . . . . . . . . . . . . . . . . . . . . . . . . . . . . . . . . . . .6
Package contents . . . . . . . . . . . . . . . . . . . . . . . . . . . . . . . . . . . . . . . . . . . 7
Installing backup batteries . . . . . . . . . . . . . . . . . . . . . . . . . . . . . . . . . .7
Connecting the AC/DC power adapter . . . . . . . . . . . . . . . . . . . . . . .8
Setting the time . . . . . . . . . . . . . . . . . . . . . . . . . . . . . . . . . . . . . . . . . . . .8
Setting the alarm sound. . . . . . . . . . . . . . . . . . . . . . . . . . . . . . . . . . . . .9
Setting the alarm time . . . . . . . . . . . . . . . . . . . . . . . . . . . . . . . . . . . . . .9
Using the snooze feature . . . . . . . . . . . . . . . . . . . . . . . . . . . . . . . . . . .10
Turning off the alarm. . . . . . . . . . . . . . . . . . . . . . . . . . . . . . . . . . . . . . .10
Setting the sleep timer . . . . . . . . . . . . . . . . . . . . . . . . . . . . . . . . . . . . .10
Adjusting the LCD brightness . . . . . . . . . . . . . . . . . . . . . . . . . . . . . .11
Playing your radio . . . . . . . . . . . . . . . . . . . . . . . . . . . . . . . . . . . . . . . . .11
Programming a radio station preset . . . . . . . . . . . . . . . . . . . . . . . .12
Tuning to a preset radio station . . . . . . . . . . . . . . . . . . . . . . . . . . . .12
Connecting an audio device. . . . . . . . . . . . . . . . . . . . . . . . . . . . . . . .12
Introduction
Congratulations on your purchase of a high-quality Insignia product. Your
NS-CLOPP1 represents the state of the art in digital clock radio design and
is designed for reliable and trouble-free performance.
2
www.insigniaproducts.com
Page 3

Insignia NS-CLOPP1 Digital Clock Radio with FM
Important safety instructions
1
Read these instructions.
2
Keep these instructions.
3
Heed all warnings.
4
Follow all instructions.
5
Do not use this apparatus near water.
6
Clean only with dry cloth.
7
Do not block any ventilation openings. Install in accordance with the
manufacturer's instructions.
8
Do not install near any heat sources such as radiators, heat registers,
stoves, or other apparatus (including amplifiers) that produce heat.
9
Do not defeat the safety purpose of the polarized or grounding-type plug.
A polarized plug has two blades with one wider than the other. A
grounding type plug has two blades and a third grounding prong. The
wide blade or the third prong are provided for your safety. If the provided
plug does not fit into your outlet, consult an electrician for replacement of
the obsolete outlet.
10
Protect the power cord from being walked on or pinched particularly at
plugs, convenience receptacles, and the point where they exit from the
apparatus.
11
Only use attachments/accessories specified by the manufacturer.
12
Unplug this apparatus during lightning storms or when unused for long
periods of time.
13
Refer all servicing to qualified service personnel. Servicing is required
when the apparatus has been damaged in any way, such as power-supply
cord or plug is damaged, liquid has been spilled or objects have fallen into
the apparatus, the apparatus has been exposed to rain or moisture, does
not operate normally, or has been dropped.
14
To reduce the risk of fire or electric shock, do not expose this device to
rain, moisture, dripping, or splashing, and no objects filled with liquids,
such as vases, shall be placed on it.
15
The wall plug is the disconnecting device. The plug must remain readily
operable.
16
Batteries should not be exposed to excessive heat such as sunshine, fire, or
the like.
Caution
Danger of explosion if battery is incorrectly replaced. Replace
only with the same or equivalent type.
www.insigniaproducts.com
3
Page 4

Insignia NS-CLOPP1 Digital Clock Radio with FM
Features
Top buttons
3
1
2
Preset
Sleep
Source
# Item Description
5
4
6
1
2
9
8
10
7
SNOOZE / DIMMER
1 Preset button Press to program a radio station preset or to tune to a preset radio
2 Sleep button Press to set the time or the sleep timer. For more information, see
3 (previous/fast reverse) button Press and hold for one second to go to the next lower radio station.
4 (Alarm 1) button Press to set Alarm 1. See “Setting the alarm sound” on page 9 and
5 (next/fast forward) button Press and hold for one second to go to the next higher radio station.
6 (Alarm 2) button Press to set Alarm 2. See “Setting the alarm sound” on page 9 and
7 button When the alarm turns on, press to turn off the alarm for 10 minutes.
8 Source (source/standby) button When your radio is turned off (in standby mode), press to turn it on.
1
2
SNOOZE / DIMMER
station. See “Programming a radio station preset” on page 12 or
“Tuning to a preset radio station” on page 12.
“Setting the time” on page 8 or “Setting the sleep timer” on page 10.
Quickly press and release to manually tune to a lower radio frequency.
“Setting the alarm time” on pa ge 9.
Quickly press and release to manually tune to a higher radio
frequency.
“Setting the alarm time” on pa ge 9.
See “Using the snooze feature” on page 10.
Press to adjust the LCD brightness. See “Adjusting the LCD brightness”
on page 11.
See “Playing your radio” on page 11.
When your radio is turned on, press and hold for more than two
seconds to turn your radio off (put in standby mode).
When your radio is turned on, quickly press and release to switch
between playing the radio and playing a connected audio device. See
“Connecting an audio device” on page 12.
4
www.insigniaproducts.com
Page 5
Insignia NS-CLOPP1 Digital Clock Radio with FM
# Item Description
9 (volume down) button Press to decrease the volume.
10 (volume up) button Press to increase the volume.
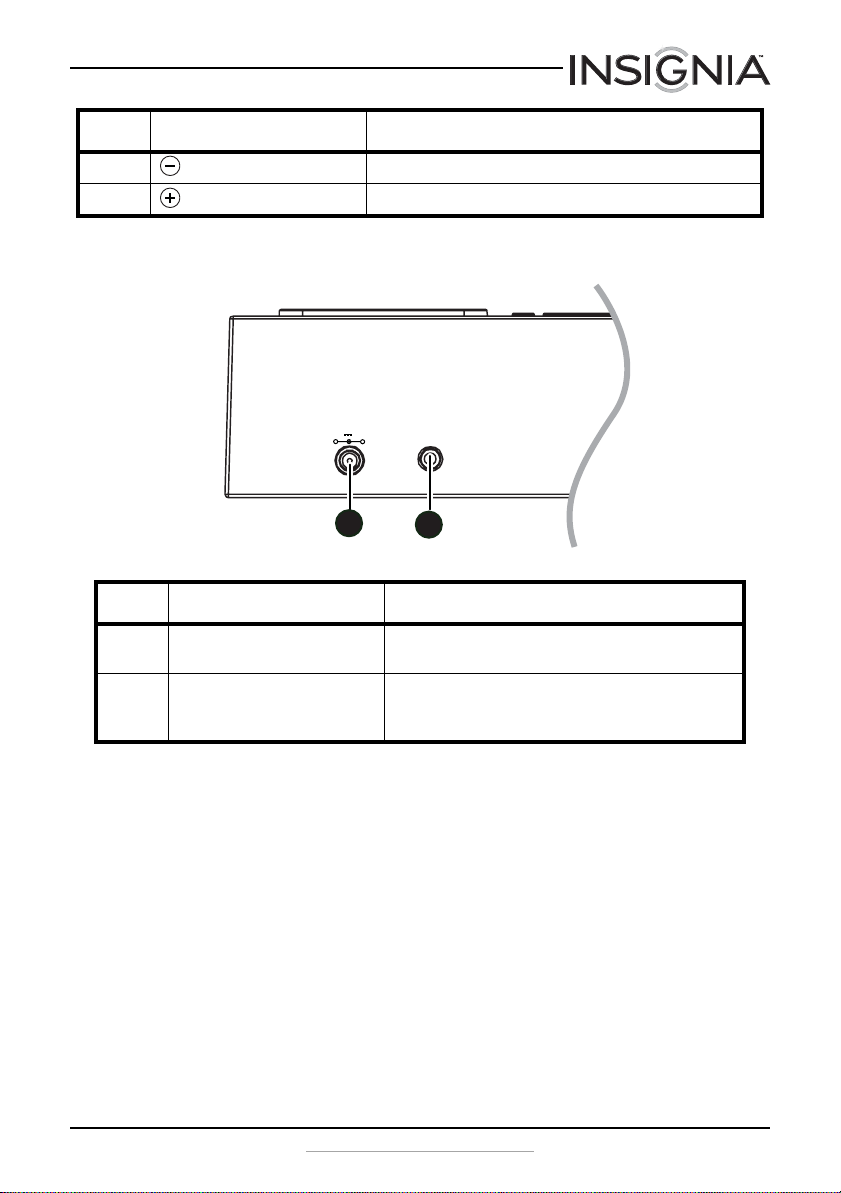
Back
5V 0.7A AUX
1
2
# Item Description
1 DC IN jack Connect the AC/DC power adapter to this the jack. See
2 AUX jack Connect an audio device to this jack to play the audio from the
“Connecting the AC/DC power adapter” on page 8.
device through the radio speakers. See “Connecting an audio
device” on page 12.
www.insigniaproducts.com
5
Page 6

LCD
Insignia NS-CLOPP1 Digital Clock Radio with FM
1
Volume Preset AUX FM
2
3
12:08
4
5
# Icon Description
1 Preset When you are programming a radio station preset, “Preset” and the preset number (P-01
2 Volume After you select the alarm sound, this icon indicates that you can change the volume of the
3 Current time Displays the current time.
4 Sleep Lights when the sleep timer is active. See “Setting the sleep timer” on page 10.
5 Alarm 1 Lights when Alarm 1 has been set. See “Setting the alarm time” on page 9.
6 AUX Lights when a connected audio device is selected as the audio source. See “Connecting an
7 FM Lights when the radio is selected as the audio source.
8 AM/PM “AM” lights after midnight and before noon. “PM” lights after noon and before midnight.
9 Snooze Lights when your radio is in snooze mode. See “Using the snooze feature” on page 10.
10 Battery Lights when no backup batteries are installed or when the backup battery charge is low.
11 Alarm 2 Lights when Alarm 2 has been set. See “Setting the alarm time” on page 9.
SLEEP
Buzzer
1 Radio
through P-10) appear in the center of the LCD. See “Programming a radio station preset”
on page 12.
When you are tuning to a radio station preset, “Preset” and the preset number (P-01
through P-10) appear in the center of the LCD. See “Tuning to a preset radio station” on
page 12.
alarm. See “Setting the alarm sound” on page 9.
When you are playing the radio, the “Volume” icon lights and the current volume level
(1 through 15) appears in the center of the LCD.
audio device” on page 12.
Buzzer
2 Radio
SNOOZE
AM
PM
MHz
6
7
8
9
10
11
6
www.insigniaproducts.com
Page 7
Insignia NS-CLOPP1 Digital Clock Radio with FM
Package contents
• Digital clock radio with FM
•AC/DC power adapter
•Quick Setup Guide
• User Guide
Setting up your radio
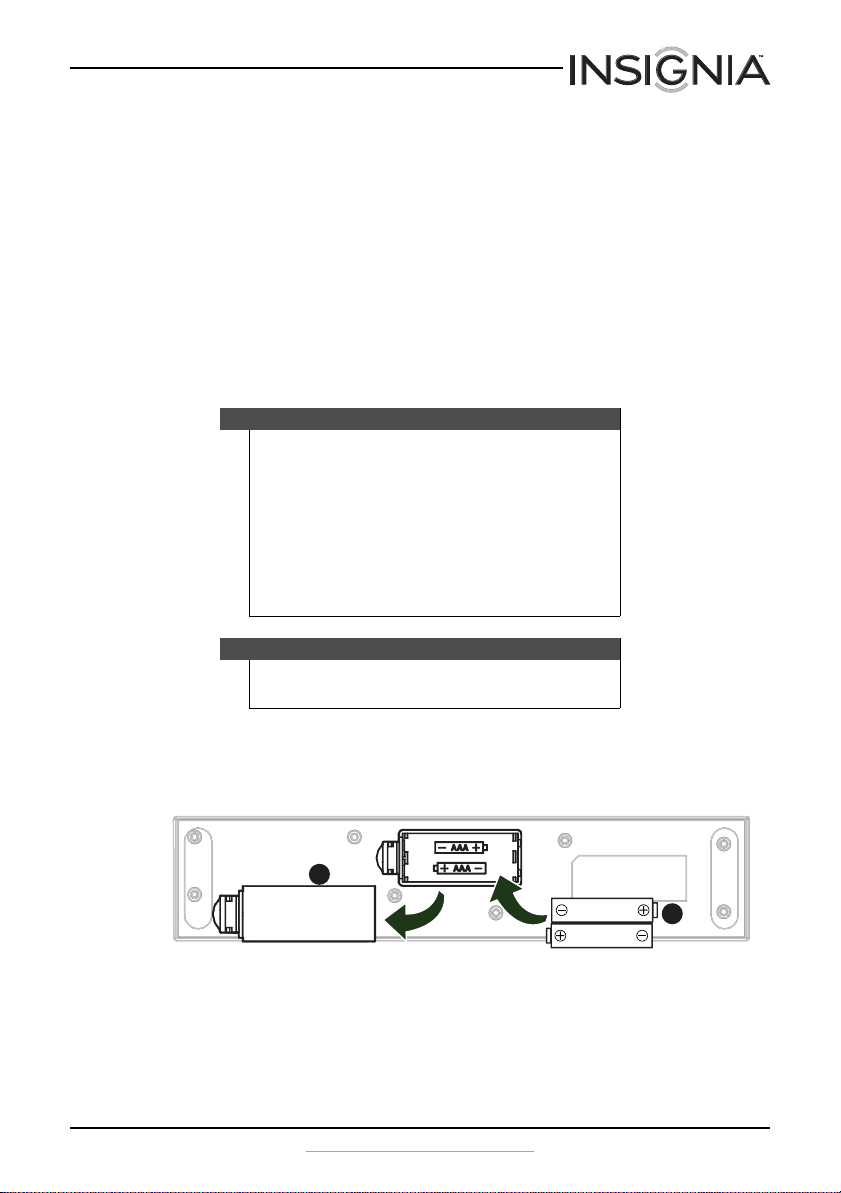
Installing backup batteries
The backup batteries provide power to backup the time setting when you
unplug the AC/DC power adapter.
Cautions
• Use only the size and type of batteries specified.
• Do not mix old and new batteries.
• Make sure that you follow the correct polarity as
indicated in the battery compartment.
• Do not try to recharge batteries not intended to be
recharged. They can overheat and rupture. (Follow the
battery manufacturer’s directions.)
• Do not throw batteries into a fire. Dispose of used
batteries as hazardous waste.
Note
If you unplug the AC/DC power adapter and the backup batteries
are dead or not installed, the time setting is lost.
To install batteries:
1 Push the latch to release the battery compartment cover on the
bottom of your radio, then lift the cover off the battery compartment.
1
AAA
2
AAA
2 Insert two AAA batteries (not included) into the battery compartment.
Make sure that the + and – symbols on the batteries align with the +
and – symbols inside the compartment.
www.insigniaproducts.com
7
Page 8

Insignia NS-CLOPP1 Digital Clock Radio with FM
3 Insert the tab on the battery compartment cover into the slot on the
battery compartment, then press the cover down until it clicks into
place.
Connecting the AC/DC power adapter
Note
If you unplug the AC/DC power adapter and the backup batteries
are dead or not installed, the time setting is lost.
To connect the AC/DC power adapter:
1 Plug the small connector on the power adapter into the DC IN jack on
the back of your radio.
2 Plug the other connector on the power adapter into a power outlet.
Using your radio
Setting the time
Notes
“AM” or “PM” appears on the LCD to the right of the time. When
you set the time, make sure that the “AM” or “PM” displays
correctly.
To set the time:
1 Press Sleep for about two seconds until the hour digits blink on
the LCD.
2 Press or to increase the hour or press or to decrease the
hour.
3 Press Sleep again. The minutes digits blink on the LCD.
4 Press or to increase the minutes or press or to decrease
the minutes.
5 Press Sleep again or wait 10 seconds to save the time setting and
exit time setting mode.
8
www.insigniaproducts.com
Page 9

Insignia NS-CLOPP1 Digital Clock Radio with FM
Setting the alarm sound
Your radio has two alarms and can play the buzzer or the radio for the
alarm sound. You can use the same alarm sound for both alarms or set one
alarm to use the buzzer and the other alarm to use the radio.
Note
Button presses must be within three seconds of each other. If
you do not press a button within three seconds, your radio exits
alarm setting mode.
To set the alarm sound:
1 Press (Alarm 1) or (Alarm 2). The or icon blinks on
1
the LCD.
2 To use the radio as the alarm sound, press (Alarm 1) or (Alarm 2)
once. The or icon blinks on the LCD and the alarm sound
1Radio
is set to the radio. Wait three seconds to save the setting and exit alarm
sound setting mode. When the alarm turns on, the last tuned radio
station plays.
OR
To use the buzzer as the alarm sound, press (Alarm 1) or
2
(Alarm 2) twice. The or icon blinks on the LCD and
the alarm sound is set to the buzzer. Wait three seconds to save the
setting and exit alarm sound setting mode.
3 To completely turn off the alarm, press (Alarm 1) or (Alarm 2)
repeatedly until the or icon disappears from the LCD.
Setting the alarm time
Your radio has two alarms that you can set for different times.
Notes
• “AM” or “PM” appears on the LCD to the right of the time.
• Button presses must be within 10 seconds of each other.
2
2Radio
1
Buzzer
1
2
Buzzer
2
1
1
1
1
When you set the time, make sure that the “AM” or “PM”
displays correctly.
If you do not press a button within 10 seconds, your radio
exits alarm setting mode.
2
2
2
To set the alarm time:
1 Press and hold (Alarm 1) or (Alarm 2) for about two seconds
1
2
until the hour digits blink on the LCD.
2 Press or to increase the hour or press or to decrease the
hour.
3 Press (Alarm 1) or (Alarm 2) again. The minutes digits blink on
1
2
the LCD.
www.insigniaproducts.com
9
Page 10

4 Press or to increase the minutes or press or to decrease
the minutes.
5 Press (Alarm 1) or (Alarm 2) again. The Volume icon appears on
1
the LCD and the volume digits blink.
6 Press or to increase the alarm volume or press or to
decrease the alarm volume. The alarm volume range is from 1 to 15
with 15 being the loudest setting. The default setting is 10.
7 Press (Alarm 1) or (Alarm 2) again to save the time setting and
1
exit alarm setting mode.
Turning off the alarm
Insignia NS-CLOPP1 Digital Clock Radio with FM
2
2
To turn off the alarm:
• Press any button except .
Using the snooze feature
Note
You can press a total of six times. If you press it a
seventh time, the alarm turns off.
To use the snooze feature:
• When the alarm sounds, press . The alarm turns off for 10
minutes and SNOOZE appears on the LCD.
Setting the sleep timer
You can specify the amount of time your radio waits before it turns off
automatically.
To set the sleep timer:
• Press Sleep repeatedly to select the amount of time you want
your radio to wait before it turns off automatically. You can select 15,
30, 45, 60, or 90 minutes. The time you select and the SLEEP icon
appear on the LCD.
• To turn off the sleep timer, press Sleep repeatedly until 00
appears and the SLEEP icon disappears.
SNOOZE / DIMMER
SNOOZE / DIMMER
SNOOZE / DIMMER
10
www.insigniaproducts.com
Page 11

Insignia NS-CLOPP1 Digital Clock Radio with FM
Adjusting the LCD brightness
When you adjust the LCD brightness, your radio retains the setting and
uses this setting the next time you turn on your radio.
To adjust the LCD brightness:
1 Quickly press repeatedly to select a brightness level. You can
SNOOZE / DIMMER
select High, Middle, or Low.
2 Wait a few seconds to save your setting and exit brightness mode.
Playing your radio
Notes
When you turn off your radio, it goes into standby mode.
To play your radio:
1 Make sure that you have connected the AC/DC power adapter. See
“Connecting the AC/DC power adapter” on page 8.
2 Press Source . Your radio turns on.
3 Press or to manually select a radio frequency.
OR
Press and hold or to automatically tune to the next lower or
higher radio station.
4 Press or to increase or decrease the volume.
5 To turn off your radio, press and hold Source for two seconds.
OFF appears on the LCD for three seconds, then your radio turns off.
www.insigniaproducts.com
11
Page 12

Insignia NS-CLOPP1 Digital Clock Radio with FM
Programming a radio station preset
A radio station preset lets you assign a preset number to a radio station to
make it easier to tune to a station. You can program 10 presets.
To program a radio station preset:
1 Tune to the radio station you want to program, then press and hold
Preset for two seconds. The “Preset” icon lights and the next
available preset number (P-01 through P-10) appears in the center of
the LCD.
2 If you want to use a different preset number, press or repeatedly
until the number you want appears on the LCD.
3 Within 10 seconds, press Preset again to save your station preset.
If you do not press Preset within 10 seconds, your radio exits
preset mode and your station preset is not saved.
Tuning to a preset radio station
After you program radio station presets, you can quickly tune to a preset
station.
To tune to a preset radio station:
• Quickly press and release Preset one or more times until the
preset number for the station you want appear in the center of the
LCD. Your radio tunes to the station.
Connecting an audio device
You can connect an audio device, such as an MP3 player, to your radio to
play music through your radio’s speakers.
To connect an audio device:
1 Plug an audio cable with a 3.5 mm connector (not included) into the
AUX IN jack on the back of your radio and into the audio out jack on
your audio device.
2 Press Source to turn on your radio, then press Source
repeatedly until AUX appears on the LCD.
3 Press or to increase or decrease the device volume.
4 Use the controls on the audio device to control playback.
12
www.insigniaproducts.com
Page 13

Insignia NS-CLOPP1 Digital Clock Radio with FM
Specifications
Total RMS power 2 W @1kHz, @ 10% THD
Total peak power 4 W
Signal-to-noise ratio ≥ 65dB
Frequency response 300Hz - 20kHz
Speakers 2 × 40 mm
Batteries 2 AAA
Dimensions (W × D × H) 9.8 × 2.1 × 2.1 in. (250 × 54 × 54 mm)
Weight 1.1 lbs. (0.5 kg)
Legal notices
FCC Statement
This device complies with Part 15 of the FCC Rules. Operation is subject to the following two
conditions: (1) this device may not cause harmful interference, and (2) this device must
accept any interference received, including interference that may cause undesired
operation.
This equipment has been tested and found to comply with the limits for a Class B digital
device, pursuant to Part 15 of the FCC Rules. These limits are designed to provide reasonable
protection against harmful interference in a residential installation. This equipment
generates, uses and can radiate radio frequency energy and, if not installed and used in
accordance with the instructions, may cause harmful interference to radio communications.
However, there is no guarantee that interference will not occur in a particular installation. If
this equipment does cause harmful interference to radio or television reception, which can
be determined by turning the equipment off and on, the user is encouraged to try to correct
the interference by one or more of the following measure:
• Reorient or relocate the receiving antenna
• Increase the separation between the equipment and receiver.
• Connect the equipment into an outlet on a circuit different from that to which the
receiver is connected.
• Consult the dealer or an experienced radio/TV technician for help
Warning: Changes or modifications not expressly approved by the party responsible for
compliance could void the user's authority to operate the equipment.
IC Statement
This device complies with Industry Canada licence-exempt RSS standard(s).
Operation is subject to the following two conditions: (1) this device may not cause
interference, and (2) this device must accept any interference, including interference that
may cause undesired operation of the device.
This equipment complies with IC radiation exposure limits set forth for an uncontrolled
environment.
Canada ICES-003 statement
This Class B digital apparatus complies with Canadian ICES-003.
www.insigniaproducts.com
13
Page 14

Insignia NS-CLOPP1 Digital Clock Radio with FM
90-day limited warranty - Insignia
Definitions:
Insignia Products (“Insignia”) warrants to you, the original purchaser of this new
Insignia-branded product (“Product”), that the Product shall be free of defects in the original
manufacturer of the material or workmanship for a period of ninety (90) days from the date
of your purchase of the Product (“Warranty Period”). For this warranty to apply, your Product
must be purchased in the United States or Canada from a Best Buy or Future Shop
authorized dealer of Insignia brand products only that are packaged with this warranty
statement.
How long does the coverage last?
The Warranty Period lasts for ninety (90) days from the date you purchased the Product. Your
purchase date is printed on the receipt you received with the Product.
What does this warranty cover?
During the Warranty Period, if the original manufacture of the material or workmanship of
the Product is determined to be defective by an authorized Insignia repair center or store
personnel, Insignia will (at its sole option): (1) repair the Product with new or rebuilt parts; or
(2) replace the Product at no charge with new or rebuilt comparable products or parts.
Products and parts replaced under this warranty become the property of Insignia and are
not returned to you. If service of Products or parts are required after the Warranty Period
expires, you must pay all labor and parts charges. This warranty lasts as long as you own your
Insignia Product during the Warranty Period. Warranty coverage terminates if you sell or
otherwise transfer the Product.
How to obtain warranty service?
If you purchased the Product at a Best Buy or Future Shop retail store location, please take
your original receipt and the Product to any Best Buy or Future Shop store. Make sure that
you place the Product in its original packaging or packaging that provides the same amount
of protection as the original packaging. If you purchased the Product from a Best Buy or
Future Shop online web site, mail your original receipt and the Product to the address listed
on the web site. Make sure that you put the Product in its original packaging or packaging
that provides the same amount of protection as the original packaging.
To obtain warranty service, in the United States call 1-888-BESTBUY, Canada call
1-866-BESTBUY for Future Shop call 1-800-663-2275. Call agents may diagnose and correct
the issue over the phone.
Where is the warranty valid?
This warranty is valid only in the United States and Canada at Best Buy or Future Shop
branded retail stores or websites to the original purchaser of the product in the county
where the original purchase was made.
What does the warranty not cover?
This warranty does not cover:
• Customer instruction/education
• Installation
•Set up adjustments
•Cosmetic damage
• Damage due to acts of God, such as power surges
•Accident(s)
•Misuse
14
www.insigniaproducts.com
Page 15

Insignia NS-CLOPP1 Digital Clock Radio with FM
•Abuse
• Negligence
• Commercial purposes/use, including but not limited to use in a place of business or in
communal areas of a multiple dwelling condominium or apartment complex, or
otherwise used in a place of other than a private home.
• Modification of any part of the Product, including the antenna
• Display panel damaged by static (non-moving) images applied for lengthy periods
(burn-in).
• Damage due to incorrect operation or maintenance
• Connection to an incorrect voltage or power supply
• Attempted repair by any person not authorized by Insignia to service the Product
• Products sold “as is” or “with all faults”
• Consumables, including but not limited to batteries (i.e. AA, AAA, C etc.)
• Products where the factory applied serial number has been altered or removed
• Loss or Theft of this product or any part of the product
• Up to three (3) pix el fail ures ( dots th at are dar k or in correc tly illum inated) g rouped in an
area smaller than one tenth (1/10) of the display size or up to five (5) pixel failures
throughout the display. (Pixel based displays may contain a limited number of pixels
that may not function normally.)
• Failures or Damage caused by any contact including but not limited to liquids, gels or
pastes.
REPAIR REPLACEMENT AS PROVIDED UNDER THIS WARRANTY IS YOUR EXCLUSIVE REMEDY
FOR BREACH OF WARRANTY. INSIGNIA SHALL NOT BE LIABLE FOR ANY INCIDENTAL OR
CONSEQUENTIAL DAMAGES FOR THE BREACH OF ANY EXPRESS OR IMPLIED WARRANTY ON
THIS PRODUCT, INCLUDING, BUT NOT LIMITED TO, LOST DATA, LOSS OF USE OF YOUR
PRODUCT, LOST BUSINESS OR LOST PROFITS. INSIGNIA PRODUCTS MAKES NO OTHER
EXPRESS WARRANTIES WITH RESPECT TO THE PRODUCT, ALL EXPRESS AND IMPLIED
WARRANTIES FOR THE PRODUCT, INCLUDING, BUT NOT LIMITED TO, ANY IMPLIED
WARRANTIES OF AND CONDITIONS OF MERCHANTABILITY AND FITNESS FOR A PARTICULAR
PURPOSE, ARE LIMITED IN DURATION TO THE WARRANTY PERIOD SET FORTH ABOVE AND
NO WARRANTIES, WHETHER EXPRESS OR IMPLIED, WILL APPLY AFTER THE WARRANTY
PERIOD. SOME STATES, PROVINCES AND JURISDICTIONS DO NOT ALLOW LIMITATIONS ON
HOW LONG AN IMPLIED WARRANTY LASTS, SO THE ABOVE LIMITATION MAY NOT APPLY TO
YOU. THIS WARRANTY GIVES YOU SPECIFIC LEGAL RIGHTS, AND YOU MAY ALSO HAVE OTHER
RIGHTS, WHICH VARY FROM STATE TO STATE OR PROVINCE TO PROVINCE.
Contact Insignia:
For customer service please call 1-877-467-4289
www.insigniaproducts.com
Distributed by Best Buy Purchasing, LLC
7601 Penn Avenue South, Richfield, Minnesota, U.S.A. 55423-3645
© 2013 BBY Solutions, Inc.
All rights reserved. INSIGNIA is a trademark of BBY Solutions, Inc. Registered in some
countries. All other products and brand names are trademarks of their respective owners.
www.insigniaproducts.com
15
Page 16

INSIGNIA is a registered trademark of BBY Solutions, Inc.
Registered in some countries.
Distributed by Best Buy Purchasing, LLC, 7601 Penn Ave South, Richfield, MN 55423 U.S.A.
©2013 BBY Solutions, Inc.
All Rights Reserved
1-877-467-4289
www.insigniaproducts.com
V3 ENGLISH
13-0144
 Loading...