

Page 1

User Guide | Guide de l’utilisateur | Guía del Usuario
Clock Radio with iPod® Dock
Radio-réveil avec station d’accueil pour iPod
Radio reloj con estación de acoplamiento para iPod
NS-CL01
MD
®
Page 2

Page 3
Insignia NS-CL01
Clock Radio with iPod® Dock
Contents
Welcome . . . . . . . . . . . . . . . . . . . . . . . . . . . . . . . . . . . . . . . . . . 3
Safety information . . . . . . . . . . . . . . . . . . . . . . . . . . . . . . . . . . . 3
Important safeguards . . . . . . . . . . . . . . . . . . . . . . . . . . . . . . . . 4
Features . . . . . . . . . . . . . . . . . . . . . . . . . . . . . . . . . . . . . . . . . . 6
Setting up your clock radio . . . . . . . . . . . . . . . . . . . . . . . . . . . . 9
Using your clock radio. . . . . . . . . . . . . . . . . . . . . . . . . . . . . . . 12
Troubleshooting. . . . . . . . . . . . . . . . . . . . . . . . . . . . . . . . . . . . 18
Legal notices. . . . . . . . . . . . . . . . . . . . . . . . . . . . . . . . . . . . . . 19
90-day limited warranty . . . . . . . . . . . . . . . . . . . . . . . . . . . . . . 21
Français . . . . . . . . . . . . . . . . . . . . . . . . . . . . . . . . 23
Español. . . . . . . . . . . . . . . . . . . . . . . . . . . . . . . . . 45
Welcome
Congratulations on your purchase of a high-quality Insignia product.
Your NS-CL01 represents the state of the art in clock radios and is
designed for reliable and trouble-free performance.
Safety information
To prevent fire or shock hazard, do not plug the power adapter into an
extension cord, receptacle, or other outlet unless the blades can be
fully inserted to prevent blade exposure. To prevent fire or shock
hazard, do not expose this appliance to rain or moisture.
CAUTION: To reduce the risk of electric
shock, do not remove cover (or back). No
user-serviceable parts inside. Refer
servicing to qualified service personnel.
www.insignia-products.com
3
Page 4
Insignia NS-CL01 Clock Radi
d
®
Dock
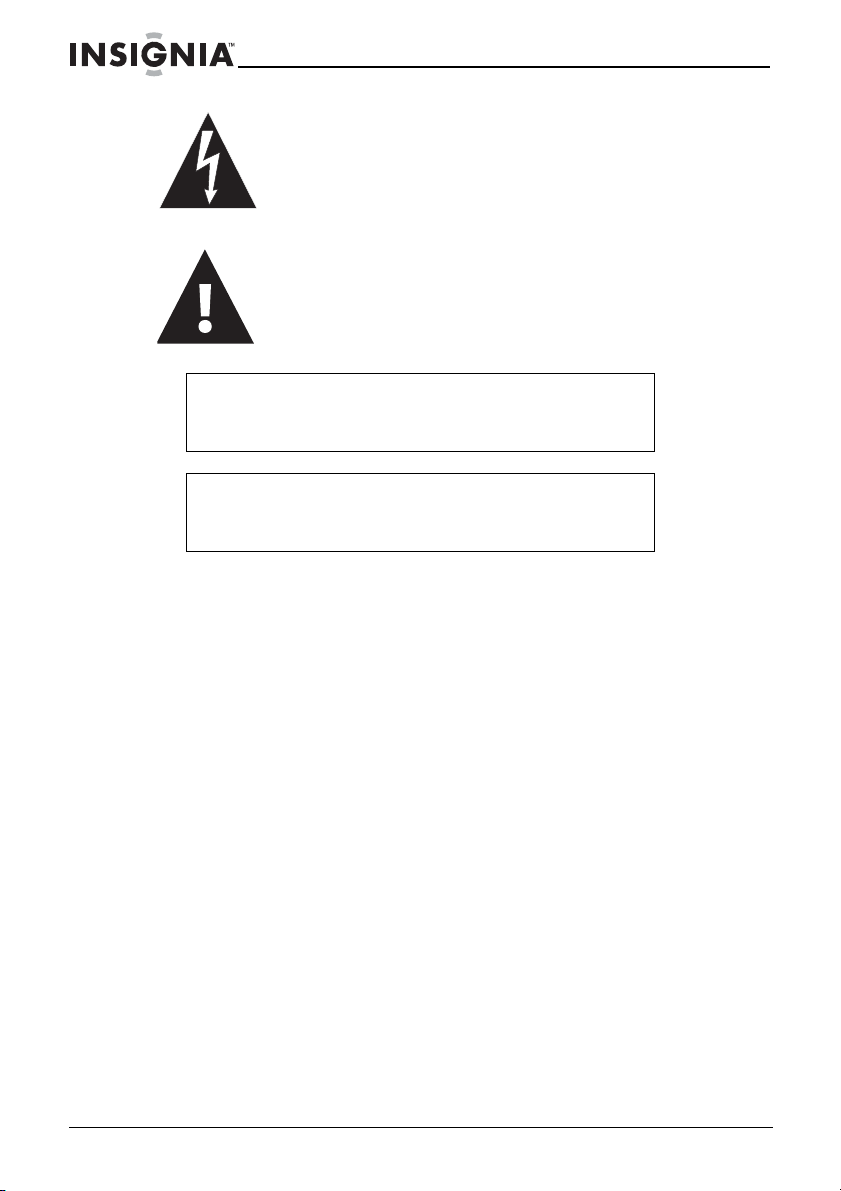
The lightning flash with arrowhead symbol within a
triangle is intended to alert you to the presence of
uninsulated dangerous voltage within your shelf
system’s enclosure that may be of sufficient magnitude
to constitute risk of electric shock to persons.
The exclamation point within a triangle is intended to
alert you to the presence of important operating and
maintenance (servicing) instructions in the literature
accompanying your shelf system.
Caution
Any change or modification to your clock radio not expressly
approved by Insignia or its authorized parties could void
your authority to operate your shelf system.
Caution
Your clock radio should not be exposed to water (dripping or
splashing) and no objects filled with liquids, such as vases,
should be placed on it.
Important safeguards
• Read instructions—Read all the safety and operating
instructions before operating your clock radio.
• Retain instructions—Retain the safety and operating
instructions for future reference.
• Follow warnings—Follow all warnings on your clock radio and
in the operating instructions.
• Follow instructions—Follow all operating and use
instructions.
• Cleaning—Unplug your clock radio’s AC power adapter from
the power outlet before cleaning. Do not use liquid cleaners or
aerosol cleaners. Use a damp cloth for cleaning.
• Attachments—Do not use attachments not recommended by
Insignia because they may cause hazards.
• Water and moisture—Do not use your clock radio near water.
Such as near a bath tub, in a wet basement, or near a
swimming pool.
• Ventilation—To ensure reliable operation of your clock radio
and to protect it from overheating, ventilation slots and
openings are provided in the cabinet back. Do not block these
openings. Your clock radio should never be placed near or over
a radiator or heat register. Do not place your clock radio in a
o with iPo
4
www.insignia-products.com
Page 5

Insignia NS-CL01 Clock Radi
o with iPo
d
®
Dock
built-in installation such as a bookcase or rack unless correct
ventilation is provided or the manufacturer’s instructions have
been adhered to.
• Power sources—Use only the type of power source indicated
on the label. If you are not sure of the type of power supply to
your home, consult Insignia Technical Support or your local
power company. For clock radios intended to operate from
battery power or other sources, refer to the operating
instructions.
• Grounding or polarization—Your clock radio’s AC power
adapter may be equipped with a polarized alternating-current
line plug (a plug having one blade wider than the other). This
plug will fit into the power outlet only one way. This is a safety
feature. If you are unable to insert the plug fully into the outlet,
try reversing the plug. If the plug should still fail to fit, contact
your electrician to replace your obsolete outlet. Do not defeat
the safety purpose of the polarized plug.
• Power cord protection—Route power supply cords so that
they are not likely to be walked on or pinched by items placed
upon or against them, paying particular attention to cords at
plugs, convenience receptacles, and the point where they exit
from your clock radio.
• Surge protector—We recommend the use of a surge
protector for the AC power adapter connection. Lightning and
power surges ARE NOT covered under warranty for this
product.
• Lightning—For added protection for your clock radio during a
lightning storm, or when it is left unattended and unused for
long periods of time, unplug the AC power adapter from the
power outlet. This will prevent damage to your clock radio due
to lightning and power line surges.
• Overloading—Do not overload power outlets and extension
cords, because this can result in a risk of fire or electric shock.
• Object and liquid entry—Never insert objects of any kind into
your clock radio through openings, because they may touch
dangerous voltage points or short out parts that could result in
a fire or electric shock. Never spill liquid of any kind on your
clock radio.
• Servicing—Do not attempt to service your clock radio yourself,
because opening or removing covers may expose you to
dangerous voltage or other hazards. Refer all servicing to
qualified service personnel.
• Damage requiring service—Unplug your clock radio’s AC
power adapter from the power outlet and refer servicing to
qualified service personnel under the following conditions:
• When the power supply cord or plug is damaged or frayed.
• If liquid has been spilled, or objects have fallen into your
clock radio.
www.insignia-products.com
5
Page 6

Insignia NS-CL01 Clock Radi
o with iPo
d
®
Dock
• If your clock radio has been exposed to rain or water.
• If your clock radio does not operate normally by following
the operating instructions. Adjust only those controls that
are covered by the operating instructions, because incorrect
adjustment of other controls may result in damage and
often requires extensive work by a qualified technician to
restore your clock radio to its normal operation.
• If your clock radio has been dropped or damaged in any
way.
• When your clock radio exhibits a distinct change in
performance.
• Replacement parts—When replacement parts are required,
make sure that the service technician uses replacement parts
specified by the manufacturer that have the same
characteristics as the original part. Unauthorized substitutions
may result in fire, electric shock, injury to persons, or other
hazards.
• Safety check—Upon completion of any service or repairs to
your clock radio, ask the service technician to perform routine
safety checks to determine that your clock radio is in correct
operating condition.
• Heat—Place your clock radio away from heat sources such as
radiators, heat registers, stoves, or other products (including
amplifiers) that produce heat.
Caution
To prevent electric shock, match the wide blade of the AC
power adapter plug to the wide slot in the power outlet and
fully insert the plug.
The mains plug of the AC power adapter is used as the disconnect
device. It should remain readily accessible and should not be
obstructed during use. To completely disconnect the clock radio from
supply mains, the mains plug of the AC power adapter should be
disconnected from the AC power outlet completely.
The marking plate of the AC power adapter is located on the bottom
of the adapter.
Features
Package contents:
•Clock radio
• AC power adapter
•User Guide
•iPod® holders (5)
• Decorative covers (pink, blue, and silver)
6
www.insignia-products.com
Page 7
Insignia NS-CL01 Clock Radi
d
®
Dock
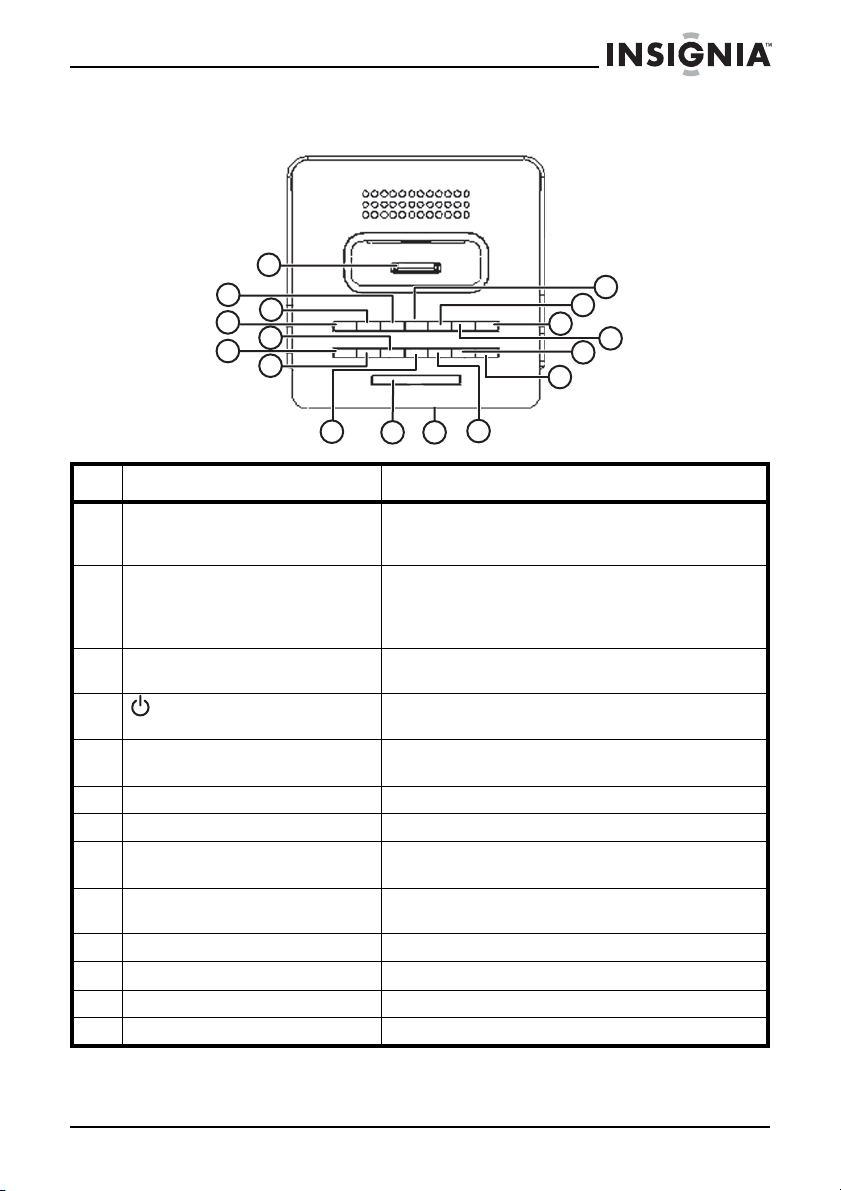
Top panel
o with iPo
1
15
12
16
13
17
14
2
3
4
5
6
7
10
11
8
9
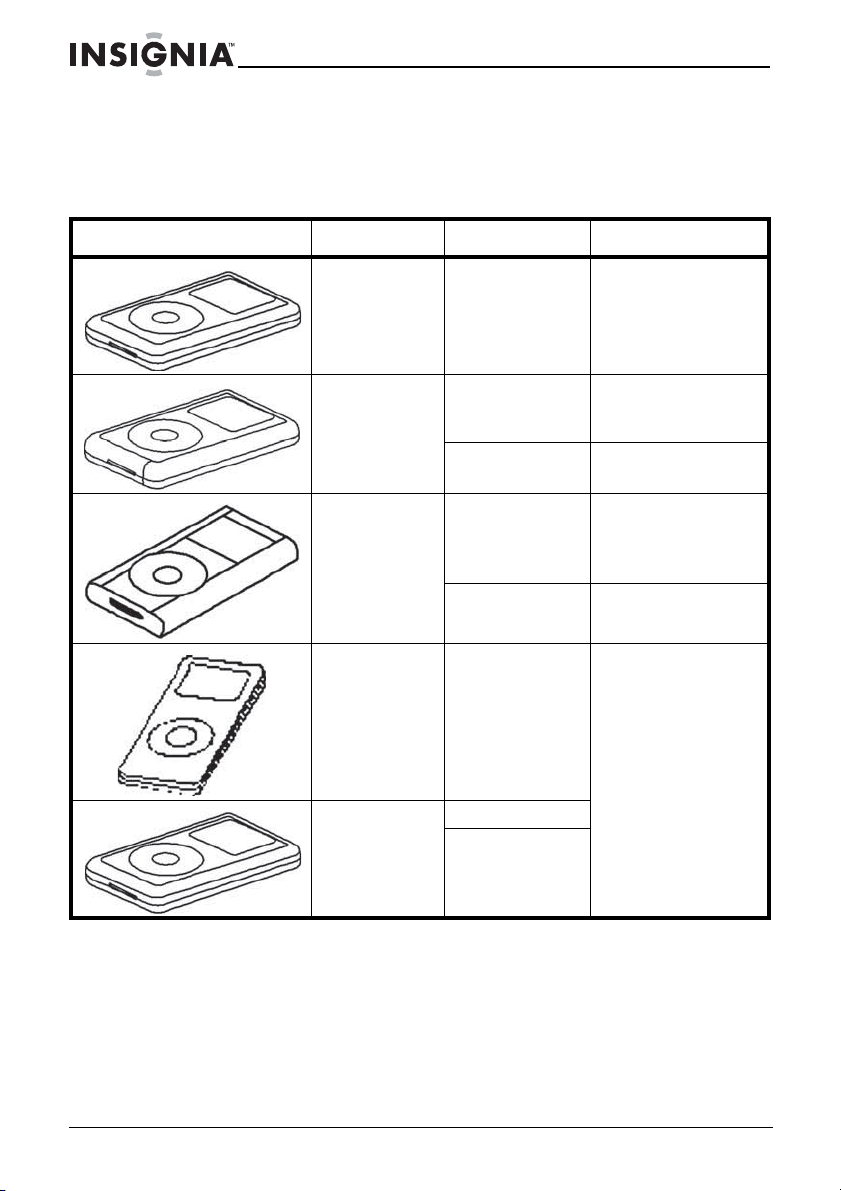
# Description Function
1iPod® connector Connect an iPod® to your clock radio here. See
2 BASS/TREB button Press repeatedly to adjust the bass and trebel
3 FUNCTION button Press to select AM, FM, iPod®, Line-in, or
4
5ALARM 1 button Press to select and change settings for Alarm
6 Volume down button Press to decrease the volume of the radio.
7 Volume up botton Press to increase the volume of the radio.
8 ALARM 2 button Press to select and change settings for Alarm
9 SNOOZE/SLEEP button Press to temporarily turn off the alarm or to set
10 Display Shows information about the radio.
11 TIME SET button Press to enter time set mode.
12 MIN (minute) button Press to set the minute.
13 HR (hour) button Press to set the hour.
Standby/ON button Press to turn on the radio. Press again to return
“Connecting an iPod® to your clock radio” on
page 15.
settings of your clock radio. The settings will be
stored and shown on the Bass or Treb indicator
on the display (on the front of the radio).
Alarm on buzzer.
the radio to standby mode.
mode 1.
mode 2.
the sleep timer.
www.insignia-products.com
7
Page 8
Insignia NS-CL01 Clock Radi
o with iPo
d
®
Dock
# Description Function
14 TUNE DOWN/SKIP– button In radio mode, press to tune or scan the radio
15 TUNE UP/SKIP+ button In radio mode, press to tune or scan the radio
16 PLAY/PAUSE button Press to begin playback when your iPod® is
17 PRESET/MEMORY button In radio mode, press to tune to a preset station.
to a lower frequency. In iPod® mode, press to
skip to the previous track. In bass/treb mode,
press to decrease bass/treble level.
to a higher frequency. In iPod® mode, press to
skip to the next track. In bass/treb mode, press
to increase bass/treble level.
connected to the clock radio. Press again to
pause playback.
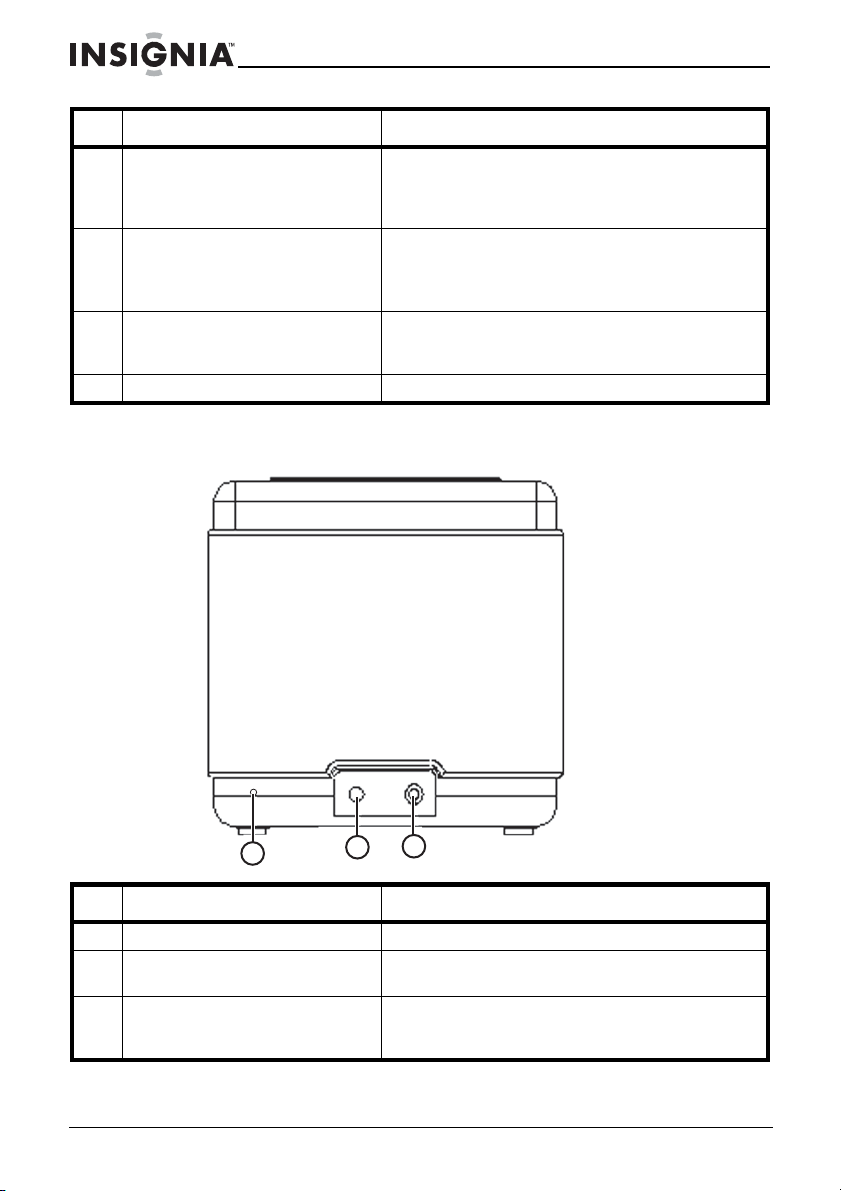
Back panel
# Description Function
1 FM antenna Improves reception of FM broadcasts.
2 DC IN jack Insert the small connector from the AC power
3 Line in jack Connect a cable from an external audio source
8
3
1
2
adapter here.
to this input jack to hear the sound through your
clock radio.
www.insignia-products.com
Page 9
Insignia NS-CL01 Clock Radi
o with iPo
d
®
Dock
Setting up your clock radio
Using the AC power adapter
To use the AC power adapter:
1 Insert the small connector at the end of the AC power adapter
cable into the DC IN jack on the back of your clock radio.
2 Plug the AC power adapter into a wall power outlet.
Note
Only use the supplied AC power adapter, which has the
following specifications: DC=6V 1A
Unplug both the DC plug and the adapter when not in use.
The batteries are automatically disconnected when the AC
power adapter is used.
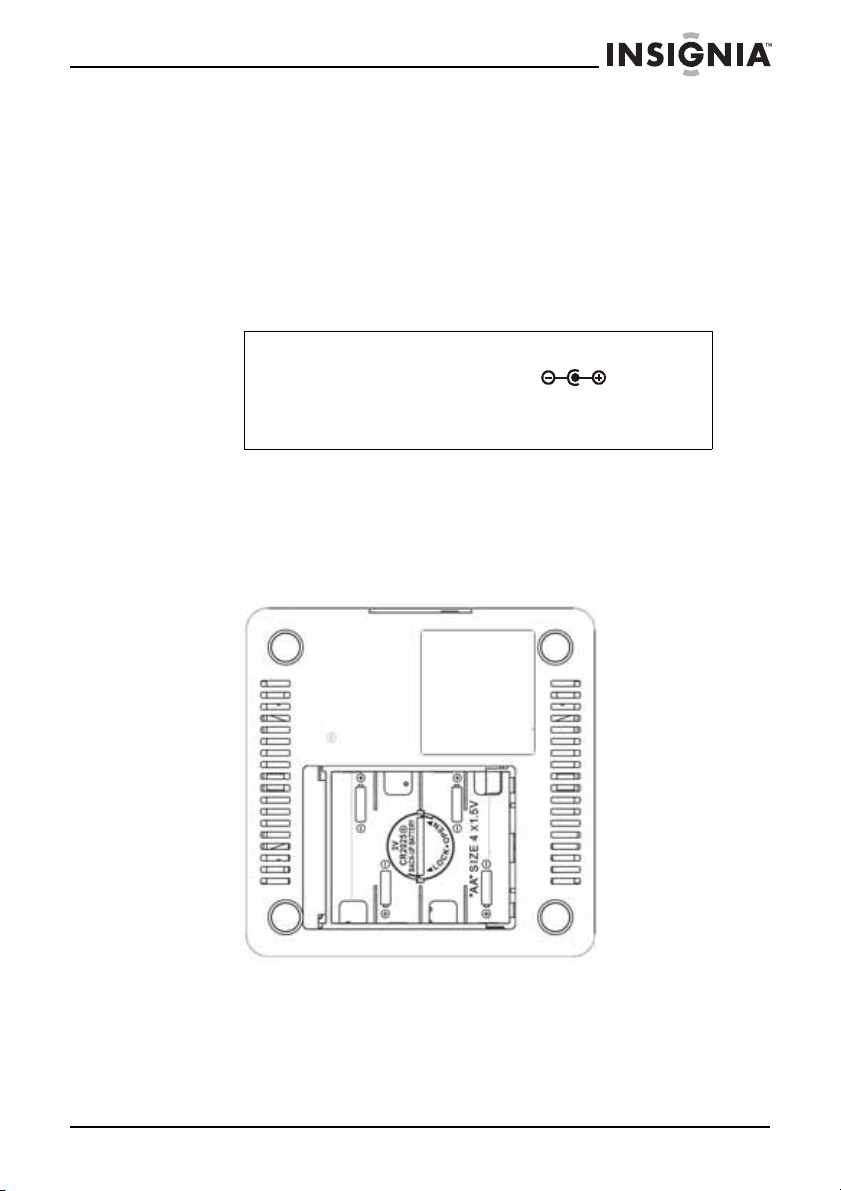
Installing the batteries
To install the batteries:
1 Turn your clock radio over, then open and remove the door to the
battery compartment.
2 Insert four (4) AA batteries into the battery compartment. Make
sure that you match the + and – symbols on the batteries with the
+ and – symbols in the battery compartment.
www.insignia-products.com
9
Page 10
Insignia NS-CL01 Clock Radi
d
®
Dock
3 Reinstall and close the battery compartment and return your clock
radio to the upright position.
Note
The AC power adapter must be disconnected from the
DC IN jack on the back of the radio in order for the radio to
operate on battery power.
When the battery indicator
need to replace the batteries.
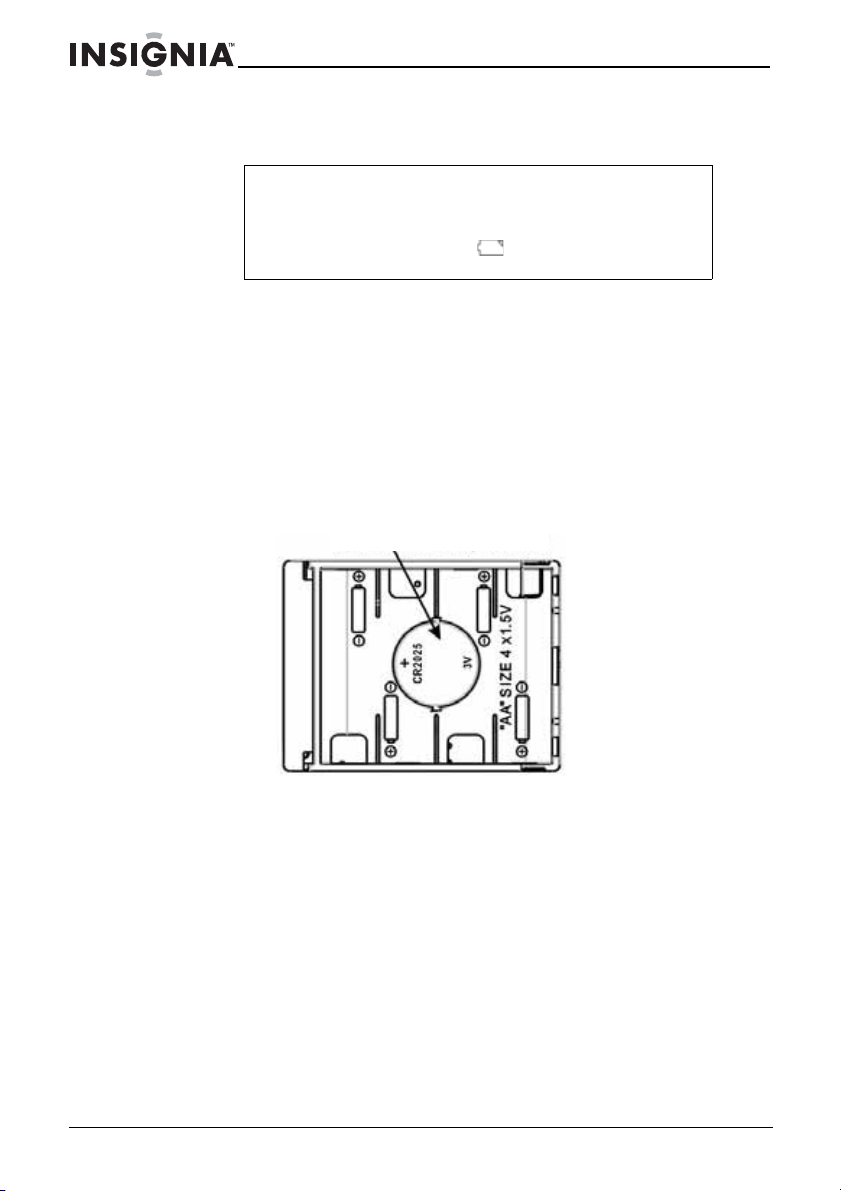
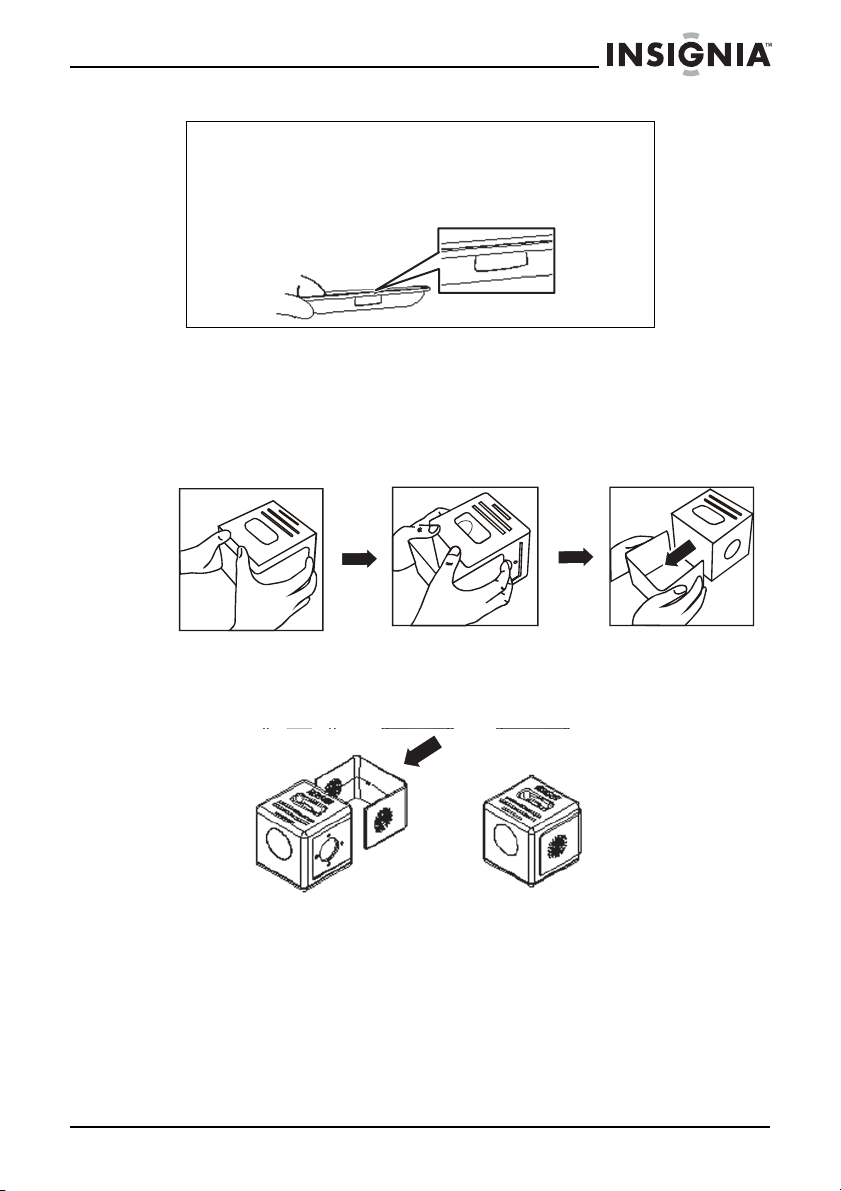
Installing a backup battery
One CR2025 battery can be used as a backup for the clock and alarm
time.
To install a backup battery:
1 Open the backup battery cover by rotating it counterclockwise,
then removing the door.
2 Insert the CR2025 battery as shown, with the positive (+) side of
the battery up.
Insert battery as shown
o with iPo
appears in the display, you
10
www.insignia-products.com
Page 11
Insignia NS-CL01 Clock Radi
o with iPo
d
®
Dock
3 Place the backup battery cover back on the compartment, then
rotate it clockwise until it locks.
Caution
Follow these precautions when using batteries in this
device:
1. Use only the size and type of batteries specified.
2. Make sure that you follow the correct polarity as indicated
in the battery compartment when installing batteries.
Reversed batteries may cause damage to the radio.
3. Do not mix different types of batteries together (for
example, alkaline, rechargeable, and carbon zinc), or
semi-used batteries with fresh ones.
4. If your clock radio is not to be used for a long period of
time, remove the batteries to prevent damage or injury from
possible battery leakage.
5. Do not try to recharge batteries not intended to be
recharged, because they can overheat and rupture. (Follow
battery manufacturer’s directions.)
6. Do not throw batteries into a fire. Dispose of used
batteries as hazardous waste.
Note
The backup battery is used to back up the clock and alarm
times only.
When the battery is depleted, it should be changed
immediately.
Connecting the power cord
To prepare your clock radio for use:
1 Make sure that your local AC power source matches the voltage
shown on the plate located on the AC power adapter. If it does not,
consult your dealer or service center.
2 Plug the small connector on the power cable into the DC IN jack
on the back of the clock radio and the AC power adapter itself into
an AC power outlet.
3 Press the (Standby/on) button to turn on your clock radio.
To completely turn off the clock radio, unplug the AC power
adapter from the AC power outlet.
Caution
To protect your clock radio during thunderstorms, unplug the
AC power adapter from the AC power outlet.
www.insignia-products.com
11
Page 12

Insignia NS-CL01 Clock Radi
d
®
Dock
Using your clock radio
Playing the radio
To play the radio:
1 Press (Standby/on) to turn on the clock radio.
2 Press FUNCTION repeatedly to select the radio band you want to
listen to.
3 Press TUNE UP/SKIP + or TUNE DOWN/SKIP– to tune the radio
up or down and select the station you want.
4 Adjust the volume to a comfortable level by pressing either the
VOLUME UP or VOLUME DOWN button.
5 To scan to a higher or lower frequency, press and hold TUNE UP/
SKIP + or TUNE DOWN/SKIP – for more than one second. The
radio automatically scans to the next station.
6 Press (Standby/on) to turn off the clock radio.
To improve reception:
• For FM reception, uncoil and extended the FM wire antenna.
• For AM reception, turn the radio slightly until reception
improves.
• Move the AC power adapter 3 feet away from your radio to
reduce interference to radio reception.
o with iPo
To use presets:
1 Press (Standby/on) to turn on the clock radio.
2 Press FUNCTION repeatedly to select the radio band you want to
listen to.
3 Press TUNE UP/SKIP + or TUNE DOWN/SKIP– to tune the radio
up or down and select the station you want.
4 To save the station as a preset, press and hold the PRESET/
MEMORY button for more than one second. “P01” blinks on the
display.
5 Press TUNE UP/SKIP + or TUNE DOWN/SKIP– to select the
preset number you want to designate for that station.
6 Press PRESET/MEMORY to confirm the setting. The station is
stored in memory.
7 Repeat Steps 3 to 6 to store as many as 10 AM presets and 10
FM presets.
8 To select a preset station, briefly press PRESET/MEMORY
repeatedly until you reach the station you want.
12
www.insignia-products.com
Page 13
Insignia NS-CL01 Clock Radi
o with iPo
d
®
Dock
To listen to another audio device:
1 Make sure the clock radio is turned off
2 Plug one end of the auxiliary line-in cable (not included) into the
Line-in jack on the back of the radio.
3 Plug the other end of the cord into the Line-out jack on the audio
device.
4 Turn on the radio.
5 Press FUNCTION one or more times until “Line-in” appears on the
display.
6 Use the controls on the audio device to control playback.
Setting the clock and the alarm
To set the clock:
1 Press and hold TIME SET. The time blinks on the display.
2 Press MIN (minute) to set the minute and HR (hour) to set the
hour. Make sure that you set the correct AM/PM setting.
3 Press TIME SET again. The clock is set.
Note
Press the TIME SET button to display the clock and current
operation mode.
If no key is pressed within 10 seconds, the radio returns to
the previous operation mode automatically.
To set the alarm:
1 Press and hold ALARM 1 or ALARM 2 (depending on the alarm
mode you want) until the display blinks.
2 Press MIN (minute) to set the alarm minute and HR (hour) to set
the alarm hour. Make sure to set AM/PM correctly.
3 Briefly press ALARM 1 or ALARM 2 again to save the setting.
The display stops blinking.
4 To cancel the alarm, press ALARM 1 or ALARM 2 until the alarm
indicator disappears from the display.
To set the alarm to buzzer, radio, or iPod
1 Briefly press ALARM 1 or ALARM 2 (depending on the alarm
mode you want). The time is displayed.
www.insignia-products.com
®
:
13
Page 14
Insignia NS-CL01 Clock Radi
o with iPo
d
®
Dock
2 Press ALARM 1 or ALARM 2 repeatedly to select iPod®, radio, or
buzzer.
Notes
• When the alarm time is reached, the alarm volume starts
at the minimum settings, then gradually increases in
volume until it reaches the current volume setting.
• If set to AM, FM, or buzzer, the alarm automatically turns
on for 20 minutes and then shuts off.
• If set to iPod
track. The radio will play back for 20 minutes, then turn off
automatically or, if the remaining song has less than 20
minutes of playback time remaining, the radio plays back
the remaining time of the song and then stops.
• If the alarm is set to iPod
alarm will sound the buzzer instead.
• If no key is pressed within 10 seconds, the radio will be
returned to the previous operation mode automatically.
®
, the radio starts playback on the current
®
and the iPod® is removed, the
To turn the alarm off:
1 Press any key (except SNOOZE/SLEEP) to turn off the alarm.
The alarm will be set for the next day.
2 If you do not want to set the alarm for the next day, press
ALARM 1 or ALARM 2 until “ALARM 1” or “ALARM 2” disappears
from the display.
To use the snooze:
3 While the alarm is sounding, press SNOOZE/SLEEP. The
SNOOZE indicator appears on the display and “10” appears in the
display for five seconds, then it reverts back to the real time. The
alarm turns back on automatically 10 minutes later.
4 If you press SNOOZE/SLEEP within those five seconds, each
time you press the SNOOZE/SLEEP button, the snooze time
increases by five minutes up to 60 minutes.
After you set snooze, the real time will display. Press SNOOZE/
SLEEP again to view the remaining snooze time for five seconds.
5 To cancel snooze (alarm will not turn back on), press ALARM 1 or
ALARM 2 (depending on the alarm that was set). The SNOOZE
indicator disappears from the display.
6 Repeatedly press ALARM 1 or ALARM 2 to select between alarm
off (alarm will not be set for the next day), alarm on for buzzer,
radio, or iPod
®
(alarm will be set for the next day).
14
www.insignia-products.com
Page 15

Insignia NS-CL01 Clock Radi
o with iPo
d
®
Dock
To set sleep timer:
1 Make sure the radio is turned on.
2 Press SNOOZE/SLEEP once. The “SLEEP” indicator appears in
the display, and “10” appears in the display for five seconds
(indicating that the radio will turn off after 10 minutes).
3 Repeatedly press SNOOZE/SLEEP to increase the sleep timer in
10 minute increments up to 60 minutes.
4 After you set the sleep timer, the real time displays. Press
SNOOZE/SLEEP again to view the remaining sleep time for five
seconds.
5 To cancel the sleep function, repeatedly press SNOOZE/SLEEP
until “00” shows on the display.
Connecting an iPod® to your clock radio
You can connect an iPod® (not included) to your clock radio so you
can listen to the songs stored on your iPod®.
®
To connect an iPod
1 Make sure that the radio is turned off.
2 Select the appropriate iPod
shown on the front of the holder, as shown on the table on the next
page) to match your iPod®.
3 Insert the corresponding holder and your iPod
on top of your radio.
to your radio:
®
holder (the universal dock number is
®
into the iPod® dock
To listen to the iPod
1 Make sure that the radio is turned off and that the iPod
matching your iPod® is installed.
2 Insert your iPod
3 Adjust the volume to a comfortable level by pressing either the
VOLUME UP or VOLUME DOWN button.
4 Press TUNE UP/SKIP+ or TUNE DOWN/SKIP– to skip to the
beginning of the current, last, or next track.
®
:
®
into the dock.
www.insignia-products.com
®
holder
15
Page 16
Insignia NS-CL01 Clock Radi
o with iPo
d
®
Dock
iPod
To charge the iPod® battery:
• Make sure that you have installed the correct iPod
the iPod
®
dock on the radio, then insert the iPod®. The battery
charging indicator appears on the iPod® display.
®
Type Memory Universal dock #
iPod® mini 4 and 6 GB 3
Fourth
generation
iPod
iPod
iPod® with
color display
First and
second
generation
iPod® nano
®
®
Photo/
®
holder in
20 GB/U2
4
Special Edition
20 GB
40 GB 5
20 GB
6
30 GB
U2 Special
Edition
40 and 60 GB 7
2 and 4 GB Use the universal
dock included with
your iPod®.
16
Fifth
generation
®
(w/video)
iPod
30 GB
60 and 80 GB
www.insignia-products.com
Page 17
Insignia NS-CL01 Clock Radi
d
®
Dock
Note
The five iPod® holders provided with this radio are for use
with this radio only. They are not universal docks.
The universal dock number is shown on the front of each
dock (see the following).
Changing the cover
To remove the cover:
• Press the locks on the sides of the radio and pull the cover
from the back of the radio.
o with iPo
5
5
To install the cover:
• Slide the cover onto the radio from the back. The locks snap
into place to hold the cover on.
www.insignia-products.com
17
Page 18

Insignia NS-CL01 Clock Radi
d
®
Dock
Troubleshooting
Caution
Do not try to repair the clock radio yourself. Doing so will
invalidate your warranty.
Problem Possible cause Solution
Noise or sound
distorted on AM
or FM radio
broadcasts
No sound The volume control is turned
No sound in
®
mode
iPod
Not charging the
iPod® battery
The clock resets
to “12:00”
The alarm does
not turn on
FM—The antenna wire is not
extended.
AM—The radio is not
positioned correctly.
down.
The AC power adapter is
unplugged.
Extend the FM antenna.
Rotate the radio until the best
reception is obtained.
Increase the volume.
Plug in the AC power adapter and
press
the radio.
No batteries, dead batteries, or
batteries not installed correctly.
The iPod® is not connected
correctly.
The radio is not in iPod® mode. Press FUNCTION to select iPod®
The AC power adapter is not
plugged in.
The backup battery is installed
incorrectly, not installed, or
dead.
The clock is not set. Set the clock.
The alarm is not activated or
set correctly.
The clock is not set. Set the clock.
Make sure that you have installed
fresh batteries and that they are
installed correctly.
Make sure that the connection is
correct.
mode.
Plug in the AC power adapter.
Check the backup battery.
Set and activate the alarm as
described in “Setting the clock and
the alarm” on page 13.
o with iPo
(Standby/on) to turn on
18
www.insignia-products.com
Page 19

Insignia NS-CL01 Clock Radi
d
®
Dock
Legal notices
FCC Part 15
This device complies with Part 15 of the FCC Rules. Operation of this product is
subject to the following two conditions: (1) this device may not cause harmful
interference, and (2) this device must accept any interference received, including
interference that may cause undesired operation.
This equipment has been tested and found to comply within the limits for a class B
digital device, pursuant to Part 15 of the FCC Rules. These limits are designed to
provide reasonable protection against harmful interference in a residential installation.
This equipment generates, uses, and can radiate radio frequency energy and, if not
installed and used in accordance with the instructions, may cause harmful interference
to radio communications. However, there is no guarantee that interference will not
occur in a particular installation. If this equipment does cause harmful interference to
radio or television reception, which can be determined by turning the equipment off and
on, the user is encouraged to try to correct the interference by one or more of the
following measures:
• Reorient or relocate the receiving antenna.
• Increase the separation between the equipment and receiver.
• Connect the equipment into an outlet on a circuit different from that to which the
receiver is connected.
• Consult the dealer or an experienced technician for help.
o with iPo
www.insignia-products.com
19
Page 20

Insignia NS-CL01 Clock Radi
o with iPo
d
®
Dock
20
www.insignia-products.com
Page 21

Insignia NS-CL01 Clock Radi
o with iPo
d
®
Dock
90-day limited warranty
Insignia Products (“Insignia”) warrants to you, the original purchaser of this new
NS-CL01 (“Product”), that the Product shall be free of defects in the original
manufacture of the material or workmanship for a period of 90 days from the date of
your purchase of the Product (“Warranty Period”). This Product must be purchased
from an authorized dealer of Insignia brand products and packaged with this warranty
statement. This warranty does not cover refurbished Product. If you notify Insignia
during the Warranty Period of a defect covered by this warranty that requires service,
terms of this warranty apply.
How long does the coverage last?
The Warranty Period lasts for 90 days from the date you purchased the Product. The
purchase date is printed on the receipt you received with the Product.
What does this warranty cover?
During the Warranty Period, if the original manufacture of the material or workmanship
of the Product is determined to be defective by an authorized Insignia repair center or
store personnel, Insignia will (at its sole option): (1) repair the Product with new or
rebuilt parts; or (2) replace the Product at no charge with new or rebuilt comparable
products or parts. Products and parts replaced under this warranty become the
property of Insignia and are not returned to you. If service of Products or parts are
required after the Warranty Period expires, you must pay all labor and parts charges.
This warranty lasts as long as you own your Insignia Product during the Warranty
Period. Warranty coverage terminates if you sell or otherwise transfer the Product.
How to obtain warranty service?
If you purchased the Product at a retail store location, take your original receipt and the
Product to the store you purchased it from. Make sure that you place the Product in its
original packaging or packaging that provides the same amount of protection as the
original packaging. If you purchased the Product from an online web site, mail your
original receipt and the Product to the address listed on the web site. Make sure that
you put the Product in its original packaging or packaging that provides the same
amount of protection as the original packaging.
To obtain in-home warranty service for a television with a screen 25 inches or larger,
call 1-888-BESTBUY. Call agents will diagnose and correct the issue over the phone
or will have an Insignia-approved repair person dispatched to your home.
Where is the warranty valid?
This warranty is valid only to the original purchaser of the product in the United States
and Canada.
What does the warranty not cover?
This warranty does not cover:
• Customer instruction
• Installation
• Set up adjustments
• Cosmetic damage
• Damage due to acts of God, such as lightning strikes
• Accident
•Misuse
•Abuse
• Negligence
www.insignia-products.com
21
Page 22

Insignia NS-CL01 Clock Radi
o with iPo
d
®
Dock
• Commercial use
• Modification of any part of the Product, including the antenna
• Plasma display panel damaged by static (non-moving) images applied for lengthy
periods (burn-in).
This warranty also does not cover:
• Damage due to incorrect operation or maintenance
• Connection to an incorrect voltage supply
• Attempted repair by anyone other than a facility authorized by Insignia to service
the Product
• Products sold as is or with all faults
• Consumables, such as fuses or batteries
• Products where the factory applied serial number has been altered or removed
REPAIR REPLACEMENT AS PROVIDED UNDER THIS WARRANTY IS YOUR
EXCLUSIVE REMEDY. INSIGNIA SHALL NOT BE LIABLE FOR ANY INCIDENTAL
OR CONSEQUENTIAL DAMAGES FOR THE BREACH OF ANY EXPRESS OR
IMPLIED WARRANTY ON THIS PRODUCT, INCLUDING, BUT NOT LIMITED TO,
LOST DATA, LOSS OF USE OF YOUR PRODUCT, LOST BUSINESS OR LOST
PROFITS. INSIGNIA PRODUCTS MAKES NO OTHER EXPRESS WARRANTIES
WITH RESPECT TO THE PRODUCT, ALL EXPRESS AND IMPLIED WARRANTIES
FOR THE PRODUCT, INCLUDING, BUT NOT LIMITED TO, ANY IMPLIED
WARRANTIES OF AND CONDITIONS OF MERCHANTABILITY AND FITNESS FOR
A PARTICULAR PURPOSE, ARE LIMITED IN DURATION TO THE WARRANTY
PERIOD SET FORTH ABOVE AND NO WARRANTIES, WHETHER EXPRESS OR
IMPLIED, WILL APPLY AFTER THE WARRANTY PERIOD. SOME STATES,
PROVINCES AND JURISDICTIONS DO NOT ALLOW LIMITATIONS ON HOW LONG
AN IMPLIED WARRANTY LASTS, SO THE ABOVE LIMITATION MAY NOT APPLY TO
YOU. THIS WARRANTY GIVES YOU SPECIFIC LEGAL RIGHTS, AND YOU MAY
ALSO HAVE OTHER RIGHTS, WHICH VARY FROM STATE TO STATE OR
PROVINCE TO PROVINCE.
Contact Insignia:
For customer service please call 1-877-467-4289
www.insignia-products.com
Distributed by Best Buy Purchasing, LLC
7601 Penn Avenue South, Richfield, Minnesota, U.S.A. 55423-3645
© 2008 Best Buy Enterprise Services, Inc.
All rights reserved. INSIGNIA is a trademark of Best Buy Enterprise Services, Inc.
Registered in some countries. All other products and brand names are trademarks of
their respective owners.
22
www.insignia-products.com
Page 23

NS-CL01 de Insignia Radi
o-réveil avec station d’accueil
NS-CL01 de Insignia
Radio-réveil avec station d’accueil pour
iPod
MD
Table des matières
Bienvenue . . . . . . . . . . . . . . . . . . . . . . . . . . . . . . . . . . . . . . . . 23
Informations sur la sécurité. . . . . . . . . . . . . . . . . . . . . . . . . . . 23
Importantes mesures de sécurité . . . . . . . . . . . . . . . . . . . . . . 24
Fonctionnalités . . . . . . . . . . . . . . . . . . . . . . . . . . . . . . . . . . . . 27
Configuration du radio-réveil . . . . . . . . . . . . . . . . . . . . . . . . . . 29
Fonctionnement du radio-réveil. . . . . . . . . . . . . . . . . . . . . . . . 33
Problèmes et solutions . . . . . . . . . . . . . . . . . . . . . . . . . . . . . . 40
Avis juridiques. . . . . . . . . . . . . . . . . . . . . . . . . . . . . . . . . . . . . 41
Garantie limitée de 90 jours . . . . . . . . . . . . . . . . . . . . . . . . . . 43
Bienvenue
Félicitations d’avoir acheté ce produit Insignia de haute qualité. Le
modèle NS-CL01 représente la dernière avancée technologique dans
la conception de radio-réveil et il a été conçu pour des performances
et une fiabilité exceptionnelles.
Informations sur la sécurité
Afin de réduire les risques d’incendie et de choc électrique, ne pas
utiliser l'adaptateur d'alimentation avec une rallonge ou autres prises
d’alimentation, sauf si les plots peuvent s’y enfoncer entièrement
sans être exposés. Afin de réduire les risques d’incendie et de choc
électrique, ne pas exposer cet appareil à la pluie ou l’humidité.
ATT ENT ION: Afin de réduire le risque de
choc électrique, ne pas enlever le couvercle
(ou le panneau arrière). Ne contient aucune
pièce réparable par l'utilisateur. Confier
l’entretien à du personnel qualifié.
www.insignia-products.com
23
Page 24

NS-CL01 de Insignia Radi
o-réveil avec station d’accue
il
L'éclair fléché au centre d'un triangle prévient l'utilisateur
de la présence de tensions élevées non isolées dans
l’appareil, pouvant constituer un risque de choc
électrique pour les personnes.
Le point d’exclamation au centre d’un triangle prévient
l’utilisateur de la présence d’instructions importantes
dans le manuel de l’utilisateur livré avec l'appareil
concernant son utilisation et son entretien.
Attention
Tout changement ou modification de l’appareil non
expressément approuvé par le fabricant ou ses
représentants autorisés pourrait annuler l’autorisation pour
l’utilisateur de le mettre en service.
Attention
Ce radio-réveil ne doit pas être exposé à l’eau
(éclaboussures ou gouttes d’eau) et aucun objet rempli de
liquide, tel qu’un vase, ne doit être posé sur lui.
Importantes mesures de sécurité
• Lire les instructions – Lire toutes les instructions de sécurité
et de fonctionnement avant d’utiliser ce radio-réveil.
• Conserver les instructions – Conserver les instructions de
sécurité et de fonctionnement pour toute référence ultérieure.
• Respecter les avertissements – Observer tous les
avertissements figurant sur l’appareil ainsi que dans les
instructions d’utilisation.
• Suivre les instructions – Toutes les instructions d’utilisation
doivent être observées.
• Nettoyage – Débrancher le cordon d'alimentation CA du
radio-réveil de la prise secteur avant de le nettoyer. Ne pas
utiliser de nettoyants liquides ou en aérosol. Utiliser un chiffon
humide pour le nettoyage.
• Périphériques – Ne pas utiliser de périphériques non
recommandés par Insignia, car ils pourraient être source de
dangers.
• Eau et humidité – Ne pas utiliser cet appareil près de l’eau.
Par exemple, à côté d’une baignoire, dans une cave humide ou
à côté d’une piscine.
• Ventilation – Les fentes et ouvertures au dos du boîtier sont
prévues pour la ventilation, afin d’assurer un fonctionnement
fiable de l’appareil et de le protéger contre toute surchauffe. Ne
24
www.insignia-products.com
Page 25

NS-CL01 de Insignia Radi
o-réveil avec station d’accueil
pas obstruer les ouvertures. L’appareil ne doit jamais être
placé à proximité ou sur un radiateur, ou une bouche de
chauffage. Ne pas installer l’appareil dans un meuble encastré
tel qu’une bibliothèque ou sur une étagère, sauf si une
ventilation adéquate a été prévue ou si les instructions du
fabricant ont été respectées.
• Sources d’alimentation – Utiliser uniquement le type
d’alimentation électrique indiqué sur la plaque signalétique. En
cas d’incertitude sur la tension d'alimentation électrique de la
maison, consulter l'assistance technique d’Insignia ou la
compagnie locale d'électricité. Pour les appareils fonctionnant
sur piles ou d'autres sources d'alimentation électrique,
consulter les instructions d'utilisation.
• Mise à la terre ou polarisation – Le radio-réveil est équipé
d'un adaptateur d'alimentation CA avec prise polarisée (à deux
plots un plus large que l'autre). Cette fiche ne s'insère dans
une prise secteur que d'une seule façon. Il s'agit d'un dispositif
de sécurité. S’il est impossible d’introduire à fond la fiche dans
la prise secteur, essayer de retourner la prise. Si la fiche ne
s'adapte toujours pas à la prise secteur, contacter un
électricien afin qu'il remplace la prise inadéquate. Ne pas
chercher à modifier le dispositif de sécurité de la prise
polarisée.
• Protection du cordon d’alimentation – Acheminer le cordon
d'alimentation de telle manière qu'on ne puisse pas marcher
dessus ou qu'il ne soit pas pincé par des objets placés dessus
ou tout contre; prêter particulièrement attention au point de
raccordement du cordon à la prise murale, à la plaque
multiprises et au connecteur de l’appareil sur lequel il est
branché.
• Parasurtenseur – Il est recommandé d’utiliser une protection
contre les surtensions pour la connexion à la prise
d’alimentation CA. La foudre et les surtensions ne sont pas
couvertes par la garantie de ce produit.
• Foudre – Pour protéger l’appareil pendant un orage ou s’il se
trouve inutilisé et sans surveillance pendant une période
prolongée, débrancher l'adaptateur d'alimentation CA de la
prise secteur. Ceci évitera d’endommager l’appareil en cas de
foudre et de variations de tension du secteur.
• Surcharge – Les prises secteur et les rallonges ne doivent pas
être surchargées, cela pourrait provoquer des risques
d'incendie ou de choc électrique.
• Pénétration de liquides et d'objets divers – Ne jamais
enfoncer un objet quelconque dans les ouvertures de
l’appareil, car il pourrait entrer en contact avec des tensions
dangereuses ou provoquer un court-circuit à l'origine d'un
incendie ou d'un choc électrique. Ne jamais répandre un
liquide sur l’appareil.
www.insignia-products.com
25
Page 26

NS-CL01 de Insignia Radi
o-réveil avec station d’accue
il
• Réparation – L’utilisateur ne doit pas essayer de réparer cet
appareil lui-même; en effet son ouverture ou le démontage des
couvercles peut l’exposer à des tensions dangereuses et à
d'autres dangers. Toutes les réparations doivent être réalisées
par un personnel qualifié.
• Dommages requérant des réparations – Débrancher
l’adaptateur d’alimentation CA de l’appareil de la prise secteur
et utiliser les services d’un technicien qualifié dans les
conditions suivantes :
• Lorsque le cordon d’alimentation est effiloché ou la prise
endommagée.
• Si un liquide a été répandu ou des objets sont tombés dans
l’appareil.
• Si l’appareil a été exposé à la pluie ou à l’eau.
• Si l'appareil fonctionne anormalement en appliquant les
instructions d’utilisation. Ne régler que les commandes
décrites dans les instructions d’utilisation; en effet, un
réglage incorrect d’autres commandes pourrait provoquer
des détériorations entraînant souvent d'importantes
réparations par un technicien qualifié afin de rétablir un
fonctionnement normal de l’appareil.
• Si l’appareil est tombé ou s’il est endommagé de quelque
façon que ce soit.
• Lorsque l’appareil présente une détérioration marquée de
ses performances.
• Pièces de rechange – Si des pièces doivent être remplacées,
vérifier que le technicien utilise des pièces spécifiées par le
fabricant ayant les mêmes caractéristiques que celles
d’origine. Toute substitution par des pièces non autorisées
risque de provoquer un incendie, un choc électrique, des
blessures ou d'autres dangers.
• Contrôle de sécurité – Les réparations ou la maintenance
ayant été effectuées, demander au technicien de réaliser les
contrôles de sécurité de routine afin de déterminer que
l’appareil est en bon état de fonctionnement.
• Chaleur – Installer l'appareil à l’écart de sources de chaleur,
telles que radiateurs, bouches de chaleur, fours ou autres
appareils (y compris les amplificateurs) qui produisent de la
chaleur.
Attention
26
Pour éviter les chocs électriques, introduire la lame la plus
large de la fiche de l’adaptateur d’alimentation CA dans la
fente correspondante de la prise secteur et pousser à fond.
www.insignia-products.com
Page 27

NS-CL01 de Insignia Radi
o-réveil avec station d’accueil
La prise principale de l'adaptateur d’alimentation CA est utilisée
comme dispositif de déconnexion. Elle doit être facilement accessible
et sans aucune obstruction pendant l'utilisation. Pour complètement
déconnecter l’appareil de l’alimentation principale, la prise de
l’adaptateur d’alimentation CA doit être débranchée complètement de
la prise secteur CA.
La plaque signalétique de l’adaptateur d'alimentation CA se trouve
sur la partie inférieure de l'adaptateur.
Fonctionnalités
Contenu de l’emballage :
• Radio-réveil
• Adaptateur d’alimentation CA
• Guide de l'utilisateur
• Adaptateurs pour iPodMD (5)
• Boîtiers décoratifs (rose, bleu et argent)
Panneau supérieur
# Description Fonction
1 Connecteur pour iPod
2 Touche GRAVES/AIGUS Appuyer plusieurs fois pour régler les
1
15
12
16
13
17
14
27
2
3
4
5
6
7
10
11
MD
8
9
Connecter un iPodMD au radio-réveil ici. Voir
“Connexion d’un iPodMD au radio-réveil” à la
page 36.
paramètres des graves et des aigus du
radio-réveil. Les paramètres seront enregistrés
et indiqués sur le témoin Bass (Graves) ou Treb
(Aigus) de l'écran (à l’avant du radio-réveil).
www.insignia-products.com
Page 28

NS-CL01 de Insignia Radi
o-réveil avec station d’accue
il
# Description Fonction
3 Touche de FONCTION Permet de sélectionner AM, FM, iPodMD,
4 Touche Attente/Marche Appuyer sur cette touche pour mettre le
5 Touche ALARM 1 (Alarme 1) Permet de sélectionner et de modifier les
6 Touche de diminution du
volume
7 Touche d’augmentation du
volume
8 Touche ALARM 2 (Alarme 2) Permet de sélectionner et de modifier les
9 Touche RAPPEL D'ALARME/
ARRÊT DIFFÉRÉ
10 Affichage Affiche des informations relatives à la radio.
11 Touche de RÉGLAGE DE
L’HEURE
12 Touche MIN (minute) Permet de régler les minutes.
13 Touche HR (heure) Permet de régler les heures.
14 Touche de SYNTONISATION
DÉCROISSANTE/SAUT–
15 Touche de SYNTONISATION
CROISSANTE/SAUT+
16 Touche LECTURE/PAUSE Permet de commencer la lecture quand
17 Touche de PRÉRÉGLAGE/
MÉMORISATION
Line-in (Entrée ligne) ou Alarm on buzzer
(Alarme sur sonnerie).
radio-réveil en marche. Appuyer de nouveau
sur cette touche pour le mettre en mode
attente.
réglages du mode d’Alarme 1.
Permet de diminuer le volume de la radio.
Permet d’augmenter le volume de la radio.
réglages du mode d’Alarme 2.
Permet d’arrêter l’alarme momentanément ou
de configurer l’arrêt différé.
Permet d’accéder au mode de réglage de
l’heure.
En mode radio, permet de syntoniser ou de
balayer les stations radio à fréquence
inférieure. En mode iPod
à la piste précédente. En mode graves/aigus,
permet de diminuer le niveau des graves et des
aigus.
En mode radio, permet de syntoniser ou de
balayer les stations radio à fréquence
supérieure. En mode iPod
à la piste suivante. En mode graves/aigus,
permet d'augmenter le niveau des graves et
des aigus.
l’iPodMD est connecté au radio-réveil. Appuyer
de nouveau pour interrompre la lecture
momentanément.
En mode radio, permet de syntoniser une
station préréglée.
MD
, permet de revenir
MD
, permet de passer
28
www.insignia-products.com
Page 29

NS-CL01 de Insignia Radi
o-réveil avec station d’accueil
Panneau arrière
3
1
# Description Fonction
1 Antenne FM Améliore la réception des transmissions FM.
2 Prise d’entrée CC Insérer le petit connecteur de la prise
3 Prise d’entrée ligne Brancher le câble d'une source audio externe
2
d’alimentation CA ici.
sur cette prise d’entrée pour écouter le son à
travers le radio-réveil.
Configuration du radio-réveil
Utilisation de l'adaptateur d'alimentation CA
Pour utiliser l'adaptateur d'alimentation CA :
1 Insérer le petit connecteur à l’extrémité du câble de l’adaptateur
d'alimentation CA dans la prise d’entrée CC (DC IN) à l’arrière du
radio-réveil.
www.insignia-products.com
29
Page 30

NS-CL01 de Insignia Radi
il
2 Brancher l’adaptateur d'alimentation CA sur une prise secteur.
Remarque
N'utiliser que l'adaptateur d'alimentation CA fourni, dont les
spécifications sont les suivantes : CC = 6 V 1 A
Débrancher la prise CC et l'adaptateur si l'appareil n'est pas
utilisé.
Les piles sont automatiquement déconnectées lorsqu'un
adaptateur CA est utilisé.
Installation des piles
Pour installer les piles :
1 Retourner le radio-réveil, puis ouvrir et retirer le couvercle du
compartiment des piles.
o-réveil avec station d’accue
2 Insérer quatre (4) piles AA dans le compartiment. Veiller à ce que
les pôles + et – des piles coïncident avec les repères + et –
figurant à l'intérieur du compartiment.
3 Remettre et fermer le couvercle du compartiment des piles, puis
retourner le radio-réveil dans sa position verticale.
30
Remarque
L’adaptateur d'alimentation CA doit être déconnecté de la
prise d'entrée CC à l'arrière de l’appareil pour que celui-ci
puisse fonctionner sur les piles.
Quand le témoin des piles
doivent être remplacées.
s’affiche à l’écran, les piles
www.insignia-products.com
Page 31

NS-CL01 de Insignia Radi
o-réveil avec station d’accueil
Installation d’une pile de secours
Une pile de secours CR2025 peut être utilisée pour sauvegarder
l’heure de l’horloge et de l'alarme.
Pour installer une pile de secours :
1 Ouvrir le compartiment de la pile de secours en le pivotant dans le
sens antihoraire, puis retirer le couvercle.
2 Insérer la pile CR2025 tel qu’illustré ci-dessous, avec le signe + de
la pile tourné vers le haut.
Insérer la pile telle qu’illustré
www.insignia-products.com
31
Page 32

NS-CL01 de Insignia Radi
o-réveil avec station d’accue
il
3 Remettre le couvercle du compartiment de la pile en place, puis le
faire pivoter dans le sens horaire jusqu’à enclenchement.
Attention
Observer ces précautions pour le fonctionnement de
l'appareil sur piles :
1. N'utiliser que la taille et le type de piles spécifiés.
2. Prendre soin de respecter la polarité correcte indiquée
dans le compartiment des piles lors de leur installation.
L'inversion accidentelle des piles peut endommager le
radio-réveil.
3. Ne pas mélanger différents types de piles (alcalines,
rechargeables ou au carbone-zinc, par exemple) ou des
piles usagées avec des piles neuves.
4. Si l’appareil ne va pas être utilisé pendant une période
prolongée, retirer les piles afin d'éviter tout épanchement
d'acide éventuel pouvant provoquer des dommages ou des
blessures.
5. Ne pas essayer de recharger des piles qui ne sont pas
prévues à cet effet; elles pourraient surchauffer et éclater.
(Observer les instructions du fabricant de piles.)
6. Ne pas jeter les piles au feu. Se débarrasser des piles
usagées en suivant les normes relatives aux déchets
dangereux.
Remarque
La pile de secours est uniquement réservée à l’alimentation
de secours de l’heure de l’horloge et de l’alarme.
Quand la pile est déchargée, la remplacer immédiatement.
Connexion du cordon d’alimentation
Avant de mettre le radio-réveil en service :
1 Vérifier que la source d’alimentation CA locale correspond à la
tension indiquée sur la plaque signalétique de l'adaptateur
d'alimentation CA. Si elle ne correspond pas, contacter le
détaillant ou un centre de réparation.
2 Brancher le petit connecteur du câble d’alimentation sur la prise
d’entrée CC (DC IN) à l’arrière du radio-réveil, puis brancher
l’adaptateur d’alimentation CA sur une prise secteur CA.
3 Appuyer sur la touche (Attente/Marche) pour mettre le
radio-réveil en marche.
Pour éteindre l’appareil complètement, débrancher l’adaptateur
d’alimentation CA de la prise secteur CA.
Attention
32
Afin de protéger l’appareil pendant les gros orages,
débrancher l'adaptateur d'alimentation CA de la prise
secteur CA.
www.insignia-products.com
Page 33

NS-CL01 de Insignia Radi
o-réveil avec station d’accueil
Fonctionnement du radio-réveil
Fonctionnement de la radio
Pour utiliser la radio :
1 Appuyer sur la touche (Marche/Arrêt) pour mettre le
radio-réveil en marche.
2 Appuyer plusieurs fois sur FUNCTION (Fonction) pour
sélectionner la bande radio souhaitée.
3 Appuyer sur TUNE UP/SKIP + (Syntonisation croissante/Saut +),
ou TUNE DOWN/SKIP– (Syntonisation décroissante/Saut –) pour
syntoniser la radio vers le haut ou le bas et sélectionner la station
souhaitée.
4 Régler le volume sonore à un niveau confortable en appuyant sur
VOLUME UP (Augmentation du volume) ou VOLUME DOWN
(Diminution du volume).
5 Pour rechercher des stations de fréquence supérieure ou
inférieure, maintenir appuyée la touche TUNE UP/SKIP + ou
TUNE DOWN/SKIP – pendant plus d’une seconde. La radio
syntonise automatiquement la station suivante.
6 Appuyer sur la touche (Marche/Arrêt) pour éteindre le
radio-réveil.
Pour améliorer la réception :
• Pour une réception FM, dérouler et déployer l’antenne filaire
• Pour une réception AM, faire pivoter légèrement l’appareil
• Déplacer l’adaptateur d’alimentation CA à une distance de 3
Pour prérégler les stations :
1 Appuyer sur la touche (Marche/Arrêt) pour mettre le
radio-réveil en marche.
2 Appuyer plusieurs fois sur FUNCTION (Fonction) pour
sélectionner la bande radio souhaitée.
3 Appuyer sur TUNE UP/SKIP + (Syntonisation croissante/Saut +),
ou TUNE DOWN/SKIP– (Syntonisation décroissante/Saut –) pour
syntoniser la radio vers le haut ou le bas et sélectionner la station
souhaitée.
4 Pour la mémoriser comme station préréglée, maintenir appuyée la
touche PRESET/MEMORY (Préréglage/Mémorisation) pendant
plus d’une seconde. Le message « P01 » clignote sur l’écran.
FM.
jusqu’à ce que la réception s’améliore.
pieds (91 cm) de l'appareil pour éviter les interférences radio.
www.insignia-products.com
33
Page 34

NS-CL01 de Insignia Radi
o-réveil avec station d’accue
il
5 Appuyer sur TUNE UP/SKIP + ou TUNE DOWN/SKIP– pour
sélectionner le numéro préréglé souhaité de la station radio.
6 Appuyer sur PRESET/MEMORY pour confirmer le paramètre. La
station est mise en mémoire.
7 Répéter les étapes 3 à 6 pour mémoriser jusqu’à 10 stations AM
et 10 stations FM préréglées.
8 Pour sélectionner une station préréglée, appuyer plusieurs fois
brièvement sur PRESET/MEMORY jusqu’à ce que la station
souhaitée s’affiche.
Pour écouter un autre périphérique audio :
1 Vérifier que le radio-réveil est hors tension.
2 Brancher une extrémité du câble d’entrée ligne auxiliaire (non
fourni) sur la prise d’entrée ligne (Line-in) située à l'arrière du
radio-réveil.
3 Brancher l’autre extrémité du câble sur la prise de sortie ligne
(Line-out) du périphérique audio.
4 Mettre le radio-réveil sous tension.
5 Appuyer une ou plusieurs fois sur la touche FUNCTION (Fonction)
jusqu’à ce que « Line-in » s’affiche sur l’écran.
6 Utiliser les commandes du périphérique audio pour contrôler la
lecture.
Réglage de l’horloge et de l’alarme
Pour régler l’horloge :
1 Appuyer sans relâcher sur TIME SET (Réglage de l’heure).
L’heure clignote sur l’écran.
2 Appuyer sur MIN (minute) pour régler les minutes et sur HR
(heure) pour régler les heures. Vérifier d'avoir réglé correctement
le paramètre AM ou PM.
3 Appuyer de nouveau sur TIME SET. L’heure est réglée.
Pour régler l’alarme :
1 Appuyer sans relâcher sur ALARM 1 (Alarme 1) ou ALARM 2
(Alarme 2) [selon le mode d’alarme souhaité] jusqu’à ce que
l’affichage clignote.
34
Remarque
Appuyer sur TIME SET pour afficher l’horloge et le mode de
fonctionnement actuel.
Si aucune touche n’est appuyée dans les 10 secondes,
l’appareil revient automatiquement au mode de
fonctionnement antérieur.
www.insignia-products.com
Page 35

NS-CL01 de Insignia Radi
o-réveil avec station d’accueil
2 Appuyer sur MIN (minute) pour régler les minutes de l’alarme et
sur HR (heure) pour régler l’heure de l’alarme. Vérifier d’avoir
réglé correctement AM ou PM.
3 Appuyer de nouveau brièvement sur ALARM 1 ou ALARM 2 pour
enregistrer le réglage. L’affichage arrête de clignoter.
4 Pour annuler l’alarme, appuyer sur ALARM 1 ou ALARM 2
jusqu’à ce que le témoin d’alarme disparaisse de l’écran.
Pour régler l’alarme sur sonnerie, radio, ou iPod
MD
:
1 Appuyer brièvement sur ALARM 1 ou ALARM 2 (selon le mode
d’alarme souhaité). L’heure s’affiche.
2 Appuyer plusieurs fois sur ALARM 1 ou ALARM 2 pour
sélectionner l’iPod
Remarques
• Quand l’alarme retentit, le volume est réglé au minimum,
• Si l’alarme est réglée sur AM, FM, ou buzzer (sonnerie),
• Si l’alarme est réglée sur iPod
• Si l’alarme est réglée sur iPod
• Si aucune touche n’est appuyée dans les 10 secondes, le
MD
, la radio ou la sonnerie.
puis augmente graduellement jusqu’à l’obtention du
réglage actuel du volume.
elle se déclenche automatiquement pendant 20 minutes,
puis elle s’arrête.
commence la lecture de la piste en cours. L’appareil
continue la lecture pendant 20 minutes, puis s’arrête
automatiquement ou, si la durée de la chanson en cours
de lecture est de moins de 20 minutes, l’appareil continue
de jouer la durée restante de la chanson, puis s'arrête.
de sa station d’accueil, l’alarme sonore se déclenchera.
radio-réveil revient automatiquement au mode de
fonctionnement antérieur.
MD
, le radio-réveil
MD
et que celui-ci est retiré
Pour désactiver l’alarme :
1 Appuyer sur n’importe quelle touche (excepté sur SNOOZE/
SLEEP) [Rappel d'alarme/Arrêt différé] pour désactiver l’alarme.
L’alarme est réglée pour sonner le lendemain.
2 Pour désactiver l’alarme afin qu’elle ne sonne pas le lendemain,
appuyer sur ALARM 1 (Alarme 1) ou ALARM 2 (Alarme 2)
jusqu’à ce que « ALARM 1 » ou « ALARM 2 » disparaisse de
l’écran.
Pour utiliser le rappel d’alarme :
3 Quand l’alarme sonore retentit, appuyer sur la touche SNOOZE/
SLEEP. Le témoin SNOOZE apparaît à l’écran et « 10 » s’affiche
pendant cinq secondes, puis l’affichage revient à l'heure actuelle.
L'alarme se déclenche de nouveau automatiquement 10 minutes
plus tard.
www.insignia-products.com
35
Page 36

NS-CL01 de Insignia Radi
o-réveil avec station d’accue
il
4 Si la touche SNOOZE/SLEEP est appuyée dans les cinq
secondes, la durée du rappel d’alarme augmente par incréments
de cinq minutes allant jusqu’à 60 minutes à chaque appui de la
touche SNOOZE/SLEEP.
Après avoir réglé le rappel d’alarme, l’heure actuelle s’affiche.
Appuyer de nouveau sur SNOOZE/SLEEP pour voir la durée
restante du rappel d’alarme pendant cinq secondes.
5 Pour annuler le rappel d’alarme (l’alarme ne retentira pas de
nouveau), appuyer sur ALARM 1 ou ALARM 2 (selon le mode
d’alarme réglé). Le témoin SNOOZE disparaît de l’écran.
6 Appuyer plusieurs fois sur ALARM 1 ou ALARM 2 pour choisir
entre alarm off [alarme désactivée] (l’alarme ne sera pas réglée
pour le lendemain) et alarm on (alarme activée) pour buzzer
(sonnerie), radio ou iPod
MD
(l’alarme sera réglée pour le
lendemain).
Pour régler l'arrêt différé :
1 Vérifier que le radio-réveil est sous tension.
2 Appuyer une fois sur la touche SNOOZE/SLEEP (Rappel
d’alarme/Arrêt différé). Le témoin « SLEEP » (Arrêt différé)
apparaît sur l'écran et « 10 » s'affiche pendant cinq secondes
(indiquant que le radio-réveil s’éteindra au bout de 10 minutes).
3 Appuyer plusieurs fois sur SNOOZE/SLEEP pour augmenter la
durée de l’arrêt différé par incréments de 10 minutes allant jusqu’à
60 minutes.
4 Après avoir réglé l’arrêt différé, l’heure actuelle s’affiche. Appuyer
de nouveau sur SNOOZE/SLEEP pour voir la durée restante de
l’arrêt différé pendant cinq secondes.
5 Pour annuler la fonction de l’arrêt différé, appuyer plusieurs fois
sur SNOOZE/SLEEP jusqu’à ce que « 00 » s’affiche à l’écran.
Connexion d’un iPodMD au radio-réveil
Il est possible de connecter un iPodMD (non inclus) au radio-réveil, afin
de pouvoir écouter des chansons enregistrées sur l'iPodMD.
Pour connecter un iPod
1 Vérifier que le radio-réveil est hors tension.
2 Sélectionner l’adaptateur approprié pour iPod
station d'accueil universelle est indiqué sur l'avant de l’adaptateur
tel qu'illustré à la page suivante) pour qu'il corresponde à l'iPodMD
utilisé.
3 Insérer l’adaptateur correspondant et l'iPod
d’accueil pour iPodMD sur la partie supérieure du radio-réveil.
36
MD
au radio-réveil :
www.insignia-products.com
MD
(le numéro de la
MD
dans la station
Page 37

NS-CL01 de Insignia Radi
o-réveil avec station d’accueil
Pour écouter l'iPodMD:
1 Vérifier que le radio-réveil est hors tension et que l’adaptateur
pour iPod
2 Insérer l’iPod
MD
correspondant à l’iPodMD utilisé est installé.
MD
dans la station d’accueil.
3 Régler le volume sonore à un niveau confortable en appuyant sur
VOLUME UP (Augmentation du volume) ou VOLUME DOWN
(Diminution du volume).
4 Appuyer sur TUNE UP/SKIP+ (Syntonisation croissante/Saut +),
ou TUNE DOWN/SKIP– (Syntonisation décroissante/Saut –) pour
aller au début de la piste actuelle, précédente, ou suivante.
www.insignia-products.com
37
Page 38

NS-CL01 de Insignia Radi
o-réveil avec station d’accue
il
iPod
Pour charger la batterie de l'iPodMD:
• Vérifier que l’adaptateur pour iPod
dans la station d’accueil pour iPod
insérer l’iPodMD. Le témoin de charge de la batterie s'affiche sur
l'écran de l'iPodMD.
MD
Type Mémoire
iPodMD mini 4 et 6 Go 3
MD
de
iPod
quatrième
génération
MD
iPod
photo/
iPodMD avec
affichage
couleur
MD
approprié est installé
MD
du radio-réveil, puis
Station d’accueil
universelle n°
20 Go/U2 Édition spéciale
20 Go
40 Go 5
20 Go
30 Go
U2 - Édition
spéciale
40 et 60 Go 7
4
6
38
iPodMD nano
2 et 4 Go Utiliser la station
de première et
deuxième
génération
MD
de
iPod
cinquième
génération
30 Go
60 et 80 Go
(avec vidéo)
www.insignia-products.com
Universal Dock
fournie avec l’iPodMD.
Page 39

NS-CL01 de Insignia Radi
o-réveil avec station d’accueil
Remarque
Les cinq adaptateurs iPodMD fournis avec l’appareil sont
uniquement destinés à être utilisés avec ce radio-réveil. Ce
ne sont pas des stations Universal Dock.
Le numéro de la station Universal Dock est indiqué sur
l'avant de chaque station (voir l’illustration suivante).
5
Remplacement du boîtier
Pour retirer le boîtier :
• Appuyer sur les verrous de chaque côté du radio-réveil et
retirer le boîtier de l’arrière de l’appareil.
5
Pour installer le boîtier :
• Faire glisser le boîtier par l’arrière de l’appareil. Les verrous
s’enclenchent pour maintenir le boîtier en place.
www.insignia-products.com
39
Page 40

NS-CL01 de Insignia Radi
o-réveil avec station d’accue
il
Problèmes et solutions
Attention
L’utilisateur ne doit pas essayer de réparer lui-même le
radio-réveil. Cela annulerait la garantie.
Problème Cause éventuelle Solution
Bruit ou son
déformé lors de
l’écoute
d’émissions de
radio AM ou FM
Pas de son La commande du volume est
Pas de son en
mode iPod
La batterie de
l'iPodMD ne se
recharge pas
L’horloge est
réinitialisé à
«12:00»
L’alarme ne se
déclenche pas
FM – L’antenne filaire n’est pas
déployée.
AM – L’appareil n’est pas
positionné correctement.
au minimum.
L’adaptateur d’alimentation CA
est débranché.
Pas de piles, piles mortes ou
les piles ne sont pas installées
correctement.
L’iPodMD n'est pas correctement
MD
connecté.
Le radio-réveil n’est pas en
mode iPodMD.
L’adaptateur d’alimentation CA
n’est pas branché.
La pile de secours n’est pas
installée correctement, n’est
pas installé du tout, ou elle est
morte.
L’horloge n’est pas réglée. Régler l'horloge.
L’alarme n’est pas activée ou
réglée correctement.
L’horloge n’est pas réglée. Régler l'horloge.
Déployer l'antenne FM.
Faire pivoter l’appareil jusqu’à
l’obtention d’une meilleure
réception.
Augmenter le volume.
Brancher l’adaptateur
d’alimentation CA et appuyer sur
(Standby/on [Attente/Marche])
pour mettre l'appareil en
marche.
Vérifier que des piles neuves ont
été utilisées et qu’elles sont
installées correctement.
Vérifier que la connexion est faite
correctement.
Appuyer sur FUNCTION (Fonction)
pour sélectionner le mode iPodMD.
Brancher l’adaptateur
d’alimentation CA.
Vérifier la batterie de secours.
Régler et activer l’alarme tel que
décrit dans “Réglage de l’horloge et
de l’alarme” à la page 34.
40
www.insignia-products.com
Page 41

NS-CL01 de Insignia Radi
Avis juridiques
FCC article 15
Ce dispositif est conforme à l’article 15 du règlement de la FCC. Son utilisation est
soumise aux deux conditions suivantes : (1) cet appareil ne doit pas provoquer
d’interférences préjudiciables, et (2) il doit accepter toute interférence reçue, y compris
celles risquant d’engendrer un fonctionnement indésirable.
Cet équipement a été mis à l’essai et déclaré conforme aux limites prévues pour un
appareil numérique de classe B, définies dans la section 15 du règlement de la FCC.
Ces limites ont été établies pour fournir une protection raisonnable contre les
interférences préjudiciables lors d’une installation résidentielle. Cet équipement
génère, utilise et diffuse des ondes radio et, s’il n’est pas installé et utilisé
conformément aux instructions dont il fait l’objet, il peut provoquer des interférences
préjudiciables avec les communications radio. Cependant, il n'est pas possible de
garantir qu’aucune interférence ne se produira pour une installation particulière. Si cet
équipement produit des interférences préjudiciables lors de réceptions radio ou
télévisées, qui peuvent être détectées en éteignant puis en rallumant l’appareil,
essayer de corriger l’interférence au moyen de l’une ou de plusieurs des mesures
suivantes :
• Réorienter ou déplacer l’antenne réceptrice.
• Augmenter la distance entre l’équipement et le récepteur.
• Brancher l’équipement sur la prise électrique d’un circuit différent de celui auquel
le récepteur est relié.
• Contacter le revendeur ou un technicien qualifié pour toute assistance.
o-réveil avec station d’accueil
www.insignia-products.com
41
Page 42

NS-CL01 de Insignia Radi
o-réveil avec station d’accue
il
42
www.insignia-products.com
Page 43

NS-CL01 de Insignia Radi
o-réveil avec station d’accueil
Garantie limitée de 90 jours
Insignia Products (« Insignia ») garantit au premier acheteur de ce NS-CLO1 neuf
(« Produit »), qu’il est exempt de vices de fabrication et de main-d’œuvre à l’origine,
pour une période de 90 jours à partir de la date d’achat du Produit (« Période de
garantie »). Ce Produit doit avoir été acheté chez un revendeur agréé des produits de
la marque Insignia et emballé avec cette déclaration de garantie. Cette garantie ne
couvre pas les Produits remis à neuf. Les conditions de la présente garantie
s’appliquent à tout Produit pour lequel Insignia est notifié pendant la Période de
garantie, d’un vice couvert par cette garantie qui nécessite une réparation.
Quelle est la durée de la couverture?
La Période de garantie dure 90 jours à compter de la date d’achat de ce Produit. La
date d’achat est imprimée sur le reçu fourni avec le Produit.
Que couvre cette garantie?
Pendant la Période de garantie, si un vice de matériau ou de main-d’œuvre d'origine
est détecté sur le Produit par un service de réparation agréé par Insignia ou le
personnel du magasin, Insignia (à sa seule discrétion) : (1) réparera le Produit en
utilisant des pièces détachées neuves ou remises à neuf; ou (2) remplacera le Produit
par un produit ou des pièces neuves ou remises à neuf de qualité comparable. Les
produits et pièces remplacés au titre de cette garantie deviennent la propriété
d’Insignia et ne sont pas retournés à l’acheteur. Si les Produits ou pièces nécessitent
une réparation après l’expiration de la Période de garantie, l’acheteur devra payer tous
les frais de main-d’œuvre et les pièces. Cette garantie reste en vigueur tant que
l’acheteur reste propriétaire du Produit Insignia pendant la Période de garantie. La
garantie prend fin si le Produit est revendu ou transféré d’une quelconque façon que ce
soit à tout autre propriétaire.
Comment obtenir une réparation sous garantie?
Si le Produit a été acheté chez un détaillant, le rapporter accompagné du reçu original
chez ce détaillant. Prendre soin de remettre le Produit dans son emballage d’origine ou
dans un emballage qui procure la même qualité de protection que celui d’origine. Si le
Produit a été acheté en ligne, l’expédier accompagné du reçu original à l’adresse
indiquée sur le site Web. Prendre soin de remettre le Produit dans son emballage
d’origine ou dans un emballage qui procure la même qualité de protection que celui
d’origine.
Pour obtenir le service de la garantie à domicile pour un téléviseur avec écran de 25 po
ou plus, appeler le 1-888-BESTBUY. L’assistance technique établira un diagnostic et
corrigera le problème au téléphone ou enverra un technicien agréé par Insignia pour la
réparation à domicile.
Où cette garantie s’applique-t-elle?
Cette garantie ne s’applique qu’à l’acheteur original du produit aux États-Unis et au
Canada.
Ce qui n’est pas couvert par cette garantie limitée
La présente garantie ne couvre pas :
• la formation du client;
• l’installation;
• les réglages de configuration;
• les dommages esthétiques;
• les dommages résultants de catastrophes naturelles telles que la foudre;
www.insignia-products.com
43
Page 44

NS-CL01 de Insignia Radi
o-réveil avec station d’accue
il
• les accidents;
• une utilisation inadaptée;
• une manipulation abusive;
• la négligence;
• une utilisation commerciale;
• la modification de tout ou partie du Produit, y compris l’antenne;
• un écran plasma endommagé par les images fixes (sans mouvement) qui restent
affichées pendant de longues périodes (rémanentes).
La présente garantie ne couvre pas non plus :
• les dommages ayant pour origine une utilisation ou une maintenance
défectueuse;
• la connexion à une source électrique dont la tension est inadéquate;
• toute réparation effectuée par quiconque autre qu’un service de réparation agréé
par Insignia pour la réparation du Produit;
• les produits vendus en l’état ou hors service;
• les consommables tels que les fusibles ou les piles;
• les produits dont le numéro de série usine a été altéré ou enlevé.
LA RÉPARATION OU LE REMPLACEMENT, TELS QU’OFFERTS PAR LA
PRÉSENTE GARANTIE, CONSTITUENT LE SEUL RECOURS DE L’ACHETEUR.
INSIGNIA NE SAURAIT ÊTRE TENU POUR RESPONSABLE DE DOMMAGES
ACCESSOIRES OU CONSÉCUTIFS, RÉSULTANT DE L’INEXÉCUTION D'UNE
GARANTIE EXPRESSE OU IMPLICITE SUR CE PRODUIT, Y COMPRIS, SANS S’Y
LIMITER, LA PERTE DE DONNÉES, L’IMPOSSIBILITÉ D’UTILISER LE PRODUIT,
L’INTERRUPTION D’ACTIVITÉ OU LA PERTE DE PROFITS. INSIGNIA PRODUCTS
N’OCTROIE AUCUNE AUTRE GARANTIE EXPRESSE RELATIVE À CE PRODUIT;
TOUTES LES GARANTIES EXPRESSES OU IMPLICITES POUR CE PRODUIT, Y
COMPRIS MAIS SANS LIMITATION, TOUTE GARANTIE DE QUALITÉ
MARCHANDE, D'ADÉQUATION À UN BUT PARTICULIER, SONT LIMITÉES À LA
PÉRIODE DE GARANTIE APPLICABLE TELLE QUE DÉCRITE CI-DESSUS ET
AUCUNE GARANTIE EXPRESSE OU IMPLICITE NE S’APPLIQUERA APRÈS LA
PÉRIODE DE GARANTIE. CERTAINS ÉTATS ET PROVINCES NE
RECONNAISSENT PAS LES LIMITATIONS DE LA DURÉE DE VALIDITÉ DES
GARANTIES IMPLICITES. PAR CONSÉQUENT, LES LIMITATIONS
SUSMENTIONNÉES PEUVENT NE PAS S'APPLIQUER À L’ACHETEUR ORIGINAL.
LA PRÉSENTE GARANTIE DONNE À L'ACHETEUR DES GARANTIES JURIDIQUES
SPÉCIFIQUES; IL PEUT AUSSI BÉNÉFICIER D'AUTRES GARANTIES QUI VARIENT
D'UN ÉTAT OU D'UNE PROVINCE À L'AUTRE.
Pour contacter Insignia :
Pour le service à la clientèle, appeler le 1-877-467-4289
www.insignia-products.com
Distribué par Best Buy Purchasing, LLC
Dynex, 7601 Penn Avenue South, Richfield, Minnesota, É.-U. 55423-3645
© 2008 Best Buy Enterprise Services, Inc.
Tous droits réservés. INSIGNIA est une marque de commerce de Best Buy Enterprise
Services, Inc. déposée dans certains pays. Tous les autres produits et noms de
marques sont des marques de commerce appartenant à leurs propriétaires respectifs.
44
www.insignia-products.com
Page 45

Insignia NS-CL01 Radi
o reloj con estación de acoplamiento
Insignia NS-CL01
Radio reloj con estación de
acoplamiento para iPod
Contenido
Bienvenido . . . . . . . . . . . . . . . . . . . . . . . . . . . . . . . . . . . . . . . 45
Información de seguridad . . . . . . . . . . . . . . . . . . . . . . . . . . . . 45
Medidas de seguridad importantes. . . . . . . . . . . . . . . . . . . . . 46
Características . . . . . . . . . . . . . . . . . . . . . . . . . . . . . . . . . . . . 49
Configuración de su radio reloj . . . . . . . . . . . . . . . . . . . . . . . . 51
Uso de su radio reloj . . . . . . . . . . . . . . . . . . . . . . . . . . . . . . . . 55
Localización y corrección de fallas . . . . . . . . . . . . . . . . . . . . . 62
Avisos legales . . . . . . . . . . . . . . . . . . . . . . . . . . . . . . . . . . . . . 63
Garantía limitada de 90 días. . . . . . . . . . . . . . . . . . . . . . . . . . 65
Bienvenido
Felicitaciones por su compra de un producto de alta calidad de
Insignia. Su NS-CL01 representa el más moderno diseño de radio
reloj y está concebido para brindar un rendimiento seguro y sin
problemas.
Información de seguridad
Para evitar el peligro de incendio o choque eléctrico, no conecte el
cable de alimentación en un cable de extensión, receptáculo, ni con
otro tipo de tomacorriente, ya que las clavijas deben quedar
completamente insertadas para evitar su exposición. Para reducir el
riesgo de incendio o choque eléctrico, no exponga este aparato a la
lluvia o la humedad.
®
CUIDADO: Para evitar el riesgo de choque
eléctrico, no retire la cubierta (o parte posterior).
En su interior hay piezas que no debe manipular
el usuario. Para las reparaciones, póngase en
contacto con personal de servicio calificado.
www.insignia-products.com
45
Page 46

Insignia NS-CL01 Radi
o reloj con estación de acoplamiento
La figura de relámpago que termina en punta de flecha
dentro de un triángulo tiene por finalidad alertarle de la
presencia de voltaje peligroso sin aislamiento en el
interior de su sistema de audio que podría tener
potencia suficiente para constituir riesgo de choque
eléctrico para las personas.
El signo de admiración dentro de un triángulo tiene por
finalidad alertarle de la presencia de instrucciones
importantes de operación y mantenimiento (servicio) en
la literatura que se incluye con su sistema de audio.
Cuidado
Cualquier cambio o modificación a su radio reloj, que no
esté aprobado expresamente por Insignia o sus centros
autorizados, pueden cancelar su autoridad para operar su
sistema de audio.
Cuidado
Su radio reloj no debe de ser expuesto al agua (goteo o
salpicaduras), y ningún objeto lleno de líquido, como por
ejemplo vasijas, deberá ser colocado sobre la unidad.
Medidas de seguridad importantes
46
• Lea las instrucciones – Lea todas las instrucciones de
seguridad y operación antes de usar su radio reloj.
• Guarde las instrucciones – Guarde las instrucciones de
seguridad y operación para referencia futura.
• Siga las advertencias – Preste atención a todas las
advertencias en su radio reloj y en las instrucciones de
operación.
• Siga las instrucciones – Siga todas las instrucciones de
operación y uso.
• Limpieza – Desconecte su radio reloj del tomacorriente antes
de limpiarlo. No use productos de limpieza líquidos o en
aerosol. Use un paño húmedo para limpiar la unidad.
• Aditamentos – No use aditamentos que no hayan sido
recomendados por Insignia ya que podrían causar problemas.
• Agua y humedad – No use su radio reloj cerca del agua. Por
ejemplo, cerca de una bañera, en un sótano mojado o cerca
de una piscina.
• Ventilación – Para asegurar la operación confiable de su radio
reloj y para protegerlo contra el sobrecalentamiento, se
proveen ranuras y aberturas de ventilación en la parte
www.insignia-products.com
Page 47

Insignia NS-CL01 Radi
o reloj con estación de acoplamiento
posterior del gabinete. No bloquee estas aberturas. Su radio
reloj nunca se debe colocar cerca o sobre un radiador o
calefactor. No coloque su radio reloj en una instalación
empotrada, tal como un librero o estante, a menos que se
proporcione la correcta ventilación o se hayan seguido las
instrucciones del fabricante.
• Fuentes de alimentación – Use sólo el tipo de fuente de
alimentación indicada en la etiqueta de marca. Si no está
seguro del tipo de voltaje suministrado a su casa, consulte con
el Soporte Técnico de Insignia o con la compañía local de
energía. Para radios reloj diseñados para funcionar con pilas o
con otras fuentes de alimentación, consulte las instrucciones
de operación respectivas.
• Conexión a tierra o polarización – Conexión a tierra o
polarización - Su radio reloj está equipado de un adaptador de
alimentación de CA con un enchufe polarizado (un enchufe
que tiene una clavija más ancha que la otra). Este enchufe se
conecta en el tomacorriente de una sola forma. Ésta es una
característica de seguridad. Si no puede insertar
completamente el enchufe en el tomacorriente, intente
voltearlo. Si el enchufe todavía no entra, contacte a su
electricista para que reemplace el tomacorriente obsoleto. No
anule el propósito de seguridad del enchufe polarizado.
• Protección del cable de alimentación – Coloque los cables
de alimentación eléctrica de tal forma que no se pisen o
queden aplastados por objetos colocados contra ellos; preste
atención especial a los cables conectados a tomacorrientes y
al lugar de donde salen de su radio reloj.
• Protector contra sobretensión – Le recomendamos usar un
protector contra sobretensión para la conexión del adaptador
de alimentación de CA. Los daños causados por relámpagos y
sobretensión NO están cubiertos por la garantía de este
producto.
• Rayos – Para la protección adicional de su radio reloj durante
una tormenta de rayos, o cuando se deje de usar por un
periodo de tiempo prolongado, desconéctelo del adaptador de
alimentación de CA. Esto evitará que su radio reloj sufra daños
debido a sobretensión eléctrica o a rayos.
• Sobrecarga – No sobrecargue los tomacorrientes ni los
cables de extensión ya que esto podría resultar en riesgo de
incendio o choque eléctrico.
• Introducción de objetos y líquidos – Nunca inserte objetos
de ningún tipo en su radio reloj a través de las aberturas, ya
que podrían tocar puntos de voltaje peligrosos o hacer
cortocircuito con otros componentes que podrían resultar en
incendio o choque eléctrico. Nunca derrame líquidos de
ninguna clase sobre su radio reloj.
www.insignia-products.com
47
Page 48

Insignia NS-CL01 Radi
o reloj con estación de acoplamiento
• Reparación – No trate de reparar su radio reloj usted mismo,
ya que abrir o quitar las cubiertas puede exponerle a voltajes
peligrosos o a otros peligros. Remita todas las reparaciones a
personal de servicio calificado.
• Daños que requieren reparación – Desconecte su radio reloj
del tomacorriente de alimentación de CA y refiera la
reparación a personal de servicio calificado en los siguientes
casos:
• Cuando el cable de alimentación o el enchufe esté dañado
o expuesto.
• Si se ha derramado líquido u objetos han caído dentro de
su radio reloj.
• Si su radio reloj ha estado expuesto a la lluvia o al agua.
• Si su radio reloj no funciona normalmente aún siguiendo
las instrucciones de operación. Limítese a ajustar los
controles descritos en las instrucciones de operación, ya
que la radio reloj puede dañarse si se ajustan
incorrectamente otros controles, siendo frecuentemente
necesario que un técnico calificado realice un gran
cantidad de trabajo para que vuelva a funcionar
normalmente.
• Si su radio reloj se ha caído o dañado de cualquier forma.
• Cuando su radio reloj exhiba un cambio significativo en el
rendimiento.
• Piezas de repuesto – Cuando se necesiten repuestos,
asegúrese de que el técnico de reparación use repuestos
especificados por el fabricante o que tengan las mismas
características que la pieza original. Las sustituciones no
autorizadas pueden resultar en incendio, choque eléctrico,
lesiones a personas u otros peligros.
• Verificación de seguridad – Después de completar la
reparación de la radio reloj, pídale al técnico de servicio que
realice verificaciones de seguridad rutinarias para determinar
que se encuentra en buen estado de operación.
• Calor – No instale su radio reloj cerca de fuentes de calor tales
como radiadores, calefactores, estufas u otros productos
(incluyendo amplificadores) que produzcan calor.
48
Cuidado
Para evitar un choque eléctrico haga corresponder la clavija
ancha del enchufe del adaptador de alimentación de CA
con la ranura ancha del tomacorriente e inserte el enchufe
completamente.
www.insignia-products.com
Page 49

Insignia NS-CL01 Radi
o reloj con estación de acoplamiento
El enchufe del adaptador de alimentación de CA se usa como
dispositivo de desconexión. Debe permanecer preparado para
utilizarse y no se debe obstruir durante el uso. Para desconectar
completamente el radio reloj de la red eléctrica, se debe desconectar
completamente el adaptador de alimentación de CA del
tomacorriente.
La placa de marca del adaptador de CA se encuentra en la parte
inferior del adaptador.
Características
Contenido de la caja:
• Radio reloj
• Adaptador de alimentación de CA
• Guía del usuario
• Adaptadores para iPod® (5)
• Cubiertas decorativas (rosada, azul y plateada)
Panel superior
# Descripción Función
1 Conector para iPod
2 Botón de GRAVES/AGUDOS Presione repetidamente para ajustar el ajuste
1
15
12
16
13
17
14
49
2
3
4
5
6
7
10
11
8
®
9
Conecte un iPod® a su radio reloj en este lugar.
Refiérase a “Conexión de un iPod® a su radio
reloj” en la página 58.
de los graves y agudos de su radio reloj. Los
ajustes se almacenaran y se mostraran en el
indicador de graves o agudos en la pantalla (en
la parte frontal del radio).
www.insignia-products.com
Page 50

Insignia NS-CL01 Radi
o reloj con estación de acoplamiento
# Descripción Función
3 Botón de FUNCIÓN Permite seleccionar entre AM, FM, iPod®,
4 Botón de Suspensión/
Encendido
5 Botón de ALARMA 1 Permite seleccionar y cambiar los ajustes del
6 Botón para bajar el volumen Permite bajar el volumen del radio.
7 Botón para subir el volumen Permite subir el volumen del radio.
8 Botón de ALARMA 2 Permite seleccionar y cambiar los ajustes del
9 Botón de REPETICIÓN DE
ALARMA/APAGADO
AUTOMÁTICO
10 Visualización Muestra información sobre el radio.
11 Botón AJUSTE DE HORA Permite ingresar al modo de ajuste de la hora.
12 Botón de MIN (minutos) Permite ajustar los minutos.
13 Botón de HR (hora) Permite ajustar la hora.
14 Botón de SINTONIZAR
ABAJO/SALTAR–
15 Botón de SINTONIZAR
ARRIBA/SALTAR+
16 Botón de REPRODUCIR/
PAUSAR
17 Botón de ESTACIÓN
PREDEFINIDA/MEMORIA
Line-in (Entrada de línea), o Alarm on buzzer
(Timbre de alarma).
Permite encender el radio. Presione de nuevo
para volver a poner el sistema en el modo de
suspensión.
modo de alarma 1.
modo de alarma 2.
Permite desactivar temporalmente la alarma o
ajustar el temporizador de apagado
automático.
En el modo de radio, permite sintonizar o
escanear a una frecuencia inferior. En el modo
®
de iPod
el modo de graves/agudos, presione para
reducir el nivel de los graves y los agudos.
En el modo de radio, permite sintonizar o
escanear a una frecuencia superior. En el
modo de iPod
pista. En el modo de graves/agudos, presione
para aumentar el nivel de los graves y los
agudos.
Presione para comenzar a reproducir cuando
su iPod® está conectado al radio reloj. Presione
de nuevo para pausar la reproducción.
En el modo de radio, permite sintonizar una
estación predefinida.
, permite saltar a la pista anterior. En
®
, permite saltar a la siguiente
50
www.insignia-products.com
Page 51

Insignia NS-CL01 Radi
o reloj con estación de acoplamiento
Panel posterior
3
1
# Descripción Función
1 Antena de FM Mejora la recepción de las transmisiones de
2 Toma de la entrada de CC Inserte aquí el conector pequeño del
3 Toma de entrada de línea Conecte un cable de una fuente de audio
2
FM.
adaptador de alimentación de CA.
externa en esta toma de entrada para escuchar
el sonido a través de su radio reloj.
Configuración de su radio reloj
Uso del adaptador de alimentación de CA
Para usar el adaptador de alimentación de CA:
1 Inserte el conector de alimentación al final del cable de
alimentación de CA en la toma DC IN (Entrada de CC) en la parte
posterior de su radio reloj.
www.insignia-products.com
51
Page 52

Insignia NS-CL01 Radi
2 Enchufe el enchufe de alimentación de CA en un tomacorriente de
pared.
Nota
Sólo use el adaptador de alimentación de CA suministrado
que tenga las siguientes especificaciones: CC = 6 V 1 A
Desenchufe el enchufe de CC y el adaptador cuando no se
esté utilizando.
Cuando se usa el adaptador de CA, las pilas se
desconectan automáticamente.
Instalación de las pilas
Para instalar las pilas:
1 Voltee su radio reloj, abra y remueva la cubierta del
compartimiento de las pilas.
o reloj con estación de acoplamiento
2 Inserte cuatro (4) pilas tipo AA en el compartimiento de las pilas.
3 Reinstale y cierre el compartimiento de las pilas y vuelva a
52
Verifique que los símbolos + y – en las pilas correspondan con los
símbolos + y – en el compartimiento de las pilas.
colocar su radio reloj a la posición vertical.
Nota
Para que el radio funcione con pilas, el adaptador de
alimentación de CA debe estar desconectado de la toma de
entrada de CC (DC IN) en la parte posterior del radio.
Cuando el indicador de batería
pantalla, necesitará reemplazar las pilas.
aparezca en la
www.insignia-products.com
Page 53

Insignia NS-CL01 Radi
o reloj con estación de acoplamiento
Instalación de la pila de respaldo
Una pila CR2025 puede ser usada como respaldo para la hora del
reloj y de la alarma.
Para instalar la pila de respaldo:
1 Abra la cubierta de la pila de respaldo girándola en el sentido
horario y removiendo la puerta.
2 Inserte una pila CR2025 según se muestra, con el lado positivo
(+) de la pila orientado hacia arriba.
Inserte la pila según se muestra
www.insignia-products.com
53
Page 54

Insignia NS-CL01 Radi
o reloj con estación de acoplamiento
3 Coloque la cubierta de la pila de respaldo en el compartimiento y
gírela en el sentido horario hasta que se encaje.
Cuidado
Siga estas precauciones cuando use pilas en este
dispositivo:
1. Use sólo el tamaño y tipo de pilas especificados.
2. Cuando instale las pilas, asegúrese de observar la
polaridad correcta según lo indicado el compartimiento de
la pila. Si invierte las pilas puede dañar el radio.
3. No combine diferentes tipos de pilas (por ej., alcalinas,
recargables y carbón-zinc), ni tampoco pilas usadas con
nuevas.
4. Sí su radio reloj no se usará por un periodo de tiempo
extensivo, se deben extraer las pilas para evitar daños o
lesiones causadas por el posible derrame del acido de las
mismas.
5. No intente recargar pilas que no están diseñadas para
ser recargadas, ya que pueden sobrecalentarse y
reventarse. (Siga las instrucciones del fabricante de las
pilas).
6. No tire las pilas al fuego. Deseche las pilas usadas como
si fueran residuos peligrosos.
Nota
La pila de respaldo sólo se usa para respaldar la hora del
reloj y de la alarma.
Cuando la pila está gastada, se debe cambiar
inmediatamente.
Conecte el cable de alimentación
Para preparar su radio reloj para ser usado:
1 Asegúrese de que el voltaje de su fuente de alimentación de CA
2 Enchufe el conector pequeño en el cable de alimentación en la
3 Presione el botón de suspensión/encendido para encender su
54
local sea el mismo que el indicado en la placa ubicada en el
adaptador de alimentación de CA. Si no lo es, consulte con su
vendedor o centro de servicio.
toma DC IN (Entrada de CC) en la parte posterior del radio reloj y
en el adaptador de alimentación en un tomacorriente de
alimentación de CA.
radio reloj.
Para apagar completamente el radio reloj, desenchufe el cable de
alimentación de CA del tomacorriente.
Cuidado
Para proteger su radio reloj durante las tormentas eléctricas
fuertes, desenchufe el adaptador de alimentación de CA del
tomacorriente.
www.insignia-products.com
Page 55

Insignia NS-CL01 Radi
o reloj con estación de acoplamiento
Uso de su radio reloj
Escuchando radio
Para escuchar radio:
1 Presione (Suspensión/encendido) para encender el radio reloj.
2 Presione FUNCTION (Función) repetidamente para seleccionar la
banda de radio que desea escuchar.
3 Presione TUNE UP/SKIP + (Sintonizar arriba/Saltar +) o TUNE
DOWN/SKIP– (Sintonizar abajo/Saltar -) para sintonizar el radio
hacia arriba o abajo y seleccionar la estación deseada.
4 Ajuste el volumen a un nivel cómodo presionando ya sea el botón
VOLUME UP (Subir volumen) o VOLUME DOWN (Bajar
volumen).
5 Para escanear una frecuencia superior o inferior, mantenga
presionado TUNE UP/SKIP + (Sintonizar arriba/Saltar +) o TUNE
DOWN/SKIP – (Sintonizar abajo/Saltar -) por más de un segundo.
El radio escanea automáticamente la siguiente estación.
6 Presione el botón de suspensión/encendido para apagar el
radio reloj.
Para mejorar la recepción:
• Para la recepción de FM, desenrolle y extienda el cable de la
antena de FM.
• Para la recepción de AM, gire el radio ligeramente hasta que la
recepción mejore.
• Ponga el adaptador de alimentación de CA a 3 pies de su radio
para reducir la interferencia a la recepción de radio.
Para usar las estaciones predefinidas:
1 Presione (Suspensión/encendido) para encender el radio reloj.
2 Presione FUNCTION (Función) repetidamente para seleccionar la
3 Presione TUNE UP/SKIP + (Sintonizar arriba/Saltar +) o TUNE
4 Para guardar la estación como predefinida, mantenga presionado
5 Presione TUNE UP/SKIP + (Sintonizar arriba/Saltar +) o TUNE
banda de radio que desea escuchar.
DOWN/SKIP– (Sintonizar abajo/Saltar -) para sintonizar el radio
hacia arriba o abajo y seleccionar la estación deseada.
el botón PRESET/MEMORY (Predefinida/Memoria) por más de
un segundo. “P01” parpadea en la pantalla.
DOWN/SKIP– (Sintonizar abajo/Saltar -) para seleccionar el
número predefinido que desea designar a esa estación.
www.insignia-products.com
55
Page 56

Insignia NS-CL01 Radi
6 Presione PRESET/MEMORY (Predefinida/Memoria) para
confirmar el ajuste. La emisora queda almacenada en la memoria.
7 Repita los pasos 3 y 6 para guardar hasta 10 estaciones AM y 10
FM).
8 Para resaltar una estación predefinida, presione brevemente
PRESET/MEMORY (Predefinida/Memoria) repetidamente hasta
que alcance la estación deseada.
Para escuchar otro dispositivo de audio:
1 Asegúrese de que el radio reloj esté apagado.
2 Conecte un extremo del cable de entrada de línea auxiliar (no
incluido) en el conector Line-in (Entrada de línea) en la parte
posterior de su radio reloj.
3 Enchufe el otro extremo del cable en la toma de salida de línea
(Line-out) en el dispositivo de audio.
4 Encienda el radio.
5 Presione el botón de función (FUNCTION) una o más veces hasta
que el indicador “Line-in” aparezca en la pantalla.
6 Use los controles en el equipo de audio para controlar la
reproducción.
Ajuste del reloj y la alarma
o reloj con estación de acoplamiento
Para ajustar el reloj:
1 Mantenga presionado el botón de ajuste de la hora (TIME SET).
2 Presione el botón MIN para ajustar los minutos y HR para ajustar
3 Presione nuevamente el botón TIME SET (Ajuste de hora). El reloj
Para ajustar la alarma:
1 Mantenga presionado ALARM 1 [Alarma 1] o ALARM 2 [Alarma
56
La hora parpadea en la pantalla.
la hora. Asegúrese de que seleccionó AM o PM correctamente.
se ha ajustado.
Nota
Presione el botón TIME SET (Ajuste de hora) para mostrar
la hora y el modo de operación actual.
Si no se presiona un botón dentro de 10 segundos, el radio
regresará automáticamente al modo de operación anterior.
2] (dependiendo del modo de alarma deseado) hasta que la
pantalla parpadee.
www.insignia-products.com
Page 57

Insignia NS-CL01 Radi
o reloj con estación de acoplamiento
2 Presione el botón MIN para ajustar los minutos de la alarma y HR
para ajustar la hora de la alarma. Asegúrese de seleccionar AM o
PM correctamente.
3 Presione de nuevo ALARM 1 (Alarma 1) o ALARM 2 (Alarma 2)
brevemente para guardar el ajuste. La pantalla deja de parpadear.
4 Para cancelar la alarma, presione ALARM 1 o ALARM 2 hasta
que el indicador desaparezca de la pantalla.
Para ajustar la alarma para despertarse con el timbre, la radio o
un iPod
®
:
1 Presione brevemente ALARM 1 (Alarma 1) o ALARM 2 (Alarma
2) dependiendo del modo de alarma deseado. Se muestra la hora.
2 Presione repetidamente ALARM 1 (Alarma 1) o ALARM 2
(Alarma 2) para seleccionar iPod
Notas
• Cuando se llega a la hora de la alarma, el volumen de la
alarma comienza con el ajuste mínimo y gradualmente
aumenta en volumen hasta que alcance el ajuste de
volumen actual.
• Si se selecciona AM, FM, o buzzer, la alarma se activa
automáticamente por 20 minutos y luego se desactivará.
• Si se selecciona iPod
pista actual. La radio comenzará a reproducir por 20
minutos y se apagará automáticamente o si la canción
restante dura menos de 20 minutos, el radio comenzará a
reproducir el tiempo restante de la canción y luego se
detendrá.
• Si seleccionó iPod
sonará el timbre en su lugar.
• Si no se presiona un botón dentro de 10 segundos, el
radio regresará automáticamente al modo de operación
anterior.
®
, radio, o timbre.
®
, la radio comienza a reproducir la
®
y se remueve el iPod®, la alarma
Para desactivar la alarma:
1 Presione cualquier botón (con excepción de SNOOZE/SLEEP)
para desactivar la alarma. La alarma se ajustará para el siguiente
día.
2 Si no desea ajustar la alarma para el siguiente día, presione
ALARM 1 (Alarma 1) o ALARM 2 (Alarma 2) hasta que el
indicador “ALARM 1” o “ALARM 2” desaparezca de la pantalla.
Para usar la función de repetición de alarma:
3 Mientras la alarma está sonando, presione el botón SNOOZE/
SLEEP (Repetición de alarma/Apagado automático). El indicador
SNOOZE aparecerá en la pantalla y “10” aparecerá en la pantalla
por cinco segundos y regresará al tiempo real. La alarma se
activará automáticamente 10 minutos después.
www.insignia-products.com
57
Page 58

Insignia NS-CL01 Radi
o reloj con estación de acoplamiento
4 Si presiona SNOOZE/SLEEP (Repetición de alarma/Apagado
automático) dentro de esos cinco segundos, cada vez que
presione el botón SNOOZE/SLEEP, el tiempo de repetición de
alarma aumenta cinco minutos hasta 60 minutos.
Después de ajustar la repetición de alarma, se mostrará el tiempo
real. Presione repetidamente SNOOZE/SLEEP para ver el tiempo
de repetición de alarma restante por cinco segundos.
5 Para cancelar la repetición de alarma (la alarma no se volverá a
activar), presione ALARM 1 (Alarma 1) o ALARM 2 (Alarma 2)
dependiendo de la alarma que se ajustó. El indicador de
repetición de alarma (SNOOZE) desaparecerá de la pantalla.
6 Presione repetidamente ALARM 1 (Alarma 1) o ALARM 2
(Alarma 2) para seleccionar entre alarma desactivada (la alarma
no se activará el siguiente día), alarma activada con timbre,
radio, o iPod
®
(la alarma se activará el siguiente día).
Para ajustar el temporizador de apagado automático:
1 Asegúrese de que el radio esté encendido.
2 Presione una vez el botón SNOOZE/SLEEP (Repetición de
alarma/Apagado automático) El indicador “SLEEP” aparece en la
pantalla y “10” aparece en la pantalla por cinco segundos
(indicando que el radio se apagará después de 10 minutos).
3 Presione repetidamente SNOOZE/SLEEP para aumentar el
temporizador de apagado automático en incrementos de 10
minutos hasta 60 minutos.
4 Después de ajustar el temporizador de apagado automático, se
mostrará el tiempo real. Presione nuevamente SNOOZE/SLEEP
para ver el tiempo de apagado automático restante por cinco
segundos.
5 Para cancelar la función de apagado automático, presione
repetidamente SNOOZE/SLEEP hasta que se muestre “00” en la
pantalla.
Conexión de un iPod® a su radio reloj
Puede conectar un iPod® (no incluido) en su radio reloj para escuchar
las canciones almacenadas en su iPod®.
Para conectar un iPod
1 Verifique que el radio esté apagado.
2 Seleccione el adaptador de iPod
58
®
a su radio:
®
apropiado (el número de la
estación de acoplamiento universal se muestra en la parte frontal
del adaptador, según se muestra en la tabla en la página
siguiente) para su iPod
®
.
www.insignia-products.com
Page 59

Insignia NS-CL01 Radi
o reloj con estación de acoplamiento
3 Inserte el adaptador correspondiente y su iPod® en la estación de
acoplamiento en la parte superior de su radio.
Para escuchar el iPod
1 Asegúrese de que el radio esté apagado y que el adaptador de
®
iPod
que coincide con su iPod® esté instalado.
2 Inserte su iPod
®
:
®
en la estación de acoplamiento.
3 Ajuste el volumen a un nivel cómodo presionando ya sea el botón
VOLUME UP (Subir volumen) o VOLUME DOWN (Bajar
volumen).
4 Presione TUNE UP/SKIP+ (Sintonizar arriba/Saltar +) o TUNE
DOWN/SKIP– (Sintonizar abajo/Saltar -) para saltar al comienzo
de la pista actual, la siguiente o la última.
www.insignia-products.com
59
Page 60

Insignia NS-CL01 Radi
o reloj con estación de acoplamiento
iPod
Para cargar la batería del iPod®:
• Asegúrese de que ha instalado el adaptador de iPod
en la estación de acoplamiento del radio e inserte el iPod
indicador de batería cargando aparece en la pantalla del iPod®.
®
Tipo Memoria
iPod® mini 4 y 6 GB 3
®
de
iPod
cuarta
generación
®
iPod
Foto/
iPod® con
pantalla a color
No. de estación
de acoplamiento
universal
20 GB/ Edición
Especial U2
20 GB
40 GB 5
20 GB
30 GB
Edición especial
U2
40 y 60 GB 7
®
correcto
®
. El
4
6
60
iPod® nano de
2 y 4 GB Use la estación de
primera y
segunda
generación
®
de
iPod
quinta
generación
30 GB
60 y 80 GB
(con video)
www.insignia-products.com
acoplamiento
universal dock
incluida con su
iPod®.
Page 61

Insignia NS-CL01 Radi
o reloj con estación de acoplamiento
Nota
Los cinco adaptadores para iPod® incluidos con este radio
son para este radio únicamente. No son estaciones de
acoplamiento universales.
El número de estación de acoplamiento universal se
muestra en la parte frontal de cada estación (refiérase a la
siguiente figura).
Cambio de cubierta
Para extraer la cubierta:
• Presione los seguros en los lados del radio y tire de la cubierta
de la parte posterior del radio.
5
5
Para instalar la cubierta:
• Deslice la cubierta en la radio desde la parte posterior. Los
seguros encajan en su lugar para sostener la cubierta.
www.insignia-products.com
61
Page 62

Insignia NS-CL01 Radi
o reloj con estación de acoplamiento
Localización y corrección de fallas
Cuidado
No intente reparar el radio reloj usted mismo. Hacerlo
anulará su garantía.
Problema Causa probable Solución
Se escucha
ruido o sonido
distorsionado en
las
transmisiones
de radio AM o
FM.
No hay sonido El control de volumen está
No hay sonido
en el modo de
®
iPod
La batería del
iPod® no se está
cargando
El reloj muestra
“12:00”
La alarma no se
activa.
FM — El cable de la antena no
está extendido.
AM — El radio no está
posicionado correctamente.
bajo.
El adaptador de alimentación
de CA está desenchufado.
Extienda completamente la antena
de FM.
Gire el radio hasta que se obtenga
la mejor recepción.
Suba el volumen.
Enchufe el adaptador de
alimentación de CA y presione
(
Suspensión/encendido) para
apagar el radio.
No hay pilas, están gastadas, o
no se han instalado
correctamente.
El iPod® no está conectado
correctamente.
La radio no se encuentra en el
modo iPod
El adaptador de alimentación
de CA no está enchufado.
La pila de respaldo está
instalada incorrectamente, no
instalada o gastada.
El reloj no se ha ajustado. Ajuste el reloj.
La alarma no está activada o
ajustada correctamente.
El reloj no se ha ajustado. Ajuste el reloj.
®
.
Asegúrese de que se han instalado
pilas frescas y que están
correctamente instaladas.
Verifique que la conexión es la
correcta.
Presione el botón de función
(FUNCTION) para seleccionar el
modo iPod®.
Enchufe el adaptador de
alimentación de CA.
Verifique la pila de respaldo.
Ajuste y active la alarma según
descrito en la sección “Ajuste del
reloj y la alarma” en la página 56.
62
www.insignia-products.com
Page 63

Insignia NS-CL01 Radi
o reloj con estación de acoplamiento
Avisos legales
FCC Parte 15
Este dispositivo satisface la parte 15 del reglamento FCC. La operación de este
producto está sujeta a las dos condiciones siguientes: (1) Este dispositivo no puede
causar interferencia dañina, y (2) este dispositivo debe aceptar cualquier interferencia
recibida incluyendo interferencias que puedan causar una operación no deseada.
Este equipo ha sido sometido a prueba y se ha determinado que satisface los límites
establecidos para ser clasificado cómo dispositivo digital de la Clase B de acuerdo con
la Parte 15 del reglamento FCC. Estos límites están diseñados para proporcionar una
protección razonable contra interferencias dañinas en un ambiente residencial. Este
equipo genera, usa y puede emitir energía de radiofrecuencia, y si no se instala y usa
de acuerdo con las instrucciones, puede causar interferencias perjudiciales a las
comunicaciones de radio. Sin embargo, no se garantiza que no ocurrirá interferencia
en una instalación particular. Si este equipo causa interferencias perjudiciales en la
recepción de la señal de radio o televisión, lo cual puede comprobarse encendiendo y
apagando el reproductor alternativamente, se recomienda al usuario corregir la
interferencia mediante uno de los siguientes procedimientos:
• Cambie la orientación o la ubicación de la antena receptora.
• Aumente la distancia entre el equipo y el receptor.
• Conecte el equipo a un tomacorriente de un circuito distinto de aquel al que está
conectado el receptor.
• Solicite consejo al distribuidor o a un técnico calificado para obtener ayuda.
www.insignia-products.com
63
Page 64

Insignia NS-CL01 Radi
o reloj con estación de acoplamiento
64
www.insignia-products.com
Page 65

Insignia NS-CL01 Radi
o reloj con estación de acoplamiento
Garantía limitada de 90 días
Insignia Products (“Insignia”) le garantiza a usted, el comprador original de este nuevo
NS-CLO1 (“Producto”), que éste se encontrará libre de defectos de material o de
mano de obra en su fabricación original por un período de 90 (noventa) días a partir de
la fecha de compra del Producto (“Período de Garantía”). Este Producto debe ser
comprado en un distribuidor autorizado de productos Insignia y empacado con esta
declaración de garantía. Esta garantía no cubre Productos reacondicionados. Si
notifica a Insignia durante el Período de Garantía sobre un defecto cubierto por esta
garantía que requiere reparación, los términos de esta garantía se aplican.
¿Cuánto dura la garantía?
El Período de Garantía dura por 90 (noventa) días a partir de la fecha en que compró
el Producto. La fecha de compra se encuentra impresa en el recibo que recibió con el
Producto.
¿Qué es lo que cubre esta garantía?
Durante el Período de Garantía, si un centro de reparación autorizado de Insignia
concluye que la fabricación original del material o la mano de obra del Producto se
encuentran defectuosos Insignia (cómo su opción exclusiva): (1) reparará el Producto
con repuestos nuevos o reacondicionados; o (2) reemplazará el Producto con uno
nuevo o con uno reacondicionado con repuestos equivalentes. Los Productos y
repuestos reemplazados bajo esta garantía se volverán propiedad de Insignia y no se
le regresarán a usted. Si se requiere la reparación de Productos o partes después de
que se vence el Período de Garantía, usted deberá pagar todos los costos de mano de
obra y de repuestos. Esta garantía estará vigente con tal que usted sea el dueño de su
producto Insignia durante el periodo de garantía. El alcance de la garantía se termina
si usted vende o transfiere el producto.
¿Cómo se obtiene la reparación de garantía?
Si ha comprado el Producto en una tienda de ventas, lleve su recibo original y el
Producto a la tienda en donde lo compró. Asegúrese de que vuelva a colocar el
Producto en su empaque original o en un empaque que provea la misma protección
que el original. Si compró el Producto en un sitio Web, envíe por correo su recibo
original y el Producto a la dirección postal listada en el sitio Web. Asegúrese de colocar
el Producto en su empaque original o en un empaque que provea la misma protección
que el original.
Para obtener servicio de garantía a domicilio para un televisor con una pantalla de 25
pulgadas o más, llame al 1-888-BESTBUY. El soporte técnico diagnosticará y
corregirá el problema por teléfono o enviará un técnico certificado por Insignia a su
casa.
¿En dónde es válida la garantía?
Esta garantía sólo es válida al comprador original del producto en los Estados Unidos
y en Canadá.
¿Qué es lo que no cubre la garantía?
Esta garantía no cubre:
• Capacitación del cliente
• Instalación
• Ajuste de configuración
• Daños cosméticos
• Daños debido a actos de la naturaleza, tal como rayos
www.insignia-products.com
65
Page 66

Insignia NS-CL01 Radi
o reloj con estación de acoplamiento
• Accidentes
• Mal uso
• Abuso
• Negligencia
• Uso comercial
• Modificación de alguna parte del Producto, incluyendo la antena
• Un panel de pantalla de plasma dañado por la persistencia de imágenes estáticas
(sin movimiento), mostradas por periodos de tiempo extendido (efecto “burn-in”).
Esta garantía tampoco cubre:
• Daño debido al uso o mantenimiento incorrecto
• La conexión a una fuente de voltaje incorrecta
• El intento de reparación por alguien que no sea una compañía autorizada por
Insignia para reparar el Producto
• Productos vendidos tal cual (en el estado en que se encuentran) o con todas sus
fallas
• Productos consumibles, tal como fusibles o baterías
• Productos en los cuales el número de serie asignado en la fábrica ha sido
alterado o removido
EL REEMPLAZO DE REPARACIÓN SEGÚN PROVISTO BAJO ESTA GARANTÍA ES
SU ÚNICO RECURSO. INSIGNIA NO SERÁ RESPONSABLE POR DAÑOS
INCIDENTALES O CONSECUENTES DEBIDO AL INCUMPLIMIENTO DE
CUALQUIER GARANTÍA EXPRESA O IMPLÍCITA RELACIONADA CON ESTE
PRODUCTO, INCLUYENDO PERO SIN LIMITARSE A LA PÉRDIDA DE
INFORMACIÓN, LA PÉRDIDA DE NEGOCIOS O DE GANANCIAS. INSIGNIA
PRODUCTS NO HACE NINGUNA OTRA GARANTÍA EXPRESA E IMPLÍCITA
RELACIONADA A ESTE PRODUCTO, INCLUYENDO PERO SIN LIMITARSE A,
CUALQUIER GARANTÍA IMPLÍCITA Y CONDICIONES DE COMERCIALIZACIÓN Y
IDONEIDAD PARA UN USO PARTICULAR, ESTÁN LIMITADAS EN DURACIÓN AL
PERÍODO DE GARANTÍA DECLARADO ANTERIORMENTE Y NINGUNA GARANTÍA
YA SEA EXPRESA O IMPLÍCITA SE APLICARÁ DESPUÉS DEL PERÍODO DE
GARANTÍA. ALGUNOS ESTADOS, PROVINCIAS Y JURISDICCIONES NO
PERMITEN RESTRICCIONES EN CUANTO A LA DURACIÓN DE UNA GARANTÍA
IMPLÍCITA, ASÍ QUE LA RESTRICCIÓN ANTERIOR PUEDE NO APLICARSE EN SU
CASO. ESTA GARANTÍA LE DA DERECHOS LEGALES ESPECÍFICOS, Y USTED
PUEDE POSEER OTROS DERECHOS QUE VARÍAN DE ESTADO A ESTADO, O DE
PROVINCIA A PROVINCIA.
Comuníquese con Insignia:
Para servicio al cliente favor llamar al 1-877-467-4289
www.insignia-products.com
Distribuido por Best Buy Purchasing, LLC
Dynex, 7601 Penn Avenue South, Richfield, Minnesota, E.U.A. 55423-3645
© 2008 Best Buy Enterprise Services, Inc.Todos los derechos reservados. INSIGNIA™
es una marca comercial de Best Buy Enterprise Services, Inc. registrada en ciertos
países. Todos los otros productos y los nombres de marca son marcas comerciales de
sus respectivos dueños.
66
www.insignia-products.com
Page 67

Insignia NS-CL01 Radi
o reloj con estación de acoplamiento
www.insignia-products.com
67
Page 68

www.insignia-products.com (877) 467-4289
Distributed by Best Buy Purchasing, LLC
7601 Penn Avenue South, Richfield, MN USA 55423-3645
All rights reserved. INSIGNIA is a trademark of Best Buy Enterprise Services, Inc. Registered in some countries.
Tous droits réservés. INSIGNIA est une marque de Best Buy Enterprise Services, Inc. Déposée dans certains pays.
Tous les autres produits ou noms de marques sont des marques de commerce qui appartiennent à leurs
Todos los derechos reservados. INSIGNIA es una marca de Best Buy Enterprise Services, Inc. Registrada en ciertos países.
All other products and brand names are trademarks of their respective owners.
iPod® is a trademark of Apple Computer, Inc., registered in the U.S. and other countries.
iPod® est une marquee d’Apple Computer, Inc., déposée aux États-Unis et dans d’autres pays.
Todos los demás productos y marcas son marcas comerciales de sus respectivos dueños.
iPod® es una marca de Apple Computer, Inc., registrada en los Estados Unidos y otros países.
© 2008 Best Buy Enterprise Services, Inc.
Distribué par Best Buy Purchasing, LLC
7601 Penn Avenue South, Richfield, MN USA 55423-3645
© 2008 Best Buy Enterprise Services, Inc.
propriétaires respectifs.
Distribuido por Best Buy Purchasing, LLC
7601 Penn Avenue South, Richfield, MN USA 55423-3645
© 2008 Best Buy Enterprise Services, Inc.
08-1112
 Loading...