

Page 1

15" Combo DVD/LCD TV
Ensemble DVD/ TV ACL de 15 po
NS-CL15C
Page 2

Page 3
Insignia NS-CL15C
(
)
Safety information
15" Combo
DVD/LCD TV
Contents
Welcome. . . . . . . . . . . . . . . . . . . . . . . . . . . . . . . . . .3
Safety information. . . . . . . . . . . . . . . . . . . . . . . . . . .3
Features . . . . . . . . . . . . . . . . . . . . . . . . . . . . . . . . . .5
Accessories. . . . . . . . . . . . . . . . . . . . . . . . . . . . . . . . . 5
Front view . . . . . . . . . . . . . . . . . . . . . . . . . . . . . . . . . . 5
Rear view - connectors . . . . . . . . . . . . . . . . . . . . . . . . 6
Remote control . . . . . . . . . . . . . . . . . . . . . . . . . . . . . . 7
Setting up your TV . . . . . . . . . . . . . . . . . . . . . . . . . .8
Installing the remote control batteries. . . . . . . . . . . . . 8
Using the remote control. . . . . . . . . . . . . . . . . . . . . . . 8
Connecting to video sources. . . . . . . . . . . . . . . . . . . . 8
Using your TV. . . . . . . . . . . . . . . . . . . . . . . . . . . . .10
Turning the power on and off. . . . . . . . . . . . . . . . . . . 10
Changing the volume . . . . . . . . . . . . . . . . . . . . . . . . 10
Changing the video source . . . . . . . . . . . . . . . . . . . . 10
Changing channels . . . . . . . . . . . . . . . . . . . . . . . . . . 10
Programming channels into memory. . . . . . . . . . . . . 11
Using the DVD player . . . . . . . . . . . . . . . . . . . . . . .13
Playing a DVD . . . . . . . . . . . . . . . . . . . . . . . . . . . . . . 13
Playing a CD. . . . . . . . . . . . . . . . . . . . . . . . . . . . . . . 14
Playing a JPEG disc . . . . . . . . . . . . . . . . . . . . . . . . . 15
Customizing TV settings. . . . . . . . . . . . . . . . . . . . .15
Opening and navigating the on-screen menus . . . . . 15
Using the on-screen menu . . . . . . . . . . . . . . . . . . . . 15
On-screen menus . . . . . . . . . . . . . . . . . . . . . . . . . . . 15
Customizing DVD player settings . . . . . . . . . . . . . .16
Using the setup menu. . . . . . . . . . . . . . . . . . . . . . . . 16
Changing DVD settings. . . . . . . . . . . . . . . . . . . . . . . 17
Troubleshooting . . . . . . . . . . . . . . . . . . . . . . . . . . .17
Maintaining . . . . . . . . . . . . . . . . . . . . . . . . . . . . . . .18
Specifications . . . . . . . . . . . . . . . . . . . . . . . . . . . . .18
Legal Notices . . . . . . . . . . . . . . . . . . . . . . . . . . . . .19
1 Year Limited Warranty . . . . . . . . . . . . . . . . . . . . .21
Français. . . . . . . . . . . . . . . . . . . . . . . . 23
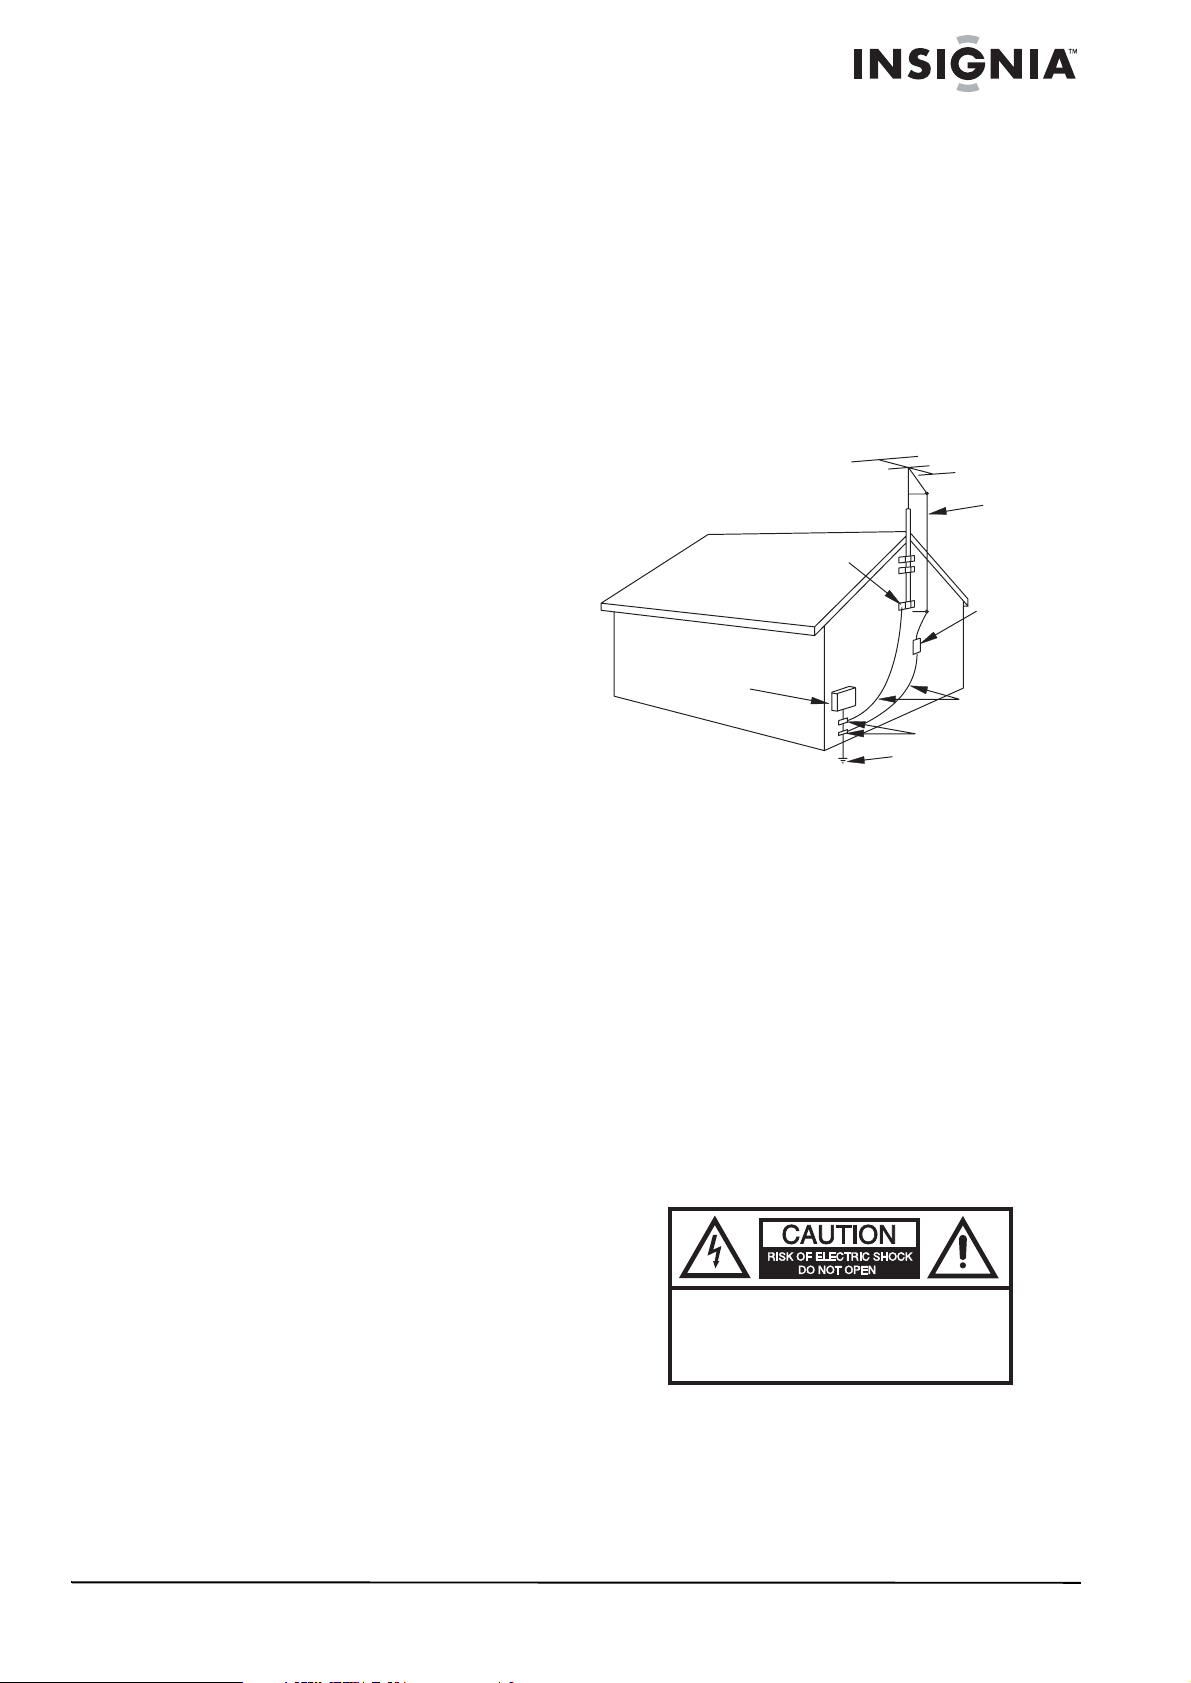
Antenna connections
If an outside antenna is connected to the
television equipment, make sure that the
antenna system is grounded to provide
protection against voltage surges and built-up
static electricity charges. Section 810 of the
National Electrical Code provides information on
proper grounding of the mast and supporting
structure, grounding of the lead-in wire to an
antenna discharge unit, size of the grounding
conductors, location of the antenna discharge
unit, connection to grounding electrodes, and
requirements for the grounding electrode.
EXAMPLE OF ANTENNA GROUNDING AS SPECIFIED
BY NATIONAL ELECTRICAL CODE (NEC) ANTENNA
GROUND
CLAMP
ELECTRIC
SERVICE
EQUIPMENT
GROUND CLAMPS
POWER SERVICE GROUNDING
ELECTRODE SYSTEM
NEC ART 250, PAR T H
• For added protection during a lightning
storm, or when the product is left unattended
and unus ed for long periods of time , un plu g it
from the power outlet and disconnect the
antenna. This will prevent damage to the
equipment due to lightning and power line
surges.
• An outside antenna system should not be
located near overhead power lines or other
electric light or power circuits, or where it can
fall into such power lines or circuits. When
installing an outside antenna system,
extreme care should be taken to keep from
touching such power lines or circuits,
because contact with them can be fatal.
LEAD-IN
WIRE
ANTENNA
DISCHARGE UNIT
(NEC SECTION 810-20)
GROUNDING CONDUCTORS
(NEC SECTION 810-21)
Welcome
Congratulations on your purchase of a
high-quality Insignia product. Your NS-CL15C
represents the state of the art in television and
DVD player design, and is designed for reliable
and trouble-free performance.
Risk of shock
To prevent fire or shock hazard, do not expose
this appliance to rain or moisture.
CAUTION:
ELECTRIC
COVER
PARTS INSIDE. REFER SERVICING
QUALIFIED SERVICE PERSONNEL.
www.insignia-products.com
TO REDUCE THE RISK OF
SHOCK, DO NOT REMOVE
(OR BACK). NO USER-SERVICEABLE
TO
3
Page 4

Insignia NS-CL15C 15" Combo DVD/LCD TV
The lightning flash with arrowhead symbol, within an
equilateral triangle is intended to alert the user to the
presence of uninsulated dangerous voltage within the
product’s enclosure that may be of sufficient magnitude
to constitute a risk of electric shock.
The exclamation point within an equilateral triangle is
intended to alert the user to the presence of important
operating and maintenance (servicing) instructions in the
literature accompanying the appliance.
Caution:
This product employs a laser system. To ensure
correct use of this product, read this owner’s
manual carefully and retain it for future
reference. Should the DVD/VCR require
maintenance, contact qualified service
personnel.
Making adjustments to controls or performing
procedures other than those spec ifi ed here in
may result in hazardous radiation exposure.
To prevent direct exposure to laser beam, do not
try to open the enclosure. DO NOT ST ARE INTO
BEAM.
Caution:
Your DVD/VCR should not be exposed to water
(dripping or splashing) and no objects filled with
liquids, such as vases, should be placed on the
apparatus.
Caution:
Class 2M visible and invisible laser radiation
when open and interlocks defeated. Do not stare
into the beam or look at it directly with an optical
instrument.
Caution
Most recorder manufacturers recommend their
recorders be placed upon a dedicated circuit. That
is, a single outlet circuit which powers only that
recorder and has no additional outlets or branch
circuits.
Do not overload wall outlets. Overloaded wall
outlets, loose or damaged wall outlets, overloaded
extension cords, frayed power cords, or damaged
or cracked wire insulation are dangerous. Any of
these conditions could result in electric shock or
fire. Periodically examine the cord of your
recorder, and if its appearance indicates damage
or deterioration, unplug it, discontinue use of the
recorder, and have t he cord replaced with an exact
replacement part by an authorized servicer.
Protect the power cord from physical or
mechanical abuse, such as being twisted, kinked,
pinched, closed in a door, or walked upon. Pay
particular attention to plugs, wall outlets, and the
point where the cord exits the recorder.
To disconnect power from the power outlet, pull
out the power cord plug. When installing the
product, make sure that the plug is easily
accessible.
Important safeguards
This product has been designed and
manufactured to ensure personal safety.
Improper use can result in electric shock or fire
hazard. The safeguards incorporated in this
product will protect you if you observe the
following procedures in installing, using and
servicing. The internal components of this
product cannot be serviced or repaired by the
user.
• Read these instructions—Read and
understand all operating instructions before
operating the product.
• Keep these instructions—These safety and
operating instructions must be kept in a safe
place for future reference.
• Heed all warnings—Al l war n in gs on the
product and in these instructions must be
closely followed.
• Follow instructions—All operating
instructions must be followed.
• Accessories—Do not use attachments or
accessories not recommended by Insignia.
Use of improper accessories can result in
accidents.
• Power source—This product must operate on
a power so urce spec ifie d on t he device label.
If you are not sure of the type of power supply
used in your home, ask your dealer or local
power company.
• AC power cord protection—The AC power
cords must be routed correctly to prevent
damage from people stepping on them or
from objects resting on them. Check the cord
connections at the power outlet and where
the cord attaches to the product.
• Overloading—Do not overload AC power
outlets or extension cords. Overloading can
cause fire or electric shock.
• Intrusions and spills—Never insert an object
into the product through vents or openings.
High voltage flows in the product, and
inserting an object can cause electric shock
and damage electrical components. For the
same reason, do not spill water or liquid on
the product.
• Servicing—Do not attempt to service the
product yourself. Removing covers can
expose you to high voltage and other
dangerous conditions. Ask a qualified service
technician to perform servicing.
• Repair—If any of the following conditions
occur, unplug the AC power cord from the
AC power outlet, then request a qualified
service technician to perform repairs.
• When the AC power cord or plug is
damaged.
• When liquid has spilled on the product or
when objects have fallen into the product.
• When the product has been exposed to
rain or water.
• When the product does not operate
normally as described in these operating
instructions. Do not touch controls other
than those described in these
instructions. Incorrect adjustment of
4
www.insignia-products.com
Page 5
Insignia NS-CL15C 15" Combo DVD/LCD TV
controls not described in these
instructions can cause damage, which
often requires extensive adjustment work
by a qualified technician.
• When the product has been dropped or
damaged.
• When the product displays an abnormal
condition. Any noticeable abnormality in
the product indicates that the product
needs servicing.
• Replacement parts—In case the product
needs replacement parts, make sure that the
service person uses replacement parts
specified by the manufacturer, or those with
the same characteristics and performance as
the original parts. Use of unauthorized parts
can result in fire, electric shock, and other
danger.
• Safety checks—After completion of service
or repair work, ask the service technician to
perform safety checks to make sure that the
product is in proper operating condition.
• Wall or ceiling mounting—When mounting
the product on a wall or ceiling, make sure to
install the product according to the method
recommended by the manufacturer of the
mounting or support device.
• Speakers—Unplug the AC power cord from
the AC power outlet before installing the
speakers.
• Cleaning—Unplug the AC power cord from
the AC power outlet before cleaning the
product. Clean only with a dry cloth. Do not
use liquid or aerosol cleaners.
• Water and moisture—Do not use this product
near wet or moist environments, such as near
a bathtub, washbasin, sink, laundry tub,
swimming pool, or wet basement. Do not
expose this product to dripping or splashing.
Do not place objects filled with liquid on this
product.
• Shelves and carts—Do not place this product
on an unstable cart, stand, tripod, or table.
Unstable installation is likely to make the
product fall, resulting in serious injuries as
well as damage to the product. Use only the
cart, stand, tripod, bracket, or table specified
by Insignia, or sold with the product. When
you use a cart, exercise caution when moving
the cart and device to avoid injury from them
tipping over.
• V entilation—The vents and other openings in
the cabinet are designed for ventilation. Do
not cover or block them, because insufficient
ventilation can overheat and shorten the
product’s life span. Do not place the product
on a bed, sofa, rug, or other soft surfaces,
because they can block ventilation openings.
This product is not designed for built-in
installation. Do not place the product in an
enclosed place, such as a bookcase or rack,
unless you provide proper ventilation and the
manufacturer’s instructions are closely
followed.
• Fragile—The LCD panel used in this product
is made of glass, and can easily be broken
when the product is dropped or receives an
impact. If the panel becomes broken,
exercise extreme caution to prevent injury
from the broken glass.
• Non-active pixels—The LCD panel contains
almost 3 million thin-film transistors, which
provide exceptionally sharp video quality.
Occasionally, a few non-active pixels may
appear on the screen as a fixed blue, green,
or red point. These non-active pixels do not
adversely affect the performance of your
product, and are not considered defects.
• Heat sources—Do not install this product
near any heat sources such as radiators,
heat registers, stoves, amplifiers, or other
devices that produce heat.
Features
Accessories
Make sure that the following accessories are
provided in the packaging:
• Remote control
• Batteries (two - AA)
•User Guide
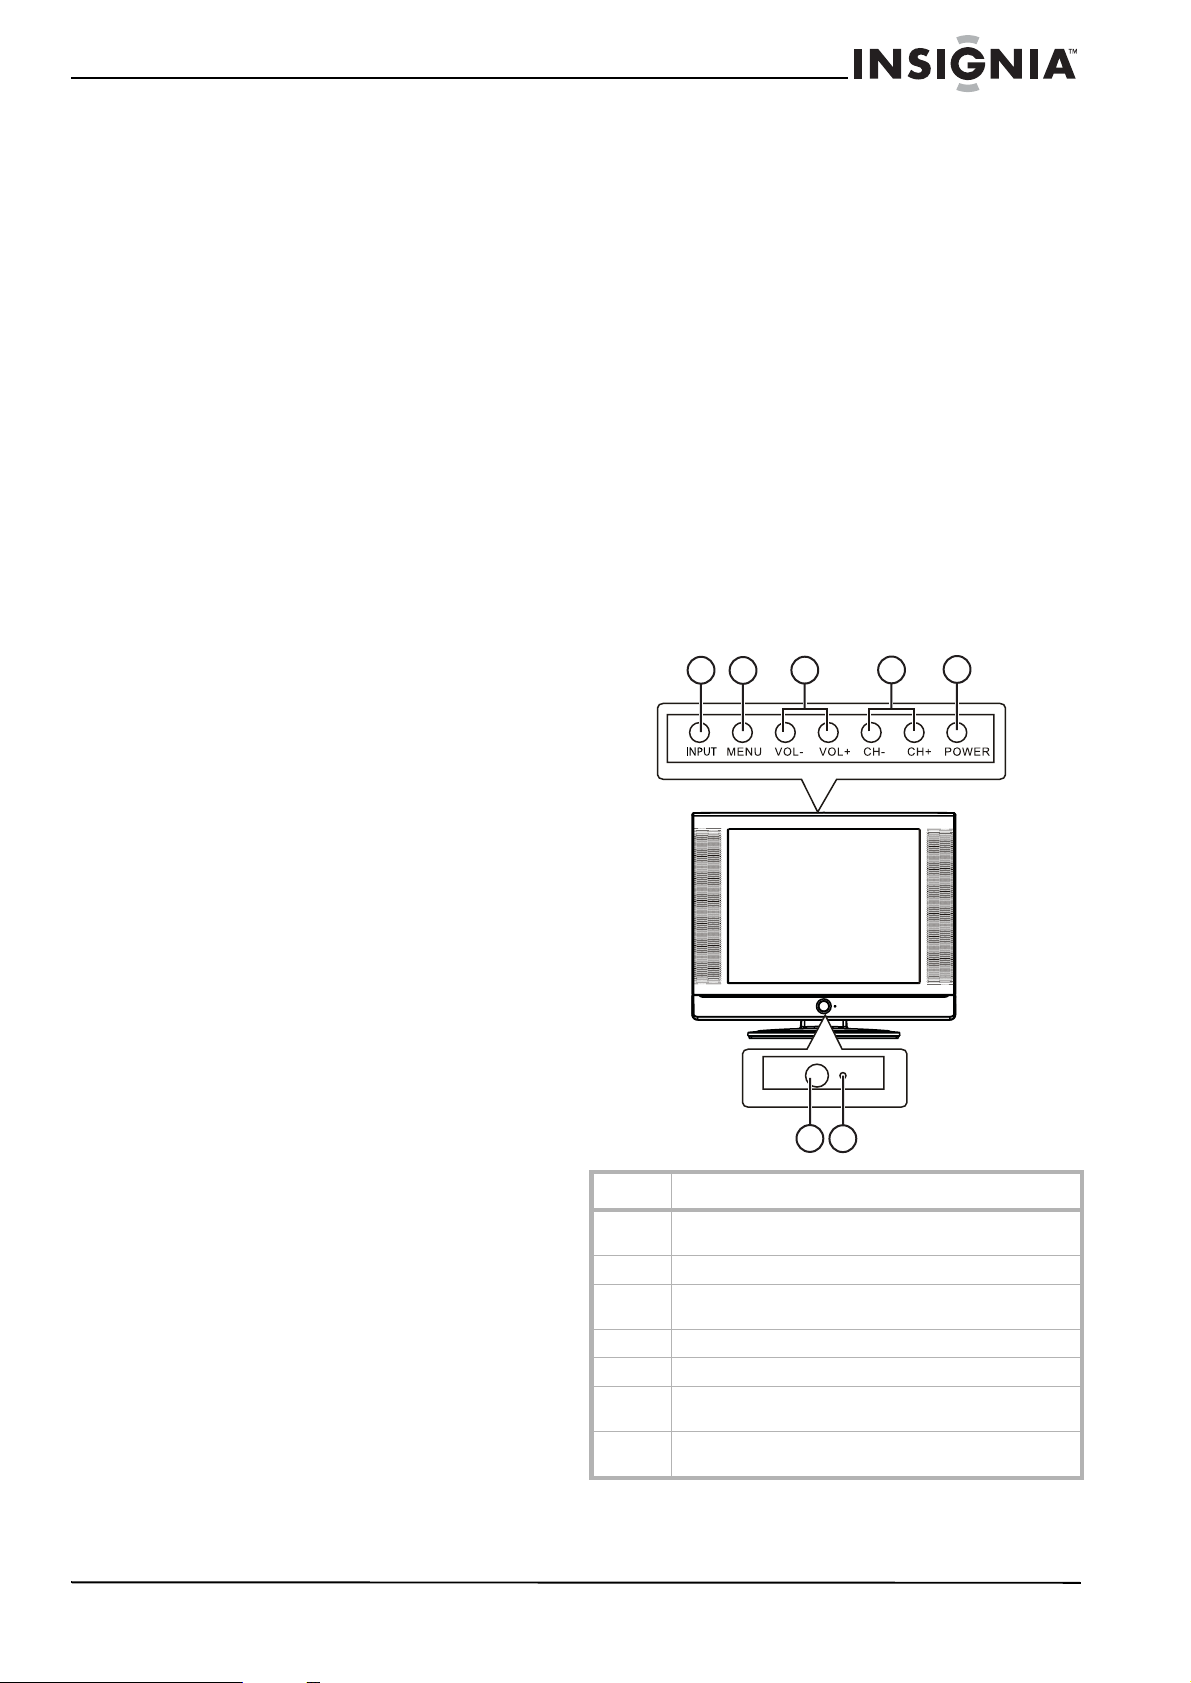
Front view
2
1
Item Description
1 INPUT button. Press to select the AV signal input
2 MENU button. Press to op en the main on screen menu.
3 VOL -/+ buttons. Press to decrease or increase the
4 CH -/+ buttons. Press to change the chann el .
5 POWER button. Press to turn on and turn off the TV.
6 Remote sensor. Receives signals from the remot e
7 Power Indicator LED. T urns green when the TV is turned
between TV, AV, S-VIDEO, PC, COMPONENT, and DVD.
volume.
control.
on and turns red when the TV is in standby mode.
3
6
4
7
5
www.insignia-products.com
5
Page 6
Insignia NS-CL15C 15" Combo DVD/LCD TV
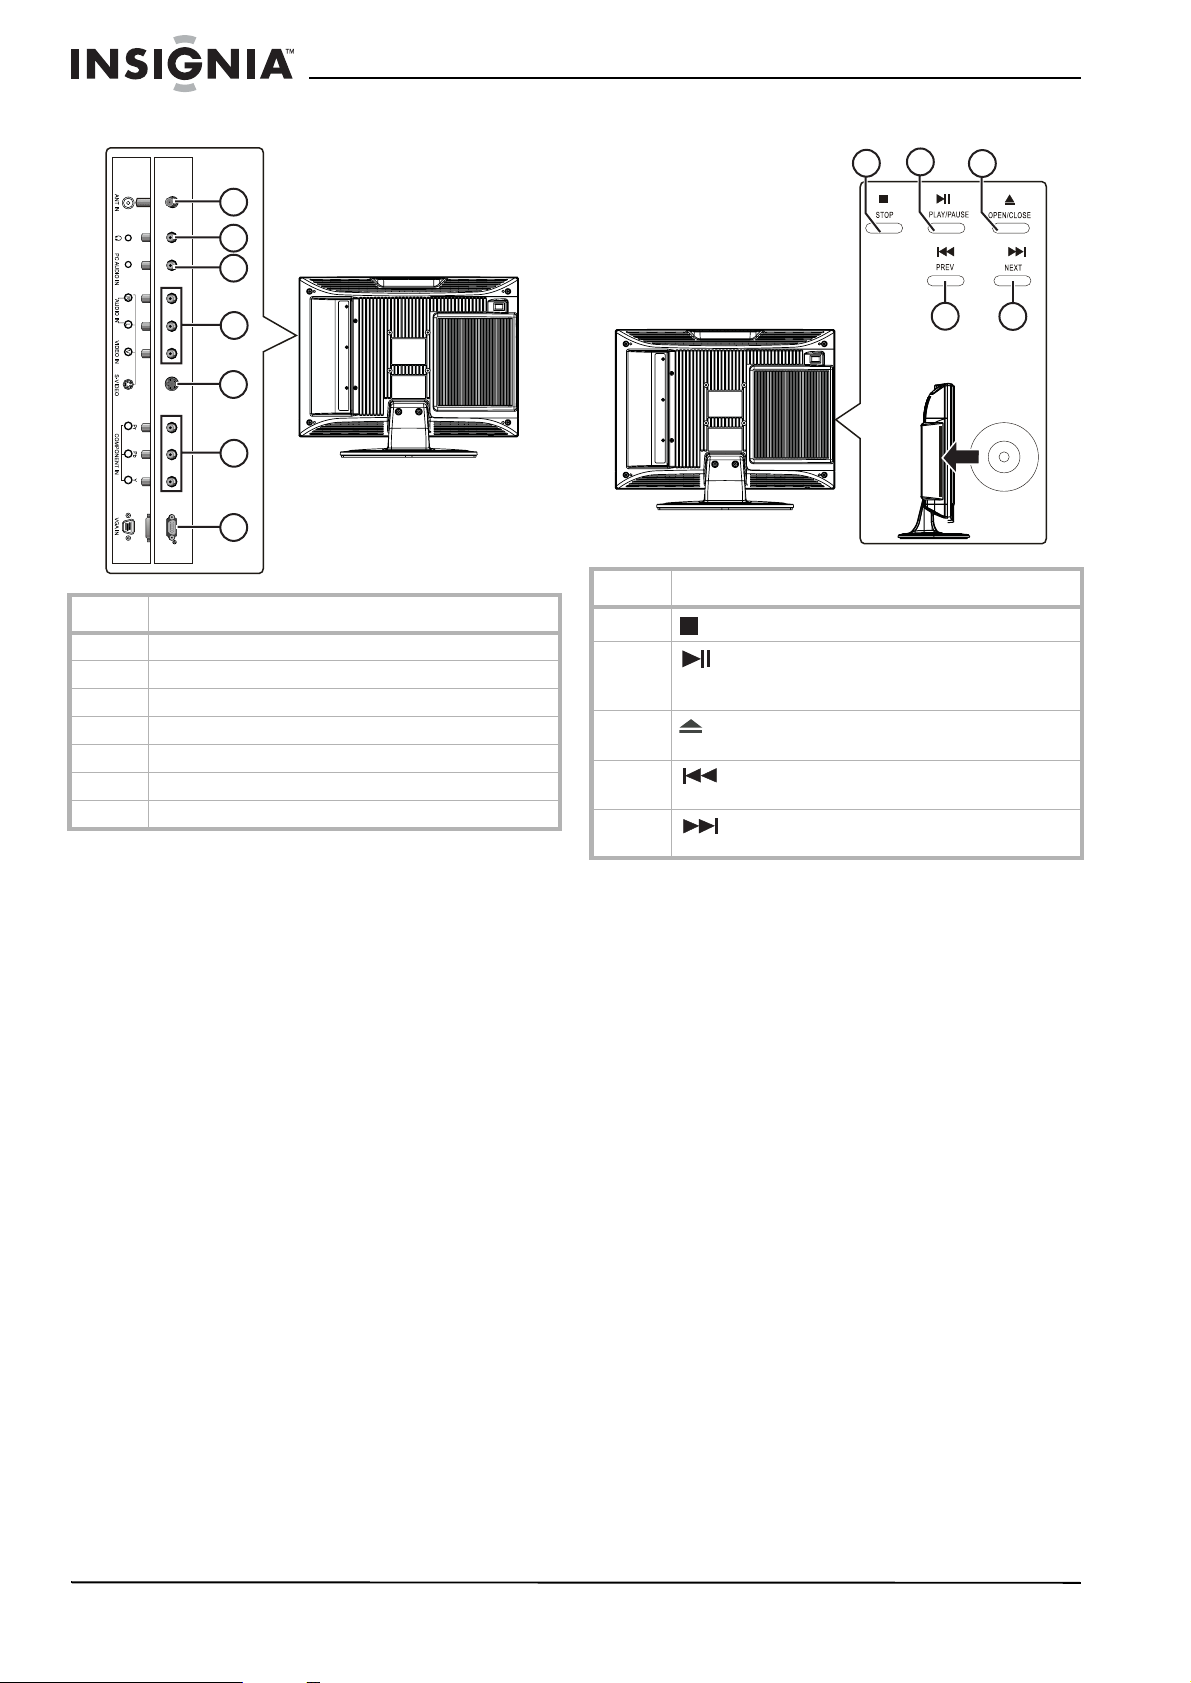
Rear view - connectors Rear view - DVD player
1
2
3
2
1
3
4
5
6
7
Item Description
1 RF (75 ohm) antenna connector
2 Headphone jack
3 PC audio input jack
4 Composite video/audio input jacks
5 S-Video input jack
6 Component (YPbPr) input jacks
7 VGA video input (PC) jack
Item Description
1
2
3
4
5
STOP button. Press to stop disc playback .
PLAY/PAUSE button. Press to begin playback,
press again to pause playback. press again to resume
playback.
OPEN/CLOSE button. Press to open the disc tray.
Press again to close the di sc tray.
PREV button. Press to go to the previous chapter
or track. Press again to skip back by chapter or track.
NEXT button. Press to go to the next chapter o r
track. Press again to skip forward by chapter or track.
4
5
6
www.insignia-products.com
Page 7
Insignia NS-CL15C 15" Combo DVD/LCD TV
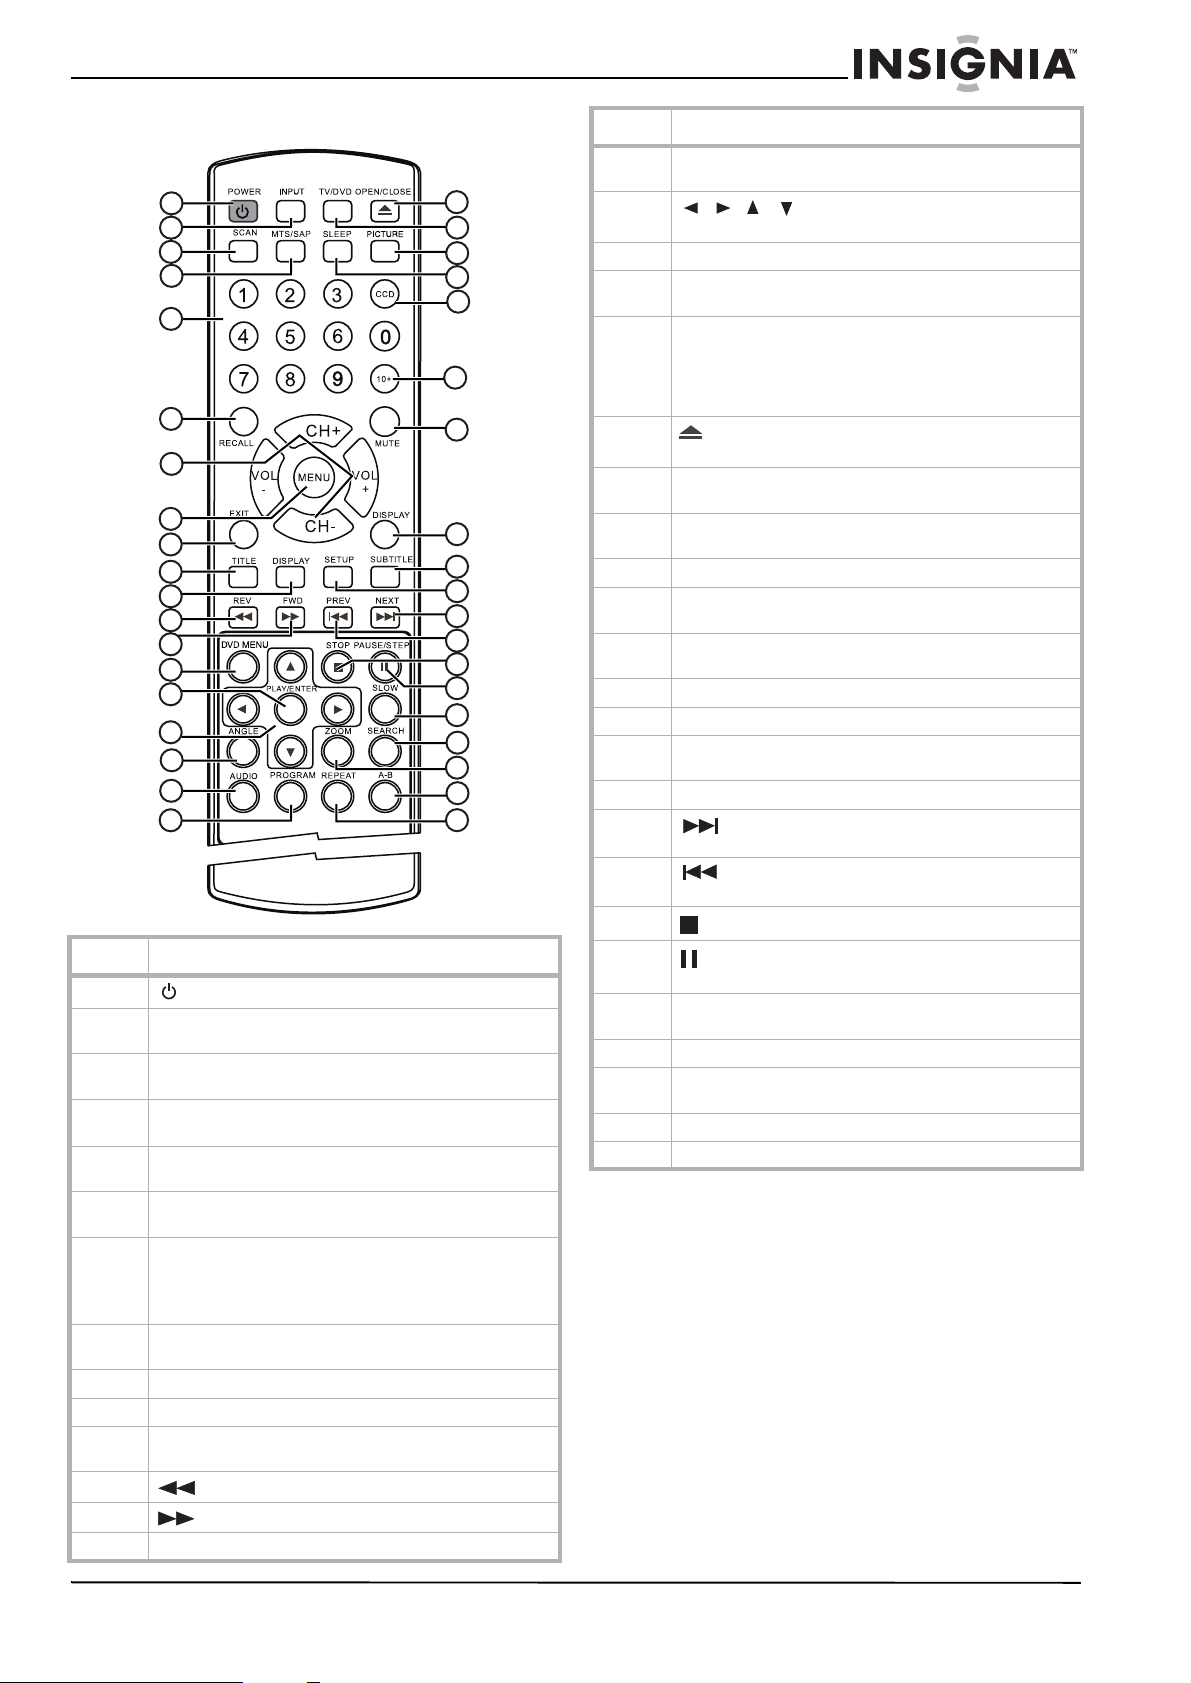
Remote control
1
2
3
4
5
6
7
8
9
10
11
12
13
14
15
16
17
18
19
Item Description
1
2 INPUT button. Press to select the AV signal input
3 SCAN button. Press to sca n thro u gh mem o riz e d TV
4 MTS/SAP button. Press to select Stereo, Mono, or SAP
5 Number buttons: Press to di rectly enter channel
6 RECALL button. Whi le in TV mode , press to return to the
7 CH +/- buttons. Press to skip to the previous or next
8 MENU button. Press to op en the TV menu. Press again
9 EXIT button. Press to turn off the on screen display.
10 TITLE button. Press to display t he current DVD title.
11 DISPLAY button. Press to show information about the
12
13
14 DVD MENU button. Press to open the DVD root menu.
POWER button. Press to turn the TV on and off.
between TV, AV, S-VIDEO, PC, COMPONENT, and DVD.
channels.
mode.
numbers, DVD chapter numbers, and CD track numbers.
previous channel.
channel while in TV mode. In other modes (except DVD
mode), press to change to TV mode.
VOL+/- buttons. Press to change the volume.
to exit.
DVD playing.
REV button. Press to fast reverse a DVD.
FWD button. Press to fast forward a DVD.
20
21
22
23
24
25
26
27
28
29
30
31
32
33
34
35
36
37
38
Item Description
15 PLAY/ENTER button. Pres s to begin disc playback, or in
16
17 ANGLE button. Press to change the DVD viewing angle.
18 AUDIO button. Press to change the DVD audio language/
19 PROGRAM button. Press to enter DVD progra m mode.
20
21 TV/DVD button. Press to switch between the current
22 PICTURE button. Press to cycle through the picture
23 SLEEP button. Press to set the sleep tim e r.
24 CCD button. Press to select Close Captions modes while
25 10+ button. If the track or channel number is over 10,
26 MUTE button. Press to mute the sound.
27 DISPLAY button. Press to show TV channel information.
28 SUBTITLE button. Press repeatedly until the subtitle
29 SETUP button. Press to open the DVD Set up menu.
30
31
32
33
34 SLOW button. Press to decrease the DVD playback
35 SEARCH button. Press to go to DVD search mode.
36 ZOOM button. Press to zoom the DVD display image in
37 A-B button. Press to repeat a selected portion of a DVD.
38 REPEAT button. Press to go to DVD repeat mode.
menu mode to confirm yo ur selections.
/// cursor buttons: Pr ess to navigate in on
screen menus.
options.
In CD mode, pressing th is button switches between
"Folder" and "Filelist " . Folder means play the tracks in
current folder, and Filelist means play all tracks on the
disk.
OPEN/CLOSE button. Press to open or close the
disc tray.
inputs and DVD.
modes (Personal, Standard, Mild, and Fresh).
in TV mode.
press this button once, then a button 1-9.
language you want is selected.
NEXT button. Press to go to the next chapter o r
track. Press again to skip forward by chapter or track.
PREV button. Press to go to the previous chapter
or track. Press again to skip back by chapter or track.
STOP button. Press to stop DVD and CD playback.
PAUSE/STEP button. Press to pause DVD playback.
Press again to step through a DVD one frame at a time.
speed.
on the picture.
www.insignia-products.com
7
Page 8
Insignia NS-CL15C 15" Combo DVD/LCD TV
Setting up your TV
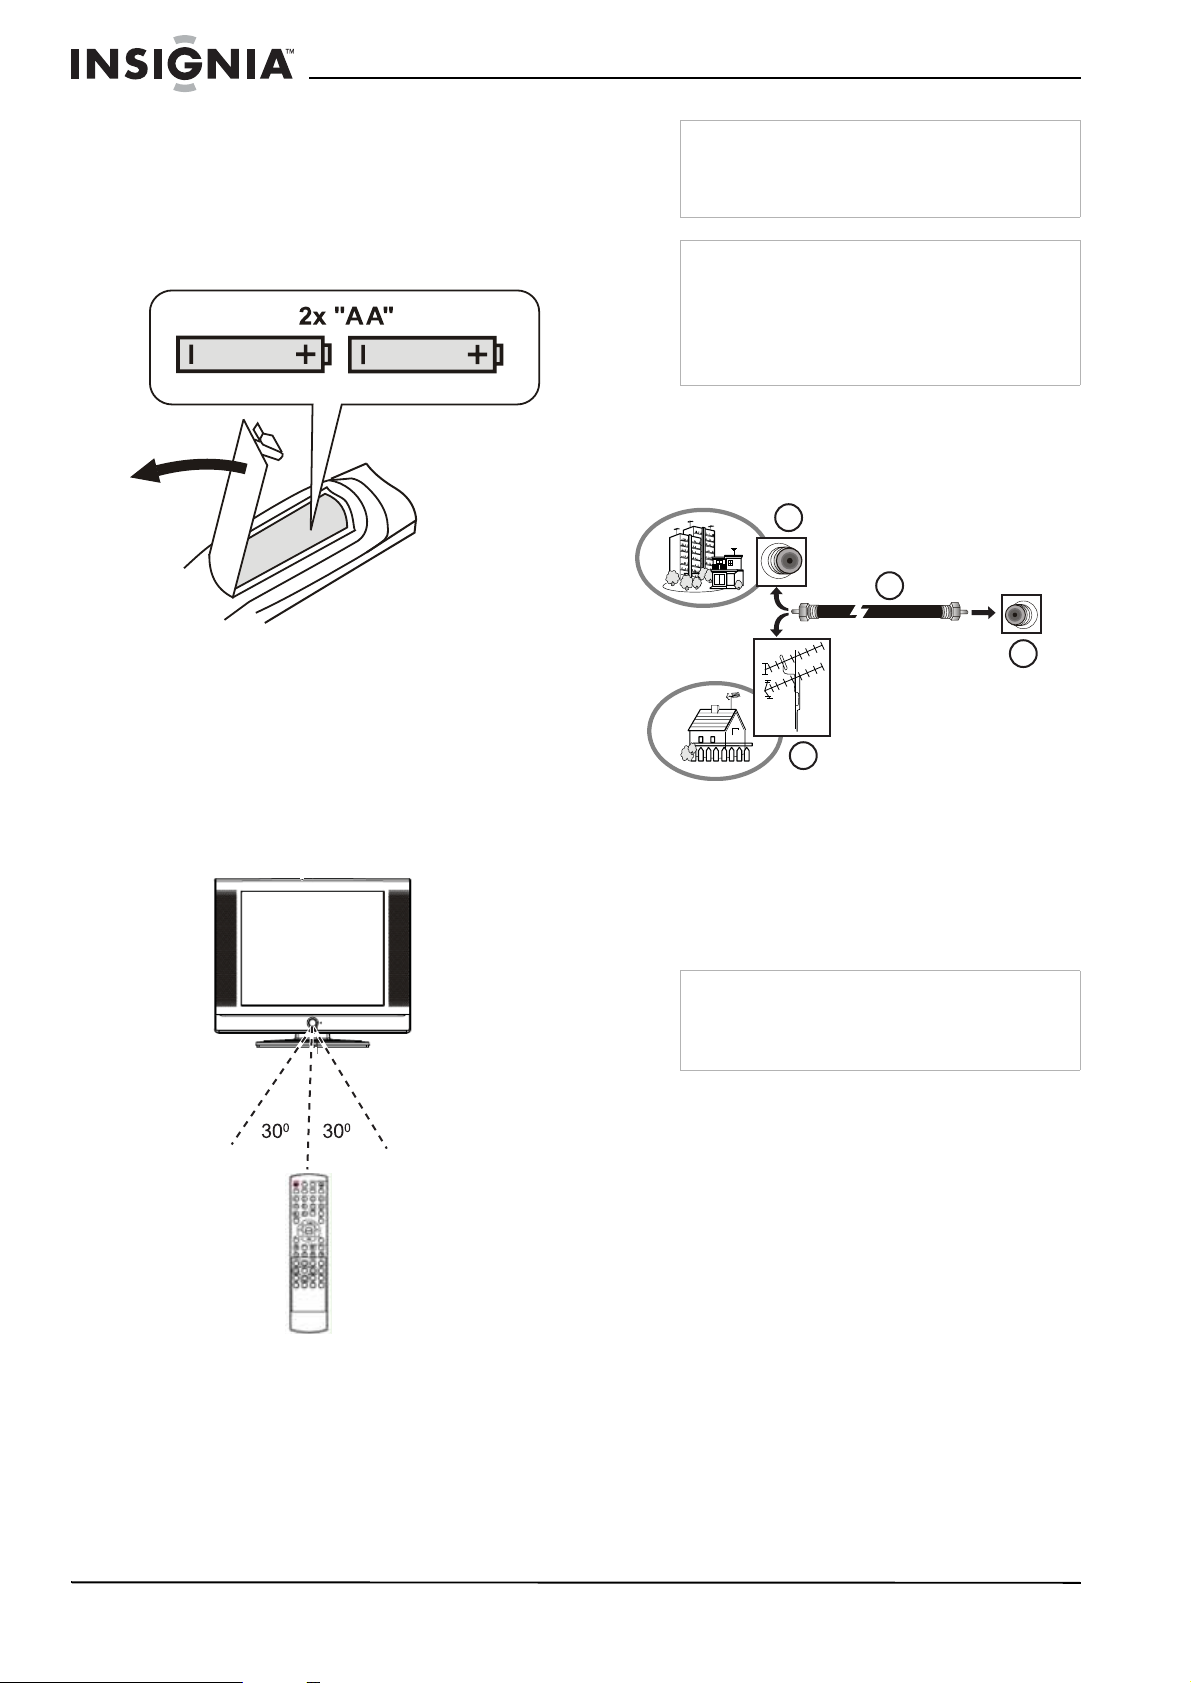
Installing the remote control batteries
To install the batteries:
1 Open the battery compartment on the back of
the remote control.
2 Insert the two AA batteries (provided) into the
battery compartment. Make sure that the (+)
and (-) symbols on the batteries match the
diagram inside the compartment.
Note
Objects between the remote control and the
sensor may weaken the remote control’s IR signal.
Range can be diminished by direct sunlight
shining on the TV’s IR sensor.
Cautions
Do not expose the remote control to liquids, direct
sunlight, or shock.
The remote control may not work correctly if the
TV’s IR sensor is under direct sunlight or strong
lighting. In these cases, change the angle of the
lighting or the TV screen, or operate the remote
control closer to the IR sensor.
Connecting to video sources
Connecting to an antenna or cable/satellite receiver
3
1
4
Using the remote control
To use the remote control:
• Point it directly at the TV , within a 30° angle of
the IR sensor on the front of the TV, and
within 20 feet.
2
To connect an external antenna or cable/ satellite receiver:
1 Connect the antenna cable (1) from an
antenna (2) or cable/satellite receiver (3) to
the antenna input jack (4) on the TV.
2 Press the INPUT button to set the TV’s signal
input to TV.
Notes
• T o improv e picture quality in a poor signal area,
you can purchase and install a signal amplifier.
• To split the signal from an antenna, you will
need a 2-way signal splitter.
8
www.insignia-products.com
Page 9
Insignia NS-CL15C 15" Combo DVD/LCD TV
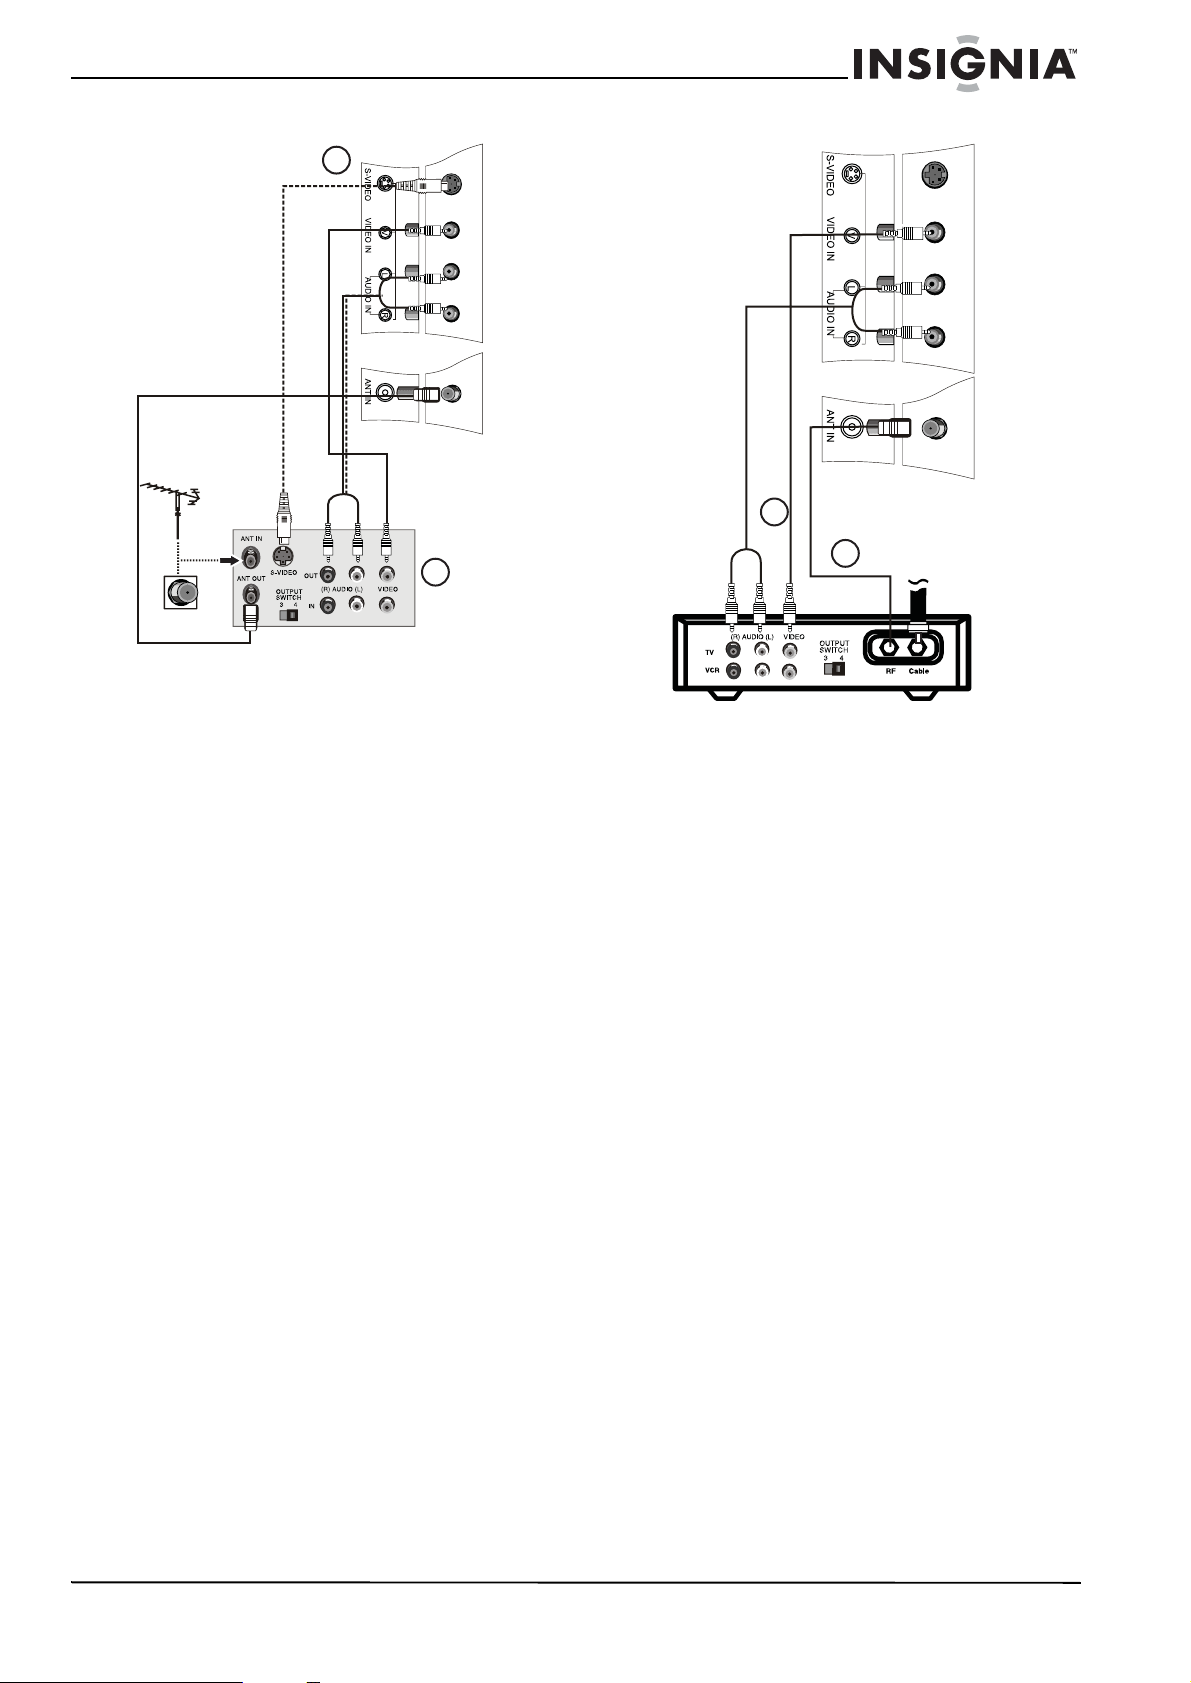
Connecting to a VCR or other AV source
2
1
To connect your TV to a VCR or other AV source:
1 Turn off the TV and the VCR (or other
source).
2 Connect an RCA video cable to the VCR (1),
then to the VIDEO IN jack on the back of the
TV (2).
- OR Connect an S-Video cable to the VCR, then
to the S-VIDEO jack on the back of the TV.
3 Connect RCA audio cables to the VCR’s
audio output jacks, then to the AUDIO L and
R jacks on the back of the TV.
4 Turn on the TV and the VCR.
5 Set the VCR output switch to channel 3 or 4,
then tune your TV to the same channel.
6 Press the INPUT button to set the TV’s signal
input to AV or S-VIDEO.
Connecting to a cable box
2
1
T o connect your TV to a cable box with an RF cable (1):
1 Turn off the TV and the cable box.
2 Connect a 75 ohm RF cable from the cable
box to the ANT IN jack on the back of your
TV.
3 Set the cable box output switch to channel 3
or 4, then tune your TV to the same channel.
4 Turn on the TV and the cable box.
5 Change channels at the cable box or with the
cable box remote.
To connect your TV to a cable box with a AV cables (2):
1 Turn off the TV and the cable box.
2 Connect RCA video and audio cables from
the cable box to the VIDEO and AUDIO IN
jacks on the back of your TV.
•Yellow - Video
• White - Audio left
• Red - Audio right
3 Turn on the TV and the cable box.
4 Press the INPUT button to set the TV’s signal
input to AV or S-VIDEO.
5 Change channels at the cable box or with the
cable box remote.
www.insignia-products.com
9
Page 10
Insignia NS-CL15C 15" Combo DVD/LCD TV
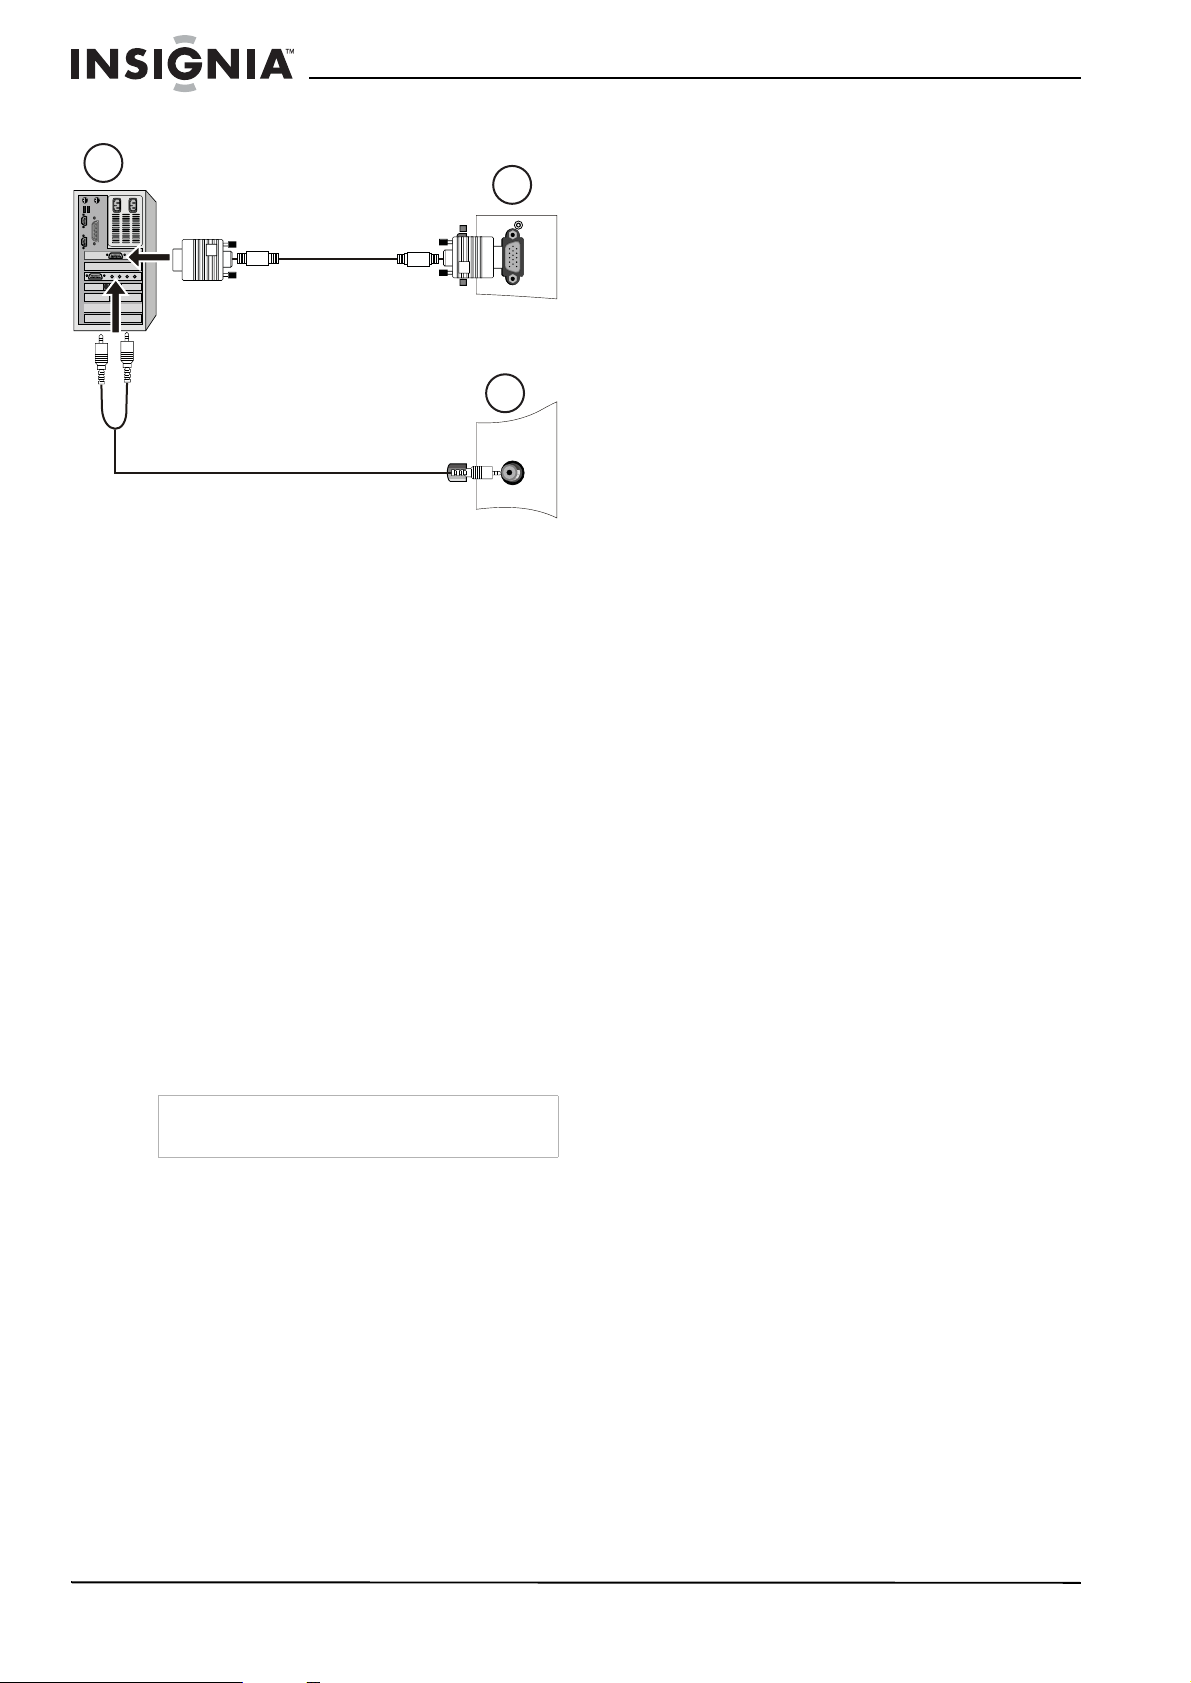
Connecting to a computer
1
To connect a computer video source to the
VGA jacks:
1 Connect a VGA cable from the computer to
the VGA IN port on the TV.
2 Connect a male-to-male audio cable from the
computer to the PC AUDIO IN port on the TV.
3 Turn on the TV, then turn on the PC.
4 Press the INPUT button to set the TV’s signal
input to PC.
See “ADJUST” on page 16 to adjust the
picture.
Using your TV
Turning the power on and off
Changing the video source
Your TV supports multiple video sources.
2
3
To select the video source:
• Press the INPUT button to select from the
following input modes:
•TV
•AV
•S-VIDEO
•PC
• COMPONENT
•DVD
The name of the input source appears on the
screen when it is selected.
Changing channels
To change channels:
• Press CH+ or CH-.
To enter a channel number directly:
• Press the number buttons on the remote
control.
To switch between two channels:
1 Press RECALL to change from the currently
tuned channel to the previous channel.
2 Press RECALL again to change back to the
originally tuned channel.
To scan through memorized channels:
1 Press SCAN on the remote control. The
picture pauses for about two seconds on
each memorized channel.
2 To stop the Scan function, press SCAN
again.
To turn the power on and off:
1 Press the POWER button on the front panel
of the TV or on the remote control. The
POWER indicator turns green.
2 To turn off the TV, press the POWER button
again. The screen image disappears and the
POWER indicator turns red.
Note
A small amount of electric power is consumed
even when the power is turned off.
Changing the volume
You can change the volume using the TV’s front
panel or the remote control.
To change the volume:
1 Press VOL+ or VOL- .
2 Press MUTE on the remote control to mute
the sound, and press it again (or the VOL+ or
VOL- ) to restore the sound.
Changing the picture mode
To change the picture mode:
• Press PICTURE on the remote control to
cycle through the following modes:
• PERSONAL
• STANDARD
•MILD
•FRESH
10
www.insignia-products.com
Page 11
Insignia NS-CL15C 15" Combo DVD/LCD TV
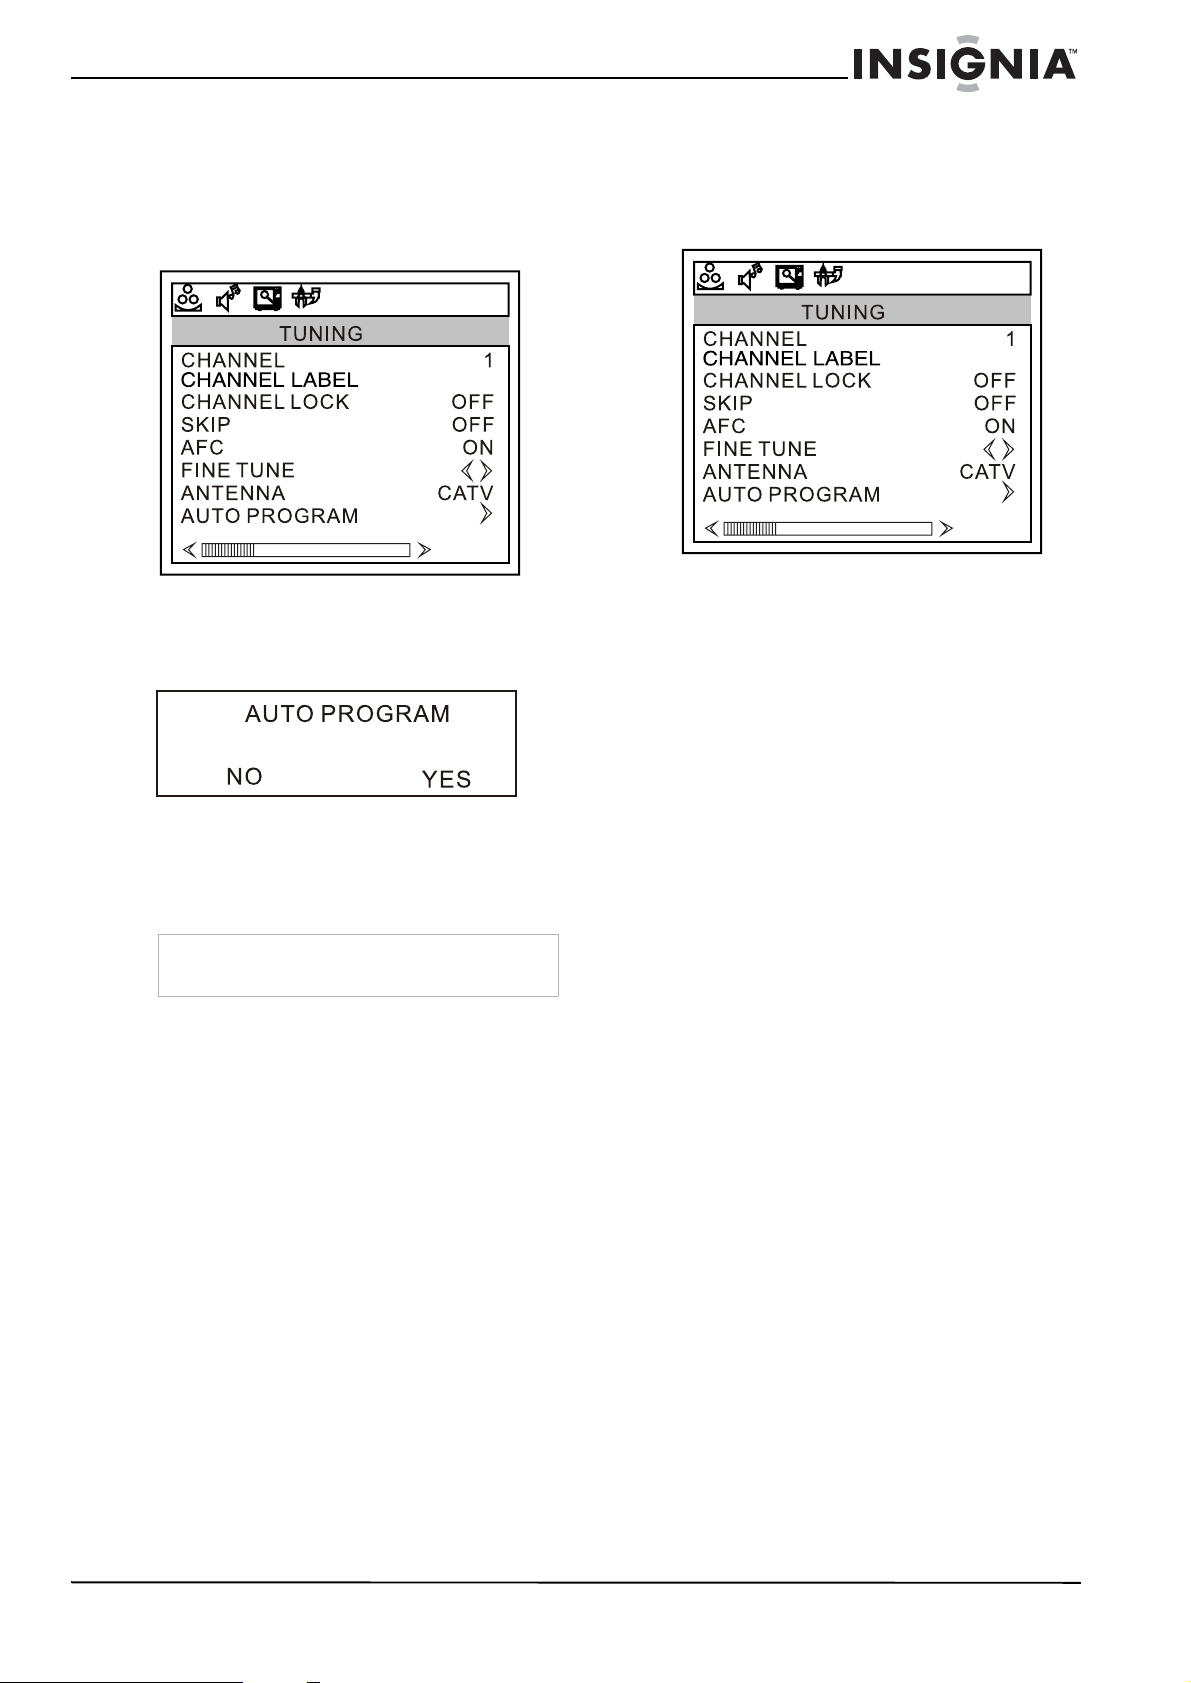
Programming channels into memory
To automatically program channels into memory:
1 Press MENU on the TV or remote control,
then press VOL+/VOL- to display the
TUNING
2 Press CH+/CH- to enter the
and to highlight AUTO PROGRAM, then
press VOL+ to enter the
submenu.
menu.
73. 12MHZ
TUNING
AUTO PROGRAM
menu
Adding a channel label
To add a label to a channel:
1 Press MENU on the TV or remote control,
then press VOL+/VOL- to display the
TUNING
2 Press CH+/CH- to enter the
and to highlight CHANNEL LABEL, then
press VOL+ to enter the menu.
3 Press VOL+/VOL- to select the position and
CH+/CH- to select the letters or symbols to
set.
4 Press MENU to confirm.
menu.
73. 12MHZ
TUNING
menu
3 Press VOL+ highlight YES, then press MENU
to confirm your selection.
4 The TV searches and memorizes all
channels on the selected antenna input
available in your area.
Note
If your TV is connected to cable, select CATV in
ANTENNA
the
5 To stop the auto search, press MENU.
submenu.
Displaying status information
To display status information:
• Press the DISPLAY button. Your TV displays
status information, such as the channel
number or signal source.
Setting the sleep timer
The sleep timer lets you select the amount of
time before your TV turns off automatically.
To set the sleep timer:
• Press the SLEEP button on the remote
control repeatedly until the time duration you
want is shown on the screen. Options
include:
• SLEEP 240 MIN
• SLEEP 180 MIN
• SLEEP 120 MIN
•SLEEP 90 MIN
•SLEEP 60 MIN
•SLEEP 45 MIN
•SLEEP 30 MIN
•SLEEP 15 MIN
•SLEEP 10 MIN
•SLEEP 5 MIN
•SLEEP 0 MIN
Viewing closed captions
To view closed captions:
• Press the CCD button to toggle the closed
captions on or off.
Setting parental controls
Your TV has a V-chip that lets you control the
type of programs your children can watch.
Parental controls include two ratings: MPAA
(based on age) and TV Parental Guidelines
(based on content and age). A TV program may
have an MPAA or TV Parental Guidelines rating,
so you should set controls for both ratings.
www.insignia-products.com
11
Page 12

Insignia NS-CL15C 15" Combo DVD/LCD TV
Before you can select ratings, you need to set up
a parental controls password.
To set up a password:
1 Press MENU on the TV or remote control,
then press VOL+/VOL- to display the
FUNCTION
2 Press CH+/CH- to enter the
menu.
FUNCTION
menu and to highlight PARENTAL, then
press VOL+ to enter the
submenu. The
PASSWORD
PARENTAL
box opens.
3 Press the number buttons to enter 0000. The
PARENTAL
menu opens.
Setting the Parental Control level
To set the Parental Control level:
1 Press MENU on the TV or remote control,
then press VOL+/VOL- to display the
FUNCTION
menu.
2 Press CH+/CH- to enter the
menu and to highlight PARENTAL, then
press VOL+ to enter the
submenu. The
PASSWORD
3 Press the number buttons to enter your
password. The
PARENTAL
FUNCTION
PARENTAL
box opens.
menu opens.
12
4 Press CH+/CH- to select
PASSWORD
, then press VOL+ to enter the
CHANGE PASSWORD
CHANGE
submenu.
5 Press the number buttons to enter a
password.
6 Press the number buttons to enter the new
password again, to confirm.
Caution
Write down your password and save it for future
use.
Note
If you forget your password, enter 9443 for the old
password, then enter a new password. This
password always remains valid for resetting your
password.
www.insignia-products.com
4 Press CH+/CH- to select the option you want
to change, then press VOL+/VOL- to change
the option.
5 Press MENU or EXIT button to close the
menu.
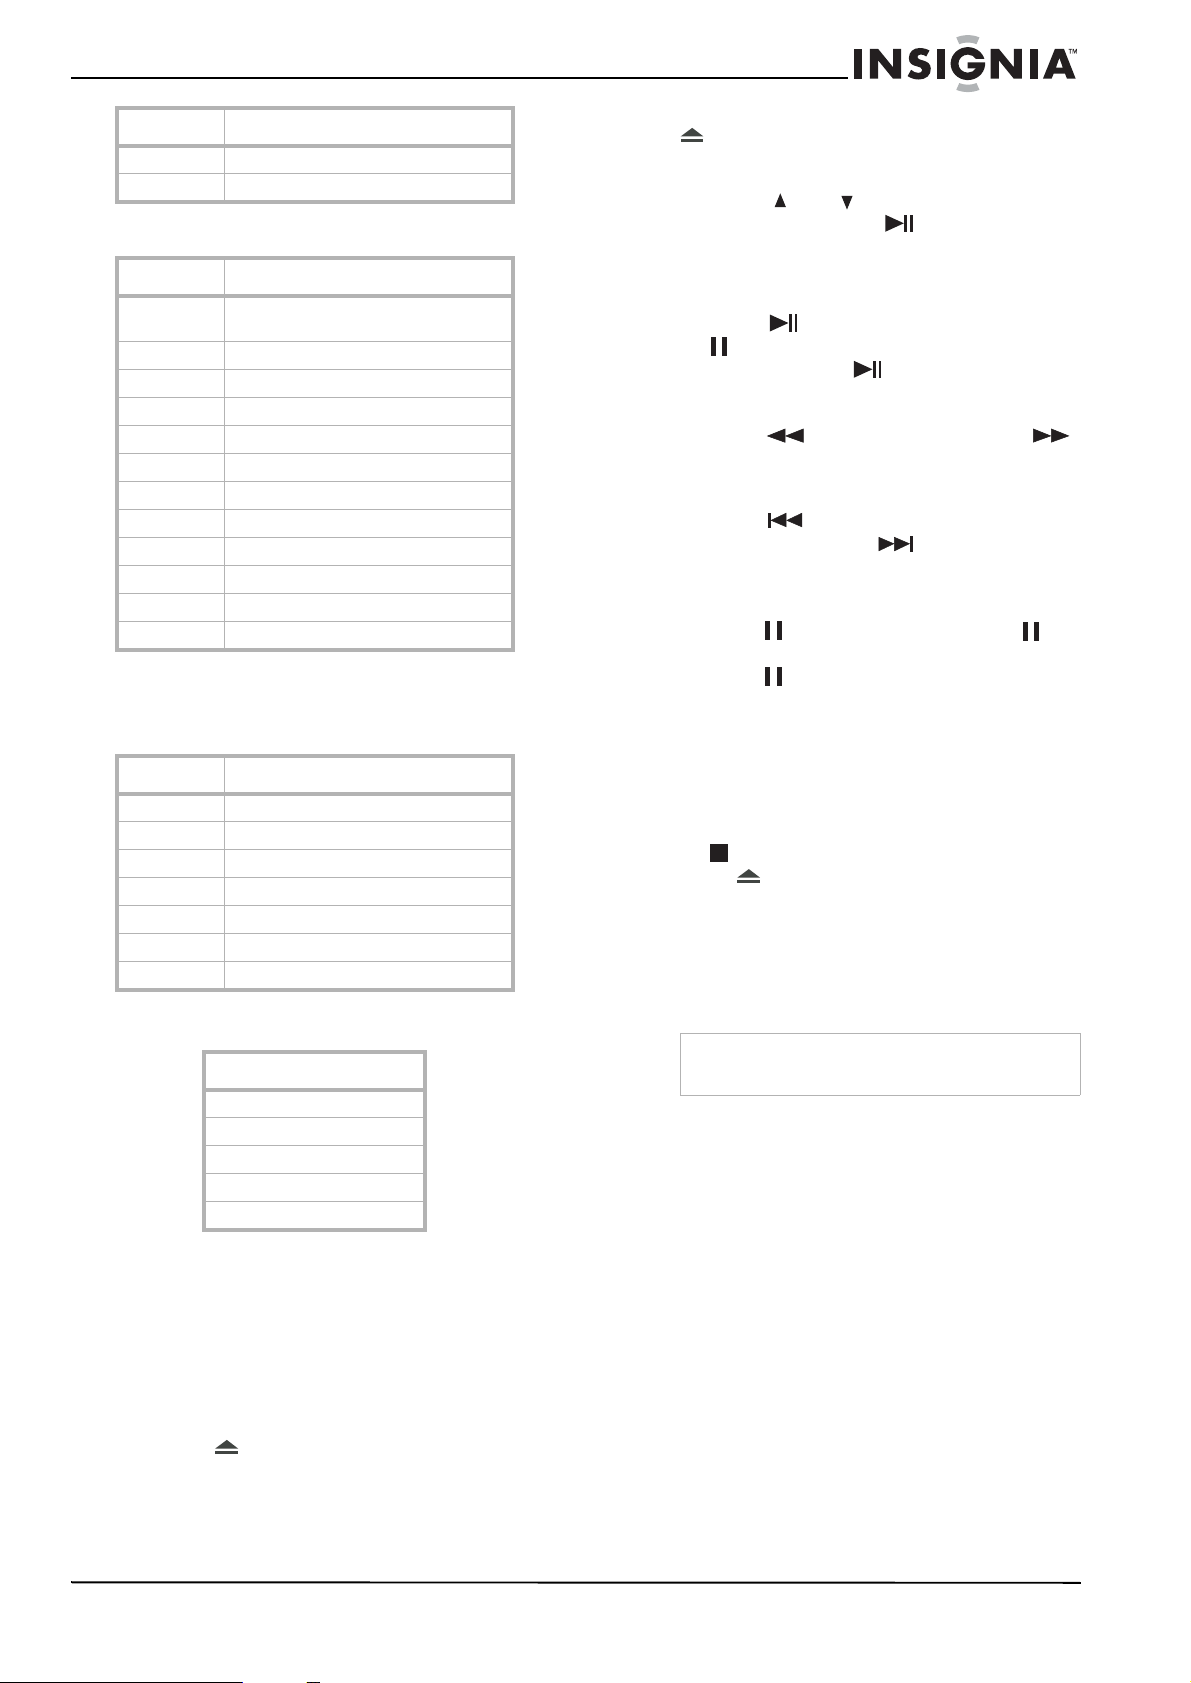
American MPAA ratings
Rating Description
NONE or NR Not rated.
G General audiences.
PG Parental guidance suggested. Some
material may not be suitable for
children.
PG 13 Parental guidance st rongly suggested.
Some material may not be sui table for
children under 13 years of age.
R Restricted. Not suitable for children
under 17 years of age unless
accompanied by a parent or guardian.
NC 17 Not suitable for children under 17
years of age.
Page 13
Insignia NS-CL15C 15" Combo DVD/LCD TV
Rating Description
X Adul ts only.
OFF No controls
Canadian MPAA Ratings
Rating Description
E Exempt - includes news, sports,
documentaries, talk sho ws.
C* Children (English)
G** Children (French)
8+** Children 8 years and above (Fren c h)
C8+* Children 8 years and above (English)
G* General audience ( English)
PG Parental guid a nce suggested.
13+** 13 years old and above (French)
14+* 14 years old and above (English)
16+** 16 years old and above (French)
18+ Adult programming
OFF No controls
* Can. English only
** Can. French only
TV Parental Guidelines ratings
Rating Description
NONE or NR Not rated.
TV-Y All children.
TV-Y7 Children over seven years of age.
TV-G General audiences.
TV-PG Parental guidance suggested.
TV-14 Parents strongly cautioned.
TV-MA Mature audiences only.
Some of the age-based TV Parental Guidelines
ratings also have PG Content-based ratings.
Rating
FANTASY VIOLENCE.
DIALOGUE
LANGUAGE.
SEX
VIOLENCE.
4 Place the DVD in the disc tray, then press
OPEN/CLOSE to close the disc tray. The
DVD player reads the DVD and displays the
opening menu.
5 Press the and buttons to highlight
menu items, and press PLAY/P AUSE on
the player, or PLAY/ENTER on the remote, to
select.
6 During playback:
• Press PLAY/PAUSE on the player, or
PAUSE/STEP on the remote, to pause
playback. Press PLAY/PAUSE on the
player, or PLAY/ENTER on the remote, to
resume playback.
• Press to fast review, and press
to fast forward. Each time you press the
fast reverse or fast forward button, the
speed changes.
• Press to skip to the previous
chapter, and press to skip to the next
chapter. Press repeatedly to continue
skipping back or forward.
• To advance a movie frame by frame,
press PAUSE/STEP, then press
PAUSE/STEP again. Each time you
press PAUSE/STEP, the movie
advances by one frame.
• To play in slow motion, press SLOW.
• To search for a specific scene, press
SEARCH to open the
press the number buttons to indicate the
scene you want.
• To completely stop DVD playback, press
STOP twice.
7 Press OPEN/CLOSE to remove the DVD.
Accessing the root DVD menu
To access the root DVD menu:
1 Press DVD M EN U on the remote control.
2 Select and change the options you want.
Note
This function is not available on DVDs with
multi-layer menus.
Displaying DVD information
To display DVD information:
• Press DISPLAY on the remote control
repeatedly to cycle through
Title Remain, Chapter Elapsed, Chapter
Remain
, and
Display Off
SEARCH
Title Elapsed
.
menu,
,
Using the DVD player
Playing a DVD
To play a DVD:
1 Press POWER to turn on the TV.
2 Press TV/DVD to select DVD.
3 Press OPEN/CLOSE to open the disc
tray.
Selecting the subtitle language
If the DVD was created with subtitles, you can
change the subtitle language.
To change the subtitle language:
1 Press SUBTITLE repeatedly until the desired
language is selected.
www.insignia-products.com
13
Page 14

Insignia NS-CL15C 15" Combo DVD/LCD TV
2 To remove subtitles, press SUBTITLE until
“Off ” appe ars on t he screen.
Note
Changing the subtitle language using this method
only affects the DVD currently being play ed. When
the DVD is remo ved or the player is turned off, the
subtitle language reverts to the language setting
specified through the DVD player’s main menu.
Tip
The subtitle language can also be changed
through the DVD player’s main menu or the DVD’s
own subtitle settings.
Using repeat play
You can repeat chapters, titles, or the entire DVD
using Repeat Play.
To repeat a segment:
1 While the DVD is playing, press REPEAT to
scroll through the options:
• Chapter (repeats the current chapter)
• Title (repeats the current title)
• All (repeats all content on the DVD)
2 To stop repeat playback, do one of the
following:
• Press REPEAT until “ALL” disappears
from the screen.
• Press STOP twice.
• Eject the DVD.
To repeat selected parts of a DVD:
1 Set a starting point by pressing A-B.
2 Set an end point by pressing A-B again.
3 The player plays from point A to point B.
4 To stop the repeat function, press A-B again.
Changing the camera angle
Some DVDs contain multiple angles of a scene
or sequence. If the DVD has only one angle, this
feature does not work.
To program playback:
1 Press PROGRAM while a disc is playing to
enter Program mode.
2 Press the number buttons on the remote
control to enter the title and chapter you want
to play first. The title and chapter number you
entered appears in the box.
3 The cursor jumps to the next spot in the
program list section. Make sure the box is
highlighted and enter your next title and
chapter.
4 Continue adding titles and chapters until your
program is finished.
5 Highlight Start, then press PLAY/ENTER to
start playing the program.
6 To stop the programmed playback, press
STOP twice during program play.
Changing the audio options
If the DVD was created with multiple language
tracks (recorded in different languages), or
multiple sound options, you can temporarily
change the DVD player’s Audio settings.
To change the audio options:
1 Press AUDIO. The OSD shows the current
audio setting.
2 If multiple audio options are available, press
AUDIO again to select the next audio track.
Note
This feature only works if the DVD was created
with multiple audio tracks. When you choose an
audio language, you only temporarily override the
audio language setting in the DVD player’s main
menu.
Allow a three second interval between selections.
Tip
The audio language can also be changed through
the DVD player’s main menu or the DVD’ s own
audio settings.
To change the camera angle:
1 Press ANGLE repeatedly until the desired
camera angle is selected.
2 To resume normal playback, press ANGLE
until the original angle is selected.
Magnifying the image
You can enlarge or reduce the display image
while the DVD is playing or while it is paused.
To magnify the image:
1 While a DVD is playing, press ZOOM. The
image is magnified 2×. Continue pressing
ZOOM to magnify the image 3×, then 4×.
• While the image is magnified, press the
and buttons to move the
picture on the screen.
2 To return to normal picture s iz e, press ZOOM
until the picture returns to normal.
Program play
To play chapt ers and titles in a custom order , you
can create a playback program.
Playing a CD
To play a CD:
1 Press POWER to turn on the player.
2 Press TV/DVD to select DVD.
3 Press OPEN/CLOSE to open the disc
tray.
4 Place the CD in the disc tray, then press
OPEN/CLOSE to close the disc tray. The
DVD player begins playing the CD.
5 During playback:
• Press PLAY/PAUSE on the player , or
PAUSE/STEP on the remote, to pause
playback. Press PLAY/PAUSE on the
player, or PLAY/ENTER on the remote, to
resume playback.
• Press to fast review, and press
to fast forward.
• Press to skip to the previous track,
and press to skip to the next track.
Press repeatedly to continue skipping
back or forward.
• To completely stop CD playback, press
STOP.
6 Press OPEN/CLOSE to remove the CD.
14
www.insignia-products.com
Page 15

Insignia NS-CL15C 15" Combo DVD/LCD TV
Using repeat play
You can repeat tracks or the entire CD using
repeat play.
To use repeat play:
1 While the CD is playing, press REPEAT to
scroll through the options:
• Single - (play current track)
• Repeat One - (repeat current track)
• Repeat Folder - (repeat current folder)
• Folder - (play current folder)
2 To stop repeat playback, do one of the
following:
• Press REPEAT until “Folder” disappears
from the screen.
• Press STOP twice.
• Eject the CD.
Changing the audio mode
To change the audio output of a multi-channel CD:
• During CD playback, press AUDIO. The
setting changes each time you press the
button:
• Mono Left
• Mono Right
•Mix-Mono
•Stereo
• To completely stop disc playback, press
STOP twice.
7 Press OPEN/CLOSE to remove the disc.
Customizing TV settings
Opening and navigating the on-screen menus
Using the on-screen menu
Your TV has an on-screen menu that lets you
adjust TV settings, such as video and audio
settings.
To use the on-screen menu:
1 Press MENU on the TV or remote control,
then press VOL+/VOL- to display the menu
you want.
2 Press CH+/CH- to enter the menu and to
highlight option you want, then press VOL+/
VOL- to change the setting.
3 If a submenu is available, press VOL+ to
enter the submenu, the press VOL+/VOL- to
change the setting.
4 Press MENU or EXIT to close the on-screen
menu.
On-screen menus
Selecting a track for playback
To select a specific track for playback:
• After you load a CD into the player, and after
the player finishes reading the disc, press the
number buttons to enter the track number,
then press PLAY/ENTER to play the track.
Tip
If the track number is under 10, press buttons 1-9
to select it. If the track number is 10, press 10+
once, then button 0 to select it. If the track number
is over 10, press 10+ once, then a button 1-9.
Playing a JPEG disc
To play a JPEG disc:
1 Press POWER to turn on the player.
2 Press TV/DVD to select DVD.
3 Press OPEN/CLOSE to open the disc
tray.
4 Place the disc in the disc tray, then press
OPEN/CLOSE to close the disc tray. The
disc navigation menu opens.
5 Press to select the file you want, then
press PLAY/ENTER to confirm. The
slideshow begins.
6 During playback:
• Press PAUSE/STEP on the remote, to
stop the picture and press PLAY/ENTER
resume norma l play.
• Press PREV to skip to the previous
picture, and press NEXT to skip to
the next picture. Press repeatedly to
continue skipping back or forward.
On-screen
menu
TUNING CHANNEL–The current channel selected. Press
Options
VOL+/VOL- to change the setting.
CHANNEL LABEL– Lets you add a label to a
channel.
CHANNEL LOCK–Lets you lock a channel.
SKIP–Setting this to ON causes the current
channel (see CHANNEL ab ove) to be skipped
on the channel list. You can select a skipp ed
channel by inp ut ting t he ch anne l nu mbe r u sing
the number keys.
AFC–Auto frequency control. Select ON to
automatically improve image quality.
FINE TUNE–Use to manually adjust tuning to
improve image and sound quality. Do not use
unless reception is poo r.
ANTENNA–Sel e cts the TV antenna source (AIR
or CATV).
AUTO PROGRAM–Automatically sets up a list
of the channels available i n your area for the
antenna type selected. For mo re information,
see “Programming channel s into memory” on
page 11.
www.insignia-products.com
15
Page 16

Insignia NS-CL15C 15" Combo DVD/LCD TV
On-screen
menu
PICTURE
(Options may vary
in different
modes.)
SOUND VOLUME–Adjusts the vo lume of the TV.
FUNCTION INPUT SOURCE–Shows the currently selected
Options
CONTRAST–Increases the picture leve l to
adjust the white areas of the picture. Decreases
the picture level to adjust the black areas of the
picture. (0 ~ 100)
BRIGHTNESS–Increases the brightness to add
more light to dark areas of the pict ure.
Decreases the brightness to add more dark to
light areas of the pic ture. (0 ~ 100)
SHARPNESS–Increases the sharpness for a
cleaner and clearer image. Decrea ses t he
sharpness for a smoother picture. (0-4)
COLOR TEMP–Adjusts the overall color of the
picture. (NEUTRA L, WARM, COOL)
COLOR–Adjusts the color saturation of the
picture.
H POSITION–Adjusts th e horizontal position of
the picture. Comp onent mode only.
V POSITION–Adjusts the vertical position of
the picture. Comp onent mode only.
NOISE REDUCTION–Adjusts the quality of the
picture (OFF, LOW. MID, or HIGH). TV/AV/
S-VIDEO/DVD modes only.
HUE–Adjusts the tone of the picture.TV/AV/
S-VIDEO/DVD modes in NTSC system only.
BALANCE–Adjusts the right and left speaker
volumes.
BASS–Adjusts the low sounds (bass). Available
in Personal mode only.
TREBLE–Adjusts the high sounds (treble).
Available in Personal m ode only.
AUDIO MODE–Selects an audio equaliz ation
mode for the TV sound (PERSONAL, VOICE,
MUSIC, or THEATRE)
AVL–Automatic Volume Limit Control. Reduces
the effect of high vol ume by limiting volume
peaks across all channels.
TV signal source (TV, AV, S-VIDEO, PC,
COMPONENT, or DVD).
LANGUAGE–Selects the language for the
on-screen display (OSD).
CC MODE–Select s the Closed Captionin g
mode. Options include:
• OFF–Turns off Closed Captioning
• ON WH EN MUTE–Turns on Closed
Captioning when the sound is muted.
• ON–Turns on Closed Captioning.
CC CAPTION –Selects the Closed Cap ti on type
for viewing.
• CC1–Turns on Closed Captioning in the
primary languag e of yo ur area
• CC2-CC4–Turns on other modes of
video-related broadcase information in
a secondary language.
• TT1–Turns on the program guide
provided by broadcasters.
• TT2-TT4–Turns on other types of
information provided by broadcas ters.
PARENTAL–A ccesses V-chip controls. For
more information, see “Setting parental
controls” on page 11.
BLUE SCREEN–Sets the option to turn on the
blue screen if there is no signal for three
seconds.
ASPECT RATIO–Selects the aspect ratio of the
picture. Choices include:
• FULL SCREE N
• ZOOM
RESET–Restores the settings to factory de fault.
On-screen
menu
ADJUST
(Only available in
PC mode)
Options
AUTO CONFIG–Automatically adj usts the
picture frequency and phase parameters for
use with a PC.
PHASE–Adjus ts the phase of the PC image to
remove horizontal distortion and sharpen
characters.
CLOCK–Adjusts the TFT-LCD to match the PC
input source clock frequ ency.
H POSITION–Adjusts the horizontal positi on of
the picture.
V POSITION–Adjusts the vertical position of
the picture.
Customizing DVD player settings
Using the setup menu
Use your remote control to navigate the setup
menu, where you can configure DVD player
settings.
To open and navigate the Setup menu:
1 Press SETUP on the remote control. The
General Setup Page
Hdcd
Last Memory
2 If no disc is playing, press SETUP again. The
Preference Page
..Preference Page..
Parental
Password
Default
3 Press to highlight a selection or
submenu, then press to show the options
available.
4 Press to select the option/setting you
want, then press PLAY/ENTER to confirm.
5 To exit the Setup menu, press SETUP.
opens.
4:3/Ps
4:3/Lb
16:9
Off
On
opens.
1 Kid Saf
2 G
3 Pg
4 Pg 13
5 Pgr
6 R
7 Nc17
8 Adult
16
www.insignia-products.com
Page 17

Insignia NS-CL15C 15" Combo DVD/LCD TV
Changing DVD settings
On-screen
menu
GENERAL SETUP TV DISPLAY–Sets the aspect ratio of the TV
PREFERENCE
(only available
when no disc is in
the player)
Options
display.
• 4:3/PS (Pan and Scan - may be used
with external TVs) Widescreen images
are shown on the screen, but with some
parts automatically cut of f the ends.
• 4:3/LB (Letter Box - use with internal
TV) Widescreen images are shown on
the screen with black bars on the top
and bottom of the screen.
• 16:9 (may be used with external TVs)
Widescreen images fill the entire
screen.
ANGLE MARK–Lets you turn the Angle option
On or Off. If you set this to On, you can use the
ANGLE button on the remote to select an
alternate viewing angle on the DVD.
OSD Lang.–Let s you select the language for
the On Screen Display (OSD).
CAPTION–Lets you turn the caption On or Off.
SCREEN SAVER–Lets you turn on the screen
saver, which displays when the DVD player is
idle for more than three minutes.
Hdcd–Lets you set Hdcd to "OFF","1X","2X" to
switch the CD play mode between "Normal
CD","HDCD with 44.1 K","HDCD w ith 88.2K". You
can play normal CDs when "HDCD" is set to off.
You can play 44.1K CDs when HDCD is set to
1X, and 88.2K CDs when HDCD is set to 2X to
enhance the audio quality.
Last Memory–Lets you turn the last me mory
option On or Off. When set to On, the DVD
player remembers the chapter that you were
viewing when you turn the DVD p layer off and
starts the DVD at that chapter when you turn
the DVD player back on.
PARENTAL–Lets you set Parental Controls for
watching DVDs. Initial password is 1234
Options include:
•Off
•1 Kid Saf
•2 G
•3 Pg
•4 Pg 13
•5 Pgr
•6 R
•7 Nc 17
• 8 Adult
PASSWORD CHANGE–Lets you change the
password used to set or change Parental
Controls. The initia l p as sw ord is 1234. Use the
number buttons to enter, then confirm the new
password.
Note: If you forget your password, enter 1369.
DEFAULT–Resets all settings (except Parental
Controls and the password) to f actory default.
Press ENTER to confirm.
Troubleshooting
Please check the following items before asking
for repair service:
Problem Solution
No picture or
sound.
Picture is OK, but
no sound.
No picture Make sure that the TV is working properly.
Sound is OK, but no
color.
The picture has
overlapped images.
Picture has “snow.” Check the antenna and its connection. If there
Stripes on picture. Check for interference from other electronic
Bad stereo or SAP
sound.
Remote control
does not work.
Image is not clear. Adjust the NOISE REDUCTION.
Image is not
centered.
Bad sound quality Make sure that the audio output mode is set
Disc cannot be
played
The player doesn’t
operate nor m al ly
Check all cable connections.
Make sure that the TV is plugged in and turned
on.
Make sure that electricity is available at the AC
power outlet.
Check the volume level and mute settings.
Switch to another chan ne l to de te r m in e if the
station is the problem.
Press the INPUT button to select TV in put.
Make sure the color system is set correctly.
Check the color control and adjust it.
Check the program’s color features, because it
may be a black and white movie.
Make sure that the antenna is installed
correctly. If not, adjust the antenna toward the
broadcasting station.
are problems, correct them. If all connections
are tight, the problem may be wit h a f aulty
antenna or cable.
Check whether car traffic or neon sig ns
disturb the image.
devices, such as radios an d televisions, and
keep magnetic or electro nic devices away
from the TV.
Long distance from t he station or interf ering
radio waves can result in bad sound reception.
If so, change the mode to Mono.
Point the remote control at the TV’s IR sensor.
Change the batteries in the remote control.
Remove any obstacles between the TV’s IR
sensor and the remote control.
Adjust the Horizontal or Vertical control.
correctly.
Make sure that the audio connection between
the unit and amplifier (if used) is secure.
Make sure the disc is inserted with the label
facing forward.
Clean the disc.
Moisture has condensed in the player.
Remove the disc and leave the pl ayer on for
about an hour.
Disconnect the power plug for ten secon ds,
then reconnect it.
If the problem persists, contac t Insignia or
your dealer for help.
www.insignia-products.com
17
Page 18

Maintaining
Handling and cleaning the TV/DVD
Shipping the DVD/VCR
Please save the original shipping carton and
packing materials. If you need to ship the TV/
D VD, for maximum protection, re-pack the it as it
was originally packed at the factory.
Keeping the exterior surfaces clean
• Do not use volatile liquids such as insecticide
spray near the TV/DVD.
• Do not leave rubber or plastic products in contact
with the TV/DVD for a long period of time becau se
they can leave marks on the surface.
Cleaning the case
• To clean the player, use a soft, dry cloth. If
the surfaces are extremely dirty, use a soft
cloth lightly moistened with a mild detergent
solution.
• Do not use strong solvents such as alcohol,
benzine, or thinner, as these might damage
the surface of the player.
Maintaining the TV/DVD
This TV/DVD is a high-tech, precision device. If
the optical pick-up lens and disc drive parts are
dirty or worn, the picture quality could be
diminished.
Depending on the operating environment,
regular inspection and maintenance are
recommended after every 1,000 hours of use.
For details, please contact your nearest
authorized service center.
Care and handling of discs
Handling discs
Do not touch the playback side of the disc. Hold
the disc by the edges so that fingerprints do not
get on the surface. Never stick paper or tape on
the disc.
Insignia NS-CL15C 15" Combo DVD/LCD TV
Do not use strong solvents such as alcohol,
benzine, thinner, commercially available
cleaners, or anti-static spray intended for older
vinyl records.
Note
Never operate this product immediately after
moving it from a cold location to a warm location.
Leave it for two or three hours without operating it.
If you use this product in such a situation, it may
damage tapes, discs, or internal parts.
Specifications
Model
Picture and sound
system
Audio output
External input
Power
requirements
Power consumption
Temperature
Accessories
Playable discs
The following discs, and only the following discs,
can be played in the DVD player.
NS-CL15C
NTSC
1.5 W + 1.5 W
AV, PC, S-Video, PC audio, YPbPr, Antenna
~ 120 V 60 Hz
60 W
Working: 41° F ~ 95° F (+5° C ~ +35° C)
Storage: 5° F ~ 113° F (-15° C ~ +45° C)
Remote control
Batteries (two - AA)
User Guide
Storing discs
After playing, store the disc in its case. Do not
expose the disc to direct sunlight or sources of
heat and never leave it in a parked car exposed
to direct sunlight.
Cleaning discs
Fingerprints and dust on the disc can cause
poor picture quality and sound distortion. Before
playing, clean the disc with a clean cloth. Wipe
the disc from the center out.
18
Discs Label Contents Dimension
DVD Audio + Video
CD Audio 12 cm
HDCD Audio 12 cm
MPEG-4 Audio + Video
JPEG Video (picture) 12 cm
KODAK CD Video (picture) 12 cm
CD-R Audio or Video
CD-RW Audio or Video
CD+G Audio (picture) 12 cm
www.insignia-products.com
12 cm
(moving picture )
12 cm
(moving picture )
12 cm
(moving picture )
12 cm
(moving picture )
Page 19

Insignia NS-CL15C 15" Combo DVD/LCD TV
Legal Notices
Macrovision statement
This product incorporates copyright protection
technology that is protected by method claims of
certain U.S. patents and other intellectual property
rights owned by Macrovision Corporation and other
rights owners. Use of this copyright protection
technology must be authorized by Macrovision
Corporation, and is intended for home and other limited
viewing uses only unless otherwise authorized by
Macrovision Corporation. Reverse engineering or
disassembly is prohibited.
Copyright
© 2007 Insignia. Insignia and the Insignia logo are
trademarks of Best Buy Enterprise Services, Inc. Other
brands and product names are trademarks or
registered trademarks of their respective holders.
Specifications and features are subject to change
without notice or obligation.
For service and support call (877) 467-4289.
www.insignia-products.com
19
Page 20

Insignia NS-CL15C 15" Combo DVD/LCD TV
20
www.insignia-products.com
Page 21

Insignia NS-CL15C 15" Combo DVD/LCD TV
1 Year Limited Warranty
Insignia Products (“Insignia”) warrants to you, the
original purchaser of this new 15” Combo DVD/LCD TV
(“Product”), that the Product shall be free of defects in
the original manufacture of the material or workmanship
for a period of one (1) year from the date of your
purchase of the Product (“Warranty Period”). This
Product must be purchased from an authorized dealer of
Insignia brand products and packaged with this warranty
statement. This warranty does not cover refurbished
Product. If you notify Insignia during the Warranty Period
of a defect covered by this warranty that requires
service, terms of this warranty apply.
HOW LONG DOES THE COVERAGE LAST?
The Warranty P eriod lasts for 1 year (365 days) from the
date you purchased the Product. The purchase date is
printed on the receipt you received with the Product.
WHAT DOES THIS WARRANTY COVER?
During the Warranty Period, if the original manuf acture of
the material or workmanship of the Product is
determined to be defective by an authorized Insignia
repair center or store personnel, Insignia will (at its sole
option): (1) repair the Product with new or rebuilt parts;
or (2) replace the Product at no charge with new or
rebuilt comparable products or parts. Products and parts
replaced under this warranty become the property of
Insignia and are not returned to you. If service of
Products or parts are required after the Warranty Period
expires, you must pay all labor and parts charges. This
warranty lasts as long as you own your Insignia Product
during the Warranty Period. Warranty coverage
terminates if you sell or otherwise transfer the Product.
HOW TO OBTAIN WARRANTY SERVICE?
If you purchased the Product at a retail store location,
take your original receipt and the Product to the store
you purchased it from. Make sure that you place the
Product in its original packaging or packaging that
provides the same amount of protection as the original
packaging. If you purchased the Product from an online
web site, mail your original receipt and the Product to the
address listed on the web site. Make sure that you put
the Product in its original packaging or packaging that
provides the same amount of protection as the original
packaging.
To obtain in-home warranty service for a television with a
screen 25 inches or larger, call 1-888-BESTBUY. Call
agents will diagnose and correct the issue over the
phone or will have an Insignia-approved repair person
dispatched to your home.
WHERE IS THE WARRANTY VALID?
This warranty is valid only to the original purchaser of the
product in the United States and Canada.
WHAT DOES THE WARRANTY NOT COVER?
This warranty does not cover:
• Customer instruction
• Installation
• Set up adjustments
• Cosmetic damage
• Damage due to acts of God, such as lightning
strikes
• Accident
• Misuse
• Abuse
• Negligence
• Commercial use
• Modification of any part of the Product, including
the antenna
• Plasma display panel damaged by static
(non-moving) images applied for lengthy periods
(burn-in).
This warranty also does not cover:
• Damage due to incorrect operation or maintenance
• Connection to an incorrect voltage supply
• Attempted repair by anyone other than a facility
authorized by Insignia to service the Product
• Products sold as is or with all faults
• Consumables, such as fuses or batteries
• Products where the factory applied serial number
has been altered or removed
REPAIR REPLACEMENT AS PROVIDED UNDER THIS
WARRANTY IS YOUR EXCLUSIVE REMEDY.
INSIGNIA SHALL NOT BE LIABLE FOR ANY
INCIDENTAL OR CONSEQUENTIAL DAMAGES FOR
THE BREACH OF ANY EXPRESS OR IMPLIED
WARRANTY ON THIS PRODUCT, INCLUDING, BUT
NOT LIMITED TO, LOST DATA, LOSS OF USE OF
Y OUR PRODUCT, LOST BUSINESS OR LOST
PROFITS. INSIGNIA PR ODUCTS MAKES NO OTHER
EXPRESS WARRANTIES WI T H RE SP EC T TO THE
PRODUCT, ALL EXPRESS AND IMPLIED
WARRANTIES FOR THE PR ODUCT, INCLUDING, BUT
NOT LIMITED TO, ANY IMPLIED WARRANTIES OF
AND CONDITIONS OF MERCHANTABILITY AND
FITNESS FOR A PARTICULAR PURPOSE, ARE
LIMITED IN DURATION TO THE WARRANTY PERIOD
SET FORTH ABOVE AND NO WARRANTIES,
WHETHER EXPRES S OR I MPLIED, WILL APPLY
AFTER THE WARRANTY PER I OD. SOME STATES,
PROVINCES AND JURISDICTIONS DO NO T ALLOW
LIMITATIONS ON HOW LONG AN IMPLIED
WARRANTY LASTS, SO THE ABOVE LIMITATION MA Y
NOT APPLY TO YOU. THIS WARRANTY GIVES YOU
SPECIFIC LEGAL RIGHTS, AND YOU MAY ALSO
HAVE OTHER RIGHTS, WHICH VARY FROM STATE
TO STATE OR PROVINCE TO PROVINCE.
Contact Insignia:
For customer service please call 1-877-467-4289
www.insignia-products.com
INSIGNIA™ is a trademark of Best Buy Enterpri se
Services, Inc.
Distributed by Best Buy Purchasing, LLC.
Insignia, 7601 Penn A ven ue South, Richfield, Minnesota,
U.S.A.
www.insignia-products.com
21
Page 22

Insignia NS-CL15C 15" Combo DVD/LCD TV
22
www.insignia-products.com
Page 23

Ensemble Lecteur de DVD/TV ACL de 15 pouces Insignia NS-CL15C
(
)
Ensemble Lecteur de
DVD/TV ACL de 15
pouces
Insignia NS-CL15C
Table des matières
Bienvenue. . . . . . . . . . . . . . . . . . . . . . . . . . . . . . . .23
Informations sur la sécurité . . . . . . . . . . . . . . . . . .23
Fonctionnalités . . . . . . . . . . . . . . . . . . . . . . . . . . . .26
Accessoires. . . . . . . . . . . . . . . . . . . . . . . . . . . . . . . . 26
Vue avant. . . . . . . . . . . . . . . . . . . . . . . . . . . . . . . . . . 26
Vue arrière - connecteurs . . . . . . . . . . . . . . . . . . . . . 26
Télécommande . . . . . . . . . . . . . . . . . . . . . . . . . . . . . 27
Installation du téléviseur. . . . . . . . . . . . . . . . . . . . .28
Installation des piles de la télécommande. . . . . . . . . 28
Utilisation de la télécommande . . . . . . . . . . . . . . . . . 29
Connexion à des sources vidéo . . . . . . . . . . . . . . . . 29
Utilisation du téléviseur. . . . . . . . . . . . . . . . . . . . . .30
Mise sous et hors tension de l’appareil. . . . . . . . . . . 30
Réglage du volume . . . . . . . . . . . . . . . . . . . . . . . . . . 31
Changement de source vidéo . . . . . . . . . . . . . . . . . . 31
Changement de canal. . . . . . . . . . . . . . . . . . . . . . . . 31
Modification du mode d'image. . . . . . . . . . . . . . . . . . 31
Mémorisation des canaux. . . . . . . . . . . . . . . . . . . . . 31
Utilisation du lecteur de DVD . . . . . . . . . . . . . . . . .34
Lecture d’un DVD . . . . . . . . . . . . . . . . . . . . . . . . . . . 34
Lecture d’un CD . . . . . . . . . . . . . . . . . . . . . . . . . . . . 35
Lecture d'un disque de fichiers JPEG. . . . . . . . . . . . 36
Configuration personnalisée du téléviseur . . . . . . .36
Ouverture et navigation parmi les menus d'écran. . . 36
Utilisation du menu à l’écran. . . . . . . . . . . . . . . . . . . 36
Menus d’écran. . . . . . . . . . . . . . . . . . . . . . . . . . . . . . 37
Personnalisation de la configuration du lecteur de DVD
38
Utilisation du menu de configuration. . . . . . . . . . . . . 38
Modifications des paramètres du DVD . . . . . . . . . . . 38
Problèmes et solutions . . . . . . . . . . . . . . . . . . . . . .39
Entretien. . . . . . . . . . . . . . . . . . . . . . . . . . . . . . . . .39
Spécifications . . . . . . . . . . . . . . . . . . . . . . . . . . . . .40
Avis légaux . . . . . . . . . . . . . . . . . . . . . . . . . . . . . . .40
Garantie limitée d’un an . . . . . . . . . . . . . . . . . . . . .41
Information s su r la sécurité
Prises d'antenne
Si le téléviseur est connecté à une antenne
extérieure, vérifier que l'antenne est mise à la
terre afin de bénéficier d'une certaine protection
contre les variations de tension et les charges
électrostatiques L'article 810 du Code national
de l’électricité (CNE) fournit des informations
relatives à la mise à la terre correcte du mât et
du support, à la mise à la terre du câble
d’antenne sur la décharge de l’antenne, au
diamètre des câbles de terre, à l’emplacement
de l’unité de décharge de l’antenne, à la
connexion aux conducteurs de terre ainsi qu'aux
normes en matière de prise de terre.
EXAMPLE OF ANTENNA GROUNDING AS SPECIFIED
BY NATIONAL ELECTRICAL CODE (NEC) ANTENNA
GROUND
CLAMP
ELECTRIC
SERVICE
EQUIPMENT
GROUND CLAMPS
POWER SERVICE GROUNDING
ELECTRODE SYSTEM
NEC ART 250, PAR T H
• Pour protéger l’appareil pendant un orage ou
s’il se trouve inutilisé et sans surveillance
pendant de longues périodes, le débrancher
de la prise murale et débrancher l'antenne.
Ceci évitera d’endommager l'appareil en cas
de foudre et de variations de tension du
secteur.
• L’antenne externe ne doit pas être située près
de lignes électriques aériennes ou d’autres
circuits d’alimentation et électriques, ni à un
emplacement où elle pourrait tomber sur de
tels circuits ou lignes électriques. Lors de
l'installation d'une antenne extérieure, faire
très attention de ne pas toucher de telles
lignes électriques ou circuits car tout contact
peut être mortel.
LEAD-IN
WIRE
ANTENNA
DISCHARGE UNIT
(NEC SECTION 810-20)
GROUNDING CONDUCTORS
(NEC SECTION 810-21)
Bienvenue
Félicitati ons d’ av oir ac heté ce produit Insign ia de
haute qualité. Le modèle NS-CL15C représente
la dernière avancée technologique dans la
conception de téléviseur et lecteur de DVD et a
été conçu pour des performances et une fiabilité
exceptionnelles.
Risque de choc électrique
Afin de réduire les risques d’incendie et de choc
électrique, ne pas exposer cet appareil à la pluie
ou l’humidité.
ATTENTION
RISQUES DE CHOC ÉLECTRIQUE, NE RETIREZ
PAS LE COUVERCLE (OU LE PANNEAU ARRIÈRE)
AUCUNE PIÈCE NE PEUT ÊTRE RÉPARÉE PAR
L'UTILISATEUR. CONFIEZ L'APPAREIL À UN
TECHNICIEN QUALIFIÉ.
www.insignia-products.com
ATTENTION
RISQUE DE CHOC ÉLECTRIQUE
NE PAS OUVRIR
:
AFIN DE RÉDUIRE LES
23
Page 24
Ensemble Lecteur de DVD/TV ACL de 15 pouces Insignia NS-CL15C
Le symbole représentant un éclair dans un
triangle équilatéral a pour but d'avertir l'utilisateur
du danger présenté par des pièces
non isolées à l'intérieur de l'appareil et dont la
tension est suffisante pour provoquer des
décharges électriques dangereuses.
Le point d'exclamation dans un triangle équilatéral
a pour but d'avertir l'utilisateur que des instructions
importantes relatives à l'utilisation et à l'entretien se
trouvent dans le manuel accompagnant l'appareil.
Attention :
Cet appareil est doté d’un système au laser.
Pour s’assurer d’une utilisation correcte de ce
produit, prendre soin de lire attentivement le
manuel de l’opérateur et de le conserver sous la
main pour toute référence ultérieure. Contacter
un réparateur qualifié si un entretien de
l’appareil s'avère nécessaire.
L'utilisation de commandes ou l'exécution de
réglages ou procédures autres que celles
indiquées ici peuvent aboutir à une irradiation
dangereuse.
Pour éviter toute exposition directe aux rayons
laser, ne pas essayer d’ouvrir le boîtier. NE PAS
REGARDER DIRECTEMENT DANS L'AXE DU
FAISCEAU.
Attention :
Cet appareil ne doit pas être exposé à des
éclaboussures ou à des gouttes d’eau et aucun
objet rempli de liquide, tel qu’un vase, ne doit
être posé sur l’appareil.
Attention :
Émission de rayon laser visible et invisible de
classe 2M en cas d’ouverture ou de
neutralisation du dispositif de verrouillage. Ne
pas fixer des yeux l’axe du faisceau laser ni le
regarder directement avec des instruments
optiques.
Attention
La plupart des fabricants recommandent que leurs
graveurs/enregistreurs soient branchés sur un
circuit dédié. À savoir , un circuit à prise unique qui
n’alimente que l’appareil sur lequel aucune autre
prise ou autre circuit ne sont branchés.
Ne pas surcharger les prises secteur. Les prises
secteur surchargées, desserrées ou
endommagées, les rallonges surchargées, les
cordons d'alimentation effilochés, l’isolement des
fils fissurés ou endommagée sont dangereux.
N’importe quelle situation de ce type peut être la
cause d’un choc électrique ou d’un incendie.
Examiner régulièrement le cordon d'alimentation
de l’appareil, et en présence de signes de
dommage ou de détérioration, débrancher
l’appareil et ne plus l'utiliser tant qu’un réparateur
agréé n’a pas remplacé le cordon par une pièce
neuve identique.
Protéger le cordon d’alimentation des
détériorations résultant de torsions, déformations,
pincements, coincements dans une porte qui se
ferme ou piétinement. Prêter particulièrement
attention au point de branchement du cordon à la
prise, à la prise murale et à l’endroit où il est
raccordé à l’appareil.
Pour débrancher l'appareil de la prise murale, tirer
sur la prise du cordon d'alimentation. Lors de
l’installation de l’appareil, veiller à ce que la prise
soit d’un accès facile.
Importantes mesures de sécurité
Cet appareil a été conçu et fabriqué pour
garantir la sécurité personnelle. Toute utilisation
incorrecte peut provoquer un risque de choc
électrique ou d’incendie. Les dispositifs de
protection intégrés à cet appareil protégeront
l'utilisateur, sous réserve de respecter les
procédures ci-dessous, lors de l’installation, de
l’utilisation et des travaux d’entretien. Les
composants internes de cet appareil ne peuvent
pas être démontés ou réparés par l'utilisateur.
• Lire ces instructions — Lire et comprendre
toutes les instructions de fonctionnement
avant d’utiliser l'appareil.
• Conser ver ces ins tructions — Ces
instructions de sécurité et de fonctionnement
doivent être conservées en lieu sûr afin de
pouvoir s’y référer ultérieurement.
• Respecter tous les avertissements — Tous
les avertissements figurant sur l'appareil et
dans ces instructions doivent être
scrupuleusement observés.
• Suivre les instructions — Toutes les
instructi ons de fonctionnement doivent être
observées.
• Accessoires — N’utiliser que des outils et
des accessoires recommandés par Insignia.
L’utilisation d’accessoires inadéquats peut
être à l’origine d’accidents.
• Source d'alimentation — Cet appareil doit
fonctionner à partir de la source
d'alimentation spécifiée sur sa plaque
signalétique. En cas d’incertitude sur la
tension d'alimentation électrique de la
maison, consulter le revendeur ou la
compagnie d'électricité.
• Protection du cordon d'alimentation CA —
Les cordons d'alimentation CA doivent être
acheminés correctement pour éviter qu'ils
soient piétinés ou que des objets soient
24
www.insignia-products.com
Page 25

Ensemble Lecteur de DVD/TV ACL de 15 pouces Insignia NS-CL15C
posés dessus. Vérifier les fiches du cordon
au niveau de la prise secteur et à l'endroit où
le cordon se branche à l'appareil.
• Surcharge — Ne pas surcharger les prises
secteur CA ou les rallonges. Les surcharges
de puissance peuvent provoquer des
incendies ou des risques d’électrocution.
• Introduction d'objets et de liquides — Ne
jamais insérer d'objet dans l'appareil par les
ouvertures ou les ouïes de ventilation. Des
tensions élevées se trouvent à l’intérieur de
l’appareil et l’insertion d’un objet peut
provoquer une décharge électrique et
endommager des composants électriques.
Pour la même raison, ne pas répandre d’eau
ou tout autre liquide sur l’appareil.
• Réparation — Ne pas essayer de démonter
cet appareil. L’ouverture du boîtier expose
l’utilisateur à des tensions élevées et autres
dangers. Confier toute réparation à un
technicien qualifié.
• Réparations — Si les conditions suivantes se
produisent, débrancher le cord on
d’alimentation CA de la prise secteur et
demander à un technicien qualifié de
procéder aux réparations.
• Lorsque le cordon d’alimentation CA ou la
fiche est endommagé;
• Lorsqu'un liquide s'est déversé sur
l'appareil ou que des objets sont tombés à
l'intérieur;
• Si l’appareil a été exposé à la pluie ou à
l’eau.
• Lorsque l'appareil ne fonctionne pas
comme décrit dans ces instructions
d'utilisation. Ne pas toucher à d’autres
commandes que celles décrites dans ces
instructions. Un réglage inadéquat des
commandes qui ne sont pas décrites
dans ces instructions peut être à l’origine
de détériorations, qui souvent nécessitent
une longue remise en état par un
technicien qualifié;
• Si l’appareil est tombé ou a été
endommagé.
• Si l’appareil n’est plus aussi performant
qu’à l’habitude. Toute anomalie sensible
de fonctionnement du produit indique que
ce dernier nécessite une maintenance.
• Pièces de rechange — Si la réparation de cet
appareil nécessite l’utilisation de pièces de
rechange, s’assurer que le technicien utilise
des pièces spécifiées par le fabricant ou des
pièces ayant les mêmes caractéristiques et
performances que celles d’origine.
L’utilisation de pièces non autorisées peut
être à l'origine d'un incendie, d'une décharge
électrique et d'autres événements
dangereux.
• Contrôles de sécurité — Après avoir terminé
les travaux de maintenance ou de réparation,
l’utilisateur demandera au technicien de
réaliser des contrôles de sécurité afin de
s’assurer que l'appareil fonctionne
normalement.
• Montage sur un mur ou au plafond — En cas
de montage de l’appareil sur un mur ou au
plafond, s’assurer de l’installer conformément
à la méthode recommandée par le fabricant
du dispositif de montage ou de support.
• Haut-parleurs — Débrancher le co rdon
d'alimentation CA de la prise secteur avant
d'installer les haut-parleurs.
• Nettoyage — Débrancher le cordon
d'alimentation CA de la prise secteur avant
de nettoyer l'appareil. Nettoyer uniquement
avec un chiffon sec. Ne pas utiliser de
nettoyant liquide ou en aérosol.
• Eau et humidité — Ne pas utiliser cet
appareil à proximité d'environnements
mouillés ou humides, par exemple à côté
d’une baignoire, d'un lavabo, d'un évier, d’un
bac à laver, d'une piscine ou dans une cave
humide. Ne pas exposer cet appareil aux
gouttes d’eau ou aux éclaboussures. Ne pas
placer d’objets remplis de liquide sur cet
appareil.
• Étagères et tables roulantes — Ne pas
placer cet appareil sur une table roulante, un
pied, un trépied ou une table instable. Les
installations instables risquent de faire
tomber l'appareil, pouvant occasionner de
graves blessures ainsi que des dégâts à
l'appareil. Utiliser uniquement la table
roulante, le pied, le trépied, le support ou la
table spécifié par Insignia ou vendu avec
l'appareil. Lorsqu’une table roulante est
utilisée, déplacer l’ensemble appareil/table
roulante avec précaution pour éviter les
blessures provoquées par une éventuelle
chute de l’appareil.
• Ventilation — Les aérations et les autres
ouvertures du boîtier sont conçues pour la
ventilation. Ne pas les couvrir ni les obstruer,
sinon une ventilation insuffisante pourrait
provoquer une surchauffe et réduire la durée
d'utilisation de l'appareil. Ne pas placer
l'appareil sur un lit, un sofa, un tapis ou une
autre surface molle susceptible d'obstruer les
ouvertures d'aération. Cet appareil n'est pas
conçu pour être installé dans un meuble
encastré. Ne pas installer l’appareil dans un
espace clos, tel qu’une bibliothèque ou sur
une étagère, sauf si une ventilation adéquate
a été prévue et que les instructions du
fabricant ont été scrupuleusement
respectées.
• Fragile — Le panneau ACL utilisé dans cet
appareil est fabriqué en verre et peut
facilement se briser si l'appareil tombe ou
reçoit un choc. Si le panneau se casse, faire
extrêmement attention de ne pas se blesser
avec le verre brisé.
• Pixels morts — Le panneau ACL contient
presque 3 millions de transistors en couches
minces, ce qui fournit une qualité vidéo d'une
netteté exceptionnelle. Il peut arriver que des
pixels morts apparaissent à l'écran sous
forme de points bleus, verts ou rouges. Ces
pixels morts ne nuisent pas aux
performances de l'appareil et ne sont pas
considérés comme des défauts.
• Sources de chaleur — Installer l’appareil à
l’écart de sources de chaleur, telles que
radiateurs, bouches de chaleur, fours,
amplificateur ou autres appareils qui
produisent de la chaleur.
www.insignia-products.com
25
Page 26
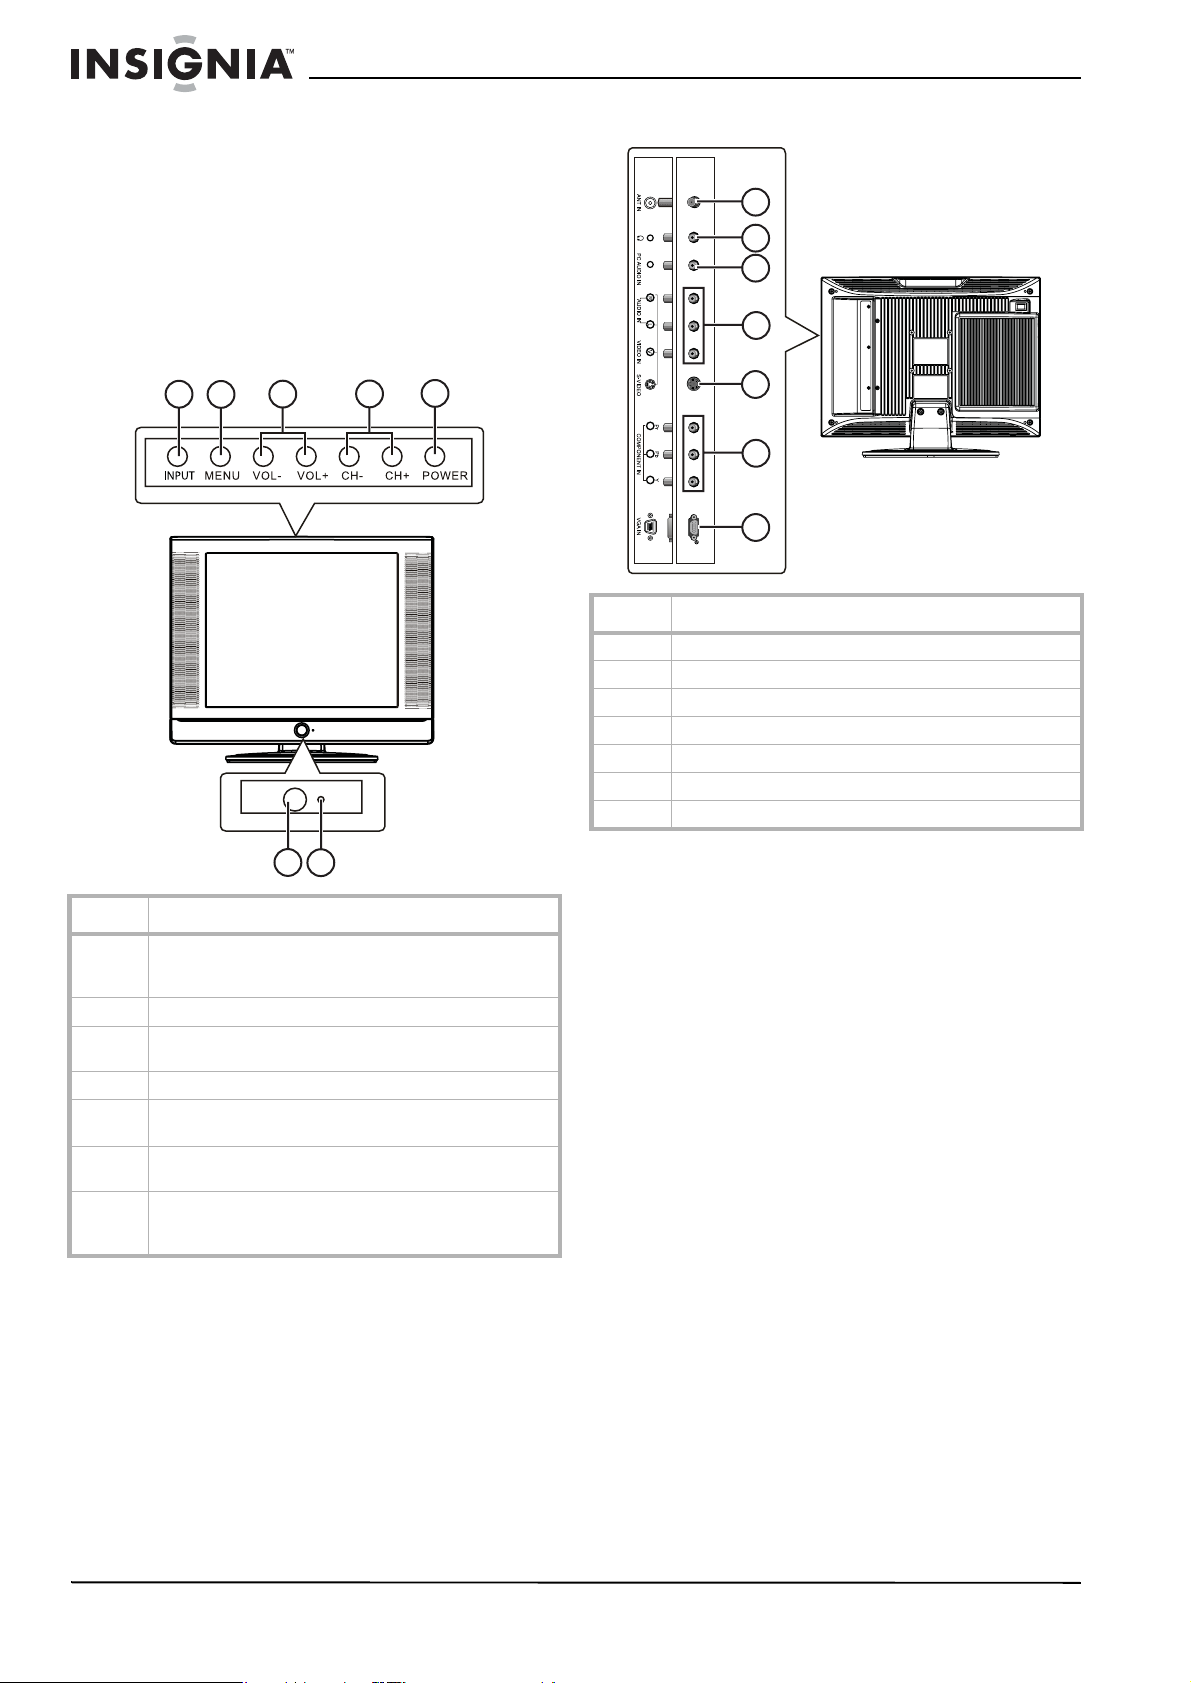
Ensemble Lecteur de DVD/TV ACL de 15 pouces Insignia NS-CL15C
Fonctionnalités
Accessoires
Vérifier que les accessoires suivants sont
fournis dans l’emballage :
• Télécommande
• Piles (deux - AA)
• Guide de l'utilisateur
Vue avant
2
1
3
4
Vue arrière - connecteurs
1
2
3
4
5
Élément Description
1 Connecteur d' antenne RF (75 ohms)
2 Prise de casque d'éco ute
3 Prise d’entrée audio PC
4 Prises d'entrée vi déo composite/audio
5 Prise d'entrée S-V idéo
6 Prises d'entrée composantes (YPbPr)
7 Prise d'entrée vidéo (P C) VGA
5
6
7
6
7
Élément Description
1Touche ENTRÉE. Permet de sélectionner le signal
2Touche MENU. Permet d’accéder au menu d’écran.
3Touches VOL -/+. Permettent de diminuer ou
4Touches CH -/+. Permettent de changer le canal.
5Touche MARCHE/ARRÊT. Permet de mettre le téléviseur
6 Capteur de télécommande. Reçoit les signaux de la
7 Témoin DEL d’alimentation. S'allume en vert lorsque le
d'entrée AV parmi TV, A V, S-VIDÉO, PC, COMPOSANTES
et DVD.
d’augmenter le volume son ore.
sous et hors tension.
télécommande.
téléviseur est sous tension et en rouge lorsqu’il est en
mode attente
26
www.insignia-products.com
Page 27
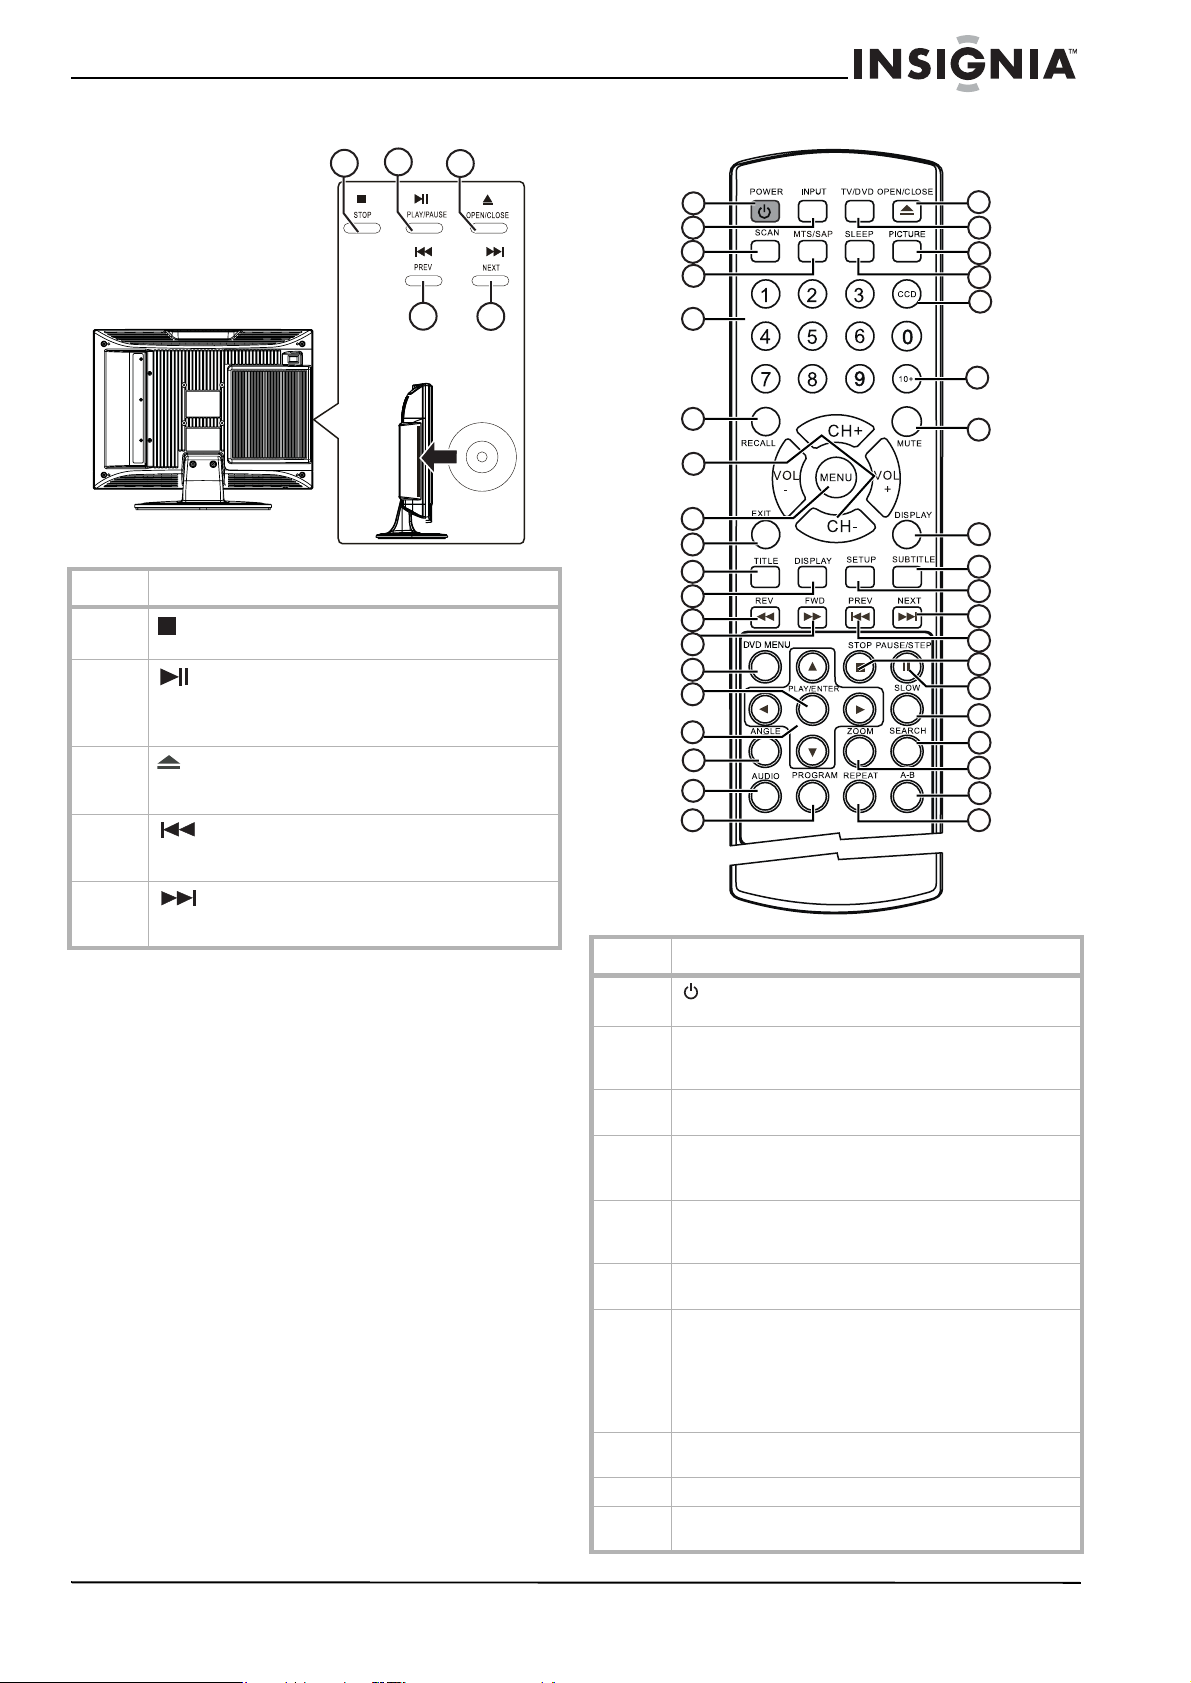
Ensemble Lecteur de DVD/TV ACL de 15 pouces Insignia NS-CL15C
Vue arrière - lecteur de DVD Télécommande
2
1
3
Élément Description
1
2
3
4
5
touche ARRÊT Permet d’arrêter la lecture du
disque.
toucheLECTURE/PAUSE L'ap puyer pour
commencer la lecture, l’appuyer de nouveau pour
interrompre momentanément la lecture, puis de
nouveau pour la reprendre.
touche OUVRIR/FERMER Permet d’ouvrir le
plateau à disque. Appu yer de nouveau sur cette touche
pour fermer le plateau.
touche
piste ou au chapitre précédent. L'appuyer de nouveau
pour revenir en arrière par chapitre ou piste.
touche NEXT (Suivant). Permet de passer à la
piste ou au chapitre suivant. L'appuyer de nouveau pour
aller au chapitre ou à la pist e suivante.
4
5
PREV (Précédent). Permet de revenir à la
1
2
3
4
20
21
22
23
24
5
25
6
26
7
8
9
10
11
12
13
14
15
27
28
29
30
31
32
33
34
16
17
18
19
35
36
37
38
Élément Description
1
2 Touche ENTRÉE. Permet de sélectionner le signal
3 Touche de BALAYAGE. Permet de parcourir les canaux
4 Touche MTS/SAP (Stéréo/Seconde trame sonore).
5 Touches numériques : Elles permettent de saisir
6 Touche RAPPEL. En mode TV, cette touche permet de
7 Touches CH +/-. Permettent de passer au canal
8 Touche MENU. Permet d’afficher le menu TV. L’ appuyer
9 Touche QUITTER. Permet de quitter les menus d'écran.
10 Touche TITRE. Permet d’afficher le titre du DVD en cours
touche MARCHE/ARRÊT. Permet d’allumer et
d’éteindre le téléviseur.
d'entrée AV parmi TV, AV, S-Vidéo, PC, COMPOSANTES
et lecteur de DVD.
télévisés mémorisés.
Permet de sélectionner le mode Stereo (Stéréo), Mono
ou SAP.
directement des numéros de ca naux, de chapitres de
DVD et de pistes de CD.
revenir au canal précédent.
précédent ou suivant en mode TV. Dans les autres
modes (à l'exception du mode lecteur de DVD), elles
permettent de passer en mode TV.
Touches VOL+/-. Permet tent de modifier le volume
sonore.
de nouveau pour sort ir.
de lecture.
www.insignia-products.com
27
Page 28

Ensemble Lecteur de DVD/TV ACL de 15 pouces Insignia NS-CL15C
Élément Description
11 Touche AFFICHAGE. Permet d'afficher l’information sur
12
13
14 Touche MENUDVD. Appuyer sur cette touche pour
15 Touche LECTURE/ENTRÉE. Permet de commencer la
16
17 Touche ANGLE. Permet de changer l’angle de prise de
18 Touche AUDIO. Permet de changer les options/la langue
19 Touche PROGRAMMATION Pour entrée en mode de
20
21 Touche TV/DVD. Permet de basculer entre les entrées en
22 Touche IMAGE. Permet de basculer entre les différents
23 Touche ARRÊT DIFFÉRÉ . Permet de régler l’arrêt différé
24 Touche CCD (Sous-titres codés). Permet de sélectionner
25 Touche 10+. Si le numéro de la piste ou de canal est
26 Touche SOURDINE. Permet de mettre le son en
27 Touche AFFICHAGE. Permet d’afficher les informations
28 Touche SOUS-TITRES. L’appuyer de façon répétée pour
29 Touche CONFIGURATION. Permet d’accéder au menu de
30
31
le DVD en cours de lecture.
touche REV (Retour arrière). Permet le retour
rapide d’un DVD.
touche FWD (Avance rapide). Permet l’avance
rapide d’un DVD.
ouvrir le menu racine du DVD.
lecture du disque o u en mode menu de confirme r les
sélections.
Touches de déplacement
de parcourir les menus d’écran.
vues d’un DVD.
audio du DVD.
programmation de DVD. En mode CD, cette touche
permet de basculer entre « Folder » (Dossier) et
« Filelist » (Liste de fichiers). Folder signifie la lecture
des pistes du dossier en co urs et Filelist signifie la
lecture de toutes les pistes du disque.
touche OUVRIR/FERMER. Permet d’ouvrir ou
fermer le plateau à disque.
cours et le mode DVD.
modes d’image (Personal [Personnalisé], Standard, Mild
[Doux] et Fresh [Vif]).
de l’appareil.
les modes de sous-titres codés en mode TV.
supérieur à 10, appuyer une fois su r cette touche, puis
sur une touche entr e 1 et 9.
sourdine.
sur le canal TV.
sélectionner la langue des sous-titres souhaitée.
configuratio n du DVD.
/// : Permettent
touche NEXT (Suivant). Permet de passer à la
piste ou au chapitre suivant. L'appuyer de nouveau pour
aller au chapitre ou à la pist e suivante.
touche PREV (Précédent). Permet de revenir à la
piste ou au chapitre précédent. L'appuyer de nouveau
pour revenir en arrière par chapitre ou piste.
Élément Description
32
33
34 Touche RALENTI. Permet de réduire la vitesse de lecture
35 Touche RECHERCHE. Permet d’accéder au mode de
36 Touche ZOOM. Permet d'effectuer un zoom avant de
37 Touche A-B. Permet de répéter une partie sélectionnée
38 Touche RÉPÉTITION. Permet d’accéder au mode
touche ARRÊT. Permet d’arrêter la lecture du DVD
ou du CD.
touche PAUSE/IMA GE PAR IMAGE. Permet
d’interrompre momentanément la lecture du DVD.
L ’appuyer une deuxième fois pour faire avancer le DVD
image par image.
du DVD.
recherche du DVD.
l’image du DVD.
d’un DVD.
répétition du DVD.
Installation du téléviseur
Installation des piles de la télécommande
Pour installer les piles :
1 Ouvrir le compartiment des piles au dos de la
télécommande.
2 Insérer deux piles AA (fournies) dans le
compartiment. Vérifier que les symboles (+)
et (–) sur les piles coïncident avec le schéma
à l’intérieur du compartiment.
28
www.insignia-products.com
Page 29

Ensemble Lecteur de DVD/TV ACL de 15 pouces Insignia NS-CL15C
Utilisation de la télécommande
Pour utiliser la télécommande :
• La pointer directement vers le téléviseur,
avec un angle inférieur à 30° par rapport au
capteur infrarouge sur le devant du
téléviseur, et à moins de 20 pieds (6,10 m).
Connexion à des sources vidéo
Connexion à une antenne ou à un récepteur câble/ satellite
3
1
4
2
Pour connecter une antenne externe ou un
récepteur câble/satellite :
1 Connecter le câble d’antenne (1) d'une
antenne (2) ou d'un récepteur câble/satellite
(3) à la prise d'entrée d'antenne (4) du
téléviseur.
2 Appuyer INPUT (Entrée) pour régler le signal
d'entrée du téléviseur sur TV.
Remarque
Des objets entre la télécommande et le capteur
peuvent affaiblir le signal infrarouge de la
télécommande.
La portée peut être réduite si le soleil éclaire
directement le capteur infrarouge du téléviseur.
Avertissements
Ne pas exposer la télécommande à des liquides,
au soleil ou à des chocs.
La télécommande peut ne pas fonctionner
correctement si le capteur infrarouge du téléviseur
reçoit directement la lumière du soleil ou un
éclairage important. Dans ce cas, modifier l’angle
de l'éclairage ou de l'écran du téléviseur ou
rapprocher la télécommande du capteur
infrarouge.
Remarques
• Pour améliorer la qualité de l'image dans les
zones à signal faible, il est possible de se
procurer et d'installer un amplificateur de
signal.
• Pour séparer le signal d'une antenne, un
séparateur de signaux à deux voix sera
nécessaire.
Connexion à un magnétoscope ou à une autre source AV
2
Pour connecter le téléviseur à un
magnétoscope ou à une source AV :
1 Mettre le téléviseur et le magnétoscope hors
tension (ou tout autre source).
www.insignia-products.com
1
29
Page 30
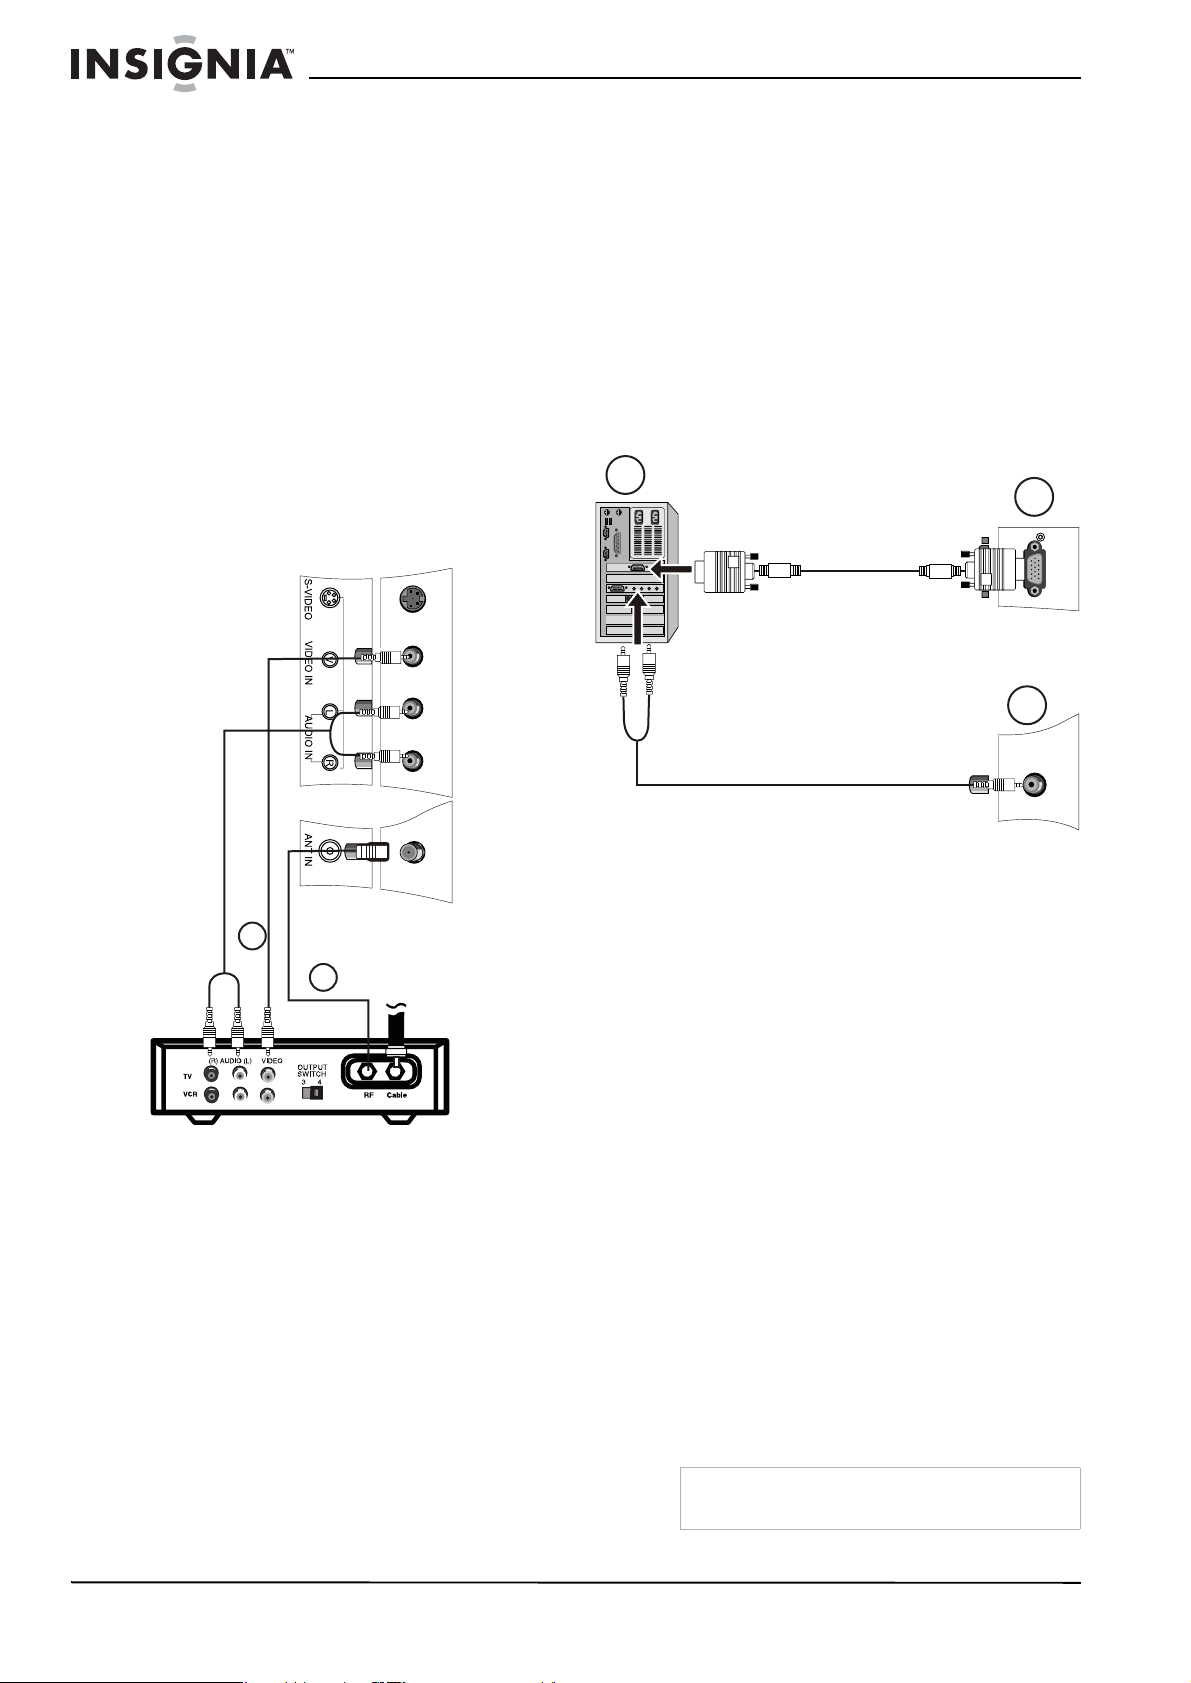
Ensemble Lecteur de DVD/TV ACL de 15 pouces Insignia NS-CL15C
2 Connecter un câble vidéo RCA au
magnétoscope (1), et à la prise VIDEO IN à
l'arrière du téléviseur (2).
- OU Connecter un câble S-vidéo au
magnétoscope et à la prise S-VIDEO à
l'arrière du téléviseur.
3 Connecter les câbles audio RCA aux prises
de sortie audio du magnétoscope et aux
prises AUDIO G et D à l'arrière du téléviseur.
4 Mettre le téléviseur et le magnétoscope sous
tension.
5 Régler la sortie du magnétoscope sur le
canal 3 ou 4 et régler ensuite le téléviseur sur
le même canal.
6 Appuyer sur INPUT (Entrée) pour définir
l'entrée du signal TV sur AV ou sur
S-VIDEO.
Connexion à un décodeur
2 Connecter les câbles audio et vidéo RCA
entre le décodeur et les prises VIDEO et
AUDIO IN à l'arrière du téléviseur.
• Jaune — Vidéo
• Blanc — Audio gauche
• Rouge — Audio droite
3 Mettre sous tension le téléviseur et le
décodeur.
4 Appuyer sur INPUT (Entrée) pour définir
l'entrée du signal TV sur AV ou sur
S-VIDEO.
5 Changer les canaux sur le décodeur ou au
moyen de sa télécommande.
Connexion à un ordinateur
1
2
2
1
Pour connecter le téléviseur à un décodeur,
avec un câble HF (1) :
1 Mettre hors tension le téléviseur et le
décodeur.
2 Connecter un câble HF 75 ohms entre le
décodeur et la prise ANT IN à l'arrière du
téléviseur.
3 Régler la sortie du décodeur sur le canal 3 ou
4 et régler ensuite le téléviseur sur le même
canal.
4 Mettre sous tension le téléviseur et le
décodeur.
5 Changer les canaux sur le décodeur ou au
moyen de sa télécommande.
3
Pour connecter une source vidéo provenant
d'un ordinateur aux prises VGA :
1 Connecter un câble VGA entre l'ordinateur et
le port VGA IN (Entrée VGA) sur le
téléviseur.
2 Connecter un câble audio mâle-mâle entre
l'ordinateur et le port PC AUDIO IN (Entrée
audio du PC) sur le téléviseur.
3 Mettre le téléviseur sous tension, puis le PC.
4 Appuyer sur INPUT (Entrée) pour définir
l'entrée du signal TV sur PC.
Voir « RÉGLAGE » à la page 38 pour régler
l'image.
Utilisation du téléviseur
Mise sous et hors tension de l’appareil
Pour mettre l’appareil sous et hors tension :
1 Appuyer sur POWER (Marche/Arrêt) du
panneau avant du téléviseur ou de la
télécommande. Le témoin POWER devient
vert.
2 Pour éteindre le téléviseur, appuyer de
nouveau sur POWER. L'image à l'écran
disparaît et le témoin POWER devient rouge.
Pour connecter le téléviseur à un décodeur
avec les câbles AV (2) :
1 Mettre hors tension le téléviseur et le
décodeur.
30
Remarque
www.insignia-products.com
Une petite quantité d'électricité est consommée
même lorsque l'appareil est éteint.
Page 31
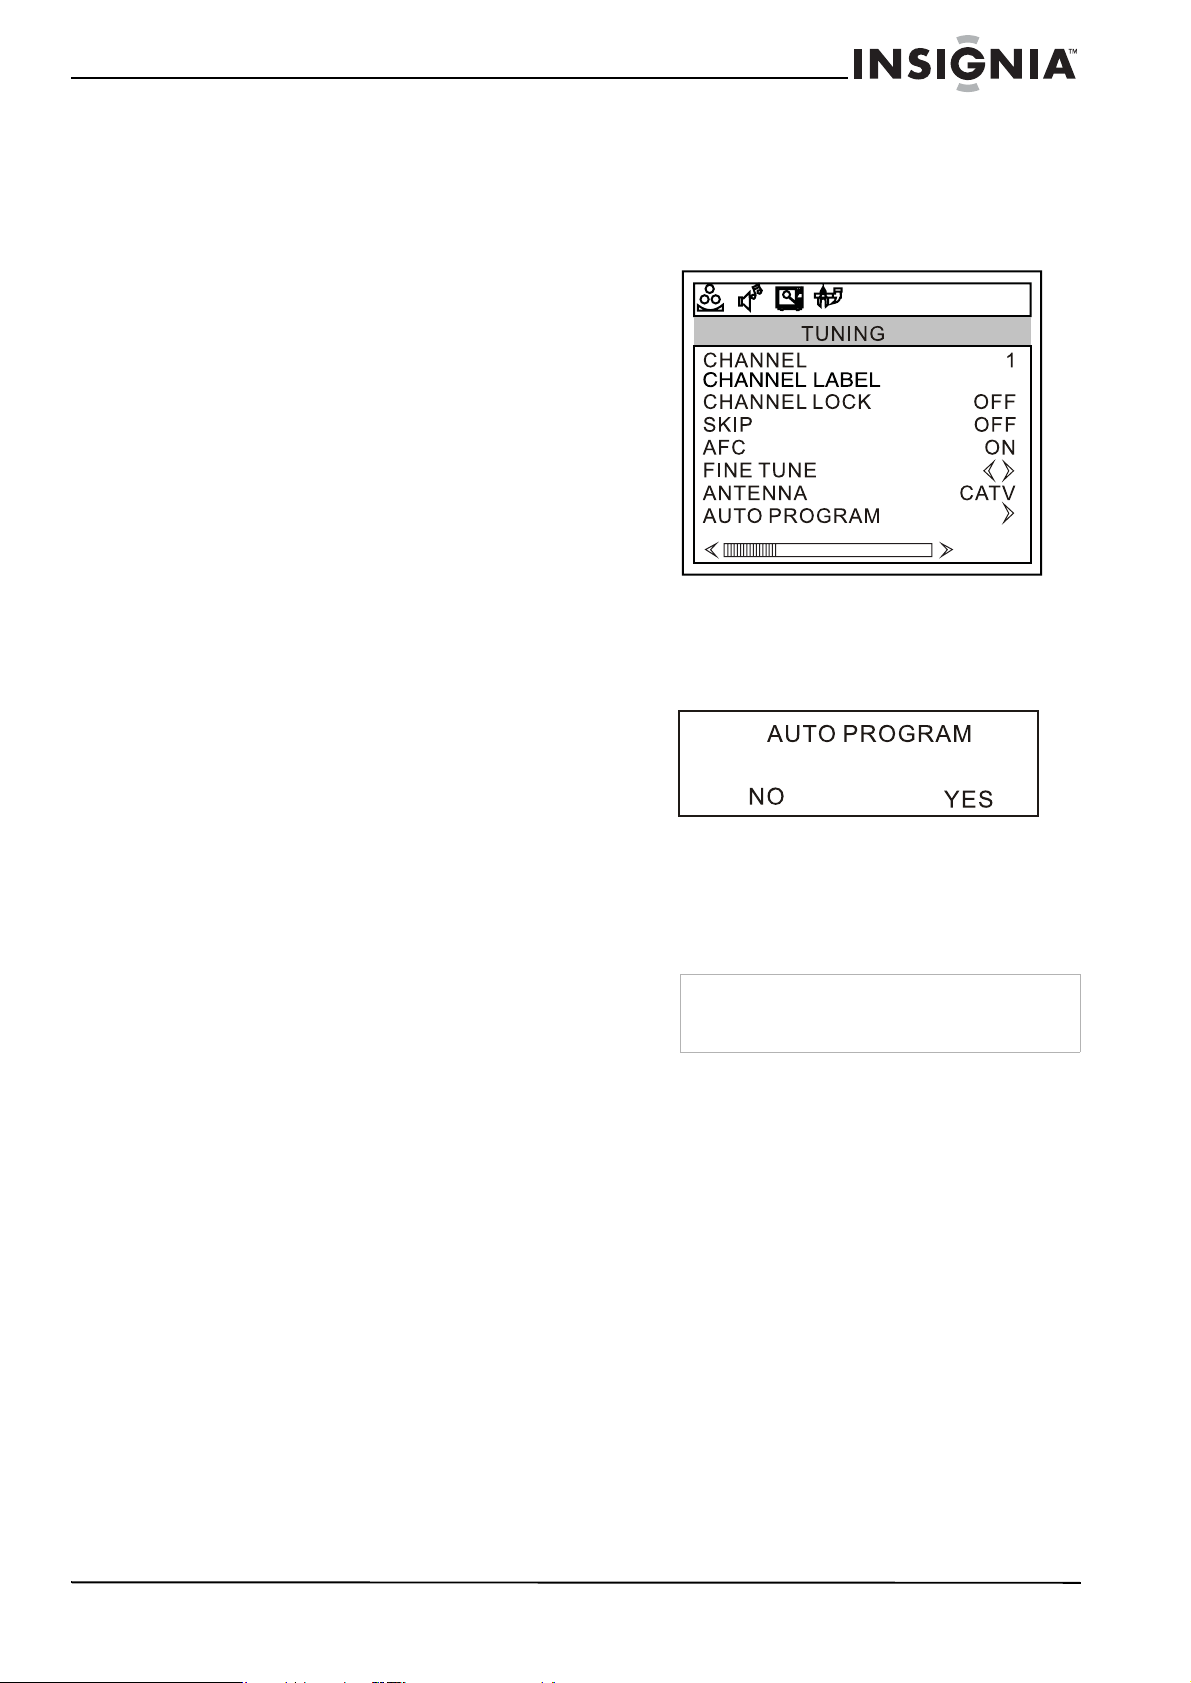
Ensemble Lecteur de DVD/TV ACL de 15 pouces Insignia NS-CL15C
Réglage du volume
Le volume sonore peut être ajusté à l'aide de la
télécommande ou sur le panneau avant du
téléviseur.
Pour modifier le volume sonore :
1 Appuyer sur VOL+ ou sur VOL- .
2 Appuyer sur MUTE (Sourdine) de la
télécommande pour mettre le son en
sourdine et une deuxième fois (ou sur VOL+
ou VOL- ) pour le rétablir.
Changement de source vidéo
Le téléviseur peut accepter des sources vidéo
multiples.
Pour sélectionner la source vidéo :
• Appuyer sur INPUT (Entrée) pour
sélectionner parmi les modes d'entrée
suivants :
•TV
•AV
•S-VIDEO
•PC
• COMPONENT (Composantes)
•DVD
Le nom de la source d'entrée apparaît à
l'écran lors de sa sélection.
Mémorisation des canaux
Pour mémoriser automatiquement des
canaux :
1 Appuyer sur MENU du téléviseur ou de la
télécommande, puis sur VOL+/VOL- pour
afficher le menu
2 Appuyer sur CH+/CH- pour accéder au menu
TUNING
surbrillance AUTO PROGRAM, puis sur
VOL+ pour accéder au sous-menu
(Syntonisation) et mettre en
PROGRAM
TUNING
73. 12MHZ
.
(syntonisation).
AUTO
Changement de canal
Pour changer de canal :
• Appuyer sur CH+ ou CH-.
Pour entrer un numéro de canal
directement :
• Appuyer sur les touches numériques de la
télécommande.
Pour basculer entre deux canaux :
1 Appuyer sur RECALL (Rappel) pour passer
du canal en cours à celui précédemment
choisi.
2 Appuyer de nouveau sur RECALL pour
revenir au canal initialement syntonisé.
Pour effectuer un choix parmi les canaux
mémorisés :
1 Appuyer sur SCAN de la télécommande.
L'image se gèle pendant environ deux
secondes sur chaque canal mémorisé.
2 Pour désactiver la fonction Scan (balayage),
appuyer de nouveau sur SCAN.
Modification du mode d'image
Pour modifier le mode d’image :
• Appuyer sur PICTURE (Image) de la
télécommande pour naviguer parmi les
modes suivants :
• PERSONAL (Personnalisé)
• STANDARD
• MILD (Doux)
• FRESH (Vif)
3 Appuyer sur VOL+ et mettre en surbrillance
YES (Oui), puis sur MENU pour confirmer la
sélection.
4 Le téléviseur recherche et mémorise tous les
canaux sur l'entrée antenne sélectionnée et
disponibles localement.
Remarque
Si le téléviseur est connecté au câble,
sélectionner CATV (TV câblée) dans le
sous-menu
5 Pour arrêter la recherche automatique,
appuyer sur MENU.
ANTENNA
(Antenne).
Affichage des informations d'état
Pour afficher les informations d’état :
• Appuyer sur DISPLAY (Affichage). Le
téléviseur affiche les informations d'état,
telles que le numéro de canal ou la source du
signal.
www.insignia-products.com
31
Page 32

Ensemble Lecteur de DVD/TV ACL de 15 pouces Insignia NS-CL15C
Ajout d’une étiquette à un canal
Pour ajouter une étiquette à un canal :
1 Appuyer sur MENU du téléviseur ou de la
télécommande, puis sur VOL+/VOL- pour
afficher le menu
2 Appuyer sur CH+/CH- pour accéder au menu
TUNING
CHANNEL LABEL (Étiquette d'un canal),
puis sur VOL+ pour accéder au sous-menu.
3 Appuyer sur VOL + ou sur VOL- pour
sélectionner la position et sur
CH+/CH- pour sélectionner les lettres ou les
symboles à définir.
4 Appuyer sur MENU pour confirmer.
et mettre en surbrillance
TUNING
73. 12MHZ
(Syntonisation).
Réglage de l’arrêt différé
L’arrêt différé permet de sélectionner la durée
avant la mise automatique de l’appareil hors
tension.
Configuration du contrôle parental
L’appareil est doté d’une puce antiviolence
(V-chip) qui permet de contrôler l’accès à
certaines émissions par les enfants. Le contrôle
parental inclut deux classifications : MPAA (en
fonction de l’âge) et les directives parentales TV
(en fonction de l'âge et du contenu). Un
programme TV pouvant utiliser soit les niveaux
MPAA ou les directives parentales TV, les deux
classifications doivent être réglées pour un
contrôle total.
Avant de sélectionner les classifications, il est
nécessaire de configurer le mot de passe du
contrôle parental.
Pour configurer un mot de passe :
1 Appuyer sur MENU du téléviseur ou de la
télécommande, puis sur VOL+/VOL- pour
afficher le menu
2 Appuyer sur CH+/CH- pour accéder au menu
FUNCTION
PARENTAL, puis sur VOL+ pour accéder au
sous-menu
PASSWORD
FUNCTION
et mettre en surbrillance
PARENTAL
(Mot de passe) s’affiche.
.
. La boîte de dialogue
Pour régler l'arrêt différé :
• Appuyer plusieurs fois sur SLEEP (Arrêt
différé) jusqu'à ce que la durée souhaitée
s'affiche à l'écran. Les options comprennent :
• SLEEP 240 MIN
• SLEEP 180 MIN
• SLEEP 120 MIN
•SLEEP 90 MIN
•SLEEP 60 MIN
•SLEEP 45 MIN
•SLEEP 30 MIN
•SLEEP 15 MIN
•SLEEP 10 MIN
•SLEEP 5 MIN
•SLEEP 0 MIN
Visualisation des s ous-titres codés
Pour visualiser les sous-titres codés :
• Appuyer sur CCD pour activer ou de
désactiver les sous-titres codés.
3 Appuyer sur les touches numériques pour
saisir 0000. Le menu
4 Appuyer sur CH+/CH- pour sélectionner
CHANGE PASSWORD
passe), puis sur VOL+ pour accéder au
sous-menu
5 Appuyer sur les touches numériques pour
saisir un mot de passe.
CHANGE PASSWORD
PARENTAL
(Modifier le mot de
s’affiche.
.
32
www.insignia-products.com
Page 33
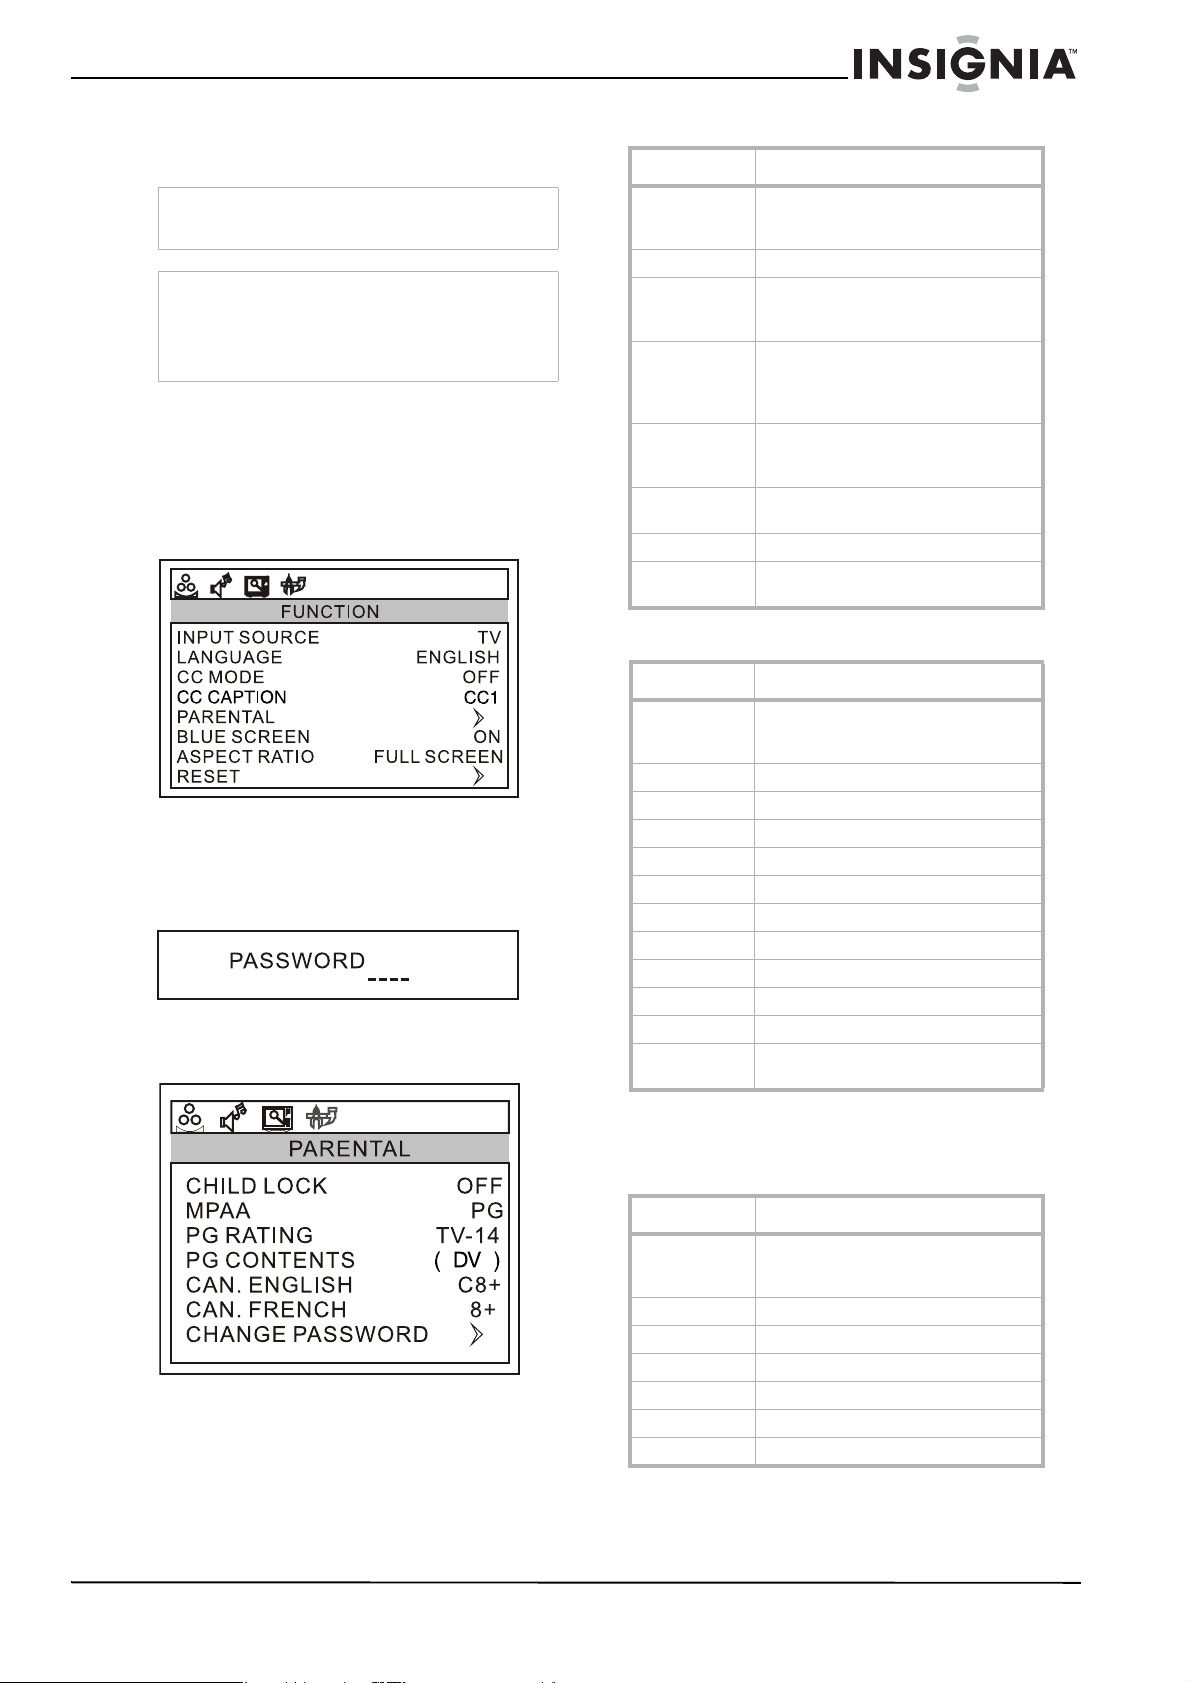
Ensemble Lecteur de DVD/TV ACL de 15 pouces Insignia NS-CL15C
6 Appuyer sur les touches numériques pour
ressaisir le nouveau mot de passe pour
confirmation.
Attention
Prendre note du mot de passe et en conserver
trace pour référence ultérieure.
Remarque
En cas d’oubli du mot de passe, entrer 9443
comme ancien mot de passe, puis saisir un
nouveau mot de passe. Ce mot de passe est
toujours valable pour la réinitialisation du mot de
passe.
Configuration du niveau de Contrôle parental
Pour configurer le niveau de Contrôle
parental :
1 Appuyer sur MENU du téléviseur ou de la
télécommande, puis sur VOL+/VOL- pour
afficher le menu
FUNCTION
.
2 Appuyer sur CH+/CH- pour accéder au menu
FUNCTION
et mettre en surbrillance
PARENTAL, puis sur VOL+ pour accéder au
sous-menu
PASSWORD
PARENTAL
. La boîte de dialogue
(Mot de passe) s’affiche.
3 Appuyer sur les touches numériques pour
saisir le mot de passe. Le menu
PARENTA L
s’affiche.
Classifications américaines MPAA
Classification Description
AUCUNE ou
NON
CLASSIFIÉ
G Tout public.
PG Surveillance parentale suggérée.
PG13 Surveillance parentale fortement
R Réservé aux adultes. Interdit aux
NC17 Déconseillé aux enfants de moins de
X Pour adultes uniquement.
OFF
(Désactivés)
Non classifié.
Certains aspects peuvent ne pas
convenir à des enfants.
suggérée. Certains aspects peuvent
être totalement inappropriés pour des
enfants de moins de 13 ans.
mineurs de moins de 17 ans ou
accompagnement par un adulte requis.
17 ans.
Pas de contrôle.
Classifications canadiennes MPAA
Classification Description
E Exempté - comprend les ac t u a lités, le
C* Enfants (anglais)
G** Enfants (français)
8+** Enfants de 8 ans et plus (français)
C8+* Enfants de 8 ans et plus (anglais)
G* Tous publics (anglais)
PG Surveillance parentale suggé r ée.
13+** Enfants de 13 ans et plus (fran çais)
14+* Enfants de 14 ans et plus (anglais)
16+** Enfants de 16 ans et plus (fran çais)
18+ Programmation pour adultes
OFF
(Désactivés)
sport, les documentaires, les
émissions-débats.
Pas de contrôle.
* Can. En anglais uniquement
** Can. En français seulement
4 Appuyer sur CH+/CH- pour sélectionne r
l'option devant être modifiée, puis sur VOL+/
VOL- pour changer l'option.
5 Appuyer sur MENU ou EXIT (Quitter) pour
fermer le menu.
www.insignia-products.com
Classifications des directives pa rent al es TV
Classification Description
AUCUNE ou
NON
CLASSIFIÉ
TV-Y Enfants de tous âges.
TV-Y7 Enfants de 7 a ns et plus.
TV-G Tout public.
TV-PG Surveillance parenta le suggérée.
TV-14 P arents sérieusement mis en garde.
TV-MA Adultes seulement.
Non classifié.
33
Page 34

Ensemble Lecteur de DVD/TV ACL de 15 pouces Insignia NS-CL15C
Certaines des classifications des direct ives
parentales TV basées sur une tranche d’âge
spécifique ont aussi un classement PG en
fonction du contenu.
Classification
VIOLENCE FI CTIVE.
DIALOGUE
LANGAGE.
SEXE
VIOLENCE.
Utilisation du lecteur de DVD
Lecture d’un DVD
Pour lire un DVD :
1 Appuyer sur POWER (Marche/Arrêt) pour
mettre le téléviseur sous tension.
2 Appuyer sur TV/DVD pour sélectionner
DVD .
3 Appuyer sur OPEN/CLOSE (Ouvrir/
fermer) pour ouvrir le plateau à disque.
4 Placer le DVD sur le plateau et appuyer sur
OPEN/CLOSE (Ouvrir/fermer) pour
refermer le plateau. Le lecteur de DVD lit le
DVD et affiche le menu d'introduction.
5 Appuyer sur et pour mettre en
surbrillance les éléments du menu, puis sur
PLAY/PAUSE (Lecture/pause) sur le
lecteur ou sur PLAY/ENTER (Lecture/Entrée)
sur la télécommande, pour effectuer la
sélection.
6 Pendant la lecture :
• Appuyer sur PLAY/PAUSE du
lecteur ou sur PAUSE/STEP de la
télécommande pour mettre la lecture en
pause. Appuyer sur PLAY/PAUSE
du lecteur ou sur PAUSE/ ENTER de la
télécommande pour reprendre la lecture.
• Appuyer sur pour effectuer un retour
arrière rapide, puis sur pour une
avance rapide. Lors de chaque appui sur
retour rapide ou sur avance rapide, la
vitesse change.
• Appuyer sur pour passer au chapitre
précédent, puis sur pour passer au
chapitre suivant. Appuyer plusieurs fois
pour continuer de revenir en arrière ou
d'avancer.
• Pour une lecture image par image,
appuyer sur PAUSE/STEP et ensuite
de nouveau sur PAUSE/STEP .
Chaque fois que la touche PAUSE/
STEP est appuyée, le film avance
d'une image.
• Pour une lecture au ralenti, appuyer sur
SLOW (Ralenti).
• Pour rechercher une scène particulière,
appuyer sur SEARCH (Recherche) pour
accéder au menu
SEARCH
ensuite sur les touches numérotées pour
indiquer la scène souhaitée.
• Pour arrêter complètement la lecture d'un
DVD, appuyer deux fois sur STOP.
7 Appuyer sur OPEN/CLOSE (Ouvrir/
fermer) pour retirer le DVD.
Accès au menu principal du DVD
Pour accéder au menu principal du DVD :
1 Appuyer sur DVD MENU de la
télécommande.
2 Sélectionner et modifier les options
souhaitées.
Remarque
Cette fonction n'est pas disponible sur les DVD
avec des menus multi-couches.
Affichage de l’information sur le DVD
Pour afficher l’information sur le DVD :
• Appuyer plusieurs fois sur DISPLAY
(Affichage) de la télécommande pour
naviguer parmi
Title Elapsed, Title Remain
Chapter El apsed, Chapter Remain
Off
(Durée écoulée du titre, durée restante du
titre, durée écoulée du chapitre, durée
restante du chapitre et extinction de
l'affichage).
Sélection de la langue des sous-titres
Si le DVD a été créé avec des sous-titres, il est
possible de changer la langue de ces
sous-titres.
Pour changer la langue des sous-titres :
1 Appuyer plusieurs fois sur SUBTITLE
(Sous-titres) jusqu’à obtention de la langue
souhaitée.
2 Pour supprimer les sous-titres, appuyer sur
SUBTITLE (Sous-titres) jusqu’à l’affichage
de « Off » (Désac tiv és ).
Remarque
Le changement de langue de sous-titrage au
moyen de cette méthode ne s’applique qu’au DVD
en cours de lecture. Lors du retrait du DVD ou de
la mise hors tension du lecteur, la langue de
sous-titrage revient à celle définie dans le menu
principal du lecteur de DVD.
Conseil
Il est également possible de modifier la langue
des sous-titres depuis le menu principal du lecteur
de DVD ou au moyen des réglages de sous-titrage
du DVD lui-même.
Lecture en boucle
Il est possible de répéter des chapitres, des
titres ou la totalité d'un DVD en effectuant une
lecture en boucle.
Pour répéter un segment :
1 Pendant la lecture du DVD, appuyer sur
REPEAT pour faire défiler les options.
• Chapter [Chapitre] (répète le chapitre en
cours)
• Title [Titre] (répète le titre en cours)
• All [Tout] (répète tout le contenu du DVD)
et appuyer
et
Display
,
34
www.insignia-products.com
Page 35

Ensemble Lecteur de DVD/TV ACL de 15 pouces Insignia NS-CL15C
2 Pour arrêter la lecture en boucle, effectuer
l’une des opérations suivantes :
• Appuyer sur REPEAT jusqu'à ce que
« ALL » (Tout) disparaisse de l'écran.
• Appuyer deux fois sur STOP.
• Éjecter le DVD.
Pour répéter des segments d’un DVD :
1 Définir un point de démarrage en appuyant
sur A-B.
2 Définir un point de fin de lecture en appuyant
de nouveau sur A-B.
3 Le lecteur lit du point A au point B.
4 Pour désactiver la fonction de répétition,
appuyer de nouveau sur A-B.
Changement de l’angle de prise de vues
Certains DVD contiennent des prises de vue
sous plusieurs angles d’une scène ou d’une
séquence. Si le DVD ne contient qu’un seul
angle, cette fonctionnalité n’est pas disponible.
Pour changer l’angle de prise de vues :
1 Appuyer plusieurs fois sur ANGLE jusqu’à la
sélection de l'angle de prise de vues
souhaité.
2 Pour reprendre la lecture normale, appuyer
sur ANGLE jusqu'à ce que l'angle de prise
de vues d’origine soit sél ec t ionné.
Agrandissement de l’image
Il est possible d'agrandir ou de réduire l'image
affichée pendant la lecture du DVD ou lors d'un
arrêt momentané de la lecture.
5 Mettre en surbrillance Démarrage, puis
appuyer sur PLAY/ENTER (Lecture/Entrée)
pour commencer la lecture du programme.
6 Pour arrêter la lecture programmée, appuyer
deux fois sur STOP (Arrêt) pendant la
lecture du programme.
Modification des options audio
Si le DVD a été créé avec plusieurs pistes de
langues (enregistrées dans des langues
différentes), ou avec des options audio
multiples, il est possible de changer
temporairement les réglages de l’audio du
lecteur DVD.
Pour modifier les options de l’audio :
1 Appuyer sur AUDIO. L'OSD affiche les
paramètres en cours de l'audio.
2 Si plusieurs options audio sont disponibles,
appuyer de nouveau sur AUDIO pour
sélectionner la piste audio suivante.
Remarque
Cette fonction n’est disponible que si le D VD a été
créé avec plusieurs pistes audio. Lors de la
sélection d’une langue audio, le réglage de langue
audio dans le menu principal du lecteur DVD n’est
suspendu que temporairement.
Permettre un intervalle de trois secondes entre les
sélections.
Conseil
Il est également possible de modifier la langue
audio depuis le menu principal du lecteur de DVD
ou au moyen des réglages audio du DVD
lui-même.
Lecture d’un CD
Pour agrandir l’image :
1 Pendant la lecture d'un DVD, appuyer sur
ZOOM. L’image est agrandie 2×. Continuer à
appuyer sur ZOOM pour agrandir l'image
jusqu'à 3× et 4×.
• Lorsque l'image est agrandie, appuyer sur
et pour déplacer l'image à
l'écran.
2 Pour revenir aux dimensions normales de
l'image, appuyer sur ZOOM jusqu'à ce que
l'image revienne à la normale.
Lecture programmée
Pour lire des chapitres et des titres dans un
ordre personnalisé, il est nécessaire de créer un
programme de lecture.
Pour programmer la lecture :
1 Appuyer sur PROGRAM pendant la lecture
d'un disque pour passer au mode
Programme.
2 Appuyer sur les touches numériques de la
télécommande pour saisir le titre et le
chapitre à lire en premier. Le numéro du titre
et du chapitre saisi apparaît dans la boîte de
dialogue.
3 Le curseur saute à la case suivante dans la
section de la liste des programmes. Vérifier
que la boîte est en surbrillance et saisir le
titre et le chapitre suivants.
4 Continuer d’ajouter des titres et des chapitres
jusqu’à ce que le programme soit complet.
Pour lire un CD :
1 Appuyer sur POWER (Marche/Arrêt) pour
mettre le lecteur sous tension.
2 Appuyer sur TV/DVD pour sélectionner DVD.
3 Appuyer sur OPEN/CLOSE (Ouvrir/
fermer) pour ouvrir le plateau à disque.
4 Placer le CD sur le plateau et appuyer sur
OPEN/CLOSE pour refermer le plateau.
Le lecteur de DVD commence à lire le CD.
5 Pendant la lecture :
• Appuyer sur PLAY/PAUSE du
lecteur ou sur PAUSE/STEP de la
télécommande pour mettre la lecture en
pause. Appuyer sur PLAY/PAUSE
du lecteur ou sur PLAY/ ENTER de la
télécommande pour reprendre la lecture.
• Appuyer sur pour effectuer un retour
en arrière rapide et sur pour une
avance rapide.
• Appuyer sur pour revenir au chapitre
précédent et sur pour passer au
chapitre suivant. Appuyer plusieurs fois
pour continuer de revenir en arrière ou
d'avancer.
• Pour arrêter complètement la lecture d'un
CD, appuyer deux fois sur STOP.
6 Appuyer sur OPEN/CLOSE (Ouvrir/
fermer) pour retirer le CD.
www.insignia-products.com
35
Page 36

Ensemble Lecteur de DVD/TV ACL de 15 pouces Insignia NS-CL15C
Lecture en boucle
Il est possible de répéter des pistes ou la totalité
d'un CD en effectuant une lecture en boucle.
Pour effectuer une lecture en boucle :
1 Pendant la lecture du CD, appuyer sur
REPEAT (Répéter) pour faire défiler les
options.
• Single (Unique) - (lecture de la piste en
cours)
• Repeat One (Répéter une fois) –
(répétition de la piste en cours)
• Repeat Folder (Répéter le dossier) (répétition du dossier en cours)
• Folder (dossier) - (lecture du dossier en
cours)
2 Pour arrêter la lecture en boucle, effectuer
l’une des opérations suivantes :
• Appuyer sur REPEAT jusqu'à ce que
« Folder » (dossier) disparaisse de
l'écran.
• Appuyer deux fois sur STOP.
• Éjecter le CD.
Changement de mode audio
Pour changer la sortie audio d'un CD
multicanal :
• Pendant la lecture d'un CD, appuyer sur
AUDIO. Le réglage change à chaque
pression de la touche :
• Mono Left (Mono G)
• Mono Right (Mono D)
• Mix-Mono (Mono mixte)
•Stéréo
Lecture d'une piste spécifique
Pour lire une piste particulière :
• Après le chargement d'un CD dans le lecteur,
et une fois que le lecteur a terminé de lire le
disque, appuyer sur les touches numériques
pour saisir le numéro de la piste, et ensuite
sur PLAY/ENTER (Lecture/Entrée) pour lire
la piste.
Conseil
Si le numéro de la piste est inférieur à 10, appuyer
sur les touches de 1 à 9 pour la sélectionner. Si le
numéro de la piste est égal à 10, appuyer une fois
sur 10+, puis sur 0 pour la sélectionner. Si le
numéro de la piste est supérieur à 10, appuyer
une fois sur 10+, puis sur une touche entre 1 et 9.
5 Appuyer sur pour sélectio nne r le
fichier souhaité, puis sur PLAY/ENTER
(Lecture/Entrée) pour confirmer. Le
diaporama commence.
6 Pendant la lecture :
• Appuyer sur PAUSE/STEP de la
télécommande pour arrêter l'image et sur
PLAY/ENTER pour reprendre la lecture
normale.
• Appuyer sur PREV pour passer à
l'image précédente et sur NEXT
pour passer à l’image suivante. Appuyer
plusieurs fois pour continuer de revenir en
arrière ou d'avancer.
• Pou r arrêter complètement la lecture,
appuyer deux fois sur STOP (Arrêt)
7 Appuyer sur OPEN/CLOSE pour retirer le
disque.
Configuration personnalisée du téléviseur
Ouverture et navigation parmi les menus d'écran
Utilisation du menu à l’écran
L’appareil est doté d’un menu d’écran qui permet
de régler les paramètres du téléviseur, tels que
l’image vidéo et le son.
Pour utiliser le menu d’écran :
1 Appuyer sur MENU du téléviseur ou de la
télécommande, puis sur VOL+/VOL- pour
afficher le menu souhaité.
2 Appuyer sur CH+/CH- pour accéder au menu
et pour mettre en surbrillance l'option
retenue, puis sur VOL+/VOL- pour modifier
le réglage.
3 Si un sous-menu est disponible, appuyer sur
VOL+ pour accéder au sous-menu, puis sur
VOL+/VOL- pour modifier le réglage.
4 Appuyer sur MENU ou sur EXIT (Quitter)
pour fermer le menu d’écran.
Lecture d'un disque de fichiers JPEG
Pour lire un disque JPEG :
1 Appuyer sur POWER (Marche/Arrêt) pour
mettre l’appareil sous tension.
2 Appuyer sur TV/DVD pour sélectionner DVD.
3 Appuyer sur OPEN/CLOSE (Ouvrir/
fermer) pour ouvrir le plateau à disque.
4 Placer le disque sur le plateau et appuyer sur
OPEN/CLOSE pour refermer le plateau.
Le menu de navigation du disque s'ouvre.
36
www.insignia-products.com
Page 37

Ensemble Lecteur de DVD/TV ACL de 15 pouces Insignia NS-CL15C
Menus d’écran
Menu d’écran Options
TUNING
(Syntonisation)
IMAGE
(Les options
varient en fonction
des différents
modes).
CHANNEL (Canal) – Le canal en cour s
sélectionné. Appuyer sur VOL+/VOL- pour
modifier le réglage.
CHANNEL LABELS (Étiquettes de canaux) –
Permet d’ajouter une étiqu ette à un canal.
CHANNEL LOCK (Verrouillage canal) – Permet
de verrouiller un canal.
SKIP(Saut) - Réglé su r ON (a ctivé) impose au
canal en cours (se reporter à CANAL ci-dessus)
d'être sauté sur la liste des canaux. Il est
possible de sélectionner un canal sauté en
introduisant le numéro du canal au moyen des
touches numériques.
AFC – Contrôle automatique des fréquences .
Sélectionner ON (Activé) pour améliorer
automatiquement la qualité de l'image.
FINE TUNE (Réglage fin) – Est utilisé pour
régler manuellement la syntonisation et
améliorer la qualité de l' image et du son. Ne
doit pas être utilisé si la réception est de bonne
qualité.
ANTENNA (Antenne) – Sélectionne la s ource
d’antenne TV (Air [ Ré c ep t io n he r tz ienne] ou
CATV [Câble]).
AUTO PROGRAM (Programmation
automatique) – Configu re auto mati qu e men t
une liste des canaux disponibles dans la zone
de réception pour le typ e d'antenne
sélectionné. Pour toute information
complémentaire, voir « Programming channels
into memory » à la page 31.
CONTRAST (Contraste) – Augmente le niveau
des zones blanches de l’image. Diminue le
niveau de l'image pour régle r les zones
sombres de l'image. (0 ~ 100)
BRIGHTNESS (Luminosité) – Augmen te la
luminosité pour ajouter plus de lumière aux
zones sombres de l’image. Diminue la
luminosité pour assombrir les zones claires de
l’image. (0 ~ 100)
SHARPNESS (Netteté) – Augmente la netteté
pour afficher une im age plus nette et plus
claire. Diminue la netteté p our afficher une
image plus fluide. (0-4)
COLOR TEMP (Température de couleur) –
Permet de régler la richesse de l'image.
(NEUTRAL [NEUTRE], WARM [CHAUDE],
COOL [FROIDE])
COLOR (Couleur) – Permet de régler la
saturation colorimétrique de l'image.
POSITION H – Permet de régle r la position
horizontale de l’image. En mode composante s
seulement.
POSITION V – Permet de régler la position
verticale de l’image. En mode composantes
seulement.
NOISE REDUCTION (Réduction du bruit) –
Permet de régler la qualité de l'image (OFF,
LOW (Désactivée, faible). MID ou HIGH
(Moyen, élevé)). En mode TV/AV/S-VIDEO/DVD
seulement.
HUE (Teinte) – Permet de régler la tonalité de
l'image en modes TV/AV/S-VIDEO/DVD avec le
système NTSC seulement.
Menu d’écran Options
SOUND (Son) VOLUME – Permet de régler le volume du
téléviseur.
BALANCE – Règle l'équilibre du volume entre
les haut-parleurs droit et gauche.
BASS (Graves) – Règle les graves (notes
basses). Disponible en mode Personnalisé
uniquement
TREBLE (Aigus) – Règle les aigus (notes
élevées). Disponible en mode Personnalisé
seulement.
AUDIO MODE – Sélectionne le mode
d'égalisation du son du téléviseur (PERSONAL,
VOICE, MUSIC ou THEATRE [Personnalisé,
Voix, Musique ou Théâtre]).
AVL – Contrôle automatique de limite du
volume. Réduit les effets des volumes élevés
en limitant les crêtes de volume sur tous les
canaux.
FONCTION INPUT SOURCE (Source d'entrée) – Affiche la
source du signal actuellement sélectionné (TV,
AV, S-VIDEO, PC,
COMPONENT ou DVD).
LANGUAGE (Langue) – Sélectionne la langue
du menu s'affichant à l'écran (OSD).
CCD MODE – Permet de sélectionner le mode
Sous-titres codés. Les options comprennent :
• OFF – Pour désactiver les sous-titres
codés.
• ON WHEN MUTE (Sous-titres codés en
mode sourdi ne) – Affi che les so us-tit res
codés quand le son est en sourdine.
• OFF – Pour désactiver les sous-titres
codés.
CC CAPTION – Sélectionne le type de
sous-titres codés à l'affichage.
• CC1 – Active les sous-titres codés dans
la langue principale de la zone
géographique d'utilisation
• CC2-CC4 – Active les autres modes
d'informations vidéo émises dans une
deuxième langue.
• TT1 – A c t ive le guide des programmes
fourni par les télédiffuseurs.
• TT2-TT4 – Active d'autres types
d'informations fournies par les
télédiffuseurs.
PARENTAL (Contrôle parental) – Permet
d’accéder aux paramètres de la puce
antiviolence. Pour toute information
complémentaire, voir « Setting parental
controls» à la page32.
BLUE SCREEN – Active l'option de l'écran bleu
en cas d'absence de signal au-delà de trois
secondes.
ASPECT RATIO – Permet de sélectionner le
format d'image. Les choix so nt les suivants :
• FULL SCREEN (Plein écran)
• ZOOM
RESET (Réinitia lisation) – Permet de revenir
aux paramètres us ine par défaut.
www.insignia-products.com
37
Page 38

Ensemble Lecteur de DVD/TV ACL de 15 pouces Insignia NS-CL15C
Menu d’écran Options
RÉGLAGE
(disponible
uniquement en
mode PC).
AUTO CONFIG (Configuration automatique) –
Permet de régler automatiquement les
paramètres de phase et de fréq uence de
l'image pour une utilisation avec un PC.
PHASE – Permet de régler la phase de l'image
d'un PC afin d'éliminer les distorsions
horizontales et d'affiner l es caractères.
CLOCK (Horloge) – Permet de régler l'écran
TFT- ACL pour correspondre à la fréquence de
l'horloge de la source d'entrée du PC.
H POSITION – Permet de régler la position
horizontale de l’ima ge.
V POSITION – Permet de régler la position
verticale de l’image.
Personnalisation de la configuration du lecteur de DVD
Utilisation du menu de configuration
Utiliser la télécommande pour naviguer dans le
menu de configuration (setup menu), à partir
duquel il est possible de configurer les
paramètres du lecteur de DVD.
Pour ouvrir le menu de configuration (Setup)
et naviguer au sein de celui-ci :
1 Appuyer sur SETUP (Configuration) de la
télécommande. La page de configuration
générale (
Hdcd
Last Memory
2 Si aucun disque n'est en lecture, appuyer de
nouveau sur SETUP. La page des
Préférences (
l’écran.
..Preference Page..
Parental
Password
Default
General Setup Page
4:3/Ps
4:3/Lb
16:9
Off
On
Preference Page
1 Kid Saf
2 G
3 Pg
4 Pg 13
5 Pgr
6 R
7 Nc17
8 Adult
) s’affiche.
) s’affiche à
3 Appuyer sur pour mettre en
surbrillance une sélection ou un sous-menu,
puis sur pour afficher les options
disponibles.
4 Appuyer sur pour sélectio nne r le
paramétrage/l'option souhaitée, puis sur
PLAY/ENTER (Lecture/Entrée) pour
confirmer.
5 Pour quitter le menu de configuration,
appuyer sur SETUP.
Modifications des paramètres du DV D
Menu d’écran Options
GENERAL SETUP
(Configuration
générale)
TV DISPLAY (Affichage TV) – Permet de régler
le format d'écran du téléviseur.
• 4:3/PS (Pan and Scan ou plein écran peut être utilisé avec un tél éviseur
externe). Les images grand écran
s'affichent sur le téléviseur mais avec
certaines parties automatiqu ement
coupées sur les extrémités.
• 4:3/LB (Letter Box ou boîtes aux lettres
- utilisation avec un té léviseur interne).
Les images grand écran s'affichent sur
le téléviseur avec des barres no ires en
partie supérieure et inférieure de
l'écran.
• 16:9 (peut être utilisé avec un
téléviseur externe). Le s images grand
écran remplissent complètement
l'écran.
ANGLE MARK (Repère d'angle) – Permet
d'activer ou de désactiver l' option de repère
d'angle. Si cette option est définie su r Activée ,
il est possible d'utiliser ANGLE sur la
télécommande pour sé lectionner un autre
angle de vue sur le DVD.
OSD Lang (Langue de l’OSD) – Permet de
sélectionner la langue de l’affichage des menus
d’écrans.
CAPTION (Sous-titres codés) – Permet
d'activer ou de désactiver les so us-titres
codés.
SCREEN SAVER (Économiseur d'écran) –
Permet d'activer l'économiseur d'écran qui
s'affiche lorsque le lecteur de DVD est inactif
pendant plus de trois minutes.
Hdcd– Permet de définir Hdcd sur Arrêt (OFF),
1X, 2X pour commuter le mode de lecture du
CD entre CD Normal, HDCD avec 44,1 K, HDCD
avec 88,2 K. Il est possible de lire normalement
des CD lorsque HDCD est défini sur arrêt. Il est
possible de lire des CD à 44,1 K lorsque HDCD
est défini sur 1X et à 88,2 K lorsque HDCD est
défini sur 2X pour améliorer la qualité de
l'audio.
Last Memory(D ernière mémorisation) –
Permet d'activer ou de désactiver l'option de
dernière mémorisation. Lorsqu'elle est activée
(On), le lecteur de DVD garde en mémoire le
chapitre en cours de visual isation au moment
de la mise hors tension et reprend la lecture au
même endroit lorsqu'il est remis sous tension.
38
www.insignia-products.com
Page 39

Ensemble Lecteur de DVD/TV ACL de 15 pouces Insignia NS-CL15C
Menu d’écran Options
PREFERENCE
(Préférences)
(disponible
seulement si
aucun disque ne
se trouve dans le
lecteur)
PARENTAL – Permet de régler des contrôles
parentaux lors de la lecture de DVD. Le mot de
passe d'origine est 1234. Les options
comprennent :
• Off (Désactivé)
• 1 - Kid Safe (Pour enfants)
•2 G
•3 Pg
•4 Pg13
•5 Pgr
•6 R
•7 Nc17
• 8 Adult (Adultes)
PASSWORD CHANGE (Modification du mot de
passe) – Permet de changer le mot de passe
utilisé pour définir ou modifier les contrôles
parentaux. Le mot de passe d'origine est 1234.
Utiliser les touches numériques pour saisir le
nouveau mot de passe et le confirmer.
Remarque : En cas d’oubli du mot de passe,
saisir 1369.
DEFAULT – Permet de réinitialiser tous les
réglages (à l'exception des contrôles parentaux
et du mot de passe) sur les valeurs pa r déf aut .
Appuyer sur ENTER (Entrée) pour confirmer.
Problèmes et solutions
Effectuer les vérifications suivantes avant de
contacter le service de réparation :
Problème Solution
Son SAP ou stéréo
défectueux.
La télécommande
ne marche pas.
L’image n’est p as
nette.
L’image n’est p as
centrée.
Mauvaise q uali té du
son
Impossible de lire le
disque
Le lecteur ne
fonctionne pas
normalement
Une distance élevée par rapport à la station de
diffusion ou des interférences radio peuvent
générer une mauvaise réception sonore. Si
c'est le cas, passer en mode Mono.
Pointer la télécommand e en direction du
capteur infrarouge du téléviseur.
Changer les piles de la télécommande.
Éliminer les obstacles ent re le capteur
infrarouge du téléviseur et la télécommande.
Régler la réduction du bruit (NOISE
REDUCTION).
Régler la position horizontale ou verticale.
Vérifier que le mode de so rtie audio est réglé
correctement.
Vérifier que la connexion audio entre l'appareil
et l’amplificateur (le cas échéant) est bonne.
Vérifier que le disque est inséré avec
l’étiquette tournée vers l'avant.
Nettoyer le disque.
De l'humidité s'est condensée dans le lecteur.
Retirer le disque et laisser le lecteur sous
tension pendant environ une heure.
Débrancher le cor don d'alimentatio n pendant
10 secondes, puis le rebrancher.
Si le problème persiste, contact er Insignia ou
le revendeur pour toute assistance.
Problème Solution
Absence d’image et
de son.
L’image est
correcte, mais pas
de son.
Absence d’image. Vérifier que le téléviseur fonctionne
Le son est corr e ct,
mais pas de
couleur.
Il y a plusieurs
images
superposées à
l'écran.
L'image est
«neigeuse».
Bandes traversant
l’image.
Vérifier les connexions de tous les câbles.
Vérifier que le télévise ur est branché et sous
tension.
Vérifier que la prise secteur CA est alimentée.
Vérifier les réglages du volume sonore et de la
sourdine.
Basculer sur un autre canal pour déterminer si
la station de diffusion est à l'origine du
problème.
correctement.
Appuyer sur INPUT (Entrée) pour sélectionner
entrée TV.
Vérifier si le standard couleur est réglé
correctement.
Vérifier et ajuster le réglage de la couleur.
Vérifier les caractéristiqu es de couleur de
l'émission : il est possible que ce soit un film
en noir et blanc.
Vérifier que l’antenne est installée
correctement. Sinon, orienter l'antenne vers la
station de télévision.
Vérifier l'antenne et sa connexion. S'il y a des
problèmes, y remédier. Si toutes les
connexions sont bonnes, il est possible que
l'antenne ou le câble soit défectueux.
Vérifier si la circulation automobile ou des
enseignes au néon pertur bent l'image.
Veiller à éliminer toute interférence d'autres
appareils électroniques, tels que postes de
radio et téléviseurs, et éloigner du téléviseur
tous les dispositifs magnétiques ou
électroniques.
Entretien
Manipulation et nettoyage de l'appareil
Expédition de l'appareil
Conserver la boîte et le matériel d’em bal lag e
d’origine. Si l'appareil doit être expédié, pour une
protection maximale, l'emballer dans son
emballa ge d'origine.
Conservation des surfaces extérieures propres
• Ne pas utiliser de liquide volatil, tels qu'un
insecticide en pulvérisation, à proximité de
l'appareil.
• Ne pas laisser des produits en caoutchouc ou en
plastique en contact avec l'appareil pendant des
périodes prolongées, car cela pourrait laisser des
marques sur la surface.
Nettoyage du boîtier
• Pour nettoyer l'appareil, utiliser un chiffon
doux, sec. Si les surfaces sont extrêmement
sales, utiliser un chiffon doux légèrement
humecté d’une solution détergente douce.
• Ne pas utiliser des solvants puissants
comme l’alcool, le benzène ou les diluants,
étant donné que ceux-ci peuvent
endommager la surface de l’appareil.
Entretien de l'appareil
Cet appareil est un dispositif de précision de
haute technologie. Si la lentille de lecture
optique et les pièces du lecteur de disque sont
sales ou usées, la qualité de l'image sera
médiocre.
Suivant les conditions de fonctionnement, une
inspection régulière et un entretien sont
recommandés toutes les 1 000 heures
d'utilisation
www.insignia-products.com
39
Page 40

Ensemble Lecteur de DVD/TV ACL de 15 pouces Insignia NS-CL15C
Pour plus de détails, contacter le centre de
réparation agréé le plus proche.
Soins et manipulation des disques
Manipulation des disques
Ne pas toucher le côté lecture du disque. Saisir
le disque par les bords afin de ne pas maculer la
surface du disque d'empreintes digitales. Ne
jamais coller du papier ou du ruban sur le
disque.
Rangement des disques
Après lecture, ranger le disque dans son boîtier.
Ne pas exposer le disque à la lumière directe du
soleil ou d’autres sources de chaleur et ne
jamais le laisser dans une voiture garée en plein
soleil.
Nettoyage des disques
Des empreintes digitales et de la poussière sur
un disque sont sources d’image médiocre et de
son déformé. Nettoyer le disque avec un chiffon
propre avant de l’utiliser. Essuyer le disque en
partant du centre vers l’extérieur.
Consommation
électrique
Température
Accessoires
60 W
Fonctionnement : 41 à 95 °F (+ 5 à + 35 °C)
Entreposage : 5 à 113 °F (- 15 à + 45 °C)
Télécommande
Piles (deux - AA)
Guide de l'utilisateur
Disques compatibl es
Seuls les disques indiqués ci-après peuvent être
lus par le lecteur de DVD.
Disques Logo
DVD Audio + Vidéo
CD Audio 12 cm
HDCD (CD
audio haute
définition)
MPEG-4 Audio + Vidéo
JPEG Vidéo (image) 12 cm
CD Kodak Vidéo (Image) 12 cm
Table des
matières
(film)
Audio 12 cm
(film)
Dimensions
12 cm
12 cm
Ne pas utiliser des solvants puissants comme
l’alcool, le benzène, les diluants, les nettoyants
disponibles dans le commerce ou les
vaporis ateurs antis tatiques des tinés aux an ciens
disques en vinyle.
Remarque
Ne jamais utiliser cet appareil immédiatement
après l’avoir transféré d’un lieu froid à un lieu
tiède. Ne pas le faire fonctionner pendant deux ou
trois heures. L’utilisation immédiate de l’appareil
risque d’endommager les cassettes, les disques
ou les composants internes.
Spécifications
Modèle
Standard d'images
et système sonore
Sortie audio
Entrée externe
Alimentation
requise
NS-CL15C
NTSC
1,5 W + 1,5 W
AV, PC, S-Vidéo, PC audio, YPbPr, Antenne
~ 120 V 60 Hz
CD-R Audio ou vidéo
(film)
CD-RW Audio ou vidéo
(film)
CD+G Audio (image) 12 cm
12 cm
12 cm
Avis légaux
Déclaration de Macrovision
Ce produit incorpore une technologie de protection de
droits d’auteurs protégée par des revendications de
procédé de certains brevets américains et d’autres
droits de propriété intellectuelle de Macrovision
Corporation et d’autres propriétaires de droits.
L’utilisation de cette technologie de protection des
droits d’auteur doit être autorisée par la société
Macrovision et doit se limiter à des fins de
divertissement privé à moins d’une autorisation
préalable et explicite de Macrovision Corporation. La
rétro-ingénierie ou le démontage sont interdits.
Droits d'auteurs
© 2007 Insignia. Insignia et le logo Insignia sont des
marques de commerce de Best Buy Enterprise
Services, Inc. Les autres noms de marques et de
produits mentionnés sont des marques de commerce
ou des marques déposées de leurs propriétaires
respectifs. Les spécifications et caractéristiques sont
susceptibles d'être modifiées sans préavis.
Pour l’assistance technique, appeler le (877) 467-4289.
40
www.insignia-products.com
Page 41

Ensemble Lecteur de DVD/TV ACL de 15 pouces Insignia NS-CL15C
Garantie limitée d’un an
Insignia Products (“Insignia”) garantit au premier
acheteur de ce NS-CL15C neuf (“Produit”), qu’il est
exempt de vices de fabrication et de main-d’œuvre à
l’origine, pour une période d’un (1) an à partir de la date
d’achat du Produit (“Période de garantie”). Ce produit
doit avoir été acheté chez un revendeur agréé des
produits de la marque Insignia et emballé avec cette
déclaration de garantie. Cette garantie ne couvre pas les
Produits remis à neuf. Les conditions de la présente
garantie s’appliquent à tout Produit pour lequel Insignia
est notifié, pendant la Période de garantie, d’un vice
couvert par cette garantie qui nécessite une réparation.
QUELLE EST LA DURÉE DE LA COUVERTURE ?
La Période de garantie dure 1 an (365 jours) à compter
de la date d’achat de ce Produit. La date d’achat est
imprimée sur le reçu fourni avec le Produit.
QUE COUVRE CETTE GARANTIE ?
Pendant la Période de garantie, si un vice de matériau
ou de main-d’œuvre d'origine est détecté sur le Produit
par un service de réparation agréé par Insignia ou le
personnel du magasin, Insignia (à sa seule discrétion) :
(1) réparera le Produit en utilisant des pièces détachées
neuves ou remises à neuf ; ou (2) remplacera le Produit
par un produit ou des pièces neuves ou remises à neuf
de qualité comparable. Les produits et pièces remplacés
au titre de cette garantie deviennent la propriété
d’Insignia et ne sont pas retournés à l’acheteur. Si les
Produits ou pièces nécessitent une réparation après
l’expiration de la Période de garantie, l’acheteur devra
payer tous les frais de main d’œuvre et les pièces. Cette
garantie reste en vigueur tant que l’acheteur reste
propriétaire du Produit Insignia pendant la Période de
garantie. La garantie prend fin si le Produit est revendu
ou transféré d’une quelconque façon que ce soit à tout
autre propriétaire.
COMMENT OBTENIR UNE RÉPARATION SOUS GARANTIE ?
Si le Produit a été acheté chez un détaillant, le rapporter
accompagné du reçu original chez ce détaillant.
S’assurer de remettre le Produit dans son emballage
d’origine ou dans un emballage qui procure la même
qualité de protection que celui d’origine. Si le Produit a
été acheté en ligne, l’expédier accompagné du reçu
original à l’adresse indiquée sur le site Web. S’assurer
de remettre le Produit dans son emballage d’origine ou
dans un emballage qui procure la même qualité de
protection que celui d’origine.
Pour obtenir le service de la garantie à domicile pour un
téléviseur avec écran de 25 po ou plus, appeler le
1-888-BESTBUY. L’assistance technique établira un
diagnostic et corrigera le problème au téléphone ou
enverra un technicien agréé par Insignia pour la
réparation à domicile.
OÙ CETTE GARANTIE S’APPLIQUE-T-ELLE ?
Cette garantie ne s’applique qu’à l’acheteur original du
Produit aux États-Unis et au Canada.
CE QUI N’EST PAS COUVERT PAR CETTE GARANTIE LIMITÉE
La présente garantie ne couvre pas :
• la formation du client ;
• l'installation ;
• les réglages de configuration ;
• les dommages esthétiques ;
• les dommages résultants de catastrophes
naturelles telles que la foudre ;
• les accidents ;
• une utilisation inadaptée ;
• une manipulation abusive ;
• la négligence ;
• une utilisation commerciale ;
• la modification de tout ou partie du Produit, y
compris l’antenne ;
• Un écran plasma endommagé par les images fixes
(sans mouvement) qui restent affichées pendant de
longues périodes (rémanentes).
La présente garantie ne couvre pas non plus :
• les dommages ayant pour origine une utilisation ou
une maintenance défectueuse ;
• la connexion à une source électrique dont la
tension est inadéquate ;
• Toute réparation effectuée par quiconque autre
qu’un service de réparation agréé par Insignia pour
la réparation du Produit
• les Produits vendus en l’état ou hors service ;
• les consommables tels que les fusibles ou les piles
;
• les produits dont le numéro de série usine a été
altéré ou enlevé du Produit.
LA RÉPARATION OU LE REMPLACEMENT , TELS
QU’OFFERTS PAR LA PRÉSENTE GARANTIE,
CONSTITUENT LE SEUL RECOURS DE L ’A CHETEUR.
INSIGNIA NE SAURAIT ÊTRE TENU POUR
RESPONSABLE DE DOMMAGES ACCESSOIRES OU
CONSÉCUTIFS, RÉSULTANT DE L’INEXÉCUTION
D'UNE GARANTIE EXPRESSE OU IMPLICITE SUR CE
PRODUIT, Y COMPRIS, SANS S’Y LIMITER, LA
PERTE DE DONNÉES, L’IMPOSSIBILITÉ D’UTILISER
LE PRODUIT, L ’ INTERRUPTION D’ACTIVITÉ OU LA
PERTE DE PROFITS. INSIGNIA PRODUCTS
N’OCTROIE AUCUNE AUTRE GARANTIE EXPRESSE
RELA TIVE À CE PRODUIT ; T OUTES LES GA RANTIES
EXPRESSES OU IMPL IC ITES POUR CE PRODUIT, Y
COMPRIS MAIS SANS LIMITATION, TOUTE
GARANTIE DE QUALITÉ MARCHANDE,
D'ADÉQUATION À UN BUT PA RTICULIER, SONT
LIMITÉES À LA PÉRIOD E D E GARANTIE
APPLICABLE TELLE QUE DÉC R I TE CI-D ESSUS ET
AUCUNE GARANTIE EXPRESSE OU IMPLICITE, NE
S’APPLIQUERONT APRÈS LA PÉRIODE DE
GARANTIE. CERTAINS ÉTATS ET PROVINCES NE
RECONNAISSENT PAS LES LIMITATIONS DE LA
DURÉE DE VALIDITÉ DES GARANTIES IMPLICITES.
PAR CONSÉQUENT, LES LIMITATIONS
SUSMENTIONNÉE S PEUVENT N E PAS S'APPLIQUER
À L’ACHETEUR ORIGINAL. LA PRÉSENTE GARANTIE
DONNE À L'ACHETEUR DES GARANTIES
JURIDIQUES SPÉCIFIQUES ; IL PEUT AUSSI
BÉNÉFICIER D'AUTRES GARANTIES Q U I VARIENT
D'UN ÉTAT OU D'UNE PROVINCE À L'AUTRE.
Pour contacter Insignia :
Pour le service à la clientèle, appeler le 1-877-467-4289
www.insignia-products.com
INSIGNIAMC est une marque commerciale de Best Buy
Enterprise Services, Inc.
Distribué par Best Buy Purchasing, LLC
Insignia, 7601 Penn A ven ue South, Richfield, Minnesota,
U.S.A.
www.insignia-products.com
41
Page 42

Ensemble Lecteur de DVD/TV ACL de 15 pouces Insignia NS-CL15C
42
www.insignia-products.com
Page 43

Ensemble Lecteur de DVD/TV ACL de 15 pouces Insignia NS-CL15C
www.insignia-products.com
43
Page 44

2007
2007
 Loading...