

Wi-Fi Camera
NS-CH1IPC8
USER GUIDE
Before using your new product, please read these instructions to prevent any damage.

Contents
Introduction . . . . . . . . . . . . . . . . . . . . . . . . . . . . . . . . . . . . . . . . . . . . . . . . . . . . . . . . . . . . . . . . . . . . . . . . . . . . . . . . . . . . . . . . . 3
IMPORTANT SAFETY INSTRUCTIONS . . . . . . . . . . . . . . . . . . . . . . . . . . . . . . . . . . . . . . . . . . . . . . . . . . . . . . . . . . . . . . . . . . 3
Features . . . . . . . . . . . . . . . . . . . . . . . . . . . . . . . . . . . . . . . . . . . . . . . . . . . . . . . . . . . . . . . . . . . . . . . . . . . . . . . . . . . . . . . . . . . . . 4
Package contents . . . . . . . . . . . . . . . . . . . . . . . . . . . . . . . . . . . . . . . . . . . . . . . . . . . . . . . . . . . . . . . . . . . . . . . . . . . . . . . . . . . . . . . . . . . . . . . . 4
Front and back . . . . . . . . . . . . . . . . . . . . . . . . . . . . . . . . . . . . . . . . . . . . . . . . . . . . . . . . . . . . . . . . . . . . . . . . . . . . . . . . . . . . . . . . . . . . . . . . . . . 4
Understanding the LED indicator . . . . . . . . . . . . . . . . . . . . . . . . . . . . . . . . . . . . . . . . . . . . . . . . . . . . . . . . . . . . . . . . . . . . . . . . . . . . . . . . . 4
System requirements . . . . . . . . . . . . . . . . . . . . . . . . . . . . . . . . . . . . . . . . . . . . . . . . . . . . . . . . . . . . . . . . . . . . . . . . . . . . . . . . . . . . . . . . . . . . . 5
Electrical requirements . . . . . . . . . . . . . . . . . . . . . . . . . . . . . . . . . . . . . . . . . . . . . . . . . . . . . . . . . . . . . . . . . . . . . . . . . . . . . . . . . . . . . . . . . . . 5
Mounting tools . . . . . . . . . . . . . . . . . . . . . . . . . . . . . . . . . . . . . . . . . . . . . . . . . . . . . . . . . . . . . . . . . . . . . . . . . . . . . . . . . . . . . . . . . . . . . . . . . . . 5
Mounting your Wi-Fi camera . . . . . . . . . . . . . . . . . . . . . . . . . . . . . . . . . . . . . . . . . . . . . . . . . . . . . . . . . . . . . . . . . . . . . . . . . . 6
Mounting to a flat surface . . . . . . . . . . . . . . . . . . . . . . . . . . . . . . . . . . . . . . . . . . . . . . . . . . . . . . . . . . . . . . . . . . . . . . . . . . . . . . . . . . . . . . . . 6
Mounting to the ceiling . . . . . . . . . . . . . . . . . . . . . . . . . . . . . . . . . . . . . . . . . . . . . . . . . . . . . . . . . . . . . . . . . . . . . . . . . . . . . . . . . . . . . . . . . . 6
Mounting to a wall . . . . . . . . . . . . . . . . . . . . . . . . . . . . . . . . . . . . . . . . . . . . . . . . . . . . . . . . . . . . . . . . . . . . . . . . . . . . . . . . . . . . . . . . . . . . . . . 8
Inserting a micro SD card . . . . . . . . . . . . . . . . . . . . . . . . . . . . . . . . . . . . . . . . . . . . . . . . . . . . . . . . . . . . . . . . . . . . . . . . . . . . . 9
Resetting to factory defaults . . . . . . . . . . . . . . . . . . . . . . . . . . . . . . . . . . . . . . . . . . . . . . . . . . . . . . . . . . . . . . . . . . . . . . . . .10
Specifications . . . . . . . . . . . . . . . . . . . . . . . . . . . . . . . . . . . . . . . . . . . . . . . . . . . . . . . . . . . . . . . . . . . . . . . . . . . . . . . . . . . . . . . 10
Frequently Asked Questions . . . . . . . . . . . . . . . . . . . . . . . . . . . . . . . . . . . . . . . . . . . . . . . . . . . . . . . . . . . . . . . . . . . . . . . . .10
Legal notices . . . . . . . . . . . . . . . . . . . . . . . . . . . . . . . . . . . . . . . . . . . . . . . . . . . . . . . . . . . . . . . . . . . . . . . . . . . . . . . . . . . . . . . . 12
ONE-YEAR LIMITED WARRANTY . . . . . . . . . . . . . . . . . . . . . . . . . . . . . . . . . . . . . . . . . . . . . . . . . . . . . . . . . . . . . . . . . . . . . . 13
2
www.insigniaproducts.com

NS-CH1IPC8
Wi-Fi Camera
Introduction
Congratulations on your purchase of a high-quality Insignia product. Your NS-CH1IPC8 represents the state of the art in
Wi-Fi camera design and is designed for reliable and trouble-free performance.
IMPORTANT SAFETY INSTRUCTIONS
1 Read these instructions.
2 Keep these instructions.
3 Heed all warnings.
4 Follow all instructions.
5 Do not use your Wi-Fi camera near water.
6 Clean only with a soft, dry cloth.
7 Do not install near any heat sources, such as radiators, heat registers, stoves, or other apparatus (including amplifiers)
that produce heat.
8 Do not defeat the safety purpose of the polarized or grounding-type plug. A polarized plug has two blades with one
wider than the other. A grounding type plug has two blades and a third grounding prong. The wide blade or the third
prong are provided for your safety. If the provided plug does not fit into your outlet, consult an electrician for
replacement of the obsolete outlet.
9 Protect the power cord from being walked on or pinched, particularly at plugs, convenience receptacles, and the point
where it exits from your Wi-Fi camera.
10 Do not attempt to modify or extend the power cord of your Wi-Fi camera.
11 Unplug your Wi-Fi camera during lightning storms or when it will not be used for long periods of time.
12 Make sure that the available AC power matches the voltage requirements of your Wi-Fi camera.
13 Do not handle the plug with wet hands. This could result in an electric shock.
14 Unplug the power cord by holding the plug, never by pulling the cord.
15 Refer all servicing to qualified service personnel. Servicing is required when your Wi-Fi camera has been damaged in
any way, such as the power-supply cord or plug is damaged, liquid has been spilled or objects have fallen into your
Wi-Fi camera, your Wi-Fi camera has been exposed to rain or moisture, does not operate normally, or has been
dropped.
16 To reduce the risk of fire or electric shock, do not expose your Wi-Fi camera to rain, moisture, dripping, or splashing, and
no objects filled with liquids should be placed on top of it.
17 Do not install your Wi-Fi camera outdoors. Your Wi-Fi camera is intended for indoor use only.
18 Do not use extension cords or ungrounded (two prong) adapters. If the power cord is too short, have a qualified
electrician install an outlet near your Wi-Fi camera. Use of an extension cord can negatively affect your Wi-Fi camera’s
performance.
19 Your Wi-Fi camera is not intended for use by persons (including children) with reduced physical, sensory, or mental
capabilities, or lack of experience and knowledge, unless they have been given supervision or instruction concerning
use of your Wi-Fi camera by a person responsible for their safety.
20 Children should be supervised to ensure that they do not play with your Wi-Fi camera.
21 Do not leave packaging material unattended, as it may become dangerous playing material for children.
22 If the power cord is damaged, it must be replaced by the manufacturer, its service agent, or similarly qualified person, in
order to avoid a hazard.
www.insigniaproducts.com
3
Features
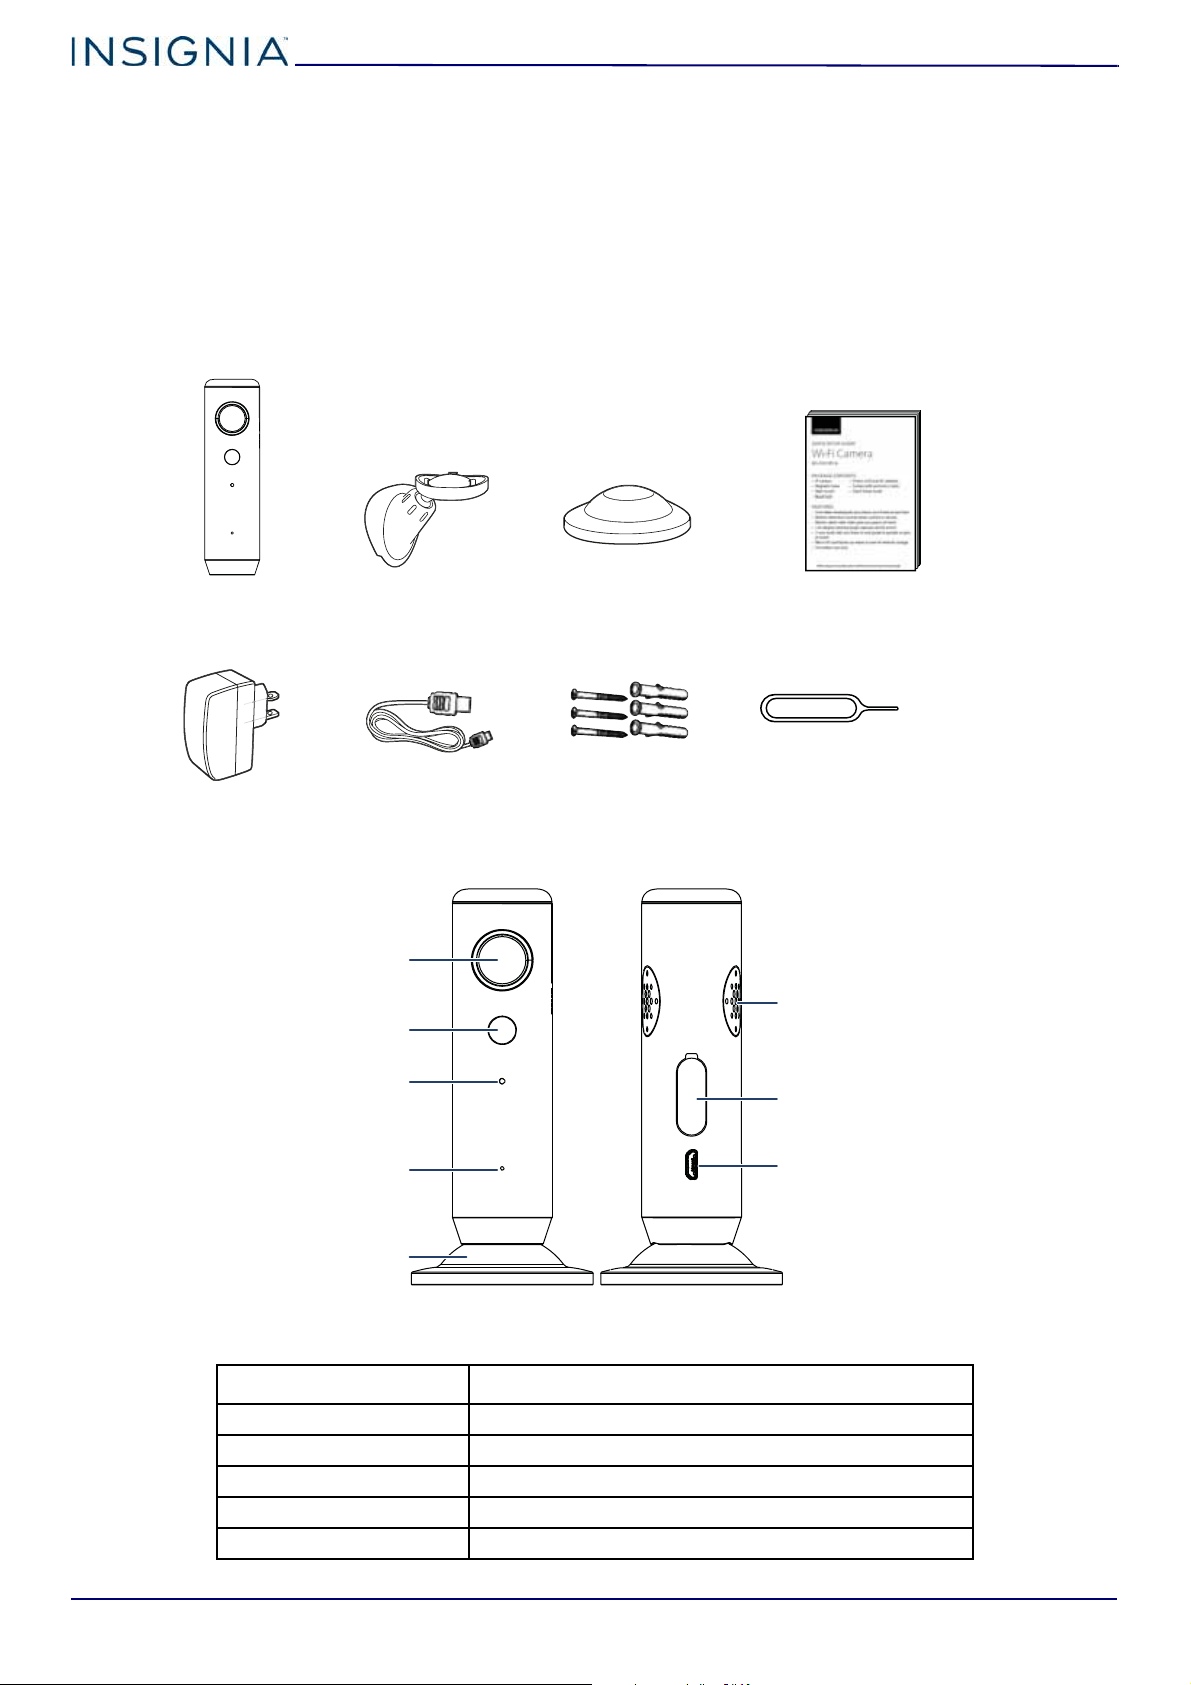
Wi-Fi camera Wall mount Magnetic base Quick Setup Guide
AC adapter Power cord
Screws with
anchors (3 sets)
Reset tool
Camera
IR LED for night vision
LED indicator
Microphone
Magnetic base
Speaker
Micro SD slot / Reset hole
Micro USB power port
• Live video viewing lets you check your home at any time
• Records when activity is sensed
• Motion alerts with video give you peace of mind
• 120-degree viewing angle captures all the action
• 2-way audio lets you listen in and speak to people or pets at home
• Micro SD card backs up video in case of network outage
• For indoor use only
Package contents
Wi-Fi Camera
Front and back
Understanding the LED indicator
LED INDICATOR STATUS
Blinks blue slowly Searching for a Wi-Fi connection
Blinks blue quickly Connecting to Wi-Fi
Solid blue Connected to a Wi-Fi network
Solid red Camera powering up (may last up to 20 seconds)
Blinks red quickly Upgrading firmware
4
www.insigniaproducts.com
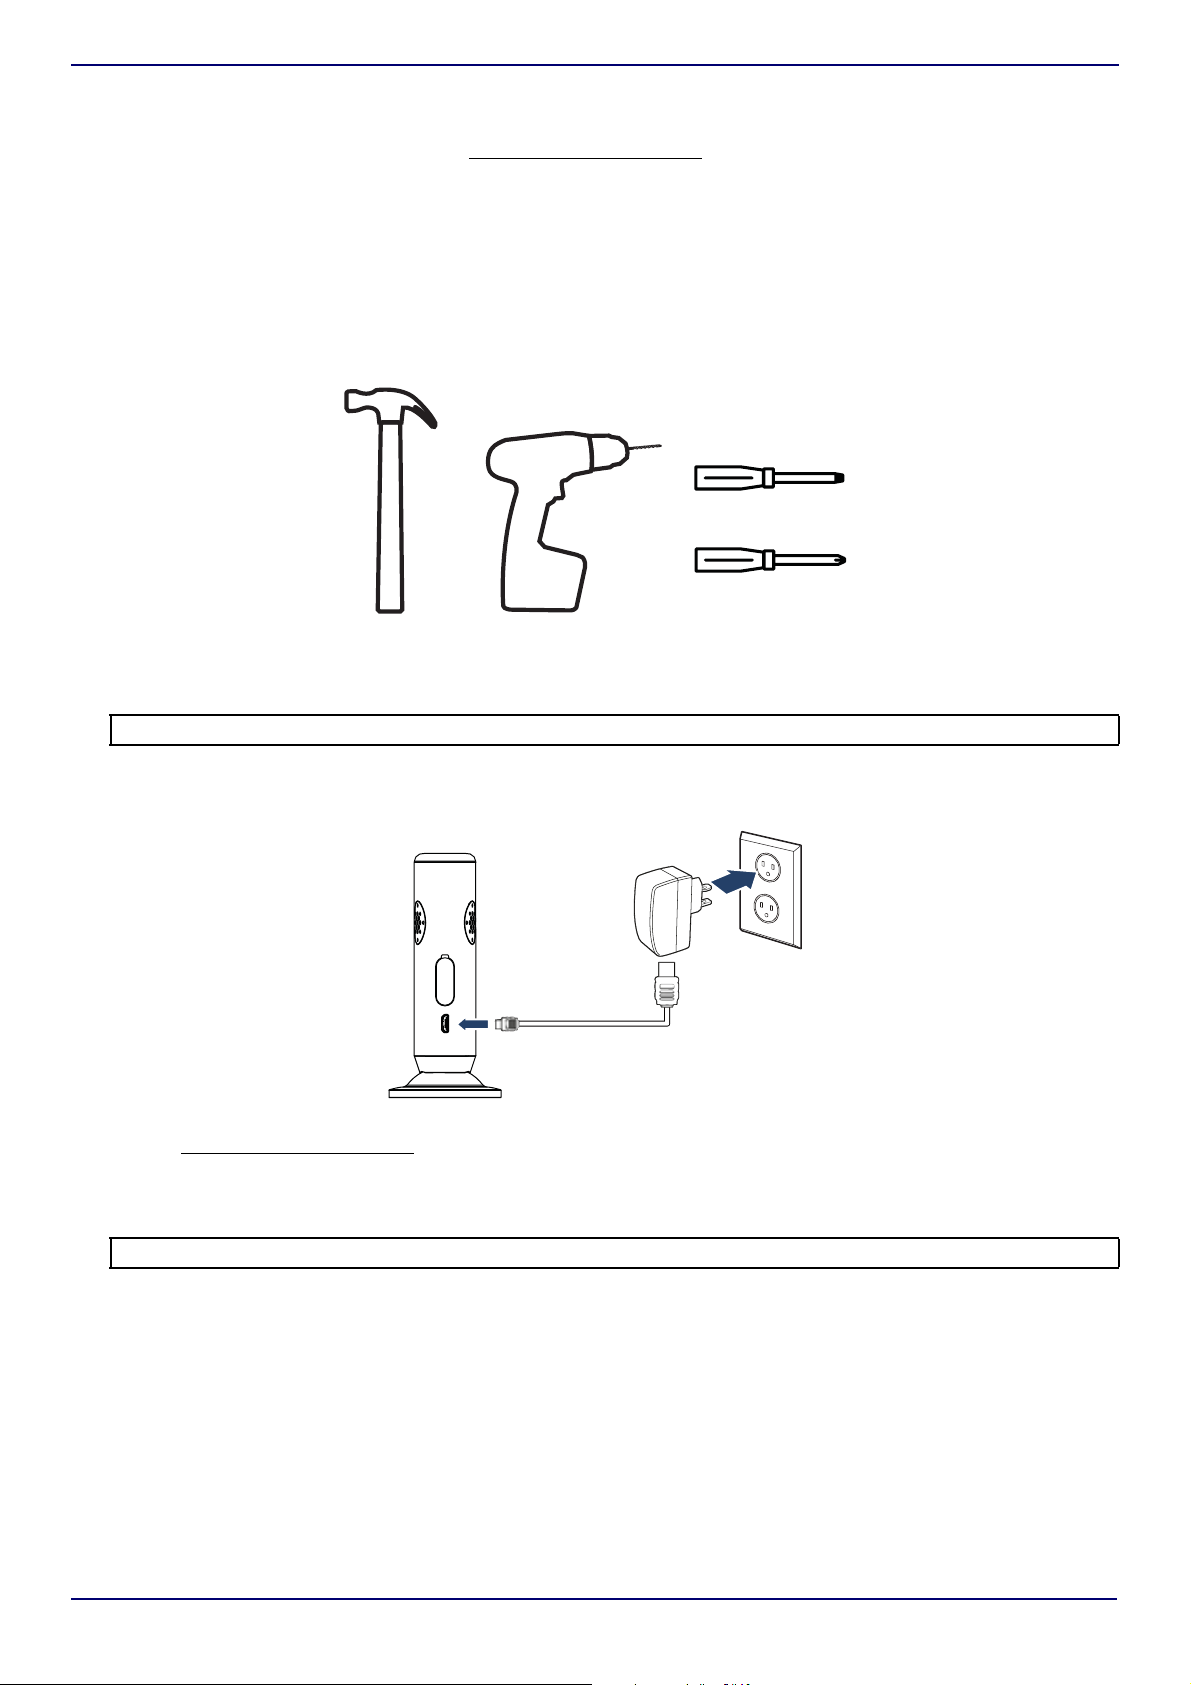
System requirements
Hammer (for
anchors)
Drill with 4.2 mm
drill bit
Phillips screwdriver
Flathead screwdriver
• Home Wi-Fi network (2.4GHz)
• Insignia Connect app (free download at connect.bestbuy.com/setup
The Insignia connect app tracks status information for all of your Insignia smart home devices in one place. Signing into
a Best Buy account is required for remote access and to keep your data secure.
• iOS 10.0 or later
OR
Android 6.0.1 (Marshmallow) or later
)
Electrical requirements
Make sure that the power cord will be able to reach a power outlet from your mounting location.
Mounting tools
NS-CH1IPC8
Note: You don’t need any tools to mount to a flat surface.
Setting up your Wi-Fi camera
1 Plug your Wi-Fi camera into a wall outlet using the included power cord and adapter.
2 Connect your mobile device to a Wi-Fi network.
3 Type connect.bestbuy.com/setup
download the Insignia Connect app.
4 Open the app and register or sign in with your existing Best Buy account info. Follow the on-screen instructions to
complete setup.
Note: If you plan to access your camera on multiple devices, you must sign into the same Best Buy account.
in the search bar of your device’s browser and follow the on-screen instructions to
www.insigniaproducts.com
5

Wi-Fi Camera
Tab
Cover
Mounting your Wi-Fi camera
Using the magnetic base, you can place your indoor camera on a flat surface or mount it to the wall or ceiling. Before you
mount your camera, make sure the power cord will be able to reach a power outlet.
Note: Only install your Wi-Fi camera in a dry, indoor area. Your Wi-Fi camera must not get damp or wet.
Mounting to a flat surface
1 Place the magnetic base on a flat surface.
2 Attach the camera to the magnetic base.
Mounting to the ceiling
1 Insert a screwdriver into the tab on the magnetic base, then pry the cover from the magnetic base.
2 Drill a hole in the ceiling with a 4.2 mm drill bit where you want to mount your camera.
6
www.insigniaproducts.com

3 Insert an anchor into the hole, then secure the magnetic base to the ceiling with a screw (included).
Cover
4 Push the cover back onto the magnetic base.
NS-CH1IPC8
5 Attach the camera to the magnetic base.
www.insigniaproducts.com
7

Mounting to a wall
Wall mount
Wall plate
1 Remove the wall plate from the back of the wall mount.
Wi-Fi Camera
2 Using the wall plate as a guide, mark and then drill two holes with a 4.2 mm drill bit where you want to mount your
camera.
3 Insert the two anchors into the holes, then secure the wall plate to the wall with the two screws.
8
www.insigniaproducts.com

4 Align the bottom of the camera with the tabs on the magnetic base, then twist the camera to secure.
NS-CH1IPC8
5 Slide the wall mount onto the wall plate.
Inserting a micro SD card
1 Pull open the cover to the micro SD slot on the back of your Wi-Fi camera.
2 Insert a micro SD card (up to 32 GB) into the slot until it clicks into place.
Note: The micro SD card is only used if your network or Wi-Fi stops working. Anything saved to the micro SD card is only accessible via
the Connect app and cloud services. In most cases, a small-capacity micro SD card (1–4 GB) would be sufficient.
www.insigniaproducts.com
9

Resetting to factory defaults
Resetting to factory defaults disconnects your camera from your Insignia Connect app and resets Wi-Fi and system
settings. Video stored on the cloud is not affected.
1 Pull open the cover to the reset hole on the back of your Wi-Fi camera.
2 Push the reset tool or a paper clip into the reset hold and hold for five seconds.
Note: You should reset your camera to factory defaults if the initial setup failed or did not complete, if the Connect app no longer has
access to the camera, if your Wi-Fi network or password changed, or if you want to setup a new user account.
Specifications
CPU ARM processor
Image sensor 1/4” color CMOS sensor
Image resolution HD 720P (1280 × 720), WVGA (854 × 480)
Camera lens F2.8 aperture
Video compression format H.264
Audio format G.711
Network interface 2.4GHz Wi-Fi (IEEE 802.11b/g/n)
Focus mode Fixed
Focus range .4 m to infinity
Memory Micro SD card (32GB max)
Working status indicator Bi-color LED indicator light
Mobile terminal Supports iOS and Android
Operating temperature 14–122º F (-10–50º C)
Operating humidity <95%
Power consumption <5W
Power input 5V/1A, USB interface
Dimensions without base (W × D × H) 1.4 × 1.6 × 3.5 in. (36 × 40 × 89 mm)
Dimensions with base (W × D × H) 2.0 × 2.0 × 3.9 in. (50 × 50 × 98 mm)
Power cord length 12 ft. (3.7 m)
Wi-Fi Camera
Frequently Asked Questions
QUESTION ANSWER
Why can’t the app find
my Wi-Fi Camera?
How do I enable night
vision mode?
How is the micro SD card
used for recording
videos?
• Make sure that your camera is connected to the wall adapter with the
supplied USB cord and that the outlet has power. Do not use other USB
cables.
• Make sure that your mobile device and the camera are connected to
the same Wi-Fi network.
• Repeat the Wi-Fi setup procedure.
• Make sure your home Wi-Fi router’s 2.4GHz band is active and visible.
Your camera will not function with the 5GHz band.
• Make sure that your network is working properly.
Your camera activates night vision automatically as the environment become
dark. It may take up to 10 minutes for the camera to activate or deactivate
night vision.
The micro SD card is used as a backup in case the Wi-Fi network or internet
goes offline. Once Wi-Fi connectivity is resumed, the captured motion events
are uploaded to the cloud and will be accessible in your app. All files on the
card are encrypted for security and you cannot view captured files directly
from the SD card.
10
www.insigniaproducts.com

QUESTION ANSWER
NS-CH1IPC8
What does the LED
indicator mean?
How do I reset my
camera?
How do I factory reset on
my camera?
How can I check the
Wi-Fi signal strength
where my camera is
located?
How many Wi-Fi cameras
can I connect?
Why is the live video not
playing back smoothly?
Why is the app not
showing the live video or
showing a blank screen?
How do I listen to live
camera audio?
How do I send audio to
the camera to speak with
someone remotely?
• Solid red: The camera is starting up. This shows for up to 20 seconds
after power-up.
• Flashing red: The camera software is updating. This normally lasts less
than a minute.
• Solid Blue: The camera is powered up and operating normally.
• Slowly flashing blue: The camera is searching for a Wi-Fi network.
• Quickly flashing blue: The camera has found a Wi-Fi network and is
connecting to it.
• Off: The Camera is not connected to power or the outlet is off. Try
disconnecting the power and reconnecting again.
• Remove the cover on the back of your camera.
• Using the included reset tool (or a metal paper clip), press and hold the
reset button for five seconds. The camera announces that it has been
reset.
• Follow the Wi-Fi pairing instructions in your Setup Guide.
Resetting to factory defaults disconnects your camera from your Insignia
Connect app and resets Wi-Fi and system settings. Video stored on the cloud
is not affected.
• Remove the cover on the back of your camera.
• Using the included reset tool (or a metal paper clip), press and hold the
reset button for five seconds. The camera announces that it has been
reset.
• Follow the Wi-Fi pairing instructions in your Setup Guide.
• Before setup, you can connect a mobile device to your Wi-Fi network,
then hold it next where you plan to set up your camera. Use your
device's Wi-Fi indicator to determine signal strength at that location.
• After the Wi-Fi Camera is set up, you can check signal strength in the
CONNECT app. Tap the info "i" button in the upper, right corner of your
screen:
• Strong Wi-Fi signal: Displays 3 green bars
• Weak Wi-Fi signal: Displays 1 green bar or red
If you have a weak signal, the camera may work intermittently. You
can move the camera and Wi-Fi router closer to each other or install
a Wi-Fi range extender (booster) halfway between your router and
the camera to increase the signal in that part of your home.
You can connect as many cameras as you want, as long as your Wi-Fi network
can support it.
• Make sure that the camera has a strong Wi-Fi signal.
• Your internet service must support sustained upload speed of at least
1Mbps per camera.
• Another Wi-Fi device in the home may be using most of the available
network bandwidth. Wait a few minutes and try again.
• If you are viewing remotely using a cell connection, the video may
appear choppy due to slow connection speed.
• The camera may be offline or turned off.
• Wi-Fi signal may be weak where the camera is located or there may be
interference.
• The cloud service may be temporarily unavailable.
• Try restarting the app and checking the live view again.
• Try disconnecting the camera from power and reconnecting after 10
seconds.
Audio capture is turned off by default. You can an enable it from the settings
screen. Once enabled, you can monitor and record audio along with video.
In the live view screen, press and hold the Microphone button and speak.
Release the button to send the audio to the camera.
www.insigniaproducts.com
11

Wi-Fi Camera
Legal notices
FCC Statement
Warnin g: Changes or modifications to this unit not expressly approved by the party responsible for compliance could void
the user’s authority to operate this equipment.
Note: This equipment has been tested and found to comply with the limits for a Class B digital device, pursuant to Part 15
of the FCC Rules. These limits are designed to provide reasonable protection against harmful interference in a residential
installation. This equipment generates, uses, and can radiate radio frequency energy and, if not installed and used in
accordance with the instructions, maybe cause harmful interference to radio communications.
However, there is no guarantee that interference will not occur in a particular installation. If this equipment does cause
harmful interference to radio or television reception, which can be determined by turning the equipment off and on, the
user is encouraged to try to correct the interference by one or more of the following measures:
• Reorient or relocate the receiving antenna.
• Increase the separation between the equipment and receiver.
• Connect the equipment into an outlet on a circuit different from that to which the receiver is connected.
• Consult the dealer or an experienced radio/TV technician for help.
This device complies with Part 15 of the FCC Rules. Operation is subject to the following conditions:
(1) this device may not cause harmful interference, and
(2) this device must accept any interference received, including interference that may cause undesired operation.
The device has been evaluated to meet general RF exposure requirements. The device can be used in portable exposure
condition without restriction.
12
www.insigniaproducts.com

ONE-YEAR LIMITED WARRANTY
Definitions:
The Distributor* of Insignia branded products warrants to you, the original purchaser of this new Insignia-branded product (“Product”), that the
Product shall be free of defects in the original manufacturer of the material or workmanship for a period of one (1) year from the date of your purchase
of the Product (“Warranty Period”).
For this warranty to apply, your Product must be purchased in the United States or Canada from a Best Buy branded retail store or online at
www.bestbuy.com or www.bestbuy.ca, and is packaged with this warranty statement.
How long does the coverage last?
The Warranty Period lasts for 1 year (365 days) from the date you purchased the Product. Your purchase date is printed on the receipt you received
with the Product.
What does this warranty cover?
During the Warranty Period, if the original manufacture of the material or workmanship of the Product is determined to be defective by an authorized
Insignia repair center or store personnel, Insignia will (at its sole option): (1) repair the Product with new or rebuilt parts; or (2) replace the Product at
no charge with new or rebuilt comparable products or parts. Products and parts replaced under this warranty become the property of Insignia and are
not returned to you. If service of Products or parts are required after the Warranty Period expires, you must pay all labor and parts charges. This
warranty lasts as long as you own your Insignia Product during the Warranty Period. Warranty coverage terminates if you sell or otherwise transfer the
Product.
How to obtain warranty service?
If you purchased the Product at a Best Buy retail store location, please take your original receipt and the Product to any Best Buy store. Make sure that
you place the Product in its original packaging or packaging that provides the same amount of protection as the original packaging. If you purchased
the Product from a Best Buy online web site (www.bestbuy.com or www.bestbuy.ca), mail your original receipt and the Product to the address listed
on the web site. Make sure that you put the Product in its original packaging or packaging that provides the same amount of protection as the original
packaging.
To obtain warranty service, in the United States call 1-888-BESTBUY, Canada call 1-866-BESTBUY. Call agents may diagnose and correct the issue over
the phone.
NS-CH1IPC8
Where is the warranty valid?
This warranty is valid only in the United States and Canada at Best Buy branded retail stores or websites to the original purchaser of the product in the
county where the original purchase was made.
What does the warranty not cover?
This warranty does not cover:
• Food loss/spoilage due to failure of refrigerator or freezer
• Customer instruction/education
•Installation
•Set up adjustments
• Cosmetic damage
• Damage due to weather, lightning, and other acts of God, such as power surges
• Accidental damage
•Misuse
•Abuse
•Negligence
• Commercial purposes/use, including but not limited to use in a place of business or in communal areas of a multiple dwelling condominium or
apartment complex, or otherwise used in a place of other than a private home.
• Modification of any part of the Product, including the antenna
• Display panel damaged by static (non-moving) images applied for lengthy periods (burn-in).
• Damage due to incorrect operation or maintenance
• Connection to an incorrect voltage or power supply
• Attempted repair by any person not authorized by Insignia to service the Product
• Products sold “as is” or “with all faults”
• Consumables, including but not limited to batteries (i.e. AA, AAA, C etc.)
• Products where the factory applied serial number has been altered or removed
• Loss or Theft of this product or any part of the product
• Display panels containing up to three (3) pixel failures (dots that are dark or incorrectly illuminated) grouped in an area smaller than one tenth
(1/10) of the display size or up to five (5) pixel failures throughout the display. (Pixel based displays may contain a limited number of pixels that
may not function normally.)
• Failures or Damage caused by any contact including but not limited to liquids, gels or pastes.
REPAIR REPLACEMENT AS PROVIDED UNDER THIS WARRANTY IS YOUR EXCLUSIVE REMEDY FOR BREACH OF WARRANTY. INSIGNIA SHALL NOT BE
LIABLE FOR ANY INCIDENTAL OR CONSEQUENTIAL DAMAGES FOR THE BREACH OF ANY EXPRESS OR IMPLIED WARRANTY ON THIS PRODUCT,
INCLUDING, BUT NOT LIMITED TO, LOST DATA, LOSS OF USE OF YOUR PRODUCT, LOST BUSINESS OR LOST PROFITS. INSIGNIA PRODUCTS MAKES NO
OTHER EXPRESS WARRANTIES WITH RESPECT TO THE PRODUCT, ALL EXPRESS AND IMPLIED WARRANTIES FOR THE PRODUCT, INCLUDING, BUT NOT
LIMITED TO, ANY IMPLIED WARRANTIES OF AND CONDITIONS OF MERCHANTABILITY AND FITNESS FOR A PARTICULAR PURPOSE, ARE LIMITED IN
DURATION TO THE WARRANTY PERIOD SET FORTH ABOVE AND NO WARRANTIES, WHETHER EXPRESS OR IMPLIED, WILL APPLY AFTER THE WARRANTY
PERIOD. SOME STATES, PROVINCES AND JURISDICTIONS DO NOT ALLOW LIMITATIONS ON HOW LONG AN IMPLIED WARRANTY LASTS, SO THE ABOVE
LIMITATION MAY NOT APPLY TO YOU. THIS WARRANTY GIVES YOU SPECIFIC LEGAL RIGHTS, AND YOU MAY ALSO HAVE OTHER RIGHTS, WHICH VARY
FROM STATE TO STATE OR PROVINCE TO PROVINCE.
Contact Insignia:
For customer service please call 1-877-467-4289
www.insigniaproducts.com
INSIGNIA is a trademark of Best Buy and its affiliated companies.
Distributed by Best Buy Purchasing, LLC
7601 Penn Ave South, Richfield, MN 55423 U.S.A.
©2017 Best Buy. All rights reserved.
Made in China
www.insigniaproducts.com
13

For product inquiries, please contact us with the information below:
1-877-467-4289
www.insigniaproducts.com
INSIGNIA is a trademark of Best Buy and its affiliated companies.
Distributed by Best Buy Purchasing, LLC
7601 Penn Ave South, Richfield, MN 55423 U.S.A.
©2017 Best Buy. All rights reserved.
Made in China
V1 ENGLISH
17-0864
 Loading...