

Page 1

User Guide | Guide de l’utilisateur | Guía del Usuario
CD Car Deck with HD Radio Receiver
Système audio pour l'auto avec lecteur CD et récepteur HD Radio
Unidad de CD para automóvil con receptor HD Radio
NS-C5112
Page 2

Page 3
Insignia NS-C5112
CD Car Deck with HD
• Do not use your car deck in extremely high or
low temperatures. Make sure that the
temperature inside the vehicle is between
°F and 14°F (+60°C and -10°C) before
140
turning on your car deck.
Radio Receiver
Contents
Welcome . . . . . . . . . . . . . . . . . . . . . . . . . . . . . . . .1
Safety information . . . . . . . . . . . . . . . . . . . . . . . . .1
Features. . . . . . . . . . . . . . . . . . . . . . . . . . . . . . . . .1
Installing your car deck . . . . . . . . . . . . . . . . . . . . .3
Using your car deck . . . . . . . . . . . . . . . . . . . . . . . .6
Using the radio. . . . . . . . . . . . . . . . . . . . . . . . . . . .7
Using the CD player. . . . . . . . . . . . . . . . . . . . . . . .7
Troubleshooting . . . . . . . . . . . . . . . . . . . . . . . . . . .8
Maintaining. . . . . . . . . . . . . . . . . . . . . . . . . . . . . . .8
Specifications. . . . . . . . . . . . . . . . . . . . . . . . . . . .10
Legal notices . . . . . . . . . . . . . . . . . . . . . . . . . . . .10
90-Day Limited Warranty . . . . . . . . . . . . . . . . . . .11
Français. . . . . . . . . . . . . . . . . . . . . . . . 13
Español . . . . . . . . . . . . . . . . . . . . . . . . 27
Welcome
Congratulations on your purchase of a
high-quality Insignia product. Your NS-C5112
represents the state of the art in CD player and
HD radio design and is designed for reliable and
trouble-free performance.
Safety information
• Make sure that you connect the color coded
leads according to the diagram. Incorrect
connections can cause your car deck to
malfunction or damage the vehicle’s
electrical system.
• Make sure that you connect the speaker (-)
leads to the speaker (-) terminal. Never
connect the left and right channel speaker
cables to each other or to the vehicle body.
• Make sure that all the connections are
completed correctly before turning on your
car deck.
• When replacing the fuse(s), the replacement
fuse(s) must be of the same amperage as
shown on the fuse holder.
• Do not block vents or radiator panels.
Blocking them can cause heat build-up inside
that may result in fire.
• After you complete the installation and before
you use your car deck or when you replace
the vehicle battery, remove your car deck’s
front panel, then press the RESET button (on
the base) with a pointed object (such as
ball-point pen) to return your car deck to it’s
default settings.
• Do not attempt to modify your car deck.
Modifying it could cause a fire.
• Stop the vehicle before carrying out any
operation that could interfere with your
driving.
Features
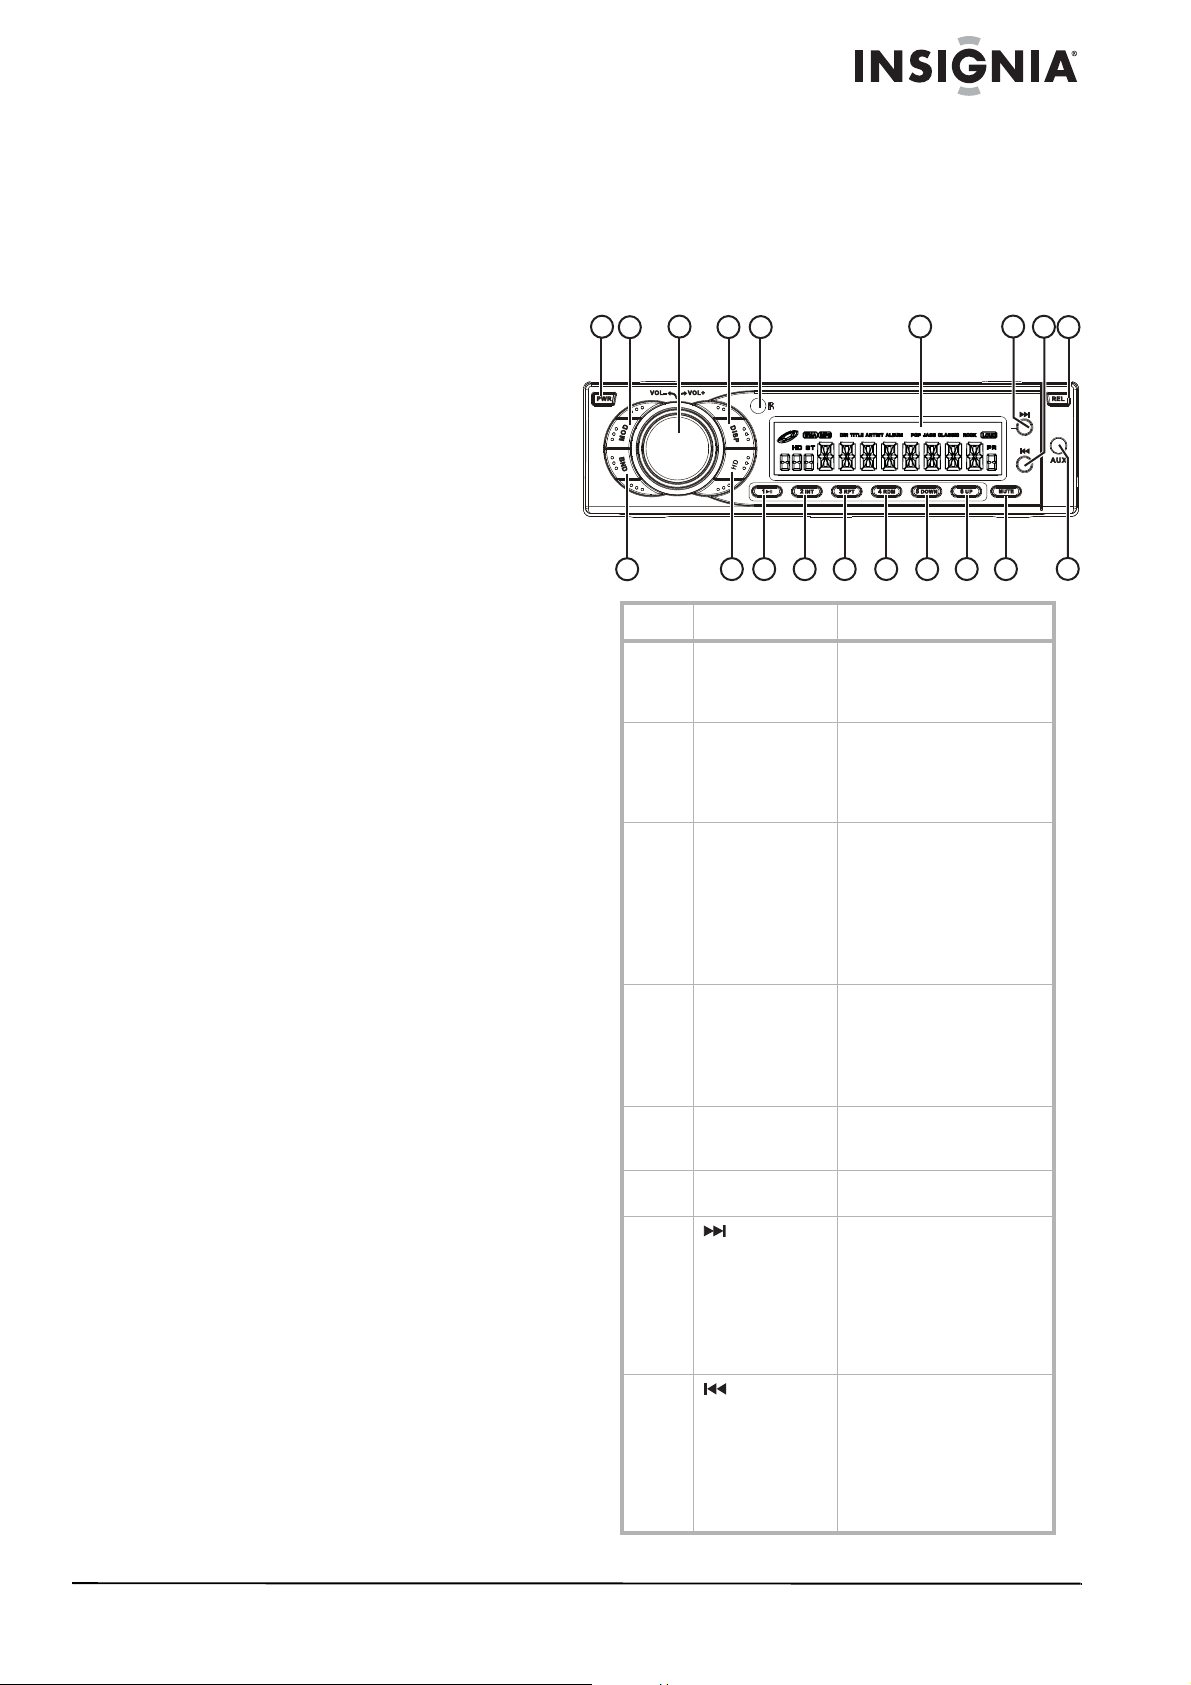
Front panel
15
6
16
1
3
4
11
sensor
5
12
14
13
on or off. Press and hold to
show the current volume
level.
mode. You can select radio
mode, CD playback mode, or
AUX (external input source)
mode.
Briefly press one or more
times to select the sound
option you want to adjust,
then turn the button to
adjust the option.
Press and hold to turn the
clock or alarm on or off.
Press and hold to adjust the
time.
When playing an MP3 file,
press to display information
about the MP3 file.
Receives signals from the
remote control. Do not
block.
information.
select the next higher
station. Press and hold to
manually select a station.
In CD playback mode, press
to select the next higher
track. Press and hold to
fast-forward on a CD.
select the next lower station.
Press and hold to manually
select a station.
In CD playback mode, press
to select the next lower
track. Press and hold to
fast-reverse on a CD.
2
10
# Component Description
1 PWR Press to turn your car deck
2 MOD Press to select the audio
3 VOL–/VOL+/SEL Turn to adjust the volume.
4 DISP Press to display the time.
5 Remote control
6 LCD Displays current status
7 In radio mode, press to
8 In radio mode, press to
17
18
7
8
9
19
www.insignia-products.com
1
Page 4
Insignia NS-C5112 CD Car Deck with HD Radio Receiver
# Component Description
9 REL Press to release the front
10 BND In radio mode, press one or
11 HD Press to turn digital stations
12
13 2 INT In radio mode, press to
14 3 RPT In radio mode, press to
15 4 RDM In radio mode, press to
16 5 DOWN Press to select options or
17 6 UP Press to select options or
18 MUTE Press to mute the sound.
19 AUX Use to connect an external
1
panel.
more times to select a radio
band.
on or off. When HD-S ON
appears on the LCD and you
search for a station, your car
deck searches through
digital stations. When HD-S
OFF appears and you search
for a station, your car deck
searches through regular
stations.
In radio mode, press to
select stored station 1.
In CD playback mode, press
to start or pause playback.
select stored station 2.
In CD playback mode, press
to play the first 10 seconds
of each track on the CD.
select stored station 3.
In CD playback mode, press
to repeat the current track.
Press and hold to repeat the
current CD or MP3 folder.
select stored station 4.
In CD playback mode, press
to start or stop random
playback.
MP3 files.
MP3 files.
Press again to restore the
sound.
input source.
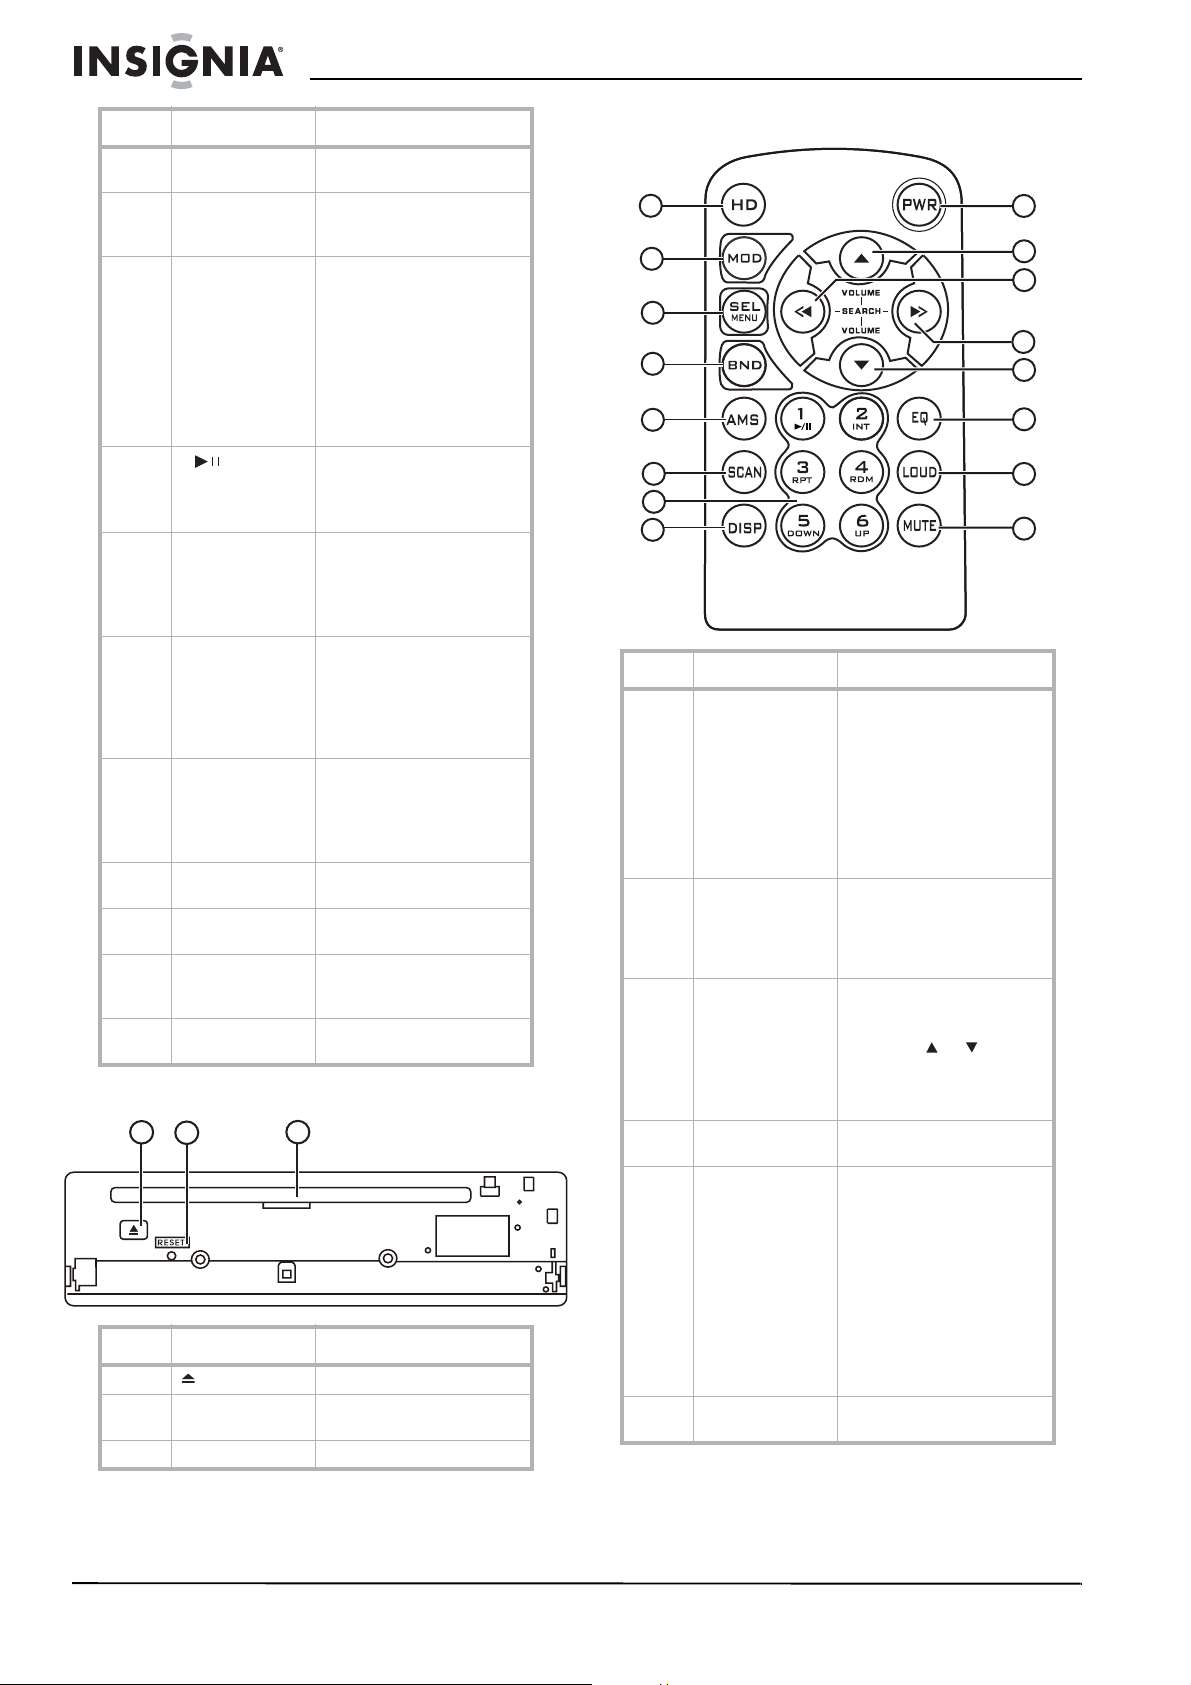
Inside (front panel open)
1
2
# Component Description
1 Press to eject a CD.
2 RESET Press to reset your car deck
3 CD slot Insert a CD into this slot.
3
to the factory defaults.
Remote control
1
2
3
4
5
6
7
8
# Button Description
1 HD Press to turn digital stations
on or off. When HD-S ON
appears on the LCD and you
search for a station, your car
deck searches through
digital stations. When HD-S
OFF appears and you search
for a station, your car deck
searches through regular
stations.
2 MOD Press to select the audio
mode. You can select radio
mode, CD playback mode, or
AUX (external input source)
mode.
3 SEL/MENU Briefly press one or more
times to select the sound
option you want to adjust,
then press or to adjust
the option.
Press and hold to turn the
clock or alarm on or off.
4 BND In radio mode, press to
select the radio band.
5 AMS In radio mode, press to scan
each stored station for five
seconds. When you hear a
station you want to play,
press this button again.
When you are tuned to a
station you want to store,
press and hold to store the
station. Your car deck
automatically assigns the
station to a button
(1 through 6).
6 SCAN Press to scan for the next
station with a clear signal.
9
10
11
12
13
14
15
16
2
www.insignia-products.com
Page 5
Insignia NS-C5112 CD Car Deck with HD Radio Receiver
# Button Description
7 Numbers In radio mode, press a
number to tune to a stored
station.
In CD mode:
1- Press to start or pause
playback.
2- Press to play the first 10
seconds of each track on the
CD.
3-Press to repeat the current
track. Press and hold to
repeat the current CD or
MP3 folder.
4-Press to start or stop
random playback.
5-Press to select options or
MP3 files.
6-Press to select options or
MP3 files.
8 DISP Press to display the time.
Press and hold to adjust the
time.
When playing an MP3 file,
press to display MP3 file
information.
9 PWR Press to turn your car deck
on or off. Press and hold to
show the current volume
level.
10 Press to increase the
volume.
11 In radio mode, press to
select the next lower station.
Press and hold to manually
select a station.
In CD playback mode, press
to select the next lower
track. Press and hold to
fast-reverse on a CD.
12 In radio mode, press to
select the next higher
station. Press and hold to
manually select a station.
In CD playback mode, press
to select the next higher
track. Press and hold to
fast-forward on a CD.
13 Press to decrease the
volume.
14 EQ Press to select an equalizer
mode. You can select POP,
JAZZ, CLASSIC, NOR
(normal), or ROCK.
15 LOUD Press to turn the loud
function on or off. When this
function is turned on, the
lower audio (bass) is
increased. This lets you hear
the bass without increasing
the volume.
16 MUTE Press to mute the sound.
Press again to restore the
sound.
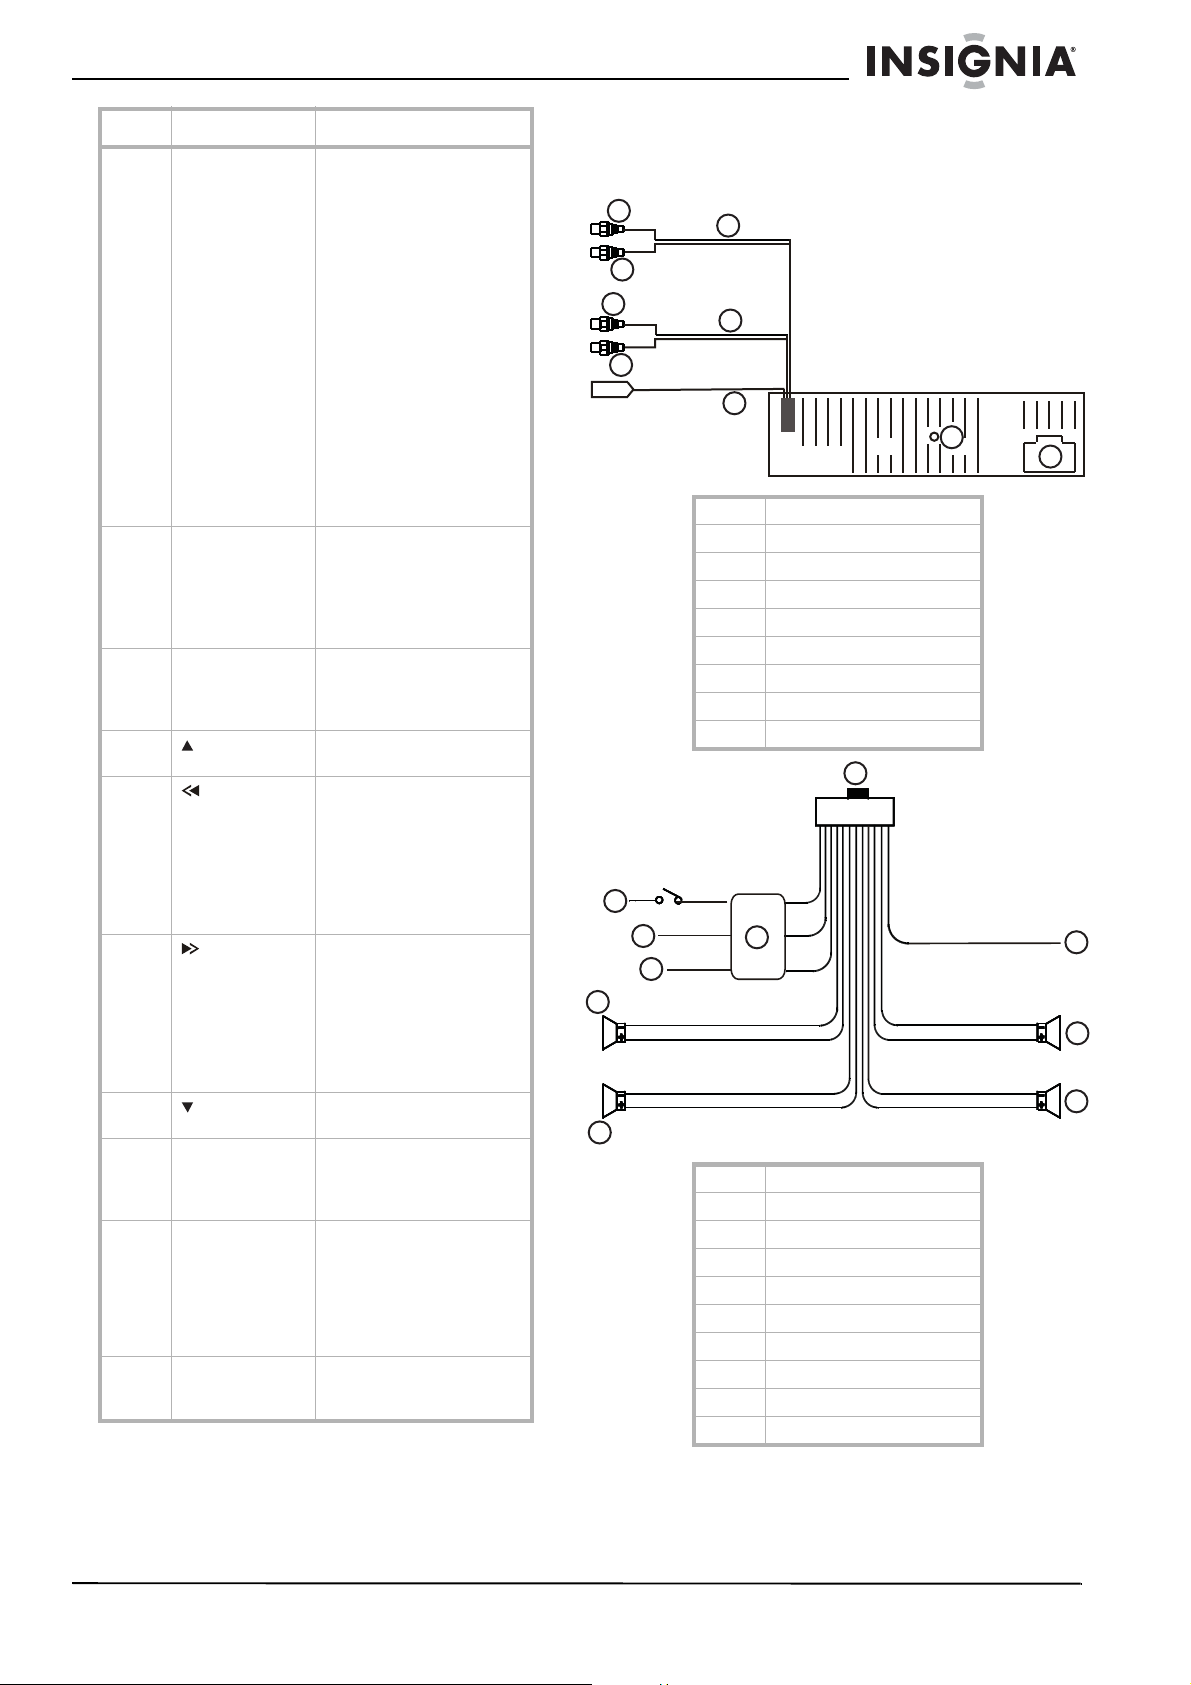
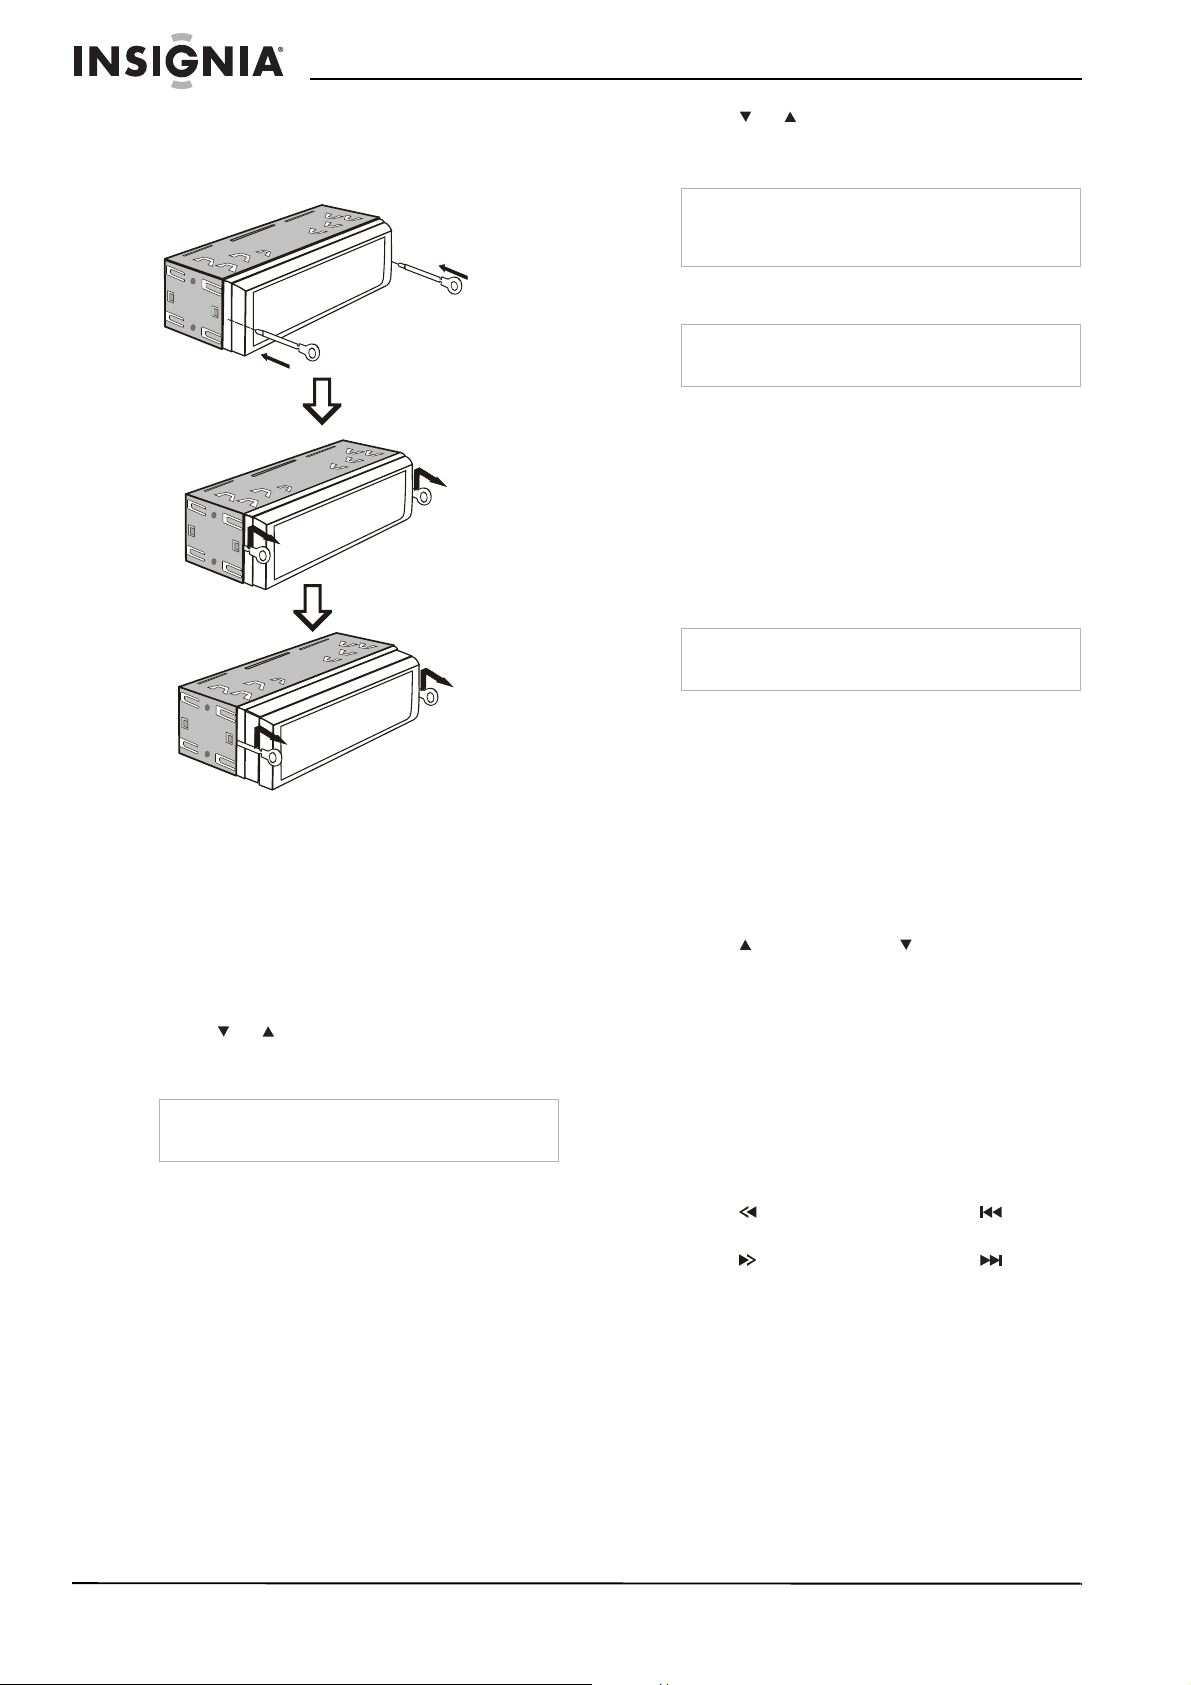
Installing your car deck
Wiring connections
1
2
4
5
1
Yellow
2
3
4
5
3
6
7
1 Left (white)
2Right (red)
3 Front RCA (dark grey)
4 Left (white)
5Right (red)
6 Rear RCA (light grey)
7 Antenna Receptacle
8Screw holes
9 Output socket
7
Red
6
Black
Green/Black
Green
White/Black
White
1 Ignition key
2 Memory back-up 12 V
3 Negative ground
4 Rear left speaker
5 Front left speaker
6 Choke box
7 Output plug
8 To power antenna
9 Rear right speaker
10 Front right speaker
8
Blue
Violet/Black
Violet
Grey/Black
Grey
9
8
9
10
www.insignia-products.com
3
Page 6
Insignia NS-C5112 CD Car Deck with HD Radio Receiver
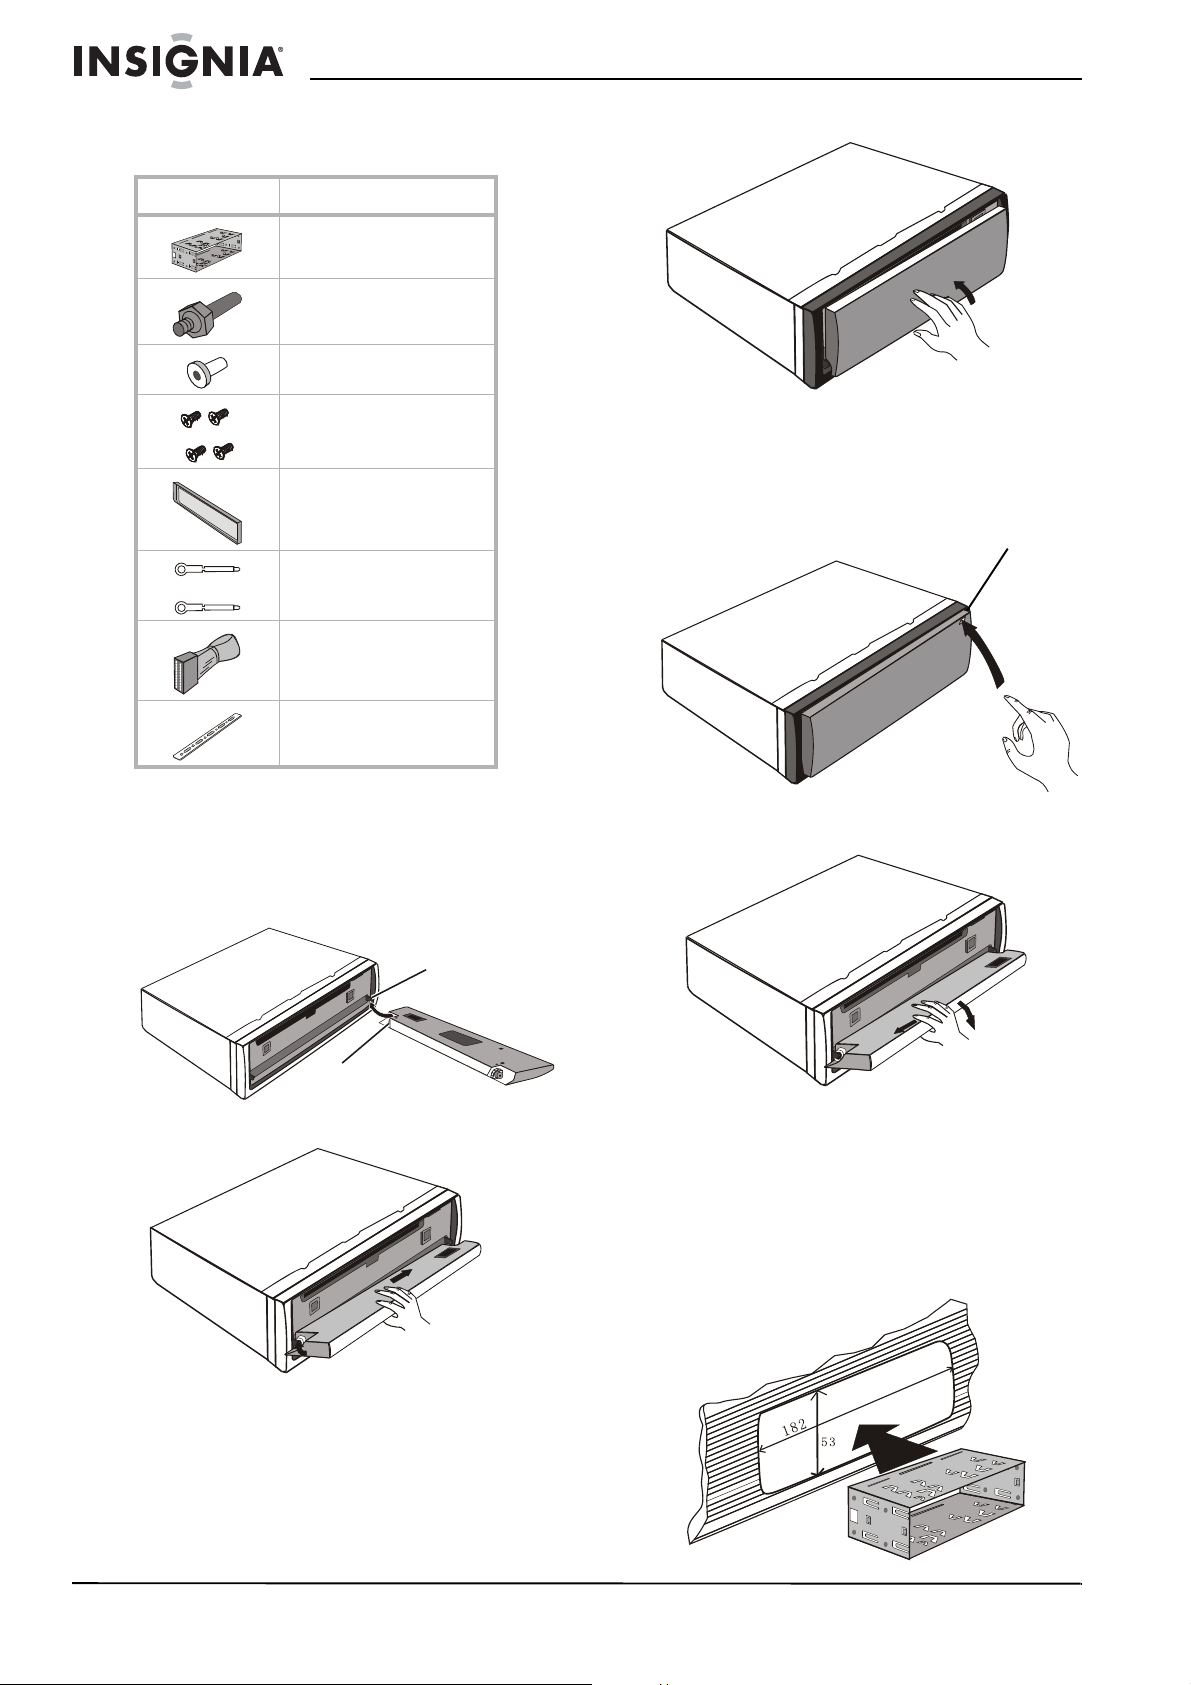
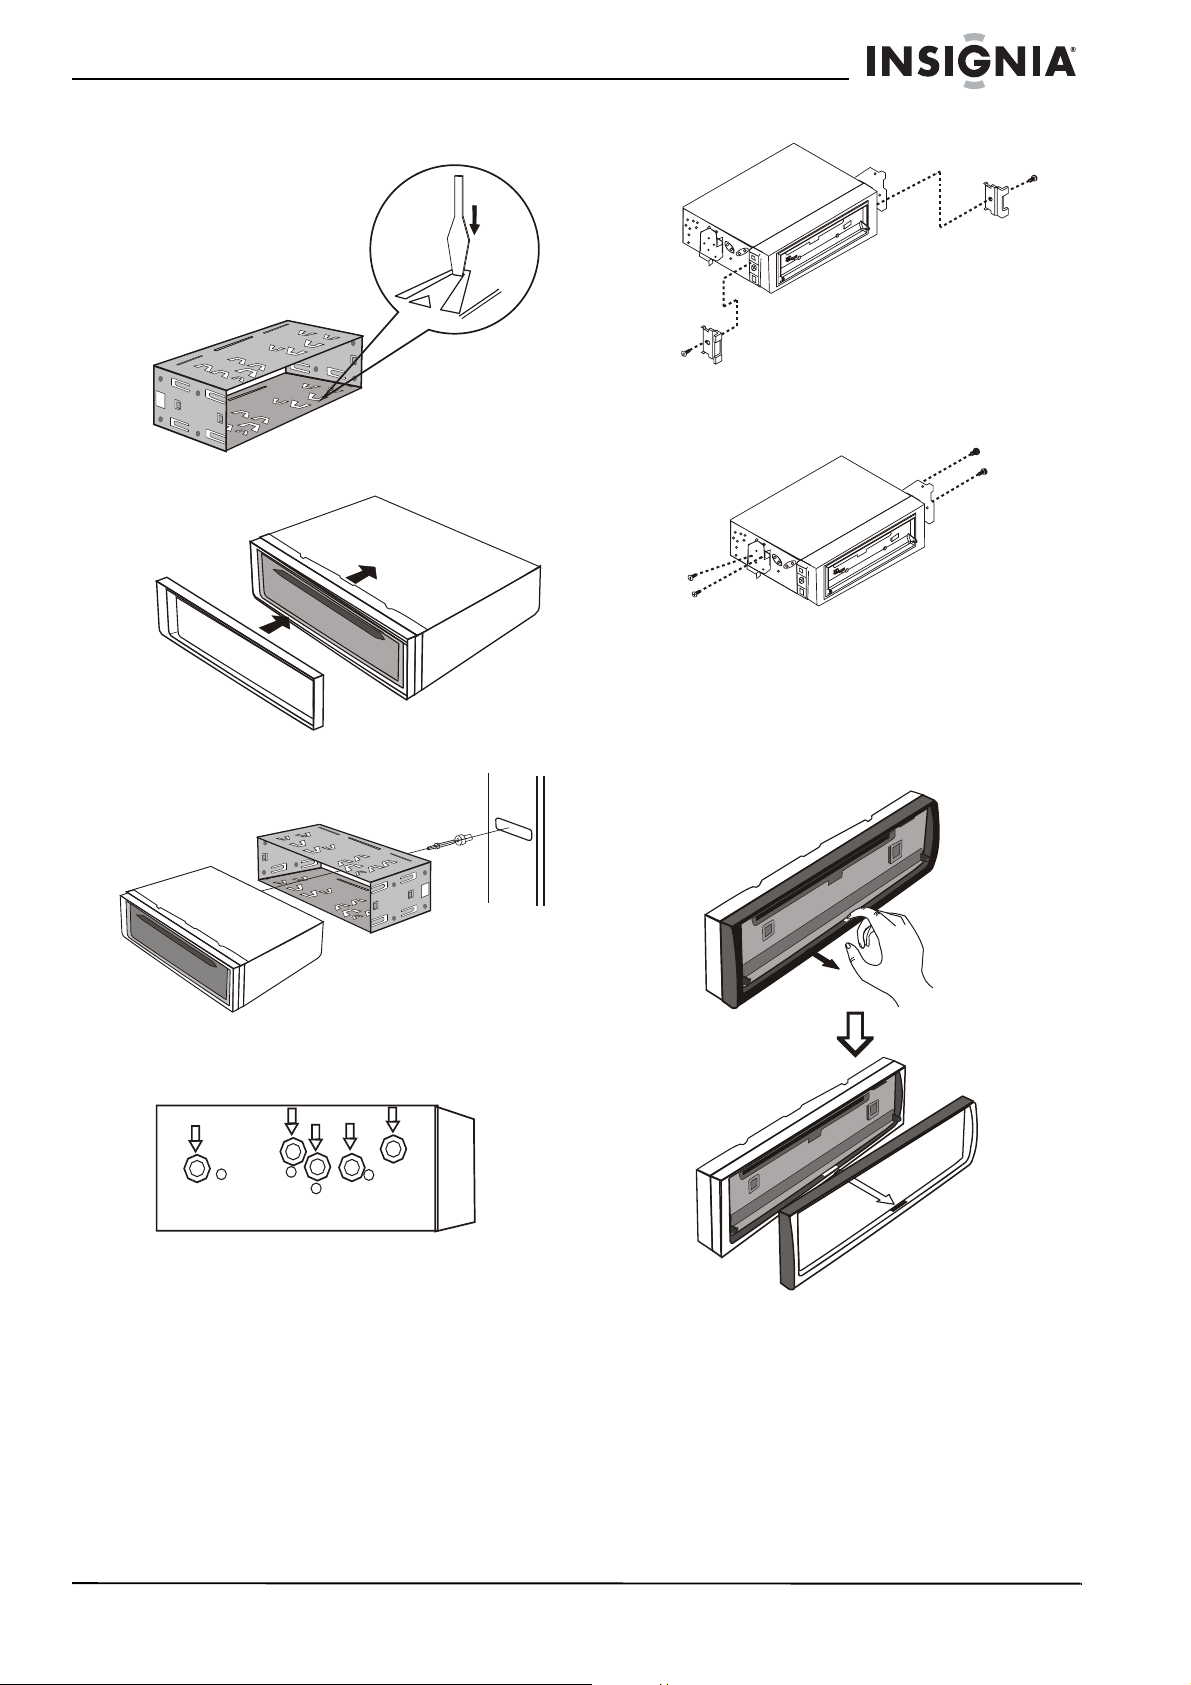
Parts
Make sure that you have the following parts:
Part Description
Mounting sleeve (1)
Rear mounting bolt (1)
Harness rubber (1)
Screws (M5 × 5)
Outer trim (1)
Keys (2)
Connecting wire (1)
3 Swing the panel up until it snaps into place.
Removing the front panel
To remove the front panel:
1 Push the REL button to release the front
panel.
REL button
Steel bar (1)
Installing the front panel
To install the front panel:
1 Align the notch on the front panel with the
post on the right side of your car deck, then
push the panel in slightly.
Notch
2 Slide the panel slightly to the right.
Post
2 Pull the front panel toward you until it is at a
45
° angle, then slide it to the left to remove it.
Installing your car deck
There are two methods for installing your car
deck into the vehicle’s dash.
DIN front-mount
To install using the DIN front-mount method:
1 Slide the mounting sleeve into the opening in
the vehicle’s dash.
4
www.insignia-products.com
Page 7
Insignia NS-C5112 CD Car Deck with HD Radio Receiver
2 If necessary, bend the mounting claws out to
ensure a tight fit.
3 Install the outer trim.
4 Slide your car deck into the mounting sleeve.
Fire wall
2 Remove the brackets from your car deck.
3 Align the screw holes on the sides of your car
deck with the screw holes in the vehicle’s
mounting bracket, then tighten the screws.
Removing your car deck
To remove your car deck:
1 Remove the front panel. For more
information, see “Removing the front panel”
on page 4.
2 Remove the outer trim.
Side screw mounting
The following graphic shows the screw hole
locations on the side of your card deck.
To install using the side screw mounting
method:
1 Remove the hooks from both sides of your
car deck.
www.insignia-products.com
5
Page 8
Insignia NS-C5112 CD Car Deck with HD Radio Receiver
3 Insert the supplied keys into the openings on
both sides of your car deck, then pull the
keys forward to remove your card deck from
the vehicle’s dash.
2 Press or on the remote control or rotate
the volume button on your car deck to adjust
the option.
Note
If you do not adjust the setting within five seconds
of selecting the setting, your car deck
automatically returns to the current mode.
Selecting the equalizer mode
Note
You can only select an equalizer mode with the
remote control.
To select the equalizer mode:
• Press EQ one or more times to select the
equalizer mode you want. You can select
POP, JAZZ, CLASSIC, NOR (normal), or
ROCK.
Turning the loudness function on or off
When the loudness function is turned on, the
lower audio (bass) is increased. This lets you
hear the bass without increasing the volume.
Note
You can only turn the loudness function off and on
with the remote control.
Using your car deck
Turning your car deck on or off
To turn your car deck on or off:
• Briefly press PWR to turn.
Adjusting the volume
To adjust the volume:
• Press or on the remote control or press
VOL– or VOL+ on your car deck to decrease
or increase the volume.
Note
You can press and hold PWR to display the
current volume level.
• Press MUTE to mute the sound. Press MUTE
again to restore the sound.
Adjusting sound settings
To adjust sound settings:
1 Press SEL one or more times to select the
sound setting you want to adjust. You can
select:
• VOL–Adjusts the volume.
• BAS–Adjusts the bass.
• TRE–Adjusts the treble.
• FAD–Adjust the balance between the
front and rear speakers.
• BAL–Adjusts the balance between
speakers.
To turn the loudness function on or off:
• Press LOUD.
Turning the clock or alarm on or off
To turn the clock or alarm on or off with the
remote:
1 Press and hold SEL/MENU for two seconds
to open the clock/alarm display, then press
SEL/MENU one or more times to select
CLOCK ON or BEEP ON.
2 Press to select ON or to select OFF.
Displaying the time
To display and adjust the time:
• Press DISP. The time appears. Press this
button again to close the display.
Adjusting the time
To adjust the time:
1 Press and hold DISP until the two dots (:) in
the middle of the time display begin to blink.
2 Press on the remote control or on your
car deck to adjust the hours.
3 Press on the remote control or on your
car deck to adjust the minutes.
Selecting the audio mode
To select the audio mode:
• Press MOD to select RADIO, CD, or AUX.
6
www.insignia-products.com
Page 9
Insignia NS-C5112 CD Car Deck with HD Radio Receiver
Resetting your car deck
You need to reset your car deck when:
• You first install it.
• You replace the vehicle’s battery.
• You see errors on the LCD.
Note
When you reset your car deck, the clock setting
and other memorized functions are erased.
To reset your car deck:
• Open the front panel, then press RESET.
Using the radio
Selecting the radio band
To select the radio band:
1 Make sure that you are in radio mode.
2 Press BND one or more times to select the
radio band. You can select F1, F2, F3, A1, or
A2. F1 through F3 are FM bands. A1 and A2
are AM bands
Automatically tuning a radio station
To automatically tune a radio station:
1 Make sure that you are in radio mode.
2 Briefly press or on the remote control
or or on your car deck. AUTO
appears on the LCD, and your car deck
scans for the next station with a signal.
Manually tuning a radio station
To manually tune a radio station:
1 Make sure that you are in radio mode.
2 Press and hold or on the remote
control or or on your car deck.
MANUAL appears on the LCD.
3 Briefly press and release or on the
remote control or or on your car deck
one or more times to tune to the station you
want.
Automatically scanning for stations
3 Tune to the station you want to store.
4 Press AMS on the remote control or a preset
number button (1 through 6) on your car deck
for more than three seconds. The station is
stored in memory.
Scanning stored stations
You can scan stored stations. Your car deck
plays five seconds of each stored station before
going to the next stored station.
Note
You can only scan for stored stations with the
remote control.
To scan stored stations:
1 Make sure that you are in radio mode.
2 Select the radio band that has the stored
stations you want to scan.
3 Press AMS on the remote control to start the
scan. You car deck plays five seconds of
each stored station before going to the next
stored station.
4 When you hear the station you want to play,
press AMS again.
Turning digital (HD) stations on or off
To turn digital (HD) stations on or off:
1 Make sure that you are in radio mode.
2 Press and hold HD until the LCD displays
HD-S ON or HD-S OFF.
When HD-S ON is displayed on the LCD,
tuning and scanning for stations occurs on
the digital band.
Using the CD player
Playable discs
Your car deck can play the following discs:
Disc
type
CD Audio 12 cm
Label Format Size
Note
You can only scan for stations with the remote
control.
To automatically scan for stations:
1 Press SCAN. Your car deck scans for a
station with a signal, then plays five seconds
of the station before it goes to the next
station.
2 When you hear the station you want to play,
press SCAN again.
Storing stations
You can store as many as six stations per radio
band.
To memorize stations:
1 Make sure that you are in radio mode.
2 Select the radio band that has the station you
want to store.
MP3
Playing a CD
To play a CD:
1 Make sure that you are in CD playback
mode.
2 Press REL on your car deck to open the front
panel.
3 Insert a CD with the label side up onto the
CD slot. The CD starts playing automatically.
www.insignia-products.com
Audio 12 cm
MP3
7
Page 10

Insignia NS-C5112 CD Car Deck with HD Radio Receiver
Controlling CD playback
To control CD playback:
• To pause playback, press . To resume
playback, press this button again.
• To replay the current track, press on the
remote control or on your car deck.
• To replay the previous track, press on the
remote control or on your car deck twice.
• To play the next track, press on the
remote control or on your car deck.
• To fast-reverse, press and hold on the
remote control or on your car deck.
Release the button when you reach the track
you want to play.
• To fast-forward, press and hold on the
remote control or on your car deck.
Release the button when you reach the track
you want to play.
• To scan for a track, press INT. Your car deck
plays the first 10 seconds of each track.
When you hear the track you want to play,
press this button again.
• To play the same track repeatedly, press
RPT. To stop repeat play, press this button
again.
• To play tracks in random order, press RDM.
To resume normal playback, press this
button again.
Selecting an MP3 file
If the CD your are playing has multiple MP3 files,
you can select the file you want to play.
To select an MP3 file:
• While the CD is playing, press or on the
remote control or UP or DOWN on your car
deck to select the file you want to play.
Displaying MP3 information
To display MP3 information:
• While the CD is playing, press DISP one or
more times to display the current time, track
name, directory name, and ID3 information.
Ejecting a CD
To eject a CD:
1 Press REL on your car deck to open the front
panel.
2 Press to eject the CD.
Troubleshooting
Problem Solution
No power. Check the fuse. If the fuse has
The LCD displays incorrect
information or does not
display any information.
Cannot play radio stations Make sure that the vehicle’s antenna
Radio station reception is
poor.
Cannot insert a CD. Make sure that a CD is not already in
Sound skips. The CD is dirty or damaged.
Note
If the preceding solutions do not solve the
problem, contact authorized service
personnel.
Do not try to repair your car deck yourself.
blown, replace the fuse with a fuse of
the same amperage.
Remove the front panel, then press
the RESET button.
is connected correctly and securely.
Make sure that you are in radio
mode.
Make sure that the vehicle’s antenna
is fully extended. If the antenna is
broken, replace it.
Make sure that the vehicle’s antenna
is correctly grounded.
the CD player.
Maintaining
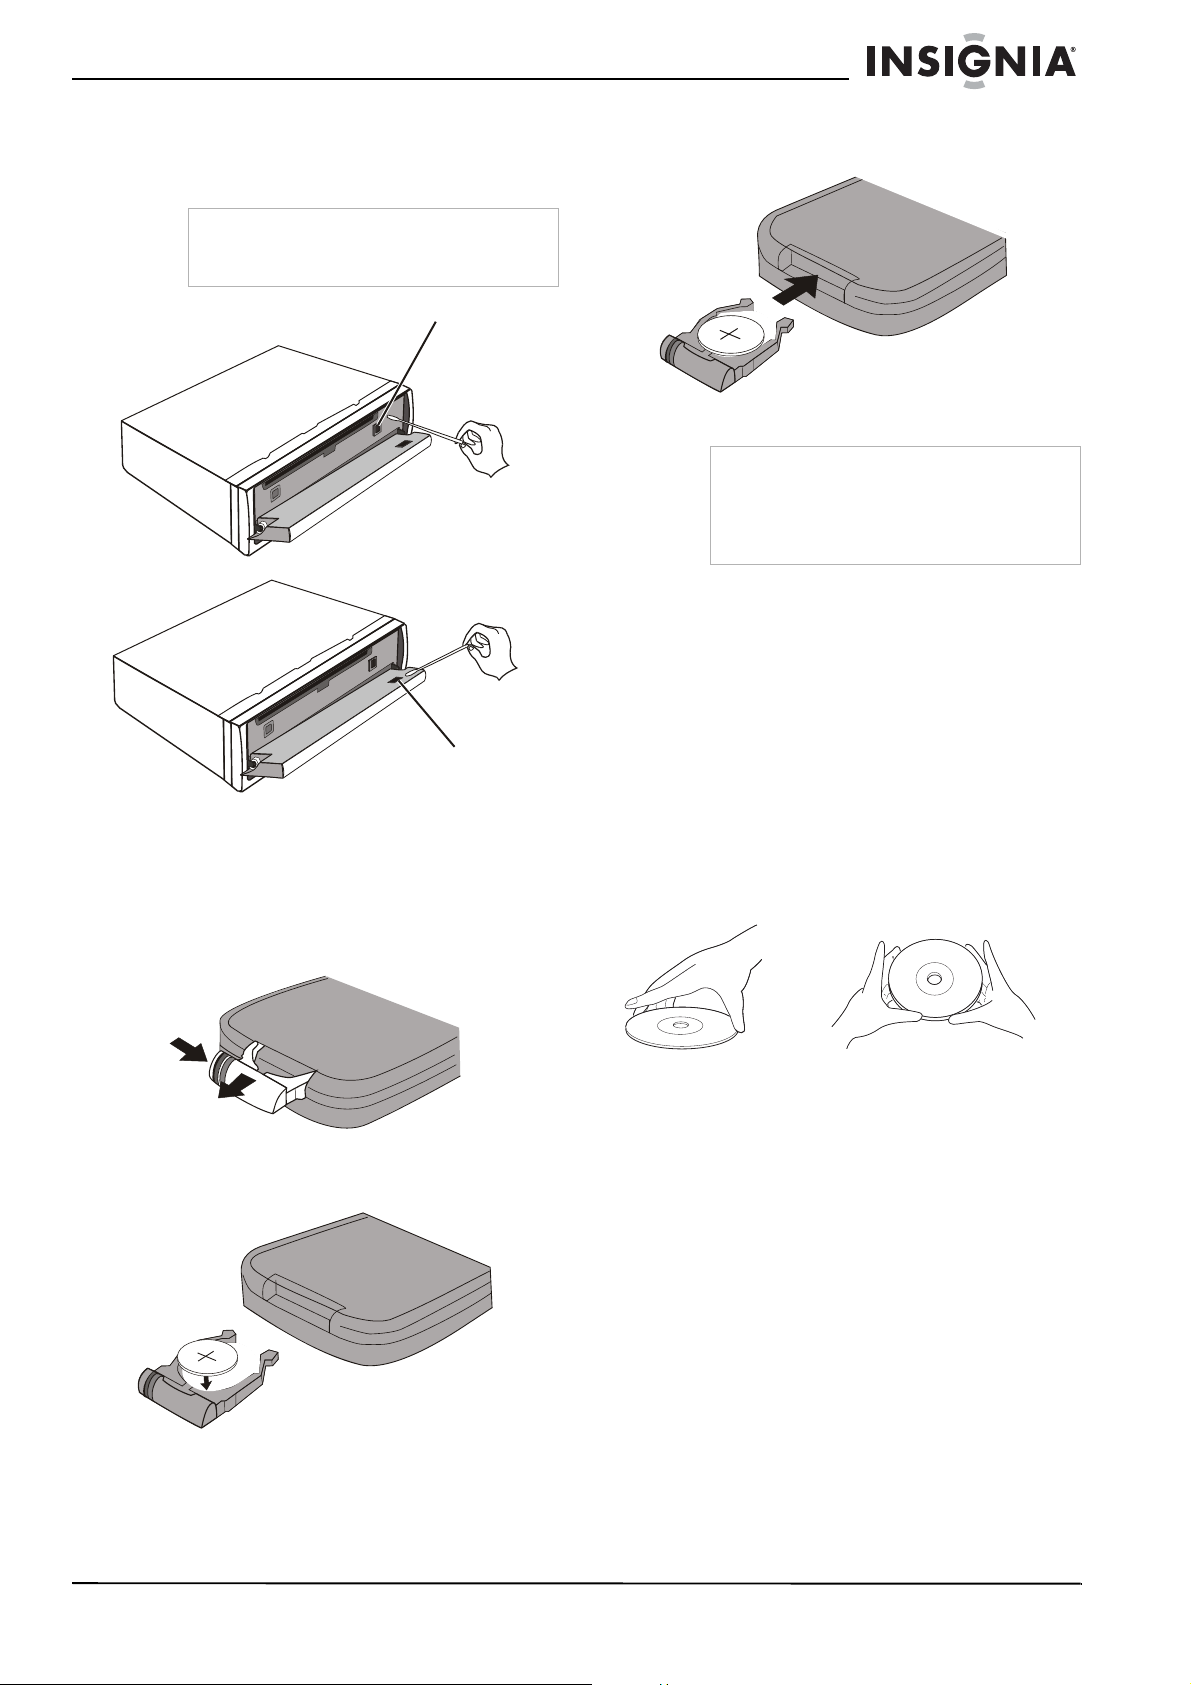
Replacing the fuse
Make sure that the replacement fuse is of the
same amperage as the original fuse. If you
replace a fuse and the replacement fuse blows,
contact authorized service personnel.
Caution
Never use a fuse with a amperage that is
greater than the original fuse, or you may
damage your car deck.
Cleaning the connector
If the connector between your car deck and the
front panel gets dirty, your car deck may operate
erratically or not at all.
To clean the connector:
1 Turn off the vehicle and remove the key from
the ignition.
2 Remove the front panel. For more
information, see “Removing the front panel”
on page 4.
8
www.insignia-products.com
Page 11
Insignia NS-C5112 CD Car Deck with HD Radio Receiver
3 Use an alcohol swab to gently clean the
connector on your car deck and the front
panel. Be careful not to damage the
connector.
Caution
Do not touch the connector with your finger or
a metal object. You may damage the
connector.
Connector
Connector
3 Slide the battery holder into the remote
control.
Battery precautions
Warning
• Incorrect handling of the battery could
result in an explosion.
• The battery cannot be recharged.
• Do not try to disassemble a battery.
• Do not throw the battery into a fire;
• Always keep batteries out of the reach of
children. If a battery is swallowed, contact a
doctor immediately.
• To ensure the best performance, clean the
battery with a dry cloth before you install it.
• Make sure that the + side of the battery is
facing up.
• Do not touch the battery with a metal object,
such as tweezers, because you may cause
an electrical short.
Replacing the remote control battery
The replacement battery should be a button cell
(CR2025) battery.
To replace the remote control battery:
1 While pressing the release latch, gently pull
the battery holder out of the remote control.
2 Remove the old battery, then place the new
battery into the holder with the + side facing
up.
Handling discs
A dirty, scratched, or warped disc may cause
skipping or noise.
To care for discs:
• Hold discs by their edges.
• Store discs in their cases when you are not
using them.
• Do not expose discs to direct sunlight, high
humidity, high temperature, or dust.
Prolonged exposure to extreme
temperatures can warp discs.
• Do not stick labels or tape on discs.
www.insignia-products.com
9
Page 12
Insignia NS-C5112 CD Car Deck with HD Radio Receiver
To clean a disc:
• With a soft cloth, wipe the disc from the
center to the outer edge.
Caution
Do not use detergent or abrasive cleaning
agents. They will damage the disc surface.
Specifications
Specifications are subject to change without
notice.
General
Power requirement 14.4 V DC
(11-16 V allowable)
Load impedance 4Ω
Maximum power output 40 W × 4
Tone controls ± 10dB
Bass 100 Hz
Dimensions
(approximate)
Mounting dimensions
(approximate)
Weight 3.86 lbs (1.75 kg)
FM
7.56 × 7.0 × 1.97 inches
(192×178×50 mm)
6.65 × 7.17 × 2.09 inches
(169×182×53 mm)
Legal notices
FCC Part 15
This device complies with Part 15 of the FCC Rules.
Operation of this product is subject to the following two
conditions: (1) this device may not cause harmful
interference, and (2) this device must accept any
interference received, including interference that may cause
undesired operation.
This equipment has been tested and found to comply within
the limits for a class B digital device, pursuant to Part 15 of
the FCC Rules. These limits are designed to provide
reasonable protection against harmful interference in a
residential installation. This equipment generates, uses, and
can radiate radio frequency energy and, if not installed and
used in accordance with the instructions, may cause harmful
interference to radio communications. However, there is no
guarantee that interference will not occur in a particular
installation. If this equipment does cause harmful
interference to radio or television reception, which can be
determined by turning the equipment off and on, the user is
encouraged to try to correct the interference by one or more
of the following measures:
• Reorient or relocate the receiving antenna.
• Increase the separation between the equipment
and receiver.
• Connect the equipment into an outlet on a circuit
different from that to which the receiver is
connected.
• Consult the dealer or an experienced technician for
help.
FCC warning
Changes or modifications not expressly approved by the
party responsible for compliance with the FCC Rules could
void the user’s authority to operate this equipment.
Copyright
© 2007 Insignia. Insignia and the Insignia logo are
trademarks of Best Buy Enterprise Services, Inc. Other
brands and product names are trademarks or registered
trademarks of their respective holders. Specifications and
features are subject to change without notice or obligation.
For service and support call (877) 467-4289.
Tuning range 87.5 to 107.9 MHz
(In the United States)
IF range 10.7 MHz
Usable sensitivity 10dBuV (-30dB)
Signal-to-noise ratio 60dB
Stereo separation 30dB (1 KHz)
Frequency response 30 to15000 Hz
AM
Frequency range 530 to 1710 KHz
(In the United States)
IF Range 450 KHz
Usable sensitivity 28dBuV (-20dB)
CD player
Signal-to-noise ratio 65dB
Separation 60dB (1 KHz)
Distortion 0.1%
10
www.insignia-products.com
Page 13

Insignia NS-C5112 CD Car Deck with HD Radio Receiver
90-Day Limited Warranty
Insignia Products (“Insignia”) warrants to you, the original
purchaser of this new NS-C5112 (“Product”), that the
Product shall be free of defects in the original manufacture of
the material or workmanship for a period of 90 days from the
date of your purchase of the Product (“Warranty Period”).
This Product must be purchased from an authorized dealer
of Insignia brand products and packaged with this warranty
statement. This warranty does not cover refurbished
Product. If you notify Insignia during the Warranty Period of a
defect covered by this warranty that requires service, terms
of this warranty apply.
How long does the coverage last?
The Warranty Period lasts for 90 days from the date you
purchased the Product. The purchase date is printed on the
receipt you received with the Product.
What does this warranty cover?
During the Warranty Period, if the original manufacture of the
material or workmanship of the Product is determined to be
defective by an authorized Insignia repair center or store
personnel, Insignia will (at its sole option): (1) repair the
Product with new or rebuilt parts; or (2) replace the Product
at no charge with new or rebuilt comparable products or
parts. Products and parts replaced under this warranty
become the property of Insignia and are not returned to you.
If service of Products or parts are required after the Warranty
Period expires, you must pay all labor and parts charges.
This warranty lasts as long as you own your Insignia Product
during the Warranty Period. Warranty coverage terminates if
you sell or otherwise transfer the Product.
How to obtain warranty service?
If you purchased the Product at a retail store location, take
your original receipt and the Product to the store you
purchased it from. Make sure that you place the Product in
its original packaging or packaging that provides the same
amount of protection as the original packaging. If you
purchased the Product from an online web site, mail your
original receipt and the Product to the address listed on the
web site. Make sure that you put the Product in its original
packaging or packaging that provides the same amount of
protection as the original packaging.
To obtain in-home warranty service for a television with a
screen 25 inches or larger, call 1-888-BESTBUY. Call agents
will diagnose and correct the issue over the phone or will
have an Insignia-approved repair person dispatched to your
home.
Where is the warranty valid?
This warranty is valid only to the original purchaser of the
product in the United States and Canada.
What does the warranty not cover?
This warranty does not cover:
• Customer instruction
• Installation
• Set up adjustments
• Cosmetic damage
• Damage due to acts of God, such as lightning strikes
• Accident
•Misuse
• Abuse
• Negligence
• Commercial use
• Modification of any part of the Product, including the
antenna
• Plasma display panel damaged by static (non-moving)
images applied for lengthy periods (burn-in).
This warranty also does not cover:
• Damage due to incorrect operation or maintenance
• Connection to an incorrect voltage supply
• Attempted repair by anyone other than a facility
authorized by Insignia to service the Product
• Products sold as is or with all faults
• Consumables, such as fuses or batteries
• Products where the factory applied serial number has
been altered or removed
REPAIR REPLACEMENT AS PROVIDED UNDER THIS
WARRANTY IS YOUR EXCLUSIVE REMEDY. INSIGNIA
SHALL NOT BE LIABLE FOR ANY INCIDENTAL OR
CONSEQUENTIAL DAMAGES FOR THE BREACH OF ANY
EXPRESS OR IMPLIED WARRANTY ON THIS PRODUCT,
INCLUDING, BUT NOT LIMITED TO, LOST DATA, LOSS
OF USE OF YOUR PRODUCT, LOST BUSINESS OR LOST
PROFITS. INSIGNIA PRODUCTS MAKES NO OTHER
EXPRESS WARRANTIES WITH RESPECT TO THE
PRODUCT, ALL EXPRESS AND IMPLIED WARRANTIES
FOR THE PRODUCT, INCLUDING, BUT NOT LIMITED TO,
ANY IMPLIED WARRANTIES OF AND CONDITIONS OF
MERCHANTABILITY AND FITNESS FOR A PARTICULAR
PURPOSE, ARE LIMITED IN DURATION TO THE
WARRANTY PERIOD SET FORTH ABOVE AND NO
WARRANTIES, WHETHER EXPRESS OR IMPLIED, WILL
APPLY AFTER THE WARRANTY PERIOD. SOME
STATES, PROVINCES AND JURISDICTIONS DO NOT
ALLOW LIMITATIONS ON HOW LONG AN IMPLIED
WARRANTY LASTS, SO THE ABOVE LIMITATION MAY
NOT APPLY TO YOU. THIS WARRANTY GIVES YOU
SPECIFIC LEGAL RIGHTS, AND YOU MAY ALSO HAVE
OTHER RIGHTS, WHICH VARY FROM STATE TO STATE
OR PROVINCE TO PROVINCE.
Contact Insignia:
For customer service please call 1-877-467-4289
www.insignia-products.com
INSIGNIA™ is a trademark of Best Buy Enterprise Services,
Inc.
Distributed by Best Buy Purchasing, LLC.
Insignia, 7601 Penn Avenue South, Richfield, Minnesota,
U.S.A.
www.insignia-products.com
11
Page 14

Insignia NS-C5112 CD Car Deck with HD Radio Receiver
12
www.insignia-products.com
Page 15

Système audio pour
l'auto avec lecteur
CD et récepteur HD
Radio
Insignia NS-C5112
• Ne pas essayer de modifier ce système
audio pour l'auto. Cela pourrait être source
d'incendie.
• Arrêter le véhicule avant d'effectuer toute
opération qui pourrait interférer avec la
conduite.
• Ne pas utiliser le système audio ou pour
l'auto sous des températures extrêmement
élevées ou basses. La température intérieure
du véhicule doit s’établir entre 140
(+ 60 et – 10 °C) pour pouvoir utiliser le
système audio pour l'auto.
Fonctionnalités
et 14 °F
Table des matières
Bienvenue . . . . . . . . . . . . . . . . . . . . . . . . . . . . . .13
Informations sur la sécurité . . . . . . . . . . . . . . . . .13
Installation du système audio pour l'auto . . . . . . .16
Utilisation du système audio pour l'auto . . . . . . .19
Utilisation de la radio . . . . . . . . . . . . . . . . . . . . . .20
Utilisation du lecteur CD . . . . . . . . . . . . . . . . . . .20
Problèmes et solutions. . . . . . . . . . . . . . . . . . . . .21
Entretien. . . . . . . . . . . . . . . . . . . . . . . . . . . . . . . .21
Spécifications. . . . . . . . . . . . . . . . . . . . . . . . . . . .23
Avis juridiques . . . . . . . . . . . . . . . . . . . . . . . . . . .23
Garantie limitée de 90 jours. . . . . . . . . . . . . . . . .25
Bienvenue
Félicitations d’avoir acheté ce produit Insignia de
haute qualité. Le modèle NS-C5112 représente
la dernière avancée technologique dans la
conception de lecteurs CD et de récepteur HD
Radio et il a été conçu pour des performances et
une fiabilité exceptionnelles.
Informations sur la sécurité
• Vérifier que les câbles repérés par couleur
sont connectés conformément au schéma.
Une connexion incorrecte peut provoquer le
mauvais fonctionnement du système audio
pour l'auto ou endommager le circuit
électrique du véhicule.
• Veiller à connecter les câbles (-) du
haut-parleur à la borne (-) du haut-parleur.
Ne jamais connecter ensemble les câbles
des haut-parleurs des voies droites et
gauches ou à la masse du véhicule.
• Vérifier que toutes les connexions sont
correctement réalisées avant de mettre
l'appareil sous tension.
• Lorsque le fusible est remplacé, le fusible de
rechange doit être du même ampérage que
celui indiqué sur le porte-fusible.
• Ne pas bloquer les ouïes et les panneaux du
radiateur. Tout blocage provoquera une
accumulation de chaleur dans le boîtier et un
éventuel incendie.
• Quand l'installation est terminée ou quand la
batterie du véhicule est remplacée, retirer le
panneau avant du système audio pour l'auto
avant de le mettre en service, puis appuyer
sur RESET [Réinitialisation] (sur la base)
avec un objet pointu (tel qu'un stylo à bille)
pour réinitialiser le système audio pour l'auto
à ses paramètres par défaut.
Panneau avant
15
6
16
17
1
3
4
2
10
# Composants Description
1 MARCHE/ARRÊT Permet d'allumer ou
2 MOD Permet de sélectionner le
3 VOL–/VOL+/SEL Tourner pour régler le
4 AFFICHAGE Permet d’afficher l’heure. La
5 Capteur de
6 ACL Affiche des informations
5
11
12
télécommande
14
13
d'éteindre l’appareil. La
maintenir appuyée pour
afficher le niveau actuel du
volume sonore.
mode audio. Il est possible
de sélectionner les modes
radio, lecture CD ou AUX
(source d'entrée externe).
volume.
L'appuyer brièvement une
ou plusieurs fois pour
sélectionner l'option sonore
à régler, puis tourner le
bouton pour régler l'option.
Maintenir cette touche
appuyée pour activer ou
désactiver l'horloge ou
l'alarme.
maintenir appuyée pour
régler l'heure.
Lors de la lecture d'un
fichier MP3, appuyer sur
cette touche pour afficher
l'information sur le fichier
MP3.
Reçoit les signaux de la
télécommande. Ne pas
obstruer la transmission des
signaux.
concernant l'état actuel.
18
7
8
9
19
Page 16

Système audio pour l'auto avec lecteur CD et récepteur HD Radio Insignia NS-C5112
# Composants Description
7 En mode radio, permet de
8 En mode radio, permet de
9 REL Permet d'ouvrir le panneau
10 BND En mode radio, appuyer une
11 HD Permet d'activer ou de
12
13 2 INT En mode radio, permet de
14 3 RPT En mode radio, permet de
15 4 RDM En mode radio, permet de
16 5 DOWN Permet de sélectionner des
1
sélectionner la station
suivante. La maintenir
appuyée pour sélectionner
manuellement une station.
En mode lecture de CD,
permet de sélectionner la
piste suivante. La maintenir
appuyée pour avancer
rapidement pendant la
lecture d'un CD.
sélectionner la station
précédente. La maintenir
appuyée pour sélectionner
manuellement une station.
En mode lecture de CD,
permet de sélectionner la
piste précédente. La
maintenir appuyée pour un
retour arrière rapide pendant
la lecture d'un CD.
avant.
ou plusieurs fois pour
sélectionner une bande
radio.
désactiver les stations
numériques. Quand HD-S
ON s'affiche sur écran ACL,
la recherche d'une station
par le système audio pour
l'auto se fera parmi les
stations numériques. Quand
HD-S OFF s'affiche, la
recherche d'une station par
le système audio pour l'auto
se fera parmi les stations
conventionnelles.
En mode radio, permet de
sélectionner la station
mémorisée 1.
En mode de lecture d'un CD,
permet de lancer ou
d’interrompre
momentanément la lecture.
sélectionner la station
mémorisée 2.
En mode lecture d'un CD,
permet de lire les premières
10 secondes de chaque piste
du CD.
sélectionner la station
mémorisée 3.
En mode de lecture d'un CD,
permet de répéter la piste en
cours. La maintenir appuyée
pour répéter le CD actuel ou
le dossier MP3.
sélectionner la station
mémorisée 4.
En mode de lecture d'un CD,
permet de commencer ou
d'arrêter la lecture aléatoire.
options ou des fichiers MP3.
# Composants Description
17 6 UP Permet de sélectionner des
18 SOURDINE Permet de mettre le son en
19 AUX Pour connecter l'appareil à
options ou des fichiers MP3.
sourdine. Appuyer de
nouveau sur cette touche
pour rétablir le son.
la source d'un signal
externe.
Partie interne (panneau avant ouvert)
1
2
# Composants Description
1 Permet d’éjecter un CD.
2 RÉINITIALISER Permet de réinitialiser le
3 Fente de CD Insérer le CD dans cette
3
système audio pour l'auto
aux paramètres par défaut.
fente.
14
www.insignia-products.com
Page 17

Système audio pour l'auto avec lecteur CD et récepteur HD Radio Insignia NS-C5112
Télécommande
1
2
3
4
5
6
7
8
# Touche Description
1 HD Permet d'activer ou de
désactiver les stations
numériques. Quand HD-S
ON s'affiche sur écran ACL,
la recherche d'une station
par le système audio pour
l'auto se fera parmi les
stations numériques. Quand
HD-S OFF s'affiche, la
recherche d'une station par
le système audio pour l'auto
se fera parmi les stations
conventionnelles.
2 MOD Permet de sélectionner le
mode audio. Il est possible
de sélectionner les modes
radio, lecture de CD ou AUX
(source d'entrée externe).
3 SEL/MENU L'appuyer brièvement une
ou plusieurs fois pour
sélectionner l'option sonore
à régler, puis appuyer sur
ou pour régler l'option.
Maintenir cette touche
appuyée pour activer ou
désactiver l'horloge ou
l'alarme.
4 BND En mode radio, elle permet
de choisir la bande radio.
5 AMS En mode radio, l’appuyer
pour parcourir chaque
station mémorisée pendant
cinq secondes. Appuyer de
nouveau sur cette touche
pour s'arrêter à la station
souhaitée.
Pour mémoriser la station
syntonisée, maintenir cette
touche appuyée. Le système
audio pour l'auto affecte
automatiquement la station à
une touche (de 1 à 6).
6 BALAYAGE Permet d'aller à la station
suivante avec un signal clair.
9
10
11
12
13
14
15
16
# Touche Description
7 Touches
numériques
8 AFFICHAGE Permet d’afficher l’heure. La
9 MARCHE/ARRÊT Permet d'allumer ou
10 Permet d’augmenter le
11 En mode radio, permet de
12 En mode radio, permet de
13 Permet de diminuer le
14 ÉGALISATION Permet de sélectionner un
En mode radio, appuyer sur
un chiffre pour syntoniser
une station mémorisée.
En mode CD :
1 – Permet de démarrer ou
de mettre en pause la lecture
d’un disque.
2 – Permet de lire les
premières dix secondes de
chaque piste du CD.
3 – Permet de répéter la
piste actuelle. La maintenir
appuyée pour répéter le CD
actuel ou un dossier MP3.
4 – Permet de démarrer ou
d’arrêter la lecture aléatoire.
5 – Permet de sélectionner
des options ou des fichiers
MP3.
6 – Permet de sélectionner
des options ou des fichiers
MP3.
maintenir appuyée pour
régler l'heure.
Lors de la lecture d'un
fichier MP3, cette touche
permet d'afficher
l'information sur le fichier
MP3.
d'éteindre l’appareil. La
maintenir appuyée pour
afficher le niveau actuel du
volume sonore.
volume sonore.
sélectionner la station
précédente. La maintenir
appuyée pour sélectionner
manuellement une station.
En mode lecture de CD,
permet de sélectionner la
piste précédente. La
maintenir appuyée pour un
retour arrière rapide pendant
la lecture d'un CD.
sélectionner la station
suivante. La maintenir
appuyée pour sélectionner
manuellement une station.
En mode lecture de CD,
permet de sélectionner la
piste suivante. La maintenir
appuyée pour avancer
rapidement pendant la
lecture d'un CD.
volume sonore.
mode d’égalisation.
Sélectionner POP, JAZZ,
CLASSIC (Classique), ou
ROCK.
www.insignia-products.com
15
Page 18

Système audio pour l'auto avec lecteur CD et récepteur HD Radio Insignia NS-C5112
# Touche Description
15 LOUD Permet d'activer ou de
16 SOURDINE Permet de mettre le son en
désactiver la fonction
d'accentuation des graves.
Quand cette fonction est
activée les sons graves sont
accentués. Cela permet
d'écouter les graves sans
augmenter le volume.
sourdine. Appuyer de
nouveau sur cette touche
pour rétablir le son.
Installation du système audio pour l'auto
Raccordement des câbles
1
2
4
5
3
6
7
8
1 Clé de contact
2 Alimentation de secours
pour la mémoire 12 V
3 Masse négative
4 Haut-parleur arrière gauche
5 Haut-parleur avant gauche
6 Boîte de la bobine
d’induction
7 Prise de sortie
8 Vers antenne alimentée
9 Haut-parleur arrière droit
10 Haut-parleur avant droit
Éléments
Vérifier qu'aucun élément ne manque.
Élément Description
Châssis de montage (1)
Vis de montage arrière (1)
Gaine de faisceau (1)
Vis (M5 × 5)
9
1 Gauche (blanc)
2 Droit (rouge)
3 RCA avant (gris foncé)
4 Gauche (blanc)
5 Droit (rouge)
6 RCA arrière (gris clair)
7 Prise d'antenne
8Trous de vis
9 Prise de sortie
Cadre de garniture (1)
Clés (2)
Câble de connexion (1)
Patte métallique (1)
7
Installation du panneau avant
Pour installer le panneau avant :
Rouge
1
Jaune
2
Noir
3
4
Vert/noir
Blanc/noir
6
Vert
Blanc
5
Bleu
Violet/noir
Violet
Gris/noir
Gris
8
9
10
1 Aligner l'encoche du panneau avant avec la
broche située sur le côté droit du système
audio pour l'auto, puis enfoncer légèrement
le panneau.
Broche
Encoche
16
www.insignia-products.com
Page 19

Système audio pour l'auto avec lecteur CD et récepteur HD Radio Insignia NS-C5112
2 Faire glisser légèrement le panneau vers la
droite.
3 Faire pivoter le panneau vers le haut jusqu'à
enclenchement.
Installation du système audio pour l'auto
Il existe deux méthodes pour installer le système
audio pour l'auto sur le tableau de bord du
véhicule.
Montage avant DIN
Pour installer en utilisant la méthode de
montage avant DIN :
1 Faire glisser le châssis de montage dans
l'ouverture du tableau de bord du véhicule.
2 Le cas échéant, recourber les pattes de
montage pour éliminer le jeu.
Retrait du panneau avant
Pour retirer le panneau avant :
1 Appuyer sur le bouton REL pour déverrouiller
le panneau avant.
2 Tirer le panneau avant vers l'extérieur
jusqu'à ce qu'il forme un angle de 45
faire glisser la gauche pour le retirer.
Touche REL (Déverrouillage)
3 Installer le cadre de garniture.
°, puis le
4 Glisser le système audio pour l'auto dans le
châssis de montage.
www.insignia-products.com
Cloison pare-feu
17
Page 20

Système audio pour l'auto avec lecteur CD et récepteur HD Radio Insignia NS-C5112
Montage en utilisant les vis latérales
Le graphique ci-après indique les emplacements
des trous pour les vis sur le côté du système
audio pour l'auto.
Pour installer en utilisant la méthode de
montage avec les vis latérales :
1 Retirer les crochets de chaque côté du
système audio pour l'auto.
2 Retirer les pattes de fixation du système
audio pour l'auto.
3 Aligner les trous pour les vis sur le côté du
système audio pour l'auto avec les trous pour
les vis du support de montage sur le
véhicule, puis serrer les vis.
2 Retirer le cadre de garniture.
3 Insérer les deux clés fournies dans les
ouvertures de chaque côté du système audio
pour l'auto, puis tirer les clés vers l'avant
pour retirer l'appareil du tableau de bord du
véhicule.
Retrait du système audio pour l'auto
Pour retirer le système audio pour l'auto :
1 Retirer le panneau avant. Pour plus
d’informations, voir « Retrait du panneau
avant » à la page 17.
18
www.insignia-products.com
Page 21

Système audio pour l'auto avec lecteur CD et récepteur HD Radio Insignia NS-C5112
Utilisation du système audio pour l'auto
Mise sous et hors tension du système audio pour l'auto
Pour mettre le système audio pour l'auto
sous et hors tension :
• Appuyer brièvement sur PWR
(Marche/Arrêt).
Réglage du volume
Pour régler le volume :
• Appuyer sur ou de la télécommande ou
sur VOL– ou VOL+ de l'appareil pour
diminuer ou augmenter le volume.
Remarque
Il est possible de maintenir PWR appuyée pour
afficher le niveau actuel du volume.
• Appuyer sur MUTE pour mettre le son en
sourdine. Appuyer de nouveau sur MUTE
pour restaurer le son.
Réglage des paramètres sonores
Pour régler les paramètres sonores :
1 Appuyer une ou plusieurs fois sur SEL
(Sélecteur) pour sélectionner le paramètre
sonore à ajuster. Sélections possibles :
• VOL – Permet de régler le volume.
• BAS – Permet de régler les graves.
• TRE (Aigus) – Permet de régler les aigus.
• FAD – Permet de régler l’équilibre entre
les haut-parleurs avant et arrière.
• BAL – Permet de régler la balance entre
les haut-parleurs.
2 Appuyer sur ou de la télécommande ou
tourner le bouton du volume de l'appareil
pour régler l'option.
Remarque
Si le paramètre n'est pas réglé dans les cinq
secondes de sa sélection, l'appareil revient
automatiquement au mode actuel.
Sélection du mode d'égalisation
Remarque
Le mode d'égalisation ne peut être sélectionné
qu'avec la télécommande.
Pour sélectionner le mode d’égalisation :
• Appuyer une ou plusieurs fois sur EQ pour
sélectionner le mode d'égalisation souhaité.
Il est possible de sélectionner POP, JAZZ,
CLASSIC (Classique), NOR (normal), ou
ROCK.
Activation et désactivation de la fonction d'accentuation des graves
Quand cette fonction est activée les sons graves
sont accentués. Cela permet d'écouter les
graves sans augmenter le volume.
Remarque
La fonction d'accentuation des graves ne peut être
désactivée ou activée qu'en utilisant la
télécommande.
Pour activer ou désactiver la fonction
d'accentuation des graves :
• Appuyer sur LOUD.
Activation et désactivation de l'horloge ou de l'alarme
Pour activer ou désactiver l'horloge ou
l'alarme avec la télécommande :
1 Maintenir SEL/MENU appuyée pendant deux
secondes pour afficher l'horloge/l'alarme,
puis appuyer sur SEL/MENU une ou
plusieurs fois pour sélectionner CLOCK ON
(Horloge activée) ou BEEP ON (Alarme
activée).
2 Appuyer sur pour sélectionner ON (Activé)
ou pour sélectionner OFF (Désactivé).
Affichage de l'heure
Pour afficher et régler l’heure :
• Appuyer sur DISP. L'heure s'affiche. Appuyer
de nouveau sur cette touche pour fermer
l’affichage.
Réglage de l'heure
Pour régler l’heure :
1 Maintenir DISP appuyée jusqu'à ce que les
deux points (:) du milieu de l'affichage de
l'heure commencent à clignoter.
2 Appuyer sur de la télécommande ou sur
de l'appareil pour régler les heures.
3 Appuyer sur de la télécommande ou sur
de l'appareil pour régler les minutes.
Sélection du mode audio
Pour sélectionner le mode audio :
• Appuyer sur MOD pour sélectionner RADIO,
CD ou AUX.
Réinitialisation du système audio pour l'auto
L'appareil doit être réinitialisé quand :
• Il est installé pour la première fois.
• La batterie du véhicule est remplacée.
• Des messages d'erreur s'affichent sur l'écran
ACL.
Pour réinitialiser le système audio pour
l'auto :
• Ouvrir le panneau avant, puis appuyer sur
RESET (Réinitialisation).
www.insignia-products.com
Remarque
Quand l'appareil est réinitialisé, le réglage de
l'heure et les autres fonctions mémorisées sont
effacés.
19
Page 22

Système audio pour l'auto avec lecteur CD et récepteur HD Radio Insignia NS-C5112
Utilisation de la radio
Sélection de la bande de syntonisation
Pour sélectionner la bande de
syntonisation :
1 Veiller à être en mode radio.
2 Appuyer une ou plusieurs fois sur BND pour
sélectionner la bande radio. Il est possible de
sélectionner F1, F2, F3, A1 ou A2. F1 à F3
sont des bandes FM. A1 et A2 sont des
bandes AM
Syntonisation automatique d’une station radio
Pour syntoniser automatiquement une
station radio :
1 Veiller à être en mode radio.
2 Appuyer brièvement sur ou de la
télécommande ou sur ou de
l'appareil. AUTO s'affiche sur l'écran ACL et
l'appareil s'arrête sur la prochaine station
avec un signal.
Syntonisation manuelle d’une station
radio :
Pour syntoniser manuellement une station
radio :
1 Veiller à être en mode radio.
2 Maintenir appuyée ou de la
télécommande ou ou de l'appareil.
MANUAL s’affiche sur l'écran ACL.
3 Appuyer une ou plusieurs fois brièvement
ou de la télécommande ou ou de
l'appareil pour syntoniser la station
souhaitée.
Balayage automatique de stations
Balayage des stations mémorisées
Il est possible de parcourir les stations
mémorisées. L'appareil joue cinq secondes de
chaque station mémorisée avant d'aller à la
suivante.
Remarque
Le balayage des stations de peut se faire qu'avec
la télécommande.
Pour parcourir les stations mémorisées :
1 Veiller à être en mode radio.
2 Sélectionner la bande radio de la station à
mémoriser.
3 Appuyer sur AMS de la télécommande pour
commencer le balayage. L'appareil joue cinq
secondes de chaque station mémorisée
avant d'aller à la suivante.
4 Quand la station souhaitée a été détectée,
appuyer de nouveau sur AMS.
Activation et désactivation des stations numériques (HD)
Pour activer et désactiver les stations
numériques (HD)
1 Veiller à être en mode radio.
2 Maintenir HD appuyée jusqu'à l'affichage sur
l'écran ACL de HD-S ON (Stations
numériques activées) ou HD-S OFF (Stations
numériques désactivées).
Quand HD-S ON est affiché sur l'écran ACL,
la syntonisation et le balayage des stations
se fait sur la bande numérique.
Utilisation du lecteur CD
Disques compatibles
Cet appareil peut lire les disques suivants :
Remarque
Le balayage des stations de peut se faire qu'avec
la télécommande.
Pour balayer automatiquement des stations :
1 Appuyer sur SCAN (Balayage). L'appareil
recherche une station avec un signal, permet
de l'écouter pendant cinq secondes puis
recherche la station suivante.
2 Quand la station souhaitée a été détectée,
appuyer de nouveau sur SCAN.
Mémorisation des stations
Il est possible de mémoriser jusqu'à six stations
par bande radio.
Pour mémoriser des stations :
1 Veiller à être en mode radio.
2 Sélectionner la bande radio de la station à
mémoriser.
3 Syntoniser la station à mémoriser.
4 Appuyer sur AMS de la télécommande ou
l'une des touches numériques (1 à 6) de
l'appareil pendant plus de trois secondes. La
station est mise en mémoire.
Type
de
disque
s
CD Audio 12 cm
MP3
Logo Format
Lecture d’un CD
Pour lire un CD :
1 Veiller à être en mode de lecture d'un CD.
2 Appuyer sur REL de l'appareil pour ouvrir le
panneau avant.
3 Insérer un CD avec l'étiquette tournée vers le
haut dans la fente pour CD. La lecture du CD
commence automatiquement.
Dimen
sion
Audio 12 cm
MP3
20
www.insignia-products.com
Page 23

Système audio pour l'auto avec lecteur CD et récepteur HD Radio Insignia NS-C5112
Commande de la lecture d'un CD
Pour commander la lecture d'un CD :
• Pour arrêter momentanément la lecture,
appuyer sur . Pour reprendre la lecture,
appuyer de nouveau sur cette touche.
• Pour recommencer la lecture de la piste
actuelle, appuyer sur de la télécommande
ou de l'appareil.
• Pour recommencer la lecture de la piste
précédente, appuyer deux fois sur de la
télécommande ou de l'appareil.
• Pour commencer la lecture de la piste
suivante, appuyer sur de la
télécommande ou de l'appareil.
• Pour un retour rapide, maintenir appuyée
de la télécommande ou de l'appareil.
Relâcher la touche quand la piste souhaitée
est atteinte.
• Pour une avance rapide, maintenir appuyée
de la télécommande ou de l'appareil.
Relâcher la touche quand la piste souhaitée
est atteinte.
• Pour rechercher une piste, appuyer sur INT.
Le lecteur joue alors les quelques premières
10 secondes de chaque piste. Quand la piste
recherchée est localisée, appuyer de
nouveau sur cette touche.
• Pour la lecture de la même piste en mode
répétition, appuyer sur RPT. Pour arrêter la
lecture en mode répétition, appuyer de
nouveau sur cette touche.
• Pour reproduire les pistes en ordre aléatoire,
appuyer sur RDM. Pour reprendre la lecture
normale, appuyer de nouveau sur cette
touche.
Sélection d'un fichier MP3
Si le CD en lecture a plusieurs fichiers MP3, il
est possible de sélectionner le fichier souhaité.
Pour sélectionner un fichier MP3 :
• Avec le CD en cours de lecture, appuyer sur
ou de la télécommande ou sur UP ou
DOWN de l'appareil pour sélectionner le
fichier souhaité.
Affichage de l'information sur le MP3
Pour afficher l'information sur le MP3 :
• Avec le CD en cours de lecture, appuyer une
ou plusieurs fois sur DISP pour afficher
l'heure actuelle, le nom de la piste, le nom du
répertoire et l'information ID3.
Éjection d'un CD
Pour éjecter un CD :
1 Appuyer sur REL de l'appareil pour ouvrir le
panneau avant.
2 Appuyer sur pour éjecter le CD.
Problèmes et solutions
Problème Solution
Aucune alimentation. Vérifier le fusible. Si le fusible est
L'écran ACL affiche une
information incorrecte
n'affiche aucune
information.
Les stations radio ne
fonctionnent pas
La réception de la station
radio est médiocre.
Impossible d'insérer un CD. Vérifier l'absence de CD dans le
Sauts du son. Le CD est sale ou endommagé.
Remarque
Si le problème persiste après avoir essayé les
solutions ci-dessus, contacter un service de
réparation agréé.
L’utilisateur ne doit pas essayer de réparer cet
appareil lui-même.
grillé, le remplacer par un autre ayant
le même ampérage.
Retirer le panneau avant, puis
appuyer sur RESET
(Réinitialisation).
Vérifier que l’antenne du véhicule est
connectée correctement et
fermement.
Veiller à être en mode radio.
Vérifier que l’antenne est
entièrement déployée. Si l'antenne
est détériorée, la remplacer.
Vérifier que l’antenne du véhicule est
correctement mise à la masse.
lecteur.
Entretien
Remplacement du fusible
Vérifier que le fusible de rechange a le même
ampérage que celui d'origine. Si le fusible grille
après avoir été remplacée, contacter un service
de réparation agréé.
Attention
Ne jamais utiliser un fusible dans l'ampérage
est supérieur à celui d'origine, car cela
pourrait endommager l'appareil.
Nettoyage du connecteur.
Si le connecteur entre l'appareil et le panneau
avant devient sale, le système audio pour l'auto
peut fonctionner de façon incorrecte ou ne pas
fonctionner du tout.
Pour nettoyer le connecteur :
1 Couper le contact du véhicule et retirer la clé
du démarreur.
2 Retirer le panneau avant. Pour plus
d’informations, voir « Retrait du panneau
avant » à la page 17.
www.insignia-products.com
21
Page 24

Système audio pour l'auto avec lecteur CD et récepteur HD Radio Insignia NS-C5112
3 Utiliser un coton-tige trempé dans l'alcool
pour nettoyer délicatement le connecteur de
l'appareil et le panneau avant. Attention de
ne pas endommager le connecteur.
Attention
Ne pas toucher le connecteur avec les doigts
ou un objet métallique. Le connecteur pourrait
être endommagé.
Connecteur
Connecteur
3 Remettre le porte- pile dans la
télécommande.
Précautions relatives aux piles
Avertissement
• Une manipulation incorrecte de la pile peut
être source d'explosion.
• La pile ne peut être rechargée.
• Ne pas essayer de démonter une pile.
• Ne pas jeter les piles dans le feu.
• Les piles doivent toujours être tenues hors de
la portée des enfants. Si une pile est avalée,
consulter immédiatement un médecin.
• Pour un rendement optimal, nettoyer la pile
avec un chiffon sec avant de l'installer.
• Veiller à ce que le signe + de la pile soit
tournée vers le haut.
• Ne pas toucher la pile avec un objet
métallique, tel qu'une pince, car cela peut
être source de court-circuit électrique.
Remplacement de la pile de la télécommande
La pile de rechange doit être une pile bouton
(CR2025).
Pour remplacer la pile de la télécommande :
1 Tout en appuyant sur le dispositif de
verrouillage, retirer délicatement le porte-pile
de la télécommande.
2 Retirer la vieille pile et placer la nouvelle
dans le porte-pile avec le côté du (+) tourné
vers le haut
Manipulation des disques
Un disque sale, rayé ou voilé peut causer des
sauts ou des parasites.
Pour entretenir les disques :
• Tenir les disques par les bords.
• Ranger les disques dans leur boîtier lorsqu'ils
ne sont pas utilisés.
• Ne pas exposer les disques à la lumière
directe du soleil, à une humidité élevée, à de
hautes températures ou à la poussière. Une
exposition prolongée à des températures
extrêmes peut avoir pour effet de voiler les
disques.
• Ne pas coller d’étiquette ou de ruban adhésif
sur les disques.
22
www.insignia-products.com
Page 25

Système audio pour l'auto avec lecteur CD et récepteur HD Radio Insignia NS-C5112
Pour nettoyer un disque :
• À l'aide d'un chiffon doux, essuyer le disque
à partir du centre vers la périphérie.
Attention
Ne pas utiliser de détergent, ni d'agents de
nettoyage abrasifs. Ils endommageraient la
surface du disque.
Spécifications
Les spécifications sont sujettes à modification
sans préavis.
Générales
Alimentation 14,4 V CC
(11 à 16 V autorisés)
Impédance de charge 4Ω
Puissance de sortie
maximale
Contrôles de la tonalité ± 10 dB
Dimensions
(approximatives)
Dimensions du montage
(approximatives)
Poids 3,86 lb (1,75 kg)
FM
40 W × 4
Graves 100 Hz
7,56 × 7 × 1,97 po
(192×178×50 mm)
6,65 × 7,17 × 2,09 po
(169×182×53 mm)
Avis juridiques
FCC article 15
Cet appareil est conforme à l’article 15 du règlement de la
FCC. Son utilisation est soumise aux deux conditions
suivantes : (1) cet appareil ne doit pas provoquer
d’interférences préjudiciables, et (2) il doit accepter toute
interférence reçue, y compris celles risquant d’engendrer un
fonctionnement indésirable.
Cet équipement a été mis à l’essai et déclaré conforme aux
limites prévues pour un appareil numérique de classe B,
définies dans la section 15 de la réglementation FCC. Ces
limites ont été établies pour fournir une protection
raisonnable contre les interférences préjudiciables lors d’une
installation résidentielle. Cet équipement génère, utilise et
diffuse des ondes radio et, s’il n’est pas installé et utilisé
conformément aux instructions dont il fait l’objet, il peut
provoquer des interférences préjudiciables aux
communications radio. Cependant, il n'est pas possible de
garantir qu’aucune interférence ne se produira pour une
installation particulière. Si cet équipement produit des
interférences préjudiciables lors de réceptions radio ou
télévisées, qui peuvent être détectées en éteignant puis en
rallumant l’appareil, essayer de corriger l’interférence au
moyen de l’une ou de plusieurs des mesures suivantes :
• Réorienter ou déplacer l’antenne réceptrice.
• Augmenter la distance entre l’équipement et le
récepteur.
• Brancher l’équipement sur la prise électrique d’un
circuit différent de celui auquel le récepteur est
relié.
• Contacter le revendeur ou un technicien qualifié
pour toute assistance.
Avertissement de la FCC
Tous changements ou toutes modifications qui ne seraient
pas expressément approuvés par les responsables de
l’application des règles FCC pourraient rendre nul le droit de
l’utilisateur d’utiliser cet équipement.
Droits d’auteurs
© 2007 Insignia. Insignia et le logo Insignia sont des
marques de commerce de Best Buy Enterprise Services, Inc.
Les autres noms de marques et de produits mentionnés sont
des marques de commerce ou des marques déposées de
leurs propriétaires respectifs. Les spécifications et
caractéristiques sont susceptibles d’être modifiées sans
préavis.
Pour l’assistance technique, appeler le (877) 467-4289.
Gamme du syntoniseur 87,5 à 107,9 MHz
(Aux États-Unis)
Gamme FI 10,7 MHz
Sensibilité utilisable 10 dB µV (- 30 dB)
Rapport signal à bruit 60 dB
Séparation stéréo 30 dB (1 kHz)
Réponse en fréquence 30 à 15 000 Hz
AM
Gamme de fréquence 530 à 1 710 kHz
(Aux États-Unis)
Gamme FI 450 kHz
Sensibilité utilisable 28 dB µV (- 20 dB)
Lecteur CD
Rapport signal à bruit 65 dB
Séparation - 60 dB (1 kHz)
Distorsion 0,1 %
www.insignia-products.com
23
Page 26

Système audio pour l'auto avec lecteur CD et récepteur HD Radio Insignia NS-C5112
24
www.insignia-products.com
Page 27

Système audio pour l'auto avec lecteur CD et récepteur HD Radio Insignia NS-C5112
Garantie limitée de 90 jours
Insignia Products (« Insignia ») garantit au premier acheteur
de ce NS-C5112 neuf (« Produit »), qu’il est exempt de vices
de fabrication et de main-d’œuvre à l’origine, pour une
période de 90 jours à partir de la date d’achat du Produit
(« Période de garantie »). Ce Produit doit avoir été acheté
chez un revendeur agréé des produits de la marque Insignia
et emballé avec cette déclaration de garantie. Cette garantie
ne couvre pas les Produits remis à neuf. Les conditions de la
présente garantie s’appliquent à tout Produit pour lequel
Insignia est notifié pendant la Période de garantie, d’un vice
couvert par cette garantie qui nécessite une réparation.
Quelle est la durée de la couverture?
La Période de garantie dure 90 jours à compter de la date
d’achat de ce Produit. La date d’achat est imprimée sur le
reçu fourni avec le Produit.
Que couvre cette garantie?
Pendant la Période de garantie, si un vice de matériau ou de
main-d’œuvre d'origine est détecté sur le Produit par un
service de réparation agréé par Insignia ou le personnel du
magasin, Insignia (à sa seule discrétion) : (1) réparera le
Produit en utilisant des pièces détachées neuves ou remises
à neuf; ou (2) remplacera le Produit par un produit ou des
pièces neuves ou remises à neuf de qualité comparable. Les
produits et pièces remplacés au titre de cette garantie
deviennent la propriété d’Insignia et ne sont pas retournés à
l’acheteur. Si les Produits ou pièces nécessitent une
réparation après l’expiration de la Période de garantie,
l’acheteur devra payer tous les frais de main-d’œuvre et les
pièces. Cette garantie reste en vigueur tant que l’acheteur
reste propriétaire du Produit Insignia pendant la Période de
garantie. La garantie prend fin si le Produit est revendu ou
transféré d’une quelconque façon que ce soit à tout autre
propriétaire.
Comment obtenir une réparation sous garantie?
Si le Produit a été acheté chez un détaillant, le rapporter
accompagné du reçu original chez ce détaillant. Prendre
soin de remettre le Produit dans son emballage d’origine ou
dans un emballage qui procure la même qualité de
protection que celui d’origine. Si le Produit a été acheté en
ligne, l’expédier accompagné du reçu original à l’adresse
indiquée sur le site Web. Prendre soin de remettre le Produit
dans son emballage d’origine ou dans un emballage qui
procure la même qualité de protection que celui d’origine.
Pour obtenir le service de la garantie à domicile pour un
téléviseur avec écran de 25 po ou plus, appeler le
1-888-BESTBUY. L’assistance technique établira un
diagnostic et corrigera le problème au téléphone ou enverra
un technicien agréé par Insignia pour la réparation à
domicile.
Où cette garantie s’applique-t-elle?
Cette garantie ne s’applique qu’à l’acheteur original du
produit aux États-Unis et au Canada.
Ce qui n’est pas couvert par cette garantie limitée
La présente garantie ne couvre pas :
• la formation du client;
• Installation
• les réglages de configuration;
• les dommages esthétiques;
• les dommages résultants de catastrophes naturelles
telles que la foudre;
• les accidents;
• une utilisation inadaptée;
• une manipulation abusive;
• la négligence;
• une utilisation commerciale;
• la modification de tout ou partie du Produit, y compris
l’antenne;
• un écran plasma endommagé par les images fixes
(sans mouvement) qui restent affichées pendant de
longues périodes (rémanentes).
La présente garantie ne couvre pas non plus :
• les dommages ayant pour origine une utilisation ou une
maintenance défectueuse;
• la connexion à une source électrique dont la tension est
inadéquate;
• toute réparation effectuée par quiconque autre qu’un
service de réparation agréé par Insignia pour la
réparation du Produit;
• les produits vendus en l’état ou hors service;
• les consommables tels que les fusibles ou les piles;
• les produits dont le numéro de série usine a été altéré
ou enlevé.
LA RÉPARATION OU LE REMPLACEMENT, TELS
QU’OFFERTS PAR LA PRÉSENTE GARANTIE,
CONSTITUENT LE SEUL RECOURS DE L’ACHETEUR.
INSIGNIA NE SAURAIT ÊTRE TENU POUR
RESPONSABLE DE DOMMAGES ACCESSOIRES OU
CONSÉCUTIFS, RÉSULTANT DE L’INEXÉCUTION D'UNE
GARANTIE EXPRESSE OU IMPLICITE SUR CE PRODUIT,
Y COMPRIS, SANS S’Y LIMITER, LA PERTE DE
DONNÉES, L’IMPOSSIBILITÉ D’UTILISER LE PRODUIT,
L’INTERRUPTION D’ACTIVITÉ OU LA PERTE DE
PROFITS. INSIGNIA PRODUCTS N’OCTROIE AUCUNE
AUTRE GARANTIE EXPRESSE RELATIVE À CE
PRODUIT; TOUTES LES GARANTIES EXPRESSES OU
IMPLICITES POUR CE PRODUIT, Y COMPRIS MAIS
SANS LIMITATION, TOUTE GARANTIE DE QUALITÉ
MARCHANDE, D'ADÉQUATION À UN BUT PARTICULIER,
SONT LIMITÉES À LA PÉRIODE DE GARANTIE
APPLICABLE TELLE QUE DÉCRITE CI-DESSUS ET
AUCUNE GARANTIE EXPRESSE OU IMPLICITE NE
S’APPLIQUERA APRÈS LA PÉRIODE DE GARANTIE.
CERTAINS ÉTATS ET PROVINCES NE RECONNAISSENT
PAS LES LIMITATIONS DE LA DURÉE DE VALIDITÉ DES
GARANTIES IMPLICITES. PAR CONSÉQUENT, LES
LIMITATIONS SUSMENTIONNÉES PEUVENT NE PAS
S'APPLIQUER À L’ACHETEUR ORIGINAL. LA PRÉSENTE
GARANTIE DONNE À L'ACHETEUR DES GARANTIES
JURIDIQUES SPÉCIFIQUES; IL PEUT AUSSI
BÉNÉFICIER D'AUTRES GARANTIES QUI VARIENT D'UN
ÉTAT OU D'UNE PROVINCE À L'AUTRE.
Pour contacter Insignia :
Pour le service à la clientèle, appeler le 1-877-467-4289
www.insignia-products.com
INSIGNIA
Enterprise Services, Inc.
Distribué par Best Buy Purchasing, LLC.
Insignia, 7601 Penn Avenue South, Richfield, Minnesota,
U.S.A.
MC
est une marque de commerce de Best Buy
www.insignia-products.com
25
Page 28

Système audio pour l'auto avec lecteur CD et récepteur HD Radio Insignia NS-C5112
26
www.insignia-products.com
Page 29

Unidad de CD para automóvil con receptor HD Radio Insignia NS-C5112
Unidad de CD para
automóvil con
receptor HD Radio
Insignia NS-C5112
Contenido
Bienvenido . . . . . . . . . . . . . . . . . . . . . . . . . . . . . .27
Información de seguridad . . . . . . . . . . . . . . . . . .27
Características . . . . . . . . . . . . . . . . . . . . . . . . . . .27
Instalación de su unidad de CD para auto. . . . . .30
Usando su unidad para auto . . . . . . . . . . . . . . . .33
Usando la radio . . . . . . . . . . . . . . . . . . . . . . . . . .34
Uso del reproductor de CD . . . . . . . . . . . . . . . . .35
Localización y corrección de fallas . . . . . . . . . . .36
Mantenimiento . . . . . . . . . . . . . . . . . . . . . . . . . . .36
Especificaciones . . . . . . . . . . . . . . . . . . . . . . . . .37
Avisos legales . . . . . . . . . . . . . . . . . . . . . . . . . . .38
Garantía limitada de 90 días . . . . . . . . . . . . . . . .39
Bienvenido
Felicitaciones por su compra de un producto de
alta calidad de Insignia. Su NS-C5112
representa el más moderno diseño de
reproductores de CD con receptor HD Radio y
está concebido para brindar un rendimiento
seguro y sin problemas.
Información de seguridad
• Asegúrese de conectar los cables
codificados por color de acuerdo al
diagrama. Conexiones incorrectas pueden
causar que su unidad de CD para auto
funcione mal o que dañe el sistema eléctrico
del vehículo.
• Asegúrese de conectar los cables de altavoz
(-) a los terminales (-) de los altavoces.
Nunca conecte los cables de altavoz
izquierdo y derecho entre ellos o al chasis
del vehículo.
• Asegúrese de que todas las conexiones
están hechas correctamente antes de
encender su unidad de CD para auto.
• Cuando reemplace el fusible, los de
reemplazo deberán ser de la misma
capacidad que se muestra en el
portafusibles.
• No bloquee las aberturas o los paneles de
radiador. Bloquearlas puede causar que se
acumule calor adentro y puede resultar en un
incendio.
• Después de completar la instalación y antes
de usar su unidad de CD para auto o cuando
reemplace la batería del vehículo, renueva
su unidad del panel frontal y presiona el
botón RESET [Restablecer] (en la base) con
un objeto con punta (tal como un bolígrafo)
para regresar la unidad con sus ajustes de
fábrica.
• No intente modificar su unidad de CD para
auto. Modificarla puede causar un incendio.
• Depende del vehículo antes de realizar
cualquier operación que pudiera interferir con
el manejo del vehículo.
• No use su unidad de CD para auto en
temperaturas extremadamente altas o bajas.
Asegúrese de que la temperatura adentro del
vehículo se encuentra entre 140
(+60°C y -10°C) antes de encender su
unidad de CD para auto.
Características
Panel frontal
15
6
16
17
1
3
4
11
remoto
5
12
14
13
su unidad de CD para auto.
Mantenga presionado para
mostrar el nivel de volumen
actual.
de audio. Puede seleccionar
el modo de radio, modo de
reproducción de CD, o un
modo auxiliar (fuente de
entrada externa).
Presione brevemente una o
más veces para seleccionar
la opción de sonido que
desea ajustar y gire la perilla
para ajustar la opción.
Mantenga presionado para
activar o desactivar el reloj o
la alarma.
Mantenga presionado el
botón para ajustar la hora.
Cuando se reproduce un
archivo MP3, permite
mostrar información acerca
del archivo.
Recibe las señales del
control remoto. No se debe
bloquear.
el estado actual.
2
10
# Componente Descripción
1 ENCENDIDO Permite encender o apagar
2 MODO Permite seleccionar el modo
3 VOL–/VOL+/SEL Gire para ajustar el volumen.
4 VISUALIZACIÓN Permite mostrar la hora.
5 Sensor del control
6 LCD Muestra información sobre
°F y 14 °F
7
18
8
9
19
www.insignia-products.com
27
Page 30

Unidad de CD para automóvil con receptor HD Radio Insignia NS-C5112
# Componente Descripción
7 En el modo de radio, permite
8 En el modo de radio, permite
9 LIBERAR Permite liberar el panel
10 BANDA En el modo de radio,
11 HD Permite activar o desactivar
12
13 2 INTRO En el modo de radio, permite
14 3 REPETIR En el modo de radio, permite
1
seleccionar la siguiente
emisora adyacente.
Mantenga presionado el
botón para seleccionar una
emisora manualmente.
En el modo de reproducción
de CD, permite seleccionar
la siguiente pista de un CD.
Mantenga presionado el
botón para avanzar
rápidamente por un CD.
seleccionar la emisora
adyacente anterior.
Mantenga presionado el
botón para seleccionar una
emisora manualmente.
En el modo de reproducción
de CD, permite seleccionar
la pista anterior de un CD.
Mantenga presionado el
botón para retroceder
rápidamente por un CD.
frontal.
presione a una o más veces
para seleccionar una banda
de radio.
las emisoras digitales.
Cuando el indicador HD-S
ON (HD-S ACTIVADO)
aparezca en la pantalla LCD y
esté buscando una emisora,
su unidad de CD para auto
buscará entre las emisoras
digitales. Cuando el
indicador HD-S OFF (HD-S
DESACTIVADO) aparezca en
la pantalla LCD y esté
buscando una emisora, su
unidad de CD para auto
buscará entre las emisoras
normales.
En el modo de radio, permite
seleccionar la estación
programada número 1.
En el modo de CD, permite
comenzar o pausar la
reproducción.
seleccionar la estación
programada número 2.
En el modo de reproducción
de CD, permite reproducir
los primeros 10 segundos
de cada pista del CD.
seleccionar la estación
programada número 3.
En el modo de reproducción
de CD, permite repetir la
pista actual. Mantenga
presionado el botón para
repetir el CD o la carpeta de
MP3 actual.
# Componente Descripción
15 4 ALEATORIO En el modo de radio, permite
16 5 ABAJO Permite seleccionar
17 6 ARRIBA Permite seleccionar
18 SILENCIAR Permite silenciar el sonido.
19 AUXILIAR Úsela para conectar una
seleccionar la estación
programada número 4.
En el modo de reproducción
de CD, permite iniciar o
detener la reproducción
aleatoria.
opciones o archivos MP3.
opciones o archivos MP3.
Presiónelo de nuevo para
restaurar el sonido.
fuente de entrada externa.
Adentro (panel frontal abierto)
1
2
# Componente Descripción
1 Permite expulsar un CD.
2 RESTABLECER Presione para restablecer su
3 Ranura para CDs Inserte un CD en esta
3
unidad de CD para auto a los
valores predefinidos de
fábrica.
ranura.
28
www.insignia-products.com
Page 31

Unidad de CD para automóvil con receptor HD Radio Insignia NS-C5112
Control remoto
1
2
3
4
5
6
7
8
# Botón Descripción
1 HD Permite activar o desactivar
las emisoras digitales.
Cuando el indicador HD-S
ON (HD-S ACTIVADO)
aparezca en la pantalla LCD y
esté buscando una emisora,
su unidad de CD para auto
buscará entre las emisoras
digitales. Cuando el
indicador HD-S OFF (HD-S
DESACTIVADO) aparezca en
la pantalla LCD y esté
buscando una emisora, su
unidad de CD para auto
buscará entre las emisoras
normales.
2 MODO Permite seleccionar el modo
de audio. Puede seleccionar
el modo de radio, modo de
reproducción de CD, o un
modo auxiliar (fuente de
entrada externa).
3 SEL/MENÚ Presione brevemente una o
más veces para seleccionar
la opción de sonido que
desea ajustar y presione o
para ajustar la opción.
Mantenga presionado para
activar o desactivar el reloj o
la alarma.
4 BANDA En el modo de radio, permite
seleccionar la banda de
radio.
9
10
11
12
13
14
15
16
# Botón Descripción
5 AMS En el modo de radio, permite
escanear cada emisora
programada por cinco
segundos. Cuando escuche
una emisora que desea
escuchar, presione este
botón de nuevo.
Cuando sintonice una
emisora que desea
programar, mantenga
presionado este botón para
guardarla. Su unidad de CD
para auto asigna
automáticamente la emisora
a un botón (del 1 al 6).
6 RASTREAR Permite buscar la siguiente
emisora con una señal clara.
7 Números En el modo de radio,
presione a un número para
sintonizar una emisora
programada.
En el modo de CD:
1- Permite comenzar o
pausar la reproducción.
2- Permite reproducir los
primeros 10 segundos de
cada pista en el CD.
3- Permite repetir la pista
actual. Mantenga presionado
el botón para repetir el CD o
la carpeta de MP3 actual.
4- Permite iniciar o detener
la reproducción aleatoria.
5- Permite seleccionar
opciones o archivos MP3.
6- Permite seleccionar
opciones o archivos MP3.
8 VISUALIZACIÓN Permite mostrar la hora.
Mantenga presionado el
botón para ajustar la hora.
Cuando se reproduce un
archivo MP3, permite
mostrar información acerca
del archivo.
9 ENCENDIDO Permite encender o apagar
su unidad de CD para auto.
Mantenga presionado para
mostrar el nivel de volumen
actual.
10 Permite subir el volumen.
11 En el modo de radio, permite
seleccionar la emisora
adyacente anterior.
Mantenga presionado el
botón para seleccionar una
emisora manualmente.
En el modo de reproducción
de CD, permite seleccionar
la pista anterior de un CD.
Mantenga presionado el
botón para retroceder
rápidamente por un CD.
www.insignia-products.com
29
Page 32

Unidad de CD para automóvil con receptor HD Radio Insignia NS-C5112
# Botón Descripción
12 En el modo de radio, permite
13 Permite bajar el volumen.
14 ECUALIZADOR Permite seleccionar el modo
15 AMPLIFICACIÓN
DE GRAVES
16 SILENCIAR Permite silenciar el sonido.
seleccionar la siguiente
emisora adyacente.
Mantenga presionado el
botón para seleccionar una
emisora manualmente.
En el modo de reproducción
de CD, permite seleccionar
la siguiente pista de un CD.
Mantenga presionado el
botón para avanzar
rápidamente por un CD.
de ecualización. Puede
seleccionar POP, JAZZ,
CLASSIC (Clásica), NOR
(Normal) o ROCK.
Permite activar y desactivar
la función de amplificación
de graves. Con esta función
está activada, se intensifican
los tonos de audio más
bajos (los graves). Esto le
permite escuchar a los
graves sin subir el volumen.
Presione el botón de nuevo
para restaurar el sonido.
Instalación de su unidad de CD para auto
Conexiones de los cables
1
2
4
5
3
6
7
8
9
1 Izquierdo (blanco)
2 Derecho (rojo)
3 RCA frontal (gris oscuro)
4 Izquierdo (blanco)
5 Derecho (rojo)
6 RCA posterior (gris claro)
7 Receptáculo de antena
8 Agujeros de tornillos
9 Conector de salida
7
Rojo
1
Amarillo
2
Negro
3
4
Verde / Negro
Blanco / Negro
6
Verde
Blanco
5
1 Llave de encendido
2 Respaldo de memoria 12 V
3 Tierra negativa
4 Altavoz posterior izquierdo
5 Altavoz frontal izquierdo
6 Caja del estárter
7 Conector de salida
8 A la antena motorizada
9 Altavoz posterior derecho
10 Altavoz frontal derecho
Azul
Violeta / Negro
Violeta
Gris / Negro
Gris
8
9
10
30
www.insignia-products.com
Page 33

Unidad de CD para automóvil con receptor HD Radio Insignia NS-C5112
Piezas
Asegúrese de que tener las siguientes piezas.
Pieza Descripción
Chasis de montaje (1)
Perno de montaje posterior
(1)
Hule de arnés (1)
Tornillos (M5 x 5)
Marco exterior (1)
Llaves (2)
Alambre de conexión (1)
6 Deslice el panel hacia arriba hasta que
encaje en su lugar.
Extracción del panel frontal
Para extraer el panel frontal:
1 Presione el botón REL para liberar el panel
frontal.
Botón REL
Barra de acero (1)
Instalación del panel frontal
Para instalar el panel frontal:
4 Alinee la muesca en el panel frontal con el
gancho en el lado derecho de su unidad de
CD para auto y empuje el panel ligeramente.
Muesca
5 Deslice el panel ligeramente hacia la
derecha.
Gancho
2 Tire del panel frontal hacia usted hasta que
se encuentre en un ángulo de 45
° y deslícelo
hacia la izquierda para extraerlo.
www.insignia-products.com
31
Page 34

Unidad de CD para automóvil con receptor HD Radio Insignia NS-C5112
Cómo instalar su unidad para automóvil
Hay dos métodos para instalar su unidad de CD
para auto en el tablero frontal del vehículo:
Montaje frontal DIN
Para instalar su unidad de CD para auto
usando el método DIN de montaje frontal:
1 Deslice el chasis de montaje en la abertura
en el tablero del vehículo.
2 Si es necesario, doble las pestañas de
montaje para que el chasis esté apretado.
4 Deslice su unidad de CD para auto en el
chasis de montaje.
Cortafuegos
Montaje lateral con tornillos
La siguiente ilustración muestra los lugares de
los agujeros para tornillos en el lado de su
unidad de CD para auto.
Para instalar su unidad de CD para auto
usando el método de montaje lateral con
tornillos:
1 Remueva los ganchos de ambos lados de su
unidad de CD para auto.
2 Remueva los soportes de su unidad de CD
para auto.
3 Instale el marco exterior.
3 Alinee los agujeros para tornillos a los lados
de su unidad de CD para auto con los
agujeros para tornillos en el soporte de
montaje del vehículo y apriete los tornillos.
32
www.insignia-products.com
Page 35

Unidad de CD para automóvil con receptor HD Radio Insignia NS-C5112
Extracción de su unidad de CD para auto
Para extraer su unidad de CD para auto:
1 Extraiga el panel frontal. Para obtener más
información, refiérase a “Extracción del panel
frontal” en la página 31.
2 Extraiga el marco exterior.
3 Inserte las llaves suministradas en las
aberturas en ambos lados de su unidad de
CD para auto y tire de las llaves hacia
delante para extraer su unidad de CD para
auto del tablero frontal del vehículo.
Usando su unidad para auto
Encendiendo y apagando su unidad de CD para auto
Para encender y apagar su unidad de CD
para auto:
• Presione brevemente el botón PWR
(Encendido) para encender/apagar.
Ajuste del volumen
Para ajustar el volumen:
• Presione o en el control remoto o
presione VOL– o VOL+ en su unidad de CD
para auto para bajar o subir el volumen.
Nota
Puede mantener presionado el botón PWR
(Encendido) para mostrar el nivel de volumen
actual.
• Presione MUTE (Silenciar) para silenciar el
sonido. Presione MUTE (Silenciar) de nuevo
para restaurar el sonido.
Ajustando la configuración del sonido
Para ajustar la configuración del sonido:
1 Presione el botón SEL una o más veces para
seleccionar la configuración de sonido que
desea ajustar. Se puede seleccionar:
• VOL – Ajusta el volumen.
• BAS (Graves) – Ajusta los graves.
• TRE (Agudos) – Ajusta los agudos.
• FAD (Atenuador) – Ajusta el balance
entre los altavoces frontales y los
posteriores).
• BAL (Balance) – Ajusta el balance entre
los altavoces.
2 Presione o en el control remoto o gire la
perilla de volumen en su unidad de CD para
auto para ajustar la opción.
Seleccionando el modo de ecualizador
Para seleccionar el modo de ecualizador:
• Presione EQ (Ecualizador) una o más veces
para seleccionar el modo de ecualizador que
guste. Se puede seleccionar POP, JAZZ,
CLASSIC (Clásica), NOR (Normal) o ROCK.
www.insignia-products.com
Nota
Si no ajusta la configuración dentro de cinco
segundos de seleccionar el ajuste, su unidad de
CD para auto regresará automáticamente al modo
actual.
Nota
Solo puede seleccionar un modo de ecualizador
con el control remoto.
33
Page 36

Unidad de CD para automóvil con receptor HD Radio Insignia NS-C5112
Activando y desactivando la función de amplificación de graves
Con la función de amplificación de graves está
activada, se intensifican los tonos de audio más
bajos (los graves). Esto le permite escuchar a
los graves sin subir el volumen.
Nota
Sólo puede desactivar y activar la función de
amplificación de graves con el control remoto.
Para activar y desactivar la función de
amplificación de graves:
• Presione LOUD (Amplificación de graves).
Activando o desactivando el reloj o la alarma
Para activar o desactivar el reloj o la alarma
con el control remoto:
1 Mantenga presionado el botón SEL/MENU
por dos segundos para mostrar la pantalla de
reloj/alarma y presione SEL/MENU una o
más veces para seleccionar CLOCK ON
(Reloj activado) o BEEP ON (Pitido
activado).
2 Presione para seleccionar ON (Activado) o
para seleccionar OFF (Desactivado).
Mostrando la hora
Para mostrar y ajustar la hora:
• Presione el botón DISP (Visualización). La
hora actual se muestra. Presione este botón
nuevamente para cerrar la pantalla.
Ajustando la hora
Para ajustar la hora:
1 Mantenga presionado el botón DISP
(Pantalla) hasta que los dos puntos (:) en
medio de la hora comenzará a parpadear.
2 Presione en el control remoto o en su
unidad de CD para auto para ajustar la hora.
3 Presione en el control remoto o en su
unidad de CD para auto para ajustar los
minutos.
Selección del modo de audio
Usando la radio
Seleccionando la banda de radio
Para seleccionar la banda de radio:
1 Asegúrese de que se encuentra en el modo
de radio.
2 Presione el botón BND (Banda) una o más
veces para seleccionar la banda de radio. Se
puede seleccionar F1, F2, F3, A1 o A2. F1 a
F3 son bandas de FM. A1 y A2 son bandas
de AM
Sintonización automática de una emisora de radio
Para sintonizar automáticamente una
emisora de radio:
1 Asegúrese de que se encuentra en el modo
de radio.
2 Presione brevemente el botón o en el
control remoto o o en su unidad de
CD para auto. El indicador AUTO aparecerá
en la pantalla LCD y su unidad de CD para
auto buscará la siguiente emisora con señal.
Sintonización manual de una emisora de radio
Para sintonizar manualmente una emisora de
radio:
1 Asegúrese de que se encuentra en el modo
de radio.
2 Mantenga presionado el botón o en el
control remoto o o en su unidad de
CD para auto. El indicador MANUAL
aparece en la pantalla LCD.
3 Presione brevemente el botón o en el
control remoto o o en su unidad de
CD para auto una o más veces para
sintonizar la emisora que guste.
Escaneando automáticamente las emisoras
Nota
Sólo puede escanear las emisoras con el control
remoto.
Para seleccionar el modo de audio:
• Presione MOD (Modo) para seleccionar
RADIO, CD, o AUX.
Restableciendo su unidad de CD para auto
Necesitará restablecer su unidad de CD para
auto cuando:
• Lo instale por primera vez.
• Reemplace la batería del vehículo.
• Vea errores en la pantalla LCD.
Nota
Cuando restablece su unidad de CD para auto, se
borrará el ajuste del reloj y otras funciones
memorizadas.
Para restablecer su unidad de CD para auto:
• Habrá el panel frontal y presione RESET
(Restablecer).
34
www.insignia-products.com
Para escanear automáticamente las
emisoras:
1 Presione SCAN (Escanear). Su unidad de
CD para auto escaneará una estación con
señal y reproducir a cinco segundos de la
emisora antes de sintonizar la siguiente
emisora.
2 Cuando escuche una emisora que desea
escuchar, presione SCAN de nuevo.
Guardando emisoras
Puede guardar hasta seis emisoras por cada
banda de radio.
Para memorizar emisoras:
1 Asegúrese de que se encuentra en el modo
de radio.
2 Seleccione la banda de radio que tiene la
emisora que desea guardar.
Page 37

Unidad de CD para automóvil con receptor HD Radio Insignia NS-C5112
3 Sintonice la emisora que desea guardar.
4 Presione el botón AMS en el control remoto
o un botón de número de emisora
programada (1 al 6) en su unidad de CD para
auto por más de tres segundos. La emisora
queda almacenada en la memoria.
Escaneando emisoras programadas
Puede escanear las emisoras programadas. Su
unidad de CD para auto reproduce cinco
segundos de cada emisora programada antes
de ir a la siguiente emisora programada.
Nota
Sólo puede escanear las emisoras programadas
con el control remoto.
Para escanear emisoras programadas:
1 Asegúrese de que se encuentra en el modo
de radio.
2 Seleccione la banda de radio que tiene las
emisoras programadas que desea escanear.
3 Presione el botón AMS en el control remoto
para comenzar a escanear. Su unidad de CD
para auto reproduce cinco segundos de cada
emisora programada antes de ir a la
siguiente emisora programada.
4 Cuando escuche una emisora que desea
escuchar, presione AMS de nuevo.
Activando y desactivando las emisoras digitales (HD)
Para activar o desactivar las emisoras
digitales (HD):
1 Asegúrese de que se encuentra en el modo
de radio.
2 Mantenga presionado el botón HD hasta que
la pantalla LCD muestre el indicador HD-S
ON (HD-S Activado) o HD-S OFF (HD-S
Desactivado).
Cuando se muestra el indicador HD-S ON en
la pantalla LCD, se sintonizan y escanean
emisoras en la banda digital.
Uso del reproductor de CD
Discos reproducibles
Su unidad de CD para auto puede reproducir los
siguientes discos:
Tipo de
disco
CD Audio 12 cm
MP3
Etiqueta Formato
Audio 12 cm
MP3
Tamañ
o
Reproducción de un CD
Para reproducir un CD:
1 Asegúrese de que se encuentra en el modo
de reproducción de CD.
2 Presione el botón REL (Liberar) en su unidad
de CD para auto para abrir el panel frontal.
3 Inserte un CD, con la etiqueta hacia arriba en
la ranura para CDs. El CD comenzará a
reproducirse automáticamente.
Control de la reproducción de CD
Para controlar la reproducción del CD:
• Para pausar la reproducción, presione .
Para reanudar la reproducción, presione
nuevamente este botón.
• Para volver a reproducir la pista actual,
presione el botón en el control remoto o
en su unidad de CD para auto.
• Para volver a reproducir la pista anterior,
presione el botón en el control remoto o
presione dos veces el botón en su unidad
de CD para auto.
• Para reproducir la siguiente pista, presione el
botón en el control remoto o en su
unidad de CD para auto.
• Para retroceder rápidamente, mantenga
presionado el botón en el control remoto o
en su unidad de CD para auto. Suelte el
botón cuando llegue a la pista que desea
reproducir.
• Para avanzar rápidamente, mantenga
presionado el botón en el control remoto o
en su unidad de CD para auto. Suelte el
botón cuando llegue a la pista que desea
reproducir.
• Para buscar una pista, presione el botón INT.
Su unidad de CD para auto reproducirá los
primeros 10 segundos de cada pista.
Cuando escuche la pista que desea
reproducir, presione este botón de nuevo.
• Para reproducir la misma pista
repetidamente, presione el botón RPT. Para
detener la reproducción repetida, presione
este botón de nuevo.
• Para reproducir las pistas en orden aleatorio,
presione RDM (Aleatorio). Para reanudar la
reproducción normal, presione este botón de
nuevo.
Seleccionando un archivo MP3
Si el CD que está reproduciendo tiene múltiples
archivos MP3, puede seleccionar el archivo que
desea reproducir.
Para seleccionar un archivo MP3:
• Mientras se reproduce el CD, presione el
botón o en el control remoto o ARRIBA
o ABAJO en su unidad de CD para auto para
seleccionar el archivo que desea reproducir.
Mostrando información de MP3
Para mostrar información de MP3:
• Mientras se reproduce el CD, presione DISP
(Visualización) una o más veces para
mostrar la hora actual, nombre de la pista,
nombre del directorio y la información de ID3.
www.insignia-products.com
35
Page 38

Unidad de CD para automóvil con receptor HD Radio Insignia NS-C5112
Expulsando un CD
Para expulsar un CD:
1 Presione el botón REL (Liberar) en su unidad
de CD para auto para abrir el panel frontal.
2 Presione el botón para expulsar el CD.
Localización y corrección de fallas
Problema Solución
La unidad no enciende. Revise el fusible. Si se quema el
La pantalla LCD muestra
información incorrecta o no
muestra ninguna
información.
No puede reproducir
emisoras de radio
La recepción de emisoras de
radio es deficiente.
No se puede insertar un CD. Asegúrese de que no haya un CD en
El sonido se salta. El CD está sucio o dañado.
Nota
Si las soluciones anteriores no resuelven el
problema, póngase en contacto con personal
de servicio autorizado.
No intente reparar su unidad de CD para auto
usted mismo.
fusible, reemplácelo con un fusible
de la misma capacidad.
Extraiga el panel frontal y presione
RESET (Restablecer).
Asegúrese de que la antena del
vehículo esté correctamente
conectada y asegurada.
Asegúrese de que se encuentra en el
modo de radio.
Asegúrese de que la antena del
vehículo esté completamente
extendida. Si la antena no sirve,
reemplácela.
Asegúrese de que la antena del
vehículo esté conectada a tierra
correctamente.
el reproductor de CD.
3 Use un hisopo de algodón para limpiar
delicadamente el conector en su unidad de
CD para auto y el panel frontal. Tenga
cuidado de no dañar el conector.
Cuidado
No toque el conector con sus dedos o un
objeto metálico. Podría dañar el conector.
Conector
Conector
Reemplazo de la pila del control remoto
La batería de reemplazo deberá ser una pila de
celda de botón (CR2025).
Para reemplazar la pila del control remoto:
1 Mientras presione el seguro de liberación,
tire delicadamente del portapilas para
sacarlo del control remoto.
Mantenimiento
Reemplace el fusible
Asegúrese de que el fusible de reemplazo es de
la misma capacidad del fusible original. Si
reemplaza un fusible y el fusible de reemplazo
se quema, póngase en contacto con personal de
servicio autorizado.
Cuidado
Nunca use un fusible con una capacidad que
sea mayor que la del fusible original, o puede
dañar su unidad de CD para auto.
Limpieza del conector
Si el conector entre su unidad de CD para auto y
el panel frontal se ensucia, su unidad de CD
para auto puede funcionar erróneamente o dejar
de funcionar completamente.
Para limpiar el conector:
1 Apague el vehículo y saque la llave de la
ignición.
2 Extraiga el panel frontal. Para obtener más
información, refiérase a “Extracción del panel
frontal” en la página 31.
2 Extraiga la pila antigua y coloque la nueva
pila en el portapilas con el lado + hacia
arriba.
36
www.insignia-products.com
Page 39

Unidad de CD para automóvil con receptor HD Radio Insignia NS-C5112
3 Deslice el portapilas en el control remoto.
Precauciones relacionadas a las pilas
Advertencia
• El manejo incorrecto de la pila puede
resultar en una explosión.
• La pila no se puede recargar.
• No intente desmontar la pila.
• No tire la pila al fuego.
• Siempre mantenga las pilas fuera del
alcance de los niños. En caso de ingestión
de la pila, comuníquese con un médico
inmediatamente.
• Para asegurar el mejor rendimiento, limpie la
pila con un paño seco antes de instalarla.
• Asegúrese de que el lado + de la pila esté
hacia arriba.
• No toque la pila con un objeto metálico, tal
como tenazas, ya que puede causar un
cortocircuito eléctrico.
Manejo de los discos
Un disco sucio, rayado o doblado puede causar
ruido o saltos en la reproducción.
Para cuidar los discos:
Para limpiar un disco:
• Con un paño suave, limpie el disco desde el
centro hacia el borde exterior.
Cuidado
No use detergente o agentes limpiadores
abrasivos ya que estos productos dañarán la
superficie del disco.
Especificaciones
Las especificaciones están sujetas a cambio sin
aviso previo.
General
Requisitos de alimentación 14.4 V CC
(11-16 V permisible)
Impedancia de carga 4Ω
Potencia máxima de salida 40 W × 4
Controles de tono ± 10 dB
Graves 100 Hz
Dimensiones
(aproximadamente)
Dimensiones de montaje
(aproximadamente)
Peso 3.86 lb (1.75 kg)
FM
7.56×7×1.97 pulgadas
(192×178×50 mm)
6.65 × 7.17 × 2.09 pulgadas
(169×182×53 mm)
• Sujete los discos por los bordes.
• Guarde los discos en sus estuches cuando
no los esté usando.
• No exponga los discos a la luz solar directa,
humedad alta, temperatura alta o polvo. La
exposición prolongada a temperaturas
extremas puede deformar los discos.
• No pegue etiquetas ni cinta adhesiva sobre
los discos.
Rango de sintonización 87.5 a 107.9 MHz
(En los Estados Unidos)
Rango de IF 10.7 MHz
Sensibilidad utilizable 10 dB µV (-30 dB)
Relación señal-ruido 60 dB
Separación de estéreo 30 dB (1 kHz)
Respuesta en frecuencia 30 a 15000 Hz
AM
Rango de frecuencia 530 a 1710 kHz
(En los Estados Unidos)
Rango de IF 450 kHz
Sensibilidad utilizable 28 dB µV (-20 dB)
Reproductor de CD
Relación señal-ruido 65 dB
Separación 60 dB (1 kHz)
Distorsión 0.1%
www.insignia-products.com
37
Page 40

Unidad de CD para automóvil con receptor HD Radio Insignia NS-C5112
Avisos legales
FCC Parte 15
Este dispositivo satisface la parte 15 del reglamento FCC.
La operación de este producto está sujeta a las dos
condiciones siguientes: (1) Este dispositivo no puede causar
interferencia dañina, y (2) este dispositivo debe aceptar
cualquier interferencia recibida incluyendo interferencias que
puedan causar una operación no deseada.
Este equipo ha sido sometido a prueba y se ha determinado
que satisface los límites establecidos para ser clasificado
cómo dispositivo digital de la Clase B de acuerdo con la
Parte 15 del reglamento FCC. Estos límites están diseñados
para proporcionar una protección razonable contra
interferencias dañinas en un ambiente residencial. Este
equipo genera, usa y puede emitir energía de
radiofrecuencia, y si no se instala y usa de acuerdo con las
instrucciones, puede causar interferencias perjudiciales a las
comunicaciones de radio. Sin embargo, no se garantiza que
no ocurrirá interferencia en una instalación particular. Si este
equipo causa interferencias perjudiciales en la recepción de
la señal de radio o televisión, lo cual puede comprobarse
encendiendo y apagando el reproductor alternativamente,
se recomienda al usuario corregir la interferencia mediante
uno de los siguientes procedimientos:
• Cambie la orientación o la ubicación de la antena
receptora.
• Aumente la distancia entre el equipo y el receptor.
• Conecte el equipo a un tomacorriente de un circuito
distinto de aquel al que está conectado el receptor.
• Solicite consejo al distribuidor o a un técnico
calificado para obtener ayuda.
Advertencia de la FCC
Cualquier cambio o modificación que no esté aprobado
expresamente por la parte responsable por el cumplimiento
con el reglamento de FCC puede anular la autoridad del
usuario para operar este equipo.
Derechos de reproducción
© 2007 Insignia. Insignia y el logotipo de Insignia son
marcas comerciales de Best Buy Enterprise Services, Inc.
Otras marcas y nombres de productos son marcas
comerciales o marcas registradas de sus dueños
respectivos. Las especificaciones y características están
sujetas a cambio sin aviso previo u obligación.
Para reparación y soporte llamar al (877) 467-4289.
38
www.insignia-products.com
Page 41

Unidad de CD para automóvil con receptor HD Radio Insignia NS-C5112
Garantía limitada de 90 días
Insignia Products (“Insignia”) le garantiza a usted, el
comprador original de este nuevo NS-C5112 (“Producto”),
que éste se encontrará libre de defectos de material o de
mano de obra en su fabricación original por un período de 90
(noventa) días a partir de la fecha de compra del Producto
(“Período de Garantía”). Este Producto debe ser comprado
en un distribuidor autorizado de productos Insignia y
empacado con esta declaración de garantía. Esta garantía
no cubre Productos reacondicionados. Si notifica a Insignia
durante el Período de Garantía sobre un defecto cubierto
por esta garantía que requiere reparación, los términos de
esta garantía se aplican.
¿Cuánto dura la garantía?
El Período de Garantía dura por 90 (noventa) días a partir de
la fecha en que compró el Producto. La fecha de compra se
encuentra impresa en el recibo que recibió con el Producto.
¿Qué es lo que cubre esta garantía?
Durante el Período de Garantía, si un centro de reparación
autorizado de Insignia concluye que la fabricación original
del material o la mano de obra del Producto se encuentran
defectuosos Insignia (cómo su opción exclusiva): (1)
reparará el Producto con repuestos nuevos o
reacondicionados; o (2) reemplazará el Producto con uno
nuevo o con uno reacondicionado con repuestos
equivalentes. Los Productos y repuestos reemplazados bajo
esta garantía se volverán propiedad de Insignia y no se le
regresarán a usted. Si se requiere la reparación de
Productos o partes después de que se vence el Período de
Garantía, usted deberá pagar todos los costos de mano de
obra y de repuestos. Esta garantía estará vigente con tal
que usted sea el dueño de su producto Insignia durante el
periodo de garantía. El alcance de la garantía se termina si
usted vende o transfiere el producto.
¿Cómo se obtiene la reparación de garantía?
Si ha comprado el Producto en una tienda de ventas, lleve
su recibo original y el Producto a la tienda en donde lo
compró. Asegúrese de que vuelva a colocar el Producto en
su empaque original o en un empaque que provea la misma
protección que el original. Si compró el Producto en un sitio
Web, envíe por correo su recibo original y el Producto a la
dirección postal listada en el sitio Web. Asegúrese de
colocar el Producto en su empaque original o en un
empaque que provea la misma protección que el original.
Para obtener servicio de garantía a domicilio para un
televisor con una pantalla de 25 pulgadas o más, llame al
1-888-BESTBUY. El soporte técnico diagnosticará y
corregirá el problema por teléfono o enviará un técnico
certificado por Insignia a su casa.
¿En dónde es válida la garantía?
Esta garantía sólo es válida al comprador original del
producto en los Estados Unidos y en Canadá.
¿Qué es lo que no cubre la garantía?
Esta garantía no cubre:
• Capacitación del cliente
• Instalación
• Ajuste de configuración
• Daños cosméticos
• Daños debido a actos de la naturaleza, tal cómo rayos
• Accidentes
• Mal uso
• Abuso
• Negligencia
• Uso comercial
• Modificación de alguna parte del Producto, incluyendo
la antena
• Un panel de pantalla de plasma dañado por la
persistencia de imágenes estáticas (sin movimiento),
mostradas por periodos de tiempo extendido (efecto
“burn-in”).
Esta garantía tampoco cubre:
• Daño debido al uso o mantenimiento incorrecto
• La conexión a una fuente de voltaje incorrecta
• El intento de reparación por alguien que no sea una
compañía autorizada por Insignia para reparar el
Producto
• Productos vendidos tal cual (en el estado en que se
encuentran) o con todas sus fallas
• Productos consumibles, tal cómo fusibles o baterías
• Productos en los cuales el número de serie asignado
en la fábrica ha sido alterado o removido
EL REEMPLAZO DE REPARACIÓN SEGÚN PROVISTO
BAJO ESTA GARANTÍA ES SU ÚNICO RECURSO.
INSIGNIA NO SERÁ RESPONSABLE POR DAÑOS
INCIDENTALES O CONSECUENTES DEBIDO AL
INCUMPLIMIENTO DE CUALQUIER GARANTÍA EXPRESA
O IMPLÍCITA RELACIONADA CON ESTE PRODUCTO,
INCLUYENDO PERO SIN LIMITARSE A LA PÉRDIDA DE
INFORMACIÓN, LA PÉRDIDA DE NEGOCIOS O DE
GANANCIAS. INSIGNIA PRODUCTS NO HACE NINGUNA
OTRA GARANTÍA EXPRESA E IMPLÍCITA RELACIONADA
A ESTE PRODUCTO, INCLUYENDO PERO SIN
LIMITARSE A, CUALQUIER GARANTÍA IMPLÍCITA DE O
CONDICIONES DE COMERCIALIZACIÓN O IDONEIDAD
PARA UN USO PARTICULAR, ESTÁN LIMITADAS EN
DURACIÓN AL PERÍODO DE GARANTÍA DECLARADO
ANTERIORMENTE Y NINGUNA GARANTÍA YA SEA
EXPRESA O IMPLÍCITA SE APLICARÁ DESPUÉS DEL
PERÍODO DE GARANTÍA. ALGUNOS ESTADOS,
PROVINCIAS Y JURISDICCIONES NO PERMITEN
RESTRICCIONES EN CUANTO A LA DURACIÓN DE UNA
GARANTÍA IMPLÍCITA, ASÍ QUE LA RESTRICCIÓN
ANTERIOR PUEDE NO APLICARSE EN SU CASO. ESTA
GARANTÍA LE DA DERECHOS LEGALES ESPECÍFICOS,
Y USTED PUEDE POSEER OTROS DERECHOS QUE
VARÍAN DE ESTADO A ESTADO, O DE PROVINCIA A
PROVINCIA.
Comuníquese con Insignia:
Para servicio al cliente favor llamar al 1-877-467-4289
www.insignia-products.com
INSIGNIA™ es una marca comercial de Best Buy Enterprise
Services, Inc.
Distribuido por Best Buy Purchasing, LLC
Insignia, 7601 Penn Avenue South, Richfield, Minnesota,
U.S.A.
www.insignia-products.com
39
Page 42

Unidad de CD para automóvil con receptor HD Radio Insignia NS-C5112
40
www.insignia-products.com
Page 43

Page 44

www.insignia-products.com (877) 467-4289
Distributed by Best Buy Purchasing, LLC
7601 Penn Avenue South, Richfield, MN USA 55423-3645
All rights reserved. INSIGNIA is a registered trademark of Best Buy Enterprise Services, Inc.
All other products and brand names are trademarks of their respective owners.
Tous les autres produits ou noms de marques sont des marques de commerce qui appartiennent à leurs propriétaires respectifs.
Tous droits réservés. INSIGNIA est une marque déposée de Best Buy Enterprise Services, Inc.
Todos los derechos reservados. INSIGNIA es una marca registrada de Best Buy Enterprise Services, Inc.
Todos los demás productos y marcas son marcas comerciales de sus respectivos dueños.
© 2007 Best Buy Enterprise Services, Inc.
Distribué par Best Buy Purchasing, LLC
7601 Penn Avenue South, Richfield, MN USA 55423-3645
© 2007 Best Buy Enterprise Services, Inc.
Distribuido por Best Buy Purchasing, LLC
7601 Penn Avenue South, Richfield, MN USA 55423-3645
© 2007 Best Buy Enterprise Services, Inc.
07-404
 Loading...