

Page 1
Digital clock radio
Radio-réveil numérique I Reloj despertador digital con radio
NS-C2112
Page 2

Page 3
Welcome
Congratulations on your purchase of a high-quality Insignia product. Your
NS-C2112 AM/FM clock radio represents the state of the art in clock radio
design, and is designed for reliable and trouble-free performance.
Contents
Features . . . . . . . . . . . . . . . . . . . . . . . . . . . . . . . . . . . . . . . . . . 1
Setting up your clock radio . . . . . . . . . . . . . . . . . . . . . . . . . . . . 2
Using your clock radio. . . . . . . . . . . . . . . . . . . . . . . . . . . . . . . . 3
Maintaining your clock radio . . . . . . . . . . . . . . . . . . . . . . . . . . . 5
Specifications . . . . . . . . . . . . . . . . . . . . . . . . . . . . . . . . . . . . . . 6
Warranty Information . . . . . . . . . . . . . . . . . . . . . . . . . . . . . . . . 6
Français. . . . . . . . . . . . . . . . . . . . . . . . . . . . . . . . . . . . . . . . . . 8
Español . . . . . . . . . . . . . . . . . . . . . . . . . . . . . . . . . . . . . . . . . . 15
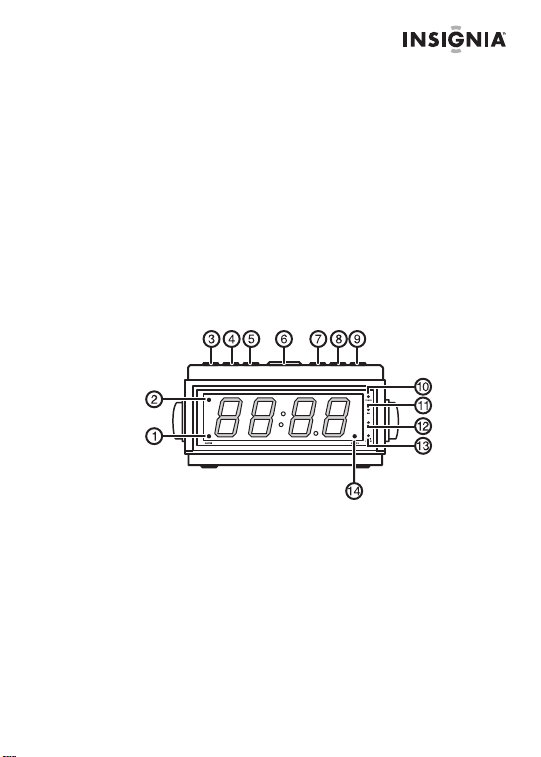
Features
Front
1 Alarm 1 indicator
2 PM indicator
3 Power On/Band button
4 Sleep button
5 Power Off/Alarm Off button
6 Snooze button
7 Alarm 1 Set button
8 Alarm 2 Set/Store button
9 Time Set/Memory button
10 Power indicator
11 FM frequency indicator
12 AM frequency indicator
13 Sleep/Alarm/Snooze indicator
14 Alarm 2 indicator
www.Insignia-Products.com
Page 4
NS-C2112 AM/FM clock radio
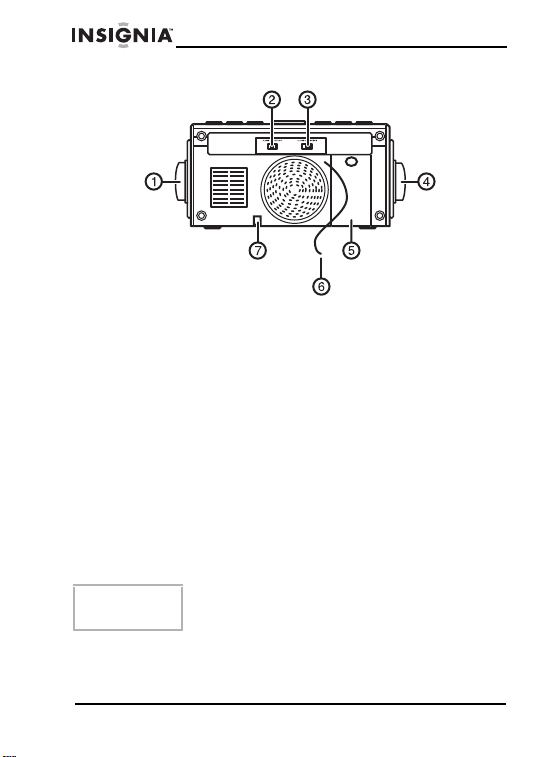
Back
1 Volume knob
2 Alarm 2 Radio/Buzzer/Off switch
3 Alarm 1 Radio/Buzzer/Off switch
4 Up/Down knob
5 Battery compartment
6 Pigtail antenna
7 AC cord
Setting up your clock radio
Power source
Your clock radio requires AC power to operate. Battery usage is for clock
backup only.
To use AC house current:
• To use AC house current plug the radio’s AC cord into an outlet.
To use batteries:
1 Open the battery cover.
2 Insert 2 AA batteries, making sure to match the polarity +/- as indicated
in the battery compartment.
3 Close the battery compartment cover.
Note The battery is only used for clock backup. When the
2
batteries drain, change them immediately.
www.Insignia-Products.com
Page 5

NS-C2112 AM/FM clock radio
Using your cloc k radio
Using the radio
To use the radio:
1 Press and hold the Power On/Band button for over one second to turn
on the radio. The power indicator turns on.
2 Adjust the volume by turning the Volume knob.
3 Select the band (AM/FM) by pressing the Power On/Band button. The
appropriate band (AM or FM) frequency indicator turns on.
4 Press the Power Off/Alarm Off button to turn off the radio.
Tuning the radio
To tune your radio automatically:
• Turn and hold the Up/Down knob for over 1 second. The radio searches
for the nearest AM/FM station.
To tune your radio manually:
• Turn the Up/Down knob. Each time you turn the knob, the frequency
changes by one step. Turn and hold the knob when searching for a
specific frequency.
STORING STATIONS IN MEMORY
You can store 20 radio stations (10 AM and 10 FM).
To select a stored station:
1 Select the band you want.
2 Press the Time Set/Memory button. The memory address (01 through
10) flashes.
3 Select the memory address you want b y pressing th e Time Set/Memory
button. The frequency is displayed.
To store a radio station:
1 Select the band and tune to the station.
2 Press the Store button. The memory address (01 through 10) flashes.
3 While the memory address flashes, turn the Up/Down knob to select the
memory address you want.
4 Press the Store button again to store the station in the sel ected mem ory
address. The radio displays the frequency.
Setting the clock
To set the clock:
1 When the radio is turned off, press the Time Set/Memory button. The
hour number flashes.
2 Turn the Up/Down knob to adjust the hour.
3 Press the Time set/Memory button again. The minute number fla shes .
4 Turn the Up/Down knob to adjust the minute.
5 Press the Time set/Memory button again to confirm.
www.Insignia-Products.com
3
Page 6

NS-C2112 AM/FM clock radio
Setting the sleep timer
To set the sleep timer:
1 Press the Sleep button. The radio turns on, plays the last tuned station,
and “30” displays.
2 Select the time (5 to 30 minutes) by repeatedly pressing the Sleep
button. The Sleep/Alarm/Snooze indicator turns on until the radio turns
off at the preset time.
3 Cancel Sleep mode by pressing the Power Off/Alarm Off button.
Using the alarm
You can set up to two alarm times. The radio must be turned off while setting
the alarm times.
SETTING THE ALARM
To set the alarm:
1 Press the Alarm 1 Set or Alarm 2 Set/Store button. The Alarm 1 or
Alarm 2 indicator turns on and the hour number flashes.
2 Turn the Up/Down knob to adjust the hour until the hour number you
want displays. (Turning and holding the knob for more than three
seconds increases the adjustment speed.)
3 Press the Alarm 1 Set or Alarm 2 Set/Store button again. The Alarm 1
or Alarm 2 indicator and the minute number flash.
4 Tur n the Up/Down knob to adjust the minute until the min ute n umber y o u
want displays.
5 Press the Alarm 1 Set or Alarm 2 Set/Store button to confirm your
settings and go back to clock mode.
6 Turn the Alarm 1 Radio/Buzzer/Off or Alarm 2 Radio/Buzzer/Off
switch to Radio or Buzzer. The Alarm 1 or Alarm 2 indicator turns on.
The Sleep/Alarm/Snooze indicator flashes while Alarm 1 or Alarm 2 is
active.
7 Press the Power Off/Alarm Off button to stop the alarm.
8 Turn the Alarm 1/Radio/Buzzer/Off or Alarm 2/Radio/Buzzer/Off
switch to Off. The Alarm 1 or 2 indicator turns off and Alarm 1 or 2 is
switched off.
Note If the two alarm times are the same, only Alarm 1 will
sound at the alarm time. If the two alarm times are close,
the first alarm will stop when the second one sounds.
Using snooze
To use snooze:
When the alarm sounds, press the Snooze button. The alarm stops and the
Alarm/Sleep/Snooze indicator flashes. After about eight minutes, the alarm
sounds again.
4
www.Insignia-Products.com
Page 7
NS-C2112 AM/FM clock radio
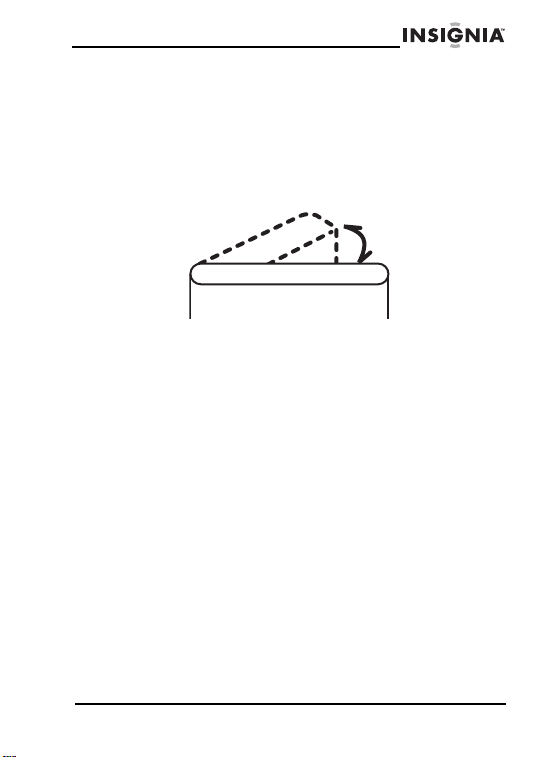
Using the antennas
FM
For good FM reception, stretch the pigtail antenna and move it until you get
the best possible reception for your selected radio station.
AM
For AM reception, there is an antenna inside the radio. For optimum
reception, rotate the clock radio until you get the best possible reception for
your selected radio station.
Maintaining your clock radio
• If the clock radio isn’t going to be used for a long time, remove all of the
batteries to prevent battery leakage.
• Keep the clock radio away from heat sources and moisture. Never spill
any liquids, especially chemical solvents, onto the clock radio.
• There is a strong magnet in the clock radio. Keep magnetism-sensitive
devices (such as credit cards, recorded tapes, and watches) away from
the clock radio.
• Do not drop or sharply strike the clock radio.
• If possible, use the radio near a window for best reception. Setting the
clock radio on metal surfaces may adversely affect reception.
• Do not use benzene, thinn er-based, or abrasive pow de r clean sers on the
clock radio’s cabinet. To clean the clock radio, wipe only with a soft cloth
moistened with a mild soap and water solution.
www.Insignia-Products.com
5
Page 8
Specifications
NS-C2112 AM/FM clock radio
Power source AC 120 V @ 60 Hz
Frequency ra nge AM 520-1710 KHz
Speaker 8 ohm 0.5 W
Power output 200 mW
2 AA batteries
FM 87.5-108 MHz
Warranty Information
LIMITED WARRANTY
Insignia Products warrants to you, the original purchaser of this Product, that
this product shall be free o f defects in material or workman s hip for a period of
ninety (90) days from the date of purchase as follows:
1 LABOR: During the Warranty Period if this Product is determined to be
defective, Insignia will repair or replace the Product, at its option at no
charge, or pay the labor charges to any Insignia authorized service
facility. After the Warranty Period, you must pay for all labor charges.
2 PARTS: In addition, Insignia will supply, at no charge, new or rebuilt
replacement parts in exchange for defective parts for the Warranty
Period. After the Warranty Period, you must pay all parts costs.
To obtain warranty service, you must take the Product with your original
receipt or other proof of purchase, either in its original packaging or
packaging affordi ng an equal deg ree of protection, to y ou r ne ares t re tail store
location of the store or online w eb site from which y ou purchased the Prod uct.
This warranty does not cover cosmetic damage or damage due to acts of
God, lightning strikes, accident, misuse, abuse, negligence, commercial use,
or modification of, or to any part of the Product, including the antenna. This
warranty does not cover damage due to improper operation or maintenance,
connection to improper voltage supply, or attempted repair by anyone other
than a facility authorized by Insignia to service the Product. This warranty
does not cover Products sold AS IS or WITH ALL FAULTS, or consumables
(such as fuses or batteries). This warranty is valid only in the United States
and Canada.
This warranty is invalid if the factory applied serial number has been altered
or removed from the Product.
6
www.Insignia-Products.com
Page 9

NS-C2112 AM/FM clock radio
REPAIR REPLA CEMENT AS PROVIDED UNDER THIS WARRANTY IS THE
EXCLUSIVE REMEDY OF THE CONSUMER. INSIGNIA SHALL NOT BE
LIABLE FOR ANY INCIDENTAL OR CONSEQUENTIAL DAMAGES FOR
BREACH OF ANY EXPRESS OR IMPLIED WARRANTY ON THIS
PRODUCT. EXCEPT TO THE EXTENT PROHIBITED BY APPLICABLE
LAW, ANY IMPLIED WARRANTY, REPRESENTATION OR CONDITION OF
MERCHANTABILITY OR FITNESS FOR A PARTICULAR PURPOSE ON
THIS PRODUCT IS LIMITED IN DURAT ION TO THE DURATION OF THIS
WARRANTY.
Some states or provinces do not allow the e xclusion or limita tion of inci denta l
or consequential damages, or allow limitations on how long an implied
warranty lasts, so the above limitations or exclusions may not apply to you.
This warranty gives you specific legal rights, and you may have other rights
which vary from state to state, or province to province.
For customer service, please call 1-877-467-4289.
www.insignia-products.com
Insignia Products, Richfield, Minnesota, U.S.A.
www.Insignia-Products.com
7
Page 10

NS-C2112 AM/FM clock radio
Bienvenue
Félicitations d’avoir acheté ce produit Insignia de haute qualité. Le
radio-réveil AM-F M NS-C 2 112 repr ésente la d ernière avancée technologique
dans la conception de radio-réveil et il a été conçu pour des performances et
une fiabilité exceptionnelles.
Tabl e des matières
Fonctionnalités . . . . . . . . . . . . . . . . . . . . . . . . . . . . . . . . . . . . . 8
Configuration du radio-réveil. . . . . . . . . . . . . . . . . . . . . . . . . . . 9
Fonctionnement du radio-réveil . . . . . . . . . . . . . . . . . . . . . . . . 10
Entretien du radio-réveil . . . . . . . . . . . . . . . . . . . . . . . . . . . . . . 12
Spécifications . . . . . . . . . . . . . . . . . . . . . . . . . . . . . . . . . . . . . . 13
Informations sur la garantie . . . . . . . . . . . . . . . . . . . . . . . . . . . 13
Droits d’auteurs. . . . . . . . . . . . . . . . . . . . . . . . . . . . . . . . . . . . . 14
Fonctionnalités
Avant
1 Témoin d’alarme 1
2 Indicateur de l’après-midi
3 Bouton mise sous tension/bande
4 Bouton d’arrêt différé
5 Bouton de mise hors tension/d’arrêt d’alarme
6 Bouton de rappel d’alarme
7 Bouton de réglage de l'alarme 1
8 Bouton de réglage/enregistrement de l’alarme 2
9 Bouton de réglage de l’heure/mémorisation
10 Témoin de mise sous tension
11 Témoin fréquence FM
12 Témoin fréquence AM
13 Témoin de rappel d’alarme/alarme/arrêt différé
14 Témoin d’alarme 2
8
www.Insignia-Products.com
Page 11

NS-C2112 AM/FM clock radio
Arrière
1 Bouton de volume
2 Bouton radio/avertisseur/arrêt de l’alarme 2
3 Bouton radio/avertisseur/arrêt de l’alarme 1
4 Bouton haut/bas
5 Compartiment des piles
6 Antenne hélicoïdale
7 Cordon d’alimentation secteur
Configuration du radio-réveil
Source d’alimentation
Ce radio-réveil fonctionne sur courant CA. L’usage des piles est réservé à
l’alimentation de secours du radio-réveil.
Pour utiliser le courant secteur CA :
• Pour utiliser le courant secteur CA, brancher le cordon CA de la radio
dans une prise murale.
Pour utiliser les piles :
1 Ouvrir le couvercle du compartiment à piles.
2 Insérer deux piles AA dans le compartiment des pile s, en respectant le
schéma de polarité +/- y indiqué.
3 Replacer le couvercle du compartiment des piles.
Remarque L’usage des piles est réservé à l’alimentation de secours
du radio-réveil. Remplacer immédiatement les piles en
cas de fuites.
www.Insignia-Products.com
9
Page 12

NS-C2112 AM/FM clock radio
Fonctionnement du radio-réveil
Fonctionnement de la radio
Pour utiliser la radio :
1 Appuyer sans relâcher sur le b outon Mise so us ten sio n/band e pendan t
une ou deux secondes pour allumer la radio. Le témoin d’alimentation
s’allume.
2 Régler le volume en tournant le bouton du Volume.
3 Sélectionner la bande (AM/FM) en appuyant sur le bouton Mise sous
tension/bande. Le témoin de bande de fréquence (AM ou FM)
approprié s’allume.
4 Appuyer sur le bouton Mise hors tension/arrêt de l’alarme pour
éteindre la radio.
Réglage de la radio
Pour syntoniser automatiquement la radio :
• Tourner et maintenir en position le bouton Haut/bas pendant plus d’une
seconde environ. L'appareil recherche la station AM/FM la plus proche.
Pour régler la radio manuellement :
• Tourner le bouton Haut/bas. La fréquence change d’un incrément
chaque fois que l’opérateur tourne le bouton. Tourner et maintenir en
position le bouton pour la recherche d'une fréquence spécifique.
MÉMORISATION DE STATIONS
Il est possible de mémoriser 20 stations radio (10 AM et 10 FM).
Pour sélectionner une station mé m ori sé e :
1 Sélectionner la bande de fréquence souhaitée.
2 Appuyer sur le bouton Réglag e de l’heure/Mémoire. L’adresse de la
mémoire (01 à 10) clignote.
3 Sélectionner l'adresse mémorisée souhaitée en appuyant sur la touche
Time Set/Memory (Réglage de l'heure/Mémoire). La fréquence
s'affiche.
Pour mémoriser une station radio :
1 Sélectionner la bande de fréquence et syntoniser la station.
2 Appuyer sur le bouton Mémoriser . L’adresse de la mémoire (01 à 10)
clignote.
3 Tandis que l’adresse de mémoire clignote, tourner le bouton Haut/Bas
pour sélectionner l’adresse de mé moire souhaitée.
4 Appuyer de nouv eau sur le bouton Mémoriser pour mémoriser la station
à l'adresse mémoire souhaitée. La radio affiche la fréquence.
Réglage de l’horloge
Pour régler l'horl og e :
1 La radio étant éteinte, appuyer sur le bouton Réglage de l’heure/
Mémoire. Le champ des heures clignote.
2 Tourner le bouton Haut/Bas pour régler l'heure.
3 Appuyer de nouveau sur le bouton Réglage de l’heure/Mémoire. Le
champ des minutes clignote.
10
www.Insignia-Products.com
Page 13

NS-C2112 AM/FM clock radio
4 Tourner le bouton Haut/Bas pour régler la minute.
5 Appuyer de nouveau sur le bouton Réglage de l’heure/Mémoire pour
confirmer.
Réglage de l’arrêt différé
Pour régler l’arrêt différé :
1 Appuyer sur le bouton Arrêt différé. La radio s’allume, joue la dernière
station écoutée et affiche « 30 ».
2 Sélectionner la durée (5 à 30 minutes) en appuyant plusieurs fois sur le
bouton Arrêt différé. Le témoin Arrêt différé/Alarme/Rappel d’alarme
s’allume jusqu’à ce que la radio s’éteigne à une heure prédéfinie.
3 Annuler le mode d’Arrêt différé en appuyant sur le bouton Mise hors
tension/Désactivati on de l’alar me .
Fonctionnement de l’alarme
Il est possible de paramétrer deux réglages d’alarme. Éteindre la radio avant
de régler les alarmes.
RÉGLAGE DE L’ALARME
Pour régler l’alarme :
1 Appuyer sur le bouton Réglag e de l’alarme 1 ou Réglage/
enregistrement de l’alarme 2. Le témoin de l’Alarme 1 ou de l’Alarme 2
s’allume et le chiffre des heures cligno te.
2 Tourner le bouton Haut/Bas pour régler les heures jusqu’à ce que
l’heure souhaitée s’affiche. (Tourner et maintenir le bouton pendant plus
de trois secondes permet d'augmenter la vitesse de réglage.)
3 Appuyer de nouveau sur le bouton Réglage de l’alarme 1 ou Réglage/
enregistrement de l’alarme 2. Le témoin de l’Alarme 1 ou de l’Alarme 2
s’allume et le chiffre des minutes clignote.
4 Tourner le bouton Haut/Bas pour régler les minutes jusqu’à ce que le
chiffre des minutes souhaité s’affiche.
5 Appuyer sur le bouton Réglag e de l’alarme 1 ou Réglage/
enregistrem ent de l’alarme 2 pour confirmer les réglages et revenir en
mode horloge.
6 Tourner le sélecteur Radio/Avertisseur d’alarme 1 désactivés ou
Radio/Avertisseur d’alarme 2 désactivés sur Radio ou Avertisseur.
Le témoin de l’alarme 1 ou de l’alarme 2 s’allume. Le témoin Arrêt
différé/Alarme/Rappel d’alarme clignote tant que l’alarme 1 ou l’alarme 2
est activée.
7 Appuyer sur la touche Power Off/Alarm Off (Mise hors tension/Alarme
désactivée) pour désactiver l'alarme.
8 Mettre le sélecteur Alarm 1/Radio/Buzzer/Off (Radio/Avertisseur
d'alarme 1 désactivé) ou Alarm 2/Radio/Buzzer/Off (Radio/Avertisseur
d'alarme 2 désactivé) sur Off (Arrêt). Le tém oin de l'alarme 1 ou 2
s'éteint et l'alarme 1 ou 2 est désactivée.
www.Insignia-Products.com
11
Page 14

NS-C2112 AM/FM clock radio
Remarque Si les deux alarmes sont réglées à la même heure,
seule l'alarme 1 retentira à l'heure prévue. Si les deux
heures pour l'alarme sont proches l'une de l'autre, la
première alarme s'arrêtera quand la deuxième
commencera à retentir.
Fonctionnement du mode rappel d’alarme
Pour activer le mode rappel d'alarme :
Lorsque l'alarme retentit, appuyer sur le bouton Rappel d'alarme. L'alarme
s'arrête et le témoin d'Alarme/Arrêt diffé ré/Rappel d' alarme clignote . L'alarme
se déclenche de nouveau au bout de 8 minutes.
Fonctionnement des antennes
FM
Pour une réception FM opti male, dép loy er l'ante nne hélicoïd ale et la déplacer
jusqu'à obtention de la meilleure réception possible pour la station radio
sélectionnée.
AM
Une antenne est prévue à l’intérieur du poste radio pour la réception AM.
Pour une réception optimale, faire pivoter le radio-réveil jusqu’à obtention de
la meilleure réception possible pour la station radio sélectionnée.
Entretien du radio-réveil
• Si le radio-réveil ne va pas être utilisé pour une longue période, retirer
toutes les piles afin d’éviter des fuites.
• Maintenir le radio-réveil à l’abri des sources de chaleur et de l’humidité.
Ne jamais renverser de liquides, des solvants chimiques en particulier,
sur le radio-réveil.
• Un aimant puissant se trouve à l’intérieur du radio-réveil. Garder les
dispositifs sensibles au magnétisme (cartes de crédit, bandes
enregistrées et montres) à l’écart du radio-réveil.
• Ne pas laisser tomber ou heurter avec force le radio-réveil.
12
www.Insignia-Products.com
Page 15

NS-C2112 AM/FM clock radio
• Placer, si possible, le radio-réveil près d'une fenêtre pour une réception
radio optimale. Le placement du radio-réveil sur une surface métallique
peut affecter la qualité de la réception.
• Ne pas utiliser de benzène ou des nettoyants en poudre abrasifs ou à
base de diluant sur le boîtier du radio-réveil. Pour nettoyer le radio-réveil,
essuyer simplement avec un chiffon doux humidifié avec une solution
d'eau savonneuse.
Spécifications
Source d’alimentation 120 V CA à 60 Hz
Gamme de fréquence AM 520 - 1710 kHz
Haut-parleur 8 ohm 0.5 W
Sortie alimentation : 200 mW
2 Piles AA
FM 87.5 - 108 MHz
Informations sur la garantie
GARANTIE LIMITÉE
Insignia Products garantit au premier acheteur de ce produit qu’il sera exempt
de vices de matériaux et de fabrication pour une période de quatre vingt dix
(90) jours à partir de la date d’achat, conformément aux détails ci-dessous :
1 MAIN-D’ŒUVRE : Pendant la période de garantie, si ce produit est
considéré comme étant défectueux, Insignia le réparera ou le
remplacera, à sa discrétion, gratuitement, ou paiera les frais de
main-d’œuvre à tout service de réparation agréé par Insignia. Au-delà
de la période de garantie, l’utilisateur sera redevable de tous les frais
afférents à la main-d’œuvre.
2 PIÈCES DÉTACHÉES : En outre, Insignia fournira gratuitement les
pièces détachées neuves ou remises à neuf, en échange des pièces
défectueuses pendant la durée de la garantie. À l’expiration de la
période de garantie le coût de toute pièce détachée sera à la charge de
l’utilisateur.
Pour obtenir le service de la garantie, le produit devra être présenté
accompagné du reçu original ou de toute autre preuv e d’achat, soit dans son
emballage original, soit dans un emball age procurant des conditions
identiques de protection, au détaillant le plus proche du magasin ou du site
Web où le produit a été acheté.
www.Insignia-Products.com
13
Page 16

NS-C2112 AM/FM clock radio
Cette garantie ne couvre pas les dommages esthétiques, ou ceux résultants
de catastrophes naturelles, de la foudre, d’un accident, d’une mauvaise
utilisation, de manipulations abusives, de négligence, d’une utilisation
commerciale ou d’une modification de tout ou partie du produit, y compris
l’antenne. Cette garantie ne couvre aucun dommage ayant pour origine une
utilisation ou une maintenance défectueuses, la connexion à une source
électrique dont la tension est inadéquate ou encore toute réparation réalisée
par quiconque autre qu’un service de réparation agréé par Insignia. Cette
garantie ne couvre pas les produits vendus « EN L’ÉTAT » ou « HORS
SERVICE », ou les consommables (tels que les fusibles ou les piles). Cette
garantie n’est applicable qu’aux États-Unis et au Canada.
La garantie perd sa val idité si l e nu méro de série usi ne a é té altér é ou enlevé
du produit.
LA RÉPARATION OU LE REMPLACEMENT, TELS QU’OFFERTS PAR LA
PRÉSENTE GARANTIE, CONSTITUENT LE SEUL RECOURS DU
CONSOMMATEUR. INSIGNIA NE POURRA PAS ÊTRE TENU POUR
RESPONSABLE DE DOMMAGES ACCESSOIRES OU CONSÉCUTIFS, OU
DE L’INEXÉCUTION D'UNE GARANTIE EXPRESSE OU IMPLICITE SUR
CE PRODUIT. SAUF DISPOSITIONS CONTRAIRES AUX LOIS ET
RÈGLEMENTS APPLICABLES, TOUTE GARANTIE IMPLICITE,
DÉCLARATION OU CONDITION DE QUALITÉ MARCHANDE OU
D’ADAPTATION À UN USAGE PARTICULIER RELATIVE À CE PRODUIT
EST LIMITÉE À LA PÉRIODE DE GARANTIE APPLICABLE TELLE QUE
DÉCRITE CI-DESSUS.
Certains états ou provinces ne permettent ni l'exclusion ni la limitation des
dommages accessoires ou consécutifs, ni les limitations implicites de durée
d'une garantie, de sorte que les limitations ou exclusions énon cées ci-dessus
peuvent être nulles dans le cas du premier acheteur. La présente garantie
donne au premier acheteur des gar anties juridiqu es spécifiques ; il pe ut aussi
bénéficier d'autres garanties qui varient d'un état ou d'une province à l'autre.
Pour le service à la clientèle, appeler le 1-877-467-4289
www.insignia-products.com
Insignia Products, Richfield, Minnesota , U.S.A.
Droits d’auteurs
© 2006 Insignia. Insignia et le logo Insignia sont des marques de commerce
de Best Buy Enterprise Services, Inc. Les autres noms de marques et de
produits mentionnés sont des marques de commerce ou des marques
déposées de leurs propriétaires respectifs. Les spécifications et
caractéristiques sont susceptibles d’être modifiées sans préavis.
14
www.Insignia-Products.com
Page 17

NS-C2112 AM/FM clock radio
Bienvenido
Felicitaciones por su compra de un producto de alta calidad de Insignia. Su
reloj despertador con radio AM/FM modelo NS-C2112 representa el más
moderno diseño de reloj despertador con radio, y está concebido para
brindar un rendimiento confiable y sin problemas.
Contenido
Características . . . . . . . . . . . . . . . . . . . . . . . . . . . . . . . . . . . . . 15
Configuración del reloj despertador con radio . . . . . . . . . . . . . 16
Uso del reloj despertador con radio . . . . . . . . . . . . . . . . . . . . . 17
Mantenimiento del reloj despertador con radio. . . . . . . . . . . . . 20
Especificaciones. . . . . . . . . . . . . . . . . . . . . . . . . . . . . . . . . . . . 20
Información sobre la garantía. . . . . . . . . . . . . . . . . . . . . . . . . . 21
Características
Frente
1 Indicador de alarma 1
2 Indicador de PM
3 Botón de encendido/banda
4 Botón de apagado automático
5 Botón de apagado/alarma apagada
6 Botón de repetición de alarma
7 Botón de establecer alarma 1
8 Botón de establecer alarma 2/guardar
9 Botón de establecer hora/memoria
10 Indicador de encendido
11 Indicador de frecuencia FM
12 Indicador de frecuencia AM
13 Indicador de apagado automático/al arma/repetición de alarma
14 Indicador de alarma 2
www.Insignia-Products.com
15
Page 18

NS-C2112 AM/FM clock radio
Posterior
1 Mando del volumen
2 Interruptor de alarma 2 radio/timbre/desactivado
3 Interruptor de alarma 1 radio/timbre/desactivado
4 Mando ascendente/descendente
5 Compartimiento de pilas
6 Antena helicoidal
7 Cable de CA
Configuración del reloj despertador
con radio
Fuente de alimentación
Su reloj despertador con radio requiere alimentaci ón de CA para funcion ar . El
uso de las pilas es para respaldo del reloj solamente.
Para usar la corriente doméstica de CA:
• Para usar la corriente doméstica de CA enchufe el cable de CA de la
radio en un tomacorriente.
Para usar las pilas:
1 Abra la cubierta de las pilas.
2 Inserte 2 pilas AA asegurándose de que la polaridad +/- coincida como
se indica en el compartimiento de las pilas.
3 Cierre la cubierta del compartimiento de las pilas.
Nota Las pilas sólo se usan para respaldo del reloj. Cuando
16
se consuman las pilas, cámbielas inmediatamente.
www.Insignia-Products.com
Page 19

NS-C2112 AM/FM clock radio
Uso del reloj despertador con radio
Uso de la radio
Para usar la radio:
1 Mantenga presionado el botón de Power On/Band (Encendido/banda)
durante más de un segundo para encender la radio. El indicador de
alimentación se encenderá.
2 Ajuste el volumen girando el mando Volume (Volumen).
3 Seleccione la banda (AM/FM) presionando el botón Power On/Band
(Encendido/banda). Se enciende el indicador de frecuencia de banda
(AM o FM) apropiado.
4 Presione el botón Power Off/Alarm Off (Apagado/alarma apagada)
para apagar la radio.
Sintonización de la radio
Para sintonizar la radio automáticamente:
• Gire sin soltar el botón Up/Down (Ascendente/descendente) durante
más de 1 segundo. La radio busca la estación AM/FM más cercana.
Para sintonizar la radio manualmente:
• Gire el mando Up/Down (Ascendente/descenden te). Cada v e z que gira
el mando, la frecuenci a ca mbia u n paso. Gire sin soltar el mando cuando
busque una frecuencia específica.
CÓMO GUARDAR ESTACIONES EN LA MEMORIA
Puede guardar 20 estaciones de radio (10 AM y 10 FM).
Para seleccionar una estación guardada:
1 Seleccione la banda deseada.
2 Presione el botón Establecer hora/memoria. La dirección de memoria
(01 a 10) parpadea.
3 Seleccione la dirección de memoria que desea presionando el botón
Time Set/Memory (Establecer hora/memoria). Se mu estra la frecuencia
en la pantalla.
Para guardar una estación de radio:
1 Seleccione la banda y sintonice la estación.
2 Presione el botón Store (Almacenar). La dirección de memoria (01 a
10) parpadea.
3 Mientras la dirección de memoria parpadea, gire el mando Up/Down
(Ascendente/descendente) para seleccionar la dirección de memoria
deseada.
4 Presione el botón Store (Almacenar) nueva mente para guardar la
estación en la dirección de memoria seleccionada. La radio muestra la
frecuencia.
www.Insignia-Products.com
17
Page 20

NS-C2112 AM/FM clock radio
Ajuste del reloj
Para ajustar el reloj:
1 Cuando la radio esté apagada, presione el botón Time Set/Memory
(Establecer hora/memoria). El número de hora parpadea.
2 Gire el mando Up/Down (Ascendente/descendente) para ajustar la
hora.
3 Presione el botón Time set/Memory (Establecer hora/memoria)
memoria nuevamente. El número de minutos parpadea.
4 Gire el mando Up/Down (Ascendente/descendente) para ajustar los
minutos.
5 Presione el botón Time set/Memory (Establecer hora/memoria)
nuevamente para confirmar.
Ajuste del temporizador de apagado automático
Para ajustar el temporizador de apagado automático:
1 Presione el botón Sleep (Apagado automático). Se enciende la radio,
reproduce la última estación sintonizada y aparece “30” en la pantalla.
2 Seleccione el tiempo (5 a 30 minutos) presionando repetidamente el
botón Sleep (Apagado automático). El indicador Sleep/Alarm/Snooze
(Apagado automático/alarma/repetición de alarma) se enciende hasta
que la radio se apaga a la hora predefinida.
3 Cancele el modo de apagado automático presionando el botón Power
Off/Alarm Off (Apagado/alarma apagada).
Uso de la alarma
Puede establecer hasta dos horas de alarma. La radio debe estar apagada
mientras establece las horas de alarma.
ESTABLECIMIENTO DE LA ALARMA
Para establecer la alarma:
1 Presione el botón Alarm 1 Set (Establecer alarma 1) o Alarm 2 Set/
Store (Establecer alarma 2/Guardar). El indicador de la alarma 1 o
alarma 2 se enciende y el número de la hora par padea.
2 Gire el mando Up/Down (Ascendente/descendente) para ajustar la hora
hasta que aparezca en la panta lla el nú mer o de l a hora (si g ira sin sol ta r
el mando durante más de tres segundos, aumentará la velocidad de
ajuste).
3 Presione el botón Alarm 1 Set (Establecer alarma 1) o Alarm 2 Set/
Store (Establecer alarma 2/Guardar). El indicador de la alarma 1 o
alarma 2 se enciende y el número de la hora par padea.
4 Gire el mando Up/Down (Ascendente/descendente) para ajustar los
minutos hasta que aparezca en la pantalla el número de los minutos.
5 Presione el botón Alarm 1 Set (Establecer alarma 1) o Alarm 2 Set/
Store (Establecer alarma 2/Guardar).
6 Gire el interruptor Alarm 1 Radio/Buzzer/Off (Alarma 1 radio/timbre/
apagado) o Alarm 2 Radio/Buzzer/Off (Alarma 2 radio/timbre /apagado)
a Radio o Buzzer (Timbre). Se enciende el indicador de alarma 2 o
alarma 2. El indicador de apagado automático/alarma/repetición de
alarma parpadea mientras que la alarma 1 o alarma 2 está activa.
18
www.Insignia-Products.com
Page 21

NS-C2112 AM/FM clock radio
7 "Presione el botón Power Off/Alarm Off (Apagado/Alarma apagada)
para apagar la alarma.
8 Gire el interruptor Alarm 1/Radio/Buzzer/Off (Alarma 1 radio/timbre/
apagado) o Alarm 2/Radio/Buzzer/Off (A larma 2 radio/timbre/a pagado)
a Off (Apagado). El indicador de Alarma 1 o 2 se apaga y la Alarma 1 o
2 esta desactivada.
Nota Si las dos horas de alarma están las mismas,
únicamente la alarma 1 sonará al tiempo de alarma. Si
las dos alarmas están cercas, la primera alarma se
parará cuando la secunda empieza a sonar.
Uso de la función de repetición de alarma
Para usar la función de repetición de alarma:
Cuando suene la alarma, presione el botón Snooze (Repetición de alarma).
La alarma se detiene y parpadea el indicador de alarma/apagado
automático/repetición de alarma. La alarma suena nuevamente después de
aproximadamente ocho minutos.
Uso de las antenas
FM
Para una bu ena recep c ión d e F M, e stire la ante na h elic oidal y m uév ala hasta
que obtenga la mejor recepción posible para su estación de radio
seleccionada.
AM
Para la recepción de AM , hay una antena al interior de la radio. Para una
óptima recepción, gire el reloj despertador con radio hasta obtener la mejor
recepción posible para la estación de radio seleccionado.
www.Insignia-Products.com
19
Page 22

NS-C2112 AM/FM clock radio
Mantenimiento del reloj despertador
con radio
• Si no va a usar el reloj despertador con radio dura nte un larg o período de
tiempo, quite las pilas para evitar fugas.
• Mantenga el reloj despertador con radio lejos de fuentes de calor y
humedad. Nunca derrame líquidos, especialmente disolventes químicos
sobre el reloj despertador con radio.
• El reloj despertador con radio contiene un imán fuerte. Mantenga los
dispositivos sensibles al magnetismo (por ejemplo tarjetas de crédito,
cintas grabadas y relojes) lejos del reloj despertador con radio.
• No deje caer ni golpee fuertemente el reloj despertador con radio.
• Si es posible, use la radio cerca de una ventana para una mejor
recepción. El poner el reloj despertador con radio sobre superficies
metálicas puede afectar adversamente la recepción.
• No use limpiadores en polvo abrasivos, diluyentes o benceno en el
gabinete del reloj despertador con radio. P a ra limp iar el reloj despertador
con radio, use sólo un paño suav e hume decido con un a solución de agua
y jabón suave.
Especificaciones
Fuente de
alimentación
Rango de frecuencia AM 520 - 1710 KHz
Altavoz 8 ohm 0.5 W
Potencia de salida: 200 mW
20
CA 120 V @ 60 Hz
2 Pilas AA
FM 87.5 - 108 MHz
www.Insignia-Products.com
Page 23

NS-C2112 AM/FM clock radio
Información sobre la garantía
GARANTIA LIMITADA
Insignia Products le garantiza a usted, el comprador original de este
producto, que estará libre de defectos de material o fabricación durante un
periodo de noventa (90) días contados a partir de la fecha de compra, según
como se indica a continuación:
1 MANO DE OBRA: Durante el Periodo de Garantía, si se encuentra que
este producto esta defectuoso, Insignia reparará o reemplazará el
Producto, a su discreción sin costo alguno, o pagará los cargos de
reparación a un centro autorizado de servicio de Insignia. Después del
período de garantía, usted deberá cubrir todos los gastos de mano de
obra.
2 REPUESTOS: Además, Insignia proveerá, sin costo alguno, repuestos
ya sean nuevos o como nuevos como reemplazo de los componentes
que se encuentren defectuosos durante el Período de Garantía.
Después del período de garantía, usted deberá cubrir todos los gastos
de repuestos.
Para obtener servicio de garantía, usted deberá llevar el Producto con su
recibo original u otra prueba de compra, ya sea en su empaque original o en
un empaque que proporcione el mismo grado de protección, al centro de
venta más cercano de la tienda o del sitio Web dónde usted compró el
Producto. Esta garant ía no abarca da ños cosméticos , o daños p or fuerzas de
la naturaleza, rayos, accidentes, uso indebido, abuso, negligencia, uso
comercial o modificación de algun a parte del Pr oduct o, incluyendo la antena.
Esta garantía no abarca daño debido a operación o mantenimiento
inadecuado, conexión a una fuente de voltaje inadecuada, o el intento de
reparación por parte de cualquier persona excepto un representante
autorizado por Insignia para llevar a cabo dicha reparación del Producto . Esta
garantía no abarca productos vendidos TAL CUAL (en el estado en que se
encuentran) o CON TODAS FALLAS o consumibles (tales como fusibles o
pilas). Esta garantía es valida únicamente en Los Estados Unidos de
América y Canadá. Esta garantía es inválida si el número de serie aplicado
en la fábrica ha sido alterado o removido del Producto.
REPARACIÓN O REEMPLAZO PROVEÍDOS MEDIANTE ESTA GARANTÍA
SON LA ÚNICA SOLUCIÓN OFRECIDA AL CLIENTE. INSIGNIA NO SERÁ
RESPONSABLE POR CUALQUIER DAÑOS INCIDENTALES O DIRECTOS
CAUSADOS POR LA VIOLACIÓN DE CUALQUIER GARANTÍA EXPRESA
O IMPLÍCITA PARA CON ESTE PRODUCTO. CON EXCEPCIÓN DEL
ALCANCÉ PERMITIDO POR LA LEY, CUALQUIER GARANTÍA IMPLÍCITA
REPRESENTACIÓN O CONDICIÓN DE COMERCIALIZACIÓN O
ADECUACIÓN PARA UN FIN DETERMINADO ESTÁ LIMITADO POR LA
DURACIÓN DE LA GARANTÍA.
www.Insignia-Products.com
21
Page 24

NS-C2112 AM/FM clock radio
Dado que algunos estados o provi ncias no permiten la e xcl usión o imposición
de limitaciones sobre daños y perjuicios incidentales o directos en cuanto al
tiempo que una garantía implícita durará, es posible que la limitación o
exclusión anteriormente indicada no se aplique en su caso. Esta garantía le
da derechos legales específicos, y usted puede poseer otros derechos que
varían de estado a estado, o provincia a provincia. Para servicio al cliente
favor llamar al 1-877-467-4 289 www .insignia-pro ducts.com Insi gnia Products,
Richfield, Minnesota, U.S.A.
Derechos de reproducción
© 2006 Insignia. Insignia y el logotipo de Insignia son marcas de comerci o de
Best Buy Enterprise Services, Inc. Otras marcas y nombres de productos
son marcas de comercio o marcas registradas de sus dueños respectivos.
Las especificaciones y característ icas est án sujetas a cambio sin a viso pre vio
u obligación.
22
www.Insignia-Products.com
Page 25

Page 26

Distributed by Insignia™ Products
Distribué par Insignia™ Products
Distribuido por Insignia™ Products
7601 Penn Avenue South, Richfield, MN USA 55423-3645
© 2006 Insignia™ Products All rights reserved. All other products and brand names aretrademarks of
© 2006 produits Insignia™ T ous droits réservés. Tous les autres produits ou noms de marques sont
des marques de commerce qui appartiennent à leurs propriétaires respectifs.
© 2006 productos Insignia™ T odos los derechos reservados. Todos los demás productos y marcas
www.Insignia-Products.com
their respective owners.
son marcas comerciales de sus respectivos dueños.
 Loading...