

Page 1

User Guide
Blu-Ray Disc Home Theater System
NS-BRHTIB
Page 2

Contents
Important safety instructions . . . . . . . . . . . . . . . . . . . . . . . . . . . . . . . . . . . . . . . . . . .1
Introduction . . . . . . . . . . . . . . . . . . . . . . . . . . . . . . . . . . . . . . . . . . . . . . . . . . . . . . . . . . .2
Features . . . . . . . . . . . . . . . . . . . . . . . . . . . . . . . . . . . . . . . . . . . . . . . . . . . . . . . . . . . . . . .2
Package contents . . . . . . . . . . . . . . . . . . . . . . . . . . . . . . . . . . . . . . . . . . . . . . . . . . . . . . . . . . . . . . . 2
Front . . . . . . . . . . . . . . . . . . . . . . . . . . . . . . . . . . . . . . . . . . . . . . . . . . . . . . . . . . . . . . . . . . . . . . . . . . . 2
Back . . . . . . . . . . . . . . . . . . . . . . . . . . . . . . . . . . . . . . . . . . . . . . . . . . . . . . . . . . . . . . . . . . . . . . . . . . . 3
Remote control . . . . . . . . . . . . . . . . . . . . . . . . . . . . . . . . . . . . . . . . . . . . . . . . . . . . . . . . . . . . . . . . . 3
Setting up your player . . . . . . . . . . . . . . . . . . . . . . . . . . . . . . . . . . . . . . . . . . . . . . . . . .4
Installing remote control batteries . . . . . . . . . . . . . . . . . . . . . . . . . . . . . . . . . . . . . . . . . . . . . . 4
Connecting a TV with an HDMI cable (best) . . . . . . . . . . . . . . . . . . . . . . . . . . . . . . . . . . . . . . 5
Connecting a TV with a component video cable (better) . . . . . . . . . . . . . . . . . . . . . . . . . 5
Connecting a TV with an A/V cable (good) . . . . . . . . . . . . . . . . . . . . . . . . . . . . . . . . . . . . . . . 5
Connecting an HDMI device . . . . . . . . . . . . . . . . . . . . . . . . . . . . . . . . . . . . . . . . . . . . . . . . . . . . 6
Connecting a game system or audio device with a digital audio cable . . . . . . . . . . . . 6
Connecting a game or audio device with a standard (stereo) audio cable . . . . . . . . . 6
Connecting speakers . . . . . . . . . . . . . . . . . . . . . . . . . . . . . . . . . . . . . . . . . . . . . . . . . . . . . . . . . . . 6
Connecting radio antennas . . . . . . . . . . . . . . . . . . . . . . . . . . . . . . . . . . . . . . . . . . . . . . . . . . . . . 7
Using your player . . . . . . . . . . . . . . . . . . . . . . . . . . . . . . . . . . . . . . . . . . . . . . . . . . . . . .7
Playable discs . . . . . . . . . . . . . . . . . . . . . . . . . . . . . . . . . . . . . . . . . . . . . . . . . . . . . . . . . . . . . . . . . . 7
Playing a Blu-ray Disc or DVD . . . . . . . . . . . . . . . . . . . . . . . . . . . . . . . . . . . . . . . . . . . . . . . . . . . 7
Controlling Blu-ray Disc or DVD playback . . . . . . . . . . . . . . . . . . . . . . . . . . . . . . . . . . . . . . . . 7
Playing files on a data disc or USB memory stick . . . . . . . . . . . . . . . . . . . . . . . . . . . . . . . . . 8
Playing an audio CD . . . . . . . . . . . . . . . . . . . . . . . . . . . . . . . . . . . . . . . . . . . . . . . . . . . . . . . . . . . . 9
Controlling audio CD playback . . . . . . . . . . . . . . . . . . . . . . . . . . . . . . . . . . . . . . . . . . . . . . . . . . 9
Displaying Blu-ray Disc information . . . . . . . . . . . . . . . . . . . . . . . . . . . . . . . . . . . . . . . . . . . . . 9
Searching for a title, chapter, or elapsed time . . . . . . . . . . . . . . . . . . . . . . . . . . . . . . . . . . . . 9
Repeating a title, chapter, or CD track . . . . . . . . . . . . . . . . . . . . . . . . . . . . . . . . . . . . . . . . . . . 9
Creating a playback loop on a DVD or audio CD . . . . . . . . . . . . . . . . . . . . . . . . . . . . . . . . . 9
Viewing photographs . . . . . . . . . . . . . . . . . . . . . . . . . . . . . . . . . . . . . . . . . . . . . . . . . . . . . . . . . . . 9
Using PIP (picture-in-picture) mode . . . . . . . . . . . . . . . . . . . . . . . . . . . . . . . . . . . . . . . . . . . . 10
Using a disc popup menu . . . . . . . . . . . . . . . . . . . . . . . . . . . . . . . . . . . . . . . . . . . . . . . . . . . . . .10
Selecting a play source . . . . . . . . . . . . . . . . . . . . . . . . . . . . . . . . . . . . . . . . . . . . . . . . . . . . . . . .10
Selecting the audio mode . . . . . . . . . . . . . . . . . . . . . . . . . . . . . . . . . . . . . . . . . . . . . . . . . . . . . . 10
Adjusting the audio . . . . . . . . . . . . . . . . . . . . . . . . . . . . . . . . . . . . . . . . . . . . . . . . . . . . . . . . . . .11
Selecting a viewing angle . . . . . . . . . . . . . . . . . . . . . . . . . . . . . . . . . . . . . . . . . . . . . . . . . . . . . . 11
Selecting the on-screen menu language . . . . . . . . . . . . . . . . . . . . . . . . . . . . . . . . . . . . . . .11
Selecting the disc menu language . . . . . . . . . . . . . . . . . . . . . . . . . . . . . . . . . . . . . . . . . . . . .11
Selecting the audio language . . . . . . . . . . . . . . . . . . . . . . . . . . . . . . . . . . . . . . . . . . . . . . . . . .12
Selecting the subtitle language . . . . . . . . . . . . . . . . . . . . . . . . . . . . . . . . . . . . . . . . . . . . . . . .12
Determining whether an HDMI TV is connected . . . . . . . . . . . . . . . . . . . . . . . . . . . . . . . . 12
Automatically determining the best HDMI resolution . . . . . . . . . . . . . . . . . . . . . . . . . . . 12
Selecting the video output resolution . . . . . . . . . . . . . . . . . . . . . . . . . . . . . . . . . . . . . . . . . . 12
Selecting the TV aspect ratio . . . . . . . . . . . . . . . . . . . . . . . . . . . . . . . . . . . . . . . . . . . . . . . . . . . 13
Turning film mode on or off . . . . . . . . . . . . . . . . . . . . . . . . . . . . . . . . . . . . . . . . . . . . . . . . . . . . 13
Selecting the digital audio output mode . . . . . . . . . . . . . . . . . . . . . . . . . . . . . . . . . . . . . . .14
Turning dynamic range control on or off . . . . . . . . . . . . . . . . . . . . . . . . . . . . . . . . . . . . . . . 14
Setting the parental control password . . . . . . . . . . . . . . . . . . . . . . . . . . . . . . . . . . . . . . . . . . 14
Turning parental controls on or off . . . . . . . . . . . . . . . . . . . . . . . . . . . . . . . . . . . . . . . . . . . . . 14
ii
www.insigniaproducts.com
Page 3

Contents
Selecting the parental control country . . . . . . . . . . . . . . . . . . . . . . . . . . . . . . . . . . . . . . . . . 15
Setting the parental control level . . . . . . . . . . . . . . . . . . . . . . . . . . . . . . . . . . . . . . . . . . . . . .15
Setting automatic disc playback mode . . . . . . . . . . . . . . . . . . . . . . . . . . . . . . . . . . . . . . . . . 15
Setting the BD-Live Internet access level . . . . . . . . . . . . . . . . . . . . . . . . . . . . . . . . . . . . . . .16
Viewing available BD-Live storage space . . . . . . . . . . . . . . . . . . . . . . . . . . . . . . . . . . . . . . .16
Erasing BD-Live storage . . . . . . . . . . . . . . . . . . . . . . . . . . . . . . . . . . . . . . . . . . . . . . . . . . . . . . . . 16
Setting the screen saver activation time . . . . . . . . . . . . . . . . . . . . . . . . . . . . . . . . . . . . . . . . 16
Resetting settings to the factory defaults . . . . . . . . . . . . . . . . . . . . . . . . . . . . . . . . . . . . . . .17
Downloading player update software . . . . . . . . . . . . . . . . . . . . . . . . . . . . . . . . . . . . . . . . . . 17
Determining if the network connection is active . . . . . . . . . . . . . . . . . . . . . . . . . . . . . . . . 17
Configuring the Internet connection . . . . . . . . . . . . . . . . . . . . . . . . . . . . . . . . . . . . . . . . . . . 17
Testing the network configuration’s connectivity . . . . . . . . . . . . . . . . . . . . . . . . . . . . . . . 18
Playing files on a portable media player . . . . . . . . . . . . . . . . . . . . . . . . . . . . . . . . . . . . . . . . 18
Listening to the radio . . . . . . . . . . . . . . . . . . . . . . . . . . . . . . . . . . . . . . . . . . . . . . . . . . . . . . . . . . 18
Scanning for stations and storing radio presets . . . . . . . . . . . . . . . . . . . . . . . . . . . . . . . . . 18
Maintaining . . . . . . . . . . . . . . . . . . . . . . . . . . . . . . . . . . . . . . . . . . . . . . . . . . . . . . . . . . 18
General guidelines . . . . . . . . . . . . . . . . . . . . . . . . . . . . . . . . . . . . . . . . . . . . . . . . . . . . . . . . . . . . 18
Electrical disturbance . . . . . . . . . . . . . . . . . . . . . . . . . . . . . . . . . . . . . . . . . . . . . . . . . . . . . . . . . .19
Condensation . . . . . . . . . . . . . . . . . . . . . . . . . . . . . . . . . . . . . . . . . . . . . . . . . . . . . . . . . . . . . . . . .19
Storing discs . . . . . . . . . . . . . . . . . . . . . . . . . . . . . . . . . . . . . . . . . . . . . . . . . . . . . . . . . . . . . . . . . . 19
Handling discs . . . . . . . . . . . . . . . . . . . . . . . . . . . . . . . . . . . . . . . . . . . . . . . . . . . . . . . . . . . . . . . . . 19
Cleaning discs . . . . . . . . . . . . . . . . . . . . . . . . . . . . . . . . . . . . . . . . . . . . . . . . . . . . . . . . . . . . . . . . . 19
FAQ (frequently asked questions) . . . . . . . . . . . . . . . . . . . . . . . . . . . . . . . . . . . . . 19
Troubleshooting . . . . . . . . . . . . . . . . . . . . . . . . . . . . . . . . . . . . . . . . . . . . . . . . . . . . . 20
Resetting your player . . . . . . . . . . . . . . . . . . . . . . . . . . . . . . . . . . . . . . . . . . . . . . . . . . . . . . . . . . 20
Power . . . . . . . . . . . . . . . . . . . . . . . . . . . . . . . . . . . . . . . . . . . . . . . . . . . . . . . . . . . . . . . . . . . . . . . . . 20
Operation . . . . . . . . . . . . . . . . . . . . . . . . . . . . . . . . . . . . . . . . . . . . . . . . . . . . . . . . . . . . . . . . . . . . .20
TV screen and video . . . . . . . . . . . . . . . . . . . . . . . . . . . . . . . . . . . . . . . . . . . . . . . . . . . . . . . . . . . 21
HDMI connections . . . . . . . . . . . . . . . . . . . . . . . . . . . . . . . . . . . . . . . . . . . . . . . . . . . . . . . . . . . . .21
BD-Live and USB connections . . . . . . . . . . . . . . . . . . . . . . . . . . . . . . . . . . . . . . . . . . . . . . . . . . 21
Other playback problems . . . . . . . . . . . . . . . . . . . . . . . . . . . . . . . . . . . . . . . . . . . . . . . . . . . . . .21
Specifications . . . . . . . . . . . . . . . . . . . . . . . . . . . . . . . . . . . . . . . . . . . . . . . . . . . . . . . . 22
Video file requirement (USB/DISC) . . . . . . . . . . . . . . . . . . . . . . . . . . . . . . . . . . . . . . . . . . . . . 22
MP3/WMA audio file requirement (USB/DISC) . . . . . . . . . . . . . . . . . . . . . . . . . . . . . . . . . . 22
Photo file requirement (USB/DISC) . . . . . . . . . . . . . . . . . . . . . . . . . . . . . . . . . . . . . . . . . . . . . 22
Legal notices . . . . . . . . . . . . . . . . . . . . . . . . . . . . . . . . . . . . . . . . . . . . . . . . . . . . . . . . . 23
One-year limited warranty . . . . . . . . . . . . . . . . . . . . . . . . . . . . . . . . . . . . . . . . . . . . .27
www.insigniaproducts.com
iii
Page 4

Contents
iv
www.insigniaproducts.com
Page 5
CAUTION
RISK OF ELECTRIC SHOCK
DO NOT OPEN
The lightning flash with arrowhead symbol within an equilateral
triangle is intended to alert you to the presence of uninsulated
dangerous voltage within your player’s enclosure that may be of
sufficient magnitude to constitute a risk of electric shock to
persons.
The exclamation point within an equilateral triangle is intended
to alert you to the presence of important operating and
maintenance (servicing) instructions in the literature that came
with your player.
This symbol is the symbol for CLASS II (Double Insulation).
Warning
Your player employs a laser system.
Use of controls, adjustments, or the
performance of procedures other
than those specified may result in
hazardous radiation exposure.
Visible laser radiation is present when open and
interlocks defeated. Do not stare into the beam.
Disposal of your old appliance
1. When this crossed-out wheeled bin symbol is attached to a
product, it means the product is covered by the European
Directive 2002/96/EC.
2. All electrical and electronic products should be disposed of
separately from the municipal waste stream via designated
collection facilities appointed by the government or the local
authorities.
3. The correct disposal of your old appliance will help prevent
potential negative consequences for the environme nt and
human health.
4. For more detailed information about disposal of your old
appliance, please contact your city office, waste disposal service
or the shop where you purchased the product.
Important safety instructions
1 Read these instructions.
2 Keep these instructions.
3 Heed all warnings.
4 Follow all instructions.
5 Do not use this apparatus near water.
6 Clean only with a dry cloth.
7 Do not block any ventilation openings. Install in
accordance with the manufacturer's
instructions.
8 Do not install near any heat sources such as
radiators, heat registers, stoves, or other
apparatus (including amplifiers) that produce
heat.
9 Do not defeat the safety purpose of the
polarized or grounding-type plug. A polarized
plug has two blades with one wider than the
other. A grounding type plug has two blades
and a third grounding prong. The wide blade or
the third prong are provided for your safety. If
the provided plug does not fit into your outlet,
consult an electrician for replacement of the
obsolete outlet.
10 Protect the power cord from being walked on or
pinched particularly at plugs, convenience
receptacles, and the point where they exit from
the apparatus.
11 Only use attachments/accessories specified by
the manufacturer.
12 Use only with the cart, stand,
tripod, bracket, or table specified
by the manufacturer, or sold with
the apparatus. When a cart is used,
use caution when moving the
cart/apparatus combination to
avoid injury from tip-over.
13 Unplug this apparatus during lightning storms
or when unused for long periods of time.
14 Refer all servicing to qualified service personnel.
Servicing is required when the apparatus has
been damaged in any way, such as
power-supply cord or plug is damaged, liquid
has been spilled or objects have fallen into the
apparatus, the apparatus has been exposed to
rain or moisture, does not operate normally, or
has been dropped.
15 To reduce the risk of fire or electric shock, do not
expose this device to rain, moisture, dripping, or
splashing, and no objects filled with liquids,
such as vases, shall be placed on it.
16 An apparatus with a three-prong,
grounding-type plug is a Class I apparatus,
which needs to be grounded to prevent
possible electric shock. Make sure that you
connect this Class I device to a grounding-type,
three-prong outlet.
17 The wall plug is the disconnecting device. The
plug must remain readily operable.
18 Keep a minimum distance of 4 inches (10cm)
around the apparatus for sufficient ventilation.
19 Do not install this equipment in a confined
space such as book case or similar unit. The
ventilation should not be impeded by covering
the ventilation openings with items such as
newspaper, table-cloths, or curtains.
20 Batteries should not be exposed to excessive
heat such as sunshine, fire, or the like.
Caution
Danger of explosion if battery is incorrectly replaced. Replace
only with the same or equivalent type.
www.insigniaproducts.com
1
Page 6
NS-BRHTIB Blu-ray Disc Home Theater System
Blu-ray Disc Home Theater System
Introduction
Congratulations on your purchase of a high-quality
Insignia product. Your NS-BRHTIB represents the
state of the art in high-definition Blu-ray player
design, and is designed for reliable and trouble-free
performance.
Features
• Disc capacity: one
• 640 Watts total power
• Disc compatibility: Blu-ray Discs, BD-R, BD-RE,
DVD, DVD-/+R/RW, CD, CD-R/RW, MP3, and WMA
• Blu-ray Profile 2.0 with BD Live capabilities
(including USB and Ethernet ports)
• Upconvert to 1080p over HDMI
• AM/FM digital tuner with 20 AM and 20 FM
presets
• 85 Watts per channel @ 3% THD +/- 3 dB
• Speakers: 85 Watts per channel @ THD+N,
Impedance: 6 Ohms
• Inputs: two stereo, 1/8 mini jack, one USB, one
coaxial, one optical, and one HDMI
• Outputs: one stereo audio, one composite video,
one component video, one HDMI, and one
headphone jack
Package contents
• Blu-ray Disc player
• 5.1 channel speakers
• Remote control
• Batteries (2 AAA)
• AM antenna
•FM antenna
• AV cable 3.94 feet (1.2 meter)
•Speaker wire
•User Guide
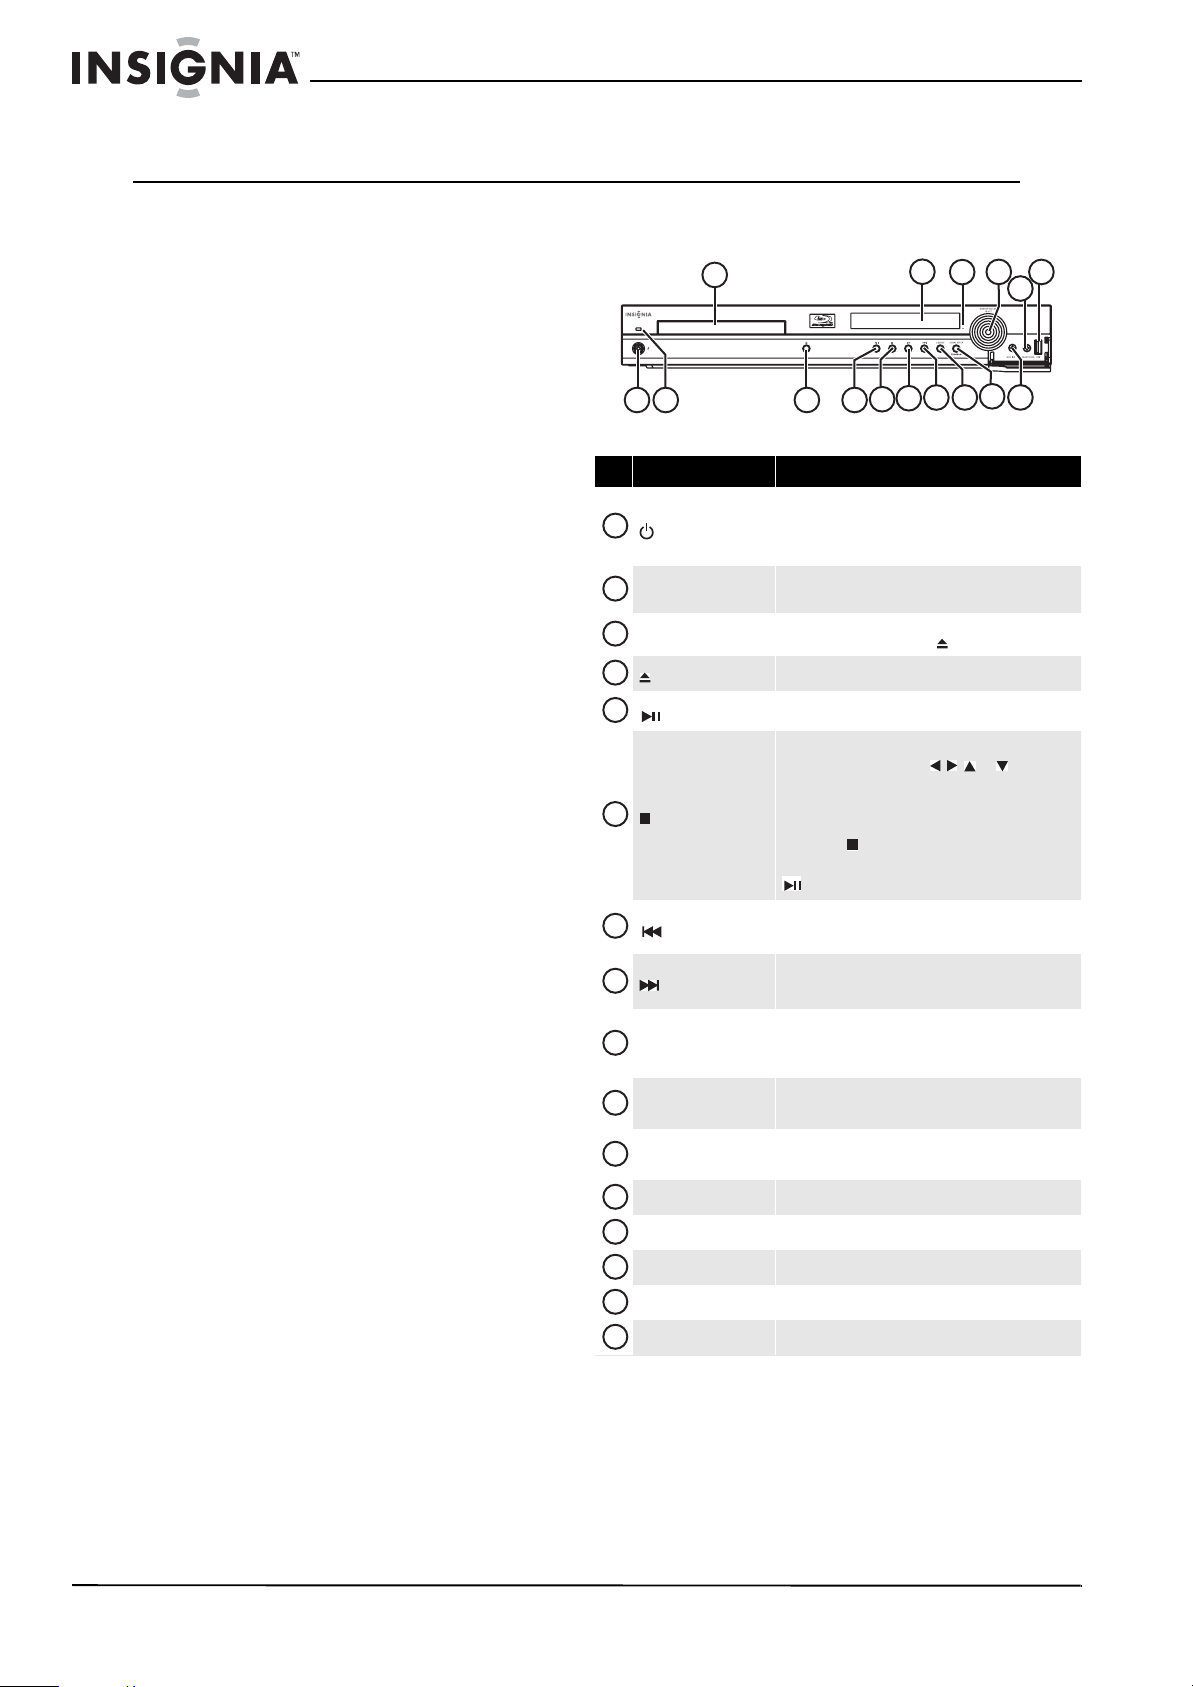
Front
13
3
2
1
4 5
# Item Description
Press to turn on your player or put your player in
1
(standby/on)
2
Power indicator
3
Disc tray
4
(open/close) Press to open or close the disc tray.
5
(play/pause)
6
(stop)
7
(previous)
8
(next)
9
SOURCE
10
AUDIO SETUP/ POGRAM
11
AUX IN 3
12
VFD screen Displays status information.
13
Remote control sensor Receives signals from the remote control. Do not block.
14
MASTER VOLUME SELECT Rotate to increase or decrease the overall volume.
15
HEADPHONE Connect headphones to this jack.
16
USB port Connect a USB flash drive to this port.
standby mode. When your player is in standby mode,
power is still entering your player. To disconnect
power, unplug the power cord.
Lights blue when your player is turned on.
Lights red when your player is turned off.
Insert a disc with the label side up into this tray. To
open or close the tray, press (open/close).
Press to start or pause playback.
Press to stop playback. The Setup menu is displayed.
To resume playback, press or to select
DVD/BD- ROM, then press ENTER. Depending on the
disc, playback starts where it stopped or at the
beginning of the disc.
If you press (stop) twice, playback stops
completely. To start playback again, press
(play/pause).
Press to go to the previous title, chapter, or track.
Press and hold to fast reverse.
Press to go to the next title, chapter, or track.
Press and hold to fast forward.
Press to select an input source. You can select
COAX IAL IN , OPTICAL IN, AUX IN 1, AUX IN 2,
AUX IN 3 , RADIO, BD IN, HDMI IN 1, or HDMI IN 2.
Press to access audio settings. Press again to exit. In
radio mode, press to manually reset a preset station.
Connect a portable media player, such as an MP3
player, to this jack.
12
8 9 10
7
6
14
16
15
11
2
www.insigniaproducts.com
Page 7
Blu-ray Disc Home Theater System
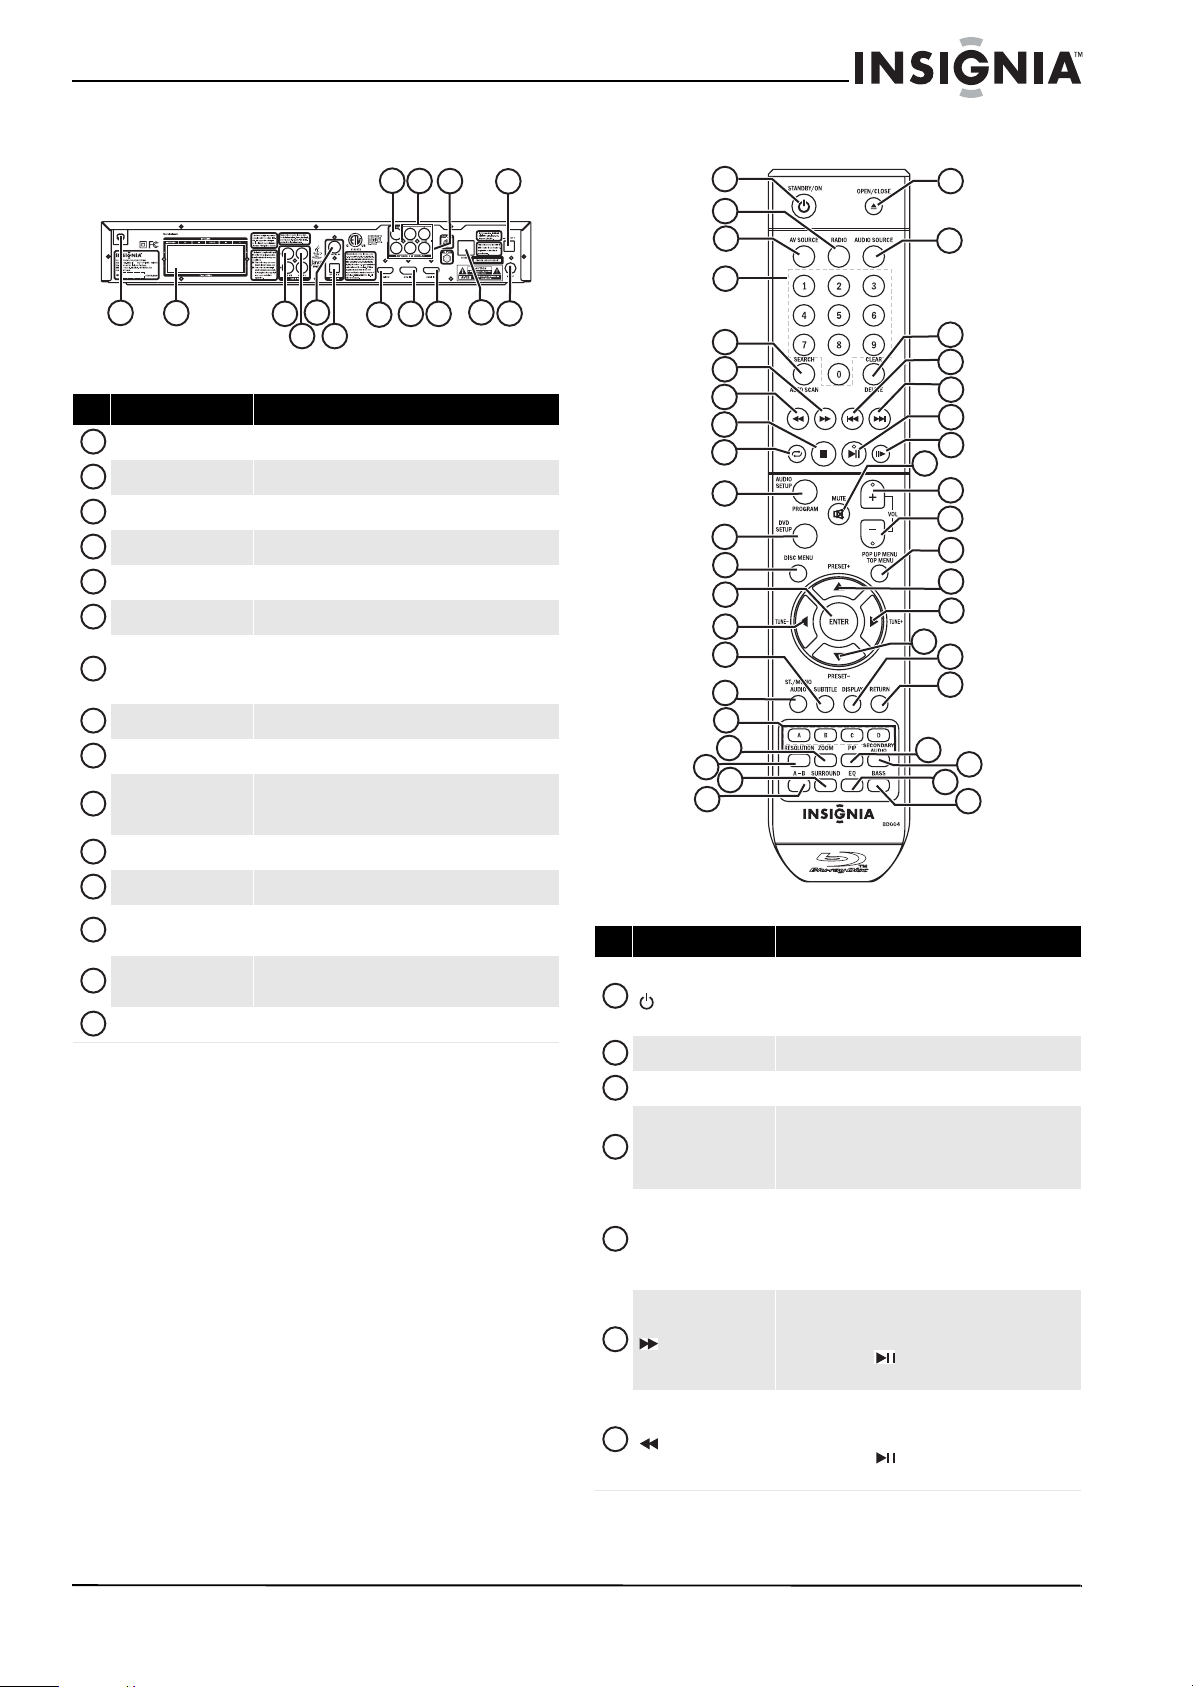
Back Remote control
13
14
12
1
2
5
3
4
6
8 9
7
# Item Description
1
Power connector Plug the power cord into a power outlet.
2
SPEAKERS Connect 5.1 surround sound speakers to these jacks.
3
AUX IN 1 L/R Connect an analog audio device to these jacks.
4
AUX IN 2 L/R Connect an analog audio device to these jacks.
5
COAXIAL IN Connect a digital coaxial sound system to this jack.
6
OPTICAL IN Connect a digital optical sound system to this jack.
7
HDMI OUT
8
HDMI IN 1 Connect an HDMI device to this jack.
9
HDMI IN 2 Connect an HDMI device to this jack.
10
ETHERNET
11
FM ANT Connect an FM antenna to this jack.
12
VIDEO OUT Connect the video for a composite TV to this jack.
Connect a TV to this jack using an HDMI cable. An
HDMI cable carries both video and audio. You do not
need to make an audio connection.
Connect an ethernet cable to th is jack and to a
broadband Internet jack to download BD-Live
informati on.
10
15
11
19
21
10
11
12
13
14
15
16
17
1
2
3
4
5
6
7
8
9
18
20
29
35
38
22
23
24
25
26
27
28
30
31
32
33
34
36
37
39
40
41
13
AUDIO OUT
Y, CB/PB, CR/PR
14
component video
15
–AM ANT+ Connect an AM antenna to these jacks.
If the TV is connected to the VIDEO OUT or Y, CB/PB,
and CR/PR jacks, connect the TV audio to these jacks.
Connect the video for a component TV to these jacks.
# Item Description
Press to turn on your player or put your player in
1
STANDBY/ON
2
RADIO Press to toggle between the FM and AM bands.
3
AV SOURCE Press to select an HDMI input source.
4
Numbers
5
SEARCH/AUTO SCAN
6
(fast-forward)
7
(fast-reverse)
standby mode. When your player is in standby mode,
power is still entering your player. To disconnect
power, unplug the power cord.
In playback mode, press SEARCH, then press the
number buttons to enter a title, chapter, track, or time.
In menu mode, press to enter the parental code
password.
Press to search for a title, chapter, or specific time on a
disc. For more information, see “Searching for a title,
chapter, or elapsed time” on page 9.
In radio mode, press to automatically scan for FM and
AM radio st ations.
Press to fast forward. Each time you press this button,
the fast-forward speed increases from Fast x 2,
Fast x 4 , Fast x 8, Fa st x 1 6, Fast x 3 2, Fast x 6 4,
Fast x 128. Press (play/pause) to resume normal
playback.
Press to fast reverse. Each time you press this button,
the fast-reverse speed decreases from Fast x 2,
Fast x 4 , Fast x 8, Fa st x 1 6, Fast x 3 2, Fast x 6 4,
Fast x 128. Press (play/pause) to resume normal
playback.
www.insigniaproducts.com
3
Page 8

NS-BRHTIB Blu-ray Disc Home Theater System
# Item Description
Press to stop playback. The Setup menu is displayed.
To resume playback, press or to select
DVD/BD- ROM, then press ENTER. Depending on the
8
(stop)
9
(repeat)
10
AUDIO SETU P/PROGRAM
11
DVD SETUP
12
DISC MENU
13
ENTER
14
/TUNE–
15
SUBTITLE
16
AUDIO/ST./MONO
A (red), B (green),
17
C (yellow), D (blue)
18
ZOOM
19
RESOLUTION Press to select the video resolution.
20
SURROUND
21
A-B
22
OPEN/CLOSE Press to open or close the disc tray.
23
AUDIO SOURCE Press to select the audio input source.
24
CLEAR/DELETE
25
(previous)
26
(next)
27
(play/pause)
28
29
30
31
(step)
MUTE
VOL+ Press to increase the volume.
VOL– Press to decrease the volume.
disc, playback starts where it stopped or at the
beginning of the disc.
If you press (stop) twice, playback stops
completely. To start playback again, press
(play/pa use).
Press to repeat the current title, chapter, track, or
repeat all. For more information, see “Repeating a
title, chapter, or CD track” on page 9.
Press to accesses or exit options for audio settings.
In radio mode, press to manually reset presets.
Press to display information about your player, such as
the language menu, display menu, and audio menu.
Note: The setup menu appears a utomatically when
these is no disc in the tray or when playback is
stopped.
During Blu-ray Disc o r DVD playback, press to open the
disc menu where you can select playback options.
(This button works for DVDs that have a multi-layer
menu.)
Press to open the Settings menu. In menus, press to
confirm a selection in a menu.
In menus, press to return to the previous menu.
In radio mode, press to tune to the next lower station.
Press to select a subtitle language or to turn subtitles
off.
Press to select the audio language or to turn audio off.
In radio mode, press to toggle between stereo (ST.)
and MONO.
When playing a Blu-ray Disc that has a Java™
application, press to control playback. For more
information, see the documentation that came with
the Blu-ray Disc.
Press to zoom in on the video. Each time you press this
button, the magnification level changes. This button is
only used for DVD discs.
Press to select the surround audio output mode. You
can select multi-channel 5.1 surround, DPL II, or
Stereo.
Press to create a playback loop. For more information,
see “Creating a playback loop on a DVD or audio CD”
on page 9.
Press to clear an input error.
In radio mode, press to delete an FM or AM station
from memory.
Press to go to the previous title, chapter, or track.
Press to go to the next title, chapter, or track.
Press to start or pause playback.
Press to advance one frame at a time. Press
(play/pause) to resume normal playback.
Press to turn off sound. Press again to turn the sound
back on.
# Item Description
POP UP MENU/
32
TOP MEN U
33
/PRESET+
34
/TUNE+
35
/PRESET–
36
DISPLAY Press to display disc information.
37
RETURN Press to return to the previous menu.
38
PIP
39
SECONDARY AUDIO
40
EQ
41
BASS
During Blu-ray Disc playback, press to open a menu
that lets you control Blu-ray Disc playback.
In menus, press to go up in a list or to increase a
setting.
In radio mode, press to go to the next higher preset
station.
In menus, press to go to the next menu.
In radio mode, press to tune to the next higher station.
In menus, press to go down in a list or to decrease a
setting.
In radio mode, press to go to the previous lower preset
station.
Press to turn PIP (picture-in-picture) mode on or off.
For more information, see “Using PIP
(picture-in-picture) mode” on page 10.
In PIP mode, press to turn the audio for the secondary
video on or off. For more information , see “Using PIP
(picture-in-picture) mode” on page 10.
Press to select the equalizer mode. You can select
CLASSIC, JA ZZ, ROCK, SPORTS, or NIGHT.
Press to turn dynamic bass enhancement
on or off.
Setting up your player
Installing remote control batteries
To install remote control batteries:
1 Remove the battery compartment cover.
2 Insert two AAA batteries into the battery
compartment. Make sure that the + and –
symbols on the batteries match the + and –
symbols in the battery compartment.
4
www.insigniaproducts.com
Page 9
Blu-ray Disc Home Theater System
3 Replace the battery compartment cover.
Notes
• Make sure that you insert the batteries correctly.
• Do not heat, open, or short-circuit batteries.
• Do not throw batteries into a fire.
• Do not mix different types of batteries or mix
old and new batteries.
• Do not try to recharge non-rechargable
batteries.
• If the remote control does not function correctly
or if the operating range becomes reduced,
replace the batteries.
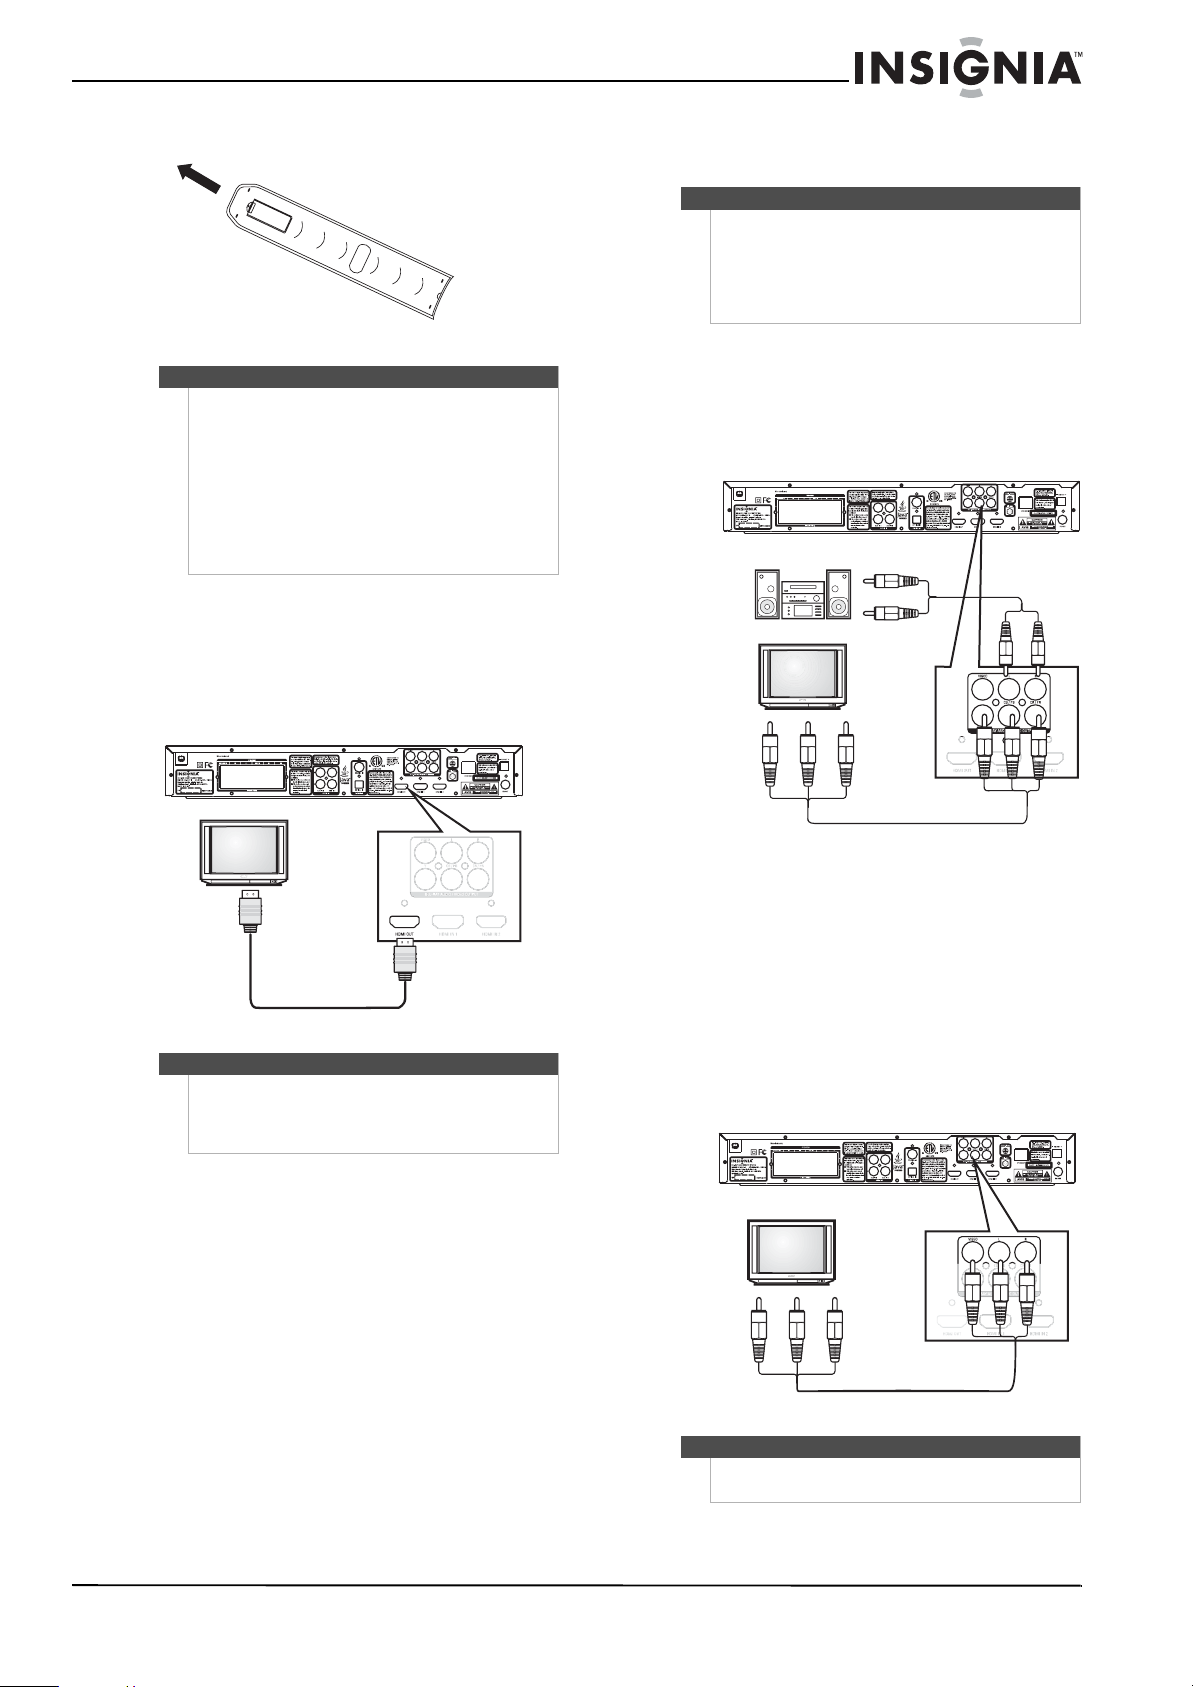
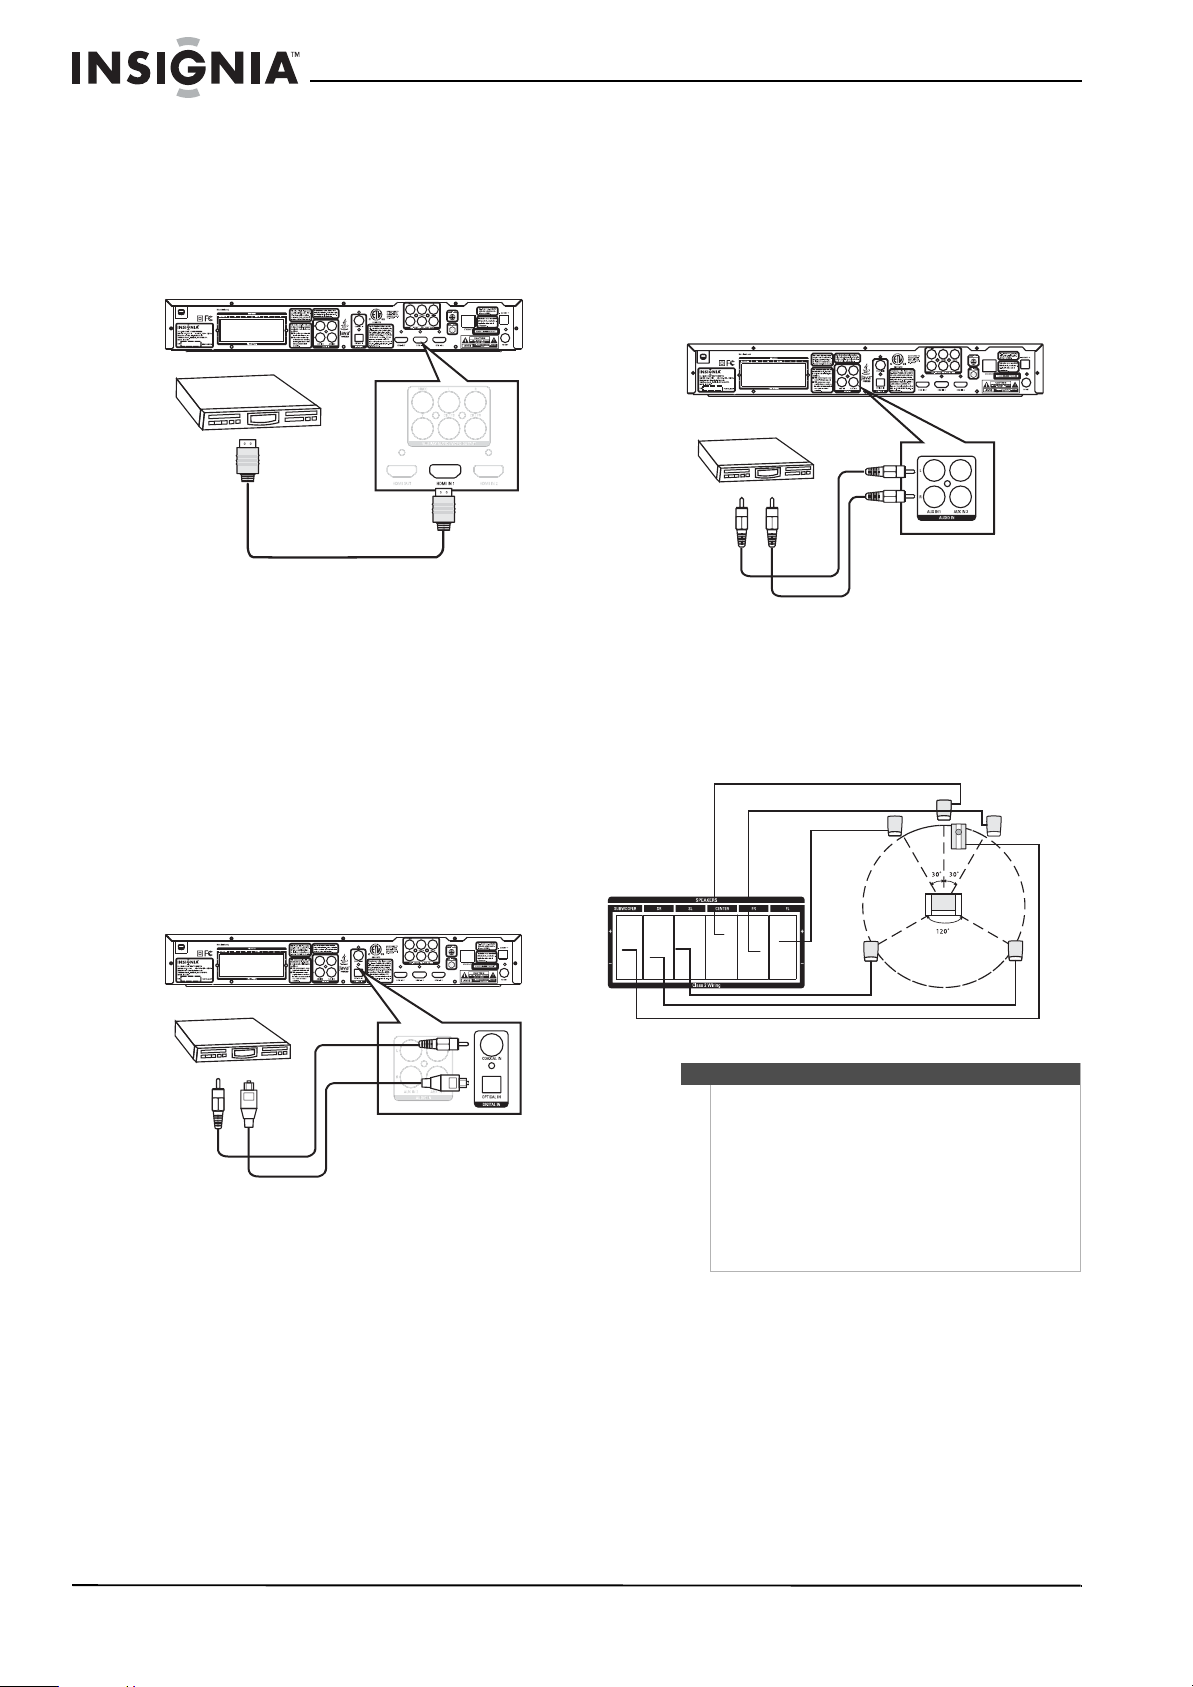
Connecting a TV with an HDMI cable (best)
To connect a TV with an HDMI cable:
• Connect an HDMI cable to the HDMI OUT jack on
the back of your player and into the HDMI IN jack
on the TV.
Back of player
Connecting a TV with a component video cable (better)
Notes
• The following task shows connecting the audio
to a receiver. If you want to use the TV speakers
instead of a receiver, connect the audio cable to
the TV’s audio in jacks on the TV.
• High definition video (up to 1080i) is supported
with a component video cable.
To connect a TV with a component video cable:
1 Connect a component video cable to the Y,
CB/PB, and CR/PR jacks on the back of your
player and to the COMPONENT VIDEO IN jacks
on the TV.
Back of player
Audio cable
Notes
• Only HDMI is capable of 1080p video output.
• An HDMI cable carries both video and audio. If
you want to use TV speakers, you do not need to
make an audio connection.
Component video cable
2 Connect an audio cable to the AUDIO OUTPUT
L and R jacks on the back of your player and to
the AUDIO IN jacks on the TV.
Connecting a TV with an A/V cable (good)
To connect a TV with an A/V cable:
• Connect an A/V cable to the VIDEO and AUDIO
OUTPUT L and R jacks on the back of your player
and to VIDEO and AUDIO IN jacks on the back of
the TV. Jacks and cable connectors are usually
color-codes. Make sure that you match the colors.
Back of player
Yellow=Video
White=Le ft
audio
Red=Right audio
www.insigniaproducts.com
Note
The A/V cable can only send standard-definition
video (480i) to your TV.
5
Page 10
NS-BRHTIB Blu-ray Disc Home Theater System
r
Connecting an HDMI device
To connect an HDMI device:
• Connect an HDMI cable to the HDMI IN 1 or
HDMI IN 2 jack on the back of your player and to
the HDMI OUT jack on the HDMI device such as
an HDMI-equipped gaming system.
Back of player
Connecting a game system or audio device with a digital audio cable
To connect a game or audio device with a digital
audio cable:
• Connect a digital optical cable to the OPTICAL
OUT jack on the back of the gaming or audio
device and to the OPTICAL IN jack on your
player.
Or
Connect a digital coaxial cable to the
COAXIAL OUT jack on the back of the gaming
or audio device and to the COAXIAL IN jack on
your player.
Connecting a game or audio device with a standard (stereo) audio cable
To connect a game or audio device with a
standard (stereo) audio cable:
• Connect an audio cable to the AUDIO OUTPUT L
and R jacks on the back of the game or audio
device and to the AUDIO IN L and R jacks on your
player.
Back of player
White
Red
Connecting speakers
To connect speakers:
• Use the following illustration to connect the
speakers.
Center speaker
Front right speaker
Front le ft speaker
Subwoofer
Back of player
Coax ial
OR
Optical
Left rear
speaker
Note
• Space all speakers about the same distance
from the main listening area.
• The front speakers should be placed next to the
TV.
• The center speaker should be above the TV.
• The rear speakers should be about three feet
(one meter) above the head of the listener.
• After you connect the speakers, you may want
to adjust each channel to get the best audio
performance.
Right rea
speaker
6
www.insigniaproducts.com
Page 11
Blu-ray Disc Home Theater System
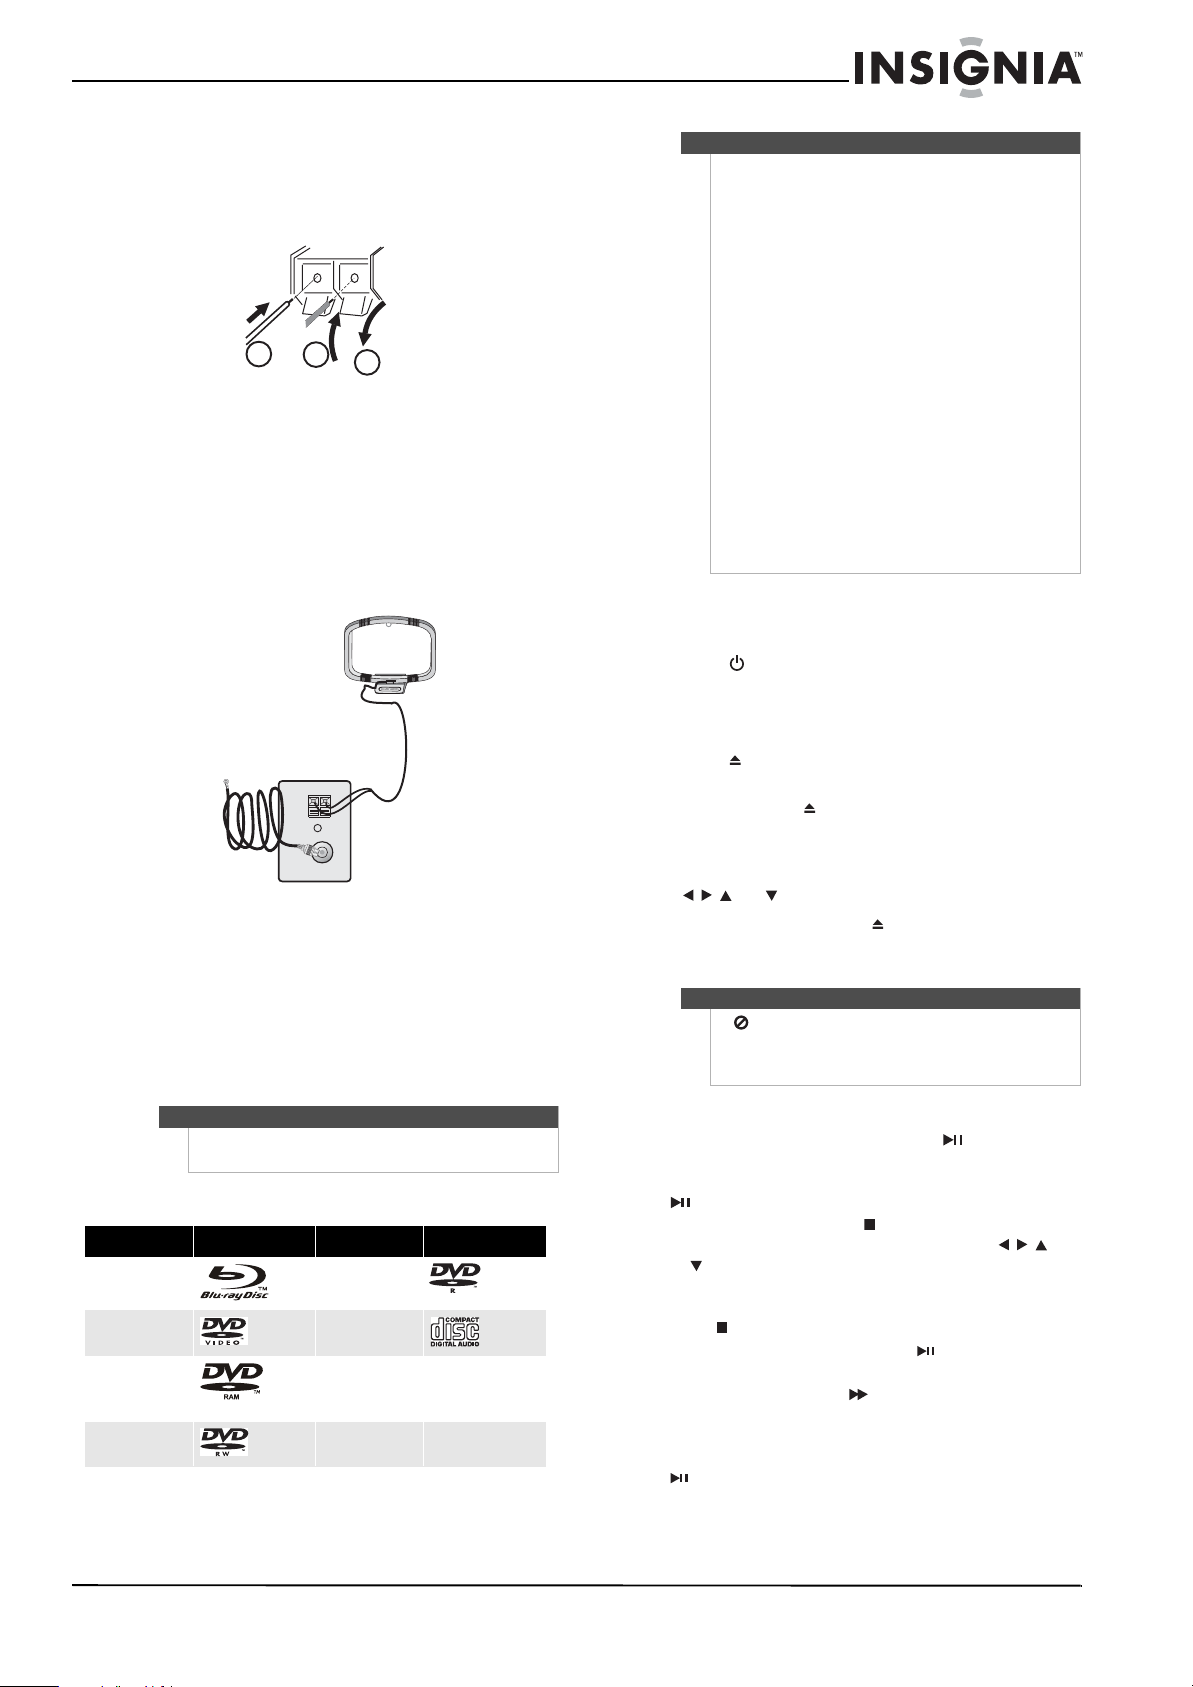
Connecting radio antennas
To connect an AM antenna wires:
1 Flip the antenna wire covers down on the
–AM ANT+ jacks on the back of your player.
2
3
2 Insert the negative wire into the – jack.
3 Insert the positive wire into the + jack.
To connect antennas:
1 Connect the AM antenna wires by following the
preceding instructions, then turn on your player,
tune to a radio station, and adjust the angle of
the antenna if necessary.
AM antenna
FM antenna
- AM ANT +
FM ANT
2 Connect the FM antenna to the FM antenna jack
on the back of your player, then turn on your
player, tune to a raido station, then attach the
antenna to a wall or pillar in a direction that
provides the best reception.
Using your player
Notes
• Writeable DVD discs (DVD-RAM, DVD-RW,
DVD-R) must be finalized, VR-mode only.
• Your player supports discs that are compatible
with DVD-RAM Standard Version 2.0.
• Playback may not work for some types of discs,
or when specific operations, such as angle
change and aspect ratio adjustment, are being
performed. Information about the discs is
written in detail on the box.
• Do not allow the disc to become dirty or
scratched. Fingerprints, dirt, dust, scratches or
1
deposits of cigarette smoke on the recording
surface may make it impossible to use the disc
for playback.
• CD-R/-RW, DVD-RAM/-RW/-R recorded with UDF
or ISO9660 format can be played back.
• Windows Media Audio (WMA) files must be
written to the disc with a .wma file extension in
order to be recognized and played back
correctly.
• JPEG picture files must be written to the disc
with a .jpeg or .jpg file extension in order to be
recognized and played back correctly.
Playing a Blu-ray Disc or DVD
To play a Blu-ray Disc or DVD:
1 Press STANDBY/ON.
2 Turn on the TV, then select the input setting on
the TV that matches the connection method
you used to connect your player.
3 Press OPEN/CLOSE to open the disc tray.
4 Place a disc on the disc tray with the label facing
up, then press OPEN/CLOSE to close the disc
tray. It may take a few seconds for the disc to
load.
5 If a Blu-ray Disc or DVD menu opens, press
or to select PLAY, then press ENTER.
6 To eject the disc, press OPEN/CLOSE.
Controlling Blu-ray Disc or DVD playback
Note
If appears on the screen, the current action is not
permitted by the disc or your player. For example,
many discs do not let you fast-forward through the
warning information at the beginning of the disc.
Note
Unless otherwise noted, all tasks in this section are
based on using the remote control.
Playable discs
Disc type Logo Disc type Logo
Blu-ray Disc DVD-R
DVD-video
(DVD-ROM)
DVD-RAM MP3/WMA/
DVD-RW
Audio CDs (CDDA)
JPEG/Data CD
To control Blu-ray Disc or DVD playback:
• To start or pause playback, press (play/pause).
The sound is muted when your player is in pause
mode. To resume normal playback, press
• To stop playback, press (stop). The Setup menu
is displayed. To resume playback, press
or to select DVD/BD-ROM, then press ENTER.
Depending on the disc, playback starts where it
stopped or at the beginning of the disc. If you
press (stop) twice, playback stops completely.
To start playback again, press (play/pause).
Playback starts at the beginning of the disc.
• To fast-forward, press . Each time you press this
button, the fast-forward speed changes in the
following sequence: Fast x 2, Fast x 4, Fast x 8,
Fast x 16, Fast x 32, Fast x 64, Fast x 128. Press
www.insigniaproducts.com
(play/pause).
(play/pause) to resume normal playback.
7
Page 12

NS-BRHTIB Blu-ray Disc Home Theater System
• To fast-reverse, press . Each time you press this
button, the fast-reverse speed changes in the
following sequence: Fast x 2, Fast x 4, Fast x 8,
Fast x 16, Fast x 32, Fast x 64, Fast x 128. Press
(play/pause) to resume normal playback.
• To go to the previous chapter, press within
two seconds after the current chapter starts. To go
to the beginning of the chapter, press any
time after playing the first five seconds of the
chapter.
• To go to the next chapter, press .
• To play one frame at a time, press (step). Each
time you press this button, the video advances
one frame. Press (play/pause) to resume
normal playback.
Playing files on a data disc or USB memory stick
When you insert a data disc or USB memory stick
containing picture, music, or video files into your
player, icons are added to the menu to indicate that
video, music, or picture files are available for
playback.
• If you want to to see information about the file
that is playing, press or to select Now
Playing, then press ENTER. The following
display appears
File 1/5 song1.mp3
Title: Cool Track
Artist: Ricardo Funiccio
Album: Dead Dux
0:02:00
Random play indicator
Repeat indicator
Play indicator
0:30:00 O O
Play
To create a playlist:
1 Insert a disc or plug in a USB flash drive, select
Music, Videos, or Pictures, then press .
2 Press or to select Optical Disc or USB, then
press ENTER. A file browser window opens with
a list of files and folders.
3 Press or to select a file or folder, then press
ENTER. If you selected a folder, the files in the
folder are displayed. Press or to select a file,
then press ENTER. The following menu opens:
Vid eos
Settings
Music
Pictures
To play audio or video files:
1 Press or to select Music or Videos, then
press ENTER. A menu opens.
2 Press or to select Play Files, then press
ENTER. The Please select Play mode box opens.
4 Press or to select Add to playlist, then
press ENTER. The file is added to the playlist.
Note
If the file you selected is already in the playlist,
Remove from playlist appears.
When you add a file to the playlist, Remove all
from playlist appears on the screen
automatically. You can use Remove all from
playlist, Previous Folder, Play Files, Browse
Pictures, and Now Playing to control playback.
3 Press or to select Play All (plays all files) or
Play Selection (plays files added to the playlist),
then press ENTER.
• If you are playing music files and want to view
JPG picture files at the same time, press
RETURN then press or to select Browse
Pictures, then press ENTER. Select the JPG files
you want to view.
8
www.insigniaproducts.com
Page 13

Blu-ray Disc Home Theater System
Playing an audio CD
To play an audio CD:
1 Press STANDBY/ON.
2 Press OPEN/CLOSE to open the disc tray.
3 Place a CD on the disc tray with the label facing
up, then press OPEN/CLOSE to close the disc
tray. It may take a few seconds for the CD to
load.
4 Press ENTER to start playback.
5 To eject the CD, press OPEN/CLOSE .
Controlling audio CD playback
To control audio CD playback:
• To start or pause playback, press (play/pause).
The sound is muted when your player is in pause
mode. To resume normal playback, press
(play/pause).
• To stop playback completely, press (stop) To
start playback again, press (play/pause).
Playback starts at the beginning of the CD.
• To fast-forward, press . To resume normal
playback, press (play/pause).
• To fast reverse, press . To resume normal
playback, press (play/pause).
• To go to the previous track, press . To go to the
next track, press .
• To select a track, press SEARCH, enter the track
number with the number buttons, then press
ENTER.
Or,
Enter the track number by pressing the
appropriate number buttons.
Repeating a title, chapter, or CD track
To repeat a title, chapter, or CD track:
• To repeat a title or chapter, press REPEAT one or
more times to select a repeat mode. You can
select Off, Repeat Title, Repeat Chapter, Repeat
track, Repeat all, or Random.
Creating a playback loop on a DVD or audio CD
Note
Blu-ray Discs do not normally support playback
loops.
To create a playback loop:
1 Play the disc until you reach the point where
you want the loop to start, then press A-B.
2 Play the disc until you reach the point where
you want the loop to stop, then press A-B. Your
player plays the loop you created repeatedly.
3 Press A-B to cancel the loop and return to
normal playback.
Viewing photographs
Your player can display digital photograph files that
have been burned onto a data disc, DVD+/-R,
DVD+/-R/(W), or Blu-ray Disc.
To view photographs:
1 Insert the disc with photographs into your
Blu-ray player. The following menu opens:
Displaying Blu-ray Disc information
Note
The information displayed for discs other than
Blu-ray Discs will be different.
To display Blu-ray Disc information:
• Press DISPLAY. Your player displays information
about the Disc, such as type of disc, current
elapsed time in title, total amount of time in title,
current chapter, and total number of chapters.
• Press DISPLAY again to close the display.
Searching for a title, chapter, or elapsed time
To search for a title, chapter, or elapsed time:
1 During playback, press SEARCH one or more
times to select a search mode.
• One press selects Goto Title - - - mode.
• Two presses selects Goto Chapter - - - mode.
• Three presses selects Goto Time --: -- : --
mode.
2 Press the number buttons to enter the title
number, chapter number, or time, then press
ENTER. Your player goes to the title, chapter, or
time you entered.
Vid eos
Settings
Music
Pictures
2 Press or to select Pictures, then press
ENTER. A menu opens.
• Main Menu—Returns to the main menu.
• Play Files—Open the Please Select Play Mode
box. Press or to select an option, then
press ENTER.
• Play All—Plays all files.
• Browse Music—Opens the music playing
menu where you can select music files to
play while you view photographs.
• Now Playing—Opens a progress bar.
www.insigniaproducts.com
9
Page 14

NS-BRHTIB Blu-ray Disc Home Theater System
To create a playlist:
1 Insert a disc or plug in a USB flash drive, then
press .
2 Press or to select Optical Disc or USB, then
press ENTER. A file browser window opens with
a list of files and folders.
3 Press or to select a file or folder, then press
ENTER. If you selected a folder, the files in the
folder are displayed. Press or to select a file,
then press ENTER.
4 Press . A menu appears.
5 Press or to select an option, then press
ENTER. You can select:
• Add all to playlist—Adds all files to the
playlist.
• Previous folder—Returns the previous menu.
• Play files—Play all files or play files in the
playlist.
• Browse Music—Opens the music playing
menu where you can select music files to play
while you view photographs.
• Now playing—Opens a progress bar.
To add a JPG file to the playlist:
1 Insert a disc or plug in a USB flash drive, then
press .
2 Press or to select Optical Disc or USB, then
press ENTER.
3 Press or to select a file or folder, then press
ENTER. If you selected a folder, the files in the
folder are displayed. Press or to select a file,
then press ENTER. The following menu opens:
Add to playlist
2 If PIP mode is on, press SECONDARY AUDIO to
turn the audio for the video in the PIP window
on or off.
Note
PIP audio cannot be heard unless Bitstream Mixed
has been selected on the Audio menu. For more
information, see “Selecting the digital audio output
mode” on page 14.
Using a disc popup menu
To use a disc popup menu:
1 During Blu-ray or DVD playback, press
POPUP MENU/TITLE MENU. The Blu-ray popup
menu or DVD disc menu opens.
2 Press or to select an option, then press
ENTER.
Selecting a play source
To select a play source:
• Press SOURCE on the front of your player
repeatedly to select COAXIAL IN, OPTICAL IN,
AUX IN 1, AUX IN 2, AUX IN 3, RADIO,
BD IN HDMI IN 1, or HDMI IN 2.
• Press AUDIO SOURCE on the remote control
repeatedly to listen to the audio output from the
connected device.
VDF display
AUX 1 AUDIO IN AU X 1
AUX 2 AUDIO IN AU X 2
AUX 3 AUX 3
COAXIA L IN DIGITAL COAXIAL IN
OPTICAL IN DIGITAL OPTICAL IN
Jack device is
connected to
4 Press ENTER.
5 Press or to select Play File, then press
ENTER. The file starts playing.
Using PIP (picture-in-picture) mode
Some Blu-ray Discs are compatible with
picture-in-picture (PIP) mode. In PIP mode, the
primary video is displayed on the full screen, and
the secondary video is displayed in a small window.
Primary video
Secondary video
See the documentation that came with the disc for
playback instructions.
To use PIP m o de:
1 Press PIP to turn PIP mode on or off.
• Press AV SOURCE on the remote control to select
the device that is connected to the HDMI IN 1
jack, HDMI IN 2 jack, or BLU-RAY AUDIO/VIDEO
IN jacks.
• Press RADIO on the remote control to toggle
between the FM and AM radio bands.
Selecting the audio mode
To select the audio mode:
1 Press AUDIO. Your player displays audio channel
information, such as “01/03 Eng Dolby Digital.”
“01” indicates the currently selected audio
channel. “03” indicates the total number of
audio channels. “Eng” (English) indicates the
audio language. “Dolby Digital” describes the
currently selected audio format.
2 Press to select an audio mode.
10
www.insigniaproducts.com
Page 15

Blu-ray Disc Home Theater System
Adjusting the audio
These settings are shown on the VFD screen on the
front of your player, not on the TV screen.
To adjust the audio:
1 Press AUDIO SETUP, then press or to
select an audio setting, then press ENTER on the
remote control or on the front of your player.
You ca n s e l e c t:
• HDMI AUDIO OUT—Turns HDMI audio on or
off.
• SURROUND—Selects the surround audio
mode. You can select multi-channel 5.1
surround, DPL II, Stereo.
• EQ—Selects the equalizer mode. You can
select CLASSIC, JAZZ, ROCK, SPORTS, or
NIGHT.
• AUDIO SYNC—Selects the speaker audio
delay time between 0 ~ 200 ms.
• DELAY—Selects the speaker for which you
want to set the delay time.
• FL DELAY— Front left speaker
• FR DELAY—Front right speaker
• CNT DELAY—Center speaker
• SL DELAY—Left back speaker
• SR DELAY—Right back speaker
• TEST TONE—Selects the speaker you want to
send a test tone to. You can adjust the volume
between –6 ~ +6. The last volume setting is
saved.
• FL 00—Front left speaker
• CNT 00—Center speaker
• FR 00—Front right speaker
• SL 00—Left back speaker
• SR 00—Right back speaker
• SUB 00—Subwoofer
• ALL 00—All speakers
Note: Tes t To n e is available only in
Multi-channel 5.1 modes.
2 Press or on the remote control or VOL+ or
VOL– on the front of your player to select a
setting. You must press a button within five
seconds.
3 Press AUDIO SETUP to exit.
Selecting a viewing angle
Note
Not all discs are recorded with multiple viewing
angles and not all scenes on a disc have multiple
viewing angles.
To select the viewing angle:
• During playback, press ANGLE. Your player
displays “Angle X of X.” “The first “X” indicates the
current viewing angle, and the second “X”
indicates the total number of viewing angles.
Selecting the on-screen menu language
To select the on-screen menu language:
1 Press ENTER. The Settings menu opens.
Settings
Displa y
Audio
Language
Parent al
System
Ne twork
OSD
Menu
Audio
Subtitle
Language
English
Auto
Auto
None
2 Press or to select Language. The Language
menu opens.
3 Press to select OSD, then press ENTER.
4 Press or to select the language you want,
then press ENTER. You can select English,
French, or Spanish.
5 Press to go to the previous menu.
Selecting the disc menu language
To select the disc menu language:
1 Press ENTER. The Settings menu opens.
Displa y
Audio
Language
Settings
Parent al
System
Ne twork
2 Press or to select Language. The Language
menu opens.
3 Press , press or to select Menu, then press
ENTER.
4 Press or to select the language you want,
then press ENTER.
Notes
• Not all languages are available on all discs.
• Most discs only have one menu language.
5 Press to go to the previous menu.
OSD
Menu
Audio
Subtitle
Language
English
Auto
Auto
None
www.insigniaproducts.com
11
Page 16

NS-BRHTIB Blu-ray Disc Home Theater System
Selecting the audio language
To select the audio menu language:
1 Press ENTER. The Settings menu opens.
Displa y
Audio
Language
Settings
Parent al
System
Ne twork
2 Press or to select Language. The Language
menu opens.
3 Press , press or to select Audio, then press
ENTER.
4 Press or to select the language you want,
then press ENTER.
Notes
• Not all languages are available on all discs.
• Some discs do not let you select the audio
language using your player’s menu. Instead, you
have to select the audio language from the disc
setup menu (the menu that appears after you
insert the disc).
5 Press to go to the previous menu.
OSD
Menu
Audio
Subtitle
Language
English
Auto
Auto
None
Determining whether an HDMI TV is connected
To determine whether an HDMI TV is connected:
1 Press ENTER. The Settings menu opens.
2 Press or to select Display. The Display menu
opens.
If an HDM I TV is conn ected, Connected appears.
If an HDMI TV is not connected Disconnected
appears
3 Press to go to the previous menu.
Automatically determining the best HDMI resolution
To automatically determine the best HDMI
resolution:
1 Press ENTER. The Settings menu opens.
Selecting the subtitle language
To select the subtitle language:
1 Press ENTER. The Settings menu opens.
Displa y
Audio
Language
Settings
Parent al
System
Ne twork
2 Press or to select Language. The Language
menu opens.
3 Press , press or to select Subtitle, then
press ENTER.
4 Press or to select the language you want,
then press ENTER.
Notes
• Not all languages are available on all discs.
• Some discs do not let you select the subtitle
language from your player. Instead, you have to
select the subtitle language from the disc setup
menu (the menu that appears after you insert
the disc).
You can also select the subtitle language from the
Subtitle menu in the on-screen menu.
OSD
Menu
Audio
Subtitle
Language
English
Auto
Auto
None
2 Press or to select Display. The Display menu
opens. Your player displays the best HDMI
format for the connected TV.
3 Press to go to the previous menu.
Selecting the video output resolution
To select the video output resolution:
1 Press ENTER. The Settings menu opens.
12
www.insigniaproducts.com
Page 17

Blu-ray Disc Home Theater System
2 Press or to select Display. The Display menu
opens.
3 Press , to select Resolution, then press ENTER.
4 Press or to select the resolution you want,
then press ENTER.
TV type Resolution
If your TV is a high-definition TV
(HDTV) connected to the HDMI jack on
your player and you want your player
to set the output resolution based on
information exchanged between the
TV and your player over the HDMI
cable
If the TV is a high-definit ion TV
(HDTV) capable of 1080p (any frame
rate) connected to the HDMI jack on
your playe r
If your TV is a high-definition TV
(HDTV) capable of 1080i only
If your TV is a high-definition TV
(HDTV) capable of 720p only
If your TV is an enhanced- definition
TV (EDTV)
If your TV is a standa rd-definition
NTSC TV (American or Asian SD TV)
HDMI Auto
1080p (HDMI)
1080i
720p
480p
480i
4 Press or to select the aspect ratio you want,
then press ENTER. You can select 16:9
Pillarbox, 4:3 Pan & Scan, 4:3 Letter Box, or
16:9 wide.
Notes
• If your TV has a rectangular (16:9) aspect ratio,
choose one of the 16:9 aspect ratios. If your TV
has a square (4:3) aspect ratio, choose one of the
4:3 aspect ratios.
• In the standard-definition (480i) mode, your
player can can output a 16:9 or 4:3 aspect ratio.
In the high-definition (720p/1080i/1080p)
mode, your player has only 16:9 aspect ratio.
5 Press to go to the previous menu.
Turning film mode on or off
Movies are recorded on film at a rate of 24 pictures
(frames) per second. Many of the movies on Blu-ray
Discs are placed on the discs at this frame rate. If
your TV supports 24 frames per second, but you
would prefer viewing the video at a higher frame
rate, you should turn off Film Mode.
To turn film mode on or off:
1 Press ENTER. The Settings menu opens.
Notes
• Selecting a resolution the TV does not support
could result in an unstable picture or loss of the
picture. See the documentation that came with
the TV to find the resolutions the TV supports.
• Only the HDMI output on your player supports
1080p video output at any frame rate. If the TV
is connected to the component output, the
video output is limited to 1080i or lower.
5 Press to go to the previous menu.
Selecting the TV aspect ratio
1 Press ENTER. The Settings menu opens.
2 Press or to select Display. The Display menu
opens.
3 Press , press or to select TV Aspect, then
press ENTER.
2 Press or to select Display. The Display menu
opens.
3 Press , press or to select Film Mode
(1080p24), then press ENTER.
4 Press or to select On or Off. Off selects a 60
frames/second output format.
5 Press to go to the previous menu.
Note
Only your player’s HDMI output supports 1080p
video output at any frame rate. The component
outputs are limited to 1080i, regardless of the Film
Mode setting.
www.insigniaproducts.com
13
Page 18

NS-BRHTIB Blu-ray Disc Home Theater System
Selecting the digital audio output mode
To select the digital audio output mode:
1 Press ENTER. The Settings menu opens.
Settings
Network
Display
Language
Parental
System
Audio
Digital Output
Dynamic Range Contro
Au dio
l
PCM
O
2 Press or to select Audio. The Audio menu
opens.
3 Press , press or to select Digital Output,
then press ENTER.
4 Press or to select the digital output mode
you want, then press ENTER. You can select:
• PCM—Sends mixed digital audio over the
HDMI connection in 7.1CH PCM (if supported
by the HDMI device) and the SPDIF connection
in two-channel PCM format.
• Bitstream HD—Sends the original bitstream
from the disc over the HDMI and SPDIF
connections using highest quality possible.
HDMI has the higher quality capabilities with
advanced audio codecs like TrueHD and
DTS-HD. Blu-ray audio is limited to the
soundtrack for the main movie (no PIP audio
and no effects audio).
• Bitstream Legacy—Sends the original
bitstream from the disc over the HDMI and
SPDIF connections using legacy audio
formats. Blu-ray audio is limited to the
soundtrack for the main movie (no PIP audio
and no effects audio).
• Bitstream mixed—Sends mixed and encoded
Blu-ray audio streams in a single bitstream.
This mode is primarily intended for use with
SPDIF 5.1CH receivers to produce mixed
Blu-ray audio in surround sound.
5 Press to go to the previous menu.
Turning dynamic range control on or off
Dynamic range control is only active when a Dolby
Digital signal is detected.
When Dynamic Range Control is set to Off, movie
soundtracks are played with the standard dynamic
range.
When movie soundtracks are played at low volume
or from smaller speakers, you can set Dynamic
Range Control to On. Your player applies
appropriate compression to make low-level content
more intelligible and prevent dramatic passages
from getting too loud.
To turn dynamic range control on or off:
1 Press ENTER. The Settings menu opens.
Settings
Network
Display
Language
Parental
System
Audio
Digital Output
Dynamic Range Contro
Au dio
l
2 Press or to select Audio. The Audio menu
opens.
3 Press , press or to select Dynamic Range
Control, then press ENTER.
4 Press or to select On or Off.
5 Press to go to the previous menu.
Setting the parental control password
To set the parental control password:
1 Press ENTER. The Settings menu opens.
Settings
Audio
Language
Parental
System
Network
Displa y
Parental Country
Parental Control
Parental Level
Parental Password
Parental
USA
On
8[Audlt]
2 Press or to select Parental. The Parental
menu opens.
3 Press . The password screen opens.
4 Enter the default password (0000). If you forget
your password, reset your player to the factory
defaults. The password will be reset to 0000. For
more information, see “Resetting settings to the
factory defaults” on page 17.
5 Press to go to the previous menu.
6 Press or to select Parental Password, then
press ENTER.
7 Enter your new password.
Turning parental controls on or off
To turn parental controls on or off:
1 Press ENTER. The Settings menu opens.
Settings
Audio
Language
Parental
System
Network
Displa y
Parental Country
Parental Control
Parental Level
Parental Password
Parental
USA
On
8[Audlt]
PCM
O
14
www.insigniaproducts.com
Page 19

Blu-ray Disc Home Theater System
2 Press or to select Parental. The Parental
menu opens.
3 Press . The password screen opens.
4 Enter the password. If you forget your password,
reset your player to the factory defaults. The
password will be reset to 0000. For more
information, see “Resetting settings to the
factory defaults” on page 17.
5 Press or to select Parental Control, then
press ENTER.
6 Press or to select On or Off, then press
ENTER. If you select On, you can change the
other parental control options. If you select Off,
you cannot change the other parental control
options.
Selecting the parental control country
If a Blu-ray Disc has parental rating systems for
more than one country, you can select the country
you want to use.
To set the parental control country:
1 Press ENTER. The Settings menu opens.
Settings
Audio
Language
Parental
System
Network
Displa y
Parental Country
Parental Control
Parental Level
Parental Password
Parental
USA
On
8[Audlt]
2 Press or to select Parental. The Parental
menu opens.
3 If the Parental Control option is set to On, set
the option to Off. See “Turning parental controls
on or off” on page 14.
4 Press or to select Parental Level, then press
ENTER.
5 Press or to select the rating level you want
to block, then press ENTER. That rating and all
higher ratings will be blocked. You can select:
• 1[Kid Safe]—Suitable for all children.
• 2[G]—General audiences.
• 3[PG]—Parental guidance suggested.
• 4[PG-13]—Not suitable for anyone under 13.
• 5[PGR]—Parental guidance recommended.
• 6[R]—Not suitable for anyone under 17 unless
supervised by a parent or adult guardian.
• 7[NC-17]—Not suitable for anyone under 17.
• 8[Adult]—All DVDs can be played.
Note
These ratings are for DVDs only.
6 Press or to select Parental Control, then
press ENTER. Press or to select On.
7 Press to go to the previous menu.
Setting automatic disc playback mode
To set automatic disc playback mode:
1 Press ENTER. The Settings menu opens.
2 If the Parental Control option is set to On, set
the option to Off. See “Turning parental controls
on or off” on page 14.
3 Press or to select Parental. The Parental
menu opens.
4 Press to select Parental Country, then press
ENTER.
Note
Some Blu-ray Discs do not have multiple countries
encoded for parental controls.
5 Press one or more times to select the country
you want.
6 Press to go to the previous menu.
Setting the parental control level
To set the parental control level:
1 Press ENTER. The Settings menu opens.
Settings
Audio
Language
Parental
System
Network
Displa y
Parental Country
Parental Control
Parental Level
Parental Password
Parental
USA
On
8[Audlt]
Settings
Langua ge
Parent al
System
Netwo rk
Displa y
Audio
Optical Dis c Auto Play
BD- Live Interne t Ac cess
BD- Live Sto rage
Erase Blu-r ay Stora ge
Screen Saver D uration
Reset Settings
Update Via Network
System
On
Alw ays Allow
Internal USB(1.9GB Free)
5 Minutes
Required Storag e:84 MB
2 Press or to select System. The System menu
opens.
3 Press to select Optical Disc Auto Play, then
press ENTER.
4 Press or to On or Off. When On is selected
and you insert a Blu-ray Disc or DVD, the disc
starts playing automatically. When Off is
selected and you insert a Blu-ray Disc or DVD,
you must select the disc from the main menu,
and press to play the disc.
5 Press to go to the previous menu.
www.insigniaproducts.com
15
Page 20

NS-BRHTIB Blu-ray Disc Home Theater System
Setting the BD-Live Internet access level
You can set the BD-Live Internet access level to
control access to BD-Live.
To set the BD-Live Internet access level:
1 Press ENTER. The Settings menu opens.
Settings
Langua ge
Parent al
System
Netwo rk
Displa y
Audio
Optical Dis c Auto Play
BD- Live Interne t Ac cess
BD- Live Sto rage
Erase Blu-r ay Stora ge
Screen Saver D uration
Reset Settings
Update Via Network
System
On
Alw ays Allow
Internal USB(1.9GB Free)
5 Minutes
Required Storag e:84 MB
2 Press or to select System. The System menu
opens.
3 Press , press or to select BD-Live Internet
Access, then press ENTER.
4 Press one or more times to select the access
level you want. You can select:
• Limit Access—Allows Internet access with
valid “BD-Live” network access approval.
• Always Allow Access—Always allows BD-Live
Internet access.
• Prohibit Access—Never allows BD-Live
Internet access.
5 Press to go to the previous menu.
Viewing available BD-Live storage space
Erasing BD-Live storage
To erase BD-Live storage:
1 Press ENTER. The Settings menu opens.
Settings
Langua ge
Parent al
System
Netwo rk
Displa y
Audio
Optical Dis c Auto Play
BD- Live Interne t Ac cess
BD- Live Sto rage
Erase Blu-r ay Stora ge
Screen Saver D uration
Reset Settings
Update Via Network
System
On
Alw ays Allow
Internal USB(1.9GB Free)
5 Minutes
Required Storag e:84 MB
2 Press or to select System. The System menu
opens.
3 Press , press or to select Erase BD-Live
Storage, then press ENTER.
4 Press or to select OK, then press ENTER. All
bookmarks and BD-live content saved in
memory are deleted.
5 Press to go to the previous menu.
Setting the screen saver activation time
Your player has a screen saver feature that turns the
screen black when your player is inactive. You can
set the amount of time you want your player to wait
before activating the screen saver.
To set the screen saver activation time:
1 Press ENTER. The Settings menu opens.
To view available BD-Live storage space:
1 Press ENTER. The Settings menu opens.
Settings
Langua ge
Parent al
System
Netwo rk
Displa y
Audio
Optical Dis c Auto Play
BD- Live Interne t Ac cess
BD- Live Sto rage
Erase Blu-r ay Stora ge
Screen Saver D uration
Reset Settings
Update Via Network
System
On
Alw ays Allow
Internal USB(1.9GB Free)
5 Minutes
Required Storag e:84 MB
2 Press or to select System. The System menu
opens. The available storage space is displayed
next to BD-Live Storage.
3 Press to go to the previous menu.
Settings
Langua ge
Parent al
System
Netwo rk
Displa y
Audio
Optical Dis c Auto Play
BD- Live Interne t Ac cess
BD- Live Sto rage
Erase Blu-r ay Stora ge
Screen Saver D uration
Reset Settings
Update Via Network
System
On
Alw ays Allow
Internal USB(1.9GB Free)
5 Minutes
Required Storag e:84 MB
2 Press or to select System. The System menu
opens.
3 Press , press or to select Screen Saver
Duration, then press ENTER.
4 Press one or more times to select the amount
of time you want the player to wait before
activating the screen saver feature.
5 Press to go to the previous menu.
16
www.insigniaproducts.com
Page 21

Blu-ray Disc Home Theater System
Resetting settings to the factory defaults
To reset settings to the factory defaults:
1 Press ENTER. The Settings menu opens.
Settings
Langua ge
Parent al
System
Netwo rk
Displa y
Audio
Optical Dis c Auto Play
BD- Live Interne t Ac cess
BD- Live Sto rage
Erase Blu-r ay Stora ge
Screen Saver D uration
Reset Settings
Update Via Network
System
On
Alw ays Allow
Internal USB(1.9GB Free)
5 Minutes
Required Storag e:84 MB
2 Press or to select System. The System menu
opens.
3 Press , press or to select Reset Settings,
then press ENTER. A message appears asking
you to confirm your selection.
4 Select OK, then press ENTER to close the
message box.
5 Press to go to the previous menu.
Downloading player update software
2 Press or to select Network.
3 Press , press or to select Wired, then press
ENTER. The IP Settings screen opens. If the
network connection is active, Link Up appears
next to Link Status. If the network connection is
not active, Link Down appears next to Link
Status.
4 Press to go to the previous menu.
Configuring the Internet connection
To download player update software:
1 Press ENTER. The Settings menu opens.
Settings
Langua ge
Parent al
System
Netwo rk
Displa y
Audio
Optical Dis c Auto Play
BD- Live Interne t Ac cess
BD- Live Sto rage
Erase Blu-r ay Stora ge
Screen Saver D uration
Reset Settings
Update Via Network
System
On
Alw ays Allow
Internal USB(1.9GB Free)
5 Minutes
Required Storag e:84 MB
2 Press or to select System. The System menu
opens.
3 Press , press or to select Update Via
Network, then press ENTER.
4 Follow the on-screen instructions for updating
the software.
5 Press to go to the previous menu.
Determining if the network connection is active
To determine if the network connection is active:
1 Press ENTER. The Settings menu opens.
To configure the Internet connection:
1 Press ENTER. The Settings menu opens.
Parent al
System
Wired
Network Test
Settings
Ne twork
Display
Audio
Language
2 Press or to select Network, then press
ENTER.
3 Press , press or to select Wired, then press
ENTER. The IP Settings screen opens. The IP
Settings screen opens.
Settings
Parent al
System
Ne twork
Display
Audio
Language
Wired
Network Test
4 Press or to select IP Mode, then press
www.insigniaproducts.com
ENTER.
17
Page 22

NS-BRHTIB Blu-ray Disc Home Theater System
5 Press to select an IP mode. You can select:
• Dynamic—Uses DHCP to automatically
obtain an IP address.
• Manual—Lets you manually configure
network settings, such as IP address, subnet
mask, and gateway settings.
• Off—Disables the network interface.
6 Press to go to the previous menu.
Testing the network configuration’s connectivity
You can test the connectivity of the network
configuration by “pinging” an IP address. Pinging
means sending a signal to an IP address and waiting
for a returning signal.
To test the network configuration’s connectivity:
1 Press ENTER. The Settings menu opens.
Parent al
System
Wired
Network Test
Settings
Ne twork
Display
Audio
Language
2 Press or to select Network.
3 Press , press or to select Network Test,
then press ENTER.
Playing files on a portable media player
3 Press ENTER. Your player searches for stations
with a strong signal and stores the station
information. When the search is complete, your
player tunes to the first station it found.
Note
• Your player can store up to 20 radio stations.
• If auto installation is not activated or less than 5
radio stations are stored, you will be prompted
to install the radio stations again.
To listen to the radio:
1 Press RADIO to switch to radio mode and select
the FM or AM radio band.
2 Press /PRESET+ or /PRESET– to select a
preset radio station.
3 Press /TUNE– or /TUNE+ to tune to the
previous or next radio frequency. Press and hold
one of these buttons for two seconds to
automatically search for radio stations.
Scanning for stations and storing radio presets
To scan for stations and store radio presets:
1 Press RADIO.
2 Press AUTO SCAN. All the available radio
stations with a strong signal will be stored
automatically. Your player can store up to 20
stations.
3 Press PROGRAM. The first available preset
number blinks on the display.
4 Press or (or press the number buttons) to
select the preset number you want to use.
5 Press PROGRAM to confirm.
To play file on a portable media player:
1 Connect a stereo audio cable from the AUX IN 3
jack on the front of your player to the
headphone jack on the media player (such as an
MP3 player).
2 Press AUDIO SOURCE repeatedly until AUX 3 is
displayed.
3 Use the controls on the media player to start,
stop, and control playback.
Note
• Playback can only be controlled using the
controls on the portable media player.
• Stop playback on the portable media player
before you switch the input source.
Listening to the radio
To listen to the radio for the first time:
1 Make sure that you have installed the FM and
AM antennas. See “Connecting radio antennas”
on page 7.
2 Press RADIO. “AUTO INSTALL ... PRESS PLAY” is
displayed.
Maintaining
General guidelines
• The top and back panels of your player may
become hot after a long period of use. This is not a
malfunction.
• When you are not using your player, make sure
that you remove the disc and put your player into
standby mode.
• If you do not use your player for a long period of
time, it may not function correctly. Turn on and
use your player occasionally.
• Do not place objects on the disc tray.
• Do not locate your player:
• Near heating devices or in an enclosed vehicle
• In an area with a temperature over 104°F
(40°C) or humidity over 90%
•Dirty places
• In an area with direct exposure to sunlight
• Do not install this equipment in a confined
space such as a book case or similar unit. The
ventilation should not be impeded by
covering the ventilation openings with items
such as newspapers, table-cloths, or curtains.
• Make sure that you leave a minimum of 4 inches
(10 cm) around your player for sufficient
ventilation.
18
www.insigniaproducts.com
Page 23

Blu-ray Disc Home Theater System
Electrical disturbance
If you place your player next to a radio, TV, or VCR,
the image may be poor and the sound may be
distorted. In this case, move your player away from
the radio, TV, or VCR.
Condensation
Condensation may form inside your player when:
• You move your player from a cold area to a warm
area
• You use it in a cold room where you have just
turned on a heater
• Air conditioning is blowing directly on your player
• Your player is in a damp place
If condensation forms inside your player, your
player will not work correctly. Turn on your player,
remove the disc and leave the tray open, then leave
your player on for two to three hours.
To minimize condensation problems, keep the
power cord connected to a power outlet.
Storing discs
• Do not store discs in a place that is exposed to
direct sunlight or heat.
• Do not store discs in a place that is exposed to
moisture and dust, such as a bathroom or near a
humidifier.
• Store discs vertically in their cases. Stacking discs
or placing objects on discs when not in their cases
may cause warping.
Handling discs
• To keep a disc clean, do not touch the play side
(non-label side) of the disc.
• Do not attach paper or tape to the disc.
Cleaning discs
• Before playback, wipe the disc outwards from the
center (not in a circle) with a clean cloth.
FAQ (frequently asked questions)
Question Answer
Can I connect headphones to my
player?
My television has COMPOSITE VIDEO
IN, COMPONENT(YUV) IN, and
HDMI IN jacks.
Can I play Blu-ray Discs and DVDs
bought in another country?
Can I play Blu-ray Discs and DVDs that
do not have a region code?
What types of discs will my player
play?
You cannot directly connect
headphones to your player. Connect
headphones to the connected TV or
sound system.
HDMI provides the best video and
audio. Component video provides
better video than composite video,
but not as good as HDMI video.
Composite video provides good video.
You can play them if the video
standard is NTSC. However, you
cannot play:
• Blu-ray Discs that do not
include region code A.
• DVDs that do not include
region code 1 or ALL.
Region codes are on the discs or disc
packaging.
No. Region codes indicate that a disc
conforms to industry standards. You
cannot play a disc that does not have
a region code.
Your player can play:
•Blu-ray Discs
• DVD-Video, DVD-RAM (DVD
Video Recording format,
AVC HD fo rma t, an d JP EG
format), DVD-R/RW (DVD
Video format and DVD Video
Recording format), DVD-R DL
(DVD Video format and DVD
Video Recording format),
DVD+R, DVD+RW, and
DVD+R DL
•Audio CD
• CD-R/RW discs which have
been recorded in one of the
following standards: CD-DA
and still pictures (JPEG).
Close the session after
recording.
Note: Your player cannot write to
discs.
www.insigniaproducts.com
19
Page 24

NS-BRHTIB Blu-ray Disc Home Theater System
Troubleshooting
Check the following information for the possible
cause and solution for a problem before contacting
the nearest service center or dealer for repairs.
The following do not indicate a problem with your
player:
• Regular disc rotation sounds.
• Image disturbance during search.
Resetting your player
To reset you r pl a ye r :
• If your player “freezes,” press STANDBY/ON on
the front of your player. Wait five seconds then
press STANDBY/ON again. This resets your
player but does not change any settings.
• To reset all settings (include parental control
settings) to the factory default, select Reset
Settings in the System menu.
Power
Problem Solution
No power Make sure that the power cord is
The player switches to standby mode After a period of inactivity, your player
Operation
Problem Solution
Remote control does not work
plugged into a power outlet and that
the outlet is supplying power.
switches to standby mode
automatically. This is a power saving
feature.
If your player switches to standby
mode unexpectedly, a safety device
may have been activated. Press
STANDBY/ON on the front of your
player.
• Make sure that you are
pointing the remote control
at the remote control sensor
on the front of your player.
• Make sure that there are no
obstructions between the
remote control and the
remote control sensor on the
front of your player.
• Make sure that there is no
colored glass between the
remote control and the
remote control sensor on the
front of your player. Colored
glass, such as the glass door
of an entertainment center,
can interfere with signal
reception.
• Make sure that the remote
control sensor is not exp osed
to direct sunlight or bright
light. These can interfere
with signal reception.
• Replace the batteries.
Problem Solution
Some or all functions do not work
Playback fails to start or starts then
stops even when (play/pause) is
pressed
Start up is slow and audio and video
output takes a long time
When reading a disc, the disc tray
opens
Audio or video pause during playback
The player is on and the logo and
menu appear, but there is no image
from the disc
The player freezes when reading a disc
• Some functions are not
• Condensation may have
• Reset your player. For
• Make sure that the disc is
• Make sure that the disc is not
• The disc may be blank or
• If power has been
• If your player is connected to
• Make sure that the disc is not
• The disc may be
• Reset your player. For
• Make sure that the disc is not
• Reset your player. For
• Make sure that the disc is not
• Reset your player. For
• Reset your player. For
• If your player freezes again,
allowed by the disc, for
example, fast-forwarding
through the warning
information at the
beginning of the disc.
formed inside your player.
Turn off your player and wait
one to two hours for the
condensation to evaporate.
instructions, see “Resetting
your player” on page 20.
inserted face up in the disc
tray.
dirty. For instructions, see
“Cleaning discs” on page 19.
incompatible with your
player. Try another disc.
interrupted or the power
cord has just been
connected, startup is slow.
This is not a defect.
the TV with an HDMI cable,
startup is slow. This is not a
defect.
dirty. For instructions, see
“Cleaning discs” on page 19.
incompatible with your
player. Try another disc.
instructions, see “Resetting
your player” on page 20.
dirty. For instructions, see
“Cleaning discs” on page 19.
instructions, see “Resetting
your player” on page 20.
dirty. For instructions on
cleaning a disc, see
“Cleaning discs” on page 19.
instructions, see “Resetting
your player” on page 20.
instructions, see “Resetting
your player” on page 20.
When you see “loading” on
the screen, press
(open/close) to open the disc
tray and remove the disc.
Clean the disc. (For
instructions, see “Cleaning
discs” on page 19), then try
the disc again.
the disc may contain some
content that is not
compatible with yo ur player.
Do no try playing the disc
with your player.
20
www.insigniaproducts.com
Page 25

Blu-ray Disc Home Theater System
TV screen and video
Problem Solution
Video does not appear on the TV
screen or the picture is distorted
Video is not output in high definition
The 4:3 aspect ratio picture expands
left and right or the picture size is
incorrect
There is no apparent change in the
picture quality when the picture
settings are changed in the Setup
menu
When playing a BD-Live disc, the
screen is black
HDMI connections
Problem Solution
The 4:3 aspect ratio picture expands
left and right or the picture size is
incorrect
• Make sure that the TV is
connected to the correct
jacks on the back of your
player.
• Make sure that the TV is set
to the correct video input
source.
• The TV may be in screen
saver mode. Check the
documentation that came
with the TV for instructions
about “waking” your TV.
• Reset your player. For
instructions, see “Resetting
your player” on page 20.
• High definition video cannot
be output through the VIDEO
OUT jack. You must connect
the TV to your player using
the COMPONENT OUT jacks
or HDMI jack.
• Make sure that the correct
HDMI or component video
resolution has be se lected in
the Setup menu. See
“Selecting the video output
resolution” on page 12.
• Depending on the Blu-ray
Disc, output from the
COMPONENT VIDEO OUT
jacks may be restricted to
480p.
• Use the TV to change the
aspect ratio. See the
documentation that came
with the TV.
• When using a com ponent
video cable, set TV Aspect
to 4:3 Pan & Scan.
• Depending on the video
type, changes may not be
apparent.
• Erase BD Storage. See
“Erasing BD- Live storage” on
page 16.
• Make sure that your Internet
connection is working.
• Make sure that the Internet
cable is connected securely
and correctly to your player
and the Internet jack. Some
discs require an Internet
connection to play.
• Change TV Aspect to 16:9.
See “Selecting the TV aspect
ratio” on page 13.
BD-Live and USB connections
Problem Solution
Cannot access BD -Live content
After connecting to the Internet,
cannot download a file
File was downloaded, but playback
from file pauses
• Make sure that the BD-Live
• Make sure that the network
•Erase BD Storage. See
• Make sure that the Internet
• Try a different USB flash
• Make sure that the USB flash
• Try a different USB flash
Other playback problems
Problem Solution
Audio and video pause momentarily
Blu-ray Disc or DVD does not play
Picture-in-Picture (PIP) does not work
on a Blu-ray Disc
No subtitles
Cannot change the viewing angle
Resume function does not work
• This happens when your
• When playing a disc that is
• Make sure that the disc has
• Check the rating on the disc.
• Some Blu-ray discs will only
• Make sure that the disc
•Turn on subtitles. See
• Make sure that the disc was
• Some discs are not recorded
• Not all scenes on a disc have
•If you press (stop) twice,
• Some discs do not support
Disc you are using is a legal
copy.
connection is working.
“Erasing BD-Live storage” on
page 16.
connection is working.
drive.
drive is a USB 2.0 device.
Using a USB 1.1 device may
cause pausing.
drive.
player is changing chapters
in a playlist.
recorded on both layers,
audio and video may pause
when your player is
changing layers.
the correct region code.
You may h ave set pare nta l
controls to block that rating.
play over an HD MI
connection.
supports PIP mode.
“Selecting the subtitle
language” on page 12.
recorded with subtitles. If
the disc has subtitles, a
subtitle option should
appear on the disc’s menu.
with multiple viewing
angles. Check the
documentation that came
with the disc.
multiple viewing angles.
Check the documentation
that came with the disc.
the resume information is
erased.
the resume function.
www.insigniaproducts.com
21
Page 26

NS-BRHTIB Blu-ray Disc Home Theater System
Specifications
Specifications subject to change without notice.
Media BD-ROM, BD-JAVA 1.1, DVD-video,
VH signal system NTSC
Video output Electric level output: 1.0 Vp-p
Component video (Y, CB, CR) Y output level: 1.0 Vp-p Resistance: 75 Ohm
Audio output Output level: 2 Vrms (1 kHz, 0 dB)
Audio performance (frequency
response)
HDMI output format 480i/480p/1080i/720p/1080p
FM tuning Frequency range: 87.5MHz ~ 107.9.00MHz
AM tuning Frequency range: 530KHz ~ 1710 KHz (10KHz)
Amplifier Total output power: 640W RMS
Power 110V-120V ~ 50/60Hz
Power cons umptio n 120 W
Dimensions (L × W × H) 16.9 × 14.4 × 2.5 inches
Wei ght 41.88 lbs. (19 kg)
Operating temperature 41°F to 95°F
Operating humidity 10% to 75%
DVD+RW/+R, DVD-RW/-R, CD-RW/-R
Resistance:75 Ohm
Output connector: Pin jack (1 system)
PB output level: 0.7 Vp-p Resistance: 75 Ohm
PR output level: 0.7 Vp-p Resistance: 75 Ohm
Output connector: Pin jack (Y: green, PB: blue,
PR: red)(1 system)
Output format: 480i/480p/720p/1080i/ 1080p
Number of connectors: 2 channel: 1 system
(Linear audio): 20 Hz to 20 kHz
S/N ratio:90 dB
Dynamic range: 80 dB
Total harmonic distor tion:0.004 %
(200KHz)
Sensitivity: <20dBu
Signal-to-noise ratio: >60dB
Antenna conector: 75 Ohms, unbalanced
Signal-to-noise ratio: >40dB (1000KHz)
Frequency response: 40Hz-20KHz
Signal-to-noise ratio: >60db (A-weighted)
Input sensitivity: AUX IN 1&2: 200mV, AUX IN 3:
200mV
(430 × 365 × 63 mm)
(5°C to 35°)
Video file requirement (USB/DISC)
Video file compatibility with your player is limited
as follows:
• Maximum resolution size: 1920x1080 (W x H)
pixels
• File extensions: .wmv
• Playable Audio format: Dolby Digital , DTS , MP3 ,
WMA , AAC , AC3
• Sampling frequency: within 32 to 48kHz (WMA),
within 16-48kHz (Mp3)
• Bit rate: within 20-320kbps (WMA), within
32-320kbps (Mp3)
• CD-R/RW, DVD R/RW, BD-R/RE Format: ISO
9660+JOLIET, UDF and UDF Bridge format
• Maximum Files/Folder: Less than 2000. The movie
file name and subtitle are limited to 180
characters.
• Not all of the WMA and AAC Audio formats are
compatible with your player.
• HD WMV movie files contained on a USB 1.0/1.1
flash drive may not play correctly. Blu-ray, DVD, or
USB 2.0 are recommended to play back WMV HD
movie files.
• Your player does not support files that are
recorded with GMC (Global Motion
Compensation) or Qpel (Quarter pixel). Those are
video encoding techniques in MPEG4 standard,
like DivX or XVID.
MP3/WMA audio file requirement (USB/DISC)
• File extensions: .mp3, .wma
• Sampling frequency: Within 8 to 48kHz (WMA),
within 11 to 48kHz (Mp3)
• Bit rate: Within 8-320kbps (WMA, Mp3)
• CD-R/RW, DVD R/RW, BD-R/RE Format:
ISO 9660+JOLIET, UDF and UDF Bridge format
• Maximum Files/Folder: Less than 2000 (total
number of files and folders)
• Depending on the size and number of the
MP3/WMA files, it may take several minutes to
read the contents of the media.
• The total playback time indicated on the screen
may not correct for VBR files.
Photo file requirement (USB/DISC)
• File extensions: .jpg , .jpeg , .png
• Recommended size:
• Less than 4,000 x 3,000 x 24 bit/pixel
• Less than 3,000 x 3,000 x 32 bit/pixel
• CD-R/RW, DVD R/RW, BD-R/RE Format:
ISO 9660+JOLIET, UDF, and UDF Bridge format
• Maximum Files/Folder: Less than 2000 (total
number of files and folders)
• Progressive and lossless compression photo
image files are not supported.
• Depending on the size and number of the photo
files, it may take several minutes to read the
contents of the media.
22
www.insigniaproducts.com
Page 27

Blu-ray Disc Home Theater System
Legal notices
FCC Part 15
This device complies with Part 15 of the FCC Rules. Operation of
this product is subject to the following two conditions: (1) this
device may not cause harmful interference, and (2) this device
must accept any interference received, including interference
that may cause undesired operation.
This equipment has been tested and found to comply within the
limits for a class B digital device, pursuant to Part 15 of the FCC
Rules. These limits are designed to provide reasonable
protection against harmful interference in a residential
installation. This equipment generates, uses, and can radiate
radio frequency energy and, if not installed and used in
accordance with the instructions, may cause harmful
interference to radio communications. However, there is no
guarantee that interference will not occur in a particular
installation. If this equipment does cause harmful interference to
radio or television reception, which can be determined by
turning the equipment off and on, the user is encouraged to try
to correct the interference by one or more of the following
measures:
• Reorient or relocate the receiving antenna.
• Increase the separation between the equipment and
receiver.
• Connect the equipment into an outlet on a circuit different
from that to which the receiver is connected.
• Consult the dealer or an experienced technician for help.
FCC warning
Changes or modifications not expressly approved by the party
responsible for compliance with the FCC Rules could void the
user’s authority to operate this equipment.
DHHS and FDA safety certification
This product is made and tested to meet safety standards of the
FCC, requirements and compliance with safety performance of
the U.S. Department of Health and Human Services, and also
with FDA Radiation Performance Standards 21 CFR Subchapter J.
Canada ICES-003 statement
This Class B digital apparatus complies with Canadian ICES-003.
About copyright
Unauthorized copying, broadcasting, public performance, and
lending of discs are prohibited. Your player incorporates
copyright protection technology that is protected by U.S.
patents and other intellectual property rights. Use of this
copyright protection technology must be authorized by
Macrovision, and is intended for home and other limited viewing
uses only unless otherwise authorized by Macrovision. Reverse
engineering or disassembly is prohibited.
HDMI™
Your TV incorporates HDMI™ technology.
HDMI, the HDMI Logo and High-Definition Multimedia Interface
are trademarks or registered trademarks of HDMI Licensing LLC.
Energy Star
Products that have earned ENERGY STAR® are designed
to protect the environment through superior energy
efficiency. Your player is Energy Star compliant.
Sun Microsystems, Inc.
Java and all other Java trademarks and logos are
trademarks or registered trademarks of Sun
Microsystems, Inc. in the United States and/or other
countries.
Macrovision
This product incorporates copyright protection technology that
is protected by U.S. patents and other intellectual property
rights. Use of this copyright protection technology must be
authorized by Macrovision, and is intended for home and other
limited viewing uses only unless otherwise authorized by
Macrovision. Reverse engineering or disassembly is prohibited.
Dolby Laboratories
Manufactured under license from Dolby Laboratories.
Dolby, Pro Logic and the double-D symbol are trademarks
of Dolby Laboratories.
DTS, Inc.
Manufactured under license under U.S. Patent #’s:
5,451,942; 5,956,674; 5,974,380; 5,978,762; 6,487,535 &
other U.S. and worldwide patents issued & pending. DTS is a
registered trademark and the DTS logos, symbol, DTS-HD and
DTS-HD Advanced Digital Out are trademarks of DTS, Inc.
1996-2008 DTS, Inc. All rights reserved.
PUBLIC LICENSE
This product contains software that is subject to the GNU Public
License Version 2 (GPL2). You can obtain a copy of the GPL
License from
http://www.gnu.org/licenses/old-licenses/gpl-2.0.html.
If you require additional information or you wish to receive
source code, please call the Insignia support line at
1-877-467-4289. The source code is available for a period of
three (3) years from the date of the distribution of this product
by Insignia.
GNU PUBLIC LICENSE
The BD player runs software that is covered under the GPL. As
such, we are required to publish the following:
GNU GENERAL PUBLIC LICENSE
Version 2, June 1991
Copyright (C) 1989, 1991 Free Software Foundation, Inc.
51 Franklin Street, Fifth Floor, Boston, MA 02110-1301, USA
Everyone is permitted to copy and distribute verbatim copies of
this license document, but changing it is not allowed.
Preamble
The licenses for most software are designed to take away your
freedom to share and change it. By contrast, the GNU General
Public License is intended to guarantee your freedom to share
and change free software--to make sure the software is free for
all its users. This General Public License applies to most of the
Free Software Foundation's software and to any other program
whose authors commit to using it. (Some other Free Software
Foundation software is covered by the GNU Lesser General
Public License instead.) You can apply it to your programs, too.
When we speak of free software, we are referring to freedom, not
price. Our General Public Licenses are designed to make sure
that you have the freedom to distribute copies of free software
(and charge for this service if you wish), that you receive source
code or can get it if you want it, that you can change the
software or use pieces of it in new free programs; and that you
know you can do these things.
To protect your rights, we need to make restrictions that forbid
anyone to deny you these rights or to ask you to surrender the
rights.
These restrictions translate to certain responsibilities for you if
you distribute copies of the software, or if you modify it.
For example, if you distribute copies of such a program, whether
gratis or for a fee, you must give the recipients all the rights that
you have. You must make sure that they, too, receive or can get
the source code. And you must show them these terms so they
know their rights.
We protect your rights with two steps: (1) copyright the software,
and (2) offer you this license which gives you legal permission to
copy, distribute and/or modify the software.
Also, for each author's protection and ours, we want to make
certain that everyone understands that there is no warranty for
this free software. If the software is modified by someone else
and passed on, we want its recipients to know that what they
have is not the original, so that any problems introduced by
others will not reflect on the original authors' reputations.
Finally, any free program is threatened constantly by software
patents. We wish to avoid the danger that redistributors of a free
program will individually obtain patent licenses, in effect making
the program proprietary. To prevent this, we have made it clear
that any patent must be licensed for everyone's free use or not
licensed at all.
The precise terms and conditions for copying, distribution and
modification follow.
www.insigniaproducts.com
23
Page 28

NS-BRHTIB Blu-ray Disc Home Theater System
TERMS AND CONDITIONS FOR COPYING, DISTRIBUTION
AND MODIFICATION
0. This License applies to any program or other work which
contains a notice placed by the copyright holder saying it may
be distributed under the terms of this General Public License.
The "Program", below, refers to any such program or work, and a
"work based on the Program" means either the Program or any
derivative work under copyright law: that is to say, a work
containing the Program or a portion of it, either verbatim or with
modifications and/or translated into another language.
(Hereinafter, translation is included without limitation in the
term "modification".) Each licensee is addressed as "you".
Activities other than copying, distribution and modification are
not covered by this License; they are outside its scope. The act of
running the Program is not restricted, and the output from the
Program is covered only if its contents constitute a work based
on the Program (independent of having been made by running
the Program). Whether that is true depends on what the
Program does.
1. You may copy and distribute verbatim copies of the Program's
source code as you receive it, in any medium, provided that you
conspicuously and appropriately publish on each copy an
appropriate copyright notice and disclaimer of warranty; keep
intact all the notices that refer to this License and to the absence
of any warranty; and give any other recipients of the Program a
copy of this License along with the Program.
You may charge a fee for the physical act of transferring a copy,
and you may at your option offer warranty protection in
exchange for a fee.
2. You may modify your copy or copies of the Program or any
portion of it, thus forming a work based on the Program, and
copy and distribute such modifications or work under the terms
of Section 1 above, provided that you also meet all of these
conditions:
a) You must cause the modified files to carry prominent notices
stating that you changed the files and the date of any change.
b) You mus t caus e any wo rk tha t you di strib ute or pub lish, tha t in
whole or in part contains or is derived from the Program or any
part thereof, to be licensed as a whole at no charge to all third
parties under the terms of this License.
c) If the modified program normally reads commands
interactively when run, you must cause it, when started running
for such interactive use in the most ordinary way, to print or
display an announcement including an appropriate copyright
notice and a notice that there is no warranty (or else, saying that
you provide a warranty) and that users may redistribute the
program under these conditions, and telling the user how to
view a copy of this License. (Exception: if the Program itself is
interactive but does not normally print such an announcement,
your work based on the Program is not required to print an
announcement.) These requirements apply to the modified work
as a whole. If identifiable sections of that work are not derived
from the Program, and can be reasonably considered
independent and separate works in themselves, then this
License, and its terms, do not apply to those sections when you
distribute them as separate works. But when you distribute the
same sections as part of a whole which is a work based on the
Program, the distribution of the whole must be on the terms of
this License, whose permissions for other licensees extend to the
entire whole, and thus to each and every part regardless of who
wrote it.
Thus, it is not the intent of this section to claim rights or contest
your rights to work written entirely by you; rather, the intent is to
exercise the right to control the distribution of derivative or
collective works based on the Program.
In addition, mere aggregation of another work not based on the
Program with the Program (or with a work based on the
Program) on a volume of a storage or distribution medium does
not bring the other work under the scope of this License.
3. You may copy and distribute the Program (or a work based on
it, under Section 2) in object code or executable form under the
terms of Sections 1 and 2 above provided that you also do one of
the following:
a) Accompany it with the complete corresponding
machine-readable source code, which must be distributed under
the terms of Sections 1 and 2 above on a medium customarily
used for software interchange; or,
b) Accompany it with a written offer, valid for at least three years,
to give any third party, for a charge no more than your cost of
physically performing source distribution, a complete
machine -readable copy of the corresponding source code, to be
distributed under the terms of Sections 1 and 2 above on a
medium customarily used for software interchange; or,
c) Accompany it with the inform ation you received as to the offer
to distribute corresponding source code. (This alternative is
allowed only for noncommercial distribution and only if you
received the program in object code or executable form with
such an offer, in accord with Subsection b above.)
The source code for a work means the preferred form of the work
for making modifications to it. For an executable work, complete
source code means all the source code for all modules it
contains, plus any associated interface definition files, plus the
scripts used to control compilation and installation of the
executable. However, as a special exception, the source code
distributed need not include anything that is normally
distributed (in either source or binary form) with the major
components (compiler, kernel, and so on) of the operating
system on which the executable runs, unless that component
itself accompanies the executable.
If distribution of executable or object code is made by offering
access to copy from a designated place, then offering equivalent
access to copy the source code from the same place counts as
distribution of the source code, even though third parties are not
compelled to copy the source along with the object code.
4. You may not copy, modify, sublicense, or distribute the
Program except as expressly provided under this License. Any
attempt otherwise to copy, modify, sublicense or distribute the
Program is void, and will automatically terminate your rights
under this License. However, parties who have received copies,
or rights, from you under this License will not have their licenses
terminated so long as such parties remain in full compliance.
5. You are not required to accept this License, since you have not
signed it. However, nothing else grants you permission to modify
or distribute the Program or its derivative works. These actions
are prohibited by law if you do not accept this License. Therefore,
by modifying or distributing the Program (or any work based on
the Program), you indicate your acceptance of this License to do
so, and all its terms and conditions for copying, distributing or
modifying the Program or works based on it.
6. Each time you redistribute the Program (or any work based on
the Program), the recipient automatically receives a license from
the original licensor to copy, distribute or modify the Program
subject to these terms and conditions. You may not impose any
further restrictions on the recipients’ exercise of the rights
granted herein. You are not responsible for enforcing
compliance by third parties to this License.
7. If, as a consequence of a court judgment or allegation of
patent infringement or for any other reason (not limited to
patent issues),
conditions are imposed on you (whether by court order,
agreement or otherwise) that contradict the conditions of this
License, they do not excuse you from the conditions of this
License. If you cannot distribute so as to satisfy simultaneously
your obligations under this License and any other pertinent
obligations, then as a consequence you may not distribute the
Program at all. For example, if a patent license would not permit
royalty-free redistribution of the Program by all those who
receive copies directly or indirectly through you, then the only
way you could satisfy both it and this License would be to refrain
entirely from distribution of the Program.
If any portion of this section is held invalid or unenforceable
under any particular circumstance, the balance of the section is
intended to apply and the section as a whole is intended to
apply in other circumstances.
It is not the purpose of this section to induce you to infringe any
patents or other property right claims or to contest validity of
any such claims; this section has the sole purpose of protecting
the integrity of the free software distribution system, which is
implemented by public license practices. Many people have
made generous contributions to the wide range of software
distributed through that system in reliance on consistent
application of that system; it is up to the author/donor to decide
if he or she is willing to distribute software through any other
system and a licensee cannot impose that choice.
This section is intended to make thoroughly clear what is
believed to be a consequence of the rest of this License.
8. If the distribution and/or use of the Program is restricted in
certain countries either by patents or by copyrighted interfaces,
the original copyright holder who places the Program under this
License may add an explicit geographical distribution limitation
excluding those countries, so that distribution is permitted only
in or among countries not thus excluded. In such case, this
License incorporates the limitation as if written in the body of
this License.
24
www.insigniaproducts.com
Page 29

Blu-ray Disc Home Theater System
9. The Free Software Foundation may publish revised and/or
new versions of the General Public License from time to time.
Such new versions will be similar in spirit to the present version,
but may differ in detail to address new problems or concerns.
Each version is given a distinguishing version number. If the
Program specifies a version number of this License which applies
to it and "any later version", you have the option of following the
terms and conditions either of that version or of any later version
published by the Free Software Foundation. If the Program does
not specify a version number of this License, you may choose any
version ever published by the Free Software Foundation.
10. If you wish to incorporate parts of the Program into other free
programs whose distribution conditions are different, write to
the author to ask for permission. For software which is
copyrighted by the Free Software Foundation, write to the Free
Software Foundation; we sometimes make exceptions for this.
Our decision will be guided by the two goals of preserving the
free status of all derivatives of our free software and of
promoting the sharing and reuse of software generally.
NO WARRANTY
11. BECAUSE THE PROGRAM IS LICENSED FREE OF CHARGE,
THERE IS NO WARRANTY FOR THE PROGRAM, TO THE EXTENT
PERMITTED BY APPLICABLE LAW. EXCEPT WHEN OTHERWISE
STATED IN WRITING THE COPYRIGHT HOLDERS AND/OR OTHER
PARTIES PROVIDE THE PROGRAM "AS IS" WITHOUT WARRANTY
OF ANY KIND, EITHER EXPRESSED OR IMPLIED, INCLUDING, BUT
NOT LIMITED TO, THE IMPLIED WARRANTIES OF
MERCHANTABILITY AND FITNESS FOR A PARTICULAR PURPOSE.
THE ENTIRE RISK AS TO THE QUALITY AND PERFORMANCE OF
THE PROGRAM IS WITH YOU. SHOULD THE PROGRAM PROVE
DEFECTIVE, YOU ASSUME THE COST OF ALL NECESSARY
SERVICING, REPAIR OR CORRECTION.
12. IN NO EVENT UNLESS REQUIRED BY APPLICABLE LAW OR
AGREED TO IN WRITING WILL ANY COPYRIGHT HOLDER, OR ANY
OTHER PARTY WHO MAY MODIFY AND/OR REDISTRIBUTE THE
PROGRAM AS PERMITTED ABOVE, BE LIABLE TO YOU FOR
DAMAGES, INCLUDING ANY GENERAL, SPECIAL, INCIDENTAL OR
CONSEQUENTIAL DAMAGES ARISING OUT OF THE USE OR
INABILITY TO USE THE PROGRAM (INCLUDING BUT NOT LIMITED
TO LOSS OF DATA OR DATA BEING RENDERED INACCURATE OR
LOSSES SUSTAINED BY YOU OR THIRD PARTIES OR A FAILURE OF
THE PROGRAM TO OPERATE WITH ANY OTHER PROGRAMS),
EVEN IF SUCH HOLDER OR OTHER PARTY HAS BEEN ADVISED OF
THE POSSIBILITY OF SUCH DAMAGES.
END OF TERMS AND CONDITIONS
www.insigniaproducts.com
25
Page 30

NS-BRHTIB Blu-ray Disc Home Theater System
26
www.insigniaproducts.com
Page 31

Blu-ray Disc Home Theater System
One-year limited warranty
Insignia Products (“Insignia”) warrants to you, the original
purchaser of this new product (“Product”), that the Product shall
be free of defects in the original manufacture of the material or
workmanship for a period of one (1) year from the date of your
purchase of the Product (“Warranty Period”). This Product must
be purchased from an authorized dealer of Insignia brand
products and packaged with this warranty statement. This
warranty does not cover refurbished Product. If you notify
Insignia during the Warranty Period of a defect covered by this
warranty that requires service, terms of this warranty apply.
How long does the coverage last?
The Warranty Period lasts for 1 year (365 days) from the date you
purchased the Product. The purchase date is printed on the
receipt you received with the Product.
What does this warranty cover?
During the Warranty Period, if the original manufacture of the
material or workmanship of the Product is determined to be
defective by an authorized Insignia repair center or store
personnel, Insignia will (at its sole option): (1) repair the Product
with new or rebuilt parts; or (2) replace the Product at no charge
with new or rebuilt comparable products or parts. Products and
parts replaced under this warranty become the property of
Insignia and are not returned to you. If service of Products or
parts are required after the Warranty Period expires, you must
pay all labor and parts charges. This warranty lasts as long as you
own your Insignia Product during the Warranty Period. Warranty
coverage terminates if you sell or otherwise transfer the Product.
How to obtain warranty service?
If you purchased the Product at a retail store location, take your
original receipt and the Product to the store you purchased it
from. Make sure that you place the Product in its original
packaging or packaging that provides the same amount of
protection as the original packaging. If you purchased the
Product from an online web site, mail your original receipt and
the Product to the address listed on the web site. Make sure that
you put the Product in its original packaging or packaging that
provides the same amount of protection as the original
packaging.
To obtain in-home warranty service for a television with a screen
30 inches or larger, call 1-888-BESTBUY. Call agents will diagnose
and correct the issue over the phone or will have an
Insignia-approved repair person dispatched to your home.
Should the Insignia-approved repair person not correct the issue
on the first call, an Insignia television (size and features to be
determined by Insignia) will be loaned to you until your TV is
repaired and returned, at no charge to you. This feature is only
available to Insignia television consumers residing in the United
States.
Where is the warranty valid?
This warranty is valid only to the original purchaser of the
product in the United States, Canada, and Mexico.
What does the warranty not cover?
This warranty does not cover:
• Customer instruction
•Installation
•Set up adjustments
•Cosmetic damage
• Damage due to acts of God, such as lightning strikes
•Accident
•Misuse
•Abuse
•Negligence
•Commercial use
• Modification of any part of the Product, including the
antenna
• Plasma display panel damaged by static (non-moving)
images applied for lengthy periods (burn-in).
This warranty also does not cover:
• Damage due to incorrect operation or maintenance
• Connection to an incorrect voltage supply
• Attempted repair by anyone other than a facility
authorized by Insignia to service the Product
• Products sold as is or with all faults
• Consumables, such as fuses or batteries
• Products where the factory applied serial number has been
altered or removed
REPAIR REPLACEMENT AS PROVIDED UNDER THIS WARRANTY IS
YOUR EXCLUSIVE REMEDY. INSIGNIA SHALL NOT BE LIABLE FOR
ANY INCIDENTAL OR CONSEQUENTIAL DAMAGES FOR THE
BREACH OF ANY EXPRESS OR IMPLIED WARRANTY ON THIS
PRODUCT, INCLUDING, BUT NOT LIMITED TO, LOST DATA, LOSS
OF USE OF YOUR PRODUCT, LOST BUSINESS OR LOST PROFITS.
INSIGNIA PRODUCTS MAKES NO OTHER EXPRESS WARRANTIES
WITH RESPECT TO THE PRODUCT, ALL EXPRESS AND IMPLIED
WARRANTIES FOR THE PRODUCT, INCLUDING, BUT NOT LIMITED
TO, ANY IMPLIED WARRANTIES OF AND CONDITIONS OF
MERCHANTABILITY AND FITNESS FOR A PARTICULAR PURPOSE,
ARE LIMITED IN DURATION TO THE WARRANTY PERIOD SET
FORTH ABOVE AND NO WARRANTIES, WHETHER EXPRESS OR
IMPLIED, WILL APPLY AFTER THE WARRANTY PERIOD. SOME
STATES, PROVINCES AND JURISDICTIONS DO NOT ALLOW
LIMITATIONS ON HOW LONG AN IMPLIED WARRANTY LASTS, SO
THE ABOVE LIMITATION MAY NOT APPLY TO YOU. THIS
WARRANTY GIVES YOU SPECIFIC LEGAL RIGHTS, AND YOU MAY
ALSO HAVE OTHER RIGHTS, WHICH VARY FROM STATE TO STATE
OR PROVINCE TO PROVINCE.
Contact Insignia:
For customer service please call 1-877-467-4289
www.insigniaproducts.com
Distributed by Best Buy Purchasing, LLC
7601 Penn Avenue South, Richfield, Minnesota, U.S.A.
55423-3645
© 2009 Best Buy Enterprise Services, Inc.
All rights reserved. INSIGNIA is a trademark of Best Buy
Enterprise Services, Inc. Registered in some countries. All other
products and brand names are trademarks of their respective
owners.
www.insigniaproducts.com
27
Page 32

NS-BRHTIB Blu-ray Disc Home Theater System
28
www.insigniaproducts.com
Page 33

Blu-ray Disc Home Theater System
www.insigniaproducts.com
29
Page 34

NS-BRHTIB Blu-ray Disc Home Theater System
30
www.insigniaproducts.com
Page 35

Blu-ray Disc Home Theater System
www.insigniaproducts.com
31
Page 36

www.insigniaproducts.com (877) 467-4289
Distributed by Best Buy Purchasing, LLC
7601 Penn Avenue South, Richfield, MN USA 55423-3645
© 2009 Best Buy Enterprise Services, Inc.
All rights reserved. INSIGNIA is a trademark of Best Buy Enterprise Services, Inc. Registered in some countries.
All other products and brand names are trademarks of their respective owners.
ENGLISH
09-1019
 Loading...