

Page 1

User Guide | Guide de l’utilisateur | Guía del Usuario
Blu-ray Disc Player| Lecteur de disques Blu-ray | Reproductor de discos Blu-ray
NS-BRDVD
Page 2
TM
ANTENNA
UDIO
VIDEO INID
L
(
I
T
OUT
S
O
COMPO
T
O OUTPUT
Y
P
B
/
B
P
R/CR
DIG
TALA
UDIO OUTPUT
P
M
C
O
UDIO IN
DIG
TALA
UDIO OUTPUT
PCM/
M
C
O
AXIAL
A
A
UDIO
VIDEO INID
L
VIDEO OUTID
(
IN
I
T
OUT
S
O
COMPO
T
O OUTPUT
P
B
/
B
P
R/CR
UDIO
VIDEO INID
L
R
U
VIDEO OUT
D
(L1)
O
OU
S
O
T
V
Y
/C
P
R/CR
R
DIGI
UDIO OUTPUT
M
C
O
L
Printed in China E7A03CD / 1VMN25094*****
Congratulations on your purchase of a high-quality Insignia product.
Your DVD recorder is designed for reliable and trouble-free
performance. Use this guide for initial setup of your DVD recorder. If
you have questions, see your User Guide for more information.
Félicitations d’avoir acheté ce produit Insignia de haute qualité.
Ce graveur de DVD a été conçu pour des performances et une abilité
exceptionnelles. Utiliser ce guide pour la première mise en service du
graveur de DVD. Pour toutes questions, consulter le guide de l’utilisateur.
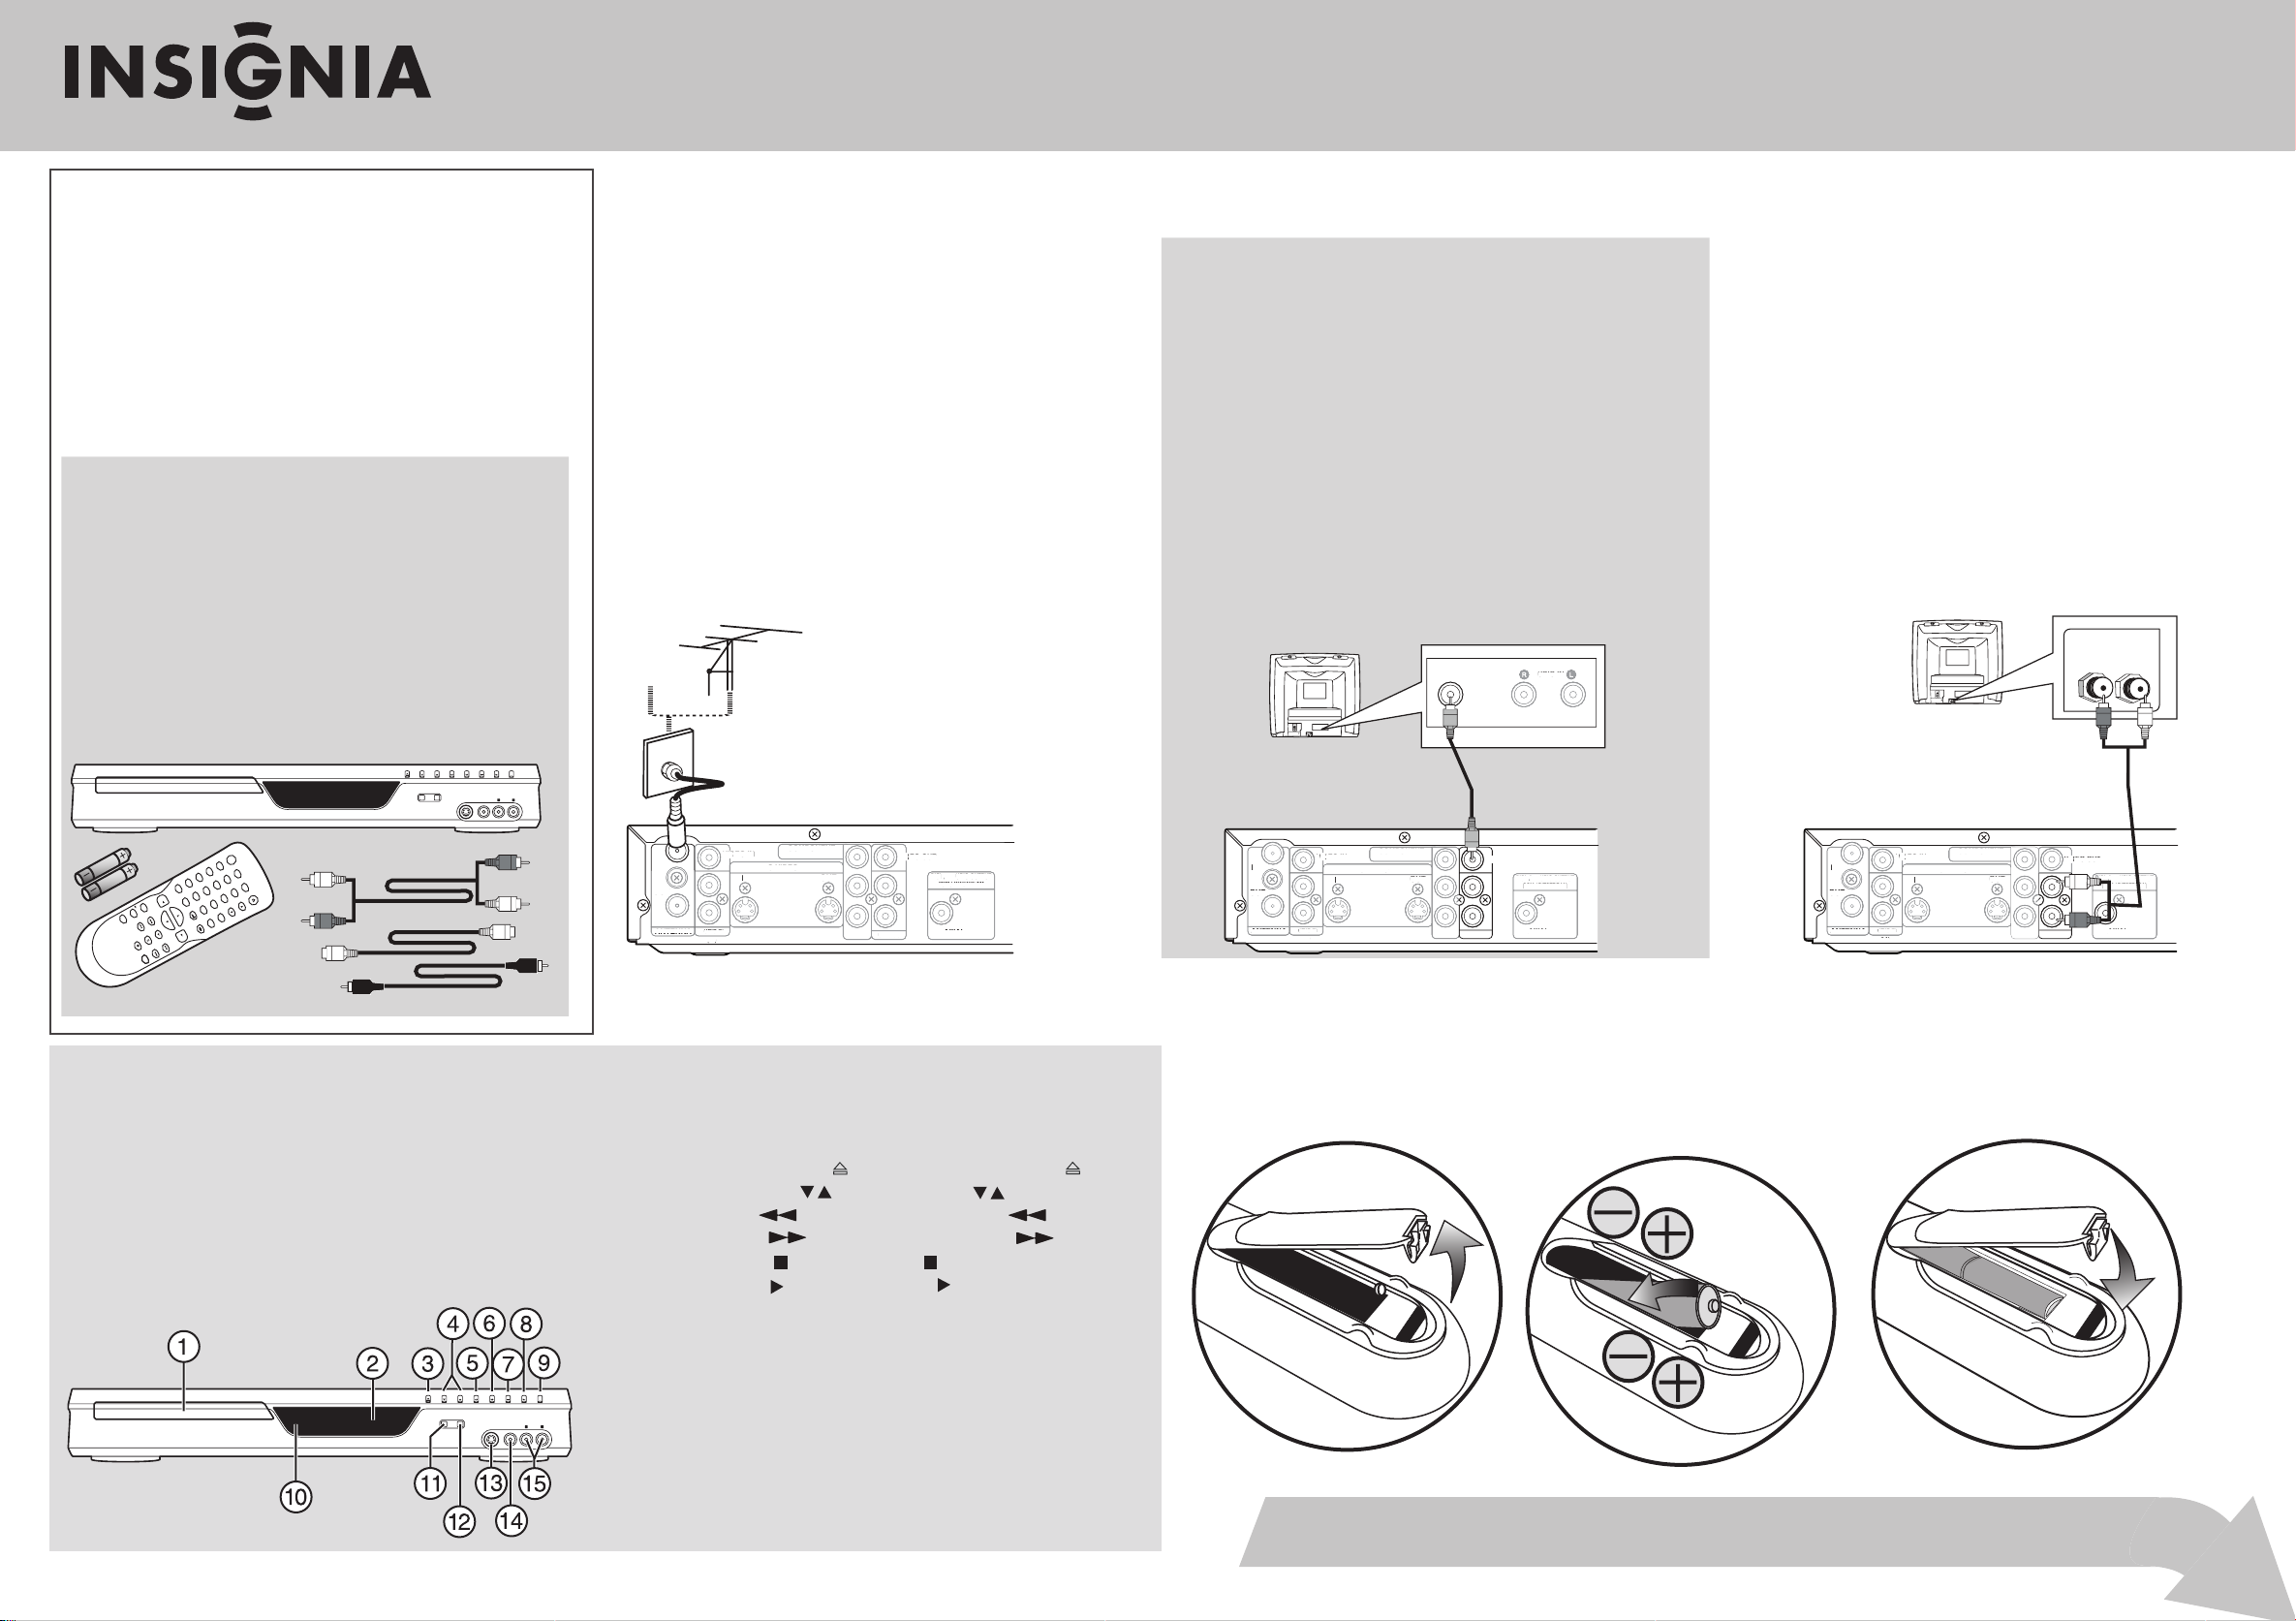
Package contents/ Contenu de la boîte
DVD recorder / Graveur de DVD
Remote control / Télécommande
AA batteries (2) / Piles AA (2)
Audio cables / Câbles audio
Composite video cable / Câble vidéo composite
RF cable / Câble RF
User Guide / Guide de l’utilisateur
Quick Start Guide / Guide d’installation
Setup Guide I Guide d’installation
Step 1
Connect your DVD recorder using the illustrations below as a guide. / Connecter le graveur de DVD en se référant aux schémas ci-dessous.
Connecting an antenna or cable/satellite box
1 Disconnect the 75 ohm RF cable from the back of your TV.
2 Connect the 75 ohm RF cable from the antenna or cable
wall jack to the ANTENNA IN jack on your DVD recorder.
3 Connect the ANTENNA OUT jack on your DVD recorder to
the ANT IN jack on your TV using a 75 ohm RF cable.
Connexion d'une antenne ou d'un décodeur câble/satellite
1 Déconnecter le câble RF de l'antenne de 75 ohms de
l'arrière du téléviseur.
2 Connecter le câble RF d'antenne de 75 ohms de la prise
3 Connecter la prise de sortie antenne (ANTENNA OUT) du
Connecting your DVD recorder • Étape 1
d'antenne ou câble murale à la prise d'entrée antenne
(ANTENNA IN) du graveur de DVD.
graveur de DVD à la prise d'entrée antenne (ANT IN) du
téléviseur avec un câble RF de 75 ohms.
Cable or antenna / Câble ou antenne
Connexion du graveur de DVD
Connecting to your TV using composite cables
Connect the provided composite video cable (yellow plug)
from the VIDEO OUT jack on your DVD recorder to the VIDEO
IN jack on the back of your TV.
Connexion au téléviseur avec des câbles composites
Connecter le câble vidéo composite fourni (connecteur jaune)
de la prise de sortie vidéo (VIDEO OUT) du graveur à la prise
d'entrée vidéo (VIDEO IN) à l'arrière du téléviseur.
Back of TV / Arrière du téléviseur
AUDIO INVIDEO
Connecting the audio
Connect the provided audio cable (left-white plug and right-red
plug) from the AUDIO OUT jacks on your DVD recorder to the
AUDIO IN jacks on the back of your TV.
Connexion de l’audio
Connecter le câble audio fourni (connecteur gauche/blanc et
droit/rouge) des prises de sortie audio (AUDIO OUT) du graveur de
DVD aux prises d'entrée audio (AUDIO IN) à l'arrière du téléviseur.
NS-FSDVDR
Back of TV / Arrière du téléviseur
R L
Antenna wall jack / Prise d’antenne murale
OPEN/CLOSE CHANNEL REV FWD STOP PLAY POWER
REC/OTRREC SPEED
P
O
WER
.@/:
1
GHI
ZOOM
4
PQRS
ABC
DISPL
7
2
T
OP MENU
MENU/LIST
REC SPEED
x1.3/0.8
REC/
REV
O
TR
SKI
P
PL
A
Y
P
A
USE
S
T
OP
FWD
SKIP
CM SKIP
TIMER
JKL
P
A
R
Y
5
OG.
TUV
DEF
S
P
A
CE
0
RETURN
OPEN/CLOSE
8
3
MNO
6
WXYZ
9
CLEAR
CH
REPE
A
SETUP
T
ENTER
S-VIDEO VIDEO AUDIO
L R
IN
OUT
UT
ANTENNA
75 ohm RF cable / Câble RF de 75 ohms
Back of DVD recorder / Arrière du graveur de DVD
COMPONENT
IN
COMPONEN
VIDEO OUTPUT
IDEO OUTPUT
S-VIDEO
-VIDE
OUT
Y
T
B
PB/C
R
PR/C
AUDIO IN
(L1)
VIDEO IN
L
R
IN
AUDIO OUT
DIO OUT
VIDEO OUT
I
L
R
DIGITAL AUDIO OUTPUT
PCM / BITSTREAM
PCM/ BITSTREA
COAXIAL
AXIA
Refer to your User Guide for more information about other types of connections. / Voir le Guide de l’utilisateur pour plus d’information sur les autres types de connexions.
Step 2 Getting to know your DVD recorder • Étape 2 Présentation du graveur de DVD
Check out the front and back panels to familiarize yourself with
buttons and jacks. Refer to your User Guide for more information
about how to get the most out of your DVD recorder.
L’utilisateur doit inspecter les panneaux avant et arrière, an de
se familiariser avec les touches et les prises. Voir le Guide de
l’utilisateur pour plus d’informations sur la façon d’utiliser toutes
les possibilités de ce graveur de DVD.
OPEN/CLOSE CHANNEL REV FWD STOP PLAY POWER
REC/OTRREC SPEED
S-VIDEO VIDEO AUDIO
L R
1 Disc tray • Plateau à disque
2 Display • Achage
3 OPEN/CLOSE button • Touche OUVRIR/FERMER
4 Channel buttons • Touches Canal
5 REV button • Touche RETOUR RAPIDE
6 FWD button • Touche AVANCE RAPIDE
7 STOP button • Touche ARRÊT
8 PLAY button • Touche LECTURE
9 POWER button • Touche MARCHE/ARRÊT
10 Remote control sensor • Capteur de télécommande
11 REC SPEED button • Touche VITESSE D'ENREGISTREMENT
12 REC/OTR button • Touche ENREGISTREMENT IMMÉDIAT
13 S-VIDEO (L2) input jack • Prise d'entrée S-VIDEO [S-Vidéo] (L2)
14 VIDEO (L2) input jack • Prise d’entrée VIDEO [Vidéo] (L2)
15 AUDIO L/R (L2) input jack •Prises d’entrée AUDIO G/D (L2)
Composite video cable / Câbles audio (G/D)
Back of DVD recorder / Arrière du graveur de DVD
COMPONENT
IN
IN
OUT
OU
ANTENNA
AUDIO IN
(L1)
L1)
VIDEO IN
L
R
R
IN
IN
N
VIDEO OUTPUT
VIDE
S-VIDEO
-VIDE
NEN
OUT
VIDEO OUT
Y
B
PB/C
C
R
PR/C
AUDIO OUT
L
R
DIGITAL AUDIO OUTPUT
I
PCM / BITSTREAM
CM / BITSTREA
COAXIAL
Step 3 Install remote control batteries
Back of DVD recorder / Arrière du graveur de DVD
IN
OUT
OU
ANTENNA
NTENNA
•
Étape 3 Installation des piles de la télécommande
Audio cables (L/R) / Câbles audio (G/D)
COMPONENT
VIDE
VIDEO OUTPUT
S-VIDEO
-VIDE
NEN
OUT
Y
Y
B
PB/C
C
PR/C
R
AUDIO IN
(L1)
L1)
VIDEO IN
L
R
R
IN
N
IN
Remove the cover from the back of the remote control, insert the batteries as indicated, then replace the cover.
Retirer le couvercle à l’arrière de la télécommande, insérer les piles tel qu’illustré, puis remettre le couvercle.
AUDIO OUT
VIDEO OUT
L
R
DIGITAL AUDIO OUTPUT
I
PCM / BITSTREAM
BITSTREA
COAXIAL
Setup and recording options can be found on the back of this guide.
La conguration et les options d’enregistrement sont détaillées au verso de ce guide.
Page 3
Setup Guide I Guide d’installation
NS-FSDVDR
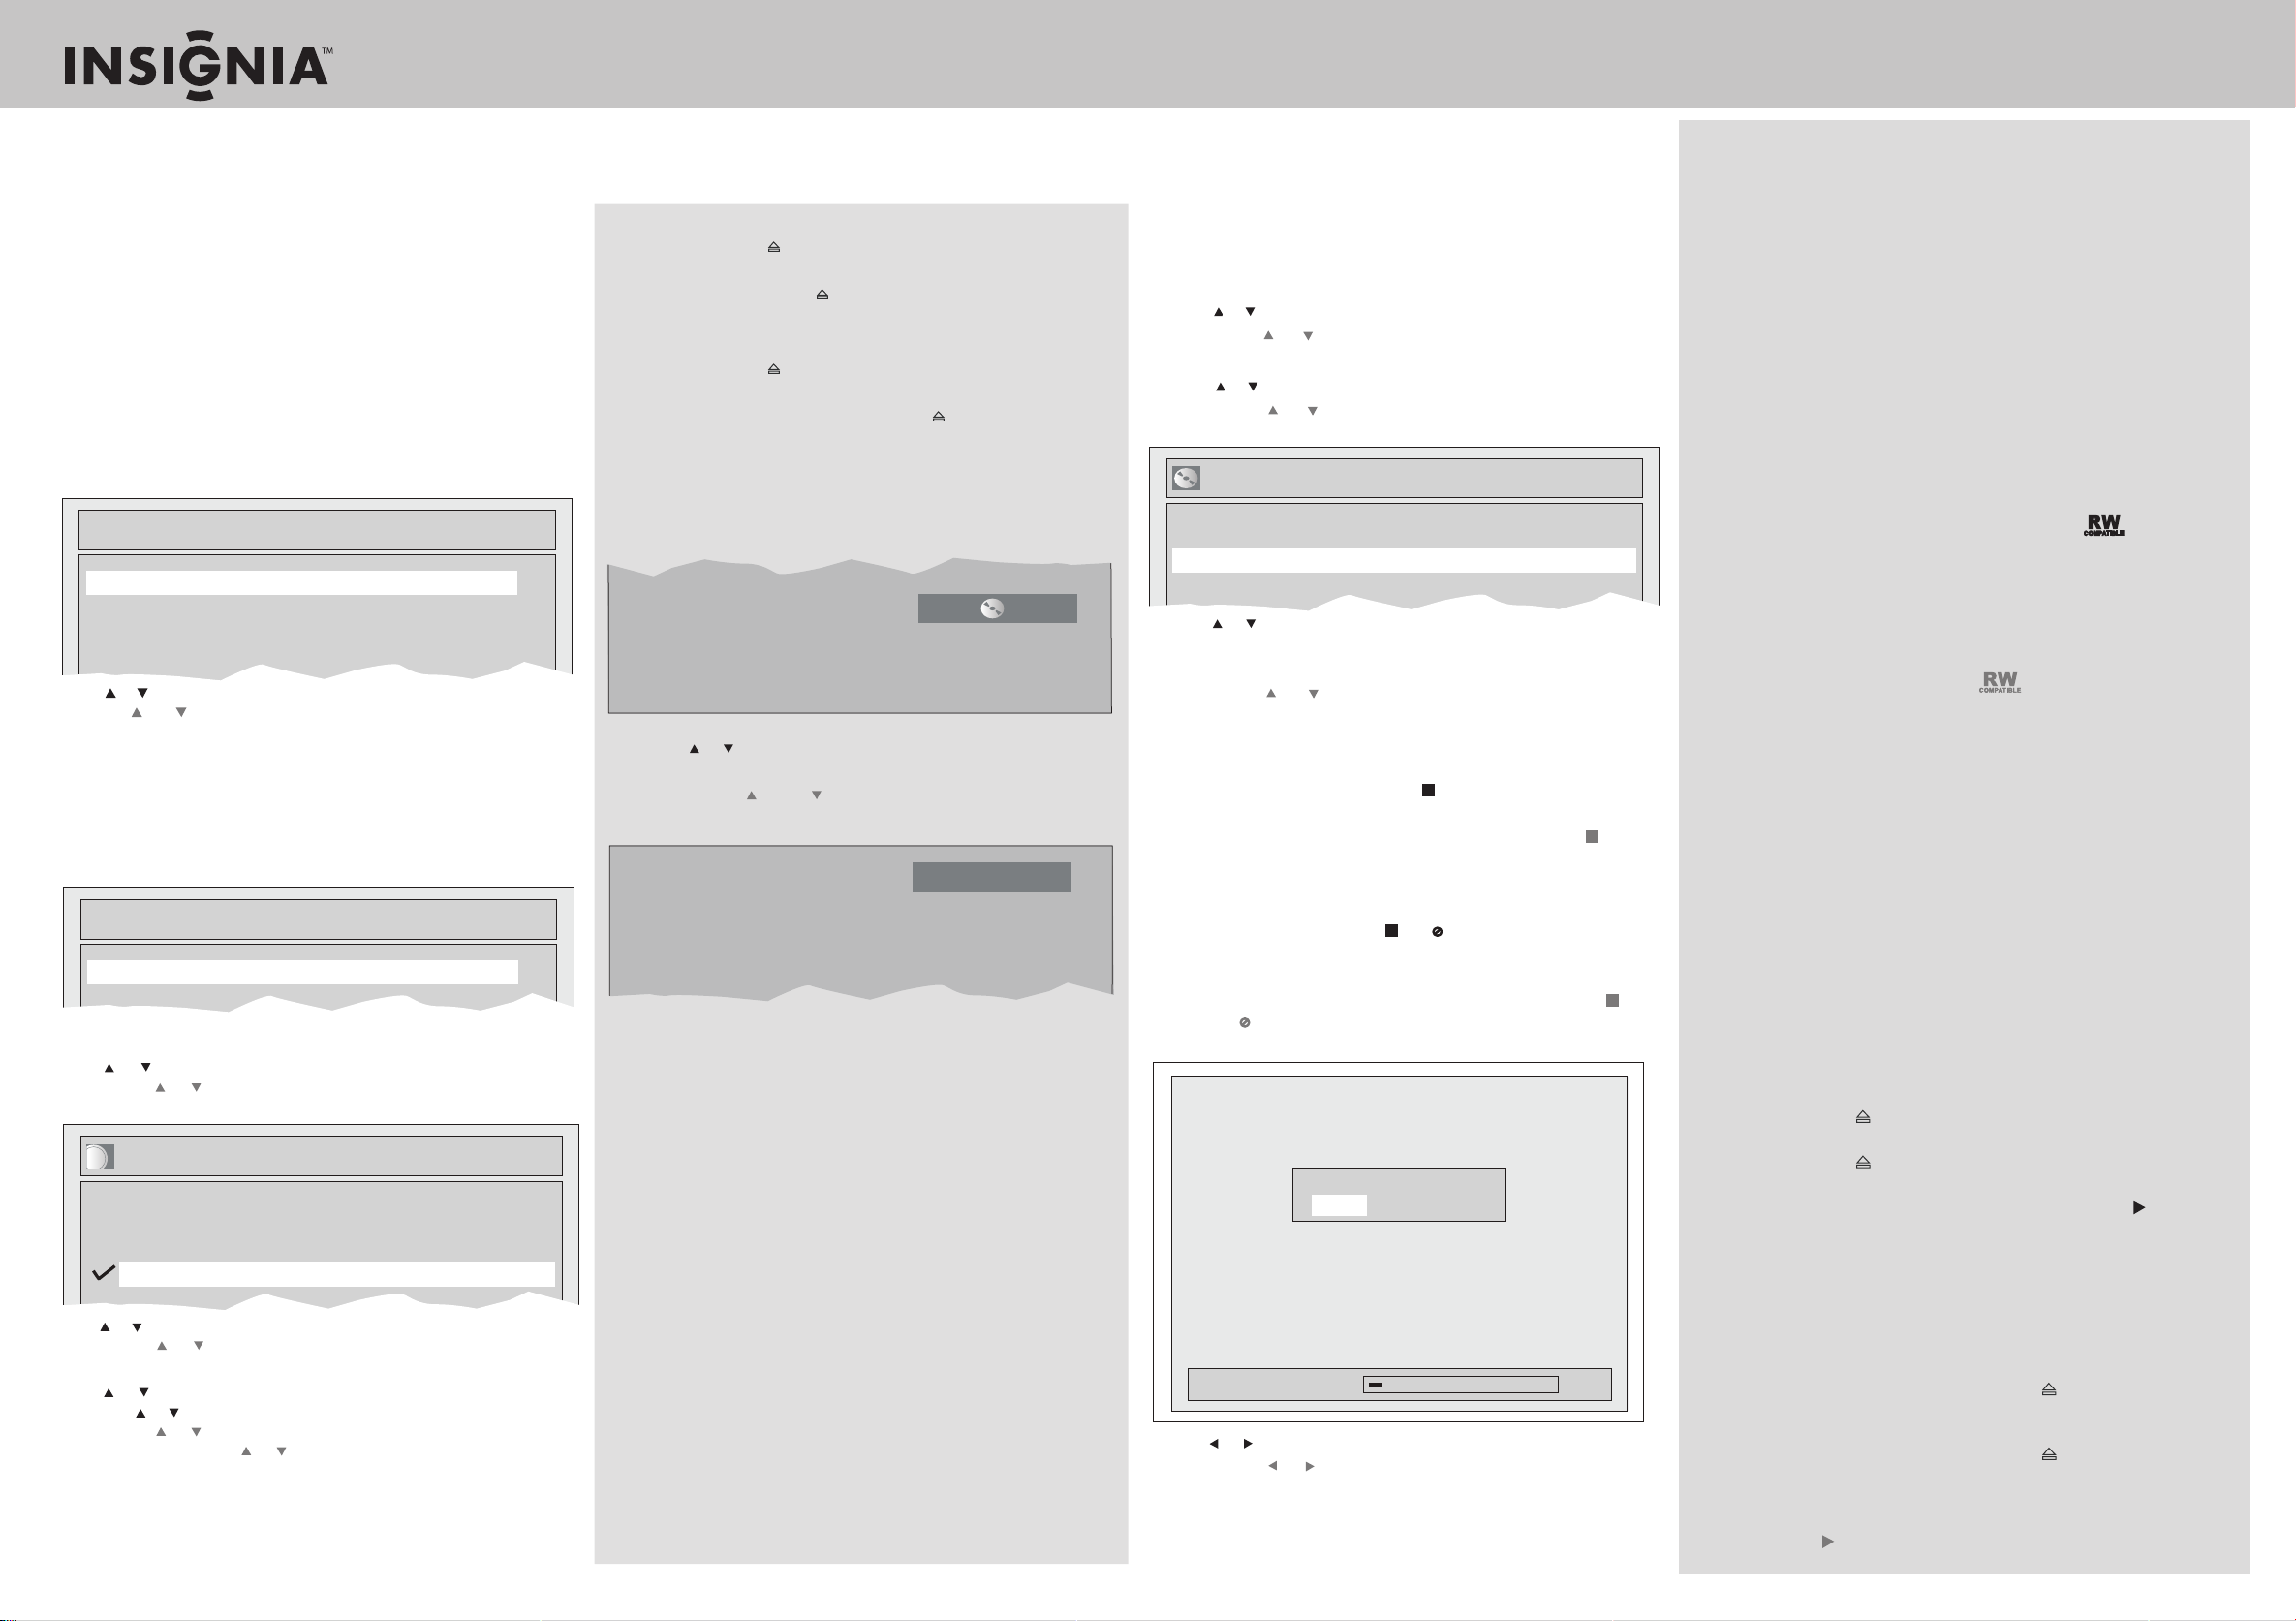
Step 4
Selecting basic options •
Étape 4
Sélection des options de base
The rst time you turn on your DVD recorder, you are prompted to select initial settings.
La première fois que le graveur de DVD est mis en service, l’utilisateur est invité à sélectionner les paramètres d’installation.
1 Make sure that your DVD recorder is connected to a TV and that the
power cord is plugged into a power outlet.
Vérier que le graveur de DVD est connecté à un téléviseur et que
le cordon d’alimentation est branché sur une prise secteur.
2 Turn on your TV, then select the TV input source for the jacks your
DVD recorder is connected to.
Mettre le téléviseur sous tension, puis sélectionner la source
d’entrée du téléviseur à laquelle vont être connectées les prises du
graveur de DVD.
3 Press POWER to turn on your DVD recorder.
Appuyer sur POWER (Marche/Arrêt) pour mettre le graveur de DVD
en marche.
Initial Setting
English
Français
Español
4 Press or
Appuyer sur ou pour sélectionner la langue des menus d’écrans,
puis appuyer sur ENTER (Entrée).
to select the on-screen menu language, then press ENTER
5 Press ENTER again. Your DVD recorder searches for channels and
stores the channel information in the channel list. When the search
is complete, the Clock Setting screen opens.
Appuyer une nouvelle fois sur ENTER (Entrée). Le graveur de DVD
recherche les canaux et enregistre l’information qui les concerne
dans la liste des canaux. Quand la recherche est terminée, l'écran
Clock Setting (Réglage de l'horloge) s'ache.
Initial Setting
Clock Setting
6 Press SETUP.
Appuyer sur SETUP (Conguration).
7 Press or to select Clock, then press ENTER.
Appuyer sur ou pour sélectionner Clock (Horloge), puis sur
ENTER (Entrée).
Auto Clock Setting
OFF
Auto
Manual
8
Press or to select Clock Setting, press ENTER, then press ENTER again.
Appuyer sur ou pour sélectionner Clock Setting (Réglage de
l'horloge), appuyer sur ENTER, puis appuyer de nouveau sur ENTER.
Recording a program • Enregistrement d'un programme
1 Press OPEN/CLOSE to open the disc tray, then insert a
formatted DVD into the tray with the label facing up.
Appuyer sur OPEN/CLOSE pour ouvrir le plateau à disque, puis
insérer un DVD formaté dans le plateau avec l’étiquette tournée vers
le haut.
2 Press OPEN/CLOSE to close the disc tray. Your DVD recorder
reads the disc. This may take a while.
Appuyer sur OPEN/CLOSE (Ouvrir/fermer) pour fermer le plateau
à disque. Le graveur de DVD identie le disque. Ceci peut prendre
un certain temps.
3 Press REC SPEED to select a recording speed.
Appuyer sur REC SPEED (Vitesse d'enregistrement) pour
sélectionner une vitesse d’enregistrement.
XP 0:58
.
4 Press CH or CH or press the number buttons to select the
channel you want to record.
Appuyer sur CH ou CH ou sur les touches numériques pour
sélectionner le canal à enregistrer.
CH 12
5 Press REC/OTR to start the recording.
Appuyer sur REC/OTR (Enregistrement immédiat) pour
commencer l'enregistrement.
6 To stop the recording, press STOP .
Pour arrêter l'enregistrement, appuyer sur STOP (Arrêt).
You can pause the recording, change channels, then continue
recording a dierent channel to the same DVD.
Il est possible d'arrêter momentanément l'enregistrement, de
changer de canal, puis de continuer à enregistrer un canal
diérent sur le même DVD.
9 Press or to adjust the month, day, year, hour, minutes, or AM or
PM. Press or to move from eld to eld.
Appuyer sur ou pour régler le mois, le jour, l’heure, les minutes et
AM ou PM. Appuyer sur ou pour passer d'un champ à un autre.
10 When you have set the date and time, press ENTER.
Quand la date et l’heure ont été réglés, appuyer sur ENTER.
11 Press SETUP to close the menu.
Appuyer sur SETUP (Conguration) pour fermer le menu.
Finalizing a DVD • Finalisation d’un DVD
After your have recorded a DVD, you can nalize it so you can
play it on another DVD.
Quand l'enregistrement d'un DVD est terminé, celui-ci peut
être nalisé an d'être lisible sur un autre lecteur DVD.
1 Press SETUP. The Setup menu opens.
Appuyer sur SETUP (Conguration). Le menu Setup s’ache.
2 Press or to select Disc, then press ENTER.
Appuyer sur ou pour sélectionner Disc (Disque),
puis sur ENTER (Entrée).
3 Press or to select Finalize, then press ENTER.
Appuyer sur ou pour sélectionner Finalize (Finaliser),
puis sur ENTER (Entrée).
Finalize
Yes
No
4 Press or to select Yes, then press ENTER. Finalizing starts
automatically and a progress screen opens. Finalizing is
complete when the progress bar reaches 100%.
Appuyer sur ou pour sélectionner Yes (Oui), puis sur ENTER
(Entrée). La nalisation démarre automatiquement et un écran
de progression s'ache. La nalisation est terminée lorsque la
barre de progression atteint 100 %.
5 To cancel nalizing, press STOP . A conrmation message
opens. (DVD-RW only)
Pour annuler la nalisation, appuyer sur STOP (Arrêt) . Un
message de conrmation s'ache. (DVD-RW uniquement)
Note: Remarque:
After nalizing has started, you may not be able to cancel.
DVD-R only)
nalizing.
Une fois la nalisation commencée, il peut être impossible de
l'annuler. (DVD-R uniquement) Si en appuyant sur STOP le
symbole s’ache, la nalisation ne peut pas être interrompue. (DVD-RW uniquement)
6
Press or to select Yes , then press ENTER. (DVD-RW only)
Appuyer sur ou pour sélectionner Yes (Oui), puis sur
ENTER (Entrée). (DVD-RW uniquement)
If you press STOP and appears, you cannot stop
(for DVD-RW only)
Do you want to cancel ?
Yes No
(for
%5gnizilaniF
Your DVD recorder can record to DVD-Rs and DVD-RWs
Ce graveur de DVD peut eectuer des enregistrements sur
des DVD-R et des DVD-RW.
DVD-Rs can only be recorded once and cannot be erased. DVD-Rs can be
recorded only in Video mode.DVD-RWs can be recorded and erased
times. DVD-RWs can be recorded in either Video mode or VR mode.
Les DVD-R ne peuvent être enregistrés qu'une fois et ne peuvent pas
être eacés. Les disques DVD-R ne peuvent être utilisés que pour un
enregistrement en mode Vidéo.
Il est possible d'enregistrer et d'eacer de nombreuses fois les disques
DVD-RW. Les DVD-RW peuvent être utilisés pour un enregistrement en
mode Vidéo ou en mode VR.
many
Recording modes / Modes d’enregistrement
Video mode is the same recording format as DVD movies purchased in
stores. You can play them in most DVD players after you have nalized them
VR (Video Recording) mode is a basic recording format for DVD-RW. You
can record and edit repeatedly. Only DVD players with are capable of
playing DVD-RWs recorded in VR mode.
Le mode Video (Vidéo) est le même format que les lms DVD achetés
dans les magasins. Il est possible de les reproduire dans la plupart des
lecteurs DVD quand ils ont été nalisés. Le mode VR (enregistrement
vidéo) est un format d'enregistrement de base pour les DVD-RW. Il
permet un nombre illimité d'enregistrements et de modications.
Seuls les lecteurs DVD portant le logo sont capables de lire des
DVD-RW enregistrés en mode VR.
.
Finalizing discs / Finalisation des disques
After recording, you must nalize the DVD to play it on other DVD players.
After nalizing:
DVD-RW/R (Video mode) cannot record more content or be edited.
DVD-RW (VR mode) can record more content and be edited.
Après l'enregistrement, il faut naliser le DVD pour pouvoir le lire sur
d'autres lecteurs DVD. Après la nalisation :
Les DVD-RW/R (mode Vidéo) ne peuvent plus être utilisés pour
enregistrer un contenu supplémentaire, ni être modiés.
Un DVD-RW (mode VR) peut enregistrer du contenu supplémentaire et
être modié.
The following instructions are for playing a pre-recorded DVD that you buy
or an audio CD. For instructions on playing DVDs recording in Video or VR
mode, see your User Guide.
1 Turn on your TV and DVD recorder.
2
On the TV, select the video source that your DVD recorder is connected to.
3 Press OPEN/CLOSE to open the disc tray, then insert a DVD into the
tray with the label facing up.
4 Press OPEN/CLOSE to close the disc tray. Your DVD recorder reads
the DVD. This may take a while.
5 If the disc does not automatically start playing, press PLAY .
Les instructions qui suivent s'appliquent à un DVD préenregistré
acheté en magasin ou à un CD audio.
Pour les instructions relatives à l’enregistrement de DVD en mode
vidéo ou VR, voir le Guide de l’utilisateur.
1 Mettre le téléviseur et le graveur de DVD sous tension.
2 Sur le téléviseur, sélectionner la source vidéo à laquelle est connecté
le graveur de DVD.
3 Appuyer sur OPEN/CLOSE (Ouvrir/Fermer) pour ouvrir le plateau
à disque, puis insérer un DVD dans le plateau avec l’étiquette
tournée vers le haut.
4 Appuyer sur OPEN/CLOSE (Ouvrir/Fermer) pour fermer le
plateau à disque. Le graveur de DVD identie le DVD. Ceci peut
prendre un certain temps.
5 Si la lecture ne commence pas automatiquement, appuyer sur
PLAY (Lecture) .
Distributed by/ Distribué Best Buy Purchasing, LLC/Distribué par Best Buy Purchasing, LLC 7601 Penn Avenue South, Richeld, MN USA 55423-3645 www.insignia-products.com 877-467-4289
08-1033
Page 4
Setup Guide / Guide d’installation / Guía de instalación
Blu-ray Disc Player / Lecteur de disques Blu-ray /
Reproductor de discos Blu-ray
I NS-BRDVD
Congratulations on your purchase of a high-quality Insignia
product. Your Blu-ray Disc player is designed for reliable and
trouble-free performance. Use this guide for initial setup of
your player. If you have questions, see your User Guide for more
information.
Félicitations d’avoir acheté ce produit Insignia de haute qualité.
Ce lecteur de Disques Blu-ray a été conçu pour fournir des
performances et une abilité exceptionnelles. Utiliser ce guide
pour la première mise en service du lecteur. Pour toutes questions,
consulter le Guide de l’utilisateur.
Felicitaciones por su compra de un producto de alta calidad de
Insignia. Su reproductor de Discos Blu-ray está diseñado para
proveer un rendimiento con able y libre de problemas. Utilice
esta guía para la con guración inicial de su reproductor. Si tiene
preguntas, re érase a su Guía del usuario para obtener más
información.
Package contents / Contenu de la boîte /
Contenido del paquete
Blu-ray Disc player / Lecteur de Disques Blu-ray / Reproductor de
Discos Blu-ray
Remote control / Télécommande / Control remoto
AA batteries (2) / Piles AA (2) / Pilas AA (2)
RCA audio cable / Câble audio RCA / Cable de audio RCA
RCA video cable / Câble vidéo RCA / Cable de video RCA
Power cord / Cordon d’alimentation / Cable de alimentación
User Guide / Guide de l’utilisateur / Guía del usuario
Setup Guide / Guide d’installation / Guía de instalación
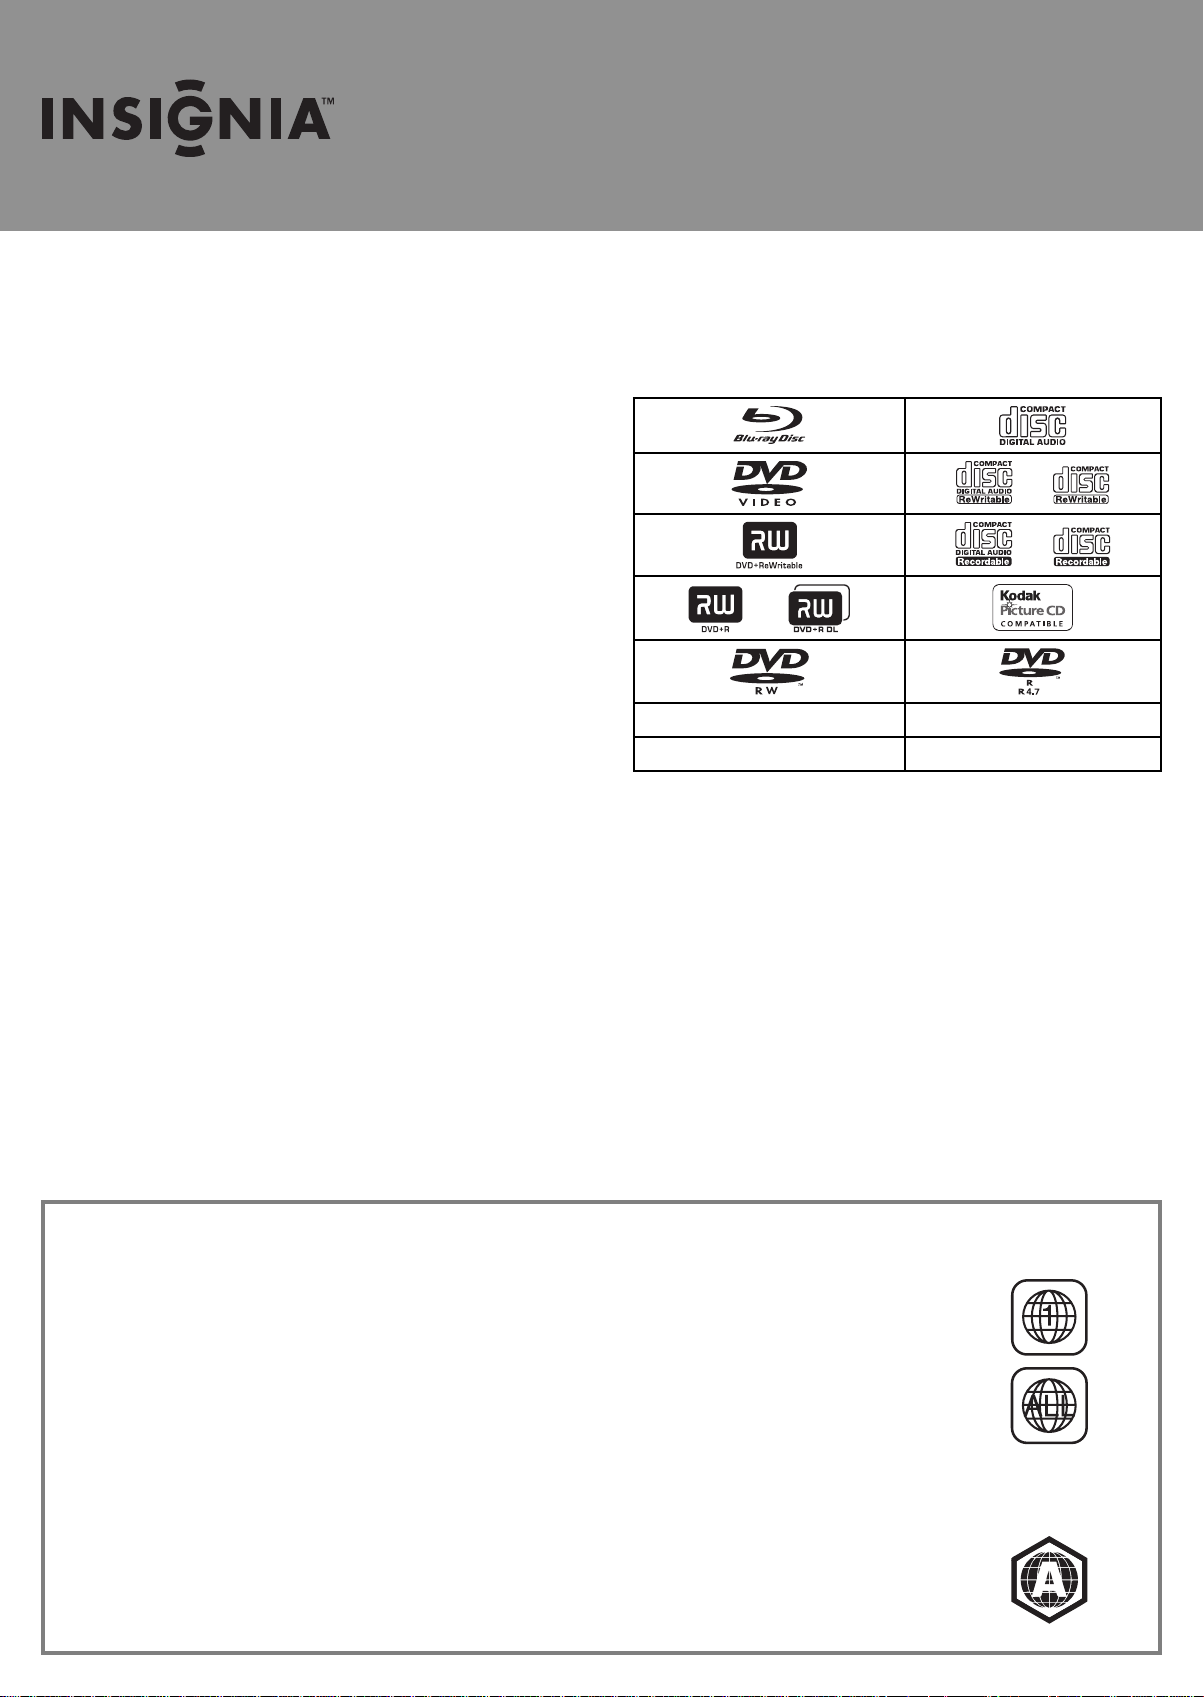
Playable discs and les / Disques et chiers
compatibles / Discos y archivos compatibles
WMA MP3
JPEG
Region codes / Codes régionaux / Codi cación regional
Your NS-BRDVD Blu-ray Disc player plays Blu-ray discs with region A and DVDs with region 1 or ALL.
You cannot play Blu-ray Discs or DVD discs labeled for other regions. Look for these symbols on your Blu-ray Disc
or DVD. If these symbols do not appear on your Blu-ray Disc or DVD, you cannot play the disc in this player.
Ce lecteur de Disques Blu-ray NS-BRDVD reproduit des Disques Blu-ray de la région A et des DVD de la région 1
ou Toutes (ALL).
Il n’est pas possible de reproduire des Disques Blu-ray ou des DVD étiquetés pour d’autres régions. Identi er ces
symboles sur le Disque Blu-ray ou le DVD. Si ces symboles ne sont pas sur le le Disque Blu-ray ou le DVD, il n’est
pas possible de reproduire le disque avec ce lecteur.
Su reproductor de Discos Blu-ray NS-BRDVD reproduce Discos Blu-ray de la región A y DVDs de la región 1 o
Todas (ALL).
No se puede reproducir Discos Blu-ray o discos DVD etiquetados para otras regiones. Busque estos símbolos en
su Disco Blu-ray o DVD. Si estos símbolos no aparecen en su Disco Blu-ray o DVD, no se puede reproducir el disco en este
reproductor.
DVD video / DVD vidéo /
DVD video
BD video / BD vidéo /
BD video
Page 5
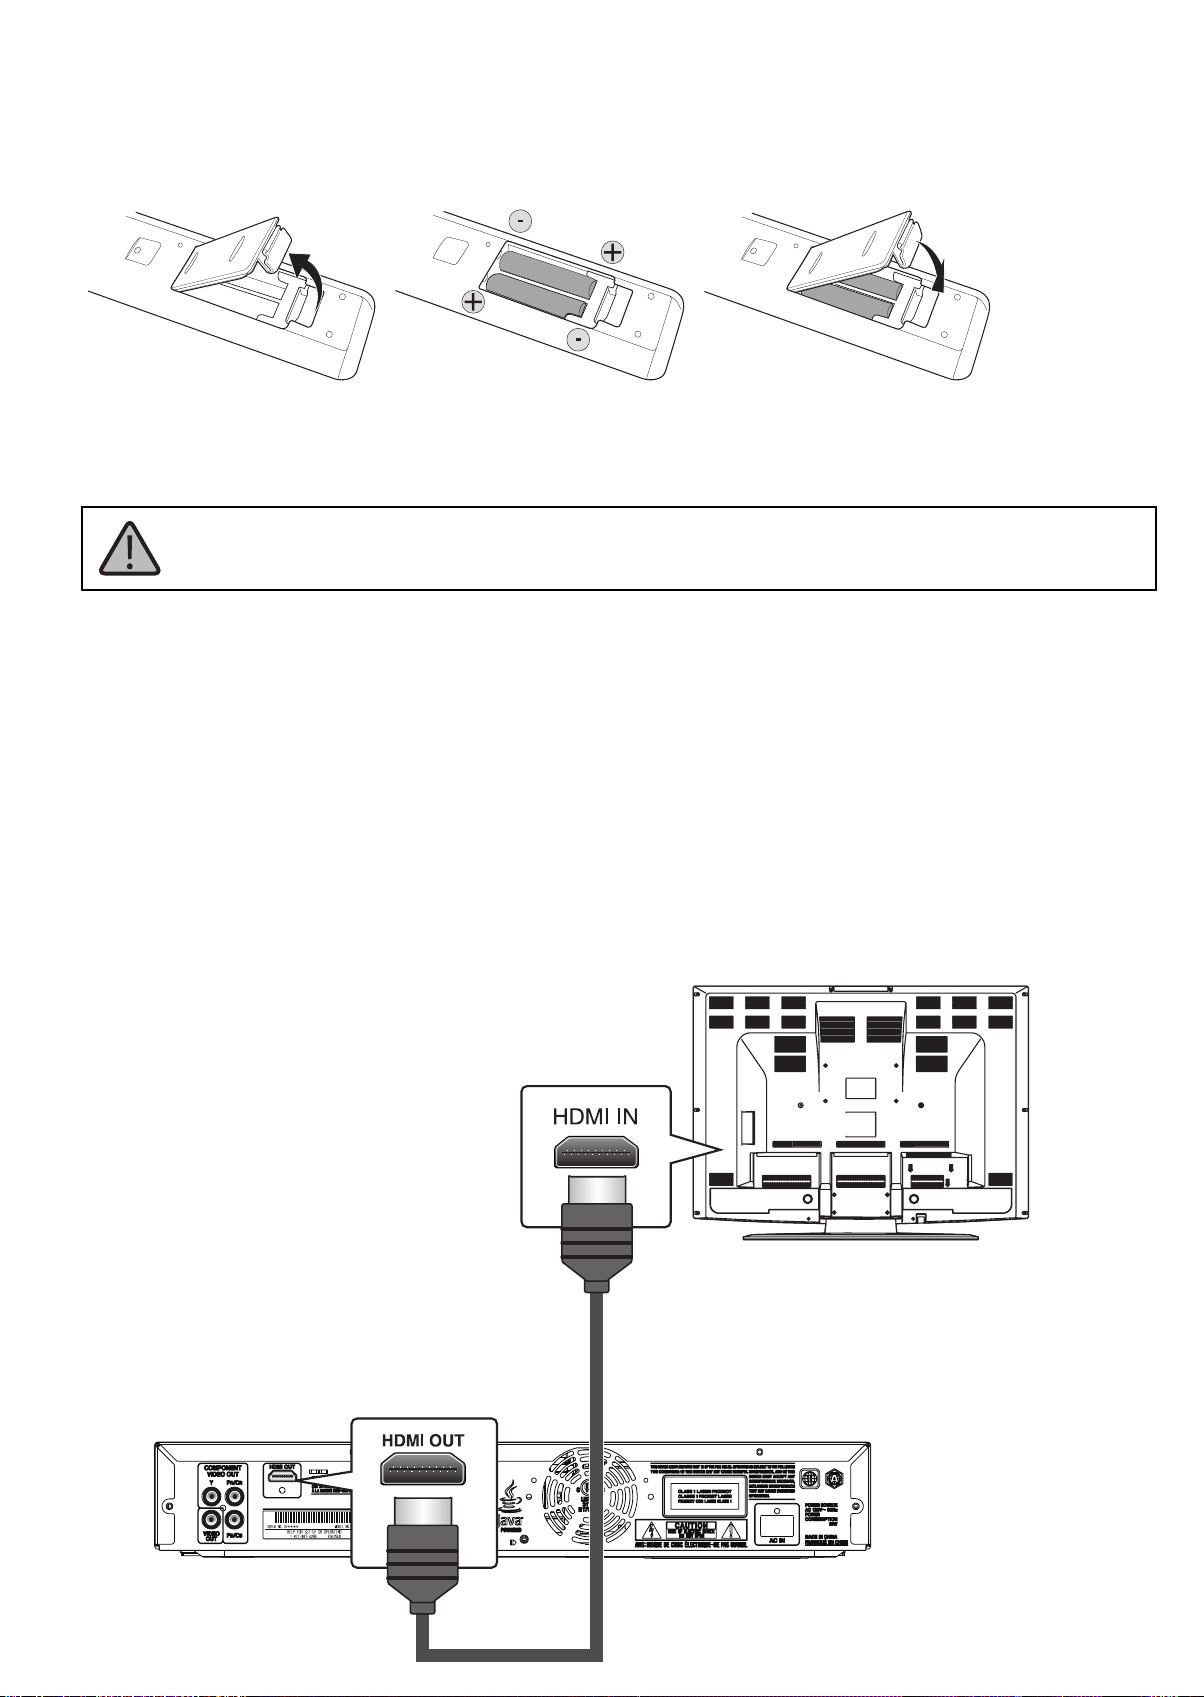
1 Insert remote control batteries / Insérer les piles de la
télécommande / Insertar las pilas del control remoto
Remove the cover from the back of the remote control, insert the batteries as indicated into the compartment, then replace the cover. / Retirer le
couvercle à l’arrière de la télécommande, insérer les piles tel qu’illustré dans le compartiment, puis remettre le couvercle. / Retire la cubierta de la parte
posterior del control remoto, inserte las pilas como se indica en el compartimiento y vuelva a colocar la cubierta.
2 Make connections / E ectuer les connexions / Hacer las
conexiones
All devices should be turned o and disconnected from the power outlet before making connections.
Tous les périphériques doivent être mis hors tension et déconnectés de la prise secteur avant d’e ectuer les connexions.
Todos los equipos tienen que estar apagados y desenchufados del tomacorriente antes de hacer las conexiones.
Connecting to a TV / Connexion à un téléviseur / Conexión a un televisor
HDMI audio and video connection (best audio and video) / Connexion audio et vidéo HDMI (qualité
vidéo et audio optimale) / Conexión audio y video HDMI (audio y video óptima)
Use an HDMI cable (not supplied) to provide both digital audio and video (RCA audio cable connection unnecessary). You will enjoy the best quality pictures
from 480p/720p/1080i/1080p/1080p24 if your TV or audio system is compatible. Press HDMI on your remote control to cycle through the modes.
Utiliser un câble HDMI (non fourni) pour obtenir l’audio et la vidéo numérique (la connexion d’un câble audio RCA n’est pas nécessaire). Des images d’une
qualité optimale sera obtenue avec les résolutions 480p/720p/1080i/1080p/1080p24, si le téléviseur ou le système audio est compatible. Appuyer sur HDMI
de la télécommande pour basculer entre les modes.
Use un cable HDMI (no se incluye) para obtener ambos audio y video digital (no se necesita conectar un cable de audio RCA). Podrá disfrutar de una calidad
de imagen óptima con las resoluciones 480p/720p/1080i/1080p/1080p24 si su televisor o sistema de audio es compatible. Presione HDMI en su control
remoto para seleccionar los modos.
TV
HDMI cable (available at Best Buy)
Câble HDMI (disponible à Best Buy)
cable HDMI (disponible en Best Buy)
Your TV port locations and labels may vary
L’emplacement des ports du téléviseur et les
étiquettes peuvent varier
La posición de los puertos de su televisor y las
etiquetas pueden variar
Blu-ray Disc player
Lecteur de Disques Blu-ray
Reproductor de Discos Blu-ray
Page 6
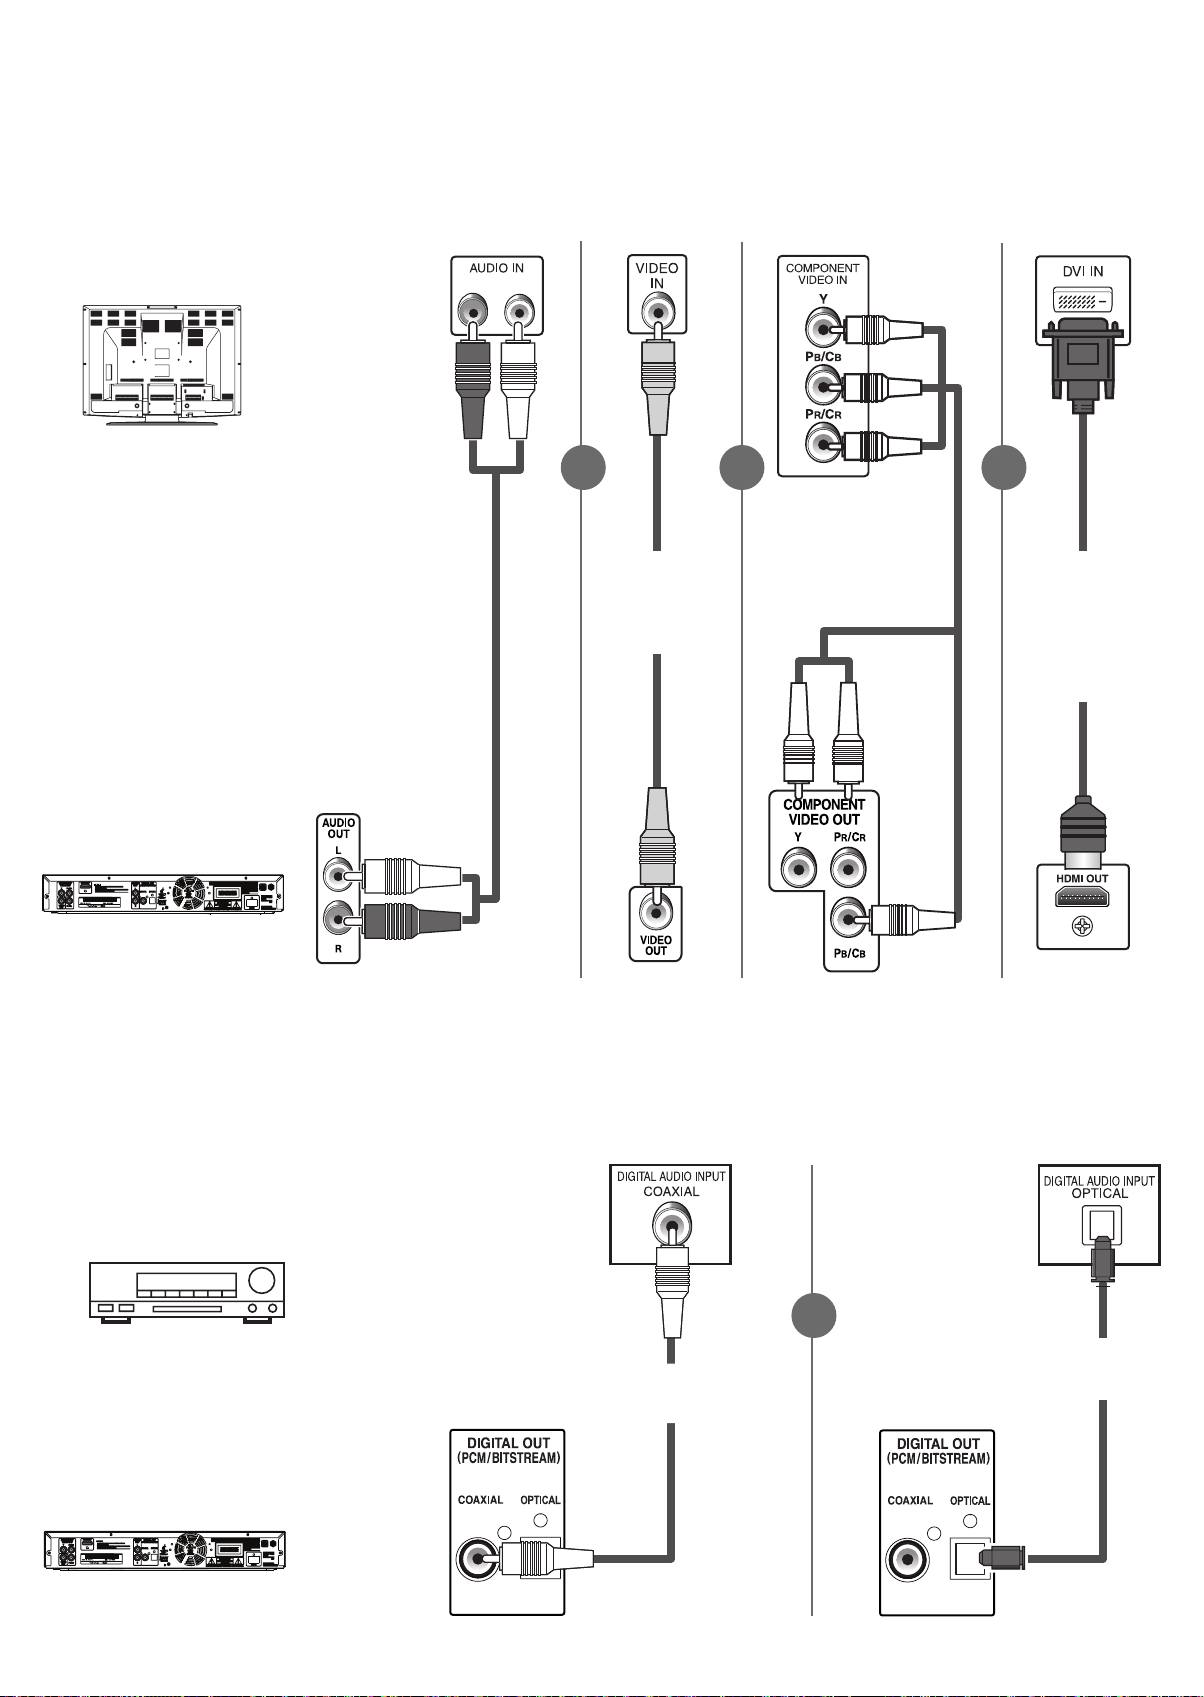
Basic audio and video connection / Connexion audio et vidéo de base / Conexión audio y video
básicas
Note: For the best surround sound experience, see “Connecting to a surround sound receiver” below. / Remarque°: Pour un son ambiophonique de qualité
optimale, voir « Connexion à un récepteur de son ambiophonique » ci-après. / Nota: Para una experiencia de sonido envolvente óptima, re érase a “Conexión a
un receptor de sonido envolvente” a continuación.
Audio/Audio/
Audio
TV
LR
Good picture/
Bonne image/
Buena imagen
Better picture/
Meilleure image/
Mejor imagen
Best picture/ Image
optimale/ Imagen
óptima
Blu-ray Disc player
Lecteur de Disques Blu-ray
Reproductor de Discos Blu-ray
RCA audio cable (supplied)
Câble audio RCA (fourni)
Cable de audio RCA (suministrado)
Audio out/ Sortie audio/
Salida de audio
and/
et/y
RCA video cable
Câble vidéo RCA
Cable de video RCA
(suministrado)
(supplied)
(fourni)
ou/o
Video out/ Sortie vidéo/
Salida de video
or/
Component video cable
(available at Best Buy)
Câble vidéo à composantes
(disponible à Best Buy)
Cable video de componentes
(disponible en Best Buy)
Component video out/ Sortie
vidéo à composantes/ Salida
de video de componentes
or/
ou/o
HDMI/DVI video cable
(available at Best Buy)
Câble vidéo HDMI/
DVI (disponible
à Best Buy)
Cable video HDMI/
DVI (disponible en
Best Buy)
HDMI out/ Sortie
HDMI/ Salida HDMI
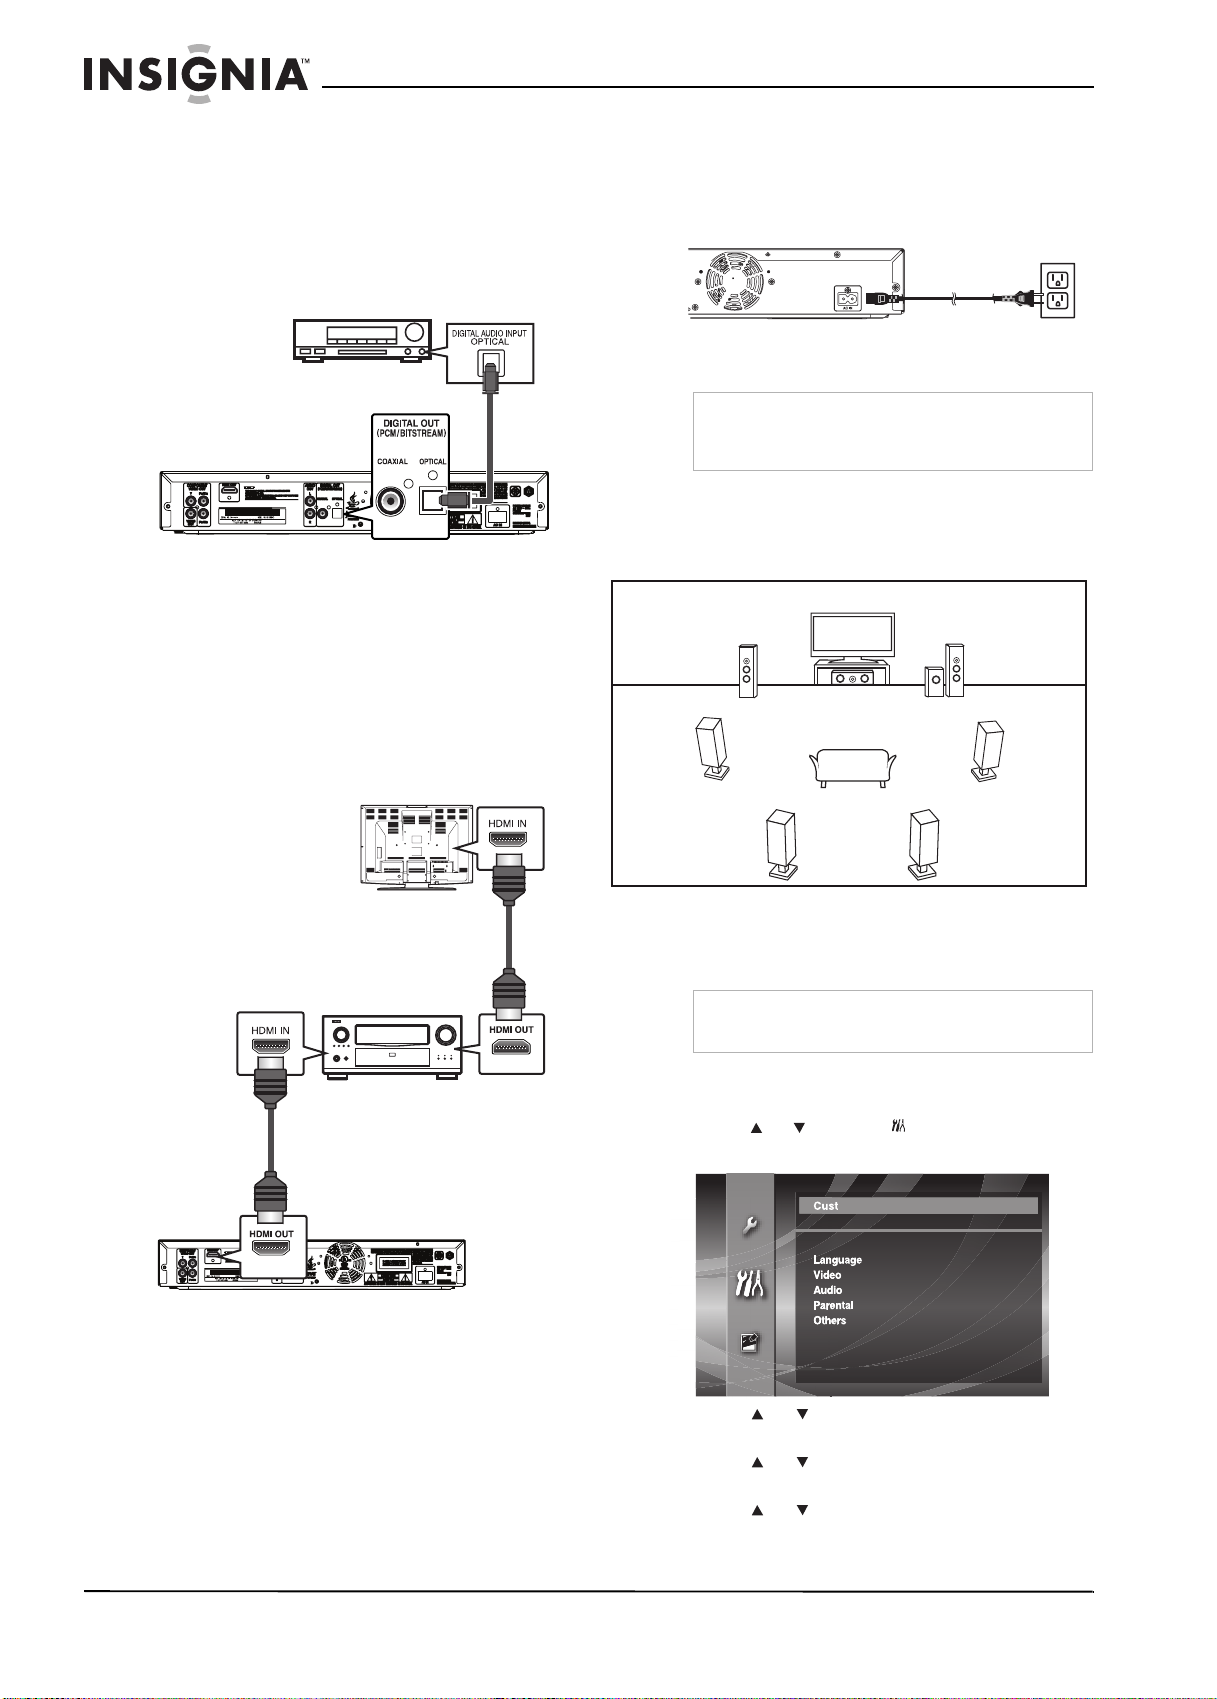
Connecting to a surround sound receiver / Connexion à un récepteur de
son ambiophonique / Conexión a un receptor de sonido envolvente
AV receiver (ampli er)
Récepteur AV (ampli cateur)
Receptor AV (ampli cador)
or/
ou/o
digital audio optical cable
câble audio optique numérique
cable de audio óptico digital
alida digital (óptica)
Blu-ray Disc player
Lecteur de Disques Blu-ray
Reproductor de Discos Blu-ray
digital audio coaxial cable
câble audio coaxial numérique
cable de audio coaxial digital
Digital out (coaxial) / Sortie numérique
(coaxiale) / Salida digital (coaxial)
Digital out (optical) / Sortie numérique
(optique) / S
Page 7
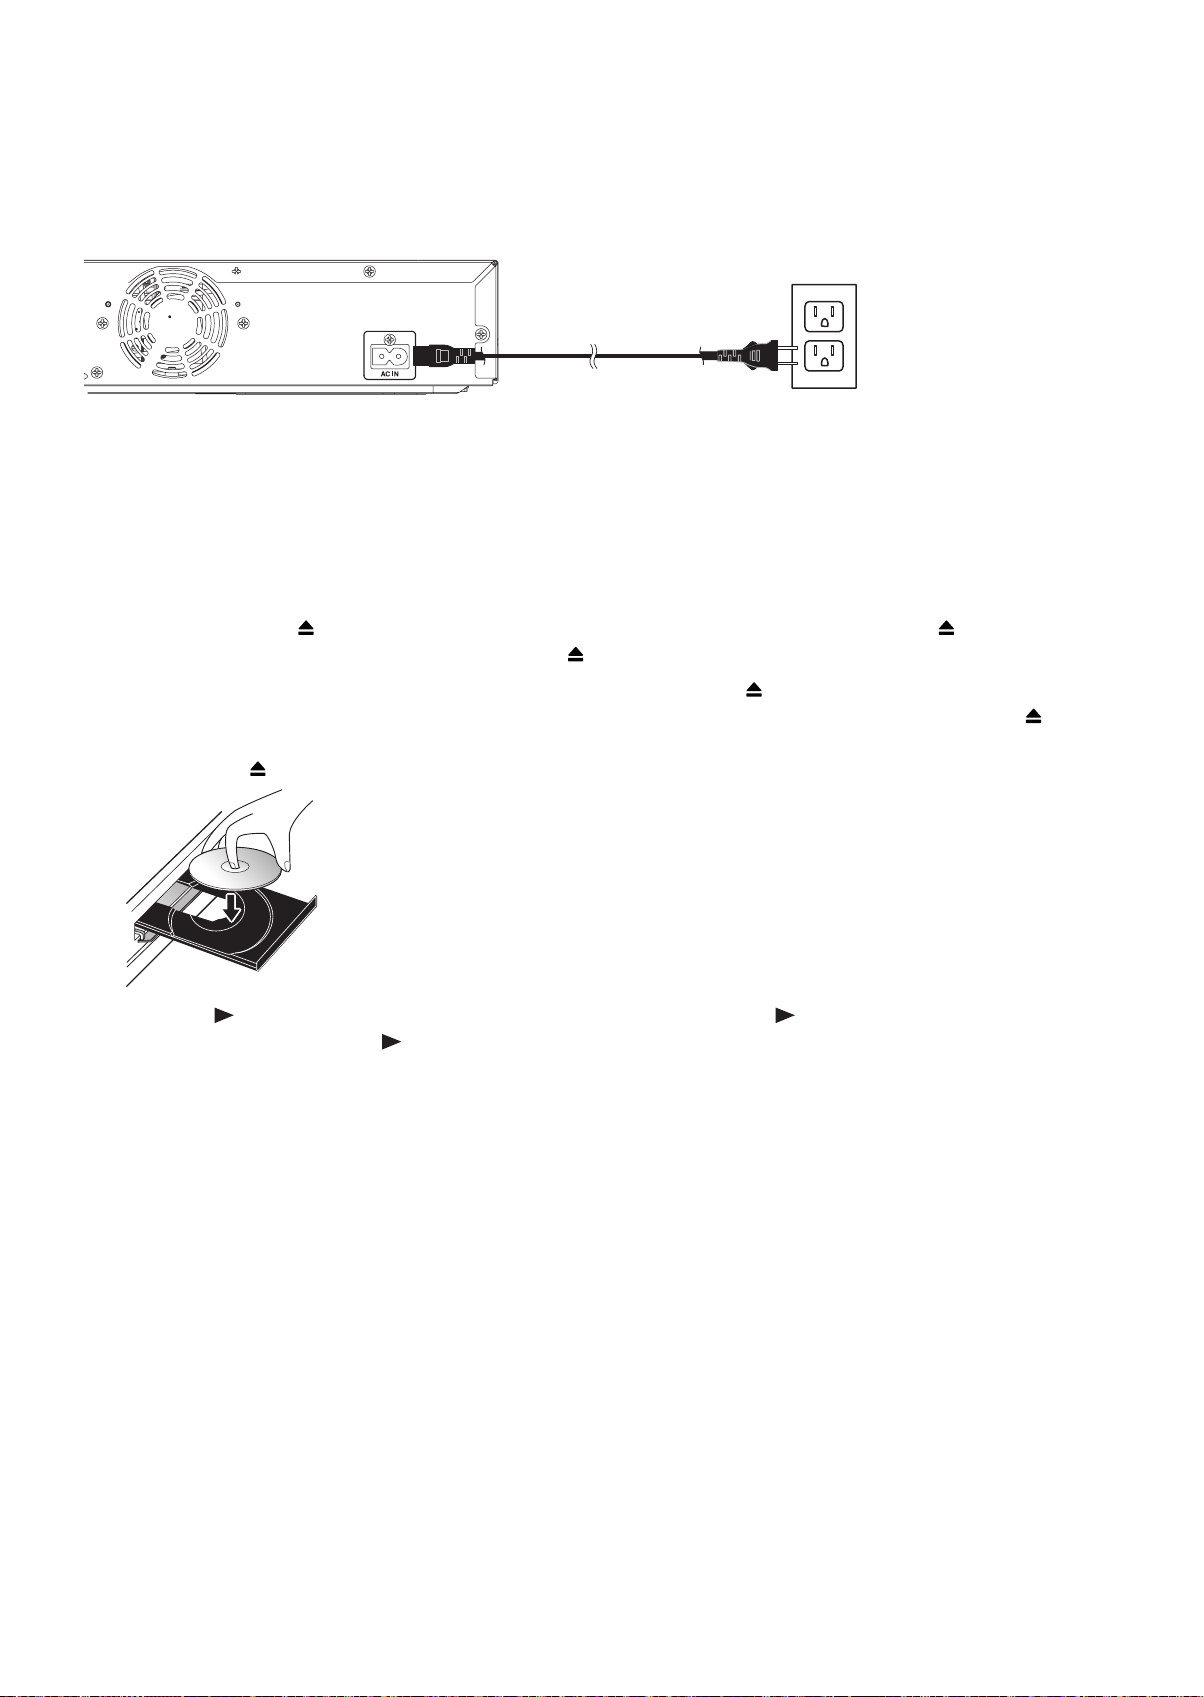
3 Connect power / Connexion de l’alimentation / Conecte la
alimentación
Connect the power cord to a power outlet, pressing rmly to ensure connection. / Brancher le cordon d’alimentation sur une
prise secteur, en l’enfonçant fermement pour assurer la connexion. / Enchufe el cable de alimentación en un tomacorriente,
presionando rmemente para asegurar la conexión.
4 Play a disc / Lecture d’un disque / Reproducción de un disco
1 Press POWER on the remote control, then turn on the TV and select the input on the TV to which your Blu-ray Disc
player is connected. / Appuyer sur POWER (Marche/Arrêt) de la télécommande, puis mettre le téléviseur sous tension
et sélectionner l’entrée sur le téléviseur à laquelle le lecteur de Disques Blu-ray est connecté. / Presione POWER
(Encendido) en el control remoto, y luego encienda el televisor y seleccione la entrada en el televisor correspondiendo a
la del reproductor de Discos Blu-ray.
2 Press OPEN/CLOSE
ouvrir le plateau à disque. / Presione OPEN/CLOSE
3 Place a disc in the tray with the label facing up, then press OPEN/CLOSE
tray. / Mettre le disque sur le plateau avec l’étiquette tournée vers le haut, puis appuyer sur OPEN/CLOSE de la
télécommande pour fermer le plateau. / Ponga el disco en la bandeja con la etiqueta hacia arriba, y luego presione
OPEN/CLOSE en el control remoto para cerrar la bandeja.
4 Press play on the remote control to start playback. / Appuyer sur Lecture de la télécommande pour commencer la
lecture. / Presione reproducir en el control remoto para comenzar la reproducción.
on the remote control to open the disc tray. / Appuyer sur OPEN/CLOSE (Ouvrir/Fermer) pour
(Abrir/Cerrar) para abrir la bandeja del disco.
on the remote control to close the
For customer service please call 1-877-467-4289 / Pour le service à la clientèle, appeler le 1-877-467-4289 /
Para servicio al cliente favor llamar al 1-877-467-4289
www.insignia-products.com
Distributed by Best Buy Purchasing, LLC 7601 Penn Avenue South, Rich eld, Minnesota, U.S.A. 55423-3645
© 2008 Best Buy Enterprise Services, Inc. All rights reserved. INSIGNIA is a trademark of Best Buy Enterprise Services, Inc. Registered in some countries.
All other products and brand names are trademarks of their respective owners.
Distribué par Best Buy Purchasing, LLC, 7601 Penn Avenue South, Rich eld, Minnesota 55423-3645, É.-U.
© 2008 Best Buy Enterprise Services, Inc. Tous droits réservés. INSIGNIA est une marque de commerce de Best Buy Enterprise Services, Inc. déposée dans certains pays.
Tous les autres produits et noms de marques sont des marques de commerce appartenant à leurs propriétaires respectifs.
Distribuido por Best Buy Purchasing, LLC, 7601 Penn Avenue South, Rich eld, Minnesota 55423-3645 E.U.A.
© 2008 Best Buy Enterprise Services, Inc. Todos los derechos reservados. INSIGNIA es una marca comercial de Best Buy Enterprise Services, Inc. registrada en ciertos países.
Todos los otros productos y los nombres de marca son marcas comerciales de sus respectivos dueños.
Printed in China E5E25UD/ E5E27CD/1VMN25436*****
08-1139
Page 8

Page 9

Insignia NS-BRDVD Blu-ray Disc Player
Contents
Introduction . . . . . . . . . . . . . . . . . . . . . . . . . . . . . . . . . . . . . . . . . . . . . . . . . . . . . . . . . . .1
Safety information . . . . . . . . . . . . . . . . . . . . . . . . . . . . . . . . . . . . . . . . . . . . . . . . . . . . . .2
Features. . . . . . . . . . . . . . . . . . . . . . . . . . . . . . . . . . . . . . . . . . . . . . . . . . . . . . . . . . . . . .4
Front. . . . . . . . . . . . . . . . . . . . . . . . . . . . . . . . . . . . . . . . . . . . . . . . . . . . . . . . . . . . . . . . . . . . . .4
Back . . . . . . . . . . . . . . . . . . . . . . . . . . . . . . . . . . . . . . . . . . . . . . . . . . . . . . . . . . . . . . . . . . . . . .5
Remote control. . . . . . . . . . . . . . . . . . . . . . . . . . . . . . . . . . . . . . . . . . . . . . . . . . . . . . . . . . . . . .5
Display . . . . . . . . . . . . . . . . . . . . . . . . . . . . . . . . . . . . . . . . . . . . . . . . . . . . . . . . . . . . . . . . . . . .7
Setting up your player . . . . . . . . . . . . . . . . . . . . . . . . . . . . . . . . . . . . . . . . . . . . . . . . . . .7
Installing remote control batteries . . . . . . . . . . . . . . . . . . . . . . . . . . . . . . . . . . . . . . . . . . . . . . .7
Connecting a TV. . . . . . . . . . . . . . . . . . . . . . . . . . . . . . . . . . . . . . . . . . . . . . . . . . . . . . . . . . . . .8
Connecting an audio system . . . . . . . . . . . . . . . . . . . . . . . . . . . . . . . . . . . . . . . . . . . . . . . . . . .9
Connect the AC power cord . . . . . . . . . . . . . . . . . . . . . . . . . . . . . . . . . . . . . . . . . . . . . . . . . . .10
Setting up speakers . . . . . . . . . . . . . . . . . . . . . . . . . . . . . . . . . . . . . . . . . . . . . . . . . . . . . . . . .10
Adjusting speakers. . . . . . . . . . . . . . . . . . . . . . . . . . . . . . . . . . . . . . . . . . . . . . . . . . . . . . . . . .10
Using your player . . . . . . . . . . . . . . . . . . . . . . . . . . . . . . . . . . . . . . . . . . . . . . . . . . . . . .12
Playable discs, memory cards, and files. . . . . . . . . . . . . . . . . . . . . . . . . . . . . . . . . . . . . . . . . .12
Playing a Blu-ray Disc or DVD . . . . . . . . . . . . . . . . . . . . . . . . . . . . . . . . . . . . . . . . . . . . . . . . .12
Controlling Blu-ray Disc or DVD playback . . . . . . . . . . . . . . . . . . . . . . . . . . . . . . . . . . . . . . . .13
Playing an audio CD or JPEG/MP3/WMA disc. . . . . . . . . . . . . . . . . . . . . . . . . . . . . . . . . . . . .13
Controlling audio CD or JPEG/MP3/WMA disc playback . . . . . . . . . . . . . . . . . . . . . . . . . . . . .14
Playing a Kodak Picture CD . . . . . . . . . . . . . . . . . . . . . . . . . . . . . . . . . . . . . . . . . . . . . . . . . . .14
Controlling Kodak Picture CD playback . . . . . . . . . . . . . . . . . . . . . . . . . . . . . . . . . . . . . . . . . .15
Playing from an SD Memory Card . . . . . . . . . . . . . . . . . . . . . . . . . . . . . . . . . . . . . . . . . . . . . .15
Formatting an SD Memory Card . . . . . . . . . . . . . . . . . . . . . . . . . . . . . . . . . . . . . . . . . . . . . . .16
Displaying status information . . . . . . . . . . . . . . . . . . . . . . . . . . . . . . . . . . . . . . . . . . . . . . . . . .16
Creating a playback loop . . . . . . . . . . . . . . . . . . . . . . . . . . . . . . . . . . . . . . . . . . . . . . . . . . . . .18
Creating a program. . . . . . . . . . . . . . . . . . . . . . . . . . . . . . . . . . . . . . . . . . . . . . . . . . . . . . . . . .18
Controlling program playback. . . . . . . . . . . . . . . . . . . . . . . . . . . . . . . . . . . . . . . . . . . . . . . . . .18
Using random play . . . . . . . . . . . . . . . . . . . . . . . . . . . . . . . . . . . . . . . . . . . . . . . . . . . . . . . . . .18
Controlling random play . . . . . . . . . . . . . . . . . . . . . . . . . . . . . . . . . . . . . . . . . . . . . . . . . . . . . .18
Searching for a chapter, title, track, or time . . . . . . . . . . . . . . . . . . . . . . . . . . . . . . . . . . . . . . .19
Searching using markers . . . . . . . . . . . . . . . . . . . . . . . . . . . . . . . . . . . . . . . . . . . . . . . . . . . . .19
Using PIP (picture-in-picture) . . . . . . . . . . . . . . . . . . . . . . . . . . . . . . . . . . . . . . . . . . . . . . . . . .19
Selecting a camera angle. . . . . . . . . . . . . . . . . . . . . . . . . . . . . . . . . . . . . . . . . . . . . . . . . . . . .19
Selecting subtitle languages or style . . . . . . . . . . . . . . . . . . . . . . . . . . . . . . . . . . . . . . . . . . . .19
Switching the audio soundtrack . . . . . . . . . . . . . . . . . . . . . . . . . . . . . . . . . . . . . . . . . . . . . . . .20
Adjusting the black level . . . . . . . . . . . . . . . . . . . . . . . . . . . . . . . . . . . . . . . . . . . . . . . . . . . . . .20
Reducing video noise. . . . . . . . . . . . . . . . . . . . . . . . . . . . . . . . . . . . . . . . . . . . . . . . . . . . . . . .20
Adjusting the HDMI video resolution . . . . . . . . . . . . . . . . . . . . . . . . . . . . . . . . . . . . . . . . . . . .20
Adjusting the component resolution . . . . . . . . . . . . . . . . . . . . . . . . . . . . . . . . . . . . . . . . . . . . .21
Selecting the audio CD audio mode. . . . . . . . . . . . . . . . . . . . . . . . . . . . . . . . . . . . . . . . . . . . .21
Setting the Blu-ray audio mode . . . . . . . . . . . . . . . . . . . . . . . . . . . . . . . . . . . . . . . . . . . . . . . .21
Using disc menus. . . . . . . . . . . . . . . . . . . . . . . . . . . . . . . . . . . . . . . . . . . . . . . . . . . . . . . . . . .22
Adjusting the still image . . . . . . . . . . . . . . . . . . . . . . . . . . . . . . . . . . . . . . . . . . . . . . . . . . . . . .23
Setting parental controls. . . . . . . . . . . . . . . . . . . . . . . . . . . . . . . . . . . . . . . . . . . . . . . . . . . . . .23
Changing the parental control password . . . . . . . . . . . . . . . . . . . . . . . . . . . . . . . . . . . . . . . . .24
Using the Quick menu . . . . . . . . . . . . . . . . . . . . . . . . . . . . . . . . . . . . . . . . . . . . . . . . . . . . . . .25
Using the Custom menu. . . . . . . . . . . . . . . . . . . . . . . . . . . . . . . . . . . . . . . . . . . . . . . . . . . . . .26
Resetting setup options to the defaults . . . . . . . . . . . . . . . . . . . . . . . . . . . . . . . . . . . . . . . . . .29
Maintaining. . . . . . . . . . . . . . . . . . . . . . . . . . . . . . . . . . . . . . . . . . . . . . . . . . . . . . . . . . .29
Cleaning the cabinet. . . . . . . . . . . . . . . . . . . . . . . . . . . . . . . . . . . . . . . . . . . . . . . . . . . . . . . . .29
Handling discs . . . . . . . . . . . . . . . . . . . . . . . . . . . . . . . . . . . . . . . . . . . . . . . . . . . . . . . . . . . . .29
Cleaning discs . . . . . . . . . . . . . . . . . . . . . . . . . . . . . . . . . . . . . . . . . . . . . . . . . . . . . . . . . . . . .29
Cleaning the disc lens . . . . . . . . . . . . . . . . . . . . . . . . . . . . . . . . . . . . . . . . . . . . . . . . . . . . . . .29
Checking the remote control signal . . . . . . . . . . . . . . . . . . . . . . . . . . . . . . . . . . . . . . . . . . . . .29
Language codes . . . . . . . . . . . . . . . . . . . . . . . . . . . . . . . . . . . . . . . . . . . . . . . . . . . . . .30
Troubleshooting . . . . . . . . . . . . . . . . . . . . . . . . . . . . . . . . . . . . . . . . . . . . . . . . . . . . . . .31
Specifications. . . . . . . . . . . . . . . . . . . . . . . . . . . . . . . . . . . . . . . . . . . . . . . . . . . . . . . . .32
One-year limited warranty . . . . . . . . . . . . . . . . . . . . . . . . . . . . . . . . . . . . . . . . . . . . . . .35
Français. . . . . . . . . . . . . . . . . . . . . . . . . . . . . . . . . . . . . . . . . . . . . . . . .xx
Español . . . . . . . . . . . . . . . . . . . . . . . . . . . . . . . . . . . . . . . . . . . . . . . . .xx
Introduction
Congratulations on your purchase of a high-quality Insignia product. Your NS-BRDVD represents the state of
the art in Blu-ray Disc player design and is designed for reliable and trouble-free performance.
www.insignia-products.com
1
Page 10
Insignia NS-BRDVD Blu-ray Disc Player
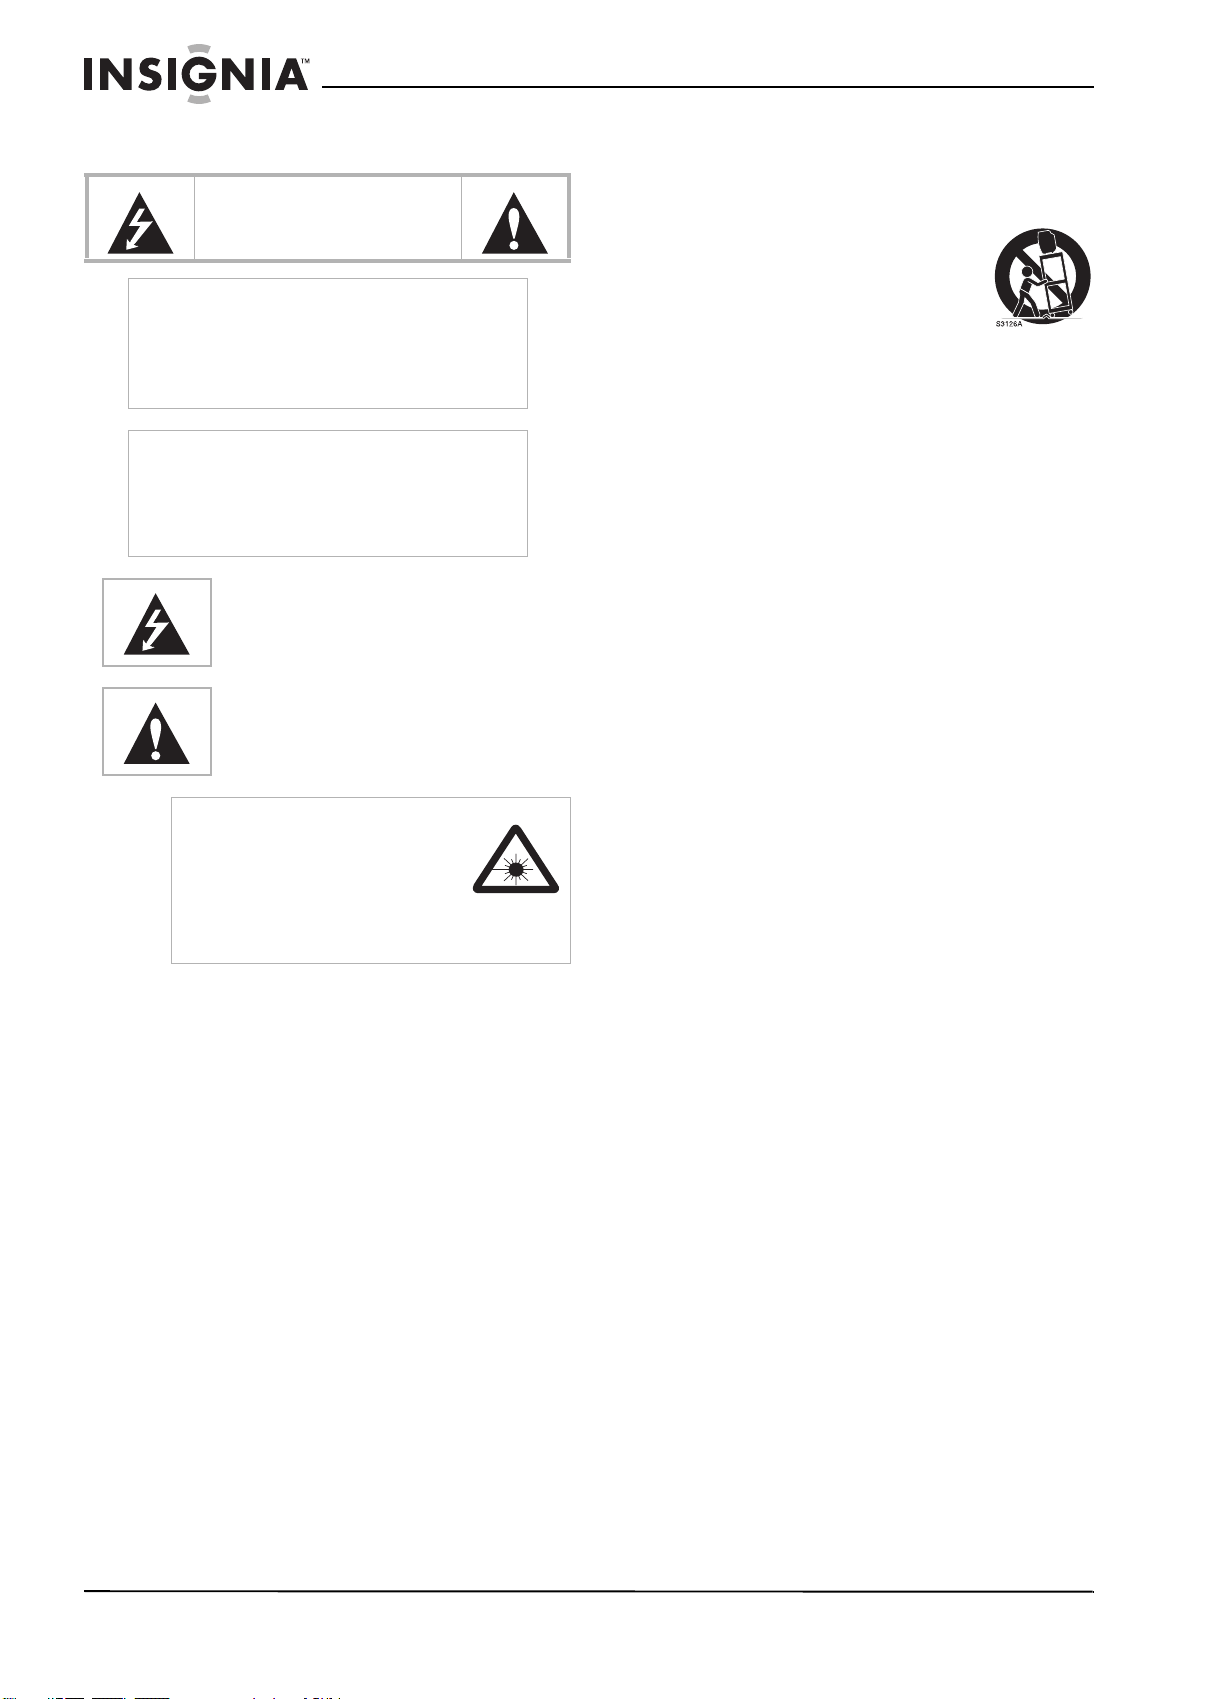
Safety information
CAUTION
RISK OF ELECTRIC SHOCK
DO NOT OPEN
Warning
To reduce the risk of electric shock, do not remove
the cover or back. No user serviceable parts
inside. Refer servicing to qualified service
personnel.
To reduce the risk of fire or electric shock, do not
expose your player to rain or moisture.
Caution
To prevent electric shock, match the wide blade on
the power cord plug to the wide slot on an electric
outlet. If the plug does not fit, consult a licensed
electrician to replace the obsolete outlet. Do not
modify the power cord plug, or you will defeat this
safety feature.
This symbol indicates that dangerous
voltage constituting a risk of electric shock
is present within your player. This label is
located on the back of your player.
This symbol indicates that there are
important operating and maintenance
instructions in the literature accompanying
your player.
Warning
Your player employs a laser
system.
Use of controls, adjustments, or the
performance of procedures other
than those specified may result in
hazardous radiation exposure.
Visible laser radiation is present when open and
interlocks defeated. Do not stare into beam.
1 Read instructions—Read all safety and
operating instructions before you use your
player.
2 Retain instructions—Retain the safety and
operating instructions for future reference.
3 Heed warnings—Heed all warnings on your
player and in the operating instructions.
4 Follow instructions—Follow all operating
and use instructions.
5 Cleaning—Unplug your player from the
power outlet before cleaning. Do not use
liquid cleaners or aerosol cleaners. Use a
damp cloth for cleaning.
Exception: A player that is meant for
uninterrupted service and, that for some
specific reason, such as the possibility of the
loss of an authorization code for a CATV
converter, is not intended to be unplugged for
cleaning or any other purpose, may exclude
the reference to unplugging the player in the
cleaning description.
6Attachments—Do not use attachments not
recommended by your player’s manufacturer
because they may cause hazards.
7 Water and moisture—Do not use your
player near water. For example, do not use it
near a bath tub, wash bowl, kitchen sink, or
laundry tub, in a wet basement, or near a
swimming pool.
8 Accessories—Do not place
your player on an unstable cart,
stand, tripod, bracket, or table.
Your player may fall, causing
serious injury to someone, and
serious damage to your player.
Use only with a cart, stand, tripod, bracket, or
table recommended by the manufacturer, or
sold with your player. Any mounting of your
player should follow the manufacturer’ s
instructions and should use a mounting
accessory recommended by the
manufacturer. A player and cart combination
should be moved with care. Quick stops,
excessive force, and uneven surfaces may
cause your player and cart combination to
overturn.
9 Ventilation—Slots and openings in the
cabinet and the back or bottom are provided
for ventilation and to ensure reliable
operation of your player and to protect it from
overheating. These openings must not be
blocked or covered. The openings should
never be blocked by placing your player on a
bed, sofa, carpet, rug, or other similar
surface. Your player should never be placed
near or over a radiator or heat register. Your
player should not be placed in a built-in
installation such as a bookcase or rack
unless proper ventilation is provided or the
manufacturer’s instructions have been
adhered to.
10 Power sources—Your player should be
operated only from the type of power source
indicated on the marking label. If you are not
sure of the type of power supply to your
home, consult your player’s dealer or local
power company.
11 Grounding or polarization—Your player is
equipped with a polarized alternating-current
line plug (a plug having one blade wider than
the other). This plug will fit into the power
outlet only one way. This is a safety feature. If
you are unable to insert the plug fully into the
outlet, try reversing the plug. If the plug
should still fail to fit, contact your electrician
to replace your obsolete outlet. Do not defeat
the safety purpose of the polarized plug.
12 Power cord protection—Power-supply
cords should be routed so that they are not
likely to be walked on or pinched by items
placed upon or against them, paying
particular attention to cords at plugs,
convenience receptacles, and the point
where they exit from the apparatus.
2
www.insignia-products.com
Page 11
Insignia NS-BRDVD Blu-ray Disc Player
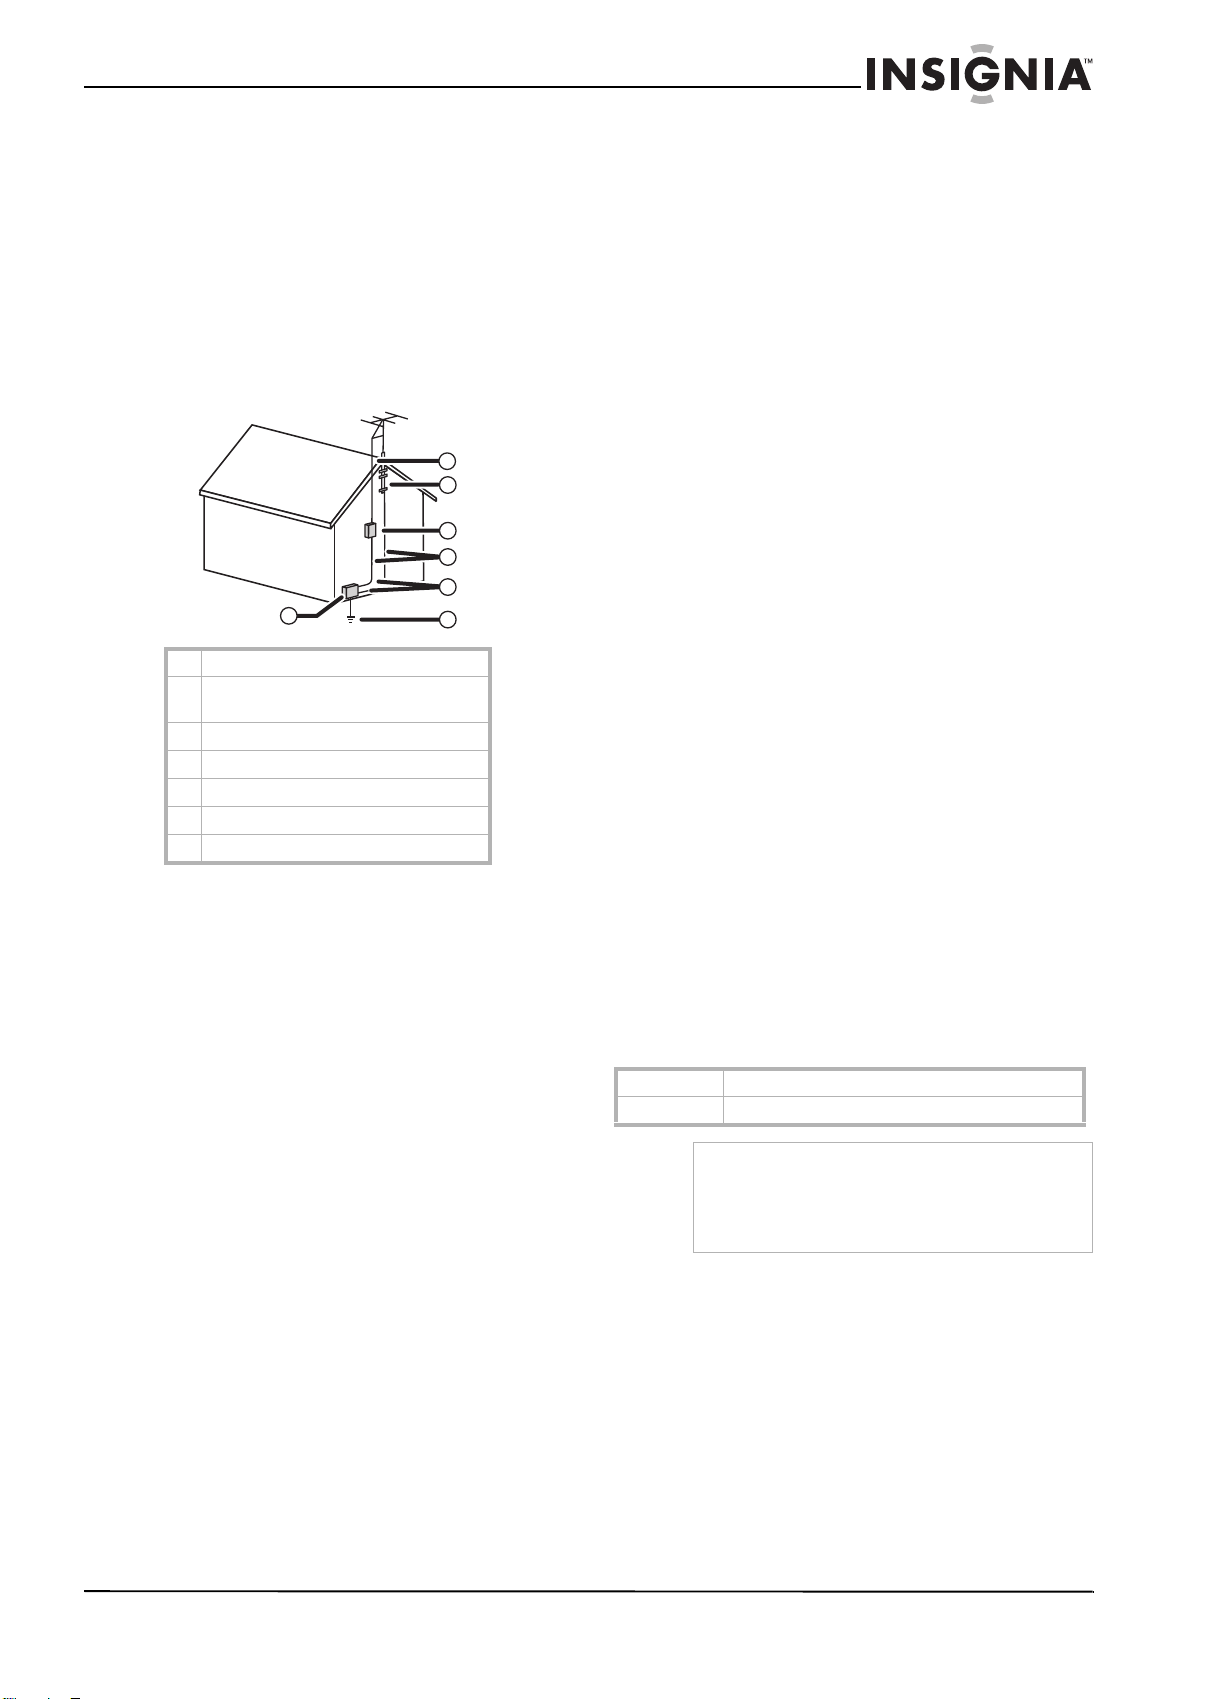
13 Outdoor antenna grounding—If an outside
antenna or cable system is connected to your
player, be sure the antenna or cable system
is grounded so as to provide some protection
against voltage surges and built-up static
charges. Article 810 of the National Electrical
Code, ANSI/NFPA No. 70, provides
information with respect to proper grounding
of the mast and supporting structure,
grounding of the lead-in wire to an antenna
discharge unit, size of grounding conductors,
location of antenna-discharge unit,
connection to grounding electrodes, and
requirements for the grounding electrode.
7
6
5
4
3
1
1 Electric service equipment
2 Power service grounding electrode
system
3 Ground clamps
4 Grounding conductors
5 Antenna discharge unit
6 Grounding clamp
7 Antenna lead-in wire
2
14 Power lines—An outside antenna system
should not be located in the vicinity of
overhead power lines or other electric light of
power circuits, or where it can fall into such
power lines or circuits. When installing an
outside antenna system, extreme care
should be taken to keep from touching such
power lines or circuits because contact with
them might be fatal.
15 Lightning—For added protection for your
player during a lightning storm, or when it is
left unattended and unused for long periods
of time, unplug it from the power outlet and
disconnect the antenna or cable system. This
will prevent damage to your player due to
lightning and power-line surges.
16 Overloading—Do not overload wall outlets
and extension cords because this can result
in a risk of fire or electric shock.
17 Object and liquid entry—Never push
objects of any kind into your player through
openings as they may touch dangerous
voltage points or short out parts that could
result in a fire or electric shock. Never spill
liquid of any kind on your player.
18 Servicing—Do not attempt to service your
layer yourself because opening or removing
covers may expose you to dangerous voltage
or other hazards. Refer all servicing to
qualified service personnel.
19 Damage requiring service—Unplug your
player from the power outlet and refer
servicing to qualified service personnel under
the following conditions:
• When the power supply cord or plug is
damaged or frayed.
• If liquid has been spilled, or objects have
fallen into your player.
• If your player has been exposed to rain or
water.
• If your player does not operate normally
by following the operating instructions.
Adjust only those controls that are
covered by the operating instructions,
because incorrect adjustment of other
controls may result in damage and will
often require extensive work by a qualified
technician to restore your player to its
normal operation.
• If your player has been dropped or
damaged in any way.
• When your player exhibits a distinct
change in performance, this indicates a
need for service.
20 Replacement parts—When replacement
parts are required, be sure the service
technician uses replacement parts specified
by the manufacturer that have the same
characteristics as the original parts.
Unauthorized substitutions may result in fire,
electric shock, injury to persons, or other
hazards.
21 Safety check—Upon completion of any
service or repairs to your player, ask the
service technician to perform routine safety
checks to determine that the apparatus is in
correct operating condition.
22 Heat—Your player should be situated away
from heat sources such as radiators, heat
registers, stoves, or other products (including
amplifiers) that produce heat.
The model and serial numbers of your player
can be found on the cabinet. You should record
and retain those numbers for future reference.
Serial No.
Model No.
Warning
Do not place your player on furniture that is
capable of being tilted by a child or an adult
leaning, pulling, standing next to, or climbing on it.
If your player falls it can cause serious injury or
even death.
Avoiding electrical shock and fire
• Do not handle the power cord with wet
hands.
• Do not pull on the power cord when
disconnecting it from a power outlet. Grasp it
by the plug.
• Do not put your fingers or objects into your
player.
www.insignia-products.com
3
Page 12
Insignia NS-BRDVD Blu-ray Disc Player
Installation location
For safety and optimum performance of your
player:
• Install your player in a horizontal and stable
position. Do not place anything directly on top
of your player. Do not place your player
directly on top of the TV.
• Shield your player from direct sunlight and
keep it away from devices of intense heat.
Avoid dusty or humid places.
• Avoid places with insufficient ventilation for
correct heat dissipation. Do not block the
ventilation holes on the back and sides of
your player. Avoid locations subject to strong
vibration or strong magnetic fields.
• Make sure that you remove the disc and
unplug the power cord from the power outlet
before carrying your player.
Moisture condensation
Moisture condensation may occur inside your
player when it is moved from a cold place to a
warm place or after heating a cold room or under
conditions of high humidity. Do not use your
player for at least for two hours so the inside gets
dry.
Recycling
• Your player’s packaging materials are
recyclable and can be reused. Dispose
of any materials in accordance with
your local recycling regulations. Batteries
should never be thrown away or incinerated
but disposed of in accordance with your local
regulations concerning chemical wastes.
Features
• Full high-definition video playback at up to
1080p resolution for an amazing viewing
experience.
• Upconversion of standard definition DVDs for
enhanced picture quality at up to 1080p over
an HDMI connection.
• Full backward compatibility with standard
definition DVDs and audio CDs.
• Can play slide shows of JPEGs recorded on
discs or SD Memory Cards.
• Rich multi-channel surround sound.
• Easy and simple HDTV connection using a
single HDMI cable (cable not included).
• Multiple outputs for connecting your home
theater system or amplifier.
• PIP functionality that lets you display primary
and secondary video at the same time (if
available on the Blu-ray Disc).
• Pop-up menu display without interrupting
playback (if available on the Blu-ray Disc).
• HDMI Deep Color that reduces the
posterization effect (color banding or striping)
of the playback image.
• HDMI 1080p/fps output (Blu-ray Disc only)
that provides smooth playback of video with a
frame rate of 24 frames per second (TV must
be connected with an HDMI cable and be
compatible with 1080p24 frame).
• SD Memory Card playback of JPEG, MP3, or
WMA files.
• SD Memory Card playback of
picture-in-picture commentary, subtitles, or
other extras for BD-ROM Profile 1 ver.1.1
files with Blu-ray-video.
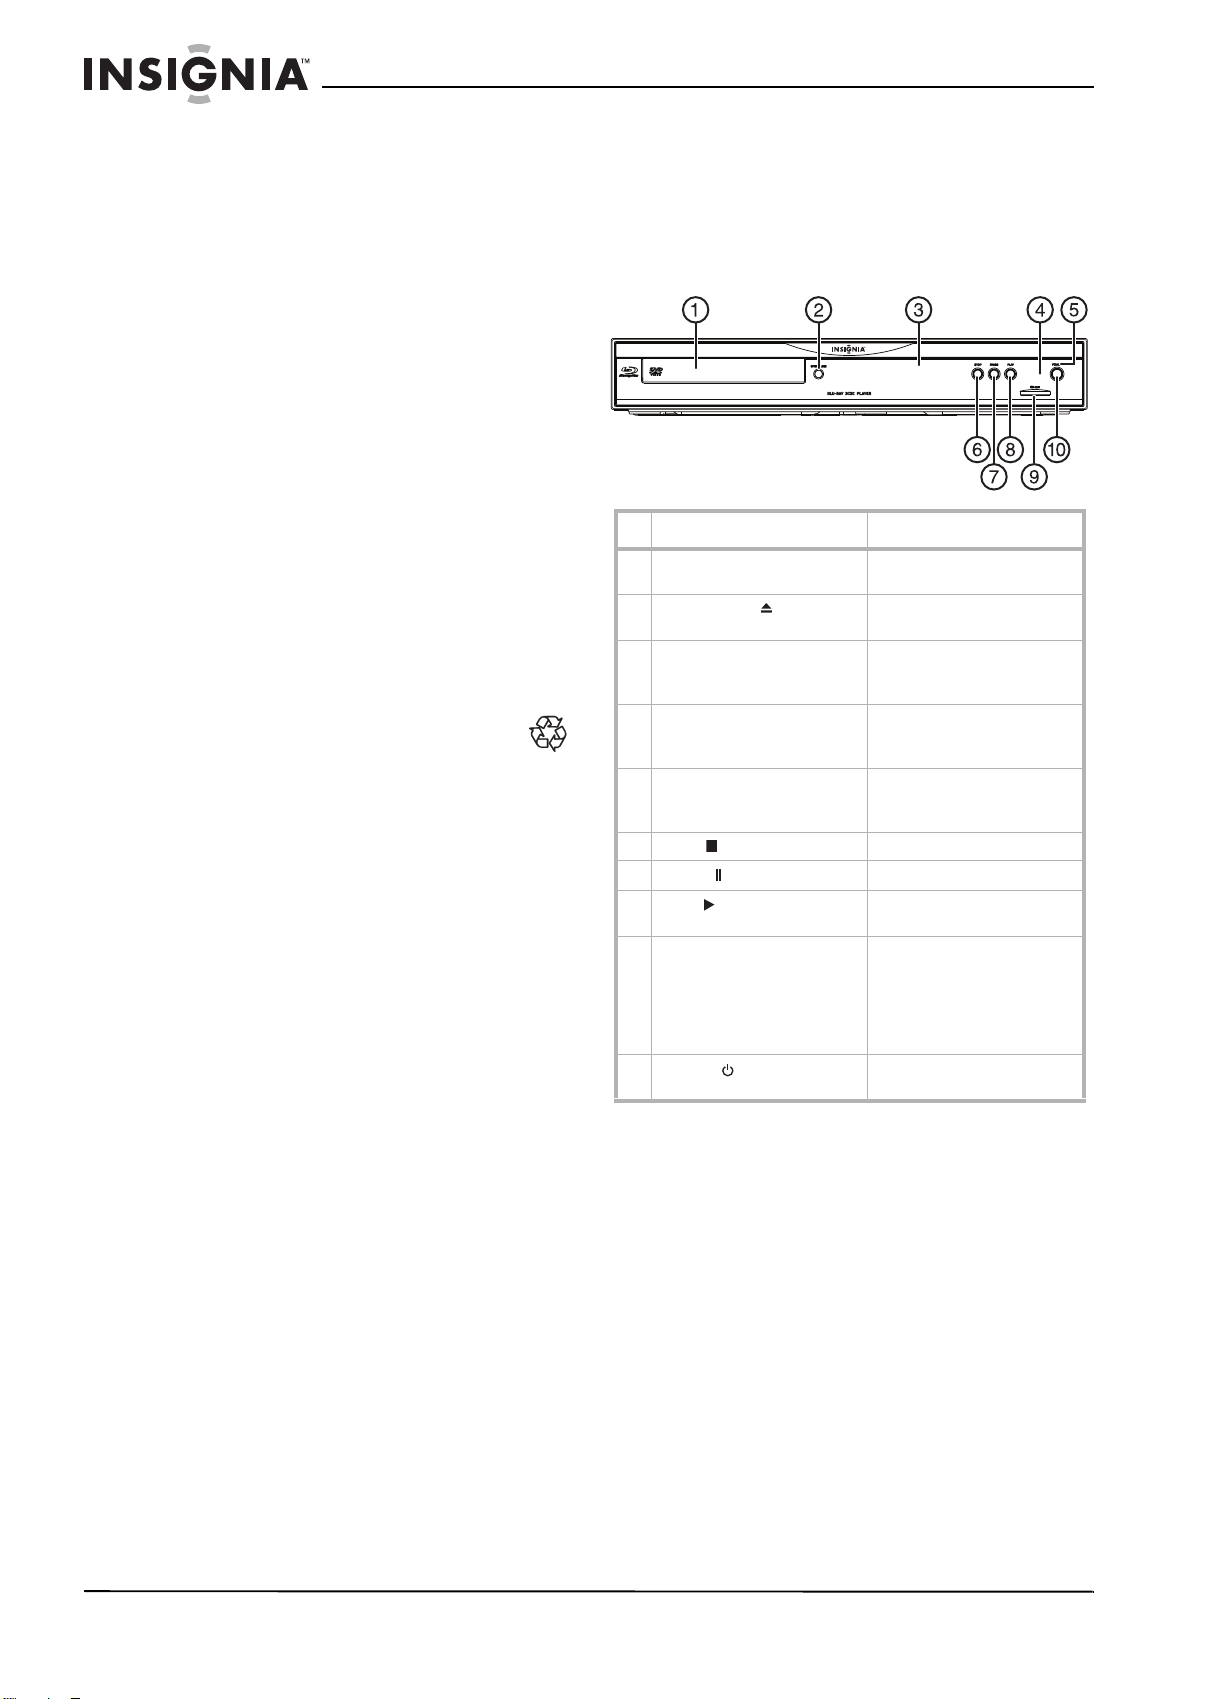
Front
Component Description
1 Disc tray Place a disc with the label
2 OPEN/CLOSE button Press to open or close the
3 Display Displays status information.
4 Remote control sensor Receives signals from the
5 POWER indicator Lights red when your player
6 STOP button Press to stop playback.
7
PAUSE button
8
PLAY button
9 SD Memory Card slot Insert an SD Memory Card
10
POWER button
side up in this tray.
disc tray.
For more information, see
“Display” on page 7
remote control. Do not
block.
is turned on. Turns off when
your player is turned off.
Press to pause playback.
Press to start or resume
playback.
into this slot to play from the
SD Memory Card. For more
information, see “Playing
from an SD Memory Card”
on page 15.
Press to turn your player on
or off.
4
www.insignia-products.com
Page 13

Insignia NS-BRDVD Blu-ray Disc Player
Back Remote control
Component Description
1 VIDEO OUT jack Connect a TV, AV receiver, or
2 COMPONENT VIDEO OUT
jacks
3 HDMI OUT jack Connect a TV or AV receiver
4 AUDIO OUT jacks Connect a TV, AV
5 DIGITAL OUT (COAXIAL)
jack
6 DIGITAL OUT (OPTICAL) Connect a TV, Dolby
7 AC IN jack Connect the AC power cord
Caution
Do not touch the inner pins on the jacks.
Electrostatic discharge (static electricity) may
cause permanent damage to your player.
Note
Your player does not have an RF modulator.
video device to this jack
using a composite video
cable. For more information,
see “Connecting a TV using
standard video” on page 9.
Connect a TV or AV receiver
with component video input
jacks to these jacks using a
component video cable. For
more information, see
“Connecting a TV using
component video” on
page 9.
with an HDMI input jack to
this jack using an HDMI
cable. For more information,
see “Connecting a TV using
HDMI” on page 8 or
“Connecting a receiver with
HDMI” on page 10.
receiver/amplifier, or audio
device to these jacks using a
standard audio cable. For
more information, see
“Connecting standard audio”
on page 9.
Connect a TV, Dolby
Digital/DTS decoder,
AV receiver/amplifier, or
digital audio device with a
coaxial input jack using a
digital audio coaxial cable.
For more information, see
“Connecting a digital audio
coaxial system” on page 9.
Digital/DTS decoder,
AV receiver/amplifier, or
digital audio device with an
optical input jack using a
digital audio optical cable.
For more information, see
“Connecting a digital audio
optical system” on page 10.
to this jack and to a power
outlet. For more information,
see “Connect the AC power
cord” on page 10.
Button Description
1 DISPLAY Press to open the on-screen
2
POWER
3 Number buttons Press to enter the title,
4 SEARCH Press to open the search
5 Red/Green/Blue/Yellow Press to select items on
6 TOP MENU Press to open the top menu.
7 Press to select items or
8 SETUP Press to open the setup
display menu. For more
information, see “Display”
on page 7.
Press to turn your player on
or off.
chapter, track, or file
number.
Press to enter the parental
password or values in menu
options.
menu. For more information,
see “Searching for a chapter,
title, track, or time” on page
19 and “Searching using
markers” on page 19
Blu-ray Disc menus,
depending on the Blu-ray
Disc.
menus.
menu.
www.insignia-products.com
5
Page 14
Insignia NS-BRDVD Blu-ray Disc Player
Button Description
9 SUBTITLE Press to open the subtitle
10
REV
11
PLAY
12
SKIP
13
PAUSE
14 HDMI Press to select the HDMI
15 OPEN/CLOSE Press to open or close the
16 PIP During Blu-ray Disc
17 ANGLE During Blu-ray Disc or DVD
18 REPEAT Press one or more times to
19 A-B Press to repeat a section of
20 CLEAR Press to clear (delete)
21 POP MENU/MENU During Blu-ray Disc
22 ENTER Press to confirm or select
23
RETURN
menu. For more information,
see “Selecting subtitle
languages or style” on
page 19.
During playback, press to
fast reverse.
Press to start or resume
playback.
During disc playback, press
once to return to the
beginning of the current title,
chapter, or track. Press twice
to return to the previous
title, chapter, or track.
During JPEG playback, press
to return to the previous file.
Press to pause playback.
When playback is paused,
press repeatedly to play
forward step by step.
output mode.
disc tray.
playback, press to turn the
picture-in-picture (PIP)
mode on or off. Not all
Blu-ray Discs support this
feature. For more
information, see “Using PIP
(picture-in-picture)” on
page 19.
playback, press to switch the
camera angle, if the disc has
multiple camera angles. For
more information, see
“Selecting a camera angle”
on page 19.
During JPEG playback, press
to rotate the picture 90°
clockwise.
select a repeat mode.
the disc. For more
information, see “Creating a
playback loop” on page 18.
information you have
entered, to clear marker
settings, or to cancel
programming.
playback, press to open the
POP menu.
During DVD playback, press
to open the disc menu.
During audio CD, JPEG,
MP3, or WMA playback,
press to open the file list.
menu items.
Press to return to the
previous on-screen menu.
Button Description
24
AUDIO
25
FWD
26
STOP
27
SKIP
28 MODE During playback, press to
Press to open the audio
menu. For more information,
see “Switching the audio
soundtrack” on page 20 or
“Selecting the audio CD
audio mode” on page 21.
During playback, press to
fast forward. In pause mode,
press to play forward slowly.
Press to stop playback.
During playback, press to
skip to the next title, chapter,
track, or file.
open the picture adjustment
menu.
During JPEG playback, press
to open menus for changing
visual effect displayed when
you move from one picture
to the next, or press to
change the size of the
picture.
In stop mode when a Blu-ray
Disc is inserted, press to
open a menu for setting the
audio mode.
In stop mode when an audio
CD, disc, or SD Memory
Card with JPEG, MP3, or
WMA files is inserted, press
to open menus for program
and random playback.
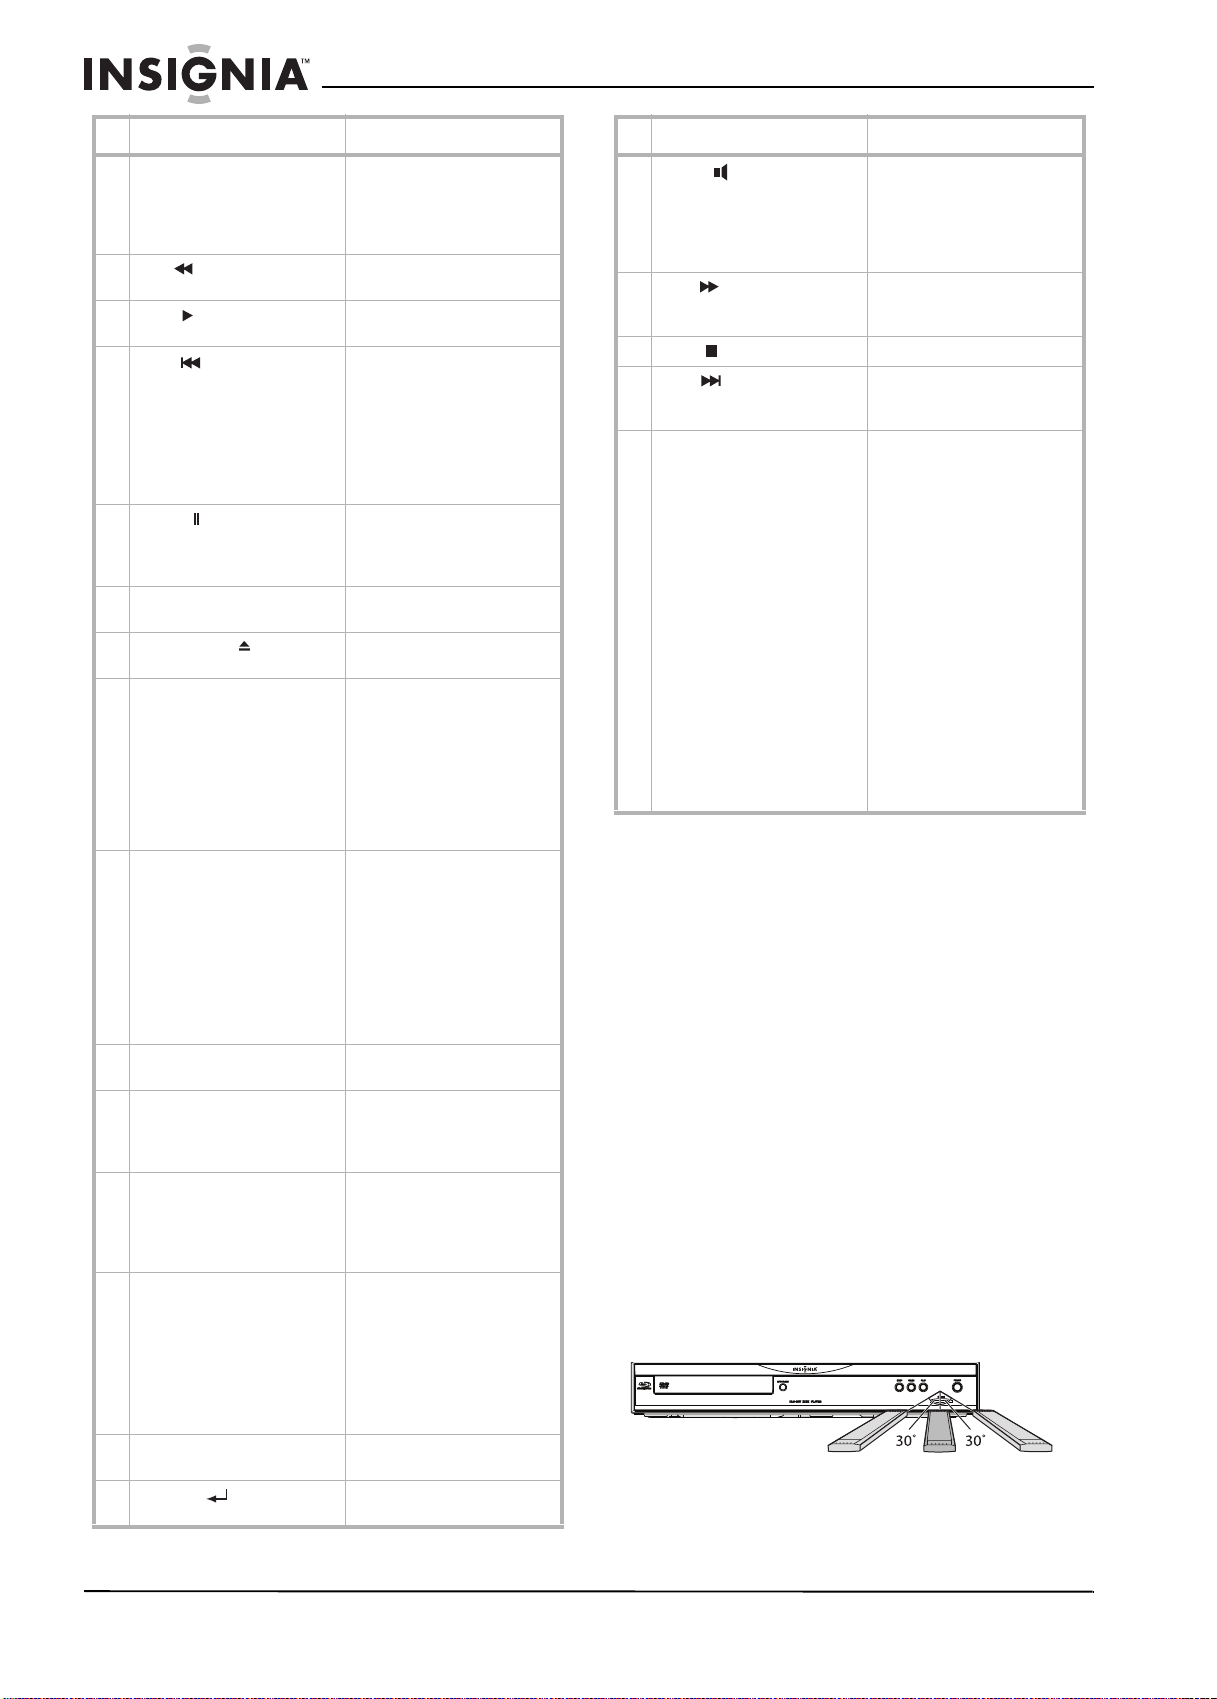
Using the remote control
To use the remote control:
• Make sure that there are no obstacles
between the remote control and the remote
control sensor on the front of your player.
• Make sure that strong sunlight or fluorescent
lighting does not shine on the remote control
sensor. Strong light can interfere with the
reception of signals from the remote control.
• Avoid using a remote control for another
device near your player. The signals from
different remote controls can interfere with
each other.
• Replace the batteries when you notice a
shortening in the operating range of the
remote control.
The maximum operable ranges between the
remote control and the remote control sensors
are:
• Line of sight: About 23 feet (7 m)
• Either side of the center: About 16 feet (5 m)
within a 30° angle
• Above: About 16 feet (5 m) within a 15° angle
• Below: About 10 feet (3 m) within a 30° angle
16 ft. (5 m) 23 ft. (7 m) 16 ft. (5 m)
6
www.insignia-products.com
Page 15

Insignia NS-BRDVD Blu-ray Disc Player
Display
1 Displays the playback status icon. For
more information, see “Playback
status icons” on page 7.
2 Displays status information, such as
title number, elapsed time, and repeat
mode. For more information, see
“Status information displays” on
page 7 and “Displaying status
information” on page 16.
Playback status icons
Playback status icon
Disc
SD Memory
Card
Setting up your player
Installing remote control batteries
To install remote control batteries:
1 Open the battery compartment cover.
2 Insert two AA batteries into the battery
compartment. Make sure that the + and –
symbols on the batteries match the + and –
symbols inside the battery compartment.
Mode
Playback in progress
Stop mode
Pause mode
Fast forward mode
Fast reverse mode
Slow forward mode
—
Repeat mode
Status information displays
The following are examples of status information
displays.
When a title is playing, the display
shows the current title number
and elapsed time.
The current chapter is in chapter
repeat mode.
Your player is loading a disc.
Dolby Digital audio is being
played back.
3 Close the battery compartment cover.
Notes
• Do not mix new and old batteries together.
• Do not use different kinds of batteries together.
Although they may look similar, different
batteries may have different voltages.
• Make sure that the + and – symbols on the
batteries match the + and – symbols in the
battery compartment.
• If you will not use the remote control for a
month or more, remove batteries to avoid
leakage.
• Dispose of batteries according to local
hazardous waste regulations.
• Do not short-circuit, heat, burn, or disassemble
batteries.
• Do not recharge batteries that are not intended
to be recharged.
www.insignia-products.com
7
Page 16
Insignia NS-BRDVD Blu-ray Disc Player
Connecting a TV
Notes
Connect your player directly to the TV. If you
connect your player to the TV through a VCR, the
video may be distorted because of the
copy-protection system.
If you connect your player to the TV with HDMI or
component video cables and the picture is not
displayed correctly, press and hold PLAY on
the front of your player for more than five seconds.
Your player resets to the default video resolution
automatically.
You cannot change the video resolution during
Blu-ray Disc playback. To change the resolution,
stop playback.
Copyright protection system
To play back the digital video images of a Blu-ray
Disc or DVD through the HDMI connection, the
TV (or an AV amplifier) must support the
copyright protection system called
(high-bandwidth digital content protection
system). HDCP is copy protection technology
that comprises data encryption and
authentication of the connected AV device. See
the operating instructions for your TV (or AV
amplifier) for more information.
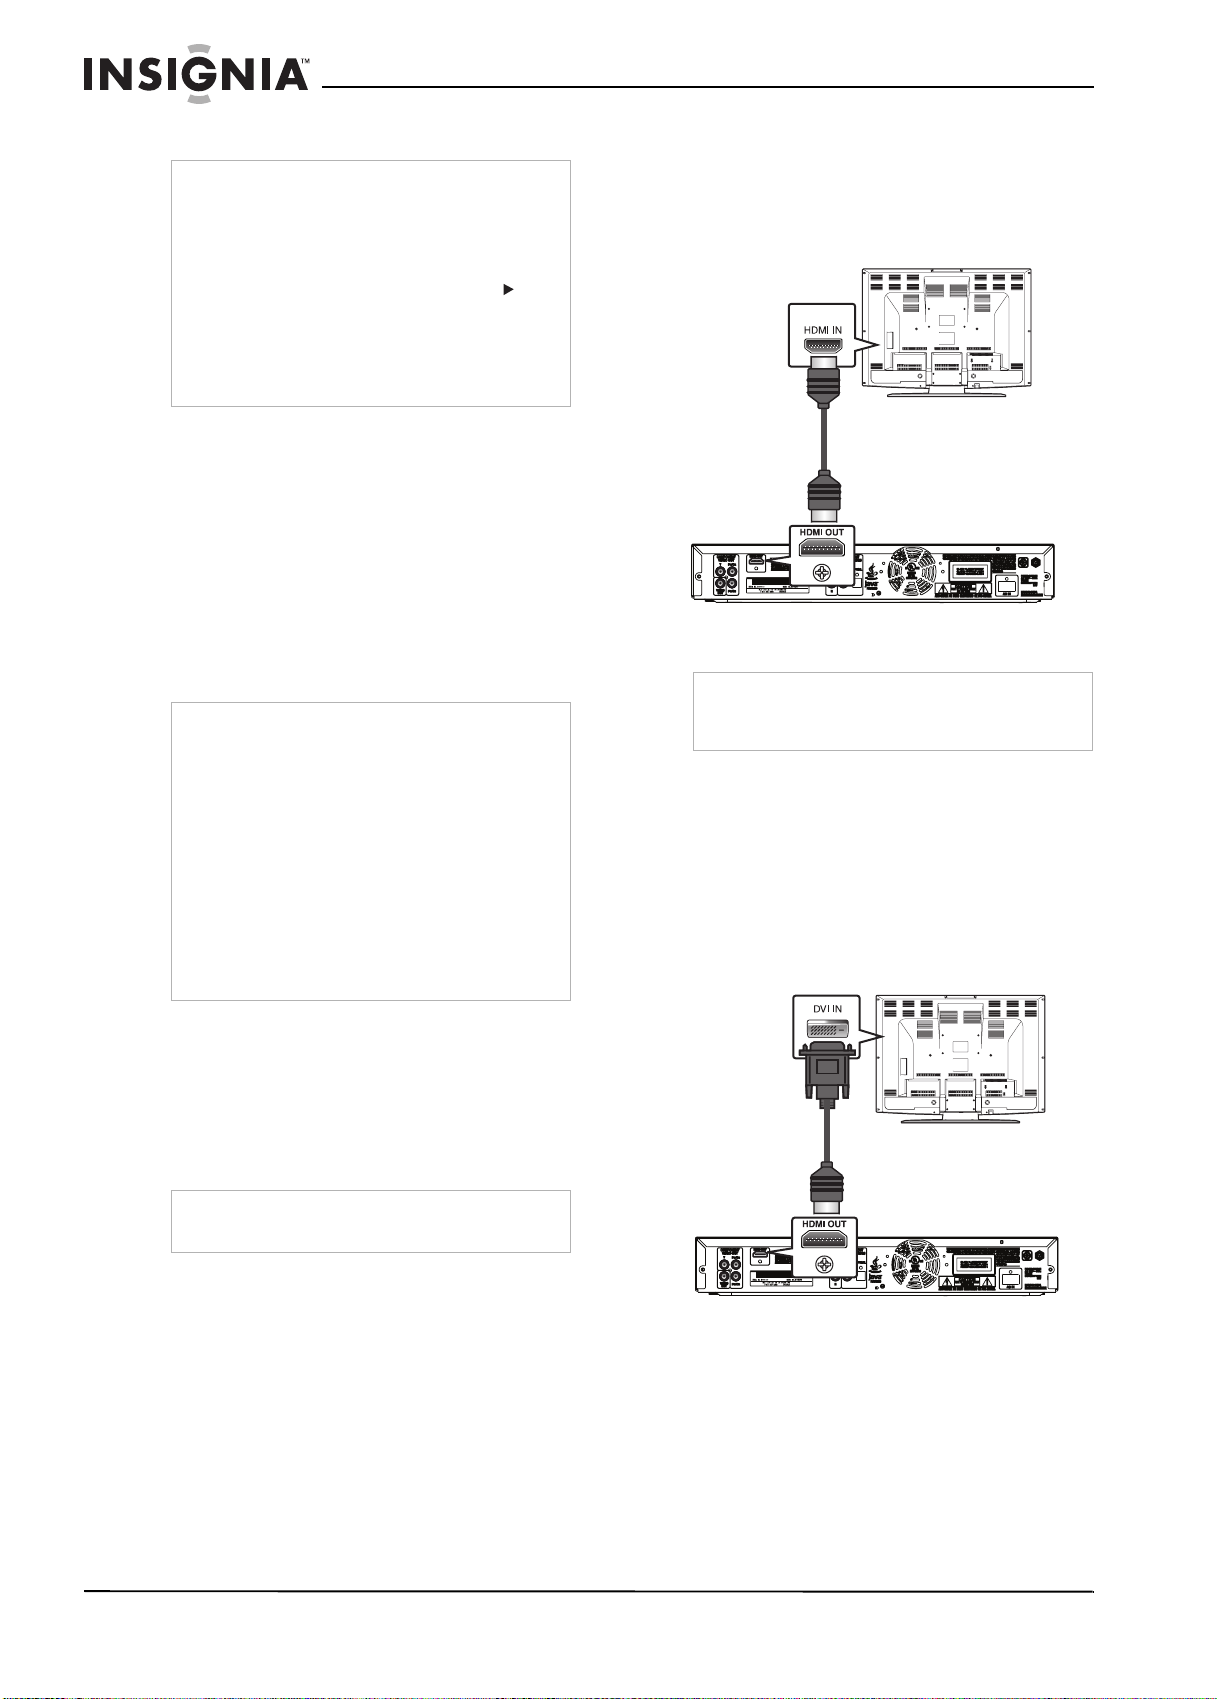
Connecting a TV using HDMI
Notes
• We recommend that you use High Speed
HDMI Cable (also known as HDMI category 2
cable) for better compatibility.
• When using HDCP-incompatible TV, the image
will not be displayed correctly.
• Your player cannot be controlled by another
device through the HDMI jack.
• The audio signals from the HDMI OUT jack
(including the sampling frequency, the number
of channels, and bit length) maybe limited by
the device that is connected.
• If the device connected to the HDMI OUT jack
does not support audio output (for example, a
projector), no audio is output from the HDMI
OUT jack.
HDCP
To connect a TV using HDMI:
1 Make sure that your player and the TV are
turned off.
2 Connect one end of an HDMI cable (not
provided) to the HDMI OUT jack on the back
of your player.
HDMI cable
3 Connect the other end of the cable to the
HDMI IN jack on the TV.
Note
If you are connecting a TV to the HDMI OUT jack,
you do not need to make audio connections. The
HDMI cable carries both audio and video.
Connecting a TV using DVI
A DVI connection provides better video than
component or standard video.
To connect a TV using DVI:
1 Make sure that your player and the TV are
turned off.
2 Connect an HDMI-DVI cable (not provided) to
the HDMI OUT jack on the back of your
player.
An HDMI connection provides the best audio
and video.
Your player is compatible with progressive scan.
The feature provides you with higher quality
pictures than a traditional output system. You
may need to adjust the HDMI Video Resolution
setting. For more information, see “Adjusting the
HDMI video resolution” on page 20.
Note
The HDMI cable carries both audio and video. You
do not need to make additional audio connections.
HDMI-DVI
cable
3 Connect the other end of the cable to the
DVI IN jack on the TV.
4 Complete the steps in “Connecting standard
audio” on page 9 to connect the standard
audio.
8
www.insignia-products.com
Page 17
Insignia NS-BRDVD Blu-ray Disc Player
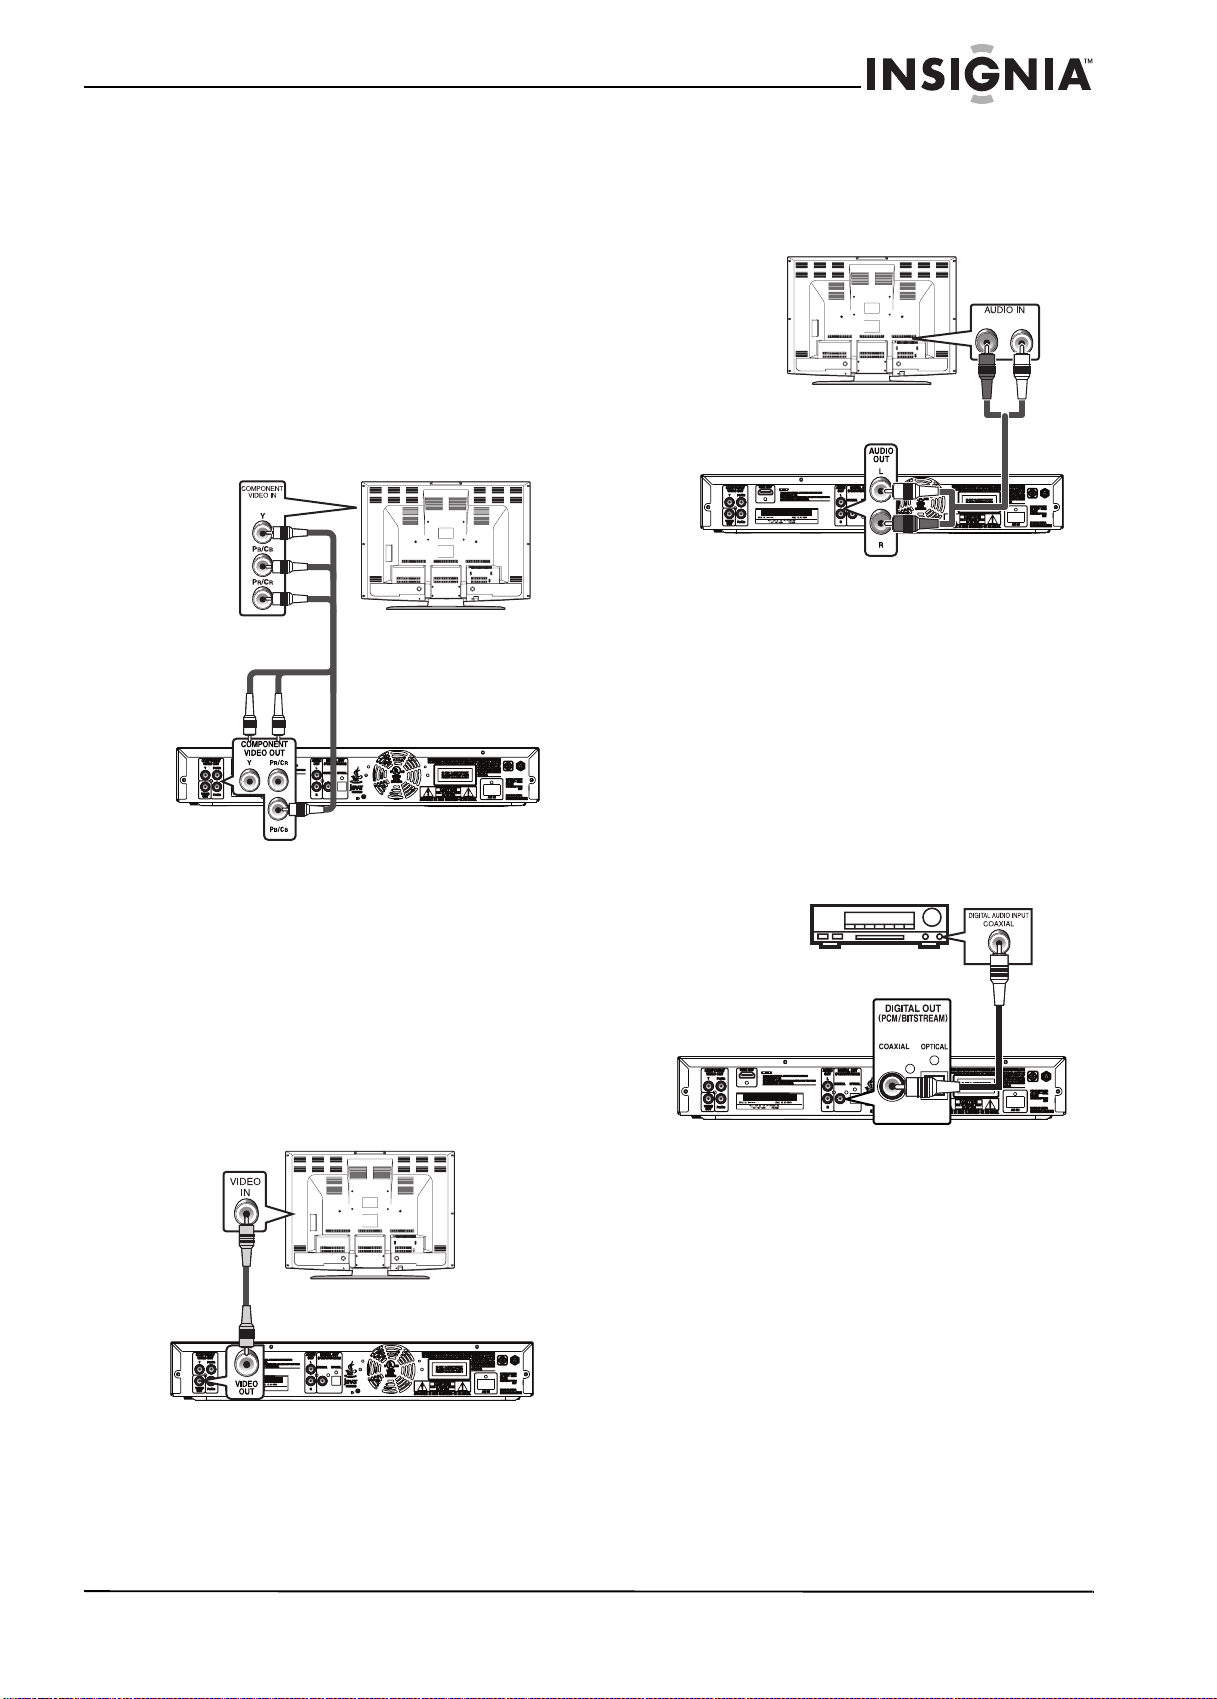
Connecting a TV using component video
A component video connection provides better
video than standard video.
Your player is compatible with progressive scan.
The feature provides you with the higher quality
pictures than traditional output system does. You
may need to adjust the Component Output
setting. For more information, see “Adjusting the
component resolution” on page 21.
To connect a TV using component video:
1 Make sure that your player and the TV are
turned off.
2 Connect one end of a component video cable
(not provided) to the COMPONENT VIDEO
OUT jacks on the back of your player.
Component video cable
Connecting standard audio
To connect standard audio:
1 Connect one end of the standard audio cable
(provided) to the AUDIO OUT L/R jacks on
the back of your player.
LR
Audio cable
2 Connect the other end of the cable to the
AUDIO IN L/R jacks on the TV.
Connecting an audio system
You can connect a digital or analog audio
system.
Connecting a digital audio coaxial system
3 Connect the other end of the cable to the
COMPONENT VIDEO IN jacks on the TV.
4 Complete the steps in “Connecting standard
audio” on page 9 to connect the standard
audio.
Connecting a TV using standard video
To connect a TV using standard video:
1 Make sure that your player and the TV are
turned off.
2 Connect one end of the standard video cable
(provided) to the VIDEO OUT jack on the
back of your player.
Video cable
To connect a digital audio coaxial system:
1 Make sure that your player and the TV are
turned off.
2 Connect one end of a digital audio coaxial
cable (not provided) to the DIGITAL OUT
(PCM/BITSTREAM) COAXIAL jack on the
back of your player.
Digital audio
coaxial cable
3 Connect the other end of the cable to the
DIGITAL AUDIO COAXIAL INPUT jack on
the digital audio system.
3 Connect the other end of the cable to the
VIDEO IN jack on the TV.
4 Complete the steps in “Connecting standard
audio” on page 9 to connect the standard
audio.
www.insignia-products.com
9
Page 18
Insignia NS-BRDVD Blu-ray Disc Player
Connecting a digital audio optical system
To connect a digital audio optical system:
1 Make sure that your player and the TV are
turned off.
2 Connect one end of a digital audio optical
cable (not provided) to the DIGITAL OUT
(PCM/BITSTREAM) OPTICAL jack on the
back of your player.
3 Connect the other end of the cable to the
DIGITAL AUDIO OPTICAL INPUT jack on
the digital audio system.
Connecting a receiver with HDMI
To connect a receiver with HDMI:
1 Make sure that your player and the TV are
turned off.
2 Connect one end of an HDMI cable (not
provided) to the HDMI OUT jack on the back
of your player.
Digital
audio
optical
cable
Connect the AC power cord
To connect the power cord:
1 Connect one end of the AC power cord to the
AC IN jack on the back of your player.
AC power cord
2 Connect the other end of the AC power cord
into a power outlet.
Note
Make sure that the AC power cord is connected
securely. If the cord is loose, your player will
generate noise or static.
Setting up speakers
To set up speakers:
• Use the following illustration as an example:
Left front Right front
Center
Surround left Surround right
Subwoofer
HDMI cable
HDMI cable
3 Connect the other end of the cable to the
HDMI IN jack on the receiver.
4 Connect an HDMI cable to the HDMI OUT
jack on the receiver.
5 Connect the other end of the cable to the
HDMI IN jack on the TV.
Surround
back left
Surround
back right
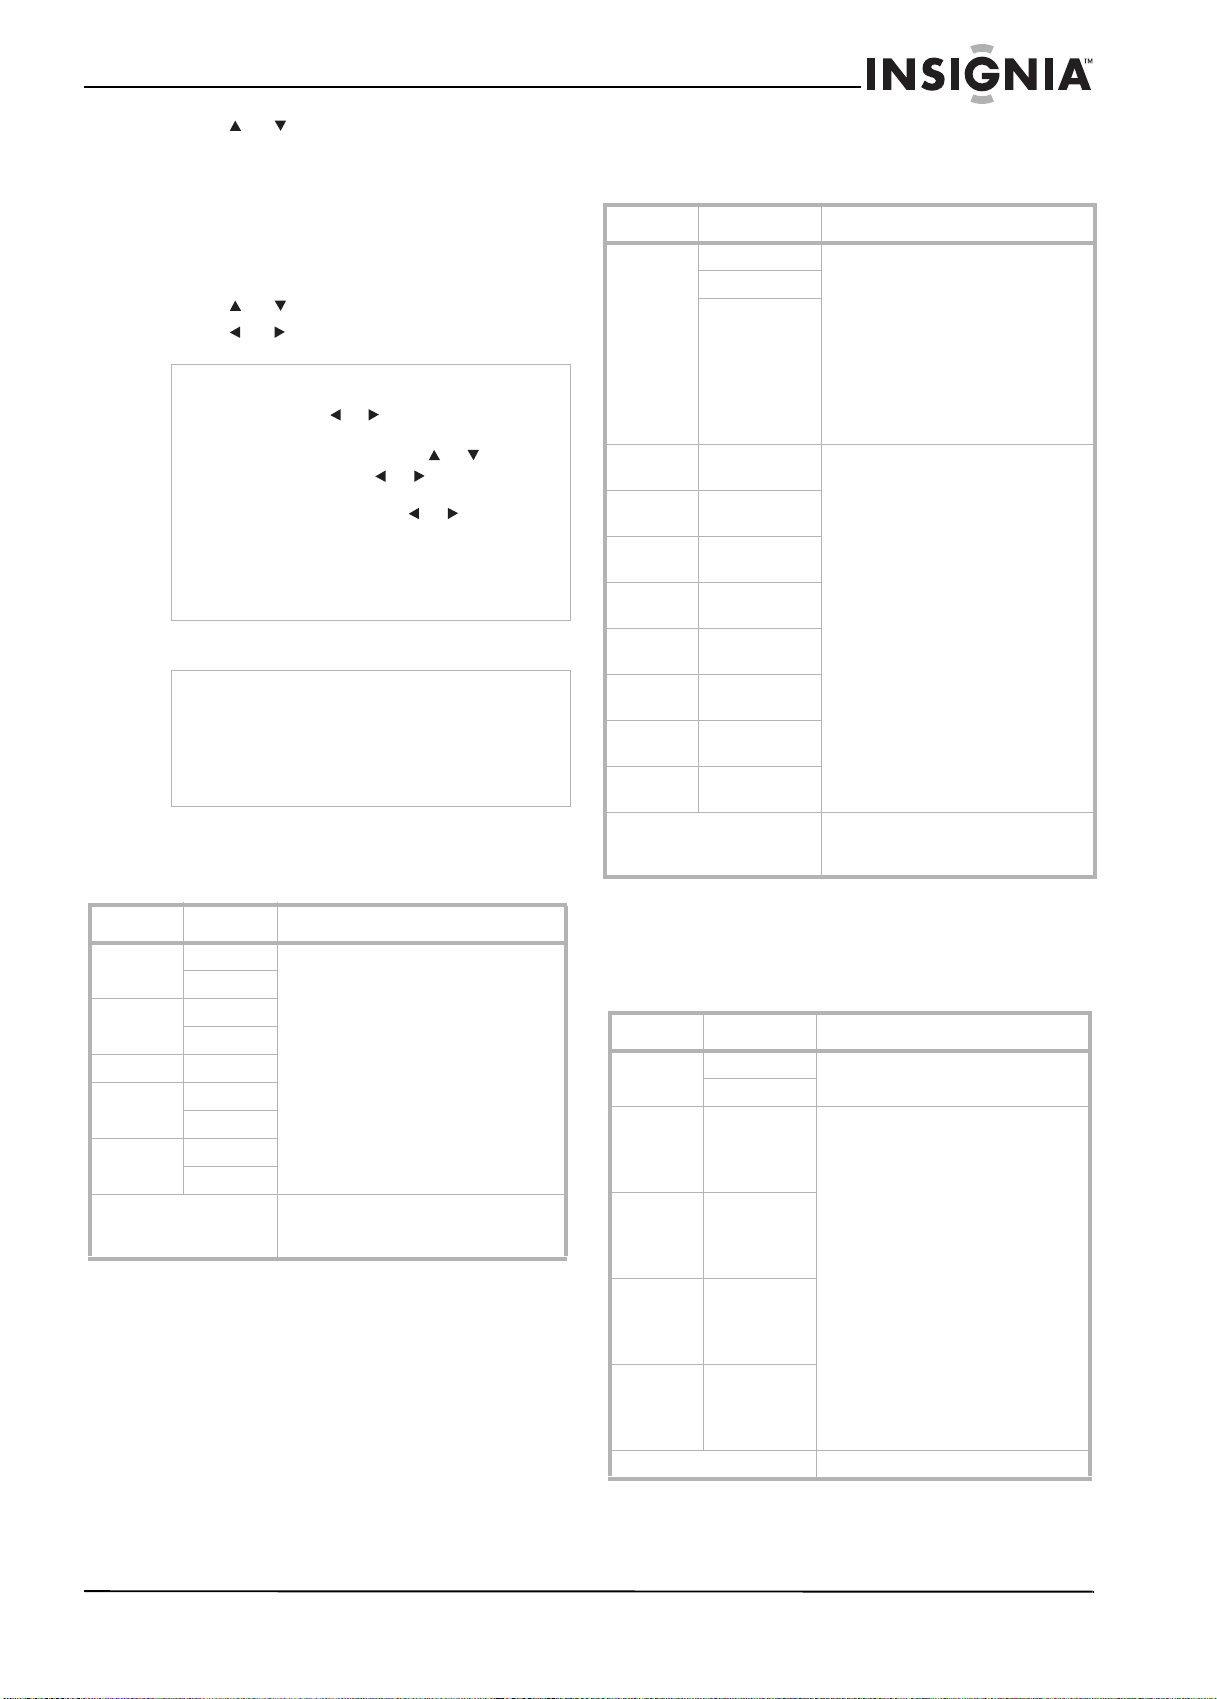
Adjusting speakers
You can specify the speaker size and adjust the
speaker volume and delay time.
Note
You can also access HDMI Audio option from the
Quick
menu.
To adjust speakers:
1 Press SETUP.
2 Press or to select , then press ENTER.
3 Press or to select Audio, then press
4 Press or to select HDMI Audio, then
5 Press or to select HDMI Multi(LPCM),
The
Custom
menu opens.
Custom
ENTER.
press ENTER.
then press ENTER.
10
www.insignia-products.com
Page 19
Insignia NS-BRDVD Blu-ray Disc Player
6 Press or to select a speaker setting,
then press ENTER. You can select:
• Speaker Size—See “Speaker Size
setting” on page 11.
• Channel Level—See “Channel Level
setting” on page 11.
• Delay Time—See “Delay Time setting” on
page 11.
7 Press or to select a sub-setting.
8 Press or to adjust the sub-setting.
Note
• If you select Test Tone in the Channel Level
setting, press or to select Off, Manual, or
Auto, then press ENTER.
• If you select Manual, press
speaker, then press or to adjust the
volume.
• If you select Auto, press or to adjust the
volume of the speaker that automatically
outputs a test tone.
• If you select Default on any setting, press
ENTER. All sub-settings for the setting you
selected are reset to the default settings.
or to select a
9 Press SETUP to close the menu.
Notes
• All speaker sizes must be the same. For
example, is you set the front speaker to Small,
you cannot set another speaker to Large.
• In the Delay Time setting, the distance
between speakers cannot exceed 15 ft. (4.5
m).
Speaker Size setting
The Speaker Size setting specifies the size
individual speakers.
Setting Options Description
Front Large Large:
Small
Center Large
Small
Subwoofer On
Surround Large
Small
Surround
back
Default Select Default, then press ENTER to
Large
Small
For large speakers with strong low
frequency reproduction capabilities.
Small:
For small speakers which do not
provide strong bass sound.
You cannot change the Subwoofer
setting. If the connected device is not
compatible with a subwoofer,
Subwoofer will be displayed in gray.
reset the Speaker Size setting to the
default.
Channel Level setting
The Channel Level setting tests each speaker
or sets the volume for each speaker.
Setting Option Description
Test Tone Off The test tone can be output from the
Manual
Auto
Front Lch 0 dB to - 12 dB
Center 0 dB to - 12 dB
Subwoofer 0 dB to -12 dB
Front Rch 0 dB to -12 dB
Surround
Rch
Surround
Back Rch
Surround
Back Lch
Surround
Lch
Default Select Default, then press ENTER to
(0 dB default)
(0 dB default)
(0 dB default)
(0 dB default)
0 dB to -12 dB
(0 dB default)
0 dB to -12 dB
(0 dB default)
0 dB to -12 dB
(0 dB default)
0 dB to -12 dB
(0 dB default)
speakers so that you can adjust the
volume for each speaker.
Select Off to deactivate the test tone.
Select Manual, then press ENTER to
manually set the volume for the each
speaker.
Select Auto, then press ENTER to
automatically output the test tone
from each speaker.
If you set Test Tone to Manual,
select a speaker and adjust the
volume.
If you set Test Tone to Auto, a test
tone is automatically output to each
speaker in order. Adjust the volume
for the speaker that outputs the test
tone.
reset the Channel Level settings to
the defaults.
Delay Time setting
The Delay Time setting optimizes the timing at
which the sounds are output from the speakers
according to their distance from the listening
position.
Setting Option Description
Distance Feet Select the distance measurement,
Meters
Front 0 ft. to 60 ft.
Center 0 ft. to 60 ft.
Surround 0 ft. to 60 ft.
Surround
Back
Default Select Default, the press ENTER.
(0 m to 18 m)
Default is
12 ft. (3.6m)
(0 m to 18 m)
Default is
12 ft. (3.6m)
(0 m to 18 m)
Default is
10 ft. (3.0m)
0 ft. to 60 ft.
(0 m to 18 m)
Default is
10 ft. (3.0m)
then press ENTER.
Select the distance between the
speaker and the listening position.
www.insignia-products.com
11
Page 20
Insignia NS-BRDVD Blu-ray Disc Player
Using your player
All tasks are written for use with the remote
control unless otherwise noted.
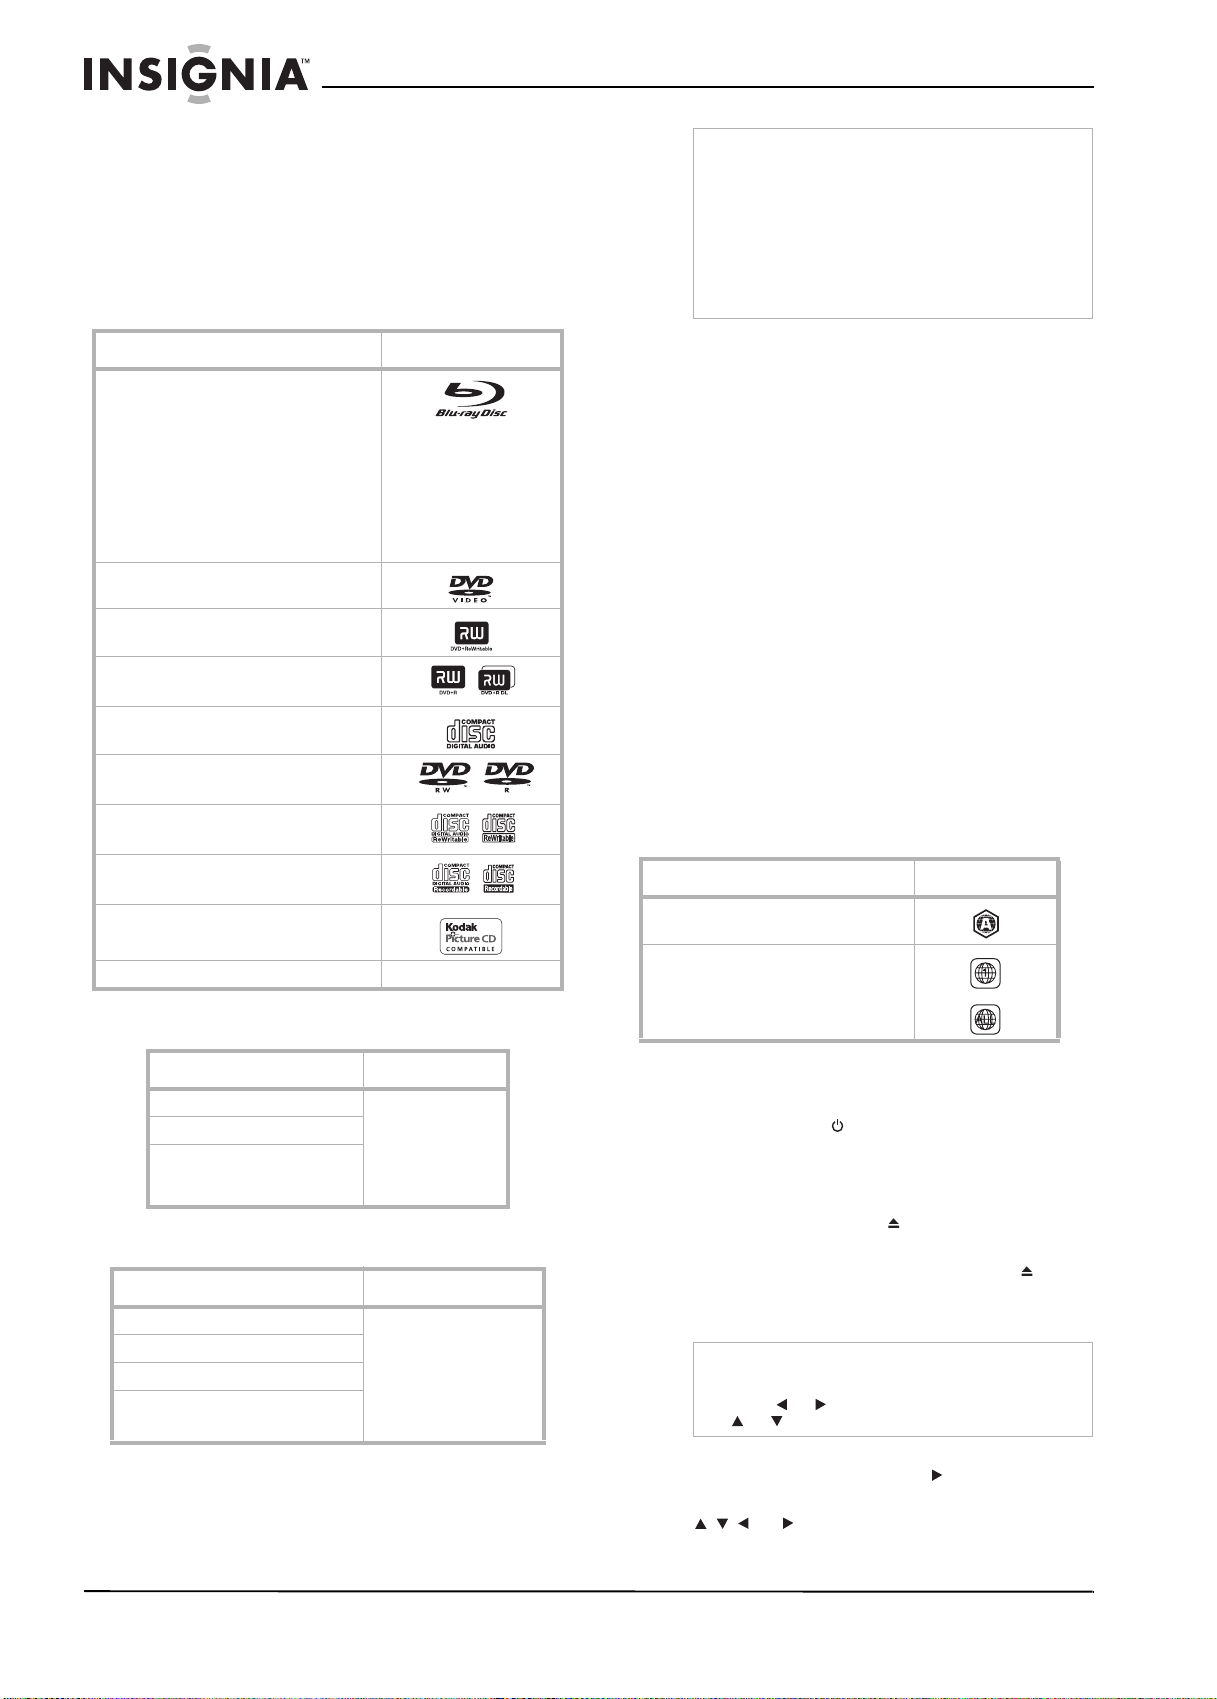
Playable discs, memory cards, and files
Playability of dual discs is not guaranteed.
The following table includes a list of the playable
discs.
Disc type Logo
Blu-ray Disc
• Blu-ray Video (single or double
layer)
• Blu-ray Disc-RE (single or
double layer recorded in BDMV
format)
• Blu-ray Disc-R (single or
double layer recorded in BDMV
format) Unclosed discs cannot
be played.
DVD-video
DVD+RW (single layer)
DVD+R (single and double layer)
CD-DA (audio CD)
DVD-R/RW
CD-RW
Notes
• Your player cannot play a disc if the contents
are protected by Windows Media™ Digital
Rights Management (DRM).
• Windows Media™ Audio is an codec
developed by Microsoft® Corporation in the
United States.
• Your player supports SD Memory Cards with
FAT12/FAT16 file systems and SDHC Memory
Cards with FAT32 file systems.
You cannot play the following discs and files
• CD-ROM
• CD-I (compact disc-interactive)
•DVD-RAM
• VSD (video single disc)
• DVD-audio
• BD-RE (ver.1 / ver.3)
• HD DVD
•video CD
• Unfinalized disc
•SVCD
• BD-RE/-R recorded in BDAV format
• DVD, CD, or SD Memory Card that contains
DivX® files
• Super audio CD (Only the sound on the CD
layer can be heard. The sound on the
high-density super audio CD layer cannot be
heard.)
Region codes
Your player can play discs with the following
region codes. Look for the symbols on the disc
or disc packaging.
CD-R
Kodak Picture CD
DTS-CD
The following table includes a list of playable files
and related media types.
Playable files Media
JPEG DVD, CD-RW,
MP3
WMA
CD-R, SD Memory
Card (including
SDHC), miniSD
Card, microSD
Card
The following table includes a list of the playable
SD Memory Cards.
Readable cards Playable files/data
SD Memory Card (8 MB to 2 GB) JPEG, MP3, or WMA
SDHC Memory Card (4 GB)
miniSD Card (8 MB - 2 GB)
microSD Card (8 MB to 2 GB)
files and
picture-in-picture
commentary, subtitles
or other extras for
BD-ROM Profile 1
ver.1.1
Disc type and region code Region code
Blu-ray (region code A)
DVD (region codes 1 and All)
Playing a Blu-ray Disc or DVD
To play a Blu-ray Disc or DVD:
1 Press POWER . Your player turns on.
2 Turn on the TV, then select the input setting
on the TV that matches the connection
method you used to connect your player.
3 Press OPEN/CLOSE to open the disc tray.
4 Place a disc on the disc tray with the label
facing up, then press OPEN/CLOSE to
close the disc tray. It may take a few seconds
for the disc to load.
Note
If the DVD was recorded in VR mode, you can
press POP MENU/MENU to open the DVD menu.
Press or to select Original or Playlist, press
or to select a title, then press ENTER.
5 If the disc does not start playing
automatically, press PLAY .
6 If a Blu-ray Disc or DVD menu opens, press
ENTER.
or to select Play, then press
12
www.insignia-products.com
Page 21
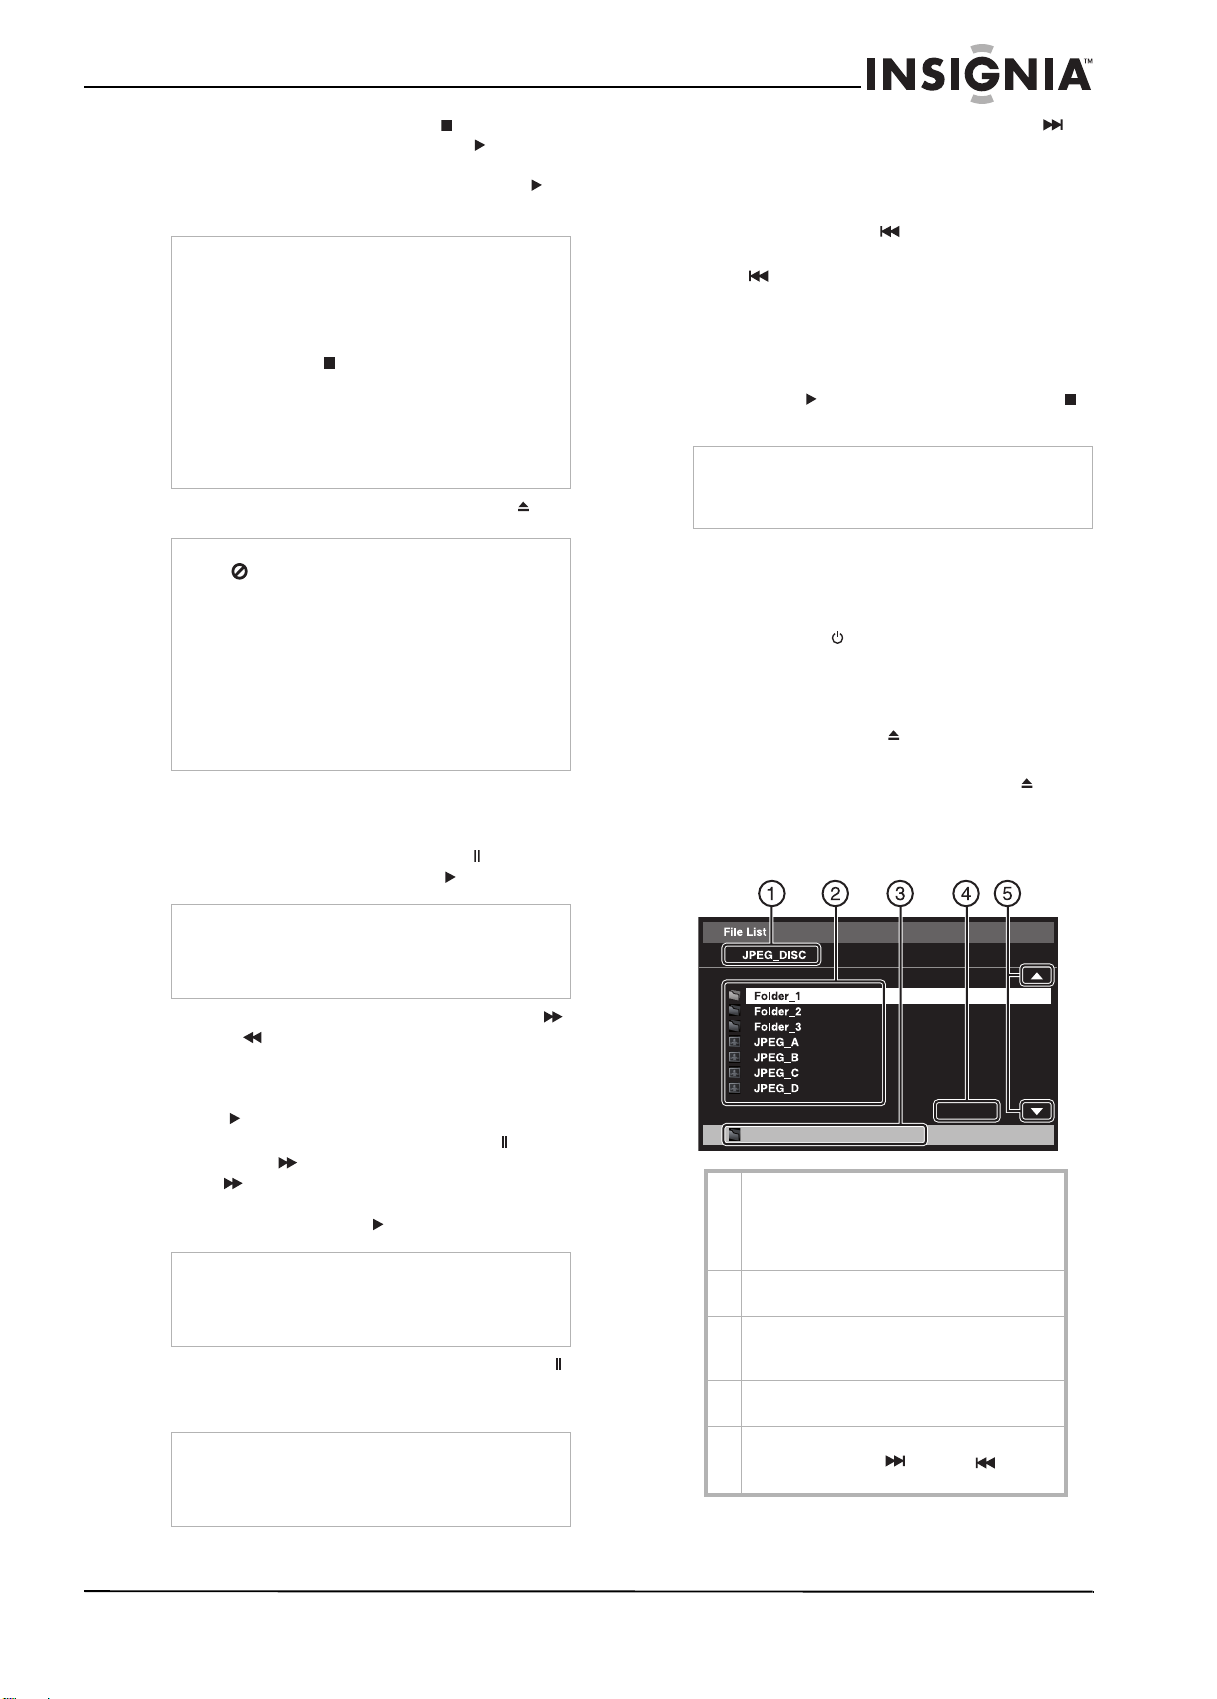
Insignia NS-BRDVD Blu-ray Disc Player
7 To stop playback, press STOP . If you press
this button once then press PLAY ,
playback resumes where it stopped. If you
press this button twice then press PLAY ,
playback begins at the beginning of the disc.
Note
Not all Blu-ray Discs support the resume feature.
The resume information is saved even when the
power is turned off.
The resume information is cleared if you:
• Open the disc tray
• Press STOP twice
• Switch between Disc mode and SD Memory
mode
• Change the BD Rating Level or DVD Rating
Level setting in the
• Open the disc tray or turn off your player when
in SD Memory mode
Parental
menu
8 To eject the disc, press OPEN/CLOSE .
Notes
• may appear at the top-right corner on the
TV screen when an operation is prohibited by
the disc or your player.
• During the playback of a two-layered disc, the
video may stop for a moment. This happens
when your player switches from the first layer to
the second layer. This is not a malfunction.
• The operation may vary when you play back
Blu-ray Discs and DVDs using the disc menu.
Refer to the documentation accompanying the
disc for details.
Controlling Blu-ray Disc or DVD playback
To control Blu-ray or DVD playback:
• To pause playback, press PAU SE . To
resume playback, press PLAY .
• To skip to the next chapter, press SKIP . If
the disc does not have any chapters,
pressing this button goes to the next title (if
available).
• To skip to the beginning of the current
chapter, press SKIP .
• To skip to the previous chapter, press
SKIP twice. If the disc does not have any
chapters, pressing this button goes to the
previous title (if available).
• To repeat the current title, press REPEAT
once. To repeat the current chapter, press
REPEAT twice. To resume normal playback,
press PLAY . You can also press STOP
to cancel repeat mode.
Notes
• Repeat mode may not work with all scenes.
• Repeat mode does not work during A-B repeat
mode.
Playing an audio CD or JPEG/MP3/WMA
disc
To play an audio CD or JPEG/MP3/WMA disc:
1 Press POWER . Your player turns on.
2 Turn on the TV, then select the input setting
on the TV that matches the connection
method you used to connect your player.
3 Press OPEN/CLOSE to open the disc tray.
4 Place a disc on the disc tray with the label
facing up, then press OPEN/CLOSE to
close the disc tray.
5 If the file list does not open automatically,
press POP MENU/MENU.
Note
If the picture is blurred when paused, change the
Still Mode setting to Fields in the
For more information, see “Adjusting the still
image” on page 23.
Video
menu.
• To fast forward or fast reverse, press FWD
or REV . Each time you press one of
these buttons, the fast-forward or fast-reverse
speed changes from 2×, 8×, 20×, 50×, to
100×. To resume normal playback, press
PLAY .
• To play forward slowly, press PAU SE , then
press FWD . Each time you press
FWD , the slow-forward speed changes
from 1/16×, 1/8×, to 1/2×. To resume normal
playback, press PLAY .
Note
If the picture is blurred during slow forward play,
change the Still Mode setting to Fields in the
Video
menu. For more information, see “Adjusting
the still image” on page 23.
• To play forward step by step, press PAUSE
repeatedly. Each time you press this button,
the video advances one step (frame).
Note
If the picture is blurred during step-by-step play,
change the Still Mode setting to Fields in the
Video
menu. For more information, see “Adjusting
the still image” on page 23.
2 / 4
Folder_1
1 Disc type: For audio CDs, CD-DA appears.
For JPEG, MP3, or WMA files, the current
folder name appears. For Blu-ray Discs,
DVDs, or SD Memory Cards, the disc or
card name appears if not within a folder.
2 List of audio CD track numbers and times or
JPEG, MP3, or WMA folders or files.
3 Currently selected audio CD track number
and time or JPEG/MP3/WMA disc file or
folder name.
4 Current page and total number of pages in
the list.
5 Indicates that a next or previous page
exists. Press SKIP or SKIP to go to
the next or previous page.
www.insignia-products.com
13
Page 22
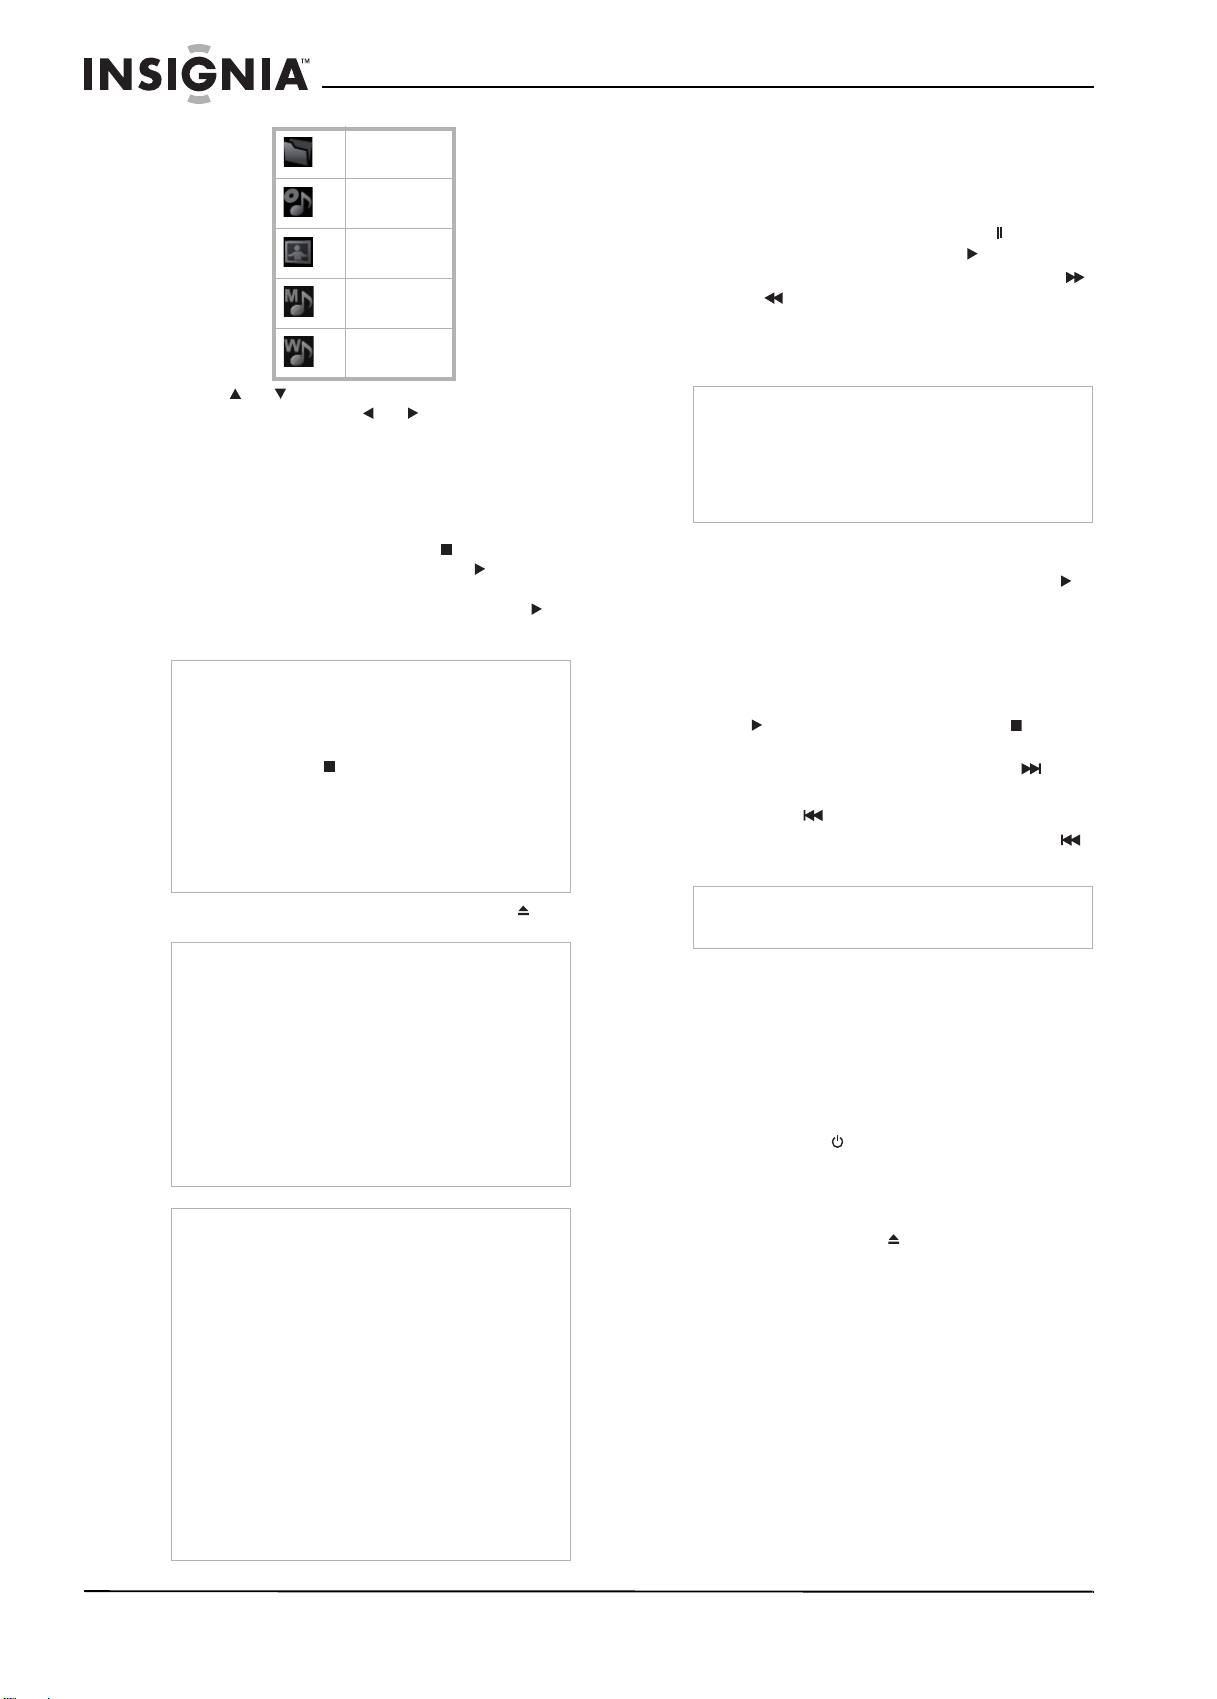
Insignia NS-BRDVD Blu-ray Disc Player
Folder icon
Audio CD
track icon
JPEG icon
MP3 icon
WMA icon
6 Press or to select a folder or file, then
press ENTER. Press or to move
backward or forward between files and
folders. If you select a file, then press
ENTER, playback starts automatically.
7 To return to the top of the list, press
TOP MENU.
8 To stop playback, press STOP . If you press
this button once then press PLAY ,
playback resumes where it stopped. If you
press this button twice then press PLAY ,
playback begins at the beginning of the disc.
Note
The resume information is saved even when the
power is turned off.
The resume information is cleared if you:
• Open the disc tray
• Press STOP twice
• Switch between Disc mode and SD Memory
mode
• Change the BD Rating Level or DVD Rating
Level setting in the
• Open the disc tray or turn off your player when
in SD Memory mode
Parental
menu
9 To eject the disc, press OPEN/CLOSE .
Note
JPEG files: should be recorded with the following
specifications:
• Upper limit: 2,560 × 1,900 pixels (sub sampling
is 4:4:4) 5,120 × 3,840 pixels (sub sampling is
up to 4:2:2)
• Lower limit: 32 x 32 pixels
• Maximum file size of image: 12 MB
MP3 and WMA files should be recorded with the
following specifications:
• Sampling frequency: 44.1 kHz or 48 kHz
• Constant bit rate: 112 kbps to 320 kbps (MP3)
48 kbps to 192 kbps (WMA)
Notes
• Your player can recognize up to 255 folders and
999 files for a CD and 999 folders and 9999
files for a DVD and SD Memory Card.
• The first 28 characters of folder or file names
are displayed. Unrecognizable characters are
replaced with asterisks.
• Your player can only display the first eight
levels of folders on a CD and the first nine
levels of folders on a DVD or SD Memory Card.
• Your player only plays files with jpg, jpeg, mp3,
or wma extensions. Files with other extensions
are not displayed.
• Your player may display some unplayable
folders or files because of the recording status.
• High-resolution JPEG files take longer to
display.
• Your player cannot display progressive JPEG
files (JPEG files saved in progressive format).
Controlling audio CD or JPEG/MP3/WMA
disc playback
To control audio CD or JPEG/MP3/WMA disc
playback:
• To pause playback, press PAU SE . To
resume playback, press PLAY .
• To fast forward or fast reverse, press FWD
or REV . Each time you press one of these
buttons, the fast-forward or fast-reverse
speed changes from 2×, 8×, to 30×. (Audio
CD, MP3, and WMA only)
Note
• When playing an audio CD, fast forwarding and
reversing between different tracks is not
available during program or random playback.
• When playing MP3 or WMA files, fast
forwarding and reversing between different files
is not always available.
• To repeat the current audio CD track or
JPEG, MP3, or WMA folder, press REPEAT.
To resume normal playback, press PLAY .
• To repeat all audio CD tracks, press REPEAT
twice. To repeat all the JPEG, MP3, or WMA
files in the current folder, press REPEAT
twice. To repeat all the JPEG, MP3, or WMA
files on the disc or card, press REPEAT three
times. To resume normal playback, press
PLAY . You can also press STOP to
cancel repeat mode.
• To skip to the next track, press SKIP .
• To skip to the beginning of the current track,
press SKIP .
• To skip to the previous track, press SKIP
twice.
Note
Repeat mode does not work during A-B repeat
mode.
Playing a Kodak Picture CD
Your player can play JPEG files on a Kodak
Picture CD. The CD must be in the Kodak
Picture CD version 7.0 format. If you are not sure
what version your CD is recorded in, check with
a retailer that develops Kodak Picture CDs.
To play a Kodak Picture CD:
1 Press POWER . Your player turns on.
2 Turn on the TV, then select the input setting
on the TV that matches the connection
method you used to connect your player.
3 Press OPEN/CLOSE to open the disc tray.
14
www.insignia-products.com
Page 23
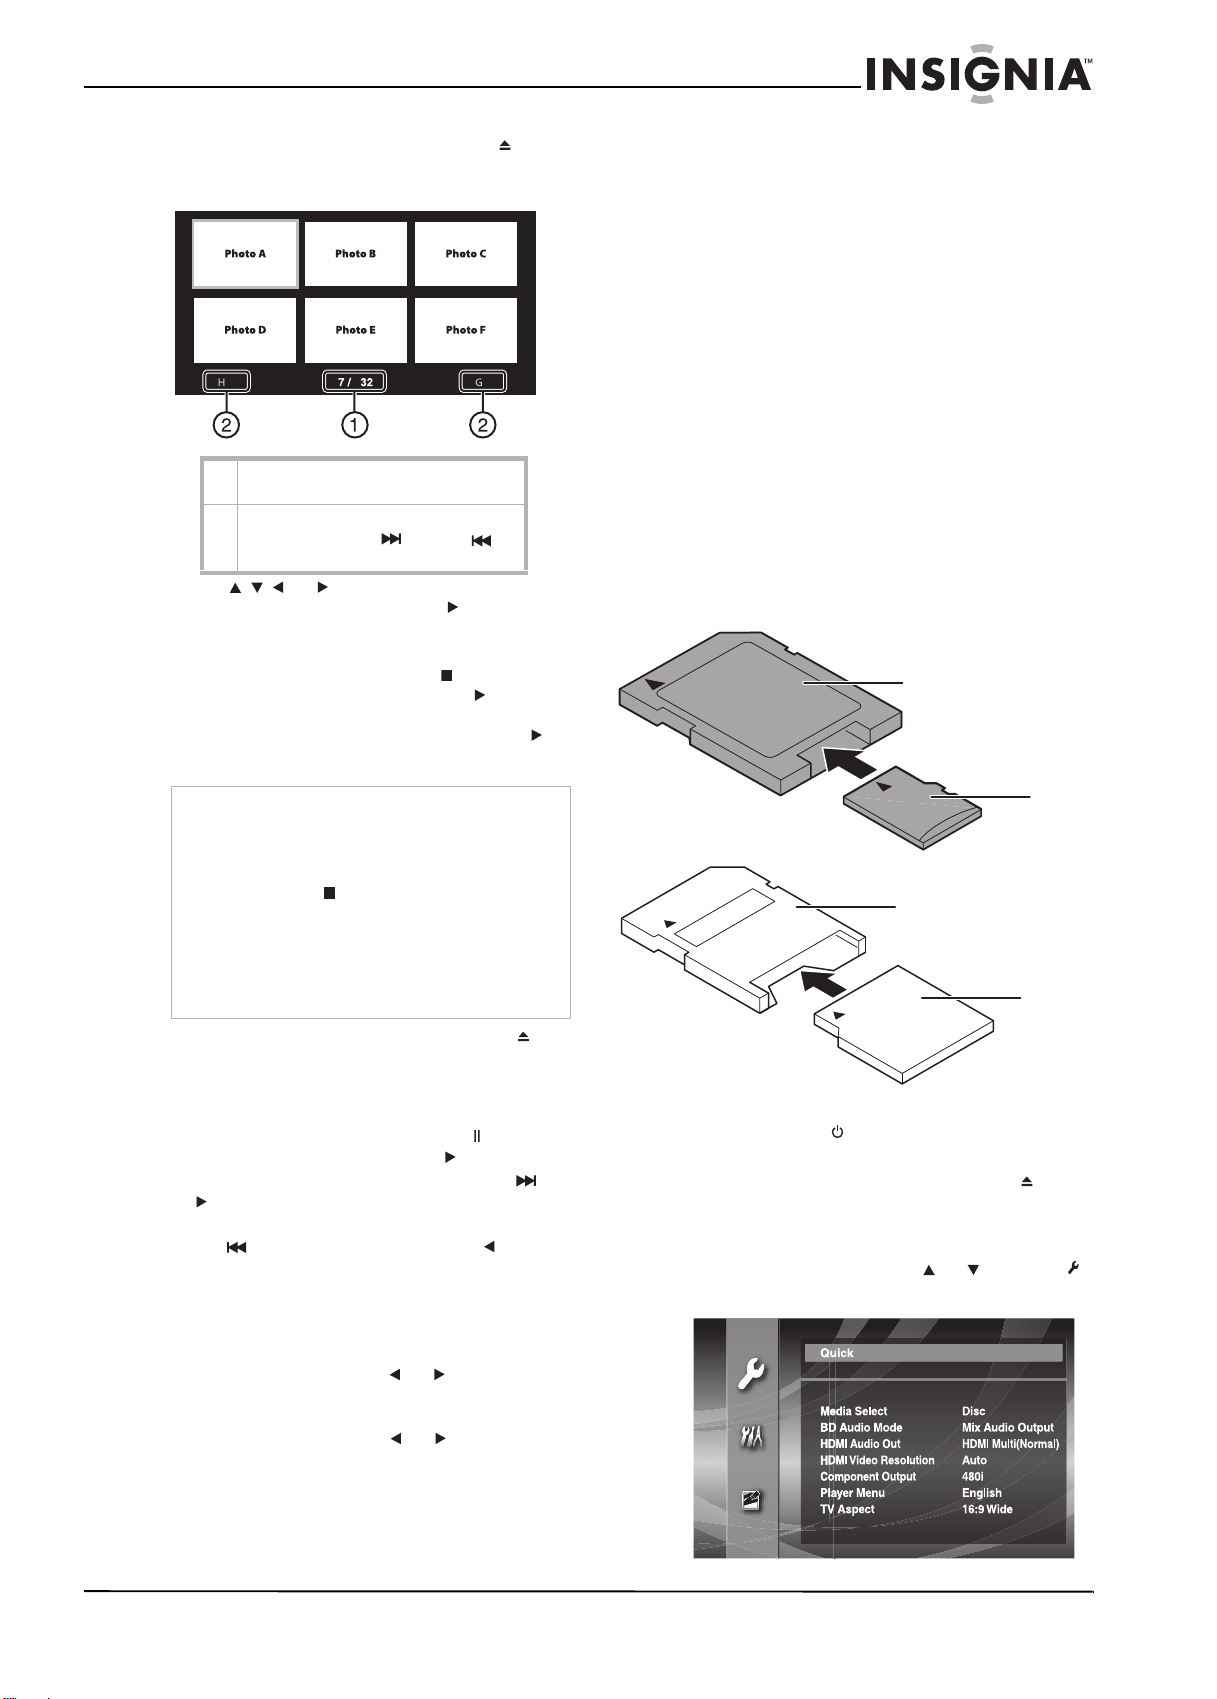
Insignia NS-BRDVD Blu-ray Disc Player
4 Place a disc on the disc tray with the label
facing up, then press OPEN/CLOSE to
close the disc tray. The menu opens
automatically.
1 Current picture and total number of
pictures.
2 Indicates that a next or previous page
exists. Press SKIP or SKIP to
go to the next or previous page.
5 Press or to select the picture you
want to view, then press PLAY or ENTER.
Your player displays the picture you selected,
then automatically goes to the next picture.
6 To stop playback, press STOP . If you press
this button once then press PLAY ,
playback resumes where it stopped. If you
press this button twice then press PLAY ,
playback begins at the beginning of the CD.
Playing from an SD Memory Card
Your player can play JPEG, MP3, or WMA files
recorded on an SD Memory Card.
Some Blu-ray Discs provide additional
picture-in-picture commentary, subtitles, or other
extras in BD-ROM Profile 1 ver.1.1 files. You can
download these files from the Internet to a
computer, then copy them to an SD Memory
Card. You can play the BD-ROM file while you
watch the related Blu-ray Disc. Check the
documentation that came with the Blu-ray Disc
to see if a BD-ROM file is available.
Before you can play from an SD Memory Card,
you have to select SD Memory as the media
mode.
Your player can play the following SD Memory
Cards:
• SD Memory Card (8 MB to 2 GB)
• SDHC Memory Card (4 GB)
• miniSD Card (8 MB to 2 GB)
• microSD Card (8 MB to 2 GB)
You need an adapter for the miniSD Card and
microSD Card.
microSD Card
adapter
Note
The resume information is saved even when the
power is turned off.
The resume information is cleared if you:
• Open the disc tray
• Press STOP twice
• Switch between Disc mode and SD Memory
mode
• Change the BD Rating Level or DVD Rating
Level setting in the
• Open the disc tray or turn off your player when
in SD Memory mode
Parental
menu
7 To eject the disc, press OPEN/CLOSE .
Controlling Kodak Picture CD playback
To control Kodak Picture CD playback:
• To pause playback, press PAU SE . To
resume playback, press PLAY .
• To skip to the next picture, press SKIP
or .
• To skip to the previous picture, press
SKIP twice. You can also press .
• To rotate the picture, press ANGLE. Each
time you press this button, the picture rotates
°.
90
• To change the visual effect that occurs when
you switch from picture to picture, press
MODE once, then press or or ENTER to
select Cut In/Out or Fade In or Out.
• To change the size of the picture, press
MODE twice, then press or or ENTER to
select Normal (100%) or Small (95%). If the
picture is small, you may not see a difference.
microSD
Card
miniSD Card
adapter
miniSD
Card
To select SD Memory as the media mode:
1 Press POWER . Your player turns on.
2 Place a disc on the disc tray with the label
facing up, then press OPEN/CLOSE to
close the disc tray. The menu opens
automatically.
3 Make sure that your player is in stop mode,
then press SETUP. Press or to select ,
Quick
then press ENTER. The
menu opens.
www.insignia-products.com
15
Page 24

Insignia NS-BRDVD Blu-ray Disc Player
4 Press or to select Media Select, then
press ENTER repeatedly to select SD
Memory.
5 Press SETUP to close the menu.
To play from an SD Memory Card:
1 Insert an SD Memory Card, label side up,
into the SD Memory Card slot until it clicks
into place.
SD Memory Card
2 When the file list opens, press or to
select a folder or file, then press ENTER.
Press or to move backward or forward
between files and folders. If you select a file,
then press ENTER, playback starts
automatically.
To remove the SD Memory Card:
1 Make sure that your player is in stop mode,
then push in on the card and release it. The
card will pop out slightly.
2 Grasp the card and pull it out of the slot.
Notes
• Your player displays the first eight characters of
SD Memory Card files and folders.
• Your player can recognize up to 999 folders and
9999 files for an SD Memory Card.
• Do not use a computer to delete files or folders
on an SD Memory Card. Your player may not
be able to read the card.
• Do not remove the SD Memory Card or turn off
your player while the card is playing. The card
may be damaged or files may be corrupted.
• Keep the SD Memory Cards in their cases
when you are not using them.
• Do not try to open or modify the card.
• Do not touch the terminals with your fingers or
any metals.
• Do not attach additional labels or stickers to
cards.
• Do not remove the label of the SD Memory
Cards.
• Your player supports SD Memory Cards with
the FAT12/ FAT16 file system, and SDHC
Memory Cards with the FAT32 file system.
• Your player may not read SD Memory Cards
formatted on a computer. If that is the case,
reformat the SD Memory Cards in your player
and try again.
• Your player cannot play miniSDHC and
microSDHC Memory Cards.
Formatting an SD Memory Card
To format an SD Memory Card:
1 Press SETUP.
2 Press or to select , then press ENTER.
The
Initialize
menu opens.
3 Press or to select Erase/Format SD
Card, then press ENTER.
Note
If you do not have an SD Memory Card inserted,
Erase/Format SD Card will be grayed.
4 When a message prompts you to confirm the
initialization, press ENTER again.
5 Press SETUP to close the menu.
Displaying status information
You can display status information about the
currently playing disc.
To display status information:
• During playback, press DISPLAY repeatedly.
Each time you press this button, the status
information changes.
• For Blu-ray Discs, the display sequence is
title and chapter information, elapsed time
for the title, remaining time for the title,
HDMI information, then display off.
• For DVDs, the display sequence is
elapsed time for the chapter, remaining
time for the chapter, elapsed time for the
title, remaining time for the title, bitrate
information, HDMI information, then
display off.
• For audio CDs, the display sequence is
elapsed track time, remaining track time,
elapsed CD time, remaining CD time,
HDMI information, then display off.
• For JPEG files, the display sequence is
file name information, file information,
HDMI information, then display off.
• For MP3 files, the display sequence is file
name information, elapsed time for the
current file, HDMI information, then
display off.
• For WMA files, the display sequence is file
name information, song title (based on tag
information), artist’s name (based on tag
information), elapsed time for the current
file, HDMI information, then display off.
16
www.insignia-products.com
Page 25
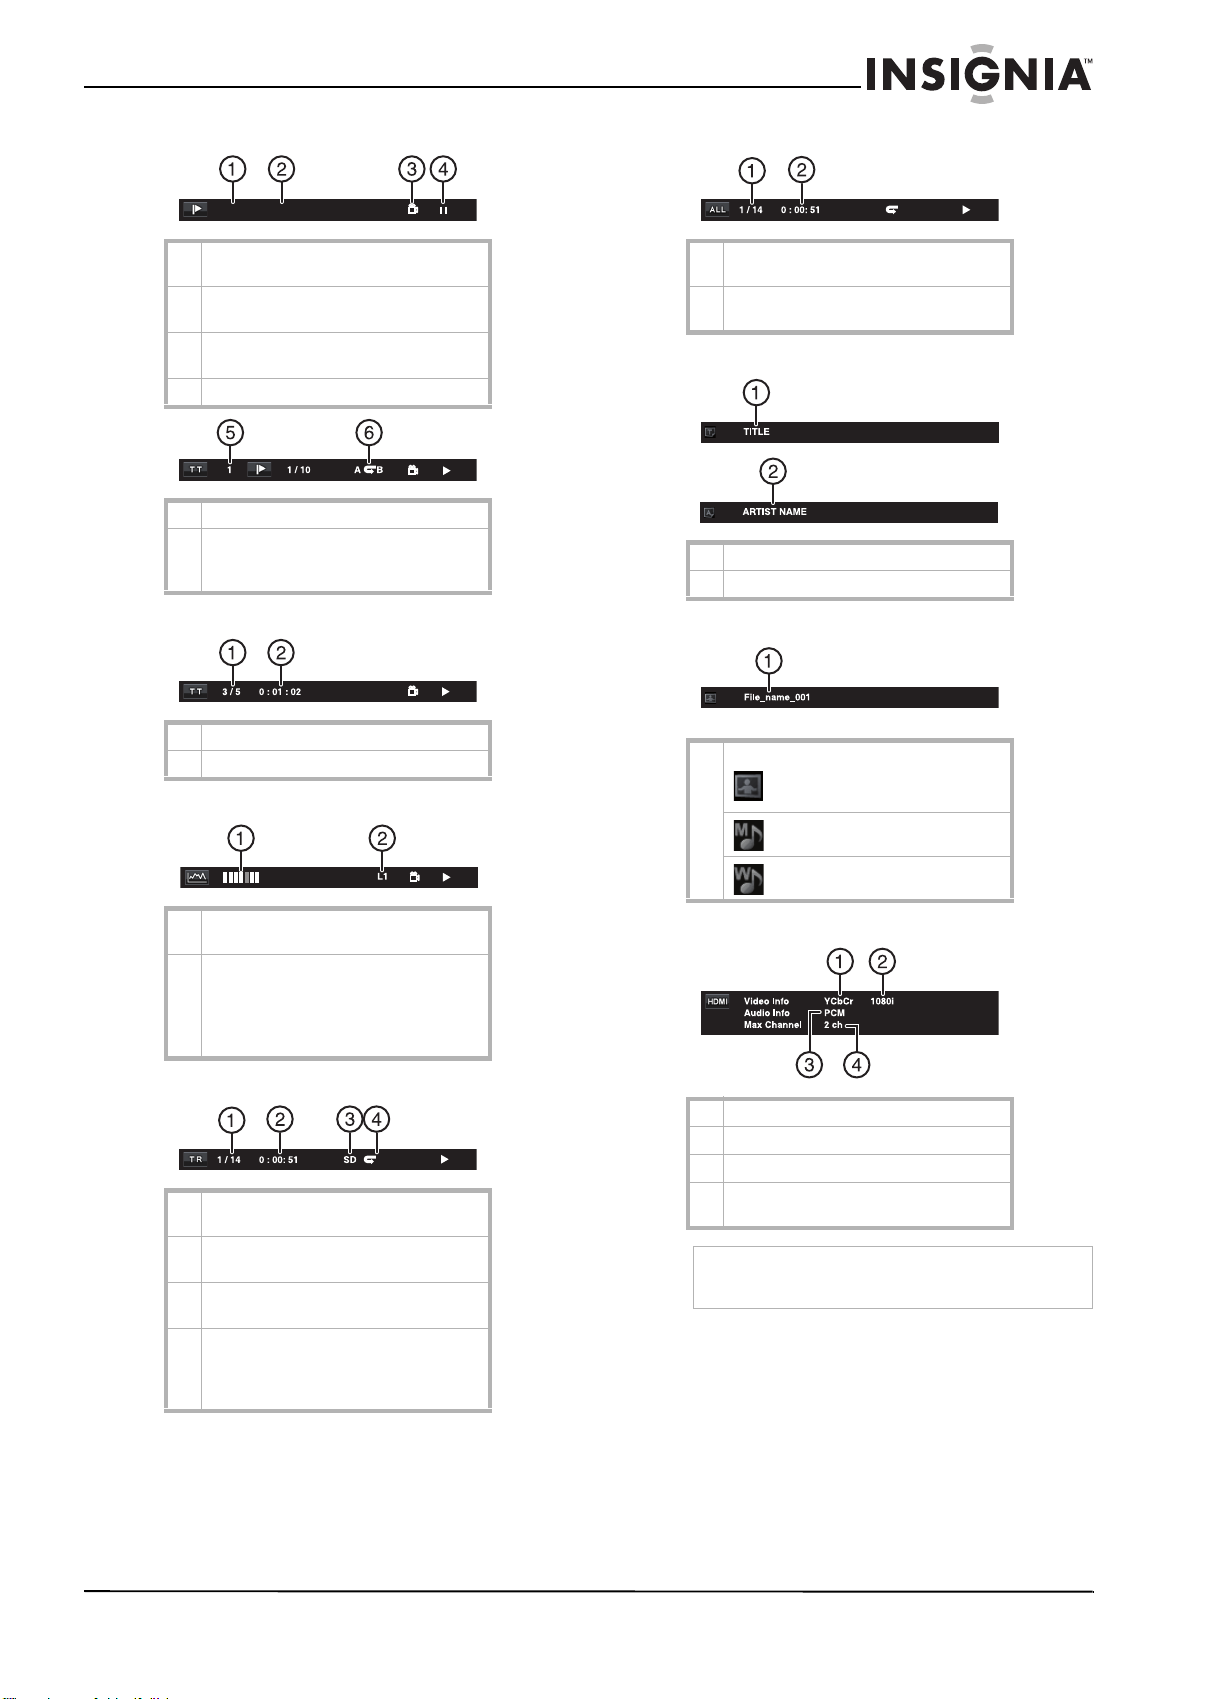
Insignia NS-BRDVD Blu-ray Disc Player
Chapter information
3 / 5 0 : 01 : 02
1 Current chapter number and total
number of chapters
2 Elapsed time and remaining time for
the current chapter
3 Angle icon (appears when multiple
viewing angles are available)
4 Current playback status
5 Current title number
6 Repeat setting if repeat mode is active.
C means chapter repeat. T means title
repeat. AB means playback loop.
Title information
Disc information
T
1 Current track number and total number
of tracks
2 Elapsed and remaining time for the
current disc
WMA tag information
1 Title based on tag information
2 Artist’s name based on tag information
File name information
1 Current and total number of titles
2 Elapsed and remaining title time
Bitrate information
1 Bitrate (the amount of video data
currently being read).
2 Layer number (only for two-layer
discs). L0 means layer 0 is playing. L1
means layer 1 is playing.
For DVD-R/RWs, ORG (original) or PL
(playlist) instead of the layer number.
Track and file information
1 Current track or file number and total
number of tracks or files.
2 Elapsed and remaining time for the
current track.
3 SD Memory Card indicator. SD appears
if an SD Memory Card is playing.
4 Repeat setting if repeat mode is active.
T means track or file repeat. G means
group repeat. A means repeat all. AB
means playback loop.
1 Media icon and file name. For example:
JPEG file
MP3 file
WMA file
HDMI information
/:
:
:
1 HDMI video format.
T
2 HDMI audio format.
3 HDMI output resolution.
4 Maximum number of channels that can
be accepted by the connected device.
Note
If an HDMI cable is not connected, ––– appears
instead of HDMI information.
www.insignia-products.com
17
Page 26
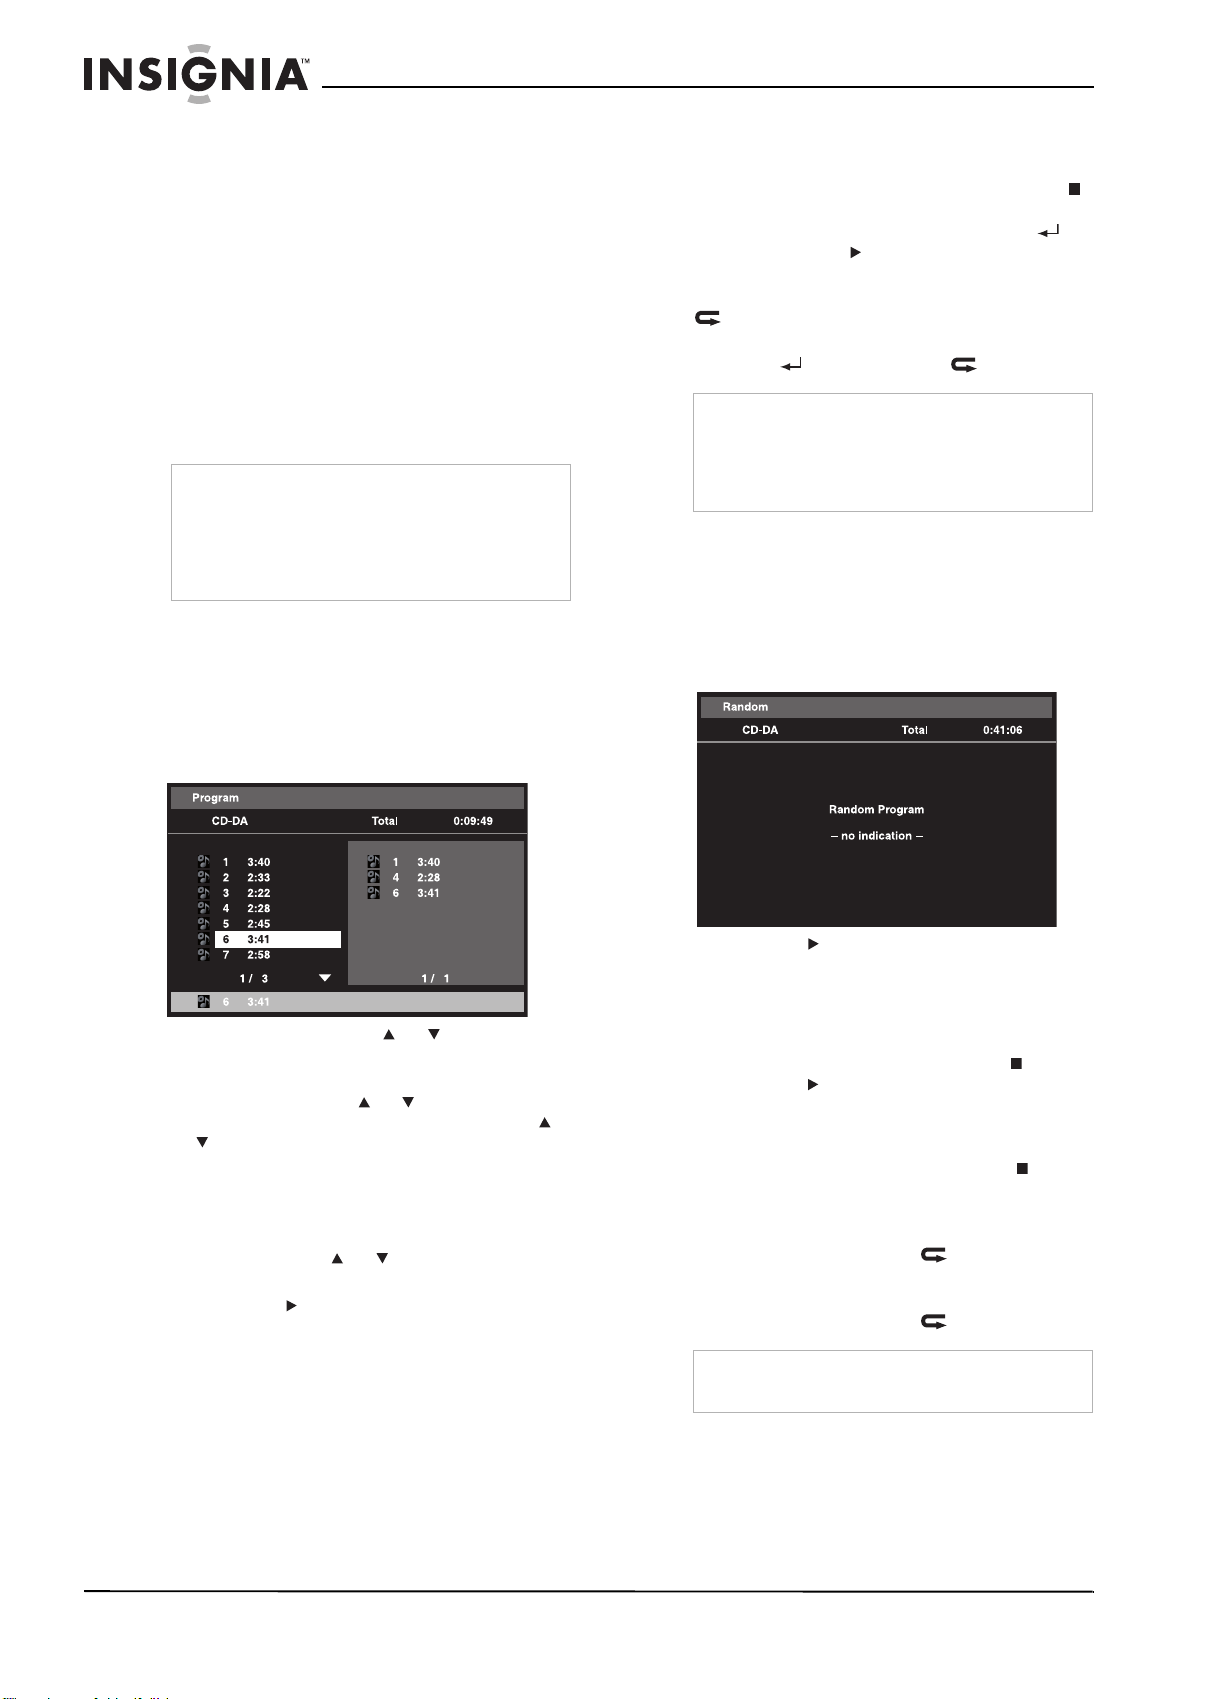
Insignia NS-BRDVD Blu-ray Disc Player
Creating a playback loop
You can play a section of a Blu-ray Disc, DVD, or
audio CD repeatedly.
To create a playback loop:
1 During playback, find the place where you
want the playback loop to begin, then press
A-B. If you want to cancel the starting point,
press CLEAR, then when you find the new
starting point, press A-B.
2 Play the disc until you reach the place where
you want the playback loop to end, then
press A-B. The playback loop starts playing
immediately.
3 To cancel the playback loop, press A-B.
Note
• The beginning and ending points of the
playback loop must be in the same title or track.
• The playback loop feature may not work with all
scenes.
• The playback loop feature does not work when
your player is in regular repeat mode.
Creating a program
You can create a program for audio CD tracks
and JPEG, MP3, or WMA files.
Controlling program playback
To control program playback:
• To open the program screen, press STOP
twice. To close the program screen and
return to the program, press RETURN ,
then press PLAY .
• To repeat the current track or file in the
program, press REPEAT repeatedly until
Track appears on the display.
• To repeat the entire program, press
REPEAT repeatedly until All appears.
Notes
• If you open the disc tray, remove the SD
Memory Card, or turn off the power, the
program is cleared.
• You cannot select a track to play or use random
play during program playback.
Using random play
You can play audio CD tracks or JPEG, MP3, or
WMA files in random order.
To use random play:
1 In stop mode, press MODE twice. The
Random
screen opens.
To create a program:
1 In stop mode, press MODE. The program
screen opens.
2 For an audio CD, press or to select a
track, then press ENTER.
Or, for a JPEG, MP3, or WMA disc or SD
Memory Card, press or to select a folder
(if necessary), then press ENTER. Press
or to select a file, then press ENTER.
3 Repeat Step 2 to add additional tracks or files
to the list.
4 To delete the last track or file you added,
press CLEAR. To delete all tracks and files
you added, press or to select All Clear
at the bottom of the list, then press ENTER.
5 Press PLAY to start playback.
2 Press PLAY . Tracks or files play back in
random order.
Controlling random play
To control random play:
• To set a resume point, press STOP once.
Press PLAY to resume playback. An audio
CD track starts playing where you stopped. A
JPEG slide show starts playing at the file
where you stopped.
• To cancel random play, press STOP twice.
Random
The
Random play is cancelled.
• To repeat the current track or file, press
REPEAT repeatedly until Track appears
on the display.
• To repeat the entire random selection, press
REPEAT repeatedly until All appears.
screen opens. Press MODE.
18
Note
www.insignia-products.com
You cannot go to the previous track or file during
random play.
Page 27
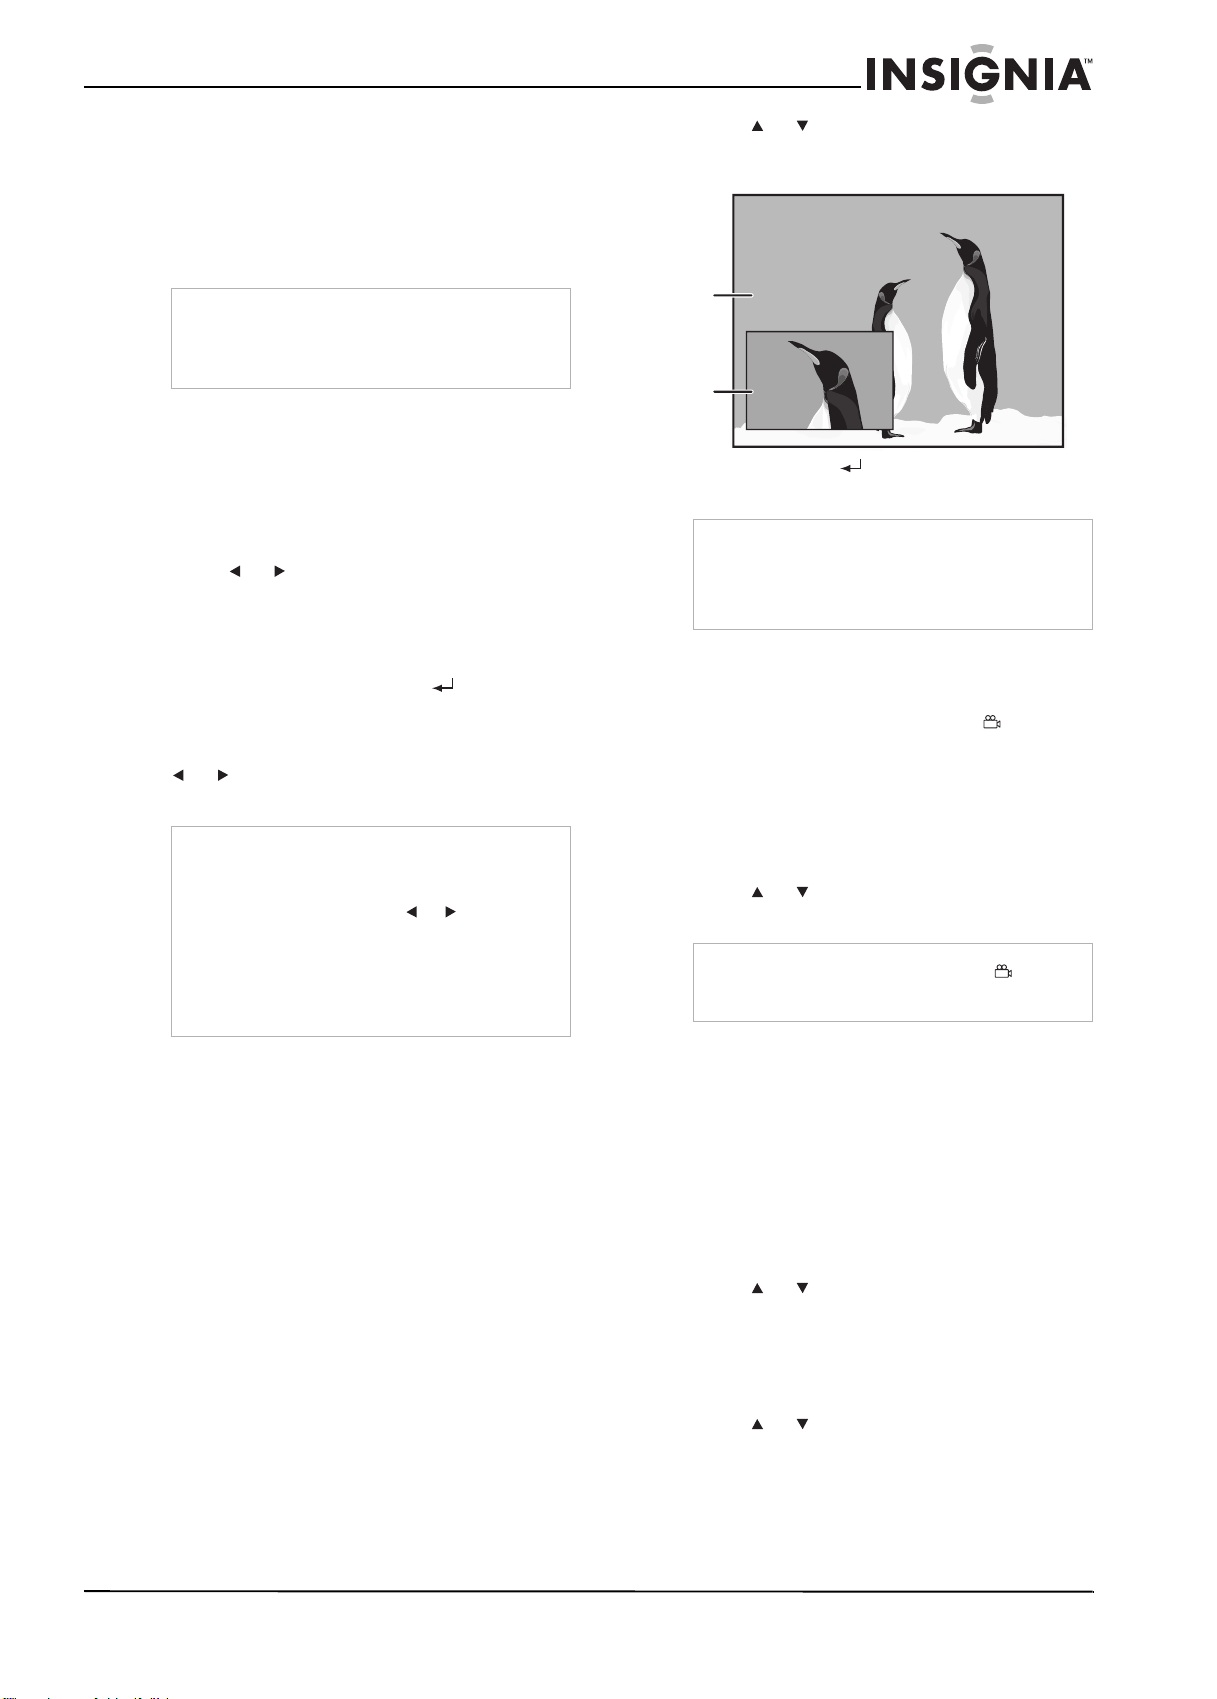
Insignia NS-BRDVD Blu-ray Disc Player
Searching for a chapter, title, track, or time
To search for a chapter, title, track, or time:
1 During playback, press SEARCH repeatedly
to select a search mode.
2 Press the number buttons to enter the
chapter, title, track, or time.
Notes
• You cannot search during program and random
playback.
• Time search only works in the same title, track,
or file.
Searching using markers
You can add markers to a title or track so you
can return to the marker at a later time.
To search using markers:
1 During playback, press SEARCH repeatedly
until the marker setting menu opens.
2 Press or to select a marker number.
3 When playback reaches the point you want to
add a marker, press ENTER. The title or track
and elapsed playback time appear on the TV
screen.
4 Press SEARCH or RETURN to close the
menu.
5 To return to the marker, press SEARCH
repeatedly to open the marker menu, press
or to select a marker, then press
ENTER.
Notes
• Opening the disc tray, turning off the power, or
selecting AC in Step 2 and pressing ENTER
erases all markers.
• To clear a marker, press or to select a
marker, then press CLEAR.
• You can mark up to nine points.
• For Blu-ray Discs, marker search between
different titles is not available.
• For Blu-ray Discs, you can return to the marker
only during playback.
Using PIP (picture-in-picture)
Some Blu-ray Discs have the PIP
(picture-in-picture) feature that lets you display a
secondary video in a small box on top of the
main video.
To use PIP:
1 During playback, press PIP. If the Blu-ray
Disc has the PIP feature, PIP information
appears.
2 Press or to select the secondary video
you want. The secondary video appears and
the secondary audio plays.
Primary
video
Secondary
video
3 Press RETURN or PIP to remove the PIP
information.
Note
The secondary audio does not play if the
secondary audio if set to Off or if BD Audio Mode
is set to HD Audio Output. For more information,
see “Switching the audio soundtrack” on page 20
and “Setting the Blu-ray audio mode” on page 21.
Selecting a camera angle
Some Blu-ray Discs and DVDs have scenes
recorded from more than one camera angle. If
the Angle Icon option is turned on, appears
on the screen when multiple angles are
available.
To select a camera angle:
1 During playback, press ANGLE. The
selected angle appears in a bar at the top of
the screen.
2 Press or to select the angle you want to
view.
Note
If the Angle Icon option is turned off,
appear on the screen. For more information, see
“Others menu” on page 28.
Selecting subtitle languages or style
To select a subtitle language or style on a
Blu-ray Disc:
1 During playback, press SUBTITLE
repeatedly to select:
• Primary—Selects subtitles for the
primary video.
• Secondary—Selects subtitles for the
secondary video.
• Subtitle style—Select the subtitle style.
2 Press or to select the subtitle language
or style.
3 Press SUBTITLE to close the menu.
does not
To select a subtitle language for a DVD:
1 During playback, press SUBTITLE.
2 Press or to select the subtitle language.
www.insignia-products.com
19
Page 28
Insignia NS-BRDVD Blu-ray Disc Player
3 Press SUBTITLE to close the menu.
Notes
• Some discs only you change the subtitles only
from the disc menu or pop-up menu. Press
TOP MENU or POP MENU/MENU to display
the disc menu or pop-up menu.
• If a 4-digit language code appears in the
subtitle menu, see “Language codes” on page
30.
• If the disc has no subtitle language or subtitle
style, “Not Available” appears on the TV
screen.
• During playback of the secondary video, the
primary subtitle setting is not available except
when there is no subtitle for the secondary
video.
• The secondary subtitle setting is only available
during playback of the secondary video.
• If you choose a language that has a 3-letter
language code, the code is displayed every
time you change the subtitle language setting.
If you choose any other Languages, –––
appears instead.
Switching the audio soundtrack
To switch the audio soundtrack for a Blu-ray
Disc or DVD:
1 During playback, press AUDIO repeatedly
to select Primary or Secondary.
2 Press or to select the soundtrack.
3 Press AUDIO to close the menu.
Notes
• For some Blu-ray Discs, secondary audio is not
output when the secondary video is not
displayed or when the BD Audio Mode option
is set to HD Audio Output.
• The sound track cannot be changed during
playback of discs that are not recorded in
multiple audio.
• Some discs let you change the audio language
setting on the disc menu. (Operation varies
depending on the discs.)
• AUDIO may not work on some discs with
multiple audio streams or channels.
• If you select a language that has a three-letter
language code, the code will be displayed
every time you change the audio language
setting. If you select any other languages, –––
appears instead.
• If the disc has no audio languages, “Not
Available” appears on the TV screen.
Adjusting the black level
To adjust the black level:
1 During playback, press MODE.
2 Press or to select Black Level, then
press or to select On or Off.
3 Press RETURN repeatedly to close the
menu.
Note
Your player retains the black level setting even
when you turn off your player.
The Black Level option does not work with video
output from the HDMI OUT jack.
Reducing video noise
To reduce video noise:
1 During playback, press MODE.
2 Press or to select Noise Reduction,
then press or to select:
• 1—Activates MPEG noise reduction,
which reduces the noise when subtitles
are displayed.
• 2—Activates 3D noise reduction, which
detects and deletes the noise by
comparing video frames.
• 3—Activates both MPEG and 3D noise
reduction.
3 Press RETURN repeatedly to close the
menu.
Note
Your player retains the noise reduction setting
even when you turn off your player.
The Noise Reduction option does not work with
Blu-ray Discs.
Adjusting the HDMI video resolution
To adjust the HDMI video resolution:
• Press HDMI repeatedly. Each time you press
this button, the resolution changes in the
following sequence:
Front display Resolution
480P 480 progressive
720P 720 progressive
1080i 1080 interlaced
1080P 1080 progressive
1080P24 1080 progressive 24 frame
Notes
• You cannot select the video resolutions which
are not supported by the connected TV, unless
the device is a compatible DVI device
connected to the HDMI OUT jack with an
HDMI-DVI cable.
• When you select an HDMI output mode for a
connected DVI device, the corresponding
HDMI video resolution is output even if the TV
is not compatible with the HDMI video
resolution. If there is no image displayed, select
another HDMI resolution.
• Video and audio signals may be distorted
temporarily when switching to or from the
HDMI output mode.
• In order to get natural and high-quality film
reproduction of 24-frame film material, use an
HDMI cable (a category 2 high-speed HDMI
cable is recommended) and select 1080p24 if
the connected TV is compatible with 1080p24
frame input.
• If you select 1080p24 for the HDMI video
resolution and the disc you are playing is not
compatible with 1080p24, the video is output at
1080p60.
• If video resolution is set to 1080p24 and the TV
is connected to the VIDEO OUT or
COMPONENT VIDEO OUT jacks, no signal is
sent through these jacks.
20
www.insignia-products.com
Page 29
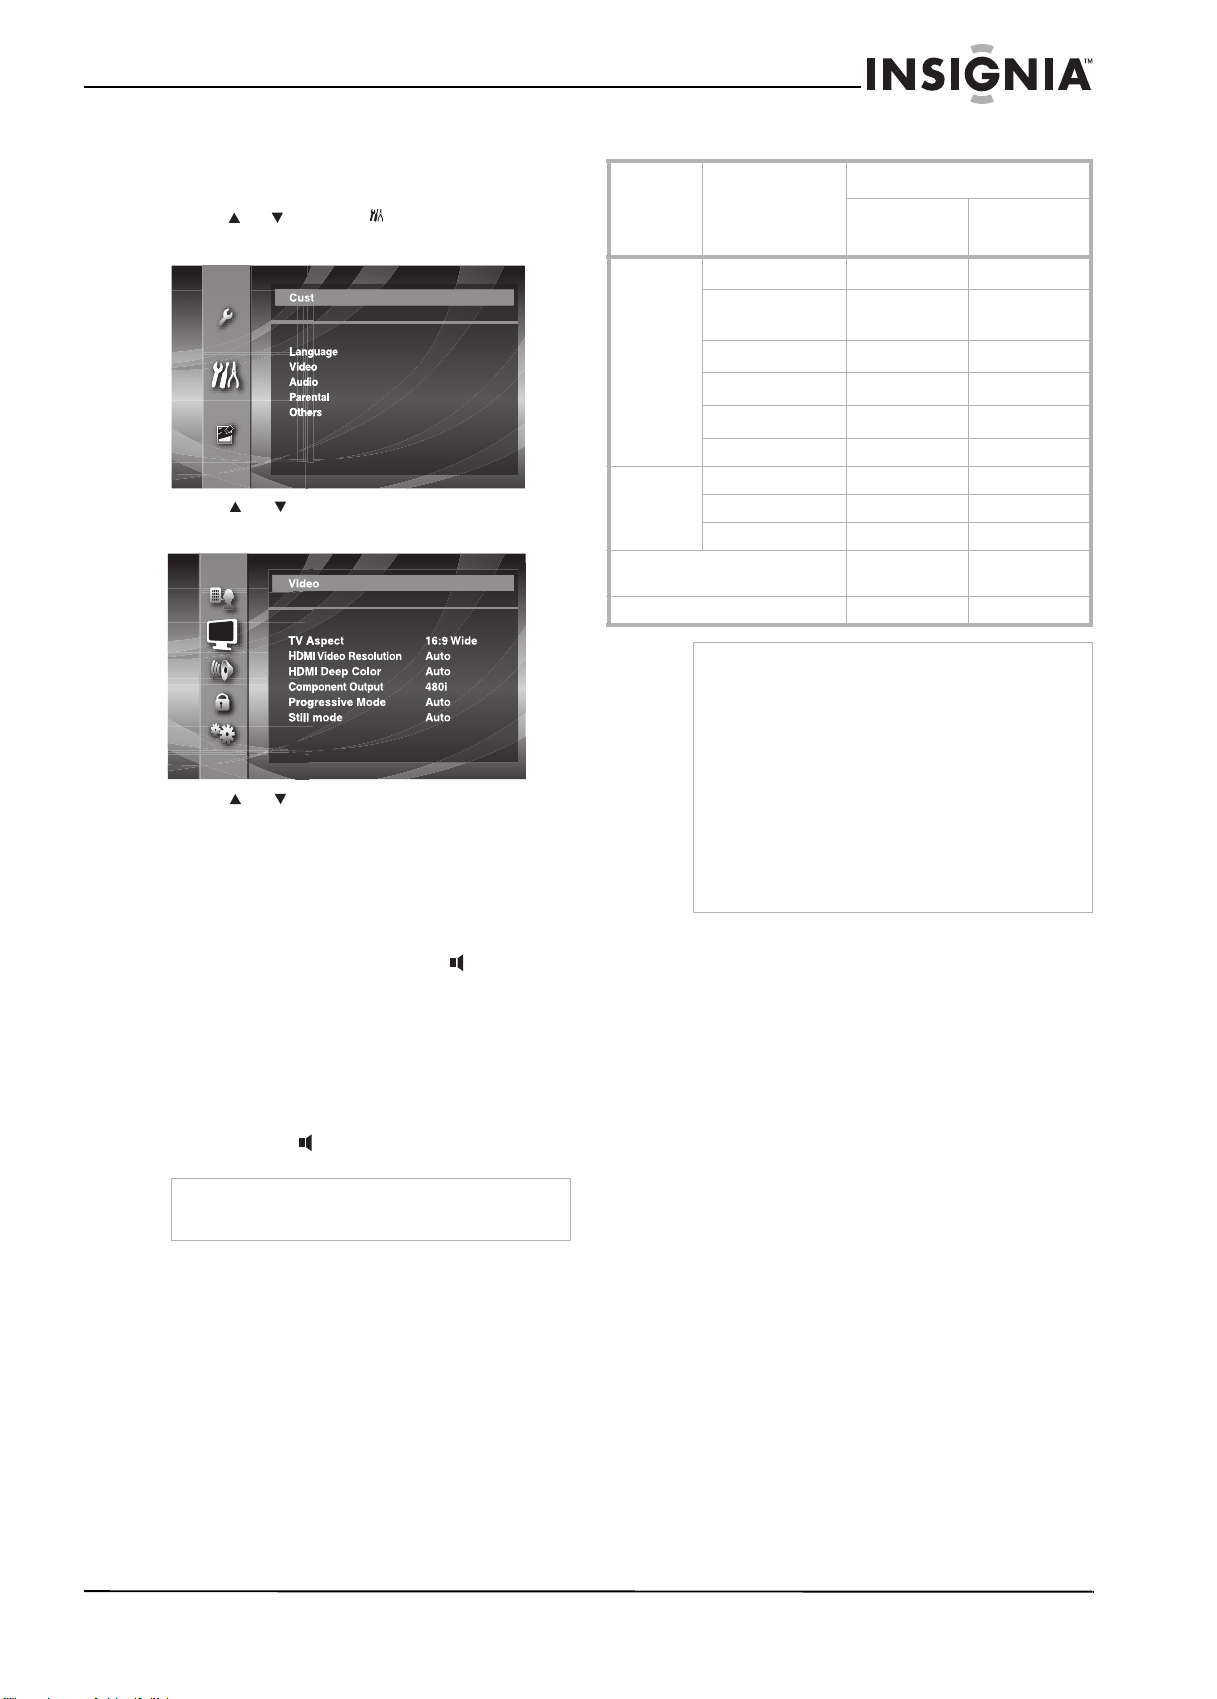
Insignia NS-BRDVD Blu-ray Disc Player
Adjusting the component resolution
To adjust the component resolution:
1 In stop mode, press SETUP.
2 Press or to select , then press ENTER.
The
Custom
menu opens.
Custom
3 Press or to select VIDEO, then press
ENTER. The
Video
menu opens.
4 Press or to Component Output, then
press ENTER repeatedly to select a
resolution.
5 Press SETUP to close the menu.
Selecting the audio CD audio mode
To select the audio CD audio mode:
1 During playback, press AUDIO repeatedly
to select:
• Stereo—Both right and left audio
channels are active.
• L-ch—Only the left audio channel is
active.
• R-ch—Only the right audio channel is
active.
2 Press AUDIO to close the menu.
Setting the Blu-ray audio mode
Disc type
Blu-ray Dolby Digital
DVD Dolby Digital Dolby Digital Multi LPCM
Audio CD,
MP3, WMA
DTS-CD DTS Multi LPCM
Audio recording
format
Dolby Digital Plus Dolby Digital
Dolby TrueHD
DTS
DTS-HD
LPCM Multi LPCM Multi LPCM
DTS DTS Multi LPCM
LPCM Multi LPCM Multi LPCM
Notes
1
If the BD Audio Mode option is set to Mix Audio
Output, audio is output as multi LPCM.
2
Outputs audio signals decoded from an
independent substream.
3
Outputs audio signals decoded from the Dolby
Digital stream.
4
Outputs audio signals decoded from the DTS
core stream.
If the connected device is not compatible with the
HDMI BITSTREAM, audio will be output as
multi LPCM or 2-channel down-mixed LPCM
depending, on the capability of the connected
device, even if you set the HDMI Audio Out option
to HDMI Multi (Normal).
When you select Audio Mute, audio signals
from the HDMI OUT jack are muted and the
signals are sent to the DIGITAL OUT jack.
HDMI Audio Out setting
HDMI Multi
(Normal)
Dolby Digital
1
Plus
Dolby TrueHD
1
DTS
1
DTS-HD
2-channel
LPCM
HDMI Multi
(LPCM)
1
Multi LPCM
Multi LPCM
1
Multi LPCM
Multi LPCM
Multi LPCM
2-channel
LPCM
2
3
4
Note
Selecting audio streams or channels is not
available for DTS-CD (5.1 music disc).
www.insignia-products.com
21
Page 30
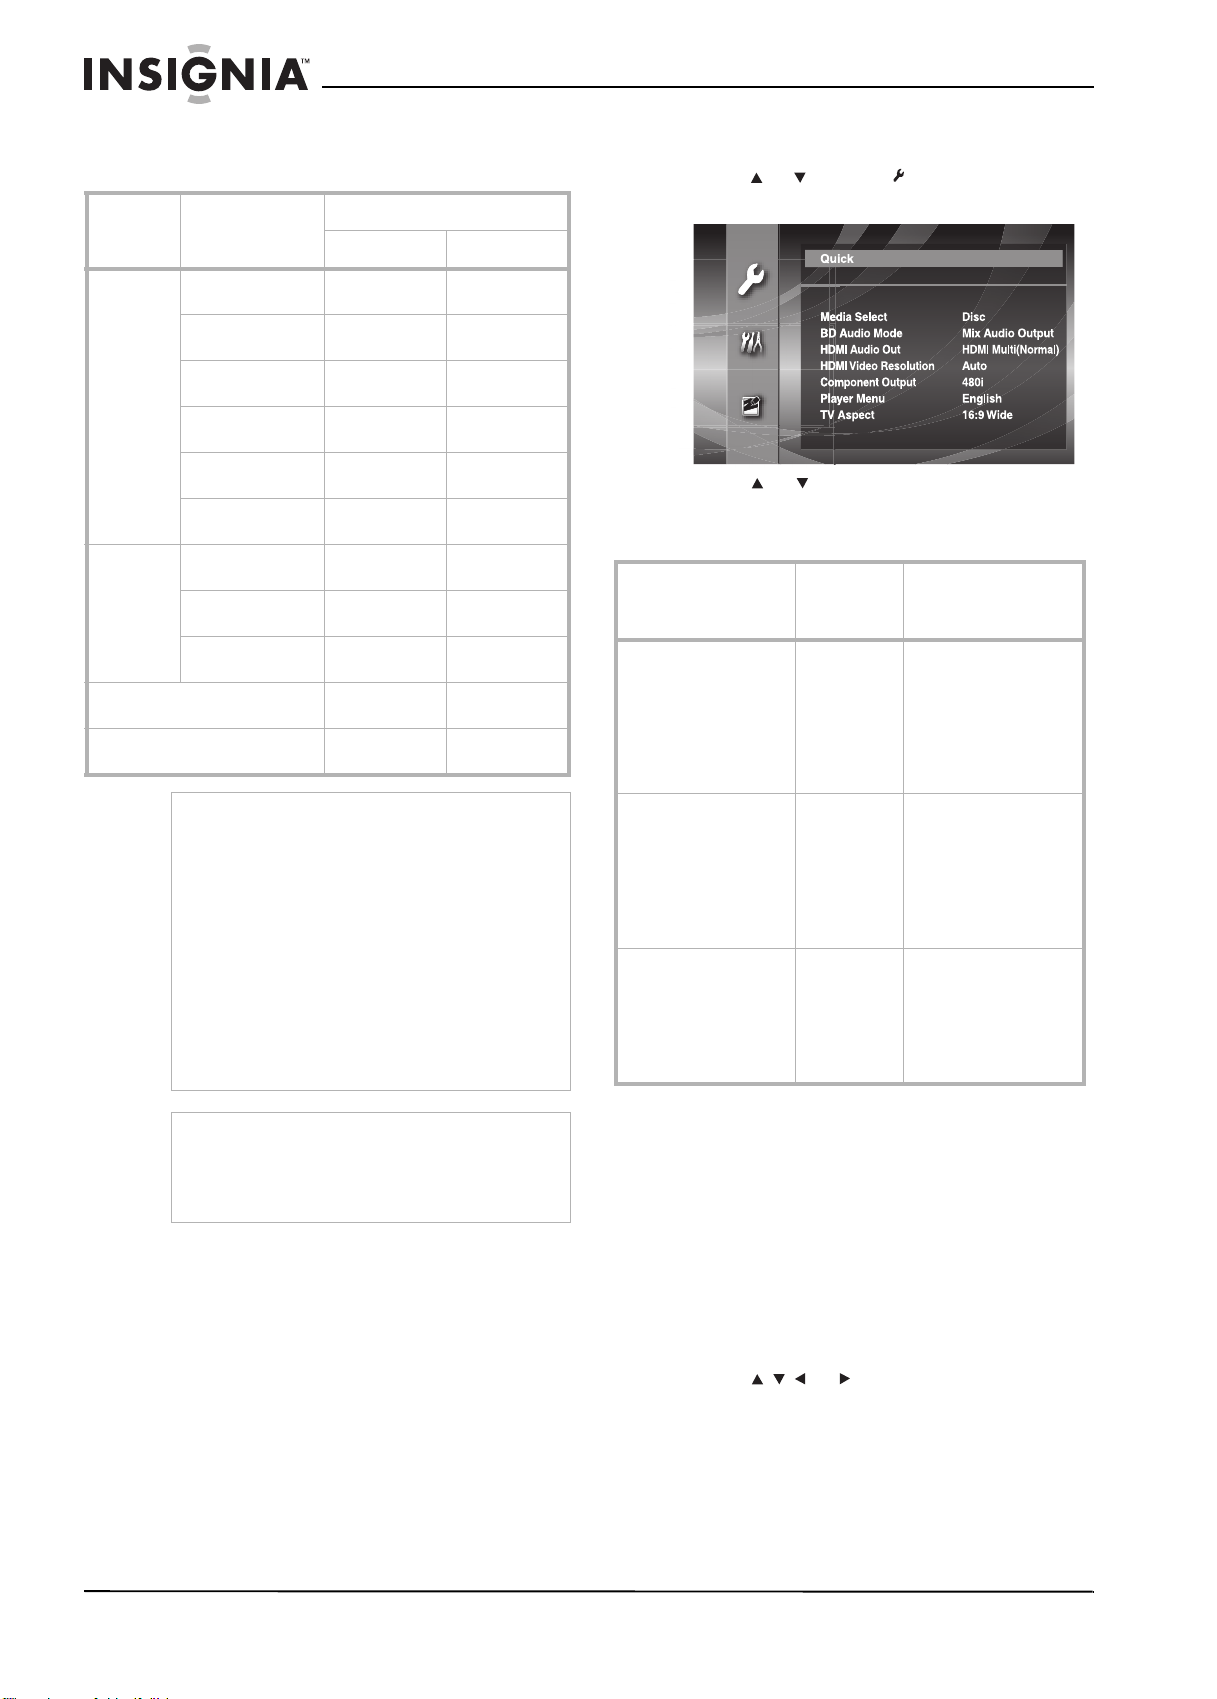
Insignia NS-BRDVD Blu-ray Disc Player
The DIGITAL OUT jack outputs Dolby Digital
Plus and Dolby TrueHD as Dolby Digital. The
jack outputs DTS-HD as DTS.
Disc type
Blu-ray
Disc
DVD Dolby Digital Dolby Digital 2ch Downmix
Audio CD,
MP3, WMA
DTS-CD 2ch LPCM 2-ch Downmix
Audio recording
format
Dolby Digital Dolby Digital 2ch Downmix
Dolby Digital Plus Dolby Digital 2ch Downmix
Dolby TrueHD Dolby Digital 2ch Downmix
DTS DTS* 2ch Downmix
DTS-HD DTS* 2ch Downmix
LPCM 2ch Downmix
DTS DTS 2ch Downmix
LPCM 2ch Downmix
Digital Out setting
Bitstream LPCM
LPCM
LPCM
LPCM
LPCM
LPCM
LPCM*
LPCM
2ch LPCM 2ch LPCM
2ch Downmix
LPCM
LPCM
LPCM
2ch Downmix
LPCM
LPCM
*
The secondary or interactive audio for Blu-ray
Discs is output as Dolby Digital when all of the
following conditions exist:
• When the BD Audio Mode option is set to
Mix Audio Output.
• When the HDMI Audio Out option is set to
Audio Mute.
• When the Digital Out option is set to
Bitstream.
If Blu-ray titles do not have secondary or
interactive audio, the audio is output as shown in
the table.
This table applies only when an HDMI cable is not
connected or the HDMI Audio Out option is set to
Audio Mute.
Note
To output LPCM audio from the DIGITAL OUT
jack while outputting the HDMI audio signal, set
the BD Audio Out option to Mix Audio Output
and the HDMI Audio Out option to
HDMI Multi (LCPM).
To adjust HDMI audio:
1 In stop mode, press SETUP.
2 Press or to select , then press ENTER.
Quick
The
menu opens.
3 Press or to select HDMI Audio Out.
4 Press ENTER repeatedly to select the HDMI
audio out mode.
Connected device
Device compatible with
Dolby Digital, Dolby
Digital Plus, Dolby
TrueHD, DTS, or
DTS-HD decoding
Device compatible with
3 or more channels of
audio inputs (not Dolby
Digital, Dolby Digital
Plus, Dolby TrueHD,
DTS, or DTS-HD
compatible)
HDMI connection to a
TV and digital audio
connection (coaxial) to
an AV amplifier
HDMI
Audio Out
setting
HDMI Multi
(Normal)
HDMI Multi
(LPCM)
Audio Mute HDMI audio is muted,
Output HDMI audio
signal
Dolby Digital, Dolby
Digital Plus, Dolby
TrueHD, DTS, or
DTS-HD bitstream are
output from HDMI OUT
jack. Make the speaker
settings on the
connected AV amplifier.
Multi-channel audio
signals are output from
HDMI OUT jack. Make
the speaker settings
with the speaker setting
items that appear after
you select HDMI
Multi(LPCM).
and Dolby Digital/DTS
bitstream or LPCM is
output from the
DIGITAL OUT jack
depending on the
Digital Out setting.
5 Press SETUP to close the menu.
Using disc menus
Many Blu-ray Discs or DVDs contain menus you
can use to select playback options. A DVD may
have a title or disc menu. A Blu-ray Disc may
have a title menu or pop-up menu. The options
on these menus vary from disc to disc.
When you open a Blu-ray Disc pop-up menu, the
video continues to play in the background.
22
To use a Blu-ray Disc or DVD title menu:
1 Press TOP MENU. The title menu opens.
2 Press or to select an option, then
press ENTER.
3 Press TOP MENU to close the menu.
www.insignia-products.com
Page 31

Insignia NS-BRDVD Blu-ray Disc Player
To use a DVD disc menu or Blu-ray Disc
pop-up menu:
1 Press POP MENU/MENU. The disc or
pop-up menu opens.
2 Press or to select an option, then
press ENTER.
3 Press POP MENU/MENU to close the menu.
Adjusting the still image
If the image is blurry when you pause playback
or play forward slowly, you can adjust the image.
To adjust the still image:
1 In stop mode, press SETUP.
2 Press or to select , then press ENTER.
The
Custom
menu opens.
Custom
Setting parental controls
You can set parental controls for Blu-ray Discs
and DVDs.
To set parental control for Blu-ray Discs:
1 In stop mode, press SETUP.
2 Press or to select , then press ENTER.
Custom
The
3 Press or to select Parental, then press
ENTER. The
menu opens.
Custom
Parental
menu opens.
3 Press or to select VIDEO, then press
ENTER. The
Video
menu opens.
4 Press or to select Still Mode, then press
ENTER repeatedly to select a mode. You can
select:
• Auto—Automatically selects the best
resolution setting (Frame or Field) based
on the data characteristics of the picture.
• Field—Stabilizes the picture. Picture
quality may become coarse because of
the limited amount of data.
• Frame—Displays relatively motionless
pictures in higher resolution and improves
the picture quality. The picture may
become unstable because of alternate
output of two-field data.
5 Press SETUP to close the menu.
4 Press or to select , then press ENTER.
5 Press the number buttons to enter your
four-digit password. If this is the first time you
are entering a password, enter any four-digit
password except 4737, then press ENTER. If
you enter an incorrect digit, press CLEAR,
then enter the digit again.
Note
If you forget your password, enter 4737. The
password is cleared and the rating levels are set to
All.
6 Press or to select BD Rating Level,
then press ENTER.
7 Press or to select a rating, then press
ENTER. You can select:
• All—All Blu-ray Discs can be viewed.
• Age Setting—Press the number buttons
for the age you want to block. For
example, if you want to block Blu-ray
Discs that are not appropriate for ages 15
and below, press 015.
8 Press SETUP to close the menu.
www.insignia-products.com
23
Page 32

Insignia NS-BRDVD Blu-ray Disc Player
To set parental control for DVDs:
1 In stop mode, press SETUP.
2 Press or to select , then press ENTER.
The
Custom
menu opens.
Custom
3 Press or to select Parental, then press
ENTER. The
Parental
menu opens.
Changing the parental control password
To change the parental control password:
1 In stop mode, press SETUP.
2 Press or to select , then press ENTER.
Custom
The
3 Press or to select Parental, then press
ENTER. The
menu opens.
Custom
Parental
menu opens.
4 Press or to select , then press ENTER.
5 Press the number buttons to enter your
four-digit password. If this is the first time you
are entering a password, enter any four-digit
password except 4737, then press ENTER. If
you enter an incorrect digit, press CLEAR,
then enter the digit again.
Note
If you forget your password, enter 4737. The
password is cleared and the rating levels are set to
All.
6 Press or to select DVD Rating Level,
then press ENTER.
7 Press or to select a rating, then press
ENTER. You can select:
• All—Parental control is turned off. All
DVDs can be played.
• 8 [Adult]—All DVDs can be played.
• 7 [NC-17]—Not suitable for anyone
under 17.
• 6 [R]—Not suitable for anyone under 17
unless supervised by a parent or adult
guardian.
• 5 [PGR]—Parental guidance
recommended.
• 4 [PG-13]—Not suitable for anyone
under 13.
• 3 [PG]—Parental guidance suggested.
• 2 [G]—General audiences.
• 1 [Kid Safe]—Suitable for all children.
8 Press SETUP to close the menu.
4 Press or to select , then press ENTER.
5 Press the number buttons to enter your old
four-digit password. If you enter an incorrect
digit, press CLEAR, then enter the digit
again.
Note
If you forget your password, enter 4737. The
password is cleared and the rating levels are set to
all.
6 Press or to select Password Change,
then press ENTER.
7 Press the number buttons to enter your new
password, the press ENTER.
8 Press SETUP to close the menu.
24
www.insignia-products.com
Page 33

Insignia NS-BRDVD Blu-ray Disc Player
Using the Quick menu
From the setup menu, you can change settings
for audio, video, languages, and so forth.
The most commonly selected options are
included in the
To use the Quick menu:
1 In stop mode, press SETUP.
2 Press or to select , the press ENTER.
Quick
The
3 Press or to select an option.
4 If does not appear to the right of the option,
press ENTER repeatedly to adjust the option.
Or, if appears to the right of the option,
press ENTER, press or to select the
sub-option you want, then press ENTER.
You can select:
• Media Select
• BD Audio Mode
• HDMI Audio Out
• HDMI Video Resolution
• Component Out
• Player Menu
• TV Aspect
For more information about these options,
see, “Quick menu options” on page 25.
5 Press SETUP to close the menu.
Quick menu options
BD Audio Mode Selects whether to play the secondary (PIP)
Quick
menu.
menu opens.
audio (when available) with the primary audio
or only the primary audio. You can select:
• Mix Audio Output plays both the
primary and secondary audio.
• HD Audio Output plays the primary
audio only.
Note: For Blu-ray Discs, select HD Audio
Output to play Dolby Digital, Dolby Digital Plus,
Dolby TrueHD, DTS, or DTS-HD audio through
then HDMI connection.
HDMI Audio Out Selects the audio format for the audio from the
HDMI Video
Resolution
Component
Output
Player Menu Selects the language for the setup menu. You
HDMI OUT jack. You can select:
• HDMI Multi (Normal) selects
multi-channel audio with bitstream or
LPCM.
• HDMI Multi (LPCM) selects
multi-channel audio with LPCM.
• Audio Mute turns off the audio from the
HDMI OUT jack and turns on the audio
from the DIGITAL OUT jack.
Note: HDMI Multi (Normal) and HDMI Multi
(LPCM) are not available if:
• An HDMI cable is not connected to
HDMI OUT jack.
• The connected TV is off.
• The connected TV is not compatible
with the audio output.
Selects the HDMI video resolution. You can
select:
• Auto to let your player automatically
select the resolution based on the
connected HDMI device.
• 480p
• 720p
• 1080i
• 1080p
• 1080p24 gives a natural and high
quality film reproduction of 24-frame
file material. The connected TV must be
compatible with 1080p24 frame input.
Notes:
• If you select 1080p24 and the contents
of the Blu-ray Disc are not compatible
with 1080p24-frame format, your player
outputs 1080p60-frame format.
• If the picture is not displayed correctly
because of the HDMI Video Resolution
setting, press and hold PLAY on the
front of your player for more than five
seconds. The setting is reset to the
default automatically.
Selects the component video resolution. You
can select 480i, 480p, 720p, or 1080i.
Notes:
• If the component video resolution and
HDMI video resolution do not match,
the video resolution for the component
output is switched to 480i.
• COMPONENT VIDEO OUT jacks may not
output any signals depending on the
disc material.
• If you play a copy-protected DVD video,
a 480p signal is output from
COMPONENT VIDEO OUT jacks when
this option is set to 720p or 1080i.
can select English, Français, or Español.
www.insignia-products.com
25
Page 34

Insignia NS-BRDVD Blu-ray Disc Player
TV Aspect Selects the picture size according to the aspect
ratio of the connected TV. You can select:
• 16:9—Select if the TV is a wide-screen
TV. Discs recorded in wide-screen
format are displayed full-screen.
• 4:3 Pan & Scan—Select if the TV is a
standard screen TV and you want discs
recorded in wide-screen format to be
displayed full-screen with the sides cut
off. Discs recorded in 4:3 format are
displayed full-screen.
• 4:3 Letter Box—Select if the TV is a
standard screen TV and you want discs
recorded in wide-screen format to be
displayed without the sides cut off.
Black bars appear at the top and bottom
of the screen.
• 16:9 Squeeze—Select if the TV is a
wide-screen TV and you want discs
recorded in 4:3 format to be displayed
in the center of the screen in a 4:3
aspect ratio.
Using the Custom menu
The
Custom
can adjust for your player.
To use the Custom menu:
1 In stop mode, press SETUP.
2 Press or to select , then press ENTER.
The
3 Press or to select a menu, then press
ENTER. You can select:
• Language—See “Language menu” on
• Video—See “Video menu” on page 27.
• Audio—See “Audio menu” on page 28.
• Parental—See “Parental menu” on
• Others—See “Others menu” on page 28.
4 Press or to select an option.
5 If does not appear to the right of the option,
press ENTER repeatedly to adjust the option.
Or, if appears to the right of the option,
press ENTER, press or to select the
sub-option you want, then press ENTER.
6 Press SETUP to close the menu.
menu has all the options that you
Custom
menu opens.
Custom
page 26.
page 28.
Language menu
Audio Selects the audio language. You can select:
• Original, English, French, Spanish,
German, Italian, Swedish, Dutch,
Russian, Chinese, Japanese, Korean,
Danish, Finnish, Norwegian, Icelandic,
Hungarian, Romanian, Turk is h, Greek,
Irish, Portuguese, Polish, Czech,
Slovak, Bulgarian, or Other.
If you select Other, enter the four-digit code for
the language you want. For a list of language
codes, see “Language codes” on page 30. You
can only select languages that are on the disc.
Subtitle Selects the subtitle language. You can select:
• Off, English, French, Spanish, German,
Italian, Swedish, Dutch, Russian,
Chinese, Japanese, Korean, Danish,
Finnish, Norwegian, Icelandic,
Hungarian, Romanian, Turk is h, Greek,
Irish, Portuguese, Polish, Czech,
Slovak, Bulgarian, or Other.
If you select Other, enter the four-digit code for
the language you want. For a list of language
codes, see “Language codes” on page 30. You
can only select languages that are on the disc.
Disc Menu Selects the disc menu language. You can
select:
• English, French, Spanish, German,
Italian, Swedish, Dutch, Russian,
Chinese, Japanese, Korean, Danish,
Finnish, Norwegian, Icelandic,
Hungarian, Romanian, Turk is h, Greek,
Irish, Portuguese, Polish, Czech,
Slovak, Bulgarian, or Other.
If you select Other, enter the four-digit code for
the language you want. For a list of language
codes, see “Language codes” on page 30. You
can only select languages that are on the disc.
Player Menu Selects the setup menu language. You can
select English, Français, or Español.
26
www.insignia-products.com
Page 35

Insignia NS-BRDVD Blu-ray Disc Player
Video menu
TV Aspect Selects the picture size according to the aspect
HDMI Video
Resolution
HDMI Deep Color Selects whether the video from the HDMI OUT
ratio of the connected TV. You can select:
16:9—Select if the TV is a wide-screen TV.
Discs recorded in wide-screen format are
displayed full-screen.
4:3 Pan & Scan—Select if the TV is a standard
screen TV and you want discs recorded in
wide-screen format to be displayed full-screen
with the sides cut off. Discs recorded in 4:3
format are displayed full-screen.
4:3 Letter Box—Select if the TV is a standard
screen TV and you want discs recorded in
wide-screen format to be displayed without the
sides cut off. Black bars appear at the top and
bottom of the screen.
16:9 Squeeze—Select if the TV is a
wide-screen TV and you want discs recorded in
4:3 format to be displayed in the center of the
screen in a 4:3 aspect ratio.
Selects the HDMI video resolution. You can
select:
• Auto to let your player automatically
select the resolution based on the
connected HDMI device.
• 480p
• 720p
• 1080i
• 1080p
• 1080p24 gives a natural and
high-quality film reproduction of
24-frame file material. The connected
TV must be compatible with 1080p24
frame input.
Notes:
• If you select 1080p24 and the contents
of the Blu-ray Disc are not compatible
with 1080p24-frame format, your player
outputs 1080p60 frame.
• If the picture is not displayed correctly
because of the HDMI Video Resolution
setting, press and hold PLAY on the
front of your player for more than five
seconds. The setting is reset to the
default automatically.
jack uses Deep Color. You can select:
• Auto—Video from the HDMI OUT jack is
output in Deep Color to a TV that
supports HDMI Deep Color.
• Off—Video from the HDMI OUT jack is
output without Deep Color.
Component
Output
Progressive mode Selects the progressive mode for the video
Still Mode Adjusts the picture resolution and quality in
Selects the component video resolution. You
can select 480i, 480p, 720p, or 1080i.
If the picture is not displayed correctly because
of the Component Output setting, press and
hold PLAY on the front of your player for
more than five seconds. The setting is reset to
the default automatically.
If an HDMI cable is connected, you can only
select the video resolution that the HDMI OUT
jack is set to or 480i.
Notes:
• If the component video resolution and
HDMI video resolution do not match,
the video resolution for the component
output is switched to 480i.
• COMPONENT VIDEO OUT jacks may not
output any signals depending on the
disc material.
• If you play a copy-protected DVD video,
a 480p signal is output from
COMPONENT VIDEO OUT jacks when
this option is set to 720p or 1080i.
from the HDMI OUT jack and the COMPONENT
VIDEO OUT jacks. You can select:
• Auto—Your player automatically
detects 24-frame film, such as movies,
and automatically selects the
appropriate progressive mode.
• Video—Suitable for playing back video
disc content such as TV shows or
animation.
still mode. You can select:
• Auto—Automatically selects the best
resolution setting (Frame or Field)
based on the data characteristics of the
picture.
• Field—Stabilizes the picture. Picture
quality may become coarse because of
the limited amount of data.
• Frame—Displays relatively motionless
pictures in higher resolution and
improves the picture quality. The picture
may become unstable because of
alternate output of two-field data.
An individual picture on the TV screen is called
frame
. Each frame consists of two separate
a
images called
blurred at the Auto setting because of their data
characteristics.
fields
. Some pictures may be
www.insignia-products.com
27
Page 36

Insignia NS-BRDVD Blu-ray Disc Player
Audio menu
BD Audio Mode Selects whether to play the secondary (PIP)
audio (when available) with the primary audio
or only the primary audio. You can select:
• Mix Audio Output plays both the
primary and secondary audio.
• HD Audio Output plays the primary
audio only.
Note: For Blu-ray Discs, select HD Audio
Output to play Dolby Digital, Dolby Digital Plus,
Dolby TrueHD, DTS, or DTS-HD audio through
the HDMI jack.
HDMI Audio Out Selects the audio format for the audio from the
HDMI OUT jack. You can select:
• HDMI Multi (Normal) selects
multi-channel audio with bitstream or
LPCM.
• HDMI Multi (LPCM) selects
multi-channel audio with LPCM.
• Audio Mute turns off the audio from the
HDMI OUT jack and turns on the audio
from the DIGITAL OUT jack.
Notes:
HDMI Multi (Normal) and HDMI Multi (LPCM)
are not available if:
• An HDMI cable is not connected to
HDMI OUT jack.
• The connected TV is off.
• The connected TV is not compatible
with the audio output.
When Audio Mute is selected, the audio signal
output from DIGITAL OUT jack changes
depending on Digital Out setting.
• Bitstream—When playing back discs
recorded in Dolby Digital, Dolby Digital
Plus, Dolby TrueHD, DTS, or DTS-HD,
the corresponding core stream (Dolby
Digital or DTS) is output.
• LPCM—An LPCM signal is output from
the DIGITAL OUT jack.
The Digital Out setting is not effective when
the HDMI audio signal is output.
Down Sampling Selects the digital audio output when playing a
Blu-ray Disc or DVD recorded in LPCM. You
can select:
• On—Converts LPCM signals to 48 kHz
for output. Select On when using digital
connections to an AV amplifier that is
not compatible with sampling
frequencies of 96 kHz.
• Off—For discs recorded in LPCM
without copyright protection,
two-channel audio signals up to 192
kHz are output as LPCM signals with no
conversion.
DRC Sets whether to compress the range of sound
volume (dynamic range control) when Dolby
Digital, Dolby Digital Plus, or Dolby TrueHD
audio is played back. You can select:
• Auto—When the discs recorded in
Dolby TrueHD format are in played, your
player detects the DRC setting of the
disc and set the DRC setting to On or
Off automatically.
• Off
• On
Virtual Surround Selects whether to create a surround effect in a
system with two speakers connected. You can
select:
• Off—Virtual surround is set to off.
• 1—Creates a natural surround effect.
• 2—Creates a stronger surround effect
than 1.
Notes:
• Set the Virtual Surround setting to Off
or lower the volume if the sound is
distorted.
• For virtual surround, the audio signal is
always two-channel LPCM.
Parental menu
BD Rating Level Sets the rating level for Blu-ray Discs. For more
information, see “Setting parental controls” on
page 23.
DVD Rating Level Sets the rating level for DVDs. For more
information, see “Setting parental controls” on
page 23.
Password Change Changes the parental control password. For
more information, see “Changing the parental
control password” on page 24.
Others menu
Angle Icon Turns the angle icon on or off. The angle icon
appears when a Blu-ray Disc or DVD is playing
a scene with multiple viewing angles. You can
select On or Off.
Auto Power Off Selects whether your player automatically
turns off after more than 30 minutes of no
activity. You can select On or Off.
28
www.insignia-products.com
Page 37

Insignia NS-BRDVD Blu-ray Disc Player
Panel Display Selects the brightness level for the display on
Slide Show Select the amount of time a JPEG is displayed
Media Select Select the type of media for playback. You can
the front of your player. You can select:
• Auto—The display gets darker during
playback.
• Bright—Makes the display brighter.
• Dimmer—Makes the display darker.
before your player displays the next JPEG. You
can select 5sec or 10sec.
select Disc or SD Memory.
Resetting setup options to the defaults
Resetting the setup options to the defaults does
not reset the parental controls.
To reset setup options to the defaults:
1 Press SETUP.
2 Press or to select , then press ENTER.
The
Initialize
menu opens.
Cleaning discs
• Before playback, wipe the disc outwards from
the center with clean cloth.
Cleaning the disc lens
If your player still does not perform correctly after
you try the solutions in “Troubleshooting” on
page 31, the laser optical pickup lens may be
dirty. Consult your dealer or an authorized
service center for inspection and cleaning of the
laser optical pickup lens.
Checking the remote control signal
If the remote control is not working correctly, you
can use an AM radio or digital camera (including
a cellular phone with built-in camera) to see if
the remote control is sending an infrared signal.
To check the signal with an AM radio:
1 Tune the AM radio to a non-broadcasting
frequency.
2 Point the remote control towards the radio,
then push any button and listen. If the sound
from the radio flutters, the remote control is
working.
3 Press or to select Restore Defaults,
then press ENTER.
4 Press ENTER again.
5 Press SETUP to close the menu.
Maintaining
Cleaning the cabinet
Use a soft cloth slightly moistened with a mild
detergent solution. Do not use a solution
containing alcohol, spirits, ammonia, or abrasive
cleaners. They may damage the cabinet.
Handling discs
• To keep a disc clean, do not touch the play
side (non-label side) of the disc.
• Do not attach paper or tape to the disc.
• Keep the disc away from direct sunlight or
heat sources.
• Store the disc in a disc case after you remove
it from your recorder.
To check the signal with a digital camera:
1 Point a digital camera towards the remote
control.
2 Push any button on the remote control and
look at the camera's LCD viewfinder. If the
infrared light appears on the LCD, the remote
control is working.
www.insignia-products.com
29
Page 38

Language codes
Insignia NS-BRDVD Blu-ray Disc Player
Language Code Language Code Language Code
Abkhazian 4748 Hungarian [HUN] 5467 Russian [RUS] 6467
Afar 4747 Icelandic [ICE] 5565 Samoan 6559
Afrikaans 4752 Indonesian 5560 Sangho 6553
Albanian 6563 Interlingua 5547 Sanskrit 6547
Amharic 4759 Interlingue 5551 Scots Gaelic 5350
Arabic 4764 Inupiak 5557 Serbian 6564
Armenian 5471 Irish [IRI] 5347 Serbo-Croatian 6554
Assamese 4765 Italian [ITA] 5566 Sesotho 6566
Aymara 4771 Japanese [JPN] 5647 Setswana 6660
Azerbaijani 4772 Javanese 5669 Shona 6560
Bashkir 4847 Kannada 5760 Sindhi 6550
Basque 5167 Kashmiri 5765 Singhalese 6555
Bengali/Bangla 4860 Kazakh 5757 Siswat 6565
Bhutani 5072 Kinyarwanda 6469 Slovak [SLO] 6557
Bihari 4854 Kirghiz 5771 Slovenian 6558
Bislama 4855 Kirundi 6460 Somali 6561
Breton 4864 Korean [KOR] 5761 Spanish [SPA] 5165
Bulgarian [BUL] 4853 Kurdish 5767 Sundanese 6567
Burmese 5971 Laothian 5861 Swahili 6569
Byelorussian 4851 Latin 5847 Swedish [SWE] 6568
Cambodian 5759 Latvian/Lettish 5868 Tagalog 6658
Catalan 4947 Lingala 5860 Tajik 6653
Chinese [CHI] 7254 Lithuanian 5866 Tamil 6647
Corsican 4961 Macedonian 5957 Tatar 6666
Croatian 5464 Malagasy 5953 Telugu 6651
Czech [CZE] 4965 Malay 5965 Thai 6654
Danish [DAN] 5047 Malayalam 5958 Tibetan 4861
Dutch [DUT] 6058 Maltese 5966 Tigrinya 6655
English [ENG] 5160 Maori 5955 Tonga 6661
Esperanto 5161 Marathi 5964 Tsonga 6665
Estonian 5166 Moldavian 5961 Turkish [TUR] 6664
Faroese 5261 Mongolian 5960 Turkmen 6657
Fiji 5256 Nauru 6047 Twi 6669
Finnish [FIN] 5255 Nepali 6051 Ukrainian 6757
French [FRE] 5264 Norwegian [NOR] 6061 Urdu 6764
Frisian 5271 Occitan 6149 Uzbek 6772
Galician 5358 Oriya 6164 Vietnamese 6855
Georgian 5747 Oromo(Afan) 6159 Volapuk 6861
German [GER] 5051 Panjabi 6247 Welsh 4971
Greek [GRE] 5158 Pashto/Pushto 6265 Wolof 6961
Greenlandic 5758 Persian 5247 Xhosa 7054
Guarani 5360 Polish [POL] 6258 Yiddish 5655
Gujarati 5367 Portuguese [POR] 6266 Yoruba 7161
Hausa 5447 Quechua 6367 Zulu 7267
Hebrew 5569 Rhaeto-Romance 6459
Hindi 5455 Romanian [RUM] 6461
30
Note
If you choose a language that has a three-letter language code in brackets, the letter code is displayed when you change the audio
or subtitle language setting to that language. If you choose any other languages, --- is displayed instead.
www.insignia-products.com
Page 39

Insignia NS-BRDVD Blu-ray Disc Player
Troubleshooting
Warning
Do not try to repair your player yourself. There are
no user-serviceable parts inside.
Instead, turn off your player, unplug the power
cord, and contact qualified service personnel.
Problem Solution
No power • Make sure that the power
No sound or picture • Make sure that the TV is
Distorted picture • Sometimes a small
Completely distorted picture
or black and white picture
with Blu-ray Disc or DVD
No sound or distorted sound • Adjust the volume.
Picture freezes momentarily
during playback
cord is connected
correctly and securely.
• Unplug the power cord,
wait 5 to 10 seconds, then
plug it back in again.
turned on.
• Make sure that all cables
are connected correctly
and securely.
• Make sure that the
connected TV or other
device supports HDCP.
Your player will not output
a video signal unless the
other device supports
HDCP.
• Make sure that the output
format for your player
matches the input format
for the connected device.
• If the HDMI Deep Color
setting is set to Auto,
change the setting to Off.
Set the HDMI Video
Resolution setting to
something other than Auto
or 1080p24.
amount of picture
distortion may appear.
This is not a malfunction.
• Connect your player
directly to the TV. If RCA
A/V cables are connected
to a VCR, the video may be
distorted because of the
copyright system.
• Make sure that the disc is
compatible with your
player.
• Make sure that the
speakers are connected
correctly and securely.
• If you are using an HDMI
connection, make sure
that the HDMI cable is
connected correctly and
securely.
• Adjust the settings in the
Audio
menu.
• Check the disc for
fingerprints and scratches.
• If the disc is dirty, clean
the disc.
Problem Solution
Cannot play a disc • Make sure that the disc
Cannot read an SD memory
card
When disc is removed,
start-up screen does not
appear
The remote control does not
work
Buttons do not work or your
player stops responding
Your player does not
respond to some operating
commands during playback
You player cannot read the
disc
Angle does not switch • Not all discs are recorded
Playback does not start
when the title is selected
Password forgotten • Press the number buttons
label is facing up.
• If the disc is dirty, clean
the disc.
• Try another disc. The disc
may be warped or
damaged.
• The disc’s rating may be
blocked by the parental
controls. Unlock parental
controls or change the
rating level.
• Make sure that the disc is
compatible with your
player.
• The card format does not
match your player’s
format.
• The card is not compatible
with your player.
• Reset your player by
turning it off, then on
again.
• Aim the remote control
directly at the remote
control sensor on the front
of your player.
• Decrease the distance
between the remote
control and the remote
control sensor on the front
of your player.
• Make sure that the + and –
symbols on the batteries
match the + and –
symbols inside the battery
compartment.
• Replace the batteries.
• Unplug the power cord for
5 to 10 seconds, then plug
it back in.
• Some discs do not permit
some commands. Check
the instructions that came
with the disc.
• Make sure that the disc is
inserted label side up.
• Make sure that the disc is
compatible.
• If the disc is dirty, clean
the disc.
• Try another disc. The disc
may be warped or
damaged.
• Moisture may have
condensed inside your
player. Let your player sit
for one to two hours to let
the condensation
evaporate.
with multiple angles.
• If a disc is recorded with
multiple angles, every
scene may not have
multiple angles.
• The title may be blocked
by the parental controls.
Unlock parental controls
or change the rating level.
to enter 4737. Your
password is cleared.
www.insignia-products.com
31
Page 40

Note
Some functions may not be available in specific
modes. This is not a malfunction. Check the
sections in this guide for the type disc you are
playing to see what functions are available.
Some discs do not allow some functions.
Specifications
Specifications are subject to change without
notice.
Media BD-video, DVD-video,
Power requirements 120V AC, 60Hz
Power consumption 30 W (standby: 0.8 W)
Dimensions (W × H × D) 17.2 × 2.8 × 13.9 inches
Weight 9.1 lbs. (4.1kg)
Operating temperature 41°F (5°C) to 104°F (40°C)
Operating humidity Less than 80% (no
Audio output (Analog) RCA jack × 2
Video output RCA jack × 1
Component video output RCA jack × 3
Audio output (digital) RCA jack × 1
HDMI output HDMI jack × 1
DVD+RW/+R, DVD-RW/-R,
CD-DA, CD-RW/-R, DTS-CD,
SD Memory Card
(435 × 70 × 351 mm)
condensation)
L/R: 2Vrms (output
impedance: more than 1kΩ)
1Vp-p (75Ω)
Y: 1Vp-p (75Ω)
PB/CB: 700mVp-p (75Ω)
PR/CR: 700mVp-p (75Ω)
500mVp-p (75Ω)
Optical jack × 1
Video: 480p, 720p, 1080i,
1080p, 1080p24
Audio
Legal notices
FCC Part 15
This device complies with Part 15 of the FCC Rules.
Operation of this product is subject to the following two
conditions: (1) this device may not cause harmful
interference, and (2) this device must accept any interference
received, including interference that may cause undesired
operation.
This equipment has been tested and found to comply within
the limits for a class B digital device, pursuant to Part 15 of
the FCC Rules. These limits are designed to provide
reasonable protection against harmful interference in a
residential installation. This equipment generates, uses, and
can radiate radio frequency energy and, if not installed and
used in accordance with the instructions, may cause harmful
interference to radio communications. However, there is no
guarantee that interference will not occur in a particular
installation. If this equipment does cause harmful
interference to radio or television reception, which can be
determined by turning the equipment off and on, the user is
encouraged to try to correct the interference by one or more
of the following measures:
• Reorient or relocate the receiving antenna.
• Increase the separation between the equipment and
receiver.
• Connect the equipment into an outlet on a circuit
different from that to which the receiver is connected.
Insignia NS-BRDVD Blu-ray Disc Player
• Consult the dealer or an experienced technician for
help.
FCC warning
Changes or modifications not expressly approved by the
party responsible for compliance with the FCC Rules could
void the user’s authority to operate this equipment.
Canada ICES-003 statement
This Class B digital apparatus complies with Canadian
ICES-003.
Laser safety
This apparatus employs a laser. Only a qualified service
person should remove the cover or attempt to service this
apparatus, due to possible eye injury.
Warning
Use of controls or adjustments or performance of
procedures other than those specified herein may
result in hazardous radiation exposure.
Visible and invisible laser radiation when open and
interlock defeated. Do not stare into beam.
The laser is inside, near the deck mechanism.
About copyright
Unauthorized copying, broadcasting, public performance,
and lending of discs are prohibited. Your player incorporates
copyright protection technology that is protected by U.S.
patents and other intellectual property rights. Use of this
copyright protection technology must be authorized by
Macrovision, and is intended for home and other limited
viewing uses only unless otherwise authorized by
Macrovision. Reverse engineering or disassembly is
prohibited.
Copyrights
This product incorporates copyright protection technology
that is protected by method claims of certain US patents and
other intellectual property rights owned by Macrovision
Corporation and other rights owners. Use of this copyright
protection technology must be authorized by Macrovision
Corporation, and is intended for home and other limited
viewing uses only unless otherwise authorized by
Macrovision Corporation. Reverse engineering or
disassembly is prohibited.
Dolby Laboratories
Manufactured under license from Dolby
Laboratories. Dolby and the symbol are
registered trademarks of DOLBY LABORATORIES. All rights
reserved.
HDMI™
Your TV incorporates HDMI™
technology. HDMI, the HDMI Logo and
High-Definition Multimedia Interface are trademarks or
registered trademarks of HDMI Licensing LLC.
Energy Star
Products that have earned ENERGY STAR® are
designed to protect the environment through
superior energy efficiency. Your player is Energy Star
compliant.
Sun Microsystems, Inc.
Java and all other Java trademarks and logos are
trademarks or registered trademarks of Sun
Microsystems, Inc. in the United States and/or other
countries.
DTS, Inc.
Manufactured under license under U.S.
Patent #’s: 5,451,942; 5,956,674;
5,974,380; 5,978,762; 6,487,535 and other U.S. and
worldwide patents issued & pending. DTS and DTS Digital
Surround are registered trademarks and the DTS logos and
Symbol are trademarks of DTS, Inc.
© 1996-2007 DTS, Inc. All Rights Reserved.
32
www.insignia-products.com
Page 41

Insignia NS-BRDVD Blu-ray Disc Player
Blu-ray
“Blu-ray Disc” and the Blu-ray Disc logo are
trademarks.
Eastman Kodak Company
The Kodak Picture CD logo is a trademark of
Eastman Kodak Company.
www.insignia-products.com
33
Page 42

Insignia NS-BRDVD Blu-ray Disc Player
34
www.insignia-products.com
Page 43

Insignia NS-BRDVD Blu-ray Disc Player
One-year limited warranty
Insignia Products (“Insignia”) warrants to you, the
original purchaser of this new NS-BRDVD (“Product”),
that the Product shall be free of defects in the original
manufacture of the material or workmanship for a period
of one (1) year from the date of your purchase of the
Product (“Warranty Period”). This Product must be
purchased from an authorized dealer of Insignia brand
products and packaged with this warranty statement.
This warranty does not cover refurbished Product. If you
notify Insignia during the Warranty Period of a defect
covered by this warranty that requires service, terms of
this warranty apply.
How long does the coverage last?
The Warranty Period lasts for 1 year (365 days) from the
date you purchased the Product. The purchase date is
printed on the receipt you received with the Product.
What does this warranty cover?
During the Warranty Period, if the original manufacture of
the material or workmanship of the Product is
determined to be defective by an authorized Insignia
repair center or store personnel, Insignia will (at its sole
option): (1) repair the Product with new or rebuilt parts;
or (2) replace the Product at no charge with new or
rebuilt comparable products or parts. Products and parts
replaced under this warranty become the property of
Insignia and are not returned to you. If service of
Products or parts are required after the Warranty Period
expires, you must pay all labor and parts charges. This
warranty lasts as long as you own your Insignia Product
during the Warranty Period. Warranty coverage
terminates if you sell or otherwise transfer the Product.
How to obtain warranty service?
If you purchased the Product at a retail store location,
take your original receipt and the Product to the store
you purchased it from. Make sure that you place the
Product in its original packaging or packaging that
provides the same amount of protection as the original
packaging. If you purchased the Product from an online
web site, mail your original receipt and the Product to the
address listed on the web site. Make sure that you put
the Product in its original packaging or packaging that
provides the same amount of protection as the original
packaging.
To obtain in-home warranty service for a television with a
screen 25 inches or larger, call 1-888-BESTBUY. Call
agents will diagnose and correct the issue over the
phone or will have an Insignia-approved repair person
dispatched to your home.
• Connection to an incorrect voltage supply
• Attempted repair by anyone other than a facility
authorized by Insignia to service the Product
• Products sold as is or with all faults
• Consumables, such as fuses or batteries
• Products where the factory applied serial number
has been altered or removed
REPAIR REPLACEMENT AS PROVIDED UNDER THIS
WARRANTY IS YOUR EXCLUSIVE REMEDY.
INSIGNIA SHALL NOT BE LIABLE FOR ANY
INCIDENTAL OR CONSEQUENTIAL DAMAGES FOR
THE BREACH OF ANY EXPRESS OR IMPLIED
WARRANTY ON THIS PRODUCT, INCLUDING, BUT
NOT LIMITED TO, LOST DATA, LOSS OF USE OF
YOUR PRODUCT, LOST BUSINESS OR LOST
PROFITS. INSIGNIA PRODUCTS MAKES NO OTHER
EXPRESS WARRANTIES WITH RESPECT TO THE
PRODUCT, ALL EXPRESS AND IMPLIED
WARRANTIES FOR THE PRODUCT, INCLUDING, BUT
NOT LIMITED TO, ANY IMPLIED WARRANTIES OF
AND CONDITIONS OF MERCHANTABILITY AND
FITNESS FOR A PARTICULAR PURPOSE, ARE
LIMITED IN DURATION TO THE WARRANTY PERIOD
SET FORTH ABOVE AND NO WARRANTIES,
WHETHER EXPRESS OR IMPLIED, WILL APPLY
AFTER THE WARRANTY PERIOD. SOME STATES,
PROVINCES AND JURISDICTIONS DO NOT ALLOW
LIMITATIONS ON HOW LONG AN IMPLIED
WARRANTY LASTS, SO THE ABOVE LIMITATION MAY
NOT APPLY TO YOU. THIS WARRANTY GIVES YOU
SPECIFIC LEGAL RIGHTS, AND YOU MAY ALSO
HAVE OTHER RIGHTS, WHICH VARY FROM STATE
TO STATE OR PROVINCE TO PROVINCE.
Contact Insignia:
For customer service please call 1-877-467-4289
www.insignia-products.com
Distributed by Best Buy Purchasing, LLC
7601 Penn Avenue South, Richfield, Minnesota, U.S.A.
55423-3645
© 2008 Best Buy Enterprise Services, Inc.
All rights reserved. INSIGNIA is a trademark of Best Buy
Enterprise Services, Inc. Registered in some countries.
All other products and brand names are trademarks of
their respective owners.
Where is the warranty valid?
This warranty is valid only to the original purchaser of the
product in the United States and Canada.
What does the warranty not cover?
This warranty does not cover:
• Customer instruction
• Installation
• Set up adjustments
• Cosmetic damage
• Damage due to acts of God, such as lightning
strikes
• Accident
• Misuse
• Abuse
• Negligence
• Commercial use
• Modification of any part of the Product, including
the antenna
• Plasma display panel damaged by static
(non-moving) images applied for lengthy periods
(burn-in).
This warranty also does not cover:
• Damage due to incorrect operation or maintenance
www.insignia-products.com
35
Page 44

Insignia NS-BRDVD Blu-ray Disc Player
36
www.insignia-products.com
Page 45

Lecteur de disques Blu-ray Insignia NS-BRDVD
Lecteur de disques Blu-ray Insignia
NS-BRDVD
Table des matières
Introduction . . . . . . . . . . . . . . . . . . . . . . . . . . . . . . . . . . . . . . . . . . . . . . . . . . . . . . . . . .37
Informations sur la sécurité . . . . . . . . . . . . . . . . . . . . . . . . . . . . . . . . . . . . . . . . . . . . . .38
Fonctionnalités. . . . . . . . . . . . . . . . . . . . . . . . . . . . . . . . . . . . . . . . . . . . . . . . . . . . . . . .40
Face avant . . . . . . . . . . . . . . . . . . . . . . . . . . . . . . . . . . . . . . . . . . . . . . . . . . . . . . . . . . . . . . . .41
Face arrière . . . . . . . . . . . . . . . . . . . . . . . . . . . . . . . . . . . . . . . . . . . . . . . . . . . . . . . . . . . . . . .41
Télécommande. . . . . . . . . . . . . . . . . . . . . . . . . . . . . . . . . . . . . . . . . . . . . . . . . . . . . . . . . . . . .42
Affichage . . . . . . . . . . . . . . . . . . . . . . . . . . . . . . . . . . . . . . . . . . . . . . . . . . . . . . . . . . . . . . . . .44
Configuration du lecteur. . . . . . . . . . . . . . . . . . . . . . . . . . . . . . . . . . . . . . . . . . . . . . . . .44
Installation des piles de la télécommande . . . . . . . . . . . . . . . . . . . . . . . . . . . . . . . . . . . . . . . .44
Connexion à un téléviseur . . . . . . . . . . . . . . . . . . . . . . . . . . . . . . . . . . . . . . . . . . . . . . . . . . . .45
Connexion d'un système audio . . . . . . . . . . . . . . . . . . . . . . . . . . . . . . . . . . . . . . . . . . . . . . . .46
Connecter le cordon d’alimentation CA.. . . . . . . . . . . . . . . . . . . . . . . . . . . . . . . . . . . . . . . . . .47
Configuration des haut-parleurs . . . . . . . . . . . . . . . . . . . . . . . . . . . . . . . . . . . . . . . . . . . . . . . .47
Réglage des haut-parleurs. . . . . . . . . . . . . . . . . . . . . . . . . . . . . . . . . . . . . . . . . . . . . . . . . . . .47
Fonctionnement du lecteur . . . . . . . . . . . . . . . . . . . . . . . . . . . . . . . . . . . . . . . . . . . . . .49
Disques compatibles, cartes mémoire et fichiers. . . . . . . . . . . . . . . . . . . . . . . . . . . . . . . . . . .49
Lecture d'un disque Blu-ray ou d'un DVD. . . . . . . . . . . . . . . . . . . . . . . . . . . . . . . . . . . . . . . . .50
Contrôle de la lecture d'un disque Blu-ray ou d'un DVD. . . . . . . . . . . . . . . . . . . . . . . . . . . . . .51
Lecture d'un CD audio ou d'un disque JPEG/MP3/WMA. . . . . . . . . . . . . . . . . . . . . . . . . . . . .51
Contrôle de la lecture d'un CD audio ou d'un disque JPEG/MP3/WMA. . . . . . . . . . . . . . . . . .53
Lecture d'un CD Image Kodak . . . . . . . . . . . . . . . . . . . . . . . . . . . . . . . . . . . . . . . . . . . . . . . . .53
Lecture d'un CD Image Kodak . . . . . . . . . . . . . . . . . . . . . . . . . . . . . . . . . . . . . . . . . . . . . . . . .53
Lecture à partir d'une carte mémoire SD . . . . . . . . . . . . . . . . . . . . . . . . . . . . . . . . . . . . . . . . .54
Formatage d'une carte mémoire SD . . . . . . . . . . . . . . . . . . . . . . . . . . . . . . . . . . . . . . . . . . . .55
Affichage des informations d'état . . . . . . . . . . . . . . . . . . . . . . . . . . . . . . . . . . . . . . . . . . . . . . .55
Programmation d’une lecture en boucle programmée . . . . . . . . . . . . . . . . . . . . . . . . . . . . . . .57
Création d'un programme. . . . . . . . . . . . . . . . . . . . . . . . . . . . . . . . . . . . . . . . . . . . . . . . . . . . .57
Contrôle de la lecture programmée . . . . . . . . . . . . . . . . . . . . . . . . . . . . . . . . . . . . . . . . . . . . .57
Utilisation du mode de lecture aléatoire . . . . . . . . . . . . . . . . . . . . . . . . . . . . . . . . . . . . . . . . . .57
Contrôle de la lecture aléatoire . . . . . . . . . . . . . . . . . . . . . . . . . . . . . . . . . . . . . . . . . . . . . . . .57
Recherche d’un chapitre, d'un titre, d'une piste ou d'une position horaire . . . . . . . . . . . . . . . .58
Recherche au moyen de signets . . . . . . . . . . . . . . . . . . . . . . . . . . . . . . . . . . . . . . . . . . . . . . .58
Utilisation de la fonction PIP (image dans l'image). . . . . . . . . . . . . . . . . . . . . . . . . . . . . . . . . .58
Sélection d'un angle de prise de vues . . . . . . . . . . . . . . . . . . . . . . . . . . . . . . . . . . . . . . . . . . .58
Sélection de la langue ou du style des sous-titres . . . . . . . . . . . . . . . . . . . . . . . . . . . . . . . . . .59
Changement de bande sonore. . . . . . . . . . . . . . . . . . . . . . . . . . . . . . . . . . . . . . . . . . . . . . . . .59
Réglage du niveau du noir . . . . . . . . . . . . . . . . . . . . . . . . . . . . . . . . . . . . . . . . . . . . . . . . . . . .59
Réduction du bruit vidéo. . . . . . . . . . . . . . . . . . . . . . . . . . . . . . . . . . . . . . . . . . . . . . . . . . . . . .59
Réglage de la résolution vidéo à composantes . . . . . . . . . . . . . . . . . . . . . . . . . . . . . . . . . . . .60
Réglage de la résolution vidéo à composantes . . . . . . . . . . . . . . . . . . . . . . . . . . . . . . . . . . . .60
Sélection du mode audio d'un CD audio . . . . . . . . . . . . . . . . . . . . . . . . . . . . . . . . . . . . . . . . .60
Réglage du mode audio Blu-ray. . . . . . . . . . . . . . . . . . . . . . . . . . . . . . . . . . . . . . . . . . . . . . . .61
Utilisation des menus du disque. . . . . . . . . . . . . . . . . . . . . . . . . . . . . . . . . . . . . . . . . . . . . . . .62
Réglage de l'image fixe . . . . . . . . . . . . . . . . . . . . . . . . . . . . . . . . . . . . . . . . . . . . . . . . . . . . . .62
Configuration des contrôles parentaux. . . . . . . . . . . . . . . . . . . . . . . . . . . . . . . . . . . . . . . . . . .63
Modification du mot de passe pour le contrôle parental. . . . . . . . . . . . . . . . . . . . . . . . . . . . . .64
Utilisation du menu Quick (Rapide) . . . . . . . . . . . . . . . . . . . . . . . . . . . . . . . . . . . . . . . . . . . . .65
Utilisation du menu Custom (Personnalisé) . . . . . . . . . . . . . . . . . . . . . . . . . . . . . . . . . . . . . . .66
Rétablissement des paramètres par défaut pour les options de configuration. . . . . . . . . . . . .69
Entretien. . . . . . . . . . . . . . . . . . . . . . . . . . . . . . . . . . . . . . . . . . . . . . . . . . . . . . . . . . . . .69
Nettoyage du boîtier . . . . . . . . . . . . . . . . . . . . . . . . . . . . . . . . . . . . . . . . . . . . . . . . . . . . . . . . .69
Manipulation des disques. . . . . . . . . . . . . . . . . . . . . . . . . . . . . . . . . . . . . . . . . . . . . . . . . . . . .69
Nettoyage des disques. . . . . . . . . . . . . . . . . . . . . . . . . . . . . . . . . . . . . . . . . . . . . . . . . . . . . . .70
Nettoyage de la lentille optique . . . . . . . . . . . . . . . . . . . . . . . . . . . . . . . . . . . . . . . . . . . . . . . .70
Vérification du signal de la télécommande. . . . . . . . . . . . . . . . . . . . . . . . . . . . . . . . . . . . . . . .70
Codes de langue . . . . . . . . . . . . . . . . . . . . . . . . . . . . . . . . . . . . . . . . . . . . . . . . . . . . . .71
Problèmes et solutions. . . . . . . . . . . . . . . . . . . . . . . . . . . . . . . . . . . . . . . . . . . . . . . . . .72
Spécifications. . . . . . . . . . . . . . . . . . . . . . . . . . . . . . . . . . . . . . . . . . . . . . . . . . . . . . . . .73
Garantie limitée d’un an. . . . . . . . . . . . . . . . . . . . . . . . . . . . . . . . . . . . . . . . . . . . . . . . .75
Introduction
Félicitations d’avoir acheté ce produit Insignia de haute qualité. Le modèle NS-BRDVD représente la
dernière avancée technologique dans la conception de lecteur de disques Blu-ray et a été conçu pour des
performances et une fiabilité exceptionnelles.
www.insignia-products.com
37
Page 46

Lecteur de disques Blu-ray Insignia NS-BRDVD
Informations sur la sécurité
ATTENTION
RISQUE DE CHOC ÉLECTRIQUE
NE PAS OUVRIR
Avertissement
Afin de réduire le risque de choc électrique, ne
pas enlever le couvercle (ou le panneau arrière).
Ne contient aucune pièce réparable par
l'utilisateur. Confier l’entretien à un personnel
qualifié.
Afin de réduire le risque d’incendie et de choc
électrique, ne pas exposer le lecteur à la pluie ou
l’humidité.
Attention
Pour éviter des chocs électriques, introduire le plot
le plus large de la prise du cordon d’alimentation
dans la fente correspondante de la prise secteur.
Si la prise ne s'adapte pas, contacter un
électricien afin qu’il remplace la prise secteur
inadéquate. Ne pas modifier la prise du cordon
d’alimentation, sinon ce dispositif de sécurité
serait inopérant.
Ce symbole indique qu'une tension
dangereuse, constituant un risque de choc
électrique, est présente dans cet appareil.
Cette étiquette est située au dos de
l’appareil.
Ce symbole indique que d'importantes
instructions concernant le fonctionnement
et la maintenance figurent dans la
documentation qui accompagne cet
appareil.
Avertissement
Cet appareil est doté d’un lecteur
au laser.
L’utilisation de commandes ou de
réglages ou la réalisation de
procédures autres que celles
spécifiées dans les présentes
pourrait entraîner une exposition dangereuse aux
radiations.
Émission de rayon laser visible en cas d’ouverture
ou de dispositif de verrouillage défectueux. Ne
pas regarder directement le rayonnement
laser.
1 Lire les instructions – Lire toutes les
instructions de sécurité et de fonctionnement
avant d’utiliser cet appareil.
2 Conserver les instructions – Conserver les
instructions de sécurité et de fonctionnement
pour toute référence ultérieure.
3 Respecter les avertissements – Observer
tous les avertissements figurant sur l’appareil
ainsi que dans les instructions d’utilisation.
4 Suivre les instructions – Toutes les
instructions d’utilisation doivent être
observées.
5Nettoyage – Débrancher l'appareil de la
prise secteur avant tout nettoyage. Ne pas
utiliser de nettoyants liquides ou en aérosol.
Utiliser un chiffon humide pour le nettoyage.
Exception : Dans le cas d'un lecteur qui est
destiné à un service ininterrompu et qui, pour
une raison spécifique (comme par exemple le
risque de perdre un code d'autorisation pour
un décodeur de TV câblée) ne doit pas être
débranché par l'utilisateur pour le nettoyage
ou pour toute autre raison, la référence au
débranchement de l'appareil peut ne pas
figurer dans la description du nettoyage.
6 Périphériques – Ne pas utiliser de
périphériques qui ne sont pas recommandés
par le fabricant de l’appareil et qui pourraient
être dangereux.
7 Eau et humidité – Ne pas utiliser cet
appareil à proximité de l’eau. Par exemple
près d’une baignoire, un lavabo, un évier ou
un baquet à linge, dans un sous-sol humide
ou près d’une piscine.
8 Accessoires – Ne pas placer
l’appareil sur une table roulante,
un pied, un trépied, un support
ou une table instables. L’appareil
risque de tomber et, dans sa
chute, de provoquer des
blessures graves et de subir des dommages
importants. N’utiliser qu’avec la table
roulante, le pied, le trépied, le support ou la
table recommandés par le fabricant ou
vendus avec l'appareil. Tout montage de
l'appareil doit observer les instructions du
fabricant, notamment la recommandation de
ce dernier en matière d'accessoire de
montage. Si l’appareil est installé sur un
meuble à roulettes, déplacer l’ensemble avec
précaution. Un arrêt brusque, l’utilisation
d’une force excessive et des surfaces
irrégulières risquent de déstabiliser
l’ensemble et de le renverser.
9 Ventilation – Les fentes et ouvertures au dos
et au bas du boîtier sont prévues pour la
ventilation, pour assurer un fonctionnement
fiable de l’appareil et le protéger contre toute
surchauffe. Ces ouvertures ne doivent être ni
bloquées ni obstruées. Elles ne doivent
jamais être bloquées en installant l'appareil
sur un lit, un sofa, une moquette ou toute
autre surface semblable. Le haut-parleur ne
doit jamais être positionné à proximité ou sur
un radiateur, ni proche d’une bouche de
chauffage. Ne pas installer l'appareil dans un
meuble encastré comme une bibliothèque ou
sur une étagère, sauf si une ventilation
adéquate a été prévue ou si les instructions
du fabricant ont été respectées.
10 Sources d’alimentation – Cet appareil doit
fonctionner conformément à la source
d’alimentation indiquée sur la plaque
signalétique. En cas d’incertitude sur la
tension d'alimentation électrique de la
maison, consulter le revendeur ou la
compagnie d'électricité.
38
www.insignia-products.com
Page 47

Lecteur de disques Blu-ray Insignia NS-BRDVD
11 Mise à la terre ou polarisation – L’appareil
est équipé d'une prise de courant CA
polarisée (à deux plots, un plus large que
l'autre). Cette fiche ne s'insère dans une
prise secteur que d'une seule façon. Il s'agit
d'un dispositif de sécurité. S’il est impossible
d’introduire à fond la fiche dans la prise
secteur, essayer de retourner la prise. Si la
fiche ne s'adapte toujours pas à la prise
secteur, contacter un électricien afin qu'il
remplace la prise inadéquate. Ne pas
chercher à modifier le dispositif de sécurité
de la prise polarisée.
12 Protection du cordon d’alimentation –
Acheminer le cordon d'alimentation de telle
manière qu'on ne puisse marcher dessus ou
qu'il ne soit pas pincé par des objets placés
dessus ou tout contre ; prêter
particulièrement attention au point de
raccordement du cordon à la prise murale, à
la plaque multiprises et au connecteur de
l'appareil dans lequel il est branché.
13 Mise à la terre d’une antenne extérieure –
Si l’appareil est connecté à une antenne
extérieure ou à un réseau câblé, vérifier que
l'antenne ou la connexion au réseau câblé
sont mis à la terre afin de bénéficier d'une
certaine protection contre les sautes de
courant et les charges électrostatiques
L'article 810 du Code national de l’électricité
(CNE), ANSI/NFPA Nº 70, fournit des
informations relatives à la mise à la terre
correcte du mât et du support, la mise à la
terre du fil conducteur de l’antenne à l’unité
de décharge de l’antenne, la taille des
conducteurs de mise à la terre,
l’emplacement de l’unité de décharge de
l’antenne, la connexion aux conducteurs de
terre ainsi que les normes en matière de
prise de terre.
7
6
5
4
3
1
1 Équipement de la compagnie
d'électricité
2 Système de mise à la terre des
électrodes de la compagnie
d’électricité
3 Serre-fils de mise à la terre
4 Conducteurs de mise à la terre
5 Unité de décharge de l’antenne
6 Serre-fil de mise à la terre
7 Fil conducteur de l’antenne
2
14 Lignes électriques – L'antenne externe ne
doit pas être située près de lignes électriques
aériennes ou d'autres circuits d'alimentation
et électriques, ni à un emplacement où elle
pourrait tomber sur de tels circuits ou lignes
électriques. Lors de l'installation d'une
antenne extérieure, faire très attention de ne
pas toucher de telles lignes électriques ou
circuits car tout contact peut être mortel.
15 Foudre – Pour protéger l’appareil pendant un
orage ou s’il se trouve inutilisé et sans
surveillance pendant de longues périodes, le
débrancher de la prise secteur et débrancher
l'antenne ou la connexion au réseau câblé.
Ceci évitera d’endommager l'appareil en cas
de foudre et de variations de tension du
secteur.
16 Surcharge – Les prises secteur et les
rallonges ne doivent pas être surchargées,
cela pourrait provoquer des risques
d'incendie ou de choc électrique.
17 Pénétration de liquides et d'objets divers
– Ne jamais introduire un objet quelconque
dans les ouvertures de l’appareil, car il
pourrait entrer en contact avec des tensions
dangereuses ou provoquer un court-circuit à
l'origine d'un incendie ou d'un choc
électrique. Ne jamais répandre un liquide sur
l'appareil.
18 Réparation – L’utilisateur ne doit pas essayer
de réparer cet appareil lui-même; en effet
son ouverture ou le démontage des
couvercles peut l’exposer à des tensions
dangereuses et à d'autres dangers. Toutes
les réparations doivent être réalisées par un
personnel qualifié.
19 Dommages requérant des réparations –
Débrancher le lecteur de la prise secteur et
utiliser les services d’un technicien qualifié
dans les conditions suivantes :
• lorsque le cordon d’alimentation est
effiloché ou la prise endommagée;
• si un liquide a été répandu ou des objets
sont tombés dans l’appareil;
• si l’appareil a été exposé à la pluie ou à
l’eau;
• si l'appareil fonctionne anormalement en
appliquant les instructions d’utilisation. Ne
régler que les commandes décrites dans
les instructions d’utilisation; en effet, le
réglage incorrect d’autres commandes
pourrait provoquer des dégâts, entraînant
souvent d'importantes réparations par un
technicien qualifié pour rétablir le
fonctionnement normal de l’appareil;
• si l'appareil est tombé ou s’il est
endommagé de quelque façon que ce
soit;
• lorsque l’appareil présente d’importantes
modifications de ses performances, il doit
être réparé.
20 Pièces de rechange – Si des pièces doivent
être remplacées, vérifier que le technicien
utilise des pièces spécifiées par le fabricant
ayant les mêmes caractéristiques que celles
d’origine. Toute substitution par des pièces
non autorisées risque de provoquer un
incendie, un choc électrique, des blessures
ou d'autres dangers.
www.insignia-products.com
39
Page 48

Lecteur de disques Blu-ray Insignia NS-BRDVD
21 Contrôle de sécurité – Les réparations ou la
maintenance ayant été effectuées, demander
au technicien de réaliser les contrôles de
sécurité de routine afin de déterminer que
l’appareil est en bon état de fonctionnement.
22 Chaleur – Installer l'appareil à l’écart de
sources de chaleur, telles que radiateurs,
bouches de chaleur, fours ou autres
appareils (y compris les amplificateurs) qui
produisent de la chaleur.
Les numéros de modèle et de série du lecteur
se trouvent sur le boîtier. Prendre note de ces
numéros et les conserver pour toute référence
ultérieure.
Nº de série
Nº de
modèle
Avertissement
Ne pas mettre l'appareil sur un meuble qui pourrait
basculer si un enfant ou un adulte s'appuyait
contre lui, le tirait vers soi, se tenait debout sur lui
ou y grimpait. S'il tombait, l'appareil pourrait
provoquer des blessures graves, voire mortelles.
Éviter les risques de choc et d'incendie
• Ne pas manipuler le cordon d'alimentation
avec les mains mouillées.
• Ne pas tirer sur le cordon d'alimentation pour
le débrancher d'une prise secteur. Saisir la
fiche.
• Ne mettre ni les doigts, ni aucun autre objet
dans le lecteur.
Où installer l'appareil
Pour un rendement optimale et la sécurité de
l'appareil :
• Installer l'appareil dans une position
horizontale et stable. Ne rien placer
directement sur le dessus de l’appareil. Ne
pas placer l'appareil directement sur le
dessus du téléviseur.
• Protéger l'appareil des rayons directs du
soleil et le garder à l'abri des sources de
chaleur intenses. Éviter les endroits
poussiéreux ou humides.
• Éviter les endroits où la ventilation est
insuffisante pour assurer une dissipation
correcte de la chaleur. Ne pas obstruer les
orifices de ventilation à l’arrière et sur le côté
de l'appareil. Éviter les endroits soumis à de
fortes vibrations ou à des champs
magnétiques élevés.
• Vérifier que le disque a été retiré et le cordon
d’alimentation débranché de la prise secteur,
avant de déplacer l’appareil.
Condensation de l’humidité
Une condensation d'humidité peut se produire à
l'intérieur de l'appareil lorsqu'il est transporté
d'un endroit froid à un endroit chaud, lorsqu'une
pièce froide est réchauffée ou dans des
conditions d'humidité élevée. Ne pas utiliser
l'appareil pendant au moins deux heures,
jusqu'à complète évaporation de l'humidité à
l'intérieur.
Recyclage
• Le matériel d'emballage de cet
appareil est recyclable et réutilisable.
Pour la mise au rebut de matériaux,
observer la réglementation locale en matière
de recyclage. Les piles ne doivent jamais
être mises au rebut ni incinérées, mais
éliminées de façon conforme aux
réglementations locales relatives aux
déchets chimiques.
Fonctionnalités
• Reproduction vidéo entièrement en haute
définition avec une résolution maximale de
1080p pour une expérience visuelle
exceptionnelle.
• Conversion ascendante des DVD à définition
standard pour améliorer la qualité de l’image
jusqu’à 1080p par rapport à une connexion
HDMI.
• Compatibilité totale avec les DVD à définition
standard et les CD audio.
• Peut reproduire des présentations de fichiers
JPEG enregistrés sur disques ou sur cartes
mémoires SD.
• Son ambiophonique multicanal riche.
• Connexion TVHD facile et simple avec un
seul câble HDMI (câble non inclus).
• Nombreuses sorties pour la connexion d’un
système de cinéma maison ou d’un
amplificateur.
• Fonctionnalité d’image sur image (PIP) pour
afficher simultanément la vidéo primaire et
secondaire (si disponible sur le disque
Blu-ray).
• Le menu contextuel s’affiche sans
interruption de la lecture (si disponible sur le
disque Blu-ray).
• Intègre la nouvelle norme HDMI qui permet
d’accroître la profondeur des couleurs et
atténue l’effet de déformation du contour
(colonnes et bandes de couleur) de l’image
reproduite.
• Sortie HDMI 1080p/fps (disques Blu-ray
uniquement) qui offre une lecture de vidéo en
souplesse, à un taux de 24 images par
seconde (le téléviseur doit être connecté
avec un câble HDMI tout en étant compatible
avec la résolution 1080p/ 24 images).
• Lecture de fichiers JPEG, MP3 ou WMA sur
carte mémoire SD.
• Lecture sur carte mémoire SD de
commentaires image sur image, de
sous-titres ou autres extras pour les fichiers
du BD-ROM Profile 1 ver.1.1, avec Blu-ray
vidéo.
40
www.insignia-products.com
Page 49

Lecteur de disques Blu-ray Insignia NS-BRDVD
Face avant
Composant Description
1 Plateau à disque Placer le disque dans le
2 Touche OUVRIR/FERMER Permet d’ouvrir ou de fermer
3 Affichage Affichage des informations
4 Capteur de télécommande Reçoit les signaux de la
5 Témoin MARCHE-ARRÊT S'allume en rouge quand
6 Touche ARRÊT Permet d’arrêter la lecture.
7
Touche PAUSE
8
Touche LECTURE
9 Logement pour carte
mémoire SD
10
Touche MARCHE/ARRÊT
plateau, l’étiquette tournée
vers le haut.
le plateau à disque.
d'état. Pour plus
d’informations, voir
« Affichage » à la page 44.
télécommande. Ne pas
obstruer la transmission des
signaux.
l’appareil est mis sous
tension. S’éteint quand le
lecteur est mis hors tension.
Permet d’interrompre la
lecture momentanément.
Pour commencer ou
reprendre la lecture.
Insérer une carte mémoire
SD dans ce logement pour la
reproduction à partir de la
carte. Pour plus
d’informations, voir
« Lecture à partir d'une carte
mémoire SD » à la page 54.
Pour la mise sous ou hors
tension du lecteur.
Face arrière
Composant Description
1 Prise de SORTIE VIDÉO Connecter un téléviseur, un
récepteur AV ou un
périphérique vidéo à cette
prise en utilisant un câble
vidéo composite. Pour plus
d’informations, voir
« Connexion d’un téléviseur
avec vidéo standard » à la
page 46.
Composant Description
2 Prise de SORTIE VIDÉO À
COMPOSANTES
3 Prise de SORTIE HDMI Connecter un téléviseur ou
4 Prises de SORTIE AUDIO Connecter un téléviseur, un
5 Prise DIGITAL OUT
(COAXIAL) [Sortie
numérique coaxiale ]
6 SORTIE NUMÉRIQUE
(OPTIQUE)
7 Prise d’entrée CA Brancher le cordon
Attention
Ne pas toucher les broches à l'intérieur des
prises. Les décharges électrostatiques (électricité
statique) peuvent provoquer des dommages
permanents à l’appareil.
Remarque
Ce lecteur n'est pas équipé d'un modulateur RF.
Connecter un téléviseur ou
un récepteur AV avec prises
d’entrée vidéo à
composantes à ces prises en
utilisant un câble vidéo à
composantes. Pour plus
d’informations, voir
« Connexion d’un téléviseur
en utilisant la vidéo à
composantes » à la page
46.
un récepteur AV avec une
prise d’entrée HDMI à cette
prise en utilisant un câble
HDMI. Pour plus
d’informations, voir
« Connexion à un téléviseur
en utilisant le port HDMI » à
la page 45 ou « Connexion
d’un récepteur avec port
HDMI » à la page 47.
récepteur AV/amplificateur
ou un périphérique audio à
ces prises en utilisant un
câble audio standard. Pour
plus d’informations, voir
« Connexion de l’audio
standard » à la page 46.
Connecter un téléviseur, un
décodeur Dolby Digital/DTS,
un récepteur/amplificateur
ou un périphérique audio
numérique avec prise
d’entrée coaxiale en utilisant
un câble audio numérique
coaxial. Pour plus
d’informations, voir
« Connexion d’un système
audio numérique coaxial » à
la page 46.
Connecter un téléviseur, un
décodeur Dolby Digital/DTS,
un récepteur/amplificateur
ou un périphérique audio
numérique avec prise
d’entrée optique en utilisant
un câble audio numérique
optique. Pour plus
d’informations, voir
« Connexion d'un système
audio numérique optique » à
la page 47.
d’alimentation CA sur cette
prise et sur une prise
secteur. Pour plus
d’informations, voir
« Connecter le cordon
d’alimentation CA. » à la
page 47.
www.insignia-products.com
41
Page 50

Lecteur de disques Blu-ray Insignia NS-BRDVD
Télécommande
Touche Description
1 AFFICHAGE Permet d’accéder au menu
2
MARCHE/ARRÊT
3 Touches numériques Permettent de saisir le
4 RECHERCHE Permet d’ouvrir le menu
5 Rouge/Vert/Bleu/Jaune Permettent de sélectionner
6 MENU PRINCIPAL Permet d’afficher le menu
7 Permettent de sélectionner
d’écran. Pour plus
d’informations, voir
« Affichage » à la page 44.
Pour la mise sous ou hors
tension du lecteur.
numéro du titre, du chapitre,
de la piste ou du fichier.
Permettent de saisir le mot
de passe du contrôle
parental ou les valeurs dans
les options des menus.
Search (Recherche). Pour
plus d’informations, voir
« Recherche d’un chapitre,
d'un titre, d'une piste ou
d'une position horaire » à la
page 58 et « Recherche au
moyen de signets » à la page
58.
des options des menus du
disque Blu-ray, si le disque
Blu-ray le permet.
principal.
des options ou des menus.
Touche Description
8 CONFIGURATION Permet d'accéder au menu
9 SOUS-TITRES Permet d’ouvrir le menu des
10
RETOUR RAPIDE
11
LECTURE
12
SAUT
13
PAUSE
14 HDMI Permet de sélectionner le
15 OUVRIR/FERMER Permet d’ouvrir ou de fermer
16 PIP Pendant la lecture d’u disque
17 ANGLE Pendant la lecture d’un
18 RÉPÉTITION Appuyer une ou plusieurs
19 A-B Permet de répéter une
de configuration (Setup).
sous-titres. Pour plus
d’informations, voir
« Sélection de la langue ou
du style des sous-titres » à
la page 59.
En mode de lecture, permet
d'activer le retour rapide.
Pour commencer ou
reprendre la lecture.
Pendant la lecture du disque,
appuyer une fois sur cette
touche pour revenir au
commencement du titre, du
chapitre ou de la piste
actuelle. Appuyer deux fois
sur cette touche pour revenir
au titre, au chapitre ou à la
piste précédente.
Pendant la lecture de fichier
JPEG, permet de revenir au
fichier précédent.
Permet d’interrompre la
lecture momentanément.
Quand la lecture est arrêtée
momentanément, appuyer
de façon répétée sur cette
touche pour une lecture
avant étape par étape.
mode de sortie HDMI.
le plateau à disque.
Blu-ray, permet d’activer ou
désactiver le mode image
sur image (PIP). Cette
fonctionnalité n’est pas
disponible sur tous les
disques Blu-ray. Pour plus
d’informations, voir
« Utilisation de la fonction
PIP (image dans l'image) » à
la page 58.
disque Blu-ray ou d’un DVD,
permet de changer l’angle de
prise de vues, si le disque
dispose d’angles multiples.
Pour plus d’informations,
voir « Sélection d'un angle
de prise de vues » à la page
58.
Pendant la lecture d’un
fichier JPEG, permet de faire
pivoter l’image de 90° dans
le sens horaire.
fois sur cette touche pour
sélectionner le mode
répétition
section du disque. Pour plus
d’informations, voir
« Programmation d’une
lecture en boucle
programmée » à la page 57..
42
www.insignia-products.com
Page 51

Lecteur de disques Blu-ray Insignia NS-BRDVD
Touche Description
20 EFFACER Permet d’effacer
21 MENU CONTEXTUEL/MENU Pendant la lecture d’un
22 ENTRÉE Permet de confirmer des
23
RETOUR
24
AUDIO
25
AVANCE RAPIDE
26
ARRÊT
27
SAUT
28 MODE Pendant la lecture, permet
(supprimer) l’information
saisie, de supprimer les
signets configurés ou
d’annuler la programmation.
disque Blu-ray, permet
d’accéder au menu
contextuel.
Pendant la lecture d’un DVD,
permet d’accéder au menu
du disque.
Pendant la lecture d’un CD
audio, de fichiers JPEG, MP3
ou WMA, permet d’ouvrir la
liste des fichiers.
choix ou de sélectionner des
éléments de menus.
Permet de revenir au menu
d'écran précédent.
Permet d’ouvrir le menu
audio. Pour plus
d’informations, voir
« Changement de bande
sonore » à la page 59 ou
« Sélection du mode audio
d'un CD audio » à la page
60.
Pendant la lecture, cette
touche permet l’avance
rapide. En mode Pause,
permet une lecture avant au
ralenti.
Permet d’arrêter la lecture.
Pendant la lecture, permet
d’aller au titre, au chapitre
ou à la piste suivante.
d’accéder au menu de
réglage de l’image.
Pendant la lecture d’un
fichier JPEG, permet
d’accéder aux menus pour
modifier l’effet visuel affiché
lors du passage d’une image
à la suivante ou de modifier
la taille de l’image.
En mode arrêt, quand un
disque Blu-ray est inséré,
permet d’accéder au menu
permettant de régler le mode
audio.
En mode arrêt, quand un CD
audio ou une carte mémoire
SD avec fichiers JPEG, MP3
ou WMA est insérée, permet
d’accéder aux menus de
programmation et de lecture
aléatoire.
Utilisation de la télécommande
Pour utiliser la télécommande :
• Vérifier qu'il n'existe aucune obstruction entre
la télécommande et le capteur à l'avant du
lecteur.
• Veiller à éviter la réflexion d’une forte lumière
solaire ou d’une lumière fluorescente sur le
capteur de la télécommande. Une lumière
forte peut interférer avec la réception du
signal de la télécommande.
• Éviter d’utiliser une télécommande pour un
autre appareil proche du lecteur. Les
télécommandes de périphériques différents
peuvent brouiller leurs signaux respectifs.
• Remplacer les piles lorsque la portée de la
télécommande diminue sensiblement.
La portée maximale de fonctionnement de la
télécommande et de ses capteurs est :
• Ligne de mire : Environ 23 pi (7 m)
• De chaque côté de l'axe de l'appareil :
Environ 16 pi (5 m) avec un angle de 30°
• Du dessus : Environ 16 pi (5 m) avec un
angle de 15°
• Du dessous : Environ 10 pi (3 m) avec un
angle de 30°
16 pi (5m) 23 pi (7 m) 16 pi (5m)
www.insignia-products.com
43
Page 52

Lecteur de disques Blu-ray Insignia NS-BRDVD
Affichage
1 Affiche l’icône d’état de la lecture. Pour
plus d’informations, voir « Icônes
d’état de la lecture » à la page 44.
2 Affiche l’information d’état, telle que le
numéro du titre, la durée écoulée et le
mode répétition. Pour plus
d’informations, voir « Affichage des
informations d'état » à la page 44 et
« Affichage des informations d'état » à
la page 55.
Icônes d’état de la lecture
Icône d’état de la lecture
Disque
Carte
mémoire
SD
Configuration du lecteur
Installation des piles de la télécommande
Pour installer les piles de la télécommande :
1 Ouvrir le couvercle du compartiment des
piles.
2 Insérer deux piles AA dans le compartiment.
Veiller à ce que les pôles + et – des piles
coïncident avec les repères + et – figurant à
l'intérieur du compartiment.
Mode
Lecture en cours
Mode Arrêt
Mode Pause
Mode Avance rapide
Mode Retour rapide
Mode Avance au ralenti
—
Mode Répétition
Affichage des informations d'état
Les affichages ci-après sont des exemples de
l’information d’état.
Pendant la lecture d’un titre,
l’affichage montre le numéro du
titre en cours et la durée écoulée.
Le chapitre en cours est en mode
de répétition du chapitre.
Disque en cours de chargement
dans le lecteur.
Lecture d’audio Dolby Digital en
cours.
3 Replacer le couvercle du compartiment des
piles.
Remarques
• Ne pas mélanger des piles neuves et usagées.
• Ne pas mélanger des piles de types différents.
Même si des piles paraissent extérieurement
similaires, des piles différentes peuvent avoir
des tensions différentes.
• Veiller à ce que les pôles + et – des piles
coïncident avec les repères + et – figurant à
l'intérieur du compartiment.
• Si la télécommande n’est pas utilisée pendant
un mois ou plus, retirer les piles pour éviter
qu’elles ne fuient.
• Mettre les piles usées au rebut conformément
à la réglementation sur les déchets dangereux.
• Ne pas mettre en court-circuit, chauffer, brûler
ni ouvrir des piles.
• Ne pas essayer de recharger des piles qui ne
sont pas conçues pour cela.
44
www.insignia-products.com
Page 53

Lecteur de disques Blu-ray Insignia NS-BRDVD
Connexion à un téléviseur
Remarques
Connecter le lecteur directement au téléviseur. Si
le lecteur est connecté au téléviseur par
l’intermédiaire d’un magnétoscope, la vidéo peut
faire l’objet de déformation en raison du système
de protection contre la copie.
En cas de connexion du lecteur à un téléviseur
avec des câbles HDMI ou vidéo à composantes et
que l’image ne s’affiche pas correctement,
maintenir appuyée la touche PLAY (Lecture)
sur la face avant du lecteur pendant plus de cinq
secondes. Le lecteur réinitialise la résolution vidéo
aux paramètres par défaut automatiquement.
Il n’est pas possible de modifier la résolution vidéo
pendant la lecture d’un disque Blu-ray. Pour
modifier la résolution, arrêter la lecture.
Système de protection des droits d’auteur
Pour la lecture d’images vidéo numériques d’un
disque Blu-ray ou d’un DVD à travers une
connexion HDMI, le téléviseur (ou l’amplificateur
AV) doit être compatible avec le système de
protection des droits d’auteur appelé protection
des contenus numériques haute définition
(
HDCP
protection contre la copie qui intègre le codage
et l’authentification de données du périphérique
AV connecté. Voir les instructions de
fonctionnement du téléviseur (ou de
l’amplificateur) pour plus d’informations.
Connexion à un téléviseur en utilisant le port HDMI
). HDCP est une technologie de
Remarques
• Il est recommandé d’utiliser le câble HDMI à
haut débit (appelé aussi câble HDMI de
catégorie 2) pour une meilleure compatibilité.
• En cas d’utilisation d’un téléviseur non
compatible avec la norme HDCP, l’image ne
s’affichera pas correctement.
• Le lecteur ne peut être commandé par un autre
périphérique à travers la prise HDMI.
• Les signaux audio de la prise de sortie HDMI
(HDMI OUT) [y compris la fréquence
d’échantillonnage, le nombre de canaux et la
longueur en bits] peuvent être limités par le
périphérique connecté.
• Si le périphérique connecté à la prise de sortie
HDMI (HDMI OUT) n’a pas de sortie audio (par
exemple un projecteur), la prise HDMI OUT
n’émet pas de son.
Pour connecter l’appareil au téléviseur en
utilisant la connexion HDMI :
1 Vérifier que le lecteur et le téléviseur sont
hors tension.
2 Connecter une extrémité du câble HDMI (non
fourni) à la prise de sortie HDMI (HDMI OUT)
à l’arrière du lecteur.
Câble HDMI
3 Connecter l’autre extrémité du câble à la
prise d’entrée HDMI (HDMI IN) du téléviseur.
Remarque
En cas de connexion d’un téléviseur à la prise de
sortie HDMI (HDMI OUT), il n’est pas nécessaire
d’effectuer de connexions audio. Un câble HDMI
transporte la vidéo et l'audio.
Connexion à un téléviseur en utilisant le port DVI
Une connexion DVI donne une meilleure vidéo
que la vidéo à composantes ou standard.
Pour connecter un téléviseur en utilisant la
connexion DVI :
1 Vérifier que le lecteur et le téléviseur sont
hors tension.
2 Connecter un câble HDMI-DVI (non fourni) à
la prise de sortie HDMI (HDMI OUT) à
l’arrière du lecteur.
Une connexion HDMI permet d’obtenir un audio
et une vidéo de qualité optimale.
Ce lecteur prend en charge le balayage
progressif. Cette fonctionnalité permet d’obtenir
une meilleure qualité d’image qu’un système
avec sortie traditionnelle. Il peut être nécessaire
de régler le paramètre de la résolution vidéo
HDMI (HDMI Video Resolution). Pour plus
d’informations, voir « Réglage de la résolution
vidéo HDMI » à la page 60.
Remarque
Un câble HDMI transmet la vidéo et l'audio.
Aucune autre connexion audio n'est nécessaire.
www.insignia-products.com
Câble
HDMI-DVI
3 Connecter l’autre extrémité du câble à la
prise d’entrée DVI (DVI IN) du téléviseur.
4 Effectuer les étapes de la section
« Connexion de l’audio standard » à la page
46 pour connecter l’audio standard.
45
Page 54

Lecteur de disques Blu-ray Insignia NS-BRDVD
Connexion d’un téléviseur en utilisant la vidéo à
composantes
Une connexion vidéo à composantes donne une
meilleure vidéo que la vidéo standard.
Ce lecteur prend en charge le balayage
progressif. Cette fonctionnalité permet d’obtenir
une meilleure qualité d’image qu’un système
avec sortie traditionnelle. Il peut être nécessaire
de régler le paramètre de la sortie à
composantes (Component Output). Pour plus
d’informations, voir « Réglage de la résolution
vidéo à composantes » à la page 60.
Pour connecter un téléviseur en utilisant la
vidéo à composantes :
1 Vérifier que le lecteur et l’ordinateur sont
hors tension.
2 Connecter une extrémité du câble vidéo à
composantes (non fourni) à la prise de sortie
vidéo à composantes (COMPONENT VIDEO
OUT) à l’arrière du lecteur.
3 Connecter l’autre extrémité du câble à la
prise d’entrée vidéo (VIDEO IN) sur le
téléviseur.
4 Effectuer les étapes de la section
« Connexion de l’audio standard » à la page
46 pour connecter l’audio standard.
Connexion de l’audio standard
Pour connecter l’audio standard :
1 Connecter une extrémité du câble audio
standard (fourni) à la prise de sortie audio
(AUDIO OUT) à l’arrière du lecteur.
LR
Câble audio
Câble vidéo à
composantes
3 Connecter l’autre extrémité du câble à la
prise d’entrée vidéo à composantes
(COMPONENT VIDEO IN) du téléviseur.
4 Effectuer les étapes de la section
« Connexion de l’audio standard » à la page
46 pour connecter l’audio standard.
Connexion d’un téléviseur avec vidéo standard
Pour connecter un téléviseur en utilisant la
vidéo standard :
1 Vérifier que le lecteur et l’ordinateur sont
hors tension.
2 Connecter une extrémité du câble vidéo
standard (fourni) à la prise de sortie vidéo
(VIDEO OUT) à l’arrière du lecteur.
2 Connecter l’autre extrémité du câble aux
prises d’entrée audio droite et gauche
(AUDIO IN L/R) du téléviseur.
Connexion d'un système audio
Il est possible de connecter un système audio
analogique ou numérique.
Connexion d’un système audio numérique coaxial
Pour connecter un système audio numérique
coaxial :
1 Vérifier que le lecteur et l’ordinateur sont
hors tension.
2 Connecter une extrémité du câble audio
numérique coaxial (non fourni) à la prise de
sortie numérique (PCM/Train de bits)
coaxiale (DIGITAL OUT (PCM/BITSTREAM)
COAXIAL) à l’arrière du lecteur.
Câble audio
numérique
coaxial
46
3 Connecter l’autre extrémité du câble à la
prise d’entrée audio numérique coaxiale
(DIGITAL AUDIO COAXIAL INPUT) du
système audio numérique.
Câble vidéo
www.insignia-products.com
Page 55

Lecteur de disques Blu-ray Insignia NS-BRDVD
Connexion d'un système audio numérique optique
Pour connecter un système audio
numérique optique :
1 Vérifier que le lecteur et l’ordinateur sont
hors tension.
2 Connecter une extrémité du câble audio
numérique optique (non fourni) à la prise de
sortie numérique (PCM/Train de bits) optique
(DIGITAL OUT (PCM/BITSTREAM)
OPTICAL) à l’arrière du lecteur.
Câble
audio
3 Connecter l’autre extrémité du câble à la
prise d’entrée audio numérique optique
(DIGITAL AUDIO OPTICAL INPUT) du
système audio numérique.
Connexion d’un récepteur avec port HDMI
Pour connecter un récepteur avec port
HDMI :
1 Vérifier que le lecteur et l’ordinateur sont
hors tension.
2 Connecter une extrémité du câble HDMI (non
fourni) à la prise de sortie HDMI (HDMI OUT)
à l’arrière du lecteur.
Connecter le cordon d’alimentation CA.
Pour brancher le cordon d’alimentation :
1 Connecter une extrémité du cordon
d’alimentation CA à la prise d’entrée CA
(AC IN) à l’arrière du lecteur.
Cordon
d’alimentation CA
2 Brancher l'autre extrémité du cordon
d'alimentation CA sur une prise secteur.
Remarque
Vérifier que le cordon d’alimentation CA est
correctement connecté. Si le cordon n’est pas
fermement connecté, le lecteur émettra des
parasites ou de l’électricité statique.
Configuration des haut-parleurs
Pour configurer les haut-parleurs :
• Utiliser l’illustration suivante comme
exemple :
Avant gauche Avant droit
Central
Ambiance gauche Ambiance droit
Haut-parleur
d’infra-graves
Câble HDMI
Câble HDMI
3 Connecter l’autre extrémité du câble à la
prise d’entrée HDMI (HDMI IN) du récepteur.
4 Connecter un câble HDMI à la prise de sortie
HDMI (HDMI OUT) du récepteur.
5 Connecter l’autre extrémité du câble à la
prise d’entrée vidéo (HDMI IN) du téléviseur.
Ambiance
arrière gauche
Ambiance
arrière droit
Réglage des haut-parleurs
Il est possible de spécifier la taille du
haut-parleur et de régler son volume ainsi que le
temps de réponse.
Remarque
Il est possible également d’accéder à l’option
HDMI Audio (Audio HDMI) à partir du menu
(Accès rapide).
Pour régler les haut-parleurs :
1 Appuyer sur SETUP (Configuration).
2 Appuyer sur ou pour sélectionner ,
puis sur ENTER (Entrée). Le menu
(Personnalisé) s’affiche.
Custom
3 Appuyer sur ou pour sélectionner Audio,
puis appuyer sur ENTER (Entrée).
Quick
Custom
www.insignia-products.com
47
Page 56

Lecteur de disques Blu-ray Insignia NS-BRDVD
4 Appuyer sur ou pour sélectionner HDMI
Audio, puis appuyer sur ENTER (Entrée).
5 Appuyer sur ou pour sélectionner HDMI
Multi (LPCM), puis appuyer sur ENTER
(Entrée).
6 Appuyer sur ou pour sélectionner le
paramètre d’un haut-parleur, puis appuyer
sur ENTER (Entrée). Sélections possibles :
• Speaker Size (Taille du haut-parleur) —
Voir « Paramétrage de la taille des
haut-parleurs » à la page 48.
• Channel Level (Niveau du canal) — Voir
« Paramétrage du niveau du canal » à la
page 48.
• Delay Time (Temps de réponse) — Voir
« Paramétrage du temps de réponse » à
la page 49.
7 Appuyer sur ou sur pour accéder à un
sous-paramètre.
8 Appuyer sur ou pour régler le
sous-paramètre.
Remarque
• Si l’option tonalité test (Test Tone) est
sélectionné dans le cadre du paramétrage du
niveau du canal (Channel Level), appuyer sur
ou pour sélectionner Off (Désactivé),
Manual (Manuel) ou Auto, puis appuyer sur
ENTER (Entrée).
• Si manuel (Manual) est sélectionné, appuyer
sur
ou pour sélectionner un haut-parleur,
puis appuyer sur ou pour régler le
volume.
•Si Auto est sélectionné, appuyer sur ou
pour régler le volume du haut-parleur afin qu’il
émette une tonalité test.
• Si par défaut (Default) est sélectionné pour
l’un des paramètres, appuyer sur ENTER
(Entrée). Tous les sous-paramètres du
paramètre sélectionné sont réinitialisés aux
paramètres par défaut.
9 Appuyer sur SETUP (Configuration) pour
fermer le menu.
Remarques
• La taille de tous les haut-parleurs doit être la
même. Par exemple si le haut-parleur avant est
réglé sur petit (Small), il n’est pas possible de
régler un autre haut-parleur sur grand (Large).
• Dans le paramétrage du temps de réponse
(Delay Time), la distance entre les
haut-parleurs ne peut dépasser 15 pi (4,5 m).
Paramétrage de la taille des haut-parleurs
Le paramètre de la taille des haut-parleurs
(Speaker Size) spécifie la taille des
haut-parleurs individuels.
Configuration Options Description
Front (Avant) Large
Center
(Central)
Subwoofer
(Haut-parleur
d’infra-graves)
Surround
(Ambiophoniqu
e)
Surround back
(Ambiophoniqu
e arrière)
Default (Par défaut) Sélectionner Default, puis
(Grand)
Small
(Petit)
Large
(Grand)
Small
(Petit)
On (Activé)
Large
(Grand)
Small
(Petit)
Large
(Grand)
Small
(Petit)
Grand :
Pour de grands haut-parleurs
avec la possibilité de reproduction
de sonorités graves puissantes.
Petit :
Pour de petits haut-parleurs qui
ne peuvent reproduire des
sonorités graves puissantes.
Il n’est pas possible de modifier le
paramètre du haut-parleur
d’infra-graves (Subwoofer). Si le
périphérique connecté n’est pas
compatible avec le haut-parleur
d’infra-graves, l’option
Subwoofer sera affichée en grisé.
appuyer sur ENTER (Entrée) pour
réinitialiser le paramètre de la
taille du haut-parleur (Speaker
Size) aux paramètres par défaut.
Paramétrage du niveau du canal
Le paramétrage du niveau du canal (Channel
Level) teste chaque haut-parleur ou règle le
volume de chaque haut-parleur.
Configuration Option Description
Test Tone
(Tonalité test)
Off
(Désactivée)
Manual
(Manuel)
Auto
La tonalité test peut être émise
par les haut-parleurs,
permettant ainsi de régler le
volume de chacun d’entre eux.
Sélectionner Off pour
désactiver la tonalité test.
Sélectionner Manual (Manuel),
puis appuyer sur ENTER
(Entrée) pour régler
manuellement le volume de
chaque haut-parleur.
Sélectionner Auto, puis appuyer
sur ENTER (Entrée) pour
émettre automatiquement la
tonalité test pour chaque
haut-parleur.
48
www.insignia-products.com
Page 57

Lecteur de disques Blu-ray Insignia NS-BRDVD
Configuration Option Description
Front Lch
(Canal avant
gauche)
Center
(Central)
Subwoofer
(Haut-parleur
d’infra-graves)
Front Rch
(Canal avant
droit)
Surround Rch
(Canal
ambiophonique
droit)
Surround Back
Rch (Canal
ambiophonique
arrière droit)
Surround Back
Lch (Canal
ambiophonique
arrière gauche)
Surround Lch
(Canal
ambiophonique
gauche)
Default (Par défaut) Sélectionner Default, puis
0 dB à – 12 dB
(0 dB par
défaut)
0 dB à – 12 dB
(0 dB par
défaut)
0 dB à – 12 dB
(0 dB par
défaut)
0 dB à – 12 dB
(0 dB par
défaut)
0 dB à – 12 dB
(0 dB par
défaut)
0 dB à – 12 dB
(0 dB par
défaut)
0 dB à – 12 dB
(0 dB par
défaut)
0 dB à – 12 dB
(0 dB par
défaut)
Sil la tonalité test (Test Tone)
est réglée sur Manual
(Manuel), sélectionner un
haut-parleur et régler le volume.
Si la tonalité test (Test Tone) est
réglée sur Auto, une tonalité
test sera émise par chaque
haut-parleur l’un après l’autre.
Régler le volume du
haut-parleur qui émet la tonalité
test.
appuyer sur ENTER (Entrée)
pour réinitialiser le paramètre
du niveau du canal (Channel
Level) aux paramètres par
défaut.
Paramétrage du temps de réponse
Le paramétrage du temps de réponse (Delay
Time) permet d’optimiser l’émission des sons
des haut-parleurs en fonction de leur distance
par rapport à la zone d’écoute.
Configuration Option Description
Distance Feet (Pieds) Sélectionner la distance, puis
Meters
(Mètres)
Front (Avant) 0 pi à 60 pi
Center
(Central)
Surround
(Ambiophoniqu
e)
Surround back
(Ambiophoniqu
e arrière)
Default (Par défaut) Sélectionner Default (Par défaut)
(0 m à 18 m)
La valeur par
défaut est
12 pi (3,6 m)
0pi à 60pi
(0 m à 18 m)
La valeur par
défaut est
12 pi (3,6 m)
0pi à 60pi
(0 m à 18 m)
La valeur par
défaut est
10 pi (3 m)
0pi à 60pi
(0 m à 18 m)
La valeur par
défaut est
10 pi (3 m)
appuyer sur ENTER (Entrée).
Sélectionner la distance entre le
haut-parleur et la zone d’écoute.
puis appuyer sur ENTER
(Entrée).
Fonctionnement du lecteur
Toutes les fonctionnalités sont décrites pour une
utilisation avec la télécommande sauf indication
contraire.
Disques compatibles, cartes mémoire et
fichiers
La lecture de disques doubles n’est pas
garantie.
Le tableau ci-après indique la liste des disques
compatibles.
Type de disque Logo
Disque Blu-ray
• Disque vidéo Blu-ray (simple ou
double couche)
• Blu-ray Disc-RE (simple ou
double couche, enregistré au
format BDMV)
• Blu-ray Disc-R (simple ou
double couche, enregistré au
format BDMV). Les disques non
finalisés ne peuvent pas être
reproduits.
DVD vidéo
DVD+RW (simple couche)
DVD+R (simple et double couche)
CD-DA (CD audio)
www.insignia-products.com
49
Page 58

Lecteur de disques Blu-ray Insignia NS-BRDVD
Type de disque Logo
DVD-R/RW
CD-RW
CD-R
CD image Kodak
DTS-CD
Le tableau ci-après indique la liste des fichiers
reproductibles et des types de média
correspondants.
Fichiers pouvant être
reproduits
JPEG DVD, CD-RW,
MP3
WMA
Média
CD-R, carte
mémoire SD (y
compris SDHC),
carte miniSD,
carte microSD
Le tableau ci-après indique la liste des cartes
mémoires SD compatibles.
Fichiers/données
Cartes pouvant être lues
pouvant être
reproduits
Carte mémoire SD (8 Mo à 2 Go) Fichiers JPEG, MP3 ou
Carte mémoire SDHC (4 Go)
Carte miniSD (8 Mo à 2 Go)
Carte microSD (8 Mo à 2 Go)
Remarques
• Ce lecteur ne peut pas reproduire un disque si
le contenu est protégé par Windows Media
Digital Rights Management (DRM).
• Windows Media
développé par Microsoft
États-Unis.
• Ce lecteur est compatible avec les cartes
mémoires SD utilisant les systèmes de fichiers
FAT12/FAT16 et les cartes mémoires SDHC
avec les systèmes de fichiers FAT32.
WMA et les
commentaires image
sur image, les
sous-titres ou autres
extras pour les
BD-ROM Profile 1
ver.1.1
MC
Audio est un codec
MD
Corporation aux
Les disques et fichiers ci-après ne peuvent être
reproduits
• CD-ROM
• CD-I (disques compacts interactifs)
•DVD-RAM
• VSD (disque vidéo simple)
• DVD audio
• BD-RE (ver. 1/ver. 3)
• HD DVD
• CD vidéo
• Disques non finalisés
•SVCD
• BD-RE/-R enregistrés au format BDAV
• DVD, CD ou carte mémoire SD qui contient
des fichiers DivX
MD
MC
• CD Super audio CD (uniquement le son de la
couche du CD peut être entendu. Le son
enregistré sur la couche à haute densité du
CD Super Audio n'est pas accessible.)
Codes régionaux
Ce lecteur ne peut reproduire que les disques
ayant les codes régionaux suivants. Localiser le
symbole sur le disque ou sur son emballage.
Type de disque et code régional Code de région
Blu-ray (code de région A)
DVD (codes de région 1 et All
[Toutes])
Lecture d'un disque Blu-ray ou d'un DVD
Pour reproduire un disque Blu-ray ou un
DVD :
1 Appuyer sur POWER (Marche/Arrêt) pour
mettre le lecteur sous tension.
2 Mettre le téléviseur sous tension, puis
sélectionner sur le téléviseur l'entrée qui
correspond à la méthode de connexion
utilisée pour brancher le lecteur.
3 Appuyer sur OPEN/CLOSE
(Ouvrir/Fermer) pour ouvrir le plateau à
disque.
4 Placer un disque sur le plateau, avec
l’étiquette tournée vers le haut, puis appuyer
sur OPEN/CLOSE (Ouvrir/Fermer) pour
refermer le plateau. Le chargement du
disque peut prendre quelques secondes.
Remarque
Si le DVD a été enregistré en mode VR, appuyer
sur POP MENU/MENU (Menu contextuel/Menu)
pour ouvrir le menu du DVD. Appuyer sur ou
5 Si la lecture ne commence pas
6 Si un menu de disque Blu-ray ou de DVD
pour sélectionner Original ou Playlist (Liste de
lecture), appuyer sur ou pour sélectionner
un titre, puis appuyer sur ENTER (Entrée).
automatiquement, appuyer sur PLAY
(Lecture).
s'affiche, appuyer sur ou pour
sélectionner Play (Lecture), puis appuyer sur
ENTER (Entrée).
50
www.insignia-products.com
Page 59

Lecteur de disques Blu-ray Insignia NS-BRDVD
7 Pour arrêter la lecture, appuyer sur STOP
(Arrêt). En appuyant une fois sur cette
touche, puis sur PLAY (Lecture), la lecture
reprend à partir du point d’arrêt. En appuyant
deux fois sur cette touche, puis sur PLAY
(Lecture), la lecture recommence à partir du
début du disque.
Remarque
La fonctionnalité de reprise de lecture n’est pas
disponible sur tous les disques Blu-ray.
Les informations de reprise de lecture restent en
mémoire même lorsque l'appareil est mis hors
tension.
Les actions suivantes effacent les informations de
reprise de lecture :
• Ouvrir le plateau à disque
• Appuyer deux fois sur STOP (Arrêt)
• Alterner entre le mode Disc (Disque) et le
mode SD Memory (Mémoire SD)
• Changer le niveau de classification des
disques Blu-ray (BD Rating Level) ou le
niveau de classification des DVD (DVD Rating
Level) dans le menu
• Ouvrir le plateau à disque ou mettre le lecteur
hors tension lorsqu'il est en mode SD Memory
(Mémoire SD)
Parental
8 Pour éjecter le disque, appuyer sur
OPEN/CLOSE (Ouvrir/Fermer).
Remarques
• peut apparaître dans le coin supérieur droit
de l'écran du téléviseur lorsqu'une opération
est interdite par le disque ou par le lecteur.
• Lors de la lecture d'un disque double couche,
la vidéo peut se figer pendant un moment. Ceci
se produit lorsque le lecteur passe de la
première couche à la seconde. Ceci est
normal.
• Le fonctionnement peut varier lors de la lecture
de disques Blu-ray ou de DVD à l'aide du menu
disque. Se reporter à la documentation qui
accompagne le disque pour plus de détails.
Contrôle de la lecture d'un disque Blu-ray
ou d'un DVD
Pour contrôler la lecture d'un disque Blu-ray
ou d'un DVD :
• Pour arrêter momentanément la lecture,
appuyer sur PAUS E . Pour reprendre la
lecture, appuyer sur PLAY (Lecture).
Remarque
Si l'image est floue lors d'un arrêt momentané,
régler le mode arrêt sur image (Still Mode) sur
Fields (Champs) dans le menu
Pour plus d’informations, voir « Réglage de
l'image fixe » à la page 62.
• Pour une recherche avant ou arrière rapide,
appuyer sur FWD (Avance rapide) ou
REV (Retour rapide). Après chaque appui
sur l'une de ces touches, la vitesse de
recherche rapide vers l'avant ou vers l'arrière
passe sur 2×, 8×, 20×, 50× et 100×. Pour
reprendre la lecture normale, appuyer sur
PLAY (Lecture).
Video
(Vidéo).
• Pour une lecture avant au ralenti, appuyer sur
PAU SE , puis sur FWD (Avance rapide).
Chaque fois que la touche FWD (Avance
rapide) est appuyée, la vitesse de l'avance
au ralenti passe sur 1/16×, 1/8× et 1/2×. Pour
reprendre la lecture normale, appuyer sur
PLAY (Lecture).
Remarque
Si l'image est floue lors d'une lecture au ralenti,
régler le mode arrêt sur image (Still Mode) sur
Fields (Champs) dans le menu
Pour plus d’informations, voir « Réglage de
l'image fixe » à la page 62.
Video
(Vidéo).
• Pour une lecture avant pas à pas, appuyer de
façon répétée sur PAUS E . À chaque appui
sur cette touche, la vidéo avance d'un pas
(image).
Remarque
Si l'image est floue lors d'une lecture pas à pas,
régler le mode arrêt sur image (Still Mode) sur
Fields (Champs) dans le menu
Pour plus d’informations, voir « Réglage de
l'image fixe » à la page 62.
Video
(Vidéo).
• Pour aller au chapitre suivant, appuyer sur
SKIP (Saut) . Si le disque ne contient
aucun chapitre, cette touche envoie au titre
suivant (le cas échéant).
• Pour aller au début du chapitre en cours,
appuyer sur SKIP (Saut) .
• Pour aller au chapitre précédent, appuyer
deux fois sur SKIP (Saut) . Si le disque ne
contient aucun chapitre, cette touche envoie
au titre précédent (le cas échéant).
• Pour répéter le titre en cours, appuyer une
fois sur REPEAT (Répétition). Pour répéter le
chapitre en cours, appuyer deux fois sur
REPEAT (Répétition). Pour reprendre la
lecture normale, appuyer sur PLAY
(Lecture). Il est aussi possible d’appuyer sur
STOP (Arrêt) pour annuler le mode de
répétition.
Remarques
• Le mode de répétition peut ne pas être
disponible pour toutes les scènes.
• Le mode de répétition ne fonctionne pas
pendant le mode de répétition A-B.
Lecture d'un CD audio ou d'un disque
JPEG/MP3/WMA
Pour reproduire un CD audio ou un disque
JPEG/MP3/WMA :
1 Appuyer sur POWER (Marche/Arrêt) pour
mettre le lecteur sous tension.
2 Mettre le téléviseur sous tension, puis
sélectionner sur le téléviseur l'entrée qui
correspond à la méthode de connexion
utilisée pour brancher le lecteur.
3 Appuyer sur OPEN/CLOSE
(Ouvrir/Fermer) pour ouvrir le plateau à
disque.
4 Placer un disque sur le plateau, avec
l’étiquette tournée vers le haut, puis appuyer
sur OPEN/CLOSE (Ouvrir/Fermer) pour
refermer le plateau.
www.insignia-products.com
51
Page 60

Lecteur de disques Blu-ray Insignia NS-BRDVD
5 Si la liste de fichiers ne s'ouvre pas
automatiquement, appuyer sur
POP MENU/MENU (Menu contextuel/Menu).
2 / 4
Folder_1
1 Type de disque : Pour des CD audio, CD-DA
s'affiche. Pour des fichiers JPEG, MP3 ou
WMA, le nom du dossier en cours s'affiche.
Pour des disques Blu-ray, des DVD ou des
cartes mémoires SD, le nom du disque ou
de la carte s'affiche si les fichiers ne sont
pas à l'intérieur d'un dossier.
2 Liste des numéros et durées de pistes d'un
CD audio, ou dossiers ou fichiers JPEG,
MP3 ou WMA.
3 Numéro et durée de la piste actuellement
sélectionnée d'un CD audio, ou nom de
dossier ou de fichier JPEG/MP3/WMA.
4 Page en cours et nombre total de pages
dans la liste.
5 Indique qu'il existe une page suivante ou
précédente. Appuyer sur SKIP (Saut) ou
SKIP (Saut) pour aller à la page
suivante ou précédente.
Icône de
dossier
Icône de
piste de CD
audio
Icône JPEG
Icône MP3
Icône WMA
6 Appuyer sur ou pour sélectionner un
dossier ou un fichier, puis appuyer sur
ENTER (Entrée). Appuyer sur ou pour
se déplacer vers l'arrière ou vers l'avant entre
les fichiers et les dossiers. Si un fichier est
sélectionné, appuyer sur ENTER (Entrée) et
la lecture démarre automatiquement.
7 Pour revenir en haut de la liste, appuyer sur
TOP MENU (Menu principal).
8 Pour arrêter la lecture, appuyer sur STOP
(Arrêt). En appuyant une fois sur cette
touche, puis sur PLAY (Lecture), la lecture
reprend à partir du point d’arrêt. En appuyant
deux fois sur cette touche, puis sur PLAY
(Lecture), la lecture recommence à partir du
début du disque.
Remarque
Les informations de reprise de lecture restent en
mémoire même lorsque l'appareil est mis hors
tension.
Les actions suivantes effacent les informations de
reprise de lecture :
• Ouvrir le plateau à disque
• Appuyer deux fois sur STOP (Arrêt)
• Alterner entre le mode Disc (Disque) et le
mode SD Memory (Mémoire SD)
• Changer le niveau de classification des
disques Blu-ray (BD Rating Level) ou le
niveau de classification des DVD (DVD Rating
Level) dans le menu
• Ouvrir le plateau à disque ou mettre le lecteur
hors tension lorsqu'il est en mode SD Memory
(Mémoire SD)
Parental
9 Pour éjecter le disque, appuyer sur
OPEN/CLOSE (Ouvrir/Fermer).
Remarque
Fichiers JPEG : doivent être enregistrés avec les
spécifications suivantes :
• Limite supérieure : 2 560 × 1 900 pixels
(sous-échantillonnage de 4:4:4) 5 120 × 3 840
pixels (sous-échantillonnage jusqu'à 4:2:2)
• Limite inférieure : 32 x 32 pixels
• Taille maximale du fichier de l'image : 12 Mo
Les fichiers MP3 et WMA doivent être enregistrés
avec les spécifications suivantes :
• Fréquence d’échantillonnage : 44,1 kHz ou 48
kHz
• Débit binaire constant : 112 kbps à 320 kbps
(MP3) 48 kbps à 192 kbps (WMA)
Remarques
• Le lecteur peut reconnaître jusqu'à
255 dossiers et 999 fichiers pour un CD et
999 dossiers et 9999 fichiers pour un DVD et
une carte mémoire SD.
• Les 28 premiers caractères des noms de
dossier ou de fichier sont affichés. Les
caractères qui ne peuvent pas être reconnus
sont remplacés par des astérisques.
• Le lecteur peut seulement afficher les huit
premiers niveaux de dossiers sur un CD et les
neuf premiers niveaux de dossiers sur un DVD
ou une carte mémoire SD.
• Le lecteur ne lit que les fichiers qui ont une
extension jpg, jpeg, mp3 ou wma. Les fichiers
qui ont une autre extension ne sont pas
affichés.
• Le lecteur peut afficher certains dossiers ou
fichiers illisibles en raison de l'état
d'enregistrement.
• Les fichiers JPEG à haute résolution mettent
plus longtemps à s'afficher.
• Le lecteur ne peut pas afficher les fichiers
JPEG progressifs (fichiers JPEG enregistrés
en format progressif).
52
www.insignia-products.com
Page 61

Lecteur de disques Blu-ray Insignia NS-BRDVD
Contrôle de la lecture d'un CD audio ou
d'un disque JPEG/MP3/WMA
Pour contrôler la lecture d'un CD audio ou
d'un disque JPEG/MP3/WMA :
• Pour arrêter momentanément la lecture,
appuyer sur PAUS E . Pour reprendre la
lecture, appuyer sur PLAY (Lecture).
• Pour une recherche avant ou arrière rapide,
appuyer sur FWD (Avance rapide) ou
REV (Retour rapide). Après chaque appui
sur l'une de ces touches, la vitesse de
recherche rapide vers l'avant ou vers l'arrière
passe sur 2×, 8× et 30×. (CD audio, MP3 et
WMA uniquement)
Remarque
• Lors de la lecture d'un CD audio, les opérations
d'avance et de retour rapide entre différentes
pistes ne sont pas disponibles au cours d'un
programme ou d'une lecture aléatoire.
• Lors de la lecture de fichiers MP3 ou WMA, les
opérations d'avance et de retour rapide entre
différentes fichiers ne sont pas toujours
disponibles.
• Pour répéter la piste du CD audio ou le
dossier JPEG, MP3 ou WMA en cours,
appuyer sur REPEAT (Répétition). Pour
reprendre la lecture normale, appuyer sur
PLAY (Lecture).
• Pour répéter toutes les pistes d'un CD audio,
appuyer deux fois sur REPEAT (Répétition).
Pour répéter tous les fichiers JPEG, MP3 ou
WMA du dossier en cours, appuyer deux fois
sur REPEAT (Répétition). Pour répéter tous
les fichiers JPEG, MP3 ou WMA sur le
disque ou la carte, appuyer trois fois sur
REPEAT (Répétition). Pour reprendre la
lecture normale, appuyer sur PLAY
(Lecture). Il est aussi possible d’appuyer sur
STOP (Arrêt) pour annuler le mode de
répétition.
• Pour aller à la piste suivante, appuyer sur
SKIP (Saut) .
• Pour aller au début de la piste en cours,
appuyer sur SKIP (Saut) .
• Pour aller à la piste précédente, appuyer
deux fois sur SKIP (Saut) .
Remarque
Le mode de répétition ne fonctionne pas pendant
le mode de répétition A-B.
Lecture d'un CD Image Kodak
Le lecteur peut reproduire des fichiers JPEG
files sur un CD Image Kodak. Le CD doit être au
format CD Image Kodak version 7.0. En cas
d'incertitude, consulter un détaillant qui
développe des CD Image Kodak pour
déterminer la version dans laquelle le CD est
enregistré.
Pour reproduire un CD Image Kodak :
1 Appuyer sur POWER (Marche/Arrêt) pour
mettre le lecteur sous tension.
2 Mettre le téléviseur sous tension, puis
sélectionner sur le téléviseur l'entrée qui
correspond à la méthode de connexion
utilisée pour brancher le lecteur.
3 Appuyer sur OPEN/CLOSE
(Ouvrir/Fermer) pour ouvrir le plateau à
disque.
4 Placer un disque sur le plateau, avec
l’étiquette tournée vers le haut, puis appuyer
sur OPEN/CLOSE (Ouvrir/Fermer) pour
refermer le plateau. Le menu s'affiche
automatiquement.
1 Image actuelle et nombre total
d'images.
2 Indique qu'il existe une page suivante
ou précédente. Appuyer sur
SKIP (Saut) ou SKIP (Saut)
pour aller à la page suivante ou
précédente.
5 Appuyer sur ou pour sélectionner
l'image souhaitée, puis sur PLAY (Lecture)
ou ENTER (Entrée). Le lecteur affiche
l'image sélectionnée, puis passe
automatiquement à l'image suivante.
6 Pour arrêter la lecture, appuyer sur STOP
(Arrêt). En appuyant une fois sur cette
touche, puis sur PLAY (Lecture), la lecture
reprend à partir du point d’arrêt. En appuyant
deux fois sur cette touche, puis sur PLAY
(Lecture), la lecture recommence à partir du
début du CD.
Remarque
Les informations de reprise de lecture restent en
mémoire même lorsque l'appareil est mis hors
tension.
Les actions suivantes effacent les informations de
reprise de lecture :
• Ouvrir le plateau à disque
• Appuyer deux fois sur STOP (Arrêt)
• Alterner entre le mode Disc (Disque) et le
mode SD Memory (Mémoire SD)
• Changer le niveau de classification des
disques Blu-ray (BD Rating Level) ou le
niveau de classification des DVD (DVD Rating
Level) dans le menu
• Ouvrir le plateau à disque ou mettre le lecteur
hors tension lorsqu'il est en mode SD Memory
(Mémoire SD)
Parental
7 Pour éjecter le disque, appuyer sur
OPEN/CLOSE (Ouvrir/Fermer).
Contrôle de la lecture d’un CD Image
Kodak
Pour contrôler la lecture d’un CD Image
Kodak :
• Pour arrêter momentanément la lecture,
appuyer sur PAUS E . Pour reprendre la
lecture, appuyer sur PLAY (Lecture).
• Pour aller à l'image suivante, appuyer sur
SKIP (Saut) ou .
www.insignia-products.com
53
Page 62

Lecteur de disques Blu-ray Insignia NS-BRDVD
• Pour aller à l'image précédente, appuyer
deux fois sur SKIP (Saut) . Il est
également possible d'appuyer sur .
• Pour faire pivoter l'image, appuyer sur
ANGLE. Chaque fois que cette touche est
appuyée, l'affichage pivote de 90
°.
• Pour modifier l'effet visuel qui se produit lors
du passage d'une image à une autre,
appuyer une fois sur MODE, puis appuyer
sur ou ou ENTER (Entrée) pour
sélectionner Cut In/Out (Coupé à
l'ouverture/fermeture) ou Fade In or Out
(Fondu à l'ouverture ou à la fermeture).
• Pour changer la taille de l'image, appuyer
deux fois sur MODE, puis appuyer sur
ou ou ENTER (Entrée) pour
sélectionner Normal (100 %) ou Small
(Petite) (95 %). La différence entre les deux
tailles d'image peut être à peine visible.
Lecture à partir d'une carte mémoire SD
Le lecteur peut reproduire des fichiers JPEG,
MP3 ou WMA enregistrés sur une carte
mémoire SD.
Certains disques Blu-ray fournissent des
commentaires supplémentaires en image sur
image, des sous-titres ou d'autres extras dans
des fichiers BD-ROM Profile 1 ver.1.1. Il est
possible de télécharger ces fichiers de l'Internet
vers un ordinateur, puis de les copier sur une
carte mémoire SD. Il est possible de reproduire
le fichier BD-ROM en même temps que le
disque Blu-ray associé. Consulter la
documentation fournie avec le disque Blu-ray
pour savoir si un fichier BD-ROM est disponible.
Avant de pouvoir lire une carte mémoire SD, il
faut sélectionner SD Memory (Mémoire SD) en
tant que mode de support.
Le lecteur peut lire les cartes mémoires SD
suivantes :
• Carte mémoire SD (8 Mo à 2 Go)
• Carte mémoire SDHC (4 Go)
• Carte miniSD (8 Mo à 2 Go)
• Carte microSD (8 Mo à 2 Go)
Il faut un adaptateur pour les cartes miniSD et
microSD.
Adaptateur pour
carte microSD
Pour sélectionner SD Memory (Mémoire SD)
en tant que mode de support :
1 Appuyer sur POWER (Marche/Arrêt) pour
mettre le lecteur sous tension.
2 Mettre le téléviseur sous tension, puis
sélectionner sur le téléviseur l'entrée qui
correspond à la méthode de connexion
utilisée pour brancher le lecteur.
3 Vérifier que le lecteur est en mode arrêt, puis
appuyer sur SETUP (Configuration). Appuyer
sur ou pour sélectionner , puis sur
Quick
ENTER (Entrée). Le menu
(Rapide)
s’affiche.
4 Appuyer sur ou pour sélectionner Media
Select (Sélection de support), puis appuyer
de façon répétée sur ENTER (Entrée) pour
sélectionner SD Memory (Mémoire SD).
5 Appuyer sur SETUP (Configuration) pour
fermer le menu.
Pour lire à partir d'une carte mémoire SD :
1 Insérer une carte mémoire SD, l'étiquette
tournée vers le haut, dans le logement pour
carte mémoire SD jusqu'à enclenchement.
SD Memory Card
2 Lorsque la liste de fichiers s'affiche, appuyer
sur ou pour sélectionner un dossier ou
un fichier, puis appuyer sur ENTER (Entrée).
Appuyer sur ou pour se déplacer vers
l'arrière ou vers l'avant entre les fichiers et les
dossiers. Si un fichier est sélectionné,
appuyer sur ENTER (Entrée) et la lecture
démarre automatiquement.
54
Adaptateur
pour carte
miniSD
Carte
microSD
Carte
miniSD
www.insignia-products.com
Page 63

Lecteur de disques Blu-ray Insignia NS-BRDVD
Pour retirer la carte mémoire SD :
1 Vérifier que le lecteur est en mode arrêt, puis
appuyer sur la carte pour la déverrouiller. La
carte sortira légèrement du logement.
2 Saisir la carte et la sortir du logement.
Remarques
• Le lecteur affiche les huit premiers caractères
des fichiers et dossiers de la carte mémoire
SD.
• Le lecteur peut reconnaître jusqu'à 999
dossiers et 9999 fichiers d'une carte mémoire
SD.
• Ne pas utiliser un ordinateur pour supprimer
des fichiers ou des dossiers sur une carte
mémoire SD. Cela pourrait rendre impossible la
lecture de la carte par le lecteur.
• Ne pas retirer la carte mémoire SD pour arrêter
le lecteur au cours de la lecture de la carte. La
carte pourrait être endommagée ou des
fichiers corrompus.
• Garder les cartes mémoires SD dans leurs
boîtiers lorsqu'elles ne sont pas utilisées.
• Ne pas essayer d'ouvrir ou de modifier la carte.
• Ne pas toucher les bornes avec les ongles ou
un objet métallique.
• Ne coller ni étiquette ni adhésif supplémentaire
sur les cartes.
• Ne pas retirer l'étiquette des cartes mémoires
SD.
• Ce lecteur est compatible avec les cartes
mémoires SD utilisant le système de fichiers
FAT12/FAT16 et avec les cartes mémoires
SDHC utilisant le système de fichiers FAT32.
• Il est possible que le lecteur ne puisse pas lire
les cartes mémoires SD formatées sur un
ordinateur. Si c'est le cas, reformater les cartes
mémoires SD dans le lecteur et réessayer.
• Le lecteur ne peut pas lire les cartes mémoires
miniSDHC et microSDHC.
Formatage d'une carte mémoire SD
Pour formater une carte mémoire SD :
1 Appuyer sur SETUP (Configuration).
2 Appuyer sur ou pour sélectionner ,
puis sur ENTER (Entrée). Le menu
(Initialisation) s’affiche.
Initialize
4 Lorsqu'un message demande de confirmer
l'initialisation, appuyer une nouvelle fois sur
ENTER (Entrée).
5 Appuyer sur SETUP (Configuration) pour
fermer le menu.
Affichage des informations d'état
Il est possible d’afficher des informations sur
l’état du disque en cours de lecture.
Pour afficher les informations d’état :
• Pendant la lecture du disque, appuyer de
façon répétée sur DISPLAY (Affichage). À
chaque appui sur cette touche, les
informations d'état changent.
• Pour des disques Blu-ray, la séquence
d'affichage est la suivante : titre et
chapitre, durée écoulée pour le titre,
durée restante pour le titre, informations
HDMI, puis affichage désactivé.
• Pour des DVD, la séquence d'affichage
est la suivante : durée écoulée pour le
chapitre, durée restante pour le chapitre,
durée écoulée pour le titre, durée restante
pour le titre, informations de débit binaire,
informations HDMI, puis affichage
désactivé.
• Pour des CD audio, la séquence
d'affichage est la suivante : durée écoulée
pour la piste, durée restante pour la piste,
durée écoulée pour le CD, durée restante
pour le CD, informations HDMI, puis
affichage désactivé.
• Pour des fichiers JPEG, la séquence
d'affichage est la suivante : nom du
fichier, informations relatives au fichier,
informations HDMI, puis affichage
désactivé.
• Pour des fichiers MP3, la séquence
d'affichage est la suivante : nom du
fichier, durée écoulée pour le fichier en
cours, informations HDMI, puis affichage
désactivé.
• Pour des fichiers WMA, la séquence
d'affichage est la suivante : nom du
fichier, titre de la chanson (d'après les
informations de l'étiquette), nom de
l'artiste (d'après les informations de
l'étiquette), durée écoulée pour le fichier
en cours, informations HDMI, puis
affichage désactivé.
3 Appuyer sur ou pour sélectionner
Erase/Format SD Card (Effacer/Formater la
carte SD), puis appuyer sur ENTER (Entrée).
Remarque
Si aucune carte mémoire SD n'est insérée,
l'option Erase/Format SD Card (Effacer/Formater
la carte SD) s'affiche en grisé.
www.insignia-products.com
55
Page 64

Lecteur de disques Blu-ray Insignia NS-BRDVD
Informations concernant le chapitre
3 / 5 0 : 01 : 02
1 Numéro du chapitre en cours de
lecture et nombre total de chapitres
2 Durée écoulée et durée restante pour le
chapitre en cours
3 Icône d'angle de prise de vues
(s'affiche lorsque plusieurs angles de
prise de vues sont disponibles)
4 État de lecture actuel
5 Numéro du titre en cours
6 Réglage de la fonction de répétition si
le mode de répétition est actif. C
indique la répétition du chapitre. T
indique la répétition du titre. AB
indique une lecture en boucle
programmée.
Informations concernant le titre
1 Titre actuel et nombre total de titres
2 Durée écoulée et durée restante pour le
titre
Informations concernant le débit binaire
4 Réglage de la fonction de répétition si
le mode de répétition est actif. T
indique la répétition de la piste ou du
fichier. G indique la répétition du
groupe. A indique que tout est répété.
AB indique une lecture en boucle
programmée.
Informations concernant le disque
T
1 Numéro de la piste en cours de lecture
et nombre total de pistes
2 Durée écoulée et durée restante pour le
disque en cours
Informations de l'étiquette WMA
1 Titre, d'après les informations de
l'étiquette
2 Nom de l'artiste, d'après les
informations de l'étiquette
Informations concernant le nom du fichier
1 Débit binaire (la quantité de données
vidéo actuellement lues).
2 Numéro de la couche (uniquement
pour les disques double couche). L0
signifie que la couche 0 est en cours de
lecture. L1 signifie que la couche 1 est
en cours de lecture.
Pour des DVD-R/RWs, ORG (original)
ou PL (liste de lecture) s'affiche au lieu
de numéro de la couche.
Informations concernant la piste et le fichier
T
1 Numéro de la piste ou du fichier en
cours et nombre total de pistes ou de
fichiers.
2 Durée écoulée et durée restante pour la
piste en cours.
3 Témoin de carte mémoire SD. SD
s'affiche lors de la lecture d'une carte
mémoire SD.
1 Icône de support et nom du fichier. Par
exemple :
Informations HDMI
1 Format vidéo HDMI.
2 Format audio HDMI.
3 Résolution de sortie HDMI.
4 Nombre maximum de canaux pouvant
être acceptés par l'appareil connecté.
Remarque
Si aucun câble HDMI n'est connecté, –––
s'affiche au lieu des informations HDMI.
Fichier JPEG
Fichiers MP3
Fichier WMA
/:
:
:
56
www.insignia-products.com
Page 65

Lecteur de disques Blu-ray Insignia NS-BRDVD
Programmation d’une lecture en boucle
programmée
Il est possible de reproduire de façon répétée
une section d'un disque Blu-ray, d'un DVD ou
d'un CD audio.
Pour programmer une lecture en boucle :
1 Au cours de la lecture, rechercher l'endroit
souhaité pour commencer la lecture en
boucle, puis appuyer sur A-B. Pour annuler le
point de départ, appuyer sur CLEAR
(Effacer). Ensuite, après avoir trouvé le
nouveau point de départ, appuyer sur A-B.
2 Reproduire le disque jusqu'au point d'arrêt de
lecture en boucle, puis appuyer sur A-B. La
lecture en boucle commence
immédiatement.
3 Pour annuler la lecture en boucle, appuyer
sur A-B.
Remarque
• Les points de début et de fin de la lecture en
boucle doivent se trouver au sein d'un même
titre ou d'une même piste.
• La fonction de lecture en boucle peut ne pas
être disponible pour toutes les scènes.
• La fonction de lecture en boucle ne fonctionne
pas lorsque le lecteur est en mode de
répétition ordinaire.
Création d'un programme
Il est possible de créer un programme pour les
pistes d'un CD audio et des fichiers JPEG, MP3
ou WMA.
Pour créer un programme :
1 En mode arrêt, appuyer sur MODE. L’écran
de programmation s’affiche.
5 Appuyer sur PLAY (Lecture) pour
commencer la lecture.
Contrôle de la lecture programmée
Pour contrôler la lecture programmée :
• Pour ouvrir l'écran de programmation,
appuyer deux fois sur STOP (Arrêt). Pour
fermer l'écran de programmation et revenir
au programme, appuyer sur RETURN
(Retour), puis appuyer sur PLAY (Lecture).
• Pour répéter la piste ou le fichier en cours
dans le programme, appuyer de façon
répétée sur REPEAT (Répétition) jusqu'à ce
que Track (Piste) s'affiche à l'écran.
• Pour répéter le programme entier, appuyer
de façon répétée sur REPEAT
(Répétition) jusqu'à ce que All (Tout)
s'affiche.
Remarques
• En cas d'ouverture du plateau à disque, du
retrait de la carte mémoire SD ou de la mise
hors tension du système, le programme est
effacé.
• Il n'est pas possible de sélectionner une piste à
reproduire, ni d'utiliser la lecture aléatoire, lors
d'une lecture programmée.
Utilisation du mode de lecture aléatoire
Il est possible de reproduire les pistes d'un CD
audio et des fichiers JPEG, MP3 ou WMA dans
un ordre aléatoire.
Pour utiliser le mode de lecture aléatoire :
1 En mode arrêt, appuyer deux fois sur MODE.
L’ é c r a n
Random
(Aléatoire) s'affiche.
2 Pour un CD audio, appuyer sur ou pour
sélectionner une piste, puis sur ENTER
(Entrée).
Ou, pour un disque JPEG, MP3 ou WMA ou
une carte mémoire SD, appuyer sur ou
pour sélectionner un dossier (le cas
échéant), puis sur ENTER (Entrée). Appuyer
sur ou pour sélectionner un fichier, puis
appuyer sur ENTER (Entrée).
3 Répéter l’étape 2 pour ajouter des pistes ou
fichiers supplémentaires à la liste.
4 Pour supprimer la dernière piste ou le dernier
fichier ajouté, appuyer sur CLEAR (Effacer).
Pour supprimer toutes les pistes et tous les
fichiers ajoutés, appuyer sur ou pour
sélectionner All Clear (Effacer tout) en bas
de la liste, puis appuyer sur ENTER (Entrée).
www.insignia-products.com
2 Appuyer sur la touche PLAY (Lecture). La
lecture des pistes ou des fichiers s'effectue
dans un ordre aléatoire.
Contrôle de la lecture aléatoire
Pour contrôler la lecture aléatoire :
• Pour définir un point de reprise de la lecture,
appuyer une fois sur STOP (Arrêt).
Appuyer sur PLAY (Lecture) pour
reprendre la lecture. La lecture des pistes
d'un CD audio redémarre à l'endroit où elle a
été arrêtée. Une présentation de photos
JPEG continue à partir du fichier où elle a été
arrêtée.
• Pour annuler la lecture aléatoire, appuyer
deux fois sur STOP (Arrêt). L’écran
Random
MODE. La lecture aléatoire est annulée.
(Aléatoire) s'affiche. Appuyer sur
57
Page 66

Lecteur de disques Blu-ray Insignia NS-BRDVD
• Pour répéter la piste ou le fichier en cours,
appuyer de façon répétée sur REPEAT
(Répétition) jusqu'à ce que Tra ck (Piste)
s'affiche à l'écran.
• Pour répéter l'ensemble de la sélection
aléatoire, appuyer de façon répétée sur
REPEAT (Répétition) jusqu'à ce que All
(Tout) s'affiche.
Remarque
Il n'est pas possible de revenir à la piste ou au
fichier précédent pendant la lecture aléatoire.
Recherche d’un chapitre, d'un titre, d'une
piste ou d'une position horaire
Pour rechercher un chapitre, un titre, une
piste ou une position horaire :
1 Pendant la lecture, appuyer de façon répétée
sur SEARCH (Recherche) pour sélectionner
un mode de recherche.
2 Utiliser les touches numériques pour saisir le
chapitre, le titre, la piste ou la position
horaire.
Remarques
• Il n'est pas possible d'effectuer une recherche
pendant une lecture programmée ou une
lecture aléatoire.
• La recherche de position horaire fonctionne
uniquement dans le même titre, la même piste
ou le même fichier.
Remarques
• L'ouverture du plateau à disque, la mise hors
tension du système ou la sélection de l'option
AC à l'étape 2, suivie d'une pression sur
ENTER (Entrée), efface tous les signets.
• Pour effacer un signet, appuyer sur ou
pour sélectionner un signet, puis appuyer sur
CLEAR (Effacer).
• Il est possible de marquer jusqu'à neuf points.
• Pour les disques Blu-ray, il n'est pas possible
d'effectuer une recherche de signet d'un titre à
un autre.
• Pour les disques Blu-ray, il n'est possible de
revenir au signet que pendant la lecture.
Utilisation de la fonction PIP (image dans
l'image)
Certains disques Blu-ray offrent la fonction PIP
(image dans l'image), qui permet d'afficher une
vidéo secondaire dans une petite fenêtre
superposée à la vidéo principale.
Pour utiliser la fonction PIP :
1 Au cours de la lecture, appuyer sur PIP
(Image dans l'image). Si le disque Blu-ray
offre la fonction PIP, des informations PIP
s'affichent.
2 Appuyer sur ou pour sélectionner la
vidéo secondaire souhaitée. La vidéo
secondaire s'affiche et la trame sonore
secondaire est diffusée.
Recherche au moyen de signets
Il est possible d'ajouter des signets à un titre ou
à une piste afin de pouvoir y revenir
ultérieurement.
Pour effectuer une recherche au moyen de
signets :
1 Au cours de la lecture, appuyer de façon
répétée sur SEARCH (Recherche) jusqu'à ce
que le menu des signets s'affiche.
2 Appuyer sur ou pour sélectionner un
numéro de signet.
3 Quand la lecture atteint l'endroit à repérer par
un signet, appuyer sur ENTER (Entrée). Le
titre ou la piste et le temps de lecture écoulé
s'affichent à l'écran du téléviseur.
4 Appuyer sur SEARCH (Recherche) ou sur
RETURN (Retour) pour fermer le menu.
5 Pour revenir au signet, appuyer de façon
répétée sur SEARCH (Recherche) pour
ouvrir le menu des signets, appuyer sur
ou pour sélectionner un signet, puis
appuyer sur ENTER (Entrée).
Vidéo
principale
Vidéo
secondaire
3 Appuyer sur RETURN (Retour) ou PIP
pour supprimer les informations PIP.
Remarque
La trame sonore secondaire n'est pas diffusée si
la trame sonore secondaire est réglée sur Off
(Désactivée) ou si le mode audio du disque
Blu-Ray (BD Audio Mode) est réglé sur HD
Audio Output (Sortie audio HD). Pour plus
d’informations, voir « Changement de bande
sonore » à la page 59 et « Réglage du mode
audio Blu-ray » à la page 61.
Sélection d'un angle de prise de vues
Certains disques Blu-ray et DVD contiennent
des scènes enregistrées sous divers angles de
prise de vues. Si l'option Angle Icon (Icône
d'angle de prise de vues) est activée,
s'affiche à l'écran lorsque plusieurs angles de
prise de vues sont disponibles.
58
www.insignia-products.com
Page 67

Lecteur de disques Blu-ray Insignia NS-BRDVD
Pour sélectionner un angle de prise de vues :
1 Pendant la lecture, appuyer sur ANGLE.
L'angle sélectionné s'affiche dans une barre
en haut de l'écran.
2 Appuyer sur ou pour sélectionner l'angle
de prise de vues souhaité.
Remarque
Si l'option Angle Icon (Icône d'angle de prise de
vues) est désactivée, ne s'affiche pas à
l'écran. Pour plus d’informations, voir « Menu
Others (Autres) » à la page 69.
Sélection de la langue ou du style des
sous-titres
Pour sélectionner une langue ou un style de
sous-titres sur un disque Blu-ray :
1 Au cours de la lecture, appuyer de façon
répétée sur SUBTITLE (Sous-titres) pour
sélectionner :
• Primary (Principale) — Permet de
sélectionner les sous-titres pour la vidéo
principale.
• Secondary (Secondaire) — Permet de
sélectionner les sous-titres pour la vidéo
secondaire.
• Subtitle style (Style des sous-titres) —
Permet de sélectionner le style des
sous-titres.
2 Appuyer sur ou pour sélectionner la
langue ou le style des sous-titres.
3 Appuyer sur SUBTITLE (Sous-titres) pour
fermer le menu.
Pour sélectionner la langue des sous-titres
pour un DVD :
1 Au cours de la lecture, appuyer sur
SUBTITLE (Sous-titres).
2 Appuyer sur ou pour sélectionner la
langue des sous-titres.
3 Appuyer sur SUBTITLE (Sous-titres) pour
fermer le menu.
Changement de bande sonore
Pour changer de bande sonore pour un
disque Blu-ray ou un DVD :
1 Pendant la lecture, appuyer de façon répétée
sur AUDIO pour sélectionner Primary
(Principale) ou Secondary (Secondaire).
2 Appuyer sur ou pour sélectionner la
bande sonore.
3 Appuyer sur AUDIO pour fermer le menu.
Remarques
• Pour certains disques Blu-ray, la trame sonore
secondaire n'est pas diffusée lorsque la vidéo
secondaire n'est pas affichée ou lorsque le
mode audio du disque Blu-ray (BD Audio
Mode) est réglé sur HD Audio Output (Sortie
audio HD).
• La bande sonore ne peut pas être changée lors
de la lecture de disques qui ne sont pas
enregistrés avec plusieurs bandes sonores.
• Certains disques permettent de changer la
langue audio à partir du menu disque. (Le
fonctionnement varie suivant les disques.)
• Il est possible que la touche AU DIO ne
fonctionne pas avec certains disques offrant
plusieurs canaux ou flux audio.
• En cas de sélection d’une langue dont le code
est constitué de trois lettres, le code s'affichera
à chaque changement du réglage pour la
langue audio. En cas de sélection d’une autre
langue, ––– s'affiche à la place.
• Si le disque ne comporte aucune langue audio,
« Not Available » (« Non disponible ») s'affiche
à l'écran du téléviseur.
Réglage du niveau du noir
Pour régler le niveau du noir :
1 Pendant la lecture, appuyer sur MODE.
2 Appuyer sur ou pour sélectionner Black
Level (Niveau du noir), puis sur ou
pour choisir On (Activé) ou Off (Désactivé).
3 Appuyer de façon répétée sur RETURN
(Retour) pour fermer le menu.
Remarques
• Certains disques permettent seulement de
changer les sous-titres à partir du menu disque
ou du menu contextuel. Appuyer sur TOP
MENU (Menu principal) ou sur POP
MENU/MENU (Menu contextuel/Menu) pour
afficher le menu disque ou le menu contextuel.
• Si un code de langue à 4 chiffres s'affiche dans
le menu des sous-titres, voir « Codes de
langue » à la page 71.
• Si le disque ne comporte ni langue de
sous-titres, ni style de sous-titres, « Not
Available » (« Non disponible ») s'affiche à
l'écran du téléviseur.
• Pendant la lecture de la vidéo secondaire, le
réglage des sous-titres de la vidéo principale
n'est pas disponible, sauf s'il n'y a pas de
sous-titres pour la vidéo secondaire.
• Le réglage des sous-titres de la vidéo
secondaire est seulement disponible pendant
la lecture de la vidéo secondaire.
• En cas de sélection d’une langue dont le code
est constitué de 3 lettres, le code s'affiche à
chaque changement du réglage pour la langue
des sous-titres. En cas de sélection d’une autre
langue, ––– s'affiche à la place.
www.insignia-products.com
Remarque
Le lecteur garde en mémoire le réglage de niveau
du noir même lorsqu'il est mis hors tension.
L'option Black Level (Niveau du noir) ne
fonctionne pas avec la sortie vidéo provenant de
la prise de sortie HDMI ( HDMI OUT).
Réduction du bruit vidéo
Pour réduire le bruit vidéo :
1 Pendant la lecture, appuyer sur MODE.
2 Appuyer sur ou pour sélectionner Noise
Reduction (Réduction du bruit), puis sur
ou pour sélectionner :
• 1 — Active la réduction de bruit MPEG,
qui réduit le bruit lorsque des sous-titres
sont affichés.
• 2 — Active la réduction de bruit 3D, qui
détecte et supprime le bruit en comparant
les trames vidéo.
• 3 — Active à la fois la réduction de bruit
MPEG et 3D.
59
Page 68

Lecteur de disques Blu-ray Insignia NS-BRDVD
3 Appuyer de façon répétée sur RETURN
(Retour) pour fermer le menu.
Remarque
Le lecteur garde en mémoire le réglage de
réduction du bruit même lorsqu'il est mis hors
tension.
L'option Noise Reduction (Réduction du bruit) ne
fonctionne pas avec les disques Blu-ray.
Réglage de la résolution vidéo HDMI
Pour régler la résolution vidéo HDMI :
• Appuyer plusieurs fois sur HDMI. À chaque
pression de cette touche, la résolution
change dans l’ordre suivant :
Affichage avant Résolution
480P 480 progressive
720P 720 progressive
1080i 1080 entrelacée
1080P 1080 progressive
1080P24 1080 progressive 24 images
Remarques
• Il n'est pas possible de sélectionner les
résolutions vidéo qui ne sont pas prises en
charge par le téléviseur connecté, à moins que
l'appareil soit un appareil compatible DVI
connecté à la prise de sortie HDMI (HDMI
OUT) au moyen d'un câble HDMI-DVI.
• Lors de la sélection d'un mode de sortie HDMI
pour un appareil DVI connecté, la résolution
vidéo HDMI correspondante est transmise le
même si le téléviseur n'est pas compatible
avec la résolution vidéo HDMI. Si aucune
image ne s'affiche, sélectionner une autre
résolution HDMI.
• Une distorsion temporaire des signaux vidéo et
audio est possible lors du passage en mode de
sortie HDMI, ou lors du passage du mode
HDMI à un autre mode.
• Afin d'obtenir une reproduction naturelle et de
haute qualité d'un film en 24 images par
seconde, utiliser un câble HDMI (un câble
HDMI haute vitesse de catégorie 2 est
recommandé) et sélectionner 1080p24 si le
téléviseur connecté est compatible avec une
entrée 1080p24.
• Si l'option 1080p24 est sélectionnée pour la
résolution vidéo HDMI et que le disque lu n'est
pas compatible avec 1080p24, la vidéo est
transmise à 1080p60.
• Si la résolution vidéo est réglée sur 1080p24 et
que le téléviseur est connecté aux prises de
sortie vidéo (VIDEO OUT) ou de sortie vidéo à
composantes (COMPONENT VIDEO OUT),
aucun signal n'est envoyé par ces prises.
Réglage de la résolution vidéo à
composantes
Pour régler la résolution vidéo à
composantes :
1 En mode arrêt, appuyer sur SETUP
(Configuration).
2 Appuyer sur ou pour sélectionner ,
puis sur ENTER (Entrée). Le menu
Custom
(Personnalisé) s’affiche.
Custom
3 Appuyer sur ou pour sélectionner
VIDEO (Vidéo), puis appuyer sur ENTER
(Entrée). Le menu
Video
(Vidéo) s’affiche.
4 Appuyer sur ou pour sélectionner
Component Output (Sortie vidéo à
composantes), puis appuyer de façon
répétée sur ENTER (Entrée) pour
sélectionner une résolution.
5 Appuyer sur SETUP (Configuration) pour
fermer le menu.
Sélection du mode audio d'un CD audio
Pour sélectionner le mode audio d'un CD
audio :
1 Au cours de la lecture, appuyer de façon
répétée sur AUDIO pour sélectionner :
• Stereo (Stéréo) — Le canal audio droit et
le canal audio gauche sont tous deux
actifs.
• L-ch (Canal G) — Seul le canal audio
gauche est actif.
• R-ch (Canal D) — Seul le canal audio
droit est actif.
2 Appuyer sur AUDIO pour fermer le menu.
60
Remarque
www.insignia-products.com
La sélection de canaux ou flux audio n'est pas
disponible pour un CD encodé DTS (disque de
musique 5.1).
Page 69

Lecteur de disques Blu-ray Insignia NS-BRDVD
Réglage du mode audio Blu-ray
Type de
disque
Format
d’enregistrement
audio
Blu-ray Dolby Digital
Dolby Digital Plus Dolby Digital
Dolby TrueHD
DTS
DTS-HD
LPCM Multi LPCM Multi LPCM
DVD Dolby Digital Dolby Digital Multi LPCM
DTS DTS Multi LPCM
LPCM Multi LPCM Multi LPCM
CD audio,
MP3, WMA:
DTS-CD DTS Multi LPCM
Remarques
1
Si le mode audio du disque Blu-ray (BD Audio
Mode) est réglé sur Mix Audio Output (Sortie
audio mixte), la sortie audio est transmise en multi
LPCM.
2
Transmet des signaux audio décodés provenant
d'un sous-flux indépendant.
3
Transmet des signaux audio décodés provenant
du flux Dolby Digital.
4
Transmet des signaux audio décodés provenant
du flux principal DTS.
Si l'appareil connecté n'est pas compatible avec le
train de bits HDMI (HDMI BITSTREAM), les
signaux audio seront transmis en tant que
multi LPCM ou LPCM à 2 canaux réduit par
mixage, suivant la capacité de l'appareil connecté,
même si l'option de sortie audio HDMI (HDMI
Audio Out) est réglée sur HDMI Multi (Normal).
Lorsque l'option Audio Mute (Sourdine audio)
est sélectionnée, les signaux audio provenant de
la prise de sortie HDMI (HDMI OUT) sont mis en
sourdine et les signaux sont envoyés à la prise
de sortie numérique (DIGITAL OUT).
La prise de sortie numérique (DIGITAL OUT)
diffuse les signaux Dolby Digital Plus et Dolby
TrueHD en tant que Dolby Digital. La prise
diffuse DTS-HD en tant que DTS.
Réglage de sortie audio
HDMI
HDMI Multi
(Normal)
Dolby Digital
1
Plus
Dolby TrueHD
1
DTS
1
DTS-HD
LPCM à 2
canaux
HDMI Multi
(LPCM)
1
Multi LPCM
Multi LPCM
1
Multi LPCM
Multi LPCM
Multi LPCM
LPCM à 2
canaux
Type de
disque
Disque
Blu-ray
Format
d’enregistrement
audio
Dolby Digital Dolby Digital LPCM à
Réglage de sortie
numérique
Train de bits LPCM
2 canaux à
réduction du
mixage
2
Dolby Digital Plus Dolby Digital LPCM à
2 canaux à
3
réduction du
mixage
Dolby TrueHD Dolby Digital LPCM à
2 canaux à
4
réduction du
mixage
DTS DTS* LPCM à
2 canaux à
réduction du
mixage
DTS-HD DTS* LPCM à
2 canaux à
réduction du
mixage
LPCM LPCM à
2 canaux à
réduction du
mixage*
LPCM à
2 canaux à
réduction du
mixage
DVD Dolby Digital Dolby Digital LPCM à
2 canaux à
réduction du
mixage
DTS DTS LPCM à
2 canaux à
réduction du
mixage
LPCM LPCM à
2 canaux à
réduction du
mixage
CD audio,
MP3, WMA:
LPCM à
2 canaux
DTS-CD LPCM à
2 canaux
LPCM à
2 canaux à
réduction du
mixage
LPCM à
2 canaux
LPCM à
2 canaux à
réduction du
mixage
*
La trame sonore secondaire ou interactive pour
les disques Blu-ray est diffusée en Dolby Digital
lorsque toutes les conditions suivantes sont
réunies :
• Lorsque le mode audio du disque Blu-ray (BD
Audio Mode) est réglé sur Mix Audio Output
(Sortie audio mixte).
• Lorsque l'option de sortie audio HDMI (HDMI
Audio Out) est réglée sur Audio Mute
(Sourdine audio).
• Lorsque l'option de sortie numérique (Digital
Out) est réglée sur Bitstream (Train de bits).
Si des titres Blu-ray n'ont pas de trame sonore
secondaire ou interactive, la sortie audio est telle
qu'indiquée dans le tableau.
Ce tableau s'applique uniquement si aucun câble
HDMI n'est connecté ou si l'option de sortie audio
HDMI ( HDMI Audio Out) est réglée sur Audio
Mute (Sourdine audio).
www.insignia-products.com
61
Page 70

Lecteur de disques Blu-ray Insignia NS-BRDVD
Remarque
Pour obtenir une sortie audio LPCM au niveau de
la prise de sortie numérique (DIGITAL OUT)
parallèlement à la sortie audio HDMI, régler
l'option de sortie audio du disque Blu-ray (BD
Audio Out) sur Mix Audio Output (Sortie audio
mixte) et l'option de sortie audio HDMI (HDMI
Audio Out) sur HDMI Multi (LCPM).
Pour régler l'audio HDMI :
1 En mode arrêt, appuyer sur SETUP
(Configuration).
2 Appuyer sur ou pour sélectionner ,
puis sur ENTER (Entrée). Le menu
(Rapide) s’affiche.
3 Appuyer sur ou pour sélectionner la
sortir audio HDMI (HDMI Audio Out).
4 Appuyer de façon répétée sur ENTER
(Entrée) pour sélectionner le mode de sortie
audio HDMI.
Appareil connecté
Appareil compatible
avec un décodage
Dolby Digital, Dolby
Digital Plus, Dolby
TrueHD, DTS ou
DTS-HD
Appareil compatible
avec au moins 3 canaux
d'entrée audio (pas
compatible avec Dolby
Digital, Dolby Digital
Plus, Dolby TrueHD,
DTS ou DTS-HD)
Connexion HDMI à un
téléviseur et connexion
audio numérique (câble
coaxial) à un
amplificateur AV
Réglage de
sortie
audio HDMI
HDMI Multi
(Normal)
HDMI Multi
(LPCM)
Audio Mute
(Sourdine
audio)
Signal audio HDMI
diffusé
Des trains de bits Dolby
Digital, Dolby Digital
Plus, Dolby TrueHD,
DTS ou DTS-HD sont
émis au niveau de la
prise de sortie HDMI
(HDMI OUT). Régler les
haut-parleurs sur
l'amplificateur AV
connecté.
Des signaux audio
multicanaux sont émis
au niveau de la prise de
sortie HDMI (HDMI
OUT). Régler les
haut-parleurs au moyen
des réglages qui
s'affichent lors de la
sélection de l'option
HDMI Multi (LPCM).
La sortie audio HDMI
est mise en sourdine, et
un train de bits Dolby
Digital/DTS ou un
signal LPCM est émis
au niveau de la prise
numérique (DIGITAL
OUT), suivant le
réglage de la sortie
numérique (Digital
Out).
Quick
5 Appuyer sur SETUP (Configuration) pour
fermer le menu.
Utilisation des menus du disque
De nombreux disques Blu-ray ou DVD
contiennent des menus qui peuvent être utilisés
pour sélectionner des options de lecture. Un
DVD peut avoir un menu de titres ou un menu
disque. Un disque Blu-ray peut avoir un menu de
titres ou un menu contextuel. Les options de ces
menus varient d'un disque à l’autre.
Lors de l'ouverture du menu contextuel d'un
disque Blu-ray, la lecture de la vidéo continue en
arrière-plan.
Pour utiliser le menu de titres d'un disque
Blu-ray ou d'un DVD :
1 Appuyer sur TOP MENU (Menu principal). Le
menu de titres s'affiche.
2 Appuyer sur ou pour sélectionner
une option, puis appuyer sur ENTER
(Entrée).
3 Appuyer sur TOP MENU (Menu principal)
pour fermer le menu.
Pour utiliser le menu de titres d'un DVD ou le
menu contextuel d'un disque Blu-ray :
1 Appuyer sur POP MENU/MENU (Menu
contextuel/Menu). Le menu du disque ou le
menu contextuel s'affiche.
2 Appuyer sur ou pour sélectionner
une option, puis appuyer sur ENTER
(Entrée).
3 Appuyer sur POP MENU/MENU (Menu
contextuel/Menu) pour fermer le menu.
Réglage de l'image fixe
Si l'image est floue lors d'un arrêt momentané
de la lecture ou lors d'une lecture avant au
ralenti, il est possible de régler l'image.
Pour régler l'image fixe :
1 En mode arrêt, appuyer sur SETUP
(Configuration).
2 Appuyer sur ou pour sélectionner ,
puis sur ENTER (Entrée). Le menu
(Personnalisé) s’affiche.
Custom
Custom
62
www.insignia-products.com
Page 71

Lecteur de disques Blu-ray Insignia NS-BRDVD
3 Appuyer sur ou pour sélectionner
VIDEO (Vidéo), puis appuyer sur ENTER
(Entrée). Le menu
Video
(Vidéo) s’affiche.
4 Appuyer sur ou pour sélectionner Still
Mode (Mode arrêt sur image), puis appuyer
de façon répétée sur ENTER (Entrée) pour
sélectionner un mode. Sélections possibles :
• Auto — Permet de sélectionner
automatiquement le meilleur paramètre
de résolution de l'appareil [Frame (Cadre)
ou Field (Champ)] en fonction des
caractéristiques de données des images.
• Field (Champ) — Stabilise l'image. La
qualité de l'image risque de se dégrader
en raison de la quantité limitée de
données disponibles.
• Frame (Cadre) — Permet d'afficher des
images relativement fixes à une résolution
supérieure et améliore la qualité des
images. L'image peut devenir instable en
raison de la sortie alternée de données à
deux champs.
5 Appuyer sur SETUP (Configuration) pour
fermer le menu.
Configuration des contrôles parentaux
Il est possible de configurer des contrôles
parentaux pour les disques Blu-ray et les DVD.
Pour configurer des contrôles parentaux
pour les disques Blu-ray :
1 En mode arrêt, appuyer sur SETUP
(Configuration).
2 Appuyer sur ou pour sélectionner ,
puis sur ENTER (Entrée). Le menu
(Personnalisé) s’affiche.
Custom
Custom
3 Appuyer sur ou pour sélectionner
Parental, puis appuyer sur ENTER (Entrée).
Le menu
Parental
s’affiche.
4 Appuyer sur ou pour sélectionner ,
puis sur ENTER (Entrée).
5 Utiliser les touches numériques pour saisir le
mot de passe à quatre chiffres. En cas de
saisie du mot de passe pour la première fois,
saisir n'importe quel mot de passe à quatre
chiffres sauf 4737, puis appuyer sur ENTER
(Entrée). En cas de saisie d'un chiffre
incorrect, appuyer sur CLEAR (Effacer), puis
entrer à nouveau le chiffre.
Remarque
En cas d'oubli du mot de passe, saisir 4737. Le
mot de passe est effacé et les niveaux de
classification sont réglés sur All (Tous).
6 Appuyer sur ou pour sélectionner le
niveau de classification des disques Blu-ray
(BD Rating Level), puis appuyer sur ENTER
(Entrée).
7 Appuyer sur ou pour sélectionner une
classification, puis appuyer sur ENTER
(Entrée). Sélections possibles :
• All (Tous) — Tous les disques Blu-ray
peuvent être visualisés.
• Age Setting (Âge) — Utiliser les touches
numériques pour saisir la tranche d'âge à
bloquer. Par exemple, pour bloquer les
disques Blu-ray qui ne sont pas
appropriés pour les enfants âgés de 15
ans et moins, appuyer sur 015.
8 Appuyer sur SETUP (Configuration) pour
fermer le menu.
Pour configurer le contrôle parental pour les
DVD :
1 En mode arrêt, appuyer sur SETUP
(Configuration).
2 Appuyer sur ou pour sélectionner ,
puis sur ENTER (Entrée). Le menu
Custom
(Personnalisé) s’affiche.
www.insignia-products.com
Custom
63
Page 72

Lecteur de disques Blu-ray Insignia NS-BRDVD
3 Appuyer sur ou pour sélectionner
Parental, puis appuyer sur ENTER (Entrée).
Le menu
Parental
s’affiche.
4 Appuyer sur ou pour sélectionner ,
puis sur ENTER (Entrée).
5 Utiliser les touches numériques pour saisir le
mot de passe à quatre chiffres. En cas de
saisie du mot de passe pour la première fois,
saisir n'importe quel mot de passe à quatre
chiffres sauf 4737, puis appuyer sur ENTER
(Entrée). En cas de saisie d'un chiffre
incorrect, appuyer sur CLEAR (Effacer), puis
entrer à nouveau le chiffre.
Remarque
En cas d'oubli du mot de passe, saisir 4737. Le
mot de passe est effacé et les niveaux de
classification sont réglés sur All (Tous).
Modification du mot de passe pour le
contrôle parental
Pour modifier le mot de passe du contrôle
parental :
1 En mode arrêt, appuyer sur SETUP
(Configuration).
2 Appuyer sur ou pour sélectionner ,
puis sur ENTER (Entrée). Le menu
(Personnalisé) s’affiche.
Custom
3 Appuyer sur ou pour sélectionner
Parental, puis appuyer sur ENTER (Entrée).
Le menu
Parental
s’affiche.
Custom
6 Appuyer sur ou pour sélectionner le
niveau de classification des DVD (DVD
Rating Level), puis appuyer sur ENTER
(Entrée).
7 Appuyer sur ou pour sélectionner une
classification, puis appuyer sur ENTER
(Entrée). Sélections possibles :
• All (Tous) — Le contrôle parental est
désactivé. Tous les DVD peuvent être lus.
• 8 [Adult]— Tous les DVD peuvent être
lus.
• 7 [NC-17] — Non recommandé pour les
moins de 17 ans.
• 6 [R] — Non recommandé pour les moins
de 17 ans ou accompagnement par un
adulte requis.
• 5 [PGR] — Surveillance parentale
recommandée.
• 4 [PG-13] — Non recommandé pour les
moins de 13 ans.
• 3 [PG] — Contrôle parental suggéré.
• 2 [G] — Tous publics.
• 1 [Kid Safe] — Approprié pour les
enfants de tous âges.
8 Appuyer sur SETUP (Configuration) pour
fermer le menu.
4 Appuyer sur ou pour sélectionner ,
puis sur ENTER (Entrée).
5 Utiliser les touches numériques pour saisir
l'ancien mot de passe à quatre chiffres. En
cas de saisie d'un chiffre incorrect, appuyer
sur CLEAR (Effacer), puis entrer à nouveau
le chiffre.
Remarque
En cas d'oubli du mot de passe, saisir 4737. Le
mot de passe est effacé et les niveaux de
classification sont réglés sur All (Tous).
6 Appuyer sur ou pour sélectionner
Password Change (Modification du mot de
passe), puis appuyer sur ENTER (Entrée).
7 Utiliser les touches numériques pour saisir le
nouveau mot de passe, puis appuyer sur
ENTER (Entrée).
8 Appuyer sur SETUP (Configuration) pour
fermer le menu.
64
www.insignia-products.com
Page 73

Lecteur de disques Blu-ray Insignia NS-BRDVD
Utilisation du menu Quick (Rapide)
À partir du menu de configuration, il est possible
de changer les réglages pour l'audio, la vidéo,
les langues, etc.
Les options les plus souvent sélectionnées sont
incluses dans le menu
Pour utiliser le menu Quick (Rapide) :
1 En mode arrêt, appuyer sur SETUP
(Configuration).
2 Appuyer sur ou pour sélectionner ,
puis sur ENTER (Entrée). Le menu
(Rapide) s’affiche.
3 Appuyer sur ou pour sélectionner une
option.
4 Si ne s'affiche pas à droite de l'option,
appuyer de façon répétée sur ENTER
(Entrée) pour régler l'option.
Ou, si s'affiche à droite de l'option, appuyer
sur ENTER (Entrée), appuyer sur ou
pour sélectionner la sous-option souhaitée,
puis appuyer sur ENTER (Entrée).
Sélections possibles :
• Media Select (Sélection de support)
• BD Audio Mode (Mode audio BD)
• HDMI Audio Out (Sortie audio HDMI)
• HDMI Video Resolution (Résolution
vidéo HDMI)
• Component Out (Sortie vidéo à
composantes)
• Player Menu (Menu du lecteur)
• TV Aspect (Format d’image)
Pour plus d’informations concernant ces
options, voir « Options du menu Quick
(Rapide) » à la page 65.
5 Appuyer sur SETUP (Configuration) pour
fermer le menu.
Options du menu Quick (Rapide)
BD Audio Mode
(Mode audio BD)
Détermine si la trame sonore secondaire (PIP)
(si disponible) doit être lue avec la trame
sonore principale, ou si seule la trame sonore
principale doit être lue. Sélections possibles :
• Mix Audio Output (Sortie audio mixte)
lit à la fois la trame sonore principale et
la trame sonore secondaire.
• HD Audio Output (Sortie audio HD) lit
uniquement la trame sonore principale.
Remarque : Pour les disques Blu-ray,
sélectionner HD Audio Output (Sortie audio
HD) pour reproduire une trame sonore Dolby
Digital, Dolby Digital Plus, Dolby TrueHD, DTS
ou DTS-HD par l'intermédiaire de la connexion
HDMI.
Quick
(Rapide).
Quick
HDMI Audio Out
(Sortie audio
HDMI)
HDMI Video
Resolution
(Résolution vidéo
HDMI)
Component
Output (Sortie
vidéo à
composantes)
Player Menu
(Menu du lecteur)
Sélectionne le format audio pour les signaux
audio provenant de la prise de sortie HDMI
(HDMI OUT). Sélections possibles :
• HDMI Multi (Normal) sélectionne un
signal audio multicanal avec train de
bits ou LPCM.
• HDMI Multi (LPCM) sélectionne un
signal audio multicanal avec LPCM.
• Audio Mute (Sourdine audio) désactive
les signaux audio provenant de la prise
de sortie HDMI (HDMI OUT) et active
les signaux audio provenant de la prise
de sortie numérique (DIGITAL OUT).
Remarque : HDMI Multi (Normal) et HDMI
Multi (LPCM) ne sont pas disponibles si :
• Aucun câble HDMI n'est connecté à la
prise de sortie HDMI (HDMI OUT).
• Le téléviseur connecté est éteint.
• Le téléviseur connecté n’est pas
compatible avec la sortie audio.
Permet de sélectionner la résolution vidéo
HDMI. Sélections possibles :
• Auto permet au lecteur de sélectionner
automatiquement la résolution en
fonction de l'appareil HDMI connecté.
• 480p
• 720p
• 1080i
• 1080p
• 1080p24 donne une reproduction
naturelle et de haute qualité d'un film en
24 images par seconde. Le téléviseur
connecté doit être compatible avec le
format 1080p24.
Remarques :
• Si l'option 1080p24 est sélectionnée et
que le contenu du disque Blu-ray n'est
pas compatible avec le format 1080p24,
le lecteur transmet la vidéo au format
1080p60.
• Si l'image ne s'affiche pas correctement
à cause du réglage de l'option HDMI
Video Resolution (Résolution vidéo
HDMI), appuyer sans la relâcher sur la
touche PLAY (Lecture) à l'avant du
lecteur pendant plus de cinq secondes.
Ceci réinitialise automatiquement le
paramètre à sa valeur par défaut.
Permet de sélectionner la résolution de la vidéo
à composantes. Les sélections possibles sont :
480i, 480p, 720p ou 1080i.
Remarques :
• Si la résolution de la vidéo à
composantes et la résolution vidéo
HDMI ne sont pas compatibles, la
résolution adoptée pour la sortie vidéo à
composantes est de 480i.
• Suivant le contenu du disque, il est
possible que les prises de sortie vidéo à
composantes (COMPONENT VIDEO
OUT) ne transmettent aucun signal.
• Lors de la lecture d'un DVD protégé
contre la copie, un signal 480p est
transmis par les prises de sortie vidéo à
composantes (COMPONENT VIDEO
OUT) lorsque cette option est réglée sur
720p ou 1080i.
Permet de sélectionner la langue du menu de
onfiguration. Choisir entre English (anglais),
c
French (français) ou Spanish (espagnol).
www.insignia-products.com
65
Page 74

Lecteur de disques Blu-ray Insignia NS-BRDVD
TV Aspect
(Format d’image)
Permet de sélectionner la taille de l'image en
fonction du format de l'écran du téléviseur
connecté. Sélections possibles :
• 16:9 — Sélectionner cette option si le
téléviseur a un écran panoramique. Les
disques enregistrés au format
panoramique s'affichent sur tout
l'écran.
• 4:3 Pan & Scan (Recadrage
automatique 4:3) — Si le téléviseur a un
écran standard, sélectionner cette
option pour que les disques enregistrés
au format panoramique s'affichent sur
tout l'écran avec les côtés tronqués. Les
disques enregistrés au format 4:3
s'affichent sur tout l'écran.
• 4:3 Letter Box (Boîte aux lettres 4:3) —
Si le téléviseur a un écran standard,
sélectionner cette option pour que les
disques enregistrés au format
panoramique s'affichent sans que les
côtés soient tronqués. Des barres
noires s'affichent en haut et en bas de
l'écran.
• 16:9 Squeeze (Rétrécissement 16:9) —
Si le téléviseur a un écran panoramique,
sélectionner cette option pour que les
disques enregistrés au format 4:3
s'affichent au centre de l'écran avec un
format d'image 4:3.
Utilisation du menu Custom
(Personnalisé)
Le menu
les options qui peuvent être réglées pour le
lecteur.
Pour utiliser le menu Custom
(Personnalisé) :
1 En mode arrêt, appuyer sur SETUP
2 Appuyer sur ou pour sélectionner ,
3 Appuyer sur ou pour sélectionner un
4 Appuyer sur ou pour sélectionner une
Custom
(Personnalisé) contient toutes
(Configuration).
puis sur ENTER (Entrée). Le menu
(Personnalisé) s’affiche.
Custom
menu, puis appuyer sur ENTER (Entrée).
Sélections possibles :
• Language (Langue) — Voir « Menu
Language (Langue) » à la page 66.
• Video (Vidéo) — Voir « Menu Video
(Vidéo) » à la page 67.
• Audio — Voir « Menu Audio » à la page
68.
• Parental — Voir « Menu Parental » à la
page 69.
• Others (Autres) — Voir « Menu Others
(Autres) » à la page 69.
option.
Custom
5 Si ne s'affiche pas à droite de l'option,
appuyer de façon répétée sur ENTER
(Entrée) pour régler l'option.
Ou, si s'affiche à droite de l'option, appuyer
sur ENTER (Entrée), appuyer sur ou
pour sélectionner la sous-option souhaitée,
puis appuyer sur ENTER (Entrée).
6 Appuyer sur SETUP (Configuration) pour
fermer le menu.
Menu Language (Langue)
Audio Permet de sélectionner la langue audio.
Subtitle
(Sous-titres)
Sélections possibles :
• Original, English (Anglais), French
(Français), Spanish (Espagnol),
German (Allemand), Italian (Italien),
Swedish (Suédois), Dutch (Hollandais),
Russian (Russe), Chinese (Chinois),
Japanese (Japonais), Korean (Coréen),
Danish (Danois), Finnish (Finnois),
Norwegian (Norvégien), Icelandic
(Islandais), Hungarian (Hongrois),
Romanian (Roumain), Tu rk ish (Turc),
Greek (Grec), Irish (Irlandais),
Portuguese (Portugais), Polish
(Polonais), Czech (Tchèque), Slovak
(Slovaque), Bulgarian (Bulgare) ou
Other (Autre).
Si Other (Autre) est sélectionné, saisir le code à
quatre chiffres pour la langue souhaitée. Pour
une liste des codes de langue, voir « Codes de
langue » à la 71. Seules les langues
enregistrées sur le disque peuvent être
sélectionnées.
Permet de sélectionner la langue des
sous-titres Sélections possibles :
• Off (Désactivés), English (Anglais),
French (Français), Spanish (Espagnol),
German (Allemand), Italian (Italien),
Swedish (Suédois), Dutch (Hollandais),
Russian (Russe), Chinese (Chinois),
Japanese (Japonais), Korean (Coréen),
Danish (Danois), Finnish (Finnois),
Norwegian (Norvégien), Icelandic
(Islandais), Hungarian (Hongrois),
Romanian (Roumain), Tu rk ish (Turc),
Greek (Grec), Irish (Irlandais),
Portuguese (Portugais), Polish
(Polonais), Czech (Tchèque), Slovak
(Slovaque), Bulgarian (Bulgare) ou
Other (Autre).
Si Other (Autre) est sélectionné, saisir le code à
quatre chiffres pour la langue souhaitée. Pour
une liste des codes de langue, voir « Codes de
langue » à la 71. Seules les langues
enregistrées sur le disque peuvent être
sélectionnées.
66
www.insignia-products.com
Page 75

Lecteur de disques Blu-ray Insignia NS-BRDVD
Disc Menu (Menu
du disque)
Player Menu
(Menu du lecteur)
Permet de sélectionner la langue du menu du
disque. Sélections possibles :
Si Other (Autre) est sélectionné, saisir le code à
quatre chiffres pour la langue souhaitée. Pour
une liste des codes de langue, voir « Language
codes » à la 71. Seules les langues
enregistrées sur le disque peuvent être
sélectionnées.
Permet de sélectionner la langue du menu de
configuration. Choisir entre English (Anglais),
French (Français) ou Spanish (Espagnol).
Menu Video (Vidéo)
TV Aspect
(Format d’image)
Permet de sélectionner la taille de l'image en
fonction du format de l'écran du téléviseur
connecté. Sélections possibles :
16:9 — Sélectionner cette option si le
téléviseur a un écran panoramique. Les
disques enregistrés au format panoramique
s'affichent sur tout l'écran.
4:3 Pan & Scan (Recadrage automatique 4:3)
— Si le téléviseur a un écran standard,
sélectionner cette option pour que les disques
enregistrés au format panoramique s'affichent
sur tout l'écran avec les côtés tronqués. Les
disques enregistrés au format 4:3 s'affichent
sur tout l'écran.
4:3 Letter Box (Boîte aux lettres 4:3) — Si le
téléviseur a un écran standard, sélectionner
cette option pour que les disques enregistrés
au format panoramique s'affichent sans que les
côtés soient tronqués. Des barres noires
s'affichent en haut et en bas de l'écran.
16:9 Squeeze (Rétrécissement 16:9) — Si le
téléviseur a un écran panoramique,
sélectionner cette option pour que les disques
enregistrés au format 4:3 s'affichent au centre
de l'écran avec un format d'image 4:3.
• English (Anglais), French (Français),
Spanish (Espagnol), German
(Allemand), Italian (Italien), Swedish
(Suédois), Dutch (Hollandais), Russian
(Russe), Chinese (Chinois), Japanese
(Japonais), Korean (Coréen), Danish
(Danois), Finnish (Finnois), Norwegian
(Norvégien), Icelandic (Islandais),
Hungarian (Hongrois), Romanian
(Roumain), Turk is h (Turc), Greek
(Grec), Irish (Irlandais), Portuguese
(Portugais), Polish (Polonais), Czech
(Tchèque), Slovak (Slovaque),
Bulgarian (Bulgare) ou Other (Autre).
HDMI Video
Resolution
(Résolution vidéo
HDMI)
HDMI Deep Color
(Couleur foncée
HDMI)
Component
Output (Sortie
vidéo à
composantes)
Permet de sélectionner la résolution vidéo
HDMI. Sélections possibles :
• Auto permet au lecteur de sélectionner
automatiquement la résolution en
fonction de l'appareil HDMI connecté.
• 480p
• 720p
• 1080i
• 1080p
• 1080p24 donne une reproduction
naturelle et de haute qualité d'un film en
24 images par seconde. Le téléviseur
connecté doit être compatible avec le
format 1080p24.
Remarques :
• Si l'option 1080p24 est sélectionnée et
que le contenu du disque Blu-ray n'est
pas compatible avec le format 1080p24,
le lecteur transmet la vidéo au format
1080p60.
• Si l'image ne s'affiche pas correctement
à cause du réglage de l'option HDMI
Video Resolution (Résolution vidéo
HDMI), appuyer sans la relâcher sur la
touche PLAY (Lecture) à l'avant du
lecteur pendant plus de cinq secondes.
Ceci réinitialise automatiquement le
paramètre à sa valeur par défaut.
Détermine si la vidéo provenant de la prise de
sortie HDMI (HDMI OUT) utilise la fonction
Deep Color (Couleur foncée). Sélections
possibles :
• Auto — La vidéo provenant de la prise
de sortie HDMI (HDMI OUT) est
transmise en Deep Color (Couleur
foncée) à un téléviseur qui prend en
charge la fonction HDMI Deep Color
(Couleur foncée HDMI).
• Off (Désactivée) — La vidéo provenant
de la prise de sortie HDMI (HDMI OUT)
est transmise sans la fonction Deep
Color (Couleur foncée).
Permet de sélectionner la résolution de la vidéo
à composantes. Les sélections possibles sont :
480i, 480p, 720p ou 1080i.
Si l'image ne s'affiche pas correctement à
cause du réglage de l'option Component
Output (Sortie vidéo à composantes), appuyer
sans la relâcher sur la touche PLAY
(Lecture) à l'avant du lecteur pendant plus de
cinq secondes. Ceci réinitialise
automatiquement le paramètre à sa valeur par
défaut.
Si un câble HDMI est connecté, il est seulement
possible de sélectionner la résolution vidéo sur
laquelle est réglée la prise de sortie HDMI
(HDMI OUT) ou 480i.
Remarques :
• Si la résolution de la vidéo à
composantes et la résolution vidéo
HDMI ne sont pas compatibles, la
résolution adoptée pour la sortie vidéo à
composantes est de 480i.
• Suivant le contenu du disque, il est
possible que les prises de sortie vidéo à
composantes (COMPONENT VIDEO
OUT) ne transmettent aucun signal.
• Lors de la lecture d'un DVD protégé
contre la copie, un signal 480p est
transmis par les prises de sortie vidéo à
composantes (COMPONENT VIDEO
OUT) lorsque cette option est réglée sur
720p ou 1080i.
www.insignia-products.com
67
Page 76

Lecteur de disques Blu-ray Insignia NS-BRDVD
Progressive mode
(Mode progressif)
Still Mode (Mode
d’arrêt sur image)
Menu Audio
BD Audio Mode
(Mode audio BD)
Permet de sélectionner le mode progressif
pour la vidéo provenant de la prise de sortie
HDMI (HDMI OUT) et des prises de sortie vidéo
à composantes (COMPONENT VIDEO OUT).
Sélections possibles :
• Auto — Le lecteur détecte
automatiquement les enregistrements à
24 images par seconde, tels que les
films, et sélectionne automatiquement
le mode progressif approprié.
• Video (Vidéo) — Adapté à la lecture de
disques vidéo contenant des
programmes tels qu'une animation ou
des émissions télévisées.
Permet de régler la résolution et la qualité de
l'image en mode d'arrêt sur image. Sélections
possibles :
• Auto — Permet de sélectionner
automatiquement le meilleur paramètre
de résolution de l'appareil [Frame
(Cadre) ou Field (Champ)] en fonction
des caractéristiques de données des
images.
• Field (Champ) — Stabilise l'image. La
qualité de l'image risque de se dégrader
en raison de la quantité limitée de
données disponibles.
• Frame (Cadre) — Permet d'afficher des
images relativement fixes à une
résolution supérieure et améliore la
qualité des images. L'image peut
devenir instable en raison de la sortie
alternée de données à deux champs.
Une image individuelle à l'écran du téléviseur
porte le nom de
constituée de deux images séparées appelées
champs
. Certaines images peuvent être floues
avec le paramètre Auto, en raison de leurs
caractéristiques de données.
Détermine si la trame sonore secondaire (PIP)
(si disponible) doit être lue avec la trame
sonore principale, ou si seule la trame sonore
principale doit être lue. Sélections possibles :
• Mix Audio Output (Sortie audio mixte)
lit à la fois la trame sonore principale et
la trame sonore secondaire.
• HD Audio Output (Sortie audio HD) lit
uniquement la trame sonore principale.
Remarque : Pour les disques Blu-ray,
sélectionner HD Audio Output (Sortie audio
HD) pour reproduire une trame sonore Dolby
Digital, Dolby Digital Plus, Dolby TrueHD, DTS
ou DTS-HD par l'intermédiaire de la prise
HDMI.
trame
. Chaque trame est
HDMI Audio Out
(Sortie audio
HDMI)
Down Sampling
(Sous-échantillon
nage)
DRC (Commande
de portée
dynamique)
Sélectionne le format audio pour les signaux
audio provenant de la prise de sortie HDMI
(HDMI OUT). Sélections possibles :
• HDMI Multi (Normal) sélectionne un
signal audio multicanal avec train de
bits ou LPCM.
• HDMI Multi (LPCM) sélectionne un
signal audio multicanal avec LPCM.
• Audio Mute (Sourdine audio) désactive
les signaux audio provenant de la prise
de sortie HDMI (HDMI OUT) et active
les signaux audio provenant de la prise
de sortie numérique (DIGITAL OUT).
Remarques :
HDMI Multi (Normal) et HDMI Multi (LPCM)
ne sont pas disponibles si :
• Aucun câble HDMI n'est connecté à la
prise de sortie HDMI (HDMI OUT).
• Le téléviseur connecté est éteint.
• Le téléviseur connecté n’est pas
compatible avec la sortie audio.
Lorsque l'option Audio Mute (Sourdine audio)
est sélectionnée, les signaux audio provenant
de la prise de sortie numérique (DIGITAL OUT)
changent en fonction du paramétrage de la
sortie numérique (Digital Out).
• Bitstream (Train de bits) — Lors de la
lecture de disques enregistrés en Dolby
Digital, Dolby Digital Plus, Dolby
TrueHD, DTS ou DTS-HD, le flux
principal correspondant (Dolby Digital
ou DTS) est transmis.
• LPCM — Un signal LPCM est émis au
niveau de la prise de sortie numérique
(DIGITAL OUT).
Le paramètre Digital Out (Sortie numérique)
est sans effet lors de l'émission du signal audio
HDMI.
Permet de sélectionner la sortie audio
numérique lors de la lecture d'un disque
Blu-ray ou d'un DVD enregistré en LPCM.
Sélections possibles :
• On (Activé) — Convertit les signaux
LPCM en sortie 48 kHz. Sélectionner On
(Activé) pour utiliser des connexions
numériques vers un amplificateur AV
qui n’est pas compatible avec des
fréquences d'échantillonnage de
96 kHz.
• Off (Désactivé) — Pour les disques
enregistrés en LPCM sans protection
des droits d'auteur, des signaux audio à
deux canaux allant jusqu'à 192 kHz sont
émis en tant que signaux LPCM sans
conversion.
Indique s'il faut comprimer la plage de volume
sonore (commande de portée dynamique) lors
de la lecture de signaux audio Dolby Digital,
Dolby Digital Plus ou Dolby TrueHD. Sélections
possibles :
• Auto — Si le disque lu a été enregistré
en format Dolby TrueHD, le lecteur
détecte le paramètre DRC du disque et
règle automatiquement l'option DRC
sur On (Activée) ou Off (Désactivée).
• Off (Désactivée)
• On (Activée)
68
www.insignia-products.com
Page 77

Lecteur de disques Blu-ray Insignia NS-BRDVD
Virtual Surround
(Ambiophonie
virtuelle)
Permet de créer un effet ambiophonique avec
un système ne comportant que deux
haut-parleurs. Sélections possibles :
• Off (Désactivée) — L'ambiophonie
• 1 — Crée un effet ambiophonique
• 2 — Crée un effet ambiophonique plus
Remarques :
• En cas de distorsion du son, régler
• Pour une ambiophonie virtuelle, le
Menu Parental
BD Rating Level
(Niveau de
classification des
BD)
DVD Rating Level
(Niveau de
classification des
DVD)
Password Change
(Modification du
mot de passe)
Permet de définir le niveau de classification
pour les disques Blu-ray. Pour plus
d’informations, voir « Configuration des
contrôles parentaux » à la page 63.
Permet de définir le niveau de classification
pour les DVD. Pour plus d’informations, voir
« Configuration des contrôles parentaux » à la
page 63.
Permet de modifier le mot de passe pour le
contrôle parental. Pour plus d’informations,
voir « Modification du mot de passe pour le
contrôle parental » à la page 64.
Menu Others (Autres)
virtuelle est désactivée.
naturel.
marqué que 1.
l'option Virtual Surround (Ambiophonie
virtuelle) sur Off (Désactivée) ou réduire
le volume sonore.
signal audio est toujours LPCM à deux
canaux.
Panel Display
(Affichage du
panneau)
Slide Show
(Présentation de
photos)
Media Select
(Sélection de
support)
Permet de sélectionner le niveau de luminosité
pour le panneau situé à l'avant du lecteur.
Sélections possibles :
• Auto — L'affichage s'assombrit
pendant la lecture.
• Bright (Lumineux) — Augmente la
luminosité de l'affichage.
• Dimmer (Atténué) — Assombrit
l'affichage.
Permet de sélectionner la durée pendant
laquelle un fichier JPEG reste affiché avant que
le lecteur affiche le fichier JPEG suivant.
Sélectionner 5sec (5 secondes) ou 10sec (10
secondes).
Permet de sélectionner le type de support pour
la lecture. Les sélections possibles sont Disc
(Disque) ou SD Memory (Mémoire SD).
Rétablissement des paramètres par défaut
pour les options de configuration
Le rétablissement des paramètres par défaut
pour les options de configuration ne réinitialise
pas le contrôle parental.
Pour rétablir les paramètres par défaut pour
les options de configuration :
1 Appuyer sur SETUP (Configuration).
2 Appuyer sur ou pour sélectionner ,
puis sur ENTER (Entrée). Le menu
(Initialisation) s’affiche.
3 Appuyer sur ou pour sélectionner
Restore Defaults (Rétablir les paramètres
par défaut), puis appuyer sur ENTER
(Entrée).
4 Appuyer une nouvelle fois sur ENTER
(Entrée).
5 Appuyer sur SETUP (Configuration) pour
fermer le menu.
Initialize
Angle Icon (Icône
d'angle de prise
de vues)
Auto Power Off
(Arrêt
automatique)
Permet d'activer ou de désactiver l'icône
d'angle de prise de vues. L'icône d'angle de
prise de vues s'affiche lorsque la scène d'un
disque Blu-ray ou d'un DVD en cours de lecture
comporte plusieurs angles de prise de vues.
Les sélections possibles sont On (Activée) ou
Off (Désactivée).
Permet de sélectionner si le lecteur se met
automatiquement hors tension après
30 minutes d'inactivité. Les sélections
possibles sont On (Activée) ou Off
(Désactivée).
www.insignia-products.com
Entretien
Nettoyage du boîtier
Utiliser un chiffon doux légèrement humecté
d'un détergent. Ne pas utiliser une solution
contenant de l’alcool, de l’ammoniaque ou des
produits de nettoyage abrasifs. Cela pourrait
endommager le boîtier.
Manipulation des disques
• Pour conserver un disque propre, ne pas
toucher le côté de lecture (sans étiquette).
69
Page 78

Lecteur de disques Blu-ray Insignia NS-BRDVD
• Ne coller ni papier ni adhésif sur le disque.
• Ne pas laisser le disque exposé au soleil ou
près d’une source de chaleur.
• Ranger le disque dans sa boîte après l'avoir
retiré du graveur.
Nettoyage des disques
• Avant lecture, essuyer le disque du centre
vers la périphérie avec un chiffon propre.
Nettoyage de la lentille optique
Si le lecteur ne fonctionne toujours par
correctement après avoir essayé les solutions
suggérées dans « Problèmes et solutions », à la
page 72, il est possible que la cellule optique du
laser soit sale. Consulter le revendeur ou un
centre agréé de service après-vente pour
inspecter et nettoyer la cellule optique du laser.
Vérification du signal de la télécommande
Si la télécommande ne fonctionne pas
correctement, il est possible d'utiliser une radio
AM ou un appareil photo numérique (y compris
un téléphone cellulaire avec un appareil photo
intégré) pour voir si la télécommande envoie un
signal infrarouge.
Pour vérifier le signal à l'aide d'une radio
AM :
1 Syntoniser la radio AM sur une fréquence qui
ne diffuse aucun signal.
2 Pointer la télécommande vers la radio, puis
appuyer sur un bouton quelconque et
écouter. Si le son de la radio vibre, la
télécommande fonctionne.
Pour vérifier le signal avec un appareil photo
numérique :
1 Pointer un appareil photo numérique vers la
télécommande.
2 Appuyer sur un bouton quelconque de la
télécommande et regarder le viseur ACL de
l'appareil photo. Si le faisceau infrarouge
apparaît sur l'écran ACL, la télécommande
fonctionne correctement.
70
www.insignia-products.com
Page 79

Lecteur de disques Blu-ray Insignia NS-BRDVD
Codes de langue
Langue Code Langue Code Langue Code
Abkhaze 4748 Hongrois [HUN] 5467 Russe [RUS] 6467
Afar 4747 Islandais [ICE] 5565 Samoan 6559
Afrikaans 4752 Indonésien 5560 Sango 6553
Albanais 6563 Interlingua 5547 Sanskrit 6547
Amharique 4759 Interlingue 5551 Gaélique écossais 5350
Arabe 4764 Inupiaq 5557 Serbe 6564
Arménien 5471 Irlandais [IRI] 5347 Serbo-croate 6554
Assamais 4765 Italien [ITA] 5566 Southo 6566
Aymara 4771 Japonais [JPN] 5647 Setswanais 6660
Azéri 4772 Javanais 5669 Shona 6560
Bachkir 4847 Kannada 5760 Sindhi 6550
Basque 5167 Cachemiri 5765 Cinghalais 6555
Bengali 4860 Kazakh 5757 Siswat 6565
Bhoutanais 5072 Rwanda 6469 Slovaque (slo) 6557
Bihari 4854 Kirghiz 5771 Slovène 6558
Bichelamare 4855 Kirundi 6460 Somali 6561
Breton 4864 Coréen [KOR] 5761 Espagnol [SPA] 5165
Bulgare (bul) 4853 Kurde 5767 Soundanais 6567
Birman 5971 Laotien 5861 Souahili 6569
Biélorusse 4851 Latin 5847 Suédois [SWE] 6568
Khmer 5759 Letton 5868 Tagalog 6658
Catalan 4947 Lingala 5860 Tadjik 6653
Chinois [CHI] 7254 Lituanien 5866 Tamoul 6647
Corse 4961 Macédonien 5957 Tatar 6666
Croate 5464 Malgache 5953 Telougou 6651
Tchèque (cze) 4965 Malais 5965 Thaï 6654
Danois (dan) 5047 Malayalam 5958 Tibétain 4861
Néerlandais (dut) 6058 Maltais 5966 Tigréen 6655
Anglais (eng) 5160 Maori 5955 Tonga 6661
Espéranto 5161 Marathe 5964 Tsonga 6665
Estonien 5166 Moldave 5961 Turc (tur) 6664
Féroïen 5261 Mongol 5960 Turkmène 6657
Fidji 5256 Nauruan 6047 Twi 6669
Finnois (fin) 5255 Népalais 6051 Ukrainien 6757
Français (fre) 5264 Norvégien (nor) 6061 Ourdou 6764
Frison 5271 Occitan 6149 Ouzbek 6772
Galicien 5358 Oriya 6164 Vietnamien 6855
Géorgien 5747 Oromo 6159 Volapük 6861
Allemand (ger) 5051 Pendjabi 6247 Gallois 4971
Grec (gre) 5158 Afghan 6265 Wolof 6961
Groenlandais 5758 Iranien 5247 Xhosa 7054
Guarani 5360 Polonais (pol) 6258 Yiddish 5655
Goujrati 5367 Portugais [POR] 6266 Yorouba 7161
Haoussa 5447 Quetchua 6367 Zoulou 7267
Hébreu 5569 Rhéto-roman 6459
Hindi 5455 Roumain [RUM] 6461
Remarque
En cas de choix d’une langue qui a un code à trois lettres entre parenthèses, ce code de langue s’affiche si cette langue est
sélectionnée pour l’audio ou les sous-titres. En cas de sélection d’une autre langue, --- s'affiche à la place.
www.insignia-products.com
71
Page 80

Lecteur de disques Blu-ray Insignia NS-BRDVD
Problèmes et solutions
Avertissement
L’utilisateur ne doit pas essayer de réparer
lui-même cet appareil. Aucune pièce interne ne
peut être réparée par l'utilisateur.
Mettre le lecteur hors tension, débrancher le
cordon d'alimentation et contacter un technicien
agréé.
Problème Solution
Pas d’alimentation. • Vérifier que le cordon
Absence d’image et de son • Vérifier que le téléviseur
Image déformée. • Parfois, une légère
Image totalement déformée
ou image en noir et blanc
avec un disque Blu-ray ou un
DVD
d’alimentation est branché
correctement et
fermement.
• Débrancher le cordon
d’alimentation, attendre 5
à 10 secondes, puis le
rebrancher.
est allumé.
• Vérifier que tous les câbles
sont correctement et
fermement connectés.
• Vérifier que le téléviseur
ou l’autre périphérique
connectés sont
compatibles HDCP. Ce
lecteur n’émettra pas de
signal vidéo si l’autre
périphérique n’est pas
compatible HDCP.
• Vérifier que le format de
sortie du lecteur
correspond au format
d’entrée du périphérique
connecté.
•Si le paramètre HDMI
Deep Color (norme HDMI
qui permet d’accroître la
profondeur des couleurs)
est réglé sur Auto, mettre
le paramètre sur Off
(Désactivé). Régler le
paramètre de la résolution
vidéo HDMI (HDMI Video
Resolution) sur un autre
réglage que Auto ou
1080p24.
déformation de l’image
peut se produire. Ceci est
normal.
• Connecter le lecteur
directement au téléviseur.
Si des câbles A/V RCA A/V
sont connectés à un
magnétoscope, la vidéo
peut être déformée en
raison du système de droit
d’auteur.
• Vérifier que le disque est
compatible avec ce lecteur.
Problème Solution
Absence ou déformation du
son
L’image se fige pendant
quelques instant pendant la
lecture
Impossible de reproduire un
disque
Impossible de lire une carte
mémoire SD
Quand le disque est retiré,
l’écran de démarrage ne
s’affiche pas
La télécommande ne
fonctionne pas.
Les touches sont
inopérantes ou le lecteur ne
répond plus
Le lecteur ne répond pas à
certaines commandes de
fonctionnement pendant la
lecture
• Régler le volume.
• Vérifier que les
haut-parleurs sont
correctement et
fermement connectés.
• En cas d’utilisation d’une
connexion HDMI vérifier
que le câble HDMI est
connecté correctement et
fermement.
• Régler les paramètres
dans le menu
• Vérifier que le disque n'est
ni sale ni rayé.
• Si le disque est sale, le
nettoyer.
• Vérifier que l’étiquette du
disque est tournée vers le
haut.
• Si le disque est sale, le
nettoyer.
• Essayer un autre disque.
Le disque est peut-être
voilé ou endommagé.
• La classification du disque
est peut-être interdite dans
le cadre du contrôle
parental. Déverrouiller le
contrôle parental ou
modifier le niveau de
classification.
• Vérifier que le disque est
compatible avec ce lecteur.
• Le format de carte n’est
pas compatible avec le
format du lecteur.
• La carte n’est pas
compatible avec le lecteur.
• Réinitialiser le lecteur en le
mettant hors tension puis
en le mettant de nouveau
sous tension.
• Pointer la télécommande
directement vers le
capteur situé sur la face
avant du lecteur.
• Diminuer la distance entre
la télécommande et le
capteur situé sur la face
avant du lecteur.
• Veiller à ce que les pôles +
et – des piles coïncident
avec les repères + et –
figurant à l'intérieur du
compartiment.
• Remplacer les piles.
• Débrancher le cordon
d’alimentation pendant 5 à
10 secondes, puis le
rebrancher.
• Certains disques
interdisent l’usage de
certaines commandes.
Vérifier les instructions
fournies avec le disque.
Audio
.
72
www.insignia-products.com
Page 81

Lecteur de disques Blu-ray Insignia NS-BRDVD
Problème Solution
Le lecteur ne peut pas
reproduire le disque
Angle de prise de vues ne
change pas
La lecture ne démarre pas
quand le titre est sélectionné
Mot de passe oublié • Appuyer sur les touches
Remarque
Certaines fonctions peuvent ne pas etre
disponibles pour des modes spécifiques. Ceci est
normal. Vérifier les sections de ce guide pour
identifier le disque qui est mis en lecture, afin de
déterminer les fonctions qui sont disponibles.
Certains disques interdisent l’usage de certaines
commandes.
• Vérifier que le disque est
inséré avec l’étiquette
tournée vers le haut.
• Vérifier que le disque est
compatible.
• Si le disque est sale, le
nettoyer.
• Essayer un autre disque.
Le disque est peut-être
voilé ou endommagé.
• De l'humidité a pu
s'infiltrer dans le lecteur et
être source de
condensation. Ne pas
utiliser le lecteur pendant
une ou deux heures pour
laisser la condensation
s’évaporer.
• Certains DVD ne sont
enregistrés qu'avec un
seul angle de prise de
vues.
• Si un disque est enregistré
avec plusieurs angles,
certaines scènes peuvent
n’avoir qu’un angle.
• Le titre est peut-être
interdit dans le cadre du
contrôle parental.
Déverrouiller le contrôle
parental ou modifier le
niveau de classification.
numériques pour saisir
4737. Le mot de passe est
effacé.
Spécifications
Les spécifications sont sujettes à modification
sans préavis.
Média BD-vidéo, DVD-vidéo,
Alimentation électrique 120 V CA, 60 Hz
Consommation électrique 30 W (attente : 0,8 W)
Dimensions (L × H × P) 17.2 × 2,8 × 13,9 pouces
Poids 9,1 lb (4,1 kg)
Température de
fonctionnement
Humidité en service Moins de 80 % (sans
Sortie audio (analogique) 2 prises RCA
Sortie vidéo 1 prise RCA
DVD+RW/+R, DVD-R/-RW
CD-DA, CD-RW/-R, DTS-CD,
carte mémoire SD
(435 × 70 × 351 mm)
41 °F (5 °C) à 104 °F (40 °C)
condensation)
G/D : 2 V rms (impédance de
sortie : plus de 1 kΩ)
1V c-c (75 Ω)
Sortie vidéo à composantes 3 prises RCA
Y: 1V c-c (75 Ω)
PB/CB : 700 m V c-c (75 Ω)
PR/CR : 700 m V c-c (75 Ω)
Sortie audio (numérique) 1 prise RCA
500 m V c-c (75 Ω)
1 prise optique
Sortie HDMI 1 prise HDMI
Vidéo : 480p, 720p, 1080i,
1080p, 1080p24
Audio
Avis juridiques
FCC article 15
Ce dispositif est conforme à l’article 15 du règlement de la
FCC. Son utilisation est soumise aux deux conditions
suivantes : (1) ce dispositif ne doit pas provoquer
d’interférences préjudiciables, et (2) il doit accepter toute
interférence reçue, y compris celles risquant d’engendrer un
fonctionnement indésirable.
Cet équipement a été mis à l’essai et déclaré conforme aux
limites prévues pour un appareil numérique de classe B,
définies dans la section 15 du règlement de la FCC. Ces
limites ont été établies pour fournir une protection
raisonnable contre les interférences préjudiciables lors d’une
installation résidentielle. Cet équipement génère, utilise et
diffuse des ondes radio et, s’il n’est pas installé et utilisé
conformément aux instructions dont il fait l’objet, il peut
provoquer des interférences préjudiciables aux
communications radio. Cependant, il n'est pas possible de
garantir qu’aucune interférence ne se produira pour une
installation particulière. Si cet équipement produit des
interférences importantes lors de réceptions radio ou
télévisées, qui peuvent être détectées en éteignant puis en
rallumant l’appareil, essayer de corriger l’interférence au
moyen de l’une ou de plusieurs des mesures suivantes :
• Réorienter ou déplacer l’antenne réceptrice.
• Augmenter la distance entre l’équipement et le
récepteur.
• Brancher l’équipement sur la prise électrique d’un
circuit différent de celui auquel le récepteur est relié.
• Contacter le revendeur ou un technicien qualifié pour
toute assistance.
Avertissement de la FCC
Tous changements ou toutes modifications qui ne seraient
pas expressément approuvés par les responsables de
l’application des règles FCC pourraient rendre nul le droit de
l’utilisateur d’utiliser cet équipement.
Déclaration NMB-003 du Canada
Cet appareil numérique de la classe B est conforme à la
norme NMB-003 du Canada.
Sécurité du laser
Cet appareil utilise un laser. Seul un technicien qualifié doit
retirer le couvercle ou entreprendre une réparation sur cet
appareil, compte tenu du risque de lésions oculaires.
Avertissement
L’utilisation de commandes ou de réglages ou de
performance de procédures autres que celles
spécifiées dans le présent document pourrait
entraîner une exposition dangereuse aux
radiations.
Émission de rayon laser visible et invisible en cas
d’ouverture ou de dispositif de verrouillage
défectueux. Ne pas regarder directement le
rayonnement laser.
Le laser est situé à l’intérieur, près du mécanisme
du lecteur.
www.insignia-products.com
73
Page 82

Lecteur de disques Blu-ray Insignia NS-BRDVD
Au sujet des droits d’auteur
La copie, la diffusion, la représentation publique et le prêt
non autorisés de disques sont interdits. Cet appareil
incorpore une technologie protégée par des droits d'auteurs
qui font l'objet de brevets aux États-Unis et par d'autres
droits de propriété intellectuelle. L’utilisation de cette
technologie protégée par le droit d’auteur doit être autorisée
par Macrovision ; cette technologie est destinée à un usage
domestique et limité, sauf en cas d’autorisation spéciale de
Macrovision. La rétro-ingénierie ou le démontage sont
interdits.
Droits d'auteurs
Ce produit incorpore une technologie de protection de droits
d’auteurs protégée par des revendications de procédé de
certains brevets américains et d’autres droits de propriété
intellectuelle de Macrovision Corporation et d’autres
propriétaires de droits. L’utilisation de cette technologie de
protection des droits d’auteur doit être autorisée par la
société Macrovision et doit se limiter à des fins de
divertissement privé à moins d’une autorisation préalable et
explicite de Macrovision Corporation. La rétro-ingénierie ou
le démontage sont interdits.
Dolby Laboratories
Fabriqué sous licence de Dolby Laboratories.
Dolby et le symbole sont des marques de
commerce déposées de DOLBY LABORATORIES. Tous
droits réservés.
MC
HDMI
Ce téléviseur incorpore une technologie
MC
HDMI
Interface (Interface multimédia haute définition) sont des
marques de commerce, ou des marques déposées de HDMI
Licensing LLC.
. HDMI, le logo HDMI et High-Definition Multimedia
Energy Star
Les produits revêtus du logo ENERGY STARMD sont
conçus pour protéger l’environnement grâce à une
excellent efficacité énergétique. Ce lecteur est agréé Energy
Star.
Sun Microsystems, Inc.
Java et toutes les autres marques de commerce et
logos sont des marques de commerce ou des
marques déposées de Sun Microsystems, Inc. aux
États-Unis et dans d’autres pays.
DTS, Inc.
Fabriqués sous licence des brevets
américains n° : 5,451,942; 5,956,674;
5,974,380; 5,978,762; 6,487,535 et d’autres brevets
américains et internationaux émis et en instance. DTS et
DTS Digital Surround sont des marques déposées et les
logos et symboles DTS sont des marques de commerce de
DTS, Inc.
© 1996-2007 DTS, Inc. Tous droits réservés..
Blu-ray
« Blu-ray Disc » et le logo Blu-ray Disc sont des
marques de commerce.
Eastman Kodak Company
Le logo Kodak Picture CD est une marque de
commerce de Eastman Kodak Company.
74
www.insignia-products.com
Page 83

Lecteur de disques Blu-ray Insignia NS-BRDVD
Garantie limitée d’un an
Insignia Products (« Insignia ») garantit au premier
acheteur de ce NS-BRDVD neuf (« Produit »), qu’il est
exempt de vices de fabrication et de main-d’œuvre à
l’origine, pour une période d’un (1) an à partir de la date
d’achat du Produit (« Période de garantie »). Ce Produit
doit avoir été acheté chez un revendeur agréé des
produits de la marque Insignia et emballé avec cette
déclaration de garantie. Cette garantie ne couvre pas les
Produits remis à neuf. Les conditions de la présente
garantie s’appliquent à tout Produit pour lequel Insignia
est notifié pendant la Période de garantie, d’un vice
couvert par cette garantie qui nécessite une réparation.
Quelle est la durée de la couverture?
La Période de garantie dure 1 an (365 jours) à compter
de la date d’achat de ce Produit. La date d’achat est
imprimée sur le reçu fourni avec le Produit.
Que couvre cette garantie?
Pendant la Période de garantie, si un vice de matériau
ou de main-d’œuvre d'origine est détecté sur le Produit
par un service de réparation agréé par Insignia ou le
personnel du magasin, Insignia (à sa seule discrétion) :
(1) réparera le Produit en utilisant des pièces détachées
neuves ou remises à neuf; ou (2) remplacera le Produit
par un produit ou des pièces neuves ou remises à neuf
de qualité comparable. Les produits et pièces remplacés
au titre de cette garantie deviennent la propriété
d’Insignia et ne sont pas retournés à l’acheteur. Si les
Produits ou pièces nécessitent une réparation après
l’expiration de la Période de garantie, l’acheteur devra
payer tous les frais de main-d’œuvre et les pièces. Cette
garantie reste en vigueur tant que l’acheteur reste
propriétaire du Produit Insignia pendant la Période de
garantie. La garantie prend fin si le Produit est revendu
ou transféré d’une quelconque façon que ce soit à tout
autre propriétaire.
Comment obtenir une réparation sous
garantie?
Si le Produit a été acheté chez un détaillant, le rapporter
accompagné du reçu original chez ce détaillant. Prendre
soin de remettre le Produit dans son emballage d’origine
ou dans un emballage qui procure la même qualité de
protection que celui d’origine. Si le Produit a été acheté
en ligne, l’expédier accompagné du reçu original à
l’adresse indiquée sur le site Web. Prendre soin de
remettre le Produit dans son emballage d’origine ou
dans un emballage qui procure la même qualité de
protection que celui d’origine.
Pour obtenir le service de la garantie à domicile pour un
téléviseur avec écran de 25 po ou plus, appeler le
1-888-BESTBUY. L’assistance technique établira un
diagnostic et corrigera le problème au téléphone ou
enverra un technicien agréé par Insignia pour la
réparation à domicile.
Où cette garantie s’applique-t-elle?
Cette garantie ne s’applique qu’à l’acheteur original du
produit aux États-Unis et au Canada.
• la modification de tout ou partie du Produit, y
compris l’antenne;
• un écran plasma endommagé par les images fixes
(sans mouvement) qui restent affichées pendant de
longues périodes (rémanentes).
La présente garantie ne couvre pas non plus :
• les dommages ayant pour origine une utilisation ou
une maintenance défectueuse;
• la connexion à une source électrique dont la
tension est inadéquate;
• toute réparation effectuée par quiconque autre
qu’un service de réparation agréé par Insignia pour
la réparation du Produit;
• les produits vendus en l’état ou hors service;
• les consommables tels que les fusibles ou les piles;
• les produits dont le numéro de série usine a été
altéré ou enlevé.
LA RÉPARATION OU LE REMPLACEMENT, TELS
QU’OFFERTS PAR LA PRÉSENTE GARANTIE,
CONSTITUENT LE SEUL RECOURS DE L’ACHETEUR.
INSIGNIA NE SAURAIT ÊTRE TENU POUR
RESPONSABLE DE DOMMAGES ACCESSOIRES OU
CONSÉCUTIFS, RÉSULTANT DE L’INEXÉCUTION
D'UNE GARANTIE EXPRESSE OU IMPLICITE SUR CE
PRODUIT, Y COMPRIS, SANS S’Y LIMITER, LA
PERTE DE DONNÉES, L’IMPOSSIBILITÉ D’UTILISER
LE PRODUIT, L’INTERRUPTION D’ACTIVITÉ OU LA
PERTE DE PROFITS. INSIGNIA PRODUCTS
N’OCTROIE AUCUNE AUTRE GARANTIE EXPRESSE
RELATIVE À CE PRODUIT; TOUTES LES GARANTIES
EXPRESSES OU IMPLICITES POUR CE PRODUIT, Y
COMPRIS MAIS SANS LIMITATION, TOUTE
GARANTIE DE QUALITÉ MARCHANDE,
D'ADÉQUATION À UN BUT PARTICULIER, SONT
LIMITÉES À LA PÉRIODE DE GARANTIE
APPLICABLE TELLE QUE DÉCRITE CI-DESSUS ET
AUCUNE GARANTIE EXPRESSE OU IMPLICITE NE
S’APPLIQUERA APRÈS LA PÉRIODE DE GARANTIE.
CERTAINS ÉTATS ET PROVINCES NE
RECONNAISSENT PAS LES LIMITATIONS DE LA
DURÉE DE VALIDITÉ DES GARANTIES IMPLICITES.
PAR CONSÉQUENT, LES LIMITATIONS
SUSMENTIONNÉES PEUVENT NE PAS S'APPLIQUER
À L’ACHETEUR ORIGINAL. LA PRÉSENTE GARANTIE
DONNE À L'ACHETEUR DES GARANTIES
JURIDIQUES SPÉCIFIQUES; IL PEUT AUSSI
BÉNÉFICIER D'AUTRES GARANTIES QUI VARIENT
D'UN ÉTAT OU D'UNE PROVINCE À L'AUTRE.
Pour contacter Insignia :
Pour le service à la clientèle, appeler le 1-877-467-4289
www.insignia-products.com
Distribué par Best Buy Purchasing, LLC
Dynex, 7601 Penn Avenue South, Richfield, Minnesota,
É.-U. 55423-3645
© 2008 Best Buy Enterprise Services, Inc.
Tous droits réservés. INSIGNIA est une marque de
commerce de Best Buy Enterprise Services, Inc.
déposée dans certains pays. Tous les autres produits et
noms de marques sont des marques de commerce
appartenant à leurs propriétaires respectifs.
Ce qui n’est pas couvert par cette garantie
limitée
La présente garantie ne couvre pas :
• la formation du client;
• l’installation;
• les réglages de configuration;
• les dommages esthétiques;
• les dommages résultants de catastrophes
naturelles telles que la foudre;
• les accidents;
• une utilisation inadaptée;
• une manipulation abusive;
• la négligence;
• une utilisation commerciale;
www.insignia-products.com
75
Page 84

Lecteur de disques Blu-ray Insignia NS-BRDVD
76
www.insignia-products.com
Page 85

Reproductor de discos Blu-ray Insignia NS-BRDVD
Reproductor de discos Blu-ray Insignia
NS-BRDVD
Contenido
Introducción . . . . . . . . . . . . . . . . . . . . . . . . . . . . . . . . . . . . . . . . . . . . . . . . . . . . . . . . . .77
Información de seguridad . . . . . . . . . . . . . . . . . . . . . . . . . . . . . . . . . . . . . . . . . . . . . . .78
Características . . . . . . . . . . . . . . . . . . . . . . . . . . . . . . . . . . . . . . . . . . . . . . . . . . . . . . . .80
Vista frontal . . . . . . . . . . . . . . . . . . . . . . . . . . . . . . . . . . . . . . . . . . . . . . . . . . . . . . . . . . . . . . .81
Vista posterior . . . . . . . . . . . . . . . . . . . . . . . . . . . . . . . . . . . . . . . . . . . . . . . . . . . . . . . . . . . . .81
Control remoto . . . . . . . . . . . . . . . . . . . . . . . . . . . . . . . . . . . . . . . . . . . . . . . . . . . . . . . . . . . . .82
Pantalla. . . . . . . . . . . . . . . . . . . . . . . . . . . . . . . . . . . . . . . . . . . . . . . . . . . . . . . . . . . . . . . . . . .83
Preparación de su reproductor . . . . . . . . . . . . . . . . . . . . . . . . . . . . . . . . . . . . . . . . . . .84
Instalación de las pilas del control remoto . . . . . . . . . . . . . . . . . . . . . . . . . . . . . . . . . . . . . . . .84
Conexión de un televisor . . . . . . . . . . . . . . . . . . . . . . . . . . . . . . . . . . . . . . . . . . . . . . . . . . . . .84
Conexión de un sistema de audio . . . . . . . . . . . . . . . . . . . . . . . . . . . . . . . . . . . . . . . . . . . . . .87
Conexión del cable de alimentación de CA . . . . . . . . . . . . . . . . . . . . . . . . . . . . . . . . . . . . . . .87
Configuración de los altavoces. . . . . . . . . . . . . . . . . . . . . . . . . . . . . . . . . . . . . . . . . . . . . . . . .88
Ajuste de los altavoces. . . . . . . . . . . . . . . . . . . . . . . . . . . . . . . . . . . . . . . . . . . . . . . . . . . . . . .88
Uso de su reproductor . . . . . . . . . . . . . . . . . . . . . . . . . . . . . . . . . . . . . . . . . . . . . . . . . .89
Discos, tarjetas de memoria y archivos compatibles . . . . . . . . . . . . . . . . . . . . . . . . . . . . . . . .89
Reproducción de un disco Blu-ray o DVD . . . . . . . . . . . . . . . . . . . . . . . . . . . . . . . . . . . . . . . .90
Control de la reproducción de discos Blu-ray o DVD . . . . . . . . . . . . . . . . . . . . . . . . . . . . . . . .91
Reproducción de un CD de audio o un disco con archivos JPEG/MP3/WMA. . . . . . . . . . . . .91
Control de reproducción de un CD de audio o un disco con archivos JPEG/MP3/WMA. . . . .93
Reproducción de un Kodak Picture CD:. . . . . . . . . . . . . . . . . . . . . . . . . . . . . . . . . . . . . . . . . .93
Control de la reproducción de Kodak Picture CD. . . . . . . . . . . . . . . . . . . . . . . . . . . . . . . . . . .93
Reproducción desde una tarjeta de memoria SD . . . . . . . . . . . . . . . . . . . . . . . . . . . . . . . . . .94
Formateo de una tarjeta de memoria SD. . . . . . . . . . . . . . . . . . . . . . . . . . . . . . . . . . . . . . . . .95
Visualización de la información de estado . . . . . . . . . . . . . . . . . . . . . . . . . . . . . . . . . . . . . . . .95
Creación de un bucle de reproducción. . . . . . . . . . . . . . . . . . . . . . . . . . . . . . . . . . . . . . . . . . .96
Creación de un programa. . . . . . . . . . . . . . . . . . . . . . . . . . . . . . . . . . . . . . . . . . . . . . . . . . . . .97
Control de la reproducción programada. . . . . . . . . . . . . . . . . . . . . . . . . . . . . . . . . . . . . . . . . .97
Uso de la reproducción aleatoria . . . . . . . . . . . . . . . . . . . . . . . . . . . . . . . . . . . . . . . . . . . . . . .97
Control de la reproducción aleatoria . . . . . . . . . . . . . . . . . . . . . . . . . . . . . . . . . . . . . . . . . . . .97
Búsqueda de un capítulo, título, pista o tiempo . . . . . . . . . . . . . . . . . . . . . . . . . . . . . . . . . . . .98
Búsqueda usando marcadores . . . . . . . . . . . . . . . . . . . . . . . . . . . . . . . . . . . . . . . . . . . . . . . .98
Uso de PIP (imagen en imagen) . . . . . . . . . . . . . . . . . . . . . . . . . . . . . . . . . . . . . . . . . . . . . . .98
Selección del ángulo de cámara . . . . . . . . . . . . . . . . . . . . . . . . . . . . . . . . . . . . . . . . . . . . . . .98
Selección de idiomas o estilos de subtítulos . . . . . . . . . . . . . . . . . . . . . . . . . . . . . . . . . . . . . .99
Cambio de la pista de audio. . . . . . . . . . . . . . . . . . . . . . . . . . . . . . . . . . . . . . . . . . . . . . . . . . .99
Ajuste del nivel de negro . . . . . . . . . . . . . . . . . . . . . . . . . . . . . . . . . . . . . . . . . . . . . . . . . . . . .99
Reducción del ruido de video . . . . . . . . . . . . . . . . . . . . . . . . . . . . . . . . . . . . . . . . . . . . . . . . . .99
Ajuste de la resolución de video de HDMI . . . . . . . . . . . . . . . . . . . . . . . . . . . . . . . . . . . . . . .100
Ajuste de la resolución de componentes . . . . . . . . . . . . . . . . . . . . . . . . . . . . . . . . . . . . . . . .100
Selección del modo de sonido del CD de audio. . . . . . . . . . . . . . . . . . . . . . . . . . . . . . . . . . .100
Ajuste del modo de audio de Blu-ray . . . . . . . . . . . . . . . . . . . . . . . . . . . . . . . . . . . . . . . . . . .101
Uso de los menús de disco . . . . . . . . . . . . . . . . . . . . . . . . . . . . . . . . . . . . . . . . . . . . . . . . . .102
Ajuste de la imagen fija . . . . . . . . . . . . . . . . . . . . . . . . . . . . . . . . . . . . . . . . . . . . . . . . . . . . .102
Configuración de los controles de los padres. . . . . . . . . . . . . . . . . . . . . . . . . . . . . . . . . . . . .103
Cambio de la contraseña del control de los padres . . . . . . . . . . . . . . . . . . . . . . . . . . . . . . . .104
Uso del menú rápido . . . . . . . . . . . . . . . . . . . . . . . . . . . . . . . . . . . . . . . . . . . . . . . . . . . . . . .104
Uso del menú personalizado . . . . . . . . . . . . . . . . . . . . . . . . . . . . . . . . . . . . . . . . . . . . . . . . .106
Restauración de las opciones de configuración a los valores predefinidos . . . . . . . . . . . . . .109
Mantenimiento . . . . . . . . . . . . . . . . . . . . . . . . . . . . . . . . . . . . . . . . . . . . . . . . . . . . . . .110
Limpieza del gabinete . . . . . . . . . . . . . . . . . . . . . . . . . . . . . . . . . . . . . . . . . . . . . . . . . . . . . .110
Manejo de los discos . . . . . . . . . . . . . . . . . . . . . . . . . . . . . . . . . . . . . . . . . . . . . . . . . . . . . . .110
Limpieza de los discos . . . . . . . . . . . . . . . . . . . . . . . . . . . . . . . . . . . . . . . . . . . . . . . . . . . . . .110
Limpieza del lente del disco . . . . . . . . . . . . . . . . . . . . . . . . . . . . . . . . . . . . . . . . . . . . . . . . . .110
Verificación de la señal del control remoto. . . . . . . . . . . . . . . . . . . . . . . . . . . . . . . . . . . . . . .110
Códigos de idioma . . . . . . . . . . . . . . . . . . . . . . . . . . . . . . . . . . . . . . . . . . . . . . . . . . . .111
Localización y corrección de fallas . . . . . . . . . . . . . . . . . . . . . . . . . . . . . . . . . . . . . . .112
Especificaciones . . . . . . . . . . . . . . . . . . . . . . . . . . . . . . . . . . . . . . . . . . . . . . . . . . . . .113
Garantía limitada de un año. . . . . . . . . . . . . . . . . . . . . . . . . . . . . . . . . . . . . . . . . . . . .115
Introducción
Felicitaciones por su compra de un producto de alta calidad de Insignia. Su NS-BRDVD representa el más
moderno diseño de reproductor de discos Blu-ray y está concebido para brindar un rendimiento confiable y
sin problemas.
www.insignia-products.com
77
Page 86

Reproductor de discos Blu-ray Insignia NS-BRDVD
Información de seguridad
CUIDADO
RIESGO DE CHOQUE ELÉCTRICO
NO ABRIR
Advertencia
Para reducir el riesgo de choque eléctrico, no
retire la cubierta ni la parte posterior. No hay
partes reparables por el usuario en el interior.
Refiera cualquier reparación a personal de
servicio calificado.
Para reducir el riesgo de incendio o choque
eléctrico, no exponga su reproductor a la lluvia o
humedad.
Cuidado
Para evitar un choque eléctrico, introduzca la
clavija ancha del enchufe del cable de
alimentación en la ranura ancha de un
tomacorriente. Si el enchufe no entra, solicite a un
electricista certificado que cambie el
tomacorriente obsoleto. No modifique el enchufe
del cable de alimentación ya que se anulará esta
característica de seguridad.
Este símbolo indica que voltaje peligroso
que puede constituir un riesgo de choque
eléctrico se encuentra presente dentro de
su reproductor. Esta etiqueta se encuentra
ubicada en la parte posterior de su
reproductor.
Este símbolo indica que hay instrucciones
importantes de operación y mantenimiento
en la literatura que acompaña a su
reproductor.
Advertencia
Su reproductor utiliza un sistema
de láser.
El uso de cualquier otro control,
ajuste o procedimiento que no sea
especificado en este manual puede
resultar en una exposición
peligrosa a la radiación.
Existe radiación láser visible cuando la unidad
está abierta y sus seguros se han anulado. No
mire directamente al haz de luz.
1 Lea las instrucciones — Lea todas las
instrucciones de seguridad y operación antes
de usar su reproductor.
2 Guarde las instrucciones — Guarde las
instrucciones de seguridad y operación para
referencia futura.
3 Siga las advertencias — Preste atención a
todas las advertencias sobre su reproductor
y las instrucciones de operación.
4 Siga las instrucciones — Siga todas las
instrucciones de operación y uso.
5Limpieza — Desenchufe su reproductor del
tomacorriente de la pared antes de limpiarlo.
No use productos de limpieza líquidos o en
aerosol. Use un paño húmedo para limpiar la
unidad.
Excepción: Los productos que requieren el
uso de servicio sin interrupción y que, por
alguna razón específica, cómo la posibilidad
de pérdida del código de autorización del
convertidor CATV, no se deben desconectar
para limpiarlos o por cualquier otra razón, no
requieren seguir las instrucciones que
indican desconectar el reproductor en la
descripción de limpieza.
6 Aditamentos — No use accesorios que no
hayan sido recomendados por el fabricante
del reproductor a ya que podrían causar
problemas peligrosos.
7 Agua y humedad — No use su reproductor
cerca del agua. Por ejemplo, no lo use cerca
de una bañera, lavabo, fregadero de cocina o
lavadero, en un sótano mojado o cerca de
una piscina.
8 Accesorios — No coloque su
reproductor sobre un carro,
base, trípode, soporte, o mesa
inestable. Su reproductor podría
caerse y causar lesiones graves
a alguna persona y daños
graves al reproductor. Utilice este producto
solamente con carros, bases, trípodes,
soportes, o mesas especificadas por el
fabricante o que se vendan con su
reproductor. Cualquier montaje de su
reproductor debe seguir las instrucciones del
fabricante, y debe usar accesorios de
montaje recomendados por el fabricante. Un
reproductor y un carro juntos deben moverse
con cuidado. Las paradas repentinas, la
fuerza excesiva y las superficies irregulares
pueden causar que su reproductor y el carro
se volteen de lado.
9 Ventilación — Las ranuras y aberturas en el
gabinete y en la parte posterior o inferior se
proveen por ventilación, para asegurar la
operación confiable del reproductor, y para
protegerlo contra el sobrecalentamiento.
Estas aberturas no se deben bloquear ni
cubrir. Las aberturas nunca se deben
bloquear si se coloca su reproductor sobre
una cama, un sofá, una alfombra u otra
superficie similar. Su reproductor nunca se
debe colocar cerca o sobre un radiador o
calefactor. Su reproductor no deberá
colocarse en una instalación integrada, como
un librero o estantería, a menos que se
proporcione ventilación apropiada o se hayan
seguido las instrucciones del fabricante.
10 Fuentes de energía — Su reproductor debe
funcionar únicamente con el tipo de fuente
de energía indicada en la etiqueta de marca.
Si no está seguro del tipo de fuente de
energía en su casa, consulte con el vendedor
de su reproductor o la compañía local de
energía.
78
www.insignia-products.com
Page 87

Reproductor de discos Blu-ray Insignia NS-BRDVD
11 Conexión a tierra o polarización — Su
reproductor está equipado con un enchufe
polarizado de corriente alterna (un enchufe
que tiene una lámina más ancha que la otra).
Este enchufe se conecta en el tomacorriente
de una sola forma. Esto es una característica
de seguridad. Si no puede insertar
completamente el enchufe en el
tomacorriente, intente voltearlo. Si el enchufe
todavía no entra, contacte a su electricista
para que reemplace el tomacorriente
obsoleto. No anule el propósito de seguridad
del enchufe polarizado.
12 Protección del cable de alimentación —
Los cables de alimentación eléctrica deben
colocarse de tal forma que no se pisen o
queden aplastados por objetos colocados
contra ellos; preste atención especial a los
cables conectados a tomacorrientes y al
lugar de donde salen del aparato.
13 Conexión a tierra de la antena exterior —
Si una antena externa o un sistema de cable
está conectado al reproductor, asegúrese de
que la antena o el sistema de cable esté
conectado a tierra, para proporcionar algo de
protección contra sobretensiones de voltaje y
la acumulación de cargas estáticas. El
artículo 810 del código nacional eléctrico,
ANSI/NFPA No. 70-1984 proporciona
información con respecto a la conexión a
tierra del poste y la estructura de soporte, la
conexión a tierra del alambre principal de
una unidad de descarga de antena, el
tamaño de los conductores de la conexión a
tierra y la conexión del electrodo de conexión
a tierra.
7
6
5
4
3
1
1 Equipo de servicio eléctrico
2 Sistemas de electrodos de tierra para
el servicio de alimentación eléctrica
3 Abrazaderas de tierra
4 Conductores de conexión a tierra
5 Unidad de descarga de antena
6 Abrazadera de tierra
7 Cable conductor de entrada de antena
2
14 Líneas de alimentación — Un sistema de
antena externa no debe de ubicarse en las
inmediaciones de líneas de corriente aéreas
u otros circuitos de luz eléctrica o de energía,
o donde pueda caer sobre dichos circuitos o
líneas de corriente. Al instalar un sistema de
antena exterior, se debe tener sumo cuidado
para no tocar los circuitos o líneas de alto
voltaje ya que el contacto con ellos podría
ser fatal.
15 Relámpagos — Para protección adicional de
su reproductor durante una tormenta
eléctrica, o cuando se deje sin usar durante
largos periodos de tiempo, desconéctelo del
tomacorriente y desconecte la antena o el
sistema de cable. Esto evitará daños a su
reproductor debido a rayos y a sobrevoltaje
en la línea de energía.
16 Sobrecarga — No sobrecargue los
tomacorrientes ni los cables de extensión ya
que esto podría resultar en peligro de
incendio o choque eléctrico.
17 Introducción de objetos y líquidos —
Nunca inserte objetos de ningún tipo en su
reproductor a través de las aberturas, ya que
podrían tocar puntos de voltaje peligrosos o
hacer corto circuito con otros componentes
que podrían resultar en incendio o choque
eléctrico. Nunca derrame líquidos de ninguna
clase sobre su reproductor.
18 Reparación — No trate de reparar su
reproductor usted mismo, ya que abrir o
quitar las cubiertas puede exponerlo a
voltajes peligrosos u otros peligros. Remita
todas las reparaciones a personal de servicio
calificado.
19 Daños que requieren reparación –
Desconecte su reproductor del tomacorriente
y refiera la reparación a personal de servicio
calificado bajo las siguientes condiciones:
• Cuando el cable de alimentación o el
enchufe esté dañado o expuesto.
• Si líquido ha sido derramado u objetos
han caído dentro de su reproductor.
• Si su reproductor ha sido expuesto a la
lluvia o al agua.
• Si su reproductor no funciona
normalmente aún siguiendo las
instrucciones de operación siguientes.
Ajuste únicamente los controles que
están cubiertos en las instrucciones de
operación, ya que el ajuste incorrecto de
otros controles puede resultar en daño y
frecuentemente requerirá trabajo
intensivo de un técnico calificado para
restaurar la operación normal del
reproductor.
• Si su reproductor se ha caído o dañado
de cualquier forma.
• Cuando su reproductor muestra un
cambio evidente en el funcionamiento,
esto indica que se necesita reparación.
20 Piezas de repuesto — Cuando se necesiten
repuestos, asegúrese de que el técnico de
reparación use repuestos especificados por
el fabricante o que tengan las mismas
características que las partes originales. Las
sustituciones no autorizadas pueden resultar
en incendio, choque eléctrico, lesiones a
personas u otros peligros.
21 Verificación de seguridad — Después de
completar el servicio o la reparación de su
reproductor, pídale al técnico de servicio que
realice verificaciones de seguridad rutinarias
para determinar que el aparato se encuentra
en buena condición de operación.
www.insignia-products.com
79
Page 88

Reproductor de discos Blu-ray Insignia NS-BRDVD
22 Calor — Su reproductor debe ubicarse
alejado de fuentes de calor tales como
radiadores, estufas u otros productos (tales
como amplificadores) que produzcan calor.
El modelo y el número de serie de su
reproductor se pueden encontrar en el gabinete.
Se recomienda que guarde esos números para
referencia futura.
No. de serie
No. de
modelo
Advertencia
No coloque su reproductor sobre muebles que
pueden ser inclinados cuando un niño o un adulto
se apoyen en él, tiren de él, se paren junto a él o
se suban sobre él. Si su reproductor se cae podría
causar una lesión grave o aún la muerte.
Para evitar el peligro de choque eléctrico e
incendio
• No manipule el cable de alimentación con las
manos húmedas.
• No jale el cable de alimentación cuando lo
desconecte del tomacorriente. Sujételo por el
enchufe.
• No introduzca sus dedos u otro objeto dentro
de su reproductor.
Ubicación para la instalación
Como medida de seguridad y para obtener el
mejor rendimiento de su reproductor:
• Instale su reproductor en una posición
horizontal estable. No coloque nada
directamente sobre su reproductor. No
coloque su reproductor directamente sobre el
televisor.
• Proteja su reproductor del contacto directo
con la luz solar y manténgala alejada de
equipo que produzca calor intenso. Evite
lugares polvorientos o húmedos.
• Evite lugares con ventilación insuficiente que
impida la disipación correcta de calor. No
bloquee los agujeros de ventilación en la
parte posterior y lateral de su reproductor.
Evite lugares expuesto a vibración intensa o
campos magnéticos fuertes.
• Asegúrese de extraer el disco y desenchufar
el cable de alimentación del tomacorriente
antes de mover su reproductor.
Condensación de humedad
Podría presentarse condensación de humedad
dentro de su reproductor si se le mueve de un
lugar frío a un lugar caliente o después de
calentar una habitación fría o bajo condiciones
de alta humedad. No use su reproductor por lo
menos por dos horas para que se seque el
interior.
Reciclaje
• Los materiales de empaque de su
reproductor son reciclables y pueden
ser reutilizados. Deseche cualquier
material de acuerdo con los reglamentos de
reciclaje local. Las baterías no deben tirarse
o incinerarse, sino descartarse de acuerdo
con las normativas locales concernientes a
desechos químicos.
Características
• Reproducción de video de alta definición con
una resolución de hasta 1080p para una
experiencia visual impresionante.
• Conversión ascendente de DVD de definición
estándar para una calidad de imagen
mejorada hasta de 1080p por medio de una
conexión de HDMI.
• Compatibilidad completa con DVDs de
definición estándar y CDs de audio.
• Puede mostrar presentación de JPEGs
grabados en discos o tarjetas de memoria
SD.
• Intenso sonido envolvente multicanal.
• Conexión fácil y sencilla de HDTV usando un
solo cable de HDMI (no se incluye el cable).
• Salidas múltiples para conectar su sistema
de cine en casa o amplificador.
• Funcionalidad PIP que le permite mostrar
video principal y secundario al mismo tiempo
(si está disponible en el disco Blu-ray).
• Visualización con menús emergentes que no
interrumpen la reproducción (si está
disponible en el disco Blu-ray).
• Tecnología HDMI Deep Color (color
profundo) que reduce el efecto de
posterización (bandas o barras de colores)
en la imagen reproducida.
• Salida HDMI de 1080p/24 fps (sólo para
discos Blu-ray) que provee una reproducción
fluida de video con una frecuencia de imagen
de 24 imágenes por segundo (el televisor
debe estar conectado con un cable de HDMI
y ser compatible con una imagen de
1080p/24 fps.)
• Reproducción de archivos JPEG, MP3 o
WMA en una tarjeta de memoria SD.
• Reproducción desde tarjetas de memoria SD
de comentarios de imagen en imagen,
subtítulos u otras extras de archivos de
BD-ROM Perfil 1 versión 1.1 con video
Blu-ray.
80
www.insignia-products.com
Page 89

Reproductor de discos Blu-ray Insignia NS-BRDVD
Vista frontal
# Componente Descripción
1 Bandeja de discos Coloque un disco con la
2 Botón de ABRIR/CERRAR Permite abrir o cerrar la
3 Pantalla Muestra información de
4 Sensor del control remoto Recibe las señales del
5 Indicador de ENCENDIDO Se ilumina color rojo cuando
6 Botón de DETENER Permite detener la
7
Botón de PAUSAR .
8
Botón de REPRODUCIR
9 Ranura para tarjeta de
memoria SD
10
Botón ENCENDIDO
etiqueta hacia arriba en esta
bandeja.
bandeja de discos.
estado. Para obtener más
información, refiérase a
“Pantalla” en la página 83
control remoto. No se debe
obstruir.
su reproductor se encuentra
encendido. Se apaga cuando
su reproductor está
apagado.
reproducción.
Permite pausar la
reproducción.
Presione para comenzar o
reanudar la reproducción.
Inserte una tarjeta de
memoria SD en esta ranura
para reproducir desde la
tarjeta de memoria SD. Para
obtener más información,
refiérase a “Reproducción
desde una tarjeta de
memoria SD” en la página
94.
Permite encender o apagar
su reproductor.
Vista posterior
# Componente Descripción
2 Tomas de SALIDA DE VIDEO
DE COMPONENTES
3 Toma de salida de HDMI Conecte un televisor o
4 Tomas de SALIDA DE AUDIO Conecte un televisor,
5 Toma (COAXIAL) de SALIDA
DIGITAL
6 SALIDA DIGITAL (ÓPTICA) Conecte un televisor,
7 Toma de ENTRADA DE CA Conecte el cable de
Conecte un televisor o un
receptor de AV con tomas de
entrada de video de
componentes a estas tomas
usando un cable de video de
componentes. Para obtener
más información, refiérase a
“Conexión de un televisor
usando video de
componentes” en la página
86.
receptor de AV con una toma
de entrada de HDMI a esta
toma usando un cable de
HDMI. Para obtener más
información, refiérase a
“Conexión de un televisor
usando HDMI” on page 85 o
“Conexión de un receptor
con HDMI” en la página 87.
receptor de AV/amplificador
o equipo de audio a estas
tomas usando un cable de
audio estándar. Para obtener
más información, refiérase a
“Conexión del audio
estándar” en la página 86.
Conecte un televisor,
decodificador de Dolby
Digital/DTS, receptor
de AV/amplificador, o equipo
de audio digital con una
toma de entrada coaxial
usando un cable coaxial de
audio digital. Para obtener
más información, refiérase a
“Conexión de un sistema
con audio digital coaxial” en
la página 46.
decodificador de Dolby
Digital/DTS, receptor
de AV/amplificador, o equipo
de audio digital con una
toma de entrada óptica
usando un cable óptico de
audio digital. Para obtener
más información, refiérase a
“Conexión de un sistema
con audio digital óptico” en
la página 87.
alimentación de CA en esta
toma y a un tomacorriente.
Para obtener más
información, refiérase a
“Conexión del cable de
alimentación de CA” en la
página 87.
# Componente Descripción
1 Toma de SALIDA DE VIDEO Conecte un televisor, un
receptor de AV o un equipo
de video a esta toma usando
un cable de video
compuesto. Para obtener
más información, refiérase a
“Conexión de un televisor
usando video estándar” en la
página 86.
www.insignia-products.com
Cuidado
No toque las terminales internas de las tomas.
Una descarga electrostática (electricidad estática)
podría dañar permanente su reproductor.
Nota
Su reproductor no cuenta con un modulador de
RF (radiofrecuencia).
81
Page 90

Reproductor de discos Blu-ray Insignia NS-BRDVD
Control remoto
# Botón Descripción
1 VISUALIZACIÓN Permite abrir el menú de
2
ENCENDIDO
3 Botones numéricos Permite ingresar el número
4 BUSCAR Permite abrir el menú de
5 Rojo/Verde/Azul/Amarillo Permite seleccionar
6 MENÚ SUPERIOR Permite abrir el menú
7 Permite seleccionar
pantalla. Para obtener más
información, refiérase a
“Pantalla” en la página 83.
Permite encender o apagar
su reproductor.
de título, capítulo, pista o
archivo.
Permite ingresar la
contraseña de los padres o
valores en las opciones de
menú.
búsqueda. Para obtener más
información, refiérase a
“Búsqueda de un capítulo,
título, pista o tiempo” en la
página 98 y “Búsqueda
usando marcadores” en la
página 98
elementos en los menús de
discos Blu-ray, dependiendo
del disco Blu-ray.
superior.
elementos o menús.
# Botón Descripción
8 CONFIGURACIÓN Permite mostrar el menú de
9 SUBTÍTULOS Permite abrir el menú de
10
RETROCEDER
11
REPRODUCIR
12
SALTAR
13
PAUSAR
14 HDMI Permite seleccionar el modo
15 ABRIR/CERRAR Permite abrir o cerrar la
16 PIP (Imagen en Imagen) Durante la reproducción de
17 ÁNGULO Durante la reproducción de
18 REPETIR Presione una o más veces
19 A-B Permite repetir una sección
20 ELIMINAR Permite eliminar (borrar)
configuración.
subtítulos. Para obtener más
información, refiérase a
“Selección de idiomas o
estilos de subtítulos” en la
página 99.
Durante la reproducción,
permite retroceder
rápidamente.
Presione para comenzar o
reanudar la reproducción.
Durante la reproducción de
discos, presione el botón
una vez al principio del
título, capítulo o pista actual.
Presione dos veces para
regresar al título, capítulo o
pista anterior.
Durante la reproducción de
JPEG, permite regresar al
archivo anterior.
Permite pausar la
reproducción. Cuando la
reproducción se encuentra
pausada, presione
repetidamente para
reproducir paso a paso.
de salida de HDMI.
bandeja de discos.
discos Blu-ray, permite
activar o desactivar el modo
de imagen en imagen (PIP).
No todos los discos Blu-ray
soportan esta función. Para
obtener más información,
refiérase a “Uso de PIP
(imagen en imagen)” en la
página 98.
un disco Blu-ray o DVD,
permite cambiar el ángulo de
cámara si el disco cuenta
con múltiples ángulos de
cámara. Para obtener más
información, refiérase a
“Selección del ángulo de
cámara” en la página 98.
Durante la reproducción de
JPEG, permite girar la
imagen 90° en el sentido
horario.
para seleccionar un modo de
repetición.
del disco. Para obtener más
información, refiérase a
“Creación de un bucle de
reproducción” en la página
96.
información que ha
ingresado, para eliminar los
ajustes de marcadores, o
para cancelar la
programación.
82
www.insignia-products.com
Page 91

Reproductor de discos Blu-ray Insignia NS-BRDVD
# Botón Descripción
21 MENÚ EMERGENTE/MENÚ Durante la reproducción de
22 ENTRAR Permite confirmar o
23
REGRESAR
24
AUDIO
25
AVANZAR
26
DETENER
27
SALTAR
28 MODO Durante la reproducción,
un disco Blu-ray, permite
abrir el menú de imagen
sobre imagen.
Durante la reproducción de
DVD, permite abrir el menú
del disco.
Durante la reproducción de
un CD de audio, JPEG, MP3
o WMA, permite abrir la lista
de archivos.
seleccionar los elementos de
menú.
Permite regresar al menú de
pantalla anterior.
Permite abrir el menú de
audio. Para obtener más
información, refiérase a
“Cambio de la pista de
audio” en la página 99 o
“Selección del modo de
sonido del CD de audio” en
la página 100.
Durante la reproducción,
permite avanzar
rápidamente. En el modo de
pausa, permite avanzar
lentamente.
Permite detener la
reproducción.
Durante la reproducción,
permite saltar al siguiente
título, capítulo o pista.
permite abrir el menú de
ajuste de imagen.
Durante la reproducción de
JPEG, permite abrir menús
para cambiar los efectos
visuales mostrados cuando
se mueve de una imagen a la
siguiente, o permite cambiar
el tamaño de la imagen.
En el modo detenido cuando
se ha insertado un disco
Blu-ray, permite abrir un
menú para ajustar el modo
de audio.
En el modo detenido,
cuando se ha insertado un
CD de audio, un disco o una
tarjeta de memoria SD con
archivos JPEG, MP3 o WMA,
permite abrir menús para la
reproducción programada y
aleatoria.
Uso del control remoto
Para usar el control remoto:
• Asegúrese de que no hay obstáculos entre el
control remoto y el sensor del control remoto
al frente de su reproductor.
• Asegúrese de que luz del sol intensa o
iluminación fluorescente no brille sobre el
sensor del control remoto. Luz intensa puede
interferir con la recepción de señales del
control remoto.
• Evite usar un control remoto para otro equipo
cerca de su reproductor. Las señales de
distintos controles remotos pueden interferir
entre ellas.
• Reemplace las pilas cuando note una
reducción en el rango de operación del
control remoto.
Los rangos de operación máximos entre el
control remoto y el sensor del control remoto
son:
• Línea visual: Aprox. 23 pies (7 m)
• A cualquier lado del centro: Aprox. 16 pies
(5 m) dentro de un ángulo de 30°
• Arriba: Aprox. 16 pies (5 m) dentro de un
ángulo de 15°
• Abajo: Aprox. 10 pies (3 m) dentro de un
ángulo de 30°
16 pies (5 23 pies (7 16 pies (5
Pantalla
1 Muestra el icono del estado de
reproducción. Para obtener más
información, refiérase a “Iconos del
estado de reproducción” en la página
83.
2 Muestra información de estado, tal
como el número de título, el tiempo
transcurrido y el modo de repetición.
Para obtener más información,
refiérase a “Visualización de
información de estado” en la página
84 y “Visualización de la información
de estado” en la página 95.
Iconos del estado de reproducción
Icono del estado de
reproducción
Modo
Disco
Tarjeta de
memoria
SD
Reproducción en curso
Modo detenido
Modo pausado
Modo de avance rápido
Modo de retroceso rápido
Modo de avance lento
—
www.insignia-products.com
83
Page 92

Reproductor de discos Blu-ray Insignia NS-BRDVD
Icono del estado de
reproducción
Modo
Disco
Tarjeta de
memoria
SD
Modo de repetición
Visualización de información de estado
Los siguientes son ejemplos de visualizaciones
de información de estado.
Cuando se reproduce un título, la
pantalla muestra el número de
título actual y el tiempo
transcurrido.
El capítulo actual se encuentra en
el modo de repetición de capítulo.
Su reproductor está cargando un
disco.
Se está reproduciendo audio de
Dolby Digital.
Preparación de su
reproductor
Instalación de las pilas del control remoto
Para instalar las pilas del control remoto:
1 Abra la cubierta del compartimiento de las
pilas.
2 Inserte dos pilas AA en el compartimiento de
las pilas. Verifique que los símbolos + y – en
las pilas coincidan con los símbolos + y –
dentro del compartimiento de las pilas.
3 Cierre la cubierta del compartimiento de las
pilas.
Notas
• No combine pilas nuevas y usadas al mismo
tiempo.
• No utilice diferentes tipos de pilas al mismo
tiempo. Aunque se ven similares, distintas pilas
pueden tener diferentes voltajes.
• Verifique que los símbolos + y – en las pilas
correspondan con los símbolos + y – en el
compartimiento de las pilas.
• Si no piensa utilizar el control remoto por un
mes o más, remueva las pilas para evitar una
fuga.
• Deseche las pilas de acuerdo con los
reglamentos locales de desperdicios dañinos.
• No haga cortocircuito, caliente, queme o
desarme las pilas.
• No recargue pilas que no están diseñadas para
ser recargadas.
Conexión de un televisor
Notas
Conecte su reproductor directamente al televisor.
Si conecta su reproductor al televisor por medio
de un VCR, el video se puede distorsionar debido
al sistema de protección de copiado.
Si conecta su reproductor al televisor con un cable
de HDMI o cables de video de componentes y la
imagen no se muestra correctamente, mantenga
presionado el botón de reproducir (PLAY ) al
frente de su reproductor por más de cinco
segundos. Su reproductor regresará
automáticamente a la resolución de video
predefinida de fábrica.
No se puede cambiar la resolución de video
durante la reproducción de un disco Blu-ray. Para
cambiar la resolución, detenga la reproducción.
Sistema de protección de derechos de
reproducción
Para reproducir imágenes de video digital de un
disco Blu-ray o DVD a través de la conexión de
HDMI, el televisor (o un amplificador de AV)
debe ser compatible con el sistema de
protección de derechos de reproducción
llamado
contenido digital de ancho de banda alto, por
sus siglas en inglés). HDCP es una tecnología
de protección de copiado que provee
codificación de la información y autenticación
del equipo de AV conectado. Para obtener más
información, refiérase a las instrucciones de
operación de su televisor (o amplificador de AV).
HDCP
(Sistema de protección de
84
www.insignia-products.com
Page 93

Reproductor de discos Blu-ray Insignia NS-BRDVD
Conexión de un televisor usando HDMI
Notas
• Le recomendamos que use un cable de HDMI
de alta velocidad (también conocido como un
cable de HDMI categoría 2) para una mejor
compatibilidad.
• Cuando se use un televisor que no sea
compatible con HDCP, la imagen no se
mostrará correctamente.
• Su reproductor no puede ser controlado por
otro equipo a través de la toma de HDMI.
• Las señales de audio de la toma de salida de
HDMI [HDMI OUT] (incluyendo la frecuencia
de muestreo, el número de canales y la
longitud de bit) pueden estar limitados por el
equipo que está conectado.
• Si el equipo conectado a la toma de salida de
HDMI (HDMI OUT) no acepta salida de audio
(por ejemplo, un proyector), no habrá salida de
audio desde la toma HDMI OUT.
Una conexión de HDMI provee el mejor audio y
video.
Su reproductor es compatible con barrido
progresivo. La función le provee imágenes de
calidad más alta que un sistema de salida
convencional. Podría necesitar ajustar la
configuración de la resolución de video de HDMI
(HDMI Video Resolution). Para obtener más
información, refiérase a “Ajuste de la resolución
de video de HDMI” en la página 100.
Nota
El cable de HDMI lleva el audio y el video. No
necesita realizar otras conexiones de audio.
Para conectar un televisor usando la entrada
de HDMI:
1 Asegúrese de que su reproductor y el
televisor estén apagados.
2 Conecte un extremo de un cable de HDMI
(no incluido) a la toma HDMI OUT (Salida de
HDMI) en la parte posterior de su
reproductor.
Conexión de un televisor usando DVI
Una conexión de DVI provee mejor video que
video de componentes o video estándar.
Para conectar un televisor usando la entrada
de DVI:
1 Asegúrese de que su reproductor y el
televisor estén apagados.
2 Conecte un cable de HDMI a DVI (no
incluido) a la toma HDMI OUT (Salida de
HDMI) en la parte posterior de su
reproductor.
Cable de
HDMI a DVI
3 Conecte el otro extremo del cable a la toma
DVI IN (Entrada de DVI) en el televisor.
4 Complete los pasos en la sección
“Connecting standard audio” en la página 86
para conectar el audio estándar.
Cable de HDMI
3 Conecte el otro extremo del cable a la toma
HDMI IN (Entrada de HDMI) en el televisor.
Nota
Si está conectando un televisor a la toma HDMI
OUT (Salida de HDMI), no necesita realizar
conexiones de audio. El cable de HDMI lleva el
audio y el video.
www.insignia-products.com
85
Page 94

Reproductor de discos Blu-ray Insignia NS-BRDVD
Conexión de un televisor usando video de
componentes
Una conexión de video de componentes provee
mejor video que el video estándar.
Su reproductor es compatible con barrido
progresivo. La función le provee imágenes de
calidad más alta que las de un sistema de salida
convencional. Podría necesitar ajustar la
configuración de la salida de video de
componentes (Component Output). Para
obtener más información, refiérase a la sección
“Ajuste de la resolución de componentes” en la
página 100.
Para conectar un televisor usando video de
componentes:
1 Asegúrese de que su reproductor y el
televisor estén apagados.
2 Conecte un extremo de un cable de video de
componentes (no incluido) a la toma
COMPONENT VIDEO OUT (Salida de video
de componentes) en la parte posterior de su
reproductor.
Conexión de un televisor usando video estándar
Para conectar un televisor usando video
estándar:
1 Asegúrese de que su reproductor y el
televisor estén apagados.
2 Conecte un extremo de un cable de video
estándar (incluido) a la toma VIDEO OUT
(Salida de video) en la parte posterior de su
reproductor.
Cable de
video
3 Conecte el otro extremo del cable a la toma
VIDEO IN (Entrada de video) en el televisor.
4 Complete los pasos en la sección “Conexión
del audio estándar” en la página 86 para
conectar el audio estándar.
Conexión del audio estándar
Cable de video de
componentes
3 Conecte el otro extremo del cable a la toma
COMPONENT VIDEO IN (Entrada de video
de componentes) en el televisor.
4 Complete los pasos en la sección
“Connecting standard audio” en la página 86
para conectar el audio estándar.
Para conectar el audio estándar:
1 Conecte un extremo de un cable de audio
estándar (incluido) a la toma AUDIO OUT
L/R (Salida de audio Izq./Der.) en la parte
posterior de su reproductor.
LR
Cable de
audio
2 Conecte el otro extremo del cable a la toma
AUDIO IN L/R (Entrada de audio Izq./Der.)
en el televisor.
86
www.insignia-products.com
Page 95

Reproductor de discos Blu-ray Insignia NS-BRDVD
Conexión de un sistema de audio
Se puede conectar un sistema de audio digital o
analógico.
Conexión de un sistema con audio digital coaxial
Para conectar un sistema con audio digital
coaxial:
1 Asegúrese de que su reproductor y el
televisor estén apagados.
2 Conecte un extremo de un cable coaxial de
audio digital (no incluido) a la toma DIGITAL
OUT (PCM/BITSTREAM) COAXIAL [Salida
digital (PCM/Flujo de bits) coaxial] en la parte
posterior de su reproductor.
Cable coaxial
de audio
digital
3 Conecte el otro extremo del cable a la toma
DIGITAL AUDIO COAXIAL INPUT (Entrada
coaxial de audio digital) en el sistema de
audio digital.
Conexión de un sistema con audio digital óptico
Conexión de un receptor con HDMI
Para conectar un receptor con HDMI:
1 Asegúrese de que su reproductor y el
televisor estén apagados.
2 Conecte un extremo de un cable de HDMI
(no incluido) a la toma HDMI OUT (Salida de
HDMI) en la parte posterior de su
reproductor.
Cable de HDMI
Cable de HDMI
Para conectar un sistema con audio digital
óptico:
1 Asegúrese de que su reproductor y el
televisor estén apagados.
2 Conecte un extremo de un cable coaxial de
audio digital (no incluido) a la toma DIGITAL
OUT (PCM/BITSTREAM) OPTICAL [Salida
digital (PCM/Flujo de bits) óptica] en la parte
posterior de su reproductor.
Cable de
audio
3 Conecte el otro extremo del cable a la toma
DIGITAL AUDIO OPTICAL INPUT (Entrada
óptica de audio digital) en el sistema de
audio digital.
3 Conecte el otro extremo del cable a la toma
HDMI IN (Entrada de HDMI) en el receptor.
4 Conecte un cable de HDMI a la toma de
salida de HDMI (HDMI OUT) en el receptor
5 Conecte el otro extremo del cable a la toma
HDMI IN (Entrada de HDMI) en el televisor.
Conexión del cable de alimentación de CA
Para conectar el cable de alimentación:
1 Conecte un extremo del cable de
alimentación de CA en la toma AC IN
(Entrada de CA) en la parte posterior de su
reproductor.
Cable de
alimentación de CA
2 Conecte el otro extremo del cable de
alimentación de CA en un tomacorriente.
Nota
Asegúrese de que el cable de alimentación de CA
esté conectado firmemente. Si el cable está flojo,
su reproductor generará ruido o estática.
www.insignia-products.com
87
Page 96

Reproductor de discos Blu-ray Insignia NS-BRDVD
Configuración de los altavoces
Para configurar los altavoces:
• Utilice la siguiente figura como ejemplo:
Frontal
izquierdo
Envolvente
izquierdo
Envolvente
posterior
izquierdo
Central
Subwoofer
Envolvente
posterior
derecho
Ajuste de los altavoces
Puede especificar el tamaño de altavoz y ajustar
el volumen de los altavoces y el tiempo de
retardo.
Nota
También puede acceder a la opción de audio de
HDMI (HDMI Audio) desde el menú rápido
(
Quick
).
Para ajustar los altavoces:
1 Presione el botón de configuración (SETUP).
2 Presione o para seleccionar y
presione ENTER (Entrar). Se abre el menú
Custom
3 Presione o para seleccionar Audio y
presione ENTER (Entrar).
4 Presione o para seleccionar HDMI
Audio (Audio de HDMI) y presione ENTER
(Entrar).
5 Presione o para seleccionar HDMI Multi
(LPCM) y presione ENTER (Entrar).
6 Presione o para seleccionar un ajuste
de altavoz y presione ENTER (Entrar). Se
puede seleccionar:
• Speaker Size (Tamaño de altavoz) —
• Channel Level (Nivel de canal) —
• Delay Time (Tiempo de retardo) —
7 Presione o para seleccionar un
sub-ajuste.
(Personalizado).
Custom
Refiérase a la sección “Ajuste del tamaño
de altavoz” en la página 88.
Refiérase a la sección “Ajuste del nivel de
canal” en la página 89.
Refiérase a la sección “Ajuste del tiempo
de retardo” en la página 89.
Frontal
derecho
Envolvente
derecho
8 Presione o para ajustar el sub-ajuste.
Nota
• Si selecciona Test Tone (Tono de prueba) en
el ajuste Channel Level (Nivel de canal),
presione o para seleccionar Off
(Desactivado), Manual o Auto y presione
ENTER (Entrar).
• Si selecciona Manual, presione
seleccionar un altavoz y presione o para
ajustar el volumen.
• Si selecciona Auto, presione o para
ajustar el volumen del altavoz que
automáticamente emite el tono de prueba.
• Si selecciona Default (Predefinido) en
cualquier ajuste, presione ENTER (Entrar).
Todos los sub-ajustes del ajuste seleccionado
se restaurarán a los valores predefinidos de
fábrica.
o para
9 Presione el botón de configuración (SETUP)
para cerrar el menú.
Notas
• El tamaño de todos los altavoces debe ser el
mismo. Por ejemplo, si configura el altavoz
frontal como pequeño (Small), no puede
configurar otro altavoz como grande (Large).
• En el ajuste de tiempo de retardo (Delay Time)
la distancia entre altavoces no puede exceder
15 pies (4.5 m).
Ajuste del tamaño de altavoz
El ajuste del tamaño de altavoz (Speaker Size)
especifica el tamaño de los altavoces
individuales.
Ajuste Opciones Descripción
Frontal Large
(Grande)
Small
(Pequeño)
Center
(Central)
Large
(Grande)
Small
(Pequeño)
Subwoofer On
(Activado)
Surround
(Envolvente)
Large
(Grande)
Small
(Pequeño)
Surround
back
(Envolvente
posterior)
Large
(Grande)
Small
(Pequeño)
Default (Predefinido) Seleccione Default (Predefinido) y
Large (Grande):
Para altavoces grandes con fuerte
capacidad de reproducción de
frecuencias bajas.
Small (Pequeño):
Para altavoces pequeños que no
proveen un fuerte sonido de graves.
No se puede cambiar el ajuste de
Subwoofer. Si el equipo conectado
no es compatible con un subwoofer,
la opción Subwoofer se mostrará
color gris.
presione ENTER (Enter) para
restaurar el ajuste del tamaño de
altavoz (Speaker Size) al valor
predefinido.
88
www.insignia-products.com
Page 97

Reproductor de discos Blu-ray Insignia NS-BRDVD
Ajuste del nivel de canal
El ajuste del nivel de canal (Channel Level)
verifica cada altavoz o ajusta el volumen de
cada altavoz.
Ajuste Opción Descripción
Test Tone
(Tono de
verificación)
Front Lch
(Canal frontal
izq.)
Center
(Central)
Subwoofer 0 dB a -12 dB
Front Rch
(Canal frontal
der.)
Surround
Rch (Canal
envolvente
der.)
Surround
Back Rch
(Canal
envolvente
posterior
der.)
Surround
Back Lch
(Canal
envolvente
posterior
izq.)
Surround
Lch (Canal
envolvente
izquierdo)
Default (Predefinido) Seleccione Default (Predefinido) y
Off
(Desactivado)
Manual
Auto
0 dB a - 12 dB
(predefinido
con 0 dB)
0 dB a - 12 dB
(predefinido
con 0 dB)
(predefinido
con 0 dB)
0 dB a -12 dB
(predefinido
con 0 dB)
0 dB a -12 dB
(predefinido
con 0 dB)
0 dB a -12 dB
(predefinido
con 0 dB)
0 dB a -12 dB
(predefinido
con 0 dB)
0 dB a -12 dB
(predefinido
con 0 dB)
El tono de verificación se puede
emitir por los altavoces para que
pueda ajustar el volumen de cada
altavoz.
Seleccione Off (Desactivado) para
desactivar el tono de verificación.
Seleccione Manual y presione
ENTER (Entrar) para ajustar
manualmente el volumen de cada
altavoz.
Seleccione Auto y presione ENTER
(Entrar) para emitir
automáticamente el tono de
verificación por cada altavoz.
Si ajusta el tono de verificación
(Test Tone) como Manual,
seleccione un altavoz y ajuste el
volumen.
Si ajusta el tono de verificación
(Test Tone) como Auto, se emitirá
automáticamente un tono de
verificación por cada altavoz en
secuencia. Ajuste el volumen del
altavoz que emite el tono de
verificación.
presione ENTER (Enter) para
restaurar los ajustes del nivel de
canal (Channel Level) a los
valores predefinidos.
Ajuste del tiempo de retardo
El ajuste del tiempo de retardo (Delay Time)
optimiza el tiempo en el cual los sonidos se
emite por los altavoces de acuerdo a su
distancia desde la posición de escucha.
Ajuste Opción Descripción
Distancia Feet (Pies) Seleccione la medida de
Meters
(Metros)
Front (Frontal) 0 pies a 60 pies
Center
(Central)
Surround
(Envolvente)
Surround
back
(Envolvente
posterior)
Default (Predefinido) Seleccione Default (Predefinido)
(0 m a 18 m)
El valor
predefinido es
12 pies (3.6 m)
0 pies a 60 pies
(0 m a 18 m)
El valor
predefinido es
12 pies (3.6 m)
0 pies a 60 pies
(0 m a 18 m)
El valor
predefinido es
10 pies (3 m)
0 pies a 60 pies
(0 m a 18 m)
El valor
predefinido es
10 pies (3 m)
distancia y presione ENTER
(Entrar).
Seleccione la distancia entre el
altavoz y la posición de escucha.
y presione ENTER (Entrar).
Uso de su reproductor
Todas las tareas están redactadas para ser
realizadas con el control remoto a menos que se
indique de otra forma.
Discos, tarjetas de memoria y archivos
compatibles
No se garantiza la reproducción de discos
dobles (Dual Disc).
La siguiente tabla incluye una lista de discos
compatibles.
Tipo de disco Logotipo
Disco Blu-ray
• Blu-ray Video (una o dos capas)
• Disco Blu-ray-RE (una o dos
capas grabado en el formato
BDMV)
• Disco Blu-ray-RE (una o dos
capas grabado en el formato
BDMV). Discos sin finalizar no
pueden ser reproducidos.
DVD-video
DVD+RW (una capa)
DVD+R (una y dos capas)
CD-DA (CD de audio)
DVD-R/RW
www.insignia-products.com
89
Page 98

Reproductor de discos Blu-ray Insignia NS-BRDVD
Tipo de disco Logotipo
CD-RW
CD-R
Picture CD de Kodak
DTS-CD
La siguiente tabla incluye una lista de archivos
compatibles y los tipos de medio relacionado.
Archivos reproducibles Medio
JPEG DVD, CD-RW,
MP3
WMA
CD-R, tarjeta de
memoria SD
(incluyendo
SDHC), tarjeta
miniSD, tarjeta
microSD
La siguiente tabla incluye una lista de las
tarjetas de memoria SD compatibles.
Archivo o
Tarjetas que se pueden leer
información
reproducible
Tarjeta de memoria SD (8 MB a 2 GB) Archivos JPEG, MP3 o
Tarjeta de memoria SDHC (4 GB)
Tarjeta miniSD (8 MB - 2 GB)
Tarjeta microSD (8 MB a 2 GB)
Notas
• Su reproductor no puede reproducir un disco si
el contenido está protegido por la
administración de derechos digitales (DRM,
por sus siglas en inglés) de Windows Media™.
• Windows Media™ Audio es un codec
desarrollado por Microsoft® Corporation en los
Estados Unidos.
• Su reproductor acepta tarjetas de memoria SD
con sistemas de archivos FAT12/FAT16 y
tarjetas de memoria SDHC con sistemas de
archivos FAT32.
WMA y comentarios de
imagen en imagen,
subtítulos u otras
extras para BD-ROM
Perfil 1 versión 1.1
No se puede reproducir los siguientes discos y
archivos
• CD-ROM
• CD-I (disco compacto-interactivo)
•DVD-RAM
• VSD (disco individual de video)
• DVD-Audio
• BD-RE (versión 1/versión 3)
• HD DVD
•VCD
• Discos sin finalizar
•SVCD
• BD-RE/-R grabado en el formato BDAV
• DVD, CD, o tarjeta de memoria SD que
contenga archivos DivX®
• Super audio CD (Solo se puede escuchar el
sonido en la capa de CD. El sonido en la
capa de SACD de alta densidad no se puede
escuchar.)
Códigos regionales
Su reproductor puede reproducir discos con los
siguientes códigos regionales. Busque los
símbolos en el disco o en el empaque del disco.
Tipo de disco y código regional Código regional
Blu-ray (código regional A)
DVD (códigos regionales 1 y All
[Todos])
Reproducción de un disco Blu-ray o DVD
Para reproducir un disco Blu-ray o DVD:
1 Presione el botón de encendido
(POWER ). Su reproductor se encenderá.
2 Encienda el televisor y seleccione la entrada
en el televisor que coincide con el método
utilizado para conectar su reproductor.
3 Presione OPEN/CLOSE (Abrir/cerrar)
para abrir la bandeja de discos.
4 Coloque un disco con el lado de la etiqueta
hacia arriba en la bandeja de discos y
presione OPEN/CLOSE (Abrir/Cerrar)
para cerrar la bandeja. Puede tomar unos
cuantos segundos para cargar el disco.
Nota
Si el DVD se grabó en el modo VR, puede
presionar POP MENU/MENU (Menú
emergente/Menú) para abrir el menú de DVD.
Presione o para seleccionar Original o
Playlist (Lista de reproducción), presione o
para seleccionar un título y presione ENTER
(Entrar).
5 Si el disco no empieza a reproducirse
automáticamente, presione PLAY
(Reproducir).
6 Si se abre un menú de disco Blu-ray o DVD,
presione o para seleccionar Play
(Reproducir) y presione ENTER (Entrar).
7 Para detener la reproducción, presione
STOP (Detener). Si presiona este botón
una vez y presiona PLAY , (Reproducir) la
reproducción se reanuda donde se detuvo. Si
presiona este botón dos veces y presiona
PLAY , la reproducción comienza desde el
principio del disco.
Nota
No todos los discos Blu-ray soportan la función de
reanudar la reproducción.
La información de reanudación se graba incluso
cuando se apaga la unidad.
La información de reanudación se borra si usted:
• Abre la bandeja de discos
• Presiona STOP (Detener) dos veces.
• Alterna entre el modo de disco y el modo de
memoria SD
• Cambia el nivel de clasificación de BD (BD
Rating Level) o el nivel de clasificación de
DVD (DVD Rating Level) en el menú de los
padres (
Parental
• Abra la bandeja de discos o apague su
reproductor cuando se encuentre en el modo
de memoria SD
)
90
www.insignia-products.com
Page 99

Reproductor de discos Blu-ray Insignia NS-BRDVD
8 Para expulsar el disco, presione
OPEN/CLOSE (Abrir/Cerrar) .
Notas
• El símbolo puede aparecer en la esquina
superior derecha en la pantalla de TV cuando
una operación está prohibida por el disco o su
reproductor.
• Durante la reproducción de un disco de dos
capas, el video podría detenerse por un
momento. Esto sucede cuando su reproductor
cambia de la primera capa a la segunda. Esto
no es un mal funcionamiento.
• La operación puede variar cuando reproduce
discos Blu-ray y DVD usando el menú de disco.
Refiérase a la documentación que acompaña
al disco para obtener más detalles.
Control de la reproducción de discos
Blu-ray o DVD
Para controlar la reproducción de discos
Blu-ray o DVD:
• Para pausar la reproducción, presione
PAU SE (Pau sa r) . Para reanudar la
reproducción, presione PLAY
(Reproducir) .
Nota
Si la imagen está borrosa cuando se pausa,
cambie el ajuste del modo congelado (Still Mode)
a campos (Fields) en el menú de
obtener más información, refiérase a la sección
“Ajuste de la imagen fija” en la página 102.
• Para avanzar o retroceder rápidamente,
presione FWD o REV . Cada vez que
presione uno de estos botones, la velocidad
de avance o retroceso rápido cambiará de
2×, a 8×, a 20×, a 50×, a 100×. Para
reanudar la reproducción normal, presione
PLAY (Reproducir) .
• Para avanzar lentamente, presione PAU SE
(Pausar) y presione FWD . Cada vez
que presione FWD , la velocidad de
avance lento cambia de 1/16×, 1/8×, a 1/2×.
Para reanudar la reproducción normal,
presione PLAY (Reproducir) .
Video
. Para
• Para saltar al capítulo anterior, presione
SKIP (Saltar) dos veces. Si el disco no
tiene capítulos, presionar este botón hace
que se vaya al título anterior (si está
disponible).
• Para repetir el título actual, presione
REPEAT (Repetir) una vez. Para repetir el
capítulo actual, presione REPEAT (Repetir)
dos veces. Para reanudar la reproducción
normal, presione PLAY (Reproducir) .
También puede presionar STOP (Detener)
para cancelar el modo de repetición.
Notas
• Puede ser que el modo de repetición no
funcione con todas las escenas.
• El modo de repetición no funciona durante el
modo de repetición A-B.
Reproducción de un CD de audio o un
disco con archivos JPEG/MP3/WMA
Para reproducir un CD de audio, o un disco
con archivos JPEG/MP3/WMA:
1 Presione el botón de encendido
(POWER ). Su reproductor se encenderá.
2 Encienda el televisor y seleccione la entrada
en el televisor que coincide con el método
utilizado para conectar su reproductor.
3 Presione OPEN/CLOSE (Abrir/Cerrar)
para abrir la bandeja de discos.
4 Coloque un disco con el lado de la etiqueta
hacia arriba en la bandeja de discos y
presione OPEN/CLOSE (Abrir/Cerrar)
para cerrar la bandeja.
Nota
Si la imagen está borrosa cuando se avanza
lentamente, cambie el ajuste del modo de imagen
fija (Still Mode) a campos (Fields) en el menú de
Video
. Para obtener más información, refiérase a
“Ajuste de la imagen fija” en la página 102.
• Para reproducir paso a paso, presione
PAUSE (Pausar) repetidamente. Cada vez
que se presiona este botón, el video avanza
un paso (un marco).
Nota
Si la imagen está borrosa cuando se reproduce
paso a paso, cambie el ajuste del modo de
imagen fija (Still Mode) a campos (Fields) en el
menú de
refiérase a la sección “Ajuste de la imagen fija” en
la página 102.
Video
. Para obtener más información,
• Para saltar al siguiente capítulo, presione
SKIP (Saltar) . Si el disco no tiene
capítulos, presionar este botón hace que se
vaya al siguiente título (si está disponible).
• Para saltar al principio del capítulo actual,
presione SKIP (Saltar) .
www.insignia-products.com
91
Page 100

Reproductor de discos Blu-ray Insignia NS-BRDVD
5 Si la lista de archivos no se abre
automáticamente, presione
POP MENU/MENU (Menú
emergente/Menú).
2 / 4
Folder_1
1 Tipo de disco: Para CDs de audio, aparece
CD-DA. Para archivos JPEG, MP3, o WMA,
aparece el nombre de la carpeta actual. Para
discos Blu-ray, DVD, o tarjetas de memoria
SD, aparece el nombre del disco o de la
tarjeta si no se encuentra dentro de una
carpeta.
2 Lista de números de pista de CD y tiempos,
o carpetas o archivos JPEG, MP3, o WMA.
3 Número de pista de CD y duración, o
nombre de carpeta o archivo en un disco
con JPEG/MP3/WMA.
4 Página actual y número total de páginas en
la lista.
5 Indica que existe una página adelante o
atrás. Presione SKIP (Saltar) o SKIP
(Saltar) para ir a la página siguiente o la
anterior.
8 Para detener la reproducción, presione
STOP (Detener) . Si presiona este botón
una vez y presiona PLAY (Reproducir) , la
reproducción se reanuda donde se detuvo. Si
presiona este botón dos veces y presiona
PLAY (Reproducir) , la reproducción
comienza desde el principio del disco.
Nota
La información de reanudación permanece
incluso cuando se apaga la unidad.
La información de reanudación se borra si usted:
• Abre la bandeja de discos
• Presiona STOP (Detener) dos veces.
• Alterna entre el modo de disco y el modo de
memoria SD
• Cambia el nivel de clasificación de BD (BD
Rating Level) o el nivel de clasificación de
DVD (DVD Rating Level) en el menú de los
padres (
Parental
• Abra la bandeja de discos o apague su
reproductor cuando se encuentre en el modo
de memoria SD
)
9 Para expulsar el disco, presione
OPEN/CLOSE (Abrir/Cerrar) .
Nota
Archivos JPEG: deberán guardarlos con las
siguientes especificaciones:
• Límite superior: 2,560 × 1,900 píxeles (sub
muestreo es 4:4:4) 5,120 × 3,840 píxeles (sub
muestreo es de hasta 4:2:2)
• Límite inferior: 32 x 32 píxeles
• Tamaño de archivo máximo de la imagen: 12
MB
Los archivos MP3 y WMA deben ser grabados
con las siguientes especificaciones:
• Frecuencia de muestreo: 44.1 kHz o 48 kHz
• Velocidad de bit constante: 112 kbps a 320
kbps (MP3), 48 kbps a 192 kbps (WMA)
Icono de
carpeta
Icono de
pista de CD
de audio
Icono de
JPEG
Icono de
MP3
Icono de
WMA
6 Presione o para seleccionar una carpta
o archivo y presione ENTER (Entrar).
Presione o para moverse hacia atrás o
adelante entre los archivos y las carpetas. Si
selecciona un archivo y presiona ENTER
(Entrar), la reproducción comienza
automáticamente.
7 Para regresar al principio de la lista, presione
TOP MENU (Menú superior).
Notas
• Su reproductor puede reconocer hasta 255
carpetas y 999 archivos para un CD y 999
carpetas y 9999 archivos para un DVD y una
tarjeta de memoria SD.
• Se muestran los primeros 28 caracteres de los
nombres de carpeta y archivos. Caracteres
que no se reconocen se reemplazan con
asteriscos.
• Su reproductor solo puede mostrar los
primeros ocho niveles de carpetas en un CD y
los primeros nueve niveles de carpetas en un
DVD o una tarjeta de memoria SD.
• Su reproductor solo reproduce archivos con
extensiones jpg, jpeg, mp3 o wma. Archivos
con otras extensiones no se muestran.
• Su reproductor puede mostrar algunas
carpetas o archivos que no se pueden
reproducir debido al estado de grabación.
• Archivos JPEG de alta resolución toman más
tiempo para mostrarse.
• Su reproductor no puede mostrar archivos
JPEG progresivos (archivos JPEG grabados
en el formato progresivo.
92
www.insignia-products.com
 Loading...