

Insignia NS-BL01-B, NS-BL01-R Quick Setup Manual
Quick Setup Guide | NS-BL01-B/NS-BL01-R
Insignia Blender
IMPORTANT
SAFEGUARDS
When using electrical appliances, basic safety
precautions should always be followed including
the following:
• Read all instructions.
• Portable – To protect against risk of electrical
shock do not put cord, plug, or motor housing in
water or other liquid.
• Close supervision is necessary when any
appliance is used by or near children.
• Unplug from outlet when not in use, before
putting on or taking o parts, and before
cleaning.
• Avoid contacting moving parts.
• Do not operate any appliance with a damaged
cord or plug or after the appliance malfunctions,
or is dropped or damaged in any manner. Return
appliance to the nearest authorized service
facility for examination, repair or electrical or
mechanical adjustment.
• The use of attachments not recommended or
sold by the manufacturer may cause re, electric
shock or injury.
• Do not use outdoors.
• Do not let cord hang over edge of table or
counter.
• Do not place on or near a hot gas or electric
burner, or in a heated oven.
• When mixing liquids, especially hot liquids, use a
tall container or use a small quantity at a time to
avoid splattering or burning.
• Keep hands and utensils out of container while
blending to reduce the risk of severe injury to
persons or damage to the blender. A scraper may
be used but must be used only when the blender
is not.
• The blades are VERY sharp. Handle carefully.
• To reduce the risk of injury, never place cutter
assembly blades on the base without the pitcher
attached.
• Always operate the blender with the lid in place.
• When blending hot liquids, remove the center
piece of the two-piece cover.
• FOR HOUSEHOLD USE ONLY.
• Do not use this appliance for other than the
intended use.
• ALWAYS unplug the appliance before assembling,
disassembling, cleaning, or storing.
• The appliance must be kept out of reach of children.
• Do not hold the motor housing under running
water, nor immerse it in water.
• The appliance is constructed to process normal
household quantities.
POWER CORD SAFETY TIPS
A short power supply cord is provided to reduce the
hazards resulting from entanglement or tripping over
a longer cord. This appliance has a polarized plug (one
blade is wider than the other). To reduce the risk of
electric shock, this plug is intended to t into a
polarized outlet only one way. If the plug does not t
fully into the outlet, reverse the plug and try again. If it
still does not t, contact a qualied electrician. Do not
attempt to modify the plug in any way.
• DO NOT OPERATE APPLIANCE IF THE CORD
SHOWS ANY DAMAGE, OR IF APPLIANCE WORKS
INTERMITTENTLY OR STOPS WORKING ENTIRELY.
• Never pull or yank on the cord or the appliance.
• To insert the plug, grasp it rmly and guide it into
the outlet.
• To disconnect the appliance, grasp the plug and
remove it from the outlet.
• Before each use, inspect the cord for cuts and
abrasion marks. If any are found, the blender should
be replaced.
• Never wrap the cord tightly around the appliance,
as this could place undue stress on the cord where
it enters the appliance and cause it to fray and
break.
• An extension cord may be used with care. However,
the marked electrical rating shall be at least as great
as the electrical rating of this appliance. The
extension cord should not be allowed to drape over
the tabletop where it can be pulled on by children
or tripped over.
SAVE THESE
INSTRUCTIONS
PACKAGE CONTENTS
• Blender
• Quick Setup Guide
FEATURES
• Powerful 350 Watt motor
• 1.25L plastic pitcher
• 5 speeds with pulse for precise blending control
• Detachable stainless steel blade for easy cleaning
• Filler cap cover
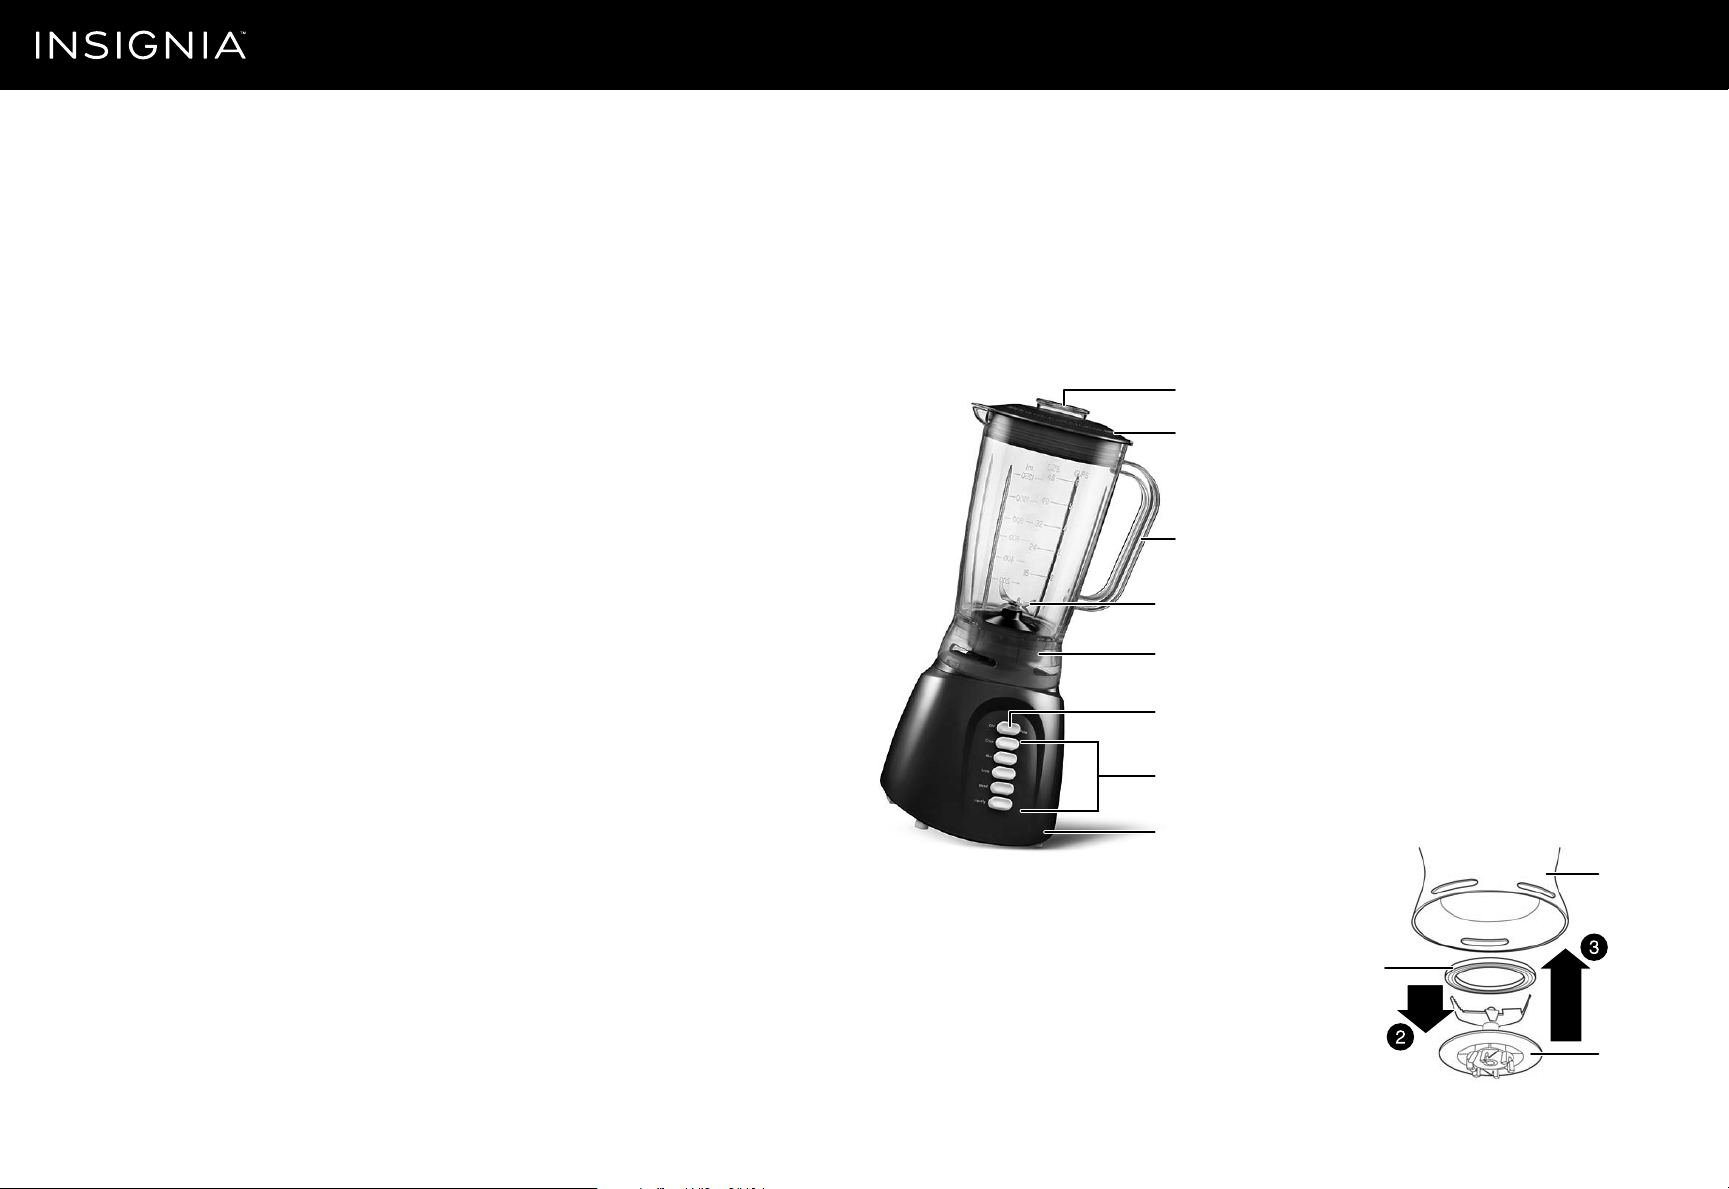
Measuring cup
Lid
Plastic pitcher
Stainless
steel blade
Pitcher collar
OFF/Pulse button
Speed buttons
Blender base
BEFORE USING YOUR BLENDER
• Unpack the blender and wash the lid, measuring
cup, plastic pitcher, gasket, and cutting blade
assembly in hot, soapy water before use. The lid,
cup, and cutting blade assemblies must be
disassembled before washing.
Warning: Handle the blade assembly carefully. The blades
are very sharp.
• To remove the measuring cup from the lid, twist the
cup until the tabs on the cup line up with the
notches on the lid, then pull the cup from the lid.
• After washing parts, rinse and dry thoroughly. Wipe
the blender base with a damp cloth or sponge to
remove any packaging dust.
Caution: Do not immerse the blender base, cord, or plug
in water or other liquids. Liquids will damage these parts.
Note: This appliance is for HOUSEHOLD USE ONLY. It should
be plugged into an AC electrical outlet (ordinary household
current). Do not use any other electrical outlet.
ASSEMBLING YOUR BLENDER
1 Place the blender base on a at, level surface. DO
NOT PLUG IN THE POWER CORD UNTIL THE
BLENDER IS COMPLETELY ASSEMBLED.
2 Place the gasket on the cutting blade assembly.
3 Place the assembly inside the pitcher collar, then
rotate the assembly counter clock wise until it locks
into place.
4 Place the cup in the pitcher lid on, then place the lid
on top of the pitcher.
5 Place the pitcher onto the blender base and rotate
clockwise until the it locks into place.
Pitcher collar
Gasket
Cutting blade
assembly
Before using your new product, please read these instructions to prevent any damage.

USING YOUR BLENDER
Important Note: During the rst few minutes of initial use,
you may notice a slight odor. This is normal and should
quickly disappear. It will not recur after the appliance has
been used a few more times.
1 Plug the cord into any 120-volt 60Hz AC (ordinary
household) outlet only.
2 Place ingredients into the plastic pitcher.
3 Make sure that the cup is on the lid and that the lid
is secured on the top of the pitcher.
4 Press one of the speed buttons to select a speed
setting.
5 Press the OFF button when blending is nished.
Warning: Before removing the lid or the pitcher from the
base, wait for the cutting blade to stop rotating.
6 To remove the pitcher from the base, grasp the
pitcher handle and rotate counterclockwise.
Caution: If the pitcher rotates during blending, immediately
press the OFF button, then secure the pitcher by rotating it
clockwise until it fully locks in place.
Using PULSE
Note: Use this function if you want to process ingredients
very briey.
1 Press one of the speed button to select a setting.
2 Repeatedly press the OFF/Pulse button. As soon as
you press the OFF/Pulse button the blender turns
ON. When you release the button, the blender turns
OFF.
Blender speed settings:
Select the appropriate speed setting for your task:
Press the OFF button when nished.
SETTING
Chop
Mix
Grate
Blend
Liquify
Pulse
Notes:
• This blender cannot grind meat, mash boiled potatoes,
knead dough, whip egg whites sti, or extract juice from
vegetables or fruits.
• Due to the varieties in the amount and consistency of
some foods, as well as personal preference, a higher or
lower speed than suggested may be preferred.
DESCRIPTION
Chop nuts, garlic, herbs, onions, or similar foods.
Note: You can use PULSE to chop foods more nely.
• Prepare pancake or wae batter
• Reconstitute frozen juice
• Make milk shakes and smoothies
• Mix cocktails
• Finely chop cabbage, carrots, or other vegetables (Add
½ to 1 cup water and pulse to chop, then drain.)
• Grate chunks of cheese (Cut cold cheese into ½ to
1-inch chunks, place ½ cup cheese chunks into blender
and pulse to chop. Ver y hard cheese, such as Parmesan
should be at room temperature for chopping.)
• Puree fruits or cooked vegetables
• Make baby food
• Blend salad dressings or mayonnaise
• Liquify cooked vegetables for soups
• Make smooth sauces
• Make cold drinks
Use PULSE for smaller quantities or short blending cycles.
For example, use the pulse setting to crumb a variety of
dry ingredients: cookies, crackers, breads, etc.
HINTS AND SUGGESTIONS
Consult favorite recipes and prepare a variety of
culinary delights with this blender. Use the blender to
create mixed and frozen beverages. Add avorful
ingredients, fresh or frozen fruits, chocolate syrup or
malted powder to a variety of ice creams.
• Stop the blender after several seconds to check the
results. This will help prevent over-blending.
• Always place the lid over the pitcher before
blending.
• Place liquid ingredients into the blender pitcher
rst, unless recipes instruct otherwise.
• Extra ingredients may be added while blending by
removing the cup on top of the lid.
• Shut the blender o if blending stops or ingredients
stick to the sides of the pitcher. Remove the lid and
use a rubber spatula to push the mixture toward
the blades. Place the lid back on top of the pitcher
and resume blending.
• Do not put any utensil in the pitcher, such as a
spatula or knife, while the blender is operating.
• To reduce wear on the cutting blade assembly,
place solid food portions in blender ½ cup at a time.
Raw fruits and vegetables should be cut into 1"
pieces before blending.
• Do not store food in the pitcher.
• When recipes require dierent speeds for blending,
blend a portion at a time.
• When crushing ice, start with 3-6 cubes and only
add 1-2 cubes at a time. Crush ice by adding liquid
in the blender plastic pitcher.
CLEANING AND MAINTENANCE
This appliance requires little maintenance. It contains
no user serviceable parts. Do not try to repair it
yourself. Refer it to a qualied repair personnel if
servicing is needed.
Note: Do not put parts in an automatic dishwasher, as
damage may occur due to heat and water pressure.
However, the plastic pitcher may be placed in a dishwasher
WITHOUT the lid, collar, and cutting blade assembly.
• Always unplug the blender before cleaning.
• To clean the pitcher, disassemble the blender by
cautiously removing the cutting blade assembly.
• Remove the gasket from the cutting blade
assembly.
• Wash the lid, cup, plastic pitcher, gasket, and cutting
blade assembly in hot, soapy water.
Rinse and dry thoroughly.
• Wipe the base with a damp cloth or sponge. NEVER
IMMERSE the base in water or any other liquids.
• Re-assemble the blender for storage. Leave the lid
slightly open to avoid odor in the pitcher.
SPECIFICATIONS
• 120V ~ 350W, 60Hz
ONE-YEAR LIMITED WARRANTY
Visit www.insigniaproducts.com for details.
CONTACT INSIGNIA:
For customer service, call 877-467-4289 (U.S.) or
01-800-926-3000 (Mexico)
www.insigniaproducts.com
INSIGNIA is a trademark of Best Buy and its aliated companies.
Registered in some countries.
Distributed by Best Buy Purchasing, LLC
7601 Penn Ave South, Richeld, MN 55423 U.S.A.
©2014 Best Buy. All rights reserved.
Made in China
V1 ENGLISH 14-0359
 Loading...