

Insignia NS-BK1TBK8 Quick Setup Manual
QUICK SETUP GUIDE
1-Tap Beverage
Before assembly
Fill the CO2 tank
See your local beer keg
provider, air/gas or
welding supplier, or
sporting goods store.
3”
Allow for space
Make sure that there
is 3” between the
back and sides of the
kegerator and any
surrounding walls.
You will need
Do not use an
extension cord
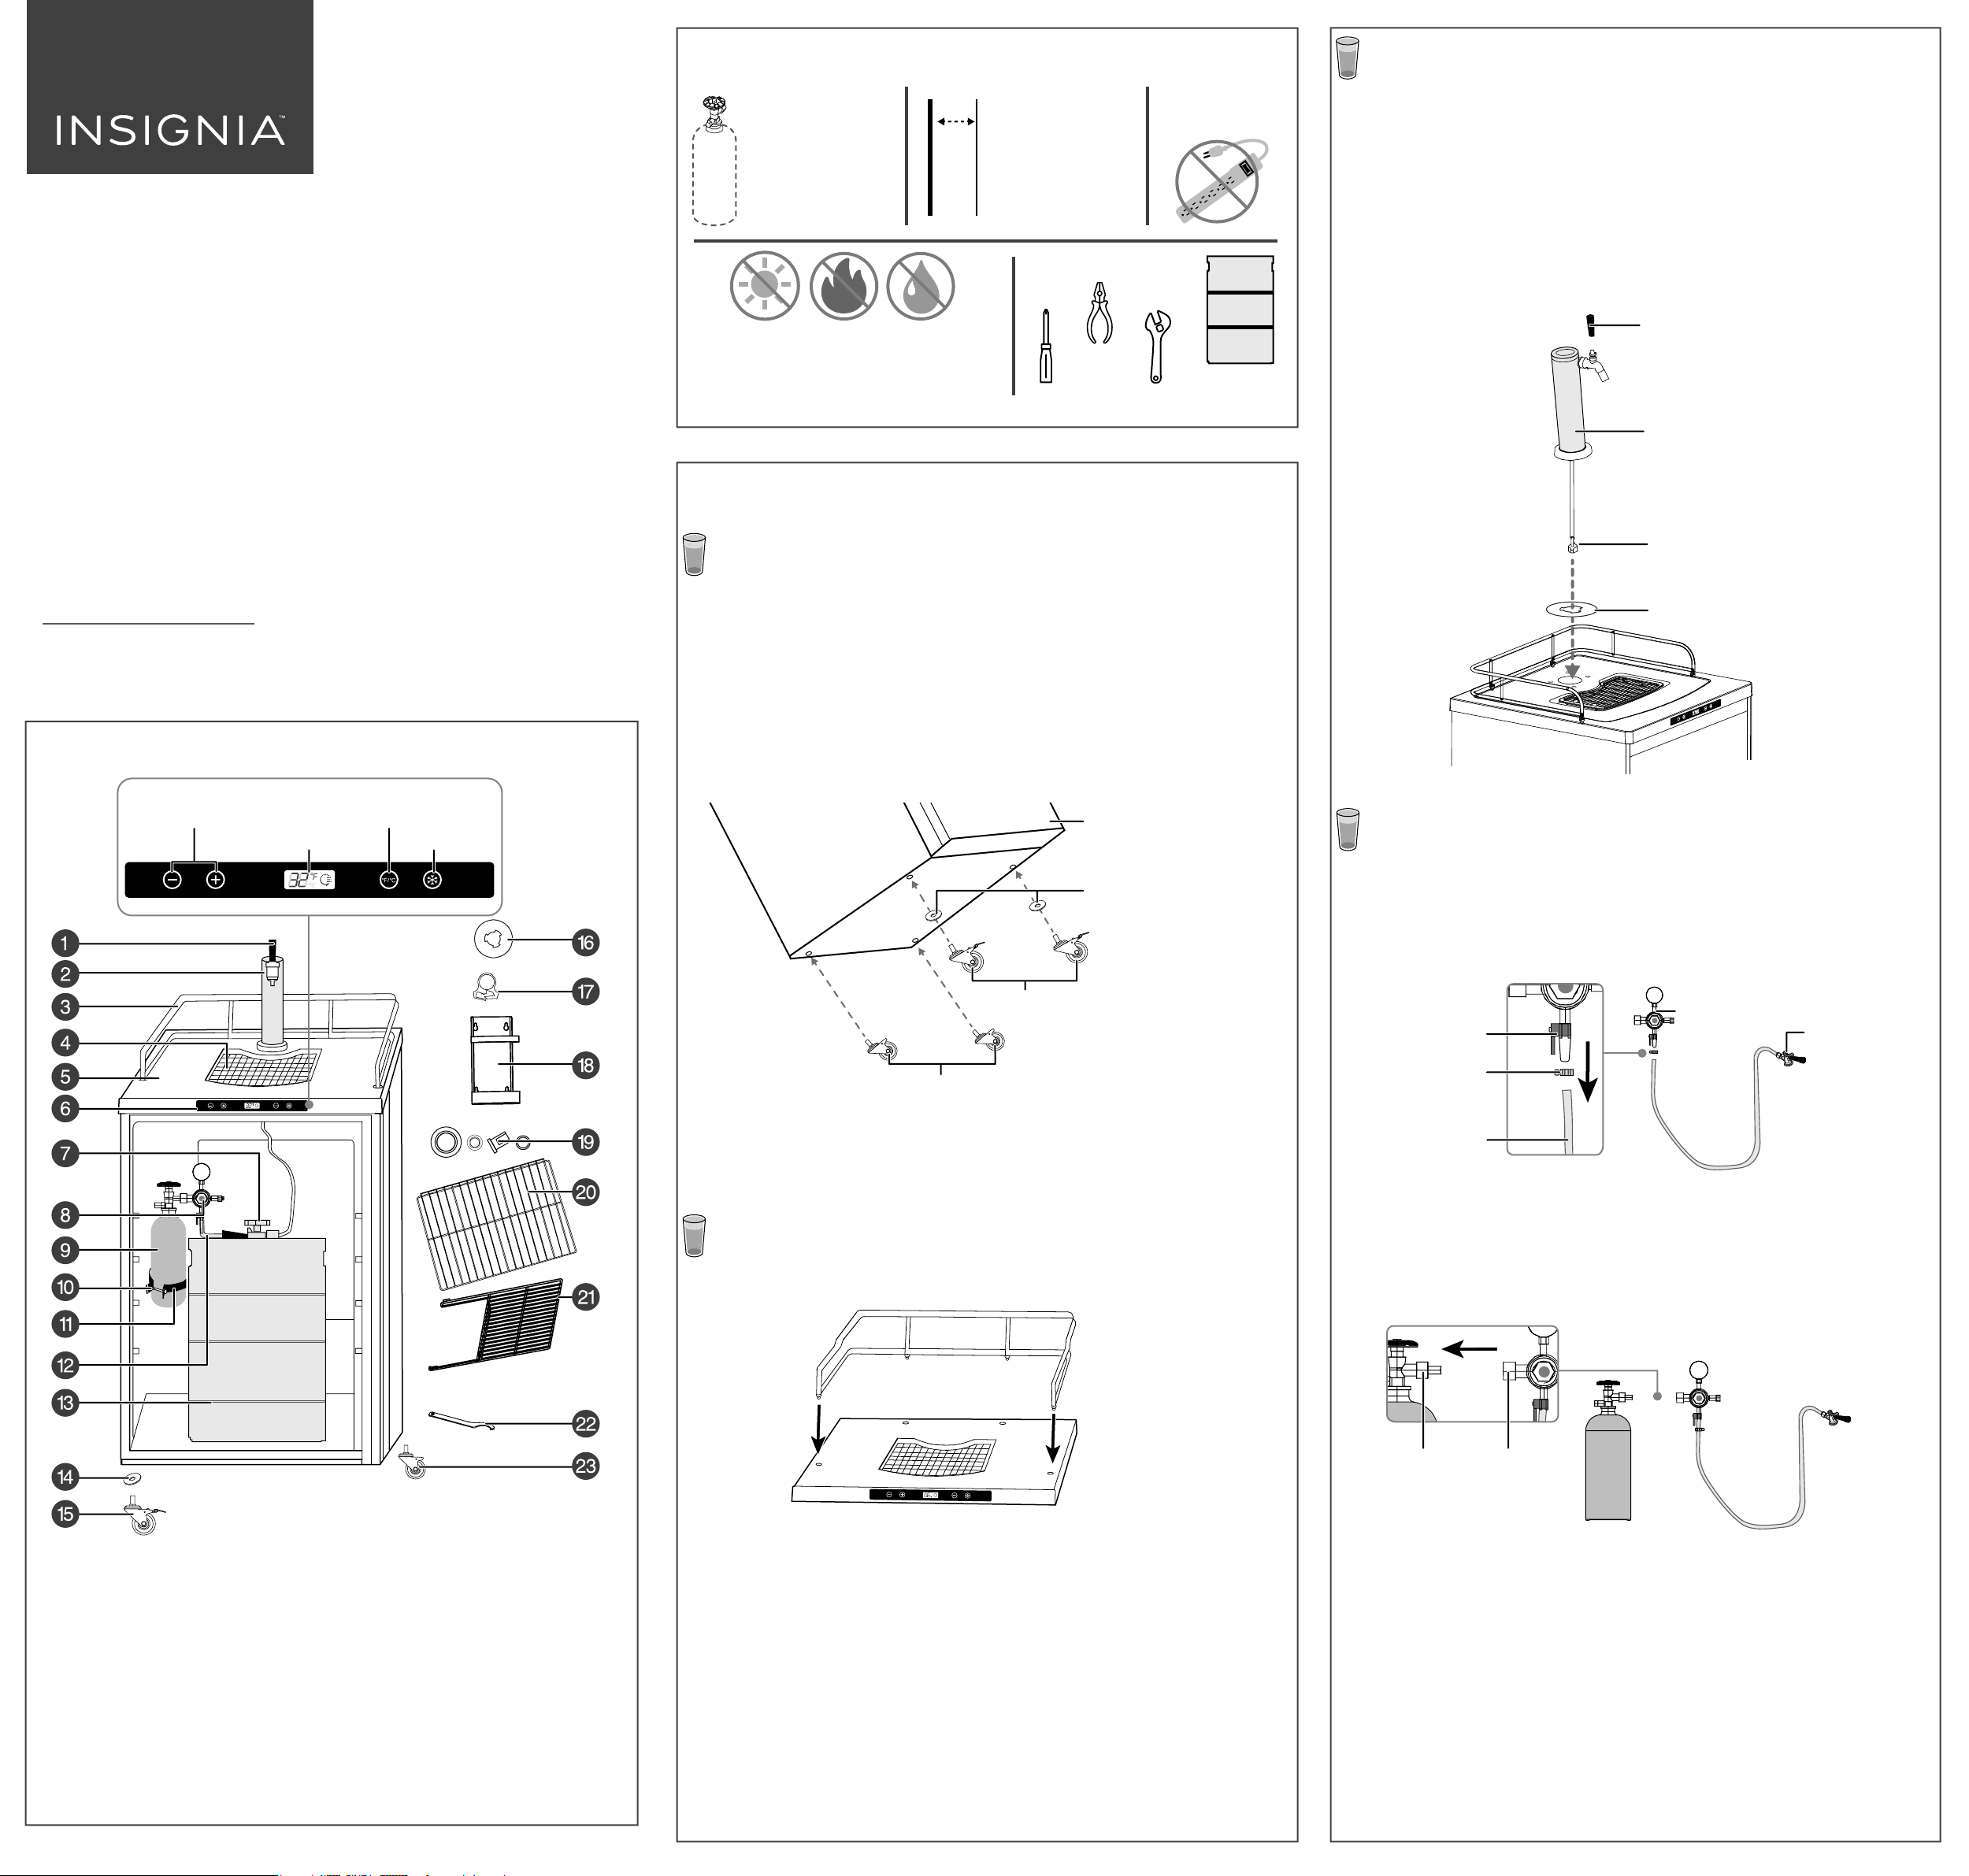
INSTALLING THE DRAFT ARM ASSEMBLY
3
1 Remove the cabinet plug from the top of the kegerator.
2 Align the beer gasket with the holes on the top of the cabinet.
3 Pass both the wing nut and the beer tube (both are attached to the
draft arm assembly) through the hole on the worktop until the draft
arm assembly is resting on the top of the cabinet.
4 Rotate the draft arm 60 degrees until the tap is facing the front. It may
take some force.
5 Attach the black plastic beer tap handle to the top of the faucet,
tightening it by hand until it's secure. Hold the silver ring snug so it
does not move.
Cooler / Kegerator
NS-BK1TBK8
Congratulations on your purchase! Your NS-BK1TBK8 kegerator is designed for
years of fun and trouble-free performance. This Quick Setup Guide is provided to
help you get your kegerator up and running quickly. If you need more help,
however, take a look at the online manual, located at
www.insigniaproducts.com.
PACKAGE CONTENTS
Find a suitable location
Position the kegerator away from direct
sunlight and sources of heat, and avoid
positioning the kegerator in moist areas.
Phillips
screwdriver
Pliers/
clamp crimper
Adjustable
Wrench
Full keg of beer
(1/2 barrel size
or smaller)
Assembling your kegerator
INSTALLING THE CASTERS OPTIONAL
1
1 Tip the kegerator onto its side on a soft surface to protect it from
scratches.
2 Unscrew and remove the black front feet. Keep them in a safe place in
case you want to use the feet later.
3 Attach the two metal washers (included) to the locking casters to
prevent scratching the cabinet, then install the two locking casters in the
front positions on the bottom of the kegerator (closest to the door).
4 Install the other two casters in the rear positions on the bottom of the
kegerator.
Beer tap handle
Draft arm assembly
Wing nut and beer tube
Beer gasket
l
o
o
C
k
c
i
u
Q
Adjust
temperature
Change
temperature unit
Display Quick cool
Quick Cool
Quick Cool
Front
Metal washers
Locking casters
Casters
5 With all four casters tightened evenly, stand the unit in the upright
position.
6 Step on the front of the locking casters to lock the kegerator into place
or step on the back to unlock the kegerator.
ATTACHING THE GUARD RAIL
2
Place the guard rail into the holes on the top of the kegerator.
INSTALLING THE CO
4
Note: The CO2 tank (provided) is empty when you receive it. Visit your local beer keg
provider, air/gas or welding supplier, or sporting goods store to get it lled.
Caution: Before installing the CO2 regulator and tank, review important safety tips in
the manual.
REGULATOR & TANK
2
1 Feed the hose clamp over one end of the CO2 gas line.
2 Attach that end to the gas line connector on the CO
CO2 tank regulator
Shut-o valve
regulator.
2
Sankey keg
coupler
Hose clamp
CO2 gas line
3 Tighten the clamp to prevent leaks. Leave about ½ inch between the
top of the clamp and the end of the hose. You may need to squeeze
with a pliers or crimper.
4 Attach the CO
regulator to the CO2 tank by screwing the regulator
2
nut onto the tank valve and tightening with an adjustable wrench.
1 Beer tap handle
2 Draft arm assembly
3 Guard rail
4 Drip tray (2 pieces)
5 Worktop
6 Control Panel
7 Sankey Type-D keg coupler
8 CO
9 5 lb. CO
tank regulator
2
tank (shipped empty)
2
10 Bolt and nut for retainer
11 CO2 tank retainer
12 CO
gas line
2
Before using your new product, please read these instructions to prevent any damage.
13 Beer keg (not included)
14 Metal washers for locking casters (2)
15 Locking casters (2)
16 Beer gasket
17 Hose clamp
18 CO
back tank retainer
2
19 Extra valve washers
20 Wire shelf
21 Wire half-shelf
22 Metal wrench (for cleaning)
23 Casters (2)
Tank
Q
u
c
i
k
C
o
o
l
valve
5 Slide the CO
Regulator
nut
tank through the retainer inside the kegerator and
2
secure it with the bolt and nut. Position the tank so that you can read
the numbers on the gauge and have easy access to the shut-o valve.
OR
Install the CO
tank retainer on the back of the kegeratorcoole for
2
extra space inside the unit. Refer to the manual for additional
information.
Assembling your kegerator (cont.)
0
INSTALLING THE KEG COUPLER
5
This kegerator accepts almost all brand name kegs. Here's what will t in
your kegerator:
BARREL
SIZE
GALLONS
12 oz
GLASSES
1/2 1/4
(short, pony)
15.5
164
7.8 5.2
82 55
1 Insert the sankey keg coupler into the neck of the beer keg and turn it
clockwise to lock it into position. Make sure that the washer is in the
connector on the top of the sankey keg coupler.
1/4
(slim)
7.8
82
1/6
1/8
2
4.0
41
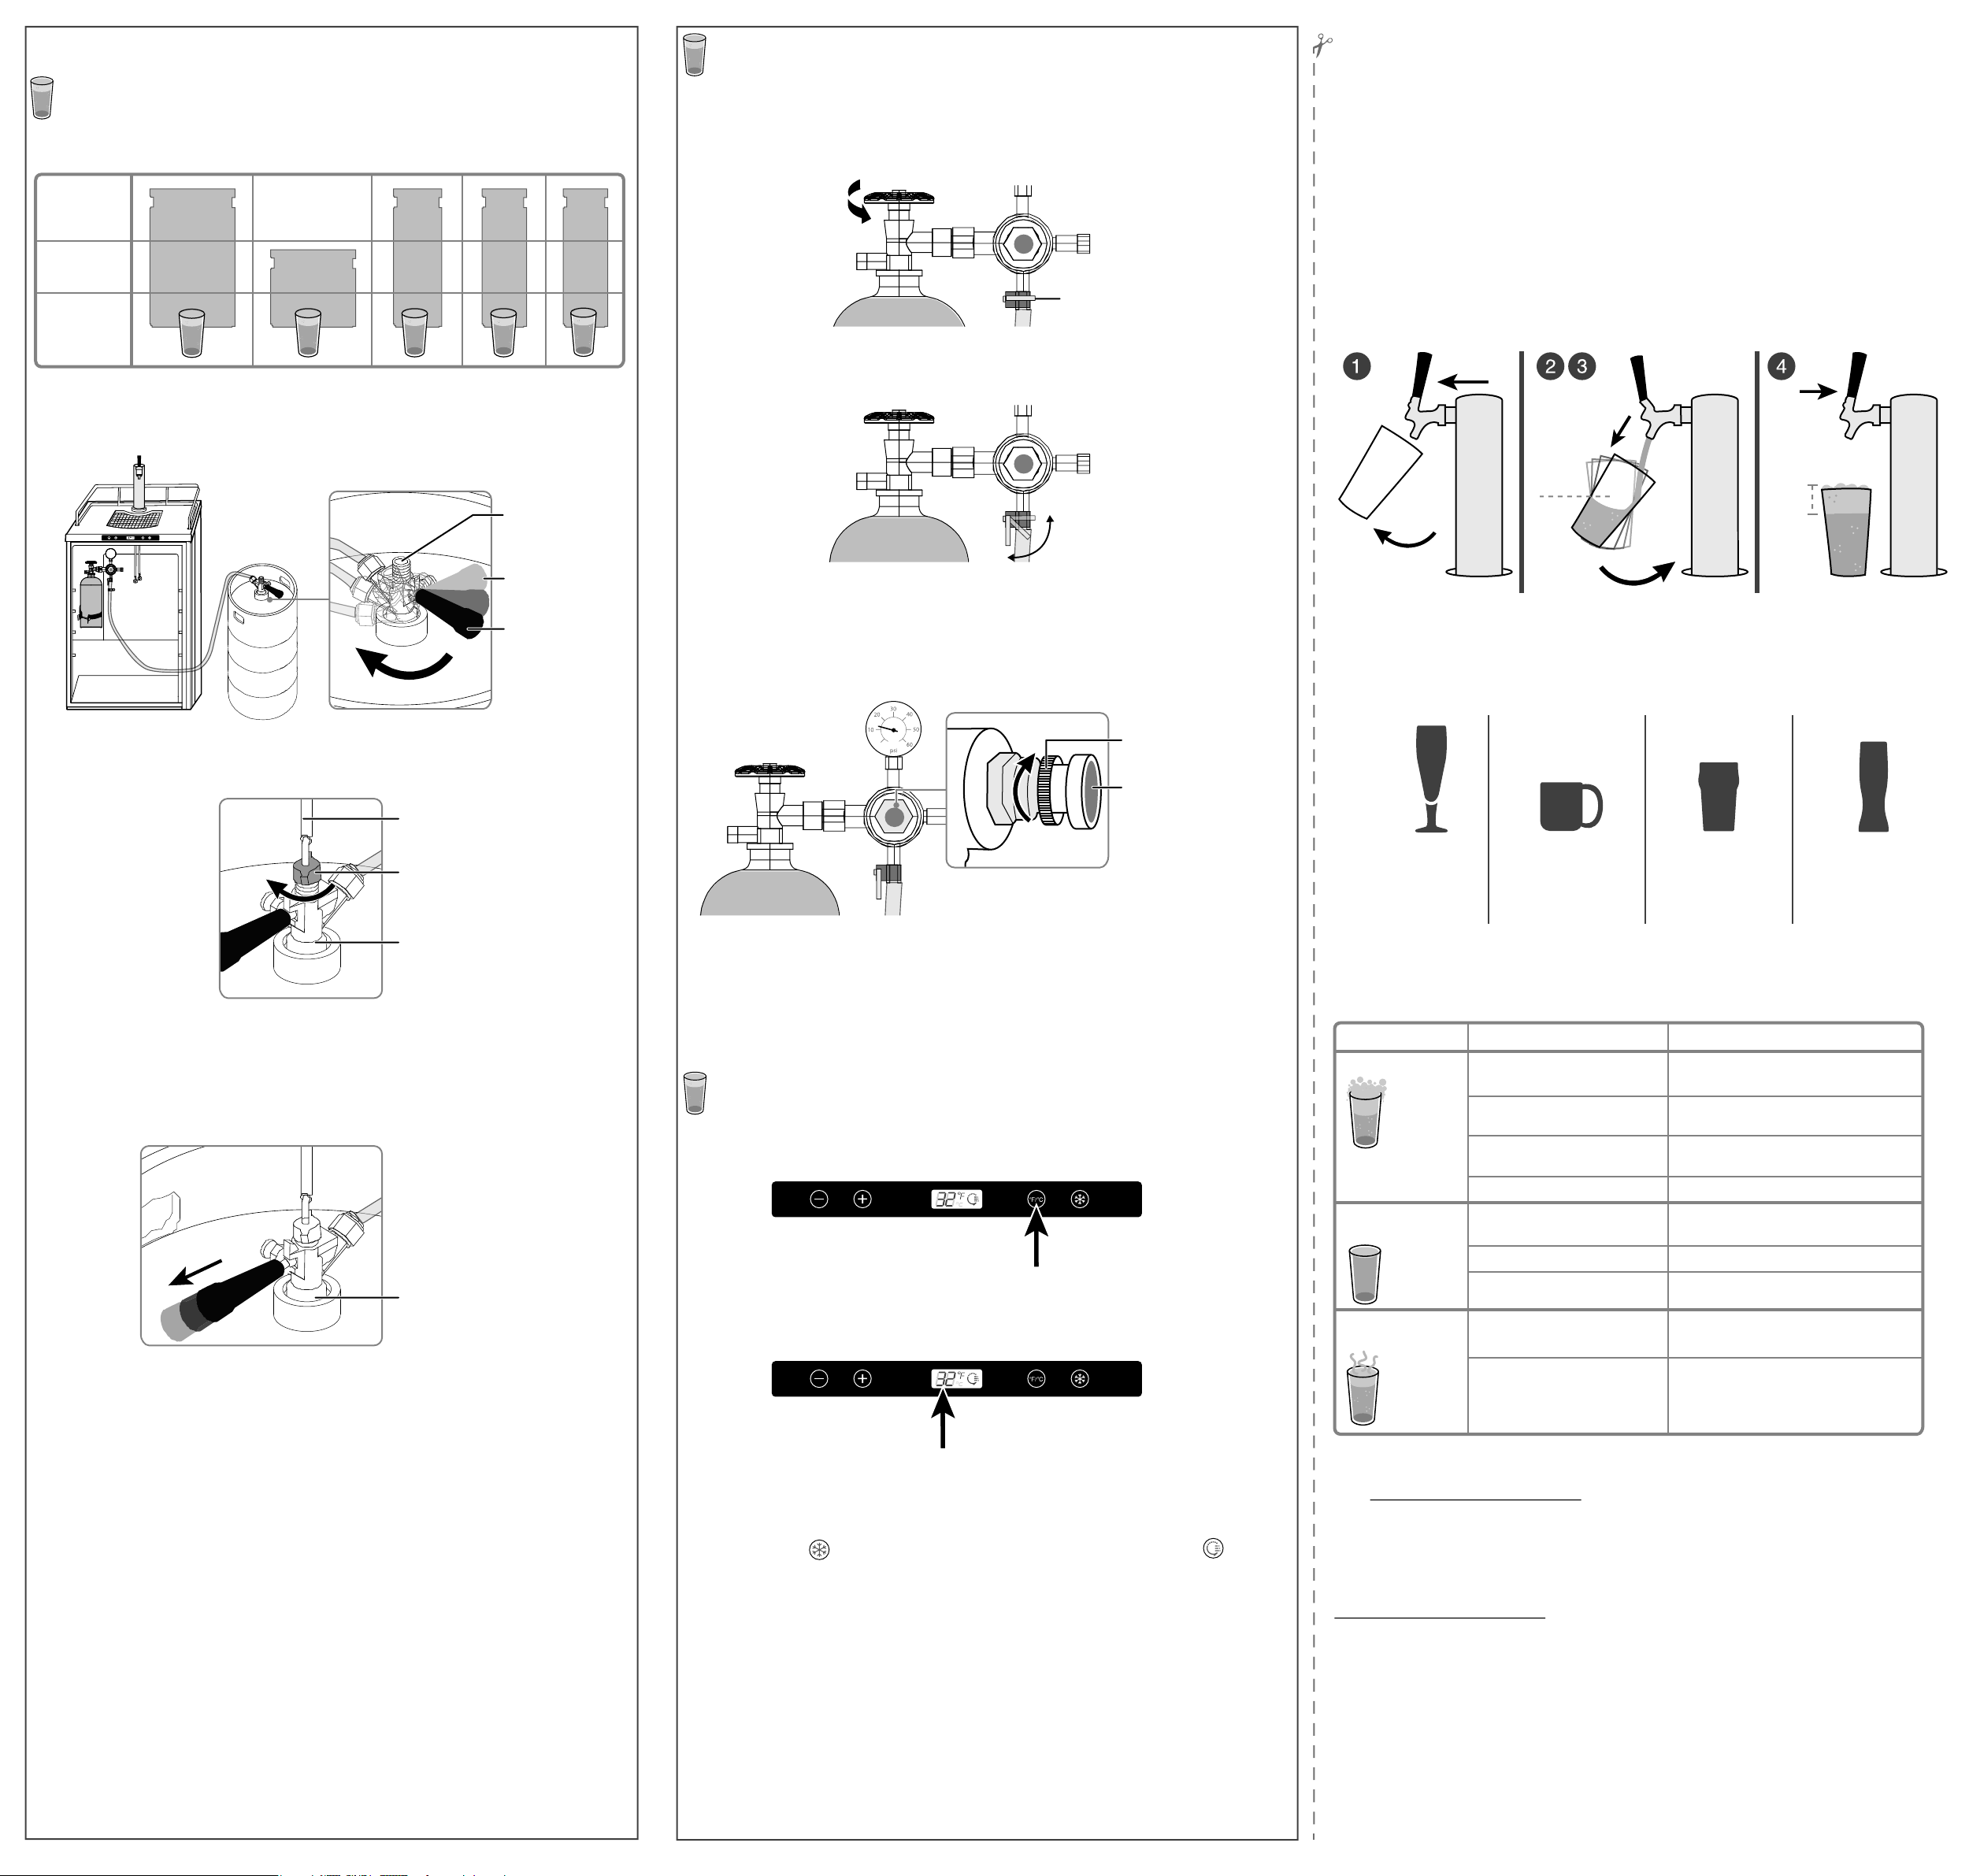
ADJUSTING THE CO2 REGULATOR
6
1 Make sure that the shut-o valve is closed (sideways if closed, down if
open), then slowly turn the main valve on the CO
tank
2
counter-clockwise until it is fully open.
Shut-o valve
2 Open the shut-o valve to allow gas to ow into the keg.
Cut this out and attach it to your kegerator for easy access to tips and help!
Tips
HOW TO GET A GREAT POUR
Pouring a proper glass of beer is very important, not only for presentation,
but for taste.
TIP: Make sure your glassware is always clean and rinsed.
1 Hold the glass at a 45° angle.
2 Grasp the handle at the bottom and open the tap quickly.
3 Once your glass is half-full, gradually bring the glass upright, and aim for
the middle to start forming the head. Slowly lower the glass as you
approach your nish to improve the head even more.
4 When your glass is full, close the tap quickly.
Sankey keg
Quick Cool
coupler
Unlocked
Locked
2 Insert the beer tube into the top of the sankey keg coupler, then
tighten the wing nut.
Beer tube
Wing nut
Sankey keg coupler
3 Pull the black handle on the sankey keg coupler and press it
downward until it locks into position. The keg is now tapped.
Note: If beer comes up through the top of the wing nut, remove the wing nut,
reposition the washer, then reattach the wingnut.
Closed
Open
3 Release the adjustment lock nut, behind the regulator screw, by
turning it clockwise about 5-7 turns.
4 Turn the regulator screw clockwise to increase pressure. The needle on
the gauge starts to climb. Set the gauge to 10-12 PSI.
Adjustment lock nut
Regulator screw
5 When the tank is at the correct pressure, tighten the adjustment lock
nut by turning it counter-clockwise.
6 Allow several minutes for the keg to pressurize. The gauge may show a
drop in pressure while this happens. Adjust as needed.
Note: Listen for a hissing sound at all connections to determine if there are any leaks.
7 Plug the kegerator into a 120V, 60Hz, 15A grounded outlet.
SETTING THE TEMPERATURE
7
See "Tips" for information about the best temperature for your beer type.
1 Press the °F/°C button to switch between Fahrenheit or Celsius.
Quick Cool
half-full
1-1.5”
45°
90°
USE DIFFERENT GLASSES FOR DIFFERENT BEERS
You wouldn’t believe how much a proper glass and temperature will change
the taste of your beer.
Lagers
(35-40° F)
Often labeled simply
as "beer." Examples
include Budweiser,
Stella Artois, Beck's,
Corona, Heineken,
and Foster's.
Stouts
(50° F)
Dark beers made
using roasted malt or
barley. Examples
include porters and
Guinness.
Ales
(45-50° F)
Includes brown ales
(such as Newcastle),
golden ales, pale
ales (IPA), mild ale,
and barley wines.
Craft Beers
(38-41° F)
Includes craft, micro,
and nano brewery
beers, often only
available regionally
or locally.
PREVENTING BAD BEER
PROBLEM
Too much head
Flat beer. No
head.
POSSIBLE CAUSE
Improper regulator setting
Pressure build up
Warm beer
Improper pour
Greasy Glasses
Improper pour
POSSIBLE SOLUTION
Make sure that the (CO2) pressure is between 10
and 12 PSI.
Activate the pressure relief valve located on the
sankey keg coupler for three seconds.
Make sure the temperature is between 34ºF and
38° F.
Open the tap quickly and completely.
Wash glasses thoroughly, then air dry. Rinse in
fresh cold water just before serving.
Open the tap quickly and completely.
4 Insert the keg into the kegerator.
Sankey keg coupler
2 Press - or + to adjust the temperature (32°F to 50°F/0°C to 10°C), then
let the kegerator cool for 48 hours.
Quick Cool
3 After the kegerator is fully cooled, press - or + to adjust to the
temperature you want. The kegerator may take a few hours to stabilize
after adjusting the temperature.
Note: Press Quick Cool to cool the kegerator to its lowest setting. The icon
appears and the kegerator cools for 24 hours. Press - or + to exit quick cool mode
early.
Abnormal beer
taste and/or smell.
Not enough pressure
System requires cleaning
Old beer
Increase the pressure or rell the CO2 tank if empty.
Refer to the manual section on “Maintaining your
kegerator/beverage cooler.”
Buy a new keg.
ONEYEAR LIMITED WARRANTY
Visit www.insigniaproducts.com for details.
CONTACT INSIGNIA:
For customer service, call 1-877-467-4289 (U.S. and Canada) or
01-800-926-3000 (Mexico)
www.insigniaproducts.com
INSIGNIA is a trademark of Best Buy and its aliated companies
Distributed by Best Buy Purchasing, LLC
7601 Penn Ave South, Richeld, MN 55423 U.S.A.
©2017 Best Buy. All rights reserved.
Made in China
V2 ENGLISH 170158
 Loading...